If you’ve got a block of air dry clay and a candle you love, you’re already halfway to making the cutest little piece of decor. I pulled together my favorite candle holder ideas—from super simple tea light cups to statement taper candle designs you’ll be proud to show off.
Classic Taper Candle Tube Holder
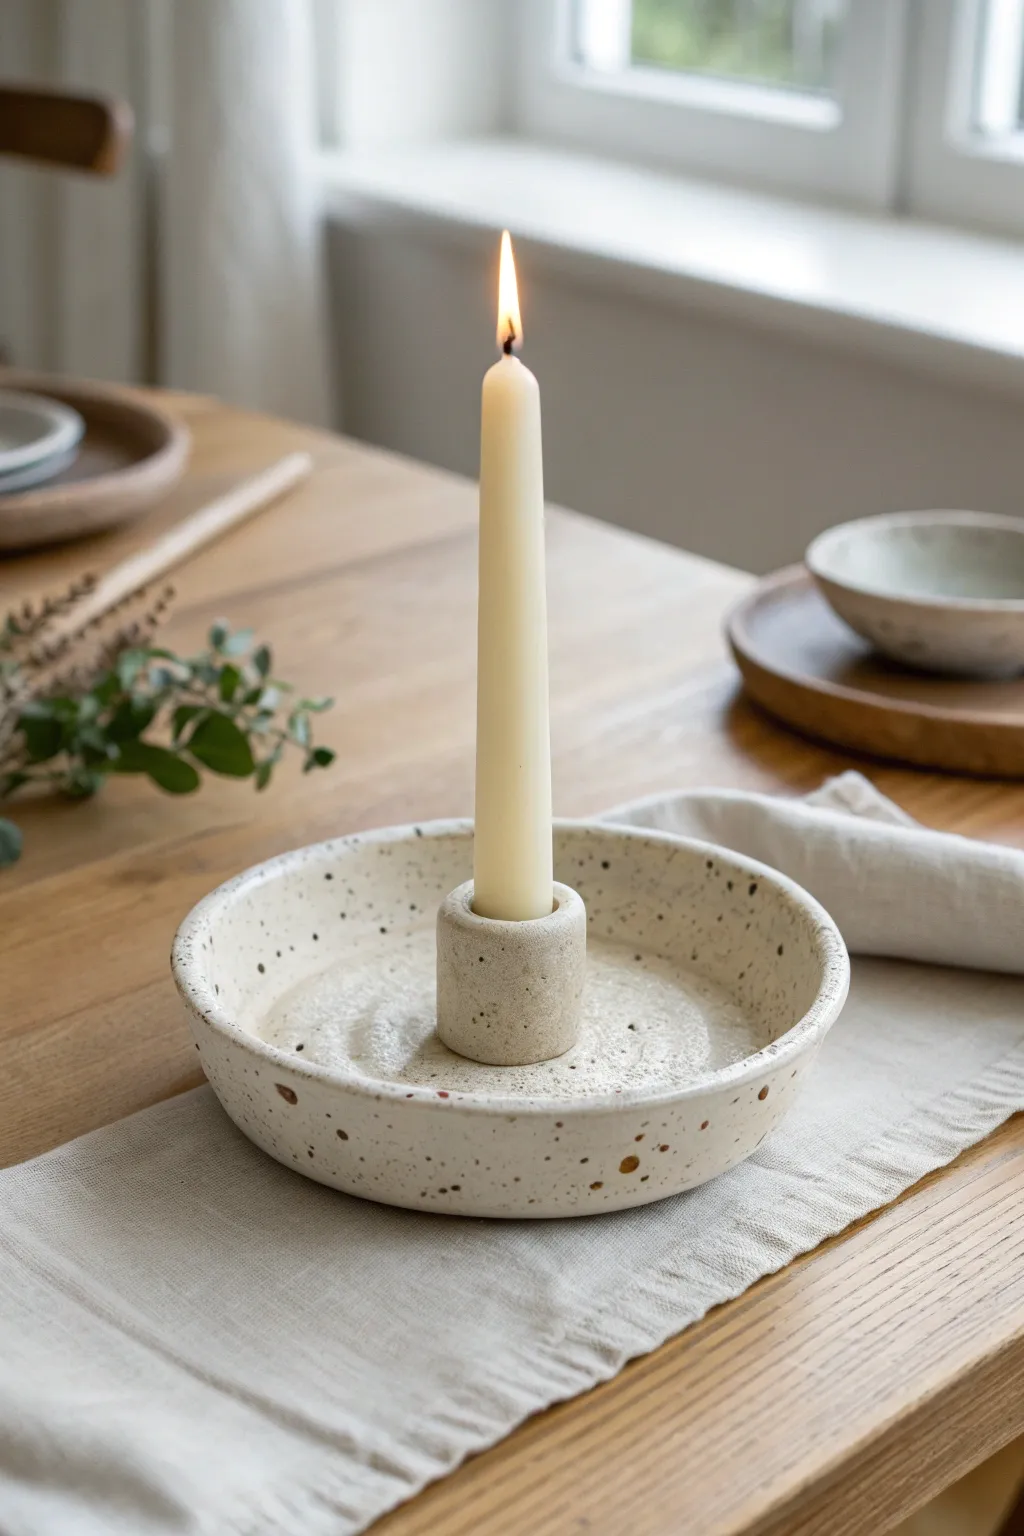
This elegant candle holder combines a classic saucer base with a sturdy central column, perfect for adding a touch of Scandinavian simplicity to your table. The speckled stone effect gives it a high-end ceramic look without the need for a kiln.
Step-by-Step Tutorial
Materials
- White air-dry clay
- Rolling pin or smooth glass jar
- Craft knife or clay cutter
- Small bowl (approx. 4-5 inches diameter) to use as a template
- Taper candle (to size the holder)
- Water in a small cup
- Sanding sponge or fine-grit sandpaper
- Acrylic paint (white, black, and grey)
- Old toothbrush
- Matte varnish or sealant
Step 1: Forming the Base
-
Roll the clay:
Begin by conditioning a large ball of white air-dry clay until it is soft and pliable. Roll it out on a flat surface to a thickness of about 1/4 inch (6mm). -
Cut the circle:
Place your bowl upside down on the rolled clay to act as a template. Use your craft knife to trace around the rim and cut out a perfect circle. -
Create the rim:
Roll a long, thin snake of clay, ensuring it is even in thickness along its entire length. This coil will become the raised edge of your dish. -
Attach the rim:
Score the outer edge of your clay circle and the underside of the clay snake with a needle tool or knife. Apply a little water to the scored areas and press the coil firmly onto the edge of the circle. -
Smooth the seams:
Using your finger and a bit of water, smudge the clay from the coil down onto the base to blend them seamlessly. Smooth both the inside and outside seams until the rim looks like one continuous piece with the base.
Cracks acting up?
If hairline cracks appear while drying, don’t panic. Mix a tiny bit of fresh wet clay with water to make a paste and fill the cracks, then sand smooth once dry.
Step 2: Building the Central Column
-
Form the cylinder:
Take a separate chunk of clay and roll it into a thick log. You want this cylinder to be stout—about 1.5 inches tall and roughly 1.5 inches wide. -
Size the hole:
Take your actual taper candle and gently press it into the center of the clay cylinder to create the holding space. Wiggle it slightly to ensure the hole is just a hair wider than the candle, as clay shrinks when drying. -
Refine the shape:
Remove the candle. Reshape the outside of the cylinder if it bulged during pressing. I like to roll the cylinder on the table gently to keep the walls vertical and smooth. -
Attach to base:
Score the bottom of the cylinder and the center of your dish base. Add a dab of water (slip) and press the cylinder firmly into the center of the dish. -
Clean connections:
Use a small modeling tool or a wet paintbrush to smooth the seam where the cylinder meets the dish, ensuring a strong bond. -
Dry thoroughly:
Let the piece dry completely for 24-48 hours. Turn it over halfway through the drying process to ensure the bottom of the dish dries evenly.
Step 3: Finishing and Decoration
-
Sand for smoothness:
Once fully dry and hard, use fine-grit sandpaper or a sanding sponge to remove any fingerprints, rough edges, or bumps. Wipe away the dust with a damp cloth. -
Mix the splatter paint:
Dilute a small amount of black or dark grey acrylic paint with water until it has an inky, fluid consistency. -
Apply the speckles:
Dip an old toothbrush into the diluted paint. Hold the brush over the candle holder and run your thumb across the bristles to flick tiny speckles onto the surface. -
Detail the rim:
If you want the faux-stone look to be convincing, ensure you get speckles on the vertical sides of the column and the outer rim, not just the flat surfaces. -
Let paint dry:
Allow the speckles to dry completely, which should only take about 15-20 minutes. -
Seal:
Finish by applying a coat of matte varnish. This protects the clay from moisture and gives the piece a professional, finished feel.
Make it a set
Create a grouping of three holders with varying column heights (1 inch, 2 inch, 3 inch) for a dramatic, architectural centerpiece.
Place your favorite taper candle inside and enjoy the modern, handmade charm of your new decor piece.
Low Dish Candle Holder With Drip Catch
This project creates a beautiful, minimalist candle holder that mimics the look of high-end speckled stoneware, perfect for adding a rustic touch to your table setting. The wide dish design isn’t just aesthetic; it acts as a functional catch for any wax drips.
Step-by-Step Tutorial
Materials
- Air dry clay (white or cream)
- Rolling pin
- Clay knife or craft knife
- Bown of water
- Sponge or smoothing tool
- Taper candle (to size the hole)
- Ruler
- Two wooden slats or guides (approx 1/4 inch thick)
- Paintbrush (old toothbrush for speckling)
- Acrylic paint (brown, cream, beige)
- Matte varnish or sealant
Step 1: Forming the Base Dish
-
Prepare your workspace:
Lay down canvas or wax paper to prevent sticking. Take a large ball of air dry clay and knead it well to warm it up and remove air bubbles. -
Roll out the slab:
Place your clay between two wooden slats or guides. This ensures an even thickness as you roll. Flatten the clay with your rolling pin until it is smooth and uniform. -
Cut the circle:
Using a template (like a bowl) or freehanding with a compass, cut a circle approximately 6-7 inches in diameter. -
Create the rim:
Gently lift the edges of the circle. Using your thumb on the inside and fingers on the outside, pinch and curve the clay upward to create a shallow wall about 1 inch high. -
Smooth the form:
Dip your sponge or fingers in a little water and smooth out any cracks or fingerprints on the rim and the base. You want the transition from floor to wall to be a gentle curve, not a sharp angle.
Uneven Rim Fix
If the rim of your bowl looks wavy or uneven after forming, let it dry until it’s ‘leather hard’ (stiff but cool), then grate it flat with a rasp or sanding block gently.
Step 2: Creating the Central Column
-
Roll a rectangle:
Roll out a smaller piece of clay, slightly thicker than your base slab. -
Size the holder:
Cut a rectangular strip. Wrap this strip loosely around the base of your taper candle to measure the circumference needed. I like to leave a tiny bit of wiggle room since clay shrinks as it dries. -
Form the cylinder:
Join the ends of the strip to form a cylinder. Score the edges (make scratch marks) and add a dab of water (slip) to glue them together securely. -
Attach to the base:
Score the bottom of your cylinder and the center of your dish. Add water/slip to both scored areas and press the cylinder firmly into the center of the bowl. -
Reinforce the seam:
Take a tiny coil of clay and wrap it around the base of the cylinder where it meets the bowl. Blend this coil upwards into the cylinder and downwards into the bowl to create a seamless, strong join. -
Make the top recess:
If you want the candle to sit deeper, gently press your candle (or a tool of similar width) slightly into the top of the cylinder to shape the opening perfectly.
Textured Finish
Mix sand or used coffee grounds into your clay before rolling it out. This adds literal gritty texture that feels like real stoneware once painted and sealed.
Step 3: Finishing and Decoration
-
Initial drying:
Let the piece dry for about 24-48 hours. Turn it over halfway through to ensure the bottom dries evenly. -
Sanding:
Once fully bone dry, use fine-grit sandpaper to smooth out any rough edges on the rim or the top of the candle holder. -
Base coat:
Paint the entire piece with a cream or off-white acrylic paint. This unifies the color and prepares it for the faux-stoneware effect. -
Create the splatter:
Dilute some dark brown acrylic paint with water until it’s runny. Dip an old toothbrush into the paint. -
Apply the speckles:
Running your thumb over the bristles, flick the paint onto the candle holder. Vary your distance to create different sizes of speckles for that natural pottery look. -
Add larger spots:
Using a small detail brush, manually paint a few larger, irregular brown or rust-colored spots to mimic iron deposits often found in ceramics. -
Seal:
Finish with a coat of matte varnish to protect the paint and give it a slight sheen without being overly glossy.
Place your favorite taper candle inside and enjoy the warm, handmade ambiance it brings to your table


Wavy “Wiggle” Taper Holder
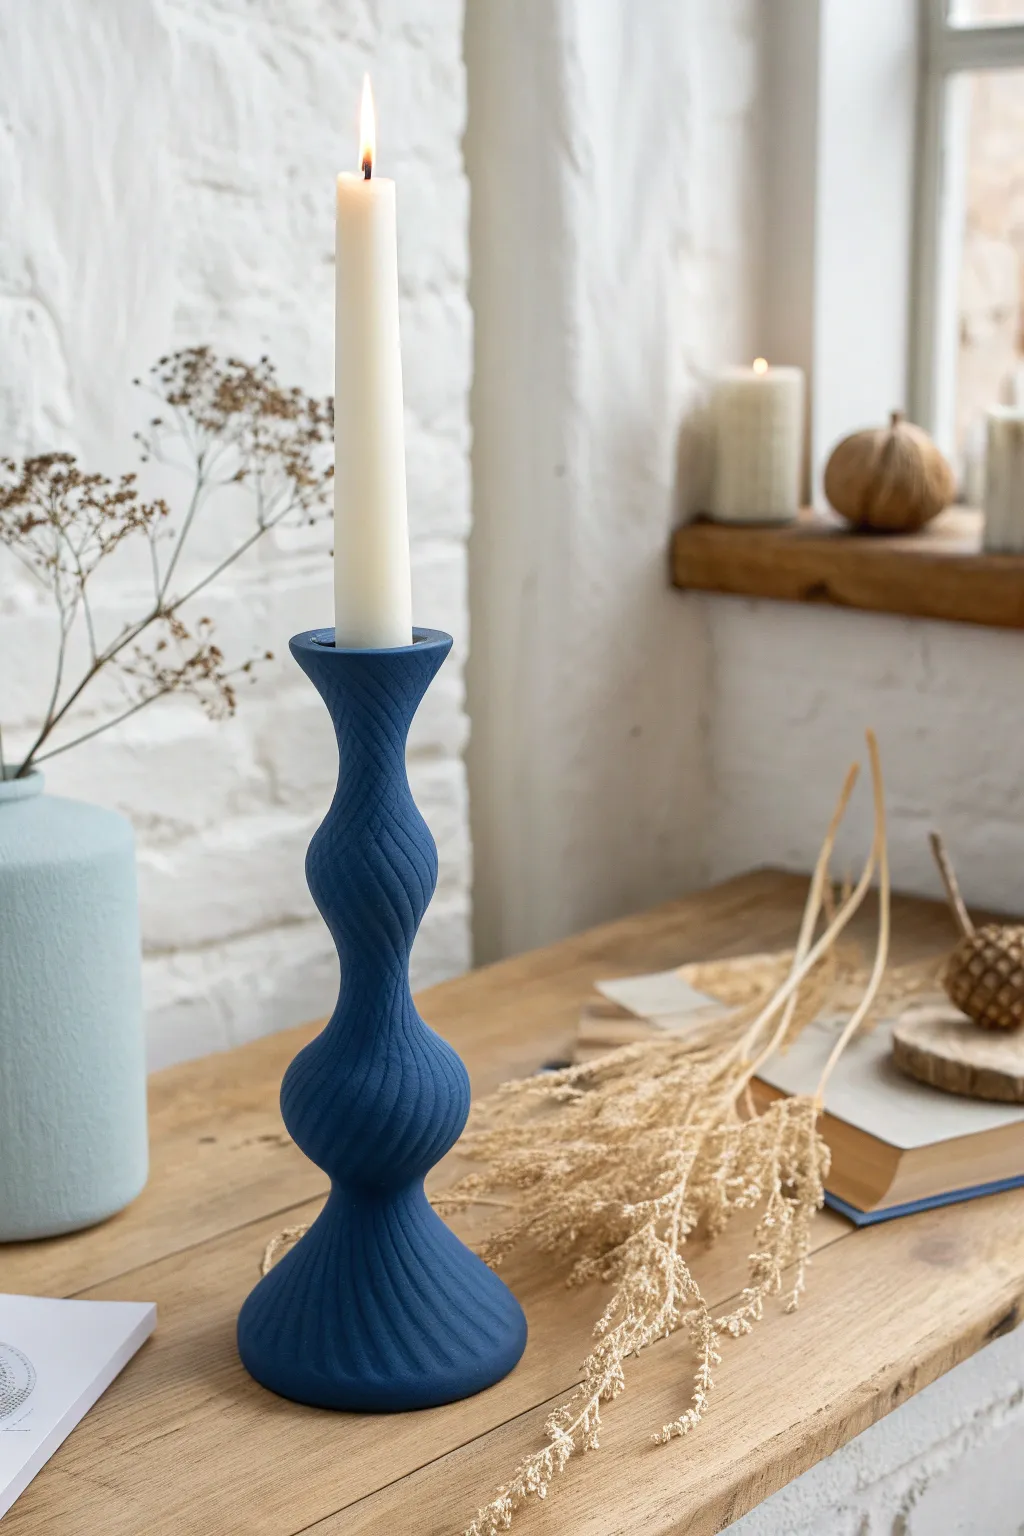
This deep blue beauty adds a sculptural, modern touch to any mantelpiece with its mesmerising ‘wiggle’ silhouette. The twisted, ridged texture mimics the precision of 3D printing but retains the warmth of a handcrafted clay piece.
How-To Guide
Materials
- High-quality air dry clay (white or terracotta)
- Rolling pin
- Cardboard mailing tube or PVC pipe (approx. 1 inch diameter)
- Parchment paper
- Craft knife
- Pottery sponge
- Bowl of water
- Flexible rib tool or old credit card
- Modeling tool with a fine rounded point (for ridges)
- Sandpaper (medium and fine grit)
- Acrylic paint (deep matte blue)
- Matte spray varnish
- Strong craft glue (optional)
Step 1: Forming the Base Structure
-
Prepare the core:
Cut your cardboard tube or PVC pipe to your desired height. This acts as the internal skeleton to ensure the candle holder stands perfectly straight and fits a standard taper candle. -
Roll your slab:
Roll out a large slab of air dry clay on parchment paper to a uniform thickness of about 1/4 inch. Ensure it’s wide enough to wrap fully around your tube with a little overlap. -
Wrap the tube:
Apply a very thin layer of slip (clay mixed with water) to the tube if it’s porous cardboard. Carefully wrap the clay slab around the tube. -
Seal the seam:
Score the overlapping edges, apply water, and press them together firmly. Smooth the seam down with a wet finger or a rib tool until it creates a seamless cylinder.
Cracking Up?
If small cracks appear while drying, don’t panic. Mix a tiny amount of fresh clay with water to make a ‘slip’ paste and fill the cracks, then sand smooth once dry.
Step 2: Sculpting the Wiggle Shape
-
Add volume for the bulbs:
Roll out two thick coils of clay. Wrap one around the lower third of the cylinder and the second around the upper middle section to create the two ‘bulbs’ of the wiggle design. -
Merge the coils:
Using your thumb and a little water, firmly drag the clay from the coils onto the main cylinder, blending them upwards and downwards. You want to create smooth slopes rather than abrupt bumps. -
Create the base flare:
Fashion a larger, cone-shaped piece of clay for the bottom. Attach it securely to the base of your cylinder, blending seams thoroughly to ensure stability. -
Flare the top:
Roll a small coil and attach it to the rim. Shape it outwards gently to create a flared cup that will catch any potential wax drips. -
Refine the silhouette:
I like to take a step back here and look at the profile. Use a moist sponge to smooth out the transitions between the wide and narrow parts, ensuring an organic, fluid curve.
Step 3: Detailing and Finishing
-
Mark the spiral guide:
Using the very tip of a knife, lightly sketch a spiral line that travels from the base to the top. This will guide your texture application. -
Carve the ridges:
Using your rounded modeling tool, press firmly and drag along your guide lines to create deep, parallel grooves. Continue this pattern around the entire circumference to mimic a twisted rope effect. -
Smooth the grooves:
Dip a soft paintbrush in water and run it gently inside the carved grooves. This removes little clay crumbs without destroying the sharp definition of your lines. -
Initial drying:
Let the piece stand undisturbed in a cool, dry place. Avoid heat sources, as uneven drying can cause cracks. -
Remove the core (optional):
If you used a PVC pipe, gently twist and pull it out once the clay is leather-hard but not fully dry. If using a cardboard tube, you can often leave it in for reinforcement. -
Sanding:
Once bone dry (usually 24-48 hours), use fine-grit sandpaper to knock off any sharp burrs or rough patches, paying attention to the rim. -
Painting the base:
Apply a coat of primer or white acrylic first. This seals the clay and makes the final colour pop. -
Applying colour:
Mix a deep, rich blue acrylic paint. Apply two to three thin layers, letting each dry fully, to get that opaque, velvety finish seen in the photo. -
Sealing:
Finish with a matte spray varnish. This protects the paint from dust and minor scratches while maintaining the modern, non-glossy aesthetic.
Make it Weighted
For extra stability, glue a heavy metal washer inside the base before painting. This gives the taller holder a satisfying weight and prevents tipping.
Place your favorite taper candle inside and admire the dramatic silhouette you have created


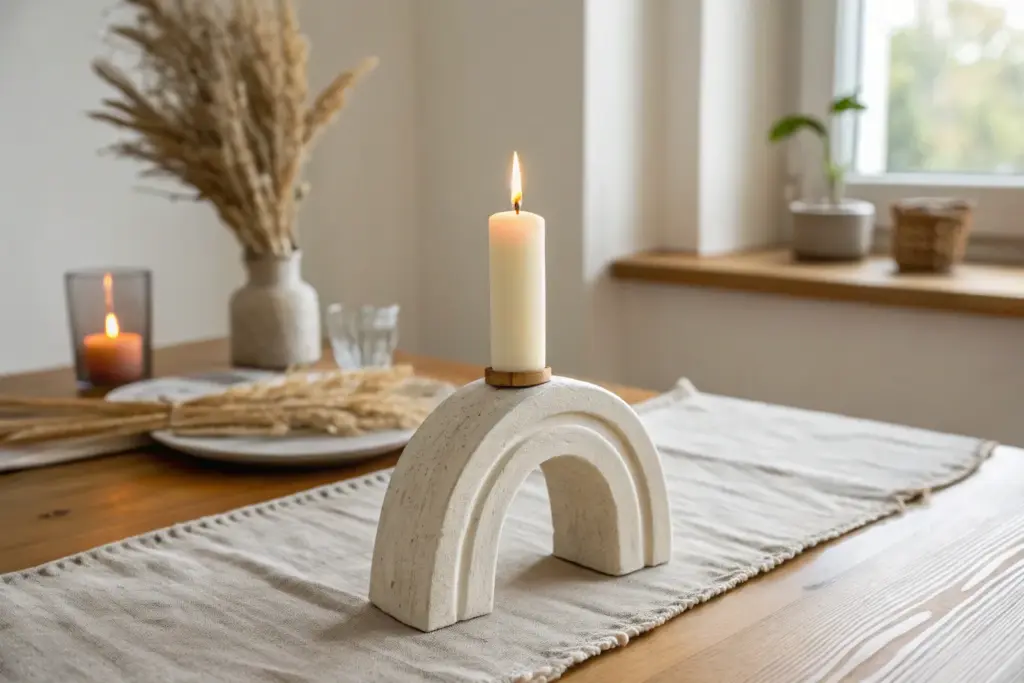
Geometric Faceted Tea Light Holder

This project transforms simple air-dry clay into a sophisticated, faceted sculpture that looks exactly like expensive carved stone. The geometric angles catch the light beautifully, while the faux-granite finish gives it a heavy, high-end feel perfect for modern decor.
Step-by-Step Tutorial
Materials
- White air-dry clay (approx. 500g)
- Standard tea light candle (for sizing)
- Sharp craft knife or scalpel
- Rolling pin
- Sandpaper (medium and fine grit)
- Acrylic sealer or varnish (matte)
- Toothbrush or splatter brush
- Black and grey acrylic paint (diluted)
- Ruler or straight edge
- Clay cutting wire or dental floss
- Bowl of water
Step 1: Shaping the Base Form
-
Condition the clay:
Begin by kneading a large handful of air-dry clay until it is pliable and warm. You want to remove any air bubbles to prevent cracks later. -
Form a ball:
Roll the clay into a smooth, tight sphere. It needs to be slightly larger than a tennis ball to account for the material we will slice away. -
Create the rough shape:
Gently tap the ball on your work surface to create a flat bottom. Then, roughly flatten the top just a little bit so it creates a squat, rounded puck shape rather than a perfect sphere. -
Insert the candle placeholder:
Take your tea light candle and press it firmly into the center of the top face. Push it down until the top of the metal casing is flush with or slightly below the clay surface. -
Wiggle for clearance:
Gently wiggle the tea light in a circular motion to widen the hole infinitesimally. Clay shrinks as it dries, so this extra millimeter of space ensures the candle will still fit later. -
Remove and refinish:
carefully pull the tea light out. Smooth the rim of the hole with a wet finger to fix any distortion caused by the removal.
Cracks happen!
If hairline cracks appear during drying, mix a tiny bit of fresh clay with water to make a ‘slip’ paste. Fill the crack, smooth it over, and let it dry again before sanding.
Step 2: Carving the Facets
-
Initial vertical cuts:
This is the most crucial part. Using a sharp craft knife or wire cutter tool, slice off a section of the rounded side to create a flat plane. I prefer to start with 5 or 6 main vertical cuts around the perimeter. -
Create the angled tiers:
Now, cut smaller triangular facets connecting those main planes. Slice downward at an angle from the top rim to meet the vertical cuts, creating a bevelled upper edge. -
Refine the bottom:
Repeat the unparalleled cutting process near the base, slicing upward to meet the middle section. The goal is to remove all rounded areas, leaving only sharp, flat geometric faces. -
Smooth the planes:
Dip your finger in water and very lightly smooth the flat surfaces of your cuts. Don’t round over the edges—you want to keep those crisp distinctive ridges between the facets. -
Deep drying:
Set the piece aside to dry completely. Because this is a thick block of clay, it may take 48-72 hours. Rotate it occasionally so the bottom dries evenly.
Step 3: Finishing the Stone Look
-
Sand for sharpness:
Once fully dry and hard, use medium-grit sandpaper to sand each facet flat. This sharpens the edges and removes any fingerprints. -
Switch to fine grit:
Go over the entire piece again with fine-grit sandpaper for a silky smooth finish that mimics polished concrete. -
Prepare the splatter mix:
Dilute a tiny drop of black acrylic paint with water until it is very runny and ink-like. -
Apply the texture:
Dip an old toothbrush into the paint mixture. Run your thumb across the bristles to flick tiny speckles onto the white clay. Less is more here; you want a faint granite effect. -
Add dimension:
You can repeat the splatter step with a diluted grey or brown for a more natural stone appearance. -
Seal the piece:
Apply two coats of matte acrylic sealer. This protects the clay from heat and dirty fingerprints while preserving that dry stone aesthetic.
Make it marble
Instead of speckling, knead a small snake of grey or black clay into your white clay ball *before* shaping. Stop before it blends fully for a swirled marble effect.
Place your tea light inside and enjoy the warm glow bouncing off those architectural angles

What Really Happens Inside the Kiln
Learn how time and temperature work together inside the kiln to transform clay into durable ceramic.
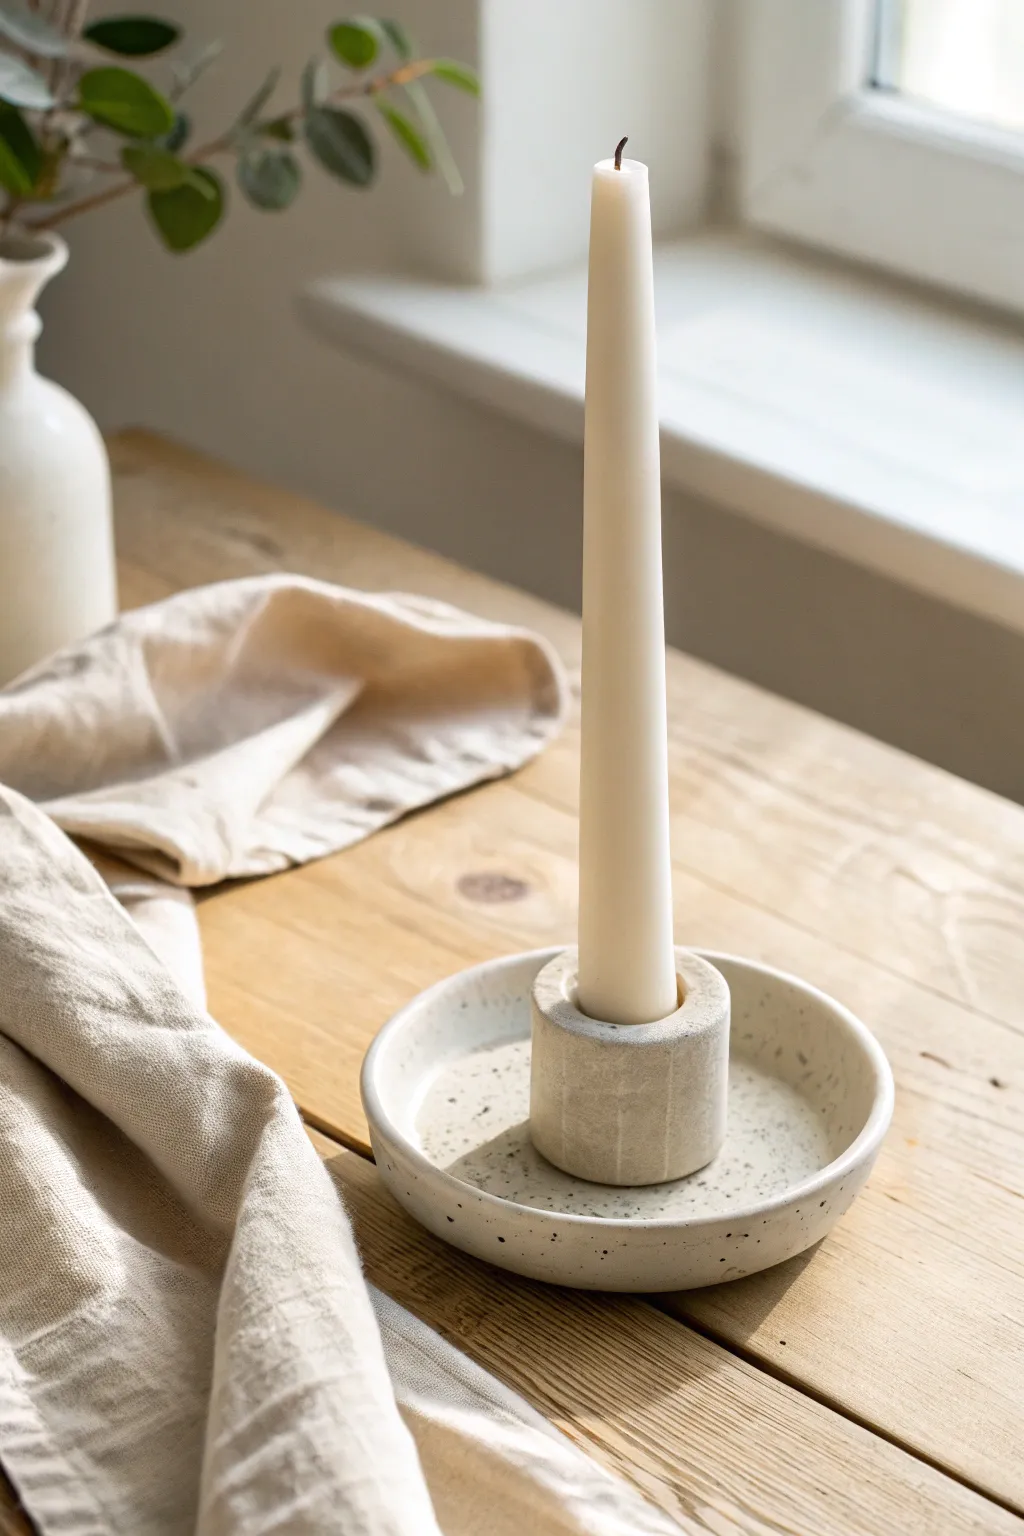
Speckled Faux Ceramic Look Holder
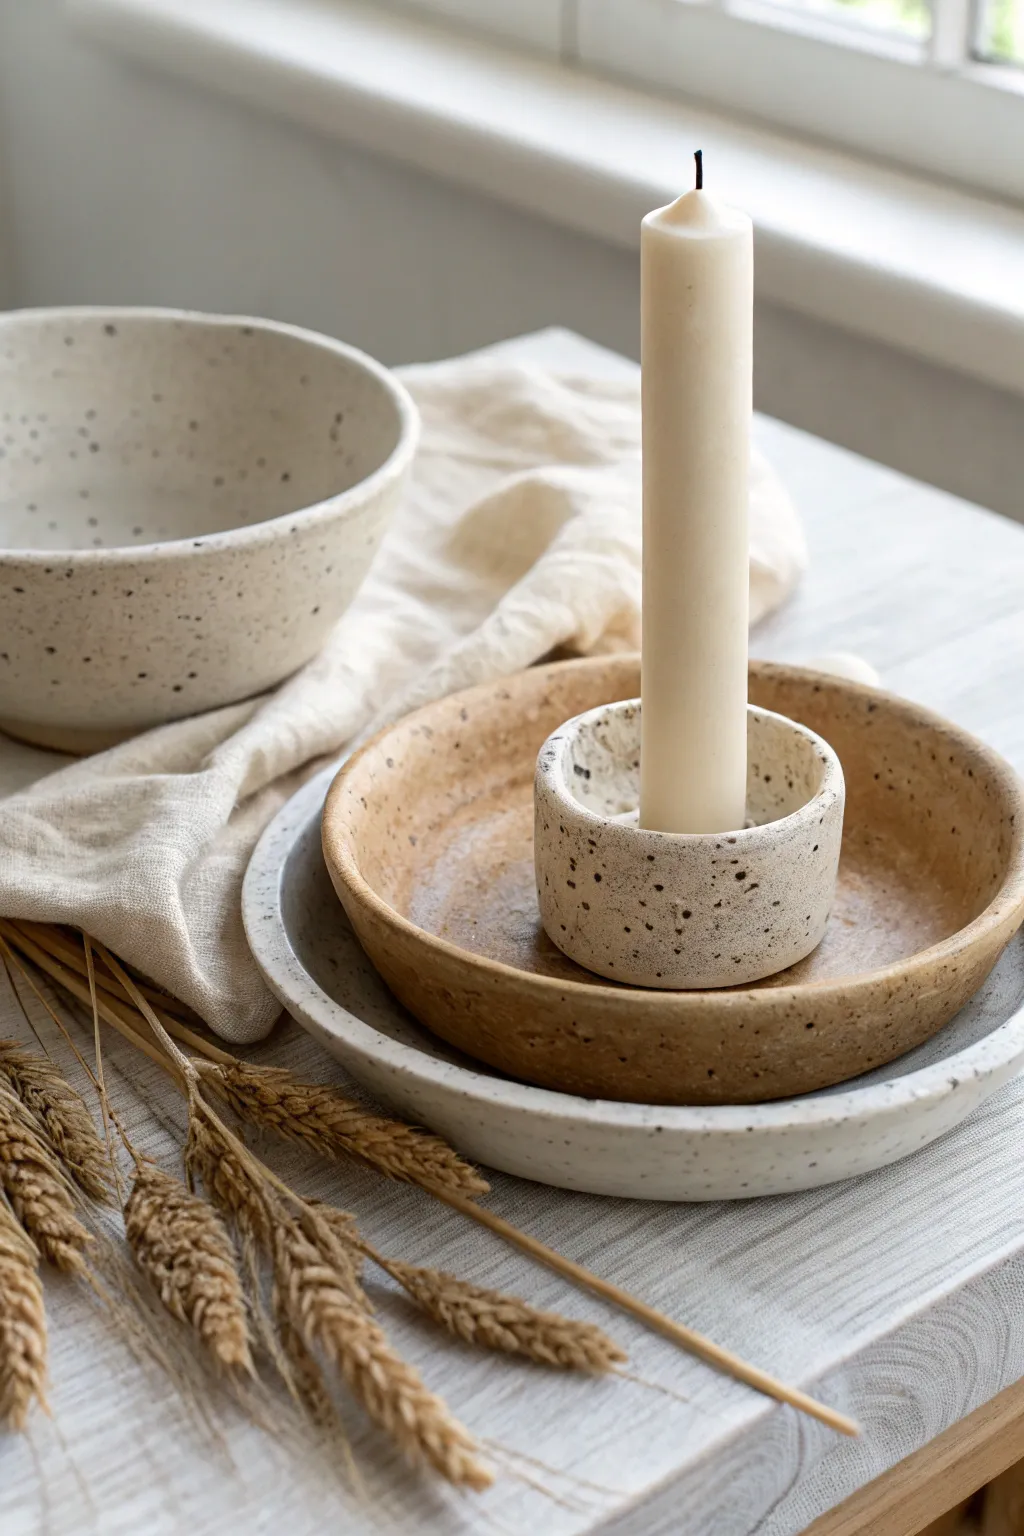
Achieve the high-end look of wheel-thrown speckled pottery using affordable air-dry clay and a clever painting technique. This project creates a stunning layered set, featuring a wide catch-all tray and a perfectly nested cylindrical taper holder with a charming, rustic finish.
Step-by-Step
Materials
- White or natural air-dry clay (approx. 1 kg)
- Rolling pin
- Parchment paper or canvas mat
- Circular templates (bowls or plates to trace, approx. 6-inch and 8-inch)
- Craft knife or clay cutter
- Small sponge
- Water in a small dish
- Taper candle (for sizing)
- Sandpaper (fine grit, e.g., 220)
- Acrylic paints: Cream/Bone White, Beige, Black, Dark Brown
- Old toothbrush or stiff bristle brush
- Matte or satin spray sealant/varnish
Step 1: Shaping the Base Plates
-
Roll the first slab:
Begin by kneading a large chunk of clay to warm it up. Place it on parchment paper and roll it out evenly to a thickness of about 1/4 inch (6mm). Ensure the surface is smooth and free of major air bubbles. -
Cut the circles:
Place your larger circular template (around 8 inches) onto the clay slab and trace around it with a craft knife to cut out the base for the large bowl. Repeat this process with a smaller amount of clay for the 6-inch middle plate. -
Create the rims:
Gently lift the edges of your clay circles. For the large bowl, curve the sides up more dramatically to create depth. For the middle plate, push the edges up just slightly to create a shallow rim. -
Smooth the edges:
Dip your finger or a small sponge into water and run it along the rims and surfaces of both pieces. This erases any cracks or rough texture from the cutting process and gives that professional ‘thrown’ look.
Fixing Cracks
Mix a tiny amount of fresh clay with water to make a paste (slip). Fill any drying cracks with this paste, smooth it over, let it dry again, and sand it flush.
Step 2: Crafting the Candle Cup
-
Form the cylinder:
Take a ball of clay roughly the size of a lemon. Roll it into a thick log, then flatten the top and bottom against your work surface to create a squat cylinder shape, about 2 inches tall. -
Hollow out the center:
Press your thumb into the center of the cylinder to create the opening, or gently press your actual taper candle into the soft clay to get the perfect diameter. Wiggle it slightly so the hole is just a hair wider than the candle to account for shrinkage. -
Refine the shape:
Pinch the walls of the candle holder to ensure they are even thickness all around. Smooth the top rim with a wet finger so it is flat and clean, matching the aesthetic of the plates. -
Dry completely:
Set all three pieces (large bowl, middle plate, and candle holder) aside in a spot with good airflow. Let them dry for at least 24-48 hours until they are bone dry and turn lighter in color.
Make It Glossy
For a ‘wet clay’ or high-gloss glazed look, swap the matte spray for a thick layer of high-gloss flow medium or resin finish as your final topcoat.
Step 3: Faux Ceramic Finish
-
Sand imperfections:
Once fully dry, take your fine-grit sandpaper and gently buff away any sharp edges or uneven bumps on the rims. Wipe away the dust with a barely damp cloth. -
Base coat color:
Mix a creamy, off-white acrylic paint. Apply two coats to the candle holder and the large bowl, allowing drying time between layers. This creates a clean, modern canvas. -
Contrast glaze:
For the middle plate (the ‘toasty’ one), mix beige with a drop of brown and a little water to create a semi-transparent wash. Paint this over the plate to give it a warmer, fired-clay appearance. -
Speckling technique:
Dilute a small amount of black and dark brown paint with water until it’s inky. Dip an old toothbrush into this mixture. -
Apply the speckles:
Hold the toothbrush over your dried pieces and run your thumb across the bristles to flick tiny droplets of paint onto the surface. I suggest practicing on a piece of paper first to control the density of the spray. -
Seal the deal:
Once the paint is totally dry, apply a matte or satin spray varnish. This protects the finish and deepens the colors slightly, completing the faux ceramic transformation.
Arrange your beautiful new set on a coffee table and enjoy the warm ambiance.
Matte “Porcelain” Air Dry Clay Holder
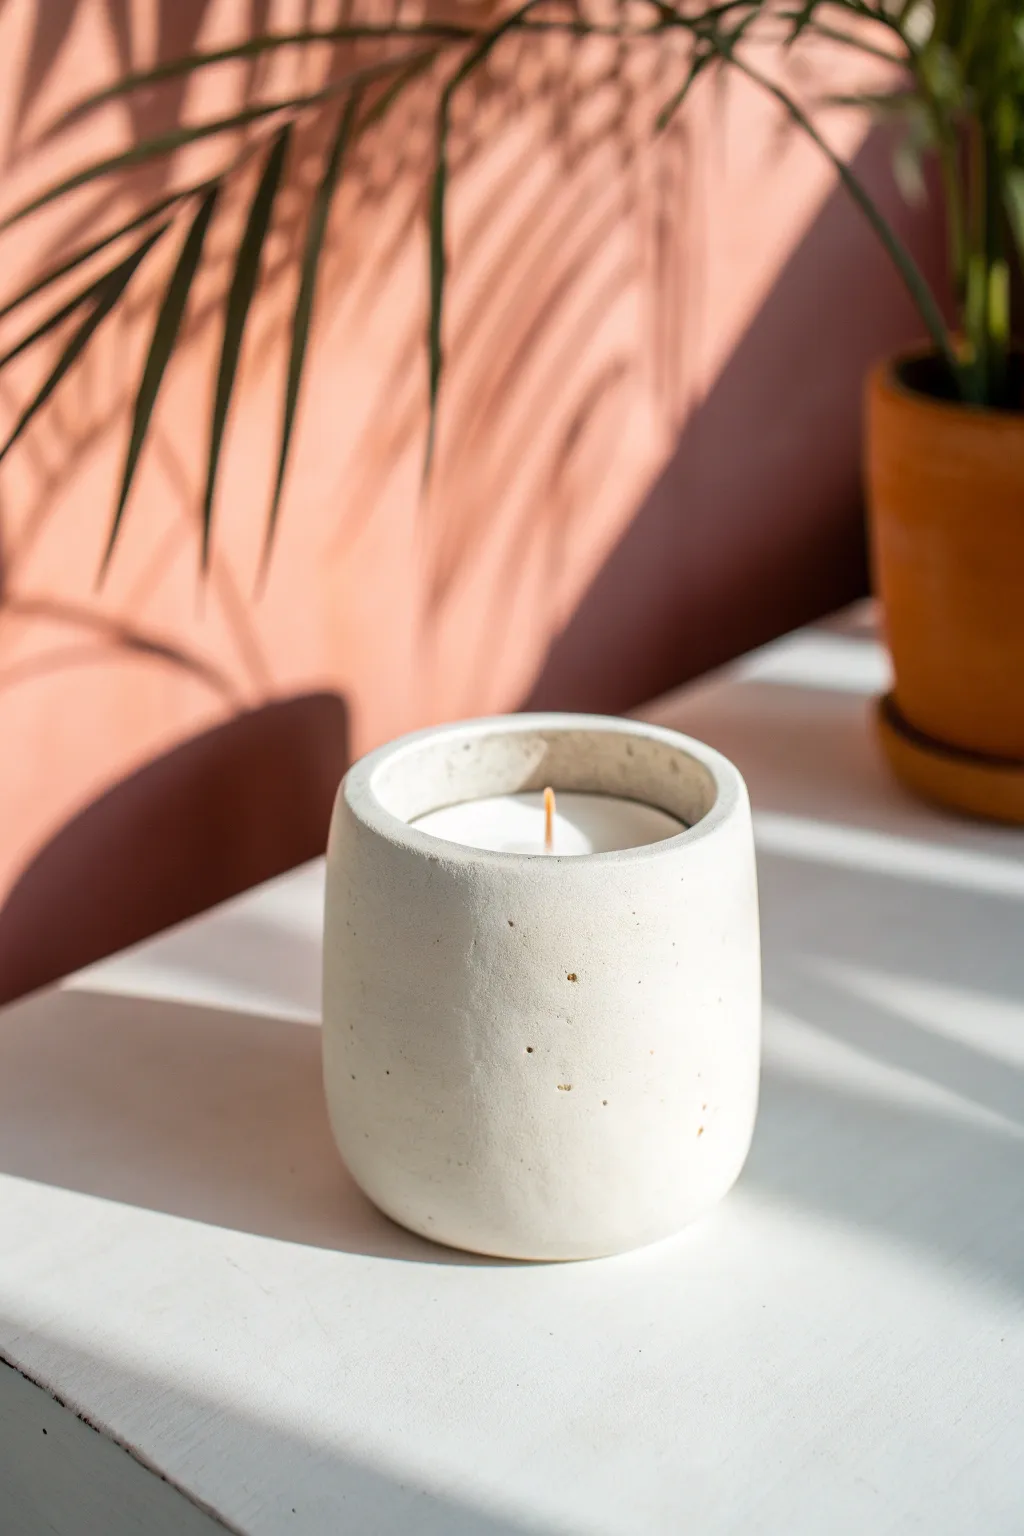
This project mimics the sophisticated, minimalist look of matte porcelain or polished concrete using simple air dry clay. The result is a substantial, heavy-bottomed vessel with an ultra-smooth finish and subtle textural imperfections that make it feel truly handmade.
How-To Guide
Materials
- White DIY air dry clay (or standard DAS clay)
- Wide rolling pin
- Circle cutter or bowl (approx. 4-inch diameter)
- Small glass jar or pill bottle (to use as a mold)
- Vegetable oil or clay release agent
- Craft knife
- Needle tool or toothpick
- Sponge and water
- Fine-grit sandpaper (220 and 400 grit)
- Matte white acrylic paint (optional)
- Matte varnish or sealant
Step 1: Shaping the Base
-
Condition the Clay:
Begin by taking a substantial chunk of air dry clay and kneading it thoroughly in your hands. You want it warm and pliable to minimize cracking later on. -
Roll a Slab:
Roll the clay out on a smooth surface until it is about 1/4-inch to 1/3-inch thick. You want this vessel to have thick, sturdy walls, so don’t go too thin. -
Cut the Base:
Use your circle cutter or trace around a bowl to cut a perfect circle for the base. Set this aside on a piece of parchment paper.
Step 2: Building the Walls
-
Prepare the Mold:
Take your small glass jar or pill bottle and lightly coat the exterior with a tiny amount of vegetable oil. This ensures the clay wont permanently stick to your form. -
Measure the Wall:
Roll out a long rectangular strip of clay. The width of the strip should match your desired height for the candle holder, and the length must wrap fully around your jar mold with a slight overlap. -
Attach to the Base:
Score the outer edge of your circular base and the bottom edge of your rectangular strip. Apply a dab of water to create a slip. -
Wrap the Form:
Place the jar in the center of the base. Wrap the clay strip around the jar, pressing it firmly down onto the base. -
Seal the Seam:
Where the two ends of the wall meet, cut through both layers at an angle with your craft knife to create a clean join. Remove the excess clay. -
Smooth the Join:
Use your fingers and a little water to smooth the vertical seam until it disappears completely. Do the same for the bottom seam connecting the wall to the base.
Smooth Seams
Use a little vinegar instead of water when smoothing joins. The acid breaks down the clay particles slightly, making the “slip” stronger.
Step 3: Refining and Finish
-
Create the Lip:
While the clay is still pliable, gently curve the top rim slightly inward using your thumbs. This slight taper gives it that modern, organic porcelain shape. -
Add Texture:
I like to take a needle tool or toothpick and prick a few tiny, random holes or scratches into the surface. This mimics the small air pockets found in concrete or stone. -
Initial Smoothing:
Dip a sponge in water and wring it out almost completely. Wipe the entire surface to remove fingerprints and harsh angles. -
Remove the Mold:
Once the clay has stiffened slightly (usually after 1-2 hours), carefully twist and pull the glass jar out. If you leave it in too long, the clay might crack as it shrinks around the rigid glass. -
Dry Completely:
Let the piece dry for 24 to 48 hours away from direct sunlight. Turn it occasionally to ensure airflow to the bottom. -
Sanding for smoothness:
Once bone dry, take your 220-git sandpaper and sand the entire exterior. Follow up with 400-grit for that ultra-smooth, matte porcelain feel. -
Dusting Off:
Wipe away all sanding dust with a slightly damp cloth or a dry paintbrush. -
Sealing:
Finish with a coat of matte varnish. This preserves the raw, earthy look while protecting the clay from moisture and heat.
Speckled Effect
Mix dried tea leaves or used coffee grounds into the wet clay before rolling it out. Sanding later will reveal organic, stone-like speckles.
Place a simple white tealight inside to enjoy the warm glow against your new handcrafted stoneware piece


The Complete Guide to Pottery Troubleshooting
Uncover the most common ceramic mistakes—from cracking clay to failed glazes—and learn how to fix them fast.
Botanical Leaf-Imprint Candle Holder
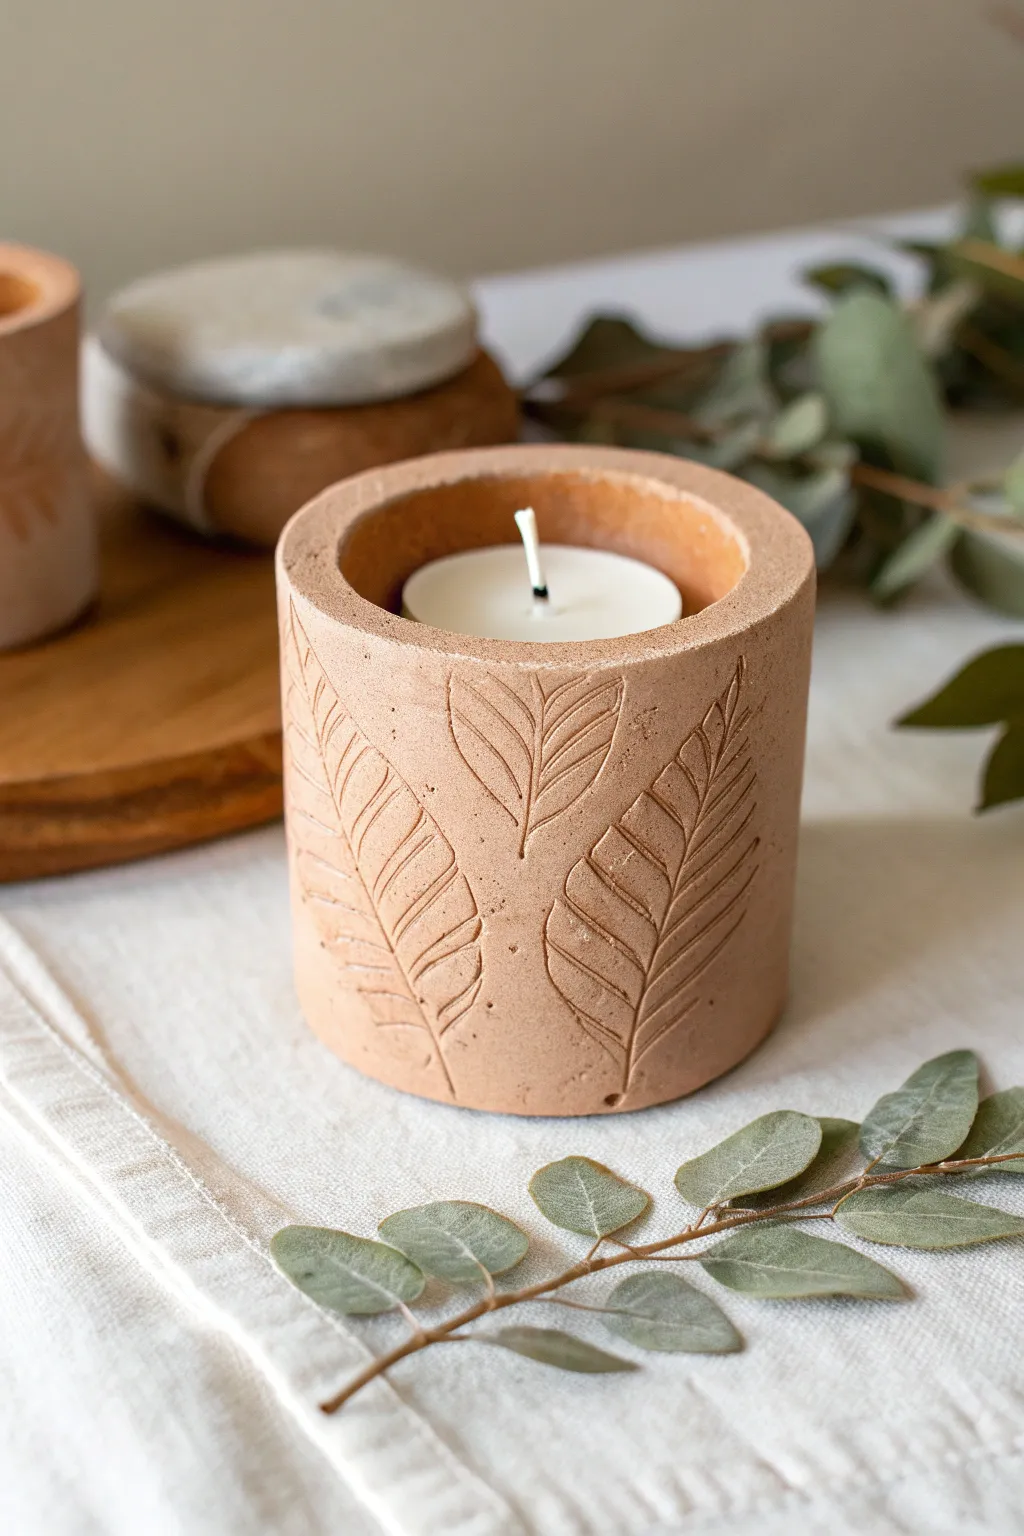
Bring the serene beauty of nature indoors with this earthy, bohemian-style candle holder. Featuring deep botanical impressions on a warm terracotta finish, this project transforms simple air dry clay into a sophisticated piece of home decor.
Step-by-Step Tutorial
Materials
- Terracotta-colored air dry clay (or white clay + terracotta acrylic paint)
- Rolling pin
- Empty can or cylindrical mold (approx. 3-inch diameter)
- Parchment paper or non-stick craft mat
- Craft knife or clay needle tool
- Fresh or faux leaves with prominent veins (e.g., eucalyptus or fern)
- Small bowl of water
- Fine-grit sandpaper (220 grit)
- Matte sealant or varnish
- Tealight candle
Step 1: Preparation & Rolling
-
Prepare your workspace:
Lay down your parchment paper or non-stick mat to protect your table and prevent the clay from sticking. Tape the corners down if it tends to curl up. -
Condition the clay:
Take a generous handful of clay and knead it until it’s soft, pliable, and free of cracks. If you are using white clay and want a colored base, knead in a small amount of acrylic paint now, though painting later is easier for beginners. -
Roll out a slab:
Use your rolling pin to flatten the clay into a long, rectangular slab. Aim for an even thickness of about 1/4 inch (6mm) ensures the walls are sturdy enough to stand but not too chunky. -
Measure the circumference:
Wrap a strip of paper around your cylindrical mold (the empty can) to determine the length needed. Mark this length on your clay slab, adding a tiny bit of extra overlap (about 1/4 inch). -
Trim the edges:
Using a craft knife and a straight edge (like a ruler), cut your clay into a clean, long rectangle based on your measurements. Save the excess clay for the base.
Vein Definition Tip
If your leaf impressions look shallow after drying, use a fine-point tool to gently re-carve the main vein lines before the clay turns completely hard.
Step 2: Creating the Leaf Texture
-
Select your botanicals:
Choose leaves that are stiff enough to leave a mark. I find that leaves with raised veins on the back work best for a deep impression. -
Arrange the pattern:
Lay your leaves onto the flat clay strip in your desired pattern. You can space them out evenly or overlap them slightly for a denser look. -
Imprint the design:
Gently roll over the leaves with your rolling pin. Press firmly enough to embed the veins into the clay, but not so hard that you distort the shape of your rectangle. -
Reveal the texture:
Carefully peel the leaves off the clay. Use the tip of a needle tool to lift the stem if they are stuck. -
Refine the details:
If the impression is faint, you can use a sculpting tool or a toothpick to manually deepen the main vein lines for a sharper look.
Gold Leaf Glam
After the clay is sealed, paint the inside of the leaf impressions with a tiny brush and liquid gold leaf for a stunning, subtle metallic highlight.
Step 3: Assembly & Finishing
-
Wrap the cylinder:
Wrap the textured clay strip around your cylindrical mold. To prevent sticking, wrap the mold in a layer of parchment paper first. -
Join the seam:
Where the ends meet, score (scratch) both touching surfaces and dab with a little water. Press them together firmly and smooth the seam on the inside with your finger. Try to keep the outside seam distinct or hidden within the pattern. -
Create the base:
Roll out a small circle of leftover clay slightly larger than the diameter of your cylinder. Place your wrapped cylinder on top of this base. -
Seal the bottom:
Use a modeling tool to blend the clay from the base up into the walls of the cylinder on the outside, creating a seamless join. Trim away any excess clay sticking out from the bottom. -
Smooth the rim:
Dip your finger in water and run it along the top rim of the candle holder to soften any sharp edges left from cutting. -
Initial Drying:
Let the clay sit on the mold for about 1-2 hours until it is leather-hard. Then, carefully slide the mold out so the inside can dry properly. -
Full Cure:
Allow the piece to dry completely for 24-48 hours. Keep it away from direct heat sources to prevent cracking. -
Sand and smooth:
Once fully dry, use fine-grit sandpaper to gently smooth the rim and any rough spots on the surface. Be careful not to sand away your beautiful leaf texture. -
Seal the piece:
Apply a coat of matte varnish to protect the clay. This is especially important for candle holders to make them easier to wipe clean of soot or dust.
Place a tea light inside and watch the flickering flame cast beautiful shadows across your handmade botanical design
Stamped Pattern Band Taper Holder
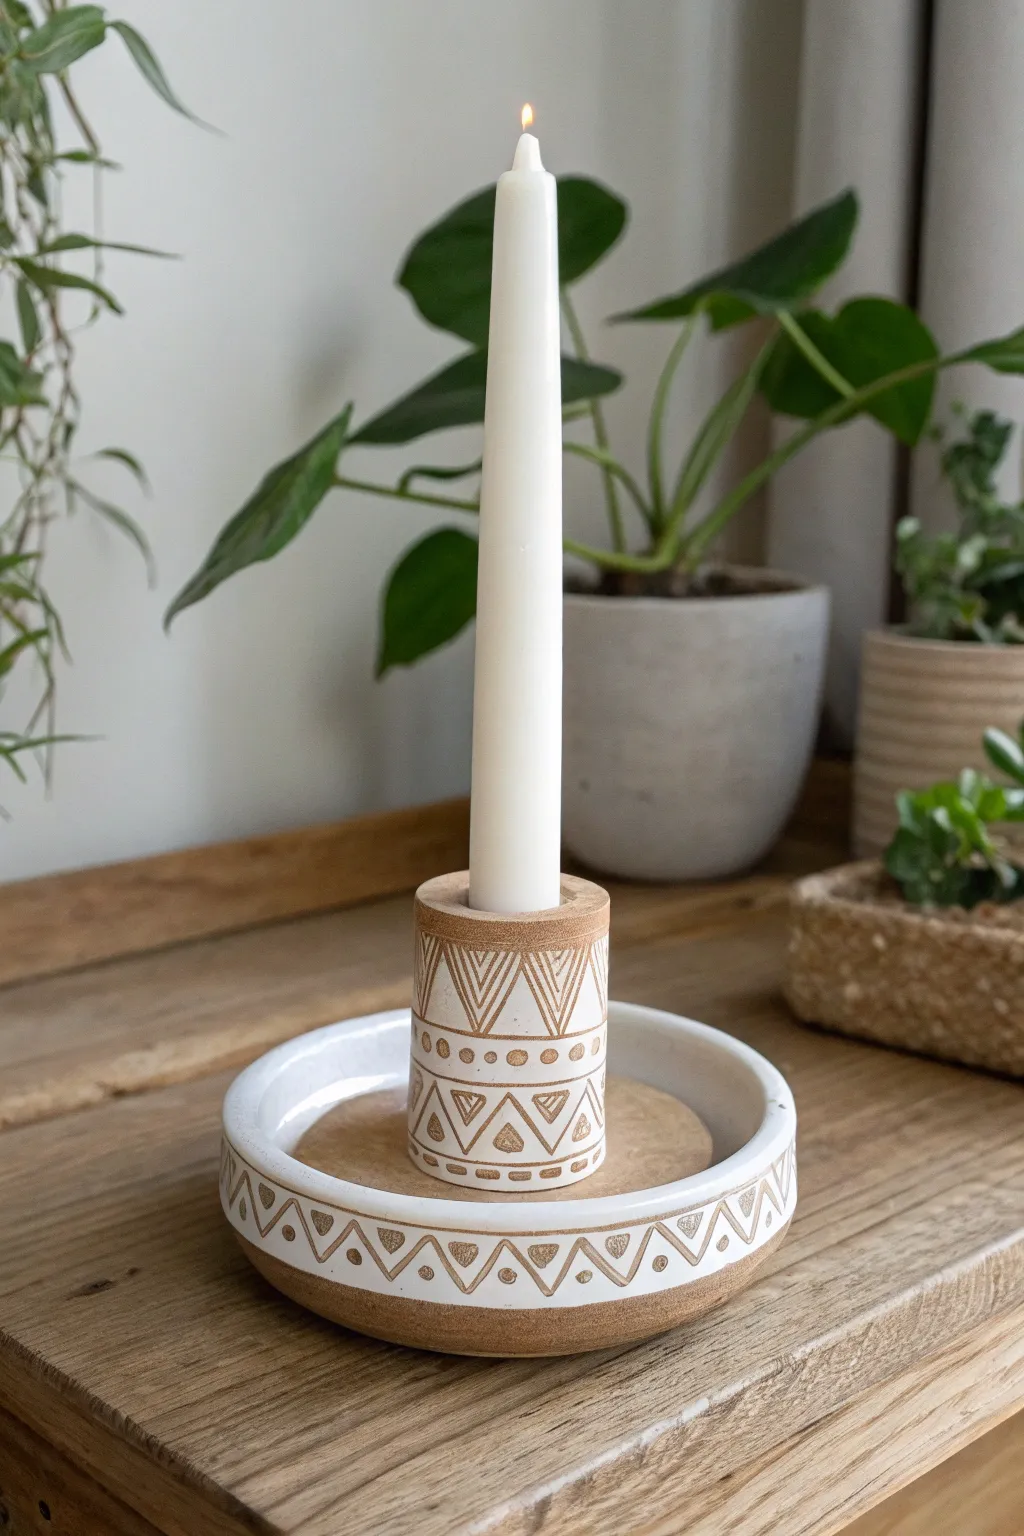
This earthy, stamped candle holder combines a functional taper stand with a useful catch-all dish for matches or trinkets. The white finish with exposed raw-clay detailing gives it a warm, artisanal vibe perfect for cozying up any corner.
Detailed Instructions
Materials
- Air dry clay (terracotta or brown color)
- White acrylic paint or matte white clay slip
- Rolling pin
- Clay knife or craft knife
- Ruler
- Small circular cookie cutter (approx. 1 inch)
- Medium bowl (for tracing the base shape)
- Carving tool or linocut gouge
- Water and sponge
- Taper candle (for sizing)
- Clear matte varnish (optional)
Step 1: Forming the Base Dish
-
Roll the clay slab:
Begin by rolling out a generous amount of brown air dry clay to a consistent thickness of about 1/4 inch. Ensure the surface is smooth and free of air bubbles. -
Cut the base circle:
Place your medium-sized bowl upside down on the clay slab to use as a template. Trace around it with your clay knife to cut out a perfect circle for the base. -
Create the rim:
Roll a long snake or coil of clay, keeping it even in thickness. Score the outer edge of your base circle and the underside of the coil, moistening both with a little water before pressing the coil onto the rim. -
Smooth the connection:
Use your thumb or a modeling tool to blend the inside of the coil down into the base so the seam disappears. Repeat on the outside edge for a seamless, solid look.
Step 2: Building the Taper Holder
-
Cut the central strip:
Roll out a smaller piece of clay, slightly thinner than the base. Cut a rectangle that is roughly 2 inches tall and long enough to wrap around your taper candle with a little overlap. -
Form the cylinder:
Wrap the rectangular strip around the base of your taper candle to check the fit (leave a tiny bit of wiggle room for shrinkage). Join the ends by scoring and slipping, blending the seam until smooth. -
Attach cylinder to base:
Score the bottom of your cylinder and the center of your dish. Apply a dab of water or slip, press the cylinder firmly into the center, and use a small tool to blend the clay at the interior and exterior base of the cylinder so it is securely anchored. -
Refine the edges:
Dip a sponge in water and gently run it over all rims and edges to soften any sharpness. I like to make sure the top rim of the cylinder is perfectly flat so the wax doesn’t pool unevenly. -
Initial drying:
Let the piece dry for about 24-48 hours until it is completely hard and light in color.
Clean Lines Tip
When carving through dry paint (sgraffito style), keep your carving tool sharp. A dull tool will chip the paint rather than slicing it, resulting in jagged lines instead of crisp geometric shapes.
Step 3: Decorating and Finishing
-
Apply the white coat:
Paint the entire piece—except for the very bottom of the inside dish optionally—with an opaque layer of white acrylic paint. You want good coverage, so a second coat might be needed. -
Let paint dry:
Allow the white paint to dry completely. It must be dry to the touch before you start carving. -
Mark the pattern guidelines:
Using a pencil, very lightly sketch your geometric bands. Draw horizontal lines around the cylinder and the outer rim of the dish to keep your zig-zags straight. -
Carve the zig-zags:
Use a carving tool or a sharp linocut gouge to scratch through the layer of white paint, revealing the brown clay underneath. Carve continuous zig-zag lines (triangles) within your horizontal guides. -
Add inner details:
Inside the larger triangles on the cylinder, carve smaller nested triangles or vertical lines to add complexity to the pattern. -
Carve the dots:
Use the tip of your tool to bore small circular divots between the varying bands of triangles. This creates the ‘beaded’ look seen in the reference. -
Clean up dust:
Use a dry, soft brush to sweep away the paint crumbs created by carving. Do not use a wet cloth, or you might smudge the white paint into the exposed clay lines. -
Seal the project:
Finish by applying a coat of clear matte varnish or sealant to protect the paint and the raw clay areas.
Wobbly Candle?
If the clay shrunk too much and the candle won’t fit, gently sand the inside of the holder with sandpaper. If it’s too loose, drip a little melted wax into the bottom before inserting the candle.
Place a fresh white taper inside and enjoy the warm glow of your new handmade accent piece

TRACK YOUR CERAMIC JOURNEY
Capture glaze tests, firing details, and creative progress—all in one simple printable. Make your projects easier to repeat and improve.
Painted Marbled Tea Light Cup
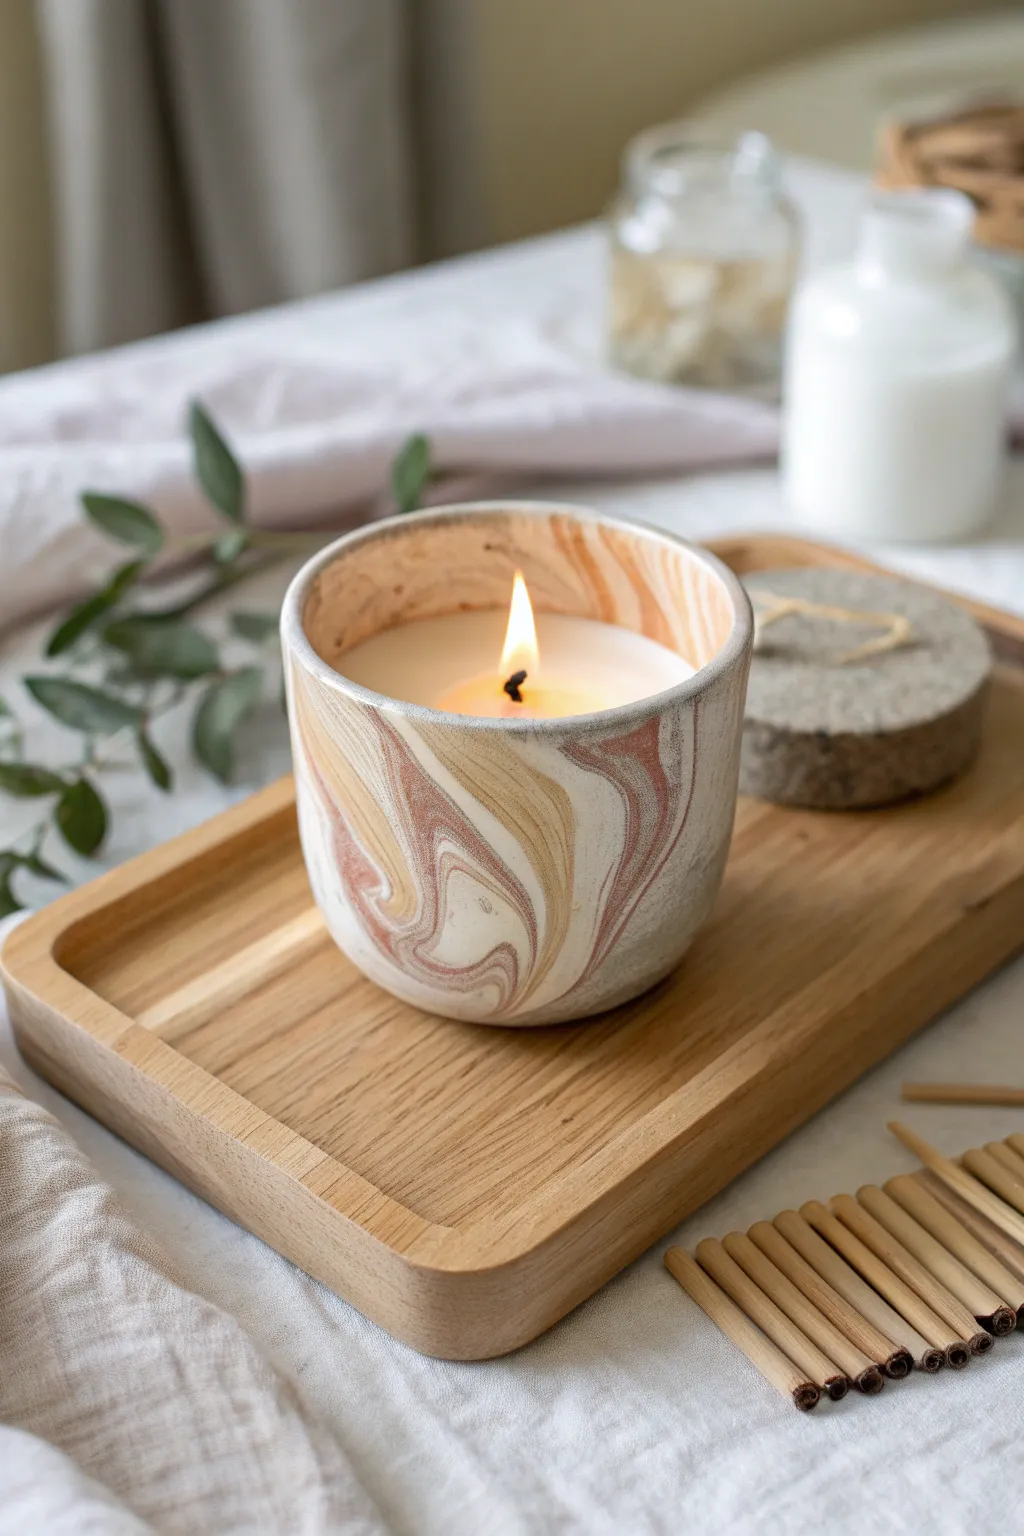
Achieve the sophisticated look of wheel-thrown pottery using humble air-dry clay with this marbling technique. The swirling ribbons of terracotta, sand, and cream create a cozy, earthy vessel perfect for holding larger tea lights or small votives.
Step-by-Step Tutorial
Materials
- White polymer or air-dry clay (primary base)
- Terracotta or brown air-dry clay
- Yellow ochre or beige acrylic paint (to tint clay if needed)
- Rolling pin
- Cylinder mold (like a smooth glass jar or can)
- Craft knife or scalpel
- Slip (water mixed with clay scraps)
- Sponge and fine-grit sandpaper
- Water-based matte or satin varnish (heat resistant if possible)
Step 1: Preparing the Clay Colors
-
Tinting the base:
Since we want three distinct tones, start by separating your white clay into two batches. Keep one pure white. For the second batch, knead in a small amount of yellow ochre acrylic paint until you achieve a soft sand color. -
Prepping the accent color:
Prepare your terracotta or reddish-brown clay. If you don’t have colored clay, tint a third batch of white clay with burnt sienna paint. You want about 60% white clay, 30% sand, and 10% terracotta for this balanced mix. -
Creating logs:
Roll each color into several long, snake-like logs about half an inch thick. The lengths don’t need to be perfectly uniform, as irregularity helps the marble effect.
Don’t Over-Mix!
Stop twisting the clay colors sooner than you think. If you twist too much, the colors blend into a single muddy brown instead of distinct ribbons.
Step 2: The Marbling Technique
-
Twisting the rope:
Gather your clay logs and twist them together into one large, thick rope. Fold the rope in half and twist it again. I like to repeat this fold-and-twist motion about 3 or 4 times—stop before the colors muddy together. -
Forming the slab:
Ball up your twisted clay and flatten it firmly onto your work surface with your palm to start the compression process. -
Rolling it out:
Using a rolling pin, roll the clay out into a flat slab about 1/4 inch thick. Roll in different directions to stretch the marble pattern organically. You should see beautiful, distinct swirls appearing. -
Cutting the base:
Place your chosen cylinder mold (like a glass jar) onto the clay slab and cut around it with a craft knife to create the circular bottom of your candle holder. -
Cutting the wall:
Measure the height and circumference of your mold. Cut a long rectangular strip from the remaining marbled slab that is slightly longer than the circumference and matches your desired height.
Cracking Seams?
If the clay starts cracking while wrapping it around the mold, your slab might be too dry. Mist it lightly with water and let it sit for a minute before trying again.
Step 3: Construction and Refining
-
Scoring the edges:
Take your craft knife and gently cross-hatch (score) the outer edge of the circular base and the bottom long edge of your rectangular strip. -
Applying slip:
Dab a little water or slip onto the scored areas to act as glue. Wrap the rectangular strip around your mold or directly onto the base if you are free-handing. -
Sealing the seam:
Join the two ends of the wall together. Use a modeling tool or your decorative finger to smooth the clay across the seam on both the inside and outside until the line disappears. -
Attaching the base:
Press the wall firmly onto the circular base. Smooth the clay downwards from the wall onto the base to fuse them completely, ensuring there are no gaps for wax to leak through later. -
Smoothing the rim:
Dip your finger in water and run it along the top rim to round off any sharp edges cut by the knife. The look should be soft and ceramic-like, not sharp. -
Drying phase:
Let the piece dry slowly away from direct sunlight for 24-48 hours. Turn it upside down halfway through so the bottom dries evenly.
Step 4: Finishing Touches
-
Sanding:
Once bone dry, use fine-grit sandpaper to gently buff the surface. This removes fingerprints and reveals the marble pattern more clearly. -
Dusting off:
Wipe the entire vessel with a slightly damp sponge to remove all clay dust before sealing. -
Sealing:
Apply 2-3 coats of a matte or satin varnish. This protects the clay and gives it that slight sheen seen in the photo. Ensure the varnish is fully cured before inserting a candle.
Now you have a stunning, stone-like vessel ready to add a warm glow to your space
Scalloped “Flower” Tea Light Holder
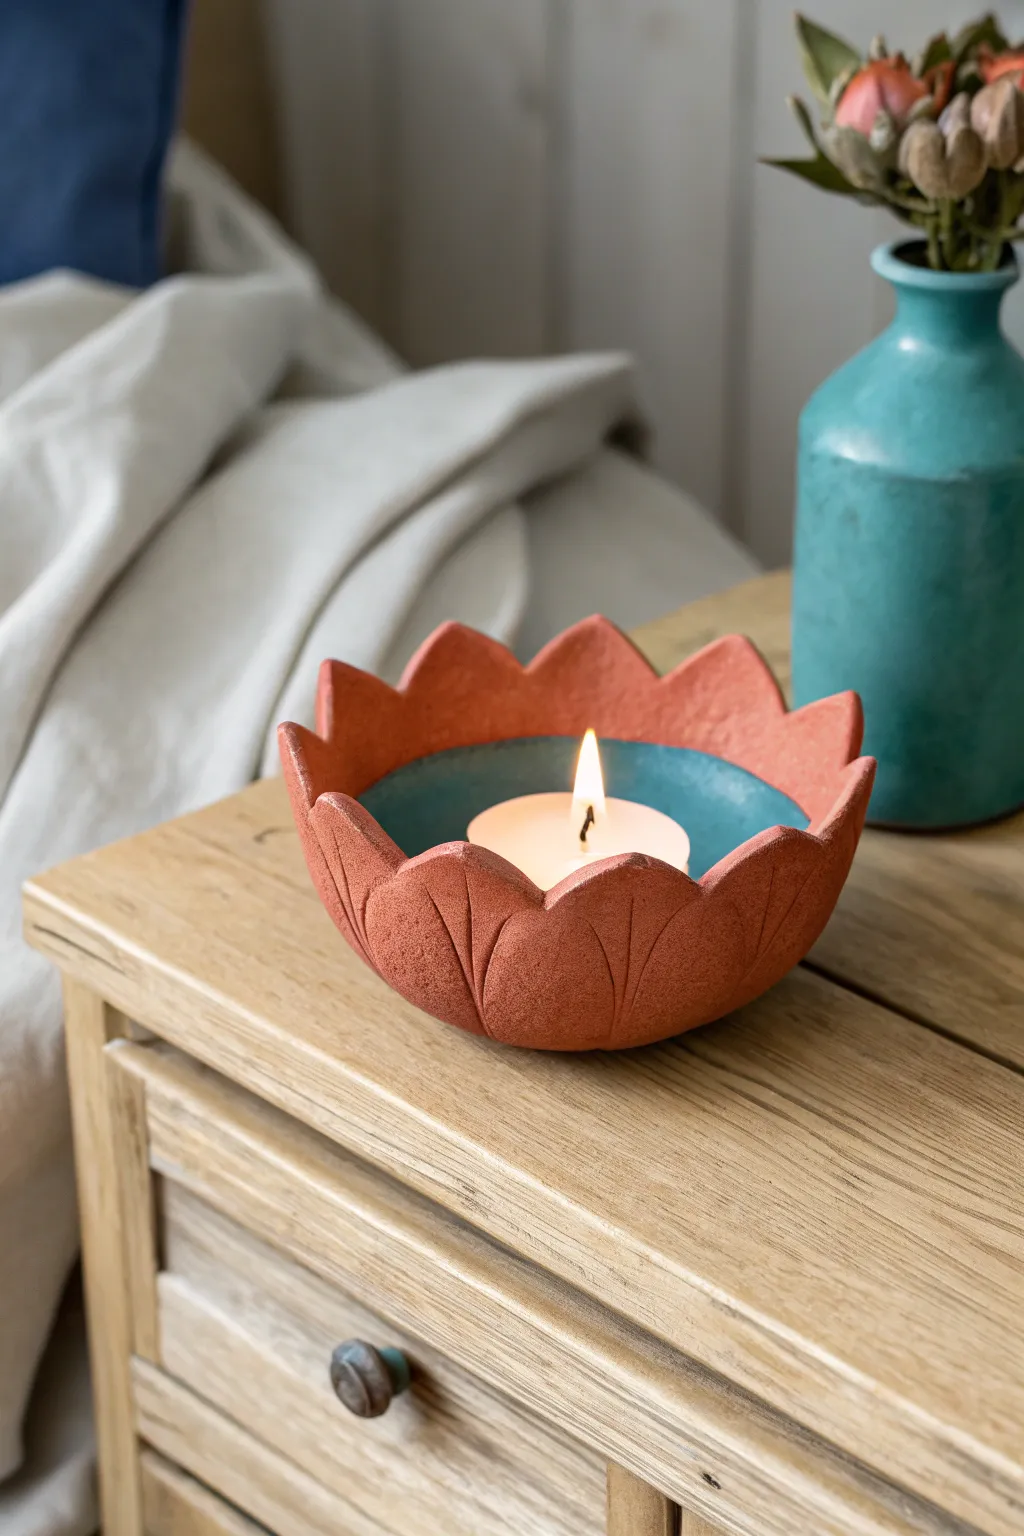
Capture the serenity of a blooming lotus with this elegantly sculpted tea light holder. The warmth of the terracotta-colored exterior contrasts beautifully with the cool, glossy teal interior, making it a perfect accent piece for any bedside table.
Step-by-Step
Materials
- Air dry clay (terracotta color or white)
- Rolling pin
- Small bowl (approx. 4-5 inches wide) to use as a mold
- Leaf-shaped cookie cutter or paper template
- Craft knife
- Small cup of water
- Needle tool or toothpick
- Fine-grit sandpaper
- Acrylic paint: Burnt Sienna (if using white clay) and Teal/Turquoise
- Gloss varnish or sealant
- Paintbrushes (flat and detail)
Step 1: Forming the Base
-
Prepare the Clay:
Start by conditioning a large ball of air dry clay in your hands until it feels pliable and warm. If you are using white clay, you can knead in some terracotta-colored acrylic paint now, or choose to paint the exterior later. -
Roll the Slab:
Roll the clay out on a flat, clean surface to a uniform thickness of about 1/4 inch. Lift the clay occasionally to ensure it isn’t sticking to your work surface. -
Create the Bowl Shape:
Place your clay slab gently inside the small bowl you’ve chosen as a mold. Press it firmly against the bottom and sides to take the shape, trimming away any excess clay that hangs significantly over the rim.
Step 2: Sculpting the Petals
-
Cut the Petal Shapes:
Use a sharp craft knife to cut the rim of the bowl into a series of pointed, scalloped arches. Aim for roughly 8-10 points to mimic flower petals. -
Smooth the Edges:
Dip your finger in a little water and run it along the cut edges of the petals. Smooth out any jagged bits or sharpness from the knife cuts for a polished look. -
Detail the Petals:
Using a needle tool or the back of your knife, gently score a vertical line down the center of each petal. Start from the base and fade the line out just before the tip. -
Add Secondary Lines:
Add two shorter, curved lines on either side of the central vein on each petal. These depressions add texture and make the ‘flower’ look more organic. -
Refine the Shape:
While the clay is still in the mold, gently push the petals inward slightly so they cup the center space rather than flaring out too wide. -
Initial Drying:
Let the clay dry inside the bowl mold for at least 12-24 hours. I prefer to let this dry away from direct sunlight to prevent cracking.
Uneven Petals?
Don’t stress over perfect symmetry. Real flowers are organic and imperfect. Variation in petal size actually makes the final piece look more natural and artistic.
Step 3: Finishing Touches
-
Remove and Sand:
Once the clay is firm enough to hold its shape, carefully pop it out of the mold. Let it dry completely (another 24 hours), then use fine-grit sandpaper to smooth any rough spots on the rim or base. -
Paint the Exterior:
If you used white clay, apply a coat of matte terracotta or reddish-brown acrylic paint to the outside and the rim. Use a dabbing motion with a sponge or stiff brush to create a stone-like texture. -
Paint the Interior:
Paint the inside of the bowl with a vibrant teal or turquoise acrylic paint. You may need two coats to get a solid, opaque color that covers the clay completely. -
Seal the Project:
Apply a gloss varnish specifically to the teal interior to give it a ceramic-like shine. Keep the exterior matte for contrast, or use a matte sealant if you want to protect the paint without adding shine. -
Final Check:
Ensure the bottom is flat so it sits safely on a table. If it wobbles, you can gently sand the bottom flat before placing your tea light inside.
Gilded Edge
Use a small brush to apply liquid gold leaf or metallic gold paint just along the very top rim of the petals. This adds a luxurious outline that catches the candlelight.
Place a tea light inside and enjoy the warm, peaceful glow of your handcrafted sculpture
Triple Cluster Taper Candle Centerpiece
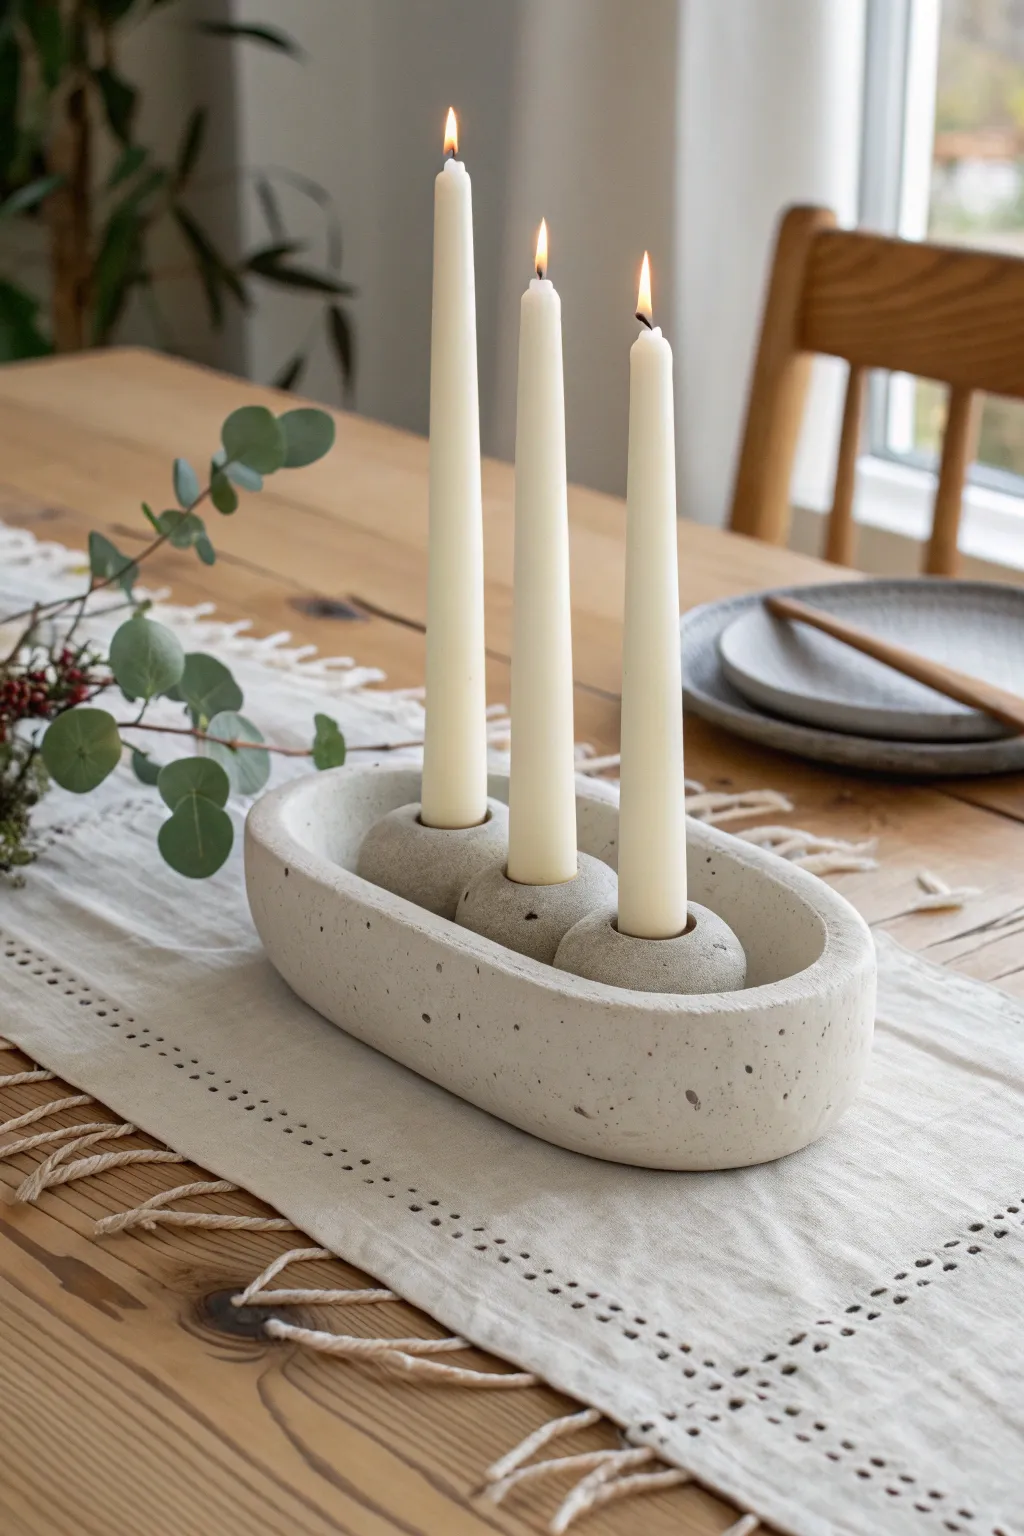
Create a sophisticated, minimalist centerpiece that mimics the look of high-end cast stone using accessible air-dry clay. This oval vessel cradles three distinct spherical holders, offering a modern and sculptural resting place for your favorite taper candles.
Step-by-Step Guide
Materials
- Air-dry clay (white or light grey)
- Rolling pin
- Sharp crafting knife
- Cardstock (for templates)
- Taper candle (to size the holes)
- Water in a small cup
- Sponge or smoothing tool
- Acrylic paint (light grey, white, black/dark brown)
- Old toothbrush (for splattering)
- Matte sealant or varnish
- Fine grit sandpaper
Step 1: Forming the Oval Vessel
-
Create the base template:
Sketch a long oval shape on cardstock, approximately 10-12 inches long and 4-5 inches wide, and cut it out to use as your guide. -
Roll the slab:
Roll out a large portion of your air-dry clay until it is uniform in thickness, aiming for about 1/4 to 1/3 inch thick. -
Cut the base:
Place your cardstock template onto the clay slab and trace around it with a sharp knife to cut out the oval base. -
Cut the walls:
From the remaining rolled clay, cut long rectangular strips for the side walls. Make them about 2 inches tall. -
Attach the walls:
Score the edges of the base and the bottom of the wall strips with a hatching pattern. Apply a little water or slip (clay mixed with water) and press the walls firmly onto the base. -
Blend the seams:
Using your thumb or a modeling tool, blend the clay from the wall down into the base on both the inside and outside until the seam disappears completely. -
Smooth the rim:
Run a wet sponge or finger along the top rim to round it off slightly, ensuring it isn’t sharp or uneven.
Shrinkage Issues?
If the candle holes shrank too much during drying, simply use a folded piece of coarse sandpaper to gently widen the opening until the taper fits snugly again.
Step 2: Crafting the Spheres
-
Roll three balls:
Take three equal lumps of clay and roll them between your palms to create three smooth spheres, sized to fit comfortably inside your oval vessel with a little breathing room. -
Create the taper sockets:
Press the base of a real taper candle gently into the top of each sphere to create an indentation. You want it deep enough to hold the candle stable, about 1 inch deep. -
Test the fit:
Wiggle the candle slightly to widen the hole just a hair—clay shrinks as it dries, so a slightly loose fit now means a perfect fit later. -
Flatten the bottoms:
Gently tap the bottom of each sphere on your work surface to create a flat spot so they won’t roll around. -
Drying time:
Place the oval vessel and the three spheres in a safe spot to dry. Air-dry clay takes patience; allow 24-48 hours depending on humidity.
Weighted Stability
For extra stability, embed a small heavy washer or a heavy stone into the bottom of the wet clay spheres. This keeps them bottom-heavy and safe.
Step 3: Creating the Stone Finish
-
Sand for smoothness:
Once fully bone dry, use fine-grit sandpaper to remove any fingerprints or rough bumps from all pieces. -
Base coat:
Paint all pieces with a creamy off-white or very pale grey acrylic paint for a neutral stone foundation. -
Add texture:
Mix a small amount of grey paint with baking soda (optional) or just use unmixed grey paint to dab subtle cloudy patches onto the clay for depth. -
The speckled effect:
Dip an old toothbrush into watered-down black or dark brown paint. Run your thumb across the bristles to flick tiny speckles over the vessel and spheres. -
Arrange and seal:
I prefer to finish with a matte spray sealant to protect the ‘stone’ look without making it shiny. Once dry, place the spheres inside the vessel.
Now you have a stunning, heavy-weight centerpiece ready to light up your next dinner gathering
Long Bar Candle Holder for Multiple Tapers
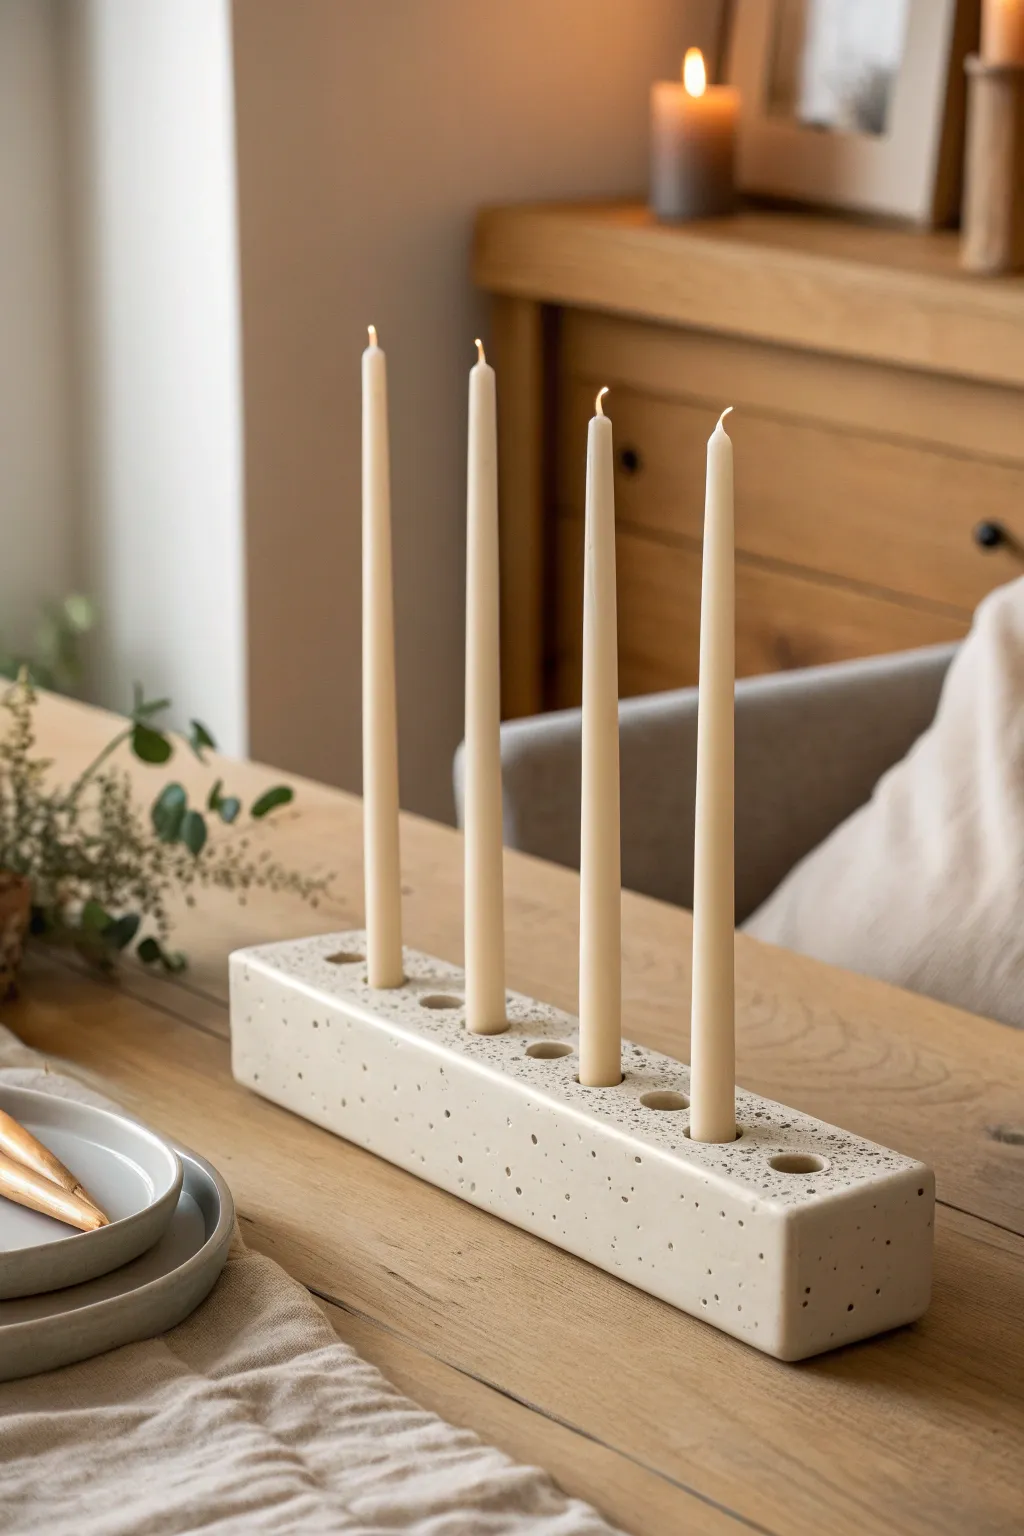
This minimalist, modern centerpiece brings an architectural element to your table with its clean lines and organic texture. The speckled finish mimics the look of high-end stone or terrazzo, creating a sophisticated vessel for four elegant taper candles.
Step-by-Step Tutorial
Materials
- White or cream air-dry clay (approx. 1kg)
- Four taper candles (for sizing)
- Rolling pin
- Sharp craft knife or clay slicer
- Ruler
- Two long wooden guide strips (approx. 3-4cm thick)
- Water and a sponge
- Medium and fine grit sandpaper
- Black and grey acrylic craft paint
- Stiff-bristled toothbrush or fan brush
- Matte spray varnish
Step 1: Shaping the Block
-
Prepare your workspace:
Lay down a piece of canvas or parchment paper to prevent sticking. Place your two wooden guide strips parallel to each other, spacing them about 8-10cm apart. -
Condition the clay:
Take a large block of white air-dry clay and knead it briefly to make it pliable but firm. You want a solid, dense consistency for this structural piece. -
Form the initial slab:
Press the clay down between your wooden guides. The guides ensure the height of your candle holder remains perfectly consistent, which is crucial for this geometric look. -
Roll to thickness:
Roll your rolling pin over the clay, resting it on the wooden guides. Keep rolling until the clay is completely flat and flush with the top of your guides. -
Trim the edges:
Using a ruler and a sharp craft knife, slice away the uneven sides to create a perfect, sharp-edged rectangular prism. Aim for a length of about 30-35cm and a width of 6-8cm. -
Smooth the surfaces:
Dip your finger in a little water and run it along the cut edges to soften any dragging marks from the knife, but be careful to maintain the sharp corners.
Clean Corner Hack
To get super sharp 90-degree corners, let the clay dry to a ‘leather hard’ state (about 3-4 hours) before doing your final knife trimming.
Step 2: Creating the Candle Wells
-
Measure spacing:
Lightly mark four (or more depending on length) evenly spaced center points along the top of your block using your ruler. Leave about 4-5cm of space at each end. -
Create the holes:
Take one of your actual taper candles and wrap the base in a small layer of cling film. Press it firmly and vertically into the clay at your marked spots, going about 2-3cm deep. -
Widen slightly:
Gently wiggle the candle in a small circular motion to widen the hole just a fraction—clay shrinks as it dries, so openings need to be slightly larger than the candles. -
Clean the rims:
As you press the holes, clay might bulge up around the rim. Use your wet finger or a damp sponge to smooth this back down flush with the top surface. -
Let it dry completely:
Allow the block to dry for at least 48-72 hours. Turn it gently on its side halfway through to let air reach the bottom. It must be bone dry before sanding.
Level Up: Terrazzo
Mix dried, colored clay chips into your wet clay block before rolling. Once sanded, these chips will reveal a colorful heavy terrazzo pattern.
Step 3: Finishing and Speckling
-
Sand for smoothness:
Once fully dry, use medium-grit sandpaper to remove any major bumps. Follow up with fine-grit sandpaper to achieve a velvety, stone-like smooth finish, paying attention to corners. -
Wipe down:
Use a slightly damp cloth or a dry tack cloth to remove all sanding dust. The surface needs to be clean for the paint effect to adhere. -
Prepare the splatter paint:
Mix a small amount of black acrylic paint with a drop of water to make it fluid. Repeat this with grey paint in a separate dish. -
Apply the first speckles:
Dip a stiff toothbrush into the black paint mixture. Hold it over the clay block and run your thumb across the bristles to flick tiny droplets onto the surface. -
Add dimension:
Repeat the splatter technique with the grey paint. I find that layering different shades creates a more convincing faux-stone depth than using a single color. -
Seal the piece:
Allow the paint speckles to dry completely. Finish by spraying the entire piece with a matte varnish to protect the clay and lock in the design without adding unnatural shine.
Place your tapers into the holders and enjoy the calm atmosphere your new centerpiece provides
Coiled Snake Taper Candle Holder
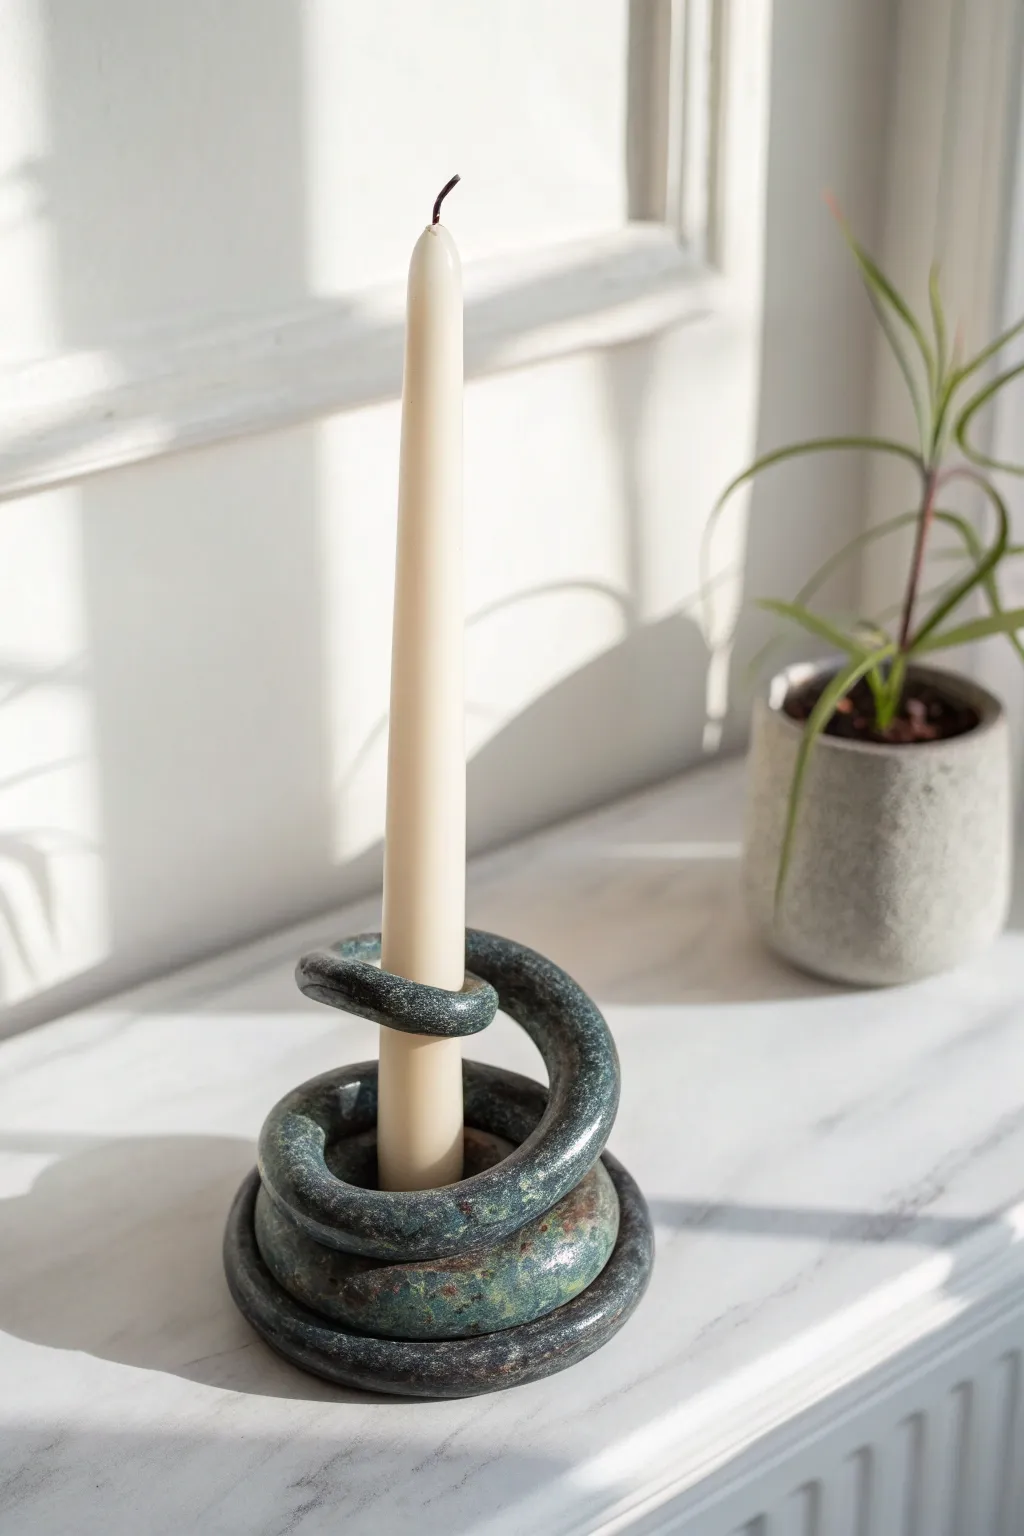
This striking candle holder mimics the organic movement of a coiled snake, creating a sculptural piece that feels both ancient and modern. The dark, mottled green glaze gives it a moody, stone-like weight, perfect for holding a solitary taper candle on a mantel or windowsill.
Step-by-Step Tutorial
Materials
- Air dry clay (approx. 500g)
- Taper candle (for sizing)
- Small bowl of water
- Rolling pin or flat surface
- Mod Podge or clay varnish
- Acrylic paints (dark forest green, black, metallic bronze/gold)
- Sponge or stiff paintbrush
- Fine-grit sandpaper
- Sculpting tool or butter knife
Step 1: Forming the Coil
-
Condition the clay:
Start by taking a substantial chunk of air dry clay and kneading it in your hands until it becomes warm, pliable, and free of cracks. -
Roll the snake:
On a clean, flat surface, roll the clay out into a long, even rope. Aim for a thickness of about 3/4 inch to 1 inch throughout. -
Check the length:
Ensure the rope is long enough to coil around itself about three times with some extra length for the rising neck. Depending on your desired size, a rope around 20-24 inches is usually good. -
Start the base:
Begin coiling the clay rope flat on your work surface to create the base. Tightly spiral the clay for two full rotations to create a stable foundation. -
Build the height:
Once the base is established, begin angling the coil upwards. Instead of laying the clay next to the previous ring, place it on top, slightly offset inward. -
Spiral upward:
Wind the rope upward for another rotation or two, creating a conical, spring-like shape. Keep the structure somewhat open in the center. -
Size the holder:
Take your actual taper candle and gently insert it into the center of the coil to ensure it fits snugly but isn’t crushed. I find it helpful to wiggle the candle slightly to create a perfect socket. -
Form the top loop:
Take the remaining ‘tail’ of the clay rope and loop it tightly around the candle shaft, creating the topmost ring that holds the candle upright. -
Secure the shape:
With the candle still in place (carefully!), press the clay gently together where the coils touch to bond them slightly, while maintaining the rope texture. -
Remove and refine:
Gently twist the candle out. Smooth the very tip of the coil (the snake’s head/tail) so it looks deliberate and rounded, not torn.
Use Water for Bonding
If your clay feels dry while coiling, dip your finger in water and run it along the rope. This slip helps the coils stick together securely as they stack.
Step 2: Finishing and Painting
-
Dry thoroughly:
Let the piece dry completely. This usually takes 24-48 hours depending on humidity. Flip it upside down halfway through to let the bottom dry. -
Sand imperfections:
Once bone dry, use fine-git sandpaper to gently smooth out any unwanted bumps or rough fingerprints, but keep the organic coil texture intact. -
Base coat:
Paint the entire sculpture with a dark forest green acrylic paint. Be sure to get the brush into all the nooks between the coils. -
Add dimension:
While the green is still slightly tacky, dab a sponge lightly into black paint and gently press it over the textured areas to create depth and shadow. -
Create the stone look:
For that mottled, ancient stone effect seen in the photo, sponge on tiny flecks of metallic bronze or a lighter mossy green. Less is more here. -
Seal the piece:
Apply a coat of gloss varnish or Mod Podge. This not only protects the clay but gives it that polished, slightly wet ceramic look. -
Final fit check:
Once the varnish is dry, place your taper candle back in. If the fit is too loose, you can add a drop of melted wax to the bottom to secure it.
Add a Scale Texture
Before drying, press a piece of netting or a mesh fruit bag into the wet clay surface. This imitates snakeskin scales for extra realism.
Now you have a unique, sculptural accent piece ready to add a warm glow to your shelf