If you’re craving a relaxing project, air dry clay cats are the perfect mix of cute and doable. I’m sharing my favorite cat ideas that start super simple and slowly level up into those fun “how did you make that?” studio pieces.
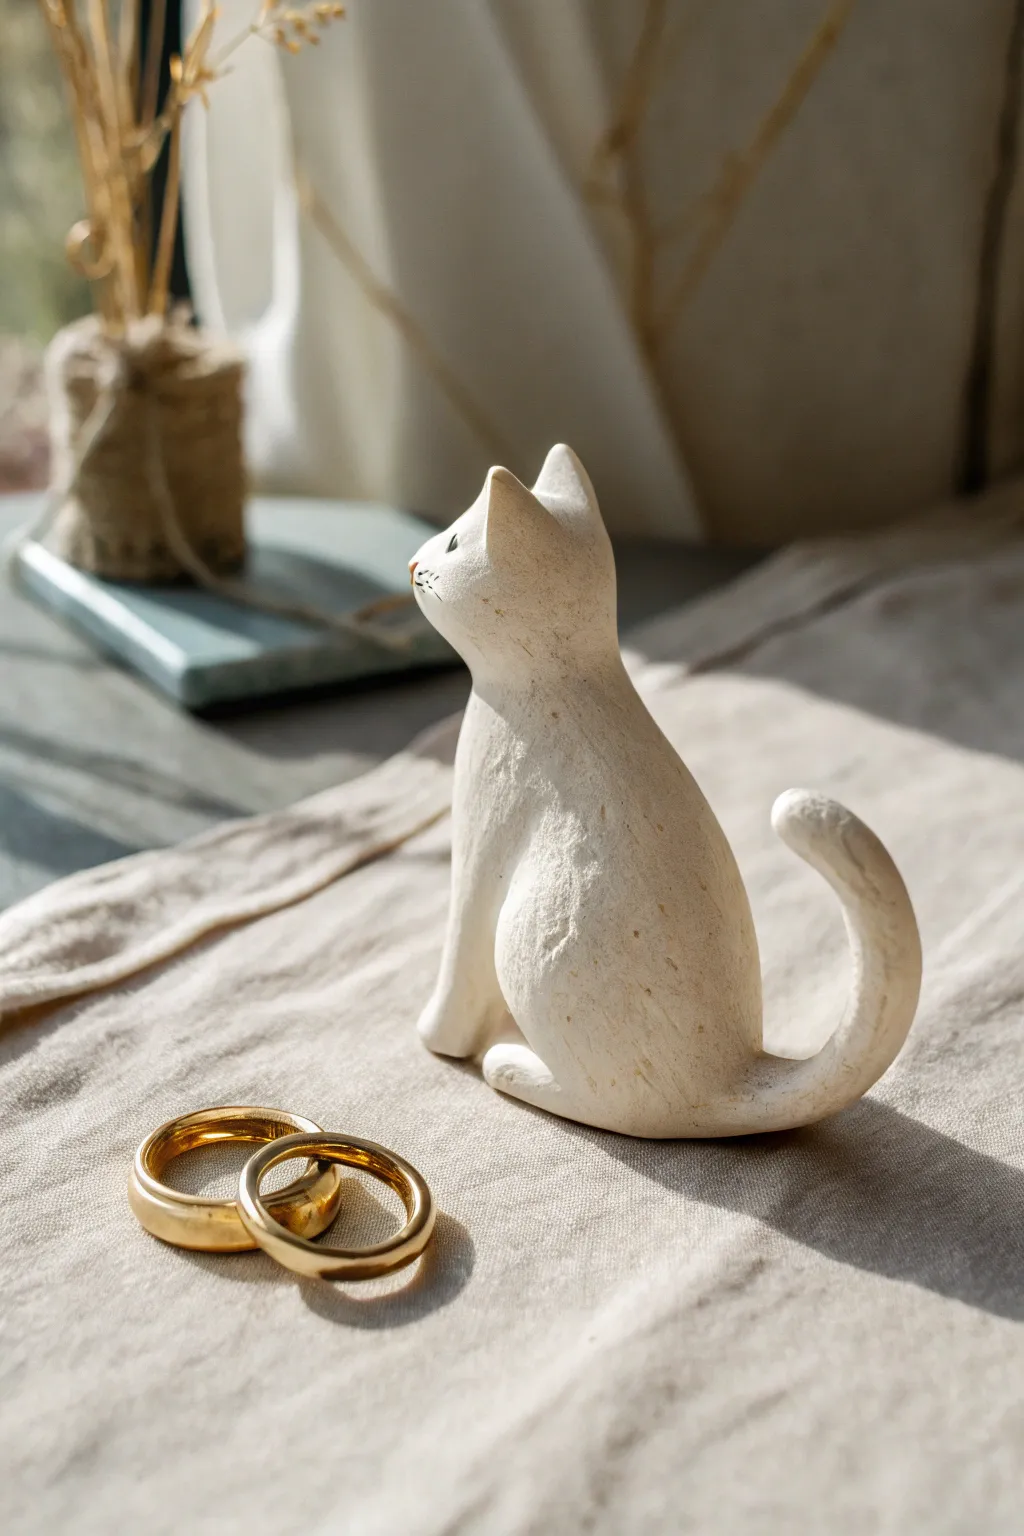
Chibi Sitting Cat Figurine
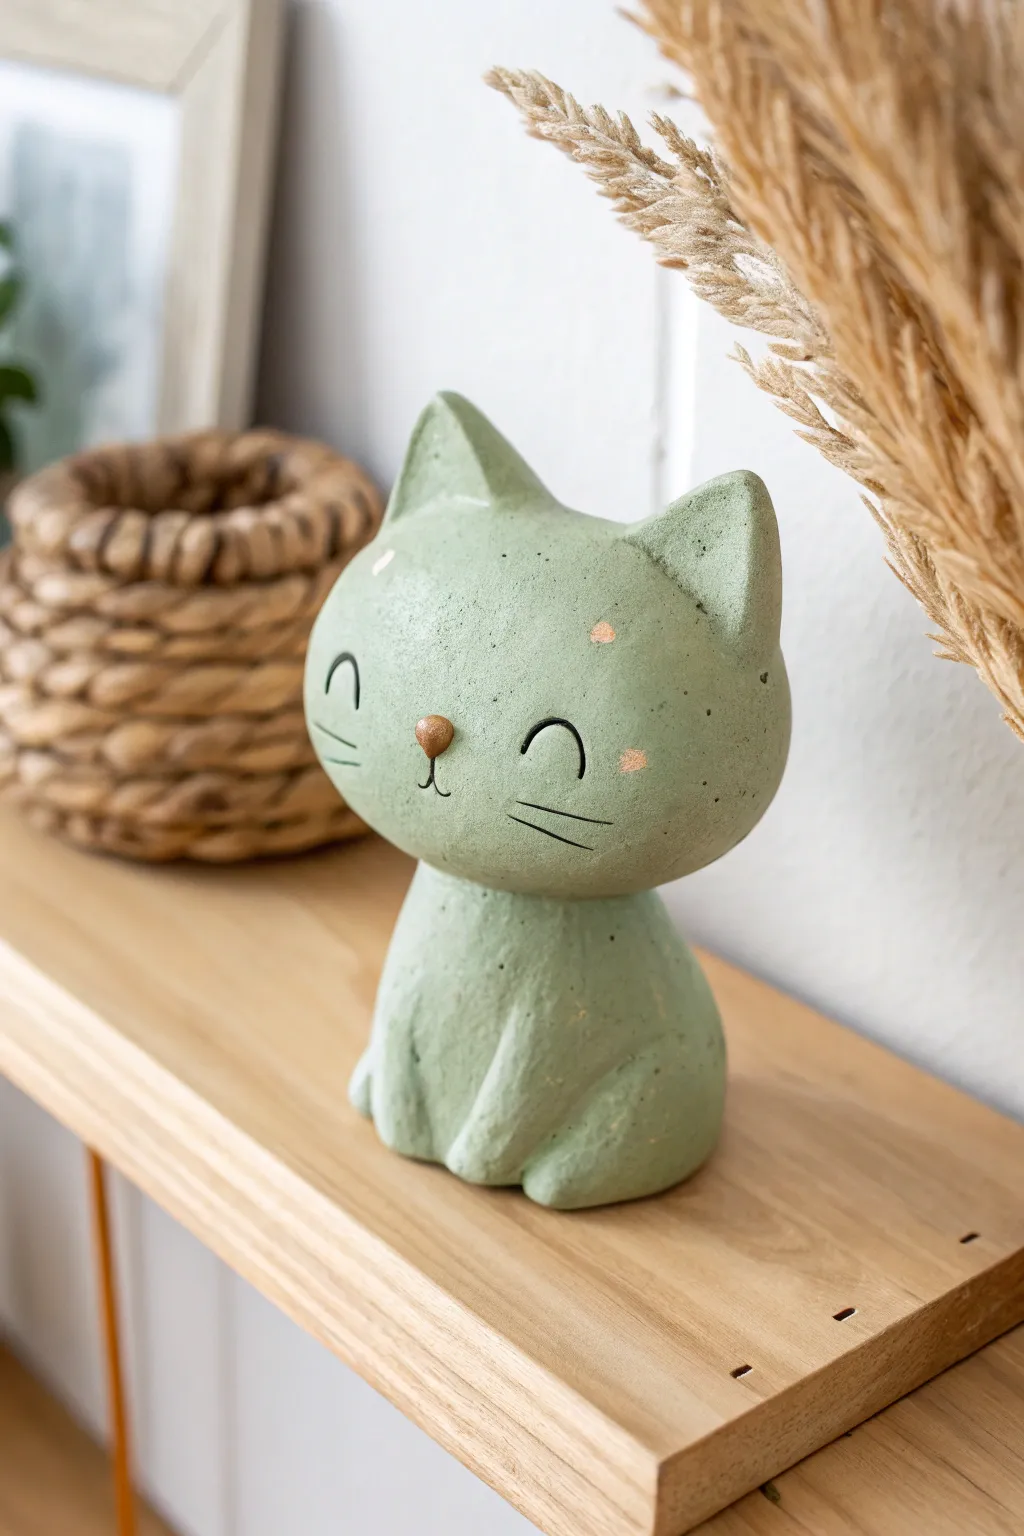
This adorable, stylized cat figurine brings a calm and whimsical vibe to any shelf with its soothing sage green color and simplified shapes. The smooth, matte finish and minimalist facial features give it a modern, almost stone-like ceramic appearance without needing a kiln.
Step-by-Step
Materials
- Air dry clay (white or grey)
- Acrylic paint (sage green, black, soft pink, metallic bronze/gold)
- Clay tools (modeling tool, needle tool)
- Water cup and sponge
- Fine grit sandpaper
- Paintbrushes (medium flat and fine liner)
- Matte varnish or sealant
Step 1: Shaping the Base Components
-
Form the body:
Start with a ball of clay roughly the size of a tangerine. Roll it between your palms until smooth, then gently taper the top third to create a slightly pear-shaped cone. This will be the seated body of the cat. -
Flatten the base:
Tap the bottom of your pear shape firmly against your work surface. You want a flat, stable bottom so your figurine sits upright without wobbling. -
Shape the head:
Take a slightly larger amount of clay than used for the body and roll a smooth sphere. Gently flatten it into a rounded disc shape—like a thick hamburger patty or a rounded lozenge. Is it too round? Press the sides slightly to make it wider than it is tall. -
Create the ears:
Pinch two small triangles of clay for the ears. Attach them to the top of the head using a bit of water and scoring (making scratch marks) on both joining surfaces. Smooth the seams down completely so the ears look integral to the head shape.
Step 2: Assembly and Refining
-
Connect head to body:
Score the top of the body cone and the bottom center of the head. Add a dab of water or slip (clay and water mush) and press the head firmly onto the body. I like to twist it slightly back and forth to create a suction seal. -
Blend the neck seam:
Using a modeling tool or your finger, drag clay from the neck area up into the head and down into the body to hide the seam. Smooth it out with a damp sponge until the transition looks flawless. -
Define the front legs:
Roll two small sausage shapes for the front paws. Press them vertically onto the front of the body. Blend the top of these shapes into the chest area so they emerge naturally, but leave the bottom paws defined. -
Refine the surface:
Dip your finger in water and run it over the entire sculpture to remove fingerprints. Check that the ears are symmetrical and the head is tilted at a cute angle if desired. -
Dry completely:
Let the sculpture dry for 24-48 hours. Turn it occasionally so the bottom dries evenly. The clay will lighten in color and feel hard when ready.
Weight it Down
For a sturdier figurine that feels expensive, ball up a small piece of aluminum foil around a heavy nut or pebble and put it inside the body clay while shaping.
Step 3: Sanding and Painting
-
Sand for smoothness:
Once fully dry, take fine-grit sandpaper and gently buff the entire surface. Focus on the ears and the join areas to ensure a seamless, professional ceramic look. -
Base coat painting:
Mix a lovely sage green acrylic paint. Apply two to three thin coats over the entire cat, letting each coat dry before the next. This prevents brush strokes from showing. -
Add texture (optional):
To mimic the stone-like texture in the photo, you can gently sponge on a slightly lighter green or grey in random spots while the paint is tacky, or flick tiny specks of darker paint with a toothbrush. -
Paint facial features:
Using your finest liner brush and black paint, draw two upside-down ‘U’ shapes for sleeping eyes. Add three whiskers on each side. Keep the lines thin and delicate. -
Add the nose:
Use a small dot of metallic bronze or gold paint to create a tiny, triangular nose right between the whiskers. This metallic touch adds a sophisticated finish. -
Rosy cheeks and details:
Dilute a tiny bit of soft pink or peach paint. Dab faint spots on the cheeks and perhaps a little freckle on the forehead to give it character. -
Seal the piece:
Finish with a coat of matte varnish. This protects the paint and unifies the sheen, making it look like a store-bought decor item.
Cracks Appearing?
If hairline cracks appear while drying, mix a tiny amount of fresh clay with water to make a paste. Fill the cracks, smooth with a finger, and let it dry again.
Place your finished cat on a bookshelf or desk for a touch of handmade serenity

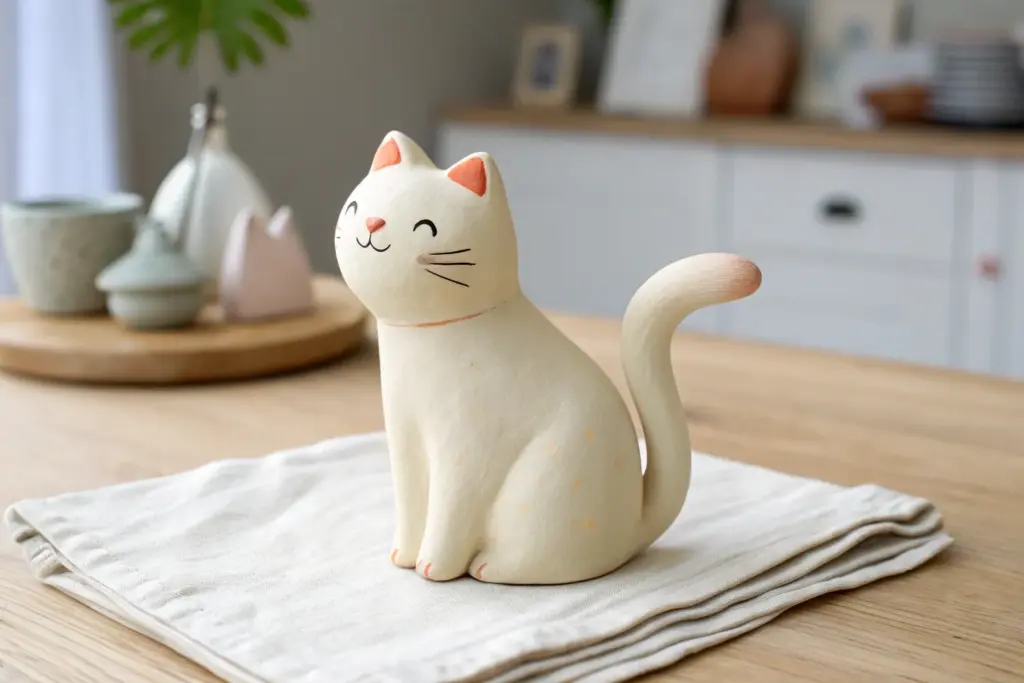
Classic Loaf Cat Sculpture
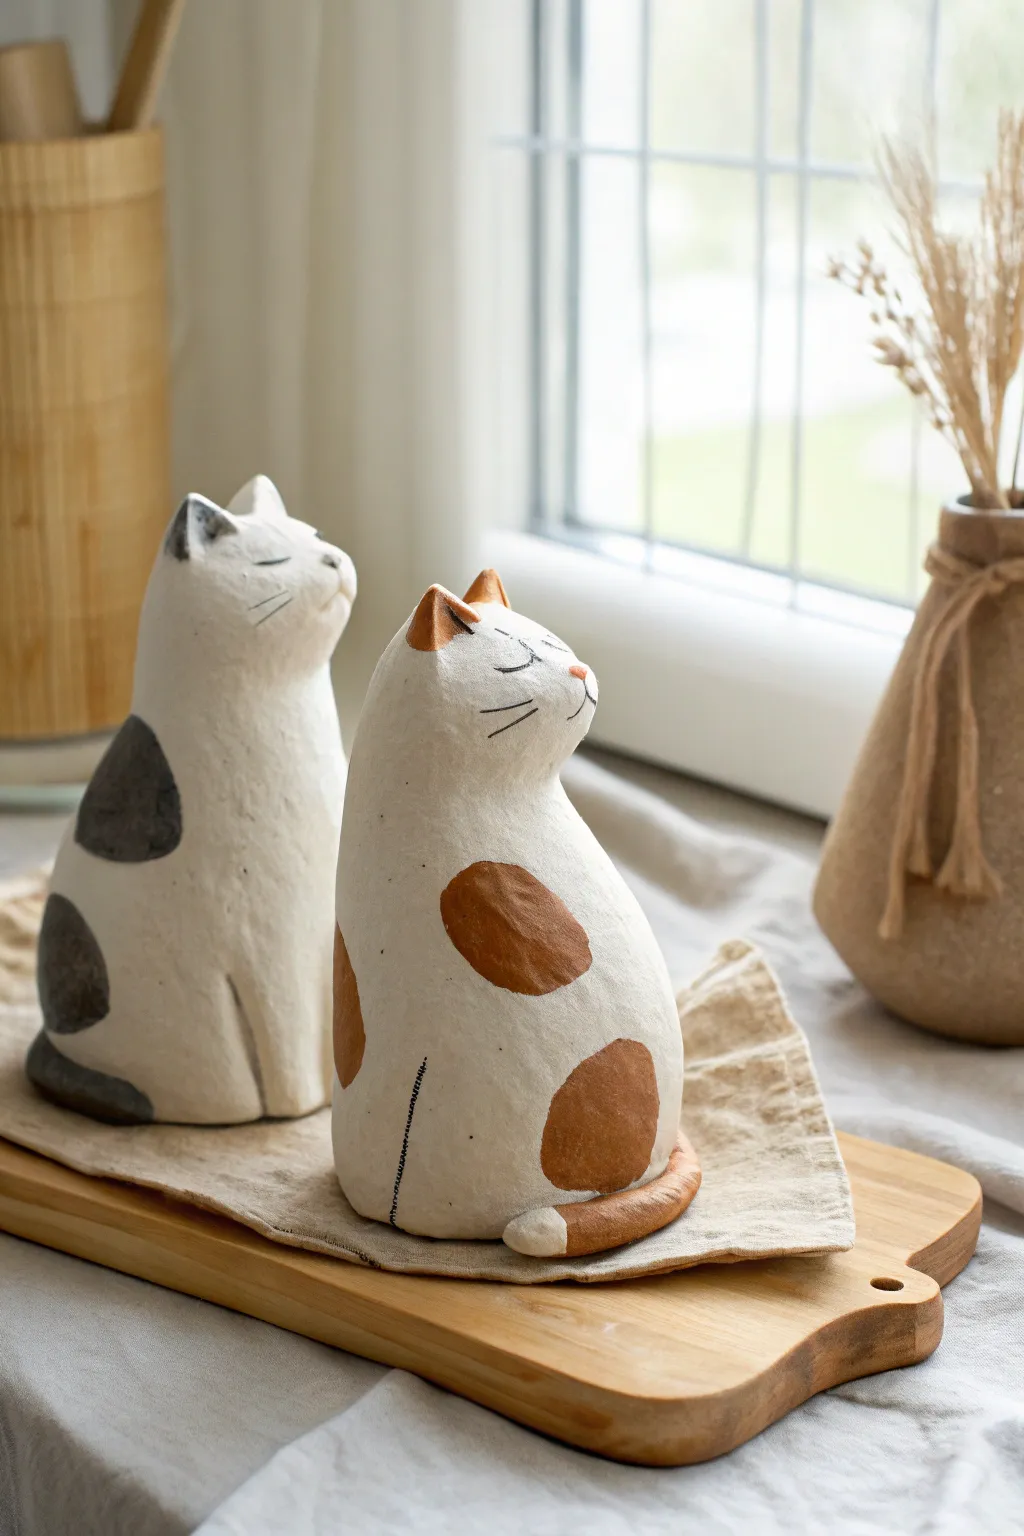
These charming minimalist feline sculptures capture the peaceful essence of a cat sitting in a ‘loaf’ position, gazing upward. With their smooth, matte finish and simple geometric shapes, they make for effortless modern decor that is deceptively easy to sculpt.
How-To Guide
Materials
- High-quality white air dry clay (e.g., DAS or Crayola Air Dry)
- Small cup of water
- Aluminum foil (for armature)
- Clay sculpting tools (specifically a needle tool and smoothing rib)
- Acrylic paints (White, Black, burnt Sienna/Terracotta)
- Matte varnish or sealant
- Fine grit sandpaper (200-400 grit)
- Small flat paintbrush
- Fine liner brush
Step 1: Forming the Base
-
Create the core:
To save clay and reduce drying time, scrunch up a piece of aluminum foil into a rough pear shape. This will be the main body of the cat. It should be slightly narrower at the top for the neck. -
Cover with clay:
Roll out a slab of clay about 1/4 inch thick. Wrap this entirely around your foil armature, pressing firmly to remove air pockets. Smooth the seams together with a bit of water until they disappear. -
Shape the ‘loaf’:
Gently tap the bottom of the shape onto your work surface to flatten it so the cat stands stably. Use your hands to smooth the sides upward creating a sturdy, tapered cylinder shape that curves slightly forward.
Seamless Blending
For invisible seams when adding the head or tail, score (scratch) both clay surfaces and add a dab of water or slip before pressing them together.
Step 2: Sculpting Features
-
Define the head:
Add a slightly smaller ball of clay to the top of the body for the head, blending the neck seam completely smooth so it looks like one continuous piece. Tilt the head slightly upward to give it that gazing posture. -
Pinch the ears:
Instead of attaching separate ears, gently pinch the clay at the top of the head to form two small, triangular points. Smooth the curves between them so they look organic, not stuck on. -
Add the snout:
Add a tiny, flattened oval of clay to the front of the face for the muzzle area. Blend the edges seamlessly into the cheeks to create a subtle protrusion. -
Sculpt the tail:
Roll a small snake of clay for the tail. Attach it to the lower back of the body, wrapping it around the side base of the cat. Blend the attachment point at the back, but leave the rest of the tail defined against the body. -
Define legs (optional):
Use a modeling tool to gently impress vertical lines on the front of the chest to suggest front legs comfortably tucked under, keeping the minimalist aesthetic.
Step 3: Smoothing and Drying
-
Refine the surface:
Dip your finger in water (sparingly) and run it over the entire sculpture to remove fingerprints and bumps. I find a damp sponge works wonders here for a truly professional finish. -
Let it dry:
Place your warm creation in a safe, dry spot away from direct heat. Let it dry for at least 24-48 hours. The clay will turn pure white and feel lighter when fully dry. -
Sand for perfection:
Once bone dry, take your fine-grit sandpaper and gently buff the surface. Focus on the ears and any lingering uneven spots to get that stone-like texture.
Cracking Issues?
If small cracks appear while drying, don’t panic. Mix a tiny amount of fresh clay with water to make a paste and fill the cracks, then sand smooth once dry.
Step 4: Painting and Finishing
-
Base coat:
Paint the entire sculpture with a coat of white acrylic paint. Even if your clay is white, this provides a uniform canvas and covers any discoloration from sanding. -
Paint the spots:
Using the Burnt Sienna or Black paint, add large, organic rounded spots. Create one large patch on the back and perhaps one over an ear. Keep the edges soft and slightly imperfect. -
Add the face:
Using your finest liner brush and black paint (or a fine-tip marker), draw two simple curved lines for sleeping eyes. Add three whiskers on each cheek and a tiny nose dot. -
Detail the tail:
Paint the tail to match your spot color (orange for ginger cats, grey/black for calicos), leaving a little white tip at the end if you like. -
Seal the work:
Finish with a clear matte varnish. Avoid glossy finishes, as the matte look contributes to the rustic, handmade charm of these pieces.
Place your peaceful clay kitties on a sunny windowsill and enjoy their calming presence.


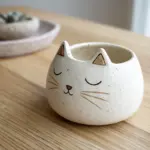
Cat Face Trinket Dish

This adorable trinket dish combines a minimalist cat silhouette with a soft pastel palette for a truly sweet jewelry holder. The raised ears and gently curved rim keep your rings safe, while a glossy finish gives it that professional ceramic look without the kiln.
Detailed Instructions
Materials
- White air dry clay
- Rolling pin
- Clay knife or X-Acto knife
- Small bowl (for shaping)
- Sandpaper (fine grit)
- Acrylic paints (pale pink, cream/off-white, black, gold)
- Paintbrushes (flat shader and fine liner)
- High-gloss varnish or glaze
- Water and sponge for smoothing
- Paper template (optional)
Step 1: Shaping the Base
-
Roll the clay:
Begin by conditioning a handful of clay until it is soft and pliable. Roll it out into a smooth slab about 1/4 inch thick. Aim for an even thickness to prevent cracking while drying. -
Cut the silhouette:
Using a paper template or freehanding with your needle tool, trace a round face shape with two pointed triangular ears at the top. Carefully cut out this cat silhouette with your clay knife. -
Make the mini-cat:
With a scrap of leftover clay, cut out a second, much smaller cat head shape directly from the slab. This will become the decorative accent piece sitting inside the dish. -
Smooth the edges:
Dip your finger in a little water and run it along the cut edges of both pieces to soften the sharp angles. You want a rounded, organic feel to the rim. -
Form the curve:
Place the large cat head onto the bottom of a small upturned bowl or drape it inside a bowl lined with plastic wrap. Gently press the center down so the sides and ears curve upward. -
Initial drying:
Allow the clay to dry in this curved position for 24-48 hours. Keep the small mini-cat flat while it dries separately. Rotate the pieces occasionally for even air circulation.
Cracks happen
If you spot hairline cracks after the clay dries, don’t panic. Mix a tiny bit of fresh clay with water to make a paste (slip) and fill the cracks, then sand smooth once dry.
Step 2: Refining and Painting
-
Sand until smooth:
Once fully dry and bone-white, take your fine-grit sandpaper and buff the entire surface. Pay special attention to the rim and the tips of the ears to ensure they are perfectly smooth. -
Base coat the interior:
Paint the inside of the dish and the face of the mini-cat with a creamy off-white acrylic paint. You may need two thin coats for full opacity. -
Paint the exterior:
Mix a soft, dusky pink color and paint the entire outside of the bowl, bringing the color just over the rim to create a delicate pink border. -
Add gold details:
Using a fine brush and metallic gold paint, carefully outline the rim where the pink meets the cream interior. Also, paint the edges of the mini-cat gold for a cohesive look. -
Draw the face:
On the small mini-cat piece, use a very fine liner brush or a black paint pen to draw simple closed eyes, a nose, a mouth, and whiskers. Add small triangles inside the ears. -
Seal the deal:
Finish both pieces with two coats of high-gloss varnish. This adds that ceramic-like shine and protects the paint from scratching when you toss your keys or rings in.
Water works
Keep a damp sponge nearby while cutting. Wiping your knife blade between cuts prevents drag and keeps your clay edges much cleaner, saving you sanding time later.
Place your favorite rings in the dish and enjoy this sweet feline addition to your vanity table


Paw Print Mini Trinket Plate
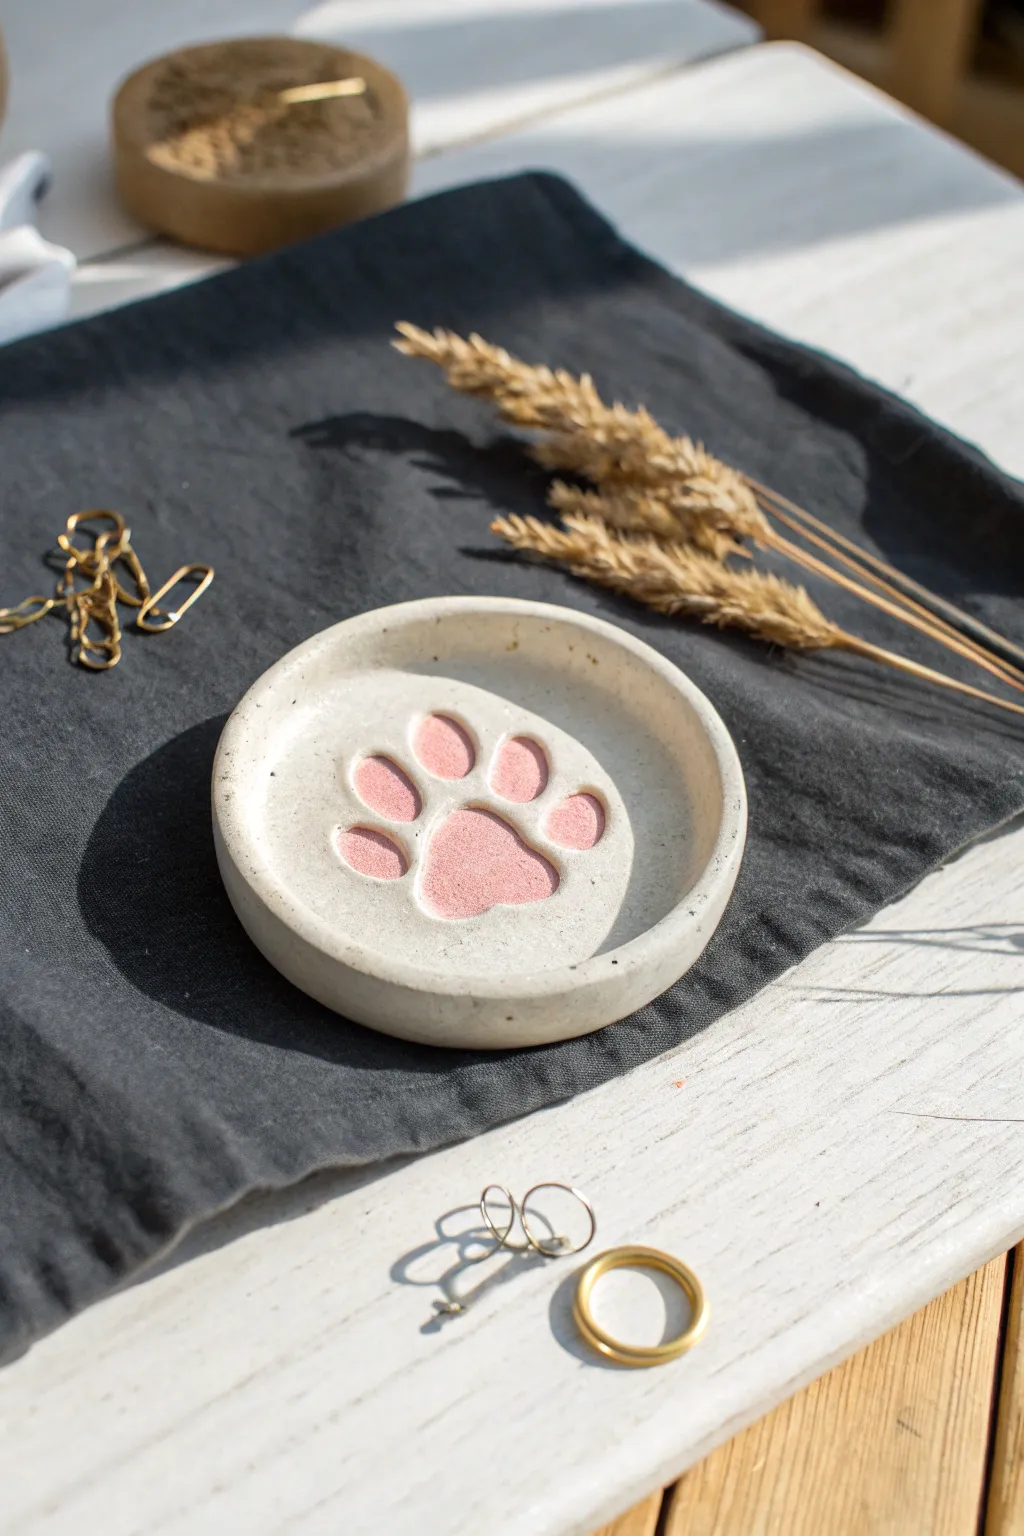
This adorable mini trinket plate features a sweet pink paw print impressed directly into the center, making it the perfect spot for your favorite rings or earrings. The speckled clay finish gives it a trendy, organic look that balances beautifully with the soft pop of pink.
Step-by-Step Tutorial
Materials
- Stone-effect or speckled air-dry clay
- Rolling pin
- Circular cookie cutter (approx. 3-4 inches)
- Small carving tool or toothpick
- Small ball stylus tool (or round end of a paintbrush)
- Pink acrylic paint
- Fine detail paintbrush
- Sandpaper (fine grit)
- Small bowl of water
- Matte sealant or varnish
Step 1: Shaping the Base
-
Prepare the clay:
Start by taking a handful of your speckled air-dry clay and kneading it in your hands until it feels soft and pliable. This warms up the material and helps prevent cracks later on. -
Roll out the slab:
Place the clay on a clean, flat surface. Using your rolling pin, roll it out evenly until you have a slab that is roughly 1/4 inch thick. Aim for a consistent thickness throughout. -
Cut the circle:
Press your circular cookie cutter firmly into the clay slab to cut out the base shape. Peel away the excess clay from the outside and set it aside for future projects. -
Smooth the edges:
Dip your finger lightly into the bowl of water and run it gently around the cut circumference of the circle. This removes any sharp drag marks left by the cutter.
Step 2: Creating the Rim & Design
-
Form the lip:
Gently pinch the outer edge of the clay circle upwards with your thumb and forefinger. Rotate the piece as you go, creating a slight, raised rim all the way around. I find using a slow, pinching motion keeps the wall height even. -
Refine the shape:
Once the rim is raised, use a damp finger to smooth out the interior curve where the rim meets the base, ensuring a seamless transition. -
Map the paw print:
Using a toothpick or a very light touch with a pencil, lightly sketch the outline of the main paw pad (somewhat heart-shaped) and four toe beans in the center of the dish to guide your carving. -
Ident the main pad:
Using a ball stylus tool or the rounded back end of a paintbrush handle, press firmly into the main pad shape. gently rotate the tool to push the clay down effectively, creating a smooth depression. -
Create the toe beans:
Repeat the pressing process for the four smaller toe pads above the main one. Make sure these indentations are deep enough to hold paint later, but not so deep they pierce through the bottom. -
Clean the imprint:
If pressing the clay caused ridges to rise up around the paw print shapes, gently smooth them back down flat with a wet finger or a flat modeling tool.
Cracks while rolling?
If edges crack while rolling, your clay might be too dry. Add a tiny drop of water, knead thoroughly again, and re-roll.
Step 3: Finishing Touches
-
Allow to dry:
Place your dish in a cool, dry spot away from direct sunlight. Let it air dry completely for 24-48 hours. The speckled clay will lighten significantly as it dries. -
Sand for smoothness:
Once bone dry, take fine-grit sandpaper and gently sand the rim and the outer edges to remove any final imperfections or fingerprints. -
Dust off debris:
Wipe the entire dish carefully with a dry cloth or soft brush to remove all fine clay dust created by sanding. -
Paint the paw:
Load a fine detail brush with pink acrylic paint. Carefully fill in the indented sections of the paw print. You may need two thin coats to get a solid, opaque pink color. -
Let paint dry:
Allow the pink paint to dry completely. This usually takes about 20-30 minutes depending on the thickness of the application. -
Seal the piece:
Apply a coat of matte sealant or varnish over the entire dish, including the painted area. This protects the clay from moisture and gives the piece a professional finish.
Pro Tip: Clean Lines
If paint spills onto the rim, wait for it to dry completely, then gently scrape it off with a craft knife or sand it away.
Now you have a charming little spot to keep your jewelry safe and display your love for cats at the same time

The Complete Guide to Pottery Troubleshooting
Uncover the most common ceramic mistakes—from cracking clay to failed glazes—and learn how to fix them fast.
Cat Ring Holder With Tail Stand
Sculpt a charming feline friend that doubles as functional jewelry storage with this simple air-dry clay project. The finished piece features a smooth, matte white finish with a gracefully curved tail designed specifically to hold your favorite rings securely.
Detailed Instructions
Materials
- White air-dry clay
- Small bowl of water
- Sculpting tools (or a toothpick and butter knife)
- Fine-grit sandpaper
- Acrylic paint (white and black)
- Fine detail paintbrush
- Matte varnish or sealant
Step 1: Forming the Body
-
Create the base:
Start with a lump of clay roughly the size of a tangerine. Roll it into a smooth ball, then gently elongate it into a pear shape to form the cat’s seated body. Flatten the bottom slightly against your work surface so it sits stably without wobbling. -
Shape the head:
Pinch the narrower top part of your pear shape to define a neck area, then round out the clay above it to form the head. You want a smooth transition, not a bobblehead look, so keep the neck relatively thick for stability. -
Add the ears:
Take two very small, pea-sized balls of clay. Pinch them into triangles and attach them to the top of the head. Use a little water to blend the seams downward until the ears look like they are growing out of the head rather than just stuck on top.
Step 2: Sculpting Details
-
Define the face:
Gently press your thumb or a smoothing tool into the front of the face to create a slight indentation for the eye area, pulling the clay out slightly below to form a subtle snout. -
Form the front legs:
Roll a small coil of clay and attach it vertically to the front of the body. Blend the top into the chest and detail the bottom to suggest paws. This gives the cat its seated posture. I find blending the edges completely makes it look more like a minimalist statue. -
Add haunch definition:
For the back leg, add a small, flattened teardrop shape of clay to the side of the body near the base. Blend the edges smoothly to suggest the folded leg of a sitting cat.
Cracks in the Clay?
If small cracks appear while drying, mix a tiny bit of fresh clay with water to make a paste (slip). Fill the cracks with this paste and smooth it over with your finger.
Step 3: Creating the Tail Stand
-
Roll the tail:
Roll a snake of clay that is thick at one end and tapers slightly towards the other. It needs to be sturdy enough to hold rings, so don’t make it too thin—think the thickness of a pencil or slightly more. -
Attach and curve:
Score the attachment point on the lower back of the cat and the thick end of the tail. Apply a dab of water and press them together firmly. Blend the clay across the seam until invisible. -
Shape the hook:
Curve the tail upwards along the cat’s back, then curl the tip slightly outward or upward. Test the curve with a ring (that you don’t mind getting a tiny bit dirty) to ensure it slides on easily and stays put. -
Smooth everything:
Dip your finger in water and run it over the entire sculpture to remove fingerprints and bumps. Pay special attention to the tail area to ensure it’s seamless and strong.
Make it Metallic
For a luxe upgrade, paint the tip of the tail or the ears with gold leaf paint. This adds a chic, modern touch that looks great with gold jewelry.
Step 4: Finishing Touches
-
Dry properly:
Let the sculpture dry completely for 24-48 hours. Turn it occasionally so the bottom dries evenly. Don’t rush this step, as trapped moisture can cause cracks. -
Sand imperfections:
Once bone dry, use fine-grit sandpaper to gently buff away any remaining roughness or uneven spots. The goal is a velvety, stone-like texture. -
Paint the base coat:
Apply a coat of white acrylic paint if you want a brighter finish than the natural clay color. If your clay is already a nice white, you can skip to the details. -
Paint facial features:
Using your finest brush and black paint, add two small dots for eyes and tiny lines for whiskers. Keep it minimal to match the style of the image. -
Add nose detail:
Mix a tiny drop of red into your white paint to make a soft pink. dab a tiny triangle for the nose. -
Seal the piece:
Finish with a coat of matte varnish. This protects the clay from moisture and gives it a finished, professional ceramic look.
Place your new clay companion on your vanity to keep your rings safe and distinct
Sleepy Cat Pocket Bowl
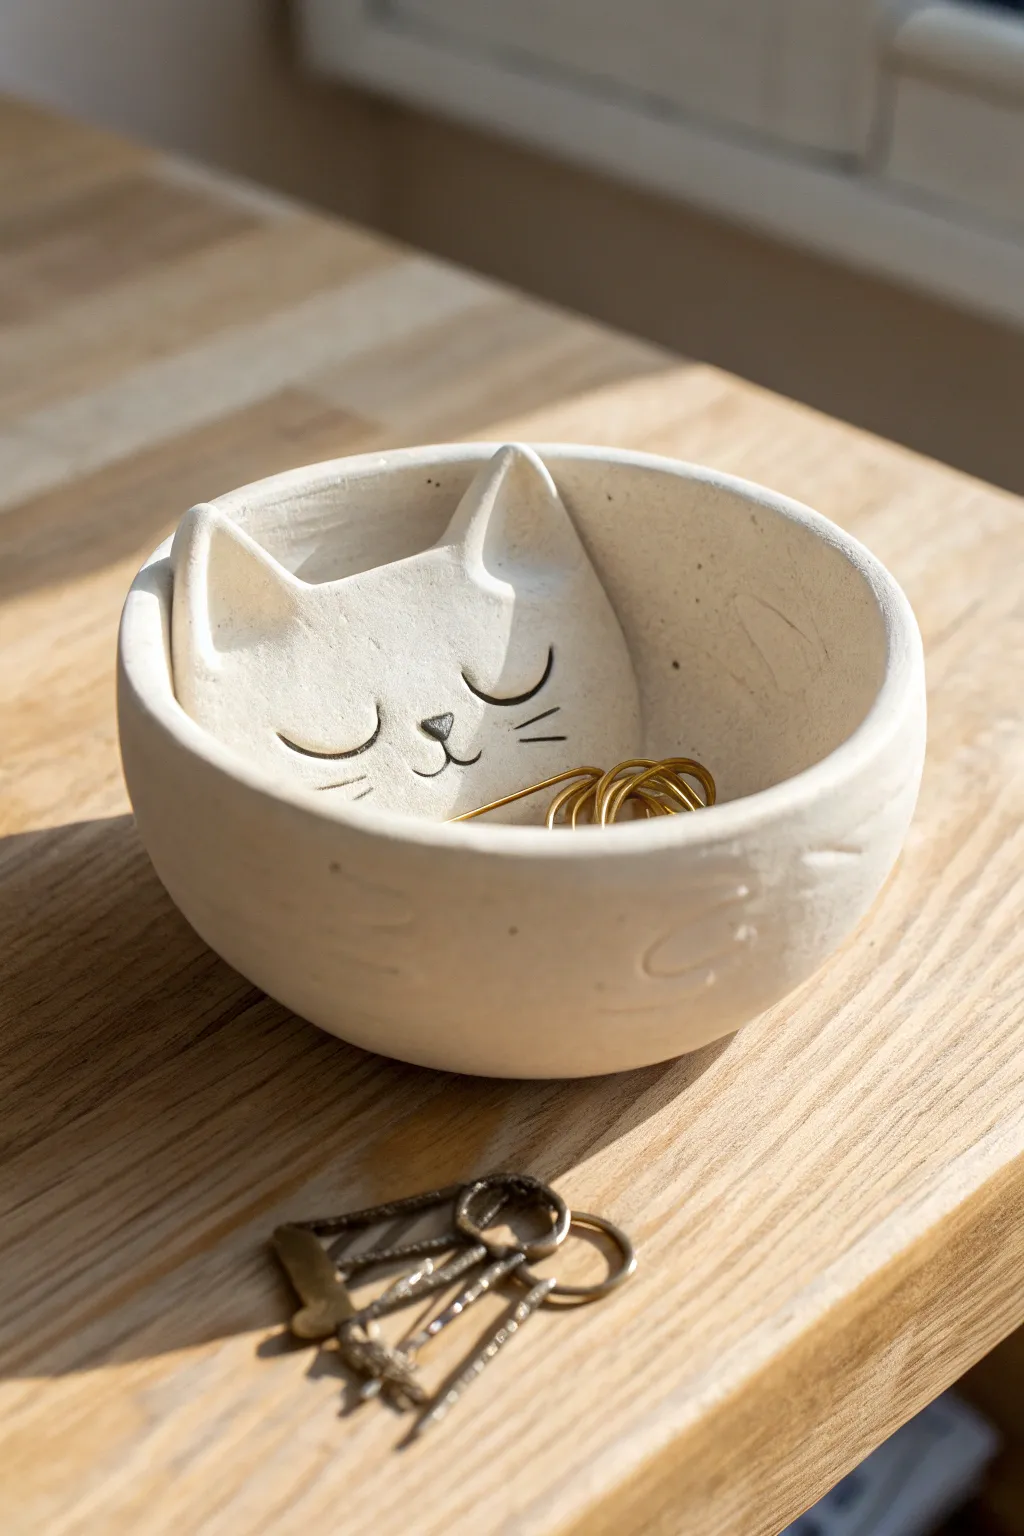
Keep your rings and favourite trinkets safe in this charming little pocket bowl, featuring a serene, sleepy cat face emerging from the rim. The clean, white finish gives it a modern ceramic look without needing a kiln.
Step-by-Step
Materials
- White extra-light air dry clay or stone clay
- Rolling pin
- Bowl for a mould (small size)
- Small knife or clay cutting tool
- Pin tool or needle tool
- Water in a small cup
- Sponge or paintbrush
- Fine-grit sandpaper
- Black acrylic paint or fine-tip black marker
- Clear matte or satin varnish
Step 1: Shaping the Bowl Base
-
Roll out the slab:
Begin by taking a handful of clay and kneading it until soft and pliable. Use your rolling pin to flatten it into an even slab, aiming for a consistent thickness of about 4-5mm. -
Cut the circle:
Place your guide bowl upside down on the clay slab and trace around it with a needle tool or knife to cut out a perfect circle. -
Form the shape:
Gently lift the clay circle and drape it inside your guide bowl. Press it lightly against the bottom and sides to take the bowl’s shape. You can also form it by hand (pinching method) if you prefer a more organic, handmade feel. -
Smooth the interior:
Dip your finger or a slightly damp sponge into water and smooth out the inside surface of the bowl, erasing any fingerprints or cracks.
Step 2: Sculpting the Cat Detail
-
Cut the face shape:
Roll out a smaller piece of clay to the same thickness as your bowl. Cut out a shape resembling a cat’s head—essentially a semi-circle with two triangular ears at the top. -
Score the surfaces:
Use your needle tool or knife to scratch cross-hatch marks (scoring) onto the back of the cat head piece and the spot inside the bowl where you want to attach it. -
Attach the face:
Apply a little water or liquid clay (slip) to the scored areas. Press the cat face firmly against the interior wall of the bowl. The ears should poke up slightly above the bowl’s rim. -
Blend the seams:
Using a sculpting tool or your finger, gently smudge the clay along the bottom and side edges of the cat face into the bowl wall so it looks like one continuous piece rather than a stick-on addition. -
Refine the ears:
Pinch the ears lightly to sharpen them. Use a small round tool to create slight indentations inside the ears for depth. -
Add texture details:
If you want the subtle markings seen on the exterior of the bowl in the photo, use a tool to gently press cloud-like or curved indentations into the outside of the bowl while the clay is still soft.
Use Water Sparingly
When smoothing air dry clay, too much water makes it slimy and weak. Use a damp finger or a slightly moist sponge rather than soaking the clay.
Step 3: Finishing Touches
-
Initial Drying:
Set the bowl aside to dry. I find it helps to let it sit in the guide bowl for the first few hours to hold its shape, then remove it to air dry completely. -
Wait patiently:
Allow the piece to dry for 24-48 hours. The clay will turn chalky white and feel lighter when fully dry. -
Sand until smooth:
Once bone dry, take fine-grit sandpaper and gently buff the entire surface. Pay special attention to the rim and the ears to remov any sharp or rough edges. -
Draw the features:
Using a very fine black marker or a thin brush with black paint, carefully draw two U-shapes for closed sleepy eyes. Add a small triangle nose and a little mouth. -
Add whiskers:
Don’t forget to draw three delicate whiskers on each cheek for extra personality. -
Seal the piece:
Protect your work by applying a coat of matte or satin varnish. This seals the clay and prevents the ink or paint from smudging over time.
Add a Tail
For a cute 3D detail, roll a small snake of clay and attach it to the outside of the bowl, curling it around to look like the cat’s tail wrapping the dish.
This serene little guardian is now ready to hold your jewelry or desk treasures


What Really Happens Inside the Kiln
Learn how time and temperature work together inside the kiln to transform clay into durable ceramic.
Tiny Cat Magnet Set

Brighten up your kitchen with these charmingly simple cat face magnets that embrace a modern, earthy aesthetic. Their matte finish and pastel tones give them a sophisticated look that steers clear of being too cartoony, perfect for holding up your grocery lists.
Step-by-Step Tutorial
Materials
- Air dry clay (white or natural)
- Acrylic paints (terracotta/rust, cream, sage green, black, red)
- Rolling pin
- Parchment paper or craft mat
- Cat head cookie cutter (approx. 2-3 inches wide)
- Craft knife or clay needle tool
- Fine grit sandpaper (320 or 400 grit)
- Fine detail paintbrush (size 0 or 00)
- Round ceramic magnets (strong)
- Superglue or heavy-duty craft glue
- Small cup of water
- Matte spray varnish (optional)
Step 1: Shaping the Clay
-
Prepare your workspace:
Lay down a sheet of parchment paper or a silicone craft mat to prevent the clay from sticking to your table. Take a handful of air dry clay and knead it in your hands until it feels pliable and warm. -
Roll the slab:
Place the clay on your mat and use a rolling pin to flatten it out. You want an even slab that is roughly 1/4 inch thick. Don’t make it too thin, or the magnets might look flat and fragile. -
Cut the shapes:
Press a cat-head cookie cutter firmly into the clay slab three times. Give the cutter a little wiggle before lifting it to ensure clean edges. If you don’t have a cutter, you can trace a simple outline lightly with a needle tool and cut it out purely by hand with a craft knife. -
Smooth the edges:
Dip your finger into a small cup of water and gently run it along the cut edges of each cat head. This softens the sharp angles left by the cutter and gives the piece that polished, ceramic look. -
Refine the ears:
Check the points of the ears. If they got blunted during the smoothing process, gently pinch them back into distinct, cute little triangles. -
Initial drying phase:
Place the three clay cats on a clean, flat surface to dry. Flip them over carefully after about 12 hours so the bottom side can get some air exposure too. Total drying usually takes 24-48 hours depending on humidity.
Smooth Moves
If your clay surface looks rough before drying, use a barely-damp sponge to wipe the entire face. This smooths texture better than a finger.
Step 2: Painting and Finishing
-
Sand for perfection:
Once fully dry and hard, take a piece of fine-grit sandpaper and lightly buff the surface and edges. This removes any tiny bumps or fingerprints, creating a receptive surface for your paint. -
Apply base colors:
Squeeze out your acrylics: a rusty terracotta, a soft cream, and a muted sage green. Paint one cat entire in each color. I usually do two thin coats rather than one thick one to avoid visible brushstrokes. Let the first coat dry completely before adding the second. -
Draft the faces:
To ensure symmetry, lightly sketch the facial features with a pencil directly on the dried paint. Draw two closed curved eyes, a tiny triangular nose, whiskers, and little vertical lines inside the ears. -
Paint the details:
Using your finest detail brush and black acrylic paint, carefully trace over your pencil lines. Keep your hand steady and use very light pressure for the whiskers so they taper off naturally. -
Add a pop of color:
For the green cat, add a playful touch by painting a small red dot over the nose area, or leave it minimal like the others. You can also add tiny pink triangles inside the ears if you want more detail. -
Seal the surface:
Allow the face paint to dry for at least an hour. To protect the paint from kitchen grease or moisture, spray a light coat of matte varnish over the fronts. Avoid glossy finishes to keep that modern, textural look shown in the image. -
Attach the magnets:
Flip the cats over to their unpainted backs. Place a drop of strong superglue in the center of each head and press a round ceramic magnet firmly into the glue. Hold it there for 30 seconds to ensure a tight bond. -
Final cure:
Let the glue set according to the package instructions (usually overnight for maximum strength) before sticking them onto your fridge.
Make it 3D
Before drying, press a small ball of clay onto the nose area to create a raised, relief nose instead of a painted one.
Now your fridge has a trio of friendly faces ready to hold up your favorite photos and notes
Cat Ornament With Dangling Legs
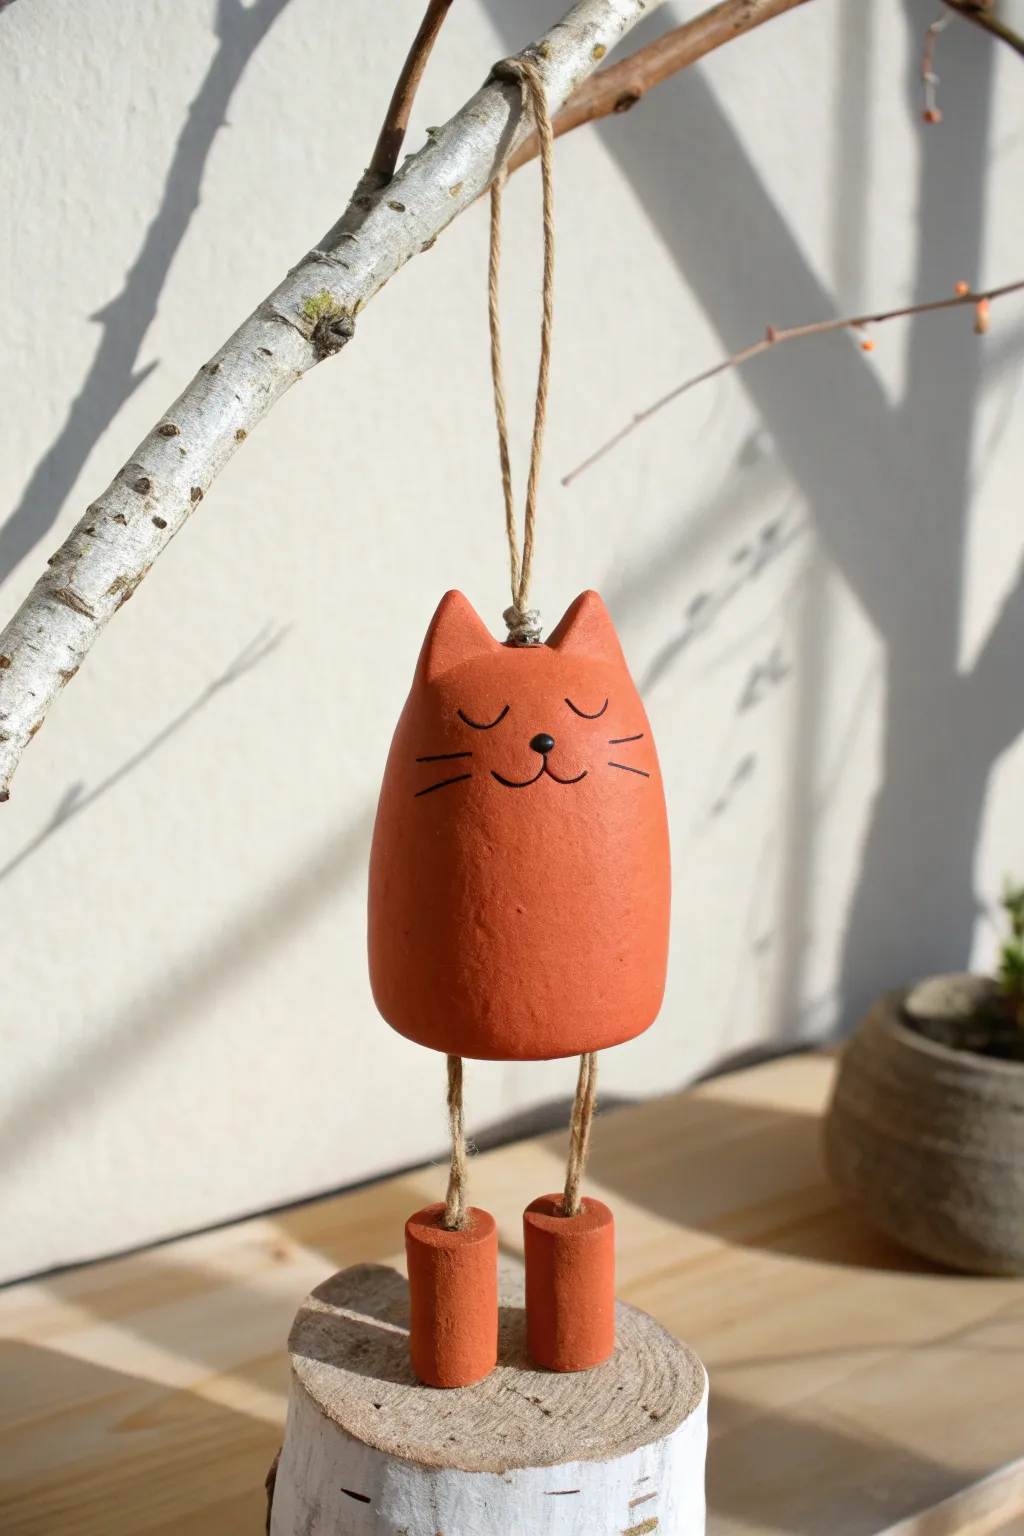
This whimsical ornament features a minimalist feline shape with delightful dangling legs that give it a playful sense of movement. The warm terracotta tone and simple line-drawn face create a rustic, handcrafted charm perfect for hanging on a decorative branch.
Step-by-Step Guide
Materials
- Terracotta-colored air dry clay
- Natural jute twine
- Black fine-tip permanent marker or acrylic paint pen
- Rolling pin
- Knife or clay cutting tool
- Toothpick or skewer
- Water dish
- Fine grit sandpaper (optional)
- Small craft drill (optional, can use skewer while wet)
Step 1: Sculpting the Body
-
Condition the Clay:
Begin by taking a handful of terracotta air dry clay and kneading it in your hands until it becomes warm, soft, and pliable. This prevents cracking later on. -
Form the Base Shape:
Roll the clay into a smooth ball, then gently elongate it into a thick oval shape. Flatten it slightly so it isn’t perfectly round but still retains a nice, chubby volume. -
Shape the Ears:
At the top of your oval, pinch up two triangular sections to form the ears. Use your fingers to smooth the transition between the ears and the head so looking seamless. -
Refine the Silhouette:
Tap the bottom of the body on your work surface to create a flat base. I find this helps keep the shape consistent even though the legs will hang underneath. -
Smooth the Surface:
Dip your finger in a tiny bit of water and rub it over the entire surface of the cat body to remove any fingerprints or cracks. -
Create the Leg Holes:
Flip the body over. Using a skewer or a toothpick, poke two holes deep into the flat bottom surface. These need to be wide enough to accommodate your jute twine later. -
Create the Hanger Hole:
While the clay is still wet, insert your skewer through the top center of the head, right between the ears. Wiggle it slightly to ensure the hole is clear for the hanging loop.
Clean Lines
Before drawing the face, practice on a scrap piece of paper. If your clay surface is bumpy, the marker might bleed, so sanding that area smooth first is key.
Step 2: Making the Feet
-
Roll Cylinders:
Take two smaller pieces of clay and roll them into short, thick cylinders. These will be the boots. -
Drill the Feet:
Carefully push your skewer all the way through the center of each cylinder lengthwise, creating a bead-like channel for the twine. -
Drying Time:
Set the body and the two feet aside in a cool, dry place. Let them dry completely for 24-48 hours until they are hard and lighter in color.
Add a Scarf
Wrap a small scrap of fabric or braided yarn around the cat’s neck to give it a seasonal scarf, adding a pop of color.
Step 3: Assembly and Details
-
Sand Imperfections:
Once fully dry, you can lightly run fine-grit sandpaper over any rough edges, particularly around the ear tips or the bottom edge. -
Draw the Face:
Using a fine-tip black marker or paint pen, draw two curved drooping eyes, a small triangular nose, and two curved lines for the mouth. Add three whiskers on each cheek for personality. -
Prepare the Leg Twine:
Cut two equal lengths of jute twine, about 3 to 4 inches long depending on how dangly you want the legs to be. -
Attach the Feet:
Thread one piece of twine through a foot cylinder. Tie a sturdy double knot at the bottom end so the clay foot rests on the knot. Repeat for the second foot. -
Attach Legs to Body:
Apply a generous drop of strong craft glue into the leg holes on the bottom of the cat body. Push the top ends of the leg twine into these holes using your skewer to jam them in deep. Let the glue set. -
Add the Hanger:
Cut a longer piece of twine for the hanging loop. Thread it through the hole between the ears and tie a secure knot.
Hang your charming cat creation on a branch or handle to see those little legs dance

TRACK YOUR CERAMIC JOURNEY
Capture glaze tests, firing details, and creative progress—all in one simple printable. Make your projects easier to repeat and improve.
Cat Keychain Charm
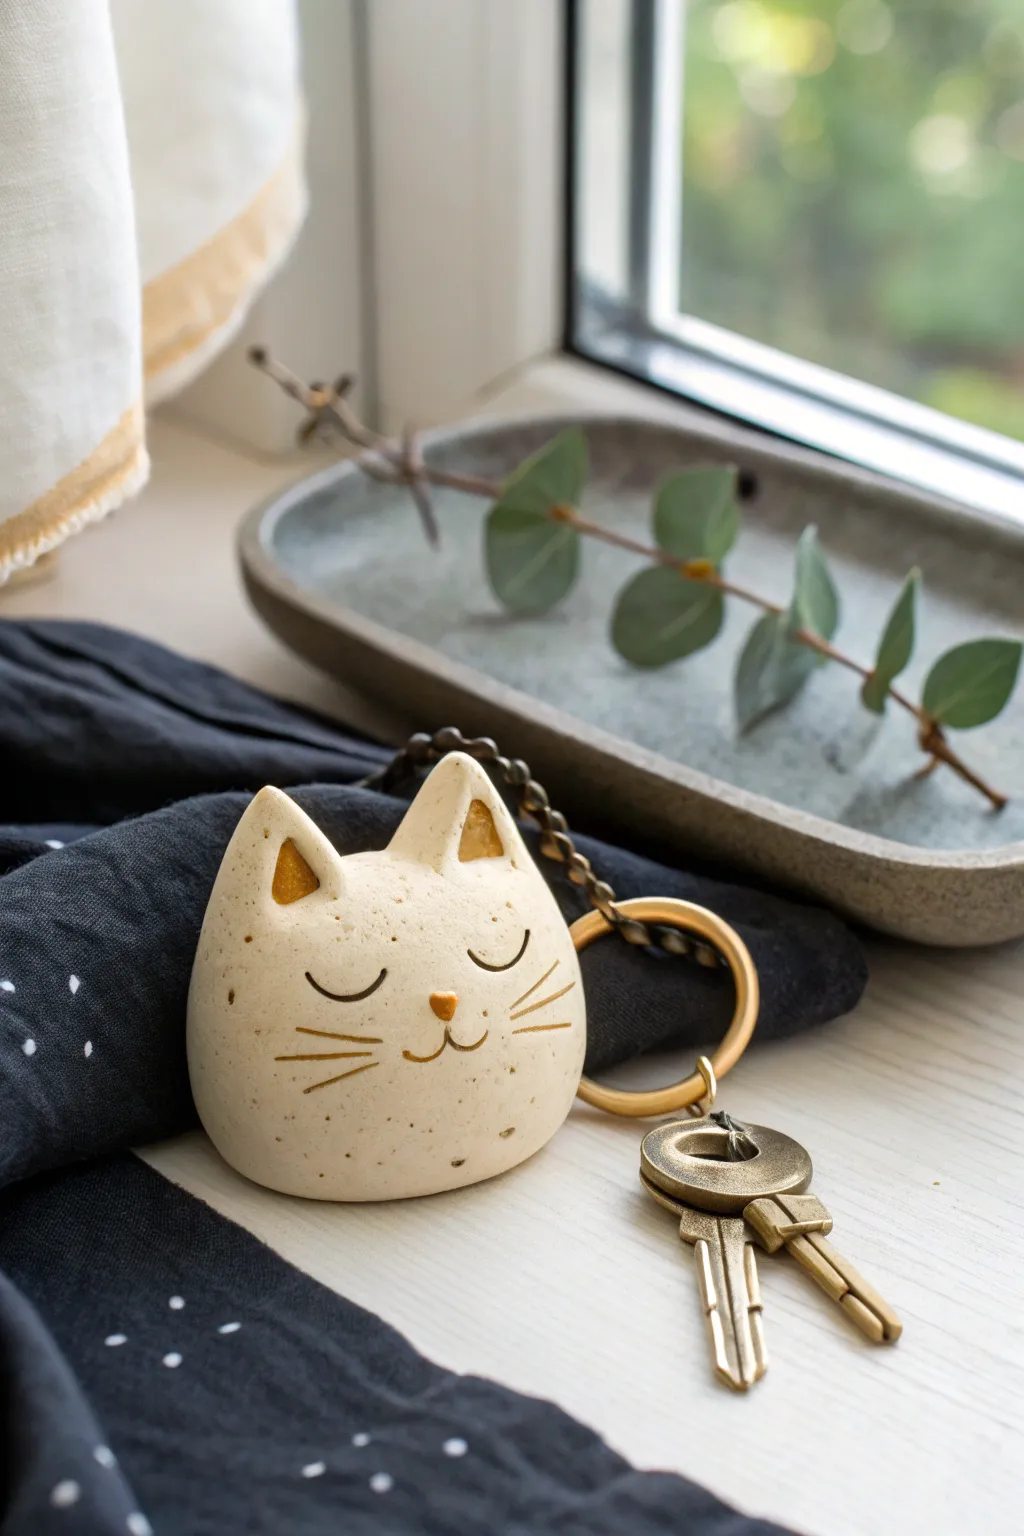
Create a serene companion for your keys with this minimalist cat charm featuring gentle closed eyes and golden accents. The smooth, speckled finish gives it a lovely organic feel that’s perfect for gifting or personalizing your keyring.
Step-by-Step Tutorial
Materials
- White air dry clay
- Speckled clay additive or black pepper (optional)
- Gold acrylic paint
- Fine detail paintbrush
- Needle tool or toothpick
- Sandpaper (fine grit)
- Water for smoothing
- Metal screw eye pin
- Keychain ring and chain hardware
- Gloss varnish (optional for eyes)
- Matte sealant
Step 1: Shaping the Base
-
Prepare the clay:
Condition your white air dry clay until it is soft and pliable. If you want the speckled look shown in the photo, knead in a tiny pinch of dried coffee grounds or black pepper, or use a pre-speckled clay variety. -
Form the head shape:
Roll a piece of clay into a smooth ball about the size of a large walnut or a golf ball. Gently flatten the bottom against your work surface so it can stand upright without tipping over. -
Refine the dome:
Cup your hands around the ball to shape it into a soft dome, ensuring the curve is symmetrical. Smooth out any fingerprints right away using a drop of water on your finger. -
Create the ears:
Pinch two small triangles of clay from your main supply. Shape them to be slightly thick at the base and pointed at the top, mimicking soft cat ears. -
Attach the ears:
Score the bottom of the ears and the top of the head where they will sit. Add a dab of water or slip, press the ears firmly in place, and smooth the seams down into the head with a modeling tool until they look seamless.
Keep it Clean
Work on a piece of parchment paper to prevent the white clay from picking up dust or colors from your table surface.
Step 2: Detailing and Refining
-
Secure the hardware:
While the clay is still wet, carefully insert a screw eye pin into the very top center of the head. Twist it gently to ensure the threads grip the clay, but be careful not to distort the head shape. -
Indent the ears:
Use the rounded end of a small paintbrush or a ball tool to gently press indentations into the front of each ear triangle, creating the inner ear hollows. -
Carve the face:
With a needle tool, lightly sketch the facial features first to ensure placement. Then, press deeper to carve two curved lines for sleeping eyes, a small triangle nose, a ‘w’ shape for the mouth, and three whiskers on each cheek. -
Initial smoothing:
Run a wet finger or a damp soft brush over the carving lines to remove any jagged clay crumbs created by the needle tool. -
Drying:
Let the piece dry completely in a safe spot away from direct heat. This usually takes 24-48 hours depending on thickness. Flip it occasionally to help the bottom dry evenly.
Loose Hardware?
If the screw eye feels loose after drying, remove it, add a drop of superglue to the hole, and screw it back in for a permanent hold.
Step 3: Painting and Assembly
-
Sanding:
Once fully cured, gently sand any rough spots or fingerprints with fine-grit sandpaper. This gives that professional, stone-smooth finish seen in the reference. -
Paint the gold accents:
Dip a fine detail brush into metallic gold acrylic paint. Carefully fill in the inner ear hollows you created earlier. -
Detail the face:
Using the same gold paint, fill in the carved lines for the whiskers, nose, mouth, and sleeping eyelids. I find it helpful to wipe away excess surface paint immediately with a damp paper towel if I go outside the lines. -
Seal the piece:
Apply a coat of matte sealant over the entire cat to protect the clay from moisture and dirt. Let this dry completely. -
Optional gloss:
For extra dimension, you can add a tiny drop of gloss varnish just inside the gold ears or on the nose to catch the light. -
Attach keyring:
Open the jump ring on your keychain hardware using two pliers. Loop it through the eye pin on top of the cat’s head and close the ring securely.
Now you have a charming, handmade accessory ready to accompany you on your daily travels
Cat Planter Buddy
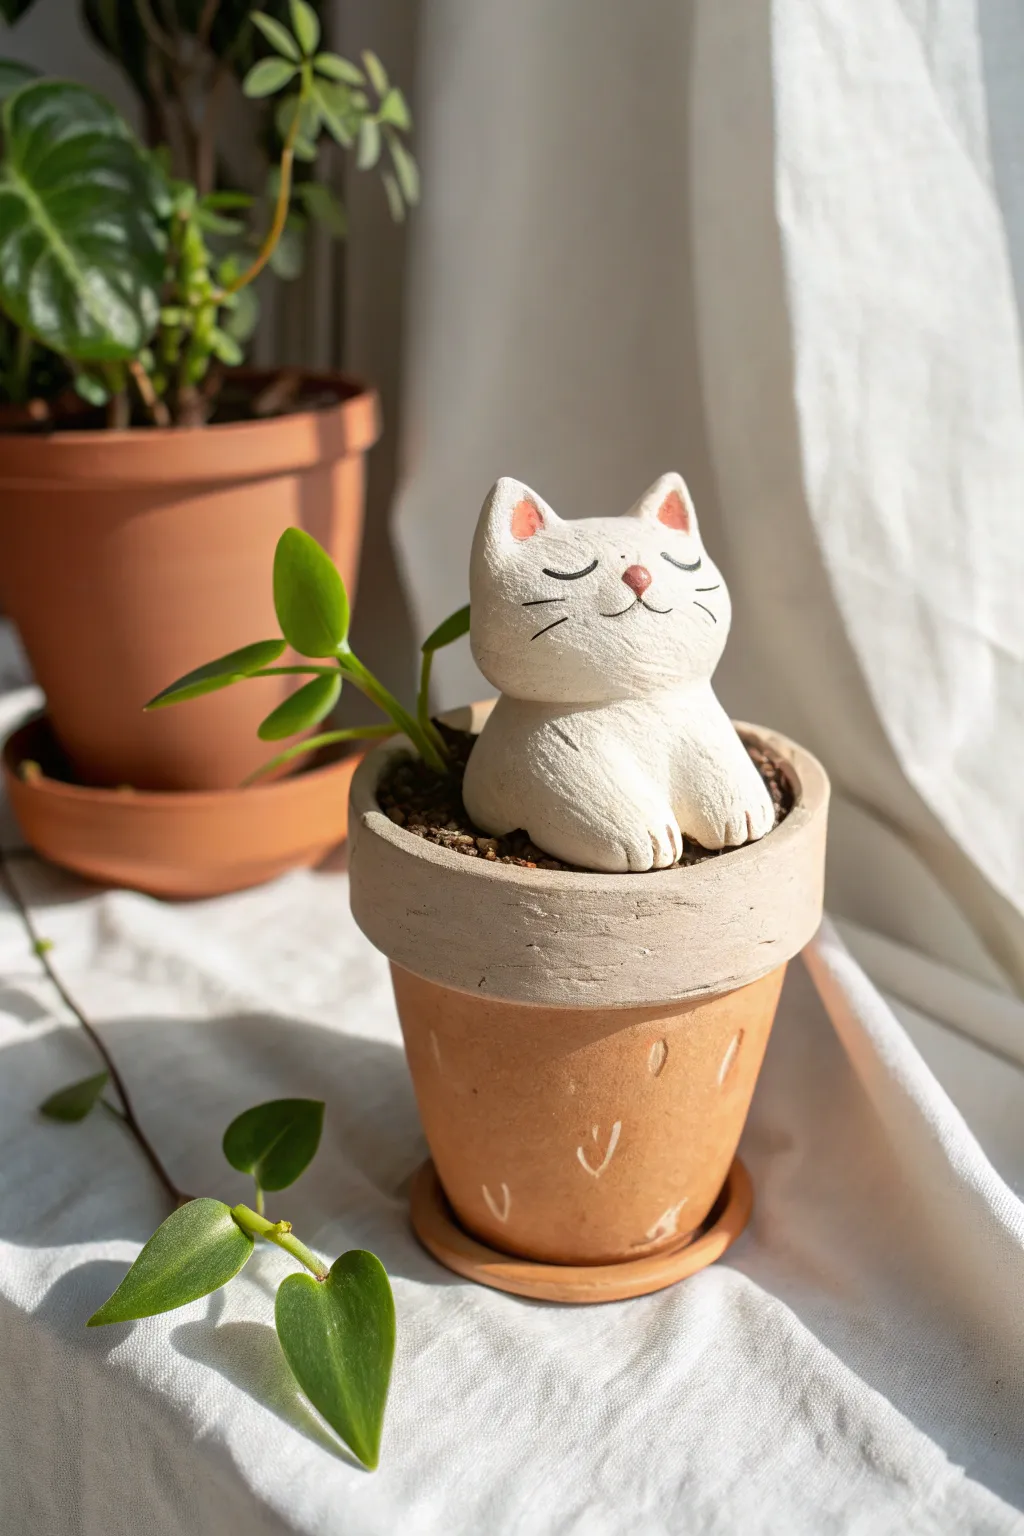
Add a touch of whimsy to your indoor garden with this serene clay cat that appears to be resting right in the soil. This charming planter buddy is sculpted as a partial figure, creating the delightful illusion that a tiny feline is tucked comfortably inside your favorite potted plant.
Step-by-Step Guide
Materials
- White specialized air-dry modelling clay
- Small cup of water
- Basic clay sculpting tools (needle tool, modeling tool)
- Acrylic paints (Soft pink, black)
- Fine detail paintbrush
- Matte or satin varnish (waterproof sealant is crucial for plant contact)
- Aluminum foil (optional for core)
- Sandpaper (fine grit)
Step 1: Shaping the Base Form
-
Prepare the core:
Start by conditioning a ball of air-dry clay roughly the size of a tangerine. If you want a lighter piece, you can scrunch a small ball of aluminum foil and cover it with clay, but solid clay works well for this size to keep it weighted in the pot. -
Form the body shape:
Roll the clay into a smooth, slightly flattened teardrop or gumdrop shape. The bottom needs to be flat so it sits primarily on top of the soil, while the top should be rounded for the head. -
Define the head:
Using your thumb and forefinger, gently pinch and smooth a ‘neck’ line about two-thirds of the way up the form. Don’t make it too thin; you just want to suggest separation between the head and the chest. -
Create the ears:
Pinch two small triangles at the very top of the head. Gently smooth the clay from the back of the ears down into the head so there are no seams. Use a small rounded tool to make slight indentations inside the ear triangles.
Step 2: Adding Details & Paws
-
Attach the paws:
Roll two small, equal-sized sausages of clay for the front legs. Attach these vertically to the front of the body, blending the top of the sausage smoothly into the chest area. -
Sculpt the feet:
Flatten the bottom of the ‘sausages’ slightly where they rest on the table. Use a needle tool or knife to press three small vertical lines into the end of each paw to create toes. -
Add the nose:
Roll a tiny, lentil-sized piece of clay. Dab a tiny bit of water on the center of the face and press the nose on securely. -
Carve facial features:
With a needle tool, carefully etch two curved semi-circles for closed, sleeping eyes. Add a small vertical line coming down from the nose and curve it outward to create the mouth. -
Add whisker detail:
Lightly press three short whiskers on each cheek area using your needle tool. Keep the pressure light here; you don’t want deep gouges, just surface texture. -
Smooth everything out:
Dip your finger in a little water and gently run it over the entire sculpture to erase fingerprints and soften any harsh tool marks.
Pot Fit Check
Before drying, gently press your wet clay cat into the soil of the intended pot to create a custom-fit indentation, then remove to dry. This ensures it sits perfectly flat later.
Step 3: Finishing Touches
-
Drying time:
Place your cat on a piece of parchment paper to dry. This usually takes 24-48 hours depending on humidity. Rotate it occasionally so the bottom dries evenly. -
Sand imperfections:
Once fully cured and hard, use fine-grit sandpaper to gently buff away any remaining rough spots or bumps, paying attention to the ears and paws. -
Paint the details:
Using a very fine brush, paint the inner ears and the nose with soft pink acrylic paint. I find mixing a tiny dot of white into the pink keeps it looking pastel and sweet. -
Define the face:
With a steady hand and a fine liner brush (or an ultra-fine paint marker), carefully trace the etched eye lines and whiskers with black paint. -
Seal for protection:
This step is vital since the cat will live near moist soil. Apply 2-3 coats of a waterproof matte or satin varnish, ensuring the bottom is thoroughly coated to prevent moisture damage.
Level Up: Tail Trick
Make a separate, curved clay ‘tail’ piece. When you place the buddy in the pot, tuck the tail into the soil on the opposite side of the plant for a playful ‘hiding’ effect.
Nestle your new friend into the soil and enjoy the peaceful vibe it brings to your plant corner
Cat Paw Coaster Set
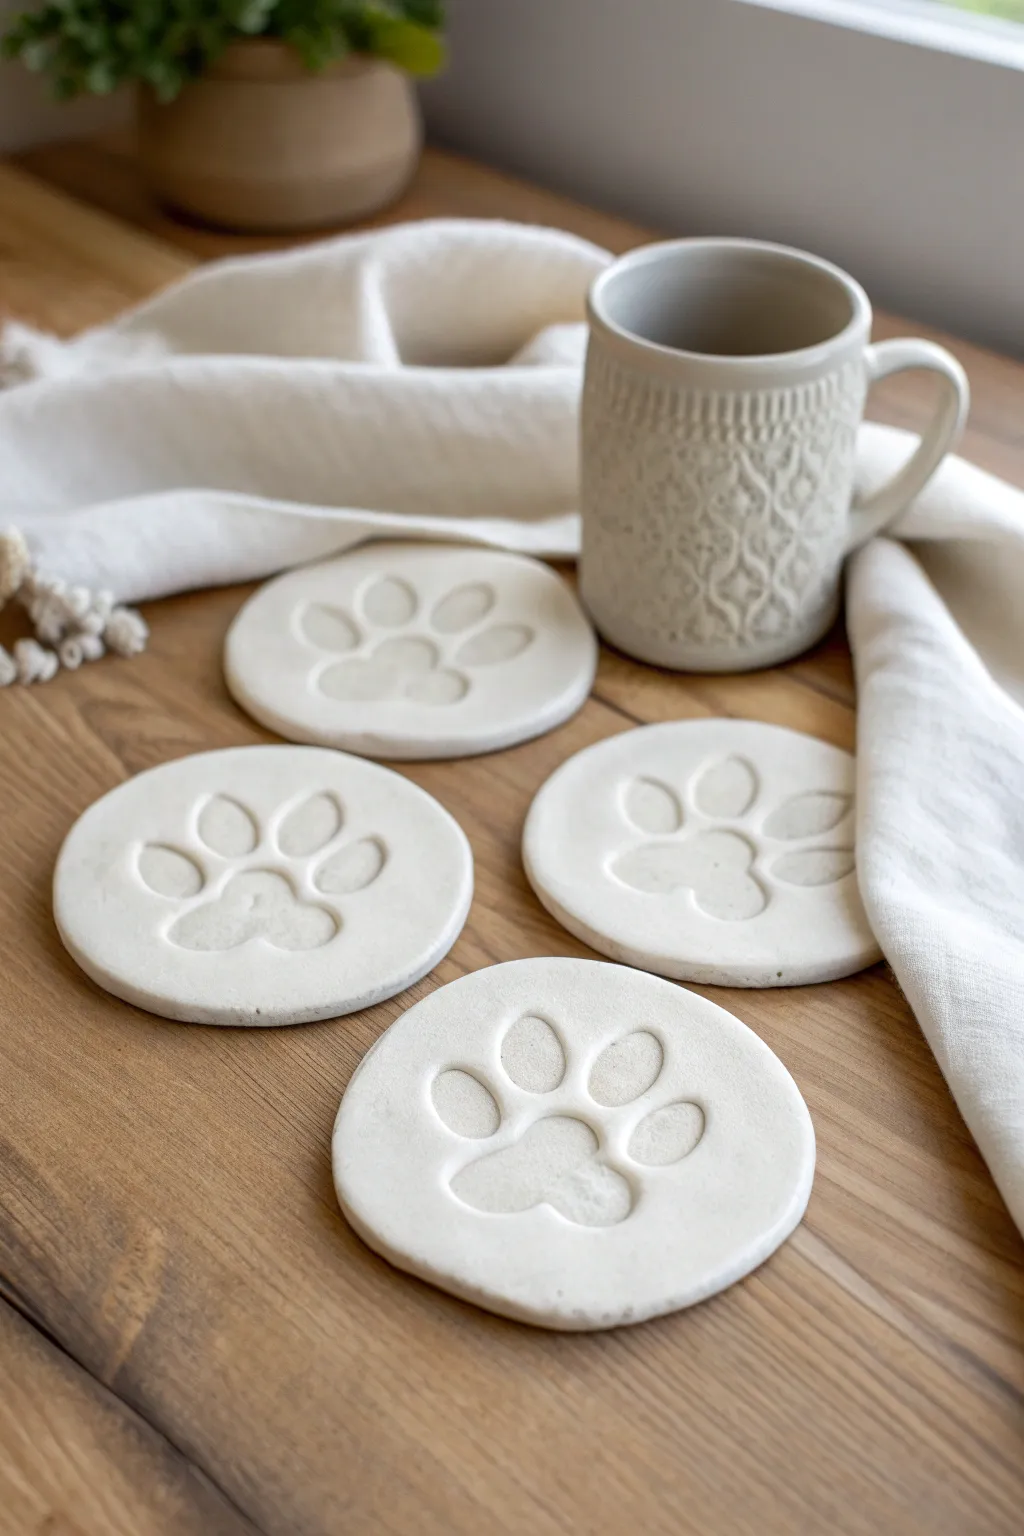
These charming, minimalist coasters feature deeply embossed paw prints that add a subtle touch of whimsy to your coffee table. The clean, white finish mimics the look of high-end ceramic without the need for a kiln, making them a perfect beginner-friendly project.
Step-by-Step Tutorial
Materials
- White air dry clay (approx. 500g)
- Circular clay cutter or large glass (approx. 3.5-4 inches diameter)
- Small rolling pin
- Parchment paper or craft mat
- Small bowl of water
- Sculpting tools or a smooth, round object (like a rounded pen cap or measuring spoon)
- Fine-grit sandpaper (220-400 grit)
- Matte or satin clear varnish/sealant
- Soft brush for sealing
Step 1: Preparation & Shaping
-
Condition the day:
Begin by taking a handful of white air dry clay and kneading it in your hands to warm and soften it. This conditioning step reduces cracks and makes rolling much easier. -
Roll the slab:
Place your clay on a sheet of parchment paper. Roll it out evenly until you have a slab that is approximately 1/4 inch (about 6-7mm) thick. -
Ensure even thickness:
It is crucial that the thickness is consistent so the coasters dry flat; you can place two wooden rulers on either side of the clay as guides while rolling. -
Cut the circles:
Use your circular cutter or press the rim of a large glass firmly into the clay to create four discs. Lift away the excess scrap clay and save it for future repairs or other projects. -
Smooth the edges:
Dip your finger lightly in water and run it along the cut edges of each circle to smooth down any rough textures or sharp ridges left by the cutter.
Uneven Impressions?
If the paw prints look jagged or rough inside, dip a soft paintbrush in water and gently sweep it inside the indentations while the clay is wet to act as a mini mop.
Step 2: Embossing the Design
-
Create the main pad:
Locate the center of the coaster, slightly offset towards the bottom. Using your thumb or a large rounded sculpting tool, press firmly into the clay to create an upside-down heart shape for the main paw pad. Gently rock your tool to deepen the impression without poking through the bottom. -
Refine the main pad:
Smooth out the interior of the depression with a wet fingertip to ensure the surface is uniform and free of fingerprints. -
Mark the toe positions:
Lightly mark four points in an arc above the main pad to ensure your spacing is symmetrical before committing to the deep impressions. -
Impress the toes:
Use a smaller rounded tool, like the back of a measuring spoon or a ball stylus, to press the four oval toe beans into the clay at your marked spots. -
Shape the toes:
Slightly drag the tool downwards toward the center pad as you lift it out to create that teardrop oval shape characteristic of cat toes. -
Final smoothing:
Once all impressions are made, do one last pass with a damp finger or soft brush over the entire surface to soften harsh ridges and erase any stray tool marks.
Step 3: Drying & Finishing
-
Initial drying:
Leave the coasters on the parchment paper in a cool, dry area away from direct sunlight. Let them air dry for about 24 hours. -
Flip for flat drying:
After the first day, flip the coasters over gently. This allows the bottom to dry evenly and helps prevent the edges from curling upward. -
Complete drying:
Allow them to dry for another 24-48 hours until the clay is completely white and no longer feels cool to the touch. -
Sand for perfection:
Use fine-grit sandpaper to gently buff the edges and surface. Pay special attention to the rim to ensure it feels smooth in the hand. -
Seal the surface:
Apply a thin coat of matte or satin varnish to the top and sides. Let it dry completely according to the bottle instructions. -
Seal the base:
Flip the coasters and seal the bottom to protect your furniture and ensure the coaster is entirely water-resistant.
Pastel Pop
Mix a tiny drop of acrylic paint into your white clay before rolling it out to create soft pastel pink or blue coasters instead of plain white.
Stack your new set on the coffee table and enjoy a cozy drink with your feline-inspired decor
Cat Spoon Rest With Curled Tail
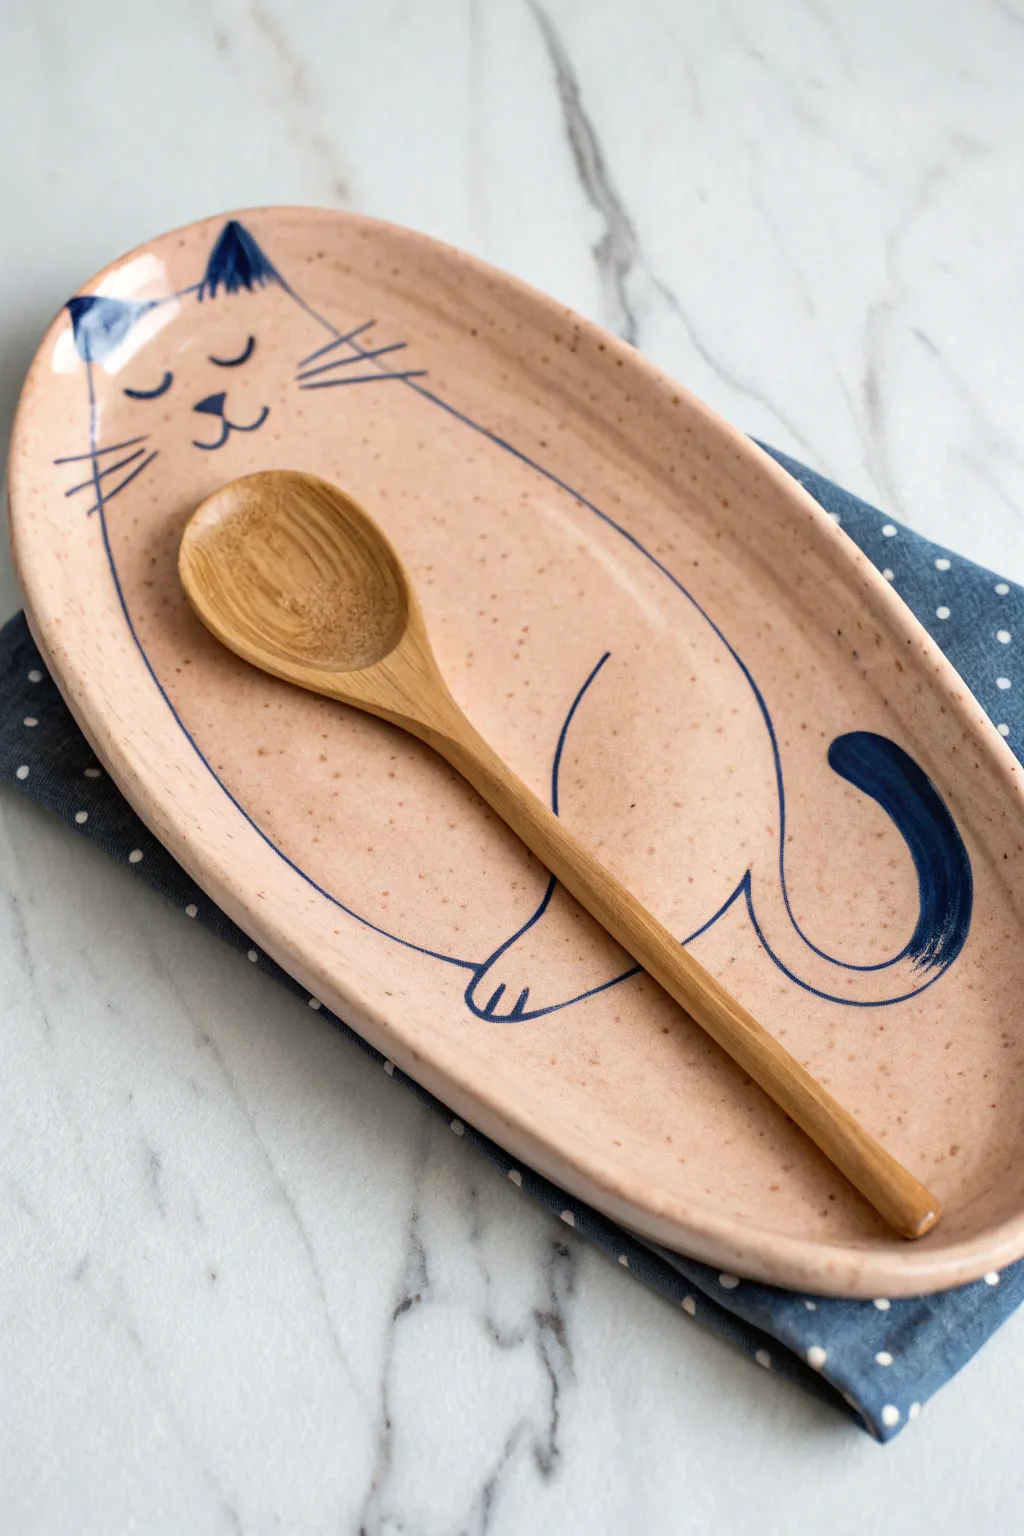
This charming spoon rest combines form and function with a simple, elegant cat design painted in classic indigo blue. The speckled pink finish gives it a lovely, handmade ceramic feel without needing a kiln.
Detailed Instructions
Materials
- Air dry clay (white or terracotta)
- Rolling pin
- Rolling guides or wooden slats (approx. 1/4 inch)
- Oval paper template (drawn or printed)
- Craft knife
- Sponge and water
- Sandpaper (fine grit)
- Acrylic paints (pastel pink, dark indigo blue, warm beige/brown)
- Old toothbrush (for speckling)
- Fine liner paintbrush
- Flat shader paintbrush
- Gloss varnish or sealant (food safe if possible, though mostly decorative)
Step 1: Shaping the Base
-
Prepare the clay:
Start by conditioning a large ball of air dry clay in your hands until it is pliable and smooth. Press it down onto a clean work surface or canvas mat. -
Roll the slab:
Place your rolling guides on either side of the clay to ensure an even thickness. Roll the clay out into a long oval shape until the rolling pin rests on the guides, aiming for about 1/4 inch thickness. -
Cut the shape:
Lay your oval paper template onto the clay slab. Use a craft knife to trace around the edge, cutting cleanly through the clay. Remove the excess clay and save it for other projects. -
Smooth the edges:
Dip your finger or a small sponge into a little water and run it along the cut edges to round them off. You want to remove any sharp angles from the cutting process. -
Create the curve:
To give the spoon rest its slight bowl shape, gently lift the edges of the oval upwards. I find it helpful to place the clay form into a shallow bowl or on a curved foam surface to hold its shape while it dries. -
Initial Drying:
Let the piece dry completely. This usually takes 24-48 hours depending on humidity. Flip it over halfway through the drying process to ensure the bottom dries evenly and doesn’t warp.
Flick It Good
Test your speckling technique on a scrap piece of paper first. The distance of the brush affects the size of the dots—closer makes bigger blobs!
Step 2: Painting and Finishing
-
Sand for perfection:
Once bone dry, take your fine-grit sandpaper and gently smooth out any bumps on the surface or rough spots on the rim. Wipe away dust with a barely damp cloth. -
Create the base color:
Mix white acrylic paint with a tiny drop of pink and a touch of beige to create a warm, pale blush tone. Paint the entire surface of the spoon rest, front and back. You may need two coats for full opacity. -
Add the speckles:
Mix a warm brown acrylic paint with a little water to make it fluid. Dip an old toothbrush into the mix, hold it over the dish, and run your thumb across the bristles to flick tiny speckles across the surface. -
Sketch the design:
Lightly sketch the cat outline with a pencil directly on the painted clay. Draw the ears at the top, a curved body line down the right side, and a curled tail near the bottom right. -
Paint the details:
Using a fine liner brush and dark indigo blue paint, carefully trace over your pencil lines. Focus on thin, confident strokes for the whiskers and the sleeping eyes to get that dainty look. -
Fill the accents:
Use the same blue to fill in the tips of the ears and the end of the tail with a solid color, mimicking the look often found on traditional ceramics. -
Dry the design:
Allow the paint to dry fully before moving on to the final step. The blue needs to be completely set so it doesn’t smear during sealing. -
Seal the piece:
Apply two to three coats of gloss varnish to protect the paint and give it that high-shine ceramic look. Let each coat dry completely in between applications.
Warping Worries?
If the clay starts curling up too much while drying, place a small, flat weight (like a coaster or book) gently in the center to hold it down.
Your adorable feline spoon rest is now ready to keep your kitchen counters clean and stylish
Minimal Cat Wall Hook Tile
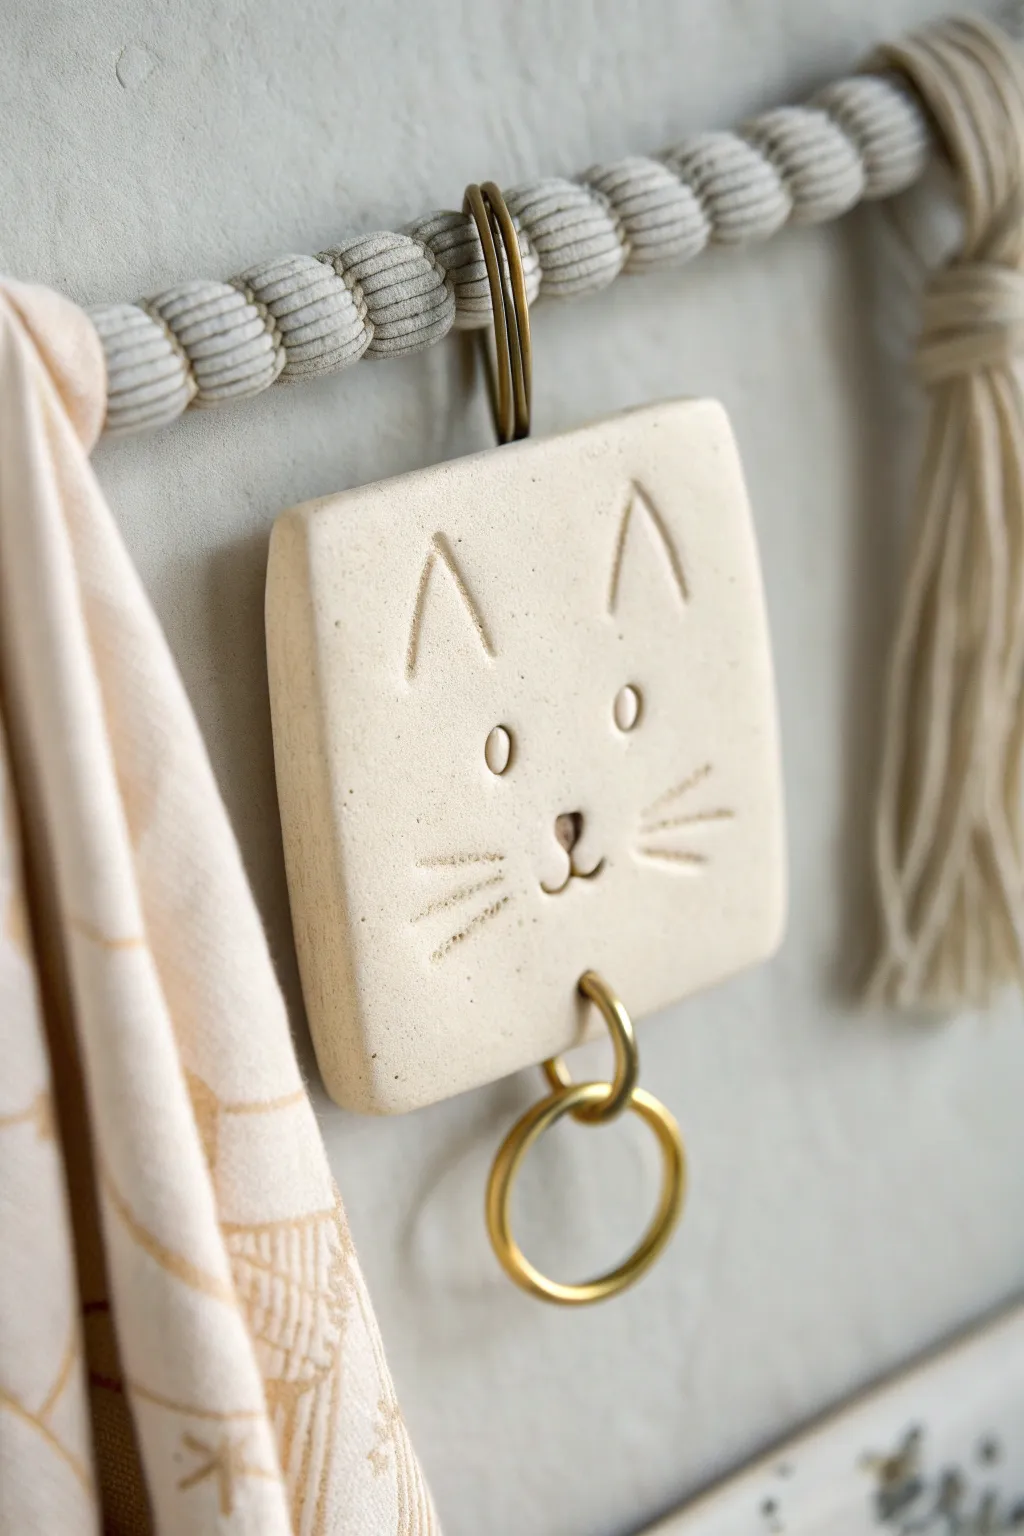
This charming wall hanging combines clean lines with a touch of whimsy, featuring a simple square clay tile with an impressed cat face. Its natural, speckled finish and brass hardware make it a functional piece of art perfect for organizing small accessories.
Step-by-Step Guide
Materials
- Air dry clay (white or cream)
- Rolling pin
- Square cookie cutter (approx. 3-4 inches) or ruler and craft knife
- Carving tools or a pointed stylus tool
- Small straw or cocktail stick
- Fine grit sandpaper
- Matte sealant or varnish
- Two open brass jump rings (large size, approx. 1 inch)
- Strong craft glue (optional)
- Brass or gold-colored wire/hook for hanging
Step 1: Shaping the Base
-
Prepare your workspace:
Lay down a piece of parchment paper or a silicone mat to prevent the clay from sticking to your table. Clean hands are essential here to keep the white clay pristine. -
Roll the slab:
Take a handful of air dry clay and knead it briefly until pliable. Roll it out to an even thickness of about 1/4 to 1/3 inch. You want it substantial enough to hold the hardware but not too heavy. -
Cut the square:
Using a square cookie cutter or a ruler and craft knife, cut out a perfect square shape. If the edges are jagged, dip your finger in a little water and smooth them down gently. -
Soften the corners:
For the look in the photo, the corners aren’t sharp 90-degree angles. Use your fingertip to gently round off each corner just slightly to give it a softer, stone-like appearance.
Step 2: Creating the Face
-
Mark the ears:
Using a carving tool or a toothpick, gently press two inverted ‘V’ shapes near the top for the ears. Don’t drag the tool; impress it into the clay to create clean lines. -
Add the eyes:
For the eyes, you want an oval, almost seed-like shape. Press a rounded tool or the back of a small paintbrush handle into the clay. Angle it slightly to create the vertical oval shape seen in the reference. -
Sculpt the nose:
The nose is a small triangular impression. Press a small tool in tightly to create depth. You can add a darker wash later, but the depth itself creates the necessary shadow. -
Draw the mouth:
Carve a small vertical line down from the nose, connecting to two small curves for the mouth. Keep the lines shallow and delicate. -
Impress the whiskers:
Add three whiskers on each cheek using the same press-and-lift technique used for the ears. Make the middle whisker slightly longer than the top and bottom ones.
Fixing Cracks
Tiny cracks while drying? Mix a small amount of fresh clay with water to create a paste (slip). Smooth this over the cracks with your finger, let dry, and sand smooth.
Step 3: Hardware Prep and Drying
-
Pierce the holes:
Create two holes in the tile: one centered at the very top edge and one centered at the very bottom edge. A straw works well for this to ensure the hole is large enough for your hardware loops. -
Check hole placement:
Ensure the holes aren’t too close to the edge—leave at least 3-4mm of clay border so it doesn’t crack under the weight of the ring. -
Initial dry:
Place the tile on a wire rack to ensure even airflow. Let it dry for at least 24-48 hours. I find turning it over halfway through the drying process helps keep it perfectly flat. -
Sand the surface:
Once fully cured and bone dry, take fine-grit sandpaper and lightly sand the edges and surface to remove any burrs or fingerprints.
Level Up: Speckled Effect
To mimic the stone look, mix used coffee grounds or cracked black pepper into your white clay before rolling it out for a natural, speckled texture.
Step 4: Finishing Touches
-
Seal the piece:
Apply a coat of matte varnish or sealant. This protects the clay from moisture and gives it a finished look without making it too glossy. -
Highlight the nose (optional):
If you want the nose to pop like in the photo, mix a tiny drop of brown paint with water and wash it into the nose crevices, wiping away the excess from the surface. -
Attach the bottom ring:
Take a large brass jump ring or split ring. Open it carefully with pliers, thread it through the bottom hole of the cat tile, and pinch it closed securely. -
Hang the project:
Thread a second brass ring or a loop of leather cord through the top hole. You can now hang this from a rod, a hook, or a macrame dowel.
Hang your little ceramic kitty in an entryway or nursery for a functional piece of art that keeps you smiling
Cat Candle Holder Dish
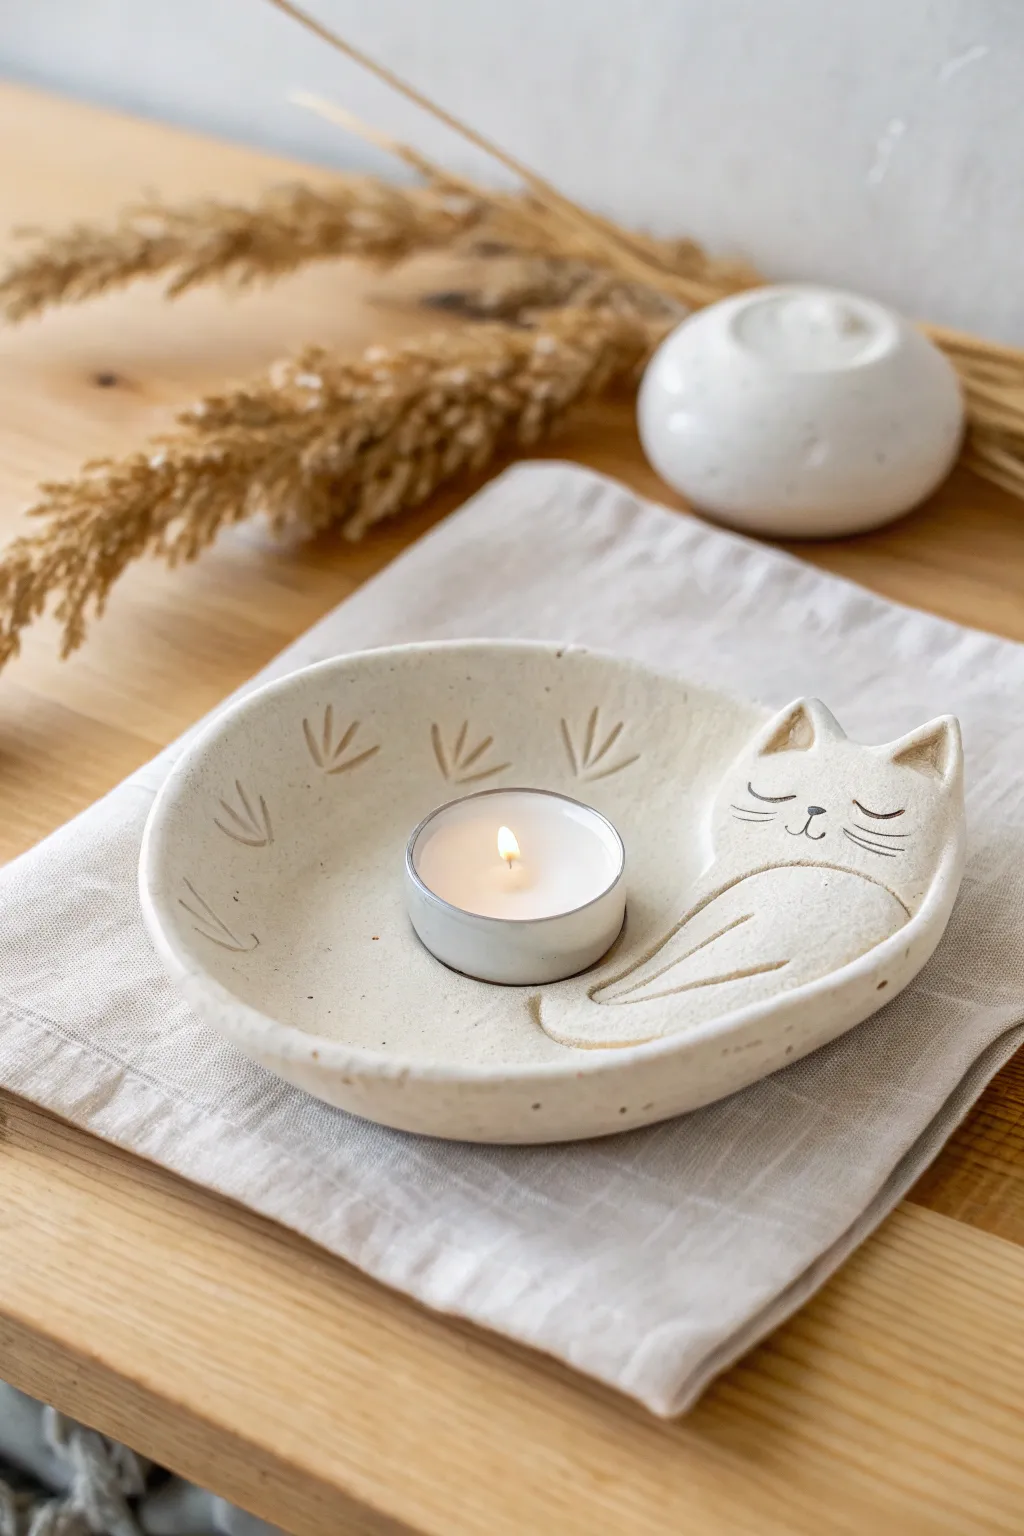
This charming little dish combines functionality with feline grace, featuring a sleeping cat curled along the rim to keep your tealight company. Its organic, specked finish and simple incised details give it a modern, minimalist pottery look without needing a kiln.
How-To Guide
Materials
- White air dry clay (approx. 200g)
- Rolling pin
- Small bowl (approx. 4-5 inches diameter) for a mold
- Needle tool or toothpick
- Sponge and water
- Sandpaper (fine grit)
- Acrylic paint (cream/off-white)
- Brown fine-point marker or paint pen
- Acrylic varnish (satin or matte)
- Tealight candle (for sizing)
- Slightly stiff brush (e.g., an old toothbrush) for speckling
Step 1: Shaping the Base
-
Prepare the Clay:
Begin by kneading your air dry clay until it feels warm and pliable. This removes air bubbles and prevents cracking later. -
Roll out the Slab:
Roll the clay out onto a flat surface to an even thickness of about 1/4 inch (6mm). Rotate the clay occasionally so it doesn’t stick to your work surface. -
Cut the Circle:
Place your bowl upside down on the clay as a template. Use your needle tool to cut a clean circle around the rim. -
Form the Dish:
Lift the clay circle and gently press it into the *inside* of your bowl to give it a curved shape. Smooth the edges with a damp finger so they are rounded, not sharp.
Fixing Cracks
If small hairline cracks appear while drying, mix a tiny amount of fresh clay with water to make a paste. Fill the cracks, smooth over, and let dry again.
Step 2: Sculpting the Cat
-
Shape the Head:
Roll a small ball of clay (about the size of a walnuts) and flatten it slightly into a rounded triangle shape. Pinch the top corners gently to form two pointed ears. -
Attach the Head:
Score the back of the head and the spot on the dish rim where you want the cat to rest. Add a dab of water (slip), press the head firmly onto the rim, and smooth the seams where the clay joins. -
Create the Body:
Roll a coil of clay and taper one end. Flatten it slightly to look like a curled body and tail. -
Attach the Body:
Score and slip this piece, attaching it just below the head so it curves along the inner slope of the dish. It should look like the cat is snuggled inside. -
Add Front Paws:
Make a small, flattened teardrop shape for the front leg. Attach this over the body section, blending the upper edge so it looks like a folded limb. -
Check Candle Fit:
Gently place your tealight in the center to ensure the cat sculpture doesn’t crowd the candle space. Adjust the clay if needed.
Step 3: Detailing and Drying
-
Refine the Surface:
Dip a sponge in water (squeeze it out well!) and wipe over the entire piece to smooth out fingerprints and bumps. -
Incise the Rim:
Using your needle tool, press small ‘V’ shapes or three-pronged grass patterns around the inner rim of the bowl for texture. -
Carve the Face:
Very gently crave two curved lines for closed eyes, a small triangular nose, and whiskers on the cat’s face. Keep these lines shallow. -
Let it Dry:
Allow the dish to dry completely in a cool, dry place. This usually takes 24-48 hours. Don’t rush this or it might warp. -
Sanding:
Once bone dry, use fine-grit sandpaper to smooth any rough edges on the rim or the cat’s ears. Wipe away the dust.
Golden Touch
For an elegant upgrade, paint the rim of the dish and the tips of the cat’s ears with liquid gold leaf or metallic gold acrylic paint after the base coat dries.
Step 4: Painting and Finishing
-
Base Coat:
Paint the entire dish with a cream or warm off-white acrylic paint. You may need two coats for opaque coverage. -
Add Speckles:
Dilute a tiny bit of brown paint with water. Dip an old toothbrush or stiff brush into it, and flick the bristles with your thumb to spray tiny speckles over the dish for a ceramic effect. -
Highlight the Face:
Use a fine brown marker or a detailed brush to carefully trace inside the carved facial features (eyes, nose, whiskers) to make them pop. -
Seal the Piece:
Apply a coat of satin or matte varnish to protect the clay. This is crucial since air dry clay isn’t waterproof.
Place a tea light inside and enjoy the warm, peaceful glow of your handmade creation
Cat Incense Holder With Starry Backing
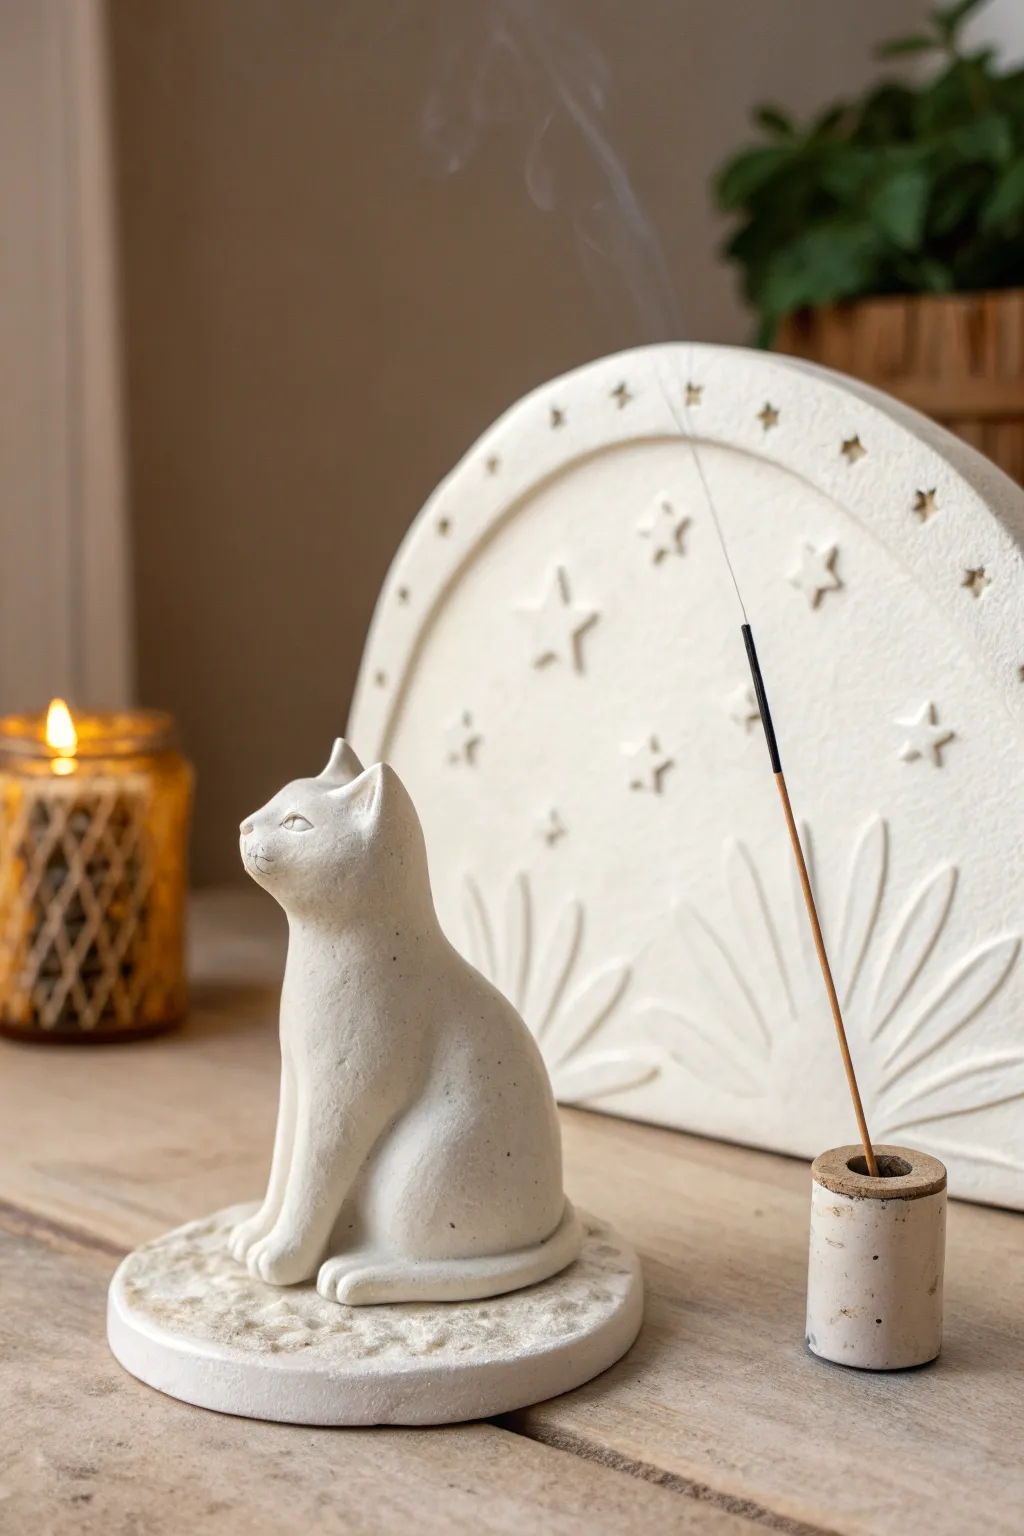
Bring a touch of serene magic to your space with this multi-piece incense holder featuring a contemplative cat and a starry backdrop. The minimalist, stone-like finish created with air-dry clay makes it a perfect addition to any meditation corner or bookshelf.
Step-by-Step
Materials
- White or sandstone air-dry clay
- Sculpting tools (wire loop, needle tool, sponge)
- Circular rolling pin
- Small bowl or circle cutter (for the base)
- Cardboard or plastic template (for the arch)
- Incense stick (for sizing)
- Small star-shaped clay cutters or stamps
- Water in a small cup
- Fine-grit sandpaper
- Matte white acrylic paint (optional)
- Matte sealant
Step 1: Sculpting the Guardian Cat
-
Form the core body:
Start with a handful of clay about the size of a lemon. Roll it into a smooth teardrop shape, flattening the bottom so it sits securely. This will be the cat’s body. -
Shape the head:
Pinch the narrower top part of your teardrop to define a neck, then gently round out the top to form the head. You want a smooth transition, not a separate ball of clay. -
Add ears and features:
Pinch two small triangles at the top of the head for ears. Use a needle tool to gently impress eye slits and a small nose. Keep the features minimalist to match the style. -
Refine the posture:
Use a damp sponge to smooth the front chest area. If you want legs, gently use a modeling tool to carve vertical lines into the front of the body to suggest seated front paws. -
Attach the tail:
Roll a thin snake of clay. Score the back of the cat’s body and use a little water (slip) to attach the tail, wrapping it around the base of the cat nicely. -
Smooth everything:
Take a damp sponge and go over the entire cat figure to remove fingerprints and ensure a stone-like texture. Set this aside to firm up.
Preventing Warpage
To keep the large arch flat, flip it over every 12 hours while drying. Drying it slowly under a loose plastic sheet also helps prevent curling edges.
Step 2: Creating the Starry Backdrop
-
Roll the slab:
Roll out a large slab of clay to about 1/4 inch thickness. It needs to be uniform so it dries flat. -
Cut the arch:
Use a cardboard template or a large bowl to cut a semi-circle arch shape. This will be the background wall. -
Create the border:
Using a clay knife or needle tool, gently etch a border line following the curve of the arch about half an inch from the edge. -
Punch the stars:
Use small star cutters or stamps to press star shapes into the clay within the arch. Don’t cut all the way through; just create deep impressions. -
Add floral details:
Roll tiny teardrops of clay and flatten them. Arrange them at the bottom of the arch in fan shapes to look like stylized leaves or flowers. Attach with slip. -
Add pierced stars (optional):
For the stars along the very outer rim, I like to use a small tool or straw to punch clean holes through the clay, creating a nice play with light.
Galaxy Glow
Paint the inside of the impressed stars with gold leaf or metallic paint after the clay dries for a subtle shimmer that catches the candlelight.
Step 3: Base and Assembly
-
Cut the base:
Roll a smaller slab and cut a perfect circle that is large enough to hold the cat. Texture the surface slightly with a crumpled foil ball for a rugged look. -
Make the incense cylinder:
Roll a small cylinder of clay. Poke a hole in the center with an actual incense stick (wiggle it slightly to make the hole a bit large than the stick to account for shrinkage). -
Join the cat to the base:
Score the bottom of your cat and the center of the round base. Apply slip and press the cat firmly onto the platform, smoothing the seam with a tool. -
The drying phase:
Place the arch (lying flat), the cat-on-base, and the incense cylinder on a wire rack. Let them dry for at least 48-72 hours away from direct heat to prevent warping. -
Sanding and finishing:
Once bone dry, use fine-grit sandpaper to smooth any rough edges on the arch and base. Wipe away dust with a damp cloth. -
Painting and sealing:
Leave the clay natural or apply a wash of matte white acrylic paint. Finish with a matte sealant to protect the incense holder from ash and heat.
Light your favorite incense stick and enjoy the peaceful atmosphere created by your handmade guardian cat
Curtain Peek Cat Sculpture
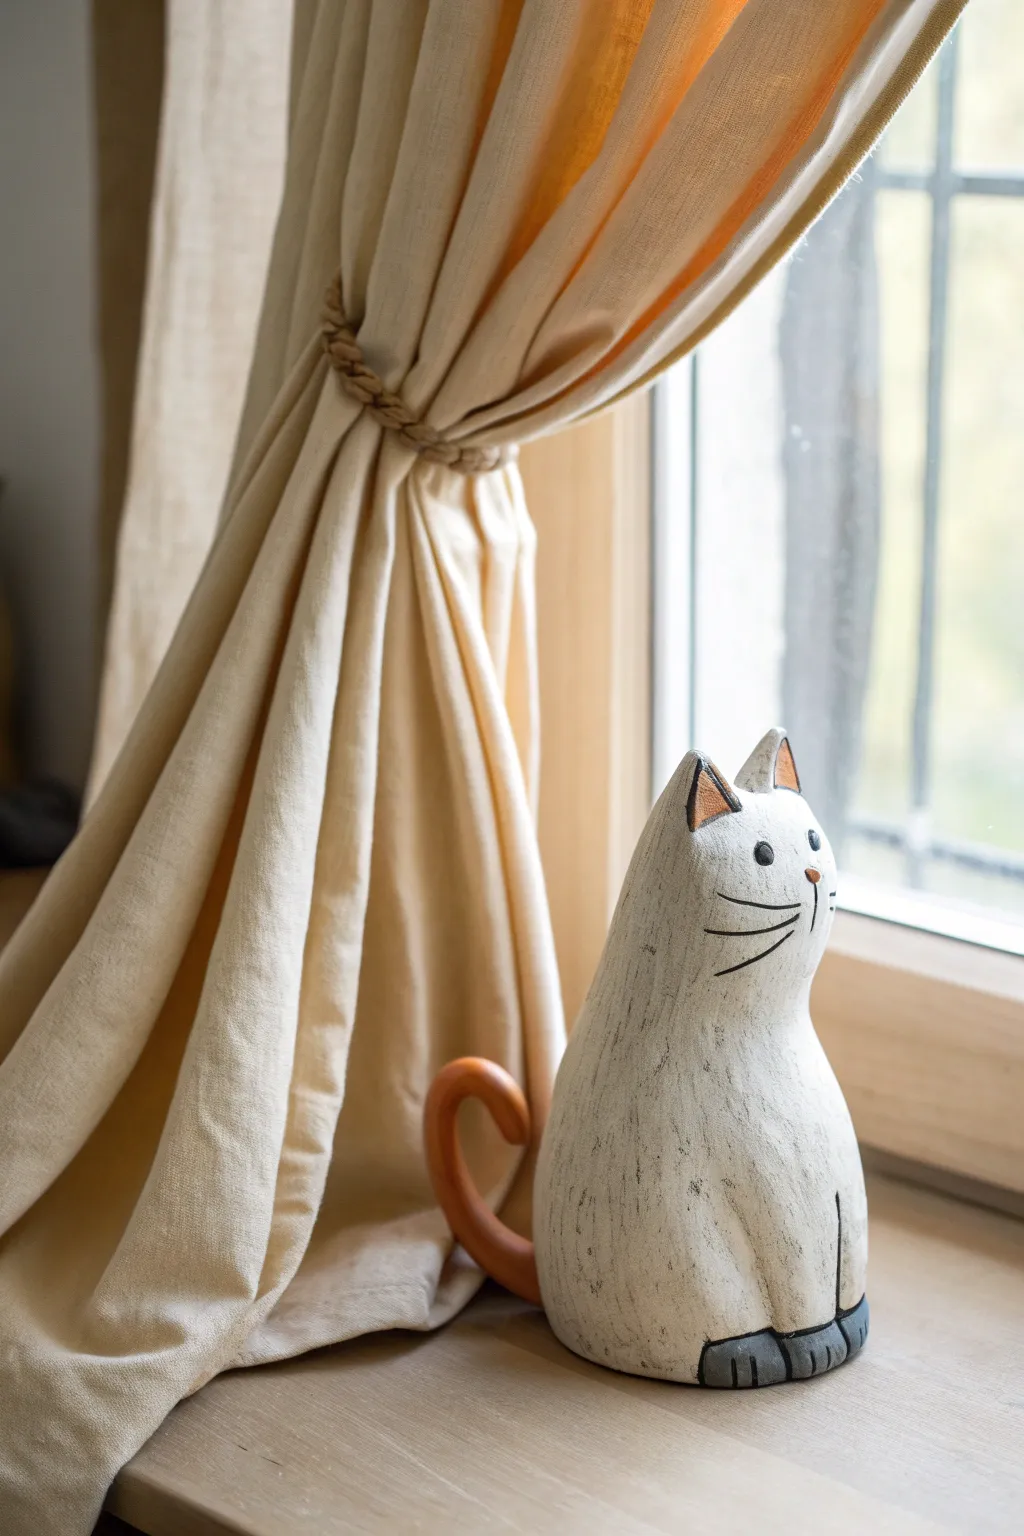
This charming, rustic cat sculpture serves a dual purpose as both adorable decor and a heavy-duty curtain weight or bookend. With its elongated posture, textural fur details, and distinctive curled tail, it brings a cozy, folk-art feel to any windowsill.
Step-by-Step Guide
Materials
- Air dry clay (white or light grey)
- Aluminum foil (for armature)
- Masking tape
- Rolling pin
- Clay sculpting tools (needle tool, modeling tool)
- Water and sponge
- Acrylic paints (White, Black, burnt orange/rust, dark grey)
- Matte varnish or sealant
- Fine grit sandpaper
Step 1: Building the Armature
-
Form the core:
Crumple aluminum foil into a sturdy, elongated pear shape to act as the core of the cat’s body. The base should be wide and flat for stability. -
Define the head:
Shape a smaller ball of foil for the head and attach it to the narrower top of the pear shape using masking tape. Ensure the transition is relatively smooth. -
Shape the tail:
Twist a piece of foil into a thick, curved tail shape. Tape one end securely to the lower back of the body armature, positioning it so it curls upward.
Step 2: Applying the Clay
-
Prepare the clay:
Knead your air dry clay until it is pliable. Roll it out into a flat sheet, roughly 1/4 inch thick. -
Cover the body:
Drape the clay sheet over the foil armature. Press it firmly against the foil to remove air pockets, smoothing the seams together with a bit of water. -
Refine the shape:
Add extra clay to the chest and base to build up a solid, sitting posture. Use wet fingers to continuously smooth the surface. -
Construct the ears:
Shape two small triangles of clay for the ears. Score and slip the top of the head where you want them to sit, then press them on, blending the edges into the head. -
Add the paws:
Roll a small sausage of clay and attach it to the very bottom front of the sculpture to create the paws. Use a tool to indent vertical lines for toes.
Cracking Up?
If small cracks appear during drying, don’t panic. Simply mix a small amount of fresh clay with water to make a paste (slip) and fill the cracks, then smooth over.
Step 3: Adding Details & Texture
-
Sculpt the tail:
Cover the foil tail with clay, ensuring it remains thick and sturdy. Blend the attachment point smoothly into the main body. -
Create texture:
Take a stiff bristle brush or a needle tool and gently scratch vertical lines all over the white body to simulate fur texture. Keep the strokes loose and uneven. -
Define the face:
Use a small modeling tool to gently indent eye sockets. Add a tiny triangle of clay for the nose. -
Dry thoroughly:
Let the sculpture dry completely. This can take 24-48 hours depending on humidity. Rotate it occasionally so the bottom dries well.
Add a Collar
Personalize your cat by sculpting a simple collar around the neck or painting a colorful bandana pattern before sealing.
Step 4: Painting & Finishing
-
Base coat:
Paint the entire body with white acrylic paint. You may need two coats for opaque coverage. -
Paint the tail and ears:
Mix a burnt orange or rust color. Carefully paint the entire tail and the inner triangles of the ears. -
Add facial features:
Using a fine detail brush and black paint, dot the eyes and draw long, sweeping whiskers. Paint a tiny nose in the same rust color. -
Paint the paws:
Paint the paw section at the base dark grey or black to ground the figure. -
Distress for effect:
If you want that rustic look shown in the image, use a very dry brush with a tiny amount of grey paint and lightly whisk it over the textured ‘fur’ lines to highlight them. -
Seal:
Once the paint is fully dry, apply a coat of matte varnish to protect your work.
Place your finished feline on a sunny ledge to keep watch over the garden
Ghost Cat Figurines
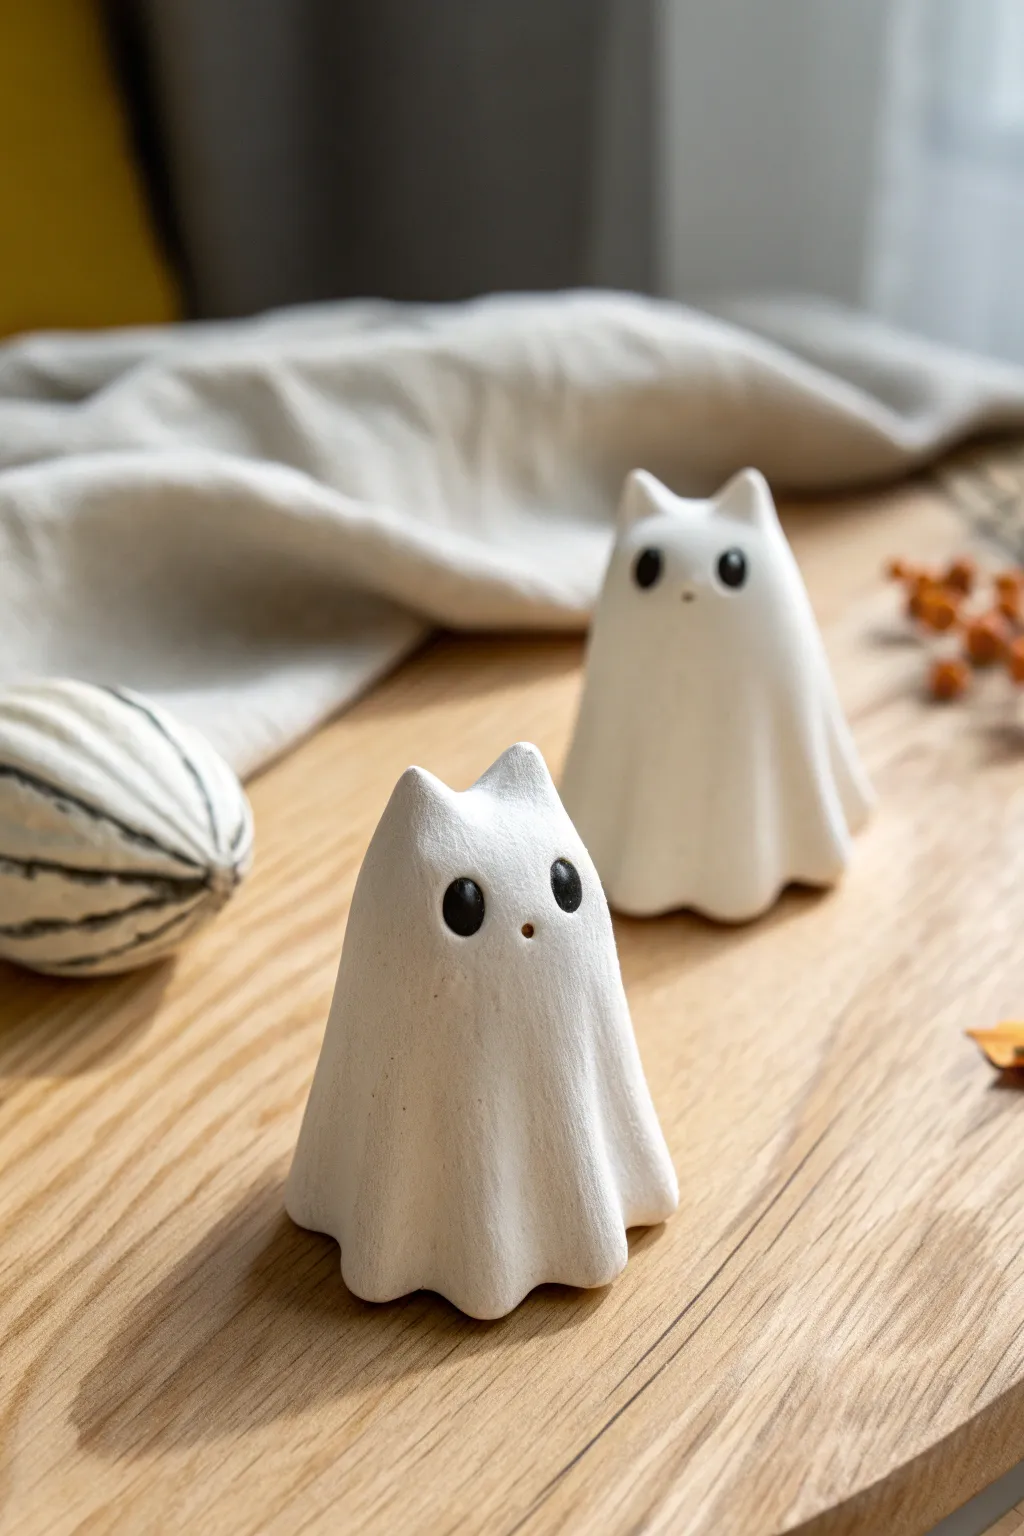
These adorable figurines combine the spooky charm of a classic sheet ghost with the irresistible cuteness of feline ears. Their smooth, matte white finish and minimalist black eyes make them a perfect, subtle Halloween decoration for any mantelpiece or desk.
Step-by-Step Tutorial
Materials
- White smooth air dry clay (approx. 200g)
- Small rolling pin
- Aluminum foil
- Modeling tools (or a toothpick)
- Water in a small cup
- Fine-grit sandpaper (220-400 grit)
- Black acrylic paint
- Fine detail paintbrush (size 0 or 00)
- Matte varnish or sealant
Step 1: Shaping the Core
-
Create the Armature:
Crumple a piece of aluminum foil into a cone shape with a slightly rounded top. This will act as the skeleton for your ghost, saving clay and reducing drying time. -
Prepare the Clay:
Knead a ball of white air dry clay until it is warm and pliable. Using a rolling pin, flatten it into a pancake about 1/4 inch thick. -
Drape the Ghost:
Gently drape the rolled clay over your foil armature. Smooth the clay down the sides, ensuring the foil is completely covered and no metal is showing.
Step 2: Sculpting the Form
-
Form the Folds:
Use your fingers to gently pinch and pull the bottom edges of the clay outward to create the wavy, ruffled look of a sheet hitting the floor. -
Add Gravity Lines:
With a modeling tool or your fingertips, press shallow vertical indentations running from the top of the head down towards the bottom ruffles to simulate fabric folds. -
Refine the Silhouette:
The shape usually tapers slightly towards the top; smooth the clay upwards to create a soft, rounded head area. -
Pinch the Ears:
At the very top of the rounded head, pinch two small triangles of clay upwards. Refine them into points to create the signature cat ears. -
Blend the Seams:
Use a tiny bit of water on your finger to smooth out the transition between the ears and the head so they look like part of the ‘sheet’ fabric. -
Smooth the Surface:
Dip your finger in water and run it over the entire sculpture to remove fingerprints and crate a porcelain-like finish.
Smoother blending
Keep a damp sponge nearby while sculpting. Wiping your tools on it keeps them clean and slightly moist, which helps drag the clay smoothly without creating cracks.
Step 3: Finishing Touches
-
Create Eye Sockets:
Before the clay dries, use the rounded end of a paintbrush handle to press two small, deep indentations where the eyes will go. Add a tiny poke for the nose/mouth area if desired. -
Slow Drying:
Set the figurine aside in a cool, dry place away from direct sunlight. Let it cure for at least 24-48 hours until completely hard and white. -
Sand for Perfection:
Once fully dry, gently buff the surface with fine-grit sandpaper to remove any remaining bumps or rough textures. -
Wipe Clean:
Use a dry brush or cloth to remove all sanding dust from the figurine, especially inside the eye sockets. -
Paint the Eyes:
Using a fine detail brush, fill the indented eye sockets carefully with matte black acrylic paint. I find that two thin coats give the deepest black. -
Seal the Work:
Apply a coat of matte varnish over the entire piece to protect the clay and give it a finished, professional look without making it too shiny.
Cracks while drying?
If hairline cracks appear as the clay shrinks, mix a tiny bit of fresh clay with water to make a paste (slip) and fill the cracks, then sand smooth once dry.
Place your little ghost cats near a window or shelf to bring a seasonal smile to anyone who spots them
Stacked Cat Totem Sculpture
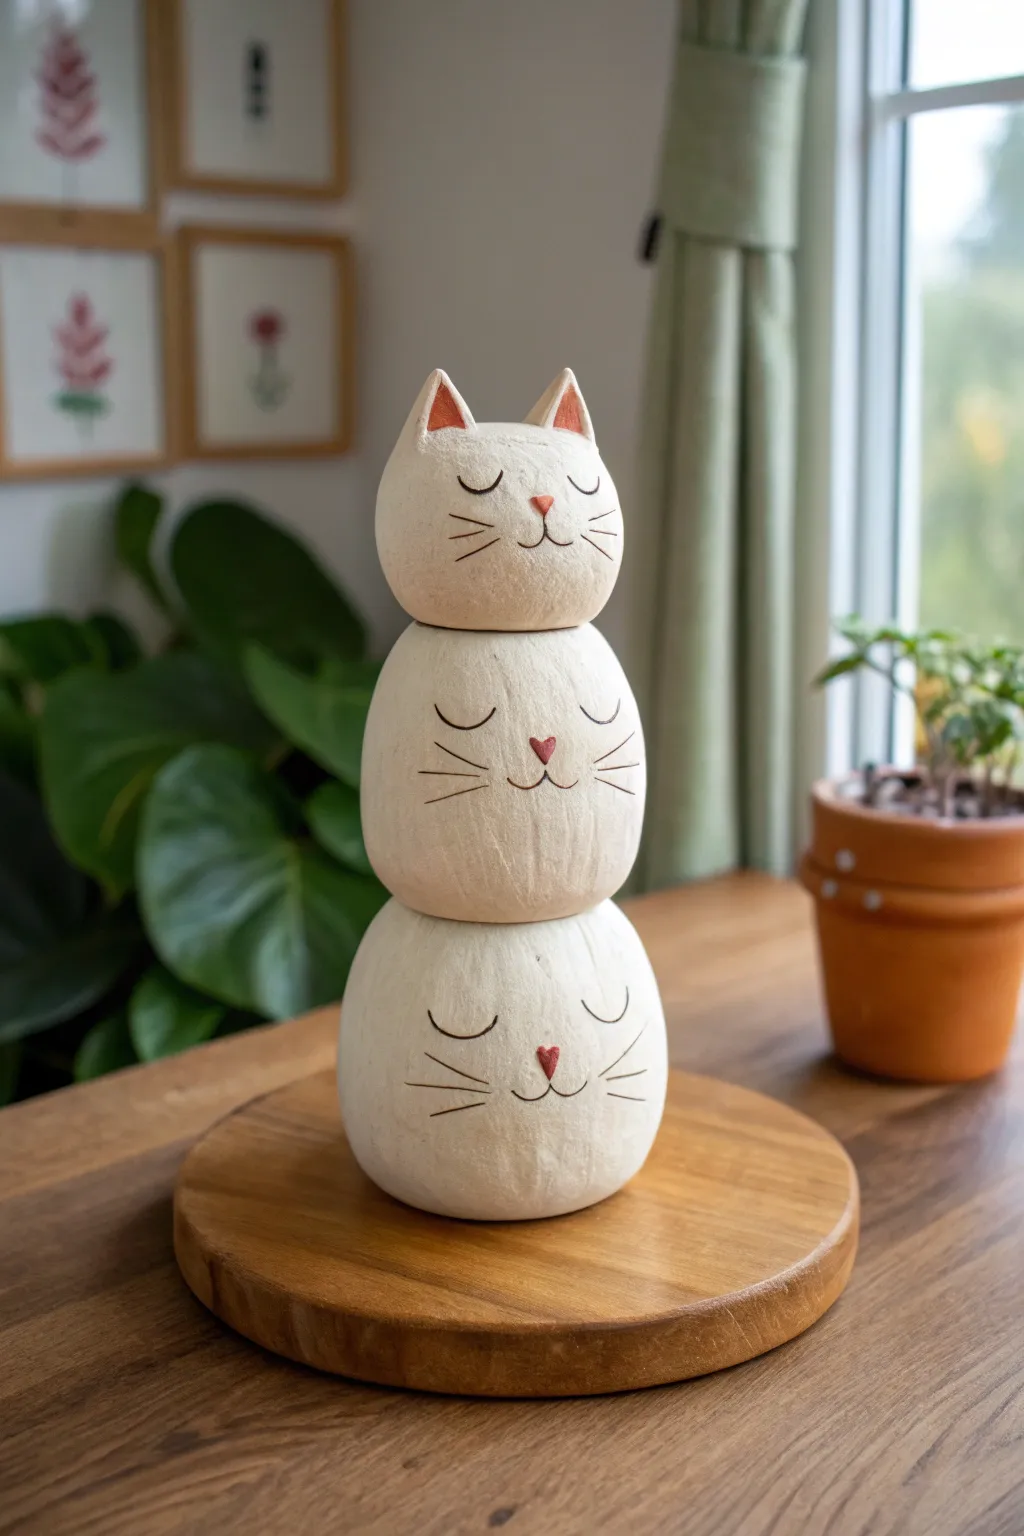
Create a charming vertical sculpture featuring three sleepy felines stacked in perfect balance. This totem-style project uses simple spherical forms and minimalist facial details to achieve a modern, peaceful aesthetic perfect for a shelf or windowsill.
Step-by-Step
Materials
- White air dry clay (approx. 1kg)
- Foil or styrofoam balls (for core armature)
- Clay rolling pin
- Needle tool or toothpick
- Cup of water
- Sponge or soft paintbrush
- Fine grit sandpaper (220-400 grit)
- Acrylic paints (black, warm pink/terracotta)
- Fine detail paintbrush
- Matte varnish or sealant
- Strong craft glue or heavy gel medium
Step 1: Forming the Base Spheres
-
Prepare the cores:
To save clay and reduce weight, start by tightly crumpling aluminum foil into three distinct balls. Make one large ball for the base, a slightly smaller one for the middle, and the smallest one for the top head. -
Roll out slabs:
Roll your air dry clay into a slab about 1/4 inch thick. It needs to be uniform so the drying process is even across the sculpture. -
Cover the armatures:
Wrap the clay sheet around your largest foil ball. Pinch the seams together and roll the ball gently between your palms to smooth it out completely. Repeat this for the other two foil cores. -
Refine the shapes:
While spherical, these aren’t perfect globes. Gently tap the bottom of each ball on your table to create a small flat spot for stability. Slightly flatten the top of the bottom and middle balls too, so the next tier sits securely.
Seamless Stacking
Before drying, press the wet spheres gently onto each other to create custom indentations. This ensures a perfect, wobble-free fit later.
Step 2: Sculpting Details
-
Shape the ears:
Focusing on the smallest ball (the top tier), pinch two small triangles of fresh clay. Attach them to the top of the head using the score-and-slip method—scratching both surfaces and adding a drop of water before pressing them on. -
Blend the seams:
Use a modeling tool or your finger to smooth the clay from the ears down into the head, ensuring there is no visible join line. The transition should be seamless. -
Carve the snouts:
Unlike the painted features, the nose area benefits from slight dimension. You can add a tiny, flattened decorative clay triangle for the nose, or simply leave the surface smooth for painting later. -
Initial smoothing:
Dip a sponge or soft brush in a little water and go over all three pieces to remove fingerprints. Let the pieces dry separately for 24-48 hours until they are rock hard and room temperature to the touch.
Step 3: Finishing and Assembly
-
Sand for perfection:
Once fully dry, take your fine-grit sandpaper and gently buff the surface of each ball. The goal is a stone-like texture, so remove any bumps or rough patches until it feels smooth. -
Draft the faces:
Lightly sketch the facial features with a pencil. Draw curved lines for sleepy eyes, a small triangle or heart for the nose, and three whiskers on each cheek. -
Paint the details:
Using a very fine liner brush and black acrylic paint, carefully trace over your pencil lines for the eyes, mouth, and whiskers. Keep your hand steady and the lines thin. -
Add nose color:
Fill in the nose shape with a warm terracotta or soft pink paint. I like to paint the inner triangles of the ears on the top cat in the same shade for balance. -
Seal the pieces:
Apply a coat of matte varnish to each piece individually. This protects the paint and gives the clay a cohesive finish. -
Stack and glue:
Apply a strong crafting glue or heavy gel medium to the flattened top of the base sphere. Center the middle sphere on top. Repeat for the top head, ensuring the faces are aligned vertically. -
Final cure:
Let the adhesive cure completely before moving your new totem sculpture.
Textured Touch
Instead of sanding perfectly smooth, use a stiff bristle brush to tap the wet clay surface. This creates a porous, stone-effect texture.
Place your finished totem on a wooden serving board or near some greenery to complete the organic look