When I’m teaching kids, air dry clay is my go-to because they can sculpt big ideas with small, simple shapes. Here are my favorite air dry clay craft ideas for kids—classic wins first, then a few delightfully weird studio-style twists.
Pinch Pot Treasure Bowls
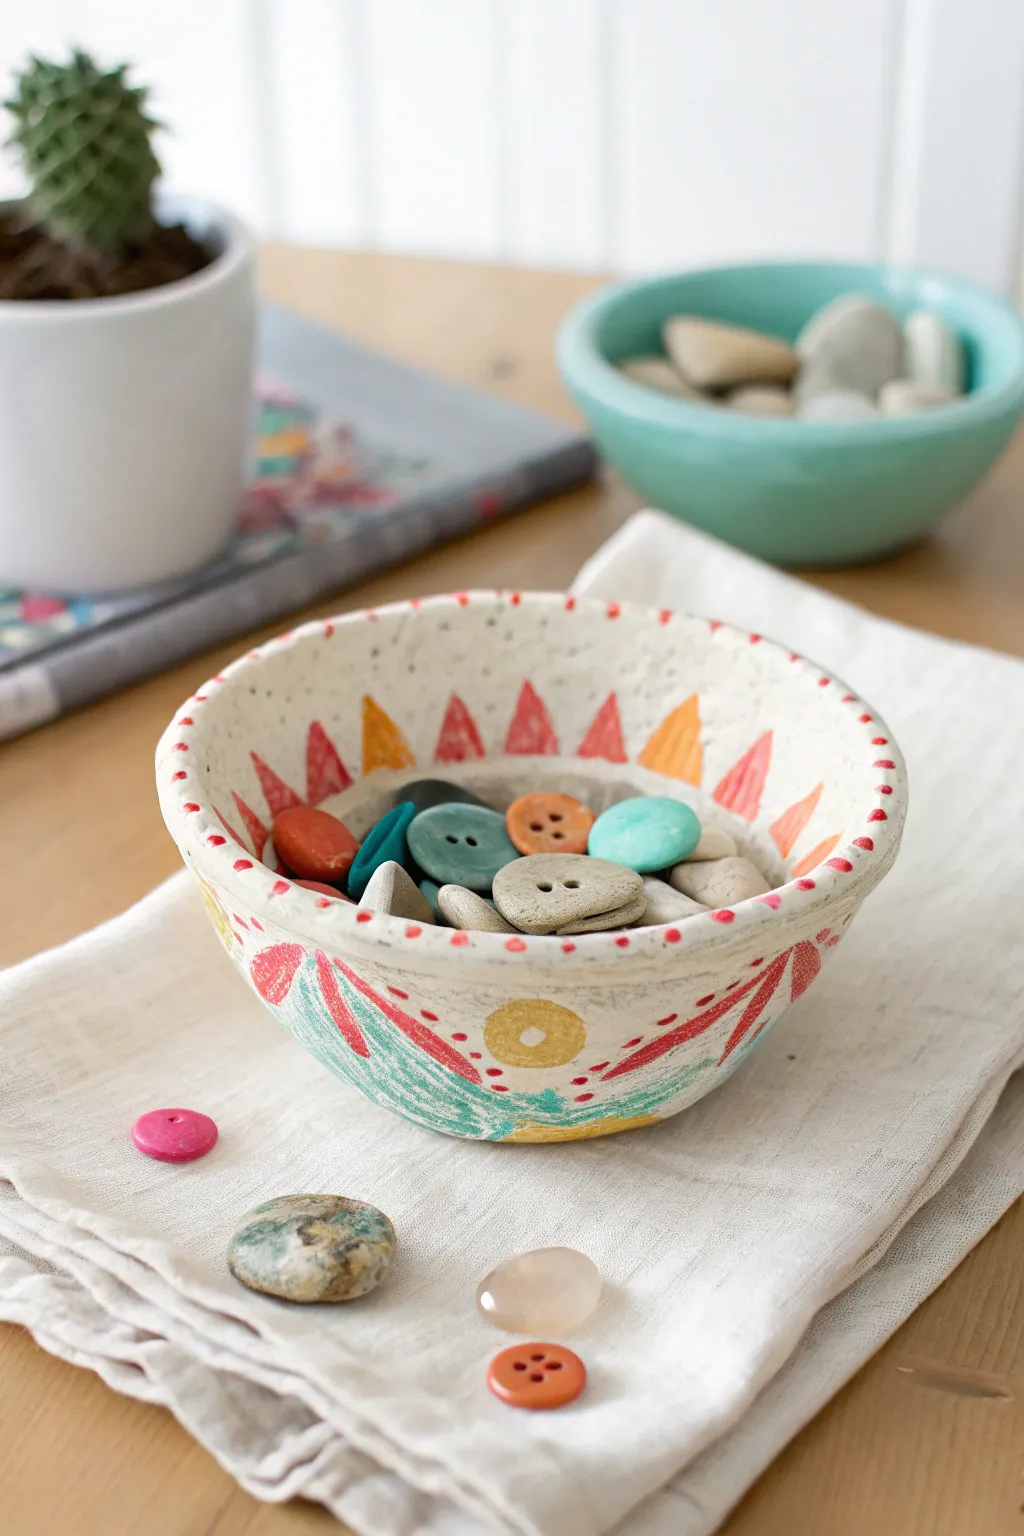
Create a charming home for your tiniest treasures with this delightful pinch pot project. Featuring a rustic, handmade texture and festive painted patterns, this bowl brings a splash of color and personality to any tabletop.
How-To Guide
Materials
- Air dry clay (white or light grey)
- Acrylic paints (coral red, orange, teal, gold/yellow)
- Fine detail paintbrush
- Medium flat paintbrush
- Cup of water
- Sponge
- Palette or paper plate
- Clear acrylic sealer or varnish (optional)
Step 1: Shaping the Bowl
-
Prepare the clay:
Start with a ball of air dry clay roughly the size of a tennis ball. Knead it briefly to warm it up and ensure it’s pliable and free of air bubbles. -
Start the pinch:
Hold the clay ball in one palm. Gently press your thumb into the center of the ball, stopping about a half-inch from the bottom to create a base. -
Form the walls:
With your thumb inside and fingers on the outside, gently pinch and rotate the clay. Work your way from the bottom up, thinning the walls gradually as you rotate. -
Even it out:
Aim for a wall thickness of about 1/4 inch. If the rim creates cracks, smooth them over with a barely damp finger to keep the edge unified. -
Flatten the base:
Gently tap the pot onto your work surface to create a flat, stable bottom so your bowl won’t wobble. -
Refine the surface:
Use a slightly damp sponge to smooth out significant bumps, but leave some of the handmade texture visible for that rustic charm shown in the photo. -
Dry completely:
Set the bowl aside in a dry area. Depending on humidity, this will take 24-48 hours. The clay should be white and hard to the touch with no cool spots.
Cracking Up?
If small cracks appear while drying, mix a tiny bit of fresh clay with water to make a paste (slip) and fill them in with a finger.
Step 2: Painting the Design
-
Base prep:
If your clay dried a bit gray, you might want to paint the entire bowl with a thin coat of white acrylic paint for a brighter canvas, though natural clay looks great too. -
Paint the rim dots:
Using the tip of a fine brush and coral red paint, dab small dots along the very top edge of the rim. Space them evenly, but don’t worry about perfect symmetry. -
Create the interior triangles:
Inside the bowl, just below the rim, paint a row of triangles pointing upwards. Alternate between coral red and orange for a vibrant look. -
Add exterior patterns:
On the outside, about halfway down, paint curved, swooping lines using teal paint to create a scalloped effect around the bowl. -
Layer the details:
Paint leaf-like shapes or teardrops in coral red nestled within the teal scallops. I like to keep my brush slightly dry here to let the texture of the clay show through. -
Add the suns:
In the negative space between the teal sections, paint small yellow or gold circles to represent suns or centers of flowers. -
Enhance with dots:
Using your finest brush, add tiny red dots around the teal curves and near the yellow centers to tie the design together. -
Seal the work:
Once the paint is fully dry, apply a coat of clear acrylic sealer or matte varnish to protect the paint and give the bowl a finished sheen.
Glaze It Up
Use a high-gloss Mod Podge or a gloss varnish instead of matte sealer to mimic the shiny look of fired ceramic glaze.
Fill your beautiful new bowl with colorful buttons, stones, or jewelry to complete the aesthetic


Cute Animal Mini Figures

This charming, stylized cat figurine stands tall with a simple, elegant silhouette reminiscent of a kokeshi doll. Its minimal features and geometric block-colour outfit make it a perfect beginner sculpting project that looks surprisingly sophisticated.
Step-by-Step Guide
Materials
- White air-dry clay
- Aluminum foil
- Rolling pin
- Clay sculpting tools (or a toothpick)
- Water in a small cup
- Acrylic paints (White, Pink, Teal/Turquoise, Black)
- Fine detail paintbrush
- Medium flat paintbrush
- Matte varnish or sealant
Step 1: Sculpting the Base Form
-
Create the core:
Crumple a piece of aluminum foil into a elongated pear shape. This will be the armature for the body, saving clay and reducing weight. Aim for a shape that is about 3-4 inches tall with a stable, flat bottom. -
Cover with clay:
Roll out a slab of air-dry clay to about 1/4 inch thickness. Wrap this sheet around your foil core, pressing it firmly to adhere. Smooth the seams where the clay joins together using a little water on your finger. -
Refine the shape:
Roll the clay-covered form gently on your work surface to create a smooth, rounded cylinder that tapers slightly towards the top (the neck area) and widens at the bottom. -
Form the head:
Roll a separate ball of clay for the head. It should be slightly oval-shaped. Flatten the bottom of the ball slightly so it sits flush on the neck area of the body. -
Attach the head:
Score (scratch hatch marks) both the top of the body and the bottom of the head. Add a dab of water or liquid clay (slip) to the scored areas and press the head firmly onto the body. Smooth the clay across the join line to blend them together into one solid piece. -
Add the ears:
Pinch two small triangles of clay for the ears. Attach them to the top of the head using the slip and score method. Gently blend the base of the ears into the head so they don’t pop off later. -
Smooth the surface:
Dip your finger in water and run it over the entire sculpture to smooth out fingerprints and bumps. I find this final smoothing step makes a huge difference in the painting phase. -
Let it dry:
Allow the figure to dry completely. This usually takes 24-48 hours depending on humidity. Rotate it occasionally so the bottom dries evenly.
Step 2: Painting and Details
-
Base coat:
Once fully dry, paint the entire head area with white acrylic paint. You may need two coats for opaque coverage. -
Draft the clothing lines:
Lightly sketch the kimono design onto the body with a pencil. Draw a vertical line down the center of the chest, and diagonal lines crossing over to mimic wrapped fabric. -
Paint the pink sections:
Mix a warm, dusty pink color. Paint the main sections of the kimono ‘robe’—specifically the right-hand panel wrapping over and the lower sides. Leave the collar area and the under-layer blank for now. -
Paint the teal accents:
Using a teal or turquoise paint, fill in the V-shape at the neckline (the collar) and a vertical strip at the bottom center to represent the under-layer of the garment. -
Paint the ears:
Use the same dusty pink color to paint the front and back of the ears. You can leave a tiny rim of white if you want extra definition, but solid pink works great too. -
Add the facial features:
Using your finest brush and black paint, carefully paint two small circles for eyes. Add a tiny dot of white inside each black circle highlights to bring the cat to life. -
Draw the whiskers and nose:
With the very tip of your brush (or a fine black marker if you are unsteady), draw a small ‘Y’ shape for the nose and mouth. Add three thin horizontal lines on each cheek for whiskers. -
Finish with varnish:
Once the paint is completely dry, apply a coat of matte varnish. This seals the clay and protects the paint from chipping.
Cracks Appearing?
If you see cracks as the clay dries, mix a tiny bit of fresh clay with water to make a paste. Fill the cracks, smooth it over, and let it dry again.
Wire Whiskers
For a 3D effect, poke small holes in the cheeks while the clay is wet. After painting, glue in short pieces of fishing line or wire for whiskers.
Now you have a serene little desk companion to keep you company throughout the day


Handprint Keepsake Dishes
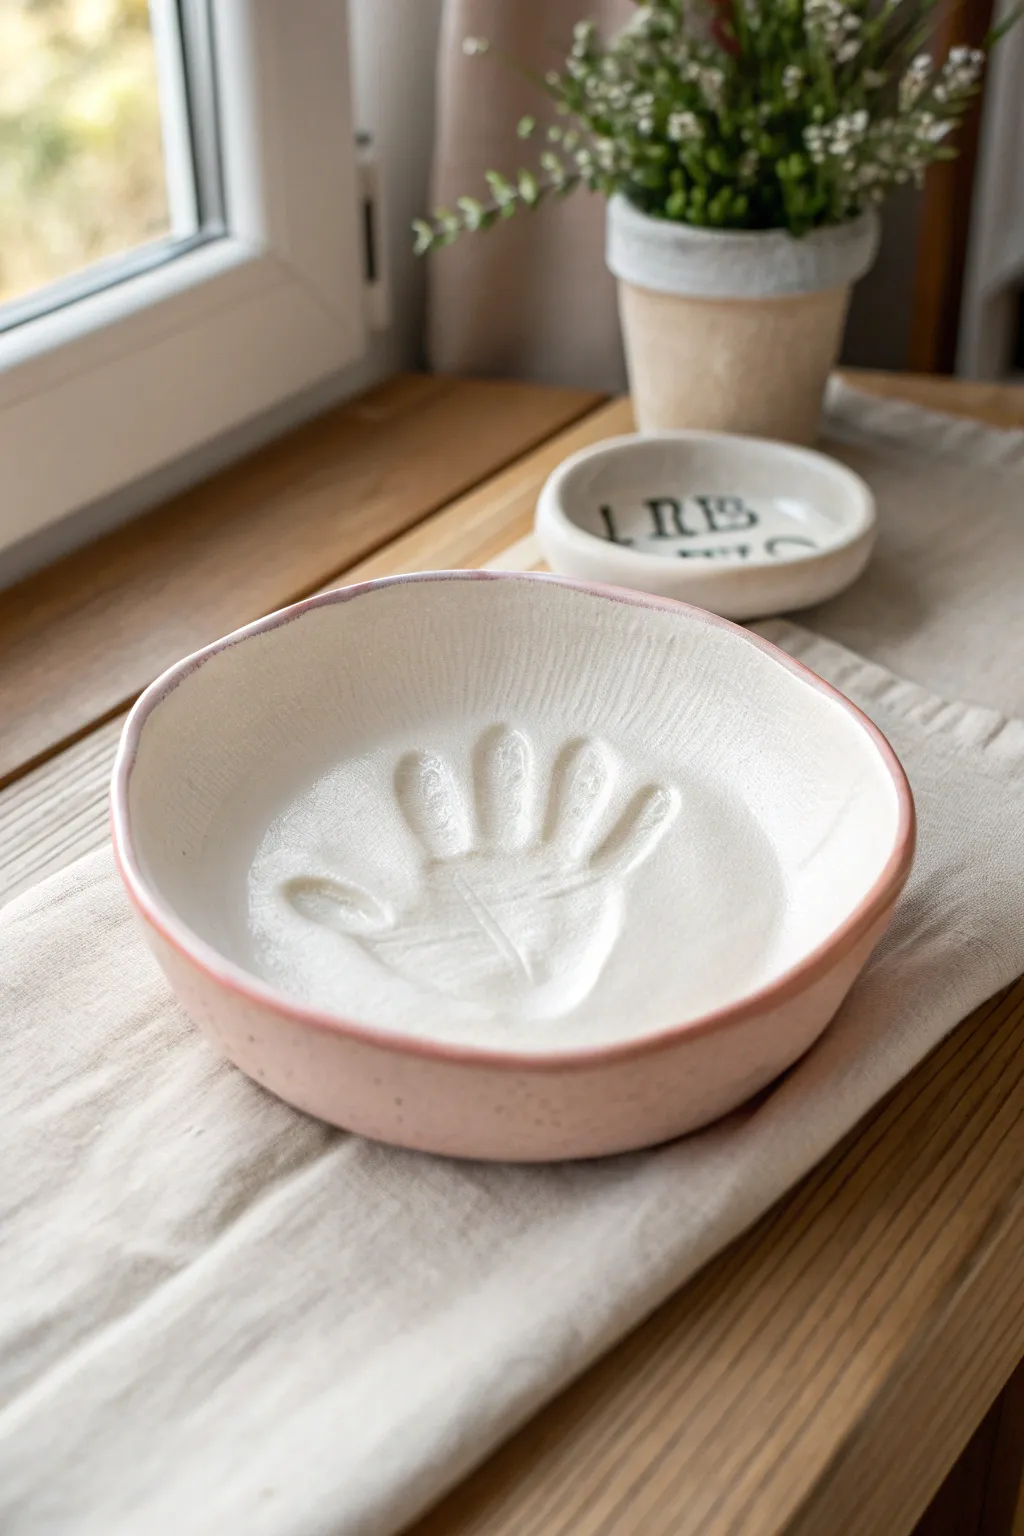
Immortalize those tiny hands with this sweet and simple dish that works perfectly as a catch-all for keys or jewelry. With its soft white interior, gentle pink rim, and textured exterior, it balances rustic charm with a modern aesthetic.
Detailed Instructions
Materials
- Air dry clay (white)
- Rolling pin
- Bowl (for use as a mold/cutter)
- Knife or clay tool
- Sandpaper (fine grit)
- Acrylic paint (white/cream)
- Acrylic paint (soft pink or peach)
- Toothbrush (old)
- Paintbrushes (flat and fine tip)
- Clear sealant or varnish (glossy)
Step 1: Shaping the Clay
-
Roll it out:
Start by kneading your air dry clay until it is soft and pliable, then roll it out into a smooth slab about 1/4 to 1/2 inch thick ensuring even thickness throughout. -
Cut the circle:
Place a medium-sized bowl upside down on the clay as a template and cut around it with a knife to create a perfect circle. -
Make the impression:
Gently press the child’s hand into the exact center of the clay circle; press down firmly on each finger and the palm to ensure a deep, clear impression. -
Lift the edges:
Carefully curve the outer edges of the circle upward to create a shallow bowl shape. -
Smooth the form:
I like to dip my finger in a tiny bit of water to smooth out any cracks on the rim or inside the bowl while the clay is still wet. -
Dry completely:
Allow the dish to dry for 24-48 hours until it turns a solid bone-white color; flip it over halfway through to help the bottom dry evenly.
Smooth Moves
To prevent the handprint from puffing back up as the clay dries, place a small bag of rice or beans inside the impression while it cures.
Step 2: Refining and Painting
-
Sand the rough spots:
Once fully cured, take a piece of fine-grit sandpaper and gently smooth the rim and any rough patches on the exterior. -
Clean the dust:
Wipe the entire piece down with a slightly damp cloth or dry brush to remove all ceramic dust before painting. -
Base coat the interior:
Paint the entire inside of the bowl, including the handprint impression, with a creamy off-white acrylic paint. -
Second interior coat:
Apply a second coat of the cream paint to ensure opaque coverage, letting the texture of the brushstrokes show slightly for a handmade look. -
Paint the exterior:
Paint the outside and bottom of the bowl with your soft pink or peach paint. -
Create the speckled effect:
Dip an old toothbrush into a slightly darker shade of pink (or mix your pink with a tiny dot of brown), then use your thumb to flick the bristles, spraying tiny speckles onto the exterior pink surface. -
Detail the rim:
Using a fine brush or the side of a flat brush, carefully paint the very top edge of the rim with the pink paint to create a delicate border that frames the white interior. -
Seal for protection:
Finish the project by applying a coat of glossy varnish or sealant over the entire dish to protect the paint and give it a ceramic-like shine.
Golden Touch
For a more elegant finish, swap the pink rim for metallic gold leaf paint or a gold paint pen to make the edges really shimmer.
Place your finished dish on a sunny windowsill or bedside table to enjoy this captured moment in time


Easy Coil Pots for Beginners
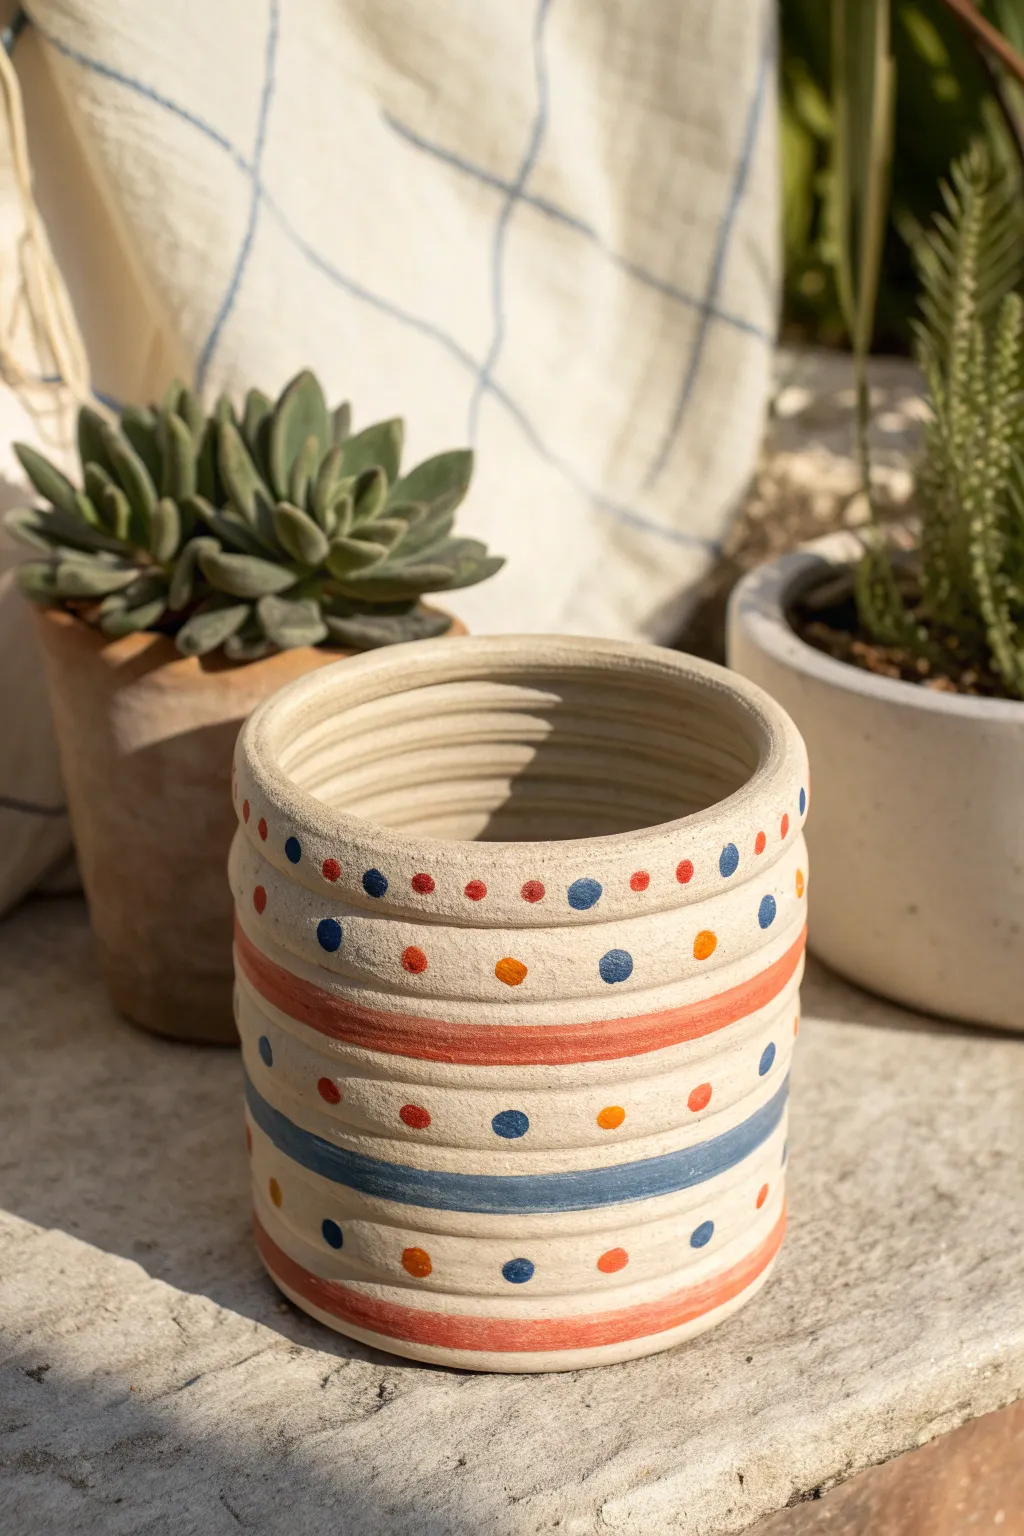
This charming planter embraces the classic coil-building technique but keeps the outside surface mostly smooth for a modern look. With its playful pattern of painted dots and stripes on a textured surface, it’s the perfect home for a small cactus or succulent.
How-To Guide
Materials
- Air dry clay (white or light grey)
- Clay rolling pin or smooth cylinder
- Small bowl of water
- Clay tools (needle tool, blending tool, or plastic knife)
- Sponge
- Acrylic paints (terracotta orange, deep blue/navy, orange-yellow)
- Small round paintbrush
- Fine-grit sandpaper
- Clear acrylic sealer or varnish (matte finish recommended)
Step 1: Building the Base and Walls
-
Create the base:
Start by rolling a ball of clay roughly the size of a tangerine. Flatten it with your palm and then use a rolling pin to create a distinct circle about 1/4 inch thick. This will determine the width of your pot. -
Roll your first coil:
Take a handful of fresh clay and roll it back and forth on your work surface to create a long, even snake. Aim for a thickness similar to a sturdy marker or your pinky finger. -
Attach the first layer:
Score (scratch) the outer edge of your base and the underside of your coil. Dab a little water on the rough areas, then press the coil onto the rim of the base. -
Blend the connection:
Using your thumb or a blending tool, smudge the clay from the coil down onto the base on the *inside* of the pot. This creates a strong seal. -
Continue stacking:
Keep rolling coils and stacking them directly on top of one another to build straight vertical walls. Join the ends of each coil by cutting them at an angle and smudging them together. -
Smooth the exterior:
Unlike visible coil pots, this design has a smoother outer face. While the coils are still soft, use your finger or a tool to gently smudge the coils downward on the outside to fill the gaps, but leave subtle horizontal ridges. -
Check the interior:
Looking inside, you can leave the coil ridges visible as shown in the photo. Just ensure they are firmly attached so no light shines through the gaps. -
Finish the rim:
Once you reach your desired height, use a damp sponge to slightly round off the top rim so it isn’t sharp or uneven.
Cracking Clays?
If you see tiny cracks forming as you smooth the outside walls, your clay might be too dry. Dip your finger in water and smooth over the crack immediately to rehydrate and bond it.
Step 2: Decorating and Painting
-
Dry completely:
Let your pot dry for at least 24-48 hours. It should turn from grey to white and feel room temperature (not cold) when fully dry. -
Sanding:
Gently gently sand the exterior. You want to keep those subtle horizontal grooves from your finger-smoothing in the earlier steps, but remove any sharp burrs. -
Paint the bottom stripe:
Mix a terracotta or coral-orange acrylic paint. Paint a thick band around the very bottom edge of the pot. -
Add the blue stripe:
About a third of the way up the pot, paint a medium-thick stripe using deep blue or navy paint. It doesn’t have to be perfectly straight; a hand-painted look adds character. -
Add the top stripe:
Paint a thinner terracotta stripe about two-thirds up the pot. I usually rest my pinky on the table to steady my hand while painting horizontal lines. -
Paint the dots:
Using a small round brush, add rows of dots between your stripes. Use alternating colors—blue dots on the very top rim, orange marks in the middle, and blue dots near the bottom. -
Seal the pot:
Apply a coat of matte acrylic sealer to protect the paint. If using for real plants, line the inside with a plastic cup or use extra waterproof sealant, as air dry clay melts if it stays wet.
Make it Waterproof
Turn this into a functional vase by inserting a cut-off plastic bottle or glass jar inside before adding your flowers. This keeps water entirely away from the clay walls.
Place your new pot on a sunny windowsill or shelf to show off those lovely hand-painted details

The Complete Guide to Pottery Troubleshooting
Uncover the most common ceramic mistakes—from cracking clay to failed glazes—and learn how to fix them fast.
Heart Trinket Trays
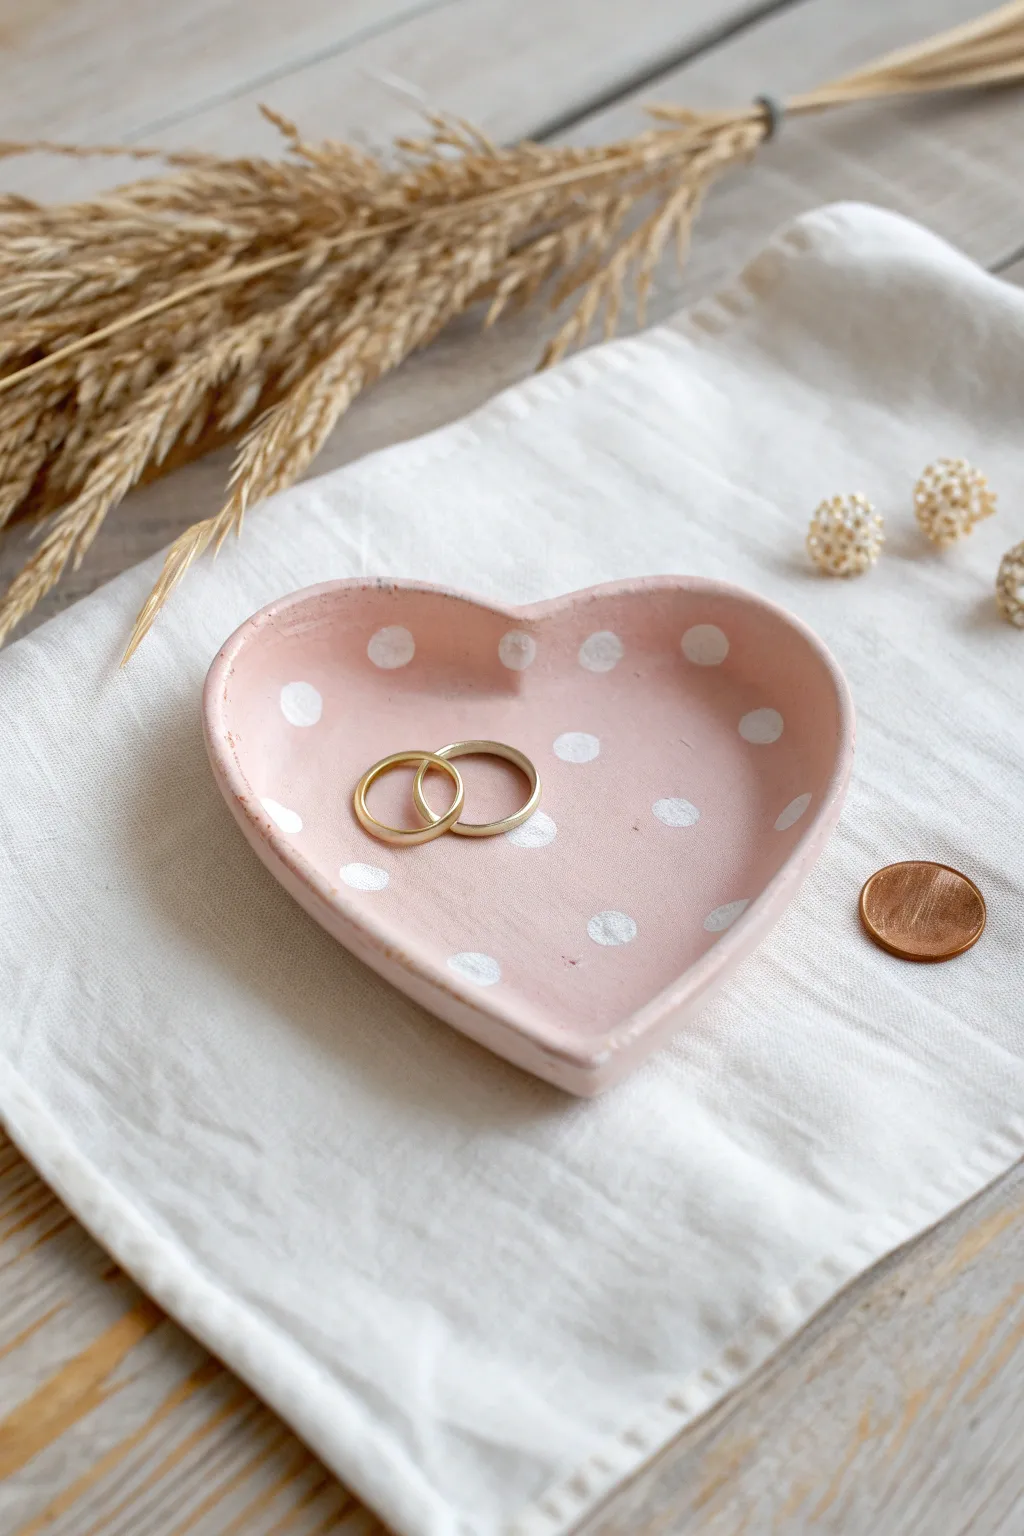
Sculpt a sweet and simple place to keep your favorite treasures with this heart-shaped trinket dish. Painted in a soft matte pink with playful white polka dots, this handmade piece makes a lovely gift or a charming addition to a bedside table.
Detailed Instructions
Materials
- White air dry clay
- Rolling pin
- Heart-shaped cookie cutter (large) or paper template
- Small bowl of water
- Sponge or fine-grit sandpaper
- Acrylic paint (pastel pink and white)
- Flat paintbrush
- Small round paintbrush or cotton swab
- Matte varnish or sealant (optional)
Step 1: Sculpting the Form
-
Condition the clay:
Begin by taking a handful of air dry clay and kneading it in your hands to warm it up. This makes the clay more pliable and less prone to cracking as you work with it. -
Roll out the slab:
Place the clay on a clean, flat surface. Use your rolling pin to flatten the clay into an even slab, aiming for a consistent thickness of about 1/4 inch. -
Cut the shape:
Press a large heart-shaped cookie cutter firmly into the clay. If you don’t have a cutter, I like to trace around a paper heart template with a craft knife for a custom size. -
Smooth the edges:
Dip your finger into a little water and run it along the raw cut edges of the heart to smooth out any roughness or jagged bits left by the cutter. -
Curve the rim:
Gently lift the edges of the heart upwards with your fingers to create a shallow rim. You want to create a slight bowl shape to hold items safely inside. -
Refine the shape:
Once edges are lifted, use a damp sponge or wet finger to smooth the transition between the base and the rim so it looks seamless and organic. -
Let it dry:
Place your tray in a safe, dry spot for 24 to 48 hours. Turn it over halfway through the drying process to ensure the bottom dries thoroughly.
Smooth Moves
To get perfectly smooth clay without fingerprints, gently wipe the surface with a slightly damp blending sponge right before you set it aside to dry.
Step 2: Painting and Finishing
-
Sand imperfections:
Once fully dry, check for any rough spots. Gently buff the surface with fine-grit sandpaper until it feels smooth to the touch. -
Base coat:
Apply a coat of pastel pink acrylic paint to the entire top surface of the heart, including the rim. Let this layer dry completely before painting the bottom. -
Second coat:
Apply a second layer of pink paint to ensure solid, opaque coverage without streaks. Allow this to dry fully. -
Add polka dots:
Dip the handle end of a paintbrush, a cotton swab, or a small round brush into white acrylic paint. Gently press it onto the pink surface to create varying sizes of dots. -
Distribute the pattern:
Continue adding white dots randomly across the surface. Don’t worry about perfect spacing; a scattered look adds to the handmade charm. -
Rim details:
If you like a rustic look, you can gently dab a tiny bit of white paint along the very top edge of the rim to highlight the shape. -
Seal the tray:
After the paint is bone dry, brush on a layer of matte varnish or sealant. This protects the clay from moisture and gives the dish a finished, professional look.
Cracked Clay?
If small cracks appear as it dries, mix a tiny bit of fresh clay with water to make a paste (slip) and fill in the cracks, then sand smooth once dry.
Now you have a delightful little spot to keep your rings and trinkets safe and organized
Name Initial Letter Ornaments
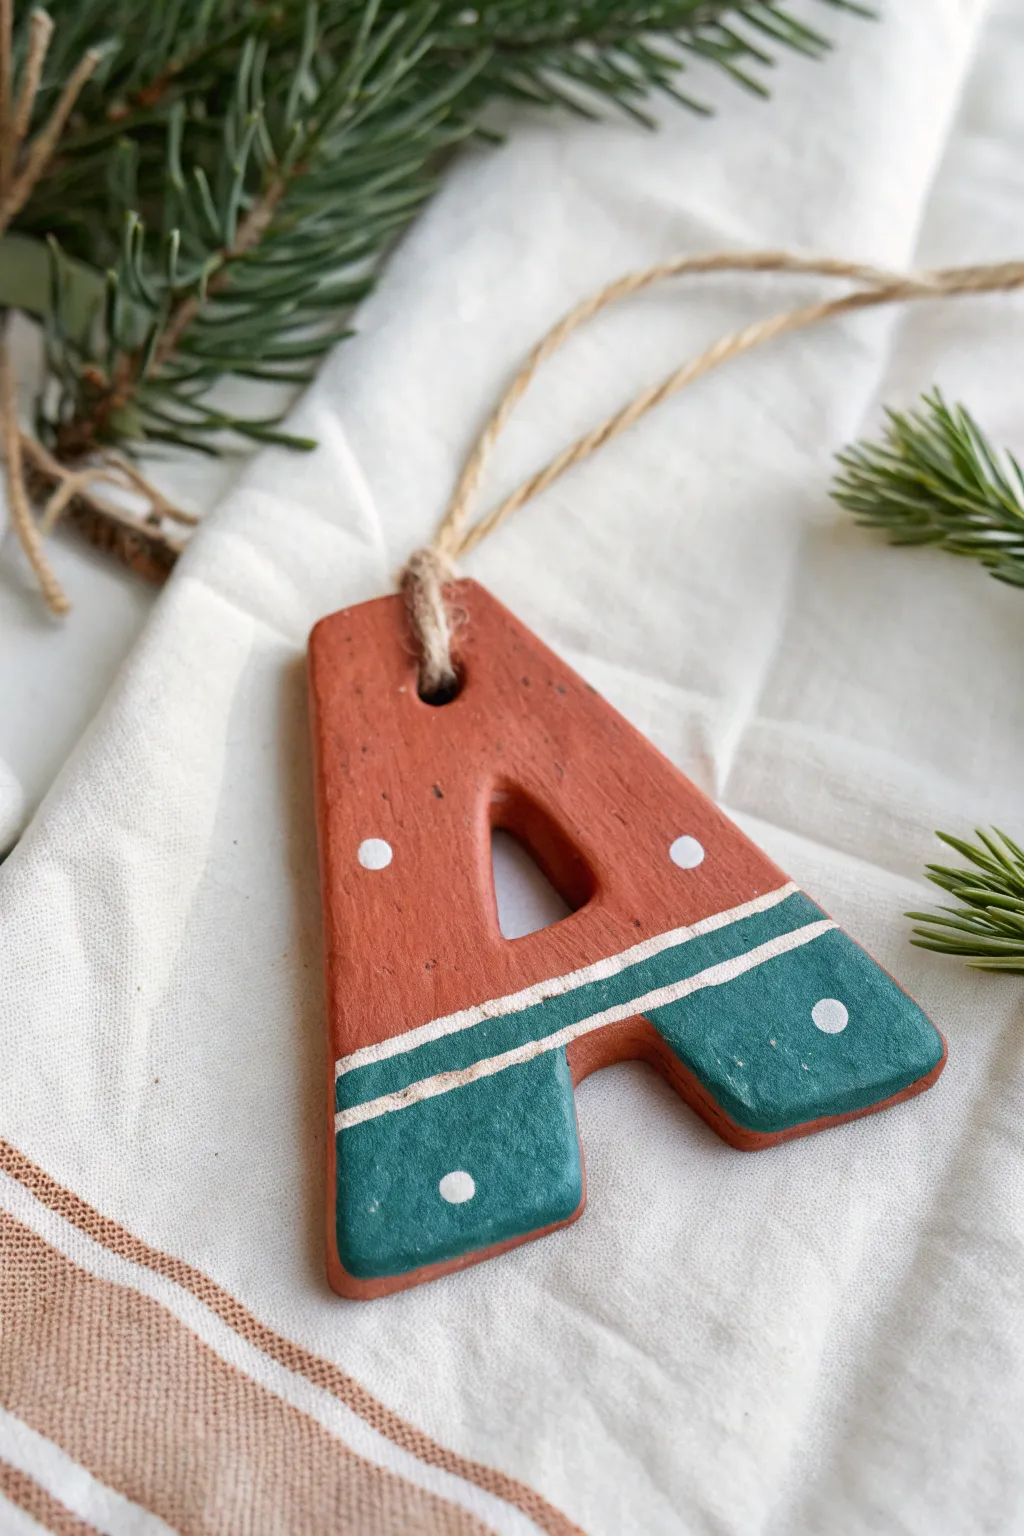
These personalized initial ornaments have a wonderfully rustic yet modern look, perfect for holiday gifting. The combination of warm terracotta tones with cool teal paint creates a cozy contrast that stands out on any tree.
Step-by-Step Guide
Materials
- Air dry clay (terracotta color)
- Rolling pin
- Parchment paper or craft mat
- Letter template (printed paper) or clay cutters
- Craft knife or plastic clay tool
- Sandpaper (fine grit)
- Acrylic paint: Teal (or deep green-blue)
- Acrylic paint: White
- Fine detail paintbrush
- Small dotting tool or toothpick
- Straw or skewer (for hole)
- Jute twine or rustic string
- Scissors
- Water cup (for smoothing)
Step 1: Shaping the Clay
-
Prepare your workspace:
Lay down a sheet of parchment paper or a silicone mat to prevent sticking. Take a handful of terracotta-colored air dry clay and knead it briefly in your hands to warm it up and make it pliable. -
Roll out the slab:
Use a rolling pin to flatten the clay. Aim for an even thickness of about 1/4 inch (6mm). If the clay is too thin, the ornament might be fragile; too thick, and it will take ages to dry. -
Create the letter shape:
Place your printed paper letter template on top of the clay slab. Using a craft knife or a plastic clay tool (safer for younger kids), carefully trace around the template to cut out your letter. -
Refine the edges:
Once the letter is cut out, dip your finger in a little bit of water and gently run it along the cut edges to smooth out any roughness or stray bits of clay. -
Add a hanging hole:
Before the clay starts to harden, verify where the top center of your letter is. Use a drinking straw or a skewer to punch a clean hole for the string. Make sure it’s not too close to the edge to prevent tearing. -
Allow to dry completely:
Place the letter on a flat surface to dry. Air dry clay often takes 24-48 hours depending on humidity. Flip it over halfway through the drying process to ensure the bottom dries evenly and to prevent warping.
Smooth Moves
Use a little bit of water on your fingertip to smooth the clay edges *before* drying. It’s much easier than sanding later and creates a professional finish.
Step 2: Painting & Finishing
-
Sand for smoothness:
Once the letter is fully dry and hard, lightly sand any rough edges with fine-grit sandpaper. Wipe away the dust with a dry cloth or paper towel. -
Mark the paint line:
Decide where you want the color block to start. Lightly sketch a horizontal line across the lower third of the letter using a pencil to guide your painting. -
Paint the teal section:
Using a flat brush, paint the area below your pencil line with teal acrylic paint. I usually apply two thin coats here, letting the first dry before adding the second for solid coverage. -
Paint the bottom stripe:
Dip a fine detail brush into white acrylic paint. Carefully paint a thin, straight line directly over the boundary where the teal paint meets the bare terracotta clay. -
Add the second stripe:
Paint a second thin white line parallel to the first one, spaced just slightly above it on the terracotta section. This creates a cute double-band effect. -
Add polka dots:
Dip the end of a small dotting tool, the back of a paintbrush, or a toothpick into white paint. Gently press dots onto the ornament—place some on the terracotta section and some on the teal section for balance. -
Dry the paint:
Let all your paintwork dry completely for about 20-30 minutes so you don’t smudge the details while handling it. -
Cut the twine:
Cut a length of jute twine or rustic string, approximately 8 inches long. -
Thread the hanger:
Feed one end of the twine through the hole at the top of the ornament. Bring the ends together and tie a secure knot to create a loop.
Stamp Initial Idea
Before drying, use small alphabet stamps to press the child’s full name or the year into the back of the ornament for a hidden keepsake create date.
Hang your finished letter on the tree or use it as a custom gift tag for a special present


What Really Happens Inside the Kiln
Learn how time and temperature work together inside the kiln to transform clay into durable ceramic.
Ladybug and Star Magnets
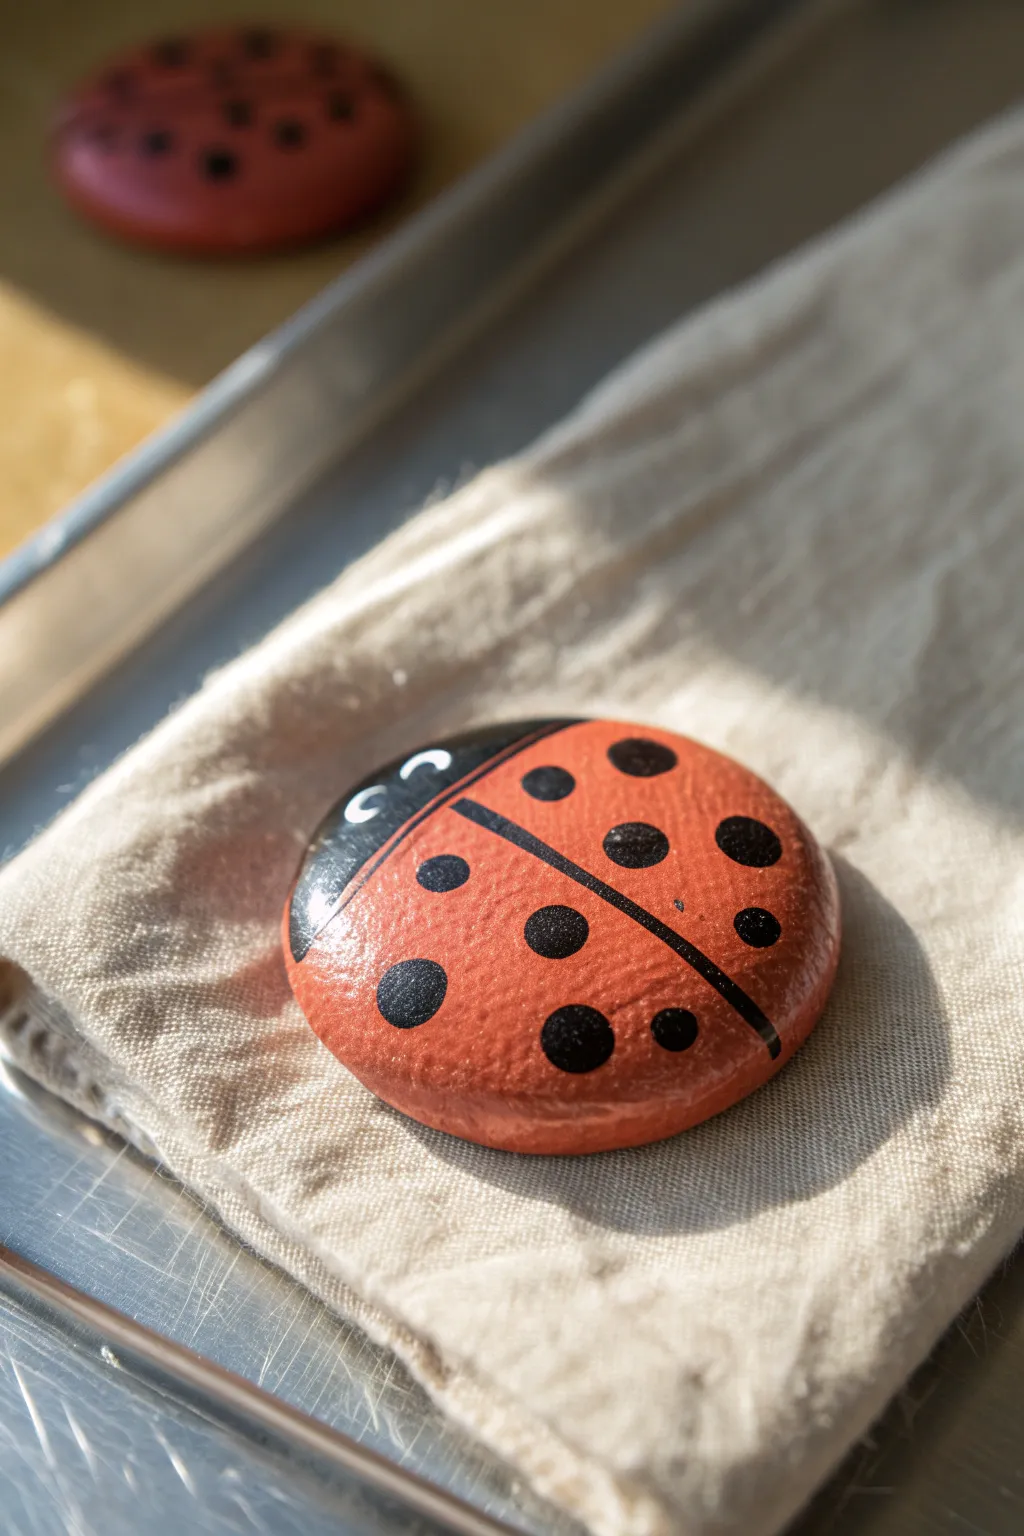
Transform a simple lump of air dry clay into a cheerful garden friend that brightens up any magnetic surface. This painted ladybug features a wonderfully glossy finish and bold black spots that make it pop.
Detailed Instructions
Materials
- White or terracotta air dry clay
- Acrylic paint (red, black, white)
- Round paintbrushes (medium and fine tip)
- Glossy varnish or Mod Podge (gloss finish)
- Small round magnet
- Strong craft glue (like E6000 or a hot glue gun)
- Small cup of water
- Parchment paper or craft mat
Step 1: Shaping the Base
-
Prepare the Clay:
Start by taking a chunk of air dry clay about the size of a walnut. Knead it in your hands for a minute until it feels soft, warm, and pliable without cracks. -
Roll a Sphere:
Roll the clay between your palms to create a smooth, perfect ball. Try to smooth out any little lines or wrinkles, using a tiny drop of water on your finger if needed. -
Create the Dome:
Place your clay ball onto your parchment paper. Gently press down with the palm of your hand to flatten the bottom while keeping the top rounded and domed, like a classic ladybug shape. -
Refine the Edges:
Run your finger around the bottom edge of the dome to soften it slightly so it isn’t too sharp. The surface should be as smooth as a river stone. -
Dry Completely:
Let the clay sit undisturbed to dry. Depending on the thickness and your local humidity, this usually takes 24 to 48 hours. I like to flip it over halfway through so the bottom dries evenly.
Step 2: Painting the Design
-
Base Coat:
Once dry and hard, paint the entire top surface of the dome with a bright, opaque red acrylic paint. -
Check Coverage:
Let the first coat dry for about 10-15 minutes. If you can still see the clay color underneath, apply a second coat of red for a rich, solid finish. -
Mark the Head:
Using black paint and a medium brush, paint a curved semi-circle at one end of the oval to create the ladybug’s head. -
Draw the Wing Line:
Switch to a fine-tip brush. Paint a straight black line starting from the center of the head section running all the way down the ladybug’s back to divide the wings. -
Add the Spots:
Dip the handle end of a paintbrush into black paint to use as a dotting tool. Stamp varied sizes of dots onto the red wings for perfectly round spots. -
Paint the Eyes:
Once the black head section is dry, use a clean fine-tip brush or a small dotting tool to add two small, curved white lines or dots for the eyes. -
Let Paint Set:
Allow the painted design to dry completely. Acrylics dry fast, so 20 minutes should be sufficient.
Stamp Perfect Circles
Don’t have a dotting tool? Use the flat head of a nail or the end of a pencil eraser dipped in paint to stamp consistent, perfect circles.
Step 3: Finishing Touches
-
Seal the Surface:
Apply a generous coat of glossy varnish or gloss Mod Podge over the entire painted surface. This gives it that shiny, beetle-shell look seen in the photo. -
Dry the Varnish:
Wait for the varnish to dry until it is no longer tacky. It should be clear and reflective. -
Attach Magnet:
Flip the ladybug over. Apply a strong dab of glue to the center of the flat bottom. -
Press and Hold:
Press your round magnet into the glue. If you are using hot glue, it will set instantly; otherwise, let it cure according to the glue instructions.
Cracked Clay?
If small cracks appear as the clay dries, mix a tiny bit of fresh clay with water to make a paste and smooth it into the cracks before painting.
Now your adorable spotted friend is ready to crawl onto the fridge and hold up your next masterpiece
Under-the-Sea Sea Creatures
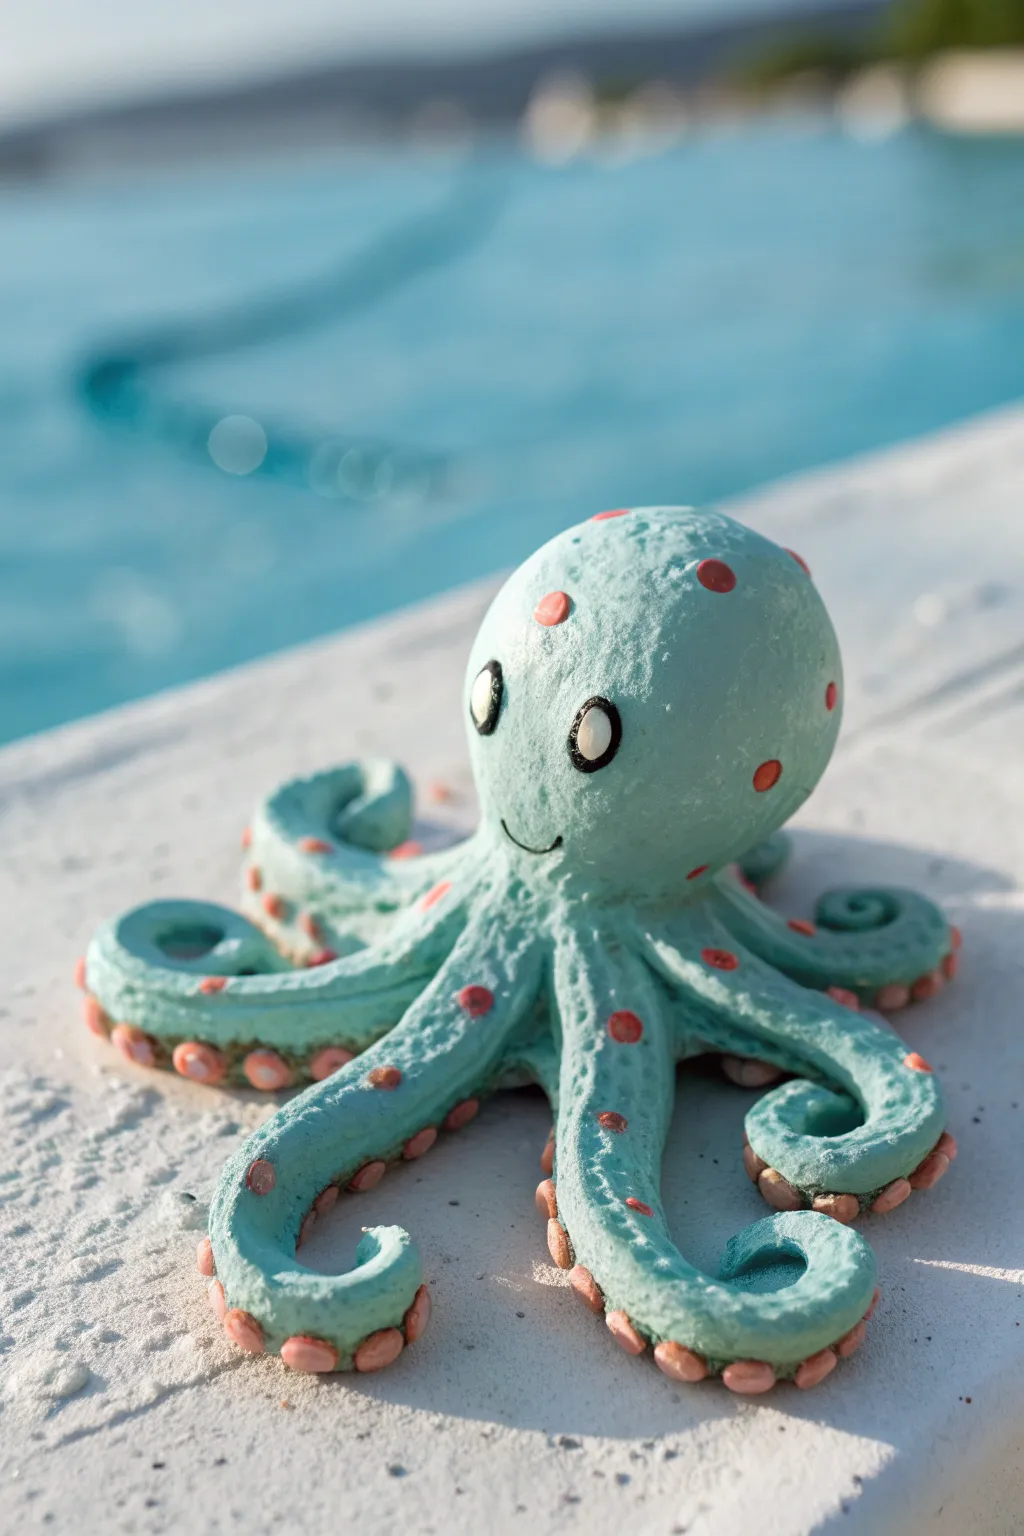
Bring a splash of ocean fun to dry land with this charming teal octopus sculpture. With its playful spotted tentacles and friendly smile, it’s the perfect poolside companion or desk buddy that captures the magic of underwater life.
How-To Guide
Materials
- White air dry clay
- Acrylic paints: Teal/Turquoise, Coral/Pink, Black, White
- Mod Podge or glossy varnish
- Detail paintbrushes (fine tip)
- Clay sculpting tools (ball tool, needle tool)
- Water cup (for smoothing)
- Aluminum foil (for the core)
Step 1: Sculpting the Head and Body
-
Build the core:
Start by crumpling a small piece of aluminum foil into a tight ball, slightly larger than a golf ball. This saves clay and helps the head keep its round shape. -
Cover the core:
Roll out a slab of air dry clay about 1/4 inch thick. Wrap it completely around your foil ball, smoothing the seams together with a bit of water until you have a perfect sphere for the head. -
Form the base:
Pinch a small amount of clay from the bottom of the sphere to create a slightly wider ‘neck’ area where the tentacles will attach, ensuring it isn’t perfectly round at the very bottom.
Step 2: Forming the Tentacles
-
Roll the coils:
Take eight equal portions of clay and roll them into tapered snakes or coils. Each one should be thicker at one end and curl into a fine point at the other. -
Attach the legs:
Score the bottom of the head and the thick end of each tentacle with a needle tool. Add a dab of water (slip) and firmly press the tentacles onto the underside of the head. -
Blend the seams:
Use a sculpting tool or your finger to smooth the clay where the legs meet the body so they look like one continuous piece rather than stuck-on parts. -
Style the pose:
Arrange the tentacles in a playful, sprawling pattern. Curl the very tips upward or inward in little spirals to give the octopus a sense of movement. -
Add texture:
Before the clay dries, take a ball tool or the end of a paintbrush and gently press indentations into the underside of the curled-up tentacle tips to suggest suction cups. -
Dry completely:
Set your sculpture aside in a safe spot. Air dry clay can take 24-48 hours to fully harden depending on humidity and thickness.
Smoothing Secret
Keep a small sponge damp with water nearby. Lightly wiping the clay before it dries removes fingerprints and creates a professional surface.
Step 3: Painting the Details
-
Base coat:
Paint the entire octopus with a lovely teal or turquoise acrylic paint. You may need two coats for full, opaque coverage. -
Add the spots:
Dip the back end of a paintbrush or a dotting tool into coral or pink paint. Stamp random dots all over the head and the tops of the tentacles. -
Paint the suction cups:
Using the same coral pink color, carefully paint the little indentations or bumps on the undersides of the curled tentacle tips. -
Create the eyes:
Paint two white ovals on the face area. I find it helps to let the white dry completely before moving to the next step to keep the colors crisp. -
Define the gaze:
Paint smaller black ovals inside the white ones for pupils. Then, add a tiny white reflection dot in the corner of each pupil to bring the character to life. -
Outline the eyes:
Use your finest brush to paint a very thin black outline around the white part of the eyes for a cartoon-like pop. -
Draw the smile:
Paint a simple, thin black curve between the eyes for a happy little smile.
Sea Sparkle
Mix a tiny pinch of fine iridescent glitter into your final glossy varnish coat to make your octopus shimmer like it’s underwater.
Step 4: Sealing and Protecting
-
Add a wet look:
Once all paint is bone dry, coat the entire sculpture with a glossy varnish or Mod Podge. This mimics the wet, shiny skin of a real sea creature.
Place your new aquatic friend on a shelf or windowsill where the light can catch its glossy finish

TRACK YOUR CERAMIC JOURNEY
Capture glaze tests, firing details, and creative progress—all in one simple printable. Make your projects easier to repeat and improve.
Dinosaur Fossil Impressions
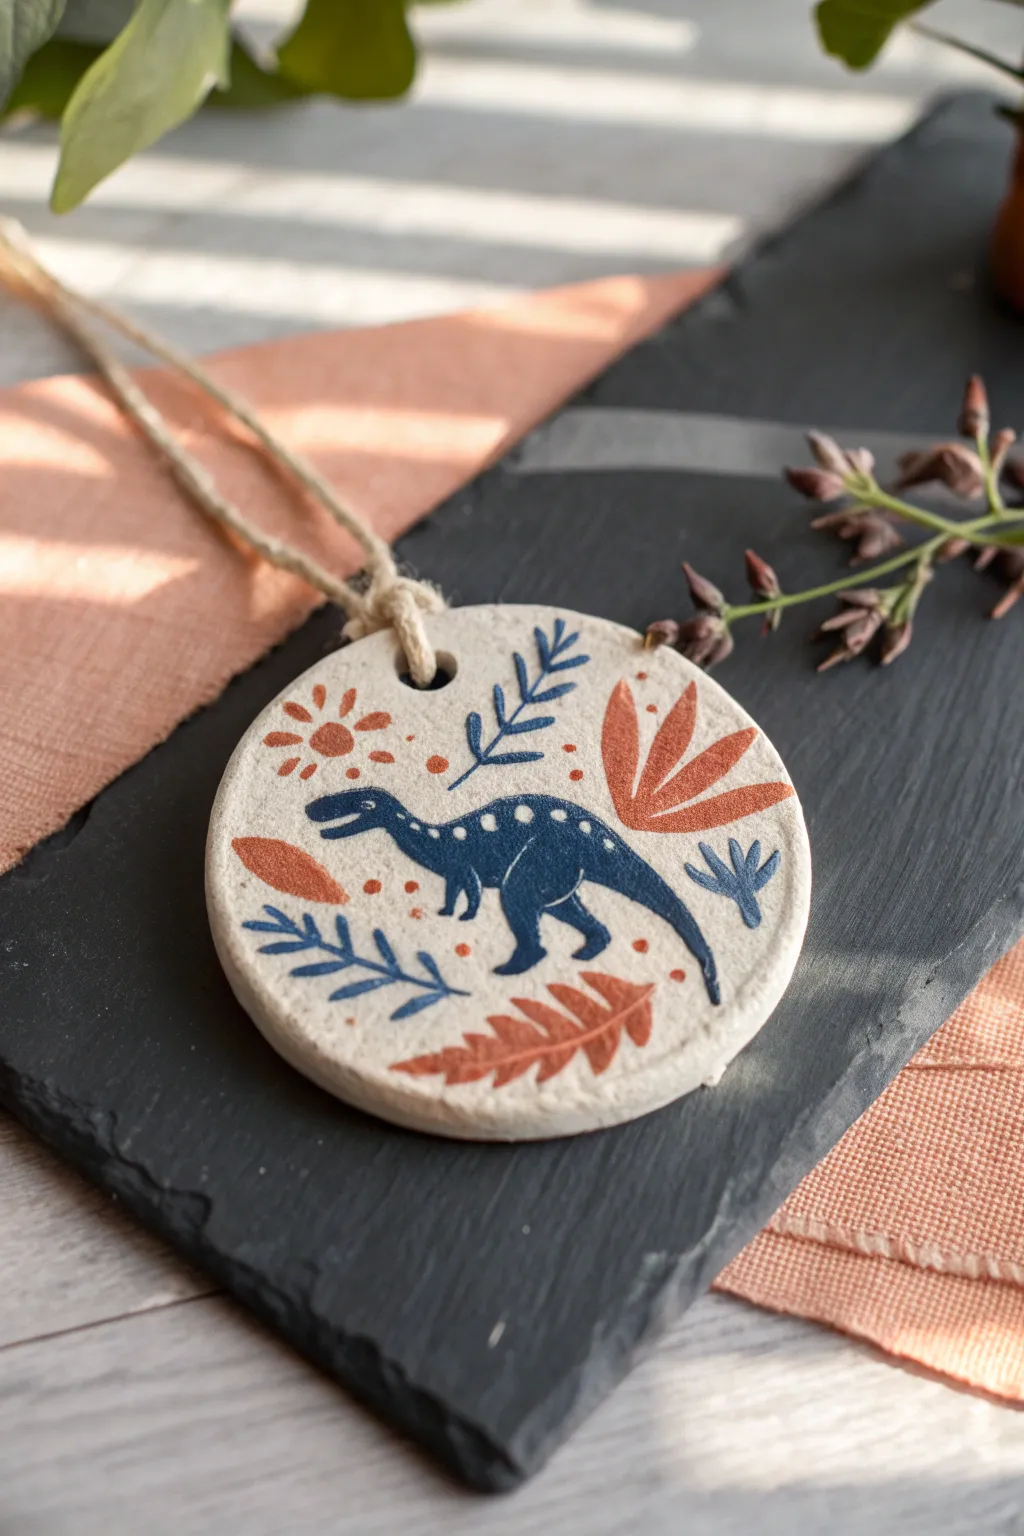
Create a charming dinosaur keepsake that looks like a fossil discovery with a colorful twist. This round clay pendant features a friendly long-neck dinosaur surrounded by stylized foliage in earthy rust and deep blue tones.
Step-by-Step
Materials
- Air dry clay (white)
- Acrylic paints (navy blue, rust orange, burnt sienna)
- Fine detail paintbrushes (size 0 and 2)
- Round cookie cutter or drinking glass
- Rolling pin
- Parchment paper
- Straw or skewer (for the hole)
- Jute twine or rustic string
- Sandpaper (fine grit)
- Palette for mixing
Step 1: Shaping the Base
-
Roll the clay:
Take a handful of white air dry clay and knead it briefly until it’s pliable and smooth. Roll it out on a piece of parchment paper to an even thickness of about 1/4 inch. -
Cut the circle:
Press your round cookie cutter or the rim of a glass firmly into the clay to cut out a perfect circle. Peel away the excess clay from the outside edges. -
Smooth the edges:
Dip your finger in a tiny bit of water and gently run it along the cut edge of the circle to smooth out any roughness or sharp bits. -
Create the hanging hole:
Before the clay starts to harden, use a straw or a skewer to poke a hole near the top edge. Make the hole slightly larger than you think you need, as clay can shrink slightly when drying. -
Dry completely:
Allow the clay disc to dry flat on a wire rack for 24-48 hours. Flip it over halfway through the drying time to ensure both sides dry evenly and prevent curling. -
Slight sanding:
Once fully cured and hard, check the surface for any bumps. I like to give it a very light pass with fine-grit sandpaper to create the smoothest possible canvas for painting.
Step 2: Painting the Design
-
Outline the dinosaur:
Using your smallest brush and slightly watered-down navy blue paint, lightly sketch the outline of the dinosaur in the center. Start with the oval body, add the long tail sweeping down, and the neck curving up. -
Fill the dinosaur:
Fill in the dinosaur shape with solid navy blue paint. You may need two thin coats for full opacity, letting the first coat dry before applying the second. -
Paint the rust foliage:
Switch to your rust orange paint. Add a large, three-leaf plant shape to the right of the dinosaur and a single leaf shape to the left. Paint a fern-like frond near the bottom. -
Add blue foliage:
Clean your brush and go back to the navy blue. Paint delicate branch shapes with small leaves above the dinosaur’s back and near the bottom left edge. -
Add the sun detail:
Using the rust paint again, create a stylized sun or flower shape in the upper left corner with simple radiating lines. -
Detail the dinosaur:
Once the blue dinosaur body is completely dry, use a tiny dot of white or very light grey paint to add a small eye and a row of spots along its back. -
Add stippling:
To fill empty space and add texture, use the tip of your brush handle or a toothpick to place small dots of rust paint around the dinosaur and leaves.
Smooth Surface Secret
Use a barely damp sponge to wipe the clay surface before drying. This removes fingerprints and creates a professional, porcelain-like smoothness.
Step 3: Finishing Touches
-
Seal the piece:
If desired, apply a layer of matte varnish or Mod Podge over the top to protect the paint and give the clay a finished look. Let this dry completely. -
Thread the string:
Cut a length of jute twine, about 8 inches long. Fold it in half and push the loop through the hole from front to back. -
Secure the hanger:
Thread the loose ends of the twine through the loop you just pushed through the hole and pull tight to create a lark’s head knot.
Texture Twist
Before the clay dries, gently press a real fern leaf or piece of lace into the surface to create an imprinted background texture behind the painting.
Now you have a prehistoric piece of art ready to hang on a wall or use as a special gift tag
Fairy Houses With Nature Details
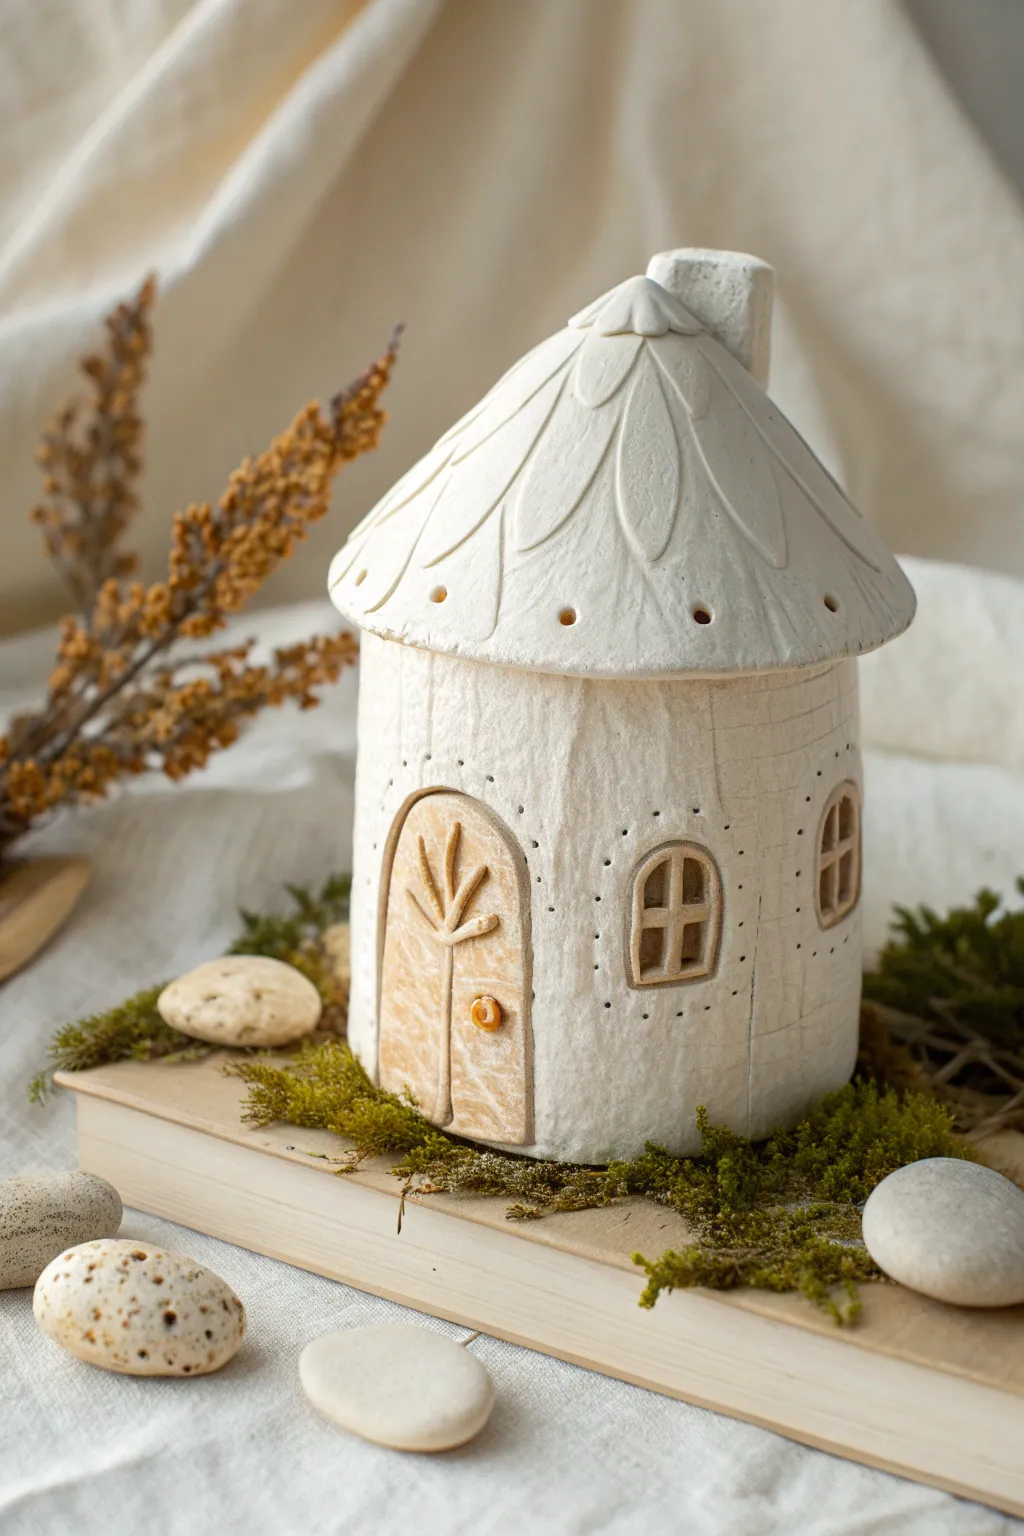
This charming fairy dwelling combines natural textures with fantasy architecture, featuring a unique petal-layered roof and delicate tree-branch door details. It’s an enchanting project that creates a cozy little home perfect for a bookshelf display.
Detailed Instructions
Materials
- White air dry clay
- Rolling pin
- Craft knife or clay tools
- Jar or cardboard tube (for forming the base)
- Parchment paper
- Small bowl of water
- Toothpick or needle tool
- Beige or light brown acrylic paint (optional wash)
- Small paintbrush
- Dried moss and smooth stones (for styling)
Step 1: Building the Base Structure
-
Prepare the workspace:
Lay down parchment paper to prevent sticking. Roll out a slab of white air dry clay to about 1/4 inch thickness. -
Cut the walls:
Measure the circumference of your jar or tube form. Cut a rectangle from your clay slab that is long enough to wrap around the form and as tall as you want the house walls to be. -
Wrap the form:
Wrap the clay rectangle around your form loosely (placing paper between the form and clay helps removal later). Join the two vertical ends by scoring them with a needle tool, adding a dab of water, and smoothing them together with your fingers. -
Add texture:
While the clay is still soft, gently press a piece of rough fabric or a stiff bristle brush against the walls to create the subtle, stucco-like texture seen in the photo. I find tapping gently creates the best organic look. -
Carve the openings:
Use a craft knife to carefully cut out an arched doorway and two or three arched windows. Remove the excess clay. -
Add window frames:
Roll thin snakes of clay and flatten them slightly. Outline the windows with these strips to create frames. Add a vertical and horizontal strip inside each window for panes.
Step 2: Creating the Roof
-
Form the roof cone:
Roll a simple cone shape from clay that is wide enough to sit atop your wall cylinder with a slight overhang. -
Create the petals:
Roll out a thin sheet of clay and cut out several elongated teardrop or petal shapes. These will be the roof tiles. -
Apply the petals:
Starting from the bottom rim of the roof cone, attach the petals using a little water. Smooth them down so they look like soft, overlapping leaves. -
detail the petals:
Use a modeling tool to gently press a center vein line down the middle of each roof petal. -
Add ventilation holes:
Use a small tool or the end of a paintbrush to poke evenly spaced round holes around the bottom rim of the roof for a decorative touch. -
Add the chimney:
Shape a small rectangle of clay and attach it to the side of the roof for a rustic chimney. -
Make the topper:
Add a tiny cluster of smaller clay petals at the very peak of the roof to cover the join of the larger petals.
Clean Cuts Pro-Tip
Does your clay drag when you cut out the windows? Let the clay walls dry for about 30 minutes until they are ‘leather hard’ before carving. You’ll get much cleaner, sharper lines.
Step 3: The Door & Details
-
Create the door slab:
Take the clay piece you cut out for the door opening earlier (or roll a new piece) and flatten it slightly so it fits inside the door frame recess. -
Sculpt the tree motif:
Roll tiny, thin threads of clay. Arrange them on the door surface to look like a stylized tree trunk and branches. Press them firmly to adhere. -
Add the doorknob:
Roll a tiny ball of clay, press it onto the door, and poke a small hole in the center for a bead-like doorknob. -
Texturing the details:
If you want a contrast, you can lightly texture the door surface to look like wood grain using a needle tool. -
Assemble and dry:
Place the roof onto the dry base. Let the entire structure dry completely for 24-48 hours away from direct heat. -
Optional color wash:
To get the beige tone on the door and window frames shown in the image, water down some beige acrylic paint heavily and brush it over just those areas, wiping away the excess for a stained effect.
Level Up: Illumination
Keep the bottom of the house open and the roof removable. Once dry, place a battery-operated LED tea light inside to make the windows glow warmly in the evening.
Now arrange your beautiful house on an old book with some moss for the perfect fairy photo op.
Mini “Small World” Characters
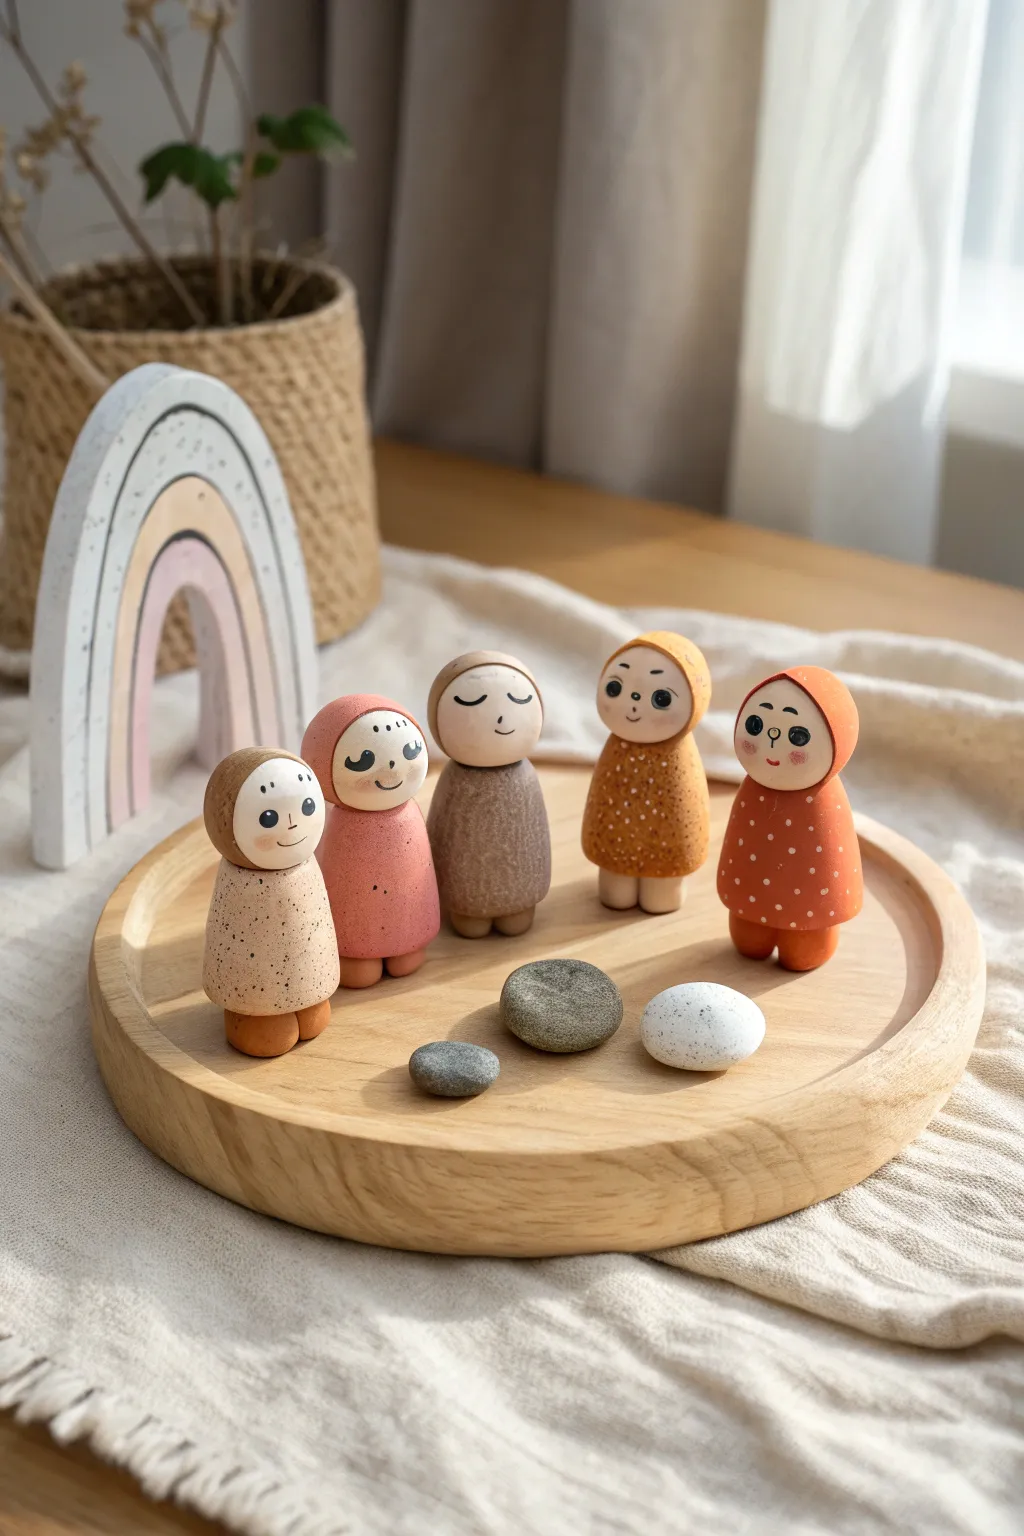
Create a charming set of miniature characters that look like little pebbles come to life. These earthy, smooth figurines are perfect for imaginative play and have a sweet, Montessori-inspired aesthetic with their simple expressions and muted colors.
Step-by-Step Tutorial
Materials
- Air dry clay (white or terracotta)
- Small bowl of water
- Modeling tools (or a toothpick)
- Acrylic paints (terracotta, beige, ochre, white, black, pink)
- Fine detail paintbrush
- Sponge or stiff brush for texture
- Matte sealant or varnish
Step 1: Sculpting the Base
-
Shape the bodies:
Begin by rolling five balls of air dry clay, each about the size of a walnut. Then, gently roll each ball on your work surface to elongate it slightly into a rounded cone or gumdrop shape. -
Form the feet:
For the feet, roll two pea-sized balls of clay for each figure. Flatten them slightly and press them firmly onto the bottom of the body so the figurine stands securely. -
Create the heads:
Roll smaller spheres for the heads ensuring they are proportional to the bodies. Attach these to the top of the body shapes using a bit of water to create a slip, blending the clay at the neck seam until smooth.
Cracking Clay?
If you see cracks forming as the clay dries, make a watery paste (slip) from a scrap of clay and fill the cracks, smoothing it over with a wet finger.
Step 2: Adding Details
-
Sculpt the hoods:
Roll out a thin, flat pancake of clay. Cut circles or ovals and drape them over the heads to create hoods or hair. Smooth the edges so they merge seamlessly with the body shape, framing the face area. -
Smooth everything out:
Dip your finger in water and gently run it over the entire figure to remove fingerprints and cracks. I find this creates that lovely stone-like finish. -
Let them dry:
Allow the figures to dry completely for at least 24-48 hours. Turn them occasionally so the bottoms dry out too.
Step 3: Painting and Finishing
-
Base coat the bodies:
Paint the body and hood of each figure in different earthy tones like muted terracotta, ochre, and warm grey. Leave the face area unpainted (or paint it a skin tone of your choice). -
Add speckling:
To get the speckled, stone-like texture visible in the photo, dip an old toothbrush or stiff brush into diluted dark brown paint. Flick the bristles to spray tiny dots over the painted bodies. -
Paint patterns:
Once the speckles are dry, use a fine brush to add simple patterns like tiny white polka dots or little dashes on the colored clothing areas. -
Draw the faces:
Using your finest brush or a fine-tip paint pen, carefully draw the facial features. Keep them simple: wide-set eyes, small smiles, and rosy cheeks. -
Seal the work:
Finish by applying a coat of matte varnish to protect the paint and give the figures a professional, finished look.
Magnetize Them
Before the clay dries, press a small, strong magnet into the back of each figure to turn your little world characters into adorable fridge magnets.
Now your little family is ready to explore their new small world on a shelf or tray
Texture Stamp Tiles With Lace Patterns
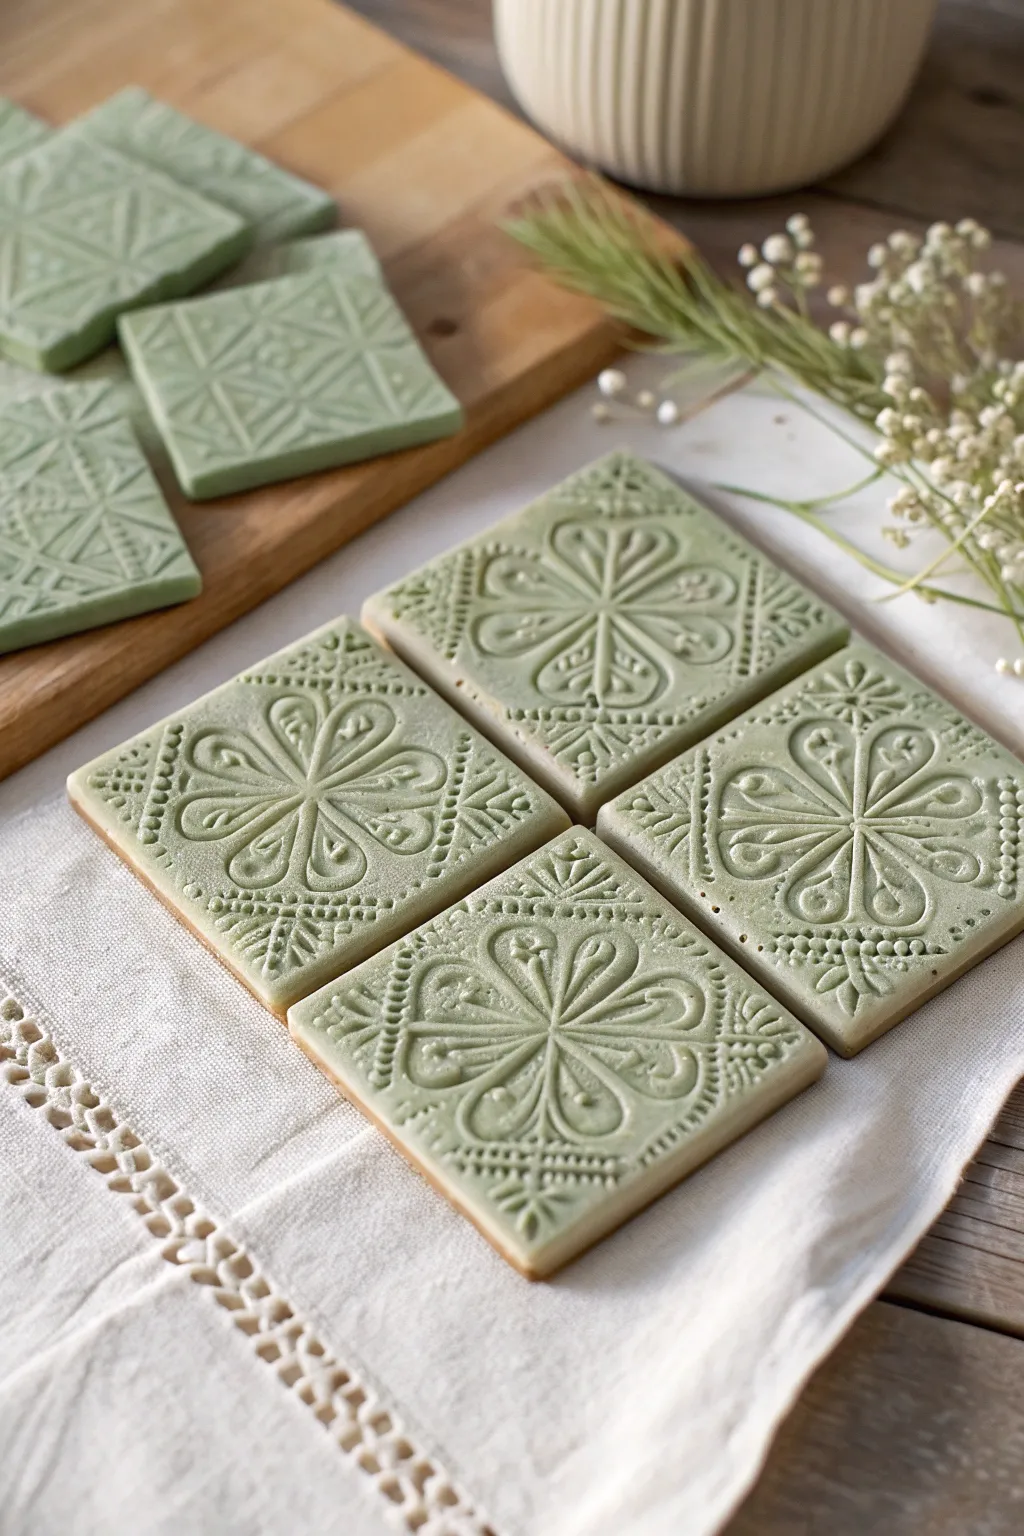
These elegant, sage-green square tiles capture the delicate beauty of lace patterns forever in clay. With their raised floral motifs and smooth matte finish, they make beautiful coasters, magnets, or simple decorative accents.
Step-by-Step Guide
Materials
- Air dry clay (white)
- Acrylic paint (sage green or muted olive)
- Rolling pin
- Square cookie cutter (approx. 3-4 inches)
- Parchment paper or non-stick silicone mat
- Detailed lace doilies or rubber texture stamps (floral/geometric patterns)
- Fine-grit sandpaper
- Matte spray sealer or varnish
- Bowl of water
- Sponge
Step 1: Preparing the Clay Base
-
Color the clay:
Before rolling, knead a small dollop of sage green acrylic paint directly into a ball of white air dry clay. Fold and press repeatedly until you achieve a uniform, muted pastel green tone throughout the batch. -
Roll it out:
Place your colored clay on parchment paper. Roll it out to an even thickness of about 1/4 inch. Aim for a slab large enough to cut multiple tiles from. -
Smoothing:
Run a slightly damp sponge over the surface of the clay slab to remove any small cracks or rolling pin lines, ensuring a pristine canvas for your texture.
Depth Perception
Use a thicker lace or a specialized rubber stamp designed for pottery. Flat fabric lace won’t create the deep, distinct grooves seen in this project.
Step 2: Creating the Texture
-
Position the pattern:
Lay your lace doily or texture stamp face-down onto the rolled clay. If using a stamp, center it carefully where you plan to cut the square. -
Imprint the design:
Firmly roll over the lace or the back of the stamp with your rolling pin. Apply steady, even pressure to ensure the intricate details transfer deeply without thinning the clay too much. -
Reveal the magic:
Gently peel back the lace or lift the stamp straight up. Do this slowly to avoid distorting the freshly impressed clay pattern. -
Cut the shape:
Center your square cookie cutter over the impressed design. Press down sharply to cut the tile shape. -
Release the tile:
Pull away the excess scrap clay first, leaving the square tile on the parchment paper. If the clay sticks to the cutter, gently push it out from the edges.
Step 3: Refining and Finishing
-
Soften the edges:
Dip your finger in water and very lightly run it along the cut edges of the square to smooth out any sharp ridges left by the cutter. -
Initial drying:
Let the tiles dry flat on the parchment paper for at least 24 hours. Keep them away from direct heat sources to prevent curling. -
Flip for airflow:
After the top feels dry to the touch, carefully flip the tiles over to let the undersides dry completely. This usually takes another 24 hours. -
Sanding:
Once bone dry, use fine-grit sandpaper to gently buff the sides and corners. I prefer doing this outside or over a trash bin to catch the dust. -
Highlighting (optional):
To make the pattern pop, you can dry-brush a tiny amount of white paint over the raised areas of the design, though the plain clay looks lovely too. -
Sealing:
Apply a thin coat of matte spray varnish to protect the surface from moisture and dust without adding unwanted shine.
Curled Corners?
If the corners start lifting while drying, place a piece of parchment paper on top and gently weigh the tiles down with a light book.
Enjoy displaying your beautiful handcrafted tiles on a table or shelf as a unique piece of decor
Painted Relief Art Tiles
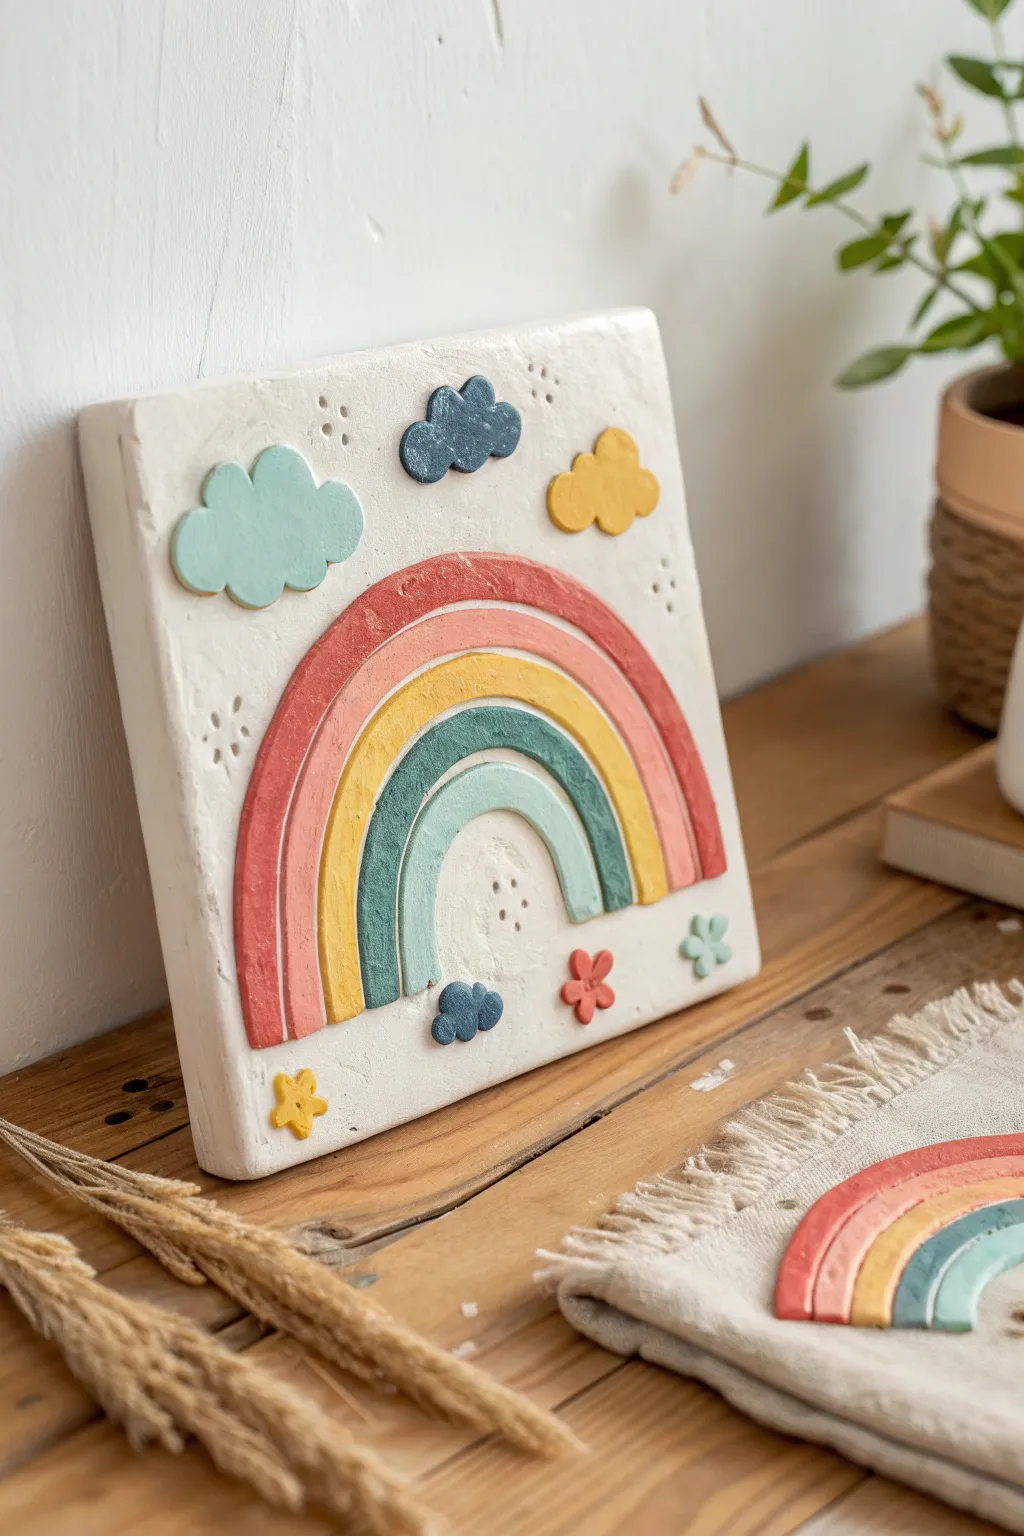
This charming art piece captures the whimsy of a sunny day with a dimensional, textured rainbow rising from a sturdy clay base. It uses a relief technique where shapes are layered on top of a flat slab, creating a lovely shadow effect that brings the scene to life.
How-To Guide
Materials
- Air dry clay (white)
- Acrylic paints (coral red, orange, yellow, teal, light blue, dark blue, white)
- Clay roller or rolling pin
- Square cookie cutter or knife and ruler
- Various small cookie cutters (clouds, small stars, flowers)
- Circle cutters in graduating sizes (or round objects like cups/lids)
- Craft knife or clay needle tool
- Small bowl of water (slip)
- Fine grit sandpaper
- Fine detail paintbrushes
- Matte sealant spray or varnish (optional)
Step 1: Creating the Base
-
Roll the slab:
Begin by taking a large chunk of air dry clay and kneading it until soft. Roll it out on a flat, non-stick surface until it is about 1/2 inch thick. -
Cut the square:
Use a ruler and a knife (or a large square cutter if you have one) to cut a perfect square shape for your tile base. Smooth the outer edges with a dab of water on your finger. -
Create texture:
Before the base dries, gently press a piece of rough fabric or sandpaper onto the surface to give it a subtle, stone-like texture, or simply poke tiny decorative dots into the background with a toothpick.
Stay Flat Tip
To prevent the corners of your square base from curling up while it dries, place a light book or a flat board gently on top of it once the clay is leather-hard.
Step 2: Shaping the Rainbow
-
Roll thin coils:
Roll out a fresh sheet of clay, slightly thinner than your base (about 1/4 inch thick). You will cut your rainbow arches from this flat sheet for a uniform look. -
Cut the arches:
Use round cutters or bowls of different sizes to cut concentric curved strips. You need four arches ranging from largest to smallest. If cutting by hand, trace your circles lightly first before slicing. -
Trimming to fit:
Lay the arches onto your square base to check the fit. Trim the bottom edges of the arches so they sit flush and centered on the tile. -
Attach the rainbow:
Score the back of each rainbow arch and the corresponding spot on the base with a needle tool. Apply a little water or clay slip, then press the arches firmly into place.
Step 3: Adding Details
-
Cut clouds and motifs:
Roll out a bit more clay and use small cutters to create two larger clouds, smaller thunderclouds, tiny flowers, and stars. -
arrange the scene:
Position your decorative elements. Place the larger clouds near the top corners, and scatter the flowers and stars around the bottom for balance. -
Secure the pieces:
Just like the rainbow, score and slip the back of each small piece before pressing it onto the background tile to ensure they don’t pop off during drying. -
Refine the edges:
Go over your work with a slightly damp brush to smooth out any fingerprints or rough cuts on the added shapes. -
Full dry time:
Let the entire piece dry completely. Since the base is thick, I recommend letting this sit for at least 24-48 hours, flipping it occasionally so the back dries evenly.
Make it Hangable
Poke two holes in the top corners of the damp clay base before adding the rainbow. After drying, thread twine through them to hang your tile on the wall.
Step 4: Painting and Finishing
-
Sand imperfections:
Once fully hard and white, gently sand any rough edges on the sides of the tile or the clay shapes. -
Paint the rainbow:
Paint the arches in a warm, muted palette. Use coral red for the outer arch, followed by a soft orange, a deep yellow, and finally a teal blue for the smallest inner arch. -
Paint the sky elements:
Paint the large cloud light blue and the smaller clouds a darker, stormy blue. The stars can be yellow, and the flowers a mix of coral and teal. -
Tidy the background:
If you accidentally got paint on the white background, use a small brush with white acrylic paint to touch up the negative space around the relief shapes. -
Seal (optional):
To protect your artwork, finish with a coat of matte spray varnish or Mod Podge.
Now you have a cheerful, dimensional piece of art ready to brighten up any shelf or wall