Whenever I need a creative reset, I reach for air dry clay—it’s quick, forgiving, and somehow always turns into something cute. Here are my go-to air dry clay design ideas, starting with the classics and moving into a few studio-favorite curveballs.
Stamped Trinket Dishes
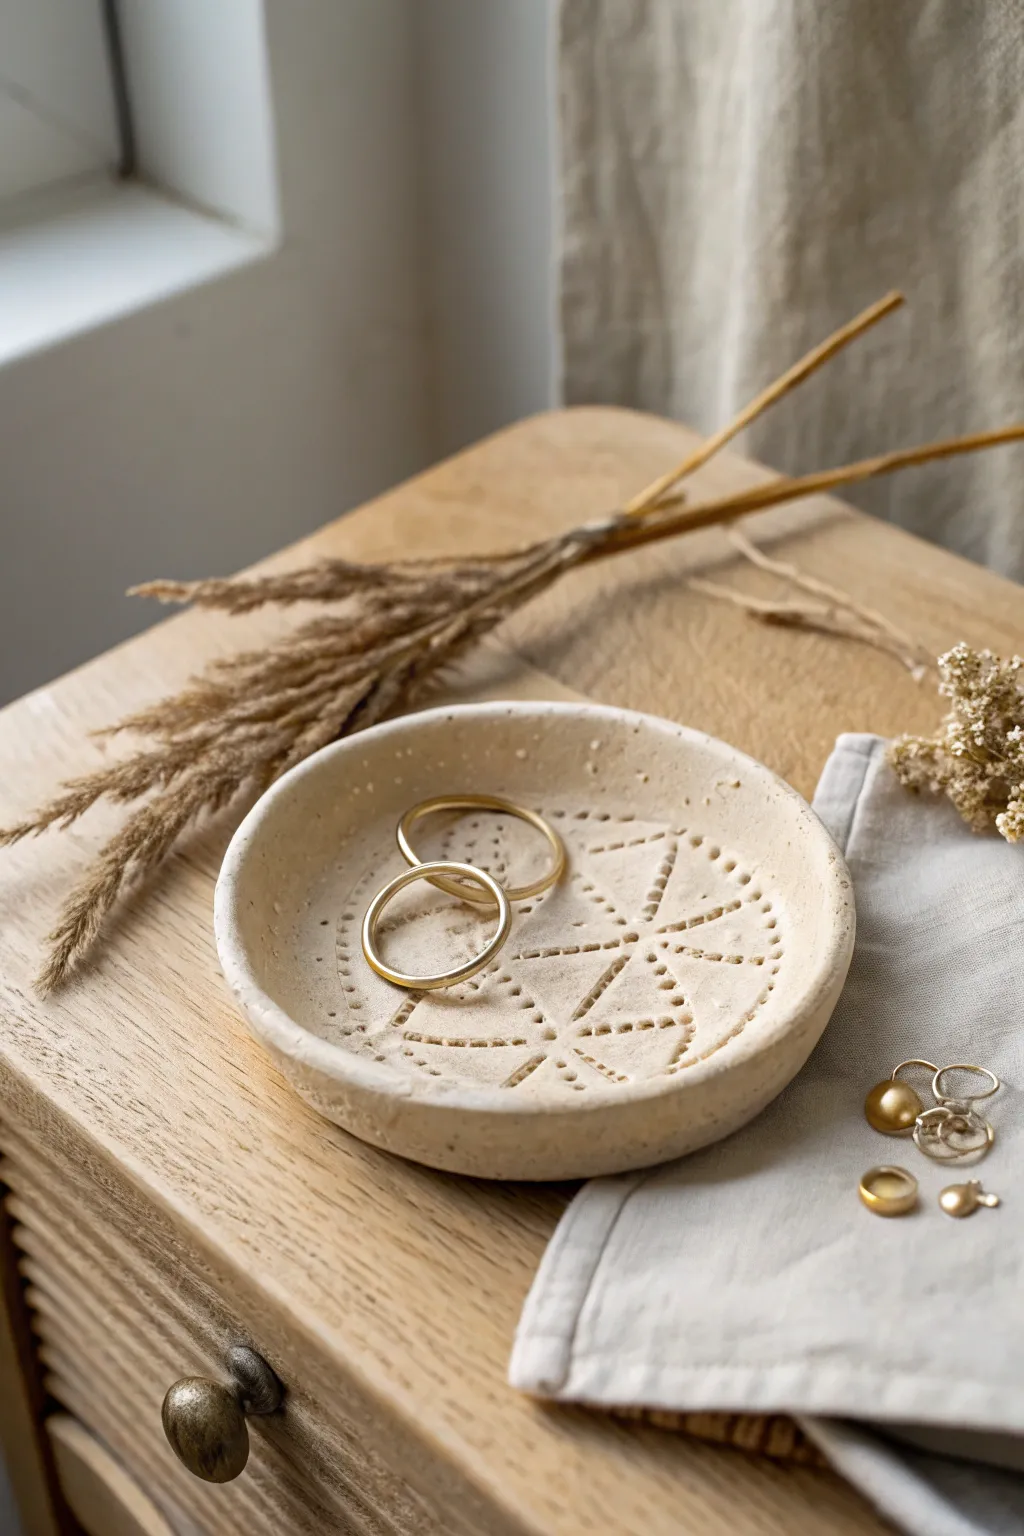
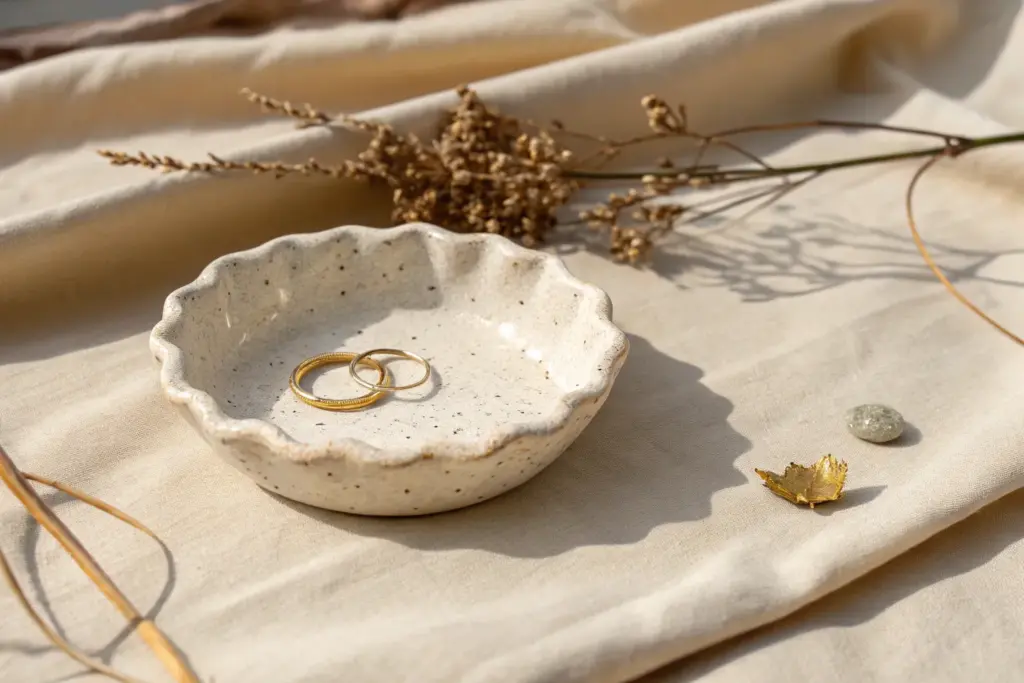
Create a stunningly simple home for your favorite rings with this textured clay dish. Using basic tools, you’ll craft a natural-looking piece featuring a delicate, mandala-inspired stippled pattern that feels both modern and organic.
Step-by-Step
Materials
- Air dry clay (white or natural stone color)
- Rolling pin
- Circle cutter or a small bowl (approx. 4-5 inches diameter)
- Craft knife
- Small bowl for shaping (slightly larger than your cutter)
- Sponge and water
- Wooden skewer or toothpick (blunt end)
- Fine grit sandpaper
- Matte varnish or sealant
Step 1: Prepping and Shaping the Clay
-
Condition the clay:
Begin by taking a handful of air dry clay and kneading it in your hands. You want it to be warm, pliable, and free of any air bubbles before you start working. -
Roll it out:
Place your clay on a smooth, clean surface or a silicone mat. using your rolling pin, roll the clay out evenly until it is approximately 1/4 inch thick. Try to keep the thickness consistent so it dries without warping. -
Cut the circle:
Place your circle cutter or a small bowl onto the clay slab. Press down firmly to cut your shape. If using a bowl as a template, carefully trace around the edge with your craft knife. -
Smooth the edges:
Dip your finger or a small sponge into a little bit of water. gently run it along the cut edge of the circle to smooth out any roughness or sharp angles left by the knife. -
Form the curve:
Lift your clay circle and gently press it into your shaping bowl. You don’t want a deep bowl shape, just a gentle curve to hold trinkets. Press lightly from the center outward to ensure it takes the form without thinning the bottom too much.
Cracks while drying?
Make a ‘slip’ by mixing a tiny bit of clay with water into a paste. Rub this into any small hairline cracks, let dry, and sand smooth.
Step 2: Creating the Stamped Pattern
-
Mark the center:
Find the approximate center of your dish. Make a very light indentation with your skewer to use as a guide, but don’t poke all the way through. -
Create the central cross:
Using the blunt end of your skewer or a toothpick, press lines of dots radiating from the center to create a cross shape. I like to press gently but firmly enough to leave a clean shadow. -
Add diagonal lines:
Add four more lines of dots in between your cross lines, creating an eight-point starburst or wheel pattern. Keep your spacing as consistent as possible. -
Connect the sections:
Create triangles within the sections by stamping lines of dots that connect the radiating lines. You can make larger triangles near the outer rim and smaller ones near the center. -
Fill with texture:
Within the triangular spaces you’ve created, add additional rows of dots or single accent dots to densify the pattern. The goal is a geometric, mosaic-like look. -
Check the rim:
Before setting it aside, run your slightly damp finger along the rim one last time to fix any distortions caused by handling the dish during stamping.
Pro Tip: Consistent Depth
Wrap a piece of tape around your skewer about 2mm from the tip. This acts as a depth stop so all your stippled dots are identical.
Step 3: Drying and Finishing
-
Initial dry:
Leave the clay inside the shaping bowl for at least 24 hours. This ensures it holds that curved shape while the clay creates its initial structure. -
Air dry completely:
Once the top feels dry to the touch, carefully remove it from the bowl and flip it over onto a wire rack. Let it dry for another 24-48 hours until the clay turns a lighter, chalky color and feels room temperature. -
Sand the imperfections:
Take your fine grit sandpaper and very gently buff the rim and the underside of the dish. Avoid sanding the textured top area as you might wear down your dot pattern. -
Dust it off:
Use a dry, soft brush or a cloth to wipe away all the sanding dust. The surface needs to be totally clean before sealing. -
Seal the piece:
Apply a thin, even coat of matte varnish to the entire dish. This protects the clay from moisture and gives it a finished, professional look without making it too shiny. -
Final cure:
Let the varnish dry according to the bottle instructions, usually overnight, before placing your jewelry inside.
Place your new textured dish on your dresser and enjoy the handmade warmth it adds to your space


Flower-Shaped Coaster Set
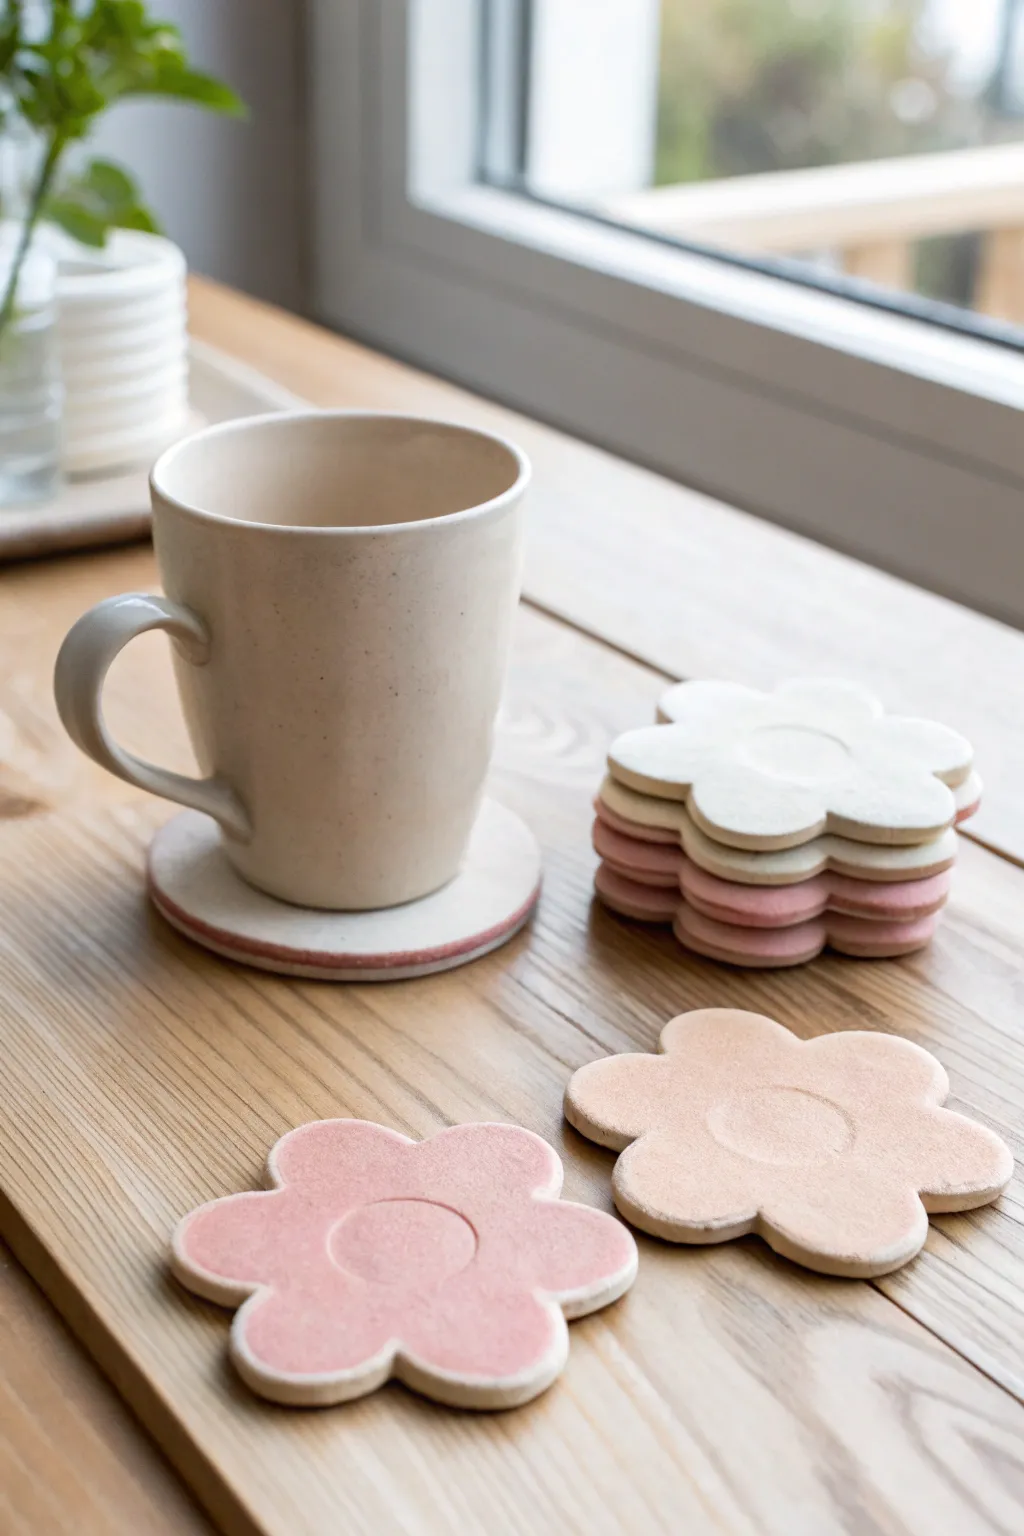
Bring a touch of perpetual spring to your coffee table with these charming, flower-shaped coasters. Their soft pastel tones and organic, handmade edges create a cozy, minimalist aesthetic perfect for holding your favorite warm mug.
Step-by-Step
Materials
- White air dry clay (approx. 500g)
- Acrylic rolling pin
- Wooden guide strips or slats (approx. 5-7mm thick)
- Flower-shaped cookie cutter (large enough for a mug base, approx. 10cm)
- Small round cookie cutter or bottle cap (approx. 3-4cm)
- Small bowl of water
- Medium-grit sandpaper sponge
- Acrylic paints (pastel pink, peach, white)
- Matte varnish or sealant
- Paintbrushes
- Canvas mat or parchment paper
Step 1: Shaping the Clay
-
Condition the Clay:
Begin by taking a handful of air dry clay and kneading it in your hands until it feels soft, pliable, and warm. This conditioning step is crucial to prevent cracks later on. -
Roll Out the Slab:
Place your clay on a canvas mat or parchment paper. Set your wooden guide strips on either side of the clay to ensure an even thickness, then use the acrylic roller to flatten the clay until the roller glides on the strips. -
Cut the Flower Base:
Take your large flower-shaped cutter and press it firmly into the rolled clay. Wiggle it slightly to ensure a clean cut before lifting it away. Create as many bases as you’d like for your set. -
Create the Centers:
Using the remaining flat clay, cut out small circles with your smaller round cutter. You will need one small circle for every flower base you have created. -
Score the Surfaces:
Take a needle tool or a toothpick and gently scratch cross-hatch marks onto the center of the flower base and the back of the small clay circle. This rough texture helps them bond. -
Attach the Center:
Dab a small amount of water (or slip) onto the scored areas. Press the small circle gently onto the center of the flower. I like to press firmly enough to adhere, but not so hard that I flatten the circle completely. -
Smooth the Edges:
Dip your finger in a little water and run it along the outside edges of the flower petals and the center circle to smooth out any harsh lines or jagged bits from the cutter.
Smooth Surface Secret
Use a barely damp sponge to wipe the clay surface smooth before it dries. This reduces the amount of sanding you’ll need to do later.
Step 2: Drying and Refining
-
Let it Dry:
Place your coasters on a flat, clean surface to dry. To prevent warping, flip them over every 12 hours. Allow them to dry fro 24 to 48 hours until they are completely hard and room temperature to the touch. -
Sand for Perfection:
Once fully dry, take your sanding sponge and gently buff the edges and surface. Focus on rounding off the perimeter so the coaster feels soft in the hand. -
Dust Off:
Use a dry dedicated dusting brush or a microfiber cloth to remove all fine clay dust from the surface before you start painting.
Step 3: Painting and Finishing
-
Mix Pastel Shades:
Prepare your palette by mixing white acrylic paint with very small drops of red or orange to create soft pastel pinks and peaches. Leave some white plain if you want a neutral coaster. -
Apply Base Coat:
Paint the top surface of the coaster. For a smooth, opaque finish, you may need two or three thin coats rather than one thick one. Let each layer dry fully before adding the next. -
Detail the Center:
You can choose to paint the center circle a slightly different shade, or keep the whole coaster monochromatic for a modern look. Ensure the paint gets into the small crease where the circle meets the petals. -
Seal the Project:
Since these are coasters, protection is key. Apply a layer of matte varnish over the entire coaster. This will protect the clay from minor splashes and finish the piece beautifully.
Make it Waterproof
For true water resistance against heavy condensation, skip standard varnish and coat the top with a thin layer of UV resin or dishwasher-safe Mod Podge.
Now you have a lovely set of custom coasters ready to protect your surfaces in style


Minimal Arch Candle Holders
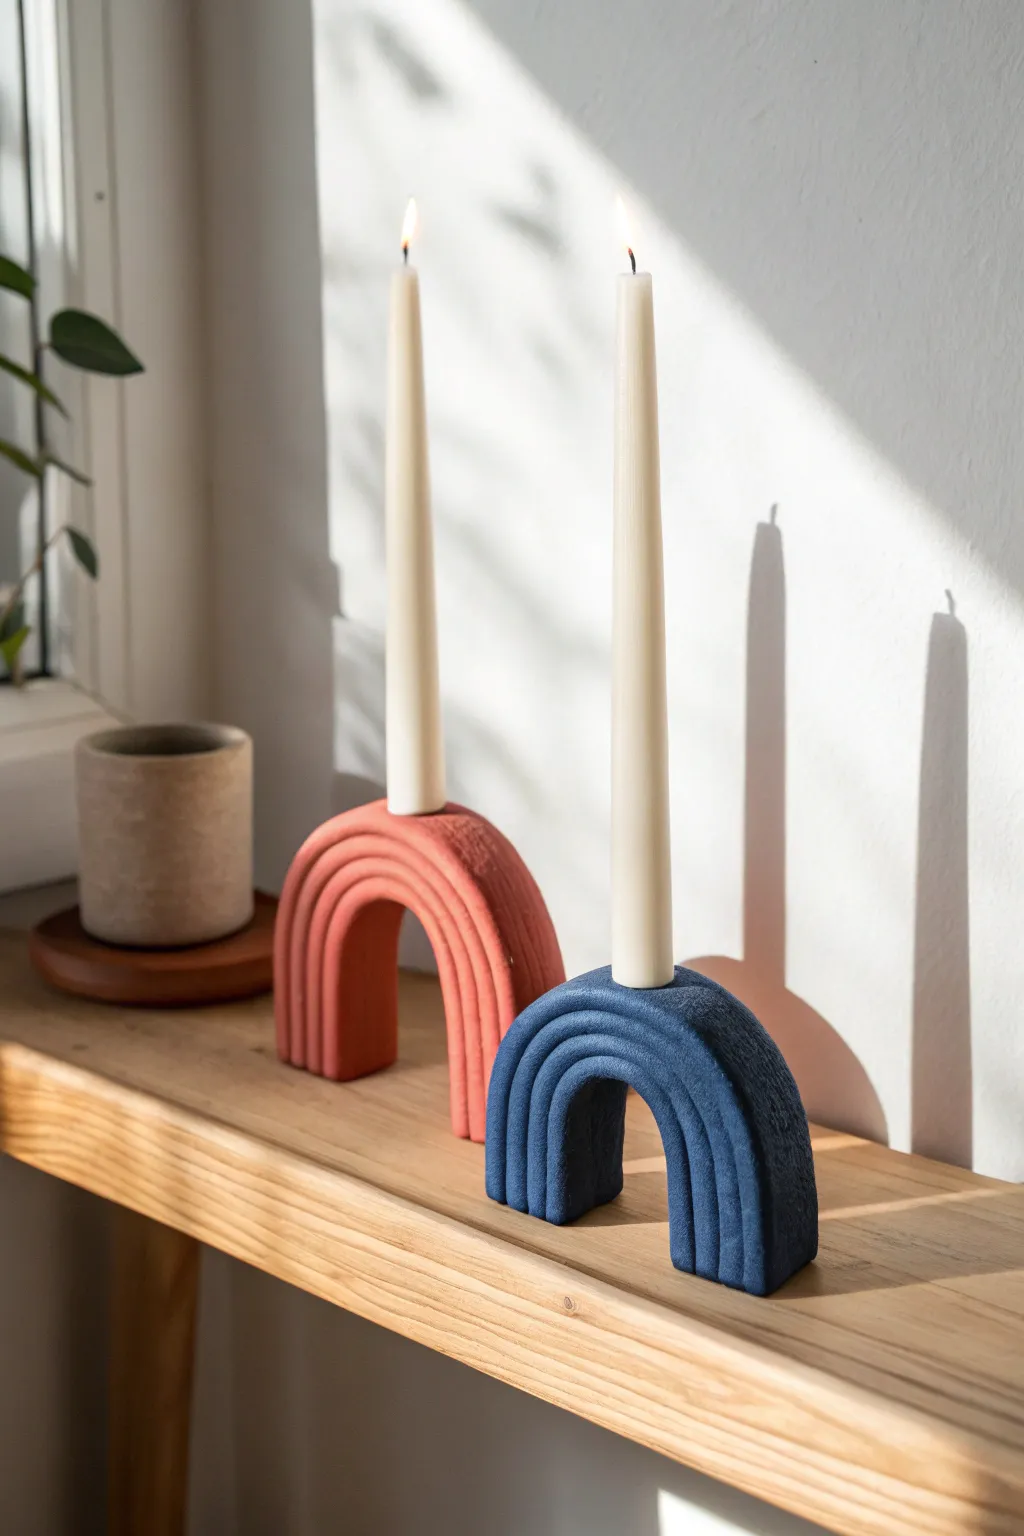
Elevate your mantle display with these sculptural, ribbed arch candle holders that boast a sophisticated matte finish. The structured ridges add a modern architectural touch while the warm terracotta and cool navy tones create a striking visual balance.
Step-by-Step Guide
Materials
- Air dry clay (white or terracotta)
- Taper candles (for sizing)
- Acrylic rolling pin
- Clay knife or craft blade
- Small bowl of water
- Sponge or fine-grit sandpaper
- Acrylic paints (Terracotta/Coral and Navy Blue)
- Baking soda (to mix with paint)
- Paintbrushes
- Cardboard or plastic placemat (work surface)
- Ruler
Step 1: Fomring the Base Structure
-
Condition the clay:
Begin by taking a substantial chunk of air dry clay and kneading it in your hands until it keeps its shape but is pliable and warm. This prevents cracking later on. -
Create the main slab:
Roll your conditioned clay out onto a flat surface into a thick, even slab. You want this to be quite sturdy, roughly 3/4 of an inch to 1 inch thick, to support the candle’s weight. -
Cut the arch strip:
Use a ruler and your craft knife to cut a long, rectangular strip from the slab. A width of about 2 inches works well, but adjust based on your preference. The length needs to be enough to fold into a U-shape. -
Shape the arch:
Gently bend the rectangular strip into a U-shape to form the arch. Stand it upright on your work surface to ensure the feet are level. If the base wobbles, slice a thin layer off the bottom of each leg to flatten them. -
Create the candle socket:
Take your actual taper candle and gently press the base into the absolute top center of the arch to create an indentation. Don’t go all the way through; just deep enough to hold the candle securely. Wiggle it slightly to ensure the hole isn’t too tight, as clay shrinks when drying.
Shrinkage Check
Make the candle hole slightly larger than your candle base. Clay shrinks about 10-15% when drying, and you don’t want the fit to be too tight later.
Step 2: Adding the Ribbed Texture
-
Roll thin coils:
Take fresh clay and roll out several long, snake-like coils. Try to keep them as uniform in thickness as possible, aiming for the width of a pencil or thinner. -
Attach the center coil:
Apply a tiny amount of water or slip (clay mixed with water) to the back of a coil. Place this coil directly along the center line of your arch’s curved surface, running from one foot, up over the top, and down to the other foot. -
Trim the excess:
Cut the ends of the coil flush with the bottom of the arch legs so the holder will still stand flat. -
Complete the ribbing:
Continue adding coils on either side of that central line until the entire front and back surfaces of the arch are covered in ridges. Press them gently so they adhere, but be careful not to flatten the roundness of the coils. -
Smooth the edges:
Dip your finger in water and very lightly run it along the coils to smooth out any bumps or cracks, paying special attention to where the coils meet the flat side of the arch. -
Allow to dry:
Let the piece dry completely in a safe spot away from direct heat. This usually takes 24-48 hours depending on thickness. I like to flip it gently onto its side halfway through to ensure the bottom dries evenly.
Step 3: Finishing Touches
-
Refine the surface:
Once fully dry and hard, use fine-grit sandpaper or a slightly damp sponge to smooth away any sharp edges or rough patches on the coils. -
Mix the textured paint:
To achieve that stony, matte look seen in the photo, mix your acrylic paint with a teaspoon of baking soda. Start with the terracotta color for the first arch. -
Paint the first coat:
Apply the baking soda paint mixture to the arch. The texture will be thick, almost like fluffy frosting. Ensure you get the brush into the crevices between the ribs. -
Apply the second color:
Repeat the mixing process with your navy blue paint and apply it to your second prepared arch distinctively. -
Final dry:
Let the paint dry completely. The baking soda addition dries very quickly, usually within an hour, creating a beautiful ceramic-like texture.
Speckled Stone Effect
For a faux-granite look, flick a toothbrush loaded with diluted black or white paint over the dried holders before the final sealant layer.
Place your tapers into the holders and enjoy the architectural shadow play on your shelf


Pinch Pot Succulent Planters
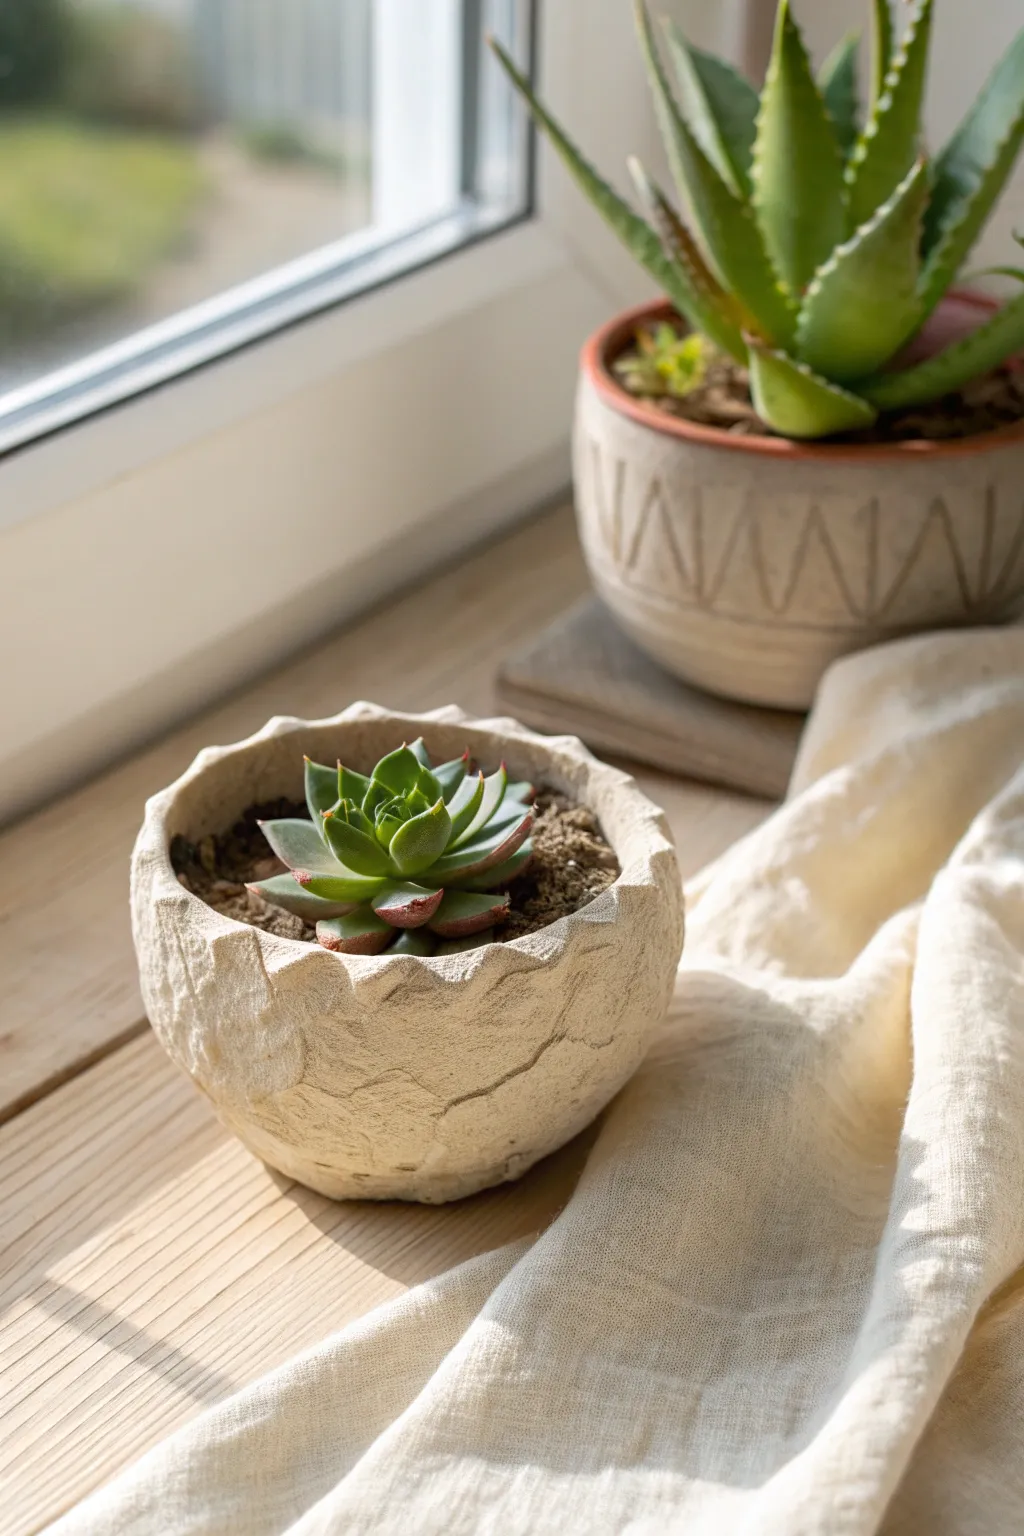
Embrace the organic beauty of air dry clay with this charmingly rustic succulent planter. The design features a cracked, stone-like texture and a delightfully uneven rim that mimics a broken eggshell or natural geode.
Step-by-Step Guide
Materials
- White classic air dry clay
- Small bowl of water
- Sponge or stiff bristle brush
- Rolling pin (optional)
- Small succulent for sizing
- Clear acrylic sealant or clay varnish
- Parchment paper or canvas mat
Step 1: Shaping the Base
-
Prepare your clay ball:
Cut off a chunk of air dry clay about the size of a tennis ball. Knead it in your hands for a minute to warm it up and ensure there are no air bubbles inside. -
Form a sphere:
Roll the clay firmly between your palms or against your work surface until you have a smooth, round sphere. It doesn’t need to be perfect, but try to minimize deep creases. -
Start the pinch method:
Hold the sphere in your non-dominant hand. Press your dominant thumb into the center of the ball, pushing down about halfway to create a deep indentation. -
Widen the opening:
With your thumb still inside the hole and fingers on the outside, begin to pinch gently while rotating the ball in your palm. Work your way from the bottom up to thin the walls. -
Check the thickness:
Aim for a wall thickness of about 1/4 inch to ensure the pot is sturdy enough for the textured effect later. Keep the base slightly thicker for stability.
Keep it Rough
Don’t over-smooth the clay! The charm of this pot comes from the ‘mistakes’ and cracks. Letting the clay dry slightly while you work enhances that texture.
Step 2: Texturing and Detailing
-
Create the signature rim:
Instead of smoothing the rim, use your fingers to pinch the very edge into irregular points. Pull tiny sections upward and outward to mimic a cracked eggshell look. -
Establish the stone texture:
Take a nearly dry sponge or a stiff bristle brush and dab it aggressively against the exterior walls. This creates a pitted, rough surface. -
Add ‘crack’ lines:
Using a needle tool or just a fingernail, gently drag irregular lines across the surface to simulate natural fissures in stone. I like to let these connect randomly. -
Refine the shape:
Gently tap the bottom of the pot against your table to flatten it so it sits securely without wobble. -
Final shaping check:
Place your empty plastic nursery pot (or the succulent itself, carefully) inside to ensure the opening is wide enough. Adjust the rim outward if needed.
Cracking While Drying?
If deep structural cracks appear as it dries, mix a tiny bit of fresh clay with water to make a paste (slip) and fill the gap, then smooth over.
Step 3: Finishing Touches
-
Dry the pot:
Place the pot on a wire rack or parchment paper. Let it air dry completely for 24-48 hours. Rotate it occasionally to ensure even exposure to air. -
Sand lightly (optional):
Once bone dry, if any jagged points on the rim feel too sharp, gently run a high-grit sandpaper over them just enough to dull the point without losing the shape. -
Seal the interior:
Since air dry clay is water-soluble, apply two thick coats of waterproof varnish or sealer to the inside of the pot to protect it from moisture. -
Seal the exterior:
Apply a matte sealant to the outside to preserve the raw, chalky look of the clay while protecting it from dust and handling. -
Plant your succulent:
Fill with cactus soil and your plant. Remember that air dry clay isn’t fully waterproof, so mist your succulent sparingly rather than soaking the soil.
This little textured vessel brings a wonderful touch of earthy minimalism to your windowsill

What Really Happens Inside the Kiln
Learn how time and temperature work together inside the kiln to transform clay into durable ceramic.
Simple Bud Vases
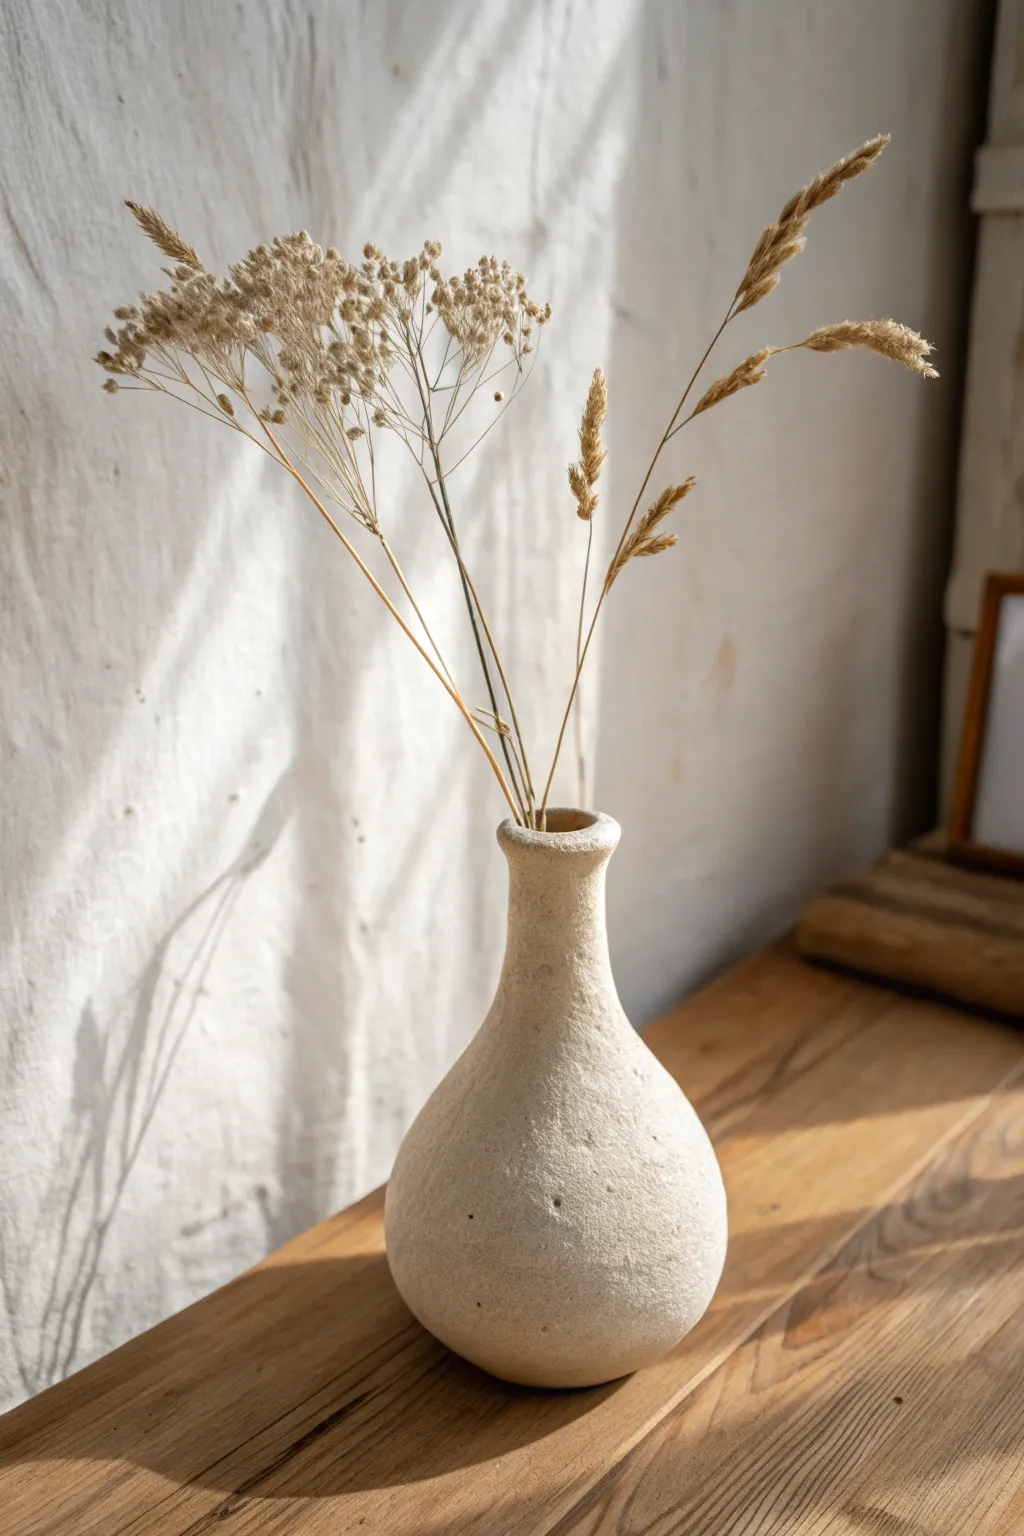
Capture the essence of organic minimalism with this textured bud vase that mimics the look of carved sandstone. Its bulbous base and slender neck create an elegant silhouette perfect for displaying delicate dried grasses.
Step-by-Step Tutorial
Materials
- Air dry clay (white or grey)
- Small rolling pin
- Clay sculpting tools (knife tool, sponge)
- Small bowl of water
- Sandpaper (coarse and fine grit)
- Acrylic paint (beige, cream, or warm grey)
- Baking soda or texture medium
- Paintbrush (flat, synthetic)
- Matte varnish or sealant
Step 1: Forming the Base
-
Condition the Clay:
Begin by taking a generous handful of air dry clay. Knead it in your warm hands for several minutes until it becomes soft, pliable, and free of cracks. -
Roll a Sphere:
Roll the clay between your palms or against a work surface to form a smooth, tight ball about the size of a large orange. This will become the main body of the vase. -
Create the Opening:
Hold the ball in one hand and firmly press your thumb into the center of the top to create an initial well. Don’t go all the way through; stop about half an inch from the bottom. -
Pinch Pot Method:
Insert your thumb into the hole and use your fingers on the outside to gently pinch and rotate the clay. Work your way upward, thinning the walls of the sphere while maintaining that bulbous, round shape at the bottom.
Step 2: Shaping the Neck
-
Gather the Top:
As you pinch upwards, start angling the clay inward to narrow the opening. You want to transition from the wide bottom to a much tighter circumference for the neck. -
Add a Coil (Optional):
If you are running out of clay height, roll a small snake of clay, score the rim of your base, add a little water, and attach the coil to build up the neck height. -
Smooth the Transition:
Use a little water on your finger or a sponge to blend the clay upwards, ensuring the transition from the round body to the vertical neck is seamless and gradual. -
Refine the Rim:
Pinch the very top rim slightly outward to create a delicate lip. It shouldn’t be too sharp; a slightly rounded, organic edge matches the stone aesthetic best. -
Initial Smoothing:
Dip a sponge in water—squeeze it out well so it’s just damp—and wipe down the entire surface to remove deep fingerprints. Don’t make it perfectly smooth; some irregularity adds character.
Cracking Up?
If small cracks appear while drying, don’t panic. Mix a small amount of fresh clay with water to make a paste (slip) and fill the cracks, then sand smooth once dry.
Step 3: Texturing and Drying
-
Add Texture:
To mimic the stone look before painting, I like to take a coarse sandpaper or a stiff bristle brush and gently tap the wet clay surface. This creates tiny pits and divots. -
Dry Completely:
Set the vase in a cool, dry place away from direct sunlight. Let it dry for at least 24-48 hours. Turn it occasionally to ensure the bottom dries evenly. -
Sand the Form:
Once fully bone dry, use medium-grit sandpaper to refine the shape. Sand away any awkward lumps, but leave the textured surface rough.
Speckled Stone Hack
For a granite effect, load an old toothbrush with watered-down brown paint and flick the bristles to splatter tiny specks onto the dried base coat.
Step 4: Faux Stone Finish
-
Mix Texture Paint:
Mix your beige or cream acrylic paint with a teaspoon of baking soda. This creates a fluffy, gritty texture paste that looks incredibly like limestone or sandstone. -
Apply Base Coat:
Dab this mixture onto the vase using a pouncing motion rather than long strokes. This stippling technique enhances the grainy appearance. -
Add Depth:
While the first layer is tacky, mix a tiny drop of brown or grey into your leftover paint. Stipple this slightly darker shade randomly near the bottom for shadow and depth. -
Seal the Work:
Once the paint is thoroughly dry, apply a coat of matte varnish. This protects the textured finish without adding an artificial glossy shine.
Now your vase is ready to hold a simple arrangement of dried bunny tails or wheat for a timeless display
Cute Clay Fridge Magnets
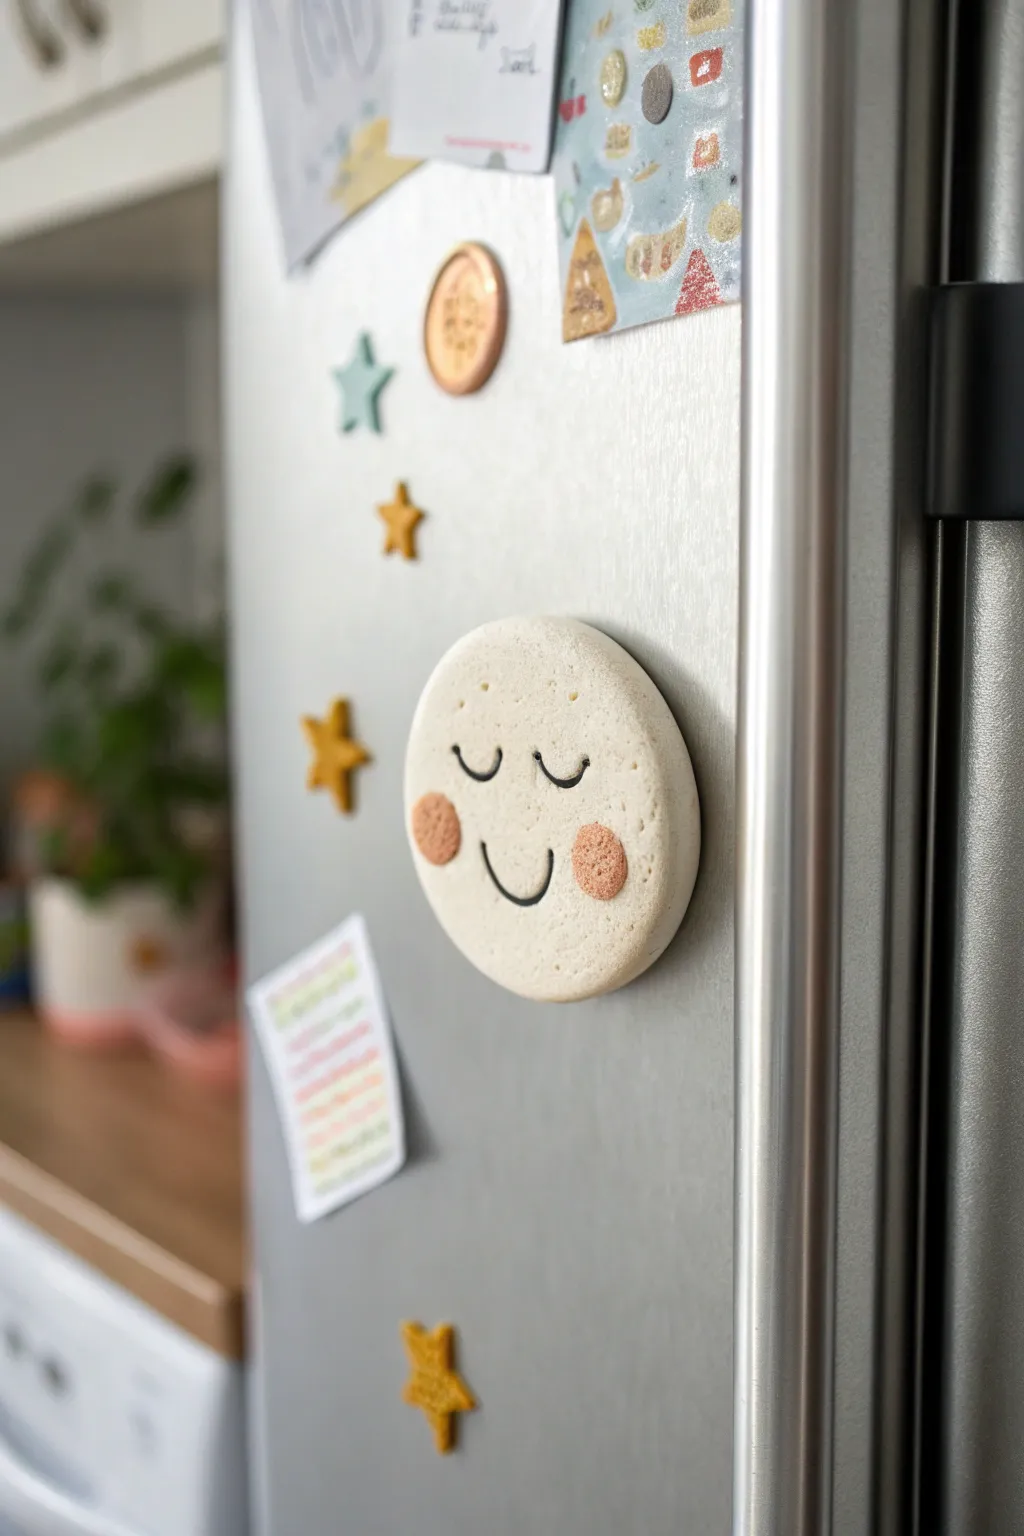
Bring a touch of sleepy sweetness to your kitchen with this charming moon-face magnet. Its simple, round shape and textured rosy cheeks create a minimalist yet warm aesthetic perfect for holding your favorite photos.
Detailed Instructions
Materials
- White air dry clay
- Rolling pin
- Circle cookie cutter (approx. 2-3 inches)
- Fine-grit sandpaper
- Black acrylic paint
- Terracotta or peach acrylic paint
- Fine detail paintbrush (size 0 or 00)
- Small round sponge dabber or stiff stencil brush
- Strong craft magnet
- Superglue or E6000
- Water for smoothing
- Matte varnish (optional)
Step 1: Shaping the Base
-
Condition the clay:
Start by taking a handful of white air dry clay and kneading it in your hands until it feels warm, pliable, and free of cracks. -
Roll it out:
Place the clay on a smooth surface or silicone mat. Use your rolling pin to flatten it to an even thickness of about 1/4 inch (6mm). Using guide sticks on either side can help keep it perfectly level. -
Cut the circle:
Press your circle cookie cutter firmly into the clay. Give it a tiny wiggle to separate it before lifting the cutter away. -
Smooth the edges:
Dip your finger in a little water and gently run it around the cut edge of the circle. This removes any sharp ridges left by the cutter and gives the magnet a softer, stone-like look. -
Dry partially:
Let the clay dry for about an hour. It shouldn’t be fully hard, just firm enough to handle without warping the shape.
Smooth Surface Secret
To get that perfectly smooth, porcelain-like finish before drying, lightly brush the wet clay with a damp soft paintbrush instead of just your finger.
Step 2: Adding Texture and Details
-
Create the cheeks:
Before the clay is completely dry, you want to add the cheek texture. Mix a tiny bit of water with leftover clay to make a thick paste (slip), or simply dampen two small spots on the face. -
Stipple the texture:
Take two very small balls of fresh clay and flatten them onto the damp spots. Use a stiff stencil brush or a crumpled piece of aluminum foil to tap repeatedly on these circles, creating a rough, pitted surface texture that contrasts with the smooth face. -
Full drying time:
Allow the piece to dry completely. This usually takes 24-48 hours depending on humidity. Flip it over halfway through the process to ensure the back dries evenly. -
Refine the surface:
Once bone dry, use fine-grit sandpaper to buff out any fingerprints or uneven spots on the main face area, being careful to avoid sanding down your textured cheeks.
Step 3: Painting and Finishing
-
Paint the cheeks:
Using a terracotta or soft peach acrylic paint, carefully color in the textured cheek circles. Dab the paint into the crevices rather than brushing across, which helps emphasize that lovely texture. -
Draft the face:
Lightly sketch the closed eyes and smile with a pencil first. I find finding the center point helps keep the expression symmetrical. -
Paint the features:
Load a fine detail brush with black acrylic paint. Paint the two crescent moon shapes for the sleepy eyes and a simple U-shape for the smile. Keep your hand steady and use light pressure for crisp lines. -
Seal the piece:
After the paint is fully dry, apply a thin coat of matte varnish. This protects the clay from moisture and stains without making it too shiny. -
Attach the magnet:
Apply a dab of strong adhesive like E6000 to the center of the back of the clay disc. -
Secure and set:
Press the magnet firmly into the glue. Let it cure face-down for several hours to ensure a permanent bond before sticking it to your fridge.
Make it a Set
Create a celestial theme by cutting out small stars from the leftover clay. Paint them yellow or gold to surround your moon face on the fridge.
Now you have a serene little friend to greet you every time you reach for a snack


The Complete Guide to Pottery Troubleshooting
Uncover the most common ceramic mistakes—from cracking clay to failed glazes—and learn how to fix them fast.
Statement Dangle Earrings
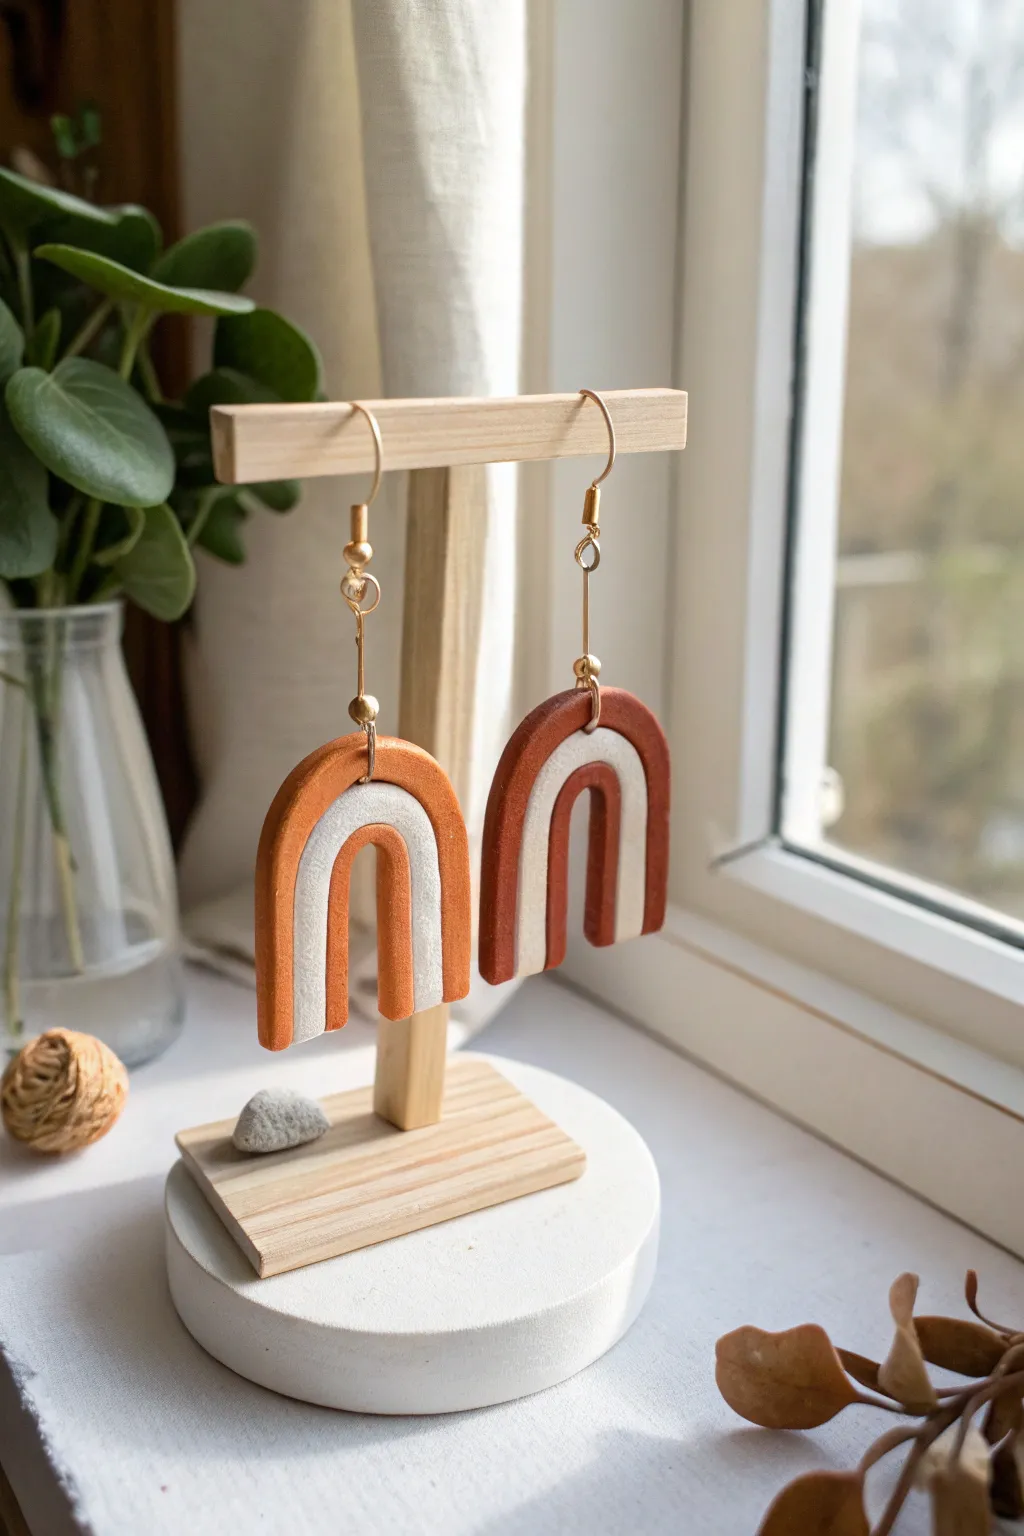
Embrace earthy, minimalist vibes with these statement arch earrings that combine warm terracotta tones with crisp white detailing. The simple construction method yields a sophisticated, high-end look perfect for adding a touch of modern bohemian flair to any outfit.
Step-by-Step
Materials
- Air dry clay (terracotta or burnt orange color)
- Air dry clay (white)
- Rolling pin or acrylic roller
- Clay knife or craft blade
- Small round cutter (approx 1-inch) or bottle cap
- Sandpaper (fine grit)
- Hand drill or needle tool
- 2 Gold earring hooks
- 2 Gold connect bars or long eye pins
- Jump rings (gold)
- Jewelry pliers
- Gloss varnish or sealant (optional)
- Strong craft glue (liquid or gel)
Step 1: Shaping the Arches
-
Prepare your workspace:
Lay down a smooth work mat or parchment paper to prevent the clay from sticking. Ensure your hands are clean and dry. -
Condition the terracotta clay:
Take a chunk of the terracotta-colored clay and knead it until it is soft, pliable, and free of cracks. -
Roll the base slab:
Roll out the terracotta clay to an even thickness of about 4-5mm. Try to keep it uniform to ensure the earrings hang straight. -
Cut the primary shape:
Using a U-shaped cutter or a steady hand with a craft knife, cut out two identical wide arch shapes. These will form the back and main structure of the earring. -
Smooth the edges:
Dip your finger in a little bit of water and gently run it along the cut edges of your terracotta arches to smooth out any roughness. -
Prepare the white accent:
Roll out a small amount of white air dry clay. You want this to be slightly thinner than the base slab, perhaps around 3mm. -
Cut the inner arches:
Cut two smaller, thinner U-shapes from the white clay. These need to be small enough to fit inside the terracotta arch with a border of terracotta visible on all sides. -
Attach the white layer:
Score the back of the white arches slightly with your needle tool, add a tiny dot of water or clay slip, and press them firmly onto the center of the terracotta bases.
Cracking Clay?
If you see tiny cracks forming as the clay dries, dip your finger in a water-glue mixture and smooth it over the crack immediately to seal it up.
Step 2: Defining & refining
-
Create the terracotta core:
Roll a very thin snake or utilize a tiny U-cutter to make the smallest terracotta arch. Adhere this right in the center of the white layer to complete the striped effect. -
Create the hanging holes:
While the clay is still wet, use a needle tool to poke a hole through the top center of each arch. Ensure the hole is big enough for your jump rings. -
Let them dry:
Place the earrings on a flat surface away from direct sunlight. I usually let them sit for at least 24 hours to ensure they are fully hardened. -
Sand for perfection:
Once fully dry, take fine-grit sandpaper and gently sand the edges and the back to remove any fingerprints or imperfections. -
Seal the piece:
Apply a thin coat of matte or gloss varnish to protect the clay from moisture and give it a finished look. Let this dry completely.
Go Textured
Before cutting your shapes, press a piece of lace or a texture mat into the damp terracotta clay for an intricate embossed surface detail.
Step 3: Assembly
-
Prepare the hardware:
Using your jewelry pliers, open your jump rings. Slide one through the hole you created in the top of the clay arch. -
Attach the connector:
Loop the bottom of your gold connector bar (or long eye pin) onto the jump ring before closing it securely. -
Add the hook:
Open the small loop on your earring hook. Slide it onto the top loop of the connector bar. -
Final check:
Close the earring hook loop securely. Hold the earring up to check that all connections are tight and the arch hangs facing forward.
Now you have a stunning pair of handmade dangles ready to wear or gift.
Layered Charm Necklaces
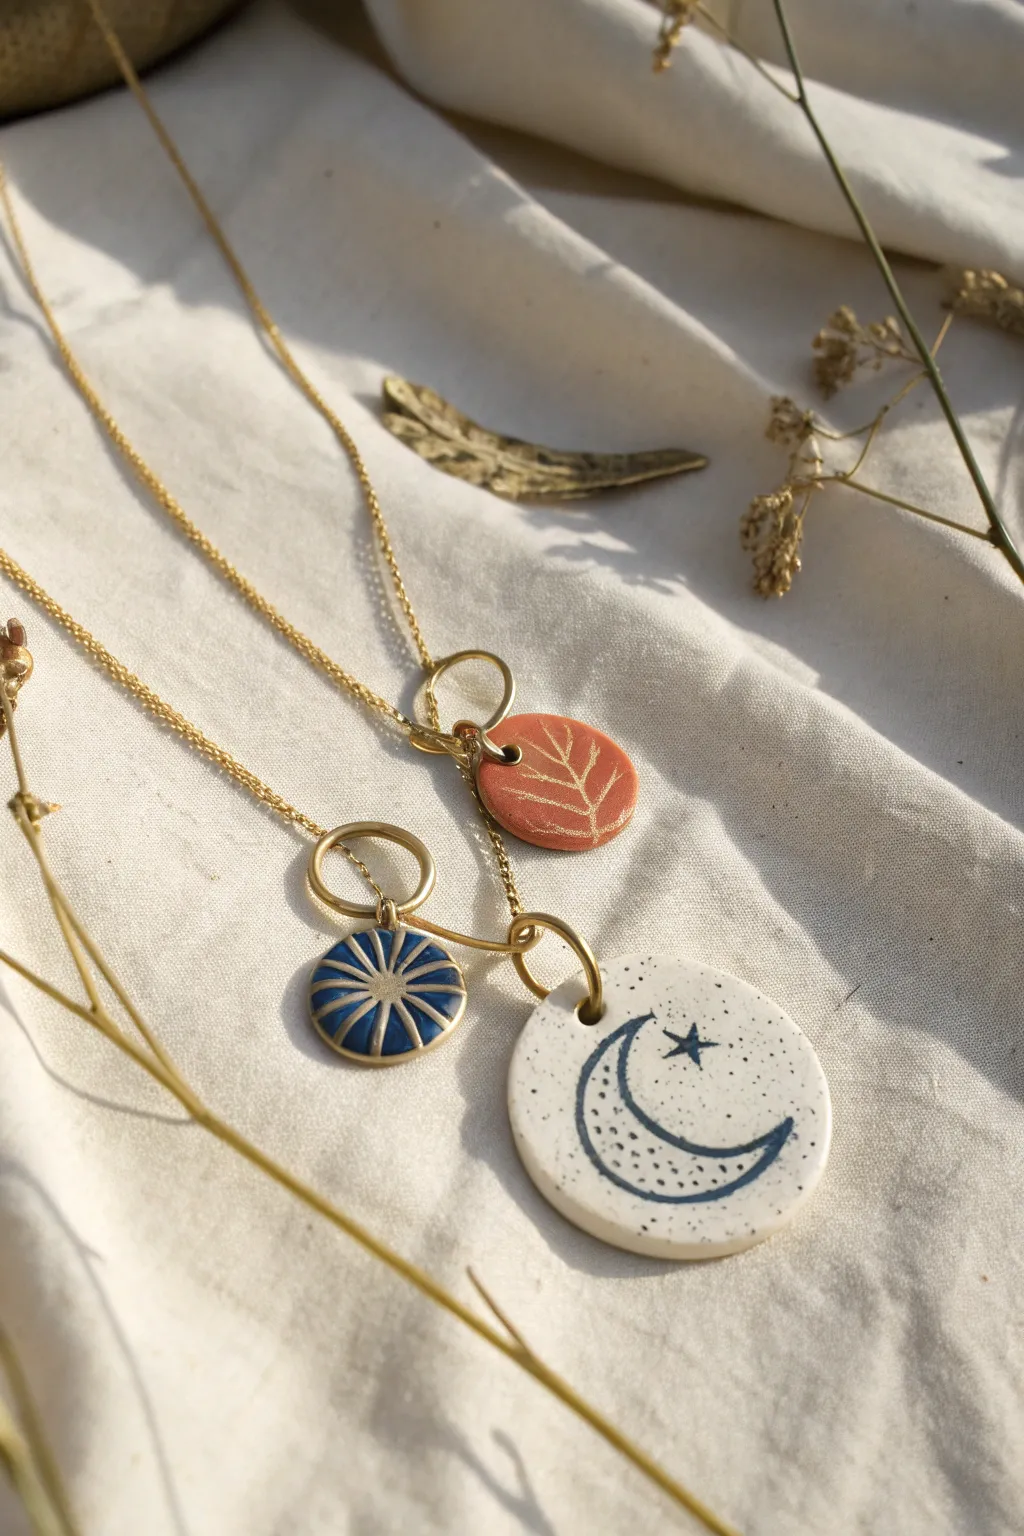
Elevate your jewelry game with these delicate, layered charm necklaces crafted from simple air dry clay. Featuring celestial motifs and organic leaf patterns, this project combines terracotta warmth with midnight blues and crisp whites for a boutique-style finish.
Detailed Instructions
Materials
- White smooth air dry clay
- Rolling pin
- Circle clay cutters (small and medium sizes)
- Small straw or cocktail stick (for piercing holes)
- Sandpaper (fine grit)
- Acrylic paints (terracotta/burnt orange, midnight blue, white)
- Thin gold paint pen or gold liner paint
- Fine detail paintbrush
- Clear gloss varnish or sealant
- Gold jump rings (oversized and standard sizes)
- Gold delicate necklace chains (varying lengths)
- Pliers
Step 1: Shaping the Base Charms
-
Condition the clay:
Begin by taking a small amount of clay and kneading it in your hands until it becomes warm, soft, and pliable. This prevents cracks later on. -
Roll it out:
Roll the clay onto a smooth surface to an even thickness of about 3-4mm. If the clay sticks, you can roll it onto a piece of parchment paper. -
Cut the shapes:
Using your circle cutters, punch out your charm shapes. For this set, you will need two smaller circles (approx. 1.5cm) and one slightly larger circle (approx. 2.5cm). -
Smooth the edges:
Dip your finger in a tiny bit of water and run it gently around the raw edges of the cut circles to smooth out any roughness. -
Create the hanging loops:
Using a straw or a cocktail stick, carefully pierce a hole near the top edge of each circle. Ensure the hole is big enough for your jump rings to move freely but not so close to the edge that the clay tears.
Step 2: Drying and Refining
-
Let them cure:
Place your clay pieces on a wire rack or flat surface to dry. Air dry clay typically needs 24-48 hours depending on humidity; flip them halfway through to ensure even drying. -
Sand for perfection:
Once fully hardened, use fine-grit sandpaper to gently buff the surface and edges. The goal is a super-smooth, porcelain-like finish before applying any color. -
Dust off:
Wipe the charms with a dry cloth or soft brush to remove all sanding dust. You need a clean base for the paint to adhere properly.
Smooth Surface Secret
Before cutting your circles, gently roll a textured acrylic roller or even a piece of fabric over the clay if you want a subtle pattern, or use plastic wrap over the clay before cutting for rounded, domed edges.
Step 3: Painting the Designs
-
Apply base coats:
Paint one small circle with a terracotta shade, the other small circle with midnight blue, and leave the large one plain (or paint it white if your clay isn’t bright enough). Apply two thin coats for opacity. -
Sketch the moon:
On the large white charm, use a very light pencil touch or go straight in with your blue paint and a fine brush to outline a crescent moon shape and a small star. -
Fill the details:
Add tiny blue dots to the moon to give it texture. I like to let this dry briefly before moving to the gold details so nothing smudges. -
Draw the sunburst:
On the blue charm, use your gold paint pen to draw radiating lines from the center to the edge, creating a sunburst or eye motif. -
Draw the leaf:
On the terracotta charm, use the gold pen to draw a simple botanical stem with veins branching out. -
Seal the work:
Once all paint is completely dry, apply a coat of clear gloss varnish to protect the designs and give them a ceramic-like shine.
Fixing Cracks
If small cracks appear as the clay dries, mix a tiny scrap of fresh clay with water to make a paste (slip). Fill the crack with this paste, smooth it over with your finger, and let it dry again.
Step 4: Final Assembly
-
Prepare jump rings:
Open an oversized gold jump ring using two pairs of pliers. Slide the terracotta charm onto it, then hook this ring onto a shorter necklace chain. -
Layer the second necklace:
For the layered look, take a longer chain. Attach the blue sunburst charm to a jump ring, and the white moon charm to a separate jump ring. -
Cluster the charms:
Thread both charms onto the longer chain so they cluster together nicely. The different sizes will naturally help them settle.
Wear your layered necklace set proudly or wrap them individually for a handmade gift that looks professionally crafted

TRACK YOUR CERAMIC JOURNEY
Capture glaze tests, firing details, and creative progress—all in one simple printable. Make your projects easier to repeat and improve.
Desk Organizer Tiles
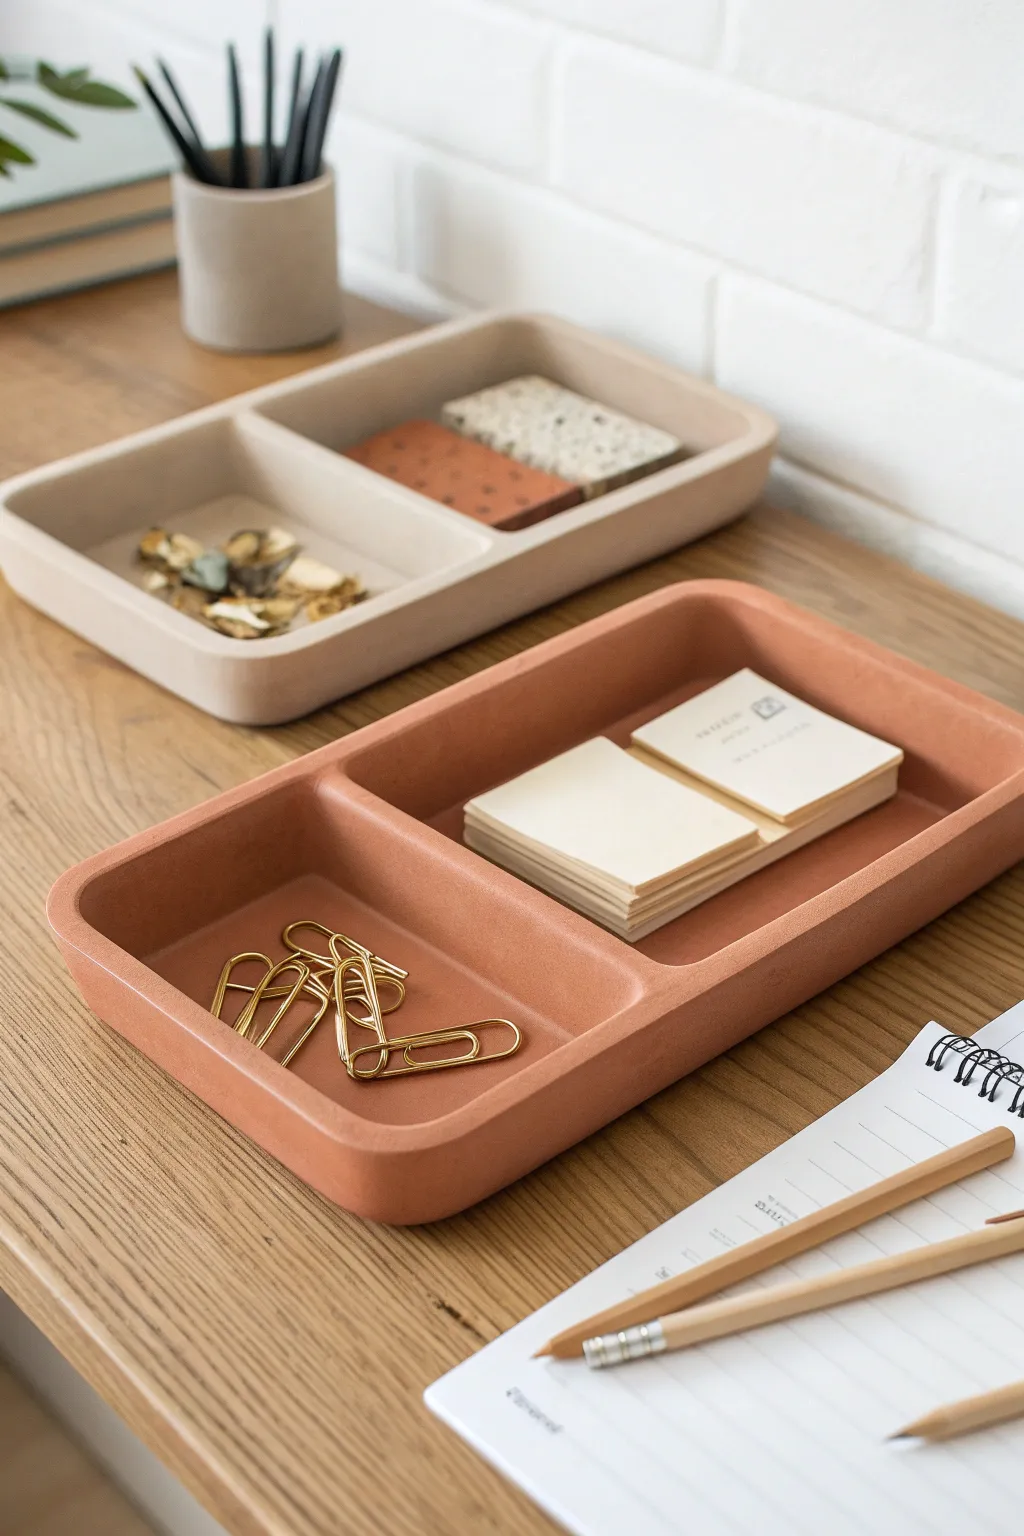
Bring a sense of calm order to your workspace with these sleek, architectural desk trays. Featuring a clean, divided layout and a matte finish, they capture the sophisticated look of fired ceramic using simple air dry clay.
Step-by-Step Guide
Materials
- High-quality air dry clay (white or terracotta)
- Rolling pin
- Two wooden guide strips (approx. 5mm thickness)
- Sharp craft knife or scalpel
- Ruler or straight edge
- Clay slip (water + clay mixture)
- Small flat paintbrush
- Sandpaper (medium and fine grit)
- Clear acrylic matte varnish
- Acrylic paint (optional, terracotta or beige tones)
Step 1: Base Construction
-
Prepare the workspace:
Lay down a piece of parchment paper or a canvas mat to prevent the clay from sticking to your table. -
Roll the slab:
Place your wooden guide strips on either side of a large ball of clay. Roll the clay out until the rolling pin rests on the guides, ensuring a perfectly even thickness of about 5mm. -
Cut the base:
Using your ruler and craft knife, cut a clean rectangle for the base. For the size shown, aim for approximately 4 inches by 8 inches. -
Smooth the foundation:
Dip your finger in a little water and gently run it over the surface and cut edges to remove any roughness or loose crumbs.
Step 2: Creating the Walls
-
Cut wall strips:
From the remaining rolled clay, cut long strips that are the same width as your desired tray height (about 0.75 to 1 inch). -
Measure the perimeter:
Measure the sides of your base rectangle. Cut your wall strips to match these lengths, creating two long sides and two short sides. -
Score and slip:
Score (scratch cross-hatch patterns) along the outer edges of the base and the bottom edge of your wall strips. Apply a generous amount of clay slip to the scored areas. -
Attach the walls:
Press the wall strips firmly onto the base. Where the corners meet, score and slip the vertical edges to join them together securely. -
Reinforce the seams:
Roll a very thin ‘snake’ of clay. Press this into the inner seam where the wall meets the floor. Use a modeling tool or your finger to smooth it out completely, blending the clay so the seam becomes invisible.
Straight Edge Secret
Use a plastic card (like an old gift card) as a smoothing tool. Dragging it gently across the flat wall surfaces creates sharper planes than your fingers can.
Step 3: Adding the Divider
-
Size the divider:
Cut a strip of clay identical in height to your exterior walls. Trim the length so it fits snugly between the two long walls. -
Position the partition:
Decide on your spacing. I like to place mine about one-third of the way across to create a designated spot for smaller items like paper clips. -
Secure vertically:
Score the interior of the long walls where the divider will go, and the ends of the divider strip. apply slip, and slide the piece into place. -
Blend connections:
Use your smoothing tool to blend the clay where the divider meets the walls and floor, ensuring specific attention to the corners for a seamless, cast-concrete look.
Faux Stone Effect
Mix dried tea leaves or cracked black pepper into the wet clay before rolling. When sanded later, these specks reappear to mimic terrazzo or granite.
Step 4: Refining and Finish
-
Initial smoothing:
Once the structure is built, dip a soft brush in water and go over the entire piece to smooth out fingerprints and minor imperfections. -
Slow drying:
Place the tray away from direct sunlight or heat sources. Let it dry slowly for 24-48 hours. Rotate it occasionally to prevent warping. -
Sand for perfection:
Once bone dry, use medium grit sandpaper to level the top rim so it is perfectly flat. Follow with fine grit sandpaper all over for a silky, matte texture. -
Color application:
If you didn’t use colored clay, paint the tray now. Mix acrylics to achieve earthy tones like terracotta red or sandstone beige. Apply two thin coats. -
Seal the deal:
Finish with a coat of matte varnish to protect the surface from scratches while maintaining that natural, non-glossy aesthetic.
Place your new organizers on your desk and enjoy the satisfaction of a tidy, stylish work surface
Photo and Card Holders
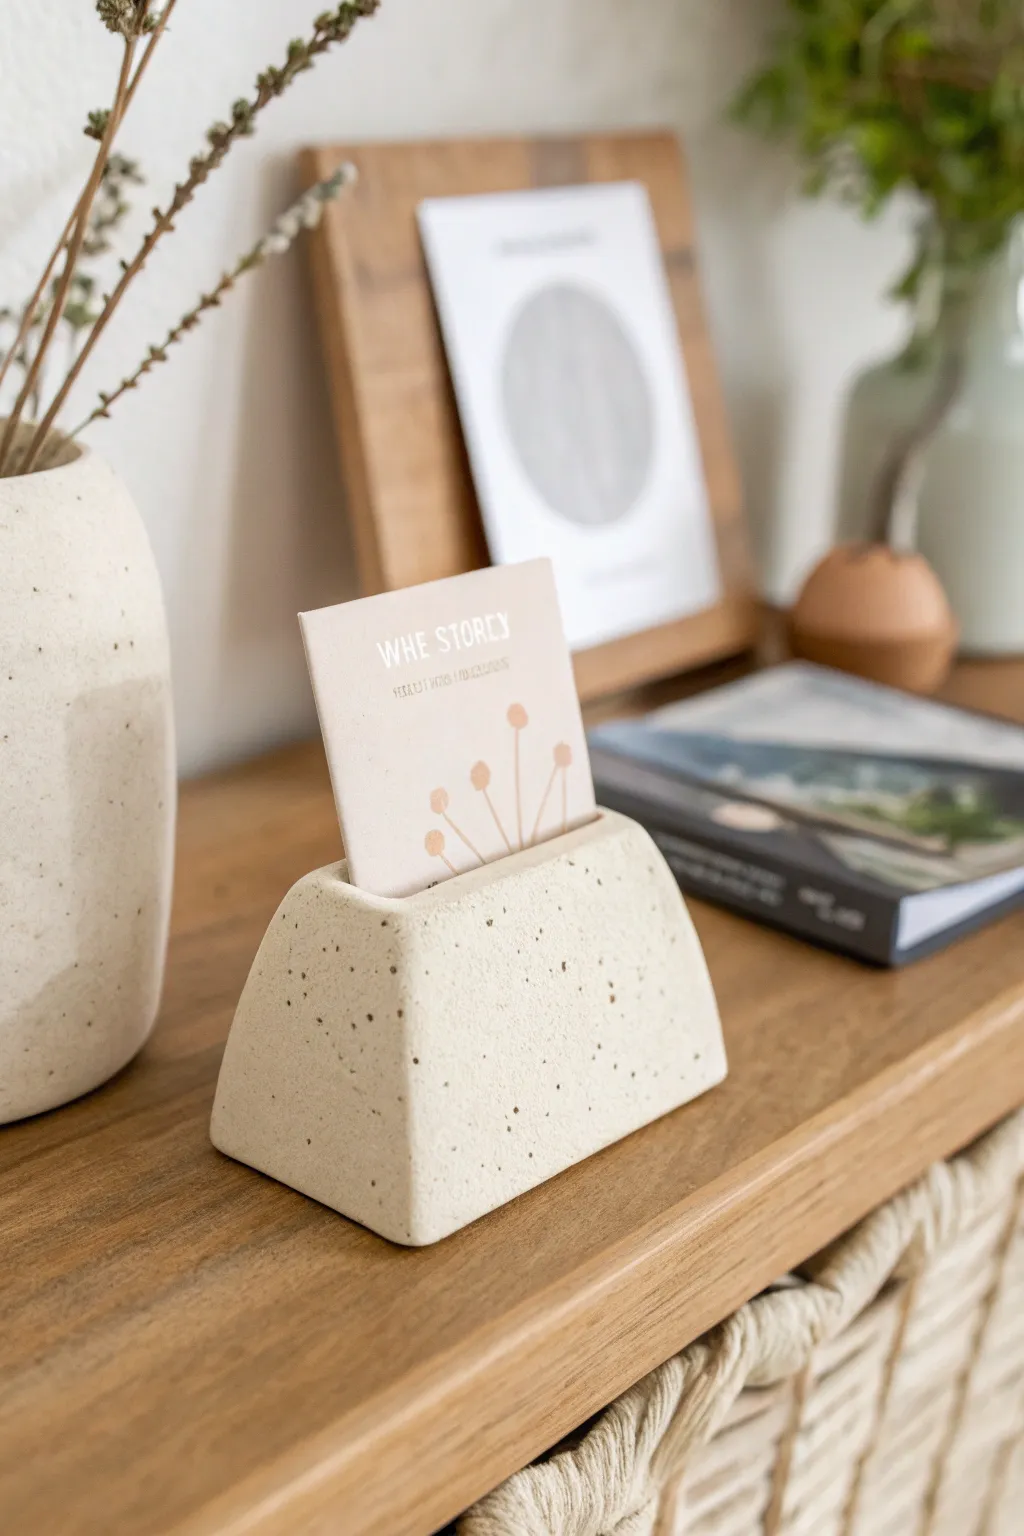
This minimal and sturdy card holder features a unique trapezoid shape and a delightful speckled texture that mimics stone or ceramic. It’s perfect for displaying photos, postcards, or place settings with an earthy, modern touch.
Detailed Instructions
Materials
- White air dry clay
- Used coffee grounds or fine black sand (for speckling)
- Rolling pin
- Sharp craft knife or clay blade
- Ruler
- Fine-grit sandpaper
- Acrylic rolling guides (optional, for even thickness)
- Small bowl of water
- Matte sealant or varnish
Step 1: Preparation & Shaping
-
Prepare the Clay:
Start by taking a generous handful of white air dry clay. Knead it thoroughly in your hands to warm it up and make it pliable. -
Add Texture:
To achieve the speckled look shown in the photo, flatten your clay slightly and sprinkle in about half a teaspoon of dried used coffee grounds or fine black sand. -
Knead in Texture:
Fold the clay over the grounds and knead repeatedly until the speckles are evenly distributed throughout the entire lump of clay. -
Form the Base Block:
Roughly shape the clay into a rectangular block using your hands. This doesn’t need to be perfect yet, just getting the general mass right. -
Refine the Sides:
Press the block onto your work surface to flatten the bottom. Use your palms to gently angle the two long sides inward, creating a trapezoidal profile where the base is wider than the top. -
Smooth the Surface:
Dip your finger in a little water and run it over the clay to smooth out any fingerprints or cracks. Keep the edges relatively soft and rounded as seen in the example, rather than razor-sharp.
Uneven Slot?
If the card slot closes up while drying, gently sand inside the groove with a folded piece of sandpaper, or use a tiny nail file to widen it back up.
Step 2: Creating the Slot
-
Mark the Center:
Use your ruler to find the exact center of the top face of your trapezoid. Make a tiny guide mark. -
Cut the Slot:
Take your craft knife or a rigid ruler and press straight down into the center mark to create the slot. I find that rocking the blade slightly helps it cut cleanly without dragging the clay. -
Widen the Opening:
Wiggle the tool slightly to ensure the gap is wide enough for a heavy cardstock card. The slot should be roughly 1 cm deep to hold items securely. -
Check Fit:
If possible, test the slot immediately with a piece of scrap paper to ensure it isn’t too tight, but remove it quickly so it doesn’t stick.
Step 3: Finishing Touches
-
Initial Drying:
Set the piece aside in a cool, dry place. Let it dry for about 24 hours. Flip it occasionally to ensure the bottom dries evenly. -
Sanding:
Once fully dry and hard, take your fine-grit sandpaper and gently sand the exterior. This will remove any lingering imperfections and expose more of the speckled texture. -
Dusting Off:
Wipe the piece down with a barely damp cloth or a dry brush to remove the clay dust from sanding. -
Sealing:
Apply a coat of matte varnish or sealant. This protects the clay from moisture and gives it a finished, professional look without making it too shiny. -
Final Dry:
Allow the sealant to cure completely according to the bottle instructions before inserting your favorite photo.
Stone Effect
Use different sized grounds (tea leaves vs coffee) to vary the speckle size. This creates a more organic, natural stone appearance.
Now you have a stylish, custom-made display piece ready for your desk or shelf
Faux Ceramic Glaze Looks
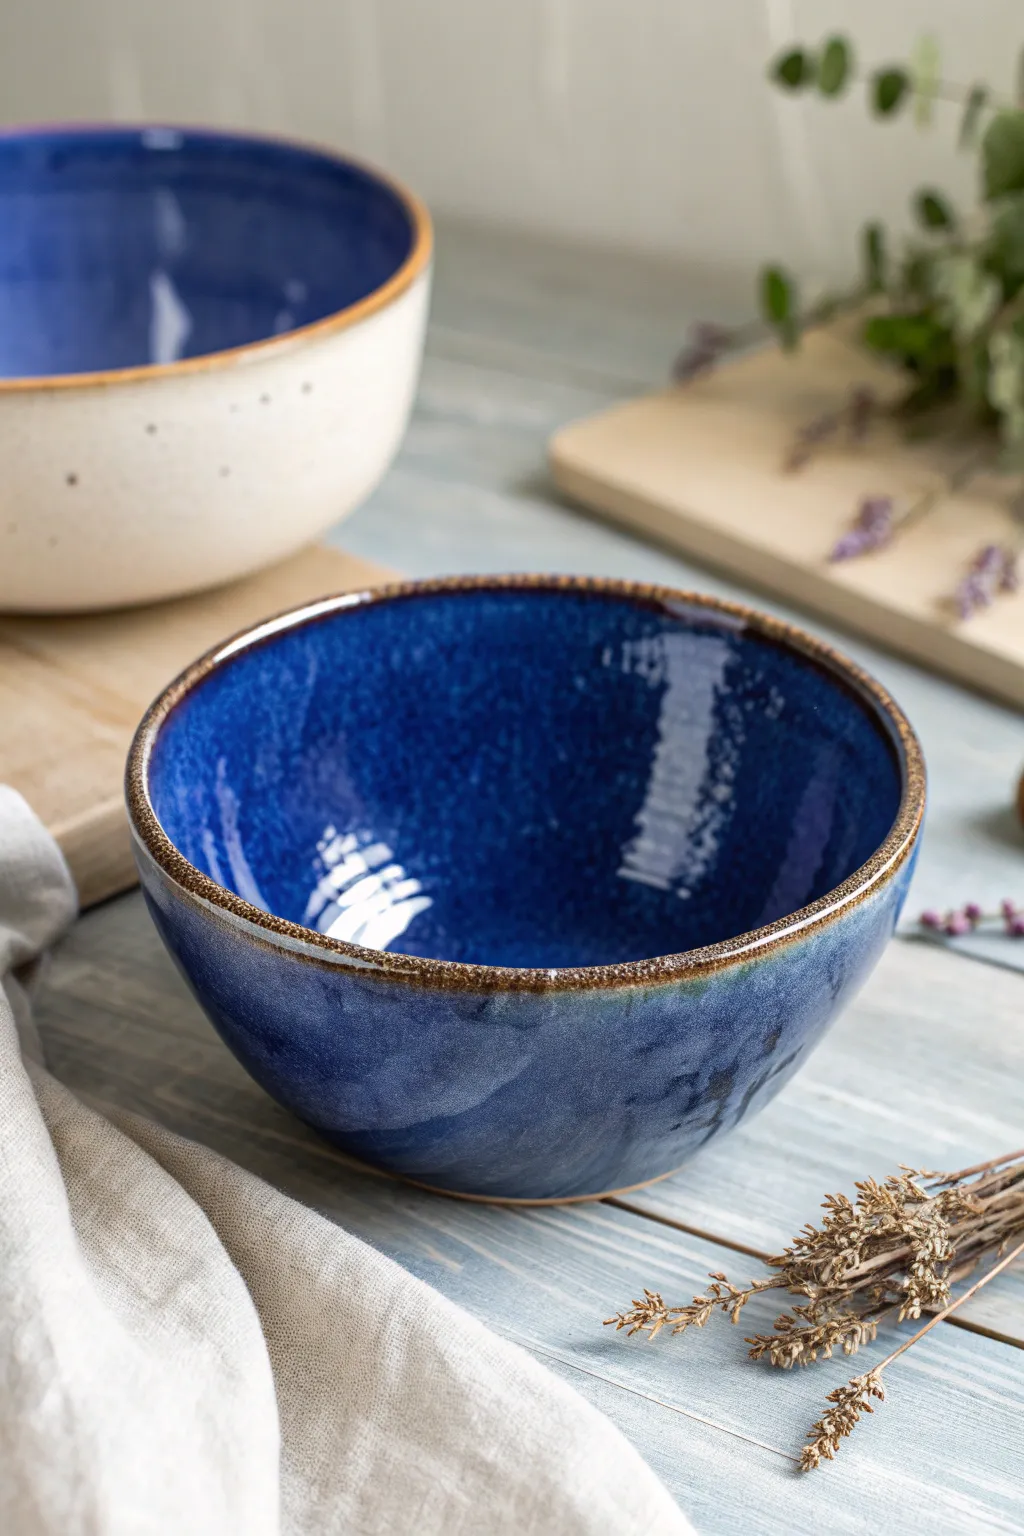
Achieve the luxurious, high-gloss depth of kiln-fired ceramics using simple air-dry clay and a clever painting technique. This project mimics a rich cobalt reactive glaze with a rustic roasted edge, perfect for holding trinkets or purely for decoration.
How-To Guide
Materials
- Air dry clay (white or terracotta)
- Rolling pin
- Bowl for mold (smooth plastic or glass)
- Sandpaper (fine grit)
- Acrylic paints: Midnight Blue, Royal Blue, Black, Burnt Umber
- High-gloss varnish or polyurethane sealer (thick consistency)
- Soft synthetic brushes
- Sponge dabber
- Plant mister with water
- Clay sculpting tools or butter knife
Step 1: Shaping the Vessel
-
Roll the Slab:
Begin by conditioning your air dry clay until it is pliable, then roll it out to a uniform thickness of about 1/4 inch. If the clay feels sticky, I like to roll it out on a piece of parchment paper for easier handling. -
Drape Over Mold:
Select a smooth bowl to serve as your form. Gently lift your clay slab and drape it over the upside-down bowl, pressing it lightly to conform to the shape without stretching it too thin. -
Trim the Excess:
Using a clay tool or knife, trim the excess clay around the rim of your mold bowl to create a clean, even edge. -
Smooth the Surface:
Dip your fingers in a little water and run them over the exterior of the clay (which will be the bottom of your bowl) to smooth out any textures or fingerprints. -
Create a Foot Ring:
Roll a thin snake of clay, form it into a circle, and attach it to the bottom center of the bowl using a scratch-and-score method with a little water slip to secure it. -
Slow Design Drying:
Allow the clay to dry on the mold for roughly 24 hours until it holds its shape, then gently remove it from the mold and let it dry completely (another 24-48 hours) upside down to prevent warping. -
Refine the Form:
Once bone dry, sand the entire surface with fine-grit sandpaper, focusing on smoothing the rim and removing any sharp edges to mimic the softness of thrown pottery. Wipe away all dust with a barely damp cloth.
Glazed Rim Illusion
Use a slightly lighter brown tone just under the dark rim line. This highlights the ‘exposed clay’ effect common in stoneware pottery.
Step 2: Creating the Faux Glaze
-
Base Coat:
Paint the entire interior and exterior of the bowl with a solid coat of Midnight Blue acrylic paint. Let this dry completely. -
Sponging Detail:
Dampen a sponge dabber and dip it into a brighter Royal Blue. Lightly sponge the interior of the bowl to create depth and texture, allowing some of the darker base to peek through. -
Creating the Rim:
Mix a small amount of Black and Burnt Umber paint. Using a small brush, carefully paint the very edge of the rim. -
Bleeding the Edge:
While the rim paint is still wet, use a slightly damp clean brush to gently pull the dark color down into the blue just a millimeter or two, simulating how glaze breaks over a ceramic edge. -
Adding Speckles:
Dilute a tiny drop of the brown/black mixture with water. Load a stiff brush or toothbrush and flick very tiny speckles onto the exterior and interior to mimic iron spots found in clay bodies. -
Initial Glazing:
Once the paint is fully cured, apply a thick layer of high-gloss varnish. Use long, smooth strokes to avoid bubbles. -
Building the Sine:
Let the first coat dry according to the bottle instructions, then apply a second thick coat. The goal is to build up a ‘glassy’ layer that looks wet even when dry. -
Final Polish:
For the ultimate ceramic look, apply a third coat of gloss, paying special attention to the rim where glaze naturally pools. Let it cure undisturbed in a dust-free area.
Level Up: Galaxy Effect
Before the final gloss, flick tiny dots of white paint into the deep blue interior to create a starry night cosmic effect.
Place your shiny new bowl on a coffee table or shelf and enjoy the sophisticated touch of deep blue ceramics in your home
Speckled Faux Terrazzo Pieces
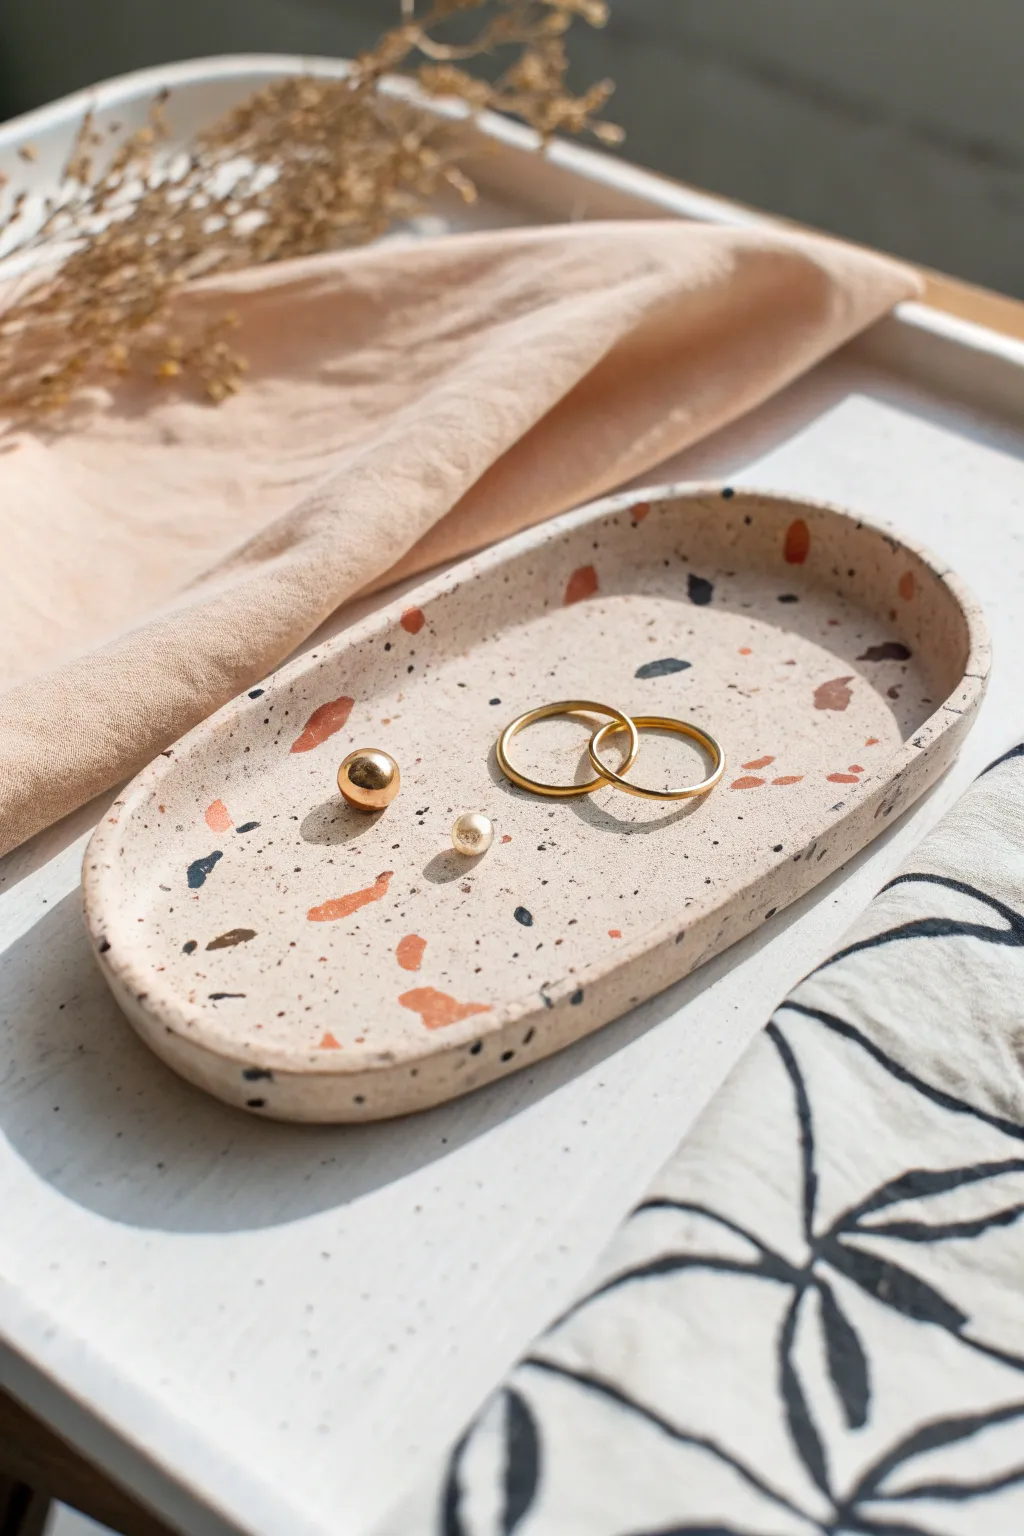
Capture the trendy, modern aesthetic of terrazzo stone without the weight or cost by using air dry clay. This oval trinket tray features warm terracotta and stark black chips embedded in a creamy base, creating a sophisticated home for your favorite jewelry pieces.
Step-by-Step
Materials
- White air dry clay (approx. 500g)
- Acrylic paint (terracotta/rust, black, beige)
- Rolling pin
- Sharp craft knife or clay blade
- Parchment paper or non-stick mat
- Small bowl of water
- Sandpaper (fine and medium grit)
- Gloss or matte varnish (sealant)
- Oval template (optional, paper or cardstock)
Step 1: Preparing the Chips
-
Coloring the accents:
Pinch off two small balls of white clay, each about the size of a walnut. Flatten them slightly and add a drop of acrylic paint to the center of each—terracotta for one and black for the other. -
Kneading the pigment:
Fold the clay over the paint and knead thoroughly until the color is uniform. If the clay feels sticky from the paint, let it sit for a few minutes to firm up. -
Flattening the colored clay:
Roll both colored clay balls into very thin, flat sheets, roughly 1-2mm thick. The thinner they are, the more delicate your final terrazzo chips will look. -
Creating the chips:
Tear the flattened colored clay into tiny, irregular pieces. Aim for variety in size and shape to mimic real stone fragments. -
Hardening the chips:
Leave these torn pieces on parchment paper to dry completely. They need to be hard so they don’t smear when you roll them into the base clay later.
Chip Variety
Mix dried chips with slightly soft ones when embedding. The dry ones stay sharp; soft ones smear slightly for a varied, organic marble look.
Step 2: Forming the Tray
-
Coloring the base:
Take a larger portion of white clay for the tray body. Mix in a very small amount of beige paint to create a warm, off-white or cream stone color. -
Initial rolling:
Roll out your base clay into a thick slab, approximately 1cm thick. It doesn’t need to be perfect yet. -
Embedding the chips:
Sprinkle your dried colored chips generously over the surface of the clay slab. Press them gently down with your hand first to secure them. -
Rolling it smooth:
Use your rolling pin to go over the slab again. This will force the hard, dry chips into the soft base clay, creating a flush surface. -
Checking the underside:
Carefully flip the slab over. I prefer to add chips to the bottom side as well, just in case they show on the edges, then roll it smooth again until the slab is about 5mm thick. -
Cutting the shape:
Place your oval template onto the clay pattern. Use a sharp craft knife held vertically to cut cleanly around the shape.
Preventing Cracks
If you see tiny cracks forming while the rim dries, smooth them immediately with a damp finger or a slurry made of clay and water.
Step 3: Refining and Finish
-
Creating the lip:
To create the raised rim, gently pinch the edges of the oval upward. Use a little water on your fingertip to smooth out the transition curve inside the tray. -
Smoothing edges:
Run a damp finger along the top rim to soften any sharp cut marks. Ensure the walls are of even height all around the oval. -
The drying phase:
Let the tray dry for 24-48 hours. Turn it over halfway through the process to ensure the bottom dries evenly and prevents warping. -
Revealing the pattern:
Once fully dry, sand the entire surface vigorously. This is the magic step—sanding removes the top film of clay to reveal the crisp, clear shapes of the colored chips underneath. -
Dusting off:
Wipe away all the clay dust with a slightly damp cloth or a soft brush. -
Sealing the piece:
Apply a coat of varnish to protect the clay and deepen the colors. A matte finish looks more like natural stone, while gloss gives a polished ceramic look.
Now you have a stylish, customized accent piece ready to hold your daily essentials