Air-dry clay is my favorite way to make Easter decor that feels handmade, sweet, and totally doable in one cozy crafting session. Here are my go-to air dry clay Easter ideas—starting with the classics and ending with a few playful twists you might not expect.
Classic Egg-Shaped Ornaments
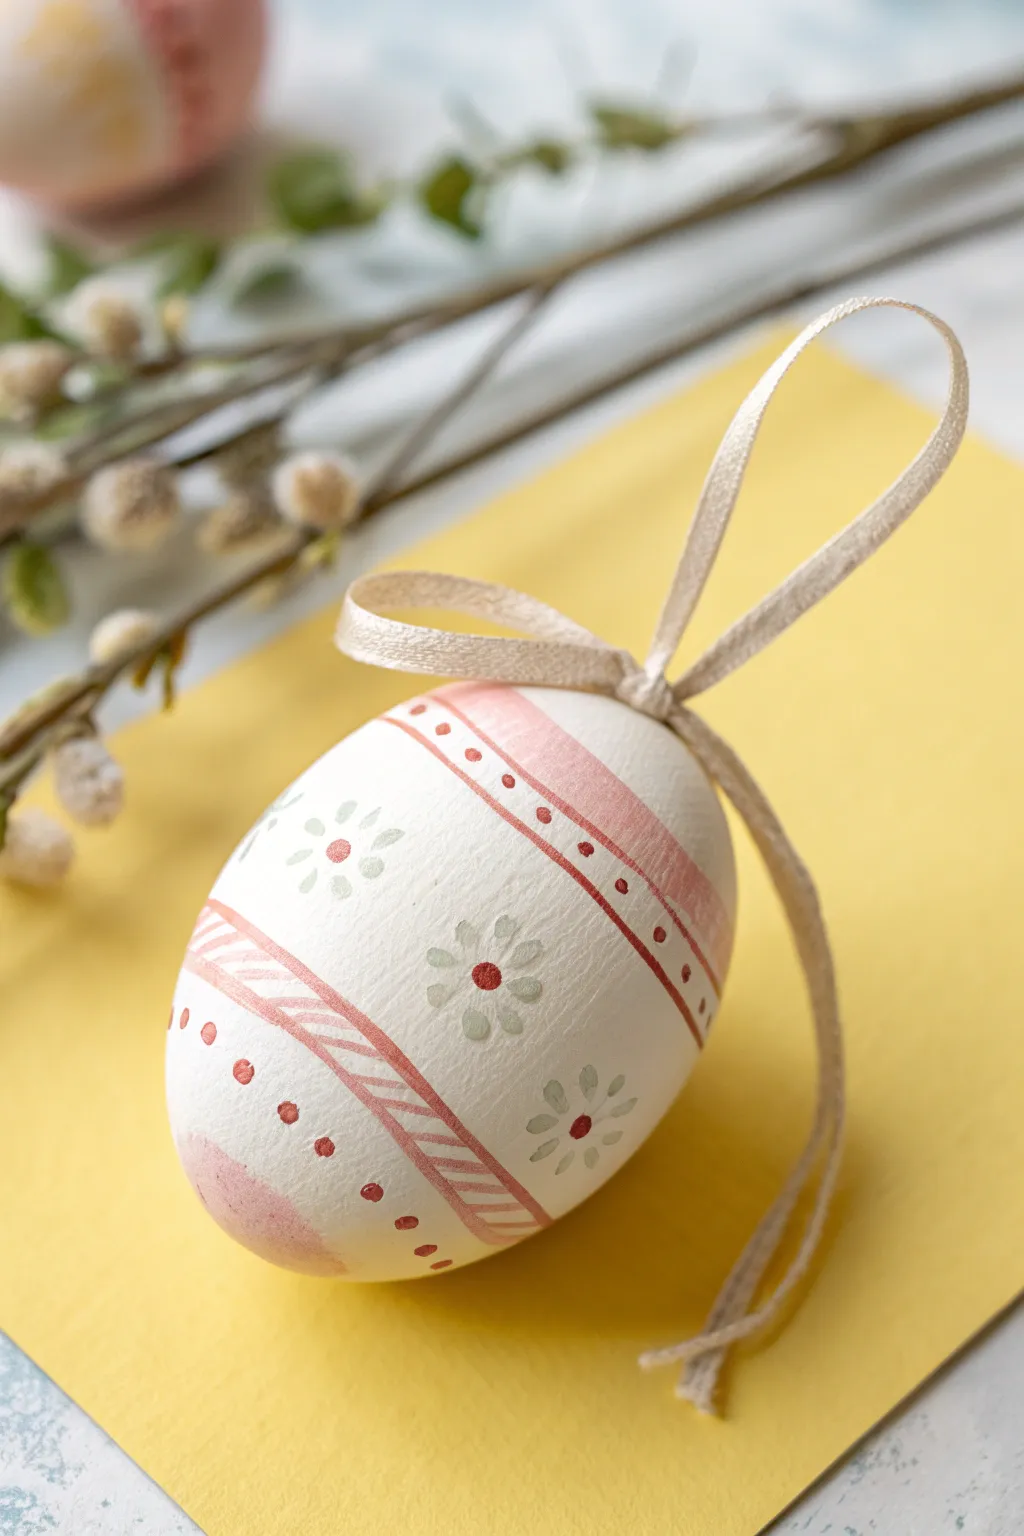
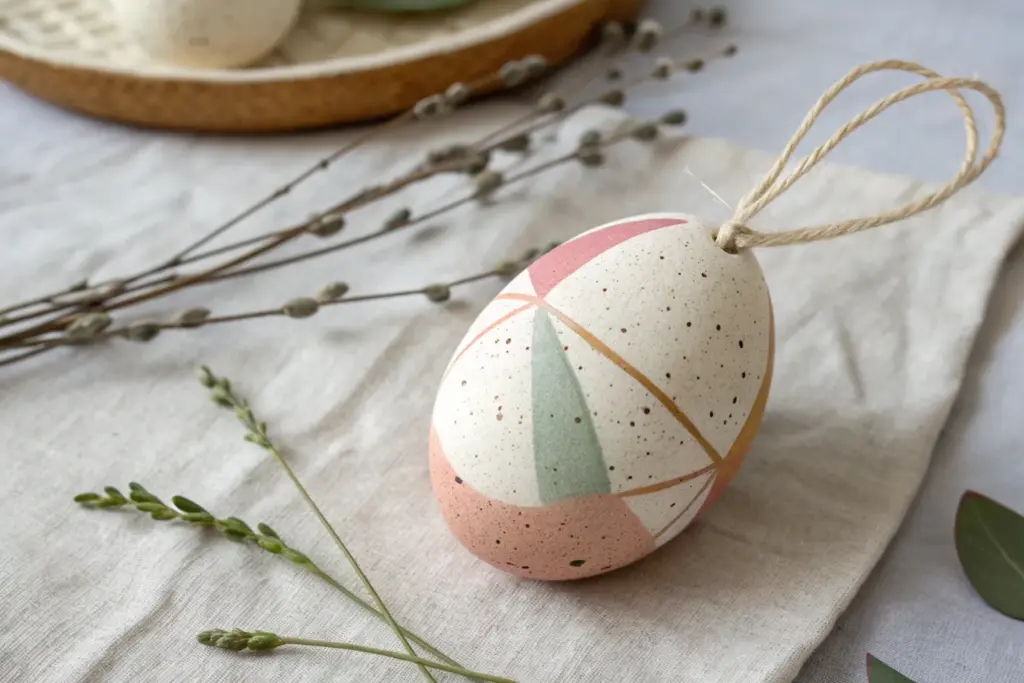
Capture the charm of traditional European Easter decor with these delicate air dry clay ornaments. Featuring soft pink and olive green motifs on a crisp white base, they look lovely hanging from pussy willow branches or tucked into a centerpiece basket.
Detailed Instructions
Materials
- White air dry clay
- Rolling pin
- Egg-shaped cookie cutter (approx. 2.5-3 inches)
- Sandpaper (fine grit)
- Sponge
- White acrylic paint (priming coat)
- Acrylic paints: Blush pink, Olive green, Deep red/burgundy
- Detailed liners or fine round paintbrushes (sizes 0/00)
- Ribbon (cream or beige satin, 1/4 inch wide)
- Straw or toothpick (for the hole)
- Matte varnish (optional)
Step 1: Shaping the Clay Base
-
Condition the clay:
Begin by kneading a handful of white air dry clay until it is soft, pliable, and free of cracks. -
Roll it out:
Use your rolling pin to flatten the clay to a uniform thickness, aiming for about 1/4 inch thick to ensure durability without being too heavy. -
Cut the shapes:
Press your egg-shaped cookie cutter firmly into the clay. Lift the cutter and gently push the clay shape out if it sticks. -
Smooth the edges:
Dip a finger in a little water and run it along the cut edges of the egg to smooth out any roughness or sharp ridges. -
Create the hanging hole:
Using a straw or a toothpick, punch a clean hole near the the top narrow end of the egg. Make sure it’s large enough for your ribbon to pass through later. -
Initial drying:
Place the eggs on a wire rack or parchment paper to dry. Flip them over after a few hours to prevent curling. -
Sand for perfection:
Once fully cured (usually 24-48 hours), use fine-grit sandpaper to gently buff the surface until it feels polished and smooth.
Pro Tip: Clean Lines
If you struggle with steady hands for the stripes, use thin washi tape or painter’s tape to mask off the areas before painting the pink bands.
Step 2: Painting the Design
-
Prime the surface:
To get that crisp, clean background, apply a thin coat of white acrylic paint over the dried clay and let it dry completely. -
Paint the bottom band:
Mix a soft blush pink shade. Paint a curved band at the very bottom of the egg, following the rounded contour. -
Add the top band:
Using the same blush pink, paint a thicker curved stripe across the upper third of the egg. This creates the main structural lines for the design. -
Detail the stripes:
Below the main top band, use a very fine brush and the pink paint to create a diagonal hatching pattern—a series of small angled lines resembling a woven texture or candy cane stripe. -
Add circular dots:
Switch to a deep red or burgundy paint. Carefully add a row of tiny dots along the top edge of the diagonal stripe section and along the bottom edge of the solid pink band. -
Paint the flowers:
Mix a muted olive green. In the central white space and the upper white space, paint small six-petaled flowers using simple tear-drop brush strokes radiating from a center point. -
Add flower centers:
Dip the non-brush end of your paintbrush into the deep red paint and dot the center of each olive green flower. -
Fill in accents:
Between the larger design elements, add tiny single olive green leaves or dots to fill any empty white space without overcrowding it. -
Top coat (optional):
I like to seal the design with a matte varnish at this stage to protect the paint, though leaving it matte gives a very authentic ceramic feel.
Troubleshooting: Warped Egg?
If your egg curled while drying, lightly sandwich it between two heavy books (protected by parchment paper) while it is still slightly flexible to flatten it back out.
Step 3: Finishing Touches
-
Thread the ribbon:
Cut a length of cream satin ribbon, about 8 inches long. -
Create the loop:
Fold the ribbon in half and push the folded loop through the hole from front to back. -
Secure the hanger:
Thread the loose ends through the loop and pull tight to create a lark’s head knot directly on the ornament.
Now your handcrafted ornaments are ready to bring a touch of artisan elegance to your holiday display


Carrot Mini Wall Charms
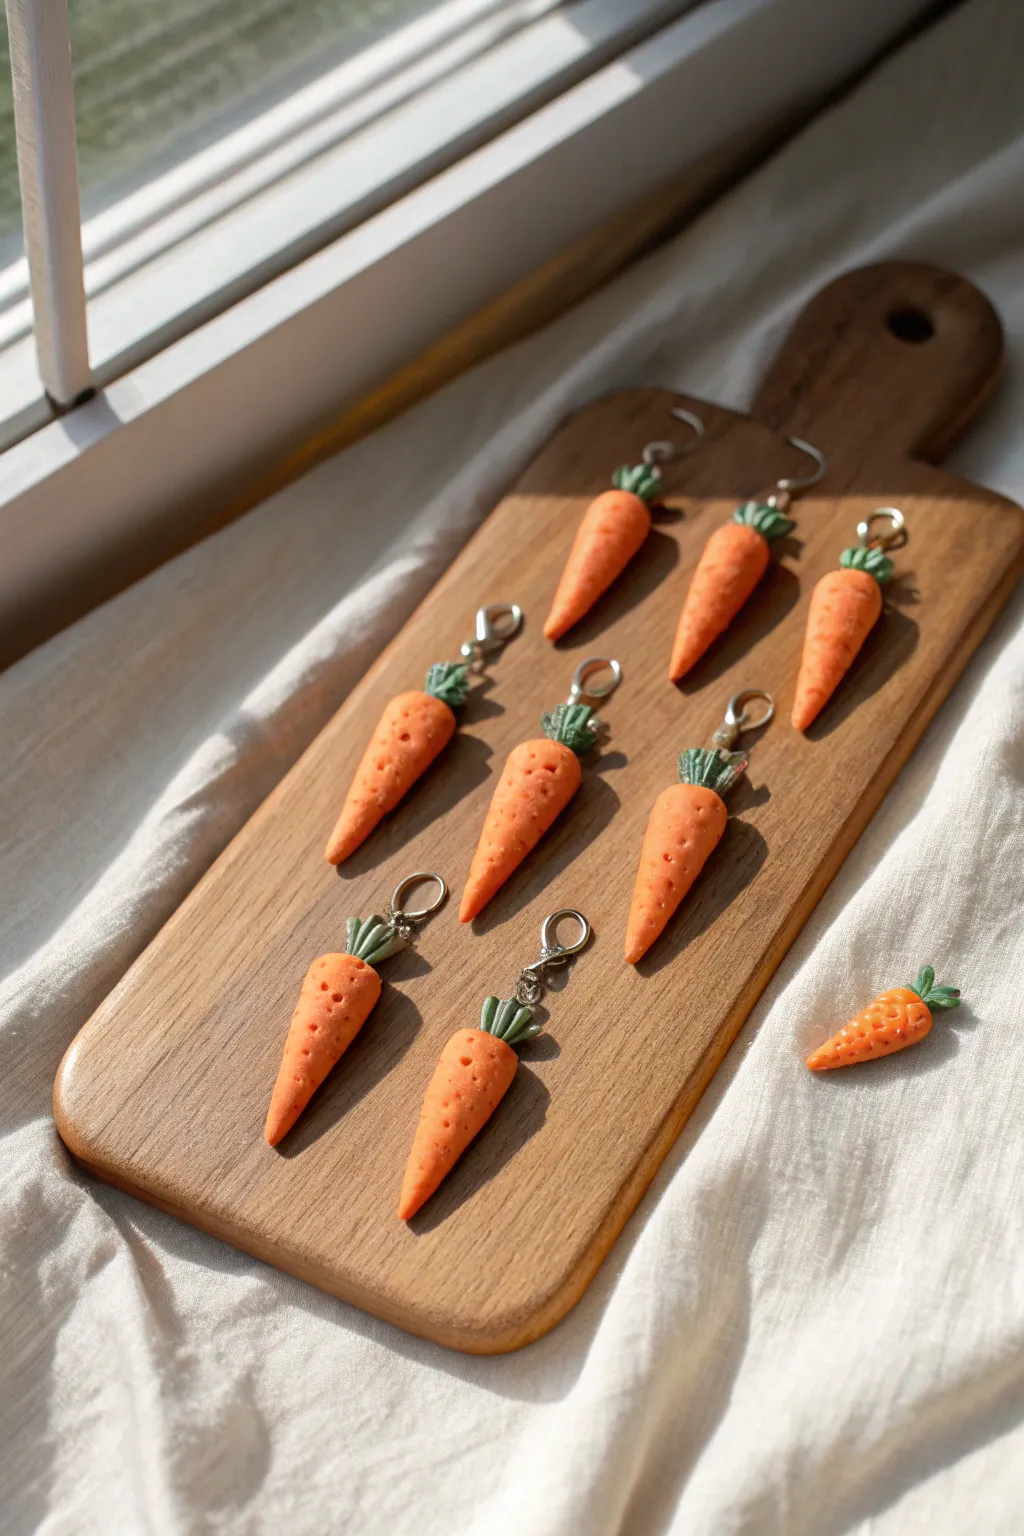
These adorable mini carrot charms add a playful pop of color to your Easter decor or spring accessories. Crafted with simple texturing techniques, they feature realistic pitted surfaces and vibrant green tops for a fresh-from-the-garden look.
Detailed Instructions
Materials
- Air dry clay (orange and green tinted, or white)
- Acrylic paint (orange, green, brown) if using white clay
- Pointed sculpting tool or toothpick
- Small metal screw eye pins
- Jump rings or lobster clasps
- Rolling pin or smooth round object
- Fine-grit sandpaper
- Matte or satin varnish (optional)
- Small pliers
Step 1: Shaping the Vegetables
-
Prepare the Clay:
Begin by conditioning your orange clay until it is pliable. If you are starting with white clay, you can mix acrylic paint directly into it now or plan to paint the finished dry piece later. -
Form the Base:
Pinch off a small amount of orange clay, about the size of a marble. Roll it into a ball between your palms to smooth out any cracks. -
Create the Cone Shape:
Apply more pressure to one side of the ball as you roll it back and forth/ This will taper the clay into an elongated cone or teardrop shape typical of a carrot. -
Flatten Slightly:
Once you have your cone, press it very gently against your work surface so the back is slightly flat. This helps the charm lay nicely against a wall or flat surface without rolling.
Step 2: Adding Texture & Detail
-
Texture the Surface:
Using a needle tool, toothpick, or even a crumpled ball of aluminum foil, gently press indentations all over the orange cone to mimic the pitted texture of a real carrot skin. -
Add Horizontal Lines:
Take a sculpting knife or the side of your toothpick to score shallow, uneven horizontal lines across the carrot body. This enhances the organic root vegetable appearance. -
Form the Greens:
Take a very small piece of green clay. Roll it into a tiny cylinder and then flatten one end to create a small fan shape. -
Detail the Leaves:
Use your sharp tool to press vertical lines into the green fan, separating it visually into individual leafy stems. Pinch the top slightly to give it movement. -
Attach the Top:
Press the bottom of the green section firmly onto the wide top of your orange carrot. You can use a tiny dab of water or liquid clay to ensure a strong bond.
Loose Eye Pins?
If the metal pin feels loose after the clay dries, unscrew it, add a drop of superglue to the threads, and screw it back into the same hole.
Step 3: Assembly & Finishing
-
Insert Hardware:
While the clay is still wet, carefully screw a small metal eye pin into the center of the green top. If the clay deforms, gently reshape it with your fingers. -
Drying Phase:
Place your carrots on a clean, flat surface to dry. Allow them to air dry completely for 24 to 48 hours, flipping them once halfway through to ensure even drying. -
Painting (Optional):
If you used white clay, now is the time to paint. Use a bright orange for the body and a deep green for the top. I prefer to add a tiny wash of thinned brown paint into the crevices to highlight the texture. -
Sealing:
Once dry (and paint is set), apply a thin coat of matte or satin varnish. This protects the clay from moisture and gives the vegetable a slight, realistic sheen. -
Final Hardware:
Using small pliers, open a jump ring and attach a lobster clasp or larger ring to the eye pin you inserted earlier. Close the ring securely.
Make it a Garland
String several finished carrots onto a length of jute twine or ribbon to create a festive Easter garland for your mantle or window.
Hang your new miniature harvest individually or group them together for a delightful seasonal display


Speckled Robin’s Egg Decor
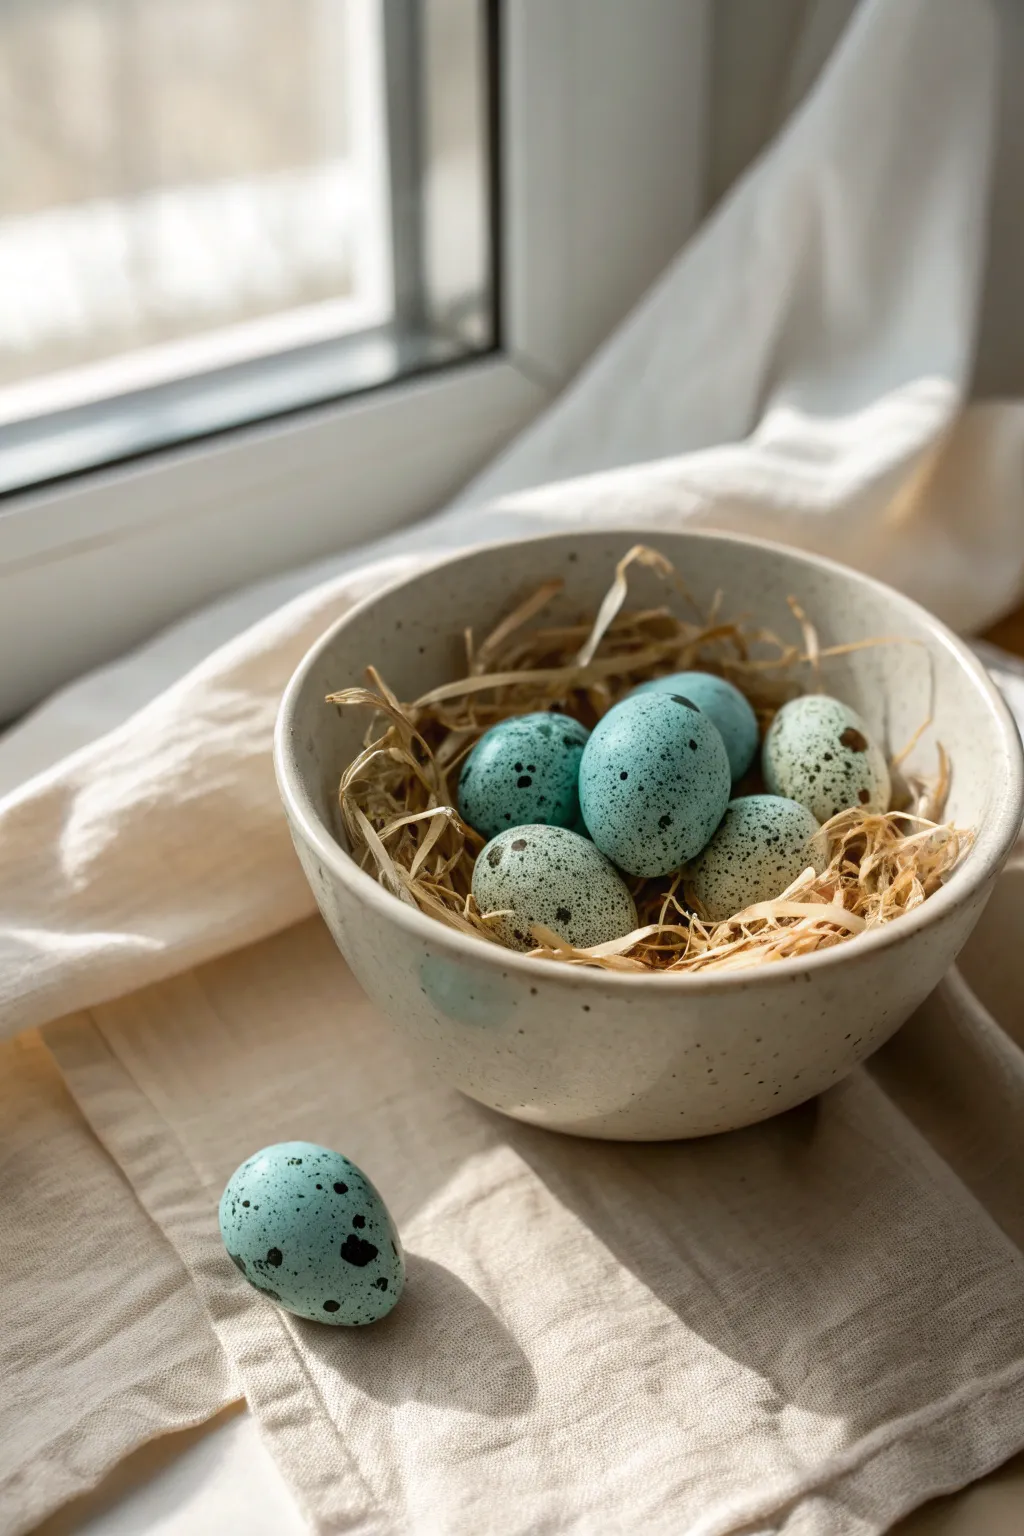
Capture the delicate beauty of spring with these handmade faux robin’s eggs, perfect for nestling into baskets or displaying in a rustic bowl. Using air-dry clay and a simple splatter technique, you can recreate that iconic soft blue hue and distinctive speckling without the fragility of real shells.
Step-by-Step Guide
Materials
- White air-dry clay
- Acrylic paints: Teal, Light Blue, White, Black, Burnt Umber
- Paintbrushes: Flat brush for base coat, stiff bristle brush or toothbrush for speckling
- Cup of water
- Small bowl or nesting material (raffia/straw) for drying
- Fine-grit sandpaper
- Matte varnish (optional)
Step 1: Shaping the Clay
-
Condition the clay:
Start by taking a chunk of air-dry clay roughly the size of a golf ball. Knead it in your hands for a minute to warm it up and make it pliable, which helps prevent future cracking. -
Roll a sphere:
Roll the clay between your palms to create a smooth, seamless ball. Apply firm pressure initially to condense the clay, then lighten your touch to smooth out the surface. -
Form the egg shape:
Gently narrow one end of the sphere by rolling just that side between your tilted palms. You want a subtle taper, not a sharp point, to mimic the organic shape of a natural egg. -
Smooth imperfections:
Dip your finger in a tiny bit of water and rub it over any creases or fingerprints. I like to spend an extra minute here ensuring the surface is glass-smooth before drying, as it saves sanding time later. -
Shape varying sizes:
Repeat the process to create a dozen eggs. Vary the amount of clay slightly for each one so your final collection looks natural and gathered, rather than manufactured. -
Allow to dry:
Place the eggs on a clean cloth or a piece of parchment paper to dry. Rotate them every few hours to prevent flat spots from forming on the bottom. Let them cure for 24-48 hours until fully hard and white.
Uneven Speckles?
If you get a large, accidental blob of paint while splattering, don’t wipe it! Dab it gently with a dry paper towel to lift the excess, leaving a faint, natural-looking stain behind.
Step 2: Painting and Speckling
-
Refine the surface:
Once dry, check for any rough spots. If necessary, use fine-grit sandpaper to gently buff the surface smooth, then wipe away the dust with a barely damp cloth. -
Mix the base colors:
Create your robin’s egg blue by mixing white acrylic paint with a small amount of teal and a tiny dot of light blue. Prepare a second mixture that is slightly lighter or greener to add variety to your clutch. -
Apply base coat:
Paint the entire surface of each egg. You may need to paint the top half, let it dry in an egg carton or bottle cap, and then flip it to paint the bottom. Two thin coats are better than one thick, gloopy coat. -
Prepare the speckle paint:
Mix a small amount of black paint with a touch of burnt umber to create a dark, warm brownish-black. Thin this mixture with water until it has an ink-like consistency. -
The splatter technique:
Dip a stiff bristle brush or an old toothbrush into the thinned dark paint. Hold the brush about 6 inches away from the eggs and run your thumb across the bristles to flick tiny droplets onto the surface. -
Control the spray:
Practice on a piece of paper first to gauge the size of the droplets. Aim for a mix of fine mist and slightly larger, distinct spots for the most realistic look. -
Rotate and repeat:
Once the first side is dry, turn the eggs over and repeat the splattering process on the other side. Don’t worry about perfection; random placement looks more authentic. -
Add large spots:
For a few standout details, use the very tip of a fine paintbrush or a toothpick to manually place a few larger, irregular dark spots on some of the eggs. -
Seal the finish:
After the paint is completely dry, apply a coat of matte varnish to protect the finish. Avoid glossy sealers, as real bird eggs have a natural, matte texture.
Gilded Glamour
For a luxe twist, mix metallic gold powder into your varnish or add a second layer of gold leaf splatter over the black speckles for elegant, jewelry-like décor.
Arranging these in a ceramic bowl with some dried grass creates an instant centerpiece that celebrates the season


Pressed Flower Easter Eggs
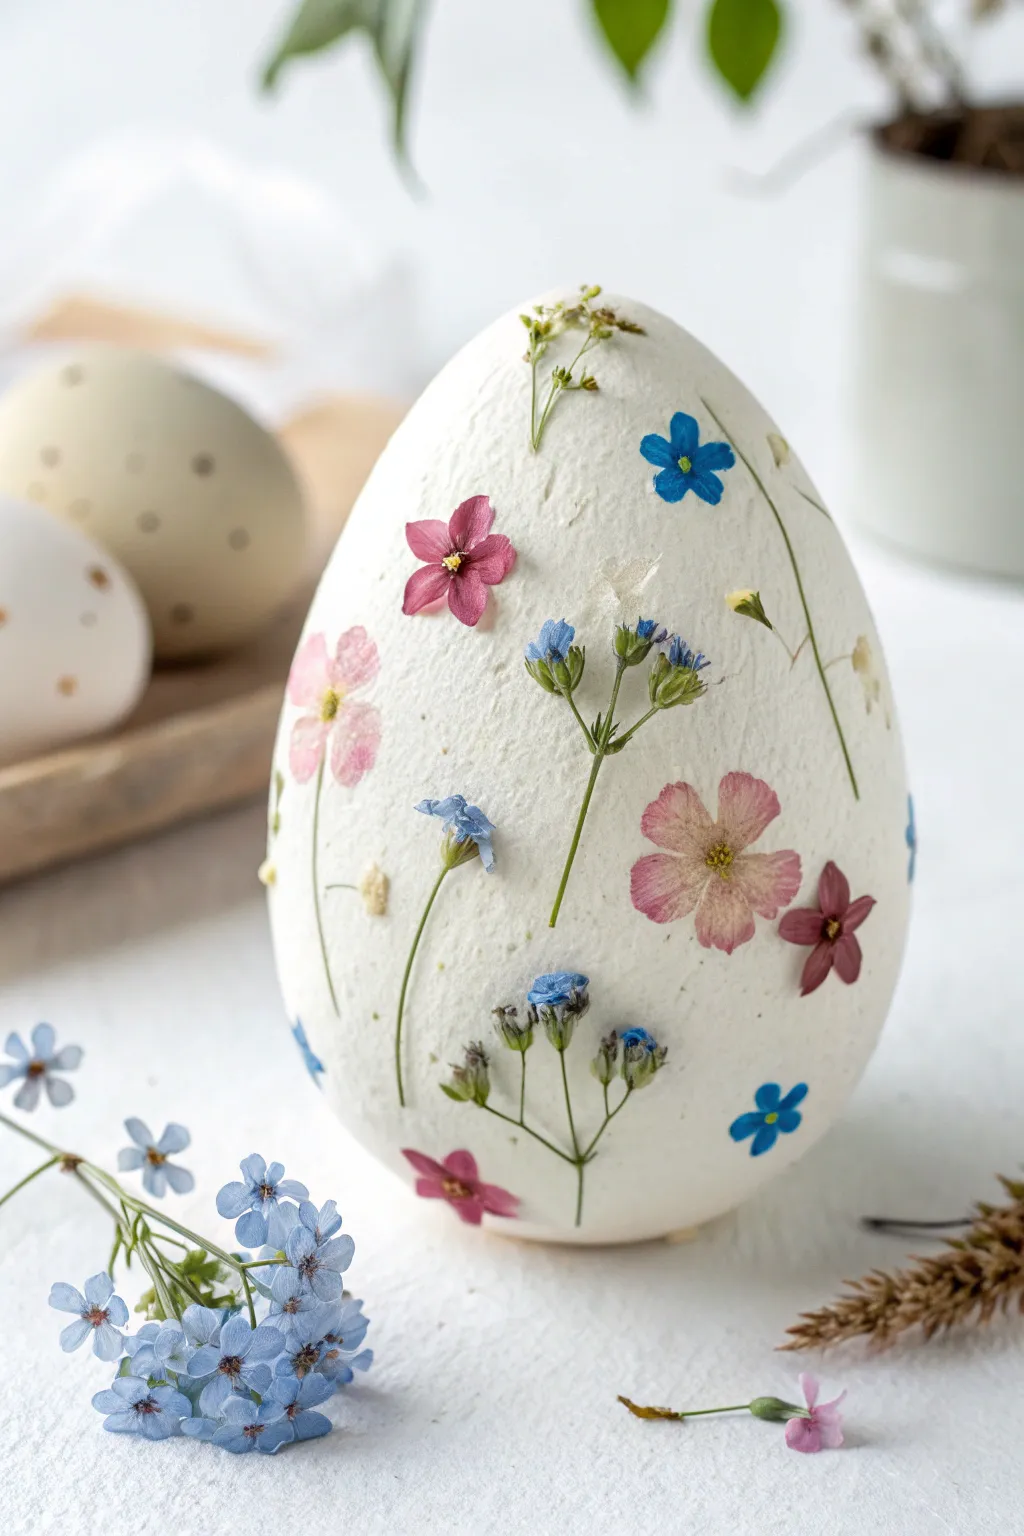
Capture the delicate beauty of spring with these air-dry clay Easter eggs featuring real pressed flowers. The result is a stunning, nature-inspired decorative piece with a soft, matte finish that highlights the vibrant colors of the botanicals.
How-To Guide
Materials
- White beautiful air-dry clay (e.g., DAS or Crayola)
- Small pressed flowers (forget-me-nots, pansies, ferns, etc.)
- Wooden rolling pin
- Parchment paper or silicone mat
- Egg-shaped styrofoam form (optional, for support)
- Water in a small cup
- Mod Podge (matte finish)
- Soft synthetic paintbrush
- Tweezers
- Fine-grit sandpaper (optional)
Step 1: Shaping the Egg Base
-
Condition the clay:
Begin by taking a handful of white air-dry clay and kneading it in your hands until it becomes warm, soft, and pliable. This prevents cracks later on. -
Form the core shape:
Roll the clay into a smooth ball first, then gently start elongating one end to create an egg shape. If you want a perfectly uniform size, you can wrap a thin layer of clay around a styrofoam egg core instead of making it solid clay. -
Smooth the surface:
Dip your finger in a little bit of water and run it over the clay surface to smooth out any fingerprints, bumps, or potential cracks. The surface should be as pristine as possible to mimic a real eggshell. -
Flatten the base slightly:
To ensure your egg can stand upright like the one in the photo, gently tap the bottom of the egg on your work surface to create a small, flat base. -
Initial drying phase:
Set the egg aside on parchment paper to dry. I like to rotate it every few hours so the bottom doesn’t stay soggy. Let it dry until the surface is firm to the touch but the clay is still slightly damp inside (about 2-4 hours depending on thickness).
Fresh Flower Hack
Don’t have pressed flowers? You can use an iron on low heat with no steam to press fresh flowers between two sheets of parchment paper in just minutes.
Step 2: Embedding the Botanicals
-
Prepare your pressed flowers:
While the egg is drying, arrange your pressed flowers on your workspace. Select small blooms like forget-me-nots, tiny pink phlox, and delicate green stems. Plan your layout loosely. -
Apply the first flower:
While the clay is still slightly tacky or ‘leather hard’, use tweezers to pick up a flower. Apply a minuscule dot of Mod Podge to the back of the flower. -
Positioning:
Gently press the flower onto the curved surface of the egg. Because the clay isn’t rock hard yet, you can press slightly firmly so the flower embeds just a tiny bit into the texture of the clay. -
Securing the edges:
Use your finger or the back of a spoon to gently smooth down the petals. Ensure every edge of the petal is making contact with the clay surface. -
Creating a pattern:
Continue adding flowers around the egg. Leave negative space between them to keep the look airy and elegant. Vary the height and angle of the stems to mimic a wild meadow. -
Adding stems and greenery:
Don’t forget the green elements. Place thin stems or tiny leaves between the colorful blooms to connect the visual elements and add contrast against the white clay.
Fixing Cracks
If small cracks appear as the clay dries, make a ‘slip’ paste by mixing a bit of clay with water and fill the cracks, then smooth over with a finger.
Step 3: Sealing and Finishing
-
Final drying:
Allow the egg to dry completely now. This usually takes 24 to 48 hours depending on the brand of clay and humidity. The clay will turn a chalky white when fully dry. -
Sanding (Optional):
If there are any rough fingerprint marks on the blank areas of the egg, very gently buff them away with fine-grit sandpaper, being careful not to touch the delicate flowers. -
First sealing coat:
Dip a soft brush into matte Mod Podge. Brush a thin layer over one pressed flower, extending just slightly past the flower’s edges onto the clay to seal it down. -
Seal the entire egg:
Once individual flowers are tacked make sure to coat the entire surface of the egg with a layer of matte Mod Podge. This unifies the texture and protects the raw clay from moisture. -
Final check:
Inspect the egg for any lifted petal edges. If you find one, use a toothpick with a dab of glue to press it back down before the sealer dries fully.
Display your beautiful botanical creation on a wooden stand or nestle it into a basket for a charming seasonal centerpiece

The Complete Guide to Pottery Troubleshooting
Uncover the most common ceramic mistakes—from cracking clay to failed glazes—and learn how to fix them fast.
Lace-Imprinted Egg Ornaments
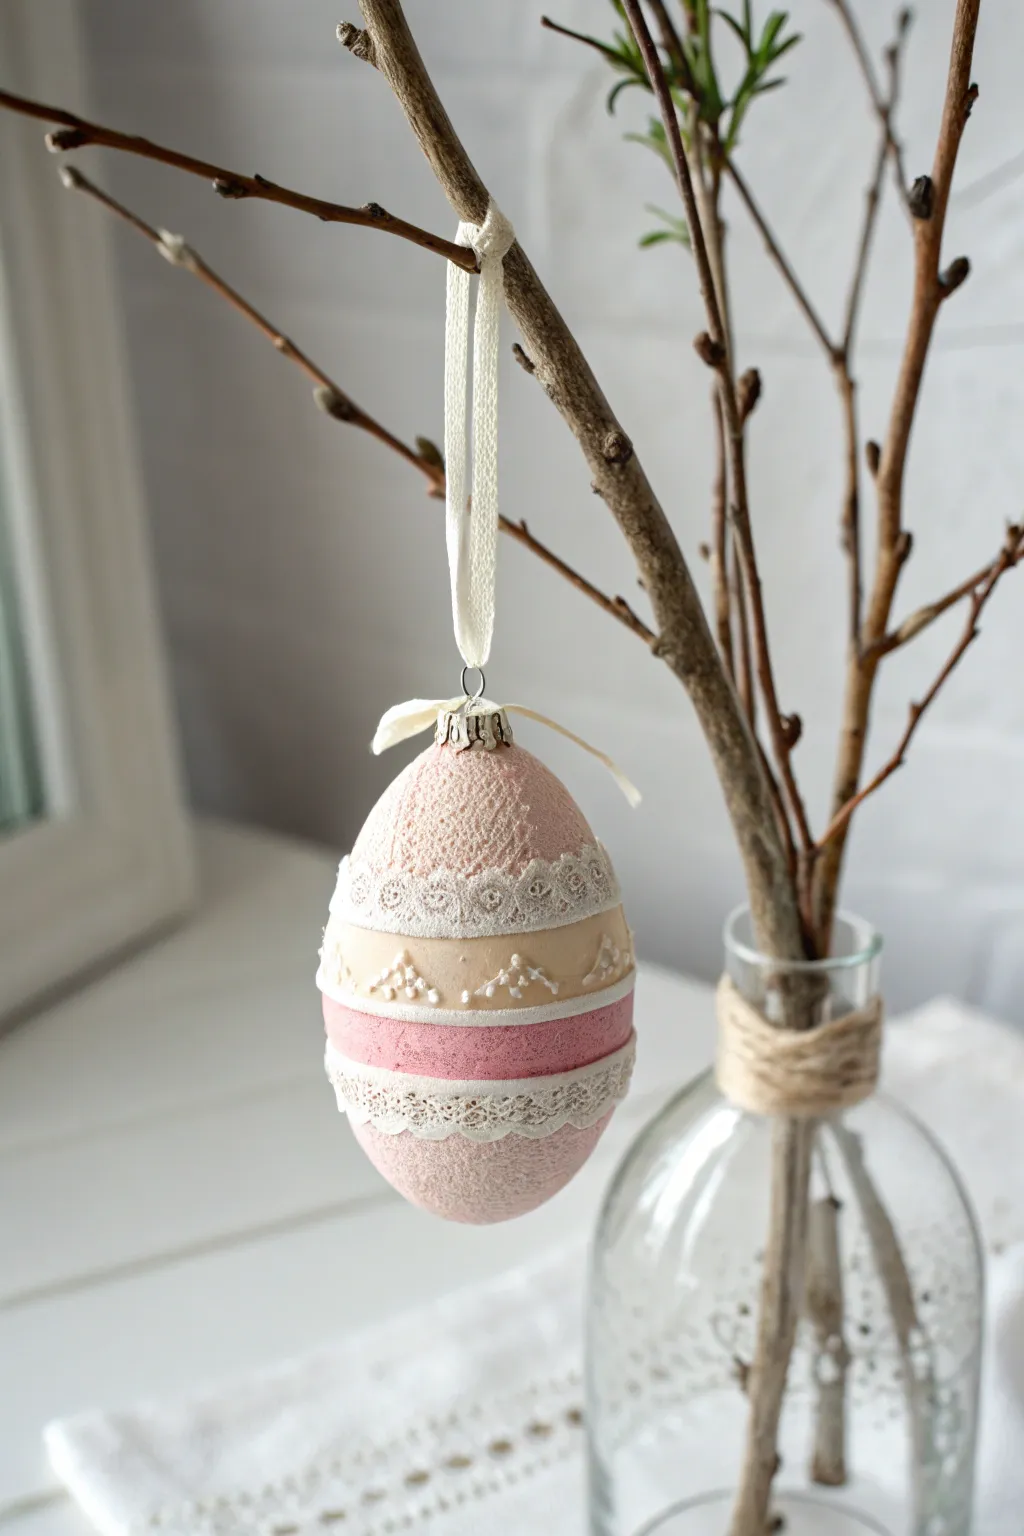
These delicate, dusty-pink egg ornaments combine the nostalgic texture of lace with the smooth finish of air dry clay for a sophisticated Easter display. The layered design features subtle beadwork and varying bands of soft color, creating a piece that feels both heirloom-quality and refreshingly modern.
Step-by-Step Guide
Materials
- Lightweight air dry clay (white)
- Small plastic or polystyrene egg base (approx. 3 inches)
- Cotton lace ribbons (two different patterns)
- Acrylic craft paint (pale blush pink, dusty rose, warm beige)
- White puff paint or dimensional fabric paint
- Matte mod podge or découpage glue
- Small flat brush
- Fine detail brush
- Small metal screw eye hook
- Cream or white ribbon for hanging
- Rolling pin or clay roller
- Craft knife
Step 1: Planning and Prep
-
Prepare the base:
Start by inserting the metal screw eye hook into the top center of your egg base. If using a Styrofoam egg, add a dab of glue to the screw threads before insertion to ensure it stays secure. -
Roll the clay:
Condition a ball of air dry clay until it is soft and pliable. Roll it out into a thin, even sheet, roughly 1/8 inch thick. It needs to be large enough to cover the entire egg surface. -
Cover the egg:
Gently drape the clay sheet over the egg base. Smooth the clay down the sides, using a craft knife to trim away excess material. Use a little water on your fingers to blend the seams until the egg is completely smooth and seamless.
Seamless Smoothing
To erase fingerprints while smoothing the initial clay layer, dip your finger in water and gently rub the surface in circular motions until polished.
Step 2: Creating Texture
-
Imprint the top texture:
While the clay is still wet, take a piece of textured fabric or coarse lace. Press it gently but firmly into the top third of the egg to create a dimpled, fabric-like surface texture. Peel it away carefully. -
Texture the bottom:
Repeat this imprinting process for the bottom third of the egg, leaving the middle band relatively smooth for now. Allow the clay-covered egg to dry completely, which usually takes 24 hours depending on humidity.
Step 3: Painting Layers
-
Base coat application:
Once dry, paint the entire textured top section and the very bottom curve with the pale blush pink acrylic paint. Use a stiff brush to work the paint into all the tiny dimples created by your texture. -
Paint the central band:
Mix the dusty rose paint with a tiny drop of brown to deepen it. Paint a distinct, straight band horizontally around the lower-middle section of the egg. -
Add the creamy accent:
Paint the remaining smooth band above the dusty rose stripe with warm beige paint. You should now have stripes of texture and color. -
Dry finish:
Allow all paint layers to dry fully before proceeding. I usually set the egg upright in a small cup or egg holder to prevent smudging.
Antique Glaze Effect
For a vintage look, mix brown paint with water (1:5 ratio). Brush over the dried egg and wipe off immediately, leaving dark pigment in the crevices.
Step 4: Detailing and Embellishment
-
Apply the upper lace:
Cut a length of cotton lace ribbon. Using Mod Podge, adhere this strip over the seam where the top textured pink section meets the smooth beige band. -
Apply the lower lace:
Repeat the process with a second piece of lace (matched or different pattern) along the seam where the dusty rose band meets the bottom textured section. -
Add dimensional dots:
Using the white puff paint or dimensional fabric paint, carefully pipe small triangles or chevron patterns onto the beige middle band. -
Detail the dots:
Add tiny dots of puff paint between your chevron lines for extra intricacy. Let the puff paint dry for several hours until hard.
Step 5: Finishing
-
Whitewash stitching:
To enhance the texture on the top and bottom pink sections, dip a dry brush into white paint, wipe almost all of it off, and very lightly dust the raised areas. This mimics the look of fabric grain. -
Attach the hanger:
Thread a length of cream ribbon through the eye hook at the top. Tie a knot at the ends to form a loop. -
Final bow:
Tie a separate small bow using the same cream ribbon or a thinner silk string directly onto the base of the eye hook hardware to conceal the metal.
Hang your new textured art piece on a branch arrangement for a lovely, handcrafted touch this spring
Chick Pebble Figurines
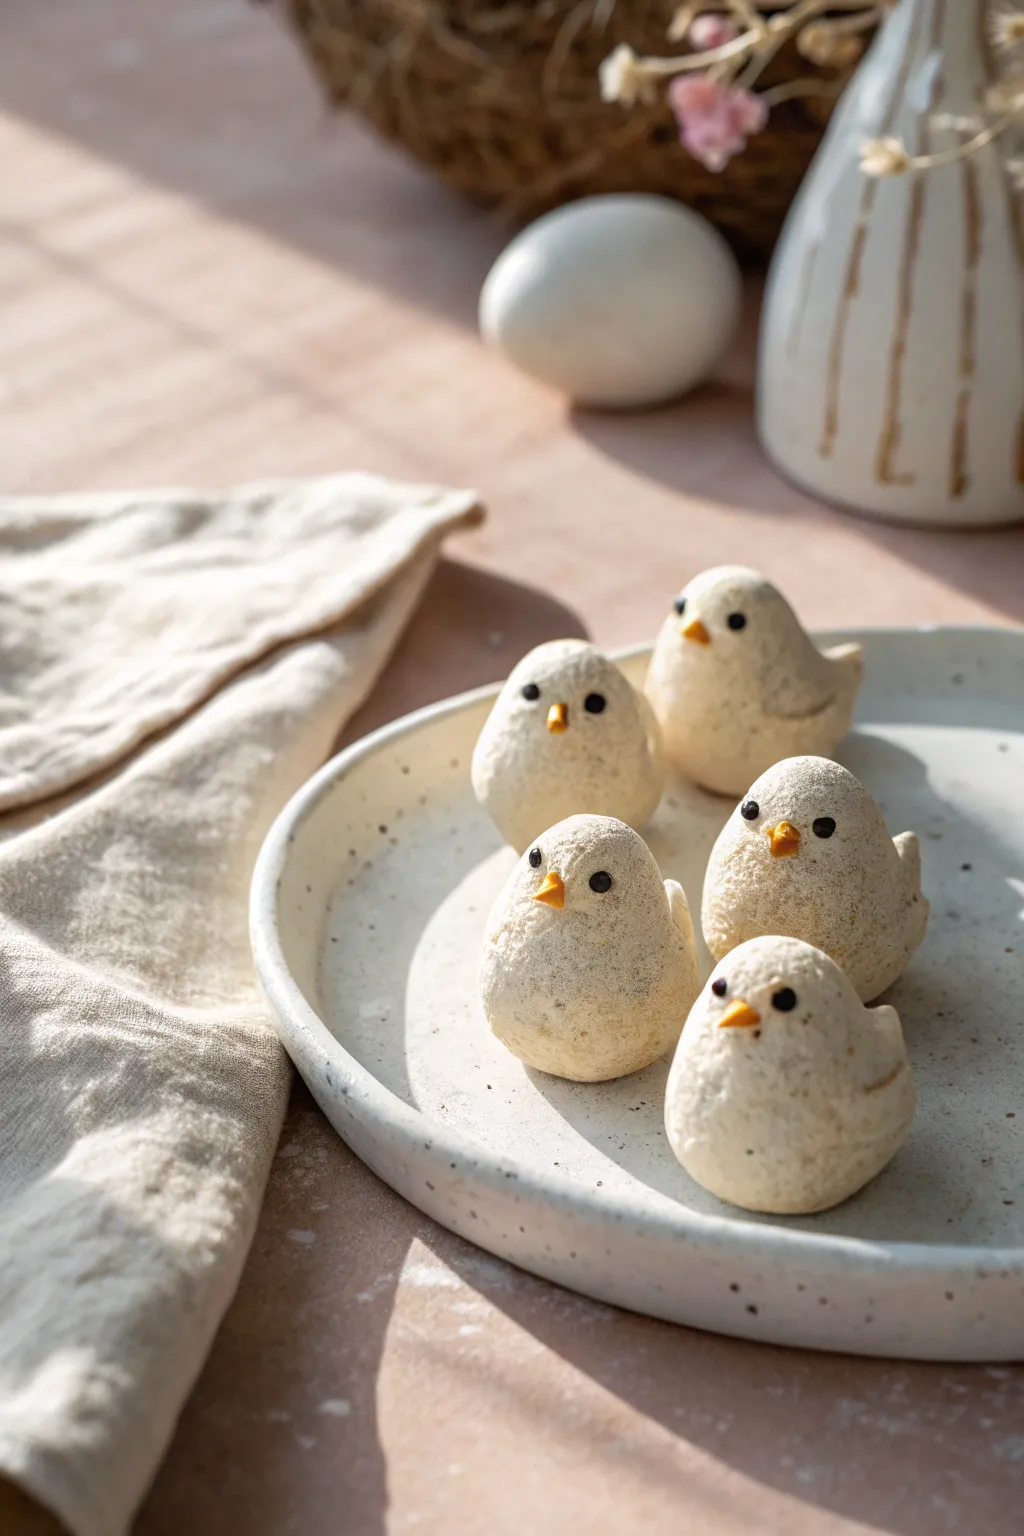
These charming little chicks combine the simplicity of smooth river stones with the playful spirit of Easter. With their subtle, speckled texture and minimalist features, they make for an understated and elegant holiday decoration.
Detailed Instructions
Materials
- White or stone-colored air-dry clay
- Dried used coffee grounds or black pepper (for texture)
- Small bowl of water
- Orange acrylic paint or orange clay
- Black acrylic paint
- Small dotting tool or toothpick
- Fine-grit sandpaper (optional)
- Matte sealant spray
Step 1: Preparing the Base
-
Condition the clay:
Start by taking a handful of white air-dry clay. Knead it in your hands to warm it up and make it pliable. -
Add texture:
To achieve that lovely stone-like speckled effect seen in the photo, knead a pinch of dried used coffee grounds or coarse black pepper directly into the white clay until it’s evenly distributed. -
Divide portions:
Separate your textured clay into golf-ball-sized portions. Each portion will become one chick, so try to keep them relatively similar in size, though slight variations add character. -
Roll spheres:
Roll each portion between your palms to create a smooth, tight ball. If you see any cracks forming, dip your finger in a little water and smooth them over.
Cracks Appearing?
If small cracks appear while drying, mix a tiny bit of fresh clay with water to make a paste (slip) and fill them in with a finger.
Step 2: Shaping the Bodies
-
Create the teardrop shape:
Gently pinch one side of the sphere and pull it upwards slightly to create a very subtle teardrop or pear shape. This narrower top part will become the head. -
Flatten the base:
Press the bottom of your pear shape onto your work surface firmly. You want the chick to sit stable and flat, rather than rolling around. -
Pinch the tail:
On the back of the body, near the bottom, gently pinch a small section of clay and pull it outward to form a tiny, pointed tail feather. -
Refine the head:
Smooth the transition between the head and body. The neck area shouldn’t be too defined; aim for a chubby, continuous silhouette where the head melts into the body. -
Smoothing texture:
Dip your finger in water and run it over the entire surface to remove fingerprints. The water will also bring some of the coffee ground speckles to the surface.
Pro Tip: Weight
For a satisfying, heavier feel similar to real stone, simply hide a small, clean pebble inside the center of your clay ball before shaping.
Step 3: Adding Features
-
Form the beak:
Take a tiny, rice-sized amount of clay. If you have orange clay, use that; otherwise, use white clay that you will paint later. Roll it into a tiny cone. -
Attach the beak:
Score the center of the face lightly with a toothpick, add a dab of water, and press the tiny cone into place. Smooth the edges so it adheres securely. -
Initial drying:
Set your chicks aside in a warm, dry place. Let them dry for at least 24-48 hours. I usually flip them over halfway through so the bottom dries completely.
Step 4: Finishing Touches
-
Sanding (Optional):
Once fully hard, check for any rough spots. You can gently sand them with fine-grit sandpaper for a smoother, stone-like feel. -
Paint the beak:
If you used white clay for the beak, carefully paint it with a small detail brush using matte orange acrylic paint. Let it dry. -
Add the eyes:
Dip a dotting tool or the blunt end of a toothpick into black acrylic paint. Press two small, symmetrical dots comfortably spaced above the beak. -
Seal the work:
Taking your matte sealant or varnish, give the chicks a light coat. This protects the clay and keeps the coffee grounds from flaking off over time.
Arranging your little flock on a plate or nest brings a calm, natural touch to your festive decor


What Really Happens Inside the Kiln
Learn how time and temperature work together inside the kiln to transform clay into durable ceramic.
Bunny Ear Egg Cup Holders
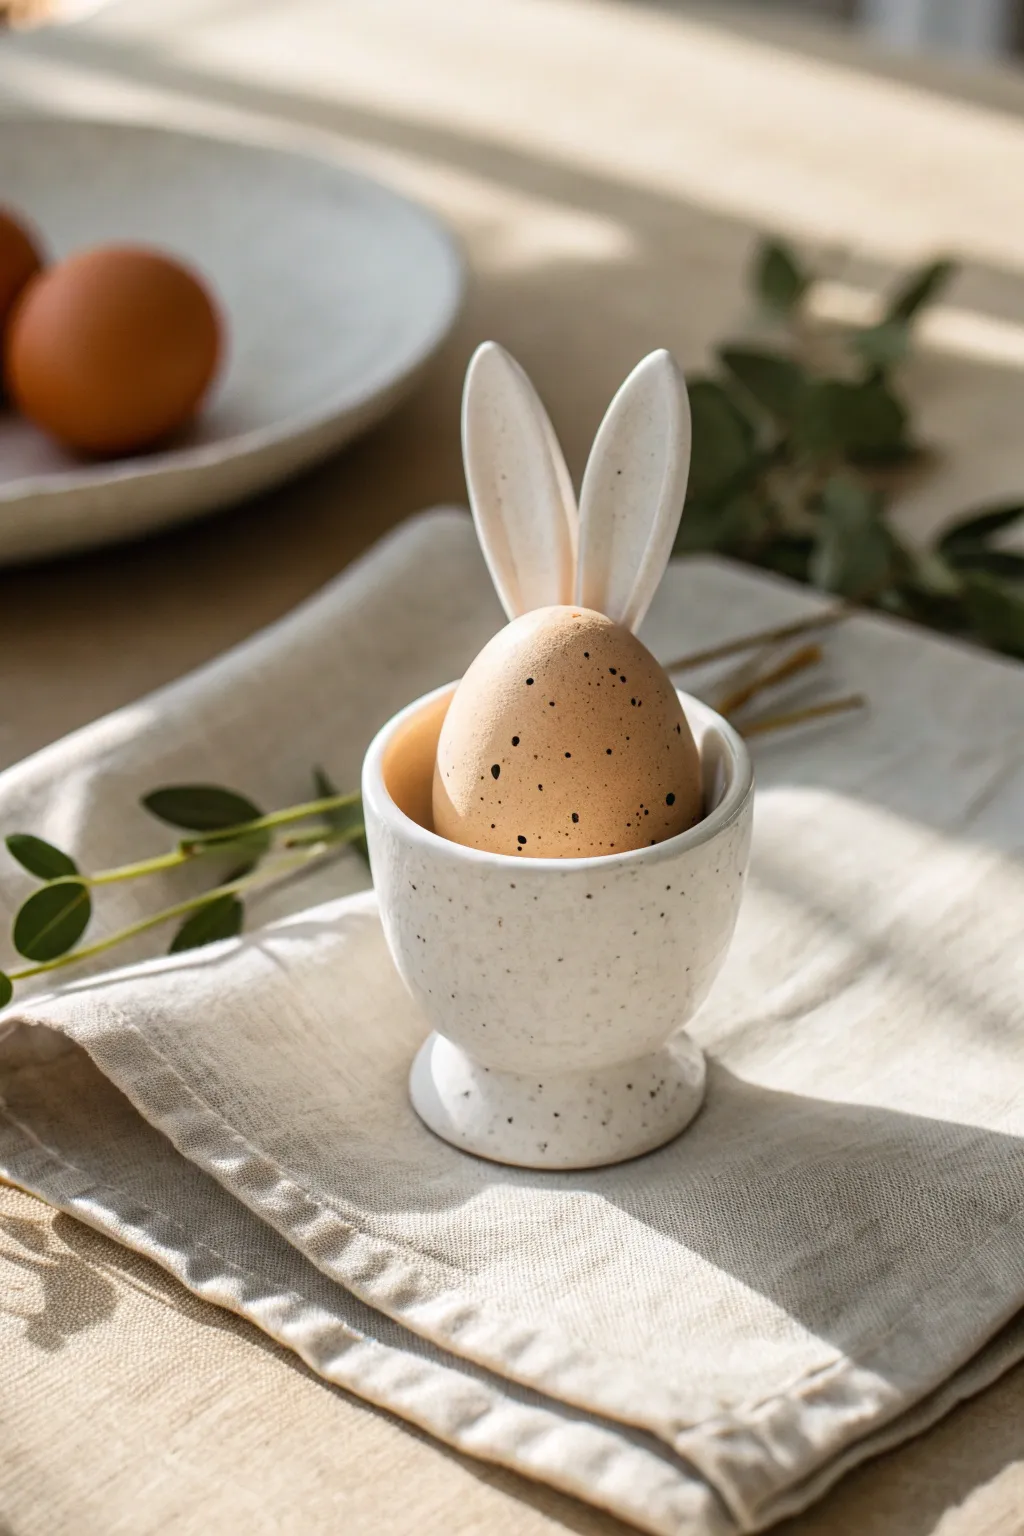
Bring a touch of whimsical spring charm to your breakfast table with this adorable handcrafted egg cup. Its minimalist design features sweet, upright bunny ears and a speckled stone-like finish that perfectly mimics high-end ceramic ware.
How-To Guide
Materials
- White air-dry clay
- Rolling pin
- Small bowl of water
- Clay knife or craft knife
- Sponge or sandpaper
- Acrylic paints (black and white)
- Old toothbrush
- Gloss or satin varnish (optional)
- Hard-boiled egg (for sizing)
Step 1: Sculpting the Base Form
-
Prepare the clay:
Start by conditioning a ball of white air-dry clay about the size of a tangerine. Knead it in your hands until it is smooth, pliable, and free of cracks. -
Form the main pinch pot:
Separate about two-thirds of the clay for the cup. Press your thumb into the center and gently pinch and rotate the clay to create a simple bowl shape. Keep the walls roughly 1/4 inch thick. -
Test the size:
Place your hard-boiled egg inside the pinch pot to ensure it fits snugly but isn’t too tight. The rim should come about halfway up the egg. Adjust the width if necessary. -
Create the pedestal foot:
Take the remaining third of your clay and roll it into a thick, short cylinder or disc. This will act as the foot of the cup. -
Attach the foot:
Score the bottom of your pinch pot and the top of the pedestal disc with a craft knife (making hashtag scratches). Dab a little water on the scored areas. -
Blend the seams:
Press the pieces together firmly. Use your thumb or a sculpting tool to drag the clay from the foot up onto the cup, smoothing the seam until the two parts become one continuous object.
Step 2: Adding the Bunny Ears
-
Cut the ear shapes:
Roll out a small scrap of clay to about 1/8 inch thickness. Use a knife to cut out two elongated teardrop shapes for the bunny ears. -
Curve the ears:
Before attaching, gently curve the ears slightly inward so they mimic the natural cupping of a real rabbit ear. I like to smooth the cut edges with a damp finger here to soften the look. -
Attach to the rim:
Score and wet the bottom edge of each ear and the back interior rim of the cup. Press the ears securely onto the rim, blending the clay downwards into the cup’s interior to ensure a strong bond. -
Smooth everything out:
Dip a sponge or your finger in water and go over the entire piece. Erase any fingerprints, smooth out the join lines around the ears, and ensure the surface feels uniform. -
Let it dry completely:
Place the finished sculpture in a safe, dry spot away from direct sunlight. Allow it to air dry for 24-48 hours until it turns fully white and hard.
Pro Tip: Support Squad
Use balled-up plastic wrap or paper towels to prop up the ears while they dry. This prevents them from drooping backward while the clay is still wet.
Step 3: Finishing Touches
-
Sand imperfections:
Once fully dry, use fine-grit sandpaper to gently buff away any rough bumps or uneven edges, paying special attention to the rim and the tips of the ears. -
Prepare the speckling paint:
Mix a small amount of black acrylic paint with a few drops of water to create a fluid, ink-like consistency. -
Splatter the speckles:
Dip an old toothbrush into the watered-down black paint. Hold it near the egg cup and run your thumb across the bristles to flick tiny speckles onto the surface. Rotate the cup to get even coverage. -
Add larger spots:
If you want a few distinct larger spots like the original image, use the tip of a toothpick dipped in undiluted black paint to manually place a few dots. -
Seal the piece:
After the paint is dry, apply a coat of gloss or satin varnish. This mimics the ceramic glaze look and protects the clay from moisture if you plan to use it with real eggs.
Troubleshooting: Cracking Up?
If small cracks appear during drying, make a paste of clay and water (slip) and fill them in. Let dry again, then sand smooth before painting.
Your charming new easter egg holder is now ready to take center stage at your holiday brunch
Egg Garland With Twine and Bows
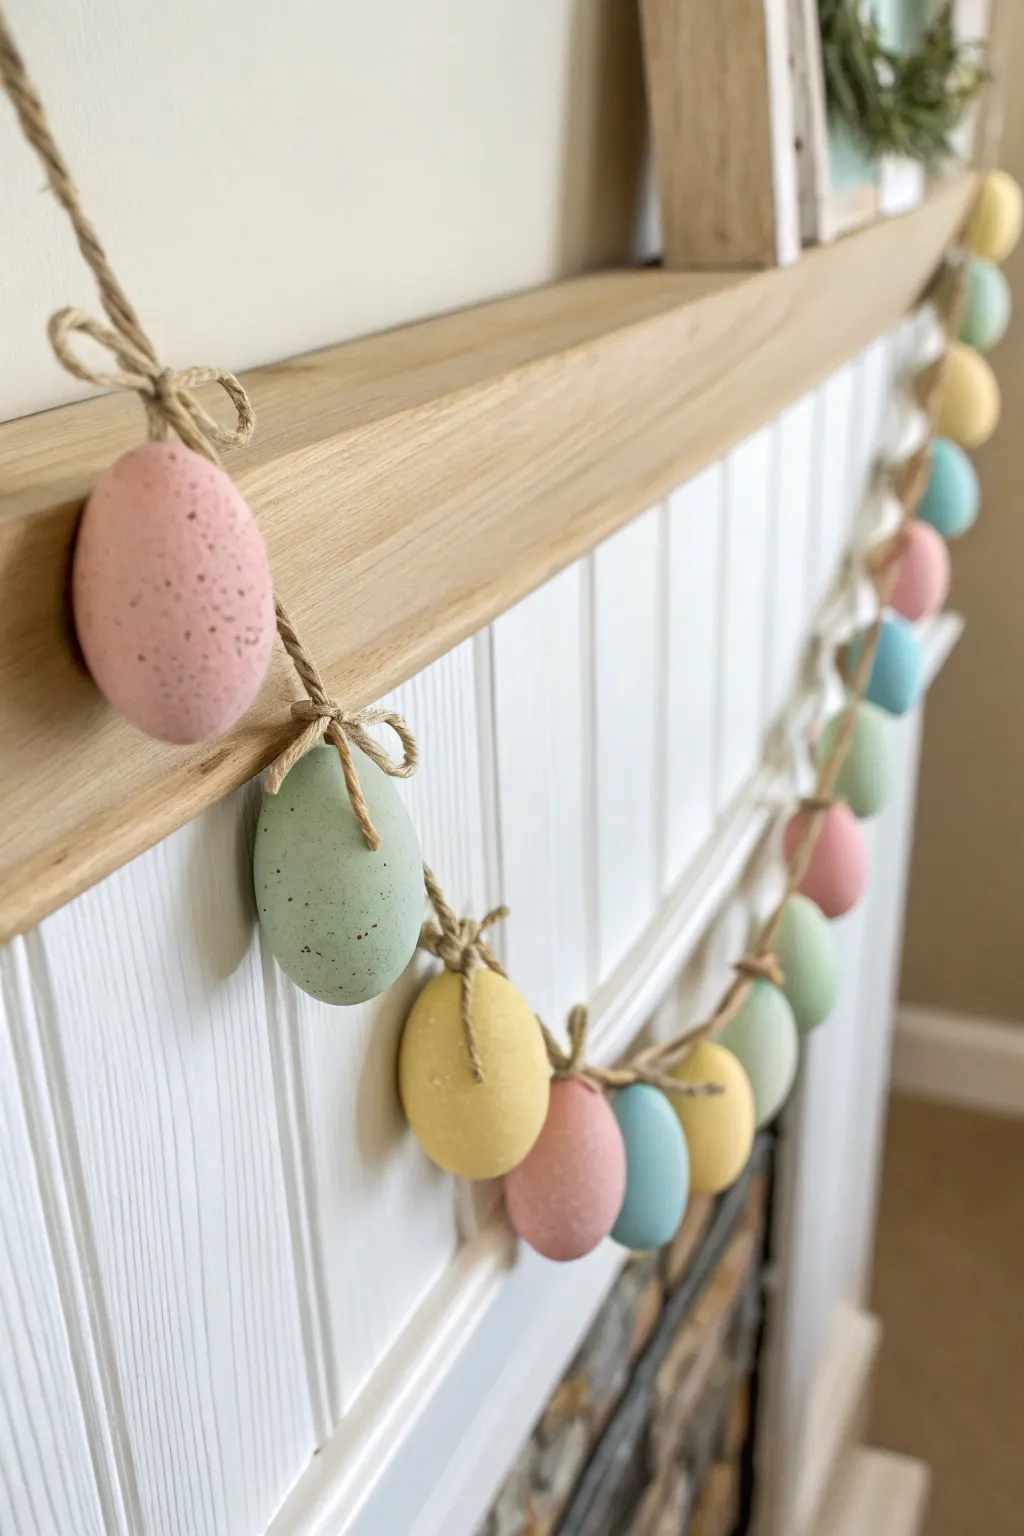
Enhance your mantel or doorway with this charming garland featuring handmade, pastel-toned eggs. The rustic jute twine bows and delicate speckling give these air dry clay creations a farmhouse-chic appeal that’s perfect for spring.
Detailed Instructions
Materials
- Air dry clay (white)
- Acrylic paints (pastel pink, sage green, pale yellow, soft blue)
- Brown acrylic paint (burnt umber or similar)
- Jute twine
- Small eye hooks (screw eyes)
- Old toothbrush or stiff paintbrush
- Two bowls of water
- Rolling pin (optional, for smoothing)
- Sandpaper (fine grit)
- Matte finish sealant spray
Step 1: Shaping the Eggs
-
Prepare the Clay:
Start by conditioning your air dry clay. Take a chunk about the size of a golf ball and knead it in your hands until it is warm, pliable, and free of cracks. -
Form the Base Shape:
Roll the clay into a smooth ball between your palms to remove any initial creases. -
Refine the Egg Contour:
Gently apply more pressure to one end of the ball while rolling, tapering it slightly to create the classic oval egg shape. Make as many eggs as you need for your desired garland length. -
Smooth Imperfections:
Dip your finger in a little water and run it over the surface of each clay egg to smooth out fingerprints or bumps. -
Insert Hardware:
While the clay is still wet, carefully screw a small eye hook into the top center (the wider end) of each egg. Ensure it goes in straight and sits flush with the clay surface. -
Allow to Dry:
Place your eggs on a clean, non-stick surface or wire rack. Let them dry completely, which usually takes 24-48 hours depending on humidity. Rotate them occasionally for even drying.
Clean Hardware Tip
Before painting, cover the metal eye hook with a tiny piece of painter’s tape. This keeps the metal loop clean and silver while you paint and splatter the rest of the egg.
Step 2: Painting and Speckling
-
Sand for Smoothness:
Once fully cured, use fine-grit sandpaper to buff away any rough spots or unevenness from the drying process. -
Base Color Application:
Select your pastel palette. Paint each egg in a solid coat of pink, green, yellow, or blue. You might need two coats for full opacity. -
Drying the Base Coat:
I usually stick the eye hooks onto a skewer or wire to let the paint dry without touching any surfaces. -
Prepare Speckling Paint:
Mix a small amount of brown acrylic paint with a tiny bit of water. You want a fluid consistency, roughly like ink or heavy cream. -
The Splatter Technique:
Dip an old toothbrush into the watered-down brown paint. Hold the brush near the eggs and run your thumb across the bristles to flick tiny speckles onto the surface. -
Seal the Design:
After the speckles are totally dry, spray the eggs with a matte clear coat to protect the paint and give them a finished look.
Step 3: Assembly
-
String the Eggs:
Cut a long piece of jute twine to fit your mantel or display area, leaving extra length for hanging loops. -
Thread the Twine:
Pass the main garland twine through the eye hook of your first egg. Slide it to your desired starting position. -
Secure with a Knot:
To keep the egg from sliding, tie a simple overhand knot in the main twine right at the eye hook location. -
Create the Bows:
Cut several shorter pieces of jute twine, about 5-6 inches each. Tie one piece into a small bow directly onto the garland twine, right above the eye hook, to hide the metal hardware. -
Repeat the Process:
Continue adding eggs, spacing them evenly (about 3-4 inches apart), knotting them in place, and adding a decorative bow to each one.
Weight Variations
For a lighter garland, wrap a thin layer of clay around a styrofoam egg core instead of using solid clay. This prevents the garland from sagging heavily.
Hang your beautiful new speckled egg garland and enjoy the subtle pop of color it brings to your space

TRACK YOUR CERAMIC JOURNEY
Capture glaze tests, firing details, and creative progress—all in one simple printable. Make your projects easier to repeat and improve.
Mini Easter Basket Bowl
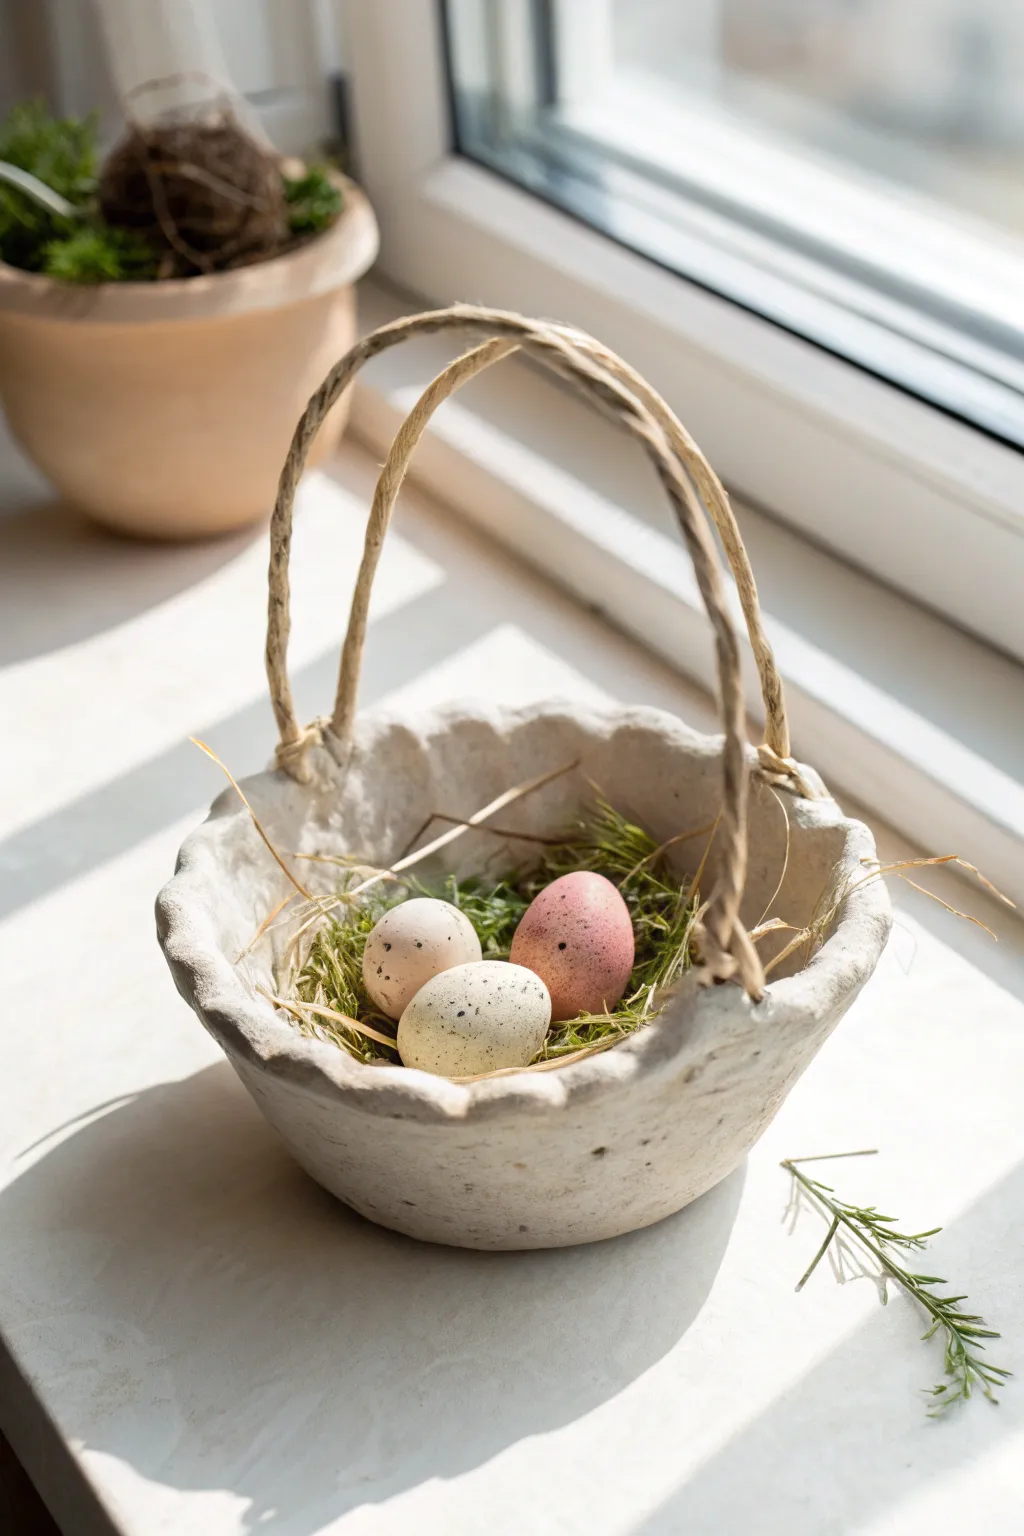
This charming, rustic basket mimics the look of a cracked eggshell or vintage pottery with its scalloped rim and stone-like texture. It is a perfect handcrafted vessel for displaying miniature speckled eggs on your windowsill.
Step-by-Step Tutorial
Materials
- White air-dry clay
- Rolling pin
- Small bowl or round cutter (approx. 4-5 inches)
- Small bowl (for molding the shape)
- Plastic wrap
- Craft knife
- Sponge or sandpaper
- Natural jute twine or thick paper wire
- Craft glue or hot glue
- Acrylic paints (white, beige, brown)
- Old toothbrush (for splattering)
- Dried moss or paper grass filler
Step 1: Shaping the Clay Bowl
-
Condition the Clay:
Begin by taking a handful of air-dry clay and kneading it in your hands until it becomes warm and pliable. This prevents cracks later on. -
Roll it Out:
Roll the clay out on a flat surface to an even thickness of about 1/4 inch. If the clay sticks, you can use a little bit of water or lay down a piece of parchment paper. -
Cut the Circle:
Place your round cutter or a small bowl upside down onto the clay and trace around it with a craft knife to create a perfect circle. -
Create the Scalloped Edge:
Using your thumb or the rounded end of a paintbrush handle, gently press down into the edge of the clay circle at regular intervals. This creates the wavy, flower-like rim pattern. -
Mold the Shape:
Line a small bowl with plastic wrap to prevent sticking. Carefully lift your clay circle and drape it inside the bowl, pressing gently so it takes the curved shape. -
Refine the Edges:
While it sits in the mold, use a damp finger to smooth out any rough cuts on the rim. I like to gently push the scallops upward slightly to enhance the basket feel. -
Initial Drying:
Let the clay dry inside the mold for at least 24 hours. Once the edges turn white and feel hard, carefully remove it from the bowl and peel off the plastic wrap to let the bottom dry completely.
Cracked Clay?
If small cracks appear as the clay dries, mix a tiny bit of fresh clay with water to make a paste (slip) and conduct a patch repair with a paintbrush.
Step 2: Adding the Handle
-
Prepare the Wire:
Cut two lengths of paper-covered wire or stiff jute twine, approximately 8 inches long. Twist them together tightly to create a sturdy, rustic handle. -
Attach the Handle:
Once the clay is dry, use a strong craft glue or a dab of hot glue to attach the ends of the twisted handle to the inside rim of the basket. Hold in place until set. -
Reinforce the Connection:
For a more seamless look, you can add a tiny bit of fresh wet clay over the glued connection points inside the bowl, smoothing it out with water.
Step 3: Finishing Touches
-
Sand Imperfections:
Once fully dry, lightly sand any sharp edges or unwanted bumps with fine-grit sandpaper or a sanding sponge. -
Base Coat:
Paint the entire bowl, inside and out, with an off-white or cream acrylic paint. This unifies the color and seals the clay. -
Create the Speckles:
Mix a small amount of dark brown paint with water to make it runny. Dip an old toothbrush into this mixture. -
Splatter Technique:
Hold the toothbrush near the bowl and run your thumb across the bristles to flick tiny specks of paint onto the surface. Rotate the bowl to get even coverage. -
Final Styling:
Fill your finished basket with green moss or paper grass and nestle your decorative eggs inside.
Handle Stability
Use paper-wrapped floral wire instead of plain twine. The internal wire lets you bend the handle into a perfect arch that holds its shape permanently.
This simple speckled bowl makes a delightful seasonal centerpiece or a personalized gift holder for mini chocolate eggs
Nest Ring Dish With Tiny Eggs
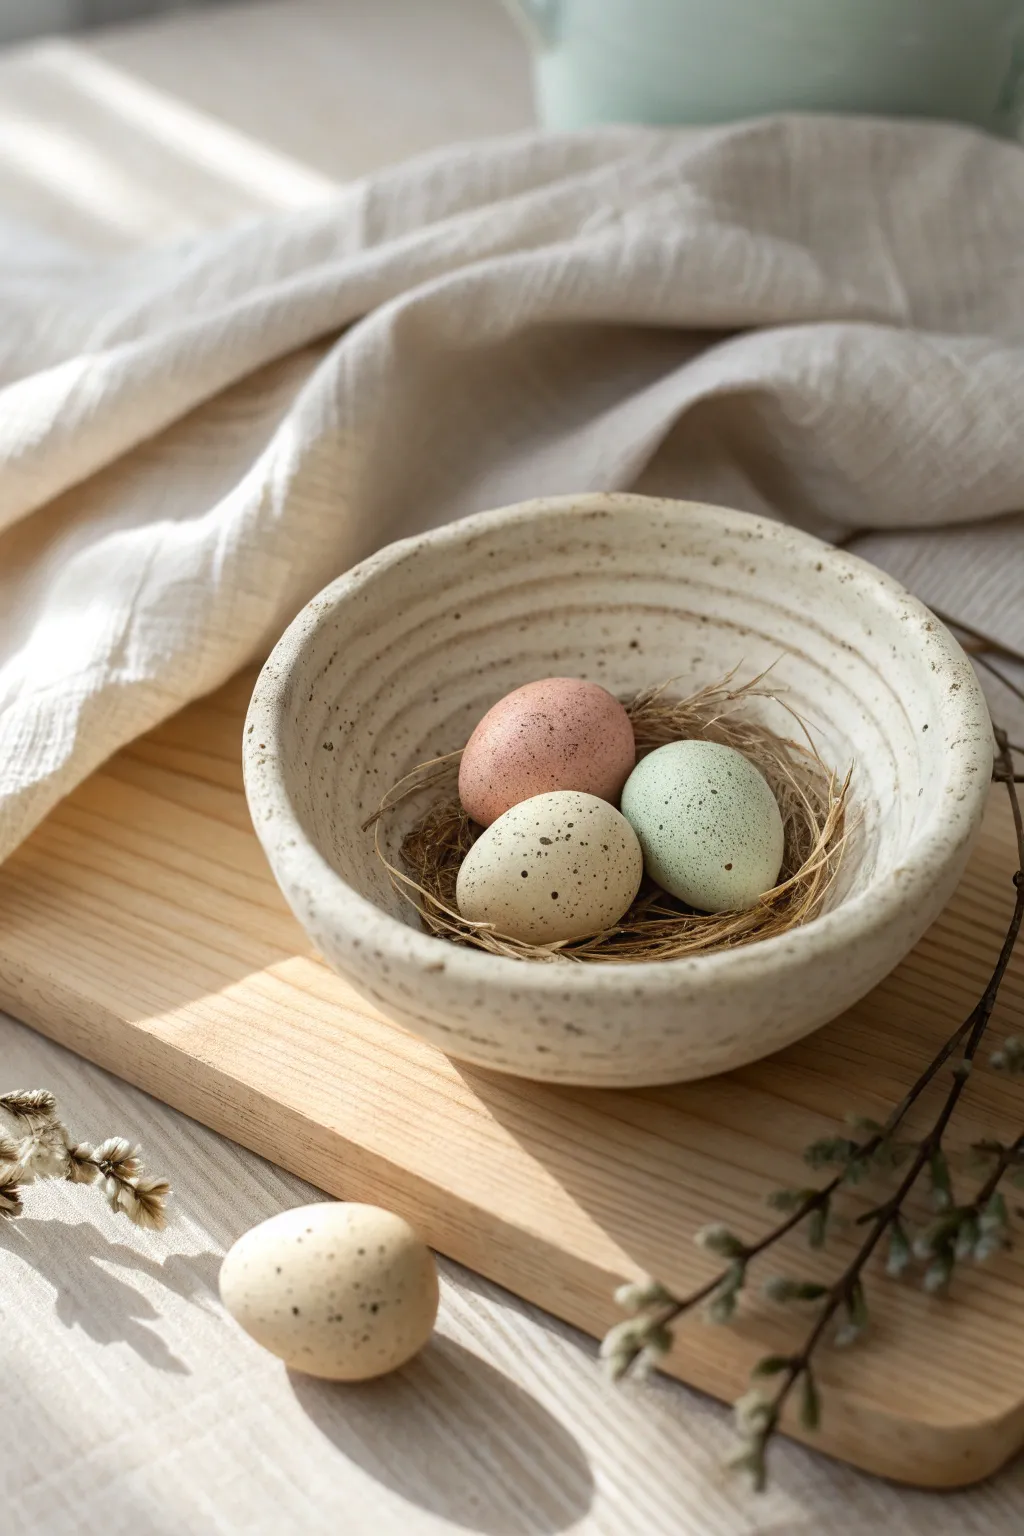
Bring a touch of organic, rustic charm to your spring decor with this delightfully imperfect ring dish setup. The combination of faux-ceramic textures and soft, speckled pastel eggs creates a cozy nesting spot that looks like it came straight from a pottery studio.
Detailed Instructions
Materials
- White air dry clay
- Rolling pin
- Small bowl (to use as a mold)
- Sponge
- Water
- Fine-grit sandpaper
- Acrylic paints (Cream, Pastel Pink, Sage Green, Brown)
- Old toothbrush or stiff bristle brush
- Matte spray varnish or sealant
- Dried nesting material (sisal fiber or dried grass)
- Small styrofoam egg shapes (or more clay to hand-form eggs)
Step 1: Creating the Bowl
-
Condition the clay:
Start with a ball of white air dry clay about the size of a tennis ball. Knead it in your hands until it’s warm, pliable, and free of cracks. -
Roll out a slab:
Roll the clay flat to a thickness of about 1/4 inch. Don’t worry about making it perfectly smooth; a little texture adds to the rustic look. -
Form the shape:
Drape your clay slab inside a small bowl lined with plastic wrap to prevent sticking. Gently press the clay against the sides to take the bowl’s form. -
Create the rim:
Trim the excess clay from the top edge using a knife or clay tool. For that handmade pottery aesthetic shown in the photo, dampen your finger and smooth the rim so it is rounded and slightly uneven rather than sharp. -
Add internal texture:
While the clay is still soft inside the mold, use a damp sponge or your fingers creates faint horizontal ridges or drag marks along the inner walls to mimic wheel-thrown pottery lines.
Natural Texture Hack
Mix a pinch of used coffee grounds or cracked pepper directly into your white clay before rolling. This creates instant, embedded texture that looks like stonewear clay.
Step 2: Crafting the Eggs
-
Shape the eggs:
Roll three small balls of remaining clay into egg shapes, roughly 1.5 inches long. If you prefer lightweight eggs, you can coat small styrofoam egg forms with a thin layer of clay and smooth out the seams. -
Dry everything:
Allow both the bowl and the eggs to dry completely. This creates a solid base for painting. Depending on humidity, this usually takes 24-48 hours. I like to flip the bowl halfway through so the bottom dries evenly. -
Smooth the surfaces:
Once bone dry, lightly sand any sharp peaks or unintended rough patches on the bowl’s rim and the eggs. Wipe away dust with a slightly damp cloth.
Step 3: Painting and Finishing
-
Base coat the bowl:
Paint the entire bowl (inside and out) with a warm cream or off-white acrylic paint. Apply two thin coats for opaque coverage. -
Base coat the eggs:
Paint one egg pastel pink, one sage green, and the last one a creamy off-white matching the bowl. -
Prepare the speckle:
Mix a small amount of dark brown paint with a few drops of water to create an inky consistency. This is crucial for getting fine splatters rather than big blobs. -
Apply the speckles:
Dip an old toothbrush into the thinned brown paint. Hold it over the bowl and eggs, and run your thumb across the bristles to flick tiny specks of paint onto the surfaces. Rotate the items to get even coverage. -
Add rim definition:
Using a relatively dry brush and the un-thinned brown paint, gently dab the very top edge of the bowl’s rim to give it that darkened, fired-clay appearance. -
Seal the project:
Once all paint is dry, spray the bowl and eggs with a matte clear coat. This protects the finish and mimics the look of matte glaze. -
Assemble the nest:
Take a small handful of dried sisal fiber or grass and twist it into a small circle. Place this nest inside your finished bowl. -
Final arrangement:
Nestle the three speckled eggs into the center of the dried grass to complete the display.
Make It Glossy
For a ‘glazed pottery’ look instead of matte, apply a thick coat of high-gloss varnish or dimensional glaze (like Mod Podge Dimensional Magic) to just the eggs.
Place your finished dish on a wooden board or sunny windowsill to enjoy the springtime vibes
Stamped “Happy Easter” Medallions
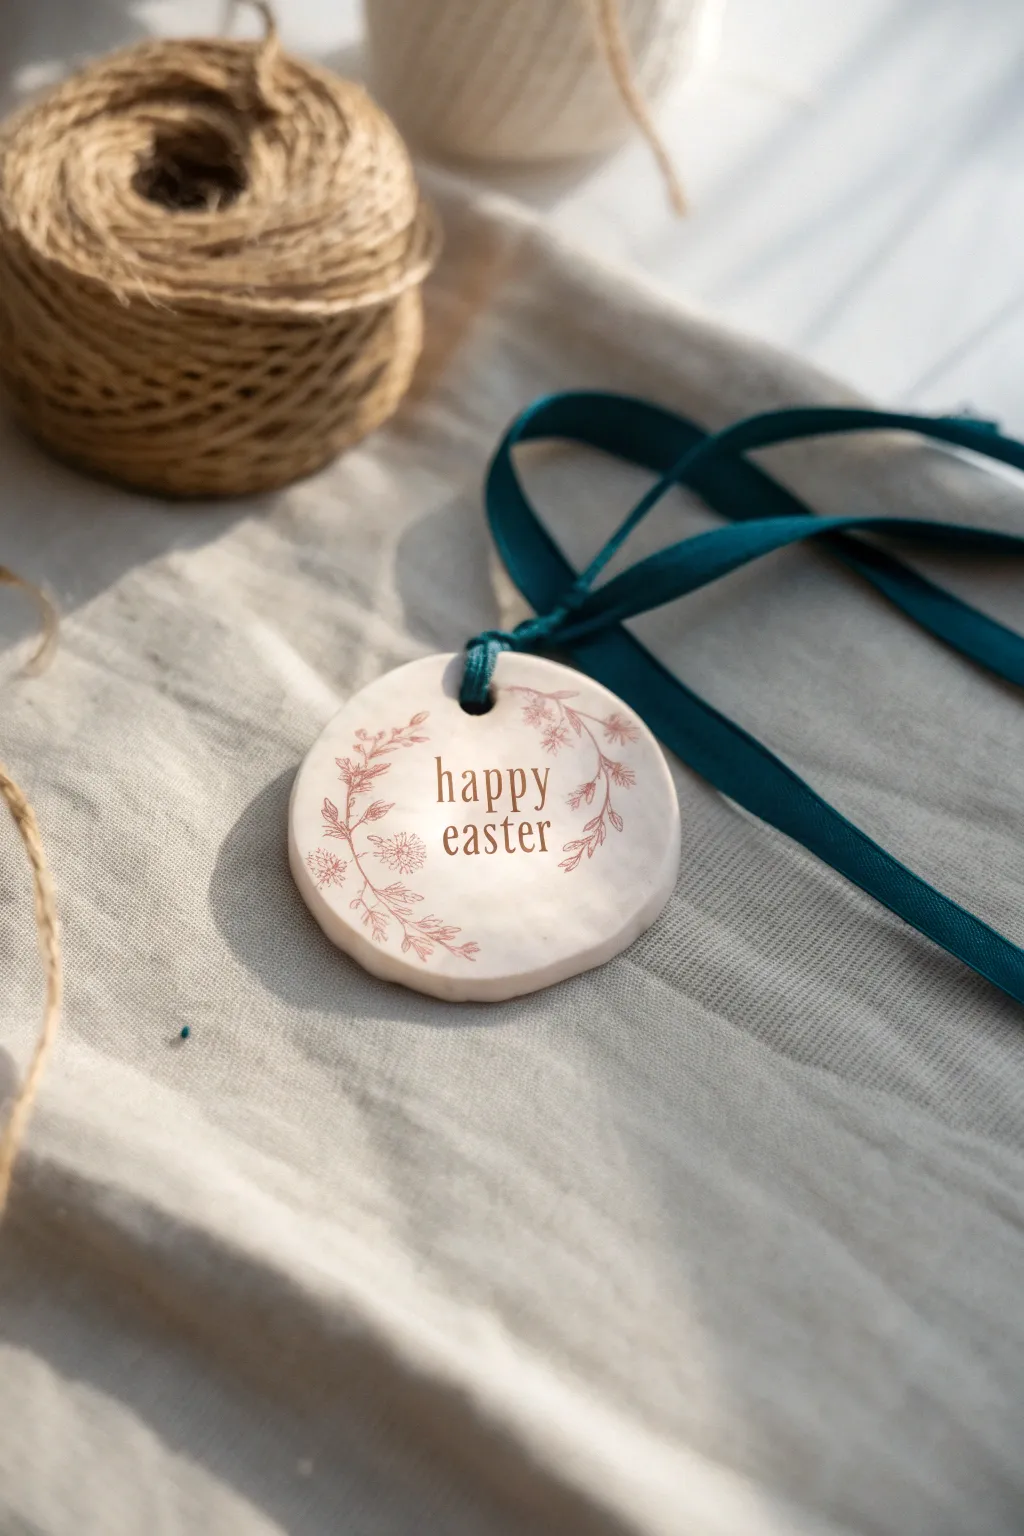
Create a sophisticated piece of Easter decor with this minimalist clay medallion, featuring delicate botanical illustrations and elegant typography. The creamy white finish of the air-dry clay paired with a deep teal ribbon makes for a stunningly modern contrast that feels both festive and refined.
How-To Guide
Materials
- White air-dry clay (e.g., DAS or Crayola Air Dry)
- Non-stick rolling pin
- Parchment paper or canvas work mat
- Round cookie cutter (approx. 3-4 inches) or a drinking glass
- Water in a small cup
- Sponge or fingers for smoothing
- Drinking straw or small circular cutter (for the hole)
- Small rubber stamps (floral/leaf motifs)
- Alphabet stamp set (serif font preferred)
- Brown or sepia ink pad (permanent/archival ink best)
- Sandpaper (fine grit, 220 or higher)
- Teal satin or grosgrain ribbon (1/4 inch or similar)
Step 1: Shaping the Base
-
Condition the clay:
Begin by taking a handful of air-dry clay and kneading it in your hands for a minute until it feels soft, pliable, and free of cracks. -
Roll it out:
Place the clay on your parchment paper or work mat. Using the rolling pin, roll the clay out evenly until it is about 1/4 inch thick. Try to keep the thickness consistent so it dries flat. -
Cut the shape:
Press your round cookie cutter or glass firmly into the clay to cut your circle. If you want the organic aesthetic shown in the photo, you can gently distort the edges with your fingers after cutting so it isn’t perfectly geometric. -
Soften the edges:
Dip your finger or a small sponge into a little water and run it around the cut edge of the circle. This smooths out any harsh lines or jagged bits left by the cutter. -
Create the hanging hole:
Use a drinking straw to punch a hole near the top of the circle. Position it about half an inch from the edge to ensure the clay is sturdy enough to hold the ribbon later.
Step 2: Stamping the Design
-
Plan your layout:
Before stamping on the actual clay, lightly hover your stamps over the surface to visualize where the text and vines will go. The text should be centered, with the floral elements framing it on the sides. -
Ink the floral stamps:
Press your floral sprig stamp into the brown ink pad. Tap it genty to ensure even coverage without flooding the fine details of the stamp. -
Stamp the left vine:
Press the floral stamp gently onto the left side of the medallion, curving slightly with the shape of the circle. Apply even pressure, but don’t push so hard that the stamp creates a deep indentation in the soft clay. -
Stamp the right vine:
Re-ink your stamp and repeat the process on the right side. I like to angle this one slightly differently so the design doesn’t look too symmetrical or rigid. -
Prepare the text:
Arrange your alphabet stamps to spell “happy”. Check them against a scrap piece of clay or paper first to make sure the letters are facing the right way. -
Stamp the first word:
Ink the letters and press “happy” into the center of the clay, just above the midline. Use a steady hand to keep the baseline straight. -
Stamp the second word:
Repeat the process for “easter”, stamping it directly below “happy”. Center it visually relative to the word above.
Stamp Smearing?
If your ink smudges while the clay is wet, wait until the piece is fully dry, then carefully sand the mistake away with fine sandpaper and re-stamp.
Step 3: Drying and Finishing
-
Let it dry:
Move the medallion (still on its parchment paper) to a safe, flat spot. Let it air dry for 24-48 hours. Flip it over halfway through the drying process to ensure the back dries evenly and prevents curling. -
Sand imperfections:
Once the clay is bone dry and hard, take your fine-grit sandpaper and very gently buff the edges. This gives it that professional, polished look. -
Optional sealing:
If you want to protect the ink, you can apply a very thin coat of matte varnish. However, leaving it raw maintains that lovely matte, chalky texture seen in the photo. -
Attaching the ribbon:
Cut a generous length of teal ribbon, about 12-15 inches. -
Looping the ribbon:
Fold the ribbon in half. Thread the folded loop end through the hole in the medallion from front to back. -
Secure the knot:
Pull the loose tails of the ribbon through the loop you just pushed through the hole. Pull tight to create a lark’s head knot that sits securely at the top of the ornament.
Organic Edges
For a truly handmade pottery look, skip the rolling pin and press the clay flat with your palm. The subtle finger impressions add artisanal charm.
Hang your beautiful new medallion on a doorknob or Easter branch to celebrate the season with style
Pastel Mosaic Egg Tiles
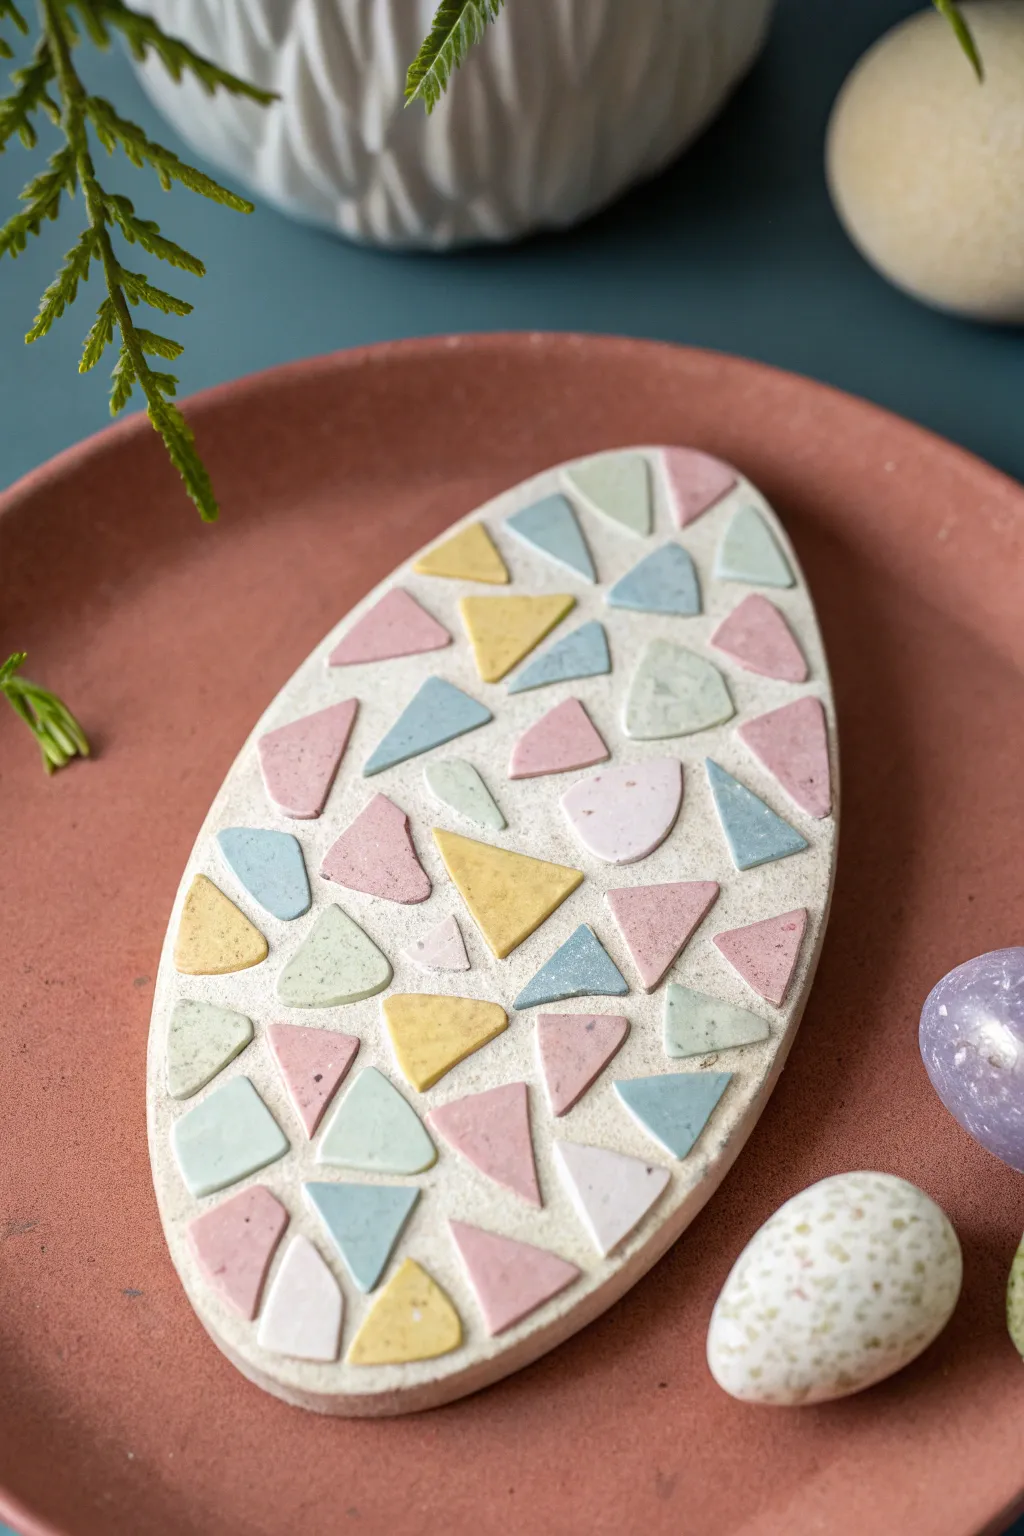
Bring a touch of modern, earthy charm to your spring decor with this beautiful pastel mosaic egg. Its soft, muted colors and geometric patterns mimic the look of high-end terrazzo or traditional mosaic tiling, all created easily with air dry clay.
Step-by-Step Guide
Materials
- White or natural air dry clay
- Rolling pin
- Rolling pin rings or guides (approx. 1/4 inch)
- Egg-shaped cookie cutter (large) or cardstock template
- Craft knife or scalpel
- Acrylic paints (pastel pink, yellow, soft blue, sage green)
- Small flat paintbrushes
- Fine-grit sandpaper (400-600 grit)
- Matte mod podge or matte varnish
- Sponge or sanding block
- Small bowl of water
- Tile grout (optional, prefer white or sandy beige)
Step 1: Creating the Tiles
-
Roll the clay sheet:
Start by rolling out a portion of your air dry clay into a thin, even sheet, aiming for about 1/8 inch thickness. Uniformity is key here so your mosaic pieces sit level later. -
Cut geometric shapes:
Using a craft knife, slice the wet clay into small, random geometric shapes. Focus primarily on triangles, trapezoids, and irregular polygons about 0.5 to 1 inch in size. -
Drying the tiles:
Separate the cut pieces slightly so they don’t stick together and let them dry completely on a flat surface. This usually takes 24 hours, but flipping them halfway through helps prevent curling. -
Sand edges:
Once fully dry, lightly sand the sharp edges of each small tile with fine-grit sandpaper to give them a softened, tumbled look. -
Paint the tiles:
Paint your geometric tiles in your chosen pastel palette—soft yellow, dusty rose, sage green, and airy blue. I like to leave some pieces unpainted or white for contrast. Let the paint dry fully.
Clean Cuts Pro Tip
Apply a tiny bit of lotion or oil to your craft knife blade before slicing the clay. This prevents dragging and keeps your geometric edges distinct.
Step 2: Assembling the Mosaic Base
-
Roll the base:
Roll out a fresh, thicker slab of air dry clay for the main egg shape. Aim for a sturdy 1/4 inch thickness. -
Cut the egg shape:
Use your large egg-shaped cutter or trace around a cardstock template with a knife to cut out the main oval base. -
Smooth the edges:
Dip your finger in a little water and run it along the cut edge of the oval to smooth out any roughness or fraying clay. -
Score the surface:
Lightly scratch or ‘score’ the top surface of the wet egg base with a needle tool or an old toothbrush to create texture for better adhesion. -
Embed the tiles:
While the base is still wet, gently press your painted dry tiles into the surface. Leave small gaps between them to mimic grout lines. -
Level surface:
Once all tiles are placed, gently roll a rolling pin over the entire assembly very lightly. You want to push the tiles flush with the soft clay base without distorting the egg shape. -
Clean up grout lines:
If the base clay squished up too much between the tiles, use a damp brush or a rubber shaping tool to wipe the ‘grout lines’ clean so the colorful tiles remain distinct.
Level Up: Speckled Effect
Before sealing, flick a toothbrush loaded with diluted brown or grey paint over the finished piece to create a realistic, speckled stone or ceramic egg look.
Step 3: Finishing Touches
-
Final drying:
Allow the entire assembled egg to dry completely. Since the base is thicker, this might take 48 hours. Drying it on a wire rack allows air to circulate underneath. -
Final sanding:
Once bone dry, take fine sandpaper and very lightly sand the surface. This helps remove any paint ridges and makes the mosaic feel like one cohesive stone piece. -
Dust off:
Wipe the project down with a slightly damp cloth or a dry tack cloth to remove all sanding dust. -
Seal the project:
Apply a coat of matte varnish or Mod Podge. This protects the paint and gives the piece a finished, ceramic quality without being overly glossy. -
Felt backing:
Optional: Cut a piece of felt to the shape of the egg and glue it to the back to protect your table surfaces.
Now you have a stunning, handcrafted centerpiece that captures the essence of spring with a sophisticated twist
“Iced” Eggs With Raised Dots and Lines
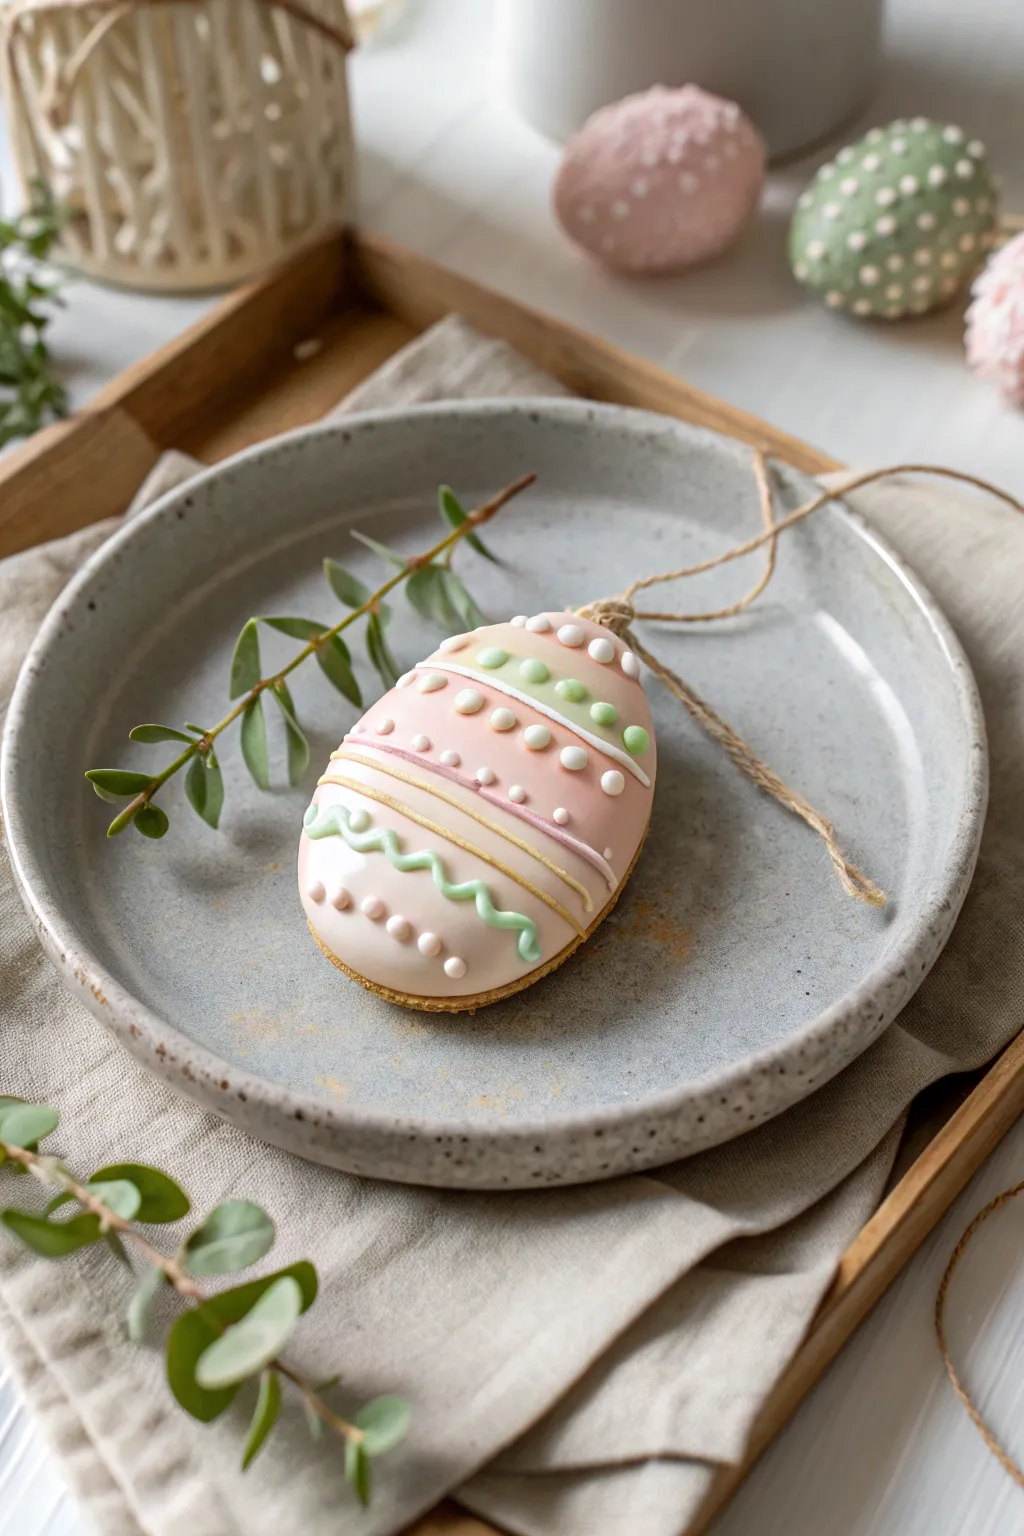
These charming ornaments evoke the sweetness of sugar cookies without the calories, featuring a smooth, pastel “icing” finish and delicate raised details. The combination of matte clay and glossy dimensional paint creates a beautiful trompe l’oeil effect perfect for Easter tree decorating.
Step-by-Step
Materials
- White air dry clay
- Rolling pin
- Egg-shaped cookie cutter (approx. 3 inches)
- Fine grit sandpaper (220-400 grit)
- Acrylic craft paint (blush pink, pale green, white, gold)
- Fine detail paintbrush
- Dimensional fabric paint or puffy paint (white, pale green, pink)
- Glossy varnish or sealer (for the ‘icing’ look)
- Jute twine or thin gold cord
- A straw or toothpick (for the hole)
- Palette or small mixing dish
Step 1: Shaping the Base
-
Condition the clay:
Start by taking a handful of white air dry clay and kneading it in your hands until it becomes warm, pliable, and free of cracks. -
Roll out the slab:
Place the clay on a smooth surface or silicone mat. Using a rolling pin, roll it out to an even thickness of about 1/4 inch. -
Cut the shape:
Press your egg-shaped cookie cutter firmly into the clay. If the clay sticks, you can lightly dust the cutter with cornstarch beforehand. -
Smooth the edges:
Dip your finger in a tiny bit of water and run it along the cut edges of the egg to soften any sharp ridges left by the cutter. -
Create the hanging hole:
Use a straw to punch a clean hole near the top tapered end of the egg. Make sure it goes all the way through and isn’t too close to the edge. -
Initial drying:
Lay the egg flat on a drying rack or a piece of parchment paper. Let it air dry completely, which usually takes 24-48 hours depending on humidity. Flip it halfway through to ensure even drying.
Smoother Puffy Paint
If your dimensional paint leaves sharp peaks when you lift the nozzle, tap the bottom of the egg gently on the table. This helps the paint settle into rounder, smoother dots.
Step 2: Creating the Iced Look
-
Sand for smoothness:
Once fully dry, gently sand the surface and edges with fine-grit sandpaper. You want a very smooth canvas for the ‘icing’ effect. -
Mix the base color:
Create a soft blush pink by mixing a small amount of pink acrylic paint with plenty of white. You want a pastel, milky tone similar to royal icing. -
Paint the ‘flooded’ base:
Paint the entire front surface of the egg with your blush pink mixture, leaving a very small rim of raw clay visible around the edge to mimic a cookie. -
Apply varnish:
After the paint dries, apply a coat of high-gloss varnish over the pink area. This is crucial for achieving that wet, sugary icing appearance.
Project Cracking?
If the clay cracks while drying, mix a tiny bit of fresh clay with water to make a paste (slip) and fill in the crack. Let dry and sand smooth before painting.
Step 3: Piping the Details
-
Prepare dimensional paint:
For the raised details, use dimensional fabric paint (puffy paint). You can use the applicator tip directly or decant it into a fine-tip piping bag for more control. -
Add the central band:
Draw three horizontal lines across the center of the egg. I like to use gold paint for the middle line and pale pink for the flanking lines to add elegance. -
Create the wave pattern:
Below the central lines, carefully pipe a wavy line using pale green dimensional paint. Try to keep your pressure consistent so the line thickness remains even. -
Pipe the top band:
Add a straight horizontal band of pale green near the top third of the egg. -
Dot the details:
Using white dimensional paint, squeeze small, precise dots in a row along the top green band. Repeat this with larger dots at the very top and bottom of the egg. -
Final drying time:
Allow the dimensional paint to dry completely. This often takes longer than standard acrylics, so leave it flat overnight to prevent the ‘icing’ from sliding. -
Add the hanger:
Cut a length of jute twine, thread it through the hole at the top, and tie a secure knot to finish your ornament.
Now you have a sweet, permanent treat to display during your spring celebrations
Marbled Egg Ornaments
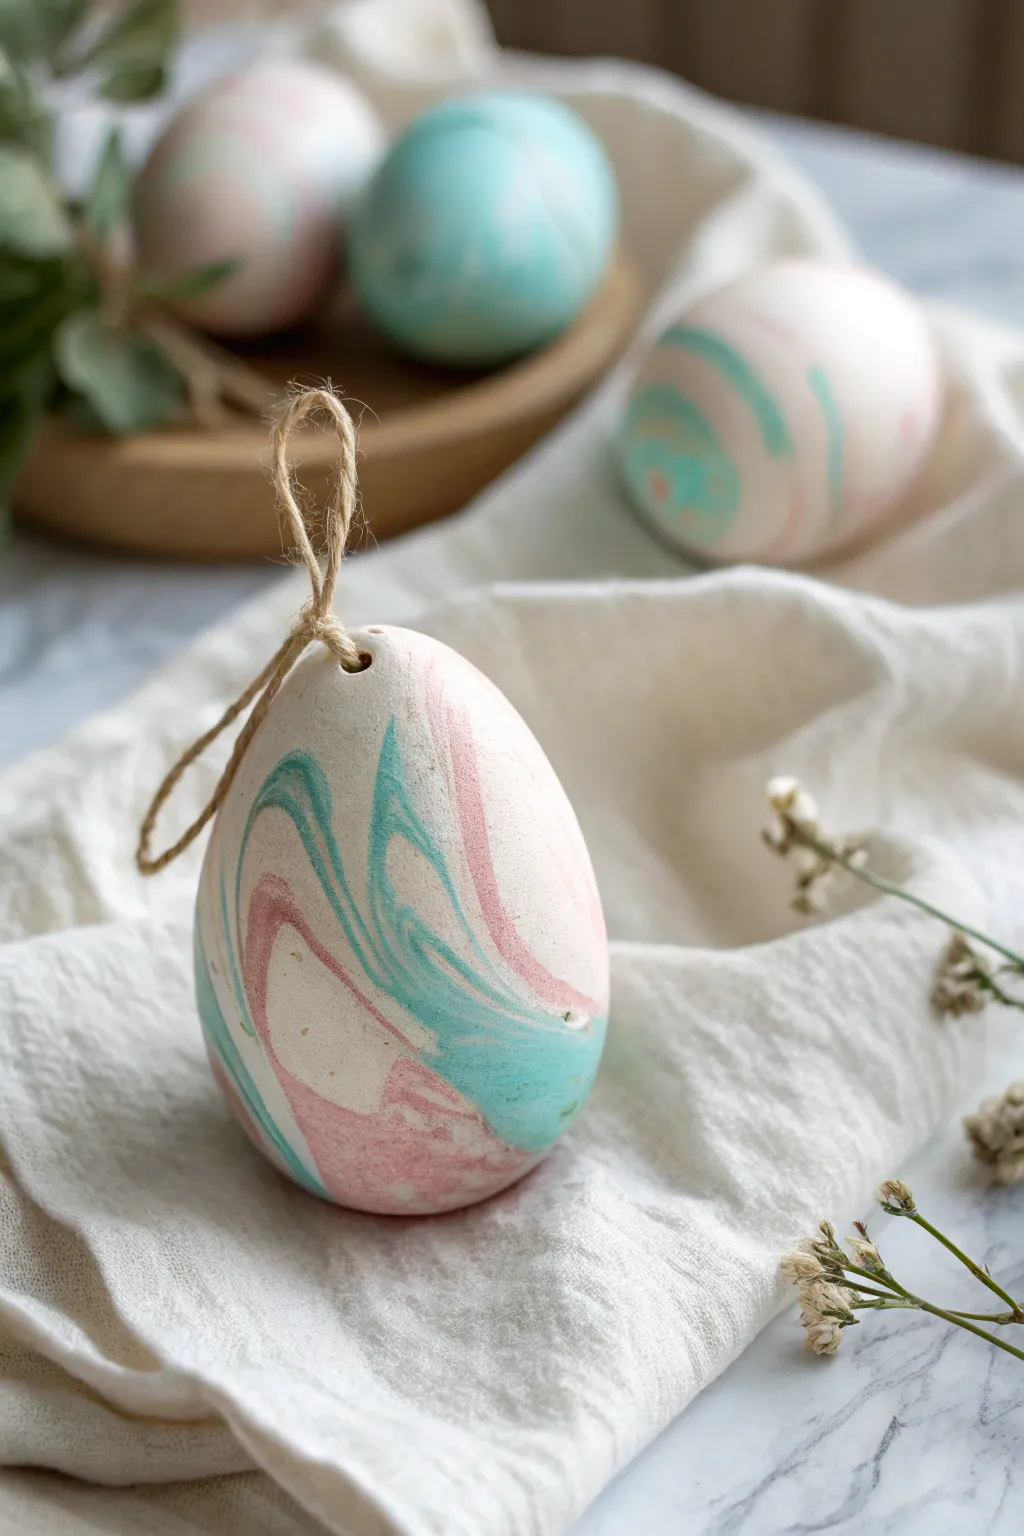
Achieve an elegant, modern Easter look with these marbled air-dry clay egg ornaments featuring soft swirls of teal and dusty pink. The organic mingling of colors creates a unique, stone-like effect that feels both rustic and refined.
Step-by-Step Guide
Materials
- White air-dry clay
- Acrylic paints (teal, dusty pink)
- Small rolling pin
- Egg-shaped cookie cutter (optional, or hand-shape)
- Skewer or toothpick
- Jute twine
- Fine-grit sandpaper
- Clear matte varnish (optional)
- Non-stick work surface or parchment paper
Step 1: Preparing the Clay
-
Portion the clay:
Start by breaking off a generous chunk of white air-dry clay, roughly the size of a tennis ball. Divide this into three separate uneven sections: one large (about 60% of the clay) and two smaller pieces. -
Tint the colors:
Take one of the smaller sections and flatten it slightly. Add a drop of teal acrylic paint into the center. Fold the clay over the paint and knead it thoroughly until the color is uniform. Repeat this process with the second small piece using the dusty pink paint. -
Create distinct ropes:
Roll each of your three colored balls—the plain white, the teal, and the pink—into long, snake-like ropes. They don’t need to be perfectly even in thickness. -
Twist and combine:
Gather the three ropes together and twist them into one large, multi-colored rope. I find that twisting tightly helps distribute the colors better for the next step. -
The fold and roll:
Fold the twisted rope in half and twist it again. Repeat this folding and twisting motion 3-4 times. Be careful not to over-knead, or the colors will muddy into a single greyish tone rather than distinct swirls.
Marbling Mastery
Stop kneading before you think you should! If you mix too much, the distinct swirls disappear. You want clear separation between white, pink, and teal for the best effect.
Step 2: Shaping the Ornament
-
Form a ball:
Once you are happy with the striations in your clay sausage, roll the entire mass into a smooth, round ball to compress the layers together. -
Roll out the slab:
Place the ball on your non-stick surface. Using a rolling pin, flatten the ball into a slab about 1/4 inch thick. You should immediately see the beautiful marbling pattern appear. -
Cut or shape the egg:
If you have an egg-shaped cutter, press it firmly into the most attractive part of the marbled pattern. Alternatively, use a knife to trace a paper template, or simply hand-mold the clay into a smooth 3D egg shape if you prefer a solid object over a flat ornament. -
Refine the edges:
Dip your finger in a little bit of water and gently run it along the cut edges of your egg to smooth out any roughness or stray bits of clay. -
Pierce the hole:
Using a skewer or a toothpick, poke a hole near the top, narrower end of the egg. Make sure the hole is large enough to accommodate your jute twine, keeping in mind that clay shrinks slightly as it dries. -
Wiggle for clearance:
Give the skewer a little wiggle inside the hole to ensure clean opening on both the front and back sides.
Golden Glamour
Once the clay is dry, paint the very edges of the egg with liquid gold leaf or metallic paint to give the rustic stone look a sudden touch of high-end elegance.
Step 3: Finishing Touches
-
Let it dry:
Place your clay egg on a clean sheet of parchment paper or a wire rack. Allow it to air dry completely for 24-48 hours. Turn it over halfway through the drying process to prevent warping. -
Sand for smoothness:
Once the egg is bone dry and hard, take a piece of fine-grit sandpaper and very gently buff the surface. This removes any fingerprints and makes the marbling look even more polished. -
Dust off:
Wipe the ornament with a dry cloth or a soft brush to remove the sanding dust. -
Optional sealing:
If you want to protect the clay or add a sheen, apply a thin coat of clear matte varnish or sealant. This makes the colors pop slightly more without making it look plastic. -
Prepare the twine:
Cut a length of jute twine, approximately 6-8 inches long. Thread one end through the hole at the top of the egg. -
Knot the loop:
Bring the two ends of the twine together and tie a simple overhand knot close to the ends to create a rustic hanging loop.
Hang your new marbled creations on a branch centerpiece to enjoy their calming spring colors
Tiny Bunny Face Magnets

Capture the sweetness of spring with this minimalist bunny face magnet. Featuring a smooth white finish, tiny pink details, and delicate sleeping eyes, it’s the perfect little accent for your fridge or filing cabinet.
How-To Guide
Materials
- White smooth air dry clay
- Rolling pin
- Circle cookie cutter (approx. 2 inches)
- Small teardrop cutter (optional) or craft knife
- Modeling tools (or a toothpick)
- Black fine-liner pen or fine tip acrylic marker
- Pink acrylic paint
- Small detail paintbrush
- Strong craft glue (E6000 or similar)
- Round magnet
- Sandpaper (fine grit)
- Small cup of water
Step 1: Shaping the Clay Base
-
Condition the Clay:
Start by kneading a small ball of white air dry clay in your hands until it becomes warm, soft, and pliable. This prevents cracking later on. -
Roll it Out:
Using a rolling pin, flatten the clay to an even thickness of about 1/4 inch. If you want a smoother surface, roll the clay on a piece of parchment paper. -
Cut the Face:
Press your circle cookie cutter firmly into the rolled clay to create the main head shape. Remove the excess clay from around the edges. -
Soften the Edges:
Dip your finger in a tiny bit of water and gently run it around the cut edge of the circle to smooth out any sharpness or roughness left by the cutter. -
Form the Ears:
Take a small pinch of fresh clay and roll it into a sausage shape, then flatten it slightly. Cut this in half or shape two identical, elongated ovals for the ears. -
Attach the Ears:
Score the bottom of the ears and the top of the head with a needle tool or toothpick. Apply a dab of water (slip) and press the ears firmly onto the back of the head so the seam is hidden. -
Create Ear Indents:
Use a rounded modeling tool or the end of a paintbrush to gently press an indentation into the center of each ear, creating the inner ear shape.
Smooth Operator
To get that porcelain-like finish without sanding later, smooth the wet clay with a baby wipe before drying. It removes fingerprints instantly.
Step 2: Adding Details & Finishing
-
Sculpt the Nose:
Roll a tiny, triangular piece of clay for the nose. Attach it to the center of the face using the scoring and water method. -
Add Cheeks:
create two very small, flattened circles of clay for the rosy cheeks. Press them gently onto the face on either side of the nose area. -
Drying Time:
Place your bunny on a flat surface to dry completely. This usually takes 24-48 hours depending on humidity. Flip it over halfway through I usually find helps it dry evenly. -
Sanding:
Once fully hard, inspect the edges. If there are any rough spots, use fine-grit sandpaper to buff them away until the magnet feels smooth to the touch. -
Paint the Pink Accents:
Using a fine paintbrush and pastel pink acrylic paint, carefully fill in the inner ear indentations, the tiny nose triangle, and the round cheeks. -
Draw the Eyes:
Take your black fine-liner pen. Draw two downward-curving arcs for the sleeping eyes. Add three tiny lashes to the outer corner of each eye. -
Draw the Mouth:
With the same pen, draw a small vertical line down from the nose, connecting to a tiny ‘W’ shape or anchor shape to form the mouth. -
Attach the Magnet:
Turn the dried and painted bunny over. Apply a strong craft glue to the back of the magnet and press it firmly into the center of the clay back. -
Final Seal:
To protect your work, you can apply a thin coat of matte varnish over the clay, though leaving it raw gives it that lovely porcelain look.
Ink Running?
If your pen bleeds into the clay, the clay might still be damp internally. Ensure it’s bone dry, or apply a thin matte sealer before drawing.
Now your adorable sleepy bunny is ready to hold up your grocery lists or favorite photos with a touch of springtime charm.
Dragon-Style Fantasy Easter Eggs
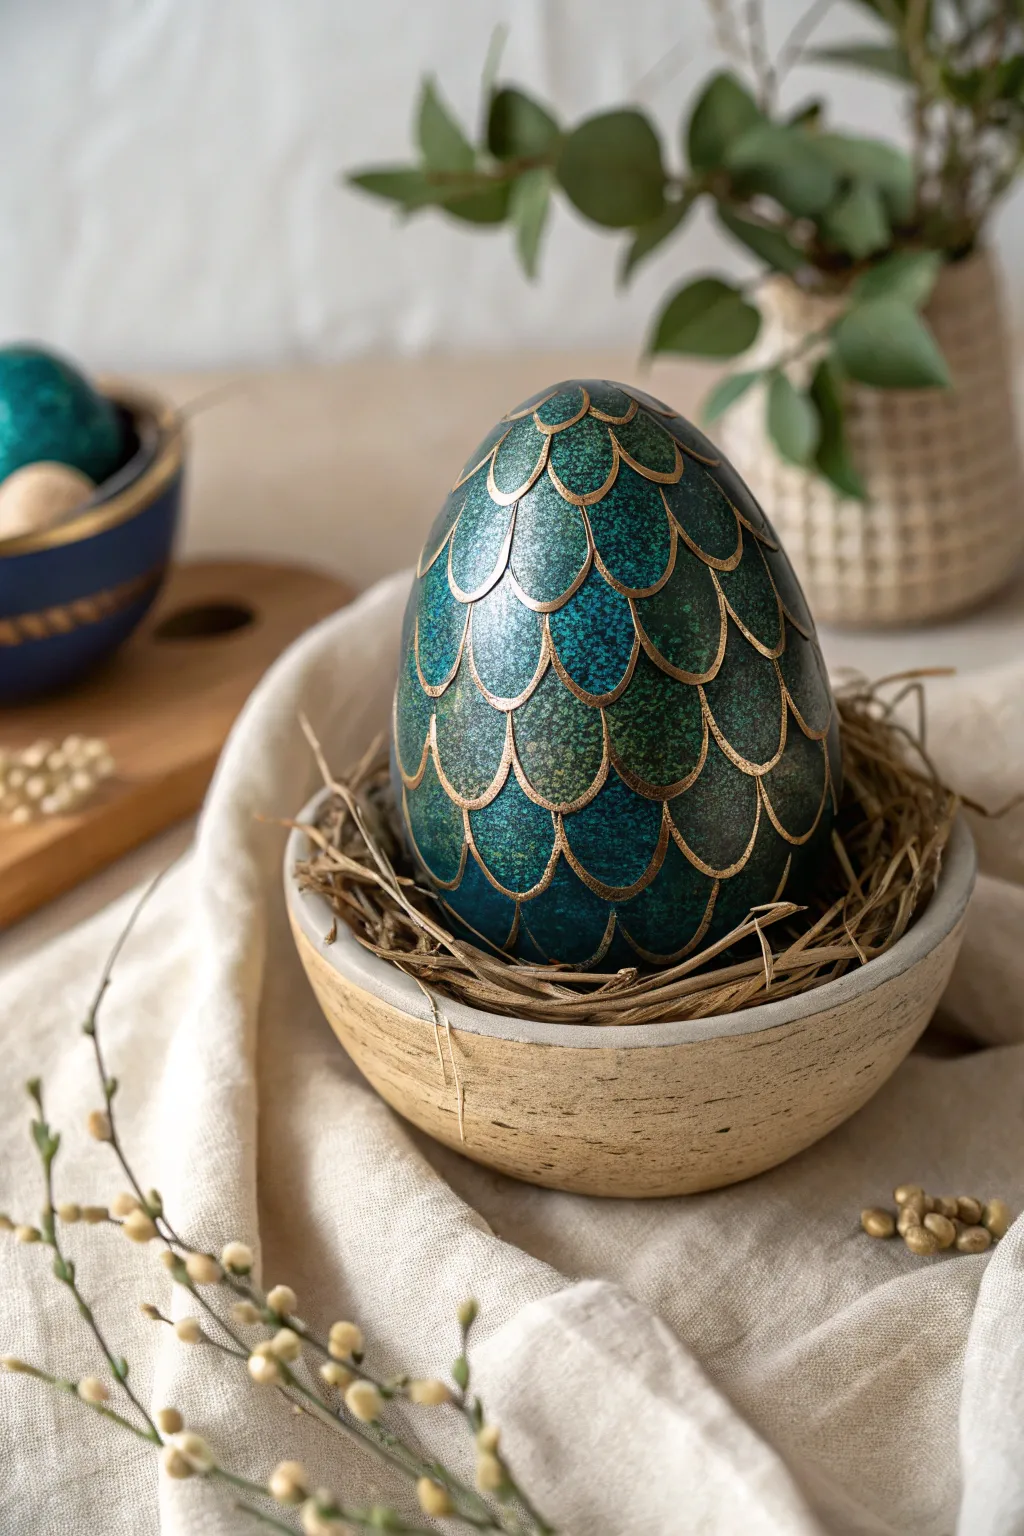
Transform a simple egg shape into a mystical artifact straight from a fantasy realm. This stunning dragon egg features deep teal and emerald scales highlighted with brilliant gold leafing, creating a rich texture that looks ancient and magical.
Step-by-Step
Materials
- Air dry clay (fine grain/smooth finish)
- Large plastic Easter egg or foam egg (as a core/armature)
- Small teardrop-shaped clay cutter (approx. 0.5 – 0.75 inch)
- Acrylic paints: Black, Emerald Green, Teal, Metallic Blue
- Gold wax paste or metallic gold acrylic paint
- Gloss varnish or polyurethane sealant
- Rolling pin
- Water in a small cup
- Sponge or sea sponge
- Fine detail paintbrush
Step 1: Preparing the Scales
-
Roll the clay:
Begin by conditioning your air dry clay until it is soft and pliable. Roll it out into a thin, even sheet, roughly 1/8th of an inch thick. You want it thin enough to layer but sturdy enough to hold the imprint. -
Cut the scales:
Using your small teardrop cutter, punch out dozens of scale shapes. If you don’t have a cutter, you can hand-mold small balls of clay and flatten them into teardrops, though a cutter ensures uniformity. -
Keep them moist:
As you work, place the cut scales under a slightly damp paper towel or plastic wrap. This prevents the thin edges from drying out before you can attach them to the egg.
Step 2: Sculpting the Egg
-
Cover the base:
Take your plastic or foam egg armature and cover it with a very thin base layer of clay. This helps the scales adhere better than sticking them directly to smooth plastic. Use a little water to smooth out any seams. -
Apply bottom scales:
Start applying the scales at the very bottom center of the egg. Dab a tiny amount of water or clay slip on the back of a scale and press it onto the base. -
Layer upwards:
Work your way up the egg in concentric circles. Place the next row of scales so that the tip of each new scale covers the gap between two scales in the row below it, just like shingles on a roof. -
Secure the edges:
Gently press the top rounded part of each scale into the egg to secure it, but leave the bottom pointed tip slightly raised to enhance the 3D texture. -
Finish the top:
As you reach the top, you may need to trim the final scales slightly to make them fit neatly into a point. Smooth the very tip with a drop of water. -
Dry completely:
Allow the egg to dry fully. Depending on the humidity and clay thickness, this usually takes 24 to 48 hours. Rotate it occasionally so the bottom dries evenly.
Scales Falling Off?
If scales detach during drying, the base wasn’t moist enough. Reattach dry scales using strong white glue or superglue, then paint over the seam.
Step 3: Painting and Finishing
-
Base coat:
Paint the entire egg with a coat of black acrylic paint. You want to get deep into the crevices and under the scale tips. This creates depth and shadows. -
Sponge texture:
Once the black is dry, sponge on a mix of emerald green and teal paint. Dab lightly rather than brushing; this keeps the black visible in the recesses while coloring the raised surfaces. -
Metallic highlights:
While the green layer is still slightly tacky or just after drying, lightly sponge or dry-brush a bit of metallic blue on the center of the scales for an iridescent effect. -
Gilding the edges:
Use your finger or a fine brush to apply gold wax paste (or metallic gold paint) along the raised edges of every scale. This outlining step is what truly defines the dragon scale look. -
Distress the gold:
I find that lightly rubbing the gold inward slightly helps blend it, making it look like natural wear rather than a painted line. -
Seal the magic:
Finish with a coat of high-gloss varnish. This protects the gold leafing and gives the egg that wet, reptilian sheen shown in the photo.
Crystal Embedded
Press a faux gemstone or large glass bead into the wet clay at the front center of the egg, building the scales around it, to create a ‘seeing’ dragon egg.
Now nestle your finished dragon egg into a bed of straw or moss for a display that feels plucked from a storybook