Whenever I’m not sure what to make, I shape a fish—because a simple air dry clay fish can go cozy, coastal, modern, or totally whimsical with just a few tweaks. Here are my favorite air dry clay fish ideas, starting with the classics and drifting into some fun, unexpected directions.
Flat Air Dry Clay Fish Cutouts
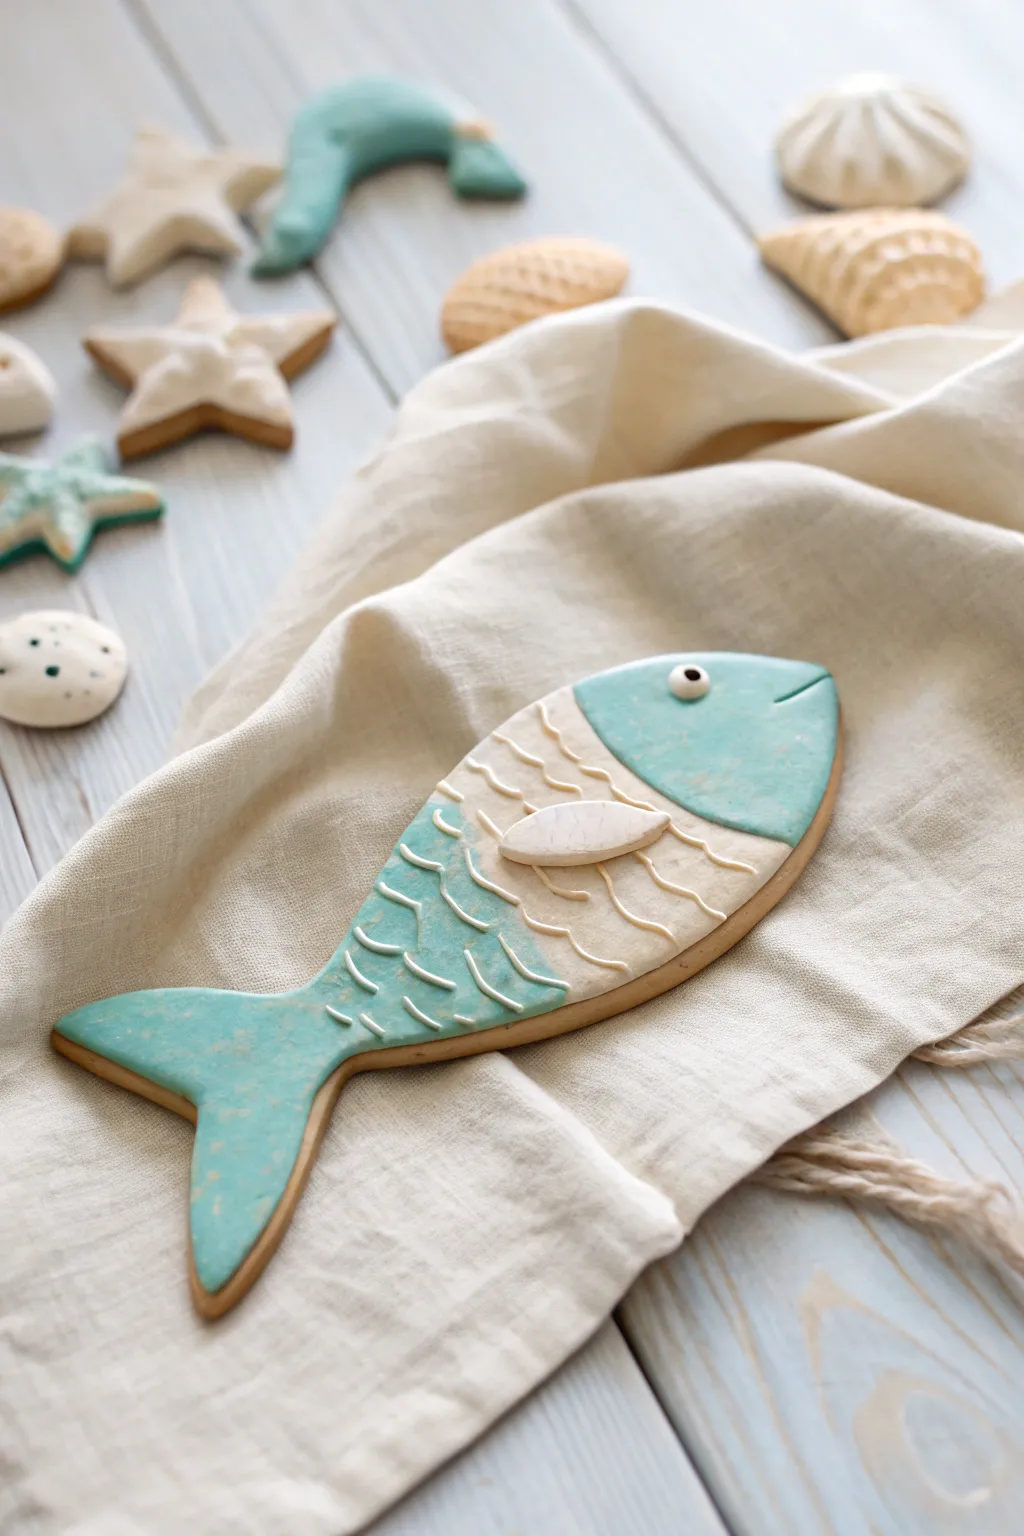
Capture the breezy elegance of the seaside with this stylized flat fish sculpture made from air-dry clay. Featuring a soothing teal and cream palette with raised scale details, this piece brings a sophisticated nautical touch to any table setting or wall display.
Step-by-Step
Materials
- White air-dry clay
- Rolling pin
- Fish-shaped cookie cutter (or paper template and craft knife)
- Small teardrop cutter or clay tool (for fin)
- Clay modeling tools (specifically a small spatula or knife)
- Acrylic paints: Teal/Turquoise, White, Cream
- Fine grit sandpaper
- Paintbrushes (flat shader and fine detail)
- Small bowl of water
- Rolling limiters or slats (optional for even thickness)
Step 1: Shaping the Base
-
Roll out the clay:
Begin by conditioning a handful of white air-dry clay until it is smooth and pliable. Roll it out on a flat surface to an even thickness of about 1/4 inch (6mm). Using depth guides or slats on either side of your roller can really help keep the surface perfectly level. -
Cut the fish shape:
Place your fish template or cookie cutter onto the slab. Cut out the main silhouette cleanly. If using a knife and template, use long, smooth strokes to avoid jagged edges. -
Refine the edges:
Dip your finger in a little water and gently run it along the cut edges of the clay to smooth out any roughness or stray crumbs. The outline should look crisp and intentional. -
Create the pectoral fin:
Roll a small separate piece of clay, slightly thinner than the body. Cut out a small, elongated teardrop shape for the side fin. Attach this to the center of the body using a dab of water and gentle pressure to score and sip the clay together. -
Add the eye:
Roll a tiny ball of clay for the eye and press it gently onto the head area. It should be slightly raised but securely attached. -
Dry completely:
Let the fish dry on a flat surface, flipping it occasionally to prevent warping. Depending on your humidity, this could take 24-48 hours. The clay must be bone dry before the next steps.
Smooth Surface Secret
Use a smooth plastic placemat or a silicone baking mat to roll out your clay. This prevents sticking without adding texture from canvas or wood grain.
Step 2: Painting and Detailing
-
Sand for smoothness:
Once fully dry, lightly sand the surface with fine-grit sandpaper if there are any bumps. Wipe away the dust with a barely damp cloth. -
Base coat the head and tail:
Mix a soft teal color using turquoise and white acrylic paint. Paint the head section (stopping where the gills would be) and the tail section using a flat brush. Apply thin layers for opaque coverage. -
Paint the body:
For the middle section of the fish, mix a warm cream color. Carefully paint the area between the teal head and tail. Don’t worry about perfect lines yet; the texture comes next. -
Detail the fin:
Paint the raised side fin in a solid white or very pale cream to make it pop against the body. -
Add the eye detail:
Use a fine detail brush or a dotting tool to paint the tiny clay eyeball white, then add a small black dot in the center for the pupil.
Wall Hanging Hack
Before the clay dries, poke a small hole near the top dorsal fin area or embed a small wire loop into the back so you can easily hang your fish on the wall.
Step 3: Adding Texture
-
Prepare piping paint:
To create the raised 3D lines that mimic scales, you generally need a thickening medium. Mix white acrylic paint with a texture paste or use a 3D fabric paint in a squeeze bottle with a fine nozzle. -
Pipe the scales:
Starting from the back of the head, pipe curved, scalloped lines across the cream body section. I like to work from top to bottom in columns, ensuring the curves flow naturally towards the tail. -
Detail the tail texture:
On the teal tail section, pipe similar scalloped lines using white textural paint, but space them out slightly more to differentiate the texture from the body scales. -
Head definition:
Use a very fine brush or your piping tool to add a subtle curved line separating the head from the body. Add a small etched line for the mouth if desired. -
Distress for effect (Optional):
If you want a rustic, weathered look like the image, once the paint is dry, very lightly dry-brush a tiny amount of diluted white paint over the teal sections to create a chalky, matte finish. -
Final matte seal:
Finish the piece with a coat of matte spray varnish. This protects the paint and gives it that unglazed ceramic look.
Now you have a serene little piece of ocean art ready to display.


Hanging Clay Fish Wall Decor
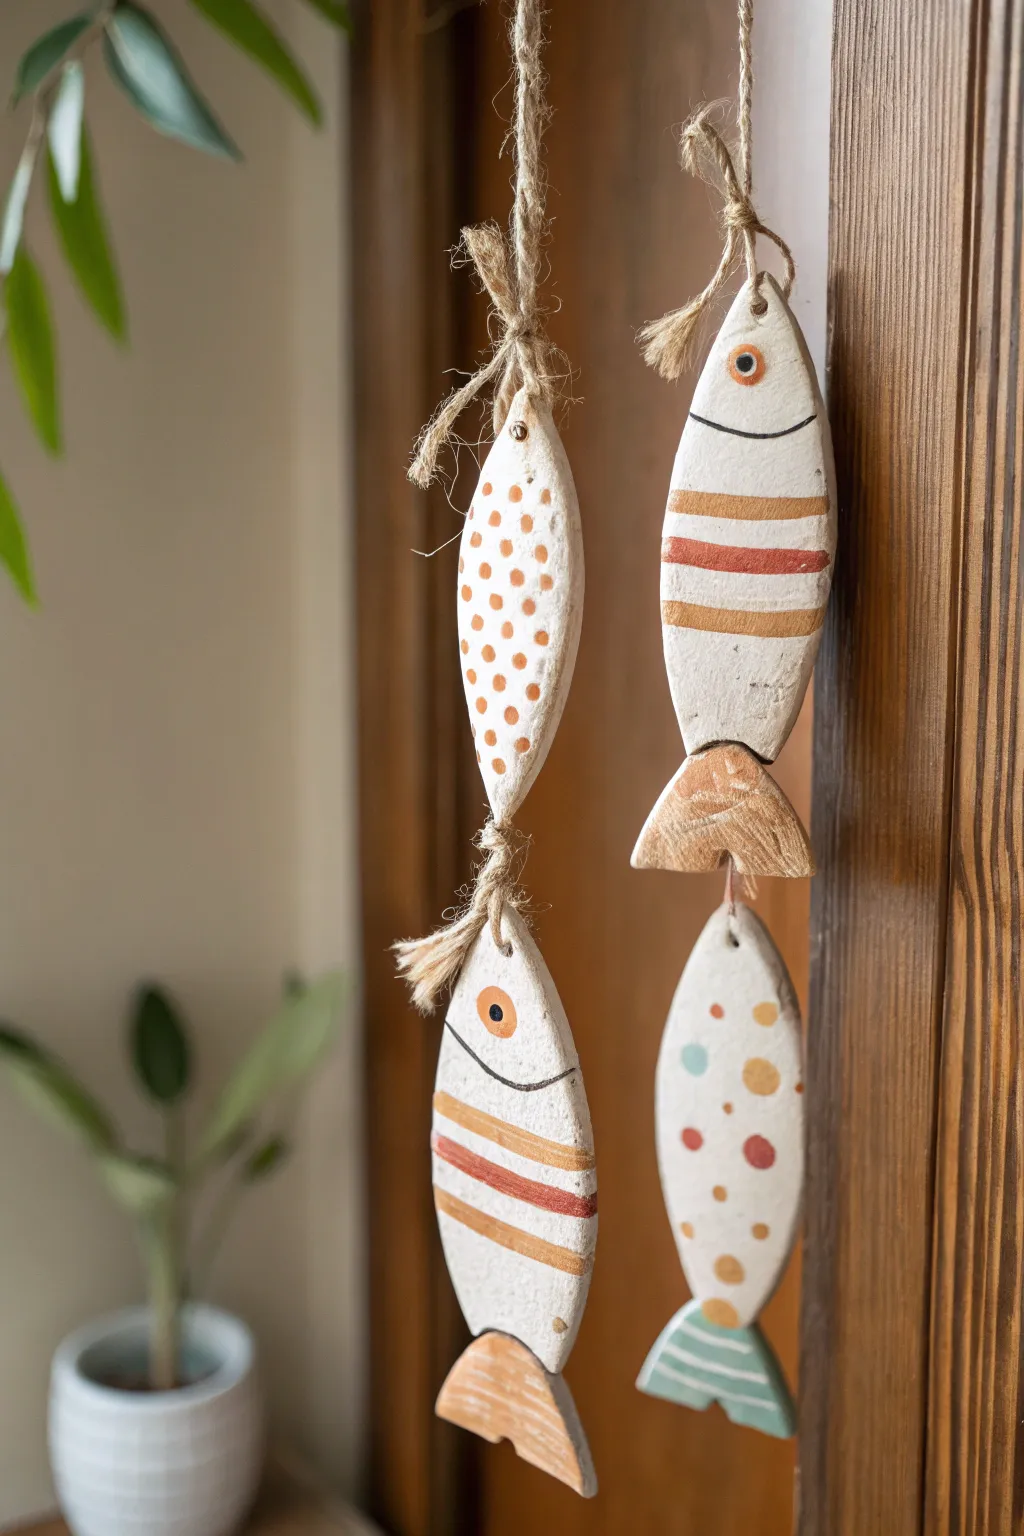
Bring a touch of coastal charm to your space with these rustic, hand-sculpted clay fish. Strung on natural jute twine, their simple geometric patterns and gentle swaying motion create a perfectly relaxed, beachy vibe.
Detailed Instructions
Materials
- Air dry clay (white or terracota)
- Rolling pin
- Knife or clay cutting tool
- Sandpaper (fine grit)
- Acrylic paints (orange, rust-red, teal, black, white/cream)
- Small round paintbrushes
- Wooden skewer or toothpick
- Jute twine
- Scissors
Step 1: Sculpting the Fish
-
Roll the clay:
Begin by conditioning your air dry clay until it’s pliable, then roll it out on a flat surface to a thickness of approximately 1/4 inch. If you want a uniform look, you can use guide sticks on either side. -
Cut the basic shapes:
Using a knife or clay tool, freehand cut elongated oval shapes that taper to a point at one end (the nose) and remain slightly wider at the other. Aim for fish bodies about 4-5 inches long. -
Add the tails:
For the tails, cut separate triangular or trapezoidal shapes. Alternatively, you can cut the fish body and tail as one continuous piece, but the separate piece method adds a nice articulated look like the reference image. -
Connect the pieces:
Score the bottom of the body and the top of the tail with a cross-hatch pattern. Add a dab of water (slip) and press them firmly together to join. -
Smooth the edges:
Dip your finger in a little water and run it along the cut edges of each fish to soften any sharpness. I like to gently tap the sides to give them a softer, more organic feel. -
create the hanging holes:
Before the clay starts to dry, use a wooden skewer to poke a hole vertically through the entire length of the fish if you want the string hidden inside. Alternatively, for easier threading, poke a hole horizontally through the nose and another through the tail section.
Driftwood Texture Tip
Before drying, gently press a piece of rough fabric or actual wood grain against the wet clay. This subtle texture makes the white paint finish look more rustic and authentic.
Step 2: Drying and Refining
-
Let them dry:
Lay the fish flat on a wire rack or a piece of parchment paper. Allow them to dry completely for 24-48 hours. Turn them over halfway through to ensure even drying and prevent curling. -
Sand for smoothness:
Once fully cured and hard, use fine-grit sandpaper to gently smooth out any rough bumps on the surface or jagged edges along the silhouette. -
Dust off debris:
Wipe the fish down with a barely damp cloth or a dry soft brush to remove all sanding dust before painting.
Step 3: Decorating the School
-
Apply base details:
For the eyes, paint a small orange circle with a black dot in the center near the nose. Use a fine liner brush and black paint to draw a simple curved line separating the head from the body. -
Paint the stripes:
On two of the fish, paint horizontal bands across the body. Mix a muted orange and a rust-red color. Paint imperfect, slightly thick stripes, leaving the raw white clay visible in between. -
Add polka dots:
On the other fish, dip the back end of a paintbrush into your orange or rust paint and dot it onto the clay to create a random polka dot pattern. -
Finish the tails:
Paint the tails in solid blocks or simple patterns. Try a solid textured brown for one, and perhaps teal stripes for another to add a pop of cool color. -
Weather the finish:
Once the paint is dry, you can lightly sand over the painted areas again. This distresses the paint slightly, giving it that worn, driftwood aesthetic.
Fixing Cracks
If small cracks appear as the clay dries, don’t panic. Mix a tiny bit of fresh clay with water to make a paste and fill the crack, then smooth it over with your finger.
Step 4: Assembly
-
Prepare the twine:
Cut a long length of jute twine. Tie a sturdy knot at the very bottom end. -
Thread the first fish:
Thread the twine through your bottom fish, resting it on the knot. If you made vertical holes, pass the string straight through. If using horizontal holes, tie knots around the top and bottom loops. -
Add spacing knots:
Decide how far apart you want your fish (about 2-3 inches looks good). Tie a large bulky knot or a series of knots at that position on the twine to support the next fish. -
Attach the second fish:
Slide the second fish down until it rests on the new knot. Repeat this process for however many fish you wish to hang in a vertical line. -
Create a hanging loop:
At the top of the twine, create a simple loop knot so you can easily hang your new mobile.
Hang your catch of the day near a window or door where they can catch the breeze and turn gently


Mini Fish Magnets for the Fridge
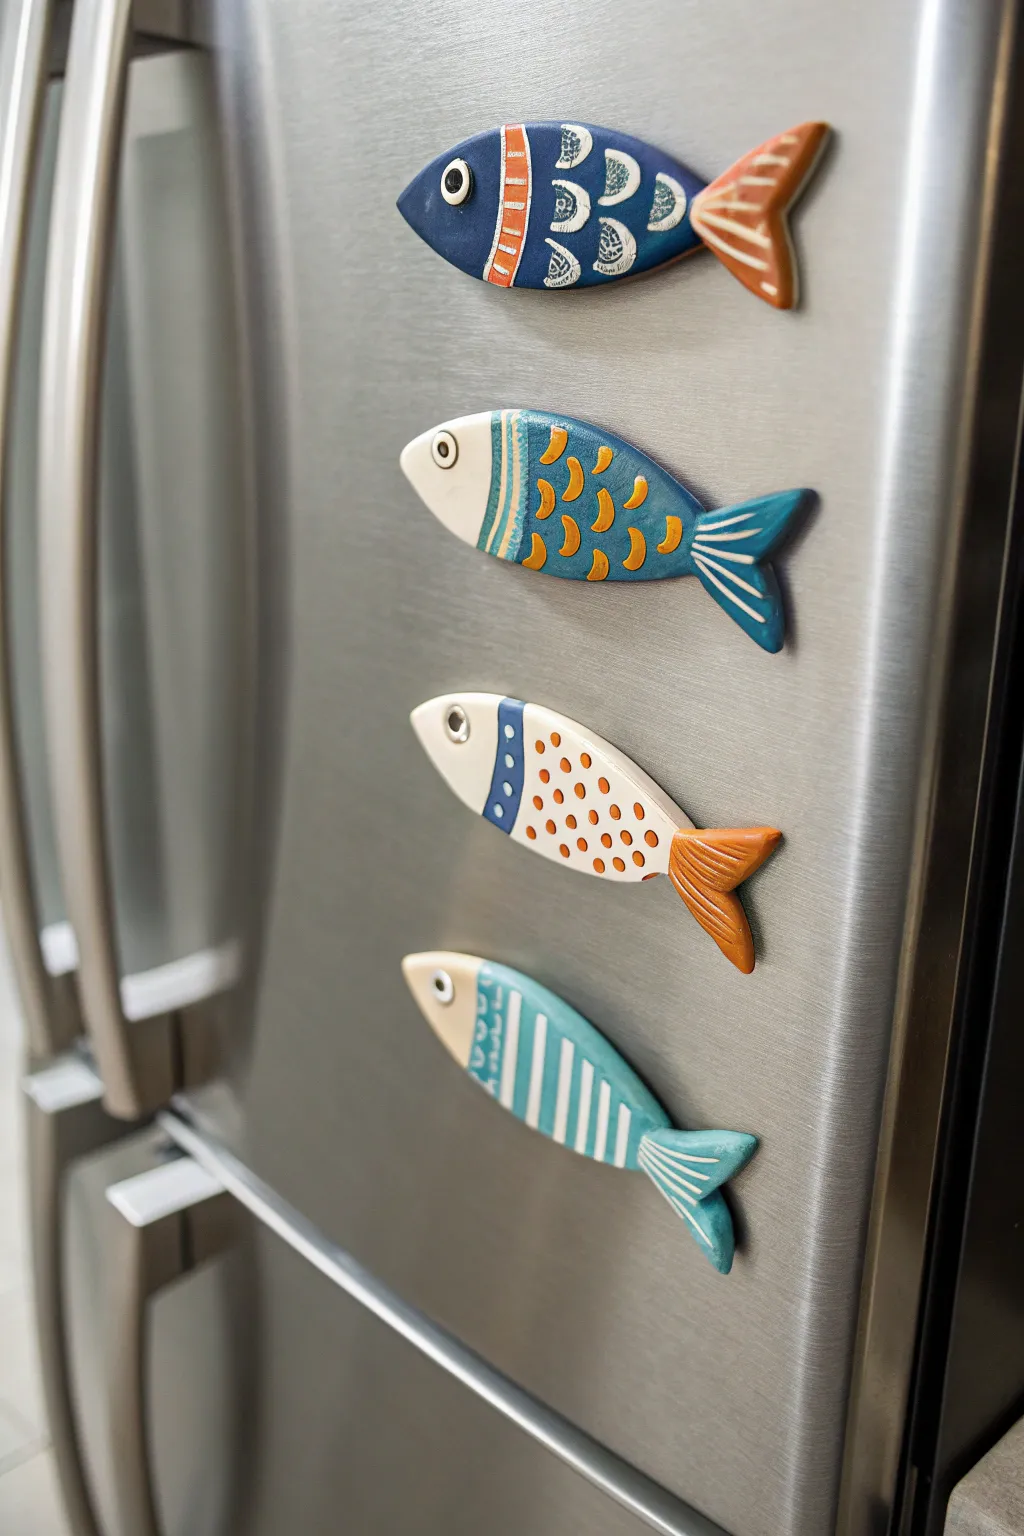
Brighten up your kitchen with a school of these charming, stylized fish magnets made from air dry clay. Featuring bold patterns like scales, dots, and stripes, each fish brings a unique splash of coastal character to your stainless steel fridge.
How-To Guide
Materials
- Air dry clay (white)
- Small round magnets (neodymium strength recommended)
- Acrylic paints (navy blue, sky blue, orange, white)
- Fine detail paintbrushes (size 0 and 2)
- Rolling pin
- Parchment paper or craft mat
- Craft knife or clay shaping tool
- Small circle cutter (optional, for eyes)
- High-gloss varnish or sealant
- Strong craft glue (e.g., E6000)
Step 1: Shaping the Catch
-
Prepare your workspace:
Lay down parchment paper or a craft mat to prevent the clay from sticking. Knead a portion of air dry clay until it is soft, pliable, and free of cracks. -
Roll out the clay:
Using your rolling pin, flatten the clay to an even thickness of about 1/4 inch (6mm). This thickness is sturdy enough for a magnet but not too heavy. -
Cut the basic shape:
Use a craft knife to cut out a simple fish silhouette. Start with an elongated oval for the body and flare out a triangular tail at the end. Aim for a shape about 3-4 inches long. -
Refine the edges:
Dip your finger in a little bit of water and run it along the cut edges of the clay to smooth out any roughness or stray crumbs. -
Create the eye socket:
Use the back of a paintbrush or a small circle tool to press a distinct indentation where the eye will be. Deepen it slightly to create a rim. -
Add texture details:
Using your crafting knife, gently carve shallow dividing lines to separate the head, the body patterning area, and the tail fin. This will help guide your painting later. -
Press in magnet (optional):
If you want the magnet embedded, press it gently into the back now to create a recess, then remove it to glue later. I prefer this method to keep the fish flush against the fridge. -
Let it dry:
Place your fish on a flat surface to dry completely. This usually takes 24-48 hours depending on humidity. Flip them halfway through to ensure even drying.
Smooth Moves
Slight imperfections in dried clay can be fixed before painting. Use a fine-grit sandpaper/nail file to gently buff away bumps for a professional finish.
Step 2: Painting the Patterns
-
Base coat the head:
Start by painting the head section. For the top fish, use a dark navy blue; for the second, use white. Paint carefully up to the dividing line you carved. -
Block in body colors:
Apply the main body color. The first fish needs a dark blue body, the second needs a sky blue body, and the third gets white. Let the base layers dry before adding details. -
Detail the first fish:
On the navy body, paint vertical white curves to suggest scales. Add a vertical orange stripe with white tick marks just behind the head, and paint the tail orange with white stripes. -
Detail the second fish:
For the sky blue fish, paint repeating yellow or orange crescent shapes to create a scale texture. Add a vertical striped band behind the head and paint the tail with detailed blue spines. -
Detail the third fish:
On the white body, use orange to create rows of small polka dots. Paint a thick blue band with white dots behind the head, and finish with a bright orange tail featuring radiating lines. -
Detail the fourth fish:
For the bottom fish, create a striped pattern on the body using white and teal-blue vertical lines. Paint the head a soft cream or white. -
Paint the eyes:
Paint the inside of the eye indentation white. Once dry, add a small black dot in the center for the pupil to bring the fish to life.
Step 3: Finishing Up
-
Seal the artwork:
Apply a coat of high-gloss varnish over the entire front and sides of the fish. This protects the paint and gives it a ceramic-like shine. -
Attach the magnet:
Once the varnish is fully cured, flip the fish over. Apply a dab of strong craft glue to your magnet and press it firmly onto the back (or into the recess you made earlier).
Go 3D
Instead of just painting the scales, use a small U-shaped tool to impress actual scale textures into the clay while it’s still wet for a tactile feel.
Arrange your school of fish on the refrigerator door to enjoy a little piece of the ocean every day

Clay Fish Keychain Charms

These delightful fish keychains combine a rustic, handmade aesthetic with clean, modern color blocking. Crafted from simple air-dry clay and painted in earthy tones of terracotta and teal, they make perfect little gifts or personal accessories.
Step-by-Step Guide
Materials
- White air-dry clay
- Rolling pin
- Fish-shaped cookie cutter (small) or craft knife
- Sandpaper (fine grit)
- Acrylic paints (terracotta/rust, teal blue, cream/off-white, black)
- Small detail paintbrush
- Flat shader paintbrush
- Paper clip or needle tool
- Small jump rings (brass finish)
- Brass keychain clasp and ring
- Small pliers
- Matte varnish or sealant
Step 1: Shaping the Fish
-
Condition the clay:
Begin by kneading a small ball of white air-dry clay until it is soft, pliable, and free of cracks. -
Roll it out:
Roll the clay out evenly on a smooth surface to a thickness of about 3-4mm. You want it substantial enough not to break, but light enough for a keychain. -
Cut the shapes:
Use a small fish-shaped cookie cutter to punch out your forms. If you don’t have a cutter, I find it easy enough to sketch a simple fish shape on paper, cut it out, and trace around it with a craft knife. -
Smooth the edges:
Dip your finger in a tiny bit of water and gently run it along the cut edges of the fresh clay to smooth out any roughness or jagged bits. -
Create the hole:
Use a straw or a needle tool to poke a hole near the top of the fish’s mouth area. Make sure the hole is big enough for your jump ring to fit through once the clay shrinks slightly during drying.
Smooth Surface Trick
Before painting, apply a thin layer of watered-down white glue or Gesso. This seals the porous clay and makes your acrylic paint glide on much smoother for crisp lines.
Step 2: Drying and Refining
-
Let it dry completely:
Place your clay fish on a clean, flat surface to dry. Turn them over occasionally to ensure even drying. This usually takes 24-48 hours depending on humidity. -
Sand for smoothness:
Once fully cured, take a piece of fine-grit sandpaper and gently buff the edges and surface. You want a beautifully smooth canvas for your paint. -
Clean off dust:
Wipe the fish down with a slightly damp cloth or a dry soft brush to remove all sanding dust.
Textured Twist
Before the clay dries, press a piece of lace or burlap into the ‘body’ section of the fish. When you paint, dry-brush over the texture to highlight the pattern.
Step 3: Painting the Design
-
Paint the base:
Using a flat shader brush, paint the entire front and back of the fish with a cream or off-white acrylic paint. You may need two thin coats for opaque coverage. -
Block the head color:
Imagine a curved line separating the head from the body. On one fish, paint the head area in a teal blue; on the other, use a warm terracotta or rust color. -
Paint the tail:
Using the terracotta/rust paint, carefully fill in the tail section on both fish. This ties the set together visually. -
Add the eye:
Dip the non-brush end of a small paintbrush into black paint and dot it onto the head area to create a perfect circular eye. Alternatively, you can paint a small black circle with a ring of white inside it. -
Detail the scales:
With your finest detail brush and black paint, add three horizontal rows of small dashes along the cream body section to represent scales. Keep them loose and sketchy for charm. -
Tail details:
Add a simple line or a small ‘V’ shape on the tail using a slightly darker shade of rust (or by mixing a tiny bit of black into your rust paint) to suggest fin texture.
Step 4: Assembly
-
Seal the work:
Once the paint is bone dry, apply a coat of matte varnish. This protects the paint from chipping in your pocket or purse. -
Open the jump ring:
Using two pairs of pliers, twist a jump ring open sideways (never pull it apart). -
Attach to hardware:
Thread the open jump ring through the hole in the fish and then attach it to the chain link on your brass keyring. -
Close the ring:
Twist the jump ring back into a closed position, ensuring the ends meet perfectly flush so the fish doesn’t slip off.
Now your charming nautical accessories are ready to organize your keys or decorate a bag

The Complete Guide to Pottery Troubleshooting
Uncover the most common ceramic mistakes—from cracking clay to failed glazes—and learn how to fix them fast.
Fish Ornament Gift Tags
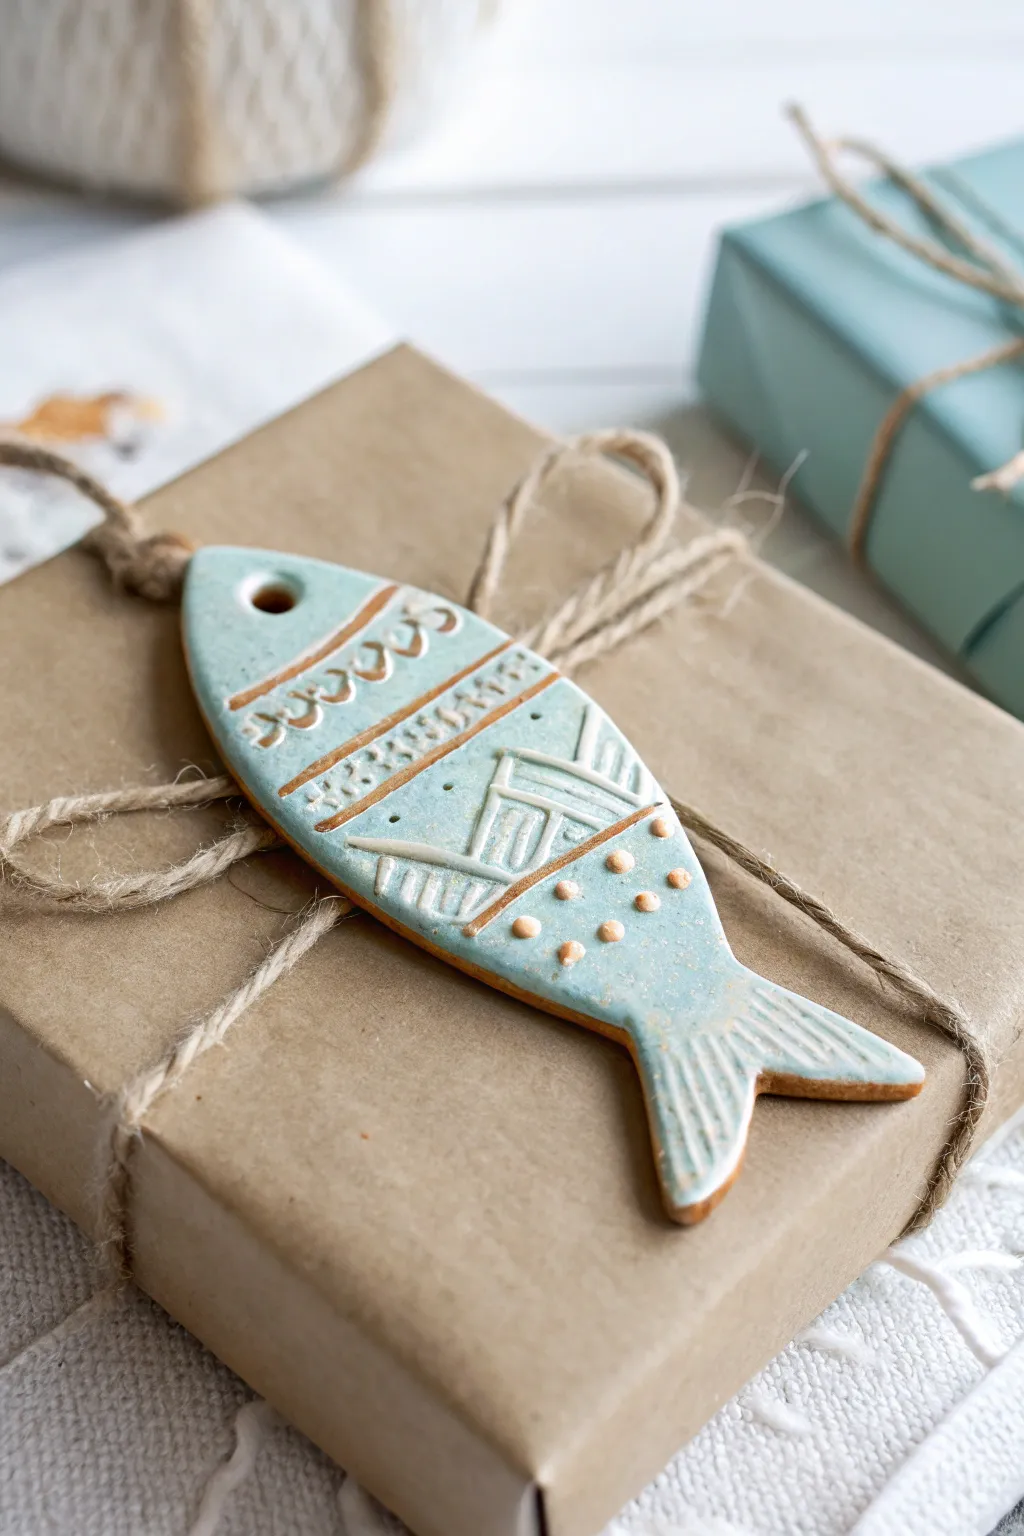
Elevate your gift wrapping with these textured, handcrafted fish ornaments that double as keepsake decor. The soft teal glaze effect contrasting with raw clay edges creates a sophisticated, beachy aesthetic perfect for special occasions.
Step-by-Step
Materials
- White or terracotta air-dry clay
- Fish-shaped cookie cutter (or cardstock template and knife)
- Rolling pin
- Parchment paper or canvas mat
- Straw or cocktail stick for hole punching
- Pointed sculpting tool or toothpick
- Acrylic paints (Teal/Turquoise and White)
- Small flat brush and fine liner brush
- Matte or satin varnish
- Jute twine for tying
- Sandpaper (fine grit)
Step 1: Shaping the Clay
-
Prepare your surface:
Lay down your canvas mat or parchment paper to prevent sticking. Take a handful of air-dry clay and knead it briefly until it is warm and pliable. -
Roll the slab:
Roll the clay out to an even thickness of about 1/4 inch (6mm). You want it sturdy enough to not crack, but not so heavy it weighs down the gift wrapping. -
Cut the shape:
Use your fish-shaped cookie cutter to press firmly into the clay. If using a paper template, trace around it carefully with a craft knife. -
Smooth the edges:
Dip your finger in a little water and gently run it along the cut edges of the fish to smooth out any jagged bits or crumbs. -
Create the hanging hole:
While the clay is still wet, use a straw to punch a clean hole near the top (the mouth area or dorsal fin) for the string. A straw removes the clay core cleanly, unlike just poking it.
Fixing Curled Edges
If the tail curls up while drying, slightly dampen the concave side and place it under a heavy book (with parchment paper) for a few hours to flatten it back out.
Step 2: Adding Texture & Drying
-
Carve the design base:
Using a pointed tool or toothpick, gently carve shallow horizontal lines across the fish body to section off different patterns. Don’t cut all the way through. -
Detailing the patterns:
Inside the sections, scratch in your designs. The example uses a mix of vertical hatching, zigzag lines, and small geometric shapes. Keep the pressure light but consistent. -
Add raised elements:
Roll tiny spheres of leftover clay and press them gently onto the tail or bottom section to create raised ‘bubbles’ or scales. Use a dab of water or slip to secure them. -
Let it dry completely:
Place the fish on a drying rack or mesh screen for airflow. Let it dry for 24-48 hours until it is hard and turns a lighter color. Flip it halfway through to prevent curling.
Make it Sparkle
Mix a tiny pinch of gold mica powder or extra-fine gold glitter into your clear varnish topcoat for a subtle shimmer that mimics fish scales in the sunlight.
Step 3: Painting & Finishing
-
Sand imperfections:
Once fully dry, use fine-grit sandpaper to briefly gently buff away any sharp burrs on the edges. -
Apply the base color:
Mix a watery wash of teal or turquoise acrylic paint. Apply this all over the front surface, avoiding the very edge to leave a ‘framed’ raw clay look. -
Highlight the carving:
I like to use a technique called dry-brushing here. Dip a very dry brush into white paint and lightly skim over the textured areas. The white will catch on the raised ridges and leave the recessed lines teal. -
Paint the embellishments:
Using a fine liner brush, paint the specific carved details (like the zigzags) and the raised clay dots with opaque white or cream paint to make them pop against the blue. -
Seal the piece:
Once the paint is dry, apply a coat of matte varnish to protect the clay from moisture and give it a finished sheen. -
Add the twine:
Cut a length of jute twine, thread it through the hole, and tie a loop. Your fish is now ready to adorn a gift.
Enjoy styling these charming little fish on your next gift exchange or hanging them on a coastal-themed tree
Beaded Garland With Clay Fish
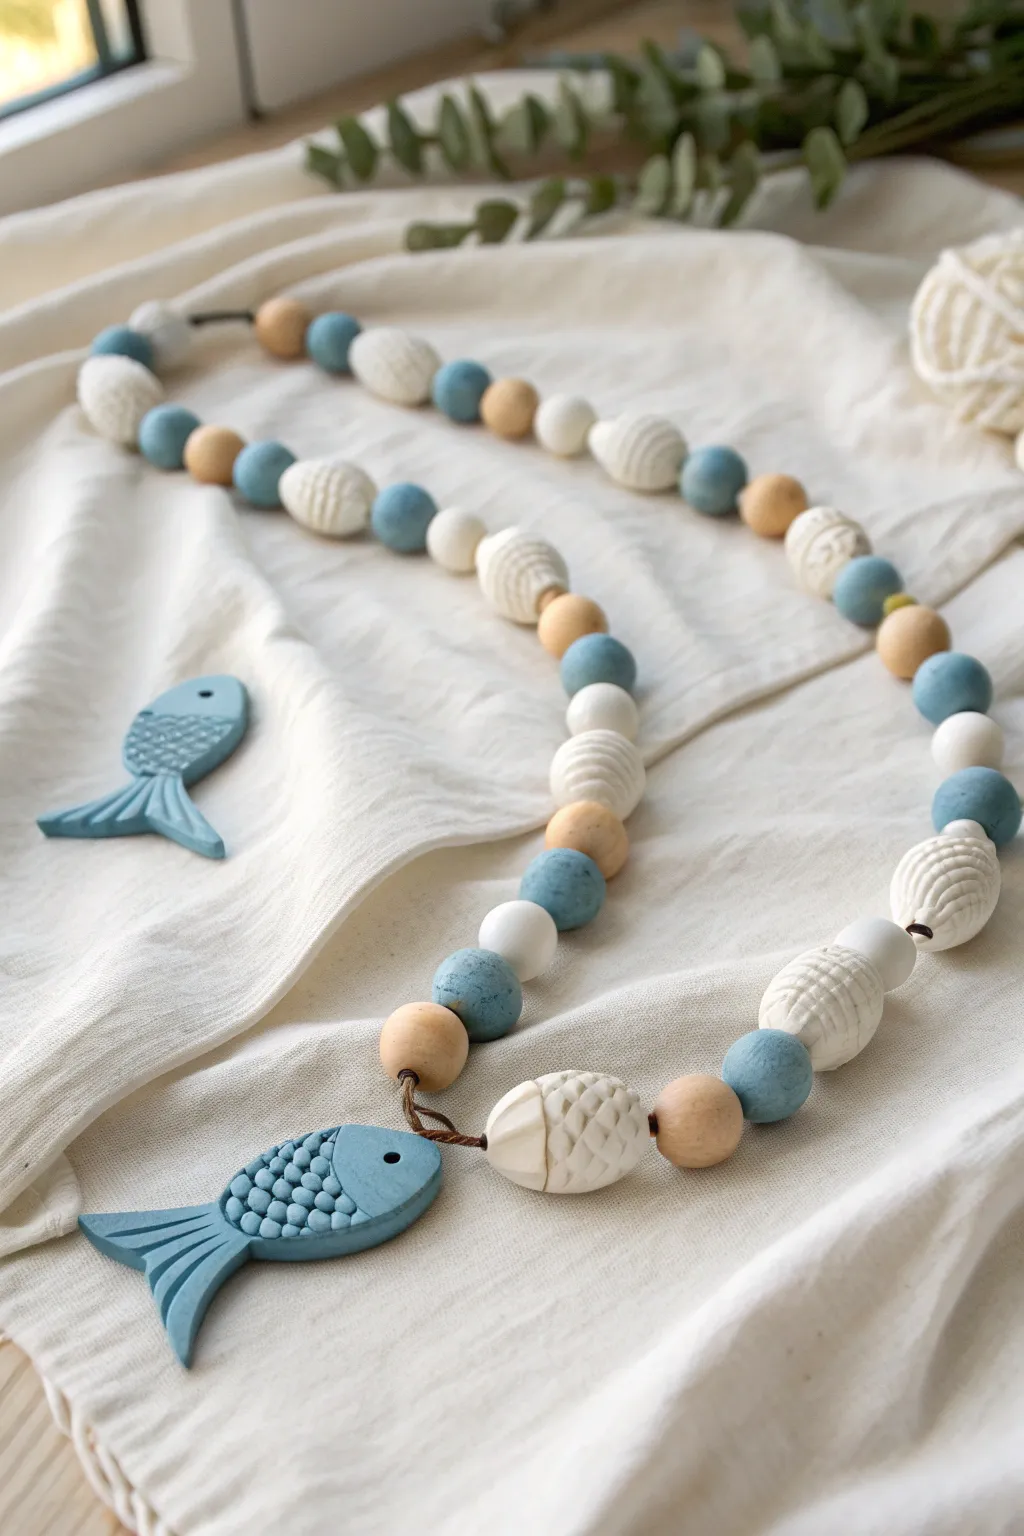
Bring the serene feeling of the sea into your home with this beautiful beaded garland features handcrafted clay fish and textured beads. The soft palette of blues, whites, and natural wood tones makes it a perfect accent for a nursery or coastal-themed living space.
Detailed Instructions
Materials
- White air-dry clay
- Rolling pin
- Clay knife or craft knife
- Fish-shaped cookie cutter (optional)
- Small straw or toothpick (for holes)
- Round piping tip or pen cap (for scale texture)
- Acrylic paint (slate blue, deep teal, white)
- Paintbrushes (flat and detail)
- Wooden beads (various sizes, 12mm-20mm)
- Jute twine or heavy cording
- Sandpaper (fine grit)
- Matte sealant or varnish
Step 1: Sculpting the Clay Elements
-
Roll out the slab:
Begin by conditioning a portion of your air-dry clay until it’s pliable. Roll it out on a smooth surface to an even thickness of about 1/4 inch. -
Cut the fish shapes:
Use a fish-shaped cutter or freehand a simple fish silhouette with a craft knife. You’ll need one large focal fish for the end and a slightly smaller flat fish for decoration. Smooth the cut edges with a damp finger. -
Add scale texture:
For the fish’s body, press the round edge of a piping tip or a pen cap into the wet clay repeatedly, overlapping the impressions slightly to mimic fish scales. Leave the head and tail smooth. -
Define the details:
Use your knife tool to gently score lines into the tail fin and create a line separating the head from the body. Poke a small eye hole using a toothpick. -
Make the piercing hole:
Crucial step: Use a straw or large skewer to create a clean hole at the mouth of the fish for stringing later. Make sure it’s wide enough for your twine. -
Form textured beads:
Roll leftover clay into spheres. While holding them gently, use a knife to score a crisscross or grid pattern around the surface to create the white textured beads seen in the garland.
Step 2: Painting and Finishing
-
Dry thoroughly:
Allow all clay pieces to dry completely for at least 24-48 hours. I find turning them over halfway through helps them dry evenly without warping. -
Sand imperfections:
Once bone dry, lightly sand any rough edges on your fish and handmade beads to ensure a professional finish. -
Paint the fish:
Mix a slate blue acrylic paint. Apply an opaque coat to the fish. If you want the texture to pop, you can wipe a little paint away while it’s wet, or dry brush a lighter blue on top. -
Paint accent beads:
Select a few wooden beads and paint them in coordinating shades of blue—perhaps a mix of the slate blue and a deeper teal. Leave the textured clay beads white. -
Seal the pieces:
Apply a coat of matte varnish to all painted pieces and the raw clay beads.This protects the clay and gives everything a unified sheen.
Clay Cracking?
If small cracks appear as the clay dries, mix a tiny bit of fresh clay with water to make a paste (slip) and fill them in like spackle before painting.
Step 3: Assembling the Garland
-
Prepare the cord:
Cut a long length of jute twine, measuring about 3-4 feet depending on your desired drape. Tie a sturdy knot at one end. -
Attach the focal fish:
Thread the twine through the mouth hole of your main fish pendant. Loop the twine back on itself and secure it with a knot so the fish hangs straight at the bottom. -
Plan your pattern:
Lay out your beads on a table before stringing. A random but balanced pattern works best—mix the wooden beads, painted blue beads, and white textured clay beads. -
String the beads:
Thread the beads onto the twine, following your layout. If the jute frays, wrap a piece of tape around the end to create a makeshift needle. -
Finish with a loop:
Once you reach the desired length, tie off the top end with a secure loop knot for hanging. Trim any excess twine.
Level Up: Driftwood
For an authentic beachcomber look, incorporate small pieces of pre-drilled driftwood or sea glass between the wooden beads.
This charming garland is now ready to add a splash of artisan coastal style to your home decor


What Really Happens Inside the Kiln
Learn how time and temperature work together inside the kiln to transform clay into durable ceramic.
Fish Trinket Dish (Simple and Sweet)
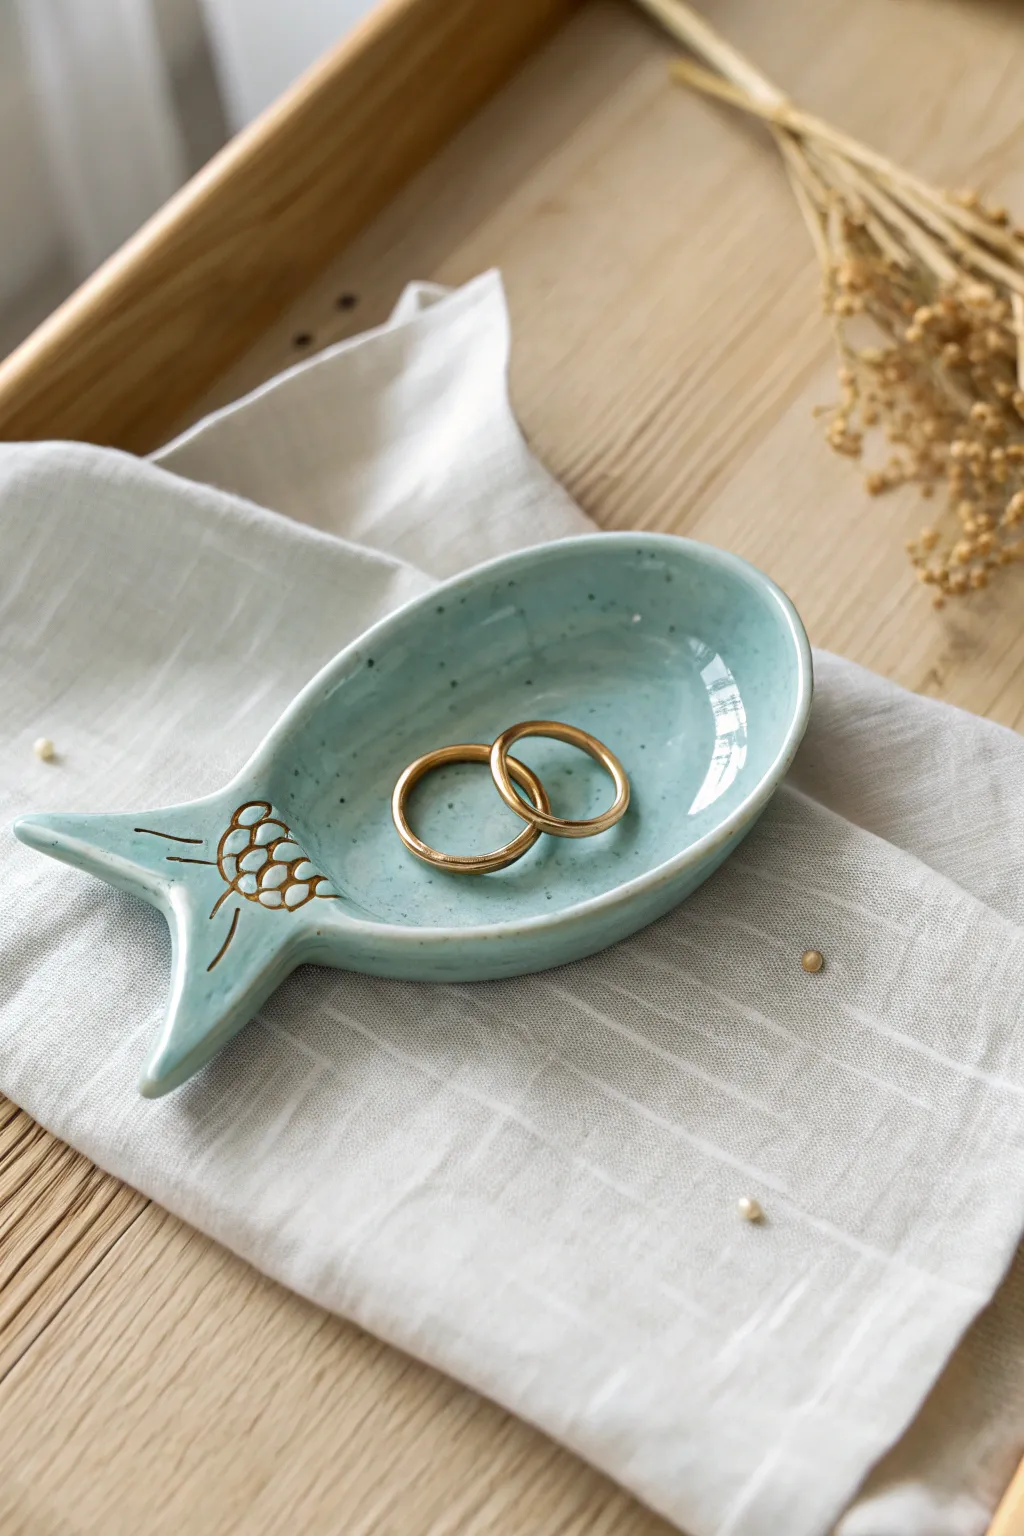
This charming project turns a simple lump of air dry clay into an elegant, glossy dish perfect for holding rings or earrings. The light teal glaze and delicate gold detailing give it a high-end ceramic look without needing a kiln.
Step-by-Step
Materials
- White air dry clay
- Rolling pin
- Clay knife or craft knife
- Small bowl of water
- Fine-grit sandpaper (220-400 grit)
- Acrylic paint (light teal/aqua)
- Gold paint marker or fine liquid gold leaf
- High-gloss varnish or dimensional glaze (like Mod Podge Dimensional Magic)
- Paintbrushes (flat shader and fine liner)
- Toothpick or needle tool
- Fish template (paper cutout)
Step 1: Shaping the Clay
-
Roll it out:
Start by conditioning your clay, kneading it until soft. Roll it out on a smooth surface to an even thickness of about 1/4 inch. -
Cut the shape:
Place your paper fish template onto the clay. Using your craft knife, carefully trace around the perimeter to cut out the fish shape. Don’t worry about the interior curve yet. -
Smooth the edges:
Dip your finger in a little water and run it along the cut edges of the clay to remove any jagged bits or crumbs. This is crucial for a professional finish. -
Form the bowl:
Gently lift the clay fish and place it into the palm of your hand. Use your thumb to softly press down the center, creating a shallow concave shape. The edges should curve upward naturally. -
Define the tail:
While curving the body, pinch the tail section slightly to give it a bit more definition, ensuring the tips of the fin remain upright and aren’t drooping flat.
Step 2: Texturing and Drying
-
Carve the details:
While the clay is still damp, take your needle tool or a toothpick. Gently carve the scale pattern near the tail and the lines on the fins. Press deep enough to see the lines, but not so deep you cut through. -
Initial drying:
Place the fish on a piece of foam or a crumpled paper towel to help it hold its curved shape while it dries. Let it air dry for 24-48 hours until completely hard and white. -
Refine the surface:
Once fully dry, inspect your dish. Use fine-grit sandpaper to gently smooth out any fingerprints or rough spots on the rim and the underside. -
Wipe clean:
Use a slightly damp cloth or a dry soft brush to remove all the sanding dust. You need a totally clean surface before painting.
Uneven Glaze?
If your glossy topcoat pools in the center, rotate the dish slightly every few minutes during the first hour of drying to help distribute the varnish evenly across the curve.
Step 3: Painting and Glazing
-
Base coat:
Paint the entire top surface of the dish with your light teal acrylic paint. I usually apply two thin coats rather than one thick one to avoid brush strokes. -
Highlight the carving:
When painting over the carved area, ensure the paint gets into the grooves, but try not to obscure the texture. -
Add the gold:
Once the teal paint is bone dry, use a gold paint marker to carefully trace the carved lines on the tail scales and fins. This makes the details pop beautifully. -
Apply the gloss:
To achieve that ceramic look, apply a thick layer of high-gloss varnish or dimensional glaze over the top surface. Do not brush back and forth; pour a small amount and help it spread to the edges. -
Let it cure:
Allow the varnish to dry completely according to the bottle instructions. It needs to be fully cured so your jewelry doesn’t stick to it. -
Finish the bottom:
Flip the dish over. You can either paint the bottom matching teal or leave it raw white clay, but do seal it with a matte varnish for durability.
Add Subtle Speckles
For a potters-clay effect, flick a toothbrush loaded with slightly darker teal or grey paint over the dried base coat before adding the clear gloss layer.
Place your favorite rings in the dish and enjoy this sweet handmade addition to your bedside table
Layered Relief Fish on a Plaque
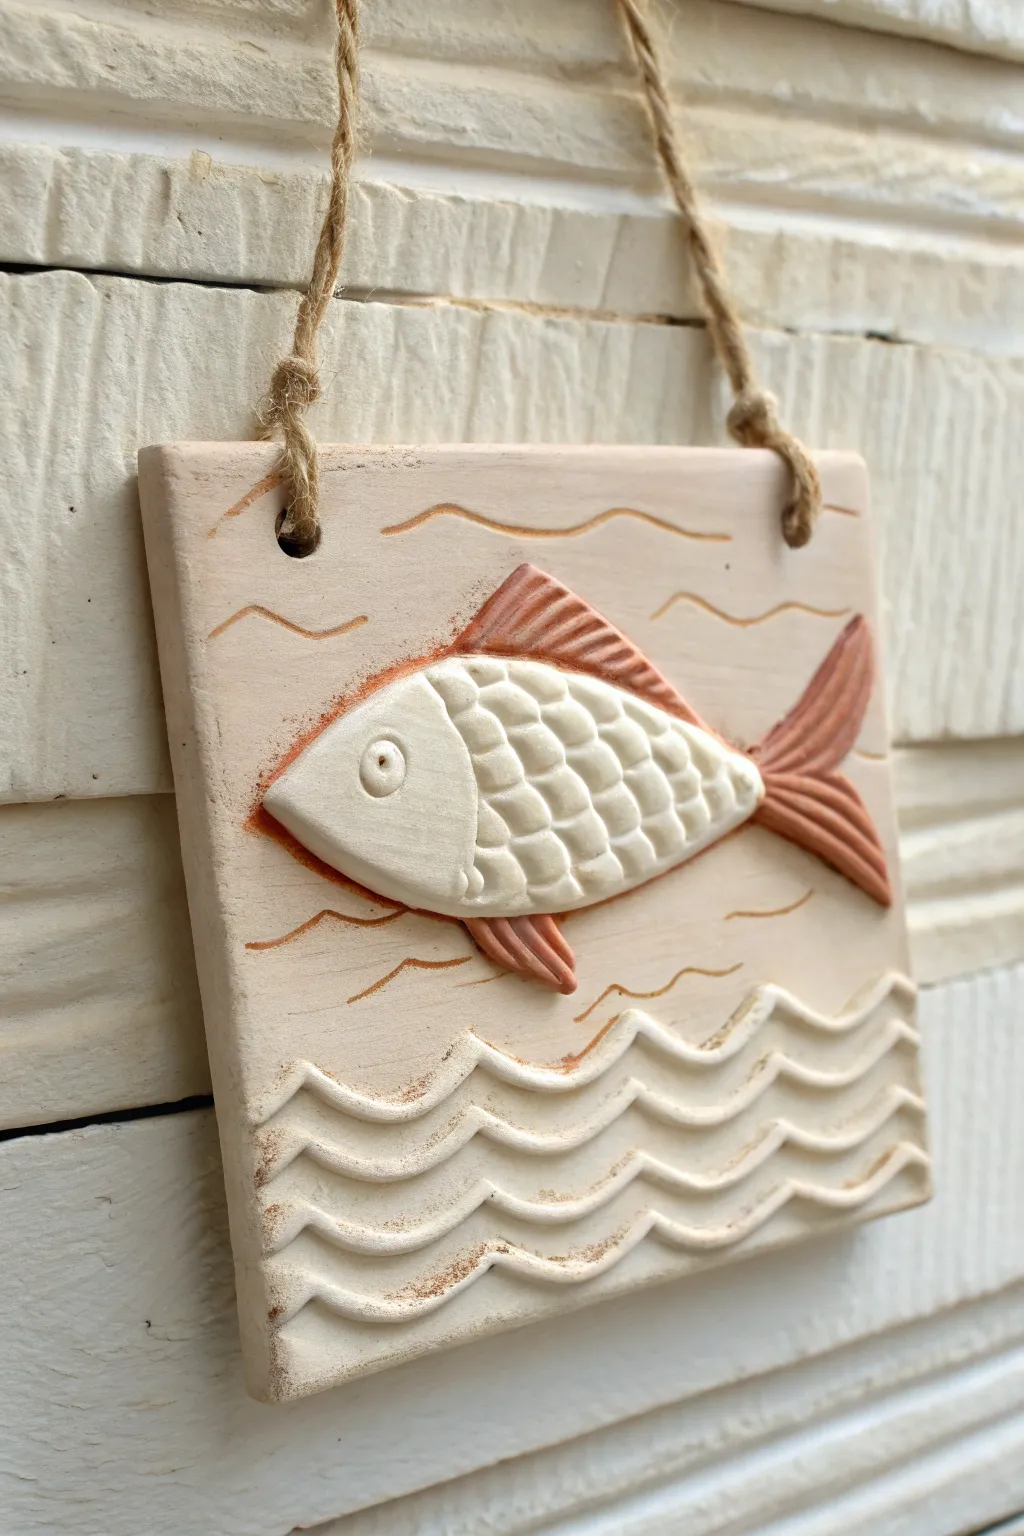
Capture the calm of the ocean with this charming relief sculpture, featuring a textured fish swimming above stylized waves. The unglazed finish with subtle terra cotta accents gives this piece a wonderful, rustic handcrafted aesthetic perfect for a bathroom or beach house.
Step-by-Step
Materials
- White air dry clay
- Rolling pin
- Clay knife or craft knife
- Small cup of water (slip)
- Terra cotta colored acrylic paint or pigment powder
- Small round paintbrush
- Drinking straw (for holes)
- Jute twine
- Ruler
- Modeling tool or toothpick
- Sandpaper (fine grit)
Step 1: Creating the Base
-
Roll the Slab:
Begin by rolling out a portion of your white air dry clay on a smooth surface to a uniform thickness of about 1/4 inch. If the clay is sticky, you can roll it on a piece of canvas or wax paper. -
Cut the Square:
Use a ruler and your clay knife to cut a perfect square from the slab. A size of roughly 4×4 or 5×5 inches works well for this design. Smooth the cut edges with a damp finger to remove any sharpness. -
Create Hanging Holes:
While the clay receives the impression easily, use a drinking straw to punch two holes near the top corners. Position them about half an inch down from the top edge and ensure they are evenly spaced. -
Dry the Base:
Allow this base plaque to dry until it is leather-hard—firm to the touch but not fully cured. This prevents it from warping while you add the heavier relief elements.
Warping Woes?
If the corners of your plaque curl up while drying, place a lightweight book or board on top of it once the fish relief is dry enough to not get squashed, or flip the plaque frequently.
Step 2: Sculpting the Relief
-
Shape the Fish Body:
Roll a separate piece of clay into a flattened teardrop shape for the fish’s body. It should be slightly smaller than the width of your plaque. -
Form the Tail and Fins:
Cut a triangle shape for the tail and smaller triangles for the top and bottom fins. Attaching these requires scoring both the body and the fin pieces with a needle tool, adding a dab of water, and pressing them together securely. -
Scale Texture:
Use a specialized U-shaped tool or simply the end of a drinking straw cut in half to press scale patterns into the body. Start from the tail and work forward toward the head, layering the impressions. -
Head Detail:
Leave the head smooth, but use a knife to gently impress a curved line separating the head from the scaled body. Add a small ball of clay flattened with a tool for the eye. -
Mount the Fish:
Score the back of your assembled fish and the center of the square plaque. Apply a little water or slip, then gently press the fish onto the plaque. I like to support the back of the plaque with my hand while doing this to avoid cracking.
Step 3: Adding Waves & Details
-
Roll Wave Coils:
Roll out long, thin snakes or coils of fresh clay. These need to be consistent in thickness, roughly 1/8 inch. -
Wave Pattern:
Lay three or four coils across the bottom section of the plaque in a wavy, undulating pattern. Press them gently to adhere, or use the score-and-slip method if the base is too dry. -
Engrave Background Waves:
In the empty space above the fish, use a needle tool or toothpick to lightly carve simple, flowing wave lines directly into the background slab. -
Fin Texturing:
Use your knife to press linear striations into the tail and fins, giving them a ribbed appearance that contrasts with the smooth head and scaled body. -
Final Drying:
Set the entire piece aside to dry completely. This usually takes 24-48 hours depending on humidity. Flip it over halfway through if possible to encourage even drying.
Texture Pop
For the specific rustic look in the photo, use terracotta pigment powder instead of paint. Rub it into the crevices and wipe the surface clean with a damp cloth.
Step 4: Finishing Touches
-
Sanding:
Once fully bone dry, gently sand any rough edges on the plaque or the fish using fine-grit sandpaper. Blow away the dust. -
Dry Brushing Color:
Dip a dry brush into a tiny amount of terra cotta paint or pigment. Wipe almost all of it off on a paper towel, then lightly brush over the textured areas—scales, fins, and wave tops. -
Highlighting:
The goal is to leave the deep crevices white while catching the raised edges with the rustic color. Pay special attention to the outlines of the fish to make it pop. -
Stringing:
Cut a length of jute twine. Thread the ends through the holes from front to back and knot them securely on the front side to create the rustic hanging loop seen in the photo.
Hang your relief art in a sunny spot to let the shadows play across the textured scales and waves

TRACK YOUR CERAMIC JOURNEY
Capture glaze tests, firing details, and creative progress—all in one simple printable. Make your projects easier to repeat and improve.
Driftwood Fish Mobile

Bring the seaside indoors with this whimsical mobile featuring a school of colorful clay fish swimming beneath weathered driftwood. The charming hand-painted details and natural textures make it a perfect accent for a coastal-themed room or nursery.
Step-by-Step Tutorial
Materials
- Air dry clay (white)
- Small rolling pin
- Fish-shaped cookie cutter (optional) or craft knife
- Cardstock (for templates)
- Driftwood branches (two sizes)
- Acrylic paints (red, teal, yellow, dark blue, white)
- Small round paintbrushes
- Natural jute twine or hemp cord
- Wooden bead (teal or matching color)
- Sandpaper (fine grit)
- Drill with small bit (1/16 or similar)
- Super glue or strong craft glue
- Clear matte varnish (optional)
Step 1: Sculpting the Shapes
-
Prepare the Clay:
Knead a generous portion of air dry clay until it becomes soft and pliable, removing any air bubbles. -
Roll it Out:
Roll the clay out on a smooth surface to an even thickness of about 1/4 inch. If you notice the clay sticking, you can lightly dust your surface with cornstarch. -
Cut Out Fish:
Using a simple fish shape template cut from cardstock, trace and cut out five fish bodies with a craft knife. Alternatively, use a fish-shaped cookie cutter if you have one. -
Create Starfish:
Cut out two small star shapes for the dangling charms at the bottom of the mobile. -
Smooth the Edges:
Dip your finger in a little water and gently run it along the cut edges of each shape to smooth out any roughness or stray clay bits. -
Make Hanging Holes:
While the clay is still wet, use a toothpick or skewer to poke a hole vertically through the top to the bottom of the fish for the string to pass through. For the starfish, just poke a hole through the top point. -
Dry Completely:
Lay all pieces on a flat surface to dry. This usually takes 24-48 hours depending on humidity; turn them over halfway through to ensure even drying.
Clay Cracking?
If small cracks appear as the clay dries, mix a tiny amount of fresh wet clay with water to make a paste and fill the cracks, then sand smooth once dry.
Step 2: Painting & Decoration
-
Sand Imperfections:
Once fully cured, gently sand any rough spots on the clay pieces with fine-grit sandpaper for a professional finish. -
Base Coats:
Paint each fish a different solid color: rustic red, teal, sunny yellow, white, and deep navy blue. Paint the starfish to match the teal and navy fish. Let them dry completely. -
Add Eyes and Lines:
Using a fine-tip brush and white paint, create a circle for the eye with a black dot in the center. Paint a curved line separate the head from the body. -
Detailing Scales:
Here I like to use a very fine brush to add the scale patterns. Use small ‘v’ shapes or dots in contrasting colors (mostly white) on the bodies. -
Tail Details:
Paint parallel lines on the tail fins to simulate texture. White works beautifully on the colored fish, whilst yellow or grey works well for the white fish. -
Seal (Optional):
Apply a coat of clear matte varnish to protect your paint job and give the pieces a finished look.
Step 3: Assembly
-
Prepare Driftwood:
Select two pieces of driftwood. If necessary, drill small holes where you want the vertical strings to hang, or you can simply tie the string around the wood as shown in the project image. -
String the Fish:
Cut varied lengths of jute twine. Thread a piece of twine through a fish, securing it with a knot at the bottom or passing it through the drilled channel you made earlier. -
Attach Starfish:
For the strands that will have starfish, tie the starfish to the very bottom end of the twine, leaving a few inches of space below the fish hanging above it. -
Tie to Lower Branch:
Tie the strings holding the fish onto the lower driftwood branch, spacing them out evenly and varying the heights slightly for visual interest. -
Connect Branches:
Use two pieces of twine to hang the lower branch from the upper branch, ensuring they are balanced so the mobile hangs straight. -
Final Loop:
Create a hanging loop with twine attached to the top branch. Thread a large painted bead onto the loop for a decorative finish before hanging.
Level Up: Texture
Before drying, gently press a piece of lace or burlap into the wet clay fish bodies to create an instant, tactile scale texture.
Hang your mobile near a window where the breeze can gently rotate the fish.
Scale Texture Techniques for Fish Bodies
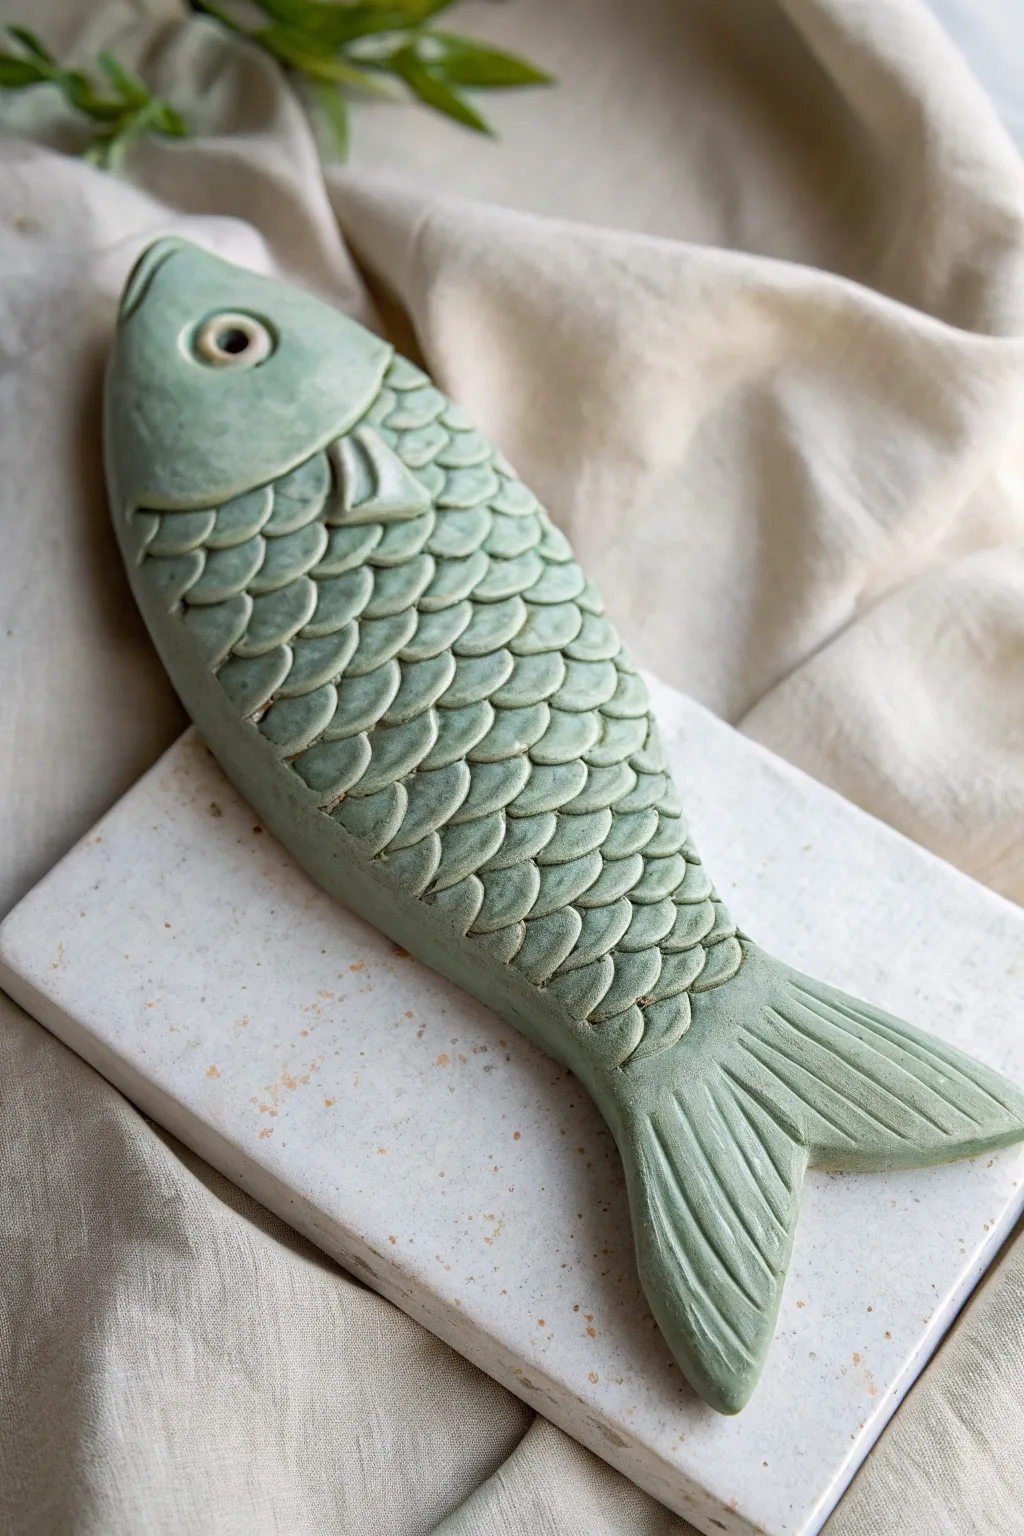
Capture the calm beauty of aquatic life with this detailed air dry clay project featuring a mesmerizing scale texture. The soft sage green finish and rhythmic pattern create a soothing, handcrafted piece perfect for coastal decor.
Step-by-Step Guide
Materials
- Air dry clay (white or grey base)
- Rolling pin
- Clay knife or fettling knife
- U-shaped carving tool or a simple drinking straw (cut in half)
- Small round piping tip or pen cap (for the eye)
- Water in a small cup
- Sponge or brush for smoothing
- Acrylic paint (sage green, white, drop of brown)
- Matte sealant or varnish
- Sandpaper (fine grit)
Step 1: Shaping the Base Form
-
Condition the Clay:
Begin by kneading a generous handful of air dry clay until it is warm, pliable, and free of cracks. If it feels too dry, dip your fingers in water and work the moisture in. -
Roll the Slab:
Roll out the clay into an elongated oval slab, keeping it fairly thick—about half an inch to three-quarters of an inch deep. You want a substantial, slightly flattened pillow shape rather than a thin sheet. -
Cut the Outline:
Using your clay knife, cut out a streamlined fish silhouette. Taper one end for the tail and round the other for the head. Smooth the cut edges with a damp finger to remove any sharpness. -
Refine the Profile:
Gently press down on the tail section to flatten it slightly more than the body, giving the fish a natural swimming contour. Keep the main body plump.
Scales Look Messy?
If clay builds up on your U-tool, the scales will snag. Keep a damp sponge nearby and wipe your tool clean after every 3-4 impressions for crisp lines.
Step 2: Carving the Texture
-
Mark the Gill Line:
About two inches from the nose, use your knife to firmly press a curved line separating the head from the body. This is your ‘gil’ line and the starting point for the scales. -
Create the Eye:
On the head section, press a small round tools (like a pen cap) into the clay to form the eye socket. Roll a tiny ball of clay, place it in the center, and press a smaller hole in the middle for the pupil. -
Add the Pectoral Fin:
Shape a small triangle of clay and score the back of it. Attach it just behind the gill line using a bit of water or slip. Blend the edges seamlessly into the body. -
Technique: The U-Shape Tool:
For the scales, you will need a U-shaped loop tool. If you don’t have one, I find that cutting a plastic drinking straw in half lengthwise works beautifully to create that perfect crescent print. -
Start the Scales:
Starting right behind the gill line, press your tool into the clay to create the first row of scales. Press deeply enough to create a shadow but not so deep that you distort the fish’s overall shape. -
Buttonhole Patterning:
Continue adding rows of scales moving toward the tail. Offset each row like bricks on a wall—place the center of the new scale directly below the intersection of the two scales above it. -
Tapering the Scales:
As you get closer to the tail where the body narrows, slightly reduce the pressure or angle your tool to make the scales appear to naturally get smaller and closer together.
Natural Variation Tip
Don’t aim for geometric perfection. Slightly varying the angle of your scale tool creates a more organic, distinctively fish-like movement in the texture.
Step 3: Detailing the Tail and Drying
-
Texture the Tail:
Use your knife to draw deep, radiating lines along the tail fin to mimic ridges. Do the same for the small pectoral fin you attached earlier per. -
Final Smoothing:
Check the edges of the fish one last time. Use a barely damp sponge to smooth out any unwanted fingerprints on the head or tail, being careful not to smudge your scale work. -
Slow Drying:
Place the fish on a wire rack or a piece of cardboard to dry. Because the body is thick, let it air dry for at least 48 to 72 hours away from direct heat to prevent cracking. -
Sand Imperfections:
Once bone dry, lightly sand any rough edges on the silhouette with fine-grit sandpaper. Blow away the dust before painting.
Step 4: Finishing Touches
-
Mix the Color:
Mix a sage green acrylic paint. I usually add a tiny drop of brown and plenty of white to a standard green to get that earthy, matte pottery look seen in the example. -
Apply the Base Coat:
Paint the entire fish, ensuring you get the bristles into the deep grooves of the scales. You might need to water the paint down slightly for the first coat to ensure coverage. -
Dry Brushing (Optional):
If the scales look too flat after the base coat dries, lightly brush a lighter shade of green over the raised surfaces to highlight the texture. -
Seal the piece:
Finish with a clear matte varnish spray. This replicates the unglazed ceramic feel and protects the paint from dust and handling.
Place your finished sculpture on a shelf or side table to bring a touch of quiet nature into your home
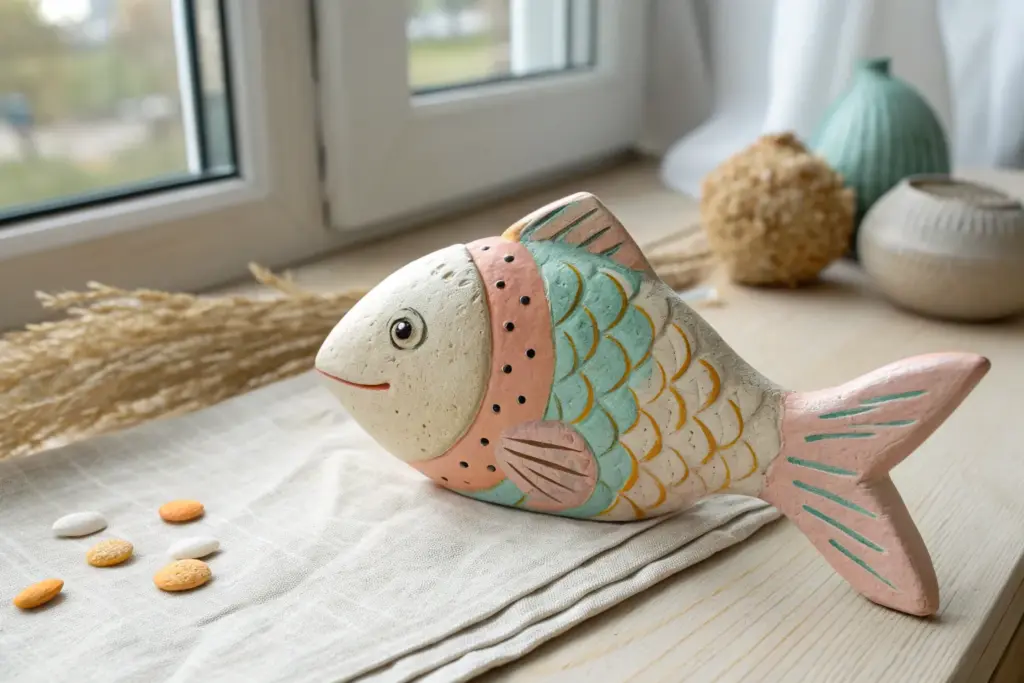
Big-Eyed Cartoon Air Dry Clay Fish
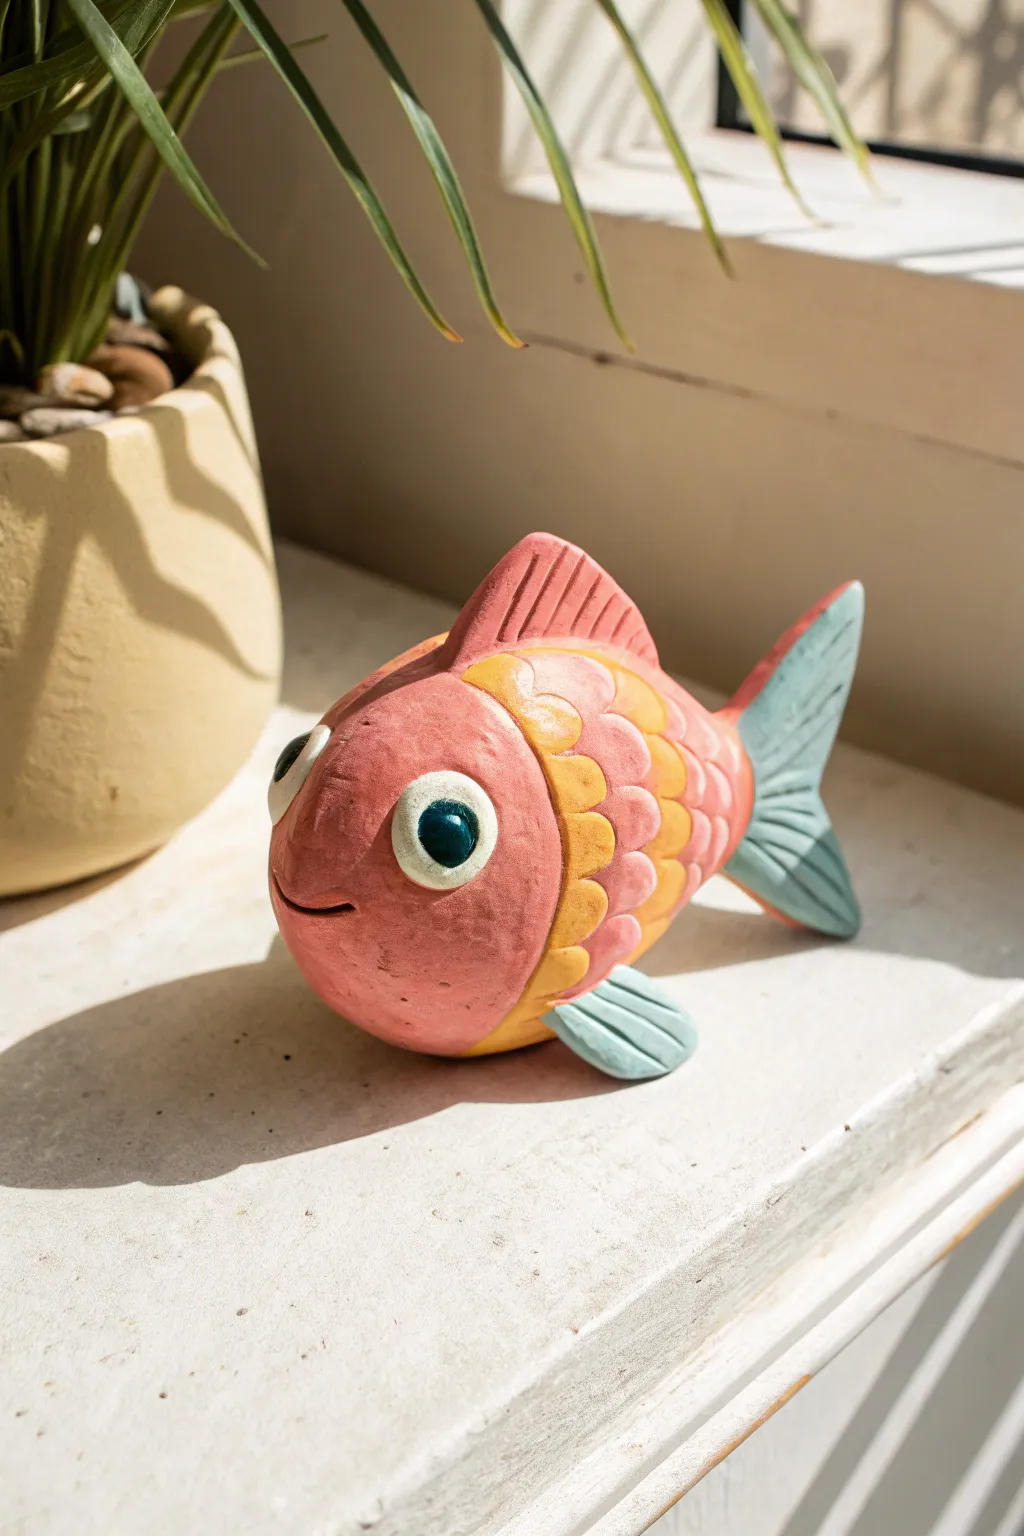
This charming, chunky goldfish brings a splash of whimsy to any shelf with its exaggerated eyes and textured scales. The playful, cartoonish style makes it a forgiving project perfect for practicing clay sculpting and layering techniques.
How-To Guide
Materials
- White air dry clay (approx. 500g)
- Acrylic paints (pink, orange, yellow, light blue, black, white)
- Clay sculpting tools (needle tool, smooth rib, rounded modeling tool)
- Rolling pin
- Water and slip (clay mixed with water)
- Small and medium paintbrushes
- Varnishing sealant (matte or soft satin finish)
Step 1: Sculpting the Body Base
-
Form the core:
Begin with a large ball of clay roughly the size of a grapefruit. Roll it firmly between your palms or on a table to remove any air pockets. -
Shape the teardrop:
Gently taper one end of the ball to create a fat teardrop or egg shape. This will be the main body of your fish. -
Flatten slightly:
Set the shape down on your work surface and press lightly to flatten the bottom just enough so the fish sits upright without rolling over. -
Carve the mouth:
Using a curved modeling tool or the side of a needle tool, press a wide, upward-curving smile into the front of the face. Deepen the indentation slightly at the corners for extra personality.
Smooth Seams
Use a wet paintbrush instead of your finger to smooth tight corners where fins meet the body. It acts like a mini mop to erase seam lines.
Step 2: Adding Fins and Tail
-
Create the dorsal fin:
Roll out a slab of clay about 1/4 inch thick. Cut out a rounded triangular shape for the top fin. Score the bottom edge of the fin and the top of the fish body, add a little water or slip, and press firmly to attach. -
Texture the top fin:
Use a needle tool or knife to draw vertical lines radiating from the base of the fin to the top edge, simulating spine details. -
Make the tail:
Cut a larger, bifurcated fin shape from your slab for the tail. It should look like a sideways heart. Attach this to the tapered end of the body using the score-and-slip method. -
Add side fins:
Shape two smaller, rounded triangles for the pectoral fins. Attach them low on the sides of the body so they act as little stabilizers. -
Sculpt tail details:
Similar to the top fin, use your needle tool to crave deep linear grooves into the tail and side fins for texture.
Step 3: Details & Drying
-
Apply scales:
Roll small balls of clay and flatten them into thumb-sized discs. Starting from the tail end and working forward, overlap these discs on the body to create rows of scales. Stop roughly halfway up the body, leaving the face smooth. -
Form the eyes:
Roll two medium-sized balls for the eyes. Flatten them slightly into domes and attach them prominently on the face. They should be quite large to achieve that cartoon look. -
Define the pupils:
I like to press a smaller circle tool or the back of a pen into the center of each eye to create a guide for painting the pupil later. -
Smooth everything out:
Dip your finger in a little water and gently smooth any rough connection points or fingerprints, especially around the base of the fins and eyes. -
Allow to dry:
Let the sculpture dry completely. Depending on humidity and thickness, this will take 24 to 48 hours. Rotate it occasionally so the bottom dries evenly.
Metallic Magic
Mix a tiny amount of gold mica powder or metallic paint into your final varnish for the scales to give your fish a subtle, shimmering glow.
Step 4: Painting
-
Base coat the body:
Paint the head and the base of the scales with a soft, dusty pink. You might need two coats for opaque coverage. -
Layer the scale colors:
Paint the individual scales in an ombre pattern, transitioning from orange near the head to yellow and pink towards the tail. -
Paint the fins:
Use a soft, muted blue for the tail and side fins to contrast with the warm body color. The top fin can match the body pink. -
Define the eyes:
Paint the outer eye white. Fill the center pupil with solid black, and add a small turquoise or blue ring around the pupil if you want extra depth. -
Add the sparkle:
Using a tiny detail brush or a toothpick, add a small white dot to the upper corner of each black pupil. This ‘catchlight’ brings the character to life. -
Seal the piece:
Once the paint is fully dry, apply a matte or satin varnish to protect your work and give it a finished ceramic look.
Now you have a cheerful aquatic friend that never needs feeding and always looks happy to see you
Tropical Patterned Fish (Stripes and Spots)
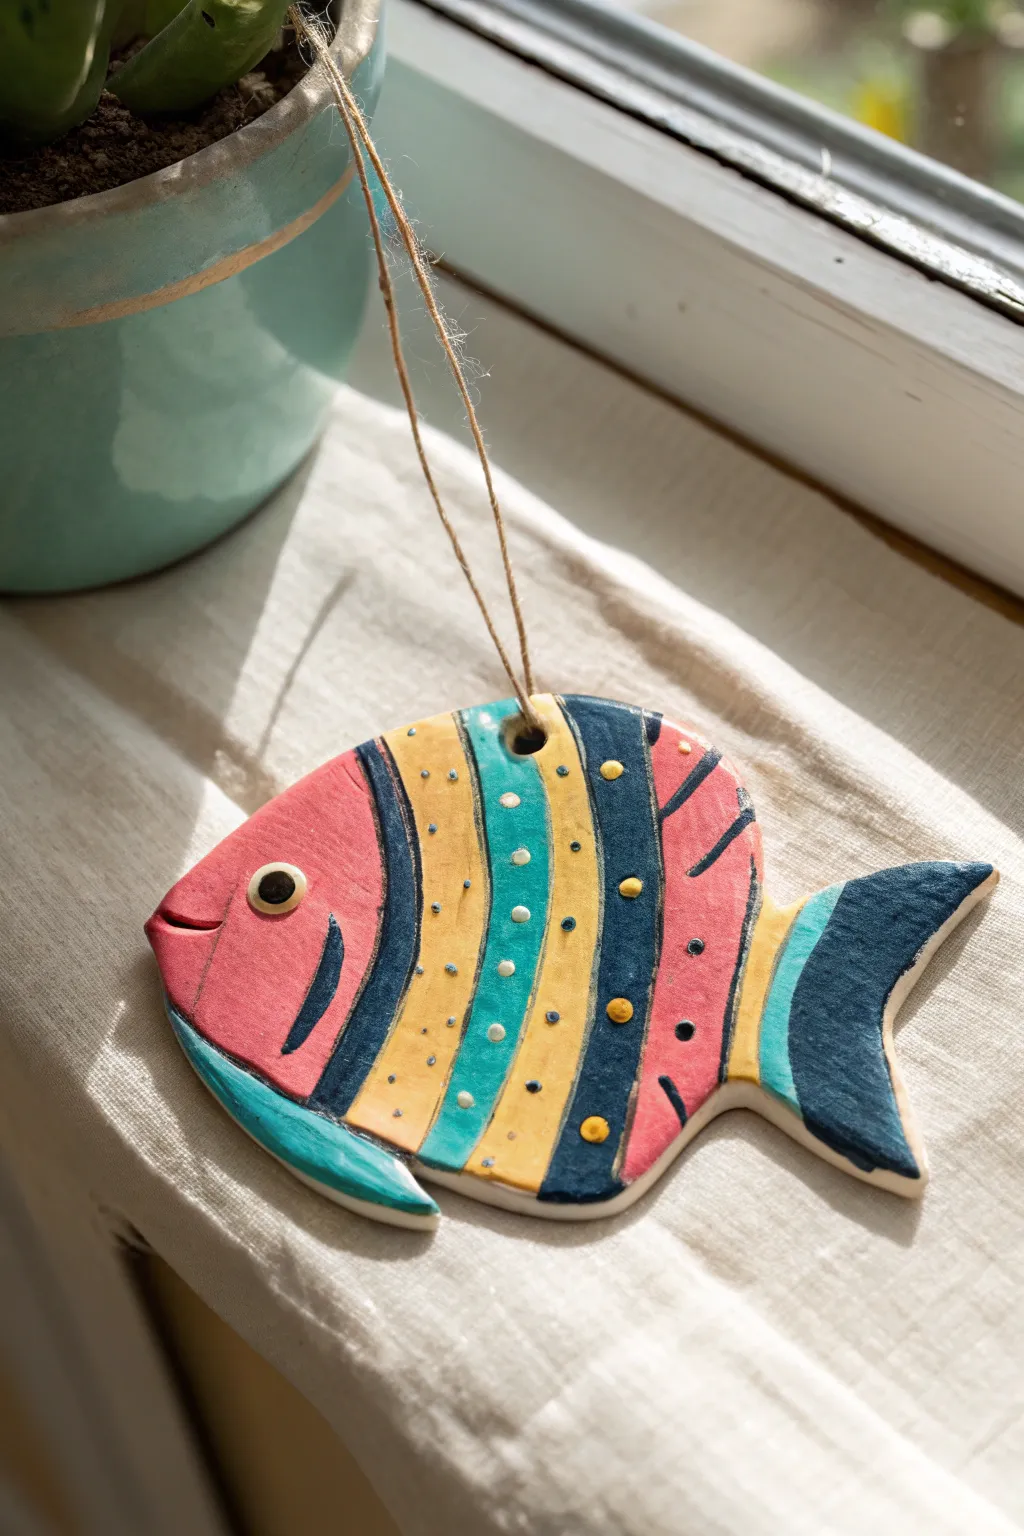
Bring a splash of summer into your home with this cheerful, striped ornament featuring vibrant tropical colors and playful polka dots. The smooth, glazed finish gives it a professional ceramic look without requiring a kiln, making it a perfect afternoon project.
Step-by-Step
Materials
- White air dry clay
- Rolling pin
- Sharp craft knife or clay tool
- A small bowl of water
- Cardstock or paper (for template)
- Pencil
- Fine grit sandpaper
- Acrylic paints (Coral pink, Mustard yellow, Teal/Turquoise, Navy blue, Cream/White)
- Fine detail paintbrushes
- Glossy varnish or Mod Podge
- Jute twine or string
- A bamboo skewer or straw (for the hole)
Step 1: Shaping the Clay Base
-
Draft your design:
Before touching the clay, sketch a simple, oval-shaped fish profile onto a piece of cardstock. Include a curved tail fin at the back and a slightly upturned mouth at the front. Cut this shape out to use as your template. -
Roll out the slab:
Take a handful of air dry clay and knead it briefly until it is pliable. Roll it out on a smooth surface to a consistent thickness of about 1/4 inch (6mm). If the clay sticks, you can lay down a piece of parchment paper first. -
Cut the shape:
Place your paper template onto the rolled clay. Using your craft knife, carefully trace around the edge of the template to cut out your fish shape. Remove the excess clay. -
Smooth the edges:
Dip your finger into a little water and gently run it along the cut edges of the fish to smooth out any roughness or sharp corners. This makes the final product look much more polished. -
Add the hanging hole:
Using a bamboo skewer or a straw, poke a hole near the top center of the fish’s back. Ensure the hole goes all the way through and is large enough for your twine to pass through later. -
Dry completely:
Lay the fish on a flat surface to dry. Depending on your climate and clay brand, this usually takes 24-48 hours. I like to flip it over halfway through the drying process to prevent curling. -
Sand for perfection:
Once fully dry and hard, use fine-grit sandpaper to buff away any remaining imperfections on the surface or edges. Wipe away the dust with a barely damp cloth.
Clean Lines Hack
If you struggle painting straight lines on a curved surface, use thin strips of washi tape or painter’s tape to mask off sections. Let one color dry completely before moving the tape to paint the next stripe
Step 2: Painting the Pattern
-
Pencil in the segments:
Lightly sketch vertical curved lines across the fish’s body to plan out your stripes. Don’t forget to mark the head area and the tail fin separation. -
Base coat the head and tail:
Start by painting the head section with a vibrant coral pink. Use a navy blue for the tail fin, ensuring nice clean edges. -
Fill the body stripes:
Paint the vertical stripes on the body, alternating colors. For this specific look, use the order: navy blue, mustard yellow, teal, mustard yellow, navy blue, and finally a coral pink stripe near the tail. -
Add the bottom fin:
Paint the small fin shape along the bottom belly of the fish in teal. If you didn’t carve a fin, just paint the shape directly onto the flat surface. -
Detail the face:
Paint a small cream circle for the eye, and once dry, add a black pupil in the center. Use a very fine brush to paint a curved navy blue line for the gill and a thin line for the mouth. -
Add the dots:
Now for the fun part. Using the back end of a paintbrush or a dotting tool, dab small cream dots down the center of the teal stripe. Add mustard yellow dots inside the navy blue stripes. -
Final decorative touches:
Add tiny navy blue dots to the yellow stripes for contrast. You can also paint thin black lines to separate the tail and head sections for a cleaner look.
Step 3: Finishing Up
-
Seal with gloss:
Once the paint is thoroughly dry, apply two coats of high-gloss varnish or Mod Podge. This seals the clay and gives it that shiny, ceramic-like quality. -
String it up:
Cut a length of natural jute twine. Thread it through the hole you made earlier and tie a secure knot to create a hanging loop.
Make it a Mobile
Instead of making just one, create three or five fish in varying sizes. Hang them at different heights from a piece of driftwood or a wooden dowel to create a stunning nautical wall hanging or baby mobile
Hang your colorful creation in a sunny window or on a handle to brighten up the room