If you’ve ever wished flowers could last forever, air dry clay flowers are the sweetest little workaround. I’m sharing my favorite ideas that feel totally doable at the kitchen table, but still look special enough to gift or display.
Classic Spiral Rose Blooms
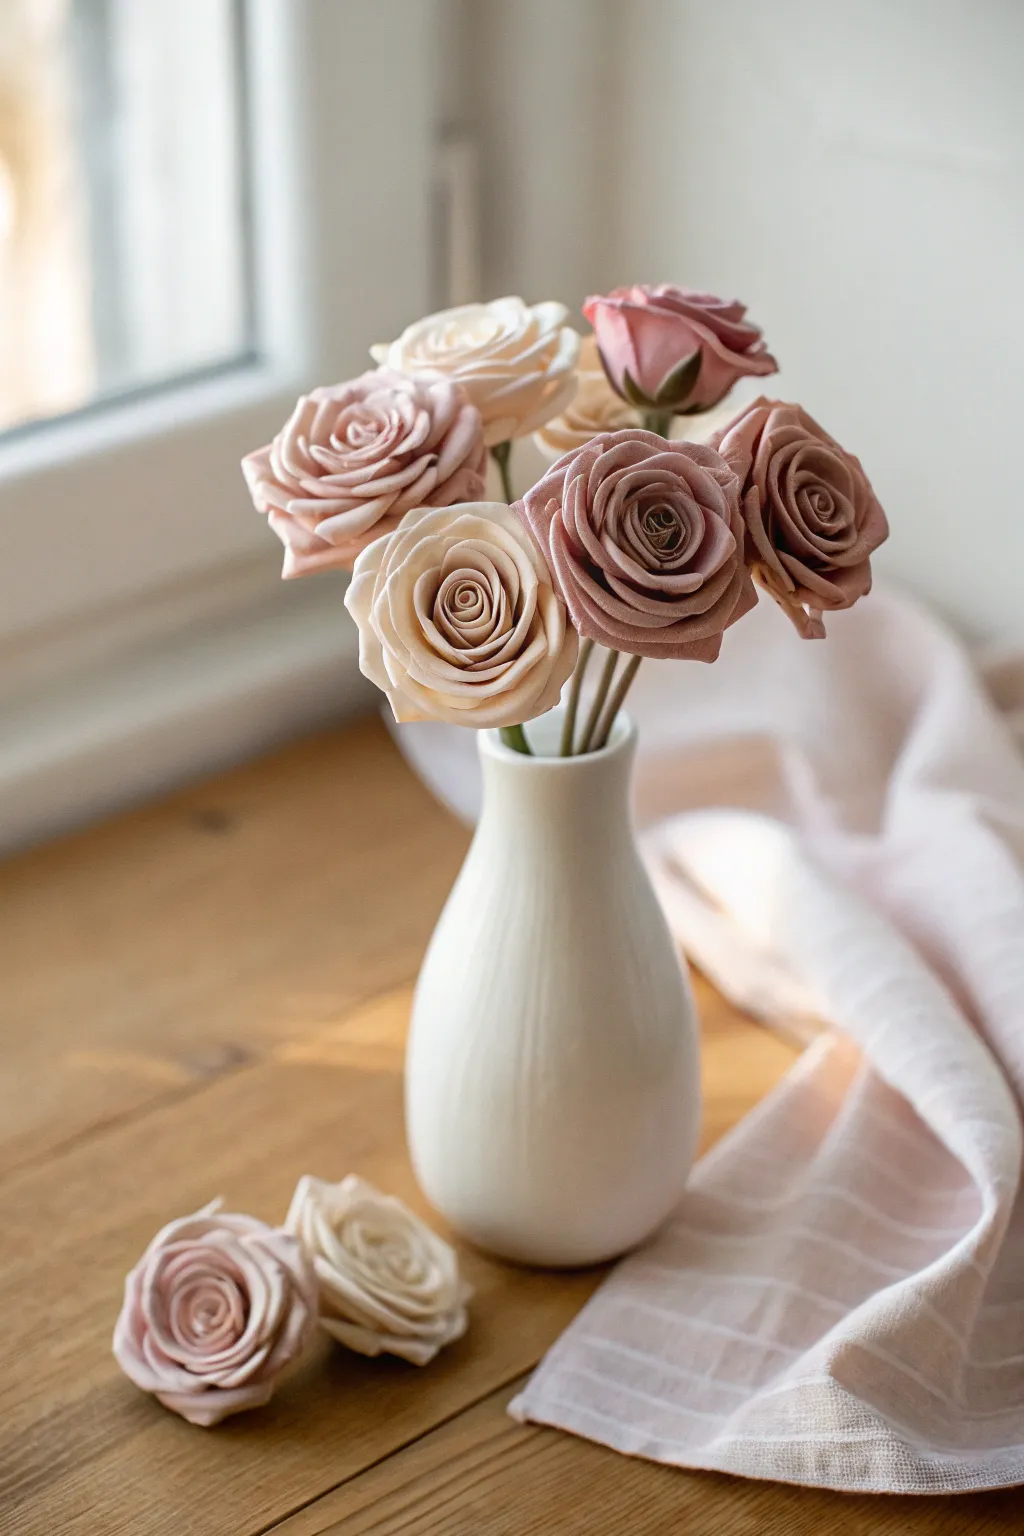
Capture the romantic elegance of a classic English garden with these sculpted spiral roses. Using air-dry clay allows for incredibly thin, delicate petals in a sophisticated palette of dusty pinks, creams, and warm beiges that will never wilt.
Detailed Instructions
Materials
- High-quality air-dry clay (cold porcelain or foam clay work best)
- Acrylic paints (dusty rose, mauve, titanium white, unbleached titanium, burnt umber)
- Green floral wire (18 or 20 gauge)
- PVA glue or tacky glue
- Ball stylus tool (medium and large)
- Non-stick rolling pin or pasta machine
- Teardrop-shaped cutter set (or scissors)
- Foam pad for sculpting
- Plastic sheet protector
Step 1: Preparing the Clay Palette
-
Color mixing:
Begin by dividing your white clay into three balls. Leave one plain white or tint slightly with unbleached titanium for a cream color. -
Creating dusty rose:
For the second ball, mix in a tiny amount of dusty rose paint. To achieve that vintage look seen in the photo, add a speck of burnt umber to desaturate the pink. -
Mixing deep mauve:
For the darkest roses, use more pink/mauve paint and a touch more brown. Knead the color thoroughly until the clay is uniform and streak-free. -
Prepping wires:
Cut your floral wires to about 8-10 inches in length. Bend the top 1/2 inch into a small hook to prevent the flower head from sliding off later.
Step 2: Forming the Center Bud
-
Rolling the core:
Take a nickel-sized ball of clay (matching your chosen flower color) and form it into a teardrop shape. Dip the hooked wire into glue and insert it into the wide base of the teardrop. -
The first petal:
Roll out a small piece of clay very thinly. Cut a small teardrop shape about the height of your center cone. Thin the edges using your fingers or a ball tool on the foam pad. -
Wrapping the spiral:
Apply a dab of glue to the seed cone. Wrap this first petal tightly around the cone so it completely conceals the top point, creating a tight spiral center. -
Drying time:
I prefer to let this core structure dry for about 15-20 minutes before adding more petals, as it provides a sturdy base to push against.
Cracking Clay?
If petal edges crack while thinning, your clay is too dry. Mix in a drop of water or lotion. Keep unused clay strictly covered with plastic wrap while working.
Step 3: Building the Bloom
-
Cutting inner petals:
Roll out more clay and cut 3 slightly larger teardrop shapes. Use the ball tool on your foam pad to cup the centers and thin the edges until they ruffle slightly. -
Attaching the first layer:
Glue these three petals around the bud in an overlapping pattern. The top of the petals should sit just slightly higher than the center spiral. -
Cutting outer petals:
For the fuller look, cut 5 to 7 larger petals. When thinning edges, roll the ball tool back and forth to curl the very rim of the clay outward. -
Layering outward:
Attach the outer petals, ensuring each new petal starts at the midpoint of the previous one. Flare the tops outward gently with your thumb to mimic an opening bloom. -
Reviewing symmetry:
Spin the wire between your fingers. If one side looks flat, tuck an extra petal in to balance the volume.
Scented Blooms
Knead a drop of high-quality rose essential oil directly into the clay before sculpting. Detailed roses like these make great passive diffusers.
Step 4: Finishing Touches
-
Smoothing the base:
Once all petals are attached, smooth the clay at the very base of the flower where it meets the wire to create a seamless transition. -
Creating sepals:
Mix a small amount of green clay (or paint white clay green). Cut a small star shape, poke the wire through the center, and glue it to the bottom of the rose head. -
Final curing:
Stick the wire stems into a block of floral foam or a heavy jar so the flowers stand upright. Let them dry completely for 24-48 hours. -
Optional texture:
For a hyper-realistic touch, you can lightly dust the edges of the dry petals with a darker shade of pastel chalk or blush powder.
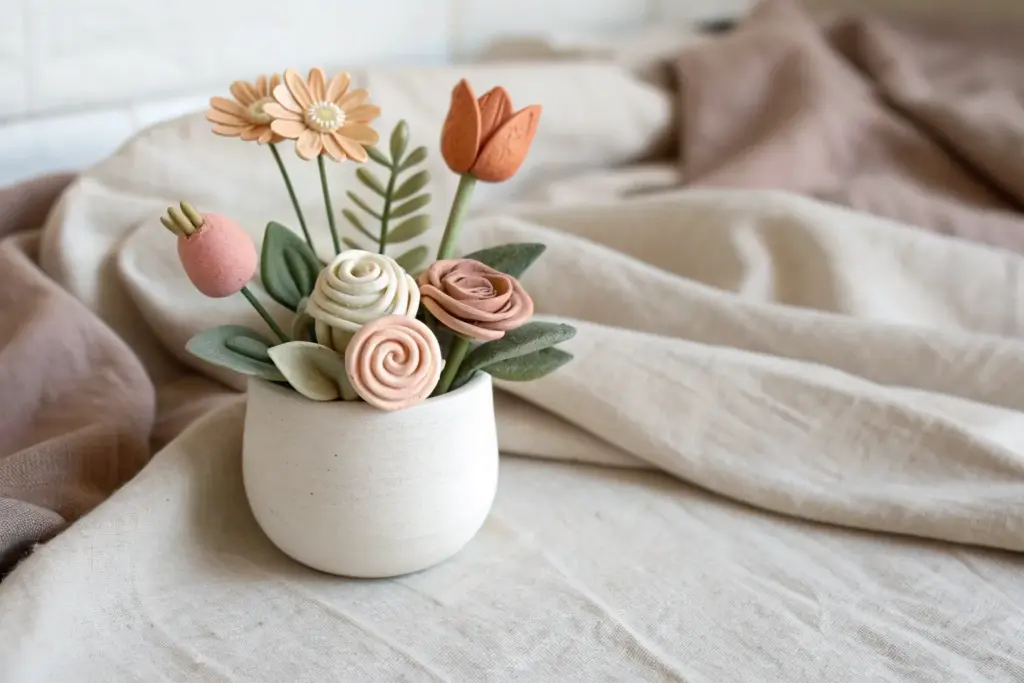
Now arrange your everlasting bouquet in a simple ceramic vase to enjoy their soft beauty year-round


Cheerful Daisy Flower Heads
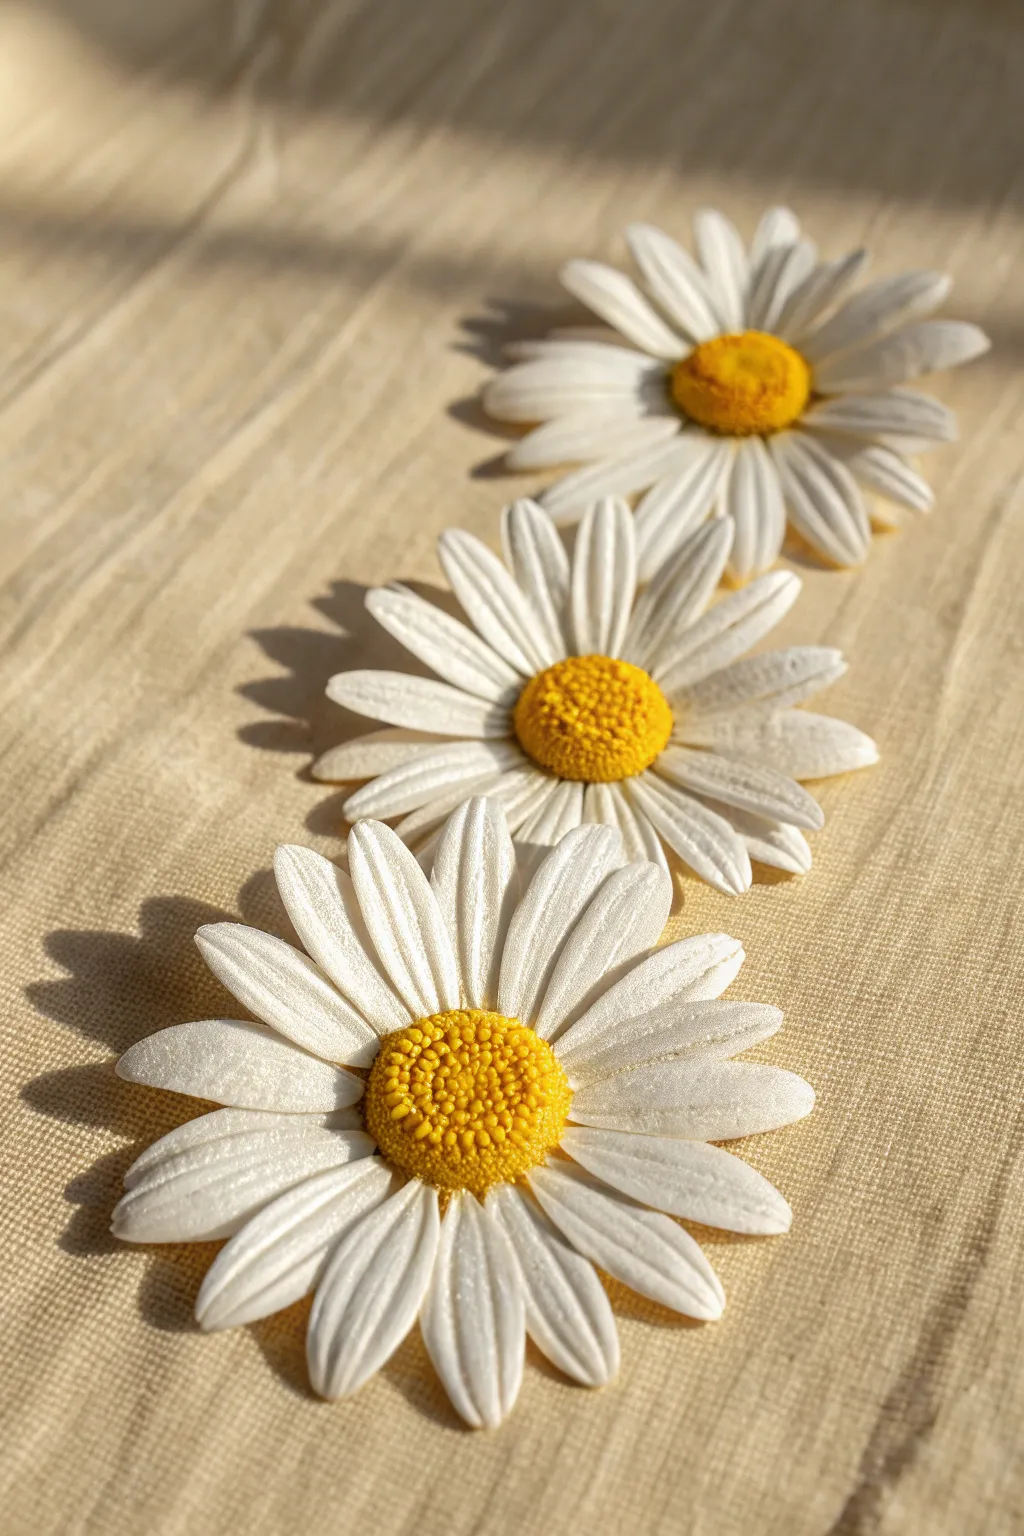
Capture the essence of a warm summer afternoon with these deceptively simple daisy heads. This project focuses on realistic texture detailing, turning flattened teardrops of white clay and textured yellow centers into cheerful, permanent blooms.
Step-by-Step Tutorial
Materials
- White polymer clay or high-quality air dry clay (like cold porcelain)
- Yellow air dry clay (or white clay mixed with yellow acrylic paint)
- Set of clay sculpting tools (specifically a needle tool and a small ball tool)
- Creating texture: A clean toothbrush or specialized stiff brush
- Rolling pin or acrylic roller
- Small circle cutter (approx. 1 inch)
- Wire mesh or sieve (optional for texture)
- Non-stick work surface (silicone mat or parchment paper)
- PVA glue or clay slip
Step 1: Creating the Centers
-
Form the base:
Start by taking a small amount of yellow clay and rolling it into a smooth ball about the size of a large pea. Gently press it down until it’s a domed button shape, keeping the top rounded and the bottom flat. -
Add deep texture:
To mimic the fuzzy, seed-packed look of a real daisy center, you need density. Press a needle tool repeatedly into the very center of the yellow dome to create tiny, distinct holes. -
Refine the surface:
For the outer ring of the yellow center, switch to a stiff brush or a texturing tool. Gently tap the surface to create a pitted, organic texture that contrasts slightly with the deeper holes in the middle. -
Set aside:
Make as many yellow centers as you need flowers and set them aside on your non-stick mat to firm up slightly while you work on the petals.
Step 2: Sculpting the Petals
-
Prepare the white clay:
Condition your white clay until it is pliable and smooth. Roll it out into a thin sheet, roughly 2-3mm thick. -
Cut basic shapes:
Use your circle cutter to punch out a base disc for each flower. This won’t be visible in the end, but it gives you a platform to build upon. -
Form individual petals:
Roll small logs of white clay and slice them into equal, tiny segments—about the size of a grain of rice. Roll each segment into a teardrop shape. -
Flatten the teardrops:
Place a teardrop on your mat and flatten it gently with your finger or a flat tool to create a long, oval petal shape. Repeat this for roughly 15-20 petals per flower. -
Add signature veins:
This step makes the difference between cartoonish and realistic. Take your needle tool or a dull knife edge and press two or three longitudinal lines down the length of each petal. Be firm enough to leave a mark, but gentle enough not to cut through. -
Curve the edges:
I find that pinching the very tip of the petal slightly, or curling the edges downward just a hair, gives them a more natural, blooming appearance.
Sticky Situation?
If your clay gets too sticky and petals won’t release from your fingers, lightly dust your hands with cornstarch or use a tiny amount of baby oil.
Step 3: Assembly
-
First layer of petals:
Apply a tiny dot of glue or clay slip to the outer edge of your white base disc. Press the wide end of your petals onto the disc, arranging them in a circle. They should overlap slightly. -
Second layer (optional):
For a fuller look like likely seen in nature, you can add a second layer of petals on top of the first, placing them in the gaps between the bottom petals. -
Attach the center:
Dab a generous amount of glue or slip into the middle of your petal arrangement. Carefully place your textured yellow center on top. -
Bonding the parts:
Gently press the yellow center down. Use the back of a paintbrush or a large ball tool to nudge the petals upward slightly so they cup the yellow center rather than lying perfectly flat. -
Final shaping:
While the clay is still pliable, adjust the petals. Bend some tips up and some down to create movement and ensure no two flowers look exactly identical.
Pro Tip: Tinting
For hyper-realism, brush a tiny amount of pale green chalk pastel dust at the very center of the yellow disc before the clay dries.
Let your daisy heads dry completely on a flat surface before using them to adorn frames, clips, or table settings


Tiny Five-Petal Blossoms
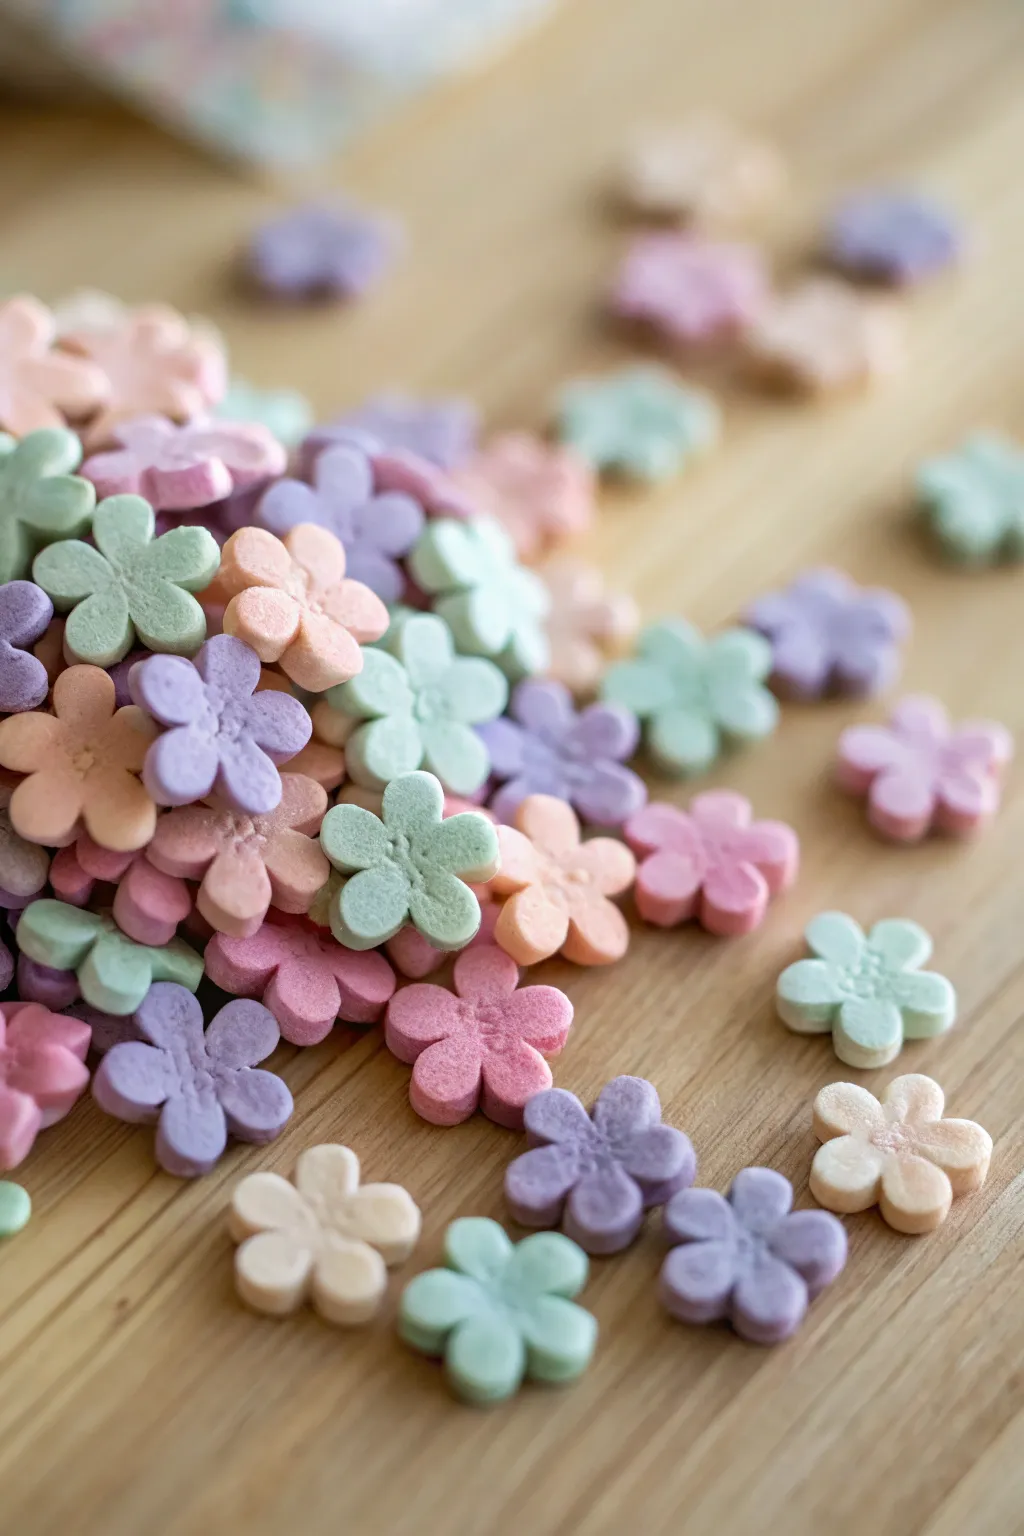
Create a delightful scattering of these matte, candy-like flowers that are perfect for filling jars or scattering across tablescapes. With their soft, chalky finish and gentle pastel hues, these five-petal charms look almost sweet enough to eat.
Step-by-Step Guide
Materials
- White lightweight air dry clay (soft, marshmallow type)
- Acrylic paints or powdered pigments (pastel pink, lavender, mint, peach, light blue)
- Small five-petal flower plunger cutter (approx. 0.5 – 0.75 inch)
- Non-stick rolling pin
- Parchment paper or silicone mat
- Toothpick or needle tool
- Cornstarch (for dusting)
- Soft brush (optional, for texturing)
Step 1: Preparing the Clay
-
Divide the clay:
Start by pinching off four or five golf-ball-sized chunks of your white air dry clay. Keep the unused portions wrapped tightly to prevent drying. -
Mix your colors:
Add a tiny drop of acrylic paint or a small dusting of pigment powder to each ball. You want very soft pastels, so start with less color than you think you need. -
Knead thoroughly:
Fold and knead the color into each ball until the tone is completely uniform with no streaks. I find stretching the clay like taffy helps distribute the pigment evenly. -
Create intermediate shades:
For a more natural look, mix small bits of two different colored balls together to create transitional hues, like a lavender-blue or a peach-pink.
Texturizing Trick
To get that sugary, matte surface texture, mix a pinch of baking soda into the clay while kneading. It creates a slightly granular, realistic finish.
Step 2: Shaping the Blossoms
-
Prepare the workspace:
Lay down your silicone mat or parchment paper and lightly dust it with cornstarch to prevent sticking. -
Roll it out:
Take your first colored ball and roll it out to an even thickness of about 3-4mm. If it’s too thin, the flowers will be brittle; too thick, and they lose their delicate look. -
Cut the shapes:
Press your five-petal plunger cutter firmly into the clay. Give it a tiny wiggle to ensure clean edges before lifting. -
Eject the flower:
Gently press the plunger to release the clay flower onto your work surface. If it sticks to the cutter, dip the tool in cornstarch before the next cut. -
Soften the edges:
The cutter might leave sharp, vertical sides. Gently tap the edges of the petals with your fingertip to round them off slightly, giving them that soft pillowy look.
Step 3: Detailing and Texturing
-
Indent the center:
Take the rounded end of a small paintbrush or a ball tool and press gently into the very center of the flower to create a small dip. -
Add petal definition:
Using a toothpick or needle tool, lightly press a line from the center halfway up each petal. This adds dimension without cutting through the clay. -
Create the stamen texture:
For the center detail seen in the image, take a toothpick and prick the center depression multiple times to create a stippled, pollen-like texture. -
Optional matte finish:
To mimic the chalky texture in the photo, you can lightly dab a dry brush with cornstarch over the wet clay surface.
Stuck in the Cutter?
If clay gets stuck inside the small details of your plunger cutter, use a stiff toothbrush and warm water to scrub it clean immediately before the clay hardens.
Step 4: Drying and Finishing
-
Arrange for drying:
Move the cut flowers to a clean sheet of parchment paper. Don’t worry if they aren’t perfectly flat; a little waviness adds character. -
Let them cure:
Allow the flowers to air dry completely for 24-48 hours. Turn them over halfway through the process to ensure the underside dries evenly. -
Check for moisture:
The flowers are ready when they feel hard, lightweight, and room temperature to the touch (coolness implies moisture remains). -
Final touch:
Once dry, check for any rough edges. You can smooth these away with a very fine emery board or sandpaper if needed.
Enjoy your collection of everlasting pastel blooms as adorable confetti or craft embellishments


Simple Tulip Buds on Stems
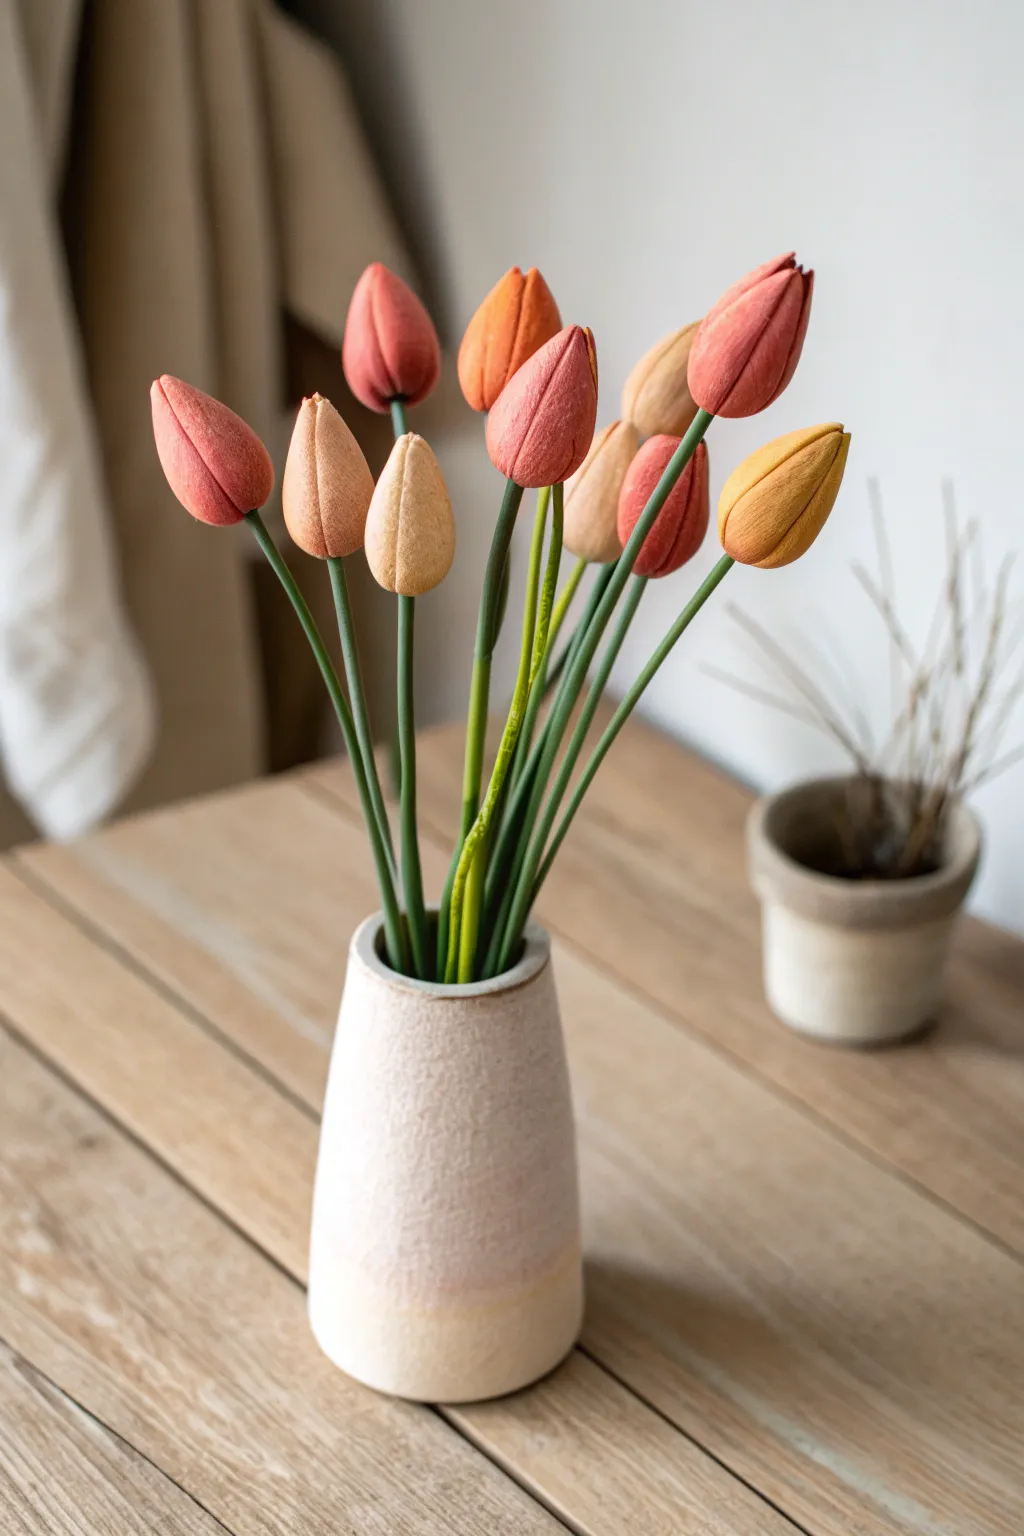
Bring a touch of minimalist beauty to your space with these charming, stylized tulip buds crafted from air-dry clay. Their smooth, sculpted forms and muted, earthy palette create a serene and modern botanical display that lasts forever.
Step-by-Step
Materials
- Air dry clay (white or pre-colored)
- Acrylic paints (terracotta, mustard yellow, coral pink, beige, forest green)
- Floral wire (18 or 20 gauge, sturdy)
- Green floral tape
- Small rolling pin
- Craft knife or clay tool
- Water for smoothing
- Paintbrushes
- Small Styrofoam block for drying (optional)
Step 1: Preparing the Stems
-
Cut the wires:
Cut your floral wire into varied lengths between 10 and 15 inches. Having different heights will make the arrangement look more natural in the vase later. -
Wrap the stems:
Starting at the top of each wire, wrap the entire length tightly with green floral tape. Pull the tape slightly as you wrap to activate the adhesive. If you prefer a smoother look, you can coat the taped wire with a thin layer of green clay instead. -
Create anchors:
Make a small hook or loop at the very top tip of each wire using pliers. This little loop will act as an anchor so the heavy clay flower head doesn’t slide off the stem.
Step 2: Forming the Buds
-
Mix your colors:
If using white clay, pre-mix your clay with acrylic paints to achieve the base tone you want—terracotta, mustard, coral, and beige. Knead the color in thoroughly until uniform. I find mixing the color into the wet clay gives a nicer matte finish than painting afterward. -
Roll the base ball:
Take a piece of colored clay roughly the size of a walnut. Roll it into a smooth, crack-free ball in the palms of your hands. -
Shape the teardrop:
Gently roll one end of the ball to taper it into a fat teardrop or egg shape. The bottom should remain rounded while the top comes to a soft point. -
Insert the stem:
Dip the hooked end of your prepared wire stem into a bit of white glue. Push it gently into the rounded bottom of your clay teardrop until it’s securely embedded about halfway up the bud. -
Smooth the connection:
Use your fingers and a tiny drop of water to smooth the clay around the insertion point so the stem looks like it flows naturally into the flower head.
Seamless Blending
When inserting the stem, tiny cracks may appear at the base. Use a wet paintbrush to ‘erase’ these cracks for a professional, durable finish.
Step 3: Refining the Petals
-
Mark the petals:
Using the back of a craft knife or a clay sculpting tool, gently score three or four distinct vertical lines from the tip of the bud down to the base. These lines simulate the separation between the closed petals. -
Deepen the definition:
Go back over your scored lines and gently press along one side of each line to make the ‘petals’ look like they are overlapping slightly. The goal is to suggest three large petals tightly wrapped together. -
Round the tips:
Soften the very top point where the petal lines meet. You want the bud to look natural and organic, not perfectly geometric. -
Add texture:
For a more realistic, matte look similar to the photo, you can gently dab the surface with a piece of sponge or a stiff brush to remove any shiny fingerprints and add a subtle organic texture.
Drooping Heads?
If the clay bud is too heavy and slides down the wire while wet, hang the flower upside down until the outer layer of clay firms up enough to hold its shape.
Step 4: Finishing Touches
-
Dry properly:
Stick the bottom ends of the wire stems into a block of Styrofoam or a jar of rice to keep the flowers upright while they dry. Let them dry completely for at least 24-48 hours. -
Paint the stems:
Once dry, paint the stems with a dark forest green acrylic paint. Ensure you paint right up to the base of the bud for a seamless transition. -
Add petal shading:
To enhance the depth, mix a slightly darker shade of your petal color (or a dry pastel powder) and lightly brush it into the grooves between the petals. This shadow makes the separation pop. -
Seal the work:
Apply a matte varnish spray to protect your clay buds. Avoid glossy finishes, as the charm of this project lies in its soft, velvety appearance. -
Arrange your bouquet:
Place your finished stems into a ceramic vase. Bend the wires slightly to give the stems a natural curve, mimicking the way real tulips seek the light.
Now you have a timeless bouquet of clay tulips that brings a warm, artisanal feel to any corner of your home

The Complete Guide to Pottery Troubleshooting
Uncover the most common ceramic mistakes—from cracking clay to failed glazes—and learn how to fix them fast.
Sunny Sunflowers With Textured Centers
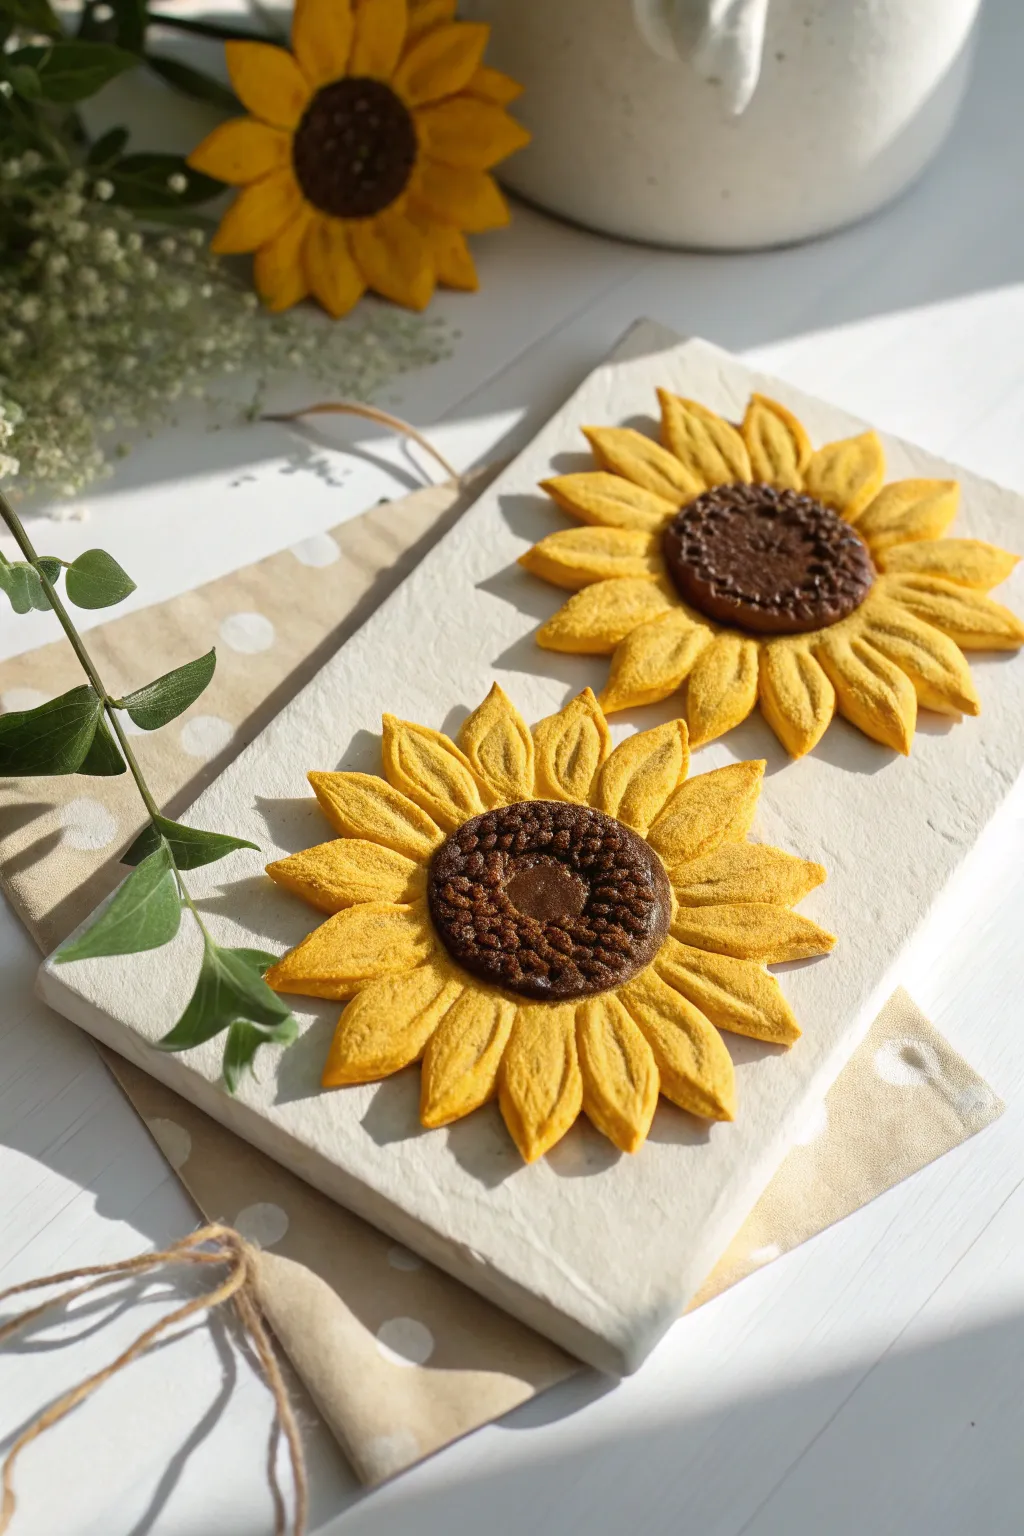
Brighten up your space with these cheerful sunflower reliefs that capture the warmth of summer. Using simple air-dry clay, you’ll sculpt detailed petals and textured centers to create a stunning botanical accent perfect for coasters or decorative wall tiles.
Step-by-Step
Materials
- White air-dry clay (or polymer clay if preferred)
- Yellow and brown acrylic paint (or pre-colored clay)
- Small rolling pin
- Leaf-shaped cutter or knife tool
- Needle tool or toothpick
- Small ball tool
- Coarse texture tool (like a stiff brush or sandpaper block)
- Clean work surface or rectangular clay slab base
Step 1: Creating the Base & Center
-
Prepare your clay:
Start by conditioning your clay until it is soft and pliable. If you are coloring white clay yourself, mix in your yellow and brown paints now—aim for a warm, golden yellow and a deep chocolate brown. Keep them wrapped to prevent drying. -
Form the flower center:
Take a generous pinch of the dark brown clay and roll it into a ball, then flatten it into a thick disc about 1 to 1.5 inches in diameter. -
Add texture to the center:
Using a small ball tool or the end of a paintbrush, press a circular indentation right in the middle of the brown disc to create the inner ring. -
Create the seed effect:
Take your needle tool or a stiff toothbrush and stipple the outer ring of the brown disc excessively. You want a rough, pitted texture that mimics sunflower seeds. -
Detail the inner ring:
For the very center indentation you made earlier, stipple it lightly but keep it smoother than the outer ring to create visual contrast.
Cracking Issues?
If you see tiny cracks forming as the clay dries, smooth a slurry of water and fresh clay into the fissures with your finger to seal them instantly.
Step 2: Sculpting the Petals
-
Roll out yellow clay:
Roll your yellow clay into a sheet approximately 1/4 inch thick. Ensuring an even thickness will help your petals look uniform. -
Cut the petal shapes:
Use a leaf-shaped cutter or a craft knife to cut out 12-15 individual pointed oval shapes. These don’t need to be identical; slight variation adds realism. -
Shape the petals:
Pinch the ends of each petal slightly to sharpen the tips. Gently curve the sides downwards so the center of the petal is higher than the edges. -
Add petal veins:
Take your needle tool and score a noticeable line down the center of each petal. Then, add smaller, fainter lines radiating outward if you want extra detail. -
Refine the surface:
For that matte, velvety look seen in the photo, I like to gently press a piece of fine sandpaper or a texture sponge against the clay surface before attaching.
Step 3: Assembly & Finishing
-
Arrange the first layer:
Place your brown center on your work surface. Begin attaching yellow petals underneath the edge of the brown center, pressing them firmly so they adhere. -
Layer the petals:
Arrange the petals so they slightly overlap. If you want a fuller look like in the image, you can do a second row of petals beneath the first, filling in any gaps. -
Mount on base (Optional):
If you are making this as a relief on a tile (as pictured), prepare a rectangular slab of white clay or use a pre-made tile. Score the back of your flower and slip it onto the slab. -
Final adjustments:
Use your modeling tool to lift the tips of some petals slightly off the surface to give the flower life and movement. -
Let it dry:
Allow the project to dry undisturbed for at least 24-48 hours. Air-dry clay shrinks slightly, so don’t be alarmed if gaps tighten up. -
Dry brushing:
Once fully dry, you can enhance the texture by dry-brushing a slightly lighter yellow over the petal ridges and a darker brown over the seeded center.
Velvet Finish Trick
To get that soft, pollen-like texture on the petals, dust a little cornstarch or yellow pastel powder onto the clay before the final drying phase.
Display your sunny creations near a window to let the natural light highlight all those lovely textures
Hydrangea Clusters From Mini Blossoms
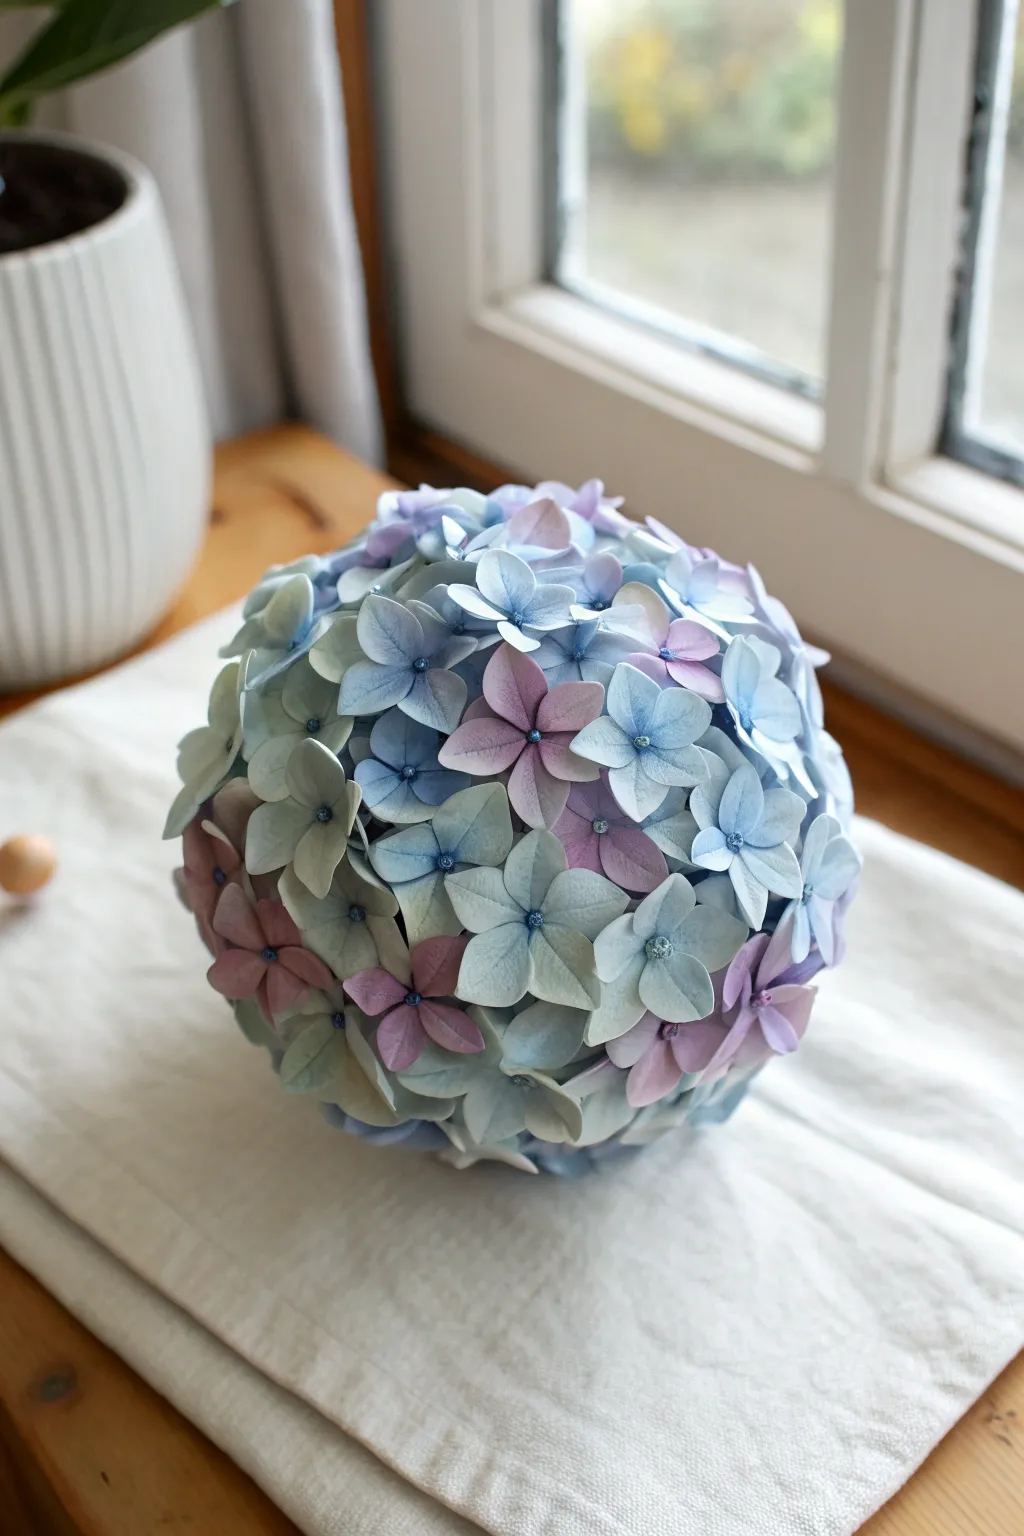
Transform simple air dry clay into a stunning botanical sphere that captures the delicate beauty of a hydrangea bloom. This project uses soft pastel gradients of blue, lilac, and seafoam green to create a calming, everlasting floral arrangement perfect for a window display.
Step-by-Step
Materials
- White air dry clay (lightweight or porcelain type preferred)
- Styrofoam ball (approx. 4-5 inches diameter)
- Acrylic paints (baby blue, lilac, mint green, white)
- Fine-tipped embossing tool or toothpick
- Small 4-petal flower cutter (approx. 0.5 – 0.75 inch)
- Rolling pin
- Parchment paper or non-stick mat
- PVA glue or tacky glue
- Small seed beads (iridescent blue/white)
- Sponge or foam pad for shaping
- Watercolor brush (optional for shading)
Step 1: Preparing the Clay Palette
-
Mix Pastels:
Divide your white clay into three equal portions. Keep a fourth portion pure white to mix into the others for varying lightness. -
Tint the Clay:
Knead a very small drop of baby blue paint into the first portion, lilac into the second, and mint green into the third. Aim for extremely pale, washed-out shades; the clay usually dries darker, so less is more. -
Create Marbled Effects:
Take a small pinch of blue clay and mash it incompletely with a pinch of green clay. Don’t over-mix; you want subtle swirls where the colors meet, just like real petals. -
Prevent Drying:
Immediately wrap any clay you aren’t currently rolling in plastic wrap or put it in an airtight container. Air dry clay skins over quickly.
Sticky Situation?
If clay sticks to your cutter, dip the cutter in cornstarch or baby powder before pressing it down. This acts as a release agent and creates cleaner petal edges.
Step 2: Crafting the Blossoms
-
Roll Out Clay:
Roll your tinted clay onto parchment paper until it is quite thin, about 1-2mm. If it sticks, lightly dust the surface with cornstarch. -
Cut the Shapes:
Use your 4-petal flower cutter to punch out dozens of blossoms. You will need roughly 80-100 flowers depending on your sphere size, so batch them out by color. -
Soften the Edges:
Place a cutout flower on your foam pad. Use the rounded end of a tool or your finger to gently press the edges of each petal, thinning them slightly for a more organic look. -
Cup the Center:
Press the embossing tool directly into the center of the flower. This will cause the four petals to lift upwards, creating a cupped, 3D shape rather than a flat cutout. -
Add Veining (Optional):
For extra detail, use a craft knife or needle tool to gently score a single line down the center of each petal. -
Insert the Center:
The image shows distinct beaded centers. While the clay is still wet, press a tiny seed bead into the glue-dotted center of each blossom. Alternatively, roll a tiny ball of contrasting clay and press it in.
Step 3: Assembly
-
Prepare the Base:
Take your Styrofoam ball. If it’s very white and your flowers are translucent, you might want to paint the ball a neutral pale green or blue first so no stark white shows through gaps. -
Begin at the Top:
Apply a dab of tacky glue to the back of a flower and press it onto the ‘North Pole’ of your sphere. Hold it for a few seconds to ensure it grabs. -
Create Tightly Packed Clusters:
Place the next flowers immediately adjacent to the first, slightly overlapping the petals. Gaps are the enemy here; you want a dense look. -
Mix Colors Randomly:
Avoid placing all blue flowers in one spot. Alternate between your blue, lilac, and green blossoms to create the variegated look seen in the reference photo. -
Handle with Care:
As you work your way down the sphere, be careful where you hold the ball so you don’t squash the previously attached flowers. I find resting the ball in a small bowl or cup helps stabilize it without crushing the bottom. -
Fill Strange Gaps:
As you approach the bottom, you may find odd triangular gaps. Gently squeeze the clay petals of your remaining flowers to make them slightly narrower to fit these tight spaces. -
Final Surface Check:
Once covered, inspect the sphere. If you see any Styrofoam peeking through, make tiny ‘filler’ petals from leftover clay and tuck them in with a needle tool. -
Dry Completely:
Let the sphere sit undisturbed for at least 24 hours. Air dry clay shrinks slightly, which actually helps tighten the arrangement.
Make it Sparkle
Mix a tiny amount of pearl mica powder into your clay before rolling, or dust the finished dry petals with shimmer powder for a morning-dew effect.
Now you have a serene, everlasting bloom that brings a soft touch of nature indoors


What Really Happens Inside the Kiln
Learn how time and temperature work together inside the kiln to transform clay into durable ceramic.
Magnolia Petals With Minimal Elegance
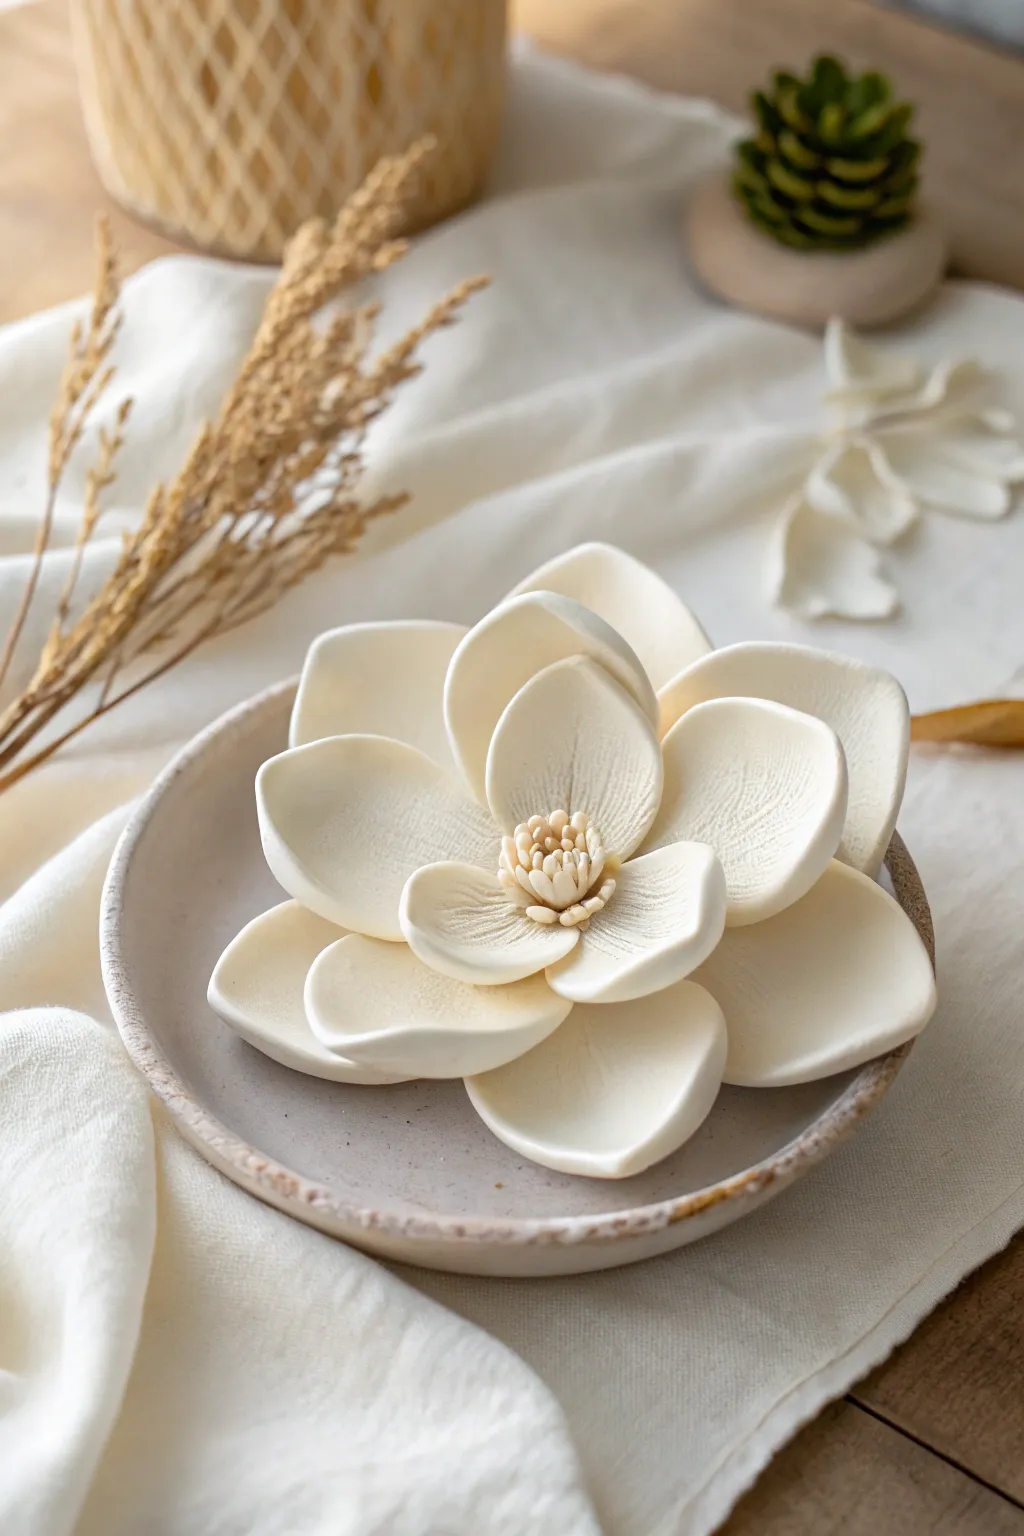
Capture the serene beauty of a blooming magnolia with this delicate air-dry clay sculpture. Its pure white petals and intricate center create a sophisticated centerpiece that looks deceptively fragile but is surprisingly sturdy once dried.
Detailed Instructions
Materials
- White smooth air-dry clay (e.g., cold porcelain or paper clay)
- Non-stick rolling pin
- Leaf veining tool or a real leaf for texture
- Teardrop-shaped petal cutters (large, medium, small)
- Small ball tool
- Fine-grit sandpaper (optional)
- PVA glue or clay slip
- Small curved bowl or flower drying rack
Step 1: Forming the Center
-
Base Cone:
Begin by rolling a small ball of white clay about the size of a marble. Gently taper one end to creating a short, rounded cone shape which will serve as the anchor for your stamens. -
Creating Pistils:
Take a very small amount of clay and roll it into a thin snake. Cut tiny segments, roughly 3-4mm long, and adhere them vertically around the top of your cone using a dab of water or clay slip. -
Lower Stamens:
Create a second row of slightly thicker, shorter stamens around the base of the cone. Gently texture these with a needle tool to mimic the pollen-bearing look shown in the image.
Natural Texture
For ultra-realistic texture without tools, press the raw clay petal against the skin of a citrus fruit like a lemon before attaching it.
Step 2: Creating the Petals
-
Rolling the Clay:
Roll out your white clay on a non-stick surface until it is about 3mm thick. You want it sturdy enough to hold its shape but thin enough to look delicate. -
Cutting Shapes:
Cut out 5 large petals, 5 medium petals, and 3-4 small petals using your teardrop cutters. If you don’t have cutters, you can hand-cut a template from cardstock and trace it with a knife. -
Refining Edges:
Use your fingers to gently smooth the cut edges of each petal. The goal is to remove any sharp, boxy angles left by the cutter so the flower looks organic. -
Adding Texture:
Press a veining tool or a clean leaf gently into the surface of each petal to create subtle ridges. I usually focus the texture near the center and let it fade toward the edges. -
Cupping the Petals:
Place each petal in the palm of your hand and firmly press the center with a ball tool. This ‘cups’ the clay, giving it a natural floral curve rather than laying flat.
Scented Decor
Mix a single drop of magnolia or jasmine essential oil into the clay body before rolling it out to make the flower a passive aroma diffuser.
Step 3: Assembly
-
Inner Layer:
Take your smallest petals and arrange them around the central stamen core. Apply a small amount of glue to the base of each petal and press firmly to the cone. -
Tight Formation:
Ensure these inner petals overlap slightly and curl inward, hugging the center tightly to mimic a flower just beginning to open. -
Middle Layer:
Attach the medium-sized petals next, positioning them in the gaps between the previous row. Angle these slightly more open than the first layer. -
Outer Layer:
Finally, attach the largest petals around the outside. Place this entire assembly into a curved bowl or flower drying rack to help the outer petals maintain their uplifted shape while drying. -
Adjusting Flow:
While the clay is still pliable, gently nudge the tips of the outer petals downward or outward to create the relaxed, blooming gesture seen in the photo. -
Drying:
Allow the flower to dry undisturbed for at least 24-48 hours. Air-dry clay shrinks slightly as it dries, which will tighten your assembly.
Step 4: Finishing Touches
-
Sanding:
Once fully cured, inspect the edges. If there are any rough spots, very gently buff them away with fine-grit sandpaper. -
Sealing:
To preserve the matte, velvety look of natural petals, leave the flower unvarnished, or apply a very thin coat of matte spray sealant to protect it from humidity.
Place your finished bloom on a ceramic dish or side table for a touch of permanent botanical grace
Anemone Flowers With Bold Centers
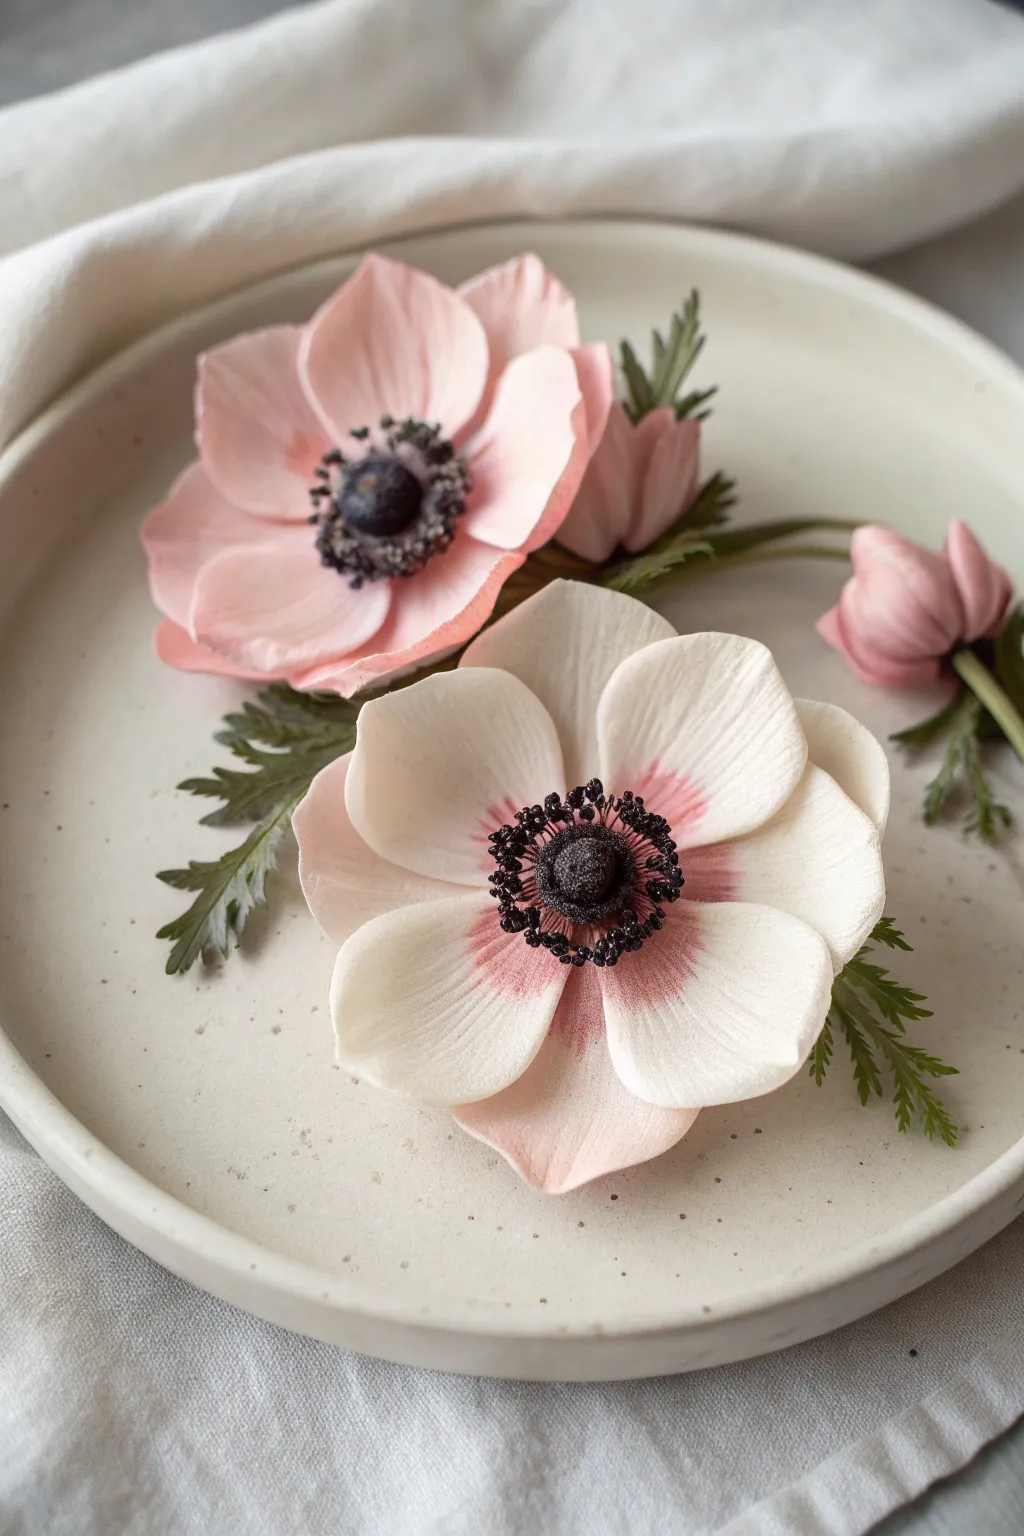
These delicate anemones capture the fragile beauty of nature with their whisper-thin petals and striking, high-contrast centers. Whether you choose a soft blush or a creamy white with pink gradients, the velvety matte finish makes them look almost hyper-realistic.
Step-by-Step Guide
Materials
- High-quality air dry clay (cold porcelain or resin clay recommended)
- Oil paints (Titanium White, Alizarin Crimson, Sap Green, Lamp Black)
- Black floral tape
- Floral wire (18-gauge for stems, 24-gauge for leaves)
- PVA glue or tacky glue
- Ball stylus tools (various sizes)
- Veining tool or petal veiner mold
- Fine black sewing thread or pre-made stamen bundles
- Black pollen powder or finely crushed black pastel
- Small scissors
- Rolling pin
- Cornstarch (for dusting)
Step 1: Creating the Bold Centers
-
Wire preparation:
Cut a 6-inch textured floral wire for your stem. Bend the top half-inch into a small hook to anchor the clay. -
Forming the ovary:
Mix a pea-sized amount of black oil paint into a small ball of clay until rich and dark. Roll it into a flattened sphere and push it onto the hooked wire, securing with a dab of glue. -
Texturing the center:
Use a needle tool or small toothbrush to stipple the surface of the black center, giving it a fuzzy, velvety texture similar to a real anemone ovary. -
Applying stamens:
If using thread, wrap black thread around your fingers to create loops, cut one end, and fan them out. Dip the cut ends in glue and attach them densely around the base of the black clay center. -
Adding pollen:
Apply a tiny amount of glue to the tips of your thread stamens. Dip them gently into black pollen powder or crushed pastel to create the little anthers.
Drooping Petals?
If petals flop down too much while assembling, hang the flower upside down for the first hour of drying. Gravity will help cup the petals inward around the center.
Step 2: Sculpting the Petals
-
Tinting the clay:
Color your main clay body. For the pink flower, mix in a tiny dot of Alizarin Crimson. For the white flower, keep it mostly translucent white, perhaps saving a bit of pink clay for the center gradient. -
Rolling teardrops:
Form 7 to 9 medium-sized teardrop shapes from your clay. Keep them covered under plastic wrap so they don’t dry out while you work. -
Thinning the edges:
Place a teardrop on your palm or a foam pad. Use a rolling pin or finger to flatten it, then switch to a ball tool to thin the edges until they are paper-thin and slightly ruffled. -
Adding texture:
Press the flattened petal onto a veining mold or use a veining tool to draw fine lines radiating from the base to the tip. Realistic anemone petals have subtle vertical ridges. -
Creating the color gradient:
For the bi-color flower, brush a very small amount of pink pastel or diluted paint just at the very base of the white petals before assembly. Blend it upwards slightly for a soft transition. -
Curving the form:
Place the finished petals into a curved spoon or paint palette to dry for about 20 minutes. This ensures they hold a natural, cupped shape rather than lying flat.
Make it a Bud
Use fewer petals (just 3 or 4) and glue them tightly overlapping around the center to create a closed bud. Add a heavier calyx at the bottom for realism.
Step 3: Assembly and Finishing
-
First layer assembly:
Apply glue to the bottom of 3 or 4 petals. Attach them to the base of the black center, spacing them evenly. This is your inner whirl. -
Second layer assembly:
Attach the remaining petals in a second layer, positioning them in the gaps between the first layer’s petals. Press the clay firmly at the base to bond everything to the stem. -
Adding the calyx:
Mix a small amount of green clay. Roll a tiny snake, flatten it, and cut minimal jagged leaves. Glue these directly under the flower head to cover the join where petals meet the stem. -
Making the foliage:
Take green clay and form larger jagged, fern-like leaves. Insert a thin wire into the leaf midrib while wet, let dry, and tape these onto the main stem lower down. -
Final stem wrap:
I like to wrap the entire stem with matching green floral tape or a thin layer of green clay to unify the look and cover any visible wires.
Now you have a stunning, permanent bloom that adds a touch of spring elegance to any room.

TRACK YOUR CERAMIC JOURNEY
Capture glaze tests, firing details, and creative progress—all in one simple printable. Make your projects easier to repeat and improve.
Mini Flower Magnets for the Fridge
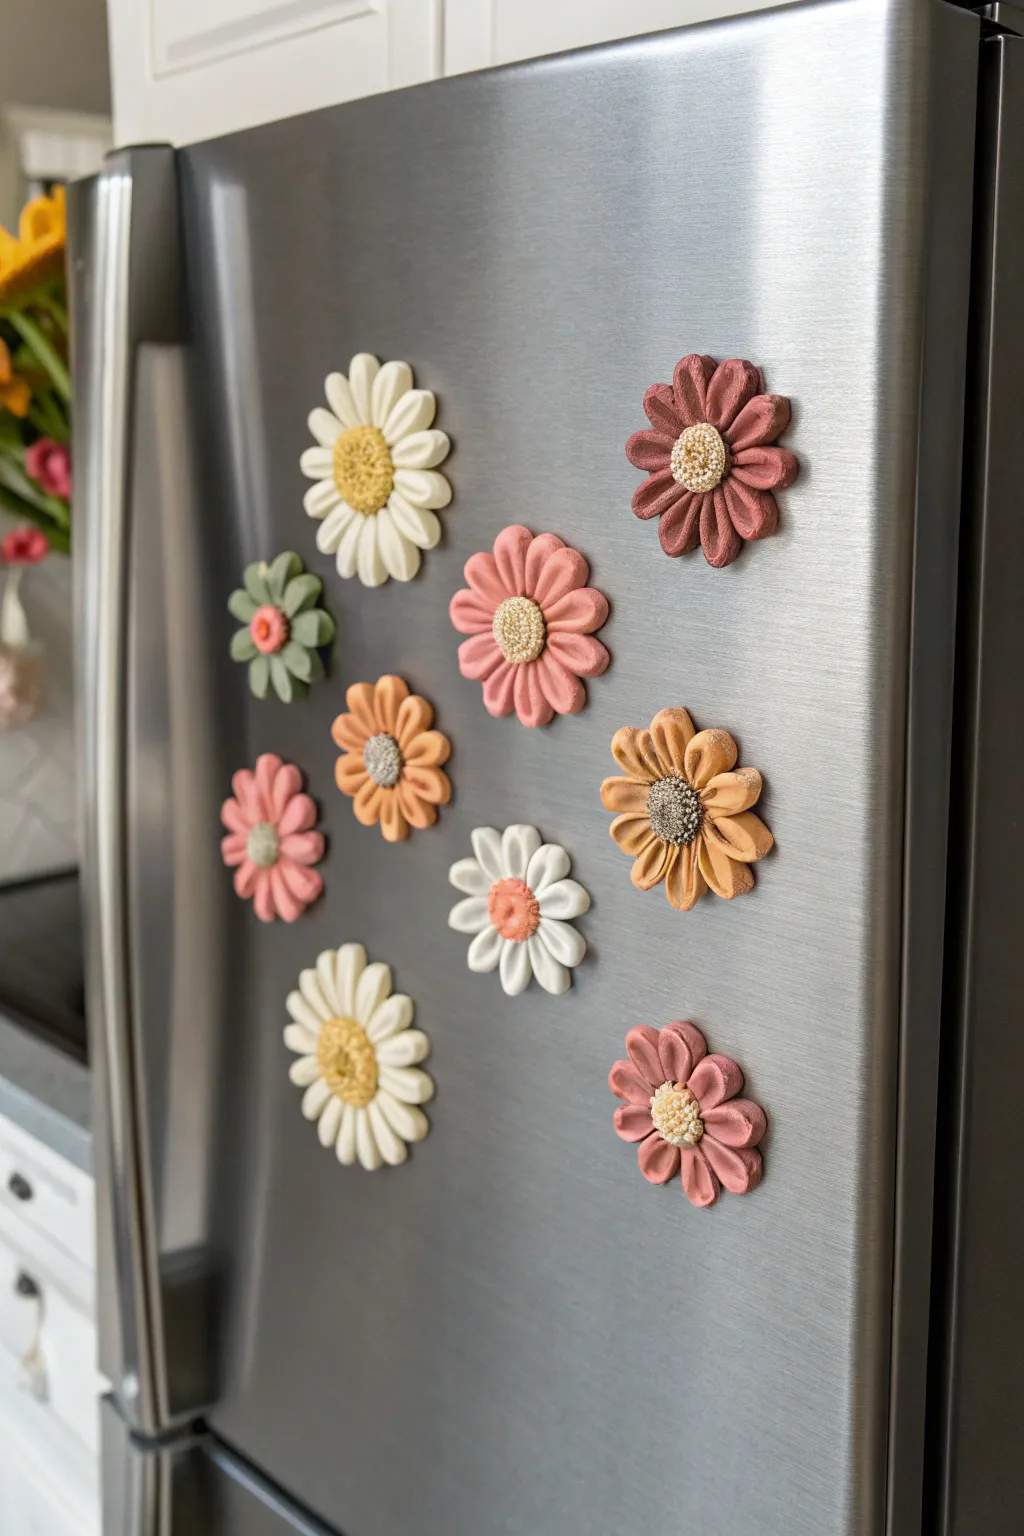
Transform your refrigerator into a blooming garden with these charming air-dry clay flower magnets. Featuring a muted, desert-inspired color palette and delightful textures, these durable little blooms add a touch of handmade warmth to any kitchen.
Step-by-Step
Materials
- Air dry clay (white)
- Acrylic paints (cream, dusty pink, terracotta, sage green, mustard, white)
- Small round magnets (neodymium or ceramic)
- E6000 glue or super glue
- Rolling pin or smooth glass jar
- Flower-shaped cookie cutters (various sizes) or a craft knife
- Sculpting tools or a toothpick
- Fine-grit sandpaper
- Small sieve or mesh strainer (for texture)
- Matte varnish or sealant
- Paintbrushes (small detail and medium)
- Water cup
Step 1: Shaping the Blooms
-
Condition the clay:
Begin by taking a chunk of air-dry clay and kneading it in your hands until it becomes warm, pliable, and smooth. This prevents cracks later on. -
Roll it out:
Roll the clay out on a smooth surface to an even thickness of about 1/4 inch. If the clay sticks, you can use a tiny bit of cornstarch on your surface. -
Cut the petals:
Use your flower-shaped cookie cutters to press out your floral shapes. If you don’t have cutters, you can lightly sketch a daisy shape with a toothpick and carefully cut it out with a craft knife. -
Smooth the edges:
Dip your finger in a little bit of water and gently run it along the cut edges of the petals to soften them and remove any sharp angles or burrs. -
Texture the petals:
Using a sculpting tool or the back of a butter knife, gently press a central line down the middle of each petal to give it dimension and a more realistic look.
Step 2: Creating the Centers
-
Form the center ball:
Roll a small ball of clay, roughly the size of a pea or slightly larger depending on your flower size, and flatten it slightly into a disc. -
Add texture:
For that pollen-filled look seen in the photo, gently press the small clay disc against a mesh strainer or prick it repeatedly with a toothpick to create a stippled surface. -
Attach the center:
Score the back of the center disc and the middle of your flower base with a scratching tool. Add a tiny dab of water (slip) to both scratched areas and press the center firmly onto the flower. -
Refine the shape:
Gently lift the petals upward slightly if you want a more cupped, 3D appearance, or leave them flat for a graphic look. I like to curve just the tips of a few petals for variation. -
Dry thoroughly:
Place your finished clay flowers on a clean, flat surface or wire rack. Let them dry completely for 24-48 hours, flipping them occasionally to ensure the backs dry evenly.
Clean Texture Tip
To keep the center texture crisp, let the clay ‘rest’ for 10 minutes after shaping before you press the sieve into it so it’s less sticky.
Step 3: Painting & Assembly
-
Sand imperfections:
Once fully dry, inspect your flowers. If there are any rough spots on the edges, lightly sand them down with fine-grit sandpaper. -
Base coat:
Paint the petals first using your chosen muted tones like cream, dusty pink, or sage green. Apply two thin coats rather than one thick one for the smoothest finish, letting the paint dry between layers. -
Paint the centers:
Using a small detail brush, paint the textured centers in contrasting colors like mustard yellow, soft brown, or white. Use a dabbing motion to get paint into the tiny textured crevices. -
Dry styling (optional):
To enhance the texture on the center, you can dry brush a slightly lighter shade over the very top of the bumps once the base color is dry. -
Seal the flowers:
Apply a coat of matte varnish or sealant over the entire front and sides of the flower to protect the paint and clay from moisture. -
Attach the magnet:
Flip the flower over. Apply a strong dab of E6000 or super glue to the back of the clay and press your magnet firmly into place. -
Final cure:
Allow the glue to cure fully according to the manufacturer’s instructions before placing your new garden on the fridge.
Add Dimensions
Before drying, gently pinch the ends of some petals to make them pointed, or curve others backward for a ‘windblown’ wildflower effect.
Now you have a budding collection of permanent blooms to brighten up your kitchen space
Flower Ring Dishes With Petal Rims
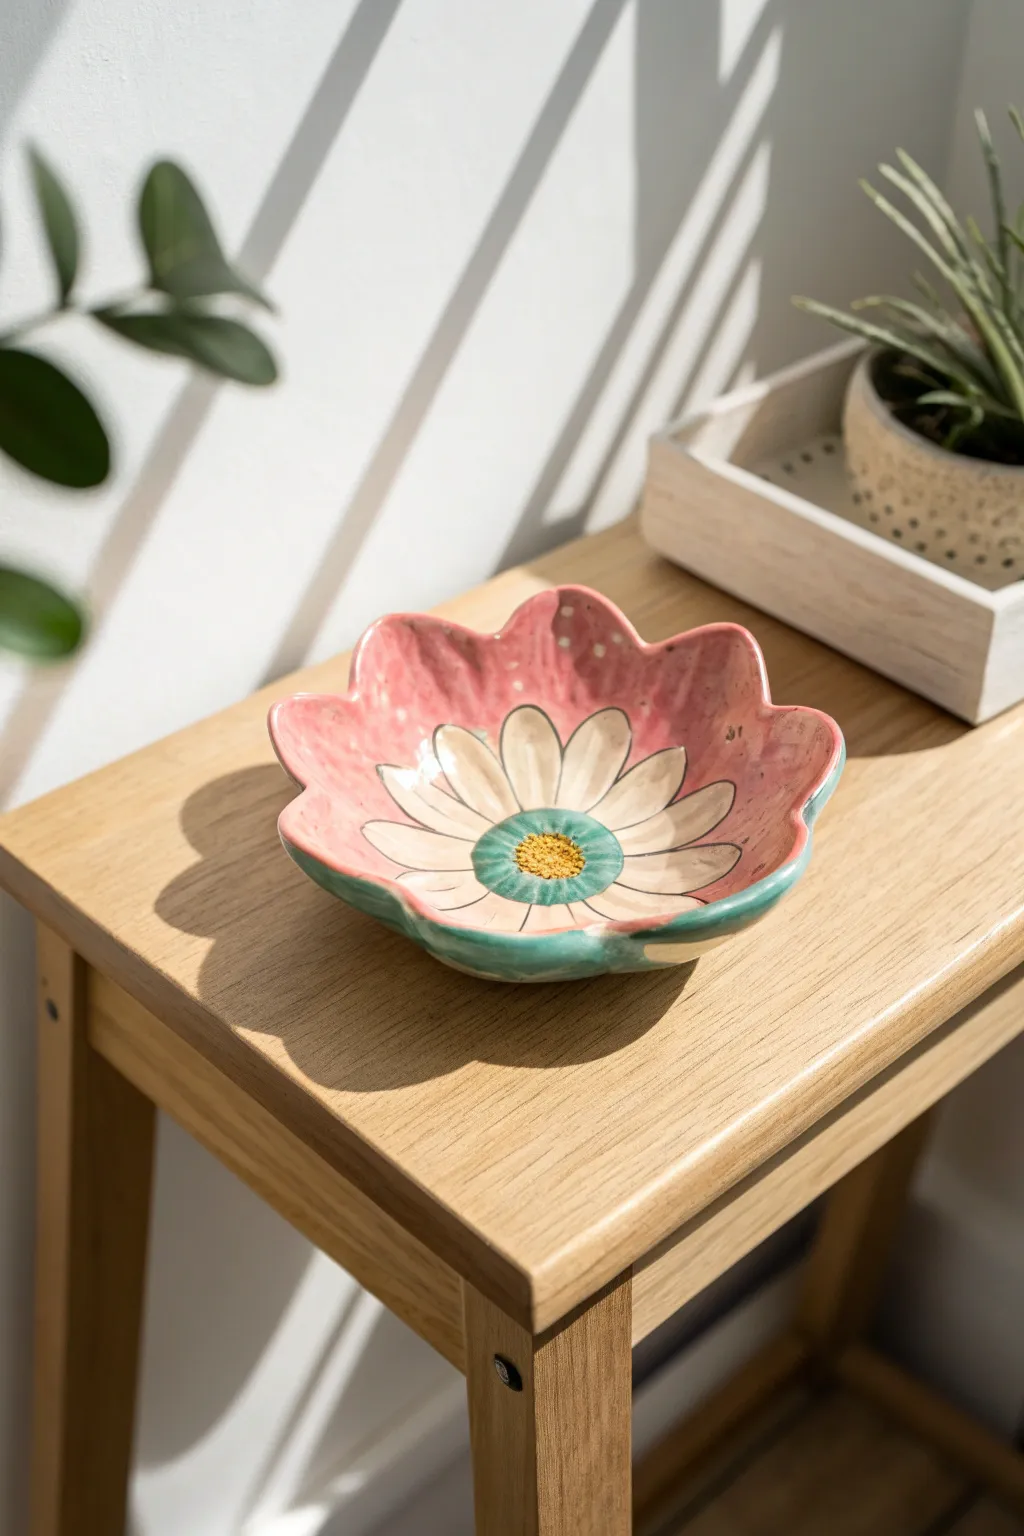
This charming ring dish captures the gentle beauty of a daisy in bloom, featuring a distinct scalloped rim that mimics delicate petals. With its cheerful hand-painted center and soft pink interior, it serves as a lovely catch-all for your favorite jewelry pieces.
Step-by-Step Tutorial
Materials
- Air dry clay (white)
- Rolling pin
- Clay knife or craft knife
- Small bowl or sponge (to use as a mold)
- Wait-based sandpaper (fine grit)
- Acrylic paints: soft pink, creamy white, teal/green, yellow
- Fine detail paintbrush
- Medium flat paintbrush
- Gloss varnish or sealant
- Circular template or large cookie cutter (approx 4-5 inches)
Step 1: Sculpting the Form
-
Roll the clay:
Begin by conditioning a handful of air dry clay until it is pliable. Roll it out on a smooth surface to an even thickness of about 1/4 inch. -
Cut the basic circle:
Place your circular template or large cookie cutter onto the clay and cut out a perfect circle. This forms the base of your flower. -
Shape the petals:
Using your craft knife, gently cut shallow, wavy notches around the outer edge of the circle to differentiate the petals. You want about 8 broad, scalloped sections. -
Smooth the edges:
Dip your finger in a little water and run it along the cut edges. Smooth down any sharpness or burrs from the knife to give the petals a soft, organic look. -
Form the bowl shape:
Lift the clay circle and gently press it into a small bowl or onto a curved sponge to give it a concave shape. Ensure the petal rims flair slightly upwards. -
Dry the clay:
Let the dish dry completely in its mold. This usually takes 24-48 hours depending on humidity. Flip it halfway through if possible to ensure the bottom dries evenly. -
Sand for perfection:
Once fully dry, lightly sand the edges and surface with fine-grit sandpaper to remove any fingerprints or bumps.
Step 2: Painting the Flower
-
Base coat the interior:
Paint the entire inside of the dish with a soft, warm pink color. You might need two layers for full opacity. Let this dry completely. -
Paint the center:
In the very middle of the dish, paint a small circle using a teal or greenish-blue paint. This will be the flower’s center disk. -
Add the yellow pollen:
Using the tip of a small brush or a dotting tool, stipple yellow paint into the center of the teal circle to create a textured pollen effect. -
Outline the petals:
With a fine detail brush and creamy white paint, draw long petal shapes radiating from the teal center outward. These internal petals should contrast against the pink background. -
Fill the white petals:
Fill in the white petal shapes you just outlined. Leave thin gaps between them so the pink background shows through as separation lines. -
Detail the lines:
Mix a very watery black or dark brown paint. Use your finest brush to add extremely thin, delicate outlines around the white petals and the center disk for definition. -
Paint the rim:
Paint the very edge of the wavy rim with the same teal/green color used in the center to frame the design effectively. -
Add whimsical dots:
Using a small dotting tool or toothpick, add tiny white dots on the pink background area near the tips of the clay petals for a playful texture. -
Seal the piece:
Finally, apply a coat of gloss varnish to the entire dish. This protects the paint and gives the clay a ceramic-like shine.
Smooth Moves
Use a damp paintbrush instead of your finger to smooth hard-to-reach crevices between petal shapes while the clay is wet.
Gold Glamour
For a luxe upgrade, paint the rim with liquid gold leaf instead of teal to give the finished dish an expensive, gilded look.
Place your new floral dish on a bright windowsill to catch the light and admire your handiwork
Floral Wall Tiles in Low Relief
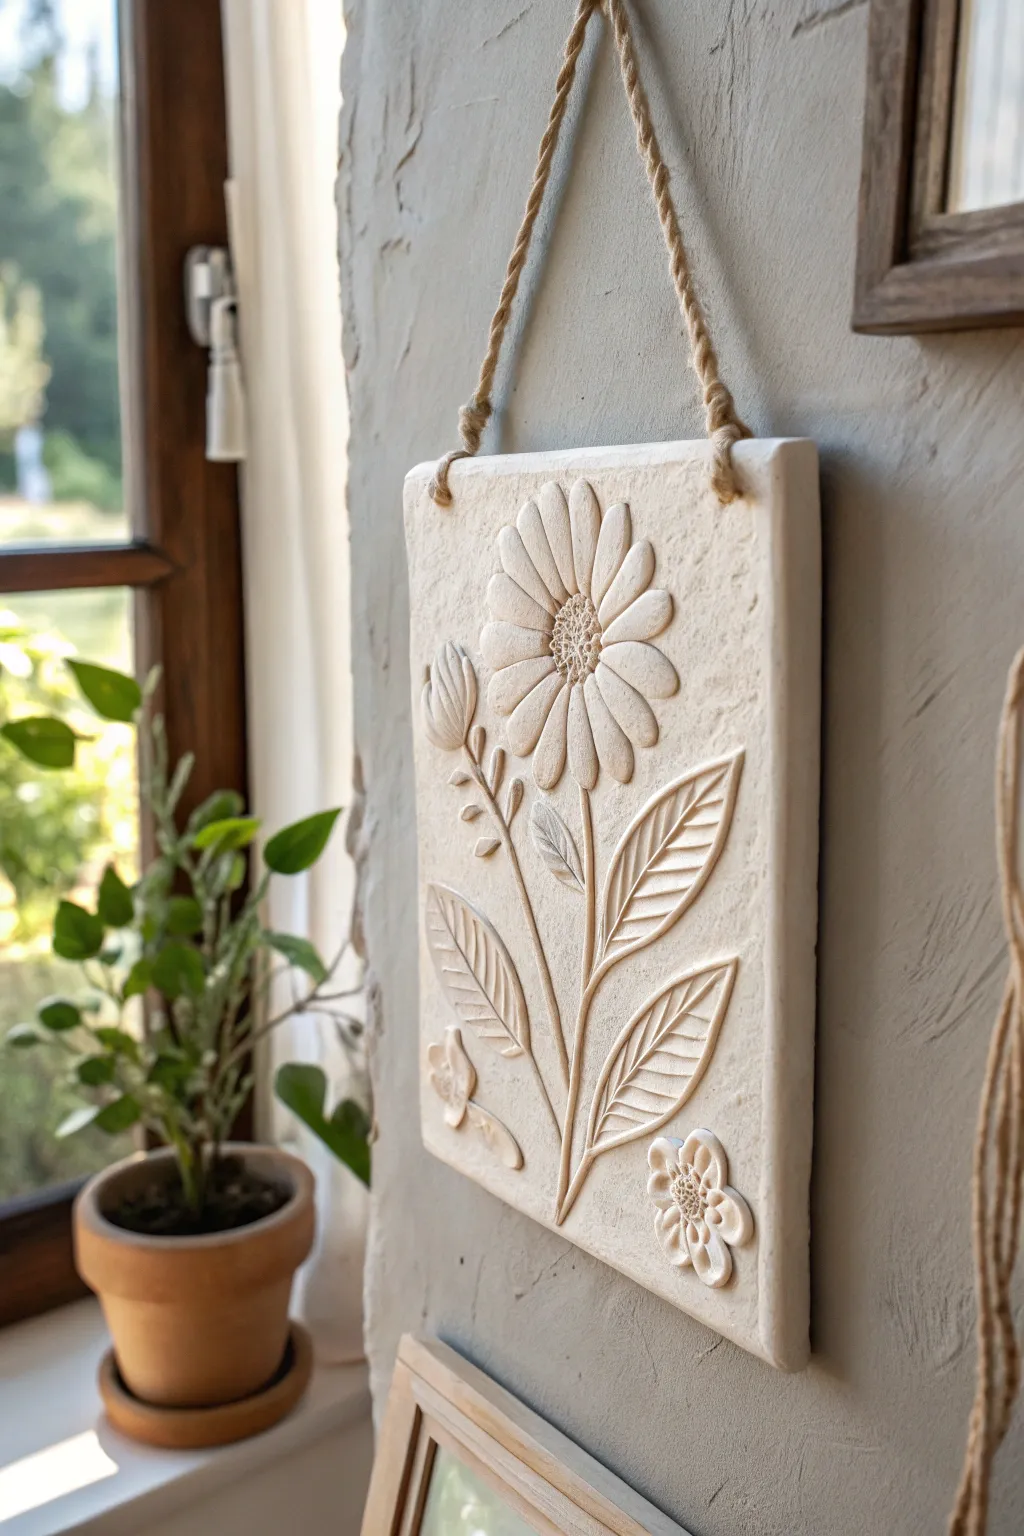
This elegant wall hanging captures the beauty of a summer garden in a permanent, stone-like relief. The project features a large, central daisy surrounded by textured leaves and delicate buds, all monochromatic for a sophisticated, minimalist aesthetic.
Step-by-Step
Materials
- White air dry clay (stone effect or smooth)
- Rolling pin
- Two guide sticks (approx. 5-7mm thick)
- Rectangular template or ruler
- Craft knife or scalpel
- Needle tool
- Clay carving tools (ball stylus, loop tool)
- Small cup of water
- Paintbrush (for smoothing)
- Jute twine or rope
- Sandpaper (fine grit)
- Parchment paper or canvas mat
Step 1: Preparing the Base
-
Condition the clay:
Start by taking a large chunk of air dry clay and kneading it in your hands until it becomes warm and pliable. This prevents cracks later on. -
Roll the slab:
Place your clay on parchment paper between two guide sticks. Roll the clay out until the rolling pin rests on the sticks, ensuring a perfectly even thickness across the entire slab. -
Cut the rectangle:
Using a ruler or a paper template, cut a clean rectangle for your tile base. Smooth the cut edges with a finger dipped slightly in water to remove sharp corners. -
Create hanging holes:
While the clay is still fresh, use the back of a paintbrush or a straw to punch two holes in the top corners. Ensure they are wide enough for your jute twine and positioned at least 1cm from the edge to support the weight.
Step 2: Sculpting the Floral Design
-
Outline the composition:
Lightly sketch your design onto the slab using a needle tool. Draw a central stem, the position of the main flower head near the top, and leaves along the sides. -
Form the main stem:
Roll a very thin snake of clay for the stem. Score the traced line on the slab and apply a tiny bit of water (slip), then press the stem gently onto the base, flattening it slightly so it integrates. -
Create leaf shapes:
Flatten small balls of clay into teardrop shapes. Attach them to the stem area using the score-and-slip method. Keep them slightly raised in the center for a 3D effect. -
Add leaf texture:
Use a knife tool or needle to press veins into the leaves. Start with a central vein, then add diagonal lines branching out. Press firmly enough to create deep shadows. -
Sculpt daisy petals:
For the main flower, roll multiple small, equal-sized teardrops. Flatten them slightly and arrange them in a circle around the stem’s top. Use a modeling tool to create longitudinal grooves on each petal for realistic texture. -
Detail the flower center:
Place a small flattened ball of clay in the center of the petals. Use a needle tool or small ball stylus to poke many tiny dots into this center disk, simulating pollen and seeds. -
Add buds and smaller blooms:
Fill empty spaces, like the bottom corners or side branches, with smaller clay coils for buds. Add a tiny secondary flower at the bottom right to balance the composition.
Slip It Good
Make your own ‘glue’ by mixing tiny scraps of dried clay with water until it forms a thick paste. This binds added parts much better than plain water.
Step 3: Finishing Touches
-
Texture the background:
To achieve that rustic, stone-like look, gently tap the empty background areas with a stiff bristle brush or a crumpled ball of aluminum foil. This removes the ‘smooth plastic’ look of fresh clay. -
Refine edges:
Check the connections between your added reliefs and the base slab. Use a slightly damp brush to smooth any harsh seams where the stems meet the background. -
Dry slowly:
Place the tile on a wire rack or mesh screen to dry. To prevent warping, I usually place a light book on top of the edges (cushioned by paper) once the surface is touch-dry. -
Sand and soften:
Once fully cured (24-48 hours), use fine-grit sandpaper to gently buff the edges of the tile and any sharp peaks on the flower petals. -
Seal to protect:
Apply a coat of matte varnish or acrylic sealer. This protects the relief from dust and humidity without making it look plasticky. -
Attach the hanger:
Thread a length of rustic jute rope through the holes from front to back (or back to front, depending on preference) and knot securely to finish the piece.
Level Up: Antique Wash
Mix brown acrylic paint with lots of water. Brush over the dried texture, then wipe away instantly with a cloth. The dark color stays in the crevices.
Hang your botanical relief near a window where the changing light will play beautifully across the textured surfaces
Pressed-Petal Texture Flowers
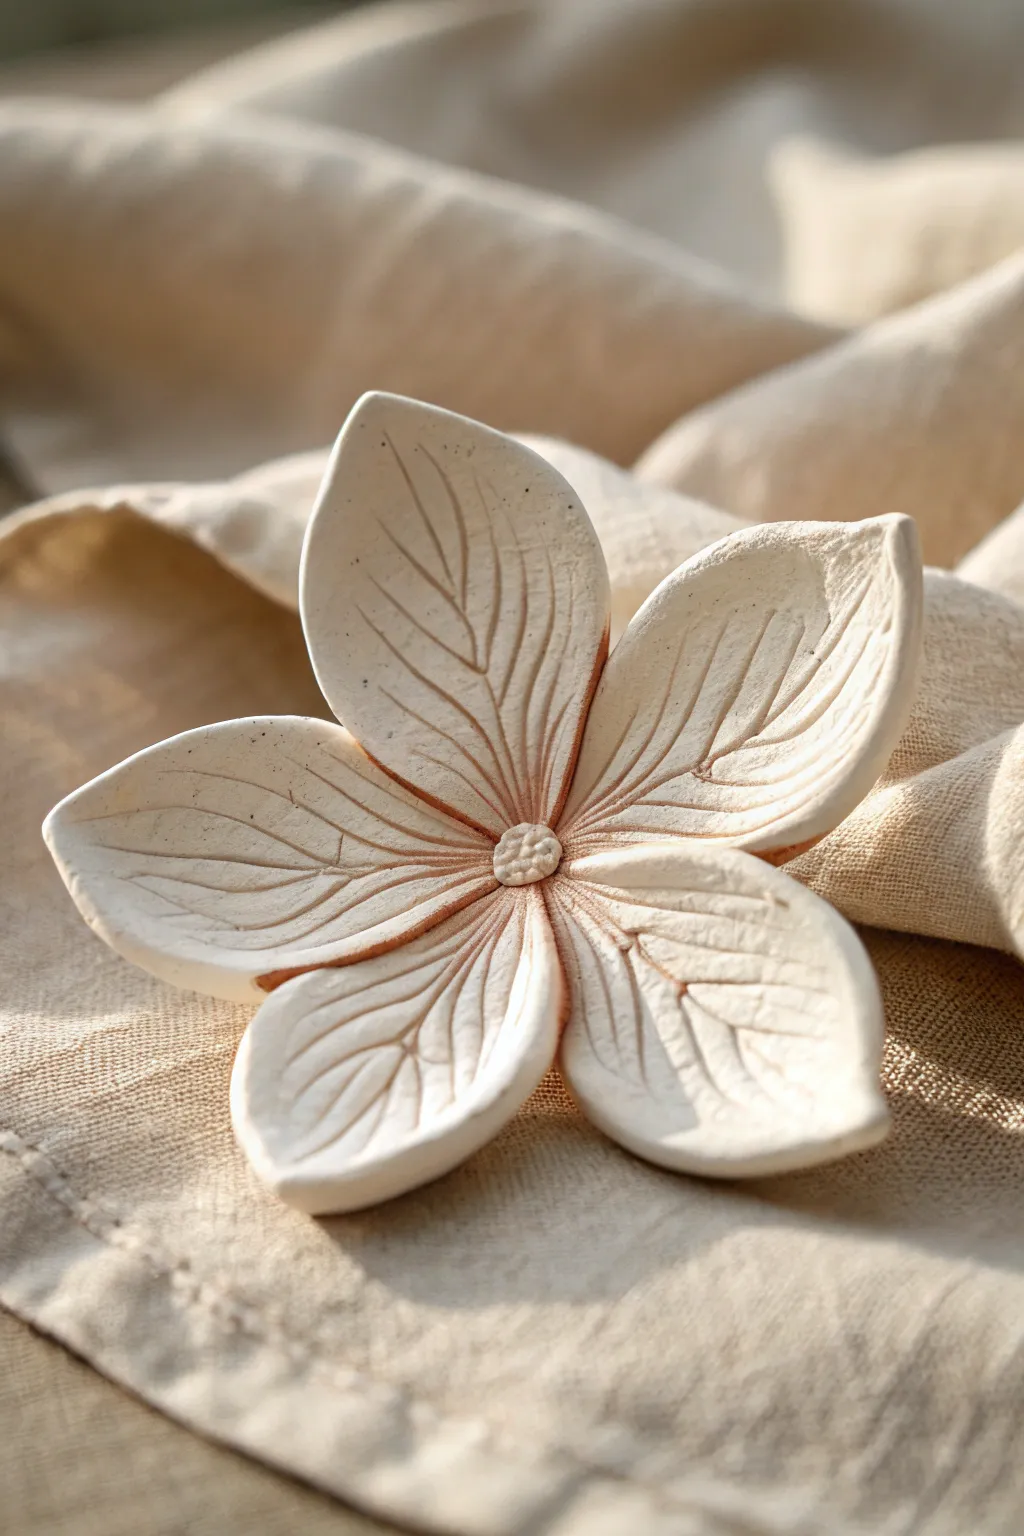
This elegant project transforms simple air-dry clay into a stunning, organic-looking bloom that mimics the natural veining of real petals. The finished piece features a beautiful matte white finish with subtle terracotta undertones, perfect for a minimalist table accent or a wall hanging.
Step-by-Step Guide
Materials
- White or cream air-dry clay (smooth texture)
- Small rolling pin
- Leaf-shaped cookie cutter (approx. 2-3 inches long) or a craft knife
- Veining tool or a needle tool
- Small bowl or curved palette for shaping
- Water in a small cup
- Sponge or fine-grit sandpaper
- Brown watercolor paint or diluted acrylic (optional)
Step 1: Shaping the Petals
-
Condition the clay:
Begin by kneading a manageable chunk of air-dry clay in your hands until it feels warm and pliable. This prevents cracking later on. -
Roll out the slab:
On a clean, non-stick surface, roll your clay out to an even thickness of about 1/4 inch. Avoid going too thin, as we want the petals to have some visual weight. -
Cut the forms:
Use a teardrop or leaf-shaped cookie cutter to punch out five separate petal shapes. If you don’t have a cutter, I like to hand-cut these with a craft knife for a more organic, less uniform look. -
Smooth the edges:
Dip your finger in a tiny bit of water and run it along the cut edges of each petal to remove any sharp burs or roughness from the cutting process. -
Create the central vein:
Take your needle tool or veining tool and draw a distinct line down the center of the petal, starting from the wider base and stopping just before the tip. -
Add side veins:
Etch curved lines branching out from the center vein toward the edges. Vary the pressure: press harder near the center and lighter near the edges to mimic natural leaf structures. -
Indent the texture:
For extra dimension, use the side of your tool to gently press down the clay between the veins, creating a slightly pillowed effect.
Cracks Appearing?
If hairline cracks appear while drying, mix a tiny bit of fresh clay with water to make a paste (slip) and fill them in immediately, then smooth.
Step 2: Assembly and Finishing
-
Prepare the center:
Roll a small ball of clay, roughly the size of a pea, and flatten it slightly to create the base for your flower assembly. -
Score and slip:
Scratch the surface of the base ball and the pointed bottom of each petal. Apply a tiny drop of water to act as glue. -
Attach the petals:
Press the five petals onto the central base in a radial pattern, ensuring they touch each other but don’t overlap excessively. -
Create the carpel:
Make a very small, textured button of clay by poking a tiny ball with a needle tool repeatedly. Place this directly in the center of the joined petals to hide the seams. -
Shape the bloom:
Carefully lift the entire flower and place it into a shallow bowl or a curved drying form. This makes the petals lift upward rather than lying flat. -
Refine the curve:
Gently curl the very tips of the petals backward or inward with your fingers to give the flower visual movement. -
Wait for drying:
Allow the piece to dry completely for 24-48 hours. Keep it away from direct heat sources to prevent warping. -
Sand the surface:
Once fully hard, inspect the edges. Use fine-grit sandpaper to gently smooth away any remaining rough spots. -
Optional wash:
To achieve the aged look in the photo, mix a very watery brown paint. Brush it into the grooves of the veins. -
Wipe back:
Immediately wipe the surface with a damp cloth. The dark paint will remain in the deep veins while the raised areas stay white, highlighting the texture.
Pro Tip: Release Agent
Dust your work surface and rolling pin with a tiny bit of cornstarch. This prevents the delicate clay petals from sticking and tearing when you lift them.
Place your finished bloom on a linen cloth or shelf to enjoy the serene, natural vibe it brings to the room
Two-Tone Petals for a Painted-Look Bloom
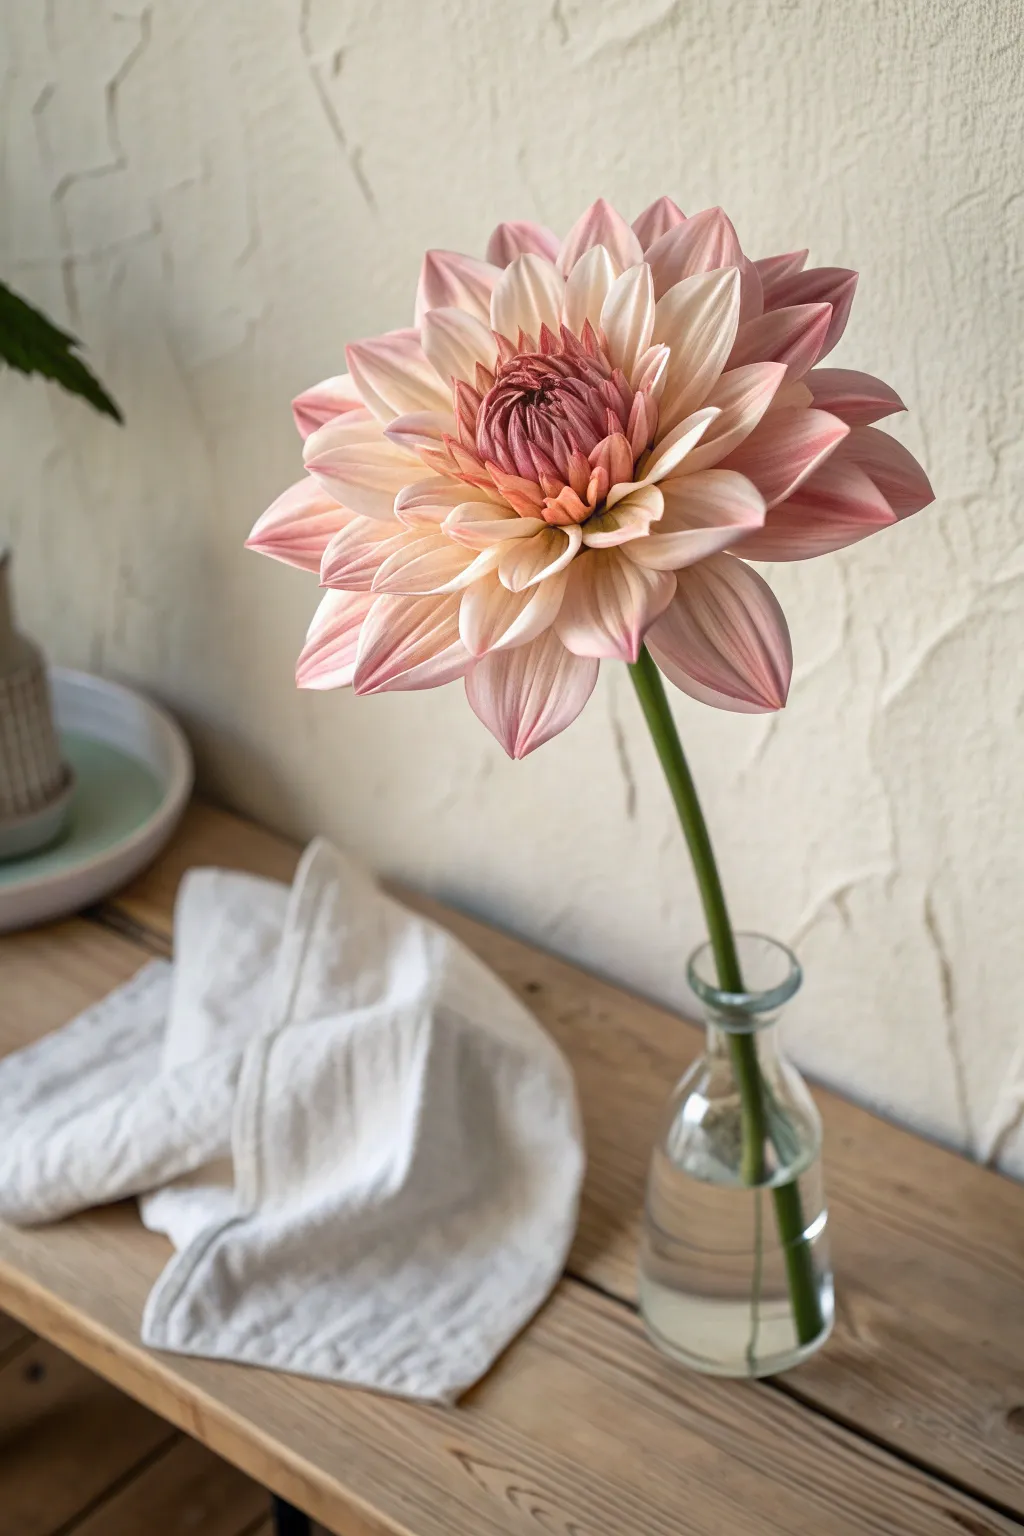
Capture the delicate beauty of a blooming dahlia with this air-dry clay project that features stunning two-tone petals. By blending tinted clays before shaping, you create a gradient effect that mimics the soft, realistic transition from a deep rose center to blush-tipped edges.
Step-by-Step Tutorial
Materials
- High-quality air dry clay (cold porcelain or lightweight clay)
- Oil paints or acrylics (Rose Madder, Titanium White, Raw Sienna)
- Floral wire (18-gauge for stem, finer gauge for structure if needed)
- PVA glue or tacky glue
- Teardrop petal cutters (small to large)
- Veining tool or needle tool
- Ball stylus tool
- Foam drying pad
- Green floral tape
- Spoon or petal veiner (optional)
Step 1: Prepping the Clay Gradient
-
Mix your base colors:
Divide your clay into three portions. Keep one portion white (or very pale cream). Mix a small amount of Rose Madder into the second portion for a medium blush pink. Mix a slightly larger amount of Rose Madder with a touch of Raw Sienna into the third for a deep, dusty rose. -
Create the two-tone logs:
Take a piece of the deep rose clay and a piece of the medium blush. Roll them into sausage shapes and press them side-by-side. Do the same with the medium blush and the white clay. -
The Skinner blend method:
Flatten your side-by-side logs and fold them over, rolling and flattening repeatedly. Stop when you see a soft transition line between the colors rather than a sharp stripe. You want individual balls of clay that are darker on one end and lighter on the other.
Step 2: Forming the Center
-
Prepare the stem:
Take your 18-gauge floral wire and create a small loop at the top with pliers. Cover the loop with a teardrop-shaped ball of your darkest clay mixture to form the bud foundation. -
Shape the center petals:
Roll out your darkest two-tone clay thinly. Cut 10-12 small teardrop shapes. Use a ball stylus to cup them deeply so they curve inward. -
Attach the first layer:
Apply a dab of glue to the center bud. Arrange these small petals so they tightly hug the center, overlapping significantly to hide the bud completely. The darker end of the petal should be at the base.
Loose Petals?
If heavy outer petals droop or detach, support them with small tufts of cotton wool or tissue placed between the layers until the clay dries completely.
Step 3: Building the Bloom
-
Create intermediate petals:
Roll out your medium-blend clay. Cut slightly larger teardrop shapes. I find it helpful to thin the edges of each petal by rolling a needle tool back and forth along the rim. -
Veining texture:
Press each petal onto a veining mold or gently score vertical lines with a needle tool to mimic the dahlia’s ribbing. Pinch the bottom of each petal to create a V-shape. -
Adding volume:
Glue this second row of petals around the center, placing them slightly more open than the first layer. Alternate the positioning so each new petal sits between two previous ones. -
Shaping the outer petals:
Using your lightest clay blend (mostly white/cream with blush tips), cut the largest teardrop shapes. Use the ball stylus on your foam pad to gently curl the tips backward. -
Final assembly:
Attach these large outer petals in concentric circles. As you move outward, angle the petals further away from the center to create that full, open bloom look.
Pro Tip: Translucency
Mix a pea-sized amount of translucent clay into your white batch. This gives the petal edges that hyper-realistic, sun-kissed delicate look.
Step 4: Finishing Touches
-
Smoothing the transition:
Check the underside of the flower (the calyx area). Smooth out any bulky clay where the petals join the wire using a little water and a sculpting tool. -
Stem work:
Once the flower head is secure, wrap the floral wire stem with green floral tape. For a realistic look like the photo, tint a small piece of clay green and smooth it over the wire to create a thicker, organic stem. -
Final drying:
Hang the flower upside down to dry. Gravity helps the large outer petals maintain their shape without flopping while the clay is still wet.
Place your single stem in a simple glass vase to let the complex petal layers take center stage
Oversized Statement Flowers for Decor
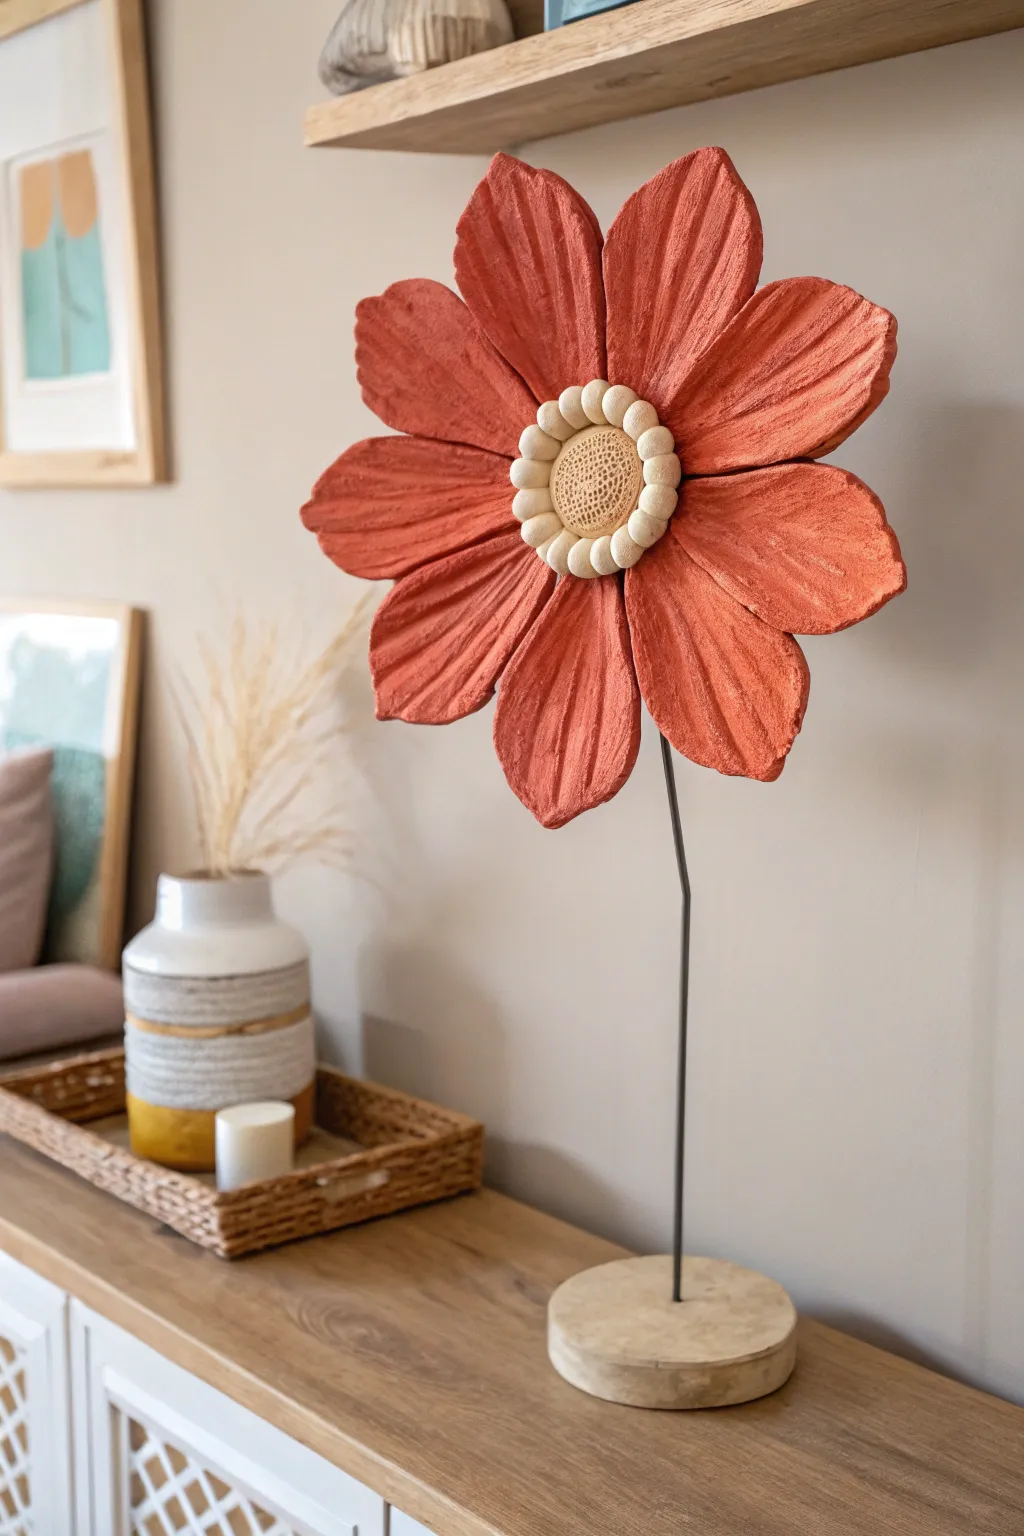
Bring earthy warmth into your living space with this striking, oversized clay flower. Standing tall on a sleek metal stem, its richly textured petals and beaded center create a sophisticated statement piece that looks far more expensive than its humble materials suggest.
Step-by-Step Guide
Materials
- High-quality air dry clay (terracotta or reddish-brown color preferred)
- Thick floral wire or a sturdy metal rod (approx. 3-4mm diameter)
- Wooden circular base (approx. 4-5 inches diameter)
- Wooden craft beads (approx. 15 small beads)
- Acrylic paint (terracotta, burnt orange, and cream)
- Texturing tools (combs, old toothbrush, or sculpting rake)
- Rolling pin
- Cardboard or cardstock (for petal templates)
- Heavy-duty craft glue or epoxy
- Sandpaper
- Paintbrushes (flat shader and small detail brush)
- Matte sealant spray
Step 1: Base and Stem Construction
-
Prepare the wooden base:
Start with a solid wooden disc or coaster. If it’s unfinished, sand the edges smooth. Drill a small hole directly in the center that corresponds to the thickness of your metal wire or rod. -
Secure the stem:
Insert your metal rod into the drilled hole. Secure it firmly with heavy-duty glue or epoxy. Allow this to cure completely so the stem doesn’t wobble while you work on the heavy flower head. -
Shape the stem:
Add a gentle, organic bend to the wire about two-thirds of the way up. This prevents the flower from looking too rigid and gives it a natural posture.
Supporting Heavy Petals
While drying, rest the heavy petals on crumpled aluminum foil or bowls. This keeps them curved naturally without flattening under their own weight.
Step 2: Sculpting the Petals
-
Make a template:
Cut a petal shape from cardstock, roughly 5-6 inches long. The shape should be teardrop-like but wider at the outer edge. -
Roll out the clay:
Roll your air dry clay to an even thickness of about 1/4 inch. If you are not using pre-colored clay, you’ll paint it later, so white or grey clay is fine. -
Cut the petals:
Using your template, cut out strictly 8 large petals. Keep the edges relatively clean, but don’t worry about perfection as organic edges look better. -
Add texture:
Before the clay dries, use a sculpting rake or a fine-tooth comb to drag deep, longitudinal lines down the length of each petal. This mimics the natural veining of a dried flower. -
Shape the curves:
Gently pinch the base of each petal to taper it. Curl the outer edges slightly upward or downward to give them movement. Lay them over curved surfaces (like PVC pipe or crumpled foil) to dry in a dynamic shape. -
Dry partially:
Let the petals dry until they are ‘leather hard’—firm enough to handle but still slightly pliable.
Fixing Cracks
If cracks appear at the joints during drying, mix a small amount of fresh clay with water to make a paste (slip) and fill the gaps, then smooth over.
Step 3: Assembly and Center
-
Create the center disc:
Roll a ball of clay and flatten it into a disc about 2 inches in diameter. Press this onto the top of your metal stem. You may need to bend the very tip of the wire into a small loop first to help anchor the clay. -
Attach the petals:
Score and slip the back of each petal base and press them firmly into the back of your center disc. Arrange them in a single, overlapping layer. I find supporting the petals with props while the connection dries is crucial here. -
Form the stamen center:
Take a smaller ball of clay and press it into the very center of the attractive side of the flower. Use a stippling tool or an old toothbrush to tap a rough, pollen-like texture into this center circle. -
Embed the beads:
While the center clay is still wet, press your small wooden beads in a ring around the stippled center. Push them in halfway so they are secure. -
Full drying:
Allow the entire sculpture to dry completely. This takes patience—wait at least 48 to 72 hours for a piece this thick to prevent cracking.
Step 4: Painting and Finishing
-
Base coat painting:
If you didn’t use colored clay, mix a warm terracotta acrylic paint. Apply a solid coat to the front and back of the petals. Don’t worry if it settles into the texture grooves; that adds depth. -
Dry brushing:
Once the base coat is dry, dip a dry brush into a lighter orange or cream paint. Wipe most of it off, then lightly drag it over the raised ridges of the petals to highlight the texture. -
Paint the center:
Paint the stippled center area a soft cream or pale yellow color. Leave the wooden beads natural for a nice material contrast, or varnish them lightly. -
Seal the piece:
Spray the entire flower head with a matte sealant to protect the paint and clay from humidity.
Place your sculpture on a console table or shelf where the light can catch the rich textures of the petals