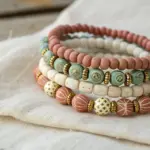
If you’ve got a little air dry clay and a cozy afternoon, you’ve got everything you need to make seriously sweet handmade gifts that look way more “boutique” than they cost. These air dry clay gift ideas are my go-to projects when I want something personal, polished, and totally doable at the kitchen table.
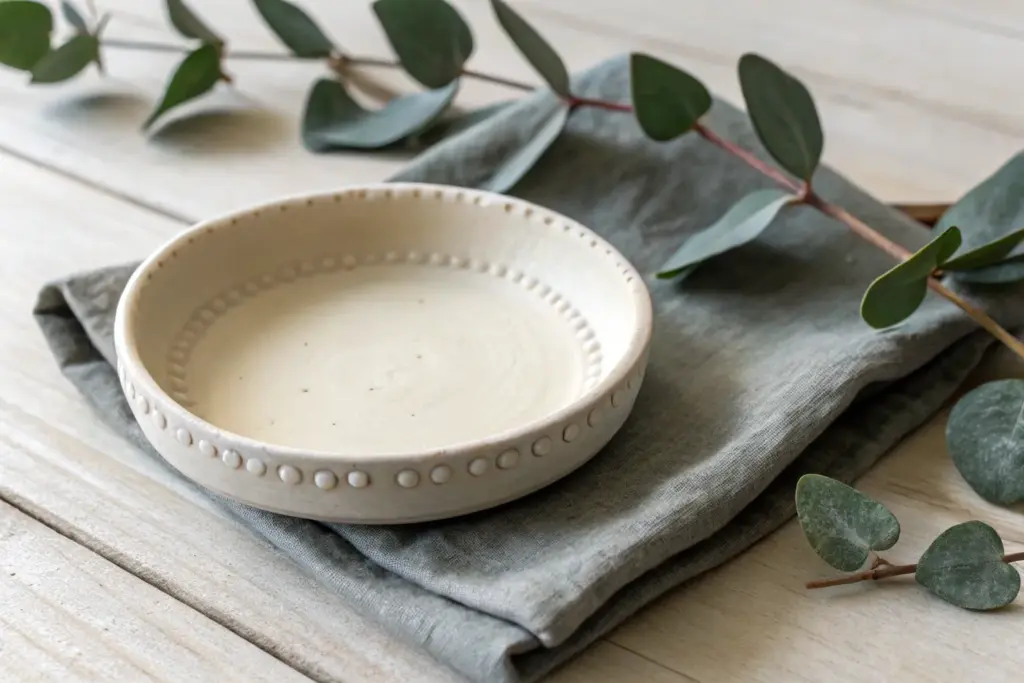
Classic Trinket Dish With a Painted Rim
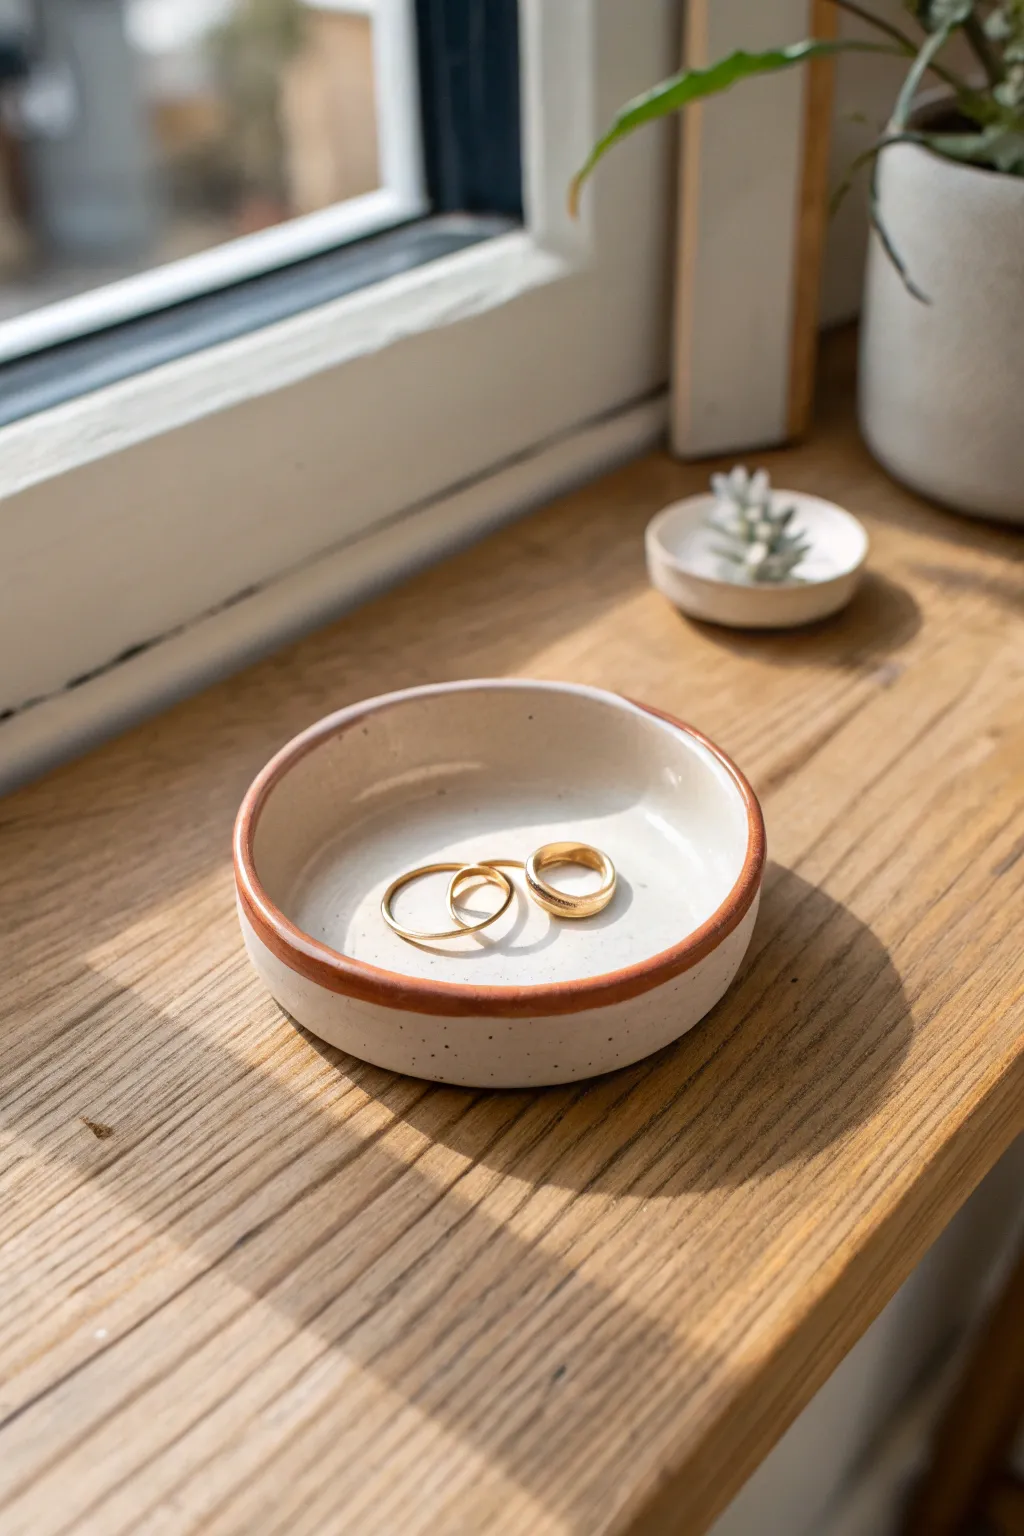
This minimalist trinket dish blends organic charm with clean lines, featuring a creamy speckled finish and a striking burnt-orange rim. It is the perfect size for holding your daily jewelry rings and sits beautifully on any windowsill or bedside table.
Step-by-Step Tutorial
Materials
- White air dry clay
- Rolling pin
- Circle cutter or small bowl (approx. 4 inches diameter)
- Small sponge
- Fine-grit sandpaper
- Acrylic paint (creamy white and terracotta/burnt orange)
- Black or brown acrylic paint (for speckles)
- Old toothbrush or stiff bristle brush
- Small flat paintbrush
- Gloss or satin varnish (water-based)
Step 1: Shaping the Clay
-
Prepare the Clay:
Cut a chunk of white air dry clay and knead it in your hands until it becomes soft, pliable, and free of air bubbles. -
Roll the Slab:
Using a rolling pin, roll the clay out into an even slab. Aim for a thickness of about 1/4 inch to ensure the dish feels substantial but not chunky. -
Cut the Circle:
Place your circle cutter or an overturned small bowl onto the clay slab. Press down firmly to cut out a perfect circle, then peel away the excess clay. -
Smooth the Edges:
At this stage, dip your finger in a little water and run it along the cut edge of the circle. This smooths out any harsh lines or jagged bits from the cutter. -
Create the Lip:
Gently curve the edges of the circle upwards to create a shallow rim. You can do this by pinching lightly or pressing the clay into a shallow bowl mold if you have one. -
Level the Base:
Tap the dish gently against your work surface to ensure the bottom is flat. This prevents it from wobbling once it’s dry and holding your jewelry. -
Final Surface Smoothing:
Use a damp sponge to wipe the entire surface of the dish. This eliminates fingerprints and creates that professional, smooth finish visible in the photo. -
Drying Phase:
Set the dish aside in a cool, dry place. Let it dry completely for 24-48 hours, flipping it occasionally to ensure even drying on both sides.
Step 2: Decorating and Sealing
-
Sanding:
Once bone dry, take fine-grit sandpaper and lightly buff the surface. Focus on the rim to make sure it is perfectly rounded and smooth. -
Base Coat:
Mix a creamy white acrylic paint. Apply two thin coats to the entire dish, allowing the first coat to dry before adding the second. -
Adding Speckles:
Dilute a tiny amount of black or dark brown paint with water. Dip an old toothbrush into this mixture. -
Applying the Speckle:
Hold the toothbrush over the dish and run your thumb across the bristles to flick tiny droplets onto the surface. I like to practice on paper first to control the spray. -
Let Speckles Set:
Allow the speckled paint to dry completely. This usually takes only about 10-15 minutes since the droplets are so fine. -
Painting the Rim:
Load a small flat brush with terracotta or burnt orange acrylic paint. Carefully paint the top edge and slightly down the outer rim of the dish. -
Refining the Rim:
Go over the rim a second time to ensure the color is opaque and vibrant. A steady hand is key here to keep the line crisp. -
Varnishing:
Finish by applying a coat of gloss or satin varnish over the entire piece. This seals the paint and gives it that ceramic-like sheen.
Smooth Moves
To get a truly seamless rim, dip your fingers in a tiny bit of slip (clay mixed with water) while shaping the edges upwards.
Gilded Edge
For a more luxe look, swap the terracotta paint for liquid gold leaf on the rim. It pairs beautifully with gold rings.
Place your new handmade dish on a sunny windowsill and enjoy seeing your jewelry organized in style


Minimal Ring Cone or Ring Holder Stand
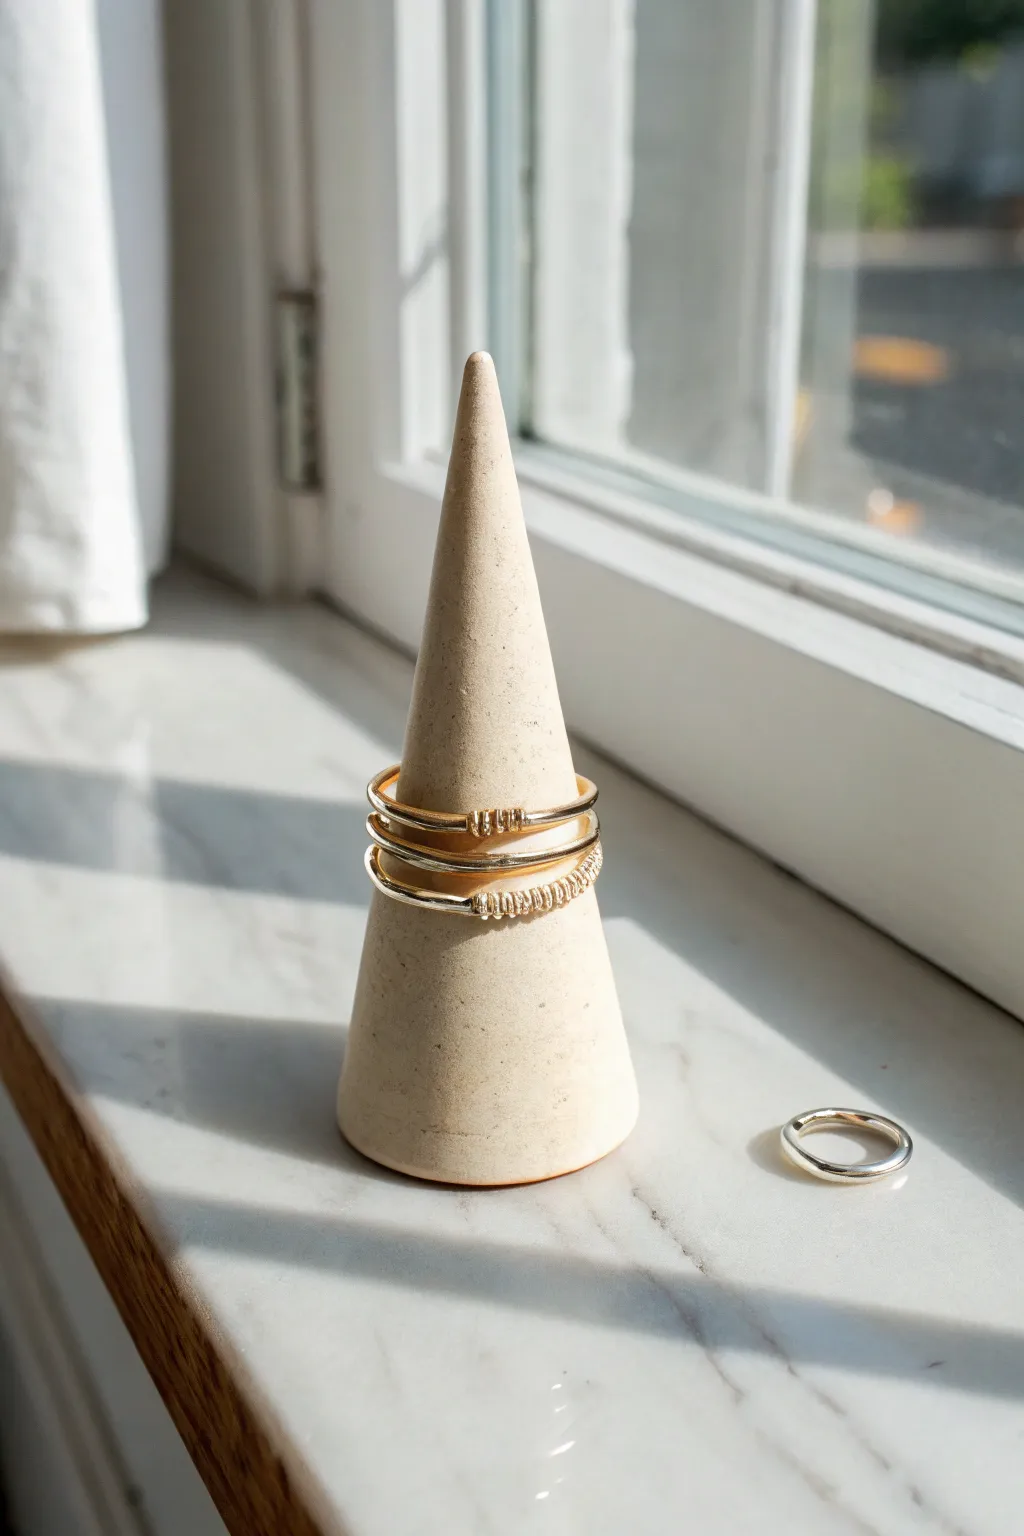
This elegant cone-shaped organizer is the perfect modern solution for keeping your favorite rings safe and displayed. Its raw, speckled cream finish mimics the look of high-end ceramic stoneware, making it a sophisticated gift or a chic addition to your own vanity.
Detailed Instructions
Materials
- Air dry clay (white or cream)
- Speckling agent (dried coffee grounds, black pepper, or dark clay dust)
- Rolling pin
- Cutting tool (knife or clay cutter)
- Small bowl of water
- Sponge or smoothing tool
- Sandpaper (fine grit)
- Matte clear sealant (optional)
Step 1: Preparing the Clay
-
Condition the clay:
Start by taking a handful of air dry clay, roughly the size of a tennis ball. Knead it thoroughly in your hands to warm it up and make it pliable, ensuring there are no air bubbles trapped inside. -
Create the speckle effect:
To achieve the raw, stoneware look seen in the photo, sprinkle a small pinch of your speckling agent—I like using fine black pepper or dried coffee grounds—onto the clay. Knead the clay again until the specks are evenly distributed throughout the batch. -
Form a ball:
Once mixed, roll the clay between your palms to create a smooth, tight sphere. This foundational shape will help ensure your final cone is symmetrical.
Natural Speckles
Don’t have pepper? You can also grate a tiny amount of dry brown or black pastel chalk into the white clay to create customized colored speckles.
Step 2: Shaping the Cone
-
Begin the cone shape:
Place the ball on your work surface. Using the flat part of your palm, begin rolling the ball back and forth, applying slightly more pressure to one side than the other. This differential pressure will naturally start to draw the clay into a tapered carrot shape. -
Refine the height:
Continue rolling until the cone reaches your desired height. For a ring holder like this, 3 to 4 inches allows enough space for stacking multiple rings without being unstable. -
Flatten the base:
Stand the cone upright. Firmly tap the bottom against your table to create a completely flat, stable base. Check that it stands perpendicular to the table and doesn’t lean. -
Smooth the surface:
Dip your finger or a small sponge into a little water. Gently stroke the sides of the cone to smooth out any fingerprints or rolling marks. Keep the moisture minimal so the clay doesn’t become slushy. -
Sharpen the tip:
Gently pinch and smooth the very top of the cone to ensure it isn’t too sharp or fragile. A slightly rounded tip is more durable and safer for your jewelry.
Luxurious Tips
After the clay dries, dip just the very tip of the cone into gold liquid gilding or gold paint for a chic, mixed-metal detail that elevates the look.
Step 3: Finishing Touches
-
Initial drying:
Set the cone aside in a cool, dry place away from direct sunlight. Let it dry for about 24 to 48 hours. I recommend rotating the cone occasionally so the base dries evenly. -
Check for imperfections:
Once fully dry, the clay will turn a lighter shade. Inspect the surface for any rough spots or bumps that might scratch delicate metal rings. -
Sanding:
Take a piece of fine-grit sandpaper and very gently buff the surface. Focus on the base rim and the tip to ensure they are perfectly smooth to the touch. -
Dust off:
Wipe the creative dust away with a barely damp cloth or a dry soft brush to reveal the beautiful speckled texture underneath. -
Sealing (optional):
If you want to protect the cone from moisture or oils from your hands, apply a thin coat of matte clear sealant. This keeps the look natural while adding durability.
Now you have a stylish, custom-made spot to keep your everyday jewelry safe and beautifully displayed


Botanical Leaf-Imprint Coaster Set
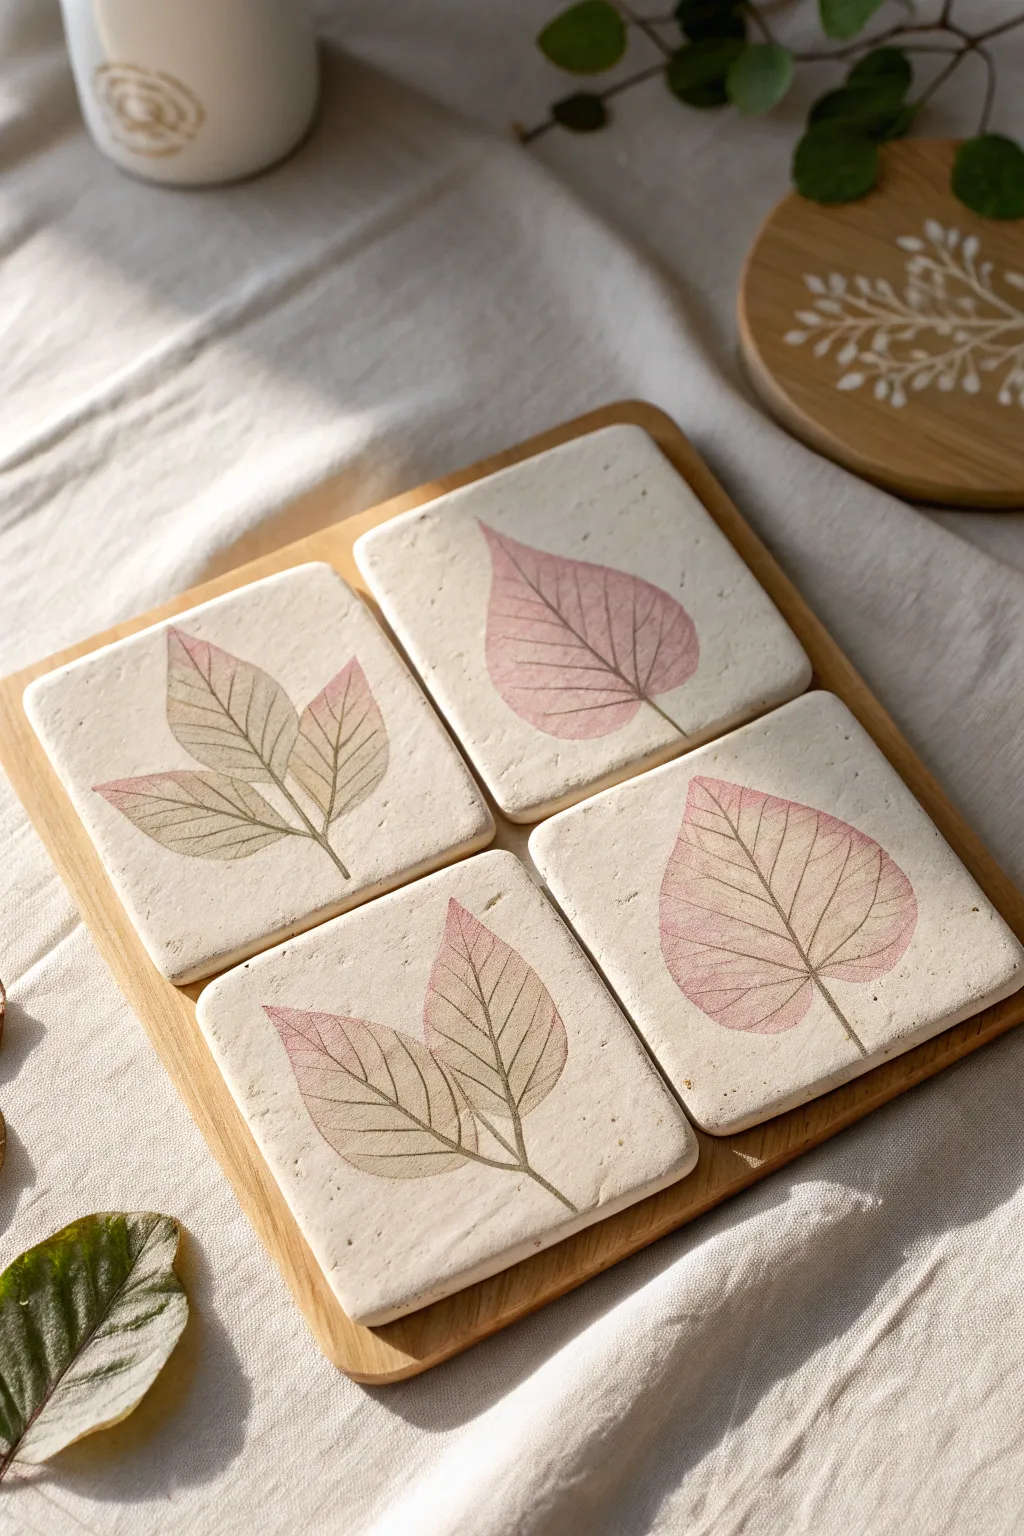
Bring the elegance of a botanical garden into your home with this delicate coaster set featuring imprinted leaf patterns and soft ombre staining. The natural texture of air-dry clay combined with subtle pink and green hues creates a sophisticated, stone-like finish perfect for gifting.
How-To Guide
Materials
- White air-dry clay (fine grain)
- Square cookie cutter (approx. 3.5 – 4 inches)
- Rolling pin
- Fresh or flexible artificial leaves (skeleton leaves or deeply veined leaves work best)
- Acrylic rolling pin or brayer
- Sandpaper (fine grit)
- Watercolor paints (Sap Green, Alizarin Crimson, Burnt Umber)
- Soft round paintbrush (size 4 or 6)
- Matte varnish or sealant (waterproof)
- Wooden tray (optional, for sizing)
- Clay knife or craft blade
- Parchment paper
Step 1: Shaping & Imprinting
-
Prepare the workspace:
Lay down a sheet of parchment paper to prevent sticking. Knead your air-dry clay until it is smooth and pliable, removing any air bubbles to prevent cracks later. -
Roll the slab:
Use your rolling pin to flatten the clay into an even slab, approximately 1/4 inch thick. Aim for a consistent thickness so your coasters sit flat. -
Cut the shapes:
Press your square cookie cutter firmly into the clay four times. If you don’t have a cutter, measure 4-inch squares and carefully cut them out using a craft knife and a straight edge. -
Select your botanicals:
Choose leaves with prominent veins. For the design shown, you’ll need two single broad leaves and two sprigs with multiple leaflets. Ensure they are clean and dry. -
Arrange the composition:
Place the leaves gently onto the wet clay squares. Center the single leaves on two squares and angle the sprigs diagonally on the other two for variety. -
Imprint the design:
Using an acrylic roller or brayer, roll firmly over the leaves to press them into the clay. You want the veins to make a deep, clear impression without distorting the square shape. -
Remove the botanicals:
Carefully lift the stems and peel the leaves away from the clay. Use the tip of a craft knife to lift the edge if needed, revealing the detailed fossil-like imprint below. -
Smooth the edges:
Dip your finger in a little water and gently run it along the cut edges of the squares to round them off slightly and remove any sharp burrs.
Fixing Curled Corners
If your clay starts curling up at the edges while drying, gently weigh the corners down with a heavy book placed over a piece of parchment paper
Step 2: Drying & Refining
-
Initial drying:
Place the clay squares on a wire rack or a fresh sheet of parchment paper. Let them dry for 24-48 hours. I like to flip them over halfway through to ensure they dry evenly and don’t warp. -
Sand for smoothness:
Once fully cured and hard, use fine-grit sandpaper to buff the edges and surface. Focus on the corners to make them soft to the touch, resembling tumbled stone. -
Clean the dust:
Wipe the coasters with a slightly damp cloth or a dry soft brush to remove all white clay dust before you start painting.
Gilded Edge Upgrade
For a luxe touch, run a gold leaf pen along the outer rim of the coasters after the varnish dries to frame your botanical art
Step 3: Painting & Sealing
-
Mix the wash:
Dilute your watercolor paints heavily with water. You want a translucent ‘tea stain’ consistency, not opaque color. Mix a dusty rose (Crimson + Umber) and a muted sage green. -
Apply the first wash:
Lightly brush the watered-down paint into the imprinted leaf area. The liquid will naturally pool in the deeper veins, highlighting the texture darker than the surface. -
Create the ombre effect:
While the paint is still damp, dab a slightly more concentrated reddish-brown at the tips or edges of the leaves, blending it backward toward the stem for a natural, faded look. -
Tint the background (optional):
If you want an aged stone look, apply a very faint wash of dirty water or extremely dilute brown over the entire coaster surface, avoiding the leaf if you want it to pop. -
Let paint dry:
Allow the watercolor to dry completely. Because air-dry clay is porous, this should happen relatively quickly. -
Seal the coasters:
Apply 2-3 coats of a matte waterproof varnish. This is crucial for coasters to prevent water rings from ruining the clay. Let each coat dry fully before adding the next. -
Add protective backing:
Stick small felt pads or a square of cork sheet to the bottom of each coaster to protect your furniture and prevent slipping.
Stack your finished coasters in a wooden tray or tie them with twine for a handmade gift that looks professionally crafted


Air Dry Clay Earrings in Modern Shapes
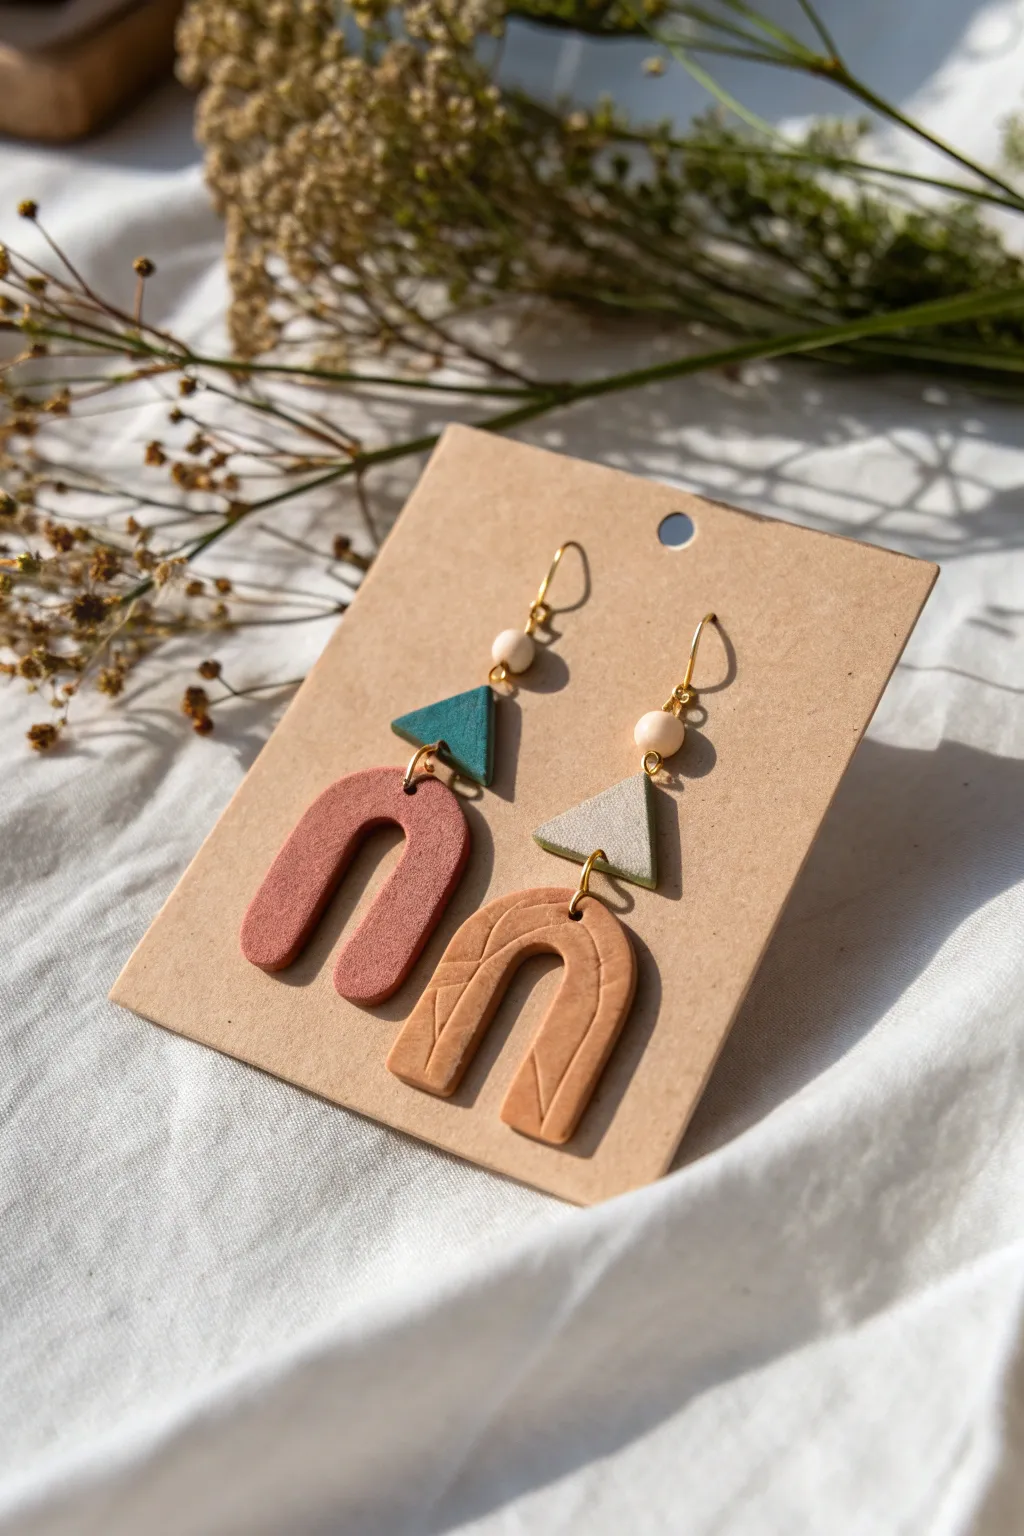
These architectural dangle earrings combine earthy tones and varied textures for a sophisticated yet handmade look. Featuring distinctive U-shapes and sleek triangles, they are the perfect beginner project to practice layering shapes and adding subtle surface details.
Detailed Instructions
Materials
- Air dry clay (white or pre-colored options)
- Acrylic paints (terracotta/rust red, teal/dark cyan, beige/light tan, grey)
- Rolling pin
- Parchment paper or craft mat
- U-shape clay cutter or X-ACTO knife
- Small triangle cutter or X-ACTO knife
- Needle tool or toothpick
- Fine grit sandpaper (400-600 grit)
- Two small wooden beads
- Four gold jump rings (approx. 5-7mm)
- Two gold earring hooks (French wire style)
- Jewelry pliers (flat nose and round nose)
- Small round paintbrushes
- Matte sealant or varnish (optional)
Step 1: Shaping the Clay
-
Roll out the base:
Begin by conditioning your air dry clay until it is pliable. Roll it out on parchment paper to an even thickness of about 3-4mm. I like to use slats or playing cards on either side of the roller to ensure the thickness is perfectly uniform. -
Cut the arch shapes:
Using a U, arch-shaped cutter, punch out two identical arch shapes. If you don’t have a cutter, print a template on paper, lay it on the clay, and carefully trace around it with a sharp craft knife. -
Cut the triangle shapes:
Cut out two small equilateral triangles, roughly 1.5cm on each side. These will sit above the arches, so ensure their scale feels balanced against the larger pieces. -
Add texture details:
For the tan-colored arch seen on the right, use a needle tool to gently scratch minimal, linear patterns into the surface while the clay is still wet. Create a few diagonal lines or chevron markings for visual interest. -
Create connection holes:
Before the clay dries, use a toothpick or needle tool to pierce holes for the hardware. You will need a hole at the very top of each triangle, one at the bottom center of each triangle, and one at the top center of each arch. -
Refine the edges:
Dip your finger in a little bit of water and gently smooth the cut edges of your shapes to remove any jagged bits or clay burrs.
Keep it Straight
To prevent curling while drying, place a heavy book on top of your clay pieces once they are ‘leather hard’ (dry to the touch but still flexible).
Step 2: Drying and Refining
-
Let them dry:
Place your clay pieces on a flat, clean surface to dry. This typically takes 24-48 hours depending on humidity. Flip them over halfway through the drying process to prevent warping. -
Sand for smoothness:
Once fully cured and hard, take your fine-grit sandpaper and gently buff the edges and flat surfaces. This step is crucial for that professional, store-bought finish. -
Dust off:
Wipe the pieces down with a slightly damp cloth or a dry soft brush to remove all sanding dust before painting.
Step 3: Painting and Decoration
-
Paint the first set:
Paint one arch in a terracotta or rust-red shade. Paint its corresponding triangle (the one that will sit above it) in a deep teal or dark cyan color. Apply 2-3 thin coats for full opacity. -
Paint the second set:
Paint the second arch (the textured one) in a warm beige or tan color. Paint its corresponding triangle in a soft, neutral grey. Let the texture you carved earlier shine through. -
Seal the pieces:
For longevity, apply a thin layer of matte varnish or sealant over the painted pieces. This protects the clay from moisture and gives a unified finish.
Fixing Cracks
If small cracks appear as the clay dries, make a paste of clay and water (slip) to fill the gap. smooth it over with a slightly wet finger.
Step 4: Assembly
-
Connect the clay pieces:
Using your flat nose pliers, twist open a jump ring. Thread it through the top hole of the arch and the bottom hole of the triangle, then close the ring securely to link them. -
Prepare the ear wire:
Take your earring hook. Thread a small wooden bead onto the wire stem so it rests just above the loop. -
Attach the hook:
Open the loop at the bottom of the earring hook (or use a second jump ring if needed). Thread it through the top hole of the triangle piece. -
Final check:
Close the loop securely. Repeat the assembly steps for the second earring, ensuring all jump rings are tightly closed so pieces don’t slip off.
You now have a stunning pair of modern, architectural earrings ready to gift or wear

The Complete Guide to Pottery Troubleshooting
Uncover the most common ceramic mistakes—from cracking clay to failed glazes—and learn how to fix them fast.
Stamped Message Pocket Token Hearts
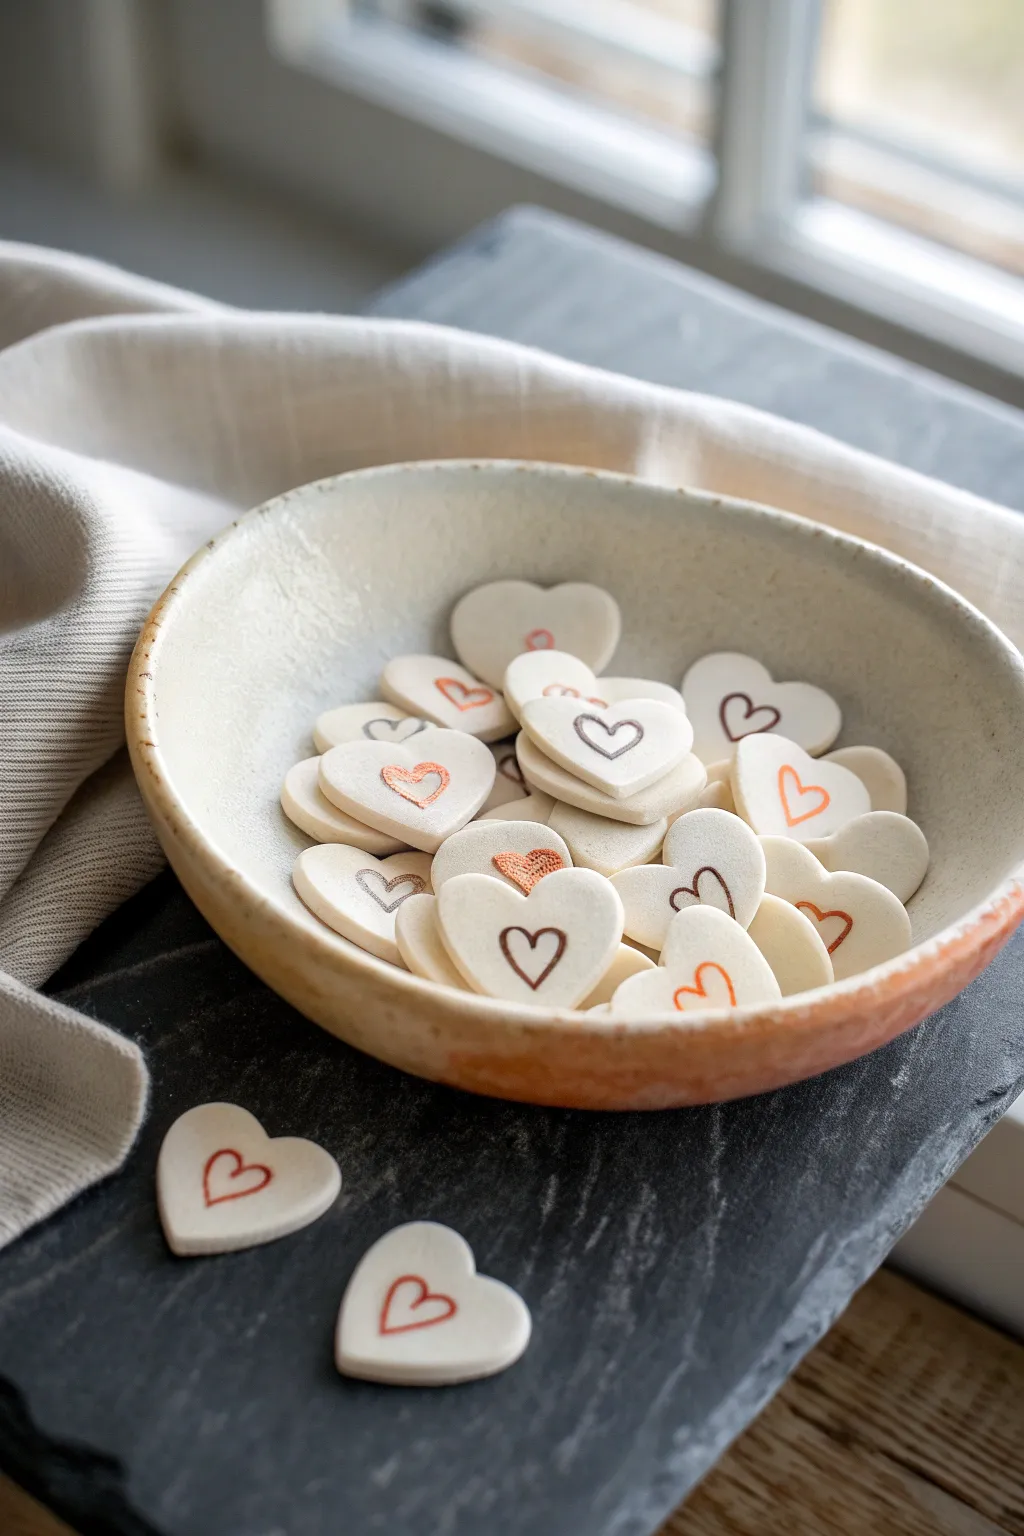
Simple yet deeply meaningful, these smooth clay hearts serve as tactile reminders of love that fit perfectly in a pocket. Their minimalist design features a stamped heart motif filled with earthy, warm tones for a modern, rustic aesthetic.
Step-by-Step Tutorial
Materials
- White smooth air-dry clay
- Rolling pin
- Small heart-shaped cookie cutter (approx. 1.5 inches)
- Miniature heart stamp or embossing tool
- Fine-grit sandpaper
- Acrylic paints (burnt orange, chocolate brown, warm grey)
- Fine detail paintbrush (size 0 or 00)
- Small bowl of water
- Parchment paper or canvas mat
- Matte varnish or sealant
Step 1: Shaping the Clay Base
-
Condition the clay:
Begin by taking a handful of white air-dry clay and kneading it in your hands until it feels warm and pliable. This conditioning step is crucial to prevent cracks later on. -
Roll out the slab:
Place the clay on a sheet of parchment paper or a canvas mat. Use your rolling pin to flatten the clay to an even thickness of about 1/4 inch (6mm). Try to keep the pressure consistent so one side isn’t thinner than the other. -
Smooth the surface:
Before cutting, minimize any texture from the rolling pin. Dip your finger slightly in water and gently run it over the surface to create a flawless, smooth top. -
Cut the shapes:
Press your small heart-shaped cutter firmly into the clay. Give it a tiny wiggle to ensure it cuts all the way through, then lift straight up. Repeat to create as many tokens as your clay allows. -
Refine the edges:
Carefully remove the excess clay from around the hearts. Pick up each heart gently; if there are jagged edges from the cutter, smooth them down immediately with a damp fingertip. I like to round the edges slightly for a softer feel.
Clean Stamping
Dust your mini stamp sparingly with cornstarch or baby powder before pressing into the clay. This acts as a release agent and ensures the stamp pulls away cleanly without sticking.
Step 2: Stamping and Drying
-
Impress the center design:
While the clay is still fresh, position your miniature heart stamp directly in the center of a token. Press down gently but firmly—you want an impression deep enough to hold paint, but not so deep it distorts the token’s shape. -
Repeat the stamping:
Continue stamping the center of each heart token. If you don’t have a stamp, you can carefully carve a heart outline using a needle tool or the end of a paperclip. -
Initial drying phase:
Lay all the stamped hearts flat on clean parchment paper. Let them air dry away from direct sunlight or heat sources, which can cause cracking. -
Flip for even drying:
After about 12 hours, flip the hearts over to let the undersides dry evenly. This prevents the edges from curling upward. -
Sanding for perfection:
Once completely bone dry (usually 24-48 hours), use fine-grit sandpaper to gently buff the edges and surface. The goal is a texture that feels like smooth river stone. -
Dust off debris:
Wipe each heart with a dry cloth or soft brush to remove all fine clay dust created by sandling. Ensure the stamped crevices are dust-free before painting.
Hidden Messages
Create a double-sided gift by stamping the front with a heart and using small alphabet stamps on the back to imprint initials or short words like “HUG” or “LOVE”.
Step 3: Adding Color and Finish
-
Prepare the palette:
Squeeze out small amounts of burnt orange, chocolate brown, and warm grey acrylic paint. You can thin the paint slightly with a drop of water to help it flow into the stamped lines. -
Paint the inlay:
Using your fine detail brush, carefully fill the stamped heart impression with color. Don’t worry if you go slightly outside the lines on the surface. -
Clean the overflow:
If paint got on the surface, let it dry for just a minute, then very gently wipe the surface with a slightly damp cloth. This leaves the paint in the recessed lines. -
Mix and match colors:
Continue painting the tokens, alternating colors to create a diverse collection like the one in the photo. Some hearts can be brown-red, others grey, and some a muted orange. -
Let the paint cure:
Allow the painted details to dry completely for at least an hour. -
Seal the tokens:
Apply a thin coat of matte varnish or sealant over the entire token. This protects the clay from moisture and dirt while maintaining that natural, unglazed ceramic look.
Fill a small bowl with these tokens to create a charming coffee table accent or give them out individually as small tokens of affection
Custom Gift Tags That Double as Ornaments
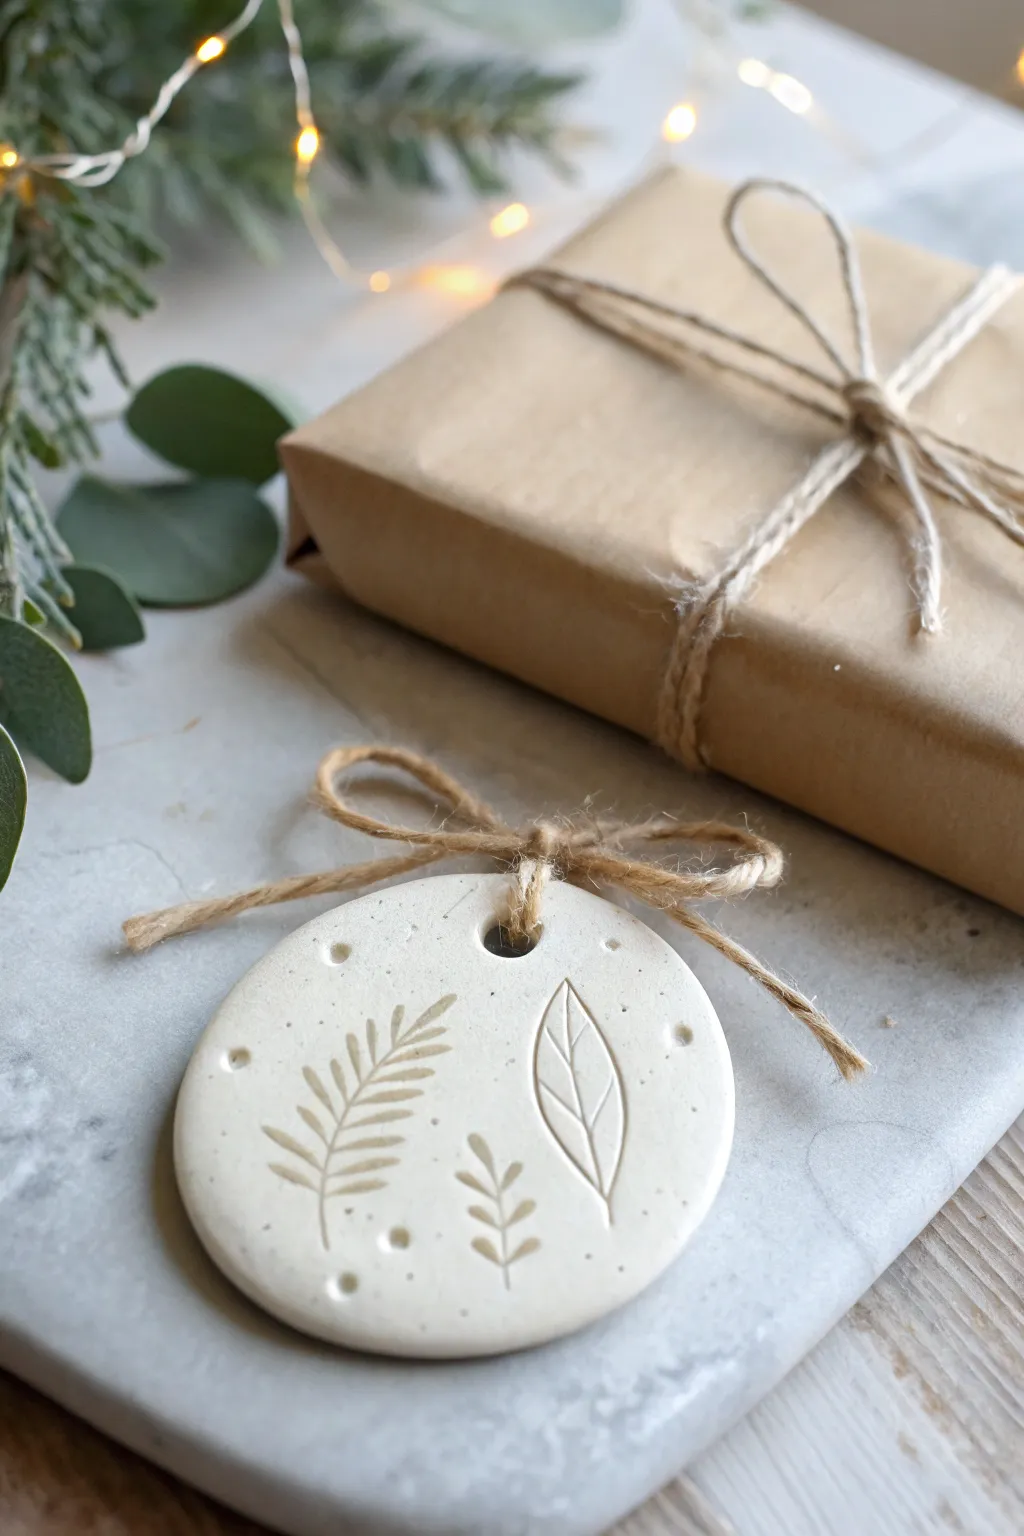
These minimal, nature-inspired tags add a sophisticated touch to your gift wrapping and can be hung on the tree long after the holidays are over. The smooth white clay provides the perfect canvas for delicate botanical impressions.
Detailed Instructions
Materials
- White smooth air dry clay
- Rolling pin (acrylic or wooden)
- Parchment paper or silicone mat
- Round cookie cutter (approx. 3 inches)
- Botanical rubber stamps (fern, leaf, sprig designs)
- Small dotting tool or toothpick end
- Straw or small circle cutter (for the hole)
- Fine grit sandpaper
- Clear matte varnish (optional)
- Jute twine
Step 1: Shaping the Base
-
Prepare your surface:
Lay down a sheet of parchment paper or a silicone mat to prevent stickiness and ensure a smooth release later. -
Condition the clay:
Take a handful of white air dry clay and knead it in your hands until it feels soft, warm, and pliable. -
Roll it out:
Using your rolling pin, roll the clay out to an even thickness of about 1/4 inch (6mm). Try to keep the pressure consistent so you don’t have sloping edges. -
Cut the shape:
Press your round cookie cutter firmly into the clay. Give it a tiny wiggle to ensure it cuts all the way through, then lift it away. -
Remove excess:
Peel away the scrap clay from around your circle, laying it aside to be re-kneaded for the next tag. -
Smooth the edges:
Dip your finger in a tiny bit of water and run it gently around the cut rim of the circle to smooth out any sharp edges or roughness.
Step 2: Impressing the Design
-
Create the hanging hole:
Use a drinking straw or a tiny circle cutter to punch a hole near the top edge of the circle. Twist the straw slightly as you pull it out to get a clean cut. -
Position your stamps:
Select your botanical stamps. I like to hover them over the clay first to plan a pleasing composition before committing to the press. -
Press the main leaf:
Take the largest leaf stamp and press it firmly into the right side of the circle. Apply even pressure so the stem and veins transfer clearly, then lift straight up. -
Add the fern detail:
Take your fern-style stamp and press it on the left side, slightly lower or angled differently to create movement and variety. -
Fill the gap:
If there is negative space at the bottom center, press a small sprig stamp there to balance the composition. -
Add texture dots:
Using a small dotting tool or the blunt end of a toothpick, gently press random divots around the botanical shapes to add whimsical texture.
Fixing Cracks
If tiny cracks appear while drying, don’t panic. Mix a small amount of fresh clay with water to make a paste (‘slip’) and smooth it into the cracks with your finger.
Step 3: Finishing Touches
-
Let it dry:
Place the tag on a clean flat surface or wire rack. Allow it to air dry for 24-48 hours, flipping it over halfway through to prevent curling. -
Sand for smoothness:
Once fully cured and hard, use fine-grit sandpaper to gently buff the edges and surface if there are any tiny burrs or fingerprints. -
Seal (Optional):
If you want extra durability, brush on a thin coat of clear matte varnish. This will slightly darken the impressions, making them pop. -
Tie the bow:
Maneuver a piece of jute twine through the hole. Tie a simple shoelace bow right at the base of the loop, trimming the ends for a neat finish. -
Attach to gift:
Use the loop of the twine to attach the finished ornament tag to your wrapped present.
Stamp Clarity
Dust your rubber stamps lightly with cornstarch or baby powder before pressing into the clay. This acts as a release agent and keeps the clay from getting stuck in the stamp crevices.
Now you have a stunning, personalized tag that serves as a secondary little gift for your recipient to cherish


What Really Happens Inside the Kiln
Learn how time and temperature work together inside the kiln to transform clay into durable ceramic.
Tea Light Candle Holders in a Matching Pair
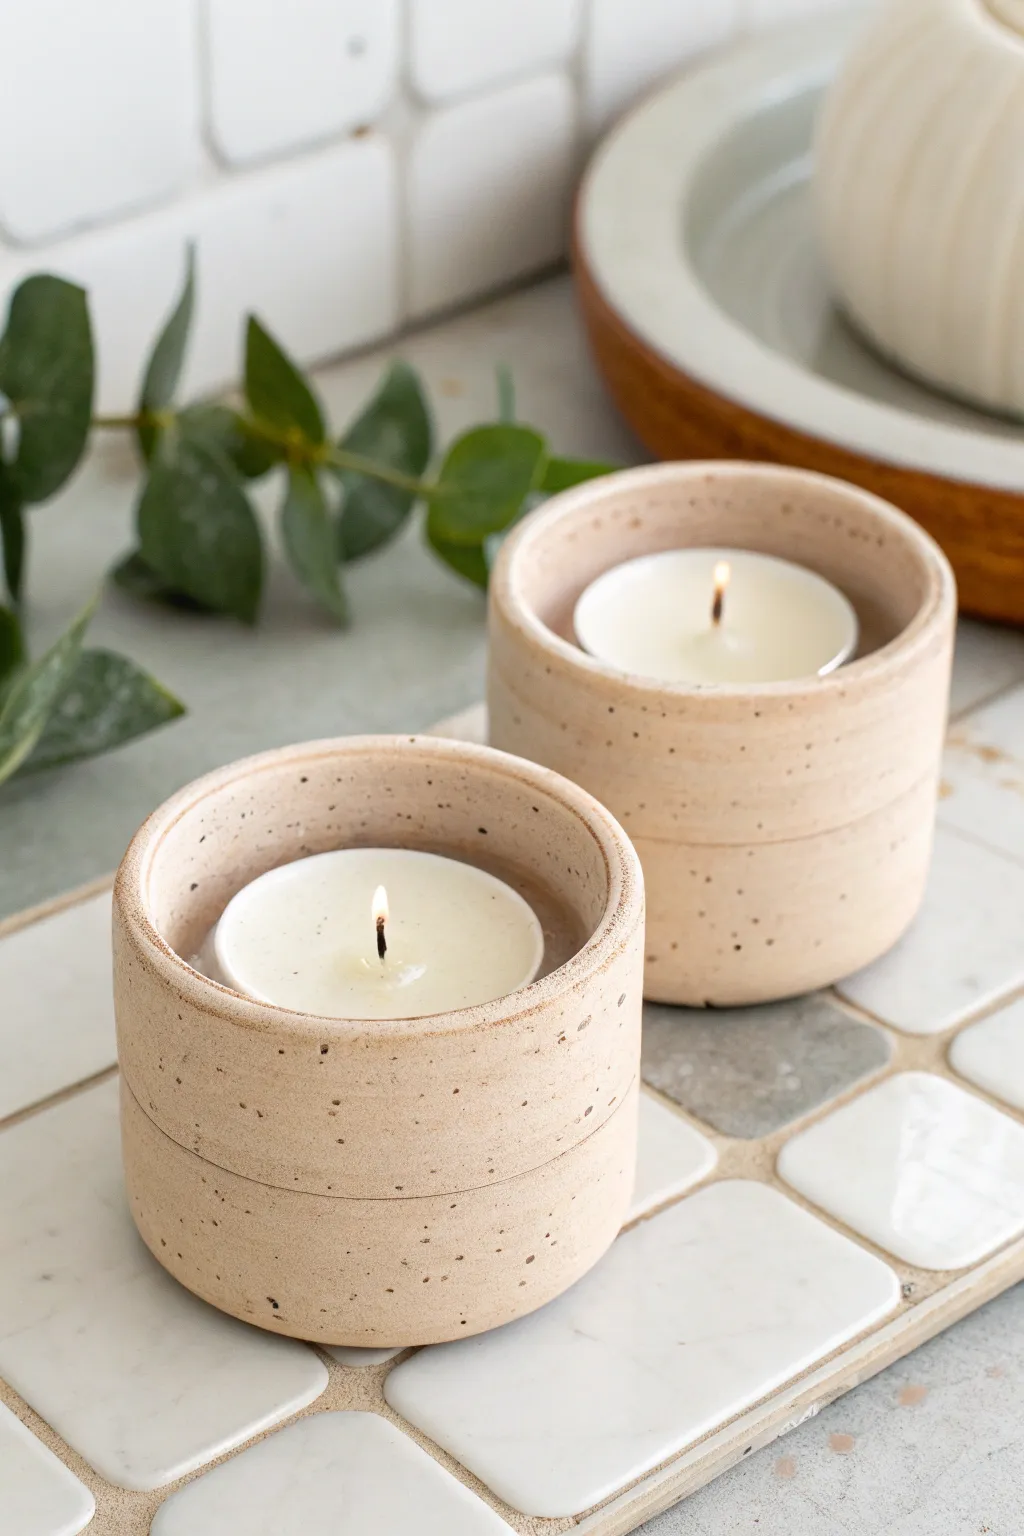
Embrace a minimalist, earthy aesthetic with this pair of stackable-looking tea light holders. The textured, speckled finish mimics natural stoneware, creating a cozy and organic addition to any tablescape.
Step-by-Step
Materials
- Air dry clay (white or natural)
- Speckled clay additive (like dry coffee grounds or pepper) or speckled air dry clay
- Rolling pin
- Circle cutter (approx. 3-inch diameter)
- Craft knife or clay trimming tool
- Small bowl of water
- Rolling guides or wooden slats (approx. 1/4 inch thick)
- PVC pipe or similar cylindrical form (slightly larger than a tea light)
- Sandpaper (fine grit)
- Matte varnish or sealant
Step 1: Preparing the Clay Base
-
Mix your speckles:
If you aren’t using pre-speckled clay, knead a small amount of dry used coffee grounds or cracked black pepper into your white air dry clay. Continue kneading until the specks are evenly distributed throughout the batch to achieve that faux-stone look. -
Roll out the slab:
Place your clay between two wooden slats or rolling guides to ensure an even thickness. Roll the clay out into a long, smooth slab that is roughly 1/4 inch thick. -
Cut the bases:
Using your circle cutter or a round object as a template, cut out two identical circles from the slab. These will serve as the heavy bottoms for your candle holders. -
Create the walls:
From the remaining slab, cut two long rectangular strips. The width of these strips determines the height of your holder; aim for about 2.5 inches wide. The length needs to be enough to wrap fully around your circle base with a little overlap.
Step 2: Assembling the Form
-
Score the edges:
Take a needle tool or knife and cross-hatch (score) the outer edge of your circular bases and the bottom edge of your rectangular strips. This rough texture helps the clay bind. -
Apply slip:
Dab a little water or liquid clay (slip) onto the scored areas to act as glue. -
Attach the wall:
Wrap the rectangular strip around the circular base, pressing the scored edges together firmly. I like to use a cylindrical form like a piece of PVC pipe inside the holder while I work to keep the shape perfectly round. -
Seal the seam:
Where the two ends of the rectangle meet, cut through both layers at an angle for a clean join. Score, slip, and smooth this vertical seam together so it disappears. -
Blend the bottom:
Turn the holder over and use a modeling tool or your finger to smooth the clay from the wall down onto the base, ensuring a tight, seamless seal prevent any gaps.
Clean Cuts Every Time
When cutting your clay strips, coat your knife blade with a tiny bit of oil or lotion. This prevents the clay from dragging and tearing, giving you crisp, professional edges.
Step 3: Adding Detail and Finishing
-
Create the faux-stack line:
To mimic the look in the photo, use a dull knife or a modeling tool to gently press a horizontal groove around the circumference of the cylinder, roughly halfway up. Don’t cut through; just indent it to look like two stacked pieces. -
Smooth the rim:
Dip your finger in water and run it along the top rim of the holder to soften any sharp edges. The goal is a slightly rounded, organic lip rather than a sharp, machined cut. -
Drill the candle well:
If you made the holder solid instead of hollow, or if the bottom is very thick, press a tea light candle (in its metal casing) gently into the center to ensure it fits perfectly. Remove it before drying. -
Let it dry slowly:
Place your finished holders in a cool, dry spot away from direct sunlight. Let them dry for 24-48 hours. Turn them occasionally to ensure the bottom dries evenly. -
Sand for texture:
Once fully dry, use fine-grit sandpaper to smooth any rough bumps, but keep the sanding light to preserve the earthy, speckled texture of the clay. -
Seal the piece:
Apply a coat of matte varnish to protect the clay. Since air dry clay is flammable, ensure you use a sealant that is safe, and always use tea lights contained in metal or glass cups, never placing a naked flame directly against the clay.
Add a Color Wash
Before sealing, dilute some terracotta or beige acrylic paint with water and wash it over the piece. Wipe it back immediately with a cloth to let color settle into the textures.
Place your new artisan-style candle holders on a tray and enjoy the warm, flickering glow they bring to your room
Mini Succulent Planter With Simple Texture
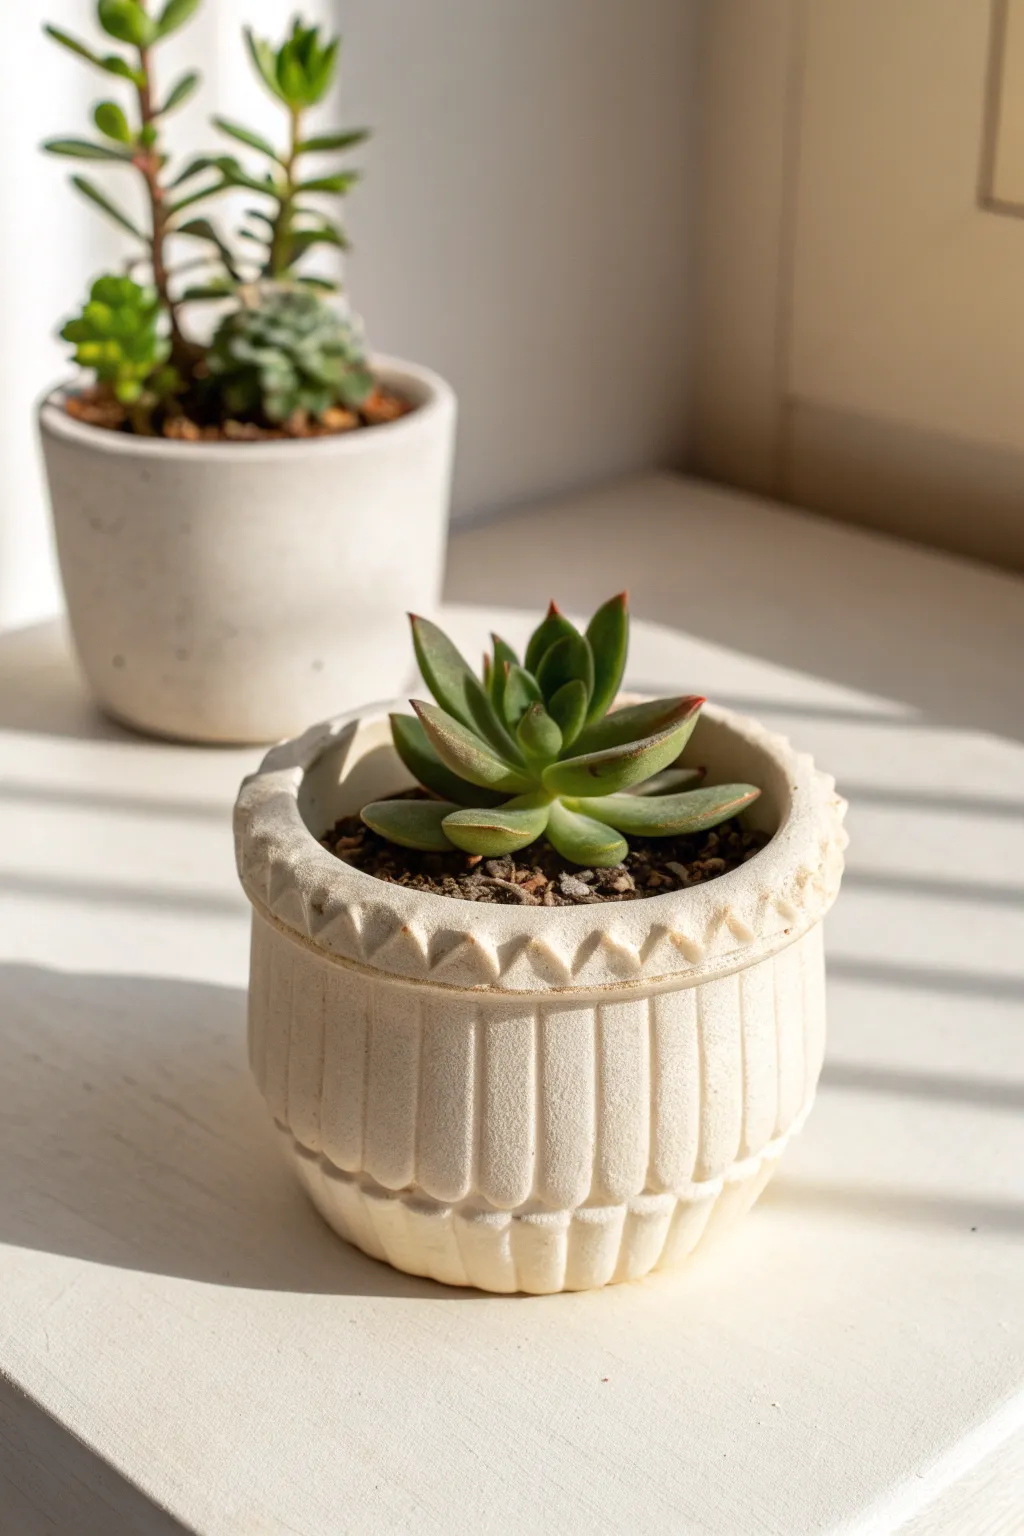
This little planter combines simple vertical lines with a charming geometric rim for a sophisticated, handcrafted look. It’s the perfect size for a petite succulent and adds a lovely textural element to any windowsill.
Step-by-Step Guide
Materials
- White Air Dry Clay (approx. 300-400g)
- Small cylindrical container or jar (to use as a mold)
- Rolling pin
- Parchment paper or canvas mat
- Clay knife or plastic cutting tool
- Butter knife or loop tool (for carving grooves)
- Small triangular stamp or tool (a dull corner of a ruler works too)
- Sponge and water
- Acrylic sealant or matte varnish
- Sandpaper (fine grit)
Step 1: Forming the Base
-
Prepare your workspace:
Lay down your parchment paper or canvas mat to prevent the clay from sticking to your table -
Roll the slab:
Roll out a portion of air dry clay into a long rectangular slab, aiming for an even thickness of about 1/4 inch (6mm). -
Cut the rectangle:
Measure the height and circumference of your chosen jar mold. Cut a rectangle from your clay slab that is slightly taller than your jar and long enough to wrap around it with a little overlap. -
Wrap the mold:
Wrap the clay rectangle loosely around your jar. If you want the clay to slide off easily later, wrap the jar in plastic wrap or paper first. -
Join the seam:
Where the ends of the clay meet, score the edges (scratch them up) and add a little water (slip). Press them firmly together and smooth the seam with your finger until it’s invisible. -
Add the bottom:
Place the clay-wrapped jar onto the remaining slab of clay. Trace around the bottom, cut out the circle, and attach it to the cylinder using the same score-and-slip method.
Uneven Seams?
If your seam is bumpy, wait until the clay is leather-hard (firm but cool). Use a damp sponge to firmly wipe and smooth the join line until it disappears.
Step 2: Adding Texture & Detail
-
Refine the rim:
With the jar still inside for support, gently fold the top 1/2 inch of clay outward and down slightly to create a double-thick rim. Smooth this folded edge onto the body of the pot. -
Mark vertical guides:
Using a ruler, very lightly mark vertical lines around the body of the pot to ensure your grooves will be straight. -
Carve the fluting:
Use a looping tool or the rounded back edge of a butter knife to press vertical indentations into the clay. Start just below the rim and stop just before the bottom edge. -
Detail the rim:
For the decorative band, use a triangular tool or press the corner of a flat ruler into the thickened rim to create a repeating sawtooth or zigzag pattern all the way around. -
Remove the mold:
Once the clay has stiffened slightly (usually after 30-60 minutes), carefully slide the jar out. If you leave it in too long, the clay might crack as it shrinks against the rigid glass. -
Create drainage (optional):
If you plan to plant directly in the pot, use a straw or small round cutter to punch a hole in the center of the bottom for drainage.
Step 3: Finishing Touches
-
Slow drying:
Let the pot dry slowly away from direct sunlight or heat sources for 24-48 hours. Rotate it occasionally to ensure even drying. -
Sand smooth:
Once fully dry and bone white, use fine-grit sandpaper to gently smooth the top rim and any rough patches on the bottom. Be careful not to sand away your texture. -
Clean up dust:
Wipe the entire piece down with a slightly damp cloth or a dry brush to remove all sanding dust. -
Seal for protection:
Apply 2-3 coats of a matte acrylic varnish or sealant. This is crucial for planters, as air dry clay will soften if it gets wet. -
Waterproofing tip:
I usually pay extra attention to the inside to make it water-resistant, often using a heavy-duty gloss varnish on the interior just to be safe.
Add Color
Before sealing, dry brush a light tan or terracotta acrylic paint over the textured rim. Wipe it back immediately to leave pigment only in the deeper grooves.
Pop in your favorite succulent and enjoy the natural, earthy vibe this planter brings to your space

TRACK YOUR CERAMIC JOURNEY
Capture glaze tests, firing details, and creative progress—all in one simple printable. Make your projects easier to repeat and improve.
Modern Photo or Place Card Holder Blocks
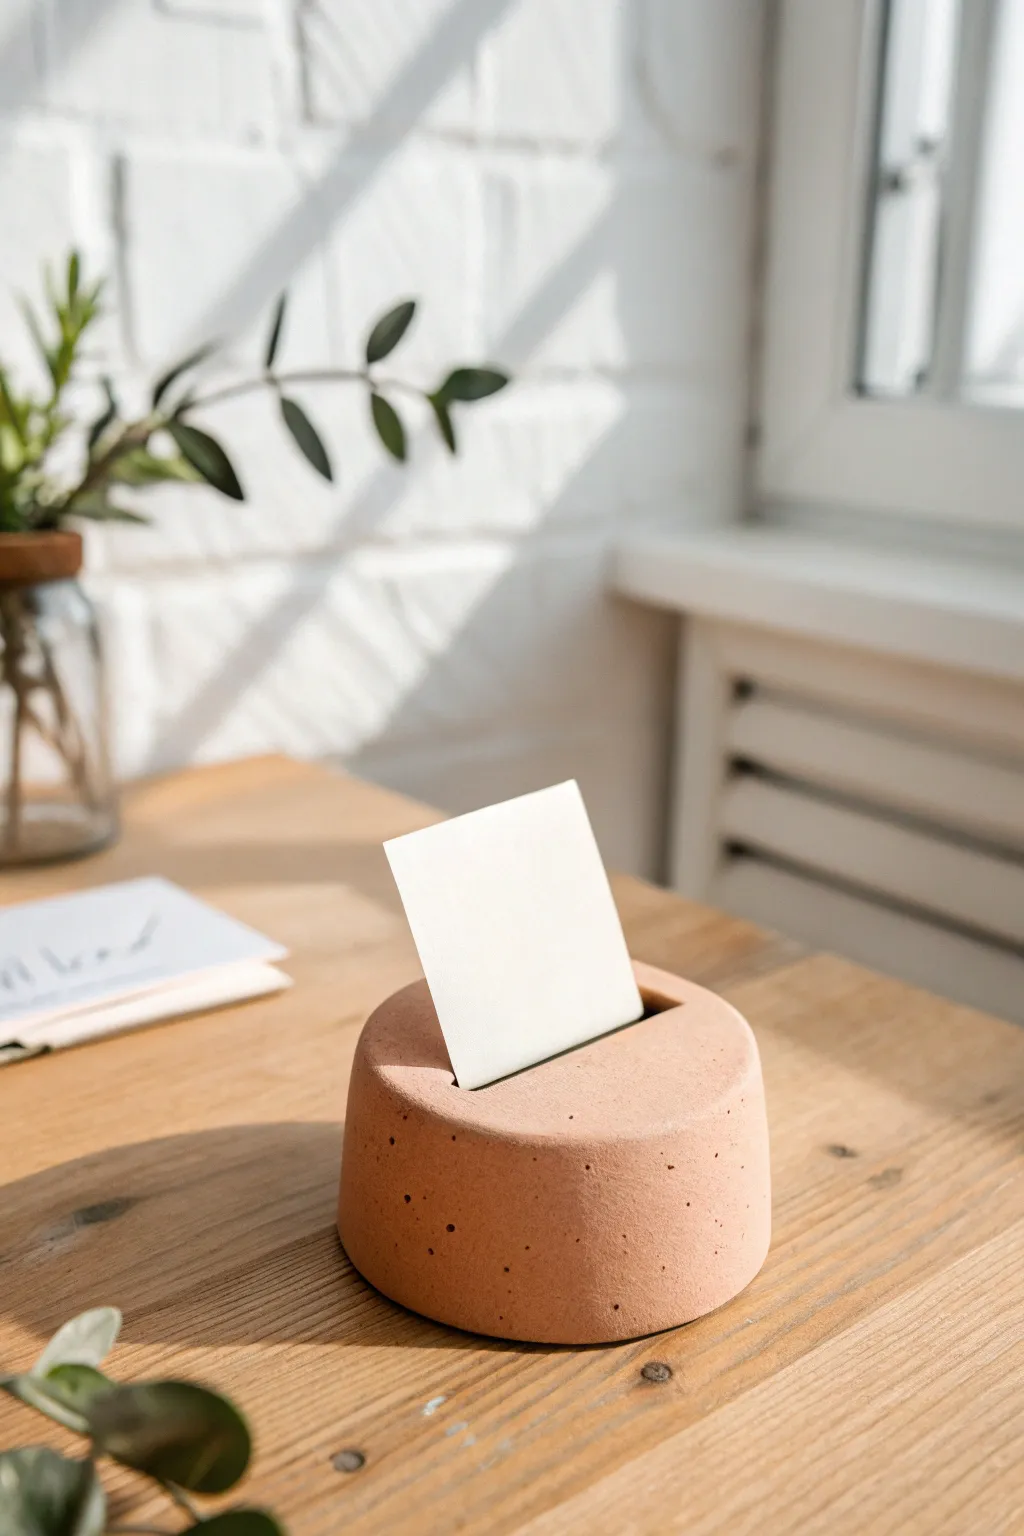
Embrace the sleek, modern aesthetic of concrete without the heavy mixing with this clever air dry clay project. This cylindrical holder features a warm terracotta tone and faux-stone texture, perfect for displaying photos, business cards, or wedding place cards.
Step-by-Step
Materials
- White or terracotta air dry clay
- Rolling pin
- Circle cookie cutter (approx. 3-4 inches diameter)
- Craft knife or clay blade
- Old toothbrush or stiff bristle brush
- Sandpaper (medium and fine grit)
- Acrylic paint (burnt sienna, white, and dark grey/black)
- Small paintbrush
- Ruler or thick cardstock for measuring
- Water in a small cup
- Matte sealant or varnish
Step 1: Shaping the Base
-
Condition the clay:
Start by taking a substantial chunk of air dry clay and kneading it in your hands until it becomes warm, soft, and pliable. This prevents cracking later. -
Create a thick cylinder:
Roll the clay into a ball, then gently flatten it on your work surface. You want a thick puck shape, roughly 1.5 to 2 inches tall. Don’t roll it thin; we need height for stability. -
Refine the shape:
Use a circle cutter that matches your desired diameter to trim the edges cleanly. If you don’t have a cutter deep enough, use it to mark the circle and cut straight down with your craft knife. -
Smooth the sides:
Dip your finger in a little water and run it along the cut edge to smooth out any harsh lines or drag marks from the knife. The cylinder should look seamless.
Clean Edges Hint
If the clay distorts when you press the card slot in, insert the cardstock or ruler and leave it in place while you re-shape the circle with your hands, then remove it.
Step 2: Adding Texture & Detail
-
Create the card slot:
Take a ruler or a stiff piece of cardstock—something slightly thicker than the item you plan to display. Press it firmly into the center of the cylinder top, creating a groove about 0.5 inches deep. -
Widen gently:
Wiggle the ruler back and forth very slightly to ensure the slot is wide enough for a card to slide in easily once dried. -
Apply texture:
To mimic the porous look of concrete shown in the photo, take an old toothbrush or a stiff-bristle brush and tap it gently all over the surface of the clay. Focus on the sides and the top curve. -
Soften the texture:
Lightly pat the textured areas with your finger to knock down any sharp peaks. You want a pitted look, not a fuzzy one. -
Let it dry completely:
Set the piece aside in a cool, dry place. Because this block is thick, I recommend letting it dry for at least 48 to 72 hours. Flip it occasionally to ensure the bottom dries evenly.
Step 3: Finishing the Faux-Concrete Look
-
Sand for imperfections:
Once fully dry, use fine-grit sandpaper to smooth out any unevenness on the bottom or sharp edges on the top rim, but try to preserve that toothbrush texture on the sides. -
Mix your base color:
To achieve that warm, earthy tone, mix burnt sienna acrylic paint with a generous amount of white. You want a soft, peachy-terracotta shade. -
Apply the base coat:
Paint the entire holder with your mixed color. You might need two coats for full opacity. -
Add speckling:
Mix a small amount of dark grey or black paint with water until it’s very distinct. Dip your toothbrush into this wash. -
The flicking technique:
Run your thumb over the toothbrush bristles to flick tiny droplets of dark paint onto the holder. This creates the ‘aggregate’ look found in real stone or concrete. -
Create variation:
Repeat the flicking process with a watered-down white paint for highlights. -
Seal the piece:
Finish with a coat of matte varnish to protect the paint and give it a professional, non-glossy finish that feels like stone.
Level Up: Color Blocking
Use painter’s tape to mark off the bottom third of the dried cylinder before speckling. Paint the bottom a solid metallic gold or a contrasting pastel for a dipped look.
Now you have a stylish, functional piece of decor that looks high-end but was made right at your kitchen table
Desk Catchall Tray and Pen Cup Set
Transform your workspace with this chic, minimalist desk set featuring a natural stone look. The faux-speckled pottery finish and terracotta-colored accents give these pieces a sophisticated, handcrafted charm without needing a kiln.
Step-by-Step Tutorial
Materials
- White air dry clay (approx. 1kg)
- Black pepper or dried coffee grounds (for speckled effect)
- Acrylic rolling pin
- Sharp craft knife
- Ruler
- Slip (clay mixed with water)
- Fine grit sandpaper (220-400 grit)
- Terracotta or warm brown acrylic paint
- Small flat paintbrush
- Clear matte acrylic sealer or varnish
- Cardboard (for templates)
- Small bowl of water
- Sponge
Step 1: Preparing the Speckled Clay
-
Mix in texture:
Begin by flattening your block of white air dry clay. Sprinkle a generous pinch of coarse black pepper or dried coffee grounds onto the surface. This is the secret ingredient that mimics expensive stoneware. -
Knead thoroughly:
Fold the clay over the speckles and knead well. Continue folding and kneading until the darker particles are evenly distributed throughout the entire batch of clay.
Cracks Appearing?
If small hairline cracks appear during drying, make a thick paste with clay and water. Fill the crack, smooth it over, and let it dry again before sanding.
Step 2: Forming the Tray
-
Roll the base:
Roll out a slab of your speckled clay to a consistent thickness of about 5mm. Use a cardboard template to cut a rectangle approximately 10cm x 22cm for the base. -
Cut the walls:
From the remaining slab, cut long strips that are roughly 2cm tall. These will become the outer walls and inner dividers of your tray. -
Attach outer walls:
Score the edges of the base and the bottom of your wall strips. Apply a dab of slip (your clay glue) and press the walls firmly onto the base edge. I find using a small tool to blend the seam on the inside strengthens the bond. -
Add dividers:
Measure the inside width of your tray. Cut two strips to size for the dividers. Place one to create a large square section on the left, and another to split the remaining space into two narrower compartments. -
Smooth the seams:
Dip your finger or a sponge in water and run it over all joints and top edges to ensure everything is perfectly smooth and seamless.
Make it Functional
Before the clay dries, gently press your specific office supplies (like a phone or stapler) into the wet clay to create custom-sized indents.
Step 3: Creating the Cups
-
Construct the pen cup base:
Roll out clay and cut a circle roughly 6cm in diameter. Cut a rectangular strip long enough to wrap around the circumference of this circle, standing about 10-12cm tall. -
Assemble the cylinder:
Score and slip the edge of the circle base. Wrap the rectangular wall around it. Join the vertical seam where the wall ends meet by blending the clay together with a modeling tool or your thumb. -
Shape the small bowl:
For the smaller catchall cup, create a pinch pot or use the slab method similar to the pen cup, but keep the height around 6-7cm and slightly taper the opening. -
Refine the edges:
Gently gently round off the top lips of both cups with a damp sponge so they mimic the soft edges of wheel-thrown pottery.
Step 4: Finishing Touches
-
Dry completely:
Let all pieces dry for 24-48 hours. Turn them occasionally to ensure the bottoms dry evenly and to prevent warping. -
Sand for smoothness:
Once fully dry and chalky white, take your project outside or wear a mask, and sand away any rough fingerprints or uneven ridges. The surface should feel silky to the touch. -
Paint the rim details:
Using a steady hand and a small flat brush, paint a thin strip of terracotta acrylic paint along the top rim and outer bottom edge of the tray. -
Accent the cups:
Mirror the design on the cups by painting a matching terracotta ring around the top rim and the base of each vessel. -
Seal the set:
Apply two coats of matte acrylic varnish to protect the clay and prevent the pepper ‘speckles’ from falling out over time.
Arranging your new handmade set on your desk will bring a sense of organic calm to your workday
Flower Frog Vase Topper for Fresh Bouquets
Transform ordinary jars into structured floral masterpieces with this clever clay flower frog. Its minimalist, speckled look and grid of carefully placed holes allows you to arrange even sparse bouquets with professional-looking volume and spacing.
Step-by-Step
Materials
- Air-dry clay (white or cream)
- Rolling pin
- Circle cutter or a round bowl (approximately 4-5 inches diameter)
- Straws (various sizes or a standard drinking straw)
- Sandpaper (fine grit)
- Small bowl of water
- Parchment paper or wax paper
- Sealant (acrylic varnish or Mod Podge)
Step 1: Shaping the Base
-
Prep the Clay:
Begin by taking a generous handful of air-dry clay. Knead it in your hands until it becomes warm, pliable, and smooth, ensuring there are no hidden air bubbles. -
Roll it Out:
Place the clay on a sheet of parchment paper. Using your rolling pin, flatten the clay into an even slab. Aim for a substantial thickness, roughly 1/2 to 3/4 of an inch, to give the frog enough weight to hold heavy stems. -
Cut the Shape:
Use your circle cutter or place a bowl upside down on the clay as a guide. Cut a clean circle that is slightly larger than the opening of the vase you intend to use. -
Smooth the Edges:
Dip your finger into a small bowl of water and run it along the cut edge of the circle. Gently round off the sharp corners to create a soft, seamless look. -
Final Flattening:
Give the top surface one last very light pass with the rolling pin or smooth it with a wet palm to ensure the top is perfectly level.
Don’t Crack Under Pressure
To prevent cracking while drying, drape a piece of plastic wrap loosely over the clay for the first 12 hours. This slows evaporation for a stronger finish.
Step 2: Creating the Grid
-
Mark the Pattern:
Before punching all the way through, lightly press your straw into the surface to map out your hole placement. A concentric circle pattern works best—start with one in the center, a ring of six around it, and a larger ring around that. -
Punch the Center:
Insert your straw straight down into the center mark. Twist the straw gently as you push to cut a clean plug of clay, then lift it out. -
Create the Inner Ring:
Punch the first ring of holes around the center. Try to space them evenly, leaving about half an inch of clay between each hole to maintain structural integrity. -
Punch the Outer Ring:
Continue with the outer ring of holes. I find that alternating the placement slightly (creating a triangle formation with the inner holes) helps fit more stems in comfortably. -
Vary Hole Sizes (Optional):
If you have different sized straws or tools, consider making the outer holes slightly larger for thicker stems and inner holes smaller for delicate accents. -
Clean the Openings:
As you punch, the clay might deform slightly. Gently smooth the top surface again with a wet finger, paying special attention to the rims of the holes to remove any jagged bits.
Step 3: Finishing Touches
-
Initial Drying Time:
Allow the piece to dry in a cool, dry place for at least 24 to 48 hours. Carefully flip the disk over halfway through the drying process to prevent warping. -
Sanding:
Once the clay is bone dry and hard, take fine-grit sandpaper and gently buff the edges and surface. Smooth out any bumps or fingerprints left behind during sculpting. -
Clearing Dust:
Wipe the piece down with a slightly damp cloth or a dry brush to remove all the sanding dust from the holes and surface. -
Sealing the Top:
Apply a coat of water-resistant sealant or varnish to the top and sides. This step is crucial since the piece will sit near water and specific organic materials. -
Sealing the Bottom:
Once the top is dry, flip it over and seal the bottom thoroughly. Applying two to three coats here is wise, as moisture from the vase can rise. -
Final Cure:
Let the sealant cure completely according to the manufacturer’s instructions before placing it atop a vase for your first arrangement.
Terrazzo Style Upgrade
Mix small distinct chips of dried, colored clay (or even crushed dried flower petals) into your wet white clay before rolling it out for a trendy faux-stone effect.
Enjoy arranging your blooms with newfound structure and artistic flair
Chunky Geometric Bookends With Color Blocking
These substantial, architectural bookends combine the rustic warmth of terracotta with the cool minimalism of stone. They utilize a simple color-blocking technique to create a modern, high-end look that keeps your favorite reads perfectly upright.
Step-by-Step Guide
Materials
- Air dry clay (white or stone color preferred)
- Acrylic paint (terracotta orange and warm beige/stone)
- Rolling pin
- Sharp craft knife or clay slicing tool
- Ruler or straight edge
- Cardboard (for templates)
- Fine-grit sandpaper (220 grit)
- Painter’s tape or masking tape
- Baking soda (optional, for texture)
- Internal weights (heavy stones, large metal nuts, or dry beans)
Step 1: Planning & Assembly
-
Create the template:
Begin by sketching your pyramid shape on cardboard. You will need a base square (approx. 4×4 inches) and four matching triangles that will slope upward to form the point. -
Roll out the slab:
Take a large chunk of air dry clay and condition it briefly by kneading. Roll it out into a thick, even slab, aiming for at least 1/4 inch thickness to ensure structural integrity. -
Cut the shapes:
Lay your cardboard templates onto the clay slab. Using your sharp craft knife and a ruler for guidance, carefully cut out the base square and the four triangular sides for your first bookend. -
Repeat for the pair:
Repeat the cutting process for the second bookend. It’s best to cut everything while the clay is fresh so the shrinking rate remains consistent. -
Score and slip:
Score the edges of the base and the bottom of the triangle pieces by scratching cross-hatch marks with your knife. Apply a small amount of water or clay slip to these roughed-up areas. -
Assemble the base:
Attach the four triangles to the base square. Carefully lift the triangles up so their sides meet, forming the pyramid. Press the seams together firmly from the inside and outside. -
Add internal weight:
Before sealing the final seam, place your heavy stones or weights inside the hollow pyramid. This is crucial for functionality—clay alone might be too light to hold heavy hardcovers. -
Seal and smooth:
Close the final seam. Use a little water on your finger or a clay tool to blend the external seams until they disappear completely. The surface doesn’t need to be perfect; a little texture adds character. -
Dry thoroughly:
Allow the pyramids to dry completely. Because of the thickness, this may take 48-72 hours. Rotate them occasionally to ensure even airflow.
Weight Distribution Tip
Wrap your inner weights in plastic wrap or scrap fabric before placing them inside. This stops them from rattling or damaging the drying clay from the inside.
Step 2: Finishing & Color Blocking
-
Sand imperfections:
Once fully dry, lightly sand any sharp edges or rough bumps with fine-grit sandpaper. Avoid smoothing it too much if you want to retain that stone-like appearance. -
Mix textured paint:
To mimic the gritty look in the photo, I like to mix a teaspoon of baking soda into my acrylic paints. Create two mixtures: a terracotta orange and a warm, creamy stone color. -
Mark the design:
Decide on your color block pattern. The design features a vertical split, running from the peak down to the base on each face, dividing the pyramid into two color zones. -
Apply tape guide:
Apply painter’s tape firmly along your intended dividing line. Press the edges of the tape down extremely well to prevent paint bleed. -
Paint the first section:
Paint one side of the taped line with your textured stone-colored mix. Use a dabbing motion rather than long strokes to enhance the faux-stone texture. -
Paint the second section:
Once the first color is dry to the touch, carefully remove the tape. Re-tape over the dry paint edge to protect it, and paint the remaining section with your terracotta mix. -
Refine the line:
Peel off the tape carefully. If you have any uneven edges, use a small detail brush to touch up the dividing line for a crisp finish. -
Final coat:
Let the paint cure fully. If you want extra durability, apply a matte varnish spray, though leaving it raw maintains the tactile, earthy feel.
Speckled Stone Effect
To get the speckled look seen on the white side, dip an old toothbrush in watered-down black paint and flick the bristles to spatter tiny dots over the dry base coat.
Place these striking geometric shapes on your shelf and enjoy the sophisticated, architectural flair they add to your library