There’s something downright magical about turning a tiny handprint into a keepsake you can hold onto for years. Air dry clay handprint projects are simple, sentimental, and perfect for gifting or decorating without needing a kiln or fancy tools.
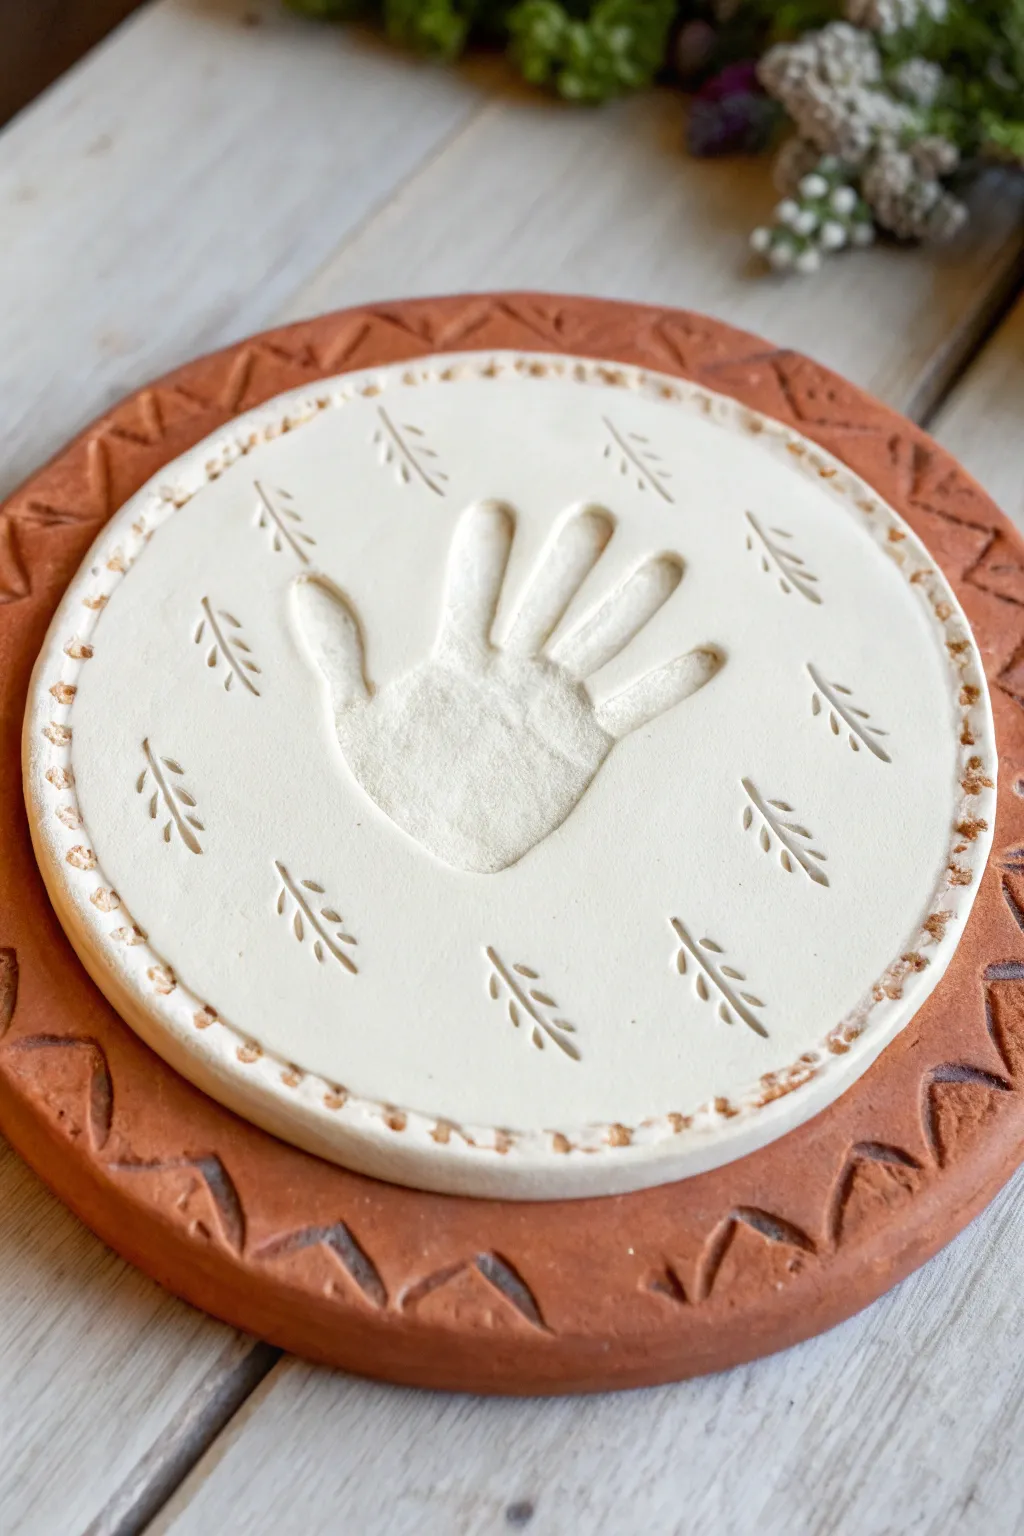
Classic Round Handprint Ornament
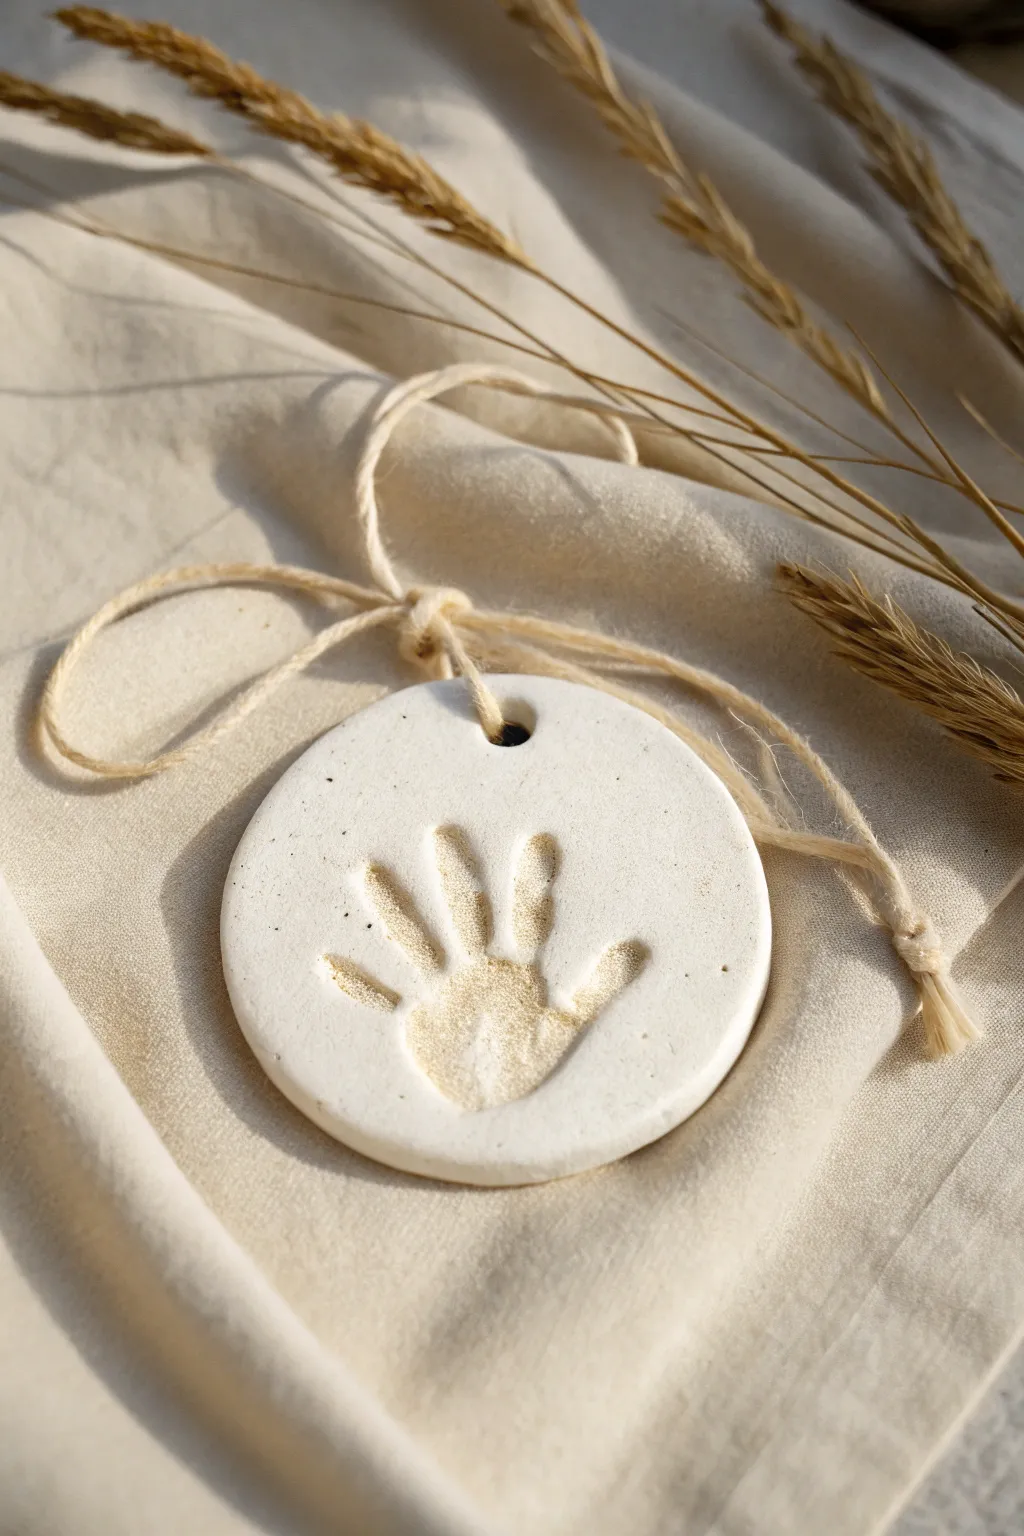
Capture a moment in time with this timeless and minimalist handprint ornament. Its clean white finish and rustic twine hanger make it a beautiful addition to any heartfelt decor collection.
How-To Guide
Materials
- White air dry clay
- Rolling pin
- Circle cookie cutter (approx. 4-5 inches) or a bowl of similar size
- Parchment paper or non-stick craft mat
- Drinking straw or small skewer
- Fine grit sandpaper (optional)
- Natural jute twine
- Scissors
- Small bowl of water
Step 1: Preparation & Impression
-
Prepare the workspace:
Lay down a sheet of parchment paper or a non-stick craft mat on a flat, stable surface. This prevents the clay from sticking and makes it easier to move later without distorting the shape. -
Soften the clay:
Take a generous handful of white air dry clay. Knead it in your hands for a minute or two until it feels pliable, warm, and smooth. This conditioning helps prevent cracks later on. -
Roll it out:
Place the ball of clay on your parchment paper. Using a rolling pin, roll the clay out evenly. You are aiming for a thickness of about 1/4 to 1/2 inch; too thin and it might crack, too thick and it will take ages to dry. -
Smooth the surface:
Dip your finger lightly into the bowl of water and gently run it over the surface of the rolled clay to smooth out any small wrinkles or textures from the rolling pin. -
Make the impression:
Guide the child’s hand onto the center of the clay. Press down firmly and evenly, ensuring you apply pressure to the palm and each individual finger to get a clear, deep print. -
Lift carefully:
Gently peel the hand away from the clay. If the print is too faint or smudged, simply ball the clay up, roll it out again, and give it another go.
Cracks Appearing?
Mix a tiny amount of clay with water to create a paste (slip). Rub this into any small cracks that appear during drying, then smooth it over with your finger.
Step 2: Cutting & Refining
-
Cut the circle:
Center your large round cookie cutter or an upside-down bowl over the handprint. Press straight down to cut out the definitive circle shape. -
Remove excess clay:
Peel away the scrap clay from the outside of the cutter before lifting the cutter itself. This keeps the edge clean. -
Create the hanging hole:
Use a drinking straw to punch a hole near the top edge of the circle. Position it centered above the handprint, leaving enough clay margin (about half an inch) so the loop doesn’t break through. -
Smooth the edges:
Dip your finger in water again and gently run it around the cut edge of the circle and the inside of the punched hole to soften any sharp ridges left by the tools.
Make it Sparkle
Before the clay dries, lightly brush a clear coat of glue inside just the handprint indentation and sprinkle fine gold glitter for a festive, magical touch.
Step 3: Drying & Finishing
-
Initial drying:
Leave the ornament on the parchment paper in a safe spot with good air circulation. Let it dry for at least 24 hours. -
Flip for even drying:
After the top feels dry to the touch, flip the ornament over carefully. This exposes the bottom side to the air, preventing curling and ensuring the core dries completely. I usually let this side dry for another 12-24 hours. -
Check hardness:
The clay should be completely white and hard, with no cool, damp spots remaining. Drying time varies based on humidity and thickness. -
Sand imperfections:
If there are any rough spots on the edges, gently buff them away with fine-grit sandpaper for a professional finish. -
Cut the twine:
Cut a piece of natural jute twine, approximately 10-12 inches long. -
Thread the loop:
Fold the twine in half. Push the folded loop end through the hole in the ornament from front to back. -
Secure the knot:
Pass the loose ends of the twine through the loop and pull tight to create a lark’s head knot at the top of the ornament. -
Final tie:
Tie the two loose ends together in a simple overhand knot to close the hanger loop.
Hang your beautiful keepsake on a branch or hook to enjoy the sweet memory of tiny hands tailored in clay


Handprint Silhouette Cutout
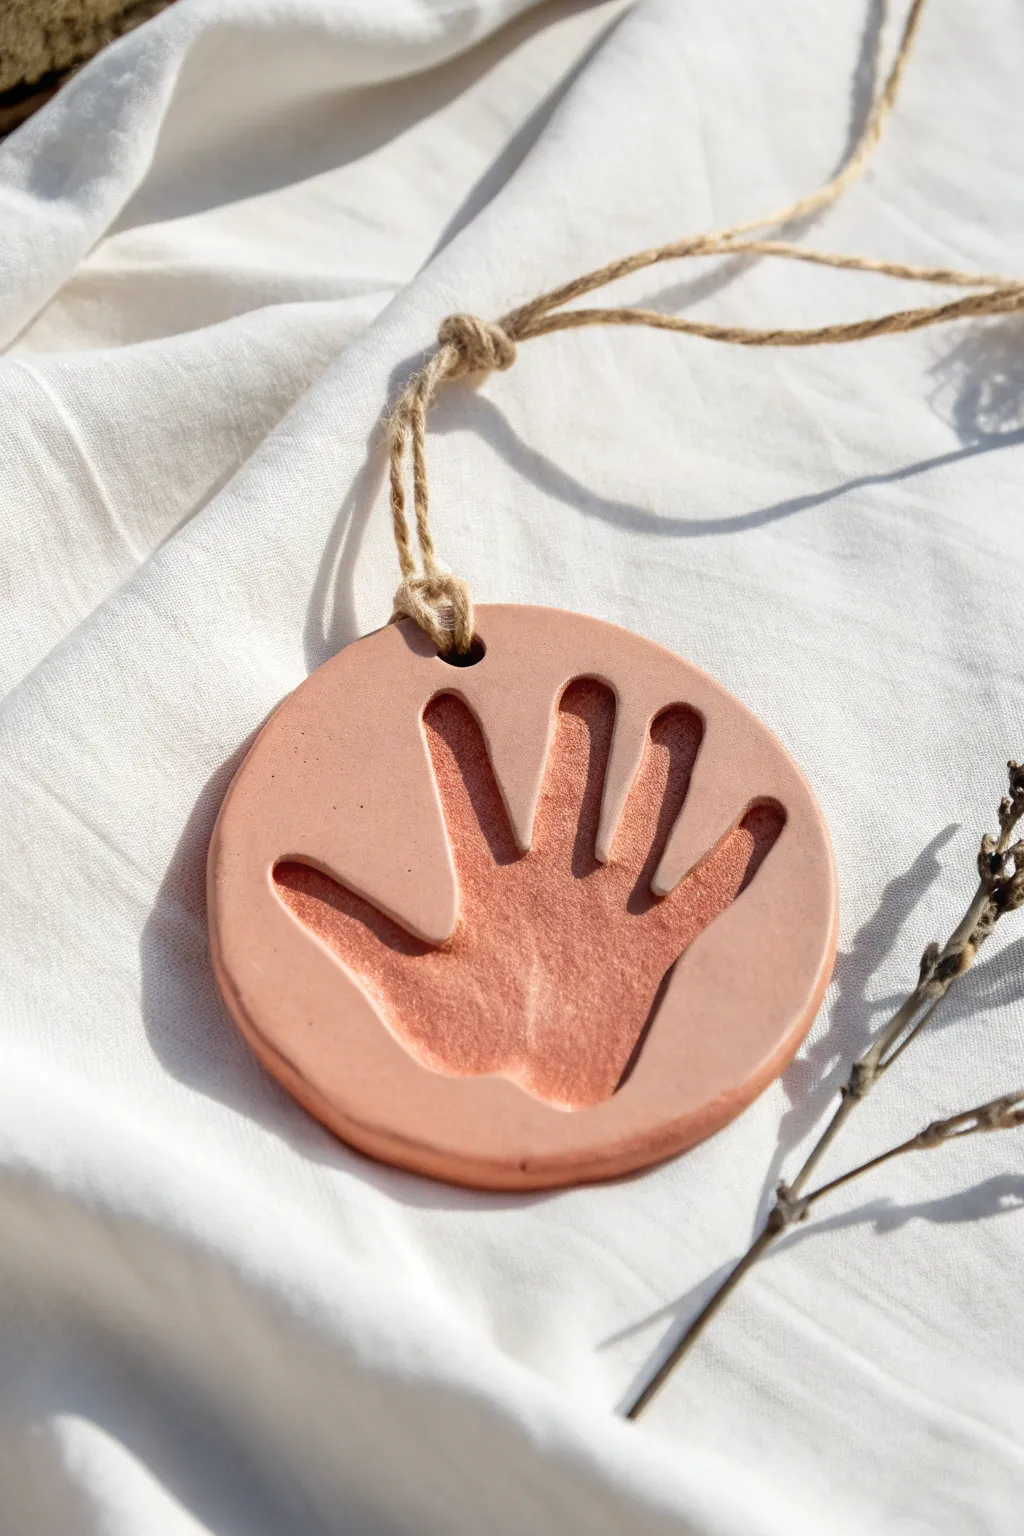
Capture a moment in time with this elegant, minimalist keepsake that turns a simple hand outline into a modern piece of decor. The warm terracotta tone and negative space design give it a sophisticated look that stands out from traditional clay impressions, perfect for hanging in a nursery or on a holiday tree.
Detailed Instructions
Materials
- Terracotta colored air dry clay
- Rolling pin
- Parchment paper or craft mat
- Round cookie cutter (large enough to fit a hand) or a bowl and knife
- Sharp craft knife or scalpel tool
- Pencil or stylus tool
- Small bowl of water
- Fine-grit sandpaper (optional)
- Jute twine or ribbon
- Straw or skewer (for the hole)
- Acrylic sealer (matte finish)
Step 1: Preparation and Rolling
-
Prepare your workspace:
Lay down a sheet of parchment paper or a non-stick craft mat. This is crucial as it prevents the clay from sticking and allows you to move the piece without distorting it later. -
Condition the clay:
Take a handful of terracotta air dry clay and knead it in your hands for a minute until it is soft, pliable, and free of cracks. If it feels too dry, dip your fingers in water and work it in. -
Roll out the slab:
Place the clay ball on your surface and use the rolling pin to flatten it. Aim for an even thickness of about 1/4 inch (6mm). Too thin and it might crack; too thick and it will be heavy. -
Cut the circle:
Use a large round cookie cutter to stamp out your base shape. If you don’t have a cutter large enough, place a bowl upside down on the clay and carefully trace around it with a craft knife to cut a perfect circle. -
Smooth the edges:
Dip your finger in a little water and gently run it around the cut edge of the circle to smooth out any roughness or sharp ridges left by the cutter.
Use a Paper Template
If your little one is too wiggly for a live tracing, trace their hand on cardstock first. Cut that out and use it as a stencil on the clay.
Step 2: Creating the Handprint
-
Position the hand:
While the clay is still wet, have the child place their hand gently in the center of the circle. You don’t need them to push down hard for an impression; you just need the outline. -
Trace the outline:
Using a pencil or a stylus tool, very lightly trace around the fingers and palm. I find it helps to do this quickly so the child doesn’t wiggle too much. Remove the hand to reveal the traced line. -
Cut out the silhouette:
Take your sharp craft knife or scalpel. Carefully cut along the traced lines, going all the way through the clay slab. Take your time around the tight curves between the fingers. -
Remove the inner clay:
Gently lift out the hand-shaped piece of clay from the center. You can save this scrap for another tiny project or roll it back up. -
Refine the cutout:
The cut edges will likely be a bit rough. slightly dampen a small paintbrush or your fingertip and smooth the inner edges of the hand silhouette. -
Create the hanging hole:
Use a straw or a skewer to poke a hole near the top of the circle. This needs to be big enough for your jute twine to pass through easily.
Step 3: Finishing Touches
-
Begin drying:
Let the ornament dry flat on the parchment paper. Keep it away from direct heat sources to prevent curling. -
Flip for even drying:
After about 24 hours, carefully flip the ornament over so the bottom side is exposed to the air. This ensures it dries evenly and stays flat. -
Sand imperfections:
Once the clay is completely bone dry (usually 48-72 hours), use fine-grit sandpaper to gently buff away any remaining rough spots on the rim or surface. -
Seal the piece:
Apply a coat of matte acrylic sealer or varnish to protect the clay from moisture and dust while maintaining that natural terracotta look. -
Add the hanger:
Cut a length of jute twine. Fold it in half, push the loop through the hole, and pull the tails through the loop to create a lark’s head knot, or simply tie it securely as shown in the inspiration photo.
Preventing Curling
If the edges start to lift while drying, place a light book or a flat board gently on top of the clay (sandwiching it between parchment paper) to weigh it down.
Now you have a timeless silhouette ornament ready to be displayed or gifted to a loved one


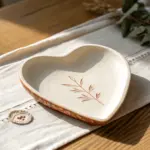
Heart-Shaped Handprint Keepsake
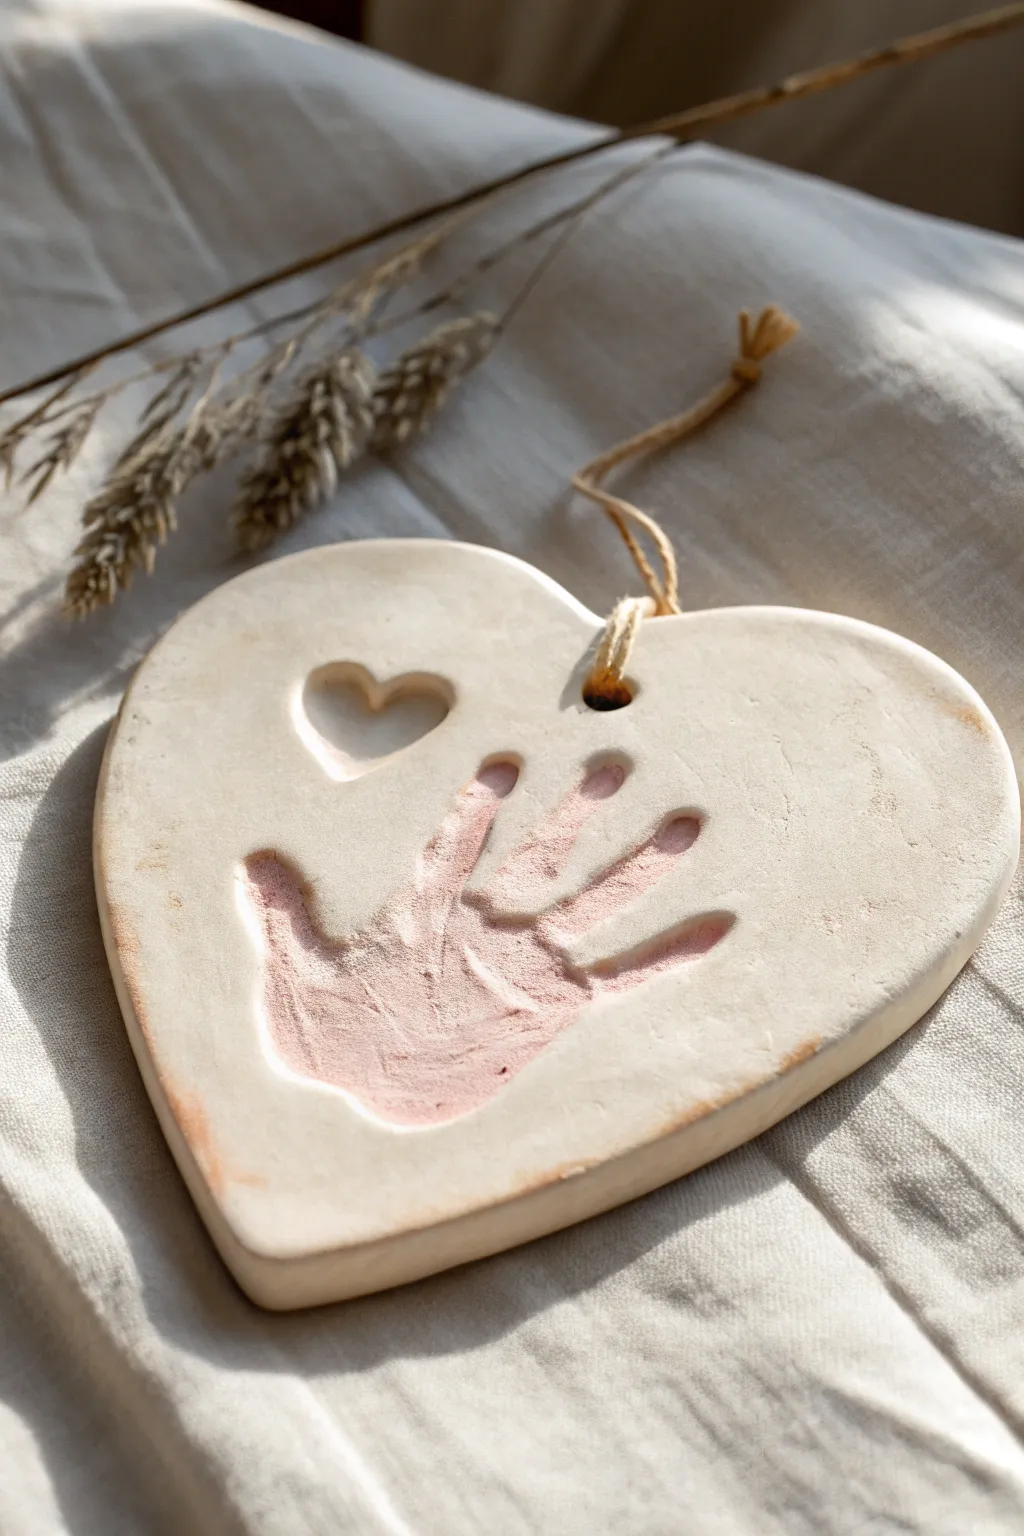
Capture a precious moment in time with this delicate and heartwarming clay project featuring a sweet handprint impression. The finished piece has a wonderfully rustic yet polished look with its smooth edges and gentle dusty pink coloring, perfect for hanging as a sentimental decoration.
Step-by-Step
Materials
- High-quality white air dry clay
- Rolling pin
- Parchment paper or smooth work mat
- Sharp knife or clay cutting tool
- Heart-shaped paper template (or large cookie cutter)
- Small heart cutter (optional)
- Drinking straw or skewer
- Fine grit sandpaper
- Water in a small bowl
- Soft pink or terracotta acrylic paint
- Paper towel or soft cloth
- Clear matte sealant or varnish
- Jute twine or ribbon for hanging
Step 1: Shaping the Clay Base
-
Prepare your workspace:
Begin by laying down a sheet of parchment paper or a silicone mat. This prevents the clay from sticking to your table and makes it easier to move later. -
Condition the clay:
Take a generous handful of air dry clay and knead it in your hands for a minute or two. This warms it up and removes air bubbles, ensuring a smoother surface. -
Roll out the slab:
Use your rolling pin to flatten the clay into an even slab. Aim for a thickness of about 1/4 inch to 1/3 inch; too thin and it might crack, too thick and it takes forever to dry. -
Cut the heart shape:
Place your heart template gently onto the clay. Trace around it carefully with a sharp knife or clay tool to cut out your main shape. Alternatively, use a very large heart cookie cutter if you have one. -
Smooth the edges:
Dip your finger into a little bit of water and run it along the cut edges of the heart to smooth out any roughness or jagged bits. This professional finish makes a huge difference.
Step 2: Creating the Impressions
-
Position the hand:
Guide the child’s hand to the center of the heart. Gently press down on the palm and each individual finger to ensure a deep, clear impression. -
Lift and inspect:
I always peel the hand away slowly to avoid distorting the clay. If the print isn’t deep enough, you can re-roll and try again while the clay is still wet. -
Add the decorative heart:
Use a small heart cutter or a shaping tool to impress a tiny heart indentation near the top left, adding a sweet decorative element. -
Create the hanging hole:
Using a straw or a skewer, poke a hole through the top right curve of the heart. Make sure the hole isn’t too close to the edge so it stays strong.
Crack Control
If hairline cracks appear while drying, don’t panic! Mix a tiny bit of fresh clay with water to make a paste (slip) and smooth it into the cracks with your finger.
Step 3: Drying and Finishing
-
Let it dry slowly:
Place the clay heart in a cool, dry area away from direct sunlight. Let it dry for 24-48 hours, flipping it over occasionally so both sides dry evenly. -
Sand for smoothness:
Once fully cured and hard, use fine-grit sandpaper to gently buff the surface and edges. This removes any final imperfections or fingerprints. -
Apply the color wash:
Mix a small amount of pink acrylic paint with a drop of water to create a wash. Paint it into the handprint grooves. -
Wipe away excess:
Immediately use a damp paper towel to wipe the paint off the raised surface, leaving the color sitting primarily inside the sunken handprint for a beautiful vintage effect. -
Add subtle distressing:
Use the same dirty paper towel to lightly smudge a tiny bit of color around the outer edges of the heart for a rustic, aged look. -
Seal the keepsake:
Apply a coat of clear matte sealant or varnish over the entire piece to protect the clay from moisture and preserve the paint. -
String it up:
Cut a length of jute twine, thread it through the hole, and tie a secure knot to create a loop for hanging.
Keepsake Upgrade
Before the clay dries, use letter stamps to impress the child’s name and the year into the clay along the bottom edge for a personalized timestamp.
Hang this beautiful memento in a special spot to cherish those tiny fingers for years to come


Handprint Ring Dish Bowl
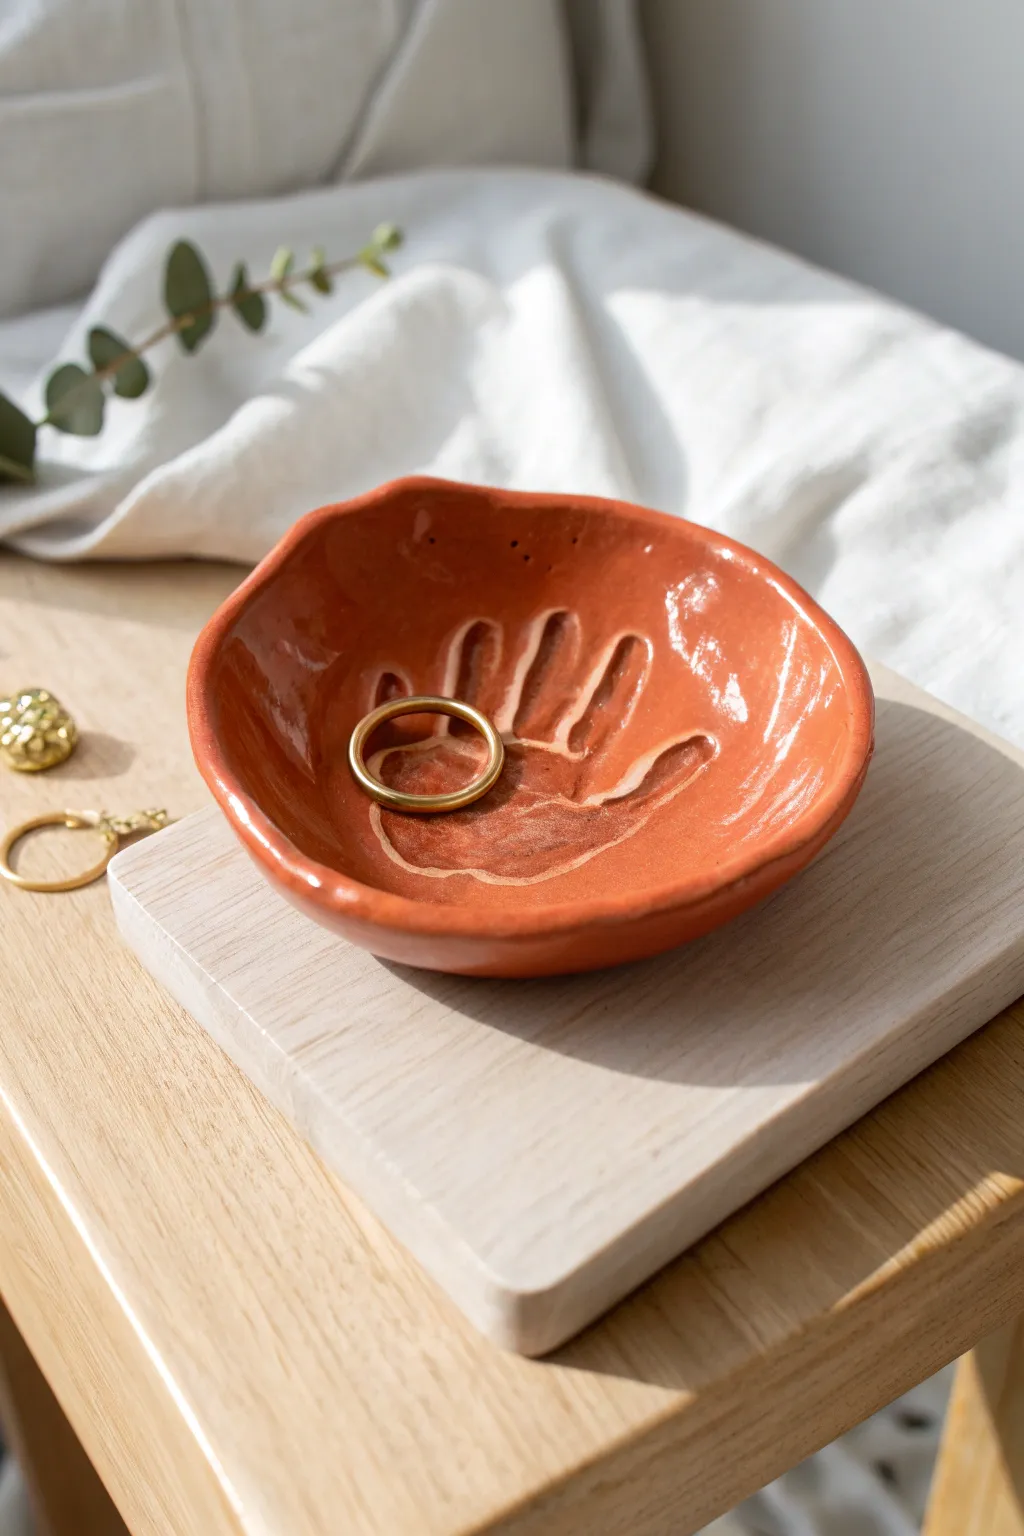
This charming ring dish captures a moment in time with a sweet handprint impression pressed directly into warm, terracotta-colored clay. The finished piece features organic, wavy edges and a high-gloss glaze that makes the earthy tones pop while keeping your jewelry safe.
Step-by-Step Tutorial
Materials
- Terracotta air dry clay (or white clay painted later)
- Rolling pin
- Parchment paper or canvas mat
- Small bowl (for shaping)
- Knife or clay cutting tool
- Sponge and water
- Fine-grit sandpaper
- High-gloss varnish or sealant for clay
- Soft paintbrush
Step 1: Preparing the Clay Base
-
Condition the clay:
Start with a ball of terracotta air dry clay about the size of a large orange. Knead it in your hands for a minute to warm it up and ensure it creates a smooth, crack-free surface. -
Roll out the slab:
Place the clay on parchment paper or a canvas mat. Using a rolling pin, roll the clay out evenly until it is approximately 1/4 inch thick. Aim for a circle shape slightly larger than the hand you intend to imprint. -
Smooth the surface:
Before making the impression, take a slightly damp sponge and gently wipe the surface of the clay slab to remove any canvas texture or rolling pin marks. A smooth surface ensures a clear print.
Clean Lines Trick
To fix a messy print without re-rolling, dip your finger in water and gently smooth out just the ridges or uneven edges of the handprint while the clay is still wet.
Step 2: Creating the Impression
-
Position the hand:
Guide the hand (yours or a child’s) to the center of the clay circle. Spread the fingers out slightly so they aren’t touching each other. -
Press evenly:
Press down firmly on the palm first, then gently press each finger individually. You want a deep enough impression to see the shape, but not so deep that you go through the clay bottom. -
Lift carefully:
Slowly lift the hand straight up to avoid smudging the edges of the print. If the print isn’t quite right, simply ball up the clay and roll it out again.
Cracking Clay?
If you see tiny hairline cracks appearing as it dries, mix a tiny bit of fresh clay with water to make a paste (slip) and stroke it into the cracks with a brush.
Step 3: Shaping and Refining
-
Cut the perimeter:
Use a clay knife to cut a circle around the handprint. Don’t make it a perfect geometric circle; allow the line to wander slightly for that organic, handmade look seen in the photo. Leave about an inch border around the fingertips. -
Smooth the edges:
Dip your finger in water and run it along the cut edge of the clay to round it off and remove any sharp bits or crumbs. -
Form the bowl shape:
Gently lift the clay circle and place it inside a cereal bowl or small mixing bowl lined with plastic wrap. Gravity will help the clay slump slightly to create the curved dish shape. -
Create the wavy rim:
While it sits in the drying bowl, use your fingers to gently push and pull the rim, creating soft waves and undulations rather than a perfectly flat edge.
Step 4: Drying and Finishing
-
Initial drying:
Let the clay dry inside the bowl for about 24 hours. This helps it hold the curved shape while it sets. -
Complete drying:
Remove the semi-dry clay from the bowl and place it on a wire rack. Let it air dry for another 24 to 48 hours until it is fully hard and lighter in color. -
Sand imperfections:
Once fully dry, take a piece of fine-grit sandpaper and very gently sand the rim and the back of the dish to remove any rough spots. Wipe away the dust with a dry cloth. -
Apply the first coat of glaze:
Using a soft brush, apply a generous coat of high-gloss varnish to the inside of the bowl. Make sure to get into the crevices of the handprint. -
Let the glaze cure:
Allow the first coat to dry completely according to the bottle instructions. The terracotta color will darken and become rich as the glaze is applied. -
Seal the back:
Flip the bowl over and varnish the bottom and sides to ensure the piece is fully sealed and protected from humidity. -
Final gloss coat:
For that glass-like finish shown in the image, apply a second coat of gloss varnish to the top surface. I find this extra layer really makes the handprint details catch the light beautifully.
Enjoy displaying your jewelry in this personalized, warm terracotta dish that preserves a special memory forever

What Really Happens Inside the Kiln
Learn how time and temperature work together inside the kiln to transform clay into durable ceramic.
Layered Parent-and-Child Handprints
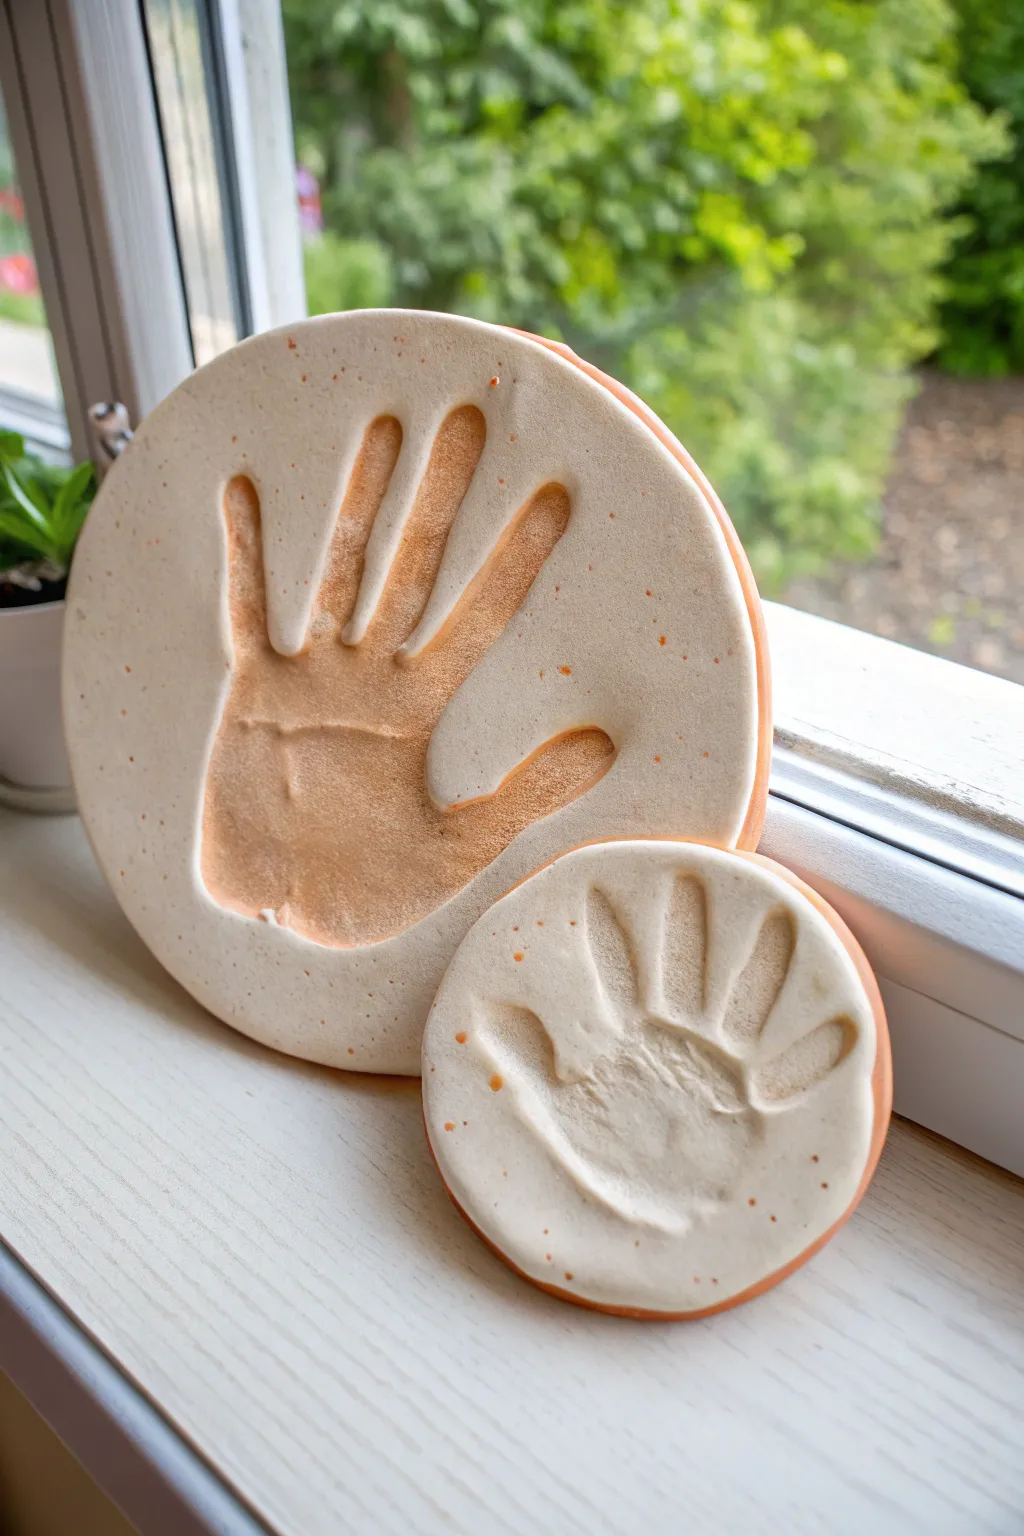
Celebrate the bond between parent and child with this striking two-tone preserved handprint set. By layering white clay over a terracotta base, you create a beautiful, warm contrast that makes the impressions pop while adding durability to your keepsake.
Detailed Instructions
Materials
- White or speckled air-dry clay
- Terracotta colored air-dry clay
- Rolling pin
- Circular cookie cutters or bowls (large & small)
- Parchment paper or craft mat
- Small bowl combined with water (slip)
- Sandpaper (fine grit)
- Sealant (spray or brush-on matte varnish)
Step 1: Creating the Bases
-
Prepare the workspace:
Lay down parchment paper or a craft mat on a flat surface to prevent sticking and ensure easy cleanup. -
Roll the terracotta layer:
Start with the terracotta-colored clay. Roll it out to an even thickness of about 1/4 inch (6mm). This will form the sturdy backing and colorful rim. -
Cut the backing circles:
Using your largest bowl or cutter, cut a perfect circle for the adult print. Use a smaller cutter to create the backing for the child’s print. -
Smooth the edges:
Dip your finger in a little water and run it along the cut edges of the terracotta circles to smooth out any roughness or fraying.
Cracks Appearing?
If tiny cracks appear while drying, don’t panic. Mix a tiny bit of white clay with water to make a paste and fill the cracks, then smooth over.
Step 2: Layering the White Clay
-
Roll the white clay:
Roll out your white or speckled clay. You want this layer slightly thinner than the base, perhaps around 1/8 to 3/16 inch thick. -
Cut the top circles:
Cut two white circles that match the exact diameter of your terracotta bases. -
Create slip:
Make a simple ‘glue’ by mixing a small pinch of scrap clay with water until it has a yogurt-like consistency. -
Attach the layers:
Score (scratch) the top of the terracotta circles and the bottom of the white circles. Apply slip to the scratched areas. -
Press together:
Gently place the white circles on top of the terracotta ones. Press them together firmly without deforming the circle shape to ensure they bond.
Clean Impressions
Apply a tiny amount of lotion to the hand before pressing into the clay. This prevents sticking and ensures the hand releases cleanly without pulling up clay.
Step 3: Making the Impressions
-
Position the hand:
For the large circle, have the adult place their hand gently in the center. I prefer to guide the hand down slowly to ensure the spacing is centered. -
Press firmly:
Press the hand down firmly, paying special attention to the palm and each individual fingertip to get a deep, clear impression. -
Repeat for the child:
Doing the same for the smaller circle, guide the child’s hand into the clay. Be quick but firm, as kids tend to wiggle. -
Check the edges:
The pressure of the hand might squish the white clay slightly, revealing a nice rim of the terracotta underneath. If not, gently press the white clay edge down to expose a thin line of the orange halo. -
Clean up details:
If there are severe nail marks or accidental dents, smooth them lovingly with a damp finger or a soft, damp paintbrush.
Step 4: Drying and Finishing
-
Initial drying:
Place the discs on a drying rack. Let them air dry away from direct sunlight or heat sources, which can cause cracking. -
Flip occasionally:
During the first 24 hours, carefully flip the discs over every few hours to urge the clay to dry evenly on both sides and prevent curling. -
Sand edges:
Once fully cured (usually 2-3 days), take your fine-grit sandpaper and lightly buff the outer rim to make the two clay layers feel seamless. -
Seal the piece:
Apply a coat of matte varnish or sealant to protect the clay from moisture and preserve the natural whiteness over time.
Display these beautiful discs on a sunny windowsill or use plate stands to showcase your timeless family artwork
Handprint With Stamped Quote Border
This two-toned keepsake combines the rustic warmth of terracotta with smooth white clay for a charming, earthy aesthetic. The simple leaf motifs stamped around the handprint create a delicate border that frames the memory beautifully without overwhelming it.
Detailed Instructions
Materials
- Terracotta air dry clay
- White or cream air dry clay
- Rolling pin
- Circular cookie cutters or bowls (two sizes: approx. 8-inch and 6-inch)
- Small craft knife or clay tool
- Leaf rubber stamp or small branch for texture
- Small geometric or chevron stamp (for the outer rim)
- Water in a small cup
- Fine-grit sandpaper (optional)
- Acrylic rolling guide or wooden slats (to keep thickness even)
Step 1: Creating the Terracotta Base
-
Prepare the terracotta clay:
Start by kneading a large ball of terracotta air dry clay until it is warm and pliable. This prevents cracks from forming later. -
Roll out the base:
Roll the clay out onto a clean surface or drying mat to a thickness of about 1/4 to 1/2 inch. Using rolling guides helps keep the slab perfectly even. -
Cut the large circle:
Place your larger bowl or circle cutter onto the clay and press down firmly to cut the base shape. Remove the excess clay from around the edges. -
Add the border detail:
Using a small geometric or chevron stamp, press a repeating pattern around the very edge of the terracotta disk. Ensure you press evenly each time for a uniform look. -
Initial set time:
Let this base sit for about 20-30 minutes so it firms up slightly, which makes it easier to handle when adding the top layer, but don’t let it dry completely.
Step 2: Forming the White Inlay
-
Roll the white clay:
Clean your rolling pin thoroughly, then roll out the white air dry clay. You want this layer to be slightly thinner than the base, perhaps 1/4 inch thick. -
Cut the inner circle:
Use your smaller bowl or cutter (the 6-inch size) to cut a perfect circle from the white clay slab. -
Prepare for attachment:
Score the back of the white circle and the center of the terracotta base with a needle tool or fork. Dab a small amount of water onto the scored terracotta area to act as glue. -
Attach the layers:
Center the white circle on top of the terracotta base. Press it down extensively but gently, starting from the center and working outward to push out any trapped air bubbles.
Fixing Cracks
If hairline cracks appear while drying, don’t panic. Mix a tiny bit of fresh clay with water to make a paste (slip) and adhere it into the crack, then smooth over with a finger.
Step 3: Making the Impressions
-
Add the dotted rim:
To secure the edges and add decoration, use a small, blunt tool (like the end of a paintbrush) to press small divots all around the perimeter of the white circle. This bonds the two clays together further. -
Position the hand:
Place the child’s hand in the center of the white circle. Spread the fingers slightly to ensure a clear silhouette. -
Press the handprint:
Press down firmly on the palm and each individual finger. I always double-check that the fingertips have made a deep enough impression before lifting the hand away. -
Stamp the leaf border:
Take your small leaf stamp. Press it into the white clay in a radial pattern, surrounding the handprint. Imagine the leaves are pointing outward like sun rays. -
Smooth imperfections:
Dip your finger in a tiny bit of water and smooth out any rough flakes of clay around the edges of the handprint or the outer rim. -
Final drying:
Allow the project to dry flat in a cool, dry place for 24-48 hours. Turn it over halfway through the drying process to ensure the bottom of the terracotta dries evenly.
Level Up: Antique Look
Once fully dry, dilute some brown acrylic paint with water. Brush it over the white clay and wipe it off immediately with a rag. The paint will stay in the stamped grooves.
Display your botanical handprint plaque on a shelf easel or attach a hook to the back once fully cured to hang it on the wall


The Complete Guide to Pottery Troubleshooting
Uncover the most common ceramic mistakes—from cracking clay to failed glazes—and learn how to fix them fast.
Handprint Rainbow Arc
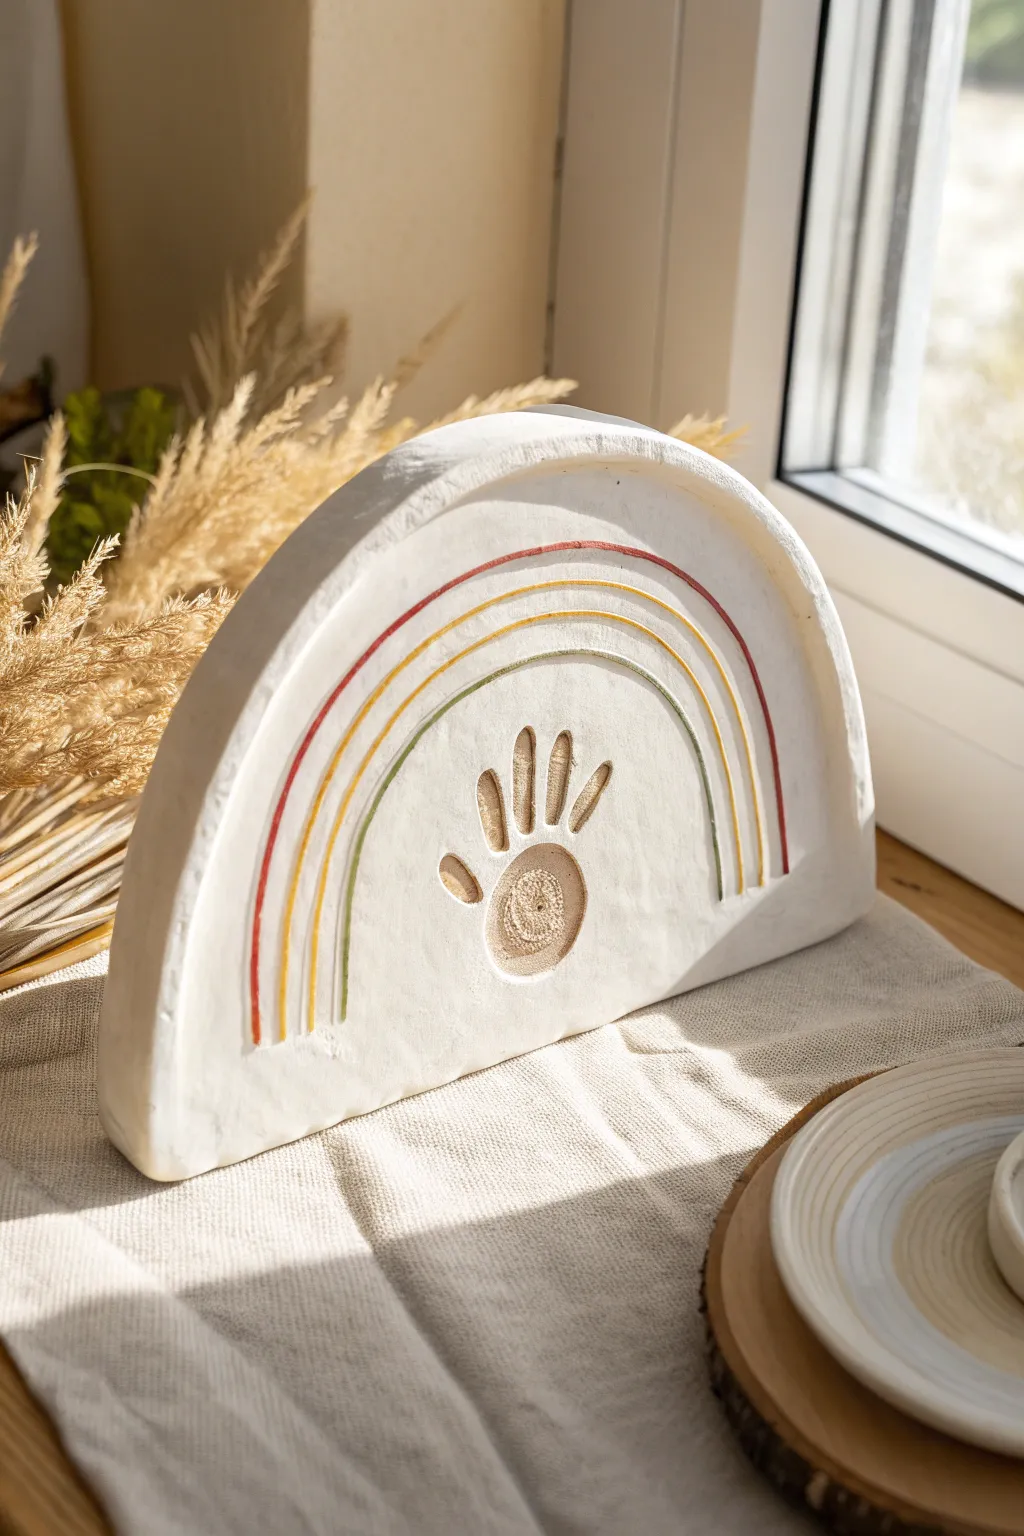
This standing arch sculpture brings a modern, minimalist touch to the classic handprint keepsake. Featuring a stylized, abstract hand design surrounded by muted rainbow arches, it makes for sophisticated nursery decor or a thoughtful grandparent gift.
Detailed Instructions
Materials
- White creative paperclay or high-quality air-dry clay
- Rolling pin
- Sharp craft knife or clay slicing tool
- Semicircle template (paper or cardboard)
- Small carving tools or a toothpick
- Water and a sponge
- Acrylic paints (muted terracotta, mustard yellow, sage green)
- Fine detail paintbrush
- Fine-grit sandpaper
Step 1: Shaping the Clay Base
-
Roll the slab:
Begin with a substantial amount of air-dry clay. Roll it out into a large, even slab that is quite thick—approximately 3/4 inch to 1 inch deep. This thickness is crucial because the finished piece needs to stand upright on its edge without tipping over. -
Cut the arch shape:
Place your semicircle template onto the rolled slab. Using your sharp craft knife or clay tool, cut straight down into the clay to create a clean, crisp arch shape. Remove the excess clay. -
Smooth the edges:
Dip your finger or a small sponge into a little bit of water. Gently run it along the cut edges of the arch to soften any sharp corners and smooth out the texture of the clay. -
Flatten the base:
Stand the arch up on its flat edge to test its stability. If it wobbles, tap the flat bottom gently against your work surface to flatten it further, ensuring it stands perfectly vertical.
Clean Lines
When carving the rainbow grooves, do it when the clay is leather-hard (partially dry). It will crumble less and yield much cleaner, sharper lines than wet clay.
Step 2: Carving the Design
-
Plan the palm:
Locate the center point near the bottom of the arch face. Lightly etch a circle for the palm of the hand. This stylized design uses a simple circle rather than a realistic palm print. -
Plan the fingers:
Above the circle, lightly etch five oval shapes radiating outward to represent fingers. Keep them detached from the palm circle for that modern, abstract look shown in the inspiration photo. -
Carve the handprint:
Using a loop tool or spoon-shaped carving tool, scoop out the clay within your sketched palm and finger shapes. Aim for a concave indentation, similar to a fossil or relief. -
Texture the indentation:
I like to use a stiff bristle brush or a textured stamp inside the carved areas to give the ‘handprint’ a rougher, contrasting texture compared to the smooth surface of the arch. -
Outline the rainbow:
Use a compass or trace circular objects to lightly mark three concentric arches above the handprint design. -
Carve the rainbow channels:
Use a V-gouge tool or a careful hand with a toothpick to carve thin, shallow channels along your pencil lines. These grooves will hold the paint later and create a nice dimensional effect.
Step 3: Finishing and Painting
-
Allow to dry completely:
Let the sculpture dry for at least 48-72 hours. Flip it occasionally to ensure airflow reaches all sides. It must be bone dry before the next step. -
Sand for smoothness:
Once fully dry, take fine-grit sandpaper and gently buff the flat surfaces and the outer rim of the arch to remove any fingerprints or bumps. -
Paint the first arc:
Dip a fine detail brush into muted terracotta or rust-colored acrylic paint. Carefully paint inside the outermost carved channel. -
Paint the middle arc:
Clean your brush and switch to a mustard yellow or ochre shade. Paint the middle channel, taking care to keep the paint inside the groove. -
Paint the inner arc:
For the smallest rainbow arch, use a sage or olive green paint. This earthy palette complements the natural white clay perfectly. -
Touch up the handprint:
If you want the handprint to stand out more, you can apply a very watered-down wash of brown paint into the indented palm and fingers, then wipe the surface clean, leaving color only in the texture. -
Seal (Optional):
To protect your work, apply a layer of matte varnish or spray sealant over the entire piece.
Cracking Issues?
If small cracks appear while drying, don’t panic. Mix a small amount of fresh clay with water to make a paste (slip) and fill the cracks, then sand smooth once dry.
Place your finished arc on a shelf near a window to let the natural light highlight the carved textures
Handprint Handprint: High-Five Wall Charm
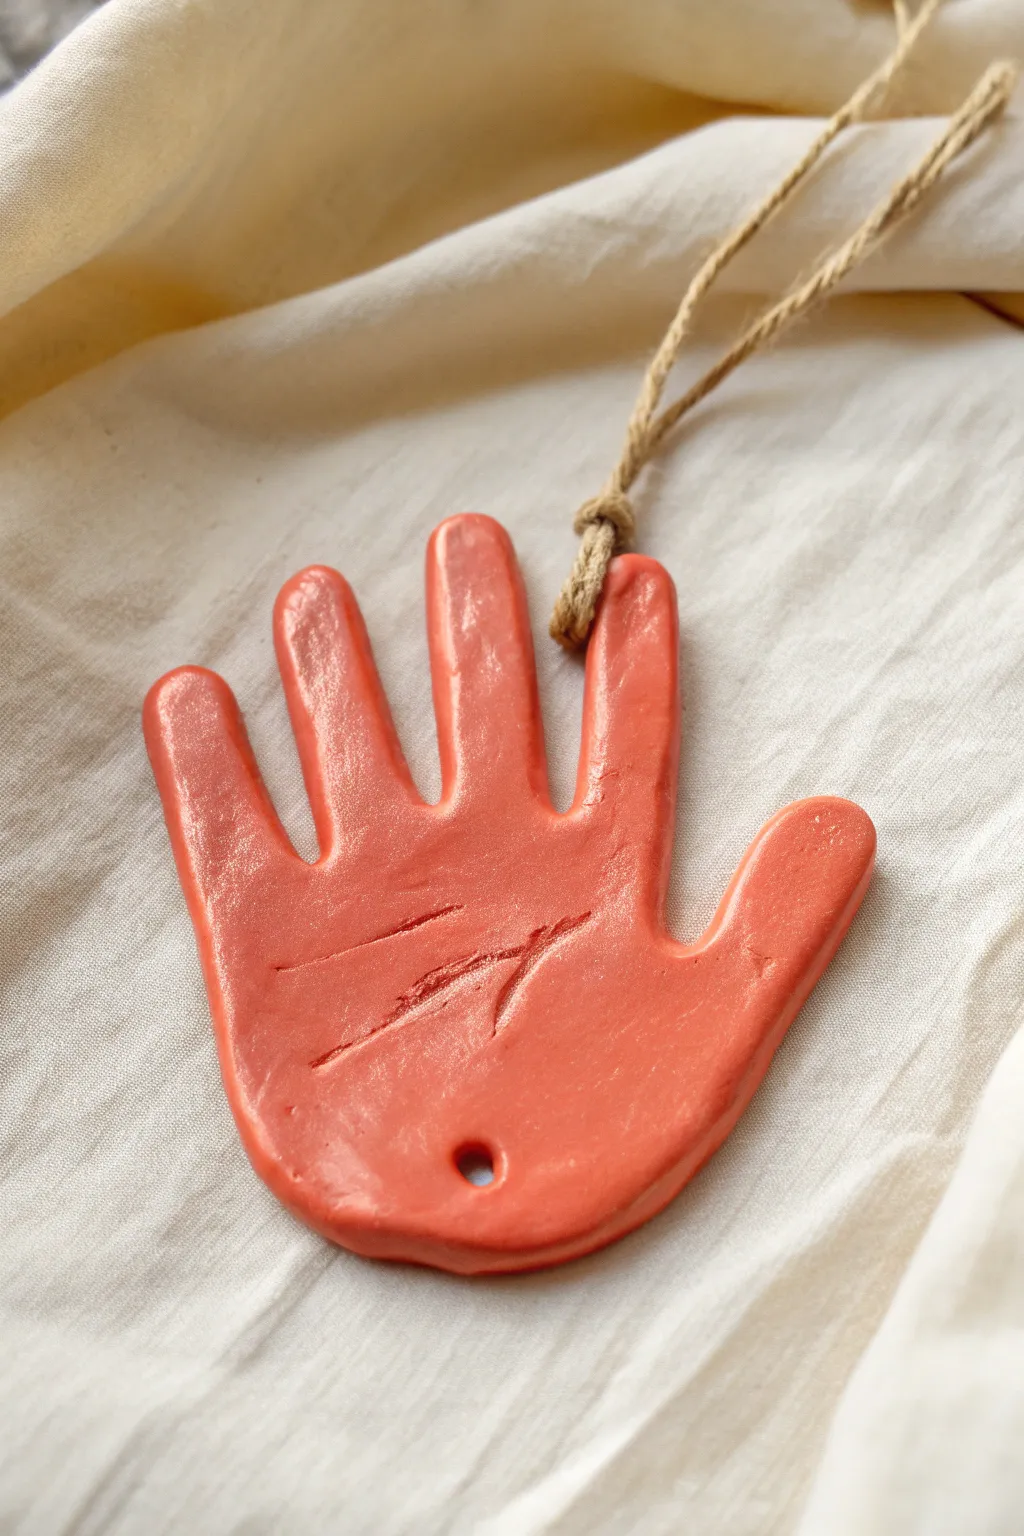
This rustic charm captures a simple hand silhouette in a warm, earthy terracotta tone, perfect for adding a personal touch to your wall décor. It features distinct palm line carvings and a glossy finish, suspended by natural twine for an organic look and feel.
Step-by-Step Guide
Materials
- Air dry clay (white or terracotta colored)
- Acrylic paint (terracotta or burnt orange shades)
- Pencil or tracing paper
- Rolling pin
- Parchment paper or craft mat
- X-Acto knife or clay craft knife
- Sculpting tool with a fine tip (or a toothpick)
- Straw or round cutter (for holes)
- Fine-grit sandpaper (optional)
- High-gloss varnish or sealant (Mod Podge or spray acrylic)
- Natural jute twine
- Scissors
- Small paintbrush
- Water cup
Step 1: Shaping the Hand
-
Prepare your workspace:
Lay down parchment paper or a non-stick craft mat to protect your table and prevent the clay from sticking. -
Roll out the clay:
Take a generous handful of air dry clay and knead it slightly to warm it up. Roll it out into an even slab, aiming for a consistent thickness of about 1/4 inch (6mm) to ensure it’s sturdy but doesn’t take forever to dry. -
Trace the hand:
Place your hand (or your child’s hand) directly onto the clay slab passing fingers slightly apart. Trace around the entire hand shape gently with a dull tool or toothpick, just making an light outline. -
Refine the template:
Alternatively, if working with a wiggly kid, trace their hand onto paper first, cut that out, and lay the paper template onto the clay. -
Cut the shape:
Using an X-Acto knife or a dedicated clay knife, carefully cut along your traced outline. Create smooth, flowing lines rather than sawing back and forth for clean edges. -
Smooth the edges:
Dip your finger in a tiny bit of water and run it along the cut edges of the hand to smooth out any roughness or sharp clay bits.
Smooth Operator
Use a tiny amount of water on your finger to ‘erase’ cracks while the clay is wet. Don’t over-wet or the clay weakens.
Step 2: Adding Details & Drying
-
Carve the palm lines:
Using a fine-tipped sculpting tool or a toothpick, carve three distinct, curved lines into the center of the palm area to mimic natural lifelines. Press deep enough to be seen, but don’t cut all the way through. -
Punch the hanging holes:
Use a straw to punch a clean hole. In this design, notice the unique placement: punch one hole near the base of the wrist/palm area and another hole strategically placed between the index and middle finger webbing if you want to hang it vertically, or just one at the top. -
Let it dry completely:
Set the clay hand aside on a flat surface in a dry area. Depending on humidity and thickness, let it cure for 24-48 hours. I like to flip it over halfway through the process to ensure the back dries evenly. -
Sand imperfections:
Once fully hardened, use fine-grit sandpaper to gently buff away any remaining rough spots on the edges or surface.
Make It Personal
Instead of carving generic palm lines, use a stamp set to impress the year or the child’s name into the clay before drying.
Step 3: Painting & Assembly
-
Apply base color:
Paint the entire hand, front and back, with a terracotta or burnt orange acrylic paint. Use a medium brush for smooth coverage. -
Layer for depth:
If the color feels too flat, mix a tiny drop of brown into your orange and lightly paint only the carved palm lines to make them pop. -
Seal the piece:
Once the paint is dry, apply a coat of high-gloss varnish or sealant. This gives it that ceramic-like shine seen in the photo and protects the paint. -
Prepare the string:
Cut a length of natural jute twine, roughly 12-15 inches long. -
Thread and knot:
Pass one end of the twine through the hole located near the fingers (or top hole). Tie a sturdy double knot right at the hole so the string is secured to the ornament. -
Create the loop:
Tie the two loose ends of the twine together at the top to create a hanging loop.
Now you have a timeless little keepsake to hang on your wall or gift to a grandparent

TRACK YOUR CERAMIC JOURNEY
Capture glaze tests, firing details, and creative progress—all in one simple printable. Make your projects easier to repeat and improve.
Handprint Santa Ornament
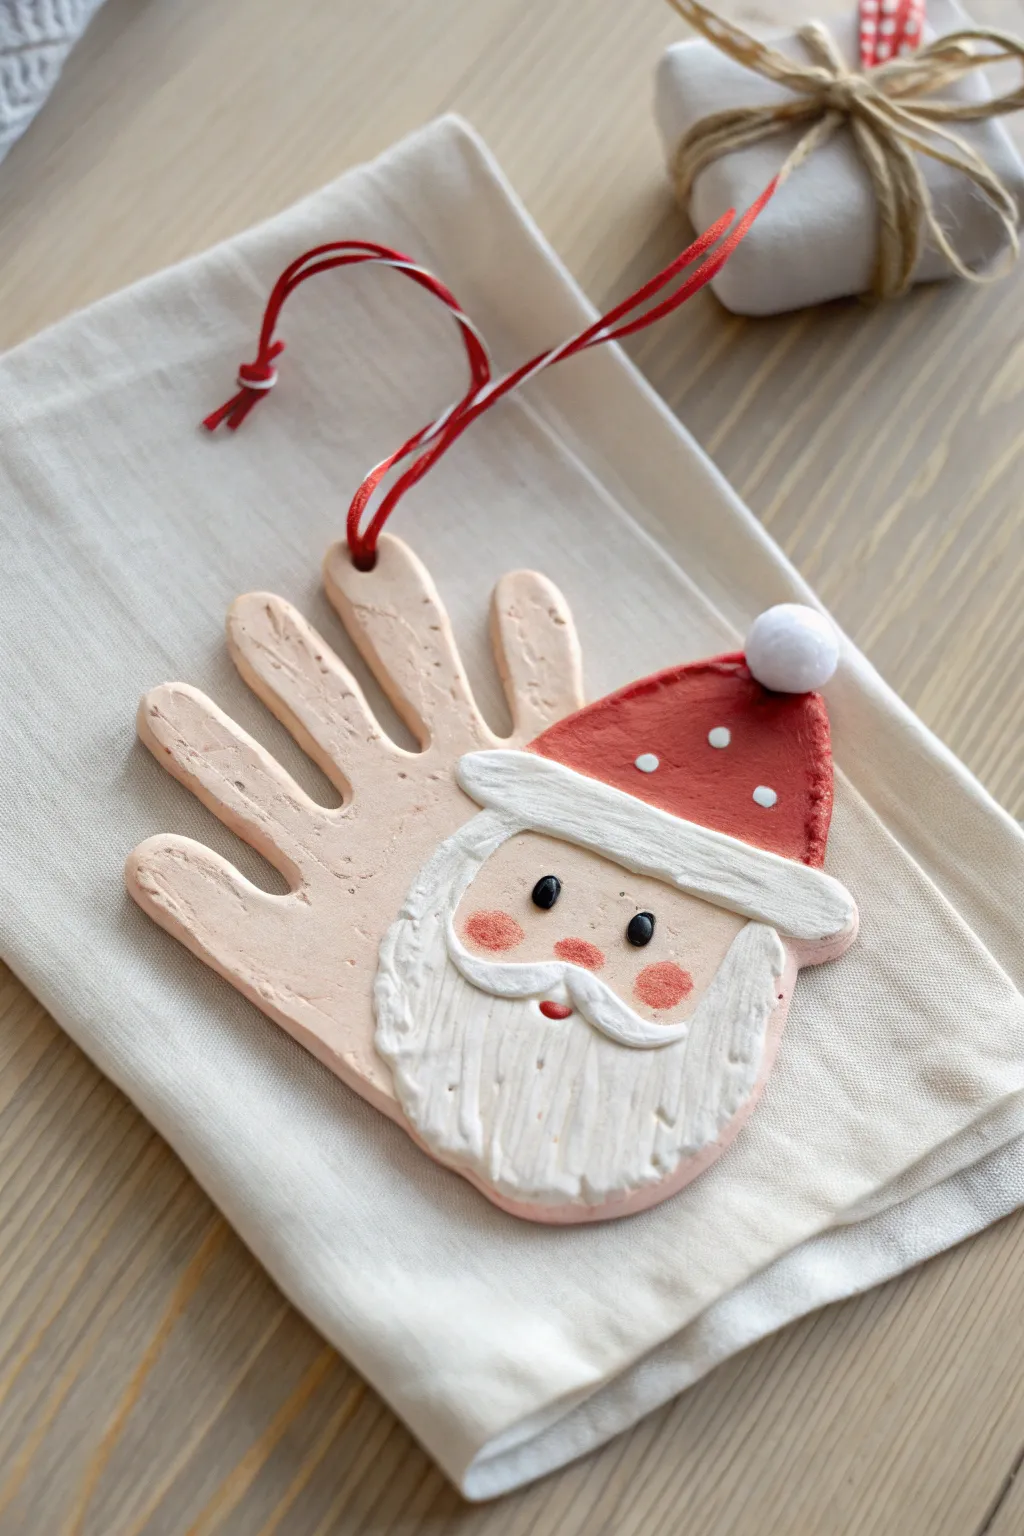
Transform a simple handprint into a jolly keepsake that captures a moment in time forever. This air dry clay project turns the palm into Santa’s face and the thumb into his festive hat, creating a charming addition to your tree.
Detailed Instructions
Materials
- Air dry clay (white or terracotta)
- Rolling pin
- Knife or clay cutting tool
- Parchment paper
- Drinking straw
- Acrylic paints (red, white, black, peach/skin tone, pink)
- Paintbrushes (medium flat brush and fine detail brush)
- Small white pom-pom
- Hot glue gun or strong craft glue
- Baker’s twine or ribbon for hanging
- Clear sealant (optional but recommended)
Step 1: Making the Handprint Base
-
Prepare the workspace:
Lay down a sheet of parchment paper on a flat surface to prevent sticking. Take a large ball of air dry clay and knead it until it is soft and pliable. -
Roll out the slab:
Using your rolling pin, roll the clay out to an even thickness of about 1/4 inch. Ensure the slab is wide enough to accommodate the entire hand. -
Create the impression:
Gently press the hand onto the clay with fingers spread comfortable apart. Press firmly on the palm and each finger to ensure a deep, clear impression. -
Cut the outline:
Use a knife or clay tool to carefully cut around the handprint, leaving a small border of about 1/4 inch around the fingers and palm for stability. -
Add a hanging hole:
Using the drinking straw, punch a hole near the top of the middle finger or ring finger, ensuring it is not too close to the edge to prevent cracking. -
Smooth the edges:
Dip your finger in a little water and run it along the cut edges of the clay to smooth out any roughness or loose bits. -
Dry the ornament:
Let the clay dry completely according to package instructions. This usually takes 24-48 hours. I like to flip it over halfway through the drying process to ensure the back dries evenly.
Step 2: Painting & Decorating Santa
-
Paint the skin tone:
Mix a peach or skin-tone color and paint the entire palm area and the four fingers. Let this base coat dry. -
Create the hat base:
Paint the thumb area red to represent the Santa hat. Extend the red paint slightly onto the top corner of the palm to create the shape of the hat resting on his head. -
Add the hat brim:
Use white paint to create a thick, fluffy brim for the hat right where the red paint meets the skin tone on the palm. You can stipple the paint to give it texture. -
Paint the beard base:
Outline the bottom of the face (the heel of the handprint) with white paint to start the beard shape. Fill in the beard area, sweeping the brush strokes downward to mimic hair. -
Detail the mustache:
Paint a white handlebar mustache just above the beard. Add a tiny red dot below the center of the mustache for the mouth. -
Add facial features:
Using a fine detail brush or enormous dotting tool, paint two black oval eyes. Add two soft pink circles on the cheeks for a rosy glow. -
Add polka dots:
Dip the back of a paintbrush into white paint and dot it onto the red hat section to give Santa’s hat a festive pattern. -
Attach the pom-pom:
Once the paint is fully dry, use hot glue to attach the small white pom-pom to the very tip of the thumb. -
Seal (Optional):
Apply a coat of clear sealant or Mod Podge to protect the paint and give the ornament a finished sheen. -
Finish with string:
Thread a piece of festive red and white baker’s twine through the hole you punched earlier and tie a loop for hanging.
Smoother Surfaces
Before drying, dip your finger in water and gently rub the clay surface. This ‘burnishing’ erases fingerprints and creates a canvas-like smoothness for painting.
Curling Clay?
If the fingers start curling up while drying, place a lightweight book or flat board gently on top of the clay (after it has surface-dried for an hour) to keep it flat.
Now hang your distinctive Santa ornament on the tree and enjoy the handmade holiday cheer
Handprint Reindeer Ornament
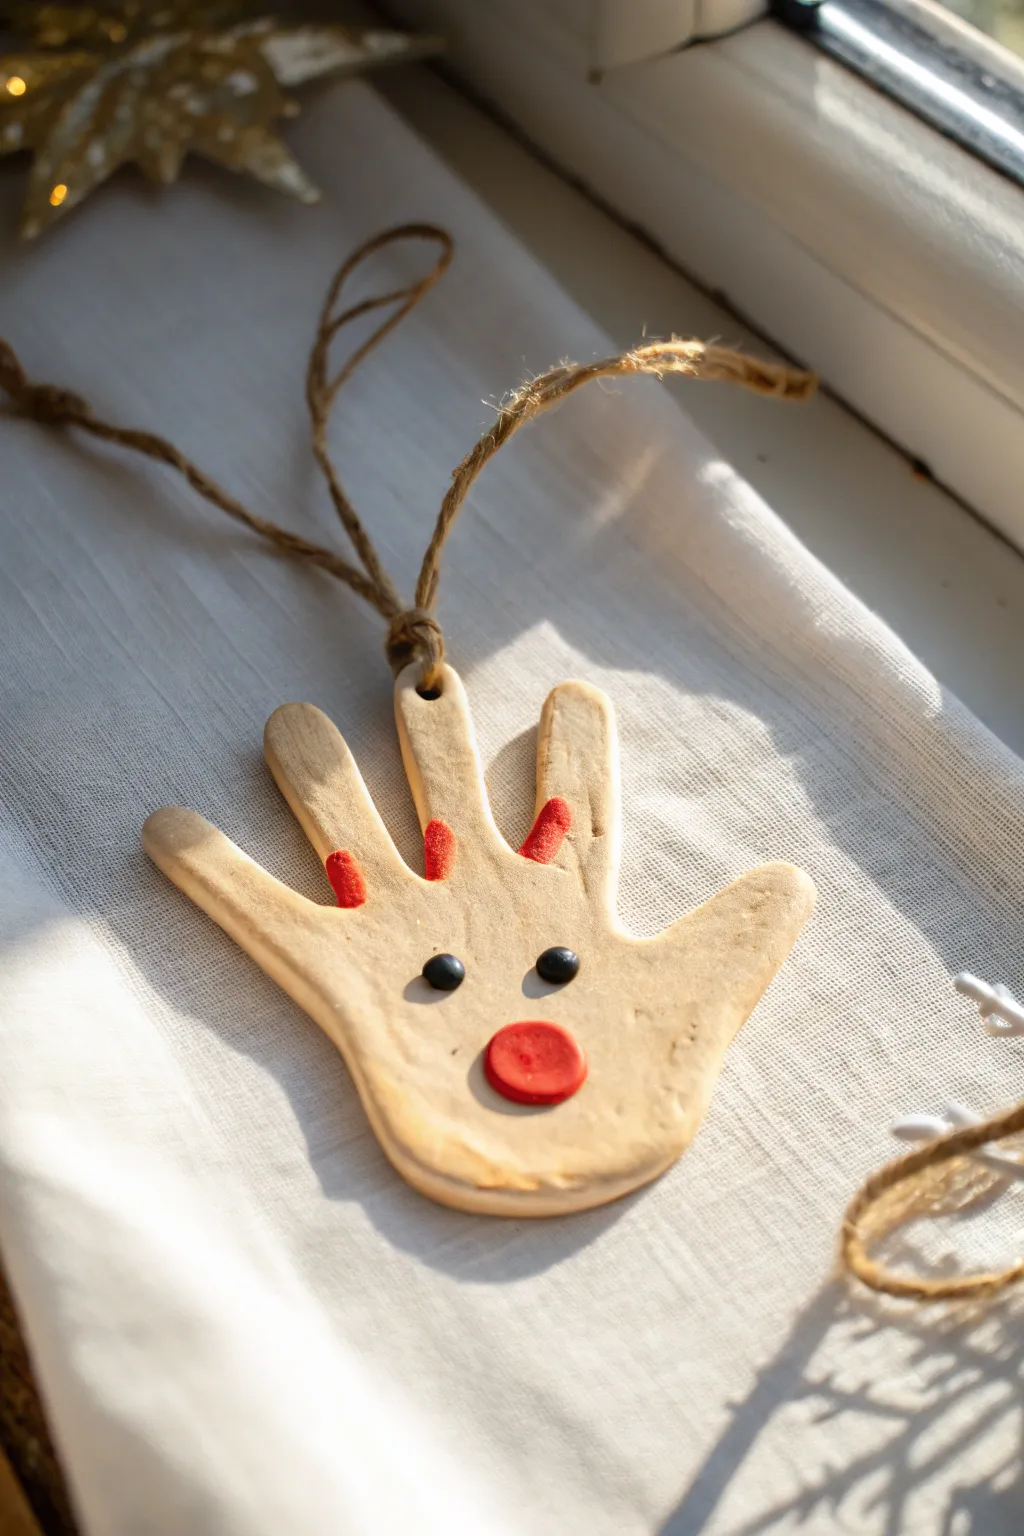
Transform a simple handprint into a festive keepsake with this adorable air dry clay reindeer ornament. The fingers become antlers and the palm turns into a sweet reindeer face complete with a bright red nose.
How-To Guide
Materials
- Air dry clay (white or natural)
- Rolling pin
- Parchment paper or craft mat
- Butter knife or clay cutting tool
- Plastic straw or skewer
- Fine-grit sandpaper
- Acrylic paint (red and black)
- Small round paintbrush
- Jute twine or ribbon
- Clear matte sealant (optional)
Step 1: Shaping the Clay
-
Prepare your surface:
Lay down a sheet of parchment paper on a flat surface to prevent sticking. Take a ball of air dry clay about the size of a large orange and knead it until it feels soft and pliable. -
Roll out the slab:
Using a rolling pin, flatten the clay ball into a smooth slab. You want an even thickness of about 1/4 inch—too thin and it might crack, too thick and it will be heavy. -
Make the impression:
Place the child’s hand (or your own!) firmly onto the clay slab. Press down gently on each finger and the center of the palm to ensure a clear, deep outline without pushing all the way through. -
Lift straight up:
Carefully lift the hand straight up off the clay to avoid smudging the edges of the print. -
Cut out the shape:
Use a butter knife or a clay tool to cut around the handprint. Leave a small border of about 1/4 inch around the impression so the edges are smooth and rounded rather than sharp. -
Smooth the edges:
Dip your finger in a tiny bit of water and run it along the cut edges of the handprint to smooth out any rough spots or knife marks. -
Create the hanger hole:
Use a plastic straw to punch a clean hole near the bottom of the palm (which will become the top of the reindeer’s head). Pierce clearly through to the other side.
Clay Smoothing Tip
If you see tiny cracks forming while the clay is wet, blend them together immediately with a drop of water on your fingertip to prevent them from growing during drying.
Step 2: Drying and Refining
-
Let it dry completely:
Place the ornament on a wire rack or leave it on the parchment paper to dry. This usually takes 24-48 hours depending on humidity. Flip it over halfway through to ensure even drying. -
Sand imperfections:
Once the clay is bone dry and hard, use a piece of fine-grit sandpaper to gently buff the edges or any bumps on the surface for a professional finish. -
Clean dust:
Wipe the ornament with a dry cloth or a soft brush to remove any clay dust before you start painting.
Step 3: Decoration
-
Paint the nose:
Using red acrylic paint, create a round circle on the thumb area of the print. Since the handprint is usually hung fingers-up for this design, the thumb acts as the nose area on the side, or you can place it low on the palm. -
Add the nose dimension:
For the look in the photo, you can actually attach a small flattened ball of clay for the nose *before* drying, or just paint a bold red circle now. If painting, I like to do two coats for vibrancy. -
Paint the eyes:
Dip the handle end of a paintbrush into black paint and dot two eyes onto the palm area, centered above your red nose. -
Add antler detail:
The fingers act as the antlers. Use a small brush and red paint (or brown if you prefer realism) to add small dashes or lines on the fingers to suggest texture or decoration. -
Let paint dry:
Allow the painted details to dry completely, which should only take about 15-20 minutes. -
Seal (optional):
If you want the ornament to last for years, apply a coat of clear matte sealant or Mod Podge over the entire front surface. -
Attach the hanger:
Cut a length of jute twine or festive ribbon. Thread it through the hole you made earlier and tie a secure knot to create a loop for hanging.
Make it Sparkle
Mix fine glitter into your red paint for the nose, or dust the wet paint on the ‘antler’ fingers with gold glitter for a magical holiday touch.
Now your custom reindeer is ready to bring holiday cheer to your tree or be given as a thoughtful gift
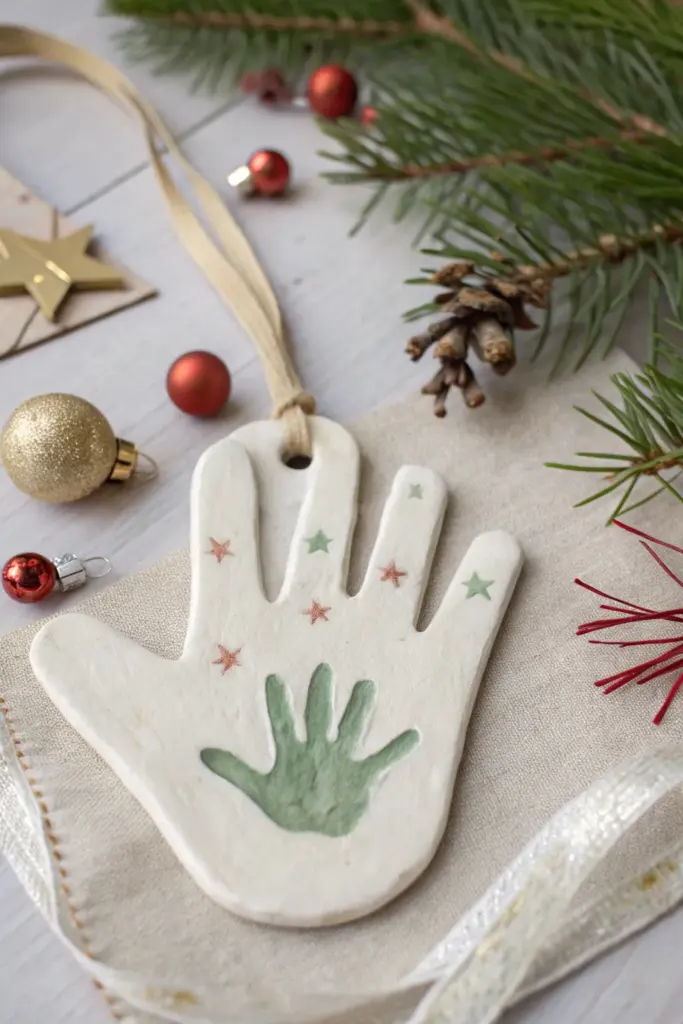
Handprint Christmas Tree Ornament

Keep a snapshot of little hands forever with this charming clay keepsake that features a large handprint cutout holding a tiny painted palm within. Decorated with delicate stamped stars and hung with a rustic ribbon, it makes for a heartwarming addition to any Christmas tree.
Step-by-Step Tutorial
Materials
- White coloring air dry clay
- Rolling pin
- Parchment paper or silicone mat
- Sharp craft knife or clay tool
- Small star stamps
- Acrylic paint (sage green and metallic bronze/red)
- Fine detail paintbrush
- Straw or skewer (for hole punching)
- Sandpaper (fine grit)
- Clear matte sealant or varnish
- Beige or cream cloth ribbon
Step 1: Shaping the Clay Base
-
Prepare your workspace:
Lay down a sheet of parchment paper or a silicone mat to prevent the clay from sticking to your table. -
Roll the clay:
Book a chunk of white air dry clay and roll it out evenly until it is about 1/4 inch thick. You want it sturdy enough not to crack, but not too heavy for a branch. -
Capture the big hand:
Have the older child (or adult) place their hand firmly onto the rolled clay. Press down gently on each finger and the palm to get a clear impression, but don’t push all the way through. -
Cut out the shape:
Using a sharp craft knife or a precision clay tool, carefully trace around the hand outline, leaving a smooth border around the fingers and palm. Remove the excess clay. -
Smooth the edges:
Dip your finger in a little bit of water and run it along the cut edges to smooth out any roughness or jagged bits for a polished look. -
Create the hanging hole:
Use a straw to punch a clean hole at the base of the palm (which will become the top when hanging) or near the wrist area, ensuring it’s not too close to the edge.
Smooth Operator
To fix small cracks that appear during drying, make a ‘slip’ by mixing a tiny bit of clay with water and smooth it into the cracks with your finger.
Step 2: Decorating & Drying
-
Add the inner print:
This is the tricky part! Paint a younger child’s palm with sage green acrylic paint. Carefully press their painted hand into the center of the clay hand cutout. Alternatively, for a cleaner look like the photo, press the clean hand into the clay first to make an impression, then paint inside it later. -
Stamp the stars:
Take your small star stamps. Press them gently into the clay on the fingers and surrounding the palm area to create indented patterns. -
Let it dry completely:
Place the clay on a wire rack to ensure air circulation. Let it dry for 24-48 hours, flipping it occasionally to prevent curling. I find waiting a full two days yields the best durability. -
Sand imperfections:
Once fully hard, use fine-grit sandpaper to gently buff away any rough spots on the edges or surface.
Step 3: Painting & Finishing
-
Paint the inner hand:
Using a fine brush and sage green paint, carefully fill in the impression of the smaller hand if you haven’t already, or refresh the paint if it faded during drying. -
Paint the stars:
Select specific stamped stars to highlight. Paint the alternating stars with the sage green and the metallic bronze/red color to create a festive pattern. -
Seal the ornament:
Apply a coat of clear matte varnish or sealant over the entire front and back. This protects the clay from moisture and preserves the paint colors. -
Add the hanger:
Cut a length of beige cloth ribbon. Thread it through the hole you created earlier. -
Secure the loop:
Tie a secure knot at the base of the ribbon near the clay, then tie the ends together to form a loop for the tree branch.
Make It Sparkle
Mix a tiny pinch of fine biodegradable glitter into your clear sealant before applying it for a subtle, snowy shimmer.
Hang your beautiful handmade keepsake on a sturdy branch and enjoy the memory for years to come