Whenever I need a quick, feel-good project, I reach for air dry clay and make a batch of hearts. Heart shapes are simple, super versatile, and they turn into the sweetest handmade decor or gifts with just a few finishing touches.
Classic Air Dry Clay Heart Ornaments
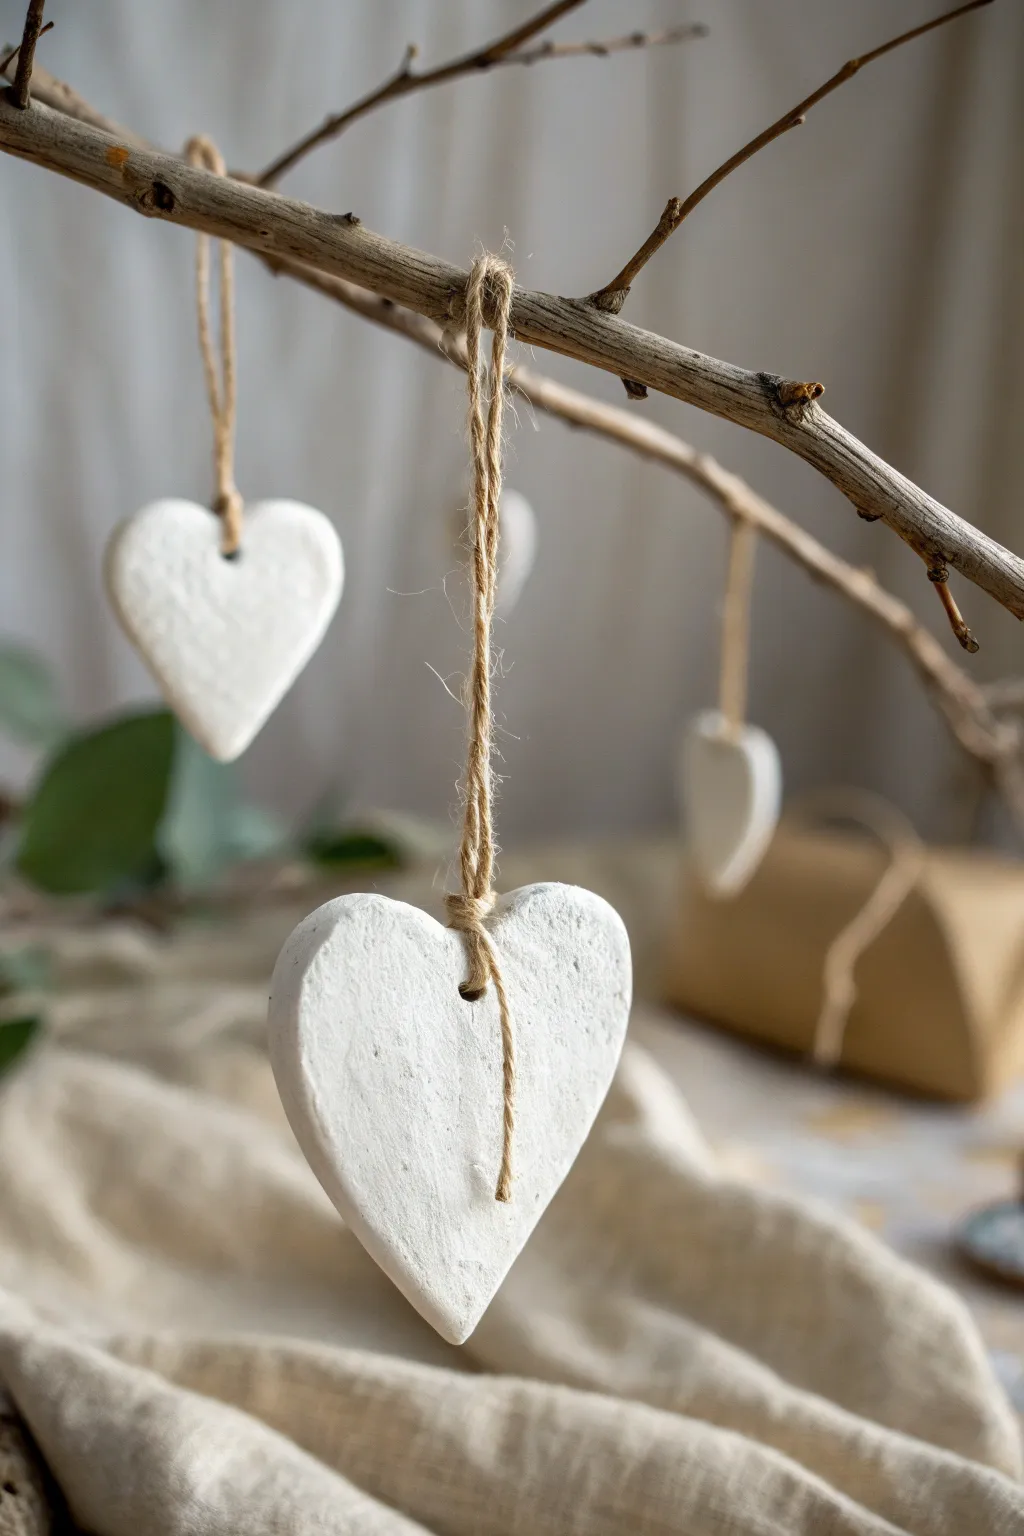
These charming, simplistic hearts capture a rustic elegance with their textured, matte white finish and natural jute hangers. Perfect for a Scandinavian-inspired display, they bring a touch of handmade warmth to any branch or holiday tree.
Step-by-Step
Materials
- White stone-effect air dry clay (or standard white air dry clay)
- Heart-shaped cookie cutter (approx. 2-3 inches wide)
- Rolling pin
- Parchment paper or silicone craft mat
- Straw, skewer, or chopstick (for creating the hole)
- Fine-grit sandpaper (optional)
- Natural jute twine or hemp cord
- Scissors
Step 1: Preparation & Shaping
-
Prep your workspace:
Lay down a sheet of parchment paper or a silicone mat on a flat surface. This prevents the clay from sticking and picking up unwanted debris while you work. -
Condition the clay:
Take a handful of your air dry clay and knead it gently in your hands for about a minute. The heat from your palms helps soften it, making it easier to roll out smoothly. -
Roll out the slab:
Place the clay on your mat and use the rolling pin to flatten it. Aim for a thickness of about 1/4 inch (approx. 5-7mm). You want them substantial enough to not be brittle, but light enough to hang. -
Add texture (optional):
If you want that slightly weathered look seen in the photo, lightly press a piece of crumpled aluminum foil or a rough fabric onto the surface of the clay slab before cutting. -
Cut the shapes:
Press your heart-shaped cookie cutter firmly into the clay. Give it a tiny wiggle before lifting to ensure a clean cut. -
Remove excess clay:
Peel away the scrap clay from around your heart shape rather than lifting the heart itself, which prevents distorting its form. -
Smooth the edges:
Dip your finger in a tiny bit of water and run it gently along the cut edges of the heart to soften any sharp ridges left by the cutter.
Step 2: Finishing & Assembly
-
Create the hanging hole:
I usually aim for the center of the top dip or slightly lower. Use a straw or skewer to punch a clear hole through the clay. Ensure the hole is wide enough for your twine. -
Let them dry:
Leave the hearts on a flat surface to dry. This typically takes 24-48 hours depending on humidity. Flip them over halfway through the drying process to ensure even drying and prevent curling. -
Check for rough spots:
Once fully dry and hard, inspect the edges. If there are any jagged bits, very gently sand them down with fine-grit sandpaper. -
Cut the twine:
Cut a length of jute twine, about 8-10 inches long depending on how low you want the ornament to hang. -
Thread the ornament:
Fold the twine in half to create a loop. Push the folded loop end through the hole in the heart from front to back. -
Secure the loop:
Open the loop you just pushed through and thread the loose ends of the twine through it. Pull tight to create a lark’s head knot directly on the ornament. -
Or, try a simple knot:
Alternatively, just thread a single strand through, pull both ends up together, and tie an overhand knot near the clay for a rustic finish like the one in the photo, leaving a long loop above. -
Tie off the top:
Knot the two loose ends of the twine together at the top to close the hanging loop. -
Display:
Hang your finished hearts on a bare branch for a minimalist look, or use them as gift tags.
Keep it Clean
Work with clean hands and tools. White clay shows dust easily! Keep baby wipes nearby to clean your fingers between steps.
Fixing Cracks
If clear cracks appear while drying, mix a tiny bit of clay with water to make a paste (slip) and fill the crack. Smooth it over and let dry again.
Enjoy the soothing simplicity of these handmade decorations in your home


Botanical Imprint Clay Hearts
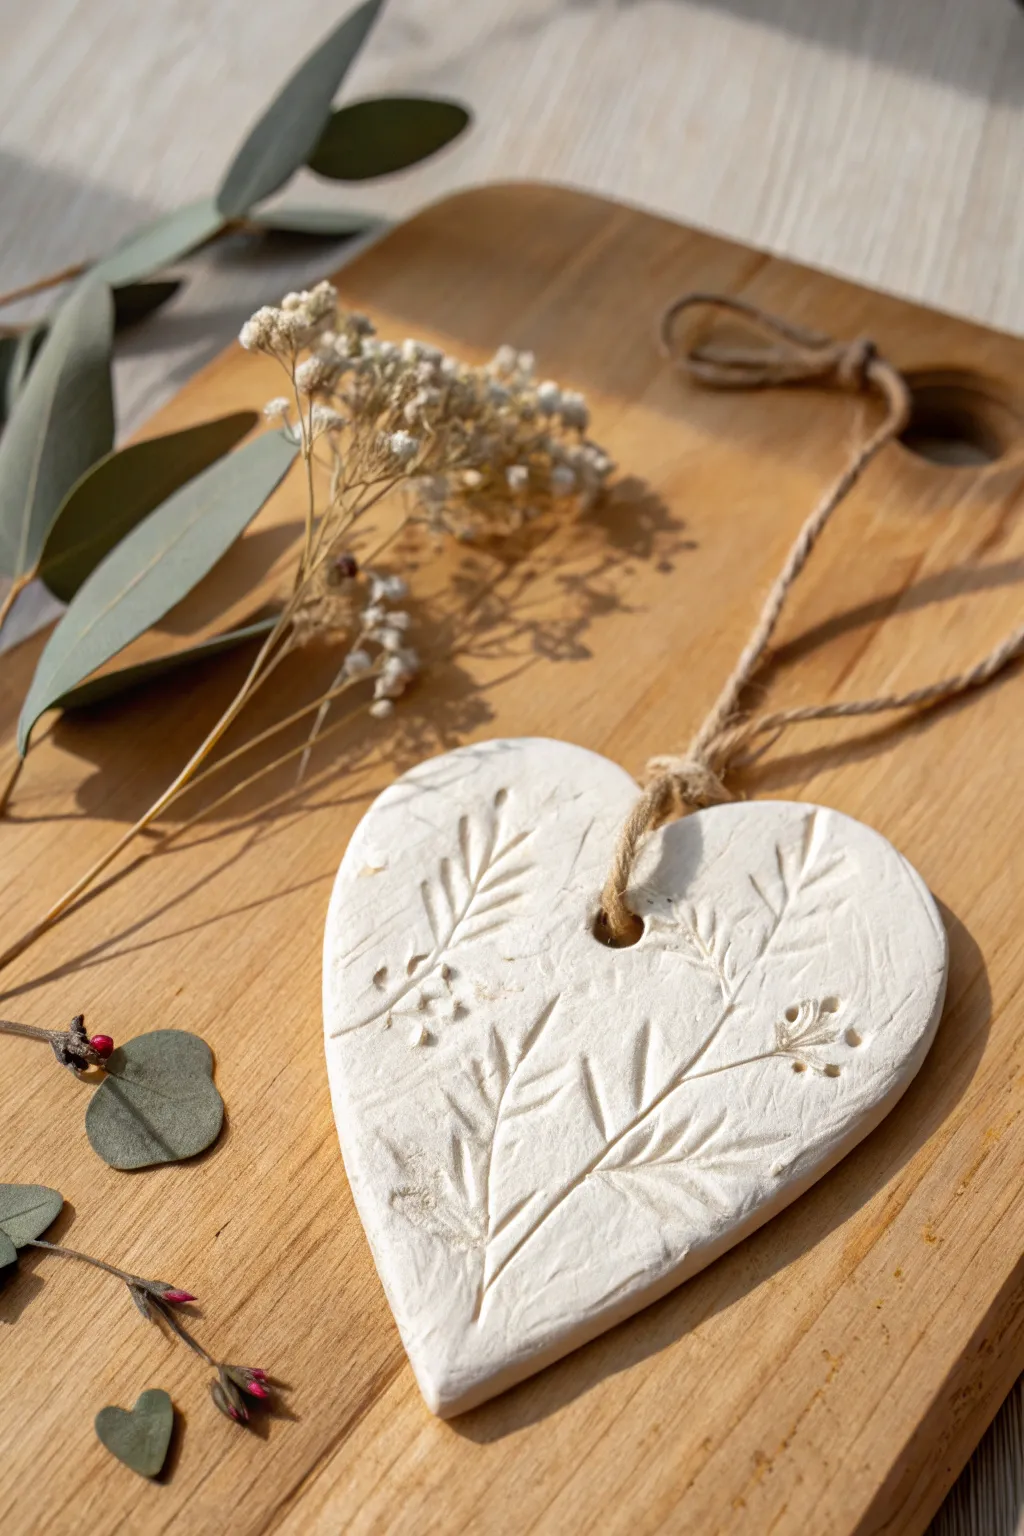
Capture the delicate beauty of nature in these timeless air-dry clay ornaments. With their organic textures and rustic twine hangers, these botanical imprinted hearts make stunning gift tags or year-round natural decor.
Step-by-Step Guide
Materials
- White organic air-dry clay
- Rolling pin (acrylic or wooden)
- Parchment paper or silicone mat
- Heart-shaped cookie cutter (medium to large size)
- Fresh or dried botanicals (eucalyptus leaves, baby’s breath, fern)
- Straw or skewer (for creating the hole)
- Natural jute twine
- Fine-grit sandpaper (optional)
- Small bowl of water
- Clear matte varnish (optional)
Step 1: Preparing the Canvas
-
Condition the Clay:
Begin by taking a handful of white air-dry clay. Knead it in your hands for a minute or two until it feels warm, pliable, and free of cracks. This conditioning step is crucial to prevent the clay from tearing later. -
Roll it Out:
Place your clay on a sheet of parchment paper or a silicone mat. Using your rolling pin, roll the clay out to a uniform thickness of about 1/4 inch (6mm). Avoid going too thin, as the clay needs to be sturdy enough to hold the imprint without cracking. -
Smooth the Surface:
Dip your finger lightly into a bowl of water and gently smooth over the top surface of the clay slab. This removes imperfections and prepares the ‘canvas’ for a clean botanical print.
Step 2: Creating the Botanical Impression
-
Select Your Botanicals:
Choose small sprigs of vegetation. In the reference image, fine-leafed stems resembling rosemary or fern and small flower buds work best. Ensure they are clean and dry. -
Arrange the Composition:
Gently lay your selected stems onto the rolled clay. I like to arrange them slightly off-center or cascading upwards to create a natural, growing movement similar to the photo. -
Press the Plants:
Take your rolling pin and gently roll *over* the plant material once. Use firm, even pressure to push the stems and leaves into the clay surface. Do not roll back and forth, as this can create a double image or shift the plants. -
Reveal the Details:
Carefully lift the plant stems away from the clay using tweezers or your fingernail. Pull slowly to ensure you don’t tear the clay edges where the impression is deep.
Fixing Cracks
If hairline cracks appear while drying, mix a tiny bit of fresh clay with water to make a paste (slip) and smooth it into the cracks with your finger.
Step 3: Shaping and Finishing
-
Cut the Heart:
Position your heart-shaped cookie cutter over the imprinted design. Frame the botanical pattern so it fills the heart nicely, then press down firmly to cut the shape. -
Clean the Edges:
Remove the excess clay from around the cutter first, then lift the cutter. Use a slightly damp finger to smooth any rough, jagged edges along the perimeter of the heart. -
Add a Hanging Hole:
While the clay is still wet, use a straw or a wooden skewer to poke a hole near the top center of the heart. Make sure the hole is large enough for your twine to pass through later, keeping in mind the clay shrinks slightly as it dries. -
Let it Dry:
Place the heart on a flat surface lined with clean parchment paper. Let it air dry for 24 to 48 hours. I suggest turning it over carefully halfway through the drying process to ensure the back dries evenly and prevents warping. -
Sand for Perfection:
Once fully dry and hard, inspect the edges. If there are any sharp spots, very gently buff them away with fine-grit sandpaper for a professional finish. -
The Final Touch:
Cut a length of natural jute twine, thread it through the hole, and tie a simple knot to create a loop. Your rustic botanical ornament is now ready to display.
Add Subtle Color
After the clay dries completely, brush a very diluted watercolor wash (light green or brown) into the impressions to make the botanical details pop.
Enjoy finding the perfect spot to hang your handcrafted piece of nature


Lace-Textured Heart Keepsakes
These delicate keepsakes capture the intricate beauty of lace in a permanent, stone-like finish. The result is a sophisticated, textured heart ornament perfect for wedding favors, holiday decor, or a simple, elegant gift.
How-To Guide
Materials
- White air-dry clay (or white polymer clay)
- Small rolling pin
- Heart-shaped cookie cutter (approx. 3-4 inches)
- Piece of textured lace, doily, or a lace texture mat
- Parchment paper or non-stick craft mat
- Straw or small circular cutter (for the hole)
- Fine-grit sandpaper (optional)
- Cream or beige satin/grosgrain ribbon
- Clear matte varnish (optional)
Step 1: Preparing the Clay Canvas
-
Condition the clay:
Begin by taking a handful of white air-dry clay. Knead it thoroughly in your hands until it feels warm, pliable, and free of any cracks. -
Initial rolling:
Place a sheet of parchment paper down on your work surface to prevent sticking. Place your clay ball in the center. -
Flattening:
Roll the clay out into a smooth slab. You want an even thickness of about 1/4 inch (6mm). Don’t go too thin, or the heart might be fragile later. -
Check for bubbles:
Inspect the surface for any air bubbles. If you see one, gently pierce it with a needle tool and smooth the area with your finger.
Step 2: Creating the Texture
-
Position the lace:
Lay your piece of lace or doily directly onto the rolled clay slab. I like to choose a section of lace with distinct floral motifs, as seen in the photo, for the best visual impact. -
Imprinting:
Take your rolling pin and roll firmly over the lace *once* in a single direction. Rolling back and forth can cause the pattern to shift and create a ‘ghost’ image. -
Reveal the pattern:
Carefully peel back the lace to reveal the raised botanical design left behind in the clay.
Clay curling up?
If the edges curl while drying, place a light book on top of the heart (sandwiched between parchment paper) once it is semi-dry but still slightly flexible.
Step 3: Cutting and Refining
-
Cut the shape:
Position your heart-shaped cookie cutter over the most attractive part of the pattern. Press down firmly to cut the shape. -
Add the hole:
Before removing the cutter (if possible) or immediately after, use a straw to punch a clean hole near the top center of the heart for hanging. -
Remove excess:
Peel away the excess scrap clay from the outside of the cutter. Then, gently lift the clay heart. If it sticks, lift the parchment paper underneath to help release it. -
Smooth the edges:
Dip your finger in a tiny bit of water and lovingly smooth out the rough edges of the heart to ensure a professional finish. Be careful not to smudge the top texture.
Highlight the Details
After drying, lightly brush a watered-down brown or grey acrylic paint over the texture and immediately wipe it off with a damp cloth to create an antique look.
Step 4: Drying and Finishing
-
Let it dry:
Place the heart on a fresh sheet of parchment paper or a wire cooling rack. Allow it to air dry for 24-48 hours. Turn it over gently halfway through so the back dries evenly. -
Sand edges:
Once fully cured and hard, use fine-grit sandpaper to lightly buff away any remaining sharp spots on the outer rim. -
Seal (optional):
For longevity, brush on a thin coat of matte clear varnish or Mod Podge. This seals the porous surface without making it look plasticky. -
Add the ribbon:
Cut a length of cream-colored ribbon (about 12 inches). Fold it in half and thread the loop through the hole from front to back. -
Secure the loop:
Pass the loose ends of the ribbon through the loop and pull tight to create a lark’s head knot, securing the hanger.
Now you have a timeless piece of decor that looks like fossilized lace ready to hang or gift


Stamped Name Heart Gift Tags
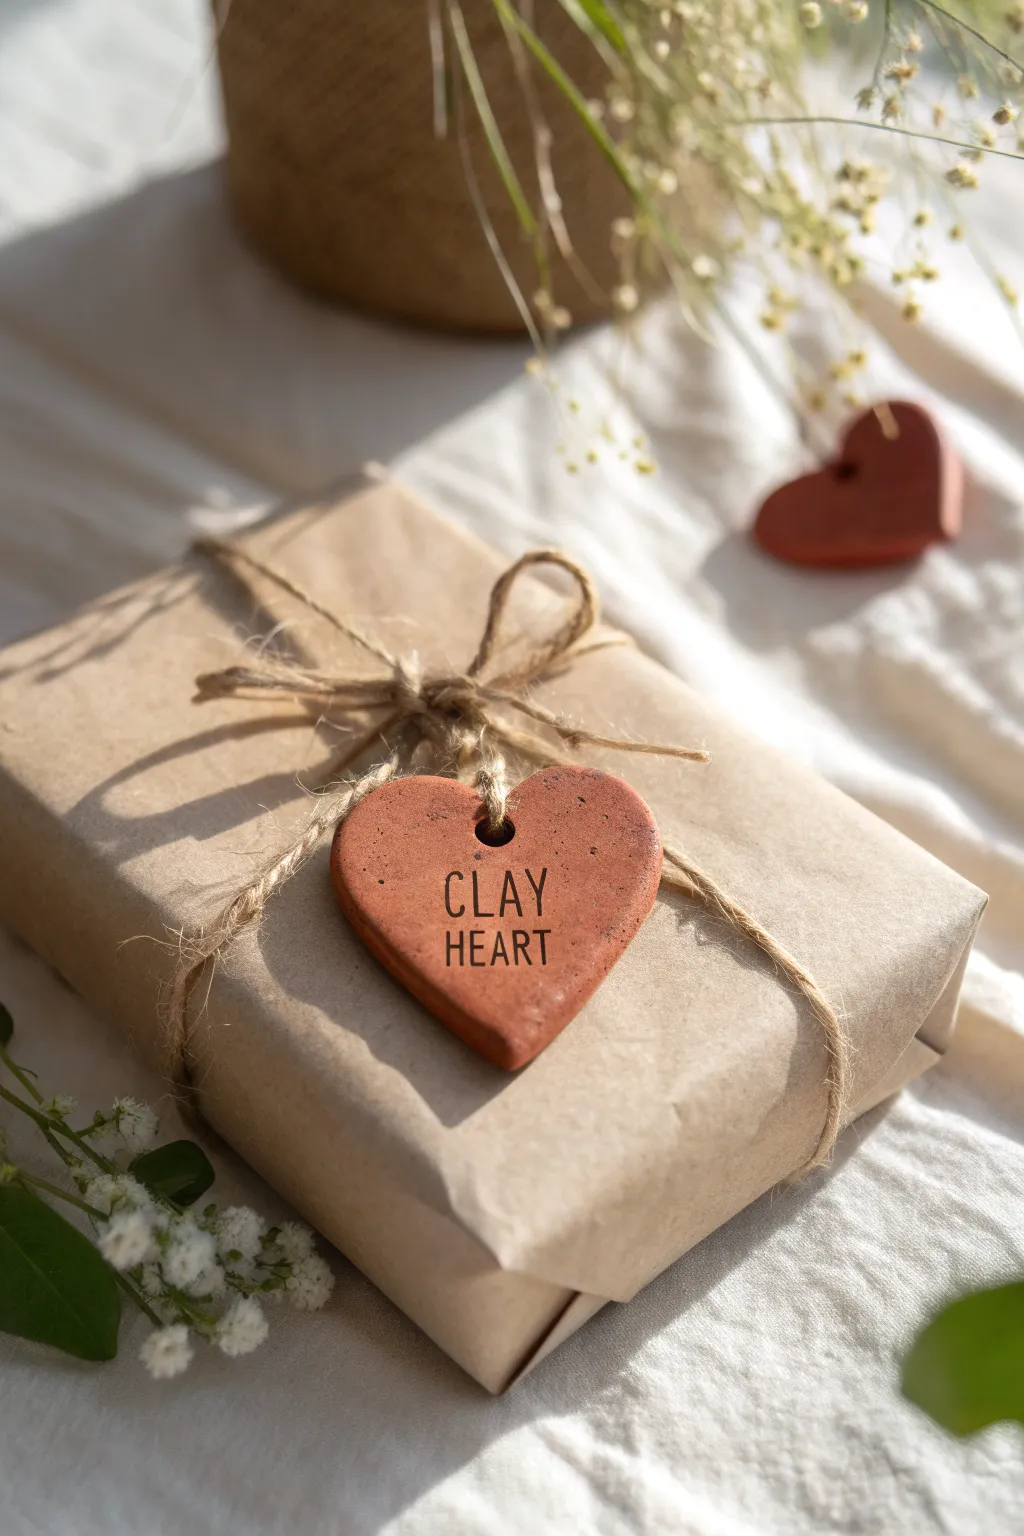
Elevate your gift wrapping with these charming, rustic heart-shaped tags that look just like fired terracotta. Stamped with custom text and attached with natural twine, they add a personal, handmade touch to plain kraft paper parcels.
Detailed Instructions
Materials
- Terracotta-colored air dry clay (e.g., DAS or Crayola)
- Rolling pin or smooth glass jar
- Heart-shaped cookie cutter (approx. 2-3 inches wide)
- Alphabet stamp set (small serif or sans-serif font)
- Parchment paper or non-stick craft mat
- Drinking straw or cocktail stick
- Fine grit sandpaper (optional)
- Jute twine
- Kraft wrapping paper
- Dried baby’s breath or greenery (for styling)
Step 1: Shaping the Clay Hearts
-
Prepare your workspace:
Lay down a sheet of parchment paper or a non-stick craft mat on a flat, stable surface. Take a handful of terracotta air dry clay and knead it gently in your hands to warm it up and make it pliable. -
Roll out the slab:
Place the clay on the parchment paper. Using a rolling pin, flatten the clay to an even thickness of about 1/4 inch (6mm). If you want a smoother surface, you can dip your finger in a little water and glide it over the clay slab. -
Cut the shapes:
Press your heart-shaped cookie cutter firmly into the clay slab. Wiggle it slightly to ensure a clean cut, then lift the cutter directly up. Repeat to create as many tags as you need. -
Remove excess clay:
Peel away the scrap clay from around your heart shapes. You can ball this up and store it in an airtight container for later use. Leaving the hearts on the parchment paper helps prevent them from warping as you move them. -
Create the hanging hole:
Using a drinking straw or a cocktail stick, press a hole into the top center of each heart, right in the dip between the two lobes. Twist the straw gently as you pull it out to get a clean hole.
Clean Stamp Impressions
If the clay is sticking to your stamps, lightly dust the stamp surface with cornstarch or baby powder before pressing it into the wet clay.
Step 2: Stamping and Finishing
-
Plan your text:
Before stamping the clay, arrange your letter stamps on the table to ensure you have the correct spelling and spacing. For the sample shown, I used the words ‘CLAY’ and ‘HEART’ on two separate lines. -
Stamp the clay:
Gently press the letter stamps into the soft clay. Apply even pressure, but not so deep that it distorts the heart shape. Start with the middle letter of each word to help center the text perfectly. -
Smooth the edges:
Dip your finger in a tiny bit of water and run it along the cut edges of the heart to smooth out any roughness left by the cookie cutter. This gives it a professional, finished look. -
Initial drying phase:
Let the hearts sit undisturbed on the parchment paper. After about 4 hours, gently flip them over. This ensures the bottom side gets air exposure and prevents the clay from curling upward as it dries. -
Complete drying:
Allow the clay to dry fully for 24 to 48 hours. The color will lighten slightly as the moisture evaporates, turning into a beautiful matte terracotta shade. -
Sand imperfections:
Once fully hard, check the edges. If there are any sharp bits or uneven areas, very lightly sand them down with fine-grit sandpaper.
Step 3: Assembly
-
Wrap the gift:
Wrap your box neatly in brown kraft paper. Secure it with tape on the underside for a clean presentation. -
Cut the twine:
Cut a long length of jute twine. You’ll need enough to wrap around the package multiple times and tie a bow. -
Thread the tag:
Thread one end of the twine through the hole in your dried clay heart. Slide the heart so it rests in the middle of the twine length. -
Tie the package:
Wrap the twine around the gift box, crossing it underneath if desired, or just wrapping it around the top several times for a rustic look. Position the heart centrally on the top face of the box. -
Secure the bow:
Tie a secure knot to hold the heart in place, then finish with a simple bow. Fray the ends of the twine slightly for texture. -
Add floral accents:
Take a small sprig of dried baby’s breath or greenery. Tuck the stem underneath the twine knot behind the bow to complete the look.
Add Subtle Color
For a two-tone effect, gently rub a bit of white acrylic paint or dark wax into the stamped letters after drying, then wipe the surface clean.
Now you have a beautifully personalized tag that transforms a simple gift into a keepsake

The Complete Guide to Pottery Troubleshooting
Uncover the most common ceramic mistakes—from cracking clay to failed glazes—and learn how to fix them fast.
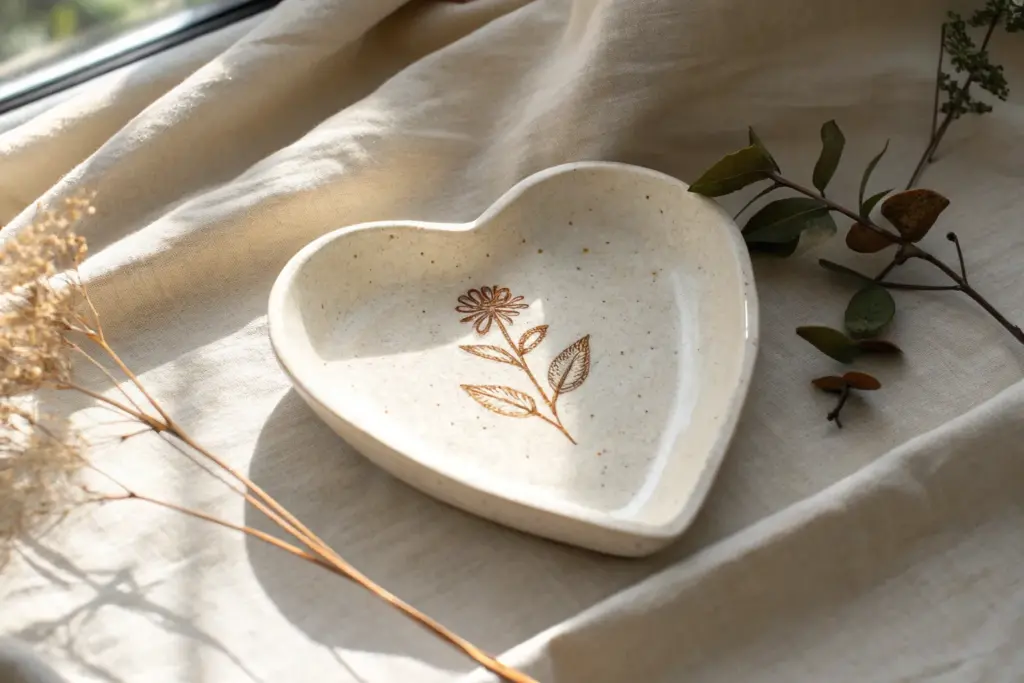
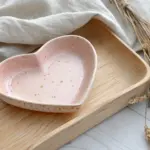
Heart Trinket Dishes for Rings
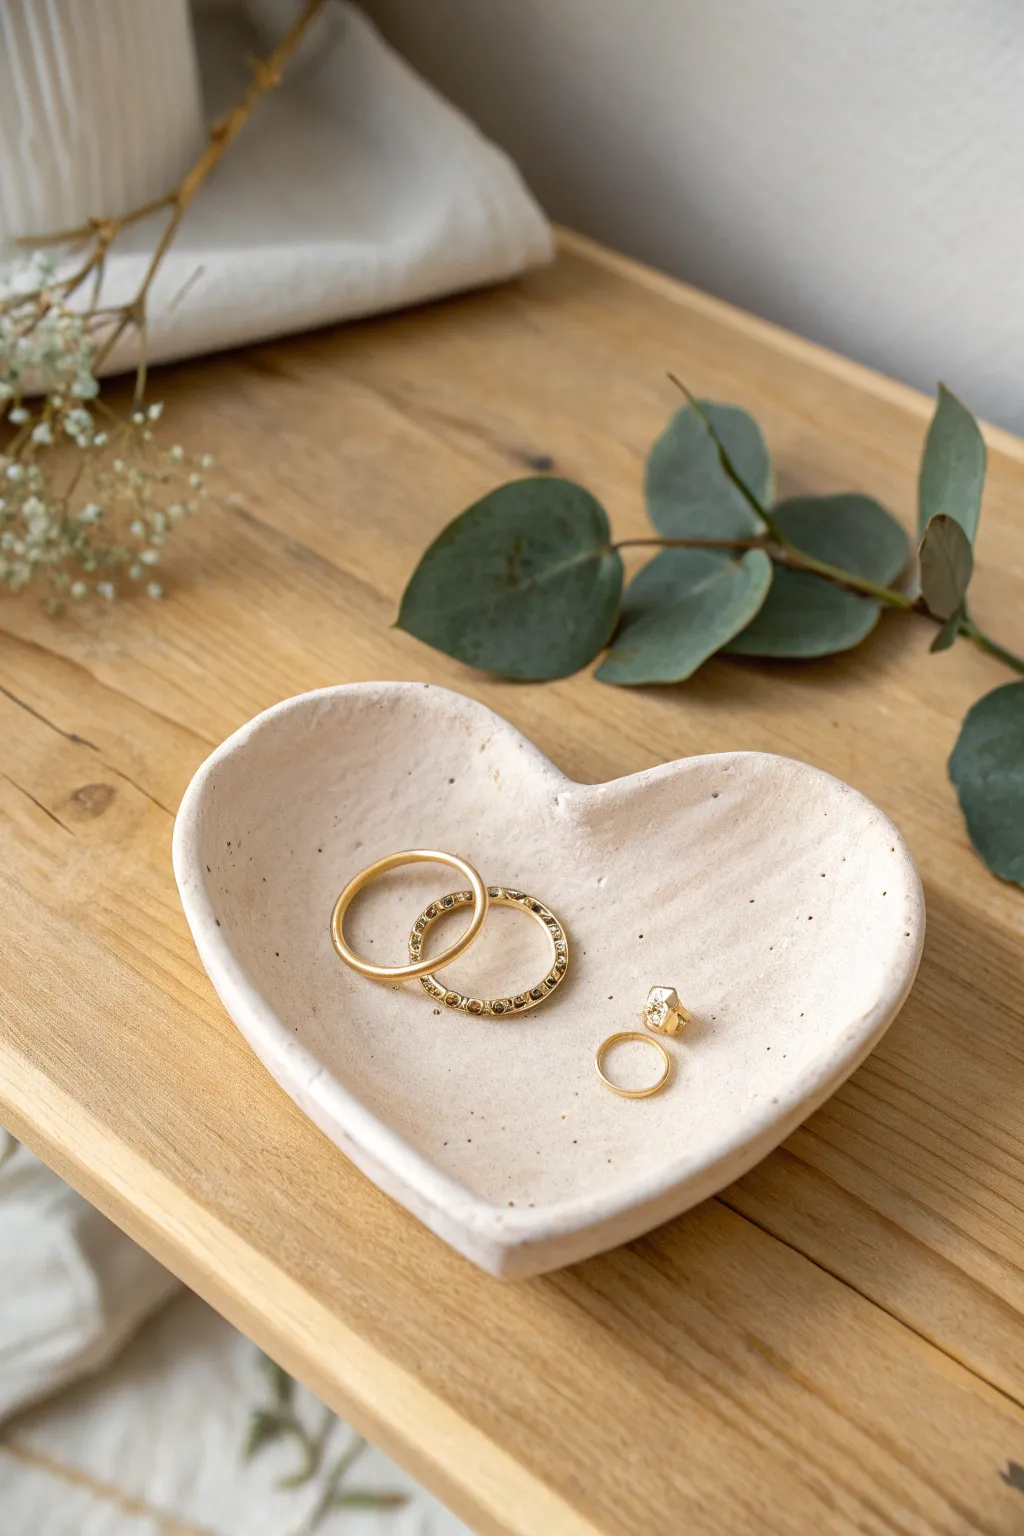
This minimalist heart-shaped dish features a lovely organic texture and speckled finish that mimics high-end ceramic stoneware. It is the perfect size for holding your everyday gold bands and adds a touch of rustic elegance to any bedside table.
Step-by-Step Tutorial
Materials
- White air dry clay
- Rolling pin
- Parchment paper or craft mat
- Heart-shaped cookie cutter (medium size)
- Small bowl or water for smoothing
- Fine grit sandpaper (220 grit)
- Acrylic paint (cream or off-white)
- Dark brown or black acrylic paint
- Old toothbrush
- Matte varnish or sealant
- Small paintbrush
- Sponge (optional)
Step 1: Shaping the Clay
-
Condition the clay:
Begin by grabbing a handful of air dry clay. Knead it in your hands for a minute or two until it feels warm, pliable, and free of cracks. -
Roll it out:
Place the clay on a sheet of parchment paper to prevent sticking. Use your rolling pin to flatten the clay into an even slab, aiming for a thickness of about 1/4 inch. -
Cut the shape:
Press your heart-shaped cookie cutter firmly into the clay slab. Wiggle it slightly to ensure a clean cut, then lift the cutter and peel away the excess clay from the outside edges. -
Soften the edges:
Dip your finger into a small amount of water. Gently run your fingertip along the sharp cut edges of the heart to round them over slightly, removing any harsh lines left by the cutter. -
Create the curve:
To give the dish its concave shape, gently lift the edges of the heart upwards with your fingers. Pinch and curve the sides up gradually to create a shallow bowl form. -
Refine the form:
Use your thumbs to smooth the inside of the dish, pressing lightly to ensure the curve is consistent. If any small cracks appear at the rim, smooth them over immediately with a little touch of water. -
Add surface texture:
For that handmade, organic look seen in the photo, refrain from making the surface perfectly glass-smooth. You can lightly tap the surface with a dry sponge or crumpled parchment paper to add subtle indentations.
Step 2: Drying and Finishing
-
Let it dry:
Place the heart on a flat surface to dry. I like to let this dry for at least 24-48 hours, flipping it over halfway through to ensure the bottom dries evenly. -
Sand for perfection:
Once fully hard, take your fine-grit sandpaper and gently buff the rim and any rough spots on the curve. Wipe away the white dust with a slightly damp cloth or paper towel. -
Apply base color:
Mix a cream or warm off-white acrylic paint. Apply two thin coats to the entire dish, allowing the first coat to dry completely before adding the second. -
Prepare the speckles:
Dilute a very small amount of dark brown or black acrylic paint with water until it has an ink-like consistency. -
Splatter the texture:
Dip an old toothbrush into the diluted dark paint. Hold the brush over the dish and run your thumb across the bristles to flick tiny specks of paint onto the surface. Practice on paper first to control the spray. -
Seal the dish:
Once the paint effects are completely dry, apply a coat of matte varnish. This protects the clay from moisture and gives it that finished ceramic feel without adding unwanted gloss.
Uneven Rims?
If the edges warp while drying, don’t worry. Wait until it’s bone dry, then place a sheet of sandpaper flat on the table and rub the dish upside-down in circles to level the rim.
Level Up: Gold Rim
For an extra touch of luxury, paint just the very top edge of the rim with liquid gold leaf or metallic gold paint after the speckling step is dry.
Now you have a charming spot to keep your favorite rings safe
Mini Heart Bowls for Desk Bits
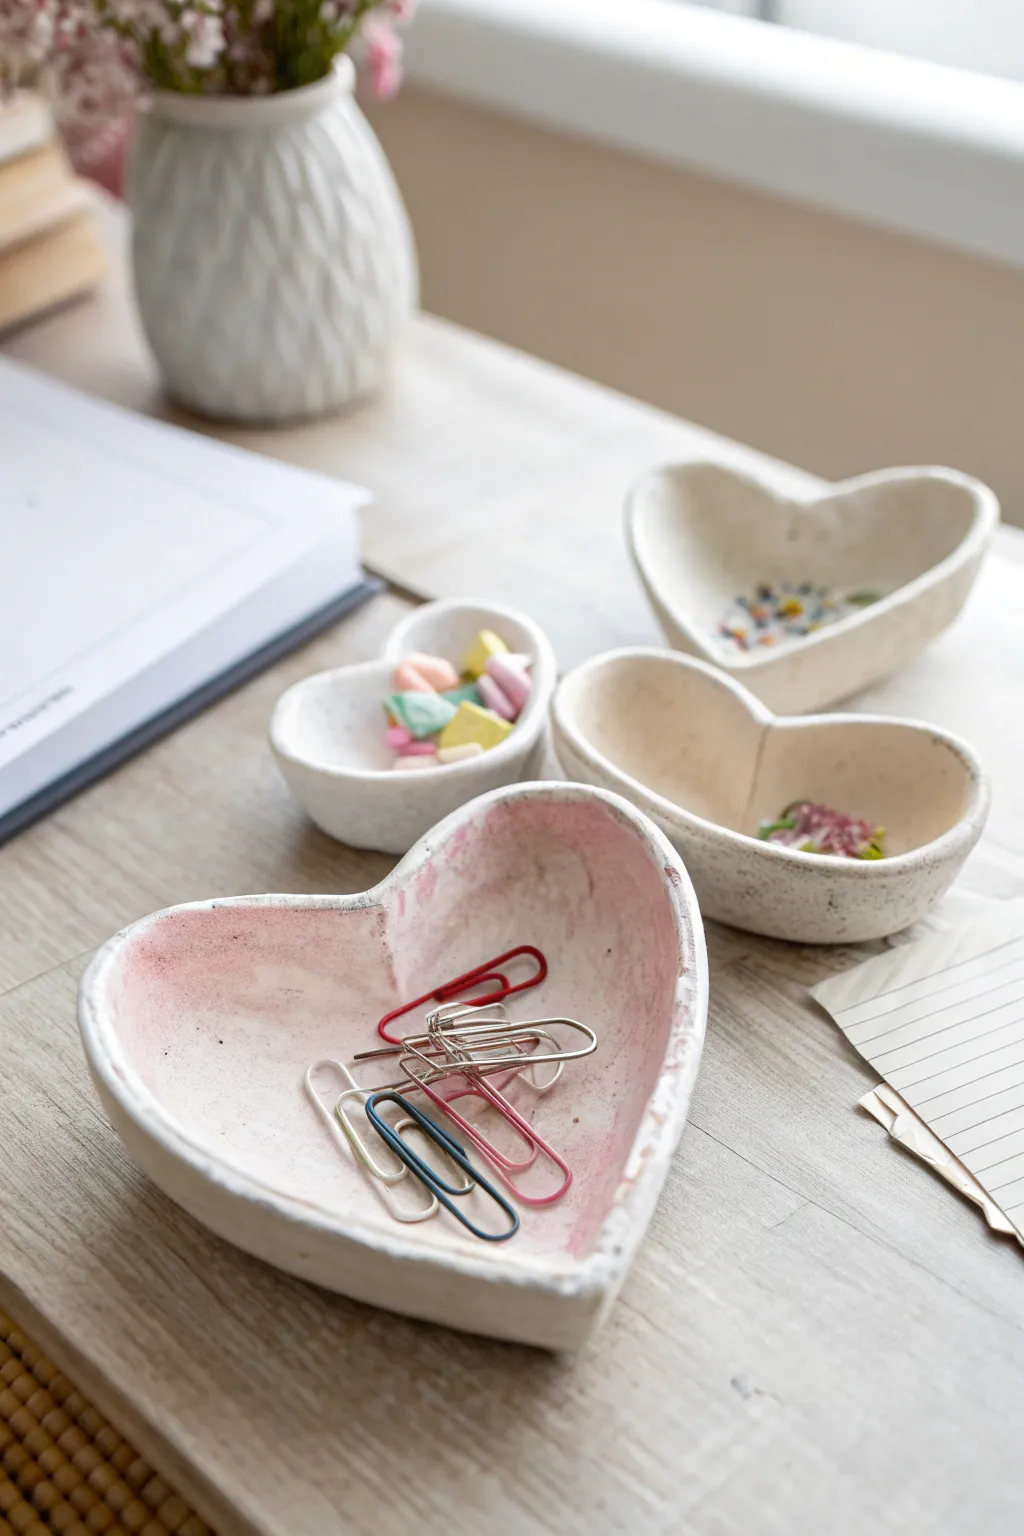
Keep your workspace tidy with these charming, rustic heart bowls crafted from air-dry clay. Their organic shape and soft, washed finish make them perfect catch-alls for paperclips, beads, or other tiny desk treasures.
How-To Guide
Materials
- White air-dry clay
- Rolling pin or smooth glass jar
- Heart-shaped cookie cutters (various sizes) or a paper template
- Small bowl of water
- Craft knife or clay tool
- Fine-grit sandpaper (220 grit)
- White acrylic paint
- Pink acrylic paint (optional for the wash)
- Small paintbrush
- Matte sealant or varnish
- Palette or small dish for mixing
Step 1: Shaping the Clay
-
Condition the clay:
Begin by taking a handful of air-dry clay and kneading it in your hands to warm it up. This helps remove air bubbles and makes the clay more pliable and less prone to cracking later. -
Roll it out:
On a clean, flat surface, roll the clay out to an even thickness of about 1/4 inch. Avoid making it too thin, as the edges need some structure to stand up. -
Cut the shapes:
Press your heart-shaped cookie cutters firmly into the clay. If you want different sizes like in the photo but don’t have cutters, simply trace around a paper heart template with a craft knife. -
Curve the edges:
Gently lift the clay heart. Using your fingertips, slowly curl the edges upward to create a shallow bowl shape. Pinch the bottom point and the top ‘v’ of the heart slightly to define the form. -
Smooth the surface:
Dip your finger into a little water and run it along the rim and inside of the bowl. This smooths out any rough cuts or fingerprints. Don’t use too much water, or the clay will get mushy. -
Refine the shape:
Set the bowl down on your work surface and gently press the center down so it has a flat bottom. This ensures it won’t wobble on your desk once it’s dry.
Cracks appeared?
Mix a small amount of fresh clay with water to create a paste (slip). Fill the crack, smooth it over, and let it dry again before sanding.
Step 2: Drying and Refining
-
Let it dry:
Place your moulded hearts in a safe spot away from direct heat. Let them air dry completely for 24-48 hours. I usually flip them over halfway through the drying process to ensure the bottom dries evenly. -
Sand for smoothness:
Once bone dry, use fine-grit sandpaper to gently buff away any sharp edges or uneven bumps on the rim. Wipe away the dust with a barely damp cloth.
Make it Luxe
Paint the very rim of the heart with metallic gold leaf paint for a chic, high-end finish that catches the light.
Step 3: Painting and Finishing
-
Apply base coat:
Paint the entire bowl, inside and out, with opaque white acrylic paint. You may need two coats to get a solid, crisp white finish. Let this dry completely. -
Mix a pink wash:
To recreate the subtle look shown in the larger bowl, mix a tiny drop of pink paint with water to create a very sheer, watery consistency. -
Apply the wash:
Brush the watery pink mixture casually inside the bowl. Because it’s a wash, it will settle into the texture of the clay, giving it that lovely rustic, worn effect rather than a solid block of color. -
Blot excess:
If the color looks too heavy, quickly dab it with a paper towel to lift some pigment while it’s still wet. -
Seal the bowl:
Finish by applying a coat of matte sealant or varnish. This protects the paint from chipping and gives the bowl a finished feel.
Now you have a sweet set of custom organizers ready to brighten up your desk space


What Really Happens Inside the Kiln
Learn how time and temperature work together inside the kiln to transform clay into durable ceramic.
Simple Heart Magnets for the Fridge
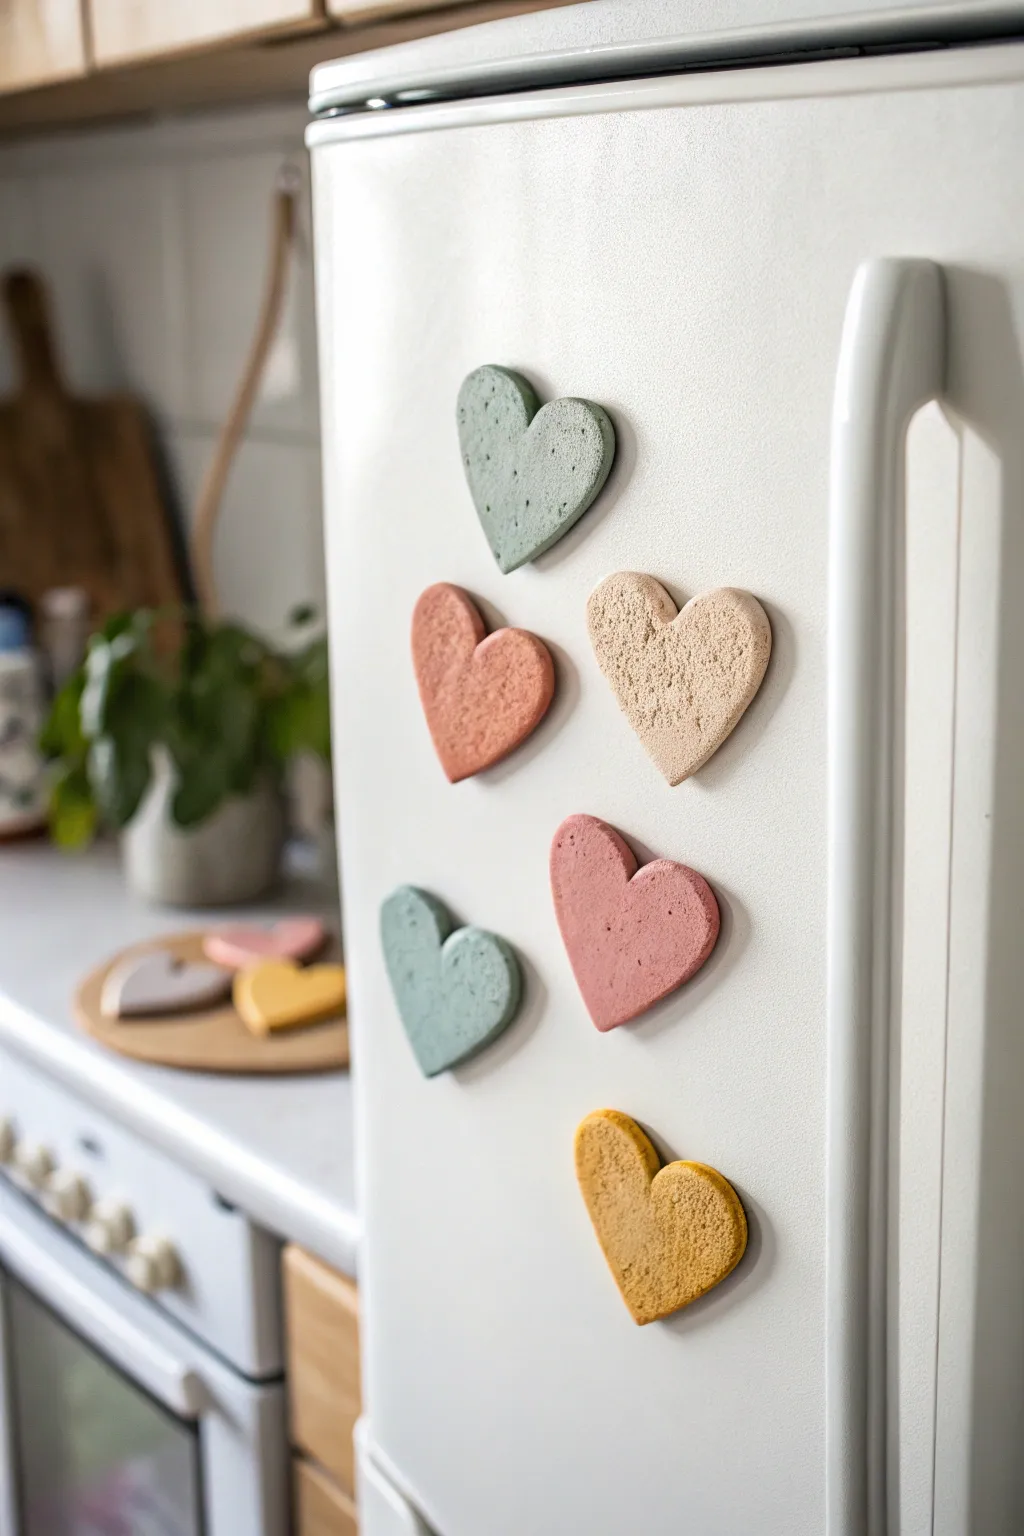
Add a touch of handmade charm to your kitchen with these earthy, textured heart magnets. The matte finish and subtle speckling give them a modern, organic feel that looks beautiful against a crisp white fridge.
Step-by-Step
Materials
- Air dry clay (white or light grey)
- Acrylic paints (sage green, terracotta, beige, dusty rose, mustard)
- Small heart-shaped cookie cutter (approx. 2-3 inches)
- Rolling pin
- Parchment paper or silicone mat
- Old toothbrush or stiff bristle brush
- Sandpaper (fine grit)
- Strong round craft magnets
- Super glue or heavy-duty craft glue
- Spray varnish (matte finish, optional)
Step 1: Shaping and Texturing
-
Prepare the workspace:
Lay down your parchment paper or silicone mat on a flat surface to prevent the clay from sticking. -
Condition the clay:
Take a handful of air dry clay and knead it warm in your hands until it becomes soft and pliable, which helps prevent cracking later. -
Roll the slab:
Use your rolling pin to flatten the clay to an even thickness of about 1/4 inch. You want them thick enough to be sturdy but not so heavy they slide down the fridge. -
Add texture:
Before cutting, take an old toothbrush or a stiff bristle brush and gently tap it all over the surface of the clay slab. This creates that lovely organic, porous stone look. -
Cut the shapes:
Press your heart-shaped cookie cutter firmly into the textured clay. Wiggle it slightly to ensure a clean cut, then lift the excess clay away. -
Smooth the edges:
Dip your finger in a little water and gently run it along the cut edges of the hearts to remove any sharp burrs or roughness left by the cutter. -
Dry the hearts:
Place the hearts on a clean wire rack or mesh screen for airflow. Let them dry completely, which usually takes 24-48 hours depending on humidity. Flip them halfway through.
Step 2: Color and Finish
-
Sand imperfections:
Once fully dry and hard, lightly sand the edges with fine-grit sandpaper if they feel too sharp, but try to preserve the surface texture you created. -
Mix your palette:
Prepare your acrylic paints. For the earthy look in the photo, mix your primary colors with a tiny dot of brown or grey to mute them into sage, terracotta, and mustard tones. -
Base coat:
Apply a solid coat of paint to the front and sides of each heart. I find a flat, soft brush works best to get paint into the little textured crevices. -
Create the speckled effect:
Dip a toothbrush into a contrasting dark color (like dark grey or brown) mixed with a little water. Run your thumb over the bristles to flick tiny speckles onto the dry painted hearts. -
Dry paint:
Allow the paint layers to dry completely before handling. -
Seal (Optional):
If these will be in a high-traffic area, spray them with a light coat of matte varnish to protect the paint without making them shiny. -
Attach magnets:
Apply a pea-sized drop of super glue or strong craft adhesive to the center of the back of each heart. -
Press and hold:
Press the round magnet firmly into the glue and hold for 30 seconds to ensure a tight bond. -
Final cure:
Let the glue cure according to the manufacturer’s instructions (usually overnight) before sticking them to your fridge.
Stone Effect Trick
Mix wet coffee grounds into the white clay before rolling it out. This creates natural speckles and texture that stay visible even after painting.
Curling Edges?
If the hearts curl up while drying, place a lightweight book or board gently on top of them once they are partially dry (leather-hard) to keep them flat.
Enjoy arranging your new collection of colorful hearts on your refrigerator
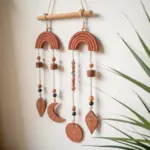
Heart Garland With Twine and Beads
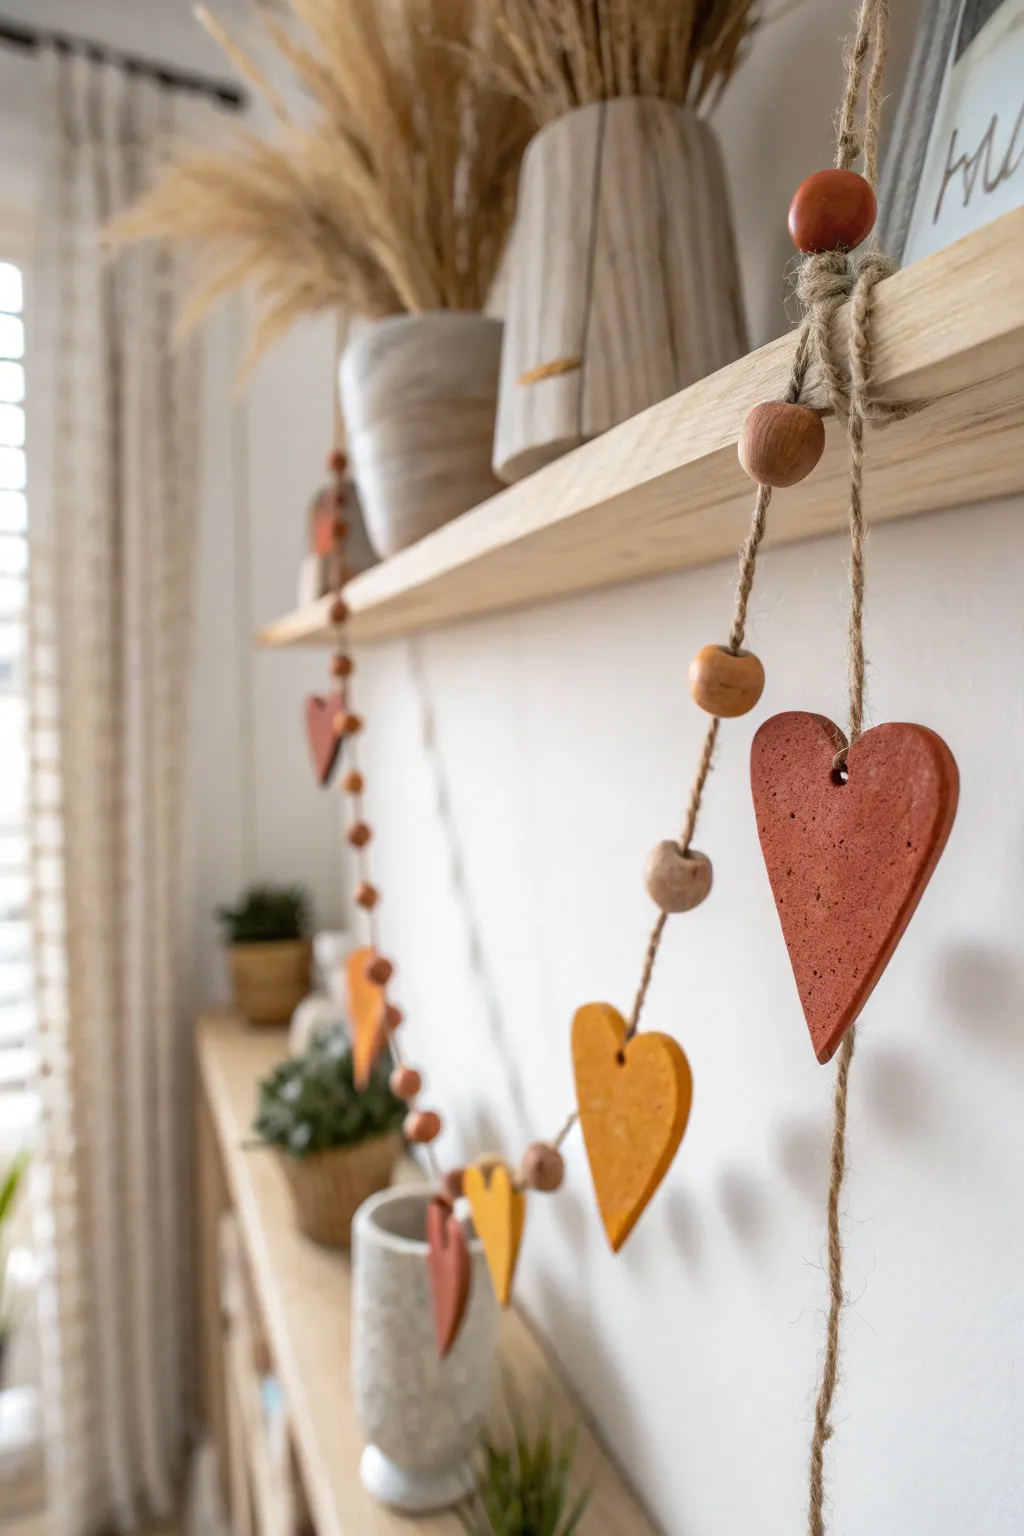
Bring warmth and texture to your mantel or shelf with this rustic, earth-toned garland. This project combines the organic feel of air-dry clay hearts with natural wooden beads and jute twine for a perfect seasonal accent.
Step-by-Step Guide
Materials
- Air-dry clay (white or terracotta)
- Acrylic paints (terracotta/burnt orange, mustard yellow)
- Jute twine
- Wooden beads (natural finish, various sizes)
- Heart-shaped cookie cutter (medium size)
- Rolling pin
- Parchment paper or craft mat
- Straw or skewer (to poke holes)
- Fine-grit sandpaper
- Paintbrushes
- Clear matte sealer (optional)
Step 1: Shaping the Hearts
-
Prepare your workspace:
Lay down parchment paper or a craft mat on a flat surface to prevent sticking. Take a handful of air-dry clay and knead it briefly until it’s pliable and smooth. -
Roll out the clay:
Using a rolling pin, flatten the clay to a uniform thickness, aiming for about 1/4 inch thick. If the clay creates cracks as you roll, smooth them gently with a droplet of water on your finger. -
Cut the shapes:
Press your heart-shaped cookie cutter firmly into the clay. Create as many hearts as you need for your desired garland length; the example image uses about 8-10 hearts per swag. -
Smooth the edges:
Gently lift the cut shapes. Dip your finger in a little water and run it along the cut edges of each heart to smooth out any roughness left by the cutter. -
Create hanging holes:
Using a straw or a skewer, poke a hole near the top center of each heart (in the ‘V’ dip). Ensure the hole is large enough for your jute twine to pass through easily, bearing in mind clay shrinks slightly when drying. -
Texture application (optional):
To mimic the speckled, stone-like texture seen in the photo, you can gently dab an old toothbrush or a crumpled piece of aluminum foil onto the wet clay surface. -
Dry thoroughly:
Lay the hearts flat on clean parchment paper. Let them dry completely for 24-48 hours, flipping them over halfway through so they dry evenly and don’t curl.
Keep Them Flat
Air dry clay loves to curl while drying. Place a heavy book on top of them (with parchment paper in between) once they are mostly dry to ensure they cure perfectly flat.
Step 2: Painting and Finishing
-
Sand for perfection:
Once fully dry, lightly sand the edges of the hearts with fine-grit sandpaper if there are any remaining sharp bits. -
Mix your colors:
Prepare your acrylic paints. For the look in the photo, you’ll need two main shades: a deep terracotta (mix orange with a touch of brown) and a mustard yellow (yellow mixed with a tiny bit of ochre or brown). -
Apply the base coat:
Paint half of your hearts in the terracotta shade and the other half in mustard yellow. I like to paint the sides first, then the face, ensuring full coverage. -
Add speckles:
To get that rustic stone effect, dilute a small amount of dark brown paint with water. Load an old toothbrush, hold it over the hearts, and run your thumb across the bristles to flick tiny speckles onto the surface. -
Let paint dry:
Allow the paint to cure completely. If desired, apply a coat of clear matte sealer to protect the finish, though leaving them unsealed keeps the raw, earthy look.
Step 3: Assembling the Garland
-
Measure and cut twine:
Cut a generous length of jute twine. Determine how long you want the drape to be and add at least 12 inches extra to each end for tying loops. -
Start the sequence:
Tie a loop at one end of the twine for hanging. Thread on a few initial wooden beads to start the pattern. -
Tie on the hearts:
Instead of just threading the hearts—which might make them slide or turn sideways—tie them in place. Thread the twine through the heart’s hole and tie a simple overhand knot right at the top of the heart to secure it facing forward. -
Add spacing beads:
Thread 2-3 wooden beads onto the twine after the knot. These act as spacers between your clay hearts. -
Repeat the pattern:
Continue the sequence: tie a knot, attach a heart (alternating colors between terracotta and yellow), tie a knot, and add wooden beads. Repeat until all hearts are attached. -
Finish the strand:
End with a final set of wooden beads to match the beginning. Tie a loop at the sheer end of the twine to complete the garland.
Scented Decor
Add a few drops of cinnamon or clove essential oil directly into the clay while kneading. Your garland will release a subtle, cozy fragrance as it warms up in the room.
Hang your beautiful new garland on a shelf or mantel to add an instant touch of handcrafted warmth to your home

TRACK YOUR CERAMIC JOURNEY
Capture glaze tests, firing details, and creative progress—all in one simple printable. Make your projects easier to repeat and improve.
Layered Hearts in Mixed Sizes
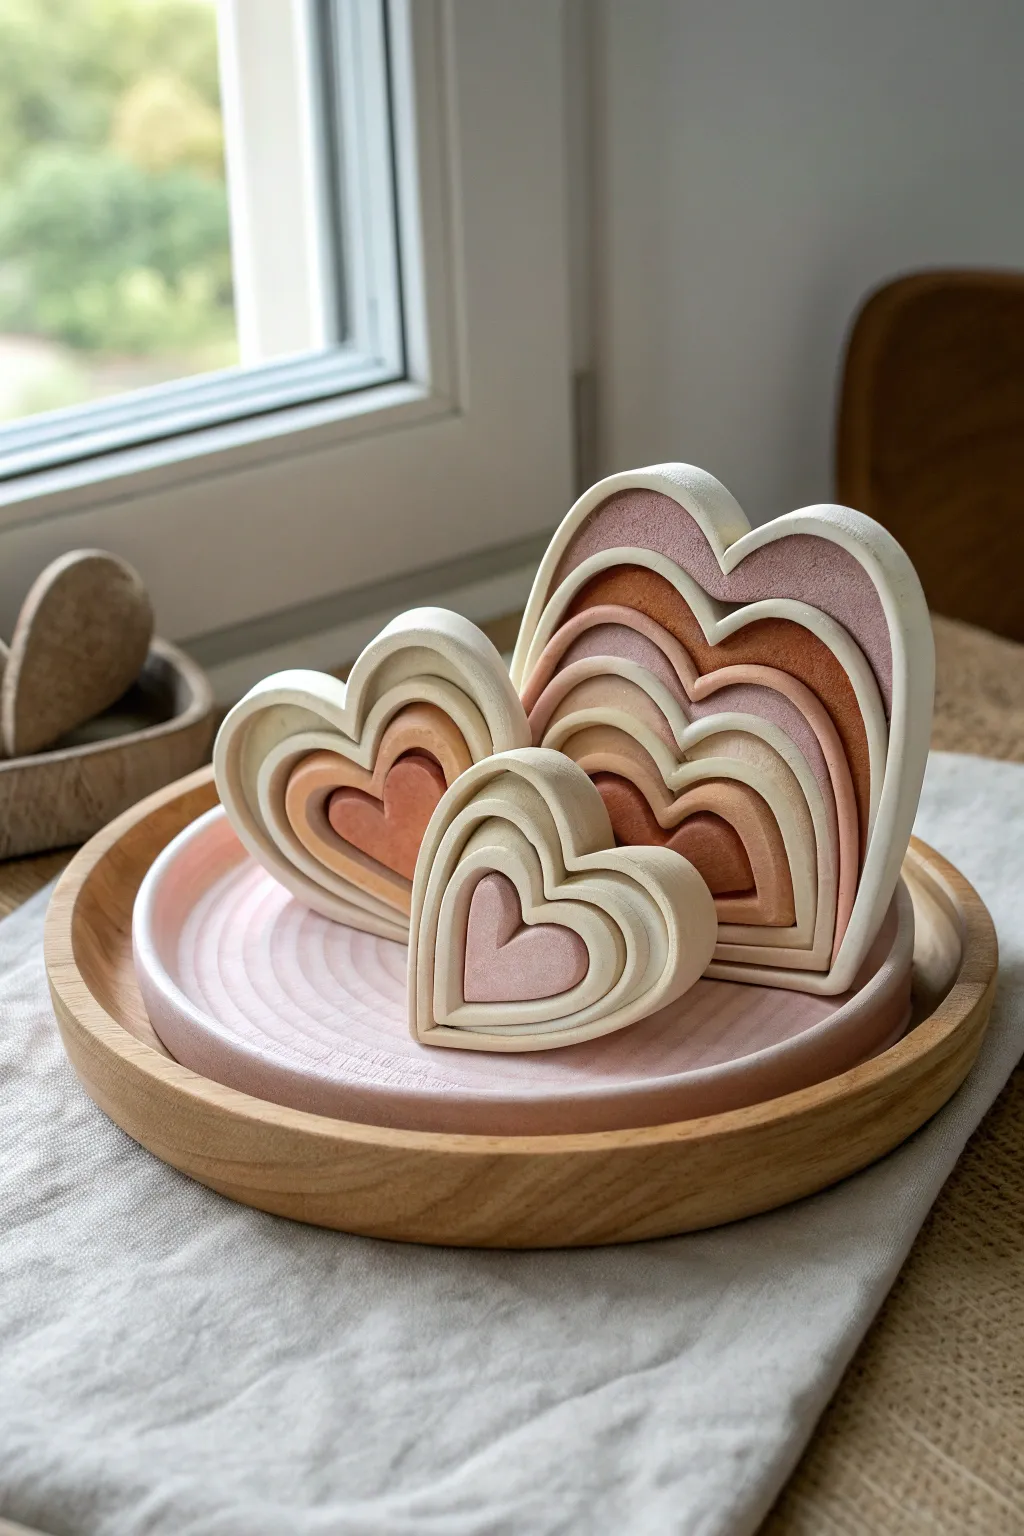
These charming nested hearts act as a sculptural puzzle, displaying a soothing gradient of peaches, terracottas, and creams. This project combines the simplicity of cookie-cutter shapes with the elegance of modern, minimalist decor.
How-To Guide
Materials
- High-quality white air dry clay
- Heart-shaped cookie cutters (nesting set of 3 or 4 sizes)
- Acrylic paints (muted earth tones: peach, terracotta, mauve, brown, cream)
- Rolling pin
- Parchment paper or non-stick mat
- Craft knife or clay trimming tool
- Sanding sponge or fine-grit sandpaper (220 grit)
- Small flat paintbrush
- Cup of water and sealant (optional matte varnish)
Step 1: Shaping the Clay Base
-
Condition the Clay:
Begin by grabbing a large chunk of air dry clay. Knead it in your hands for a few minutes until it feels warm, pliable, and free of cracks. -
Roll an Even Slab:
Place the clay on your parchment paper. Use the rolling pin to roll it out into a slab that is approximately 1/4 inch to 1/2 inch thick ensuring the thickness is consistent throughout. -
Cut Out the Largest Heart:
Take your largest heart-shaped cookie cutter and press it firmly into the slab. Wiggle it slightly to ensure a clean cut, then lift the cutter away. -
Create the Nesting Effect:
Without moving the clay heart you just cut, take the next size down cutter. Center it perfectly inside the large heart and press down. -
Continue Cutting Layers:
Repeat this process with increasingly smaller cutters until you have created a full set of nested rings and a solid center heart. -
Separate and Smooth:
Gently separate the concentric heart rings. Using a little water on your finger, smooth out any rough edges or stray clay crumbs immediately while the clay is wet. -
Repeat for Multiple Sets:
Re-roll your excess clay scraps and repeat the cutting process to make two more sets of hearts—one slightly smaller overall if you have a variety of cutter sets.
Clean Cuts Pro-Tip
Before pressing your cookie cutters into the clay, dip the cutting edge into a little bit of cornstarch or baby powder. This prevents sticking and keeps the edges sharp.
Step 2: Drying and Refining
-
Air Dry Completely:
Lay all the heart pieces flat on a clean sheet of parchment paper. Let them dry for 24-48 hours, flipping them halfway through to prevent warping. -
Check for Imperfections:
Once fully hard, inspect the edges. If there are sharp ridges or uneven spots, this is the time to fix them. -
Sand for Smoothness:
Support the fragile clay rings gently and sand the edges with a sanding sponge. You want that soft, professional finish seen in the photo. -
Dust Off:
Wipe the pieces down with a slightly damp cloth or a dry soft brush to remove all sanding dust before painting.
Level Up: Texture
Before cutting the hearts, gently press a textured rolling pin or a piece of linen fabric into the wet clay slab to give the surface a subtle, tactile pattern.
Step 3: Applying the Colors
-
Plan Your Palette:
Mix your acrylic paints to create a gradient. I usually aim for a mix of warm neutrals: a deep terracotta, a soft peach, a dusty mauve, and a creamy beige. -
Paint the Inner Faces:
Using a small flat brush, paint the front face of each heart ring a different color. Keep the sides (the thickness of the clay) unpainted white for that crisp, modern contrast. -
Create Depth:
For the largest set in the back, use deeper browns and warmer terracottas. For the smaller front sets, use lighter peaches and creams to create visual dimension. -
Detail the Sides (Optional):
If you prefer fully colored pieces, paint the inner and outer walls of the rings, but leaving them white as shown in the image highlights the nested structure. -
Let Paint Dry:
Allow the paint to dry completely. If the colors look streaky, apply a second thin coat for opacity. -
Seal (Optional):
To protect the finish without adding shine, apply a light coat of matte varnish over the painted areas. -
Assemble the Display:
Once dry, stand the hearts up, nesting them back together loosely to recreate the sculptural look on a tray or shelf.
Enjoy styling these versatile pieces on your mantle or coffee table as a warm, geometric accent
Marbled Air Dry Clay Hearts
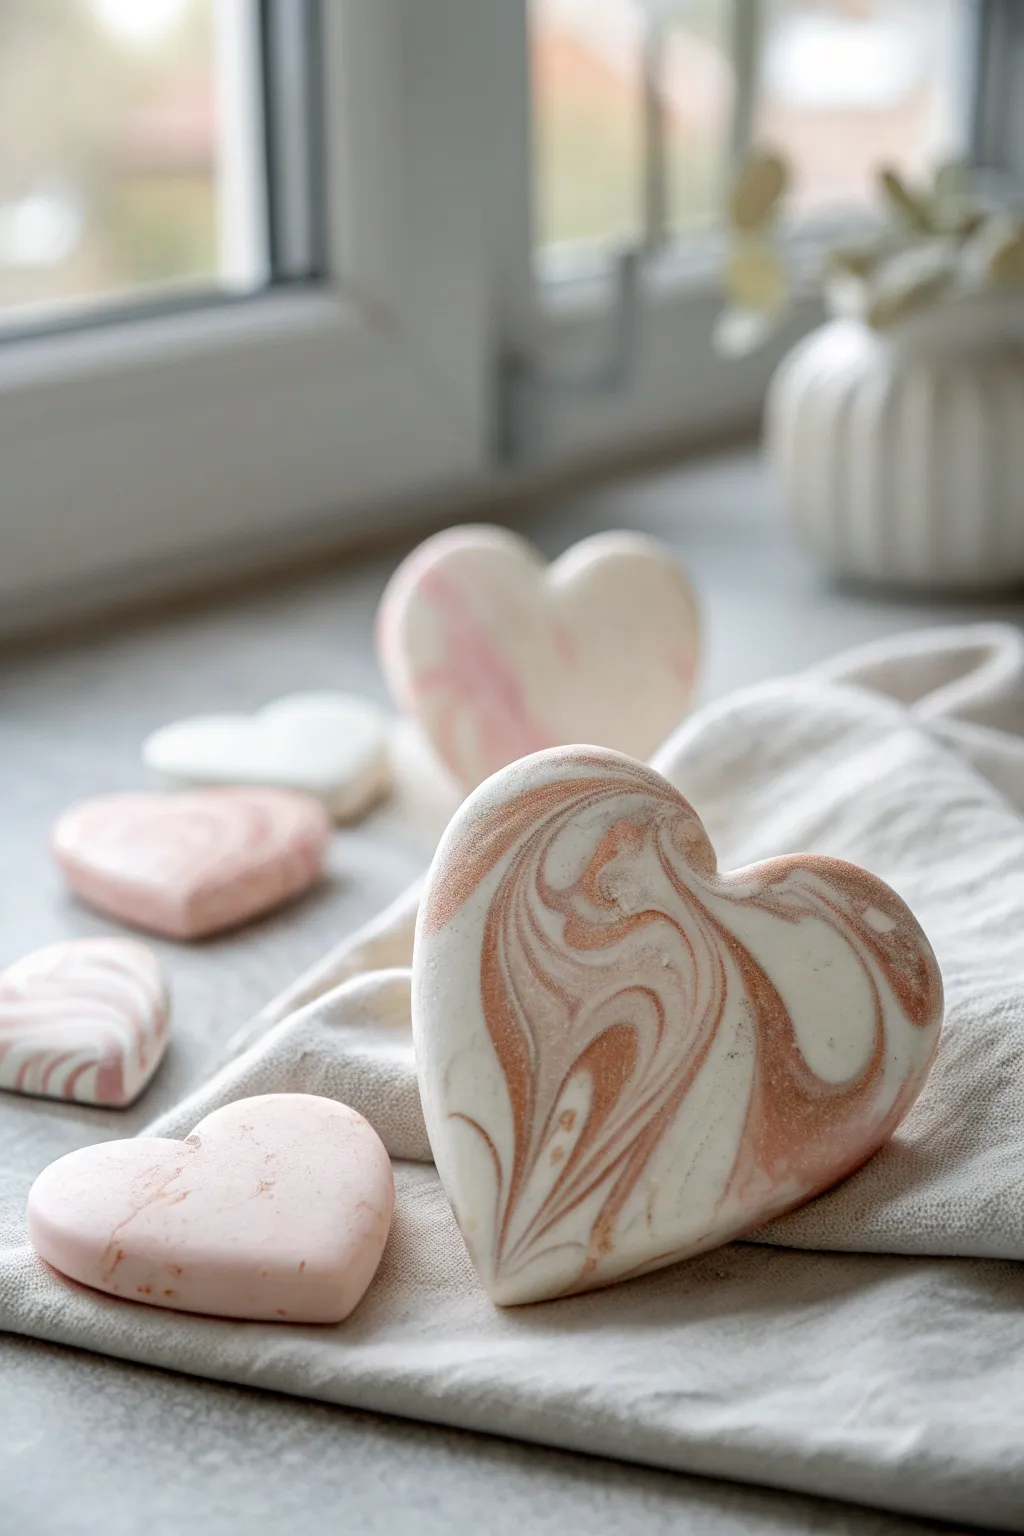
These stunning marbled hearts blend soft whites, delicate pinks, and shimmering metallic accents to create a sophisticated, stone-like finish. The organic swirling technique ensures that no two pieces are ever exactly alike, making each heart a unique little sculpture perfect for decor or gifting.
Step-by-Step Tutorial
Materials
- White air dry clay
- Acrylic paint (soft pink, rose gold/copper)
- Rolling pin
- Heart-shaped cookie cutters (various sizes)
- Parchment paper or silicone mat
- Fine grit sandpaper (320 or 400 grit)
- Gloss or satin varnish/sealer
- Small paintbrush
- Water in a spray bottle (optional, to keep clay moist)
Step 1: Preparing the Clay
-
Divide clay:
Start by taking a large chunk of white air dry clay. Divide this main chunk into three separate portions: one large portion (about 60% of the total clay) and two smaller portions (about 20% each). -
Mix the pink:
Take one of the smaller portions and flatten it slightly. Add a small drop of soft pink acrylic paint into the center. -
Knead the pink:
Fold the clay over the paint to enclose it and begin kneading. Keep folding and pushing until the pink color is evenly distributed throughout this portion. -
Mix the metallic:
Repeat the coloring process with the second small portion, this time using the rose gold or copper metallic paint. Knead until fully incorporated. You now have a large white ball, a pink ball, and a metallic ball.
Stop Before Greying
The key to crisp marbling is stopping early. If you over-knead the combined colors, they will blend into a singular muddy tone rather than distinct swirls. Less is more.
Step 2: Creating the Marble Pattern
-
Roll into snakes:
Roll each colored ball (white, pink, and metallic) into long, snake-like ropes. Aim for the white rope to be the thickest. -
Twist together:
Lay the three ropes side by side. Twist them together into one large, spiraled rope, like a candy cane. -
Fold and twist:
Fold this twisted rope in half, and then twist it again. This action begins to blend the colors without fully mixing them. -
Repeat cautiously:
Fold and twist one or two more times. Be careful here—if you over-work it, the colors will turn muddy instead of distinct swirls. Stop when you see distinct ribbons of color. -
Form a ball:
Gently squash the twisted rope into a single, cohesive ball. Try to smooth out any large creases with your thumbs.
Functional Magnets
Before the hearts dry completely, gently press a small, strong round magnet into the back until it sits flush. Secure with glue after drying for custom fridge decor.
Step 3: Shaping and Finishing
-
Roll out the slab:
Place the marbled ball onto parchment paper or a silicone mat. Use a rolling pin to flatten the clay to a thickness of about 1/4 inch (6mm). -
Check the pattern:
Look at your flattened slab. If the marbling isn’t quite right, you can fold it once and roll it again, but usually, the first roll reveals the best swirls. -
Cut the hearts:
Press your heart-shaped cookie cutters firmly into the most attractive parts of the clay slab. Lift the cutter and wiggle slightly to release. -
Smooth the edges:
Use a finger, dipped slightly in water, to gently smooth the rough edges of the cut hearts. This saves sanding time later. -
Drying time:
Lay the hearts flat on clean parchment paper. Let them dry for 24-48 hours. Flip them over halfway through the drying process to prevent warping. -
Sanding:
Once fully dry and hard, use fine-grit sandpaper to buff away any remaining rough edges or surface bumps for a professional finish. -
Add detail (optional):
If your metallic swirls faded during mixing, you can dry-brush a tiny amount of pure metallic paint directly onto the swirl lines to make them pop again. -
Sealing:
Apply a coat of gloss or satin varnish to seal the clay and enhance the vibrancy of the colors. Let it dry completely.
Arranging these hearts near a window lets the natural light catch those metallic ribbons beautifully
Painted Pattern Hearts (Dots, Stripes, Checks)
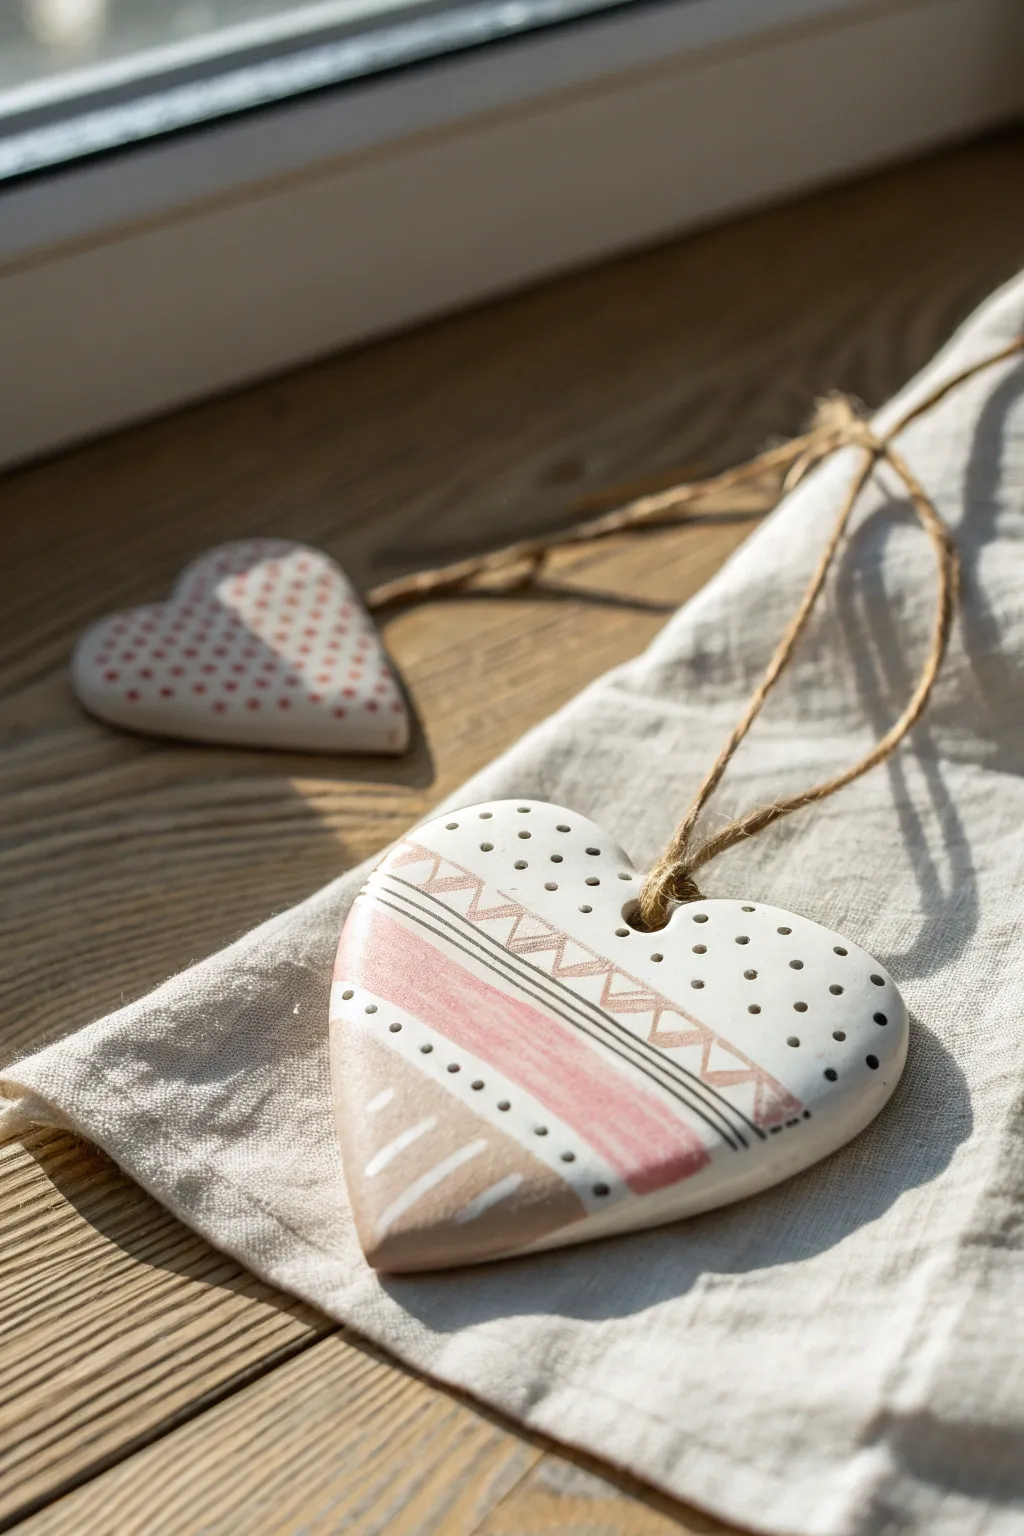
These charming air dry clay hearts combine soft pastels with striking geometric patterns for a modern, bohemian look. The intricate details—like tiny puncture marks and hand-painted lines—give them a professional ceramic finish without requiring a kiln.
How-To Guide
Materials
- White stone air dry clay
- Rolling pin
- Heart-shaped cookie cutter (medium size)
- Sandpaper (fine grit)
- Acrylic paints: gentle pink, warm taupe/grey, black
- Fine detail paintbrush (size 0 or 00)
- Flat shader brush
- Black fine-point marker or paint pen (optional)
- Stylus tool, toothpick, or awl
- Jute twine
- Straw or skewer (for hole punching)
- Matte varnish or sealant
Step 1: Shaping the Base
-
Condition the Clay:
Begin by kneading a chunk of your air dry clay until it is warm and pliable. Smooth out any cracks before you start rolling. -
Roll to Thickness:
Roll the clay out on a smooth surface or canvas mat. aim for a consistent thickness of about 1/4 inch (6mm) to ensure the heart is sturdy but not too heavy. -
Cut the Shape:
Press your heart-shaped cookie cutter firmly into the clay. Give it a tiny wiggle to ensure a clean cut before lifting the cutter away. Remove the excess clay. -
Smooth the Edges:
Dip your finger in a little water and gently run it along the cut edges of the heart to soften any sharp ridges or rough spots left by the cutter. -
Add Texture Details:
Before the clay dries, use a stylus tool or a toothpick to poke small, decorative indentations into the surface. For the design shown, create a random scattering of dots on the upper right side of the heart. -
Create the Hanging Hole:
Use a drinking straw or a skewer to punch a clean hole near the top center of the heart. Rotate the tool slightly as you push through to keep the edges neat. -
Dry Completely:
Place the heart on a wire rack to dry. I like to flip it over halfway through the drying process—usually after 24 hours—to prevent curling. Let it cure for 24-48 hours total. -
Refine the Surface:
Once fully dry and hard, lightly sand the edges and surface with fine-grit sandpaper to achieve a porcelain-smooth finish. Wipe away the dust with a slightly damp cloth.
Step 2: Painting the Design
-
Base Lines:
Using a pencil very lightly, sketch out the diagonal bands across the heart. You’ll want a wide central band and a smaller tip section. -
Paint the Pink Band:
use your flat shader brush to paint a bold stripe of gentle pink across the middle section. You may need two thin coats for opaque coverage. -
Paint the Taupe Tip:
Paint the bottom tip of the heart with the warm taupe or grey color. Let the paint dry completely before moving to detail work. -
Trace Black Lines:
Use a very fine brush with black paint (or a paint pen) to draw thin lines separating the patterned sections. Add a double line above the pink band for extra definition. -
Add the Zig-Zags:
Above the pink strip, carefully paint a row of zig-zags or connected triangles using the taupe color. Keep your hand steady and rest your wrist on the table for stability. -
White Accents:
Add thin white lines or stripes over the painted sections to create highlights. For example, add three small white stripes over the taupe tip of the heart. -
Highlight the Dots:
If paint got into your texture holes from step 5, use a clean toothpick to clear them out or re-poke them slightly to make those indentations pop. -
Seal the Project:
Apply a coat of matte varnish over the entire front of the heart to protect the paint and give it a finished, professional look. -
String It Up:
Cut a length of natural jute twine. Fold it in half, push the loop through the hole from front to back, and pull the tails through the loop to secure it with a lark’s head knot.
Clean Texture Trick
When creating the dotted texture, dip your stylus or toothpick in a tiny bit of water or oil before poking the clay. This prevents the tool from sticking and dragging the clay when you pull it out.
Make It a Set
Create a matching smaller heart using the simpler design from the background: paint the entire heart white or cream, then add rows of tiny red or pink dots for a sweet, coordinating companion piece.
Hang these lovely ornaments in a window or on a branch for a touch of handmade elegance
Gold-Edged Heart Accents
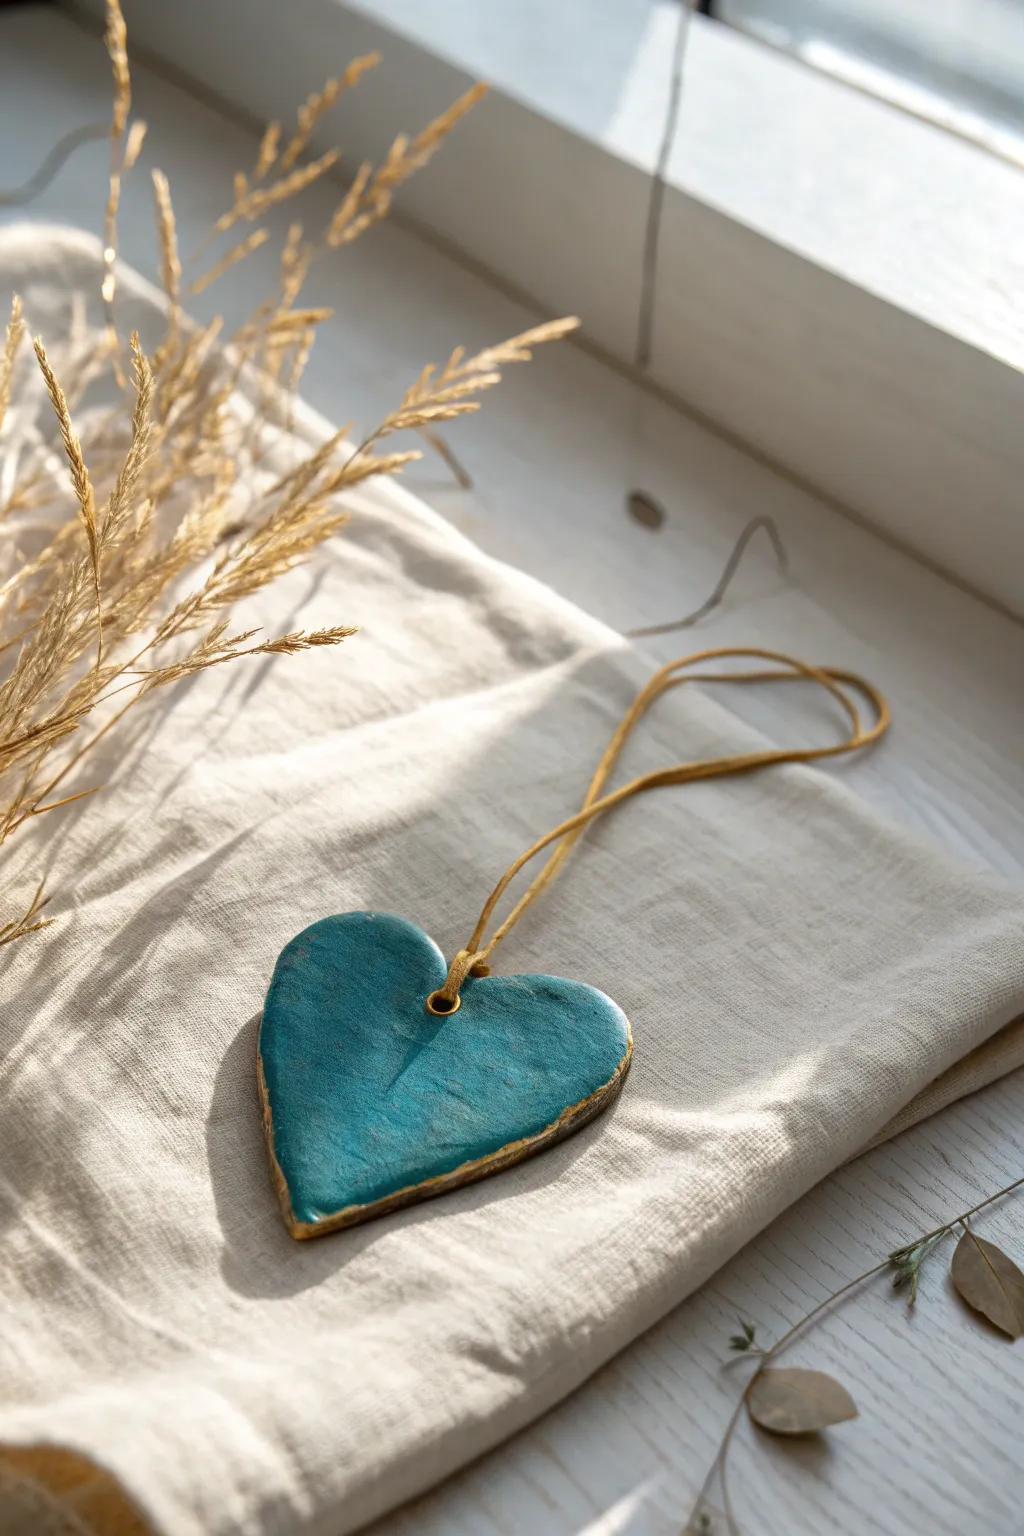
These elegant hearts combine the rustic, matte finish of air-dry clay with a rich turquoise hue and a sophisticated touch of gold leafing. They make stunning minimalist ornaments or unique gift tags that look far more expensive than they truly are.
Step-by-Step
Materials
- White polymer or air-dry clay
- Rolling pin
- Heart-shaped cookie cutter
- Sandpaper (fine grit)
- Turquoise acrylic paint
- Gold leaf paint or liquid gilding
- Small flat paintbrush
- Fine-point detail brush
- Straw or small circular tool (for the hole)
- Gold leather cord or suede lace
Step 1: Shaping and Refining
-
Prepare the Clay:
Begin by kneading a ball of white air-dry clay until it is soft, pliable, and free of cracks. If the clay feels dry, dampen your fingers slightly to add moisture. -
Roll out the Slab:
Use a rolling pin to flatten the clay to a uniform thickness of about 1/4 inch. If you want a textured surface like the image, don’t smooth it perfectly flat; subtle unevenness adds charm. -
Cut the Shape:
Press your heart-shaped cookie cutter firmly into the clay. Lift the excess clay away before removing the cutter to keep the edges sharp. -
Create the Insertion Point:
While the clay is still wet, use a drinking straw or a small circular tool to punch a hole near the top center dip of the heart. Rotate the straw gently as you pull it out to ensure a clean hole. -
Smooth the Edges:
Dip your index finger in a little water and gently run it along the cut edges of the heart to soften any harsh burrs left by the cutter. -
Initial Drying:
Place the heart on a piece of parchment paper or a drying rack. Let it dry for at least 24 to 48 hours, flipping it over halfway through to ensure both sides dry evenly. -
Sand for Perfection:
Once fully cured and hard, use fine-grit sandpaper to gently buff the edges and any rough spots on the surface. Wipe away the dust with a slightly damp cloth.
Step 2: Painting and Gilding
-
Base Color Application:
Load a flat brush with turquoise acrylic paint. Apply a solid coat to the front face of the heart. I prefer leaving the brushstrokes slightly visible to enhance the handmade look. -
Layering the Color:
Allow the first coat to dry completely. If the white clay shows through, apply a second coat for a deeper, more opaque teal finish. -
Prepare the Edge:
Before painting the rim, ensure the teal paint is fully dry to avoid smudging colors together. -
Apply Gold Liquid Gilding:
Shake your liquid gold gilding or gold leaf paint well. Using a fine-point detail brush, carefully paint the entire outer rim of the heart. -
Create the Gold Halo:
Intentionally bring a small amount of the gold paint slightly over the edge onto the front face of the heart. This creates an uneven, organic ‘halo’ effect that frames the teal color. -
Detail the Hole:
Don’t forget to paint the inside rim of the hanging hole with the gold paint for a polished, professional finish. -
Final Sealing (Optional):
If you want extra durability, apply a matte varnish over the teal section only, avoiding the metallic gold to keep its shine distinct.
Uneven Clay Surface?
If your clay dries with unwanted cracks, mix a tiny bit of fresh clay with water to make a paste. Fill the cracks, let dry, and sand smooth before painting.
Step 3: Finishing Touches
-
Select the Cord:
Cut a length of gold leather cord or suede lace, approximately 12 inches long. -
Thread the Ornament:
Fold the cord in half and push the loop through the painted hole from front to back. -
Secure the Loop:
Pull the loose ends of the cord through the loop and tighten gently to create a lark’s head knot at the top of the heart.
Add a Scent Boost
For use as an air freshener or drawer sachet, drop essential oils onto the unpainted back of the clay heart. The porous clay absorbs and holds the scent well.
Hang your beautiful creation in a sunny window or bundle it into a gift box for a friend to find
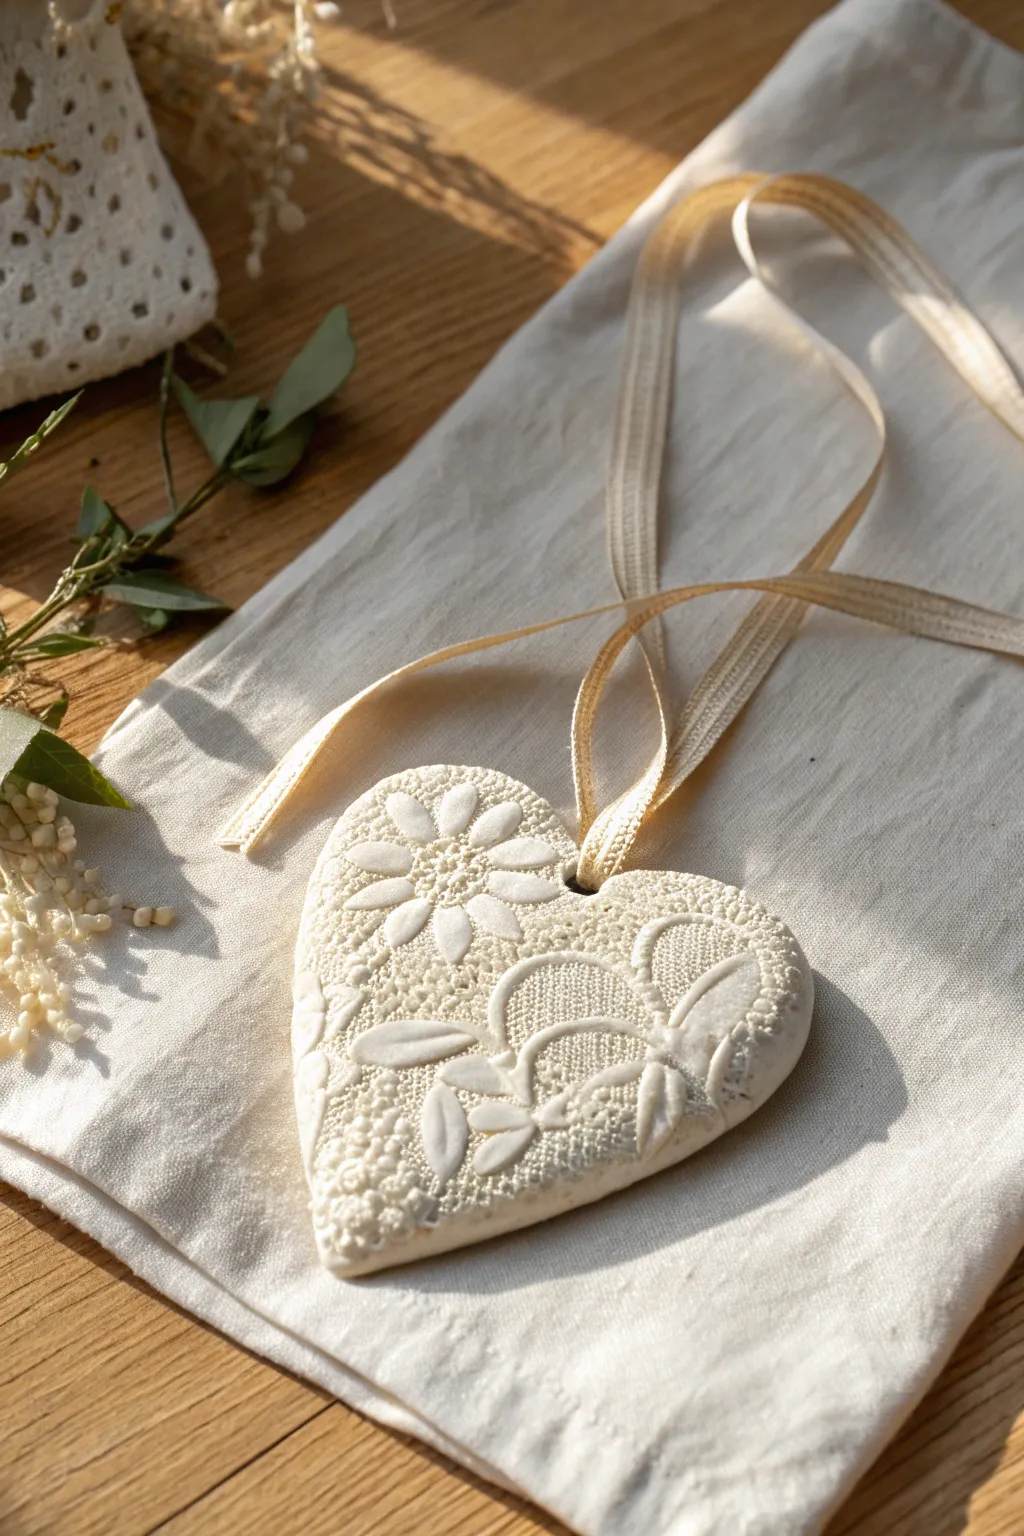
Raised Relief Hearts With Stencil Texture
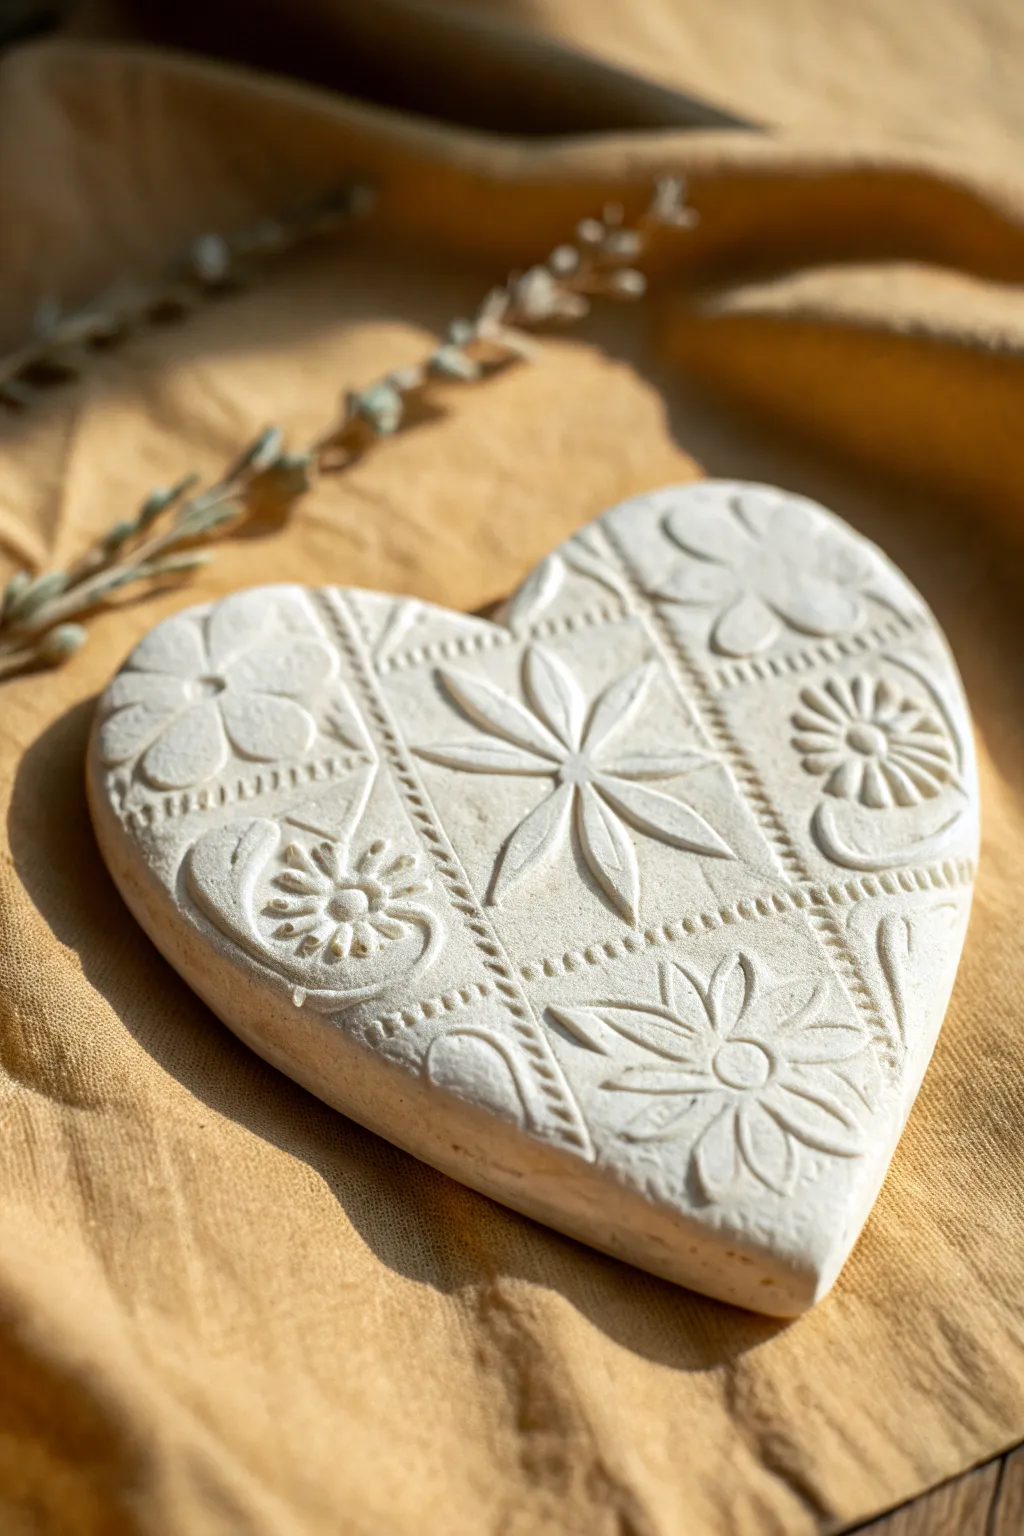
Create a stunningly intricate piece of decor using simple air dry clay and the magic of stencils. This project results in a beautiful, raised-relief heart that mimics the look of carved stone or plaster with elegant floral motifs.
How-To Guide
Materials
- White smooth air dry clay
- Rolling pin
- Heart-shaped cookie cutter (large) or paper template
- Patterned stencil (geometric or floral quilt-like design)
- Small rolling pin or brayer
- Craft knife or clay tool
- Fine-grit sandpaper
- Small bowl of water
- Parchment paper or non-stick mat
Step 1: Preparing the Clay Base
-
Condition the clay:
Begin by taking a generous amount of white air dry clay. Knead it in your hands for a few minutes until it is warm, pliable, and free of any internal air pockets. -
Roll out the slab:
Place your clay on a sheet of parchment paper. Using your main rolling pin, roll the clay out into a smooth, even slab. Aim for a thickness of about 1/4 to 1/2 inch to give your heart some substantial weight. -
Smooth the surface:
Dip your finger in a little bit of water and gently run it over the surface of the clay slab to remove any rolling marks or small cracks. Let it sit for just a minute so the surface isn’t slippery wet.
Clean Release Tip
Lightly dust the underside of your stencil with cornstarch before placing it on the clay. This prevents sticking and ensures your raised pattern stays crisp when you peel it off.
Step 2: Applying the Texture
-
Position the stencil:
Lay your chosen stencil carefully over the smoothed clay slab. Ensure the pattern is aligned straight if your design is geometric. -
Impress the design:
Use a small rolling pin or brayer to firmly roll over the stencil. You want to press the stencil deep enough into the clay that the clay puffs up slightly through the open spaces, creating that raised relief effect. -
Checking the depth:
I like to gently lift one corner of the stencil to peek at the impression. If the pattern isn’t distinct enough, lay it back down and roll with a bit more pressure. -
Reveal the pattern:
Slowly peel the stencil away from the clay. Pull it straight up to avoid dragging or smudging the crisp raised lines you’ve just created.
Step 3: Cutting and Refining
-
Cut the heart shape:
Place your large heart cutter over the textured area. Try to center a main floral element or interesting part of the pattern in the middle of the heart for a balanced look. -
Press and release:
Press the cutter down firmly all the way through the slab. Wiggle it very slightly to ensure it separates from the surrounding clay, then lift the cutter. -
Alternative cutting method:
If using a paper template instead of a cutter, lay the paper gently on top and trace around it with a sharp craft knife, being careful not to squish the texture. -
Remove excess clay:
Peel away the excess clay from around the heart shape. You can ball this up and store it in an airtight container for another project. -
Soften the edges:
Dip your finger in water again and gently run it along the cut edge of the heart to smooth out any sharpness or roughness left by the cutter.
Antique Finish
After drying, rub a small amount of diluted brown or grey acrylic paint into the crevices and wipe the surface clean with a damp cloth to highlight the texture with an aged look.
Step 4: Drying and Finishing
-
Initial drying:
Leave the heart on the parchment paper to dry in a safe spot away from direct heat. Let it dry for about 24 hours on one side. -
Flip for even drying:
After the top feels dry to the touch, gently flip the heart over to let the bottom breathe and dry out completely. This usually takes another 12-24 hours depending on humidity. -
Sand the edges:
Once the heart is bone dry and hard, take fine-grit sandpaper and lightly sand the edges to make them perfectly smooth. Be careful not to sand the textured top surface. -
Dust off:
Use a soft, dry brush to whisk away any clay dust from the sanding process, ensuring it’s clean and bright white.
Enjoy displaying your textured heart on a shelf or add a ribbon to hang it as a unique ornament
Heart Wall Tiles as a Mini Gallery
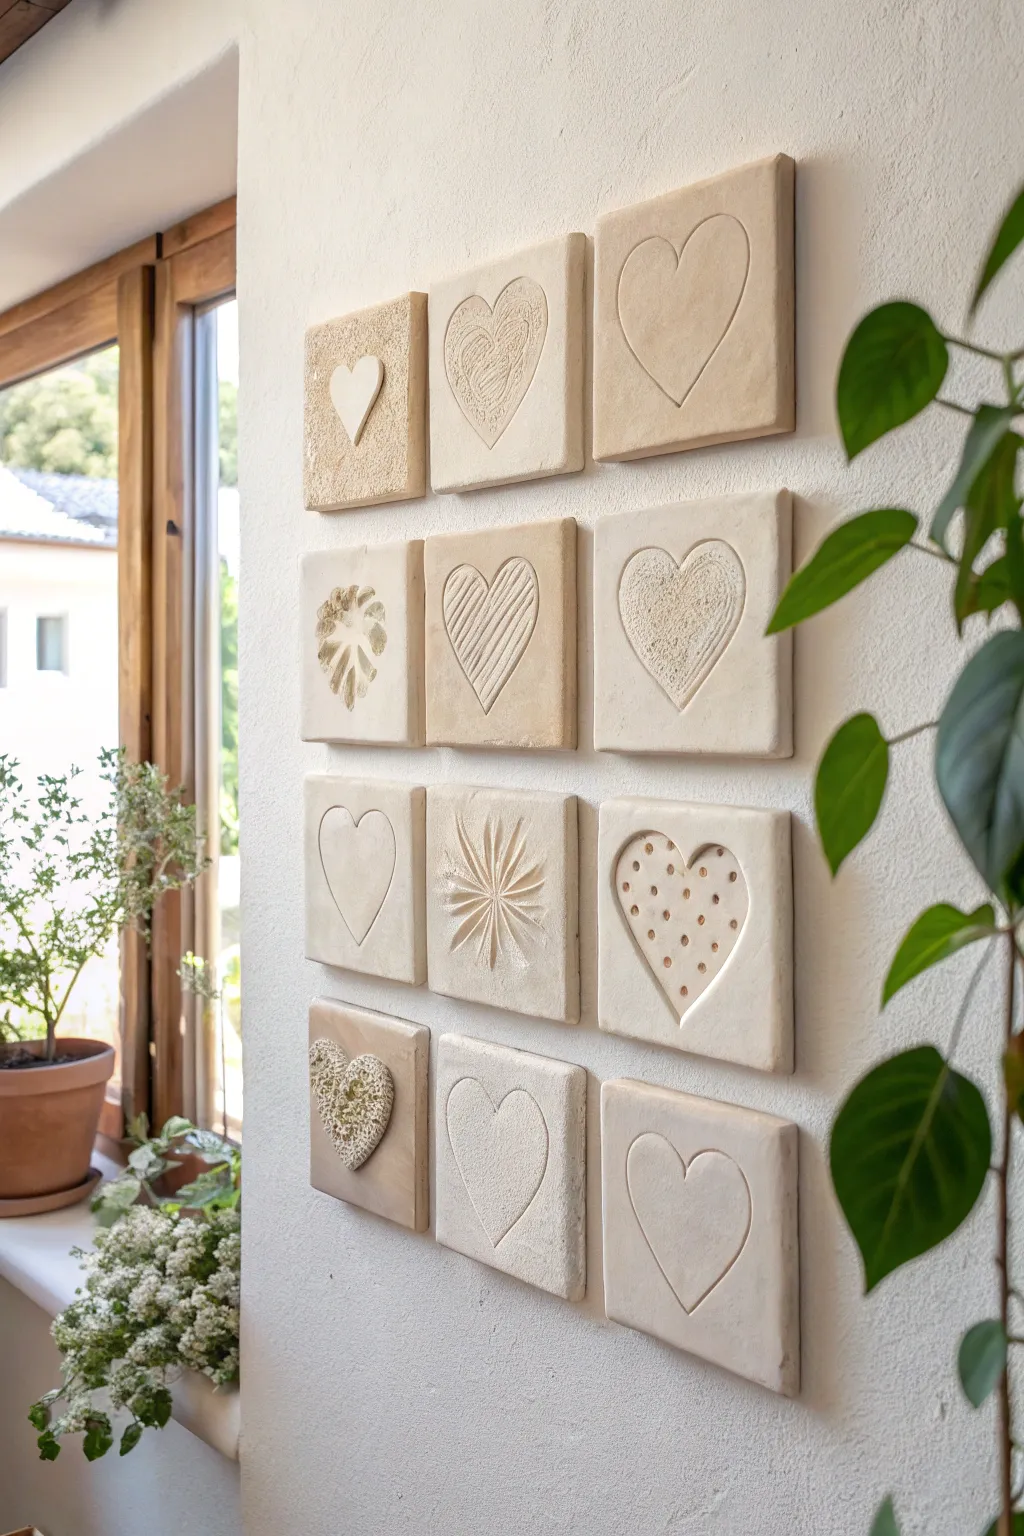
Transform a blank wall into a cozy display of affection with these handcrafted air-dry clay tiles. Each square features a unique heart design, ranging from simple line drawings to intricate textures, creating a cohesive yet varied mini gallery.
Detailed Instructions
Materials
- White or cream air-dry clay (approx. 1kg)
- Rolling pin
- Square cookie cutter (approx. 4×4 inches) or ruler and knife
- Clay carving tools (needle tool, loop tool)
- Texturing tools (lace, burlap, stamps, or household items)
- Small bowl of water
- Fine-grit sandpaper
- Strong mounting tape or adhesive strips
- Measuring tape
- Level
Step 1: Preparing the Tiles
-
Condition the Clay:
Begin by taking a large chunk of air-dry clay and kneading it in your hands until it becomes soft, pliable, and free of cracks. -
Roll Out the Slab:
On a smooth, clean surface, roll the clay out to a uniform thickness of about 1/4 inch. If you want perfectly even tiles, place two wooden rulers on either side of the clay as guide rails for your rolling pin. -
Cut the Squares:
Using a square cookie cutter or a ruler and craft knife, cut out 12 identical squares. You may need to re-roll scraps to get enough for the full set. -
Smooth the Edges:
Dip your finger in a little water and run it along the cut edges of each square to soften any sharp corners or roughness.
Curling Corners?
If tile corners lift while drying, gently weigh them down with a heavy book placed over a piece of paper towel after the surface is touch-dry.
Step 2: Creating the Designs
-
Outline the Hearts:
Lightly trace a heart shape into the center of each tile using a needle tool. Vary sizing slightly or keep them uniform depending on your preference, but keep them centered. -
The Simple Outline:
For the minimalist tiles, use a carving tool to deepen the traced line, creating a clean, recessed heart outline. Smooth the groove with a damp brush. -
The Textured Center:
For the filled hearts, press a piece of lace, burlap, or a textured sponge gently into the clay *inside* the heart outline only. Peel it back to reveal the pattern. -
The Diagonal Hatching:
Create the striped heart by using a ruler to press parallel diagonal lines inside the heart shape. Vary the pressure to create depth. -
The Starburst Heart:
Instead of a traditional heart outline, use a modeling tool to press radiating lines outward from a central point, forming a starburst pattern that suggests a heart shape overall. -
The Dotted Design:
Take a small, blunt tool end or the back of a paintbrush and press rows of dots inside a deeply carved heart outline for a pointillist effect. -
The Relief Heart:
For the 3D ‘pop-out’ heart, fashion a separate, smaller heart from a scrap of clay. Score the back of it and the center of the tile, apply a dab of water, and press the heart onto the tile. -
The Textured Relief:
Similar to the previous step, create an added clay heart, but roll it in texture (like coarse sand or dried herbs) before attaching it to the tile. -
Refine the Details:
Go back over all your tiles. Clean up any stray clay crumbs and ensure the surrounding square areas remain smooth and unblemished so the center designs really stand out.
Natural Pigment
Knead a pinch of cocoa powder or cinnamon into the clay before rolling for a warmer, sand-colored tone without needing paint.
Step 3: Finishing and Mounting
-
Let Them Dry:
Place all tiles on a wire rack or a piece of parchment paper. Allow them to dry for at least 24-48 hours. I like to flip them over halfway through to prevent the corners from curling up. -
Sand for Perfection:
Once fully cured and hard, use fine-grit sandpaper to gently smooth the outer edges and surface of the tiles. Wipe away the dust with a dry cloth. -
Seal (Optional):
If you want to protect the clay from humidity, apply a matte varnish. Keep it matte to retain the natural, stone-like look seen in the photo. -
Plan the Layout:
Arrange the finished tiles on the floor first to find the best balance of textures. The image uses a 3×4 grid. -
Mark the Wall:
Use a level and measuring tape to lightly mark where the corners of your grid will go on the wall. Aim for about 1 inch of spacing between each tile. -
Attach to Wall:
Apply strong double-sided mounting tape or adhesive strips to the back of each tile. Press them firmly against the wall according to your markings.
Step back and enjoy the calming, artisanal atmosphere your new heart gallery brings to the room
Negative Space Cutout Heart Hangings
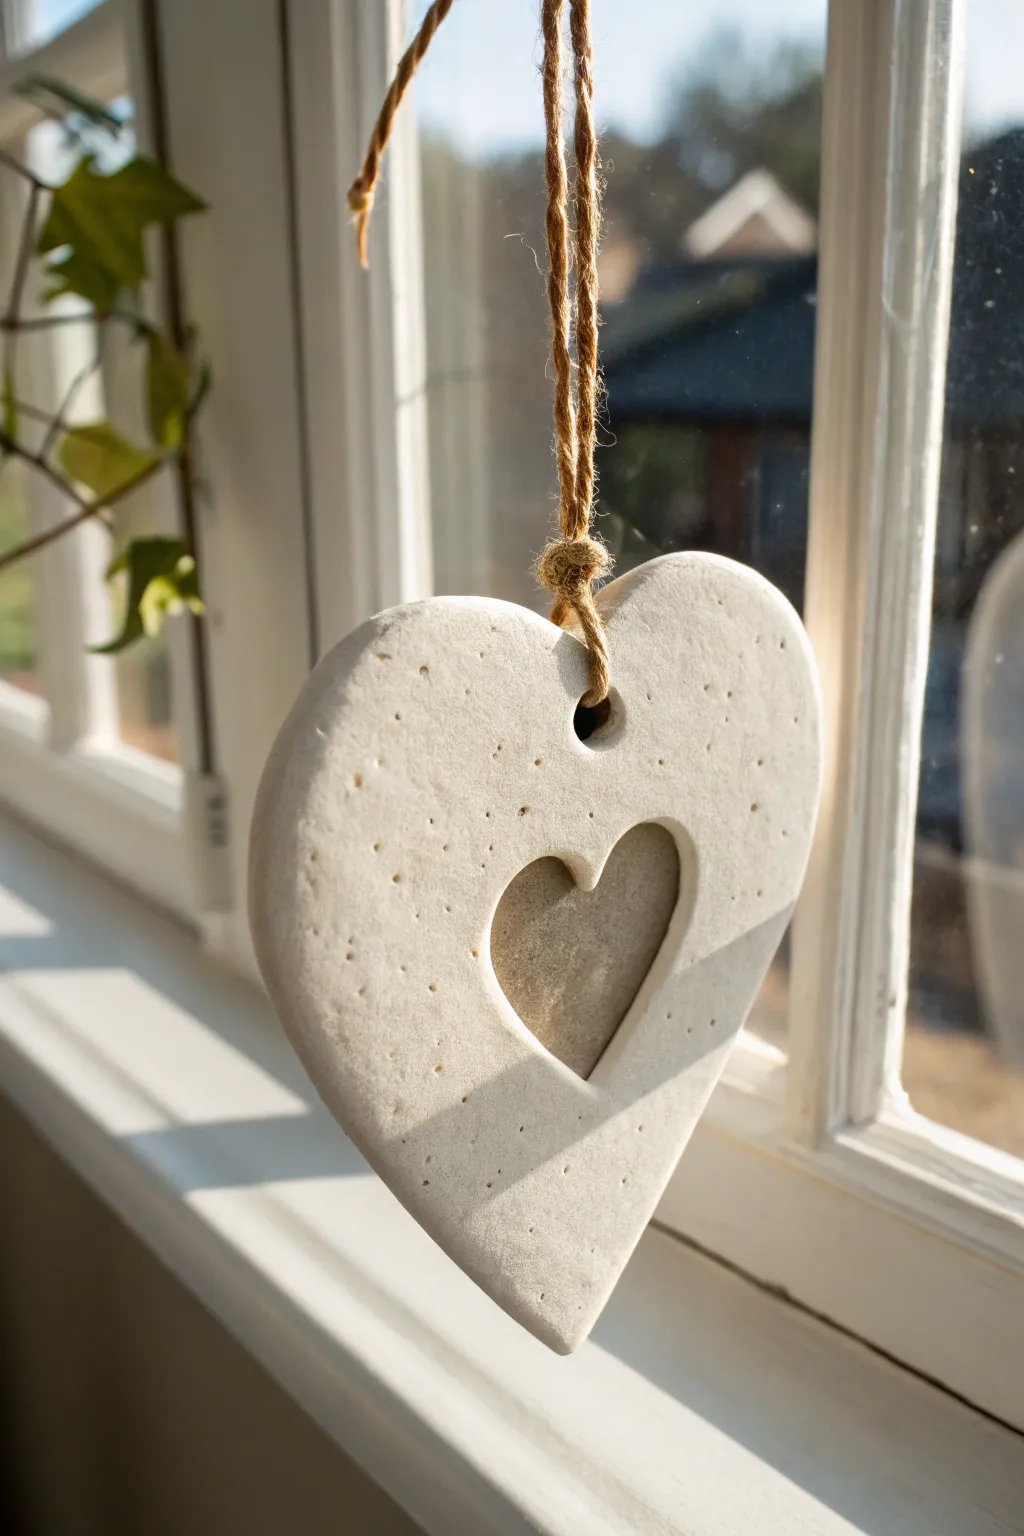
Embrace the beauty of simplicity with this elegant cutout heart ornament. The project features a smooth, stone-like texture and a charming negative space design that lets the light shine through when hung by a window.
Step-by-Step Guide
Materials
- White air dry clay
- Rolling pin
- Large heart cookie cutter (approx. 3-4 inches)
- Small heart cookie cutter (approx. 1 inch)
- Parchment paper or silicone mat
- Fine-grit sandpaper (220-400 grit)
- Straw or wooden skewer
- Jute twine or hemp cord
- Bowl of water
- Sponge or soft cloth
Step 1: Shaping the Clay
-
Prepare your workspace:
Lay down a sheet of parchment paper or a silicone mat on a flat surface. This prevents the clay from sticking and makes cleanup much easier later on. -
Condition the clay:
Take a handful of air dry clay and knead it in your hands for a minute or two. The goal is to warm it up and make it pliable, removing any air bubbles inside. -
Roll it out:
Place the ball of clay on your mat. using a rolling pin, flatten the clay until it is an even slab, approximately 1/4 inch thick. Aim for a consistent thickness so it dries evenly. -
Cut the main shape:
Take your large heart-shaped cookie cutter and press it firmly into the clay slab. Wiggle it slightly to ensure a clean cut, but don’t lift the clay yet. -
Create the negative space:
Position the small heart cutter in the center (or slightly off-center for an artistic look) of the larger heart. Press down firmly to cut the inner shape. -
Remove excess clay:
Carefully peel away the excess clay from the outside of the large heart first. Then, use a needle tool or the tip of a knife to gently lift out the small inner heart cutout. -
Smooth the edges:
Dip your finger into a small bowl of water. Gently run your wet finger along the cut edges of the heart—both the outer rim and the inner cutout—to round them off and remove any harsh lines left by the cutters. -
Add a hanging hole:
Use a drinking straw to poke a hole near the top center of the heart, right in the ‘V’ dip. Twist the straw as you pull it out to get a clean hole for the twine.
Smooth Moves
To fix hairline cracks during drying, make a ‘slip’ by mixing a tiny bit of clay with water. Rub this paste into the cracks and smooth it over with your finger.
Step 2: Drying and Refining
-
Initial drying:
Leave the heart on the parchment paper to air dry. Place it in a safe spot away from direct heat sources, which can cause cracking. -
Flip for evenness:
After about 12 hours, or when the top feels dry to the touch, gently flip the heart over. This allows the bottom side to dry and helps prevent the clay from curling as moisture evaporates. -
Full cure:
Let the project dry completely for another 24 to 48 hours. The clay will turn a stark, chalky white when fully cured and will no longer feel cool to the touch. -
Sanding for texture:
Once fully dry, take a piece of fine-grit sandpaper (around 400 grit) and lightly sand the surface. I like to focus on the edges to ensure they are buttery smooth. -
Create a stone effect:
To mimic the porous look in the reference image, you can lightly tap the surface with sandpaper or an old toothbrush to create tiny, subtle divots, though natural air bubbles usually do the trick nicely. -
Dust off:
Wipe the heart with a dry, soft cloth or a fluffy paintbrush to remove all the sanding dust.
Scented Stone
Add a few drops of essential oil to the back of the unsealed clay heart. The porous material acts as a passive diffuser, releasing scent when warmed by the sun.
Step 3: Assembly
-
Cut the twine:
Cut a length of jute twine roughly 12 to 15 inches long, depending on how low you want the ornament to hang. -
Thread the loop:
Fold the twine in half. Push the folded loop end through the hole in the clay heart from front to back. -
Secure the knot:
Thread the loose ends of the twine through the loop and pull tight to create a lark’s head knot against the clay, or simply tie a standard knot right at the top of the hole depending on your preference. -
Tie the top:
Bring the two loose ends of the twine together and tie a secure overhand knot at the very top to complete the hanger.
Hang your finished piece in a sunny spot to enjoy the gentle play of light and shadow
Two-Part Locket-Style Heart Box
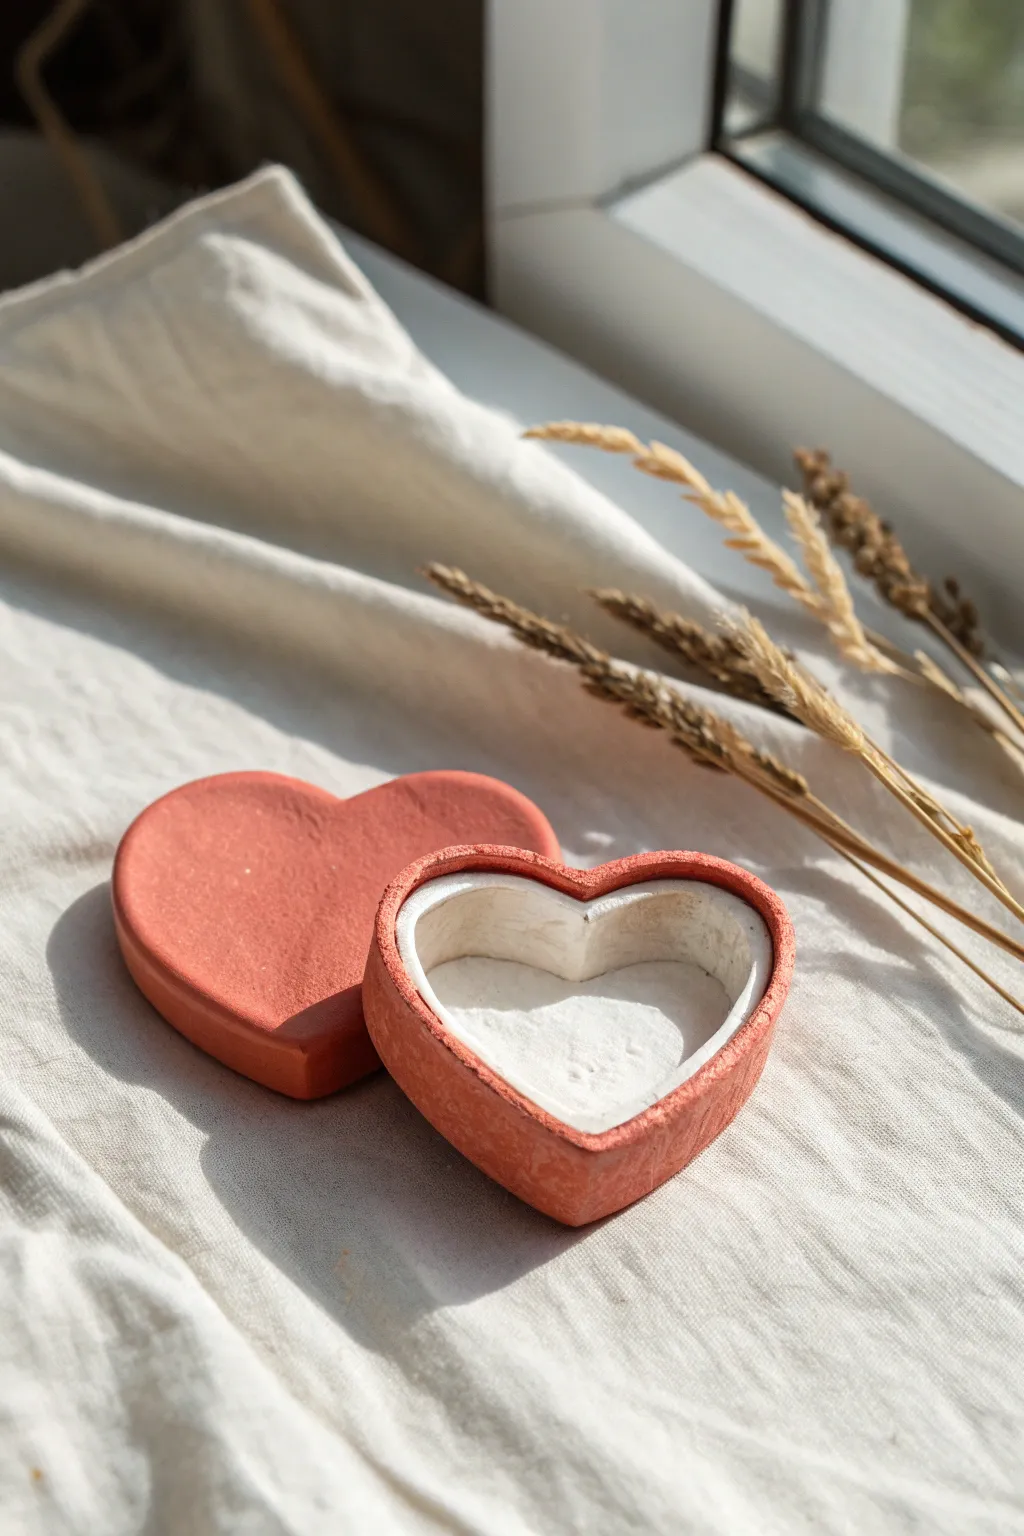
This charming two-piece locket box combines the warmth of terracotta with a clean, white interior, perfect for keeping tiny treasures safe. The contrasting finishes create a sophisticated look that feels both rustic and modern.
Step-by-Step Tutorial
Materials
- Terracotta colored air-dry clay
- White acrylic paint
- Rolling pin
- Heart-shaped cookie cutter
- Craft knife or clay needle tool
- Small bowl of water
- Fine grit sandpaper (e.g., 220 grit)
- Small flat paintbrush
- Matte varnish (optional)
- Sponge or smoothing tool
Step 1: Creating the Base and Lid
-
Roll the slabs:
Begin by conditioning your terracotta clay until it is pliable. Roll out a slab of clay to an even thickness of about 1/4 inch (6mm). This thickness ensures the box walls will be sturdy enough to hold shape. -
Cut the primary hearts:
Using your heart-shaped cookie cutter, press firmly into the slab to cut out two identical hearts. One will serve as the base floor, and the other will become the lid. -
Prepare the wall strip:
Gently roll out a long, rectangular snake of clay and flatten it until it is approximately 1/2 inch wide and matches the thickness of your base. Measure it against the perimeter of your base heart to ensure it’s long enough to go all the way around. -
Attach the walls:
Score the edges of one of your heart cutouts and the bottom edge of your clay strip. Dab a little water or slip onto the scored areas to act as glue. -
Shape the box:
Carefully wrap the clay strip around the heart base, standing it upright. Press the seams together firmly but gently. Where the strip ends meet—usually at the cleft or point of the heart—slice off the excess and blend the seam together until invisible. -
Smooth the exterior:
Dip your finger or a damp sponge into water and run it along the outside seam where the wall meets the base. Smooth the clay upward to eliminate the join line and create a seamless, solid cup shape. -
Create the lid lip (The Locket Mechanism):
To make the lid fit snugly like a locket, you need an inner lip. Roll a thinner, narrower strip of clay. Attach this strip to the *underside* of your second heart cutout, placing it just slightly inward from the edge (about 2-3mm in). -
Test the fit:
While the clay is still workable but not too soft, gently check if the lid’s inner lip fits inside the base walls. Adjust the shape if necessary so it sits securely without sticking, then separate them immediately to dry.
Fixing Cracks
If you see tiny cracks as the clay dries, mix a small amount of fresh clay with water to make a paste. Fill the cracks, smooth with a finger, and let it dry again.
Step 2: Refining and Finishing
-
Dry thoroughly:
Place both pieces on a flat surface away from direct heat. Let them air dry completely for at least 24 to 48 hours. I find flipping them over halfway through the drying process helps prevent warping. -
Sand for smoothness:
Once fully cured and hard, take your fine-grit sandpaper and gently sand the exterior walls and the top of the lid. Focus on smoothing out fingerprints or sharp ridges from the edges. -
Clean the dust:
Wipe the entire piece down with a slightly damp cloth or a dry soft brush to remove all the clay dust from sanding. This is crucial for smooth paint application. -
Paint the interior base:
Using a small flat brush, apply white acrylic paint to the *inside* floor and inner walls of the box. You will likely need 2-3 coats for full opacity, letting each layer dry in between. -
Paint the lid interior:
Paint the underside of the lid white as well, including the inner lip mechanism. Keep the exterior terracotta surface unpainted to maintain that natural clay look shown in the photo. -
Clean up edges:
If any white paint accidentally got onto the rim or outside, quickly wipe it away or carefully scrape it off once dry. You want a crisp line where the white interior meets the terracotta rim. -
Seal the piece:
Apply a coat of matte varnish over the painted white areas to protect them from chipping. If you want the exterior to remain raw and textured, you can leave it unvarnished, or apply a very thin matte sealer for durability.
Make it a Gift
Before the interior paint dries, sprinkle fine glitter into the wet paint for a sparkling surprise, or write a tiny secret message on the inside bottom.
This little box is now ready to hold rings, earrings, or secretive notes on your bedside table
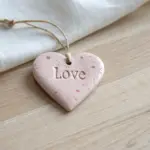
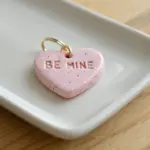
Message Hearts With Handwritten Words
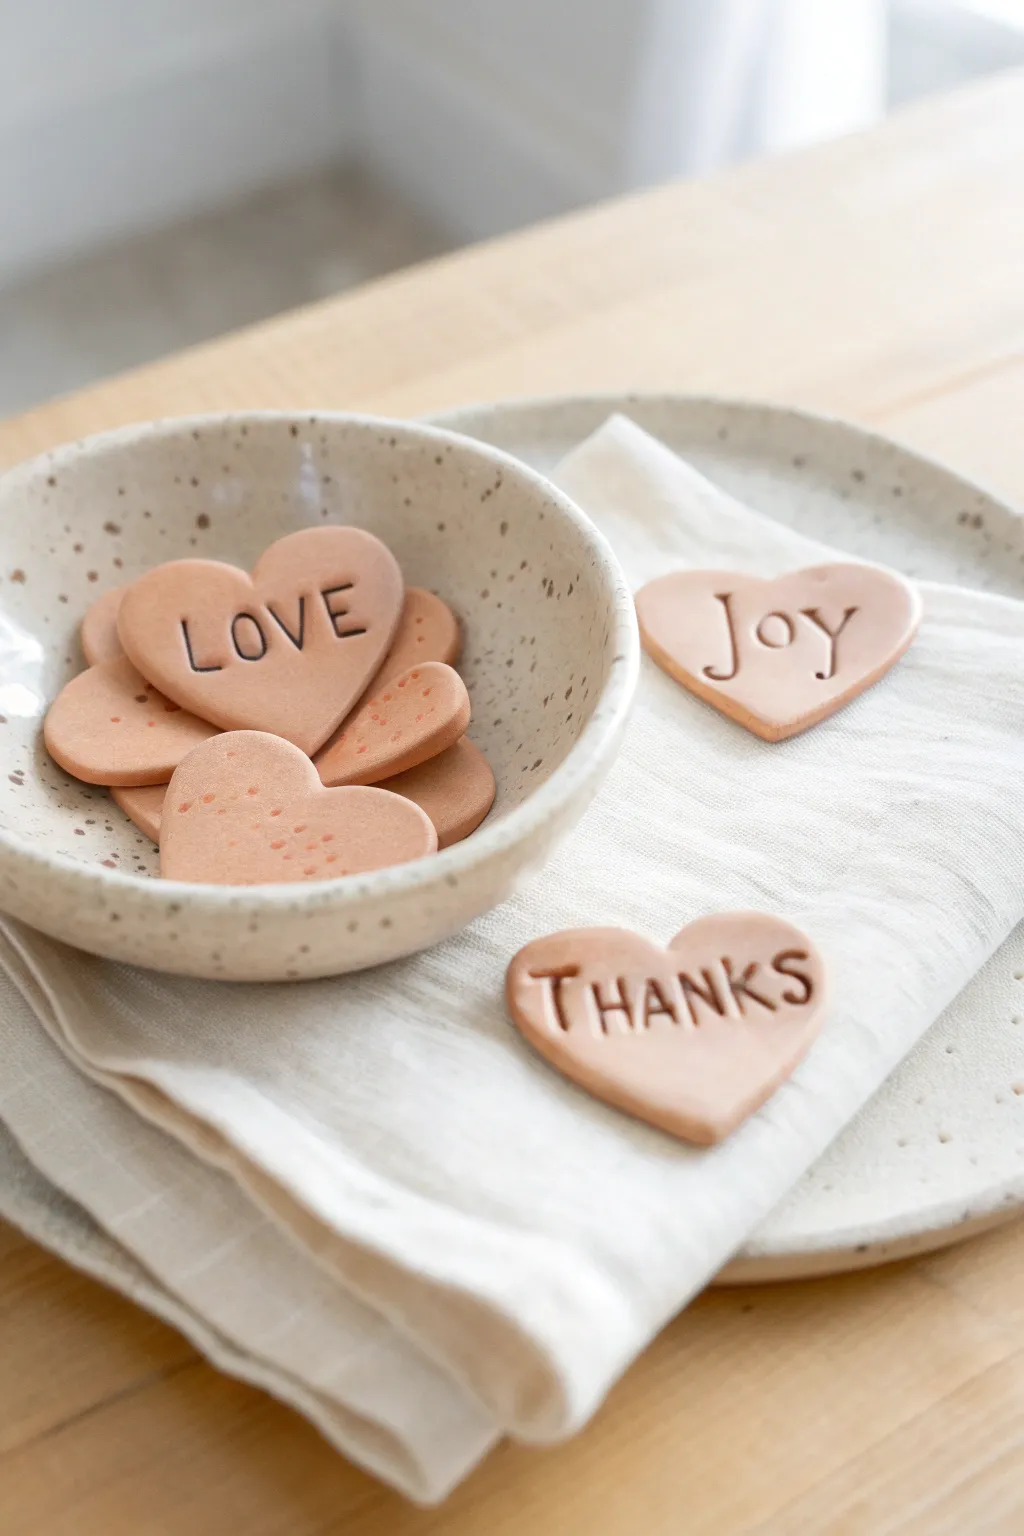
These simple, unglazed terracotta-style hearts radiate warmth with their gentle earthy tones and personal messages. Perfect for table settings or small tokens of affection, they combine the tactile charm of raw clay with crisp, stamped lettering that feels both modern and handmade.
Detailed Instructions
Materials
- Terracotta-colored air dry clay
- Rolling pin
- Heart-shaped cookie cutter (medium size)
- Small alphabet rubber stamps
- Black ink pad (permanent or pigment-based)
- Parchment paper or non-stick craft mat
- Fine-grit sandpaper (400 grit)
- Bowl of water and sponge (for smoothing)
- Optional: Acrylic sealer (matte)
Step 1: Shaping the Hearts
-
Condition the Clay:
Begin by taking a handful of the terracotta-colored clay. Knead it in your hands for a minute or two until it feels pliable and warm, ensuring there are no air bubbles trapped inside. -
Roll It Out:
Place the clay onto a sheet of parchment paper or a non-stick mat. Using your rolling pin, roll the clay out to an even thickness of about 1/4 inch (6mm). Try to keep the surface as smooth as possible. -
Cut the Shapes:
Press your heart-shaped cookie cutter firmly into the rolled clay. Wiggle it slightly to ensure a clean cut, then lift the cutter. Repeat this for as many hearts as you can fit on your slab. -
Remove Excess Clay:
Carefully peel away the excess clay from around your heart shapes. You can ball this up and re-roll it later for more hearts. -
Soften the Edges:
Dip your finger into a little water and gently run it along the cut edges of each heart. This smooths out any harsh lines left by the cutter, giving the piece a refined, finished look.
Stamp Pressure
Only press the stamp down about 1-2mm. If you press too deep, the clay will displace and warp the heart shape. A light but firm touch is key.
Step 2: Stamping and Drying
-
Plan Your Words:
Before stamping, decide on your words (like LOVE, JOY, THANKS). Lay out your alphabet stamps in order so you don’t accidentally stamp a typo. -
Ink the Stamps:
Gently tap your first letter stamp onto the black ink pad. You want an even coating of ink, but not so much that it globs into the crevices of the letter. -
Impress the Letters:
Press the inked stamp firmly into the center of the clay heart. Apply enough pressure to create a physical indentation in the clay while transferring the ink. -
Complete the Word:
Continue stamping the remaining letters. I find it helpful to start with the center letter of the word and work outwards to keep things centered. -
Add Texture (Optional):
For the speckled hearts seen in the bowl, use a toothpick or a dry brush to gently stipple a few small dots or indentations onto the clay surface for added visual interest. -
Initial Drying:
Leave the hearts on the parchment paper to dry flat. Keep them away from direct heat sources to prevent cracking. -
Flip for Even Drying:
After about 12 hours, or when the top feels dry to the touch, gently flip the hearts over. This allows the bottom side to dry evenly and prevents curling. -
Full Cure:
Let them dry completely for another 24 to 48 hours. The clay will lighten in color slightly and feel hard and room temperature (not cool) when fully cured.
Step 3: Finishing Touches
-
Sand for Smoothness:
Once fully dry, take your fine-grit sandpaper and very lightly buff the edges and surface. This removes any tiny burrs or fingerprints. -
Dust Clean:
Wipe the hearts with a dry, soft cloth or a large brush to remove any clay dust from the sanding process. -
Seal (Optional):
If you want to protect the ink and clay, apply a very thin coat of matte acrylic sealer. The project looks best with a natural, non-glossy finish, so keep the layer light.
Make them Magnets
Once fully dry, glue a small, strong circular magnet to the back. They make adorable fridge reminders or functional gifts for holding photos.
Arrange your beautiful new hearts in a small dish or scatter them on a table setting to share a little joy with your guests
Stitched-Look Hearts With Threaded Holes
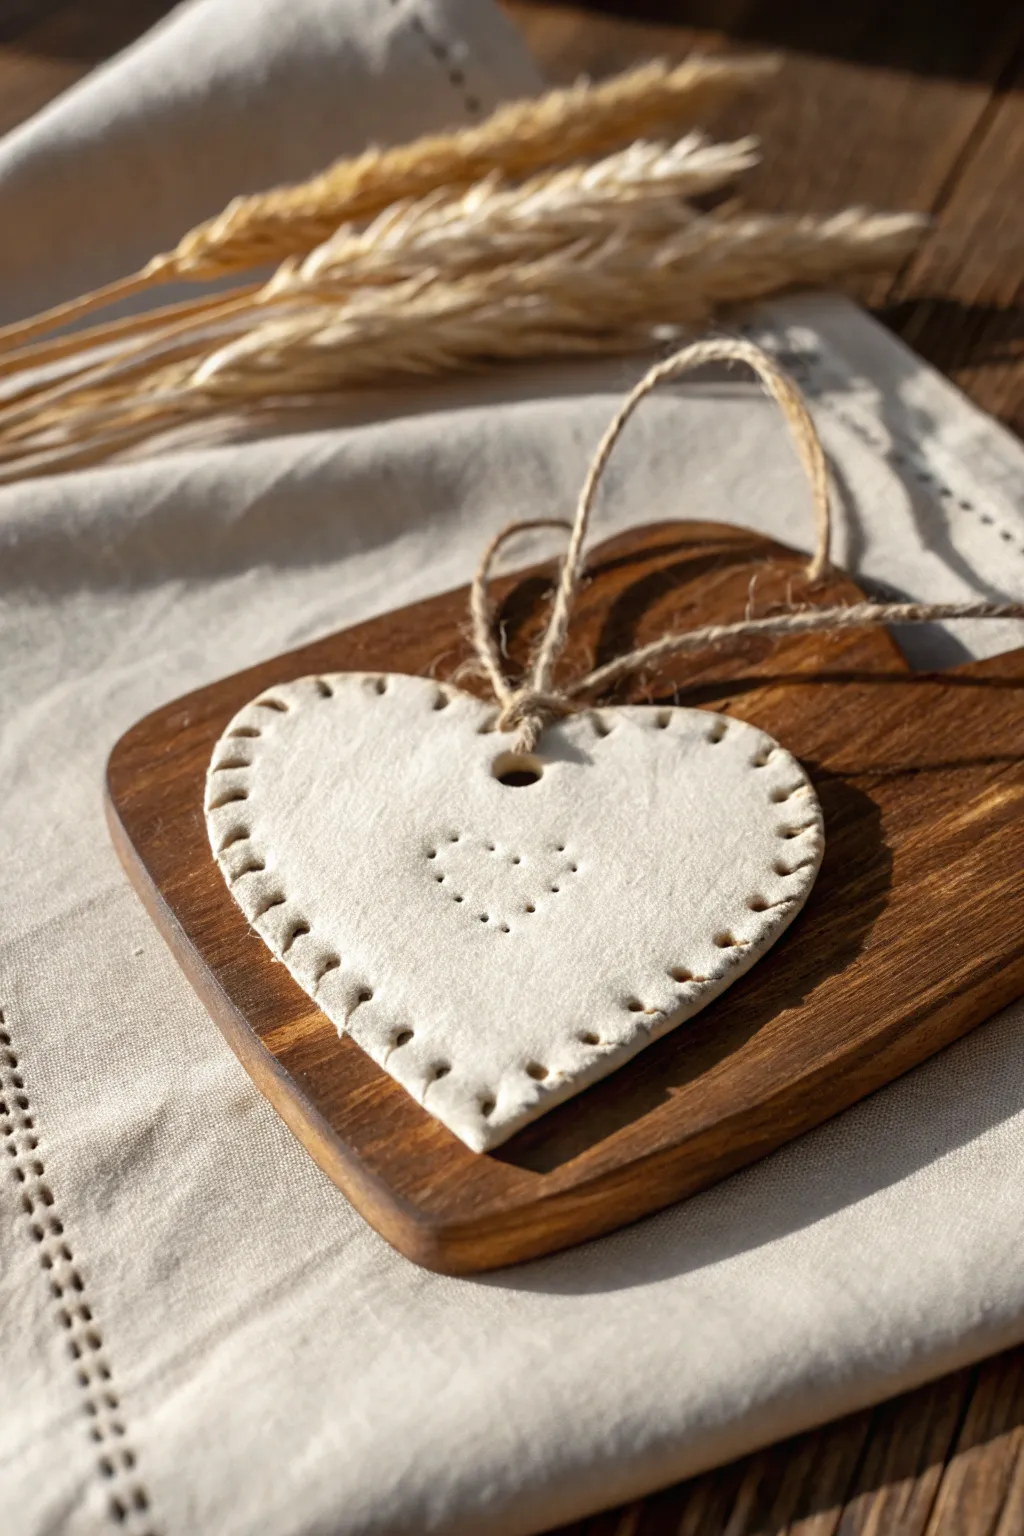
Create a rustic, Scandinavian-inspired ornament that mimics the cozy look of stitched leather or fabric using simple air-dry clay. The subtle indented details give this piece a lovely tactile quality without needing a single needle or thread.
Step-by-Step Guide
Materials
- White smooth air-dry clay
- Rolling pin
- Heart-shaped cookie cutter (approx. 3-4 inches)
- Parchment paper or non-stick mat
- Toothpick or a blunt tapestry needle
- Small straw or skewer (for the hanging hole)
- Jute twine or natural hemp cord
- Fine-grit sandpaper
- Small bowl of water
- Matte varnish (optional)
Step 1: Shaping the Base
-
Condition the Clay:
Begin by taking a handful of air-dry clay and kneading it in your hands for a minute until it feels warm and pliable. This helps prevent cracks later. -
Roll It Out:
Place the clay on parchment paper to prevent sticking. Use a rolling pin to flatten the clay to an even thickness of about 1/4 inch (6mm). Avoid rolling it too thin, as you want the ornament to have a bit of weight and durability. -
Cut the Shape:
Press your heart-shaped cookie cutter firmly into the clay. Give it a tiny wiggle to ensure it cuts all the way through, then lift the cutter. Peel away the excess clay. -
Smooth the Edges:
Dip your finger in a little bit of water and gently run it along the cut edges of the heart. This rounds them off slightly and removes any sharp or jagged bits left by the cutter.
Clean Lines
For perfectly uniform ‘stitch’ holes, use the tines of a plastic fork to gently mark your spacing before pressing deeper with your toothpick tool.
Step 2: Adding the ‘Stitched’ Details
-
Mark the Border:
Using a blunt tool like a thick tapestry needle or a dull toothpick, gently press indentations around the entire perimeter of the heart. I prefer to space these about 1/4 inch apart. -
Create the Faux Stitches:
Between each indentation mark, use the side of your toothpick or a small modeling tool to press a shallow line connecting the holes. This creates the illusion of a thread bridging the gap. -
Outline the Inner Heart:
Use the tip of a toothpick to lightly sketch a smaller heart shape in the very center of your clay piece. Keep this touch very light; it’s just a guide for your next step. -
Poke the Center Design:
Following your sketched guide, press a series of dots to form the inner heart. Press firmly enough to make a clear impression, but be careful not to poke all the way through the clay. -
Create the Hanging Hole:
Use a straw or a skewer to punch a clean, round hole near the top center of the heart, ensuring it’s large enough for your twine to pass through later. -
Refine the Details:
Inspect your work. If any clay was displaced while making holes, gently tap it back down with a damp finger to keep the surface smooth.
Curling Clay?
If the heart edges start to curl up while drying, place a light book on top of the clay (with parchment paper in between) once the surface is dry to the touch.
Step 3: Finishing Touches
-
Let it Dry:
Place the heart on a clean sheet of parchment paper in a cool, dry place. Let it air dry for at least 24-48 hours. Flip it over halfway through the drying process to ensure the bottom dries evenly. -
Sand for Perfection:
Once fully cured and hard, use fine-grit sandpaper to gently buff the edges and surface. This removes any fingerprints and gives the piece a professional matte finish. -
Optional Sealing:
If you want to protect the ornament from humidity, apply a thin coat of matte varnish. This will keep the natural look while adding durability. -
Prepare the Twine:
Cut a piece of jute twine approximately 8-10 inches long. The rustic texture of jute complements the raw clay perfectly. -
String the Ornament:
Fold the twine in half and push the loop end through the hole from front to back. -
Secure the Loop:
Take the loose ends of the twine and thread them through the loop you just pushed through the hole. Pull tight to create a lark’s head knot right at the top of the heart. -
Tie the Ends:
Knot the two loose ends of the twine together at your desired length to complete the hanger.
Hang your new ornament in a sunny spot or on a branch to enjoy its simple, handmade charm