Whenever I want that calm, hands-on studio feeling without firing anything, I reach for air dry clay. These ideas are all about making pieces that feel grown-up—functional, polished, and totally at home in a modern space.
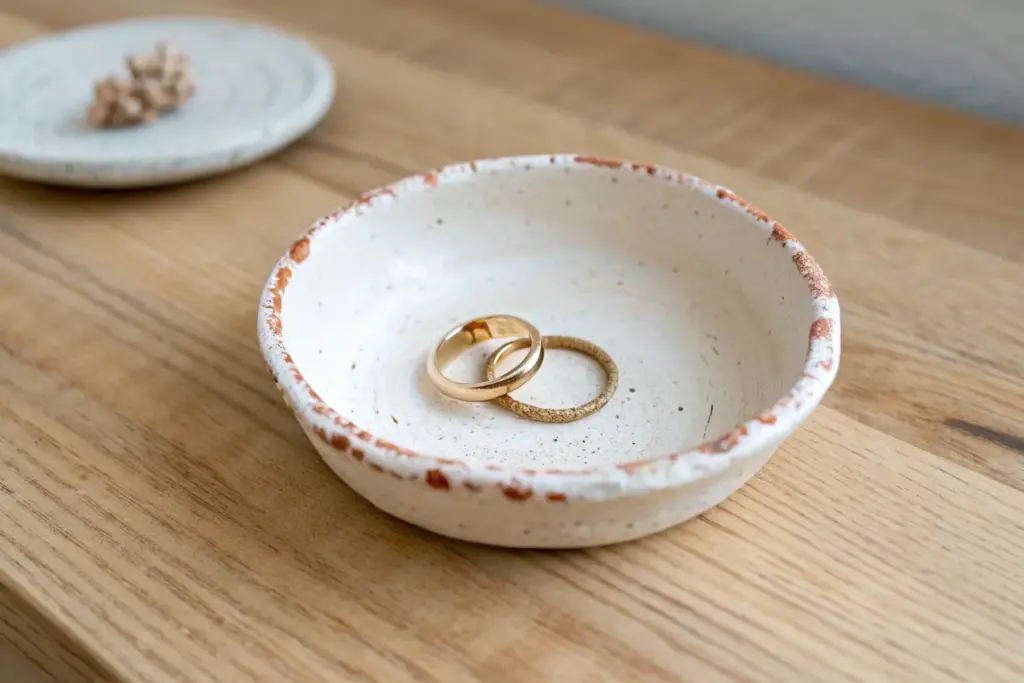
Minimal Trinket Dishes for Jewelry and Keys
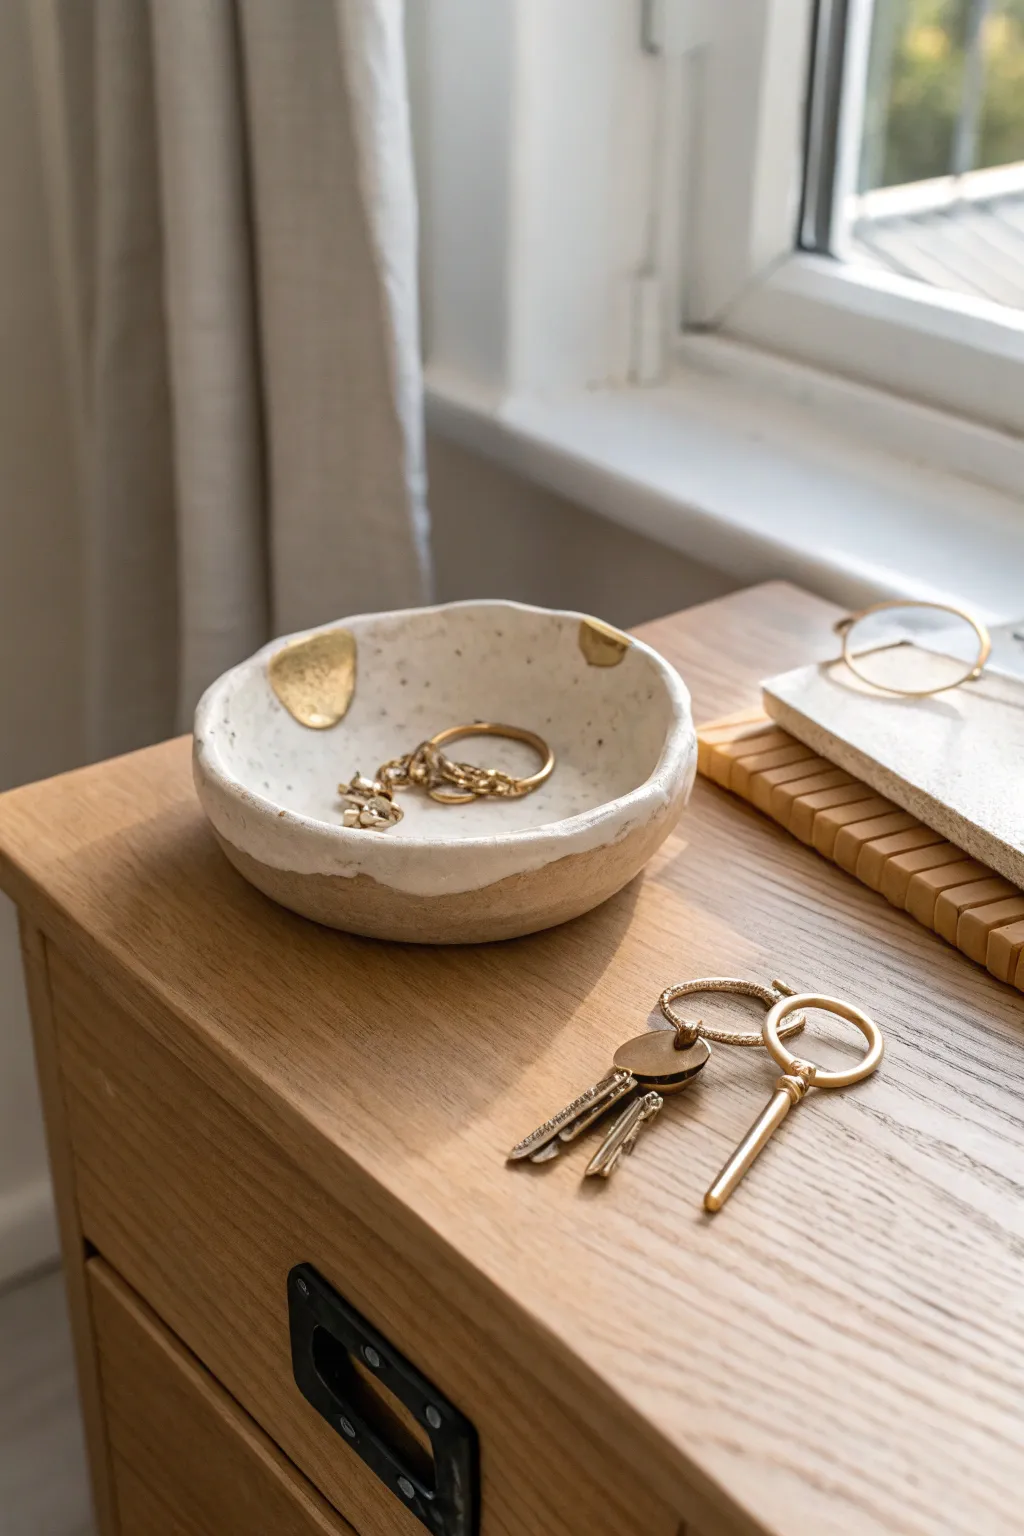
Embrace the beauty of imperfection with this wabi-sabi inspired trinket dish, featuring a creamy white glazed interior and raw, textured edges. The organic shape and distinct gold leaf accents make it an elegant catch-all for your everyday jewelry and keys.
Step-by-Step Guide
Materials
- White or speckled air-dry clay
- Rolling pin
- Small bowl (for measuring size)
- Craft knife or clay tool
- Small sponge
- Water
- White acrylic paint (warm or creamy tone)
- Gloss varnish or clear sealant
- Gold leaf sheets
- Gold leaf adhesive (size)
- Small soft paintbrushes
- Fine grit sandpaper
Step 1: Shaping the Clay
-
Prepare the clay:
Begin by taking a handful of air-dry clay, roughly the size of a tennis ball. Knead it in your hands for a minute to warm it up and ensure it is pliable and free of air bubbles. -
Roll out the slab:
On a clean, flat surface, roll the clay out into an even slab. Aim for a thickness of about 1/4 inch (6mm). Don’t worry if the edges are messy at this stage. -
Cut the base circle:
Place a small bowl upside down on your rolled clay to act as a template. Use your craft knife to cut around the bowl, creating a preliminary circle shape. -
Form the rim:
Gently lift the edges of the clay circle upwards with your fingers. Instead of smoothing it perfectly, pinch the clay sporadically to create an organic, slightly uneven rim that wavers in height. -
Add texture:
Let the natural texture of your fingerprints remain, or gently press a sponge against the outside to enhance the rustic look. Press the center down slightly to ensure there is a clear well for holding items. -
Smooth the interior:
Dip your finger in a little water and very gently smooth just the inside bottom of the dish so your jewelry will have a soft place to rest, leaving the rim textured. -
Dry completely:
Set the dish aside in a cool, dry place. Allow it to dry for 24-48 hours until it is bone dry and turns a chalky white color. Flip it over halfway through to ensure the bottom dries evenly.
Rim Technique
To get that ‘dipped’ look on the rim, don’t paint a straight line. Use a loaded brush and press it gently against the rim so the paint naturally blobs over the edge slightly.
Step 2: Painting and Gilding
-
Sand for finish:
Once solid, take your fine-grit sandpaper and lightly buff the sharpest points on the rim or any rough patches on the bottom, but maintain that handmade unevenness. -
Paint the interior:
Using a soft brush, apply a coat of warm white acrylic paint to the inside of the bowl only. Bring the paint intimately up to the rim, allowing it to naturally stop where the rim curves over, creating a ‘dripped’ glaze effect. -
Layer the color:
I usually find that one coat is too sheer, so apply a second coat of white paint once the first is dry to get that solid, opaque ceramic look. -
Apply sizing adhesive:
Identify two or three spots on the inner rim where you want the gold accents. Paint a small, irregular blotch of gold leaf adhesive in these spots. Let it sit until it becomes tacky (usually 10-15 minutes). -
Add the gold leaf:
Gently press a small sheet of gold leaf over the tacky adhesive. Use a dry, soft brush to pat it down, ensuring it adheres into the crevices of the clay. -
Brush away excess:
Once the gold is stuck, use a stiff brush to vigorously sweep away the loose gold flake that isn’t attached to the glue, revealing your organic gold shapes. -
First seal:
Apply a coat of gloss varnish over the white painted interior and the gold leaf. This seals the paint and prevents the metal leaf from tarnishing. -
Final finish:
For the outside of the bowl, you can leave it raw for contrast or apply a matte varnish to protect the clay without adding shine.
Creative Twist
Before drying, press dried lavender stems or lace into the exterior clay for added texture, then highlight these impressions with a dry-brushing of darker paint.
Place your finished dish on a nightstand to add a touch of handcrafted elegance to your daily routine


Ring Cones That Look Boutique-Grade
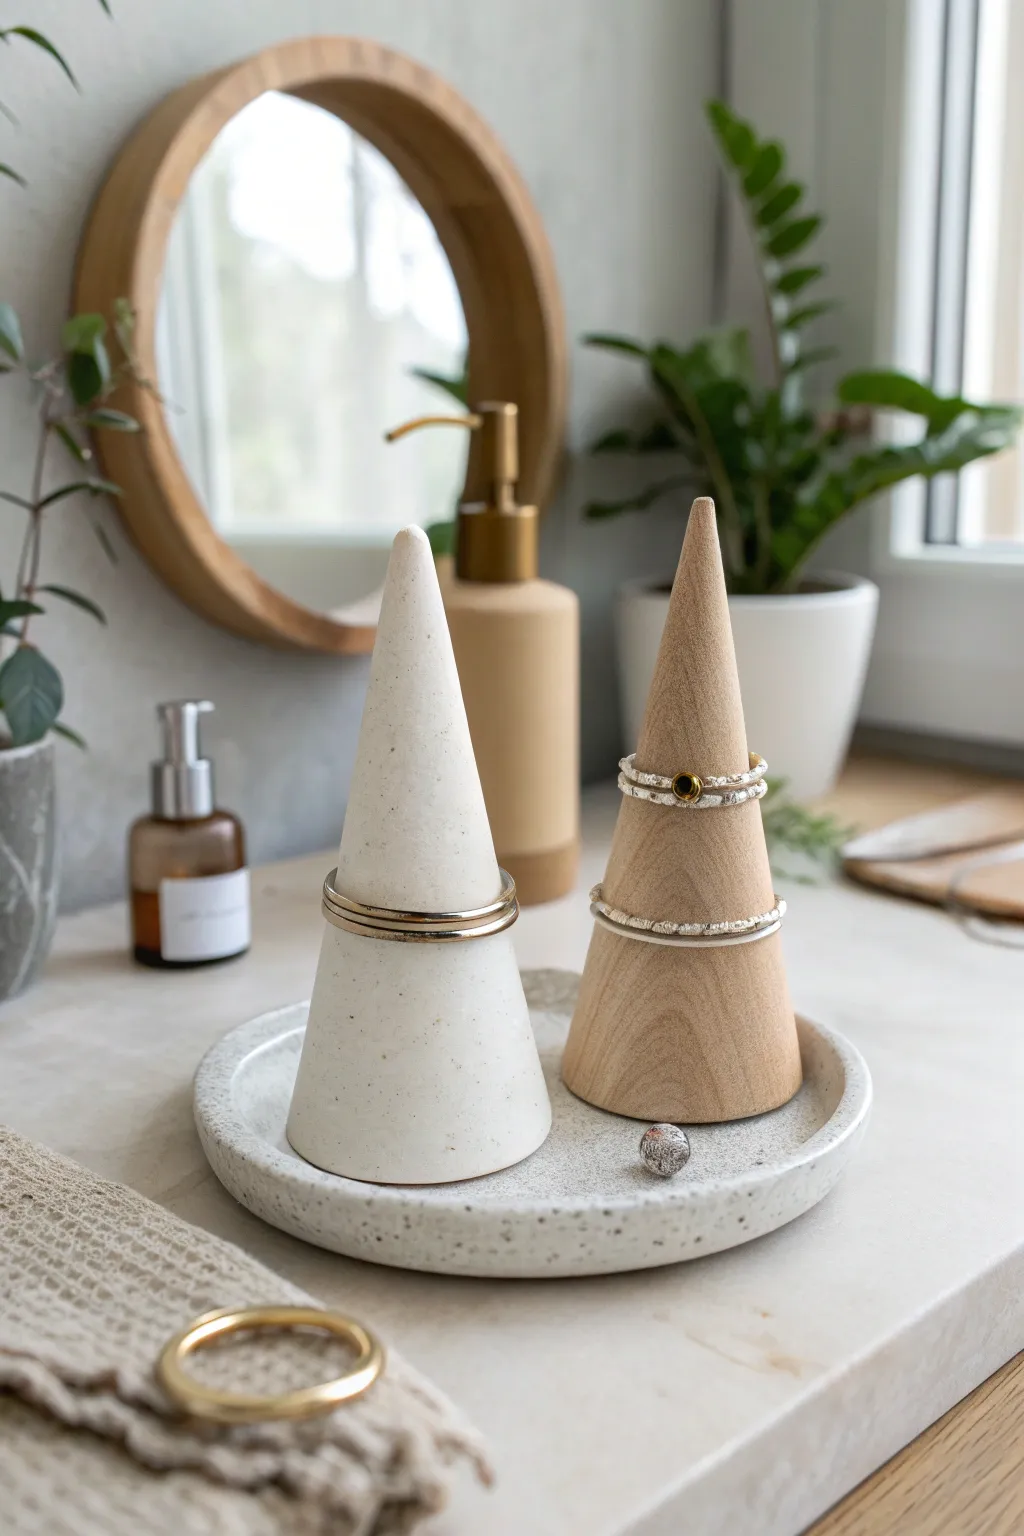
Elevate your vanity with this chic, minimalist jewelry display that pairs the rustic charm of faux wood with sophisticated speckled ceramic textures. This project uses clever finishing techniques to turn simple air dry clay into what looks like high-end boutique decor.
Detailed Instructions
Materials
- White air dry clay (250g)
- Small rolling pin
- Cardstock or thin cardboard (for template)
- Tape
- Precision craft knife or clay slicing tool
- Small bowl or cup (for tray mold)
- Sandpaper (fine grit: 220 and 400)
- Acrylic paints: Creamy white, warm beige/tan, dark brown, black
- Stiff bristle brush or toothbrush (for speckling)
- Soft synthetic paintbrushes
- Matte or satin varnish sealant
- Foil or cling film
Step 1: Shaping the Cones
-
Create the support structure:
Cut a quarter-circle shape out of cardstock to create a cone template. Roll this into a cone shape and tape it securely. This will act as the internal support for your clay so it doesn’t sag while drying. -
Wrap the core:
Cover your cardstock cone with a layer of cling film or foil. This essential step prevents the wet clay from sticking to the paper mold, making removal much easier later. -
Roll the slab:
Roll out a portion of air dry clay until it is about 1/4 inch thick. Aim for an even thickness throughout to ensure uniform drying. -
Cut and wrap:
Drape the clay sheet over your cone form. Use your knife to trim away excess clay at the seam and the bottom. Gently press the seam edges together and smooth them down with a bit of water on your finger until the join is invisible. -
Refine the shape:
Roll the clay-covered cone gently on your work surface to smooth out any fingerprints and ensure the cone is perfectly round. Slice the bottom flush so it stands straight. -
Make the second cone:
Repeat the process for the second cone. I usually like to make one slightly taller or wider than the other for visual interest.
Step 2: Creating the Base Tray
-
Form the base:
Roll a ball of clay and flatten it into a circular disc, roughly 4-5 inches in diameter and slightly thicker than the cones. -
Create the rim:
Roll a long, thin snake of clay. Score and slip (scratch the surface and add water) along the edge of your disc, then attach the snake to create a raised rim. -
Blend the edges:
Use a modeling tool or your thumb to blend the coil seamlessly into the base, both on the inside and outside, creating a smooth lip. -
Dry thoroughly:
Let all pieces dry for at least 24-48 hours. Rotate them occasionally to let air reach all sides.
Seamless Smoothness
Use a barely damp sponge during the final smoothing phase before drying. It acts like a fine sandpaper, erasing fingerprints without leaving scratches.
Step 3: Finishing: The Faux Ceramic Look
-
Initial sanding:
Once bone dry, use the 220 grit sandpaper to remove any major bumps. Switch to 400 grit to polish the surface until it feels glass-smooth. -
Base coat:
Paint one cone and the tray with a creamy white acrylic paint. Apply 2-3 thin coats for opaque coverage, letting each layer dry in between. -
Add the speckles:
Dilute a tiny amount of black or dark brown paint with water. Dip a stiff brush (or toothbrush) into it, and flick the bristles with your thumb to spray fine speckles over the white pieces.
Cracking Issues?
If hairline cracks appear while drying, mix a tiny bit of fresh clay with water to make a paste (slip) and fill the cracks. Sand smooth once dry.
Step 4: Finishing: The Faux Wood Look
-
Base wood tone:
Paint the second cone with a warm beige or light tan acrylic paint. This will be the underlying wood color. -
Create grain texture:
Mix a slightly darker brown paint with glaze medium or water to make it translucent. Brush this over the tan base in vertical strokes. -
Detail the grain:
While the glaze is wet, use a dry, clean brush to drag through the paint vertically, creating subtle streaks that mimic wood grain. -
Seal everything:
Finish all three pieces with a coat of matte or satin varnish to protect the paint and give them that professional store-bought sheen.
Now you have a stunning, modern organizer ready to display your favorite rings or gift to a stylish friend


Modern Coasters With Terrazzo-Style Speckles
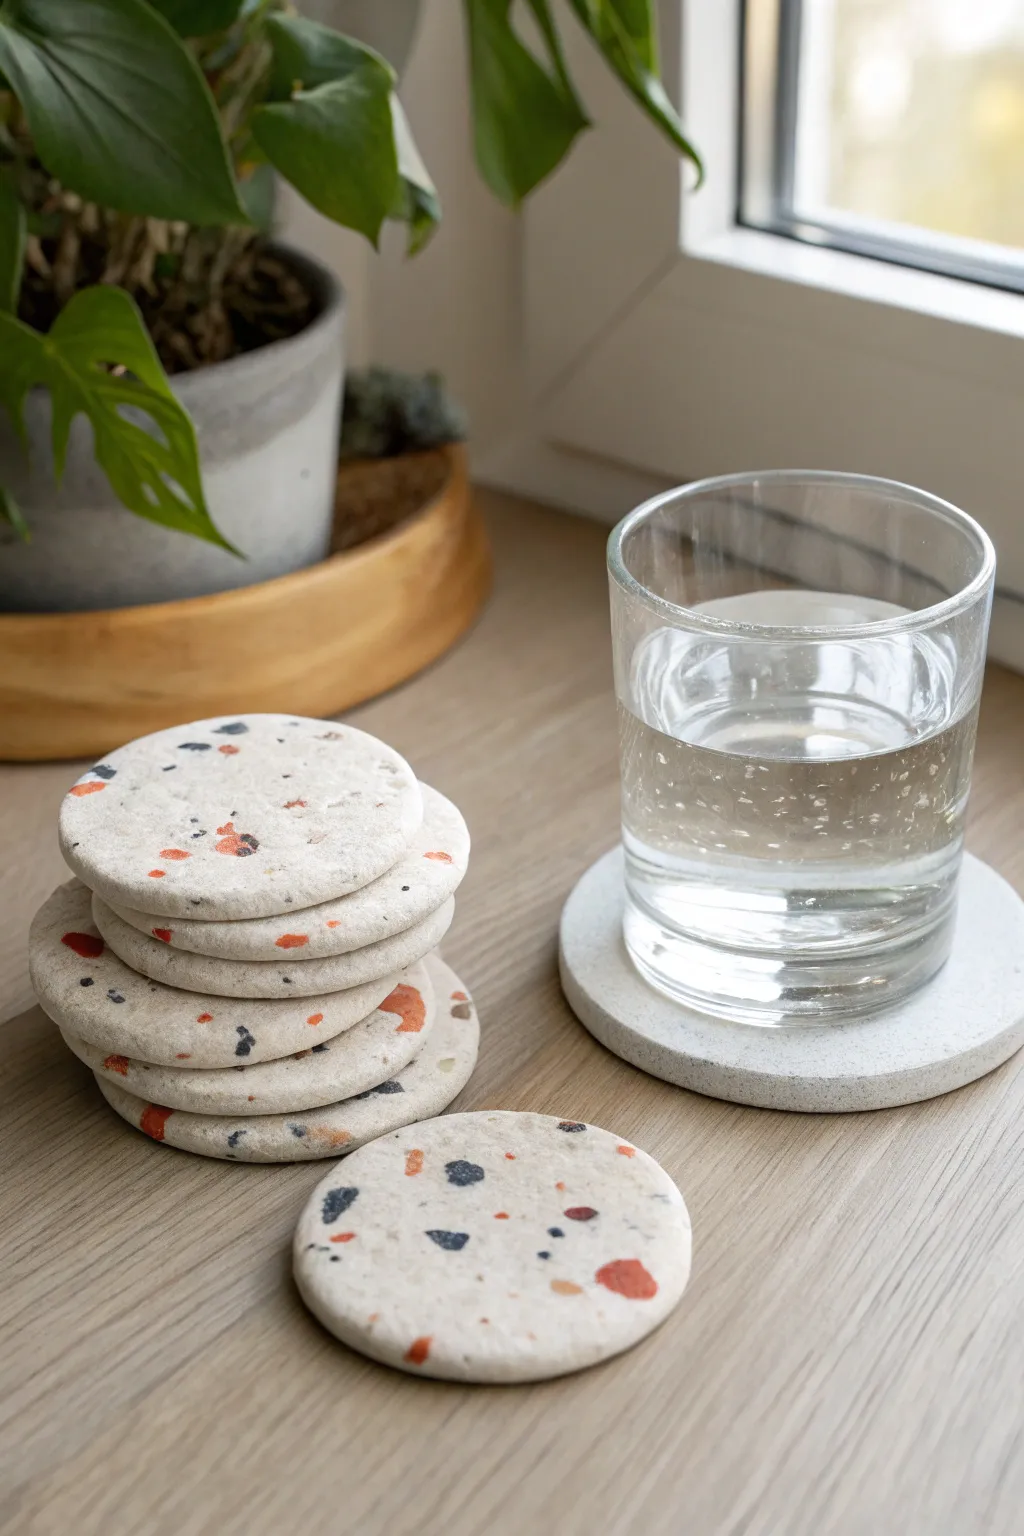
Elevate your coffee table décor with these modern, minimalist coasters that mimic the high-end look of terrazzo stone. Using simple air-dry clay, you’ll create a durable and stylish set featuring organic speckles in warm terra cotta and cool slate blue tones.
Step-by-Step Guide
Materials
- White or light grey air-dry clay (e.g., DAS or Crayola)
- Acrylic paints (Burnt Sienna/Terra Cotta, Black, Navy Blue)
- Rolling pin or smooth glass jar
- Circle cookie cutter (approx. 3.5 – 4 inches) or a glass to trace
- Craft knife or scalpel
- Sandpaper (medium and fine grit)
- Acrylic sealer or varnish (matte or satin finish)
- Small rolling board or parchment paper
- Small bowl of water
- Optional: Cork backing sheets
Step 1: Preparing the ‘Chips’
-
Color small batches:
Pinch off three small grape-sized balls of white clay. To create your terrazzo colored ‘stones,’ mix acrylic paint directly into these balls. Knead one with Burnt Sienna for a rusty orange, one with Black for charcoal, and one with a mix of Navy and Black for a dark blue-grey. -
Flatten and dry:
Once the color is fully uniform, flatten these colored clay balls into very thin pancakes, about 1-2mm thick. Set them aside on parchment paper to dry until they are leathery or fully hard. I find letting them dry completely makes the snapping step easier. -
Create the chips:
When the colored pieces are dry, break them up into small, irregular shards. Aim for varied sizes—some tiny specks and some slightly larger geometric chunks—to mimic real stone aggregate.
Don’t Waste Scraps
Combine excess white clay with leftover colored chips and re-roll it. The pattern will be more marbled than sharp terrazzo, but it makes beautiful bonus beads or keychains.
Step 2: Forming the Base
-
Prepare the main clay:
Take a large chunk of fresh white or light grey clay. Knead it until it’s pliable and smooth, ensuring there are no air bubbles trapped inside. -
Initial roll out:
Roll out the clay on a non-stick surface or parchment paper until it is roughly 1/4 inch thick. Don’t worry about perfect edges yet, just get an even surface. -
Sprinkle the chips:
Scatter your prepared dried colored chips randomly over the surface of the wet clay. Press them gently so they stick, ensuring you have a pleasing distribution of colors. -
Embed the pattern:
Take your rolling pin and roll over the clay again firmly. You want to press the colored chips *into* the white clay so they become flush with the surface. The clay will expand slightly as you do this. -
Cut the shapes:
Using your circle cutter or by tracing around a wide glass, press down firmly to cut your coaster shapes. Wiggle slightly to separate the cut shape from the excess clay.
Step 3: Refining and Sealing
-
Smooth the edges:
Dip your finger in a little water and run it around the circumference of each coaster to smooth out any ragged bits left by the cutter. -
Drying time:
Place the coasters on a flat surface to dry. To prevent curling, flip them over every few hours during the first day. Let them dry completely for 24-48 hours until they are rock hard and lighter in color. -
Sand for the reveal:
Once fully dry, use medium-grit sandpaper to sand the top surface. This is the magic step where you remove the thin film of white clay covering your chips, revealing the crisp terrazzo pattern underneath. -
Fine tuning:
Switch to fine-grit sandpaper to buff the surface until it feels smooth to the touch. Sand the edges gently as well to ensure a professional finish. -
Clean off dust:
Wipe the coasters thoroughly with a slightly damp cloth or tack cloth to remove all sanding dust before sealing. -
Sealing:
Apply 2-3 coats of acrylic varnish or sealer. A matte finish looks most like natural stone, but gloss will make the colors pop. Allow proper drying time between coats. -
Waterproofing tip:
Pay special attention to the bottom and edges when sealing, as air-dry clay is porous and needs protection from condensation. -
Optional backing:
For extra furniture protection, glue a circle of cork sheet or felt to the bottom of your dry, sealed coasters.
Color Pop
Add a tiny drop of gold acrylic paint or use gold leaf flakes as one of your ‘chip’ colors for a luxe, glamorous fleck amidst the matte earthy tones.
Stack your new set on the table and enjoy their sophisticated, handmade charm every time you take a sip


Pinch-Pot Catchalls With Clean Edges
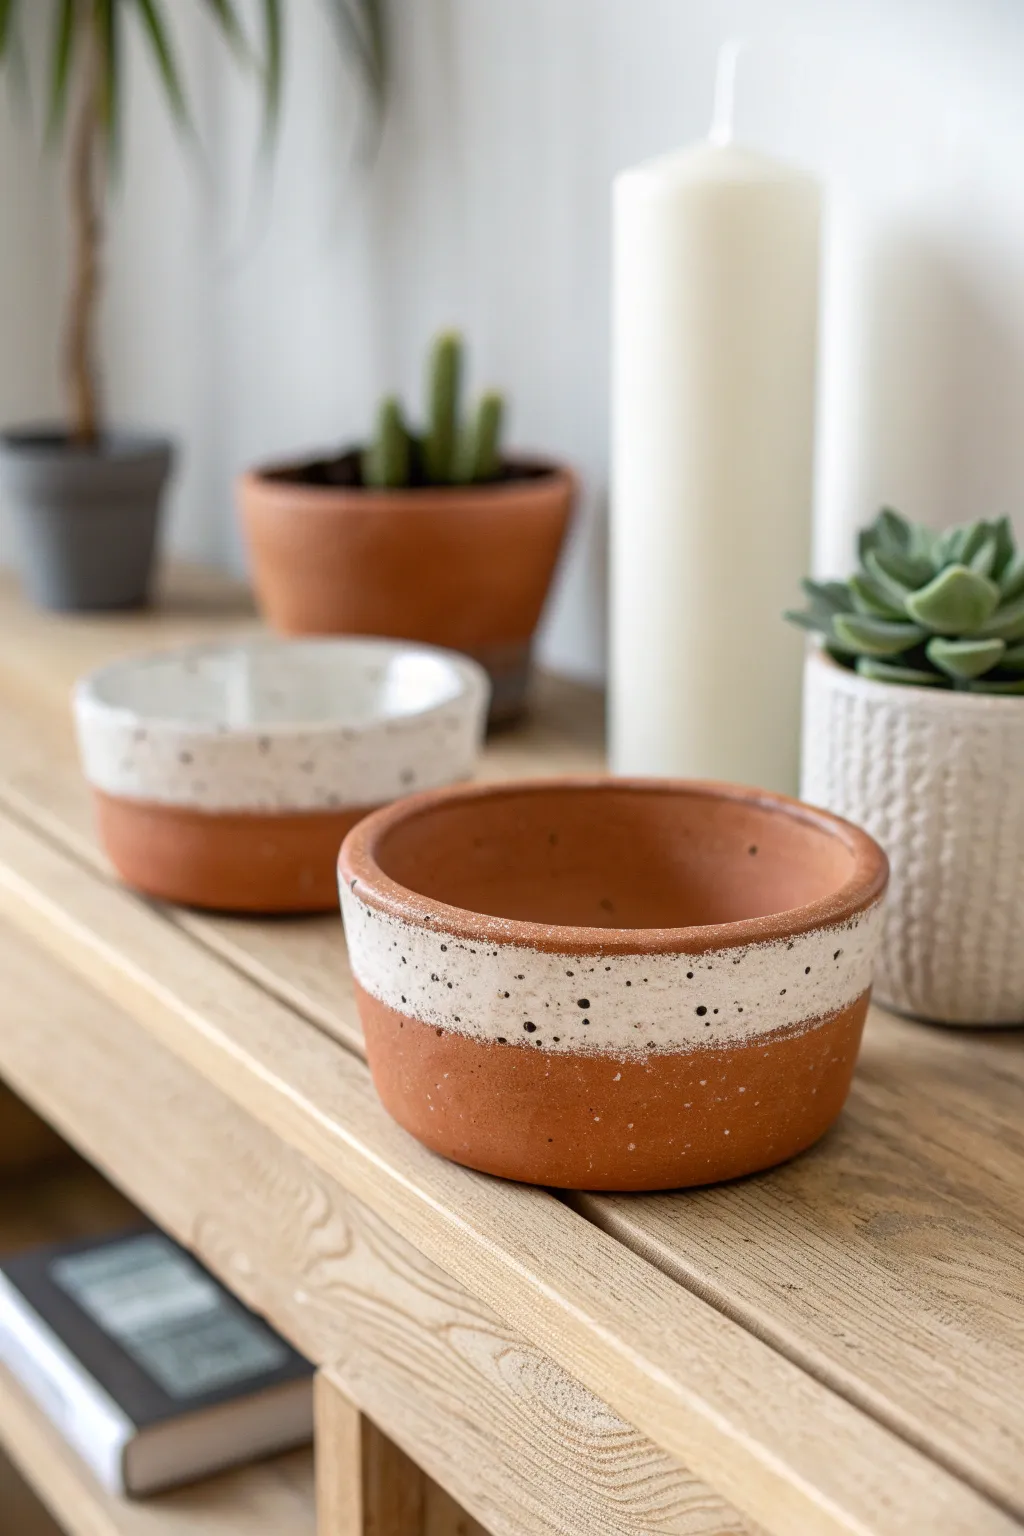
Elevate the humble pinch pot with this modern design featuring crisp, straight walls and a trendy speckled rim. The contrast between the raw terracotta warmth and the cool, speckled white band makes these catchalls perfect for organizing pocket clutter or displaying small succulents.
How-To Guide
Materials
- Terracotta-colored air dry clay
- Rolling pin
- Circle cutter or a bowl to trace/cut
- Craft knife or clay knife
- Acrylic paint (Creamy white)
- Black acrylic paint (for speckles)
- Stiff paintbrush or old toothbrush
- Flat shader paintbrush
- Painter’s tape or masking tape
- Fine grit sandpaper
- Water and sponge for smoothing
- Matte sealant/varnish
Step 1: Forming the Base Structure
-
Roll the clay slab:
Begin by conditioning a large chunk of terracotta air dry clay until it is pliable. Roll it out on a flat surface into an even slab, aiming for a thickness of about 1/4 inch. -
Cut the base and walls:
Use a circle cutter or trace around a bowl to cut a perfect circle for the base (approx. 4 inches diameter). Next, cut a long, rectangular strip for the walls; the length should match the circumference of your base, and the height determines the depth of the pot. -
Score and slip:
For a strong bond, score (scratch hatch marks) the outer edge of the circular base and one long edge of the rectangular strip. Dab a little water or liquid clay slip onto the scratched areas. -
Assemble the cylinder:
Carefully wrap the rectangular strip around the circular base, pressing the scored edges together. Join the two ends of the wall strip by scoring and overlapping them slightly or blending the seam together. -
Reinforce the seams:
Take a small coil of fresh clay and press it into the interior seam where the floor meets the wall. Smear this coil upwards and downwards with your thumb to create a seamless, rounded interior corner. -
Smooth the exterior:
On the outside, use a damp sponge or your fingers to smooth the join between the base and the wall until the line disappears completely.
Fixing Cracks
If hairline cracks appear during drying, mix a small amount of clay dust (from sanding) with white glue to create a paste. Fill the crack, let dry, and sand smooth.
Step 2: Refining and Drying
-
Straighten the rim:
To achieve the clean look seen in the photo, flip the pot upside down gently onto your work surface to foster a flat, even rim. You can also trim any uneven height with your craft knife. -
Shape the profile:
While the clay is still workable, gently push the walls outward if you want a slight curve, or use a flat object to paddle them straight if you prefer a perfect cylinder. -
Final smoothing:
Run a slightly damp sponge over the entire surface to remove fingerprints and imperfections. Pay special attention to the rim—it should be smooth to the touch. -
Let it dry:
Allow the pot to air dry completely. This usually takes 24-48 hours depending on humidity. Rotate it occasionally so the bottom dries evenly. -
Sand for perfection:
I find that a quick pass with fine-grit sandpaper once dry really elevates the piece. Sand away any remaining bumps or sharp edges on the rim.
Clean Lines
Burnish the edge of your painter’s tape with a fingernail or credit card before painting. This seals the tape to the texture of the clay and prevents bleeding.
Step 3: Decoration
-
Mask the band:
Apply painter’s tape horizontally around the exterior of the pot. Position it so that the top third of the pot is exposed, ensuring the tape line is straight and firmly pressed down to prevent leaks. -
Paint the rim:
Using creamy white acrylic paint and a flat brush, paint the area above the tape line. Extend the paint over the rim and slightly into the interior for a finished look. You may need two coats for opacity. -
Create the speckles:
Mix a tiny amount of water into black acrylic paint to make it fluid. Dip a stiff brush (or toothbrush) into the paint and flick the bristles with your thumb to spray fine contrasting dots over the white painted section. -
Reveal the line:
Wait until the paint is tacky but not fully hardened, then carefully peel away the painter’s tape. This timing helps keep the edge crisp without peeling up chunks of dry paint. -
Seal the surface:
Once all paint is perfectly dry, apply a matte sealant over the entire piece to protect the clay and give it a finished, professional sheen.
Now you have a stylish, minimalist vessel ready to organize your space

What Really Happens Inside the Kiln
Learn how time and temperature work together inside the kiln to transform clay into durable ceramic.
Taper Candle Holders With Sculptural Shapes
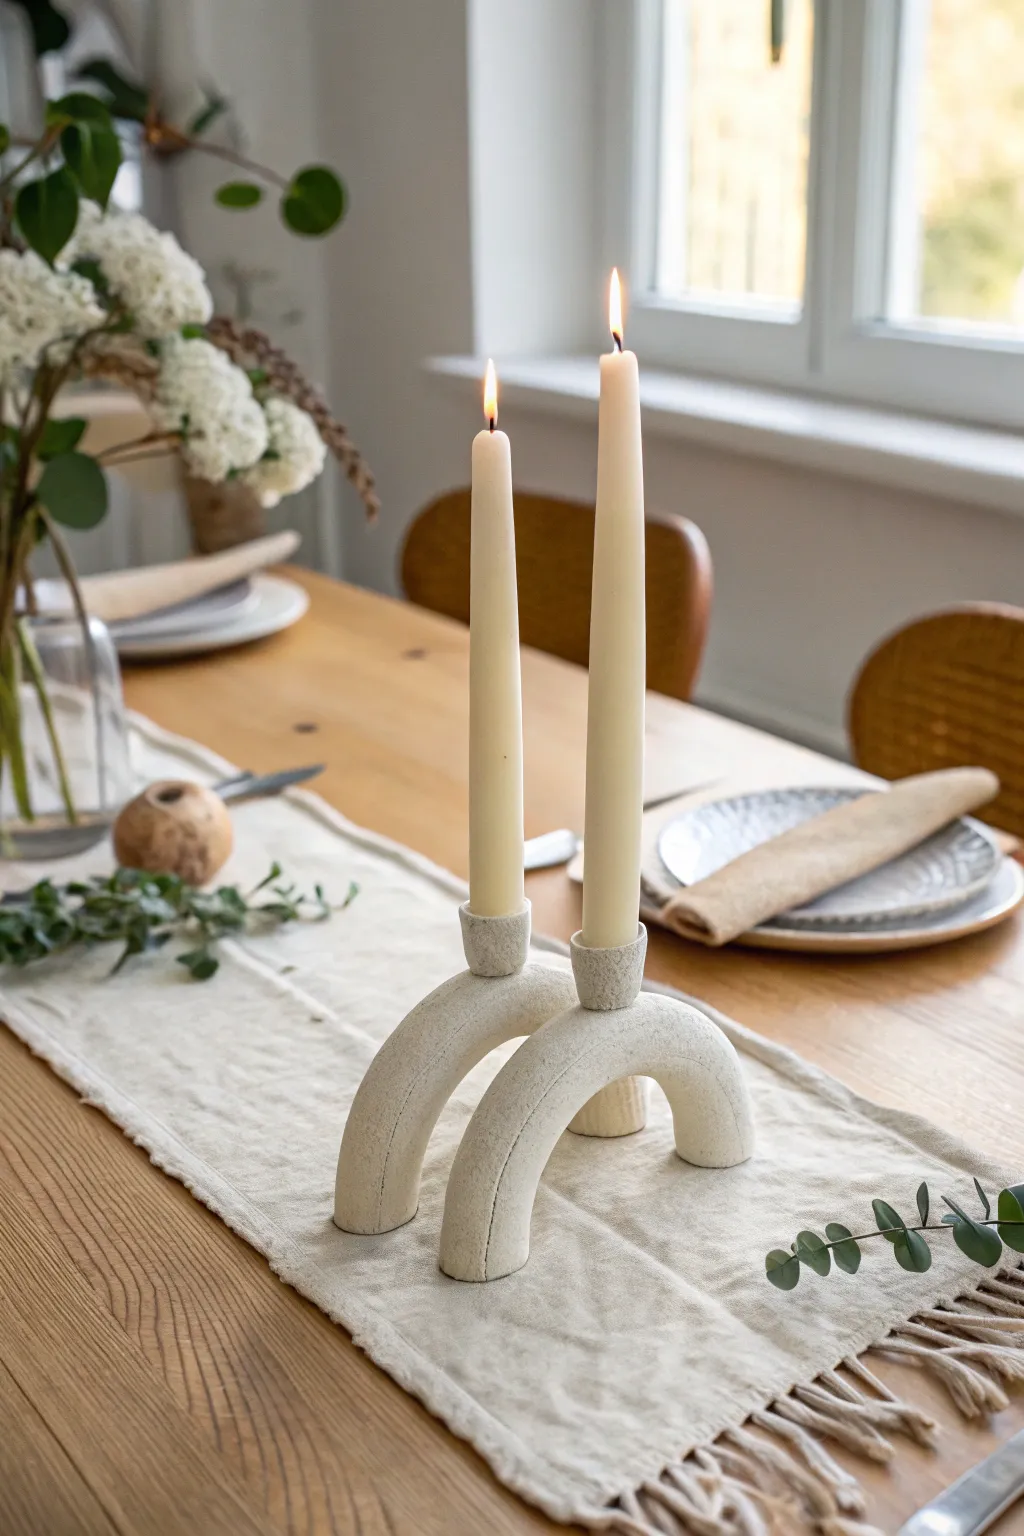
Capture the essence of high-end home decor with these sculptural, arch-shaped candle holders that serve as stunning table centerpieces. Their textured finish and organic curves give them a sophisticated stone-like appearance without the weight.
How-To Guide
Materials
- High-quality air dry clay (white or light grey)
- Acrylic rolling pin
- Taper candle (for sizing)
- Craft knife or clay wire cutter
- Small bowl of water
- Sponge or smoothing tool
- Medium-grit sandpaper
- Baking soda and acrylic paint (for the textured finish)
- Paintbrush
- Cardboard or stiff paper for templates
- Strong craft glue (optional)
Step 1: Shaping the Arch
-
Condition the clay:
Begin by taking a large chunk of air dry clay and kneading it thoroughly in your hands until it becomes warm, pliable, and free of any air pockets. -
Roll the coil:
On a clean, flat surface, roll the clay into a thick, even log about 1 inch in diameter. Aim for a uniform thickness throughout the entire length. -
Shape the curve:
Gently bend the clay log into a ‘U’ or arch shape. You can use a glass jar or a round container as a mold to ensure the curve is perfectly symmetrical. -
Cut the legs:
Once you are happy with the height of your arch, trim the bottoms of the ‘legs’ with a sharp knife or wire cutter so they sit perfectly flat on the table. -
Check stability:
Stand the arch up immediately to test its balance. If it wobbles, re-trim the base or gently tap it against the table to flatten the contact points.
Step 2: Creating the Candle Cup
-
Form the cup base:
Roll a smaller ball of clay, roughly the size of a walnut, and flatter it slightly into a thick disk. -
Size the opening:
Press the base of your actual taper candle into the center of the ball to create an indentation. Wiggle it slightly to ensure the hole is just a hair wider than the candle to account for clay shrinkage. -
Refine the cup walls:
With the candle removed, pinch and smooth the walls of the cup upwards. You want a distinct, cylindrical cup shape that is roughly 1 inch tall. -
Score and slip:
Use a needle tool or toothpick to scratch hatched lines onto the top center of your arch and the bottom of your candle cup. Dab a little water (slip) onto both scored areas. -
Attach the pieces:
Press the cup firmly onto the top of the arch. Use a clay tool or your finger to smooth the seam where the two pieces join, blending the clay until the connection is invisible.
Cracking Up?
If you see small cracks appearing while drying, don’t panic. Mix a tiny bit of fresh clay with water to make a paste and fill the crack, then smooth it over.
Step 3: Finishing Touches
-
Smooth imperfections:
Dip a sponge or your finger in a little water and gently run it over the entire sculpture to remove fingerprints and hairline cracks. -
Let it cure:
Allow the piece to dry completely for 24-48 hours. Turn it over halfway through the drying process to ensure the bottom breathes and dries evenly. -
Sand for sleekness:
Once fully hard, use medium-grit sandpaper to buff away any bumps or rough patches, paying special attention to the rim of the cup and the flat base. -
Mix the texture paint:
To recreate the stone look seen in the photo, mix white or cream acrylic paint with a teaspoon of baking soda. The mixture should feel slightly gritty and thick. -
Apply the faux stone finish:
Dab the textured paint onto the candle holder using a stabbing or stippling motion rather than long strokes. This creates that lovely organic, ceramic texture. -
Final coat:
Let the first coat dry, then apply a second layer if you want a rougher, more stone-like appearance. Ensure the inside of the cup is clean so the candle fits snuggly.
Make it Granite
For a speckled granite effect, flick tiny droplets of diluted black or dark grey paint onto the dry surface using an old toothbrush before sealing.
Place them on your dining runner for an instant touch of architectural elegance to your mealtime
Desk Organizers for Pens, Clips, and Calm Vibes
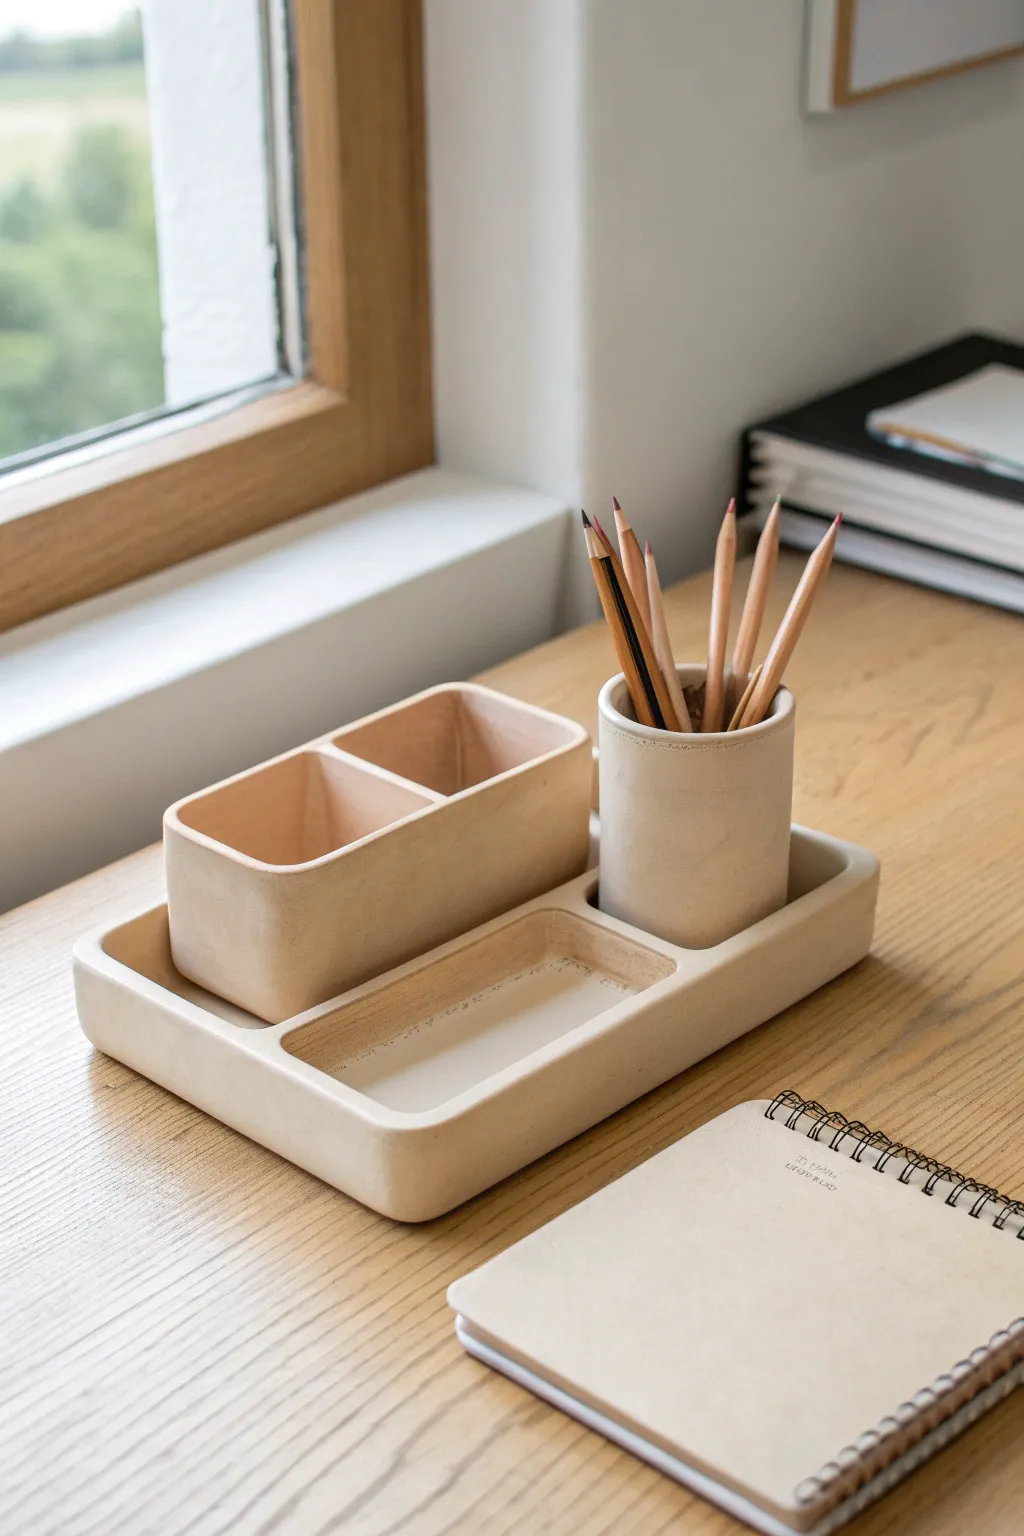
Bring a sense of calm to your workspace with this sleek, modular-style desk tidy made entirely from air dry clay. Its smooth, matte finish and clean lines mimic the look of high-end ceramic or concrete decor without the need for a kiln.
Detailed Instructions
Materials
- High-quality white air dry clay (2-3 lbs)
- Clay roller or rolling pin
- Sharp craft knife or clay blade
- Ruler
- Slip (water mixed with clay scraps) in a small bowl
- Modeling tools or a dull butter knife
- Sandpaper (medium and fine grit)
- Small bowl of water and a sponge
- Clear matte acrylic sealant (spray or brush-on)
- Cardboard or cardstock (for templates)
Step 1: Preparation & Base Construction
-
Draft your templates:
Before touching the clay, decide on the dimensions for your three main components: the main tray base, the rectangular dual-compartment box, and the cylindrical cup. Sketch these out on cardstock and cut them out to use as guides. -
Condition the clay:
Knead a large chunk of your clay until it is warm, pliable, and free of air bubbles. This ensures a crack-free finish later on. -
Roll the main slab:
Roll out a large slab of clay to an even thickness of about 1/4 inch. Use guides or slats on either side of your roller if you have them to keep the thickness consistent. -
Cut the base plate:
Place your large rectangular template on the slab and cut around it cleanly with your craft knife. Save the excess clay for the walls. -
Form the tray walls:
Cut long strips of clay from your remaining slab, also about 1/4 inch thick and roughly 3/4 inch high. These will become the low retaining walls of the main tray. -
Attach the base walls:
Score (scratch) the edges of your base and the bottom of your wall strips. Apply slip to the scored areas and press the walls firmly onto the base, smoothing the seams on both the inside and outside. -
Round the corners:
I find that gently smoothing the sharp exterior corners with a wet sponge right now creates that beautiful soft, organic radius seen in the photo.
Use Water Sparingly
Too much water makes clay weak and prone to cracking. Use a damp sponge rather than dripping water to smooth your seams.
Step 2: Sculpting the Inserts
-
Construct the rectangular box:
Using the slab building technique again, cut a base, four walls, and a center divider for the taller rectangular holder. Assemble them using the score-and-slip method, ensuring the walls are vertical and perpendicular. -
Make the cylinder:
Roll a rectangle of clay and wrap it around a tube or simply shape it by hand into a cylinder. Join the seam by scoring and smoothing it until it effectively disappears. Cut a circular base and attach it to the bottom. -
Dry fit the components:
Gently place the wet box and cylinder onto the main tray to check the spacing. In the project image, the tray has a dedicated indentation for the shallow section, but for simplicity, you can either attach the components permanently to the tray now or leave them separate. -
Refine the shallow tray area:
If you are uniting the pieces, add a small strip of clay to the main tray to create the separation for the shallow front dish area, smoothing it seamlessly into the base. -
Smooth everything down:
Dip your finger or a sponge in water and run it over every surface. Focus on the top rims of the walls and cups to ensure they are level and rounded, not sharp.
Faux Concrete Look
Mix a tiny amount of black and grey acrylic paint into your wet clay before rolling immediately to create a trendy marbled concrete effect.
Step 3: Finishing Touches
-
Slow drying phase:
Place your pieces in a cool, dry place away from direct sunlight. To prevent warping, you can loosely cover them with a plastic bag for the first 24 hours. -
Inspect for cracks:
As the clay lightens in color, check for tiny cracks. If any appear, fill them immediately with a little slip and smooth over. -
Sanding for perfection:
Once bone dry (usually 48-72 hours), use medium-grit sandpaper to level out any bumps. Follow up with fine-grit sandpaper to achieve a velvety, stone-like texture. -
Remove dust:
Wipe the entire piece down with a slightly damp cloth or a dry brush to remove all sanding dust before sealing. -
Apply sealant:
Apply two coats of a clear matte acrylic varnish or sealant. This protects the clay from ink stains and moisture while maintaining that natural, unglazed look.
Once filled with your favorite pens and pencils, this organizer will be a daily reminder of your creative capability.


The Complete Guide to Pottery Troubleshooting
Uncover the most common ceramic mistakes—from cracking clay to failed glazes—and learn how to fix them fast.
Photo and Place-Card Holders in Geometric Forms
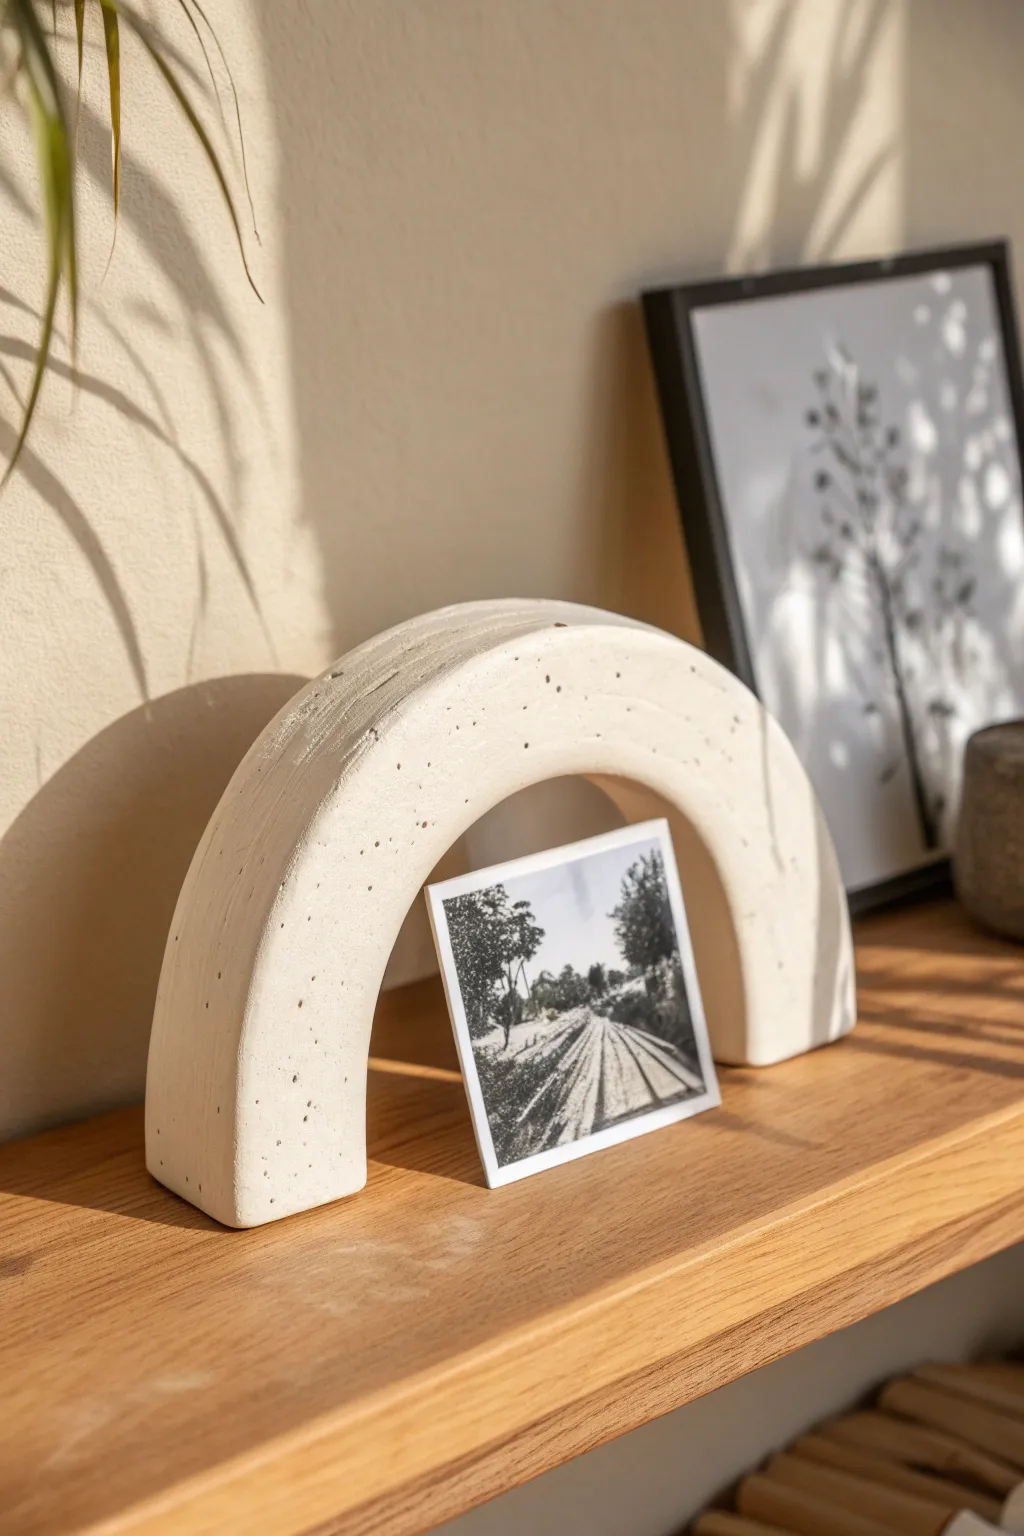
Embrace the tranquility of modern design with this understated geometric photo holder. Its speckled, stone-like finish and smooth arch shape create a sophisticated frame for your favorite snapshots or place cards, blending seamlessly into any contemporary decor.
How-To Guide
Materials
- White air-dry clay (approx. 500g)
- Acrylic rolling pin
- Sharp crafting knife or clay blade
- Fine-grit sandpaper (220 and 400 grit)
- Tan or beige acrylic paint
- Small stiff-bristled brush or old toothbrush
- Water in a spray bottle
- Piece of parchment paper
- Ruler
- Small bowl of water
- Black acrylic paint (optional for speckling)
Step 1: Shaping the Form
-
Condition the clay:
Begin by kneading a substantial chunk of air-dry clay in your hands. You want it to be warm and pliable, removing any air bubbles that might be trapped inside. -
Roll the coil:
On a clean surface covered with parchment paper, roll the clay into a thick, long cylinder. Aim for a diameter of about 1.5 to 2 inches to ensure the finished piece is stable enough to stand upright. -
Form the arch:
Gently bend the cylinder into a U-shape or arch. Pay close attention to the symmetry; you want the curve to be smooth rather than peaked. -
Flatten the faces:
To give it that geometric, structural look, you need flat sides. Place a flat object (like a hardcover book or a block of wood) against the front and back of the arch and gently press to flatten the rounded cylinder into a rectangular arch profile. -
Square the edges:
Use your fingers and the dampening spray to sharpen the corners where the front face meets the side. Minimalist designs rely on crisp lines, so take your time smoothing these transitions. -
Create the base:
Stand the arch up. If it wobbles, pick it up and use your knife to slice a thin layer off the bottom of each ‘leg’ to create perfectly flat feet. -
Smooth the surface:
Dip your finger in the small bowl of water and run it over the entire surface to erase any fingerprints or cracks. Getting it smooth now saves sanding time later. -
Initial drying phase:
Let the arch dry standing up for about 24 hours. Because the clay is thick, rotate it occasionally so air reaches all sides.
Step 2: Refining and Finishing
-
Sanding for perfection:
Once the clay is bone dry and hard (this may take 48-72 hours total depending on humidity), use 220-grit sandpaper to remove major unevenness. Follow up with 400-grit for a velvet-smooth finish. -
Creating the slot:
Usually, a slot is cut while wet, but for this leaning design, the photo simply rests against the inner curve. However, if you want a secure grip, you can carefully use a small hand saw or file to create a notch at the top of the curve now. -
Mixing the base tone:
Mix a small amount of tan or beige acrylic paint with a drop of water. We want a wash rather than a heavy coat to maintain a natural, stone-like appearance. -
Applying the wash:
Painting with a large soft brush, cover the entire piece. If the paint looks too opaque, wipe some off quickly with a paper towel to reveal the clay texture underneath. -
Creating the speckles:
Dilute a tiny dot of black paint with water until it’s inky. Dip a stiff brush or toothbrush into the mix. -
Splatter technique:
Hold the brush about 6 inches away from the arch and run your thumb across the bristles to flick tiny droplets onto the surface. I suggest testing this on a piece of paper first to gauge the spray pattern. -
Rotate and repeat:
Turn the arch to splatter the sides, back, and inner curve. The goal is an organic, random distribution to mimic granite or ceramic stoneware. -
Final wipe (optional):
If some speckles are too harsh, dab them gently with a dry paper towel while wet to soften them. -
Seal the piece:
Once the paint is fully dry, apply a matte varnish to protect the surface from dust and handling without adding unnatural shine.
Stone Texture Secret
For a gritty, realistic stone texture, mix a teaspoon of baking soda or used coffee grounds directly into your white clay before shaping the arch.
Fixing Cracks
If cracks appear while drying, don’t panic. Mix a small amount of fresh clay with water to make a ‘slip’ paste, fill the crack, and smooth it over.
Place your sleek new arch on a desk or shelf and let it frame a cherished memory with modern elegance
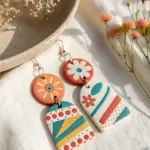
Statement Earrings With Modern, Matte Finishes
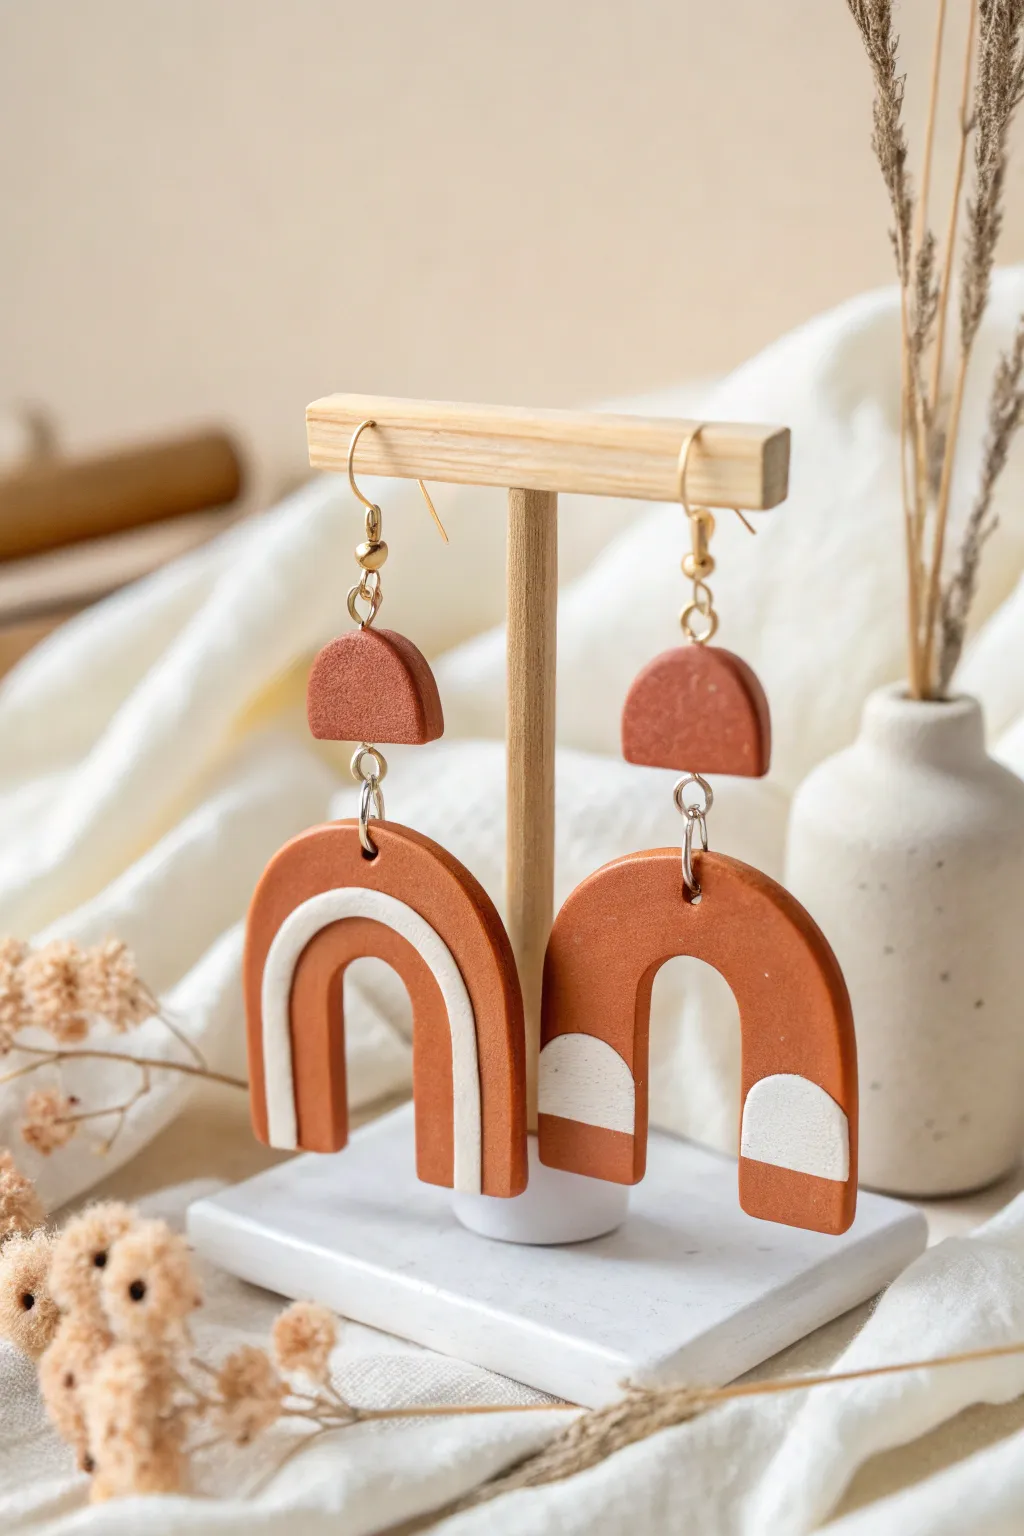
Embrace earthy tones and geometric shapes with these stunning statement earrings that mimic the look of unglazed pottery. The matte finish and asymmetrical white inlay details give them a sophisticated, high-end feel perfect for modern wardrobes.
Step-by-Step
Materials
- Air dry clay (terracotta/rust color and plain white)
- Clay roller or acrylic rolling pin
- Arch-shaped clay cutters (medium size)
- Small circle cutter (approx. 0.5 inch)
- X-Acto knife or clay blade
- Fine-grit sandpaper (400-600 grit)
- Hand drill or pin vibe
- Jump rings (gold)
- Earring hooks or posts (gold)
- Jewelry pliers
- Parchment paper or silicone mat
- Small bowl of water
- Matte varnish (optional)
Step 1: Preparing the Base Shapes
-
Condition the terra clay:
Begin by taking a chunk of the terracotta-colored air dry clay and kneading it in your hands until it is smooth, pliable, and free of cracks. If it feels dry, dip your finger in water and work it in. -
Roll flattened sheets:
Place the terracotta clay on parchment paper or a silicone mat. use your roller to flatten it into an even sheet, approximately 3-4mm thick. Aim for a consistent thickness so the earrings hang evenly. -
Cut the main arches:
Take your medium-sized arch cutter and press firmly into the terracotta sheet. You’ll need two identical arches. Wiggle the cutter slightly before lifting to ensure clean edges. -
Cut the top studs:
Using the small circle cutter, cut two circles from the terracotta sheet. Use your blade to slice these circles in half to create four semi-circles (you only need two, but spares are helpful).
Cracks Appearing?
If tiny cracks form while drying, mix a small amount of clay with water to make a paste (slip). Fill the cracks with this paste and sand smooth once dry.
Step 2: Creating the Inlay Designs
-
Condition the white clay:
Clean your hands and roller thoroughly to avoid transferring red dust. Knead and roll out the white clay to the exact same thickness as your terracotta shapes. -
Design 1: The Inner Arch:
On one of the terracotta arches, carefully use a smaller arch cutter or a knife to remove a U-shaped strip from the center. Keep the outer terracotta rim intact. -
Fit the white inlay:
Cut a matching U-shape from the white clay sheet. Gently place this white piece into the negative space you just created in the terracotta arch. Use your finger to smooth the seam where the colors meet. -
Design 2: The Block Ends:
For the second terracotta arch, used your knife to slice off the bottom 1/4 inch of both legs of the arch. Discard these terracotta tips. -
Insert white blocks:
Cut two small rectangles or semi-circles from the white clay that match the width of the arch legs. Press these onto the cut ends of the second arch, smoothing the seams gently with a drop of water so they bond.
Step 3: Assembly & Finishing
-
Drill holes:
While the clay is still wet, use a toothpick or needle tool to poke holes for the jump rings. You need a hole at the top of each main arch and the bottom of each semi-circle stud. -
Let them dry:
Allow the pieces to dry completely on a flat surface for 24-48 hours. I like to flip them over halfway through to ensure the backs dry evenly. -
Sand for smoothness:
Once fully cured, gently sand the edges and flat surfaces with fine-grit sandpaper. This removes fingerprints and creates that ultra-smooth, professional look. -
Seal (Optional):
If you want extra durability while keeping the matte look, apply a very thin coat of matte varnish. Avoid glossy sealers to maintain the organic aesthetic. -
Attach hardware:
Using two pairs of pliers, twist open a jump ring. Thread it through the top of the main arch and the bottom of the semi-circle stud, then close the ring securely. -
Add ear wires:
Attach a second jump ring or connect the earring hook directly to the top of the semi-circle stud, depending on your hardware type. Repeat for the second earring.
Make It Glossy
For a totally different vibe, finish these with UV resin or a high-gloss glaze to make them look like polished ceramic tile instead of raw matte pottery.
Enjoy wearing your handcrafted, modern art pieces that are sure to start conversations

TRACK YOUR CERAMIC JOURNEY
Capture glaze tests, firing details, and creative progress—all in one simple printable. Make your projects easier to repeat and improve.
Napkin Rings With Initials for a Grown-Up Table
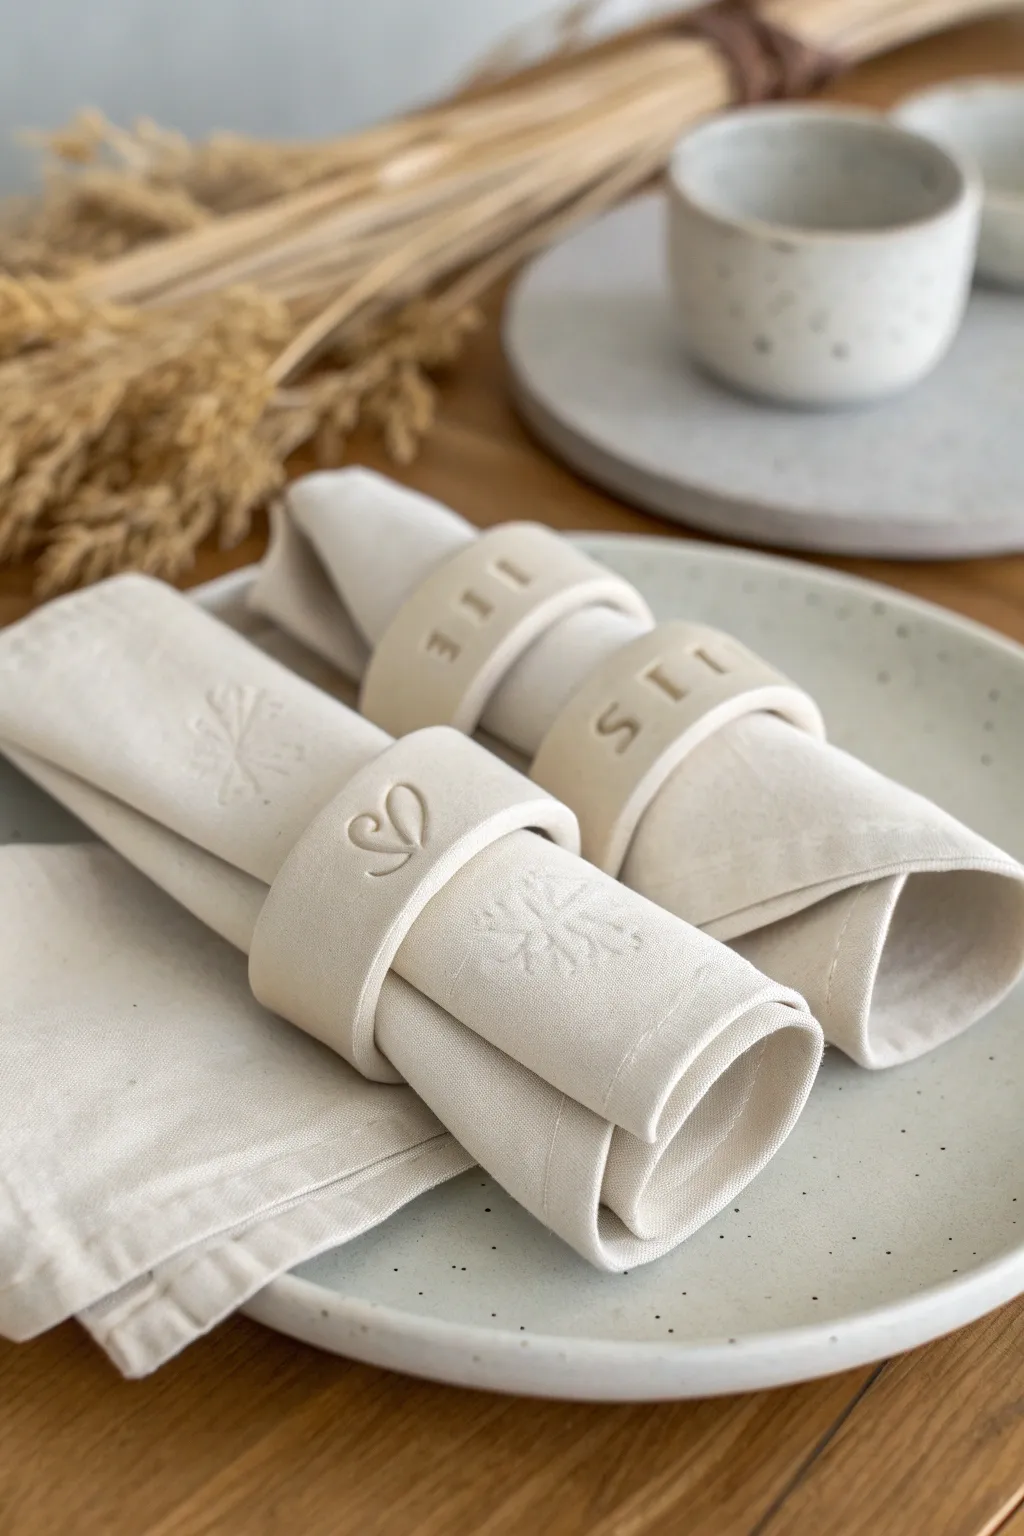
Elevate your dining table with these minimalist, elegant napkin rings crafted from air-dry clay. Including stamped initials or subtle symbols adds a bespoke touch that feels sophisticated rather than crafty, perfect for a grown-up dinner party.
Step-by-Step Tutorial
Materials
- White air dry clay
- Rolling pin
- Parchment paper or smooth work mat
- Sharp craft knife or clay slicing blade
- Ruler
- Letter stamps or clay texture tools
- Cardboard tube (paper towel or toilet roll core)
- Small bowl with water
- Fine grit sandpaper (320-400 grit)
- Matte acrylic varnish (optional)
Step 1: Shaping the Rings
-
Prepare your workspace:
Lay down your parchment paper or work mat on a flat, stable surface. Take a handful of air dry clay and knead it gently in your hands to warm it up and make it pliable. -
Roll out the slab:
Using your rolling pin, roll the clay out into a long, even slab. Aim for a thickness of about 4-5mm—too thin and they become brittle; too thick and they look clunky. -
Measure the strips:
Use your ruler to mark out straight strips. For the look in the photo, you want strips that are approximately 1 inch (2.5 cm) wide and about 6 inches (15 cm) long. -
Cut the clay:
Hold the ruler firmly against the clay as a guide and use your sharp craft knife to slice clean, straight lines. Remove the excess clay and set it aside to prevent it from drying out. -
Smooth the edges:
Dip your fingertip lightly into the water bowl. Gently run your damp finger along the cut edges of the clay strips to soften any sharpness or crumbling bits. -
Add personalization:
Before curling the clay, this is the time to stamp. Press your letter stamps or a texture tool gently into the center of the strip. Don’t press too hard, or you might distort the strip’s shape. -
Form the ring shape:
Carefully lift a clay strip and wrap it around your cardboard tube. The tube acts as a perfect form to ensure the ring is circular and sized correctly for a napkin. -
Overlap and join:
Overlap the ends of the clay strip slightly. To join them, score both meeting surfaces (make tiny scratches) with your knife, add a drop of water, and press them firmly together. -
Blend the seam:
Use your wet finger or a clay tool to smooth the seam on the outside, or leave the overlap visible for a more organic, wrapped look like the front ring in the photo. If leaving it visible, ensure the bond is tight. -
Repeat the process:
Continue cutting, stamping, and wrapping strips for as many settings as you need. Leave them on the cardboard tube for the initial drying phase to help them hold their shape.
Clean Imprints
If your stamps are sticking to the clay, lightly dust the stamp face with cornstarch before pressing it down. This ensures a crisp letter without pulling up the clay surface.
Step 2: Drying and Finishing
-
Initial dry time:
Let the rings sit on the cardboard tube for about 2-3 hours until they are leather-hard but not fully dry. -
Remove from form:
Gently slide the rings off the cardboard tube. If you leave them on too long, the clay shrinks as it dries and might crack against the rigid cardboard. -
Full cure:
Place the rings on their sides on the parchment paper. Let them dry fully for 24-48 hours. I like to flip them over halfway through to ensure even drying. -
Check for imperfections:
Once bone dry, inspect the edges. If there are any rough spots or sharp burrs, take your fine-grit sandpaper and gently buff them away. -
Dust off residue:
Wipe the rings with a dry cloth or a soft brush to remove any clay dust created by sanding. -
Seal (optional):
To protect against food stains, apply a thin coat of matte acrylic varnish. This keeps the natural look of the clay while making them wipeable.
Textured Touch
Before rolling, press a piece of lace or linen fabric into the clay slab. This transfers a subtle fabric texture to the background of your rings for extra detail.
Slide your best linen napkins through your new rings and enjoy a perfectly tailored table setting
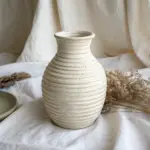
Planters and Cachepots for Tiny Succulents
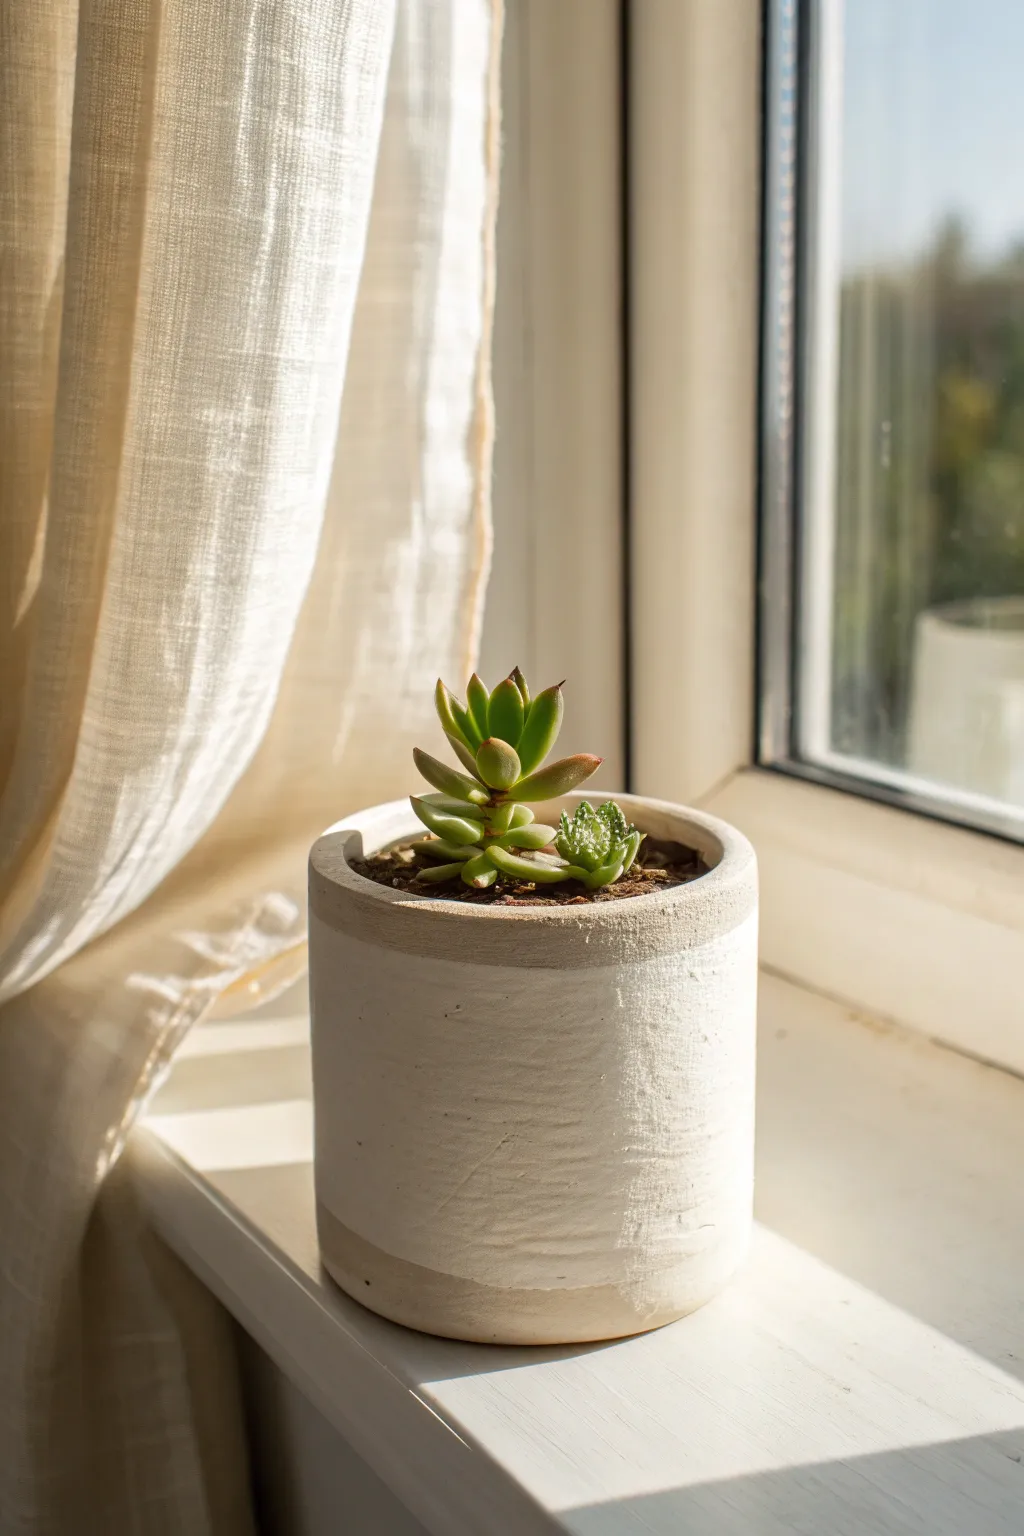
Embrace the beauty of imperfection with this lovely cylindrical planter that highlights the contrast between raw clay and matte white paint. The textured, hand-formed surface catches the light beautifully, making it a perfect home for your favorite tiny succulent.
Step-by-Step
Materials
- White air-dry clay (approx. 500g)
- Rolling pin
- Craft knife or clay cutter
- Empty can or jar (to use as a mold/armature)
- Parchment paper
- Slip (clay mixed with water)
- Small bowl of water
- Sponge
- White acrylic paint
- Flat paintbrush
- Painters tape (optional)
- Fine-grit sandpaper (optional)
- Clear matte varnish or sealant
Step 1: Forming the Base
-
Prepare the Clay:
Begin by kneading a substantial chunk of air-dry clay to warm it up and remove any air bubbles. Aim for a smooth, pliable consistency. -
Roll the Slab:
Roll the clay out on a piece of parchment paper until it is an even slab, approximately 1/4 inch thick. Keep the thickness consistent for structural integrity. -
Cut the Rectangle:
Measure the circumference and height of your chosen can or jar mold. Cut a long rectangle from your clay slab that is slightly longer than the circumference (for overlap) and matches your desired height. -
Cut the Bottom Circle:
Place your can on the remaining clay slab and trace around it lightly. Cut out this circle slightly larger than the trace line; this will be the floor of your pot.
Textured Touch
To mimic the horizontal lines seen in the photo, lightly drag a stiff-bristled brush horizontally across the wet clay before letting it dry.
Step 2: Building the Cylinder
-
Prepare the Mold:
Wrap your can or jar loosely in parchment paper. This is crucial so the clay doesn’t stick to the metal or glass and can slip off easily later. -
Wrap the Walls:
Lift your clay rectangle and wrap it around the parchment-covered can. Bring the two ends together. -
Seal the Seam:
Score (scratch) the touching edges with your knife and apply a little water or slip. Press the edges firmly together and smooth the seam down with your finger or a tool until it disappears. -
Attach the Base:
Score the bottom edge of your cylinder and the outer edge of your circular base. Apply slip, then press the cylinder onto the base. -
Blend the Connection:
Use a modeling tool or your thumb to drag clay from the base up into the wall, smoothing it deeply to ensure a solid bond. I find using a damp sponge here helps create a seamless join.
Step 3: Refining and Drying
-
Create Texture:
The pot in the image has a lovely organic texture. Instead of smoothing it perfectly, gently dab the surface with a slightly damp sponge or crumpled foil to add subtle roughness. -
Initial Drying:
Let the clay sit on the mold for about 1-2 hours until it’s leather-hard—firm enough to stand but still cool to the touch. -
Remove Mold:
Carefully slide the can and parchment paper out of the clay cylinder. If you leave it in too long while the clay shrinks, the pot might crack. -
Full Cure:
Allow the pot to dry completely for 24-48 hours. Turn it upside down occasionally to let the bottom breathe and dry evenly.
Make It Grow
Since air-dry clay isn’t waterproof, double-pot your plant. Use a small plastic nursery pot inside your clay creation to keep moisture away from the walls.
Step 4: Finishing Touches
-
Sand Lightly:
Once fully dry, you can lightly sand any sharp or jagged edges, particularly on the top rim, but keep the main body textured. -
Paint the Body:
Squeeze out your white acrylic paint. Using a flat brush, paint the central section of the cylinder. -
Leave the Bands:
Here is the key step: deliberately stop painting about 1/4 inch from the top rim and 1/4 inch from the bottom base. This leaves the natural clay exposed for that stylish two-tone look. -
Second Coat:
Depending on your paint’s opacity, you may need a second coat to get a solid, crisp white finish. Let the paint dry completely. -
Seal It Up:
Apply a coat of clear matte varnish or pot sealer to the entire piece, inside and out. This protects the clay from moisture when you water your plant.
Place your succulent inside and enjoy the serene, modern look this planter brings to your window ledge
Wall Hangings With Arches, Circles, and Quiet Color
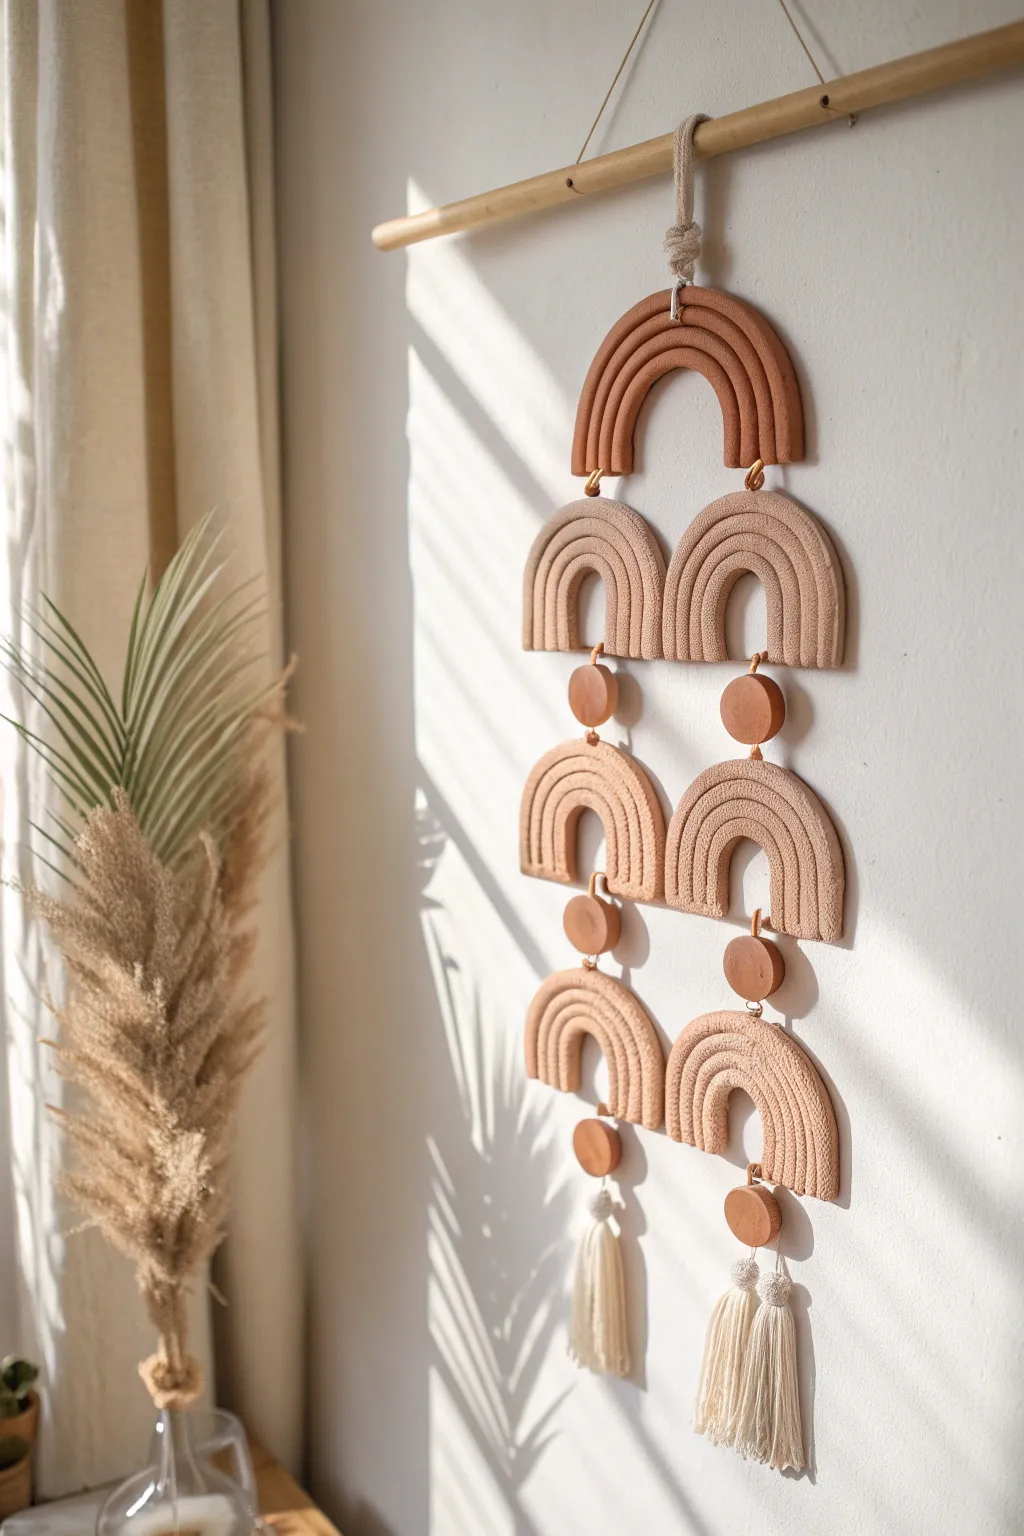
This stunning wall hanging combines the warmth of terracotta tones with modern geometric shapes for a textured, sophisticated piece of decor. By linking multiple tiers of clay arches and circles with simple cord, you create a mobile that feels both earthy and elegant.
Step-by-Step Tutorial
Materials
- Air dry clay (terracotta/brown and white/beige colors)
- Dowel rod or rolling pin
- Clay knife or craft knife
- Sanding sponge or fine-grit sandpaper
- Cotton or macrame cord (natural or beige)
- Wooden dowel for hanging (approx. 12 inches)
- Two large jump rings (optional, for connecting top arch)
- Small circle cutter (or a bottle cap)
- Needle tool or toothpick
- Baking parchment or silicone mat
Step 1: Shaping the Clay Elements
-
Prepare your workspace:
Lay down a piece of baking parchment or a silicone mat to prevent sticking. This also makes moving the wet clay easier. -
Roll the clay coils:
Start with your darker terracotta clay. Pinch off a handful and roll it on your flat surface into a long, even snake, aiming for about 1/2 inch to 3/4 inch thickness. -
Form the top arch:
Bend the snake into a U-shape. Create two more Snake coils, placing them snugly inside the first one to form a three-layered rainbow arch. Trim the ends straight across the bottom with your knife. -
Create the smaller arches:
Switch to your lighter beige or sandy-colored clay. Repeat the coil rolling process to create six individual arches. Each should consist of three nested coils, sized slightly smaller than your top terracotta arch. -
Texture the light arches:
To mimic the stone-like texture in the photo, gently press a clean sponge or a crumpled ball of aluminum foil onto the surface of the wet beige arches. -
Cut the connector circles:
Using the terracotta clay, roll out a small slab about 1/4 inch thick. Use your circle cutter to punch out six small discs. These will sit between your arch tiers. -
Add holes for assembly:
Using a needle tool, pierce holes through the pieces where the string will go. For the arches, pierce vertically through the center of the top arch layer and the bottom legs. For the circles, pierce vertically from top to bottom edge. -
Verify alignment:
Lay all pieces out in their final formation on your mat to ensure the holes line up vertically and the spacing looks balanced before drying.
Smooth Coil Trick
To get perfectly even snakes without flat spots, use a flat acrylic block or a hardcover book to roll the clay back and forth instead of using just your fingers.
Step 2: Drying and Refining
-
Allow to dry completely:
Let the pieces sit undisturbed for 24-48 hours. I find flipping them over gently halfway through helps them dry evenly and prevents warping. -
Check for structure:
Once fully dry (the clay will feel room temperature, not cold), test the bonds between the coils. If any layers separated during drying, use a dab of superglue to secure them back together. -
Sand the edges:
Use a sanding sponge to smooth out any rough ends on the bottom of the arches or sharp edges on the circles. Wipe away the dust with a barely damp cloth.
Step 3: Assembly and Hanging
-
Prepare the tassels:
Cut 10-15 lengths of macrame cord (about 8 inches long). Fold them in half and tie a gathering knot around the top to create two fluffy tassels. -
Attach tassels to bottom circles:
Thread a piece of cord through the top of your tassel and tie it securely to the bottom hole of the lowest clay circles. -
Connect the tiers:
Using short lengths of cord, tie the top of the lowest arch to the bottom of the middle circle. Continue working upward, connecting arches to circles with engaging knots hidden inside or behind the clay. -
Link to the top arch:
Once you have two vertical columns of beige arches and circles, tie them to the bottom legs of the large terracotta arch using cord loops. -
Mount to the dowel:
Cut a longer piece of rope for the main hanger. Loop it through the center top of the terracotta arch and tie it securely to your wooden dowel. -
Add the hanging string:
Tie a length of cord to both ends of the wooden dowel to create a triangle for wall mounting. -
Final adjustments:
Hang the piece on a wall and gently adjust the knots or trim the tassels to ensure everything hangs straight and symmetrical.
Fixing Cracks
Small cracks are common as clay shrinks. Mix a tiny amounts of clay with water to make a paste (slip) and fill the cracks, then smooth with a finger.
Hang your beautiful new mobile in a spot that gets gentle light to highlight the textures you created
Moon-Phase Wall Art for a Subtle Statement
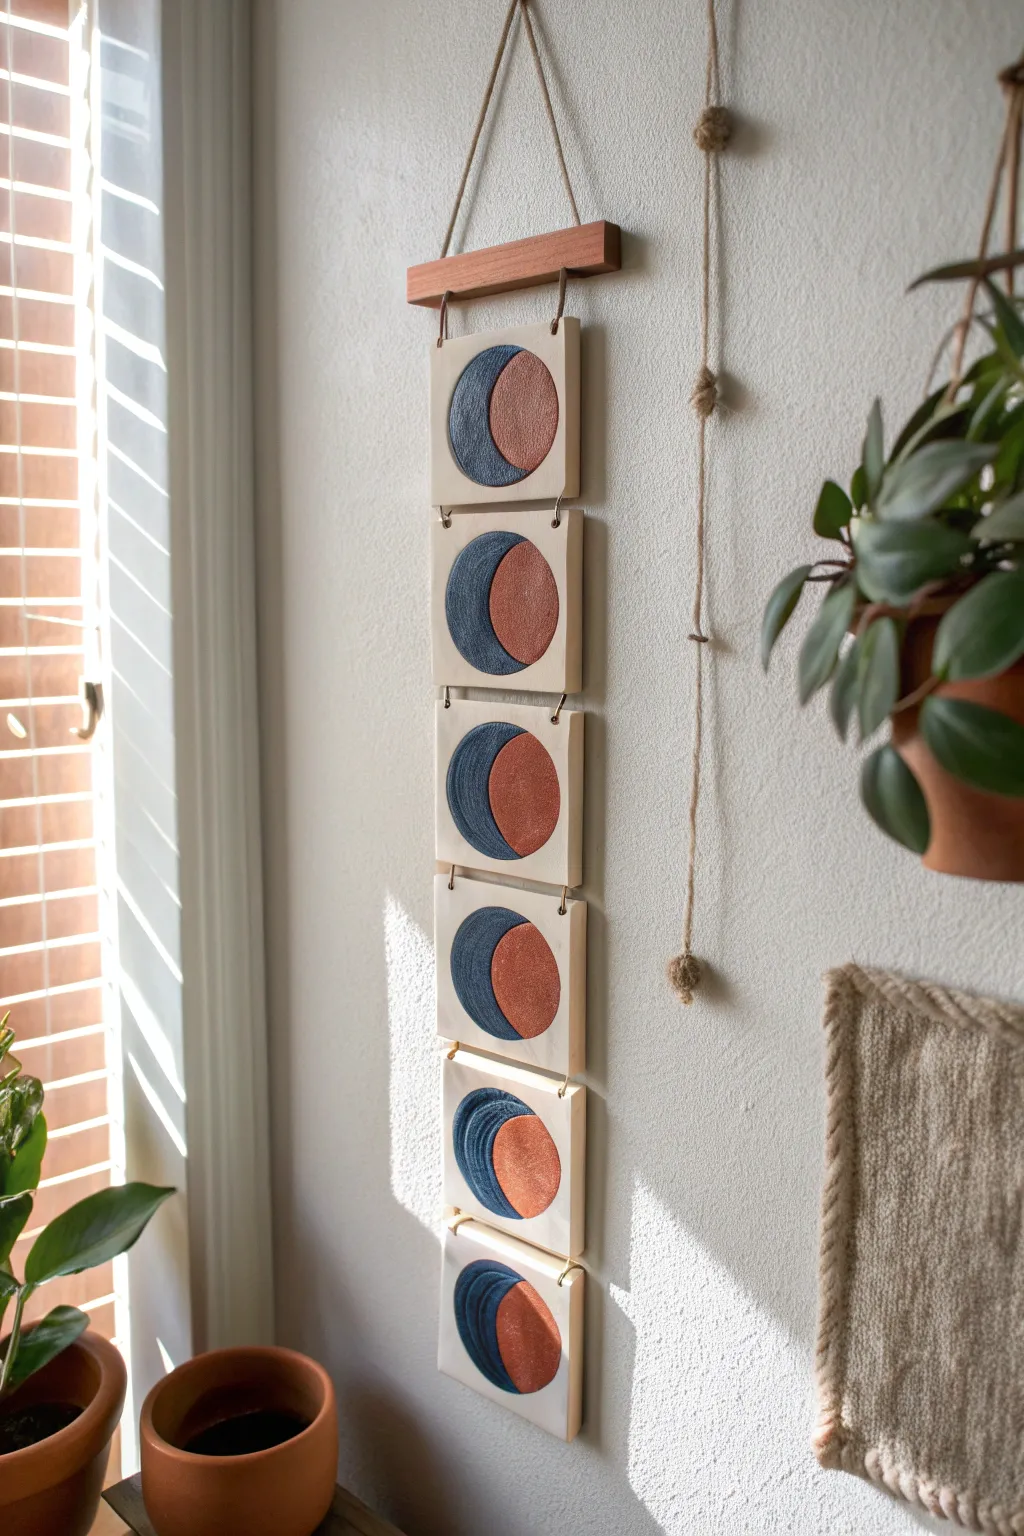
Bring celestial charm to your space with this modern, textured wall hanging made from air dry clay squares. The overlapping circles create a striking geometric moon phase effect, while the terracota and indigo tones add warmth and depth to any room.
Step-by-Step Guide
Materials
- Air dry clay (white)
- Rolling pin
- Square cookie cutter (approx. 3-4 inches) or ruler and knife
- Round cookie cutter (approx. 2.5 inches)
- Texture tool (sandpaper, sponge, or canvas fabric)
- Acrylic paints (terracotta/rust orange and deep indigo blue)
- Small paintbrushes
- Wooden dowel or flat wood trim piece (approx. 6 inches long)
- Jute twine or cotton cord
- Drill with small bit or a straw/skewer for making holes
- Fine-grit sandpaper
- Jump rings or extra twine for connecting tiles
Step 1: Shaping the Clay Tiles
-
Roll out the clay:
Start by conditioning a large chunk of air dry clay in your hands until it’s pliable. Roll it out on a smooth surface to an even thickness of about 1/4 inch. Using guide sticks on either side of your roller can ensure uniformity. -
Cut the squares:
Using a square cookie cutter or a ruler and craft knife, cut out six identical squares. If the edges are rough, smooth them gently with a little water on your finger. -
Create the moon motif:
Take your round cookie cutter and press it lightly into the center of each square to create an embossed circle outline. Do not cut all the way through; you just want a clear guide for painting. -
Add the overlapping crescent:
Position the same round cutter slightly off-center over the first circle impression (shifted to the right) and press gently again. This creates the overlapping crescent moon shape within the main circle. -
Add texture:
Before the clay hardens, press a piece of canvas or coarse sandpaper gently onto the surface of the circle area only. This grit will help the paint catch the light and look more organic later. -
Create hanging holes:
Use a straw or a skewer to poke two holes at the top and two holes at the bottom of each square. Ensure they are evenly spaced and aligned vertically so the tiles hang straight. The top tile only needs top holes if you attach it directly to the wood, but standard practice is top and bottom for all except the very last tile. -
Dry the tiles:
Lay the squares flat on a drying rack or a sheet of parchment paper. Let them dry for 24-48 hours, flipping them occasionally to prevent curling.
Keep it Flat
To prevent curling while drying, place a lightweight book or board gently on top of the tiles once they are ‘leather hard’ (dry to touch but still cool).
Step 2: Painting and Assembly
-
Sand the edges:
Once fully dry, lightly sand the edges of the squares with fine-grit sandpaper to remove any sharp burrs or irregularities. -
Paint the background:
Leave the square background unpainted for a natural cream clay look, or seal it with a clear matte varnish if you prefer a finished sheen. -
Paint the moon shadow:
Paint the left crescent shape (the larger ‘shadow’ side of the moon) with the deep indigo blue acrylic paint. Use a small, angled brush to keep the lines crisp along the embossed edges. -
Paint the illuminated moon:
Fill in the remaining crescent shape on the right with the terracotta or rust orange paint. You might need two coats to get a solid, opaque color. -
Seal the paint:
Allow the paint to dry completely. Although optional, a coat of matte spray sealant will protect the colors and prevent fading. -
Prepare the wood support:
Drill two small holes in your flat wooden trim piece or dowel corresponding to the width of the holes in your clay tiles. -
Connect the tiles:
Using small metal jump rings or short loops of jute twine, connect the bottom holes of the first tile to the top holes of the second tile. Continue this process until all six tiles are linked in a vertical chain. -
Attach to the hanger:
Tie the top tile to the wooden support using loops of twine through the drilled holes. Ensure the knot is secure on the back or top. -
Add the hanging cord:
Cut a length of jute twine, creating a triangle shape above the wood piece for hanging. Tie the ends securely to the edges of the wood support or through extra holes.
Metallic Magic
Swap the terracotta paint for gold leaf or metallic copper paint on the crescent shape for a more glamorous, shimmering moon phase effect.
Once hung, the rhythmic pattern and earthy colors will create a serene focal point on your wall
Faux-Marble Trays That Look Like Stone
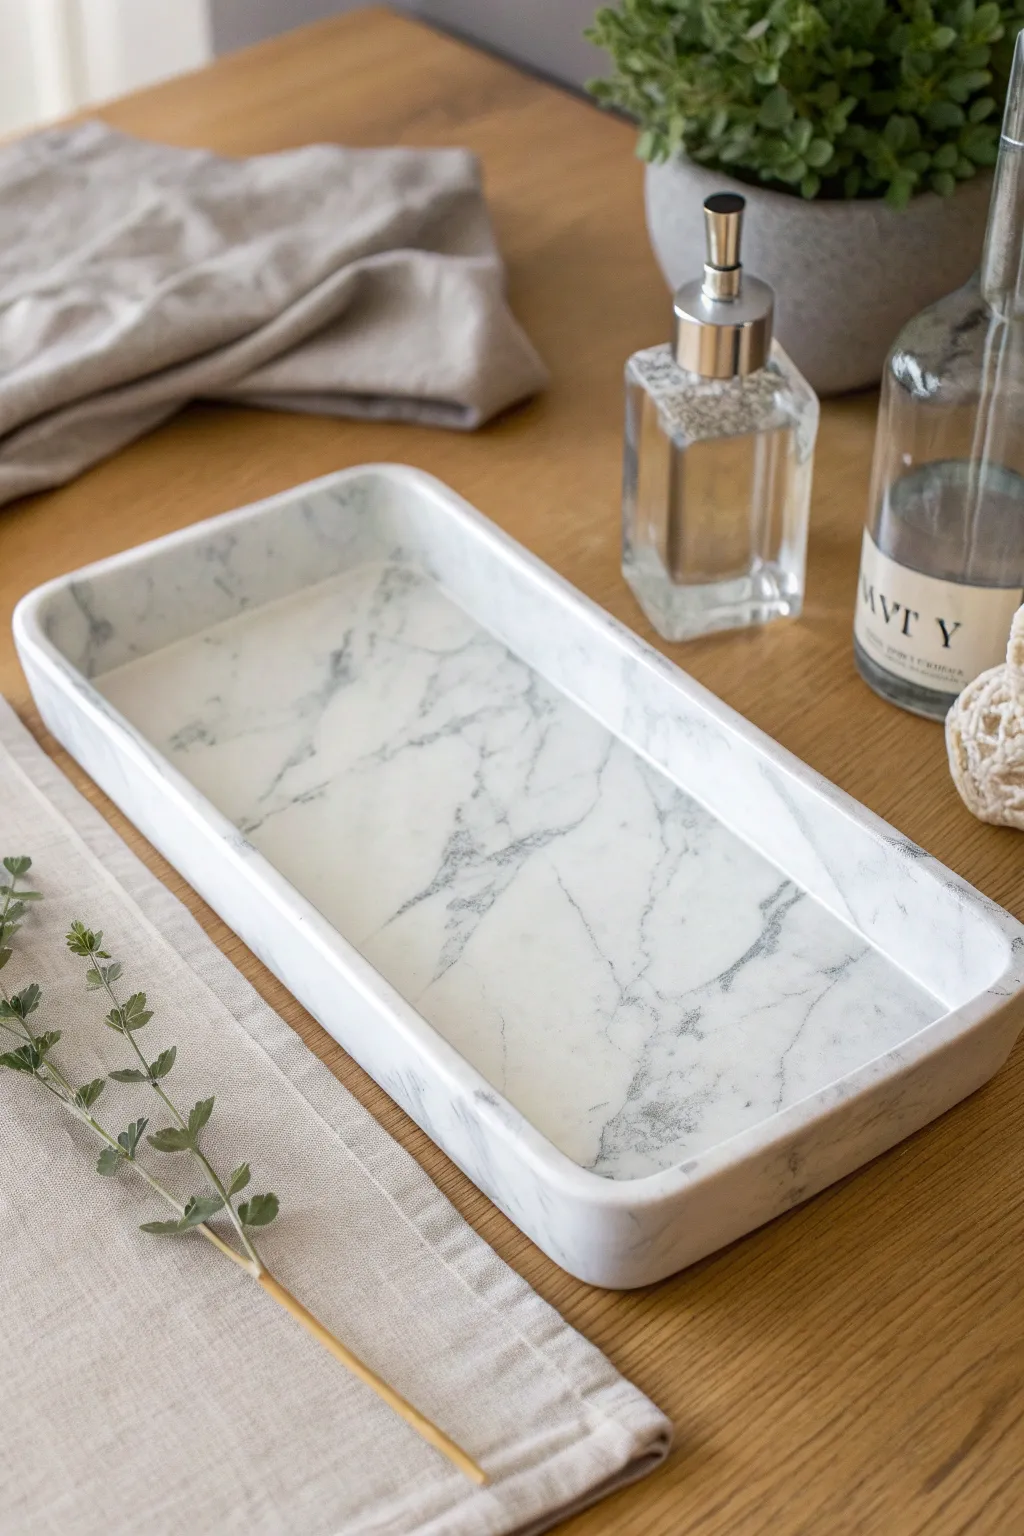
Elevate your bathroom or dresser with this sophisticated rectangular tray that perfectly mimics the cool elegance of Carrara marble. By kneading grey strands into white air dry clay, you’ll create organic, realistic stone veining without the heavy price tag of real marble.
Step-by-Step
Materials
- White air dry clay (approx. 500g)
- Black or dark grey acrylic paint
- Rolling pin
- Sharp craft knife or clay slicer
- Rectangular template (thick cardstock or a baking pan)
- Bowl of water
- Fine-grit sandpaper (220-400 grit)
- Glossy varnish or resin sealant
- Paintbrush
Step 1: Marbling the Clay
-
Prepare the base:
Start by conditioning your white air dry clay. Knead a large block until it is soft, pliable, and free of cracks. -
Create the colorant:
Take a separate, small walnut-sized piece of clay and mix in a drop or two of black acrylic paint. Knead it thoroughly until you have a uniform dark grey or black ball of clay. -
Form the veins:
Roll this dark grey clay into several long, thin snakes. Vary the thickness slightly for a more natural look, but keep them generally slender. -
Combine the clays:
Lay the grey snakes across your large block of white clay in a random pattern. Twist the main white block into a thick rope, folding it over on itself once or twice. -
Stop mixing early:
Be careful not to over-knead at this stage. I like to stop as soon as I see streaks appearing; if you mix too much, you’ll end up with solid grey clay instead of distinct marble veins.
Step 2: Shaping the Tray
-
Roll out the slab:
Using a rolling pin, roll the marbled clay out to an even thickness of about 1/4 inch (6mm). Rotate the clay frequently to prevent sticking to your work surface. -
Cut the base:
Place your rectangular template on top of the slab. Use a sharp craft knife to cut a clean rectangle, setting the excess clay aside for the walls. -
Create the walls:
Gather the Scraps, re-roll them into long strips about 1 inch high, and cut them to match the lengths of the four sides of your rectangle base. -
Score and slip:
Score (scratch) the edges of the base and the bottom of the wall strips with your knife. Dab a little water or liquid clay slip onto the roughed-up areas to act as glue. -
Assemble the perimeter:
Press the walls onto the base firmly. Use your thumb or a modeling tool to smooth the seam on the inside and outside so the clay merges into one solid piece. -
Refine the corners:
Curve the corners slightly with your fingers to mimic the rounded edges seen in the reference image. Smooth out any fingerprints with a slightly damp sponge.
Twist, Don’t Mush
When combining colors, twist the clay like a candy cane rather than squishing it. This preserves the distinct, jagged lines characteristic of real marble veins.
Step 3: Finishing Touches
-
Dry thoroughly:
Let the tray dry for 24-48 hours. Flip it over gently halfway through the drying process to ensure the bottom dries evenly and doesn’t warp. -
Sand for smoothness:
Once fully dry and hard, use fine-grit sandpaper to smooth the rim and any rough spots on the surface. Wipe away all dust with a tack cloth or slightly damp paper towel. -
Seal for shine:
Apply a coat of high-gloss varnish or resin to replicate the polished look of real stone. This also seals the clay against moisture. -
Second coat:
Allow the first coat to dry according to the manufacturer’s instructions, then apply a second coat for a durable, glass-like finish.
Warping Repair
If the tray curls up while drying, dampen the concave side slightly and weigh it down with a heavy book placed on parchment paper until it flattens out again.
Place your new faux-stone masterpiece on a side table to hold your favorite perfumes or jewelry