Air dry clay is my favorite low-pressure way to make something adorable and useful without needing fancy tools or a kiln. If you’re brand new, these beginner-friendly ideas stick to simple shapes, easy textures, and projects you can finish in a chill afternoon.
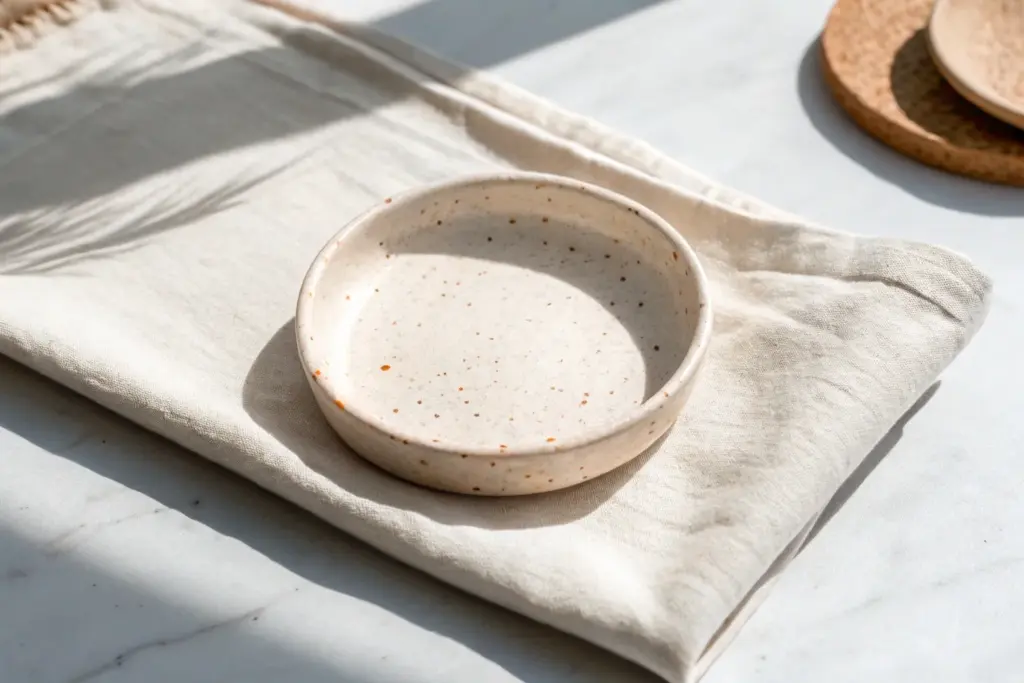
Pinch-Pot Trinket Dish With Simple Painted Rim

This charming little trinket dish combines the organic, imperfect beauty of hand-pinched clay with a sophisticated glazed finish. The distinct terracotta-colored rim adds a warm, earthy contrast that makes your favorite jewelry pieces pop.
Step-by-Step Tutorial
Materials
- White air dry clay
- Rolling pin (optional)
- Small bowl of water
- Sponge or soft paintbrush
- Fine-grit sandpaper
- White acrylic paint (glossy finish recommended)
- Burnt sienna or terracotta acrylic paint
- Gloss varnish or sealant
- Small detail paintbrush
- Medium flat paintbrush
Step 1: Forming the Pinch Pot
-
Prepare your clay:
Start by taking a lump of white air dry clay about the size of a golf ball or a large walnut. Knead it in your hands for a minute until it feels soft, warm, and pliable to prevent cracking. -
Roll a sphere:
Roll the clay between your palms to create a smooth, round ball. Try to eliminate any major seams or folds during this rolling process. -
Create the opening:
Hold the ball in your non-dominant hand. With your dominant hand, gently press your thumb into the center of the ball, stopping about a quarter-inch from the bottom. -
Pinch the walls:
Begin pinching the clay between your thumb (inside) and fingers (outside). Rotate the ball as you pinch, working your way from the bottom up to the rim. -
Ease it outwards:
Ideally, you want a shallow, open shape rather than a tall cup. Gently pull the walls outward as you pinch to widen the dish. -
Level the bottom:
Once the shape is established, tap the bottom of the pot firmly against your table surface to create a flat base so it won’t wobble. -
Smooth the surfaces:
Dip your finger in a tiny bit of water and run it over the clay to smooth out fingerprints and cracks. Pay special attention to the inside curve.
Smooth Operator
Use a slightly damp makeup sponge instead of your finger to smooth the wet clay. It removes fingerprints without adding too much water, which can weaken the structure.
Step 2: Refining and Finishing
-
Let it dry completely:
Place your dish in a spot with good airflow and let it dry for 24-48 hours. The clay will turn pure white and feel hard to the touch. -
Sand for smoothness:
Using fine-grit sandpaper, gently sand the rim to remove sharp edges. I usually give the exterior a light sanding too, just enough to remove rough bumps while keeping that handmade texture. -
Wipe away dust:
Use a barely damp sponge or cloth to wipe off all the sanding dust. This is crucial for a smooth paint application. -
Apply the base coat:
Paint the entire dish—inside vs outside—with white acrylic paint. You may need 2-3 coats for full opacity, allowing each layer to dry fully in between. -
Paint the specialty rim:
Mix a burnt sienna or terracotta paint color. Using a small detail brush, carefully paint just the very top uneven edge of the rim. -
Soften the rim edge:
Your rim shouldn’t look like a perfect machine line. Allow the brush to naturally follow the bumps of the clay, letting the color bleed ever so slightly onto the inner and outer lip for a rustic look. -
Seal the dish:
Once the paint is bone dry, apply a coat of gloss varnish. This gives it that ceramic-like shine shown in the photo and protects the paint from scratching. -
Final cure:
Let the varnish cure according to the bottle instructions (usually 24 hours) before placing any jewelry inside.
Make It Glossy
For a fierce ceramic look without a kiln, use a high-gloss Triple Thick glaze for your final coat. It adds depth and mimics real fired pottery glaze perfectly.
Place your new dish on a sunny windowsill and enjoy having a designated spot for your daily treasures


Minimal Ring Cone Stand for Your Nightstand
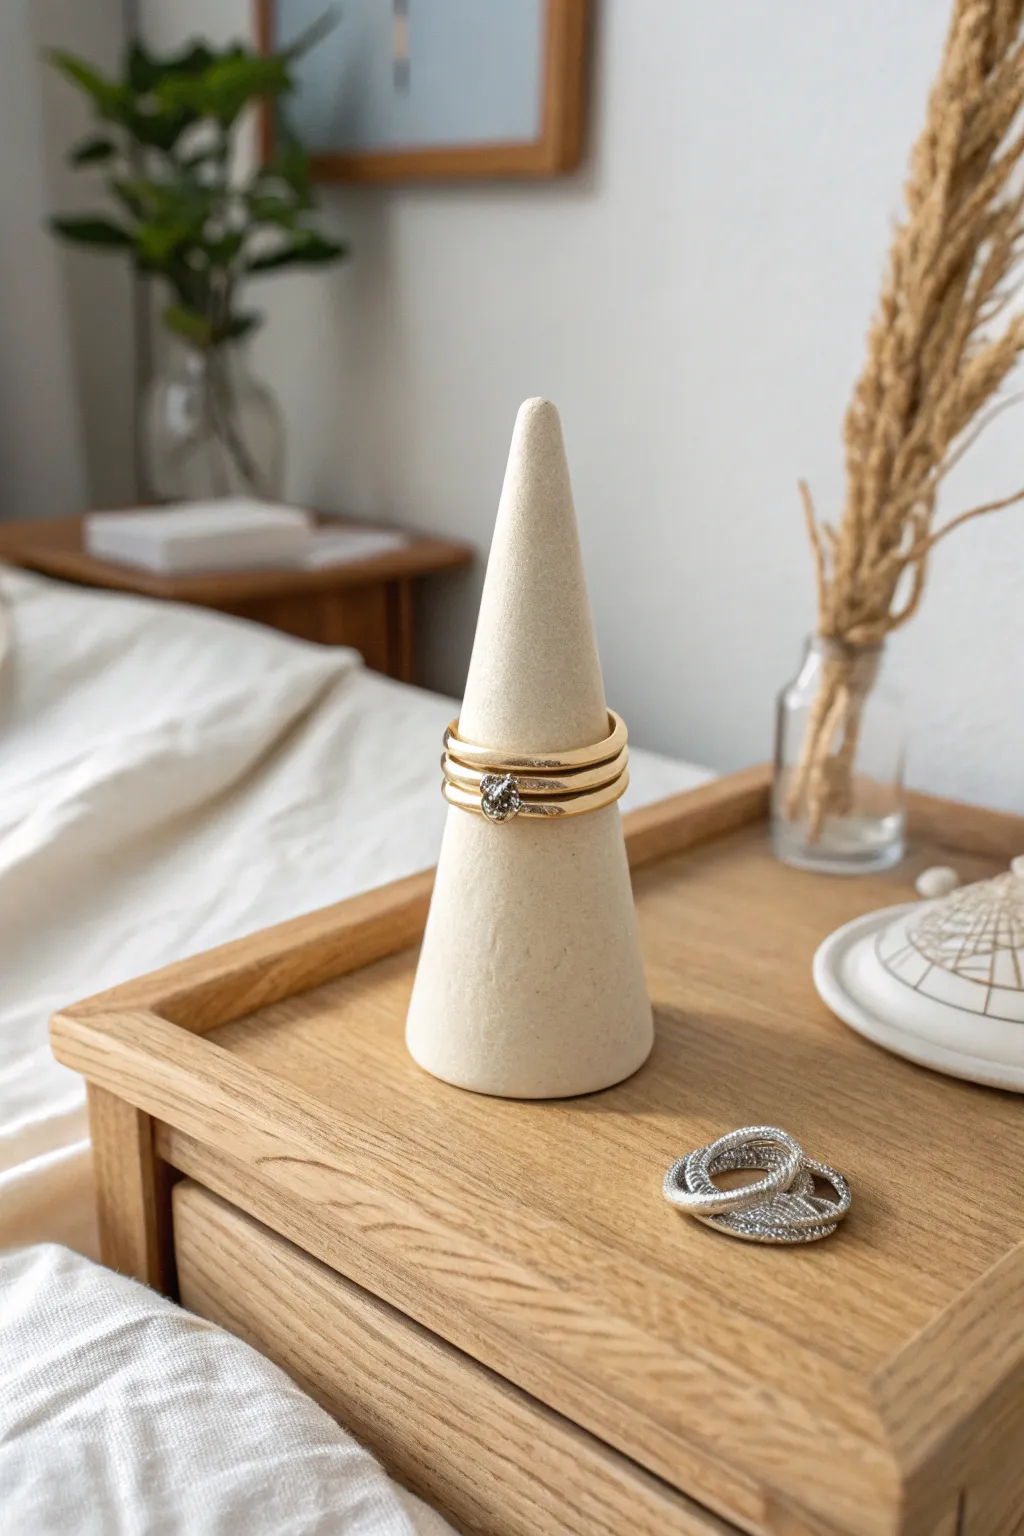
Achieve a high-end designer look with a deceivingly simple beginner project that transforms your nightstand into a boutique display. This sleek, matte cone ring holder is perfect for keeping your everyday jewelry organized while adding a touch of modern minimalism to your decor.
Step-by-Step Guide
Materials
- White air dry clay (approx. 1/2 lb)
- Small cup of water
- Rolling pin (optional)
- Cutting wire or craft knife
- Fine grit sandpaper (220-400 grit)
- Acrylic paint (optional, for tone adjustment)
- Matte varnish or sealant
- Sponge or soft brush
Step 1: Forming the Base Shape
-
Condition the Clay:
Begin by taking a handful of clay and kneading it thoroughly in your hands. You want it to be warm, pliable, and free of any air bubbles before you start shaping. -
Roll a Ball:
Once conditioned, roll the clay between your palms or on a smooth surface to create a tight, seamless sphere about the size of a golf ball. -
Begin the Cone:
Place the ball on your work surface. Using the flat of your palm, begin to roll one side of the ball back and forth, applying slightly more pressure on one end to start forming a tapered point. -
Elongate the Shape:
Continue rolling, gradually moving your hand up and down the length of the clay. Aim for a height of about 3 to 4 inches, keeping the bottom wide and the top narrow. -
Flatten the Bottom:
Pick up your cone and tap the wide bottom firmly against your table. This creates a flat, stable base so your ring holder won’t tip over.
Uneven Bottom?
If your cone wobbles after drying, tape a piece of sandpaper to a table and rub the bottom of the cone in circles against it until perfectly flat.
Step 2: Refining and Drying
-
Smoothing the Sides:
Dip your finger into a small amount of waters. Gently run your damp finger up and down the cone to smooth out any fingerprints or rolling marks. -
Checking Symmetry:
Rotate the cone at eye level. If it leans to one side, gently press it back into alignment. Use a flat ruler or card to check that the sides are straight, not bulging. -
Refining the Tip:
The tip should be rounded, not dangerously sharp. Gently tap the very top against your finger to blunt it slightly, which prevents chipping later. -
Initial Drying Time:
Set the cone aside in a cool, dry place away from direct sunlight. Let it dry for at least 24 to 48 hours. I usually flip it on its side halfway through to let the bottom breathe. -
Inspect for Cracks:
Once creating a ‘white shell’ look, check for tiny surface cracks. If you spot any, fill them with a slip mixture (water and clay paste) and let dry again.
Step 3: Finishing Touches
-
Sanding for Texture:
Once fully cured and hard, take your fine-grit sandpaper and gently buff the entire surface. This removes any final imperfections and gives it that professional stone-like texture. -
Dust Removal:
Wipe the creative dust away with a slightly damp cloth or a dry soft brush. Ensure the surface is completely clean before applying any finish. -
Color Toning (Optional):
If your clay dried too bright white and you want the warm, creamy beige tone seen in the photo, mix a tiny drop of yellow ochre or brown acrylic paint into white paint and apply a sheer wash. -
Sealing the Piece:
Apply a thin layer of matte varnish or sealant. This is crucial for protecting the clay from oils on your jewelry and hands. -
Final Cure:
Let the sealant dry completely according to the manufacturer’s instructions before placing your rings on the cone.
Add Speckles
For a terrazzo or stone effect, flick a toothbrush loaded with diluted black or brown paint onto the cone before sealing it for a trendy texture.
Now you have a serene, custom-made spot to safeguard your favorite rings every night


Easy Slab Coasters With Leaf Imprints
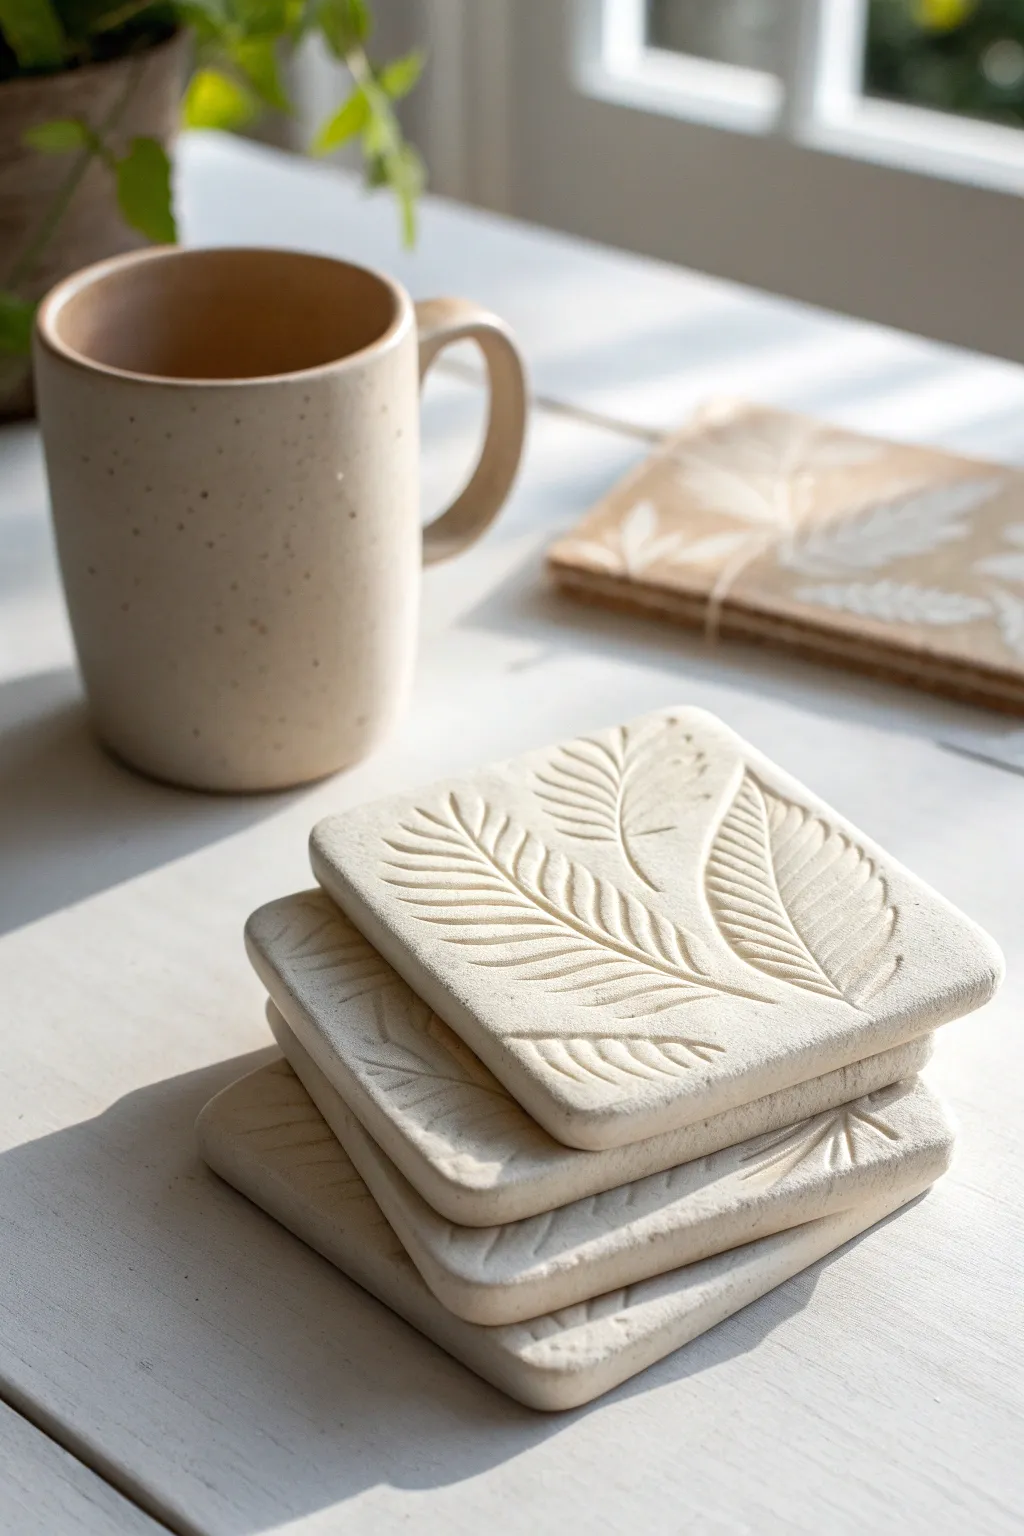
Bring a touch of nature indoors with these elegant, minimalist coasters featuring fossil-like botanical impressions. The natural speckled finish and soft, rounded edges create a professional ceramic look without needing a kiln
Detailed Instructions
Materials
- White or speckled air dry clay
- Rolling pin
- Two wooden guide sticks (approx. 1/4 inch thick) or a rolling guide
- Fresh leaves with prominent veins (ferns or sturdy herbs work best)
- Square cookie cutter or a ruler and craft knife
- Fine-grit sandpaper
- Small bowl of water
- Sponge
- Clear matte acrylic varnish or clay sealer
- Soft bristles brush
Step 1: Preparation & Rolling
-
Prep your surface:
Start by laying down a canvas cloth or a non-stick silicone mat to prevent the clay from sticking to your table. If your clay is sticky, dusting a tiny amount of cornstarch can help. -
Condition the clay:
Take a handful of your air dry clay and knead it gently in your hands until it feels pliable and warm. This removes air bubbles and makes it easier to work with. -
Set up guides:
Place your wooden guide sticks on either side of the clay ball. These will ensure your coaster has a perfectly even thickness when you roll it out. -
Roll out the slab:
Using your rolling pin, roll the clay out smoothly until the pin rests on the guide sticks. Aim for a thickness of about 1/4 inch to ensure durability. -
Smooth the surface:
Take a slightly damp sponge and very gently wipe the surface of the clay slab to remove any canvas texture or rolling pin marks. You want a pristine canvas for your leaf print.
Fixing Warp
If edges curl up while drying, lightly mist the concave side with water and weigh it down with a heavy book between parchment paper overnight to flatten it back out.
Step 2: Creating the Design
-
Select your botanical:
Choose a leaf that fits nicely within your intended coaster size. Place the leaf vein-side down onto the clay slab. -
Imprint the leaf:
Gently roll over the leaf with your rolling pin once. Apply firm, even pressure to push the veins into the clay, but don’t press so hard that you distort the slab’s thickness too much. -
Reveal the pattern:
I particularly enjoy this moment—carefully find the stem or tip of the leaf and slowly peel it away to reveal the intricate impression underneath. -
Cut the shape:
Position your square cookie cutter over the best part of the imprint. Press down firmly to cut out the coaster shape. If using a knife and ruler, measure a 4×4 inch square and cut cleanly. -
Release the shape:
Peel away the excess clay from around your square first, then carefully lift the coaster off your work surface.
Step 3: Refining & Finishing
-
Soften the edges:
Dip your finger into a little water and run it along the cut edges of the square to dull the sharpness. Following the image, round off the four corners slightly for a softer, organic look. -
Check flatness:
Place the coaster on a flat board or wire rack to dry. Gently press fast flat with your palm to ensure it hasn’t warped during handling. -
Drying process:
Let the clay dry for 24-48 hours. To prevent curling, flip the coaster over gently every few hours so both sides dry at the same rate. -
Sanding:
Once fully dry and bone-white, use fine-grit sandpaper to smooth out any remaining rough edges or bumps on the sides. Wipe away the dust with a dry cloth. -
Sealing:
Apply a thin coat of matte varnish or clay sealer to the top and sides. This protects the clay from moisture, which is crucial for a drink coaster. -
Second coat:
Allow the first coat to dry completely, then apply a second layer for added durability. -
Final cure:
Let the sealer cure according to the bottle instructions before placing any hot mugs on your beautiful new coaster.
Go Pro
For an antique look, rub a diluted brown acrylic wash into the leaf veins and wipe the surface clean, leaving the dark color only in the deep crevices.
Enjoy your handmade coasters with your morning coffee or gift a set to a plant-loving friend


Marbled Clay Coasters Using Two Colors
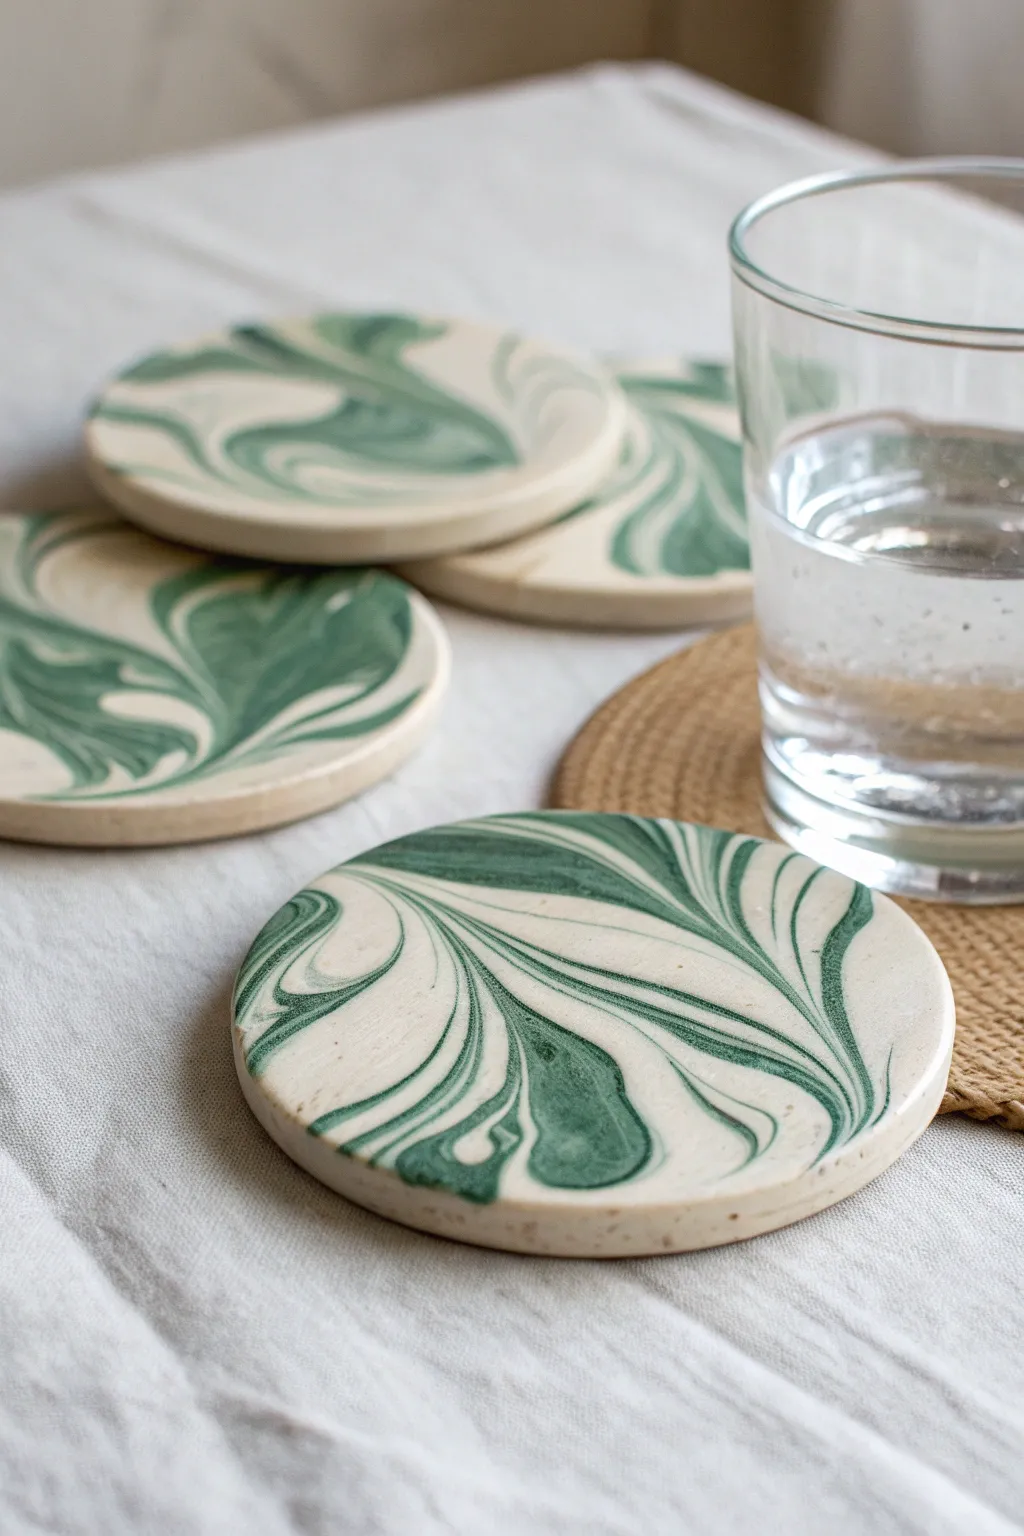
These elegant clay coasters feature a sophisticated swirl pattern created by marbling forest green and natural white clay together. The result is a set of unique, organic accessories that look like polished stone but are surprisingly simple to craft at home using air-dry clay.
Step-by-Step
Materials
- White or natural air-dry clay
- Dark green air-dry clay (or white clay + green acrylic paint)
- Rolling pin (acrylic or wooden)
- Round cookie cutter (approx. 4 inches) or a bowl guide
- Craft knife
- Bowl of water
- Fine-grit sandpaper (400-600 grit)
- Matte or satin sealant (such as Mod Podge or water-based varnish)
- Parchment paper or a silicone craft mat
Step 1: Preparing the Clay
-
Prepare the base:
Start by taking a large handful of your white or natural-colored air-dry clay. Knead it thoroughly in your hands until it is warm, pliable, and free of any air bubbles. -
Create the color accent:
Prepare a smaller amount of the dark green clay, roughly one-quarter to one-third the volume of your white clay. If you don’t have pre-colored green clay, mix a few drops of dark green acrylic paint into a ball of white clay and knead until the color is solid and uniform. -
Form clay ropes:
Roll the white clay into a thick log shape, about 6 inches long. Repeat this process with the green clay and roll it into a thinner snake of the same length. -
Combine colors:
Lay the thin green rope next to the thick white log and twist them together tightly like a candy cane. This initial twist is crucial for getting those deep, integrated swirls seen in the photo.
Twist Technique
Stop twisting the clays together as soon as you see thin, distinct lines of color. If you keep kneading, the marbling will blur and turn into a solid pastel color instead.
Step 2: Marbling and Shaping
-
Create the fold:
Fold the twisted rope in half, bringing the two ends together. Twist the combined log again. Repeat this folding and twisting process 3 to 4 times. Be careful not to over-mix, or the colors will muddy into a single light green shade instead of distinct veins. -
Form a ball:
Roll the marbled clay log into a smooth ball. You should already see striations of green running through the white surface. -
Flatten the clay:
Place the ball on your parchment paper or craft mat. Using your palm, gently press it down into a thick puck shape. -
Roll out the slab:
Use your rolling pin to roll the clay out to an even thickness of about 1/4 inch (6mm). Roll in different directions to stretch the marble pattern outward organically. I like to flip the slab over once during rolling to see which side has the more pleasing pattern. -
Check thickness consistency:
Ensure the slab is level across the entire surface so your glasses will sit flat later. You can use two magazines of equal thickness on either side of the clay as guides for your rolling pin.
Gilded Edges
Once the sealant is dry, use a small brush to paint the outer rim of the coaster with liquid gold leaf or metallic gold paint for a luxurious, high-end finish.
Step 3: Cutting and Refining
-
Cut the shapes:
Place your round cutter or bowl firmly onto the most attractive parts of the marble pattern. Press down purely vertical to get a clean cut, or trace around your bowl guide with a sharp craft knife. -
Smooth the edges:
Dip your finger into a little bit of water and run it gently along the cut edges of each coaster. This smooths out any harsh ridges or tiny crumbles left by the cutter. -
Initial drying phase:
Carefully move your coasters to a flat surface lined with fresh parchment paper. Let them dry for 24 to 48 hours depending on humidity. Flip them over halfway through the drying process to prevent curling.
Step 4: Finishing Touches
-
Sand for perfection:
Once the coasters are bone dry and hard, take your fine-grit sandpaper and lightly buff the edges and surface. This removes any fingerprints and creates that smooth, stone-like feel. -
Wipe down:
Use a barely damp cloth or paper towel to wipe away all the sanding dust. The surface must be completely clean before sealing. -
Apply sealant:
Brush on a thin coat of matte or satin sealant to protect the clay from moisture. Let it dry according to the bottle instructions. -
Second coat:
Apply a second coat of sealant for durability. Since these will hold drinks, a waterproof varnish is ideal, but a standard acrylic sealer works for light use.
Now you have a stunning set of custom coasters ready to protect your table in style

The Complete Guide to Pottery Troubleshooting
Uncover the most common ceramic mistakes—from cracking clay to failed glazes—and learn how to fix them fast.
Stamped Initial Keychain Tags (So Satisfying)
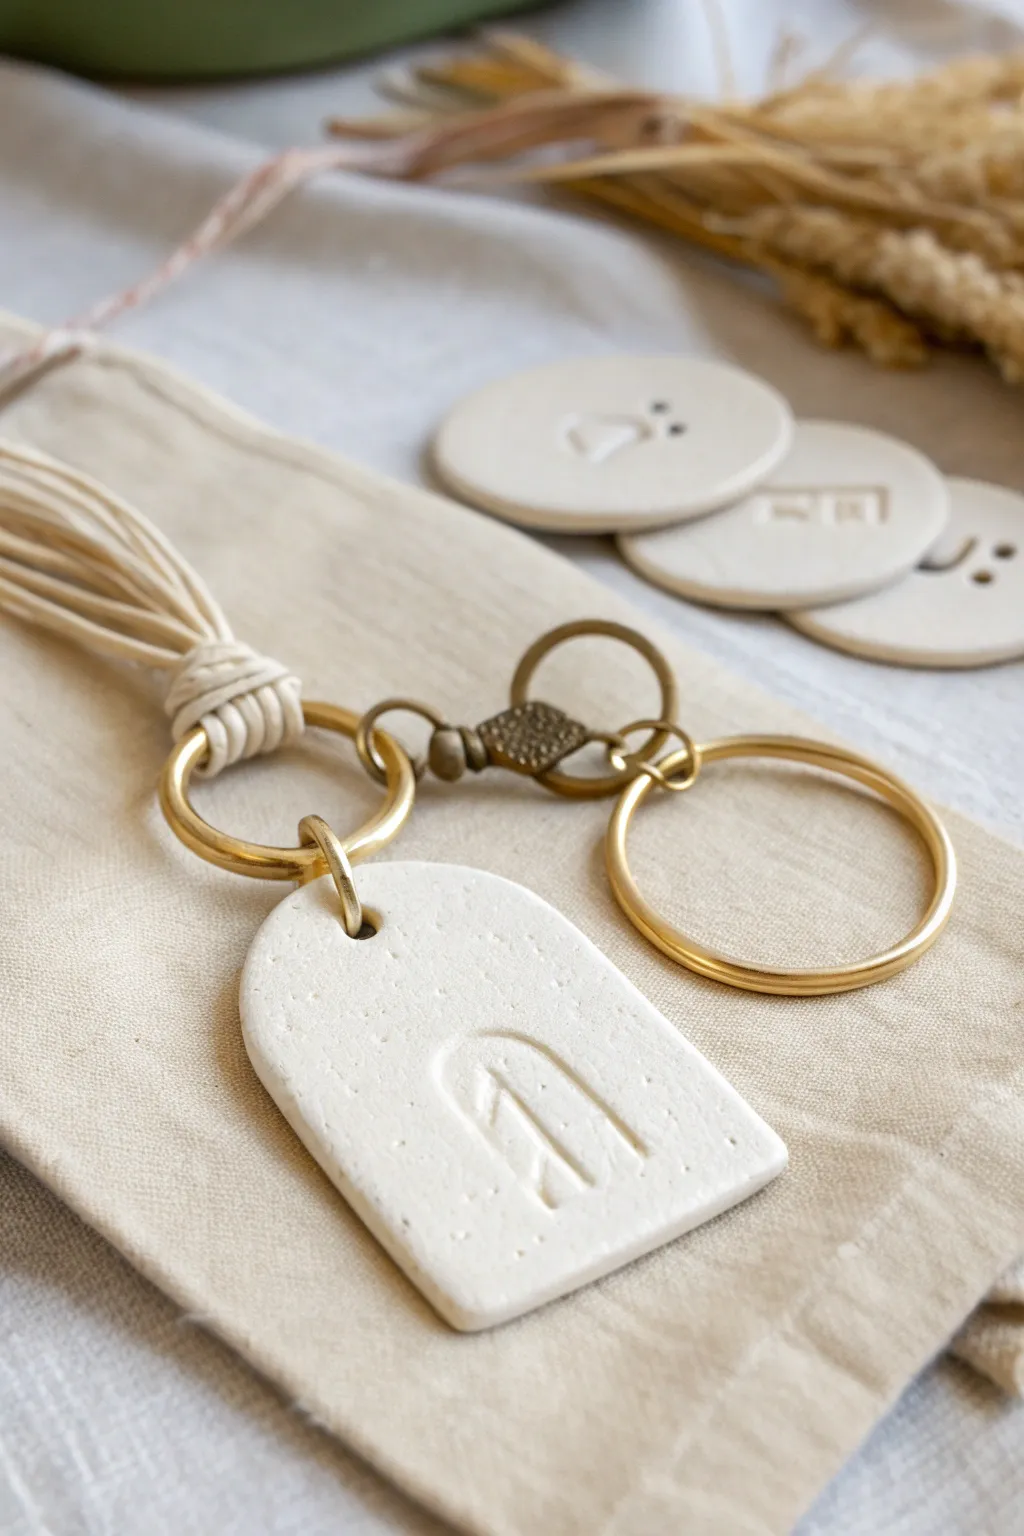
These minimalist keychains combine the rustic texture of air dry clay with elegant brass hardware and a soft cord tassel. The simple stamped arch design adds a modern, geometric touch that feels effortlessly chic.
Step-by-Step Tutorial
Materials
- White air dry clay
- Rolling pin
- Clay knife or craft blade
- Geometric clay cutters (specifically an arch shape)
- Small circle cutter or straw (for the hole)
- Arch or rainbow minimalist stamp
- Fine grit sandpaper
- Matte sealant or varnish
- Brass keyring hardware (split ring, jump ring, lobster clasp)
- Cream macramé cord or cotton twine
- Needle nose pliers
- Wax paper or craft mat
Step 1: Shaping the Clay Tag
-
Prepare your workspace:
Lay down a piece of wax paper or a dedicated craft mat to prevent the clay from sticking to your table surface. -
Condition the clay:
Take a small ball of white air dry clay and knead it in your hands until it feels soft, warm, and pliable. -
Roll it out:
Use your rolling pin to flatten the clay to an even thickness, aiming for about 1/4 inch (6mm) so it’s sturdy enough for daily use. -
Cut the shape:
Press your arch-shaped cutter firmly into the clay to create the main tag body. If you don’t have a cutter, you can carefully freehand this shape with a craft knife. -
Smooth the edges:
Dip your finger in a little bit of water and gently run it along the cut edges to smooth out any roughness or stray clay bits. -
Add the hole:
Use a straw or a small circle cutter to punch a hole near the top center of the arch. Make sure it’s not too close to the edge to prevent cracking.
Fixing Cracks
If small cracks appear while drying, don’t panic. Create a ‘slip’ by mixing a tiny bit of clay with water into a paste, fill the crack, let dry, and sand smooth.
Step 2: Stamping and Drying
-
Impress the design:
Take your arch stamp and press it gently but firmly into the center of the clay tag. Don’t push all the way through, just enough to leave a clear impression. -
Let it dry:
Place the tag on a clean, flat surface to dry. I like to flip the piece over halfway through the drying process to ensure both sides dry evenly and prevent warping. -
Wait patiently:
Allow at least 24 to 48 hours for the clay to fully cure. It should feel lightweight and chalky when completely dry. -
Sand for perfection:
Once fully dry, take a piece of fine-grit sandpaper and lightly buff the edges and surface to remove any imperfections or fingerprints. -
Seal the piece:
Apply a thin coat of matte varnish or sealant to protect the clay from moisture and dirt, which is crucial for a keychain.
Add Color
Want a pop of color? Before sealing, dilute some acrylic paint with water and wash it over the impressed design, then wipe the surface to leave color just in the grooves.
Step 3: Assembly and Tassel
-
Attach the jump ring:
Using your pliers, open a heavy-duty brass jump ring and thread it through the hole in your clay tag. -
Connect the hardware:
Before closing the jump ring, slide on the brass split ring and the lobster clasp assembly, then close the jump ring securely. -
Cut the cord:
Cut several lengths of cream cord (about 8-10 inches each) for the tassel. -
Fold onto the ring:
Fold the bundle of cords in half and loop them through the brass split ring using a lark’s head knot. -
Create the tassel neck:
Take a separate piece of cord and wrap it tightly around the top of the cord bundle, just below the ring, to create the tassel’s neck. -
Secure the wrap:
Tie off the wrapping cord and tuck the ends inside the tassel using a needle or skewer. -
Trim the fringe:
Use sharp scissors to trim the bottom of the tassel so all the cords are even and reach your desired length.
Clip your new handmade accessory onto your bag or keys and enjoy the custom touch
Cute Fridge Magnets Made From Basic Shapes
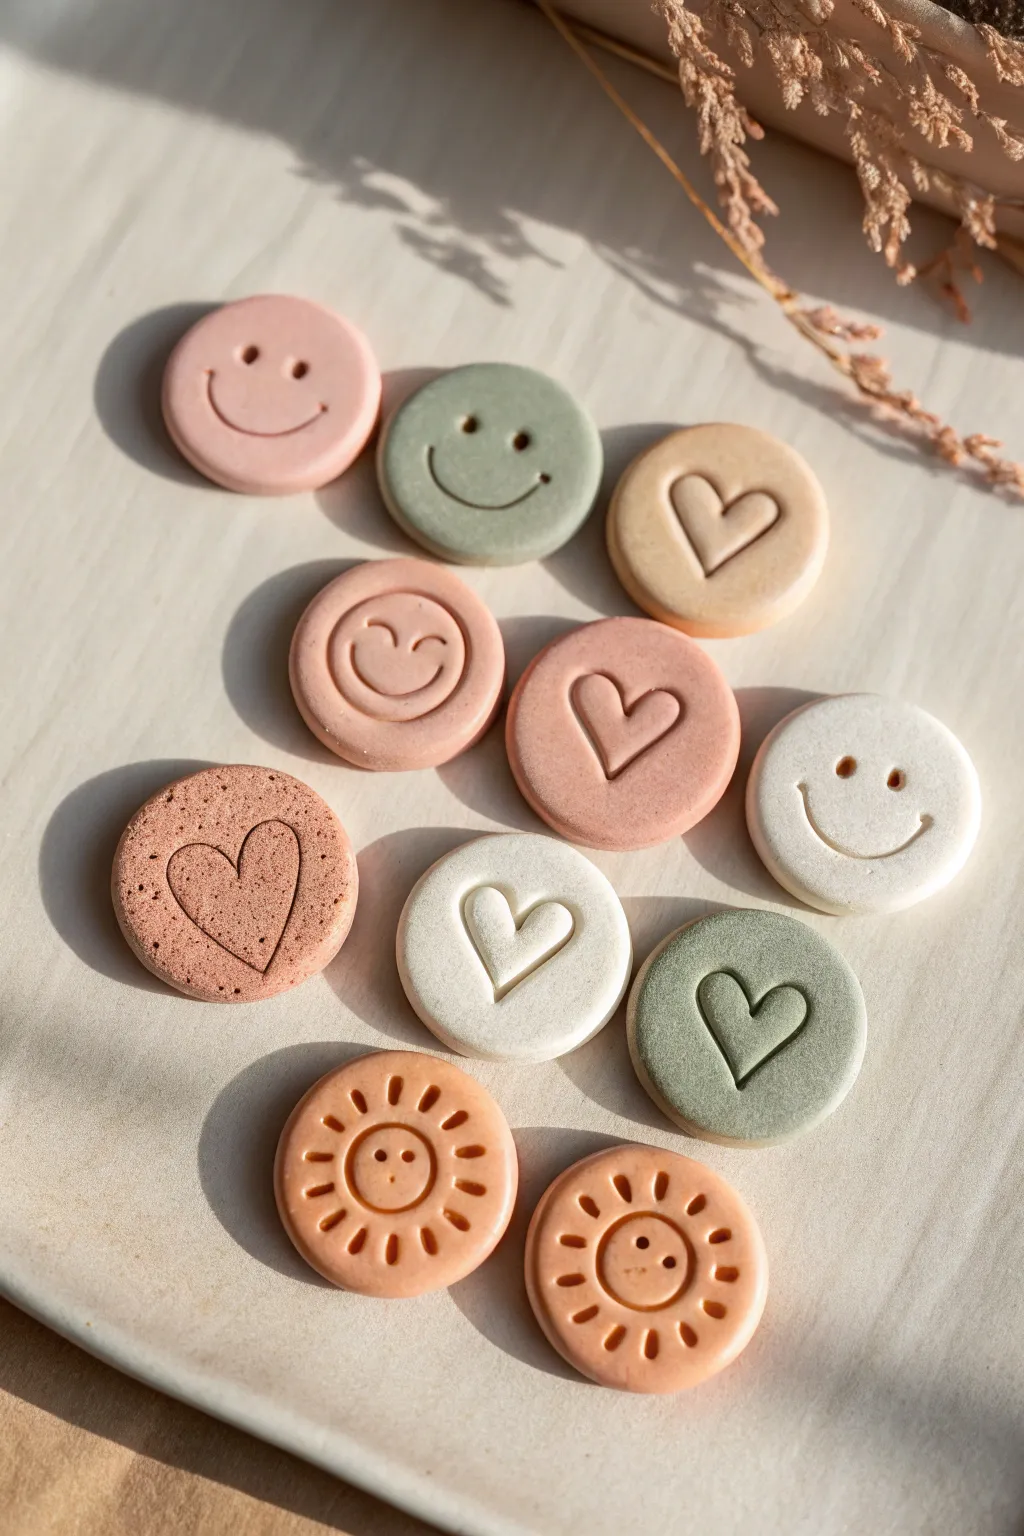
These charming, minimalist fridge magnets prove that you do not need complicated sculpting skills to make something beautiful. With their muted earth tones and simple impressed designs, they add a touch of modern warmth to any magnetic surface.
Step-by-Step Tutorial
Materials
- Air dry clay (white)
- Acrylic paints (muted pink, sage green, terracotta, beige)
- Small round cookie cutter or a small jar lid (approx. 1-1.5 inch diameter)
- Rolling pin
- Parchment paper or non-stick mat
- Detail tools (dotting tool, needle tool, or a toothpick)
- Small coffee stirrer, straw, or curved sculpting tool (for smiles)
- Coffee grounds or cinnamon (optional for texture)
- Fine grit sandpaper
- Strong round craft magnets
- Super glue or E6000 adhesive
- Matte varnish or sealant (optional)
Step 1: Preparing the Clay
-
Mix your colors:
Start by taking small balls of white air dry clay. To achieve the solid colors seen in the photo, knead a small drop of acrylic paint directly into the wet clay until the color is uniform. Aim for muted shades: sage green, soft terracotta, blush pink, and beige. -
Add texture (optional):
For the speckled ‘terrazzo’ or stone look seen on the terracotta heart magnet, knead in a tiny pinch of dried coffee grounds or cinnamon into that specific ball of clay before rolling. -
Roll it out:
Place your colored clay on a piece of parchment paper to prevent sticking. Use a rolling pin to flatten the clay to an even thickness of about 1/4 inch (4-5mm). You want them thick enough to be durable but not too heavy. -
Cut the shapes:
Using your small round cutter or jar lid, press firmly into the rolled clay to create perfect circles. Lift the excess clay away and gently smooth the edges of your circles with a damp fingertip to remove any roughness.
Cracks Appearing?
If you see hairline cracks while drying, mix a tiny bit of fresh clay with water to make a paste (slip) and smooth it over the crack with your finger
Step 2: Imprinting Designs
-
Create the simple smiley:
For the classic smiley face, use a dotting tool or the back of a small paintbrush to impress two distinct eyes. Use a curved tool, like a cut straw or a U-shaped sculpting tool, to press a clean, deep smile curve below the eyes. -
Create the winking face:
To make the winking smiley, press one eye as a dot. For the winking eye, use your curved tool to press a small, upward-facing arc. -
Impress the hearts:
For the heart designs, you can either freehand draw the heart with a needle tool or use a tiny heart-shaped stamp. If drawing freehand, I find it helps to press two dots for the top lobes first, then drag them down to meet at the bottom point for a cleaner shape. -
Make the sunshine faces:
For the sun design, start by creating a smaller smiley face in the center. Then, use a small flat tool or the side of a popsicle stick to press radiating lines around the perimeter of the circle to represent sun rays. -
Smooth the impressions:
The clay might push up slightly around your indentations. Very gently tap these raised ridges down with your finger so the surface remains flat.
Pro Tip: Consistent Thickness
Place two craft sticks or playing cards on either side of your clay while rolling. The rolling pin will rest on them, ensuring perfectly even thickness.
Step 3: Finishing Up
-
Let them dry:
Place all your discs on a clean sheet of parchment paper in a safe spot. Allow them to dry for at least 24-48 hours. Turn them over halfway through the drying process to ensure the bottoms dry evenly and don’t warp. -
Sand the edges:
Once fully dry and hard, take a piece of fine-grit sandpaper and lightly buff the edges. This removes any sharp bits and gives the magnets a professional, finished look. -
Seal (optional):
If you want to protect the finish, apply a thin coat of matte varnish. Avoid glossy finishes if you want to maintain the natural, earthy aesthetic shown in the photo. -
Attach the magnets:
Flip the clay pieces over. Apply a small dab of strong adhesive (like E6000 or super glue) to the center of the back. -
Secure the backing:
Press a round craft magnet firmly into the glue. Let the glue cure completely according to the package instructions before sticking them to your fridge.
Now you have a set of cheerful, modern magnets ready to hold up your grocery lists and photos


What Really Happens Inside the Kiln
Learn how time and temperature work together inside the kiln to transform clay into durable ceramic.
Little Bud Vase That’s Mostly for Dry Stems
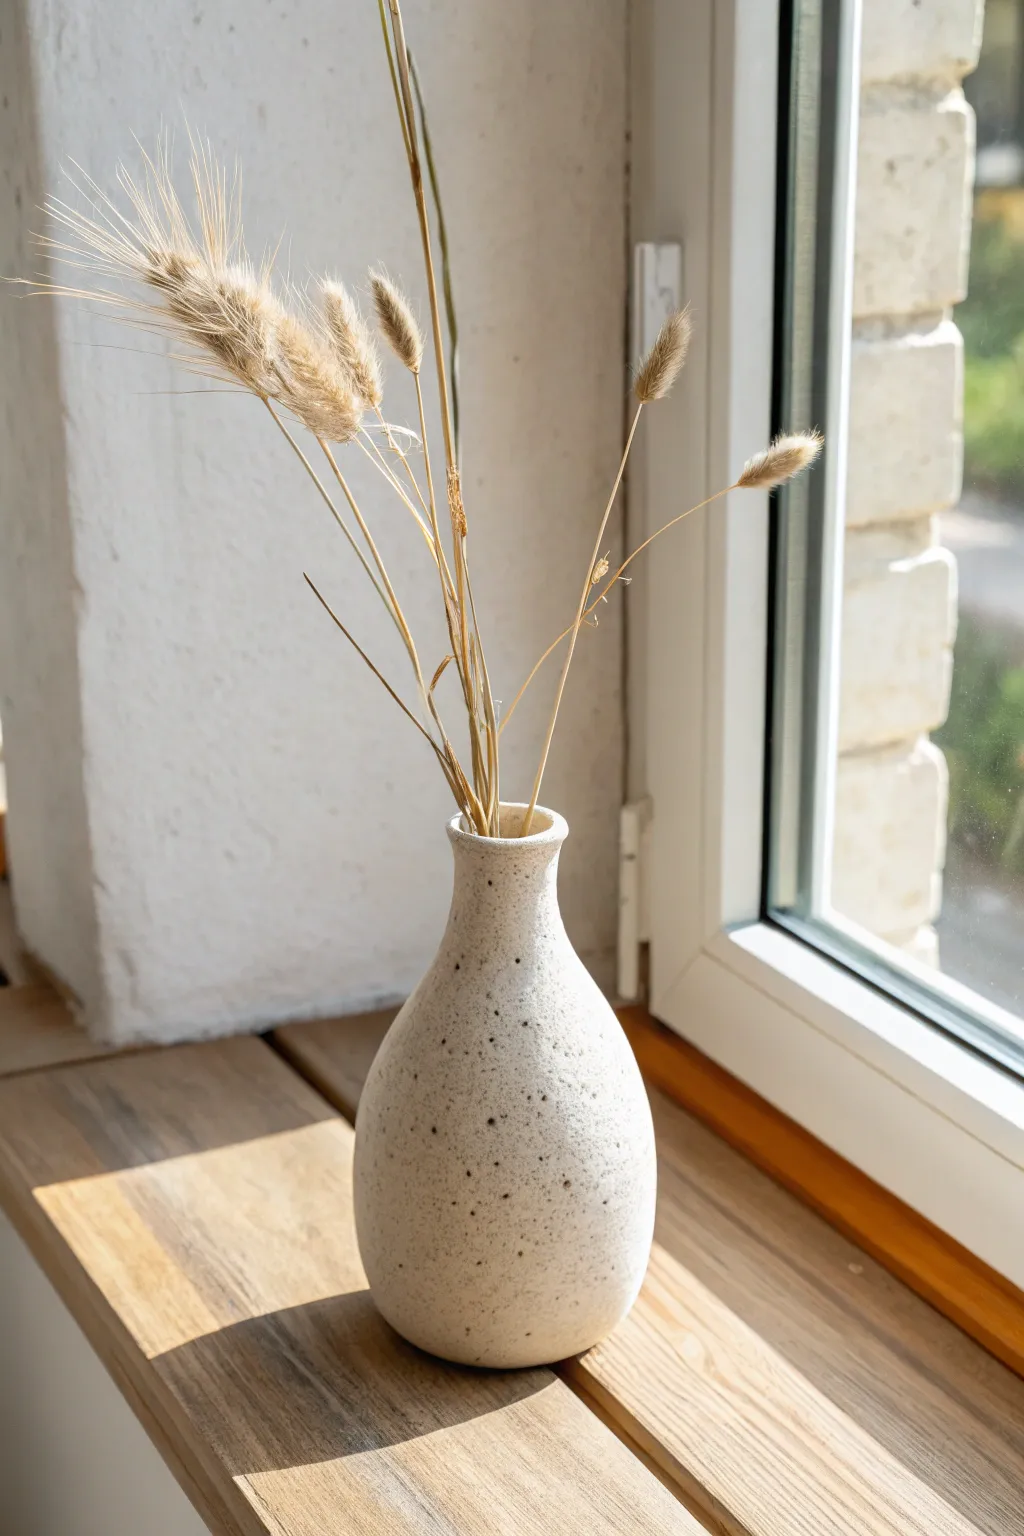
This charming, minimalist vase emulates the look of high-fire ceramic stoneware with a beautifully textured, speckled finish. Its organic shape and narrow neck make it the perfect vessel for displaying delicate dried grasses or wheat stems on a sunny windowsill.
Step-by-Step
Materials
- Air dry clay (white or natural stone color)
- Acrylic rolling pin
- Cutting tool or craft knife
- Small bowl of water
- Sponge
- Sandpaper (medium and fine grit)
- Acrylic paint (thinned brown or black)
- A stiff bristle brush or toothbrush
- Matte varnish or sealant
Step 1: Forming the Base
-
Prepare the clay:
Begin by conditioning a generous handful of air dry clay. Knead it in your hands until it becomes warm, soft, and pliable, which helps prevent cracks later on. -
create the pinch pot:
Roll the clay into a smooth ball about the size of a tennis ball. Gently push your thumb into the center, stopping about a half-inch from the bottom. -
Pinch the walls:
Slowly rotate the ball in your hand while pinching the clay between your thumb and fingers. Work your way from the bottom up to create an even wall thickness. -
Shape the belly:
Start shaping the ‘belly’ of the vase by gently pushing the walls outward from the inside. Aim for a rounded, organic curve that tapers slightly toward the top. -
Smooth the surface:
Dip your finger in a little water and smooth out any major bumps or cracks on the exterior. Keep the water usage minimal to avoid weakening the clay structure.
Uneven drying?
If you notice cracks forming while it dries, rub a tiny amount of fresh clay paste (clay mixed with water) into the fissure and smooth it immediately with a damp finger.
Step 2: Building the Neck
-
Roll a coil:
Take a separate piece of clay and roll it into a thick coil or snake, roughly the same thickness as your vase walls. -
Attach the coil:
Score the top rim of your pinch pot and the bottom of the coil with a craft knife. Add a dab of water or slip, then place the coil on top of the rim. -
Blend the seams:
Use your thumb or a modeling tool to smudge the clay downwards, blending the coil seamlessly into the base on both the inside and outside. -
Narrow the neck:
Gently squeeze the added coil to narrow the opening. You want a graceful transition from the wide belly to a slender neck. -
Refine the rim:
Use a damp sponge to smooth the very top rim. It doesn’t need to be perfectly level; a slightly organic, wavy edge adds to the handmade charm seen in the photo. -
Check the profile:
Set the vase on a flat surface and step back to look at the silhouette. Adjust gently with your hands to ensure it stands straight and the curves look balanced.
Make it Waterproof
Standard air dry clay isn’t waterproof. To hold fresh flowers instead of dried stems, insert a small glass test tube or plastic vial inside the neck to hold the water.
Step 3: Finishing Touches
-
Dry completely:
Let the vase dry for at least 24-48 hours. Turn it occasionally to ensure even drying. The clay will lighten significantly when it is fully dry. -
Sand for smoothness:
Once bone dry, use medium grit sandpaper to remove any rough lumps. Follow up with fine grit sandpaper to achieve a smooth, stone-like surface. -
Prepare the speckle paint:
Mix a small amount of dark brown or black acrylic paint with water until it reaches a very thin, inky consistency. -
Create the texture effect:
Dip a stiff brush or toothbrush into the thinned paint. Run your thumb across the bristles to flick tiny speckles onto the vase. I find testing on a paper towel first helps gauge the spray pattern. -
Layer the speckles:
Rotate the vase and continue flicking paint until you have an even distribution of speckles. Vary the distance slightly to get different sized dots. -
Seal the piece:
After the paint is completely dry, apply a coat of matte varnish. This mimics the raw ceramic look while protecting the clay from humidity.
Place your finished vase near natural light to highlight the delicate speckling and enjoy the warm, rustic vibe it brings to your space
Textured Pencil Cup Using Easy Pressed Patterns
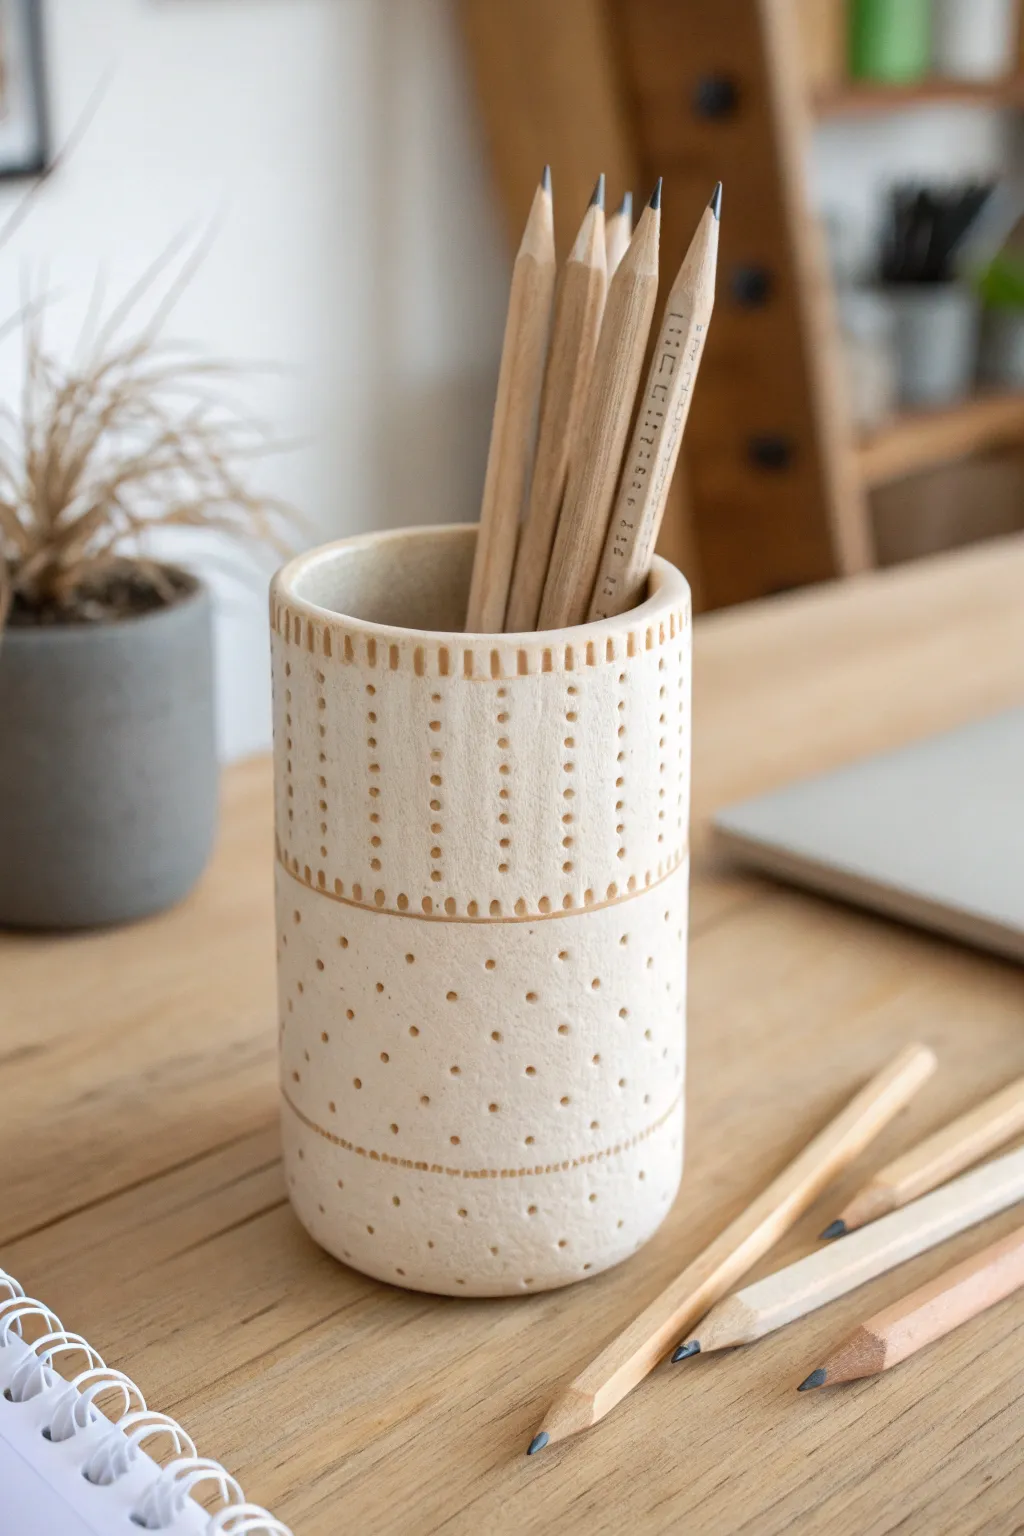
Elevate your desk organization with this minimalist, pottery-inspired pencil cup made from simple air dry clay. The charm lies in the repetitive, hand-pressed patterns that give it a sophisticated texture without requiring advanced sculpting skills.
Step-by-Step Tutorial
Materials
- White air dry clay (approx. 500g)
- Rolling pin
- Empty can or jar (for use as a mold/armature)
- Parchment paper or wax paper
- Craft knife or clay needle tool
- Slip (clay mixed with water) or scoring tool
- Wooden skewer or toothpick (for dot patterns)
- Flat-head screwdriver or clay ribbon tool (for dash patterns)
- Fine-grit sandpaper
- Matte sealant or varnish
Step 1: Preparing the Base
-
Prep your mold:
Begin by selecting a clean can or jar to act as your internal mold. Wrap it tightly in parchment paper or easy-release tape to ensure the clay doesn’t stick to the metal or glass later. -
Roll the clay slab:
Take a generous ball of white air dry clay and condition it by kneading briefly. Roll it out into a uniform rectangular slab, aiming for a thickness of about 1/4 inch (6mm). -
Cut to size:
Measure the height and circumference of your mold (adding a little extra for the seam). Using a ruler and craft knife, cut a clean rectangle from your clay slab. -
Create the base:
Use the bottom of your can as a template to cut a circular piece of clay from the remnants of your slab. This will serve as the floor of your cup.
Step 2: Assembling the Cylinder
-
Wrap the mold:
Carefully pick up your rectangular slab and wrap it around the parchment-covered mold. Bring the two short ends together. -
Join the seam:
Score the edges where the clay meets (scratch cross-hatch marks) and apply a little water or slip. Press the edges together firmly. -
Smooth the joint:
Use your finger or a smoothing tool to blend the seam until it disappears completely. I usually spend extra time here to ensure the cylinder looks seamless all around. -
Attach the bottom:
Flip the cylinder (with the mold still inside) upside down. Score and slip the bottom edge of the cylinder and the edge of your circular base piece. Press them together and smooth the seam thoroughly.
Clean Lines
When pressing your patterns, dip your tool in a tiny bit of water or cornstarch frequently. This prevents the clay from sticking to the tool and dragging, keeping your impressed marks crisp.
Step 3: Adding Texture
-
Plan your zones:
Lightly mark horizontal lines around the cylinder to define your pattern zones. In the example, there is a band of vertical dashes at the top, followed by a wider band of vertical dashes, and a dotted section at the bottom. -
Stamp the top rim:
Use a small flat tool, like the head of a small screwdriver or a dedicated clay tool, to press vertical dashes evenly around the very top rim of the cup. -
Create the vertical dash band:
Below the rim, create the main decorative band. Press rows of vertical dashes. The example shows roughly 6-7 rows of dashes aligned in columns to create a striped effect. -
Add separation lines:
It helps to define the sections by pressing a horizontal line of small dots or shallow dashes separating the top band from the bottom section. -
Dot the lower section:
For the bottom half, switch to your skewer or toothpick. Press small holes into the clay in a loose, semi-random grid pattern. Don’t push all the way through; just create dimples. -
Detail the bottom decorative bands:
Finish the texture by adding two parallel horizontal lines near the base, created by dragging a needle tool or pressing a series of tiny dashes.
Cracks Appearing?
If you see hairline cracks forming while the clay dries, mix a tiny bit of fresh clay with water to make a paste and fill them in immediately with your finger.
Step 4: Finishing
-
Initial drying:
Allow the clay to dry on the mold for a few hours until it is leather-hard (firm but not fully dry). This helps it hold the cylindrical shape. -
Remove the mold:
Carefully slide the can or jar out of the clay cylinder. If you used parchment paper, peel that away gently from the inside. -
Final drying:
Let the cup dry completely for 24-48 hours. Keep it away from direct heat sources to prevent uneven drying or cracking. -
Sand and smooth:
Once fully cured and bone dry, take fine-grit sandpaper and lightly smooth the top rim and any rough patches. Be gentle over your textured areas to preserve the pattern depth. -
Seal the piece:
Apply a coat of matte clear varnish or sealant to protect the clay from dust and moisture, giving it that finished ceramic look.
Place your favorite pens and pencils inside to instantly add a touch of handmade warmth to your workspace

TRACK YOUR CERAMIC JOURNEY
Capture glaze tests, firing details, and creative progress—all in one simple printable. Make your projects easier to repeat and improve.
No-Fuss Phone Stand With a Curved Groove
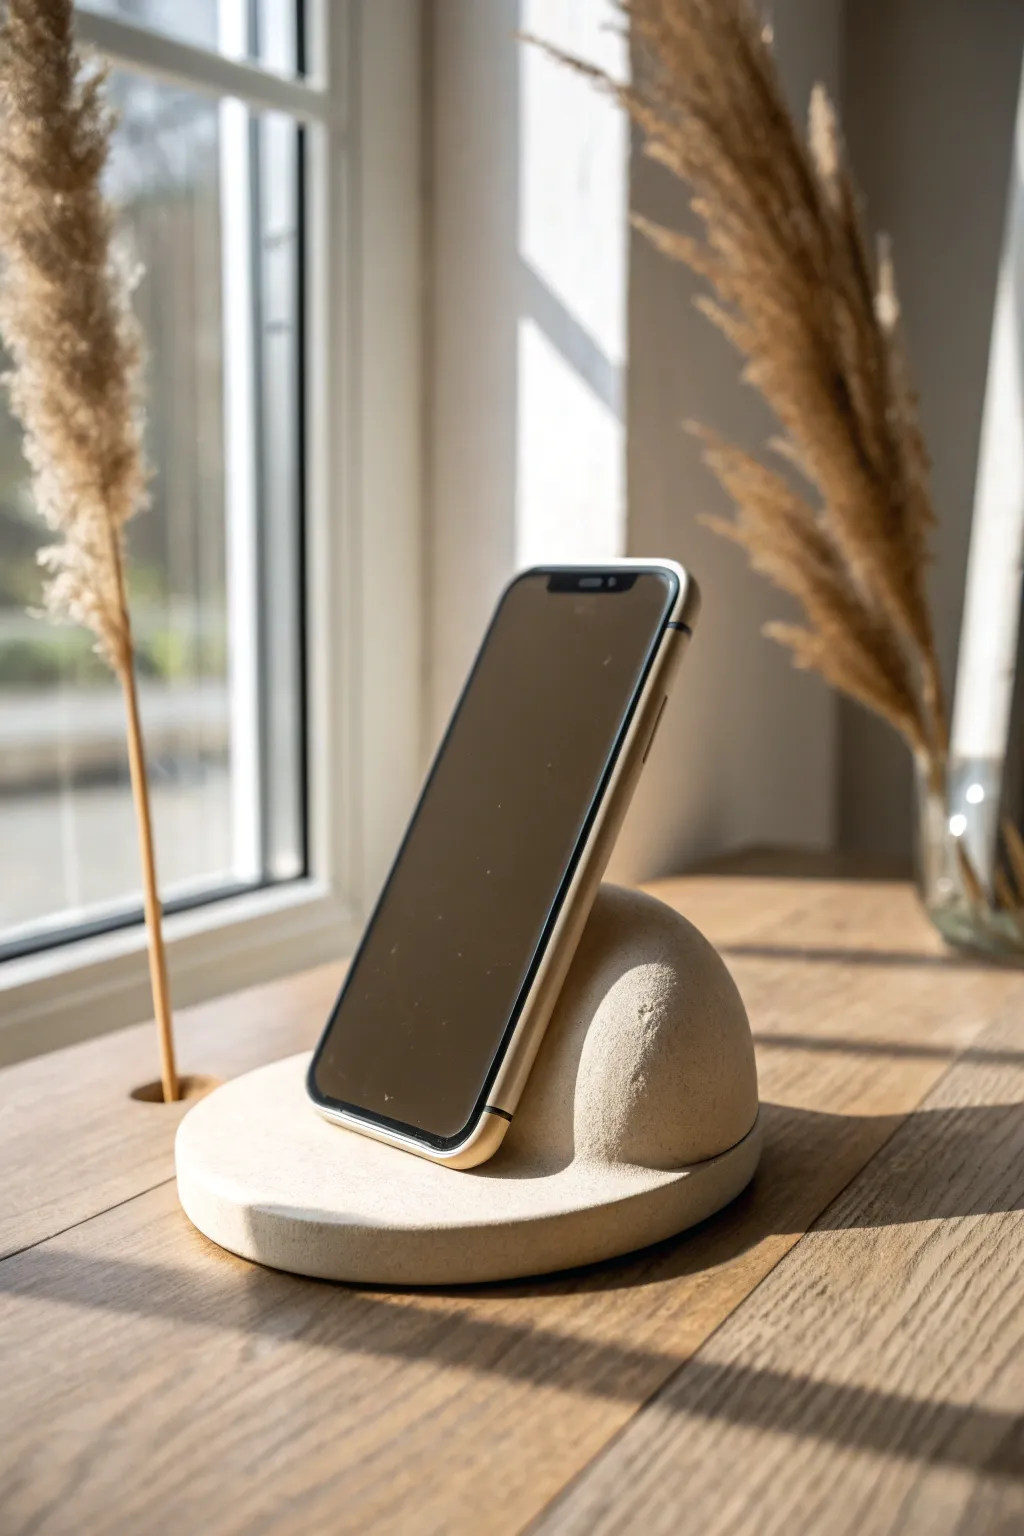
This sleek, modern phone stand combines a smooth circular base with a simple curved support, perfect for holding your device while charging or watching videos. The natural beige tone and minimalist design make it a stylish yet functional addition to any desk or nightstand.
How-To Guide
Materials
- White or beige air dry clay (approx. 500g)
- Rolling pin
- Circle cutter or a small bowl (approx. 4-5 inches diameter)
- Knife or clay cutting tool
- Small sponge
- Water in a small cup
- Sandpaper (medium and fine grit)
- Clear matte varnish or sealant (optional)
Step 1: Creating the Base
-
Condition the clay:
Start by taking a generous amount of clay and kneading it in your hands until it becomes warm, soft, and separate from any air bubbles. -
Roll out the slab:
Using your rolling pin, flatten the clay into a slab. You want this base to be substantial, so aim for a thickness of about 1/2 to 3/4 of an inch. -
Cut the circle:
Place your circle cutter or bowl onto the clay slab and press down firmly to cut out your perfect circle shape. -
Smooth the edges:
Dip your finger in a little bit of water and run it along the cut edge of the circle to smooth out any roughness or sharp debris from cutting.
Step 2: Forming the Support
-
Shape the mound:
Take another lump of clay and roll it into a sphere, then cut it in half to create a hemisphere. Shape this gently into a smooth, rounded mound. -
Test the angle:
Before attaching anything, simply place your phone against the mound on the base to check the viewing angle. Adjust the height or steepness of the mound if needed. -
Score surfaces:
Use your knife to scratch up the bottom of the mound and the spot on the base where it will sit. This rough texture helps the pieces bond. -
Apply slip:
Dab a little water or ‘slip’ (a mixture of clay and water) onto the scratched areas to act as a glue. -
Attach firmly:
Press the mound firmly onto the base. Wiggle it slightly to ensure a suction-like bond between the two pieces. -
Create a seamless join:
Using a modeling tool or your finger, drag clay from the mound down onto the base, smoothing the seam until the two parts look like a single, sculpted unit.
Cracking Up?
If small cracks appear while drying, don’t panic. Simply mix a tiny bit of fresh clay with water to make a paste and fill the cracks, then sand smooth once dry.
Step 3: Refining and Finishing
-
Check balance:
Gently place your phone on the stand again to ensure it doesn’t tip over. If it feels unstable, flatten the bottom of the base slightly by pressing the whole piece gently onto your work surface. -
Final smooth:
Take your damp sponge and wipe over the entire piece to remove fingerprints and tiny imperfections. I like to spend extra time here to get that professional finish. -
Slow drying:
Let the stand dry in a cool, dry place away from direct sunlight. Rotate it occasionally to ensure even drying, which usually takes 24-48 hours depending on thickness. -
Sanding:
Once bone dry, use medium grit sandpaper to smooth out any larger bumps, followed by fine grit sandpaper for a silky smooth surface. -
Clean dust:
Wipe away all sanding dust with a slightly damp cloth or a dry brush. -
Seal:
Apply a thin coat of clear matte varnish to protect the clay from moisture and stains, preserving that raw stone aesthetic.
Terrazzo Twist
Mix small, colorful chips of dried clay into your wet white clay before rolling it out. Sanding later will reveal a beautiful, custom terrazzo pattern.
Enjoy the organized calm your new handmade phone stand brings to your space
Tea Light Holder With Easy Cutout Shapes
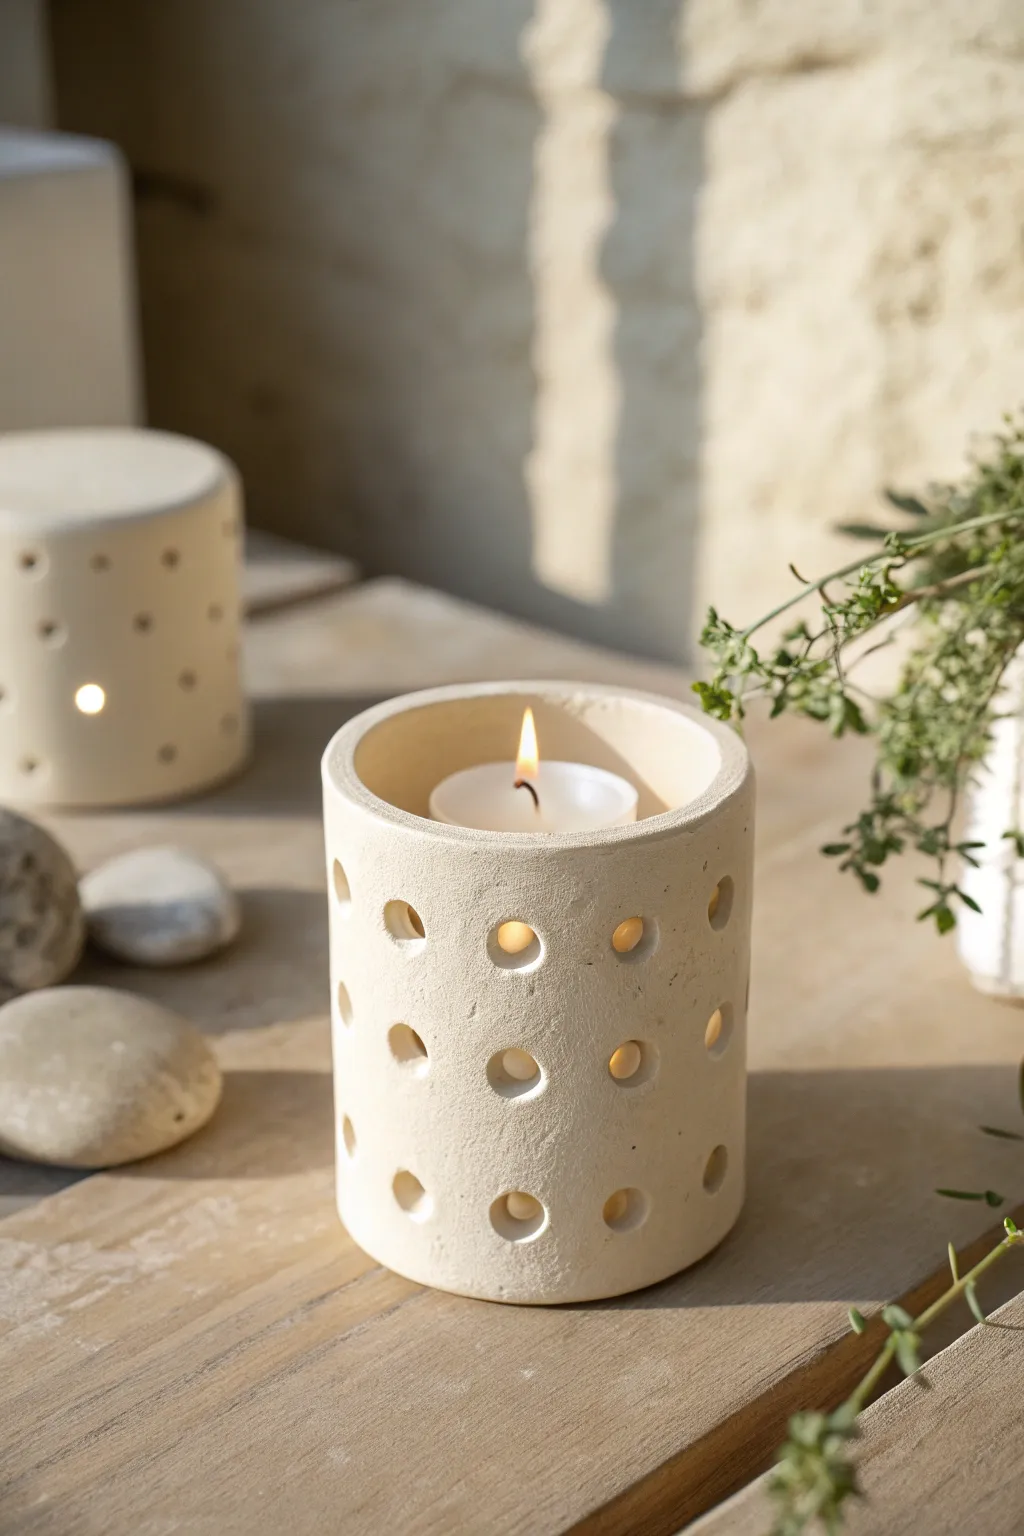
Create a warm and inviting atmosphere with this simple yet elegant cylindrical tea light holder. Using air-dry clay and a few basic tools, you can craft a piece that mimics the rustic look of limestone with charming peekaboo cutouts.
Step-by-Step Guide
Materials
- White or beige air-dry clay (approx. 500g)
- Rolling pin
- Parchment paper or canvas mat
- Ruler
- Craft knife or clay slicer
- Circular clay cutter (small, approx. 1cm diameter) or a sturdy straw
- Smooth glass jar or cylindrical can (to use as a form)
- Small bowl of water
- Sponge
- Sandpaper (fine grit)
Step 1: Preparing the Clay Slab
-
Condition the clay:
Begin by kneading your air-dry clay thoroughly to remove air bubbles and warm it up, making it distinctively more pliable. -
Roll it out:
Place the clay on your parchment paper or canvas mat. Roll it out into a long rectangular slab, aiming for an even thickness of about 5mm to 6mm. -
Measure your form:
Take the glass jar or can you intend to use as a mold. Measure its circumference and add about 1cm for the overlap seam. -
Cut the rectangle:
Using a ruler and your craft knife, trim the rolled clay into a precise rectangle that matches your measurements. Ensure the height is taller than a tea light candle, perhaps around 8-10cm.
Cracking Seams?
If the seam cracks while drying, mix a tiny bit of clay with water to make a paste (slip). Fill the crack, smooth it over, and let it dry again.
Step 2: Designing the Cutouts
-
Plan the grid:
Before lifting the clay, use your ruler to lightly mark a grid of dots where you want your holes to go. This ensures your pattern stays straight. -
Punch the holes:
Using your small circular cutter or a sturdy straw, punch out the holes at your marked points. -
Clean the edges:
If I find the punched holes have ragged edges, I gently smooth them now with a damp fingertip while the slab is still flat.
Step 3: Assembling the Cylinder
-
Wrap the form:
Wrap a piece of parchment paper around your jar or can mold first; this prevents the clay from sticking to the glass. -
Form the cylinder:
carefully lift your clay slab and wrap it around the parchment-covered mold. -
Score the seam:
Where the two ends of the clay meet, scratch cross-hatch marks into the surfaces that will touch (scoring) and add a drop of water (slipping). -
Join the ends:
Press the scored ends together firmly to create the cylinder. Smooth the seam with your fingers or a modeling tool until the join is invisible. -
Refine the shape:
Gently tap the cylinder on your work surface to ensure the bottom edge is perfectly flat.
Make it Glow
Paint the inside of the cylinder with gold or copper acrylic paint. When lit, the metallic interior will reflect the candlelight beautifully.
Step 4: Finishing Touches
-
Initial smoothing:
Dip your sponge lightly in water and run it over the entire surface to erase fingerprints and soften any sharp edges from the hole punching. -
Let it dry:
Allow the clay to dry on the mold for about 1-2 hours so it holds its shape, then carefully slide the mold out. -
Full cure:
Let the piece dry completely for 24-48 hours. Turn it upside down halfway through the process to ensure even airflow. -
Sanding:
Once fully dry and hard, use fine-grit sandpaper to buff away any remaining imperfections or rough spots for a stone-like finish.
Place a tea light inside and enjoy the soft patterns of light dancing on your table
Easy Wall Hanging With Arches and Holes for String
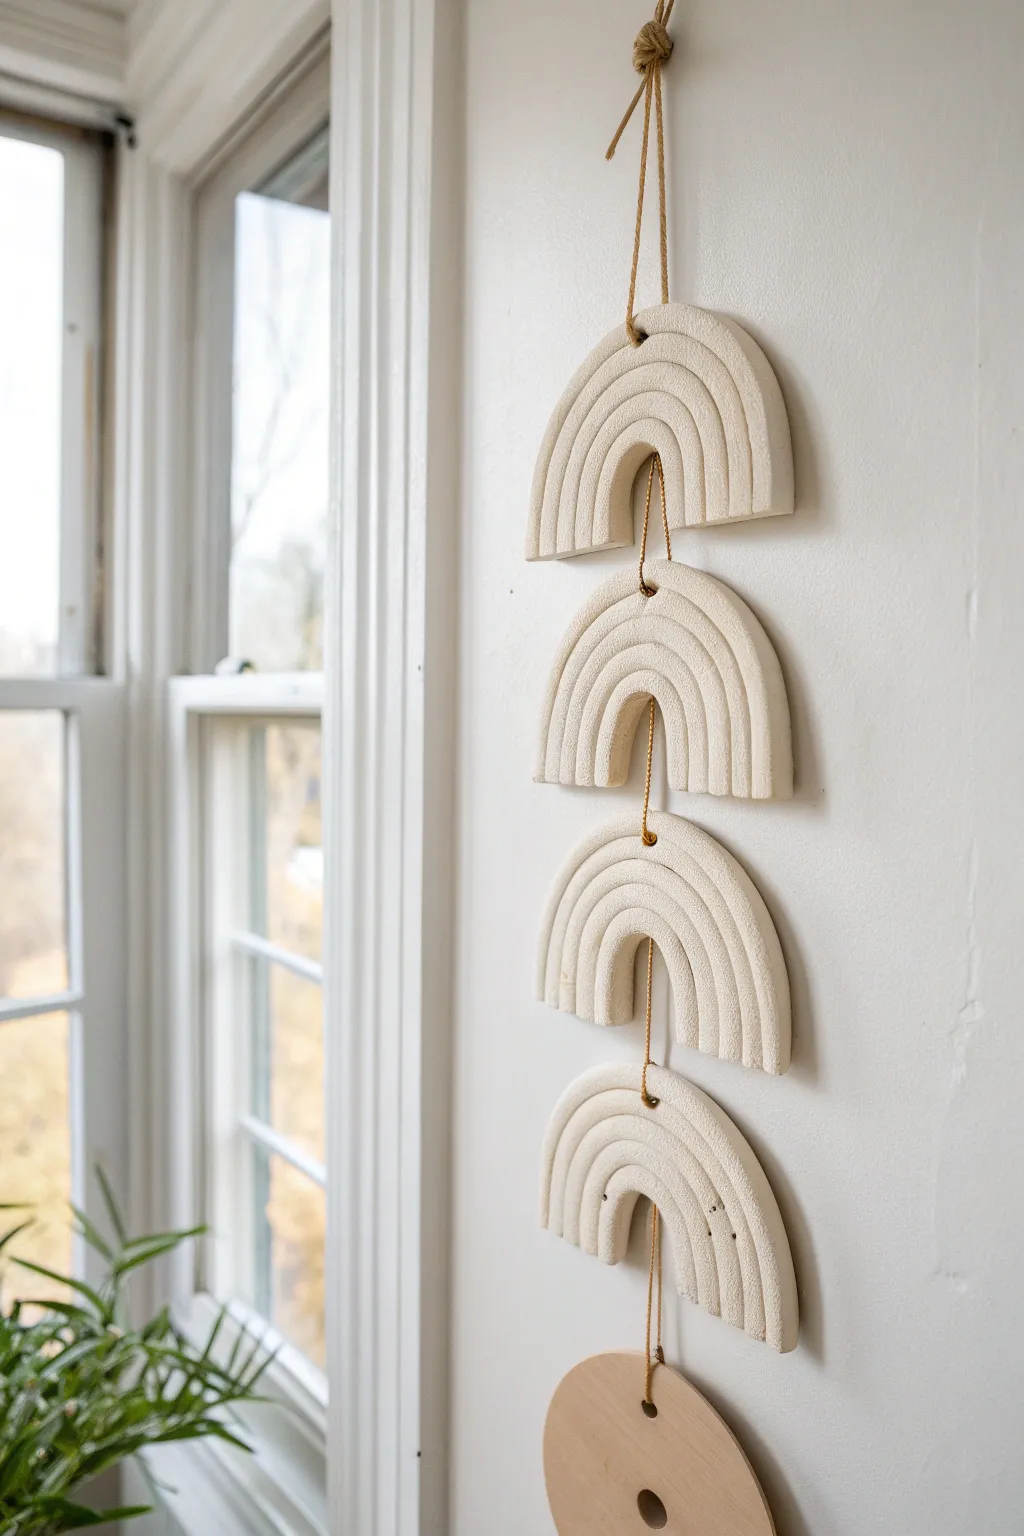
This minimalist wall hanging combines the raw, matte beauty of air-dry clay with simple geometry. The repeated arch motif creates a calming rhythm, while the textured surface adds tactile interest perfect for a modern bohemian space.
Step-by-Step Guide
Materials
- White air-dry clay (approx. 1kg)
- Rolling pin
- Parchment paper or canvas mat
- Circular cookie cutters (one large approx. 4″, one small approx. 1.5″)
- Craft knife or clay needle tool
- Sandpaper (fine grit)
- Wooden skewer or chopstick
- Jute twine or cotton cord
- Flat wooden disc (approx. 4″ diameter) with pre-drilled holes
- Ruler
- Access to water
Step 1: Creating the Clay Arches
-
Prepare your workspace:
Lay down parchment paper or a canvas mat to prevent the clay from sticking to your table. Take a substantial chunk of air-dry clay and knead it briefly until it is pliable and smooth. -
Roll out the slab:
Use your rolling pin to flatten the clay into an even slab. You want a consistent thickness of about 1/4 inch to 1/3 inch. If the slab is too thin, the arches might crack. -
Cut the base shapes:
Using your large circular cutter (or a bowl as a guide), cut out four clean circles. Remove the excess clay from around the edges so you just have the four discs. -
Create the inner arch:
Take the smaller circular cutter and position it exactly in the center of one of your large clay circles. Press down firmly to cut out the middle, creating a donut shape. Repeat for all four circles. -
Halve the rings:
Using a ruler and your craft knife, carefully cut each donut shape in half horizontally. This will give you two arches per ring. You only need four arches total for this design, but spares are always good to have. -
Add surface texture:
Before the clay dries, use a needle tool or the tip of a dull knife to score concentric curved lines across the surface of each arch. Follow the curve of the shape to mimic a rainbow pattern. -
Refine the edges:
Dip your finger in a little bit of water and smooth out any rough, jagged edges on the sides of the arches. Keep the textured face crisp, but soften the cut sides. -
Pierce holes for hanging:
Using a wooden skewer or chopstick, poke a hole vertically through the top center of each arch curve. Then, poke a hole through the bottom center of the inner curve. Ensure the holes are wide enough for your twine.
Fixing Cracks
Did a small hairline crack appear while drying? Mix a tiny amount of fresh clay with water to make a paste (slip) and fill the crack, then smooth it over.
Step 2: Drying and Assembly
-
Let it dry completely:
Place the arches on a flat surface to dry for 24-48 hours. I like to flip them over gently halfway through the drying process to ensure even airflow and prevent warping. -
Sand for a clean finish:
Once fully hard and white, use fine-grit sandpaper to buff away any remaining sharp burrs on the edges or back. Be gentle to avoid sanding off your textured lines. -
Prepare the bottom weight:
Take your flat wooden disc. If it doesn’t have holes, drill a small hole at the top and bottom edge. Ensure these holes align vertically with where the string will hang. -
Begin assembly at the top:
Cut a long length of twine (about 3 feet). Fold it in half to create a loop at the top, tying a knot to secure the loop. This is where the piece will hang from the wall. -
Thread the first arch:
Pass the loose ends of the twine down through the top hole of the first clay arch. Tie a knot underneath the top curve (hidden inside the arch) or simply let the string pass through to the bottom hole. -
Connect the arches:
Feed the twine through the bottom hole of the first arch, then into the top hole of the second arch. Leave about an inch of space between them so they dangle freely. -
Secure the spacing:
To keep the spacing consistent, you can tie small knots in the twine underneath each hole to stop the clay pieces from sliding down, or rely on friction if your twine is thick. -
Add the final wooden piece:
Continue threading all four arches. Finally, tie the string through the top hole of the wooden disc at the very bottom. This weight helps the whole piece hang straight.
Add Some Color
For a bolder look, paint the dried arches with acrylics in terracotta or sage green before stringing, or paint just the etched lines for high contrast.
Hang your new textured artwork near a window to catch the light and enjoy the handmade warmth it brings to your wall
Rainbow Coil Decor in Muted Beginner-Friendly Colors
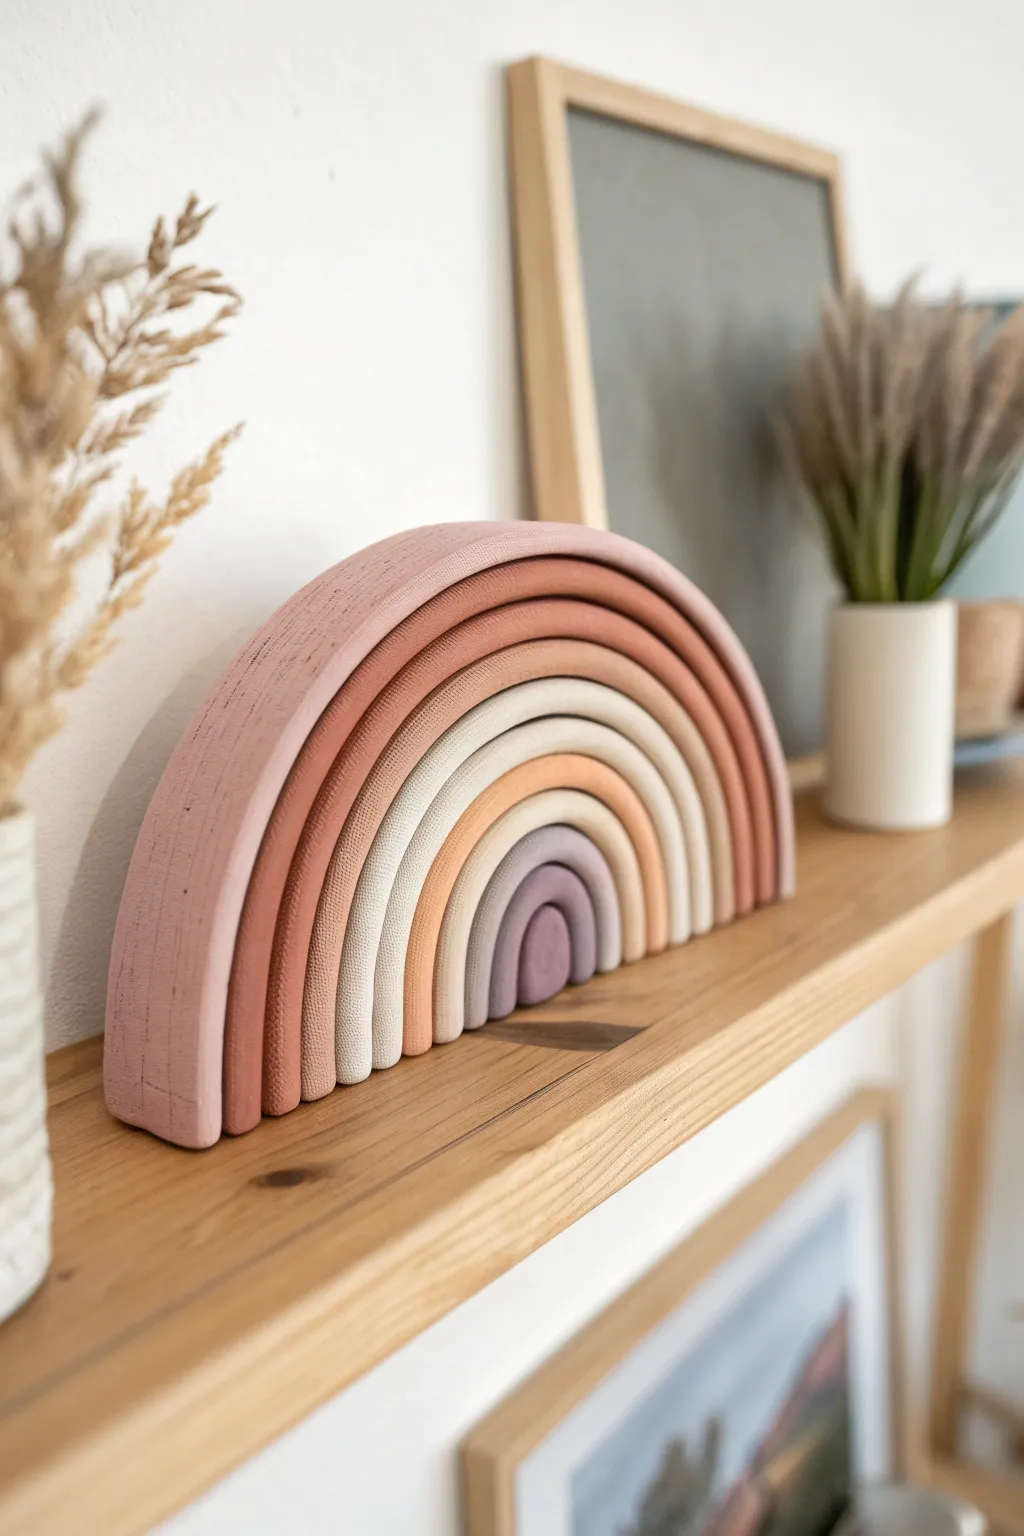
Achieve the look of expensive wooden stackers using simple air dry clay and a carefully curated palette of earthy tones. This decorative piece brings a calming, modern scandi vibe to any shelf with its gentle curves and matte finish.
Step-by-Step Tutorial
Materials
- White air dry clay (approx. 500g)
- Acrylic paints (muted pink, terra cotta, beige, cream, lavender)
- Rolling pin
- Sharp knife or clay cutting tool
- Sandpaper (fine grit)
- Ruler or measuring tape
- Small cup of water
- Matte sealant spray or varnish
- Paintbrushes (flat and detail)
Step 1: Forming the Arches
-
Condition the Clay:
Begin by taking a large chunk of air dry clay and kneading it in your hands until it feels warm, pliable, and free of cracks. -
Roll the Base Slab:
Using a rolling pin, flatten the clay on a smooth surface to an even thickness of about 1/2 inch (1.2 cm). Using guide sticks on either side can help keep the thickness consistent. -
Cut the Strips:
Use a ruler and a sharp knife to cut long, straight strips from your slab. Aim for them to be roughly 1 inch wide. Clean up any ragged edges with a damp finger. -
Form the Center Arch:
Take the shortest strip and bend it gently into a tight U-shape. This will be the smallest, innermost arch of your rainbow. -
Build Outward:
Take the next strip and drape it over the first arch to measure the length, ensuring it fits snugly. Trim off any excess length at the bottom so the feet sit flush with the first arch. -
Continue Stacking:
Repeat this process with the remaining strips, creating larger and larger arches. You should aim for about 7-8 layers to match the reference look. -
Separate for Drying:
Carefully separate the arches slightly so they aren’t touching while wet. This prevents them from fusing together. -
Initial Smoothing:
Before leaving them to dry, dip your finger in a little water and smooth out any visible cracks or fingerprints on the surface and edges.
Step 2: Finishing and Painting
-
Allow to Cure:
Let the clay pieces dry completely for 24-48 hours. Turn them over halfway through the process to ensure the undersides dry evenly. -
Sand for Texture:
Once fully dry, use fine-grit sandpaper to gently smooth the rough edges. I find sanding in a circular motion helps mimic the wood grain texture seen in the inspiration photo. -
Mix Your Palette:
Prepare your acrylic paints. The goal is an earthy spectrum: mix white into burnt sienna for terra cotta, white into purple for a dusty lavender, and keep a muted rose and cream handy. -
Paint Individual Arches:
Paint each arch a distinct color, starting from the largest (muted pink) and working inward through the terra cottas and creams to the smallest lavender arch. -
Add Texture (Optional):
To replicate the wood look further, you can use a dry brush technique with a slightly darker shade on the edges to create a faux grain effect. -
Apply Second Coat:
Let the first layer dry, then apply a second coat for opaque, solid coverage that hides the white clay underneath. -
Seal the Project:
Finish by applying a matte sealant spray. This protects the paint and gives it that velvety, high-end toy finish without making it glossy.
Cracking Up?
If small cracks appear while drying, don’t panic. Simply mix a tiny bit of fresh clay with water to make a paste (slip) and fill in the gaps, then sand smooth once dry.
Faux Wood Grain
Before the paint dries, drag a stiff-bristled brush through it in long, straight lines. This creates subtle grooves that look just like painted wood.
Arranging these distinct, soothing colors on your shelf creates an instant focal point of calm and creativity
Plant Marker Stakes for Herbs (Practical and Cute)
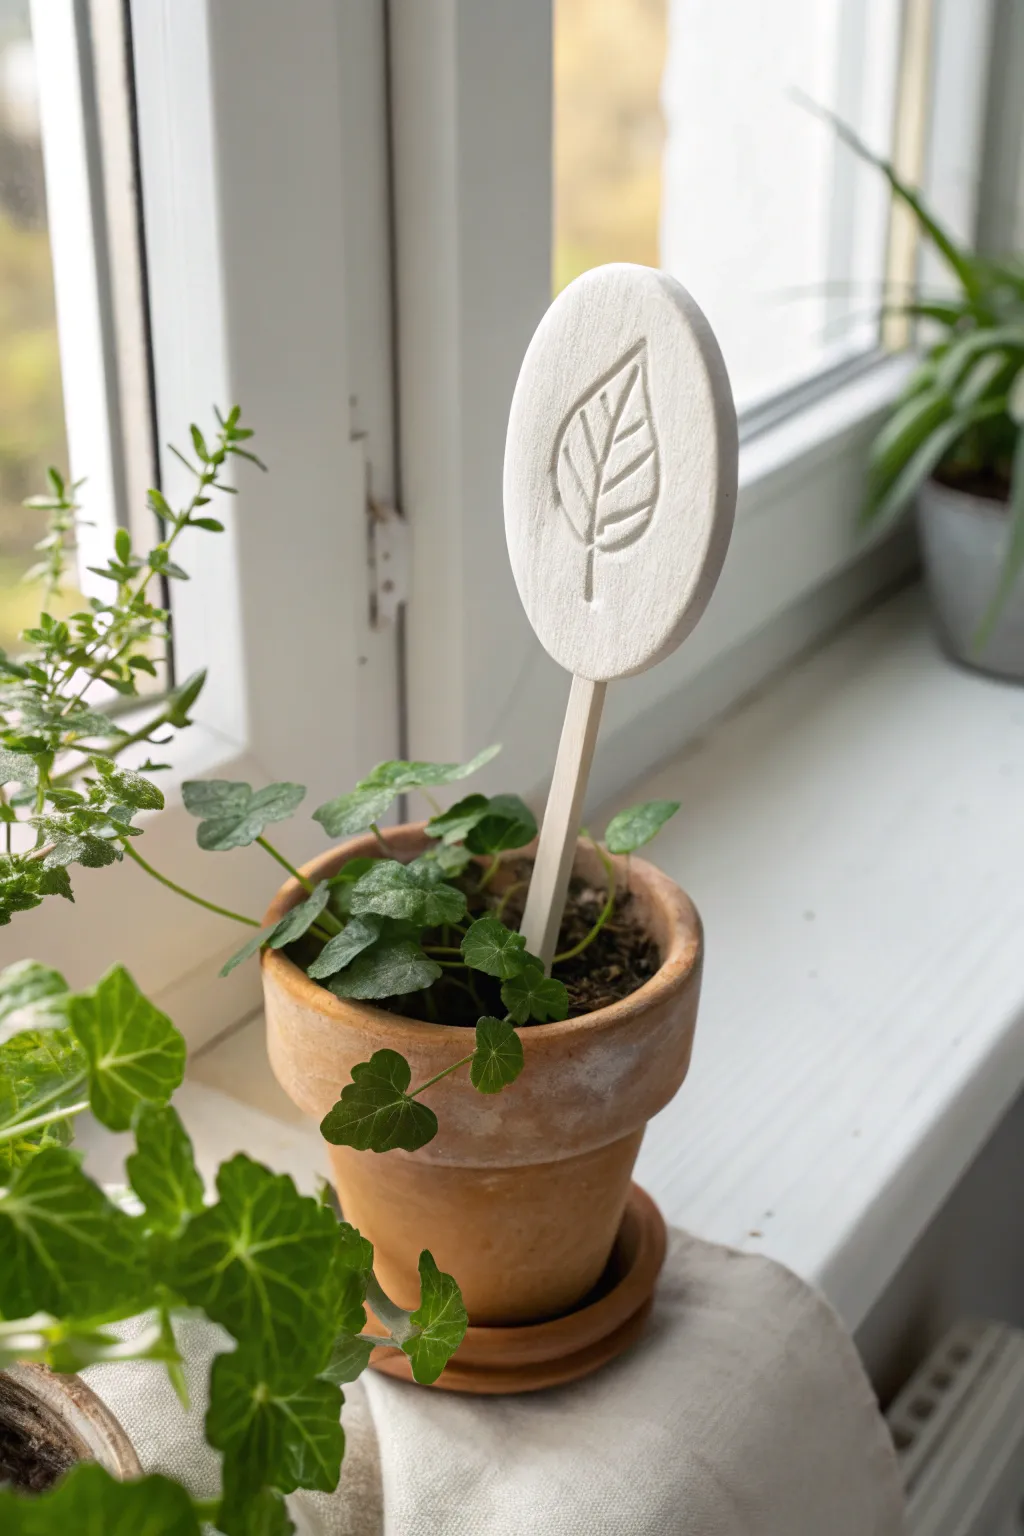
These charming, minimalist plant markers add a handmade touch to your indoor garden while keeping your herbs organized. The project features a smooth white clay oval with a simple, embossed leaf design mounted on a sturdy wooden stake.
Step-by-Step Guide
Materials
- White modeling clay (air-dry)
- Small wooden craft stick or dowel (flat style preferred)
- Rolling pin or smooth glass jar
- Oval cookie cutter (or a knife and paper template)
- Needle tool, toothpick, or empty ballpoint pen
- Small bowl of water
- Fine-grit sandpaper (optional)
- Clear acrylic sealant (matte or satin finish)
- Strong craft glue (like E6000 or wood glue)
Step 1: Shaping the Clay Base
-
Condition the clay:
Begin by taking a chunk of your air-dry clay and kneading it in your hands until it becomes soft, pliable, and free of cracks. -
Roll it out:
Place the clay on a clean, flat surface. Using a rolling pin, roll the clay out evenly until it is approximately 1/4 inch thick. Don’t go too thin, or the marker might crack later. -
Cut the shape:
Press your oval-shaped cookie cutter firmly into the clay to cut out the main tag. If you don’t have a cutter, you can trace around an oval paper template with a craft knife. -
Smooth the edges:
Dip your finger lightly into the bowl of water and run it along the cut edges of the oval to smooth down any roughness or sharp bits left by the cutter.
Step 2: Adding the Design
-
Mark the stem:
Using your needle tool or a toothpick, gently press a vertical line starting from the bottom center of the oval, reaching about halfway up, to create the leaf’s central vein. -
Draw the leaf outline:
Lightly etch a teardrop or leaf shape around that central line. You aren’t cutting through the clay, just displacing it slightly to create an embossed groove. -
Add the veins:
Press diagonal lines branching off the center stem toward the outer leaf edges. Press deep enough so the design remains visible after sealing, but be careful not to puncture the back. -
Insert the stake hole:
Take your wooden stick and carefully press it into the bottom edge of the oval to create a slot for later assembly. Do this now while the clay is wet to ensure a perfect fit. -
Remove the stick:
Gently wiggle the stick back out. We will glue it in later after the clay has fully dried to prevent the wood from swelling and cracking the clay.
Prevent Cracking
If your clay cracks while drying, you can make a ‘slip’ paste by mixing a tiny bit of clay with water and filling the crack, then sanding smooth once dry.
Step 3: Finishing and Assembly
-
Let it dry:
Place your clay oval on a flat surface or a drying rack. Allow it to air dry completely for at least 24-48 hours, flipping it occasionally to ensure even drying on both sides. -
Sand imperfections:
Once bone dry, check the edges. If there are any rough spots, use fine-grit sandpaper to gently buff them into a smooth finish. Wipe away the dust. -
Seal the clay:
To protect your marker from moisture in the soil, brush a layer of clear acrylic sealant or varnish over the entire clay piece, including the back and edges. -
Allow seal to cure:
Let the first coat of sealant dry completely. I usually add a second coat just to be safe, especially since this will live near damp soil. -
Glue the stake:
Apply a dab of strong craft glue to the tip of your wooden stick and insert it back into the slot you made earlier. -
Final cure:
Let the glue set according to the manufacturer’s instructions before placing your new marker into your favorite herb pot.
Stamp It Up
Instead of drawing a generic leaf, use small alphabet stamps to press the actual herb name (like ‘BASIL’ or ‘MINT’) into the wet clay for easy ID.
Your potted plants now have a stylish and functional accessory that helps you keep track of your greenery
Mini Tile Set for a Tiny Handmade Backsplash Moment
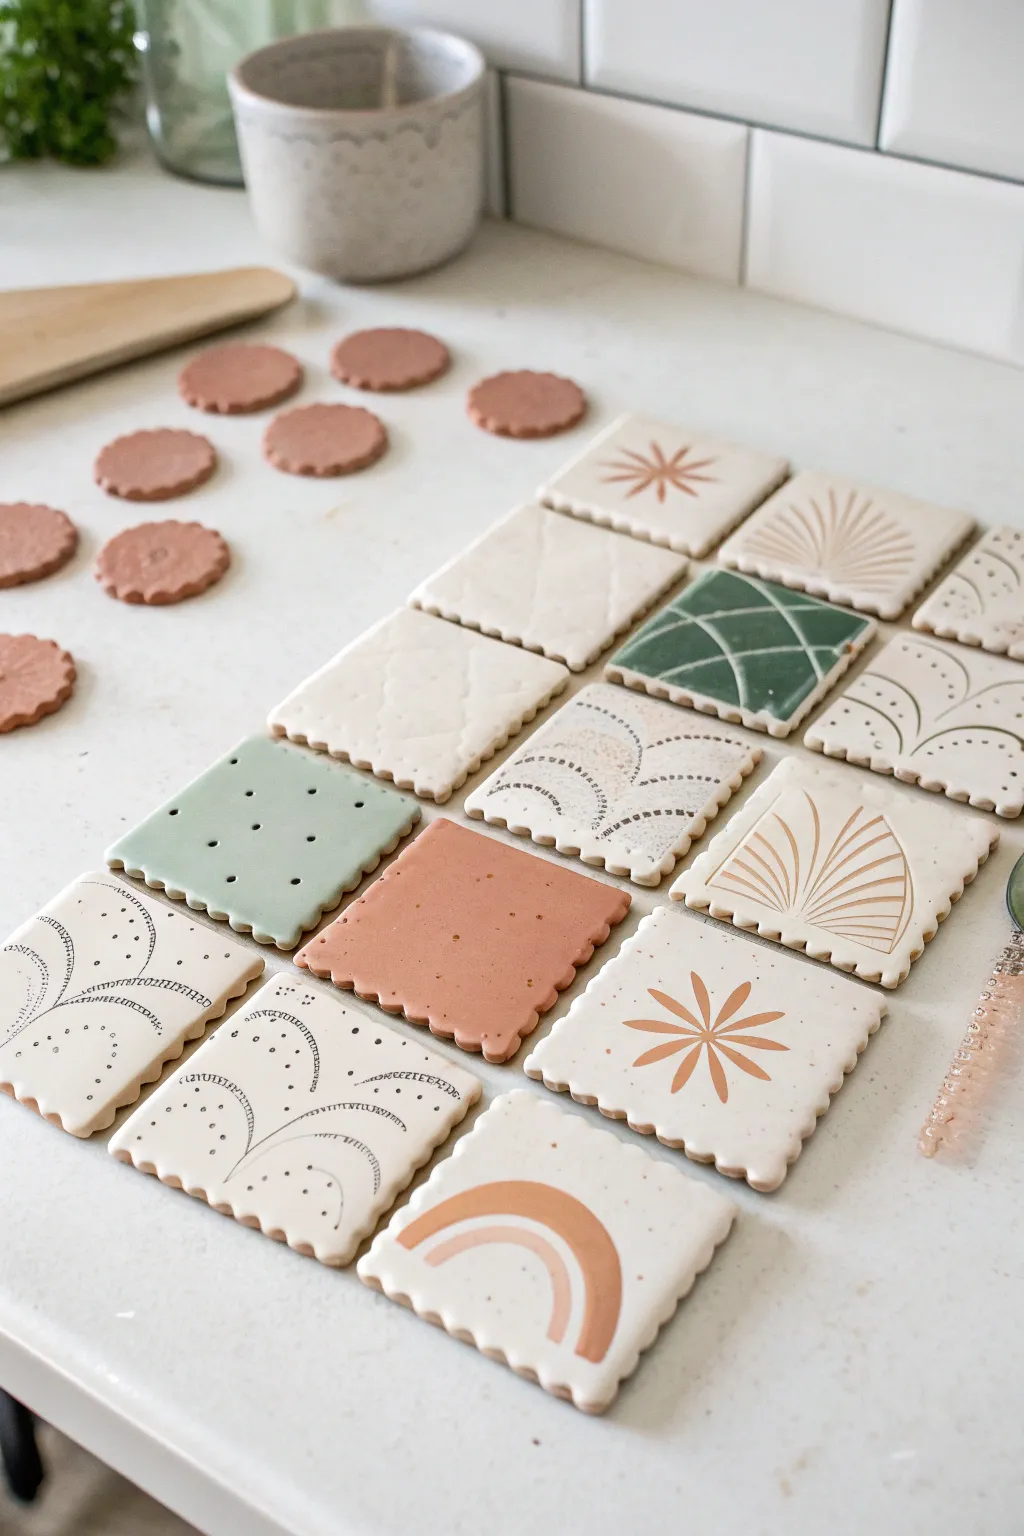
Create a charming, miniature backsplash moment with these delicate air dry clay tiles. Featuring scalloped edges and a mix of earthy terracotta and sage green tones, this project combines simple geometric painting with easy clay cutting techniques.
Detailed Instructions
Materials
- White baking soda clay or fine-grain air dry clay
- Rolling pin
- Square cookie cutter with scalloped edge (approx. 2 inches)
- Small round scalloped cutter (optional for scraps)
- Parchment paper or silicone mat
- Fine-grit sandpaper
- Acrylic paints (terracotta, sage green, cream/off-white)
- Fine detail paintbrush
- Needle tool or toothpick
- Clear matte varnish or sealant
Step 1: Shaping the Tiles
-
Roll the clay:
Begin by conditioning your white air dry clay until it is smooth and pliable. Roll it out on a piece of parchment paper to an even thickness of about 1/4 inch. I like to use guide sticks or finding two paint stirrers to place on either side of the roller to ensure the thickness is perfectly consistent across the slab. -
Cut the shapes:
Using your scalloped square cookie cutter, press firmly into the clay to create your tiles. Try to cut them as close together as possible to minimize waste. If you have extra clay, use a small round cutter to make little textured accent pieces. -
Smooth the edges:
Gently lift the cut squares away from the excess clay. Dip your finger in a tiny bit of water and run it lightly along the scalloped edges to smooth down any rough clay burrs left by the cutter. -
Dry properly:
Transfer the tiles to a flat, clean surface lined with fresh parchment paper. To prevent warping, place a lightweight board or book on top of them after an hour of drying, or flip them gently every few hours. Let them cure for 24-48 hours until completely hard and white. -
Sand for perfection:
Once fully dry, lightly sand the surfaces and edges with fine-grit sandpaper to remove any remaining bumps or fingerprints. Wipe away the dust with a barely damp cloth.
Warp Prevention
To stop tiles from curling up as they dry, dry them on a wire cooling rack so air hits both sides, or gently weigh them down with a book once they are ‘leather hard’.
Step 2: Designing and Painting
-
Base coat:
Leave most tiles in their natural white clay state for a minimalist look. For the colored tiles, paint the entire surface with an opaque layer of sage green or terracotta acrylic paint. You may need two coats for full, even coverage. -
Create the cracker look:
On the solid sage green tiles, replicate a classic cracker texture by using the back end of a small paintbrush or a toothpick to dab small dots of dark green or black paint in a grid pattern. Alternatively, you can gently press holes into the wet clay during step 2 if you prefer texture over paint. -
Paint the sunbursts:
On plain white tiles, mix a terracotta shade and use your finest detail brush to paint starburst designs. Start with a central dot and pull thin lines outward. Keep the lines delicate and varied in length. -
Add abstract arches:
For the rainbow-style tiles, paint sweeping arches in the bottom corner using terracotta paint. Make the bands thick and smooth, leaving white space in the very corner. -
Detail with fine lines:
Using a very fine black pen or black paint on a liner brush, add delicate dotted patterns. Create sweeping curves that mimic fireworks or floral stamens. Stippling—creating images using small dots—adds a lovely texture here without needing complex brushwork. -
Add geometric fans:
On other white tiles, use a thin brush dipped in light tan or gold to draw fan shapes or corner geometric lines. Keep your hand steady and rest your wrist on the table for better control. -
Paint the grid:
For the green geometric tile, paint the base dark green first. Once dry, use a white paint pen or fine brush to draw intersecting white curved lines across the surface. -
Seal the work:
Once all paint designs are completely dry, apply a thin coat of matte varnish. This seals the porous clay and protects your beautiful hand-painted designs from moisture and dust.
Make Them Magnetic
Glue strong ceramic magnets to the back of your finished tiles to turn this art project into a functional set of magnets for your refrigerator or inspiration board.
Arranging these little tiles creates a satisfying mosaic that feels both modern and handmade