
If you’ve got a kid who loves monsters, dinos, robots, and anything that can zoom, stomp, or explode (in imagination), air dry clay is basically the perfect playground. I pulled together my go-to air dry clay ideas for boys that feel fun and “cool,” but are still totally doable at the kitchen table.
Goofy One-Eyed Clay Monsters
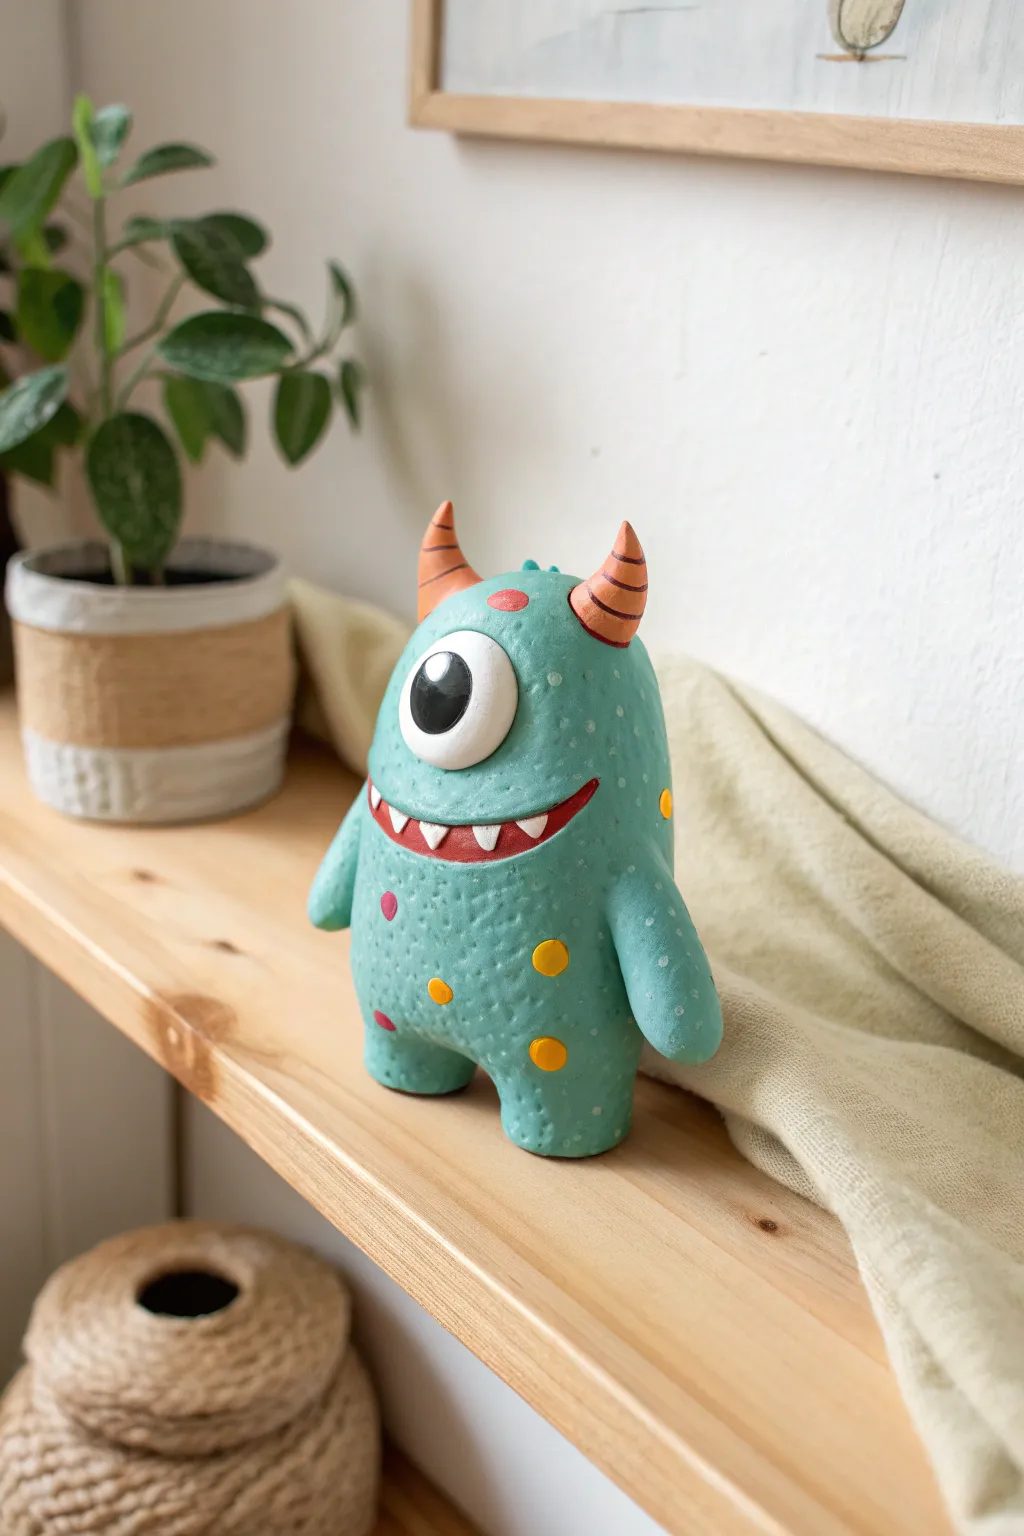
This charming, one-eyed monster makes a fantastic desk buddy or shelf decoration with its textured turquoise skin and playful grin. Standing sturdy on two legs with colorful polka dots, this project is perfect for practicing shaping basic forms and adding fun details.
How-To Guide
Materials
- Air dry clay (white)
- Acrylic paints (turquoise/teal, orange, yellow, white, black, red)
- Clay sculpting tools (needle tool, ball stylus)
- Aluminum foil
- Water cup and sponge
- Paintbrushes (small detail brush and medium flat brush)
- Clear matte varnish or sealant
- Toothpick or stiff wire (for support)
Step 1: Forming the Body Structure
-
Create the core:
Crumple a piece of aluminum foil into a vague pear shape, about 4-5 inches tall. This saves clay and helps the monster dry evenly. -
Cover the armature:
Roll out a slab of white air dry clay to about 1/4 inch thick. Wrap this entirely around your foil core, smoothing the seams together with a bit of water until you have a seamless, pill-shaped body. -
Shape the legs:
Pinch and pull the clay at the bottom of the shape to form two distinct, stubby legs. Tap the feet firmly on your table to create a flat standing surface so your monster doesn’t tip over. -
Add the arms:
Roll two shorter snake-like coils of clay. Attach one to each side of the body, blending the clay smoothly at the shoulder area so it looks like one solid piece. Curve them slightly forward.
Cracking Clay?
If small cracks appear while drying, don’t panic. Mix a tiny bit of fresh clay with water to make a paste (slip) and fill the cracks, then smooth over.
Step 2: Sculpting the Face
-
Make the eye socket:
Press a thumb gently into the upper center of the face to create a shallow indentation where the large eye will sit. -
Form the eyeball:
Roll a perfect sphere of clay that fits into your indentation. I find it helps to score the back of the eye and the socket with a needle tool, add a dab of water, and then press it in firmly. -
Add the eyelid:
Roll a very thin coil of clay and flatten it. Place this over the top half of the eye sphere to create a heavy eyelid, blending the top edge into the forehead. -
carve the mouth:
Use a sculpting tool to carve a wide, curved smile below the eye. Press deeply to create an open mouth cavity. -
Insert teeth:
Roll tiny, rice-sized cones of clay. Place these pointed-down along the top ridge of the mouth and pointed-up along the bottom ridge. Smooth them carefully into the gums.
Step 3: Horns and Texture
-
Attach the horns:
Shape two medium-sized cones for horns. Score and slip them onto the top of the head, positioning them slightly asymmetrical for a quirky look. -
Add texture:
Using a needle tool or a stiff-bristle toothbrush, gently stipple the entire surface of the monster’s skin (avoiding the eye, teeth, and horns) to create a bumpy, organic texture. -
Dry completely:
Let the sculpture sit in a dry, ventilated area for 24-48 hours. It should be fully hard and white before you start painting.
Texture Trick
Make the skin texture even cooler by pressing a piece of rough sandpaper or a textured citrus peel gently against the damp clay body.
Step 4: Painting the Monster
-
Base coat:
Paint the entire body (skin areas only) with a solid coat of turquoise or teal acrylic paint. You may need two coats for full coverage. -
Detail the eye:
Paint the eyeball pure white. Once dry, add a large black circle in the center, and a tiny white dot reflection in the corner to bring it to life. -
Paint the smile:
Fill the inside of the mouth with a dark red or maroon. Carefully paint the teeth white. -
Decorate the horns:
Paint the horns a bright orange. Once the orange is dry, use a fine brush to paint thin, dark brown horizontal stripes wrapping around them. -
Add polka dots:
Using the back of a paintbrush handle or a dotting tool, stamp yellow and pink dots randomly across the monster’s belly and sides. -
Finish with highlights:
Mix a tiny bit of white into your teal paint and dry-brush it lightly over the textured skin to catch the bumps. -
Seal it:
Protect your paint job with a coat of matte varnish.
Place your goofy creation on a bookshelf to keep an eye on things


Mini Dinosaur Figures From Simple Shapes
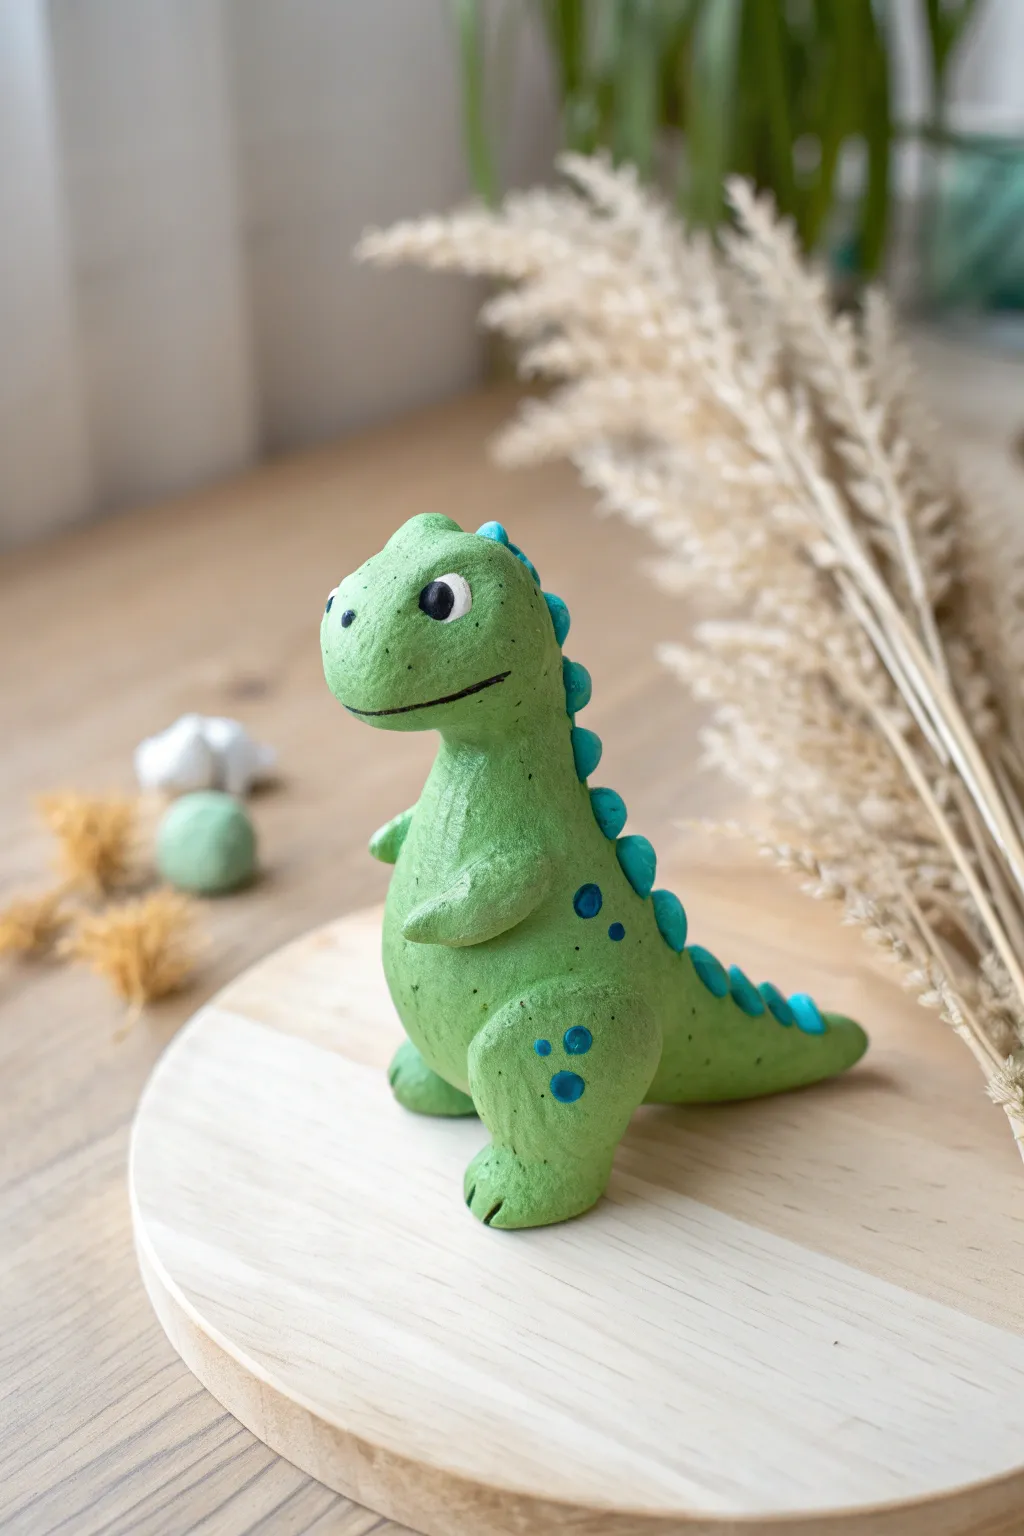
This charming, upright dinosaur figure brings a touch of Jurassic fun to your shelf with its friendly expression and vibrant teal spikes. Using basic shapes like spheres and cones, you’ll sculpt a sturdy character that feels approachable for beginners yet satisfyingly detailed.
Step-by-Step Guide
Materials
- Air dry clay (white or pre-colored green)
- Acrylic paint (bright green, teal, black, white)
- Sculpting tools (needle tool, small ball tool)
- Cup of water and paintbrush
- Toothpicks (for structural support)
- Palette for mixing paint
- Fine-grit sandpaper (optional)
Step 1: Forming the Body and Head
-
Shape the torso:
Start with a generous lump of clay and roll it into a large teardrop shape. Flatten the bottom slightly so it stands upright securely. This will serve as the dinosaur’s main body and tummy. -
Create the head structure:
Roll a second, slightly smaller ball of clay for the head. Gently elongate the front to act as the snout, giving it a slight boxy curve rather than a sharp point. -
Connect the pieces:
Insert a toothpick halfway into the top of the body teardrop, then push the head onto the exposed toothpick. This internal support is crucial for keeping the head upright as the heavy clay dries. -
Blend the neck:
Use a little water on your finger or a smoothing tool to blend the clay where the head meets the body. You want a seamless transition at the neck, smoothing out any cracks.
Cracks happen!
If small cracks appear while drying, mix a tiny bit of fresh clay with water to make a paste (slip). Paint this into the cracks and smooth over.
Step 2: Adding Limbs and Tail
-
Attach the sturdy legs:
Roll two medium-sized balls for the legs. Press them firmly onto the lower sides of the body. Shape them so they bulge out like powerful thighs, blending the seams gently into the torso. -
Define the feet:
At the base of those leg mounds, pinch the clay slightly to form flat feet. Use a knife or needle tool to press three small indentations into the front of each foot to create toes. -
Extend the tail:
Roll a thick cone of clay and attach it to the lower back of the body. Curve it slightly to the side or let it rest on the ground behind the feet to act as a third balance point. -
Add the tiny arms:
Create two small noodle shapes for the arms. Attach them high on the chest, curving them slightly inward. Since T-Rex arms are small, keep these quite petite compared to the legs.
Add a habitat
Make a flat, disc-shaped base out of marbled clay to glue your dino onto. It adds stability and makes the figure look like a museum display piece.
Step 3: Sculpting Details
-
Make the spine spikes:
Roll many tiny balls of clay. Starting from the top of the head and working down to the tail tip, attach these balls in a row down the center of the back. Pinch each one slightly to form a triangular spike. -
Carve the face:
Use a sculpting tool to carve a wide, horizontal line for the mouth. Use the ball end of a tool to press two small sockets where the eyes will go, and poke two tiny nostril holes at the end of the snout. -
Texture the skin:
For a realistic touch, I like to gently tap the entire surface of the green skin with a clean toothbrush or stiff brush. This creates a leathery skin texture rather than a perfectly smooth finish. -
Final drying phase:
Let the sculpture dry completely for at least 24-48 hours. Keep it away from direct heat sources to prevent cracking.
Step 4: Painting and Finishing
-
Base coat:
Paint the entire body (except the spikes) with a grassy green acrylic paint. You may need two coats for full opacity. -
Paint the accents:
Paint the triangular spikes down the back in a bright teal or aqua blue. Use this same teal color to paint a few decorative spots on the thighs and the side of the body. -
Detail the eyes:
Fill the eye sockets with white paint. Once dry, add a large black pupil in the center. Add a tiny white dot in the corner of the black pupil to create a ‘sparkle’ of life. -
Highlight the smile:
Using a very fine brush or a black fine-liner pen, trace the indented mouth line to make the smile pop.
Now you have a sturdy prehistoric friend ready to guard your desk.


Alien Heads With Antennas and Eyes
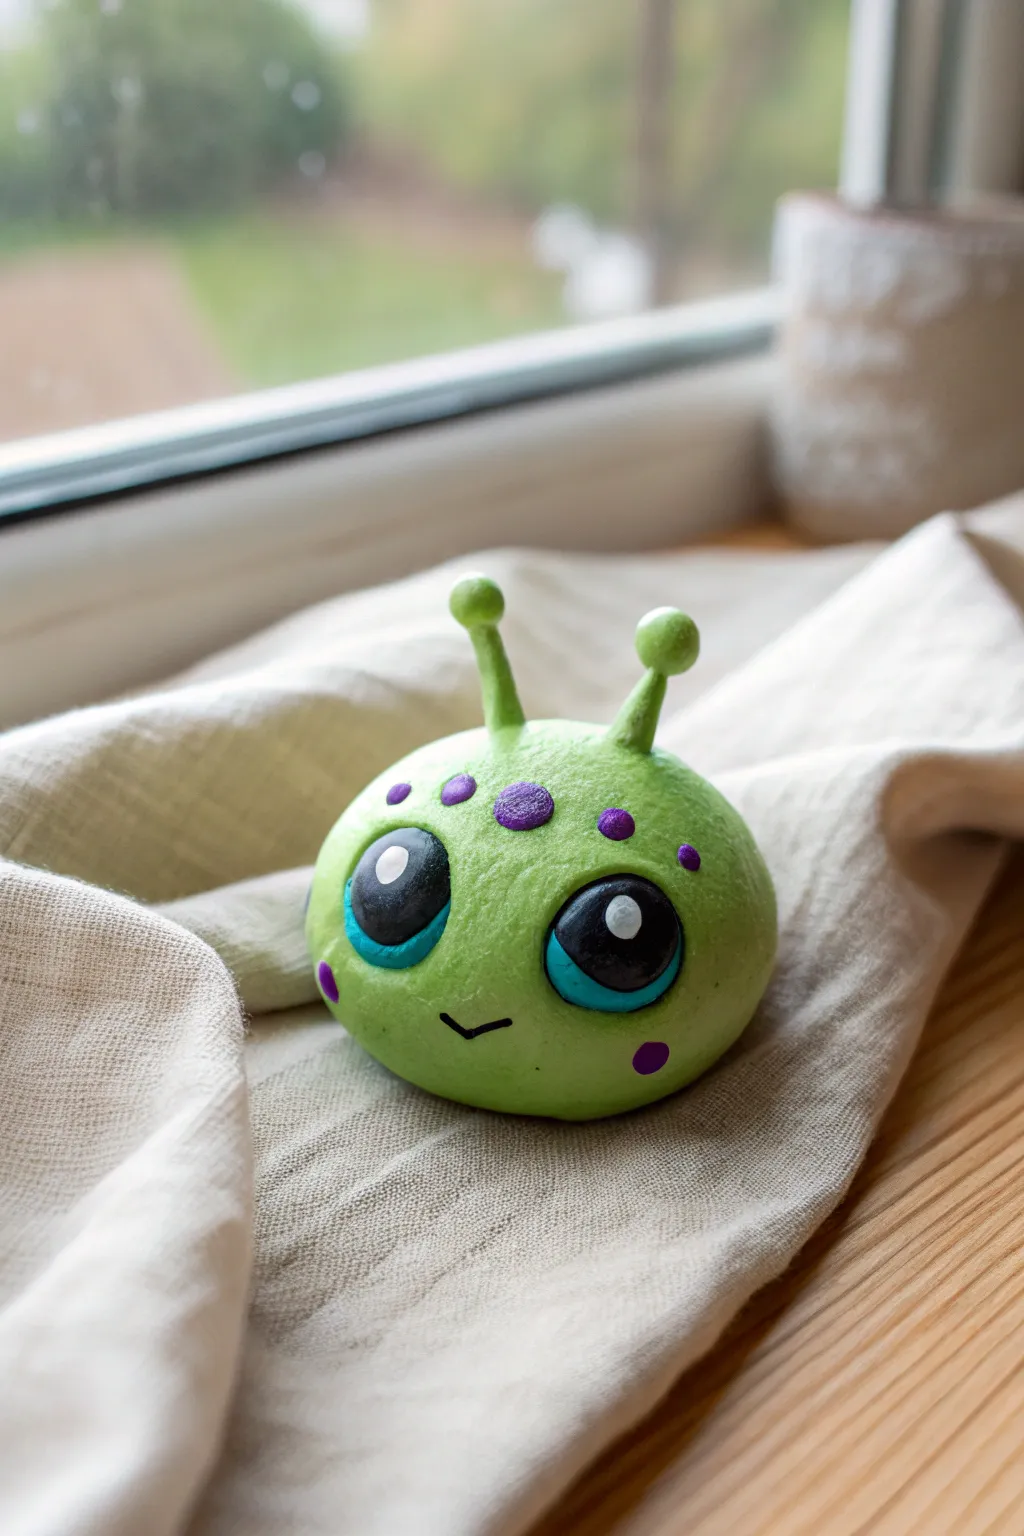
This quirky little alien pal is a simple shape that packs a huge punch of personality. By starting with a basic sphere, you’ll sculpt cute antennae and paint vibrant details to create a friendly extraterrestrial visitor.
Step-by-Step
Materials
- Air dry clay (white or pre-colored green)
- Acrylic paints (lime green, purple, black, white, cyan/light blue)
- Small paintbrushes (fine tip and flat)
- Toothpicks or short wire pieces (for armature)
- Gloss varnish or clear nail polish
- Water and smoothing tool
- Fine-grit sandpaper (optional)
Step 1: Sculpting the Alien
-
Form the Base:
Start with a chunk of clay about the size of a tangerine. Roll it firmly between your palms until you have a smooth, spherical ball. Gently tap the bottom on your table to flatten it slightly so it sits without rolling away. -
Shape the Head:
While the clay is still pliable, use your thumbs to gently press the sides if you want a slight oval shape, or keep it perfectly round for a ‘blob’ style creature. -
Prepare Antennae Supports:
Cut two small pieces of toothpick or wire (about 1 inch long). Insert them into the top of the head about an inch apart, leaving half of the length sticking out. This internal structure keeps the antennae from drooping. -
Sculpt Antennae Stalks:
Roll two small, thin logs of clay. Slide these over the exposed toothpick supports and blend the clay at the base onto the head so there are no seams. -
Add Antennae Tips:
Roll two tiny balls of clay. Place one on the very tip of each antenna stalk. I like to use a tiny bit of water here as ‘glue’ to ensure they bond securely. -
Smooth Everything Out:
Dip your finger in a little water and gently rub the entire surface of the alien to remove fingerprints or cracks. Let the sculpture dry completely, usually for 24-48 hours depending on humidity.
Step 2: Painting the Details
-
Base Coat:
Once dry, paint the entire figure with a bright lime green acrylic. You may need two coats for full opacity, letting the first layer dry before adding the second. -
Outline the Eyes:
Visualize two large, slanted oval shapes for the eyes. Use a fine brush to lightly outline where these will go, ensuring they are symmetrical. -
Fill in the Eyes:
Paint the inside of your eye outlines solid black. This forms the main pupil area. -
Add Eye Color:
Paint a thin crescent shape along the bottom curve of the black eye using cyan or light blue paint. This gives the eye depth and a ‘glassy’ cartoon look. -
Create the Highlights:
Dip the back end of a paintbrush handle into white paint and dot it onto the upper right part of the black pupil to create a ‘reflection’. This really brings the character to life. -
Paint the Spots:
Using purple paint, add several small dots to the forehead area between the eyes and the antennae. Vary the sizes slightly for a natural, organic pattern. -
Add Cheek Details:
Paint a small purple dot on each cheek, just below the outer corners of the eyes. -
Draw the Mouth:
With your finest brush or a black paint pen, draw a small, simple ‘V’ shape or wide ‘U’ between the eyes to give your alien a sweet smile. -
Final Seal:
Once all paint is totally dry, apply a coat of gloss varnish to the eyes to make them look wet and shiny, or coat the whole figure for durability.
Cracked Clay?
If cracks appear while drying, don’t panic. Mix a tiny bit of fresh clay with water to make a paste (slip) and fill in the cracks, then sand smooth once dry.
Make it Glow
Swap the lime green paint for glow-in-the-dark acrylic paint. Charge it under a lamp, and your alien will serve as a spooky nightlight buddy.
Set your finished alien on a windowsill or desk to keep watch over your room


Race Car Keychains With Number Plates
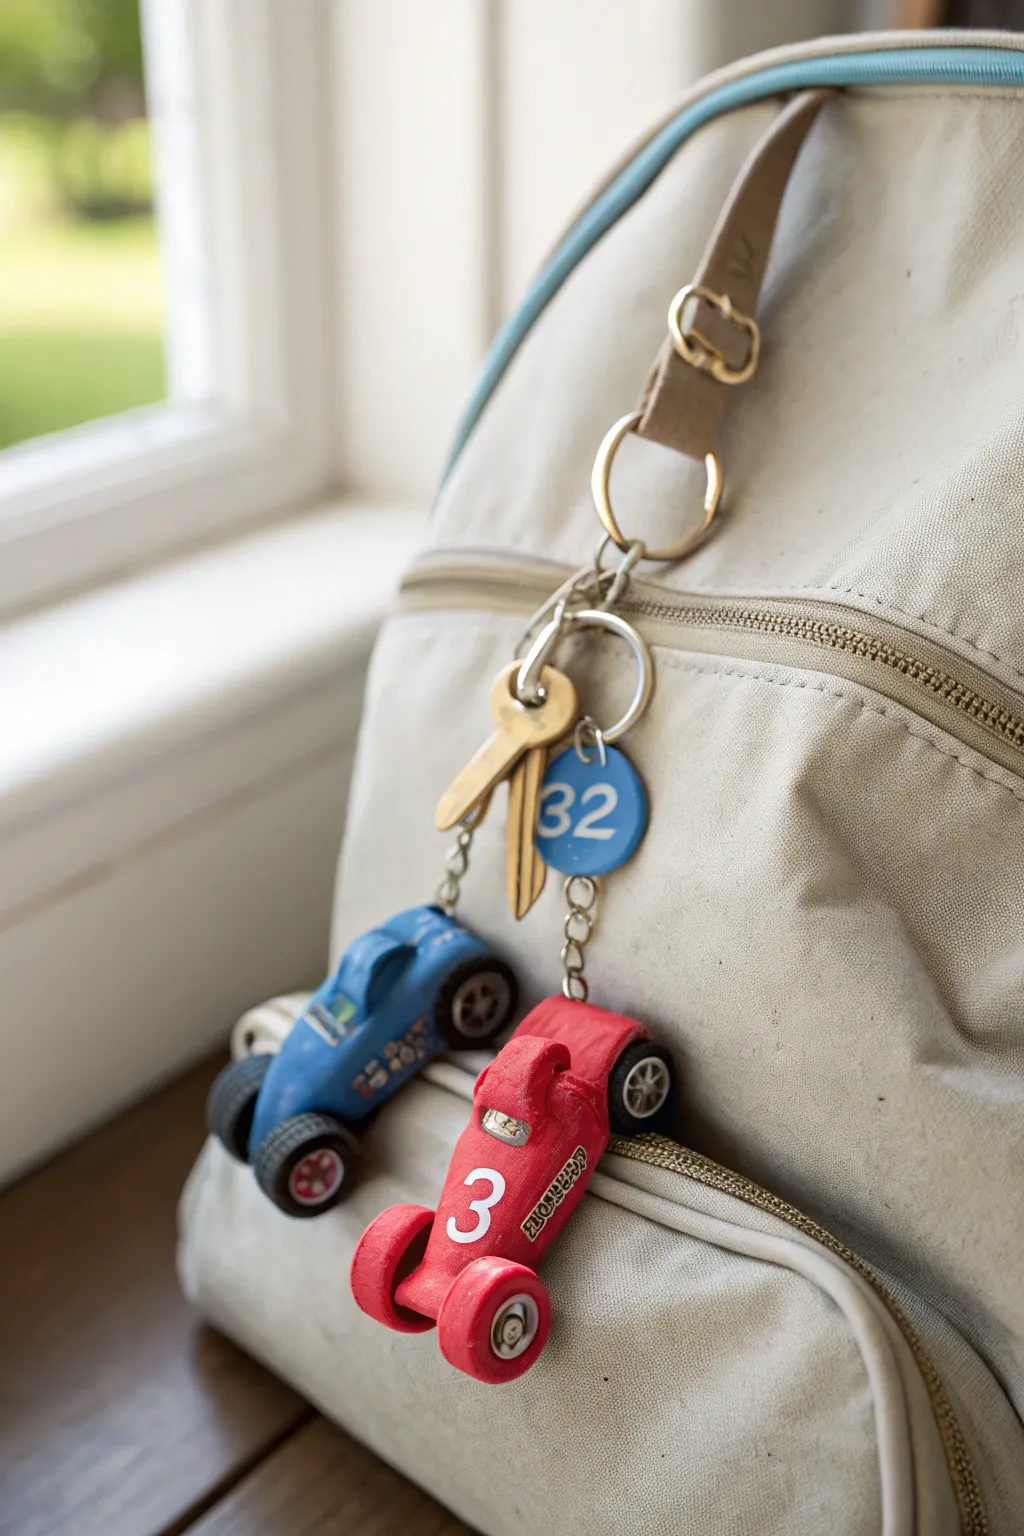
Rev up your backpack customization with these charming, vintage-style race car keychains made from simple air dry clay. This project combines sculpting tiny vehicles with personalized number plates for a sporty accessory that’s totally unique.
Step-by-Step Guide
Materials
- White air dry clay
- Acrylic paints (red, blue, white, black, silver)
- Small eye screws (approx. 10mm)
- Keychain rings and jump rings
- Sculpting tools or toothpicks
- Fine grit sandpaper
- Detail paintbrushes
- Gloss varnish or clear sealant
- Pliers
- Circle cutter or small bottle cap
Step 1: Sculpting the Body
-
Shape the chassis:
Start with a walnut-sized ball of clay. Roll it into a smooth log shape, slightly tapered at the front for an aerodynamic look. -
Form the cockpit:
Press a small indentation into the top center of the log where the driver would sit. Gently pinch up a small ridge behind this indentation to create a headrest or seat back. -
Create the nose:
Flatten the front nose of the car slightly so it slopes downward. You can use your thumb to smooth the transition from the cockpit to the nose. -
Make the axles:
Roll a very thin snake of clay. Cut two small pieces slightly wider than the car body to serve as the front and rear axles, though we will attach wheels directly to the body for sturdiness.
Loose Eye Screws?
If the eye screw feels loose after the clay dries, unscrew it, add a drop of super glue to the threads, and screw it back into the same hole for a permanent hold.
Step 2: Adding Wheels & Details
-
Sculpt the wheels:
Roll four pea-sized balls of clay. Flatten each slightly to form thick disks. These will be your tires. -
Attach the wheels:
Score surface of the clay on the sides of the car body and the back of the wheels. Apply a dab of water or clay slip, then press the wheels firmly onto the four corners of the chassis. -
Add the spoiler:
Fashion a small rectangular slab for the rear spoiler if desired, or keep it sleek without one. For the red car style, simply ensure the rear body is robust and rounded. -
Make the number plate:
Roll out a small slab of clay about 1/4 inch thick. Use a small circle cutter or bottle cap to punch out a perfect circle. -
Insert hardware:
While the clay is still wet, carefully screw a small eye screw into the back bumper of the car and into the top of the circular number plate. Ensure they are inserted deep enough to be secure. -
Dry completely:
Set all pieces aside in a safe, dry place. Let them air dry for at least 24-48 hours until they are hard and white.
Make It Vintage
Mix a tiny drop of brown paint into your gloss varnish to give the finished cars a slightly antiqued, oily garage look, perfect for that classic retro racer vibe.
Step 3: Painting & Assembly
-
Sand imperfections:
Once fully dry, lightly gently sand any rough fingerprints or jagged edges with fine grit sandpaper to get a smooth, metallic-ready finish. -
Base coat:
Paint the entire body of one car red and the other blue. Paint the number plate circle a solid blue. Let the base coats dry completely before adding details. -
Detail the tires:
Carefully paint the tires black. Once the black is dry, use a tiny dot of silver paint in the center of each wheel for the hubcaps. -
Paint numbers:
Using your smallest brush and white paint, carefully hand-paint a large number on the hood of the car and the matching number on the circular plate. I find a toothpick works great for these tiny lines. -
Add accents:
Add extra racing stripes or sponsor logos on the side using white or silver paint. Don’t forget to paint a small silver windshield area if you like. -
Seal the work:
Apply a coat of gloss varnish to the cars and the number plate. This gives them that shiny ‘new car’ look and protects the paint from chipping. -
Assemble keychain:
Use pliers to open a jump ring. Loop it through the eye screw on the car, then attach it to the main keychain ring. Repeat for the number plate.
Clip these little speedsters onto your bag and you’re ready to hit the road in style

The Complete Guide to Pottery Troubleshooting
Uncover the most common ceramic mistakes—from cracking clay to failed glazes—and learn how to fix them fast.
Outer Space Planets and Rocket Decor
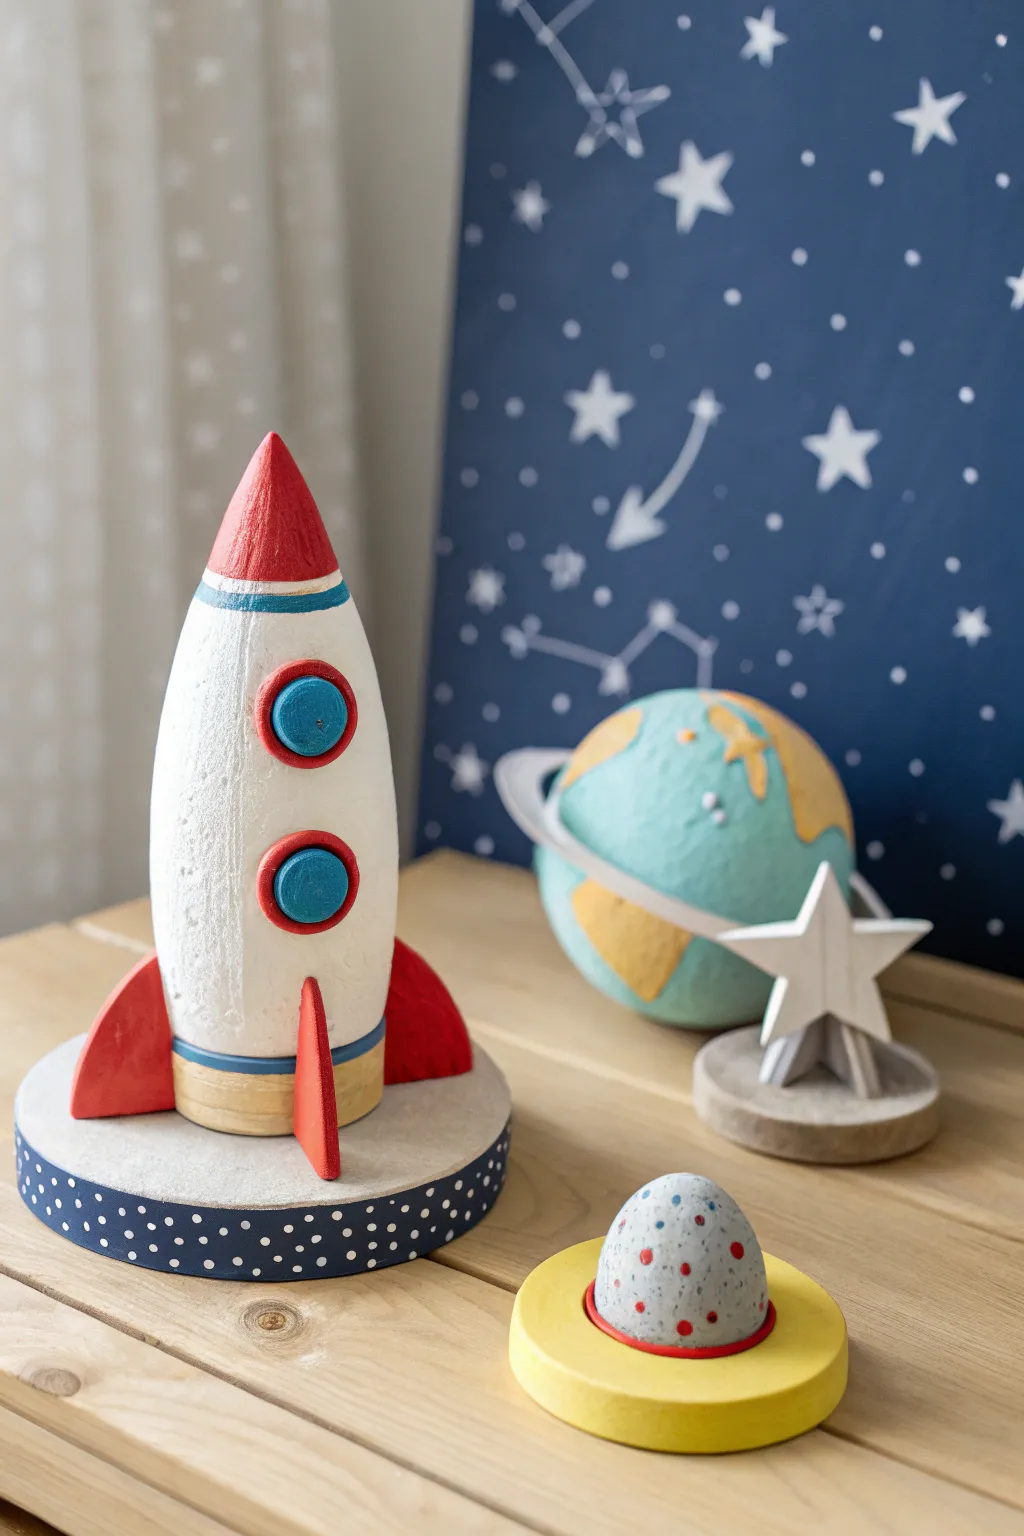
Transform simple air dry clay into an interstellar adventure with this charming rocket ship, textured planet, and accompanying space decor. The finished set features a delightful handmade texture and crisp acrylic painting that makes it perfect for a shelf display or themed bedroom.
Step-by-Step Tutorial
Materials
- White air dry clay (approx. 1kg)
- Wooden dowel or rolling pin
- Aluminum foil (for armature)
- Set of acrylic paints (red, white, light blue, dark blue, yellow, grey)
- Paintbrushes (flat shader and fine liner)
- Sanding block or fine sandpaper
- Modeling tools or a dull knife
- Water cup
Step 1: Sculpting the Rocket
-
Prepare the core:
To keep the rocket lightweight and save clay, crumple a piece of aluminum foil into a tall, tapered cone shape about 5-6 inches high. This acts as your sturdy armature. -
Cover with clay:
Roll out a slab of white air dry clay to about 1/4 inch thickness. Wrap this smoothly around your foil cone, sealing the seams by smoothing them with a wet finger. -
Shape the nose cone:
Gently pinch and smooth the top of the clay to form a distinct, pointed nose cone. Ensure the surface is even, blending any lumps downwards. -
Add windows:
Roll two small balls of clay, flatten them slightly, and press them firmly onto the front of the rocket body. Use a small dab of water as ‘glue’ to ensure they stick, then gently press a smaller circle into the center of each to create the window frame effect. -
Create the fins:
Roll out a thicker slab of clay and cut out three matching triangular fin shapes. Attach these to the base of the rocket at equal intervals, blending the clay edges into the main body for a seamless join. -
Make the base:
I prefer to make a dedicated base for stability. Cut a large circle from rolled clay thick enough to support the rocket (about 1/2 inch). Let all rocket components dry for at least 24-48 hours.
Step 2: Creating the Celestial Bodies
-
Form the planet:
Create a foil ball armature about the size of a tennis ball. Cover it with an even layer of clay, but purposely leave the surface slightly textured or pitted to mimic a planet’s terrain. -
Add the planetary ring:
Roll a long, thin snake of clay and flatten it into a ribbon. Wrap this around the planet at an angle to create the ring, pressing it gently into the surface to bond. -
Sculpt the star:
Cut a five-pointed star shape from flattened clay. Create a smaller circular base and cut a groove in the center of the base that perfectly fits the star’s bottom point, allowing it to stand upright once glued. -
Mold the lunar lander:
Form a small egg-shaped dome for the lander pod. Create a flat, circular disc for it to sit on, adding a slightly raised rim to the disc to cradle the pod.
Crack Control
If small cracks appear as the clay dries, mix a tiny bit of fresh clay with water to make a ‘slip’ paste. Fill the cracks, smooth it over, and let it dry again.
Step 3: Painting and Assembly
-
Smooth the surfaces:
Once everything is bone dry, lightly sand any rough edges, especially on the rocket fins and star points. Wipe away the dust with a barely damp cloth. -
Base coat the rocket:
Paint the main body of the rocket white. You may need two thin coats to get a solid, opaque coverage over the clay. -
Painting details:
Use bright red for the nose cone and fins. For the windows, paint the outer ring red and the inner circle deep blue. Add thin horizontal accent stripes in blue near the nose and base. -
Decorate the base:
Paint the circular rocket base a deep navy blue mostly on the sides. While the paint is wet or after drying, add small white dots to simulate stars. -
Color the planet and friends:
Paint the planet light blue with yellow continents to resemble Earth, and paint the ring white. The star gets a coat of white, and the small lander pod looks great with a grey textured speckle pattern and red dots. -
Final assembly:
Use a strong craft glue or hot glue to permanently attach the rocket to its starry base and the star into its stand.
Galaxy Textures
For the grey lunar lander pod, dip an old toothbrush in grey paint and use your thumb to flick the bristles, splattering tiny dark speckles for a realistic stone effect.
Arrange your fleet on the shelf and enjoy your custom space exploration scene
Knight Shields and Swords for Pretend Play
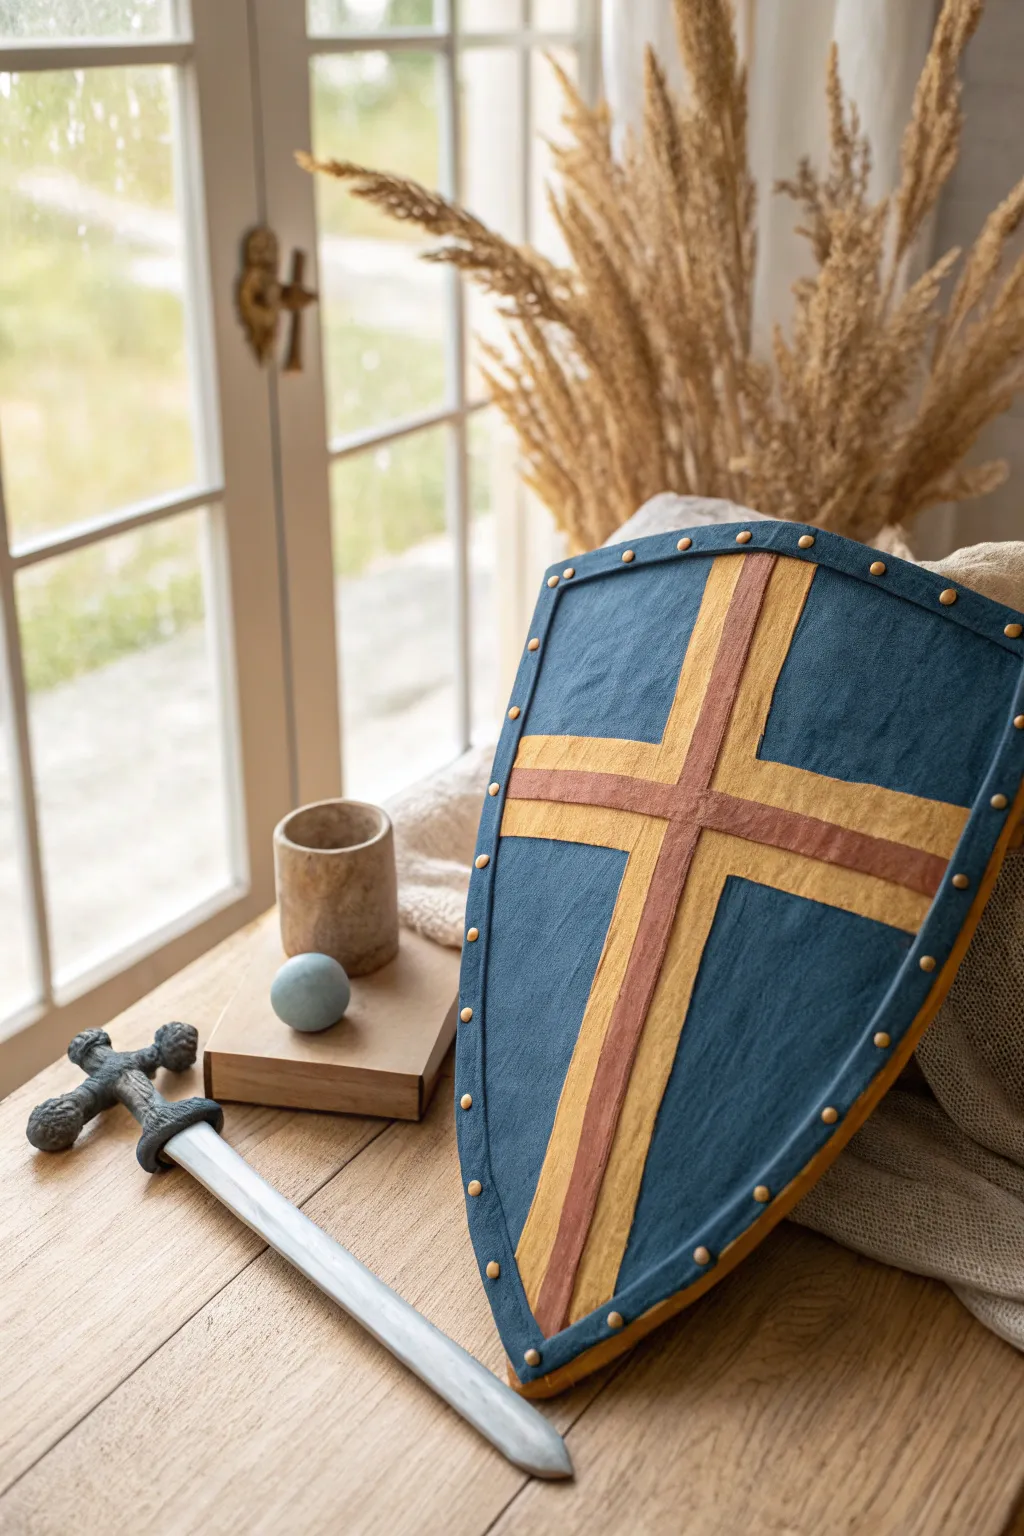
Transform simple cardboard and clay into a regal knight’s armament perfect for imaginative adventures. This project combines the structural strength of cardboard with the smooth, detailed finish of air dry clay for a surprisingly durable and authentic-looking set.
Detailed Instructions
Materials
- Air dry clay (white or grey)
- Thick corrugated cardboard (for the base)
- Craft knife or box cutter
- Rolling pin
- Acrylic paints (Navy blue, golden yellow, brick red/brown, silver, black)
- PVA glue or wood glue
- Sandpaper (fine grit)
- Paintbrushes (flat shader and fine detail)
- Sculpting tools or a butter knife
- Water cup
Step 1: Forging the Shield Core
-
Cut the Base:
Sketch a classic heater shield shape (flat top, curved sides pointing to the bottom) onto your thick cardboard. It should be large enough for a child to hold comfortably. Carefully cut this shape out using a craft knife. -
Add Straps:
Before adding clay, figure out the handle. You can punch two holes in the center and thread a thick fabric strip or leather belt through, securing it on the front side with strong tape or glue, as the clay will cover this later. -
Clay Coverage:
Roll out a large slab of air dry clay to about 1/4 inch thickness. Brush a layer of PVA glue onto the cardboard front to help adhesion, then drape the clay sheet over the shield. Trim the excess clay around the edges. -
Smooth the Surface:
Dip your fingers in a little water and smooth out the clay surface. You want to eliminate any heavy texture to make it look like painted metal or stretched leather later. -
Sculpt the Cross:
Roll out long, flat strips of clay for the cross design. Place a vertical strip down the center and a horizontal strip across the upper third. Use a little water or slip (clay and water mix) to bond these strips to the base layer. -
Add the Central Detail:
Roll a slightly thinner, narrower strip of clay to place directly on top of the vertical arm of the cross, adding depth to the design. -
Create the Border:
Roll a long snake of clay and flatten it slightly. Attach this around the entire perimeter of the shield to create a reinforced rim. -
Install Rivets:
Roll tiny balls of clay, about the size of peas. Press them gently onto the border rim at even intervals to mimic iron rivets. I find that pressing them down slightly flat helps them stick better than leaving them perfectly round.
Step 2: Crafting the Sword
-
Cardboard Armature:
Cut a sword shape from cardboard—handle, crossguard, and blade all in one piece. This internal spine prevents the clay from snapping during play. -
Wrap the Handle:
Cover the handle and crossguard with clay first. bulk up the pommel (the bottom of the handle) into a rounded shape and add light texture to the grip for a realistic look. -
Sheath the Blade:
Apply thin slabs of clay to both sides of the cardboard blade. Smoothen the edges carefully so the cardboard is completely hidden, tapering the clay slightly toward the ‘sharp’ edges.
Build it Stronger
For a truly durable sword, use a wooden dowel instead of cardboard as the core. The clay will wrap around it easily and it won’t bend.
Step 3: Heraldic Finishes
-
Dry Completely:
Let both pieces dry for at least 24-48 hours. Turn them over halfway through so the back dries evenly. Sand any rough spots gently once fully hardened. -
Base Coat:
Paint the main fields of the shield in a deep navy blue. Use a flat brush to get good coverage, likely needing two coats. -
Gild the Cross:
Paint the raised cross detail in a golden yellow. Take your time near the edges where it meets the blue to keep the lines crisp. -
Accentuate the Center:
Paint the central vertical strip on the cross with a brick red or brown shade to create visual contrast. -
Metallic Details:
Paint the rivets on the shield rim gold. For the sword blade, mix silver paint with a tiny drop of black to create an iron look, painting the hilt in a darker charcoal grey. -
Weathering:
For a battle-worn look, use a dry brush with a tiny bit of black paint to lightly dust the edges of the shield and the sword hilt.
Cracks Appearing?
Fine cracks are normal as clay shrinks. Mix a ‘slurry’ of clay and water into a paste and fill the cracks, then smooth over with a finger.
Once the paint is sealed with a clear varnish, your knight is ready to defend the castle


What Really Happens Inside the Kiln
Learn how time and temperature work together inside the kiln to transform clay into durable ceramic.
Build-Your-Own Mini Creature World Base
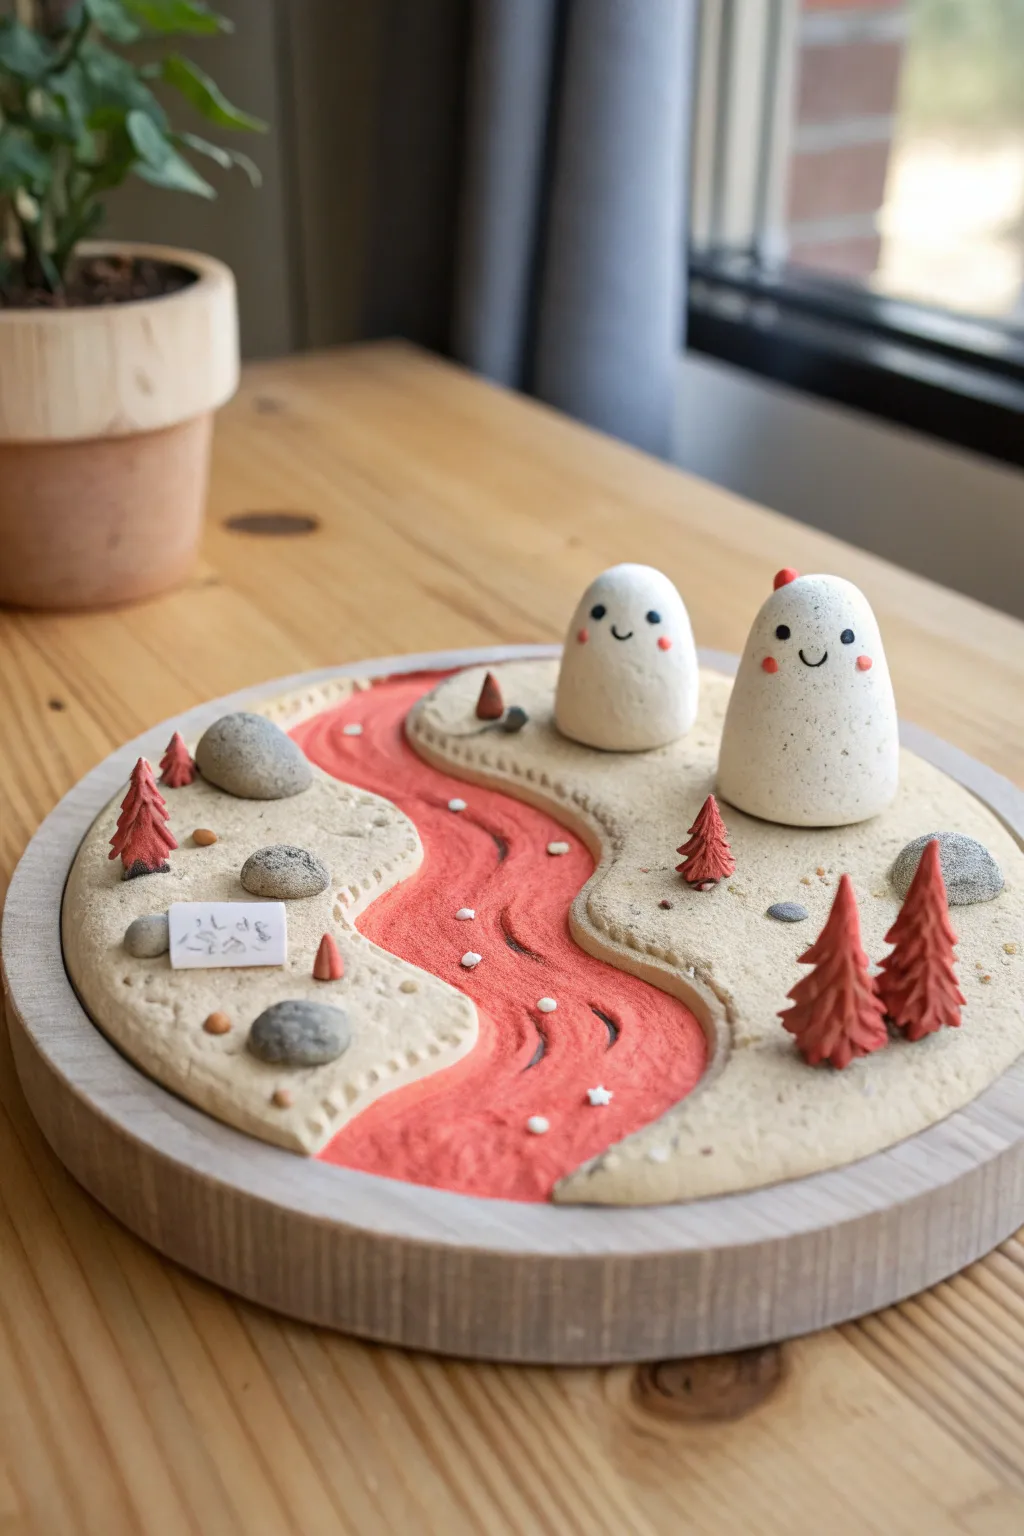
Create a charming miniature landscape featuring two friendly spirits overlooking a winding red river. This project combines simple sculpting techniques with clever texturing to build a peaceful, tiny world perfect for imaginative play or display.
Step-by-Step Guide
Materials
- White air dry clay (2-3 lbs)
- Round wooden base or sturdy cardboard circle (approx. 8-10 inches)
- Acrylic paints (sand/beige, bright red, dark grey, white, black)
- Small rolling pin
- Sculpting tools (needle tool, ball tool)
- Old toothbrush or stiff bristle brush for texturing
- Fine-grit sandpaper
- Paintbrushes (flat shader, fine detail)
- Clear matte varnish (optional)
Step 1: Sculpting the Landscape Base
-
Prepare the foundation:
Start by rolling out a thick slab of clay, about 1/4 inch thick. Cut it into a circle that matches the dimensions of your wooden base. Adhere it to the base using a small amount of water or white glue if needed. -
Carve the river path:
While the clay is still fresh, use a sculpting tool or a dull knife to carve a winding S-shape path through the center. This will be your red river. -
Build up the banks:
Add extra bits of clay to the land sections on either side of the river to raise them slightly, creating a gentle slope down towards the riverbed. Smooth the transition so it looks like natural terrain. -
Texture the land:
Before the clay dries, take an old toothbrush or a stiff bristle brush and gently stipple the surface of the ‘land’ areas. This creates a sandy, dirt-like texture that contrasts nicely with the smooth river. -
Detail the riverbed:
Use a modeling tool to etch flowing lines into the riverbed area. These lines imitate the movement of water or wind-swept sand.
Step 2: Creating the Inhabitants and Decor
-
Shape the ghosts:
Roll two balls of clay into smooth, rounded cone shapes. Flatten the bottoms so they stand upright. These will be your friendly spirit characters. -
Refine the ghost shapes:
Use a bit of water on your finger to smooth out any cracks on the ghosts. They should look polished and soft, like river stones. -
Sculpt the trees:
Create several small cone shapes for the trees. Using fine scissors or a needle tool, snip or poke into the clay surface repeatedly, pulling slightly upwards to create a textured, pine-needle effect. -
Make the rocks:
Roll small, irregular lumps of clay to serve as boulders. Press them lightly onto a flat surface to create a base, then texture them slightly by rolling them over rough fabric or pressing them with a rock from outside. -
Create the signpost:
Cut a tiny rectangle and a small cylinder for a post. If I’m feeling steady, I attach them now with slip (water and clay mix), or wait to glue them after drying. -
Dry everything:
Set all your pieces aside to dry completely. This usually takes 24-48 hours depending on thickness. Flip the base occasionally to prevent warping.
Cracked Earth?
If the clay creates gaps at the river edge while drying, mix a paste of clay and water (slip) to fill the cracks, then smooth it out with a damp brush.
Step 3: Painting and Assembly
-
Paint the land:
Paint the textured land areas with a sandy beige color. You may need two coats for opaque coverage. -
Paint the river:
Use a vibrant red paint for the river channel. Carefully paint along the ledges where the land meets the river for a crisp edge. -
Decorate the trees:
Paint your textured trees in a monochromatic reddish-pink to match the fantastical theme, or classic green if you prefer. -
Paint the ghosts:
Keep the ghost bodies natural white or cream. Use a fine detail brush or a toothpick to dot on black eyes and a tiny smile. Add soft pink blushes to their cheeks for extra cuteness. -
Detail the rocks:
Paint the boulders primarily grey. Once dry, lightly brush a darker grey on the bottom for shadow to give them weight. -
Final assembly:
Arrange your scene. Use strong craft glue to attach the ghosts, trees, and rocks to the base. Add tiny dots of white paint to the river to simulate sparkles or floating petals. -
Seal the project:
Finish with a coat of matte varnish to protect the paint and give the whole piece a unified, professional finish.
Natural Texture Hack
For realistic rock textures, press a crumpled ball of aluminum foil against the wet clay boulders before they dry. It creates instant, convincing stone details.
Now you have a whimsical diorama ready to guard your desk or bookshelf