When you’re making air dry clay animals with kids, simple shapes are your best friend—little balls, ovals, and tiny coils turn into instant cuteness. Here are my favorite air dry clay ideas for kids that feel easy, playful, and totally doable with just a small lump of clay.
Chunky Clay Cats
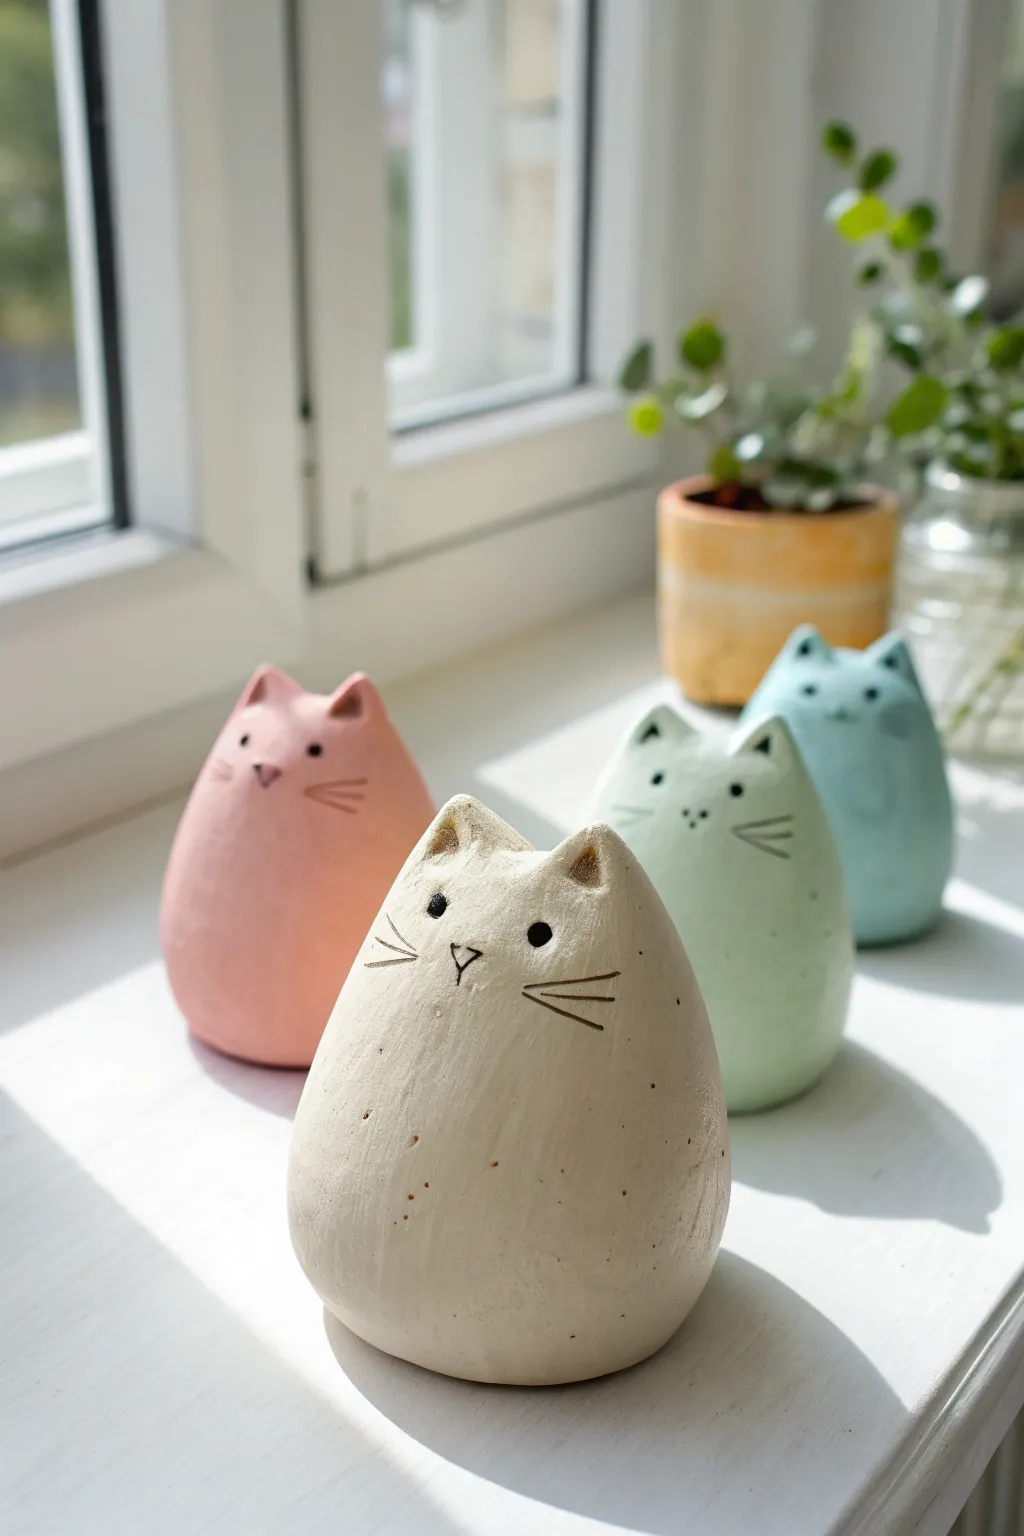
These adorable, egg-shaped kitties are perfect for beginners because they rely on simple, smooth forms rather than complex limb sculpting. Their minimalist faces and soft pastel colors give them a modern, Scandinavian-style charm that looks great on any windowsill.
How-To Guide
Materials
- Air dry clay (white)
- Acrylic paints (pastel pink, mint green, light blue, cream/off-white)
- Fine-point black permanent marker or black acrylic paint with a detail brush
- Sculpting tools (or a toothpick/needle tool)
- Water in a small cup
- Sponge or fine sandpaper
- Matte varnish or sealant (optional)
Step 1: Sculpting the Base Shape
-
Condition the clay:
Start by taking a handful of air dry clay and kneading it in your hands until it feels warm, pliable, and smooth. This prevents cracks from forming later on. -
Form a ball:
Roll the clay between your palms to create a smooth, tight sphere. Aim for a size roughly comparable to a large orange or a tennis ball. -
Shape the body:
Gently taper the top of the sphere to create an egg-like shape, keeping the bottom wide and heavy for stability. Flatten the bottom slightly by tapping it against your work surface so the cat stands upright independently. -
Smooth the surface:
Dip your finger in a little bit of water and rub it over the entire surface of the clay egg. This helps erase any fingerprints or tiny fissures.
Smooth Operator
Can’t get the fingerprints off? A slightly damp makeup sponge is the ultimate tool for smoothing raw clay without leaving new marks.
Step 2: Adding Ears and Details
-
Pinch the ears:
At the narrower top of the egg shape, use your thumb and forefinger to gently pinch up two small triangles to form the ears. Keep them relatively small and rounded at the tips for that cute, chunky look. -
Refine the ears:
Use a sculpting tool or just your finger to smooth the seam where the ears rise from the head, ensuring they look integrated rather than attached separately. -
Mark the face:
Before the clay dries, plan where the face will go. It should be positioned slightly above the vertical center. -
Indent the features:
Use a needle tool or toothpick to gently press into the clay for the eyes. You aren’t drawing ink yet, just creating small indentations where the eyes will sit. -
Etch the whiskers:
Using the same sharp tool, lightly carve three straight lines on each cheek for whiskers. Make these lines deep enough to hold paint later, but not so deep designed to crack the clay. -
Carve the nose:
In the center, carve a small inverted triangle for the nose and a small vertical line beneath it for the mouth. -
Final smoothing:
Take a damp sponge and give the entire cat one last gentle wipe to soften any sharp edges created by your carving tools. -
Dry completely:
Set your cat aside to dry. Depending on the thickness and humidity, this can take 24 to 48 hours. Turn it occasionally to ensure the bottom dries evenly.
Step 3: Painting and Finishing
-
Sand imperfections:
Once the clay is bone dry, inspect it for rough spots. I like to use a fine-grit sandpaper here to gently buff the surface until it feels like smooth porcelain. -
Apply base color:
Select a pastel shade—like soft pink, mint, or cream. Apply a solid coat of acrylic paint over the entire figurine. You may need two coats for full opacity. -
Paint the eyes:
Using a very fine detail brush and black paint (or a marker), fill in the small circular indentations you made earlier for the eyes. -
Highlight the eyes:
Add a tiny white dot to each black eye to give it a spark of life and reflection. -
Define the whiskers:
Carefully trace the carved whisker lines with your black paint or marker. The indentation guides your hand, making it easier to get straight lines. -
Fill the nose:
Outline the triangle nose. You can leave the inside the body color or fill it with a slightly darker shade. -
Seal the work:
Finish by applying a coat of matte varnish. This protects the paint and gives the clay a finished, professional texture.
Make it a Trio
Create different sizes for a family effect. Try making a tiny kitten version or a taller version to group together on a shelf.
Arranging your colorful, chubby cats in a row creates a cheerful display that brightens up any corner of the room


Puppy Dog Minis
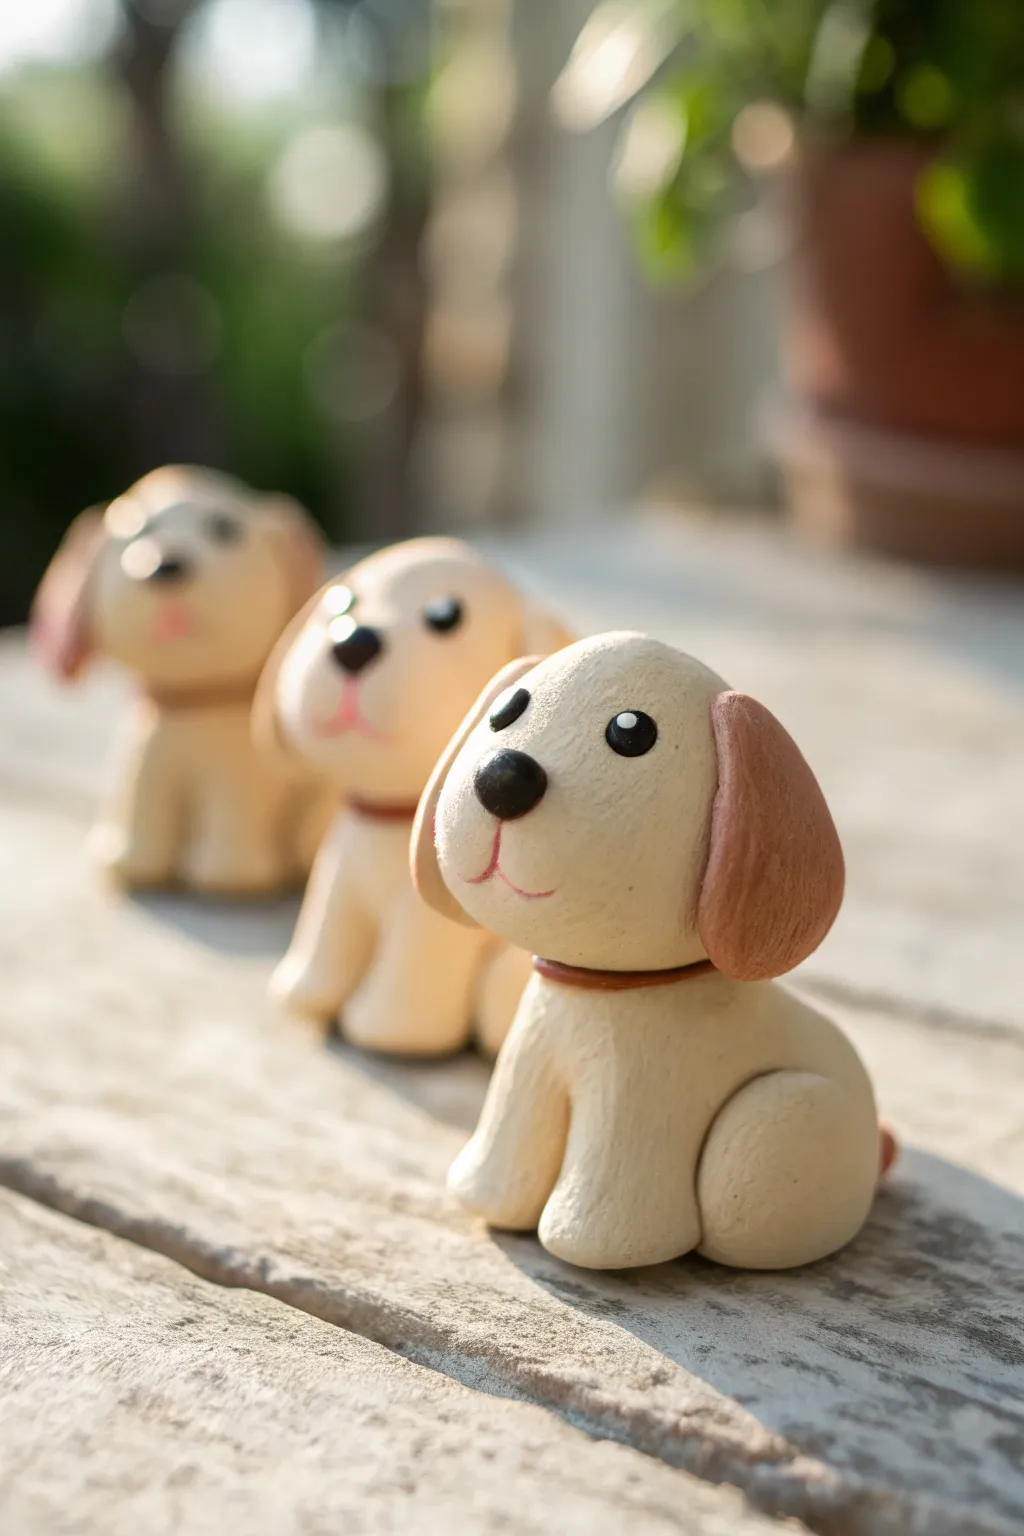
These adorable little puppies are the perfect beginner sculpting project, featuring soft beige bodies and charming floppy ears. They sit patiently in a row, making them a delightful desk companion or a cute gift for dog lovers.
Step-by-Step
Materials
- Beige or cream air-dry clay
- Light brown air-dry clay
- Small amount of black clay
- Small amount of reddish-brown clay (for collar)
- Tiny amount of pink clay involved (optional for mouth)
- Clay modeling tools (ball tool, needle tool)
- Water (for smoothing)
- Gloss varnish (optional)
Step 1: The Head and Body
-
Roll the Head:
Begin by taking a chunk of beige clay about the size of a walnut. Roll it between your palms until you have a smooth, perfect sphere for the head. -
Shape the Muzzle:
While holding the sphere, gently press and pinch slightly on one side to pull out a small, rounded muzzle area. It shouldn’t be too long, just a subtle protrusion for the nose. -
Form the Body:
Take a slightly larger piece of beige clay and roll it into a teardrop or pear shape. Flatten the bottom wide part against your work surface so it sits sturdily. -
Connect the Pieces:
Place the head on top of the narrow point of the body teardrop. If the clay is fresh, it should stick, but you can use a tiny dab of water or score the surfaces to ensure a strong bond.
Step 2: Legs and Paws
-
Front Legs:
Roll two small sausages of beige clay for the front legs. They should be thick enough to look sturdy. -
Attach Front Legs:
Press these sausages vertically against the front of the body chest area. Smooth the top seam into the body so they look integrated, not just stuck on. -
Back Legs:
Roll two small balls of beige clay for the hind legs. Flatten them slightly into rounded discs. -
Position Back Legs:
Attach these discs to the lower sides of the body, pressing them firmly so they curve around the hips. This creates the look of a sitting dog. -
Define Paws:
Use a needle tool or a dull knife to gently press two or three vertical lines into the bottom of each leg to suggest toes.
Cracking Clay?
If you see tiny cracks forming as you smooth the clay, dip your finger in water and gently massage the area. A drop of water acts like glue for dry spots.
Step 3: Adding Personality
-
Make the Ears:
Switch to your light brown clay. Roll two small ovals and flatten them into teardrop shapes. -
Attach Ears:
Press the narrow end of the brown teardrops onto the sides of the head. Gently bend the wide part downward so the ears look floppy and relaxed. -
The Collar:
Roll a very thin snake of reddish-brown clay. Wrap this carefully around the neck where the head meets the body to create a collar, trimming any excess at the back. -
Tail Time:
Roll a tiny cone of beige or brown clay and attach it to the rear of the body for a wagging tail.
Texture Time
Before the clay dries, use an old clean toothbrush to gently tap the surface of the dog. This creates a realistic ‘furry’ texture instead of smooth skin.
Step 4: The Face
-
Eye Sockets:
I find it helpful to use a small ball tool to press two small indentations into the face where the eyes will go. This helps the eyeballs sit securely. -
Place the Eyes:
Roll two tiny specks of black clay into balls and press them into the sockets you just made. Add a tiny white reflection dot with paint later if desired. -
The Nose:
Roll a slightly larger black oval and press it onto the tip of the muzzle area. -
Smile:
Use a needle tool or a very thin piece of pink clay to create a small ‘Y’ shape under the nose for the mouth. -
Final Smooth:
Dip your finger in a little water and gently run it over the clay to remove any fingerprints before letting it dry completely.
Now you have a loyal little clay companion ready to sit on your shelf


Bunny Rabbits With Big Ears
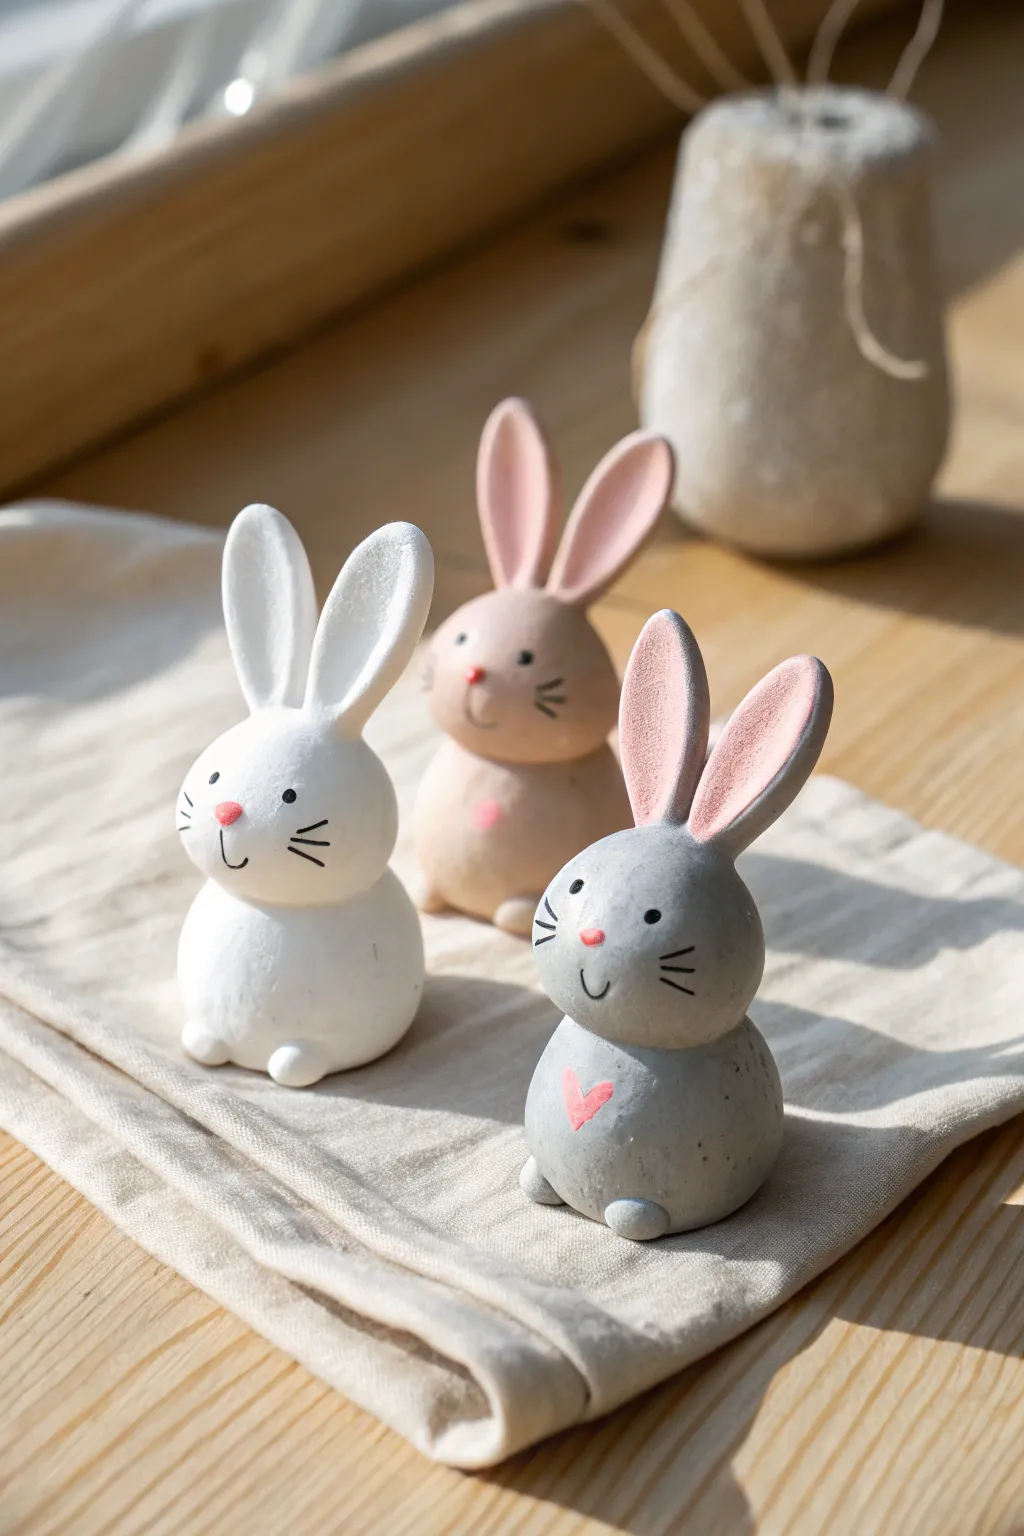
These charming little rabbits feature a modern, minimalist design with smooth, rounded shapes and sweet painted details. Their exaggerated, tall ears and tiny pink hearts make them perfect simple sculptures for a desk or shelf.
Step-by-Step Guide
Materials
- White air dry clay
- Acrylic paints (black, pink, grey, beige)
- Fine detail paintbrush (size 0 or 00)
- Small cup of water
- Smooth work surface or silicone mat
- Rolling pin or smooth jar
- Toothpicks (optional for support)
- Sandpaper (fine grit, optional)
- Matte varnish (optional)
Step 1: Shaping the Bodies
-
Prepare your clay colors:
Start by deciding on your colors. For the grey and beige bunnies, mix a very small amount of acrylic paint directly into your white clay and knead it until the color is uniform. Keep one portion pure white. -
Roll the base:
Take a walnut-sized amount of clay and roll it into a smooth ball. Gently flatten the bottom against your work surface so it sits stability without rolling away. This is the bunny’s body. -
Form the head:
Roll a slightly smaller ball of clay for the head. It should look proportional to the body but slightly lighter so the figure isn’t top-heavy. -
Attach head to body:
Score the top of the body and the bottom of the head slightly with a toothpick to create a rough texture. Dab a tiny bit of water on the scored areas and press the head firmly onto the body. Smooth the seam slightly with your finger if you want a seamless look, or leave it distinct for a segmented toy look. -
Add tiny feet:
Roll two very small, pea-sized balls of clay. Flatten them slightly into ovals and attach them to the bottom front of the body to act as little paws or feet.
Step 2: Creating the Ears
-
Roll the ear coils:
For each bunny, roll two equal coils or logs of clay. These should be quite thick at the bottom and taper gently to a rounded point at the top. -
Flatten the ears:
Gently press down on each coil to fracture it. You want a long, oval paddle shape. Use your thumb to create a slight indentation running up the center of the ear, giving it depth. -
Attach the ears:
This is the crucial balance step. Score the base of the ears and the top of the head. Use a drop of water to join them. -
Secure the bond:
Because the ears are tall, I like to use a clay tool or fingertip to smudge the clay from the back of the ear downward onto the head to create a strong anchor point. Ensure they are standing straight up. -
Smooth everything out:
Dip your finger in a little water and gently run it over the entire sculpture to remove any fingerprints or cracks. Let the clay dry completely for 24-48 hours.
Droopy Ears?
If the ears won’t stand up while the clay is wet, insert a short piece of toothpick or wire inside the ear and down into the head to act as an internal skeleton.
Step 3: Painting the Details
-
Prep for painting:
Once fully dry, check for rough spots. If needed, very gently sand them with fine-grit sandpaper. Wipe away any dust. -
Paint the inner ears:
Mix a soft, pastel pink color. Using your fine brush, paint a long oval shape inside the indentation of each ear. -
Add the nose:
Using the same pink, paint a tiny inverted triangle or oval right in the center of the face for the nose. -
Paint the heart:
On the grey and beige bunnies (and the white one if you wish), paint a small, simple pink heart on the chest, slightly off-center or right in the middle. -
Draw the eyes:
Switch to black paint and your finest brush. Paint two small dots for eyes. Space them fairly wide apart to achieve that cute, innocent look. -
Add whiskers and mouth:
With an extremely light touch, paint three thin lines on each cheek for whiskers. Add a tiny vertical line down from the nose and curve it into a small smile. -
Seal (optional):
If you want to protect your paint job, brush on a thin layer of matte varnish once the paint is completely dry.
Texture Twist
Before drying, use an old toothbrush to gently stipple the surface of the clay. This gives the bunnies a soft, stone-like or fuzzy texture instead of a smooth finish.
Now you have a trio of sweet stylized bunnies ready to brighten up your space


Happy Frogs From Clay Balls
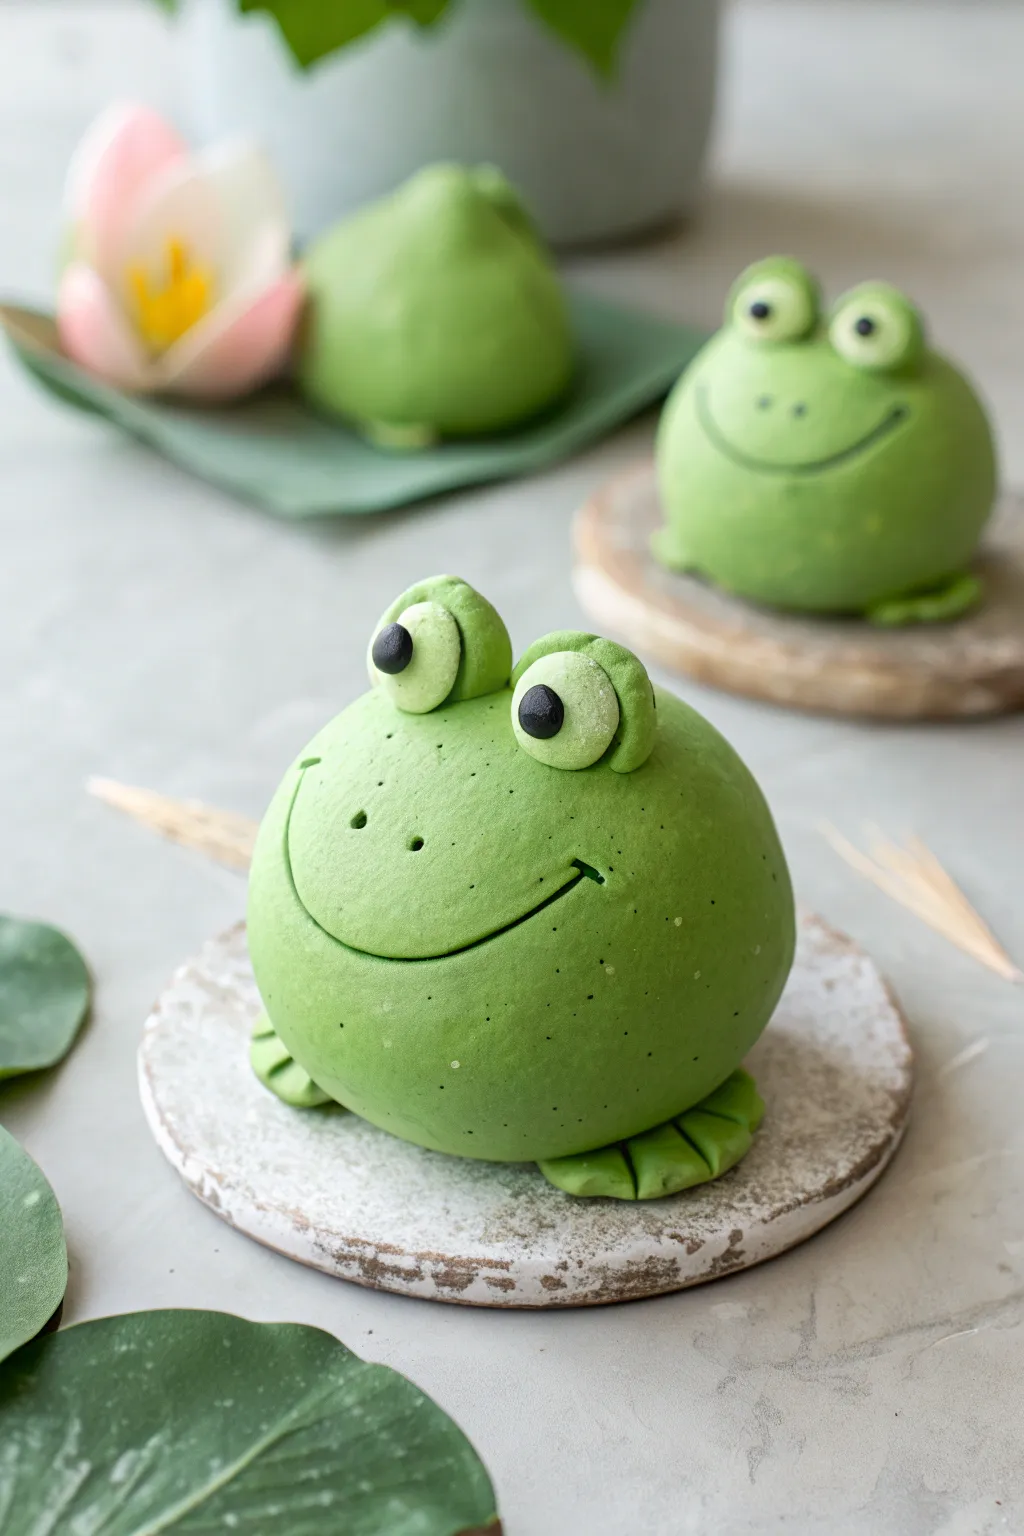
These delightfully chubby frogs start from a simple ball shape, making them perfect for younger crafters or anyone who loves kawaii-style critters. With their smooth finish and cheerful smiles, they bring a peaceful pond vibe right to your desk.
Detailed Instructions
Materials
- Green air dry clay (pre-dyed or white clay mixed with acrylic paint)
- White air dry clay (small amount)
- Black air dry clay (tiny amount)
- Small rolling pin
- Modeling tool (curved or knife-edge)
- Toothpick or needle tool
- Small bowl of water (for smoothing)
- Optional: Texture sponge (for the base)
Step 1: Shaping the Body
-
Prepare the main ball:
Start by taking a generous handful of green clay. Knead it until it’s pliable and warm, which helps prevent cracking later. Roll it into a smooth, seamless sphere about the size of a tangerine. -
Create the heavy bottom:
Gently tap the ball against your work surface to flatten the bottom slightly. You want the frog to sit stable and low, but keep that lovely roundness on top. -
Smoothing:
Dip your finger in a tiny bit of water and rub away any fingerprints or small cracks on the surface. Aim for a matte, skin-like finish.
Cracks Appearing?
If small cracks appear while drying, mix a tiny bit of fresh clay with water to make a paste (slip). Paint this into the cracks with a brush and smooth it out with your finger.
Step 2: Creating the Face
-
Make the eye sockets:
Roll two smaller balls of green clay, roughly the size of marbles. These will effectively be the ‘mountains’ that hold the eyes. -
Attach the eye mounts:
Score the top of the head where the eyes will go using a toothpick, then press the two green marbles firmly onto the head. Smooth the seams where the clay connects so they look like part of the body. -
Form the eyeballs:
Take the white clay and roll two smaller balls. Flatten them slightly into thick discs. -
Place the whites:
Press these white discs onto the front of your green eye mounts. They should look large and expressive. -
Add the pupils:
Roll tiny specks of black clay into balls and press them onto the white clay. Placing them slightly cross-eyed or varying the position adds a goofy, friendly personality. -
Carve the mouth:
Using a curved modeling tool or the side of a spoon, press a wide, U-shaped smile into the front of the face. Make the cut deep enough to create a nice shadow. -
Add dimples:
Use the rounded end of a paintbrush handle or a ball tool to press small indentations at the corners of the mouth for extra cuteness. -
Nostrils:
Prick two small holes above the smile with a toothpick for the nose.
Make it a Scene
Create a lily pad coaster for your frog! Roll out green clay flat, cut a circle with a pie-slice removed, and gently texture the surface with a sponge.
Step 3: Feet & Finishing Touches
-
Make the feet:
Roll two small balls of green clay and flatten them into teardrop shapes. -
Detail the toes:
Use your knife tool to press two lines into the wide end of each teardrop, creating three little toes on each foot. -
Attach the feet:
Lift the front of the frog slightly and tuck the feet underneath, so just the toes are peeking out. Press gently to secure them to the base. -
Add texture:
If you want a speckled look like the photo, you can gently flick a stiff toothbrush dipped in slightly watered-down dark green paint over the body. Do this very lightly. -
Final smooth:
Give the whole piece one last inspection. I always like to run a damp finger over the seams one last time before letting it sit. -
Drying:
Let the frog dry completely for 24-48 hours. Keep it away from direct sunlight to prevent surface cracks.
Once fully dry, your happy little amphibian is ready to guard your desk or bookshelf with a smile

The Complete Guide to Pottery Troubleshooting
Uncover the most common ceramic mistakes—from cracking clay to failed glazes—and learn how to fix them fast.
Little Turtles With Shell Patterns
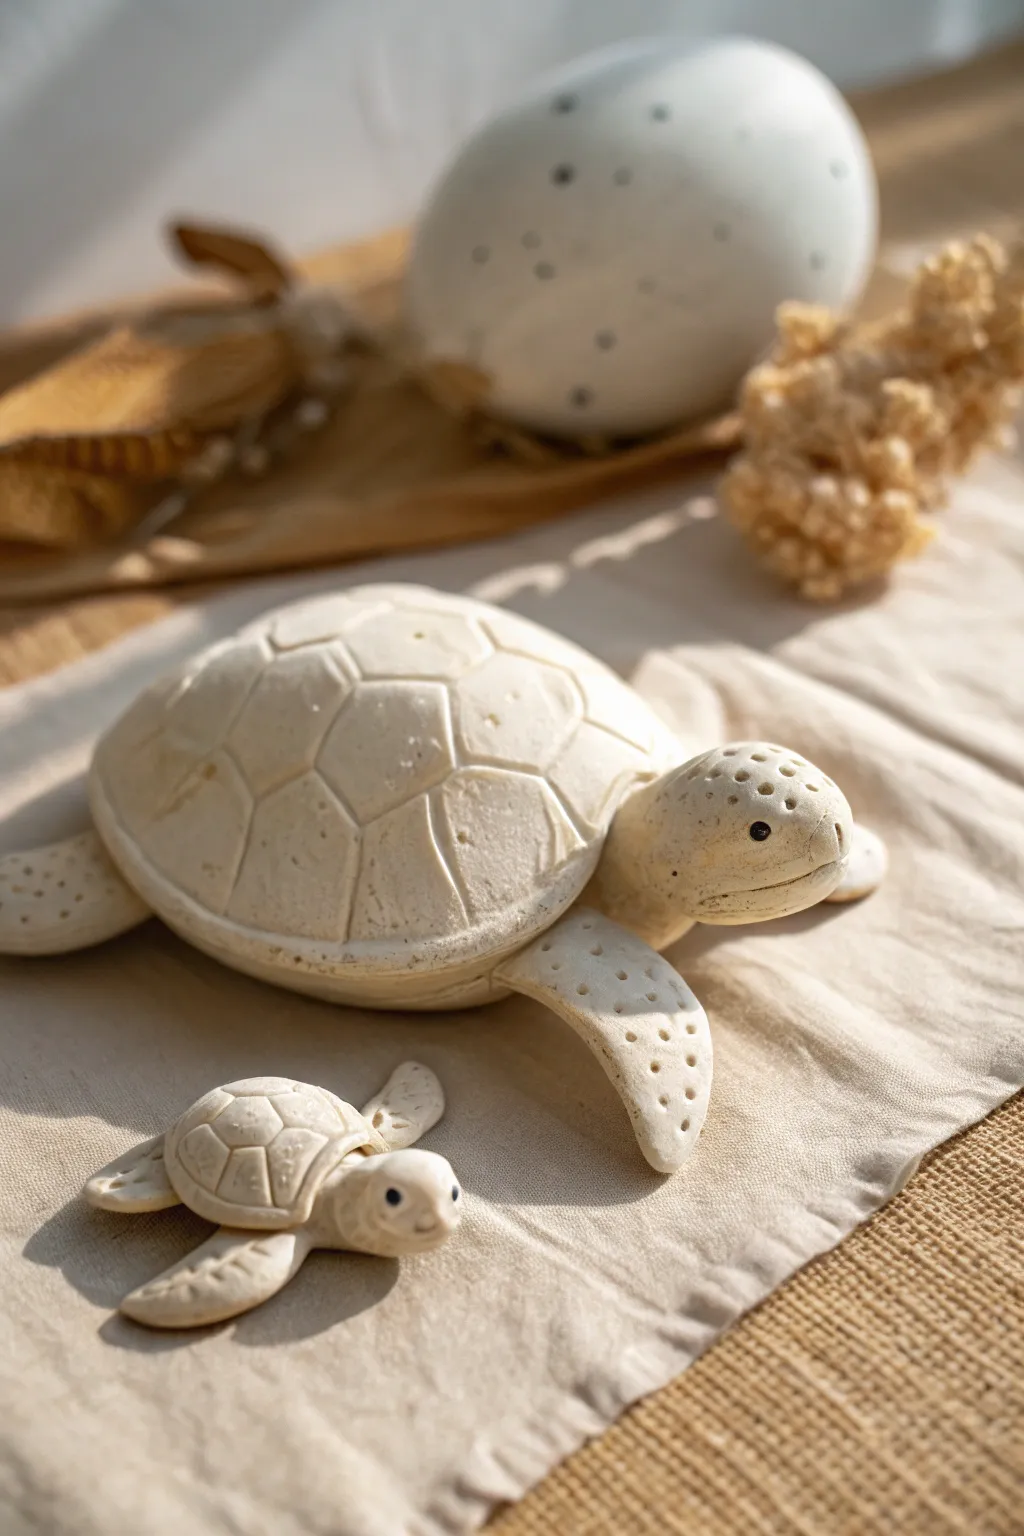
Create a serene pair of sea turtles using simple air-dry clay techniques that focus on natural textures and realistic shell patterns. This project results in a creamy, matte finish that highlights delicate stippling and carved details, perfect for a coastal-themed shelf display.
Step-by-Step Tutorial
Materials
- White or cream air-dry clay
- Rolling pin
- Clay carving tools (needle tool, small loop tool)
- Small ball tool or toothpick
- Water in a small cup
- Sponge
- Creating mat or parchment paper
- Fine-grit sandpaper (optional)
Step 1: Shaping the Bodies
-
Prepare the main shell:
Start by rolling a large ball of clay for the mother turtle’s shell. Gently press it onto your work surface to flatten the bottom while keeping a high, domed top. Smooth out any cracks with a slightly damp finger. -
Form the plastron:
Roll a smaller, flatter oval distinct from the dome. This will be the ‘plastron’ (the belly piece). You can assemble the legs onto this piece before attaching the top dome for a cleaner connection. -
Sculpt the flippers:
Shape four thick teardrop pieces for the flippers. Flatten them gently, curving the front two slightly backward to mimic a swimming motion. Attach them securely to the plastron base using a scratch-and-slip method. -
Create the head:
Roll a smooth, rounded cylinder for the head and neck. Soften the snout area so it isn’t too pointy, and attach it to the front of the plastron base. -
Assemble the mother:
Place the large dome over the leg and head assembly. Use a modeling tool to blend the seams underneath the rim of the shell so the connection is invisible. -
Repeat for the baby:
Repeat the entire process on a much smaller scale to create the baby turtle. I like to pose the baby slightly turned, as if following its mother.
Step 2: Detailing and Texturing
-
Draft the scutes:
Using a needle tool, lightly sketch the hexagonal pattern on the top of the shell. Start with a central row of hexagons down the spine, then add the surrounding shapes to fit. -
Carve the shell grooves:
Once happy with the layout, re-trace your lines deeper. Use a small loop tool or drag the needle tool at an angle to widen the grooves, giving the shell plates distinct dimension. -
Texture the top shell:
For a worn, natural look, gently tap the surface of the shell with a rough sponge or a crumpled ball of foil to remove the perfect smoothness. -
Add skin texture:
Using a small ball tool or a toothpick, press tiny dots into the head and top of the flippers. Cluster them denser near the edges and sparser near the body. -
Detail the face:
Press two deeper holes for the eyes. Use a knife tool to carve a simple, straight horizontal line for the mouth to give them a gentle expression. -
Insert eyes:
Roll tiniest balls of black clay (or paint them black later) and insert them into the eye sockets for a lively look. -
Refine the rim:
Use your thumb to smooth the edge of the shell where it meets the flippers, ensuring it looks like a solid protective ridge.
Cracking Shells?
Cracks often happen if the outer layer dries faster than the inside. To fix this fill small fissures with a ‘slip’ made of clay dissolved in water, then smooth it over.
Step 3: Finishing Touches
-
Re-check connections:
Before the clay hardens, double-check that the thin neck and flippers are securely bonded. If they wiggle, add a touch more water and smooth the clay again. -
Slow drying:
Let the turtles dry in a cool place away from direct sunlight for 24-48 hours. Turn them over halfway through so the bottom dries evenly. -
Sanding:
Once fully bone dry, use fine-grit sandpaper to gently smooth out any unintentional fingerprints or sharp burrs left from carving.
Beach Washed Look
After drying, apply a very watered-down brown acrylic paint wash over the shell and immediately wipe it off. The dark paint stays in the grooves, making the pattern pop.
Display your finished turtle family on a piece of linen or rustic wood to admire their peaceful journey
Goldfish And Bubble Pals
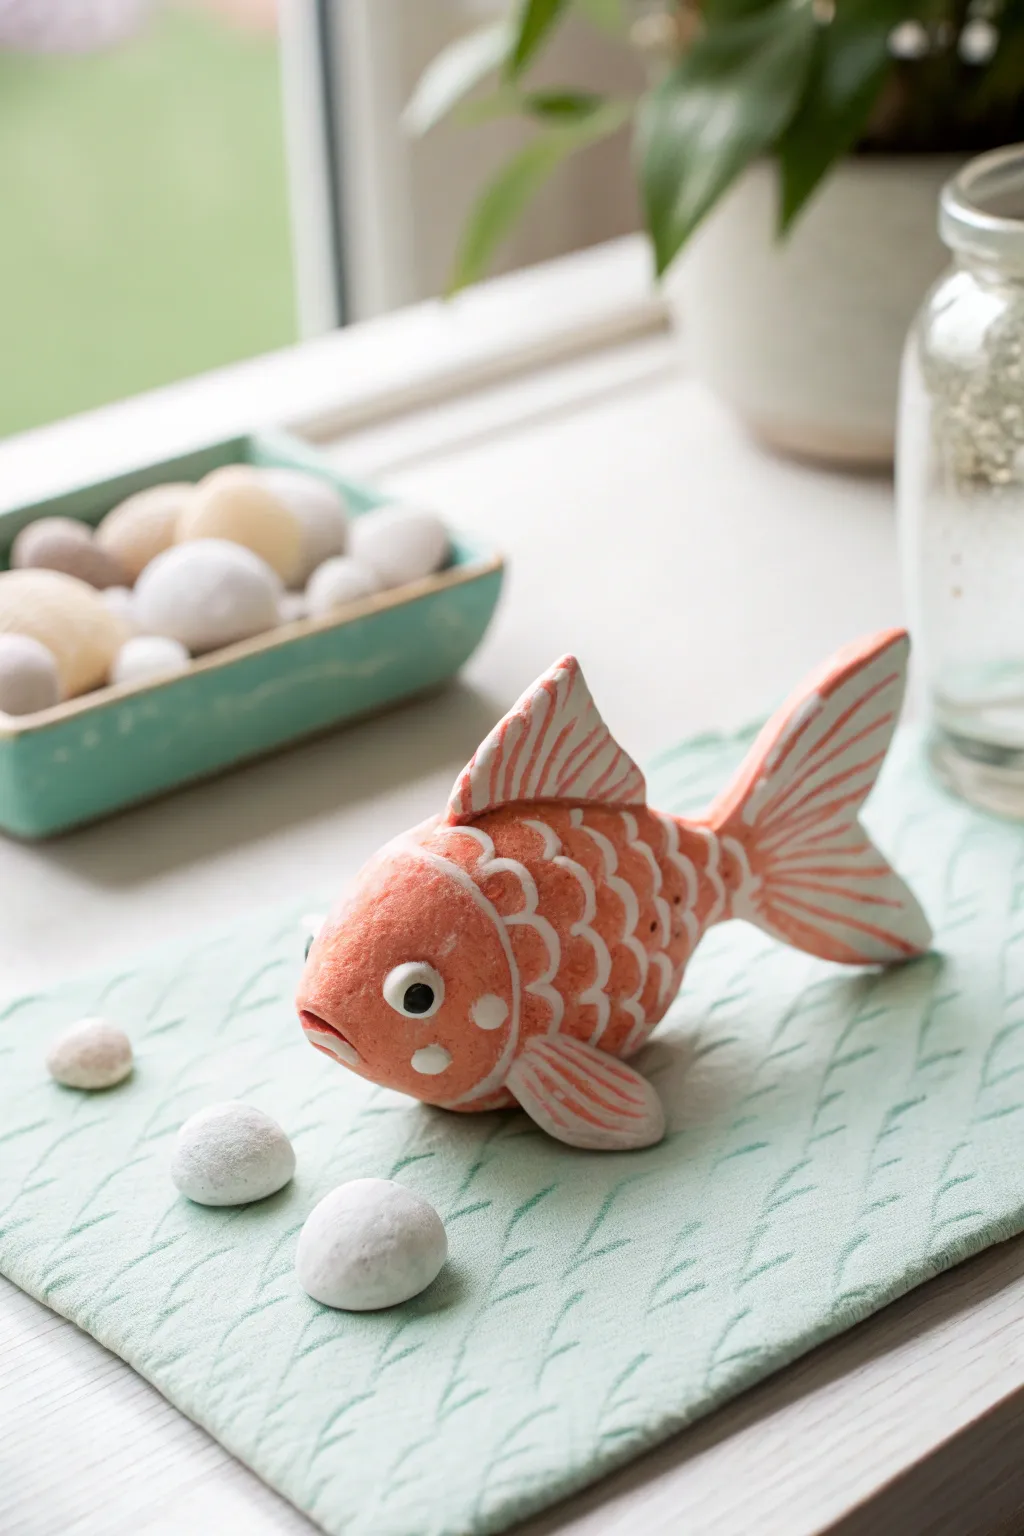
This cheerful little goldfish brings a splash of color to your shelf without needing an actual fishbowl. With its textured coral scales and playful clay “bubbles,” it’s a delightful project that captures the whimsey of underwater life.
How-To Guide
Materials
- Air dry clay (white)
- Acrylic paints (coral orange, white, black)
- Fine detail paintbrush
- Medium flat paintbrush
- Modeling tools (or a plastic knife/toothpick)
- Small cup of water
- Rolling pin (optional)
- Smooth work surface
Step 1: Sculpting the Body
-
Form the base:
Start with a medium-sized ball of white air dry clay, roughly the size of a tangerine. Roll it smooth in your palms to remove cracks. -
Shape the fish:
Gently taper one end of the ball to create the tail section, keeping the front rounded for the head. Press slightly on the sides to flatten the body just a bit, so it isn’t perfectly spherical. -
Create the mouth:
Using a modeling tool or the handle of a spoon, press a small, slightly downward-curved indentation at the very front of the face to form a pouting fish mouth. -
Add the dorsal fin:
Pinch a small triangle of clay. Score the top of the fish’s back and the bottom of the fin, add a tiny dab of water, and press the fin into place. Smooth the seam with your finger. -
Attach the tail:
Fashion a flat, V-shaped piece of clay for the tail. It should look like two rounded lobes. Attach this to the tapered end of the body using the score-and-slip method (scratching both surfaces and adding water). -
Add side fins:
Create two small, flat teardrop shapes for the pectoral fins. Attach these low on the sides of the body, just behind the head area. -
Sculpt the bubbles:
While the fish sets, roll three or four marble-sized balls of clay to serve as the “bubbles” or sea stones. Flatten the bottoms slightly so they don’t roll away. -
Dry completely:
Set all your pieces aside in a safe, dry place. Depending on the thickness of your fish, this might take 24 to 48 hours. I like to flip the pieces halfway through so the bottom dries evenly.
Smooth Seams
Use a tiny amount of water on your finger to blend the clay where fins attach. This prevents cracks from forming as the clay shrinks during drying.
Step 2: Painting and Detailing
-
Base coat:
Once fully dry, paint the entire body of the fish with a solid coat of coral orange acrylic paint. You may need two coats for opaque coverage. -
Paint the bubbles and eyes:
Paint the stone bubbles pure white. On the fish, paint two white circles for the eyes and let them dry. -
Add scale details:
Using a fine detail brush and white paint, create the scales. Paint small, U-shaped scallop lines in rows starting from behind the head and moving toward the tail. -
Detail the fins:
On the top fin, tail, and side fins, paint thin white stripes radiating outward to mimic the ribbed texture of fish fins. -
Add face markings:
Dab a few small white spots on the cheeks and lower face for extra texture. Paint the inside of the mouth indentation with a darker orange or red if you want depth, though leaving it coral works too. -
Finish the eyes:
Paint a smaller black circle inside the white eye base. Once dry, add a tiny white dot as a highlight to make the fish look alive. -
Create the scene:
If you want to recreate the textured mat look from the photo, you can roll out a slab of clay, impress it with a tool for texture, paint it mint green, and set your dry fish and bubbles on top.
Glitter Scale Effect
Mix a pinch of fine loose glitter into your white acrylic paint before painting the scales. It gives the fish a subtle, magical shimmer.
Your little aquatic friend is now ready to swim on dry land without any tank maintenance


What Really Happens Inside the Kiln
Learn how time and temperature work together inside the kiln to transform clay into durable ceramic.
Penguins With Tiny Flippers
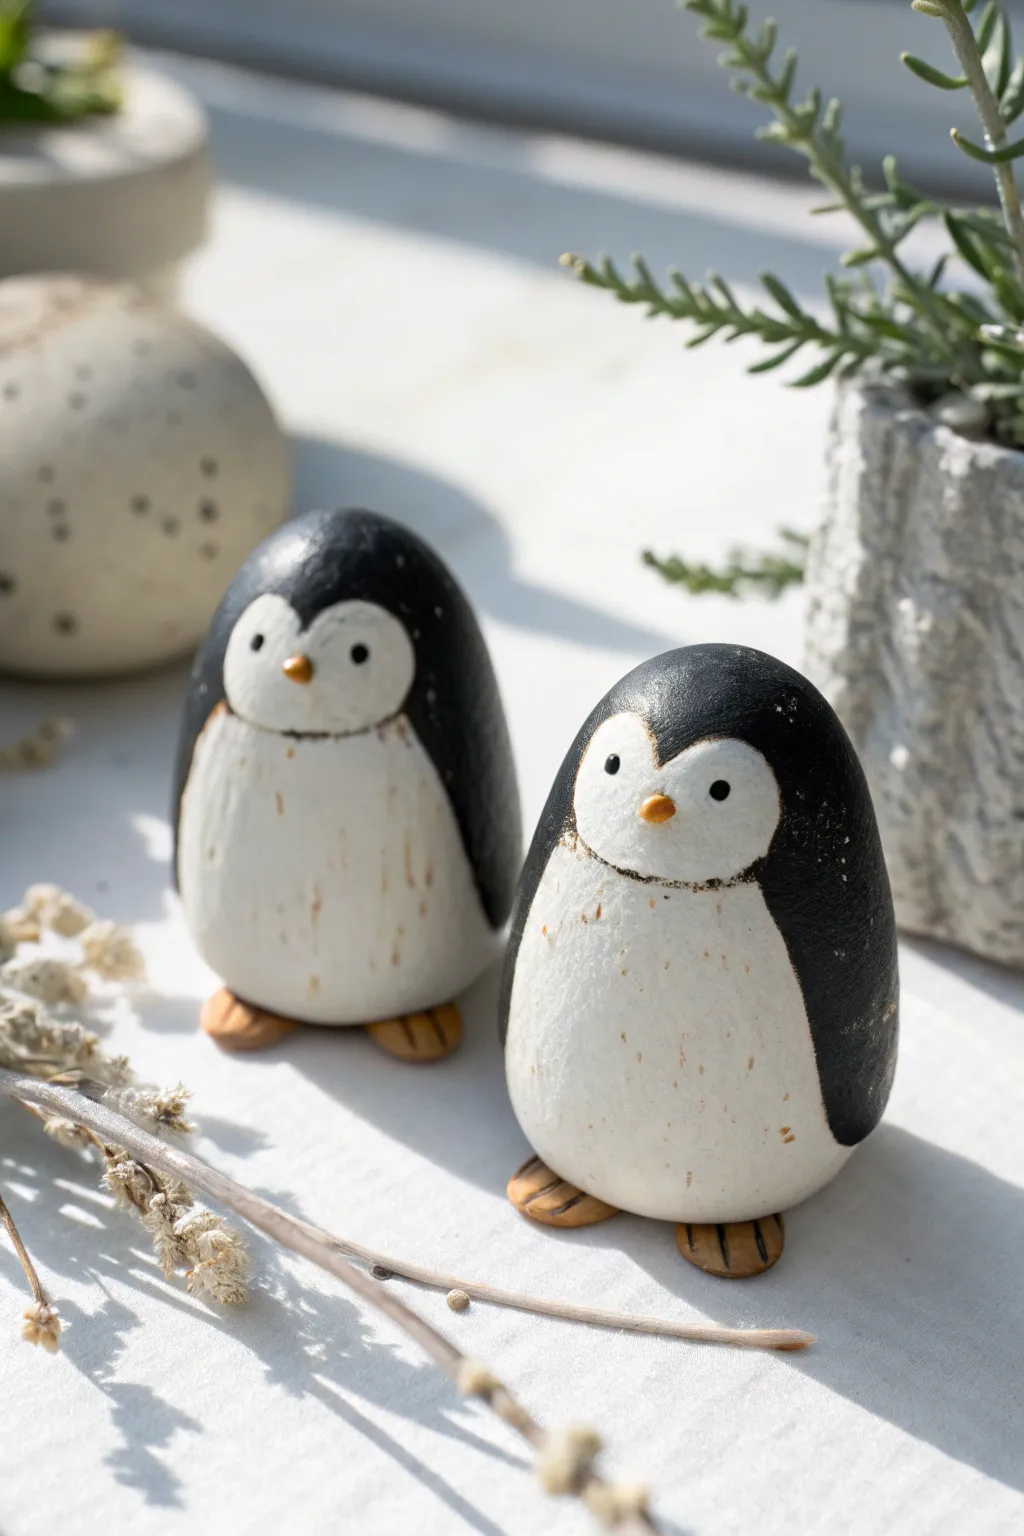
These charming little penguins start with a humble egg shape and transform into clean, minimalist friends perfect for a winter display. Their smooth, rounded bodies and tiny, distinct features give them a timeless, handcrafted look.
Detailed Instructions
Materials
- Air dry clay (white or grey)
- Acrylic paints (black, white, muted orange/yellow)
- Small paintbrush (flat and detail round)
- Water cup
- Aluminum foil (optional for core)
- Fine grit sandpaper
- Matte sealant or varnish
Step 1: Shaping the Clay
-
Form the core:
Start by grabbing a handful of air dry clay. Roll it firmly between your palms to create a smooth, solid ball about the size of a large egg. -
Refine the shape:
Gently taper the top of the ball so it’s slightly narrower than the base, creating a classic egg or teardrop silhouette. It should stand up on its own, so tap the bottom on your table to flatten it slightly. -
Review smoothness:
Dip your finger in a little water and smooth out any visible cracks or fingerprints on the clay surface. You want the finish to be as seamless as a river stone. -
Add the beak:
Pinch off a tiny, rice-sized piece of clay. Roll it into a small cone and attach it to the center of the ‘face’ area. Use a tiny bit of water or slip to secure it, blending the edges very slightly so it doesn’t fall off. -
Form the feet:
Create two small, flat ovals for the feet. Place the penguin body on top of them so the feet just peek out from underneath the front. Press gently to bond them to the base. -
Dry completely:
Set your penguin aside to dry. Since this is a solid shape, I usually let it sit for at least 24-48 hours. Turn it occasionally so the bottom dries too.
Step 2: Painting and Finishing
-
Sand for perfection:
Once bone dry, take a piece of fine-grit sandpaper and gently buff the surface. This removes any lingering bumps and gives you that professional, stone-like texture. -
Base coat the belly:
Using white acrylic paint, paint a large oval on the front of the penguin. This shape should curve over the top of the head to define the face mask area. -
Paint the body:
Paint the rest of the body black. Carefully trace around the white oval you just painted. The black paint should cover the back, sides, and the top of the head, creating the ‘hood’ look. -
Add texture:
While the white paint is dry but the brush is ‘dry’, you can lightly drag a tiny bit of brown or diluted black paint vertically on the belly to create a weathered, vintage texture. -
Paint the details:
Paint the beak a muted orange or yellow ochre. Paint the feet to match. Using the smallest detail brush or a toothpick, dot two black eyes wide apart on the white face area. -
Seal the work:
Finish with a coat of matte varnish or sealant to protect the paint and give the penguin a unified sheen without being too glossy.
Weight Saving Tip
For large penguins, scrunch a ball of aluminum foil first and wrap the clay around it. This saves clay and helps it dry faster from the inside out.
Cracks Appearing?
If small cracks appear while drying, mix a tiny bit of fresh clay with water to make a paste (slip) and fill them in. Smooth with a wet finger.
Now you have a sturdy little friend ready to keep your plants company on the windowsill
Owls With Wide Eyes
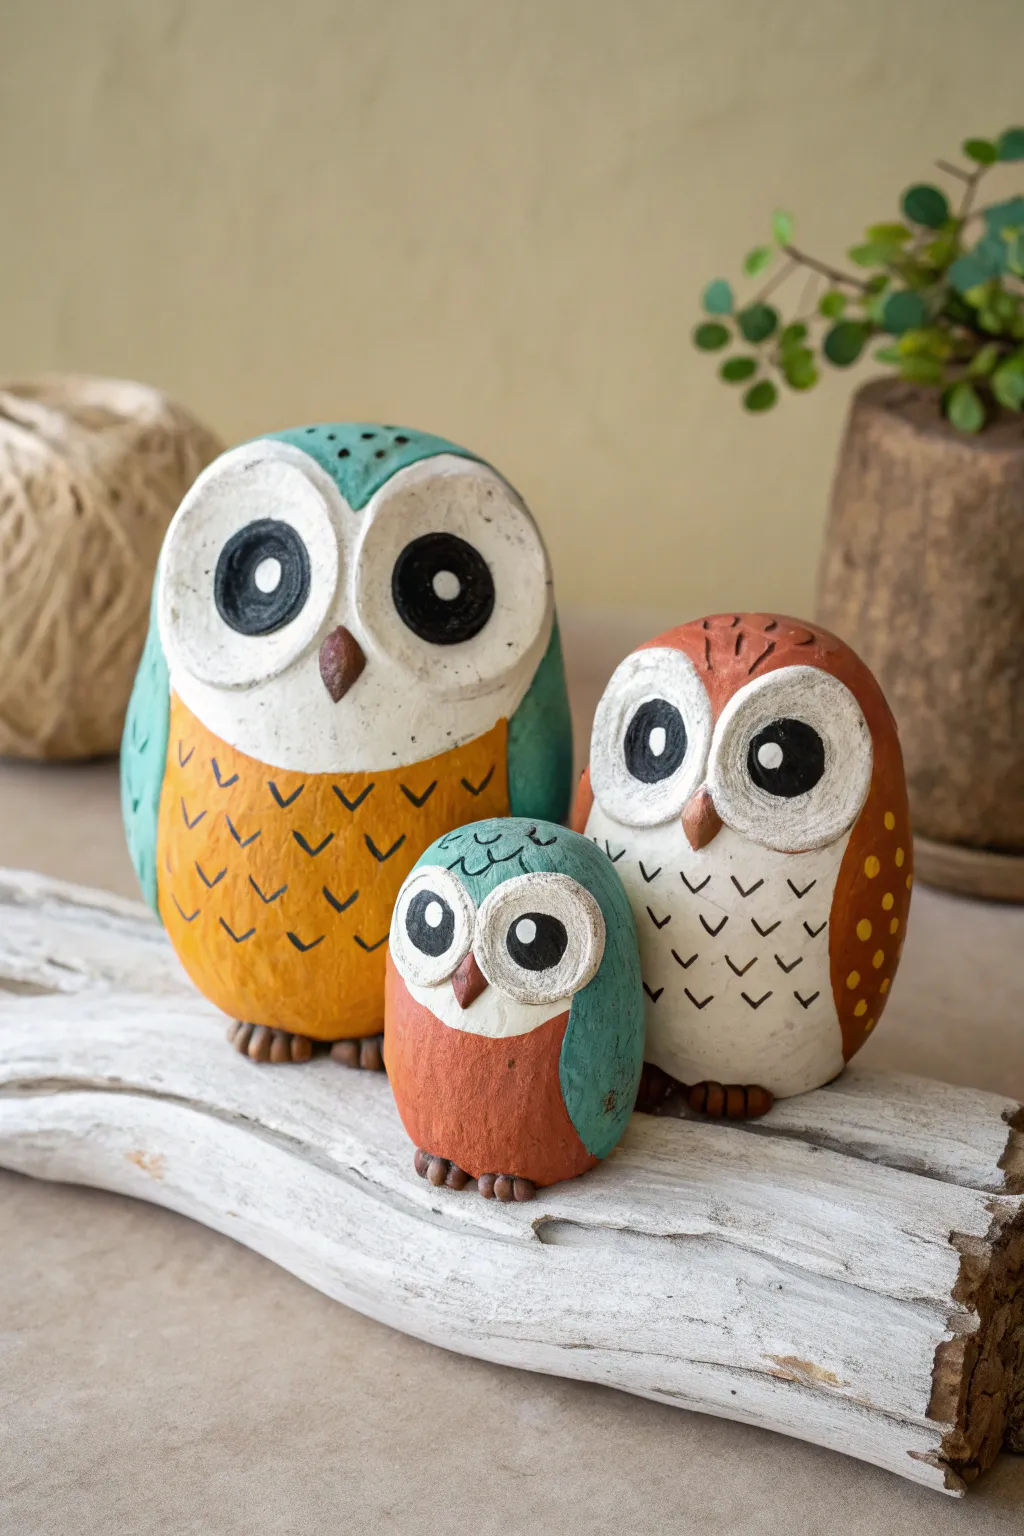
These charming, pebble-shaped owls bring a pop of personality to any shelf with their oversized eyes and delightful textures. The project focuses on simple shapes and bold, matte colors to create a stylized trio that looks like modern folk art.
Step-by-Step Guide
Materials
- Air dry clay (white or terracotta)
- Aluminum foil
- Acrylic paints (teal, orange, warm brown, white, black, pale yellow)
- Paintbrushes (flat brush, fine detail brush)
- Small sculpting tools or a toothpick
- Cup of water
- Fine-grit sandpaper (optional)
- Matte varnish or sealant
Step 1: Shaping the Owls
-
Create the core:
Start by balling up a piece of aluminum foil to form the core of your owl. Make an egg shape that is slightly flattened at the bottom so it stands upright. Create three distinct sizes if you want a family like the photo. -
Cover with clay:
Flatten a sheet of air dry clay to about 1/4 inch thickness. Wrap this around your foil egg, smoothing out the seams with a little water on your fingers until you have a seamless stone-like shape. -
Form the eye sockets:
Roll two equal-sized balls of clay and flatten them slightly into thick discs. Press these firmly onto the upper part of the body to create the large eye surroundings. They should look like oversized spectacles. -
Add the beak:
Roll a tiny cone of clay for the beak. Press it gently between the two eye discs, pointing downward. Use a sculpting tool to blend the back edge of the beak into the face for a secure bond. -
Sculpt the feet:
Roll two small balls for feet and press them under the front bottom of the owl. Use a toothpick or knife tool to press indentations into them, creating the look of toes or claws. -
Refine the texture:
If you want that slightly rustic, handmade texture shown in the image, don’t smooth the clay perfectly. Leave slight finger marks or tap the surface gently with a stiff brush. Let the owls dry completely, ideally for 24-48 hours.
Cracks happen!
If small cracks appear as the clay dries, don’t panic. Mix a tiny bit of fresh clay with water to make a paste (slip) and fill the crack, then smooth it over.
Step 2: Painting the Details
-
Base coat the face:
Once dry, paint the large eye discs white. You may need two coats to get a solid, opaque coverage. -
Block in the body color:
Paint the tummy area. For the large owl, use a warm yellow-orange; for the medium one, a creamy off-white; and for the baby, a rust-red. Let the paint dry to the touch. -
Paint the wings and head:
Paint the outer shell (the head and wings). Use teal for the large owl, reddish-brown for the medium one, and teal again for the baby owl’s wings. Define the curve where the wings meet the tummy clearly. -
Add the eyes:
Paint a large black circle in the center of each white eye disc. I find it easiest to stamp this with the back of a large paintbrush handle if possible, or just paint it carefully. -
Add the reflection:
Dip the non-brush end of a small paintbrush into white paint and dot a ‘reflection’ highlight onto the black pupil. This brings the character to life instantly. -
Detail the feathers:
Using a fine detail brush and black paint (or a dark grey), paint small ‘V’ shapes on the tummy of the large and medium owls to mimic feathers. Keep the pattern loose and irregular. -
Add wing patterns:
On the reddish-brown owl, use yellow paint to add small dots along the side of the wing. For the teal owl, use a darker teal or black line to separate the wing from the body visually. -
Paint the beak and feet:
Color the beaks a dark brown. Paint the feet the same dark brown shade to ground the figure. -
Protect the finish:
Once all paint is completely dry, apply a coat of matte varnish. This seals the clay and protects the paint without adding an unnatural glossy shine.
Natural Perch
For a stunning display, hunt for a real piece of driftwood or a thick branch outside. Hot glue your finished owls directly onto the wood for a rustic look.
Display your trio of wise observers on a bookshelf or windowsill to enjoy their company all year round

TRACK YOUR CERAMIC JOURNEY
Capture glaze tests, firing details, and creative progress—all in one simple printable. Make your projects easier to repeat and improve.
Elephants With Oversized Ears
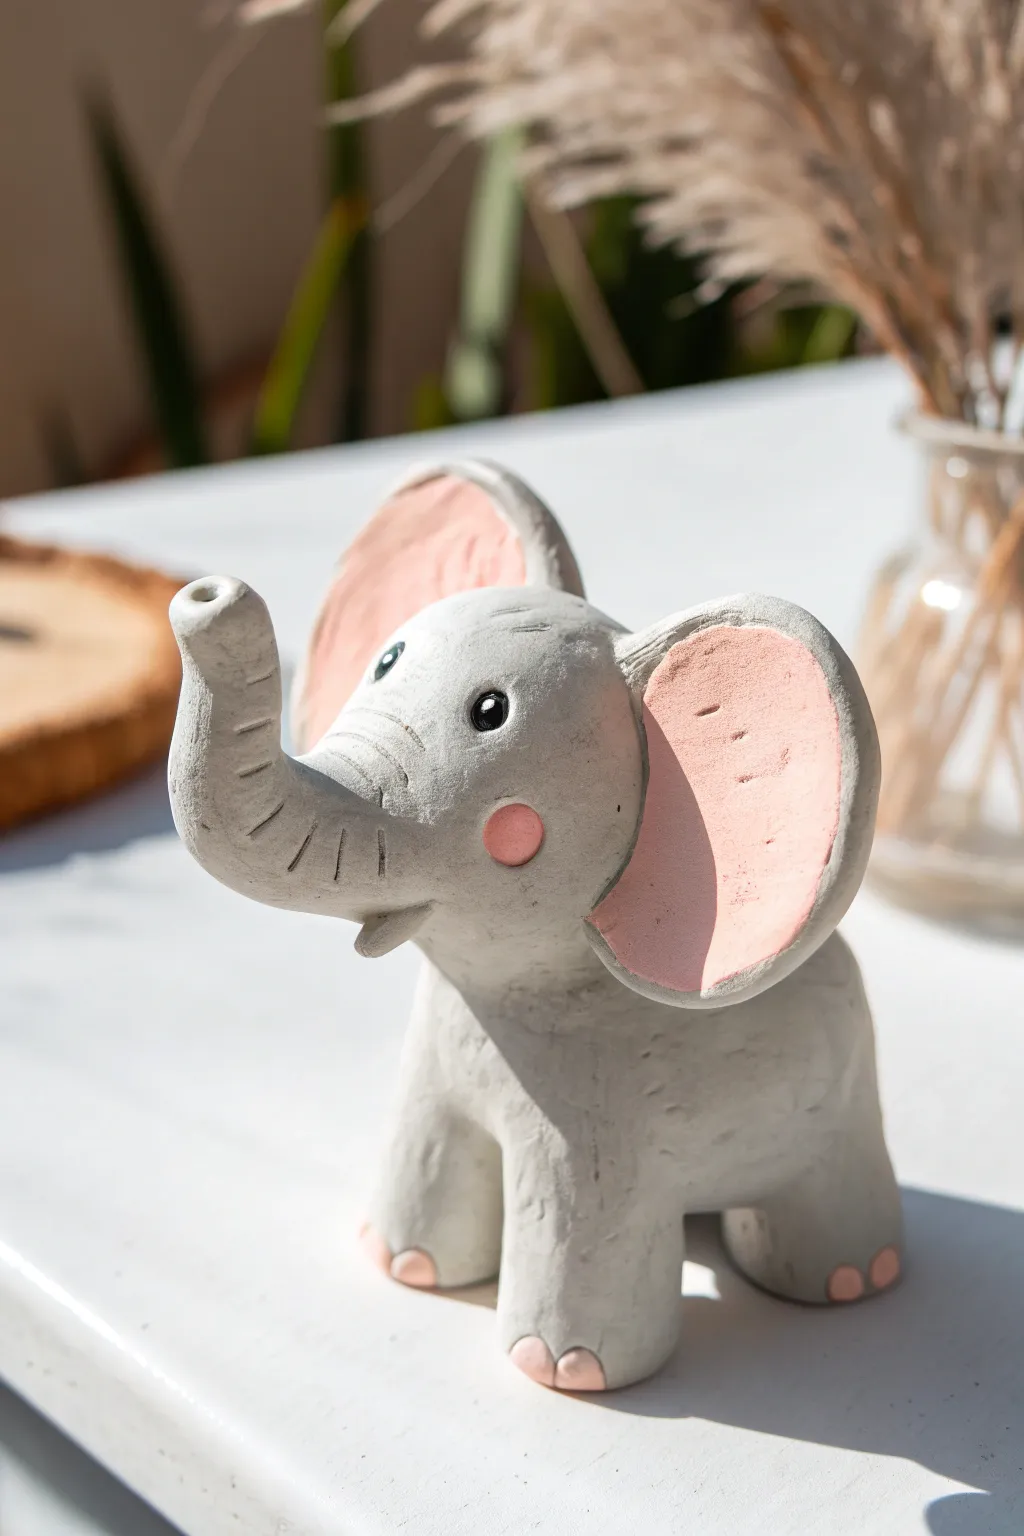
This adorable elephant features wonderfully oversized ears and a sweet, upturned trunk that brings so much personality to the figure. The matte gray finish contrasted with soft pink details gives it a modern, clean look perfect for a shelf decoration.
Detailed Instructions
Materials
- Air dry clay (white or pre-colored gray)
- Acrylic paint (light gray, soft pink, black, white)
- Small paintbrushes (detail and medium flat)
- Clay sculpting tools (needle tool, smoother)
- Water cup
- Paper towels
- Aluminum foil (optional, for armature)
Step 1: Forming the Body
-
Create the base torso:
Start with a handful of clay and roll it into a thick, slightly squarish cylinder. This will be the main body. If your clay is heavy, you can ball up some aluminum foil first and wrap the clay around it to save weight. -
Add the legs:
Pull four equal-sized balls of clay. Roll them into thick stumps and attach them firmly to the bottom four corners of the body cylinder. -
Blend the seams:
Use your thumb or a sculpting tool to smooth the clay where the legs meet the body so they look like one continuous piece, not just stuck on. Make sure the figure stands stable on a flat surface. -
Shape the head:
Roll a slightly smaller ball for the head. Attach it directly to the top of the body, slightly forward-facing. Blend the neck seam thoroughly for strength.
Step 2: Adding Features
-
Pull the trunk:
From the center of the face, gently pull and shape the clay outwards and upwards to form the trunk. Curve it slightly back so the ‘snout’ points to the sky. -
Detail the trunk:
Use a small rounded tool or the end of a paintbrush to make an indentation at the very tip of the trunk. Then, use a needle tool to scratch horizontal wrinkle lines across the curve of the trunk. -
Create the signature ears:
Flatten two large pieces of clay into thick pancakes. Shape them into rounded triangles or kidney bean shapes—remember, bigger is better for this look. -
Attach the ears:
Score (scratch) the side of the head and the attachment point of the ear. Add a dab of water (slip) and press the ears firmly onto the sides of the head. Smooth the join on the back side. -
Shape the ear curve:
Gently curve the ears forward slightly so they cup around the face, rather than sticking straight out flat. -
Make the tail:
Roll a tiny worm of clay and attach it to the rear of the body for a simple tail. -
Refine the texture:
I prefer not to smooth this project perfectly; leaving slight finger marks or using a stiff brush to dab the surface adds a nice ‘skin’ texture.
Floppy Ears?
If the large ears keep drooping while the clay is wet, prop them up with crumpled paper towels or small cardboard wedges until they stiffen up.
Step 3: Painting & Finishing
-
Dry completely:
Let the elephant sit for 24-48 hours until fully hardened. It should feel lighter and not cool to the touch. -
Base coat:
Paint the entire figure with a matte light gray acrylic paint. You might need two coats for opaque coverage. -
Paint the inner ears:
Mix a soft, pastel pink and paint the large inner surfaces of the ears, leaving a gray rim around the edges. -
Add rosy cheeks:
Paint two small pink circles right below where the eyes will go. -
Detail the toes:
Use the very tip of your brush to add three small pink half-circles at the bottom of each leg for toenails. -
Paint the eyes:
Use black paint to make two round eyes. Once dry, add a tiny white dot in each ‘pupil’ for a reflection highlight. -
Seal (Optional):
If you want to protect your work, apply a matte varnish over the whole piece once the paint is fully dry.
Textured Skin
Before drying, gently pat the entire gray surface with a crumpled ball of aluminum foil. It creates a perfect leathery elephant skin texture instantly.
Place your new elephant friend near a window or plant for a charming decorative touch
Lions With Simple Mane Texture
This adorable little lion stands proudly with a textured mane that looks like sun rays, offering a clean, modern look for young crafters. Its smooth finish and minimal face details make it a delightful project that is easier to assemble than it looks.
Step-by-Step
Materials
- Air dry clay (light beige or cream color)
- Air dry clay (terracotta or golden brown color)
- Small amount of dark brown clay (for nose/features)
- Rolling pin
- Circle cutter (cookie cutter size)
- Plastic knife or clay sculpting tool
- Toothpick or needle tool
- Water (for attaching pieces)
- Small paintbrush
Step 1: Shaping the Body
-
Form the Base:
Start with a generous handful of the light beige clay. Roll it into a smooth ball, then gently roll it on your work surface to create a thick, rounded cylinder shape. This will be the lion’s seated body. -
Create the Legs:
Using your fingers, gently pinch the front of the cylinder to distinguish two front legs. You don’t need to separate them completely; simply create a deep vertical groove down the center front. -
Define the Paws:
Slightly flatten the bottom of the cylinder so the lion sits stably. Use your plastic knife to press three small vertical lines into the bottom of each ‘leg’ section to create toes. -
Smooth it Out:
Dip your finger in a tiny bit of water and smooth over any fingerprints or cracks on the body. Ensuring the surface is pristine now is easier than fixing it after drying.
Head Heavy?
If the head keeps sliding down or tipping over while wet, insert a toothpick deeper into the body and slide the head onto it for invisible internal support.
Step 2: Crafting the Mane
-
Roll the Mane Clay:
Take your terracotta or golden-brown clay and roll it out flat with a rolling pin until it is about 1/4 inch thick. You want it substantial enough to hold the texture. -
Cut the Circle:
Use your large circle cutter to punch out a perfect circle. This disk will become the majestic mane. -
Texture the Edge:
Using a blunt tool or the dull side of a knife, press indentations all around the outer edge of the circle. Press firmly to create ridges, giving it that ‘sunburst’ or gear-like appearance. -
Attach to Body:
Score (scratch) the back of the mane slightly and add a drop of water. Press this disk firmly onto the front-top part of the body cylinder you made earlier.
Step 3: Head and Features
-
Form the Face:
Roll a smaller ball of the beige clay for the head. Flatten it slightly into a thick disk, ensuring it is smaller than the mane circle so the textured edges still show. -
Mount the Head:
Attach this beige disk to the center of the terracotta mane using the score-and-trip water method. Press gently so you don’t squash the mane’s texture. -
Add Ears:
Make two tiny balls of beige clay and flatten them into semi-circles. Attach these to the top of the head, nestled just inside the mane. -
Detail the Loop:
Use the rounded end of a paintbrush handle to press a small indentation inside each ear for depth. -
The Nose:
Take a tiny pinch of dark brown clay and roll it into a soft triangle shape. Press this into the center of the face for the nose. -
Sculpt the Mouth:
Using a sharp tool or toothpick, carefully etch a ‘J’ shape curving left and a matching curve to the right, starting from the distinct point at the bottom of the nose. -
Draw the Eyes:
Use a needle tool or toothpick to poke two small holes for the eyes. Alternatively, you can use tiny beads involved in the clay or draw them on with marker after drying. -
Whiskers:
Gently scratch three horizontal lines on each cheek area to represent whiskers. Keep the touch light so the clay doesn’t drag.
Clean Lines
To get those perfect ‘radiator’ ridges on the mane, use the side of a ruler rather than a knife. It creates a wider, more uniform indentation.
Allow your lion to dry completely in a spot away from direct sunlight to prevent any cracking
Pigs With Curly Tails
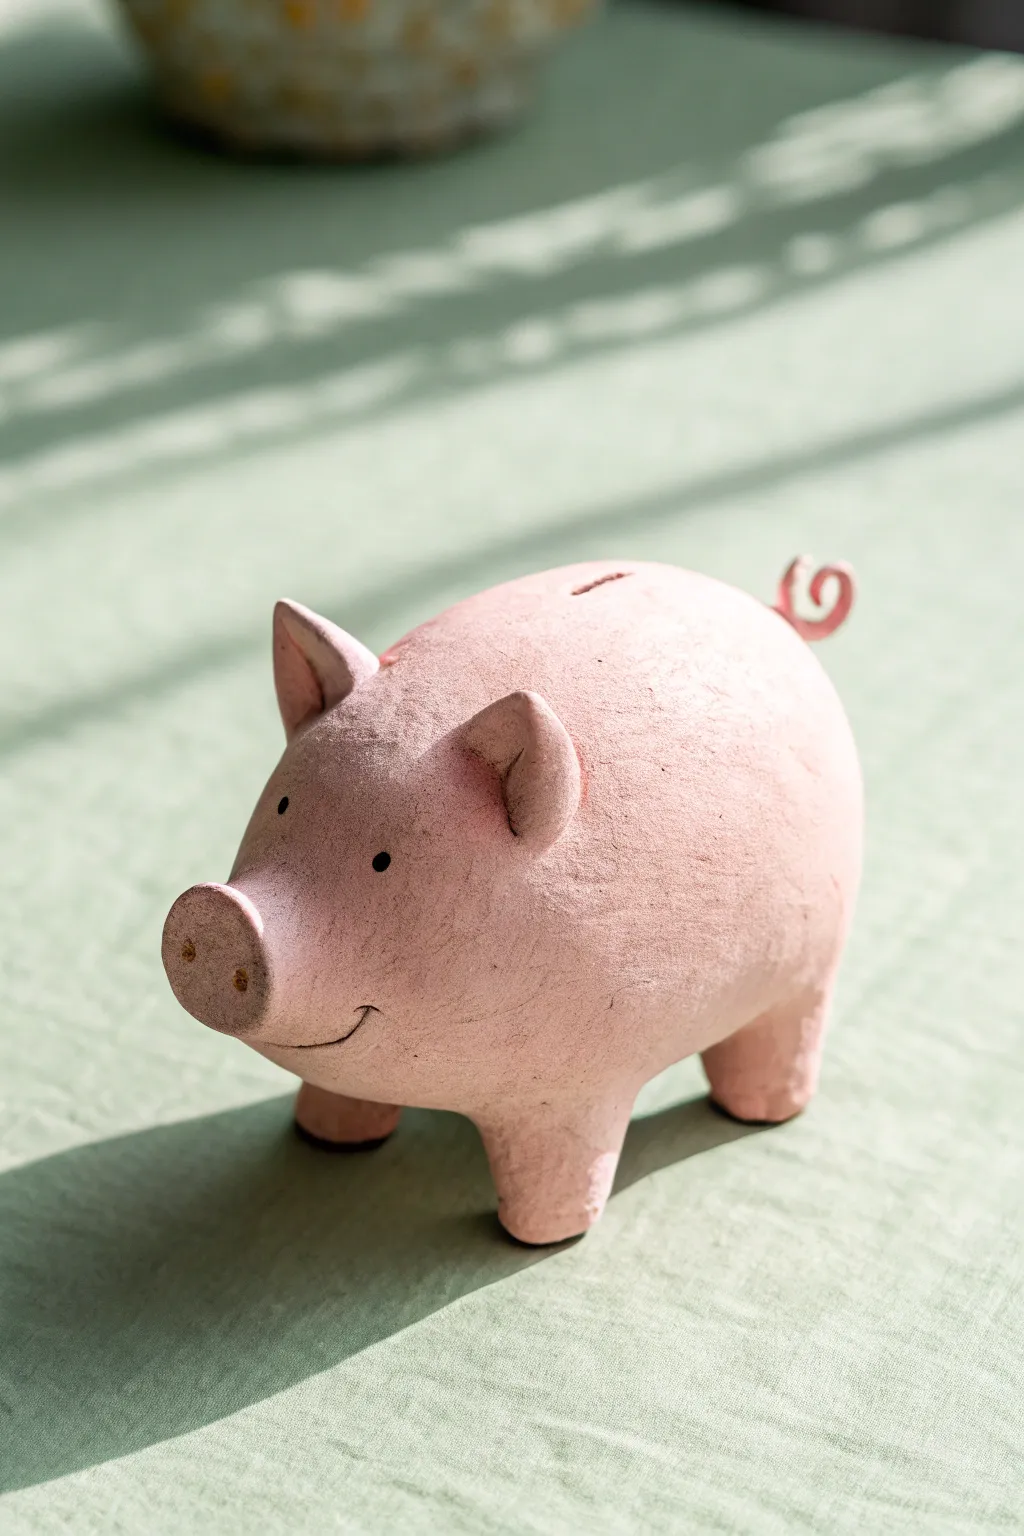
This adorable pig sculpture captures a unique, rustic look that mimics the texture of papier-mâché or stone while keeping a cheerful expression. With its classic coin slot and charming curly tail, it’s a perfect starter project for sculpting with air-dry clay.
Step-by-Step Tutorial
Materials
- White or terracotta air-dry clay
- Rolling pin
- Aluminum foil (for the core)
- Pink acrylic paint (matte finish)
- Black acrylic paint
- Small round paintbrush
- Modeling tools (or a toothpick and plastic knife)
- Sponge or textured cloth
- Wire (optional, for tail armature)
Step 1: Forming the Body
-
Create a Foil Core:
To save on clay and keep the pig lightweight, scrunch a large piece of aluminum foil into a smooth oval shape. This will be the main body of your pig. -
Roll Out the Clay:
Take a large chunk of air-dry clay and roll it out into a flat sheet, about 1/4 inch thick. It needs to be large enough to completely wrap around your foil egg. -
Wrap the Form:
Gently drape the clay sheet over the aluminum foil. smooth the seams together with your fingers and a little water until the foil is entirely hidden and the surface is uniform. -
Add Texture:
Instead of smoothing the clay perfectly, dab the surface gently with a sponge or a crumpled textured cloth. This gives it that lovely, slightly rough stone or paper-pulp appearance seen in the photo.
Step 2: Adding Features
-
Shape the Legs:
Roll four short, stout cylinders of clay for the legs. They should be wide enough to support the body’s weight. -
Attach the Legs:
Score (scratch) the top of the legs and the bottom of the body where they will attach. Add a dab of water (slip) and press the legs firmly onto the body. Blend the clay at the join so there are no visible seams. -
Make the Snout:
Roll a small ball of clay and flatten it slightly into a disc. Attach this to the front of the face for the snout, smoothing the edges backward to blend it into the head. -
Form the Ears:
Shape two triangles of clay. Gently pinch them to give them a slight curve, mimicking a real pig’s ear shape. -
Attach Ears:
Score and slip the ears onto the top of the head, positioning them just behind where the eyes will go. I like to tilt them forward slightly for a friendlier look. -
Sculpt the Tail:
Roll a thin snake of clay. Coil it into a tight spring or pigtail shape. Attach it securely to the rear of the pig.
Sturdy Details
For the curly tail, insert a small piece of craft wire inside the clay snake. This acts as an armature, preventing the fragile curl from snapping off once it dries.
Step 3: Details & Finishing
-
Create the Coin Slot:
If you want this to look like a bank, use a plastic knife or clay tool to carefully slice a rectangular slot into the top of the back. -
Carve Facial Details:
Use a toothpick to poke two small holes vertically on the snout for nostrils. Then, carve a long, upward-curving line for a happy smile. -
Let it Dry:
Allow the sculpture to dry completely. This usually takes 24-48 hours depending on the thickness of the clay and humidity. -
Paint a Base Coat:
Paint the entire pig with a soft pink acrylic paint. A matte paint works best to maintain that textured, natural feel. -
Highlight the Texture:
Once the pink is dry, you can dry-brush a very tiny amount of lighter pink or white over the high points to accentuate the sponge texture you created earlier. -
Paint the Eyes:
Using a very small brush or the tip of a toothpick, dot two small black circles for the eyes. -
Final Touches:
Add a tiny bit of darker pink or brown wash inside the nostrils and ears to give them depth.
Vintage Patina
Mix a tiny drop of brown paint into water to create a ‘wash.’ Brush this over the dried pink paint and wipe it off immediately to leave shadow in the textures.
Place your charming new piggy on a shelf where its smile can brighten your day
Cows With Spotty Markings
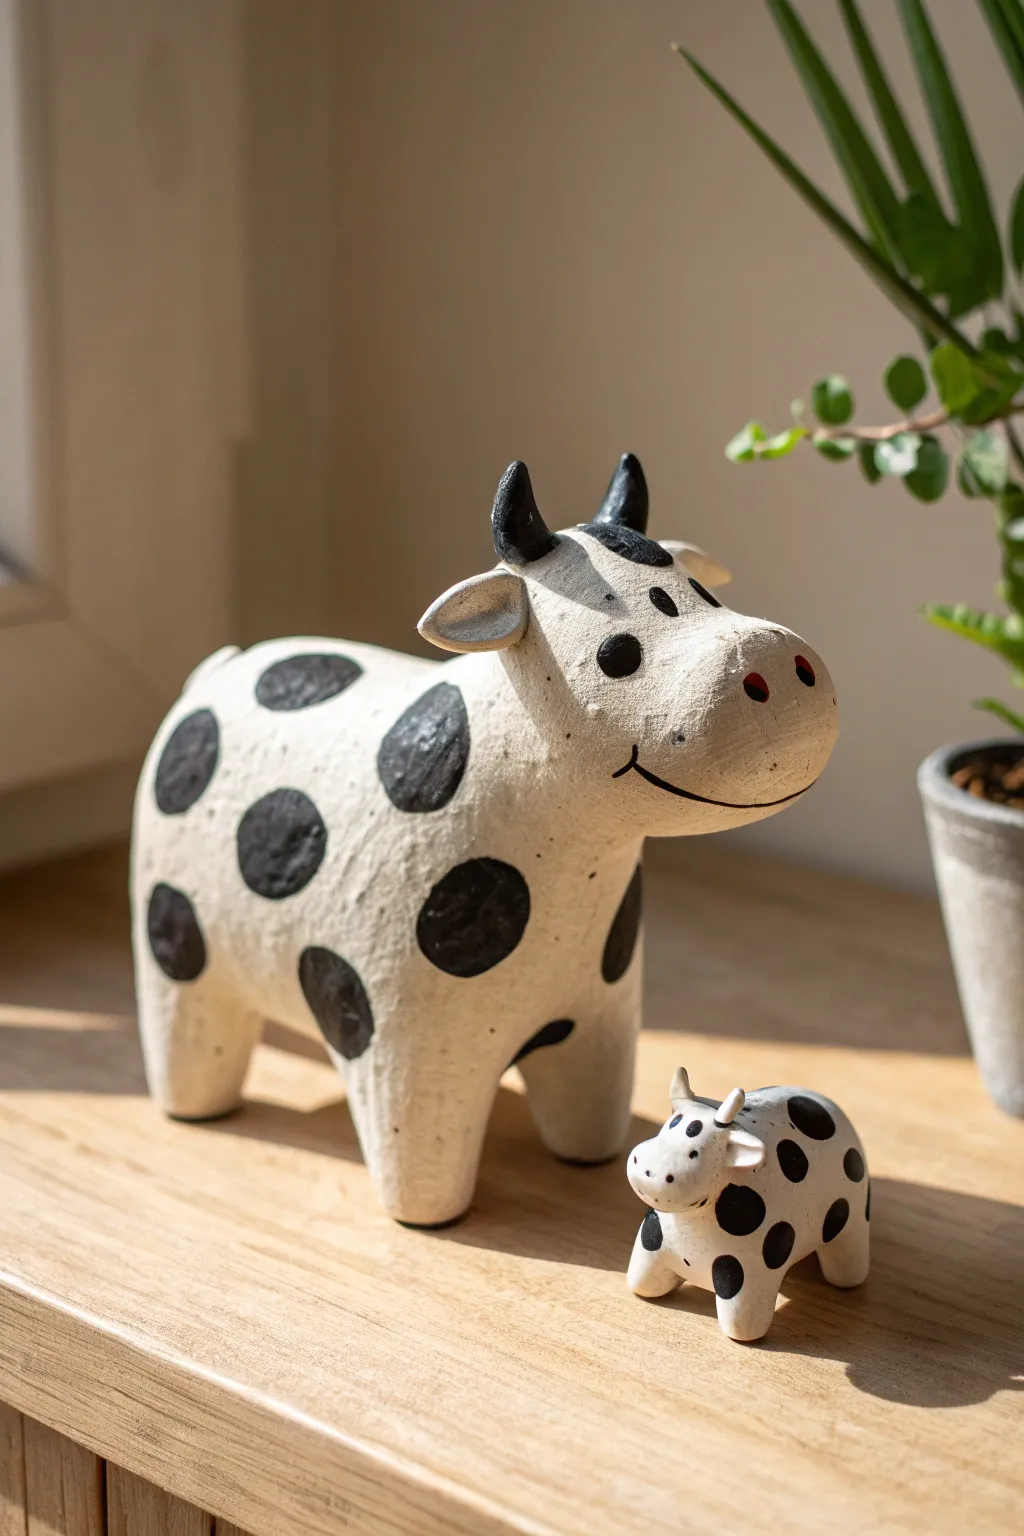
Create this adorable pair of spotted cows, one big and one small, featuring cheerful smiles and charmingly oversized snouts. These air-dry clay figurines have a delightful, handmade texture that looks perfect on a sunny windowsill next to your favorite plants.
Step-by-Step
Materials
- White air-dry clay
- Aluminum foil (for armature)
- Black acrylic paint
- Small paintbrush
- Ball stylus tool or toothpick
- Cup of water
- Sandpaper (optional)
Step 1: Shaping the Bodies
-
Form the core:
Start by crumpling a medium-sized ball of aluminum foil into an oblong shape for the larger cow’s body. This saves clay and makes the figure lighter. -
Cover the core:
Roll out a slab of white air-dry clay and wrap it completely around your foil core, smoothing out any seams with a little water on your finger. -
Create the legs:
Roll four thick, sturdy cylinders of clay for the legs. Attach them to the bottom of the body by scoring the clay (scratching crisscross lines) and adding a dot of water to create a ‘slip’ connection. -
Smooth the stance:
Stand the cow up and gently press down to ensure all four feet are flat and the cow is stable. Smooth the clay where the legs join the body so it looks like one solid piece. -
Sculpt the head:
Roll a separate, slightly smaller oval for the head. Shape one end to be wider and flatter for that exaggerated, friendly snout seen in the photo. -
Attach the head:
Score and slip the neck area, then press the head firmly onto the body. I like to blend the clay at the neck seam downward with my thumb to make it extra secure.
Pro Tip: Heavy Heads
If the big cow’s head keeps drooping while wet, prop it up with a small object (like a crumpled paper towel or a small box) until the clay stiffens enough to hold its own weight.
Step 2: Adding Details
-
Craft the ears:
Make two small teardrop shapes and flatten them. Attach these to the sides of the head, just behind where the horns will go. -
Form the horns:
Roll two tiny cones of clay. curving them slightly inward. Attach these to the very top of the head. -
Create the tail:
Roll a thin snake of clay and attach it to the rear, curling it slightly against the body so it isn’t too fragile. -
Make the calf:
Repeat the entire sculpting process but on a much smaller scale for the baby cow. You likely won’t need a foil core for this one since it’s small enough to be solid clay. -
Dry completely:
Let both figures dry for at least 24-48 hours. Turn them over occasionally so the belly and feet dry evenly.
Step 3: Painting the Spots
-
Sand imperfections:
Once bone dry, you can lightly sand any rough fingerprints or bumps to get a smoother finish. -
Paint the horns:
Using a small brush and black acrylic paint, carefully paint the horns. Leave the ears unpainted or paint the inner ear a soft grey or pink if desired, though the original keeps them simple. -
Add the spots:
Paint large, organic black ovals and circles all over the body. Don’t worry about making them perfect circles; wobbly edges add character. -
Paint the face details:
Use the tip of your smallest brush or a toothpick to paint two dots for eyes and a long, sweeping black line for the smile. -
Add the nostrils:
For the snout, you can either paint two small red or black dots, or if you pressed indentations earlier, fill them with a dab of dark paint. -
Protect your work:
Give the paint plenty of time to dry. An optional coat of matte varnish will protect your cows from moisture and keep them looking fresh.
Level Up: Bell Bling
Before the clay dries, use a needle tool to poke a horizontal hole through the neck skin. After painting, thread a tiny real bell on a piece of twine and tie it around the cow’s neck.
Place your finished cow family on a shelf where their goofy grins can brighten up the room
Dinos Made From Ovals And Cones

Travel back to prehistoric times with this adorable, long-necked dinosaur figurine crafted from simple shapes. Its soft coral body and mint-green spots make for a friendly desk companion or a playful shelf decoration.
Detailed Instructions
Materials
- Air dry clay (coral/pink, mint green, white, black)
- Aluminum foil (for armature)
- Modeling tools (ball tool, needle tool)
- Water in a small cup
- Parchment paper or craft mat
- Toothpick (optional, for neck support)
Step 1: Forming the Body Structure
-
Core construction:
Crumple a piece of aluminum foil into an oval shape roughly the size of a lemon to act as the core for the body. This saves clay and keeps the figurine lighter. -
Covering the core:
Flatten a large ball of coral-colored clay into a pancake. Wrap this fully around your foil core, smoothing the seams together with a bit of water until you have a seamless egg shape. -
Creating the neck:
Roll a thick sausage of coral clay, tapering it slightly at the top for the head area. It should be substantial enough to support its own weight. -
Attaching the neck:
Score the top of the body and the bottom of the neck with a needle tool. Apply a drop of water (slip) and press the neck firmly onto the body. Use a modeling tool to blend the clay downward so the neck transitions smoothly into the back.
Step 2: Adding Limbs and Details
-
Making legs:
Roll four equal-sized balls of coral clay. Shape them into stout, slightly tapered cylinders to form the legs. -
Attaching the legs:
Attach the legs to the bottom of the body using the score-and-slip method. Blend the clay well at the joints to ensure they stay put as the sculpture dries. -
Balancing act:
Gently press the dinosaur down onto your work surface to flatten the bottom of the feet. This ensures it creates a stable base and won’t tip over. -
Adding the tail:
Form a smaller cone shape for the tail. Attach it to the rear of the body, blending the clay smoothly so it looks like a natural extension of the spine. -
Refining the head:
Gently pinch the front of the neck’s top to pull out a slight snout shape. Use a tool to gently indent a smiling mouth line.
Neck Support Secret
If the neck keeps drooping while you work, insert a toothpick deeper into the body foil and slide the neck clay over it for an instant internal skeleton.
Step 3: Decoration and Finishing
-
Creating the spots:
Roll tiny balls of mint green clay in varying sizes. Flatten them into small discs between your fingers. -
Applying the pattern:
Start applying the mint discs at the top of the head and work your way down the spine to the tail. Press them gently so they fuse with the body surface but remain slightly raised. -
Adding eyes:
Press two small indentations on either side of the head using a ball tool. Fill these with tiny white clay balls, flattened slightly. -
Pupil placement:
Add minuscule black clay dots onto the white eyes for pupils. Placing them slightly off-center gives the dinosaur a cute, curious expression. -
Toes detail:
Using a needle tool or specialized clay tool, make small vertical indentations on the bottom of each foot to simulate toes. -
Surface texture:
If you want a matte, natural look like the photo, take a soft, dry brush and tap it gently over the pink clay (avoiding the eyes) to remove fingerprints and add subtle texture. -
Final smooth:
Check for any cracks or rough seams one last time. Smooth them out with a tiny bit of water on your finger before setting it aside. -
Drying time:
Let the project air dry completely in a safe spot away from direct heat. This usually takes 24 to 48 hours depending on thickness.
Cracks While Drying?
Common with air dry clay. Mix a tiny bit of fresh clay with water to make a paste (slip) and fill the cracks, then smooth over with a finger.
Enjoy the process of watching your prehistoric pal take shape on your sculpting table
Hedgehogs With Pressed Spines
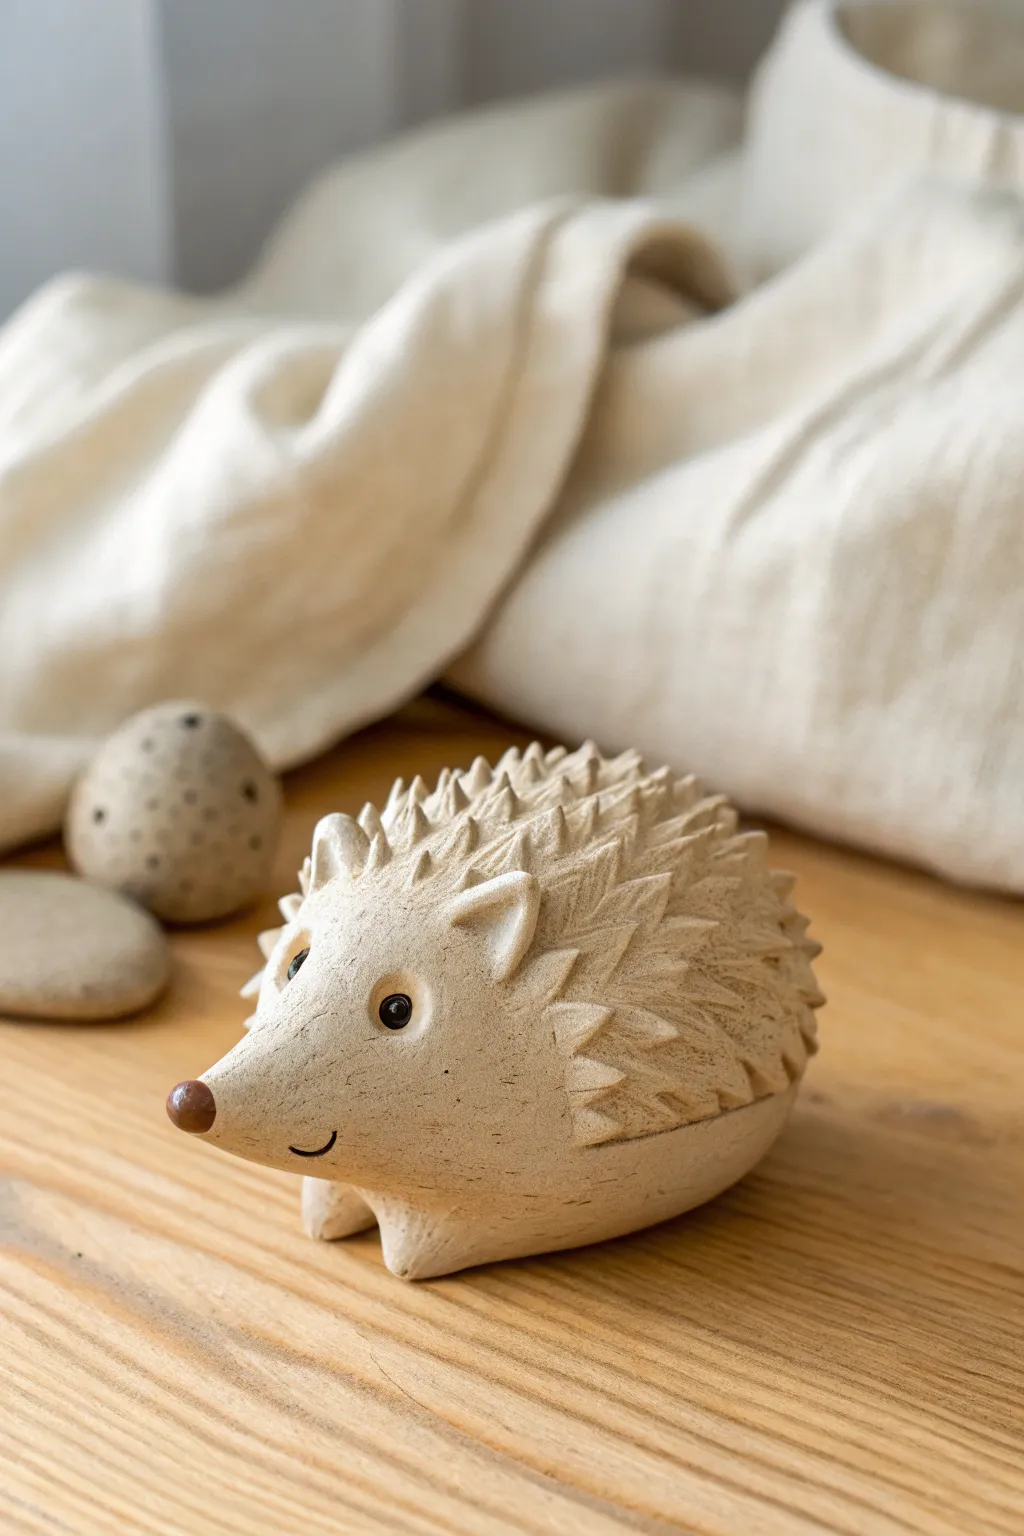
This charming hedgehog figurine brings a touch of nature indoors with its textured spines and sweet expression. Using simple scissor cuts to create the prickly back, you can achieve an impressive, professional-looking finish with just basic air-dry clay.
How-To Guide
Materials
- Air-dry clay (light beige or white)
- Small craft scissors (sharp tips are best)
- Modeling tool or toothpick
- Small round bead or bit of brown clay (for the nose)
- Black acrylic paint or fine-tip marker
- Brown acrylic paint (optional wash)
- Clear matte varnish
- Water and a small sponge
Step 1: Shaping the Base
-
Create the Body:
Start with a ball of clay about the size of a tennis ball. Roll it until it’s smooth and free of major cracks. -
Form the Teardrop:
Gently roll one side of the ball between your palms to taper it into a teardrop shape. This narrower end will become the hedgehog’s face. -
Flatten the Bottom:
Tap the bottom of your teardrop on your work surface to create a flat base so the hedgehog sits stably without rolling over. -
Define the Snout:
Using your fingers, gently pinch and lift the tapered end slightly upwards to give the hedgehog an inquisitive, tilted snout. -
Add Tiny Feet:
Roll four small, pea-sized balls of clay. Flatten them slightly and attach two near the front and two near the back on the underside, blending the seams with a little water so they don’t fall off.
Sticky Scissors?
If the clay drags or sticks to your scissors while snipping spines, dip the tips in a little water or coat them with a tiny drop of oil before cutting.
Step 2: Adding Details & Spines
-
Make the Ears:
Create two small triangles of clay. Press your thumb into the center of each to curve them slightly. -
Attach the Ears:
Score the clay where the head meets the body and attach the ears using a dab of water. Smooth the back of the ears into the body so they look seamless. -
Map the Face:
Use a modeling tool to lightly mark a curved line separating the smooth face area from where the spines will begin. -
Start Snipping:
Hold your small scissors at a low angle, almost parallel to the clay. Starting at the back of the hedgehog, make small snips into the clay surface. -
Create the Prickles:
As you snip, the scissors will naturally lift a small triangle of clay. Don’t cut the piece off; just lift it to create a spine. -
Work in Rows:
Continue snipping in offset rows, moving from the tail forward toward the head. I find it helpful to wipe the scissor blades occasionally if clay starts to stick. -
Finish at the Face:
As you approach the face line you marked earlier, make the snips slightly smaller for a neat transition. -
Indent the Eyes:
Use a rounded tool or the back of a paintbrush to press two small indentations into the face for the eyes. -
Add the Nose:
Press a tiny ball of brown clay onto the very tip of the snout. If you don’t have brown clay, shape a nose from the base clay and paint it later. -
Carve the Smile:
Use a sharp tool or toothpick to carve a simple, curved line for a happy mouth.
Softer Spines
For a softer look, gently pat the tips of the snipped spines down slightly with your finger after cutting. This makes the figurine look slightly more cuddly and less sharp.
Step 3: Finishing Touches
-
Let it Dry:
Allow the clay to dry completely. This usually takes 24-48 hours depending on thickness. Flip it carefully halfway through to let the bottom dry. -
Paint the Eyes:
Once dry, use a fine-tip brush to paint the inside of the eye indentations black. Add a tiny white dot for a highlight if you wish. -
Optional Antique Wash:
To emphasize the texture, you can mix watery brown paint, brush it over the spines, and immediately wipe the surface with a damp cloth, leaving darker color in the recesses. -
Seal the Work:
Apply a coat of clear matte varnish to protect your hedgehog and give it a finished ceramic look.
Place your little hedgehog on a shelf or desk for a friendly companion that always smiles back at you
Snails With Swirly Shells
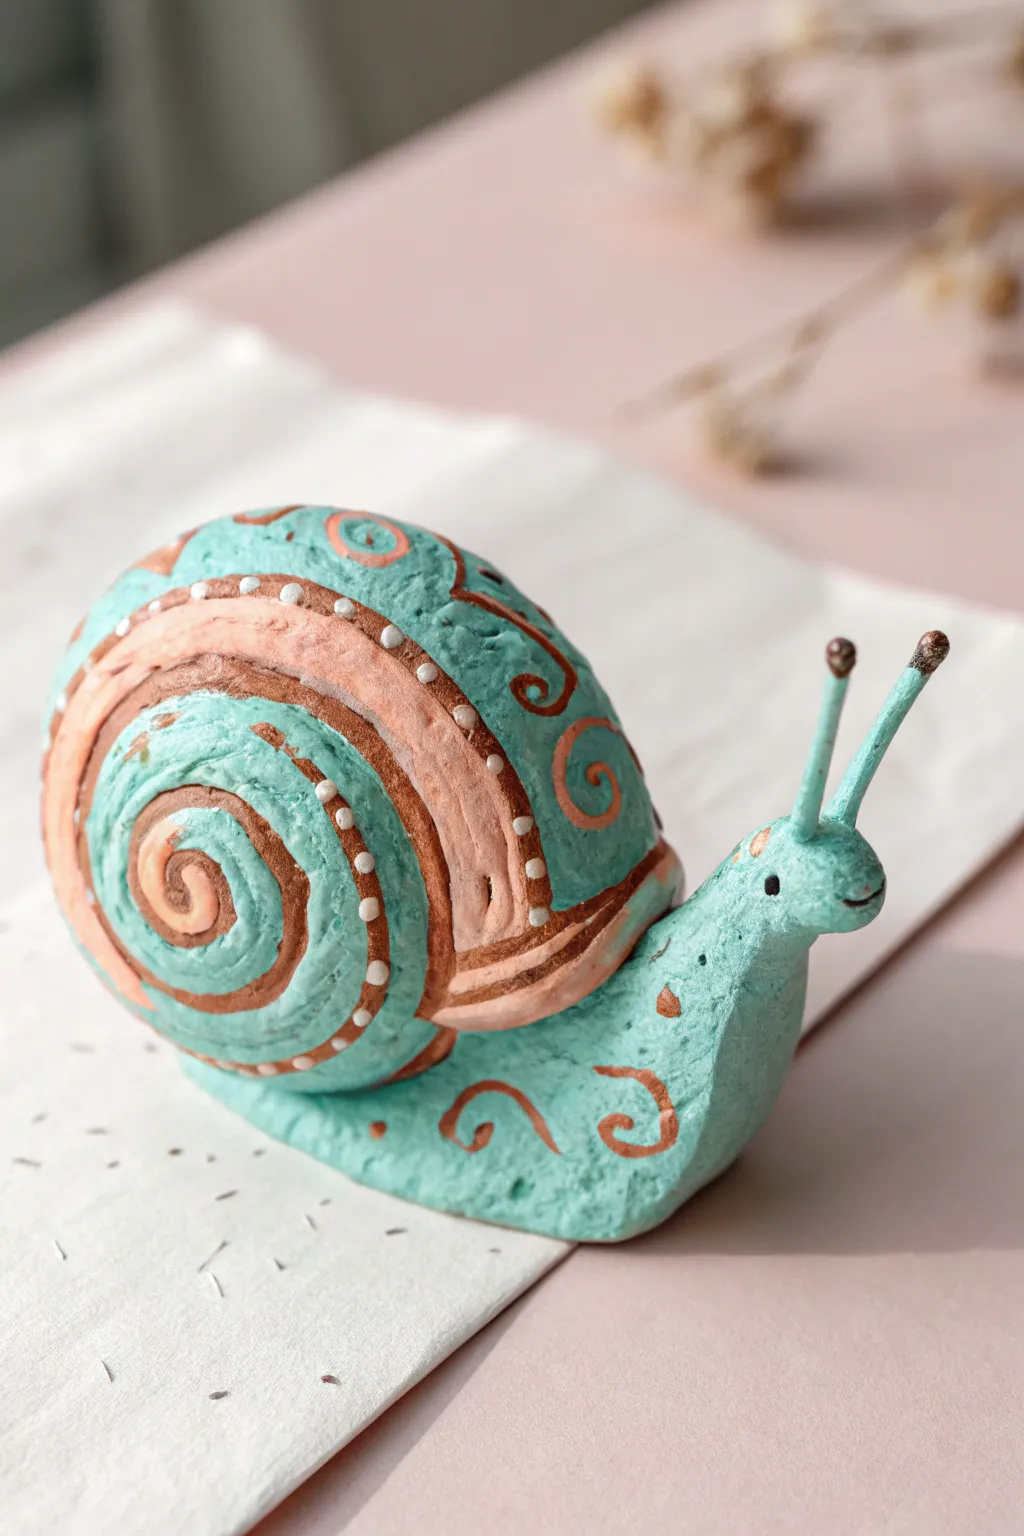
This charming snail brings a pop of whimsy to any shelf with its textured turquoise body and contrasting peach-colored shell. The delightful swirls and tiny dotted details give it a folk-art feel that is surprisingly simple to achieve.
Step-by-Step Guide
Materials
- Air dry clay (white or grey)
- Acrylic paints (turquoise/mint, terracotta/peach, white, dark brown)
- Small round paintbrush
- Fine detail brush
- Sculpting tools or a toothpick
- Aluminum foil
- Water cup
- Matte finish sealant (optional)
Step 1: Sculpting the Base
-
Form the foil core:
Crumple a piece of aluminum foil into a round ball shape about the size of a tangerine. This will make the shell lighter and save clay. -
Create the shell base:
Flatten a large piece of clay and wrap it completely around the foil ball. Roll it in your palms until it is smooth and round. -
Shape the body:
Roll a separate log of clay into a thick sausage shape. Gently flatten the bottom so it sits stable on your table. -
Form the head and neck:
Pinch one end of the body log and curve it upward to create the neck and head area. Round off the snout gently with your thumb. -
Connect the pieces:
Score the top of the body and the bottom of the shell (scratch crisscross lines). Add a dab of water to the scratched areas and press the shell firmly onto the body. -
Smooth the seams:
Use a sculpting tool or your finger to smooth the clay where the shell meets the body so they look like one solid piece. -
Add the stalks:
Roll two small, thin snakes of clay. Attach them to the top of the head for eye stalks, blending perfectly at the base so they don’t fall off. -
Create texture:
Before the clay dries, gently dab the entire surface with a crumpled ball of foil or a rough sponge to give it that stone-like texture shown in the photo.
Texturing Tip
If the clay is too smooth, tap it lightly with a stiff toothbrush while wet. This pitted texture helps the paint look more like aged stone or ceramic.
Step 2: Painting and Details
-
Dry completely:
Let your snail sit for 24-48 hours until fully hard and dry to the touch. -
Base coat:
Paint the entire snail with a solid coat of turquoise or mint green acrylic paint. You may need two coats for opaque coverage. -
Paint the spiral:
Using the terracotta or peach paint, draw a thick spiral stripe starting from the center of the shell and winding outward. -
Add decorative swirls:
Paint smaller decorative curls and swirls on the remaining turquoise parts of the shell and along the side of the snail’s body using the terracotta color. -
Outline for definition:
With a very fine brush and thinned terracotta paint (or a terracotta paint marker), outline the main spiral to make it pop against the blue background. -
Add the dots:
Dip the handle end of your paintbrush into white paint. Dot it along the edges of the main peach spiral to create the decorative border. -
Paint the face:
Use a tiny dot of black paint for the eyes near the base of the stalks, and paint the tips of the antennae brown. -
Draw the smile:
I find using a fine-tip permanent marker or the very tip of a liner brush works best to draw a tiny, curved smile. -
Seal:
Once dry, apply a matte varnish to protect your new friend.
Glossy Trail
Use high-gloss varnish only on the bottom edge of the snail’s foot to make it look like it’s leaving a slimy, shiny garden trail behind it.
Place your finished snail in a potted plant or on a sunny windowsill to enjoy
Butterflies With Flat Wing Shapes
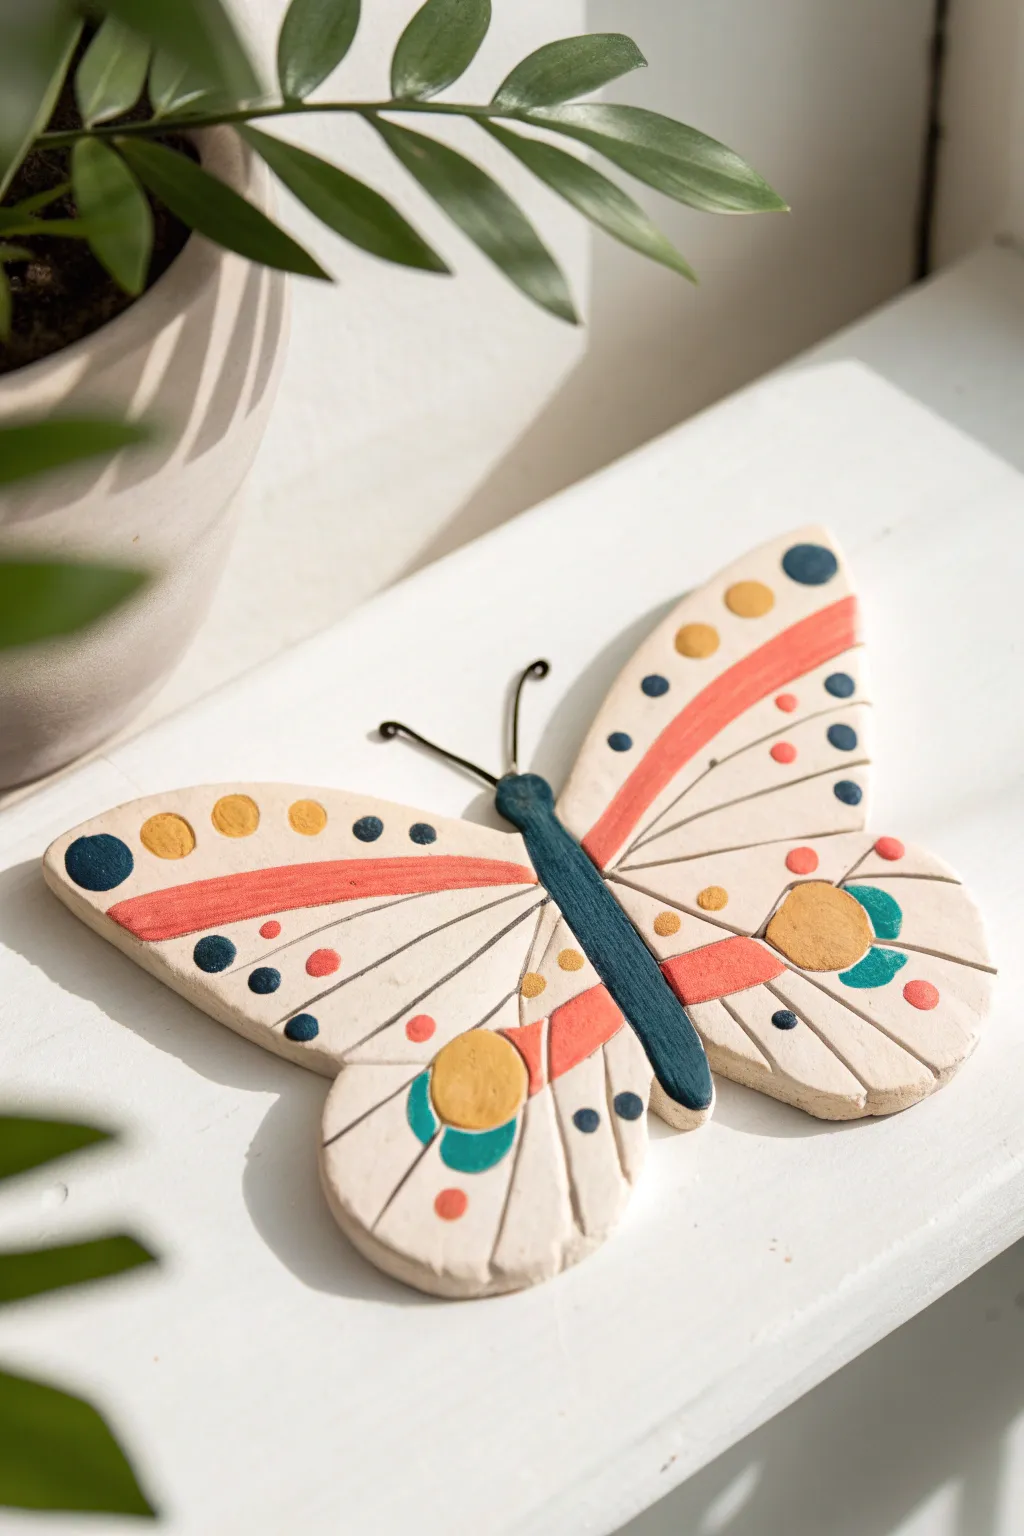
Create a stunning butterfly wall hanging or table decoration using simple air-dry clay and muted, earthy colors. This project features flat, distinctly shaped wings with etched details and a touch of wire for a mixed-media finish.
Detailed Instructions
Materials
- White air-dry clay
- Rolling pin
- Clay knife or craft scalpel
- Needle tool or toothpick
- Sandpaper (fine grit)
- Acrylic paints (Corral/Salmon, Mustard Yellow, Teal/Deep Blue, Navy)
- Small round paintbrushes
- Black wire (20 or 22 gauge)
- Strong craft glue or heavy gel medium
- Varnish (matte or satin)
Step 1: Shaping the Base
-
Roll out the clay:
Take a generous ball of white air-dry clay and condition it in your hands until it’s pliable. Roll it out on a smooth surface to an even thickness of about 1/4 inch (6mm). If you want perfectly even wings, use guide sticks on either side. -
Cut the wing shapes:
Using a reference image or a paper template, cut out two large, asymmetrical wing shapes. The top half should be more elongated and oval, while the bottom half is slightly rounder. You need a left pair and a right pair. -
Form the body:
Roll a small sausage of clay for the central body. It should be long enough to connect the wings but thin enough to look elegant. Flatten the bottom slightly so it sits stable. -
Assemble the butterfly:
Score the sides of the body and the inner edges of the wings with a needle tool. Add a tiny bit of water or slip (clay mixed with water) and press the wings firmly against the body to join them. Smooth the seams on the back for extra strength. -
Etch the details:
While the clay is still damp, use a needle tool or a dull knife to gently carve lines radiating from the body outward to the wing tips. These grooves imitate wing veins and add great texture. -
Insert antenna holes:
Before the clay hardens, poke two small holes at the top of the head using a toothpick or the wire you plan to use later. This makes attaching the antennae much easier after painting.
Smooth Operator
To get super smooth clay before painting, dip your fingertip in water and run it over the wing surface while the clay is wet to erase fingerprints.
Step 2: Refining and Painting
-
Let it dry completely:
Place your butterfly on a flat surface or a drying rack. Allow it to dry for 24–48 hours until it is fully hard and chalky white. Flip it halfway through the drying process to prevent warping. -
Sand the edges:
Once dry, take fine-grit sandpaper and gently smooth any rough edges around the perimeter of the wings. Wipe away the dust with a slightly damp cloth. -
Base coat the wings:
Paint the entire surface of the wings in a creamy off-white or beige tone if your clay isn’t naturally that color. Leave the central body unpainted for now. -
Paint the body:
Using a dark teal or navy blue paint, color the central body section. Use a small brush to get crisp edges where the body meets the wings. -
Add the coral stripes:
Paint a bold, sweeping stripe of coral or salmon pink across the upper wings. Follow the curve of the wing shape. Add smaller coral accents on the lower wings as well. -
Add yellow details:
Using mustard yellow, paint large circles near the tips of the wings and smaller decorative spots near the body. On the lower wing, paint a large central yellow circle. -
Detail with teal and navy:
Add contrast by painting small navy blue dots along the outer edges and inside the etched lines. Use the teal color to add crescent shapes or additional dots near the yellow circles. -
Enhance the grooves:
I like to take a very fine liner brush with watered-down brown or grey paint and run it inside the etched grooves to make the texture pop, though this is optional.
Wings Curling Up?
If wing edges curl while drying, gently place a light book on top after about 2 hours of drying to keep it perfectly flat.
Step 3: Finishing Touches
-
Create the antennae:
Cut two small pieces of black wire, about 2 inches long. Curl one end of each wire into a small spiral using pliers. -
Attach the antennae:
Dip the straight ends of the wire into strong craft glue and insert them into the pre-made holes at the top of the butterfly’s head. -
Seal the artwork:
Apply a coat of matte or satin varnish over the entire butterfly to protect the paint and seal the clay against moisture.
Now you have a charming, folk-art inspired butterfly ready to brighten up a windowsill or shelf
Axolotls With Frilly Gills

This adorable, chubby axolotl is the perfect beginner sculpting project thanks to its simple egg-like shape and charming details. With soft feathery gills and a sweet smile, this little amphibian makes a delightful desk companion or gift.
Step-by-Step Guide
Materials
- Lightweight air-dry clay (white)
- Acrylic paints (pastel pink, purple, black)
- Plastic sculpting tools (knife tool, ball tool)
- Water cup and brush
- Toothpick or needle tool
- Gloss varnish (optional)
Step 1: Shaping the Body
-
Mix the base color:
Start by mixing a very small amount of pastel pink paint into a handful of white clay. Knead it thoroughly until you have a uniform, pale pink color. -
Form the main shape:
Roll the pink clay into a smooth ball between your palms to remove any cracks. -
Refine the silhouette:
Gently press the ball onto your work surface to flatten the bottom slightly so it sits stable. Use your palms to taper the top just a tiny bit, creating a subtle egg shape.
Step 2: Adding Limbs
-
Create tiny legs:
Pinch off four tiny pea-sized amounts of the same pink clay. Roll them into small cone shapes. -
Attach the feet:
Press two cones onto the bottom front of the body for feet, and two slightly smaller ones near the bottom sides for the back legs. Blend the seams gently with a sculpting tool or your finger. -
Make the arms:
Roll two very small, thin sausages of clay for the arms. They should be quite stubby. -
Position the arms:
Attach these vertically on the sides of the body, just below the midline. I find using a tiny dot of water helps them stick securely.
Cracking Clay?
If you see small fissures while rolling the body, dip your finger in water and smooth them out immediately. Air dry clay needs moisture to stay seamless.
Step 3: Sculpting the Gills
-
Mix the gill color:
Take a new piece of white clay and mix in purple paint with a touch of pink to get a lavender shade that contrasts nicely with the body. -
Shape the gill stalks:
Divide the purple clay into six equal small portions. Roll each into a flattened teardrop or leaf shape. -
Add texture:
Using a knife tool or toothpick, press horizontal indentations along the edges of each teardrop to create a frilly, feathery look. -
Attach the gills:
Arrange three gills on the left side of the head and three on the right. Press them firmly against the body, blending the back edge slightly so they don’t fall off.
Galaxy Axolotl
Try using dark blue clay for the body and painting tiny white stars and constellations on it instead of the pink spots for a cosmic variation.
Step 4: Detailing the Face
-
Create eye sockets:
Use a ball tool to press two small, shallow indents where you want the eyes to sit. This helps the eyes look embedded rather than just stuck on. -
Make the eyes:
Roll two tiny balls of black clay (or paint white clay black). Press them into the sockets you just made. Add a tiny white reflection dot with paint later if desired for extra cuteness. -
Paint the smile:
Use a very fine detail brush or a black fine-tip marker to draw a simple, small ‘u’ shape for the mouth right between the eyes. -
Add rosy cheeks:
Dip a brush or cotton swab into pink paint (slightly darker than the body). Dab two small oval blushes under the eyes. -
Decorate the forehead:
Using a toothpick or fine brush, add a few tiny pink dots on the forehead area to mimic natural axolotl speckles.
Let your little amphibian dry completely for 24 hours before moving it to a shelf or windowsill
Chameleons With Curled Tails
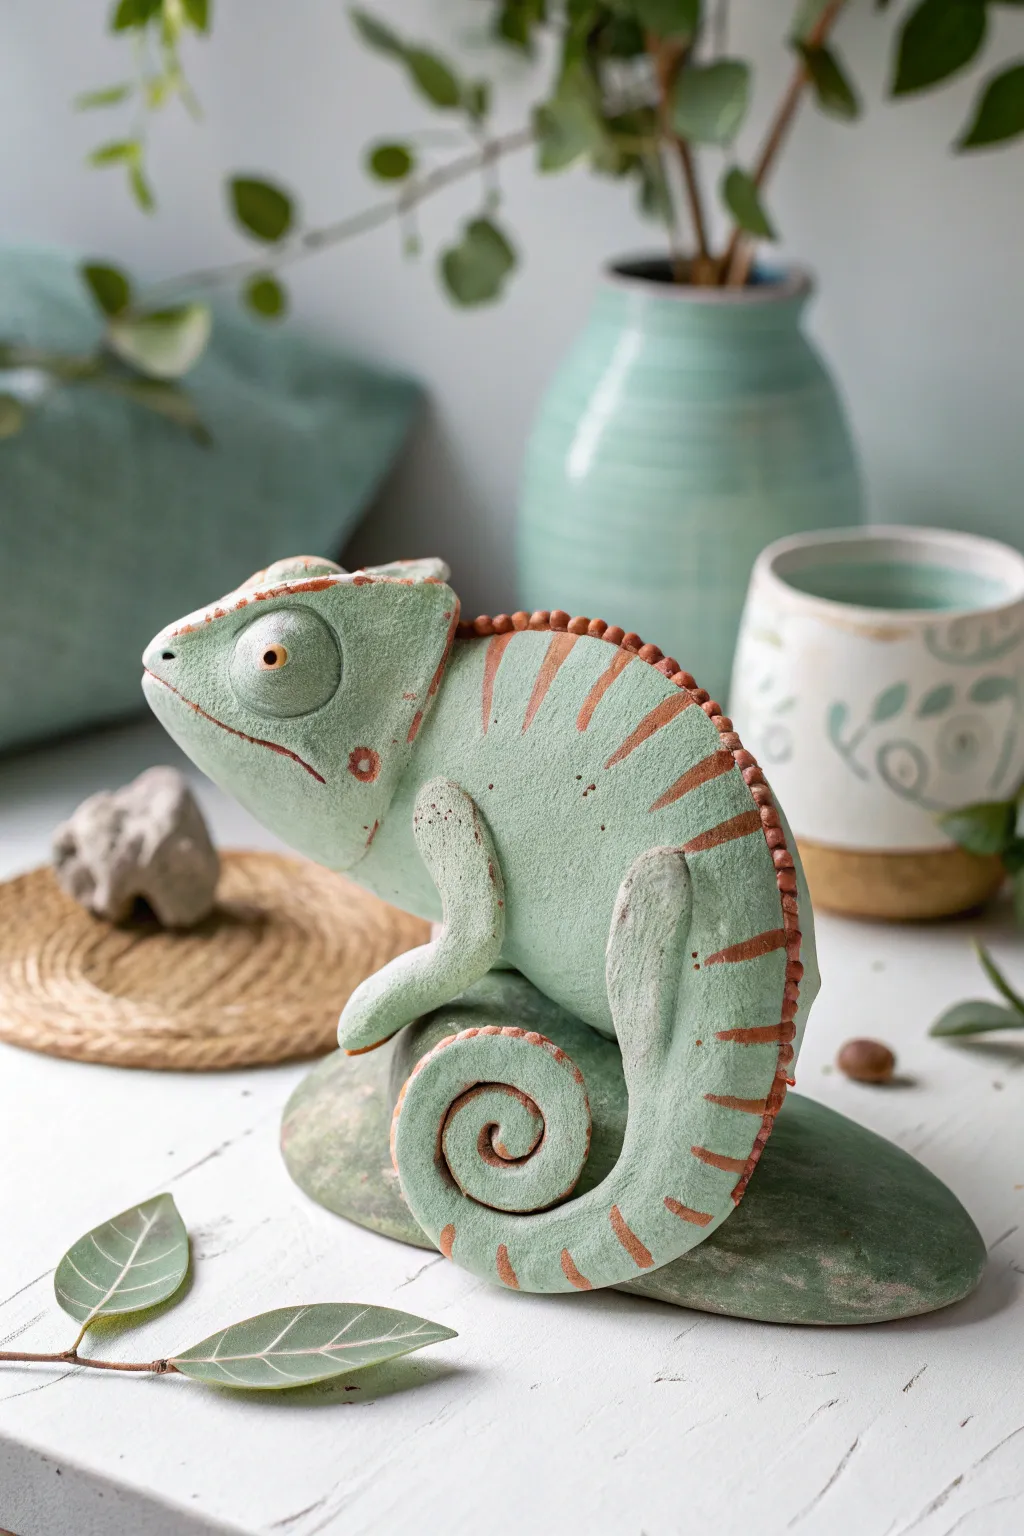
Sculpt your very own color-changing lizard friend with this charming air dry clay project. This light green chameleon features signature details like a distinct swirled tail, bumpy spine, and curious eyes, all resting comfortably on a custom leaf-shaped base.
Step-by-Step Tutorial
Materials
- Air dry clay (white or pre-colored light green)
- Acrylic paints: sage green, dark green, terracotta orange, white, black, yellow
- Sculpting tools (needle tool, small spatula, ball tool)
- Small cup of water
- Paintbrushes (small detail brush, medium flat brush)
- Fine grit sandpaper
- Matte varnish or sealant
Step 1: Forming the Base and Body
-
Create the leafy base:
Start by flattening a large lump of clay into a smooth, oval-shaped slab about half an inch thick. Smooth the edges with a wet finger to create the rock or leaf base your chameleon will sit on. -
Shape the torso:
Roll a medium-sized ball of clay into a thick teardrop shape. This will be the main body. Curve the narrower end slightly upwards where the tail will attach. -
Sculpt the head:
Form a second, slightly smaller rounded triangle shape for the head. Press it firmly onto the wider end of the body piece. Blend the clay across the neck seam using a sculpting tool or your thumb until the join is invisible. -
Add the casque:
Chameleons have a distinctive crest on their heads called a casque. Pinch the clay at the very back of the head to create a raised, triangular ridge that slopes down towards the nose.
Cracks and Seams
If you see small cracks forming as the clay dries, mix a tiny bit of fresh clay with water to make a paste (slip) and fill them in carefully with a brush.
Step 2: Limbs and Tail
-
Roll the tail coil:
Roll a long, tapered snake of clay. Attach the thick end to the rear of the body, blending the seam thoroughly. Carefully coil the thinner end into a tight, flat spiral that rests against the side of the base. -
Form the legs:
Make two thick sausage shapes for the legs seen on the visible side. Bend them at the ‘elbows’ and ‘knees’ to create angles. -
Attach the legs:
Score the side of the body and the back of the legs with a needle tool, add a drop of water, and press them into place. Position the front leg reaching forward and the back leg stabilizing the body near the tail. -
Refine the feet:
Use a small tool to press a slit into the end of each foot, creating the chameleon’s characteristic mitten-like toes that grip branches.
Step 3: Details and Texture
-
add the eye:
Roll a small ball of clay and flatten it slightly. Press this onto the side of the head. Use the handle of a paintbrush to make a small indentation in the center for the pupil. -
Create the mouth:
Use a needle tool or knife to slice a gentle curve starting from the tip of the nose extending halfway down the head to create the mouth line. -
Spine texture:
Roll very tiny little balls of clay—about the size of peppercorns. Attach them in a row along the very top of the chameleon’s spine, starting behind the head and going down the back. -
Smooth and dry:
Dip a finger in water and gently smooth out any fingerprints or rough textures on the main skin. Let the sculpture dry completely for 24-48 hours until hard.
Pattern Play
Chameleons change color! Instead of orange stripes, try bright blue polka dots or purple zig-zags to give your lizard a unique mood.
Step 4: Painting and Finishing
-
Base coat:
Paint the entire chameleon body with a mix of sage green and a touch of white to get that soft, matte look seen in the photo. Paint the base a darker, mossy green. -
Add the stripes:
Mix a terracotta orange color. Using a fine detail brush, paint vertical stripes along the back and tail. Make them wider at the top and tapering off as they go down the side. -
Spine details:
Use the same orange color to carefully dab the small textured bumps along the spine. -
Eye details:
Paint the eye ball the same green as the body, but add a tiny yellow ring around the center pupil, and fill the pupil with gloss black. -
Dry brushing:
Just a light suggestion here: dip a dry brush into very light green or off-white paint, wipe most of it off, and gently whisk it over the body to highlight the clay’s texture. -
Seal:
Once the paint is fully dry, apply a matte varnish to protect your work without making it too shiny.
Place your finished chameleon on a shelf or near a potted plant for a natural touch