When I’m teaching kids in my studio, air dry clay is my go-to because it’s forgiving, colorful, and actually finishes without any heat. Here are my favorite step by step-friendly projects that start with simple shapes and end with something your kiddo can proudly use, gift, or display.
Simple Pinch Pot Bowls
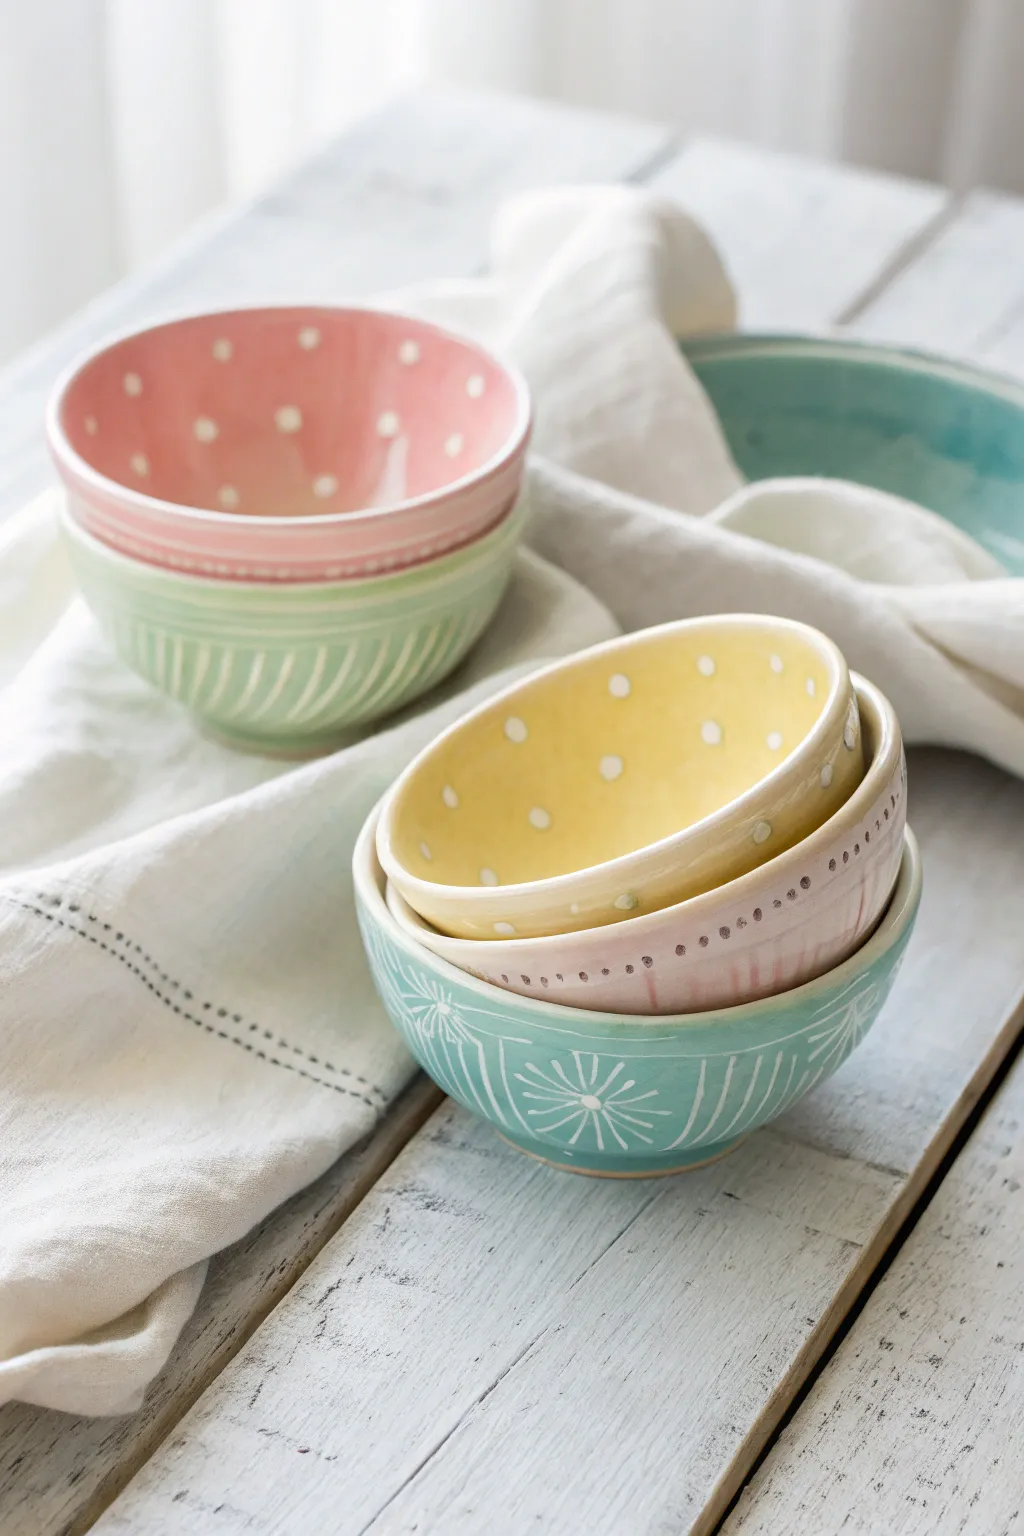
These charming, stacked nesting bowls showcase the timeless beauty of the humble pinch pot technique. With their soft pastel interiors and delicate white patterns against colorful glazes, they make perfect trinket dishes or decorative accents.
Detailed Instructions
Materials
- Air dry clay (white)
- Acrylic paints (pastel pink, yellow, mint green, teal, white)
- Clear acrylic gloss varnish or sealant
- Fine grit sandpaper
- Small cup of water
- Sponge
- Fine detail paintbrush (size 0 or 00)
- Medium flat paintbrush
- Needle tool or toothpick (for texture, optional)
Step 1: Forming the Bowls
-
Prepare clay spheres:
Start by dividing your white air dry clay into 3 or 4 equal portions. Roll each portion vigorously between your palms to create smooth, tight spheres about the size of a tangerine. -
Start the pinch:
Hold a sphere in your non-dominant hand. Push your thumb gently into the center of the ball, stopping before you breakthrough the bottom, leaving about a half-inch base. -
Pinch the walls:
Using a rhythmic pinching motion with your thumb on the inside and fingers on the outside, rotate the ball while gently thinning the walls. Aim for an even thickness from bottom to rim. -
Shape the curve:
As you pinch upwards, gently flare the rim out slightly to create a wide, open bowl shape rather than a cup. I find that pressing the base gently onto a table helps flatten it so it sits stable. -
Smooth the surfaces:
Dip your finger in a tiny bit of water and run it over any cracks or uneven fingerprints. You want the surface as smooth as possible before drying. -
Dry thoroughly:
Set your bowls aside in a cool, dry place. Let them dry completely for 24-48 hours until they are hard and chalky white. Flip them over halfway through to ensure the bottom dries evenly.
Cracks Appearing?
If small cracks appear while drying, mix a tiny bit of clay with water to make a paste (slip) and fill them in, then smooth over.
Step 2: Refining and Painting
-
Sand for perfection:
Once bone dry, take fine-grit sandpaper and gently sand the rim and exterior walls. Remove any sharp edges or bumps to get that smooth, professional ceramic look. -
Wipe clean:
Use a barely damp sponge or cloth to wipe away all the clay dust. Paint won’t stick well if the surface is dusty. -
Base coat – Interior:
Choose a different pastel color for the inside of each bowl—like soft yellow, dusty pink, or mint. Paint two thin coats on the interior, letting the first dry before adding the second. -
Base coat – Exterior:
Paint the exterior of the bowls. You can match the interior color or create a two-tone effect like the pink and green bowl in the image. Ensure full coverage. -
Add Polka Dots:
For the pink or yellow bowls, dip the non-brush end of your paintbrush into white acrylic paint. Dot the paint onto the interior surface in a random, scattered pattern. -
Paint rim details:
Using a very fine detail brush, paint a thin line or small dark dots along the rim of the bowls for definition, similar to the brown dots seen on the yellow bowl’s rim. -
Create exterior texture lines:
For the green bowl, mix a slightly lighter shade of green or use white. Paint thin, curved diagonal stripes on the outside bottom half to mimic a carved texture. -
Paint the sunburst pattern:
On the blue or teal bowl, use your finest brush and white paint to create a ‘sunburst’ or flower pattern. Draw a center dot, line a circle around class, and paint radiating lines outward. -
Seal the project:
Once all paint is completely dry, apply a coat of clear gloss varnish. This mimics the shine of fired ceramic glaze and protects your design.
Pro Tip: Nesting Check
If you want them to stack perfectly, test fit the bowls while the clay is still wet and pliable, adjusting width as needed.
Now you have a set of lovely handmade dishes ready to brighten up any shelf or table


Cute Mini Animal Figurines
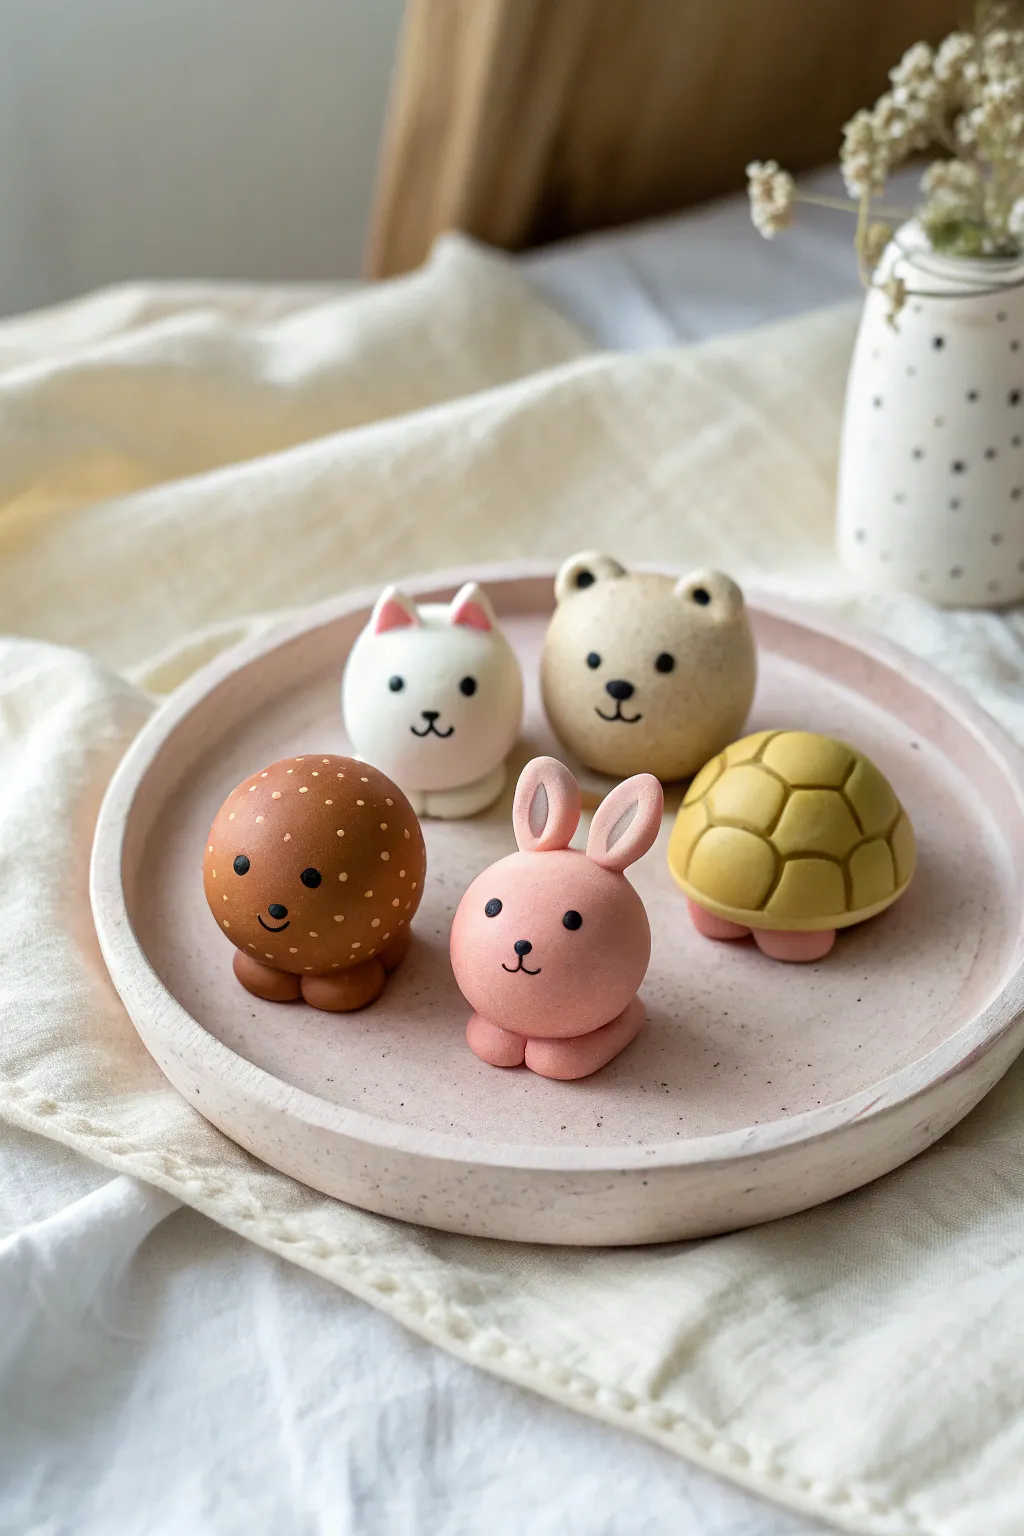
These adorable, round animal figurines are perfect for beginners, featuring simple shapes and minimal detailing that results in maximum cuteness. You’ll create a charming set including a pink bunny, a spotted hedgehog, a white kitty, a beige bear, and a tiny turtle using basic rolling and shaping techniques.
How-To Guide
Materials
- Air dry clay (white)
- Acrylic paints (pink, brown, white, beige, yellow, black)
- Fine detail paintbrush (size 0 or 00)
- Clay tools (small ball tool, needle tool)
- Water in a small cup
- Parchment paper or silicone mat (as a work surface)
- Matte sealant or varnish (optional)
Step 1: Coloring the Base Clay
-
Pre-mix your colors:
Before sculpting, separate your white clay into five equal plum-sized balls. To keep the finish smooth, I prefer to knead acrylic paint directly into the wet clay rather than painting it later. Knead a drop of pink into one ball, brown into another, beige into the third, yellow into the fourth, and keep one white. -
Prevent drying:
While you work on one animal, keep the other colored clay balls wrapped tightly in plastic wrap or a damp towel so they don’t crust over.
Cracks Appearing?
If you see tiny cracks forming as the clay dries, mix a tiny bit of fresh clay with water to make a paste (slip) and smooth it into the cracks with your finger.
Step 2: Sculpting the Pink Bunny
-
Create the body:
Take the pink clay and roll a smooth, round ball about the size of a large grape for the head. Roll a slightly smaller, flattened sphere for the body. -
Attach the head:
Score the top of the body and the bottom of the head with a needle tool. Dab a little water on the scored areas and press them together gently. -
Form the ears:
Roll two small logs of pink clay. Flatten them slightly and use a tool to indent the centers. Fill the indentation with a tiny sliver of white clay for the inner ear, then attach them to the top of the head. -
Add the feet:
Roll two tiny pink balls and press them to the bottom front of the body to create little paws.
Step 3: Sculpting the Spotted Hedgehog
-
Shape the main form:
Using the brown clay, roll a perfect sphere. This character is mostly just a round body with a face. -
Add stabilizing feet:
Create two small, flattened brown balls and attach them to the bottom front so the sphere doesn’t roll away.
Make them charms!
Before the clay dries, screw a small eye hook into the top of the heads. Once dry, you can attach jump rings to turn them into adorable keychains.
Step 4: Sculpting the Turtle
-
Make the shell:
Take the yellow clay and roll a ball, then flatten the bottom against your table to create a dome shape. -
Detail the shell:
Use a needle tool or a dull knife to gently press a hexagonal pattern into the dome to mimic a turtle shell. -
Attach legs:
Use small bits of pink clay (leftover from the bunny) to make four tiny rounded feet peaking out from under the yellow shell.
Step 5: Sculpting the Cat & Bear
-
Form the heads:
For the white cat and beige bear, roll smooth spheres. These characters are designed as ‘bodiless’ cute heads or dumplings. -
Add ears:
For the cat, pinch two small triangles of white clay and attach them. Add pink insides. For the bear, attach two small semi-circles of beige clay.
Step 6: Finishing Touches
-
Drying time:
Let all your figures dry completely for 24-48 hours. Turn them occasionally so the bottoms dry evenly. -
Paint the faces:
Using your finest brush and black paint, carefully add two dots for eyes and a small ‘Y’ shape or triangle for the noses. Keep the features centered low on the face for a kawaii look. -
Add the spots:
For the brown hedgehog, use a toothpick dipped in lighter beige paint to dot small freckles all over the body. -
Seal the work:
Once the paint is fully dry, apply a thin coat of matte varnish to protect your new friends.
Display your new miniature zoo on a shelf or gift them to a friend to brighten their day


Heart Trinket Trays
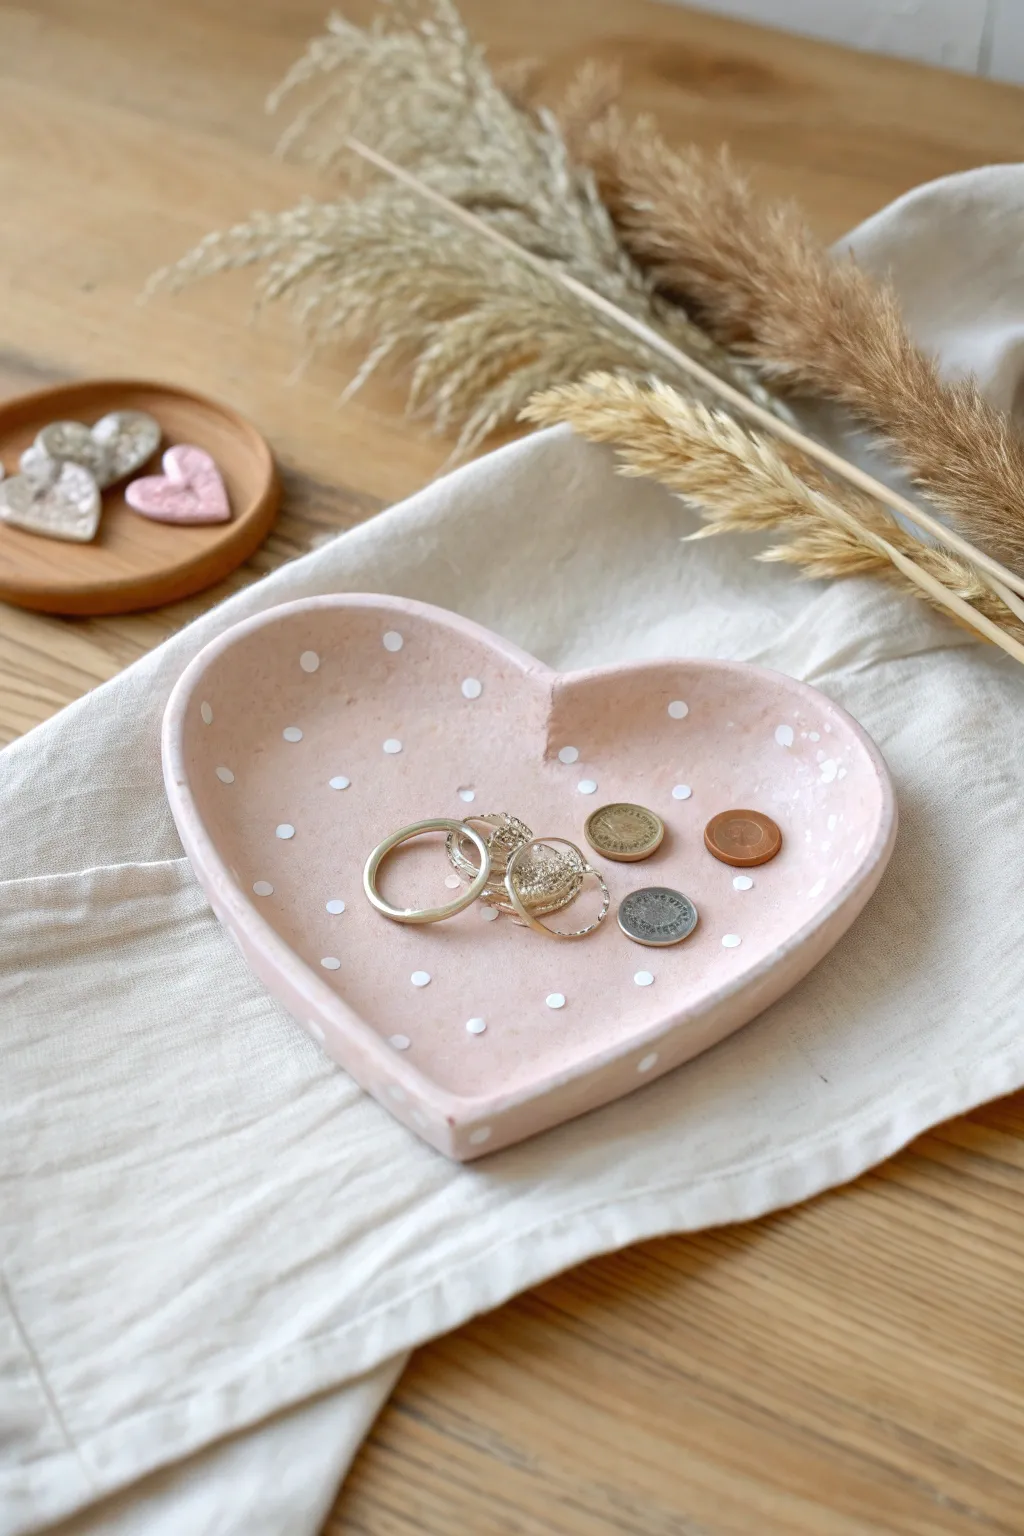
This sweet, heart-shaped tray is perfect for holding special rings and coins, painted in a soft blush pink with whimsical white polka dots. Made from simple air dry clay, it has a lovely handmade feel with slightly raised edges to keep your treasures safe.
How-To Guide
Materials
- White or terracotta air dry clay
- Rolling pin
- Heart-shaped cookie cutter (large) or paper template
- Craft knife or plastic clay tool
- Small bowl of water
- Fine grit sandpaper
- Acrylic paint (blush pink and white)
- Medium paintbrush
- Small detail brush or cotton bud
- Gloss varnish or sealant (optional)
Step 1: Shaping the Clay
-
Prepare your workspace:
Lay down a piece of parchment paper or a silicone mat to prevent the clay from sticking to your table. -
Condition the clay:
Take a handful of air dry clay and knead it in your hands for a minute until it feels soft, warm, and pliable. -
Roll it out:
Using your rolling pin, flatten the clay into an even slab. Aim for a thickness of about 1/4 inch (approx. 5-6mm) so it’s sturdy but not too chunky. -
Cut the heart shape:
Press a large heart-shaped cookie cutter firmly into the clay. If you don’t have a cutter, place a paper heart template on top and trace around it carefully with a craft knife. -
Remove excess clay:
Peel away the scraps of clay from around the heart shape, setting them aside for future projects or to make smaller matching hearts. -
Soften the edges:
Dip your finger into a little water and run it along the cut edges of the heart to smooth out any roughness or sharp corners. -
Create the rim:
Gently curb the edges of the heart upwards using your thumbs and forefingers. Pinch and smooth the clay as you go to create a raised lip all the way around. -
Refine the shape:
Place the dish back down and press the center flat gently. Check that the rim is even and smooth out any fingerprints with a damp finger. -
Let it dry completely:
Leave your heart dish in a warm, dry place. Depending on humidity, this usually takes 24 to 48 hours. I like to flip it over halfway through the drying process to ensure the bottom dries evenly.
Step 2: Decorating the Dish
-
Sand for smoothness:
Once fully dry and hard, use fine-grit sandpaper to buff away any bumpy areas on the rim or surface, then wipe away the dust with a dry cloth. -
Apply the base coat:
Paint the entire dish—top, bottom, and sides—with a coat of blush pink acrylic paint. Let this layer dry completely. -
Add a second coat:
For a solid, opaque color, apply a second layer of pink paint and let it dry again. -
Paint the polka dots:
For the dots, you can use the back end of a small paintbrush or a cotton bud. Dip it into white acrylic paint and dot it randomly onto the pink surface. -
Vary the placement:
Space the dots out nicely, and don’t be afraid to let some go partially off the edge or onto the rim for a natural pattern. -
Allow paint to set:
Let the polka dots dry thoroughly before handling the dish extensively. -
Seal the project:
To protect your jewelry dish from scratches and give it a nice shine, apply a layer of gloss varnish or sealant over the entire piece.
Smooth Operator
Work any cracks out of the clay while it is still wet using a tiny bit of water. It is much harder to fix deep cracks once the clay has started to harden.
Make It a Set
Use your leftover clay scraps to make tiny matching hearts. Paint them silver or gold to use as loose parts for play or cute table scatter decorations.
Your adorable heart dish is now ready to hold your favorite little treasures on your bedside table


Leaf and Flower Nature Imprints
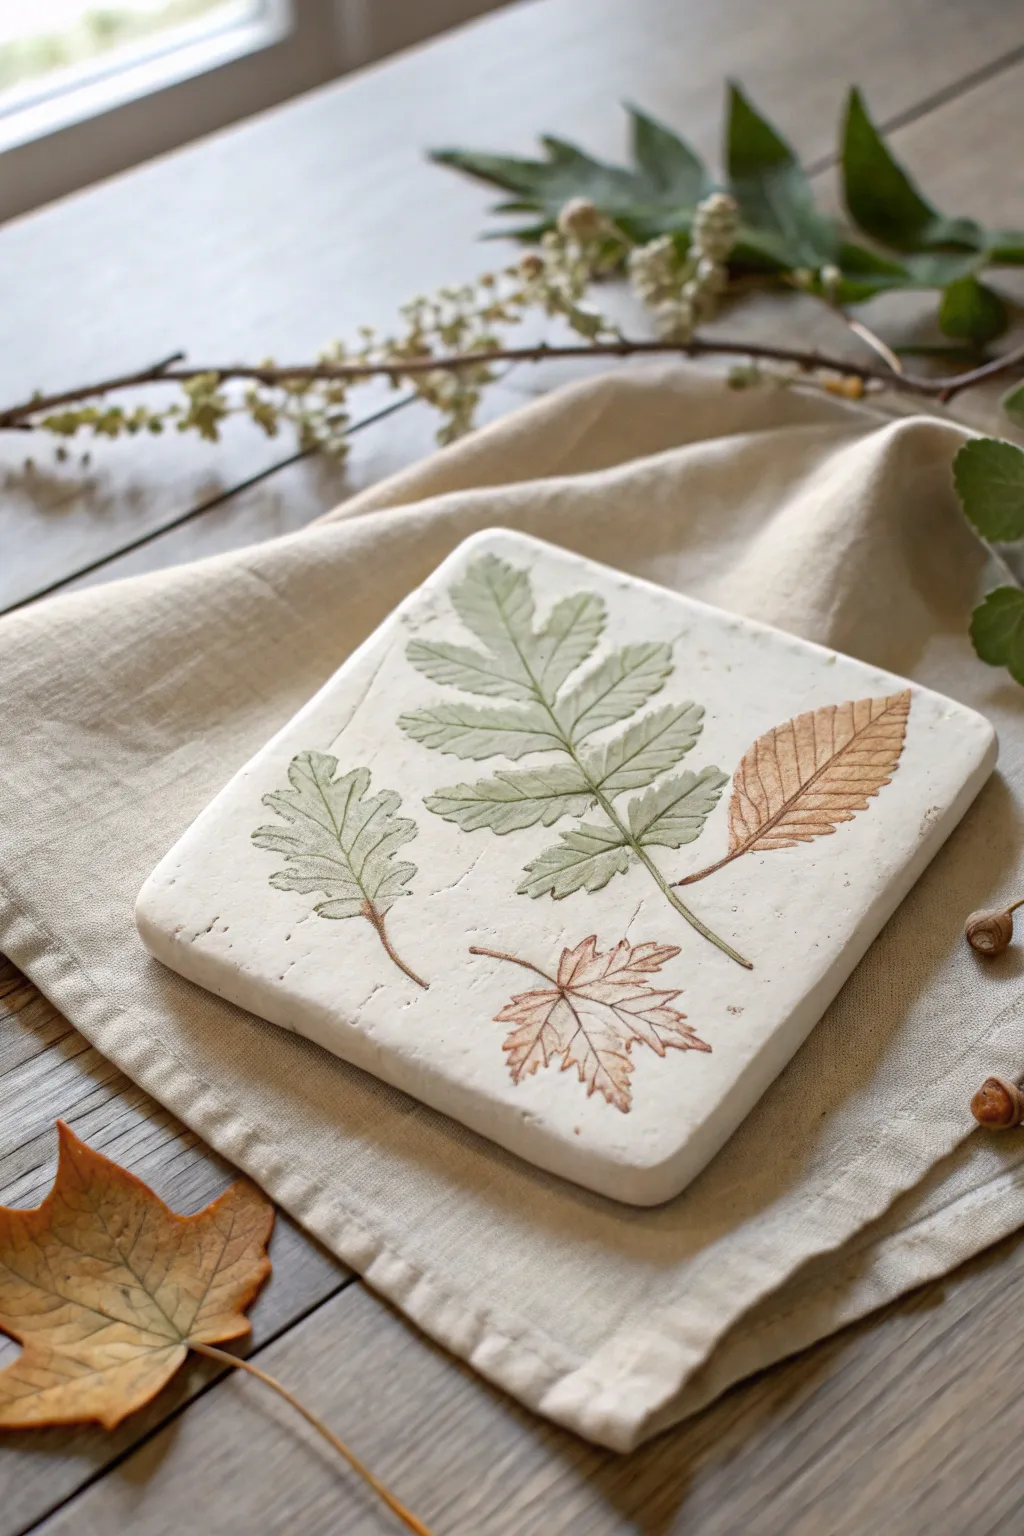
Capture the delicate details of forest foliage with these rustic air dry clay tiles. By pressing real leaves into soft clay and adding subtle washes of color, you can create a charming botanical keepsake that brings the outdoors inside.
Step-by-Step Guide
Materials
- White or natural air dry clay
- Rolling pin
- Square cookie cutter (or knife and ruler)
- Parchment paper or craft mat
- Various fresh leaves (fern, oak, maple, etc.)
- Watercolor paints or diluted acrylics
- Small soft paintbrush
- Fine-grit sandpaper (optional)
- Small bowl of water
- Clear matte sealant or varnish
Step 1: Preparing the Base
-
Condition the Clay:
Begin by taking a handful of air dry clay and kneading it in your hands until it becomes warm, soft, and pliable. If the clay feels too stiff or cracks easily, add a drop or two of water to smooth it out. -
Roll it Out:
Place the clay on a sheet of parchment paper to prevent sticking. Use a rolling pin to flatten the clay into an even slab, aiming for a thickness of about 1/4 to 1/2 inch. You want it substantial enough to look like a stone tile but not so thick that it takes forever to dry. -
Create Texture:
To achieve that rustic, stone-like appearance seen in the photo, gently tap the surface with a crumpled ball of aluminum foil or a textured sponge. This adds tiny pits and imperfections that give the final piece character. -
Cut the Shape:
Using a large square cookie cutter or a ruler and knife, cut out a clean square shape. Smooth the edges slightly with your finger dipped in water to remove any sharp burrs from cutting.
Step 2: Making Impressions
-
Arrange the Leaves:
Select your botanicals—fresh leaves with thick veins work best. Lay them out on your clay square in a pleasing composition. I like to mix different leaf shapes, like combining a long fern with a smaller maple leaf, to create visual interest. -
Press into Clay:
Once you are happy with the arrangement, gently run your rolling pin over the leaves. Apply firm, even pressure to push the leaves flush with the clay surface without distorting the square shape too much. -
Deepen the Impression:
For thicker stems or veins, you might need to press down specifically with your thumb to ensure a deep, clear imprint. -
Reveal the Design:
Carefully peel the leaves away from the clay. Use the tip of a craft knife or a needle tool to lift the edge of the leaf if it is stuck, revealing the detailed impression underneath. -
Drying Time:
Set the tile aside in a safe, dry place. Allow it to air dry completely for 24 to 48 hours. Turn the tile over halfway through the drying process to ensure the bottom dries evenly and to prevent warping.
Clearer Veins
Place the leaves vein-side down onto the clay. The underside of a leaf always has more prominent textured veins than the top, resulting in a much crisper print.
Step 3: Painting and Finishing
-
Prepare the Colors:
Mix your paints to achieve natural, earthy tones. Dilute sage greens, ochres, and brownish-oranges with plenty of water. You want a consistency closer to watercolor than thick acrylic paint to keep the look transparent and delicate. -
First Color Wash:
Dip a small brush into your diluted green paint and gently fill in the fern or larger leaf impressions. The watery paint will naturally pool in the deeper veins, highlighting the texture. -
Adding Autumn Tones:
Switch to an orange or brown wash for the other leaves. Apply the color carefully within the impressed lines, letting the white clay show through slightly for a faded, vintage look. -
Adding Detail:
If you want the stems to stand out more, use a slightly less diluted brown paint and carefully trace the central vein of each leaf with a fine-tip brush. -
Clean Up Edges:
If any paint strayed outside the leaf impression, you can often wipe it away quickly with a damp cotton swab or wait for it to dry and gently sand it off. -
Seal the Artwork:
Once the paint is completely dry, apply a thin coat of clear matte sealant or varnish. This will protect the clay from moisture and preserve the colors without making the piece look plastic or shiny.
Make it a Wall Hanging
Before the clay dries, use a straw to poke a hole near the top edge. Once finished, thread a piece of jute twine or ribbon through the hole to hang your nature art.
Display your finished tile on a shelf or use it as a coaster to add a touch of woodland charm to your home decor

The Complete Guide to Pottery Troubleshooting
Uncover the most common ceramic mistakes—from cracking clay to failed glazes—and learn how to fix them fast.
Rainbow Wall Hanging Tiles
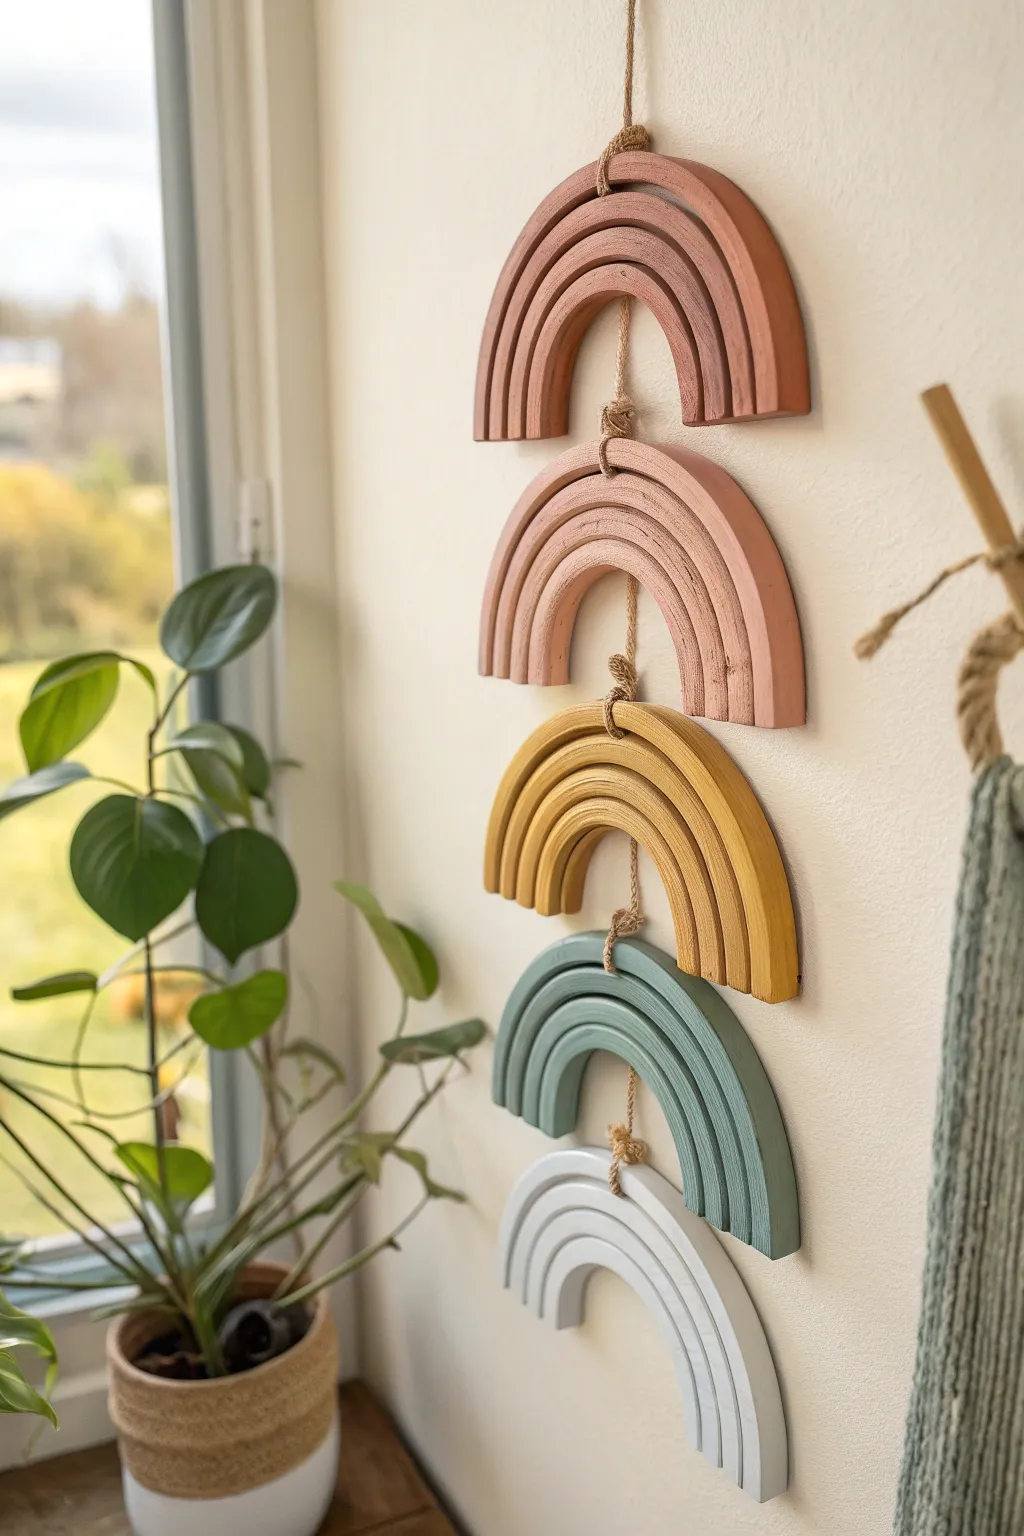
Bring a soft, bohemian touch to a child’s room with this tiered rainbow wall hanging. It features four distinct color arches connected by natural jute, creating a calming, vertical statement piece.
How-To Guide
Materials
- White polymer or air-dry clay (approximately 1kg)
- Clay roller or rolling pin
- Sharp craft knife or clay slicing tool
- Circular cookie cutters (or bowls) in three graduated sizes
- Ruler
- Jute twine or hemp cord
- Acrylic paints: Terra cotta, blush pink, mustard yellow, sage green, cool grey
- Paintbrushes (flat shader and detail brush)
- Straw or wooden skewer for making holes
- Sandpaper (fine grit)
Step 1: Shaping the Arches
-
Roll out the slab:
Begin by taking a large chunk of your air-dry clay and rolling it out on a smooth, flat surface. Aim for a consistent thickness of about 1/4 inch to ensure the tiles are sturdy but not too heavy. -
Cut the first arch:
Use your largest circular cutter or a bowl to gently impress a circle shape onto the clay. Don’t cut all the way through yet; just mark the guide. -
Create the inner curves:
Place the medium cutter inside the large circle mark, and the smallest cutter inside that one. This creates the three distinct bands of the rainbow. Now, use your craft knife to cut along these lines cleanly. -
Bisect the circle:
Using your ruler as a straight edge, cut the concentric circles exactly in half horizontally. This gives you two full sets of arches. We only need one set per color tier, so set the extras aside for another project. -
Detailing the grooves:
Carefully separate the three bands slightly. I find it helpful to run a damp finger along the cut edges to smooth them out immediately. -
Adding texture:
To mimic the look in the photo, use a dull modeling tool or the back of a knife to press shallow grooves between the bands if you decided not to cut them completely apart, though cutting them fully creates the best definition. -
Repeat the process:
Repeat these steps three more times until you have four complete rainbow sets. You should have one for the terra cotta, one for pink, one for yellow, and one for green/grey.
Smooth Cut Secrets
If the clay drags when cutting, coat your knife blade with a tiny bit of lotion or cooking oil. Clean the blade often to prevent sticky buildup.
Step 2: Assembly Prep & Drying
-
Punch the holes:
While the clay is still wet, use a straw or skewer to poke a hole through the top center of only the *top* rainbow arch. -
Connect the tiers:
For the subsequent three rainbows, poke a hole at the top peak and also at the bottom center of the arch above it so they can link together vertically. -
NOTE on hole placement:
Actually, looking closely at the design, the rope runs behind the rainbows. So, you actually just need a vertical hole or a loop attachment point on the back, or strong glue later. For kids, making holes through the top and bottom center of each arch is the most secure method. -
Let it dry:
Place all your formed arches on a drying rack or parchment paper. Allow them to air dry completely for 24-48 hours. Flip them halfway through so the backs dry evenly. -
Sand for smoothness:
Once fully cured, gently sand any rough edges, particularly around the cut lines and the outer rim, using fine-grit sandpaper.
Step 3: Painting & Assembly
-
Painting the terra cotta:
Taking the first rainbow arch, paint it entirely with the terra cotta or rust-colored acrylic paint. You may need two coats for opaque coverage. -
Painting the middle tiers:
Paint the second arch in blush pink and the third in mustard yellow. Use a small brush to get inside the grooves if your arches are single solid pieces. -
Painting the bottom tiers:
Paint the fourth arch sage green and the final bottom arch a very pale cool grey or white. -
Knotting the cord:
Cut a long length of jute twine. Tie a large, decorative knot at the very top to create a hanging loop. -
Threading the rainbows:
Thread the twine through the hole of the top terra cotta arch. Tie a knot underneath the arch to hold it in place, leaving about 2-3 inches of slack. -
Linking the rest:
Continue threading the twine through the subsequent rainbows (pink, yellow, green, grey), tying a knot underneath each one to act as a stopper and maintain the spacing seen in the photo. -
Final trim:
After the final grey arch is secured with a knot, trim any excess twine at the bottom for a clean finish.
Level Up: Texture Pop
Before the clay dries, gently press a clean piece of linen fabric onto the surface to give the rainbows a woven canvas texture.
Now you have a stunning, colorful mobile ready to brighten up any corner of the room
Pencil Toppers With Silly Faces
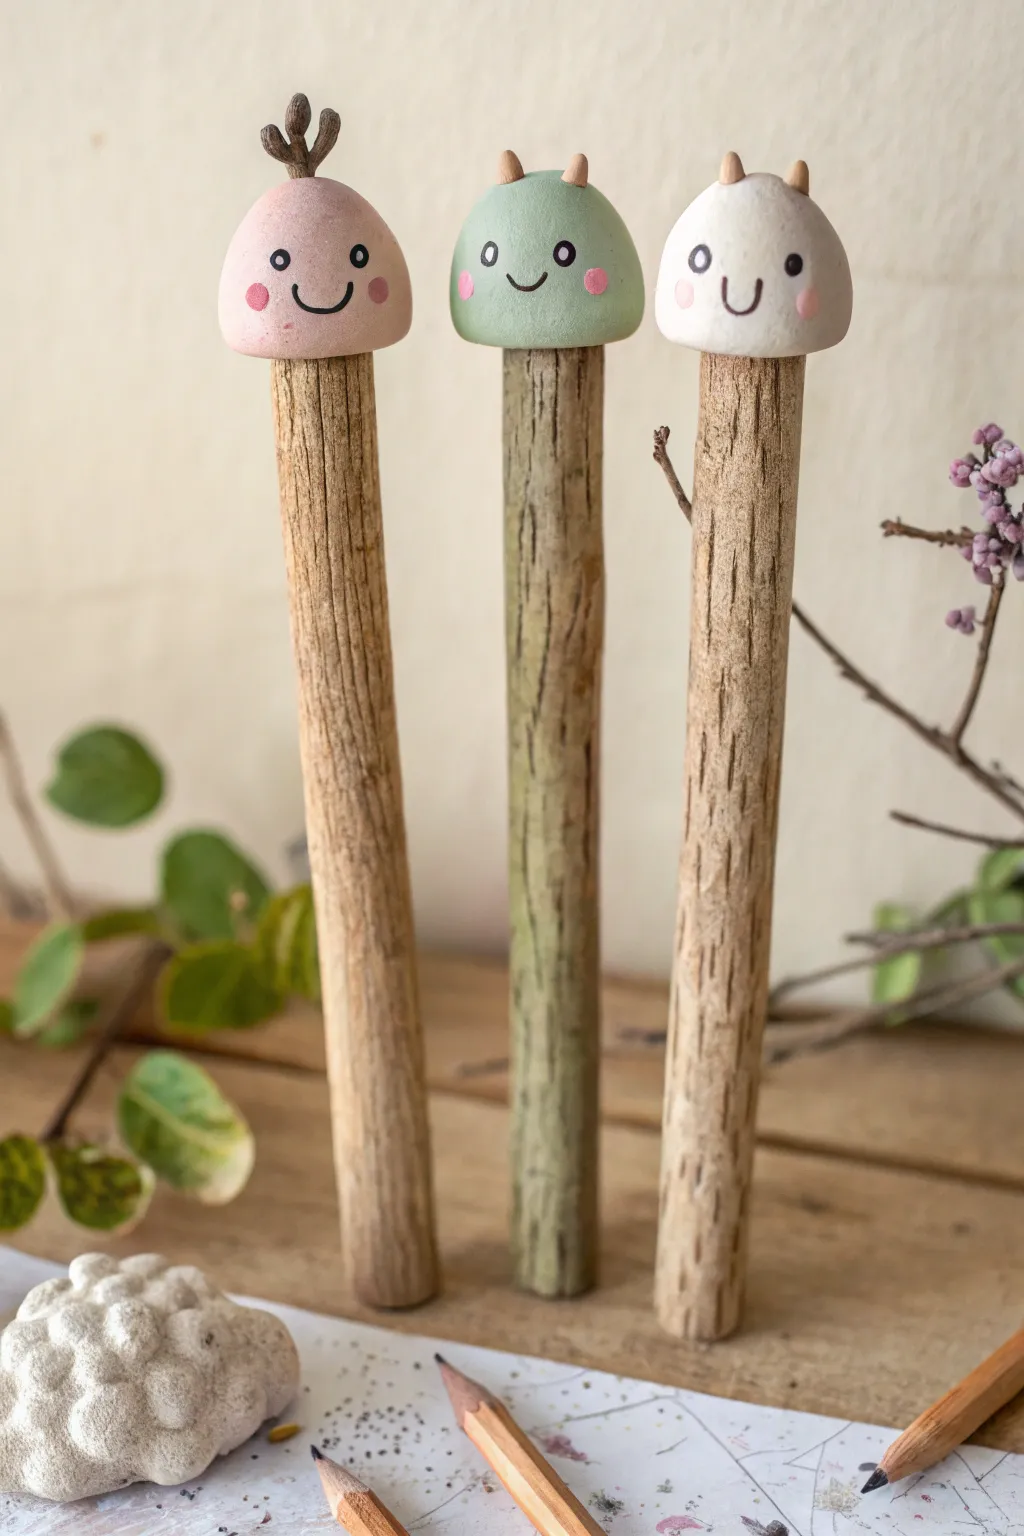
Transform ordinary pencils into adorable woodland companions with just a pinch of clay and some simple painting. These kawaii-style toppers feature smooth, rounded heads with sweet expressions, sitting perfectly atop rustic wooden pencils for a charming, earthy look.
Step-by-Step
Materials
- Air dry clay (white or terracotta)
- Rustic twig pencils or standard wooden pencils
- Acrylic paints (pastel pink, sage green, white, black)
- Fine detail paintbrush (size 0 or 00)
- Small round paintbrush (size 2-4)
- Sculpting tool or toothpick
- Water cup
- Matte sealant or varnish
Step 1: Sculpting the Base
-
Prepare the connection:
Take your chosen pencil and ensure the top end is clean and free of loose bark. Determine how large you want your topper; a ball of clay about the size of a large grape is usually perfect. -
Form the basic shape:
Roll your clay into a smooth, crack-free sphere. Press it gently onto the top of the pencil, pushing it down slightly so the pencil embeds itself about halfway into the clay ball for stability. -
Shape the head:
Mold the clay while it’s on the pencil into a soft gumdrop or dome shape. You want a flat bottom that sits flush against the wood and a rounded top. -
Smooth the transition:
Use a tiny bit of water on your finger to smooth out the seam where the clay touches the pencil, though for this rustic look, having the clay distinct from the wood is actually part of the charm.
Step 2: Adding Details
-
Create the sprout (Design 1):
For the pink character, roll a tiny snake of clay and form a little three-pronged branch. Attach this securely to the very top center of the dome using a drop of water as ‘glue’. -
Create the ears (Design 2 & 3):
For the green and white characters, roll two tiny rice-grain-sized pieces of clay. Press them gently onto the top left and right of the head to create small nubby ears or horns. -
Refine the surface:
Check your shapes for any fingerprints. Dip your finger in water and very lightly polish the clay until it is completely smooth. -
Let it dry completely:
Stand the pencils upright in a jar or stick them into a piece of floral foam. Let the clay harden fully according to the package instructions, usually 24-48 hours.
Smooth Surface Secret
Before painting, lightly sand dry clay with a fine-grit nail file. This removes tiny bumps and makes the surface look like smooth porcelain.
Step 3: Painting the Characters
-
Base coat application:
Select your pastel colors. Paint the entire clay head of the sprout character in a soft pastel pink. I find two thin coats cover better than one thick coat. -
Paint the other friends:
Paint the second character in a muted sage green and the third in a creamy off-white. Let the base coats dry completely before adding faces. -
Detail the sprout:
If you made the pink character, use a tiny brush to paint the little branch sprout on top a dark brown or black to match the pencil wood tone. -
Add the ears:
For the green and white characters, paint the tiny nub ears a soft peach or light tan color to make them stand out slightly.
Loose Topper Fix
If the clay dries and the topper feels wiggly on the pencil, pull it off gently, add a dab of superglue inside the hole, and slide it back on.
Step 4: Bringing the Faces to Life
-
Draft the face:
If you are nervous about painting freehand, lightly mark the eye placement with a pencil first. Keep the features low on the face for maximum cuteness. -
Paint the eyes:
Dip the handle end of a paintbrush into black paint and dot it onto the face to create perfect round circles for eyes. For the white character, you can paint open oval eyes instead. -
Add the smile:
Using your finest detail brush (or even a black fine-tip marker once the paint is bone dry), draw a simple ‘U’ shape between the eyes for a happy little smile. -
Add rosy cheeks:
Mix a little pink paint with white. Dip a toothpick or small stylus into the paint and add two sweet dots just outside the smile line for blushing cheeks. -
Add highlights:
For an extra sparkle, add a microscopic dot of white paint inside the black eyes using a toothpick. -
Seal the work:
Once everything is completely dry, brush on a coat of matte varnish to protect your paint from chipping during use.
These charming little forest spirits are now ready to make your homework or sketching time a bit more magical


What Really Happens Inside the Kiln
Learn how time and temperature work together inside the kiln to transform clay into durable ceramic.
Fridge Magnets With Big Expressions
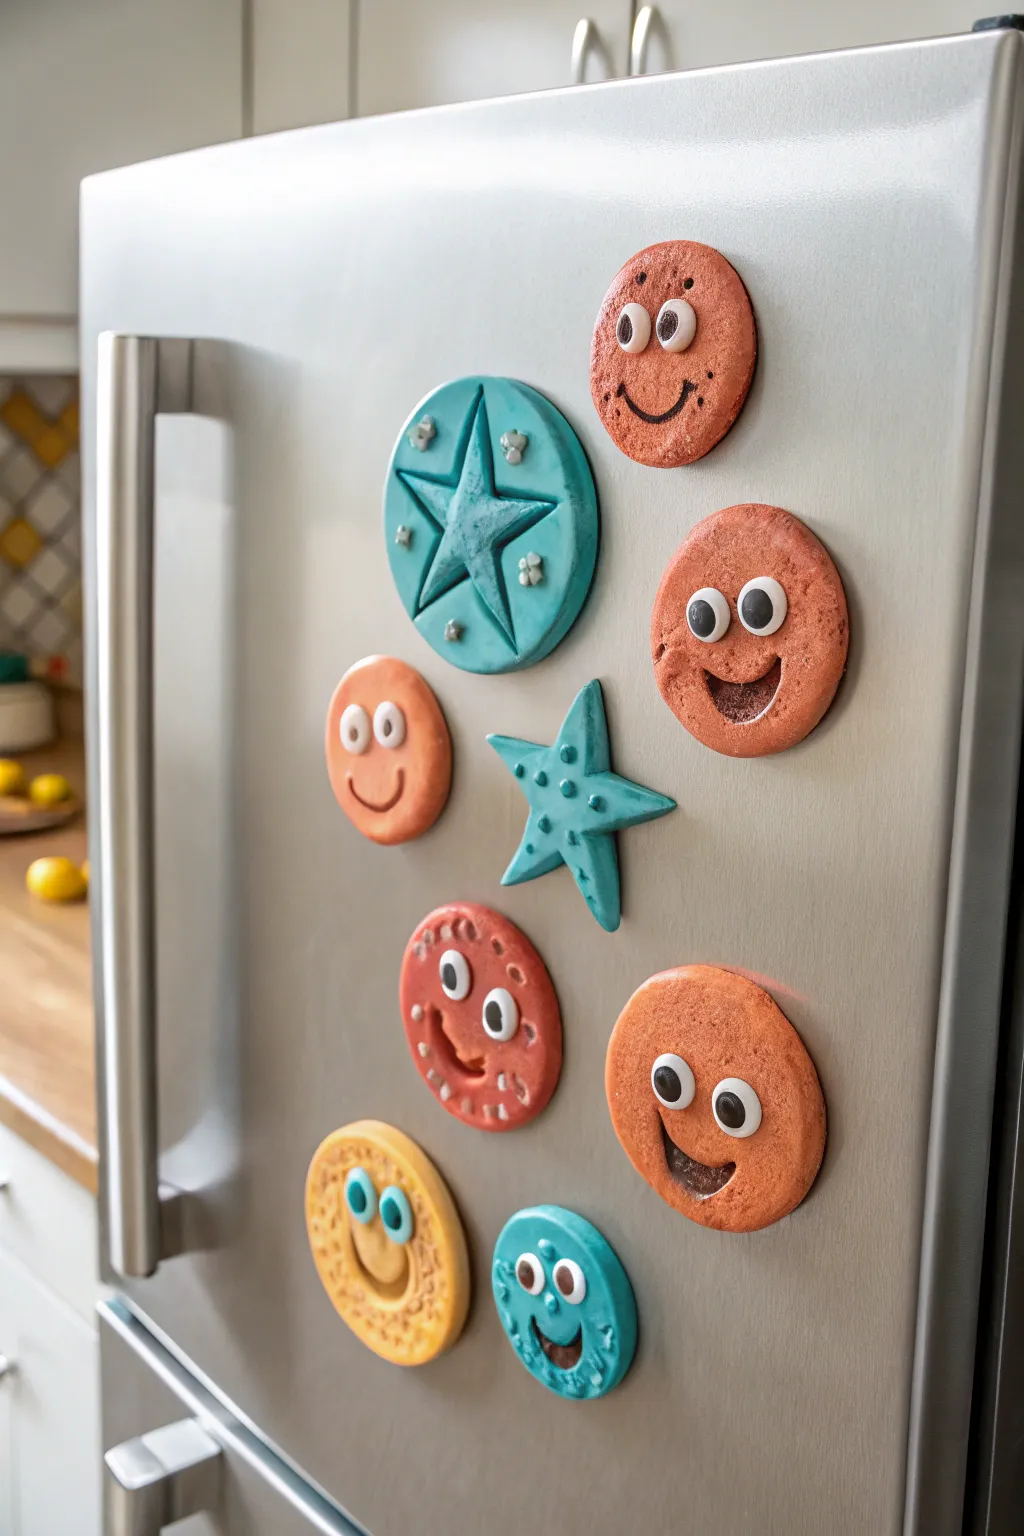
These cheerful magnets bring instant personality to your kitchen with their exaggerated expressions and textured surfaces. Using simple air-dry clay, you can create a cast of colorful characters alongside star-shaped accents to hold up your important notes and art.
Detailed Instructions
Materials
- Air-dry clay (white or pre-colored)
- Acrylic paints (orange, peach, teal, red)
- Googly eyes (various sizes)
- Strong round magnets
- Circle cookie cutters (various sizes)
- Star cookie cutter (optional)
- Sculpting tools or a toothpick
- Small paintbrush
- Mod Podge or craft glue
- Clear sealant spray or varnish
Step 1: Shaping the Clay Bases
-
Prepare the workspace:
Lay down a silicone mat or wax paper to prevent sticking. Take a handful of air-dry clay and knead it until it is soft and pliable. -
Roll out the slab:
Roll the clay out to an even thickness of about 1/4 inch. You want it thick enough to hold the magnet but not so heavy that it slides down the fridge. -
Cut the circles:
Use various sizes of circle cookie cutters or lids to punch out round shapes for the faces. Smooth the edges of each circle with a wet finger to remove any jagged bits. -
Cut the stars:
Cut out two star shapes. For one, keep it flat. For the other, you can gently press a smaller star cutter into the center to create an embossed design without cutting all the way through. -
Add texture:
Before the clay dries, use an old toothbrush or a ball of tin foil to gently tap texture onto the surface of the ‘cookie’ faces. This gives them a baked-good look.
Embedded Magnets
Instead of gluing the magnet on the back at the end, press it into the wet clay back during step 2. Let clay dry around it for a flush mount.
Step 2: Sculpting the Features
-
Create the mouths:
Use a sculpting tool to carve deep smiles into the circle faces. For wide open mouths, clear out a semi-circle of clay; for simple smiles, just press a curved line. -
Make eye indentations:
While I plan to glue eyes on later, I like to press the googly eyes gently into the wet clay to create shallow sockets, then remove them. This helps them sit flush later. -
Add details to the teal star:
For the round teal magnet shown, use a knife tool to score a large star shape into the surface. Add tiny balls of clay to the points of the star for decoration. -
Add sea-star texture:
For the standalone teal star fish shape, use a small tool to poke rows of little holes along the arms to mimic a sea star’s texture. -
Dry thoroughly:
Let all your clay pieces dry completely for 24-48 hours. Flip them over halfway through the drying process to ensure the backs dry evenly.
Step 3: Painting and Assembly
-
Paint the base colors:
Paint the faces with warm tones like terracotta orange, peach, and reddish-brown. Paint the star shapes and the embossed circle magnet with a bright teal or aqua. -
Highlight the textures:
Once the base coat is dry, use a technique called dry-brushing. Dip a dry brush into a slightly lighter shade of paint, wipe most of it off, and lightly sweep over the textured areas to make them pop. -
Paint the mouths:
Fill the inside of the open mouths with dark brown or black paint to create depth. -
Attach the eyes:
Apply a dab of craft glue or super glue into the eye sockets you made earlier and press the googly eyes firmly into place. Mix up sizes for a wacky look. -
Seal the magnets:
Coat the front of each piece with a layer of clear varnish or Mod Podge. This protects the paint and gives them a nice finished sheen. -
Attach the magnets:
Flip the dried faces over. Use strong glue (like E6000 or a hot glue gun) to attach a round magnet to the center of the back of each piece.
Fabric Texture Trick
Before cutting your circles, roll your wet clay slab onto a piece of lace or burlap. This imitates a cool knitted texture instantly.
Now your fridge is ready to greet you with a friendly smile every time you reach for a snack
Initial Name Tags for Backpacks
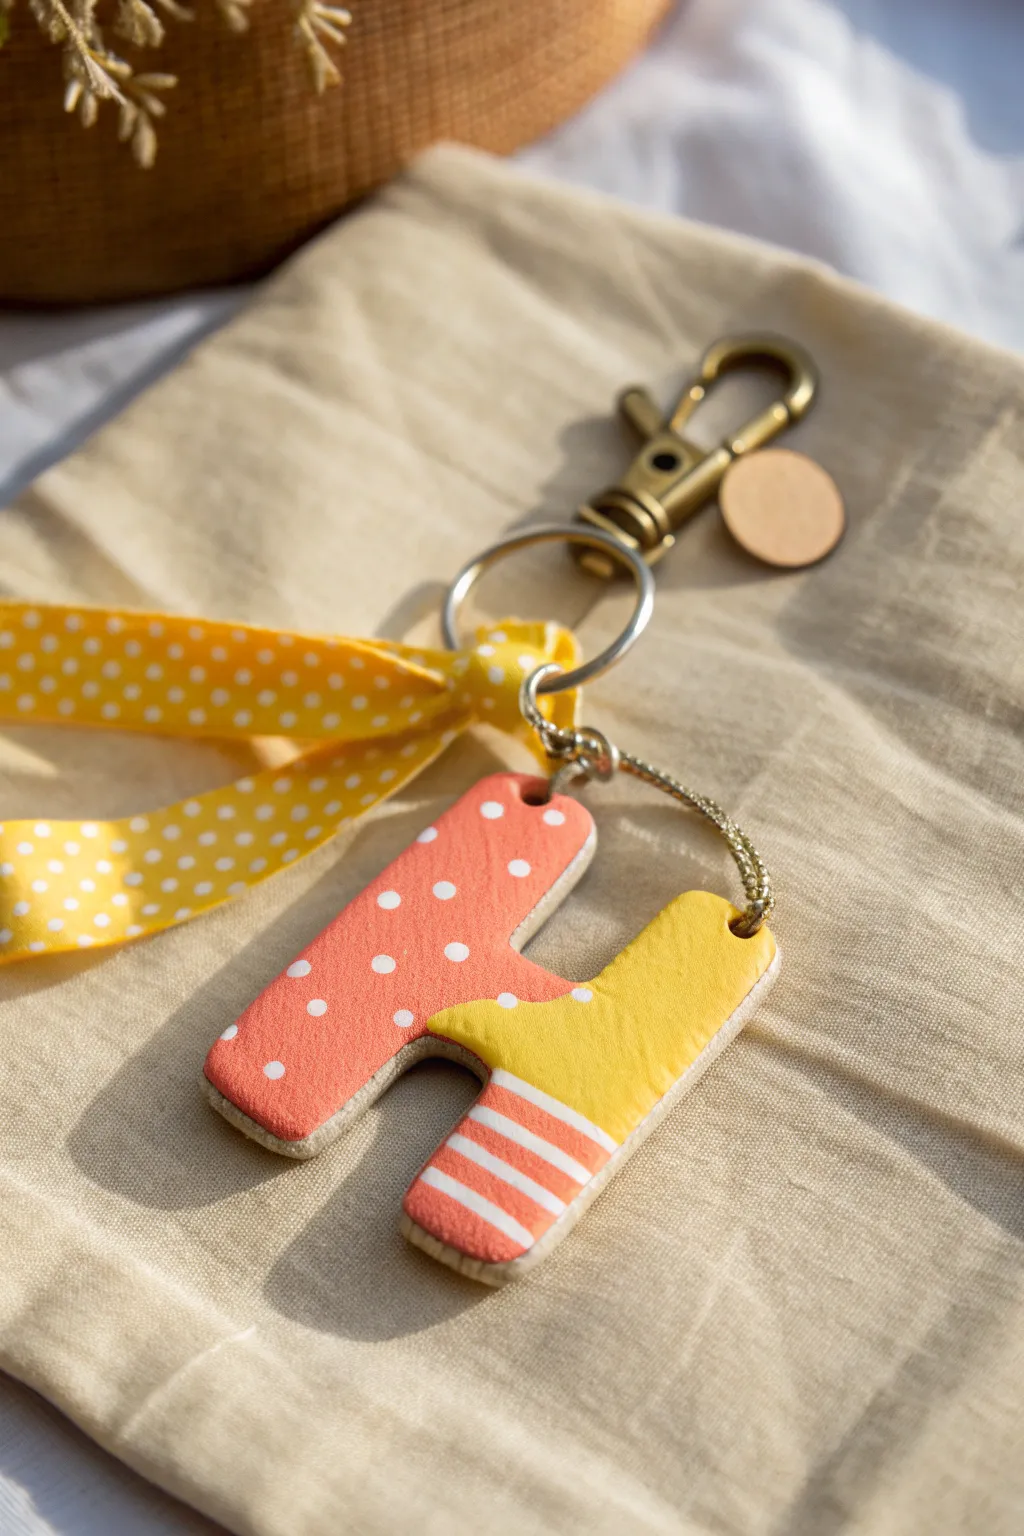
This custom backpack tag combines cheerful coral and sunny yellow hues for a personalized touch that stands out. With its playful mix of polka dots and stripes, this sturdy air-dry clay initial makes a perfect gift or a stylish way to label school gear.
How-To Guide
Materials
- White air-dry clay
- Rolling pin
- Printed letter template or letter cookie cutter
- Craft knife or plastic clay tool
- Sandpaper (fine grit)
- Acrylic paints (coral/salmon, bright yellow, white)
- Small round paintbrushes (one fine tip for details)
- Dotting tool or toothpick
- Glossy varnish or Mod Podge
- Small screw eye pin or jump ring
- Keychain clasp hardware
- Yellow polka dot ribbon
- Thin gold cord
- Strong craft glue (optional)
Step 1: Shaping the Initial
-
Roll the clay:
Take a handful of white air-dry clay and knead it until soft and pliable. Roll it out on a smooth surface to an even thickness of about 1/4 inch (6mm). Avoid rolling it too thin, as you want the tag to be durable. -
Cut the letter shape:
Place your printed letter template on top of the clay and trace around it with a craft knife, or firmly press a letter cookie cutter into the slab. Carefully remove the excess clay from around the edges. -
Smooth the edges:
Dip your finger in a tiny bit of water and run it along the cut edges of your clay letter to smooth out any roughness or jagged bits. This makes painting much easier later. -
Insert the hardware:
While the clay is still wet, carefully screw a small eye pin into the top corner of the letter where you want it to hang. If you don’t have an eye pin, use a straw or toothpick to poke a clean hole through the top instead. -
Let it dry:
Place your letter on a flat surface lined with parchment paper. Allow it to air dry for 24-48 hours, flipping it over halfway through so the back dries evenly.
Uneven Clay Surface?
If your rolled clay has lumps, place the clay between two wooden rulers (as depth guides) and roll the pin over the rulers to ensure perfectly even thickness.
Step 2: Painting and Decorating
-
Sand for smoothness:
Once completely hard and dry, gently rub the surface and edges with fine-grit sandpaper to remove any remaining bumps. -
Base coat the coral section:
Using a flat brush, paint the left side and upper portion of the letter with the coral or salmon-colored acrylic paint. Create a curved, organic line where this color will meet the yellow. -
Apply the yellow section:
Paint the remaining middle section of the letter with bright yellow paint, carefully following the curved line where it touches the coral paint. -
Paint the bottom stripe:
For the bottom leg of the letter, paint another section of coral, leaving a distinct line between it and the yellow section above. -
Add the polka dots:
Dip a dotting tool or the non-brush end of a paintbrush into white paint. Gently press dots onto the large upper coral section, spacing them out in a random, playful pattern. -
Paint the stripes:
Using a very fine detail brush, carefully paint horizontal white stripes across the bottom coral section. I find steadying my hand on the table helps keep these lines straight. -
Seal the piece:
Allow the paint to fully dry, then apply a coat of glossy varnish or Mod Podge over the entire front and sides. This protects the paint and gives it a finished ceramic look.
Step 3: Assembly
-
Secure the eye pin:
If your eye pin feels loose after drying, pull it out, add a dab of strong craft glue to the stem, and screw it back in for a secure hold. -
Attach the cord:
Thread a loop of thin gold cord through the eye pin (or the hole you created) and tie it securely. -
Connect to hardware:
Attach the other end of the gold cord to the large metal jump ring on your keychain clasp. -
Add the ribbon:
Cut a length of yellow polka dot ribbon. Loop it through the metal key ring (the large split ring part) and tie it in a simple knot so the tails hang down freely next to your clay letter.
Clean Polka Dots
Practice your dots on a scrap piece of paper first. Reload your dotting tool with fresh paint for every single dot to keep them all the same size and roundness.
Now your personalized initial charm is ready to add a pop of color to any bag or set of keys

TRACK YOUR CERAMIC JOURNEY
Capture glaze tests, firing details, and creative progress—all in one simple printable. Make your projects easier to repeat and improve.
Dino Fossil Prints
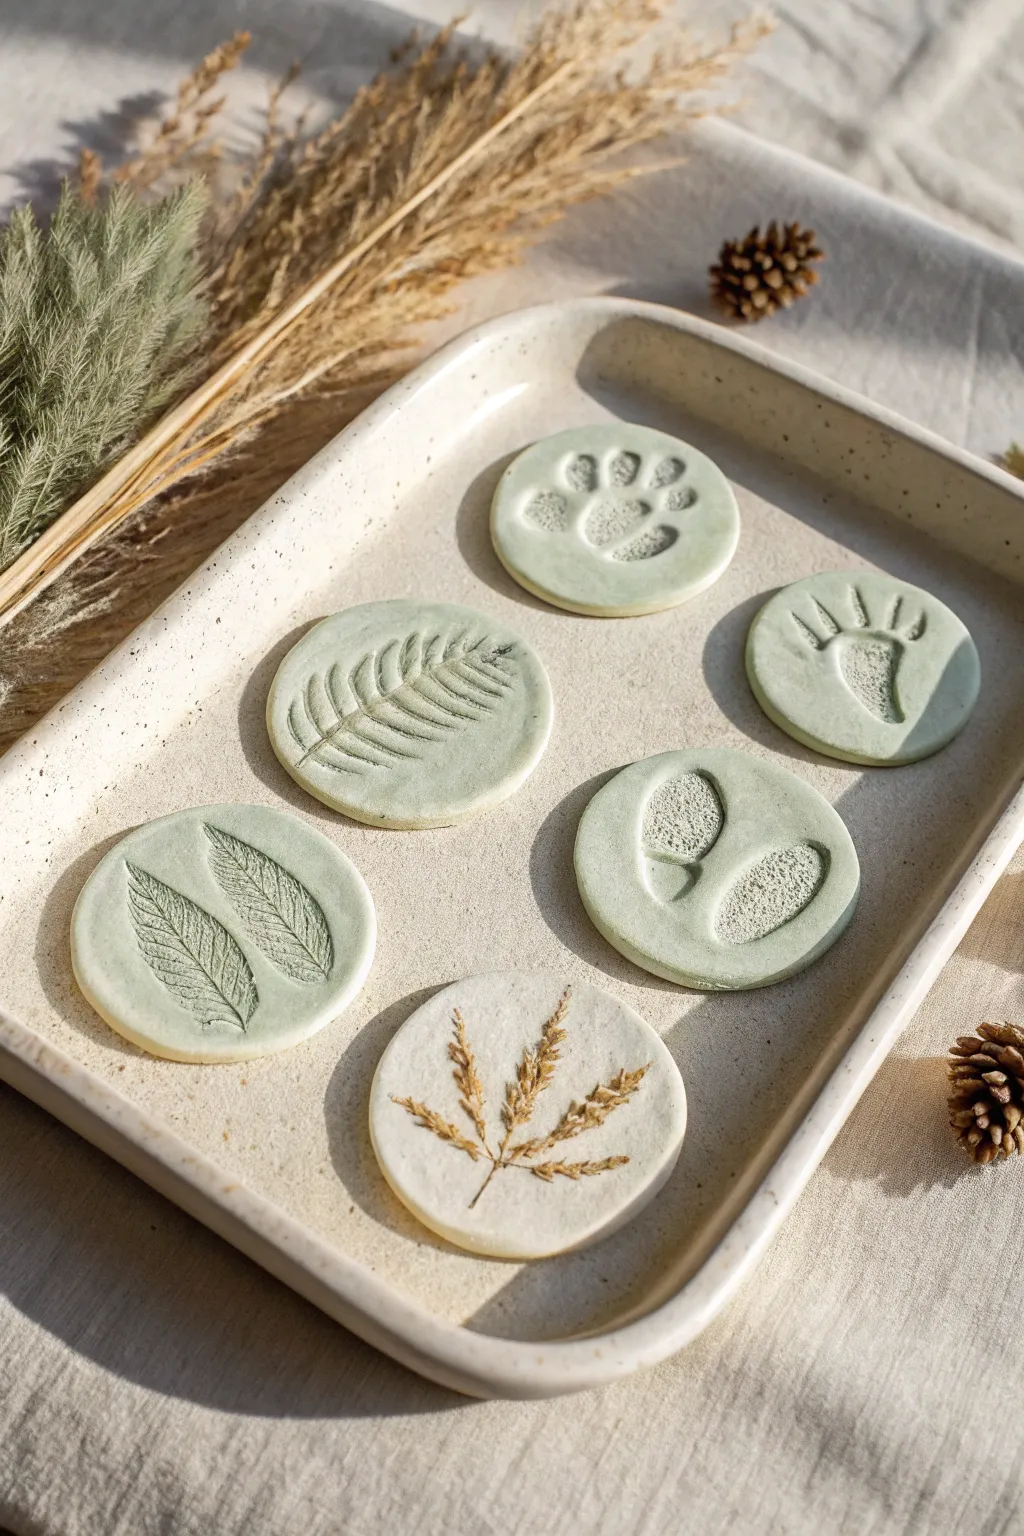
Capture the textures of the natural world with these charming fossil-like clay discs. Featuring delicate leaf veins, animal tracks, and preserved botanicals pressed into soft sage and cream clay, this project creates beautiful keepsake tokens perfect for display or play.
Step-by-Step
Materials
- Air dry clay (white)
- Acrylic paint (sage green, optional for tinting)
- Round cookie cutter or drinking glass
- Rolling pin
- Parchment paper or craft mat
- Plastic dinosaur toys (with distinct feet)
- Fresh leaves with prominent veins (ferns work well)
- Dried botanical sprigs or grass
- Small painting sponge or soft brush
- Fine grit sandpaper
Step 1: Preparation & Mixing
-
Prepare your workspace:
Lay down parchment paper or a craft mat to prevent the clay from sticking to your table. Have all your nature items and dinosaur toys clean and ready nearby. -
Tint the clay:
To achieve the muted sage green tone seen in the majority of the discs, take a large handful of white air dry clay. Add a very small drop of sage green acrylic paint into the center. -
Knead the color:
Fold the clay over the paint and knead thoroughly until the color is completely uniform. Add more paint sparingly if needed, but remember the color will dry slightly lighter. Leave a smaller portion of clay white for contrast.
Clean Release
If your toy feet or leaves are sticking to the clay, lightly dust the object with a tiny bit of cornstarch before pressing it down. This acts as a release agent.
Step 2: Shaping the Base
-
Roll out the slab:
Roll your colored clay out to an even thickness, approximately 1/4 inch thick. I find that using guide sticks on either side of the rolling pin helps keep the surface level. -
Cut the circles:
Using a round cookie cutter or the rim of a glass, press firmly into the clay to cut out your circles. Gently wiggle the cutter to release the shape. -
Smooth the edges:
Dip your finger in a little bit of water and run it along the cut edges of each circle to smooth down any roughness or stray bits of clay.
Step 3: Creating Impressions
-
Leaf prints:
Place a leaf vein-side down onto a clay disc. Use the rolling pin to gently roll over the leaf once with firm, even pressure to embed it into the surface. -
Reveal the texture:
Carefully peel the leaf away by the stem to reveal the intricate vein pattern left behind. -
Animal tracks:
Take a plastic dinosaur or animal toy. Press the foot firmly into the center of a fresh clay disc. Rock it slightly back and forth to ensure the toes and heel make a deep, clear impression. -
Create a negative texture:
For a unique look, press a textured object (like a coarse sponge or stone) gently into the bottom of the footprint impression to make the ‘track’ look rougher than the smooth clay around it. -
Botanical embedding:
For the white disc, take a dried sprig or piece of grass. Press it gently into the surface. Unlike the fresh leaves, you can leave this embedded permanently for a 3D effect, or remove it for a subtle imprint.
Ancient Artifacts
After drying, dilute brown acrylic paint with water (a ‘wash’) and brush it over the disc. Wipe the surface immediately with a rag, leaving dark paint only in the deep crevices.
Step 4: Finishing Touches
-
Initial drying:
Place the finished discs on a wire cooling rack or a mesh screen. This allows air to circulate underneath and prevents curling. -
Flip for flatness:
After about 2-3 hours, flip the discs over. I like to let this dry briefly on the reverse side to ensure they stay perfectly flat. -
Full cure:
Let the clay dry completely for 24 to 48 hours, depending on the humidity and thickness of your clay. -
Sanding edges:
Once fully hard, inspect the edges. Use a piece of fine-grit sandpaper to buff away any sharp ridges or uneven spots on the rim for a professional finish. -
Optional sealing:
To protect the prints, especially if they will be handled often, apply a thin coat of matte varnish over the top.
Arrange your collection of modern fossils on a tray or shelf to bring a serene touch of nature indoors
Mini Mushroom Fairy Garden Set
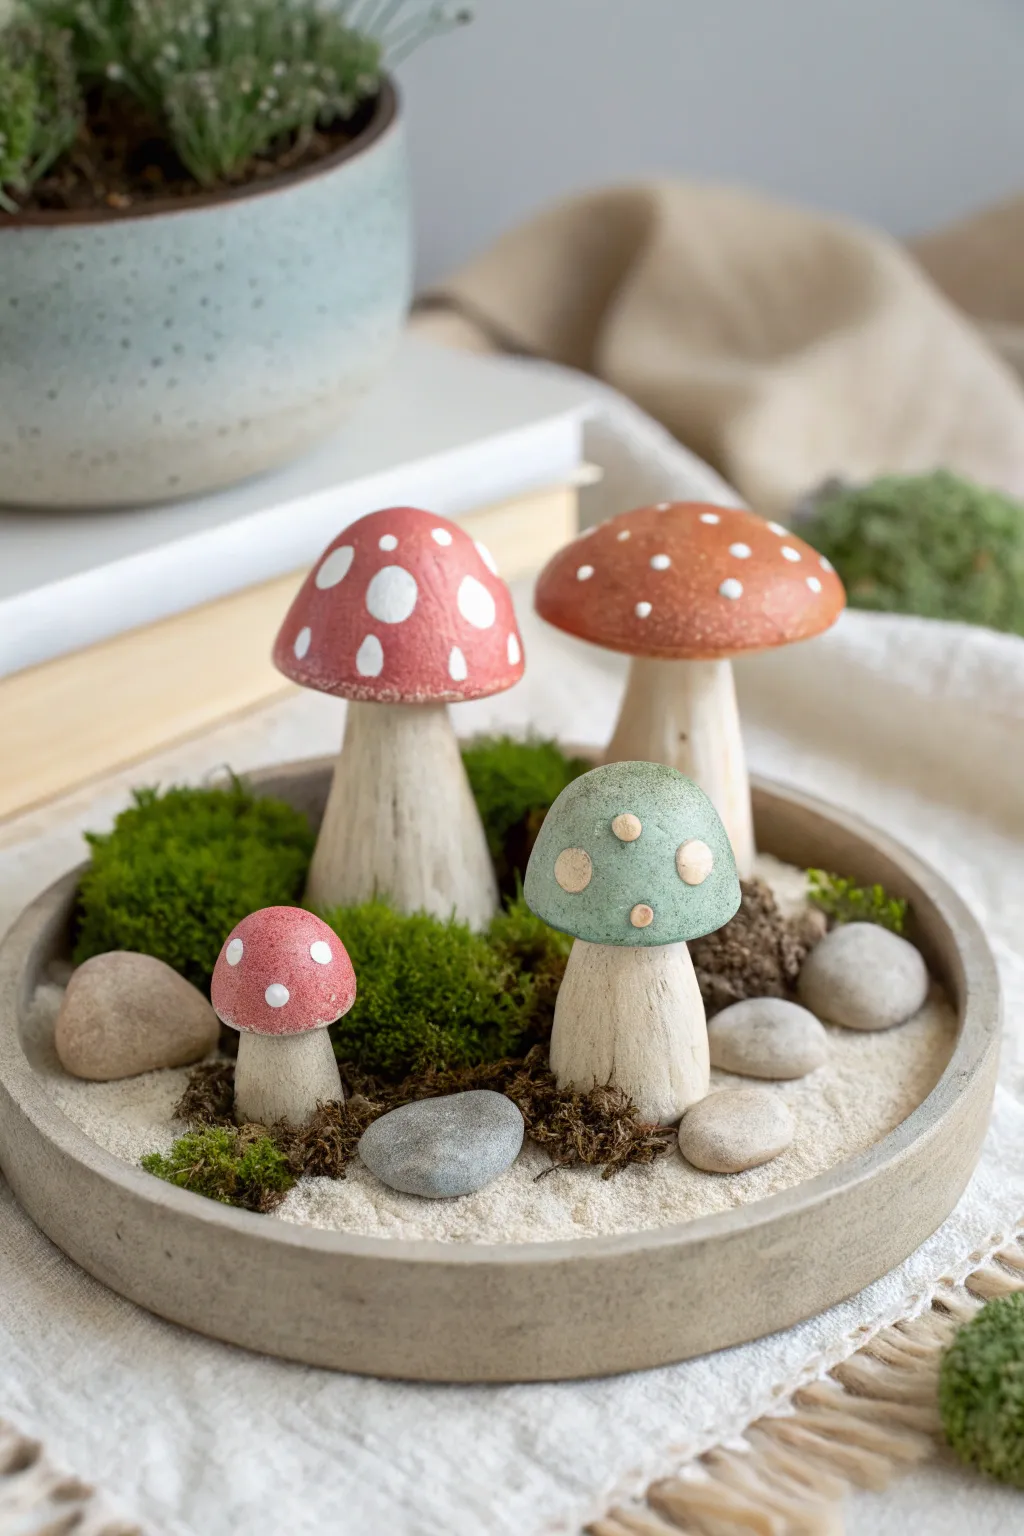
Bring a touch of magic indoors with this adorable miniature fairy garden featuring hand-sculpted clay mushrooms. These rustic toadstools sit nestled among moss and stones, creating a peaceful little scene perfect for a desk or shelf.
Detailed Instructions
Materials
- Air dry clay (white or terracotta)
- Acrylic paints (red, brown, teal/sage green, creamy white)
- Paintbrushes (small round and medium flat)
- Sculpting tools or a toothpick
- Aluminum foil
- Water cup
- Shallow round dish or planter saucer
- Fine sand (white or light beige)
- Small smooth rocks or pebbles
- Preserved moss or faux moss clumps
- Liquid glue or hot glue gun (optional)
- Matte varnish or sealant (optional)
Step 1: Sculpting the Mushrooms
-
Prepare the stems:
Start by rolling four cylinders of clay in varying sizes for the mushroom stems. Two should be thicker and taller, one medium, and one quite small. Taper them slightly so they are wider at the bottom for stability. -
Add texture:
Before the stems dry, use a sculpting tool or a toothpick to gently drag vertical lines down the sides. This mimics the fibrous texture of real mushroom stalks. -
Shape the caps:
Roll four balls of clay corresponding to your stem sizes. Press your thumb into the center of each ball and pinch the edges to create a domed cap shape. -
Refine the forms:
Smooth out the tops of the caps with a little water on your finger. You want the red and brown caps to be smooth, but you can leave the green one slightly more textured if you like. -
Create the spots:
For the raised spots seen on the green mushroom, roll tiny little balls of clay and press them firmly onto the green cap’s surface while the clay is still damp. For the other mushrooms, we will paint the spots later. -
Join the pieces:
Score (scratch) the top of a stem and the underside of a matching cap. Add a dab of water or clay slip, then press them together firmly. Smooth the clay at the join underneath so the cap stays on securely. -
Allow to dry:
Set your four assembled mushrooms aside to dry completely. Depending on humidity and thickness, this might take 24 to 48 hours.
Strong Stems
If your mushrooms are tall, insert a piece of toothpick or wire inside the stem and up into the cap while the clay is wet for internal reinforcement.
Step 2: Painting & detailing
-
Base coat the stems:
Mix a creamy white with a tiny dot of brown to get an off-white, natural bone color. Paint all the stems with this shade. I find a second coat helps cover any grayness from the clay. -
Highlight the texture:
Once the stems are bone-dry, mix a very watery brown paint. Brush it over the stems and immediately wipe it off with a paper towel. The dark paint will stay in the vertical grooves, highlighting the wood-like texture. -
Paint the red caps:
Paint the caps of the large and small mushroom with a muted, earthy red. You might need two layers for an opaque finish. -
Paint the brown cap:
Use a warm, medium-brown acrylic for the wide, flat mushroom cap. This gives variety to your garden color palette. -
Paint the green cap:
For the medium mushroom, use a sage or teal green. Make sure to paint carefully around the raised clay dots you added earlier. -
Add the dots:
Using a small round brush or the back of a paintbrush handle, dot creamy white paint onto the red and brown mushroom caps. Paint the raised clay bumps on the green mushroom with a light beige. -
Seal (Optional):
If you want to protect your paint job, apply a coat of matte varnish over the mushrooms.
Fairy House Upgrade
Turn the largest mushroom into a fairy house by painting a tiny wooden door on the stem and adding small windows with black or dark brown paint.
Step 3: Assembling the Garden
-
Prepare the base:
Fill your shallow dish with fine sand, smoothing it out to create a level surface. -
Place the mushrooms:
Arrange your mushrooms in the sand. Bury the base of the stems slightly so they stand upright securely. -
Add mossy details:
Tuck clumps of preserved moss around the base of the mushrooms to hide where they enter the sand and to add lush greenery. -
Finish with rocks:
Scatter a few smooth river stones or pebbles around the scene to complete the realistic forest floor look.
Now you have a serene little forest corner to enjoy on your desk or windowsill
Window Suncatcher Charms
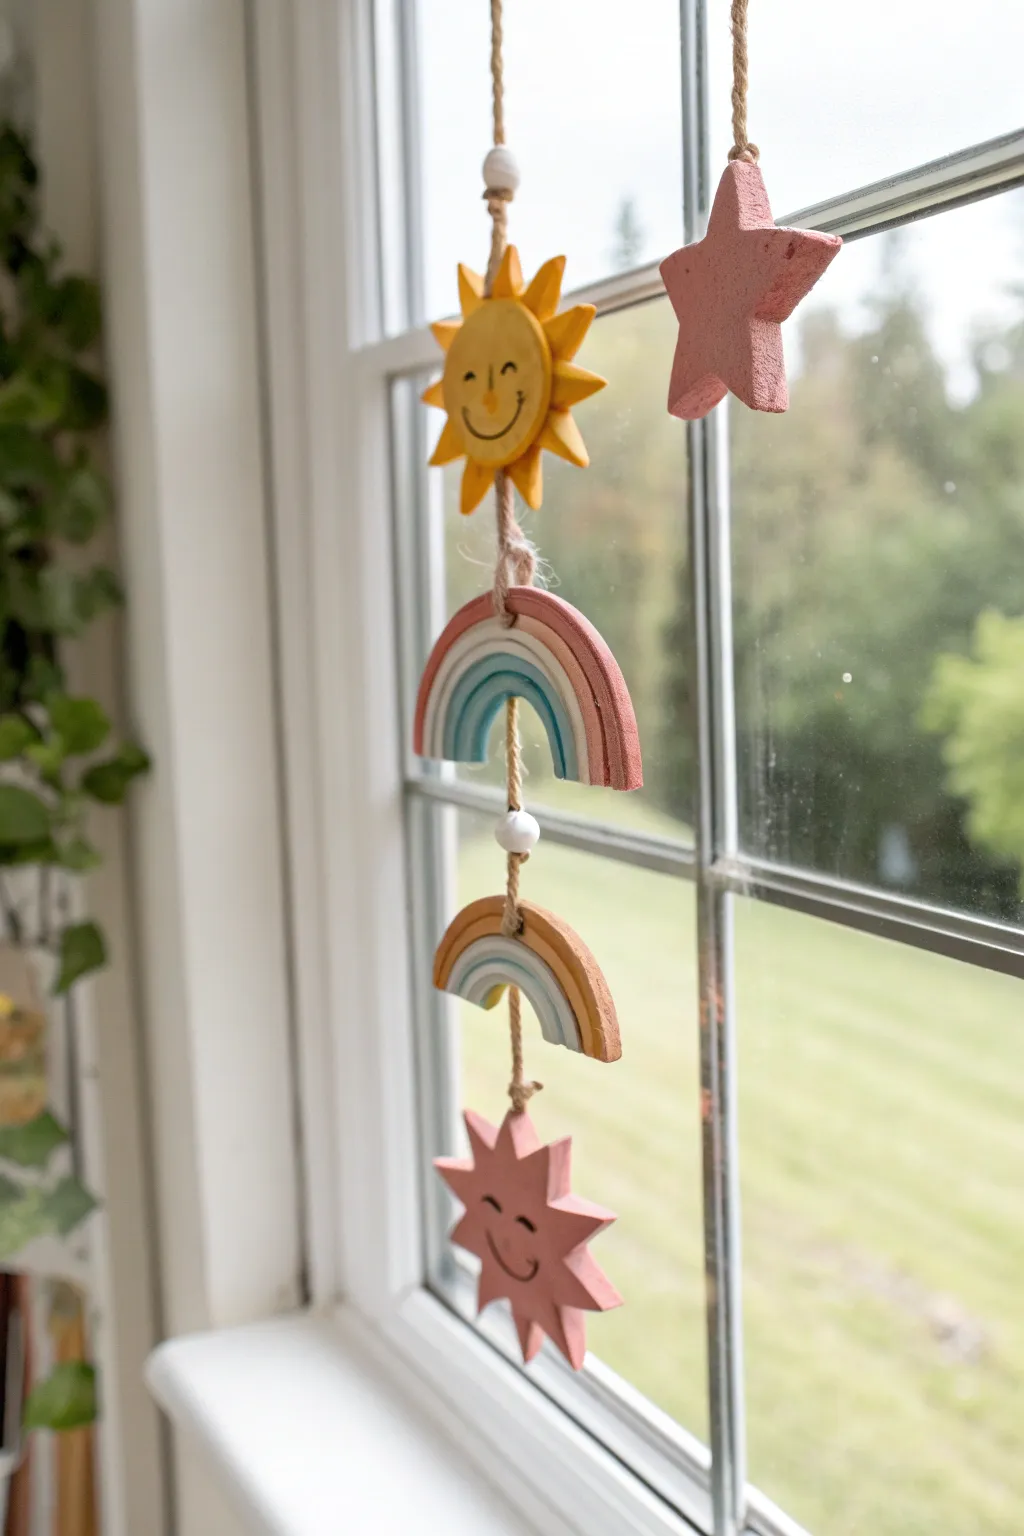
Brighten up any window with this charming, rustic mobile made from simple air dry clay shapes. Featuring smiling suns, pastel rainbows, and a hanging star, this project combines easy sculpting with a lovely hand-painted finish that captures the light perfectly.
Step-by-Step
Materials
- White air dry clay
- Rolling pin
- Cookie cutters (Sun, Star, Circle)
- Small round piping nozzle (for poking holes)
- Acrylic paints (Yellow, dusty pink, terracotta/rust, light blue, white)
- Fine detail paintbrush
- Medium flat paintbrush
- Jute twine or hemp cord
- White or natural wooden beads
- Sandpaper (fine grit)
- Parchment paper (for drying)
Step 1: Sculpting the Shapes
-
Roll out the clay:
Begin by kneading your air dry clay until it feels soft and pliable. Roll it out on a flat surface to an even thickness of about 1/4 inch. If the clay sticks, you can lay down a sheet of parchment paper first. -
Cut the suns:
Use a sun-shaped cookie cutter to press out two sun shapes. If you don’t have a cutter, you can cut a circle and then hand-mold little triangles around the edge for the rays. -
Create the rainbows:
Cut out two large circles using a round cutter or the rim of a glass. Cut these circles exactly in half to create four semi-circles, though you’ll only need two for this specific design. -
Detail the rainbows:
To create the distinct arches, use a modeling tool or a dull knife to gently score curved lines across the semi-circles. Don’t cut all the way through; just create grooves that will help you paint the different colored bands later. -
Cut the star:
Use a star-shaped cutter to punch out one star shape for the top accent piece of the mobile. -
Smooth the edges:
Dip your finger in a little bit of water and gently run it along the cut edges of all your shapes to smooth out any roughness or stray clay frizzles. -
Add hanging holes:
This is crucial: before the clay dries, use a straw or a small piping nozzle to punch holes. For the suns and rainbows, you need a hole at the very top and the very bottom center. The top star only needs one hole at the top.
Step 2: Painting and Assembly
-
Let it dry completely:
Place all your shapes on a flat surface lined with parchment paper. Allow them to dry for at least 24-48 hours. I find flipping them over halfway through the drying process helps them cure evenly and prevents curling. -
Sand imperfections:
Once fully hard, lightly sand the edges with fine-grit sandpaper if there are any sharp points remaining. -
Paint the yellow sun:
Paint the top sun a bright, cheerful yellow. You may need two coats for full opacity. Let it dry. -
Paint the pink sun:
Paint the bottom sun a dusty rose or pink shade. This creates a nice color balance with the top yellow one. -
Paint the star:
Coat the single star shape in the same dusty rose pink used for the bottom sun. -
Paint the rainbows:
Using your fine brush, paint the arches of the rainbows. Use terracotta for the outer band, dusty pink for the middle, and a soft blue-grey for the inner arch. Leave the grooves unpainted or paint them white for separation. -
Add smiling faces:
Use a very fine brush or a black paint pen to draw a simple curved smile and two small eyes on the center of both sun shapes. Add tiny eyebrows for extra character. -
Cut the twine:
Cut a long piece of jute twine, about 3 feet long to be safe. You can always trim it later. -
String the top section:
Tie a loop at the top for hanging. Thread the twine through the star, secure with a knot, and add a wooden bead below it. -
Connect the pieces:
Continue threading down through the top hole of the yellow sun, out the bottom hole, add a bead, then into the rainbow, and so on. Tie knots under each shape or bead to keep them spaced out and floating in position.
Clay Cracking?
If you see tiny cracks forming as the clay dries, mix a tiny bit of fresh wet clay with water to make a paste and smooth it into the cracks with your finger.
Clean Lines Tip
For the rainbow arches, use masking tape or painter’s tape to block off sections while you paint. This ensures your different colored bands have crisp, sharp edges.
Hang your beautiful new mobile in a sunny spot and enjoy the handmade warmth it brings to the room