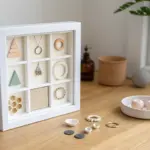
If you want air dry clay projects that feel solid, practical, and not fussy, you’re in the right lane. These ideas lean into clean lines, rugged textures, and everyday usefulness—stuff you’ll actually keep on your desk, dresser, or shelf.
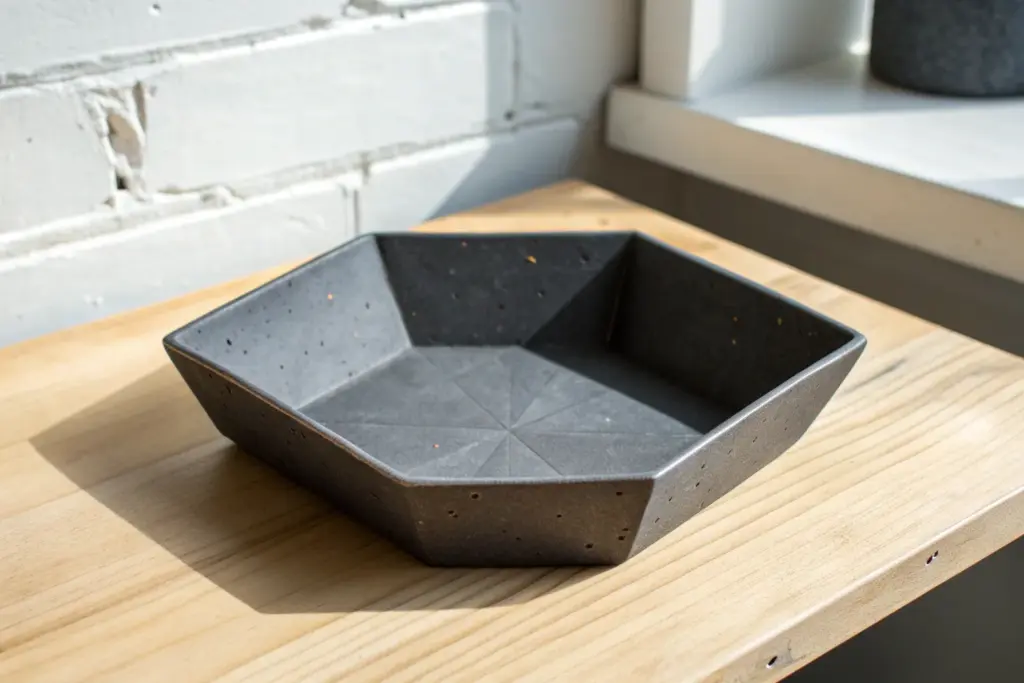
Minimal Catchall Tray for Keys and Wallet

This sleek, industrial-style tray mimics the look of poured concrete but is crafted entirely from air dry clay. Its minimalist profile and subtle speckled texture make it the perfect masculine accessory for organizing everyday essentials.
Step-by-Step Guide
Materials
- White or grey air dry clay (approx. 500g)
- Acrylic rolling pin
- Rolling guides or wooden slats (approx. 5-6mm thick)
- Craft knife or scalpel
- Ruler
- Fine grit sandpaper (220-400 grit)
- Water in a small dish
- Sponge or smoother tool
- Black coarse sand, dried coffee grounds, or black pepper (for speckling)
- Acrylic matte varnish or sealant
- Small paintbrush
Step 1: Preparation and Shaping
-
Prepare the speckling:
Before rolling, knead your chosen speckling agent into the white clay. I prefer using a pinch of dry, used coffee grounds or black coarse sand to achieve that authentic concrete aggregate look seen in the photo. -
Roll the slab:
Place your clay between two guide strips on a non-stick surface. Roll it out firmly with your acrylic roller until it is perfectly flat and even with the guides, creating a slab about 5-6mm thick. -
Cut the base:
Using a ruler and craft knife, cut a clean rectangle from the slab. A size of roughly 5×8 inches works well for a watch and keys, but you can adjust this based on your needs. -
Prepare the walls:
Gather the excess clay and re-roll it to the same thickness. Cut long, straight strips that are approximately 0.75 inches (2cm) tall. These will form the sides of your tray. -
Score the edges:
Use a needle tool or knife to cross-hatch or ‘score’ the top perimeter of the base slab and the bottom edge of your side strips. This texture is crucial for a strong bond.
Step 2: Assembly
-
Apply slip:
Dab a small amount of water or clay slip (clay mixed with water) onto the scored areas. It acts as the glue for your joinery. -
Attach the walls:
Press the side strips onto the base slab firmly. Ensure the walls are standing vertically straight, forming a 90-degree angle with the base. -
Join the corners:
Where the wall strips meet at the corners, butt them up against each other or cut them at 45-degree angles for a mitered joint. Score and slip these vertical seams as well. -
Blend the seams inside:
Use a modeling tool or your fingertip to smooth the clay where the wall meets the floor on the inside. You want a seamless transition so it looks like one solid cast piece. -
Blend the seams outside:
Repeat the smoothing process on the exterior bottom edge. Gently drag clay from the wall down to the base to lock it in place, then smooth it over. -
Refine the rim:
Run a damp sponge or finger along the top rim of the tray to soften any sharp cutting lines and ensure a uniform rounded edge.
Fixing Cracks
If hairline cracks appear while drying, mix a small paste of fresh clay and water. Fill the crack, let it dry, and sand smooth.
Step 3: Finishing Touches
-
Slow drying:
Place the tray away from direct heat or sunlight. Let it dry slowly for 24-48 hours. Flipping it gently halfway through can help the bottom dry evenly and prevent warping. -
Sanding for smoothness:
Once bone dry, take your sanding paper and gently sand the entire surface. Pay special attention to the rim and corners to achieve that manufactured, smooth concrete finish. -
Dust off:
Wipe the tray down with a slightly damp cloth or a soft brush to remove all white clay dust from the sanding process. -
Seal protection:
Apply a coat of matte varnish. This will seal the porous clay and protect it from scratches from keys or moisture from the air. -
Final cure:
Allow the varnish to cure completely according to the bottle’s instructions before placing any items inside.
Level Up: Leather Lining
Cut a piece of scrap leather or cork to the exact size of the inner rectangle and glue it to the bottom for a premium, noise-dampening finish.
Place your new industrial catchall near the door and enjoy the organized simplicity it brings to your daily routine


Geometric Desk Organizer Block
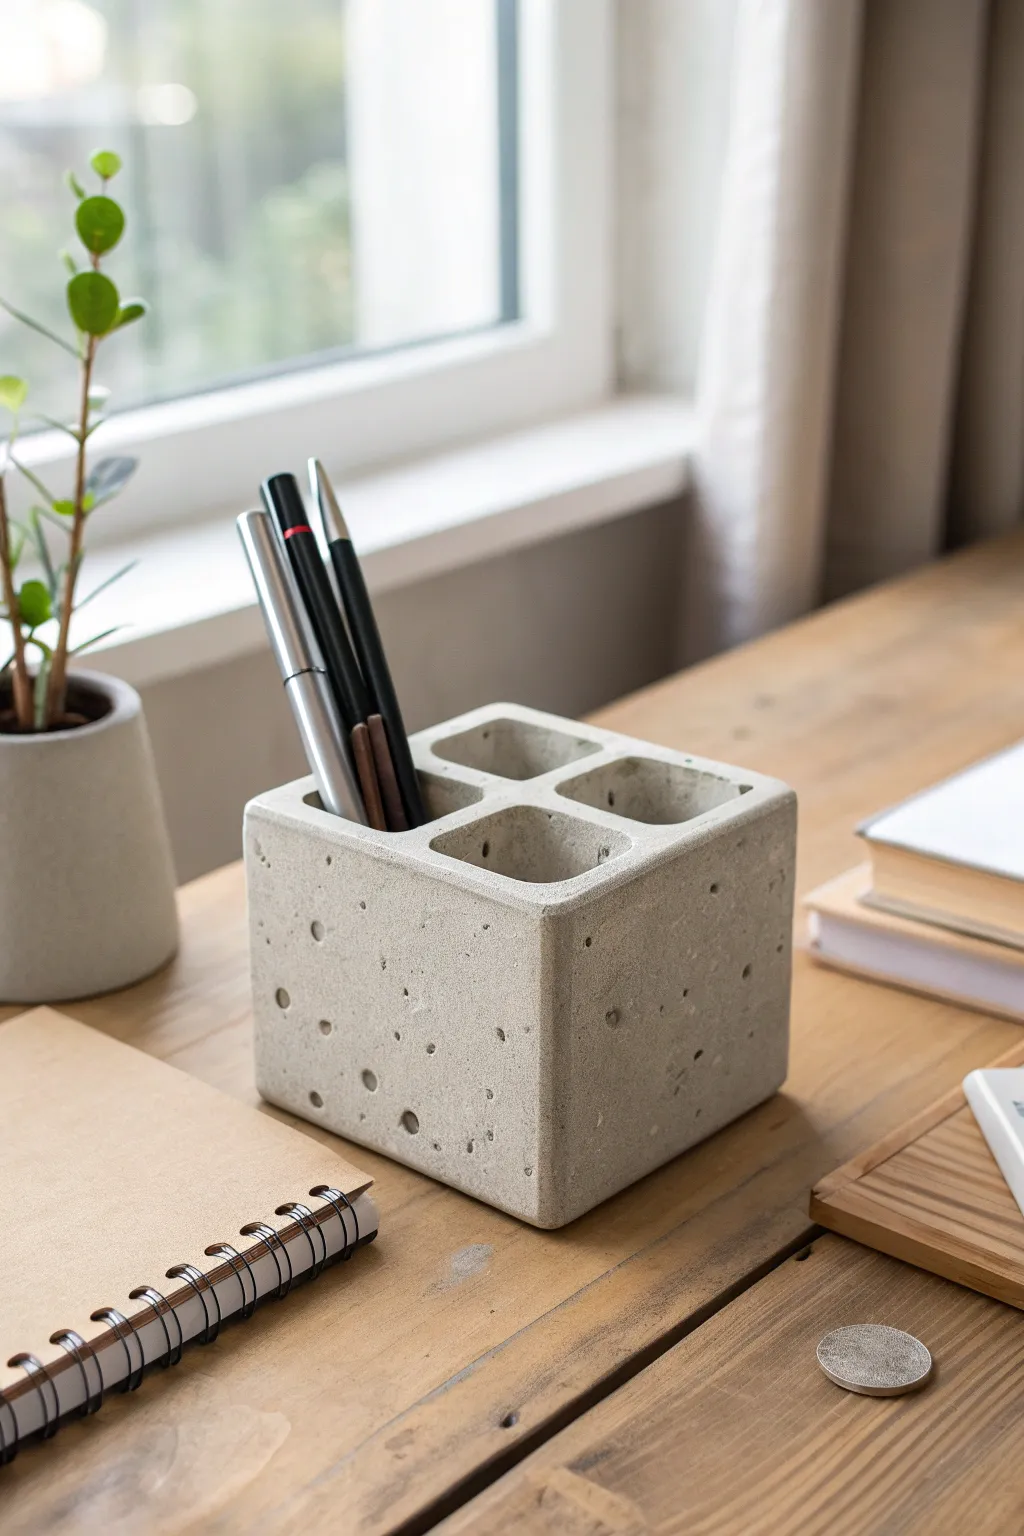
Achieve that rugged, industrial concrete aesthetic without mixing actual cement by using this clever air-dry clay technique. This chunky, geometric cube features realistic pitting and texture, making it a functional and masculine addition to any workspace.
Detailed Instructions
Materials
- Stone-colored air dry clay (grey)
- Small square cardboard box (approx. 4×4 inches) or creating a mold
- Four thick markers or dowels (for creating holes)
- Craft knife or metal ruler
- Rolling pin
- Sandpaper (coarse and fine grit)
- Toothbrush or stiff bristle brush
- Water spray bottle
- Clear matte varnish (optional)
Step 1: Shaping the Base Block
-
Prepare the Clay:
Start by conditioning a large block of grey air-dry clay. Knead it thoroughly until it is pliable and warm, which helps prevent internal cracking later. -
Form the Initial Cube:
Shape the clay into a rough cube. You can press the clay into a small square cardboard box lined with plastic wrap to get sharp initial corners, or simply use your hands and a flat surface to strike the sides flat. -
Refine the Sides:
Place the clay on your work surface and drop it firmly (but carefully) on each of its six sides. This ‘whacking’ technique helps flatten the faces and sharpen the corners. -
Slice for Precision:
For perfectly straight edges, use a long metal ruler or a large craft blade to slice off thin layers from the sides. This reveals the smooth interior clay and creates that sharp, architectural look. -
Create the Pen Holes:
Take your four markers or dowels. Mark their positions symmetrically on the top face of the cube. Slowly press them deep into the clay, twisting gently as you push to avoid warping the cube’s overall shape. Leave them in for a moment. -
Remove and Tidy:
Carefully twist and pull the markers out. If the clay bulged around the openings, slice that excess off with your craft knife to make the top surface perfectly flat again.
Cracks while drying?
Thick blocks can crack. If fissures appear, mix a small amount of fresh clay with water to make a paste (slip) and fill the cracks, then sand smooth once dry.
Step 2: Adding Texture & Detail
-
Simulate Concrete Pocking:
To mimic the look of cast concrete, take a small, blunt tool usually measuring roughly 3-5mm. Randomly press it into the sides of the cube to create small divots. -
Add Micro-Texture:
Here I like to use an old toothbrush. Dampen it slightly and flick or dab it against the clay surface. This creates tiny imperfections and air-bubble marks that make the faux-concrete look convincing. -
Detail the Corners:
Use your finger or a smoothing tool to slightly soften just the very edge of the pen holes on top. This makes it easier to slide pens in later without chipping the brittle edge. -
Controlled Drying:
Let the block dry slowly away from direct heat or sunlight. Because it is a thick block, turn it onto a different side every 12 hours to ensure airflow reaches all faces evenly.
Step 3: Finishing Touches
-
Initial Sanding:
Once bone dry (which may take 3-4 days for a block this size), use coarse sandpaper to flatten any bottom unevenness so it sits flush on a desk. -
Refining the Surface:
Switch to fine-grit sandpaper. Lightly sand the flat faces to smooth out fingerprints, but be careful not to sand away the cool ‘concrete’ pockmarks you created earlier. -
Dust Removal:
Wipe the entire piece down with a barely damp cloth or a dry brush to remove the clay dust from the textured holes. -
Seal for Durability:
Apply a coat of clear matte varnish. This will slightly darken the grey, making it look even more like cured cement, and will protect the clay from graphite marks.
Darker Industrial Look
For a darker, aged concrete look, dilute black acrylic paint with water (a wash) and brush it over the block, then wipe it off quickly with a rag.
Now you have a solid, minimalist organizer that anchors your desk with modern style


Modern Phone Stand With Clean Angles
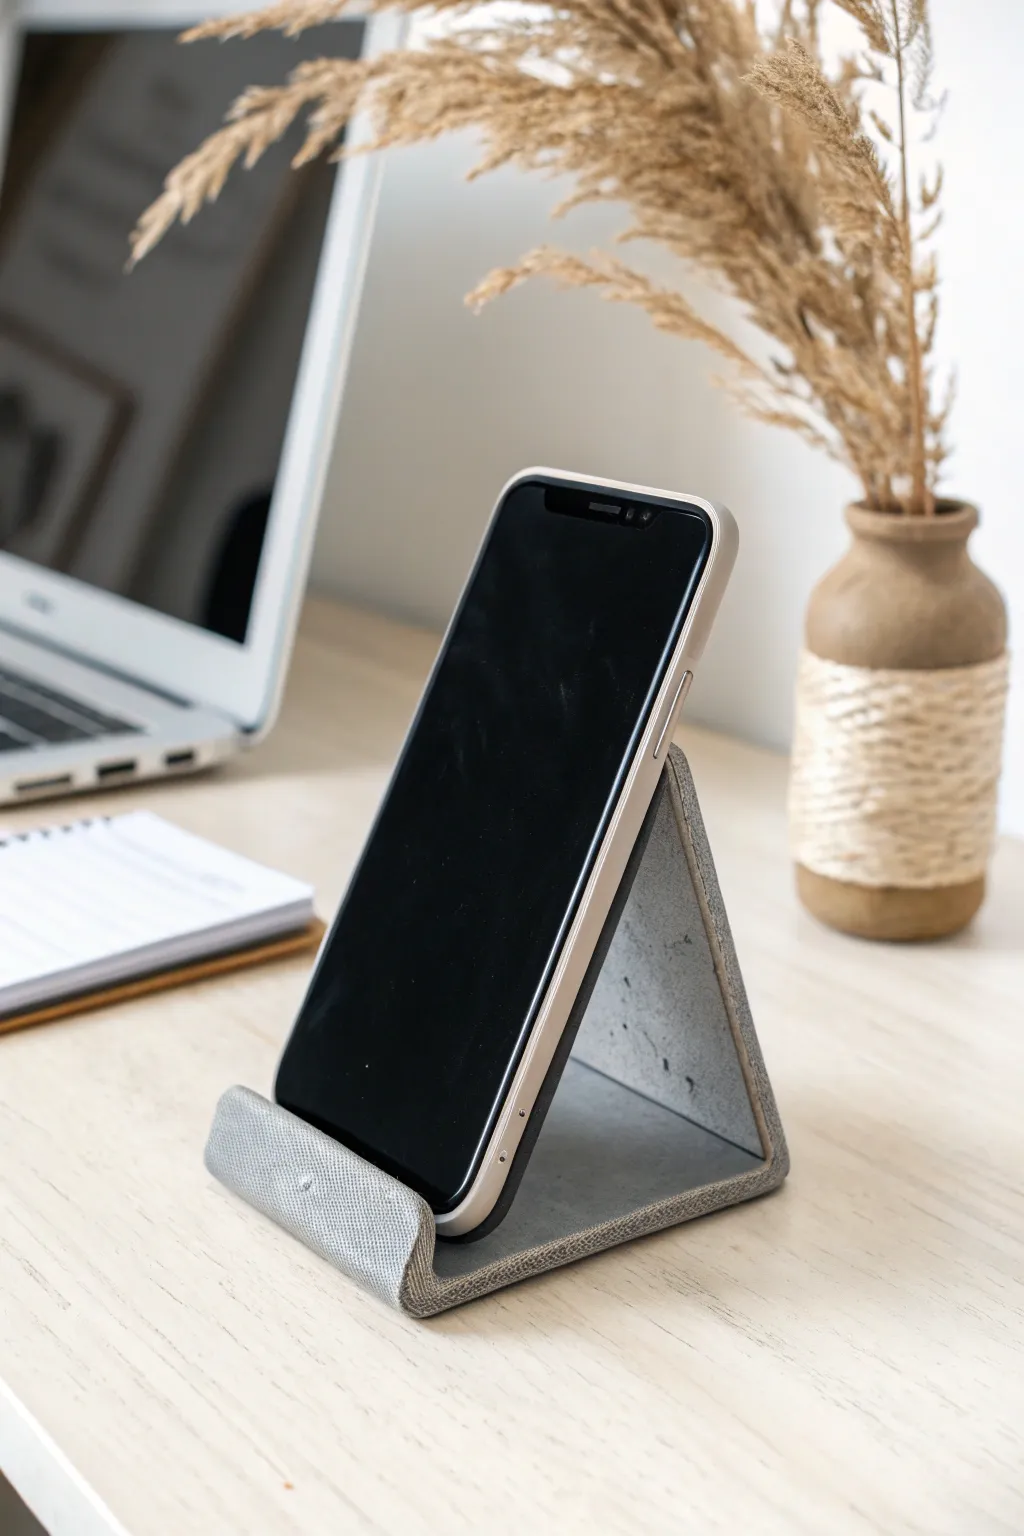
Embrace industrial minimalism with this sleek, geometric phone stand that mimics the cool weight of concrete. Its sharp angles and smooth grey finish offer a masculine, functional desk accessory that looks far more expensive than it is.
Step-by-Step
Materials
- Air dry clay (white or grey)
- Rolling pin
- Sharp craft knife or scalpel
- Ruler (metal preferred)
- Small bowl of water
- Fine-grit sandpaper (220-400 grit)
- Grey acrylic paint (stone shades)
- Black acrylic paint (for speckling)
- Matte varnish or sealant
- Cardboard or sturdy cardstock (for template)
- Old toothbrush
Step 1: Shaping the Structure
-
Create a template:
Begin by determining the dimensions for your phone. A strip about 2.5 to 3 inches wide and 10 inches long is usually sufficient. Cut this strip out of cardboard first to test the fold angles. -
Condition the clay:
Take a large chunk of air dry clay and knead it thoroughly in your hands. You want it warm and pliable to prevent cracking during the folding process. -
Roll out the slab:
Roll the clay out into an even slab on a smooth surface. Aim for a thickness of about 1/4 inch (6mm). Uniform thickness is key for structural integrity. -
Cut the strip:
Place your cardboard template onto the rolled clay. Using your metal ruler as a guide, slice cleanly along the edges with a craft knife to create a perfect rectangular strip. -
Smooth the edges:
Dip your finger in a little water and gently run it along the cut edges of the strip to soften any sharpness or drag marks from the knife. -
Form the lip:
Create the small hook that holds the phone. Gently fold up about 0.5 to 0.75 inches of one end of the strip. Use the ruler to keep this fold straight and crisp. -
Make the main fold:
Measure the length of your phone against the strip. Make a second fold where the back of the phone would end, bending the clay backwards to create the slanted backrest. -
Close the triangle:
Fold the remaining tail of the strip underneath to form the base. Bring it forward until it meets the underside of the front lip. -
Secure the join:
Where the base meets the front lip, score both contact surfaces with your knife (crosshatch pattern) and add a dab of water. Press them firmly together. -
Reinforce angles:
Place the stand upright. Use your ruler or a flat tool to gently press against the sides and back, ensuring the sides are straight and the bottom creates a flat, stable footprint.
Step 2: Refining and Finishing
-
Dry thoroughly:
Let the piece dry completely. This structure requires significant drying time—usually 48 to 72 hours. Turn it occasionally to ensure airflow reaches the inside. -
Sand for sharpness:
Once bone dry, sand the flat surfaces with fine-grit sandpaper. Focus on making the corners and edges distinct and sharp to emulate a machined or cast look. -
Base coat painting:
Mix a solid medium-grey acrylic paint. Apply two thin, even coats to the entire piece, allowing the first coat to dry before adding the second. -
Add stone texture:
To get that concrete effect, mix a slightly darker grey. Dab a paper towel or sponge into the paint, offload most of it, and gently sponge patches onto the stand. -
Speckle effect:
Dilute a small drop of black paint with water. Dip an old toothbrush into it and run your thumb across the bristles to flick tiny specks onto the surface. -
Seal the piece:
Finish with a matte varnish. This protects the paint and enhances the stony, non-reflective quality of the faux-concrete finish.
Structure Support
While the clay dries, place a wedge of crumpled parchment paper or a cardboard triangle inside the fold to stop the clay from sagging.
Level Up: Tech Ready
Before drying, use a straw or small round cutter to make a hole in the back panel or base. This allows a charging cable to pass through neatly.
Now you have a sturdy, modern home for your device that combines handmade charm with industrial edge


Ring Cone for a Wedding Band
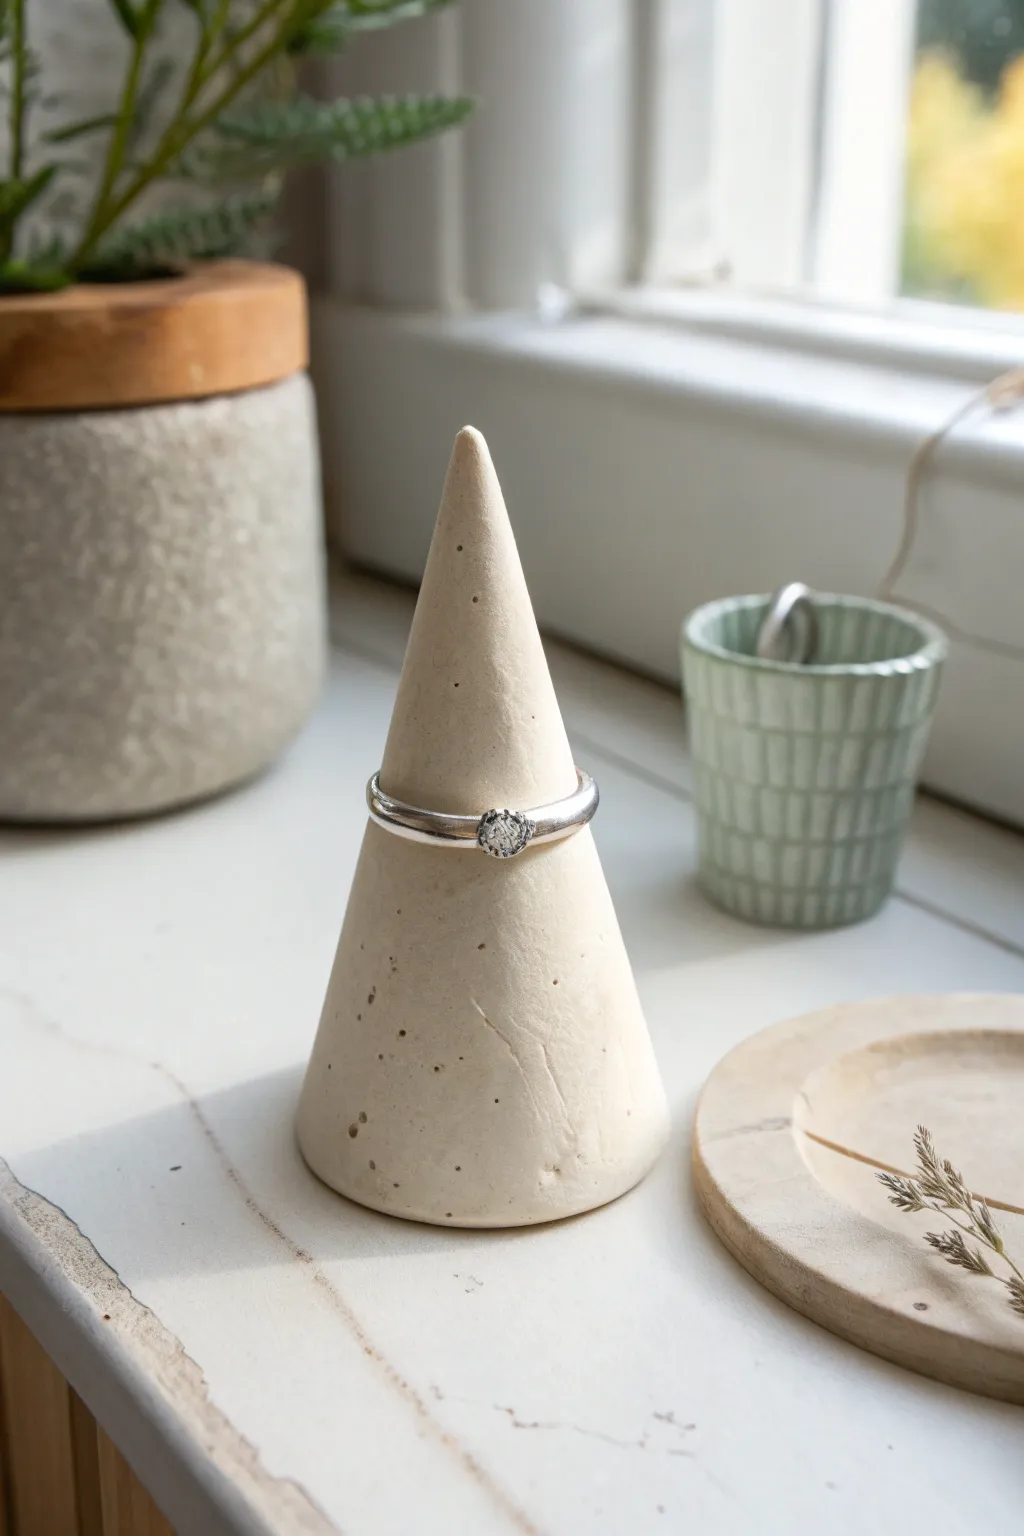
This sleek, cone-shaped ring holder combines industrial minimalism with functional design, making it a perfect addition to a workshop desk or nightstand. Its raw, matte finish mimics the look of concrete or stone, providing a sturdy and stylish spot to keep a wedding band safe.
Step-by-Step Tutorial
Materials
- White or stone-gray air dry clay
- Rolling pin or smooth glass jar
- Craft knife or scalpel
- Parchment paper or non-stick silicone mat
- Small bowl of water
- Fine-grit sandpaper (220-400 grit)
- Ruler
- Optional: Paper cone template
Step 1: Shaping the Foundation
-
Condition the Clay:
Start by taking a generous handful of air dry clay. Knead it thoroughly in your hands for several minutes until it becomes warm, pliable, and free of air bubbles or cracks. -
Initial Roll:
Place the clay on your parchment paper. Using the palm of your hand, roll the clay back and forth against the work surface to create a thick, cylinder-like log. -
Form the Cone Base:
Stand the cylinder upright. Gently press it down onto the surface to flatten the bottom, ensuring it stands perfectly straight without wobbling. -
Taper the Shape:
Using your palms, gently roll the clay while applying slightly more pressure near the top and less near the base. This creates the initial tapered cone shape. I find it helpful to rotate the cone frequently to keep it symmetrical. -
Refine the Slopes:
Place the cone back on its flat base. Use your fingers to smooth the sides from bottom to top, refining the slope so it is even all the way around. The cone should be about 3-4 inches tall for good stability.
Step 2: Detailing and Surface Texture
-
Flatten the Bottom:
Pick up the cone and tap the base firmly against the table a few times to ensure it sits perfectly flat. -
Check Vertical Alignment:
Spin the cone slowly on the table. If the tip wobbles excessively, adjust the sides gently until the point is centered directly over the base. -
Smooth Imperfections:
Dip your finger into a small amount of water. Gently run your damp finger over the entire surface of the cone to erase fingerprints and smooth out major bumps. Don’t over-wet the clay, or it might sag. -
Create Texture:
To achieve the stone-like look seen in the photo, take a slightly dry sponge or a crumpled piece of aluminum foil and very lightly dab the surface. This creates minute pits and variations. -
Sharpen the Tip:
Pinch the very top of the cone gently to ensure the point is distinct but not dangerously sharp. It needs to be narrow enough to hold a ring comfortably.
Natural Stone Look
Mix a tiny pinch of black pepper or dried used coffee grounds into the white clay before kneading. This creates natural speckles that mimic granite.
Step 3: Drying and Finishing
-
Initial Drying Phase:
Set the cone aside in a cool, dry place. Let it air dry for at least 24 hours. Placing it on a wire rack helps air circulate underneath. -
Rotation:
Halfway through the drying process, turn the cone on its side for a few hours to ensure the bottom dries evenly, then return it to the upright position. -
Sanding the Surface:
Once the clay is bone dry and hard (light in color), take your fine-grit sandpaper and gently sand the exterior. Focus on removing any sharp ridges or uneven lumps while preserving the subtle texture. -
Refining the Base:
Place the sandpaper flat on your table and rub the bottom of the cone against it in a circular motion. This creates a perfectly flat, professional footing. -
Dust Removal:
Wipe the entire piece down with a slightly damp cloth or a soft brush to remove all white clay dust. -
Optional Sealing:
If you want to protect the finish from moisture or oils from your hands, apply a coat of matte varnish. For the raw look shown in the image, you can leave it unsealed.
Fixing Cracks
If small cracks appear while drying, mix a small amount of clay with water to make a paste (slip). Fill the crack, smooth it over, and let it dry again.
Place your new sculptural piece on the windowsill or vanity for a streamlined, modern touch

What Really Happens Inside the Kiln
Learn how time and temperature work together inside the kiln to transform clay into durable ceramic.
Minimal Planter for a Cactus or Succulent
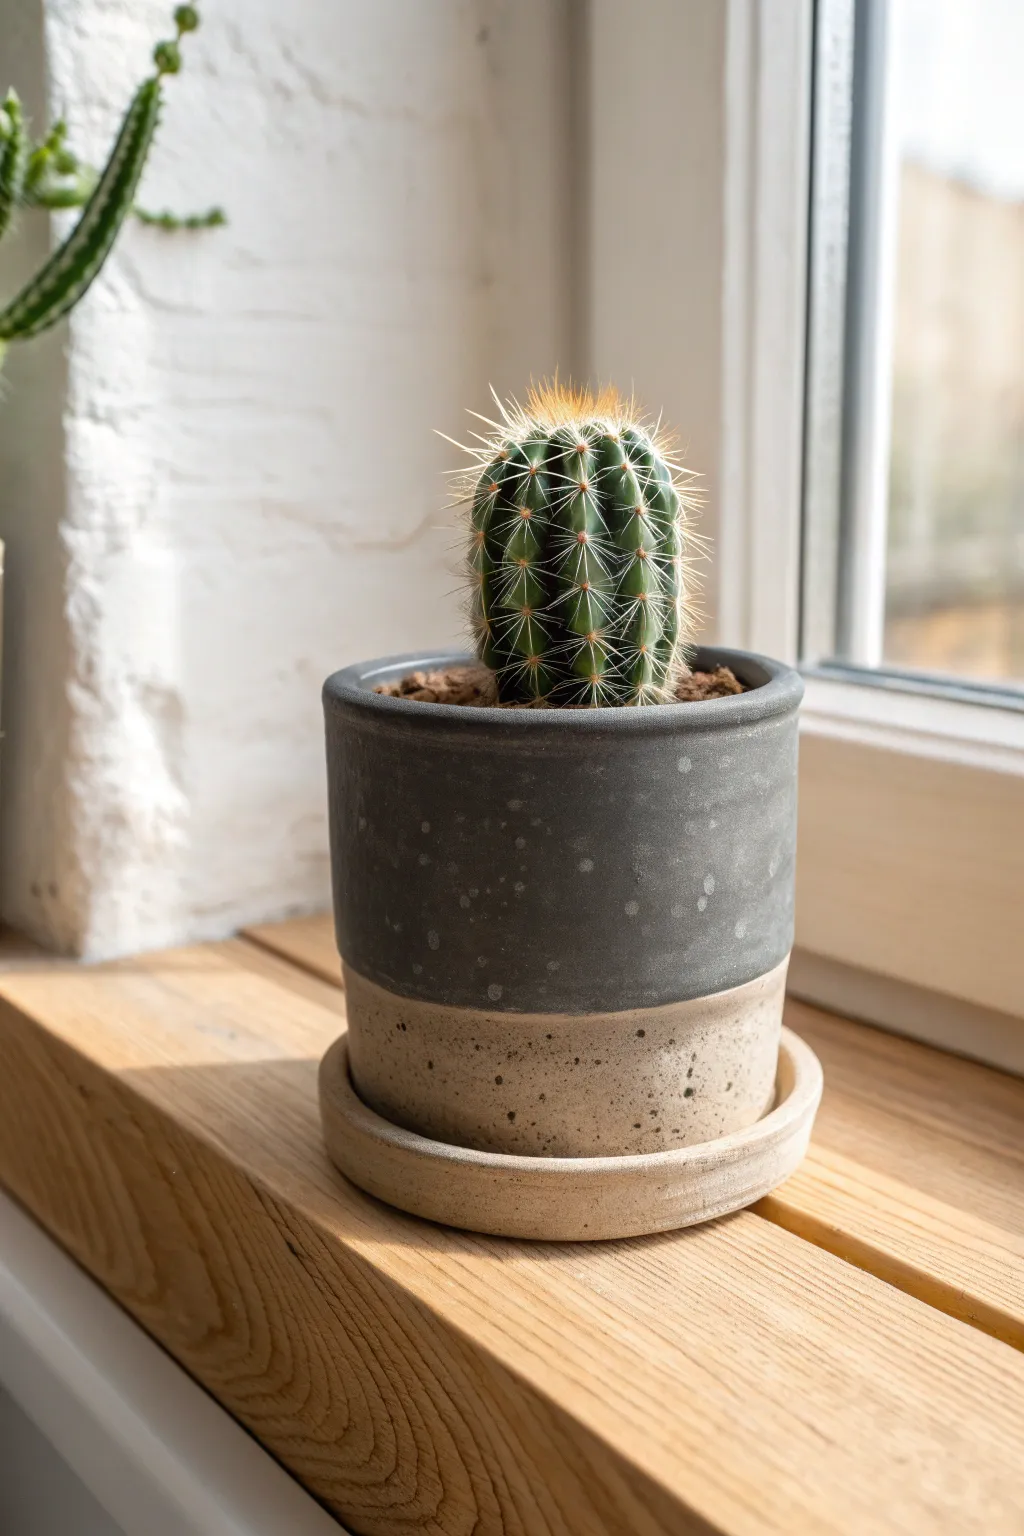
This sleek, cylindrical planter combines a raw, sandy base with a sophisticated charcoal top for a modern industrial look. The subtle speckled texture and matching saucer make it a perfect, understated home for your favorite cactus or succulent.
How-To Guide
Materials
- Air dry clay (stone or grey color)
- Air dry clay (white or light beige)
- Acrylic paint (black and dark grey)
- Matte varnish or sealant
- Rolling pin
- Craft knife
- Ruler
- Sandpaper (fine grit)
- Two jar lids or circular cookie cutters (one slightly larger for the saucer)
- Water and sponge
- Stylus or toothbrush (for speckling)
- Plastic wrap
Step 1: Creating the Base Structure
-
Prepare the clay slab:
Begin by rolling out a substantial amount of air dry clay to an even thickness of about 1/4 inch. If you want the bottom to be naturally beige, use the light-colored clay here, or stick to grey and paint later. I find using guide strips on either side of the rolling pin helps keep the thickness perfectly uniform. -
Cut the cylinder wall:
Using a ruler and craft knife, cut a long rectangle from your slab. The height should be about 4-5 inches, and the length must be enough to wrap around your desired circumference plus a little overlap. -
Cut the bases:
Cut two circles from the remaining clay slab. One will be the floor of the pot (matching the cylinder’s diameter) and the other slightly larger one will become the saucer. -
Form the cylinder:
drape the rectangular slab around a cylindrical form (like a glass jar wrapped in plastic wrap) to help it hold its shape. Score the short ends of the rectangle, add a dab of water, and press them firmly together to create a seamless tube. -
Attach the bottom:
Score the bottom edge of your clay tube and the outer edge of the smaller circle base. Apply a little water or slip, then press the tube onto the base. Use a modeling tool or your finger to smooth the seam inside and out until it is invisible.
Seamless Smoothness
Use a damp paintbrush instead of your finger to smooth hard-to-reach seams inside the pot. It acts like a mini mop.
Step 2: Refining and The Saucer
-
Smooth the surfaces:
Dip a sponge in water and gently wipe down the entire pot to remove fingerprints and harsh angles. Pay special attention to the rim feels thick and rounded like the reference image. -
Shape the saucer lip:
Take your larger clay circle and roll a thin coil commonly known as a ‘snake’. Score the edge of the circle and the coil, then attach the coil to the rim to create a raised lip. Smooth the transition so it looks like one solid piece. -
Let it dry completely:
Allow both pieces to dry for 24-48 hours away from direct heat. Turn them occasionally to ensure even drying and prevent warping. -
Sand for perfection:
Once bone dry, use fine-grit sandpaper to smooth out any remaining bumps or uneven textures on both the pot and the saucer.
Waterproofing Hack
Air dry clay isn’t waterproof. To safely hold a live plant, fit a plastic nursery pot inside immediately instead of planting directly.
Step 3: The Two-Tone Finish
-
Tape the horizon line:
Measure about one-third up from the bottom of the pot. Apply a strip of painter’s tape or masking tape around the circumference, ensuring it is level. This divides the dark top from the light bottom. -
Mix the charcoal paint:
Mix black acrylic paint with a tiny drop of white or grey to achieve a soft, matte charcoal hue. It shouldn’t be jet black, but a deep, stony grey. -
Paint the top section:
Paint the area above the tape line with your charcoal mix. Carry this color over the rim and down the inside of the pot for a couple of inches. -
Add the speckled texture:
Dilute a small amount of light grey or white paint. Load a toothbrush with this mixture and flick the bristles with your thumb to spray fine speckles over the dark painted section for that stone-like effect. -
Paint the bottom section:
Once the top is dry, remove the tape. Paint the bottom third and the entire saucer in a sandy beige or stone color to contrast with the dark top. I like to add darker speckles (brown or black) to this beige section to mimic raw ceramic. -
Seal the piece:
Finish by coating the entire project, inside and out, with a matte varnish. Apply two coats to ensure the clay is sealed against moisture.
Place your favorite spiky cactus inside and enjoy the modern, grounded vibe this planter adds to your windowsill
Wall Hook Set for Caps, Keys, or Leashes
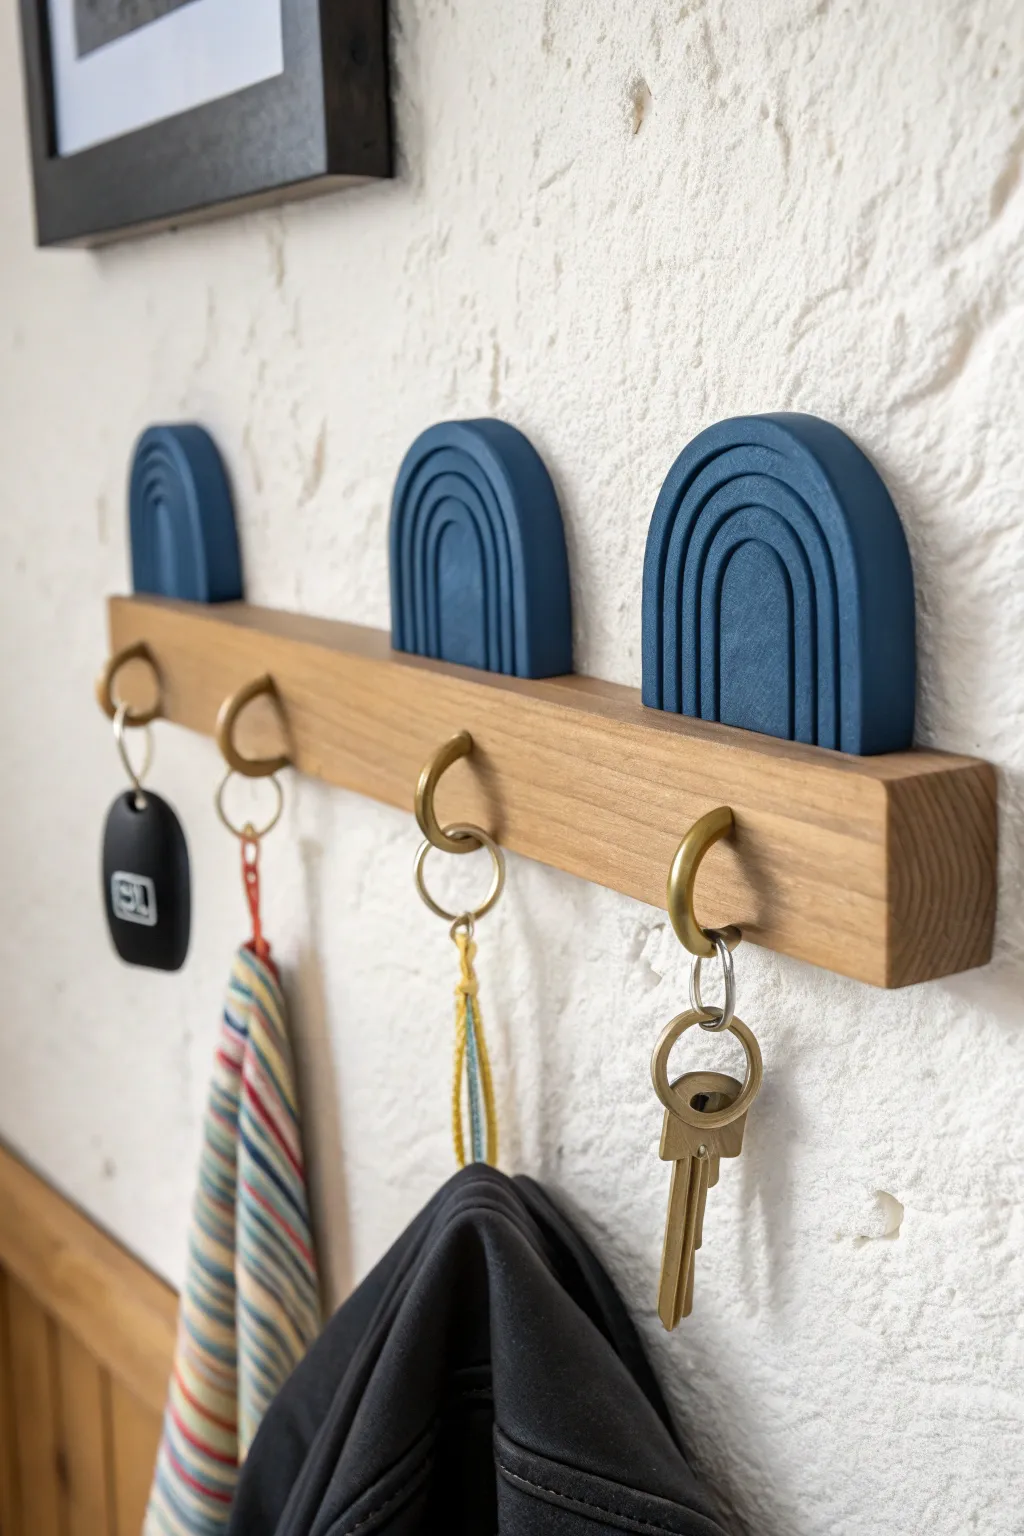
This sleek and modern wall organizer combines the warmth of natural wood with the cool tones of geometric clay art. Using air dry clay to create tiered arch shapes adds a sophisticated, tactile element that elevates a simple key holder into a piece of functional decor.
Step-by-Step Guide
Materials
- Air dry clay (white or grey)
- Wooden trim board (about 1×2 or 1×3 inches)
- Acrylic paint (Deep Navy Blue)
- Matte spray varnish
- Rolling pin
- Clay knife or craft blade
- Set of circle cutters or varying sizes of cups/lids
- Sandpaper (medium and fine grit)
- Wood glue or super glue gel
- Brass or gold screw-in cup hooks
- Drill with small bit (optional but helpful)
- Wall mounting hardware (sawtooth hangers or command strips)
- Ruler
Step 1: Shaping the Clay Arches
-
Condition the clay:
Start by taking a large chunk of air dry clay and kneading it in your hands to warm it up. This removes air bubbles and makes the material more pliable for rolling. -
Roll it out:
Roll the clay out onto a clean, smooth surface until it is approximately 1/4 inch thick. Aim for an even thickness throughout so the final pieces look uniform. -
Cut the base arch:
You will need to construct three separate arches by layering ‘U’ shapes. Start by cutting out three large semi-circles or arches using your largest cutter or template. -
Create the tiered layers:
For each arch, you need to create the illusion of stepped layers. You can do this by cutting slightly smaller arches and stacking them, or by carefully carving deep grooves into a thick slab to simulate separate bands. -
Refine the edges:
Specifically for this design, the arches should look crisp and geometric. Use a sharp craft blade to trim the bottom edge of each arch so it is perfectly flat. This flat bottom will sit flush against the top of the wood board. -
Smooth imperfections:
Dip your finger in a little bit of water and run it along the cut edges to smooth out any roughness or stray clay burrs. Don’t use too much water, or the clay might get mushy. -
Dry thoroughly:
Place your clay pieces on a wire rack or a piece of parchment paper to dry. Flip them over halfway through the drying process to ensure even evaporation. Wait 24-48 hours depending on humidity.
Step 2: Preparing the Wood Base
-
Cut and sand:
Cut your wooden board to your desired length. Give the entire board, especially the cut ends and corners, a good sanding to remove splinters and create a smooth finish. -
Mark hook placement:
Use a ruler to measure equal distances for your hooks along the center line of the board. Mark these spots lightly with a pencil. -
Pre-drill holes:
To prevent the wood from splitting, I always recommend drilling small pilot holes where you marked the spots for the hooks. -
Install the hooks:
Screw the brass cup hooks into the pilot holes by hand. Twist them until they are tight and the open end of the hook is facing upward.
Uneven Arches?
If your arches warp while drying, you can sand the bottom flat again once they are fully dry. Lay sandpaper flat on a table and rub the clay base against it.
Step 3: Assembly and Finishing
-
Sand the dried clay:
Once the clay is rock hard, use fine-grit sandpaper to gently smooth the surface and edges one last time. -
Apply paint:
Paint the clay arches with deep navy blue acrylic paint. You may need two or three coats to get an opaque, solid finish. Let the paint dry completely between coats. -
Seal the pieces:
Spray the painted clay pieces with a matte varnish. This protects the finish from chipping and gives it a professional, non-glossy look. -
Attach clay to wood:
Apply a strong wood glue or super glue gel to the bottom flat edge of each clay arch. Press them firmly onto the top edge of the wooden board, aligning them with the hooks below (or spacing them between hooks depending on your preference). -
Cure time:
Allow the glue to cure fully according to the package instructions before attempting to hang anything. -
Mount to wall:
Attach heavy-duty command strips or sawtooth hangers to the back of the wood board and mount it straight on your wall.
Use Cookie Cutters
To get perfectly concentric arches quickly, use a set of graduated round cookie cutters. Cut circles, slice them in half, and you have instant perfect arches.
Now you have a stylish, custom-made spot to drop your keys and gear the moment you walk through the door


The Complete Guide to Pottery Troubleshooting
Uncover the most common ceramic mistakes—from cracking clay to failed glazes—and learn how to fix them fast.
Tool Rest for Shaving or Studio Brushes
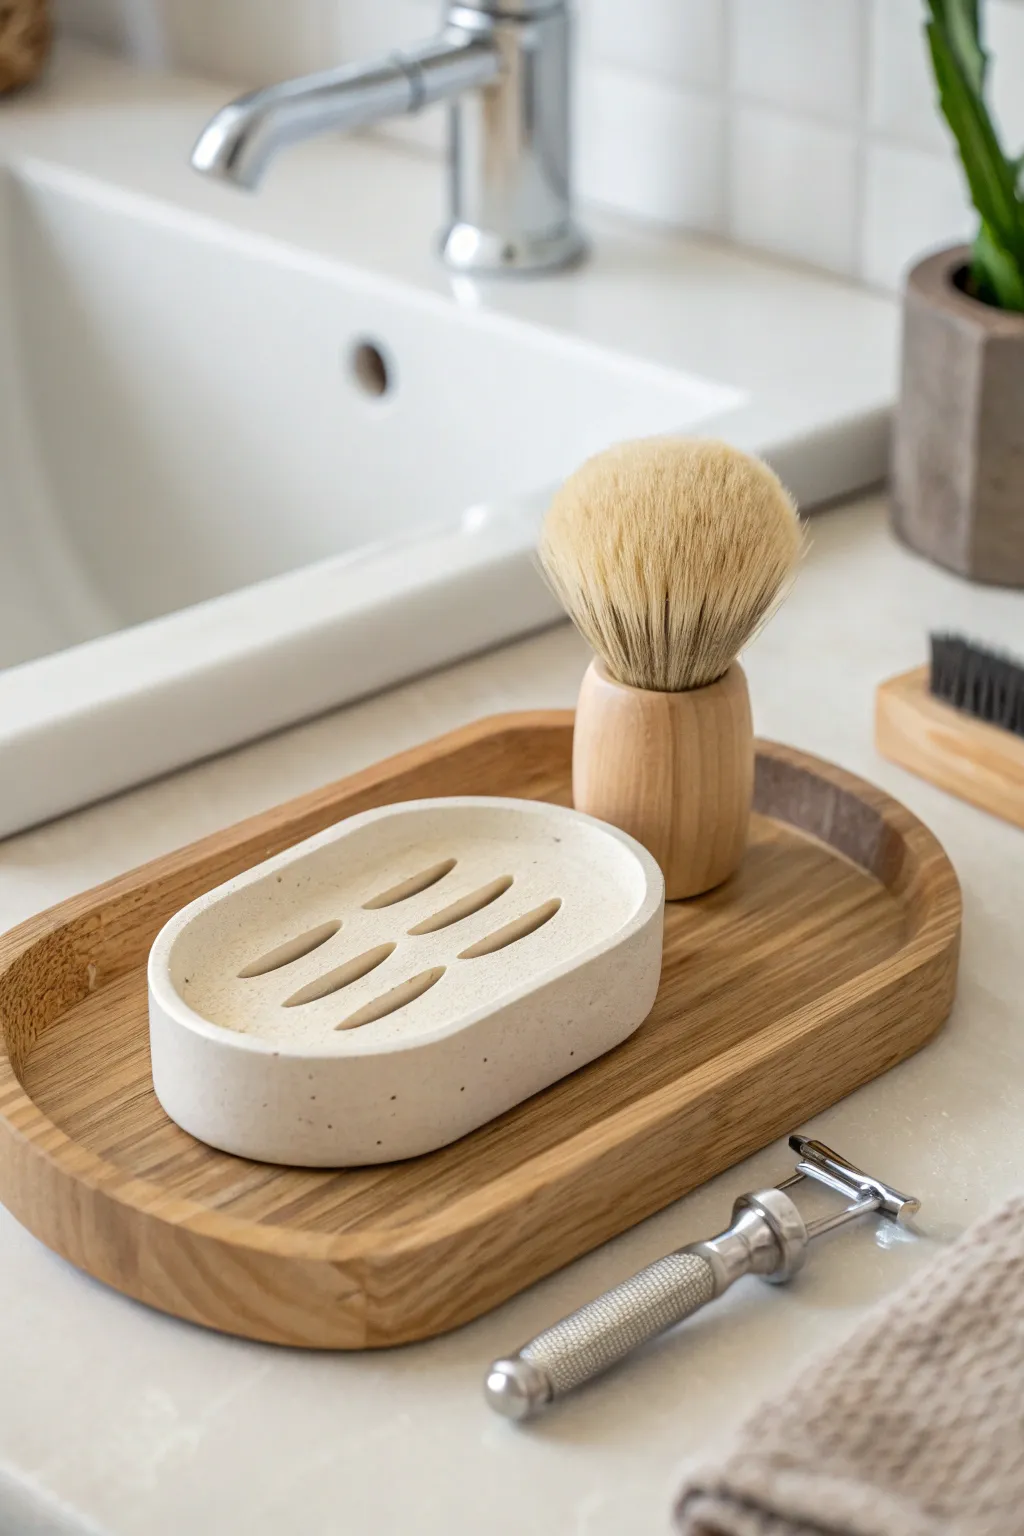
Elevate your grooming ritual or studio space with this sleek, oval-shaped tool rest perfect for draining razor soaps or drying artist brushes. Its speckled, stone-like finish and functional drainage slots combine industrial modern aesthetics with practical design.
Detailed Instructions
Materials
- White air dry clay (approx. 500g)
- Rolling pin
- Oval cutter or oval paper template
- Craft knife or clay tool
- Small bowl of water
- Fine-grit sandpaper (220-400 grit)
- Acrylic sealer (polyurethane or varnish)
- Faux stone effect spray paint or speckled acrylic paint (optional)
- Smooth work surface (ceramic tile or silicone mat)
- Straw or small dowel (for drainage holes)
Step 1: Shaping the Base
-
Prepare the Clay:
Begin by kneading your air dry clay until it is warm, pliable, and free of air bubbles. This ensures a crack-free finish later on. -
Roll the Slab:
Roll the clay out onto your smooth work surface to a thickness of approximately 3/4 inch (about 2 cm). You want this piece to be substantial and heavy. -
Cut the Oval:
Place your oval template or cookie cutter onto the slab. If using a template, carefully trace around it with your craft knife to cut out the clean oval shape. -
Smooth the Edges:
Dip your finger in a little water and run it along the cut edges to smooth out any sharpness or drag marks from the knife. Round the top edge slightly for a softer look. -
Create the Lip:
To help contain water, you can gently press the center of the oval down with your thumbs, or use a spoon to carve out a shallow depression, leaving a raised rim around the perimeter.
Clean Lines Hack
To get perfectly symmetrical slots, press a large fork into the clay to mark flexible spacing, then carve along those tine marks.
Step 2: Adding Functionality
-
Mark the Slots:
Using a toothpick, lightly sketch where your drainage slots will go. Aim for a symmetrical pattern, like two rows of three slanted lines. -
Carve the Drainage Slots:
Using a carving tool or a small loop tool, carefully scoop out the clay where you marked the slots. These notches should be deep enough to allow air circulation under a soap bar. -
Add Drainage Holes (Optional):
If you want water to drain completely through, poke holes in the deepest part of your carved slots using a straw or a small dowel. -
Refine the Carvings:
Brush a damp paintbrush inside the carved slots to smooth out any rough clay crumbs or jagged edges. -
Create the Speckled Texture:
For that natural stone look seen in the photo, sprinkle some coarse sand or dried coffee grounds onto the wet clay and press them gently into the surface. Alternatively, you can paint this effect later. -
Final Smoothing:
Give the entire piece one last wipe with a slightly damp sponge to ensure the surface texture is uniform.
Level Up: Concrete Look
Mix a small amount of black acrylic paint into your white clay before kneading to create a cool, grey concrete color throughout the material.
Step 3: Finishing Touches
-
Slow Drying:
Place the piece on a wire rack or flipping it occasionally on a flat surface to dry. I find letting it dry slowly away from direct heat prevents warping. -
Check Dryness:
Allow at least 24-48 hours for drying. The clay should be room temperature to the touch, not cold, when it is fully dry. -
Sand for Perfection:
Take your fine-grit sandpaper and gently buff the entire surface. Pay special attention to the rim and the inside of the slots to get a professional, matte finish. -
Apply Stone Effect (If Needed):
If you didn’t add texture earlier, lightly mist the piece with a stone-texture spray paint or flick diluted black paint onto it with a toothbrush for speckles. -
Waterproof Sealing:
This is crucial for a bathroom item. Apply 2-3 coats of a high-quality waterproof varnish or polyurethane sealer. -
Seal the Bottom:
Don’t forget to flip it over and seal the bottom as well to prevent moisture from seeping up into the clay.
Now you have a durable, stylish accessory that keeps your grooming tools dry and your counter organized
DIY Desk Clock Frame With a Clay Bezel
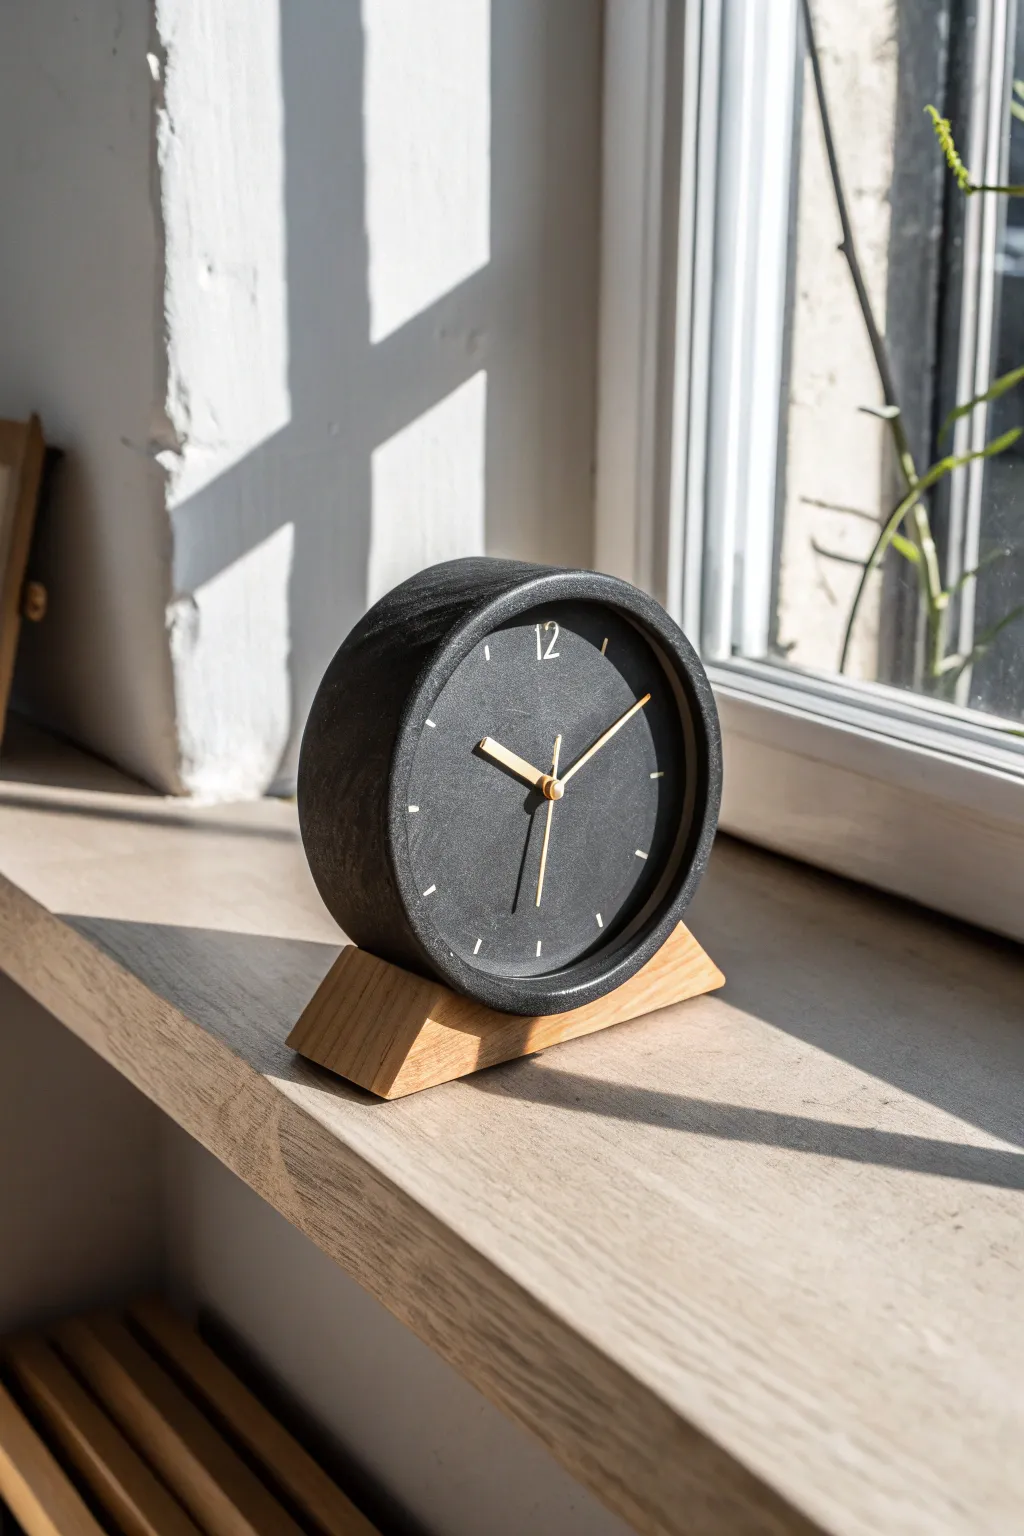
Elevate your workspace with this striking modern desk clock that mimics the weight and texture of basalt stone. By combining dark air dry clay with a warm wooden base, you’ll create a sophisticated timepiece that feels both industrial and refined.
Detailed Instructions
Materials
- Black air dry clay (approx. 500g)
- Clock mechanism kit (silent sweep preferred)
- Gold or brass clock hands
- Small block of hardwood (oak or beech)
- Circular cookie cutter or template (approx. 4-5 inch diameter)
- Rolling pin
- Sandpaper (medium and fine grit)
- White acrylic paint
- Fine tip paint brush or toothpick
- Matte finish sealant spray
- Wood glue or strong craft adhesive
- Saw needed to cut the wooden base
Step 1: Forming the Bezel
-
Roll the Slab:
Begin by conditioning your black air dry clay until it is pliable. Roll it out into a flat, even slab that is roughly 1/2 inch thick to give the clock substantial depth. -
Cut the Disc:
Using your circular cutter or a sharp knife around a template, cut out the main face of the clock. Smooth the outer edges with a little water on your finger to remove any jagged cuts. -
Create the Lip:
Roll a long, thin snake of clay. Flatten it slightly into a strip about 3/4 inch wide. Wrap this strip around the circumference of your clay disc to create the raised bezel wall. -
Blend the Seams:
This is the crucial part for durability: blend the clay strip into the base disc on the backside and the interior seam. Use a blending tool or your thumb to ensure there is no visible line where the two pieces meet. -
Pierce the Center:
Find the exact center of your circle and poke a hole large enough for your clock mechanism shaft to fit through. Rotate the tool slightly to ensure the hole is clean. -
Refine the Shape:
While the clay is still damp, check that the bezel wall is perfectly circular and perpendicular to the face. I like to use a flat ruler to gently tap the rim, ensuring it’s level all the way around.
Cracking Up?
If small cracks appear during drying, make a slip paste (clay mixed with water) and fill them in immediately. Sand it smooth once dry and the repair will be invisible.
Step 2: Refining and Assembly
-
Slow Dry:
Place the clay shell on a wire rack to dry. Cover it loosely with plastic wrap for the first 24 hours to prevent cracking, then let it air dry fully for another 24-48 hours. -
Sanding for Texture:
Once bone dry, sand the entire piece. Start with medium grit to level any bumps, then switch to fine grit. For this specific stone-like look, you don’t want it mirror-smooth; leave a tiny bit of texture. -
Seal the Clay:
Spray the clay bezel with a matte sealant. This deepens the black color and protects it from humidity without adding an unnatural shine. -
Marking the Time:
Using the white acrylic paint and a fine brush or toothpick, carefully paint small dashes at the cardinal points (12, 3, 6, 9) inside the bezel. Add the number ’12’ at the top for that classic minimalist touch. -
Cut the Base:
Take your hardwood block and cut a V-shaped notch or simply cut two small wedge blocks. The goal is to create a cradle that the rounded clock face can rest in securely. -
Sand and Finish Wood:
Sand your wooden base until it is silky smooth. Apply a natural oil or wax to bring out the grain, providing a nice contrast to the matte black clay. -
Install Mechanism:
Insert the clock mechanism from the back of the clay shell. Secure it with the washer and nut provided in the kit on the front side. -
Attach Hands:
Press the hour, minute, and second hands onto the shaft. Be gentle to avoid bending the delicate metal. The gold hands against the black background create the signature look. -
Final Glue Up:
Place a dab of strong adhesive on the contact points of the wooden base and set the clay clock into the cradle. Let it cure completely before setting the time.
Stone Effect
To enhance the slate look, gently dab the wet clay with a crumpled ball of aluminum foil before drying. This imitates the porous texture of natural rock.
Place your new timepiece near a window to watch the shadows play across the textured surface