If you’re making a Mother’s Day gift from air dry clay, you’re already on the right track—nothing feels sweeter than something handmade and useful. Here are my favorite ideas that feel heartfelt, beginner-friendly, and totally gift-worthy once they’re dry and painted.
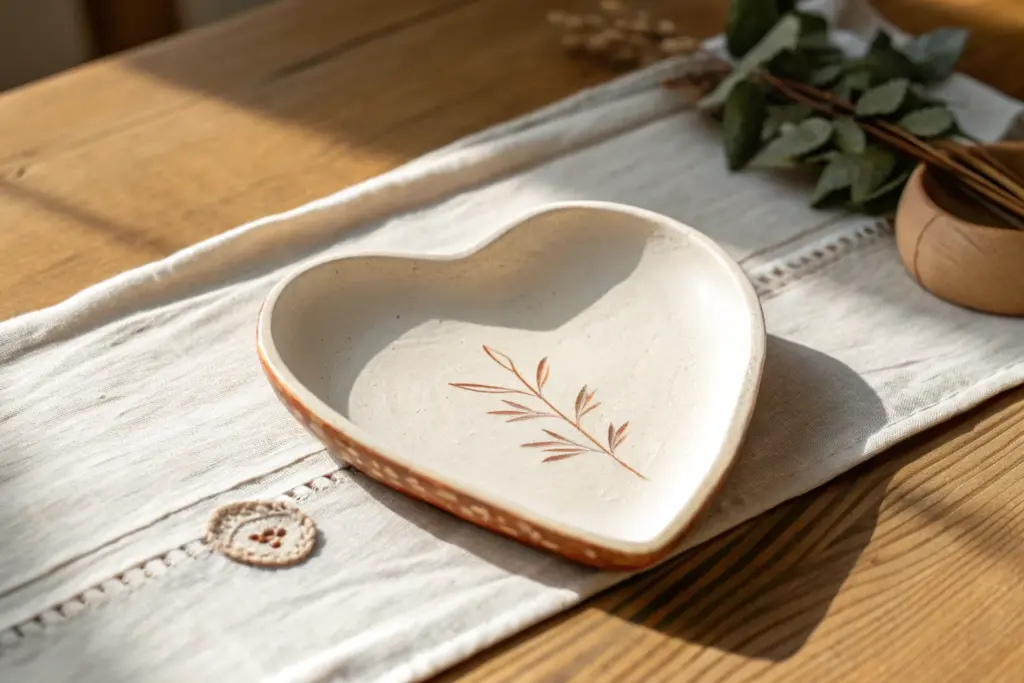
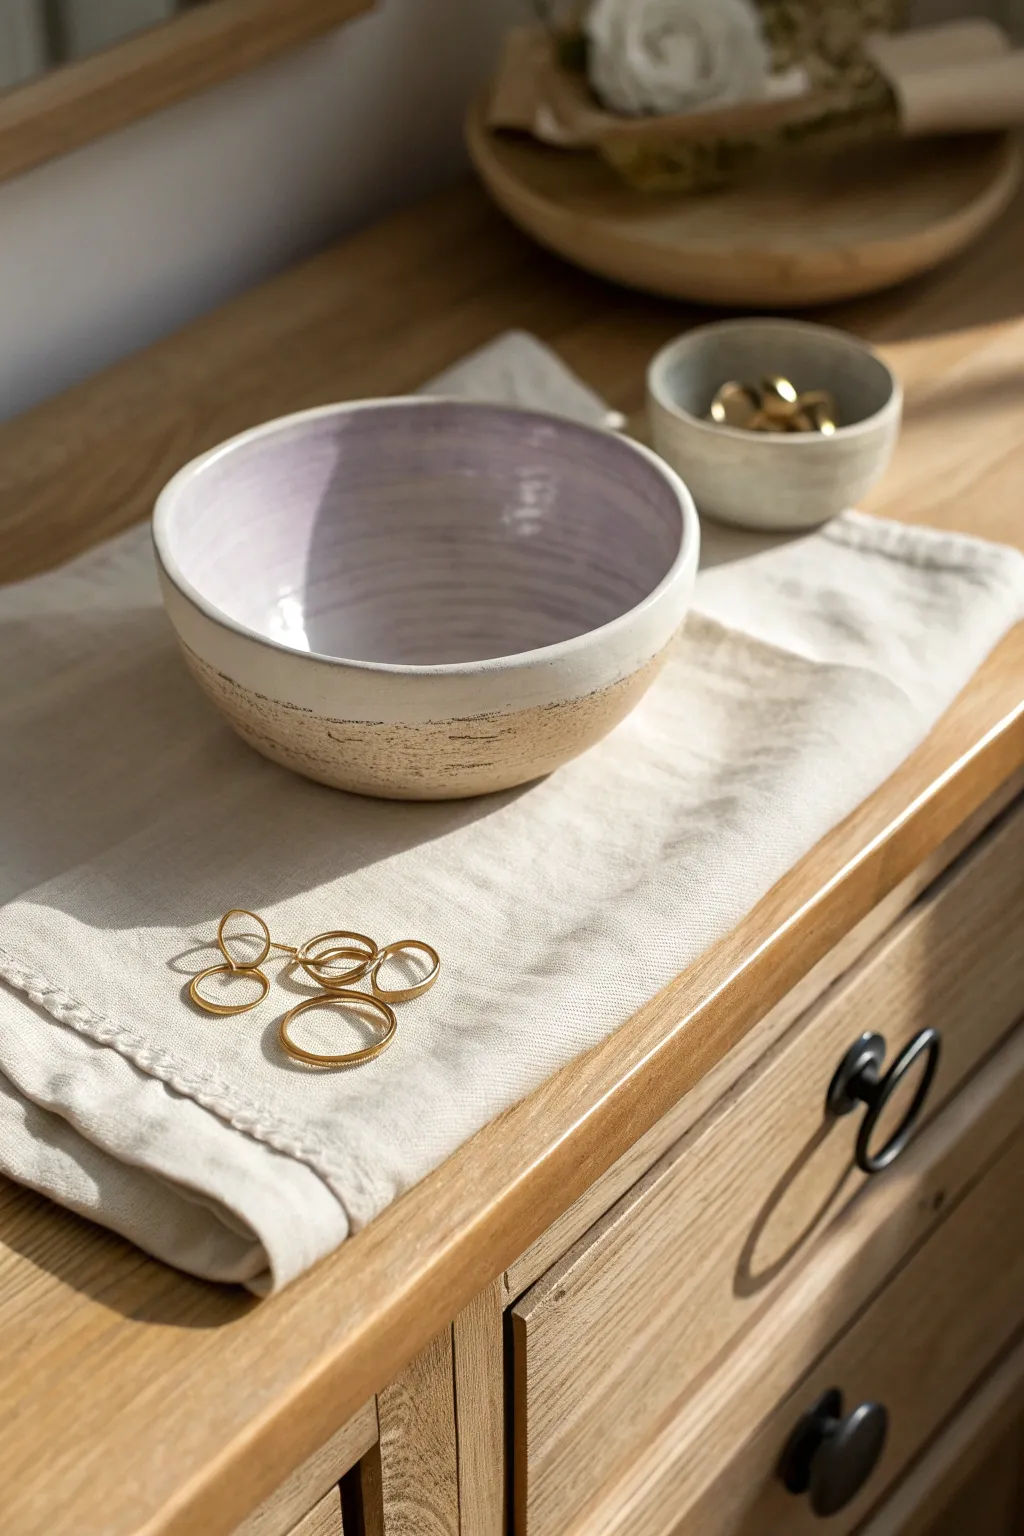
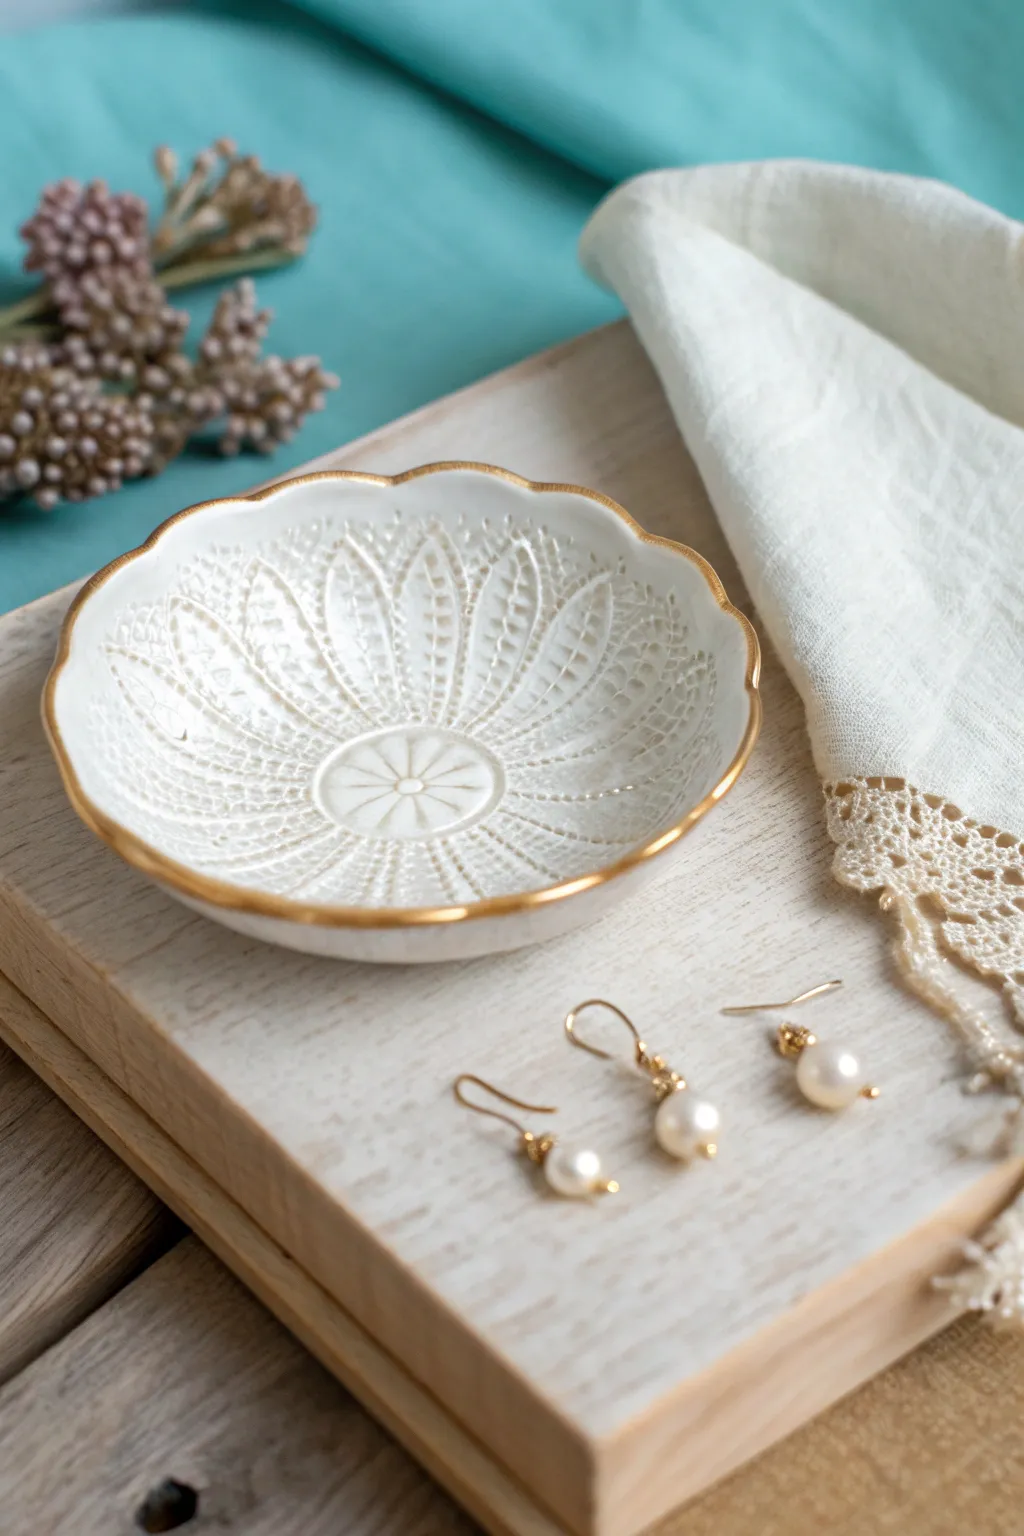
Heart Jewelry Dish for Mother’s Day
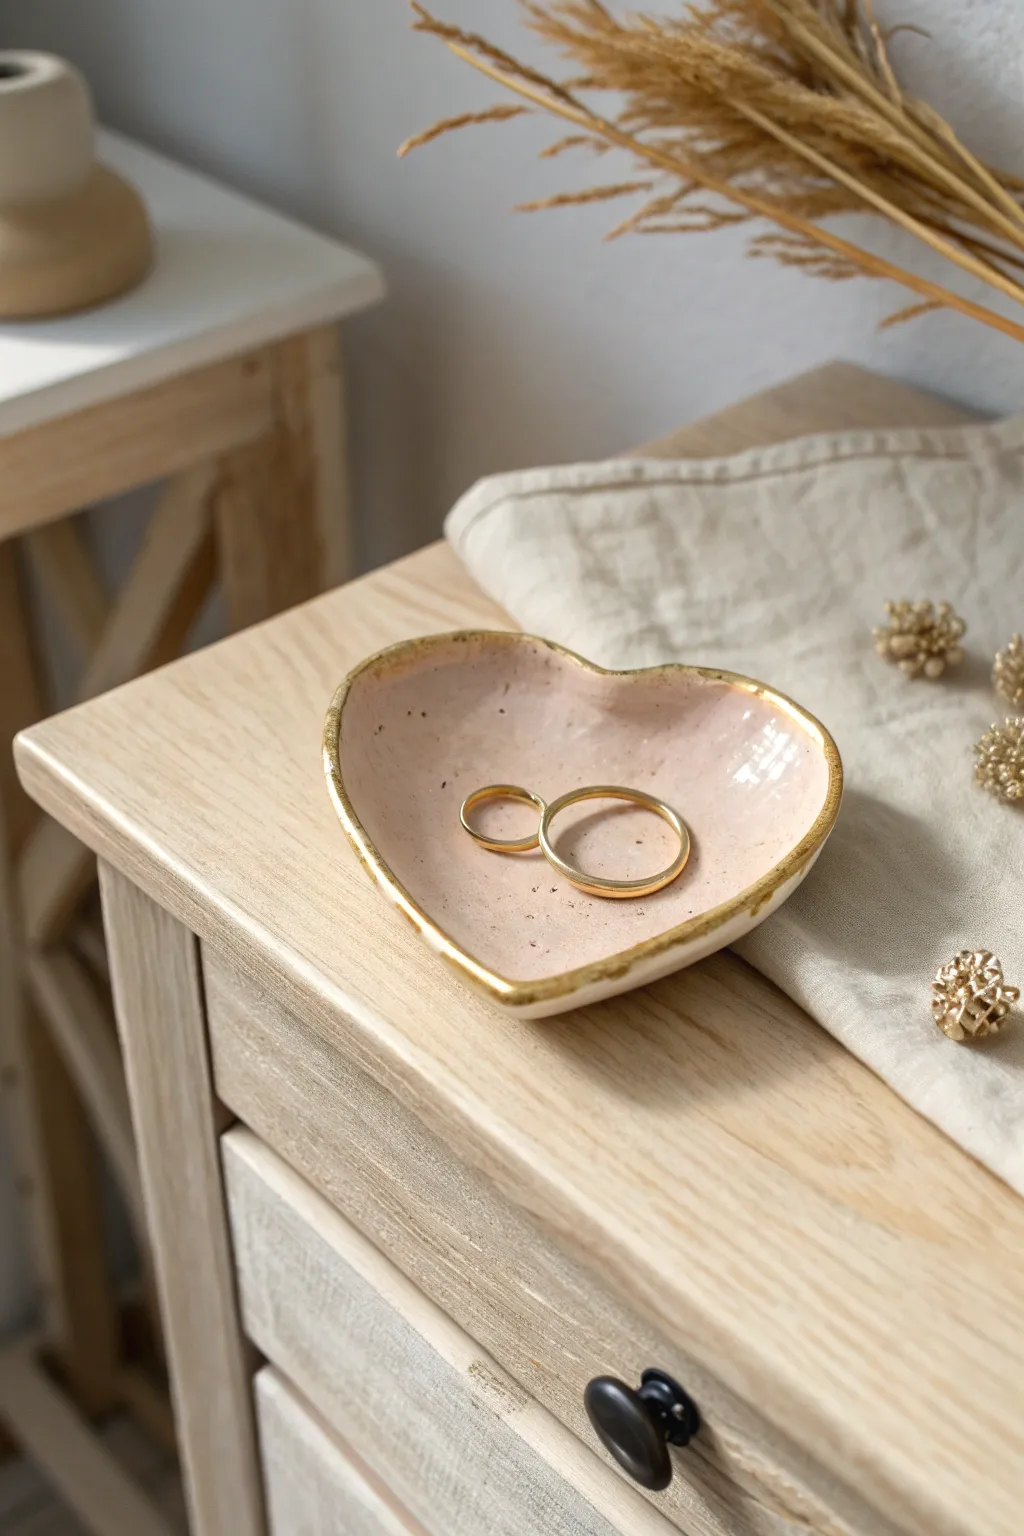
Show Mom how much you care with this delicate, handmade jewelry dish that balances rustic charm with a touch of elegance. The soft pink glaze and striking gold rim make it the perfect resting spot for her favorite rings or earrings.
Step-by-Step
Materials
- White air-dry clay
- Rolling pin
- Heart-shaped cookie cutter (or paper template)
- Craft knife
- Bowl of water
- Fine grit sandpaper
- Pale pink acrylic paint
- Gold leaf paint or liquid gilding
- High-gloss varnish or sealant
- Small paintbrush
- Detail brush for rim
Step 1: Shaping the Clay
-
Roll the Slab:
Begin by kneading a ball of white air-dry clay until it is soft and pliable. Use your rolling pin to flatten it into an even slab, aiming for a thickness of about 1/4 inch. -
Cut the Shape:
Press a heart-shaped cookie cutter firmly into the clay. If you don’t have a cutter on hand, simply place a paper heart template on the clay and trace around it carefully with a craft knife. -
Smooth the Edges:
Dip your finger into a bowl of water and gently run it along the cut edges of the heart to remove any roughness or stray bits of clay. -
Form the Dish:
Pick up the clay heart and gently curve the edges upward with your fingers to create a shallow bowl shape. You can cup it in your palm to help establish the curve. -
Refine the Form:
Place the curved heart back on your work surface. If the edges have slumped, prop them up slightly or pinch the rim to define the wall of the dish better. -
Create Texture (Optional):
For a slightly organic, handmade look like the photo, you don’t need to make the surface perfectly glass-smooth; leaving faint finger marks adds character. -
Let it Dry:
Set the dish aside in a safe place to dry completely. This typically takes 24 to 48 hours depending on humidity; turn it over halfway through so the bottom dries evenly.
Smooth Operator
To prevent the clay from sticking to your table while drying, place the wet clay dish on a piece of parchment paper or a drying rack for better airflow.
Step 2: Decorating and Finishing
-
Sand Imperfections:
Once the clay is bone dry, use fine-grit sandpaper to gently smooth out any sharp jagged edges on the rim. Wipe away the dust with a slightly damp cloth or paper towel. -
Paint the Base:
Apply a coat of pale pink acrylic paint to the inside of the dish. I prefer mixing a tiny drop of brown into the pink to get that earthy, muted blush tone seen in the example. -
Add a Second Coat:
Let the first layer dry, then apply a second coat if the clay white is still showing through. Allow this to dry completely before moving to the next step. -
Seal the Dish:
Brush a layer of high-gloss varnish over the entire painted area. This gives it a ceramic-like shine and protects the paint from scratching. -
Apply the Gold Rim:
Using a fine detail brush, carefully apply liquid gold gilding or gold leaf paint along the very top edge of the rim. -
Create the irregular edge:
Don’t worry about a perfectly straight line; allow the brush to slip slightly down the inside and outside edges to create that beautiful, organic, dipped-gold look. -
Final Cure:
Let the gold paint set according to the manufacturer’s instructions. Liquid gilding often has a strong smell, so do this in a ventilated area.
Personal Touch
Before the clay dries, stamp Mom’s initials or a short date into the center of the heart using small letter stamps for a customized keepsake.
Now you have a stunning, boutique-style jewelry dish ready to be gifted to Mom


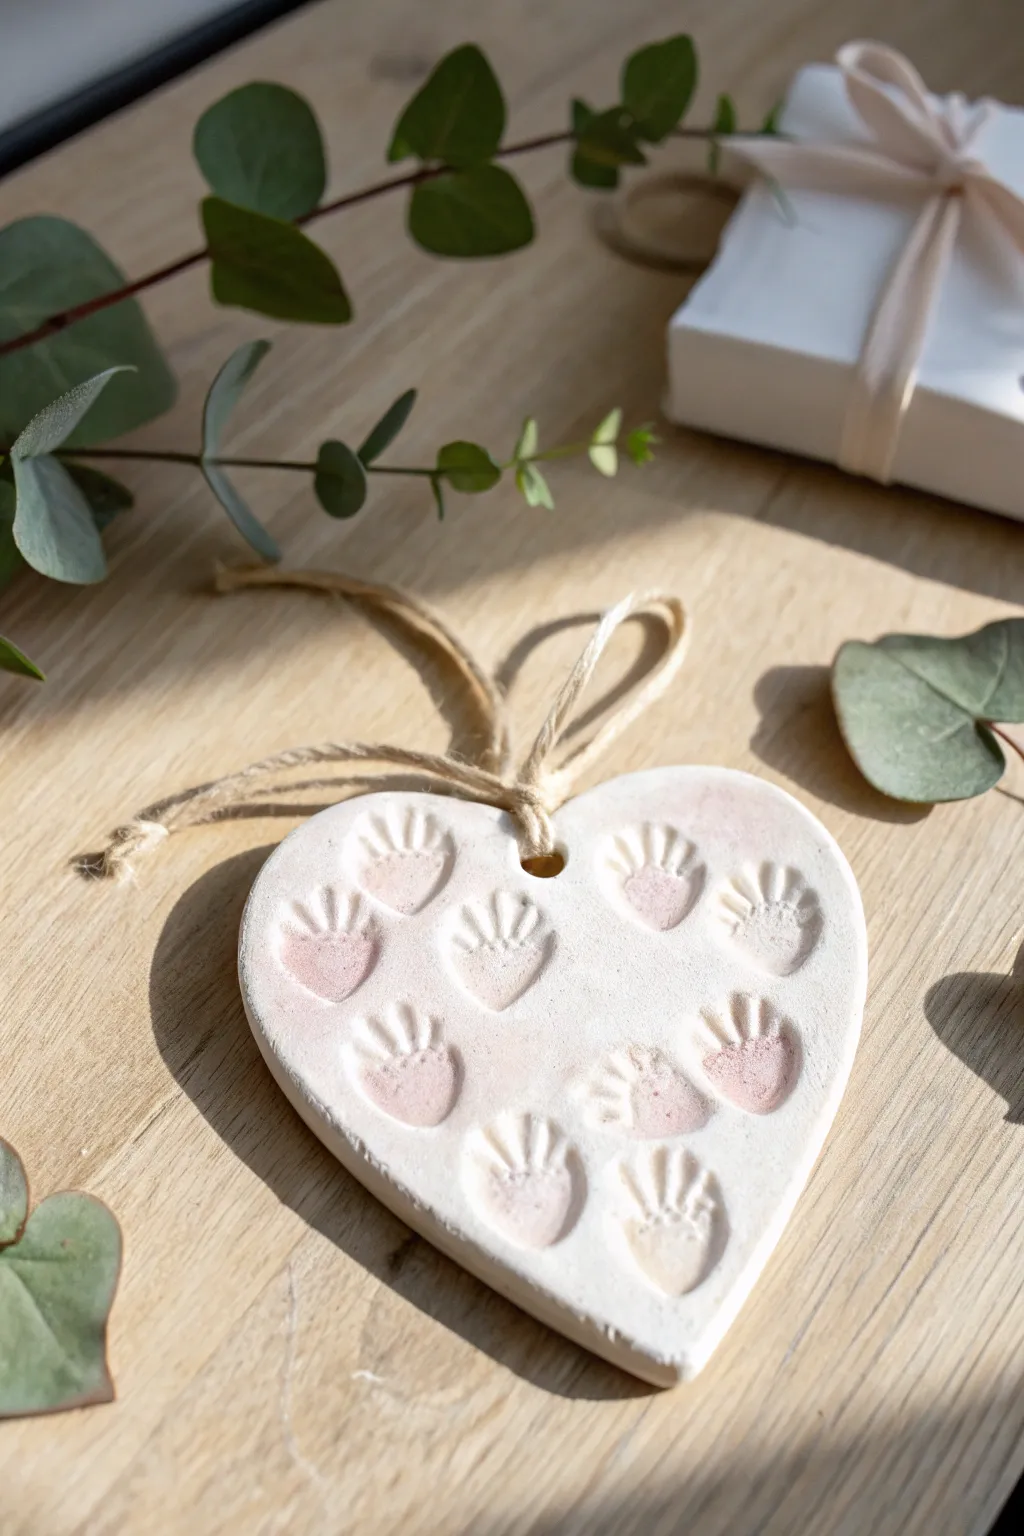
Handprint Keepsake Bowl for Mom

Capture a sweet moment in time with this dual-toned clay dish featuring a tiny handprint impression. The soft mint interior and pink rim create a delicate, modern look that’s perfect for holding Mom’s favorite rings or trinkets.
Detailed Instructions
Materials
- White air-dry clay
- Rolling pin
- Small bowl (to use as a mold)
- Craft knife or clay needle tool
- Water and a small sponge
- Fine-grit sandpaper
- Mint green acrylic paint
- Soft pink acrylic paint
- Medium paintbrush
- Gloss varnish or sealant
- Small rubber stamps (for numbers)
- Toothpick or sculpting tool
Step 1: Shaping the Clay
-
Roll out the clay:
Begin with a ball of air-dry clay roughly the size of a large orange. Roll it out on a smooth fabric or canvas surface until it is about 1/4 inch thick. Aim for an even thickness throughout. -
Create the impression:
Gently press the child’s hand into the center of the rolled slab. Apply firm, even pressure on the palm and each finger to ensure a clear imprint, then lift the hand straight up. -
Cut the circle:
Place a bowl upside down over the handprint to act as a cutting guide. Using a craft knife, trace around the rim of the bowl to cut out a perfect circle, centering the handprint. -
Form the curve:
Lift the clay circle carefully and gently place it inside your bowl mold. Press it down softly so it takes the curved shape of the bowl bottom without distorting the handprint. -
Add decorative details:
While the clay is still soft in the mold, use a toothpick or clay tool to draw a heart shape near the palm. You can also add small dots or texture marks for artistic flair. -
Stamp the date:
Using small number stamps, press the year or a special date into the outer rim area of the clay. If you don’t have stamps, you can carefully etch the numbers with a needle tool. -
Smooth the edges:
Dip your finger or a small sponge in water and run it along the cut rim of the clay to round off any sharp edges. Smooth out any small cracks that may have formed during handling.
Cracking Issues?
If small cracks appear while the clay dries, mix a tiny bit of fresh wet clay with water to make a paste perfectly suited for filling the gaps.
Step 2: Drying and Refining
-
Let it dry completely:
Allow the bowl to dry inside the mold for at least 24 hours. I usually flip it out of the mold after the first day and let it air dry for another 24 hours to ensure the bottom is fully hardened. -
Sand for smoothness:
Once the clay is bone dry and turns white, take a piece of fine-grit sandpaper and gently sand the rim and any rough spots on the surface. Wipe away the dust with a slightly damp cloth.
Step 3: Painting and Finishing
-
Paint the interior:
Squeeze out some mint green acrylic paint. Using a medium brush, carefully paint the entire interior of the bowl, working the paint into the handprint grooves. -
Wipe back the paint:
Immediately after painting the interior, use a damp paper towel to gently wipe the surface. This technique leaves more pigment in the deep impressions (handprint and heart) while giving the smooth areas a softer, washed look. -
Paint the exterior:
Flip the bowl over and paint the outside and the top rim with the soft pink acrylic paint. Use a steady hand at the rim to create a clean line where the pink meets the mint interior. -
Seal the piece:
Allow the paint to dry fully, usually about 20 minutes. Finish by applying a coat of gloss varnish or sealant over the entire bowl to protect the paint and give it a finished ceramic sheen.
Pro Tip: Release
Line your drying bowl mold with a layer of plastic wrap before placing the clay inside. This ensures the clay bowl won’t stick as it dries.
Now you have a beautiful, personalized trinket dish ready to be gifted


Thumbprint Heart Token for Mother’s Day
Capture the spirit of family or pets with this charming heart-shaped keepsake featuring stylized paw prints or fingerprints. The soft white clay and subtle pink blush details create a delicate, sentimental token perfect for gifting.
Step-by-Step Tutorial
Materials
- White smooth air-dry clay
- Rolling pin
- Heart-shaped cookie cutter (approx. 4 inches)
- Parchment paper or non-stick craft mat
- Small bowl of water
- Straw or small circular cutter (for the hanging hole)
- Small, flat sculpting tool or a blunt butter knife
- Pink watercolor paint or diluted acrylic paint
- Fine paintbrush
- Matte sealant or varnish (optional)
- Jute twine or ribbon for hanging
Step 1: Shaping the Base
-
Prepare your workspace:
Lay down a sheet of parchment paper to protect your table and prevent the clay from sticking. This also makes moving the wet clay much easier later. -
Condition the clay:
Take a handful of white air-dry clay and knead it in your hands for a minute until it feels soft, warm, and pliable. Getting rid of air bubbles now prevents cracks later. -
Roll out the slab:
Using your rolling pin, roll the clay out to an even thickness of about 1/4 inch. If it’s too thin, it might be brittle; too thick, and it takes forever to dry. -
Cut the heart shape:
Press your heart-shaped cookie cutter firmly into the rolled clay. Wiggle it slightly to ensure a clean cut, then gently remove the excess clay from around the cutter before lifting the shape. -
Smooth the edges:
Dip your finger in a little water and gently run it along the cut edges of the heart to smooth out any roughness or sharp bits left by the cutter.
Step 2: Creating the Impressions
-
Make the main pad impressions:
Using your thumb (or your child’s thumb), press firmly into the clay to create the main pad of the ‘paw print.’ Repeat this in a pattern across the heart, leaving enough space above each for the toe beans. -
Add the toe details:
For the stylized ‘toes’ shown in the image, use a sculpting tool or the edge of a blunt knife. Press four or five small, vertical lines into the top curve of each thumbprint indentation. -
Alternative method:
If you don’t have a tool, you can carefully use a pinky finger to press small indentations above the main pad instead of the tool marks. -
Create the hanging hole:
Use a drinking straw to punch a clean hole near the top center of the heart, right in the ‘V’ dip. Make sure it’s not too close to the edge to avoid breakage. -
Let it dry completely:
Place the heart on a drying rack or a fresh sheet of parchment. Allow it to air dry for 24-48 hours. I usually flip it over halfway through so the back dries evenly too.
Clean Edges Trick
If your clay edges look ragged after cutting, don’t worry. Wait about 30 minutes for the clay to firm up slightly. Then, smooth them with a damp finger—it works much better than when the clay is totally wet
Step 3: Finishing Touches
-
Sand any rough spots:
Once bone dry, use a very fine-grit sanding sponge to gently buff the edges or surface if there are any tiny bumps. -
Add the color tint:
Dilute a tiny drop of pink paint with plenty of water to create a transparent wash. Carefully paint just inside the recessed thumbprint areas. -
Blot for a soft look:
If the paint looks too dark or pools in the crevices, quickly dab it with a paper towel to lift the excess, leaving a soft, stain-like effect. -
Seal the piece:
Apply a thin coat of matte varnish or sealant to protect the clay from moisture and dust, preserving that raw, natural look. -
Attach the hanger:
Cut a length of jute twine or ribbon. Fold it in half, push the loop through the hole from front to back, and pull the ends through the loop to secure it.
Fixing Cracks
Tiny surface cracks can appear as clay dries. Mix a tiny bit of fresh clay with water to make a paste (slip) and smooth it into the cracks with your finger, then let dry again
Now you have a heartwarming, handmade decoration that beautifully captures a moment in time


Personalized Initial Keychain for Mom

This sophisticated keychain mimics the look of high-end stamped leather but is crafting entirely from humble air-dry clay. With its deep sage green hue and delicate gold accents, it adds a touch of personalized elegance to Mom’s daily essentials.
Step-by-Step Guide
Materials
- White polymer air-dry clay (or standard air-dry clay)
- Round cookie cutter (approx. 1.5 – 2 inches)
- Acrylic rolling pin
- Sage green acrylic paint
- Gold acrylic paint or gilding wax
- Alphabet stamp set
- Small flower or starburst decorative stamp
- Sandpaper (fine grit)
- Matte varnish or sealant
- Gold keyring and jump ring
- Small straw or cocktail stick
- Paintbrushes (fine tip and flat)
Step 1: Shaping the Clay
-
Condition the Clay:
Start by taking a small ball of air-dry clay and kneading it in your hands until it becomes warm, soft, and pliable. This prevents cracks later on. -
Color Mixing:
To achieve that solid stone-like color all the way through, I like to mix a drop of sage green acrylic paint directly into the raw clay. Knead it thoroughly until the color is completely uniform without streaks. -
Roll it Out:
Place the colored clay on a smooth surface or silicone mat. Use your acrylic rolling pin to flatten it to an even thickness of about 1/4 inch; you want it sturdy enough to withstand jangling keys. -
Cut the Shape:
Press your round cookie cutter firmly into the clay. Give it a tiny wiggle to ensure it separates cleanly, then peel away the excess clay from the outside. -
Smooth the Edges:
Dip your finger in a tiny bit of water and run it gently around the cut edge of the circle to remove any sharp ridges left by the cutter.
Fixing Cracks
If tiny cracks appear while drying, don’t panic! Mix a tiny bit of fresh clay with water to make a paste (slip) and smooth it into the cracks, then let dry again.
Step 2: Stamping and Drying
-
Create the Hole:
Use a straw to punch a hole near the top edge of the circle. Make sure the hole isn’t too close to the edge, or the clay might break later. -
Center the Initial:
Select the ‘M’ (or Mom’s initial) from your stamp set. Position it carefully in the direct center of the circle and press down firmly and evenly. Lift it straight up to leave a crisp impression. -
Add Decorative Accents:
Take your smaller decorative stamp—like the tiny starburst shown—and press it once to the lower left and once to the upper right of the letter for a balanced design. -
Let it Dry:
Place the charm on a clean drying rack or a sheet of parchment paper. Let it sit undisturbed for at least 24 to 48 hours. Flip it over halfway through the drying process so both sides dry evenly.
Level Up: Leather Look
For a faux-leather texture, gently press a piece of actual leather or coarse fabric onto the clay surface before stamping your letters.
Step 3: Refining and Finishing
-
Sand for Perfection:
Once bone dry, take your fine-grit sandpaper and very gently buff the edges and the surface. This removes any fingerprints and gives it that professional, matte finish. -
Dust Off:
Use a dry, soft brush or a tack cloth to completely remove any white clay dust from the sanding process, paying special attention to the stamped grooves. -
Gild the Details:
Using a very fine-tip paintbrush, carefully paint gold acrylic or apply gilding wax inside the stamped letter and the star accents. You don’t need to fill the groove entirely; just coating the recessed surface makes it pop. -
Seal the Charm:
Apply a thin coat of matte varnish over the entire piece. This protects the clay from moisture and dirt without making it look plasticky. -
Assembly:
Once the sealant is dry, open a gold jump ring using pliers. Thread it through the hole in the clay charm. -
Attach the Keyring:
Loop the large gold keyring onto the jump ring before closing the jump ring securely with your pliers.
Now package this beautiful, durable keepsake in a small box and it’s ready to make Mom smile every time she grabs her keys

The Complete Guide to Pottery Troubleshooting
Uncover the most common ceramic mistakes—from cracking clay to failed glazes—and learn how to fix them fast.
Leaf-Imprint Trinket Tray for Mother’s Day
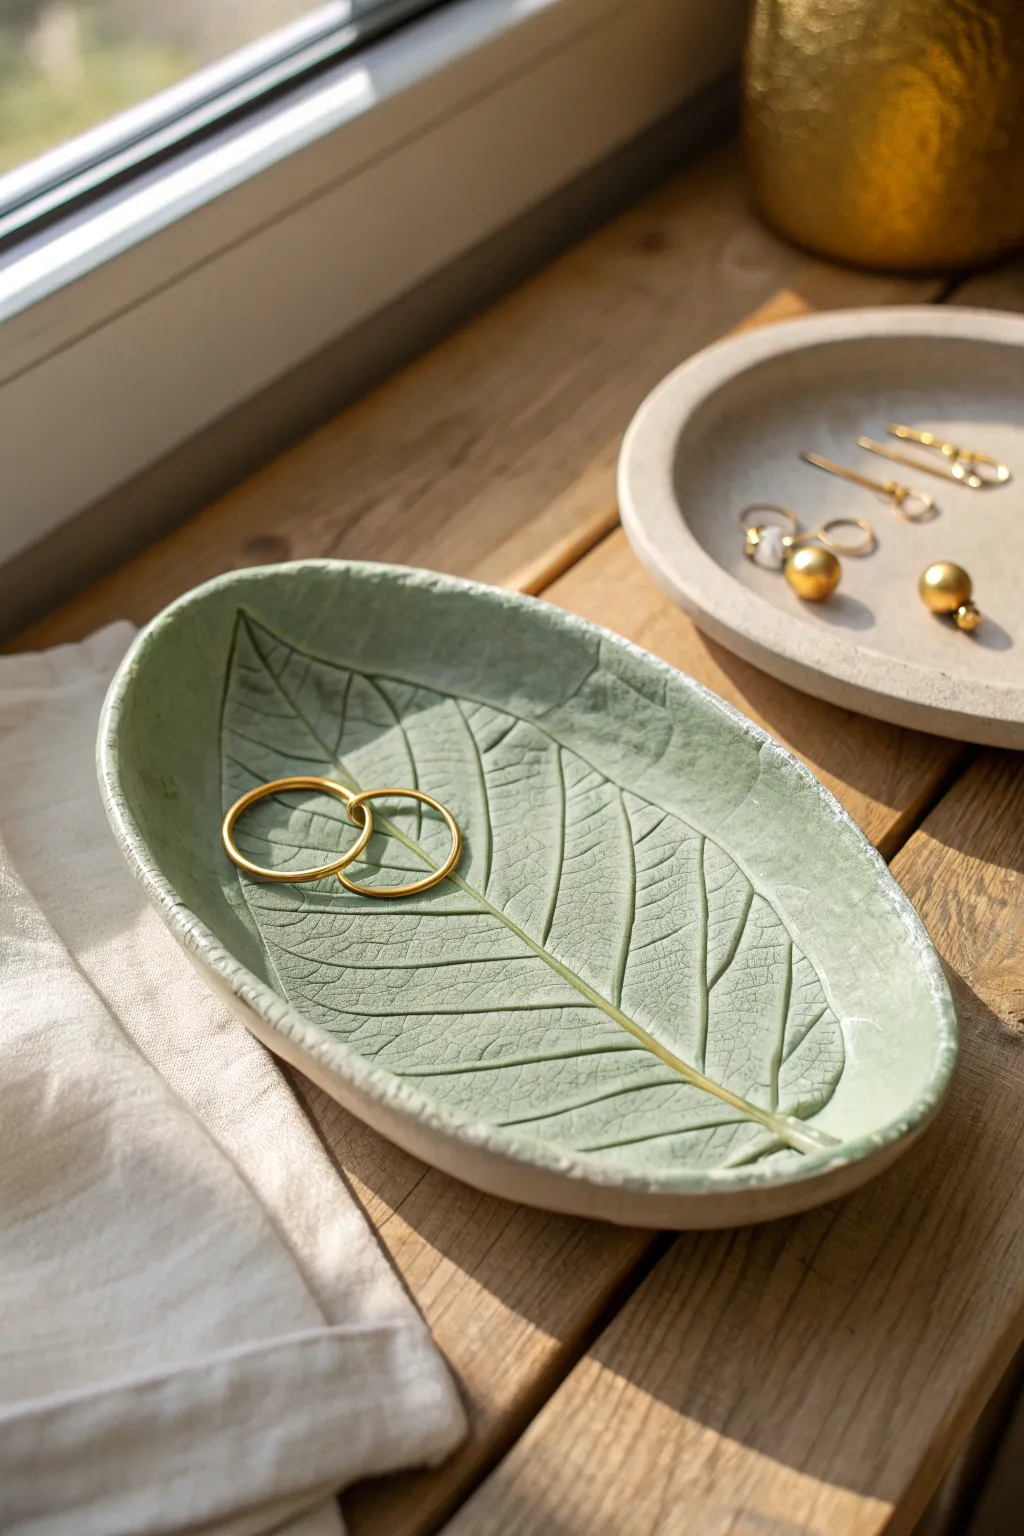
Create a stunningly realistic jewelry dish that captures the delicate textures of nature using nothing but clay and a fresh leaf. This elegant, shallow tray features a soft celadon green finish with subtly highlighted veins, making it the perfect bedside catch-all for Mom’s favorite rings.
How-To Guide
Materials
- White air-dry clay
- A large, fresh leaf with prominent veins (like hydration, walnut, or magnolia)
- Rolling pin
- Craft knife or scalpel tool
- Small bowl for water
- Fine-grit sandpaper (220-400 grit)
- Acrylic paints (Sage green, white, pale yellow)
- Small flat brush and detail brush
- Matte or satin varnish/sealant
- Parchment paper or craft mat
- Sponge or paper towel
Step 1: Preparation and Impression
-
Prepare the Clay:
Start with a ball of white air-dry clay about the size of a large orange. Knead it in your hands until it is smooth, warm, and pliable to prevent cracking later. -
Roll out the Slab:
Place the clay on a sheet of parchment paper. Roll it out into an oval or oblong shape that is roughly 1/4 inch thick being careful to keep the thickness even marks. -
Position the Leaf:
Take your fresh leaf and place it vein-side down onto the clay slab. The vein side usually has the most texture, which is crucial for a detailed print. -
Create the Impression:
Gently roll your rolling pin over the leaf. Press firmly enough to embed the veins into the clay, but not so hard that you thin the clay out too much. I like to do one confident pass to avoid ‘ghost’ images. -
Cut the Shape:
Using a craft knife or scalpel, carefully cut around the outline of the leaf. You can leave a small border of clay around the edge for a smoother look, or cut directly against the leaf margin. -
Remove the Leaf:
Find the stem of the leaf and very slowly peel it away from the clay to reveal the intricate imprint underneath.
Fixing Curled Edges
If the clay curls too much while drying, place a small, lightweight bag of rice or beans in the center of the leaf to gently weigh it down while maintaining the curve.
Step 2: Shaping and Drying
-
Smooth the Edges:
Dip your finger in a little water and gently run it along the cut edges of the clay leaf to smooth out any sharp jagged bits or knife marks. -
Form the Curve:
Carefully lift the clay leaf and place it into a shallow bowl or a curved drying form. Gently press the center down so the edges curve upward, creating a dish shape that will hold jewelry securely. -
Initial Drying:
Let the clay sit in the form for about 24 hours until it holds its shape on its own. -
Flip and Finish Drying:
Once firm, remove it from the bowl and flip it over to let the underside dry completely. This usually takes another 24-48 hours depending on humidity. -
Sanding:
When the tray is bone dry, use fine-grit sandpaper to gently smooth the rim and any rough spots on the underside. Wipe away the dust with a barely damp sponge.
Gilded Glamour
For an extra fancy touch, paint the rim of the dish with metallic gold leaf paint instead of white. It adds a luxurious finish perfect for holding rings.
Step 3: Painting and Sealing
-
Base Leaf Color:
Mix a soft sage green using green, a touch of yellow, and plenty of white. Paint the entire top surface of the leaf, working the paint into the crevices. -
Wipe Back Technique:
Immediately after applying the green, use a slightly damp paper towel or sponge to gently wipe across the surface. This removes paint from the high points but leaves it darker in the deep veins, enhancing the texture. -
Highlighting the Stem:
Mix a pale, yellowish-green. Using a fine detail brush, carefully paint the central stem and the larger primary veins to make them pop against the darker green textures. -
Painting the Rim:
Add a touch of white paint to the very edge of the rim. This ‘distressed’ look mimics the natural drying of a leaf and frames the piece beautifully. -
Back and Sides:
Paint the underside of the dish a solid cream or leave it natural white for a clean, ceramic look. -
Sealing:
Apply two coats of matte or satin varnish to the entire piece. This protects the clay from moisture and gives the dish a finished, professional sheen.
This lovely handmade tray is ready to be gift-wrapped and presented to Mom as a cherished keepsake
Pressed Flower Keepsake Ornament for Mom
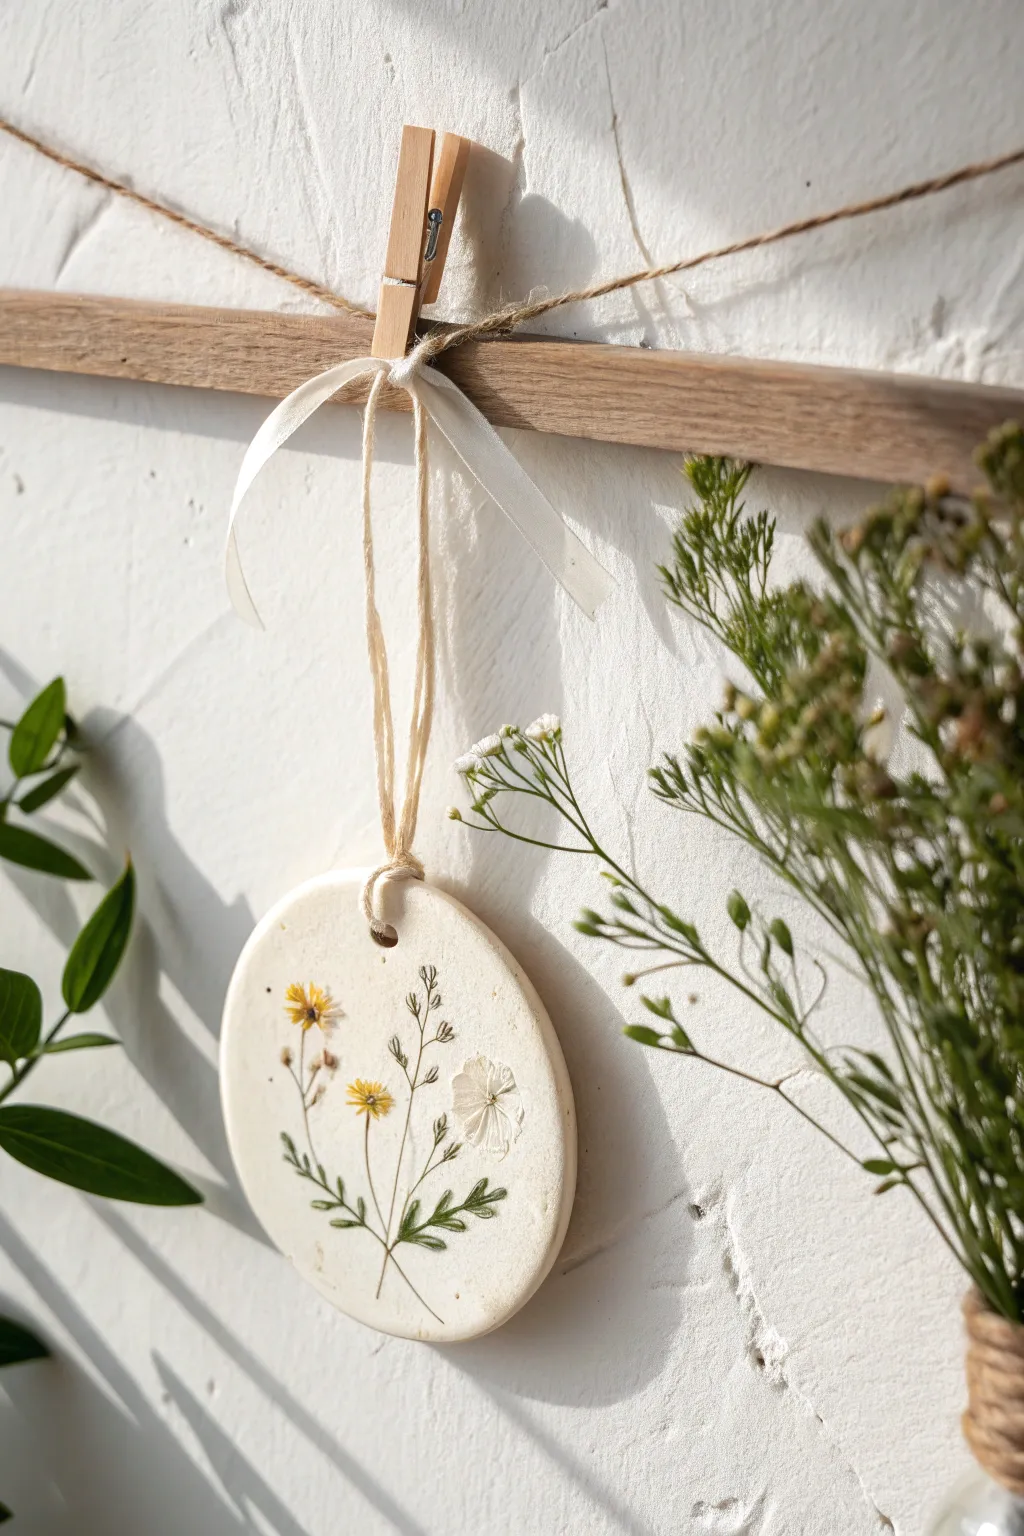
Capture the delicate elegance of nature with this air-dry clay keepsake, featuring real pressed flowers embedded forever in a smooth, white porcelain-style finish. It’s a timeless, minimalist ornament that serves as a perfect heartfelt gift for Mom.
Step-by-Step Tutorial
Materials
- White organic air-dry clay (or cold porcelain)
- Small rolling pin
- Round cookie cutter (approx. 3-4 inches)
- Pressed dried flowers (small yellow blooms, ferns, baby’s breath)
- Tweezers
- Drinking straw or skewer (for the hole)
- Fine grit sandpaper
- Mod Podge or matte varnish sealant
- Soft paintbrush
- Jute twine
- White or cream satin ribbon (narrow width)
Step 1: Shaping the Base
-
Condition the clay:
Take a handful of white air-dry clay and knead it in your hands until it becomes warm, soft, and pliable. This prevents cracking later. -
Roll it out:
Place the clay on a smooth, non-stick surface or parchment paper. Use your rolling pin to flatten it to an even thickness of about 1/4 inch. -
Cut the circle:
Press your round cookie cutter firmly into the clay. Give it a tiny wiggle to ensure a clean cut, then lift the cutter away. Remove the excess clay from around the circle. -
Smooth the edges:
Dip your finger in a tiny bit of water and run it gently around the cut rim of the circle to smooth out any rough edges or stray bits of clay. -
Create the hanging hole:
Use a drinking straw or a skewer to punch a hole near the top edge of the circle. Make sure it’s centered and not too close to the very edge, or the clay might break later.
Flatten Florals Fast
Don’t have a flower press? Place fresh blooms between two sheets of parchment paper inside a heavy book, then microwave in 30-second bursts until dry.
Step 2: Arranging the Botanicals
-
Plan your design:
Before committing to the clay, layout your dry pressed flowers on the table next to your ornament to finalize the composition. I find a simple sprig arrangement looks best. -
Position the first stem:
Using tweezers, carefully pick up the main central flower stem and place it vertically on the clay circle. -
Add supporting foliage:
Layer smaller leaves or secondary stems slightly behind or to the side of the main flower to create a natural, bouquet-like look. -
Embed the flowers:
Once you are happy with the placement, place a piece of parchment paper strictly over the top of the flowers. Gently roll your rolling pin over the paper once or twice. This presses the flowers flush into the clay surface. -
Check the impression:
Peel back the parchment carefully. If any stem ends are sticking up, gently tap them down with your finger.
Step 3: Finishing and Assembly
-
Let it dry:
Place the ornament on a wire rack or a piece of cardboard to dry. Allow it to sit for 24 to 48 hours, flipping it over halfway through to prevent curling. -
Sand for perfection:
Once fully hard, check the edges again. If there are any sharp spots, lightly buff them with fine-grit sandpaper. -
Seal:
Apply a thin coat of matte varnish or Mod Podge over the entire front surface. This protects the dried flowers from humidity and fading. -
Prepare the hanger:
Cut a length of jute twine roughly 10 inches long. Fold it in half to create a loop. -
Attach the twine:
Thread the folded end of the twine through the hole from front to back, then pass the loose ends through the loop and pull tight (a lark’s head knot). -
Tie the bow:
Take a piece of narrow satin ribbon and tie a small, delicate bow around the base of the jute knot, right where it meets the clay. -
Trim the ends:
Trim the tails of the ribbon and the twine to your desired length.
Add a Scent
Before drying, mix a few drops of lavender or rose essential oil into the clay body. The ornament will act as a passive diffuser.
Hang this lovely piece in a sunny window or wrapping a special gift to add a rustic, handmade touch


What Really Happens Inside the Kiln
Learn how time and temperature work together inside the kiln to transform clay into durable ceramic.
Spring Flower Coasters for Mother’s Day
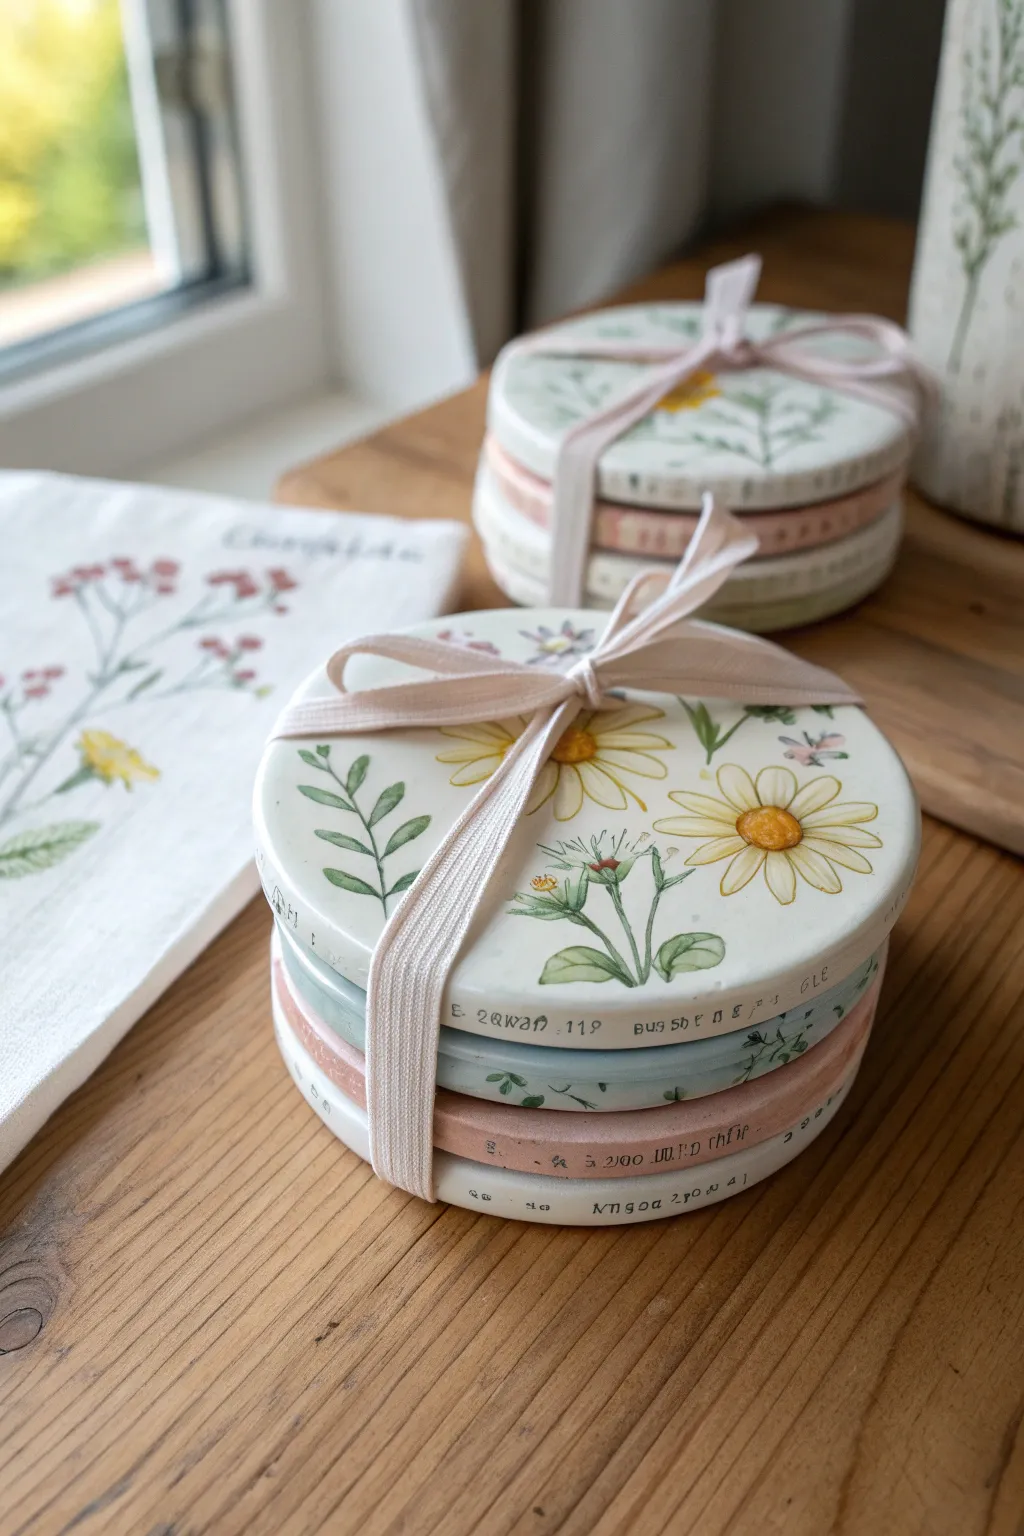
These charming coasters feature delicate wildflower illustrations on a smooth, ceramic-like surface, making them a sophisticated yet handmade gift for Mom. The stack includes a mix of white and pastel-tinted clay layers, beautifully bundled with a rustic fabric ribbon.
Step-by-Step Guide
Materials
- White smooth air dry clay
- Acrylic paints (white, pastel pink, sage green, yellow, grey)
- Rolling pin with guide rings (approx. 5mm thickness)
- Round cookie cutter or jar lid (approx. 4 inches)
- Sandpaper (fine and medium grit)
- Small detail paintbrushes (00 and 1 sizes)
- Waterproof varnish or sealant (matte or satin)
- Letter stamps (optional)
- Blush pink cotton or grosgrain ribbon
Step 1: Shaping the Base
-
Prepare the clay:
Begin by conditioning your white air dry clay until it is warm and pliable. Divide your clay into four equal balls for a standard set. -
Tint the clay:
To achieve the layered look seen in the photo, keep two balls white. For the others, knead in a tiny drop of pink acrylic paint into one ball and a drop of sage green or grey into the other to create soft pastel tones. -
Roll out the slabs:
Roll each ball out on a non-stick surface or canvas cloth. Aim for a consistent thickness of about 5mm—guide rings on your rolling pin help immensely here to ensure the coasters are level. -
Cut the circles:
Press your round cutter firmly into the clay slabs. If the edges are slightly rough, smooth them gently with a dampened finger before lifting the excess clay away. -
Stamp the edges:
Looking closely at the image, you’ll see faint text on the edges. Now is the time to carefully press small letter stamps into the side rim if you want to add a date, name, or ‘Mother’s Day’ message. -
Initial drying:
Place the rounds on a flat wire rack. To prevent curling, flip them over every few hours during the first day of drying. Let them cure completely for 24-48 hours until they are hard and room temperature to the touch.
Step 2: Painting the Florals
-
Sand for smoothness:
Once fully dry, use fine-grit sandpaper to buff the top surface and edges. You want the surface to feel like smooth porcelain so the paint glides on easily. -
Sketch the design:
Lightly sketch your floral layout with a pencil. Focus on daisies and long-stemmed wildflowers, placing the larger blooms slightly off-center for a natural composition. -
Paint the stems and leaves:
Using a size 1 brush and watered-down sage green acrylic, paint thin, flowing stems. Add small leaves in pairs, keeping the strokes loose and partially transparent for a watercolor effect. -
Add the daisy petals:
Mix a warm cream or pale yellow. Use a small detail brush to paint long, thin petals radiating from the flower centers. I find it helps to pull the brush stroke from the center outward to get that tapered petal shape. -
Detail the centers:
Using a golden yellow and effortless dabbing motion, fill in the centers of the daisies. Add a tiny dot of brown or orange on the shadowed side of the center to create depth. -
Refine with outlines:
With your smallest 00 brush and very watery grey or brown paint, add extremely fine outlines to some petals and leaves. This mimics the delicate ink-drawing style shown in the reference.
Clean Edges Pro-Tip
Dip your finger in water and smooth the clay edges *immediately* after cutting. This prevents having to sand away sharp, brittle shards later.
Step 3: Finishing Touches
-
Seal the artwork:
Since these are coasters, protection is vital. Apply 2-3 coats of a waterproof matte varnish, allowing full drying time between coats to prevent stickiness. -
Stack and styling:
Arrange the finished coasters in a stack, alternating the white ones with the pastel pink and green/grey bases to show off the layered colors. -
Tie the ribbon:
Cut a length of blush pink ribbon. Wrap it around the stack twice to create a sturdy bundle, and tie it off in a simple bow on top to complete the gift presentation.
Level Up: Cork Bases
Glue thin circles of cork sheet to the bottom of each coaster. This adds professional weight and protects table surfaces from scratches.
Present this beautiful stack on a small wooden tray or alongside a favorite mug for a thoughtful morning surprise
Pinch-Pot Catchall Bowl for Mother’s Day
Create a stunningly simple statement piece that looks like high-end boutique pottery without the kiln. This two-toned pinch pot features a lovely textural contrast between the raw, speckled base and the glossy, lilac-tinted interior.
Detailed Instructions
Materials
- Air dry clay (white)
- Acrylic paint (pastel lilac/lavender)
- Acrylic paint (tan or beige)
- Acrylic paint (brown or black for speckling)
- Clear high-gloss varnish or sealant
- Old toothbrush
- Medium paintbrush
- Water cup
- Sponge or fine-grit sandpaper
- Rolling pin (optional)
Step 1: Forming the Bowl
-
Prepare the Clay:
Start with a ball of air dry clay roughly the size of a large orange. Knead it in your hands for a minute to warm it up and ensure there are no air bubbles trapped inside. -
Start the Pinch:
Hold the ball in your non-dominant hand. Press your thumb firmly into the center of the ball, stopping about half an inch from the bottom to create the base thickness. -
Open the Walls:
Using a pinching motion with your thumb on the inside and fingers on the outside, gently rotate the ball as you press the walls outward and upward. -
Shape Evenly:
Continue working your way around the bowl, aiming for a consistent wall thickness of about a quarter-inch. Don’t worry if the rim isn’t perfectly level; that slight wave adds organic character. -
Smooth the Surface:
Dip your finger in a tiny bit of water and run it over any large cracks. For the specific look in the photo, you want the clay relatively smooth but retaining some hand-formed texture. -
Create the Base:
Gently tap the bottom of the bowl on your work surface to create a flat stable area so it doesn’t wobble. -
Dry Completely:
Let the bowl dry for 24-48 hours. I find that flipping it over halfway through the drying process helps the bottom dry evenly without warping.
Step 2: Creating the Faux-Ceramic Texture
-
Sand for Finish:
Once bone dry, take fine-grit sandpaper and lightly buff the rim and inside to remove any sharp jagged bits, making it pleasant to touch. -
Paint the Base Tone:
Mix a warm beige or tan acrylic paint. Paint the bottom half of the exterior, blending it upwards so it fades slightly rather than having a hard tape line. -
Add Texture Details:
To mimic the raw clay look, use a mostly dry brush with a darker tan color and streak it horizontally across the beige section to create subtle striations. -
Speckle Effect:
Dilute a small drop of dark brown or black paint with water. Dip an old toothbrush into it, then run your thumb across the bristles to flick tiny speckles onto the beige painted area.
Cracking Up?
If cracks appear while drying, mix a tiny bit of fresh clay with water to make a paste (slip) and fill them in, then sand smooth once dry.
Step 3: Glazing the Interior
-
Apply Interior Color:
Paint the entire inside of the bowl and the top half of the exterior with your pastel lilac acrylic. It may need two coats for full opacity. -
Create the Dip Line:
Carefully paint the transition line between the lilac top and the speckled beige bottom. An slightly imperfect, wavy line looks more authentically like hand-dipped pottery. -
Add Shine:
Once the paint is fully curing, apply a thick coat of high-gloss varnish to the lilac sections only. This mimics the look of fired glaze. -
Matte the Base:
Leave the speckled bottom section matte or use a matte sealant there to emphasize the textural contrast between the ‘raw’ clay and the ‘glazed’ top.
Gilded Edge
Paint the very rim of the bowl with liquid gold leaf or metallic gold paint after the glaze dries for an extra touch of elegance.
This sophisticated catchall is now ready to hold jewelry or trinkets on a bedside table

TRACK YOUR CERAMIC JOURNEY
Capture glaze tests, firing details, and creative progress—all in one simple printable. Make your projects easier to repeat and improve.
Cactus Ring Holder for Mother’s Day
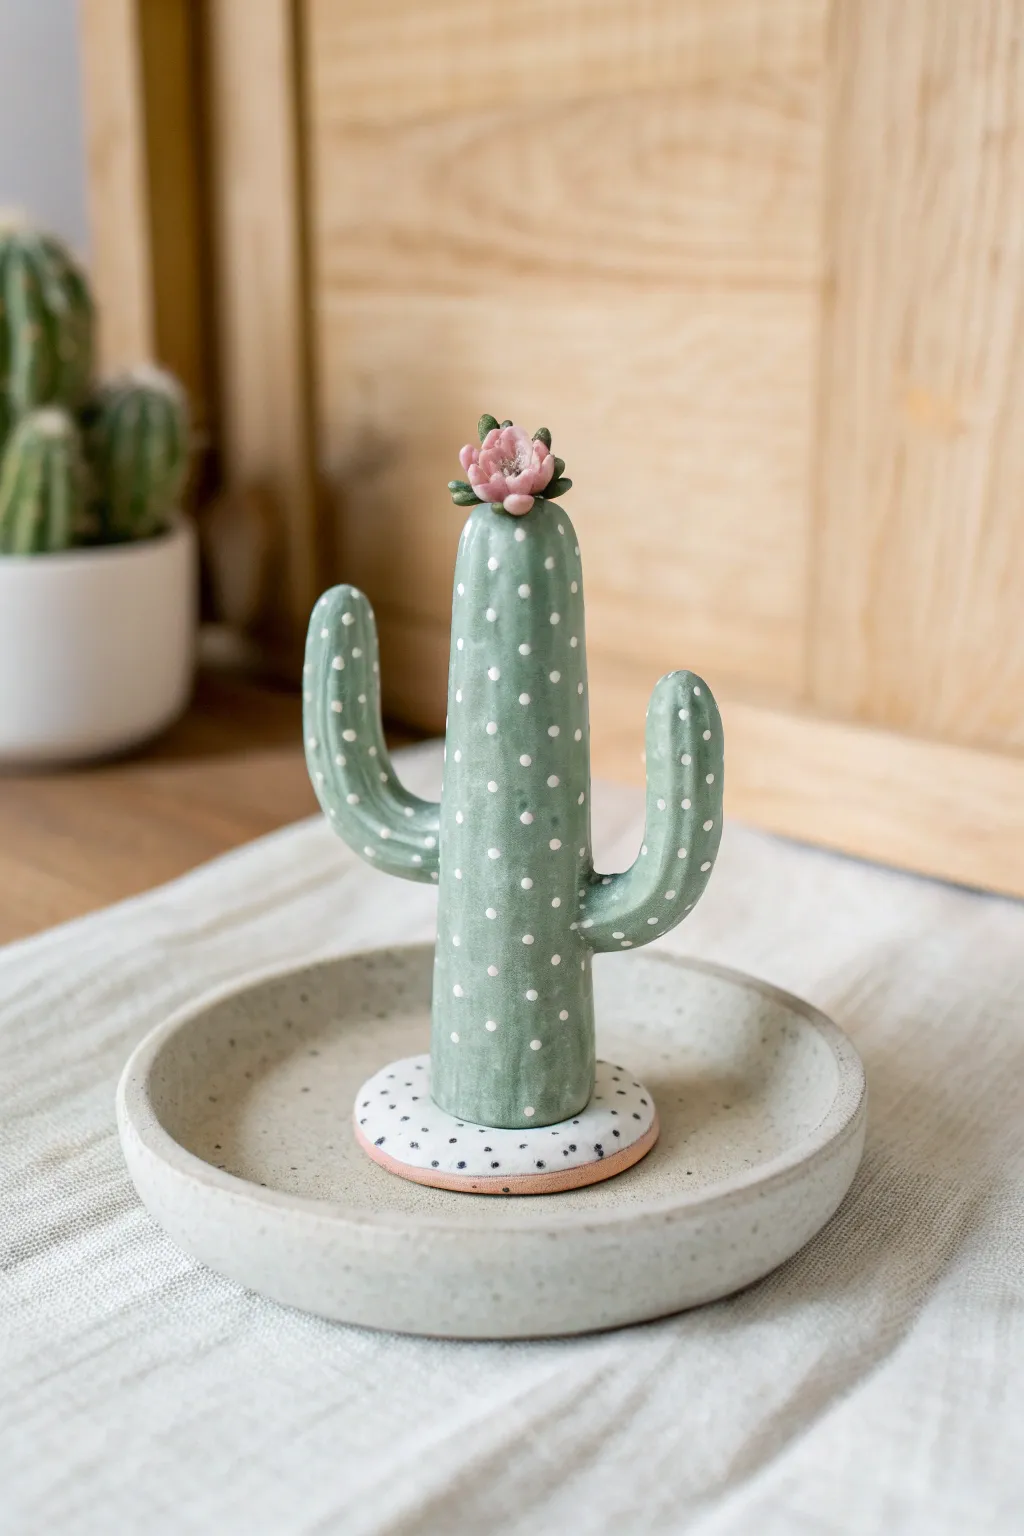
This charming cactus ring holder combines practicality with whimsical desert style, featuring a classic saguaro shape adorned with delicate white polka dots and a tiny pink bloom. The glossy finish gives it a professional ceramic look without needing a kiln, making it a perfect handmade gift for Mother’s Day.
Step-by-Step Tutorial
Materials
- Air dry clay (white)
- Acrylic paints (sage green, light pink, white, black, coral/terracotta)
- Fine detail paintbrush
- Medium paintbrush
- Rolling pin
- Circle cutter or small glass
- Clay sculpting tools (or a toothpick)
- Water in a small cup
- Sandpaper (fine grit)
- High-gloss varnish or sealant
Step 1: Sculpting the Form
-
Prepare the base:
Start by rolling out a chunk of clay to about 1/4 inch thickness. Use a circle cutter or a small glass to cut out a perfect round base, approximately 2 inches in diameter. Smooth the edges with a wet finger. -
Form the main stem:
Roll a cylinder of clay for the main cactus body. It should be slightly taller than a finger and thick enough to be stable. Flatten the bottom so it stands upright on its own. -
Attach stem to base:
Score the bottom of the cactus stem and the center of your circular base by scratching cross-hatch marks with a tool. Apply a dab of water (slip) to both scored areas and press the stem firmly onto the base. Smooth the seam with a sculpting tool to secure it. -
Create the arms:
Roll two smaller sausages of clay for the cactus arms. Curving them gently upwards into an ‘L’ shape creates the classic saguaro look. Make one slightly shorter than the other for natural asymmetry. -
Attach the arms:
Score and slip the attachment points on the main stem and the base of each arm. Press them onto the sides of the main stem, blending the clay with a damp finger or tool until the join is seamless and invisible. -
Sculpt the flower:
For the topper, create 5-6 tiny teardrop shapes from pea-sized bits of clay. Arranging them circularly on the top of the cactus creates petals. Add a tiny textured center using the tip of a toothpick. -
Dry thoroughly:
Allow your sculpture to dry completely. This usually takes 24-48 hours depending on humidity. Rotate it occasionally so the bottom of the base dries evenly.
Cracks happen
If small cracks appear while drying, don’t panic. Mix a tiny bit of fresh clay with water to make a paste and fill the cracks. Smooth over and let re-dry.
Step 2: Painting & Finishing
-
Sand imperfections:
Once bone dry, inspect the piece for any rough patches. Gently sand them away with fine-grit sandpaper to achieve a porcelain-smooth surface before painting. -
Base coat the cactus:
Paint the entire cactus body (stem and arms) with a sage green acrylic paint. You may need two thin coats for opaque coverage, letting the first dry before applying the second. -
Paint the base:
Paint the top surface of the circular base white. Careful around the green cactus stem! I find a smaller angular brush helps get right into that corner cleanly. -
Add base details:
Paint the rim or side edge of the circular base with a coral or terracotta color. Once the white top is dry, use a fine brush or toothpick to add tiny irregular black dots to simulate a speckled stone texture. -
Paint the flower:
Color the petals with a soft light pink. Use a darker pink or tiny dab of white for the center details to add dimension to the bloom. -
Add cactus spines:
Using your finest detail brush or a toothpick dipped in white paint, create the spine pattern. Dot small, evenly spaced vertical rows up and down the cactus body and arms. -
Seal for shine:
After all paint is perfectly dry, apply two coats of high-gloss varnish. This step is crucial as it transforms the matte clay into something that looks like glazed ceramic and protects the piece from everyday use.
Make it weighted
For extra stability, embed a large metal washer inside the clay base while rolling it out. This prevents the holder from tipping over when heavy rings are added.
Now you have a delightful little desert oasis ready to keep treasures safe
Tea Light Holder for Mother’s Day
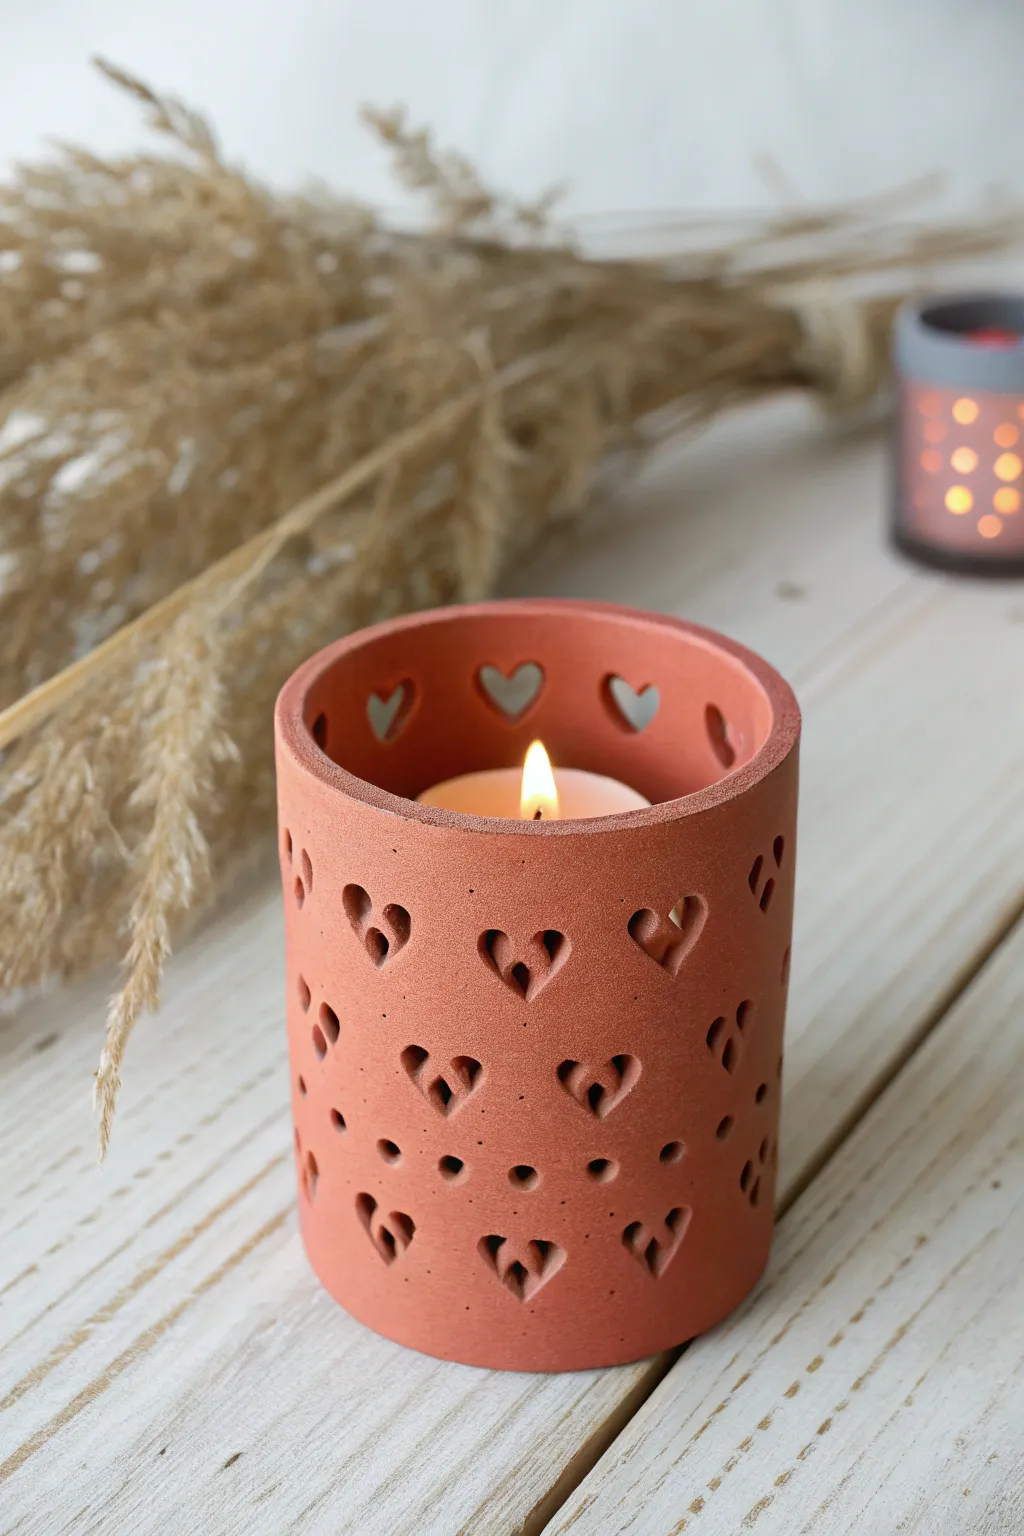
This warm, earthy tea light holder features delicate heart cut-outs that cast a cozy glow when lit. Using terracotta-colored air dry clay gives it a rustic, natural finish perfect for a heartfelt Mother’s Day gift.
Step-by-Step
Materials
- Terracotta colored air dry clay
- Rolling pin
- Cylindrical mold (like a sturdy can or glass jar)
- Parchment paper
- Small heart-shaped mini cutter (approx. 0.5 inch)
- Craft knife
- Ruler
- Bowl of water
- Sponge or fine sandpaper
- Tea light candle
Step 1: Preparing the Clay Sheet
-
Knead the clay:
Begin by taking a large handful of terracotta air dry clay and kneading it in your hands to warm it up and make it pliable. -
Roll it out:
Place the clay on a sheet of parchment paper or a craft mat. Use a rolling pin to flatten it into a long rectangular slab. Aim for an even thickness of about 1/4 inch (6mm). -
Measure your mold:
Take your cylindrical mold (a can or glass jar) and wrap a piece of paper around it to determine the circumference needed. Add a small overlap of about half an inch for the seam. -
Trim to size:
Using a ruler and craft knife, cut your clay slab into a precise rectangle based on your measurements. A height of about 3-4 inches usually works well for a standard tea light.
Clean Cuts Hack
cover the clay with cling wrap before cutting. Pressing the cutter through the plastic creates beautifully rounded, professional edges on the cut-outs.
Step 2: Creating the Pattern
-
Plan your design:
While the clay is still flat on your work surface, plan the arrangement of your hearts. The image shows a staggered, alternating pattern. -
Cut the top row:
Use your mini heart cutter to punch out a row of hearts near the top edge. Leave about half an inch of space between the top edge and the cut-out. -
Stagger the middle rows:
Punch out subsequent rows of hearts below the first. Offset them so each heart sits below the gap of the row above it, creating a brick-like pattern. -
Add detail holes:
The example design features small circular holes between the bottom hearts. You can use a straw or a small round tool to punch these tiny accents. -
Clean the edges:
Carefully remove any ragged bits of clay from inside the heart cut-outs using your craft knife or a wet finger.
Make it Shine
When punching the hearts, save the tiny clay cut-outs. Poke holes in them to make matching gift tags or string them on twine around the jar base.
Step 3: Forming the Cylinder
-
Prepare the mold:
Wrap your cylindrical mold in a piece of parchment paper. This is crucial as it prevents the clay from sticking to the mold as it dries. -
Lift the slab:
Very gently lift your clay rectangle. I find it safest to lift the parchment paper underneath it and flip it onto your hand to avoid stretching the pattern. -
Wrap around the mold:
Wrap the clay around your prepared mold. Bring the two short ends together. -
Seal the seam:
Score the touching edges (scratch them up a bit) and add a dab of water. Press the edges together firmly and smooth the join with a wet finger until the seam disappears. -
Smooth the surface:
Run a damp sponge lightly over the exterior to smooth out any fingerprints or rough texture, being careful not to distort the heart shapes.
Step 4: Drying and Finishing
-
Initial drying:
Let the clay dry on the mold for about 2-3 hours until it holds its shape firmly but isn’t fully hard. -
Remove the mold:
Carefully slide the cylinder off the mold. Peel away the parchment paper from the inside immediately to allow airflow to the interior. -
Full dry:
Allow the piece to air dry completely for 24-48 hours. Turn it occasionally to ensure even drying. -
Sand edges:
Once fully dry and hard, use fine-grit sandpaper to smooth the top and bottom rims for a professional finish. -
Optional sealing:
Apply a matte varnish if you want to protect the finish, or leave it raw for that authentic porous look.
Place a tea light inside and watch the hearts dance on the walls for a truly heartwarming display
Photo Holder Stand for Mother’s Day
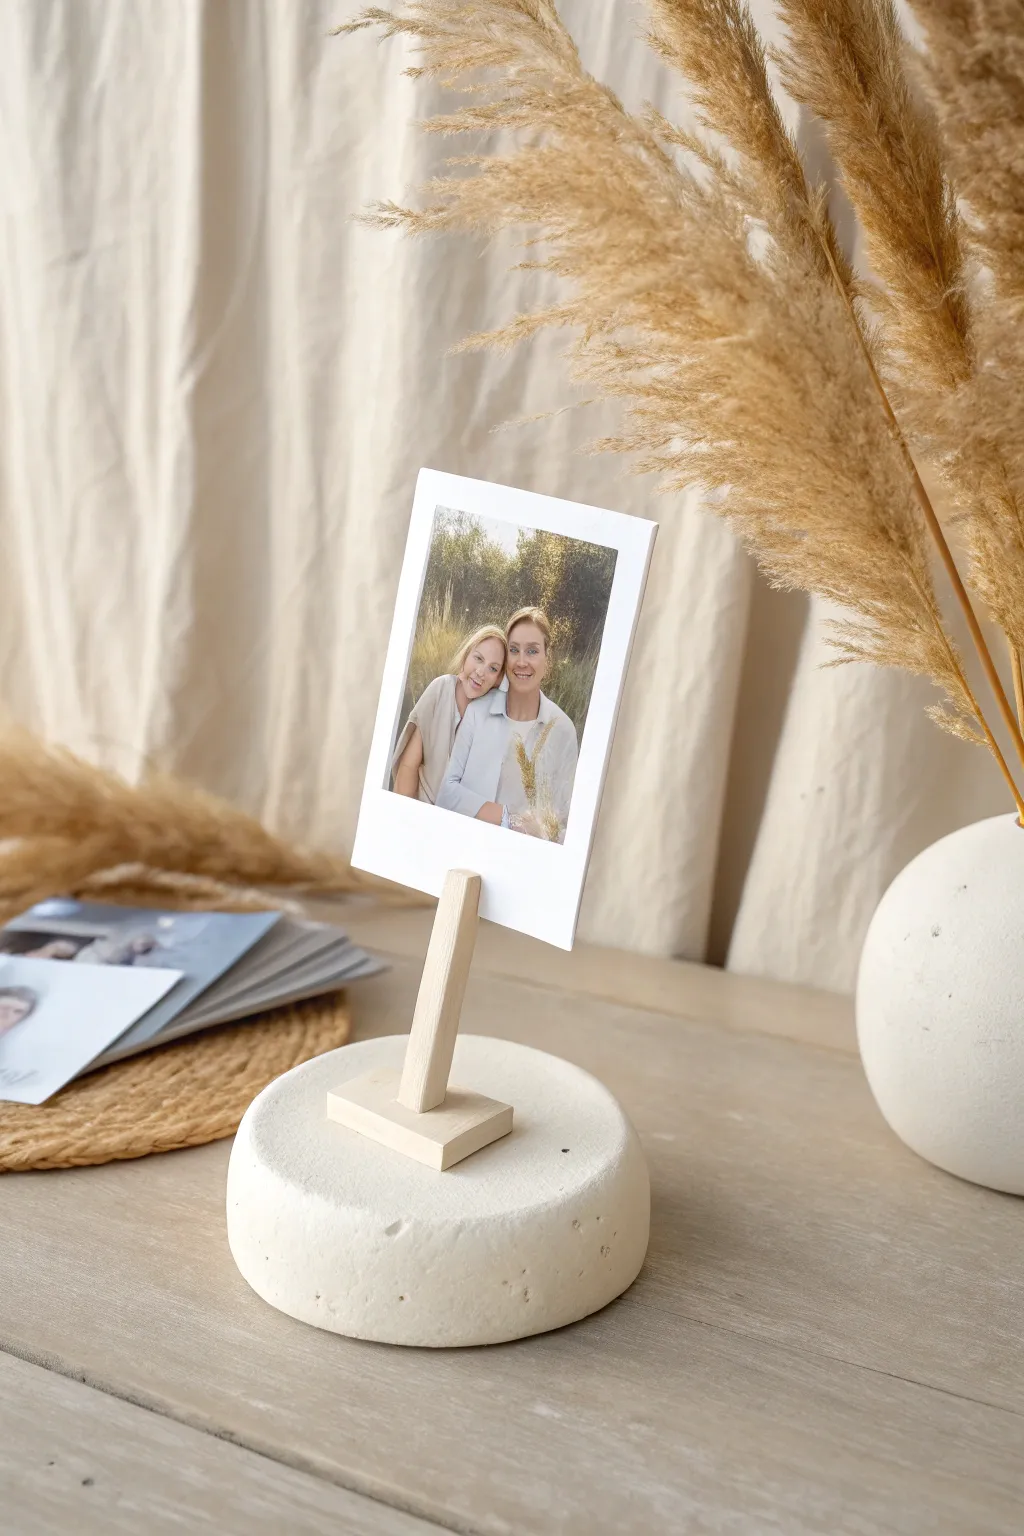
Create a modern, serene display for your favorite memories with this textured air dry clay photo holder. Its simple, substantial base and clean wooden accents make it a perfect, understated gift that fits any decor style.
Step-by-Step Tutorial
Materials
- White air dry clay
- Small wooden clothespin (natural wood finish)
- Small rectangular wood block (for the clothespin base)
- Wood glue or super glue
- Rolling pin
- Round cookie cutter (approx. 3-4 inches) or a glass
- Fine-grit sandpaper
- Matte sealant (optional)
- Instant photo or printed picture
Step 1: Shaping the Base
-
Condition the clay:
Grab a generous handful of white air dry clay and knead it in your hands for a minute until it feels soft, pliable, and free of cracks. -
Roll it out:
On a clean, flat surface, roll the clay out. You want this piece to be quite thick and substantial, so aim for a thickness of about 1 inch to 1.5 inches. -
Cut the circle:
Use your large round cookie cutter or the rim of a wide glass to press firmly into the clay, creating a perfect thick disc. -
Soften the edges:
Dip your finger in a little bit of water and run it around the top and bottom sharp edges of the cut circle to round them off gently. We want a stone-like look, not sharp pastry edges. -
Add texture:
To mimic the porous look of the stone in the photo, you can lightly tap the surface with a crumpled ball of aluminum foil or a stiff bristle brush. Don’t overdo it; subtle is better.
Cracking Up?
If small cracks appear as the thick clay dries, mix a tiny bit of fresh clay with water to make a paste. Fill the cracks, smooth with a finger, and let dry again.
Step 2: Creating the Mount
-
Assemble the wood piece:
Take your small wooden clothespin. If it has a metal spring, you can leave it, or if using a doll-peg style, that works too. Glue the bottom of the clothespin vertically onto the center of your small rectangular wood block. -
Secure the bond:
Hold the clothespin in place for a minute to ensure the glue sets straight. It needs to stand perfectly upright. -
Create the insertion point:
While the clay base is still wet, take the wooden block assembly and press it gently into the center of the clay disc just enough to make an indentation. -
Remove and refine:
Pull the wood block out. This leaves a perfect ‘seat’ for the wood to be glued into later. Smooth the clay edges around this indentation slightly if they pushed up too much.
Weight Matters
To prevent tipping, embed a heavy magnet or large metal washer into the bottom of the wet clay. Cover it with a thin clay layer so it stays hidden but adds stability.
Step 3: Drying and Assembly
-
Initial drying:
Place your clay disc on a wire rack or a piece of parchment paper. Let it sit undisturbed for at least 24 hours. -
Flip for airflow:
Because the piece is thick, I recommend flipping it over halfway through the drying process to ensure the bottom dries evenly and doesn’t warp. -
Check for dryness:
The clay should turn completely white and feel room temperature (not cold) to the touch when it is fully dry. -
Sand imperfections:
Once fully dry, use fine-grit sandpaper to buff away any unintentional fingerprints or sharp ridges, keeping that nice rounded pebble shape. -
Glue the holder:
Apply a strong adhesive (like super glue or heavy-duty craft glue) to the specific indentation you made earlier. -
Attach the wood:
Press the wooden block (with the clothespin attached) firmly into the indentation. Hold it until it feels secure. -
Seal the clay:
For longevity, brush a coat of matte sealant over the clay portion. This protects it from dust and humidity without making it look glossy. -
Add the memory:
Once everything is set and dry, clip your favorite Polaroid or printed photo of Mom into the clothespin.
This charming photo stand is now ready to hold a precious moment right where she can always see it
Recipe Card Holder for Mom
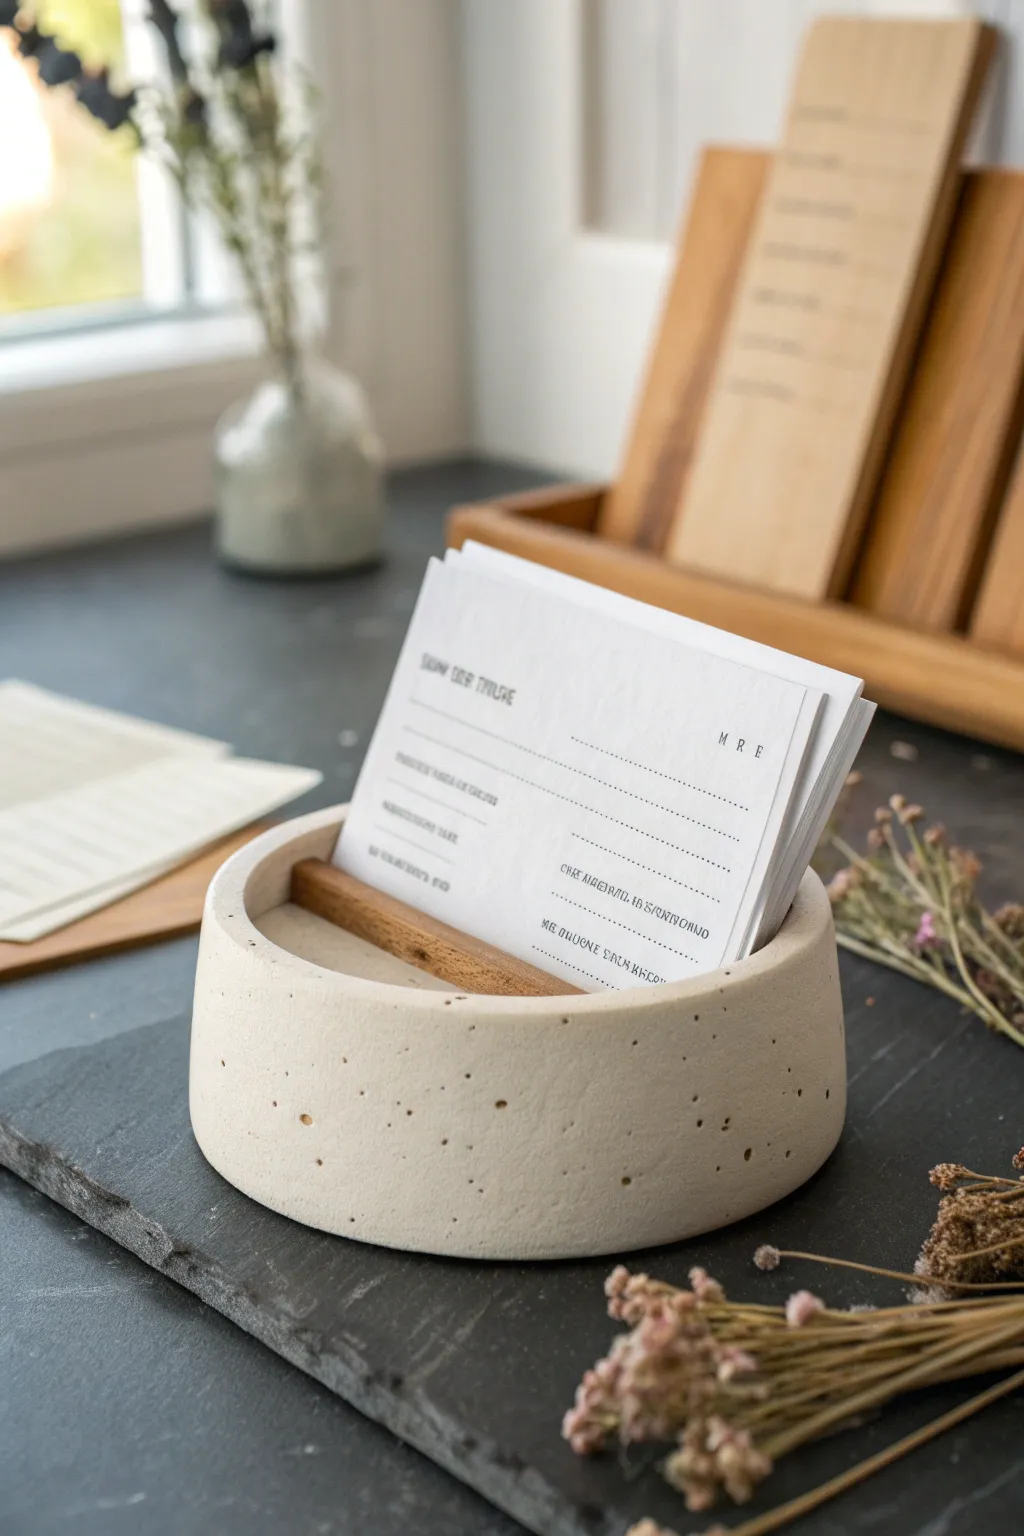
This elegant air dry clay project combines the rustic charm of stone with modern functionality to create a beautiful recipe card holder for Mom’s kitchen. The simple bowl shape features a clever wooden insert that keeps her favorite recipes propped up and easy to read while cooking.
Step-by-Step
Materials
- White air dry clay (approx. 500g)
- Small amount of dried coffee grounds or black pepper
- Rolling pin
- Circle cutter or bowl (approx. 5-6 inches diameter)
- Craft knife
- Small rectangular wood scrap (about 0.5 inch thick)
- Sandpaper (fine grit)
- Matte varnish or sealant
- Water and sponge for smoothing
Step 1: Preparing the Clay
-
Condition the clay:
Start by kneading your white air dry clay until it is soft, pliable, and warm from your hands. -
Create the texture:
To achieve that beautiful speckled stone look seen in the photo, sprinkle a small pinch of dried coffee grounds or coarse black pepper onto the clay. -
Mix thoroughly:
Fold and knead the clay repeatedly to distribute the speckles evenly throughout the block; add more if you want a denser pattern. -
Roll it out:
Roll the clay out on a flat surface to a thickness of about 1/4 to 1/2 inch. Keep it relatively thick to ensure the stand is heavy enough to hold cards without tipping.
Stone Effect Secret
Use dried tea leaves instead of coffee for a softer, earthier speckle. The tannins in the tea might slightly dye the surrounding clay for a warm beige tint.
Step 2: Forming the Base
-
Cut the base:
Use a circle cutter or trace around a small bowl (approx. 5 inches wide) to cut a perfect circle for the base. -
Prepare the wall strip:
Gather the remaining clay and roll out a long rectangular strip. This should be about 1.5 inches tall and long enough to wrap around the circumference of your base. -
Trim the edges:
Use a ruler and craft knife to cut the top and bottom of the strip so they are perfectly straight and parallel. -
Score surfaces:
Using a needle tool or an old toothbrush, rough up (score) the outer edge of the base circle and the bottom edge of your wall strip. -
Add slip:
Dab a little water or liquid clay (slip) onto the scored areas to act as glue.
Fixing Cracks
If hairline cracks appear while drying, don’t panic. Mix a tiny bit of fresh clay with water to make a paste and fill the cracks, then sand smooth once dry.
Step 3: Assembly and Refining
-
Attach the wall:
Carefully wrap the clay strip around the outside of the base circle. Press the scored edges together firmly to create a seal. -
Join the seam:
Where the two ends of the wall meet, cut through both layers at an angle for a clean join, then score, slip, and smooth the vertical seam together. -
Smooth the interior:
Use your finger or a modeling tool to smooth the inside seam where the wall meets the floor of the bowl so it looks like one solid piece. -
Level the rim:
Turn the piece upside down gently just for a moment to tap the rim flat against the table, ensuring the top edge is level. -
Create the notch:
Take your small rectangular wood scrap. Push it gently into the center of the interior base to create an indentation, or simply glue it in place later. The wood acts as the stopper for the cards.
Step 4: Finishing Touches
-
Final smoothing:
Dip a sponge in water and wipe down the entire piece to remove fingerprints and bring gravity to the clay texture. -
Slow drying:
Let the piece dry slowly away from direct heat for 24-48 hours. I find turning it over halfway through helps the bottom dry evenly. -
Sanding:
Once bone dry, use fine-grit sandpaper to smooth any sharp edges on the rim or bumps on the outer walls. -
Seal the piece:
Apply a coat of matte varnish to protect the clay while maintaining that natural, stone-like appearance. -
Add the wood block:
If you didn’t embed it earlier, use strong craft glue to attach the small wooden block inside the bowl, slightly off-center, to hold the recipe cards upright.
Now you have a stylish and practical gift that will remind Mom of you every time she cooks a family meal
Stamped “Mom” Quote Plaque for Mother’s Day
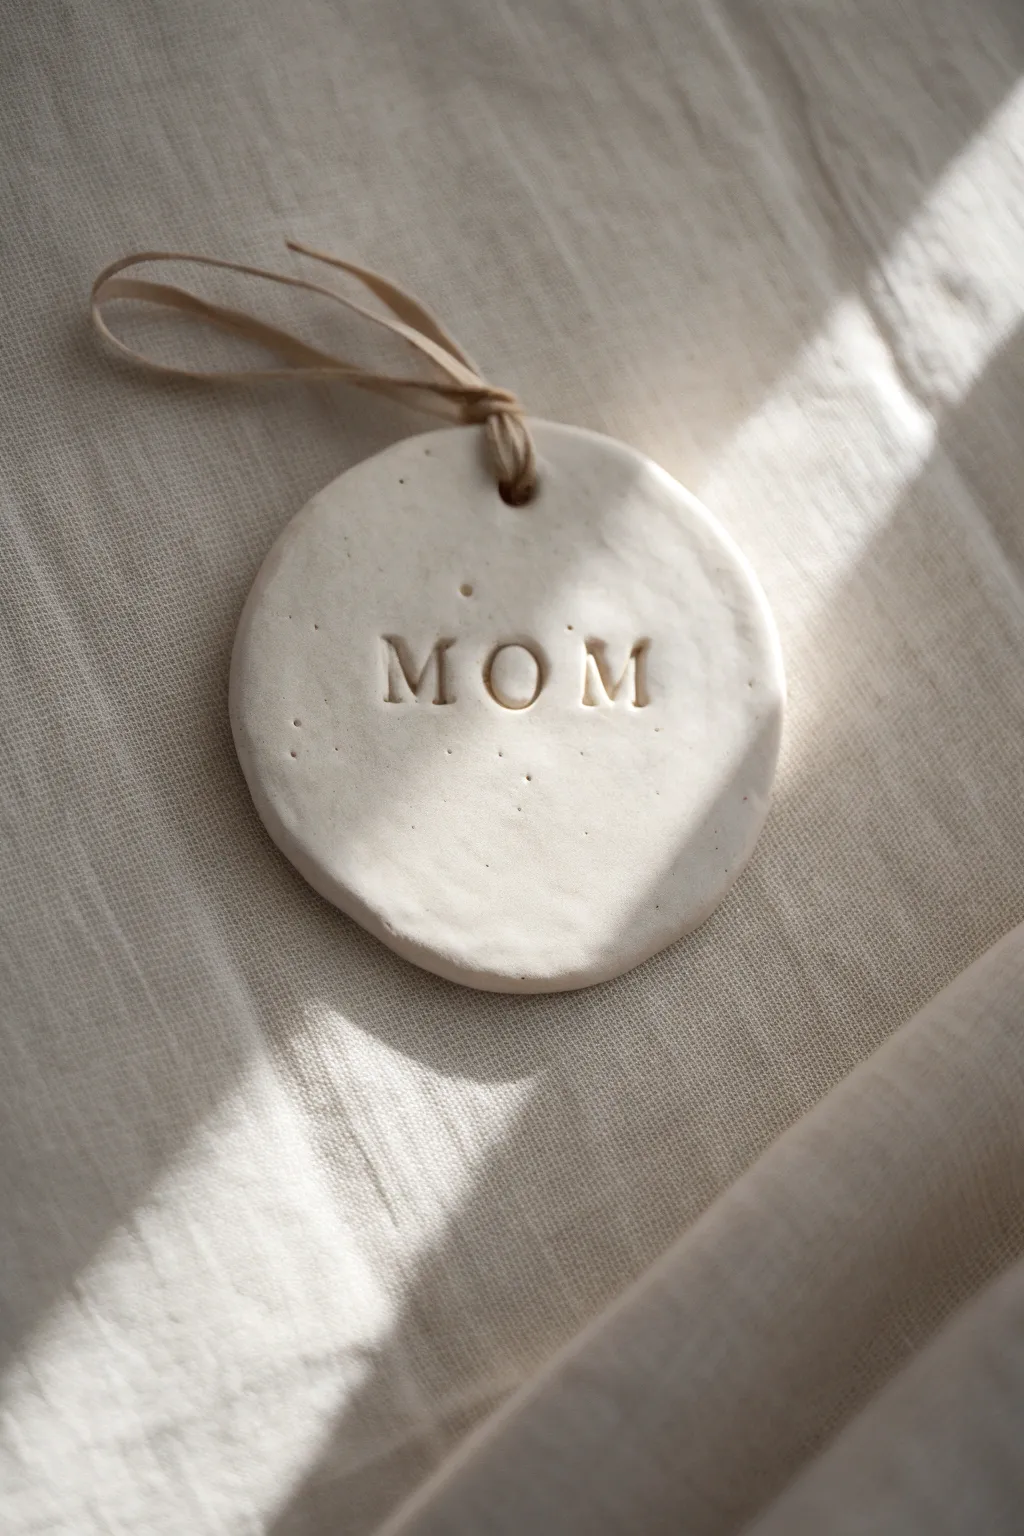
Simple yet deeply sentimental, this minimalist clay plaque captures a modern rustic charm perfect for gifting. The smooth, creamy white finish and organic edges allow the stamped lettering to take center stage, creating a timeless decoration she can treasure.
How-To Guide
Materials
- White polymer or air-dry clay
- Rolling pin (acrylic or wooden)
- Round cookie cutter (approx. 3-4 inches) or a glass
- Alphabet stamp set (serif font preferred)
- Drinking straw or skewer
- Fine-grit sandpaper (optional)
- Natural raffia ribbon or thin leather cord
- Parchment paper or smooth work mat
- Small bowl of water (for smoothing)
Step 1: Shaping the Base
-
Condition the Clay:
Begin by taking a handful of clay and kneading it in your hands until it becomes soft, pliable, and warm. This prevents cracking and ensures a smoother surface later on. -
Roll it Out:
Place the clay on a sheet of parchment paper. Using your charging rolling pin, roll the clay out to an even thickness of about 1/4 inch. You want it substantial enough to hold the stamp impression without warping. -
Cut the Circle:
Press your round cookie cutter or the rim of a glass firmly into the clay to cut your circle shape. If you want that slightly imperfect, handmade look seen in the photo, you can gently tap the edges inward with your finger after cutting. -
Smooth the Surface:
Dip your finger lightly in water and run it over the surface and edges of the clay circle. This helps remove any fingerprints or sharp ridges left by the cutter. -
Create the Hanging Hole:
Take a drinking straw or a thick skewer and press a hole near the top edge of the circle. Make sure the hole is centered and not too close to the very edge, or the clay might break when hung.
Step 2: Stamping and Finishing
-
Align the Stamps:
Select the letters M, O, and M from your stamp set. I find it helpful to line them up on the table first to visualize the spacing before touching the clay. -
Test the Impression:
Press the stamps into a scrap piece of clay first. This helps you gauge how much pressure you need to get a clear, deep impression without pushing all the way through. -
Stamp the Center:
Start with the center letter ‘O’. Position it in the exact middle of the circle and press straight down firmly, then lift straight up. -
Complete the Word:
Stamp the first ‘M’ to the left and final ‘M’ to the right of the center letter. Using the center-out method keeps the word balanced nicely on the ornament. -
Add Texture (Optional):
If you want to mimic the speckled look in the photo, you can gently prick the surface randomly with a needle tool or toothbrush, or leave it smooth for a cleaner look. -
Let it Dry:
Place the plaque on a clean, flat surface to dry. If using air-dry clay, let it sit for 24-48 hours, flipping it over halfway through to ensure even drying. -
Sand the Edges:
Once fully dry and hard, take a piece of fine-grit sandpaper and very gently buff the edges of the circle to soften any sharp areas. -
Seal the Clay:
Apply a thin layer of matte varnish or sealant if you want to protect the clay from moisture, though leaving it raw maintains that matte, stoneware aesthetic. -
Add the Ribbon:
Cut a length of natural raffia or leather cord. Fold it in half to create a loop. -
Attach the Loop:
Thread the folded end through the hole from front to back, then pass the loose ends through that loop (a lark’s head knot) and pull tight to secure it.
Clean Lettering Tip
If your clay is sticky, lightly dust the rubber letters of your stamps with cornstarch before pressing them down. This prevents the clay from lifting up when you pull the stamp away.
Cracking Trouble?
Make sure your clay isn’t too thin in the middle. If cracks appear while drying, smooth a tiny bit of wet clay paste (slip) into the cracks with your finger and let dry again.
Now you have a beautiful, minimalist token of appreciation ready to be gifted
Lace-Imprint Trinket Dish for Mother’s Day
This delicate trinket dish captures the intricate beauty of lace, preserving it in a durable and functional piece of art. With its scalloped edges and gold leaf rim, it makes a sophisticated bedside catchall for Mother’s Day jewelry.
Step-by-Step Guide
Materials
- White air-dry clay
- Rolling pin
- Piece of textured lace or a doily
- Small bowl (to use as a mold)
- Round cookie cutter or drinking glass (approx. 4-inch diameter)
- Sandpaper (fine grit)
- Gold paint or liquid gold leaf
- Small paintbrush
- Gloss varnish or sealant
- Craft knife
- Water
Step 1: Shaping the Clay
-
Prepare your workspace:
Lay down a piece of parchment paper or a silicone mat to prevent the clay from sticking to your table. -
Condition the clay:
Take a handful of white air-dry clay and knead it in your hands until it becomes soft, pliable, and free of cracks. -
Roll it out:
Using your rolling pin, flatten the clay into an even slab about 1/4 inch thick. Try to keep the thickness consistent for even drying. -
Apply the texture:
Place your lace or doily directly onto the flattened clay. Press it down gently with your hands first to secure it. -
Imprint the design:
Roll your rolling pin firmly over the lace once. You want to press hard enough to leave a deep, clear impression, but not so hard that you thin the clay out too much. -
Reveal the pattern:
Carefully peel back the lace to reveal the embossed design underneath. -
Cut the shape:
Position your round cutter or glass over the best part of the lace pattern. Press down firmly to cut out your circle. -
Refine the edges:
Lift away the excess clay. Dip your finger in a little water and run it along the cut edge to smooth out any roughness.
Step 2: Forming and Drying
-
Create the scalloped rim:
To get the wavy edge seen in the photo, gently pinch the rim of the clay circle at regular intervals using your thumb and forefinger. -
Shape the dish:
Carefully lift your clay circle and place it inside your small bowl. Press it gently to conform to the bowl’s curve, which will give the dish its concave shape. -
Dry partially:
Let the clay sit in the bowl for about 24 hours until it holds its shape firmly but isn’t bone dry. -
Finish drying:
Remove the distinct shape from the bowl and place it on a wire rack. Let it dry completely for another 24-48 hours, flipping it occasionally for even airflow. -
Sand for smoothness:
Once fully cured and hard, use fine-grit sandpaper to buff the edges and any uneven spots on the bottom.
Clean Impressions
To prevent the lace from sticking to the clay, lightly dust the clay surface with cornstarch before laying down your fabric.
Step 3: Gilding and Sealing
-
seal the surface:
Apply a coat of gloss varnish to the entire dish to protect the clay and give it a ceramic-like sheen. Let this dry completely. -
Paint the rim:
Dip a fine-tip brush into your gold paint or liquid gold leaf. Carefully paint along the very edge of the rim, following the scalloped waves you added earlier. -
Add detail:
I allow the gold to extend slightly over the lip onto the inside texture, just a millimeter or two, to frame the lace pattern. -
Final cure:
Allow the paint and varnish to cure fully according to the package instructions before gifting or using.
Vintage Patina
After the white paint dries, rub a tiny bit of diluted brown acrylic paint into the lace grooves and wipe it off to antique the texture.
Now you have a stunning, handmade piece that looks like fine ceramic without the need for a kiln
Flower Frog for Mother’s Day Bouquets

Elevate a simple grocery store bouquet with this modern, sculptural flower frog vase that mimics the look of high-end ceramic. The unique perforated design isn’t just beautiful; those holes help separate stems for effortless, professional-looking arrangements.
How-To Guide
Materials
- White air-dry clay (approx. 1kg)
- Rolling pin
- Glass bottle or jar (to use as an armature)
- Craft knife
- Various circle cutters or piping tips (small sizes)
- Needle tool or toothpick
- Sponge
- Sandpaper (fine grit)
- Water in a small bowl
- Sealant (acrylic varnish or clear resin)
- Optional: Speckled clay additive or black pepper/sand for texture
Step 1: Forming the Base
-
Prepare the Clay:
Begin by kneading your air-dry clay until it is soft and pliable. If you want that trendy speckled look shown in the photo, knead in a pinch of black pepper or craft sand at this stage until it’s evenly distributed. -
Roll the Slab:
Roll out a large portion of clay into a flat, even slab, approximately 1/4 inch thick. Aim for a rectangular shape that is tall enough to cover the body of your chosen glass jar armature. -
Wrap the Armature:
Place your glass jar in the center of the slab. Carefully lift the clay and wrap it around the jar. I find it easiest to trim the excess clay first so the edges meet perfectly without overlapping too much. -
Blend the Seam:
Use a little water on your finger to smooth the seam where the clay edges meet. Smudge the clay back and forth until the join is invisible. -
Shape the Neck:
Gently gently squeeze the clay inward at the top of the jar to form the bottle neck shape. If your armature is a wide jar, you can add a separate coil of clay on top to build a narrower neck, blending it seamlessly into the body.
Waterproof Hack
Don’t remove the glass jar! Leave it inside permanently. It acts as the waterproof liner, so you don’t have to worry about the clay dissolving.
Step 2: Sculpting the Frog Detail
-
Smooth the Form:
Take a damp sponge and wipe down the entire surface of the vase. This removes fingerprints and creates that smooth, matte stone finish. -
Plan the Holes:
Visualize where you want your flower stems to emerge. The design features a cluster of holes on the lower belly of the vase. You can lightly mark these spots with a needle tool first to ensure good spacing. -
Cut the Perforations:
Using small circle cutters or the back end of a piping tip, carefully punch holes into the clay wall. Twist the cutter gently as you push through to get a clean edge. -
Clean the Edges:
Carefully remove the small clay circles. Dip your finger in water and smooth the inner rim of each hole to remove any jagged bits or burrs. -
Define the Rim:
Roll a small, thin snake of clay and attach it to the very top opening of the vase to create a defined, rounded lip. use water to attach it securely.
Step 3: Finishing Touches
-
Initial Drying:
Let the vase sit undisturbed for about 24-48 hours. Keep it away from direct heat sources to prevent cracking. -
Remove Armature (Optional):
If your clay has shrunk enough to pull away from the glass jar, you might be able to slide the jar out. However, leaving the glass inside makes the vase waterproof and heavier, which is safer for holding water. -
Sanding:
Once fully dry, use fine-grit sandpaper to buff away any remaining uneven spots, paying special attention to the rim and the edges of the holes. -
Dusting:
Wipe away all sanding dust with a slightly damp cloth or a dry brush. -
Sealing:
Apply a coat of matte sealant or varnish to protect the clay. If you kept the glass jar inside, you only need to seal the outside. If you removed it, you must use a waterproof resin on the inside to hold fresh flowers.
Texture Twist
Before the clay dries, gently press a piece of coarse linen fabric against the surface to give it a subtle, woven textile imprint.
Now fill your beautiful creation with water and stems for a gift that lasts longer than the flowers themselves
Birth Flower Wall Charm for Mom
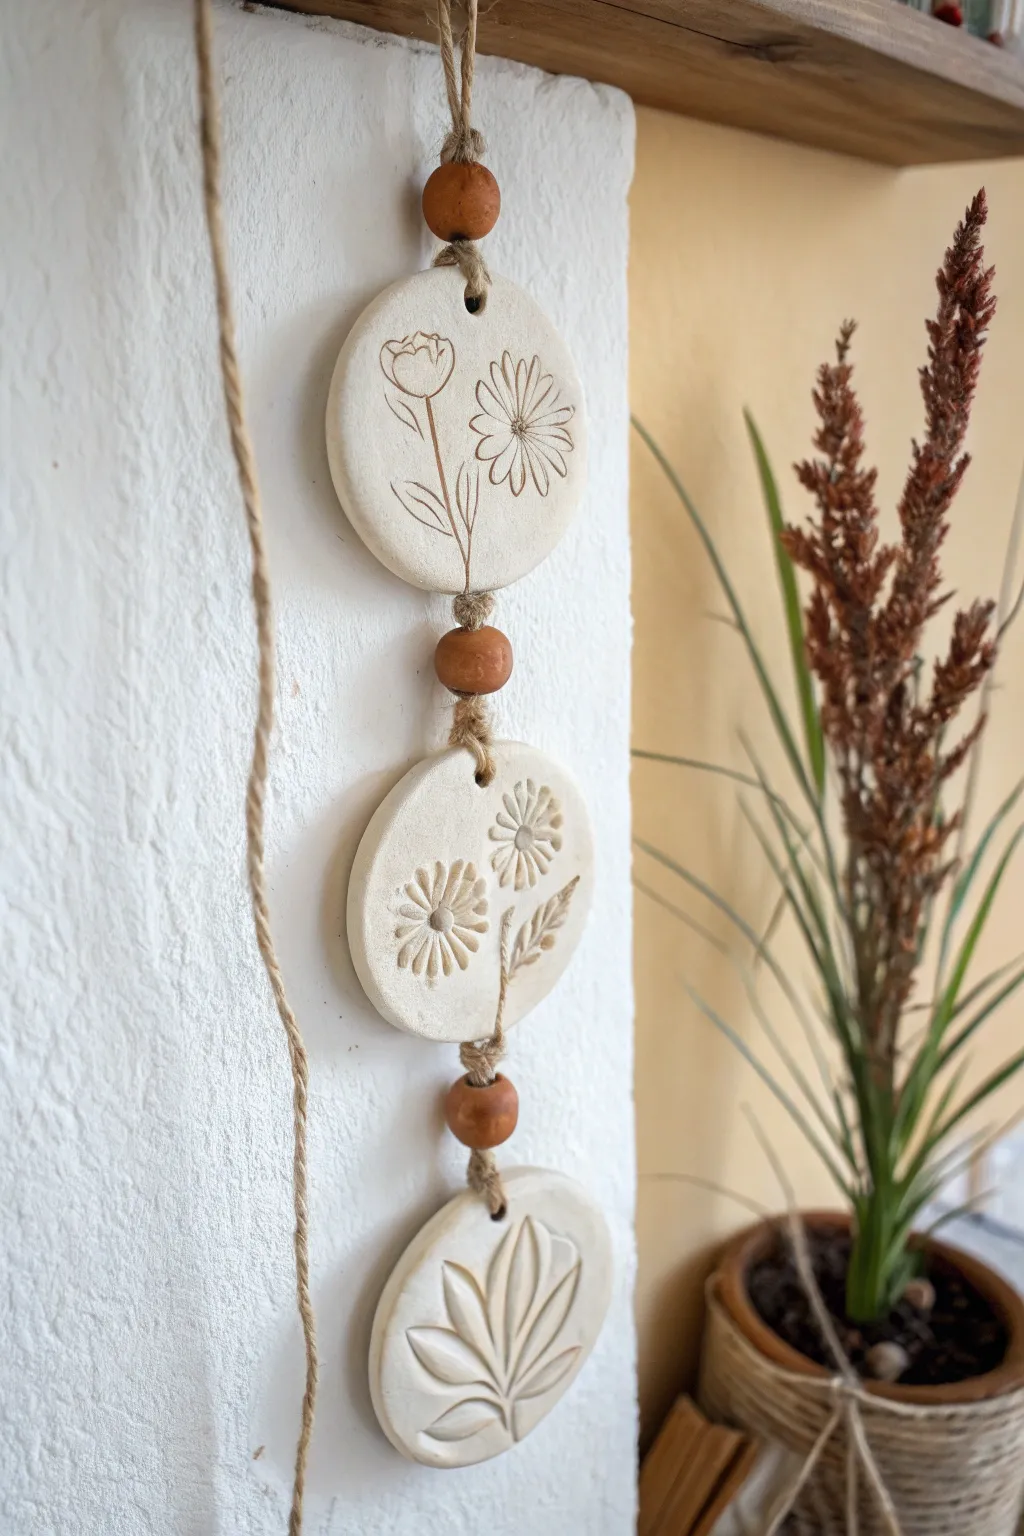
Create a meaningful and earthy piece of decor by crafting these three-tiered wall charms, featuring delicate botanical imprints on clay discs. The combination of white clay, natural jute twine, and wooden beads gives this project a lovely boho-minimalist aesthetic that’s perfect for gifting.
Step-by-Step
Materials
- White polymer clay or air-dry clay (smooth finish)
- Rolling pin or acrylic roller
- Round cookie cutter (approx. 3-inch diameter)
- Rubber stamps with flower designs (or real dried flowers for pressing)
- Wooden Beads (medium brown, approx. 12-15mm)
- Jute twine
- A thick needle, skewer, or drinking straw (for piercing holes)
- Sandpaper (fine grit)
- Brown acrylic paint (optional, for aging)
- Sealant (matte varnish or Mod Podge)
Step 1: Shaping the Clay Base
-
Condition the clay:
Begin by warming up a chunk of your white clay in your hands to make it pliable and smooth out any air bubbles, ensuring a crack-free finish. -
Roll it out:
Roll the clay out on a clean, flat surface to an even thickness of about 1/4 inch. If you want a uniform look, you can place two wooden rulers on either side of the clay as guides while rolling. -
Cut the discs:
Use your round cookie cutter to punch out three separate circles. If the edges feel rough, dip your finger in a little water and gently smooth them down.
Fixing Cracks
If you spot hairline cracks as the clay dries, mix a tiny bit of fresh clay with water to make a paste (slip). Paint this into the cracks and smooth it out with your finger.
Step 2: Adding Botanical Details
-
Prepare your stamps:
Select three distinct flower designs—perhaps representing family birth flowers. If using rubber stamps, ensure they are clean. -
Impress the design:
Gently but firmly press the stamp into the center of each clay disc. Wiggle it slightly to ensure the lines transfer deeply, then lift straight up to avoid smudging the clay. -
Refine the lines:
If using air-dry clay, sometimes the edges of the impression can look soft. I like to use a needle tool or toothpick to gently re-trace and deepen the lines while the clay is still wet for a sharper image. -
Create hanging holes:
Using a skewer or a straw, punch a hole at the very top and very bottom of the first two discs. For the third (bottom) disc, only punch a hole at the top. -
Dry the pieces:
Lay the discs on a flat surface to dry completely. Following the manufacturer’s instructions is key here, but usually, 24 to 48 hours is safe for air-dry clay. Flip them halfway through to prevent curling.
Preventing Warping
Air-dry clay tends to curl as water evaporates unevenly. Dry your discs on a wire cooling rack so air circulates on both sides, or weigh them down slightly with a book once they are semi-dry.
Step 3: Finishing Touches
-
Sand the edges:
Once fully cured, take your fine-grit sandpaper and gently buff the edges and surface of the discs to remove any burrs or fingerprints. -
Optional antique wash:
To make the flower designs stand out like the photo, dilute a tiny drop of brown acrylic paint with water. Brush it over the recessed lines and immediately wipe the surface with a damp cloth, leaving pigment only in the grooves. -
Seal the clay:
Apply a thin coat of matte varnish or sealant to protect the clay from moisture and give it a finished look.
Step 4: Assembly
-
Cut the twine:
Cut a length of specific jute twine, approximately 24 inches long. Fold it in half to create a loop at the top for hanging, and tie a knot about 2 inches down from the fold. -
Thread the first bead:
Thread a wooden bead onto the double strands of twine and push it up against the knot you just tied. -
Attach the top disc:
Feed the twine ends through the top hole of your first disc. Tie a knot on the backside (or underneath the hole) to secure the disc in place, then feed the twine out through the bottom hole. -
Add spacing beads:
Thread another wooden bead onto the twine. Tie a knot tightly below the bead to hold it in position before adding the next clay piece. -
Connect remaining tiers:
Repeat the process for the second disc: feed through top hole, knot, feed through bottom hole, add a bead, and knot. -
Secure the final piece:
Attach the final disc through its single top hole. Tie a secure double knot behind the disc or create a decorative tassle at the bottom if you have extra string length, though a simple knot behind the clay keeps the look clean.
Hang your new floral art piece in a sunny spot and enjoy the handmade charm it brings to the room