
When I’m crafting with toddlers, I’m always chasing that sweet spot where little hands can squish, roll, and press—and still end up with something they recognize and feel proud to keep. These air dry clay ideas are all about simple shapes, satisfying textures, and adorable results that dry into real little keepsakes.
Handprint Keepsake Plaques
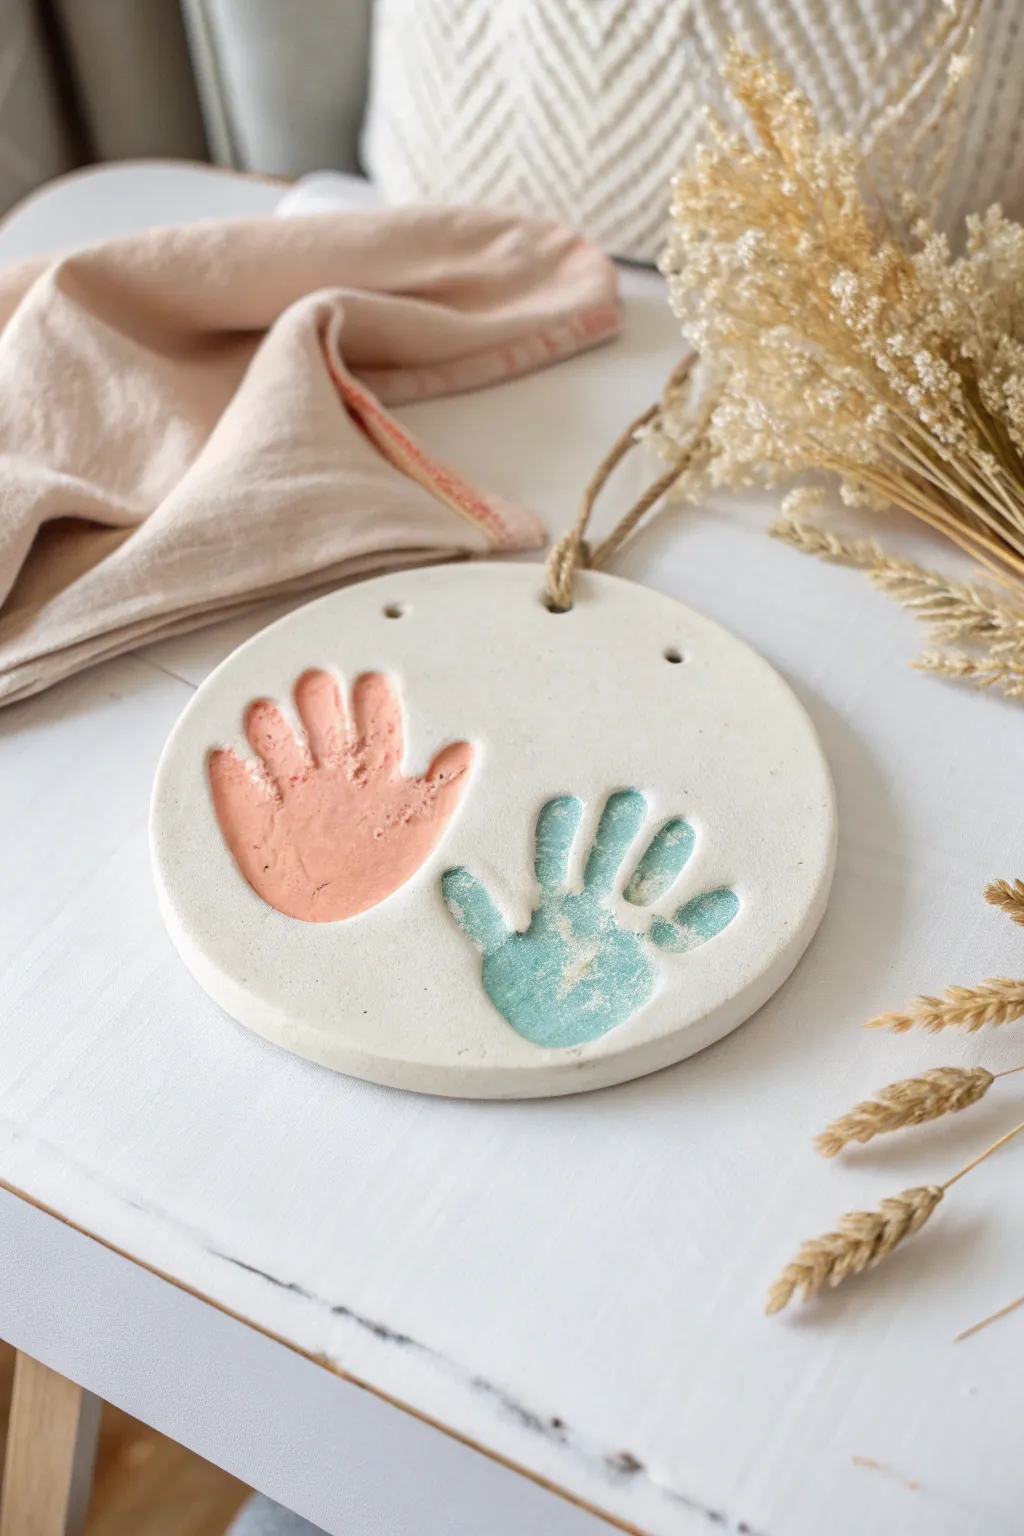
Capture the fleeting moments of childhood with this minimalist and elegant air dry clay plaque. Featuring indented pastel handprints on a clean white round, this project serves as a timeless piece of decor or a heartfelt gift for grandparents.
Step-by-Step Tutorial
Materials
- White smooth air dry clay
- Rolling pin
- Round cookie cutter or bowl (approx. 6-8 inches diameter)
- Parchment paper or craft mat
- Straw or wooden skewer
- Acrylic paints (Soft Peach and Mint Green)
- Small flat paintbrush
- Fine-grit sandpaper
- Natural jute twine
- Clear matte varnish (optional)
Step 1: Preparing the Clay Base
-
Condition the clay:
Start by taking a large chunk of white air dry clay and kneading it in your hands until it becomes soft, pliable, and free of any lumps. -
Roll it out:
Place the clay on a sheet of parchment paper to prevent sticking. Use your rolling pin to flatten the clay into an even slab, aiming for a thickness of about 1/4 to 1/2 inch so it’s sturdy. -
Cut the shape:
Place your large round cookie cutter or an overturned bowl onto the clay. Press down firmly to cut a perfect circle, then peel away the excess clay from the edges. -
Smooth the edges:
Dip your finger in a little bit of water and gently run it along the cut edge of the circle to smooth out any roughness or sharp corners.
Smoother Surfaces
Before printing, lightly mist the clay surface with water and smooth it with a flat tool or spatula. This removes roller marks and creates a porcelain-like finish.
Step 2: Creating the Impressions
-
Position the first hand:
This is where I like to ask for a helper to hold the toddler’s wrist. Gently guide the left hand onto the left side of the clay circle. -
Press firmly:
Press down on the palm and each individual finger to ensure a deep, clear impression. Lift the hand straight ‘up’ to avoid smudging the print. -
Repeat for the second hand:
Clean off any clay residue from the hand, then repeat the process with the right hand on the right side of the circle, angling it slightly upwards for a playful look. -
Add hanging holes:
Use a straw to punch two clean holes near the top edge of the circle. Position them about 2 inches apart to allow the plaque to hang evenly.
Prevent Cracking
If you see tiny cracks forming while drying, smooth a tiny bit of fresh, wet clay paste (slip) into the cracks with your finger immediately to seal them.
Step 3: Drying and Finishing
-
Dry partially:
Let the clay sit on the parchment paper in a cool, dry place for about 24 hours. Avoid direct sunlight which can cause cracking. -
Flip the plaque:
Once the top feels dry to the touch, carefully flip the circle over. This allows the bottom side to dry evenly and prevents warping. -
Sand edges:
After another 24-48 hours when the clay is fully hardened, take fine-grit sandpaper and lightly buff the edges to make them perfectly smooth. -
Prepare the paint:
Dilute a small amount of peach acrylic paint with a drop of water. This creates a wash effect that looks softer than thick paint. -
Paint the first print:
Carefully fill in the indented area of the left handprint with the peach wash. Use a small brush to get into the fingertips without going over the edge onto the white surface. -
Paint the second print:
Clean your brush and switch to the mint green paint. Apply it carefully to the recessed area of the right handprint. -
Let paint dry:
Allow the paint to dry completely. If you want extra durability, you can apply a thin coat of matte varnish over the entire piece now. -
Attach the hanger:
Cut a length of natural jute twine. Thread one end through the left hole and the other through the right hole, going from front to back. -
Knot the twine:
Tie large knots on the back side of the plaque or tie the two ends together in a bow at the top, depending on your preferred hanging style.
Hang your beautiful keepsake on a nursery wall or door handle to enjoy that tiny moment in time forever


Fingerprint Heart Tokens
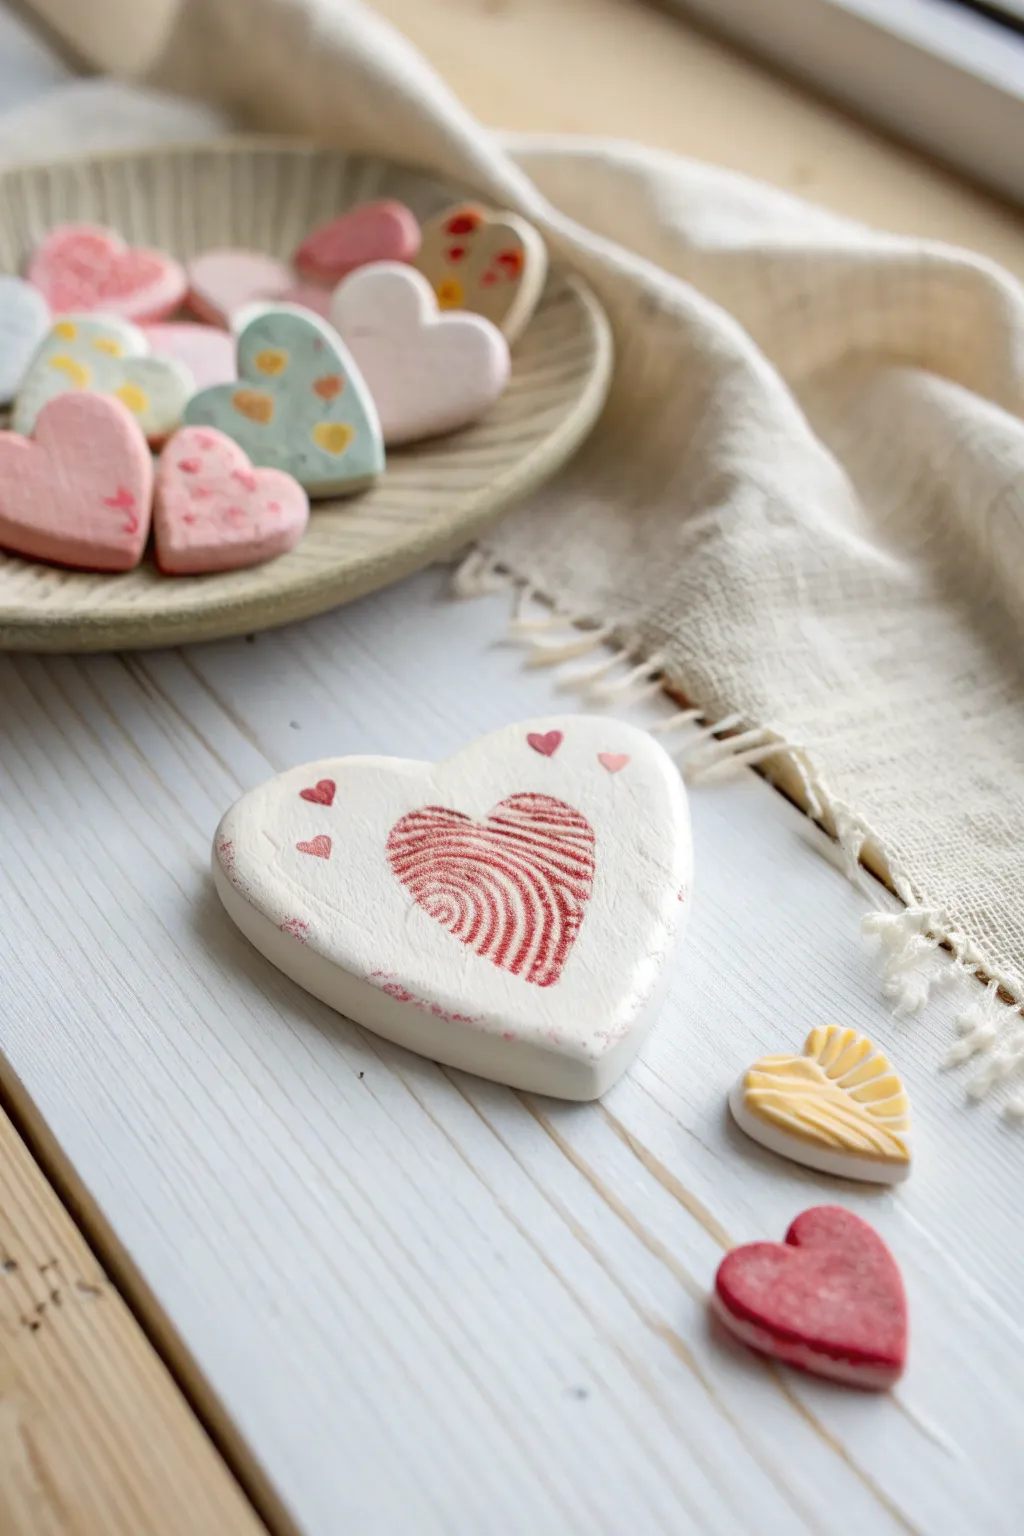
Capture a moment in time with these sweet, personalized heart tokens featuring your little one’s actual fingerprint. The finished pieces have a smooth, ceramic-like look with charming rustic edges, perfect for gifting or keeping as precious mementos.
Detailed Instructions
Materials
- White smooth air-dry clay (e.g., DAS or Crayola)
- Heart-shaped cookie cutters (large and small)
- Rolling pin
- Parchment paper or silicone mat
- Red acrylic paint or red ink pad
- Fine detail paintbrush
- Small sponge or foam dabber
- Sandpaper (fine grit)
- Matte or satin varnish (optional for sealing)
- Cup of water
Step 1: Shaping the Clay Base
-
Prep your surface:
Lay down your parchment paper or silicone mat on a flat, stable table. This prevents the clay from sticking and makes cleanup much easier. -
Condition the clay:
Take a handful of air-dry clay and knead it in your hands for a minute or two until it feels warm and pliable. If it feels a bit dry, I like to dip my finger in water and work it in. -
Roll it out:
Use your rolling pin to flatten the clay into an even slab. Aim for a thickness of about 1/4 inch (6mm)—too thin and it might crack, too thick and it takes forever to dry. -
Cut the shapes:
Press your large heart-shaped cookie cutter firmly into the clay. Give it a tiny wiggle to ensure a clean cut, then lift it away. Repeat with smaller cutters if you want to make the companion pieces shown in the bowl. -
Smooth the edges:
Dip your finger in a little water and gently run it along the cut edges of the clay heart to smooth out any rough bits or jagged clay crumbs.
Step 2: Creating the Fingerprint Heart
-
Position the thumb:
For the central design, you’ll need your toddler’s help. Gently guide their thumb. You aren’t pressing into the clay yet, just visualizing the placement in the center of the heart. -
Apply the color:
Coat your child’s thumb with red acrylic paint using a sponge or brush, or press it onto a red ink pad. Ensure the coverage is even but not gloopy, as thick paint ruins the print detail. -
Print the first half:
Press the painted thumb onto the clay at a 45-degree angle tilting left. Apply firm, even pressure without sliding, then lift straight up. -
Complete the heart:
Re-ink the thumb if needed. Press it down again, this time tilting to the right at a 45-degree angle to overlap the bottom of the first print, creating a ‘V’ shape heart. -
Add floating hearts:
With a very fine brush and a tiny amount of red paint, dab three or four tiny hearts near the top edge of the token to mimic the floating hearts in the image.
Clean Print Secret
Make a practice print on scrap paper first. This removes excess paint and ensures you get crisp ridges rather than a slippery smudge on the final clay piece.
Step 3: Finishing and Painting
-
Let it dry completely:
Place the hearts on a wire rack or leave them on the paper to dry. This usually takes 24-48 hours. Flip them over halfway through so the bottom dries evenly. -
Sand for smoothness:
Once fully hard and white, use fine-grit sandpaper to gently buff the edges and surface. This gives it that professional, polished stone look. -
Create the rustic edge:
Dip a sponge or your fingertip lightly into red paint. Make sure it’s almost dry—blot it on a paper towel first. Gently graze the very edges of the heart to create that distressed, speckled border. -
Paint companion hearts:
If you made smaller confetti hearts, paint them now. For striped ones like the yellow heart, paint a base coat first, let dry, and use a detail brush for the white lines. -
Seal the deal:
To protect the print and paint, apply a thin coat of matte or satin varnish over the entire piece. This keeps the colors vibrant and prevents smudging.
Turn It into Decor
Before drying, use a straw or toothpick to poke a small hole near the top. Once dry, thread ribbon through to make an ornament or gift tag.
Now you have a timeless little keepsake preserved in clay to cherish for years to come


Roll-and-Squish Animal Faces
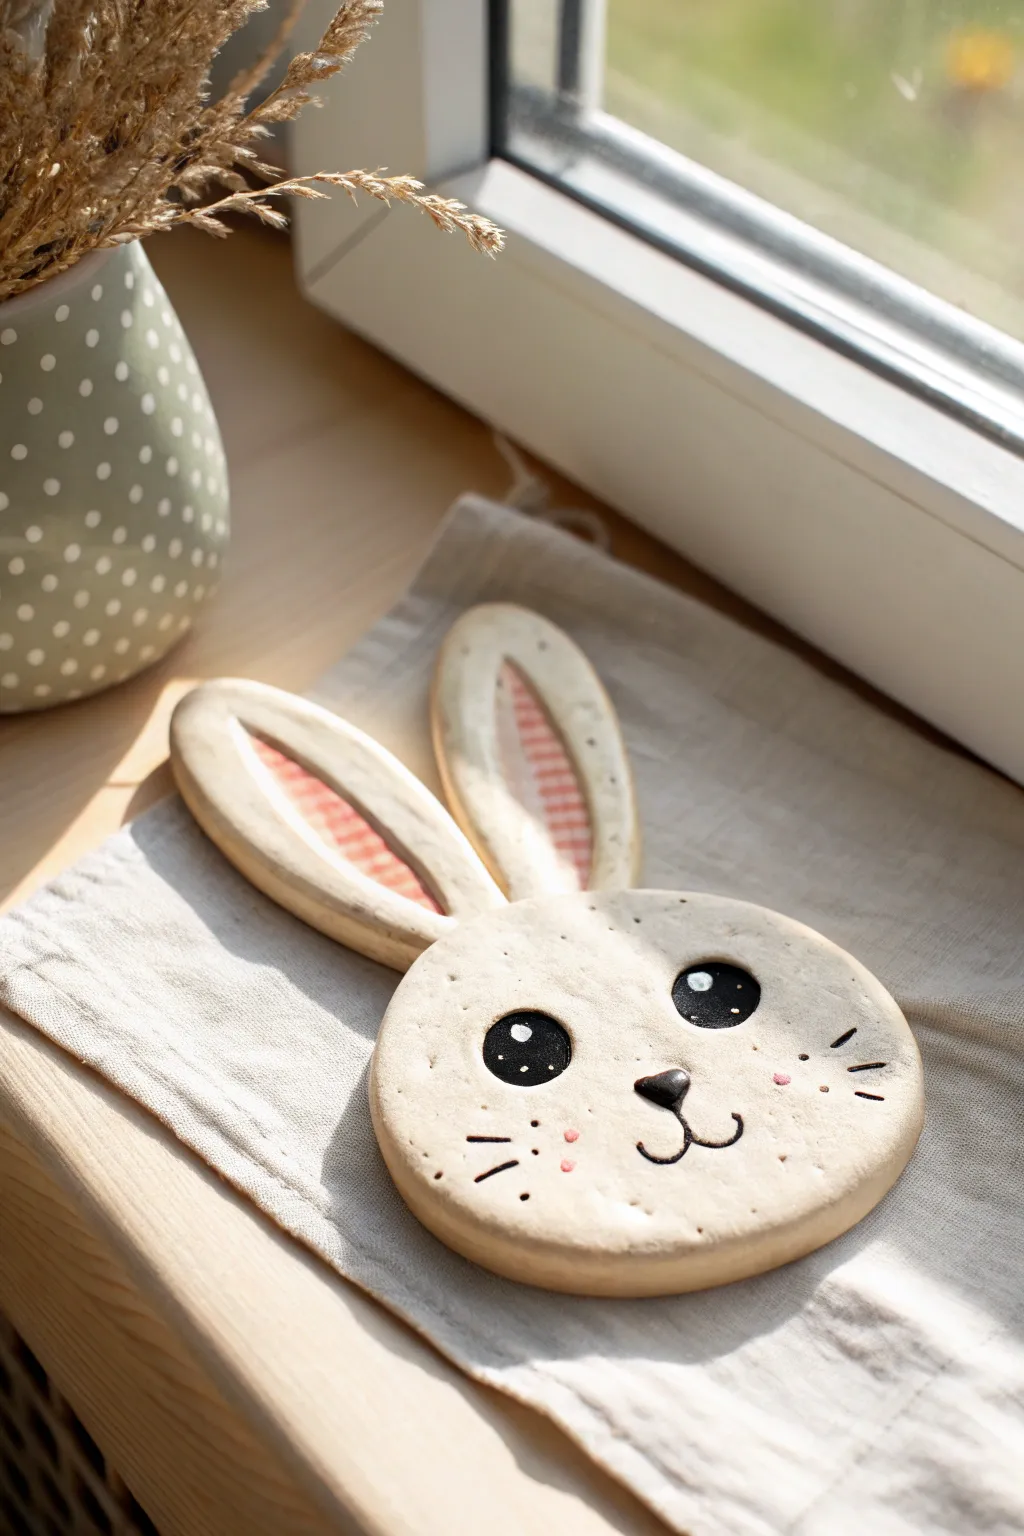
This charming bunny face is a simple yet delightful project perfect for capturing a whimsical mood. With its smooth, round face and playful fabric-lined ears, it makes for an adorable decoration for a nursery or play area.
Step-by-Step Guide
Materials
- White air-dry clay (approximately 500g)
- Rolling pin
- Circle cutter or a round bowl (approx. 4-5 inches diameter)
- Knife or clay cutting tool
- Water in a small cup
- Sandpaper (fine grit)
- Acrylic paints (black, white, pink)
- Clear varnish or sealant (matte or satin)
- Small paintbrush
- Thin detail brush
- Fabric scraps (gingham or patterned)
- Craft glue or strong adhesive
Step 1: Shaping the Clay Base
-
Prepare the workspace:
Lay down a smooth mat or parchment paper to prevent the clay from sticking. Knead a large ball of white air-dry clay until it feels soft and pliable. -
Roll the face:
Take the main portion of the clay and roll it out into a flat sheet, aiming for a thickness of about 1/4 inch (6mm). This thickness ensures durability without being too heavy. -
Cut the circle:
Using a large circle cutter or pressing down with a round bowl, cut out the main head shape. Remove the excess clay and smooth the curved edges with a wet finger. -
Form the ears:
Roll out another piece of clay to the same thickness. Use a knife to freehand cut two long, oblong ear shapes. They should point slightly inward at the bottom to attach naturally to the head. -
Create inner ear indentations:
Lightly press your thumb or a modeling tool into the center of each ear to create a shallow depression. This recessed area is where the decorated fabric will sit later. -
Attach the ears:
Score (scratch) the top edge of the head and the bottom edge of the ears. Apply a dab of water or slip to the scored areas and press the ears firmly against the back top edge of the circle. -
Smoothing the joins:
Turn the piece over carefully and use a modeling tool or your finger to smooth the clay where the ears meet the head, ensuring a seamless and strong bond.
Step 2: Drying and Refining
-
Initial drying:
Place the bunny on a flat drying rack or a towel. Let it sit undisturbed for at least 24 hours. Flip it occasionally to ensure both sides dry evenly and prevent warping. -
Checking for dryness:
The clay should look chalky white and feel room temperature (not cold) when fully dry. Depending on humidity, this might take up to 48 hours. -
Sanding imperfections:
Once fully cured, take a piece of fine-grit sandpaper and gently buff the surface and edges. Focus on smoothing out any fingerprints or rough spots on the curve of the face.
Smooth Operator
Keep a small bowl of water nearby while shaping. Dip your finger in and run it along cut edges to create a professional, porcelain-smooth finish before drying.
Step 3: Painting and Finishing Details
-
Sketch the face:
Lightly sketch the position of the eyes, nose, and mouth with a pencil. Aim for wide-set eyes to give the bunny a sweet, innocent expression. -
Paint the eyes:
Using black acrylic paint and a small round brush, fill in two large oval eyes. I find it helpful to rotate the piece as I paint to keep the curves smooth. -
Add eye details:
Once the black is dry, use a detail brush or a toothpick to add two small white dots to each eye—a larger one at the top and a tiny speck below—to create a lively sparkle. -
Paint the nose and mouth:
Paint a small, inverted triangle for the nose in black. extends a thin line downward, curving out to the left and right to form the classic bunny smile. -
Add whiskers and cheeks:
Use the very tip of your finest brush to flick three short whisker lines on each cheek. Then, tap on three tiny pink dots on either side of the smile for blush spots. -
Seal the piece:
Apply a coat of clear matte or satin varnish over the entire clay surface. This protects the paint and gives the clay a lovely finished sheen. -
Prepare the fabric inserts:
Trace the shape of the inner ear indentation onto a piece of paper to make a template. Cut this shape out of your pink gingham or patterned fabric. -
Attach the fabric:
Apply a thin layer of craft glue into the recessed areas of the ears. Carefully press the fabric shapes into place, smoothing out any bubbles or wrinkles.
Make it Hangable
Poke two holes near the top of the head before drying to thread a ribbon through later, or glue a sawtooth hanger on the back once fully dry.
Hang your cheerful bunny near a window or on a wall to bring a smile to anyone who sees it


Ladybug Magnets From Clay Discs
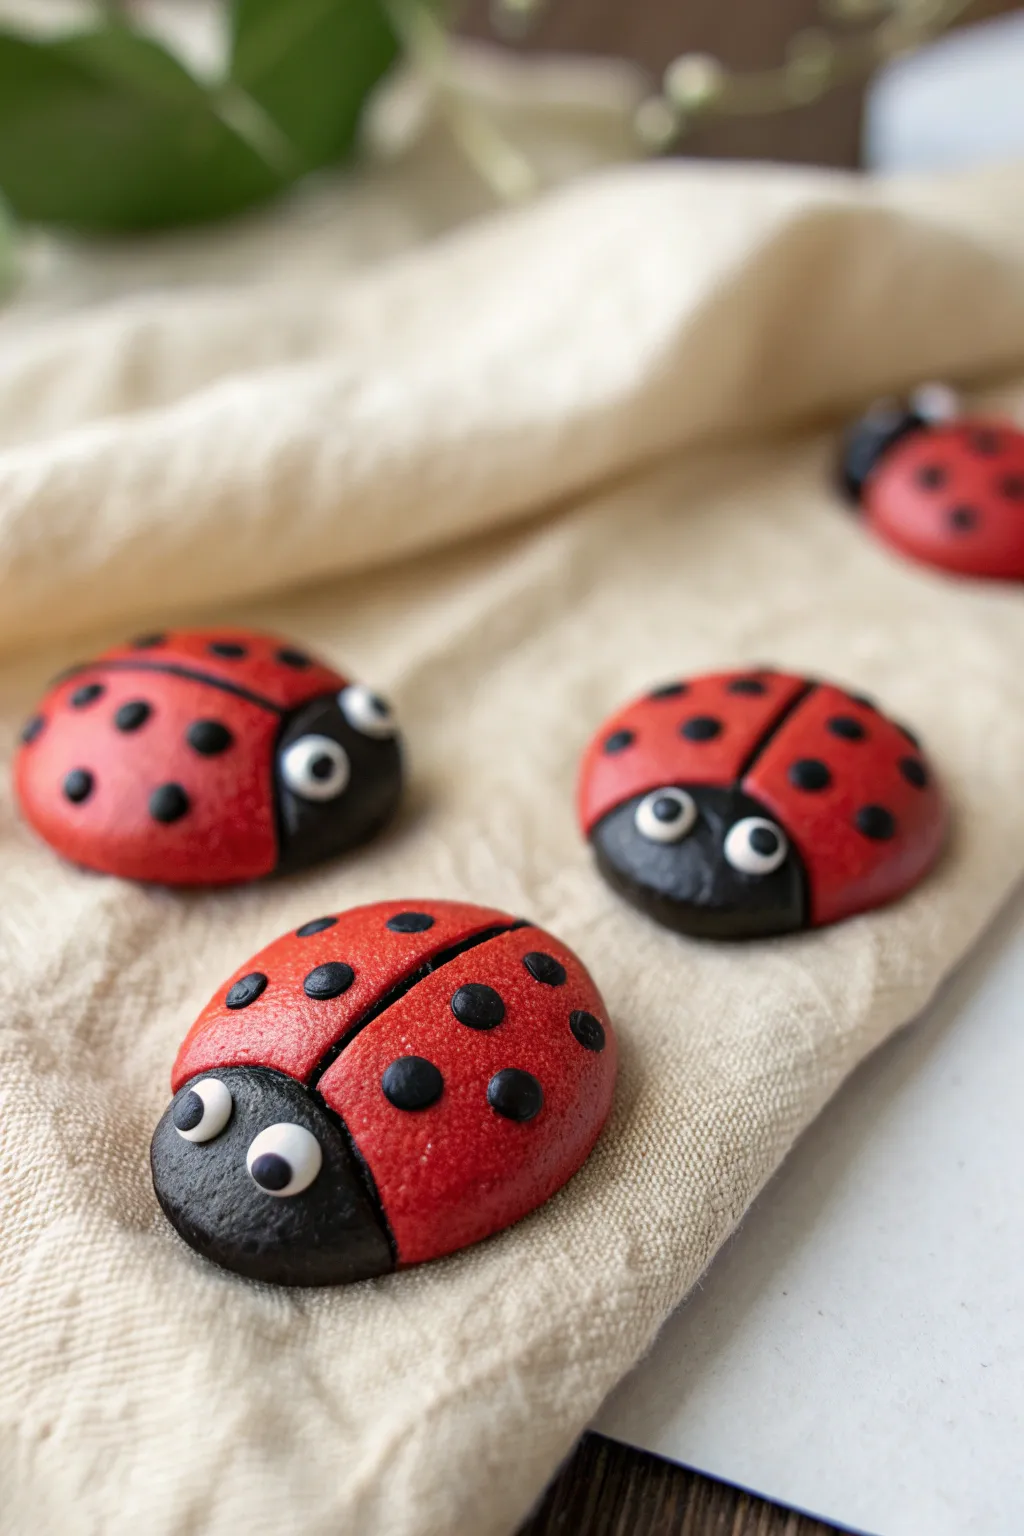
Transform simple clay discs into adorable, three-dimensional ladybugs with a few easy shaping techniques. These vibrant red and black insects have a smooth, puffy finish that makes them perfect for brightening up any refrigerator door.
Step-by-Step Tutorial
Materials
- Air dry clay (white)
- Acrylic paint (bright red, black, white)
- Paintbrushes (small detail brush and medium flat brush)
- Modeling tool or butter knife
- Small round magnets
- Strong craft glue (like E6000 or tacky glue)
- Clear acrylic sealant (glossy, optional)
- Parchment paper or non-stick mat
Step 1: Shaping the Clay Base
-
Roll the main body:
Start by taking a piece of white air dry clay about the size of a walnut. Roll it between your palms until it forms a smooth, crack-free sphere. -
Flatten into a dome:
Place the sphere on your non-stick surface and gently press down with your palm. You want to create a thick, rounded dome shape rather than a flat pancake, keeping the top nice and puffy. -
Create the head section:
Pinch off a much smaller piece of clay, roughly the size of a marble. Roll this into a ball and then slightly flatten it to match the height of your body dome. -
Attach the head:
Score the side of the body and the back of the head piece with a modeling tool to roughen the surfaces. Add a tiny dab of water and press the two pieces firmly together so they fuse into one solid shape. -
Indent the wings:
Use a modeling tool or the back of a butter knife to gently press a straight line down the center of the large red body section. This indentation separates the wings but shouldn’t cut all the way through the clay.
Step 2: Adding Details
-
Make the eyes:
Roll two tiny specks of clay into balls for the eyes. Prepare the head area with a tiny bit of water and press these small white spheres onto the face, flattening them slightly. -
Create the spots:
For the signature dots, roll several very small balls of clay. Press these flat onto the back of the ladybug’s body in a random pattern. I find pressing them down gently helps them look integrated rather than just stuck on top. -
Shape the pupils:
If you want 3D pupils, add microscopic dots of clay to the center of the white eye circles, or simply wait to paint them later for a smoother look. -
Allow to dry:
Set your ladybugs aside on parchment paper to dry completely. Depending on the thickness and your local humidity, this usually takes 24 to 48 hours. Turn them over halfway through to ensure the bottom dries evenly.
Cracked Clay?
If small cracks appear while the ladybug is drying, mix a tiny amount of fresh clay with water to make a paste and smooth it into the cracks with your finger.
Step 3: Painting and Finishing
-
Paint the body red:
Once fully hard, use a medium brush to paint the main body section a bright, vibrant red. Avoid painting over the raised dots or the head section. -
Paint the head black:
Switch to a smaller brush and carefully paint the head section black. Be steady around the white eye circles to keep them clean. -
Fill in the spots:
Paint the raised clay dots on the back with black paint. If you didn’t make clay dots earlier, you can simply paint black circles directly onto the red surface now. -
Detail the eyes:
Paint the eye circles white if they got smudged. Use the handle end of a paintbrush dipped in black paint to stamp a perfect pupil dot onto each eye. -
Define the wing line:
If paint has filled in your center groove, carefully run a very thin line of black paint or a black marker down that central indentation to define the wings clearly. -
Apply varnish:
To get that shiny, beetle-shell look shown in the image, apply a coat of glossy acrylic sealant or Mod Podge over the entire top surface once the paint is dry. -
Attach the magnet:
Flip the dried ladybug over. Apply a generous dollop of strong craft glue to the flat underside and press your magnet into the center. Let it cure completely before sticking it to the fridge.
Glitter Wings
Mix fine red glitter into your glossy topcoat before applying it to the wings. The ladybug will have a sparkling, magical shell perfect for fairy gardens.
Check on your little beetles once the glue is dry and arrange them in a cheerful group

The Complete Guide to Pottery Troubleshooting
Uncover the most common ceramic mistakes—from cracking clay to failed glazes—and learn how to fix them fast.
Cookie-Cutter Stars and Hearts Ornaments
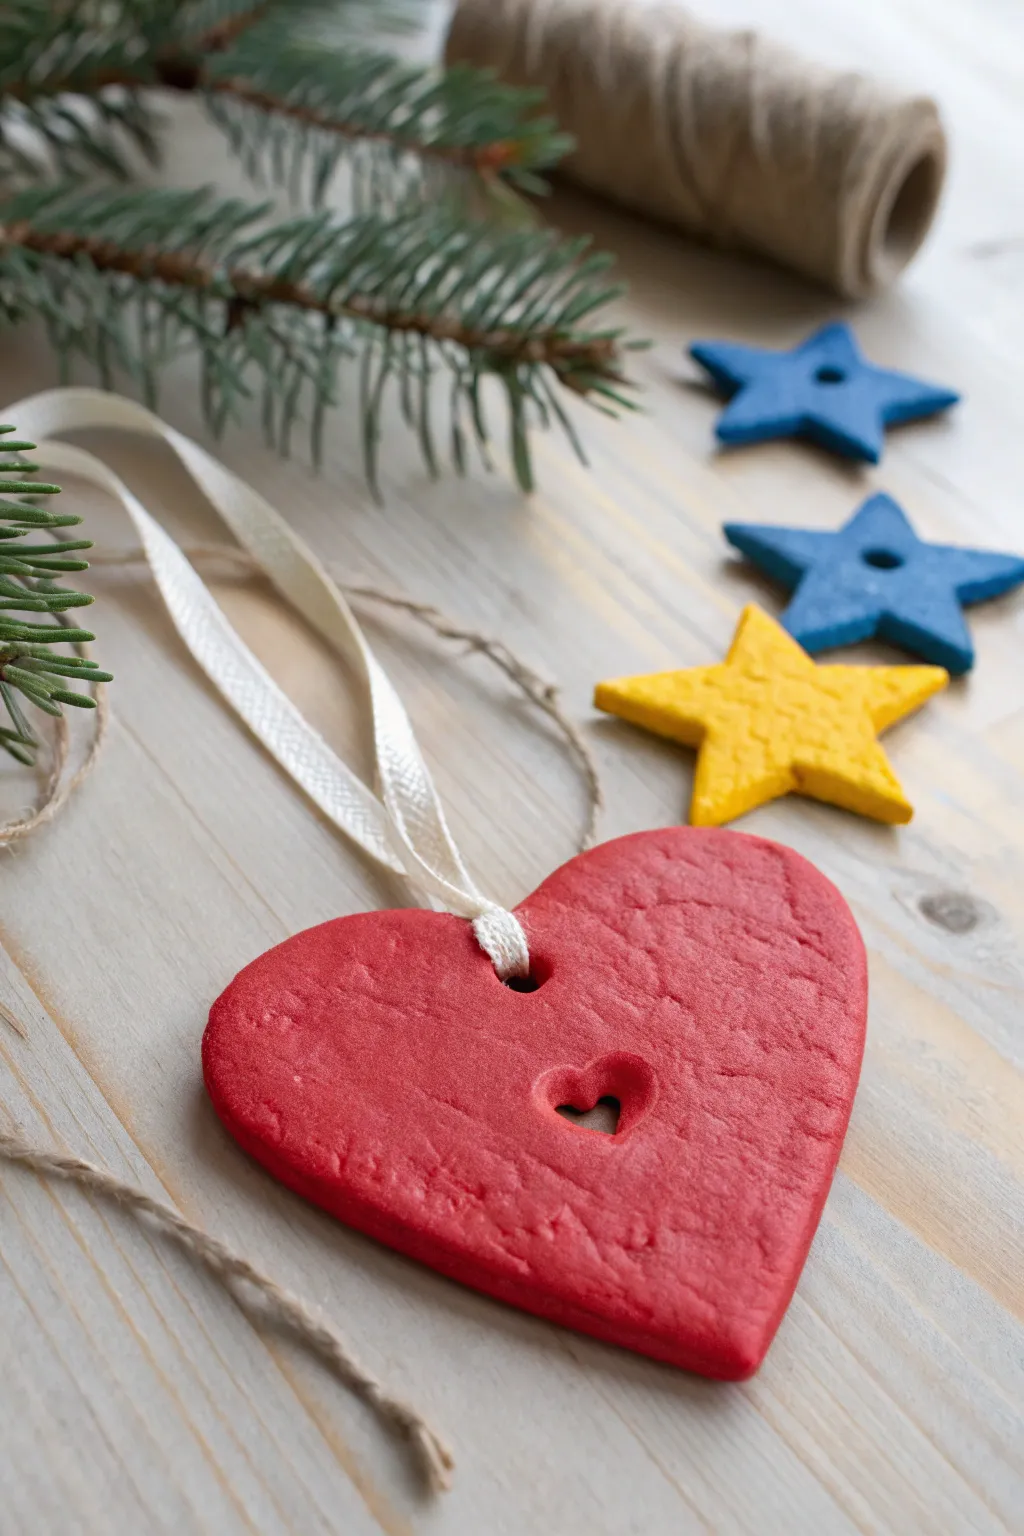
These charming, rustic ornaments double as oversized buttons and are perfect for little hands to master. With their cozy matte finish and simple shapes, they make wonderful holiday decorations or heartfelt gift tags.
Detailed Instructions
Materials
- Air-dry clay (white)
- Acrylic paints (red, yellow, blue, turquoise)
- Heart and star cookie cutters
- Rolling pin
- Parchment paper or craft mat
- Drinking straw or skewer
- Small heart-shaped cutter or knife (for the button detail)
- Fine-grit sandpaper
- Paintbrushes
- White ribbon (satin or grosgrain)
- Jute twine (optional)
Step 1: Shaping the Clay
-
Prepare the workspace:
Lay down parchment paper or a craft mat to prevent sticking. Take a ball of air-dry clay and knead it briefly until it is pliable and smooth. -
Roll out the clay:
Using a rolling pin, flatten the clay to an even thickness of about 1/4 inch. Avoid making it too thin, as the ornaments need to handle a bit of wear. -
Cut the main shapes:
Press your heart and star cookie cutters firmly into the clay. Wiggle them slightly to ensure a clean cut before lifting them away. -
Create the hanging holes:
Use a drinking straw to punch a neat, round hole near the top of each shape. This is where your ribbon will eventually go. -
Add the heart detail:
For the large heart ornament, use a tiny heart-shaped cutter or a sharp tool to create a second, smaller hole slightly below the center. This mimics a button hole. -
Smooth the edges:
Dip your finger in a little bit of water and gently run it along the cut edges of each shape to smooth out any roughness or stray bits of clay.
Fixing Cracks
If small cracks appear while drying, don’t panic. Mix a tiny bit of fresh clay with water to make a paste and smooth it into the crack like spackle.
Step 2: Drying and Refining
-
Let them dry:
Place the shapes on a flat surface to air dry. This typically takes 24 to 48 hours depending on humidity. Flip them halfway through to ensure even drying. -
Check for hardness:
The clay should turn a bright white and feel hard to the touch when fully dry. Don’t rush this stage or the paint might crack later. -
Sand the surface:
Once fully dry, take a piece of fine-grit sandpaper and lightly buff the surface and edges. This gives that professional, smooth stone-like finish seen in the photo. -
Clean off dust:
Wipe the ornaments with a dry cloth or a soft brush to remove any clay dust left over from sanding.
Step 3: Painting and Finishing
-
Paint the base coats:
Paint the large heart a vibrant red. Paint the stars in primary yellow, royal blue, and a lighter turquoise blue. -
Apply second coat:
Air-dry clay absorbs moisture, so the first coat might look streaky. Apply a second coat for the opaque, bold color coverage shown in the example. -
Let paint cure:
Allow the paint to dry completely. A matte finish looks best for this project, so no glossy sealer is needed unless you want extra protection. -
Thread the ribbon:
Fold a length of thin white satin ribbon in half. Push the folded loop through the top round hole of the red heart. -
Secure the loop:
Pull the loose ends of the ribbon through the loop and tighten gently to create a cow hitch knot. -
Thread the stars:
Use jute twine or simpler stringing methods for the stars if you plan to string them together as a garland.
Level Up
Before the clay dries, press a piece of lace or a textured fabric into the surface to create a subtle, embossed pattern under the paint.
Now you have a collection of colorful keepsakes ready to brighten up your home
Nature-Print Medallions
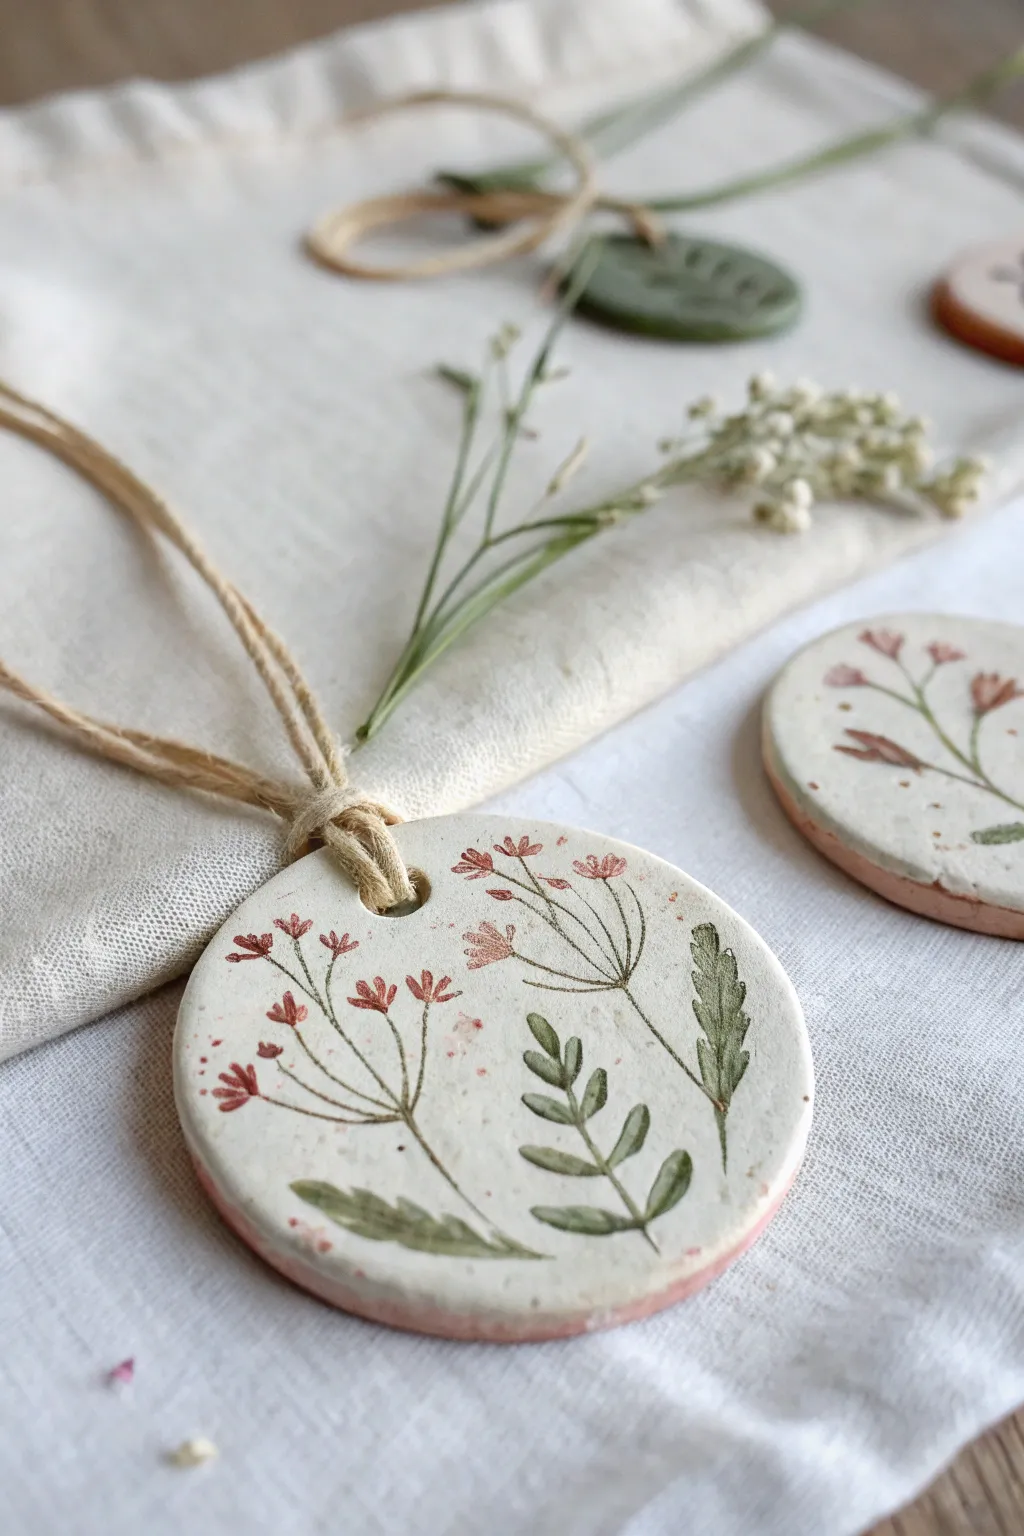
Capture the delicate beauty of nature with these charming clay keepsakes, perfect for little hands to help create. By pressing fresh blooms into air-dry clay and highlighting the details with soft watercolors, you’ll craft a timeless decoration that brings the outdoors inside.
Step-by-Step Guide
Materials
- White creative paperclay or smooth air-dry clay
- Rolling pin
- Circle cookie cutter (approx. 3-4 inches diameter)
- Straw or skewer (for making hanging holes)
- Fresh wildflowers, herbs, or small leaves (fern, baby’s breath, etc.)
- Fine grit sandpaper
- Watercolor paints (muted greens, reddish-pinks)
- Small fine-tipped paintbrush
- Jute twine or rustic string
- Wax paper or parchment paper
- Small cup of water
Step 1: Preparing the Clay Base
-
Condition the clay:
Take a handful of air-dry clay and knead it in your hands until it becomes soft, pliable, and free of cracks. If it feels too dry, dip your fingers in water and work it in slightly. -
Roll it out:
Place the clay on a sheet of parchment paper. Use a rolling pin to flatten the clay to an even thickness of about 1/4 inch. Try to keep the surface as smooth as possible. -
Cut the shape:
Press your circle cookie cutter firmly into the clay. Give it a tiny wiggle to separate it from the excess clay, then lift the cutter. Carefully peel away the scrap clay around the circle. -
Smooth the edges:
Dip your finger in a little water and gently run it around the circumference of the clay circle to smooth out any rough edges left by the cutter.
Step 2: Creating the Botanical Impression
-
Arrange your botanicals:
Select your flowers and leaves. Lay them gently on top of the cut clay circle in a pleasing arrangement. You might want a central stem with smaller leaves radiating out, mimicking a growing plant. -
Press designs:
Once you are happy with the placement, use the rolling pin to gently but firmly roll over the plants once. This presses them into the clay surface. Alternatively, you can use your fingers to press each stem and petal down to ensure a deep impression. -
Remove the plants:
Carefully use a pair of tweezers or a pin to lift the plant material out of the clay. Pull slowly to avoid tearing the delicate edges of the impression. -
Add a hanging hole:
Use a straw or a skewer to punch a clean hole near the top edge of the medallion. Make sure it isn’t too close to the edge, or the clay might break later. -
Dry thoroughly:
Set the clay medallion aside on a flat surface to dry completely. This usually takes 24-48 hours depending on humidity. Flip it over halfway through the drying process to prevent curling.
Cracks while rolling?
If jagged edges appear while rolling, your clay is too dry. Dip your fingertips in water and massage the cracks smooth before cutting your shape.
Step 3: Painting and Finishing
-
Sand imperfections:
Once bone dry, lightly check the edges. If there are any sharp spots or roughness, gently buff them away with fine-grit sandpaper. -
Mix your colors:
Prepare your watercolors. You want a watery consistency to let the texture of the clay show through. Mix a muted olive green for leaves and a soft terracotta or berry pink for the flowers. -
Paint the stems:
Using your smallest fine-tip brush, carefully paint into the impressed lines of the stems. I find it easiest to start from the bottom and pull the brush upward along the groove. -
Fill the leaves:
Paint the leaf impressions with your green mix. You don’t need to be perfectly inside the lines; a slightly loose style adds to the rustic charm. -
Add floral details:
Dab the pinkish-red paint into the flower impressions. If you want a speckled effect like the image, flick the bristles of your brush slightly to add tiny dots of color around the blooms. -
Detail the rim (optional):
For a cohesive look, run a very sheer wash of the pink color along the very outer rim of the circle. -
Seal (optional):
If you want the ornament to be more durable, you can apply a matte spray varnish or Mod Podge once the paint is fully dry, though unsealed clay has a lovely matte finish. -
Add the hanger:
Cut a length of jute twine. Fold it in half, push the loop through the hole, and pull the ends through the loop to create a secure lark’s head knot.
Use fresh plants
Use fresh, turgid plants rather than dried ones. Dried flowers tend to crumble into the clay and are difficult to remove cleanly.
Hang your beautiful nature medallion in a sunny window or use it as a special gift tag for a loved one


What Really Happens Inside the Kiln
Learn how time and temperature work together inside the kiln to transform clay into durable ceramic.
Texture Tiles With Lace and Dots
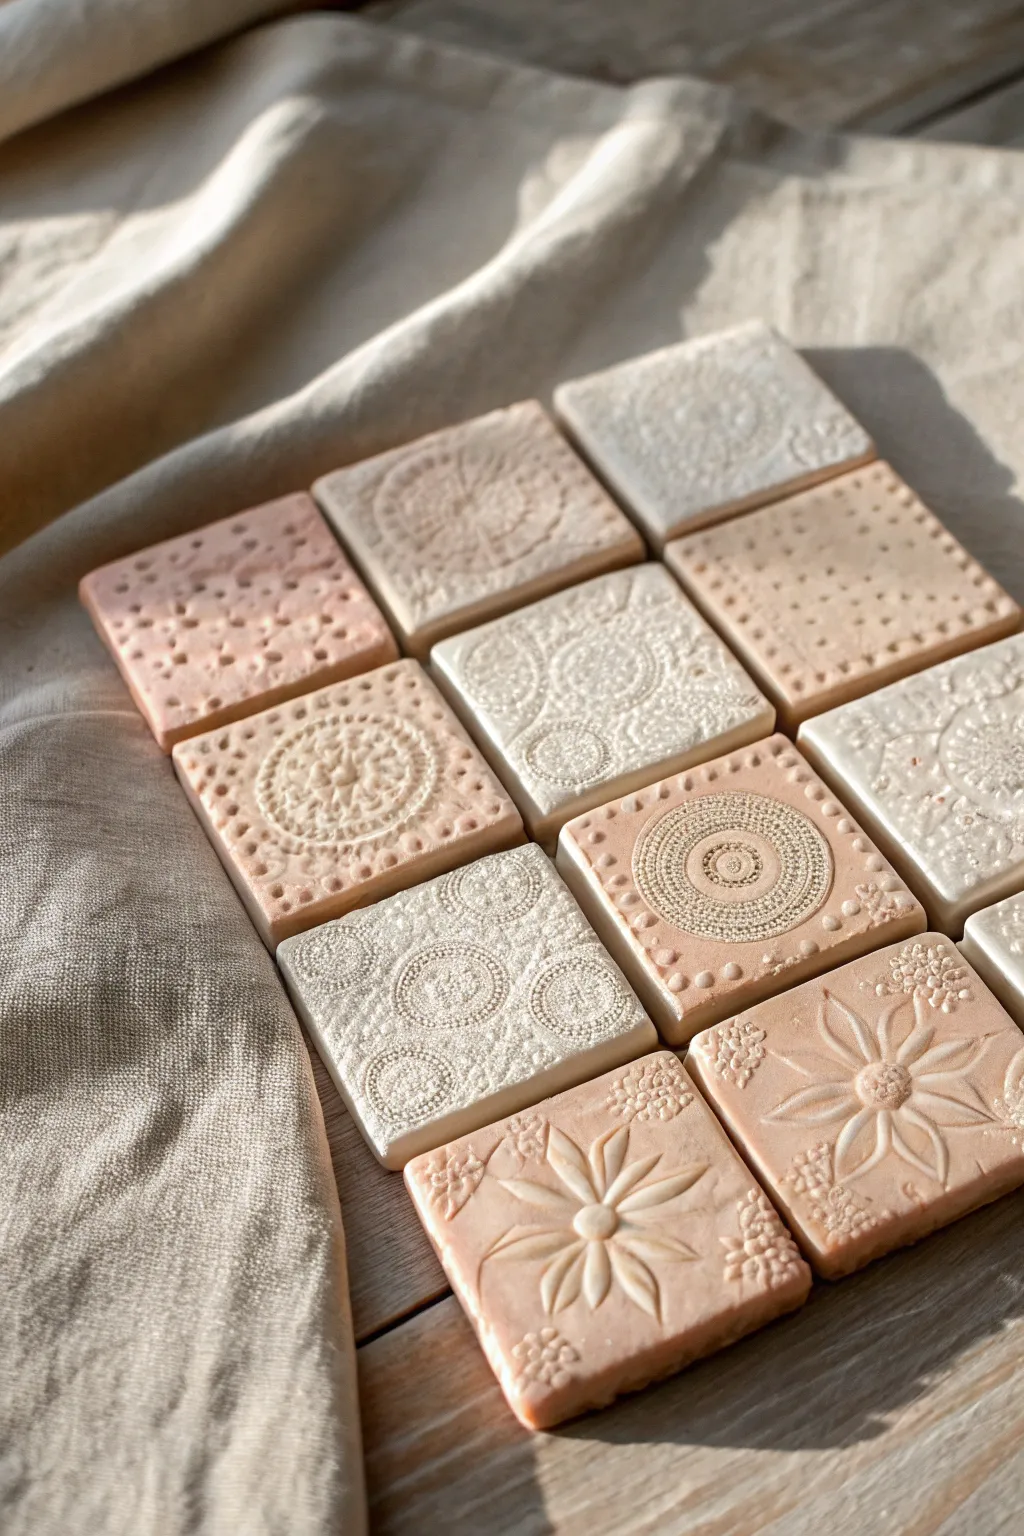
Create a stunning tactile library with these elegant, square-cut tiles featuring intricate lace patterns and playful dot relief. The soft coral and cream palette highlights the delicate impressions, making this project perfect for sensory play or beautiful nursery decor.
Step-by-Step Tutorial
Materials
- White air dry clay
- Peach or coral tempera paint (optional, for tinting)
- Square cookie cutter (approx. 3-4 inches)
- Rolling pin
- Parchment paper or canvas mat
- Scrap pieces of lace, doilies, or textured fabric
- Skewers, chopsticks, or knitting needles (for dotting)
- Plastic stamps or floral buttons (optional)
- Sandpaper (fine grit)
Step 1: Preparing the Clay Base
-
Prepare your workspace:
Lay down a sheet of parchment paper or a canvas mat to prevent sticking. This also makes it easier to move the tiles later without warping them. -
Tint the clay:
If you want the coral-colored tiles shown in the image, mix a small drop of peach or coral paint into a ball of white clay. Knead it thoroughly until the color is uniform and streak-free. Keep some clay pure white for contrast. -
Roll out the slab:
Take a portion of clay and roll it out to a consistent thickness, roughly 1/4 to 1/2 inch thick. Try not to go too thin, or the tiles might curl when drying. -
Cut the shapes:
Using your square cookie cutter, press firmly into the rolled slab to create clean, uniform squares. I like to cut more than I need just in case a few get squished during the texturing phase. -
Smooth the edges:
Dip your finger in a tiny bit of water and run it gently along the cut edges of each square to soften any sharp ridges or loose bits of clay.
Clay Curling Up?
If corners lift while drying, gently weigh them down with a heavy book over a paper towel. Flip tiles frequently during drying to keep moisture levels even.
Step 2: Creating Textures
-
Lace impressions:
For the lace tiles, lay a piece of scrap lace or a doily directly onto the wet clay square. Gently roll over it once with your rolling pin to press the pattern deep into the surface. -
Peel and reveal:
Carefully lift the lace corner and peel it back to reveal the intricate imprint. If the impression is too faint, lay the lace back down and press harder with your fingers. -
The dotting technique:
To create the dotted tiles, use the blunt end of a skewer or a chopstick. Press straight down into the clay to create rows of indentations. You can make geometric grids or random scatter patterns. -
Using stamps:
For the floral and mandala designs, center a large stamp or a textured button in the middle of a square and press firmly ensuring even pressure on all sides. -
Floral relief method:
For the raised flower design, you can press a 3D floral mold into the clay, or hand-sculpt petals by flattening small balls of clay and arranging them on top of the tile, blending the seams underneath.
Make Them Hangable
Poke a neat hole in the top center of each square with a straw before drying. Thread with twine or ribbon to create texture ornaments.
Step 3: Finishing Touches
-
Final inspection:
Check your tiles for any fingerprints or accidental marks. Smooth them out gently with water before the drying process begins. -
Begin drying:
Place the tiles on a flat surface, like a wire cooling rack covered with parchment, to allow airflow underneath. This helps prevent warping. -
Flip halfway:
Let the tiles dry for 24 hours, then flip them over. This ensures the bottom side dries at the same rate as the top. -
Full cure time:
Allow another 24-48 hours for the tiles to harden completely. The clay will turn opaque and feel lighter when fully dry. -
Sanding edges:
Once fully cured, take a piece of fine-grit sandpaper and lightly buff the edges or corners if they feel too sharp or rough. -
Arranging your set:
Group your finished tiles by mixing the textures and colors to verify you have a balanced collection ready for display or play.
Once dry, these beautiful tiles create a soothing sensory experience for little hands to explore
Dino Toy Fossil Discs
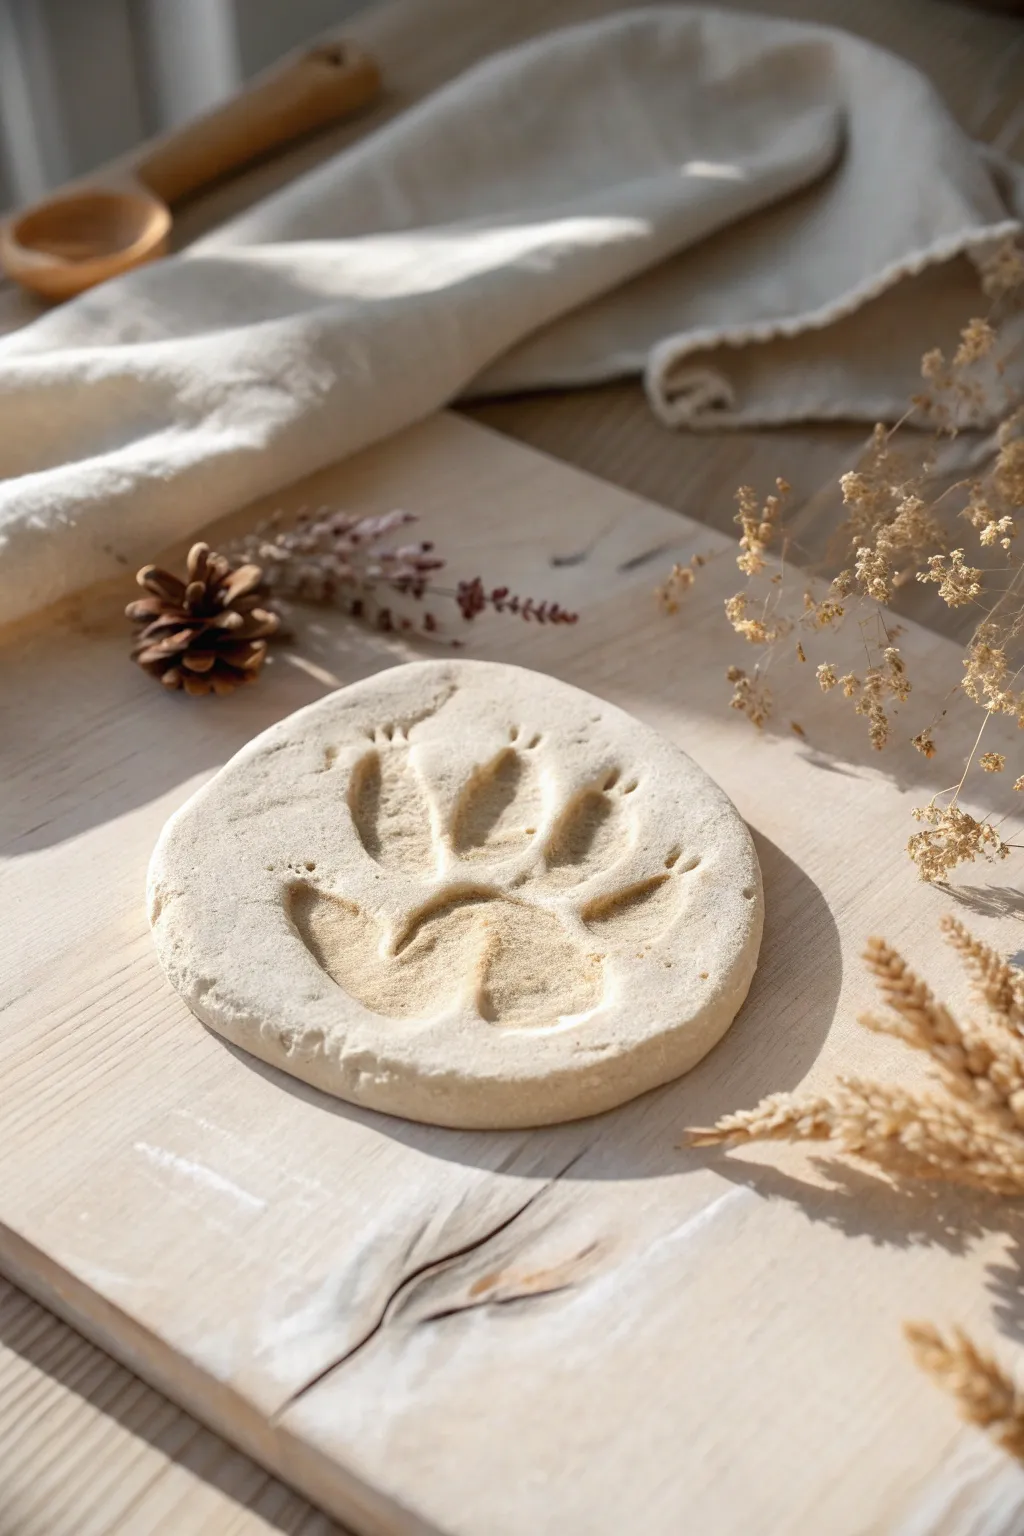
Capture the magic of the wild with these realistic faux-fossil discs that look like they were just discovered on a nature hike. The soft, textured finish gives them an authentic stone-like quality perfect for little explorers to create and display.
Step-by-Step Guide
Materials
- White or cream air dry clay (Crayola Air Dry or DAS can work well)
- Parchment paper or craft mat
- Rolling pin
- Circle cookie cutter (approx. 4 inches) or a bowl to trace
- Toy animal figurine with distinct feet (bear, dinosaur, or large cat)
- Small sponge or crumpled textured cloth
- Brown watercolor paint or diluted acrylic paint (optional for aging)
- Small paintbrush
- Fine grit sandpaper (optional)
Step 1: Shaping the Base
-
Prepare the workspace:
Lay down a sheet of parchment paper on a flat surface to prevent sticking. This makes it much easier to move your fossil later without warping the shape. -
Condition the clay:
Take a handful of air dry clay, roughly the size of a tennis ball. Knead it in your hands for a minute until it feels warm, pliable, and free of any hard lumps. -
Create a ball:
Roll the clay between your palms or against the table until you have a smooth, round sphere. -
Flatten the clay:
Place the ball in the center of your parchment paper. Using the heel of your hand, gently press straight down to begin flattening it into a thick pancake. -
Roll to thickness:
Use a rolling pin to smooth the surface further. You want a consistent thickness of about 1/2 inch (1.2 cm)—too thin and the print won’t be deep enough; too thick and it takes forever to dry. -
Cut the circle:
Press your circle cutter or inverted bowl firmly into the clay to create a perfect round shape. Peel away the excess clay from the outside and return it to your storage bag. -
Soften the edges:
Dip your finger in a tiny bit of water and run it along the cut edge of the circle. This smooths out the sharp cut line and gives it a more organic, weathered stone look. -
Add surface texture:
Take a dry sponge or a crumpled paper towel and very lightly tap it all over the top surface. This removes the ‘manufactured’ smoothness and adds a subtle, rocky grain.
Step 2: Creating the Impression
-
Select your subject:
Choose a plastic toy animal with well-defined feet. For the look in the photo, a creature with claws, like a bear or dinosaur, works best. -
Position the print:
Center the toy’s foot over the clay disc. If you want it to look like a walking trail, you can offset it slightly, but a centered print usually looks most like a museum specimen. -
Press firmly:
Push the toy’s foot straight down into the clay. Apply firm, even pressure. Make sure the ‘toes’ and the main pad sink in deep enough to catch shadows. -
Rock gently:
Without lifting the foot, gently rock the toy forward and backward just a millimeter or two. This ensures the claws leave a distinct impression and the heel is fully defined. -
Remove carefully:
Pull the toy straight up to avoid smudging the edges of the print. If the clay pulls up slightly, just tap it back down gently. -
Refine the details:
If the claws didn’t imprint deeply enough, you can use a sculpting tool or just the tip of a pencil to manually deepen those specific little holes for better definition.
Cracking Up?
If you see hairline cracks forming while drying, mix a tiny bit of fresh clay with water to make a paste (slip) and smooth it into the cracks with your finger.
Step 3: Finishing Touches
-
Initial Drying:
Let the disc sit undisturbed in a cool, dry place for at least 24 hours. Flip it over gently halfway through so the bottom dries evenly. -
Sand imperfections:
Once fully bone-dry, use fine-grit sandpaper to lightly buff the outer rim if it feels too sharp or jagged. -
Add an ‘aged’ wash (Optional):
Mix a tiny drop of brown paint with a lot of water to create a tea-like wash. Paint this inside the footprint indentation only. -
Wipe back:
Immediately wipe the surface with a paper towel. The dark color will stay in the deep crevices of the print, making the fossil pop, while the top surface remains pale.
Pro Tip: Release Agent
If the toy sticks to the clay, lightly dust the animal’s foot involves cornstarch or baby powder before pressing it down. It acts as a release agent for a clean print.
Now you have a timeless keepsake that captures a moment of prehistoric imagination