There’s something so satisfying about turning a classic game into a cute little handmade object you can actually use. These air dry clay tic tac toe ideas are all about reimagining the board and pieces so they’re playful, giftable, and totally display-worthy.
Classic Grid Board With X and O Tokens
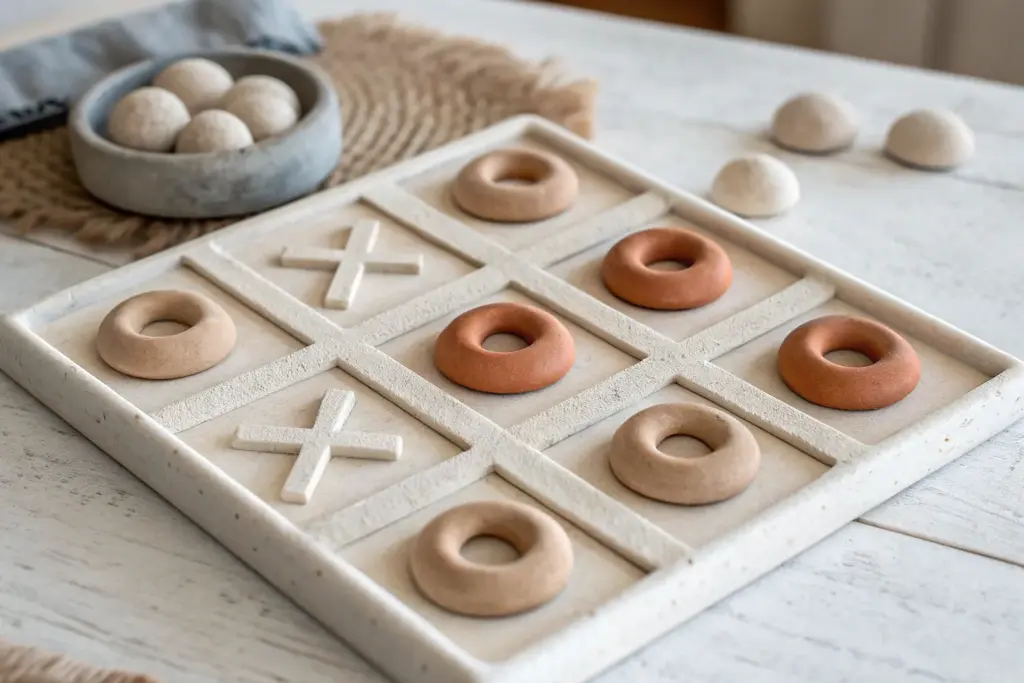
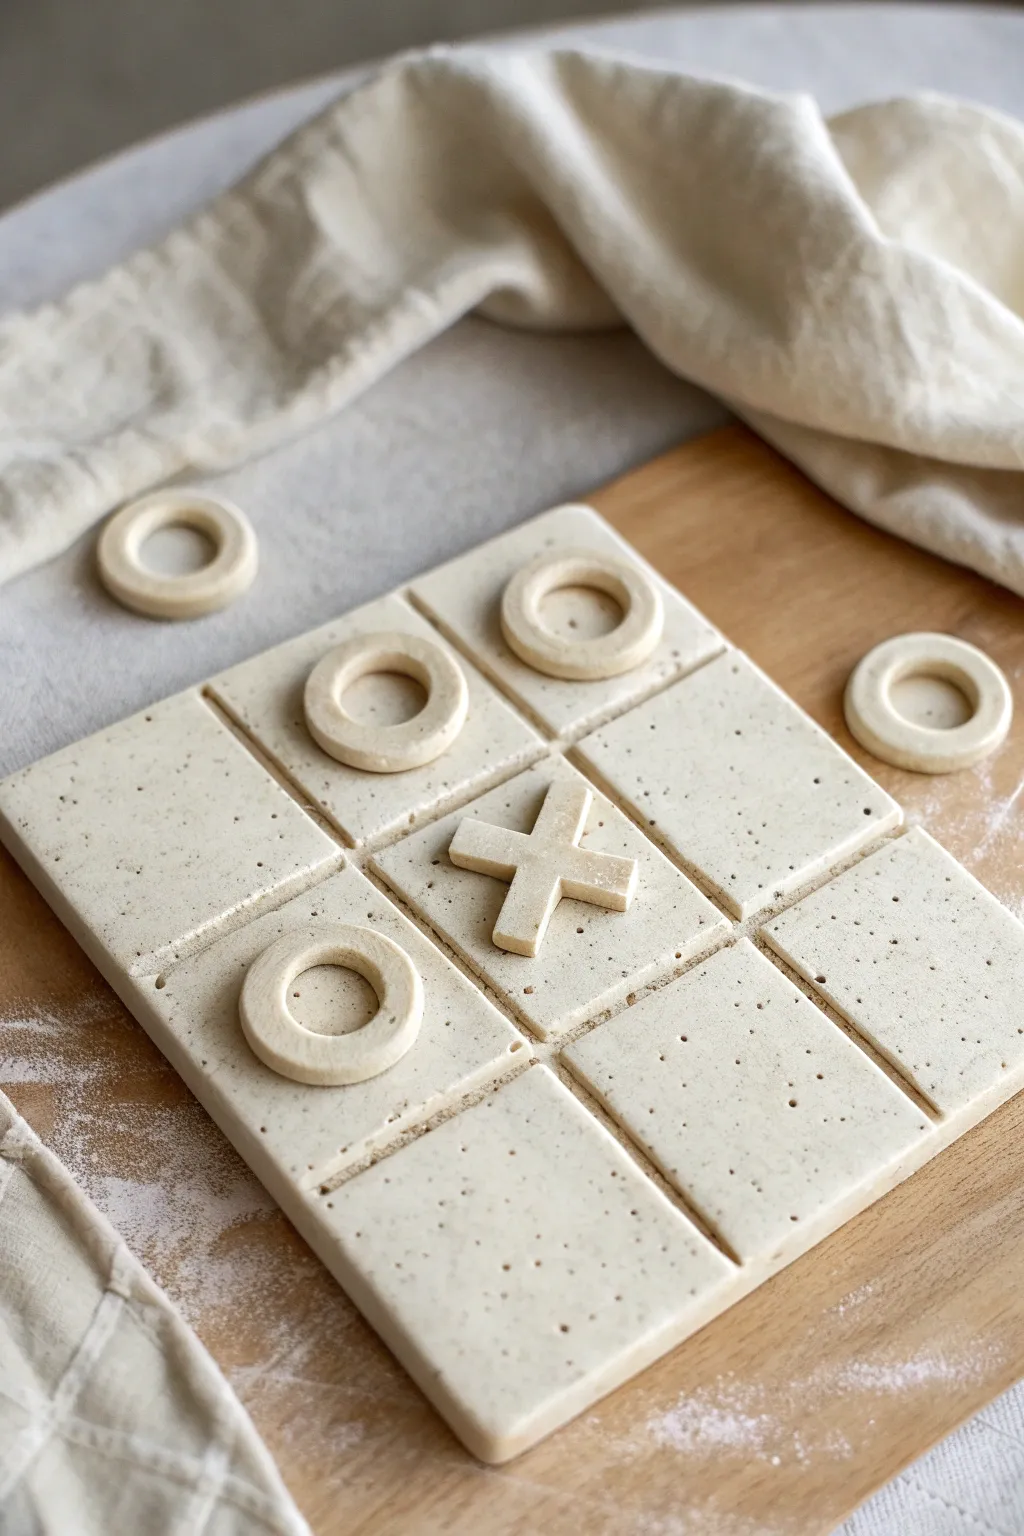
Elevate your coffee table décor with this elegant, minimalist game board crafted from simple air dry clay. Featuring a carved grid, hand-painted X marks, and smooth clay tokens, this project balances rustic charm with modern graphic appeal.
How-To Guide
Materials
- White air dry clay
- Rolling pin
- Square template (card stock or plastic)
- Craft knife or clay tool
- Ruler
- Small round cutter (approx. 1 inch)
- Sandpaper (fine grit)
- Black acrylic paint
- Fine detail paintbrush
- Terracotta or rust-colored acrylic paint
- Matte sealant or varnish
Step 1: Crafting the Board Base
-
Prepare the Clay:
Begin by kneading a large handful of air dry clay to warm it up and remove any air bubbles. Roll it out on a smooth surface until you have a slab that is roughly 1/4 to 1/2 inch thick. -
Cut the Square:
Place your square template over the rolled slab. Using a craft knife and a straight edge, cut a clean square shape. Smooth the edges of the cut clay with a little water on your finger to soften any sharpness. -
Measure the Grid:
Using a ruler, lightly mark the measurements to divide your square into a 3×3 grid. You want nine equal squares, so make small tick marks at the edges to guide your lines. -
Carve the Lines:
Take a clay tool or the back of a butter knife and firmly press into the clay connecting your tick marks. You want to create deep grooves for the grid lines, pressing down rather than dragging to keep the clay smooth. -
Refine the Grooves:
Go over the lines a second time to ensure they are uniform in depth. Use a damp finger to smooth out any ridges that may have popped up alongside the carved lines.
Step 2: Creating the Game Pieces
-
Roll Clay for Tokens:
Knead a fresh portion of clay and roll it out slightly thinner than your board, perhaps 1/4 inch thick. -
Cut Out Circles:
Use your small round cutter to stamp out at least 10 circles (5 for one player, 5 for the other, plus spares). These will serve as your game pieces. -
Soften Edges:
Just like the board, dip your finger in water and run it around the circumference of each token to round off the harsh cut edges. -
Dry Everything:
Set the board and all tokens on a wire rack or a piece of parchment paper. I usually flip them over halfway through the drying process to prevent warping. Let them dry completely for 24-48 hours.
Fixing Warp
If your board curls up at the edges while drying, dampen the concave side slightly and place it under a heavy book overnight to flatten it back out.
Step 3: Painting and Finishing
-
Sand for Smoothness:
Once fully dry, lightly sand the surface and edges of the board and tokens with fine-grit sandpaper to remove any imperfections. -
Paint the Grid:
Dip a fine detail brush into black acrylic paint. carefully paint inside the carved grooves of your grid, filling them completely for a high-contrast look. -
Paint the X Marks:
For this specific design, the ‘X’ locations are pre-marked on the board itself for aesthetic effect (or you can paint X’s on half of the round tokens). Use the black paint to create rustic, brush-stroke style X’s in random squares if mimicking the art piece. -
Paint Colors for Tokens:
Leave half of your round tokens natural white. For the opposing set, use the terracotta or rust-colored paint. Apply two coats for solid coverage. -
Add Texture Details:
For added realism on the painted tokens, you can gently dab a paper towel on the wet paint to give them a slightly stony texture. -
Seal the Project:
Finish by applying a coat of matte sealant over the board and all tokens. This protects the clay from moisture and gives the paint a finished, professional quality.
Make it Magnetic
Embed small magnets into the clay tokens and board back while wet to create a travel-friendly version that holds pieces in place.
Enjoy your stylish new game board during your next cozy game night.


Raised-Line Grid for No-Slip Play
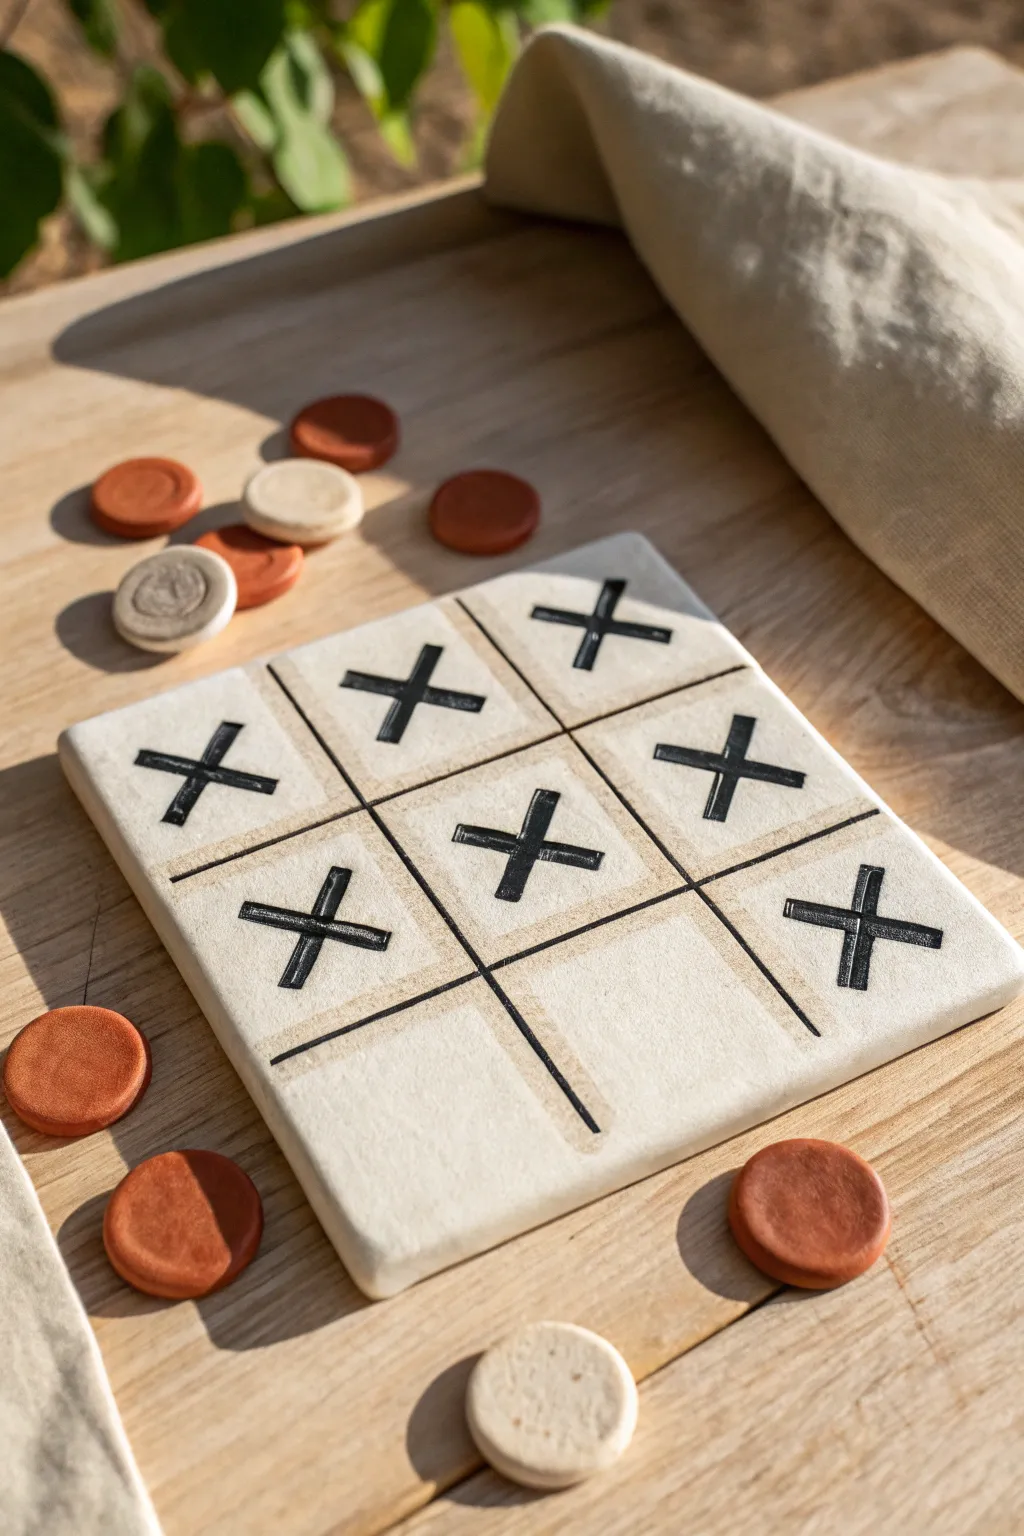
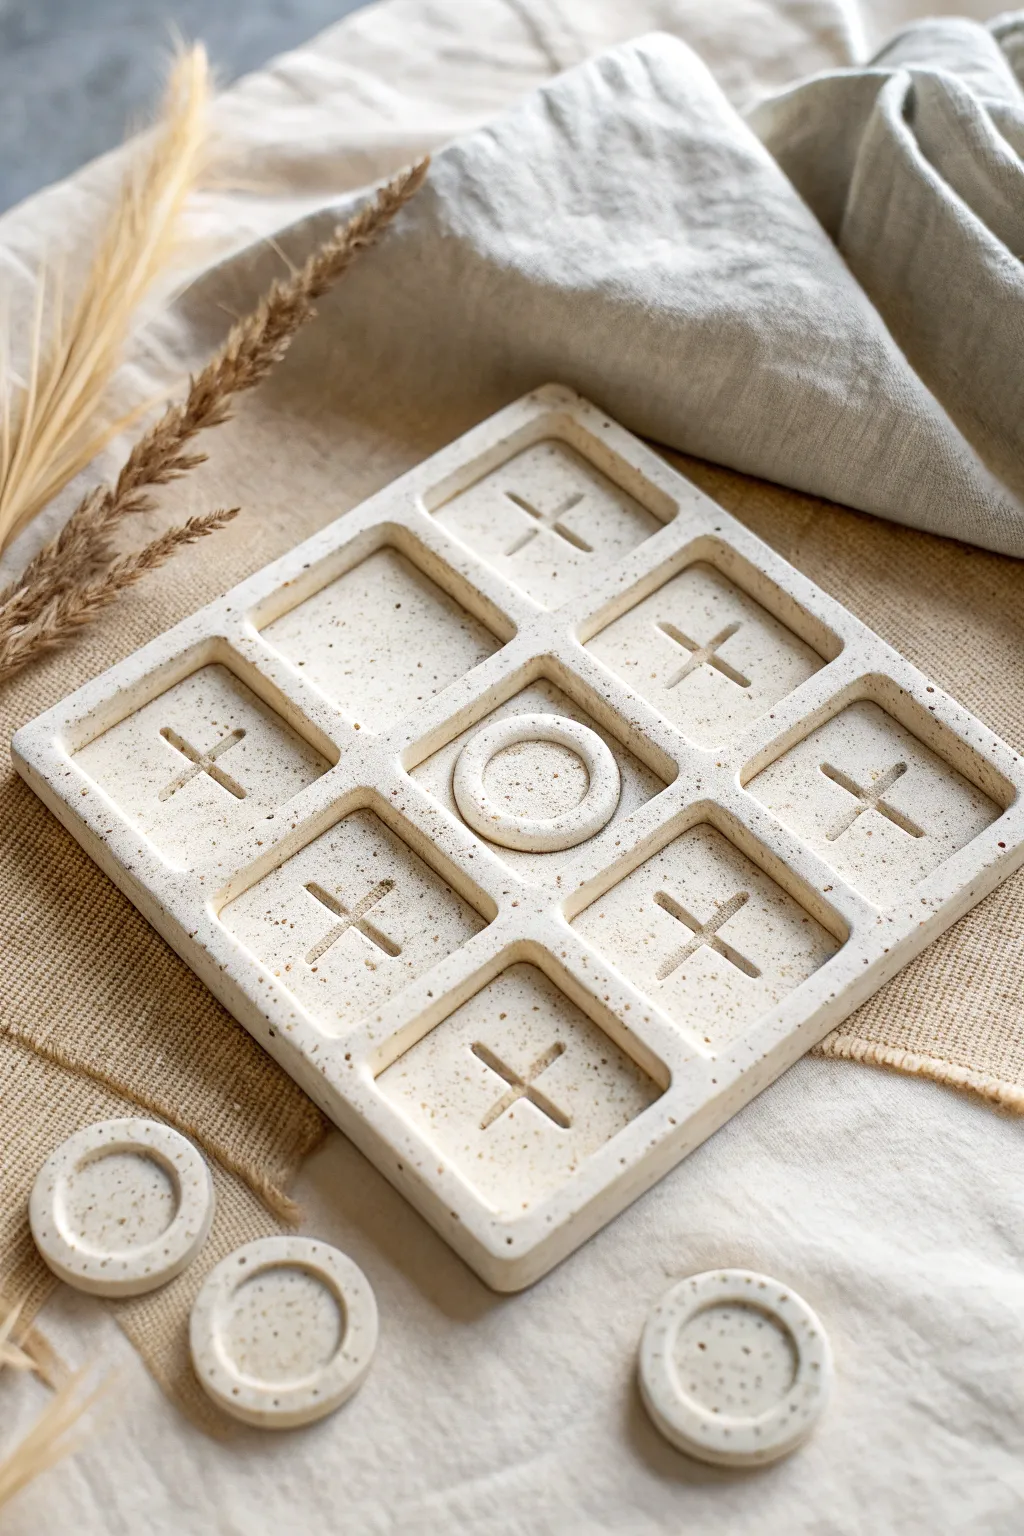
Elevate your coffee table game with this sleek, tactile tic-tac-toe board crafted from speckled air dry clay. The design features a substantial square base with deeply pressed grooves that create raised boundaries, keeping your X and O pieces perfectly in place during heated matches.
Step-by-Step Guide
Materials
- White or speckled air dry clay (approx. 500g)
- Rolling pin
- Two wooden guide rulers (0.5 inch / 1.5 cm thick)
- Ruler or straight edge
- Fettling knife or clay cutter
- Small round cookie cutter or bottle cap (approx. 1.5 inches)
- X-acto knife
- Small bowl of water
- Sponge
- Sandpaper (fine grit)
Step 1: Creating the Game Board Base
-
Prepare the workspace:
Lay down a piece of canvas or parchment paper on your work surface to prevent the clay from sticking. Place your two wooden guide rulers parallel to each other, about 8 inches apart. -
Roll the slab:
Take a large chunk of clay and kneed it briefly to remove large air bubbles. Place it between the guides and roll it out with your rolling pin until the clay is completely flat and flush with the height of your guides. -
Cut the square:
Using a ruler and a clay needle tool or knife, measure and cut a perfect 6×6 inch (or 15×15 cm) square from your slab. Remove the excess clay scraps and set them aside. -
Smooth the edges:
Dip your finger or a small sponge in water and gently run it along the cut edges of the square to soften any sharp corners and refine the shape.
Warping Woes?
If the board corners start curling up while drying, place a lightweight book on top (with parchment paper in between) to gently weigh it down flat.
Step 2: Forming the Raised Grid & Pieces
-
Measure the grid:
With your ruler, lightly mark intervals at the 2-inch and 4-inch points on all four sides of the square board. These marks will guide your grid lines. -
Impress the grid lines:
Take a long, straight object with a bit of thickness—like the back of a butter knife or a thin wooden dowel—and press it deeply into the clay connecting your marks. I prefer pressing down firmly rather than dragging to avoid crumbly edges. -
Deepen the grooves:
Go over the lines again to make them wide and deep. The goal is to create distinct ‘raised’ square islands separated by these channels. -
Roll clay for pieces:
Gather your scrap clay and roll it out again, this time slightly thinner than the base (about 0.25 inch thick). -
Cut the O pieces:
Use your small round cutter to punch out five circles. Then, use a smaller cutter (like a marker cap) to punch the centers out, creating rings. -
Cut the X pieces:
From the remaining slab, cut small strips of clay. Cut ten equal lengths (about 1.5 inches long) to form five X shapes. -
Assemble the X pieces:
Take two strips, score the centers with a needle tool, add a dab of water, and press them together in a cross shape. Smooth the seam where they join so they bond securely.
Pro Design Tip
For the cleanest grid lines, use the edge of a credit card to press into the clay. The uniform thickness ensures all your grooves look professionally identical.
Step 3: Finishing Touches
-
Smoothing the pieces:
Use a damp brush or fingertip to smooth all the edges of your X and O pieces, erasing any sharp angles from cutting. -
Initial drying:
Place the board and pieces on a wire rack or leave them on the wood board to dry. Flip them gently every 12 hours to ensure even drying and prevent warping. -
Full cure time:
Allow everything to dry completely for at least 48-72 hours. The clay will turn a lighter shade of white when fully dry. -
Sanding the board:
Once fully dry, take a piece of fine-grit sandpaper and lightly buff the surface of the board and the grid grooves to remove any texture marks. -
Final polish:
Wipe away any dust with a slightly damp cloth to reveal the clean, speckled texture of the finished clay.
Enjoy challenging your friends on this beautiful handmade board that doubles as modern decor


Pocket Grid Board With Recessed Squares
This minimalist board features deep recessed pockets to keep your game pieces perfectly in place, combining functionality with high-end decor style. The beautiful terrazzo-like finish is actually a clever clay hack using a common kitchen spice.
Detailed Instructions
Materials
- White air-dry clay
- Coarsely ground black pepper
- Rolling pin
- Ruler
- Craft knife or clay blade
- Small bowl of water
- Soft paintbrush
- Fine-grit sandpaper
- Matte acrylic varnish
Step 1: Preparing the Board
-
Mix the texture:
Begin by flattening your white clay and sprinkling a generous amount of coarse black pepper over it. Knead the clay thoroughly until the black specks are evenly distributed. -
Form the base slab:
Roll out a large slab of your speckled clay to about 1cm thickness. Use your ruler and knife to cut a perfect 15cm x 15cm (6-inch) square. -
Smooth the edges:
Dip your finger in water and run it along the cut edges of your square base to soften the sharpness slightly. -
Prepare the grid material:
Roll a second portion of clay slightly thinner than the base. Cut several long strips, approximately 0.5cm wide, which we will use to build the walls. -
Frame the board:
Score the outer perimeter of your base square and moisten it. Lay four clay strips around the edge to create a raised border frame, trimming the corners at 45-degree angles. -
Mark the grid:
Lightly mark the base clay to divide the interior space into three equal columns and three equal rows. -
Place long dividers:
Cut two clay strips to fit strictly inside the frame. Attach them vertically along your marks to create the three columns. -
Add cross dividers:
Cut smaller segments of clay strip to fit horizontally between the vertical lines. Place these carefully to complete the 9-square grid.
Pro Tip: Clean Corners
A wet paintbrush is your best friend for this project! It acts like a tiny mop to clean up messy seams inside the tight grid squares where your fingers can’t reach.
Step 2: Refining the Shape
-
Blend the seams:
Use a modeling tool to blend the clay where the strips meet the base. I like to take my time here to ensure it looks like one carved piece rather than attached strips. -
Smooth the pockets:
Use a damp paintbrush to smooth the inside corners of each square pocket. This removes fingerprints and creates that soft, molded look. -
Level the floors:
Gently press a flat object or your thumb into the center of each pocket to ensure the floor is flat and level for the pieces to sit on.
Step 3: Creating the Game Pieces
-
Prepare piece clay:
Roll out a fresh slab of speckled clay, slightly thinner than your grid walls. -
Cut the O rings:
Use a small circular cutter to punch out discs, then use a smaller cutter inside that to create rings. Make 5 of these. -
Form the X pieces:
Cut thin strips of clay and cross them over each other to form ‘X’ shapes. Press the center intersection firmly so they bond securely. Make 5 of these as well. -
Make extra tokens:
If you like the look of the discs in the photo foreground, create a few solid circles with a raised rim by pressing your thumb into the center of a clay ball.
Level Up: Magnetize It
Embed small magnets into the base of the pockets and the underside of the tokens while the clay is still wet. This makes the game travel-friendly and satisfying to click into place.
Step 4: Finishing
-
Dry slowly:
Let the project dry for 24-48 hours. I recommend flipping the pieces occasionally so they dry evenly. -
Sand for stone effect:
Once fully hard, gently sand the surfaces. This effectively removes any bumps and exposes more of the pepper flakes. -
Seal and protect:
Apply a coat of matte varnish to seal the clay and keep the pepper specks from falling out over time.
You’ll love having this chic, playable sculpture on your coffee table ready for a quick match.


Lily Pad Board With Pond Pieces

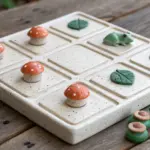
Bring the charm of a forest pond to your game nights with this adorable air dry clay set. The board mimics a giant green lily pad, hosting a friendly battle between wide-eyed frogs and spotted mushrooms.
Step-by-Step Tutorial
Materials
- Air dry clay (white)
- Acrylic paints (leaf green, darker green, muted red, off-white/cream, black)
- Rolling pin
- Circle cutter or a round plate (approx. 6-7 inches)
- Modeling tools (or a ruler/knife for grid lines)
- Ball stylus tool
- Fine detail paintbrush
- Gloss varnish (optional)
- Fine-grit sandpaper
Step 1: Sculpting the Board
-
Roll the base:
Start by conditioning a large ball of white air dry clay until it’s pliable. Roll it out into a smooth slab about 1/4 inch thick. Aim for an even thickness to ensure it dries flat. -
Cut the circle:
Place your circle cutter or round plate onto the clay slab and cut out a perfect circle. Peel away the excess clay and smooth the edges with a bit of water on your finger. -
Create the grid:
Using a ruler and a dull knife or modeling tool, gently press the tic-tac-toe grid into the soft clay. You need two vertical lines and two horizontal lines. Press deep enough to see the grooves clearly, but don’t cut all the way through. -
Smooth the grooves:
Run a damp finger or a soft silicone tool along the grid lines you just made. This softens the sharp edges and gives the board a more organic, finished look.
Step 2: Creating the Game Pieces
-
Form the mushroom caps:
Take small portions of clay and roll them into balls, then flatten them slightly into domes. I like to smooth the edges underneath to create a tidy cap shape. Make at least five of these. -
Sculpt the frog bodies:
For the opposing team, roll five slightly larger balls of clay. Press them down gently to create a squat, rounded base that won’t roll away. -
Add frog legs:
Roll tiny sausage shapes and attach them to the bottom front of the frog bodies using a little water. Use a tool to press indentations for the toes. -
Add frog eyes:
Roll two tiny spheres for each frog and attach them to the top of the head. These will be the prominent eyes that give them character. -
Dry everything:
Place the board and all ten pieces on a flat surface lined with parchment paper. Let them dry completely for 24-48 hours, flipping the board halfway through to prevent warping.
Preventing Warps
To keep your board perfectly flat, dry it between two pieces of parchment paper and place a heavy book on top after the first few hours of drying.
Step 3: Painting and Details
-
Sand imperfections:
Once fully dry, gently sand any rough edges on the board or pieces using fine-grit sandpaper. -
Base coat the board:
Paint the entire lily pad board with a solid coat of leaf green acrylic paint. You may need two coats for full opacity. -
Paint the grid lines:
Mix a small amount of darker green paint. carefully paint inside the indented grid lines to make them pop and add depth to the lily pad surface. -
Paint the mushrooms:
Paint the mushroom caps in a muted earthy red. Keep the color natural rather than neon for that cozy cottagecore vibe. -
Dot the mushrooms:
Using the back of a paintbrush or a dotting tool, add small cream-colored dots to the top of each mushroom cap. -
Color the frogs:
Paint the frog bodies a soft green—lighter than the board so they stand out. Paint their bellies a creamy white if desired. -
Frog details:
Paint the eyeballs white. Once dry, use a fine tip brush or a toothpick to add tiny black pupils. Don’t forget two tiny dots for nostrils. -
Seal the set:
Finish by applying a coat of matte or gloss varnish to all pieces. This protects the paint from chipping during intense gaming sessions.
Extra Texture
Create a ‘bite’ mark on the lily pad edge or add subtle vein textures to the green sections before the clay dries for added realism.
Enjoy challenging your friends on your charming new handmade game board

The Complete Guide to Pottery Troubleshooting
Uncover the most common ceramic mistakes—from cracking clay to failed glazes—and learn how to fix them fast.
Cat and Fish Character Piece Set
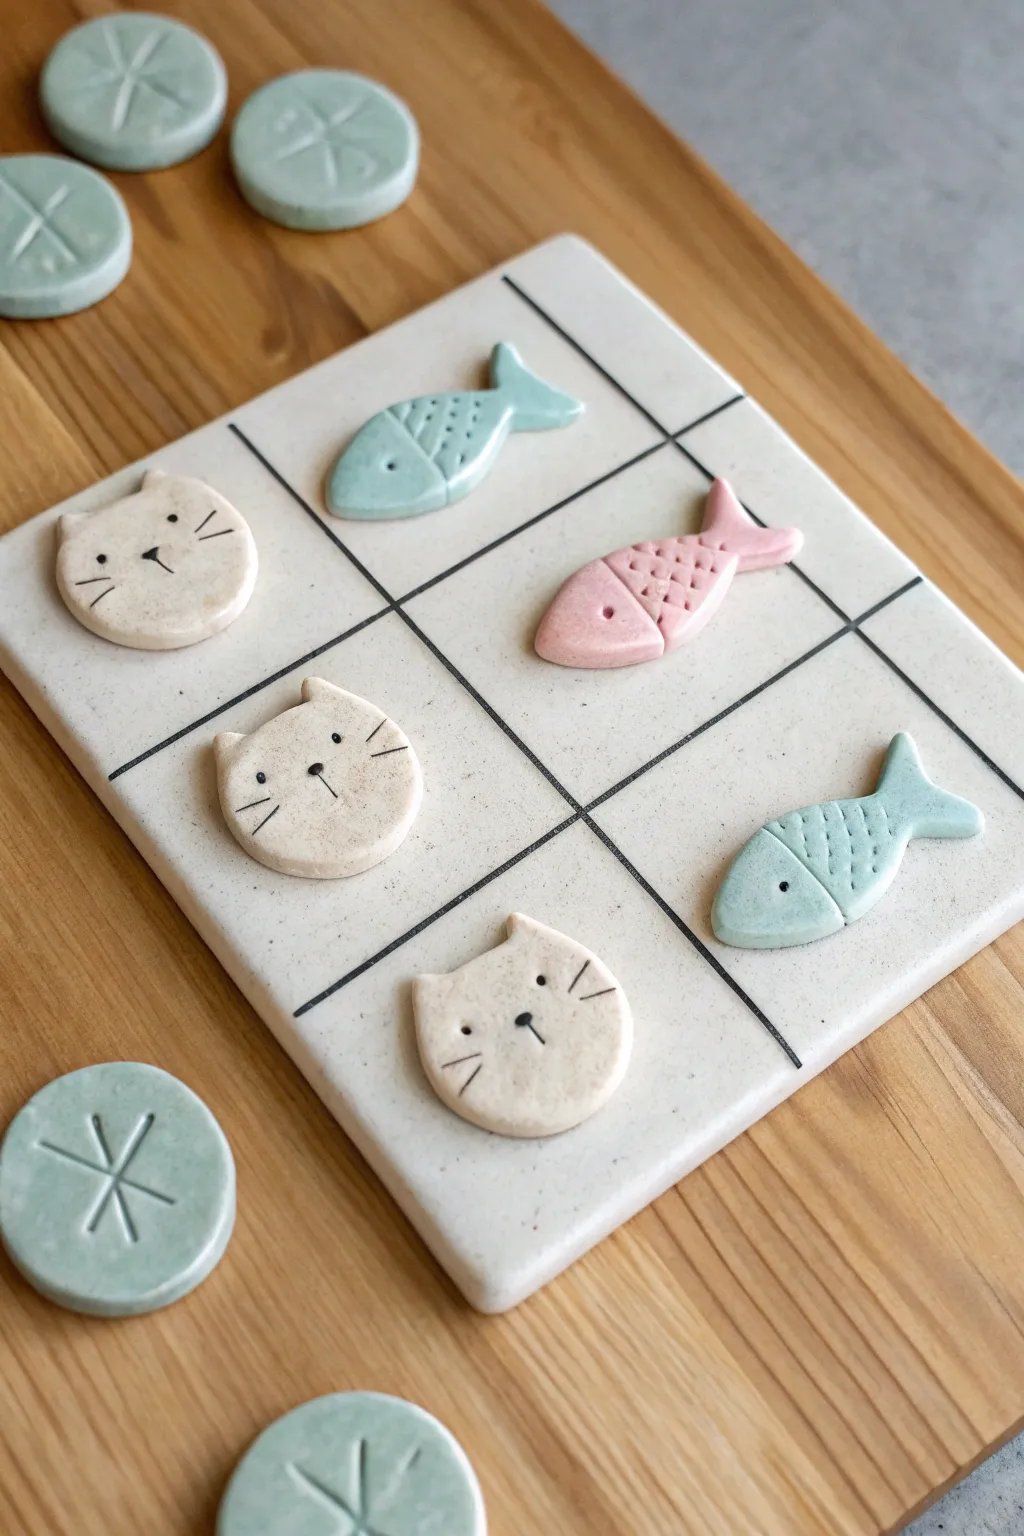
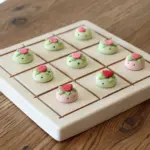
This charming twist on a classic game replaces X’s and O’s with adorable sculpted cat faces and sleek little fish. The ceramic-look finish and grid-lined clay board make it a delightful coffee table accessory as well as a playable game.
How-To Guide
Materials
- White air dry clay (smooth texture)
- Acrylic paints (pastel mint, pale pink, black)
- Rolling pin
- Clay knife or craft knife
- Needle tool or toothpick
- Fine grit sandpaper
- Ruler
- Small bowl of water
- Fine detail paintbrush
- Gloss or matte varnish (optional)
Step 1: Creating the Game Board
-
Roll the slab:
Begin by conditioning a large ball of white clay until it is pliable. Roll it out into a smooth, even slab that is approximately 1/4 inch thick throughout. -
Cut the square:
Using a ruler and your craft knife, cut a perfect square from the slab. A size of 6×6 inches works well for portability, but you can go larger if desired. -
Smooth the edges:
Dip your finger in a little water and gently run it along the cut edges of the square to soften the sharp corners and remove any crumbs. -
Score the grid:
With the ruler as a guide, lightly press the back of your knife blade or a needle tool into the clay to create the classic 3×3 tic-tac-toe grid. Don’t cut all the way through; imply the lines with a firm impression. -
Blacken the lines:
While the clay is still wet, you can carefully paint the inside of the scored lines with diluted black paint for a crisp look, or wait until dry to paint them. I prefer painting wet so the pigment sinks into the groove.
Step 2: Sculpting the Shapes
-
Form the cat heads:
Roll five small balls of clay and flatten them into thick discs. Pinch two small triangles at the ‘top’ of each disc to form ears. -
Add cat details:
Smooth out the ear joins with a wet finger. Use a needle tool to poke three dots: two for the eyes and one for the nose impact point. -
Form the fish bodies:
Roll five slightly smaller balls of clay. Elongate them into teardrop shapes, then flatten them gently against your work surface. -
Shape the tails:
Using your knife, make a small cut at the pointed end of the teardrop to separate the tail fins. Gently fan these pieces out. -
Add fish texture:
Use the needle tool to press scale patterns onto the back half of the fish bodies and striations on the tail. Poke a single depression for the eye near the front. -
Create extra tokens:
If you want extra pieces like those shown in the scene, roll out remaining clay, cut circles, and press an asterisk pattern into them using the side of a knife blade.
Warping Woes?
If the board curls up at the corners while drying, place a heavy book on top of it once it’s semi-dry (leather-hard) to force it flat.
Step 3: Finishing Touches
-
Dry thoroughly:
Place all pieces on a drying rack or paper towel. Let them dry for 24-48 hours, flipping them occasionally to ensure even drying and prevent warping. -
Sand imperfections:
Once fully cured, use fine-grit sandpaper to gently buff away any fingerprints or rough edges on the sides of the board and pieces. -
Paint the cats:
Leave the cat faces natural white. Use a very fine brush and black paint to draw whiskers, fill in the eyes, and create a small nose and mouth connected to the central indentation. -
Paint the fish:
Paint the fish bodies in your choice of pastel mint green or pale pink, filling in the textured grooves. Once the base coat is dry, add a tiny black dot for the eye. -
Seal the set:
To protect your game from wear and tear, apply a coat of varnish to all pieces and the board. A matte finish looks very modern, while gloss simulates ceramic glaze.
Make it Magnetic
Turn this into a travel set or fridge decor by gluing small, strong magnets to the back of each piece and embedding a flexible magnetic sheet under the board.
Now you have a handmade game set that is ready for play or display on your coffee table
Modern Monochrome Stone-Inspired Pieces
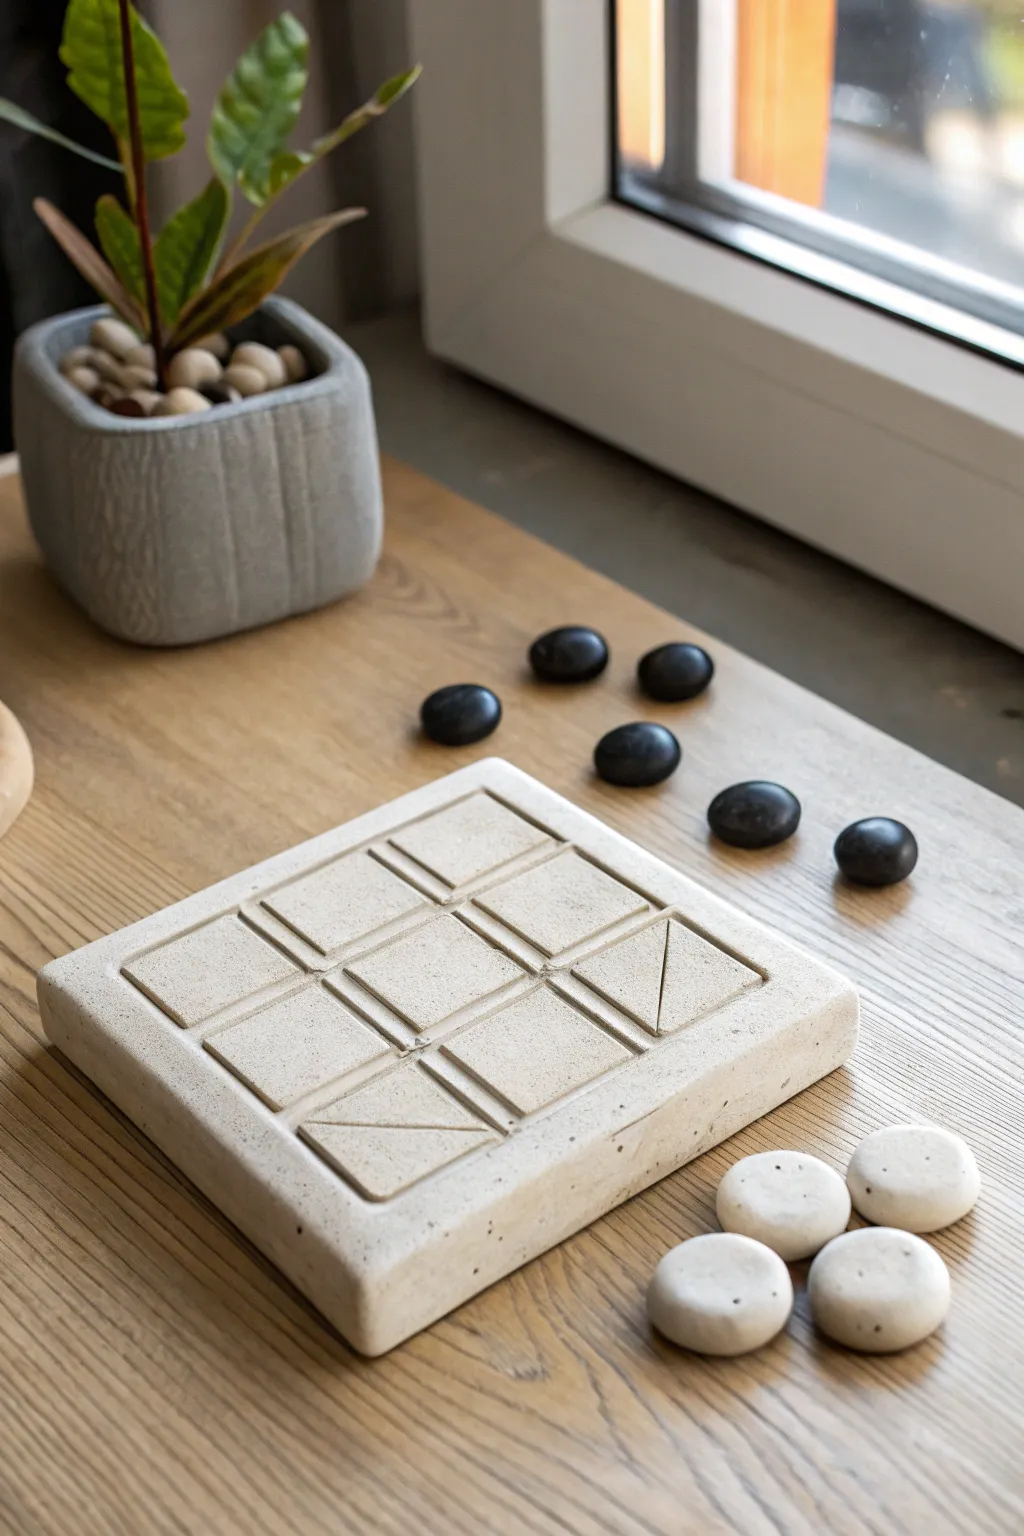
Elevate a classic game with this modern, minimalist set that mimics the look and feel of cast stone. Using air dry clay, you’ll create a weighty, textured board and smooth playing pieces perfect for a stylish coffee table display.
Step-by-Step Tutorial
Materials
- White or light grey air dry clay (approx. 1kg)
- Rolling pin
- Two 1/2-inch wooden slats (depth guides)
- Square cookie cutter or template (approx. 5×5 inches)
- Ruler
- Modeling knife or clay tool
- Pottery sponge
- Sandpaper (fine and medium grit)
- Black acrylic paint
- Matte spray varnish
- Bowl of water
Step 1: Creating the Board Base
-
Condition the clay:
Begin by wedging a large ball of air dry clay in your hands to remove air bubbles and make it pliable. You want a consistent, smooth texture before rolling. -
Roll the slab:
Place your 1/2-inch wooden slats on either side of your clay ball on a flat workspace. Roll the clay out until it is an even, thick slab, using the wood as a guide for uniform thickness. -
Cut the square shape:
Using a ruler and a modeling knife, cut a precise, large square for your game board base. Aim for about 6×6 or 7×7 inches to allow comfortable spacing for the pieces. -
Smooth the edges:
Dip your finger in a little water and run it along the cut edges of the square to soften the sharp corners and smooth out any roughness.
Warping Worries?
If the board edges curl up while drying, gently weigh it down with a heavy book placed on a piece of cardboard. Do this while the clay is still slightly cool to the touch.
Step 2: Sculpting the Grid
-
Measure the grid:
With your ruler, lightly mark a 3×3 grid on the surface of your square slab. Ensure the borders around the outside are equal to the borders between the internal squares. -
Carve the relief channels:
Using a clay carving tool or the back of a knife, carefully carve out shallow channels along your marked grid lines. You want the squares to appear slightly raised or framed by these recessed lines. -
Impress designs (Optional):
The example image features subtle diagonal lines pressed into corner squares. If desired, use the edge of your ruler to gently press diagonal indentations into specific squares for geometric flair. -
Texture the surface:
To achieve that stony, concrete look, take a stiff-bristled brush or a crumpled ball of aluminum foil and tap it gently all over the surface. This creates realistic micro-pitting.
Step 3: Forming the Playing Pieces
-
Portion the clay:
Roll out a smaller snake of clay and cut it into 10 equal segments. Divide these slightly unevenly if you want the ‘stones’ to look natural and organic. -
Shape the stones:
Roll each segment into a ball between your palms, then gently flatten them into smooth, pebble-like discs. I find slightly irregular shapes add to the organic aesthetic. -
Refine the surface:
Dip your sponge in water and wring it out mostly dry. Wipe each stone to ensure they are silky smooth, contrasting the rougher texture of the board.
Stone Texture Trick
Mix a small amount of fine sand or dried coffee grounds directly into the white clay before shaping. This gives genuine grit and texture without needing to paint speckles later.
Step 4: Finishing Touches
-
Dry thoroughly:
Let all pieces dry for at least 48-72 hours. Turn the board over halfway through the drying process to prevent warping and ensure the bottom dries evenly. -
Sand the board:
Once bone dry, use medium-grit sandpaper on the edges of the board to crisp up the square shape and remove any sharp clay burrs. -
Paint the black stones:
Select five of your dry clay stones. Paint them with two coats of matte black acrylic paint, allowing them to dry fully between coats. -
Create the speckled look:
For the board and white stones, dilute a tiny drop of black paint with water. Dip an old toothbrush in it and flick the bristles to spray a fine mist of speckles over the white clay, simulating granite. -
Seal the project:
Finish everything with a coat of matte spray varnish. This protects the clay from moisture and gives the ‘black stones’ a finished, professional sheen.
Now you have a stunning, sculptural focus piece that invites play and conversation


What Really Happens Inside the Kiln
Learn how time and temperature work together inside the kiln to transform clay into durable ceramic.
Terrazzo-Style Board With Symbol Tokens
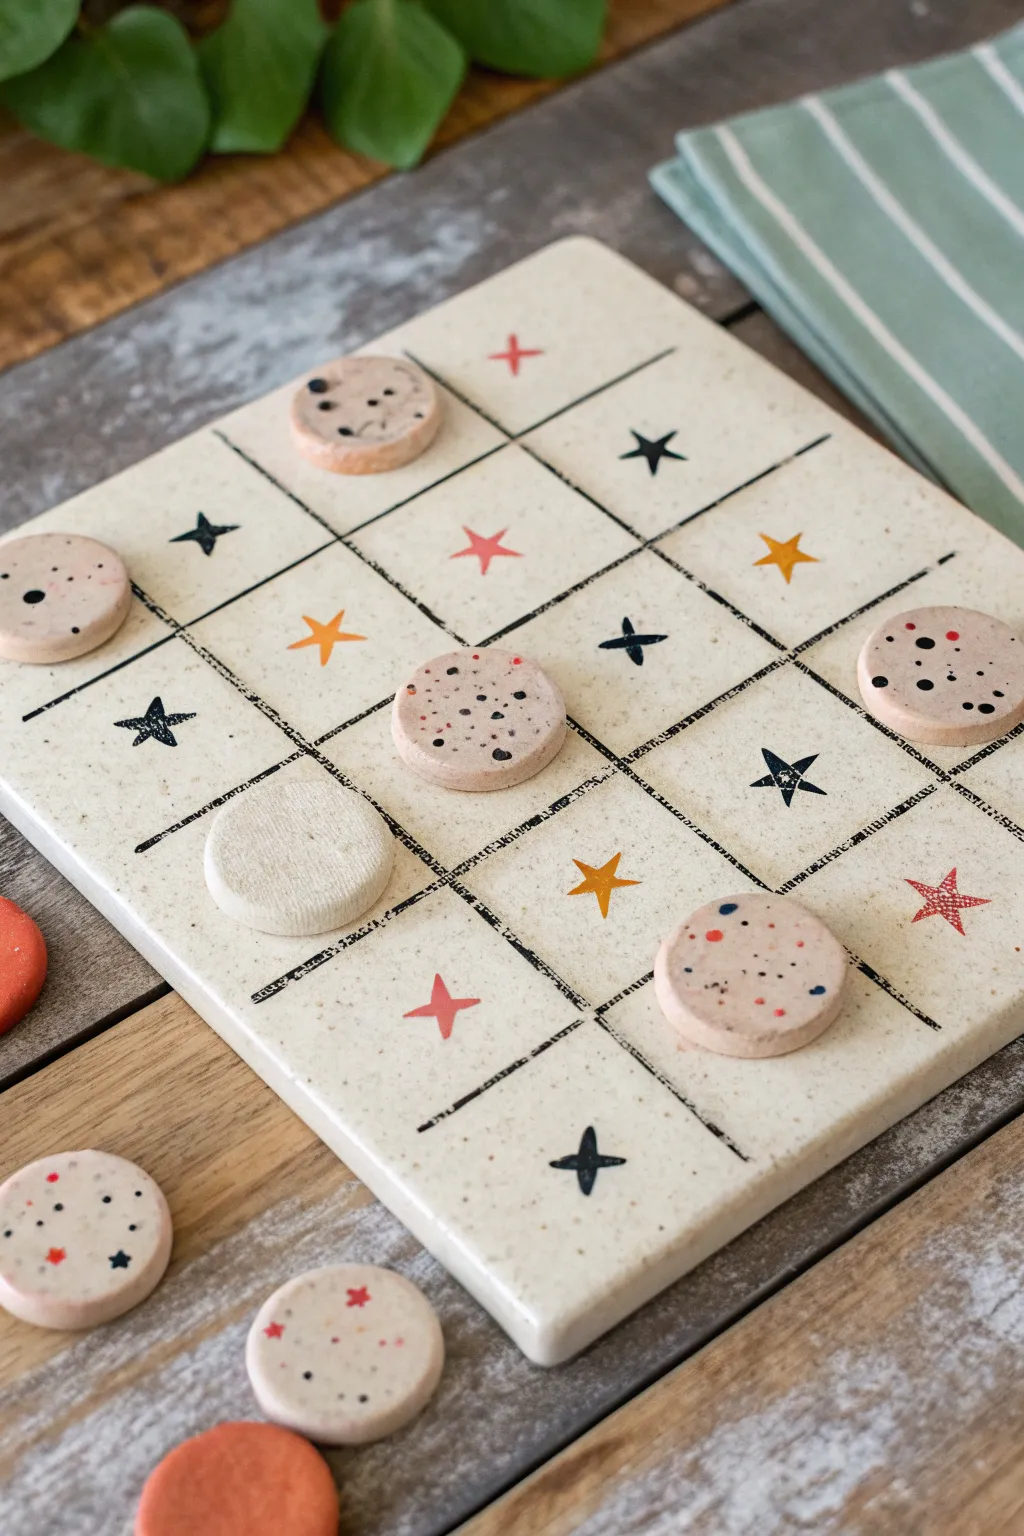
Upgrade family game night with this sophisticated take on a classic, featuring a speckled stone-effect board and hand-painted celestial accents. The clay mimics the look of high-end ceramic tile, while the terrazzo-style playing pieces add a playful pop of texture and color.
Step-by-Step Guide
Materials
- Air dry clay (white)
- Acrylic rolling pin
- Square clay cutter or craft knife
- Small round clay cutter (approx. 1 inch)
- Ruler
- Sandpaper (fine grit)
- Acrylic paints (black, muted orange, beige, red)
- Small flat paintbrush
- Fine detail paintbrush or paint pen
- Toothbrush (for speckling)
- Gloss or satin varnish
Step 1: Sculpting the Board
-
Roll the Base:
Begin by conditioning a large ball of white air dry clay until it is smooth and pliable. Roll it out into a square slab about 1/4 inch thick, trying to keep the thickness as even as possible. -
Cut to Size:
Use a large square cutter or a ruler and craft knife to trim your slab into a perfect square. A 6×6 inch or 8×8 inch square works well for a standard game board. -
Smooth the Edges:
Dip your finger in a little water and run it along the cut edges to soften any sharp corners. Let the board dry completely on a flat surface, flipping it occasionally to prevent warping. This usually takes 24-48 hours depending on humidity.
Warp Warning!
If your board starts curling up at the edges while drying, place a heavy book on top of it once it’s firm to the touch but not fully dry to flatten it out.
Step 2: Creating the Game Pieces
-
Cut the Tokens:
Roll out another slab of clay to the same thickness as your board. Use your small round cutter to punch out at least 10 circles (5 for each player), though making a few extras is always wise. -
Dry the Tokens:
Set the circles aside to dry fully. I find placing them on a wire baking rack helps air circulate underneath, speeding up the process. -
Sand Everything:
Once both the board and tokens are bone dry, gently sand the edges and surfaces with fine-grit sandpaper to remove any fingerprints or rough spots.
Level Up: Chips
Mix tiny bits of colored dried clay into your wet white clay before rolling out the tokens. Sanding the dry pieces reveals the colored bits for real terrazzo.
Step 3: Painting the Grid design
-
Base Coat (Optional):
If you want a warmer tone, mix a very diluted wash of beige paint and brush it over the board for a creamy, stone-like background. Let it dry. -
Mark the Grid:
Using a ruler and a pencil, lightly mark out a 3×3 grid on the board. You want nine equal squares. -
Paint the Lines:
Go over your pencil lines with black acrylic paint and a thin brush, or use a black paint pen for more control. Aim for imperfect, sketchy lines to achieve that organic, hand-drawn aesthetic shown in the photo. -
Add Celestial Symbols:
In the center of each grid square, paint a small star symbol. Alternate colors for visual interest—use black, orange, and red to match the example.
Step 4: The Terrazzo Effect
-
Base Color for Tokens:
Leave half the tokens the natural clay color (or paint them a light cream). Paint the other set a solid muted orange if you want distinct teams, or keep them all neutral for the speckled look. -
Prepare the Speckle Mix:
Dilute a small amount of black, red, and blue paint with water until it’s quite fluid but not dripping wet. -
Splatter Technique:
Dip an old toothbrush into your first paint color. Hold it over the tokens and run your thumb across the bristles to flick tiny specks of paint onto the surface. -
Layer the Colors:
Repeat the splatter process with your other colors, letting each layer dry briefly in between so the dots don’t muddy together. -
Seal the Deal:
Finish the entire project—board and pieces—with a coat of gloss or satin varnish. This mimics the glazed ceramic look and protects your paint from chipping during intense matches.
Now your coffee table has a functional piece of art ready for impromptu gaming sessions
Scalloped Edge Board for a Cute Display
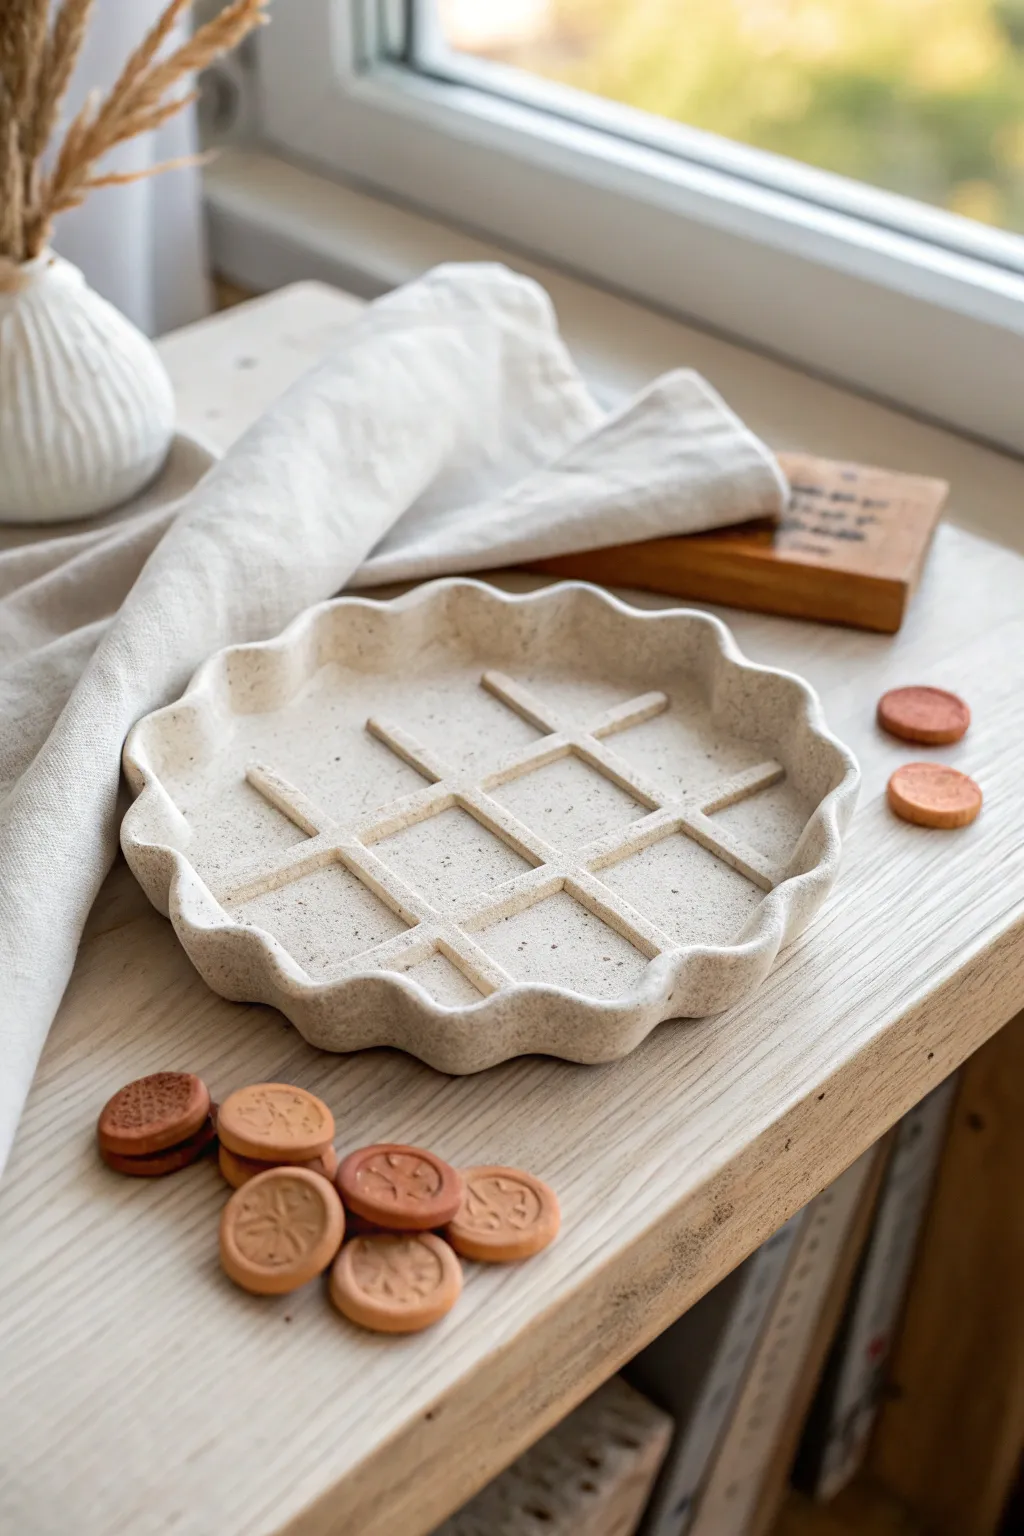
Elevate your coffee table décor with this sophisticated take on a classic game, featuring a soft, fluted edge that mimics high-end ceramics. The speckled stone effect gives the board a natural, organic feel while serving as a functional piece for family fun.
How-To Guide
Materials
- Stone-effect air dry clay (or white clay with speckled additives)
- Rolling pin
- Rolling guides (approx. 5-7mm thick)
- Circle template or bowl (approx. 6-7 inches diameter)
- Craft knife or needle tool
- Small round cookie cutter (approx. 1 inch)
- Ruler
- Small geometric stamps (optional, for game pieces)
- Water and sponge for smoothing
- Sandpaper (fine grit)
- Matte acrylic varnish
Step 1: Creating the Base
-
Prepare the Clay:
Start by kneading a large ball of your stone-effect clay until it’s pliable and warm. This prevents cracking later on. -
Roll the Slab:
Place the clay between two rolling guides to ensure an even thickness. Roll it out into a large, smooth sheet about 5-7mm thick. -
Cut the Circle:
Place your large bowl or circle template onto the clay slab. Using a needle tool, cut cleanly around the edge to form the base. -
Create the Wall Strip:
Gather the remaining clay and roll out a long, rectangular strip. It should be the same thickness as the base and long enough to wrap around the circumference of your circle. -
Trim the Wall Height:
Use a ruler and craft knife to trim the strip so it is roughly 1.5 inches tall. Long, straight cuts work best here.
Smooth Operator
Use a tiny amount of baby oil on your fingertips when smoothing the clay. It eliminates fingerprints better than water and prevents the clay from getting too mushy.
Step 2: Forming the Scalloped Edge
-
Attach the Wall:
Score the outer edge of your circular base and the bottom edge of your strip. Apply a little water or slip, then attach the strip to the base, forming a plain cylinder. -
Blend the Seams:
Use a modeling tool or your finger to firmly blend the clay on the inside and outside seams where the wall meets the base. I find a damp sponge helps smooth this transition seamlessly. -
Shape the Scallops:
Gently push the wall inward at regular intervals with your finger while supporting the clay from the inside with two other fingers. Repeat this around the entire rim to create the fluted, wavy pattern. -
Refine the Rim:
Once the waves are formed, use a damp sponge to smooth the top rim, ensuring the thickness looks consistent all the way around.
Step 3: Adding the Grid and Pieces
-
Roll Grid Strips:
Roll out very thin coils or cut thin strips of clay to create the grid lines. -
Lay the Grid:
Arrange the strips inside the dish in a hashtag (#) pattern. Use a ruler to ensure the spacing is even, creating 9 attractive squares. -
Secure the Lines:
Score underneath the strips slightly, apply a dab of water, and press them gently into the base. Use a small tool to tidy up where the lines intersect. -
Make the Tokens:
Roll out a separate piece of clay (you can use a contrasting terracotta color if desired, as seen in the photo). Cut out 10 small circles using your cookie cutter. -
Stamp Designs:
Use stamps or a sculpting tool to impress X and O designs, or floral motifs, onto the tokens. You’ll need 5 of each design.
Make it Magnetic
Embed small magnets into the base of the board and the bottom of the game pieces while the clay is wet. This makes it a perfect travel set for the car.
Step 4: Finishing Touches
-
Dry Slowly:
Place the board and pieces in a cool area away from direct sunlight. Let them dry slowly for 24-48 hours to minimize warping. -
Sand Smoother:
Once bone dry, lightly sand any rough edges on the rim or the game pieces with fine-grit sandpaper. -
Seal the Project:
Apply a coat of clear matte varnish to protect the surface and enhance the stone-like texture without making it look plasticky.
Now you have a charming, handmade game set that looks just as good on a shelf as it does during play

TRACK YOUR CERAMIC JOURNEY
Capture glaze tests, firing details, and creative progress—all in one simple printable. Make your projects easier to repeat and improve.
Mini Travel Set With A Tiny Piece Pouch
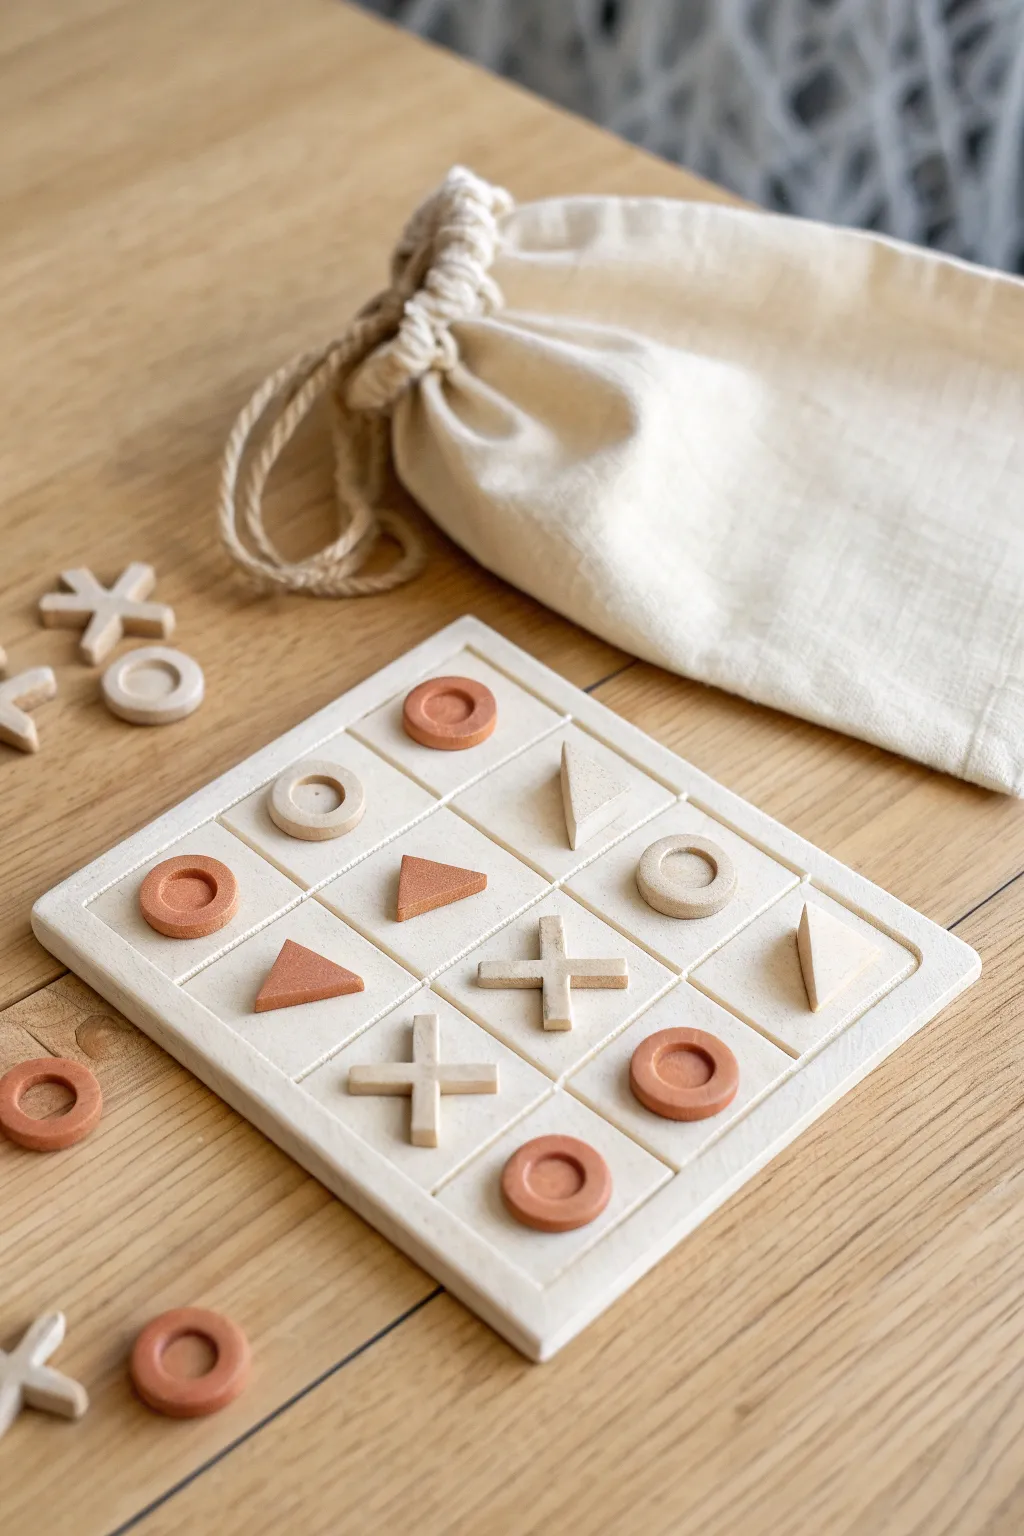
This charming, earth-toned travel game swaps paper and pencil for tactile clay pieces and a reusable board. With its minimalist aesthetic and compact drawstring storage pouch, it is perfect for road trips or coffee shop dates.
How-To Guide
Materials
- Air dry clay (white)
- Acrylic paint (terracotta or burnt orange)
- Acrylic paint (off-white or cream)
- Rolling pin
- Clay knife or craft knife
- Ruler
- Fine grit sandpaper
- Small paintbrush
- Matte sealant or varnish
- Water in a small cup
- Parchment paper or cutting mat
Step 1: Crafting the Board
-
Roll the base:
Begin by conditioning a large ball of white air dry clay until pliable. Roll it out on parchment paper to an even thickness of about 1/4 inch (6mm). -
Cut the square:
Using a ruler and a clay knife, cut out a perfect square. A 5×5 inch (13×13 cm) square is a good portable size. -
Smooth the edges:
Dip your finger in a little water and run it along the cut edges to smooth out any roughness or sharp corners. -
Score the grid:
Use your ruler to gently impress the tic-tac-toe grid lines into the wet clay. Press deep enough to be visible, but not so deep that you cut through the board. -
Create the border:
Roll thin snakes of clay and attach them around the perimeter of the square to create a raised border. Use a bit of water or slip to ensure they stick, then blend the seams.
Step 2: Sculpting the Pieces
-
Roll clay for pieces:
Roll out a fresh slab of clay, slightly thinner than the board, perhaps 1/8 inch (3mm) thick. -
Cut the shapes:
You will need at least 5 of each shape type. Cut out small ‘X’ shapes and triangles using your knife. For the ‘O’ pieces, you can roll small balls and flatten them, then press an indentation in the center, or cut small circles. -
Refine the forms:
Take time to smooth the tiny edges of each game piece with a damp fingertip. I find this step crucial for making the game feel nice to hold later. -
Dry everything:
Place the board and all game pieces on a flat surface to dry. Flip them occasionally to prevent warping. Let them dry for at least 24-48 hours until fully hardened and white.
Clean Lines Trick
When scoring grid lines, lay a piece of plastic wrap over the clay before pressing down with the ruler. This softens the indentation and prevents crumbling edges.
Step 3: Finishing Touches
-
Sand for smoothness:
Once bone dry, take fine-grit sandpaper and gently sand down any rough spots on the board edges and the game pieces. -
Paint the first team:
Select one set of shapes (for example, the circles and triangles) and paint them with the terracotta acrylic paint. -
Paint the second team:
Paint the remaining shapes (the X’s) with an off-white or cream color to match the natural clay tone but add a finished look. -
Paint the board:
Give the entire board a coat of the off-white paint. This seals the clay and provides a uniform background. -
Seal the game:
Apply a matte varnish to all pieces and the board. This protects the clay from chipping during travel and handling. -
Pack it up:
Once fully dry, slide the board and pieces into a small cotton or canvas drawstring bag for safekeeping.
Stamp It Up
Before drying, use tiny letter stamps to press the recipient’s initials into the bottom of the board or the back of the game pieces for a personalized gift.
Now you have a stylish, handmade game ready for your next adventure
Night Sky Board With Moon and Star Pieces
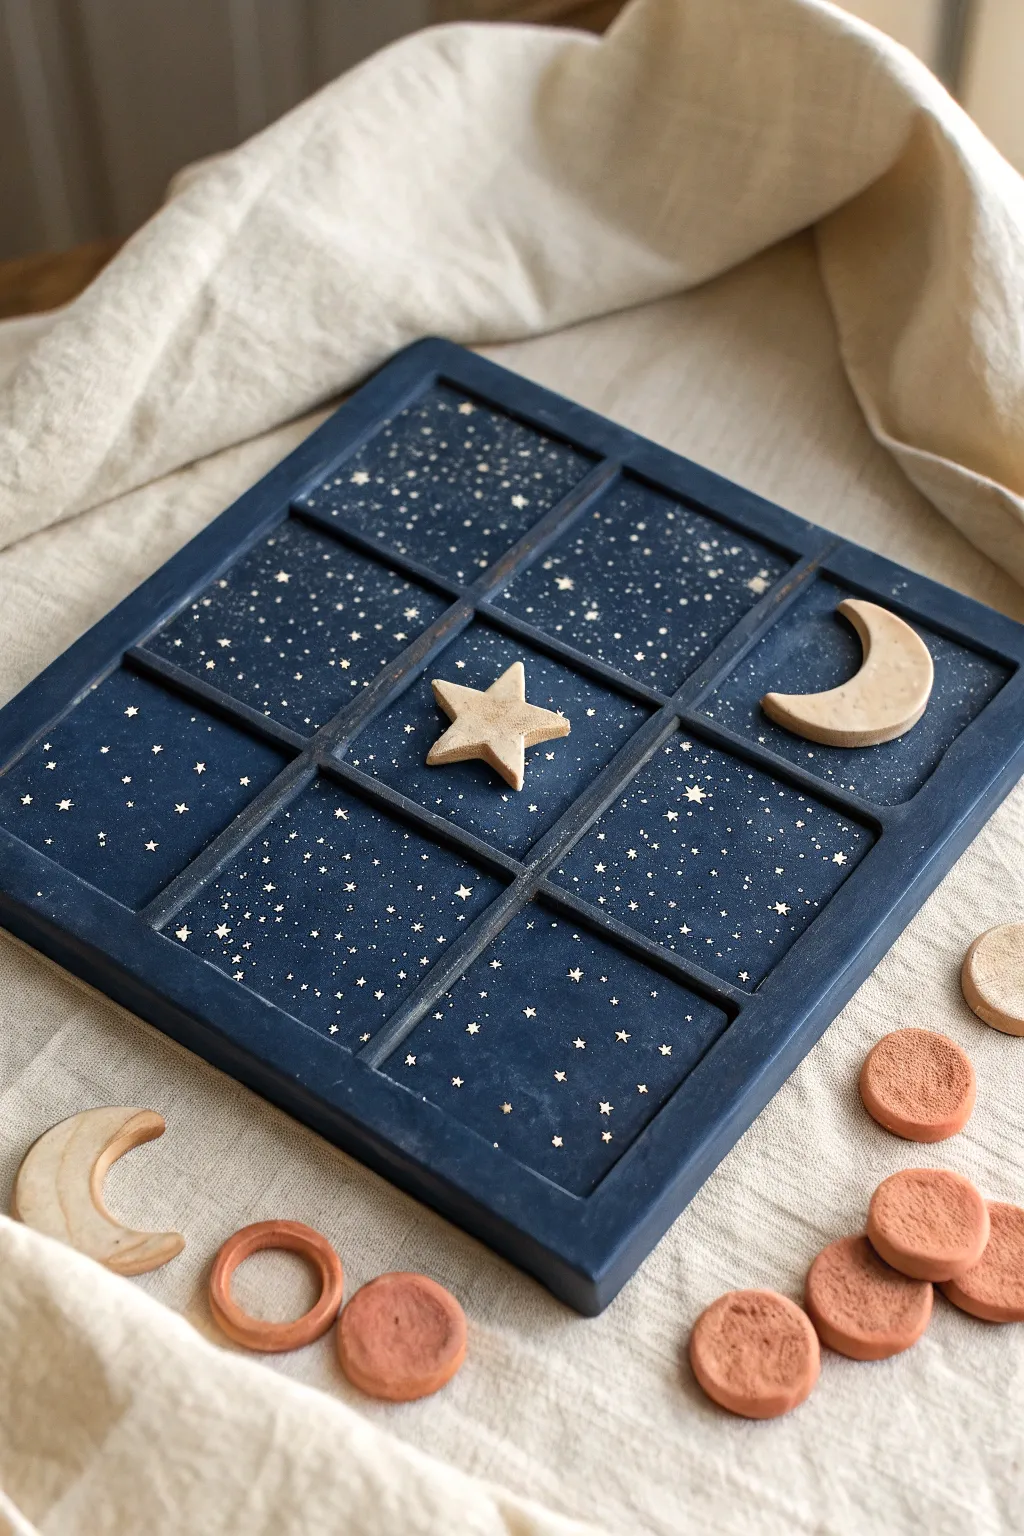
Bring the magic of the night sky to game night with this enchanting tic-tac-toe board. Featuring a deep midnight blue base speckled with starlight and charming moon and star playing pieces, this project transforms simple clay into a functional piece of art.
Step-by-Step Guide
Materials
- Air dry clay (white or terracotta)
- Square rolling pin guides or wooden slats (approx. 1/2 inch thick)
- Acrylic rolling pin
- Ruler and square tool
- Clay knife or craft knife
- Small star and moon cookie cutters (optional)
- Acrylic paint (Midnight Blue, Navy, White, Metallic Gold)
- Fine detail paintbrush or toothbrush (for splattering)
- Gloss or matte varnish
- Fine grit sandpaper
Step 1: Creating the Game Board
-
Prepare the slab:
Begin by conditioning a large chunk of air dry clay until it is smooth and pliable. Place it between your rolling pin guides and roll it out into a thick, even slab, ensuring it’s large enough to cut a perfect square later. -
Cut the square base:
Using a ruler and a sharp clay knife, cut a precise square from your slab. A size of about 6×6 or 8×8 inches works well for a tabletop game. Smooth the cut edges with a damp finger to remove any roughness. -
Measure the grid:
You need a traditional 3×3 tic-tac-toe grid. Lightly mark the measurements with a needle tool first to ensure spacing is even before committing to deep cuts. -
Indent the grid lines:
Instead of drawing lines, press a long, thin object (like the edge of a ruler or a wooden skewer) deep into the clay to create the grid channels. I find that pressing down rather than dragging creates a cleaner, more defined groove. -
Refine the edges:
The pressure from making the grid might distort the outer square slightly. Use your ruler to gently push the outer edges back into a perfect square shape. -
Dry the board:
Place the board on a wire rack or mesh screen to dry. To prevent warping, flip the board over every few hours during the first day of drying. It may take 24-48 hours to fully cure depending on thickness.
Step 2: Sculpting the Pieces
-
Roll clay for pieces:
Roll out a smaller portion of clay to a slightly thinner depth than the board, approximately 1/4 inch thick. -
Cut the shapes:
Cut out five stars and five crescent moons. You can use small cookie cutters for uniformity, or freehand cut them with a craft knife for a more rustic, organic look. -
Make the circular markers:
For added variety or an alternate player set, cut out 5-10 simple circles. These earthy discs add a nice textural contrast to the celestial theme. -
Smooth and dry:
Dip your finger in a little water and smooth the sharp edges of every game piece. Set them aside to dry completely alongside your board.
Warping Board?
If the corners curl up while drying, dampen the underside slightly and place a heavy book on top (with parchment paper in between) for a few hours.
Step 3: Painting the Night Sky
-
Sand imperfections:
Once everything is bone dry, lightly sand any rough spots on the board or pieces. Wipe away the dust with a barely damp cloth. -
Base coat the board:
Mix Midnight Blue with a touch of Navy acrylic paint. Apply this rich dark mixture over the entire top and sides of the board, getting into the grid grooves. -
Add depth:
While the blue is still slightly wet, dab a tiny bit of black or darker blue into the corners of the grid squares to create a subtle vignette effect. -
Create the stars:
Dilute white or metallic gold paint with a drop of water. Dip an old toothbrush or stiff brush into the paint and flick the bristles with your thumb to splatter tiny ‘stars’ across the board exclusively. -
Hand-paint constellations:
For the larger stars seen in the image, use a fine detail brush and metallic gold paint to manually dot specific points or draw tiny crosses. -
Detail the pieces:
Leave the moon and star pieces natural clay color to contrast against the dark board, or apply a very light wash of beige paint. Painting the simplified circular playing pieces a terracotta or copper tone adds warmth. -
Seal the project:
Finish by applying a coat of matte varnish to the board to protect the paint, and perhaps a satin glaze to the game pieces to make them durable for handling.
Glow Up
Mix glow-in-the-dark powder into your white paint for the stars. The board will look like a normal galaxy by day but illuminate when the lights go out.
Now you have a stunning, interactive centerpiece that looks as beautiful on a coffee table as it is fun to play