If you love burning incense, making your own air dry clay incense holder is one of those small projects that instantly makes your space feel more “you.” I’m sharing my favorite designs that look cute on a shelf but also do the real job: acting as a reliable ash catcher.
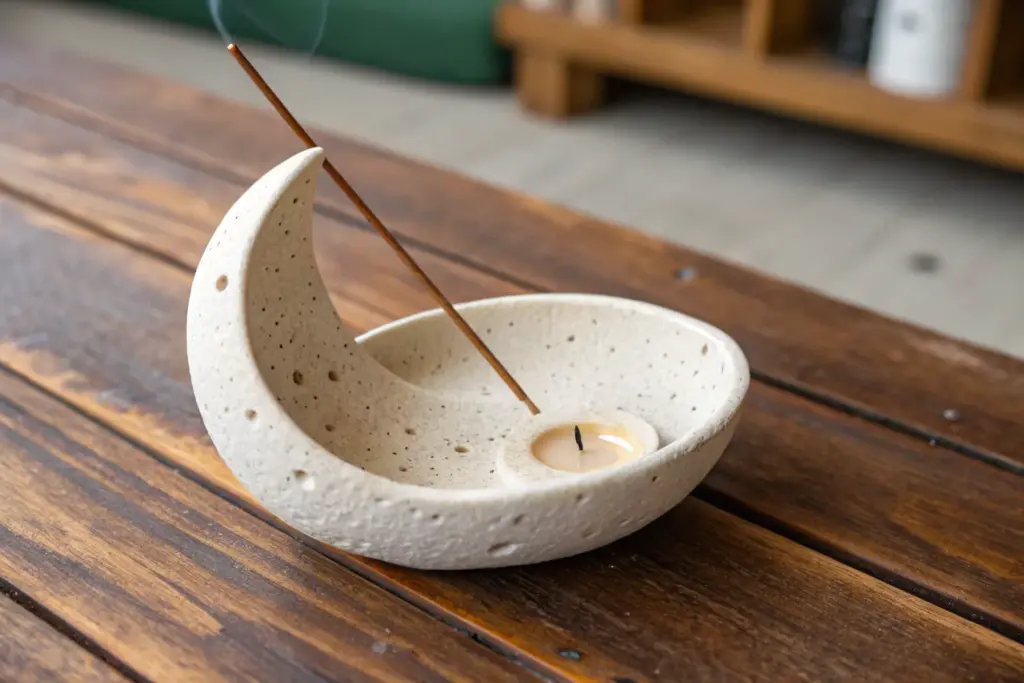
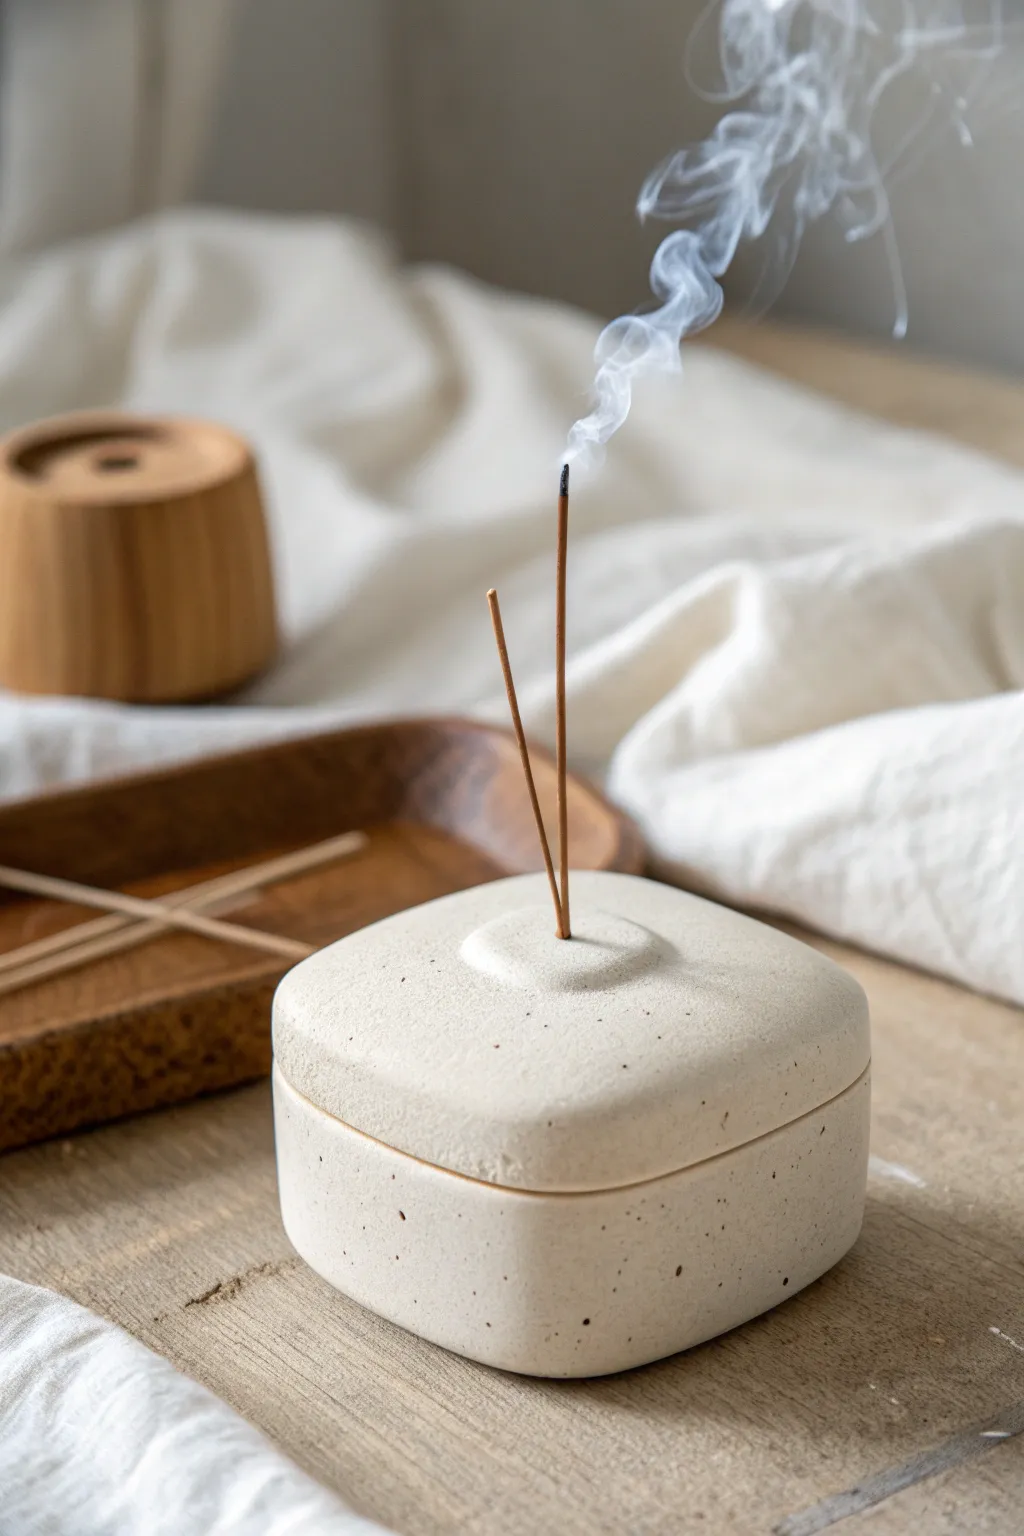
Minimalist Round Dish Holder
Embrace simplicity with this minimalist incense holder that mimics the calming texture of natural stone. This shallow basin design catches ash effortlessly while serving as a quiet, elegant centerpiece for your meditation space.
How-To Guide
Materials
- White air dry clay
- Dried coffee grounds or fine sand (for speckling)
- Rolling pin
- Circle cutter or a bowl (approx. 4-5 inches wide)
- Craft knife
- Small bowl of water
- Sponge
- Incense stick (for sizing)
- Fine grit sandpaper
- Matte sealant or varnish
Step 1: Preparing the Clay
-
Condition the clay:
Start with a handful of white air dry clay. Knead it in your hands until it is warm, pliable, and free of any cracks. -
Add texture:
Flatten the clay slightly and sprinkle in your speckling agent. I like to use dried used coffee grounds for an organic, earthy look, but fine black sand works beautifully too. -
Mix thoroughly:
Fold the clay over the speckles and knead repeatedly. Continue until the specks are evenly distributed throughout the entire ball of clay.
Shrinkage Check
Clay shrinks as it dries. Make the incense hole slightly larger than your sticks, or re-insert the stick gently halfway through the drying process to maintain the fit.
Step 2: Shaping the Base
-
Roll it out:
Using your rolling pin, roll the clay into an even slab about 1/4 inch thick. Rotate the clay frequently to prevent sticking. -
Cut the circle:
Place your bowl or circle cutter onto the slab and press down firmly to cut your main shape. Remove the excess clay. -
Create the rim:
Gently curve the outer edges of the circle upward to create a shallow bowl shape. You can use your thumb to press the center down while lifting the edges with your fingers. -
Smooth the edges:
Dip your finger in water and run it along the rim to smooth out any roughness or cracks that formed during shaping.
Marble Effect
Instead of mixing the speckles completely, stop kneading early to leave streaks of coffee or sand visible for a beautiful, swirled marble stone effect.
Step 3: Creating the Holder
-
Make the center mount:
Take a small piece of leftover clay and roll it into a ball about the size of a large marble. -
Flatten the mount:
Press the ball down slightly to create a thick, rounded disc. This will hold the incense stick. -
Indent the top:
Use your thumb or a rounded tool to press a small, shallow indentation into the top of this disc, creating a mini cup shape. -
Score and slip:
Use a craft knife to scratch cross-hatch marks on the bottom of the mount and the center of your dish. Dab a little water or liquid clay (slip) on the scratched areas. -
Attach the mount:
Press the mount firmly into the center of the dish. Wiggle it slightly to ensure a suction bond is created. -
Blend the seam:
Use a small tool or your finger to smooth the clay where the mount meets the dish, blending them so they look like one continuous piece. -
Pierce the hole:
Take your incense stick and carefully plunge it into the center of the mount. Wiggle it just a tiny bit to make the hole slightly larger than the stick, as clay shrinks when drying.
Step 4: Finishing Touches
-
Final smoothing:
Use a damp sponge to wipe down the entire piece, erasing fingerprints and softening any sharp angles. -
Let it dry:
Place the holder in a cool, dry spot away from direct sunlight. Allow it to dry for 24-48 hours, turning it occasionally to ensure even drying. -
Sand it down:
Once fully dry, use fine grit sandpaper to gently buff the surface. This exposes the coffee or sand speckles more clearly and mimics the stone texture. -
Seal the piece:
Apply a coat of matte varnish or sealant to protect the clay from ash residue and moisture.
Now you have a serene, functional piece of decor ready to bring a moment of calm to your daily routine.


Long Incense Boat Tray
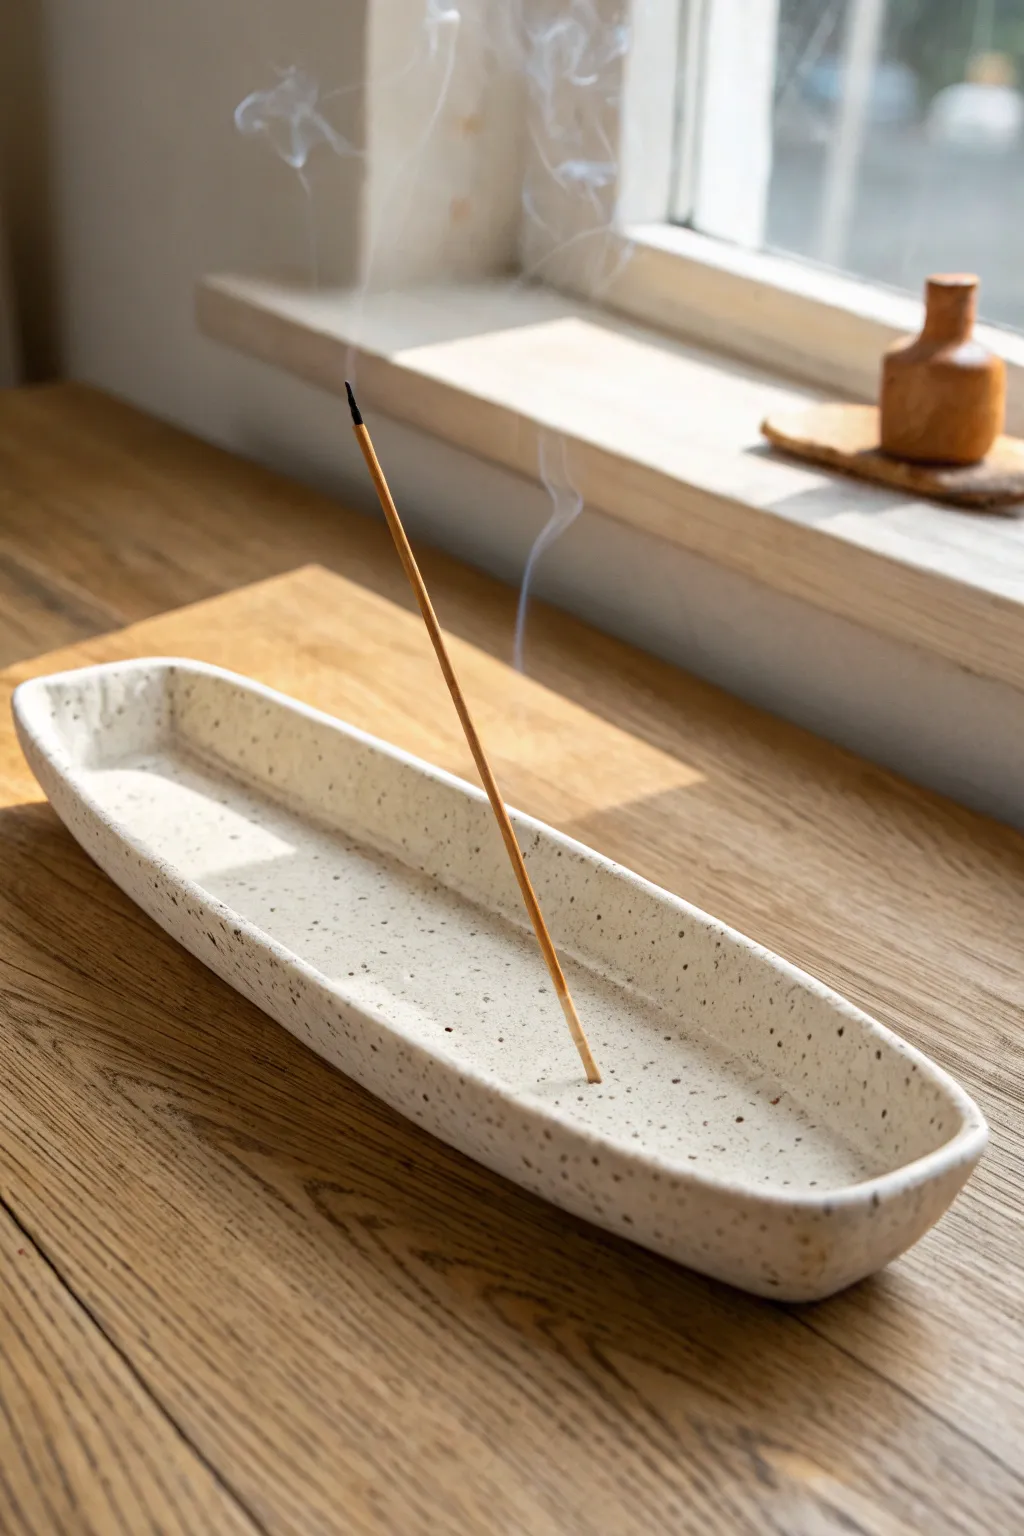
This elegant, minimalist incense holder features a long, boat-like shape with gently lifted ends, perfect for catching all the ash from your favorite scents. The speckled finish gives it a trendy ceramic look without requiring a kiln, making it a sophisticated addition to any windowsill or coffee table.
Detailed Instructions
Materials
- White air-dry clay (about 150-200g)
- Acrylic rolling pin
- Fettling knife or clay cutter
- Cup of water
- Sponge or soft paintbrush
- Sandpaper (medium and fine grit)
- Incense stick (for sizing the hole)
- Acrylic paint (cream/off-white and dark brown/black)
- Old toothbrush
- Gloss or satin varnish/sealant
Step 1: Shaping the Form
-
Condition the clay:
Start by taking a handful of white air-dry clay and kneading it in your hands to warm it up. This conditioning process prevents cracks later on. -
Roll a cylinder:
Roll the clay between your palms or on your work surface until you have a thick, even cylinder shape, roughly the length of a standard incense stick plus an inch or two. -
Flatten into a slab:
Using your acrylic rolling pin, gently flatten the cylinder into a long oval slab. Aim for a thickness of about 1/4 inch (6mm) to ensure durability. -
Refine the shape:
Use your fettling knife to trim the edges of your oval if they look uneven. You want a long, pleasing racetrack or boat shape with rounded ends. -
Lift the edges:
Gently pinch and lift the entire outer rim of the clay slab upward. Use your thumb on the inside and fingers on the outside to create a shallow wall. -
Create the boat curve:
To give it that elegant boat profile, gently push the two far ends upward a bit more aggressively than the sides. You can prop these ends up with small pieces of crumpled foil or extra clay while they dry to hold the curve. -
Smooth the surface:
Dip your finger or a sponge lightly in water and run it over the clay. Smooth out any fingerprints, cracks, or rough edges along the rim. -
Add the incense hole:
Take a spare incense stick and poke a hole into the clay where you want the stick to stand. Angle the hole slightly so the incense will lean over the tray, ensuring the ash falls safely inside. -
Widen the hole slightly:
Wiggle the stick just a tiny bit to make the hole slightly larger than the stick itself, as air-dry clay shrinks when it dries. -
Dry thoroughly:
Set your tray aside in a safe spot away from direct heat. Let it dry for at least 24-48 hours until it is bone dry and turns a chalky white color.
Hole Placement Trick
Before the clay dries, test the balance by inserting a stick. Ensure the stick’s angle keeps the burning end directly over the tray’s center line.
Step 2: Finishing and Decorating
-
Sand imperfections:
Once fully dry, take your medium grit sandpaper and smooth out any rough edges on the rim. Follow up with fine grit sandpaper for a silky finish. -
Base coat painting:
Paint the entire piece with a cream or off-white acrylic paint. You may need two coats to get a solid, opaque finish that hides the raw clay texture. -
Prepare the speckle mix:
Dilute a small amount of dark brown or black acrylic paint with water until it has an inky consistency. -
Splatter effect:
Dip an old toothbrush into the watered-down paint. Hold it over your tray and run your thumb across the bristles to flick tiny speckles onto the surface. I like to practice on a paper towel first to control the spray. -
Seal the piece:
Once the paint is completely dry, apply a coat of gloss or satin varnish. This mimics the look of glazed ceramic and protects the clay from ash stains.
Make it Waterproof
If you plan to wipe this down with a wet cloth often, swap the standard varnish for a dishwasher-safe sealant like Mod Podge Dishwasher Safe.
Now you have a serene, custom-made spot to burn your favorite incense blends


Moon and Stars Catchall Holder
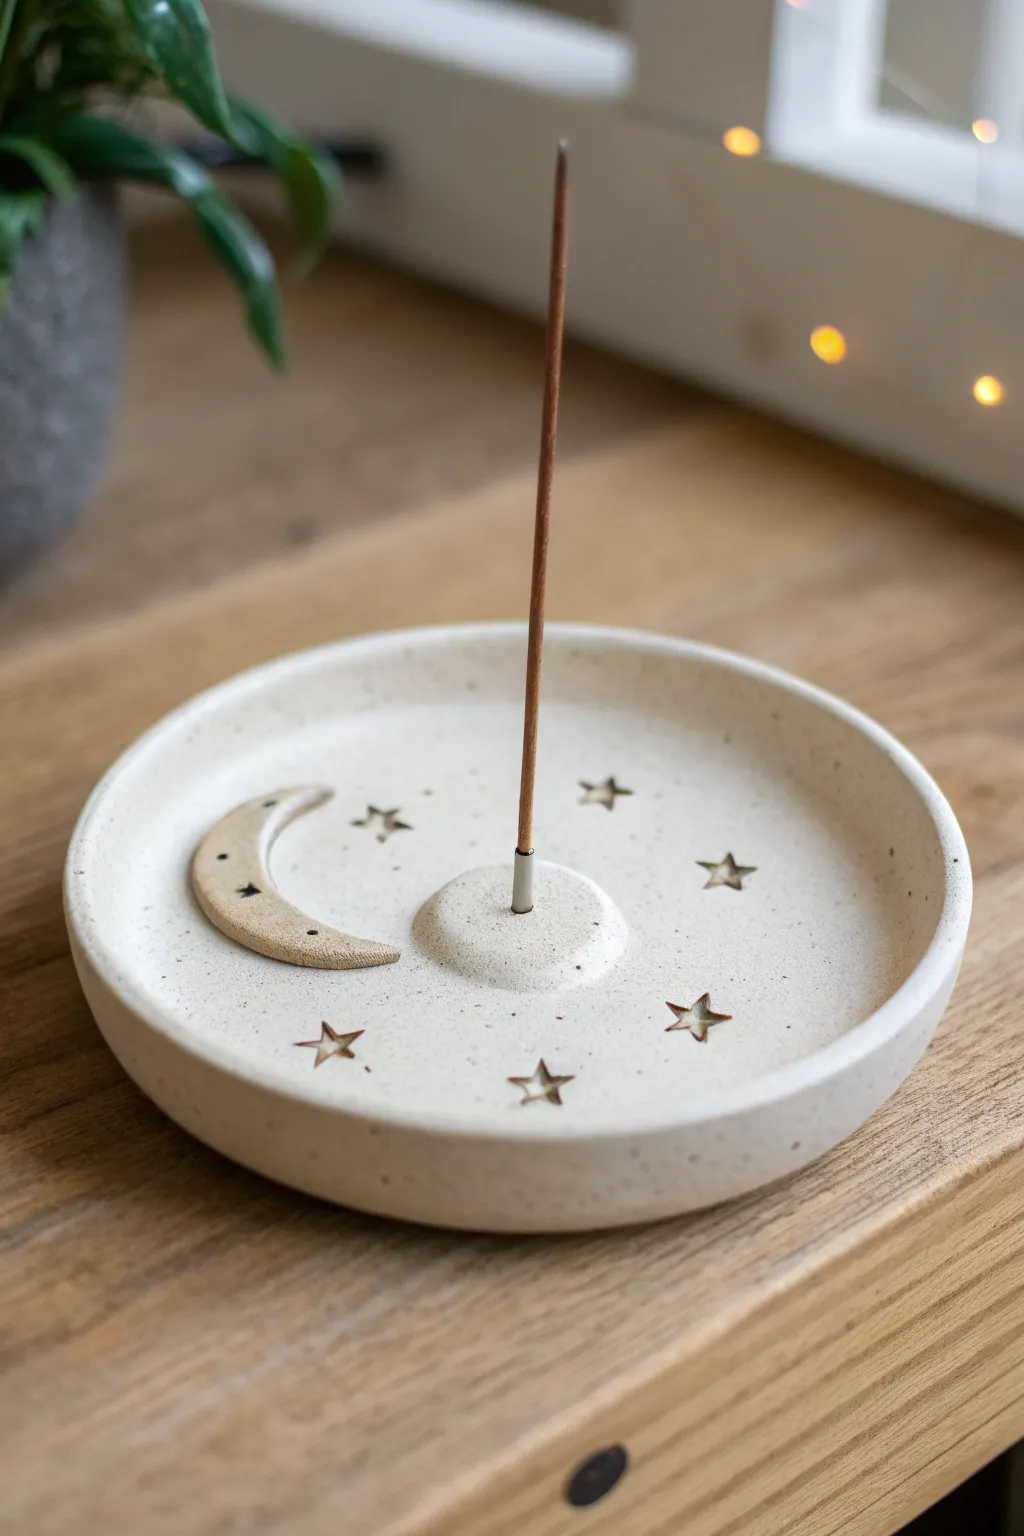
Bring the magic of the night sky into your home with this speckled, celestial-themed incense holder. Its wide basin serves as both an ash catcher and a trinket dish, adorned with a crescent moon and scattered stars.
Step-by-Step
Materials
- White air dry clay
- Rolling pin
- Circle cutter or bowl (approx. 5-6 inches)
- Small star-shaped clay cutter (or precision knife)
- Craft knife
- Incense stick (for sizing the hole)
- Small wooden incense stick insert (optional metal grommet)
- Sandpaper (fine grit)
- Acrylic paints (cream/off-white, pale beige)
- Brown paint for speckling
- Gloss or matte varnish
- Paintbrush
- Old toothbrush
- Water and sponge
Step 1: Shaping the Base
-
Roll the clay slab:
Begin by taking a large ball of white air dry clay. Roll it out on a smooth, flat surface until it is approximately 1/4 inch thick, ensuring even thickness throughout. -
Cut the main circle:
Place your circle cutter or a bowl upside down onto the clay. Press down firmly to cut out a clean circle, then peel away the excess clay. -
Smooth the edges:
Dip your finger in a little water and run it along the cut edge of the circle to smooth out any roughness or sharpness. -
Create the rim:
Gently curve the outer edge of the circle upwards to create a raised rim. You can pinch it lightly or roll a coil of clay and attach it to the edge using the score-and-slip method for a more defined wall, blending the seam thoroughly until invisible.
Keep it Straight
Make sure your center hole is perfectly vertical. If you poke it at an angle, your incense stick will lean sideways and drop ash outside the bowl.
Step 2: Adding Celestial Details
-
Form the center mount:
Take a small ball of clay and flatten it slightly into a dome shape. Attach this to the exact center of your dish using scoring (scratching both surfaces) and a dab of water. -
Pierce the incense hole:
While the center dome is still wet, use an actual incense stick or a skewer to poke a hole straight down into the middle. Wiggle it slightly to ensure the stick will fit loosely enough even after the clay shrinks during drying. -
Cut the moon shape:
Roll out a small separate piece of clay. Use a round cutter to cut a circle, then move the cutter slightly over and cut again to create a crescent moon shape. -
Attach the moon:
Score the back of the moon and a spot on the left side of the dish. Apply a little water or slip and press the moon firmly into place. -
Add texture to the moon:
Using a needle tool, poke two or three tiny dots into the moon shape to mimic craters. -
Create star impressions:
Use a small star-shaped cutter to press star outlines into the wet clay around the rest of the dish. Do not cut all the way through; just press deep enough to leave a crisp impression. -
Refine the surface:
I like to take a damp sponge and gently wipe the entire piece one last time to remove any fingerprints or stray crumbs before setting it aside.
Cracking Issues?
If small cracks appear where you joined the rim or moon while drying, mix a tiny bit of fresh clay with water to make a paste and fill the cracks, then sand smooth.
Step 3: Finishing Touches
-
Dry completely:
Let the piece dry for 24-48 hours. Turn it over halfway through the drying process so the underside dries evenly and doesn’t warp. -
Sand for smoothness:
Once fully dry and hard, use fine-grit sandpaper to buff away any uneven spots on the rim or surface. Wipe away dust with a dry cloth. -
Apply base color:
Paint the entire dish with an off-white or cream acrylic paint. Apply two thin coats for opaque coverage, letting the first coat dry before adding the second. -
Paint the moon:
Mix a very distinct, slightly darker beige or pale unbleached titanium color and paint just the crescent moon to make it stand out subtly against the base. -
Create the speckled effect:
Dilute a small amount of dark brown paint with water. Dip an old toothbrush into this mixture and flick the bristles with your thumb to spray fine speckles across the entire dish. -
Seal the piece:
Finish by applying a coat of clear varnish (matte or satin works best for this stone-like look) to protect the clay from ash and moisture. -
Add metal insert (optional):
If you have a small metal grommet or specific incense holder insert, glue it into the center hole now for extra stability and fire safety.
Place your favorite incense scent in the center and enjoy the peaceful atmosphere you’ve created


Leaf-Shaped Ash Catcher
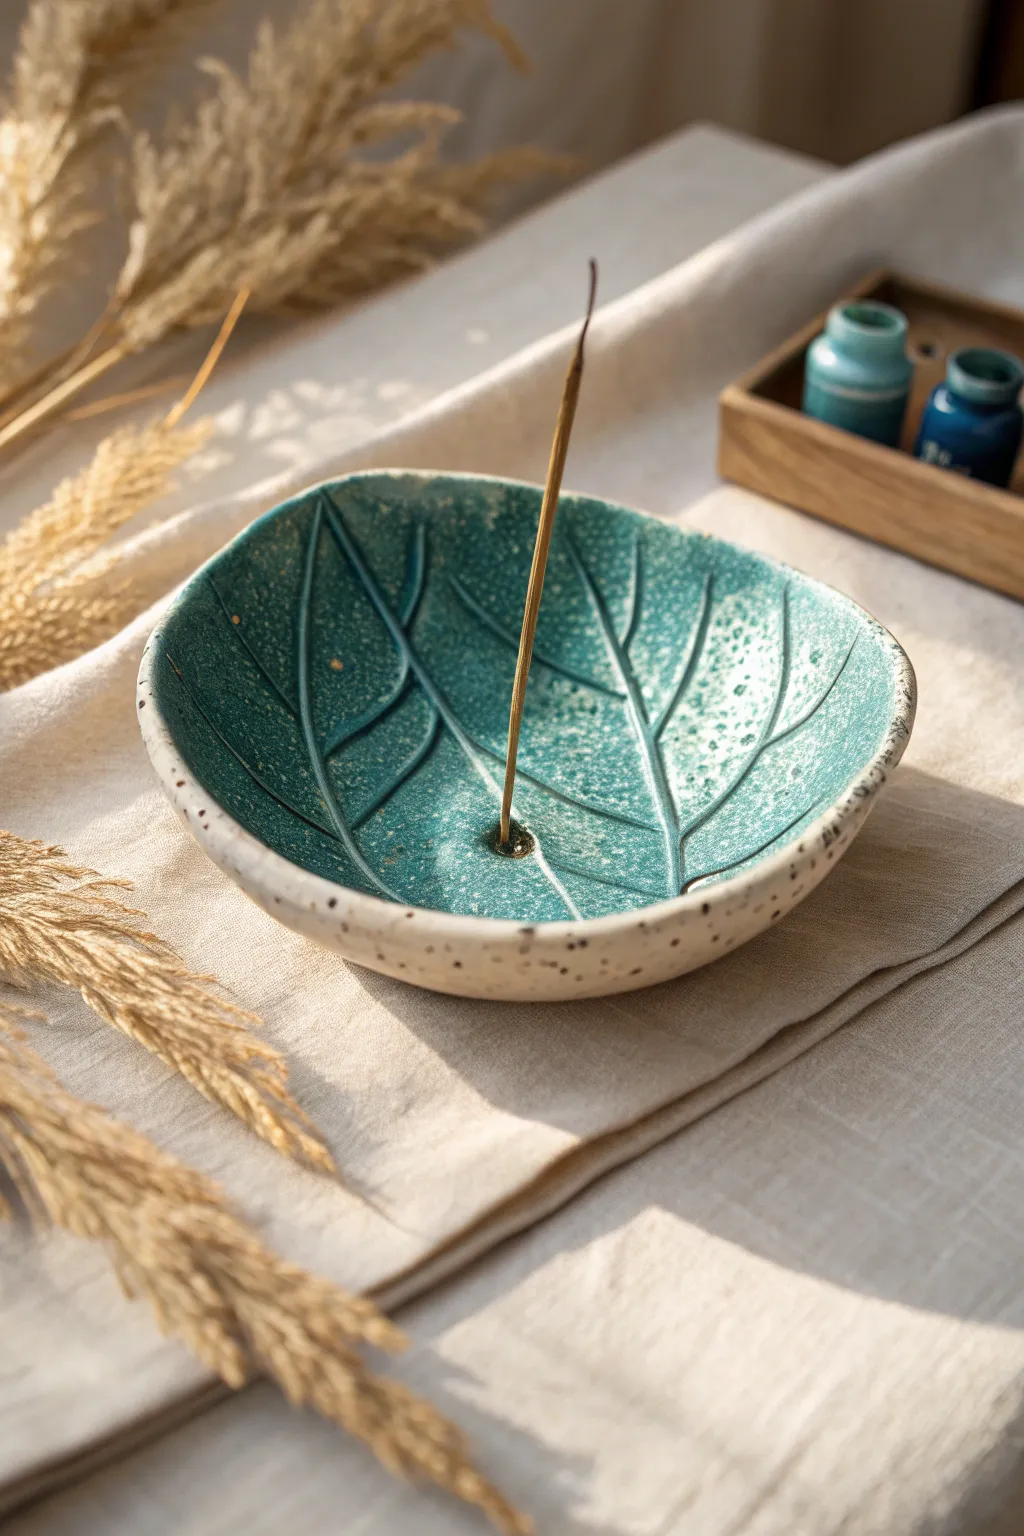
Capture the beauty of nature with this organic, bowl-style incense burner featuring carved leaf veins and a stunning teal glaze effect. The speckled clay body and contrasting interior create a piece that feels both rustic and refined, perfect for catching every bit of falling ash.
Step-by-Step Tutorial
Materials
- White or speckled air dry clay
- Rolling pin
- Small bowl (for a slump mold)
- Needle tool or clay knife
- Sponge
- Fine sandpaper
- Teal acrylic paint
- Burnt umber or dark brown acrylic paint (for wash)
- Gloss or satin varnish
- Incense stick (for sizing)
Step 1: Shaping the Base
-
Prepare the slab:
Begin by wedging your clay to remove any air pockets, then roll it out into a slab approximately 1/4 inch thick. Aim for an organic oval shape rather than a perfect circle to mimic a natural leaf. -
Cut the form:
Use a needle tool or fettling knife to cut out a soft, rounded leaf shape. Smooth the cut edges with a damp sponge or your finger to remove any sharp burrs or crumbs. -
Create the curve:
Gently lift your clay slab and drape it inside a small bowl lined with plastic wrap. Press it lightly so it takes on a shallow cupped shape, which will ensure all ash stays contained. -
Add the holder:
Roll a small ball of clay and attach it firmly to the center of the bowl using the score-and-slip method. Smooth the edges down so it blends seamlessly into the bowl floor. -
Make the insertion hole:
Take a spare incense stick (or tool of similar diameter) and press it into the center mound at a slight angle. Wiggle it gently to ensure the hole is slightly larger than the stick to account for clay shrinkage.
Uneven Drying?
If the rim curls while drying, place a light beanbag or small bag of rice in the center to weigh it down gently.
Step 2: Carving Details
-
Sketch the veins:
While the clay is still inside the support bowl but slightly firm, use your needle tool to lightly sketch a central vein line running near the incense hole. -
Carve the main lines:
Deepen your main vein line, carving cleanly into the clay surface. Branch off with secondary veins curving outwards toward the rim to create the leaf structure. -
Refine the texture:
go back over your carved lines with a damp brush to smooth out any clay crumbs. I like to press a coarse sponge gently onto the ‘leaf’ sections between the veins to add a subtle organic texture. -
Drying:
Let the piece dry completely in the mold for at least 24-48 hours. Remove it only when it is bone dry and light in color.
Step 3: Painting and Finishing
-
Sand imperfections:
Once fully dry, use fine-grit sandpaper to smooth the rim and the outside of the bowl. Wipe away all dust with a slightly damp cloth. -
Outer speckling:
Leave the outside of the bowl unpainted if you used speckled clay. If using plain white clay, dilute some light brown paint and flick it onto the exterior with an old toothbrush to create the faux-stone look. -
Paint the interior:
Apply two coats of teal acrylic paint to the inside of the bowl, ensuring you get paint into the carved vein grooves. Let this dry completely. -
Apply an antique wash:
Mix a small amount of dark brown paint with water. Brush this wash over the teal interior and immediately wipe the raised areas with a paper towel. The dark paint will remain in the carved veins and texture, highlighting the design. -
Clean the rim:
If any teal paint got onto the rim, sand it back lightly to reveal the natural clay color, creating a nice separation between the colorful inside and natural outside. -
Seal the piece:
Finish with a coat of high-gloss or satin varnish on the interior to mimic a ceramic glaze. Use a matte varnish on the exterior to maintain the natural stone feel.
Gilded Edges
Paint the very top rim of the bowl with gold liquid leaf paint for a luxurious, kintsugi-inspired finish.
Now you have a serene, nature-inspired vessel to hold your favorite scents

What Really Happens Inside the Kiln
Learn how time and temperature work together inside the kiln to transform clay into durable ceramic.
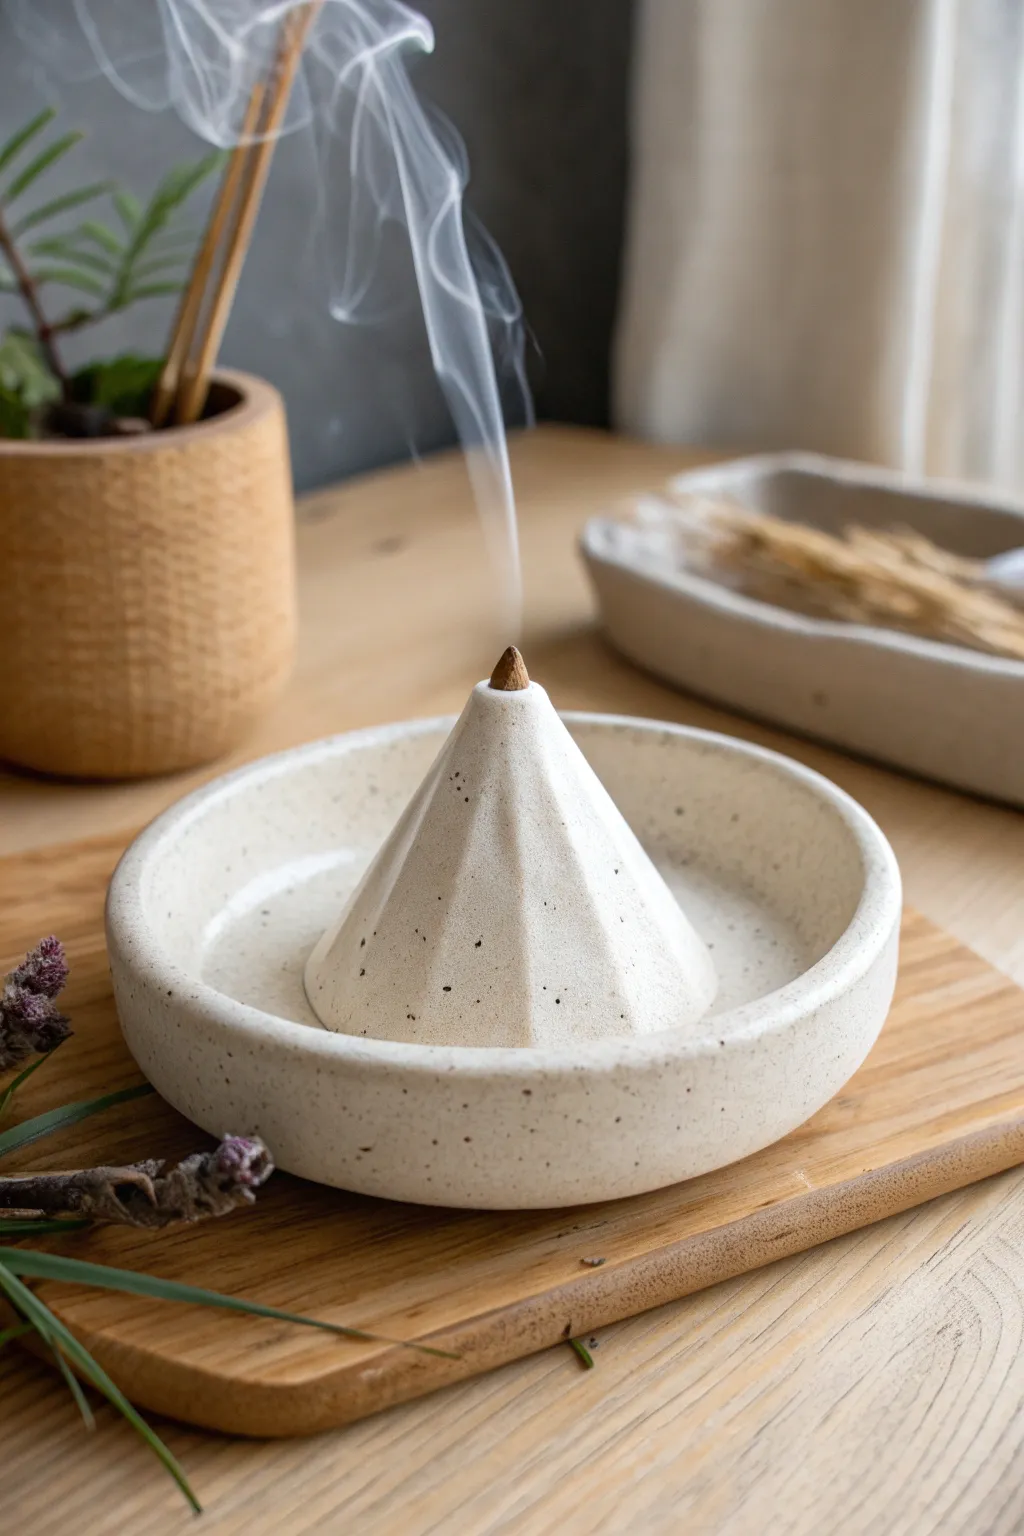
Simple Pinch Pot Cone Burner
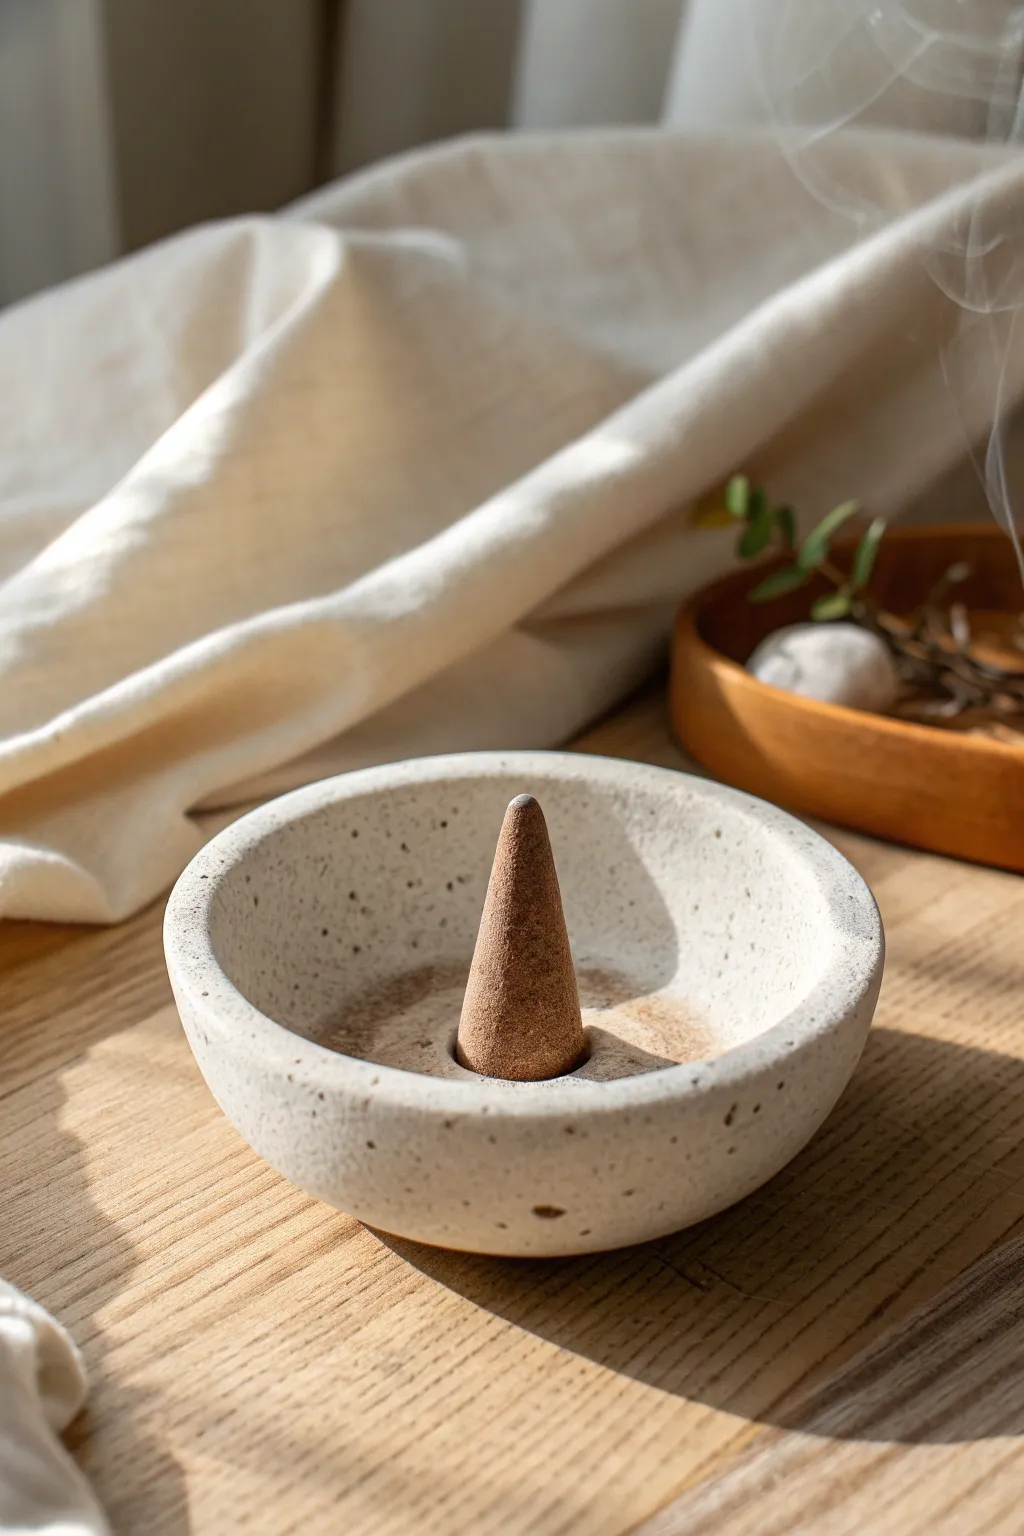
Embrace the beauty of minimalism with this serene, speckled pinch pot designed specifically for cone incense. Its wide, shallow shape catches falling ash perfectly while the neutral tones add a calming, earthy aesthetic to any corner of your home.
How-To Guide
Materials
- White polymer clay or air-dry clay (e.g., DAS white)
- Faux stone speckle dust (or dried coffee grounds/black pepper)
- Small rolling pin or acrylic roller
- Smoothing sponge
- Small bowl of water
- Fine-grit sandpaper (220-400 grit)
- Clear matte acrylic varnish/sealant
- Soft paintbrush
- Incense cone (for sizing)
Step 1: Prepping and Shaping
-
Condition the clay:
Begin by taking a chunk of white clay about the size of a golf ball or slightly larger. Knead it thoroughly in your hands until it becomes warm, pliable, and free of cracks. -
Add texture:
Flatten the ball slightly. Sprinkle your speckle dust (or a pinch of coffee grounds/coarse black pepper) onto the clay. Fold the clay over and knead again until the speckles are evenly distributed throughout the mass. -
Form a ball:
Roll the clay between your palms to create a smooth, tight sphere. This foundational shape ensures your final bowl will be symmetrical. -
Create the opening:
Hold the sphere in your non-dominant hand. Gently press your thumb into the center of the ball, pushing down about halfway, leaving a thick base at the bottom. -
Pinch the walls:
Using your thumb and forefinger, begin pinching the walls of the clay, rotating the pot as you go. Aim for a distinct bowl shape with relatively thick, sturdy walls—roughly 1/4 inch thick. -
Flatten the base:
Establish a stable bottom by gently tapping the base of your pot against your work surface. This prevents wobble and ensures it sits flat.
Cracks Appearing?
If small cracks appear while pinching, dip your finger in a tiny bit of water (or clay slip) to smooth them immediately. Don’t let cracks grow or the bowl may split when drying.
Step 2: Refining and Seating
-
Create the cone seat:
Take your sample incense cone and press it gently into the exact center of the bowl’s interior floor. You want to create a shallow depression or ‘seat’ that will hold the cone upright, but don’t press too deep. -
Widen the rim:
Gently flare the rim of the bowl outward just a little. This wider stance helps ensure any ash falling from the cone lands safely inside the dish rather than on your table. -
Smooth the edges:
Dip your finger or a small sponge into water (very sparingly) and run it along the rim and outer walls to erase fingerprints and smooth out any small cracks. -
Refine the lip:
I like to use a flat tool or just my thumb to gently flatten the very top edge of the rim, giving it that modern, substantial look seen in the photo rather than a sharp, thin edge.
Make it Organic
Instead of a perfectly round rim, gently press one side down or pinch a corner to create an intentional, organic asymmetry for a wabi-sabi aesthetic.
Step 3: Finishing Touches
-
Dry properly:
Set the piece aside in a cool, dry place away from direct sunlight. Let it air dry for at least 24-48 hours. Rotate it occasionally so the bottom dries evenly. -
Sand for smoothness:
Once fully cured and bone dry, take your fine-grit sandpaper and gently sand the rim and exterior. This removes any final bumps and exposes those lovely speckles even more. -
Wipe down:
Use a slightly damp cloth or a dry soft brush to remove all the sanding dust from the bowl, paying attention to the center depression. -
Seal the piece:
Apply a thin layer of clear matte varnish to the entire piece. This protects the clay from ash stains and scorch marks. -
Second coat:
Allow the first coat to dry completely, then apply a second coat for added durability, especially in the center where the burning cone will sit.
Once sealed and dried, light your favorite scent and watch the smoke drift from your handmade creation
Speckled Terrazzo Dish Holder
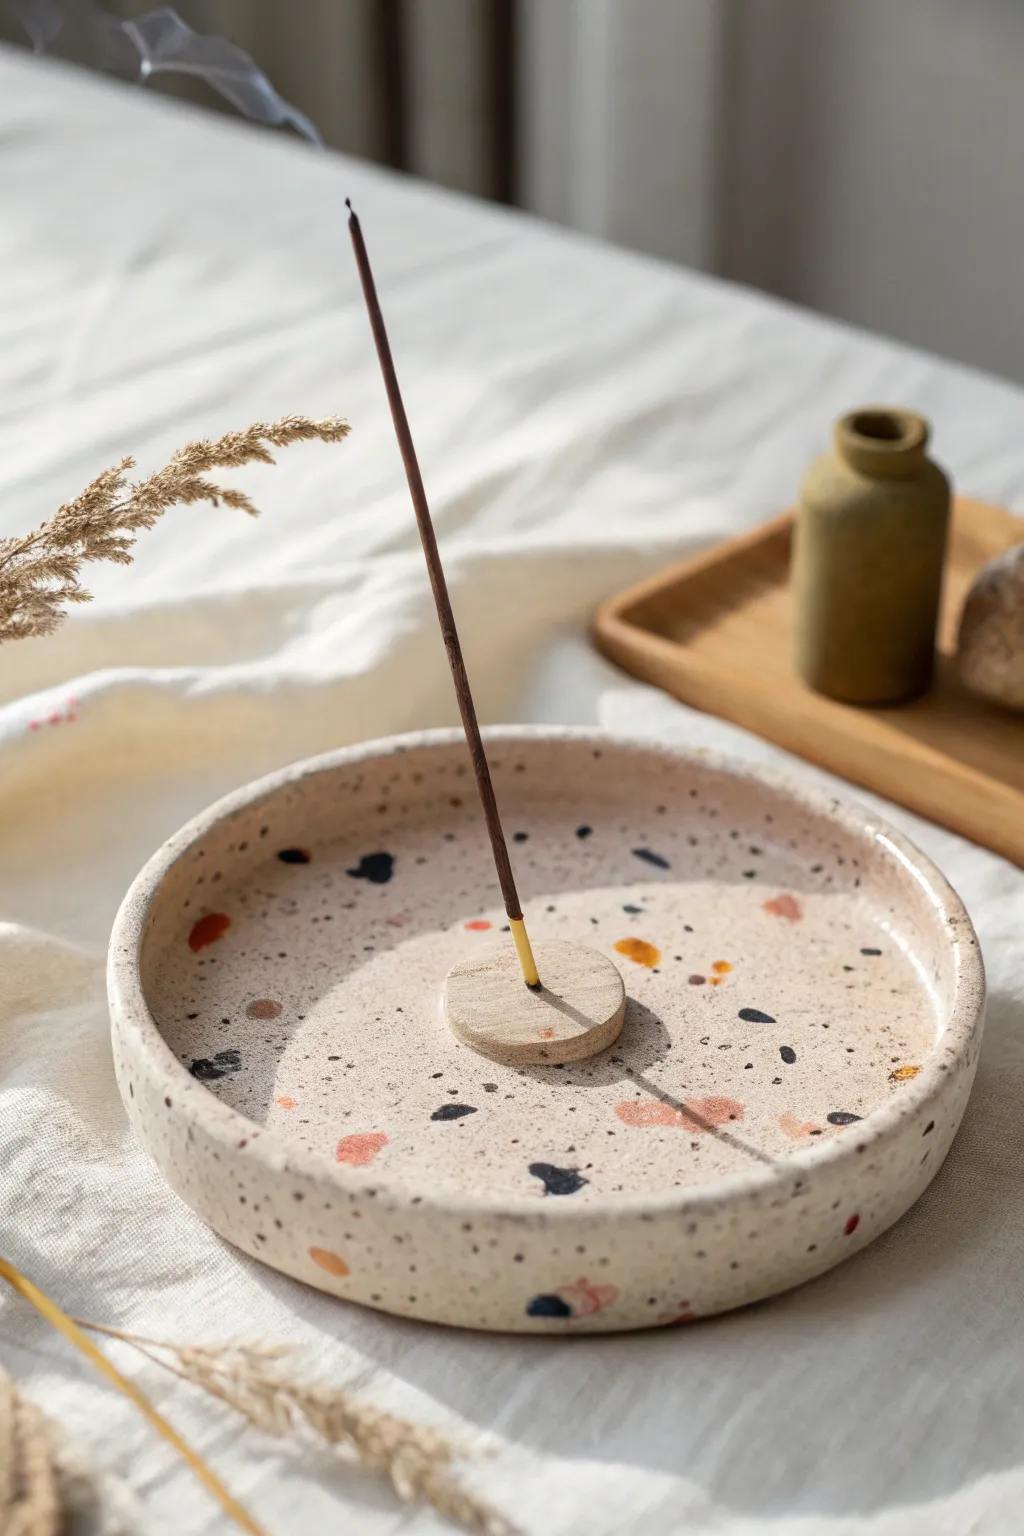
Bring a touch of modern art to your meditation corner with this chic, terrazzo-inspired incense holder. This project uses a clever “chips and chunks” technique to mimic the classic composite material, resulting in a unique, speckled finish that looks far more expensive than it is.
Step-by-Step Guide
Materials
- White or cream air-dry clay (approx. 500g)
- Acrylic paints (black, navy blue, burnt orange, rust red)
- Rolling pin
- Circle cutters (one large approx. 5-6 inches, one small approx. 1 inch)
- Clay knife or craft blade
- Small bowl of water
- Sponge or fine sandpaper
- Glossy varnish or sealant
- Skewer or toothpick
Step 1: Preparing the ‘Chips’
-
Mix your colors:
Start by pinching off four small walnut-sized pieces of white clay. Knead a different color of acrylic paint into each one until the color is solid and uniform. You want bold, saturated tones for the best contrast. -
Flatten the colored clay:
Roll each colored ball out very thinly, about 1-2mm thick. It doesn’t need to be neat; ragged edges are perfectly fine here. -
Create the fragments:
Tear these thin sheets into random, jagged little pieces. Vary the sizes from tiny specks to slightly larger, bean-sized shards to create that authentic terrazzo look. -
Let them dry slightly:
Set these colored chips aside for about 15-20 minutes. Allowing them to firm up slightly makes them easier to press into the main clay body without smearing.
Step 2: Forming the Dish
-
Prepare the base:
Take a large portion of your white clay and roll it into a ball. Flatten it with your palm on a smooth surface or canvas mat. -
Incorporate the chips:
Scatter a handful of your colored clay chips onto the white slab. Use your rolling pin to press them firmly into the surface. Fold the clay over, add more chips, and roll again to distribute the color throughout the thickness of the clay, not just the top. -
Final rollout:
Roll the clay out to a final thickness of about 1/4 inch. If the surface looks sparse, press a few extra chips onto the top and give it one last gentle roll to make it flush. -
Cut the main shape:
Use your large circle cutter or trace around a bowl to cut out the main dish base. Peel away the excess clay. -
Create the rim:
Roll a long snake of the remaining terrazzo-mixed clay. It should be long enough to circle the circumference of your base. -
Attach the rim:
Score the edge of the base and the underside of the clay snake. Apply a little water to the scored areas (this is your “slip”) and gently press the coil onto the edge of the base. -
Smooth the transition:
Use your thumb or a modeling tool to smudge the inside of the coil down into the base so they become one seamless piece. I find a slightly damp sponge helps get this perfectly smooth. -
Shape the wall:
Pinch the wall gently to straighten it up, ensuring it stands about half an inch tall and has a nice, flat top edge.
Sanding Secret
Don’t skip the sanding phase! The terrazzo effect might look cloudy or buried initially. Sanding removes the top layer of white clay, making the colored chips crisp and vibrant.
Step 3: The Centerpiece & Finish
-
Cut the holder:
From your leftover rolled slab, use your small circle cutter to punch out a disc about 1 inch in diameter. -
Make the hole:
Use an incense stick or a skewer to poke a hole directly in the center of this small disc. Wiggle it slightly so the hole is large enough to accommodate swelling during drying. -
Attach the holder:
Score the bottom of the small disc and the center of your large dish. Add a drop of water and press the small disc firmly into the center of the bowl. -
Dry slowly:
Place the piece in a cool, dry spot away from direct sunlight. Let it dry for at least 24-48 hours. Turn it over halfway through if possible to help the bottom dry evenly. -
Reveal the pattern:
Once bone dry, take fine-grit sandpaper and gently sand the entire surface. This is the magic step: sanding removes the top film of white clay and reveals the crisp, bright colors of the chips underneath. -
Dust off:
Wipe away all sanding dust with a slightly damp tack cloth or paper towel. -
Seal:
Apply two coats of glossy varnish or sealant to protect the clay and make those terrazzo flecks pop. Let the first coat dry completely before adding the second.
Cracking Clay?
If you see tiny cracks forming while it dries, mix a tiny bit of fresh clay with water to make a paste and fill them in immediately. smoothing it over with a damp finger.
Place your favorite incense stick in the center and enjoy the modern, artisan vibe you’ve created with your own hands


The Complete Guide to Pottery Troubleshooting
Uncover the most common ceramic mistakes—from cracking clay to failed glazes—and learn how to fix them fast.
Wavy Edge Incense Plate
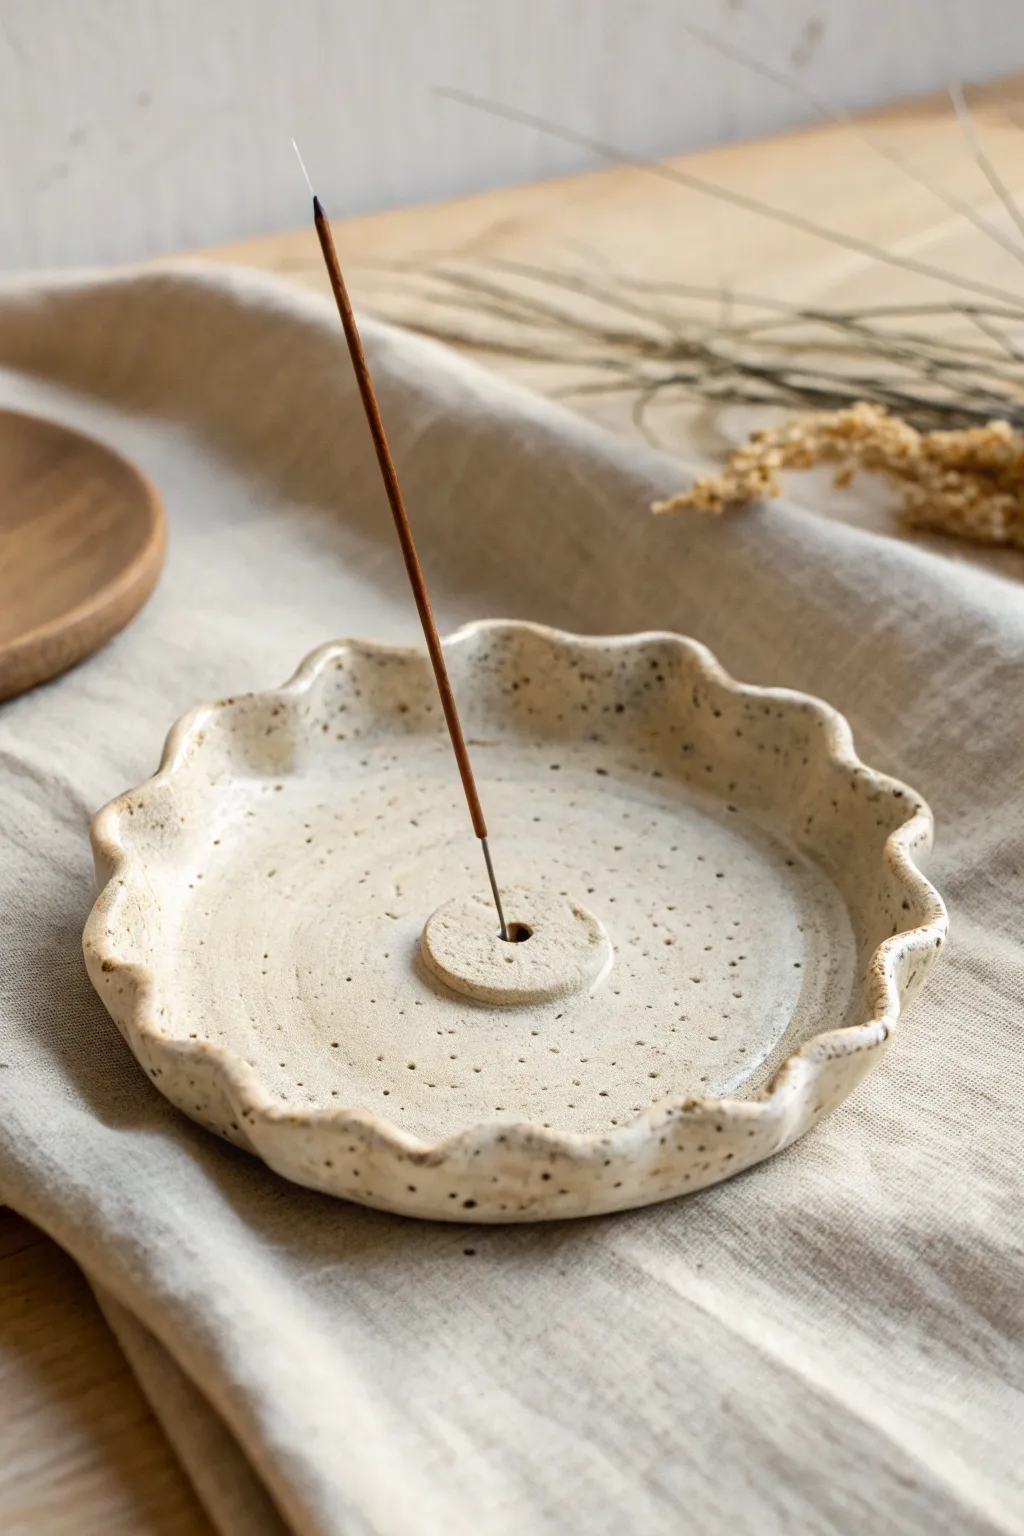
This elegant incense holder features a distinctive wavy rim and a faux-speckled stoneware finish that belies its humble air dry clay origins. The organic, rippled edges capture shadows beautifully, while the raised center ensures your incense stands tall and ash falls neatly within the bowl.
How-To Guide
Materials
- White air dry clay
- Rolling pin
- Circle cutter or bowl (approx. 4-5 inches)
- Small circle cutter or bottle cap (approx. 1 inch)
- Wooden skewer or toothpick
- Sandpaper (fine grit)
- Acrylic paint (cream/off-white, black, brown)
- Old toothbrush
- Gloss varnish or sealant
- Small bowl of water
- Sponge
Step 1: Shaping the Base
-
Condition the clay:
Begin by taking a handful of white air dry clay and kneading it in your hands until it becomes warm, soft, and pliable. This prevents cracks later on. -
Roll out the slab:
Place the clay on a smooth surface or canvas mat. Use your rolling pin to flatten it into an even slab, aiming for a thickness of about 1/4 inch (6mm) to ensure durability. -
Cut the main circle:
Press your large circle cutter or an overturned bowl into the clay to cut out the main dish shape. Remove the excess clay around the edges. -
Smooth the edges:
Dip your finger in a little water and run it along the cut edge of the circle to smooth out any sharpness or roughness left by the cutter. -
Create the center mount:
Roll out a small scrap of clay to the same thickness. Use your smaller cutter or bottle cap to cut a small disc, which will hold the incense stick. -
Attach the center:
Score the center of the large circle and the back of the small disc with a needle tool. Add a dab of water (slip) and press the small disc firmly into the exact center of the large circle. -
Blend the seam:
Use a modeling tool or your finger to gently smooth the seam where the small disc meets the large circle so it looks like one cohesive piece. -
Pierce the hole:
Using an incense stick or a skewer derived from the same size, poke a hole directly in the center of the raised disc. Wiggle it slightly so the hole is large enough to accommodate the stick after the clay shrinks during drying.
Faux Ceramic Look
Apply a very thick layer of gloss varnish, or even two coats. The thickness mimics the depth of a kiln-fired glaze.
Step 2: Forming the Waves
-
Lift the edges:
Gently lift the outer rim of the large circle. You can rest the clay inside a shallow bowl to help it hold a curved shape, or just manually curve the edges upward. -
Create the ripples:
Use your thumb and forefinger to pinch gentle curves into the rim. Push in with one finger while supporting the clay on either side with two fingers to create a consistent undulating wave pattern. -
Refine the shape:
Go around the rim twice, ensuring the waves are relatively symmetrical. I usually smooth the very edge with a damp sponge one last time to soften the look. -
Dry completely:
Set the piece aside in a cool, dry place. Let it dry for at least 24-48 hours. Turn it over halfway through the drying process to ensure the bottom dries evenly.
Step 3: Painting and Finishing
-
Sand for smoothness:
Once fully dry, use fine-grit sandpaper to buff away any fingerprints or rough spots on the rim and surface. Wipe away the dust with a barely damp cloth. -
Apply the base color:
Paint the entire piece, top and bottom, with a creamy off-white acrylic paint. You may need two coats for opaque coverage. -
Prepare the splatter:
Mix a small amount of black and brown paint with a few drops of water to create a runny, ink-like consistency. -
Create the speckles:
Dip an old toothbrush into this watery mix. Hold it over the dish and run your thumb across the bristles to flick tiny speckles onto the surface. Practice on paper first to control the spray. -
Rim detail:
For added dimension, lightly brush or sponge a tiny amount of brownish paint along the very top edge of the wavy rim to mimic the look of fired stoneware glaze breaking over an edge. -
Protect the piece:
Seal your work with a high-gloss varnish. This not only protects the paint but gives it that shiny, ceramic-like quality seen in the photo.
Incense Fit Check
Insert your incense stick while the clay is still wet to test the angle. If it leans too much, adjust the hole depth before drying.
Place your favorite scent in the holder and enjoy the peaceful, handmade addition to your space
Rainbow Arch Stand and Tray
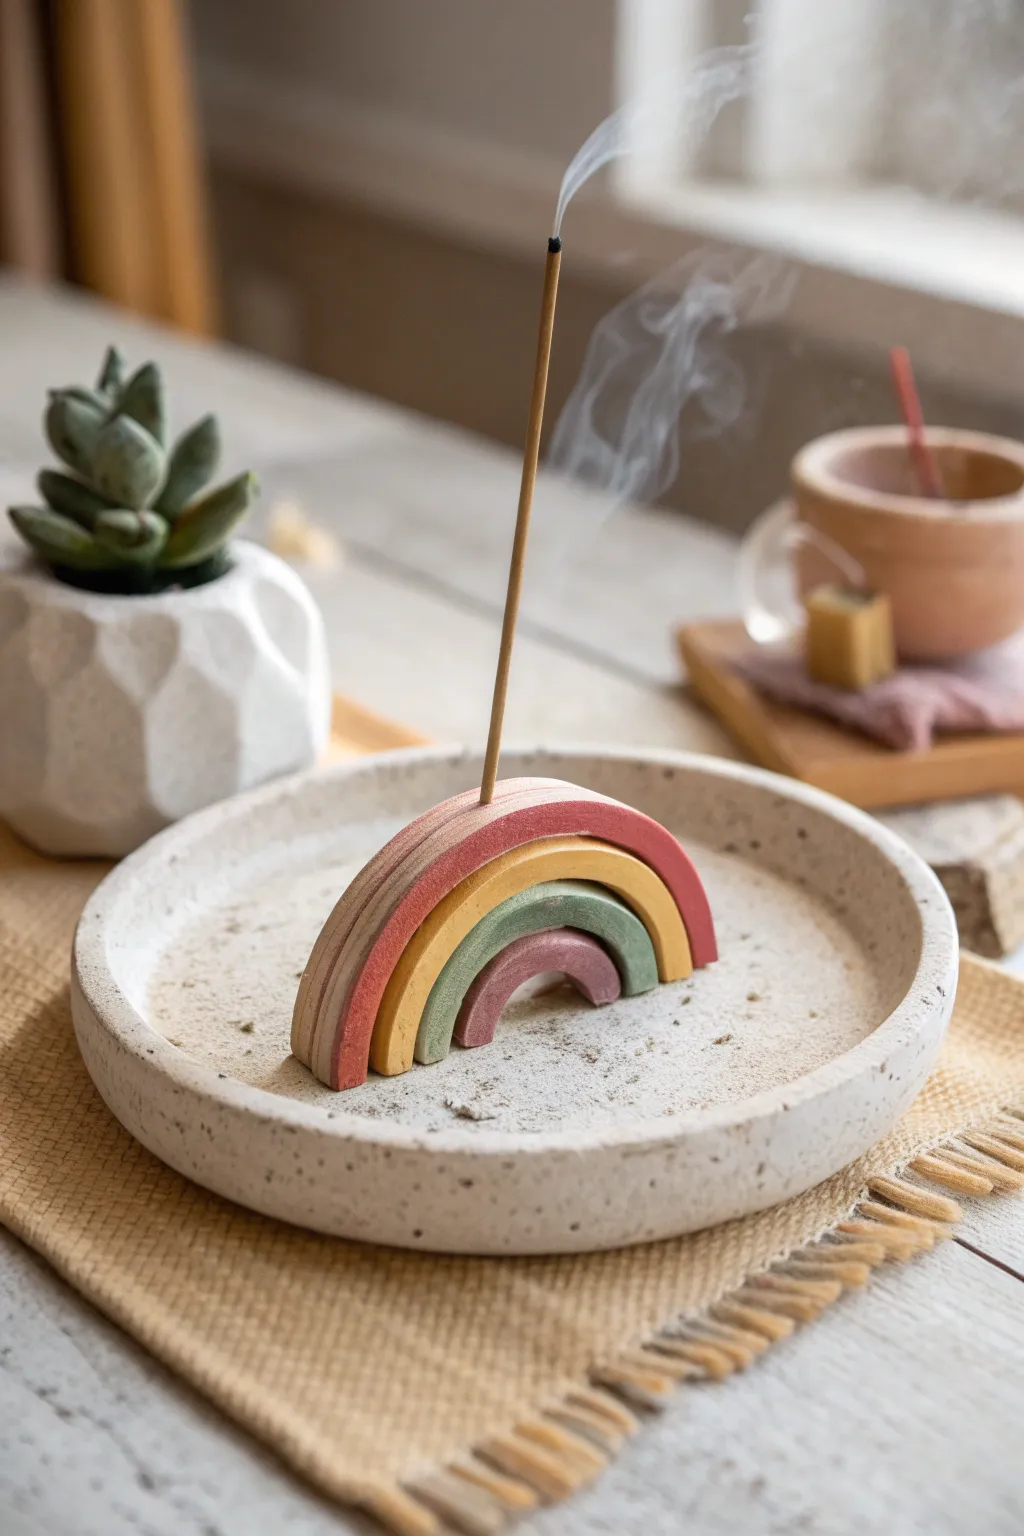
Bring a touch of playful serenity to your space with this stacked rainbow arch incense holder. The combination of a speckled stone-effect tray and muted, earthy rainbow colors creates a piece that feels both modern and grounded.
Step-by-Step
Materials
- Air dry clay (white or natural)
- Acrylic paints (terracotta, mustard yellow, sage green, mauve)
- Faux stone or speckle spray paint (optional for tray)
- Rolling pin
- X-Acto knife or clay cutting tool
- Circle cookie cutter or bowl (approx. 5-6 inches)
- Small bowl representing the smallest arch size
- Sandpaper (fine grit)
- Water and sponge for smoothing
- Incense stick (for sizing the hole)
- Matte varnish or sealant
Step 1: Creating the Base Tray
-
Roll the Slab:
Begin by conditioning your clay and rolling it out on a flat, non-stick surface to a uniform thickness of about 1/4 inch. -
Cut the Circle:
Place your circle cutter or bowl onto the clay slab and cut out a perfect circle to form the base of your tray. -
Form the Rim:
Roll a long, thin snake of clay. Score and slip the outer edge of your circular base, then attach the snake around the perimeter to create a raised rim. -
Smooth the Edges:
Using a little water and your finger or a sponge, blend the rim into the base so it looks like one seamless piece. Smooth out any cracks or fingerprints.
Sticky Situation?
If your arch keeps slumping over while drying, prop it up with small cardboard boxes or balled-up paper towels until the clay firms up enough to hold its own weight.
Step 2: Sculpting the Rainbow Arch
-
Roll Arch Coils:
Roll out a slab of clay about 1/2 inch thick—this needs to be thicker than the tray to support the incense stick. -
Cut Arcs:
Use nesting circle cutters or simply cut concentric arches freehand with a knife. You will need four distinct arches that stack neatly inside one another, graduating in size. -
Shape and Flatten:
Instead of round coils, these arches have flat faces. Tap the cut arches gently on your work surface to flatten the front and back, ensuring they will stand upright easily. -
Check the Fit:
Stack the arches together to ensure they nest perfectly. Trim any excess length from the bottom so they all sit flush on the table. -
Create the Holder Hole:
Take the largest, outermost arch. Using a needle tool or an actual incense stick, poke a hole straight down into the top center. Wiggle it slightly to ensure the fit isn’t too tight after shrinking. -
Join the Arcs:
Score and slip the contact points between the arches and press them gently together to form a solid single unit. I like to smooth the back connection slightly for extra stability.
Level Up
Instead of painting the speckles, mix clean sand, dried tea leaves, or cracked pepper directly into your white clay before sculpting for a natural, embedded texture.
Step 3: Assembly and Finish
-
Mounting the Rainbow:
Once the rainbow unit is firm enough to handle but still damp, score and slip the bottom of the rainbow and the center of your tray. Press firmly to attach. -
Drying Time:
Allow the entire structure to dry slowly away from direct sunlight for 24-48 hours. Rotate it occasionally to prevent warping. -
Sanding:
Once bone dry, sand any rough edges, particularly around the rim of the tray and the tops of the arches, until smooth. -
Painting the Rainbow:
Paint each arch strip a different color using small brushes. Use terracotta for the outer arch, mustard for the second, sage green for the third, and mauve for the center. -
Finishing the Tray:
Paint the tray a creamy off-white. For the speckled look seen here, you can flick a toothbrush loaded with brown paint over the tray or use a specialty stone-effect spray. -
Seal:
Apply a coat of matte varnish to protect your paint job and make it easier to wipe away ash.
Light your favorite scent and watch the smoke drift gently through your handmade rainbow.

TRACK YOUR CERAMIC JOURNEY
Capture glaze tests, firing details, and creative progress—all in one simple printable. Make your projects easier to repeat and improve.
Scallop Shell Incense Dish
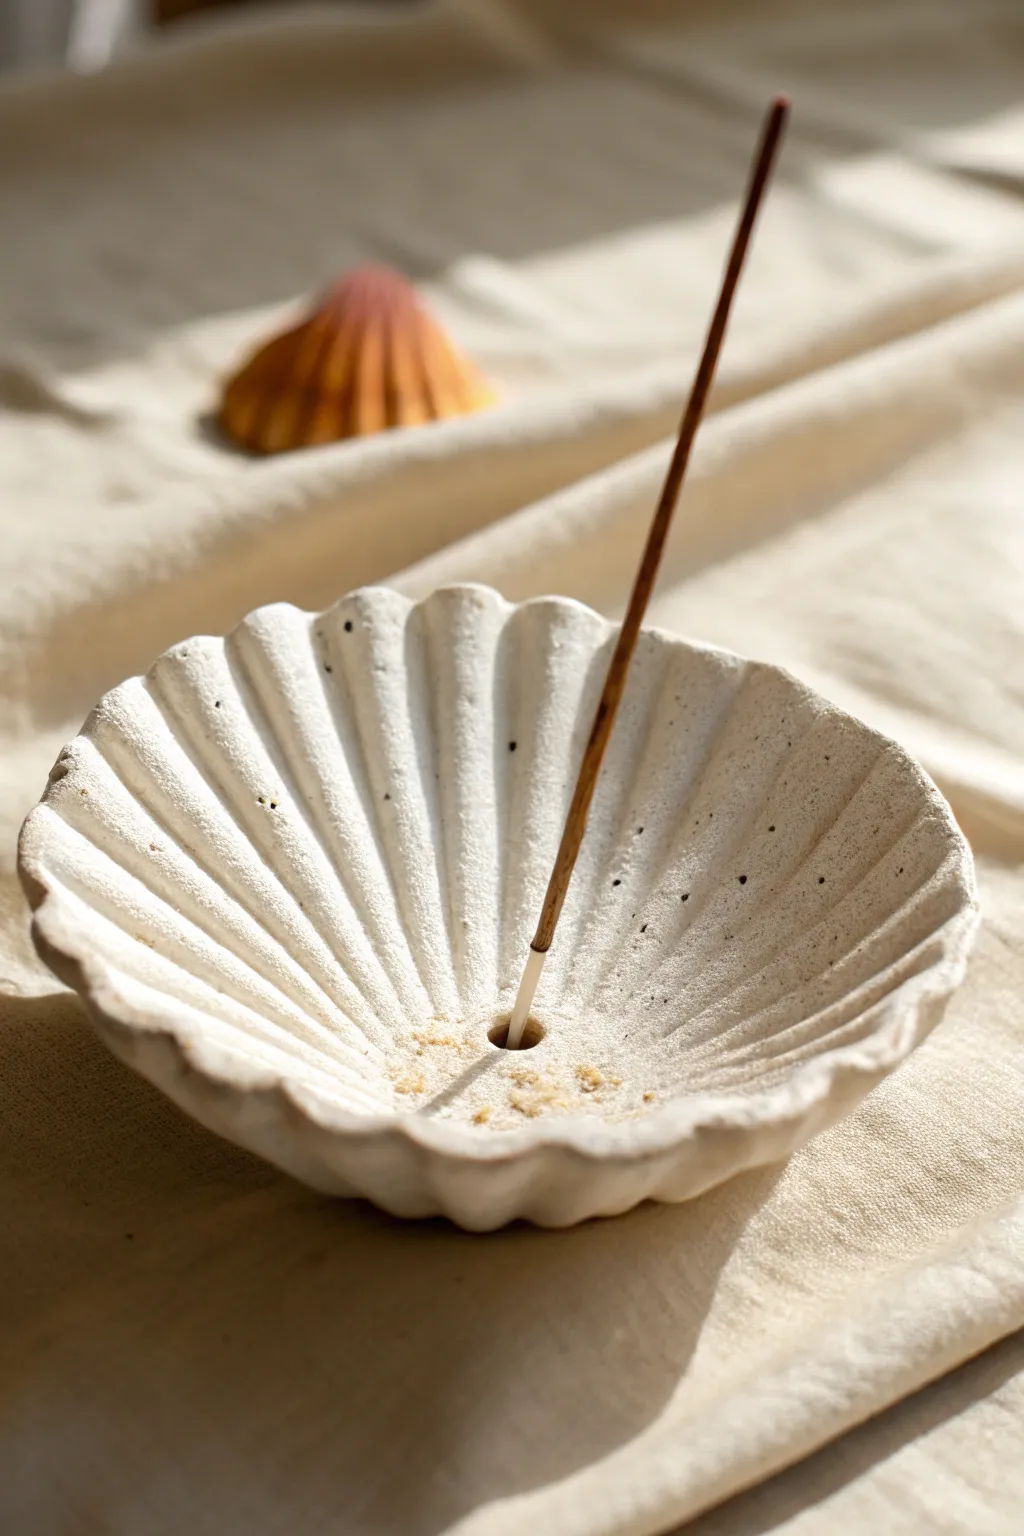
Bring a touch of the seaside into your home with this elegant scallop shell incense dish. Its organic ridges and speckled stone texture create a peaceful, minimalist aesthetic perfect for holding your favorite scents.
How-To Guide
Materials
- White air-dry clay
- Rolling pin
- Actual scallop shell (large) or a printed shell template
- Craft knife or clay tool
- Small bowl (for shaping)
- Water and sponge
- Incense stick (for sizing)
- Straw or small dowel
- Sandpaper (fine grit)
- Cream or off-white acrylic paint
- Brown or black acrylic paint (for speckling)
- Old toothbrush
- Matte varnish
Step 1: Shaping the Shell
-
Prepare the clay:
Start by taking a generous handful of air-dry clay. Knead it in your hands until it becomes soft, pliable, and free of air bubbles. If it feels too dry, dip your fingers in a little water. -
Roll it out:
On a clean, flat surface, roll the clay out into an even slab. You want it to be about 1/4 inch thick—sturdy enough to hold its shape but not clunky. -
Cut the shape:
Place your real scallop shell or paper template onto the rolled clay. Using a craft knife or needle tool, carefully trace around the perimeter to cut out the distinctive fan shape. -
Smooth the edges:
Dip your finger in water and run it along the cut edges of your clay shell. This softens any sharp cuts and prevents cracking later. -
Add the ridge texture:
Using a modeling tool or the back of a butter knife, gently press radiating lines into the clay. Start from the bottom hinge and fan them out toward the scalloped edge to mimic natural shell grooves. -
Create the holder hole:
Find the center point where the ridges converge near the base. Use a straw or a small dowel to punch a hole straight through or deeply into the clay. Wiggle it slightly to ensure it’s wide enough for an incense stick. -
Form the curve:
Lift your clay shell carefully and place it inside a curved bowl. Gently press it down so it takes on a concave, dish-like shape. This ensures it catches ash effectively.
Step 2: Finishing and Painting
-
Let it dry completely:
Leave the shell in the bowl to dry for at least 24-48 hours. It needs to be bone dry and hard before you proceed. -
Sand for smoothness:
Once fully dry, remove it from the bowl. Use fine-grit sandpaper to gently smooth out any rough spots on the rim or the underside. -
Apply base color:
Paint the entire shell with a cream or off-white acrylic paint. I usually apply two thin coats for opaque coverage, letting the first coat dry before adding the second. -
Add speckles:
Dilute a tiny amount of brown or black paint with water. Dip an old toothbrush into this mixture, aim it at the shell, and run your thumb across the bristles to flick tiny speckles onto the surface for a stone effect. -
Seal the piece:
Finish by applying a coat of matte varnish. This protects the clay from heat and ash while maintaining that natural, unglazed look.
Use a Real Shell
If you have a large real scallop shell, press the clay directly into the inside of it (use plastic wrap as a barrier) to get an instant, perfect texture mold.
Add a Gold Rim
For a luxe upgrade, paint just the scalloped edge with liquid gold leaf or metallic gold paint after the speckling step is completely dry.
Place your favorite incense stick in the center and enjoy the serene atmosphere created by your handmade coastal decor
Lotus Flower Bowl Holder

Bring a sense of tranquility to your space with this multi-layered lotus flower incense holder. The design features individual petals cupping a central pod, finished with a natural, speckled stone effect that looks expensive but is easy to achieve at home.
Step-by-Step Tutorial
Materials
- Air dry clay (white or light grey)
- Speckled clay additive (like coarse black pepper, ground coffee, or specialized ceramic speckle)
- Rolling pin
- Lotus petal template (cardstock or thick paper)
- Craft knife or clay needle tool
- Small bowl (for shaping)
- Sponge and water
- Sandpaper (fine grit)
- Acrylic matte varnish or sealant
- Small drill bit or toothpick (for the incense hole)
Step 1: Preparation & Base Creation
-
Mix the Speckles:
Before rolling, knead your chosen speckle material into the white air dry clay. I like to use ground coffee or dried tea leaves for a natural, organic look, but specialized ceramic speckle works best for a uniform finish. Knead until the dots are evenly distributed throughout the batch. -
Roll the Slab:
Roll out a large portion of your speckled clay until it is approximately 1/4 inch thick. Aim for an even thickness to ensure the petals dry at the same rate. -
Cut the Base:
Using a round cookie cutter or a bowl as a guide, cut out a circle about 4-5 inches in diameter. This will form the foundation bowl that holds the flower structure. -
Shape the Base Bowl:
Gently lift the clay circle and drape it inside a small cereal bowl to give it a curved, concave shape. Smooth the edges with a damp sponge.
Step 2: Forming the Petals
-
Create Templates:
Cut three teardrop shapes from cardstock in graduating sizes: large, medium, and small. The largest should act as the outer petals. -
Cut Out Petals:
Place your templates on the remaining rolled clay. You will need about 6-8 large petals, 6 medium petals, and 4-5 small petals. Cut them out cleanly with your craft knife. -
Soften the Edges:
Dip your finger in water and run it along the cut edge of every petal to remove sharpness and give them a soft, organic look. -
Curving the Petals:
Take each petal and gently pinch the bottom (the wider part of the teardrop) to create a slight curve. Place them into spoons or an egg carton to hold this curved shape while they firm up slightly for 15 minutes.
Use Coffee Grounds
For that realistic speckled stone look without buying special clay, knead completely dry used coffee grounds into white clay. The texture is perfect!
Step 3: Assembly
-
Attach Outer Layer:
Score the inside of your base bowl and the bottom of the large petals. Apply a little water or slip, then press the large petals into the bowl, arranging them in a circle so they slightly overlap. -
Add Middle Later:
Repeat the process with the medium petals, placing them in the gaps between the larger petals. Press firmly at the base to ensure a strong bond. -
Place Inner Petals:
Attach the smallest petals in the center, curving them upward more dramatically to mimic a blooming bud. -
Create the Central Pod:
Roll a small ball of clay about the size of a large marble. Flatten the bottom slightly and mount it in the direct center of the flower. -
Pierce the Holder:
Using an incense stick or a tool of similar thickness, poke a hole directly into the center of the pod. Ensure it is deep enough to hold a stick securely but doesn’t go all the way through the base. -
Optional Detail:
You can add a tiny second tier to the pod with a smaller flattened ball of clay on top for extra visual interest, as seen in the inspiration image.
Prevent Petal Collapse
If your petals droop during assembly, tuck small balls of crumpled paper towel or cling wrap underneath them for support until the clay hardens.
Step 4: Finishing Touches
-
Slow Drying:
Let the piece dry slowly away from direct sunlight for 24-48 hours. Using a plastic bag loosely draped over the top can prevent the petals from cracking. -
Sanding:
Once fully cured and bone dry, use fine-grit sandpaper to smooth out any rough fingerprints or sharp edges on the rim of the bowl. -
Sealing:
Apply a coat of matte varnish to protect the clay and seal in the speckles. This also makes it easier to wipe away ash later.
Now you have a serene, custom-made spot to burn your favorite scents
Mushroom Garden Incense Tray
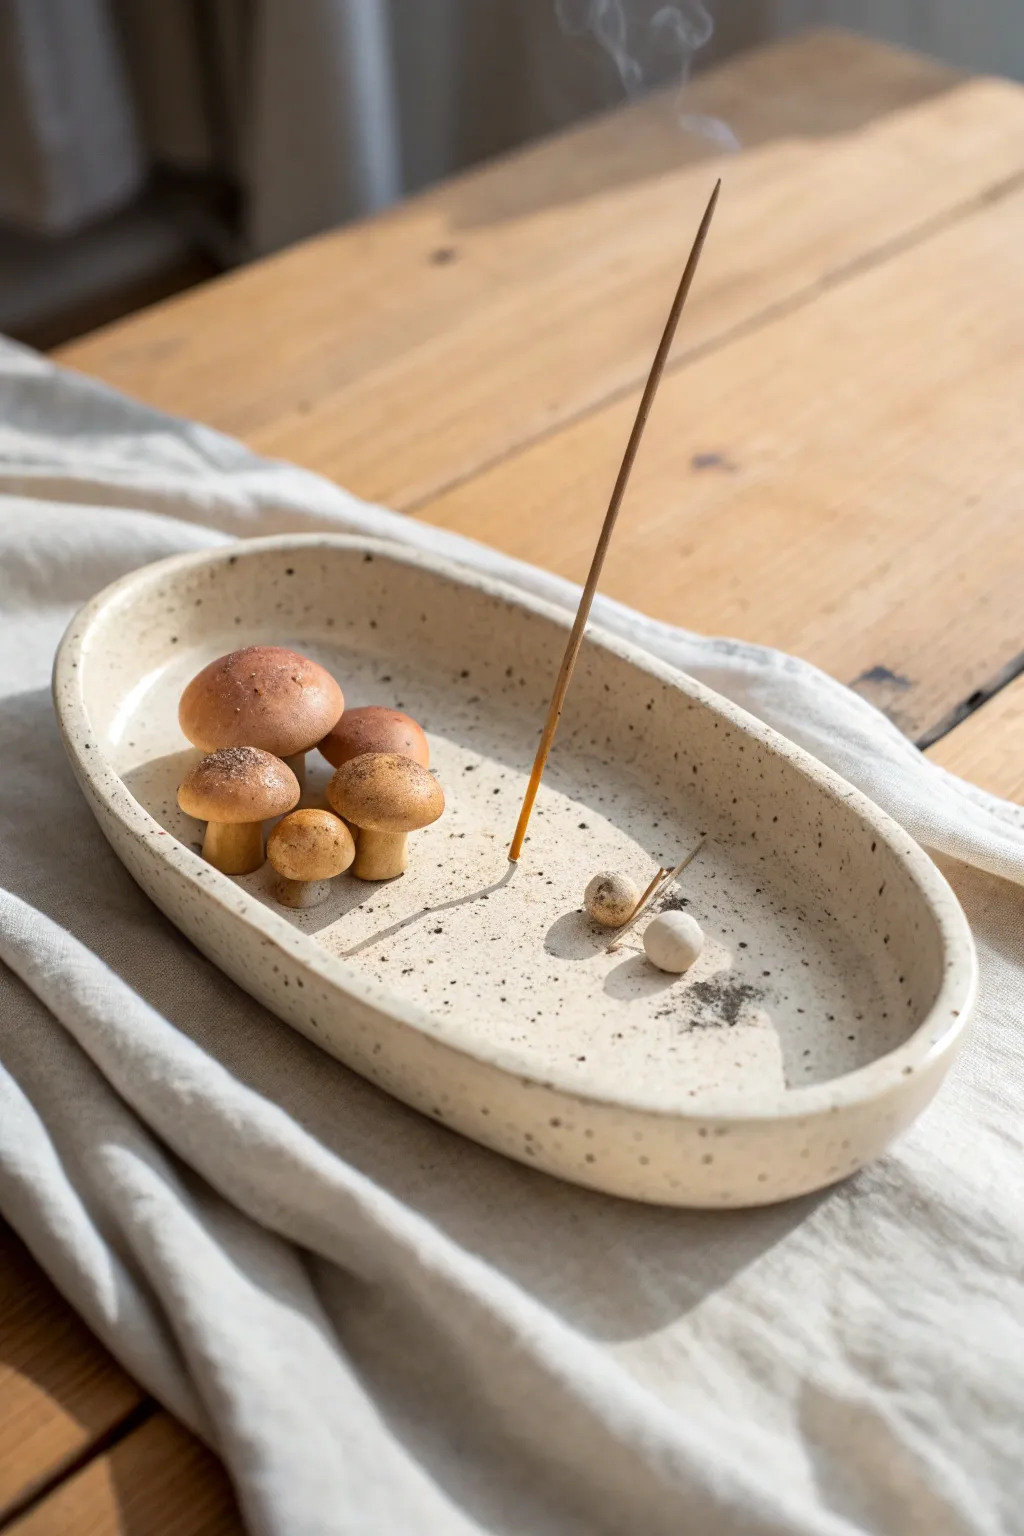
Bring a touch of woodland calm into your home with this ceramic-style incense holder featuring a cluster of realistic mushrooms. The finished piece combines functional design with the earthy charm of a miniature mushroom garden, complete with a faux stoneware speckled finish.
Step-by-Step
Materials
- White air dry clay (approx. 500g)
- Acrylic paints (Burnt Umber, Raw Sienna, Cream/Off-White, Black)
- Rolling pin
- Clay knife or craft knife
- Oval template (paper or cardboard)
- Small bowl of water
- Fine grit sandpaper
- Toothbrush (for speckling)
- Gloss varnish or clear sealant
- Thin stick or skewer (incense gauge)
Step 1: Shaping the Tray Base
-
Condition the Clay:
Begin by kneading your chunk of air dry clay until it feels warm and pliable. This removes air bubbles and prevents cracking later on. -
Roll Out the Slab:
Roll the clay into a flat slab about 5mm (1/4 inch) thick. Aim for an even thickness throughout so the tray dries uniformly. -
Cut the Oval shape:
Place your paper oval template onto the clay slab and trace around it with a knife. Peel away the excess clay, reserving it for the rim and mushrooms. -
Form the Rim:
Roll a long snake of clay, roughly the thickness of a pencil. Score the edge of your oval base and wet it slightly with your finger or a brush. -
Attach and Blend:
Lay the coil along the edge of the base. Use your thumb or a modeling tool to blend the inside of the coil down into the base until the seam disappears completely. -
Smooth the Exterior:
Repeat the smoothing process on the outside edge. Using a little water on your finger, smooth the rim until it looks like a seamless, raised lip.
Cracking Issues?
If small cracks appear while drying, don’t panic. Make a paste of clay and water (slip) to fill the gaps, then sand smooth once dry before painting.
Step 2: Sculpting the Mushrooms
-
Create Stems:
Roll out five small cylinders of clay in varying heights and thicknesses for the mushroom stems. Keep the bottoms flat so they stand easily. -
Shape the Caps:
Roll five balls of clay, then flatten them gently into domes. Vary the sizes—make one large “hero” mushroom and several smaller companions. -
Assemble the Fungi:
Score the top of a stem and the underside of a cap, dab with water, and press them together. Smooth the join slightly for a natural look. -
Grouping the Garden:
Decide on placement. I like to cluster the mushrooms off to one side to leave room for the ash to fall. Score and slip the bottoms of the stems to attach them firmly to the tray floor. -
Add Tiny Details:
Roll two or three tiny pebbles or “baby buttons” and attach them near the main cluster or scattered slightly apart for visual balance. -
Create the Incense Hole:
Before the clay dries, take your incense stick (or a skewer of similar size) and poke a hole into the tray floor. Angle it slightly so the ash will land inside the dish.
Mossy Accents
Glue small bits of dried preserved moss around the base of the mushrooms after sealing for an ultra-realistic 3D forest texture.
Step 3: Finishing and Painting
-
Dry Completely:
Let the piece dry for 24-48 hours. Once bone dry, use fine sandpaper to smooth any rough edges on the rim or mushroom caps. -
Base Coat:
Paint the entire tray and the mushroom stems a creamy off-white color. You may need two coats for opaque coverage. -
Paint the Caps:
Mix Burnt Umber with a touch of Raw Sienna. Paint the mushroom caps, blending a darker shade at the top and fading slightly lighter toward the rim of the cap. -
The Speckled Effect:
Dilute a small amount of black or dark brown paint with water. Dip an old toothbrush into the mix and flick the bristles with your thumb to spray tiny speckles over the whole piece. -
Seal the Work:
Once the paint is fully dry, apply a coat of gloss or matte varnish to protect the clay and give it that finished ceramic look.
Enjoy the gentle scent of incense drifting through your handmade fungal forest
Stacked Pebble Cairn Holder
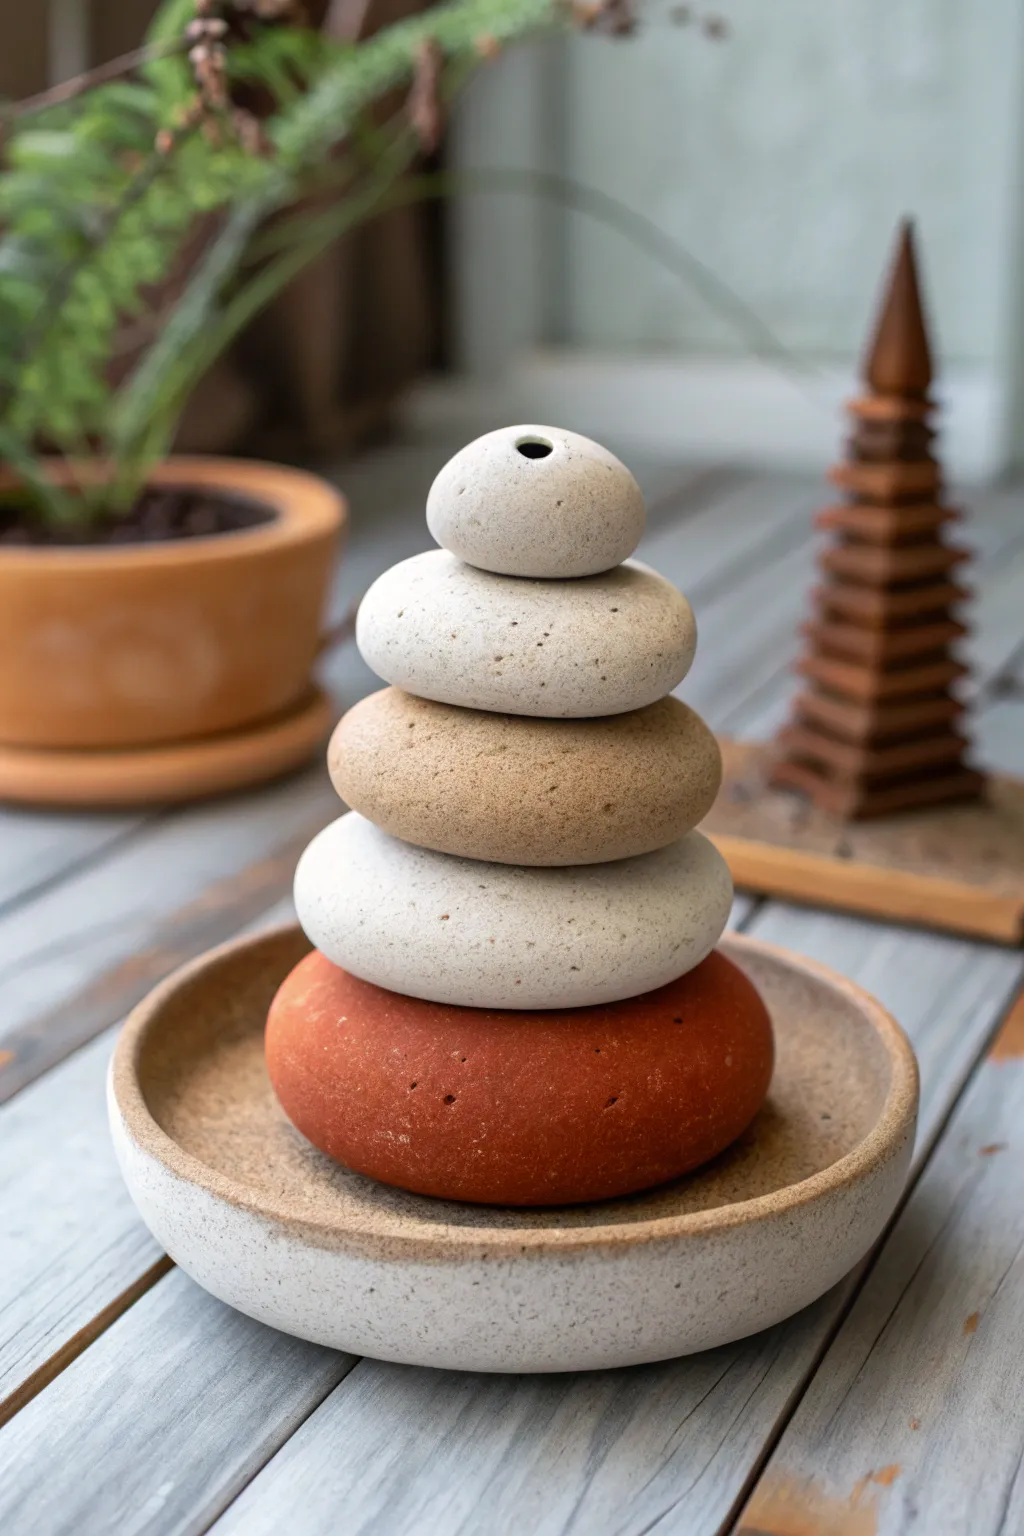
Bring a sense of balance to your space with this nature-inspired incense holder that mimics a stack of river stones. Using simple texturing and painting techniques, you’ll transform basic clay into a faux-granite and terracotta centerpiece.
Step-by-Step Tutorial
Materials
- Air dry clay (white or bright white)
- Acrylic paints (Burnt Sienna, Unbleached Titanium/Off-White, Raw Umber, Black)
- Old toothbrush
- Aluminum foil (scrunched into a ball)
- Incense stick (for measuring)
- Strong craft glue or superglue
- Matte varnish or sealant
- Fine grit sandpaper
Step 1: Sculpting the Base and Stones
-
Form the catch basin:
Start with a large ball of clay for the base dish. Flatten it into a consistent pancake shape, about 4-5 inches wide. -
Raise the rim:
Gently curve the edges of your pancake upward to create a shallow rim. This will catch the falling ash. -
Create the stone blanks:
Roll five balls of clay in varying sizes. You will need one large base stone, three medium stones, and one smaller top stone. -
Shape the river stones:
Gently press down on each ball to flatten them into organic, rounded disc shapes. Keep the smallest top stone slightly more spherical than the others. -
Check the stack:
Temporarily stack your stones to check the proportions. I like to press them gently together while the clay is distinctively soft to create small indentations or ‘seats’ that help them balance later. -
Create the incense holder:
Take the top (smallest) stone and use an actual incense stick to poke a hole straight down into the center. Wiggle it slightly to widen the opening.
Shrinkage Warning
Make the incense hole slightly larger than you think you need! Air dry clay shrinks as it dries, and a hole that fits perfectly while wet often becomes too tight once cured.
Step 2: Refining and Drying
-
Add surface texture:
Lightly tap a scrunched-up ball of aluminum foil over the surface of the stones and the dish. This removes the smooth ‘manufactured’ look and mimics porous rock. -
Smooth the edges:
Dip your finger in water and smooth out any harsh cracks on the rims, but leave the foil texture on the main surfaces intact. -
Let it dry:
Unstack all pieces and lay them flat on a drying rack. Allow them to dry completely for 24-48 hours, flipping them once halfway through. -
Sanding:
Once fully cured, use fine sandpaper to gently buff away any sharp ridges on the bottom of the stones so they sit flush.
Level Up: Organic Texture
Mix dried coffee grounds or tea leaves directly into your white clay before sculpting. This creates natural speckles and texture throughout the ‘stone’ without needing to paint them on later.
Step 3: Painting the Stone Effect
-
Base coat the granite stones:
Paint the dish, the top stone, and two of the middle stones with Unbleached Titanium (or a mix of white and a tiny drop of brown). -
Paint the terracotta stone:
Paint the large bottom stone with Burnt Sienna to create that rich, reddish-clay contrast seen in the photo. -
Paint the sandstone:
For the remaining middle stone, mix a little raw umber into your white base to create a sandy beige color. -
Create the speckles:
Dilute a small mount of black or dark brown paint with water until it is distinctively runny. -
The flicking technique:
Dip an old toothbrush into the runny paint. Run your thumb across the bristles to flick a fine mist of speckles over the white and beige stones to create a realistic granite look. -
Assembly:
Once the paint is dry, use strong glue to permanently fix the stack together in your desired arrangement, ensuring the hole is at the very top. -
Seal the project:
Finish with a coat of matte varnish. Avoid glossy finishes, as real river stones usually have a matte, chalky texture.
Light your favorite scent and enjoy the grounding atmosphere this cairn brings to your room.
Lidded Box Holder With Stick Storage
This elegant two-piece incense holder solves the problem of ash catching while doubling as a stylish storage container for your favorite scents. It features a soft, rounded square silhouette and a faux-ceramic speckled finish that looks effortlessly modern.
Step-by-Step
Materials
- White air dry clay (approx. 500g)
- Acrylic rolling pin
- Square cookie cutter (approx. 3-4 inch) or craft knife/template
- Small bowl of water
- Pottery sponge
- Needle tool or toothpick
- Sandpaper (fine grit)
- Acrylic paint (cream/off-white and dark brown)
- Old toothbrush
- Matte varnish or sealant
Step 1: Forming the Base Box
-
Prepare the clay:
Begin by conditioning your air dry clay, kneading it until it is soft, pliable, and free of cracks. If it feels too dry, add a tiny drop of water. -
Roll the slab:
Roll out a portion of the clay to an even thickness of about 1/4 inch (6mm). Using a square cookie cutter or a paper template with a craft knife, cut out two identical squares. One will be the base floor, and one will become the lid later. -
Create the walls:
Roll out a long snake of clay and flatten it into a strip roughly 1 inch tall and 1/4 inch thick. This strip needs to be long enough to wrap around the entire perimeter of your square base. -
Attach the walls:
Score the edges of your base square and the bottom edge of your wall strip. Apply a little water or slip (clay mixed with water) to the scored areas. -
Join the pieces:
Press the wall strip onto the base firmly. Where the ends of the wall meet, score and slip them to create a seamless join. Use your fingers to smooth the clay upwards, blending the seam between the wall and the floor completely so it looks like one solid piece. -
Round the corners:
Gently press and mold the corners of the box with your thumbs to soften them. The goal is a rounded square shape, often called a ‘squircle,’ rather than sharp 90-degree angles. -
Refine the rim:
Use a damp sponge to smooth the top rim of the box. Ensure it is level so the lid will sit flat.
Step 2: Creating the Lid
-
Shape the lid:
Take the second square you cut earlier. Like the base, gently round off the corners to match the curvature of the bottom box. -
Add the lip (flange):
To ensure the lid stays on, roll a thin coil of clay. Create a smaller square with this coil on the *underside* of the lid, positioning it about 1/4 inch inside the edge. Score and slip this coil into place. This inner rim will sit inside the box walls to keep the lid secure. -
Form the incense mound:
Roll a small ball of clay, about the size of a large marble, and slightly flatten it into a dome. Score the center of the lid’s top surface and attach the dome securely. -
Pierce the holder:
Using a needle tool or a skewer that matches the thickness of your incense sticks, poke a hole directly into the center of the dome. I always test the fit with a real incense stick to ensure the angle is correct before drying. -
Smooth everything:
Using your damp sponge and a little water, go over every surface of both the box and lid to erase fingerprints and smooth out imperfections. -
dry slowly:
Let both pieces dry completely for 24-48 hours. Place the lid gently on the box (separated by a piece of paper if needed) to ensure they dry in a matching shape.
Smooth Seams
Use the back of a spoon to burnish and compress the seams where walls join the base. This helps blend the clay better than fingers alone.
Step 3: Decorating & Finishing
-
Sand for smoothness:
Once fully dry, use fine-grit sandpaper to remove any rough spots or uneven edges. Wipe away all dust with a slightly damp cloth. -
Base coat:
Paint the entire exterior with a creamy off-white acrylic paint. You may need two coats for an opaque, ceramic-like finish. -
Create the speckles:
Dilute a small amount of dark brown paint with water. Dip an old toothbrush into the mixture, then run your thumb across the bristles to flick tiny specks onto the box and lid. Practice on paper first to control the splatter size. -
Seal:
Finish with a coat of matte varnish to protect the clay and give it a professional, non-glossy stoneware appearance.
Make it Functional
Before drying, insert a small metal washer or bead into the clay hole. This prevents the burning incense from charring the clay over time.
This minimal storage box brings a sense of calm to your space even before you light the incense
Checkerboard Tile Incense Plate
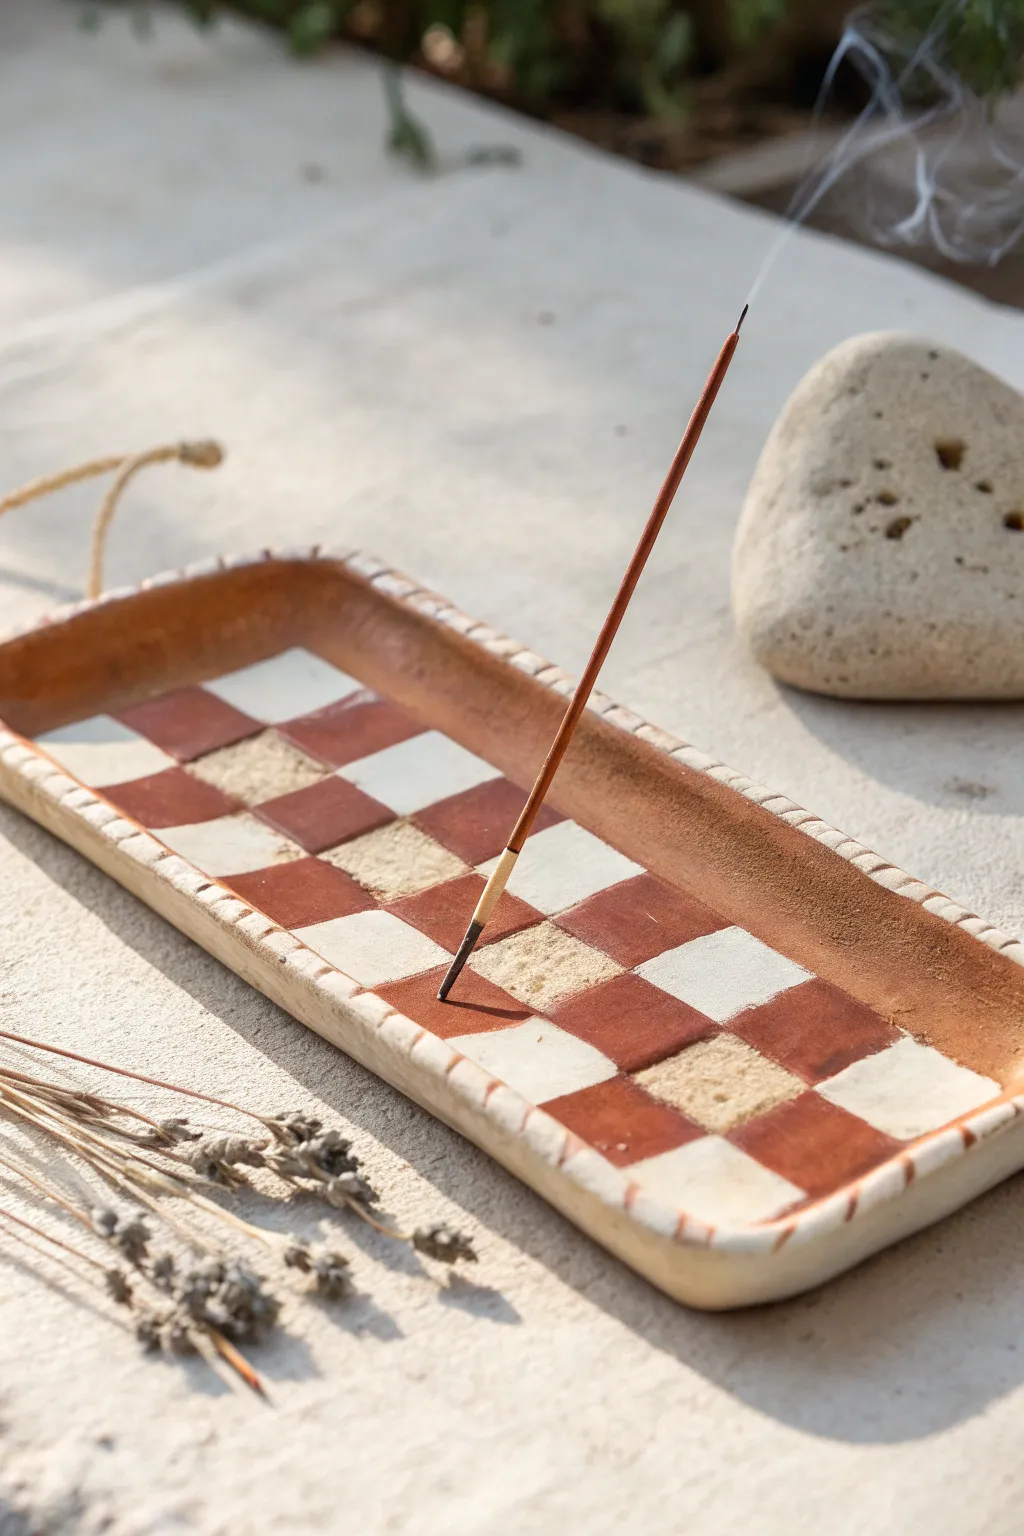
This charming incense holder combines the trendy checkerboard pattern with a rustic, handmade finish. Its elongated tray shape catches all ash while serving as a beautiful piece of decor for your coffee table or shelf.
Detailed Instructions
Materials
- Air dry clay (white or terra cotta)
- Rolling pin
- Clay knife or craft knife
- Ruler
- Small bowl of water
- Acrylic paints (burnt sienna, cream, beige)
- Small flat paintbrush
- Paintbrush with a fine tip
- Clear matte varnish or sealant
- Twine or jute cord
- Sandpaper
Step 1: Shaping the Tray
-
Roll the base:
Start by conditioning a large ball of air dry clay in your hands until it’s pliable. Roll it out on a flat surface to an even thickness of about 1/4 inch, creating a long rectangle shape. -
Cut to size:
Use your ruler and knife to trim the rolled clay into a precise rectangle, approximately 4 inches wide by 9 inches long. Smooth the rough cut edges with a little water on your finger. -
Create the rim:
Roll a long, thin snake of clay about the thickness of a pencil. Score (scratch) the outer top edge of your rectangle base and brush on a little water to act as glue. -
Attach the rim:
Press the clay snake firmly onto the scored perimeter. Fuse the coil to the base by dragging the clay downwards on the outside and inside with your finger or a sculpting tool to ensure it’s seamless. -
Decorate the edge:
To create the stitched look seen in the photo, take a dull knife or a sculpting tool and press vertical indentations all around the top of the rim, spacing them evenly apart. -
Add handle attachments:
Punch two small holes on each short end of the tray while the clay is still wet. These holes should be large enough for your twine to pass through later. -
Form the incense holder:
Roll a very small ball of clay and press it into the center of the tray where you want the incense to stand. Poke a hole in it with an actual incense stick or a skewer, making sure it goes in at a slight angle.
Step 2: Drying and Painting
-
Let it dry:
Allow the piece to air dry completely for 24-48 hours. I find flipping it over gently halfway through the drying process helps the bottom dry evenly and prevents warping. -
Sand for smoothness:
Once bone dry, use fine-grit sandpaper to smooth out any unintentional bumps or rough spots, particularly on the rim and corners. Wipe away all dust with a damp cloth. -
Draft the grid:
Using a pencil and a ruler, lightly sketch a grid inside the tray. Divide the space into squares; for this look, you want a main central panel of 3×3 or 3×5 squares depending on your tray length. -
Paint the rust squares:
Mix a burnt sienna or terra cotta acrylic paint. With a flat brush, paint alternating squares in the checkerboard pattern. Apply two coats for opacity. -
Paint the light squares:
Paint the remaining squares with a cream or off-white color. If your clay is already white, you can choose to leave these unpainted for a more natural texture. -
Add texture detail:
For the textured beige squares seen in the center, mix a little baking soda into beige paint to create grit, or simply stipple the paint on with a dry brush to mimic stone. -
Detail the rim:
Paint the rim connection points with thin lines of your rust color to highlight the ‘ticked’ texture you carved earlier, making it look like stitching. -
Seal the piece:
Apply a coat of matte varnish over the entire tray to protect the paint and clay from ash. Do not skip this step, as unsealed clay can scorch. -
Attach handles:
Cut two short lengths of jute twine. Thread the ends through the holes you made earlier and knot them on the outside or underneath to secure the rustic handles.
Warping Fix
If the tray curls up while drying, dampen the bottom slightly with a sponge and place a heavy book on top of it (use wax paper in between!) for a few hours to flatten it back out.
Faux Stone Look
To get that gritty, sandy texture on the beige squares, mix used dried coffee grounds or fine sand directly into your acrylic paint before applying it to the clay.
Light your favorite scent and enjoy the cozy atmosphere this handmade tray brings to your space
Backflow Waterfall Cone Burner
This serene project recreates a modern, geometric take on the classic backflow burner using speckled clay. The central faceted cone allows smoke to potentially drift downward while catching ash in the wide, shallow basin below.
How-To Guide
Materials
- White air dry clay (or ceramic clay if you access to a kiln)
- Speckled clay additive or fine black sand (for the speckled effect)
- Rolling pin
- Clay knife or X-Acto blade
- Small bowl or round cookie cutter (approx. 4-5 inches)
- Ruler
- Sandpaper (fine grit)
- Small circular tool or straw (for the vent hole)
- Water and sponge for smoothing
- Clear matte sealant or varnish
Step 1: Base Preparation
-
Prepare the speckled clay:
If your clay isn’t pre-speckled, kneel a small amount of fine black sand or dried coffee grounds into your white air dry clay until it is evenly distributed. This gives that natural, stone-like texture seen in the photo. -
Roll the slab:
Roll out a portion of your clay to an even thickness of about 1/4 inch. Ensure the surface is smooth and free of major air bubbles. -
Cut the base circle:
Place your small bowl or round cutter onto the clay slab and cut out a perfect circle. This will form the bottom of the ash-catching dish. -
Create the rim coil:
Roll a long, snake-like coil of clay, roughly the same thickness as your base. Measure it against the circumference of your base circle to ensure it is long enough. -
Attach the rim:
Score the outer edge of your base circle and the underside of your coil. Apply a little water or slip, then press the coil firmly onto the edge creating a raised wall. -
Smooth the transition:
Use your thumb or a modeling tool to blend the inside seam where the coil meets the base. The transition should be seamless, creating a shallow bowl shape. -
Refine the outer wall:
Smooth the outside of the rim as well. You want a vertical, slightly rounded edge that looks clean and modern.
Step 2: Sculpting the Mountain
-
Form the central cone:
Take a generous lump of clay and roll it into a ball, then shape it into a tall cone. It needs to be wide enough at the bottom to remain stable. -
Facet the sides:
Using your knife or a flat edge, slice away vertical sections of the cone to create geometric facets. Aim for a slightly irregular, ‘mountainous’ look rather than a perfect pyramid. -
Drill the smoke channel:
Carefully create a hole starting at the very tip of the mountain that goes straight down. For a backflow effect, this hole needs to connect to a small exit hole near the bottom, though a simple top-holder works too. -
Create the nesting spot:
Widen the very top of the hole slightly to ensure a standard incense cone can sit securely flat on the peak. -
Attach to the base:
Score and slip the bottom of your faceted mountain and the center of your dish. Press the mountain firmly into the center of the bowl. -
Clean up details:
Use a slightly damp sponge to wipe away any rough debris or fingerprints, but be careful not to soften your crisp faceted edges.
Clean Facets
When cutting the facets on the cone, let the clay firm up slightly (leather hard) before slicing. This creates much sharper, cleaner geometric edges.
Step 3: Finishing Touches
-
Slow drying:
Let the piece dry slowly away from direct sunlight for 24-48 hours. I find covering it loosely with plastic wrap for the first day helps prevent cracking. -
Sanding:
Once bone dry, use fine-grit sandpaper to smooth out the rim and any sharp imperfections on the facets. -
Sealing:
Apply a clear matte sealant to protect the clay. This is crucial for incense burners to make ash cleanup easier and prevent scorch marks.
Backflow Secret
Drill a tunnel from the bottom of the cone that meets the top hole. If the smoke can travel down, it will pool in the dish like water.
Light your incense cone and watch the smoke cascade down your new geometric sculpture
Constellation Zodiac Dish Holder
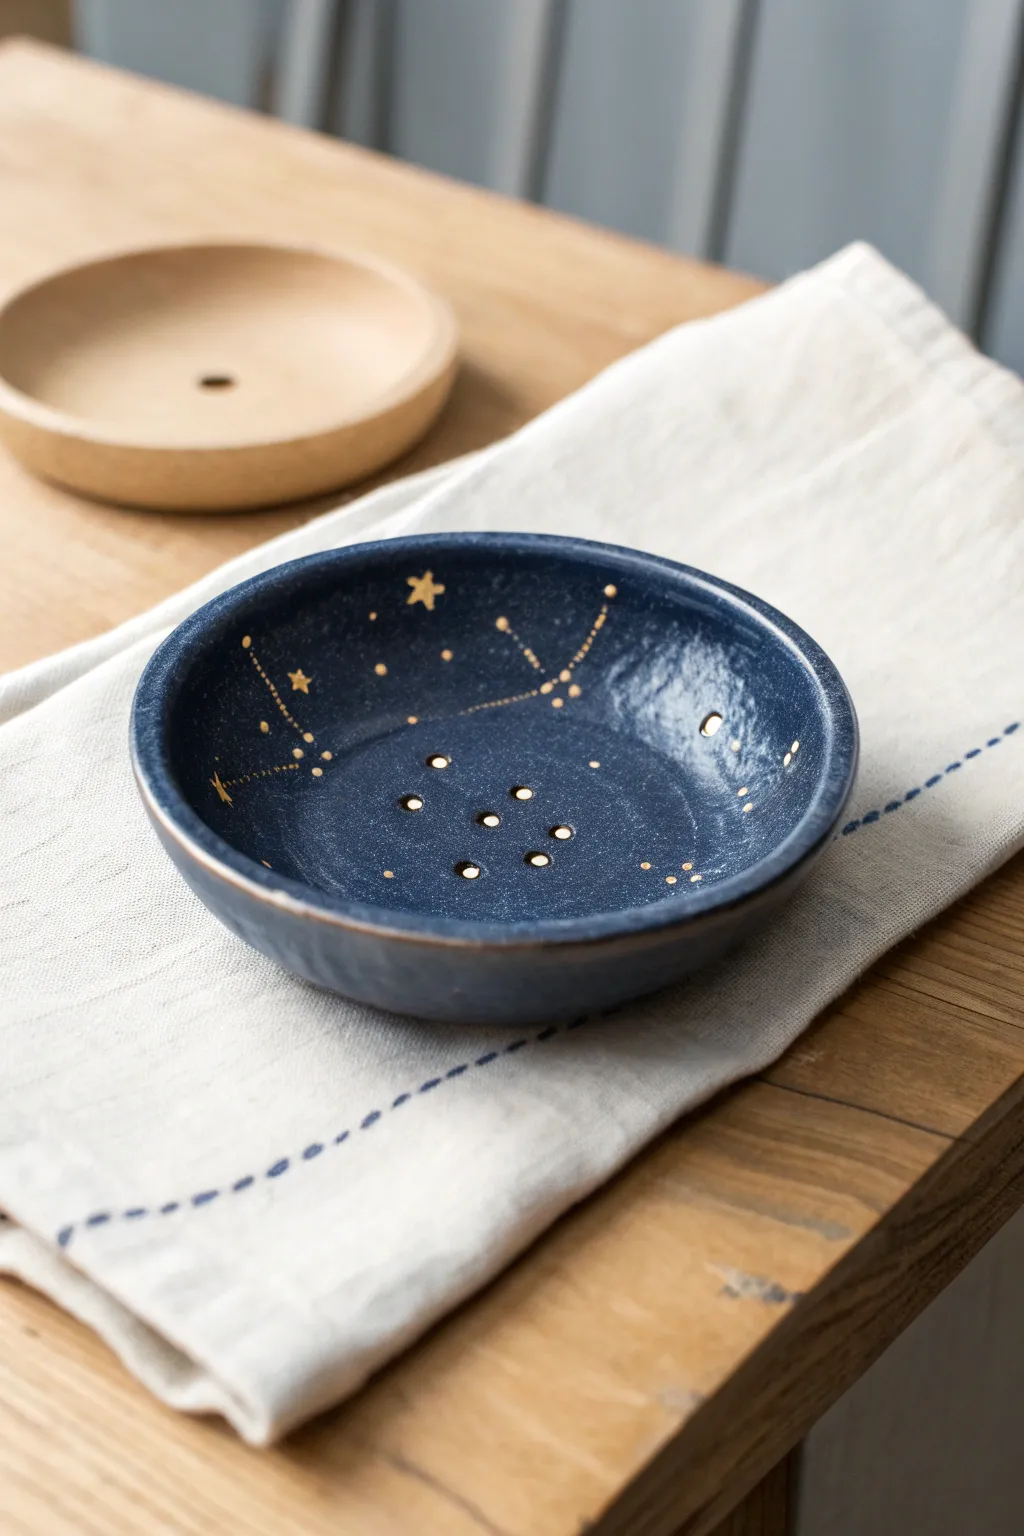
Bring the night sky into your home with this stunning, deep blue incense or soap dish featuring delicate gold constellations. The perforated design is not only practical but creates a starry base for your favorite scents.
Step-by-Step Tutorial
Materials
- Air dry clay (white or terracotta)
- Circular cookie cutter or template (approx. 4-5 inches)
- Rolling pin
- Sponge or fine-grit sandpaper
- Small straw or awl (for holes)
- Deep midnight blue acrylic paint
- Gold metallic paint or paint pen
- High-gloss varnish or resin
- Fine detail paintbrush or toothpick
- Small bowl or sphere (for molding)
Step 1: Shaping the Galaxy
-
Condition the Clay:
Begin by taking a handful of air dry clay and kneading it in your hands to warm it up. This conditioning process helps prevent cracks later on. -
Roll it Out:
Roll your clay out on a smooth surface to an even thickness of about 1/4 inch. If the clay sticks, you can use a little bit of wax paper underneath. -
Cut the Circle:
Use your circular cutter or trace around a bowl to cut a perfect circle from the slab. Remove the excess clay and smooth the edges with a damp finger. -
Create Depth:
Gently press your clay circle into a shallow bowl or drape it over a sphere mold to create the curved dish shape. Press lightly so you don’t distort the thickness. -
Smooth the Rim:
While it is in the mold, run a damp sponge along the rim to ensure it is rounded and professional-looking. I find this extra minute of smoothing makes a huge difference in the final look. -
Punch the Stars:
using a straw or an awl, poke several holes in the center of the dish. Create a pattern of about 6-8 holes; these can serve as drainage for soap or holders for stick incense. -
Initial Drying:
Let the clay dry in the mold for at least 24 hours. Ensure it is fully hardened and turns a uniform pale color before removing it.
Step 2: Painting the Night Sky
-
Sand Imperfections:
Once fully dry, lightly sand any rough spots, especially around the rim and the punched holes, using fine-grit sandpaper. -
Base Coat Application:
Apply a coat of deep midnight blue acrylic paint to the entire interior and exterior of the dish. You want a very dark, rich color to mimic space. -
Build Opacity:
Allow the first coat to dry, then apply a second or third coat until the clay color is completely hidden and the blue is solid and opaque. -
Map the Constellations:
Using a fine detail brush or a gold paint pen, lightly mark where your main stars will go. You can follow real zodiac patterns or invent your own celestial arrangement. -
Connect the Stars:
Draw very thin, delicate dotted lines connecting your main star points using the gold paint. A toothpick dipped in paint works wonderfully for these tiny dots. -
Add Starbursts:
Paint a few larger, five-point stars (asterisks) in random open spaces to add variety to the sky. -
Rim Detail:
Ideally, run a subtle line of gold along the very top edge of the rim to frame the piece elegantly. -
Seal the piece:
Finish with a high-gloss varnish. This mimics the glazed look of ceramic and protects the paint from ash or moisture.
Stuck in the Mold?
If your clay sticks to the drying bowl, place a layer of plastic wrap or a nylon stocking between the clay and the mold before shaping. This ensures an easy release once dry.
Cracking Up
Tiny cracks appear while drying? Mix a small amount of fresh clay with water to make a paste (slip) and fill the cracks. Smooth over with a finger and let dry again.
Enjoy the gentle glow of your incense against your personal starry backdrop