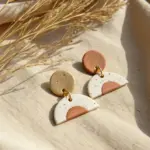
Air dry clay keychains are my favorite little project when I want something cute, quick, and actually useful. I pulled together my go-to air dry clay keychain ideas—from classic stamped shapes to playful mini charms that feel totally doable at your kitchen table.
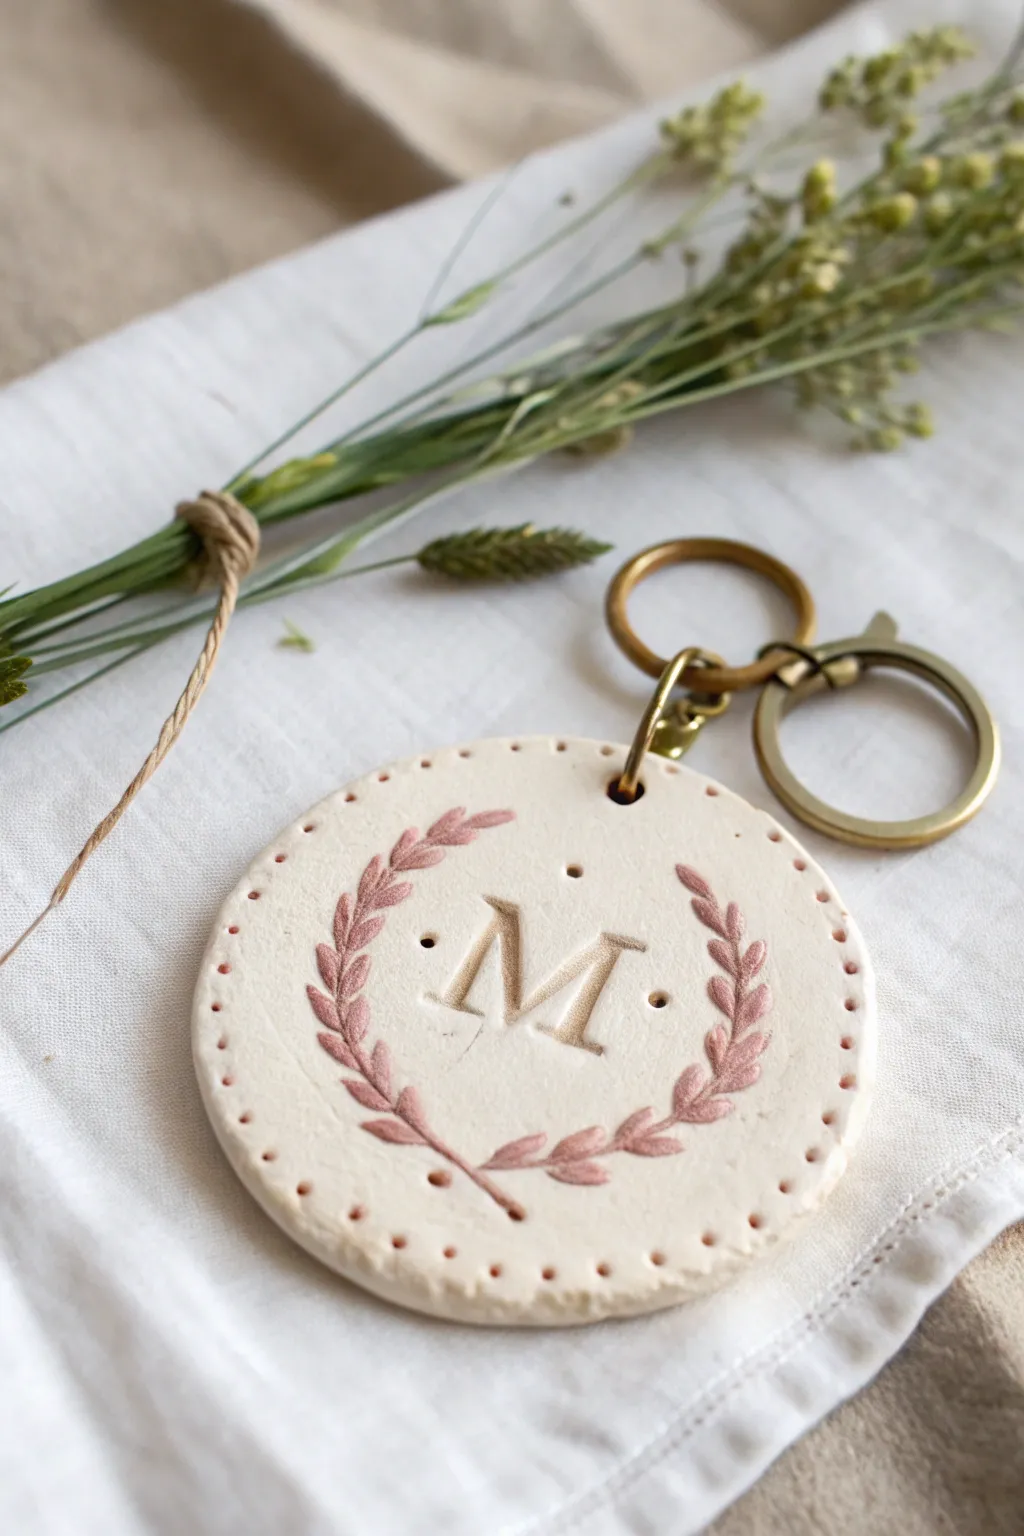
Simple Stamped Initial Tag
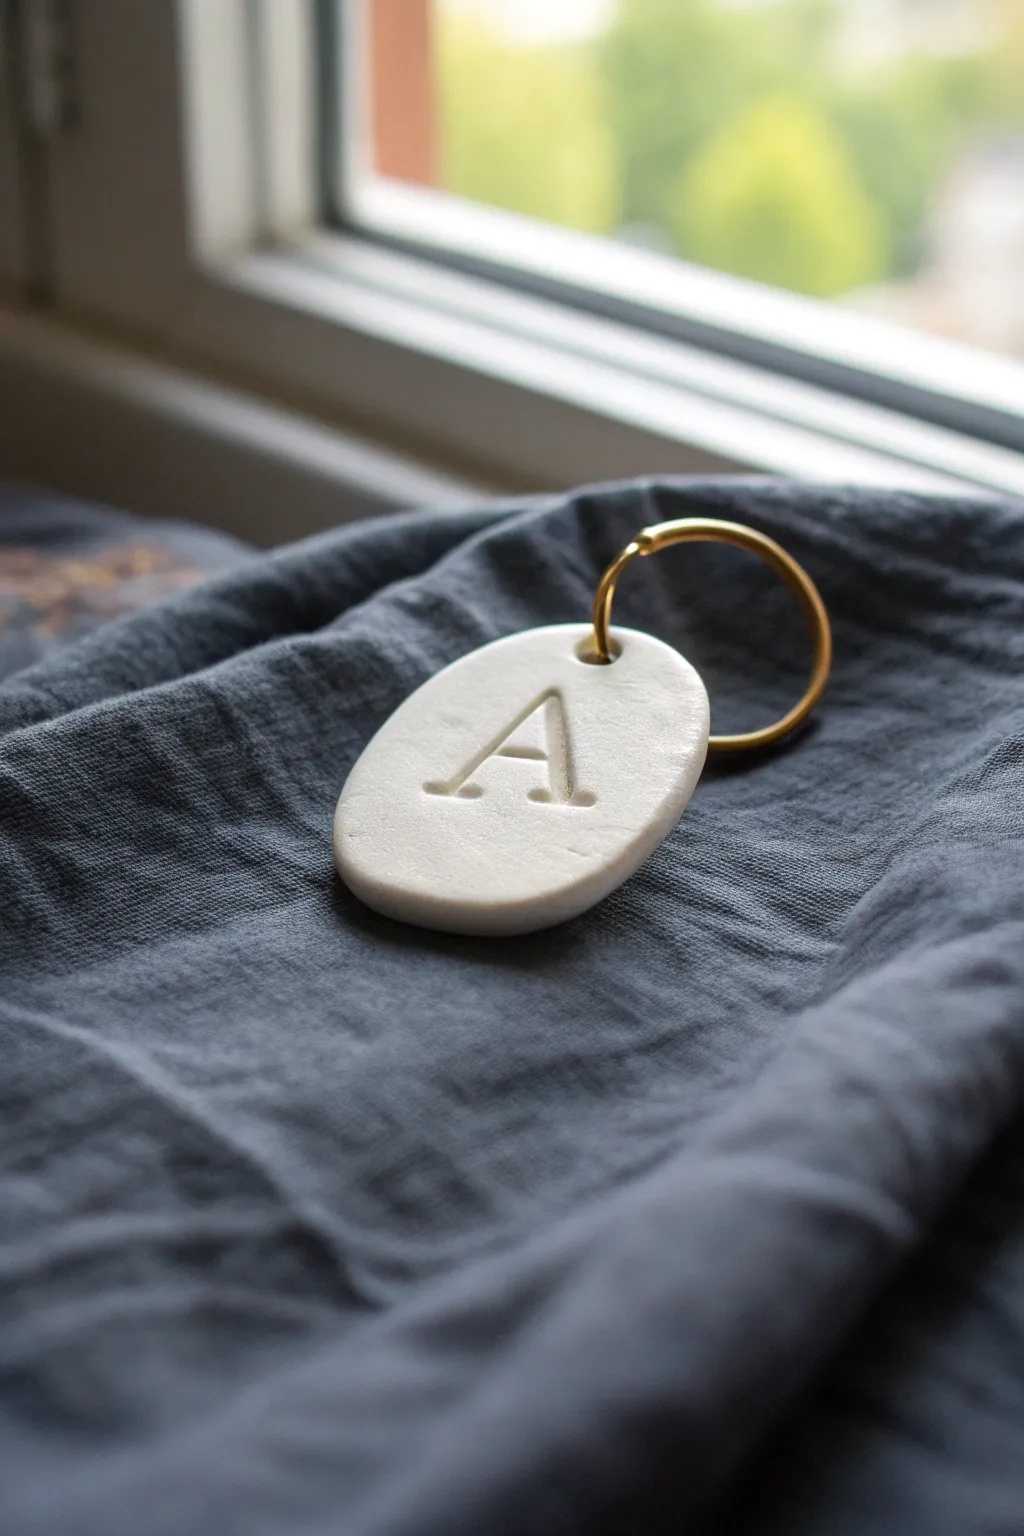
Achieve a sophisticated, understated look with this simple yet elegant stamped initial keychain. The stark white clay combined with a serif font stamp creates a classic accessory that pairs beautifully with a simple gold ring.
How-To Guide
Materials
- White air-dry clay (fine texture)
- Letter stamp set (serif font)
- Small oval cookie cutter or template
- Rolling pin
- Parchment paper or clay mat
- Small straw or cocktail stick
- Fine-grit sandpaper (400-600 grit)
- Gold tone keychain ring (split ring)
- Small bowl of water
- Clear acrylic sealant (matte finish)
Step 1: Shaping the Clay
-
Condition the clay:
Begin by taking a small ball of white air-dry clay and kneading it in your hands. You want it warm and pliable, eliminating any internal air bubbles. -
Roll it out:
Place the clay on a sheet of parchment paper. Use a rolling pin to flatten it to an even thickness of about 1/4 inch (6mm). Avoid rolling it too thin, as keychains need to be durable. -
Cut the shape:
Press a small oval cutter firmly into the clay. If you don’t have a cutter, you can sketch an oval on paper, cut it out, lay it on the clay, and trace around it with a craft knife. -
Smooth the edges:
Dip your finger into a small bowl of water and gently run it along the cut edges of the oval. This removes the harsh ‘cut’ look and creates a soft, rounded perimeter like a river stone.
Sticky Stamp Fix
If your stamp is sticking to the fresh clay and ruining the finish, lightly dust the stamp face with cornstarch or baby powder before pressing it down.
Step 2: Stamping and Drying
-
Align the stamp:
Select your desired letter from the stamp set. Position it directly over the center of the clay oval, hovering first to ensure your spacing is even on all sides. -
Make the impression:
Press the stamp straight down with firm, even pressure. Rock it very slightly side-to-side to ensure the serif details catch, but be careful not to shift the stamp’s position. -
Create the hole:
Using a small straw or a cocktail stick, puncture a hole near the top edge of the oval. Make sure the hole is large enough to accommodate your metal ring but not so close to the edge that the clay might break. -
Initial refinement:
If the hole creation pushed up any clay on the back, smooth it down gently with a wet finger. -
Let it dry:
Place the piece on a clean, flat surface to dry. I prefer to flip the clay over after about 12 hours to ensure the back dries as evenly as the front. Allow a full 24-48 hours for complete drying.
Clean Edges Pro Tip
Use plastic wrap over your clay before cutting with the shape cutter. The plastic softens the edges instantly, creating a rounded ‘pillow’ effect without needing to sand later.
Step 3: Finishing Touches
-
Sand for perfection:
Once fully dry and hard, use fine-grit sandpaper to buff the edges and surface. Focus on any irregularities around the rim to get that polished, professional feel. -
Dust off:
Wipe the tag with a slightly damp cloth or a dry soft brush to remove all the sanding dust from the crevices of the stamped letter. -
Seal the piece:
Apply a thin coat of matte acrylic sealant. This protects the porous clay from dirt and moisture without adding an artificial gloss. -
Dry the sealer:
Allow the sealant to cure completely according to the bottle instructions. -
Attach the hardware:
Carefully thread the gold split ring through the hole you created earlier. If the ring is stiff, use pliers to gently hold it open while you slide the clay tag on.
Now you have a refined, custom accessory ready to organize your keys or gift to a friend

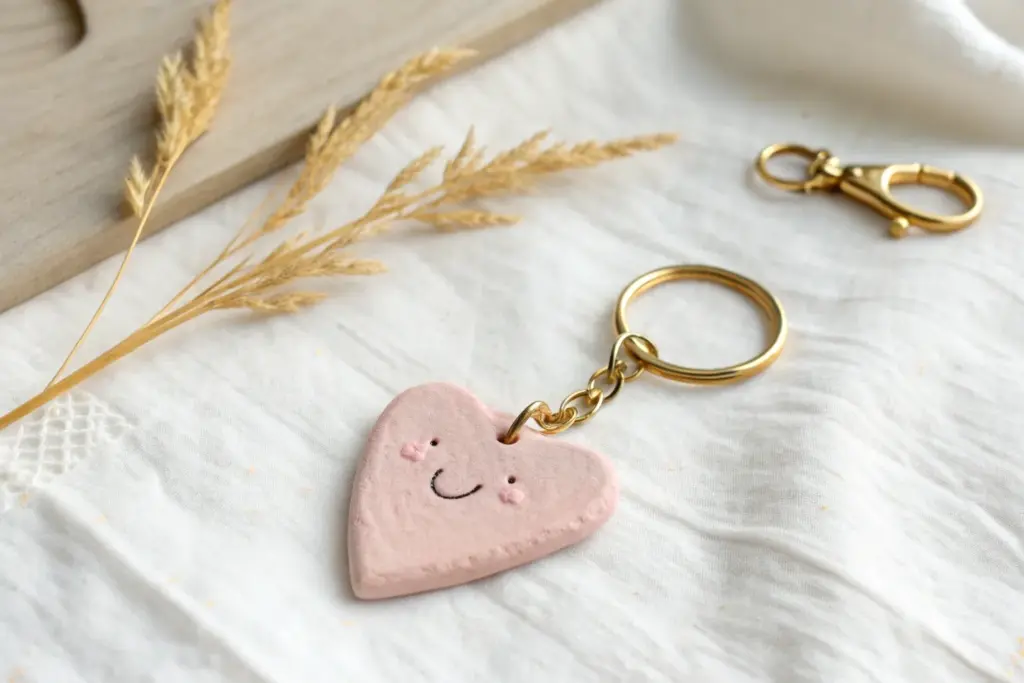
Classic Heart Name Keychain

Create a charming, personalized accessory with this classic heart name keychain. The soft, dusty pink hue and clean stamped lettering give it a timeless, minimalist aesthetic that looks perfect on any bag or key set.
Step-by-Step Tutorial
Materials
- Air dry clay (white or pre-colored terracotta/pink)
- Acrylic paint (dusty rose or burnt sienna) if using white clay
- Heart-shaped cookie cutter (medium size)
- Small alphabet stamp set
- Rolling pin
- Two dowels or pencils (for even thickness)
- Fine grit sandpaper
- Toothpick or drinking straw
- Gold jump ring (8-10mm)
- Gold split key ring
- Pliers
- Matte varnish or sealant
Step 1: Preparing the Clay Base
-
Condition the clay:
Begin by kneading a small ball of air dry clay in your hands until it becomes soft, pliable, and free of cracks. If you are using white clay and want solid color throughout like the example, mix in a drop of dusty rose acrylic paint now, kneading until the color is completely uniform. -
Set up your workspace:
Place your clay on a smooth, non-stick surface or a piece of parchment paper to prevent sticking. -
Roll the slab:
Position your two dowels or pencils on either side of the clay ball. These will act as depth guides to ensure your keychain is perfectly even. -
Flatten evenly:
Use your rolling pin to flatten the clay across the guides. You want a thickness of about 1/4 inch (4-5mm)—thick enough to be sturdy but thin enough to be lightweight. -
Cut the shape:
Press your heart-shaped cookie cutter firmly into the clay. Give it a tiny wiggle to ensure a clean cut before lifting it away. -
Smooth the edges:
Dip your finger in a tiny bit of water and gently run it along the cut edges of the heart to smooth out any roughness or sharp ridges left by the cutter.
Stamp Clarity Tip
To keep the letters crisp and readable, lightly dust your alphabet stamps with cornstarch before pressing them into the clay. This prevents the clay from sticking inside the detailed crevices.
Step 2: Customizing and Finishing
-
Plan your spacing:
Before stamping, lightly hover your letter stamps over the clay heart to visualize the spacing. You want the name ‘MIA’ (or your chosen name) to be centered horizontally. -
Stamp the name:
Press each letter stamp straight down into the center of the heart. Apply firm, even pressure to get a crisp impression, but don’t push all the way through the clay. -
Create the hardware hole:
Using a straw or a tool with a similar diameter, punch a hole near the top center of the heart, right in the ‘V’ dip. Ensure there is enough clay above the hole (at least 3-4mm) so the loop doesn’t break later. -
Clean the hole:
If the hole punching left any jagged bits on the back, smooth them down gently with a damp finger. -
Let it dry:
Place the heart on a drying rack or a sheet of paper. Allow it to air dry completely for 24 to 48 hours. I suggest flipping it over halfway through the drying process to prevent curling. -
Sand for perfection:
Once fully cured and hard, take fine-grit sandpaper and very gently buff the edges and surface. This removes any fingerprints and gives it that professional, stone-like texture. -
Dust off:
Wipe the piece with a dry cloth or soft brush to remove the sanding dust. -
Seal the surface:
Apply a thin coat of matte varnish or clear sealant to protect the clay from moisture and scratches. Let this dry according to the manufacturer’s instructions. -
Open the jump ring:
Using two pairs of pliers, twist the gold jump ring open sideways (never pull it apart outwards). -
Attach hardware:
Slide the open jump ring through the hole in the clay heart, and then thread on the larger gold split key ring. -
Close the loop:
Twist the jump ring back into a closed position with your pliers, ensuring the two ends meet flush so the keychain doesn’t slip off.
Gilded Lettering
Make the name pop by taking a very fine brush and filling the indented letters with gold liquid leaf paint or white acrylic. Wipe away excess surface paint quickly with a damp cloth.
Now you have a beautiful, minimalist keepsake ready to organize your keys or gift to a friend


Monogram Disc With Border Dots
This elegant keychain combines simple embossing techniques with delicate hand-painted details for a boutique-style accessory. The soft, creamy white clay allows the copper-rose laurel wreath and stamped monogram to truly shine, making it a perfect personalized gift.
Step-by-Step Guide
Materials
- White smooth air dry clay
- Rolling pin
- Round cookie cutter (approx. 2.5 – 3 inches)
- Small serif alphabet stamp set
- Needle tool or toothpick
- Fine grit sandpaper (320-400 grit)
- Metallic rose gold or copper acrylic paint
- Very fine detail brush (size 0 or 00)
- Antique brass keychain hardware (jump ring and split ring)
- Gloss or matte varnish (optional)
- Small bowl of water
- Parchment paper or silicone mat
Step 1: Shaping the Base
-
Condition the clay:
Begin by taking a small handful of air dry clay. Knead it in your hands for a minute until it feels warm, pliable, and free of cracks. -
Roll it out:
Place the clay on your parchment paper or mat. Use the rolling pin to roll it out to an even thickness of about 1/4 inch (6mm). You want it sturdy enough to hold hardware but not too chunky. -
Cut the circle:
Press your round cookie cutter firmly into the clay. Give it a tiny wiggle to ensure a clean cut, then remove the excess clay from around the circle. -
Smooth the edges:
Dip your finger in a little bit of water and gently run it around the cut edge of the circle. This removes any harsh lines or burrs left by the cutter.
Stamp Cleanliness
Before stamping your final piece, lightly dust your letter stamp with cornstarch or baby powder. This acts as a release agent and prevents the clay from sticking inside the crevices of the letter.
Step 2: Texturing and Stamping
-
Stamp the letter:
Select your desired letter from the stamp set. Position it dead center—hover over the clay first to check alignment—and press down firmly and evenly. Lift straight up to avoid dragging the clay. -
Create the hole:
Using a straw or a tool slightly larger than your jump ring, punch a hole near the top edge. Make sure not to get too close to the rim; leave at least 1/8 inch of clay for strength. -
Mark the dot border:
Take a needle tool or the blunt end of a toothpick. Carefully press small, evenly spaced dots around the entire perimeter of the circle, creating a decorative stitched effect. -
Add inner accents:
Referencing the photo, add three additional dots in a triangle formation around the central letter to balance the negative space. -
The drying phase:
Set the disc aside on a flat surface to dry. I find flipping the piece over carefully after the first 12 hours helps prevent warping. Let it dry fully for 24-48 hours until it’s chalky white and hard.
Step 3: Painting and Assembly
-
Sand for perfection:
Once bone dry, take your fine-grit sandpaper and very gently sand the edges and surface. This is the secret to a professional finish; just a light buff makes it feel like ceramic. -
Dust it off:
Wipe away any clay dust with a dry cloth or soft brush so your paint adheres properly. -
Start the wreath:
Dip your fine detail brush into the metallic rose gold paint. Start at the bottom center below the letter. Paint a thin, curving stem gently arching up the left side. -
Add the leaves:
Paint small, tear-shaped leaves coming off the stem. Press the brush down and lift as you pull away to create a tapered point. Repeat this process for the right side to complete the wreath. -
Highlight the embossed letter:
Using a nearly dry brush with a tiny amount of metallic paint, carefully trace inside the stamped letter ‘M’ to make the monogram pop. -
Fill the dots:
Dab a tiny dot of metallic paint into each of the perimeter indentations you created earlier. This ties the border design to the center motif. -
Seal (Optional):
If you want extra durability, apply a thin coat of varnish over the front and back. Let this cure completely according to package instructions. -
Attached hardware:
Open the jump ring with pliers using a twisting motion (don’t pull it apart). Thread it through the clay hole and your keychain ring, then twist it closed thoroughly.
Fixing Cracks
If small cracks appear while drying, don’t panic. Mix a tiny bit of fresh clay with water to make a paste (slip). Fill the crack, smooth it over with your finger, and let it dry again.
Your sophisticated monogram keychain is now ready to organize your keys or adorn your favorite bag


Terrazzo Speckle Keychain

Capture the trendy, sophisticated look of terrazzo tiles in a miniature form with this chic keychain project. By embedding colorful clay fragments into a neutral base, you create a polished, stone-like slab that feels modern and artistic.
Step-by-Step Tutorial
Materials
- White or cream air dry clay
- Air dry clay in assorted colors (orange, teal, red, navy blue)
- Acrylic rolling pin
- Rectangle clay cutter or craft knife
- Sandpaper (medium and fine grit)
- Gloss varnish or resin sealant
- Soft brush for sealing
- Jump ring and keychain hardware
- Drill or toothpick for making a hole
- Parchment paper or clay mat
Step 1: Prepping the Chips
-
Flatten colored clay:
Begin by taking small pinches of your colored clays—orange, teal, red, and navy blue. Roll each color out very thinly on your work surface until they are like paper. The thinner they are, the better they will integrate later. -
Creation of fragments:
Tear these thin colored sheets into tiny, irregular pieces. Vary the sizes; you want some tiny specks and some larger, bolder chunks to mimic real stone aggregate. -
Dry the chips:
Let these colored fragments sit out for about 10-15 minutes. Allowing them to dry slightly before using them ensures they hold their sharp, jagged shapes and don’t smear when we roll them into the base.
Don’t Smear It
When rolling chips into the base, roll in one direction only initially. Rolling back and forth can drag the colors, turning your crisp chips into muddy streaks.
Step 2: Forming the Slab
-
Roll the base:
Take a larger ball of your white or cream clay and condition it until smooth. Roll it out into a slab that is about 5-6mm thick. It needs to be substantial enough to hold the hardware. -
Scatter the pattern:
Sprinkle your dried colored chips randomly over the surface of the white slab. Don’t overthink the placement; randomness is key to the terrazzo aesthetic. -
Embed the chips:
Gently gently roll over the slab with your acrylic roller again. You want to press the colored chips *into* the white clay so they become flush with the surface, creating a single flat layer. -
Smooth the surface:
If the surface looks uneven or lumpy, drag a flat blade or your finger lightly across the top to ensure it’s diverse but level.
Step 3: Cutting and Refining
-
Cut the shape:
Using a rectangle cutter or a craft knife and ruler, cut out your final keychain shape. Position your cut to capture the most interesting arrangement of speckles. -
Punch the hole:
While the clay is still wet, use a straw or a tool to poke a hole near the top center for the hardware. Ensure it’s not too close to the edge to prevent breakage later. -
Smooth edges:
Dip your finger in a tiny bit of water and run it along the cut edges of the rectangle to soften any harsh sharpness from the knife. -
Complete drying:
Set the piece aside on parchment paper to dry completely. This usually takes 24-48 hours depending on humidity; flip it occasionally so both sides dry evenly.
Gold Leaf Glam
Add tiny flakes of gold leaf along with your clay chips before the final roll. The gold will embed alongside the colors for an extra luxurious, sparkly finish.
Step 4: Finishing Touches
-
Reveal the pattern:
Once fully dry, the colored chips might be hazy from a thin film of white clay. Sand the surface vigorously with medium-grit sandpaper to remove that top layer and reveal the crisp, bright colors underneath. -
Polish up:
Switch to fine-grit sandpaper to buff out any scratches from the previous step, leaving the surface smooth to the touch. -
Clean dust:
Wipe the piece thoroughly with a slightly damp cloth or baby wipe to remove all sanding dust. Any leftover dust will ruin the finish. -
Apply varnish:
Apply a glossy varnish or UV resin to the front, back, and sides. This makes the colors pop vividly and gives it that polished stone look seen in the photo. -
Let it cure:
Allow the sealant to dry or cure completely according to the manufacturer’s instructions. -
Attach hardware:
Open a gold jump ring using two pairs of pliers. Thread it through the hole in the clay and attach your gold keychain ring. -
Close securely:
Twist the jump ring closed tightly so there is no gap for the keychain to slip through.
Your stylish geometric accessory is now ready to organize your keys with a splash of modern art.

The Complete Guide to Pottery Troubleshooting
Uncover the most common ceramic mistakes—from cracking clay to failed glazes—and learn how to fix them fast.
Marbled Swirl Keychain
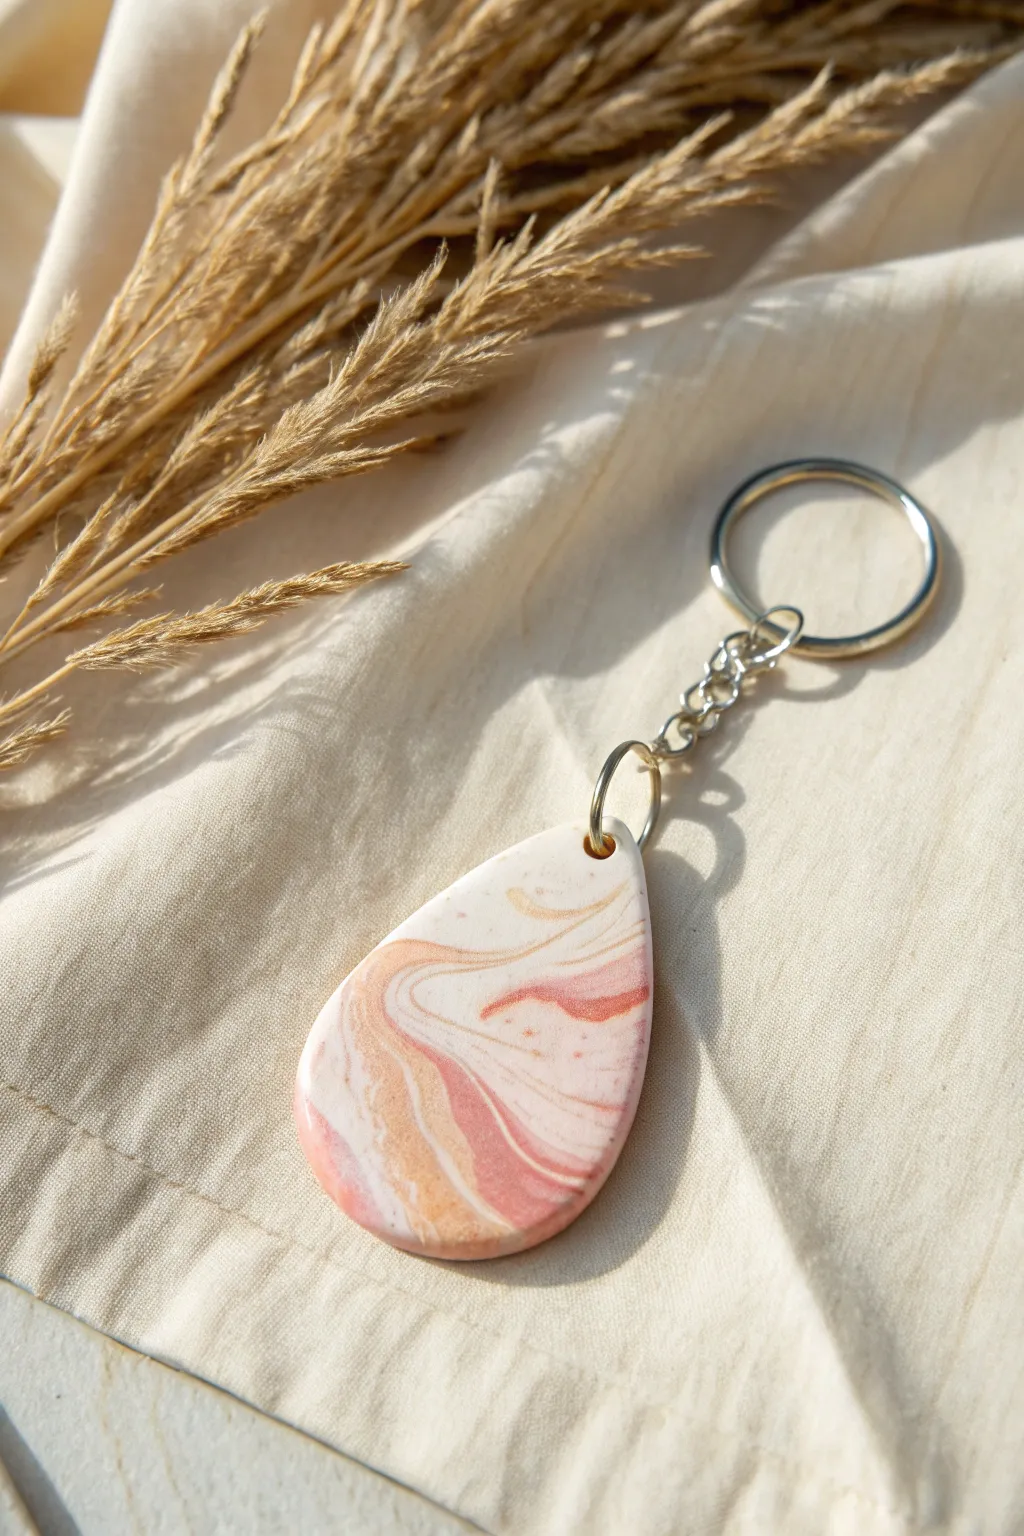
Capture the elegance of swirling sands and soft sunsets with this marbled air-dry clay keychain. The organic teardrop shape and gentle color palette of pinks, creams, and warm ochres create a sophisticated accessory that looks far more expensive than it is to make.
Detailed Instructions
Materials
- White air-dry clay
- Acrylic paints (pastel pink, warm ochre/gold, burnt orange)
- Rolling pin or smooth glass jar
- Teardrop-shaped cutter (or a craft knife and cardstock template)
- Small jump rings and keyring hardware
- Needle tool or toothpick
- Fine-grit sandpaper (around 400 grit)
- Gloss varnish or UV resin (optional for shine)
- Pliers for assembly
Step 1: Color Mixing & Marbling
-
Prepare the base:
Start by conditioning a chunk of white air-dry clay until it is soft and pliable. Divide this main lump into three smaller, unequal portions. -
Tint the clay:
Take one small portion and knead in a drop of pastel pink acrylic paint. Mix until the color is uniform. Repeat with another portion using the warm ochre or gold paint. Keep the largest portion pure white. -
Create logs:
Roll each colored ball into a long, thin snake or log shape. You should have a pink log, an ochre log, and a thicker white log. -
Twist together:
Gather the three logs and twist them together like a candy cane. Fold the twisted rope in half and twist it again. -
Marble the colors:
Gently knead the twisted clay into a ball, but don’t overmix. I find stopping just before the colors fully blend gives the best distinct streaks. -
Check the pattern:
If the marbling looks too chunky, twist and fold one more time. You want thin, elegant veins of color running through the white.
Clean Cuts Only
Apply a tiny bit of lotions or oil to your cutter blade before pressing into the clay. This helps it release cleanly without dragging the edges.
Step 2: Shaping & Drying
-
Roll out the slab:
Place your marbled ball on a smooth surface. Use a rolling pin to flatten it to a thickness of about 4-5mm (approx. 1/4 inch). Roll gently to avoid distorting the swirl pattern too much. -
Cut the shape:
Position your teardrop cutter over the section of clay with the most pleasing swirl pattern. Press down firmly to cut the shape. Alternatively, trace around a cardstock template with a craft knife. -
Smooth the edges:
Dip your finger in a tiny bit of water and gently run it along the cut edges to smooth out any roughness or loose clay bits. -
Pierce the hole:
Use a needle tool or toothpick to create a hole at the narrow top of the teardrop. Make sure the hole is big enough for your jump ring and isn’t too close to the very edge. -
Let it dry:
Place the piece on a clean, flat surface to dry. Turn it over every few hours to ensure even drying and prevent warping. Allow 24-48 hours depending on humidity.
Step 3: Finishing Touches
-
Sand for smoothness:
Once fully cured, use fine-grit sandpaper to gently buff the edges and surface. This removes any fingerprints and makes the shape look professional. -
Dust off:
Wipe the charm with a slightly damp cloth or a soft brush to remove all sanding dust before sealing. -
Seal the charm:
Apply a coat of gloss varnish for a ceramic look. For extra durability and a glass-like finish, you can use UV resin and cure it under a lamp. -
Attach hardware:
Open a jump ring using two pairs of pliers (twist sideways, don’t pull apart). Thread it through the hole in the clay. -
Connect the chain:
Add the keyring chain to the open jump ring, then twist the ring closed securely so there is no gap.
Golden Glamour
Before sealing, dry brush a tiny amount of gold mica powder or metallic paint onto the edges of the marbling veins to highlight the swirl pattern.
Now you have a chic, custom accessory perfect for organizing your keys or gifting to a friend
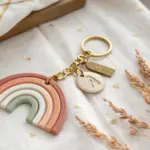
Rainbow Arch Charm
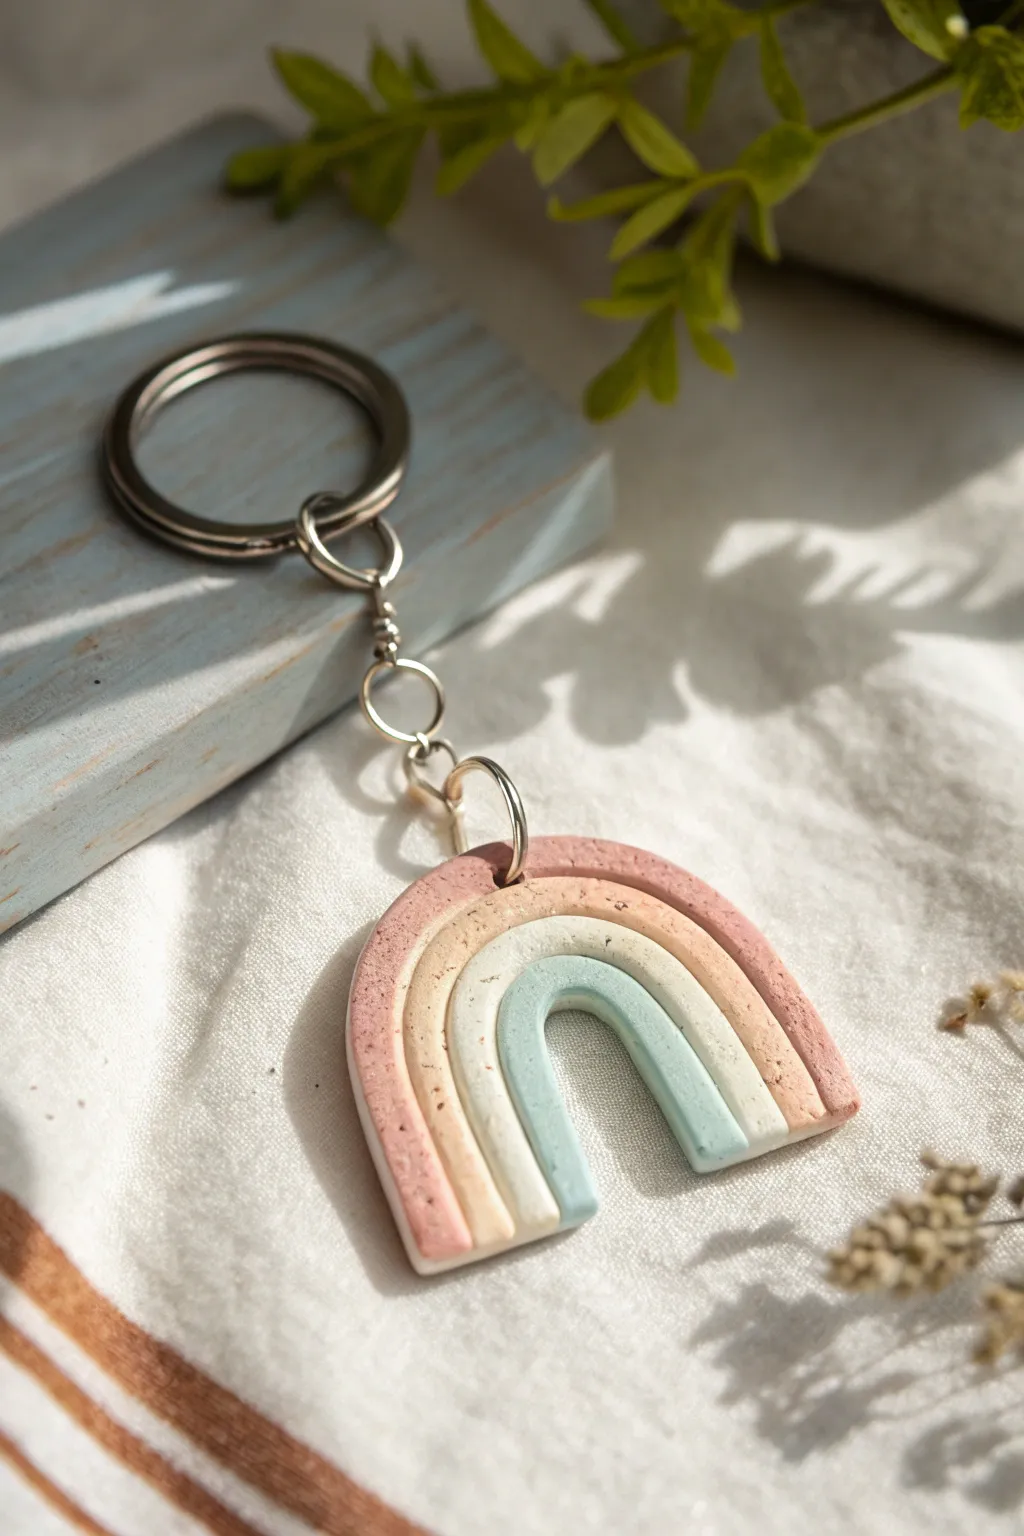
This charming keychain captures a lovely bohemian aesthetic with its muted pastel palette and subtle speckled texture. The soft arches of pink, peach, cream, and dusty blue create a miniature piece of wearable art that looks effortlessly chic hanging from your keys or bag.
Step-by-Step
Materials
- White or natural air dry clay
- Acrylic paints (Dusty Rose, Peach/Terracotta, Cream, Dusty Blue)
- Black speckled paint or diluted brown acrylic paint and stiff brush
- Rolling pin
- Clay knife or X-Acto blade
- Small circle cutter or straw (for the jump ring hole)
- Water in a small cup
- Sandpaper (fine grit)
- Silver keychain hardware (jump rings, chain, key ring)
- Pliers
- Strong craft glue (optional)
- Matte varnish or sealant
Step 1: Coloring and Forming the Clay
-
Prepare your colors:
Begin by separating your white clay into four equal-sized balls. You’ll need to tint these before shaping to get that solid color look. I find mixing paint directly into the raw clay gives a smoother, more matte finish than painting afterward. -
Mix the outer arch:
Take the first ball of clay and add a drop of Dusty Rose acrylic paint. Knead the clay thoroughly until the color is uniform. Add more paint sparingly if needed, but remember it will dry darker. -
Create the middle hues:
Repeat the kneading process with the second ball using the Peach or Terracotta paint, and the third ball with just a touch of Cream or Yellow Ochre for a warm white. -
Mix the inner arch:
Knead Dusty Blue paint into the final ball of clay. Make sure your hands are clean between mixing each color so you don’t transfer the pigments. -
Roll the coils:
Take your Dusty Rose clay and roll it on a flat surface into a long, even -
Repeat for all colors:
Roll out the Peach, Cream, and Dusty Blue clays into snakes of the same thickness. Aim for about 5-6mm thick for a sturdy keychain.
Fixing Cracks
If tiny cracks appear as the clay dries, mix a small amount of fresh clay with water to make a paste (slip). Fill the cracks, smooth with a finger, and let dry again.
Step 2: Assembling the Rainbow
-
Form the inner arch:
Take the blue snake and bend it into a tight ‘U’ shape. This determines the size of the gap in the middle. -
Add the cream layer:
Gently curve the cream snake over the blue one. Apply a tiny amount of water with your finger along the touching edges to act as glue, then press them gently together. -
Attach the remaining layers:
Continue adding the peach snake, followed by the dusty rose snake on the very outside. Ensure they are pressed snugly against each other without squashing the round profile of the coils. -
Trim the bottom:
Lay a straight edge or ruler across the bottom of the rainbow legs. Use your clay knife to slice through all four coils at once for a perfectly flush, flat base. -
Add the hardware hole:
Using a straw or a small punch, create a hole at the top center of the outermost (rose) arch. Make sure it’s not too close to the edge to prevent breaking later. -
Initial smoothing:
Dip your finger in water and gently smooth out any cracks or fingerprints on the surface and the back. Let the piece dry completely, usually for 24-48 hours. Flip it halfway through to ensure even drying.
Pro Tip: Even Coils
Use an acrylic block or a flat book to roll your clay snakes instead of just your hand. This applies even pressure across the whole length, preventing lumpy sections.
Step 3: Finishing Touches
-
Sand for perfection:
Once bone dry, use fine-grit sandpaper to gently smooth the edges, especially where you cut the bottom. Wipe away the dust with a barely damp cloth. -
Create the speckled effect:
To get that stone-like texture, create a watery mix of dark brown or black paint. Load a stiff brush or toothbrush, and flick the bristles to spatter tiny dots over the front of the rainbow. -
Seal the charm:
Apply a coat of matte varnish to protect your keychain from moisture and scratches. Using matte instead of gloss keeps that earthy, natural clay look. -
Attach the jump ring:
Use pliers to open a large jump ring. Thread it through the hole you made in the clay, then close it securely. -
Connect the chain:
Attach the keychain chain and swivel mechanism to your jump ring. Give it a gentle tug to make sure all connections are tight.
Now you have a trendy, durable accessory that adds a personal touch to your daily routine


What Really Happens Inside the Kiln
Learn how time and temperature work together inside the kiln to transform clay into durable ceramic.
Sun And Moon Duo
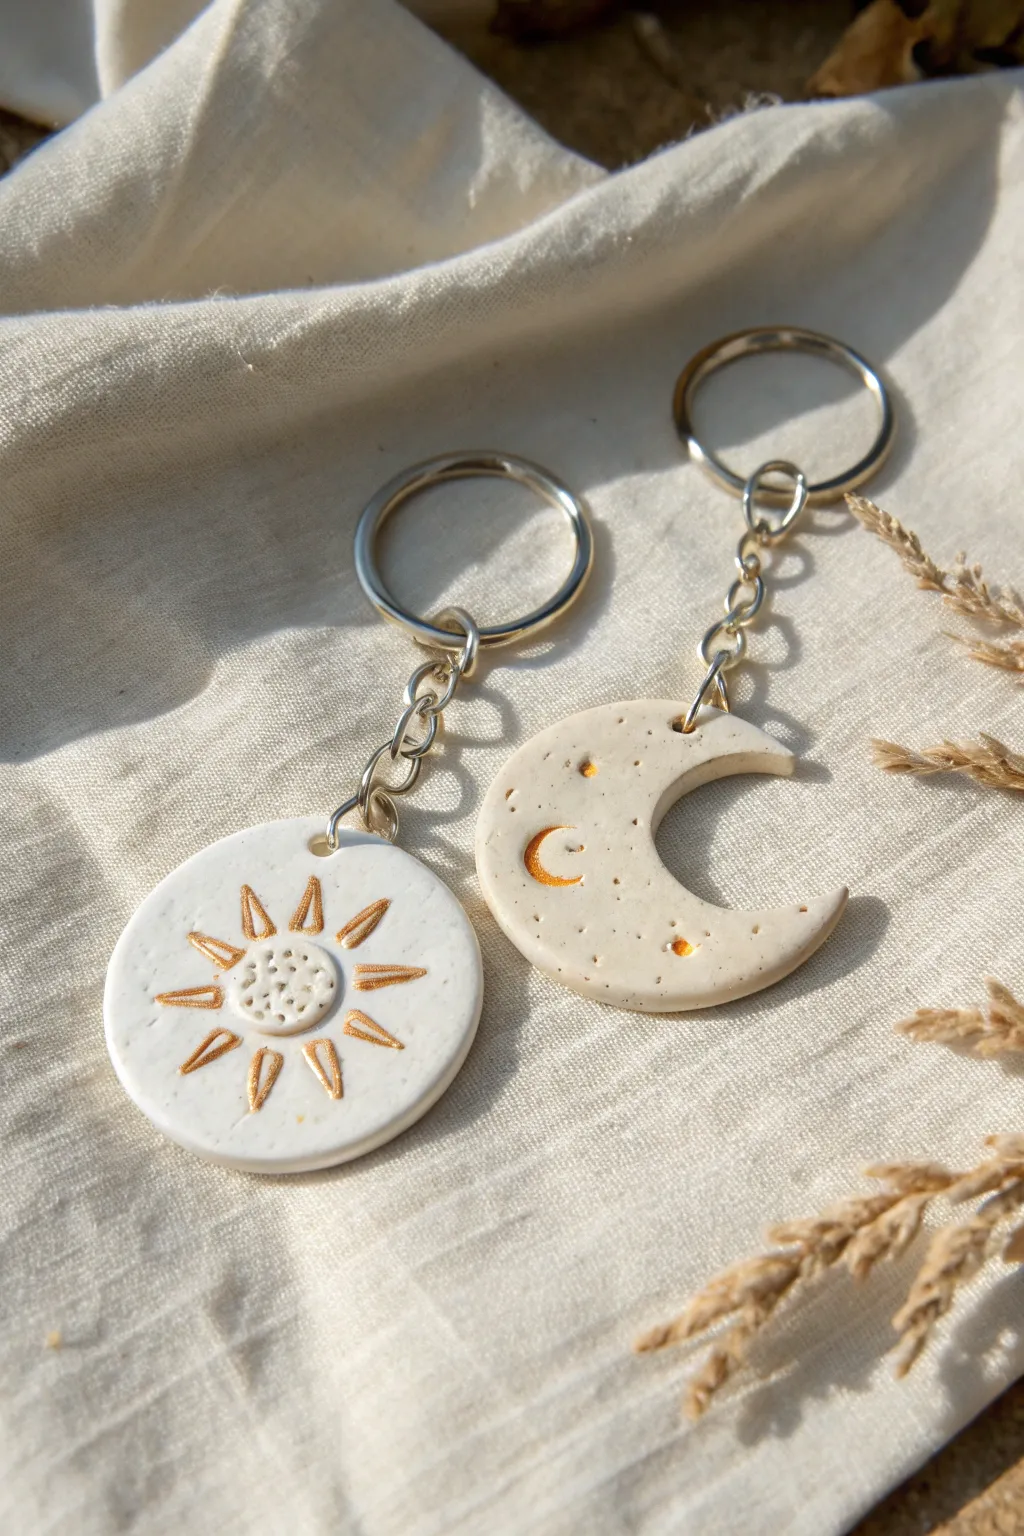
Capture the magic of the cosmos with this charming duo of clay keychains featuring a radiant sun and a serene crescent moon. The speckled clay texture combined with metallic gold accents gives them a trendy, boho-chic finish that looks professionally made.
How-To Guide
Materials
- White or speckled air-dry clay (e.g., DAS stone effect)
- Small rolling pin
- Round cookie cutter (approx. 2 inches)
- Moon-shaped cutter (or craft knife)
- Craft knife or needle tool
- Small straw or bamboo skewer
- Gold acrylic paint or metallic gold marker
- Fine-point paintbrush
- Sandpaper (fine grit)
- Gloss varnish or sealant (optional)
- Keychain hardware (split rings and chains)
- Pliers
- Jump rings
Step 1: Shaping the Celestial Bodies
-
Prepare the clay:
Begin by conditioning a small ball of clay in your hands until it is pliable. If you want the speckled look shown in the photo but only have white clay, you can knead in some black pepper or dried tea leaves. -
Roll it out:
Use your rolling pin to flatten the clay to an even thickness of about 1/4 inch (5-6mm). You don’t want it too thin, or the keychain might be brittle. -
Cut the sun:
Press your round cookie cutter firmly into the clay to create a perfect circle for the sun charm. -
Cut the moon:
Use a crescent moon cutter for the second shape. If you don’t have one, use the round cutter again, then offset the cutter and punch a second circle out of the first one to leave a crescent shape behind. -
Smooth the edges:
Dip your finger in a tiny bit of water and gently run it along the cut edges of both shapes to remove any jagged bits or roughness. -
Create attachment holes:
Using a small straw or a skewer, poke a hole near the top edge of each shape. Make sure the hole isn’t too close to the very edge to prevent tearing later.
Step 2: Sculpting the Details
-
Form the sun face:
Roll a very small pea-sized ball of clay and flatten it slightly. Press this into the center of your sun circle to create the raised face area. -
Texture the sun:
Using a needle tool or toothpick, prick small dots all over the raised center circle to give it a seed-pod texture. -
Carve the rays:
With your craft knife or needle tool, carefully carve triangular rays radiating outward from the center circle. Press deep enough to make an impression but not through the clay. -
Stamp the moon details:
For the moon, use a small tool or the end of a paintbrush handle to impress a few tiny craters. You can also use a small round cap or tool to stamp a tiny crescent shape and a circle sun onto the moon surface. -
Dry completely:
Set your pieces aside on a flat surface to air dry. This typically takes 24-48 hours. I like to flip them over halfway through so the bottom dries evenly.
Clean Lines Pro Tip
If your gold paint spills out of the grooves, let it dry slightly, then gently scrape the excess off the surface with a craft knife for crisp edges.
Step 3: Painting and Assembly
-
Sand for smoothness:
Once fully rigid and dry, gently sand the edges and flat surfaces with fine-grit sandpaper to remove any imperfections. -
Clean dust:
Wipe the pieces with a barely damp cloth or dry brush to remove all sanding dust before painting. -
Paint the sun gold:
Using a fine brush and metallic gold paint, carefully fill in the carved triangular rays of the sun. Allow the paint to settle into the grooves. -
Paint the moon accents:
Paint the inside of the tiny stamped crescent and circle on the moon charm with the same gold paint to tie the set together. -
Seal (Optional):
For durability, coat both charms with a layer of matte or gloss varnish. This protects the clay from moisture and everyday wear. -
Attach jump rings:
Open a jump ring using your pliers by twisting the ends away from each other (not pulling apart). Slide it through the hole in the clay charm. -
Connect hardware:
Loop the last link of the keychain chain onto the open jump ring, then twist the jump ring closed securely.
Cracking Clay?
If you see small cracks appearing as the clay dries, smooth a tiny bit of wet clay slurry (clay mixed with water) into the cracks with your finger.
Now your celestial duo is ready to organize your keys or serve as a thoughtful handmade gift for a friend
Daisy Flower Keychain
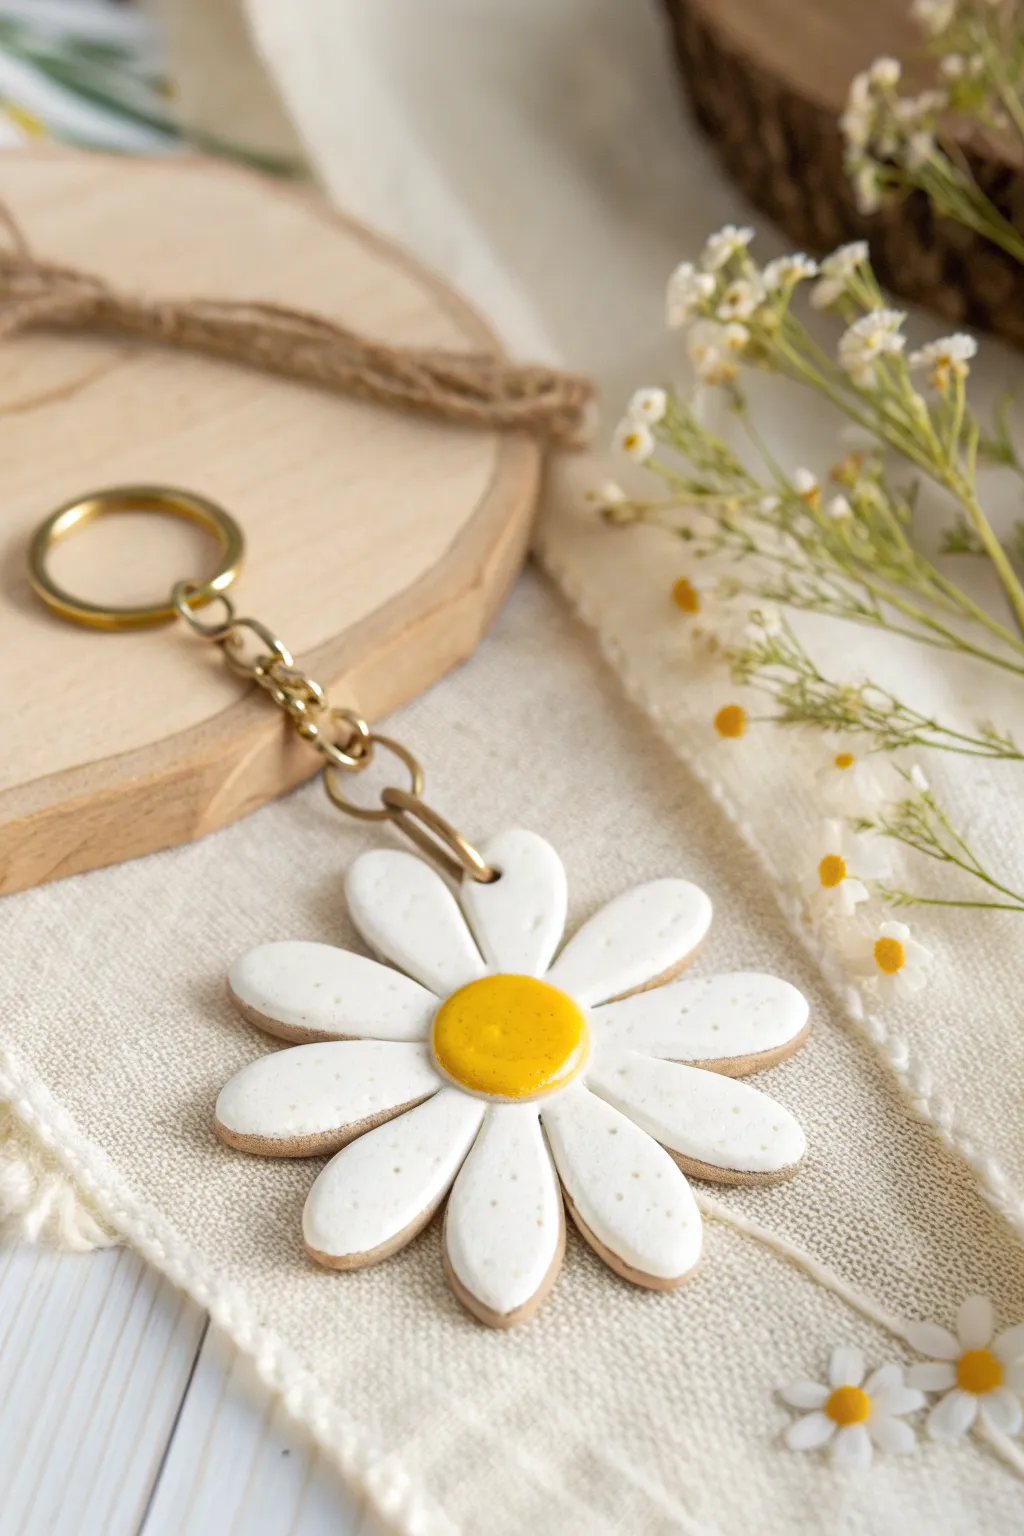
This charming daisy keychain captures the essence of a summer meadow with its clean white petals and classic yellow center. The design features a layered ‘cookie’ style look, where a warm backing peeks out behind the petals, adding durability and a professional finish.
Step-by-Step Tutorial
Materials
- White polymer or air-dry clay
- Translucent or light tan clay (for the backing)
- Yellow clay (or yellow acrylic paint)
- Rolling pin
- Daisy flower cookie cutter (medium size)
- Small round cutter (for the center)
- Needle tool or toothpick
- Jump rings (gold)
- Keychain clasp (gold)
- Needle nose pliers
- Gloss glaze or varnish
Step 1: Creating the Base Layer
-
Condition the backing clay:
Start by taking your tan or light brown clay. Knead it thoroughly until it’s soft and pliable, removing any air bubbles that might get trapped inside. -
Roll out the backing:
Roll the tan clay out into a slab that is approximately 3-4mm thick. You want this layer to be sturdy since it will hold the hardware. -
Cut the backing shape:
Using your daisy flower cutter, press firmly into the tan clay to cut out the base shape. Smooth any rough edges with your finger. -
Create the hanging hole:
While the clay is still wet, use a straw or a needle tool to punch a hole through one of the petals. Make sure it’s large enough for your jump ring but not too close to the edge.
Step 2: Sculpting the Petals
-
Prepare the white clay:
Clean your hands and work surface first so the white clay stays pristine. Roll out the white clay slightly thinner than your backing layer, perhaps 2-3mm. -
Cut the white daisy:
Cut another daisy shape using the same cutter you used for the backing. -
Separate the petals:
Using a craft knife, carefully slice the white daisy petals apart from the center so they become individual teardrop shapes. Discard the center bit. -
Attach the petals:
Place the white petal pieces onto the tan backing one by one. I like to leave a tiny sliver of the tan backing visible around the edges for that outlined ‘cookie’ effect. -
Smooth and secure:
Press the petals down gently to bond them to the backing. You can use a tiny bit of water or liquid clay as glue if needed. -
Add surface texture:
Take a needle tool and gently poke random, shallow dots into the surface of the white petals. This creates a porous, organic texture that adds wonderful detail.
Clean Edges Only
Before baking or drying, use a cotton swab dipped in a tiny bit of rubbing alcohol or water to smooth the edges of the petals. This removes fingerprints instantly.
Step 3: The Center & Assembly
-
Form the center:
Roll a small ball of yellow clay. Flatten it slightly into a disc shape that fits perfectly in the middle of your flower petals. -
Texture the center:
Press the yellow disc into the center of the flower. Use a toothbrush or your needle tool to stipple the surface, giving it a pollen-like texture. -
Align the hole:
If your white clay covered the hole you made in the backing, use your tool to pierce through again so the channel is clear. -
Dry the piece:
Allow the clay to dry completely according to the package instructions. Flip it over halfway through the drying process to prevent warping. -
Glaze the center:
Once dry, apply a high-gloss varnish just to the yellow center to make it pop. You can leave the petals matte for contrast. -
Attach hardware:
Using two pairs of pliers, twist open a heavy-duty jump ring. Thread it through the hole in the petal. -
Finish assembly:
Add the gold keychain attachment to the jump ring and twist the ring closed securely.
Double Sided Fun
Instead of a plain back, duplicate the white petal process on the reverse side. This makes the keychain beautiful no matter which way it flips.
Your keys will look instantly brighter with this cheerful floral addition

TRACK YOUR CERAMIC JOURNEY
Capture glaze tests, firing details, and creative progress—all in one simple printable. Make your projects easier to repeat and improve.
Leaf Imprint Medallion
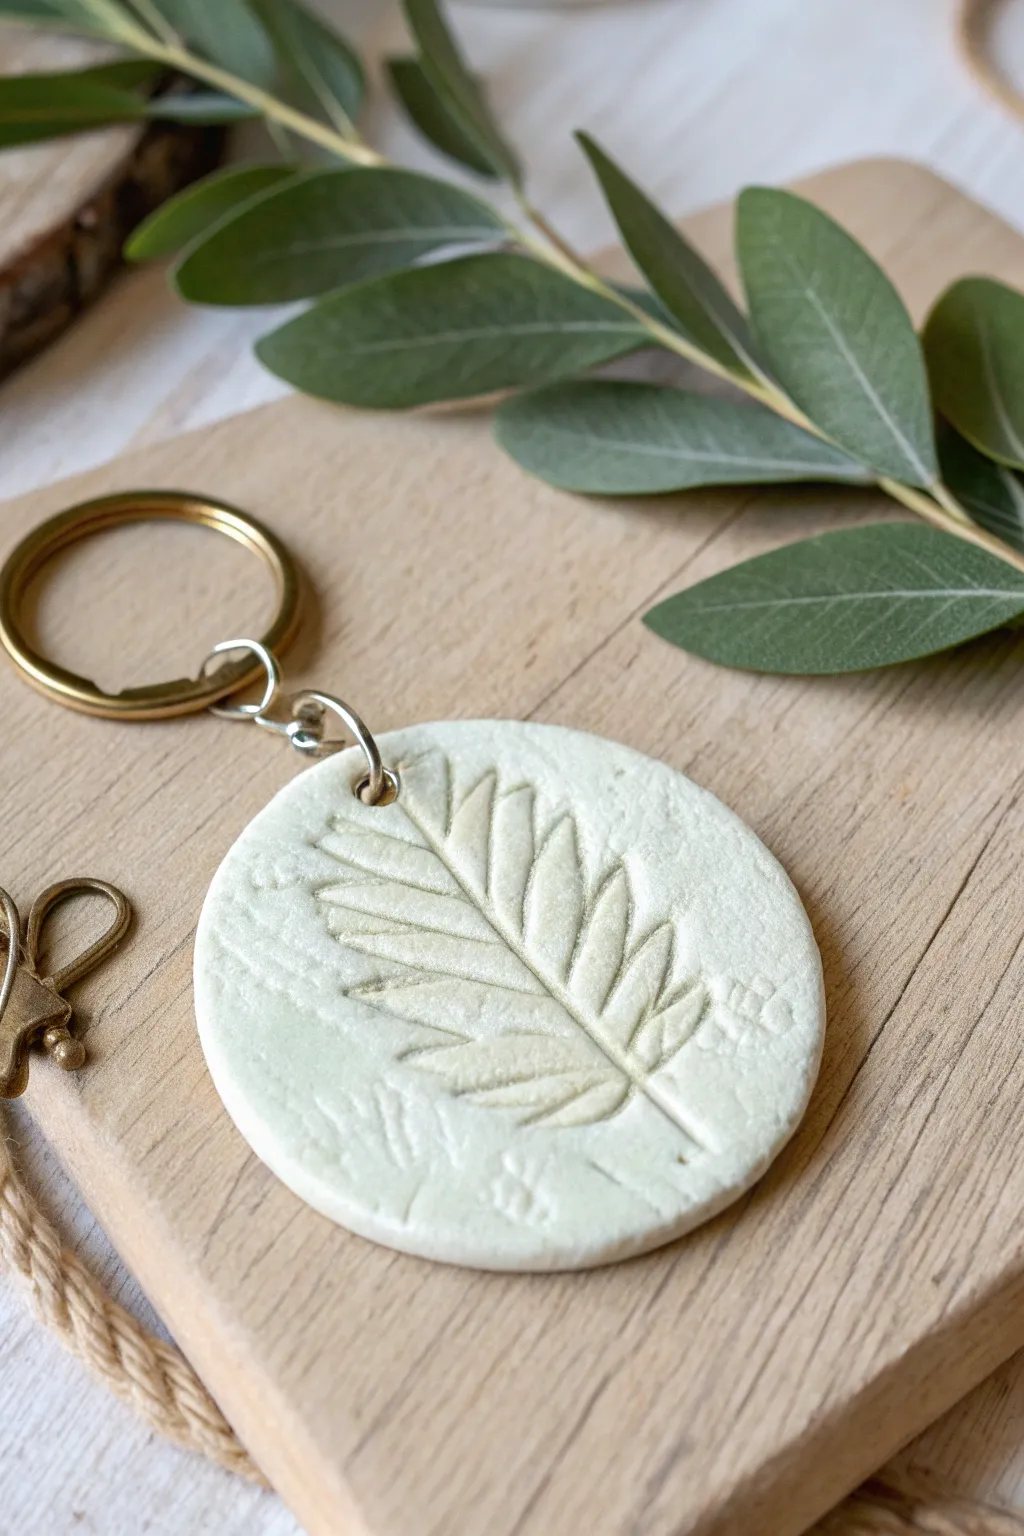
Capture the delicate details of nature with this elegant clay medallion keychain. The simple, organic design relies on a real leaf to create a textured fossil-like impression that looks beautiful in its raw, natural white state.
Step-by-Step
Materials
- White air dry clay
- Rolling pin or acrylic roller
- Circle cookie cutter (approx. 2-3 inches)
- Small fresh leaf with prominent veins (like a fern or olive leaf)
- Parchment paper or craft mat
- Straw or cocktail stick
- Fine grit sandpaper
- Clear matte varnish (optional)
- Jump ring
- Brass keychain split ring
- Pliers
Step 1: Preparing the Clay Base
-
Condition the clay:
Begin by taking a chunk of white air dry clay and kneading it in your hands. You want it to be soft, pliable, and free of any air bubbles. -
Roll it out:
Place the clay on a sheet of parchment paper to prevent sticking. Use your roller to flatten the clay to a uniform thickness, aiming for about 1/4 inch (5-6mm) thick. -
Ensure smoothness:
Check the surface for any imperfections or dust. If you see cracks, smooth them over gently with a slightly damp finger. -
Cut the shape:
Take your circle cookie cutter and press it firmly into the rolled clay. Don’t remove the excess clay around the circle just yet; leaving it there supports the edges during the imprint step.
Cracked Clay?
If small hairline cracks appear as the clay dries, make a ‘slip’ by mixing a tiny bit of clay with water into a paste. Rub this paste into the cracks and sandpaper smooth once dry.
Step 2: Creating the Botanical Impression
-
Select your leaf:
Choosing the right leaf is key. Look for one with thick, raised veins on the underside, as these will create the deepest and clearest impression. -
Position the botanical:
Place the leaf vein-side down onto the center of your clay circle. Think about the composition; centering the leaf usually looks best for this medallion style. -
Roll the imprint:
With the leaf in place, gently roll over it once or twice with your rolling pin. Apply enough pressure to press the leaf into the clay, but not so much that you distort the circle shape. -
Reveal the design:
Carefully lift the stem or edge of the leaf and peel it away from the clay. I love this moment because you finally see the crisp, detailed fossil effect left behind. -
Smooth the edges:
Now, remove the excess clay from around the cutter. Gently lift your circle and use a finger dipped in water to smooth any rough edges created by the cutter. -
Create the hole:
Use a drinking straw or a cocktail stick to punch a hole near the top edge of the medallion. Make sure the hole is big enough for your jump ring and isn’t too close to the very edge to prevent tearing.
Step 3: Finishing and Assembly
-
Let it dry:
Place the clay on a flat surface to dry completely. This usually takes 24 to 48 hours. Flipping it over halfway through the drying process helps prevent the medallion from curling. -
Sand for perfection:
Once bone dry, take a piece of fine-grit sandpaper and gently buff the edges and the flat surfaces (avoiding the imprint) to make the clay feel smooth and professional. -
Seal (optional):
To protect your keychain from moisture, apply a thin coat of clear matte varnish. This keeps the natural look while adding durability. -
Open the jump ring:
Using two pairs of pliers, twist your jump ring open sideways (never pull it apart outwards). -
Attach the hardware:
Slide the open jump ring through the hole in your clay medallion. Before closing it, hook on the brass split ring. -
Secure the closure:
Twist the jump ring back into a closed position using your pliers, ensuring the two ends meet perfectly flush so the clay doesn’t slip out.
Add an Antique Wash
After drying, brush diluted brown acrylic paint over the imprint and wipe it off immediately with a damp cloth. The dark paint stays in the crevices, highlighting the leaf veins.
You now have a chic, minimalist accessory that carries a little piece of the outdoors with you wherever you go
Smiling Strawberry Keychain
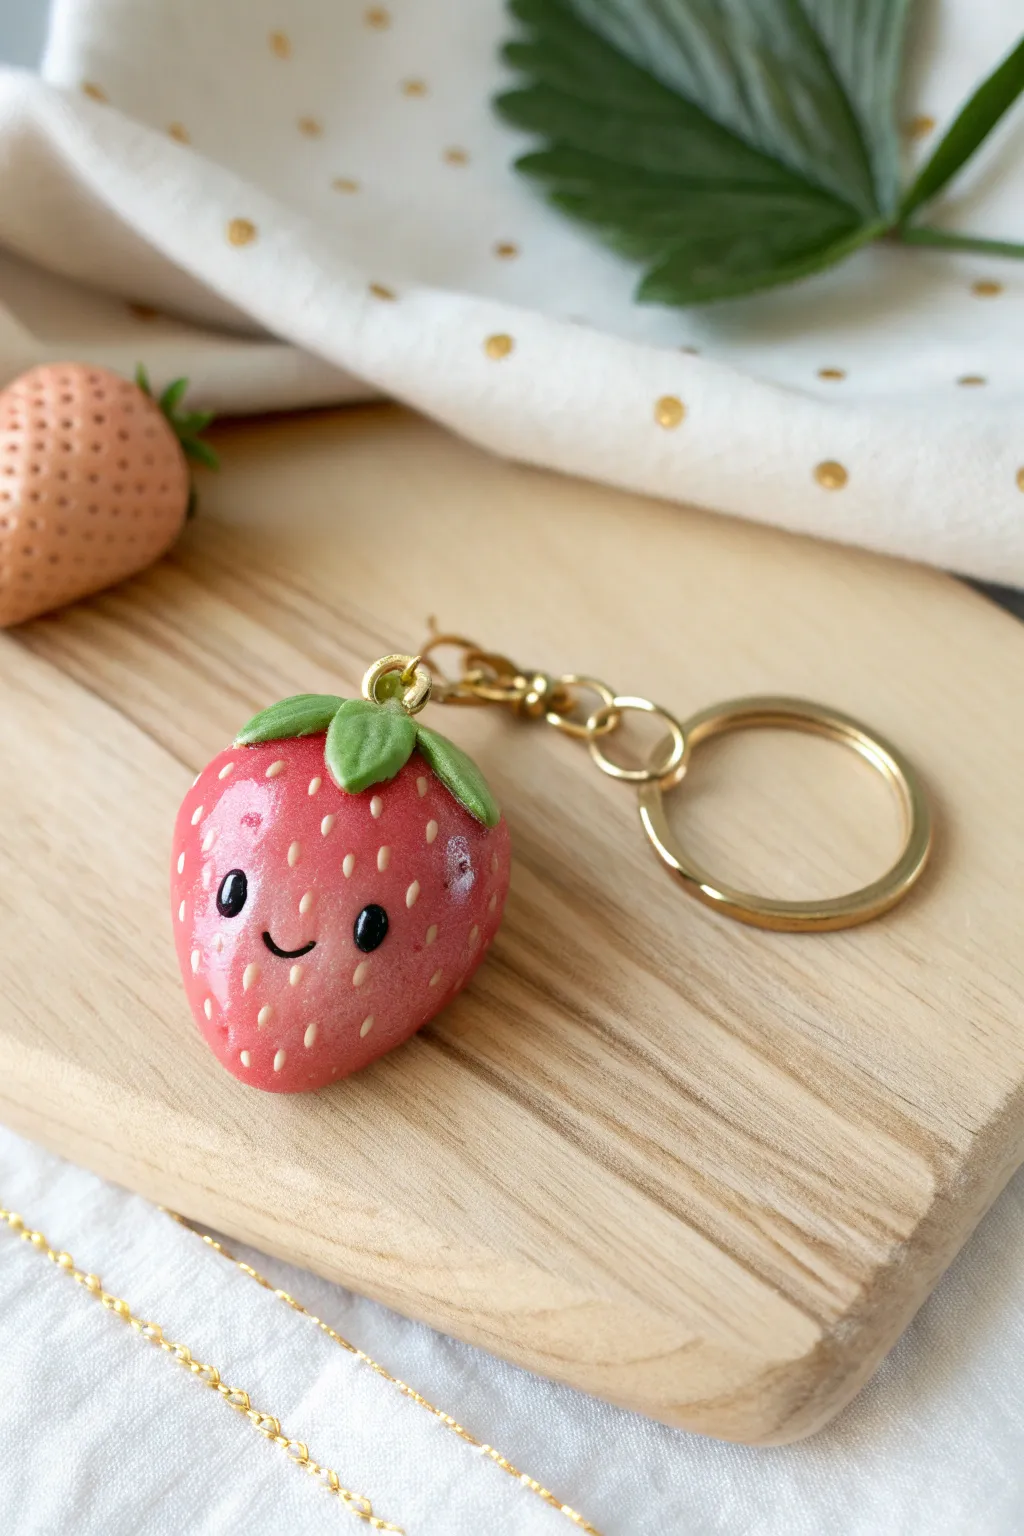
Brighten up your keys with this impossibly cute strawberry keychain, featuring a glossy finish and a friendly little face. It is a perfect beginner project that combines simple shaping with charming painted details for a professional-looking result.
Step-by-Step Tutorial
Materials
- Air dry clay (white or pre-colored pink/red)
- Acrylic paints (berry red, bright green, black, white)
- Clay sculpting tools (specifically a needle tool or toothpick)
- Screw eye pin (gold)
- Jump rings and keychain hardware (gold)
- Glossy varnish or UV resin
- Fine detail paintbrush
- Pliers
- Strong craft glue (optional)
Step 1: Shaping the Berry
-
Mix and condition:
Start by conditioning your clay. If you are using white clay, mix in a generous amount of berry-red acrylic paint until you achieve a consistent, soft pinkish-red hue like the photo. -
Form the base:
Roll a walnut-sized ball of clay between your palms until it is completely smooth and free of cracks. -
Create the taper:
Gently pinch and roll one side of the ball to create a rounded cone shape, mimicking the natural form of a strawberry. -
Flatten slightly:
Press the strawberry shape very gently against your work surface. You don’t want it flat like a pancake, but just stable enough that it has a defined front and back.
Seed Spacing
Don’t make the seed indentations perfectly uniform lines. Staggering them randomly makes the strawberry look more organic and leaves a clear space for the face.
Step 2: Adding Texture and Leaves
-
Indenting seeds:
Using a needle tool or a toothpick, press small, shallow indentations all over the surface of the strawberry to create the seed pockets. -
Make the leaves:
Take a small amount of green clay (or white clay painted green) and shape three to four tiny teardrops. -
Flatten leaves:
Flatten these teardrops with your finger to create separate leaf shapes. -
Attach the calyx:
Arrange the leaves on the top, wider part of the strawberry, pressing them down gently so they adhere to the main body. -
Insert hardware:
Dip the screw end of your eye pin into a tiny dot of glue for extra security, then screw it directly into the center top of the strawberry, right between the leaves.
Step 3: Painting and Details
-
Dry completely:
Let the piece dry fully according to your clay package instructions; 24-48 hours is standard for this thickness. -
Enhance the seeds:
Using your finest brush, dab a tiny speck of light cream or white paint into each of the seed indentations you made earlier. -
Paint the eyes:
Paint two widely spaced, vertical oval shapes for the eyes using black acrylic paint. -
Add the smile:
Paint a very small, thin ‘U’ shape between the eyes for the mouth. -
Eye highlights:
To bring the character to life, add a tiny white dot to the top right corner of each black eye.
Blushing Cheeks
Before varnishing, use a dry brush with a tiny amount of pink chalk pastel dust to add soft, rosy cheeks right under the eyes for extra cuteness.
Step 4: Assembly and Finishing
-
Apply varnish:
Coat the entire strawberry (avoiding the metal loop) with a high-gloss varnish or UV resin. This gives it that juicy, ceramic-like shine seen in the image. -
Prepare jump rings:
Once the varnish is cured or dry, use two pairs of pliers to twist open a jump ring. -
Connect hardware:
Loop the jump ring through the eye pin on the strawberry and the end of your keychain hardware. -
Secure closure:
Twist the jump ring back into a closed position, ensuring the gap is tight so the charm won’t slip off.
Now you have a sweet little accessory ready to guard your keys
Happy Avocado Half Charm
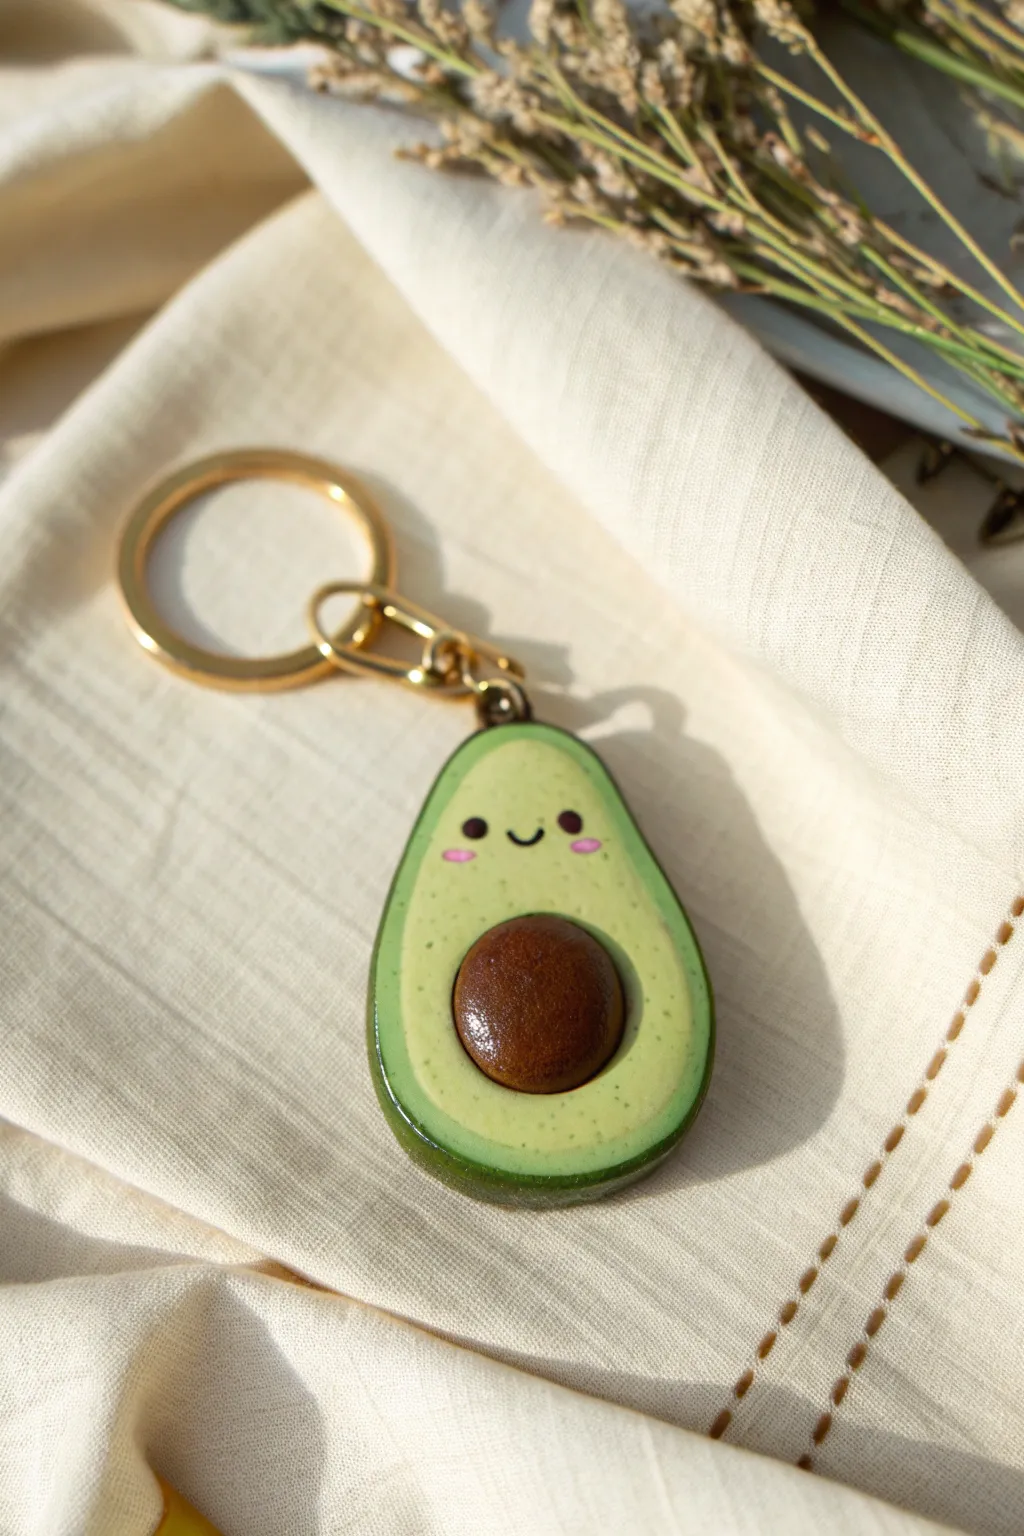
Brighten up your keyring with this adorable avocado half, featuring a friendly smile and rosy cheeks. The smooth, shiny finish and dimensional pit make this charm look almost good enough to eat—but much cuter.
Step-by-Step Guide
Materials
- Air dry clay (white)
- Acrylic paints (dark green, light yellow-green, dark brown, black, pink)
- Sculpting tools or a toothpick
- Rolling pin
- Small craft knife
- Fine detail paintbrush
- Flat shader brush
- Gloss varnish or resin (for the finish)
- Gold keychain ring with screw eye pin
- Superglue or heavy-duty craft glue
- Sandpaper (fine grit)
- Aluminium foil (optional, for texture)
Step 1: Sculpting the Base
-
Create the avocado shape:
Start with a ball of white air dry clay about the size of a large walnut. Flatten it slightly and pinch the top portion to create that classic pear shape, smoothing the edges until they are rounded and gentle. -
Refine the surface:
Use a little water on your finger to smooth out any cracks or fingerprints. The surface needs to be very sleek for the paint to look its best. -
Form the pit indentation:
Press your thumb or a large ball tool firmly into the center of the lower, wider part of the avocado to create a smooth, concave crater where the seed will sit. Make sure the edges of this hole are soft, not sharp. -
Sculpt the seed:
Roll a smaller ball of clay that fits perfectly into the indentation you just made. It should protrude significantly, like a real avocado pit. Test the fit, then remove it—we will glue it in later to make painting easier. -
Insert the hardware:
While the clay is still wet, screw the eye pin into the very top center of the avocado. Carefully unscrew strict straight back out; this pre-threads the hole so you can easily glue the pin in after painting without cracking the dry clay.
Uneven Surface?
If your dried clay feels bumpy, gently sand it with fine-grit sandpaper before painting. Wipe away the dust with a damp cloth for a silky finish.
Step 2: Painting the Greens
-
Base coat application:
Once completely dry, paint the main flat surface of the avocado with a light yellow-green acrylic paint. You may need two thin coats for full opacity. -
Paint the skin:
Carefully paint the curved outer edge and back of the charm with a darker forest green to represent the skin. Bring a very thin line of this dark green just over the front lip to frame the light green flesh. -
Add subtle texture:
To mimic the speckled look of avocado flesh, mix a tiny drop of the dark green skin color into your light green base. Take a toothbrush or stiff brush, dip it in the mix, blot most off on a paper towel, and gently stipple tiny specks around the lower edges.
Step 3: Details & Assembly
-
Paint the pit:
I prefer to paint the separate seed ball with a rich, dark brown acrylic. Add a slightly lighter brown highlight on one side to enhance the 3D effect before gluing it permanently into the indentation. -
Paint the face:
Using your finest detail brush or a toothpick, dot two small black eyes just above the pit. Paint a tiny, curved ‘u’ shape between them for the smile. -
Add rosy cheeks:
Dip the tip of a toothpick into pink paint and gently tap small ovals directly under each eye for blushing cheeks. -
Secure the hardware:
Put a dab of superglue on the threads of your eye pin and screw it back into the pre-made hole at the top. -
Seal for shine:
Finally, coat the entire piece with a high-gloss varnish or UV resin. This mirrors the oily sheen of a real avocado and protects your paint job from chipping. -
Attach the ring:
Once the varnish is cured, use pliers to open the jump ring on your gold keychain and attach it securely to the eye pin.
Make It a Duo
Make a second half without the pit (just the hole) to create a matching ‘best friends’ set. The two halves can fit together like a puzzle!
Now you have a charming little companion ready to hang on your bag or keys
Mini Breakfast Food Set
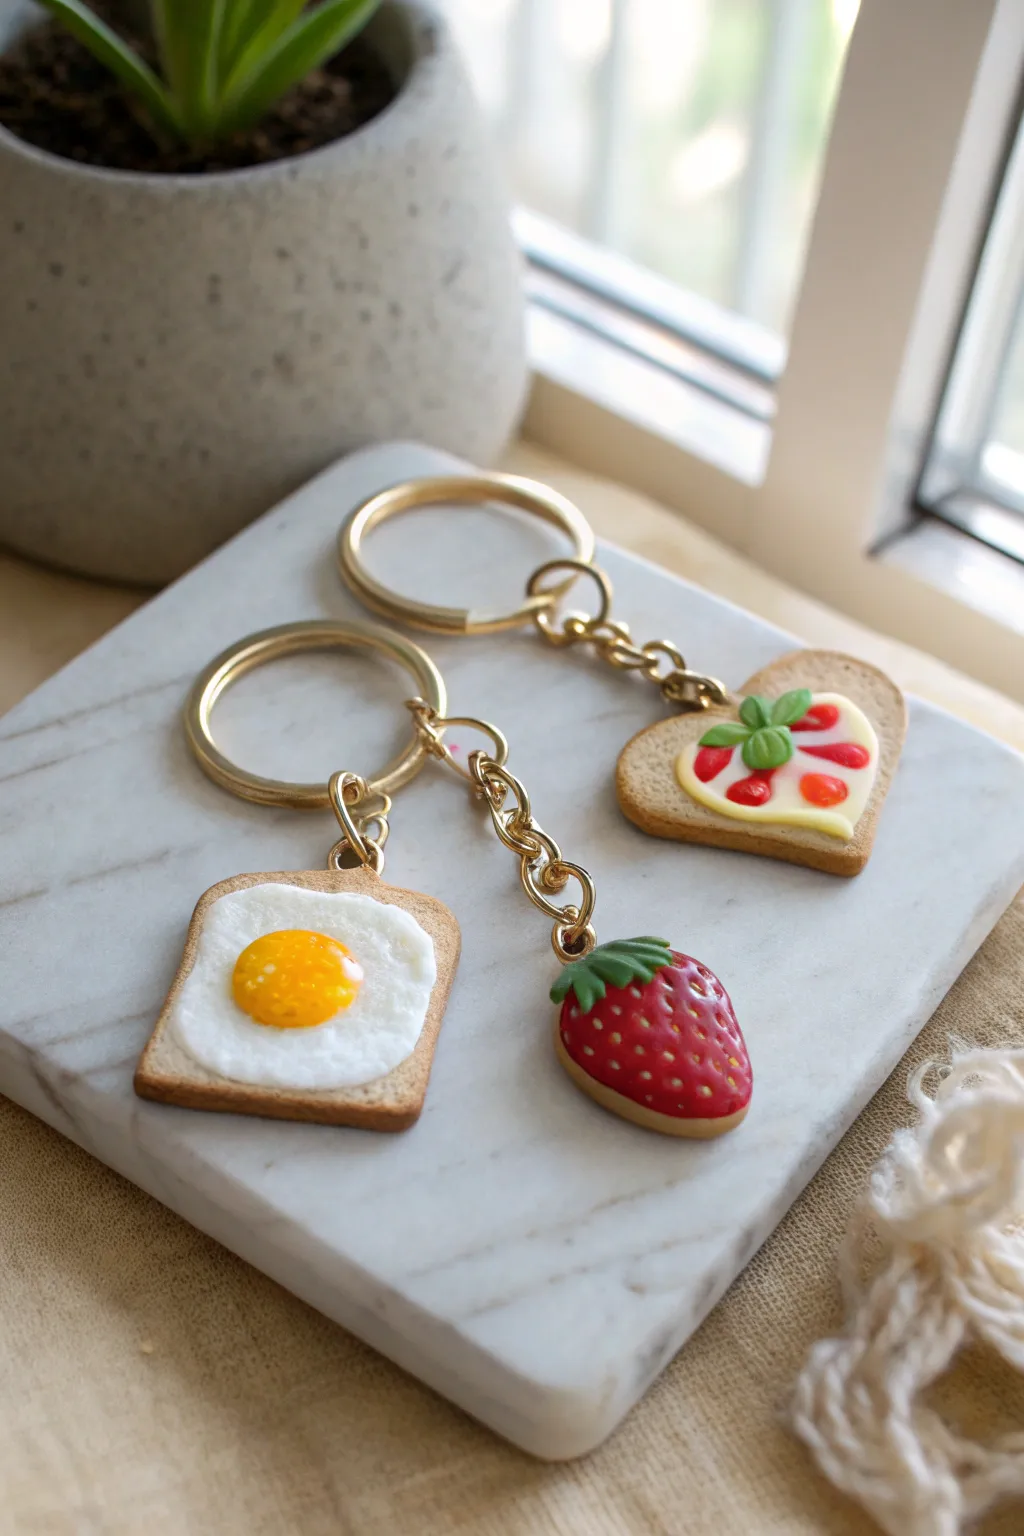
Start your day with a smile by crafting this adorable miniature breakfast set, featuring a sunny-side-up egg on toast, a heart-shaped fancy toast, and a juicy strawberry charm. The realistic textures and vibrant glazes make these air dry clay pieces look good enough to eat.
Step-by-Step
Materials
- Air dry clay (white)
- Acrylic paints (white, yellow, reddish-brown, red, green, ochre)
- Mod Podge or high-gloss varnish
- Liquid clay (or thick white glue mixed with paint)
- Toothbrush or stiff bristle brush
- Needle tool or toothpick
- Rolling pin
- Cookie cutters (small square and small heart)
- Small eye screws
- Jump rings and keychain hardware
- Fine detail paintbrush
Step 1: Sculpting the Base Shapes
-
Prepare the bread color:
Mix a tiny amount of yellow ochre and white acrylic paint into your white clay to achieve a pale, doughy beige color. Knead it thoroughly until the color is uniform. -
Cut the toast slices:
Roll out the beige clay to about 1/4 inch thickness. Use a small square cutter for the egg toast and a heart cutter for the fancy toast. -
Texture the bread:
Take a toothbrush and gently tap the entire surface of both bread slices. This creates a realistic, airy bread crumb texture. -
Form the strawberry:
Take a small ball of plain white clay and shape it into a rounded triangle or strawberry form, slightly flattened on the back. -
Add the strawberry leaves:
Create tiny teardrop shapes from plain clay and press them onto the top of the strawberry. Use your needle tool to indent veins for extra detail. -
Texture the strawberry:
Using a needle tool, poke tiny, evenly spaced holes all over the strawberry body to simulate seeds. -
Insert hardware:
Carefully screw small eye screws into the top of each toast slice and the strawberry. Dip the screw threads in glue first for extra security.
Step 2: Creating the Toppings
-
Create the egg white:
Take a small piece of plain white clay and flatten it into an irregular, organic shape. Press this onto the center of the square toast, smoothing the edges down so it looks like a cooked egg white. -
Add the yolk:
Roll a tiny ball of clay, flatten the bottom slightly, and press it firmly into the center of the white egg shape. -
Pipe the cream cheese:
For the heart toast, mix white clay with a drops of water or liquid clay to create a thick paste (or use puffy paint). Spread a heart shape onto the toast for the ‘cream cheese’ layer. -
Add heart garnish:
Sculpt tiny basil leaves and small tomato slices from clay and arrange them atop the cream cheese layer. -
Wait for drying:
Allow all pieces to dry completely for at least 24-48 hours. I find turning them over halfway through helps them dry evenly.
Sticky Situation?
If your clay is sticking to the table while rolling, lightly dust your work surface with cornstarch or baby powder before you begin.
Step 3: Painting and Glazing
-
Shade the crusts:
Using a dry brush technique with reddish-brown paint, gently stipple the outer edges of both toast slices to make them look perfectly toasted. -
Paint the egg:
Paint the yolk a vibrant yellow-orange, blending slightly lighter yellow at the very top for a highlight. -
Paint the strawberry:
Paint the body of the strawberry a deep red and the leaves a forest green. Once dry, use a tiny brush to dab yellow paint into the seed indents. -
Detail the fancy toast:
Paint the tomato slices red and the basil leaves green on your heart toast. If you added jam swirls, paint those now. -
Apply the glaze:
Coat the egg yolk, the jam/tomato sections, and the entire strawberry with a high-gloss varnish or Mod Podge. This gives them that wet, fresh food look. -
Assemble the keychains:
Once the varnish is fully dry, attach your jump rings to the eye screws and connect the charms to the main keyring hardware.
Mix It Up
Try making an avocado toast version! Use green clay textured with a needle tool for smashed avocado, and add red chili flakes with paint speckles.
Now you have a charming breakfast set ready to hang on your bag or keys
Cat Face Pebble Keychain

Turn a simple ball of clay into an adorable feline companion for your keys. This project features a smooth, organic pebble shape with sweet painted details, creating a charmingly minimalist accessory.
Detailed Instructions
Materials
- White air-dry clay
- Rolling pin or smooth jar
- Circle cookie cutter (approx. 2 inches) or a small glass
- Small craft knife or clay tool
- Water in a small cup
- Fine-grit sandpaper
- Acrylic paints (black, pink, orange/terracotta)
- Fine detail paintbrush (sizes 00 or 0)
- Jump ring
- Keychain hardware with chain
- Pliers (for the jump ring)
- Clear varnish or sealant (matte or satin finish)
Step 1: Shaping the Clay
-
Condition the Clay:
Start by taking a small handful of white air-dry clay. Knead it thoroughly in your hands until it feels soft, pliable, and free of any cracks. -
Roll it Out:
Using a rolling pin, flatten the clay on a clean, non-stick surface. You want a thickness of about 1/4 inch (6mm) to ensure the keychain is sturdy enough for daily use. -
Cut the Base Shape:
Press your circle cutter or small glass firmly into the clay to create a perfect round disc. Remove the excess clay from around the edges. -
Form the Ears:
Instead of adding separate pieces, gently pinch the top of the circle at two points to pull up the ear shapes. Use your fingers to mold them into soft, rounded triangles. -
Smooth the Edges:
Dip your finger in a little water and run it along the entire perimeter of the cat face. This ‘pebble’ look relies on having zero sharp edges, so take time to round everything off. -
Refine the Surface:
Check the face of the keychain for any fingerprints or dents. Gently smooth these out with a damp finger until the surface is pristine. -
Pierce the Hole:
While the clay is still wet, use a tool or a straw to poke a hole between the ears in the center. Make sure the hole isn’t too close to the edge to prevent breakage later. -
Let it Dry:
Place your clay cat on a piece of parchment paper to dry. It usually takes 24-48 hours. I like to flip it over halfway through the drying process to ensure the back dries evenly.
Step 2: Sanding and Painting
-
Sand for Perfection:
Once completely dry and hard, use fine-grit sandpaper to buff away any remaining rough spots or uneven edges on the rim. Wipe away the dust with a barely damp cloth. -
Paint the Ears:
Mix a soft pinkish-orange paint. Using your finest brush, paint small triangles inside the ear indentations. -
Add the Stripes:
With the same orange tone, paint three small, simple vertical dashes between the ears to create the tabby markings. -
Create Cheeks:
Dip the end of a paintbrush handle or a dotting tool into pink paint and gently stamp two cheek circles on the face. -
Paint the Eyes:
Switch to black acrylic paint. Using a dotting tool or very steady hand, place two small black dots for eyes just above the cheek line. -
Detail the Face:
Paint a small inverted triangle for the nose in black. Connect it to a tiny ‘w’ shape for the mouth. Add three thin whiskers floating on each side. -
Seal the Work:
Allow the paint to dry completely. Apply a coat of matte or satin varnish to protect the clay from moisture and scratches. -
Assembly:
Use pliers to open a jump ring, slide it through the hole in your cat charm, and attach the keychain hardware before closing the ring securely.
Cracking Up?
If small cracks appear while drying, don’t panic. Mix a tiny bit of fresh clay with water to make a paste (slip) and fill the cracks, then sand smooth once dry.
Make it Yours
Customize your kitty by changing the ear and stripe colors to match your own pet, or paint the back of the keychain with the cat’s name.
Attach your new feline friend to your keys and enjoy a handmade touch every time you leave the house
Frog Buddy Charm
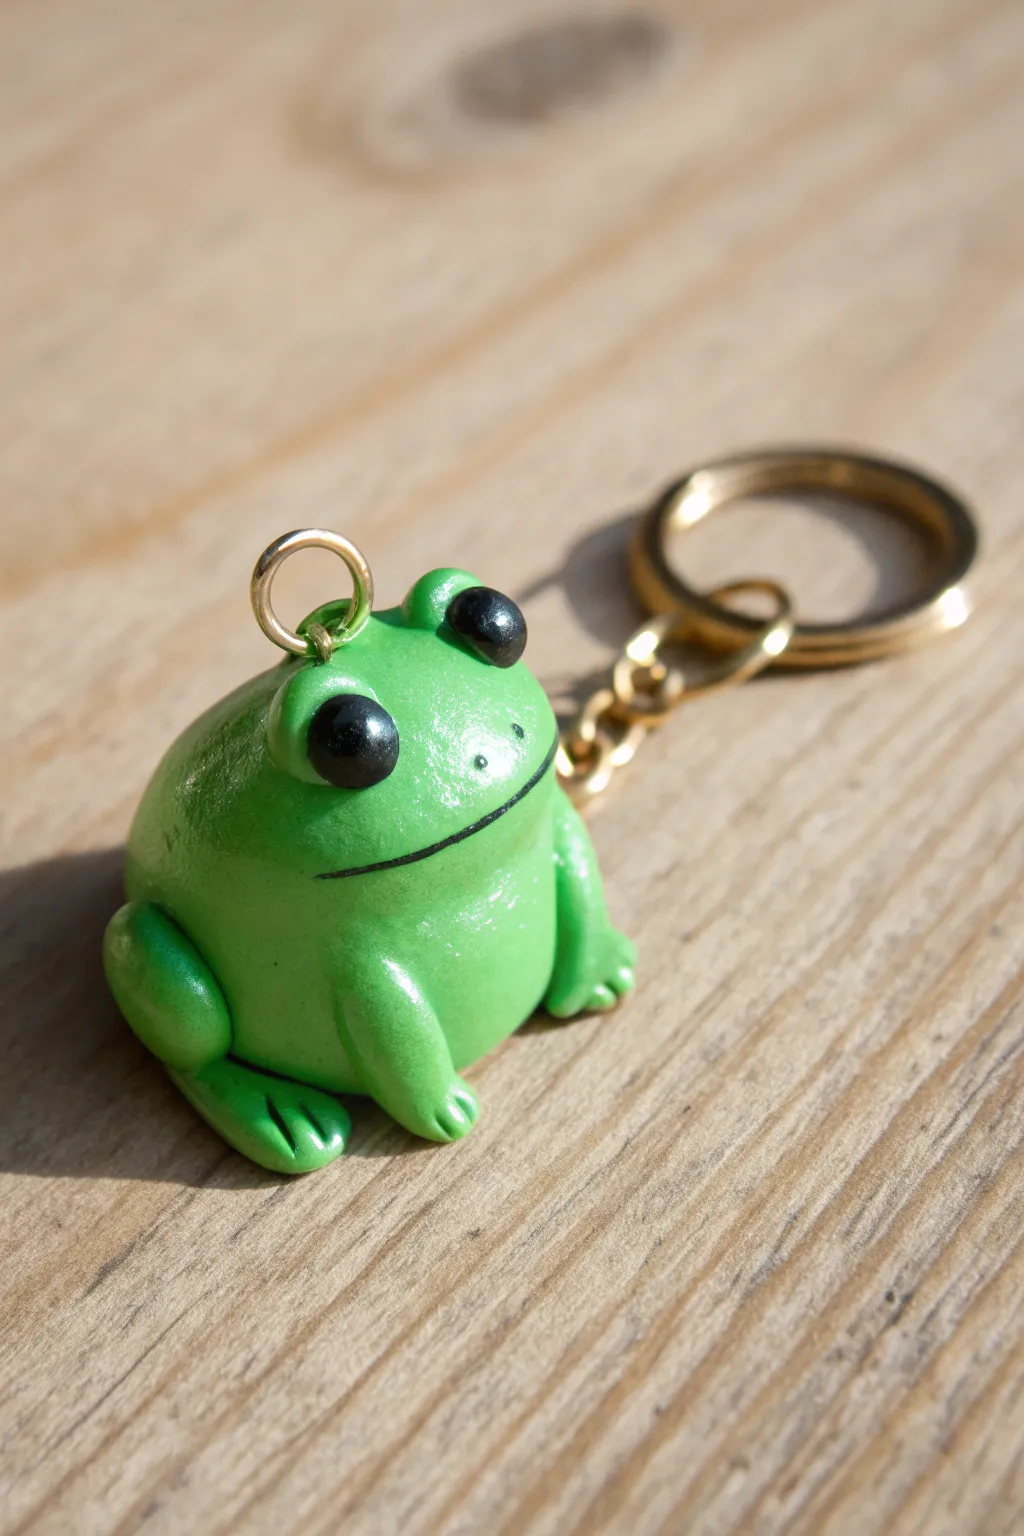
Sculpt your own adorable amphibian companion with this simple yet charming frog keychain project. Featuring a smooth, glossy finish and expressive oversized eyes, this chunky little frog is sturdy enough to tackle your daily travels.
Step-by-Step Guide
Materials
- Green air dry clay (or white clay + acrylic paint)
- Black air dry clay (small amount)
- Small eye screw or jewelry bail
- Gold split ring and chain hardware
- Glossy varnish or glaze (polyurethane or resin)
- Needle tool or toothpick
- Small dotting tool
- Super glue (optional)
- Fine grit sandpaper
Step 1: Shaping the Base
-
Create the body:
Start by taking a chunk of green clay roughly the size of a walnut. Roll it into a smooth ball between your palms to remove any cracks or lines. -
Form the shape:
Gently press the ball down onto your work surface to flatten the bottom, creating a gumdrop or mound shape. This stable base ensures your frog sits flat. -
Add the legs:
Roll two small pea-sized balls of green clay for the back legs. Press these onto the lower sides of the body, slightly blending the back edge into the main body so they look attached. -
Shape the feet:
Flatten the front of these leg balls slightly to created padded feet. Use a needle tool to press two small indentations into each foot to define three distinct toes. -
Create front arms:
Roll two smaller, elongated sausage shapes for the front arms. Attach them vertically to the front chest area of the frog, pressing the tops into the body so they slope downward. -
Detail front paws:
Just like the back legs, use your needle tool to impress simple toe markings onto the ends of the front arms.
Cracking Up?
If you see tiny cracks forming as the clay dries, patch them immediately with a ‘slip’ mixture made of a little water mixed with fresh clay.
Step 2: Adding Personality
-
Position eye sockets:
Roll two small balls of green clay and place them on top of the head, spacing them slightly apart. Press down firmly to adhere them, then use a dotting tool to create shallow divots in the front of each mound. -
Insert the eyes:
Take two tiny pieces of black clay, roll them into diverse spheres, and press them into the sockets you just created. Ensure they bulge slightly for that classic froggy look. -
Carve the smile:
Using a needle tool or a thin blade, carefully drag a wide, curved line across the frog’s face below the eyes. Press deep enough to be visible after glazing, but don’t cut all the way through. -
Add the nostrils:
Use the very tip of your needle tool to poke two tiny, close-set holes right in the center of the face, above the mouth line. -
Insert hardware:
While the clay is still wet, screw the eye pin into the top center of the frog’s back where the head meets the body. I find adding a dab of super glue to the thread helps it hold permanently once dry. -
Highlight the smile:
If you are using pre-colored clay, you can take a tiny sliver of black clay rolled extremely thin—like a thread—and gently press it into the mouth groove to make the smile pop.
Step 3: Finishing Touches
-
Initial Drying:
Set your frog aside in a cool, dry place. Allow it to air dry completely for 24 to 48 hours, flipping it occasionally to ensure the bottom dries thoroughly. -
Sanding:
Once fully cured, inspect your frog for any rough fingerprints. Lightly buff them away with fine-grit sandpaper for a professional finish. -
Painting (If needed):
If you used white clay, paint the entire body grass green now. Use a fine liner brush and black acrylic to fill in the mouth line and paint the eyes solid black. -
Glazing:
Apply a thick coat of high-gloss varnish or UV resin over the entire piece. This is crucial for achieving that ‘wet frog’ look and protecting the clay from moisture. -
Assembly:
Once the glaze is rock hard, attach your gold keychain hardware to the eye screw using jump rings and pliers.
Smoother Join Lines
Dip your finger or a silicone tool in a tiny bit of water to blend the seams where the legs meet the body. Seamless joints make the frog stronger.
Now you have a glossy green friend ready to guard your keys wherever you go
Split Best Friend Keychains
These trendy, split-heart keychains modernize the classic friendship necklace concept with warm terracotta tones and a speckled stone texture. They make a perfect handmade gift to share with your best friend, blending earthy aesthetics with functional design.
How-To Guide
Materials
- Air dry clay (white or natural)
- Acrylic paint (terracotta/burnt orange and beige)
- Fine-grit sandpaper
- Rolling pin or smooth glass jar
- Heart-shaped cookie cutter (medium size)
- X-Acto knife or sharp craft blade
- Toothbrush or stiff bristle brush
- Gold acrylic paint or dark brown paint (for speckling)
- Glossy varnish or sealant (Mod Podge or polyurethane)
- 2 Gold keychain rings with lobster clasps
- 4 large gold jump rings
- Pliers
- Needle tool or toothpick
Step 1: Shaping the Clay Foundation
-
Condition the clay:
Begin by taking a chunk of air dry clay and kneading it in your warm hands until it is soft, pliable, and free of cracks. -
Roll it flat:
Roll the clay out on a smooth, non-stick surface until it is approximately 1/4 inch thick. You want it substantial enough not to crack, but thin enough to be a keychain. -
Cut the heart shape:
Press your heart-shaped cutter firmly into the rolled clay. If the edges are ragged, smooth them gently with a bit of water on your fingertip. -
Create the split:
This is the ‘best friend’ moment. Take your X-Acto knife and cut a zigzag line down the center of the heart to separate it into two halves. You can do a simple jagged line or a more intricate interlocking pattern. -
Poke the hardware holes:
Use a needle tool or toothpick to create a hole near the top outer curve of each heart half. Make the hole slightly bigger than you think you need, as clay shrinks when drying. -
Initial smoothing:
Check the cut edges of your zigzag. Gently tap them smooth with your finger so they aren’t sharp, but keep the definition so the pieces still fit together functionally. -
Dry thoroughly:
Place the pieces on a flat surface to dry. I prefer to flip them over halfway through the drying process to prevent curling. Allow 24-48 hours depending on humidity.
Step 2: Designing the Two-Tone Look
-
Sand the imperfections:
Once fully cured and hard, use fine-grit sandpaper to gently smooth the edges, the surface, and specifically the inside of the zigzag cut. -
Apply the base coat:
Paint the entire bottom half of each heart piece (below a diagonal line) with a creamy beige or sandy color. Let it dry completely. -
Paint the top section:
Paint the top section of each heart with a rich terracotta or burnt orange acrylic paint. Use a piece of painter’s tape if you want a super crisp line, or freehand it for a more organic look. -
Create the speckles:
Dip a sturdy toothbrush into watered-down brown or dark gold paint. Run your thumb over the bristles to flick tiny speckles onto the beige section of the hearts. -
Seal to protect:
Apply two coats of glossy varnish or sealant to both sides. This protects the paint from scratching and gives that professional ceramic finish seen in the photo.
Uneven Clay Texture?
If your clay is lumpy, dip your finger in water and smooth it *before* drying. Sanding helps, but a smooth wet surface is easier.
Step 3: Final Assembly
-
Prepare jump rings:
Using two pairs of pliers (or your fingers and one pair), twist your large gold jump rings open. Never pull them apart; always twist sideways. -
Attach the chain:
Thread a jump ring through the hole in the clay heart. Before closing it, hook on the chain attached to your lobster clasp keychain mechanism. -
Secure the hardware:
Twist the jump ring back into a closed position, ensuring the ends meet perfectly flush so the clay piece doesn’t slip out. -
Double check connections:
Repeat for the second half of the heart. Give everything a gentle tug to ensure your hardware is secure before gifting one half to your bestie.
Level Up: Stamped Initials
Before drying, use small letter stamps to press you and your best friend’s initials into the back of each corresponding heart half.
Now you have a stylish symbol of friendship that is ready for your keys or backpacks
Layered Color Stack Keychain
Embrace warm, earthy vibes with this stylish arch keychain featuring layered bands of terracotta, rust, sage, and teal. It’s a modern take on the classic rainbow, perfect for adding a touch of handmade charm to your keys or bag.
Step-by-Step
Materials
- Air dry clay (white)
- Acrylic paints (Terra cotta/rust, dark orange, light sage green, deep teal)
- Rolling pin
- Clay knife or craft blade
- Small circle cutter (or a bottle cap)
- Jump ring and keychain hardware
- Small pliers
- Needle tool or toothpick
- Fine grit sandpaper
- Gloss or matte varnish (optional)
Step 1: Color Mixing & Prep
-
Condition the clay:
Start by taking a chunk of white air dry clay and kneading it in your hands until it becomes soft, pliable, and free of cracks. -
Divide portions:
Separate your clay into four balls. Since the arches get smaller as you go inward, make the balls progressively smaller. -
Mix your custom colors:
Add a small drop of acrylic paint into each clay ball: one terra cotta, one lighter rust/orange, one sage green, and one deep teal. Fold and knead the clay until the pigment is fully incorporated and uniform. -
Check consistency:
If the paint makes the clay too sticky, let it sit for a few minutes or dust your hands with a tiny bit of cornstarch.
Step 2: Shaping the Arches
-
Roll the coils:
Take your colored clay balls and roll them out into long, even snakes (coils). Aim for a thickness of about 1/4 inch for a consistent look. -
Form the center arch:
Start with the deep teal coil. Cut a short segment and bend it into a tight, small ‘U’ shape. This will be the center of your rainbow. -
Flatten the center:
Unlike the other layers, the center piece in this design looks like a solid semi-circle rather than an open arch. Gently flatten the inner gap of your teal ‘U’ or cut a small D-shaped piece of flat clay to fill the void. -
Layer the second arch:
Take the sage green coil and wrap it snugly over the top of the teal center. Press them gently together so they adhere without smashing the round shape. -
Add the third arch:
Wrap the rust/orange coil over the sage one. I like to trim the ends roughly as I go to avoid too much excess length. -
Attach the final arch:
Place the largest terra cotta coil over the very top to complete the stack. Ensure all layers are touching securely.
Seamless Bonding
e light pressure. Before joining the coils, lightly score the touching sides with a needle tool and dab a tiny bit of water (slip) to act as glue.
Step 3: Refining & Finishing
-
Trim the bottom:
Use your clay knife or blade to make a clean, straight cut across the bottom of all the arches. This creates that sharp, professional edge seen in the photo. -
Smooth the seams:
Flip the rainbow over to the back side. Gently smudge the clay across the seams with your finger or a tool to bond the arches together permanently. -
Create the hole:
Using a needle tool or toothpick, poke a hole through the top center of the outermost (terra cotta) arch. Make it large enough to fit your jump ring, keeping in mind clay shrinks slightly when drying. -
Let it dry:
Place the piece on a flat surface lined with parchment paper. Allow it to air dry completely for 24-48 hours, flipping it halfway through for even drying. -
Sand the edges:
Once fully hard, take fine-grit sandpaper and gently smooth any rough spots on the back or the bottom edge. -
Optional varnish:
Apply a thin coat of matte varnish if you want to protect the clay from moisture, though the raw matte look is also very stylish. -
Assemble the hardware:
Open a jump ring using your pliers. Thread it through the hole in the clay. -
Attach the chain:
Before closing the jump ring, loop on the keychain fixture. Use the pliers to close the jump ring securely so there is no gap.
Texture Play
Before the clay dries, gently press a piece of canvas or linen onto the surface to give the rainbow a subtle, fabric-like texture instead of a smooth finish.
Clip your new earthy rainbow onto your keys and enjoy that pop of color every day
Geometric Cutout Keychain
This sleek, minimalist keychain features a striking geometric cutout design in a deep teal hue. Its clean lines and gold hardware make it look surprisingly high-end, despite being a simple afternoon project.
How-To Guide
Materials
- White air dry clay
- Rolling pin or smooth glass jar
- Hexagon cookie cutters (two sizes: large and small)
- Sandpaper (fine grit, e.g., 400-600)
- Acrylic paint (Teal/Deep Blue-Green)
- Matte finish sealant or varnish
- Soft paintbrush
- Drill bit or toothpick (for the hole)
- Gold keyring and chain
- Large gold jump ring
- Jewelry pliers
Step 1: Shaping the Clay
-
Prepare the clay:
Start by kneading a small ball of air dry clay until it is smooth and pliable. You want to work out any air bubbles to prevent cracks later. -
Roll it out:
Roll the clay flat on a smooth surface or silicone mat. Aim for a thickness of about 4-5mm (roughly 1/4 inch). Uniform thickness is key for a professional look, so try to keep pressure even. -
Cut the outer shape:
Take your larger hexagon cutter and press it firmly into the clay. Give it a tiny wiggle before lifting to ensure a clean cut. -
Cut the center:
Center the smaller hexagon cutter inside the shape you just created. Press down to remove the middle section, creating the open geometric frame. -
Add the hardware hole:
While the clay is still wet, use a toothpick or a small straw to poke a hole near one of the outer corners. Make sure the hole is big enough for your jump ring to fit through once the clay shrinks slightly during drying. -
Smooth the edges:
Dip your finger in a little water and gently run it along all the cut edges to soften any sharpness or burrs from the cutter.
Step 2: Refining and Painting
-
Let it dry:
Place the piece on a clean, flat surface to dry. I prefer to flip the piece over halfway through the drying process (usually after 12 hours) to ensure both sides dry evenly and stay flat. -
Sand for perfection:
Once fully cured (typically 24-48 hours), take your fine-grit sandpaper and gently sand the flat surfaces and edges. This step is crucial for getting that stone-like, manufactured finish shown in the photo. -
Clean dust:
Wipe the clay piece with a slightly damp cloth or paper towel to remove all sanding dust before painting. -
Paint the first coat:
Apply a coat of teal acrylic paint. Use long, smooth strokes to minimize brush marks. Don’t forget to paint the inside edges of the center cutout. -
Apply second coat:
Allow the first layer to dry completely, then add a second coat for full opacity and rich color depth. -
Seal the piece:
To protect the paint from chipping in your pocket or bag, apply a layer of matte varnish or sealant over the entire piece.
Warping Woes?
If the hexagon curls up while drying, place a heavy book on top of it once it’s about 50% dry (leather-hard). Use parchment paper between the clay and book to prevent sticking.
Step 3: Assembly
-
Open the jump ring:
Using two pairs of jewelry pliers, twist the large gold jump ring open. Always twist ends away from each other rather than pulling them apart to maintain the circle shape. -
Attach to clay:
Slide the open jump ring through the hole you created in the clay hexagon. -
Connect the chain:
Before closing the ring, loop the bottom link of the keychain hardware onto the jump ring. -
Secure the hardware:
Use the pliers to twist the jump ring back into a closed position, ensuring the ends meet perfectly so the connection is secure.
Pro Tip: Sharp Edges
If you don’t have small cutters, print a hexagon shape on paper, cut it out, place it on the clay, and trace around it carefully with an X-Acto knife or craft blade.
Now you have a chic, geometric accessory ready to organize your keys with style