When I need a quick, satisfying project, I reach for air dry clay ornaments because they’re simple, calming, and always end up looking charming. Grab some white air dry clay, a few everyday tools, and let’s talk through ornament ideas you can actually finish and proudly hang up.
Classic Cookie-Cutter Stars and Circles
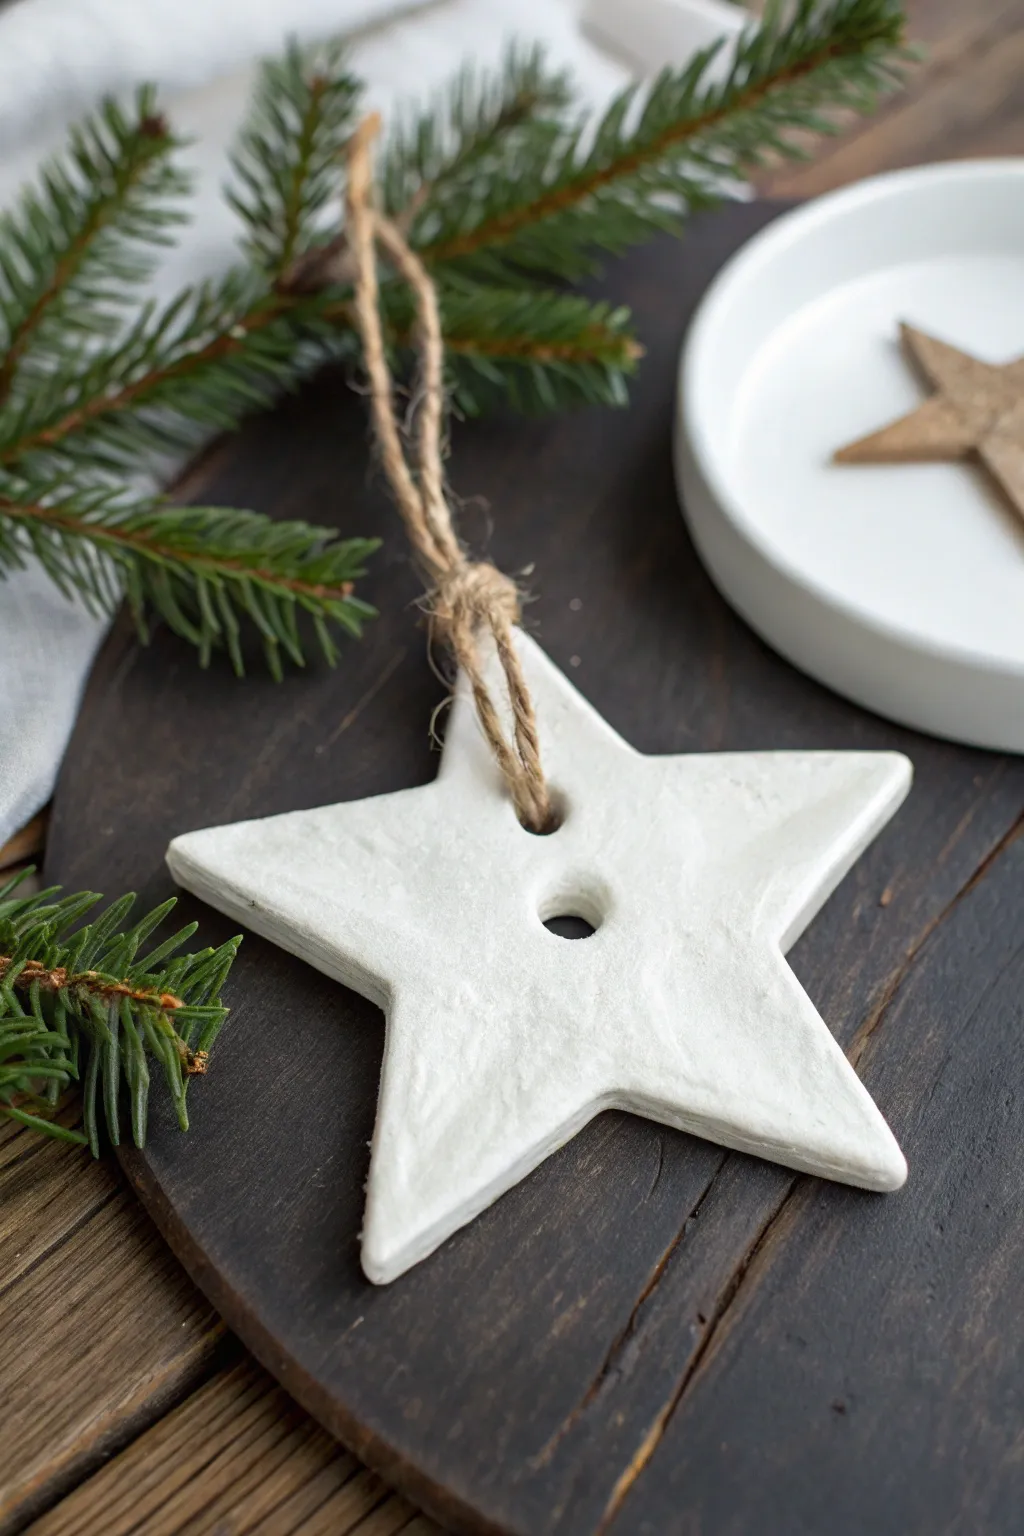
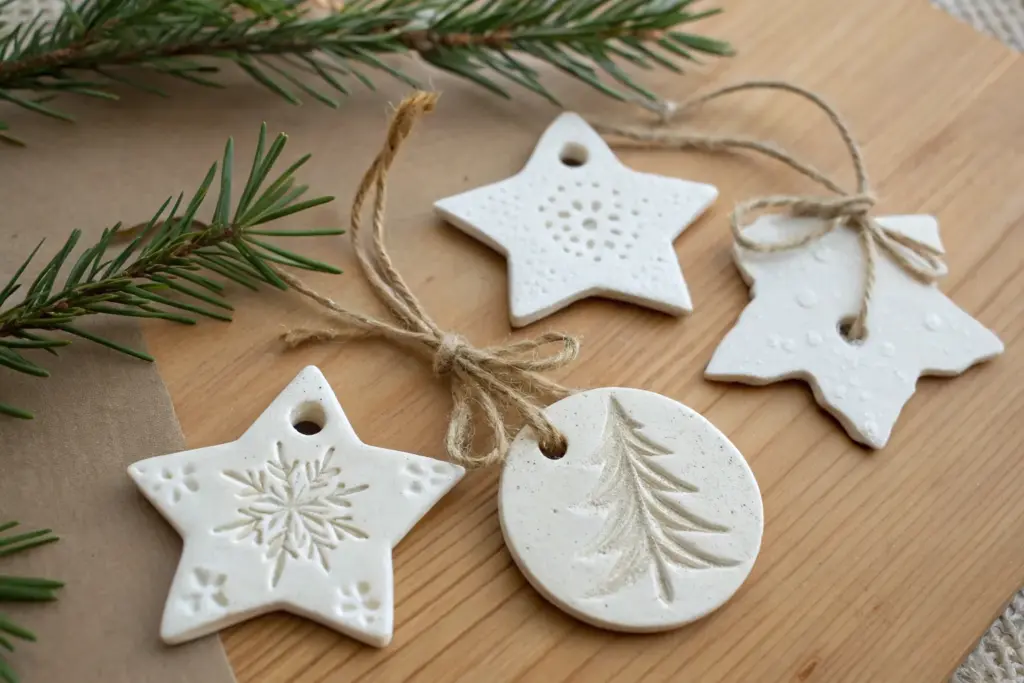
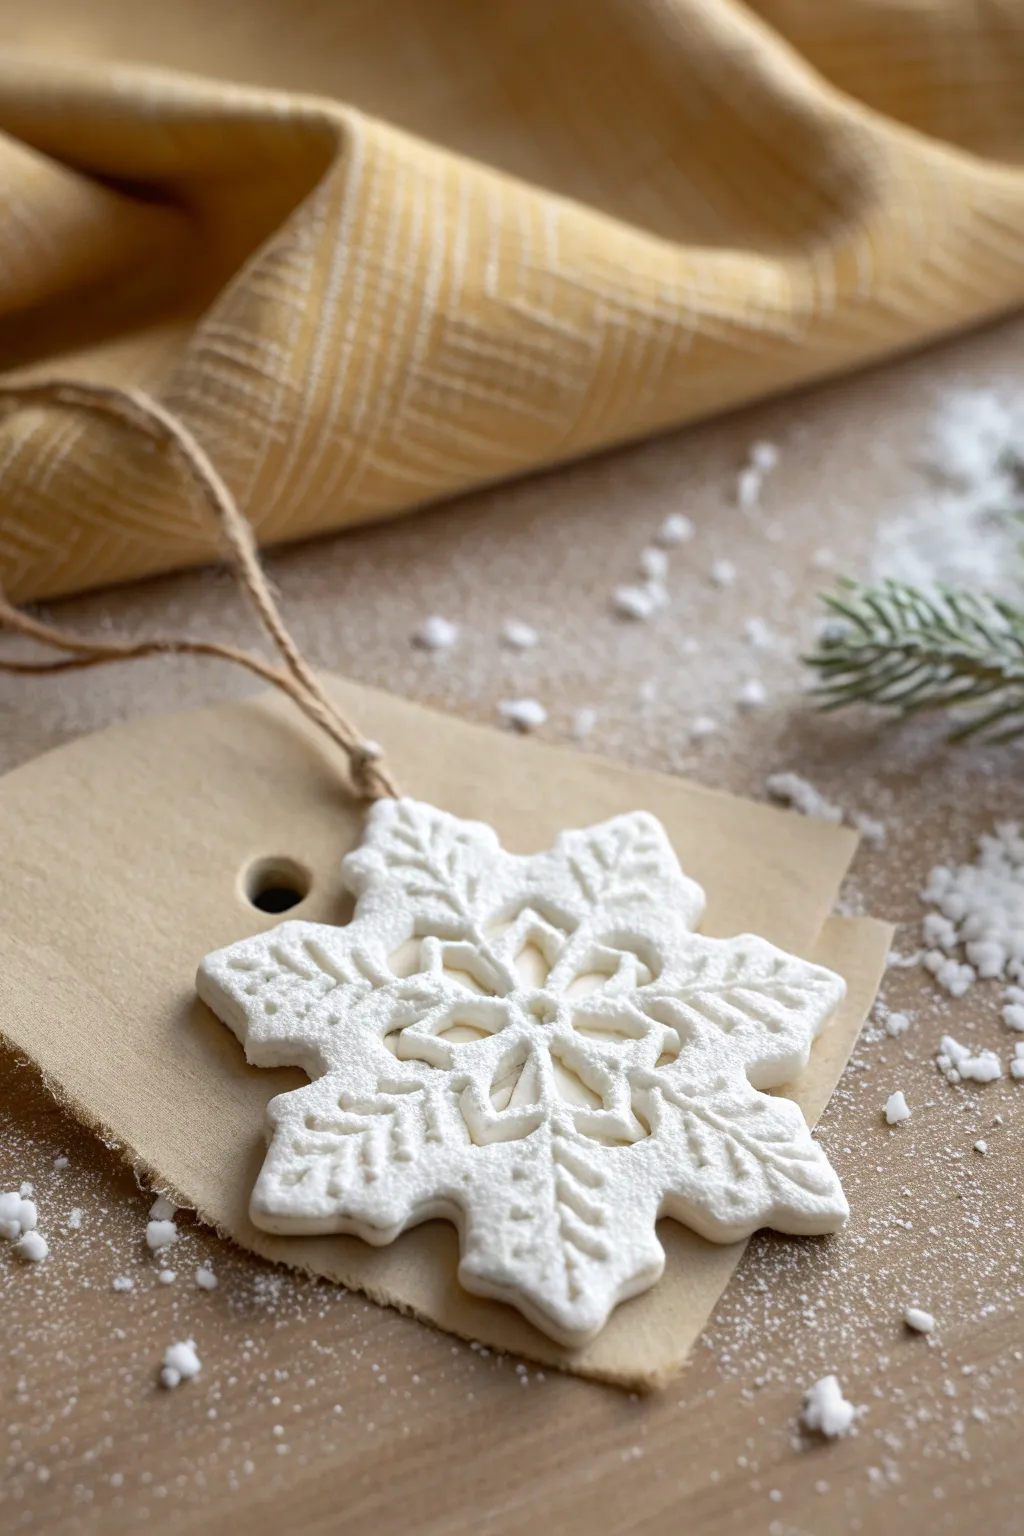
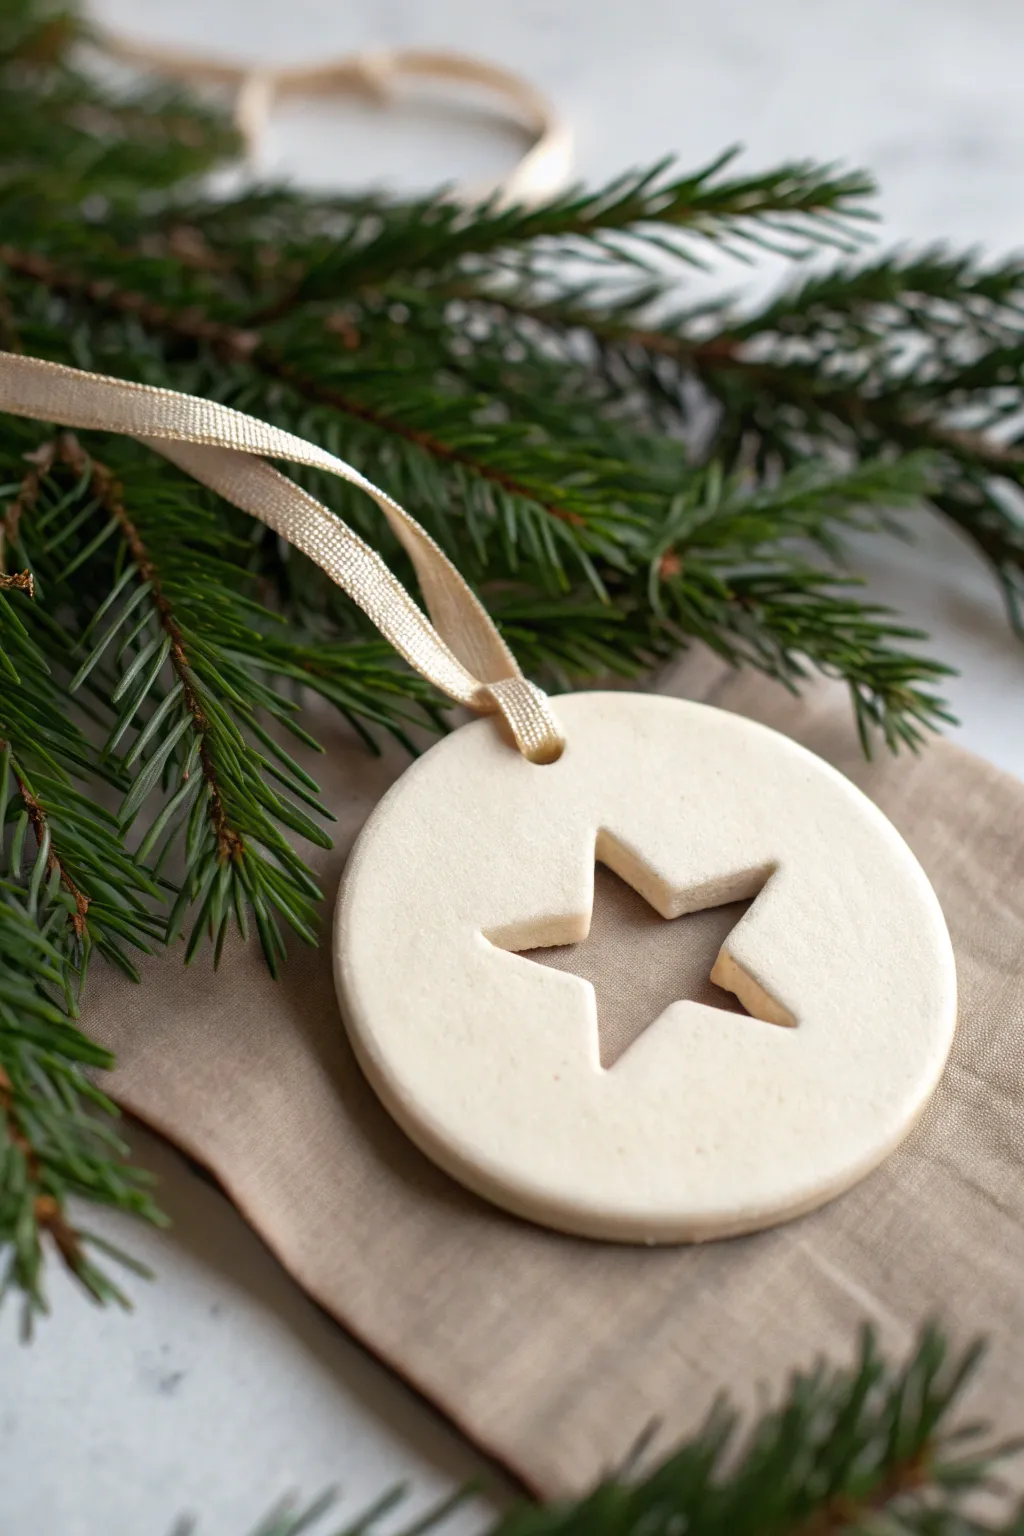
Embrace the imperfect, handmade charm of air-dry clay with these rustic star ornaments that mimic the look of oversized buttons. Their textured white finish and simple twine hangers make them a perfect addition to a farmhouse-style holiday display or a minimalist gift topper.
How-To Guide
Materials
- White air-dry clay
- Rolling pin
- Star-shaped cookie cutter (medium size)
- Small circular cutter or straw (for holes)
- Parchment paper or non-stick craft mat
- Fine-grit sandpaper (optional)
- Jute twine or hemp cord
- Scissors
- Small bowl of water
- Acrylic sealer (optional, matte finish)
Step 1: Shaping the Clay
-
Prepare your workspace:
Lay down a sheet of parchment paper or a non-stick craft mat on a flat, stable surface to prevent the clay from sticking as you work. -
Work the clay:
Take a handful of air-dry clay and knead it in your hands for a minute until it feels soft, warm, and pliable. -
Roll it out:
Use your rolling pin to flatten the clay to an even thickness. For this sturdy ornament, aim for about 1/4 inch thick—too thin and it might crack; too thick and it will be heavy. -
Cut the shape:
Press your star-shaped cookie cutter firmly into the clay. Give it a tiny wiggle to ensure it cuts all the way through, then lift the cutter. Scrape away the excess clay from the outside. -
Smooth the edges:
Dip your finger lightly into a small bowl of water and run it along the cut edges of the star to smooth out any ragged bits left by the cutter. -
Create the texture:
Instead of smoothing the surface perfectly, leave some natural fingerprints or lightly blot the surface with a crumpled texture sponge or cloth to achieve that beautiful, organic rustic look shown in the photo.
Prevent Curling
Clay sometimes curls as it dries unevenly. Place a cutting board gently on top of the drying stars (once they are strictly ‘touch dry’) to keep them perfectly flat
Step 2: Adding Details
-
Create the hanging hole:
Use a straw or a small circular cutter to punch a hole near the top point of the star. Make sure it isn’t too close to the edge, or the clay might break when hanging. -
Add the center detail:
Punch a second hole directly in the center of the star. This gives it the unique ‘button’ appearance distinct to this design. -
Check the back:
Carefully flip the star over and smooth out any clay that pushed through the back of the holes during punching. -
Allow to dry:
Leave the star on the parchment paper to dry. I find it helpful to flip the ornament over after about 12 hours to ensure the bottom dries evenly. Total drying time usually takes 24-48 hours depending on humidity. -
Refine the surface (optional):
Once fully hard and white, you can use fine-grit sandpaper to gently soften sharp edges, though keeping some roughness adds to the charm. -
Seal the piece:
If you want to protect your ornament from moisture, brush on a coat of matte acrylic sealer or Mod Podge. This will keep the clay white without making it plasticky.
Step 3: Assembly
-
Prepare the twine:
Cut a piece of natural jute twine, approximately 8-10 inches long. -
Thread the loop:
Fold the twine in half to create a loop. Push the folded end through the top hole of the star from front to back. -
Secure the hanger:
Pull the two loose ends of the twine through the loop you just pushed through the hole (a lark’s head knot) and tighten it gently against the clay. -
Tie the knot:
Bring the two loose ends together and tie a simple overhand knot at the very top to complete the hanger loop. -
Trim excess:
Snip off any fraying ends near the knot for a tidy finish.
Texture Trick
For a subtle linen texture on the surface, lay a piece of fabric or a handkerchief over the clay before the final roll with your rolling pin
Hang your finished star on a branch or tuck it into a wreath for an instant touch of handcrafted warmth


Evergreen Botanical Imprint Medallions
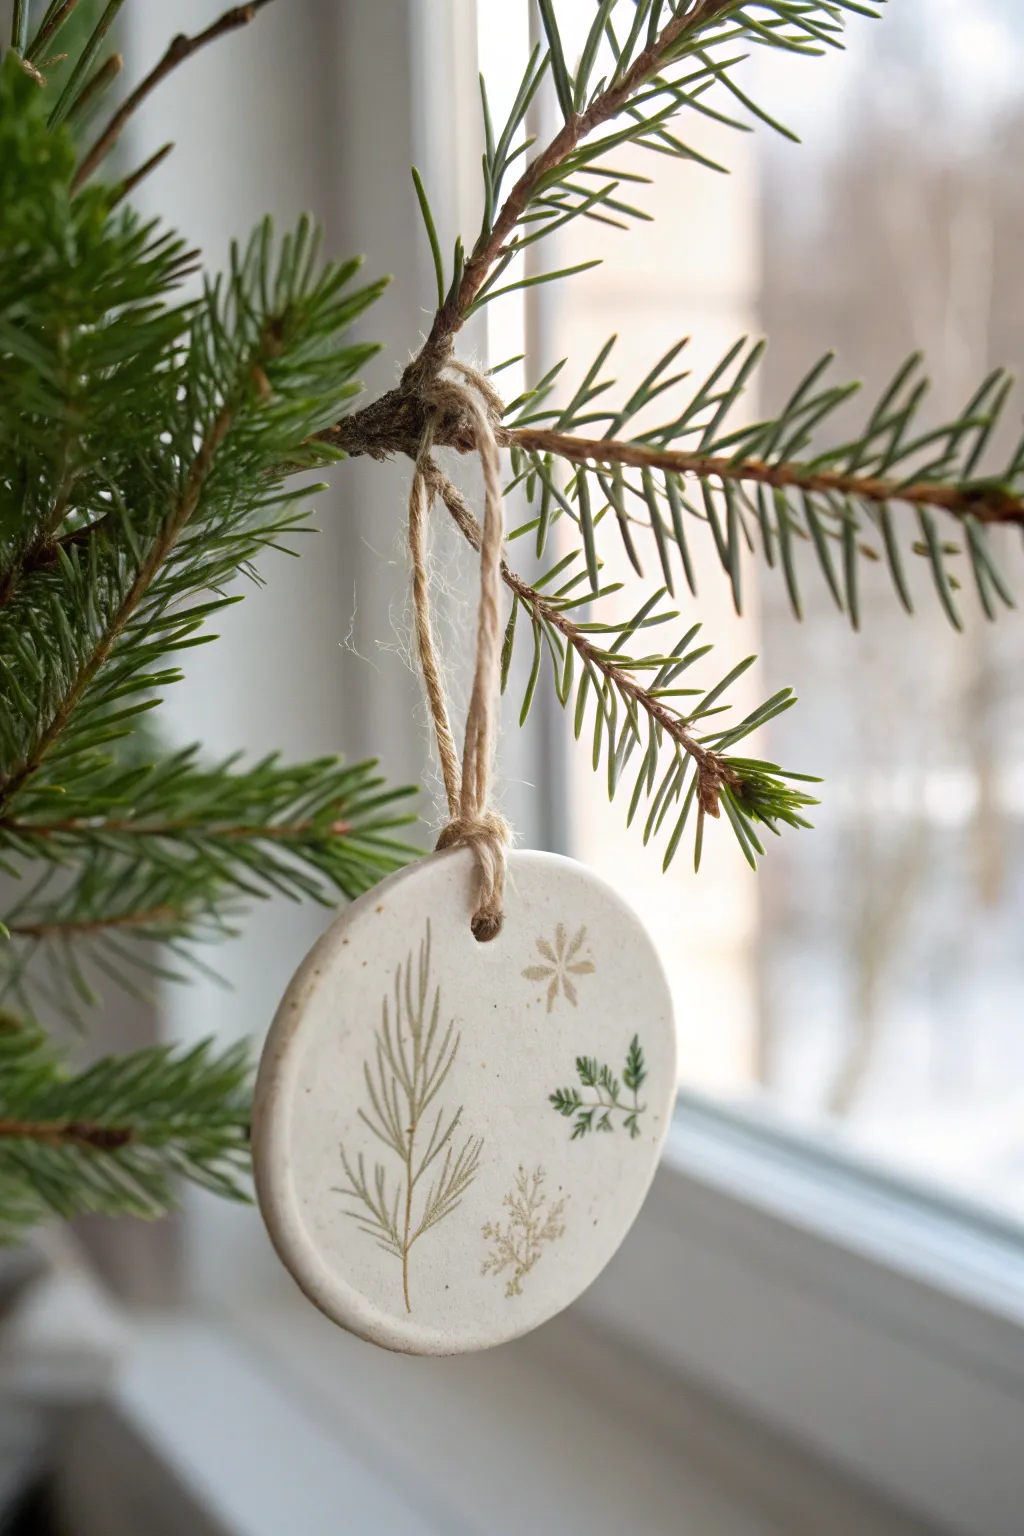
Capture the delicate details of winter flora with these elegant botanical imprint medallions. The smooth white clay provides the perfect backdrop for natural textures, creating a minimalist yet distinctively rustic ornament.
Detailed Instructions
Materials
- White smooth air dry clay
- Rolling pin
- Round cookie cutter (approx. 3 inches)
- Fresh botanical clippings (evergreen sprigs, small leaves, tiny blooms)
- Wax paper or parchment paper
- Drinking straw or small circular tool
- Fine grit sandpaper
- Clear matte varnish or sealant (optional)
- Jute twine or hemp cord
Step 1: Preparation & Rolling
-
Prepare the workspace:
Lay down a sheet of wax or parchment paper on a flat, sturdy surface to prevent the clay from sticking while you work. -
Condition the clay:
Take a handful of air dry clay and knead it gently in your hands until it feels pliable and warm, removing any air bubbles. -
Roll the slab:
Place the clay on your paper and use the rolling pin to flatten it into an even slab. Aim for a thickness of about 1/4 inch—too thin and it might crack, too thick and it will be heavy. -
Check for smoothness:
Look over the surface of your clay slab. If there are any wrinkles or heavy fingerprints, lightly dip your finger in water and smooth them away.
Prevent Cupping
If edges curl while drying, place a light book over the clay once it’s semi-dry (leather hard). This gentle weight keeps it perfectly flat without crushing the texture.
Step 2: creating the Impressions
-
Arrange your botanicals:
Select small snippets of your greenery. Before pressing, gently lay them on the clay to plan your composition. I like to mimic growing patterns, placing taller stems towards the bottom. -
Press the greenery:
Once happy with the arrangement, place the rolling pin directly over the botanicals and roll strictly once with firm, even pressure to embed them into the clay surface. -
Remove the plants:
Carefully use tweezers or the tip of a craft knife to lift the plant material out of the clay. Pull straight up to avoid smearing the delicate imprint lines. -
Cut the shape:
Position your round cookie cutter over the imprinted design to frame it perfectly, then press down firmly to cut the circle. -
Clean edges:
Remove the excess clay from around the circle. If the edges of your medallion look rough, gently tap them with a damp fingertip to smooth them out. -
Create the hanging hole:
Using a drinking straw or a small circular tool, punch a clean hole near the top of the ornament. Ensure it’s not too close to the edge to prevent tearing later.
Adding Color
Mix a tiny drop of green acrylic paint into the clay before rolling for a soft pastel base, or use watercolor to hand-paint inside the pressed grooves after drying.
Step 3: Finishing Touches
-
Dry the ornament:
Place the ornament on a clean sheet of parchment paper in a safe spot. Let it air dry for 24 to 48 hours, flipping it over halfway through to ensure even drying and prevent curling. -
Sand for perfection:
Once fully cured and hard, take a piece of fine-grit sandpaper and very gently buff the edges of the circle to make them look professional and refined. -
Enhance the details (optional):
If you want the botanical impression to stand out, you can leave it natural or very lightly dry-brush a tiny amount of diluted green watercolor into the grooves, though the natural shadow is often enough. -
Seal the piece:
Apply a thin coat of clear matte varnish to protect the clay from moisture and yellowing over time. -
Attach the hanger:
Cut a length of jute twine, thread it through the hole, and tie a secure loop knot at the top. -
Create the texture tie:
For the look in the photo, tie the knot close to the clay, leaving long tails, or double loop the twine through the hole for a chunkier, rustic appearance before hanging.
Now you have a timeless piece of nature preserved in clay to enjoy for years to come


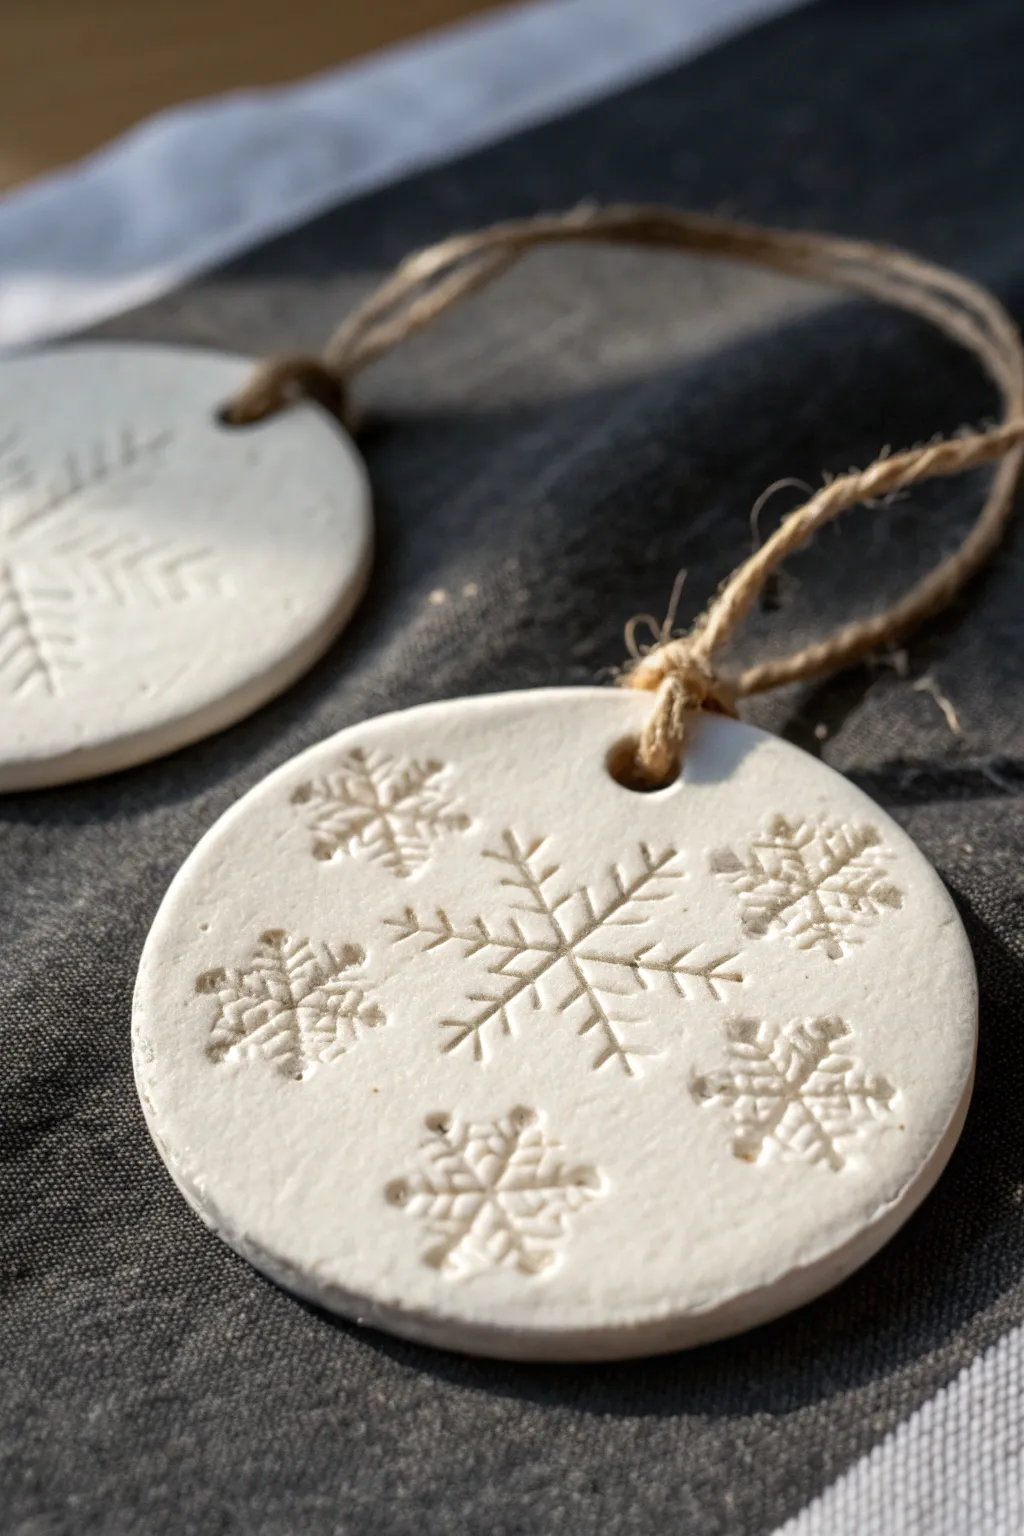
Lace-Pressed Snowflake Texture Ornaments
These delicate snowflake ornaments combine the rustic charm of air-dry clay with intricate, lace-like textures that catch the light beautifully. The finished piece looks like a frosted sugar cookie, thanks to the crisp details and soft matte finish.
How-To Guide
Materials
- White or porcelain-style air-dry clay
- Rolling pin
- Parchment paper or non-stick craft mat
- Snowflake plunger cutter (with internal embossing detail)
- Fine-grit sandpaper (400-600 grit)
- Jute twine or rustic string
- Small straw or skewer (for the hole)
- Water in a small cup
- Soft brush (optional, for smoothing)
Step 1: Preparation and Rolling
-
Condition the Clay:
Begin by taking a handful of your air-dry clay. Knead it in your hands for a minute or two until it is warm, pliable, and free of any stubborn cracks. -
Set Up Your Workspace:
Lay down a sheet of parchment paper or a silicone craft mat. This prevents sticking and makes it easier to move the fragile snowflakes later without distorting them. -
Roll the Slab:
Place your clay ball in the center of the mat. Using your rolling pin, roll the clay out into an even slab. Aim for a thickness of about 1/4 inch (6mm)—too thin and it becomes brittle; too thick and the cutter may not emboss cleanly. -
Check for Imperfections:
Scan the clay surface for little air bubbles or rough patches. I like to dip my finger in a tiny bit of water and gently smooth these out before cutting.
Sticky Situation?
If clay sticks inside intricate cutters, use a fluffy brush to dust the inside of the cutter with cornstarch or baby powder before every single press.
Step 2: Cutting and Embossing
-
Position the Cutter:
Take your snowflake plunger cutter and position it over a smooth section of the rolled clay. If your clay is sticky, you can lightly dust the cutter with cornstarch first. -
Press to Cut:
Press down firmly on the outer rim of the cutter first. This action cuts the snowflake outline cleanly from the slab. -
Plunge to Emboss:
While holding the outer rim down against the mat, gently but firmly press down the plunger mechanism. This imprints the internal veins and patterns onto the snowflake’s surface. -
Release the Shape:
Lift the cutter straight up. If the clay stays inside, gently push the plunger to eject it. If it stays on the mat, carefully peel away the excess clay surrounding the shape. -
Clean the Edges:
Inspect the edges of your snowflake. Use a damp soft brush or your fingertip to lightly tap down any jagged ragged bits left by the cutting process. -
Create the Hanging Hole:
Using a small drinking straw or a skewer, press a hole into one of the snowflake’s points. Ensure the hole is centered and not too close to the edge to prevent tearing.
Pro Tip: Flat Finish
To ensure perfectly flat ornaments, place a lightweight book on top of them (with parchment in between) once they are about 75% dry to press them straight.
Step 3: Drying and Finishing
-
Initial Drying Time:
Leave the ornament flat on the parchment paper to air dry. Place it in a safe spot away from direct heat sources, which can cause cracking. -
Flip for Even Drying:
After about 12-24 hours, gently flip the snowflake over. This exposes the damp underside to the air and helps prevent the ornament from warping or curling as it dries. -
Check Dryness:
Allow it to dry for another 24 hours. The clay should turn a stark, chalky white and feel hard to the touch with no cold, damp spots remaining. -
Sand for Smoothness:
Once fully cured, take your fine-grit sandpaper and very gently sand the outer edges. This removes any lingering burrs and gives that professional, porcelain-like finish. -
Dust Off:
Wipe the ornament with a dry cloth or a fluffy brush to remove the sanding dust. -
Attach the Hanger:
Cut a length of jute twine, about 8 inches long. Thread it through the hole you created earlier. -
Secure the Knot:
tie the ends of the twine together in a simple overhand knot. Pull it tight, and if you want a cleaner look, trim the excess ends of the twine close to the knot.
Your finished snowflake now has a timeless, handcrafted look that adds a natural elegance to any holiday display


Stamped Snowflake Pattern Discs
Capture the delicate beauty of falling snow with these rustic yet elegant clay ornaments. Featuring a crisp central snowflake surrounded by intricate crystallized patterns, these textured discs bring a touch of Nordic charm to your holiday decor.
Step-by-Step Tutorial
Materials
- White classic air dry clay
- Rolling pin (acrylic or wooden)
- Parchment paper or silicone craft mat
- Round cookie cutter (approx. 3-inch diameter)
- Large snowflake rubber stamp (simple line design)
- Small snowflake rubber stamp (detailed crystal design)
- Drinking straw or small circular cutter
- Fine-grit sandpaper (optional)
- Jute twine or rustic string
- Small bowl of water
- Sponge or paper towel
Step 1: Preparing the Base
-
Condition the clay:
Begin by taking a handful of air dry clay and kneading it in your hands until it feels soft, warm, and pliable. This conditioning step prevents cracks from forming later. -
Roll out the slab:
Place your clay on a sheet of parchment paper or a silicone mat. Using your rolling pin, roll the clay out evenly until it is approximately 1/4 inch thick. Try to keep the thickness consistent across the entire slab. -
Check surface texture:
Look closely at the surface of your rolled clay. If there are any unwanted bumps or fingernail marks, now is the time to gently smooth them out with a tiny bit of water on your finger. -
Cut the shapes:
Press your round cookie cutter firmly into the clay to create your disc shapes. Give the cutter a little wiggle before lifting it to ensure a clean cut. -
Smooth the edges:
Dip your finger in a small bowl of water and run it gently around the circumference of each cut circle. This softens the sharp cut edge and gives the ornament a more finished, ceramic look.
Sticky Stamps?
If your stamp pulls the clay up when you lift it, lightly dust the stamp surface with cornstarch or baby powder before pressing it into the wet clay.
Step 2: Imprinting the Pattern
-
Create the hanging hole:
Before stamping, use a drinking straw to punch a hole near the top edge of the circle. Position it about a half-inch down from the rim to ensure the loop is sturdy enough to hold the ornament’s weight. -
Stamp the center:
Take your larger, simple-line snowflake stamp. Press it firmly into the exact center of the clay disc. Apply even pressure so all arms of the snowflake make a clear impression, then lift straight up. -
Plan the border:
Visualize where you want the smaller snowflakes to go. I find it helpful to hover the small stamp over the clay first to test the spacing without actually touching the surface. -
Add detail stamps:
Using the smaller, more detailed snowflake stamp, press impressions randomly around the central snowflake. Aim for 4-5 surrounding flakes, rotating the stamp slightly each time for variety. -
Check impression depth:
Inspect your work. If any impression looks too faint, you can carefully re-align the stamp and press again, but be cautious not to double-stamp and blur the image.
Step 3: Finishing Touches
-
Initial dry time:
Leave the ornaments on the parchment paper to dry flat. Avoid moving them while they are wet to prevent warping. -
Flip for even drying:
After about 12 hours, gently flip the ornaments over. This exposes the bottom side to the air and helps them dry completely flat without curling up at the edges. -
Full cure:
Allow the clay to dry for a full 24-48 hours, or until the clay is stark white and feels hard to the touch with no cool, damp spots. -
Sanding edges:
Once fully dry, inspect the edges and the hole. Use a fine-grit sandpaper to gently buff away any microscopic burrs or sharp bits of dried clay for a professional finish. -
Add the hanger:
Cut a length of jute twine—about 8 inches makes a good loop. Thread one end through the hole. -
Secure the loop:
Bring the ends of the twine together and tie a simple overhand knot near the ends. Pull the knot tight, allowing the loop to hang naturally.
Make it Sparkle
While the clay is still wet, lightly brush silver mica powder or fine edible glitter into the snowflake grooves for a subtle, shimmering effect.
Hang these on your tree or use them as sophisticated gift toppers to make your presents extra special

What Really Happens Inside the Kiln
Learn how time and temperature work together inside the kiln to transform clay into durable ceramic.
Minimal Black-and-White Line Art Ornaments
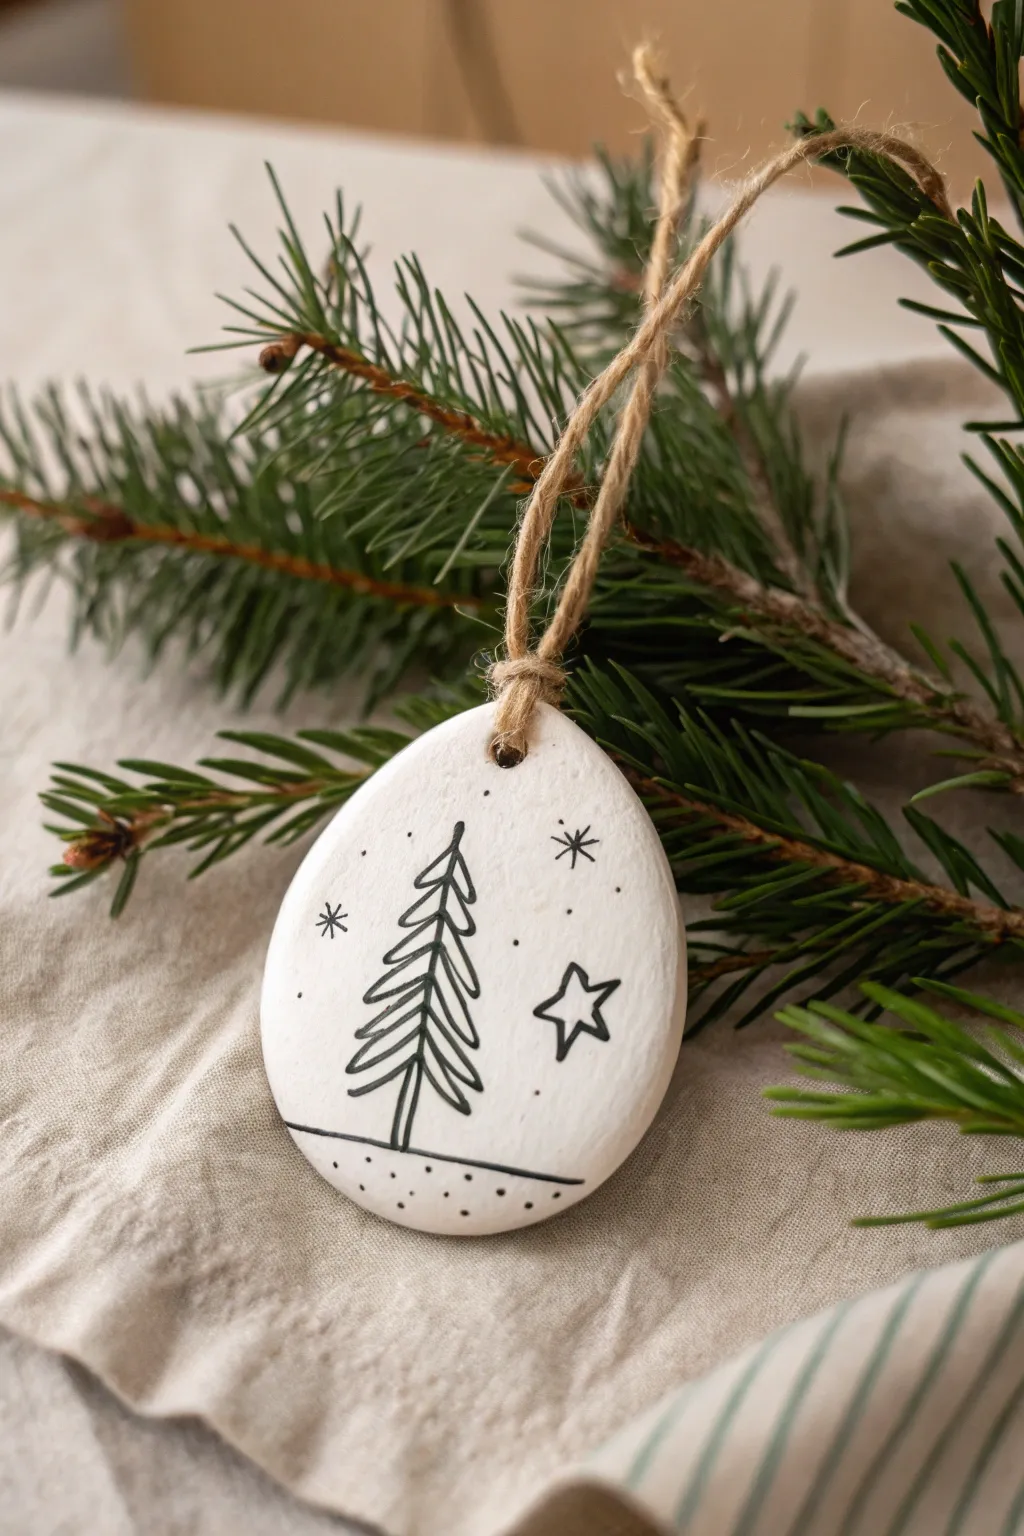
Capture the serenity of a winter forest with this minimalist drop-shaped ornament featuring delicate black line art. The organic shape paired with the crisp, illustrative style creates a modern yet rustic piece perfect for hanging on greenery.
Step-by-Step Tutorial
Materials
- White air dry clay
- Rolling pin
- Parchment paper or craft mat
- Sharp knife or clay cutting tool
- Water in a small cup
- Fine-grit sandpaper (around 220-400 grit)
- Black geometric teardrop or leaf-shaped cookie cutter (optional)
- Fine tip black permanent marker (0.3mm or 0.5mm) or black acrylic paint pen
- Bamboo skewer or straw
- Jute twine
- Clear matte varnish or sealant (optional)
Step 1: Shaping the Base
-
Condition the Clay:
Begin by taking a chunk of white air dry clay and kneading it in your hands for a minute until it feels soft, pliable, and free of cracks. -
Roll it Out:
Place the clay on a sheet of parchment paper to prevent sticking. Use your rolling pin to flatten the clay to an even thickness of about 1/4 inch (6mm). Try to keep the surface smooth. -
Cut the Shape:
If you have a teardrop or wide leaf-shaped cutter, press it firmly into the clay. If not, use a knife or needle tool to freehand a rounded, organic drop shape—make the bottom slightly wider than the top for visual balance. -
Create the Hanging Hole:
Use a straw or a bamboo skewer to poke a hole near the top, narrower point of the drop. Wiggle it slightly to ensure the opening is large enough for your twine to pass through later. -
Smooth the Edges:
Dip your finger in a tiny bit of water and run it along the cut edges of the ornament. This smooths out any jagged bits or roughness left by the cutting tool. -
Let it Dry:
Place the ornament on a flat surface away from direct heat. Let it dry completely for 24-48 hours. I find flipping it over halfway through the drying process helps prevent curling.
Ink Control Tip
Test your marker on a scrap piece of dried clay first. If the ink bleeds into the clay’s pores, lightly seal the clay with matte Mod Podge before drawing.
Step 2: Drawing the Design
-
Sanding:
Once fully dry and hard, gently rub the surface and edges with fine-grit sandpaper to remove any remaining imperfections and create a pristine canvas. -
Wipe Clean:
Use a dry cloth or a soft brush to remove all sanding dust before you start drawing. Dust can clog your marker tip. -
Draw the Tree Trunk:
Using your fine-tip black marker, draw a straight vertical line slightly to the left of the center. This will be the trunk of your pine tree. -
Add the Branches:
Starting from the top of the trunk, draw downward-sloping, jagged lines to form the triangular shape of the tree. Keep the lines sketchy and loose rather than perfectly symmetrical. -
Ground the Scene:
Draw a slightly curved horizontal line underneath the tree to represent the snowy ground. Add a few small dots below this line for texture. -
Add Celestial Elements:
To the right of the tree, draw an open, five-point star with a loose, hand-drawn feel. It doesn’t need to be geometrically perfect. -
Details and Snow:
Fill the empty space above and around the tree with small dots and a few tiny asterisks to represent falling snowflakes. -
Seal (Optional):
If you want the ornament to last longer, apply a thin coat of matte varnish. Ensure the ink is 100% dry before sealing to avoid smearing.
Step 3: Finishing Touches
-
Attach the Twine:
Cut a piece of jute twine approximately 8 inches long. -
Loop and Knot:
Thread the twine through the hole at the top. Bring the ends together and tie a simple overhand knot right at the base near the clay, or tie the ends further up for a larger loop. -
Final Adjustments:
Trim any excess twine tails if you prefer a cleaner look, or leave them a bit frayed for rustic charm.
Level Up: Gold Accents
After drawing the black lines, use a fine gold paint pen to trace just inside the star or add tiny gold dots among the snowflakes for a festive shimmer.
Hang your new minimalist masterpiece on a branch to enjoy its simple elegance throughout the season
Painted Snowflake and Dot “Snowfall” Ornaments
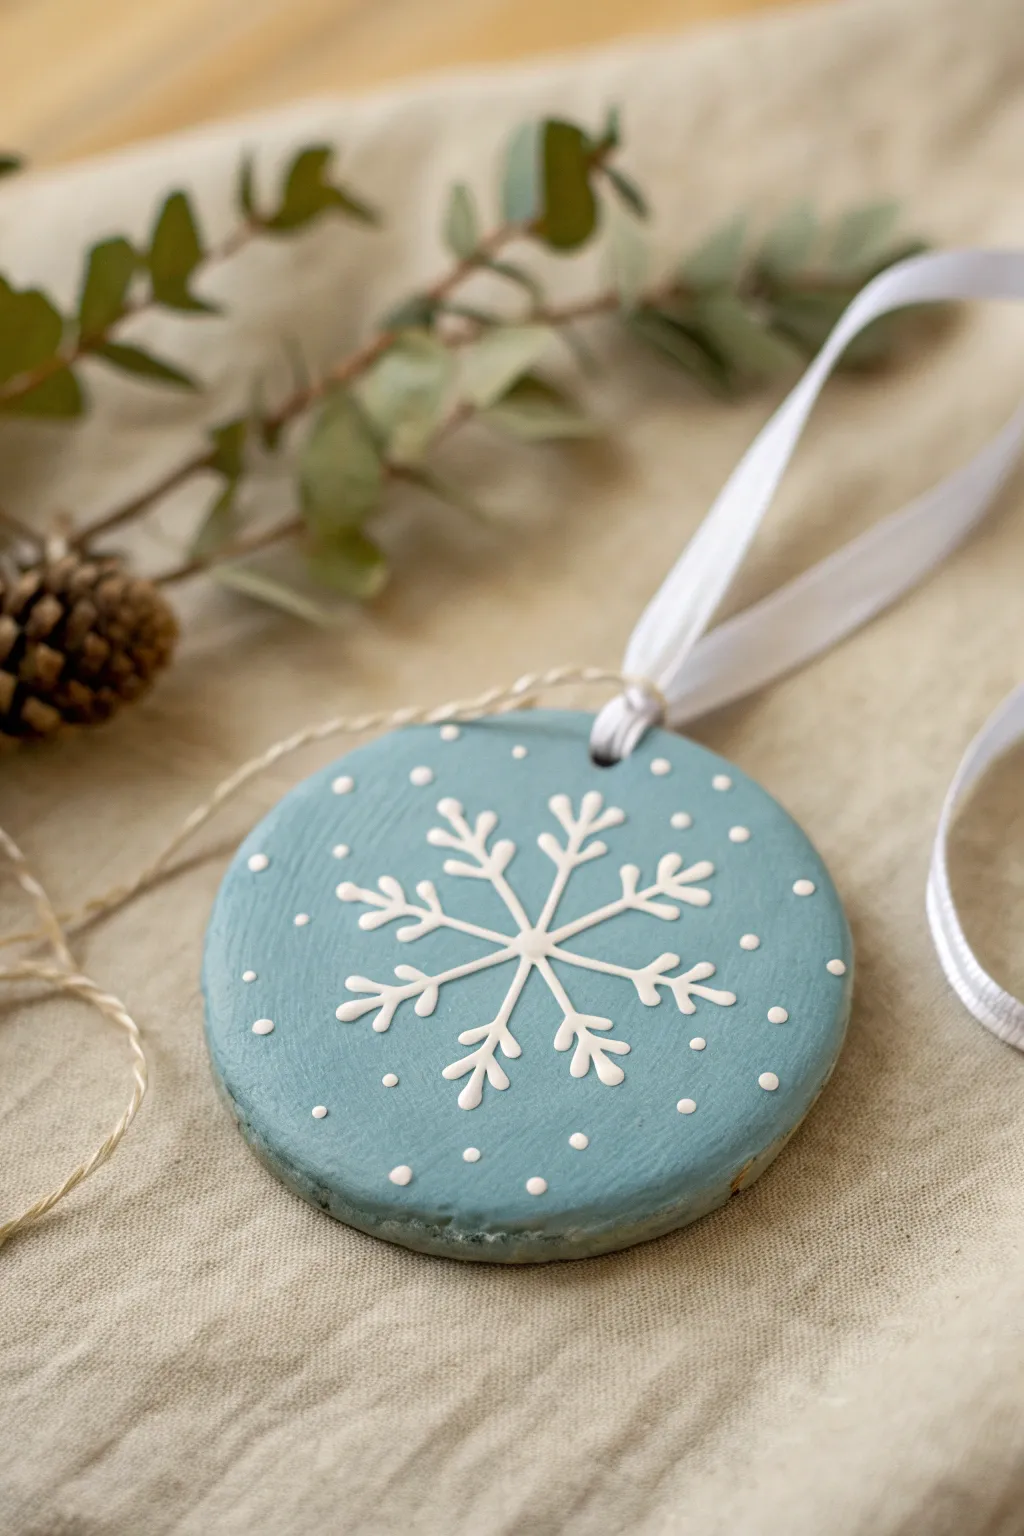
Capture the stillness of a snowy evening with this serene blue ornament featuring a delicate, raised snowflake design. The soft, dusty blue background contrasts beautifully with the crisp white details for a truly classic winter look.
Step-by-Step Guide
Materials
- White air-dry clay
- Rolling pin
- Round cookie cutter (approx. 3 inches)
- Straw or skewer (for hole punching)
- Fine-grit sandpaper
- Acrylic paint: Dusty blue-grey (e.g., mix of Cerulean Blue, Grey, and a touch of Green)
- Acrylic paint: White
- Fine detail paintbrush (size 0 or 00)
- Small dotting tool or toothpick
- White satin ribbon (1/4 inch width)
- Thin hemp twine
- Felt or craft foam (optional, for drying texture)
Step 1: Shaping the Base
-
Condition the clay:
Begin by kneading a handful of white air-dry clay until it is soft, pliable, and free of cracks. -
Roll it out:
Roll the clay out on a smooth surface to an even thickness of about 1/4 inch. If you want a smooth back, roll it on a piece of parchment paper. -
Cut the shape:
Press your round cookie cutter firmly into the clay to cut out your circle. Wiggle it slightly before lifting to ensure a clean cut. -
Smooth the edges:
Dip your finger in a little water and gently run it around the circumference of the circle to smooth down any rough clay burrs left by the cutter. -
Create the hanging hole:
Use a straw to punch a clean hole near the top edge of the circle. Position it at least 1/4 inch from the edge to prevent tearing later. -
Dry completely:
Lay the ornament on a flat surface to dry for 24-48 hours. Flipping it over halfway through the drying process helps prevent warping. -
Sand for perfection:
Once fully cured, lightly sand the edges and surface with fine-grit sandpaper to remove any remaining imperfections or fingerprints.
Step 2: Painting the Design
-
Apply the base coat:
Paint the entire front and sides of the ornament with your dusty blue-grey acrylic paint. I usually apply two thin coats for opaque coverage, letting the first dry completely before adding the second. -
Draft the center:
Ideally, lightly mark the exact center of the circle with a pencil to help guide your snowflake placement. -
Paint the main spokes:
Using a fine detail brush and white acrylic paint, draw a simple cross (+) through the center. Then, draw an ‘X’ over it to create an eight-pointed star shape. Keep the lines thin. -
Add the arrow details:
On the longer vertical and horizontal lines, paint small ‘V’ shapes facing outward near the tips to create the classic snowflake arms. -
Embellish the diagonals:
On the shorter diagonal lines, add simple dots or tiny teardrop shapes at the ends to add variety to the snowflake structure. -
Thicken the center:
Go back over the central intersection of lines to slightly thicken them, ensuring the white paint looks raised and dimensional. -
Add the snowfall border:
Dip a small dotting tool or the tip of a toothpick into white paint. Gently press dots of varying sizes randomly around the empty blue space surrounding the snowflake. -
Let the paint cure:
Allow the painted design to dry completely, which usually takes about an hour depending on how thickly the white paint was applied.
Paint Viscosity Tip
For the raised snowflake effect, use heavy body acrylic paint or don’t water down your standard acrylics. Thicker paint holds its shape better for that embossed look.
Step 3: Finishing Touches
-
Thread the ribbon:
Cut a length of white satin ribbon (about 8 inches). Fold it in half, push the loop through the hole from front to back, and pull the tails through the loop to secure it. -
Add a rustic accent:
Take a piece of thin hemp twine and tie it loosely around the base of the ribbon knot for a touch of natural texture.
Make it Sparkle
While the white paint on the snowflake is still wet, sprinkle a tiny pinch of ultra-fine clear glitter over it to mimic the shimmer of fresh frost.
Hang this lovely piece on your tree or use it as a special gift tag to bring a wintry chill to your holiday decor


The Complete Guide to Pottery Troubleshooting
Uncover the most common ceramic mistakes—from cracking clay to failed glazes—and learn how to fix them fast.
Antiqued Wash to Make Imprints Pop
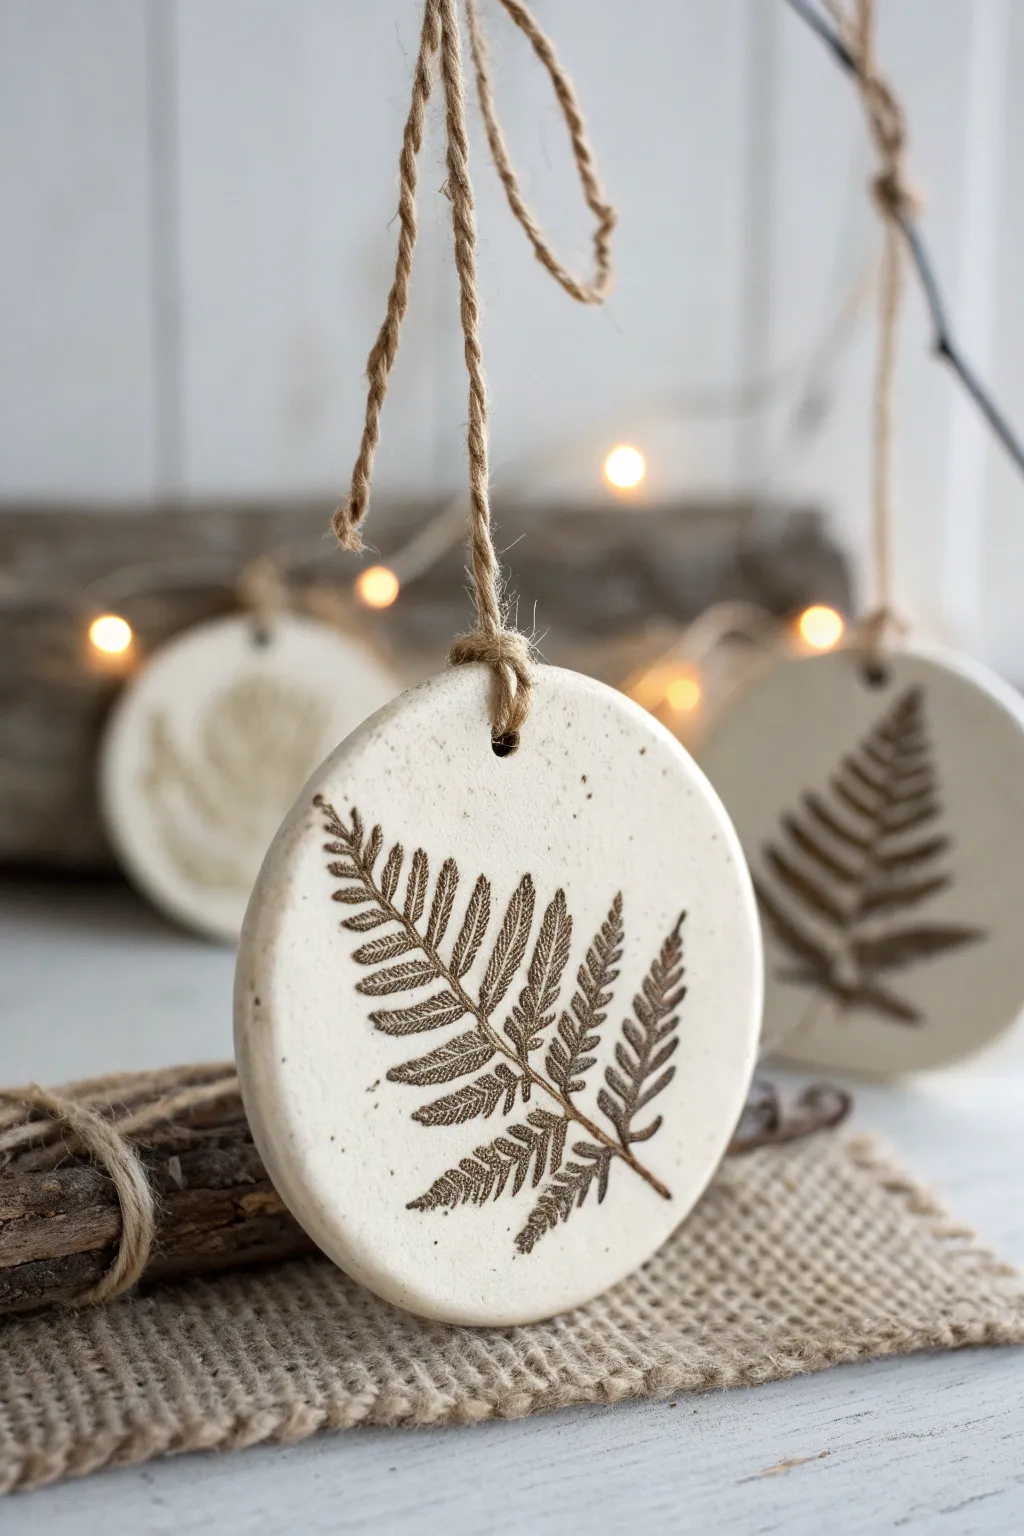
Capture the delicate beauty of nature with these charming clay ornaments featuring detailed botanical imprints. The distinct dark wash settles perfectly into the pressed fern leaves, creating a vintage, fossil-like appearance that adds warmth to any seasonal display.
Detailed Instructions
Materials
- White original air-dry clay (e.g., DAS or Crayola)
- Fresh or artificial fern fronds (stiff plastic works well for deep impressions)
- Round cookie cutter or biscuit cutter
- Rolling pin
- Parchment paper or non-stick craft mat
- Brown acrylic paint (burnt umber or raw sienna)
- Sponge or paper towels
- Small paintbrush
- Water container
- Jute twine or hemp cord
- Straw or skewer (for making hole)
- Fine-grit sandpaper (optional)
- Matte varnish or sealant (optional)
Step 1: Shaping and Imprinting
-
Prepare the workspace:
Lay down a sheet of parchment paper or a non-stick craft mat on a flat surface to prevent your clay from sticking while you work. -
Roll the clay:
Take a handful of air-dry clay and knead it briefly until pliable. Roll it out to an even thickness of about 1/4 inch (6mm). If it’s too thin, it may crack; too thick, and it will be heavy. -
Position the botanical:
Select a fern frond that fits nicely within the size of your cutter. Lay the fern vein-side down onto the smooth slab of clay. -
Press the design:
Gently glide your rolling pin over the fern once or twice. apply steady, firm pressure to ensure the veins and tiny distinct details are pushed deep into the clay surface. -
Reveal the imprint:
Carefully lift the fern stem from the clay. Peel it back slowly to reveal the clean impression left behind. -
Cut the shape:
Position your round cutter over the imprint, centering the fern design as desired. Press down firmly to cut the circle, then pull away the excess clay from the edges. -
Create a hanging hole:
Use a straw or a wooden skewer to poke a hole near the top edge of the ornament. Make sure it’s not too close to the edge to prevent tearing later. -
Smooth the edges:
Dip your finger in a tiny bit of water and run it along the cut edge of the circle to smooth out any roughness or jagged bits. -
Allow to dry:
Place the ornaments on a wire rack or leave them on parchment paper to dry completely. This usually takes 24-48 hours depending on humidity. Flip them halfway through to ensure even drying.
Clean Lines
If the clay is sticking to your fern, lightly dust the leaf with cornstarch before pressing. This acts as a release agent and prevents tearing.
Step 2: Antiquing and Finishing
-
Sand imperfections:
Once bone dry, check the edges. If there are any sharp points, gently sand them down with fine-grit sandpaper until smooth. -
Prepare the wash:
Squeeze a small amount of brown acrylic paint onto a palette. Dilute it with water until it has a thin, inky consistency—roughly a 50/50 mix. -
Apply the paint:
Using a small brush, paint the diluted brown wash over the entire front surface of the ornament, ensuring the liquid pools into all the deep crevices of the fern imprint. -
Wipe the surface:
Immediately take a slightly damp sponge or paper towel and wipe across the surface of the clay. You want to remove the paint from the raised, flat areas while leaving the dark pigment trapped inside the imprinted lines. -
Adjust the contrast:
If the imprint isn’t dark enough, I usually add a second coat of the wash into just the deep lines and wipe again. If the surface is too dark, wipe more aggressively with a clean, damp cloth. -
Seal the piece:
To protect the finish and the wash, you can apply a thin coat of matte varnish or Mod Podge, though leaving it unsealed keeps the lovely raw texture. -
Add the hanger:
Cut a length of jute twine, about 8 inches long. Thread it through the hole at the top of the ornament. -
Tie the knot:
Bring the ends of the twine together and tie a simple overhand knot. Pull it tight to secure the loop for hanging.
Gilded Touch
Use a tiny brush to apply liquid gold leaf or metallic paint just inside the deepest veins of the imprint for a subtle, elegant shimmer.
Now these earthy, botanical decorations are ready to bring a touch of woodland charm to your home
Marbled Swirl Air Dry Clay Ornaments
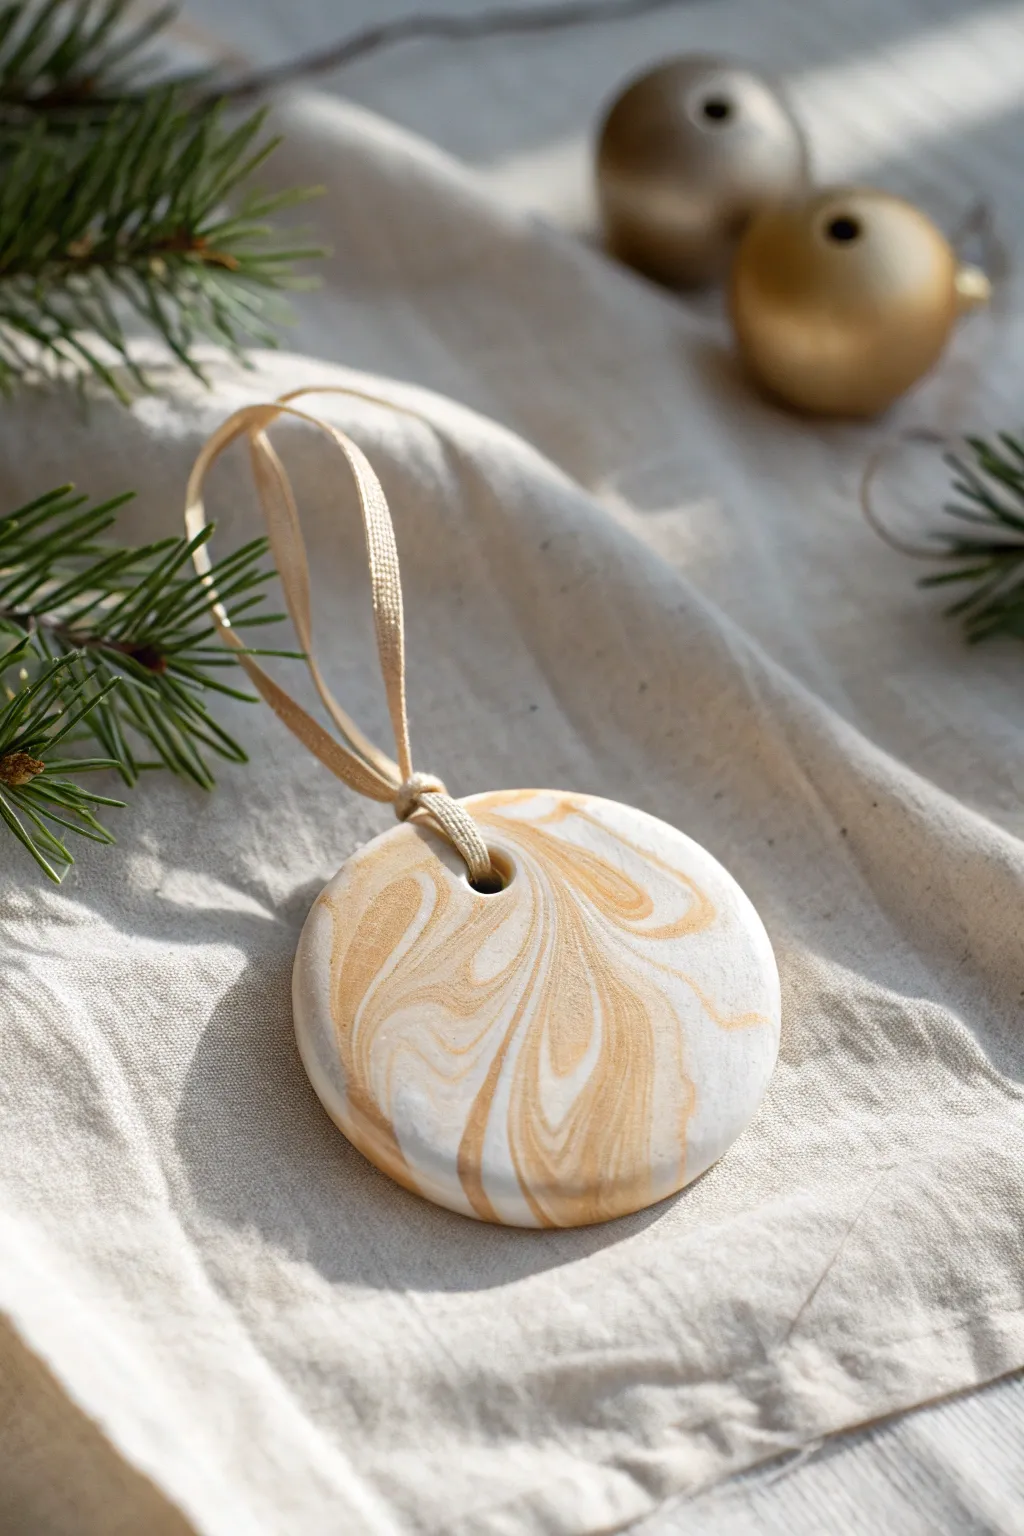
Elevate your holiday decor with these sophisticated ornaments that capture the elegance of natural stone. By mixing shimmering gold and classic white clay, you’ll create organic, one-of-a-kind marble patterns that look far more expensive than they are to make.
Step-by-Step Guide
Materials
- White polymer or air dry clay
- Gold polymer or air dry clay (or metallic bronze)
- Acrylic rolling pin
- Circular cookie cutter
- Straw or small dowel (for the hole)
- Gold ribbon or twine
- Parchment paper or silicone mat
- Fine grit sandpaper (optional)
- Gloss varnish or sealant (optional)
Step 1: Preparing the Clay
-
Condition the white clay:
Begin by taking a chunk of white clay roughly the size of a golf ball. Knead it thoroughly in your hands until it becomes warm, soft, and pliable. -
Condition the gold clay:
Take a smaller amount of gold clay, about half the size of the white piece. Knead this separately until it is equally soft. -
Form ropes:
Roll each color of clay into a long, snake-like rope on your work surface. Aim for them to be roughly the same length, about 5-6 inches long. -
Twist together:
Place the two ropes side-by-side and twist them around each other to form a single, two-tone spiral rope. -
Double over:
Fold the twisted rope in half, bringing the two ends together. -
Twist again:
Twist the folded rope again. This step begins to integrate the colors more tightly. -
Repeat the fold:
Fold and twist the clay one or two more times. Be careful not to over-knead at this stage, or the colors will blend into a muddy beige instead of distinct swirls. -
Ball it up:
Gently roll the twisted clay into a smooth ball. You should see distinct lines of gold and white on the surface.
Step 2: Shaping the Ornaments
-
Roll out the slab:
Place the clay ball on parchment paper or a silicone mat. Using an acrylic rolling pin, flatten the ball until it is about 1/4 inch thick. -
Check the pattern:
Examine your slab. If the marble effect isn’t quite right, you can fold it once more and roll it out again, but remember that less is often more. -
Cut the shape:
Position your circular cookie cutter over the area of the clay with the most pleasing swirl pattern. Press down firmly to cut out the ornament shape. -
Remove excess:
Peel away the excess clay from around the circle. Save these scraps; I like to mash them together to make a more blended, secondary ornament. -
Smooth the edges:
Dip your finger in a tiny bit of water and run it gently around the cut edge of the circle to smooth out any roughness. -
Create the hanging hole:
Use a straw or a small dowel to punch a clean hole near the top of the circle. Make sure it isn’t too close to the edge to prevent cracking.
Stop Before You Mix
For high-contrast swirls, stop twisting sooner than you think! Over-mixing creates a single, light brown color rather than defined marble veins.
Step 3: Finishing Touches
-
Dry thoroughly:
Allow the ornament to dry completely according to your clay’s package instructions. Flipping it over halfway through drying helps prevent curling. -
Sand imperfections:
Once fully dry and hard, use very fine grit sandpaper to gently buff away any sharp edges or fingerprints. -
Seal (Optional):
For a glossy, ceramic look, apply a thin coat of gloss varnish. This also helps protect the clay and makes the gold color pop. -
Attach the ribbon:
Cut a length of gold ribbon or twine. Fold it in half and feed the loop through the hole from front to back. -
Secure the loop:
Pass the tail ends of the ribbon through the loop and pull tight to create a lark’s head knot, securing the hanger.
Add Metallic Leaf
Press small flakes of real gold leaf onto the clay slab right before your final roll to add an extra layer of dimension and genuine sparkle.
Hang your new marbled creation on the tree and admire how the light catches those beautiful golden swirls.

TRACK YOUR CERAMIC JOURNEY
Capture glaze tests, firing details, and creative progress—all in one simple printable. Make your projects easier to repeat and improve.
Terrazzo Speckle Confetti Ornaments
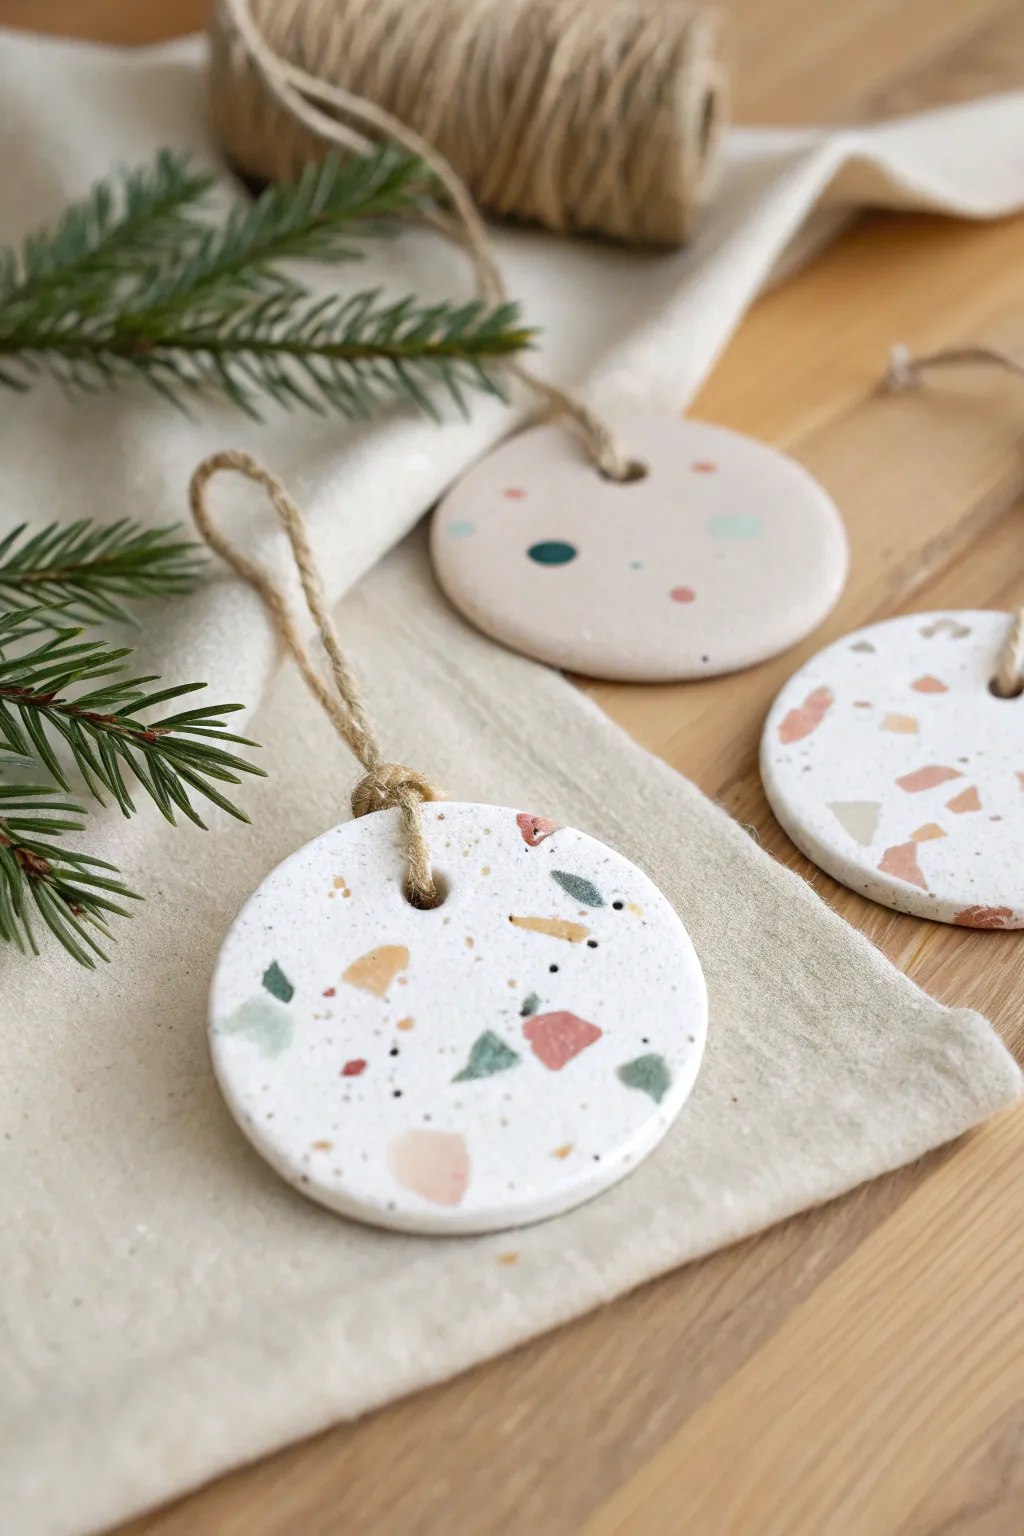
These stylish, modern ornaments bring the trendy terrazzo look right to your holiday tree with a clever, no-mess technique. By embedding colorful clay chips directly into your white base, you create a seamless, stone-like finish that looks incredibly high-end but is surprisingly simple to make.
Detailed Instructions
Materials
- White air-dry clay
- Colored air-dry clay (terracotta, slate blue, mustard, sage green)
- Rolling pin
- Round cookie cutter (approx. 3 inches)
- Parchment paper or non-stick mat
- Toothpick or straw
- Jute twine
- Fine-grit sandpaper (optional)
- Matte sealant or varnish (optional)
Step 1: Preparing the ‘Chips’
-
Roll Colored Clay:
Begin by taking small pinched-off amounts of your colored clays. Roll each color out very thinly onto your parchment paper, aiming for paper-thin sheets. -
Create Fragments:
Tear or cut these thin sheets into random, jagged little pieces. Vary the sizes from tiny specks to slightly larger mismatched triangles to mimic real stone chips. -
Let Them Harden:
Set these colored fragments aside for about 10–15 minutes. You want them to firm up just enough so they don’t smear when we roll them later, but not so dry they crack.
Step 2: Forming the Base
-
Condition White Clay:
Take a large chunk of white air-dry clay and knead it in your hands until it’s warm, pliable, and free of cracks. -
Initial Roll:
Roll the white clay out on your non-stick surface to a thickness of about 1/4 inch. It doesn’t need to be perfect yet.
Smart Chip Hack
Make your colored ‘chips’ in advance! I store dried colored scraps in a jar so I always have confetti ready to sprinkle whenever I start a project.
Step 3: Creating the Terrazzo Effect
-
Scatter the Confetti:
Sprinkle your semi-hardened colored clay chips onto the surface of the rolled white clay. Aim for a random distribution, clustering some areas while leaving others sparse for a natural look. -
Press gently:
Use your fingers to lightly press the chips down so they stick to the base clay initially. -
Embed the Design:
Take your rolling pin and gently roll over the clay again. This will press the colored chips flat and flush into the white surface, creating that smooth terrazzo finish. -
Check Thickness:
Continue rolling carefully until the entire slab is uniform and the colored pieces feel seamless against the white background.
Prevent Cupping
If your ornaments start curling up at the edges while drying, place a light book or flat board on top of them (sandwiching them between parchment) after the first 12 hours.
Step 4: Cutting and Finishing
-
Cut Shapes:
Position your round cookie cutter over the most pleasing sections of your pattern and press down firmly to cut out your ornament shapes. -
Smooth Edges:
Gently lift the circles away from the scrap clay. Dip your finger in a tiny bit of water to smooth out any rough edges on the circumference. -
Add Hanging Hole:
Use a straw or a toothpick to poke a hole near the top edge for the twine. Twisting the straw as you push through creates a cleaner hole. -
Drying Time:
Lay the ornaments flat on a clean sheet of parchment paper. Let them air dry for 24–48 hours, flipping them halfway through to ensure even drying and prevent curling. -
Sand for smoothness:
Once bone dry, you can lightly sand the surface with fine-grit sandpaper if you want to expose the crisp edges of your colored chips even more. -
Seal (Optional):
Apply a coat of matte varnish if you want to protect them from moisture, though leaving them raw gives a lovely stone-like texture. -
String It Up:
Cut a length of jute twine, thread it through the hole, and tie a secure knot to finish your rustic ornament.
Now you have a set of sophisticated, faux-stone decorations ready to hang or gift to design-loving friends
Scalloped Edge Ornaments for a Vintage Feel
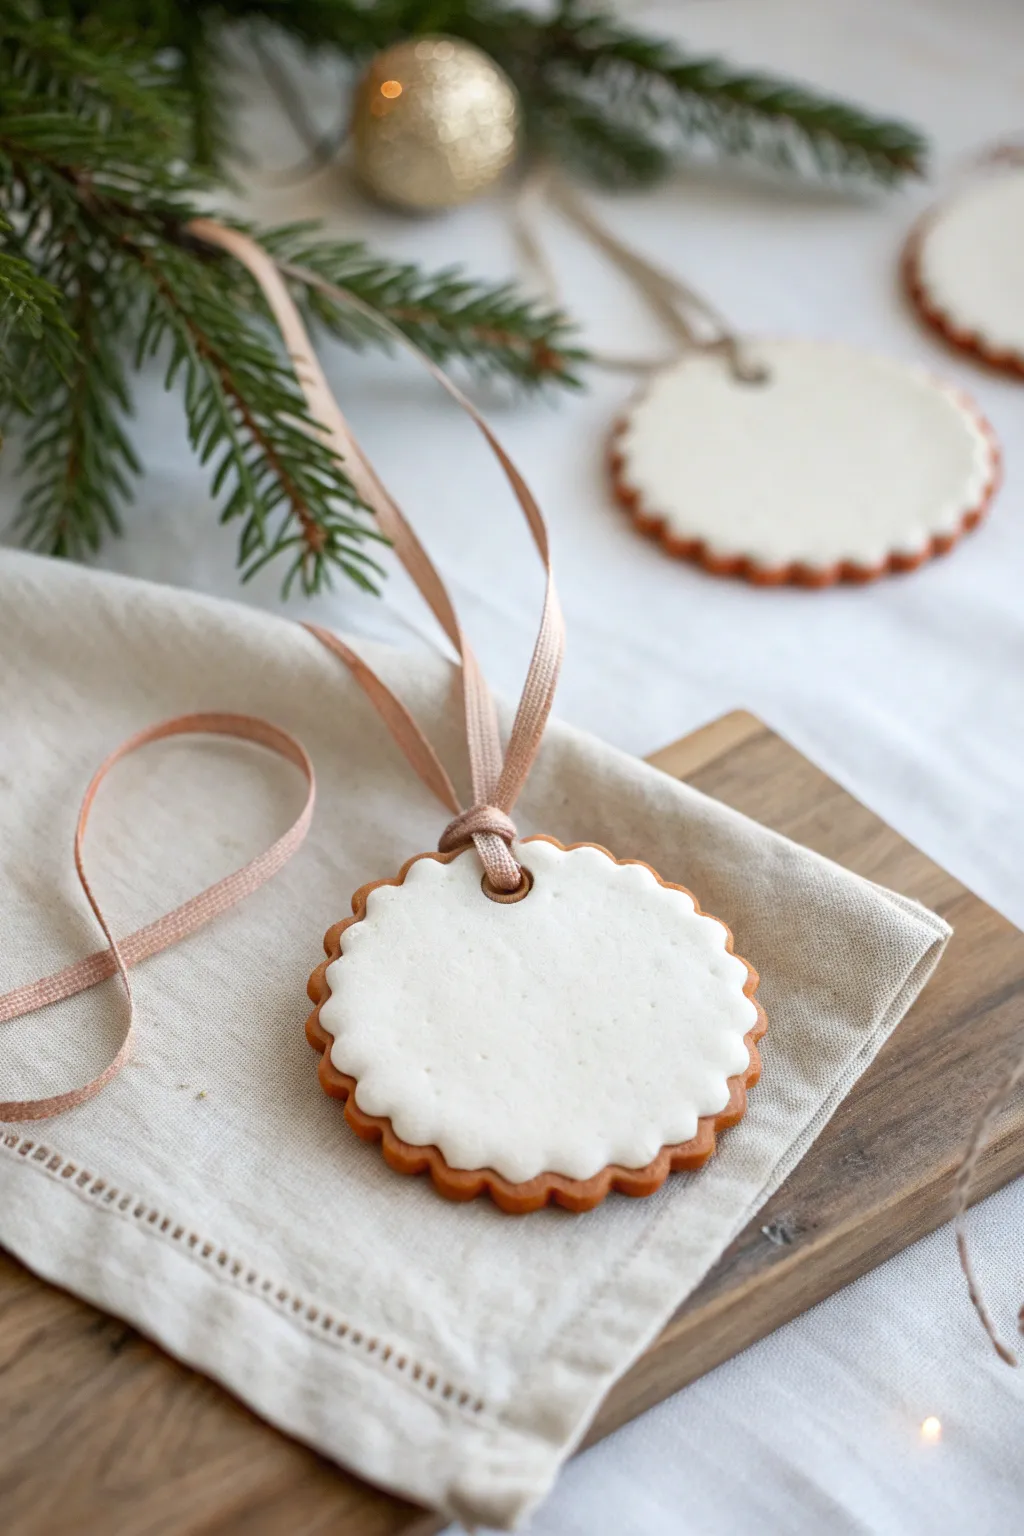
Capture the nostalgic charm of classic holiday cookies with these elegant terracotta and white clay ornaments. Their scalloped edges and smooth, ‘iced’ centers mimic the look of gingerbread without any baking required.
Step-by-Step Guide
Materials
- Terracotta colored air-dry clay
- Bright white air-dry clay (or soft white)
- Scalloped round cookie cutter
- Smaller plain round cookie cutter (optional, for sizing)
- Rolling pin
- Parchment paper or non-stick mat
- Small straw or cocktail stick (for hole)
- Fine grit sanding sponge
- Thin pink fabric ribbon (approx. 5mm width)
- Craft knife
- Water cup and small brush (for smoothing)
- Strong craft glue (PVA or heavy gel medium)
Step 1: Creating the Terracotta Base
-
Condition the clay:
Begin by taking a handful of the terracotta-colored clay. Knead it thoroughly in your warm hands until it is pliable and smooth; this prevents cracks from forming later. -
Roll out the slab:
Place the kneaded clay onto your parchment paper. Use the rolling pin to roll it out to an even thickness of about 1/4 inch (6mm). Try to keep the pressure consistent. -
Cut the shapes:
Press your scalloped round cookie cutter firmly into the clay slab. Give it a gentle wiggle to separate the shape before lifting the cutter away. -
Smooth the edges:
Dip your finger in a tiny bit of water and run it gently around the scalloped edges to soften any sharp ridges left by the cutter. -
Create the hanging hole:
Use a drinking straw to punch a clean hole near the top edge of the ornament. Position it low enough that the clay won’t break, but high enough to look balanced. -
Initial drying phase:
Lay the terracotta bases flat on a clean sheet of parchment paper. Let them dry for 24-48 hours, flipping them occasionally to ensure they dry flat.
Clean Edges Trick
If your scalloped cutter sticks, dip it into a small bowl of cornstarch before pressing into the clay. This acts as a release agent and keeps edges crisp.
Step 2: Adding the ‘Icing’ Layer
-
Prepare the white clay:
Once the bases are fully dry, condition a smaller amount of white air-dry clay. Roll it out much thinner than the base, approximately 1/8 inch (3mm) thick. -
Cut the inner circle:
You need a white circle that is slightly smaller than your base so the terracotta scallops show. You can use a smaller plain circle cutter, or carefully freehand cut a wavy circle inside your original scalloped cutter. -
Shape the white layer:
If you used a plain circle cutter, use your fingers to gently push the edges inward at intervals to mimic the scalloped pattern of the base, just slightly smaller. -
Align the hole:
Place the white layer gently over the dry terracotta base to check the fit. Use your straw to punch a matching hole through the white clay, using the base’s hole as a guide. -
Adhere the layers:
Apply a thin, even layer of craft glue to the back of the white clay piece. I find spreading it with a brush ensures it sticks all the way to the edges without oozing out. -
Press and smooth:
Press the white layer firmly onto the terracotta base. Use a damp finger to smooth the edges of the white clay down, giving it that poured ‘royal icing’ appearance. -
Refine the hole:
While the white clay is still wet, use the straw or a tool to neaten up the hole where the two layers meet, ensuring a clean passage for the ribbon.
Step 3: Finishing Touches
-
Final drying:
Allow the combined ornament to dry for another 24 hours. The white layer is thin, so it should dry relatively quickly. -
Sanding imperfections:
Once bone dry, take a fine-grit sanding sponge and very gently buff the surface of the white clay if there are any fingerprints or bumps. -
Preparing the ribbon:
Cut a length of pink fabric ribbon, approximately 10-12 inches long. Fold it in half to create a loop at one end. -
Attaching the hanger:
Thread the folded loop end through the hole from front to back. Pull the loose ends of the ribbon through the loop and tighten gently to create a lark’s head knot.
Texture Play
Before drying the white layer, press a piece of lace or a textured stamp into the surface for a delicate, embossed pattern instead of a smooth finish.
Hang these sweet faux-cookie creations on your tree or use them as sophisticated gift tags for special presents.
Layered Tree Silhouettes for Simple Dimension
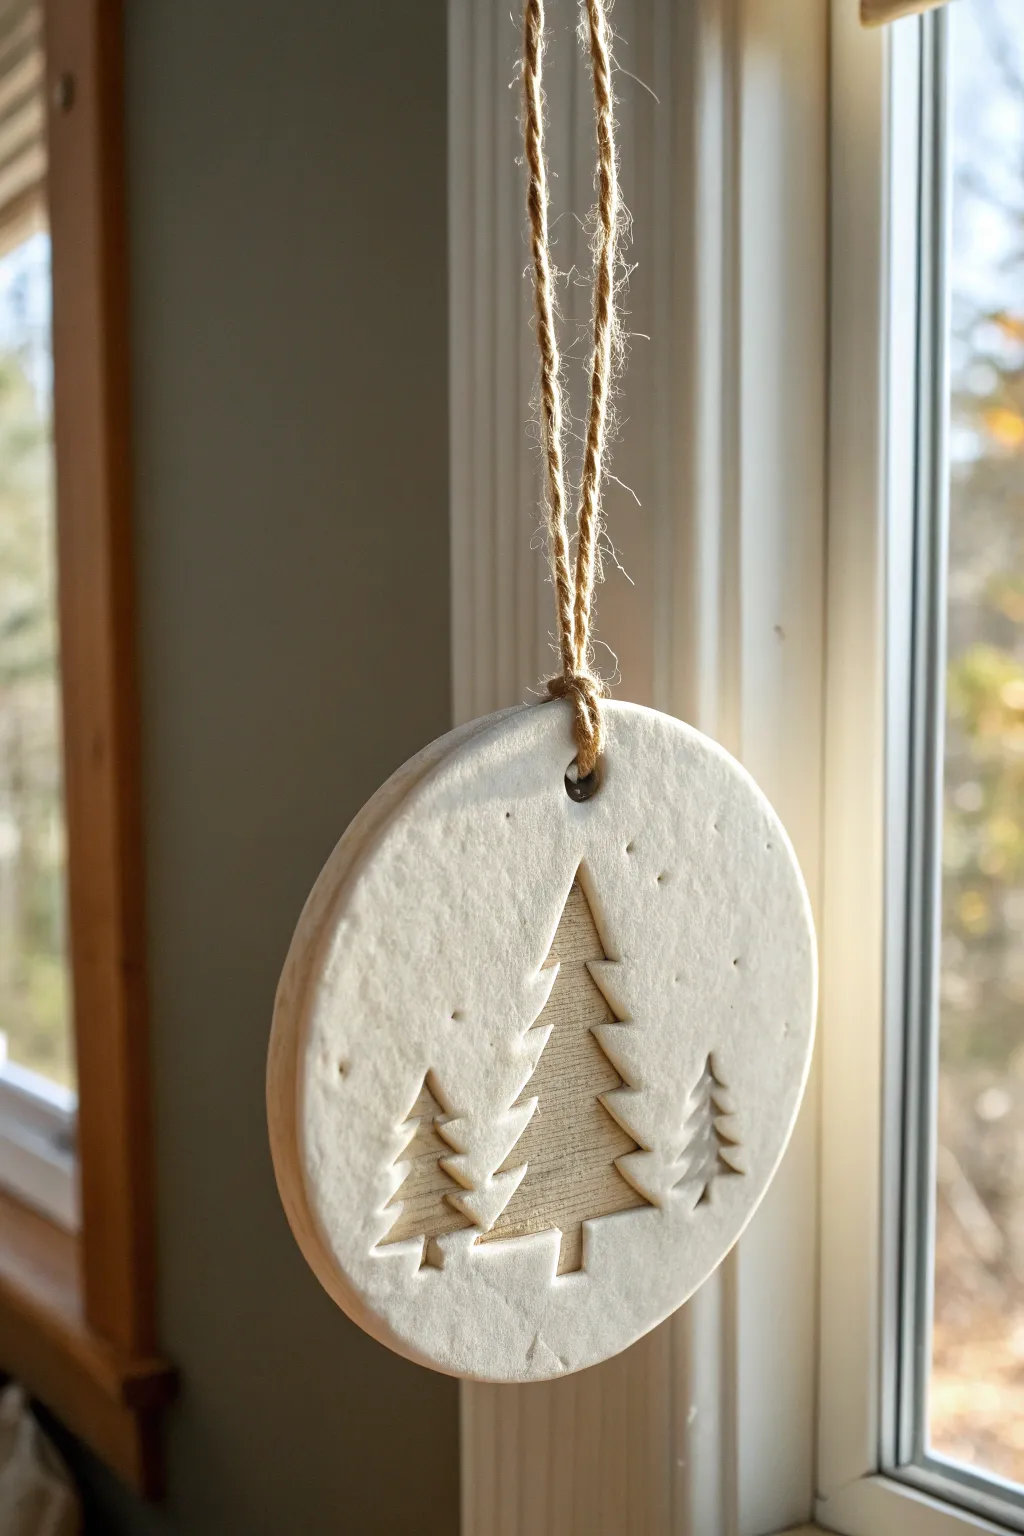
These ornaments combine the pristine, minimalist look of white air-dry clay with the rustic warmth of natural wood. The result is a charming high-relief design where the tree silhouette reveals rich wood grain texture beneath a snowy white surface.
Step-by-Step
Materials
- White air-dry clay
- Thin unfinished wood circles (approx 3-4 inches diameter)
- PVA glue or strong craft glue
- Rolling pin
- Parchment paper or silicone mat
- Round cookie cutter (same size as wood circles)
- Small Christmas tree cookie cutter or clay cutter
- Smaller accent tree stamps or carving tool
- Jute twine
- Straw or skewer (for hole punching)
- Fine grit sandpaper
Step 1: Preparation & Cutting
-
Prep the workspace:
Lay out a sheet of parchment paper or a silicone mat to prevent the clay from sticking to your table as you work. -
Condition the clay:
Take a handful of air-dry clay and knead it in your hands until it becomes soft, pliable, and free of cracks. -
Roll the slab:
Roll the clay out onto your mat until it is an even thickness, roughly 1/8 to 1/4 inch thick. I find that using guide sticks can help keep the thickness uniform. -
Cut the clay circle:
Use your large round cookie cutter to cut a perfect circle from the rolled clay. This needs to match the size of your wooden backing. -
Create the tree cutout:
Press a Christmas tree cutter into the center of the clay circle and gently remove the tree shape. Save the clay tree for another project, as we need the negative space for this ornament.
Keep it clean
Make sure your wood piece is dust-free before gluing. If staining the wood first, let it dry for 48 hours so oils don’t stain the white clay.
Step 2: Detailing & Texture
-
Add accent trees:
To create the smaller trees on either side, press a smaller tree stamp gently into the clay surface. Do not cut all the way through; just create an impression. -
Sharpen the lines:
If the stamping caused any distortions, use a hobby knife or needle tool to gently sharpen the edges of your impressed trees. -
Create snow texture:
For a subtle snowy effect, use a toothpick or a stiff bristle brush to lightly stipple tiny dots and divots across the clay surface. -
Punch the hanging hole:
Use a straw to punch a neat hole near the top edge of the clay circle. Make sure it isn’t too close to the edge to prevent cracking. -
Pre-dry the clay:
Let the clay circle sit for 15-20 minutes. This firms it up slightly, making it easier to handle without warping during the glue-up.
Step 3: Assembly & Finishing
-
Drill the wood backing:
Mark the position of the hole on your wooden circle to match the clay, and carefully drill a hole through the wood. -
Apply adhesive:
Spread a thin, even layer of strong craft glue or PVA glue onto the face of the wooden circle. -
Layer the materials:
Carefully lift your clay circle and place it directly on top of the glue-covered wood. Align the outer edges and the hanging holes perfectly. -
Establish the bond:
Gently press down on the clay to ensure it adheres to the wood, being careful not to smudge your tree impressions. -
Clean the edges:
Run a damp finger along the outer rim of the ornament to smooth out the seam between the wood and the clay. -
Dry completely:
Allow the ornament to dry flat for at least 24 hours. The wood backing helps prevent the clay from curling as it dries. -
Sand the surface:
Once fully cured, very lightly sand the edges or surface if any rough spots remain, wiping away dust with a dry cloth. -
Add the hanger:
Cut a length of natural jute twine, fold it in half, pass the loop through the hole, and pull the ends through the loop to secure it.
Clay Shrinkage
Air-dry clay shrinks slightly when drying. If the clay exposes the wood edge, just sand the wood flush after the clay has fully hardened.
Hang your finished layered ornament near a window to let the natural light highlight the beautiful depth created by the two materials
Cut-Out Window Ornaments With Bold Negative Space
Embrace the beauty of negative space with these sleek, circular ornaments featuring a simple star window. Their clean lines and matte white finish create a modern, Scandinavian-inspired look that pairs perfectly with fresh greenery.
Step-by-Step Guide
Materials
- White air dry clay
- Rolling pin
- Large circle cookie cutter (approx. 3-4 inches)
- Small star cookie cutter (approx. 1-1.5 inches)
- Parchment paper or silicone mat
- Sandpaper (fine grit)
- Small straw or cocktail stick (for the ribbon hole)
- Cream or beige satin ribbon (1/4 inch width)
- Bowl of water
- Sponge or brush
Step 1: Shaping the Clay Base
-
Prepare your workspace:
Lay down a piece of parchment paper or a silicone mat on a flat surface to prevent sticking. -
Condition the clay:
Take a handful of air dry clay and knead it gently in your hands until it feels soft, warm, and pliable. -
Roll it out:
Place the clay ball on your surface and use a rolling pin to flatten it. Aim for a consistent thickness of about 1/4 inch (6mm) to ensure it’s sturdy but not too heavy. -
Check for smoothness:
If surface cracks appear while rolling, dip your finger in a little water and smooth them out immediately. -
Cut the main circle:
Press your large circle cookie cutter firmly into the rolled clay. Give it a slight wiggle before lifting to ensure a clean cut. -
Remove excess clay:
Peel away the scrap clay from around the circle, ball it up, and store it in an airtight container for later use.
Fixing Cracks
If tiny cracks appear as it dries, mix a small amount of fresh clay with water to make a paste (slip) and fill them in, then sand smooth once dry.
Step 2: Creating the Window Design
-
Position the star:
Ideally, you want the star to be slightly below the center point to leave room for the hanging hole at the top. Hover your small star cutter over the clay until you are happy with the placement. -
Cut the negative space:
Press the star cutter straight down through the clay circle. Lift the cutter carefully; usually, the star shape will lift out with the cutter. -
Clean the edges:
If the clay star stays inside the circle, gently push it out or use a craft knife to lift the corner. Use a water-dampened fingertip or a small soft brush to smooth the inner edges of the star cut-out. -
Create the hanging hole:
Use a straw to punch a small hole near the top edge of the circle. Make sure it is centered above the star and not too close to the rim to prevent breakage.
Step 3: Finishing and Assembly
-
Initial smoothing:
Dip your finger in water and run it around the outer circumference of the ornament to smooth any sharp edges left by the cutter. -
Let it dry:
Leave the ornament flat on the parchment paper to air dry. This usually takes 24-48 hours depending on humidity. Flip it over gently halfway through the drying process to ensure even drying. -
Sand for perfection:
Once fully hard and white, use fine-grit sandpaper to gently buff the surface and edges. I like to focus on the inside of the star cut-out to make those points super sharp. -
Dust off:
Wipe the ornament with a dry cloth or a slightly damp sponge to remove any clay dust from sanding. -
Prepare the ribbon:
Cut a length of cream satin ribbon, about 8-10 inches long. Fold it in half to create a loop. -
Thread the ribbon:
Push the folded end of the ribbon through the hole from the front to the back. -
Secure the loop:
Pull the loose ends of the ribbon through the loop you just pushed through the hole and tighten it gently against the top of the ornament (a cow hitch knot).
Sharper Edges
For ultra-crisp edges, let the clay dry for about 30 minutes after rolling but before cutting. Slightly firm clay cuts cleaner than sticky, wet clay.
Now you have a beautifully simple ornament ready to hang on the tree or use as a sophisticated gift tag
Beaded Twine Toppers for a Cozy Boho Look
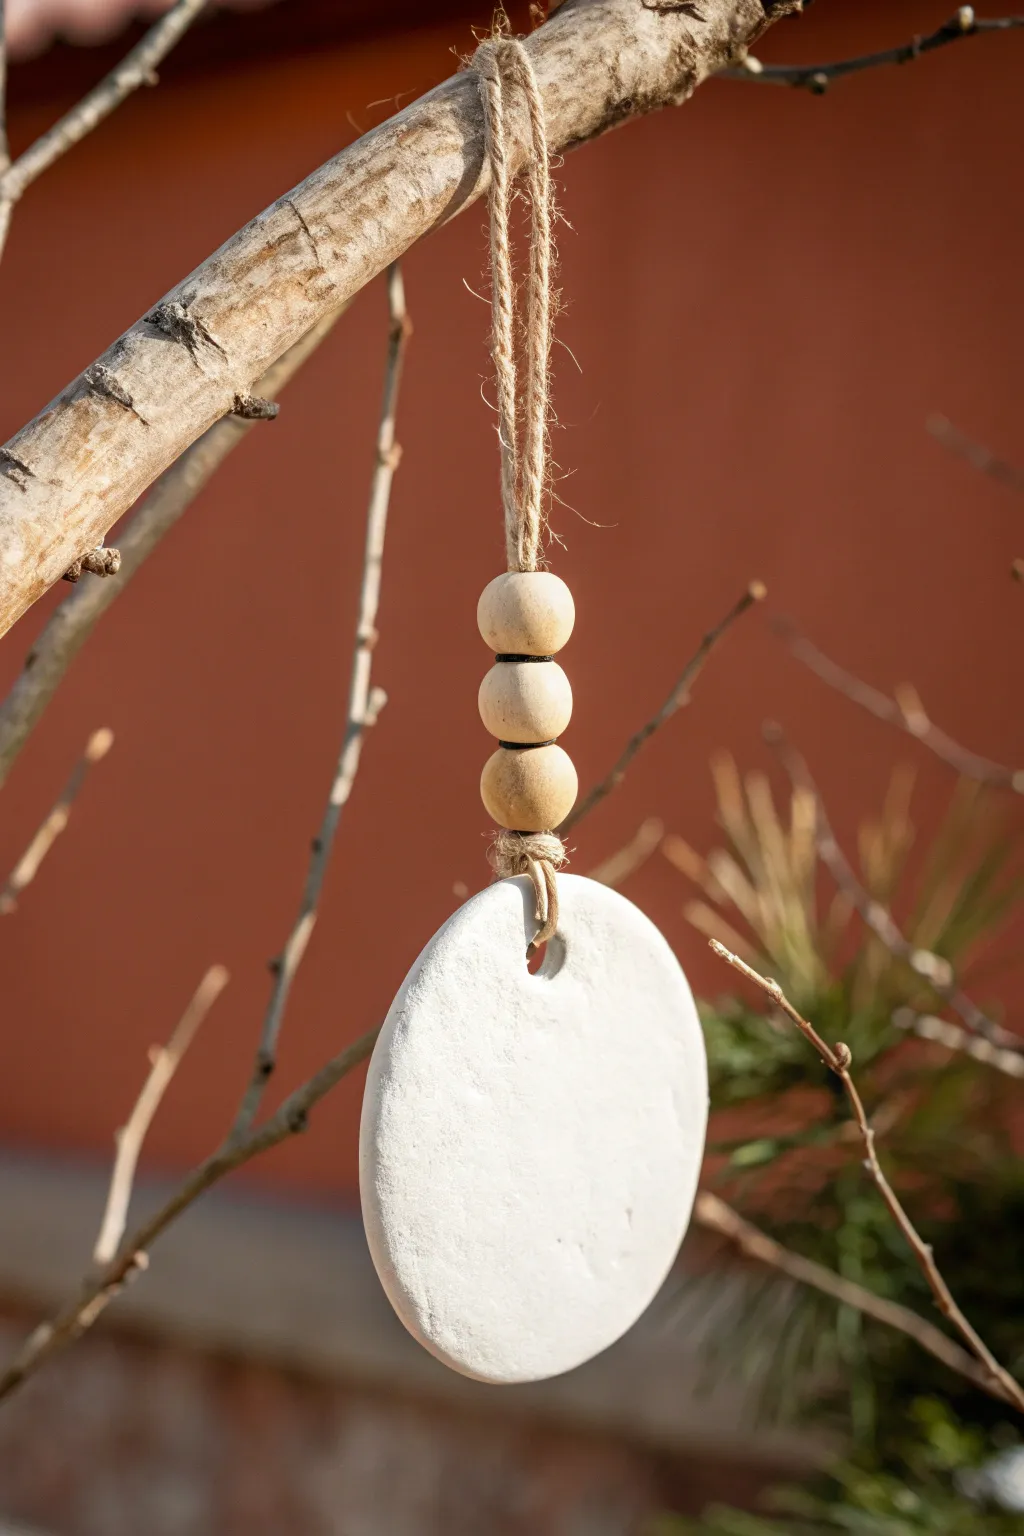
Bring a touch of natural elegance to your decor with these simple yet stunning air dry clay ornaments. The combination of smooth white clay, rustic jute twine, and wooden beads creates a cozy, minimalist aesthetic perfect for any season.
Detailed Instructions
Materials
- Air dry clay (white)
- Rolling pin
- Circle cookie cutter (approx. 3 inches)
- Straw or skewer (for piercing)
- Sandpaper (fine grit)
- Jute twine
- 3 wooden beads (medium size, unpainted)
- Scissors
- Water bowl (for smoothing)
Step 1: Shaping the Clay Base
-
Prepare your workspace:
Lay down a smooth mat or parchment paper to prevent the clay from sticking to your table. -
Condition the clay:
Take a handful of air dry clay and knead it until it feels soft, pliable, and free of cracks. -
Roll it out:
Using a rolling pin, flatten the clay into an even slab about 1/4 inch thick. Try to keep the thickness uniform so it dries evenly. -
Cut the shape:
Press your circle cookie cutter firmly into the clay slab and lift away the excess clay from the edges. -
Smooth the edges:
Dip your finger in a little water and gently run it along the cut edge of the circle to soften any sharp ridges left by the cutter. -
Create the hanging hole:
Use a straw or skewer to poke a hole near the top edge of the circle. Make sure it’s large enough for your twine to pass through easily. -
Dry the ornament:
Place the clay circle on a drying rack or parchment paper. Let it dry completely for 24-48 hours, flipping it halfway through to prevent curling. -
Sand for perfection:
Once fully hard, use fine-grit sandpaper to gently smooth out any uneven spots or rough edges on the surface and rim.
Wrap the Ends
If the twine frays while threading beads, wrap a small piece of tape tightly around the ends to create a temporary ‘needle’ that slides through easily.
Step 2: Assembling the Hanger
-
Cut the twine:
Cut a length of jute twine roughly 12-14 inches long. This will give you plenty of room for the beads and the hanging loop. -
Create the loop:
Fold the twine in half. Tie a simple overhand knot near the folded end to create the loop that will hang on the branch. -
Thread the beads:
Take the two loose ends of the twine and thread them together through the three wooden beads. Push the beads up until they sit snugly against the knot of your loop. -
Attach to clay:
Pass the loose ends of the twine through the hole in your dried clay ornament, going from front to back. -
Secure the hanger:
Bring the ends back up to meet the twine just below the bottom bead. This creates a loop through the clay. -
Tie it off:
Tie a secure knot with the loose ends around the main strand of twine, right underneath the bottom wooden bead. This holds the clay pendant in place. -
Trim excess:
Snip off any extra twine close to the knot for a clean finish. -
Final adjustment:
Just ensure your beads are stacked neatly and the knot is tight before hanging your new creation.
Fixing Cracks
Minor surface cracks during drying? Make a thick paste with a tiny bit of clay and water, fill the crack, let it dry, and sand it smooth again.
Hang these lovely boho ornaments on a branch or in a window to enjoy their simple charm
Dried Citrus and Clay Ornament Pairing Sets

Bring a touch of organic warmth to your winter decor with this minimalist pairing of bright, sun-dried citrus and textured white clay. This project combines the crisp, clean look of air-dry clay with the translucent glow of dehydrated oranges for a naturally beautiful display.
Step-by-Step
Materials
- White or sandstone air-dry clay
- Rolling pin
- Round cookie cutter (approx. 2-3 inches)
- Drinking straw or skewer
- Sandpaper (fine grit)
- Fresh oranges
- Sharp knife or mandoline slicer
- Baking sheet with parchment paper
- Paper towels
- Jute twine or natural hemp cord
- Scissors
Step 1: Preparing the Citrus
-
Preheat the oven:
Begin by preheating your oven to the lowest possible setting, usually around 200°F (95°C) or even lower depending on your appliance. -
Slice the oranges:
Using a sharp knife or a mandoline for consistency, slice your oranges into thin rounds, aiming for about 1/4 inch thickness. -
Blot excess moisture:
Place the orange slices between two layers of paper towels and press gently to absorb as much surface juice as possible, which speeds up the drying process. -
Arrangement for baking:
Lay the blotted slices flat on a parchment-lined baking sheet, ensuring they don’t overlap so air can circulate freely around each piece. -
Slow drying process:
Bake the slices for 3–4 hours, flipping them every 45 minutes to ensure they dry evenly and don’t brown too quickly. -
Cooling down:
Once the flesh is translucent and hard to the touch, remove them from the oven and let them cool completely on a wire rack to firm up.
Stay Flat
To prevent curling while drying, place a lightweight book on top of the clay discs once the surface is dry to the touch but the center is still curing.
Step 2: Crafting the Clay Discs
-
Condition the clay:
Take a handful of air-dry clay and knead it in your hands until it becomes soft, pliable, and free of cracks. -
Roll it out:
On a clean, flat surface, roll the clay out to an even thickness of about 1/4 inch; I find this thickness prevents warping while drying. -
Cut the shapes:
Press your round cookie cutter firmly into the clay to create clean circles, twisting slightly before lifting to release the shape. -
Create the hanging hole:
Use a drinking straw to punch a hole near the top edge of each circle, twisting it as you pull it out to remove the small clay plug cleanly. -
Smooth the edges:
Dip your finger in a tiny bit of water and run it along the cut edges of your discs to smooth down any roughness left by the cutter. -
Drying duration:
Place your clay discs on a wire rack or parchment paper and let them dry for 24–48 hours, flipping them halfway through so the bottom dries evenly. -
Sanding for texture:
Once fully cured and hard, use fine-grit sandpaper to gently buff the surface and edges, giving the clay a stone-like, matte finish.
Scent Boost
Add a few drops of essential oils like cinnamon, clove, or sweet orange directly onto the dried clay backs to turn these ornaments into passive diffusers.
Step 3: Assembly & Hanging
-
Cut the twine:
Cut a length of jute twine roughly 8–10 inches long for each ornament you plan to hang. -
Thread the loop:
Fold the twine in half, push the looped end through the hole in your clay disc, and pull the tails through the loop to secure it with a lark’s head knot. -
Tie the top:
Knot the very ends of the twine together to create a closed loop for hanging. -
Styling the set:
Arrange the finished white clay discs on branches alongside your dried orange slices, either alternating them or hanging them in small clusters for visual interest.
Enjoy the simple elegance of these handmade textures against the winter light in your window
Pressed Dried Flowers for Delicate Botanical Ornaments
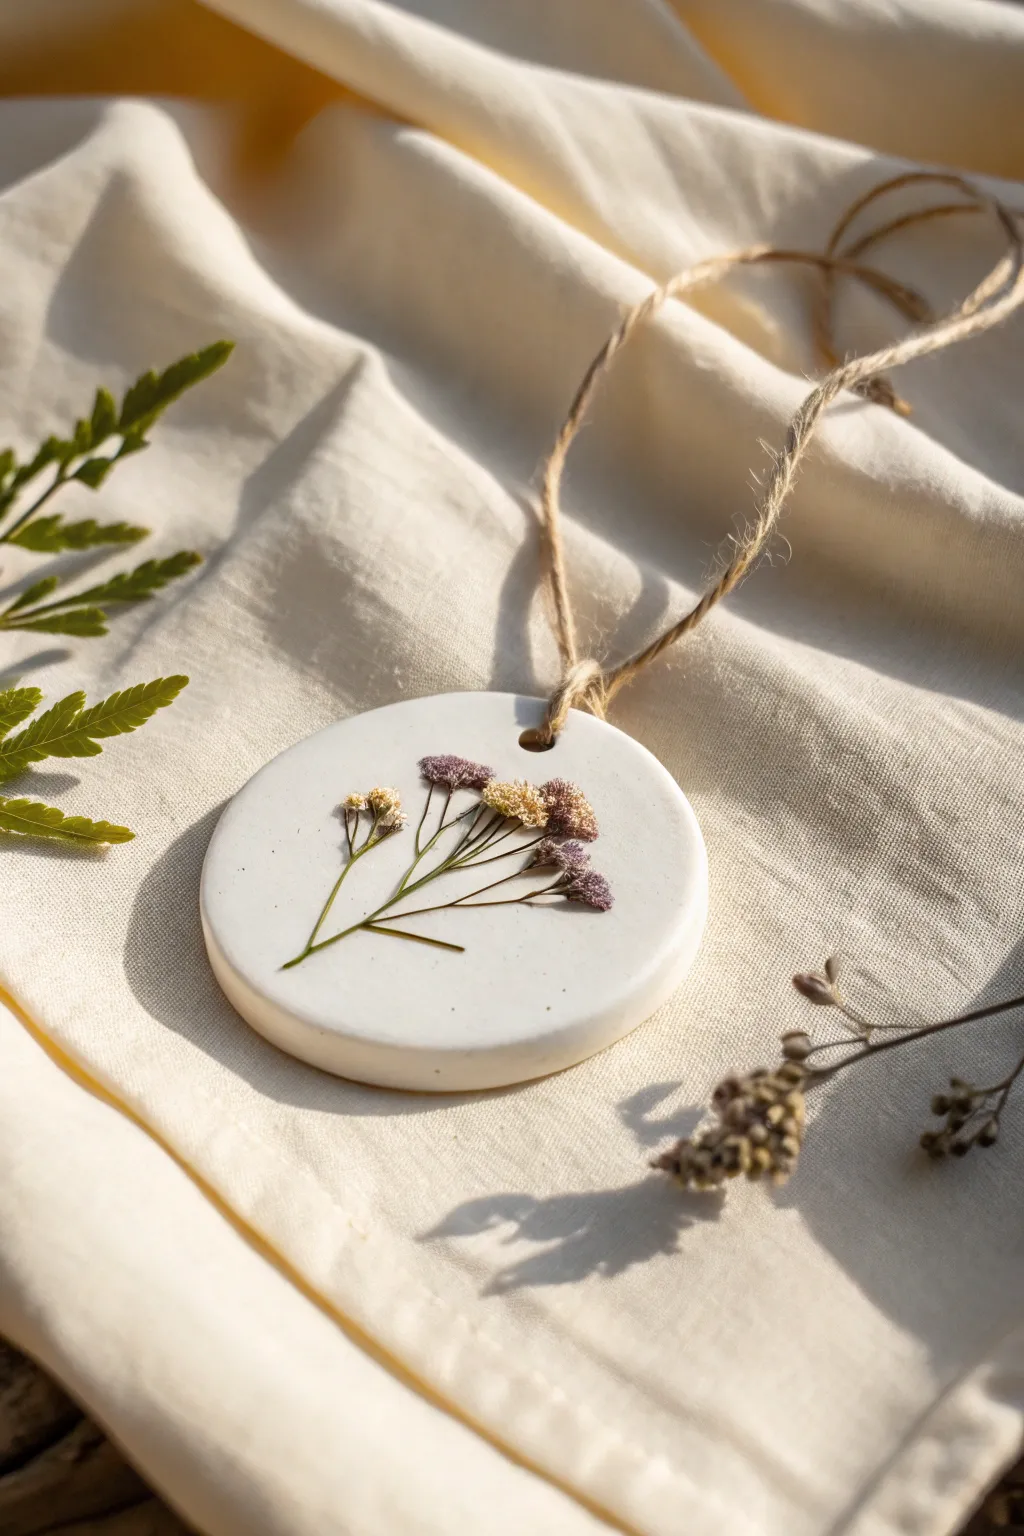
Capture the fleeting beauty of nature with these minimalist clay ornaments, featuring delicate dried blooms pressed directly into the surface. The result involves a smooth, ceramic-like finish that beautifully frames wispy wildflowers, perfect for rustic decor or thoughtful gift tags.
How-To Guide
Materials
- White or bright white air-dry clay
- Small dried flowers (baby’s breath, statice, or similar wispy blooms)
- Rolling pin or smooth glass jar
- Round cookie cutter (approx. 3-inch diameter)
- Straw or wooden skewer
- Jute twine or hemp cord
- Sandpaper (fine grit)
- Small bowl of water
- Matte finish sealant spray or Mod Podge (optional)
- Parchment paper or non-stick craft mat
Step 1: Shaping the Base
-
Condition the clay:
Take a handful of air-dry clay and knead it in your hands until it becomes warm and pliable. This conditioning step prevents cracks from forming later as it dries. -
Roll it out:
Place the clay on a sheet of parchment paper. Use your rolling pin to flatten the clay to an even thickness, aiming for about 1/4 inch thick. Don’t go too thin, or the ornament might be brittle. -
Smooth the surface:
Dip your finger slightly into a bowl of water and gently run it over the surface of the clay to smooth out any small wrinkles or fingerprints. -
Cut the shape:
Press your round cookie cutter firmly into the clay. Give it a tiny wiggle to ensure a clean cut, then lift the cutter away. Remove the excess clay from around the circle. -
Refine the edges:
Dip your finger in water again and gently run it around the cut edge of the circle to soften the sharp corner created by the cutter, giving it a more finished, stone-like look. -
Create the hanging hole:
Using a straw or a wooden skewer, poke a hole near the top edge of the circle. Make sure the hole is large enough to thread your twine through later, keeping in mind the clay shrinks slightly as it dries.
Stem Security
If a stem keeps popping up while rolling, place a tiny scrap of parchment paper over the flower before rolling. This prevents the clay from sticking to your roller.
Step 2: Embedding the Botanicals
-
Select your blooms:
Choose a small sprig of dried flowers. The example uses a mix of tiny white and purple clusters on thin stems. Ensure the sprig is flat; you may need to trim bulky stems. -
Position the arrangement:
Gently lay the dried flower sprig onto the center of the wet clay circle. Arrange it so the stems point diagonally downwards for a natural, drifting appearance. -
Press gently:
Use your fingertip to lightly tap the flowers into the clay. You want them to adhere to the surface but not vanish completely inside it. -
Roll to embed:
Take your rolling pin and very gently roll over the flowers once. This presses them flat and flush with the clay surface, securing them permanently. Be careful not to distort the circle shape. -
Inspect the edges:
If the flower stems protrude slightly from the clay surface, use a dab of water on your finger to smooth the clay slightly over the very ends of the stems to lock them in.
Scented Variation
Mix a drop or two of lavender or eucalyptus essential oil into the clay during the kneading phase. The porous clay will hold the scent as it dries.
Step 3: Finishing Touches
-
Allow to dry:
Leave the ornament on a flat surface to dry completely. This typically takes 24 to 48 hours depending on humidity. I like to flip it over halfway through the drying process to prevent curling. -
Sand the imperfections:
Once fully hard and white, take a piece of fine-grit sandpaper and gently buff the edges of the disc to remove any roughness or burrs. -
Seal the piece (optional):
To protect the dried flowers from humidity, you can apply a very thin coat of matte sealant or Mod Podge over the top. This is optional but helps with longevity. -
Add the hanger:
Cut a length of jute twine roughly 8 inches long. -
Thread the twine:
Feed one end of the twine through the hole you created earlier. -
Secure the loop:
match the ends of the twine together and tie a simpler overhand knot to close the loop, completing the rustic look.
Hang your new botanical creation in a sunlit window or on a branch to enjoy its simple elegance
Stitched Thread Details for Unexpected Texture

Bring a touch of cozy texture to your holiday decor with these charming air-dry clay ornaments. By combining smooth white clay with colorful embroidery floss, you create a delightful contrast that looks surprisingly intricate but is wonderfully simple to make.
Detailed Instructions
Materials
- White or natural air-dry clay
- Rolling pin
- Circle cookie cutter (approx. 2.5 – 3 inches)
- Embroidery floss (green and red)
- Large-eye embroidery needle (blunt tip preferred)
- Small stylus tool or thick sewing pin
- Straw or pen cap (for the hanging hole)
- Fine-grit sandpaper
- Twine or ribbon for hanging
- Parchment paper or non-stick mat
Step 1: Shaping the Clay Base
-
Condition the clay:
Begin by taking a handful of air-dry clay and kneading it in your hands until it becomes soft, pliable, and free of cracks. -
Roll it out:
Place the clay on a sheet of parchment paper. Use a rolling pin to flatten it into a smooth slab about 1/4 inch thick. Avoid rolling it too thin, as the clay needs enough structure to hold the stitches without breaking. -
Cut the shapes:
Press your circle cutter firmly into the clay to create your ornament rounds. Lift the excess clay away and gently smooth the edges of your cut circles with a damp finger to remove any jagged bits. -
Create the hanging hole:
Use a straw or a small pen cap to punch a clean hole near the top edge of the circle. This will be where your hanging twine goes later.
Step 2: Pre-punching the Pattern
-
Mark the center:
Lightly mark the center of your circle with a pencil or stylus to guide your design, ensuring your botanicals radiate evenly. -
Plan the design:
Visualize an eight-pointed star or flower shape. You will need to create lines of holes that radiate from the center out toward the edges. -
Punch the stitching holes:
Using a stylus tool or a thick pin, poke holes through the wet clay. Start near the center and work outward in a line to form a ‘petal.’ Space the holes about 1/8 inch apart. -
Complete the pattern:
Repeat this for all eight petals. Make sure the holes go all the way through the clay and are wide enough to accommodate your needle later. -
Add decorative accents:
If you like, poke a few extra random dots in the empty spaces between petals for added texture, just as seen in the photo. I usually do tiny clusters of three dots. -
Allow to dry:
Let the ornaments dry completely flat on a wire rack for 24 to 48 hours. They must be bone dry before you start stitching.
Needle Won’t Fit?
If the clay shrunk and the holes are too tight for the needle, gently twist a small drill bit or a thumb tack into the holes to widen them without cracking the dry clay.
Step 3: Stitching and Finishing
-
Sand the edges:
Once fully dry, gently run a piece of fine-grit sandpaper around the rim to soften imperfections. Be careful not to sand over your pre-punched holes. -
Thread the needle:
Cut a length of green embroidery floss (use all 6 strands for a fuller look) and thread your needle. Tie a knot at the end. -
Begin stitching:
Start from the back of the ornament. Bring the needle up through the hole closest to the center for one of your petal lines. -
Create the backstitch:
Insert the needle down into the next hole in the line. Bring it back up through the third hole, then go back down into the second hole. This ‘backstitch’ method creates a solid, continuous line of thread. -
Continue the pattern:
Work your way down each line of holes, stitching from the center outward to the tip of the petal. Secure the thread on the back when finishing a section. -
Add the hanger:
Thread a piece of decorative twine or matching embroidery floss through the top hanging hole. -
Secure the loop:
Tie the twine in a secure knot or bow to create a loop for hanging your finished piece.
Adding Metallic Sparkle
Weave a thin strand of gold or silver metallic thread along with your cotton floss to give the ornament a subtle holiday shimmer.
Hang these lovely handmade pieces on your tree or use them as unique gift tags for friends and family