When I’m craving a quick, satisfying make, air dry clay and anything plant-related are my go-to duo. These air dry clay plant ideas mix easy planters for real greenery with water-free clay plants you can style anywhere.
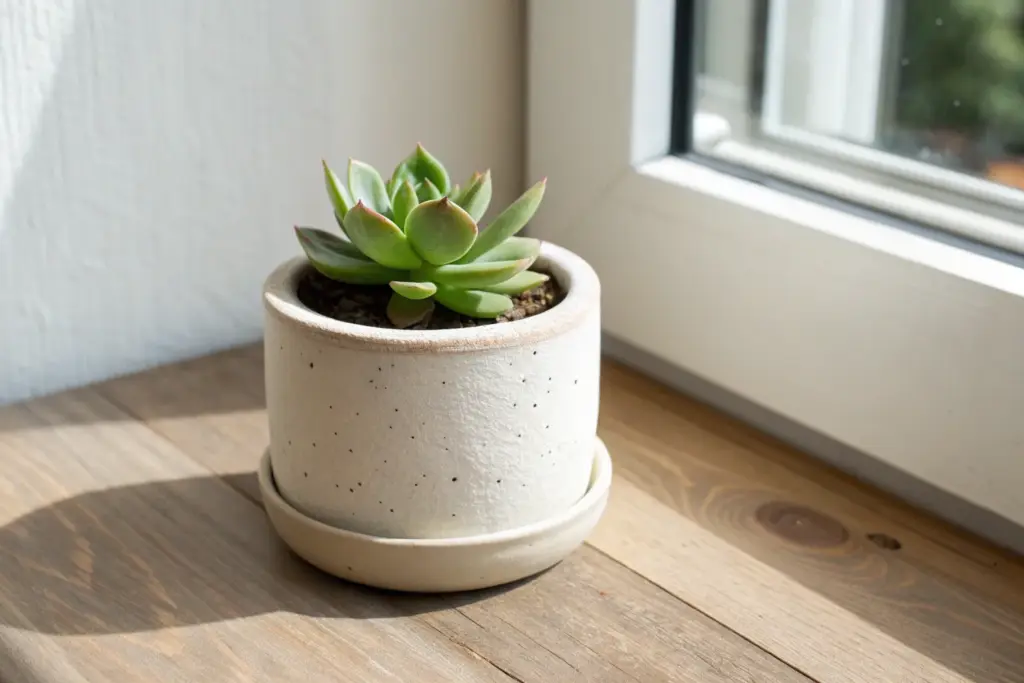
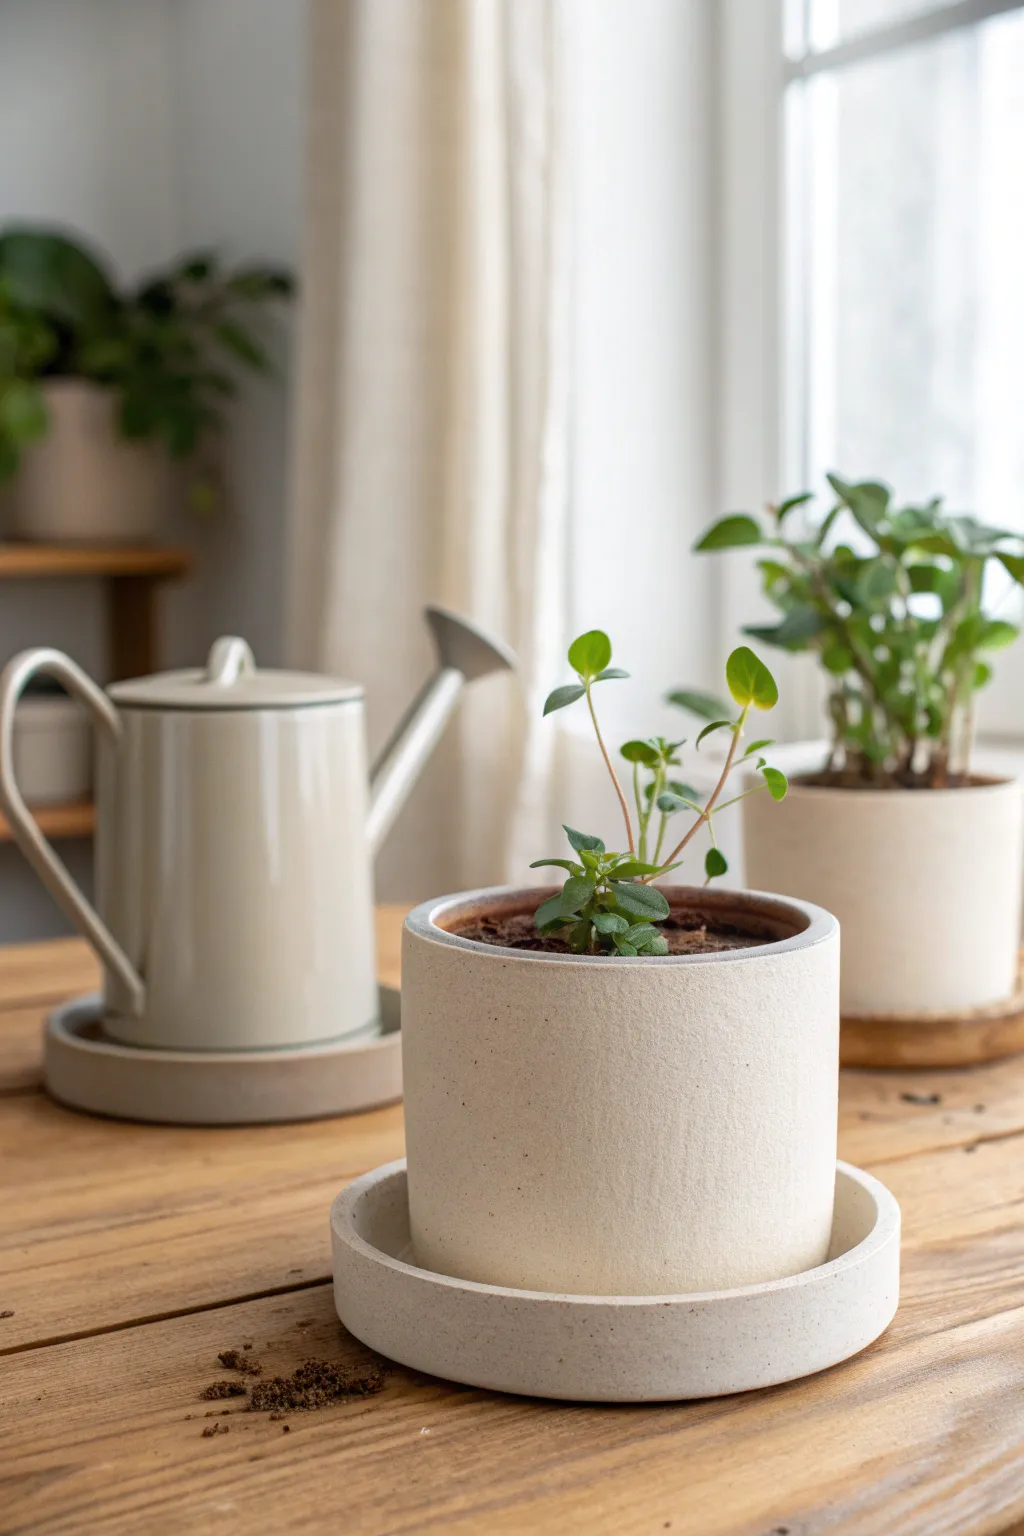
Mini Pinch-Pot Succulent Planters
These charming little planters combine a rustic, textured base with a sleek glazed rim for a modern organic look. The two-tone design creates a beautiful contrast that perfectly frames small succulents on a sunny windowsill.
Detailed Instructions
Materials
- White air dry clay (stone effect optional)
- Acrylic paints (pale sage green, white)
- Gloss varnish or glaze
- Rolling pin
- Small bowl of water
- Needle tool or toothpick
- Fine grit sandpaper
- Paintbrushes (flat and round)
- Masking tape or painter’s tape
Step 1: Shaping the Base
-
Prepare the clay:
Start with a ball of clay about the size of a tangerine. Knead it in your hands for a minute until it feels pliable and warm, removing any air bubbles. -
Open the form:
Hold the ball in one palm and press your thumb into the center, stopping about a half-inch from the bottom. This establishes your base thickness. -
Pinch the walls:
Slowly rotate the ball while pinching the clay between your thumb and fingers. Work from the bottom up, aiming for an even cylinder shape rather than a wide bowl. -
Flatten the base:
Gently tap the bottom of your pot against your work surface to create a flat, stable base so it won’t wobble. -
Smooth the exterior:
Wet your fingers slightly and run them over any large cracks. For this look, don’t over-smooth the surface texture; those tiny pores and bumps add character. -
Refine the rim:
Use your needle tool to trim the top rim if it’s very uneven, or simply pat it down with your finger for a softer, organic edge. -
Add drainage (optional):
If you plan to plant directly inside, poke a hole in the bottom center with your needle tool. If using it as a cachepot for a plastic nursery pot, you can skip this.
Clean Lines Pro-Tip
For a perfectly straight dipped line, rest your paintbrush hand on a stack of books at the right height and rotate the pot against the brush, rather than moving your hand.
Step 2: Finishing and Painting
-
Dry thoroughly:
Set the pot aside in a cool, dry place. Let it air dry completely for 24-48 hours. The clay will turn lighter and feel chalky when ready. -
Initial sand:
Take your fine-grit sandpaper and lightly buff the rim to make sure it’s pleasant to touch. Leave the main body a bit rougher to mimic stone. -
Apply base coat:
If your clay isn’t naturally white, paint the entire exterior with a matte white acrylic paint. This creates a bright, clean foundation for the next step. -
Tape the line:
Once the white base is bone dry, apply a strip of masking tape horizontally around the pot, dividing the top third from the bottom. -
Seal the tape edge:
I like to brush a tiny bit more white paint over the tape edge first; this prevents the green paint from bleeding underneath and ensures a crisp line. -
Paint the rim:
Mix a soft sage green acrylic paint. Apply it to the area above the tape, covering the exterior rim and just over into the top inside edge. -
Remove tape:
Carefully peel off the tape while the green paint is still slightly tacky. This helps prevent the dried paint from cracking or peeling away with the tape. -
Add speckles (optional):
To enhance the faux-ceramic look, dilute a tiny drop of brown paint and flick it sparingly onto the white section with an old toothbrush. -
Glaze the rim:
Apply a high-gloss varnish only to the green painted section. This contrast between the glossy ‘dipped’ look and the matte stone bottom is key to the style. -
Seal the interior:
Apply a waterproof sealer to the inside of the pot to protect the clay from moisture when watering your plant.
Why is it cracking?
If small cracks appear while drying, your clay might have been drying out while you worked. Patch them with a ‘slip’ paste made of wet clay and water, then smooth over.
Enjoy styling your new handmade pots in a sunny spot


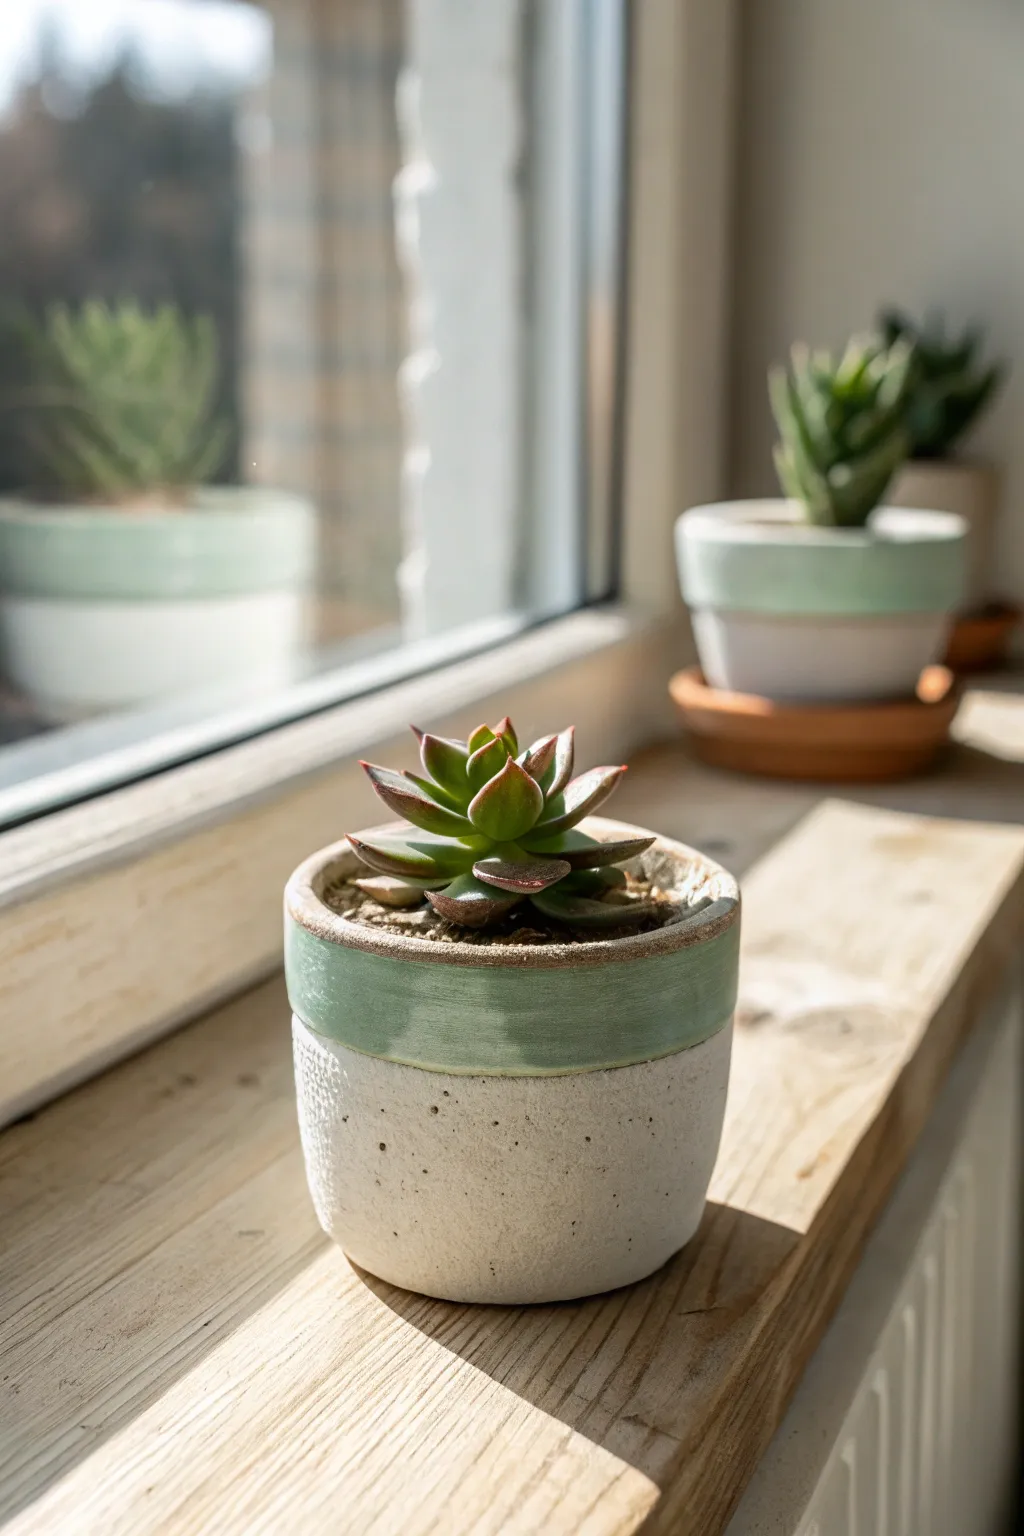
Simple Cylinder Pots With Matching Trays
Bring a touch of modern serenity to your windowsill with these clean-lined cylindrical planters and matching deep-rimmed saucers. The smooth, speckled matte finish perfectly mimics the look of high-end ceramic stoneware without needing a kiln.
How-To Guide
Materials
- White air-dry clay (stone or speckled effect preferred)
- Acrylic rolling pin
- Rolling guides or wooden slats (approx. 5mm thick)
- Craft knife or scalpel
- Ruler
- Cylindrical form (e.g., a sturdy cardboard tube, glass jar, or tin can)
- Small bowl or sponge
- Water
- Needle tool
- Sandpaper (fine and medium grit)
- Clear acrylic matte sealant or varnish
Step 1: Preparation and Rolling
-
Condition the Clay:
Begin by taking a generous chunk of your air-dry clay and kneading it in your hands. You want it warm and pliable to prevent cracks, so work it until it feels smooth and uniform. -
Set Up Guides:
Place your rolling guides or wooden slats on your work surface. These are essential for ensuring your pot walls have a consistent thickness, which is key for that professional, sleek look. -
Roll the Slab:
Place the clay between the guides and use your acrylic roller to flatten it out. Roll firmly until the roller touches the guides on both sides, creating a perfectly even slab about 5mm thick.
Seamless Seams
To fix a stubborn seam that won’t disappear, roll a tiny ‘snake’ of very soft clay, press it into the groove, and smooth it outwards with a damp sponge.
Step 2: Creating the Pot Body
-
Measure the Sides:
Wrap a piece of string or paper around your chosen cylindrical mold to determine the circumference needed. Add about 1cm to this measurement to account for the overlap. -
Cut the Rectangle:
Using your ruler and craft knife, cut a clean, long rectangle from the clay slab based on your measurements. I like to double-check the height against my mold to ensure the proportions feel right. -
Form the Cylinder:
Wrap the clay rectangle around your mold. Avoid pulling or stretching the clay; instead, gently curve it so it hugs the form. -
Score and Slip:
Where the two ends of the clay meet, use your needle tool to scratch up the surface (scoring). Dab a little water (slip) on the roughed-up areas to act as glue. -
Seal the Seam:
Press the scored edges together firmly. Use your finger or a modeling tool to smooth the seam on the outside and inside until the join is invisible. -
Cut the Base:
Roll out a small separate piece of clay for the base. Place your cylinder (still on the mold) onto this clay and trace around it with the needle tool, cut it out, and then score and slip the bottom edge of the cylinder to attach this new circular base.
Faux Stone Look
Mix dried coffee grounds or cracked black pepper into your white clay before rolling. When you sand the dry piece later, a beautiful speckled texture appears.
Step 3: Crafting the Matching Tray
-
Measure the Tray Diameter:
The saucer needs to be slightly wider than the pot. Measure the diameter of your finished pot and add about 2-3cm to determine the saucer’s size. -
Cut the Tray Base:
Roll out more clay and cut a circle slightly larger than your pot measurement. Using a circle cutter or tracing around a larger bowl works perfectly for this. -
Create the Tray Rim:
Cut a long, narrow strip of clay, approximately 1.5cm tall. This will become the vertical wall of the saucer. -
Attach the Rim:
Score and slip the outer edge of the circular base and the bottom of the strip. Wrap the strip around the base, standing it upright to create a shallow dish shape. -
Smooth the Connections:
Blend the clay where the rim meets the base on both the inside and outside. Take time here to ensure the transition is seamless and corners are crisp.
Step 4: Finishing Touches
-
Initial Smoothing:
Dip your finger in a tiny bit of water and run it over the top rims of both the pot and the tray to soften any sharp cutting lines. -
Drying Process:
Let the pieces dry slowly away from direct sunlight or heat sources. Rotate them occasionally so they dry evenly. This usually takes 24-48 hours depending on humidity. -
Sanding for Smoothness:
Once fully bone dry, use fine-grit sandpaper to buff the surface. Focus on the rims and any lingering seam marks to achieve that manufactured, minimalist finish. -
Sealing:
Apply 2-3 thin coats of matte acrylic varnish to the inside and outside. This protects the clay from moisture, though remember air-dry clay is never 100% waterproof, so use a plastic liner inside when watering plants.
Pop your favorite succulent inside and enjoy the calm, modern aesthetic you’ve created by hand


Speckled Minimal Planters
Embrace a minimalist, modern aesthetic with this simple yet striking air dry clay project. The smooth, off-white finish dotted with deliberate black speckles mimics the look of high-end ceramic stoneware without needing a kiln.
Step-by-Step
Materials
- White air dry clay (approx. 500g)
- Acrylic rolling pin
- Circular cookie cutters or a round template
- Small bowl or cup (to use as a mold)
- Craft knife
- Sponge
- Water
- Sandpaper (medium and fine grit)
- White or cream acrylic paint
- Black acrylic paint
- Old toothbrush or stiff bristle brush
- Waterproof varnish or sealant (matte finish)
Step 1: Shaping the Planter Body
-
Prepare the Clay:
Start by conditioning your clay. Knead it in your hands for a few minutes until it is warm, soft, and pliable. If it feels too dry, add a drop or two of water. -
Roll the Base:
Roll out a portion of the clay to an even thickness of about 1/4 inch (6mm). Use a circular cutter or trace around a cup to cut out the base of your pot. -
Form the Pinch Pot:
Take a separate ball of clay slightly larger than a tennis ball. Press your thumb into the center, creating a hole but not pushing all the way through. -
Build the Walls:
Gently pinch and rotate the clay ball, working from the bottom up to thin the walls and increase the height. Aim for a consistent thickness that matches your cut-out base. -
Refine the Shape:
To get that smooth, rounded cylindrical look shown in the photo, you can place your pinch pot inside a small bowl or cup lined with plastic wrap to help it hold its shape while you work. -
Smooth the Surface:
Dip your finger or a sponge in water and smooth out any fingerprints or cracks on the exterior. The goal is a sleek, modern finish, so take your time here. -
Add Drainage (Optional):
If you plan to plant directly into the pot, use a straw or a small tool to poke a drainage hole in the center of the bottom.
Smoother Splatters
If your toothbrush creates blobs that are too big, try flicking a stiff bristle paintbrush against a stick or ruler for finer mist-like speckles.
Step 2: Creating the Saucer
-
Cut the Saucer Base:
Roll out more clay to the same 1/4 inch thickness. Cut a circle that is slightly larger than the base of your main pot. -
Raise the Rim:
Roll a thin snake of clay and attach it to the outer edge of the saucer circle. Use a sculpting tool to blend the seams downward until they disappear. -
Smooth the Saucer:
Run a damp sponge along the rim of the saucer to soften the edges, matching the rounded aesthetic of the main pot.
Step 3: Finishing and Painting
-
Let it Dry:
Allow both pieces to dry completely. This usually takes 24-48 hours depending on humidity. Rotate them occasionally to ensure even drying. -
Sand for Perfection:
Once bone dry, use medium grit sandpaper to remove any large bumps. Follow up with fine grit sandpaper to achieve a velvety smooth surface. -
Apply Base Coat:
Paint the entire exterior and interior of the pot and saucer with a matte white or cream acrylic paint. I find two thin coats cover better than one thick one. -
Prepare the Speckles:
Mix a small amount of black acrylic paint with a tiny bit of water to make it fluid but not too runny. -
Flick the Paint:
Dip an old toothbrush into the watered-down black paint. Hold it near the pot and run your thumb across the bristles to flick tiny specks onto the surface. -
Control the Density:
Practice on a piece of paper first to gauge the spray. Apply lighter speckling in some areas and slightly denser clusters in others for a natural look. -
Seal the Project:
Since air dry clay isn’t waterproof, apply 2-3 coats of a waterproof matte varnish or sealant to protect your work from moisture.
Cracking Issues?
Small cracks during drying are normal. Make a ‘slip’ paste mixture of clay and water to fill them in, let dry again, sand smooth, and paint over.
Place your favorite succulent inside and enjoy the modern touch this adds to your windowsill


Color-Dipped Two-Tone Pots
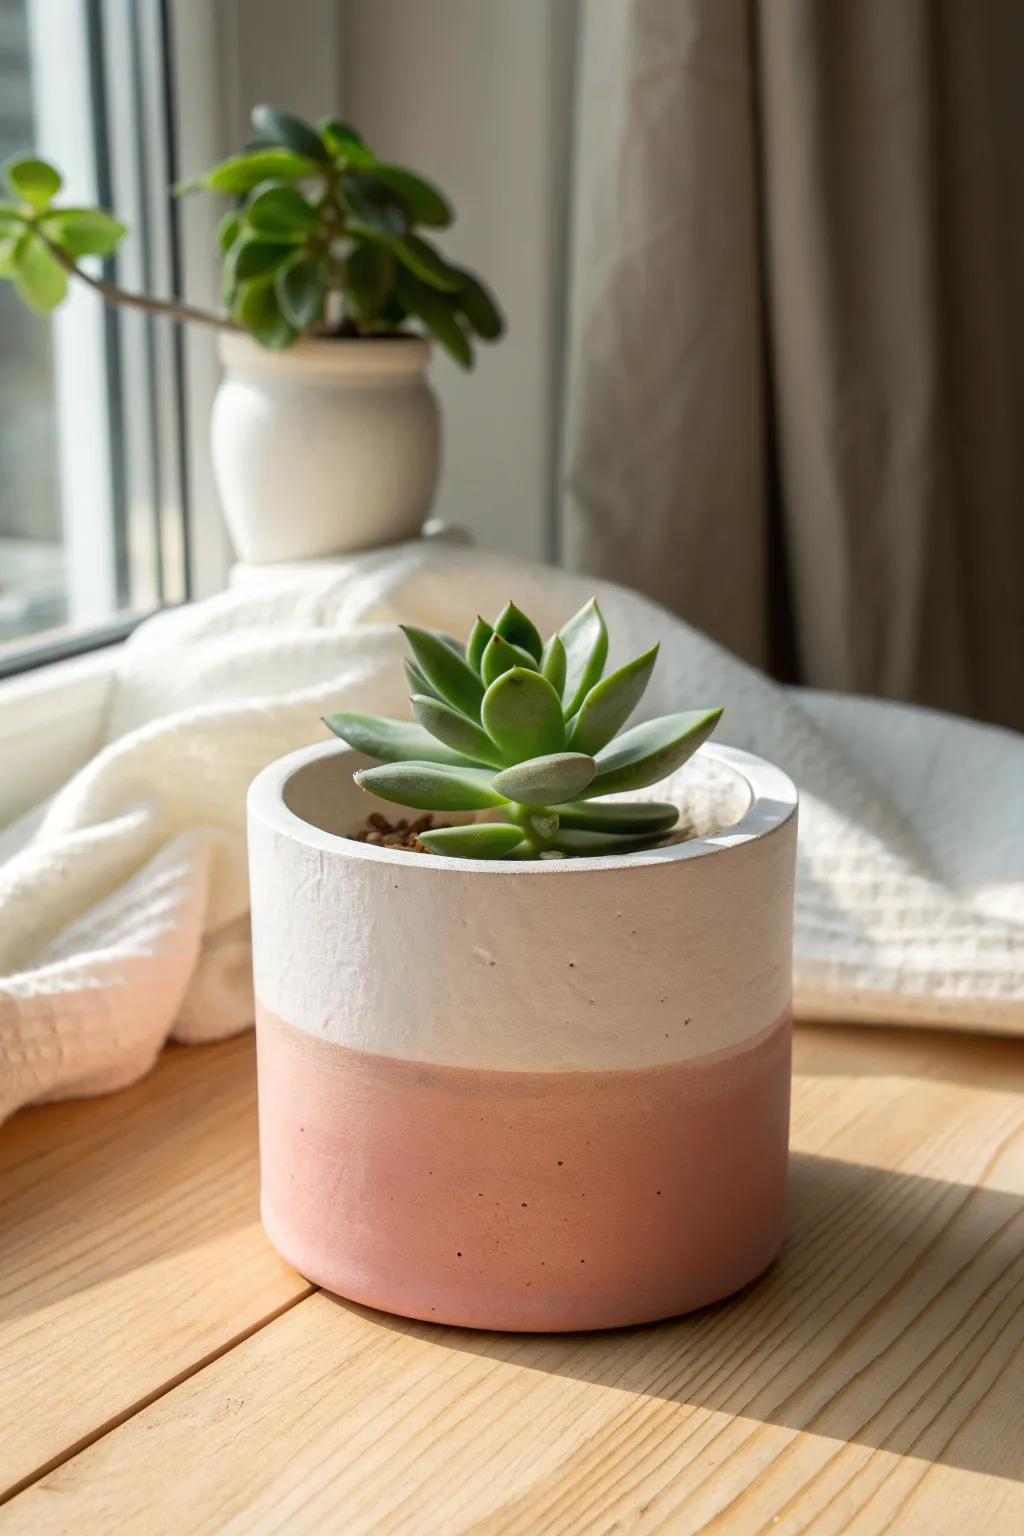
Achieve a sleek, modern look with this two-tone cylindrical planter that mimics the appearance of ceramic or concrete. The clean straight lines and soft color blocking create an elegant home for your favorite small succulent.
Step-by-Step Guide
Materials
- White or terrace stone air dry clay (approx. 500g)
- Rolling pin
- sharp craft knife or clay blade
- Ruler
- Circle cutter or round object (approx. 4-inch diameter)
- Small jar or can (to use as a mold form)
- Parchment paper
- Water and slip (clay mixed with water)
- Fine-grit sandpaper (220-400 grit)
- White acrylic paint
- Dusty pink or terracotta acrylic paint
- Painter’s tape or masking tape
- Matte varnish or sealant (waterproof)
Step 1: Forming the Base
-
Prep your surface:
Begin by laying down a sheet of parchment paper to protect your work surface and prevent the clay from sticking. -
Roll the slab:
Take a large ball of air dry clay and roll it out into a uniform slab, roughly 1/4 inch thick. Try to keep the thickness consistent for a sturdy pot. -
Cut the rectangle:
Using your ruler and craft knife, measure and cut a long rectangular strip. Ideally, the length should be the circumference of your jar mold plus a slight overlap, and the height should be how tall you want the pot (about 3-4 inches). -
Cut the base:
From the remaining clay slab, use your circle cutter or trace around the bottom of your jar mold to cut out the circular base. -
Prepare the mold:
Wrap your glass jar or metal can in a piece of parchment paper. This is crucial so you can slide the clay off later without it getting stuck.
Uneven Seams?
If the vertical seam is bulging, wait until the clay is ‘leather hard’ (firm but damp). Use a flat tool or ruler to gently paddle the seam flat against the mold.
Step 2: Assembling the Cylinder
-
Wrap the clay:
Gently lift your rectangular clay strip and wrap it around the parchment-covered jar. Bring the two short ends together. -
Join the seam:
Score (scratch) both ends of the clay where they meet, apply a little water or slip, and press them firmly together. Use your finger or a modeling tool to smooth the seam until it’s invisible. -
Attach the bottom:
Score the bottom edge of your clay cylinder and the outer edge of your circular base. Apply slip to both rough areas. -
Seal the base:
Place the cylinder onto the base. Use your thumb or a tool to blend the clay from the walls down into the base on the outside, creating a seamless seal. I generally double-check the inside seam as well to ensure it is watertight. -
Smooth the surface:
Dip your finger in water and run it over the entire exterior to smooth out fingerprints and join lines. If you want that stone-like texture, don’t over-smooth; leave a few tiny pits. -
Initial drying:
Let the pot sit on the mold for about 1-2 hours until it slightly stiffens, then carefully slide the jar out while the clay is still leather-hard to speed up interior drying.
Crisp Paint Lines
To prevent paint bleed, paint a thin layer of the *base* color (pink) over the tape edge first. This seals the tape gaps. Once dry, paint the white on top.
Step 3: Finishing and Painting
-
Full cure:
Allow the pot to dry completely for 24 to 48 hours. It should feel room temperature to the touch, not cold. -
Sanding:
Once bone dry, take your fine-grit sandpaper and gently sand the rim and the sides to remove any major bumps or sharp edges. -
Base coat:
Paint the bottom half of the pot with your dusty pink or terracotta paint. Don’t worry about a straight line yet; just cover the bottom 60% of the pot. -
Tape the line:
Once the pink paint is completely dry, apply a strip of painter’s tape horizontally around the pot. Press the edge of the tape down firmly to prevent bleeding. -
Top coat:
Paint the area above the tape with white acrylic paint. You may need two coats to get a solid, opaque finish that covers any overlapping pink paint. -
Reveal:
Peel off the tape while the white paint is still slightly tacky to get the crispest line possible. -
Sealant:
Finish by applying a waterproof matte varnish to the inside and outside. This protects the clay from moisture when you water your plant.
Pop in a small succulent and enjoy the calming, minimalist vibe this handmade piece adds to your windowsill

The Complete Guide to Pottery Troubleshooting
Uncover the most common ceramic mistakes—from cracking clay to failed glazes—and learn how to fix them fast.
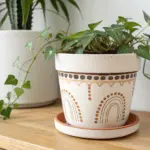
Stamped Texture Plant Pots
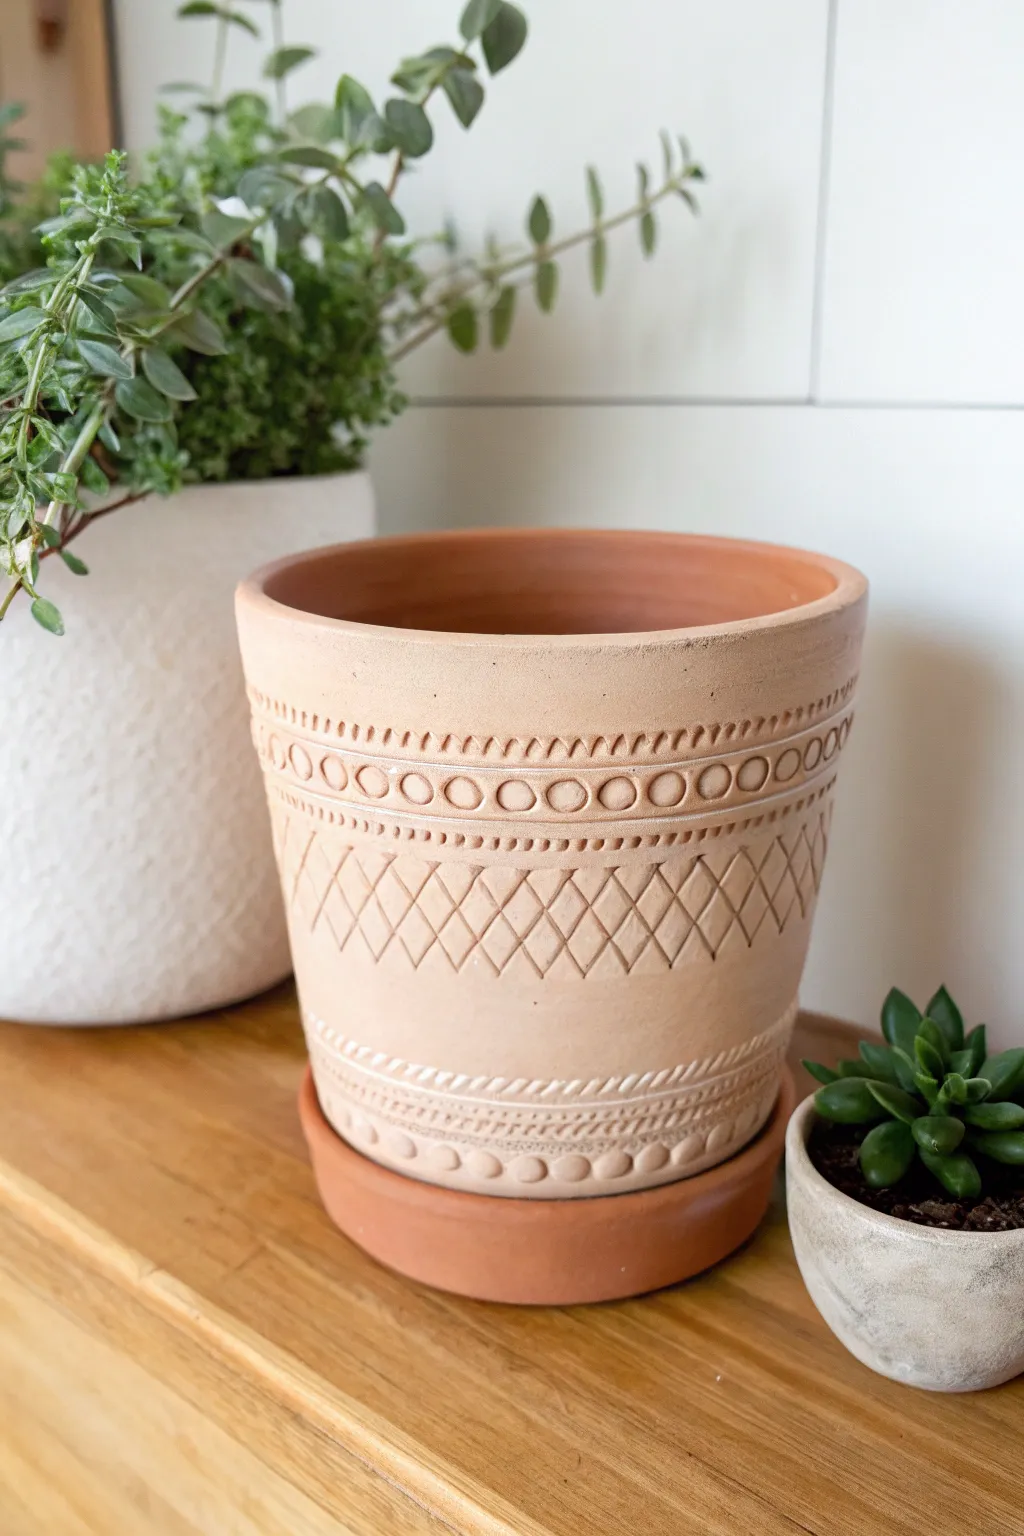
Transform a plain terracotta pot into a textured masterpiece with the clever application of air dry clay. This project uses simple household tools to create intricate geometric bands that look high-end and artisanal.
Step-by-Step
Materials
- Plain terracotta pot (cleaned)
- Air dry clay (terracotta color)
- Small bowl of water
- Rolling pin or acrylic roller
- Craft knife
- Ruler
- Slip (clay mixed with water)
- Circle cutters (various small sizes) or marker caps
- Flat head screwdriver or clay modeling tool
- Texture tool or fork
- Sandpaper (fine grit)
- Matte sealant spray
Step 1: Preparation & Application
-
Clean surface:
Begin by wiping down your terracotta pot with a damp cloth to remove any dust or oils, ensuring the clay will adhere properly. -
Condition clay:
Take a chunk of terracotta-colored air dry clay and knead it in your hands until it becomes soft, pliable, and warm. -
Roll out sheets:
Roll your clay out on a flat surface to a uniform thickness, aiming for roughly 1/8 to 1/4 inch thick. -
Cut bands:
Using a ruler and craft knife, cut long, straight strips of clay. You will need enough strips to wrap around the pot at three standard intervals: top rim, middle, and bottom base. -
Create slip:
Mix a small amount of clay with water until it reaches a paste-like consistency to create ‘slip’, which acts as your glue. -
Apply top band:
Score the pot surface lightly near the rim, add slip, and gently press your first clay strip around the circumference, smoothing the seam where the ends meet. -
Apply remaining bands:
Repeat the process to attach the middle wide band and the bottom band, ensuring they are level and smoothed against the pot surface.
Smooth Seams
Dip your finger in water and gently rub the seams where your clay strips join. Doing this before texturing makes the join invisible.
Step 2: Texturing & Detailing
-
Stamp circles:
On the upper band, use a small circular cutter or a marker cap to press a row of circles into the fresh clay. I find wiping the tool with a damp sponge prevents sticking. -
Create borders:
Use a dull knife or clay tool to press small hash marks or indentations above and below your circle row to frame the pattern. -
Carve the lattice:
For the wide middle section, use a ruler and a modeling tool to carefully carve diagonal lines in one direction, then cross them in the other direction to create a diamond lattice pattern. -
Detail the diamonds:
Deepen the lines of your lattice pattern to make the diamonds pop, ensuring the clay doesn’t drag. -
Texture bottom band:
On the bottom strip, use a twisted rope tool or press the side of a screw to create a rope-like texture wrapped around the base. -
Add final rim:
Roll a very thin snake of clay and adhere it just below the rope texture, then press small indentations into it for a beaded look.
Custom Colors
If you can’t find terracotta clay, use white clay and mix in burnt sienna acrylic paint before rolling, or paint the finished pot after drying.
Step 3: Finishing Touches
-
Dry slowly:
Allow the pot to dry away from direct sunlight or heat sources for 24-48 hours. Drying too fast can cause the clay bands to crack. -
Sand imperfections:
Once fully cured, lightly sand any rough edges or fingerprints with fine-grit sandpaper. -
Seal:
Spray the entire exterior with a matte sealant to protect the air dry clay from moisture when you water your plant.
Now you have a stunning custom planter ready to showcase your favorite greenery
Coil-Built Herb Planters
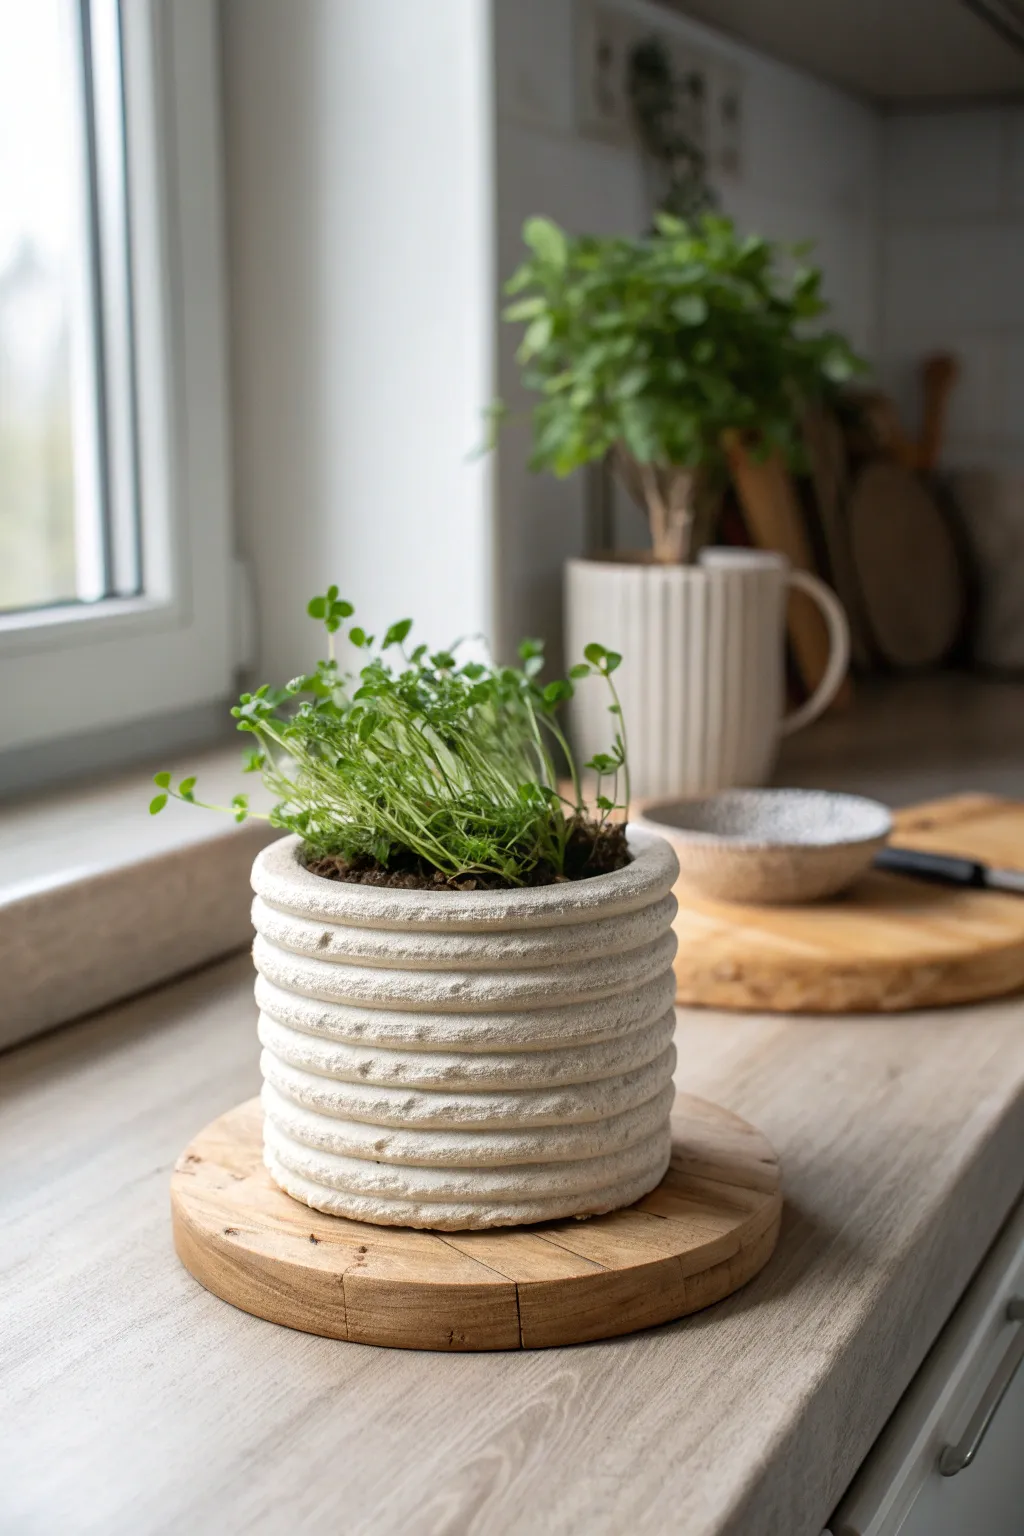
This rustic, textured planter brings an artisanal touch to your kitchen windowsill with its distinct horizontal ridges. By stacking thick coils of air dry clay, you can achieve a sophisticated, pottery-wheel look without needing any specialized equipment.
Detailed Instructions
Materials
- White or light grey air-dry clay (approx. 1 kg)
- Circular guide (can or jar) approx. 4-5 inches wide
- Rolling pin
- Clay cutting tool or knife
- Bowl of water and slip (clay mixed with water)
- Sponge
- Wooden modeling tool or old toothbrush
- Acrylic sealant or varnish (matte finish)
Step 1: Creating the Base
-
Roll the base slab:
Begin by taking a handful of clay and rolling it out into a flat, even slab about 1/4 inch thick on a clean work surface. -
Cut the circle:
Place your circular guide (like an empty coffee can or jar) onto the clay and trace around it with your cutting tool to create a perfect circle. -
Score the edge:
Using your knife or a toothbrush, rough up the outer 1/4 inch of the circle’s top surface. This scoring helps the first coil adhere securely.
Fixing Gaps
If gaps appear between coils as it dries, mix a small paste of clay and water (slip) and fill the crack. Smooth it over with a damp finger immediately.
Step 2: Building the Coils
-
Roll your first coil:
Take a chunk of clay and roll it between your palms and the table to form a long snake. Aim for a consistent thickness—about the width of your index finger. -
Attach the first layer:
Dab a little water or slip onto the scored edge of your base. Place the coil onto the base, circling it around until the ends meet. -
Join the ends:
Cut the coil ends at an angle where they overlap and smooth them together so the seam disappears. -
Blend the inside:
To ensure structural integrity, use your thumb or a wooden tool to smear the clay from the coil downwards onto the base *only on the inside*. Leave the outside distinct to keep that ribbed look. -
Prepare the next layer:
Score the top of the coil you just placed. Roll out another coil of the exact same thickness. -
Stack upwards:
Place the second coil directly on top of the first. I find it helpful to offset the seam location from the previous layer to keep the wall strength even. -
Continue building:
Repeat this process, stacking coil upon coil. Remember to blend the clay downwards on the inside of the pot after every single layer. -
Check the shape:
Step back occasionally to ensure your walls are rising straight up and not flaring out or caving in. -
Create the texture:
Don’t smooth the outside. The charm of this planter lies in the imperfect, visible ridges of the stacked coils. You can gently press a damp sponge against them to soften sharp edges without losing the form.
Waterproofing Tip
Air dry clay dissolves in water! Always use a plastic drop-in nursery pot inside for your herbs, using your clay creation as a decorative cover only.
Step 3: Finishing Touches
-
Level the rim:
Once you reach your desired height, you might notice the top rim is uneven. Gently paddle it with a flat piece of wood or slice it carefully to make it level. -
Slow drying:
Loosely cover the pot with plastic wrap for the first 24 hours to prevent cracking, then uncover and let it air dry completely for another 2-3 days until it turns chalky white. -
Sand for imperfections:
once bone dry, use a fine-grit sandpaper to gently smooth the very top rim or any accidental sharp burrs, but leave the side texture rough. -
Apply sealant:
Since air dry clay isn’t waterproof, apply 2-3 coats of a matte acrylic varnish inside and out. This protects the pot from moisture when watering your herbs.
Place your favorite small herb, like thyme or mint, inside your new vessel and enjoy the organic warmth it adds to your countertop


What Really Happens Inside the Kiln
Learn how time and temperature work together inside the kiln to transform clay into durable ceramic.
Geometric Faceted Desk Planters
Bring a touch of architectural elegance to your desk with this striking faceted planter. Its clean, angular lines and warm terracotta hue make it the perfect minimalist home for small succulents.
Step-by-Step Guide
Materials
- Air dry clay (terracotta color preferred)
- Small rolling pin
- Sharp craft knife or x-acto knife
- Ruler or straight edge
- Small cup or jar (for creating the inner void)
- Sandpaper blocks (medium and fine grit)
- Acrylic paint (burnt orange/terracotta) – optional if using white clay
- Matte spray varnish or sealant
- Water in a small bowl
- Cardboard or cardstock (for making a template)
Step 1: Shaping the Base Form
-
Prepare your template:
Before touching the clay, draw a pentagon or hexagon shape on cardstock to serve as your base guide. This ensures your planter isn’t lopsided from the start. -
Condition the clay:
Take a large handful of air dry clay and knead it thoroughly until it’s warm and pliable. This helps prevent cracks later on. -
Create a thick slab:
Roll your clay into a very thick ball, then gently flatten the top and bottom to create a thick puck shape, roughly 3-4 inches high. -
Create the opening:
Press your small jar or cup into the top center of the clay puck to create the hollow where the plant will live. Don’t press all the way through; leave at least half an inch at the bottom. -
Remove the core:
Twist the jar slightly to loosen it, or if you didn’t use a jar, use a spoon to carefully scoop out the center, smoothing the inside walls with a wet finger.
Collapsing Walls?
If the clay is too soft to hold sharp angles, chill it in the fridge for 15 minutes before cutting. This firms it up for crisper slices.
Step 2: Faceting the Design
-
Initial rough cuts:
Using your sharp craft knife, slice a flat plane off the side of the rounded clay puck. Don’t worry about perfect angles yet, just establish a flat surface. -
Create the bottom facets:
Slice upward-angled cuts around the bottom edge of the pot. These should meet your base but angle outward toward the middle of the pot’s height. -
Create the top facets:
Slice downward-angled cuts from the top rim. I find it easiest to aim for the spaces between the bottom cuts to create interlocking triangular shapes. -
Refine the geometry:
Go around the pot again, using the knife to sharpen the ridges where your cuts meet. The goal is crisp, definite lines between the flat planes. -
Smooth the lip:
Slice a clean, flat facet across the top rim of the planter so it looks intentional rather than rough. -
Let it dry slowly:
Place the planter in a cool, dry spot away from direct sunlight. Let it dry for at least 48-72 hours. Rotate it occasionally so the bottom dries evenly.
Sharper Edges
After cutting the facets, use a wet finger or a flat tool to gently burnish the flat planes. This compresses the clay for a smoother finish.
Step 3: Finishing Touches
-
Sand the planes:
Once fully cured and hard, use a sanding block to smooth each individual facet. Keep the block flat against the plane to preserve the sharp edges. -
Clean dust:
Wipe the entire piece down with a slightly damp cloth or tack cloth to remove all sanding dust. -
Paint (Optional):
If you used white air dry clay, mix a burnt orange acrylic paint to mimic the terracotta look. Apply two thin coats for opaque coverage. -
Seal the exterior:
Spray the outside with a matte variance to protect the finish without making it glossy. -
Waterproof the interior:
This is crucial for real plants: coat the inside thoroughly with a waterproof varnish or resin to prevent the clay from turning to mush when watered.
Pop in your favorite succulent and enjoy your custom modern decor on your desk
Sweet Face Planters With Plant Hair
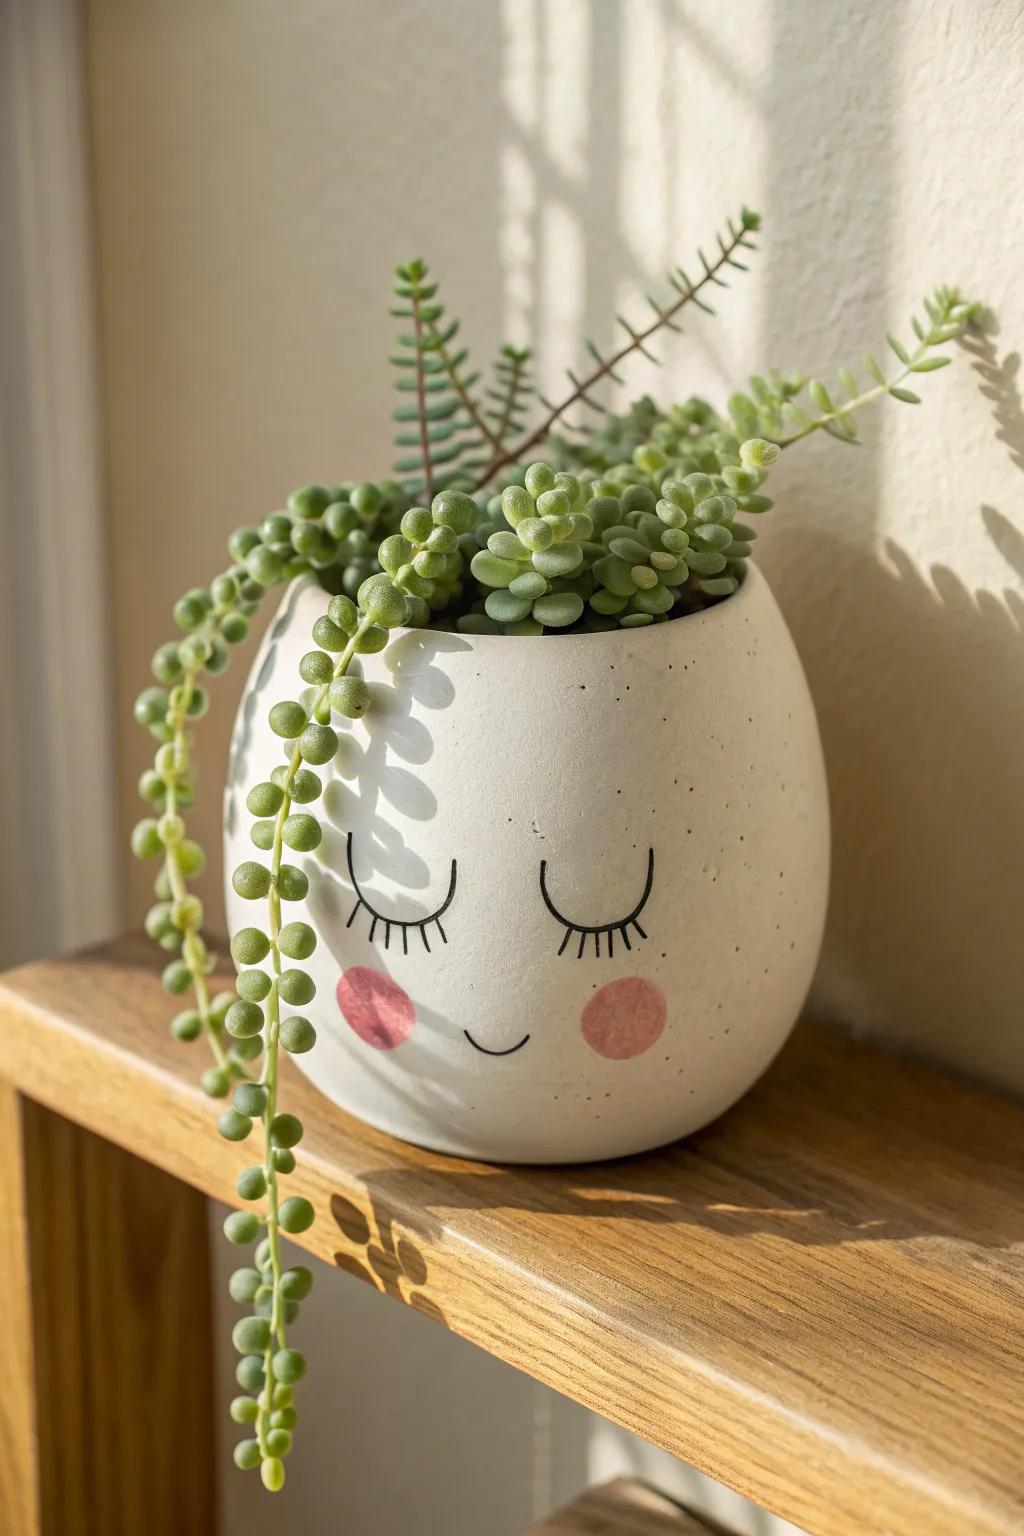
Give your favorite trailing succulent the perfect resting spot with this charming sleepy-faced planter. The smooth, rounded form and softly painted features create a peaceful vibe that turns any plant into a character with luscious green locks.
Step-by-Step
Materials
- White lush air dry clay
- Rolling pin
- Small bowl or balloon (to use as a mold)
- Plastic wrap
- Clay knife or craft knife
- Small sponge
- Water in a small dish
- Sandpaper (fine and medium grit)
- Black acrylic paint or fine-tip paint marker
- Soft pink acrylic paint
- Round detail brush
- Small round sponge dabber (optional)
- Matte spray varnish or sealant
- Drill with masonry bit (optional for drainage)
Step 1: Shaping the Vessel
-
Prepare your mold:
Select a small round bowl or inflate a balloon to the desired size of your pot. Cover your chosen mold tightly with plastic wrap to prevent the clay from sticking later. -
Roll the clay:
Roll out a substantial chunk of air dry clay until it is about 1/4 inch thick. Aim for an even thickness throughout to prevent cracking during the drying process. -
Form the base shape:
Drape the clay sheet over your mold. Gently press and smooth the clay down the sides, ensuring it hugs the shape without stretching it too thin. -
Trim the excess:
Use your clay knife to cut away the excess clay around the rim. You want a rounded pot shape that curves slightly inward at the top, rather than flaring out. -
Create a flat bottom:
While the clay is still on the mold, gently flatten the very bottom of the sphere by pressing it against your work surface. This ensures the finished planter will sit securely on your shelf without wobbling. -
Smooth the surface:
Dip your small sponge or finger into a little water and gently rub the entire exterior. Erase any fingerprints, joining marks, or hairline cracks for a flawless, porcelain-like finish. -
Initial drying:
Let the clay dry on the mold for about 24 hours until it is firm enough to hold its shape but still slightly cool to the touch.
Cracked Clay?
If hairline cracks appear while drying, mix a small amount of fresh clay with water to make a paste (slip). Fill the cracks, smooth over, and let dry again.
Step 2: Refining and Detail
-
Remove the mold:
Carefully slide the bowl or pop the balloon to remove the mold from inside the clay shell. Peel away the plastic wrap gently. -
Smooth the interior:
Clean up the inside rim and interior walls with a damp sponge. Since the clay is still slightly damp in the center, you can fix any imperfections on the lip of the pot now. -
Full cure:
Allow the pot to dry completely for another 24-48 hours. The clay should turn chalky white and feel room temperature, indicating all moisture has evaporated. -
Sand for perfection:
Take your planter outside or wear a mask, and use medium grit sandpaper to level out any bumps. Switch to fine grit sandpaper to make the surface buttery smooth, paying close attention to the rim. -
Dust off:
Wipe the entire pot with a slightly damp cloth or a dry tack cloth to remove every speck of sanding dust before painting.
Freckle Fun
Before sealing, flick a toothbrush dipped in diluted brown paint over the cheeks to add adorable faux freckles to your character’s face.
Step 3: Adding the Face
-
Sketch the features:
Lightly use a pencil to mark where the eyes and cheeks will go. Position the sleeping eyes (two semi-circles curving downward) in the middle of the pot, spaced widely apart. -
Paint the lashes:
Using a very fine brush and black acrylic paint, or a black paint marker, trace your pencil lines for the eyes. Add three or four vertical lashes to each eyelid. -
Add the smile:
Paint a tiny, simple ‘u’ shape directly between the eyes but slightly lower down for the nose/mouth area to create that sweet little smirk. -
Rosy cheeks:
I like to mix the paint with a tiny bit of water for a watercolor effect here. Dip a round sponge dabber or your finger into soft pink paint, blot off the excess, and stamp a perfect circle on each cheek. -
Seal the work:
Once the paint is fully dry, take the planter to a well-ventilated area and coat it with a matte spray sealant. Apply two thin coats to protect the clay from humidity. -
Add drainage (optional):
If you plan to plant directly into the pot, carefully drill a hole in the bottom center using a masonry bit. Alternatively, keep a plastic nursery pot inside as a liner.
Pop in a trailing plant like string of pearls to serve as hair and enjoy your new desk companion

TRACK YOUR CERAMIC JOURNEY
Capture glaze tests, firing details, and creative progress—all in one simple printable. Make your projects easier to repeat and improve.
Animal Head Mini Planters
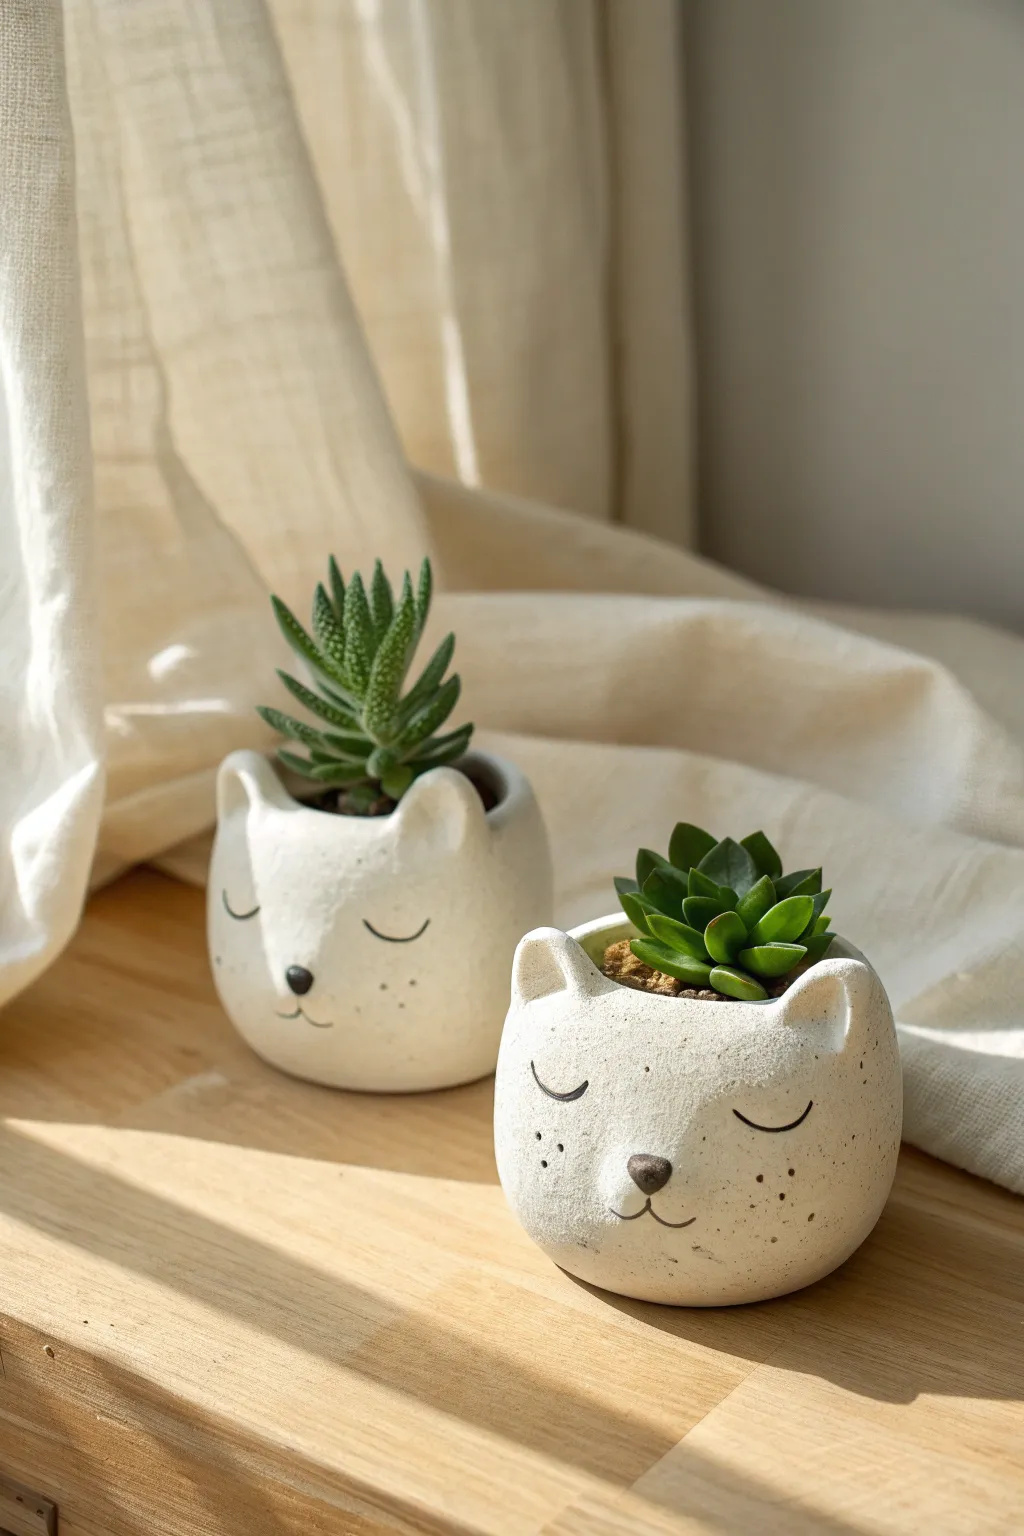
Bring a touch of serene charm to your windowsill with these adorable sleeping cat planters. Modeled from smooth air-dry clay, their minimalist faces and speckled finish create a modern, handcrafted aesthetic perfect for tiny succulents.
Step-by-Step Guide
Materials
- White air-dry clay (approx. 500g)
- Small plastic cup or jar (to use as a mold)
- Rolling pin
- Clay knife or craft knife
- Small bowl with water
- Sponge
- Fine-grit sandpaper
- Acrylic paint (Black and Brown)
- Very fine detail paintbrush
- Toothbrush (for speckling)
- Matte spray varnish or sealant
- Mod Podge (optional for waterproofing inside)
Step 1: Shaping the Base
-
Prepare the Clay:
Start by kneading your white air-dry clay until it is soft, warm, and pliable. This prevents cracks later on. -
Roll the Slab:
Roll out a slab of clay to an even thickness of about 1/4 inch (6mm). Ensure it’s large enough to cover the sides and bottom of your chosen mold. -
Cut the Base:
Use your plastic cup or jar as a template to cut a circle for the bottom of the planter. Set this aside. -
Form the Walls:
Cut a rectangular strip of clay from your slab. The length should be the circumference of your circle base, and the height should be slightly taller than you want the final pot to be. -
Assemble the Pot:
Wrap the strip around your plastic mold (loosely enough to slide off later) or simply form a cylinder. Connect the ends by scoring the edges with a knife, adding a little water, and smoothing the seam together with your finger. -
Attach the Base:
Place the clay cylinder onto the circle base. Score and slip (wet) the connection point, then blend the clay upwards from the base to the wall until the seam disappears. -
Smooth and Round:
Use a damp sponge to smooth out the walls. Gently push from the inside to bulb out the shape slightly, giving it that rounded, organic look seen in the photo.
Smooth Seams Secret
Use a little vinegar instead of plain water when smoothing clay seams. It breaks down the clay surface slightly, creating a stronger bond and smoother finish.
Step 2: Sculpting the Features
-
Form the Ears:
Pinch two small triangular pieces of fresh clay. Gently curve them to mimic cat ears. -
Attach the Ears:
Score the top rim of your pot where the ears will go. Add a dab of water and press the ears firmly in place, blending the clay at the base of the ears into the rim so they look seamless. -
Refine the Rim:
Run a wet finger along the top edge of the pot and over the ears to soften any sharp angles. -
Create the Nose:
Roll a tiny, flattened triangle or oval of clay. Attach this to the center of the pot face using the score-and-slip method for a subtle 3D relief nose. -
The Drying Phase:
Let the pot dry completely for 24-48 hours. I like to rotate it occasionally so air reaches all sides evenly.
Mix It Up
Don’t stop at cats! Change the ear shape to make a bear (round ears), a fox (large pointed ears), or a dog (floppy ears) to create a whole animal family.
Step 3: Decoration and Finishing
-
Sand for Smoothness:
Once bone dry, gently sand the entire surface with fine-grit sandpaper to remove fingerprints or uneven bumps. -
Paint the Face:
Dip a fine detail brush into black acrylic paint. Carefully paint two curved lines for sleeping eyes (lashes down for a sleepy look, or up for a happy squint) and a small mouth line. -
Detail the Nose:
Paint the raised nose bump. You can use solid black or mix a dark brown for softer contrast. -
Apply Speckles:
Dilute a tiny amount of black or brown paint with water. Dip an old toothbrush into it, then run your thumb across the bristles to flick tiny speckles onto the pot for texture. -
Seal the Exterior:
Apply two coats of matte spray varnish to the outside to protect the clay and paint. -
Waterproof the Interior:
Coat the inside liberally with Mod Podge or a heavy-duty waterproof sealant to prevent moisture from damaging the clay when watering.
Pop in your favorite succulent or air plant to give your sleeping kitty a lively green hairstyle
Hanging Planters With Three Cord Holes
This minimalist hanging planter captures a lunar beauty with its smooth, white finish and unique crater-like indentations. Perfect for trailing vines or herbs, its simple three-point suspension system brings a touch of modern organic style to any window nook.
Step-by-Step
Materials
- White or light grey air-dry clay (approx. 1kg)
- Non-stick rolling pin
- Medium mixing bowl (to use as a mold)
- Plastic wrap (cling film)
- Craft knife or clay cutter
- Small spherical object (like a marble or melon baller)
- Straw or pen cap (for cord holes)
- Sandpaper (fine grit)
- Natural jute twine or hemp cord
- Clear matte varnish or acrylic sealer
- Small bowl of water
- Sponge
Step 1: Forming the Bowl
-
Prepare the Clay:
Begin by kneading your air-dry clay until it is warm and pliable. This conditioning step is crucial to prevent cracks later on. -
Roll out a Slab:
Roll the clay out on a flat, clean surface to a uniform thickness of about 1/4 inch (6mm). Aim for a circle slightly larger than the bowl you intend to use as a mold. -
Prepare the Mold:
Take your mixing bowl and cover the exterior completely with plastic wrap. Smooth out as many wrinkles as you can to ensure the inside of your planter stays relatively smooth. -
Shape the Clay:
Lift your clay slab and gently drape it over the upside-down bowl. Use your palms to smooth the clay down the sides, ensuring it hugs the form without trapping air bubbles. -
Trim the Excess:
Using a craft knife, carefully trim around the bottom (which is currently the top) to create a clean, even rim. You can spin the bowl slowly on the table to help keep your cut steady. -
Smooth the Edges:
Dip your finger or a small sponge in water and run it along the cut rim to soften the sharp edge. I like to spend a little extra time here to make sure the rim is perfectly round.
Pro Tip: Seamless Texture
When making indentations, slightly dampen the tool (marble/baller) before pressing it into the clay. This prevents the tool from sticking and dragging the clay, leaving a crisp, clean ‘crater’ impression.
Step 2: Adding Texture and Hardware
-
Create the Suspension Holes:
Before the clay hardens, use a straw or a pen cap to punch out three evenly spaced holes about an inch below the rim. Visualize a triangle to help space them equally. -
Make the Indentations:
Using a small spherical object like a marble or the back of a melon baller, gently press ‘craters’ into the exterior surface of the clay. Vary the pressure slightly for organic depth, but be careful not to push all the way through. -
Pattern Placement:
Scatter the indentations randomly around the lower half and sides of the planter, leaving the area around the hanging holes relatively clear for structural integrity. -
Initial Drying:
Leave the clay on the bowl mold for at least 24 hours to stiffen up. This ensures it holds its shape before you manipulate it further.
Troubleshooting: Cracking Clay
If you see hairline cracks as it dries, mix a tiny bit of fresh clay with water to make a paste (slip) and fill the cracks immediately. Smooth it over with a wet finger and let it dry again.
Step 3: Finishing and Assembly
-
Remove the Mold:
Once the outside feels dry to the touch, carefully lift the clay planter off the bowl and peel away the plastic wrap. Let the inside of the planter dry exposed to air for another 24-48 hours. -
Sand for Perfection:
When completely bone dry, use fine-grit sandpaper to smooth out any rough spots on the rim or the exterior. Wipe away the dust with a slightly damp cloth. -
Seal the Clay:
Apply two to three coats of clear matte varnish or acrylic sealer to the entire pot, inside and out. This step is vital for protecting air-dry clay from moisture when watering your plant. -
Cut the Cords:
Cut three equal lengths of natural jute twine, approximately 3-4 feet long each, depending on how low you want the planter to hang. -
Attach the Cords:
Thread one end of a twine piece through a hole from the outside in. Tie a sturdy double knot on the inside so the cord won’t slip back through. -
Repeat and Gather:
Repeat this for all three holes. Gather the loose ends of the three cords at the top, ensuring the planter sits level, and tie them together in a large, secure overhand knot.
Now you have a stunning custom planter ready to showcase your favorite trailing greens in the window light
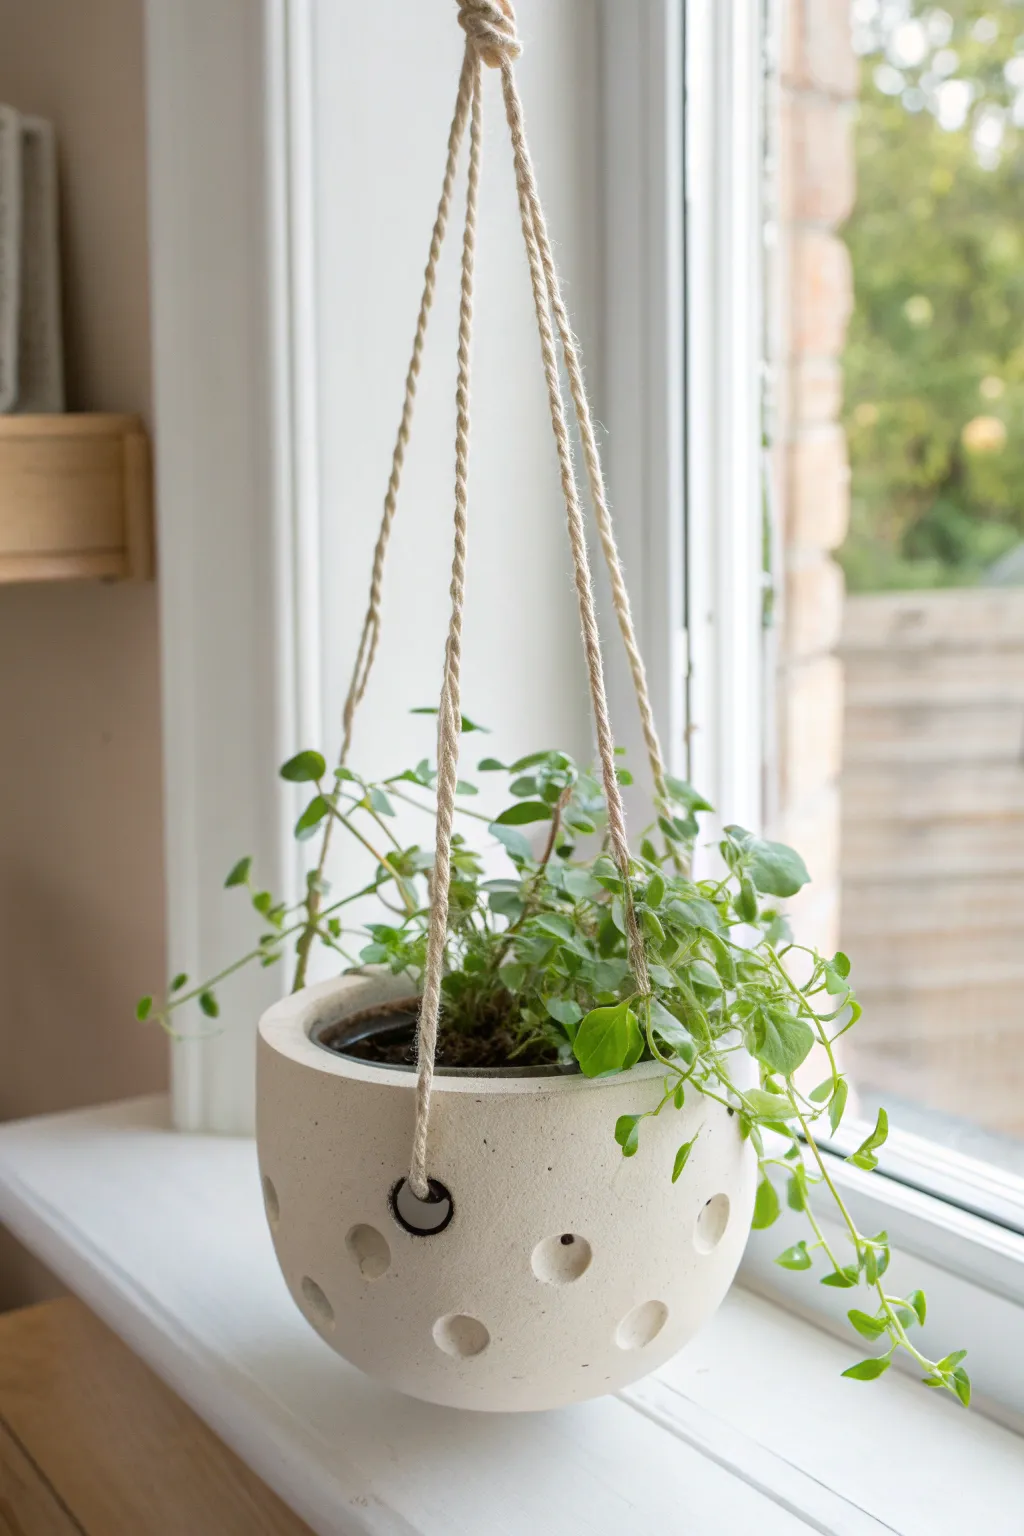
Wall-Mounted Air Plant Pods
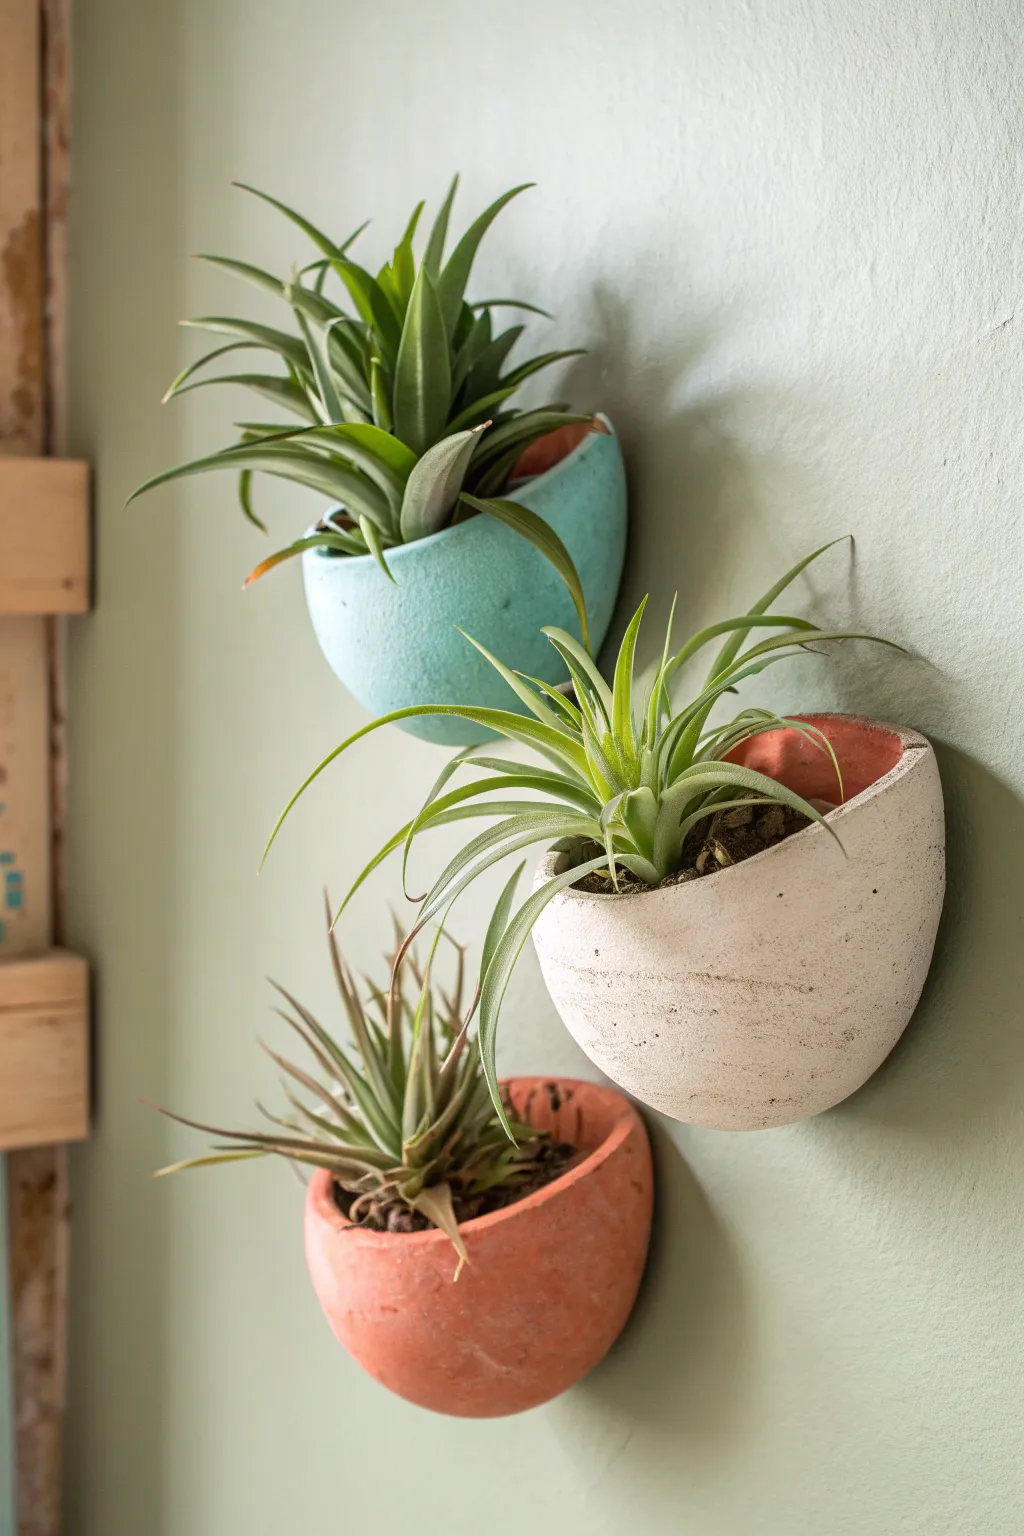
These charming, organic pockets add a pop of color and life to any wall, appearing to float effortlessly. Crafted from air dry clay, they feature a rustic texture and scooped shape perfect for cradling your favorite Tillandsia.
How-To Guide
Materials
- Air dry clay (white)
- Small rolling pin
- Rolling mat or wax paper
- Aluminum foil
- Small bowl or cup (for molding)
- Water (for smoothing)
- Loop tool or sponge
- Acrylic paints (teal, white, terracotta/peach)
- Paintbrushes
- Strong adhesive (like E6000) or mounting tape
- Command strips (optional for hanging)
- Air plants
Step 1: Shaping the Clay Forms
-
Prepare your foil core:
Since air dry clay shrinks, we need a supportive form. Crumple aluminum foil into a ball about the size of an orange, then flatten one side completely to create the back wall. -
Refine the shape:
Mold the rounded side of the foil so it resembles a half-sphere or a deep bowl shape. This will be the interior space for your plant. -
Roll out the clay:
Condition your clay by kneading it until pliable. Roll it out on your mat to a thickness of about 1/4 inch. I like to keep it slightly thicker in the middle for stability. -
Drape the clay:
Lay the clay sheet over the rounded side of your foil mold. Gently press it down to conform to the shape, but don’t smooth away all the natural imperfections. -
Trim the excess:
Using a craft knife or clay tool, cut away the excess clay around the flat back edge. Leave just a tiny bit of overlap to fold over onto the flat back for strength. -
Create the opening:
Decide where the top opening should be. Slice a diagonal or curved opening near the top of the pod so the plant can peek out. Remove that section of clay.
Cracking Up?
If small cracks appear during drying, create a ‘slip’ by mixing a little clay with water into a paste. Smear this into the cracks and let dry again seamlessly.
Step 2: Adding Texture & Drying
-
Smooth the edges:
Dip your finger in a little water and run it along the cut rim of the opening to soften any shark angles. It should look organic, not machine-cut. -
Add surface texture:
To mimic the stone-like look in the photo, gently dab a stiff paintbrush or a crumpled piece of foil against the exterior clay. This creates a pitted, rustic surface. -
Flatten the back:
Ensure the back of the pod is perfectly flat. Press the entire form gently against your work surface. This is critical for flush wall mounting later. -
Create a hanging hole (optional):
If you plan to use a nail, use a straw to poke a hole in the flat back panel near the top. If using adhesive strips, skip this step. -
Let it dry completely:
Place the pods in a cool, dry spot. Let them dry for at least 24-48 hours. Remove the foil core carefully once the outer shell feels firm but before it is bone dry to speed up the interior drying.
Go Geometric
Instead of a rounded organic shape, form your foil core into a hexagon or triangle for a modern geometric version of these wall pockets.
Step 3: Painting and Mounting
-
Sand imperfections:
Once fully cured, use fine-grit sandpaper to smooth out any unwanted jagged bits on the rim, but leave the surface texture intact. -
Mix your colors:
Prepare your palette. You’ll need a soft teal, a warm terracotta orange, and a creamy off-white. -
Apply the base coat:
Paint the exterior of each pod. Since clay is porous, the first layer will soak in quickly. Allow this to dry. -
Paint the second coat:
Apply a second layer for richer color. For the white pod, you might want to sponge the paint on lightly to let some raw clay texture peek through. -
Paint the interior:
Don’t forget the inside rim! Paint the visible interior usually a darker or contrasting shade, like the reddish-brown seen inside the white and teal pods in the photo. -
Add finishing touches:
If you want a speckled effect, flick a toothbrush with thinned dark paint over the dried pods. -
Mount to the wall:
Apply strong mounting tape or heavy-duty Command strips to the flat back of the pods. Press firmly onto the wall to secure them.
Pop your air plants inside and enjoy your new vertical garden installation
Mini Propagation Bud Vases for Cuttings
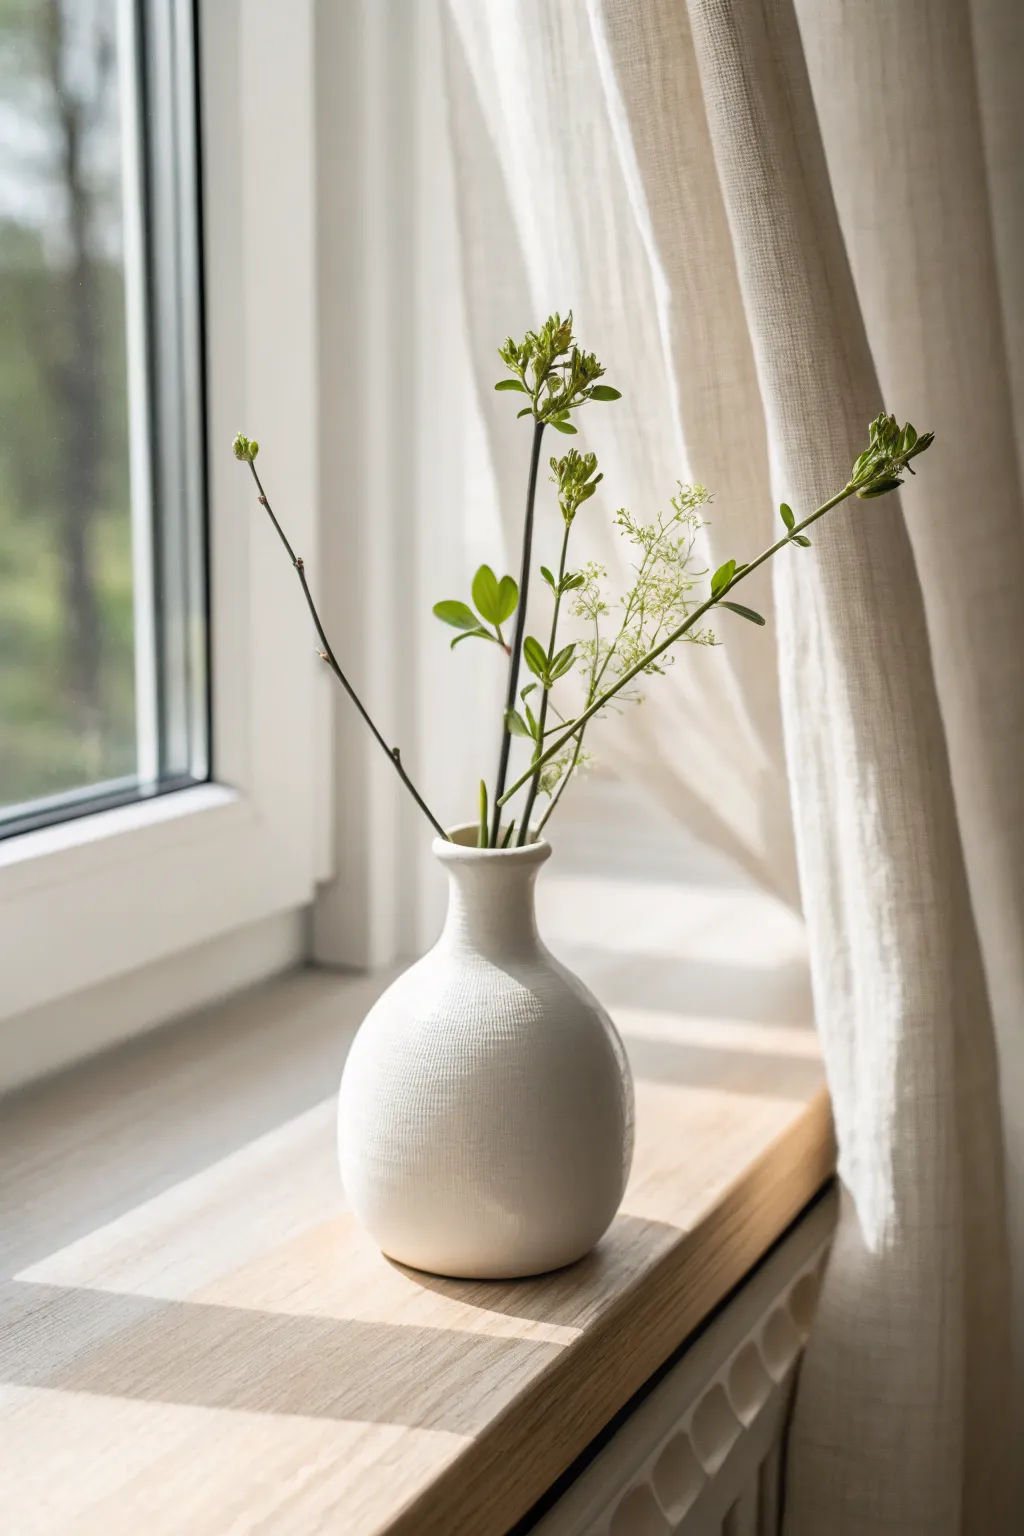
Create a serene home for your clippings with this textured, white bud vase made from air dry clay. Its bulbous base and slender neck offer a classic silhouette that highlights the delicate greenery of propagation cuttings.
Step-by-Step Guide
Materials
- White or natural air dry clay
- Small rolling pin
- Clay knife or craft blade
- Small spherical object (like a lightbulb or foam ball) for structure
- Sponge and water bowl
- Sandpaper (fine grit)
- White acrylic paint (matte finish)
- Matte varnish or sealant
- Waterproofing varnish (essential for holding water)
Step 1: Forming the Base
-
Condition the Clay:
Begin by taking a handful of air dry clay and kneading it thoroughly in your hands until it feels warm and pliable. This prevents cracks later on. -
Create a Sphere:
Roll the conditioned clay into a smooth, tight ball about the size of a large orange. Tap it gently on your work surface to create a small flat spot for stability. -
Hollow the Center:
Use your thumb to press into the center of the ball, pushing down about halfway. Slowly pinch and rotate the clay to widen the opening while maintaining a thick, sturdy wall. -
Insert Support (Optional):
If you find the spherical shape collapsing, I like to insert a small foil ball or a foam sphere inside to act as a temporary armature while shaping. -
Smooth the Exterior:
Dip your finger in a little water and smooth out any large cracks or bumps on the outside of the sphere. Keep the walls relatvely thick to support the neck.
Texturizing Secret
Gently press a piece of cheesecloth or linen fabric onto the damp clay surface before drying. Peeling it off leaves a beautiful, subtle woven pattern.
Step 2: Building the Neck
-
Roll a Coil:
Take a separate piece of clay and roll it into a thick coil or snake, roughly the width of your thumb. -
Attach the Coil:
Score the top opening of your sphere and the bottom of your coil with a craft knife. Add a dab of water (slip) and press the coil firmly onto the opening. -
Blend the Seams:
Use a modeling tool or your finger to drag the clay from the coil down onto the sphere, and the clay from the sphere up onto the coil. Do this on both the inside and outside until the seam is invisible. -
Shape the Taper:
Gently gently squeeze the coil upwards to elongate it. As you pull up, slightly narrow the clay to create that elegant tapered neck shape seen in the reference. -
Flare the Rim:
Once the neck is the desired height, use your pinky finger or a tool to gently flare the very top rim outwards just a tiny bit.
Step 3: Texturing and Refining
-
Initial Smoothing:
Use a slightly damp sponge to wipe over the entire piece. This unify the surface but don’t make it perfectly glossy; the charm lies in the handmade feel. -
Add Subtle Texture:
To recreate the subtle linen-like texture visible in the image, gently pat the surface of the clay with a stiff bristle brush or a piece of coarse fabric while the clay is still damp. -
Check Vertical Alignment:
Set the vase on a flat surface and view it from eye level to ensure the neck stands straight and isn’t leaning too far to one side. -
Deep Drying:
Let the vase dry for at least 24 to 48 hours. Turn it occasionally to ensure airflow reaches the bottom.
Fixing Leaks
If water seeps through after sealing, let it dry fully and add a layer of two-part epoxy resin to the interior for a guaranteed watertight seal.
Step 4: Finishing Touches
-
Sand Imperfections:
Once bone dry, use fine-grit sandpaper to gently smooth the rim and remove any sharp bits, but be careful not to sand away your added texture. -
Paint White:
Apply two coats of matte white acrylic paint. This gives it that crisp, ceramic look. Allow the paint to dry completely between coats. -
Waterproofing:
This is crucial for propagation: pour a specialized waterproofing varnish inside the vase, swirl it to coat every inch of the interior, and pour out the excess. -
Seal the Exterior:
Finish by brushing a matte sealant over the outside to protect the paint and texture from dust and chipping.
Now simply fill with water and add your favorite plant cutting to bring a touch of nature to your windowsill
Planters With Raised Relief Shapes
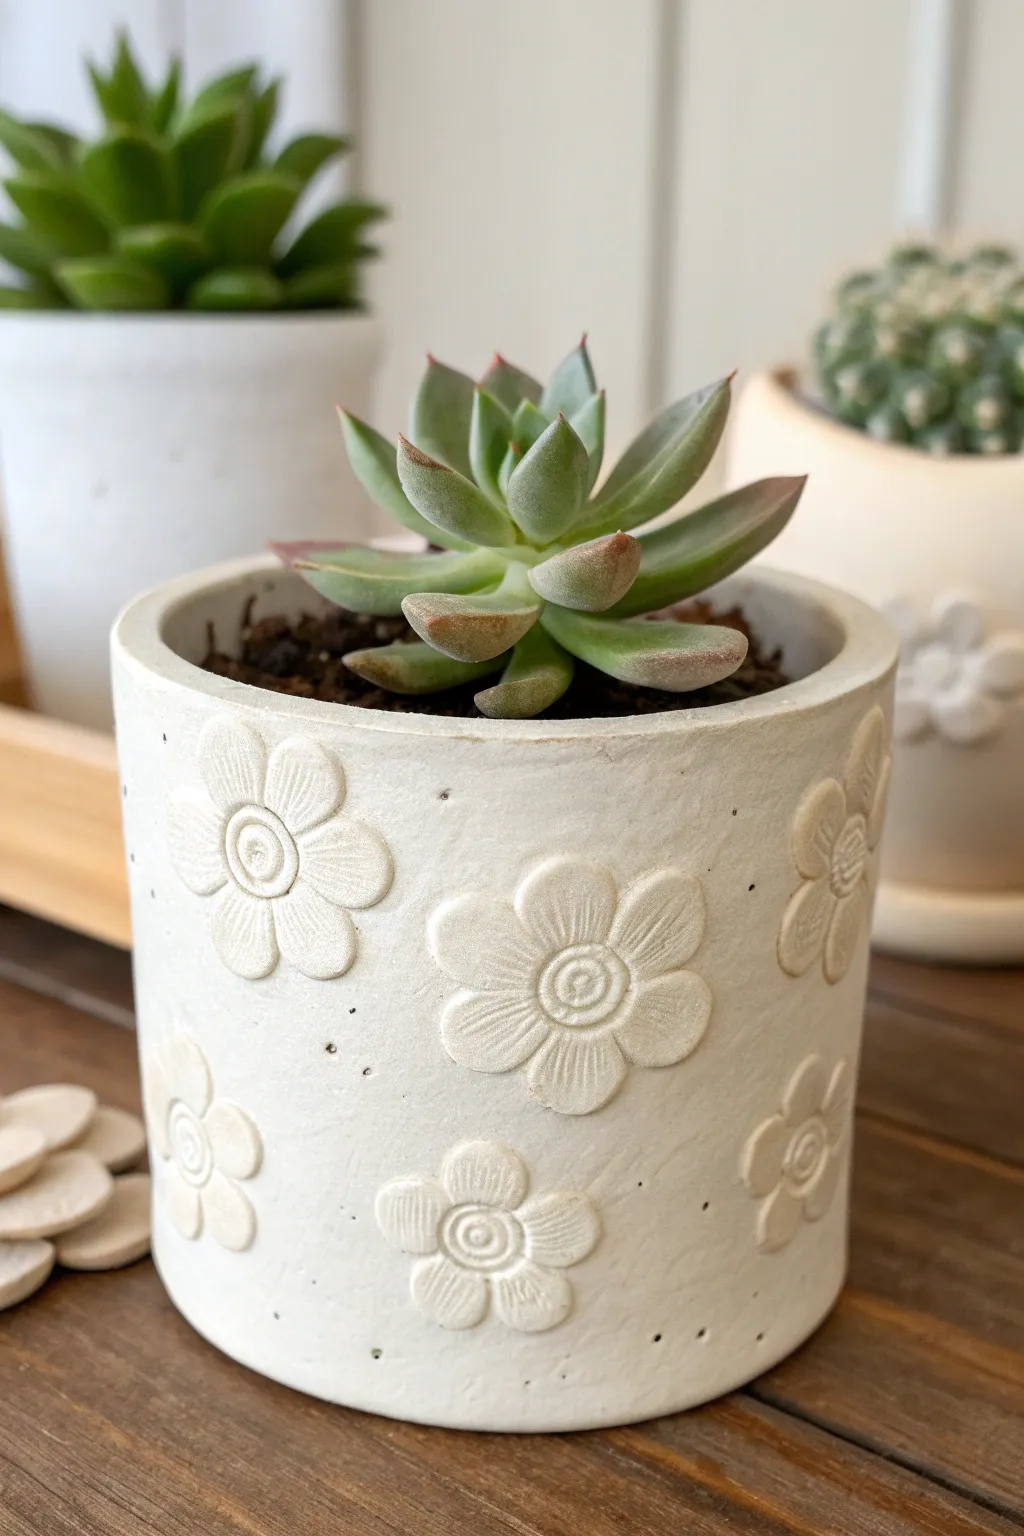
Transform a plain cylindrical container into a whimsical home for your succulents using delicate raised clay flowers. This monochrome textured design mimics the look of high-end ceramic relief pottery without requiring a kiln.
Detailed Instructions
Materials
- Air dry clay (white)
- Small cylindrical container (plastic or glass)
- Small daisy or flower shaped cookie cutter
- Rolling pin
- Clay sculpting tools (specifically a small pointed tool or needle tool)
- Small bowl of water
- Sanding sponge or fine-grit sandpaper
- Matte white acrylic paint (optional)
- Spray sealant or varnish (matte finish)
Step 1: Prepping the Base
-
Prepare your container:
Begin by cleaning your base container thoroughly. If you are using a smooth plastic or glass container, lightly scuff the surface with sandpaper to help the clay adhere better. -
Roll out the base layer:
Roll out a slab of white air dry clay to about 1/4 inch thickness. Try to make it long enough to wrap around your entire container. -
Wrap the container:
Apply the clay slab around your container. Press it firmly against the sides to remove air pockets. -
Create a seamless join:
Trim the excess clay where the ends meet. Dip your finger in water and smooth the seam until it disappears completely. -
Trim the edges:
Use a craft knife or clay tool to trim the clay flush with the top rim and bottom of the container. Smooth the rim with wet fingers for a soft, rounded look.
Step 2: Creating the Flower Reliefs
-
Roll clay for flowers:
Take a fresh piece of clay and roll it out thinner than your base layer, aiming for about 1/8 inch thickness. -
Cut out shapes:
Use your flower-shaped cutter to punch out several blossoms. You’ll need about 8-10 flowers depending on the size of your pot. -
Add petal details:
While the cutouts are still flat on your work surface, gently press simple lines into the petals using a needle tool or knife to give them texture. -
Shape the centers:
Roll tiny balls of clay for the flower centers. Flatten them slightly and press a spiral or concentric circle pattern into them using a small tool. -
Attach the centers:
Score the back of the center piece and the middle of the flower petal base with a needle tool. Apply a drop of water and press the center firmly onto the flower.
Slip it Good
Make ‘clay slip’ by mixing clay scraps with water until gooey. It acts like glue and holds relief shapes much better than plain water.
Step 3: Assembly and Finishing
-
Plan placement:
Before attaching, hold your flowers up to the pot to visualize a scattered, random pattern. I find this looks more organic than rows. -
Score and slip:
Scratch the surface of the pot where a flower will go, and scratch the back of the flower. Dab a little water (slip) on the scratches. -
Attach flowers:
Press the flower onto the pot. Use a rounded tool to gently push the areas between the petals to ensure a good bond without squishing the 3D details. -
Add subtle texture:
Use a toothbrush or stiff brush to gently tap the negative space on the pot around the flowers. This creates a stone-like texture that contrasts nicely with the smooth flowers. -
Create faux nail holes:
For added visual interest, use a needle tool to poke tiny random pinholes in the background space between the flowers. -
Slow drying:
Allow the pot to dry slowly away from direct sunlight for 24-48 hours. Rotate it occasionally so all sides dry evenly. -
Sand and smooth:
Once fully dry, use a sanding sponge to gently smooth the top rim or any rough edges on the petals. -
Seal or Paint:
If you want a pure white finish, give it a coat of matte white acrylic. Finally, seal the entire pot, inside and out, with a waterproof varnish to protect it from moisture.
Pastel Petals
Before sealing, lightly dry-brush a soft pastel pink or sage green over just the raised flowers to make the relief pop.
Enjoy the peaceful process of sculpting your own botanically inspired vessel.
Cactus Cluster Clay Sculptures
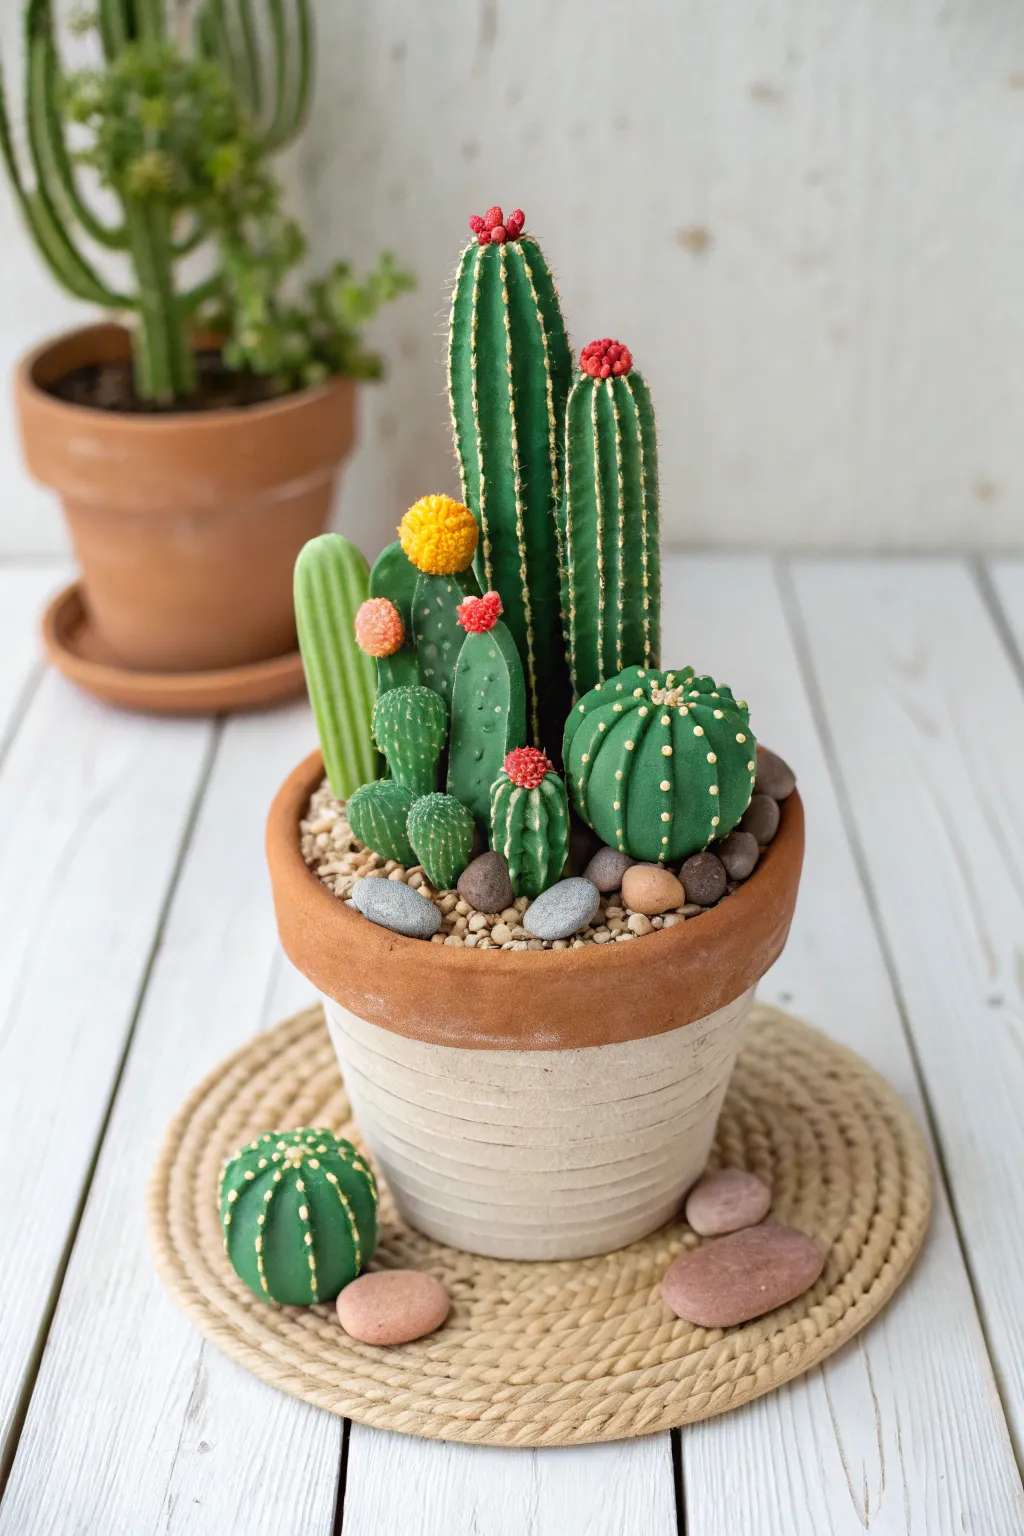
Bring the Southwest indoors without the prickly thorns using this charming air dry clay cactus cluster. This project involves sculpting a variety of classic cactus shapes, detailed with vibrant flowers and placed in a custom-made clay pot for a realistic desktop garden.
Detailed Instructions
Materials
- Air dry clay (white)
- Acrylic paints (dark green, light green, lime green, red, yellow, pink, terracotta, off-white)
- Fine detail paintbrushes
- Sculpting tools (needle tool, small ball tool)
- Aluminium foil
- Small pebbles or gravel
- Texture tool (like a toothbrush or coarse sponge)
- Varnish (matte or satin)
- Strong craft glue
Step 1: Sculpting the Pot
-
Form the base:
Start by rolling a large ball of white air dry clay. Flatten the bottom to create a stable base and use your thumbs to pinch and pull up the sides, hollowing out the center to form a classic pot shape. Keep the walls roughly half a centimetre thick for stability. -
Add the rim:
Roll a thick snake of clay long enough to encircle the top of your pot. Flatten it slightly into a strip and attach it to the upper edge of the pot using a bit of water to smooth the seam. This creates the classic terracotta pot lip. -
Create texture:
Using a sculpting tool or a dull knife, gently carve horizontal grooves around the main body of the pot below the rim. These don’t need to be perfect; the slightly uneven lines add a lovely handmade ceramic feel. Let the pot dry completely, which may take 24-48 hours depending on thickness.
Step 2: Creating the Cacti
-
Tall ribbed cactus:
Roll two cylinders of clay, one slightly taller than the other. Use a needle tool or knife to press deep vertical indents from top to bottom to create ribs. Smooth the tops into soft domes. For internal support on taller pieces, I sometimes insert a small core of crumpled foil before adding clay. -
Round barrel cactus:
Form a tennis-ball-sized sphere of clay. Like the columnar cactus, press deep vertical lines around the circumference, dividing it into pumpkin-like sections. Press a small indentation in the very top center. -
Paddle cactus (Opuntia):
Flatten small balls of clay into oval pads. Make one larger pad and attach a smaller pad to its side or top, blending the clay at the join so it’s secure. Smooth the edges so they are rounded, not sharp. -
Miniature accent cacti:
Create a few very small, finger-sized cylinders and round shapes to fill gaps. Texture some with stippling using a toothbrush to mimic a fuzzy surface, or keep them smooth for variety. -
Tiny blooms:
Roll tiny micro-balls of clay and cluster them together to form flower heads. A toothbrush can be used to texturize these into fuzzy ‘buds’. Attach these to the tops or sides of your various cactus shapes with a dab of water.
Cracks happen!
If you see small cracks as the clay dries, mix a tiny bit of fresh clay with water to make a paste (slip). Fill the crack, smooth it with a finger, and let it dry again before painting to hide it perfectly.
Step 3: Painting and Assembly
-
Base coat the pot:
Paint the rim of the pot with a warm terracotta orange-brown. For the grooved body, use an off-white or beige wash. Painting into the grooves and wiping away the excess can help highlight the texture. -
Green gradients:
Paint each cactus in different shades of green to create depth. Use a dark forest green for the tall ribbed ones, a vivid kelly green for the barrel cactus, and a softer sage for the tall thin one. Adding a slightly lighter green highlight down the center of ribs adds dimension. -
Detailing the spines:
Using your finest brush and off-white or pale yellow paint, add the spines. For the ribbed cacti, paint tiny vertical dashes along the ridges. For the barrel cactus, paint small dots in neat rows along the ribs. -
Adding colour to blooms:
Paint the textured flower clusters in bright reds, yellows, and pinks. Use a dry-brush technique (very little paint on the brush) to catch just the tips of the texture for a realistic fuzzy look. -
Assembly prep:
Once everything is dry, fill your clay pot 3/4 full with a filler material like crumpled paper or extra scrap clay if you want weight. Cover this base layer with a generous amount of strong craft glue. -
Planting the garden:
Arrange your painted cacti in the pot. Place the tallest ones at the back and the smaller ones, like the barrel cactus and paddle cactus, towards the front. Press them firmly into the glue or filler material. -
Adding the earth:
Pour small real pebbles or gravel around the base of the cacti to cover the mechanics and glue. This adds a crucial element of realism that grounds the clay sculptures. -
Final touches:
Optionally, sculpt a separate small standalone cactus ball to sit next to the pot on a coaster, painted to match the main arrangement. Seal the clay parts with a matte varnish to protect the paint and give it a finished ceramic look.
Spice it up
Instead of painted spines, try embedding tiny cut pieces of fishing line or stiff brush bristles into the wet clay before it dries. This creates real 3D spines for an extra realistic tactile effect.
Place your finished sculpture on a sunny windowsill where it can be admired without ever needing water
Mushroom Cap Planters for Tiny Plants
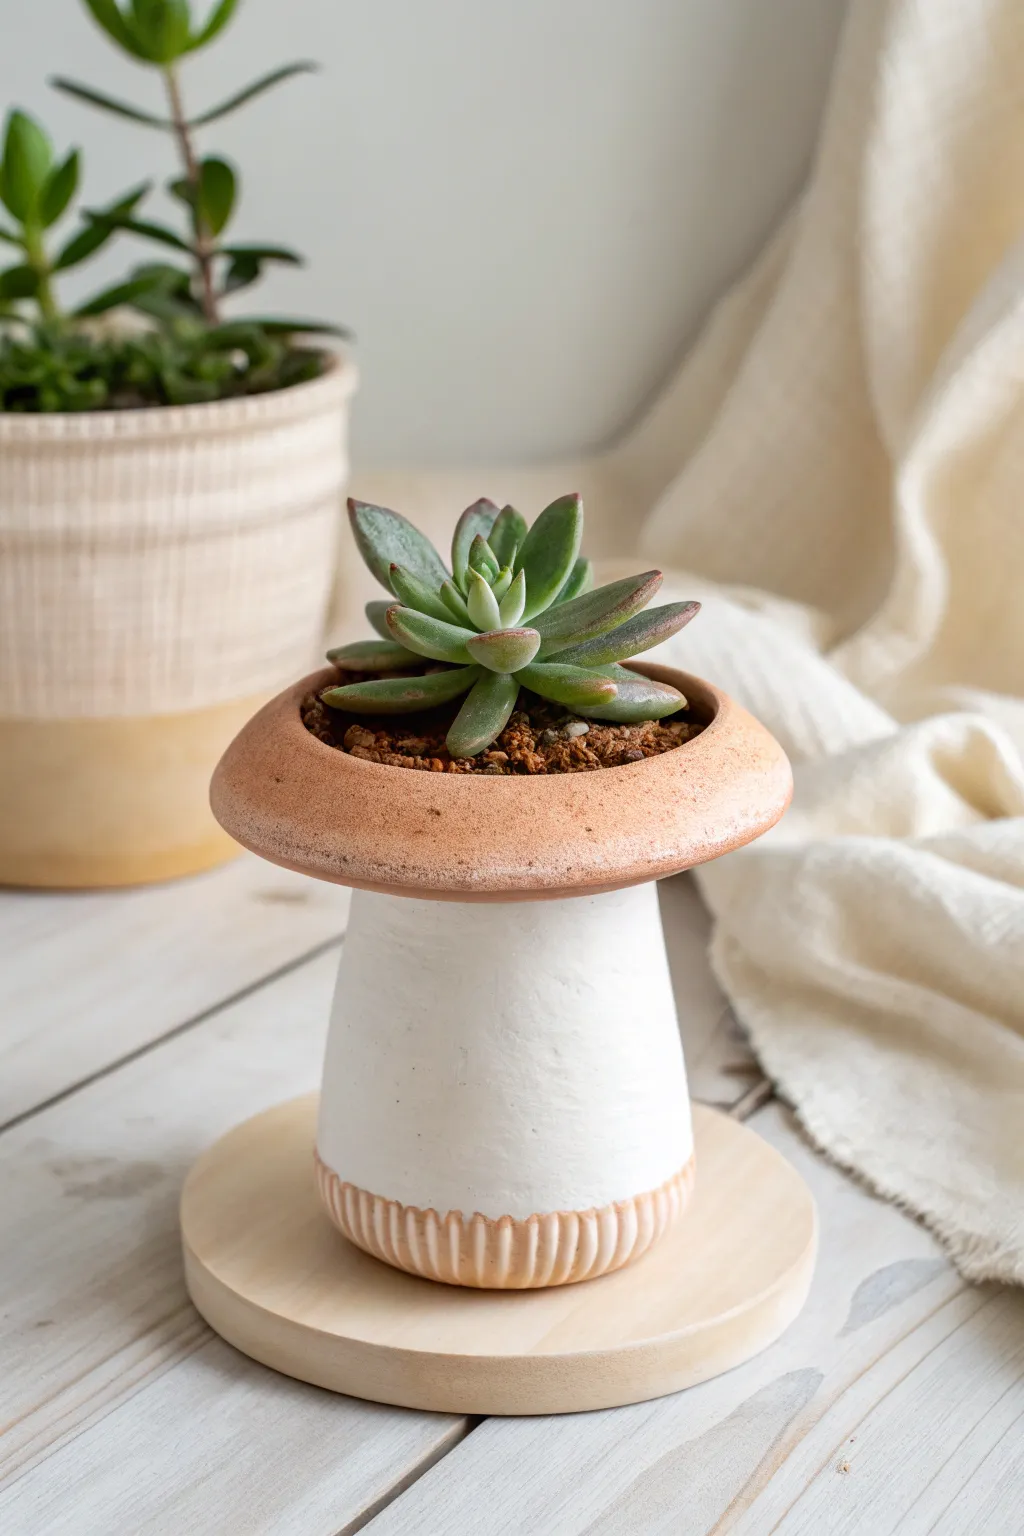
Transform simple air dry clay into an enchanting home for your favorite succulent with this mushroom-inspired planter design. Its distinctive shape features a fluted base and a wide, earthy-toned cap that cradles the soil, creating a magical forest floor vibe right on your windowsill.
Detailed Instructions
Materials
- White sculpting air dry clay (2 lbs)
- Rolling pin
- Small bowl or cup (for molding the cap)
- Pottery needle tool or toothpick
- Small cup of water
- Acrylic craft paints (creamy white, terracotta/terracotta orange)
- Small flat paintbrush
- Clear matte acrylic sealer/varnish
- Clear plastic wrap
- Sandpaper (fine grit)
Step 1: Sculpting the Base
-
Preparing the clay:
Begin by conditioning a handful of white clay, kneading it until it is soft, pliable, and free of cracks. -
Rolling the cylinder:
Roll the clay into a smooth, thick cylinder shape about 3 inches tall. You want the base slightly wider than the top to ensure stability. -
Hollowing the stem:
Use your thumb or a modeling tool to gently press into the top center of the cylinder, creating an opening. It doesn’t need to go all the way to the bottom; creating a 2-inch deep well is sufficient to reduce weight and aid drying. -
Detailing the bottom edge:
Pinch the very bottom rim of your cylinder slightly to create a defined band about half an inch tall. -
Adding texture:
To create the fluted look, take your needle tool or a toothpick and press vertical indentations all around this bottom band. Space them evenly to mimic the gills of a mushroom. -
Smoothing the stem:
Dip your finger in a little water and smooth out the main body of the stem above the fluted section. Aim for a matte, plaster-like finish.
Fixing Cracks
If you see hairline cracks as the stem dries, mix a tiny bit of fresh clay with water to make a paste. Fill the cracks, smooth with a damp finger, and let re-dry.
Step 2: Creating the Cap
-
Rolling a slab:
Roll out a fresh piece of clay into a slab approximately 1/4 inch thick. -
Cutting the circle:
Find a bowl that is wider than your stem (around 4-5 inches diameter) and use it to cut a perfect circle from your slab. -
Shaping the curve:
Line a small bowl with plastic wrap. Gently place your clay circle inside so it takes on a shallow, curved bowl shape. This will be the actual planting area. -
Thickening the rim:
Roll a long, thin snake of clay. Lay this along the upper rim of your bowl shape and blend it smoothly into the clay using water. This creates that chunky, rounded mushroom cap edge. -
Creating the connection point:
On the *outside* bottom of the bowl (the underside of the mushroom cap), score a circle the same size as the top of your stem. Apply harsh cross-hatching marks to the top of the stem as well. -
Assembly:
Apply slip (water mixed with clay) to the scored areas and press the cap firmly onto the stem. Smooth the seam carefully with your finger or a tool so the two pieces become one solid unit.
Step 3: Finishing Touches
-
The crucial drying phase:
Allow the planter to dry completely. This usually takes 24-48 hours depending on humidity. Rotate it occasionally for even air exposure. -
Sanding:
Once bone dry, use fine-grit sandpaper to buff away any fingerprints or rough ridges on the white stem section. -
Painting the cap:
Paint the top bowl section (the cap) with a terracotta-colored acrylic paint. I like to sponge it slightly to give it a textured, earthy pottery look rather than a flat plastic finish. -
Painting the base detail:
Use a diluted wash of the terracotta paint on the fluted bottom section of the stem, wiping away the excess so the color settles mostly in the grooves. -
Painting the stem:
Paint the main section of the stem with a creamy off-white paint to clean up the look. -
Sealing:
Because air dry clay dissolves in water, you must seal this project thoroughly. Apply 2-3 coats of waterproof matte varnish inside the bowl and over the entire exterior.
Level Up: Glossy Gills
For extra dimension, apply a high-gloss varnish only to the top rim of the mushroom cap while keeping the white stem completely matte.
Once sealed and dry, plant your tiny succulent and enjoy this adorable piece of handmade decor