Air dry clay plant pots are my favorite little weekend project because you get that handmade, earthy vibe without needing a kiln. If you’ve got a soft spot for cute succulents and small houseplants, these ideas will help you turn simple clay into pots you’ll actually want to display.
Classic Mini Pinch Pots
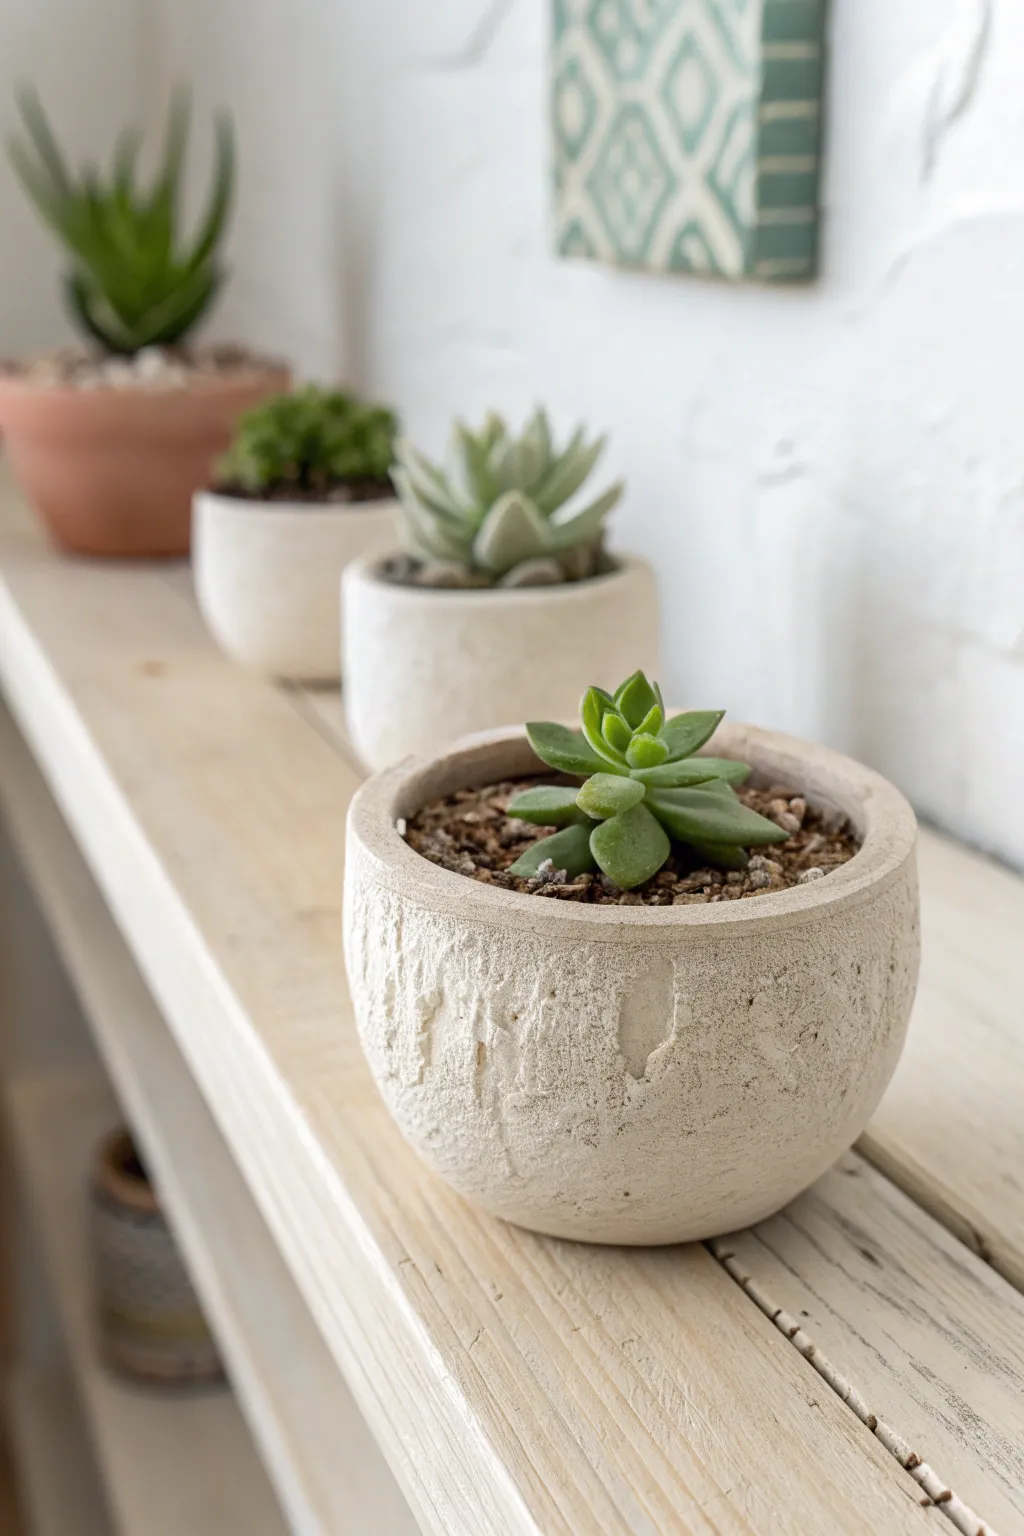
These charming little pots mimic the rugged beauty of carved limestone or pumice, but they are deceptively light and easy to make at home. The secret lies in a simple texturing technique that transforms smooth air-dry clay into an organic, ancient-looking vessel perfect for tiny succulents.
Step-by-Step Guide
Materials
- White air-dry clay (Das or similar brand)
- Small rolling pin
- Aluminum foil for creating texture
- Small bowl of water
- Sponge
- Coarse sandpaper (60 or 80 grit)
- Clay knife or craft knife
- Matte acrylic varnish or sealer
Step 1: Forming the Base
-
Prepare the Clay:
Start by pinching off a ball of white air-dry clay about the size of a tennis ball. Knead it in your hands for a minute until it feels pliable and warm, which helps prevent cracking later on. -
Open the Pinch Pot:
Push your thumb firmly into the center of the ball, stopping about a half-inch from the bottom. This thickness is crucial for stability since we will be texturing the outside later. -
Shape the Walls:
Gently pinch and rotate the clay between your thumb and fingers, working the walls upward and outward. Aim for an even thickness of about 1/4 inch all around. -
Flatten the Bottom:
Tap the base of your pot firmly against your work surface to create a flat, stable bottom so it won’t wobble on your shelf. -
Refine the Rim:
Use a little water on your fingertip to smooth out the rim. For this specific look, you want a rim that is relatively flat on top with a sharp, clean interior edge, rather than a rounded lip.
Stone Effect Secret
Mix a pinch of used coffee grounds or cracked black pepper directly into the white clay before shaping. When sanded later, these specks look exactly like delicious mineral deposits.
Step 2: Creating the Stone Texture
-
Prepare the Foil Tool:
Crumple a piece of aluminum foil into a tight ball. The tighter you squeeze it, the sharper the texture; a looser ball will create softer indentations. -
Apply Initial Texture:
Support the pot wall from the inside with one hand. With the other, firmly press and roll the foil ball all over the exterior surface of the clay. Don’t be afraid to press hard enough to distort the surface slightly. -
Add Deep Cracks:
To mimic the deep fissures seen in the photo, take a smaller, jagged piece of foil or a clay tool and drag it vertically in a few spots. This breaks up the uniform pattern. -
Rough Up the Surface:
For extra grit, take a stiff toothbrush or a dry sponge and stipple over the foil marks. This creates the micro-texture that makes the clay look like porous stone. -
Dry the Pot:
Set the pot aside in a safe place to air dry completely. Depending on humidity, this usually takes 24 to 48 hours. Rotate it occasionally to ensure the bottom dries evenly.
Level Up: Aged Look
Create a ‘wash’ by watering down light grey or beige acrylic paint. Brush it over the texture and wipe it off immediately with a paper towel, leaving color only in the deep cracks.
Step 3: Finishing Touches
-
Sand for Highlights:
Once fully dry and white, use coarse sandpaper to lightly scuff the exterior. Focus on the high points of the texture; this emphasizes the depth of the crevices you created. -
Dust Clean:
Wipe the pot down with a dry cloth or soft brush to remove all the clay dust from sanding. -
Seal the Interior:
Air-dry clay is not waterproof. Generously coat the inside of the pot with a waterproof sealer or varnish. I prefer applying two or three thick coats to ensure moisture won’t seep through. -
Seal the Exterior:
Apply a coat of matte varnish to the outside. A matte finish is essential here; a glossy finish would ruin the stone effect. -
Planting:
Since there is no drainage hole, fill the bottom inch with small gravel before adding soil and your succulent. This keeps roots away from standing water.
Place your new faux-stone pot on a bright windowsill and enjoy the natural, organic vibe it brings to your space


Simple Cylinder Slab Pots
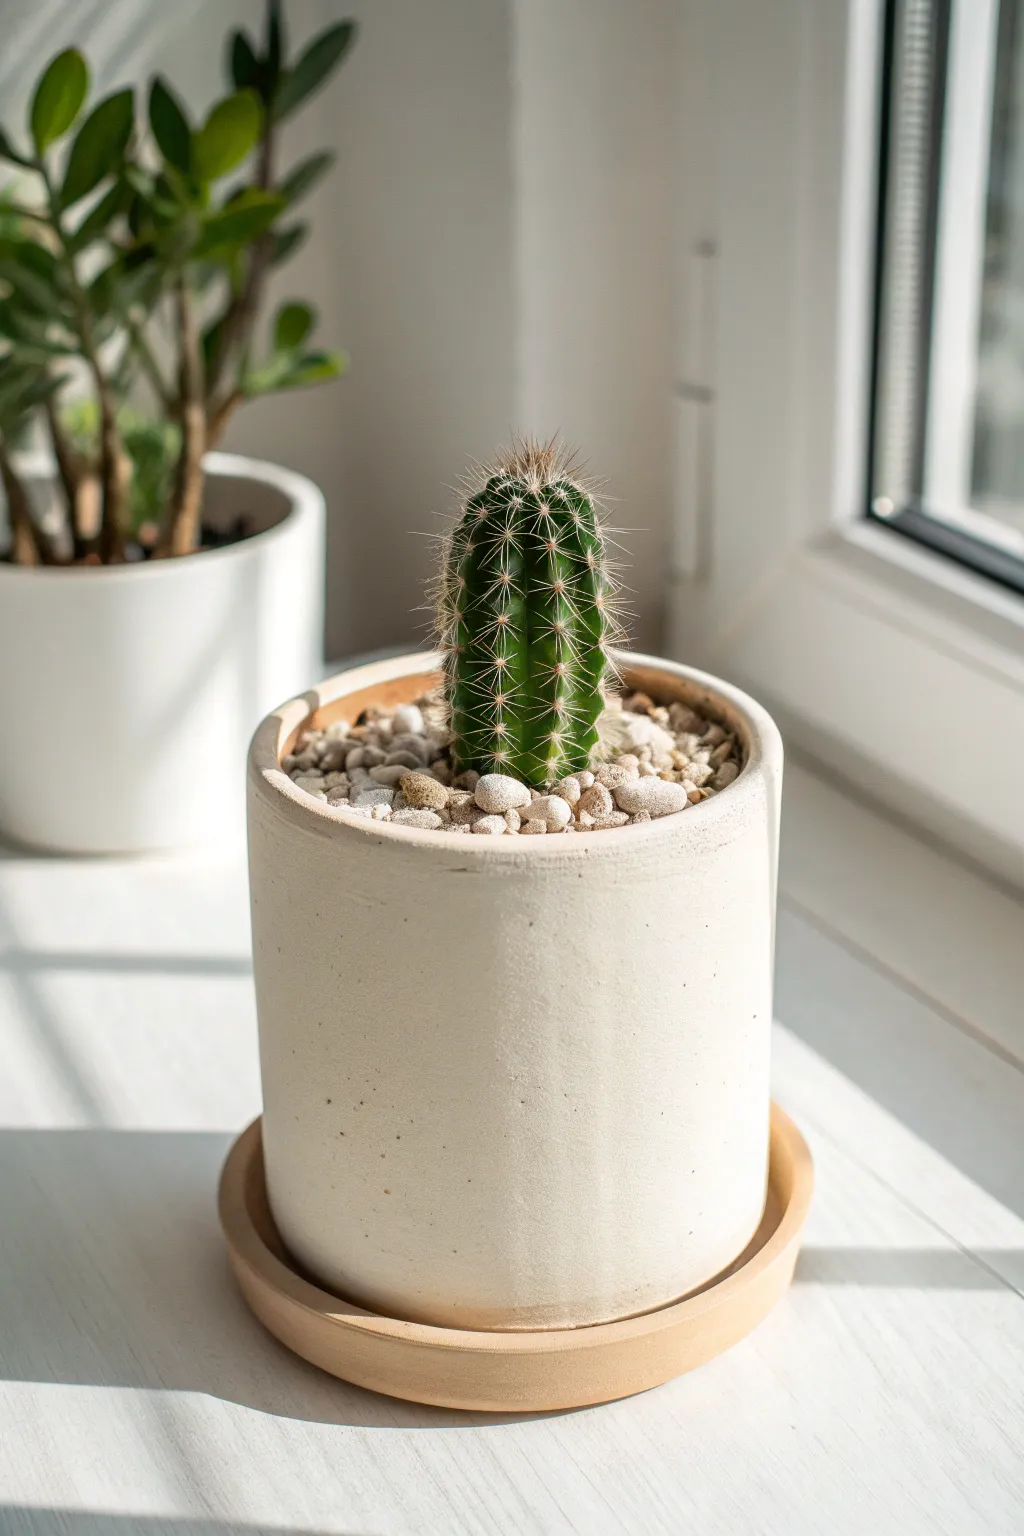
This tutorial guides you through creating a sleek, cylindrical planter that mimics the clean lines of modern ceramic ware using air-dry clay. Its matte, creamy finish and perfectly fitting saucer make it a sophisticated home for your favorite cacti or succulents.
How-To Guide
Materials
- White air-dry clay (approximately 1kg)
- Rolling pin
- Two guide sticks approx. 5mm thick (or wooden rulers)
- Ruler and craft knife
- Small cup with water (slip)
- Pottery sponge or soft piece of foam
- Cardboard or poster board (for template)
- Sandpaper (fine and medium grit)
- Matte spray sealant or waterproof varnish
- Canvas mat or parchment paper
Step 1: Preparation and Template
-
Create the cylinder template:
Decide on the height and circumference of your pot. Cut a rectangular strip of cardboard that matches these dimensions. Don’t forget to add about 1cm of overlap to the length for joining the seam later. -
Create the base templates:
Using a compass or a circular object, draw two circles on your cardboard. One should match the diameter of your cylinder (for the pot floor), and the second should be slightly larger, about 1.5cm wider diameter (for the saucer). -
Prepare your workspace:
Lay down your canvas mat or parchment paper. This prevents the clay from sticking to your table and absorbing dust.
Cracking Up?
If small cracks appear while drying, don’t panic. Mix a tiny bit of fresh clay with water to make a thick paste (slip) and fill the cracks. Let it dry again, then sand smooth.
Step 2: Rolling and Cutting
-
Roll the main slab:
Take a large chunk of clay and knead it briefly to remove air bubbles. Place it between your two guide sticks and roll it out with the rolling pin. The guides ensure an even 5mm thickness, which is crucial for structural integrity. -
Cut the clay rectangle:
Place your rectangular cardboard template onto the rolled slab. Use the craft knife to cut around it cleanly. Remove the excess clay and set it aside. -
Cut the circular bases:
Re-roll the excess clay (again using the guide sticks) and place your two circular templates on top. Cut out both circles. The smaller one is for the pot, the larger for the saucer.
Speckled Stone Effect
Knead coffee grounds or black pepper into your white clay before rolling. After sanding, you’ll get a beautiful, organic speckled texture like natural stone.
Step 3: Assembly
-
Score the edges:
Take your rectangular slab and score the short ends (the height side) where they will overlap. Use your knife or a needle tool to scratch a cross-hatch pattern. -
Form the cylinder:
Apply a little water to the scored areas to create a slip. Carefully lift the slab and curl it into a cylinder, pressing the scored ends together. I like to reach inside the tube to support the wall while pressing from the outside to ensure a tight bond. -
Smooth the seam:
Use a damp finger or a modelling tool to smudge the clay across the seam line, blending it until it vanishes on both the outside and inside. -
Attach the base:
Score the bottom edge of your cylinder and the outer rim of the smaller clay circle. Apply water, then place the cylinder on top of the circle. -
Blend the base connection:
Gently press the clay from the base up into the wall of the cylinder. A wooden tool is perfect for blending this seam so it looks seamless.
Step 4: Refining the Saucer
-
Create the saucer rim:
Roll a long, thin coil of clay (snake). Score the outer edge of your larger circle base. -
Attach the coil:
Place the coil onto the scored edge of the saucer base. Pinch it upward slightly to create a shallow wall. -
Smooth the saucer:
Blend the coil into the base using your thumb or a tool so it looks like one solid piece rather than a ring sitting on top.
Step 5: Finishing Touches
-
Initial smoothing:
Wipe the entire pot and saucer with a barely damp sponge. This smooths out fingerprints and sharp edges. -
Slow drying:
Loosely cover your pieces with plastic wrap to let them dry slowly over 24-48 hours. This prevents cracking. -
Sanding:
Once bone dry, use sandpaper to remove any remaining bumps or unevenness. Start with medium grit and finish with fine grit for that ultra-smooth matte look. -
Sealing:
Apply several coats of a matte waterproof sealant or varnish, especially on the inside. This protects the clay from moisture when you water your plant.
Now you have a chic, modern vessel ready to showcase your greenery on the windowsill


Coil-Built Rustic Planters
This project captures the timeless beauty of coil pottery with a rugged, textured finish that perfectly mimics natural stone. The repetitive horizontal ridges create a satisfying visual rhythm, while the creamy, off-white finish provides a neutral home for vibrant succulents.
Step-by-Step Tutorial
Materials
- White or stone-colored air-dry clay (approx. 1kg)
- Wide rolling pin
- Fettling knife or clay cutter
- Small bowl or cylinder for tracing base
- Slip (clay mixed with a little water) or vinegar
- Scoring tool or old fork
- Sponge
- Sandpaper (medium grit)
- Matte acrylic sealant or varnish
- Optional: Antique white or cream acrylic paint
Step 1: Creating the Base
-
Roll the slab:
Start by rolling out a portion of your clay into a flat slab, approximately 1/4 inch thick. Aim for an even thickness to ensure stability for the bottom of your pot. -
Cut the circle:
Place your small bowl or circle template onto the clay slab. Using your fettling knife, cut vertically around the template to create a perfect circle base. -
Prepare the edge:
Score the outer 1/4 inch of the textured top side of your base using a scoring tool or fork. Dab a little slip or water onto the scratched area to act as glue.
Texturizing Trick
Add used coffee grounds or fine sand into your clay body before rolling. This creates speckles and a gritty, stone-like texture that looks amazing once dry.
Step 2: Building the Coils
-
Roll the first coil:
Take a handful of clay and roll it into a long snake on your work surface. Use your palms—not your fingers—to keep it round. Aim for a thickness of about 1/2 inch, slightly thicker than typical coils for that chunky look. -
Attach the foundation:
Place the first coil directly onto the scored edge of the base. Cut the ends at a diagonal angle where they meet to increase the surface area for joining. -
Blend the inside:
This is crucial for strength: use your thumb or a modeling tool to smear the *inside* of the coil down onto the base floor. Do not touch the outside texture; we want to keep those ridges defined. -
Score the first ring:
Scratch the top surface of your placed coil to prepare it for the next layer. Apply a small amount of slip. -
Stack upwards:
Roll another thick coil and place it directly on top of the previous one. Ensure the seam (where the coil ends meet) is in a different spot than the layer below to prevent weak structural lines. -
Blend the interior seams:
After every single layer, smooth the clay downwards on the inside of the pot. The interior should become a smooth, continuous wall, while the exterior remains ribbed. -
Building height:
Continue stacking coils until you have about 8 to 10 layers, or until the pot reaches your desired height. Keep the diameter consistent so the walls go straight up rather than flaring out. -
Finishing the rim:
For the final coil, you might want to gently flatten the top edge with a paddle or flat piece of wood to give it a finished, deliberate appearance.
Faux-Glaze Effect
Mix just a drop of brown paint into your sealant and let it pool slightly in the deep grooves between coils to mimic an aged, weathered garden pot.
Step 3: Texturing and Finishing
-
Enhance the texture:
While the clay is still leather-hard, inspect the exterior ridges. If they look too perfect, I like to gently press a rough stone or textured sponge against random spots to simulate natural erosion. -
Initial drying:
Let the pot dry slowly away from direct sunlight or heat sources. Cover it loosely with plastic wrap for the first 24 hours to prevent cracking, then uncover to dry completely. -
Sanding:
Once bone dry, use medium-grit sandpaper to knock off any sharp burrs or unintended jagged bits, but be careful not to smooth away the distinct coil lines. -
Painting (Optional):
If your clay isn’t already the desired stone color, dry brush a layer of cream or antique white acrylic paint over the surface. Let the recessed crevices remain darker to accentuate depth. -
Sealing:
Apply two coats of matte acrylic varnish to the inside and outside. Since air-dry clay isn’t waterproof, this step is vital to protect your work from moisture.
Pop in a small succulent container and enjoy the organic, handcrafted charm this piece brings to your space


Painted Color-Dipped Pots
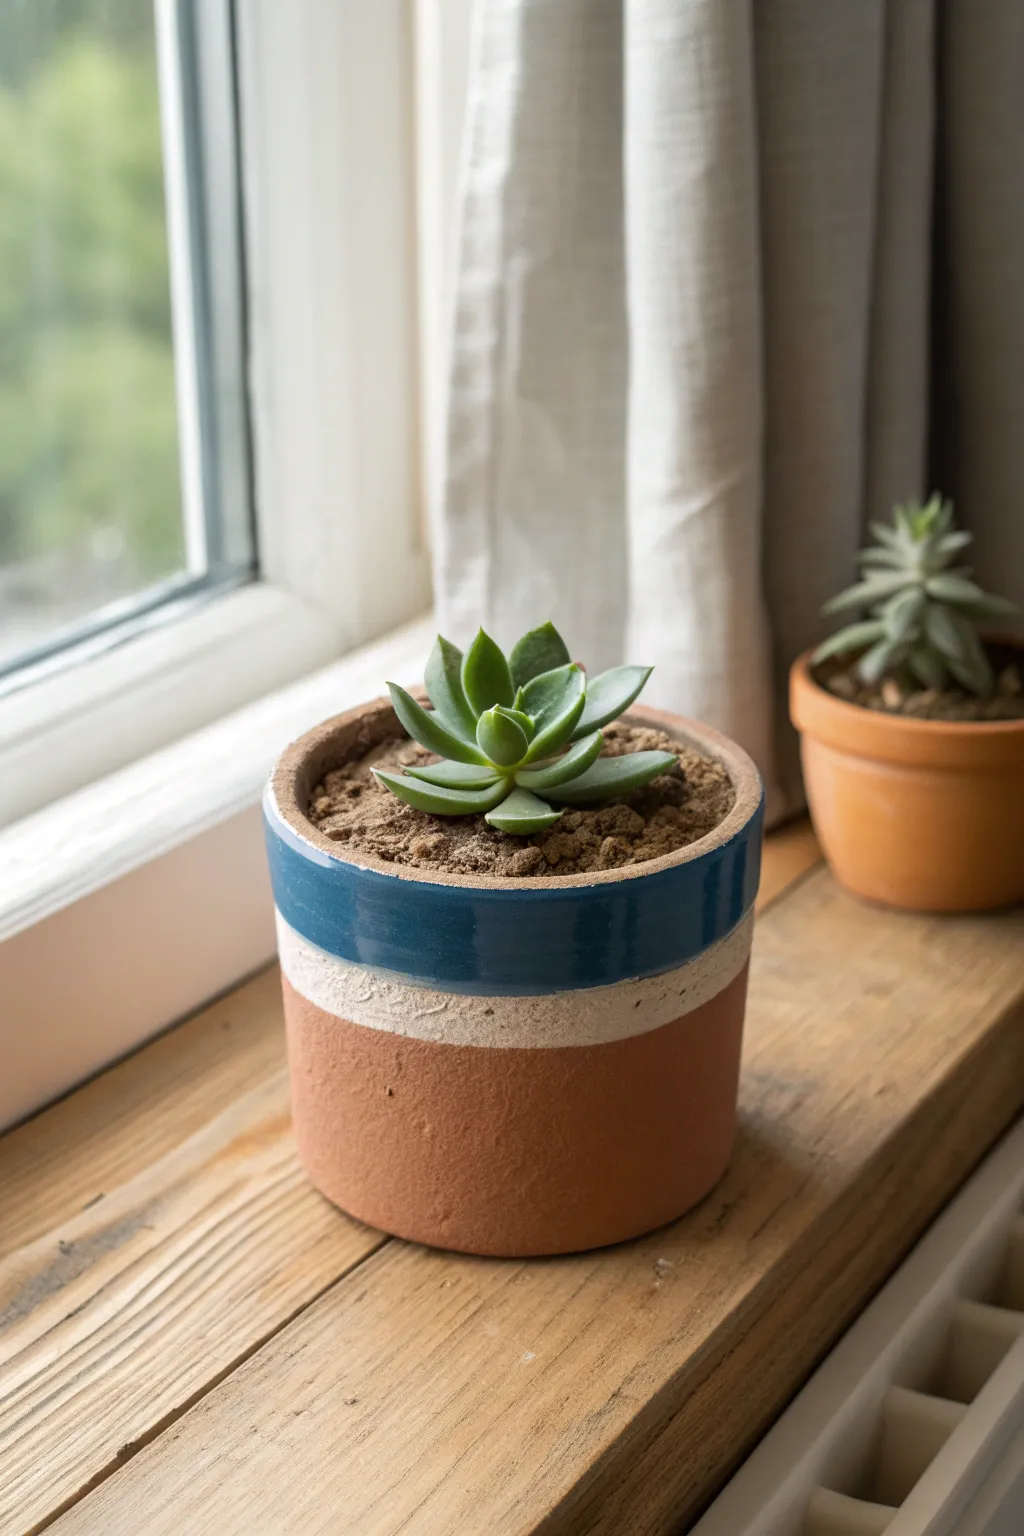
Achieve a chic, color-blocked aesthetic with this simple yet striking pot design. The contrast between the raw clay texture, the rustic white band, and the glossy teal rim creates a sophisticated home for your favorite succulent.
Step-by-Step
Materials
- Air dry clay (terracotta color)
- Rolling pin
- Clay knife or craft blade
- Small bowl or cup (specifically for use as a mold)
- Sandpaper (medium and fine grit)
- Acrylic paint (white)
- Acrylic paint (teal or deep blue-green)
- Painter’s tape or masking tape
- Flat paintbrush
- Gloss varnish or clear sealant (waterproof)
Step 1: Sculpting the Base
-
Prepare the Clay:
Begin with a substantial ball of terracotta-colored air dry clay. Knead it thoroughly in your hands to warm it up and remove any air bubbles, which helps prevent cracking later. -
Roll the Slab:
Roll out the clay onto a smooth surface to an even thickness of about 1/4 inch. If you want a perfectly straight cylinder, try to roll a long rectangular strip. -
Cut to Size:
Using a ruler and your craft knife, trim the clay slab into a clean rectangle. The length should be enough to wrap around your chosen mold (the small bowl or cup) with a slight overlap. -
Form the Cylinder:
Wrap the clay rectangle around your mold. Join the two ends by scoring the edges (making small scratches) and adding a dab of water, then pressing them firmly together to create a seam. -
Create the Base:
Place your cylinder on top of the remaining rolled-out clay and trace around the bottom. Cut out this circle and attach it to the bottom of your cylinder using the same scoring and wetting method. -
Smooth the Seams:
Use your finger or a smoothing tool dipped in a little water to blend the seams on both the side and bottom until they are invisible. The goal is a unified, smooth surface. -
First Drying Phase:
Carefully remove the mold if possible, or let the clay stiffen slightly before removing it. Allow the pot to dry completely for 24-48 hours until it turns a lighter color and feels hard.
Clean Lines Pro Tip
Run your fingernail firmly over the edge of the painter’s tape before painting. This seals the edge tight and prevents the teal paint from bleeding onto the white stripe.
Step 2: Painting & Finishing
-
Sand the Imperfections:
Once bone dry, take your sandpaper and gently smooth out any rough bumps or uneven edges. Wipe away all clay dust with a slightly damp cloth. -
Applying the White Band:
Instead of taping immediately, freehand a broad stripe of white acrylic paint around the middle section of the pot. Keep the texture a little rough for a rustic look. -
Texturing the White Layer:
While the white paint is still tacky, you can dab it gently with a dry paper towel or sponge to create the slightly distressed, uneven texture seen in the middle stripe. -
Tape the Rim Line:
Once the white paint is fully dry, apply a strip of painter’s tape horizontally around the pot, covering the top edge of the white band. This defines where the teal color will begin. -
Painting the Teal Rim:
Paint the top section of the pot, above the tape line, with your teal acrylic paint. Extend this color slightly over the inner rim for a professional finish. -
Second Coat:
Let the first coat of teal dry, then add a second layer to ensure the color is opaque and vibrant against the clay background. -
Reveal the Lines:
Carefully peel away the painter’s tape while the paint is still slightly damp to get the crispest possible line between the teal and white sections. -
Waterproofing:
Since air dry clay is not naturally waterproof, apply two to three, coats of a waterproof varnish or sealant to both the inside and outside of the pot. -
Gloss Finish for the Rim:
To mimic the glazed look in the photo, apply an extra coat of high-gloss varnish specifically over the teal painted section. -
Final Cure:
Let the sealant cure completely according to the manufacturer’s instructions before adding soil or a plant.
Level Up: Faux Glaze
Mix a tiny amount of clear gloss medium into your teal acrylic paint before applying it. This gives the paint a translucent, deep quality that looks exactly like fired ceramic glaze.
Now you have a stunning, custom planter ready to brighten up your windowsill

The Complete Guide to Pottery Troubleshooting
Uncover the most common ceramic mistakes—from cracking clay to failed glazes—and learn how to fix them fast.
Sculpted 3D Face Feature Pots
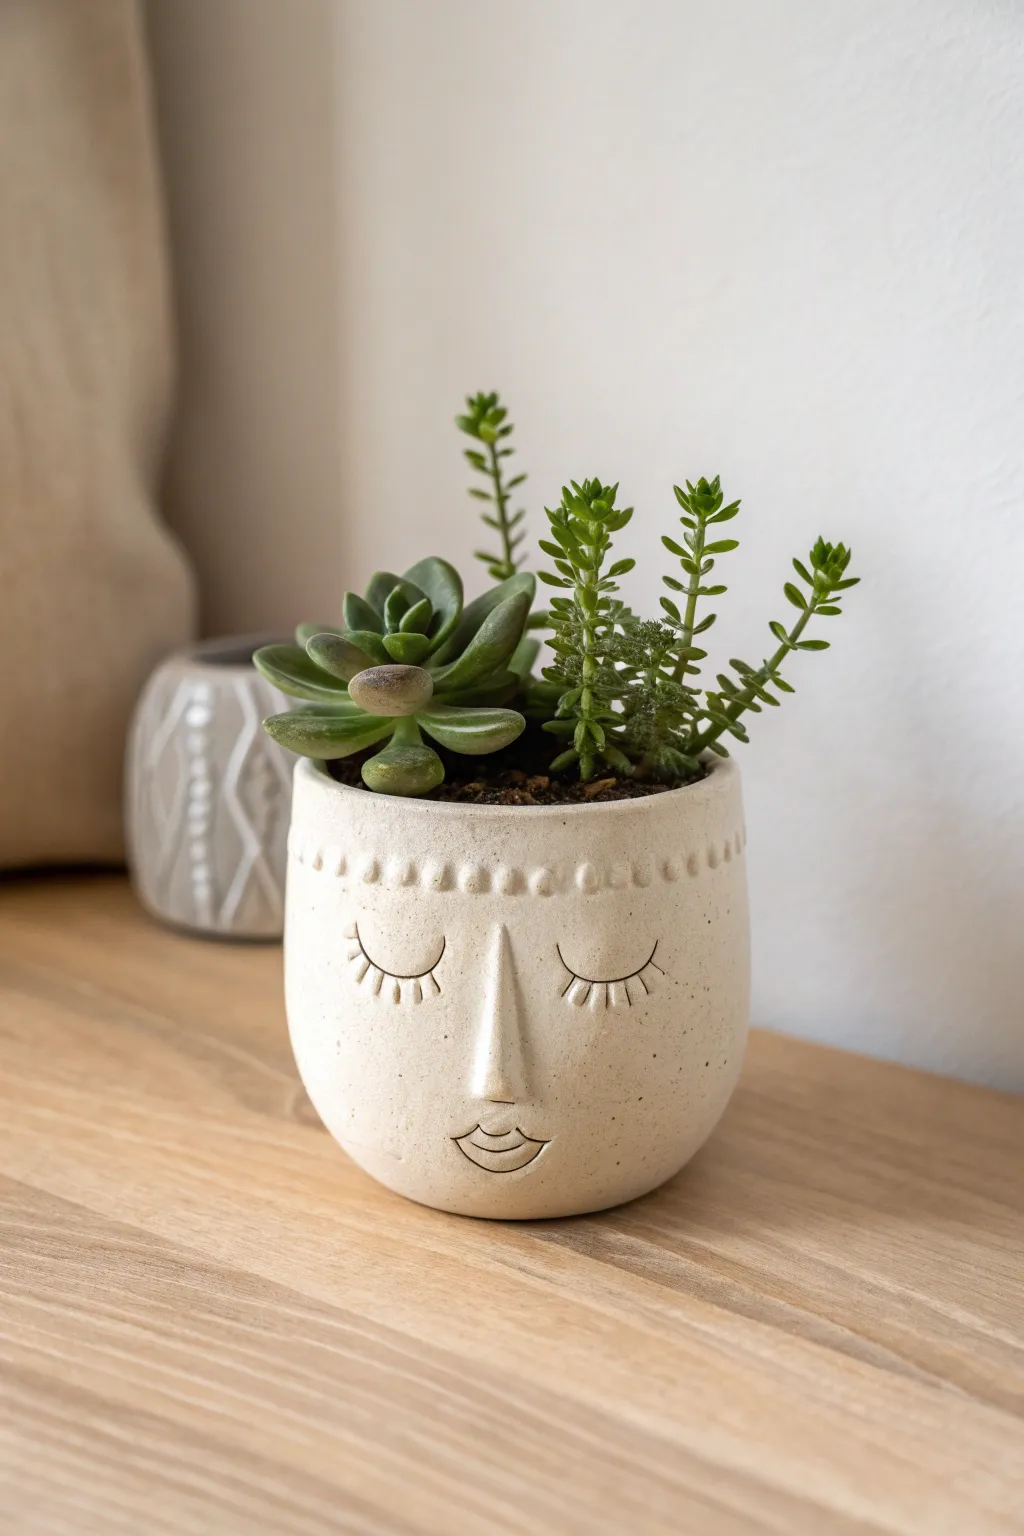
This charming, whimsically sculpted planter features a peaceful, sleeping face with subtle 3D relief and a decorative beaded rim. The natural, beige tone gives it a modern ceramic look that perfectly complements the vibrant greens of succulents.
Step-by-Step Guide
Materials
- Air-dry clay (white or terra cotta)
- Small plastic pot or tin can (to use as a mold)
- Rolling pin
- Clay knife or fettling tool
- Needle tool or toothpick
- Small cup of water (for slip)
- Small sponge
- Sandpaper (fine grit)
- Acrylic paint (cream or beige)
- Clear matte varnish or sealant
- Hot glue gun or strong construction adhesive
Step 1: Base Construction
-
Prepare the Clay:
Begin by conditioning your air-dry clay, kneading it until it is soft and pliable. Roll it out into a flat slab that is roughly 1/4 inch thick. -
Cut the Shape:
Measure the height and circumference of your plastic pot mold. Cut a long rectangle from your clay slab to match these dimensions, adding a slight overlap for the seam. -
Form the Body:
Wrap the clay rectangle around your mold. Join the ends by scoring the edges (making scratch marks), applying a little water, and pressing them firmly together. Smooth the seam with your finger or a tool until it disappears. -
Add a Bottom:
Cut a circle for the base and attach it to the bottom of the cylinder using the same score-and-slip method. Alternatively, you can coat your tin can or plastic pot in glue first and adhere the clay directly to it for a permanent internal structure.
Smooth Seams Secret
Use a little vinegar on your finger instead of water when smoothing clay seams. The acidity breaks down the clay surface slightly, creating a professional weld without lumps.
Step 2: Sculpting the Face
-
Position the Features:
Lightly sketch where the eyes, nose, and mouth will sit on the front of the pot using a needle tool to ensure symmetry before adding clay. -
Sculpt the Nose:
Roll a small, elongated triangle or cone of clay. Attach it to the center of the face with a bit of water. Use a modeling tool to blend the edges into the face, keeping the bridge distinct but smooth. -
Create the Bead Rim:
Roll many small, pea-sized balls of clay. Attach them along the very top rim of the pot, pressing them down gently so they stick but keep their rounded shape. Continue all the way around. -
Carve the Eyes:
Using your needle tool or a small carving gouge, carefully etch two downward-curving crescents for the closed eyelids. Add tiny vertical ticks along the bottom of the curve to represent eyelashes. -
Shape the Mouth:
Roll a very tiny coil for the lips. Form it into a soft smile shape and attach it below the nose. Use a fine tool to impress a line through the center to separate the upper and lower lip. -
Smoothing:
Dip your finger or a small sponge into water and gently gently smooth out any fingerprints or rough textures on the surface, being careful not to erase the etched eyelashes.
Step 3: Finishing Touches
-
Drying Time:
Allow the pot to dry completely. This usually takes 24-48 hours depending on humidity. Rotate it occasionally so all sides dry evenly. -
Sanding:
Once bone dry, use fine-grit sandpaper to buff away any remaining lumps or sharp edges, particularly around the rim and the seam. -
Painting:
Paint the entire exterior with a cream or beige acrylic paint. To highlight the etched eyes and mouth, you can darken the grooves slightly with a diluted brown wash or a fine-tip marker. -
Sealing:
Apply two coats of matte clear varnish to protect the clay from moisture, as air-dry clay is not naturally waterproof. -
Planting:
If you built the clay around a permanent internal pot, you can plant directly. If it is pure clay, insert a small plastic nursery pot inside to prevent water damage.
Cracks While Drying?
If hairline cracks appear as the clay shrinks, don’t panic. Create a paste with a bit of fresh clay and water, press it into the cracks, smooth it over, and let it dry again.
Now you have a serene little friend to hold your favorite succulents on a sunny windowsill
Speckled Terrazzo-Style Planters
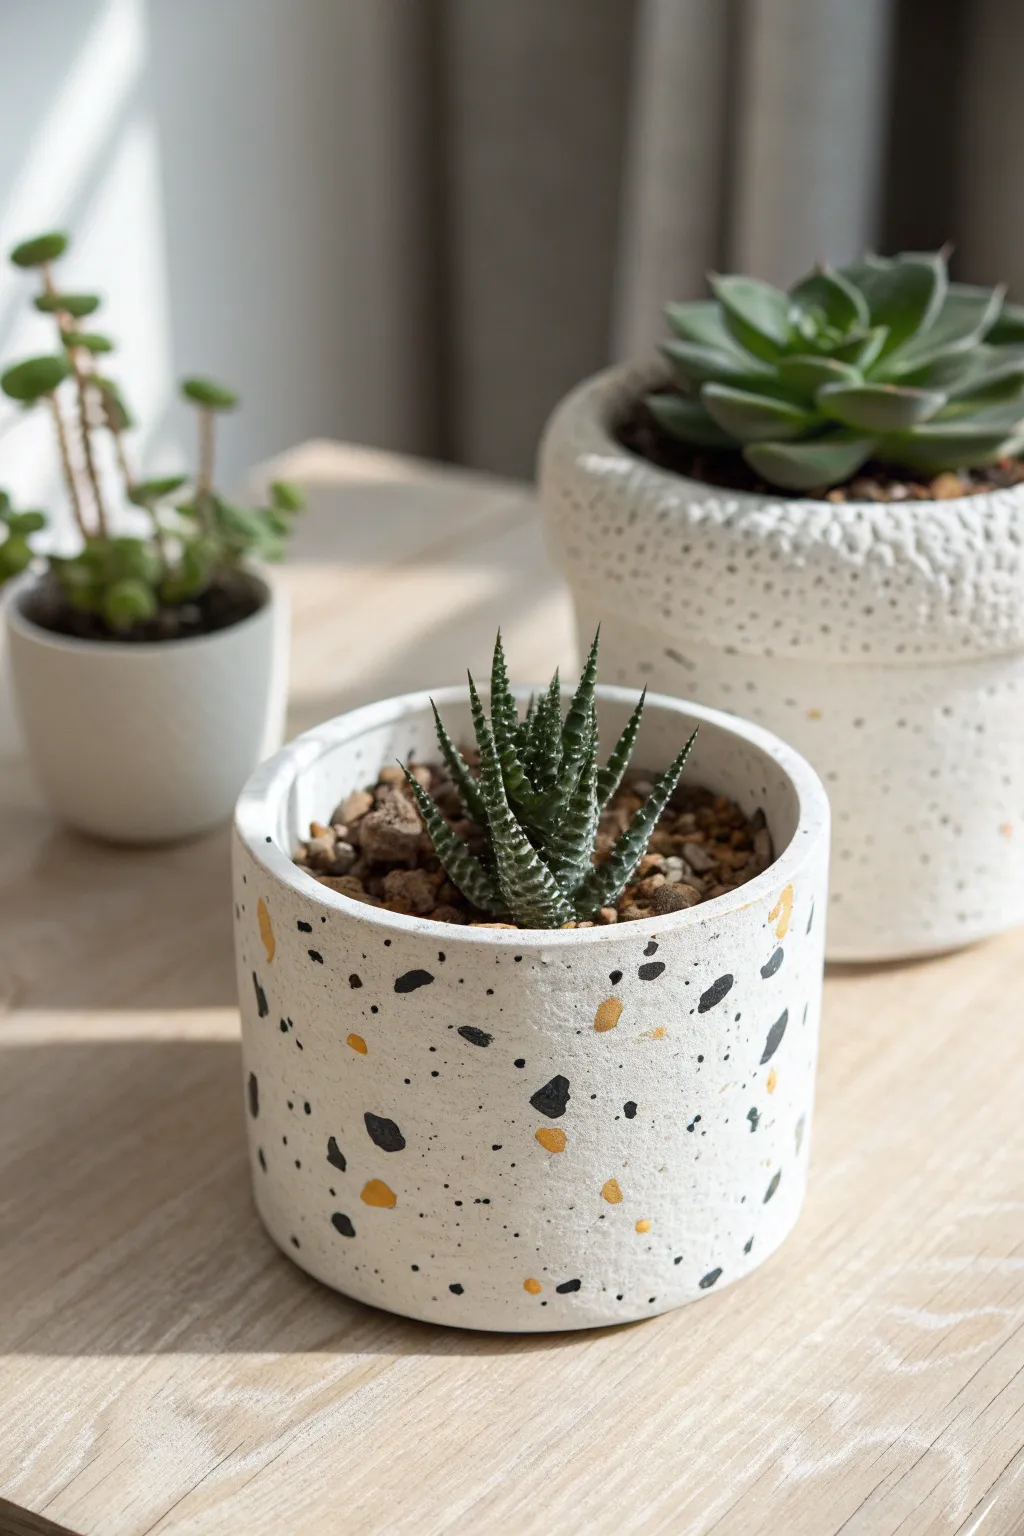
Bring a touch of modern artistry to your indoor garden with this sleek terrazzo-style planter. Using air-dry clay and a simple inlay technique, you can create a durable, professional-looking pot featuring playful black and mustard yellow flecks.
Step-by-Step
Materials
- White or light grey air-dry clay (approx. 500g)
- Black air-dry clay (small amount)
- Mustard yellow or gold air-dry clay (small amount)
- Rolling pin
- Rolling guides or wooden slats (approx. 5-7mm thick)
- Circular cookie cutter or jar lid (for the base)
- Craft knife or clay blade
- Rectangular template (cardstock works well)
- Cup of water
- Sponge or fine-grit sandpaper
- Acrylic sealant or varnish (matte finish)
Step 1: Preparing the Pattern
-
Prep the chips:
Start by taking small pinches of your black and mustard yellow clay. Roll them into tiny irregular balls, flat flakes, or rough geometric shards. -
Scatter the chips:
On a clean, non-stick work surface or canvas cloth, scatter your colored clay chips randomly. Aim for an uneven distribution to mimic real stone. -
Roll the main slab:
Take a large portion of your white clay and roll it out directly over the scattered chips using your rolling pin and guides. This embeds the colors into the surface. -
Flip and repeat:
Change the direction of your rolling pin frequently to keep the thickness even. If you want speckles on the inside too, flip the slab and press more chips into the reverse side. -
Smooth the surface:
Once rolled to about 5-7mm thickness, run a slightly damp finger or a rib tool over the surface to ensure the colored chips are flush with the white clay.
Clean Rolling
Place a sheet of parchment paper over your colored chips before rolling the white clay on top. This prevents the chips from sticking to your rolling pin and smearing.
Step 2: Constructing the Pot
-
Cut the walls:
Using your rectangular cardstock template and a craft knife, cut a long, straight strip from your speckled clay slab. This will be the wall of your pot. -
Cut the base:
Use a circular cutter or trace around a jar lid to cut a round base from the remaining rolled clay. -
Score the edges:
Use a needle tool or an old toothbrush to scratch up (score) the outer edge of the base circle and the short ends of your rectangular strip. -
Add slip:
Apply a little water or clay glue (slip) to the scored areas to act as an adhesive. -
Form the cylinder:
Wrap the rectangular strip around the base circle. Since I like a seamless look, I carefully press the two short ends of the wall together first to form a cylinder. -
Join the base:
Gently press the cylinder walls down onto the base circle. Use a modeling tool to blend the clay on the inside seam where the wall meets the floor.
Metallic Pop
Mix genuine gold leaf flakes into the clay surface after the initial sanding. Seal immediately to trap the shimmer alongside the matte colors.
Step 3: Refining and Finish
-
Blend the wall seam:
On the outside of the pot, smooth the vertical seam where the wall joins. You can use a bit of water on your finger, rubbing in a circular motion until the line disappears. -
Check the shape:
Look at the pot from above to ensure it is perfectly round. If it has warped during handling, gently nudge it back into a circle. -
Initial dry:
Let the pot sit undisturbed for 24-48 hours. Keep it away from direct heat sources to prevent cracking. -
Sanding:
Once bone dry, use fine-grit sandpaper to sand the entire surface. This is the magic step that reveals the crisp edges of your colored chips and removes any haziness. -
Wipe down:
Use a slightly damp sponge to wipe away all clay dust. The colors should look vibrant now. -
Seal:
Apply two to three coats of a matte acrylic varnish to seal the clay. This protects it from moisture when you water your plant.
Pop in a small succulent or cactus and enjoy the modern texture you have created


What Really Happens Inside the Kiln
Learn how time and temperature work together inside the kiln to transform clay into durable ceramic.
Stamped Pattern Pots
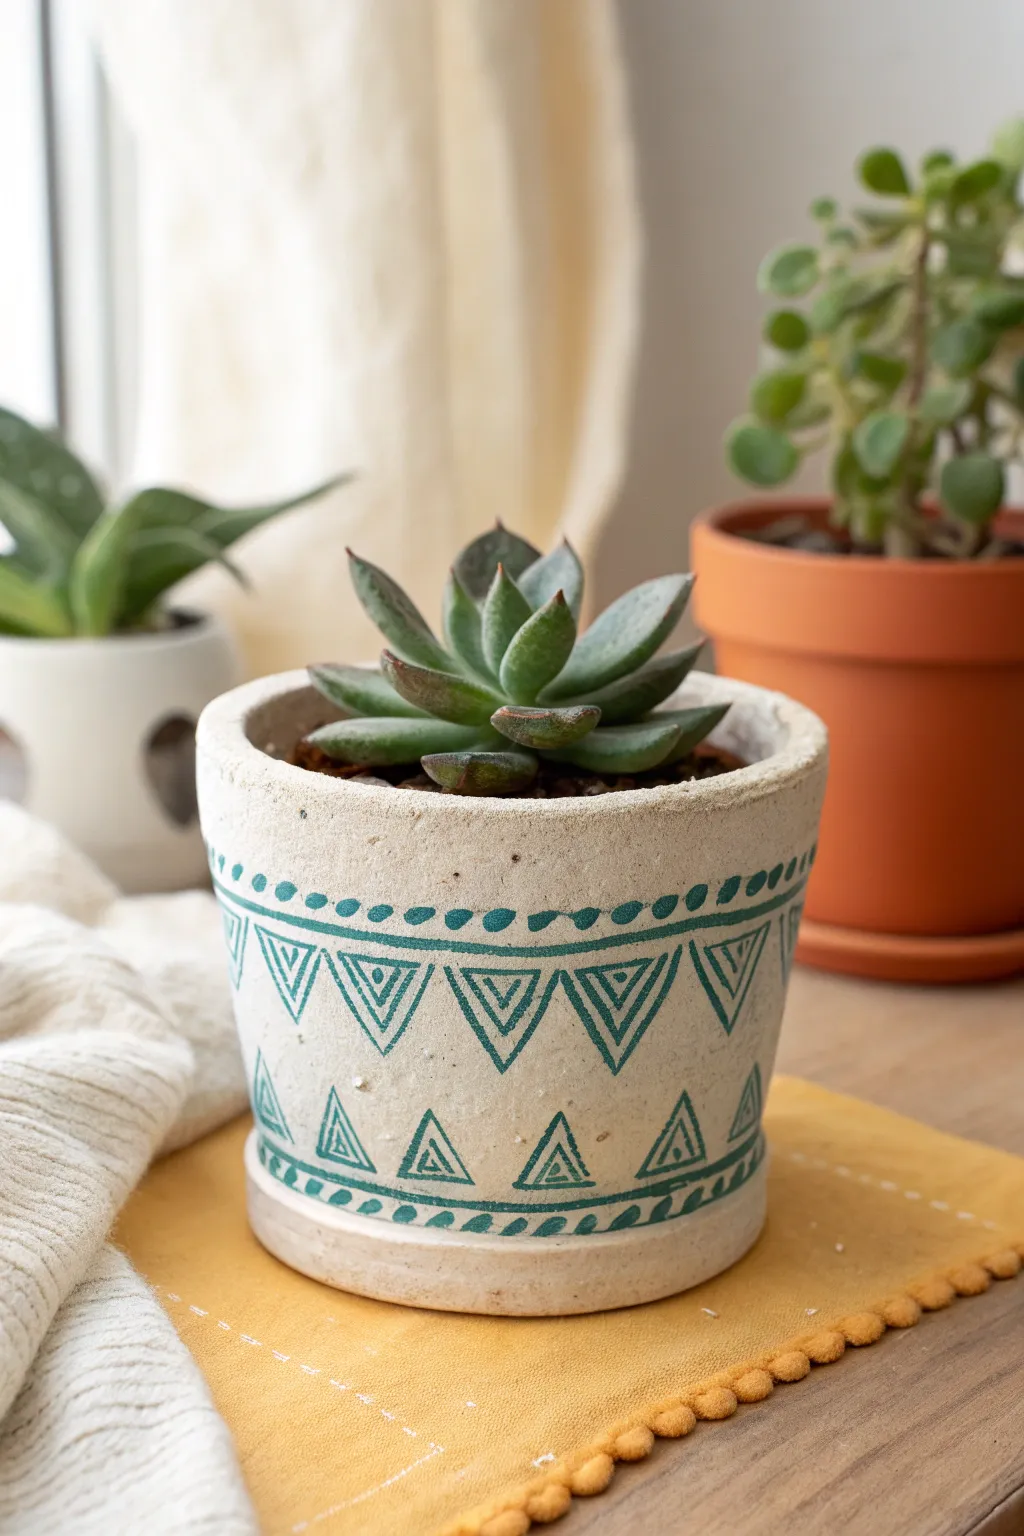
Bring a touch of artisanal charm to your succulent collection with this simple yet striking air dry clay project. The rustic cream finish paired with a hand-stamped teal geometric pattern creates a lovely boho vibe that looks far more expensive than it is.
How-To Guide
Materials
- White or terracotta-colored air dry clay (approx. 1 kg)
- Rolling pin
- Clay knife or craft knife
- Clay slip (clay mixed with water)
- Sandpaper (fine grit)
- Teal or dark turquoise acrylic paint
- Matte white or cream acrylic paint (for the base)
- Small foam pouncer or rubber stamp carving block
- Carving tools (if making your own stamp)
- Sealant or varnish (waterproof/matte finish)
- A small bowl or existing pot (to use as a mold, optional)
Step 1: Shaping the Base Vessel
-
Roll the base:
Begin by rolling out a ball of clay until it is about 1/4 inch thick. Cut out a circle that will serve as the bottom of your pot. I find using a cookie cutter or tracing the bottom of a cup ensures a perfect circle. -
Create the walls:
Roll out a long, rectangular slab of clay, maintaining that same 1/4 inch thickness. The length should be just long enough to wrap around the circumference of your circular base. -
Attach the wall:
Score the edges of your circular base and the bottom edge of your rectangular strip. Apply a generous amount of clay slip to the scored areas. -
Seal the seam:
Wrap the wall around the base. Where the two ends of the wall meet, cut them at an angle (bevel cut) for a seamless join. Score, slip, and press the ends together firmly. -
Create the rim band:
For the slightly thicker rim seen in the photo, roll a thin coil or narrow flat strip of clay. attaching it to the exterior top edge using the slip and score method. Smooth it down so it looks integrated but slightly raised. -
Form the drainage saucer:
Roll a second, slightly wider circle of clay for the saucer. Create a very low lip around the edge by pinching the clay upward. This creates the integrated saucer look at the bottom. -
Attach the saucer:
Score and slip the bottom of your main pot and the center of the saucer. Press them together firmly. This faux-saucer aesthetic gives the pot weight and balance. -
Dry completely:
Let the pot dry for at least 24-48 hours. It should be bone dry and light in color before you proceed to sanding.
Stamp Smearing?
If your stamped image is blurry, your paint is too thick or the surface is too curved. Try rocking the stamp gently from left to right as you press to catch the curve.
Step 2: Decorating and Finishing
-
Sand for texture:
Once dry, gently sand the exterior. Don’t make it perfectly smooth; keep some of the gritty, stone-like texture visible to maintain that rustic appeal. -
Base coat:
Paint the entire exterior (and the inner rim) with a matte cream or off-white acrylic paint. You might need two coats to get a solid, stony look. Let this dry fully. -
Create the triangle stamp:
If you don’t have a pre-made stamp, carve a simple nesting triangle design into a small block of rubber or a potato. The design should be an inverted triangle with smaller triangles inside it. -
Plan the spacing:
Lightly mark the circumference of the pot with a pencil to ensure your pattern stays straight. Decide how many triangles you want to fit around the pot. -
Stamp the main pattern:
Dip your stamp into teal acrylic paint. Blot excess paint on a paper towel first—too much paint will cause sliding. Press the stamp firmly onto the middle section of the pot, repeating around the circumference. -
Add detail lines:
Using a very fine detail brush or a paint pen in the same teal color, hand-paint the small horizontal dashes and dots above the main triangle band. Keep them loose and handmade looking. -
Add the bottom row:
Stamp or paint a smaller row of upright triangles near the bottom edge, alternating their placement with the larger inverted triangles above. -
Weathering (optional):
I like to take a dry brush with a tiny bit of brown paint and lightly whisk it over the cream areas to make the pot look aged and earthy. -
Seal for protection:
Apply at least two coats of waterproof varnish or sealant, both inside and out. This is crucial for air dry clay to survive contact with soil moisture.
Make it Waterproof
Air-dry clay dissolves in water! For a functional planter, stick a plastic nursery pot inside this decorative shell rather than planting directly.
Place your favorite succulent inside and enjoy the handmade warmth it adds to your windowsill
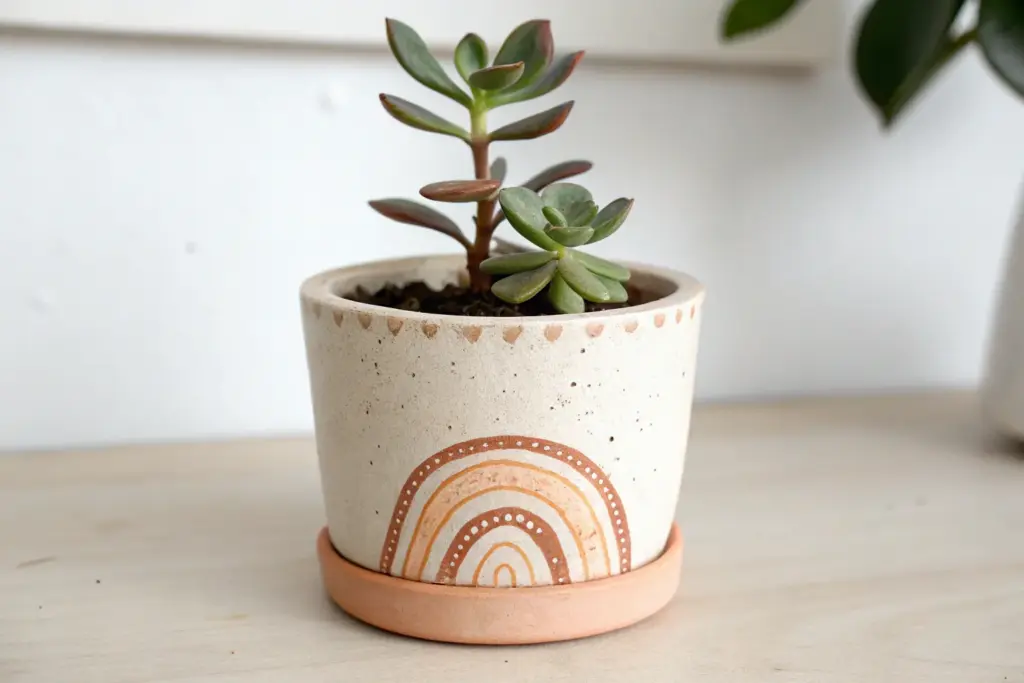
Leaf-Imprint Nature Pots

Transform a plain terracotta pot or build your own vessel featuring this elegant, nature-inspired leaf design. The contrast between the creamy white textured clay and the warm earthy base creates a sophisticated, organic look perfect for small succulents.
Step-by-Step
Materials
- White or cream air-dry clay (e.g., DAS or Crayola)
- Small terracotta pot (as a base structure)
- Leaf-shaped clay cutters or stamps (teardrop leaf shape)
- Rolling pin
- Water and a small bowl
- Score and slip tool (or a toothpick/needle tool)
- Sponge
- Matte sealant or varnish
- Optional: Real leaves with strong veins for texture
Step 1: Preparing the Base
-
Clean the pot:
Start with a clean, dry terracotta pot. Wipe away any dust or debris with a damp cloth to ensure the clay adheres properly to the surface. -
Soak briefly:
If your terracotta pot is brand new and very dry, dip it in water for just a second. This prevents the porous terracotta from sucking the moisture out of your air-dry clay too quickly, which causes cracking. -
Create the clay sheet:
Roll out a portion of your white air-dry clay into a long, rectangular sheet. Aim for a thickness of about 3-4mm. It needs to be long enough to wrap around the circumference of your pot.
Clay peeling off?
If the clay pulls away from the pot while drying, use a mixture of white PVA glue and water as your ‘slip’ instead of just water. It creates a much stronger bond.
Step 2: Creating the Leaf Relief
-
Cut the leaf shapes:
Using a leaf-shaped cutter, press firmly into your rolled clay sheet to create multiple individual leaves. You will need enough to cover the pot in a staggered pattern. -
Add vein details:
Before removing the leaves from the main sheet (or immediately after), use a needle tool or toothpick to gently draw a central vein and angled side veins onto each leaf. You can also press a real leaf into the clay here for natural texture. -
Slight curving:
Once cut, gently lift each leaf. I find it helpful to slightly curve them in your palm so they match the curve of the pot rather than being stiff and flat.
Antique Wash Effect
For more depth, mix a tiny bit of brown acrylic paint with water. Brush it over the dry leaves and wipe it off immediately. The dark color stays in the veins.
Step 3: Assembly
-
Apply the background layer:
You have a choice here: either cover the entire pot in a thin layer of white clay first, or stick the leaves directly to the terracotta. For the look in the photo, apply a very thin, textured layer of white clay to the upper 3/4 of the pot, leaving the bottom terracotta rim exposed. -
texture the background:
Dab the white clay background layer with a sponge or a crumpled ball of foil to give it that organic, stone-like texture seen between the leaves. -
Score the surface:
Use your needle tool to scratch up the backs of your clay leaves and the spots on the pot where you plan to place them. This scoring creates a mechanical bond. -
Attaching leaves:
Dab a little water (slip) on the scored areas. Press the leaves onto the pot, starting near the bottom of the white section and working upward. -
Staggering:
Arrange the leaves in slightly overlapping or closely nested rows. Orient some pointing up and some slightly tilted to mimic natural growth foliage. -
Refining edges:
Check the edges where the clay stops and the terracotta bottom begins. Use a damp finger or sponge to clean up this line so the transition is neat but slightly organic.
Step 4: Finishing Touches
-
Detail check:
Go back over your leaf veins with the needle tool if they got smudged during application. Deepen the lines to ensure they show up well after drying. -
Rim Smoothing:
Smooth the clay over the top rim of the pot. You want the white clay to just fold over the edge for a finished look. -
Slow drying:
Place the pot in a cool, dry area away from direct sunlight or heat vents to dry slowly. Drying too fast can cause the clay to detach from the terracotta core. -
Sealing:
Once completely bone dry (usually 24-48 hours), apply a matte varnish or sealant over the white clay parts. This protects the porous material from water splashes when watering your plant.
Fill your new textured pot with a hearty succulent and enjoy the natural elegance you’ve created

TRACK YOUR CERAMIC JOURNEY
Capture glaze tests, firing details, and creative progress—all in one simple printable. Make your projects easier to repeat and improve.
Easy Polka Dot And Dash Pots
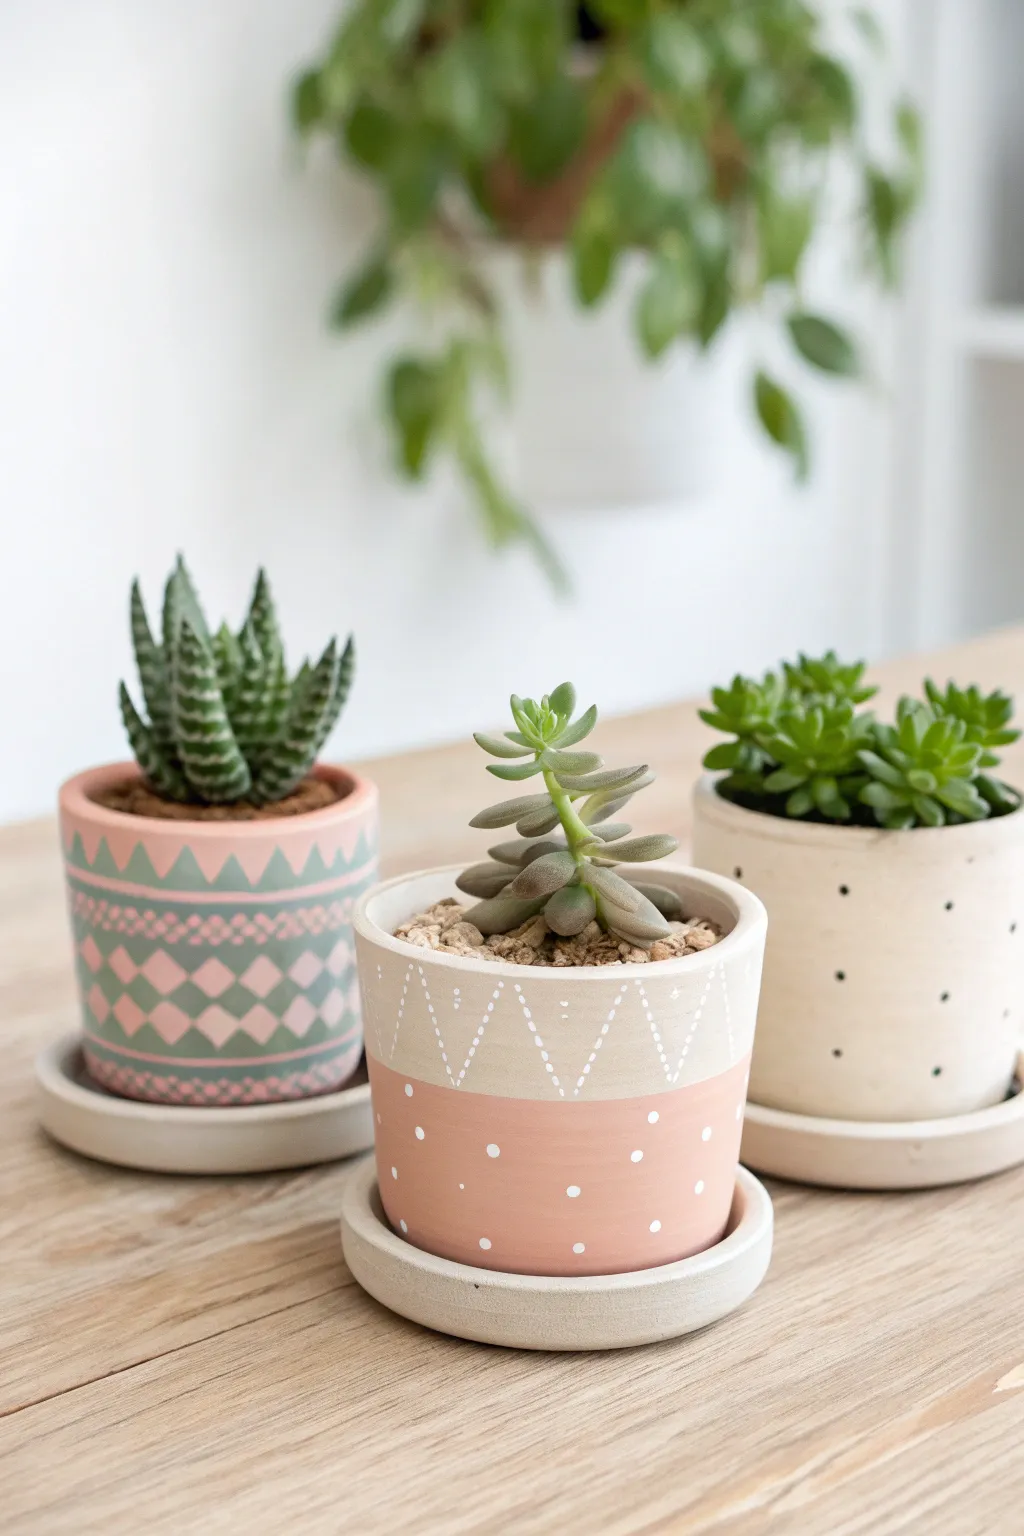
Bring a touch of modern whimsy to your succulents with these charming hand-painted clay pots featuring delicate dashes and playful polka dots. The soft contrast between natural clay textures and clean white paint creates a delightful home for your favorite small plants.
Detailed Instructions
Materials
- Air dry clay (white or terracotta)
- Rolling pin
- Circle clay cutter or template (approx. 4-inch diameter)
- Craft knife or clay tool
- Small bowl slightly larger than cutter (for forming)
- Sandpaper (fine grit)
- White acrylic paint (matte finish)
- Soft pink acrylic paint
- Fine liner paintbrush (size 0 or 00)
- Round paintbrush (size 2-4)
- Dotting tool or toothpick
- Clear matte sealant mod podge or varnish
- Water and sponge
Step 1: Forming the Pot
-
Prepare the Clay:
Begin by kneading a large handful of air dry clay until it is warm and pliable. If the clay feels too dry or cracks, dampen your hands slightly with water as you work. -
Roll the Slab:
Use a rolling pin to flatten the clay into an even slab, aiming for a thickness of about 1/4 inch. Keep the thickness consistent to prevent cracking later. -
Cut the Shape:
Place your circular template or cutter onto the clay and cut out a clean circle for the base. For the walls, cut a long rectangular strip, measuring approximately 3 inches wide and long enough to wrap around the circumference of your base. -
Assemble the Pot:
Score the edges of the base and the bottom of the rectangular strip with a needle tool. Apply a small amount of water or clay slip to the scored areas. -
Seal the Seams:
Wrap the strip around the base, pressing the scored edges together firmly. Use your finger or a modelling tool to blend the clay at the seams until they are invisible, smoothing both the inside and outside connections. -
Create the Saucer:
Roll out a smaller amount of clay and cut a circle slightly larger than your pot’s base. Gently curve the edges upward to create a shallow lip for the saucer. -
Dry Completely:
Set both the pot and saucer aside in a cool, dry place. Allow them to dry for at least 24-48 hours, turning them occasionally to ensure even drying.
Clean Lines Hack
Struggling to paint a straight horizon line? Gently wrap a rubber band around the pot at your desired height to use as a painting guide.
Step 2: Painting the Design
-
Sand for Smoothness:
Once fully dry, lightly sand any rough edges or uneven spots on the exterior of the pot using fine-grit sandpaper. Wipe away all dust with a slightly damp cloth. -
Base Coat (Optional):
If you want the top rim to be a creamy off-white rather than raw clay, apply a wash of diluted white paint to the upper third of the pot. Let it dry completely. -
Block the Color:
Using the round brush and soft pink paint, paint the bottom two-thirds of the pot. Create a clean, horizontal line where the pink meets the natural clay (or white) section. You may need two coats for full opacity. -
Paint the Zigzags:
With your fine liner brush and white paint, carefully hand-paint a zigzag line around the upper unpainted section. Keep your hand steady and try to keep the peaks and valleys consistent. -
Add Dashed Details:
Follow the path of your zigzag line, but this time paint small, vertical dashed lines descending from each ‘valley’ of the zigzag. This creates the intricate geometric look. -
Create Polka Dots:
Dip a dotting tool or the back of a paintbrush into white paint. Gently press dots onto the pink section of the pot in a random or grid pattern. I find a random scatter looks more organic and fun. -
Saucer Finish:
Paint the saucer to match—either leaving it natural or painting it a solid soft gray or white to complement the pot. -
Seal the Work:
Once all paint is dry, apply a coat of clear matte sealant to the entire outside of the pot and saucer to protect your design from moisture.
Level It Up
Mix metallic gold powder into your white paint for the dots to give the pot a glamorous, shimmering finish.
Now you have a custom, handmade vessel ready to house your favorite little succulent
Geometric Faceted Pots
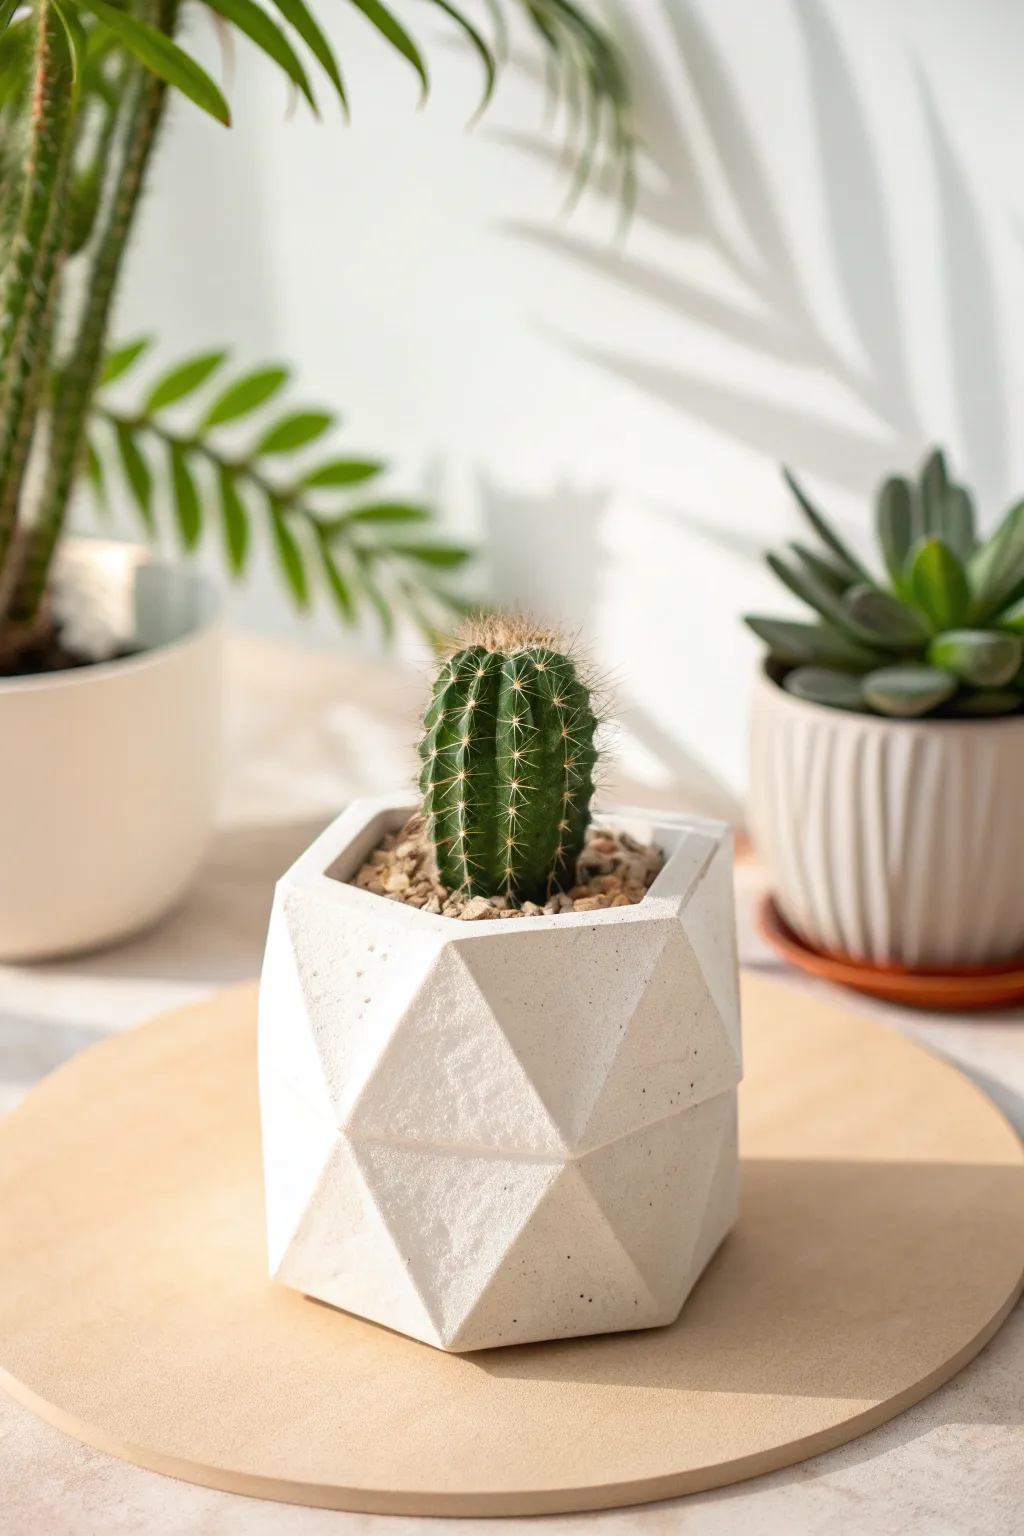
Bring a touch of contemporary elegance to your home with this stunning geometric faceted pot. The sharp angles and pristine white finish create a sophisticated look that mimics expensive ceramic or concrete planters, yet is surprisingly achievable with air dry clay.
How-To Guide
Materials
- High-quality white air dry clay (approx. 500g)
- Acrylic rolling pin
- Sharp craft knife or scalpel
- Ruler or straight edge
- Tracing paper and pencil
- Cardstock (for templates)
- Small bowl of water
- Slip (clay mixed with water)
- Fine-grit sandpaper (220 and 400 grit)
- White acrylic paint (matte finish)
- Matte spray varnish or sealant
- Small succulent or cactus for planting
Step 1: Preparation and Template Creation
-
Design your template geometry:
Sketch a geometric pattern composed of triangles on tracing paper. For this specific look, you need a repeating pattern of equilateral or isosceles triangles that fit together to form a hexagonal or octagonal base shape. -
Transfer to cardstock:
Once you are happy with the layout of your triangles—essentially a strip of triangles pointing up and down—transfer this design onto stiff cardstock. -
Cut out the main template:
Carefully cut out your cardstock template. This strip will form the walls of your pot. You will also need a separate hexagon or octagon shape for the base that matches the width of your wall structure.
Cracked Seams?
If hairline cracks appear at the folds while drying, mix a thick paste of clay and water (spackle consistency) and fill the cracks. Sand smooth once dry.
Step 2: Building the Form
-
Condition the clay:
Take a large chunk of air dry clay and knead it thoroughly until it is warm, pliable, and free of air bubbles. -
Roll out a slab:
Using your acrylic rolling pin, roll the clay out into a long, even slab. Aim for a thickness of about 0.5cm (1/4 inch). I like to use guide sticks on either side to ensure the thickness is perfectly consistent. -
Cut the clay strip:
Place your cardstock wall template onto the clay slab. Using a sharp craft knife and a ruler for precision, cut around the outline. Keep the edges as crisp and straight as possible. -
Cut the base:
Roll out a smaller piece of clay and cut out your corresponding geometric base shape using the second template. -
Score the fold lines:
Lightly score the internal lines where the triangles meet on your wall strip. Do not cut all the way through; you just want to create a guide and a weakness in the clay to allow it to fold crisply.
Step 3: Assembly and Refining
-
Fold into shape:
Carefully lift your clay strip and bend it along the scored lines to form the faceted cylinder shape. Bring the two ends together. -
Join the seam:
Score the meeting edges with a needle tool and apply a little slip. Press the edges firmly together. Smooth the seam with your finger or a modeling tool so it becomes invisible. -
Attach the base:
Score the bottom edges of your geometric walls and the perimeter of your base piece. Apply slip to both surfaces. -
Secure the bottom:
Place the wall structure onto the base piece. Reach inside the pot to press the clay together firmly, ensuring a tight seal. Smooth the outside join so it looks like one continuous piece. -
Refine the facets:
While the clay is leather-hard, use a flat modeling tool or the side of a ruler to gently press and sharpen the triangular facets, ensuring the geometric lines are distinct and not rounded. -
Let it dry slowly:
Place the pot in a cool area away from direct sunlight. Let it dry for 24-48 hours. Covering it loosely with plastic wrap for the first day can help prevent cracking.
Faux Concrete Look
Mix a small amount of fine black sand or grey paint into your white clay before rolling it out to create a speckled, granite-like texture.
Step 4: Finishing and Sealing
-
Sand for perfection:
Once fully bone dry, use fine-grit sandpaper to smooth out any fingerprints or rough edges. Pay special attention to the rim and the sharp corners of the facets. -
Apply white paint:
Brush on a coat of matte white acrylic paint. This unifies the color and gives it that clean, modern plaster look. Apply a second coat if necessary for full opacity. -
Seal carefully:
Because air dry clay is porous, seal the inside and outside with a matte spray varnish or a waterproof sealant. This protects your work from moisture when watering your plant. -
Add your plant:
Fill with gritty soil and pot a small cactus or succulent. Since there is no drainage hole, ensure you use a layer of gravel at the bottom or keep the plant in a nursery plastic pot that fits inside.
Enjoy the clean lines of your new handcrafted planter on a bright windowsill or desk.
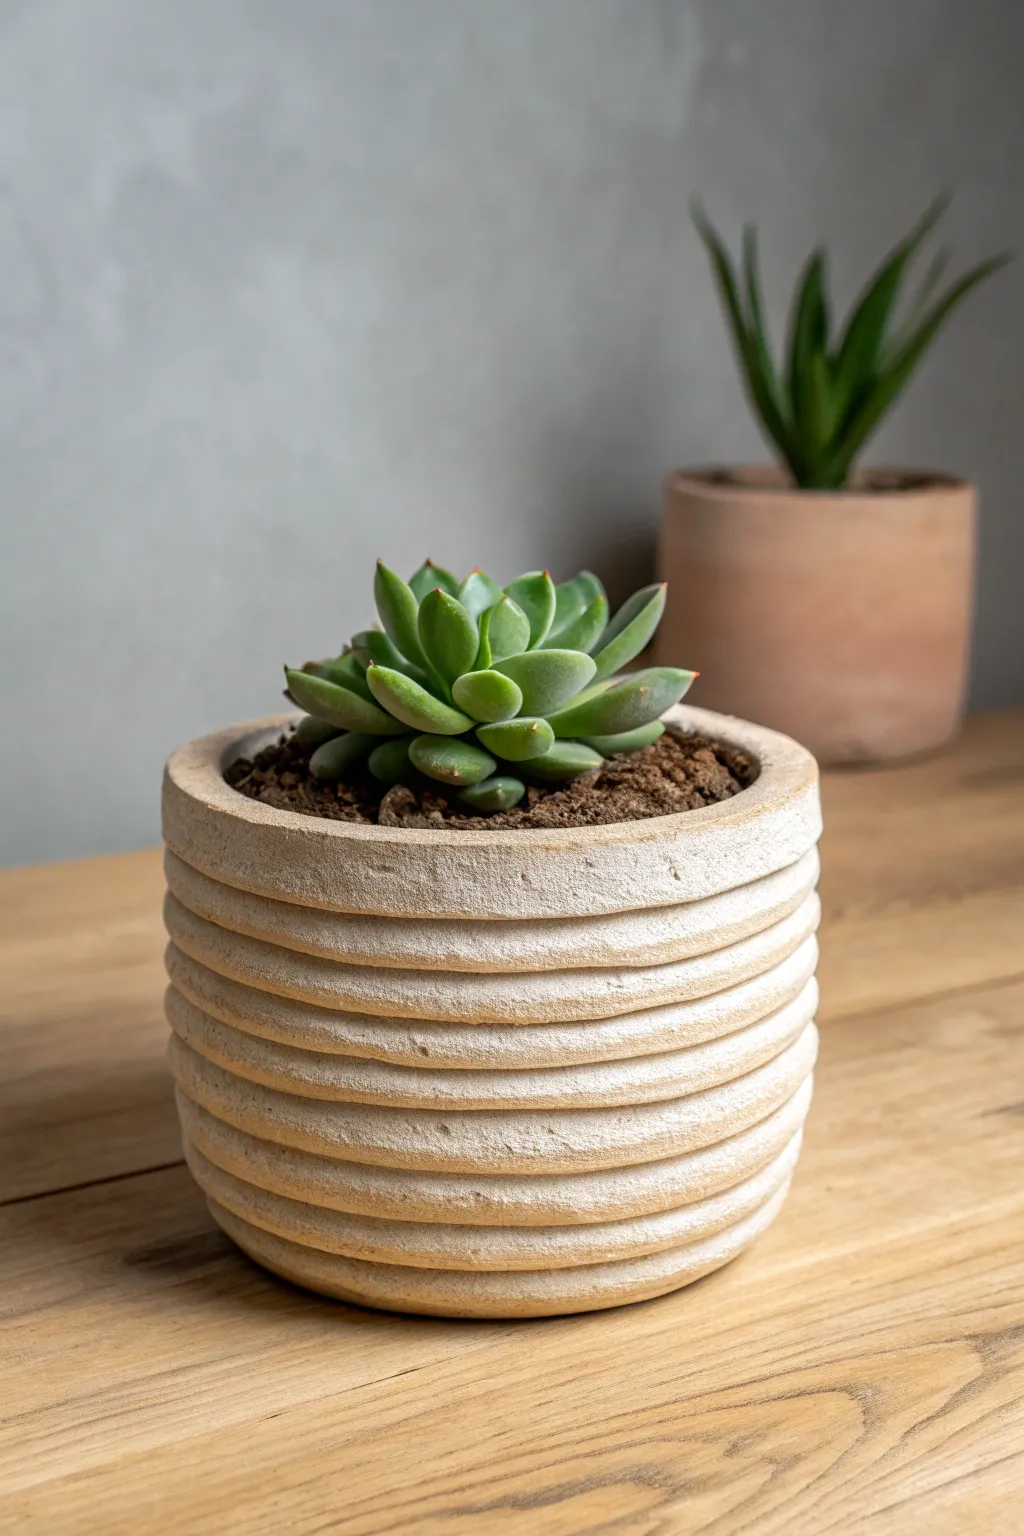
Fluted Ribbed Pots
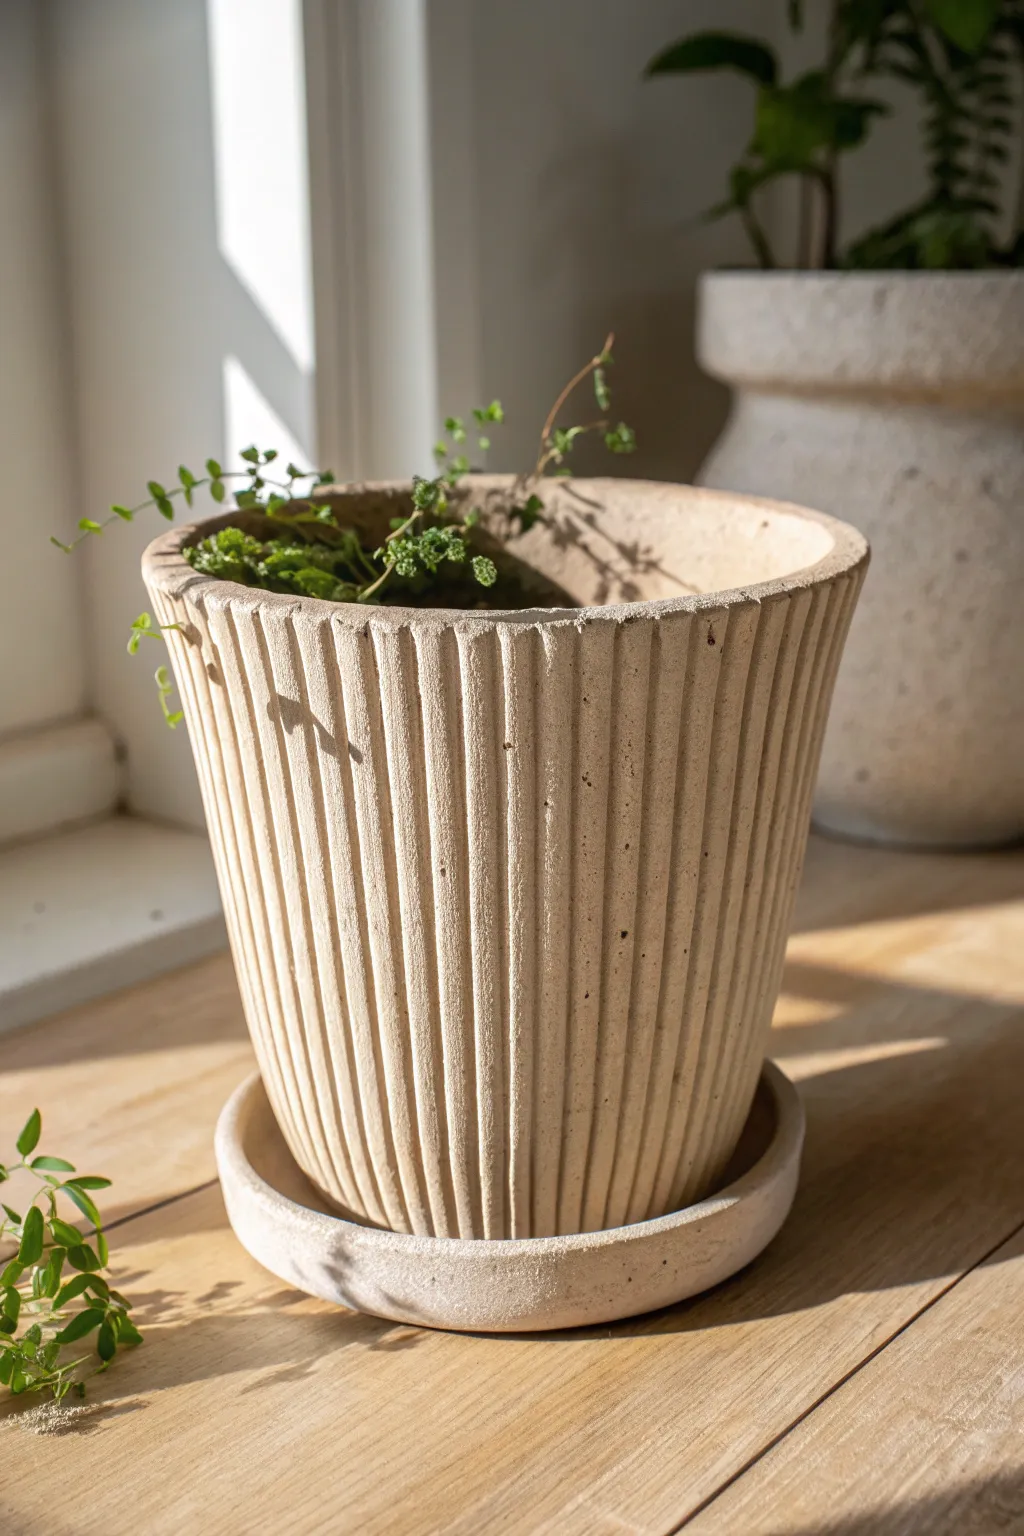
Achieve a high-end ceramic look without a kiln using this textured air dry clay project. The vertical fluting adds sophisticated architectural detail, while a stone-effect finish gives it a timeless, organic warmth perfect for sunny windowsills.
Step-by-Step Guide
Materials
- Air dry clay (white or terracotta)
- Rolling pin
- Craft knife or clay cutter
- Ruler or straight edge
- Slip (clay mixed with water)
- Loop tool or U-shaped sculpting tool
- Sponge
- Plastic container or existing pot (to use as a mold)
- Sandpaper (medium and fine grit)
- Stone texture spray paint or acrylic paint mixed with baking soda
- Matte varnish or sealant
Step 1: Building the Base Structure
-
Prepare the clay slab:
Begin by rolling out a substantial portion of your air dry clay to a consistent thickness of about 1/4 inch. Ensure the slab is large enough to wrap entirely around your chosen mold form. -
Cut the base and walls:
Using your mold as a guide, cut a circle for the base of the pot. Then, cut a long rectangular strip that matches the height and circumference of your mold form. -
Form the cylinder:
Wrap the rectangular strip around your plastic mold to check the fit. Score the edges where the clay meets, apply a generous amount of slip, and press the ends together firmly to create a seam. -
Attach the base:
Score and slip the bottom edge of your cylinder and the outer edge of your circular base. Press them together, smoothing the clay connection on both the inside and outside so the seam disappears. -
Create the taper:
To mimic the slight V-shape of the reference image, gently manipulate the clay while it is still on the mold, pressing slightly narrower at the bottom and flaring slightly at the top rim.
Uneven Ridges?
If your carved lines look wobbly, don’t restart. Use a flat wooden modeling tool to gently press and straighten the raised ribs before the clay dries completely.
Step 2: Carving the Flutes
-
Mark your spacing:
Before carving, use a ruler to lightly mark vertical guidelines around the rim of the pot. This ensures your ridges will be perfectly vertical and evenly spaced. -
Carve the first channels:
Using a loop tool or a U-shaped sculpting tool, drag it vertically from the top rim down to the base to carve out a channel. Apply steady, even pressure to maintain depth. -
Refine the ridges:
Continue carving channels around the entire circumference. Leave a raised strip of clay between each carved channel to create the ‘ribbed’ effect. -
Smooth the carved lines:
Once all channels are carved, dip your finger or a small damp sponge into water and run it gently down each groove. This softens rough burrs without removing the texture. -
Shape the rim:
The rim in the image is flat and substantial. Use your straight edge or a paddle to gently tap the top rim flat, ensuring it is level all the way around.
Step 3: The Saucer & Finishing
-
Form the saucer:
Roll out a smaller slab of clay. Cut a circle slightly larger than the base of your pot. Roll a small coil, attach it to the edge of the circle with slip, and smooth it upwards to create a shallow lip. -
Dry thoroughly:
I usually let pieces like this dry for at least 48 hours. Turn the pot upside down halfway through the drying process to ensure the bottom dries evenly. -
Sand for texture:
Once bone dry, sand the entire surface. Use medium grit to shape any uneven ridges, then switch to fine grit. Don’t over-sand; you want to keep some roughness for that stone look. -
Create the stone effect:
Apply a coat of stone-texture spray paint in a beige or cream tone. Alternatively, mix cream acrylic paint with a teaspoon of baking soda and dabbing it on with a sponge for a gritty finish. -
Seal for protection:
Since air dry clay isn’t waterproof, apply two to three thorough coats of matte varnish inside and out. This protects the pot from moisture when watering your plant.
Add Speckles
For an ultra-realistic stone look, load an old toothbrush with diluted brown paint and flick fine speckles over the dried beige base coat before sealing.
Place your favorite leafy plant inside and enjoy the organic, architectural warmth this piece brings to your space
Scalloped Rim Sweetheart Pots
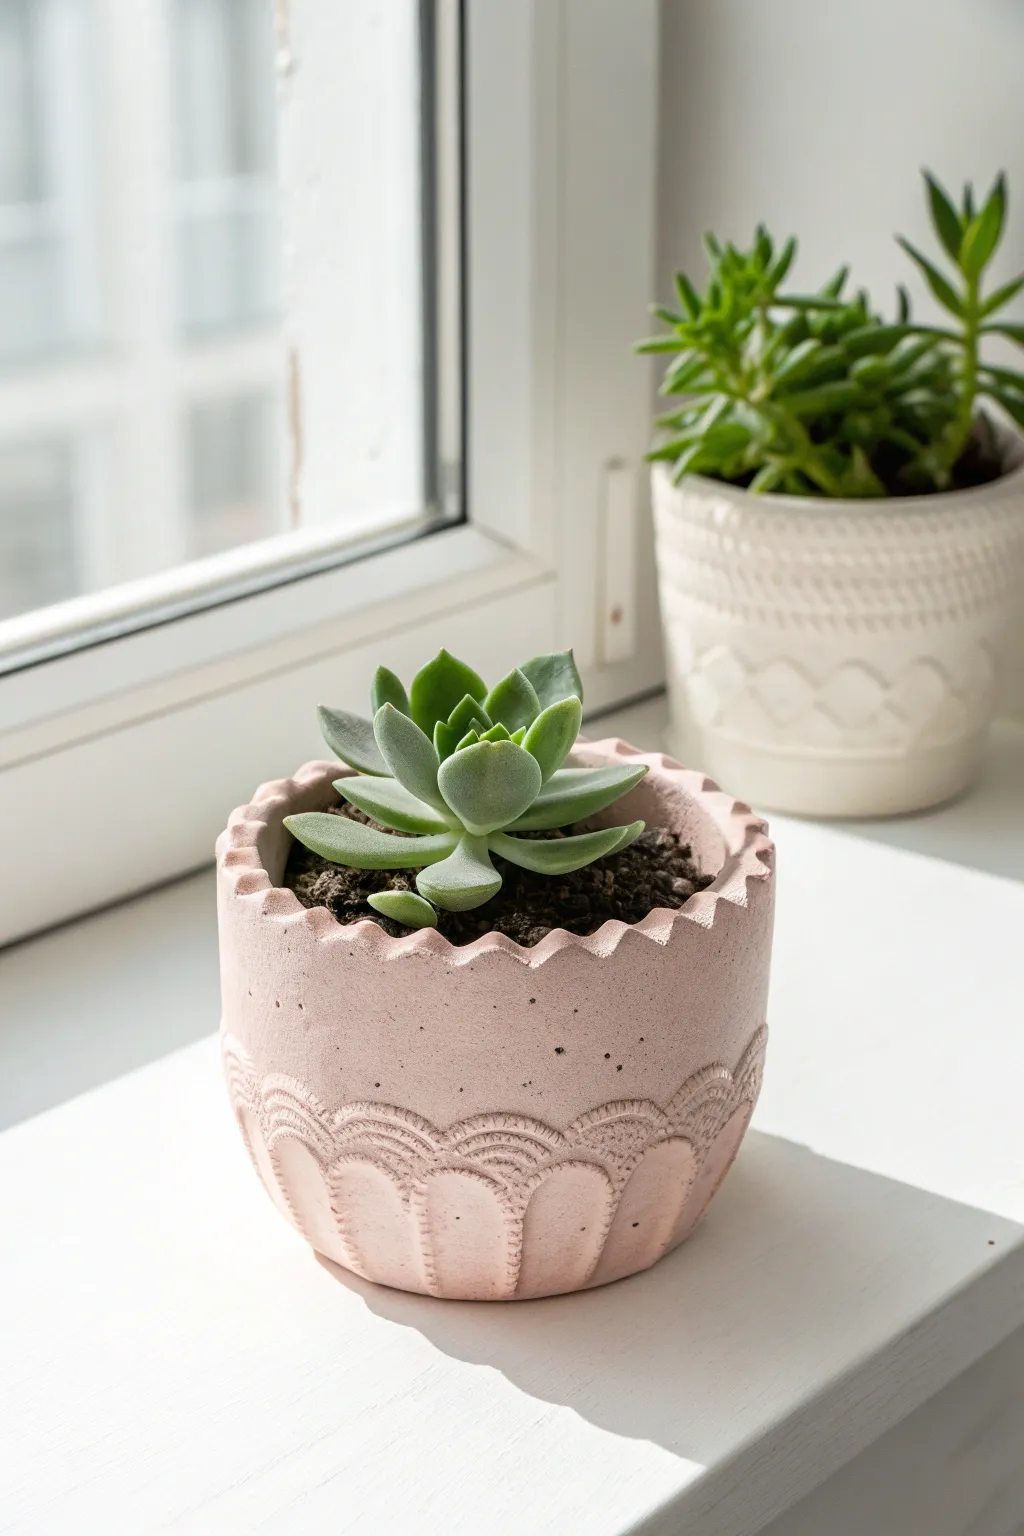
Bring a touch of soft, textured charm to your windowsill with this dusty pink scalloped pot. Its delicate zig-zag rim and embossed arch details create a polished look that belies how simple it is to construct by hand.
How-To Guide
Materials
- Air-dry clay (white or terracotta)
- Rolling pin
- Circle cutter or bowl (approx. 4-inch diameter for the base)
- Clay knife or craft knife
- Ruler
- Small round piping tip or straw (for stamping texture)
- Smoothing sponge and water
- Pink acrylic paint (dusty rose or blush)
- Matte spray varnish or sealant
- Sandpaper (fine grit)
Step 1: Base Construction
-
Roll the slab:
Begin by conditioning your clay, kneading it until it is pliable. Roll it out into a large, even slab approximately 1/4 inch thick. Aim for consistent thickness to ensure even drying. -
Cut the base:
Use your circle cutter or a bowl as a template to cut out a perfect circle for the bottom of the pot. Set this aside on a piece of parchment paper. -
Measure the wall:
Measure the circumference of your circle base. You will need a rectangular strip of clay slightly longer than this measurement to form the proper cylinder wall. -
Cut the cylinder wall:
From your rolled slab, use a ruler and knife to cut a long rectangular strip. Ideally, this should be about 3 to 4 inches tall, depending on the desired height of your pot. -
Create the scalloped rim:
On one long edge of your rectangular strip, use your knife to cut a zigzag pattern. Space the ‘peaks’ evenly, making them about 1/2 inch apart. This will become the top rim.
Keep it Straight
Use a straight edge or ruler inside the pot while attaching the walls to help keep the sides vertical, preventing the clay from slumping inward or outward.
Step 2: Assembly & Texturing
-
Attach the wall:
Score the outer edge of the circular base and the bottom edge of your wall strip. Apply a little water or slip, then wrap the wall around the base, pressing gently to join them. -
Seam the cylinder:
Where the two ends of the wall meet, overlap them slightly or cut an angled flush joint. Blend the seam thoroughly with your finger or a tool until it disappears completely. -
Establish the lower pattern:
For the embossed design at the bottom, lightly sketch a series of arches around the lower third of the pot using a needle tool or toothpick. -
Add texture lines:
Inside each sketched arch, use a modeling tool or the back of a knife to gently press vertical indentations, creating a ribbed effect within the arches. -
Detail the arches:
Using a small round piping tip or the end of a straw, press tiny circles along the curved outline of each arch to create a beaded border texture. -
Smooth the surfaces:
Dip a sponge in water and wring it out mostly dry. Gently wipe the entire surface to smooth out fingerprints and soften any sharp edges on the scalloped rim.
Speckled Finish
To mimic concrete or stone, flick a toothbrush loaded with diluted brow paint over the dried pink base before sealing for a trendy speckled effect.
Step 3: Finishing Touches
-
Dry thoroughly:
Let the pot dry completely for 24-48 hours. Turn it occasionally to ensure air reaches the bottom. -
Sand imperfections:
Once bone dry, take fine-grit sandpaper and gently smooth the rim peaks and any rough patches on the outside wall. -
Paint the base coat:
Mix a dusty pink acrylic paint. I find adding a tiny drop of brown to pink helps achieve that earthy, clay-like tone. Apply a solid coat to the exterior. -
Highlight the texture:
If desired, dry brush a lighter shade of pink over the embossed arches to make the texture pop. -
Seal for protection:
Apply two coats of matte varnish or sealant to protect the pot from moisture, especially if you plan to put a live plant inside.
Now you have a charming vessel ready to cradle your favorite succulent friend
Raised Relief Flower Pots
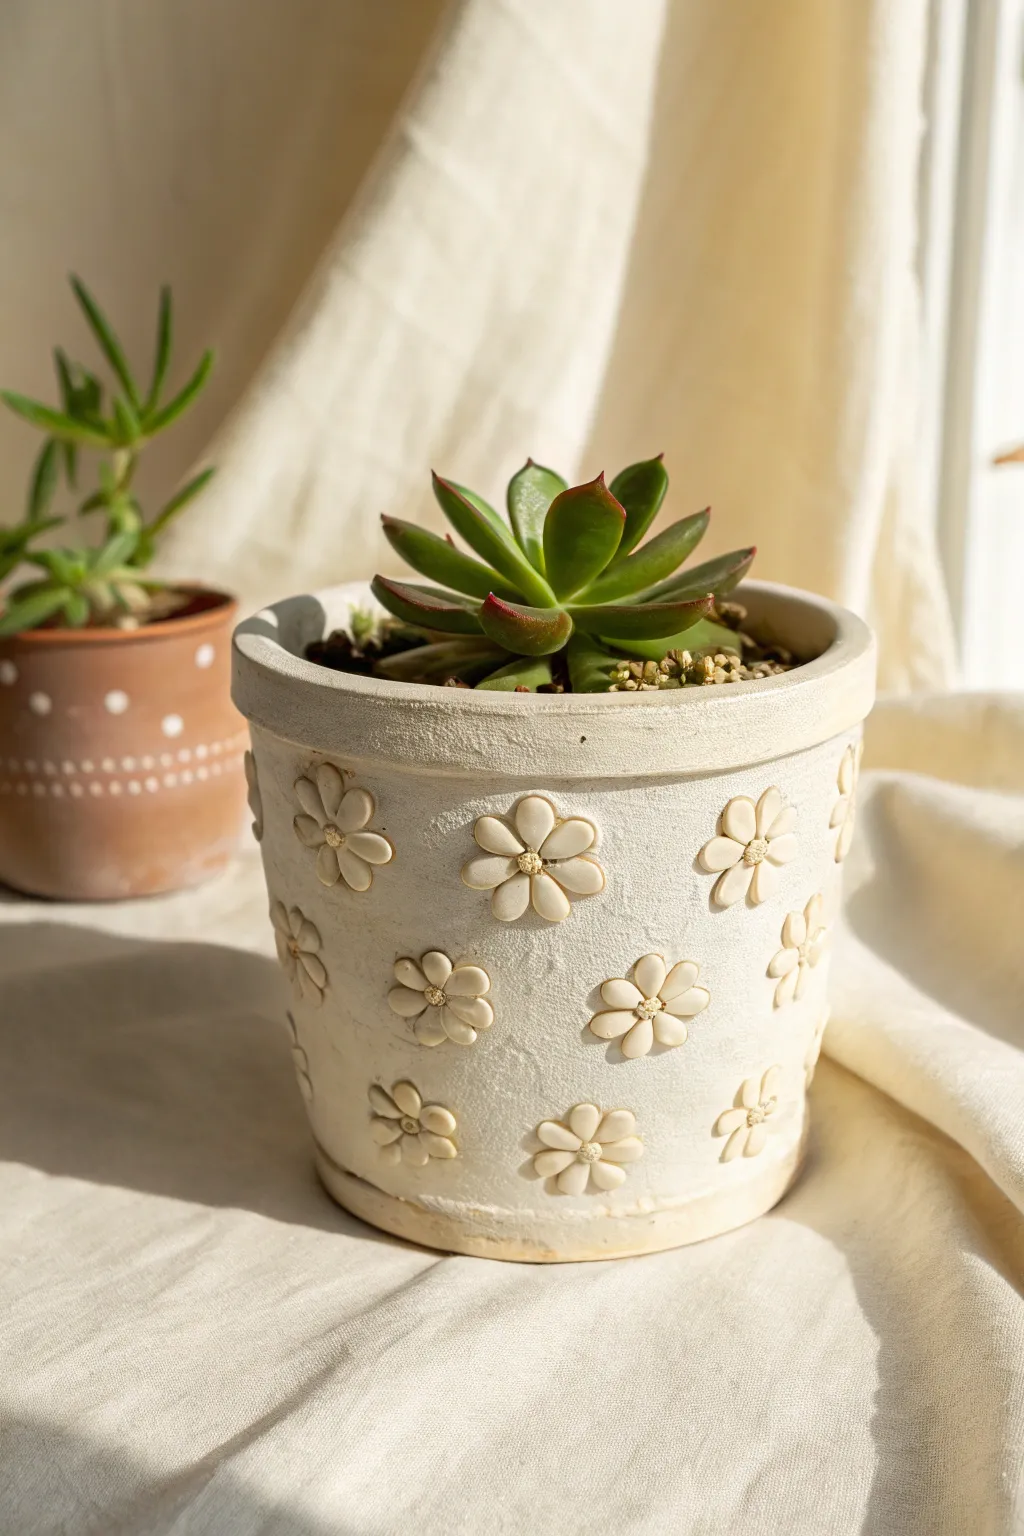
Transform a plain planter into a textured masterpiece with this charming raised relief project. The creamy white finish and delicate clay flowers create a soft, artisanal look that beautifully complements succulents and small houseplants.
Step-by-Step Tutorial
Materials
- White or terracotta plant pot (as a base)
- White air dry clay
- Rolling pin
- Small daisy shaped cookie cutter (or knife)
- Clay sculpting tools (specifically a small ball tool)
- Small bowl of water
- Fine-grit sandpaper
- Acrylic paint (cream or off-white)
- Matte varnish or sealant
- Paintbrushes
- Strong craft glue (optional but recommended)
Step 1: Preparation and Base Layer
-
Clean your base pot:
Begin by thoroughly cleaning and drying your chosen base pot to ensure the clay adheres properly. If the pot surface is very slick, scuff it lightly with sandpaper to create some tooth. -
Roll out the clay sheet:
Roll out a large sheet of air dry clay to a thickness of approximately 3-4mm. You want it substantial enough to cover imperfections but thin enough not to bulk up the pot excessively. -
Wrap the pot:
Carefully wrap the sheet of clay around the exterior of your pot. Trim any excess clay at the rim and base using a craft knife. -
Smooth the seam:
Dip your finger in water and gently rub the vertical seam where the clay edges meet until it disappears completely. Smooth the rim and bottom edge as well for a polished look. -
Create surface texture:
Before the clay dries, take a crumpled ball of aluminum foil or a coarse sponge and gently press it all over the pot’s surface. This creates the subtle, stone-like texture seen in the background.
Make It Look Antique
After the white paint dries, brush on a diluted brown paint wash and immediately wipe it off with a rag. The dark pigment will stay in the crevices.
Step 2: Sculpting the Daisies
-
Roll clay for flowers:
Roll out a fresh, slightly thinner piece of clay for your decorative elements. Aim for about 2-3mm thickness. -
Cut out flower shapes:
Use a small daisy-shaped cutter to punch out numerous flowers. If you don’t have a cutter, you can hand-cut five small teardrop shapes for petals and assemble them. -
Shape the petals:
For a more organic look, gently soften the cut edges of each petal with your fingers. I like to slightly curl up the tips of a few petals so they don’t look too uniform. -
Create center texture:
Roll tiny spheres of clay for the flower centers. Press them flat onto a surface and use a needle tool or toothpick to prick them repeatedly, creating a pollen-like texture. -
Dry fit the arrangement:
Lay your pot on its side and place the flowers on the surface without glue first. Arrange them in a loose grid pattern or scatter them randomly depending on your preference.
Step 3: Assembly and Finishing
-
Attach the flowers:
Score the back of each flower and the spot on the pot where it will sit. Apple a dab of water or clay slip, then press the flower firmly onto the pot base. -
Add the centers:
Place a tiny textured center into the middle of each attached flower, pressing down with a small ball tool to bond it securely. -
Refine the details:
Use a modeling tool to press indentations into the center of each petal, radiating from the middle. This adds dimension and mimics the look of real petals. -
Initial drying phase:
Allow the pot to dry completely in a cool, dry place away from direct sunlight. This usually takes 24-48 hours depending on humidity. -
Sand for smoothness:
Once bone dry, take fine-grit sandpaper and very gently sand any rough ridges on the rim or the flower petals. Be careful not to sand away your texture. -
Apply base paint:
Paint the entire pot, including the relief flowers, with a creamy off-white acrylic paint. You may need two coats for full coverage. -
Seal the project:
Finish by applying two coats of a matte varnish. This is crucial for protecting the clay from moisture when you water your plant.
Petals Falling Off?
If flowers detach after drying, adhesion wasn’t strong enough. Reattach them using super glue or strong craft epoxy for a permanent bond.
Place your favorite succulent inside and enjoy the handcrafted floral charm on your windowsill
Cloud And Star Add-On Pots
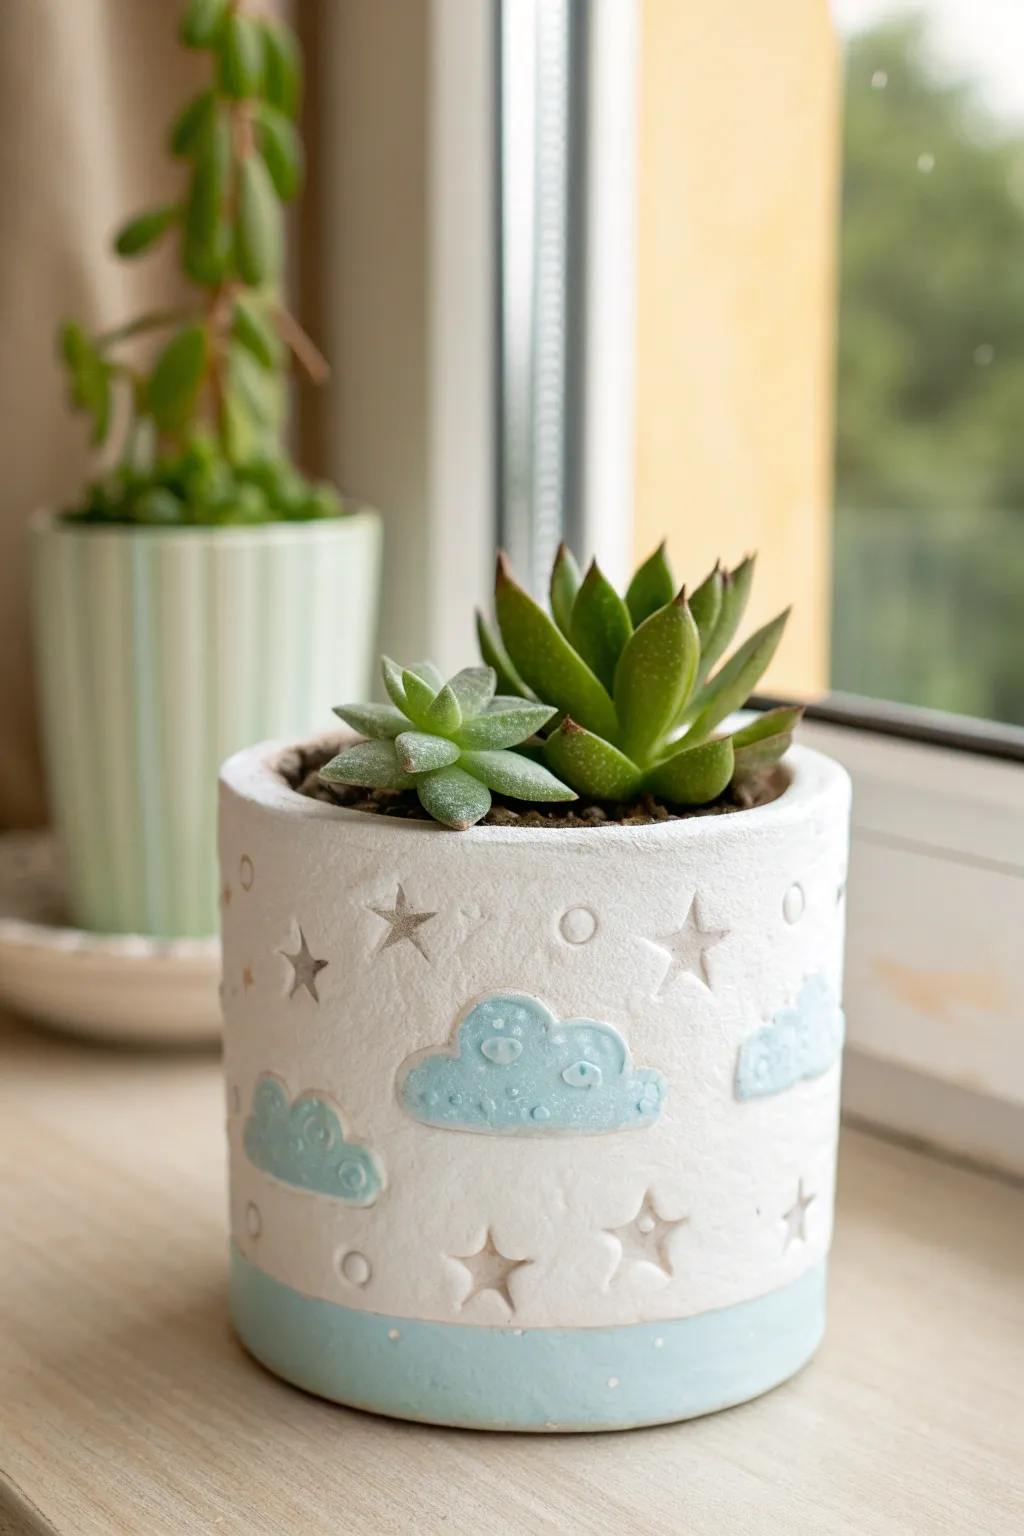
Transform a plain pot layout into a whimsical sky scene with this textured air dry clay project. The combination of raised puffy clouds, etched stars, and a soft pastel color palette gives this planter a sweet, sleeping-on-a-cloud aesthetic.
Detailed Instructions
Materials
- Air dry clay (white)
- Small cylindrical container/pot (as armature)
- Rolling pin
- Craft knife or clay tool set
- Small star-shaped clay cutter (or a toothpick for freehand)
- Acrylic paints (White, Pastel Blue)
- Small round paintbrush
- Flat shader brush
- Sponge (optional for texture)
- Water cup
- Varnish or sealant (matte finish recommended)
Step 1: Base Construction
-
Prepare the clay:
Begin by kneading a large handful of air dry clay until it is soft, pliable, and free of cracks. This conditioning step is crucial to prevent cracking later on. -
Roll the slab:
Roll the clay out into a long rectangular slab, roughly 1/4 inch thick. Aim for a length that will wrap entirely around your chosen base container. -
Wrap the base:
Carefully lift the clay slab and wrap it around the cylindrical container. Press the two ends together gently to form a seam. -
Smooth the seam:
Dip your finger in a little water and smooth over the vertical seam until it disappears completely. While you’re at it, smooth the top rim so it’s even and rounded. -
Create surface texture:
Before adding details, tap the entire surface lightly with a dry sponge or a crumpled ball of aluminum foil. This gives the pot that lovely, stone-like pitted texture seen in the photo.
Step 2: Adding Sky Details
-
Form the clouds:
Take small pinches of fresh clay and flatten them into irregular, puffy cloud shapes. They don’t need to be perfect; organic, bubbly outlines look best. -
Attach the clouds:
Score the back of each cloud and the spot on the pot where it will go (scratch cross-hatch marks). Apply a tiny dab of water as ‘glue’ and press the clouds firmly onto the pot surface. -
Detail the clouds:
Use a small ball-end tool or the back of a paintbrush to press tiny circular indentations into the clouds for extra character. -
Etch the stars:
Using a star-shaped cutter, press gently into the clay surface to create an indented outline without cutting all the way through. If you don’t have a cutter, I find carefully drawing the star shapes with a needle tool works just as well. -
Add circle accents:
Press a small straw or round tool into the clay randomly between the stars and clouds to create small indented circles. -
Dry thoroughly:
Allow the pot to dry completely. This usually takes 24-48 hours depending on humidity. Flip it occasionally if possible to ensure even airflow.
Smoother Seams
Apply a tiny bit of vinegar to your finger when smoothing the main seam. It breaks down the clay surface slightly, creating a ‘slip’ that bonds the edges perfectly.
Step 3: Painting & Finishing
-
Base coat (Optional):
The clay dries white, but for a uniform finish, paint the entire exterior (avoiding the blue areas if you’re confident, or paint over everything) with white acrylic paint. This seals the clay slightly and provides a clean background. -
Paint the bottom band:
Mix a soft pastel blue acrylic paint. Using a flat brush, paint a band around the bottom edge of the pot, about half an inch high. -
Paint the clouds:
Using the same pastel blue, carefully paint the raised surfaces of the clouds. A small round brush helps keep the edges neat. -
Highlight the texture:
If you painted over the indented stars and they lost definition, use a darker wash or a very fine tool to redefine their shadows, though the natural indentation usually creates enough contrast. -
Add speckles (optional):
Dip a toothbrush in white paint and flick it very lightly over the blue bottom band to mimic tiny stars or snow, adding to the dreamy effect. -
Seal the pot:
Once all paint is dry, apply a coat of matte varnish. This is essential for plant pots to protect the clay from moisture, though I always recommend keeping the plant in a plastic nursery pot inside your clay creation rather than planting directly.
Glow Up
Mix glow-in-the-dark powder into white paint and fill the indented stars. Your pot will look cute by day and reveal a glowing constellation at night.
Place a succulent inside to complete your adorable piece of sky decor
Wrap-Around Clay Over A Inner Liner Pot
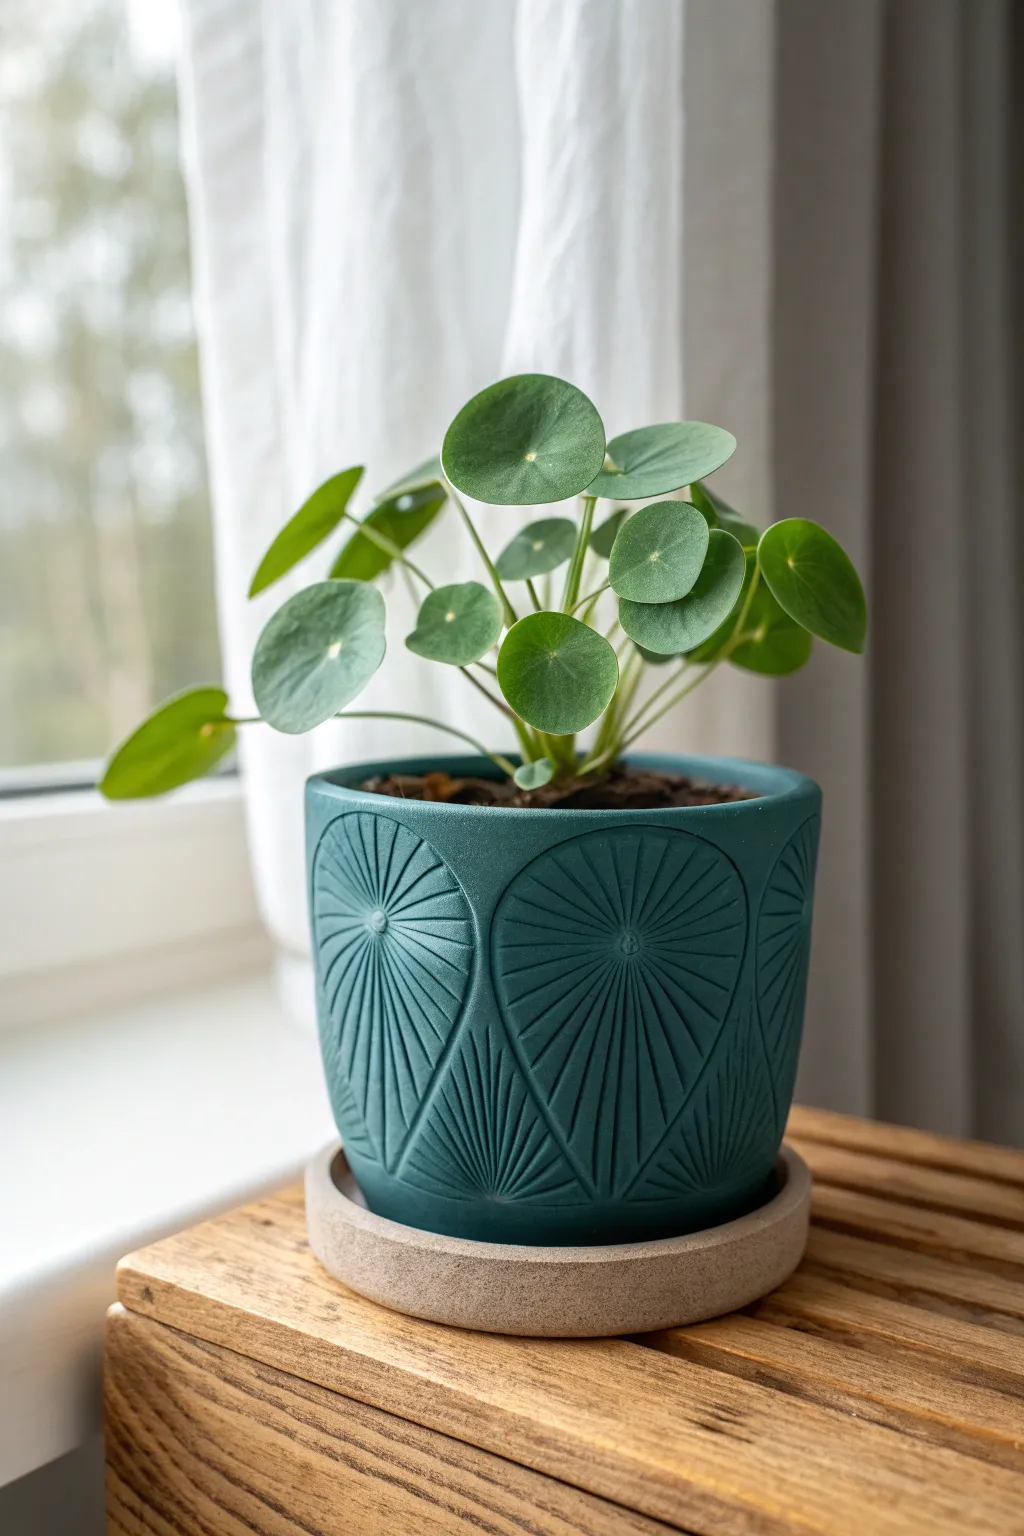
This project transforms a plain plastic nursery liner into a stunning, textured statement piece featuring an Art Deco-inspired sunburst motif. The deep teal finish and radiating carved lines create a high-end ceramic look without the need for a kiln.
Step-by-Step
Materials
- Plastic plant liner pot (straight-sided cylinder preferred)
- Air dry clay (white or terracotta)
- Rolling pin
- Carving tool or needle tool
- Craft knife
- Sponge and water
- Acrylic paint (deep teal/cyan)
- Matte or satin varnish
- Rolling guides or wooden slats (approx. 5mm thick)
- Sandpaper (fine grit)
- Straight edge or flexible ruler
Step 1: Prepping the Clay Base
-
Roll the Slab:
Begin by conditioning your clay until it’s pliable and smooth. Place your rolling guides on either side of the clay and roll it out into a long rectangle. The thickness should be consistent—about 5mm is ideal for durability without being too bulky. -
Measure and Cut:
Wrap your plastic liner pot with a piece of string or paper to find the exact circumference. Transfer this measurement to your clay slab, adding just a tiny bit of overlap, and cut a precise rectangle using a craft knife and straight edge. The height should match your liner pot exactly. -
Wrap the Liner:
Carefully lift the clay strip and wrap it around the plastic liner pot. Join the two ends together by scoring the edges (scratching crisscross marks), adding a dab of water or slip, and pressing them firmly together to create a seamless seam. -
Smooth the Join:
Use a damp finger to smooth out the seam line until it vanishes. I find that lightly blending the clay downwards with my thumb helps lock the seam in place. Ensure the rim is flush with the top of the liner pot.
Cracks while Drying?
If hairline cracks appear as the clay shrinks around the rigid liner, mix a tiny amount of clay with water to make a paste and fill them in before painting.
Step 2: Carving the Sunburst Pattern
-
Mark Center Points:
Divide the circumference of your pot into equal sections depending on how many sunbursts you want. Lightly press a small dot into the clay at the center point of each intended fan shape to guide your carving. -
Carve the Main Arcs:
Using a needle tool, draw the large, curved teardrop outlines that define the boundaries of each sunburst section. These shapes should nestle against each other, creating negative space shapes in between. -
Create the Radiating Lines:
Starting from the central dot of each section, carve straight lines radiating outward toward the curved boundary line. Use a ruler if you want machine-perfect lines, or freehand it for a more organic feel. -
Deepen the Grooves:
Go back over your lines with a carving tool to make the grooves deeper and more pronounced. This depth is effectively what catches the light and emphasizes the teal color later. -
Clean Up Edges:
As you carve, small burrs or crumbs of clay might appear. Wait until the clay stiffens slightly (leather hard), then brush them away with a soft, dry paintbrush rather than smearing them while wet.
Step 3: Creating the Coaster Base
-
Form the Saucer:
Roll out a smaller ball of clay to create a circular base. It should be slightly wider than the bottom of your pot. Use a round cutter or trace a bowl to get a perfect circle. -
Add a Rim:
Roll a small coil (snake) of clay and attach it to the outer edge of your circle base using the score-and-slip method. Flatten and smooth this coil upwards to create a short, vertical rim that mimics a saucer. -
Drying Process:
Set both the wrapped pot and the saucer aside to dry completely. This usually takes 24-48 hours depending on humidity. Rotate them occasionally to ensure even airflow.
Pro Tip: Texture Depth
Make your initial carvings deeper than you think necessary. Paint layers can fill shallow grooves, so bold lines ensure the pattern remains crisp.
Step 4: Finishing Touches
-
Sand Imperfections:
Once fully bone dry, gently sand any rough edges, especially around the rim and the seam. Be careful not to sand down the texture you carved. -
Apply Base Color:
Paint the exterior of the pot with your deep teal acrylic paint. Use a stiff brush to work the paint into all the carved grooves. You may need two coats for opaque coverage. -
Seal the Saucer:
For the saucer, you can either paint it or leave it a natural stone color as shown in the photo. If leaving it natural, simply seal it with a clear matte varnish. -
Varnish the Pot:
Apply a coat of satin or matte varnish to the teal pot. This protects the paint and gives the finish a subtle sheen that highlights the texture. -
Final Assembly:
Since air dry clay isn’t waterproof, keep your plant in its nursery pot inside the liner. Place your freshly painted pot onto the saucer, and it’s ready for display.
Now you have a striking, custom planter that looks like high-end boutique pottery.
Hanging Mini Planters With Cord Holes

This charming mini planter combines a minimalist white vessel with a strikingly tactile, pitted texture and rustic jute accents. It’s the perfect size for petite trailing succulents and adds an instant artisanal touch to any sunny window corner.
Detailed Instructions
Materials
- White air-dry clay (approx. 500g)
- Rolling pin
- sharp craft knife or clay tool
- Small circular cookie cutter or drinking glass (approx. 4-5 inches diameter)
- Wooden skewer or chopstick
- Small sponge or toothbrush (for texture)
- Sandpaper (medium and fine grit)
- Acrylic sealer or varnish (matte finish)
- Natural jute twine or macrame cord
- Cork coaster or thick cork sheet
- Strong craft glue (optional)
Step 1: Shaping the Vessel
-
Prepare the Clay:
Begin by kneading your air-dry clay until it is warm, pliable, and free of air bubbles. Roll it out into a uniform slab about 1/4 inch thick. -
Cut the Base:
Use your circular cutter or trace around a glass to cut a perfect circle for the base of your pot. Set this aside on a piece of parchment paper. -
Create the Wall Strip:
Cut a long rectangular strip from your remaining rolled clay. The height should be about 3-4 inches, and the length must be slightly longer than the circumference of your base circle. -
Attach the Walls:
Score the edges of the base circle and the bottom edge of your wall strip. Apply a little water or slip to the scored areas. -
Secure the Seam:
Wrap the strip around the base, pressing firmly to join them. Where the two ends of the wall meet, slice through both overlapping layers with a sharp knife for a perfect butt joint, then score and smooth the seam together. -
Smooth the Form:
Use a slightly damp sponge or your finger to smooth out the connection between the wall and the base, as well as the vertical seam, until they are invisible.
Uneven Hanging?
If the pot tilts, the strings aren’t equal lengths. Before tying the final top knot, hang the loose bundle from a hook, adjust the pot until level, and mark where the top knot should go.
Step 2: Texturing and Hanging Holes
-
Add the Pitted Texture:
This is the fun part where the pot gets its character. Use a stiff toothbrush, a textured rock, or the point of a wooden skewer to gently press indents all over the exterior surface. Vary the pressure to create organic, random pitting. -
Punch Cord Holes:
While the clay is still wet, use a straw or a large skewer to punch three or four evenly spaced holes about 1/2 inch below the top rim. I like to twist the tool gently as I pull it out to keep the hole clean. -
Dry Completely:
Let the pot sit in a cool, dry place for at least 24-48 hours. Turn it upside down halfway through the drying process to ensure the bottom dries evenly. -
Sand and Refine:
Once bone dry, lightly sand the rim to make it level. You can gently sand the exterior if any sharp peaks formed during texturing, but keep that rustic look intact.
Step 3: Finishing and Assembly
-
Seal the Clay:
Apply 2-3 coats of a matte acrylic sealer to the entire pot, inside and out. This creates a barrier against moisture, which is crucial for air-dry clay planters. -
Create the Bead Accents:
While you wait for sealer to dry, you can make small beads from leftover clay or simply use the jute rope itself to create the knotted look shown in the image by tying a series of overhand knots close together. -
Prepare the Cork Base:
Take your cork coaster or cut a circle from cork sheet that is slightly smaller than the pot’s base. Glue this to the bottom of the pot; this mimics the look in the photo and protects surfaces. -
Thread the Cords:
Cut three equal lengths of jute twine. Feed one end of each string through the holes in the pot from the outside in. -
Secure the Knots:
Tie a large, sturdy knot on the inside of the pot for each string so they can’t slip back through the holes. -
Create the Hanger:
Gather all three strings at the top, ensuring the pot hangs level. Tie them together in a strong loop knot or wrap with extra twine to create a hanging loop.
Level Up: Beaded Look
To exactly match the photo’s ‘beaded’ cord look without buying beads, tie a continuous series of vertical square macrame knots (cobra stitch) over a central core string.
Hang your new creation in a bright window and enjoy the warm, handmade vibe it brings to your space
Cute Animal-Inspired Pot Shapes
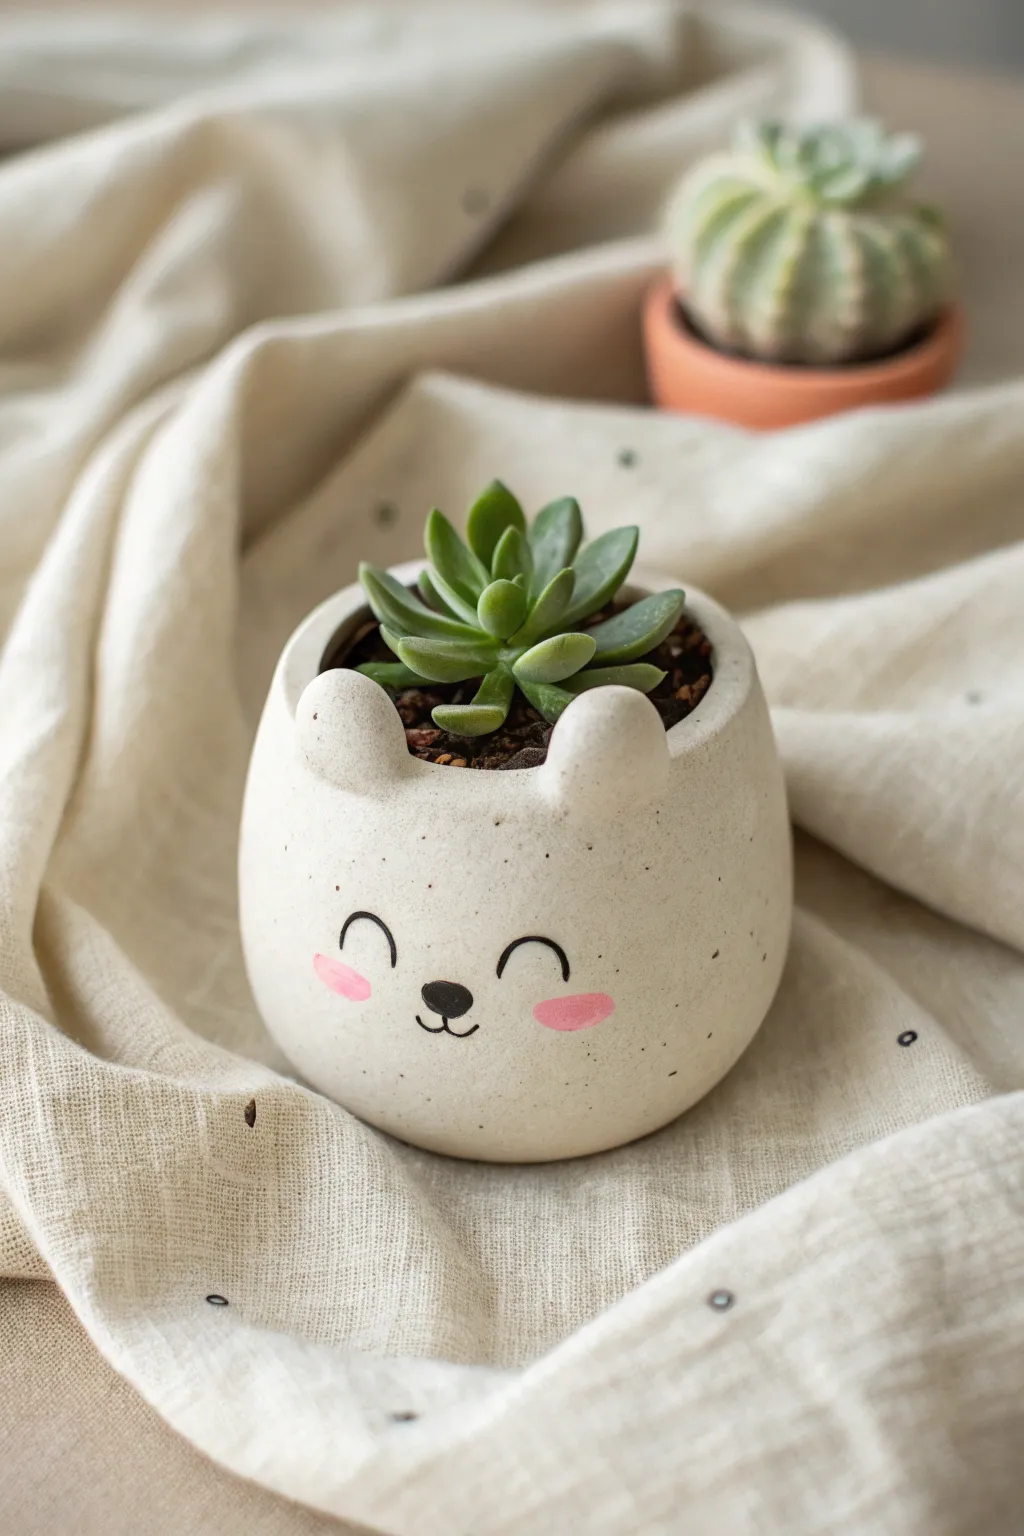
Bring a touch of sweetness to your succulent collection with this adorable bear-shaped pot. Featuring minimal painted details and round sculpted ears, this project mimics the cozy, speckled look of high-end ceramic stoneware.
Step-by-Step Guide
Materials
- White air dry clay
- Rolling pin
- Clay knife or craft blade
- Slip (clay mixed with water)
- Small bowl or cup (for molding)
- Plastic wrap
- Sponge
- Fine-grit sandpaper
- Acrylic paints (black and pink)
- Small round paintbrush
- Waterproof varnish or sealer (matte finish)
- Brown/black acrylic paint for speckling
- Old toothbrush
Step 1: Forming the Base
-
Prep your form:
Select a small bowl or cup that matches the size you want your pot to be. Wrap the outside of this form completely with plastic wrap to prevent the clay from sticking later. -
Roll the slab:
Roll out a portion of air dry clay to an even thickness, roughly 1/4 inch. Aim for a long rectangular strip that is tall enough to cover the sides of your form and long enough to wrap around it fully. -
Create the base:
Cut a circle from the clay slab that is slightly larger than the bottom of your mold. Place this circle on your work surface; this will become the floor of your pot. -
Build the walls:
Wrap the rectangular clay strip around the plastic-covered form. Where the ends meet, score the edges (scratch them up with your knife), add a dab of slip, and press firmly to join them into a cylinder. -
Join base and walls:
Place the cylinder onto the base circle. Use a modeling tool or your finger to smudge the clay from the walls down onto the base, blending the seam on both the inside and outside until invisible.
Step 2: Sculpting Detailed Features
-
Round the shape:
With the form still inside for support, gently curve the top rim of the clay slightly inward to create that rounded, organic ‘egg’ shape rather than a straight cylinder. Smooth everything with a slightly damp sponge. -
Shape the ears:
Roll two small balls of clay, roughly the size of marbles. Flatten them slightly to create thick, rounded tabs. -
Attach the ears:
Score the bottom of the ears and the top rim of the pot where you want them to sit. Apply slip and press the ears into place, blending the clay downwards into the main body so they are seamless and sturdy. -
Refining the surface:
Once the basic shape is secure, dip your finger in water and run it over the entire surface to remove any fingerprints or harsh tool marks. The goal is a super-smooth finish. -
Initial drying:
Let the pot sit for about 2-3 hours until the clay is leather-hard—strong enough to hold its shape but not fully dry. -
Remove the form:
Carefully twist and pull the internal bowl mold out, leaving the plastic wrap behind if necessary (you can peel that out separately). This is crucial to prevent cracking as the clay shrinks. -
Full cure:
Allow the pot to dry completely for 24-48 hours. I find that placing it on a wire rack helps air circulate underneath for even drying.
Cracks happen?
If small hairline cracks appear during drying, create a ‘clay paste’ by mixing a scrap of clay with water. Smear this into the crack, let dry, and sand smooth.
Step 3: finishing Touches
-
Sand until smooth:
Once bone dry, use fine-grit sandpaper to buff out any remaining bumps or uneven seams, paying special attention to the rim and the connection points of the ears. -
Create the speckled stoneware look:
Dilute a tiny amount of brown or black acrylic paint with water. Dip an old toothbrush into the mixture and run your thumb over the bristles to flick tiny speckles across the entire pot. -
Paint the face:
Using a fine-tip paintbrush and black acrylic paint, draw two small upward curves for sleepy eyes and a small triangular nose with a mouth anchor. Keep the lines thin and delicate. -
Add blush:
Take a tiny amount of pink paint and dilute it slightly so it acts like a watercolor wash. Dab two oval cheeks under the eyes for a soft, blushing effect. -
Seal for durability:
Since air dry clay isn’t waterproof, apply 2-3 coats of a waterproof matte varnish inside and out. This will protect your art from moisture when watering your plant.
Make it Functional
Before the clay dries, use a straw to punch a drainage hole in the bottom center. Just remember to use a saucer underneath your finished pot.
Now you have a charming little friend ready to hold your favorite succulent
Balloon-Bowl Style Round Planters
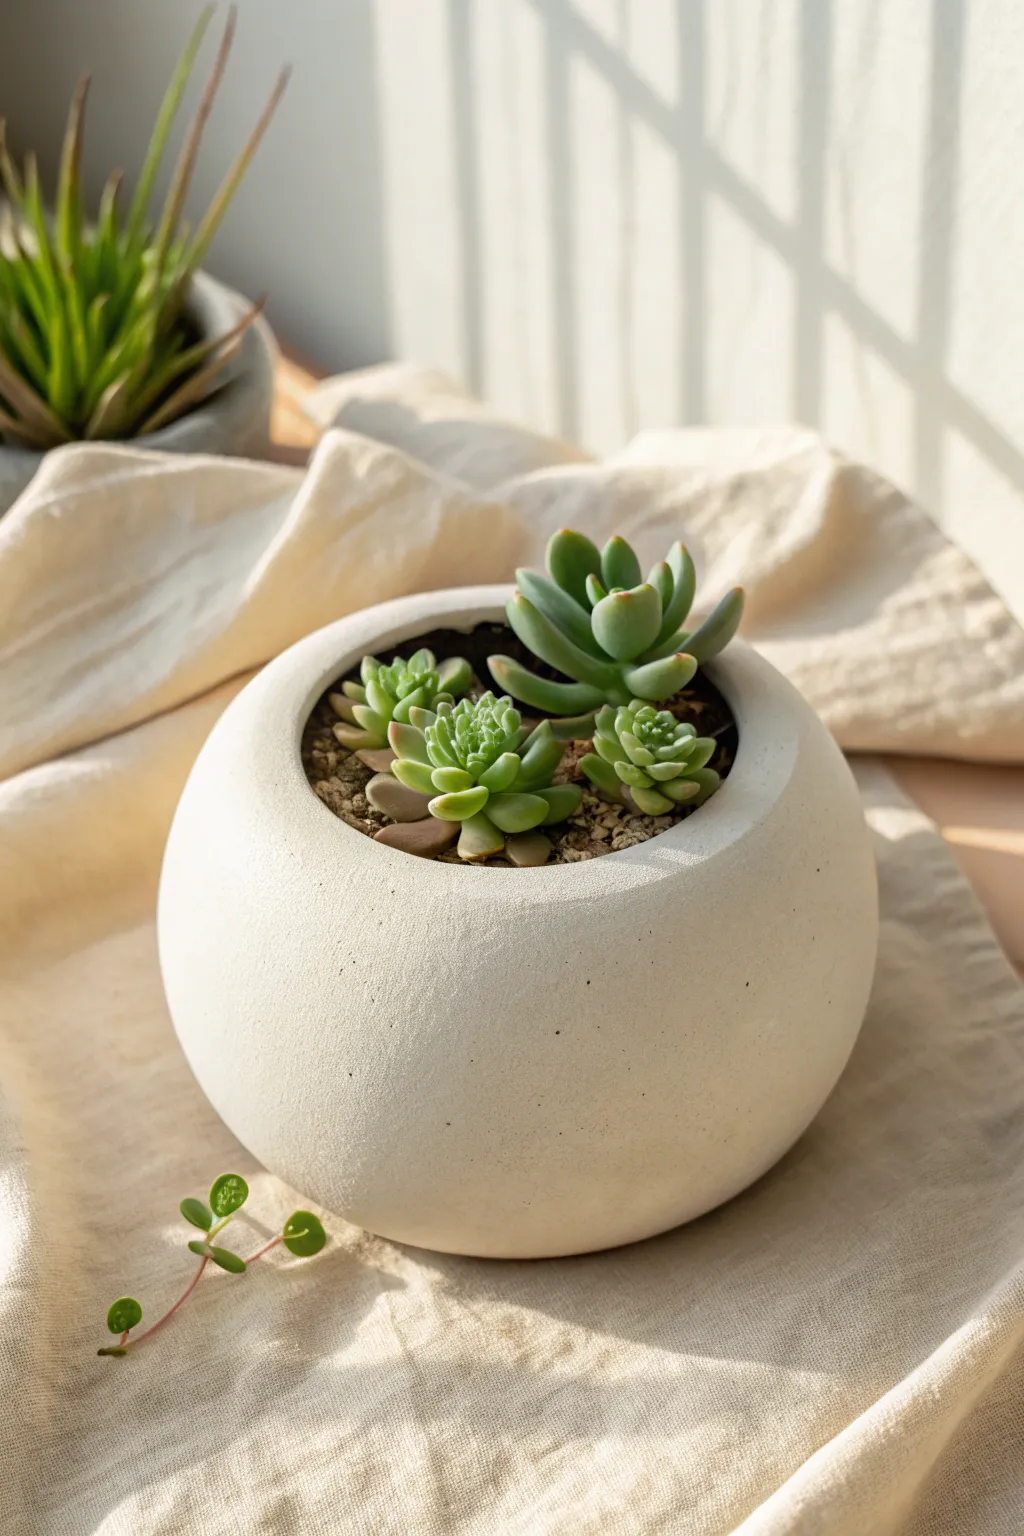
Achieve a sleek, modern look with this globe-shaped planter that perfectly mimics the clean lines of cast concrete. By using a balloon as a mold, you can easily create a perfectly rounded form that adds a touch of calmness to your succulent collection.
Detailed Instructions
Materials
- White air dry clay (approx. 500g)
- Medium-sized round balloon
- Rolling pin
- Small bowl or cup (to hold the balloon)
- Craft knife or clay cutter
- Water and a small sponge
- Fine-grit sandpaper (220 and 400 grit)
- Matte acrylic varnish or sealant
- Plastic wrap
Step 1: Preparing the Form
-
Inflate the balloon:
Blow up your balloon until it reaches your desired pot size—about 5 to 6 inches across works well—and knot it securely. -
Set the base:
Place the knotted end of the balloon downwards into a small bowl or cup so it stands upright and stable while you work. -
Prep the clay:
Take a large chunk of air dry clay and knead it briefly until it is pliable and smooth, removing any internal air bubbles. -
Roll a slab:
Roll out the clay on a flat surface to an even thickness of about 1/4 inch. Lift and rotate the clay occasionally to prevent sticking.
Smooth Surface Secret
Before drying, polish the wet clay with a tiny bit of water on a sponge. This brings fine clay particles to the surface for a super-smooth finish.
Step 2: Shaping the Sphere
-
Drape the clay:
Gently lift your clay slab and drape it over the top of the balloon. Gravity will help it settle down the sides. -
Smooth the sides:
Using the palms of your hands, gently press and smooth the clay down around the curve of the balloon, working out any pleats or folds. -
Trim the excess:
Once the clay covers about three-quarters of the balloon, use a craft knife to trim the bottom edge evenly. You want a consistent line where the curve stops. -
Create the opening:
At the very top of the sphere (opposite the knot), use a circular cookie cutter or trace a circle to cut out the opening for your plants. -
Define the rim:
Dip your finger in water and run it along the cut rim of the opening to round off the sharp edges, creating a soft, professional finish. -
Flatten the base:
While the clay is still on the balloon, gently press the bottom against a flat surface to create a stable base so the pot won’t roll away.
Step 3: Refining and Finish
-
Initial drying:
Let the clay sit on the balloon for about 24 hours until it is leather-hard and holds its shape independently. -
Remove the balloon:
Pop the balloon carefully with a pin and peel the latex away from the inside of the pot. -
Smooth the interior:
Check the inside for any rough patches. I usually dampen my finger and smooth out any seams or bumps left by the balloon. -
Full cure:
Allow the pot to dry completely for another 24-48 hours. Turning it upside down occasionally helps airflow reach the inside. -
Sand for perfection:
Once bone dry, use fine-grit sandpaper to buff the exterior surface until it is silky smooth and resembles stone. -
Seal the piece:
Apply two coats of matte sealant to the inside and outside to protect the clay from moisture, allowing full drying time between coats.
Make it Speckled
Knead roughly crushed dried herbs or tea leaves into the wet clay before rolling to create a lovely organic, speckled stone texture.
Now you have a stunning, sculptural home for your favorite succulents to thrive in
Faux Stone And Metallic Rim Pots
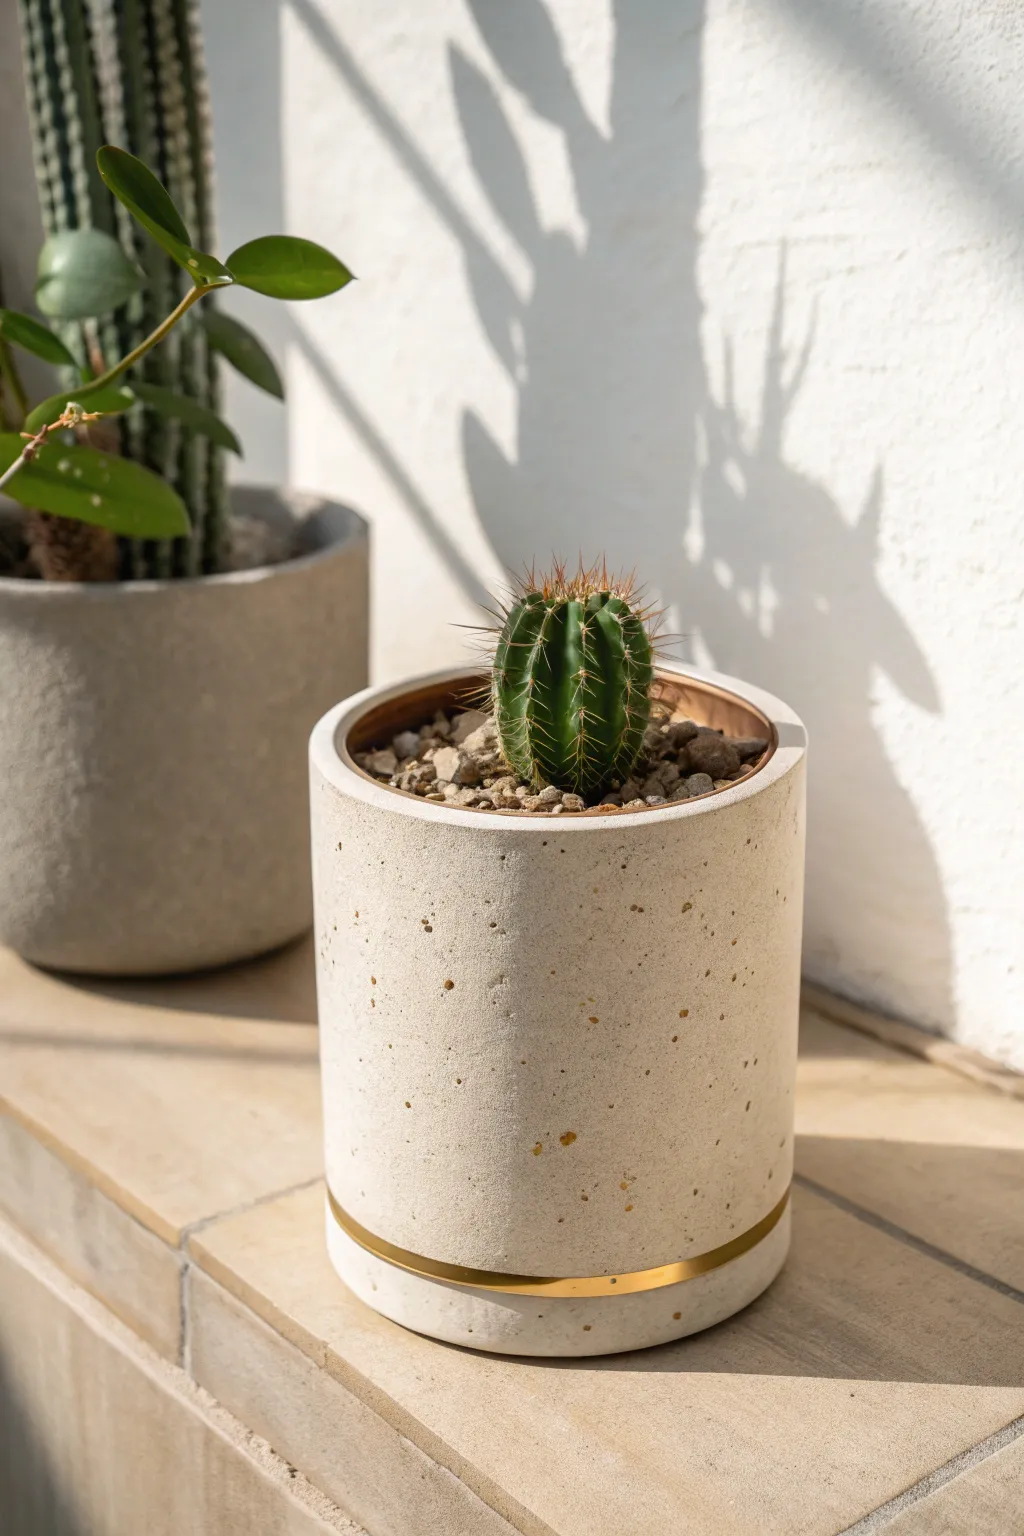
Achieve a high-end, store-bought aesthetic using simple air-dry clay. This project combines a realistic speckled stone texture with an elegant gold metallic band for a modern, sophisticated planter.
Step-by-Step Tutorial
Materials
- White or light grey air-dry clay (approx. 500g)
- Rolling pin
- Empty can or cylindrical mold (approx. 4-5 inch diameter)
- Craft knife or clay cutter
- Sandpaper (medium and fine grit)
- Acrylic paints: Cream/Beige, Tan, and Dark Brown
- Gold metallic paint or gold leaf pen
- Old toothbrush
- Painter’s tape or masking tape
- Clear matte sealant spray
- Small paintbrush
Step 1: Sculpting the Base Form
-
Prepare the clay slab:
Begin by kneading your air-dry clay until it is pliable and smooth. Roll it out on a flat surface to a consistent thickness of about 1/4 inch. Creating a consistent thickness is key for structural integrity. -
Cut the base:
Place your chosen cylindrical mold (like a clean tin can) on the clay. Using your craft knife, trace around the bottom of the mold to cut out a perfect circle. This will serve as the base of your pot. -
Measure the walls:
Calculate the circumference of your base circle. Cut a long rectangular strip from your rolled clay that matches this length, plus a tiny bit extra for overlapping, and your desired height. -
Wrap the mold:
Wrap the rectangular strip around your cylindrical mold. Depending on the stickiness of your mold, you might want to wrap it in parchment paper first to prevent sticking. -
Join the seams:
Where the ends of the rectangle meet, overlap them slightly. Use the ‘score and slip’ method—scratching the surfaces and adding a bit of water—to bond the seam together firmly. Smooth the seam with your finger or a clay tool until it disappears. -
Attach the base:
Score the bottom edge of your cylinder wall and the outer edge of your circular base. Press them together firmly, smoothing the clay connection on both the outside and inside to ensure a watertight seal. -
Refine the rim:
The top rim should be flat and even. You can slice off any excess clay carefully with your craft knife while it’s still on the form to get a clean, modern edge. -
Initial drying:
Allow the clay to dry slightly until it is leather-hard—firm but not fully dry. Carefully slide the clay off the mold so the inside can dry properly. -
Gouge (optional):
To mimic real stone, you can gently press a few tiny indentations into the surface with a tool or a small rock while the clay is still slightly soft. -
Full cure:
Let the pot dry completely for 24-48 hours. Once bone dry, use sandpaper to smooth out any rough edges or fingerprints, particularly around the top rim.
Step 2: Creating the Stone & Metallic Finish
-
Base coat application:
Paint the entire exterior and the inner rim with a coat of cream or light beige acrylic paint. This provides a neutral background for the stone effect. -
The speckle technique:
Dip an old toothbrush into somewhat watered-down tan paint. Hold the brush near the pot and run your thumb across the bristles to flick tiny specks onto the surface. -
Layering texture:
Repeat the splatter process with a darker brown paint, using less paint this time for subtler contrast. I find that varying the distance of the brush creates a more natural mix of speckle sizes. -
Masking the band:
Once the paint is totally dry, apply a strip of painter’s tape horizontally around the bottom of the pot, leaving about a 1/2 inch strip exposed at the very base. -
Applying the gold:
Paint the exposed bottom strip with high-pigment metallic gold paint. You may need two coats for a solid, shiny finish. You can also paint a thin gold line on the inside rim if desired. -
Reveal:
Carefully peel away the painter’s tape while the gold paint is still slightly tacky to ensure a crisp, clean line. -
Sealing:
Spray the entire pot with a matte sealant. This protects the faux stone finish and prevents the clay from absorbing moisture from the soil.
Clean Lines
For the sharpest gold edge, seal the tape line with a tiny bit of your beige base paint first. This blocks gold from bleeding under.
Double Band
Instead of just the bottom, add a second matching gold band around the very top rim for a symmetrical, ultra-modern look.
Place your favorite succulent inside and enjoy the modern elegance this handmade piece brings to your shelf