Whenever I need a creative win without firing anything, I reach for air dry clay—it’s cozy, forgiving, and weirdly satisfying. Here are my favorite air dry clay project ideas that look polished on a shelf or coffee table, even if you’re still figuring things out.
Minimalist Trinket Trays
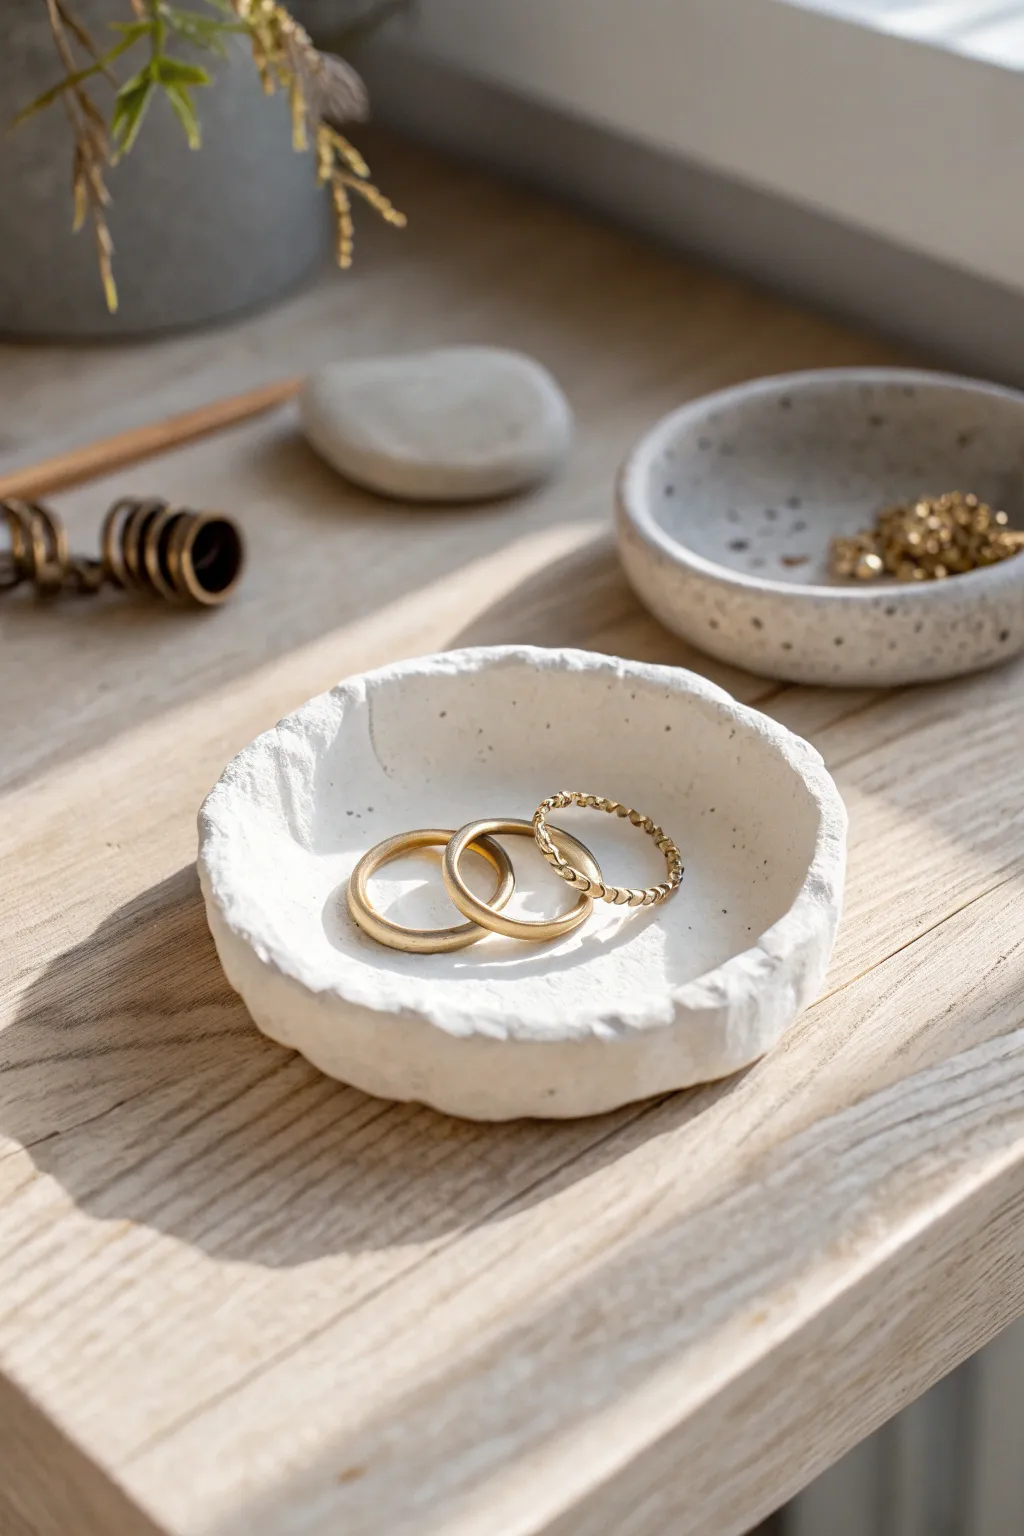
Embrace the beauty of imperfection with this handcrafted trinket bowl, featuring a raw, organic rim and a matte white finish. It captures a modern minimalist aesthetic that pairs perfectly with warm gold jewelry.
How-To Guide
Materials
- White stone-effect air dry clay
- Rolling pin
- Small bowl (for use as a mold)
- Sandpaper (fine grit)
- Parchment paper or craft mat
- Water in a small cup
- Sponge or craft paintbrush
- Clear matte varnish (optional)
Step 1: Shaping the Clay
-
Condition the clay:
Begin by taking a handful of air dry clay and kneading it in your hands to warm it up. This conditioning process makes the clay more pliable and reduces the chance of cracks forming later. -
Roll out a slab:
Place your clay onto a piece of parchment paper to prevent sticking. Use a rolling pin to flatten the ball into a slab that is roughly 1/4 inch thick, ensuring an even surface. -
Cut the rough shape:
Instead of using a cookie cutter for a perfect circle, use a knife or modeling tool to cut a freeform, roughly circular shape. This manual cutting helps establish the organic look right from the start.
Cracks happen?
Mix a tiny amount of fresh clay with water to create a paste (slip). Fill the crack, smooth it over with a wet finger, and let it dry again.
Step 2: Forming the Bowl
-
Mold the curve:
Take your clay circle and gently press it into the bottom of a small bowl that is lined with plastic wrap or parchment paper. Alternatively, for a wider shape, you can drape the clay over the *bottom* of an overturned bowl. -
Texture the rim:
This is the signature step for this look. Use your fingers to gently pinch and pull at the rim of the clay. Create slight unevenness—some parts higher, some lower. -
Create the rough edge:
To mimic the stone-like texture in the image, lightly tear small bits of clay off the very edge of the rim, or dab it with a stiff brush to scuff it up. Avoid smoothing the rim completely. -
Smooth the interior:
Dip your finger or a small piece of sponge into water. Very gently smooth the inside bottom of the tray to remove any fingerprints, but be careful not to oversaturate the clay.
Make it speckled
Before rolling, knead in used dried coffee grounds or black peppercorns. Sanding after drying reveals a beautiful terrazzo-style speckle pattern.
Step 3: Drying and Refining
-
Initial dry time:
Leave the clay in or on the mold for about 24 hours. Placing it in a cool, dry area away from direct sunlight helps prevent warping. -
Remove from mold:
Once the clay is firm enough to hold its shape (leather hard), gently remove it from the mold. Flip it over to allow the bottom, which was against the mold, to dry completely. -
Full cure:
Let the piece dry for another 24-48 hours until it is bone dry and turns a chalky white color. The clay will feel lighter and no longer cool to the touch. -
Refine the surface:
Take your fine-grit sandpaper and lightly sand the bottom and interior surface to remove any sharp snags. I prefer to leave the rim untouched during this step to maintain that rugged texture. -
Dust off:
Wipe away any clay dust with a slightly damp cloth or a dry paintbrush.
Step 4: Finishing Touches
-
Add stone texture (optional):
If your clay dried too smoothly, you can dab a mixture of white acrylic paint and baking soda onto the surface for a faux-stone gritty finish. -
Seal the piece:
To protect your jewelry and the tray, apply a thin coat of clear matte varnish. This keeps the clay white but prevents stains from oils or metals. -
Final dry:
Allow the varnish to cure fully according to the bottle’s instructions before placing any rings inside.
Now you have a serene little spot for your favorite daily jewelry pieces


Ring Dishes and Ring Cones

Bring a touch of organic modernism to your vanity with this matching set featuring a shallow ring bowl and two distinct ring holders. The faux-stone speckled finish transforms simple air-dry clay into something that looks decidedly high-end and ceramic.
Step-by-Step Guide
Materials
- White air dry clay
- Rolling pin
- Circle cutters (approx. 3-inch and 1.5-inch)
- Small bowl for molding (approx. 3-4 inch diameter)
- Sharp craft knife or clay blade
- Smooth work surface or silicone mat
- Water and a small sponge
- Acrylic paints: Cream/Off-white, Burnt Umber or Dark Brown
- Old toothbrush
- Matte varnish or sealant
- Fine grit sandpaper
Step 1: Preparation & Ring Dish
-
Condition the Clay:
Begin by taking a handful of white air-dry clay and kneading it in your hands until it becomes warm, pliable, and free of cracks. -
Roll the Slab:
On your smooth work surface, roll the clay out evenly until it is approximately 1/4 inch thick. Try to maintain a consistent thickness so it dries evenly. -
Cut the Base:
Use your larger circle cutter (or a bowl rim as a template) to cut out a clean 3-inch circle from the slab. -
Form the Dish:
Gently lift the clay circle and place it inside your small molding bowl. Press it down lightly so it takes the curved shape, but don’t squish it too thin. -
Smooth the Rim:
While it sits in the mold, dip your finger in a little water and run it along the rim of the clay to round off any sharp cutting edges.
Stone Texture Trick
Mix dried tea leaves or coffee grounds directly into the wet clay before rolling. It creates an authentic internal texture that looks great even before painting.
Step 2: Creating the Cones
-
Roll a Cone Shape:
Take a separate lump of clay and roll it into a ball, then begin rolling it back and forth while applying more pressure to one side to form a tapered cone shape. -
Refine the Tall Cone:
For the taller standalone cone shown in the back, keep rolling until it’s about 3-4 inches tall. Tap the bottom firmly on the table to flatten it so it stands straight. -
Create the Hollow Top:
If you want the vase-like look of the tall cone, use the handle of a paintbrush to gently press a small indentation into the very tip. -
Make the Small Cone Base:
Roll a small amount of clay out to 1/4 inch thickness again. Use the smaller (1.5-inch) cutter to create a tiny circular platform. -
Form the Mini Cone:
Form a second, smaller cone (about 1.5 inches tall). Score the bottom of this cone and the center of the small circular platform with a craft knife. -
Attach and Smooth:
Add a dab of water to the scored areas (slip) and press the mini cone onto the platform. Use a tool or your finger to blend the seam slightly or leave it crisp, depending on your preference. -
Dry Completely:
Set all three pieces—the bowl (still in its mold), the tall cone, and the small cone stand—aside to dry for 24-48 hours until fully hardened and white.
Step 3: Finishing & Decorating
-
Sand for Smoothness:
Once bone dry, use fine-grit sandpaper to gently smooth out any fingerprints, bumps, or rough edges on the rims. -
Base Coat:
Paint all pieces with a creamy off-white acrylic paint. You may need two coats for opaque coverage. I usually let the first coat dry for about 20 minutes before adding the second. -
Prepare the Speckle:
Dilute a small amount of dark brown paint with water until it is quite fluid, almost like ink. -
Apply the Speckles:
Dip an old toothbrush into the watered-down brown paint. Hold it over your clay pieces and run your thumb across the bristles to flick tiny droplets onto the surface. -
Control the Density:
Do a test splatter on paper first. Aim for a fine mist of dots rather than large globs to mimic the stone look in the photo. -
Seal the deal:
Allow the paint to dry completely, then finish with a coat of matte varnish to protect your jewelry holders from moisture and scratches.
Warped Edges?
If the rim of your bowl curls while drying, place a small, lightweight bag of rice or beans inside it during the drying process to gently weigh it down.
Now you have a chic, cohesive set ready to organize your favorite rings and accessories


Pinch Pot Catchalls
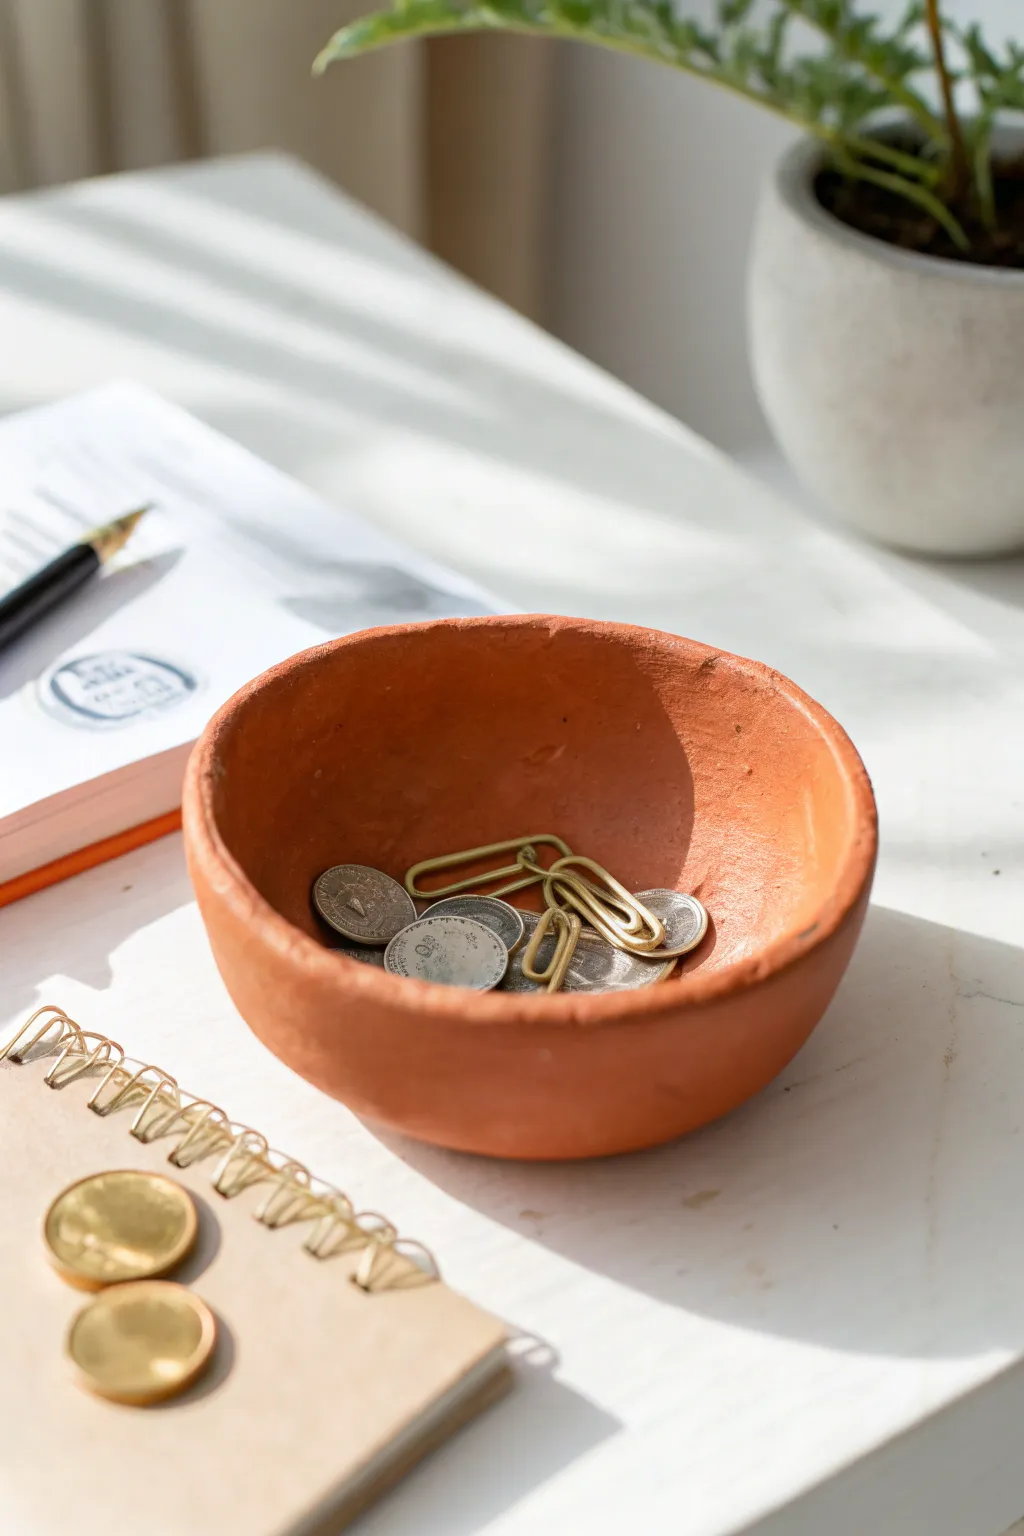
This rustic, handmade catchall brings a touch of organic warmth to any desk or entryway with its natural terracotta hue. The simple pinch pot technique creates a perfectly imperfect shape, ideal for corralling paperclips, loose change, or keys.
How-To Guide
Materials
- Terracotta air dry clay
- Small cup of water
- Parchment paper or work mat
- Sponge or soft cloth
- Fine-grit sandpaper (optional)
- Matte clear acrylic sealer (optional)
Step 1: Forming the Base
-
Prepare your clay:
Start by grabbing a chunk of air dry clay about the size of a tennis ball. Knead it in your hands for a minute or two to warm it up and make it pliable. -
Roll a sphere:
Roll the clay between your palms or on your work surface until you have a smooth, round ball. -
Center the opening:
Hold the ball in one hand and gently press your thumb into the center, going about three-quarters of the way down. Be careful not to push all the way through the bottom. -
Begin pinching:
With your thumb inside the hole and your fingers on the outside, gently pinch and rotate the clay. Work your way around the sphere, slightly turning it after each pinch. -
Widen the walls:
Continue this pinching rhythm, moving your fingers from the bottom of the pot up towards the rim. Aim for an even thickness of about a quarter-inch throughout the walls.
Step 2: Refining the Shape
-
Flatten the bottom:
Once you are happy with the width, gently tap the bottom of the pot against your table to create a flat, stable base so it won’t wobble. -
Check symmetry:
Look at your bowl from eye level and overhead. Gently push or pull any sides that look uneven to create a relatively circular shape, though remember that a little irregularity adds character. -
Smooth the interior:
Dip your finger slightly in water—just a drop—and run it smoothly along the inside curve to erase deep fingerprints or cracks. -
Refine the rim:
Run a damp finger along the top edge to round it off. If you prefer a flatter rim, you can gently tap the bowl upside down on your work surface. -
Smooth the exterior:
Use a barely damp sponge or your finger to smooth the outside texture. I like to leave a little bit of texture here to keep that raw, handmade terracotta look shown in the photo.
Keep it Slick
Work with a small bowl of water nearby, but use it sparingly. Too much water weakens the clay structure and can lead to slumping or cracking as it dries.
Step 3: Drying and Finishing
-
Initial drying:
Place your pot on a piece of parchment paper to dry. Locate it in a spot with good airflow but away from direct heat sources to prevent cracking. -
Rotate frequently:
Flip the pot upside down after a few hours, then right-side up again later. This helps the bottom dry at the same rate as the walls. -
Wait for cure:
Allow the clay to dry fully for 24 to 48 hours. The color will lighten noticeably as the moisture evaporates. -
Sand imperfections:
Once bone dry, you can lightly sand any rough edges on the rim with fine-grit sandpaper, wiping away the dust with a dry cloth afterwards. -
Seal the surface:
If you want to protect the finish without adding sheen, apply a thin coat of matte acrylic sealer. This prevents the clay from absorbing oils from handling over time.
Crack Control
If hairline cracks appear while drying, mix a tiny bit of fresh clay with water to make a paste (slip) and adhere it into the crack, then smooth it over.
Now you have a charming, minimalist vessel ready to organize your desk essentials


Tiny Bud Vases for Dried Stems
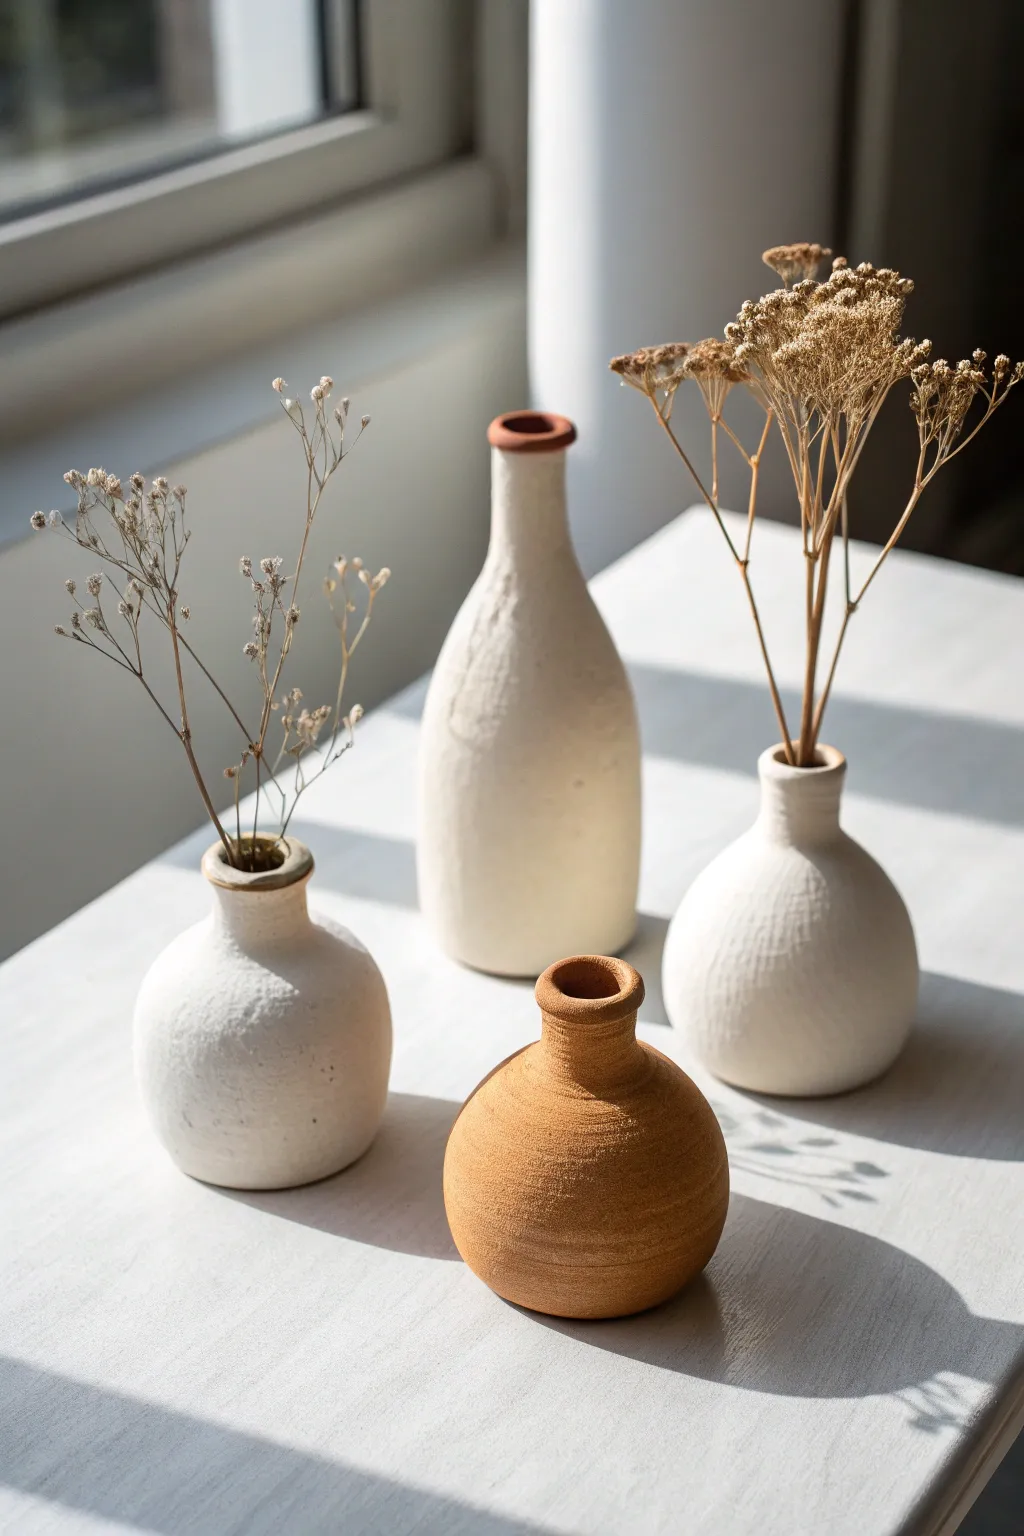
These charming miniature vases capture the beauty of organic imperfection with their rough, tactile surfaces and earthy tones. Perfect for displaying delicate dried stems, this set mixes bulbous shapes with slender necks to create a cohesive, sculptural vignette.
Detailed Instructions
Materials
- White or cream air dry clay
- Terracotta colored air dry clay
- Small cup of water
- Sponge or textured cloth
- Wooden sculpting tool or chopstick
- Fine-grit sandpaper
- Rolling pin
- Optional: Matte acrylic varnish
Step 1: Forming the Base Shapes
-
Prepare the clay:
Start by kneading your clay until it is warm and pliable. Divide the white clay into three portions of varying sizes and keep one portion of terracotta clay separate for the small brown pot. -
Create the spheres:
Roll each portion of clay into a smooth, tight sphere. Don’t worry about perfection; a slightly organic shape adds to the rustic appeal we are aiming for. -
Flatten the bottoms:
Gently tap the bottom of each sphere against your work surface to create a flat base. This ensures your vases will stand straight and won’t wobble once they are dry. -
Create the opening:
I find it easiest to use my thumb or a round sculpting tool to press a hole into the center of the sphere, stopping about a half-inch from the bottom. This is the pinch pot method.
Natural Texture Hack
Mix dried coffee grounds or sand directly into your white clay before sculpting. This creates a realistic speckled granite effect without needing to paint.
Step 2: Sculpting the Necks
-
Pinch the walls:
Starting at the bottom, gently pinch and rotate the clay walls to thin them out and raise the height of the vase. Keep the walls somewhat thick to maintain structural integrity. -
Narrow the opening:
As you move upward, gently collar the clay inward to narrow the opening. For the larger bottle shape, you will need to gently pull the clay upwards to elongate the neck significantly. -
Refine the rims:
Smooth the rims with a wet finger. For the terracotta vase and the small white one, create a slightly flared lip by pressing the rim outward gently with your thumb. -
Shape variations:
Ensure each vase has a distinct silhouette. Make one tall and slender like a bottle, one round and squat, and the others somewhere in between to mimic the photo.
Step 3: Adding Texture and Detail
-
Create the gritty texture:
Before the clay dries, take a rough sponge, a piece of burlap, or even a crumpled ball of aluminum foil. Press it gently all over the exterior surface to create that beautiful, pitted stone-like texture. -
Expose the clay body:
For the white vases, you can dampen the rim slightly to smooth it more than the body, creating a subtle contrast between the rough vessel and the smoother opening. -
Checking verticality:
Set all the vases on a flat surface and look at them from eye level. Adjust any leaning necks now while the clay is still workable. -
Initial drying phase:
Let the vases sit for about 30 minutes to firm up slightly. This prevents gravity from slumping your tall bottle shape before it fully sets.
Cracking Clay?
If small cracks appear while shaping the neck, simply dip your finger in water and smooth a small amount of fresh clay paste (slip) over the fissure to seal it.
Step 4: Finishing Touches
-
Full drying:
Allow the vases to dry completely in a cool, dry place for 24-48 hours. Turn them occasionally to ensure even drying on all sides. -
Optional sanding:
If there are any sharp jagged bits on the rim or base that interfere with the look, gently buff them away with fine-grit sandpaper, but be careful not to remove the texture you added. -
Cleaning dust:
Wipe the vases down with a dry brush to remove any clay dust from sanding. -
Arranging stems:
Once fully cured, select delicate dried florals like baby’s breath or dried grasses. Because air dry clay isn’t waterproof, these are strictly for dry arrangements.
Group your new collection on a windowsill to catch the light and highlight those lovely organic textures

What Really Happens Inside the Kiln
Learn how time and temperature work together inside the kiln to transform clay into durable ceramic.
Small Planters for Succulents
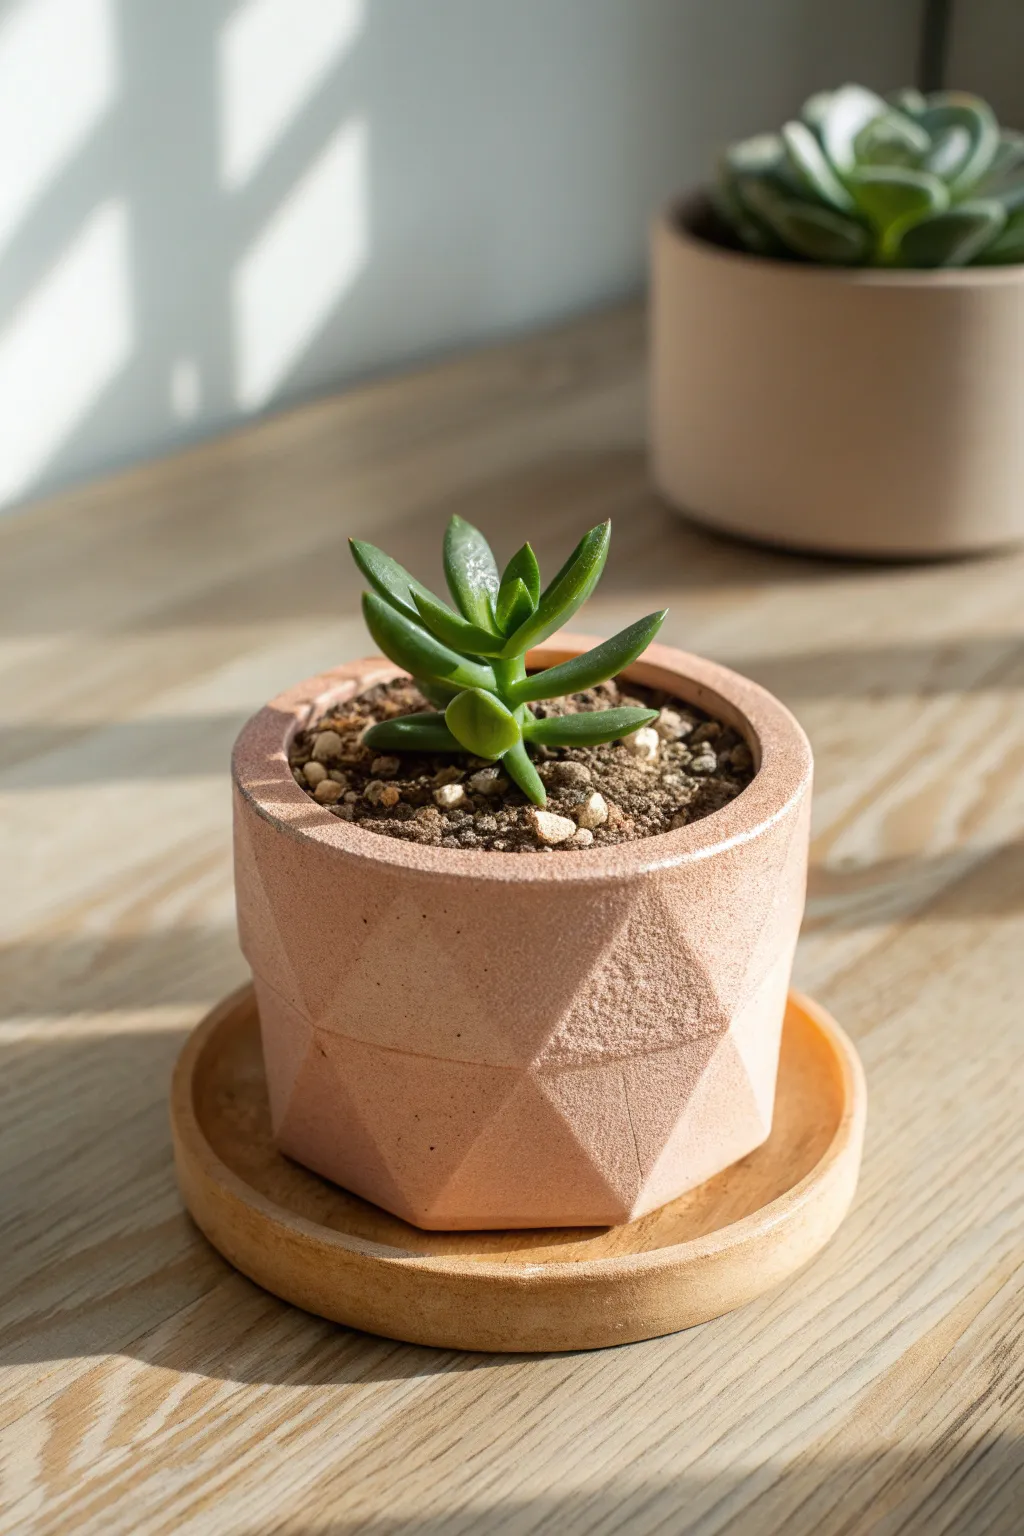
Bring modern charm to your windowsill with this faceted, gem-style planter that mimics the look of carved stone. The soft, textured pink finish pairs perfectly with the rigid geometric lines, creating a chic little home for your favorite succulent.
Step-by-Step Tutorial
Materials
- Air dry clay (white or terracotta)
- Rolling pin
- Sharp craft knife or x-acto knife
- Ruler
- Small cup or jar (to use as a mold)
- Parchment paper
- Sandpaper (fine grit)
- Acrylic paint (dusty pink/terracotta)
- Baking soda (optional, for texture)
- Sponge or foam brush
- Matte finish sealant (spray or brush-on)
- Small wooden saucer (optional base)
- Succulent potting soil and small plant
Step 1: Creating the Base Structure
-
Prepare the Clay:
Start by conditioning a generous handful of air dry clay. Knead it in your hands until it is warm, pliable, and free of cracks. If it feels too dry, dip your fingers in water and work the moisture in. -
Roll the Slab:
Place the clay on a sheet of parchment paper to prevent sticking. Use your rolling pin to roll out a slab that is roughly 1/4 inch thick. Aim for an even thickness throughout to ensure the pot dries uniformly. -
Cut the Base:
Select a small jar or cup to act as your internal mold. Place it on the clay slab and trace around the bottom with your craft knife to cut out a circular base. Set this circle aside, keeping it on the parchment. -
Size the Walls:
Measure the height of your mold. Cut a long rectangular strip from the remaining slab that is slightly taller than your mold and long enough to wrap completely around it with a little overlap.
Step 2: Forming the Geometric Shape
-
Wrap the Mold:
Wrap your clay strip around the jar or cup. If you want the inside to remain unstickable, you can lightly wrap the jar in plastic wrap first. Join the two ends of the clay strip by scoring the edges (making scratch marks) and adding a dab of water. -
Blend the Seam:
Smooth the vertical seam with your finger or a clay tool until it disappears completely. This will become the cylinder wall of your planter. -
Attach the Base:
Place the clay cylinder onto the circular base you cut earlier. Score and slip the contact points, then firmly press the clay together. Use a modeling tool to blend the outside clay downward and the inside clay upward to create a watertight seal. -
Carve the Facets:
While the clay is still on the mold (for support), take your craft knife. Instead of cutting all the way through, you are going to slice off thin wedges of clay from the exterior. -
Create the Angles:
Start shaving off angular slices. Imagine carving a gemstone. Make diagonal cuts that meet to form triangles and diamonds around the exterior surface. Vary the angles slightly to give it that organic, low-poly look. -
Remove the Mold:
Carefully slide the jar or cup out of the clay cylinder. If the clay has slumped, use your fingers to gently reshape the rim and interior. -
Smooth the Rim:
Dip your finger in water and run it along the top rim to smooth out any sharp edges or roughness left from the initial rolling.
Cracks Appearing?
Mix a tiny bit of fresh clay with water to make a paste (slip). Fill any cracks that appear during drying with this paste, let dry, and sand smooth.
Step 3: Finishing and Planting
-
Dry the Planter:
Let the pot sit in a cool, dry place for at least 24 to 48 hours. I usually rotate the piece occasionally so air reaches the bottom. -
Sand Imperfections:
Once fully cured and hard, use fine-grit sandpaper to gently smooth any overly sharp peaks or rough patches, focusing on the rim and the bottom. -
Mix Textured Paint:
Mix your dusty pink acrylic paint with a teaspoon of baking soda. This nifty trick gives the paint a realistic, stone-like texture similar to terracotta or concrete. -
Apply Color:
Dab the textured paint onto the planter using a sponge or foam brush. The dabbing motion enhances the grainy look. Let the first coat dry, then apply a second if needed for opacity. -
Seal the Surface:
Air dry clay isn’t waterproof on its own. Apply two to three coats of a matte sealant, paying special attention to the inside of the pot. Allow it to cure fully according to the bottle instructions. -
Final Setup:
Place your finished geometric pot on a small wooden coaster to protect your furniture. Fill with succulent soil and gently nestle your plant inside.
Waterproofing Tip
For extra safety against leaks, line the dried interior with a thin layer of sheer UV resin or waterproof varnish before adding any soil.
Now you have a stunning custom planter that looks high-end but was made right at your table
Candle Holders With Simple Shapes
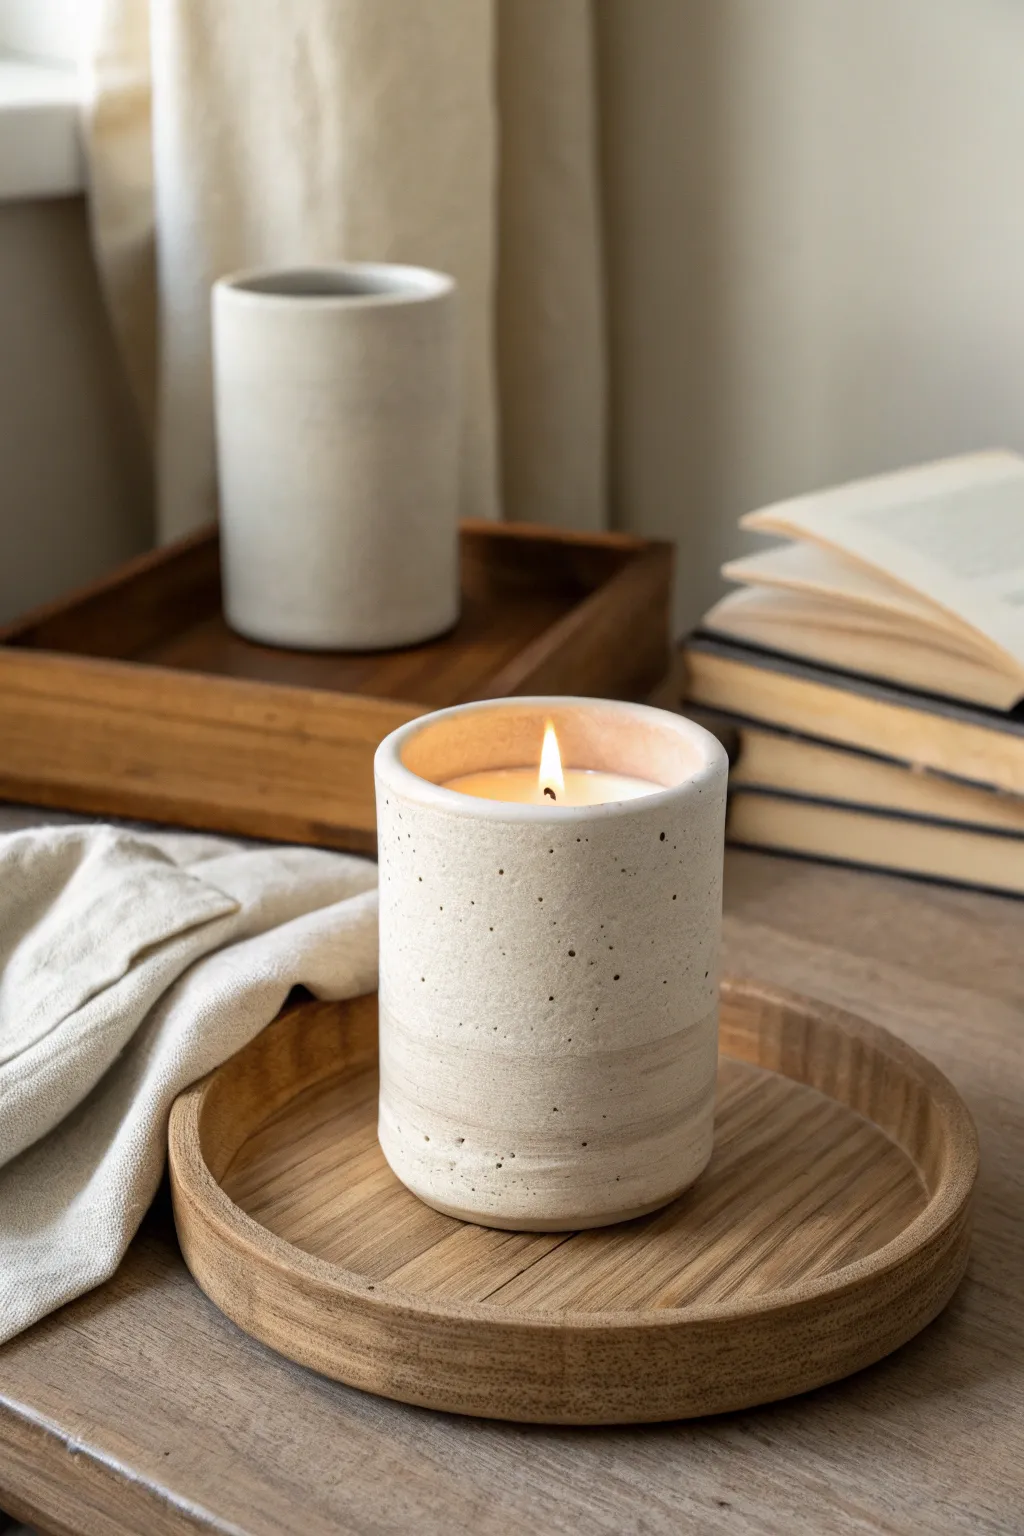
Bring the earthy charm of expensive stoneware into your home with this simple air dry clay vessel. Its straightforward cylindrical shape and faux-speckled finish create a minimalist, artisanal look that works beautifully with any warm, neutral decor.
Step-by-Step Guide
Materials
- White air dry clay (approx. 500g)
- Acrylic rolling pin
- Sharp craft knife
- Ruler
- Slip (clay mixed with water)
- Round cookie cutter or template (about 3-4 inches diameter)
- Sandpaper (fine grit)
- Acrylic paints (cream/beige, dark brown)
- Old toothbrush
- Matte varnish or sealant
- Soy wax flakes and candle wick (optional, for filling)
- Double boiler (optional)
Step 1: Forming the Base
-
Prepare the Clay:
Start by kneading your white air dry clay until it feels pliable and warm. If it feels too stiff, dip your fingers in a tiny bit of water to soften it up. -
Roll the Slab:
Roll out the clay on a smooth surface or canvas mat to a uniform thickness of about 1/4 inch. Try to keep the pressure even so the walls of your candle holder will be consistent. -
Cut the Base:
Use your round cookie cutter or a paper template to cut a perfect circle from the rolled clay. This will form the bottom of your vessel. -
Score the Edges:
Take a scoring tool or a needle and rough up the outer edge of the circle base. Apply a little bit of slip to these scored areas to act as glue.
Step 2: Building the Walls
-
Measure and Cut the Wall:
Calculate the circumference of your base circle. Cut a long rectangular strip from your remaining rolled clay that matches that length plus a tiny overlap, with your desired height (around 4-5 inches). -
Attach the Wall:
Carefully lift the rectangular strip and wrap it around the circular base. I find it easiest to stand the strip on its edge and curve it around the base rather than lifting the base to the strip. -
Seal the Vertical Seam:
Where the two ends of the wall meet, score both edges, apply slip, and press them firmly together. Use a modeling tool to smooth the clay over the seam both inside and out until it vanishes. -
Join Wall to Base:
Use your thumb or a wooden tool to smudge the clay from the wall down onto the base on the outside, and from the base up onto the wall on the inside. This ensures a watertight, strong bond.
Cracks Appearing?
Mix a tiny amount of fresh clay with water into a thick paste. Fill the cracks, smooth over with a damp finger, and let it dry again before painting.
Step 3: Refining and Drying
-
Smooth the Surface:
Dip a sponge in water and run it over the entire piece to smooth out fingerprints and tool marks. Pay special attention to the rim; gently round it off with your wet fingers. -
Add Texture (Optional):
If you want that very subtle horizontal banding seen in the lower half of the image, lightly drag a damp sponge or soft brush horizontally around the base while the clay is still wet. -
Allow to Dry:
Let the vessel dry slowly away from direct sunlight for 24-48 hours. Rotate it occasionally so it dries evenly and doesn’t warp. -
Sand for Perfection:
Once fully dry and chalky white, use fine-grit sandpaper to remove any remaining rough spots or sharp edges on the rim.
Pro Tip: Consistent Thickness
Place two wooden rulers or magazines of equal height on either side of your clay while rolling. The rolling pin will rest on them, ensuring a totally even slab.
Step 4: Faux Ceramic Finish
-
Base Coat:
Paint the entire vessel, inside and out, with a creamy beige acrylic paint. You might need two coats for full opacity. -
Create the Speckles:
Mix a small amount of dark brown paint with a drop of water to make it fluid. Dip an old toothbrush into this mixture. -
Splatter Technique:
Hold the toothbrush near the vessel and run your thumb across the bristles to flick tiny specks of paint onto the surface. Practice on paper first to control the spray. -
Seal the Piece:
Apply a coat of matte varnish to protect the paint. This gives it that soft, stoneware sheen. -
Candle Assembly:
Once the varnish is cured, secure a wick to the bottom center inside. Melt soy wax in a double boiler and carefully pour it into your new vessel, letting it set completely before lighting.
Now you have a stunning, minimalist candle holder that looks like high-end pottery without the kiln


The Complete Guide to Pottery Troubleshooting
Uncover the most common ceramic mistakes—from cracking clay to failed glazes—and learn how to fix them fast.
Photo and Card Holders
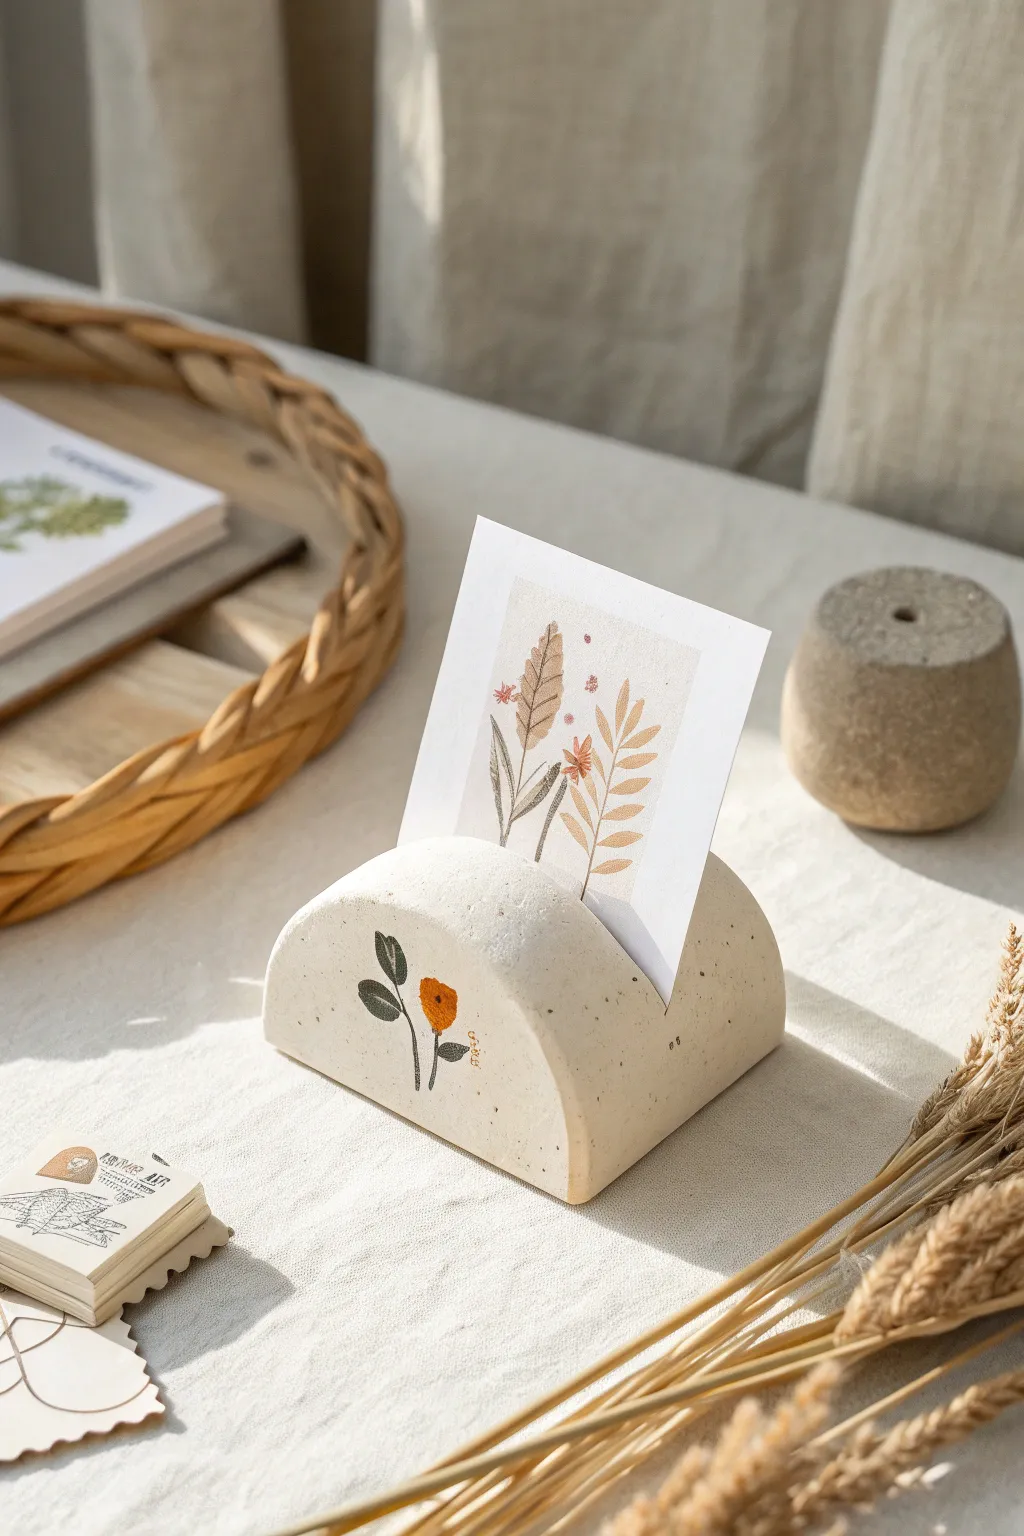
This charming, minimalistic card holder features a soft, sandy texture and a delicate hand-painted botanical illustration. Its simple arched shape provides a sturdy and stylish base for displaying favorite postcards, photos, or table numbers.
Step-by-Step Tutorial
Materials
- White or cream air-dry clay
- Rolling pin
- Sharp craft knife or scalpel
- Clay cutting wire or dental floss
- Sandpaper (medium and fine grit)
- Acrylic paints (sage green, mustard yellow, brown)
- Fine detail paintbrush (size 0 or 00)
- Ruler
- Cup of water and sponge
- Matte varnish or sealant
Step 1: Shaping the Base
-
Condition the Clay:
Begin by taking a generous handful of air-dry clay and kneading it thoroughly until it is warm, pliable, and free of air bubbles. -
Form a Block:
Shape the clay into a thick, rectangular block using your hands. It should be roughly 1.5 to 2 inches thick to provide enough weight for stability. -
Create the Arch Shape:
Use your palms to round off the top corners, smoothing them down until you have a semi-circle or domed shape. Keep the bottom completely flat. -
Slice for Crisp Edges:
To get those sharp, clean front and back faces seen in the photo, use a clay wire or a very long, sharp blade to slice off the front and back faces of your dome. This leaves you with a perfect arch profile. -
Smooth Imperfections:
Dip your finger in a little water and gently run it over the curved top and flat sides to erase any fingerprints or drag marks from the wire. -
Create the Card Slot:
Use a ruler to find the center line along the top of the arch. Press the ruler edge or a specialized clay tool straight down into the clay to create a groove about 0.5 inches deep. Wiggle it slightly to ensure it’s wide enough for a card.
Clean Cuts Pro-Tip
For the cleanest card slot, wait until the clay is leather-hard (partially dry) before cutting the groove. It holds its shape better and won’t smush downwards.
Step 2: Refining and Painting
-
Speckling (Optional):
To mimic the stone-like texture in the photo, you can flick a toothbrush loaded with watered-down brown paint over the wet clay, or knead in some dried tea leaves before shaping. -
Allow to Dry:
Let the piece dry completely. Because of its thickness, this may take 48-72 hours. Rotate it occasionally so the bottom dries evenly. -
Sand for Finish:
Once bone dry, use medium grit sandpaper to level the bottom if it warped slightly, and fine grit sandpaper to smooth the curved surface to a soft matte finish. -
Sketch the Design:
Lightly sketch your floral design onto the front face using a very faint pencil line. Aim for a simple stem with a single bloom and a few leaves. -
Paint the Stem and Leaves:
Load a fine detail brush with sage green acrylic paint. Paint the stem with a steady hand, adding two simple oval leaves on the left side. -
Paint the Flower:
Using mustard yellow or terracotta paint, fill in the small flower head at the top of the stem. I like to dab the paint on to give it a little texture. -
Add Details:
Once the base colors are dry, use a tiny amount of brown paint to add subtle veins to the leaves or a center to the flower. -
Seal the Piece:
Finish by applying a coat of matte varnish. This protects the paint and clay without adding an unnatural glossy shine, preserving that raw stone look.
Uneven Bottom?
If your holder wobbles after drying, tape a sheet of coarse sandpaper to a table and rub the holder’s base over it in figure-eight motions until flat.
Place your favorite art print or photo in the slot to instantly add a touch of organic warmth to your desk
Wall Hanging Tiles and Garlands
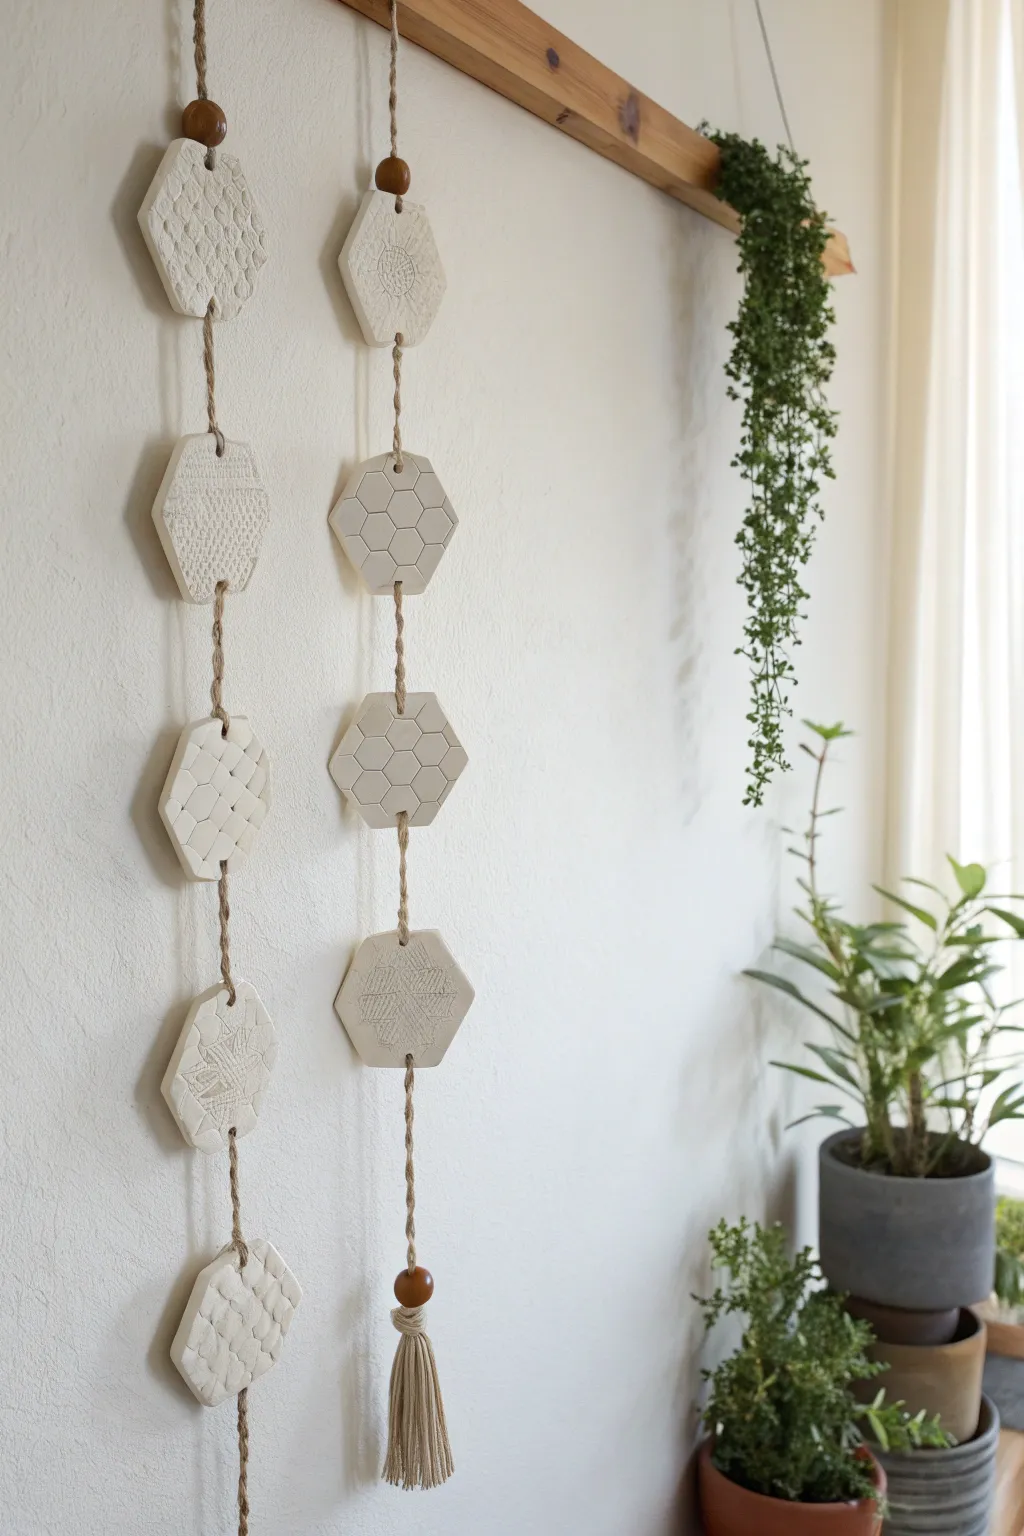
Bring natural warmth to your walls with these vertical garlands featuring stamped clay hexagons. This project combines the simplicity of geometric shapes with organic textures and unfinished wood accents for a relaxed, modern bohemian look.
Step-by-Step
Materials
- White or off-white air dry clay (2 lbs)
- Rolling pin
- Parchment paper or canvas mat
- Hexagon cookie cutter (approx. 2-3 inches)
- Jute twine
- Wooden beads (assorted sizes, natural finish)
- Straw or toothpick (for piercing holes)
- Texture tools (stamps, lace, leaves, hexagon grid stencil)
- Fine-grit sandpaper
- Scissors
Step 1: Preparing the Clay Tiles
-
Roll the slab:
Begin by kneading a portion of your air dry clay to soften it, then roll it out onto parchment paper or a canvas mat. Aim for a consistent thickness of about 1/4 inch so the tiles are sturdy but not too heavy. -
Add texture:
Before cutting your shapes, press your chosen textures into the clay slab. For the honeycomb look seen in the photo, gently press a smaller hexagon grid tool or stamp into the surface. For other tiles, roll a piece of lace or press a dried leaf into the clay to create raised patterns. -
Cut the shapes:
Using your hexagon cutter, press firmly into the textured clay to cut out your tiles. You will need about 4-5 tiles per vertical strand. -
Create hanging holes:
While the clay is still wet, use a straw or a thick skewer to poke a hole through the hidden top and bottom edges of each hexagon. Ensure the hole goes vertical from top to bottom through the center of the shape if you want the string hidden behind, or poke holes top and bottom near the edge if you plan to weave the string through. -
Refine the edges:
Dip your finger in a little water and smooth out any rough edges created by the cookie cutter. This little step makes the final product look much more professional. -
Let them dry:
Place your clay hexagons on a flat surface to dry completely. This usually takes 24-48 hours depending on humidity. I like to flip them over halfway through the drying process to prevent curling. -
Sand for smoothness:
Once fully dry and hard, use fine-grit sandpaper to gently buff away any sharp spots on the edges.
Stamp Secret
Don’t have fancy stamps? Use household items like burlap, the bottom of a crystal glass, or even a meat tenderizer mallet to create unique textures.
Step 2: Assembling the Garland
-
Cut the twine:
Measure a piece of jute twine to your desired length, leaving an extra 10 inches for knots and the top loop. For a standard wall hanging, 4-5 feet is a good starting point. -
Start the strand:
Tie a loop at the very top of your twine for hanging. Thread a large wooden bead onto the twine and push it up to the knot at the base of your loop. -
String the first tile:
Thread the twine through the top hole and out the bottom hole of your first hexagon tile. If the holes are tight, wrap a piece of tape around the end of the twine to create a rigid ‘needle’. -
Secure the placement:
Tie a simple overhand knot in the twine right below the tile to hold it in place. This knot will be hidden by the next section of string or sit visibly between tiles depending on your spacing preference. -
Repeat the pattern:
Continue threading tiles, tying knots underneath each one to space them out evenly. Leave about 1-2 inches of twine exposed between each hexagon. -
Add the bottom accent:
After your final tile is secured, thread one last wooden bead onto the bottom of the strand. -
Make the tassel:
Wrap twine around your four fingers about 15-20 times. Slide the loops off, tie a piece of string through the top loop, and wrap another piece around the ‘neck’ to secure it. Cut the bottom loops to create fringe. -
Attach the tassel:
Tie the finished tassel securely to the end of your main garland string, right below the final wooden bead. Trim any excess tail from the knot.
Cracked Clay?
If hairline cracks appear while drying, mix a tiny bit of fresh clay with water to make a paste (slip) and smooth it over the crack, then let dry again.
Now you have a stunning, handmade piece of art ready to add character to any corner of your home

TRACK YOUR CERAMIC JOURNEY
Capture glaze tests, firing details, and creative progress—all in one simple printable. Make your projects easier to repeat and improve.
Letter and Initial Ornaments
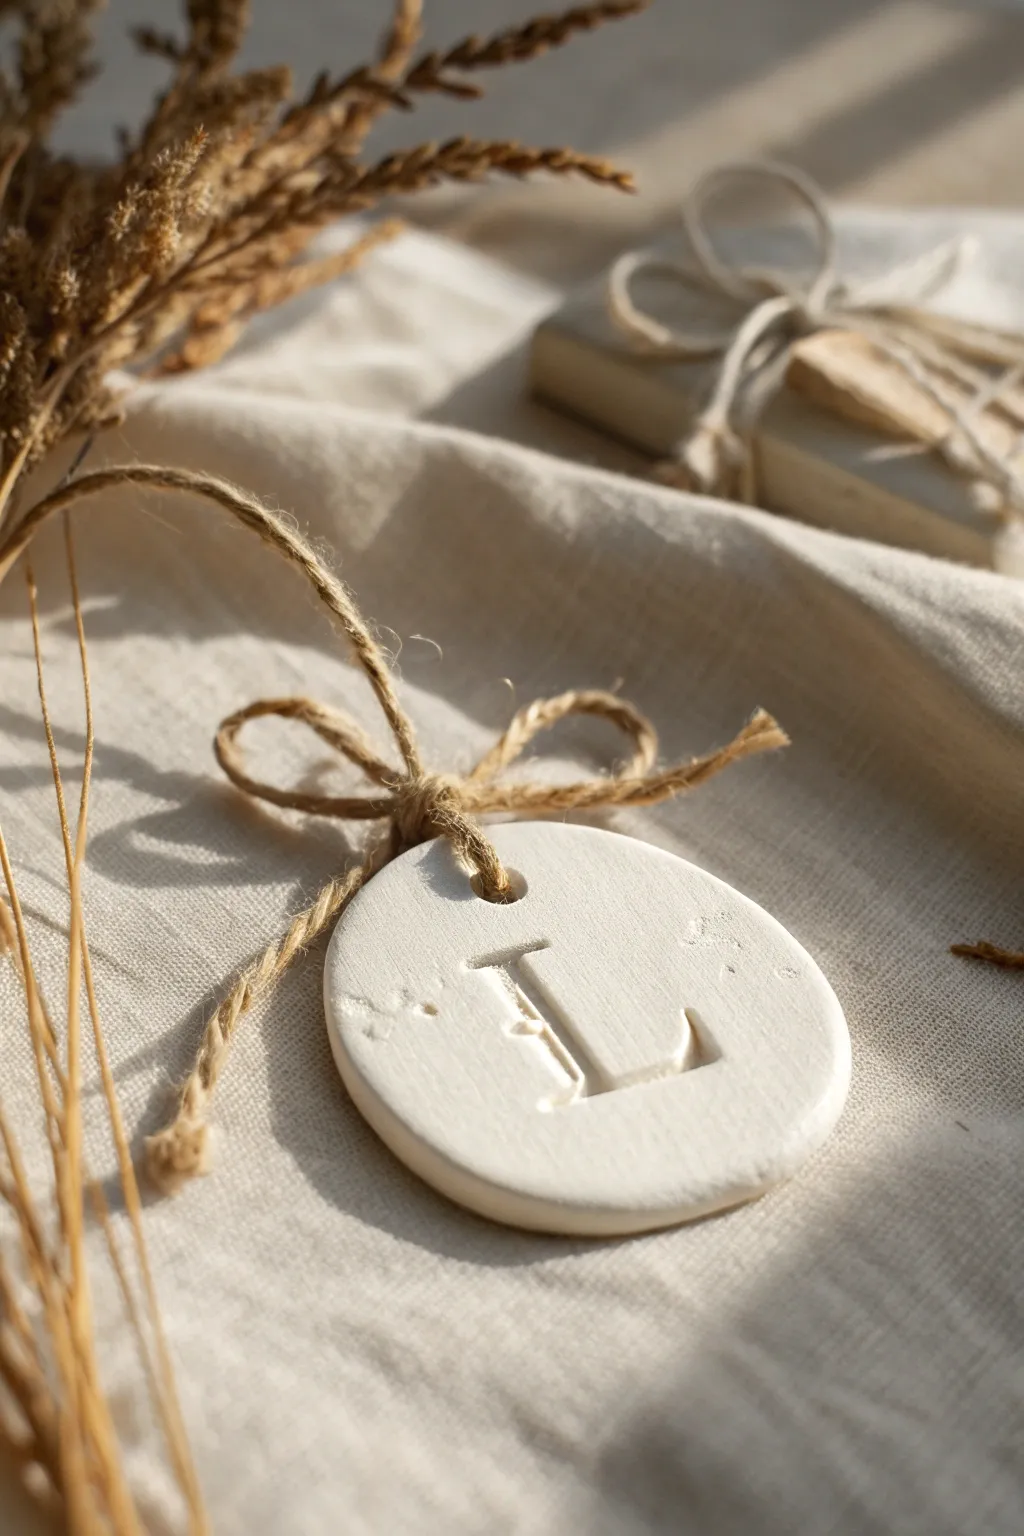
These elegant clay ornaments bring a personalized, organic touch to any gift or decoration scheme. With their raw, slightly imperfect edges and crisp embossed lettering, they capture the essence of handmade simplicity in a beautiful white finish.
Step-by-Step Guide
Materials
- White stone clay or air dry clay (fine grain)
- Rolling pin (acrylic or wooden)
- Circle cookie cutter or biscuit cutter (approx. 2-3 inches)
- Letter stamps or alphabet impress set
- Small straw or skewers (for the hole)
- Fine-grit sandpaper (320-400 grit)
- Natural jute twine
- Parchment paper or canvas mat
- Small bowl of water
- Matte clear sealant (optional)
Step 1: Shaping and Stamping
-
Prepare your workspace:
Lay down a sheet of parchment paper or a canvas mat to prevent the clay from sticking to your work surface. -
Condition the clay:
Take a handful of air dry clay and knead it gently in your hands until it feels pliable and warm, ensuring there are no air bubbles trapped inside. -
Roll it out:
Use your rolling pin to flatten the clay. Aim for a thickness of about 1/4 inch (6mm). If you want a uniform look, you can place guide strips or wooden slats on either side of the clay. -
Cut the shape:
Press your circle cutter firmly into the clay. Give it a tiny wiggle before lifting it up to ensure a clean separation. -
Smooth the edges:
Dip your finger slightly into water and run it gently around the circumference of the cut circle. This softens the sharp cut lines, giving it that pillowy, stone-like aesthetic. -
Create the hanging hole:
Use a straw or a skewer to punch a hole near the top edge. Position it centered, about a half-inch down from the top rim so the clay doesn’t crack there later. -
Prepare the stamp:
Select your desired letter stamp. If the clay is very sticky, you can lightly dust the stamp face with cornstarch or dip it in water to prevent it from pulling the clay up. -
Emboss the letter:
Center the stamp visually and press down firmly and evenly. Don’t press so hard that you go through, but deep enough to get a crisp shadow. -
Add texture (optional):
For the subtle distressed look seen in the photo, you can lightly tap a crumpled bit of foil or sandpaper in random spots around the letter, though the natural imperfections of air dry clay often do this automatically.
Clean Stamp Trick
Place a thin sheet of plastic wrap over the clay before pressing your letter stamp. This creates huge, soft rounded edges for the letter and prevents the stamp from getting gunked up with clay.
Step 2: Drying and Finishing
-
Initial drying:
Place the ornament on a clean wire cooling rack or a fresh sheet of parchment paper. I prefer a wire rack to allow air circulation underneath. -
Flip for flatness:
After about two hours, flip the ornament over. This helps prevent the edges from curling upward as moisture evaporates at different rates. -
Full cure time:
Let the clay dry completely for 24 to 48 hours. It should turn a bright, chalky white and feel hard to the touch. -
Refine the surface:
Once fully dry, take your fine-grit sandpaper and very gently buff the edges and surface. Focus on any sharp burrs left by the cutter or the hole punch. -
Dust off:
Wipe the ornament with a dry, soft cloth or a brush to remove all the sanding dust from the embossed crevice. -
Seal (optional):
To protect the white finish from dirt, apply a thin coat of matte clear sealant. This keeps the natural look but makes it wipeable. -
Add the twine:
Cut a length of jute twine, about 8 inches long. -
Thread the loop:
Fold the twine in half, push the loop through the hole from front to back, and pull the tails through the loop to create a lark’s head knot. -
Tie the bow:
Tie a small, tight bow right at the base of the clay, similar to the photo, trimming the ends so they don’t overpower the ornament.
Go Botanical
Before drying, press a sprig of rosemary or lavender into the clay alongside the initial. Once dry, paint the impression with diluted watercolor for a delicate botanical illustration effect.
Hang your beautiful personalized piece on a gift bag or a seasonal branch arrangement to enjoy its simple elegance
Air Dry Clay Earrings and Bead Charms
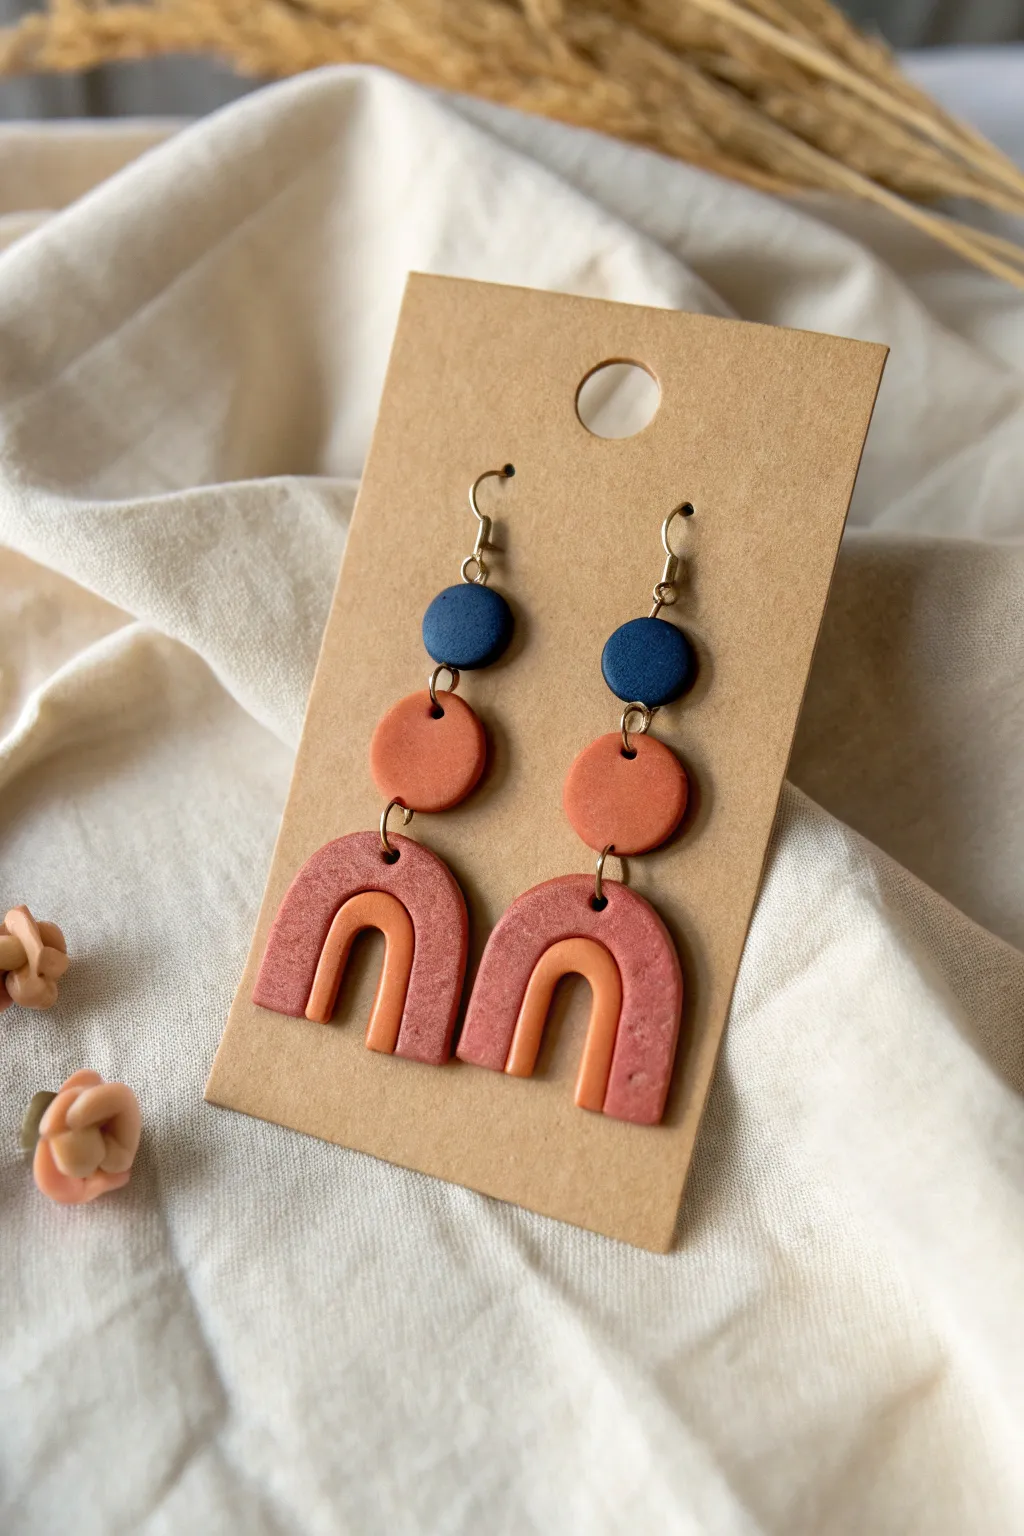
These stylish earrings combine geometric shapes with muted earth tones for a sophisticated bohemian look. The design features a cascading trio of clay elements that are surprisingly lightweight and easy to assemble.
Detailed Instructions
Materials
- Air dry clay
- Acrylic paints (dark blue, terracotta/rust, light peach)
- Rolling pin or clay roller
- Round cutters (small and medium sizes)
- Craft knife or clay blade
- Jump rings (gold finish)
- Earring hooks (gold finish)
- Small pliers
- Needle tool or toothpick
- Gloss varnish or sealant (optional)
- Fine-grit sandpaper
Step 1: Shaping the Clay
-
Prepare the clay:
Begin by conditioning your air dry clay until it is smooth and pliable. If the clay feels dry, knead in a tiny drop of water. -
Roll it out:
Roll the clay into a flat sheet, approximately 3-4mm thick. Aim for a consistent thickness to ensure all pieces dry evenly. -
Cut the top circles:
Use your smallest circle cutter to punch out two identical circles for the top tier of the earrings. -
Cut the middle circles:
Switch to a slightly larger circle cutter and punch out two more circles, which will form the mid-section connectors. -
Create the arches:
For the bottom pieces, roll two small logs or ‘snakes’ of clay. Bend each log into a U-shape to form an arch. Flatten them gently with the roller so they are flat on the top and bottom surfaces, not rounded. -
Refine the arch shape:
Use a craft knife to trim the bottom ends of the arches so they are perfectly straight and flush. -
Add the inner arc:
Roll a thinner snake of clay and form a smaller, tighter arch that fits snugly inside the larger one. Gently press them together so they bond as one solid piece, then trim the bottom to match perfectly. -
Create connection holes:
While the clay is still wet, use a needle tool to pierce holes for the jump rings. You’ll need holes at the top and bottom of the small and medium circles, and one hole at the top center of each arch. -
Dry thoroughly:
Place all components on a clean, flat surface to dry. I find that flipping them over halfway through the drying process prevents warping. Let them cure for at least 24 hours.
Sticky Situation?
If clay sticks to your cutter, dip the cutter in a little cornstarch or water before pressing down for a clean release every time.
Step 2: Painting and Finishing
-
Sand for smoothness:
Once fully dry, gently sand the edges of each piece with fine-grit sandpaper to remove any rough texture or burrs. -
Paint the top circles:
Paint the smallest circles with a deep navy blue acrylic paint. You may need two coats for full opacity. -
Paint the middle circles:
Apply a warm terracotta or rust-colored paint to the medium-sized circles. -
Paint the main arch:
Paint the outer/larger section of the bottom arch in a muted dusty pink or light reddish-brown tone. -
Paint the inner arch detail:
Carefully paint the smaller inner arch with a soft peach or apricot color. Use a fine detail brush to keep the line between the two colors clean. -
Seal the pieces:
Apply a thin coat of matte or gloss varnish to protect the paint and give the earrings a finished look. Let this dry completely.
Smooth Operator Tip
Before drying, dip your finger in water and gently rub the clay edges. This smooths out imperfections so you have less sanding to do later.
Step 3: Assembly
-
Open the jump rings:
Using two pairs of pliers, twist your gold jump rings open sideways rather than pulling them apart, which preserves their shape. -
Connect the tiers:
Thread a jump ring through the bottom of the blue circle and the top of the terracotta circle. Close the ring securely. -
Attach the arch:
Connect the bottom of the terracotta circle to the top of the arch piece with another jump ring. -
Add the hook:
Finally, attach an earring hook to the top of the blue circle using a small jump ring or the loop on the hook itself.
Now you have a stunning pair of handmade earrings ready to wear or gift to a friend
Easy Fridge Magnets With Texture
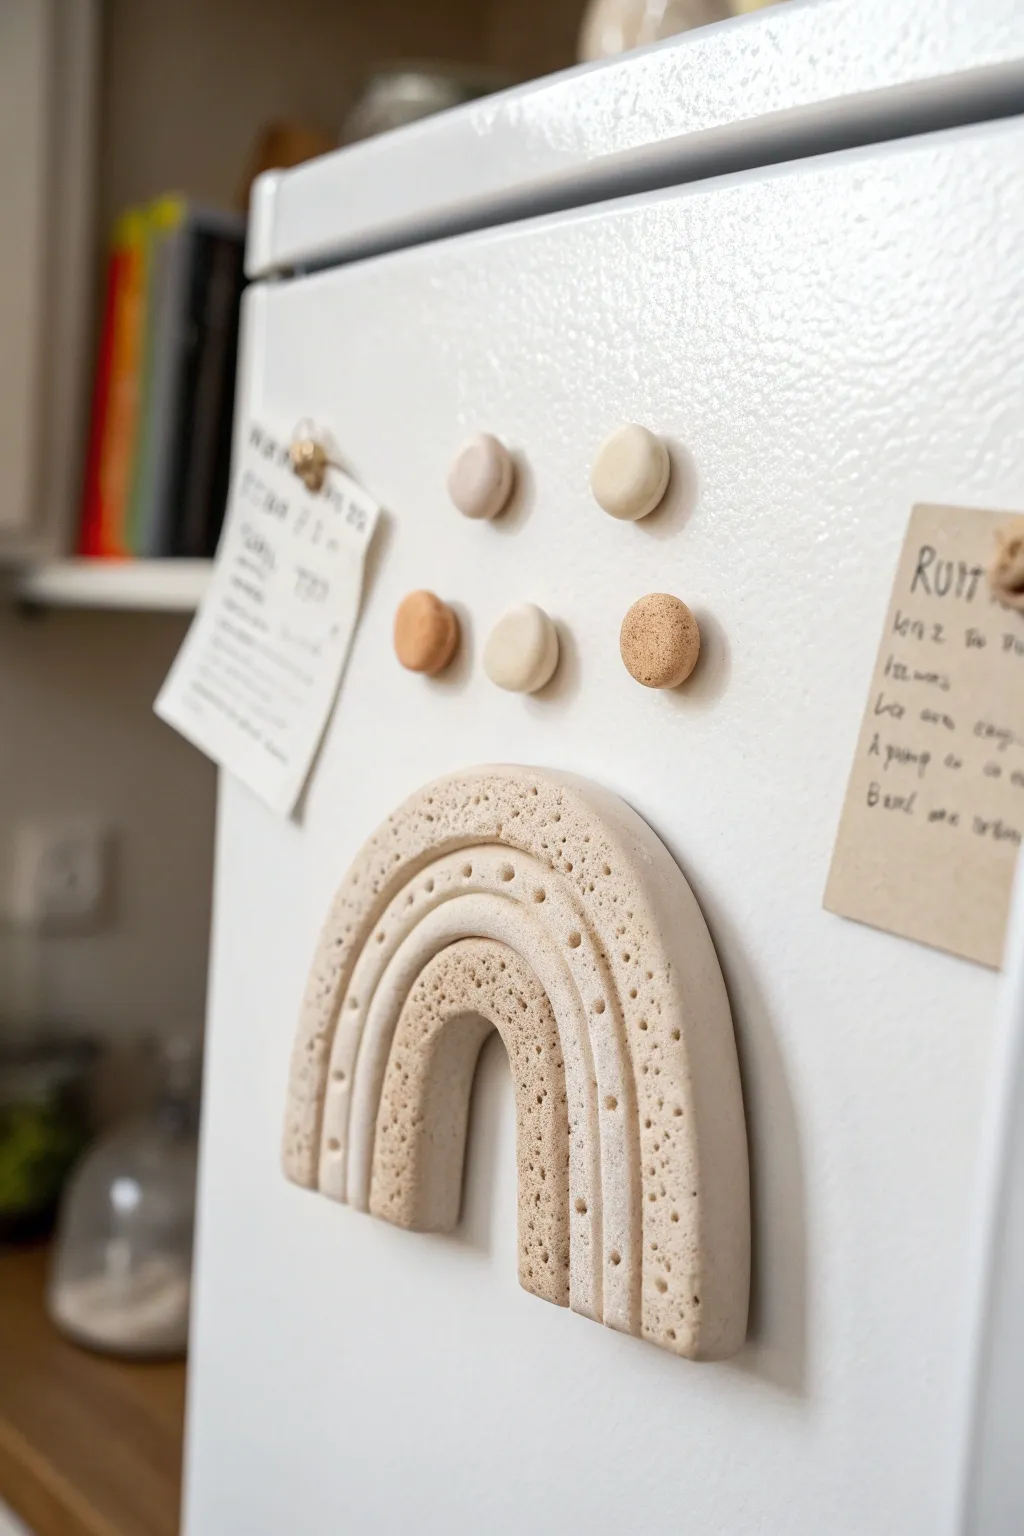
Bring a touch of minimalist, earthy charm to your kitchen with these tactile clay magnets. Featuring a grooved rainbow design and matching textured buttons, this project celebrates the beauty of raw clay and subtle details.
Step-by-Step Tutorial
Materials
- Air dry clay (white or natural stone color)
- Rolling pin
- Clay carving tools or a wooden skewer
- Old toothbrush or stiff bristle brush
- Small round cookie cutter or bottle cap
- Sandpaper (fine grit)
- Strong adhesive (E6000 or superglue)
- Round ceramic or neodymium magnets
- Optional: Acrylic paints in beige/tan tones
Step 1: Shaping the Rainbow
-
Prepare the Clay:
Start by conditioning a handful of air dry clay, kneading it until it is soft and pliable without any cracks. -
Roll the Slab:
Roll your clay out onto a smooth surface until it’s an even slab, approximately 1/4 inch thick. Aim for a consistent thickness so the magnet sits flat against the fridge. -
Cut the Arch:
Using a knife tool, cut out a semi-circle shape to form the base of your rainbow. You can trace around a bowl or cup lightly first if you need a guide. -
Refine the Cut:
Cut out the smaller inner arch to create the tunnel shape. Smooth the rough cut edges with a little bit of water on your finger. -
Carve the Arches:
Instead of rolling coils, we are carving the definition. Use a carving tool or a skewer to gently press deep, curved lines following the shape of the arch, dividing the rainbow into four distinct bands. -
Smooth the Channels:
Run a damp finger or a soft, wet brush along inside the grooves you just carved to remove any clay burrs and soften the lines.
Clay Cracking?
If you see hairline cracks while drying, mix a tiny bit of fresh clay with water to make a paste (slip) and fill/smooth the crack.
Step 2: Creating Texture
-
Stipple the Surface:
To create the porous, stone-like look, take an old toothbrush or a stiff bristle brush and gently tap it all over the surface of the clay. -
Add Deep Pores:
For more prominent texture, use the tip of a toothpick or a needle tool to poke scattered holes of varying depths—concentrate these more heavily on the outer and inner bands for contrast. -
Make Matching Buttons:
With your leftover clay scraps, cut small circles using a bottle cap or small cutter. Press them gently to flatten slightly. -
Texture the Buttons:
Apply the same toothbrush stippling technique to some of the button magnets, leaving others smooth for visual variety.
Stone Effect
Mix dried coffee grounds or black pepper into your white clay before rolling. This adds natural speckles for a convincing faux-stone look.
Step 3: Finishing and Assembly
-
Let it Dry:
Place your pieces on a flat surface to dry for at least 24-48 hours. I like to flip them over halfway through to ensure the back dries evenly. -
Check for Flatness:
Once fully dry, check the backs. If the clay warped slightly, place a sheet of fine-grit sandpaper on a flat table and rub the back of the magnet against it until perfectly flat. -
Optional Painting:
If you used white clay but want the beige tones shown in the image, water down some acrylic paint (in shades of sand, tan, and cream) and apply a wash, wiping away excess so it settles into the texture. -
Select Magnets:
Choose magnets strong enough to hold your clay pieces. Neodymium magnets are best for heavier clay projects. -
Attach the Backing:
Apply a dab of strong adhesive to the back of your clay rainbow and buttons. -
Secure the Magnet:
Press the magnet firmly into the glue and let it cure completely according to the glue manufacturer’s instructions before placing on your fridge.
Enjoy arranging your new handmade art collection on your refrigerator door
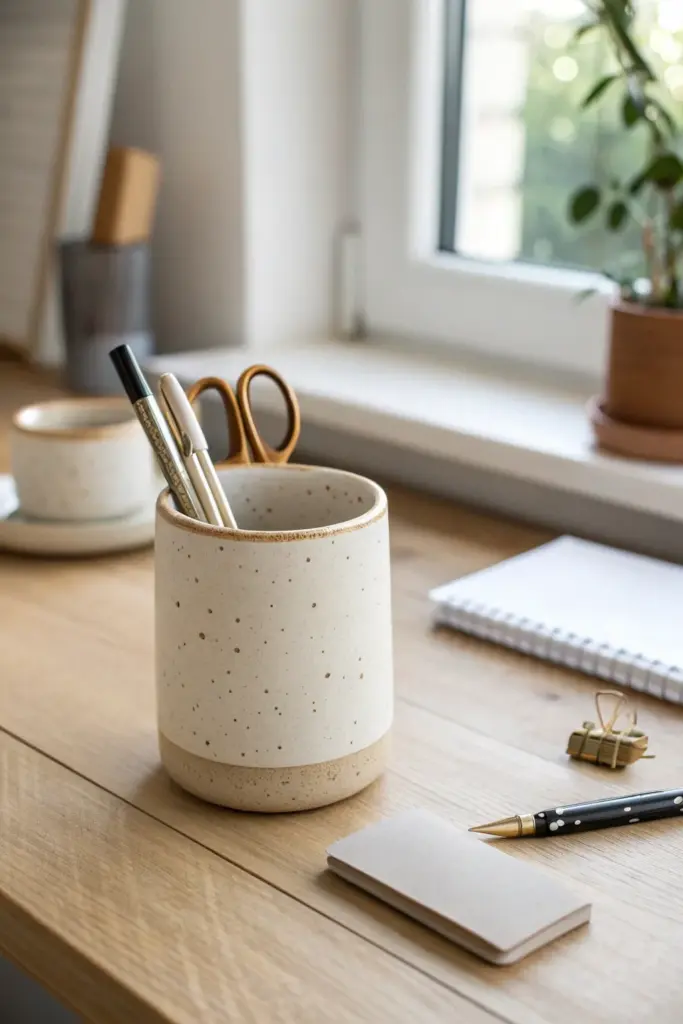
Desk Organizers and Pen Cups
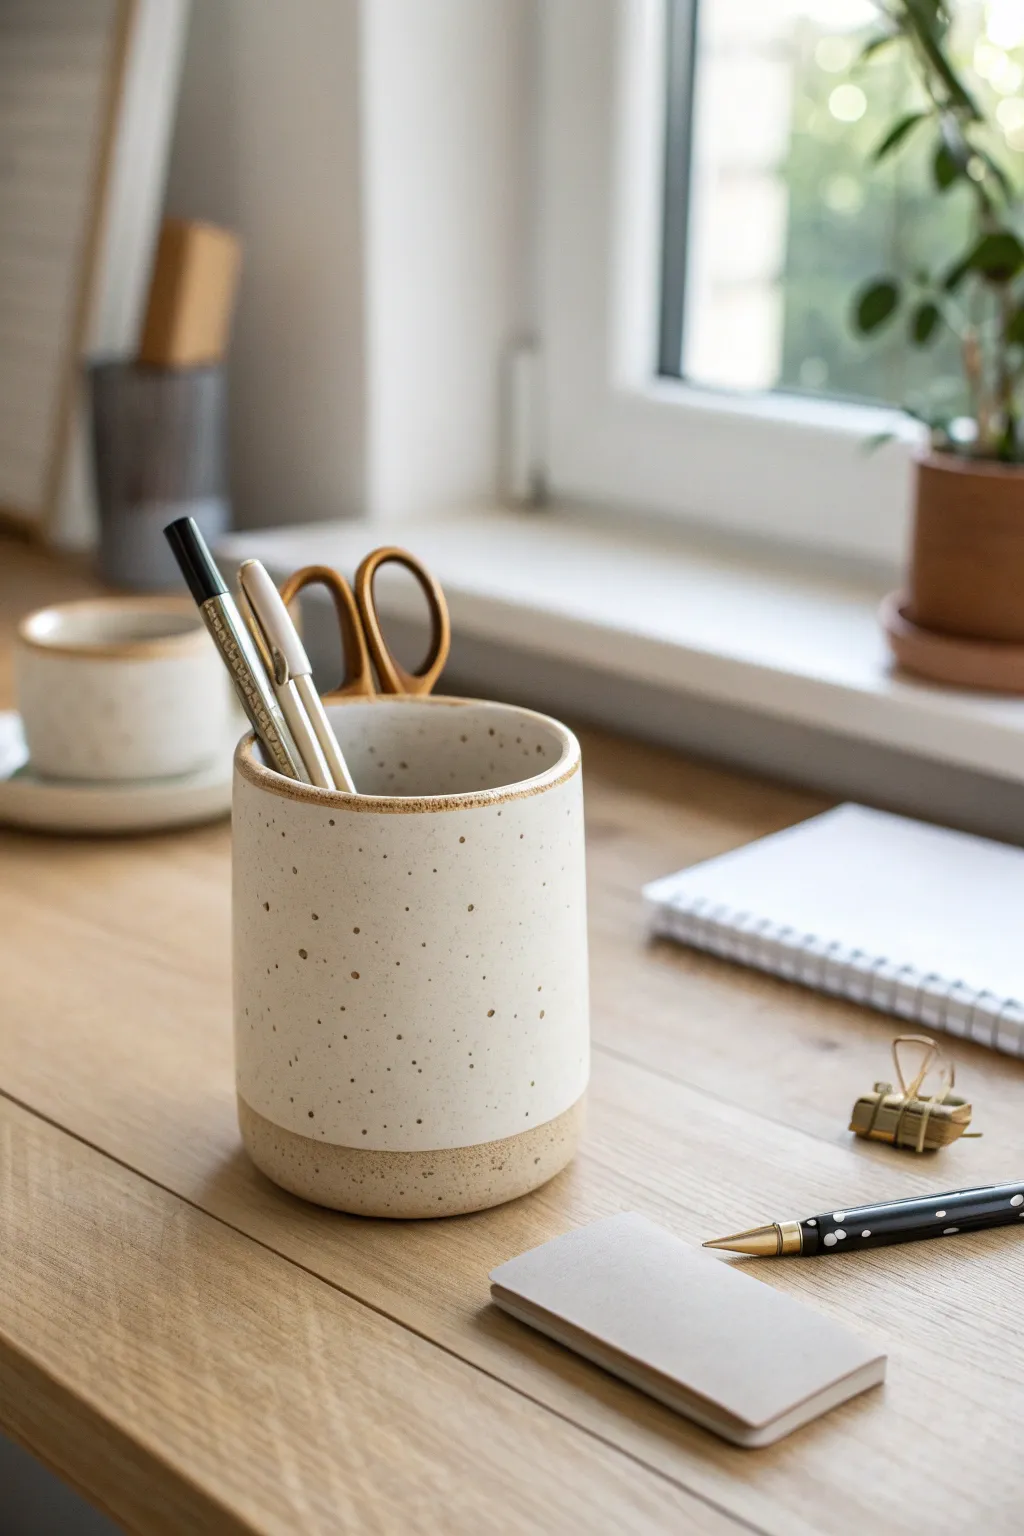
Achieve the high-end look of wheel-thrown pottery without a kiln using this simple slab-building technique. This minimalist pen cup features a faux-ceramic speckled finish and a raw, textured base that adds warmth to any workspace.
Step-by-Step
Materials
- White air dry clay (approx. 500g)
- Rolling pin
- Canvas mat or parchment paper
- Craft knife or clay cutter
- Ruler
- Empty can or jar (for mold cylinder)
- Slip (water + clay mixture)
- Pottery sponge
- Sandpaper (fine grit)
- Acrylic paints: Cream/Off-white, Tan/Beige, Dark brown
- Old toothbrush
- Matte spray sealant or varnish
Step 1: Forming the Cylinder
-
Prepare the Clay:
Begin by kneading your air dry clay to warm it up and remove any air bubbles. If the clay feels too stiff, dip your fingers in water and work it in until pliable. -
Roll the Slab:
Roll the clay out on your canvas mat to an even thickness of about 1/4 inch. Try to keep the pressure consistent so the walls of your cup will be uniform. -
Cut the Base:
Use your empty can or jar as a template. Place it on the slab and trace around the bottom with your craft knife to cut out a perfect circle. -
Measure the Wall:
Wrap a piece of string or paper around your jar to find the circumference, then add half an inch for overlap. Measure the desired height (around 4-5 inches is standard for pens). -
Cut the Rectangle:
Using your measurements and a ruler, cut a long, straight rectangle from the remaining clay slab. This will become the wall of your cup. -
Score and Slip:
Take a needle tool or fork and scratch rough textures (scoring) along the short ends of the rectangle and around the top edge of your circular base. Dab some clay slip onto these scratched areas. -
Assemble the Shape:
Wrap the rectangular slab around the circular base. I find it easiest to work directly on top of the base rather than trying to drop the base in later. -
Join the Seams:
Press the overlapping ends of the wall together firmly. Use a modeling tool or your thumb to smudge the clay across the seam line, blending it until the join disappears. -
Blend the Base:
Do the same for the bottom seam where the wall meets the circular base. Smooth the clay upwards from the base to the wall to create a seamless transition.
Clean Edges Pro-Tip
Use a piece of painter’s tape to mask off the bottom section before painting the cream top. This guarantees a crisp, straight line between the ‘glazed’ and ‘unglazed’ portions.
Step 2: Refining and Drying
-
Smooth the Surface:
Dip your sponge in a little water and gently wipe the entire surface to remove fingerprints and bumps. Pay attention to the rim; gently pinch and smooth it for a rounded, professional look. -
Create the Raw Base Texture:
For that two-tone look seen in the photo, leave the bottom inch of the cup slightly rougher, or gently tap it with a dry sponge to add a grainy texture. -
Slow Drying:
Let the cup dry for 24-48 hours. To prevent cracking, loosely drape a plastic bag over it for the first day to slow down the drying process. -
Sanding:
Once fully cured and bone dry, sand the cup lightly. Focus on the rim and the main body to make it silky smooth, but leave the bottom inch a bit textured for contrast.
Step 3: Painting the Faux Ceramic Look
-
Base Coat:
Paint the bottom inch of the cup with a tan or sandy-beige acrylic paint to mimic raw stoneware clay. Let this dry completely. -
Main Body Color:
Paint the rest of the cup (inside and out) with a creamy off-white color. Carefully paint a clean line where it meets the tan base. You may need two coats for opaque coverage. -
Deepen the Rim:
Mix a tiny amount of brown into your tan paint. Use a small detail brush to paint a very thin, slightly uneven line along the very top rim, mimicking the way glaze breaks over an edge. -
The Speckle Effect:
Dilute a small amount of dark brown paint with water until it’s inky. Dip an old toothbrush into it, point it at the cup, and run your thumb over the bristles to flick tiny specks onto the creamy section. -
Seal:
Finish with a matte spray sealant to protect your work and lock in that non-shiny, ceramic bisque appearance.
Cracks while drying?
If small hairline cracks appear during drying, create a thick paste of clay and water (spackling consistency) and fill the cracks. Smooth over with a damp finger and let dry again.
Now you have a stylish, custom organizer that brings a touch of calm to your daily tasks