
If you’ve got a little lump of air dry clay and the itch to make something sculptural, you’re in the right headspace. These air dry clay sculpture ideas are beginner-friendly but still feel like real, display-worthy pieces you’ll actually want to keep out.
Tiny Animal Figurines

Create a charming set of stylized animal figurines—a sleepy cat, an upright rabbit, and an attentive dog—perfect for a cozy windowsill display. mimicking the smooth, matte finish of wooden carvings, this air dry clay project focuses on simple shapes and delicate painted details.
Step-by-Step Tutorial
Materials
- White smooth air dry clay
- Small cup of water
- Basic sculpting tools (needle tool, smoother)
- Fine grit sandpaper (220-400 grit)
- Black acrylic paint or black fineliner pen
- Matte white acrylic paint (optional, for a uniform base)
- Matte varnish or sealant
- Rolling pin (optional)
- Fine detail brush
Step 1: Sculpting the Cat
-
Form the base:
Start with a ball of clay roughly the size of a tangerine. Gently roll and press it into a smooth, rounded teardrop shape with a flat bottom so it sits stable. -
Shape the ears:
Pinch the top of the teardrop to form two triangular peaks for the ears. Smooth the transition so they look like they are part of the single unit, not attached separately. -
Refine the form:
Use a little water on your finger to smooth out any bumps. The cat should look like a single, seamless stone-like shape.
Cracks Appearing?
If you see small cracks while drying, mix a tiny amount of fresh clay with water to make a paste (slip) and fill the cracks. Sand smooth once dry.
Step 2: Sculpting the Rabbit
-
Create the body:
Roll a cylinder of clay that is wider at the bottom and tapers slightly towards the neck. Flatten the base firmly on your work surface. -
Add the head:
Roll a smaller sphere for the head. Score the top of the body and the bottom of the head, add a dab of water or clay slip, and press them together firmly. Blend the clay at the seam lightly if needed, but a defined neck is okay. -
Form the long ears:
Roll two equal sausage shapes, flattening them slightly. Attach them to the top of the head, blending the clay at the join so they stand upright. I like to curve them very slightly for personality.
Step 3: Sculpting the Dog
-
Build the body and head:
Similar to the rabbit, create a tapered cylindrical body and attach a spherical head. For the dog, you might want the head slightly more oval-shaped. -
Shape the snout:
Add a very small, flattened button of clay to the front of the face for the snout area, blending the edges completely until seamless. -
Attach the ears:
Create two teardrop-shaped flat pieces for the floppy ears. Attach these to the sides of the head, pressing them down so they drape naturally against the cheeks.
Faux Wood Effect
Instead of white paint, use a diluted wash of beige or light brown acrylic after drying to settle into the textures and mimic light wood grain.
Step 4: Refining and Drying
-
Smooth everything:
Dip a soft brush or your finger in water and go over every surface to remove fingerprints. The charm of these figures lies in their smoothness. -
Let it dry completely:
Allow the figures to dry for 24-48 hours. Turn them occasionally so the bottoms dry evenly. Clay will turn white and feel lighter when fully dry. -
Sanding:
Once bone dry, use fine-grit sandpaper to buff away any remaining imperfections or bumps. This mimics that smooth, carved wood texture.
Step 5: Painting and Details
-
Priming (Optional):
If your clay dried off-white or greyish, paint the entire figure with a coat of matte white acrylic paint for a crisp look. -
Painting the cat’s face:
Using a fine brush or black pen, draw two downward curves for closed sleepy eyes. Add a small ‘Y’ shape for the nose and mouth, whiskers, and tiny dots on the chest for texture. -
Painting the rabbit’s face:
Draw small dots for eyes, a triangle nose, whickers, and a simple mouth line. Keep the lines thin and delicate. -
Painting the dog’s details:
Paint oval eyes with a small white highlight for an alert look. Paint the nose tip black. Add curved lines at the bottom of the body to suggest paws or legs. -
Sealing:
Finish with a coat of matte varnish to protect the paint and seal the clay without making it shiny.
Now you have a trio of sweet, minimalist pets ready to brighten up your shelf


Mini Mushroom Sculptures
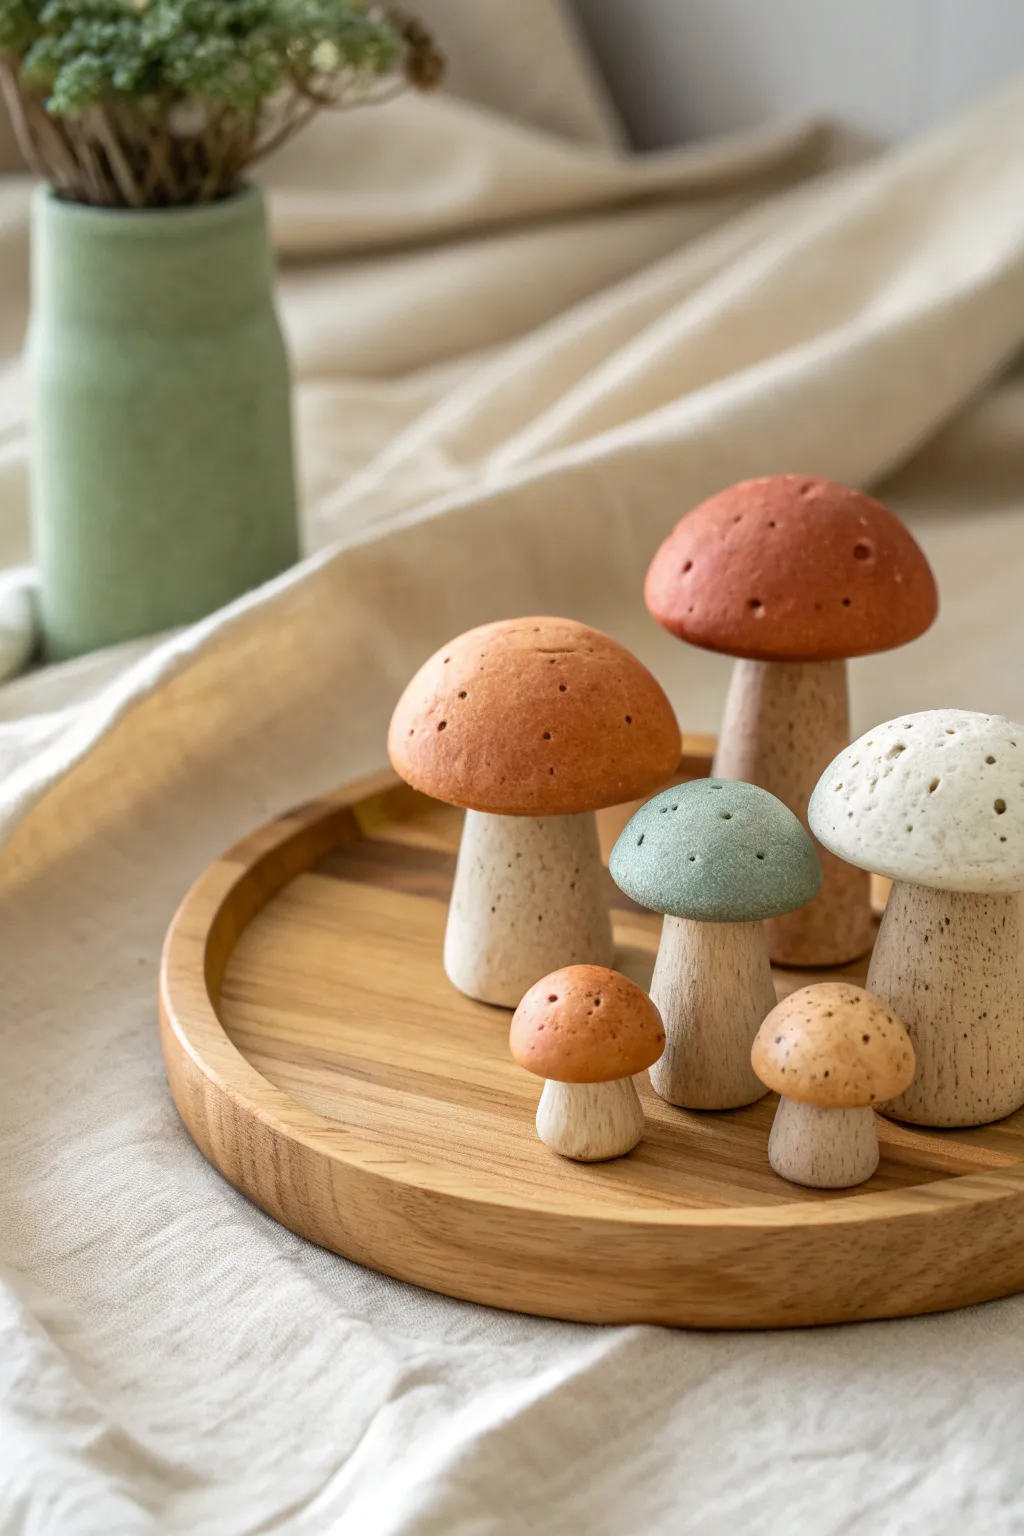
These charming mini mushrooms combine the smooth, sturdy look of wood with the versatility of air dry clay. With their matte earthy tones and delicate speckled textures, they make a perfect nature-inspired addition to any shelf or tray vignette.
Step-by-Step
Materials
- White air dry clay
- Acrylic paints (terracotta, sage green, cream, coffee brown, beige)
- Water cup and sponge
- Rolling pin
- Craft knife or clay wire
- Needle tool or toothpick
- Medium and fine grit sandpaper
- Strong craft glue or clay slip
- Small stiff paintbrush (specifically for speckling)
- Soft flat paintbrush (for base coats)
- Matte varnish or sealant
Step 1: Sculpting the Stems
-
Prepare the Clay:
Begin by conditioning a chunk of air dry clay in your warm hands until it is pliable and smooth. If it feels too dry, mist it lightly with water, but avoid making it sticky. -
Roll the Cylinders:
Divide your clay into several pieces of varying sizes to create a diverse forest. Roll each piece into a thick cylinder between your palms or on your work surface to form the mushroom stems. -
Taper the Shapes:
Gently roll one end of each cylinder slightly more to create a subtle taper towards the top, mimicking the natural growth of a mushroom stalk. -
Flatten Bases:
The key to stability is a flat bottom. Press the base of each stem firmly onto your table. Tap the top lightly to flatten the surface where the cap will eventually attach. -
Dry the Stems:
Let your stems dry partially for about 30 minutes. This firms them up enough to support the caps without squishing.
Weighted Base Trick
To keep tall mushrooms from tipping, embed a small pebble or metal washer into the base of the clay stem while you are first shaping it.
Step 2: Forming the Caps
-
Shape Basic Domes:
Roll balls of clay corresponding to your stem sizes. Press each ball between your thumb and forefinger to create a rounded dome shape. -
Refine the Edges:
Smooth out the bottom edge of the cap so it curves inward slightly, rather than having a sharp, raw edge. Use a little water on your finger to execute this smoothly. -
Create Texture:
Before assembling, take a needle tool or toothpick and gently prick the surface of the caps random spots to create the porous texture seen in the reference photo. I prefer to vary the pressure for different hole sizes. -
Attach Cap to Stem:
Score the top of the stem and the underside of the cap with a cross-hatch pattern. Apply a dab of clay slip or water joining paste, then press the pieces together firmly. -
Smoothing the Joins:
Use a damp paintbrush or sculpting tool to smooth out the seam slightly underneath, ensuring a strong bond without losing that defined mushroom silhouette. -
Final Drying:
Allow the complete mushrooms to dry for 24-48 hours. Turn them occasionally to ensure air reaches the bottom.
Faux Wood Grain
Before the clay dries, drag a stiff wire brush vertically up the stems. Once painted, apply a dark wash to settle into grooves for a realistic bark effect.
Step 3: Painting and Finishing
-
Sand for Smoothness:
Once bone dry, use fine-grit sandpaper to gently buff the stems and caps. The goal isn’t to remove the texture holes, but to achieve that soft, matte finish that resembles sanded wood. -
Base Coat – Stems:
Mix a beige or ‘latte’ color using white and a tiny dot of brown. Paint all the stems with this neutral tone to mimic raw wood. -
Base Coat – Caps:
Paint the caps in your chosen palette: deep terracotta, soft sage green, and warm cream. You may need two thin coats for opaque coverage. -
The Speckling Technique:
Dilute a dark brown paint with a little water. Dip a stiff brush (or an old toothbrush) into the paint, then run your thumb across the bristles to flick tiny specks onto the mushrooms. -
Control the spray:
Practice the flicking motion on a piece of paper first. You want a fine mist of brown spots to simulate natural imperfections and dirt. -
Seal the Work:
Finish with a matte varnish spray or brush-on sealant. Avoid glossy finishes, as the matte look is essential for the realistic, wooden aesthetic.
Group your new fungal friends on a wooden platter for a cozy, organic display


Face Planter With Cute Features
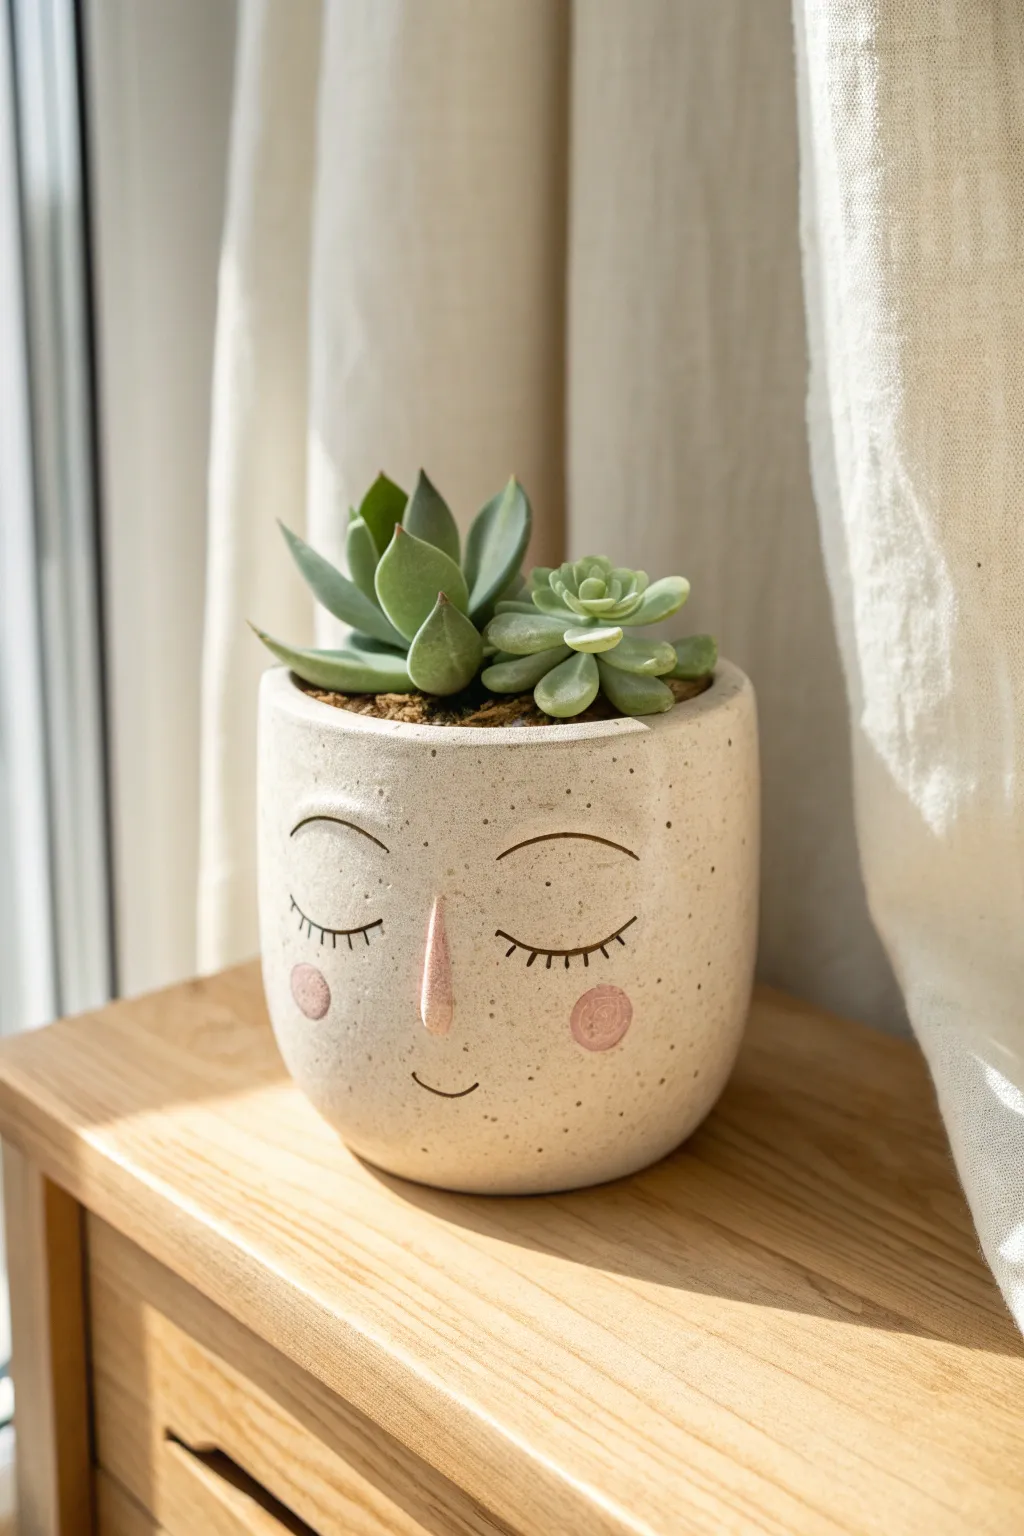
Bring character to your indoor garden with this charmingly tranquil planter. Featuring gentle, slumbering eyes and rosy cheeks, this speckled pot adds a sweet, personality-filled touch to any windowsill display.
Detailed Instructions
Materials
- Air dry clay (white or light grey)
- Speckled pottery clay slip or faux-stone spray paint (optional)
- Rolling pin
- Clay sculpting tools (needle tool, modeling tool)
- Small bowl or cylinder (as a mold)
- Water and sponge
- Sandpaper (fine grit)
- Acrylic paints (black, pink, peach/terracotta)
- Fine detail paintbrush
- Matte spray varnish
Step 1: Shaping the Vessel
-
Prepare the clay:
Begin by kneading a substantial ball of air dry clay until it is soft, warm, and pliable. This conditioning step prevents cracks later on. -
Roll the base slab:
Roll out the clay to an even thickness of about 1/4 inch. Cut a long rectangular strip for the walls and a circle for the base that matches your desired diameter. -
Form the cylinder:
Wrap the rectangular strip around the circular base to form a cylinder. If you want a perfectly round shape, you can wrap the clay loosely around a plastic-wrapped jar or bowl acting as a mold. -
Seal the seams:
Score (scratch) and slip (wet) the edges where the clay meets on the side and bottom. Press them firmly together. -
Smooth the shape:
Use your fingers and a little water to smooth out the seams completely until they are invisible. Gently round the bottom edge where the wall meets the base to create that soft, cup-like curve seen in the photo.
Use a Liner Pot!
Air dry clay dissolves in water over time. Even with varnish, ALWAYS keep your actual plant in a plastic nursery pot inside this decorative vessel.
Step 2: Sculpting the Features
-
Add the nose:
Take a tiny pinch of clay and roll it into a small, elongated teardrop shape. Attach this to the center of the pot face using the score and slip method. -
Blend the nose:
Use a modeling tool to smooth the edges of the nose into the main pot, leaving the bridge defined but seamless at the base. -
Carve the eyebrows:
Using a needle tool, gently carve two arched lines high on the forehead area for eyebrows. Keep the lines thin and delicate. -
Carve the eyes:
Below the eyebrows, carve two upward-curving semi-circles to represent closed eyelids. Add tiny tick marks along the bottom of the curve for eyelashes. -
Carve the mouth:
Create a small, simple upward curve near the bottom center for a subtle smile. -
Create texture (Optional):
If you aren’t using speckled paint later, you can mix dried tea leaves or sand into the wet clay now to mimic the stone texture shown. -
Dry the piece:
Let the planter dry completely for 24-48 hours. Keep it away from direct heat to prevent cracking.
Make it a Mug
Attach a C-shaped handle to the side before drying to turn this planter design into a cute decorative mug or pencil holder for your desk.
Step 3: Finishing Touches
-
Sand for smoothness:
Once bone dry, use fine-grit sandpaper to gently smooth out any fingerprints or rough edges, especially around the rim. -
Create the speckled look:
Use an old toothbrush dipped in diluted brown or grey acrylic paint to flick tiny speckles all over the white pot. I suggest testing this on paper first to control the splatter size. -
Paint the cheeks:
Mix a soft, dusty pink acrylic paint. Using your finger or a round brush, dab two perfect circles on either side of the nose for rosy cheeks. -
Paint the nose:
Paint the distinct bridge of the nose with a peach or terracotta tone, blending it slightly at the edges for a natural flush. -
Define the lines:
Use a very fine liner brush and black acrylic paint to carefully trace over the carved lines for the eyebrows, eyelashes, and smile to make them pop. -
Seal the planter:
Apply two coats of matte spray varnish to seal the clay. Since air dry clay isn’t waterproof, always use a plastic liner pot inside before adding your plant and soil.
Place your favorite succulent inside to give your new planter a fun, leafy hairstyle


Minimal Incense Holder Arc
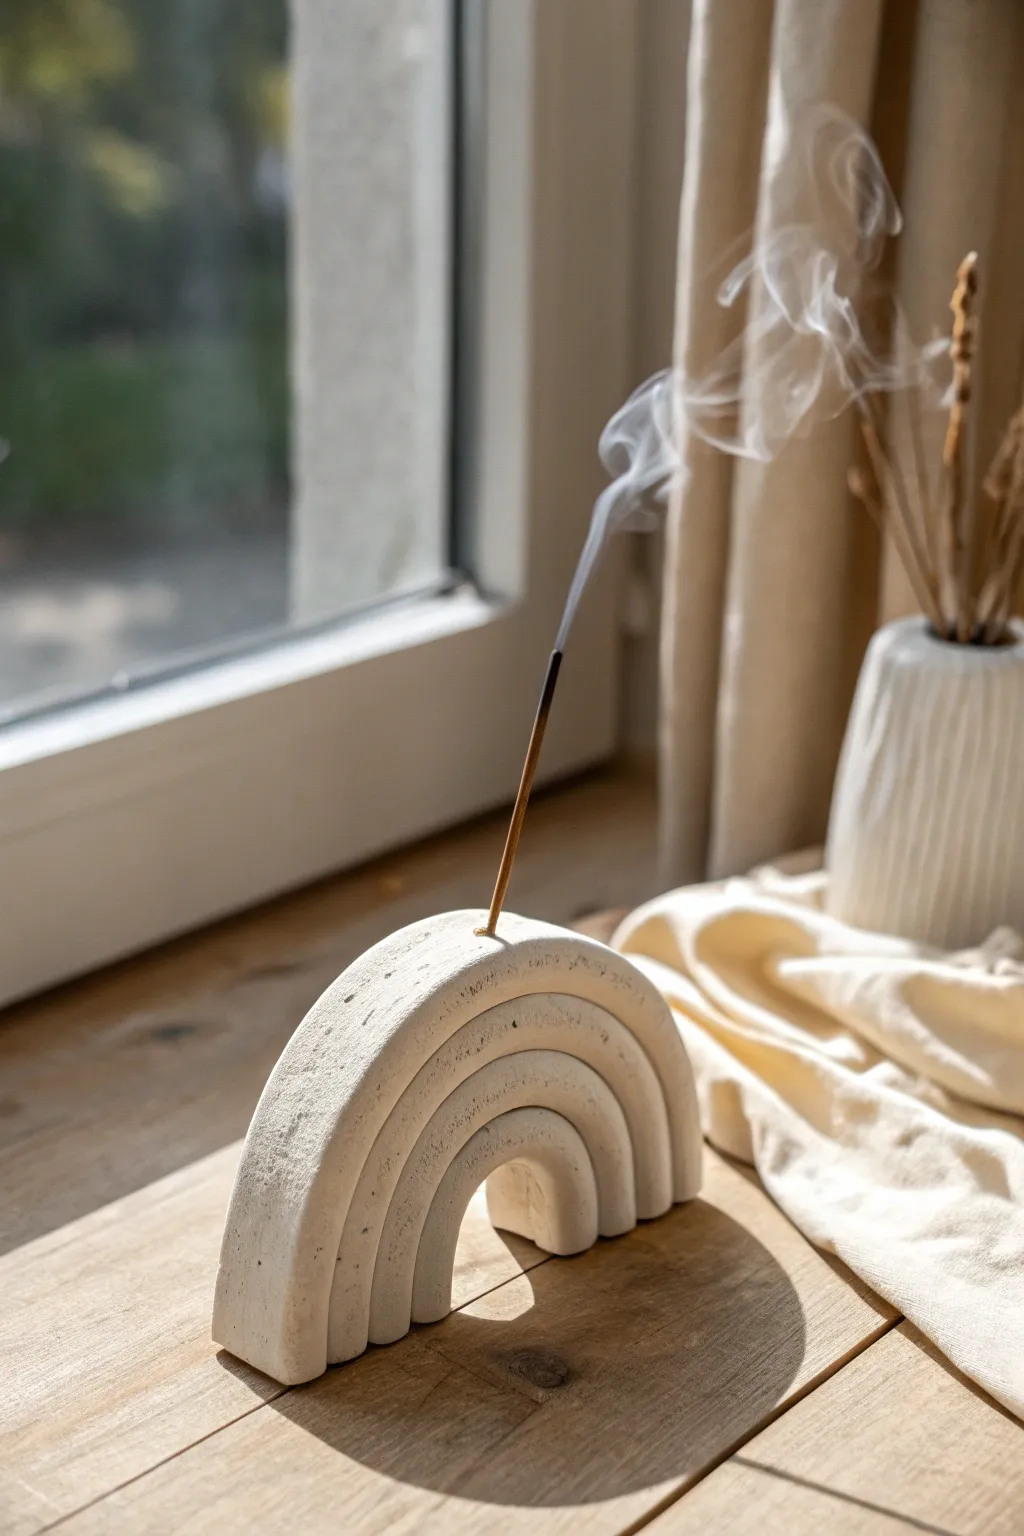
This serene incense holder combines clean architectural lines with organic warmth, functioning as both a sculpture and a practical home accessory. Its matte white finish and stacked arc design create striking shadows when placed in natural light, making it a perfect modern accent piece.
Step-by-Step
Materials
- White air-dry clay (approximately 500g)
- Rolling pin
- Sharp clay knife or X-Acto blade
- Ruler
- Compass or round objects of varying sizes (bowls, cups, lids)
- Small bowl of water
- Fine-grit sandpaper (220 and 400 grit)
- Incense stick (for sizing)
- Parchment paper or canvas mat (working surface)
- Sponge
Step 1: Shaping the Base Arcs
-
Prepare the workspace:
Lay down your parchment paper or canvas mat to prevent the clay from sticking. This also makes it easier to rotate your work without handling the clay directly. -
Condition the clay:
Take a large chunk of air-dry clay and knead it in your hands until it feels warm and pliable. If it feels a bit dry, dampen your hands slightly, but avoid making it slushy. -
Roll out the slab:
Using your rolling pin, flatten the clay into a large, consistent slab. You want this to be quite thick and sturdy, aim for about 1.5 to 2 centimeters (0.6 – 0.8 inches) in thickness. -
Draft the largest arc:
Use a large bowl or a compass to lightly mark a semi-circle on your clay slab. This will be the outer boundary of your rainbow. -
Draft the inner arcs:
Using smaller circular objects or adjusting your compass, mark three consecutively smaller semi-circles inside the first one. Leave about 1.5 cm gap between each line to create thick, chunky ribs. -
Cut the rainbow shape:
With your sharp knife held vertically, cut along the outermost line and the innermost line first. Remove the excess clay from the outside and the very center hollow. -
Separate the arches:
Carefully cut along the remaining curved lines to separate the four individual arches. Now you should have four separate curved strips of clay.
Step 2: Assembly and Refining
-
Smooth the edges:
Dip your finger in a little water and run it along the cut edges of each arc to round them off slightly. You want to remove sharp drag marks from the knife but keep the geometric profile. -
Reassemble the form:
Place the largest arc on your board. Gently nest the second largest inside it, applying a tiny bit of water or slip (clay mixed with water) to the touching surfaces to help them bond. -
Complete the stack:
Continue nesting the remaining two arcs. Press them together gently from the sides to ensure they stick, but be careful not to distort the flatness of the front and back faces. -
Unified pierced hole:
While the clay is still wet, take your incense stick (or a tool slightly thicker than one) and poke a hole straight down into the center of the top arch. wiggle it slightly to ensure the stick won’t get stuck as the clay shrinks. -
Level the bottom:
Stand the rainbow up vertically. If it wobbles, gently tap the feet of the rainbow against your work surface to flatten them, ensuring it stands perfectly stable. -
Initial surface smoothing:
Take a slightly damp sponge and wipe the front and back faces to unify the surface texture. I prefer to use a circular motion here to buff out any fingerprints. -
Slow drying process:
Loosely cover the piece with plastic wrap for the first 24 hours to prevent cracking, then uncover and let it dry completely for another 24-48 hours. Turn it over occasionally to dry evenly.
Cracks Appearing?
If small cracks form while drying, mix a small amount of fresh clay with water to make a paste. Fill the crack, smooth it over with a wet finger, and let dry again.
Step 3: Finishing Touches
-
Sand for stone effect:
Once bone dry, use the 220-grit sandpaper to remove any major bumps or uneven edges. Focus on the connection points between the arches to make them look seamless. -
Final polish:
Switch to the 400-grit sandpaper for a smooth, matte finish. Wipe away all dust with a dry brush or tack cloth. -
Optional texture:
To mimic the stone look in the photo, you can use an old toothbrush to flick a tiny amount of diluted grey paint onto the surface for a speckled effect, though the natural white clay creates a beautiful minimalist look on its own.
Terrazzo Twist
Before rolling your slab, mix small, dried chips of colored clay into your white clay ball. When you roll and sand it, you’ll reveal a multicolor terrazzo pattern.
Now you have a stunning, hand-crafted piece of decor ready to bring a moment of calm to your space

What Really Happens Inside the Kiln
Learn how time and temperature work together inside the kiln to transform clay into durable ceramic.
Sculpted Trinket Dish With Waves
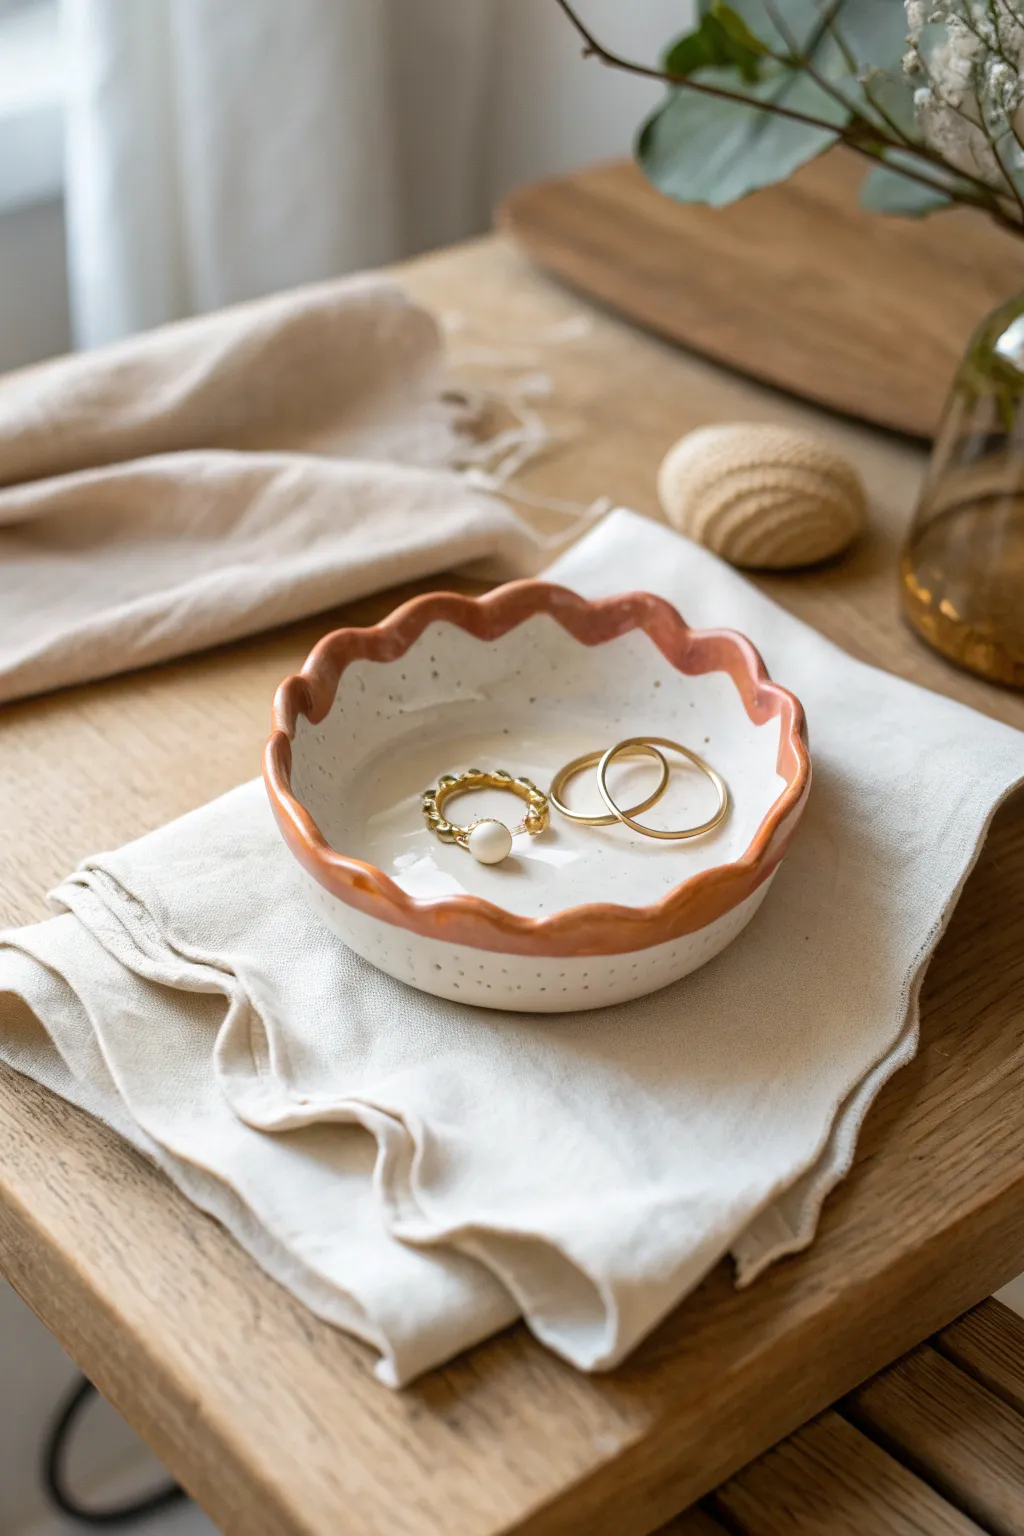
This charming little dish features a playfully sculpted scalloped edge that mimics the gentle motion of waves. With its speckled white finish and warm terracotta-colored rim, it makes a perfect minimalist resting spot for your favorite rings and jewelry.
Step-by-Step Guide
Materials
- White smooth air dry clay
- Rolling pin
- Rolling guides or wooden slats (approx. 1/4 inch thick)
- Small bowl or round cutter (approx. 4-5 inches diameter) for a template
- Craft knife or needle tool
- Bowl of water
- Sponge
- Fine-grit sandpaper (220 grit)
- White acrylic paint (warm or creamy white)
- Terracotta or warm burnt orange acrylic paint
- Stiff paintbrush (e.g., old toothbrush) for speckling
- Soft round paintbrush
- Glossy varnish or sealant
Step 1: Shaping the Base
-
Prepare the clay:
Cut off a manageable chunk of your white air dry clay. Knead it in your hands for a minute or two to warm it up and ensure it is pliable and free of air bubbles. -
Roll the slab:
Place your clay on a mat or piece of parchment paper. Using rolling guides on either side to ensure even thickness, roll the clay out until it is a smooth slab about 1/4 inch thick. -
Cut the circle:
Place your circular template (a bowl or round cutter) onto the clay slab. Create a clean circle by cutting around the template with your craft knife or needle tool. -
Form the curve:
Gently lift the clay circle. To give it a dish shape, you can either gently pinch the edges upward with your fingers or slump the clay circle inside a slightly larger bowl lined with plastic wrap to help it hold its form.
Cracking Up?
If small cracks appear while the clay dries, don’t panic. Mix a tiny bit of fresh clay with water to make a paste (slip) and fill the cracks. Sand smooth once dry.
Step 2: Sculpting the Waves
-
Create the scallops:
Using your thumb and forefinger, gently pinch the rim of the bowl at regular intervals. Push inward with your index finger while supporting the clay with your thumb and middle finger on the outside to create the wavy, scalloped effect. -
Refine the edge:
Go around the rim a second time to smooth out the waves. Dip your finger in a little water to smooth any tiny cracks that appear at the peaks or valleys of the waves. -
Smooth the surfaces:
Use a slightly damp sponge to wipe down the inside and outside of the bowl. This removes fingerprints and creates that professional, smooth ceramic look. I find this step crucial for getting a clean finish later. -
Dry thoroughly:
Let the dish dry completely. This usually takes 24-48 hours depending on humidity. Rotate it occasionally so the bottom dries evenly. -
Sand imperfections:
Once bone dry, take your fine-grit sandpaper and gently sand away any rough spots, especially along the rim and the bottom edge.
Step 3: Painting and Finishing
-
Apply base coat:
Paint the entire dish, inside and out, with a creamy white acrylic paint. You may need two coats to get full, opaque coverage. Let this dry completely. -
Add speckles:
Mix a tiny amount of black or dark grey paint with water until it’s inky. Dip a stiff brush or toothbrush into the mix, and flick the bristles with your thumb to spray fine speckles over the white surface. -
Paint the rim:
Load a soft round brush with your terracotta or burnt orange paint. Carefully paint slightly over the edge of the wavy rim, letting the color hug the top curve of the scallops. This creates that distinct, dipped look. -
Detail the outside:
If you want to match the reference perfectly, verify if you need speckles on the exterior as well, and gently extend the terracotta rim paint slightly down the outer edge. -
Seal the piece:
Once all paint is 100% dry, apply a glossy varnish. This gives the piece a ceramic-like shine and protects the paint from scratching. -
Final cure:
Allow the varnish to cure according to the bottle instructions ensuring it is no longer tacky before placing jewelry inside.
Gilded Edge
For a more glamorous look, swap the terracotta rim color for liquid gold leaf or metallic gold acrylic paint. It beautifully elevates the simple white form.
Now you have a stylish, handmade vessel ready to catch your trinkets
Abstract Torso Sculpture
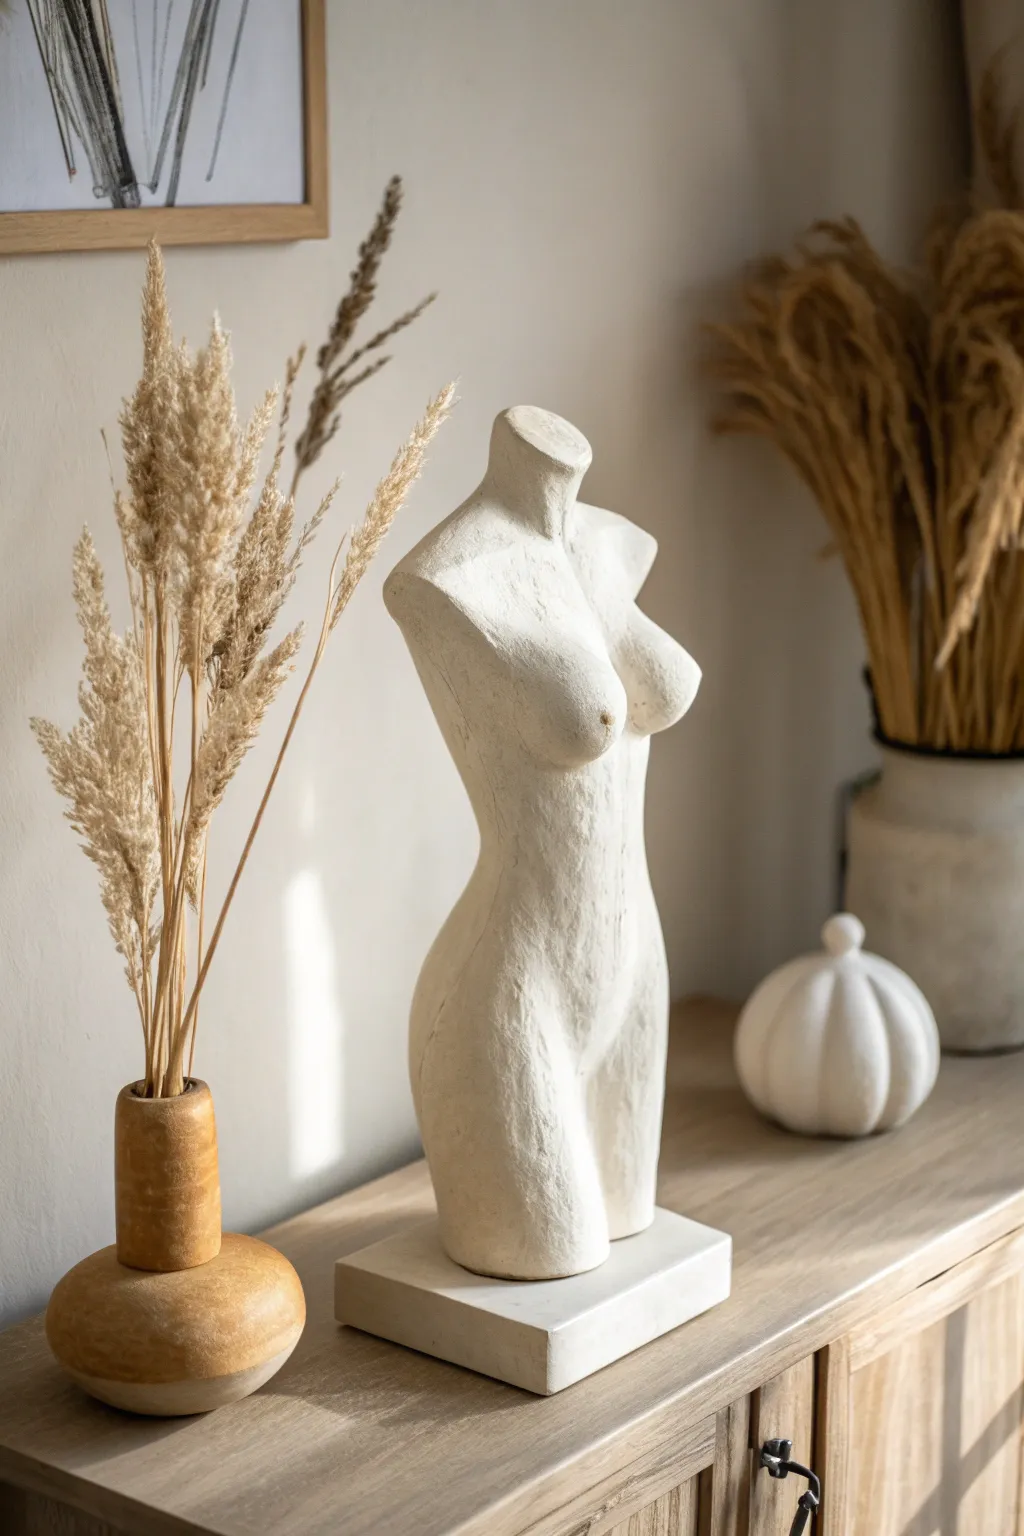
Sculpt this elegant, timeless piece that mimics the grainy texture of ancient stone carvings. This headless, armless female torso study features soft curves and a neutral, matte finish perfect for minimalist decor.
Detailed Instructions
Materials
- High-quality air dry clay (white or stone color)
- Strong wire for armature (12-gauge)
- Aluminum foil
- Pliers
- Cardboard or scrap wood base (for sculpting)
- Sculpting tools (loop tool, blending tool)
- Sponge
- Fine-grit sandpaper
- Gesso or white acrylic paint
- Baking soda (for texture)
- Matte sealant spray
Step 1: Building the Armature
-
Create the spine:
Cut a length of heavy-gauge wire, about twice the height you want your final sculpture to be. Fold it in half and twist the two strands together to create a strong central spine. -
Form the anchor:
Bend the bottom two inches of your twisted wire outward into a loop or foot shape. Secure this firmly to your temporary working base using painters tape or hot glue so the sculpture stays upright while you work. -
Bulk up the core:
Crumple aluminum foil around the wire spine to create the basic shape of a torso. Focus on creating a wider mass for the chest and hips, and a slightly narrower area for the waist. -
Refine the foil form:
Pack the foil tightly. You want a solid, dense core that is slightly smaller than your final sculpture will be. Ensure you have distinct ‘shoulders’ and ‘hip’ placements even at this rough stage.
Stone Effect
For a more aged look, apply a very diluted wash of grey or beige water over the dried white paint, then immediately wipe it off. Ideally, pigment stays in the crevices.
Step 2: Applying the Clay
-
First layer application:
Roll your clay into thin sheets or flatten manageable chunks. deeply press the clay onto the foil armature, ensuring there are no air pockets between the foil and the clay. -
Establishing landmarks:
Before refining, add extra clay to mark the key anatomical points: the chest, the curve of the hips, and the buttocks. Don’t worry about smoothing yet; focus on volume. -
Sculpting the chest:
Form two gradual mounds for the chest area. Use your thumbs to blend the edges of these additions seamlessly into the main body so they look organic, not stuck-on. -
Definition of the torso:
Use a modeling tool to gently carve out the indentation of the spine on the back and the slight depression straight down the center of the chest. -
Refining the neck:
Shape the neck area. Since this is an abstract fragment, smooth the top of the neck flat or slightly concave to look like a clean break or a finished edge. -
Smoothing the surface:
Dip a sponge or your fingers in a little water and run it over the entire sculpture to unify the surface. I find this helps merge any separate lumps into one cohesive skin. -
Initial drying phase:
Let the sculpture sit for about 24 to 48 hours until it is leather hard. It should be firm to the touch but still have a tiny bit of give.
Step 3: Refining and Finishing
-
Adding texture:
Once dry, take a rough tool or even a stiff bristle brush and stipple the surface gently if it looks too smooth. The goal is a slightly pitted, stone-like appearance. -
Sanding:
Sand the piece gently to remove fingerprints or sharp tool marks. You want soft transitions between the waist and hips, but keep the textured feeling. -
Mounting the piece:
If you want a dedicated base like the image, form a simple rectangular block of clay now. Press the bottom of your torso onto it to create a perfect fit, then let the base dry separately. -
Mixing the faux-stone finish:
Mix white acrylic paint (or gesso) with a teaspoon of baking soda. This mixture creates a thick, gritty paint that mimics limestone or plaster. -
Painting the sculpture:
Dab the baking soda paint onto the sculpture using a sponge or an old brush. Use a stippling motion rather than long strokes to enhance the granular texture. -
Final assembly:
Once everything is perfectly dry, glue the torso to the rectangular base using strong epoxy or heavy-duty craft glue. -
Sealing:
Spray the entire piece with a matte sealant to protect the textured paint without adding an unnatural glossy shine.
Cracking Issues
If you see cracks forming while drying, mix a ‘slip’ of clay and water (paste consistency) and fill the cracks immediately. Smooth over with a damp finger.
Place your finished sculpture on a shelf near natural light to highlight the gentle curves and textured surface


The Complete Guide to Pottery Troubleshooting
Uncover the most common ceramic mistakes—from cracking clay to failed glazes—and learn how to fix them fast.
Cute Sitting Character Figure
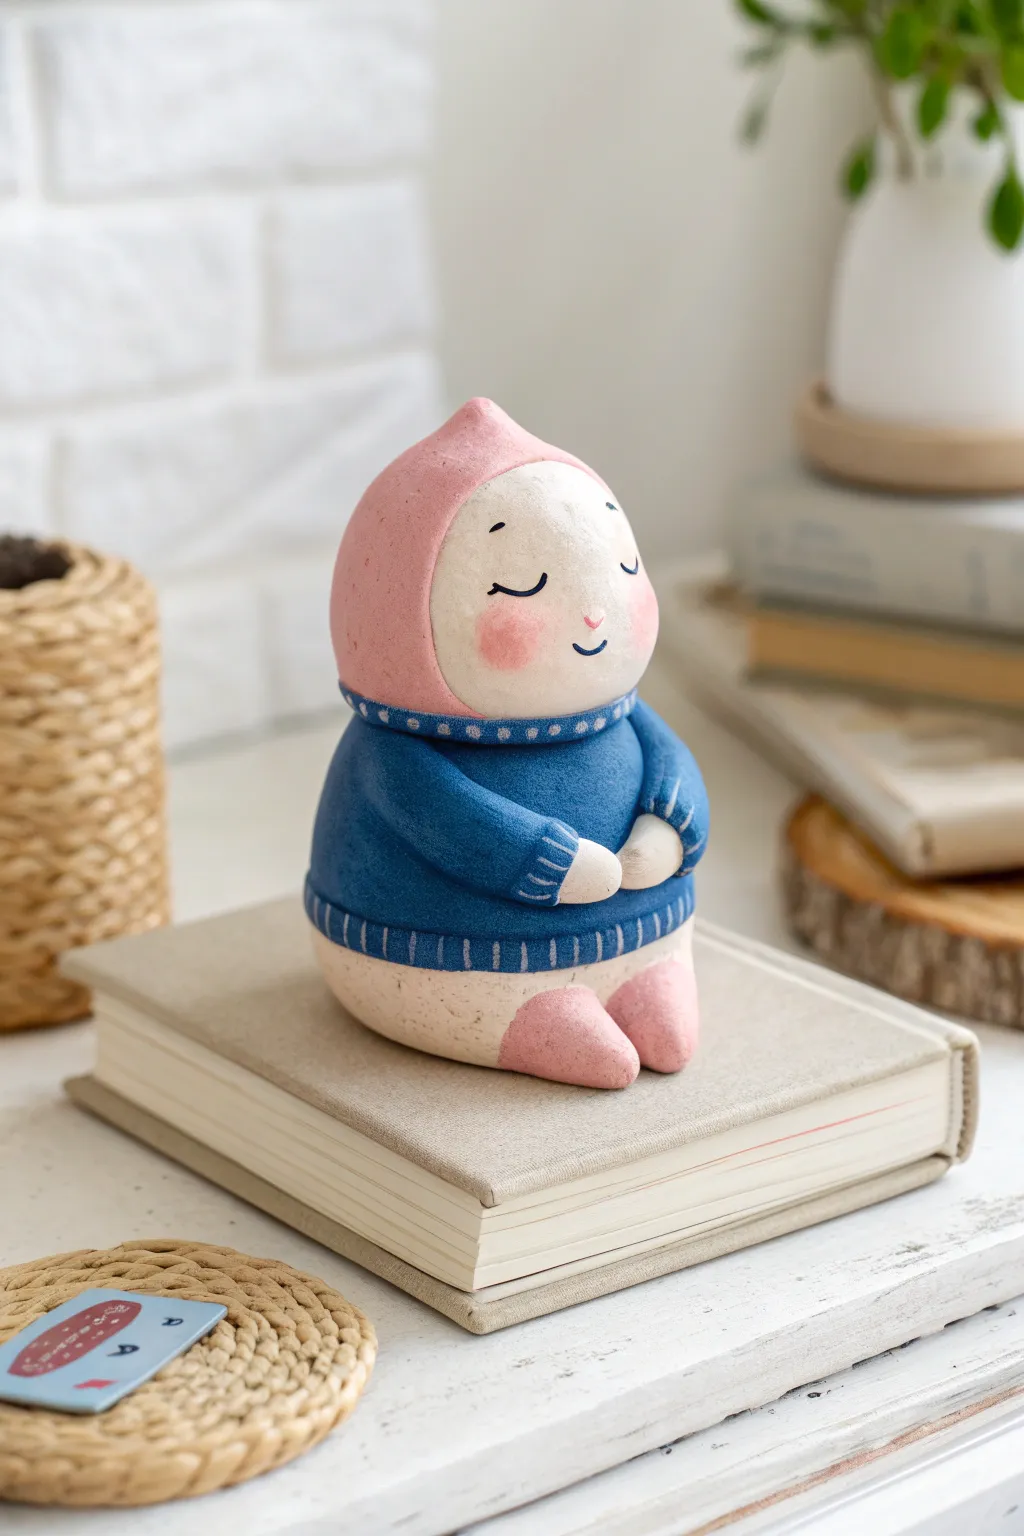
This charming little figurine captures a sense of peaceful coziness with its pointed pink hood and textured blue sweater. Its smooth, rounded forms make it a perfect project for getting comfortable with shaping basic volumes in air dry clay.
Step-by-Step Tutorial
Materials
- Air dry clay (white or terracotta)
- Modeling tools (or a toothpick and a dull knife)
- Acrylic paints (baby pink, navy blue, white, black, rosy blush)
- Fine detail paintbrushes
- Water for smoothing
- Fine sandpaper (optional)
- Matte varnish
Step 1: Shaping the Base Form
-
Form the main body:
Start with a ball of clay about the size of a tangerine. Roll it until smooth, then gently squash the bottom against your work surface to create a flat base so the figure sits securely. -
Create the head shape:
Pinch the top third of your clay mound to define a head area. It shouldn’t be a separate ball but rather flow seamlessly from the body, resembling a pear or a Russian nesting doll shape. -
Refine the hood point:
Gently pull the very top of the head upwards to create a soft point, mimicking the whimsical peak of the hood seen in the photo.
Cracks Appearing?
If small cracks appear while drying, mix a tiny bit of clay with water to make a paste (slip) and fill them in. Smooth over with a damp finger before painting.
Step 2: Adding Details and Arms
-
Define the face area:
Use a modeling tool or your thumb to slightly flatten the front of the head area where the face will be. You want a subtle heart-shaped or oval boundary that separates the ‘hood’ from the ‘face’. -
Shape the arms:
Roll two sausage shapes for arms. Taper one end of each slightly for the shoulder and keep the other rounded for the hands. -
Attach the arms:
Score and slip the sides of the body, then press the arms on. Curve them forward so the ‘hands’ meet comfortably over the belly. Blend the shoulder seams completely into the body so they look like part of the sweater. -
Add the feet:
Roll two small, stubby ovals for feet. Attach these to the very bottom front of the figure, sticking out slightly. Blend the back of the feet into the base.
Step 3: Sculpting Textures
-
Create the collar:
Roll a very thin snake of clay. Wrap it around the neck area where the blue sweater meets the hood. Flatten it slightly, then use a toothpick to press tiny vertical indentations all around it to mimic ribbing. -
Add the bottom hem:
Repeat the process for the bottom of the sweater. Add a band of clay around the lower hip area, flatten it, and texturize it with vertical lines. -
Detail the cuffs:
Add tiny bands of clay around the wrists where the hands emerge. Add the same vertical ribbing texture here. -
Smooth everything out:
Dip your finger in water and gently run it over the entire sculpture to remove fingerprints. Ensure the face area is perfectly smooth. Let the piece dry completely (24-48 hours depending on humidity).
Sweater Texture
For a fuzzy wool look, tap the wet blue paint with a stiff, dry brush or a piece of sponge before it dries. This stippling effect mimics fabric softness.
Step 4: Painting and Finishing
-
Paint the face:
Paint the face oval a solid creamy white. You may need two coats for opaque coverage. Let this dry before adding details. -
Paint the hood and feet:
Mix a soft baby pink and apply it to the hood area and the little feet. Be careful to paint a clean edge where the hood meets the white face. -
Paint the sweater:
Use a deep blue for the main body of the sweater. Paint carefully around the hands (which should be painted creamy white) and the pink hood. -
Highlight the ribbing:
Mix a slightly lighter blue or grey-blue. Gently dry brush this over the collar, cuffs, and hem to catch the raised textured lines you sculpted earlier, making the ‘knit’ pop. -
Add facial features:
Using your finest brush, paint two small U-shapes for closed eyes and a tiny smile. I like to use a toothpick dipped in paint for this to keep the lines super thin. Don’t forget pink rosy cheeks! -
Seal the piece:
Once fully dry, coat the entire figure with a matte varnish to protect the paint and give it that finished, ceramic look.
Place your little sitting friend on a stack of books or a shelf to add a peaceful vibe to your decor
Mini House Shelf Sculpture
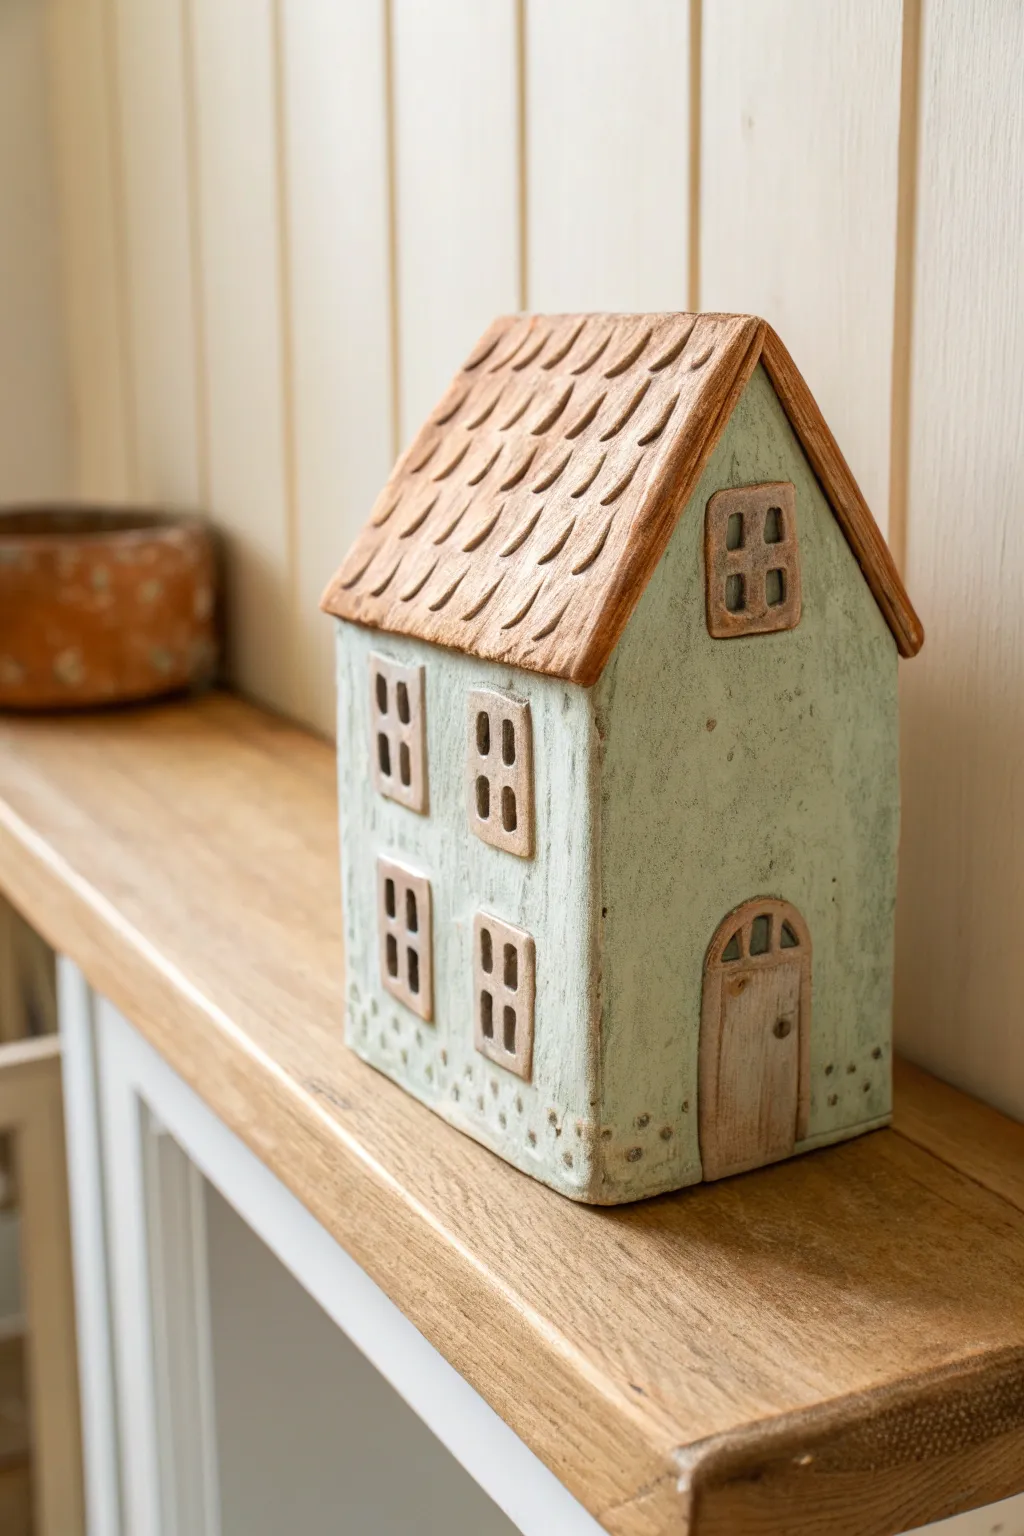
Bring a touch of fairytale charm to your bookshelf with this adorable ceramic-style miniature house. Featuring an irresistibly textured roof, earthy pastel tones, and rustic window details, this air-dry clay project doubles as a cozy decor piece or even a subtle tea light cover.
Step-by-Step
Materials
- Air dry clay (white or terracotta)
- Rolling pin with guide rings (or wooden slats)
- Craft knife or scalpel
- Clay sculpting tools (needle tool, small ribbon tool)
- Ruler
- Cardboard or cardstock (for templates)
- Slip (clay mixed with water)
- Acrylic paints (Mint green, Terracotta/Burnt Sienna, Cream/Off-white, Dark Brown)
- Matte varnish or sealant
- Sandpaper (fine grit)
- Sponge and paintbrushes
Step 1: Shaping the Structure
-
Create templates:
Begin by sketching your house dimensions on cardstock to ensure straight walls. You’ll need two rectangles for the side walls, two pentagons (rectangle bottom with triangular top) for the front and back, and two rectangles for the roof panels. -
Roll the clay:
Roll out a large slab of air dry clay to a consistent thickness, generally about 1/4 inch (6mm). Using guide rings heavily reduces unevenness here. -
Cut the components:
Place your templates onto the clay slab and carefully cut around them using a sharp craft knife. Keep the edges as crisp as possible. -
Initial drying texture:
Let the flat pieces sit for about 30-60 minutes. This ‘leather hard’ stage makes assembly much easier as the walls won’t sag. -
Assemble the walls:
Score the edges of your walls (scratch hatch marks) and apply clay slip. Press the four walls together to form the main box structure. Use a small coil of clay on the inside seams to reinforce the corners.
Clean Corners Pro Tip
When joining walls, use a wet paintbrush to smooth the outside seams. It blends the clay particles better than your finger and leaves no prints.
Step 2: Adding Details & Roof
-
Carve the windows:
While the walls are upright but still damp, use a small square cutter or your knife to cut out the window openings. Save the cut-out squares; cut them down slightly and re-attach them as raised frames around the opening. -
Sculpt the door:
Shape a small arch for the door frame and attach it to the front. Score a separate flat piece of clay to look like wood grain and fit it inside the arch. Adding a tiny ball of clay for the doorknob really sells the scale. -
Construct the roof:
Attach the two roof panels to the peak of the house using the score-and-slip method. Ensure there is a slight overhang on the sides for that charming cottage look. -
Texture the shingles:
This is the defining feature. Using a small U-shaped ribbon tool or the end of a popsicle stick, press repetitive ‘U’ shapes into the roof clay, starting from the bottom edge and working your way up to the peak. -
Base texture:
Use a rough sponge or a crumpled ball of foil to gently dab the exterior walls, giving them a stucco-like, aged stone texture. -
Add peek-a-boo holes:
Along the bottom edge of the house, use a needle tool to poke small clusters of holes. These add visual interest and allow light to twinkle through if you use an LED candle inside.
Step 3: Fainting & Finishing
-
Dry completely:
Allow the sculpture to dry fully. This usually takes 24-48 hours depending on humidity. Sand any sharp or unwanted rough edges gently. -
Base coat the walls:
Paint the walls in a soft, muted mint green. I prefer mixing a touch of grey into the green to keep it from looking too bright or cartoony. -
Paint the roof and trim:
Paint the roof, window frames, and door a warm terracotta or burnt sienna color. For the window panes themselves, use a dark brown or black to simulate depth. -
The whitewash technique:
To achieve the rustic finish shown in the photo, mix cream paint with water to make a thin wash. Brush it over the entire dry house, then immediately wipe it off with a damp sponge. The cream paint will stay in the textures and recesses. -
Dry brushing:
Dip a dry brush into a tiny amount of off-white paint, wipe most of it off on a paper towel, and lightly graze the tops of the roof shingles and window frames to highlight the texture. -
Seal:
Finish with a coat of matte varnish to protect the paint and give the house a unified, ceramic-like sheen.
Level Up: Village Life
Make three houses in slightly different heights and widths to create a complete village shelf display. Vary the roof colors for variety.
Place your finished cottage on a wooden shelf where the natural light can highlight those lovely roof textures.

TRACK YOUR CERAMIC JOURNEY
Capture glaze tests, firing details, and creative progress—all in one simple printable. Make your projects easier to repeat and improve.
Sleeping Pet on a Pillow
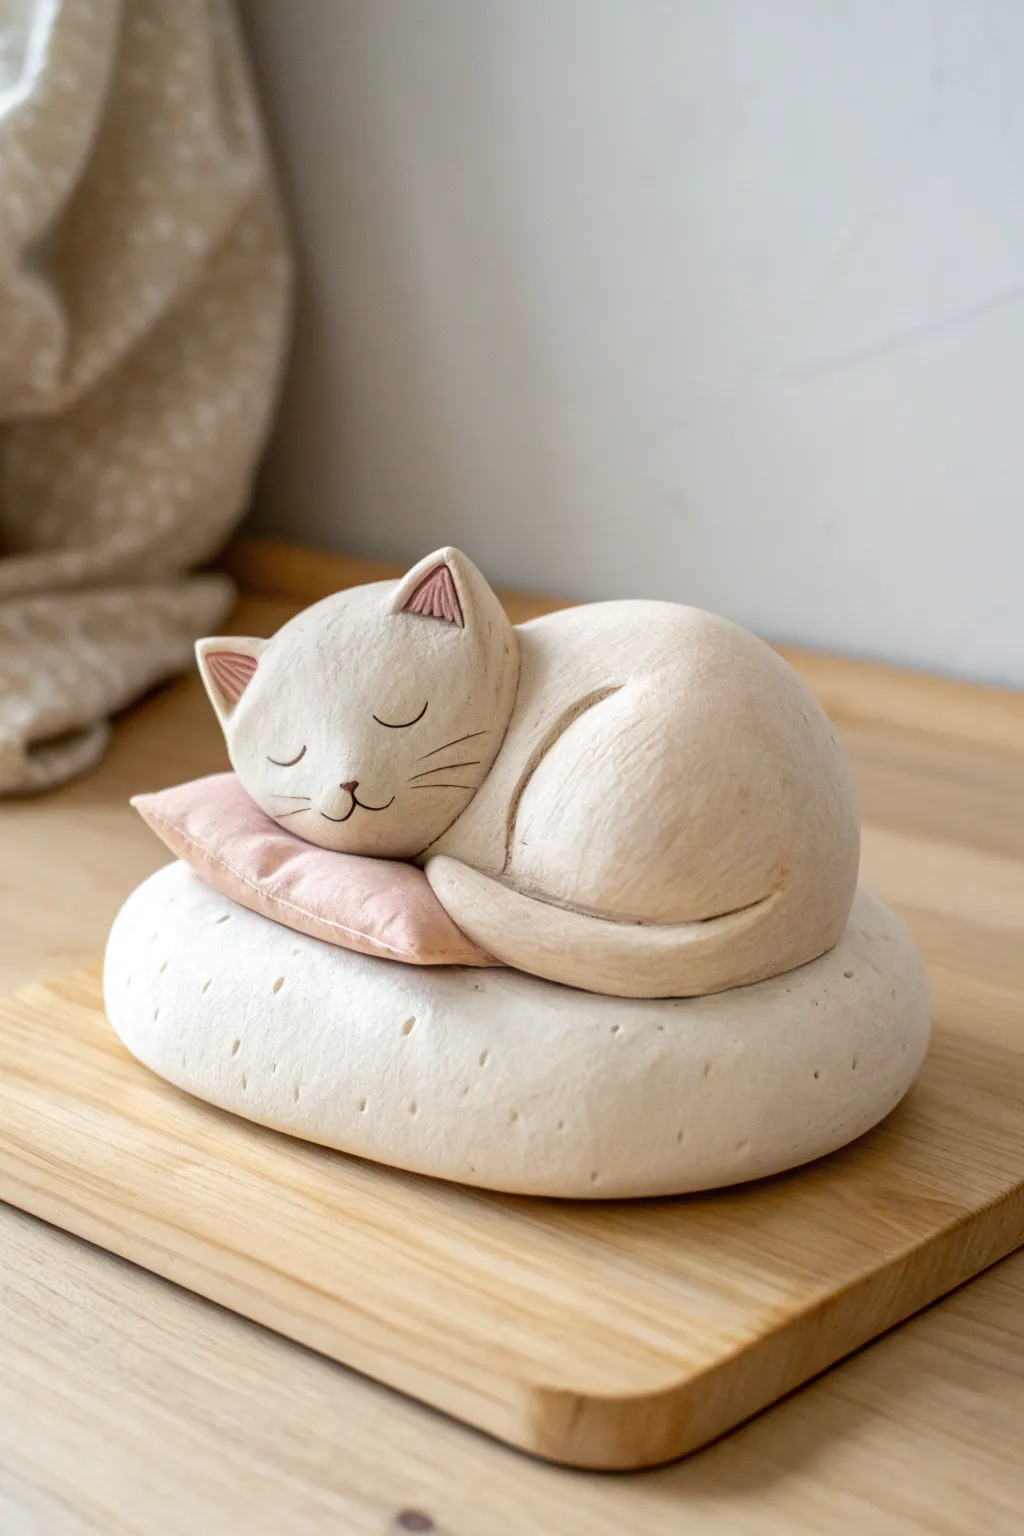
Capture the serenity of a napping feline with this adorable air-dry clay project. The smooth curves of the cat contrast beautifully with the subtle texture of the base cushion, creating a charming piece of desk decor.
How-To Guide
Materials
- White air-dry clay
- Acrylic paints (Soft pink, chocolate brown, cream/white)
- Small rolling pin
- Sculpting tools (needle tool, rubber shaper)
- Small paintbrush
- Water in a small cup
- Fine-grit sandpaper
- Clear matte varnish
Step 1: Sculpting the Base Cushion
-
Form the base:
Start with a generous ball of white clay, roughly the size of a tangerine. Flatten it gently into an oval disc shape, keeping it quite thick (about 1 inch) to serve as a sturdy foundation. -
Texture the surface:
Smooth out the edges with a bit of water on your finger so there are no cracks. Using a needle tool or a stiff toothbrush, gently stipple the surface to give it a porous, cushion-like texture similar to stone or foam. -
Create the resting spot:
Press your thumb gently into the center top of the cushion to create a slight depression. This will help the cat figure sit securely later on.
Seamless Smoothness
For a flawless finish, brush a tiny amount of baby oil over the clay before the final smoothing step. It eliminates fingerprints entirely.
Step 2: Creating the Sleeping Cat
-
Shape the body:
Take a new piece of clay and roll it into a tear-drop or pear shape. This will form the main curled-up body of the cat. Lay it into the depression of your base cushion. -
Form the head:
Role a slightly smaller sphere for the head. Attach this to the wider end of the body using a little water and a ‘scratch-and-attach’ scoring method to ensure a strong bond. -
Add the ears:
Fashion two small triangles for ears. Attach them to the top of the head, blending the clay at the base downwards so they look seamless. Use a rubber tool to gently press an indentation into the front of each ear. -
Define the tail:
Roll a snake of clay for the tail. Wrap it around the front curve of the body, creating a continuous line that tucks neatly against the side. Blend the seams where the tail meets the body. -
Add the mini-pillow:
Before the clay hardens, create a small, flat rectangle or square of clay for the pink pillow. Gently lift the cat’s head and slide this sculpted pillow underneath. -
Refine the pose:
Press the cat’s head down slightly onto the mini-pillow to look like it has weight. Ensure the body curve looks natural and relaxed.
Personalize It
Paint the cat to match your own pet! Add calico patches, tabby stripes, or a tuxedo pattern instead of keeping it plain white.
Step 3: Detailing and Refining
-
Mark the face:
Using a very fine needle tool, lightly incise two U-shapes for sleeping eyes. Add a tiny triangle nose and a mouth line. Don’t press too hard; you just want a guide for painting. -
Add whisker lines:
Lightly scratch three short, horizontal lines on each cheek area to suggest whiskers. -
Carve the legs:
Use a sculpting tool to carve a deep groove separating the rear leg haunch from the main body, emphasizing that curled-up fetal position. -
Smooth everything:
Dip a soft paintbrush in water and brush over the cat’s body to erase fingerprints. I find this works better than fingers for getting a porcelain-smooth finish. -
Drying time:
Let the sculpture dry completely. This usually takes 24-48 hours depending on thickness. Flip it carefully halfway through if the bottom feels damp.
Step 4: Painting and Finishing
-
Sand imperfections:
Once bone dry, use fine-grit sandpaper to gently buff away any rough spots on the cat’s back or head. -
Paint the small pillow:
Using a small brush, paint the little pillow under the head a soft, dusty pink. Be careful not to get paint on the white cat or the base. -
Paint the ears:
Mix a very watery pink wash. Dab this into the indentations of the ears for a soft, natural inner-ear coloring. -
Define features:
Use a fine liner brush and thinned brown paint to carefully trace the eye slits, nose, mouth, and whisker lines. Keep the lines extremely thin for a delicate look. -
Seal the work:
Wait for the paint to dry fully, then apply a coat of clear matte varnish to protect the clay and give it a finished sheen.
Enjoy the calming presence of your new handcrafted sleeping companion
Bird on a Branch Sculpture
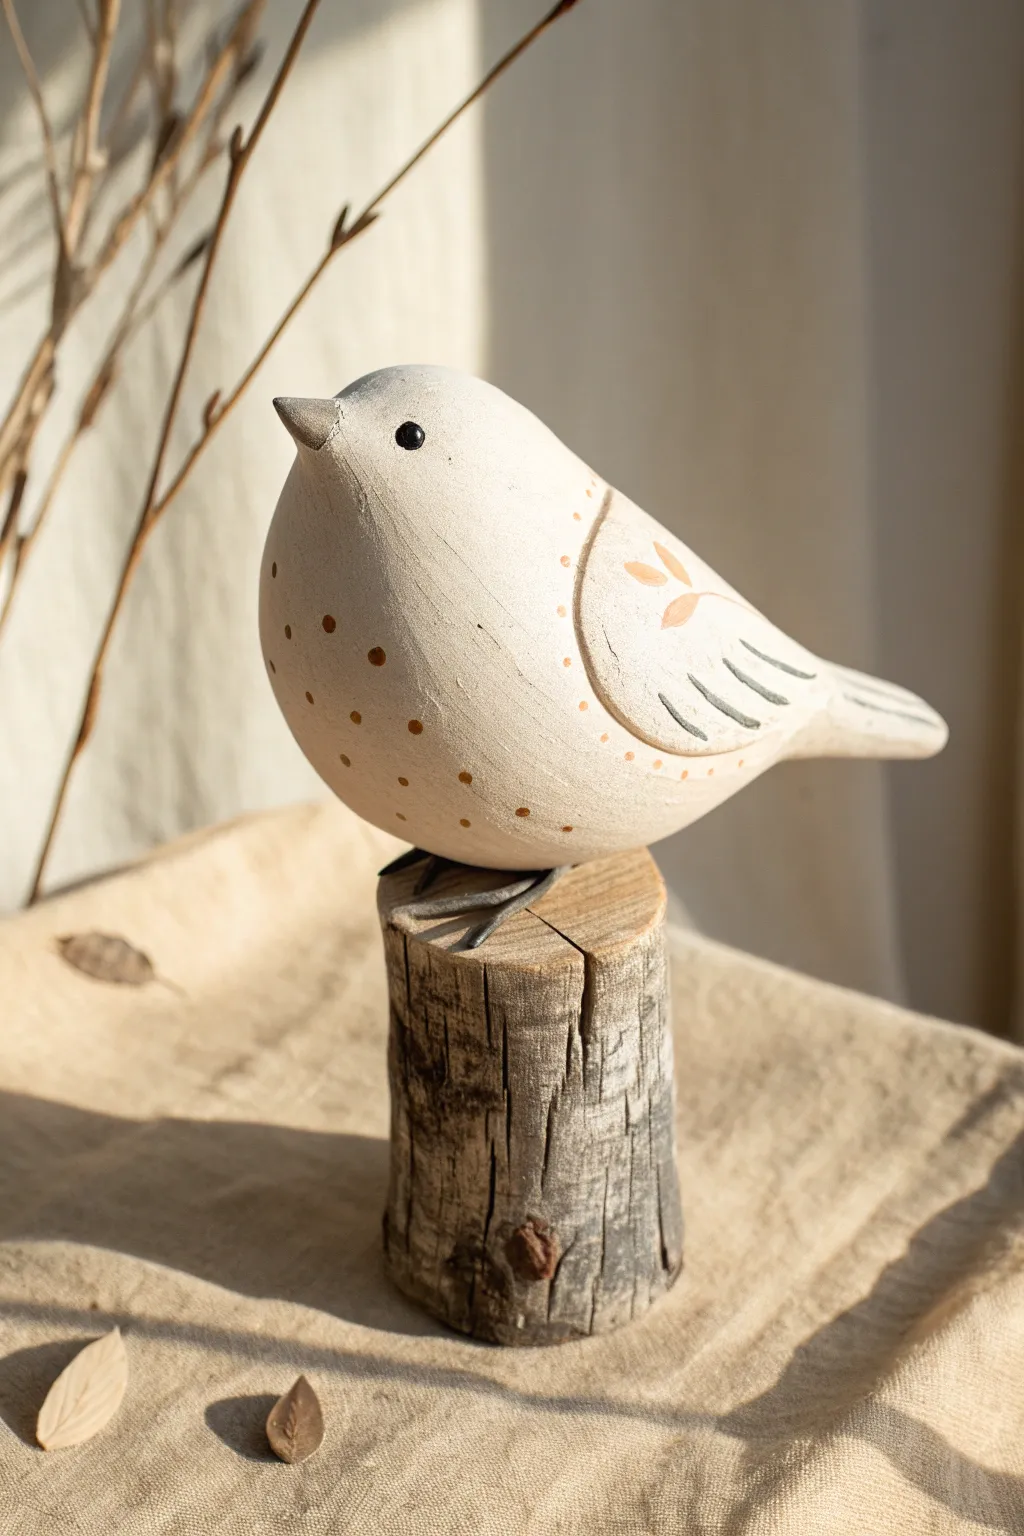
Capture the serene beauty of wood carving using accessible air-dry clay with this charming project. By keeping the shape smooth and minimal, you’ll create a Scandinavian-style bird perched atop a natural wooden base for a lovely organic finish.
Step-by-Step Guide
Materials
- White air-dry clay (smooth textured)
- Small natural wood branch slice or stump (approx. 2-3 inches high)
- Two thick wire pieces (e.g., 14-gauge) for legs
- Aluminum foil
- Clay sculpting tools (needle tool, modeling tool)
- Sandpaper (medium and fine grit)
- Acrylic paints (Cream/Off-White, Tan/Terracotta, Grey)
- Small black bead or black paint for the eye
- Matte varnish or sealant
- Strong craft glue (E6000 or super glue)
- Thin paintbrush
Step 1: Sculpting the Base Structure
-
Create the core:
Begin by crumpling aluminum foil into a tight egg shape. This will serve as the armature for the bird’s body, saving clay and reducing drying time while keeping the sculpture lightweight. -
Cover with clay:
Roll out a slab of white air-dry clay to about 1/4 inch thickness. Wrap this slab entirely around your foil egg, smoothing the seams together with a bit of water until the surface is uniform. -
Shape the tail:
Pinch one end of the egg shape and gently pull the clay outward to form a short, tapered tail. Flatten it slightly so it angles downwards harmoniously with the body’s curve. -
Form the head and beak:
On the opposite end, smooth the clay into a rounded head shape. pinch a very small amount of clay at the front to form a tiny, triangular beak. -
Define the wings:
Roll two small, flat teardrop shapes of clay separately. Attach these to the sides of the bird using the score-and-slip method (scratching both surfaces and adding water) to represent wings resting against the body. -
Add wire legs:
Cut two lengths of thick wire, about 2 inches long. Insert them deep into the bottom of the bird’s belly while the clay is still wet to create holes for the legs. Remove them, set them aside, and let the holes remain as the clay dries. -
Dry completely:
Set the bird aside to dry in a cool, dry place. This usually takes 24-48 hours depending on humidity. Rotate the bird occasionally so the bottom dries evenly.
Step 2: Refining and Painting
-
Sand for a wood-like finish:
Once fully dry, use medium-grit sandpaper to remove any fingerprints or lumps. I like to sand in one direction to mimic a slight wood grain texture. -
Base coat using a wash:
Mix a small amount of off-white or cream acrylic paint with water to create a wash. Apply this all over the bird. The wash technique keeps the look natural and rustic rather than plasticky. -
Paint the decorative details:
Using a fine brush and tan or terracotta paint, add small dots along the belly and a simple vine or leaf motif on the wing. Keep your hand loose for an organic folk-art style. -
Define the feathers:
With grey paint, carefully paint three or four simple lines on the wings and the tail to suggest feather separation. -
Add the eye:
Glue a tiny black bead into the head area for the eye, or simply paint a crisp black dot. Painting a tiny white highlight speck can make it look more alive. -
Prepare the wooden perch:
Take your natural wood branch piece and drill two small holes into the top that correspond to the distance between the leg holes on your bird. -
Paint the legs:
Paint your wire pieces a dark grey or black to resemble iron legs. Allow them to dry completely before handling. -
Final assembly:
Apply strong glue to the ends of the wires. Insert one end into the wooden base holes and the other into the bird’s body holes. Propping the bird up against a book while the glue sets helps keep it straight.
Cracking Clay?
Minor cracks are normal as clay shrinks. Fill them with a slip made of clay scraps mixed with water, smooth over, and let dry again before sanding.
Faux Wood Hack
Before the clay dries, drag a stiff bristle brush gently across the surface. Once painted, the paint settles in these grooves for a convincing wood-carved texture.
Place your finished sculpture near a window or on a mantle to bring a touch of peaceful nature indoors
Botanical Relief Wall Tile

Bring the serene beauty of nature indoors with this minimalist botanical relief tile. This project uses air-dry clay to create a sophisticated, raised design that looks like carved stone but is surprisingly simple to sculpt by hand.
Detailed Instructions
Materials
- White or cream air-dry clay (approx. 1 lb)
- Rolling pin
- Two wooden rulers (for thickness guides)
- Square cookie cutter or knife and ruler
- Sculpting tools (needle tool, modeling tool, small knife)
- Water and a small sponge
- Twine or jute cord
- Fine-grit sandpaper (optional)
- Acrylic matte varnish or sealant
Step 1: Preparing the Base
-
Roll the slab:
Begin by conditioning your clay, kneading it until it’s pliable. Place the wooden rulers on either side of the clay as guides to ensure an even thickness. Roll the clay out into a smooth slab, aiming for about 1/4 to 1/2 inch thickness. -
Cut the shape:
Using a knife and ruler (or a large square cutter), cut the clay into a perfect square. Smooth the cut edges with a damp finger or sponge to remove any sharpness. -
Create the border:
Using a flat modeling tool or the back of a knife, gently press an indentation about 1/2 inch inside the perimeter to create a framed border effect. -
Add hanging holes:
Before the clay starts to dry, use a focused tool like a straw or a wooden skewer to poke two holes near the top corners for the twine. Make sure they are large enough to accommodate your cord.
Step 2: Sculpting the Botanicals
-
Roll the stem:
Roll a very thin snake of clay for the main central stem. Lightly score the surface of the tile where the stem will go using your needle tool, add a dab of water (slip), and press the stem gently onto the tile. -
Form the leaves:
Create small teardrop shapes of varying sizes for the leaves. I find it easiest to roll a ball, pinch one end, and flatten it slightly between my fingers. -
Attach the lower leaves:
Starting at the bottom, score and slip the back of the larger leaves and press them onto the tile branching off the main stem. Use a modeling tool to verify the edges are sealed against the background. -
Add texture:
Use a needle tool or a small knife to gently carve vein lines into these larger leaves. Don’t press too hard; you want surface texture, not to cut through the leaf. -
Layer upper leaves:
As you move up the stem, make the leaves slightly smaller and narrower. Arrange them in a balanced, slightly asymmetrical pattern to mimic natural growth. -
Sculpt vertical leaves:
For the distinct vertical leaves near the center, form elongated oval shapes. Press a central vein down the middle with a tool to give them a concave, folded look before attaching them. -
Add tiny details:
Roll tiny balls of clay to create the small berry-like buds near the center right. Attach them in a cluster of two or three. -
Refine the edges:
Go over the entire design with a damp brush to smooth out any fingerprints or rough tool marks, blending the clay seamlessly where pieces join.
Warped Edges?
If the corners curl up while drying, place a lightweight book on the corners (with a paper towel barrier) once the clay is leather-hard to gently weigh it down flat.
Step 3: Finishing Touches
-
Slow drying:
Place the tile on a wire rack or a piece of mesh to dry. Flip it over carefully every few hours during the first day to prevent warping. Let it dry completely for 24-48 hours. -
Sand and smooth:
Once fully dry, you can lightly sand any rough edges on the border or the back of the tile with fine-grit sandpaper. -
Seal the piece:
Apply a coat of matte acrylic varnish or sealant. This protects the clay from humidity and gives it a finished, ceramic-like sheen without adding gloss. -
Threading the hanger:
Cut a length of jute twine. Thread the ends through the holes from the front to the back and tie secure knots on the backside.
Vintage Wash
Mix a tiny drop of brown acrylic paint with water. Brush it over the relief and wipe it off immediately with a rag. The color will stay in the crevices, adding antique depth.
Hang your botanical relief near a window where the changing light will highlight the delicate textures you’ve created
Seashell Sculpture Dish
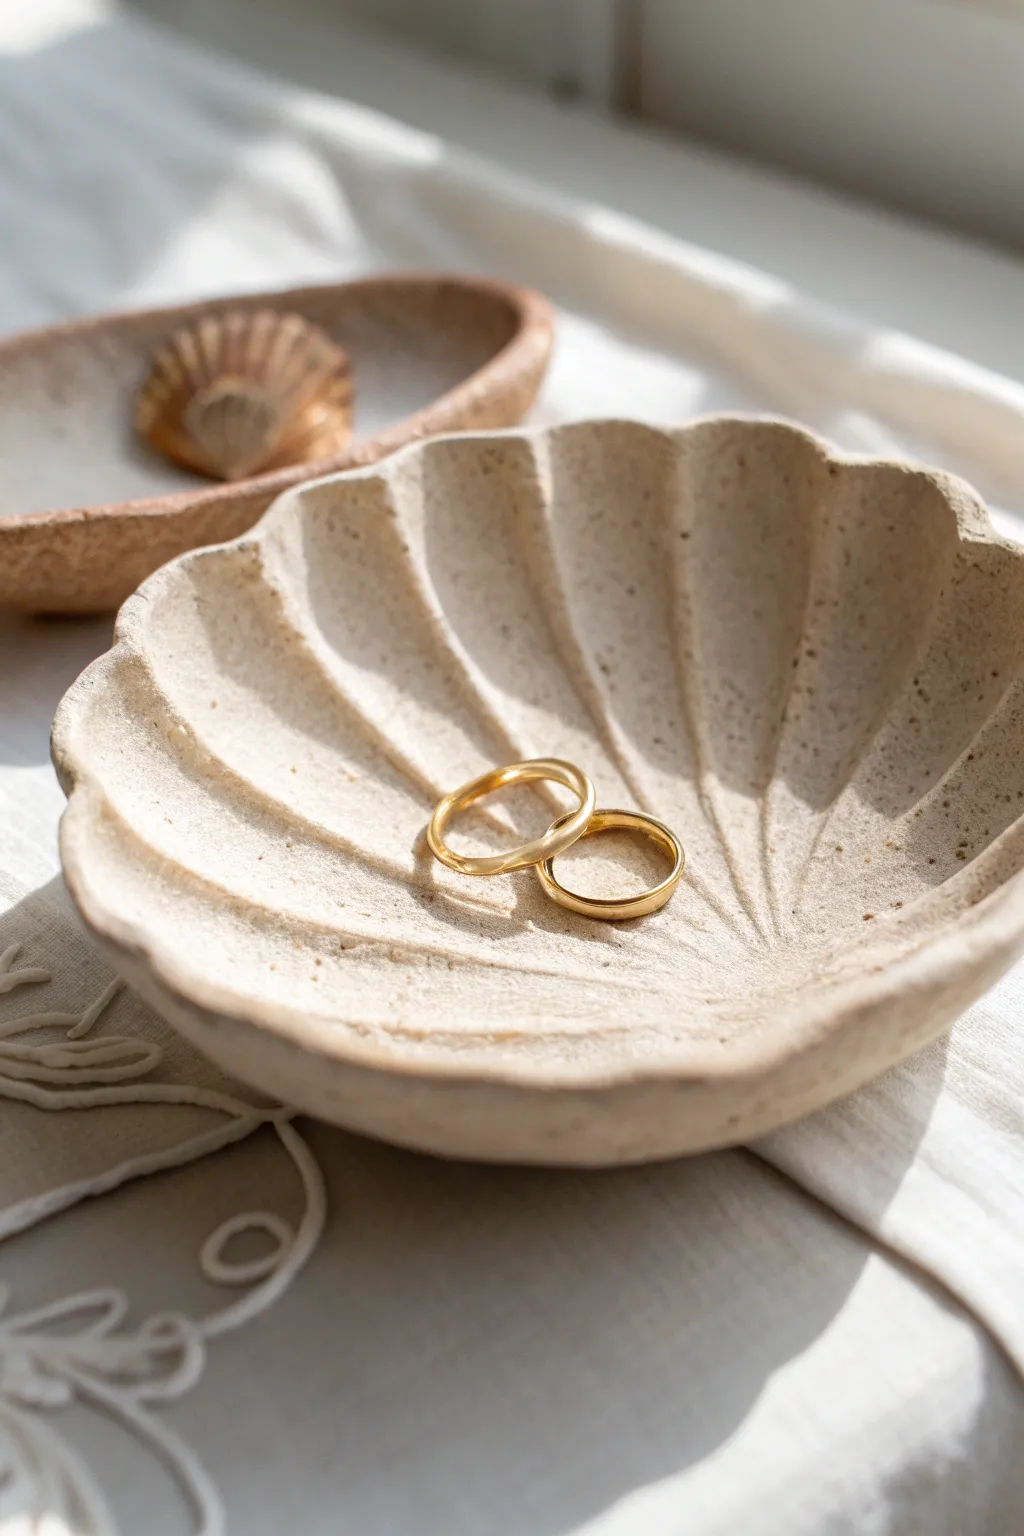
Capture the essence of the shoreline with this elegant, scallop-shaped jewelry dish. Its textured, matte finish and organic curves make it a sophisticated resting place for your favorite rings and trinkets.
Detailed Instructions
Materials
- White or stone-colored air dry clay
- Rolling pin
- Large scallop shell (real or plastic) for use as a template (optional)
- Small kitchen knife or clay needle tool
- Small bowl or curved surface (for drying)
- Sandpaper (fine grit)
- Sponge
- Water
- Clear matte varnish or sealant
Step 1: Shaping the Clay
-
Condition the clay:
Begin by taking a handful of air dry clay and kneading it in your hands until it becomes soft, pliable, and free of air bubbles. If the clay feels too stiff, dip your fingers in a tiny bit of water. -
Roll it out:
Place the clay on a clean, flat surface or a silicone mat. Use your rolling pin to flatten it into an even slab, aiming for a thickness of about 1/4 inch (approx. 5-6mm). -
Create the outline:
If you have a real scallop shell, gently press it onto the clay to leave an impression of the outline. If not, lightly sketch a fan shape with a rounded bottom directly onto the clay using a needle tool. -
Cut the shape:
Carefully trace along your outline with a small craft knife or needle tool to cut out the basic shell shape. Peel away the excess clay and set it aside for future use. -
Softening the edges:
Dip your finger in a little water and run it along the cut edges of your clay shape. Smooth out any sharpness or jagged bits until the perimeter looks rounded and organic.
Natural Speckle Trick
Mix a tiny pinch of used coffee grounds or cracked black pepper into the wet clay before rolling to create gorgeous, convincing faux-stone speckles.
Step 2: Structuring the Shell
-
Mark the ridges:
Using a modeling tool or the back of a butter knife, gently press indentations radiating from the bottom center point of the shell out to the wavy edges. These lines should mimic the natural ribs of a scallop. -
Enhance the fluting:
To give the dish depth, run your finger firmly along the grooves you just created, deepening them slightly. Press down in the valleys and pinch slightly at the ridges to accentuate the fluted texture. -
Create texture:
For that stonelike, natural look seen in the photo, take a toothbrush or a rough sponge and dab it gently over the entire surface. This removes smooth tool marks and adds organic character. -
Dry fitting:
Carefully lift your clay shell and drape it inside a small shallow bowl. This will ensure it dries in a curved, cup-like shape rather than lying flat. -
Final shaping check:
While it sits in the drying bowl, gently nudge the edges to ensure they curl upwards nicely. I prefer to ruffle the edges slightly here to make it look less manufactured.
Gilded Edge Upgrade
Once the sealant is dry, use a fine brush to paint just the rim of the shell with liquid gold leaf for a luxurious, high-end finish.
Step 3: Finishing Touches
-
Let it dry:
Allow the clay to dry completely in a cool, dry place. This usually takes 24-48 hours depending on humidity. Flip it over halfway through the process to ensure the bottom dries evenly. -
Refine with sanding:
Once fully hard and white, check the rim for any sharp spots. Use fine-grit sandpaper to gently smooth the rim, but avoid sanding the textured interior to keep that sandy look. -
Applying the seal:
Since air dry clay isn’t waterproof, apply a coat of matte clear varnish or sealant. This protects the piece from moisture and oils from your jewelry. -
Second coat:
After the first coat is dry to the touch, apply a second thin layer of sealant to ensure durability. -
Curing:
Let the varnish cure fully according to the bottle instructions before placing any jewelry inside.
Your finished dish is now ready to hold your most treasured small accessories on your nightstand or vanity
Balanced Mobile With Clay Shapes
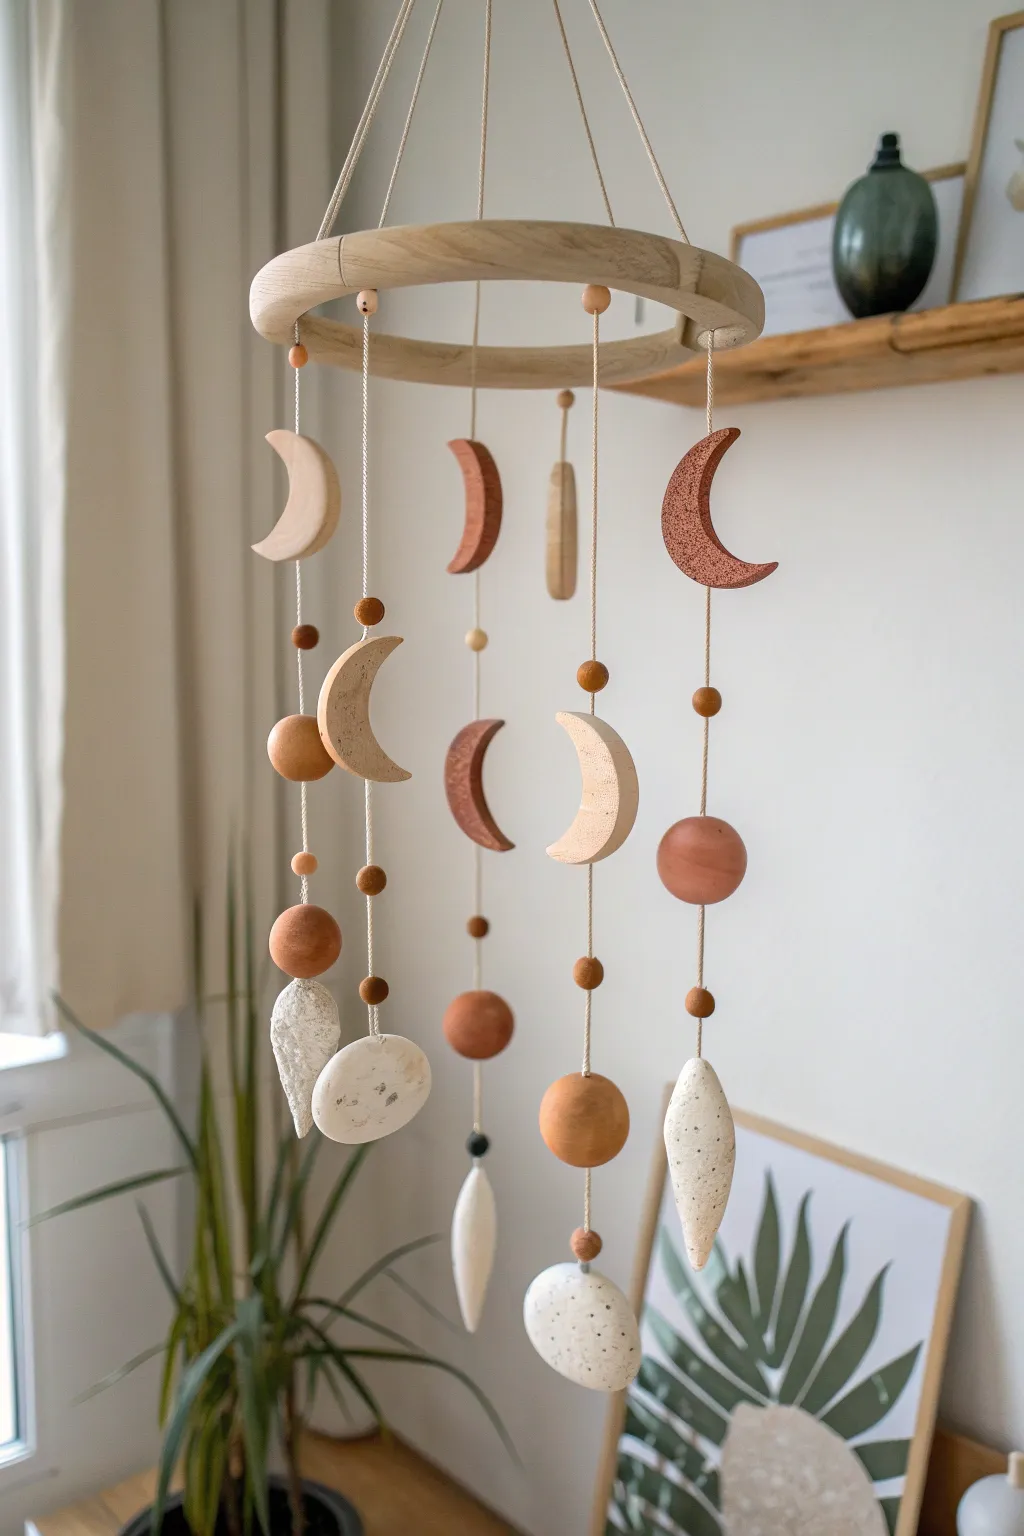
Bring a touch of celestial calm to any room with this earthy, suspended mobile featuring hand-sculpted moons and abstract stone shapes. The warm terracotta and speckled cream tones create a natural, grounding aesthetic that moves gently with the air currents.
Step-by-Step Tutorial
Materials
- Air dry clay (white and terracotta colored)
- Wooden embroidery hoop (inner ring only) or wooden mobile ring (approx. 8-10 inches)
- Strong cotton twine or macramé cord (natural/beige color)
- Acrylic paint (black, brown, metallic gold – optional for speckles)
- Toothbrush or stiff bristle brush
- Sandpaper (fine grit)
- Wooden beads (assorted small sizes)
- Rolling pin
- Round cookie cutters or a glass
- Large sewing needle or toothpick
- Scissors
- Matte varnish or sealant
Step 1: Sculpting the Clay Elements
-
Prepare your clay:
Start by conditioning your air dry clay. You will need both the white and terracotta colors. Knead them separately until soft and pliable to prevent cracking later. -
Form the moons:
Roll out slabs of both clay colors to about 1/4 inch thickness. Use a round cutter to cut a circle, then offset the cutter and cut again to create a crescent moon shape. Aim for 4-5 moons in varying sizes and colors. -
Shape the spheres:
Roll small balls of clay in your palms to create spheres. Make roughly 6-8 of these, varying the sizes from a marble to a large grape. Mix some white and terracotta clay together incompletely before rolling to achieve a marbled effect on a few. -
Create the drop shapes:
Form organic, tear-drop or flat stone shapes for the bottom weights. These should be slightly heavier to help the strings hang straight. I like to keep these a bit irregular for a hand-hewn look. -
Pierce holes:
While the clay is still wet, use a large needle or toothpick to create holes. For the moons and flat shapes, pierce from top to bottom through the center. for spheres, run the hole straight through the middle. Make sure the holes are wide enough for your twine. -
Smooth and dry:
Dip your finger in water to smooth out any rough edges or fingerprints. Lay all pieces flat on parchment paper to dry for 24-48 hours, flipping them halfway through to ensure even drying.
Uneven Hanging?
If the mobile lists to one side, balance it by gluing small fishing weights or extra wooden beads hidden inside the top rim of the lighter side until it levels out.
Step 2: Finishing and Texturing
-
Sand imperfections:
Once fully dry, use fine-grit sandpaper to gently smooth down any sharp edges or bumps on your clay pieces. -
Add speckles:
To get that stone-like texture on the white pieces, mix a little black or brown paint with water. load an old toothbrush, aim it at the clay, and flick the bristles with your thumb to spray fine speckles. -
Seal the pieces:
Apply a coat of matte varnish to all clay components. This seals the clay, protects the paint, and gives a finished professional look without being too glossy.
Needle Too Small?
Is the hole too tight for the twine? Wrap the tip of the twine tightly with a piece of tape to create a stiff ‘needle’ that makes threading the clay beads much easier.
Step 3: Assembly
-
Prepare the hoop:
Take your wooden ring. Cut three or four equal lengths of twine (about 12 inches) for the top hanger. Tie them equidistantly around the hoop and knot them together at the very top to create a hanging loop. -
Cut suspension strings:
Cut 5-6 lengths of twine for the decorative strands. Make them varying lengths, ranging from 15 to 25 inches, to create a cascading effect. -
String the first element:
Start from the bottom of a string. Tie a knot, thread on a bottom ‘stone’ or teardrop shape, and secure it with another knot or a dab of glue so it sits at the end. -
Add middle beads:
Move up the string a few inches. Tie a knot to act as a stopper, then thread on a wooden bead or a clay sphere. This keeps the elements spaced out nicely. -
Attach the moons:
Continue moving up the string, adding your crescent moons. Ensure they are balanced and can swivel freely. Mixing the order of shapes (moon, sphere, bead) creates visual interest. -
Attach to the hoop:
Tie each finished decorative strand to the wooden hoop. Space them out evenly around the circumference. You can also hang one strand from the very center crossing strings if you want a central focal point. -
Final balance check:
Hang the mobile up temporarily. Adjust the knots on the hoop to ensure the ring hangs level. Trim any excess twine tails near the knots for a clean finish.
Now hang your masterpiece near a window and watch the natural light play off the varied textures