If you’ve ever needed a cute little spot for rings, earrings, or those tiny “where did it go?” treasures, an air dry clay trinket dish is the easiest win. Here are my favorite dish ideas—starting with the classics and drifting into the fun, a-little-extra ones I love making in the studio.
Classic Round Slump Dish
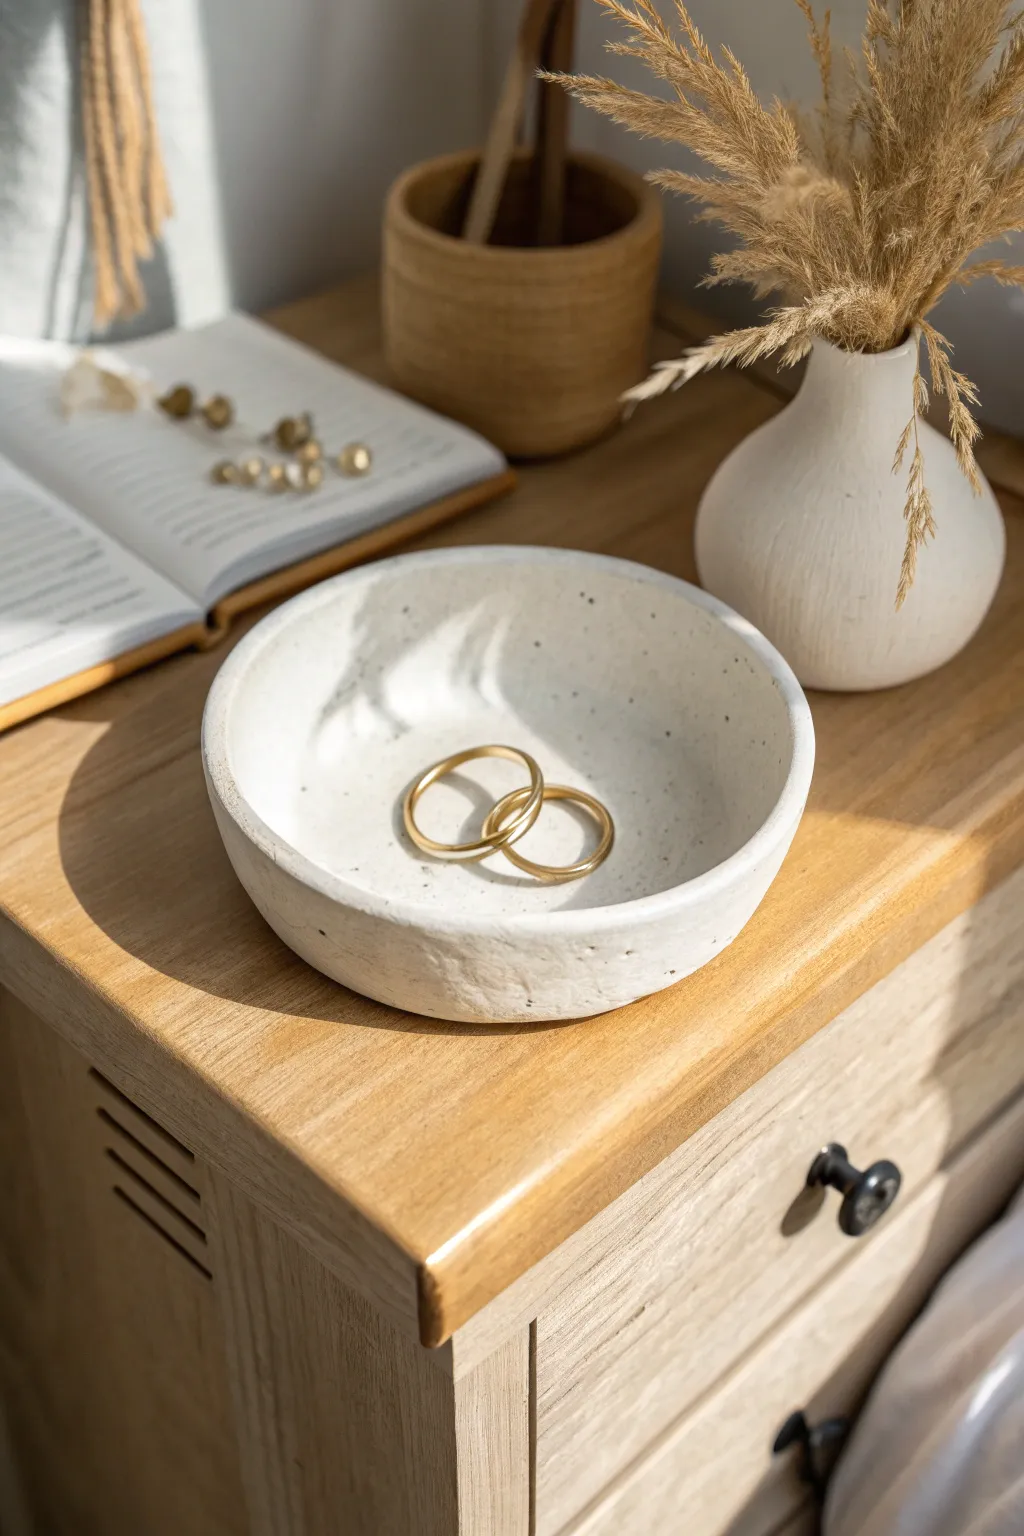
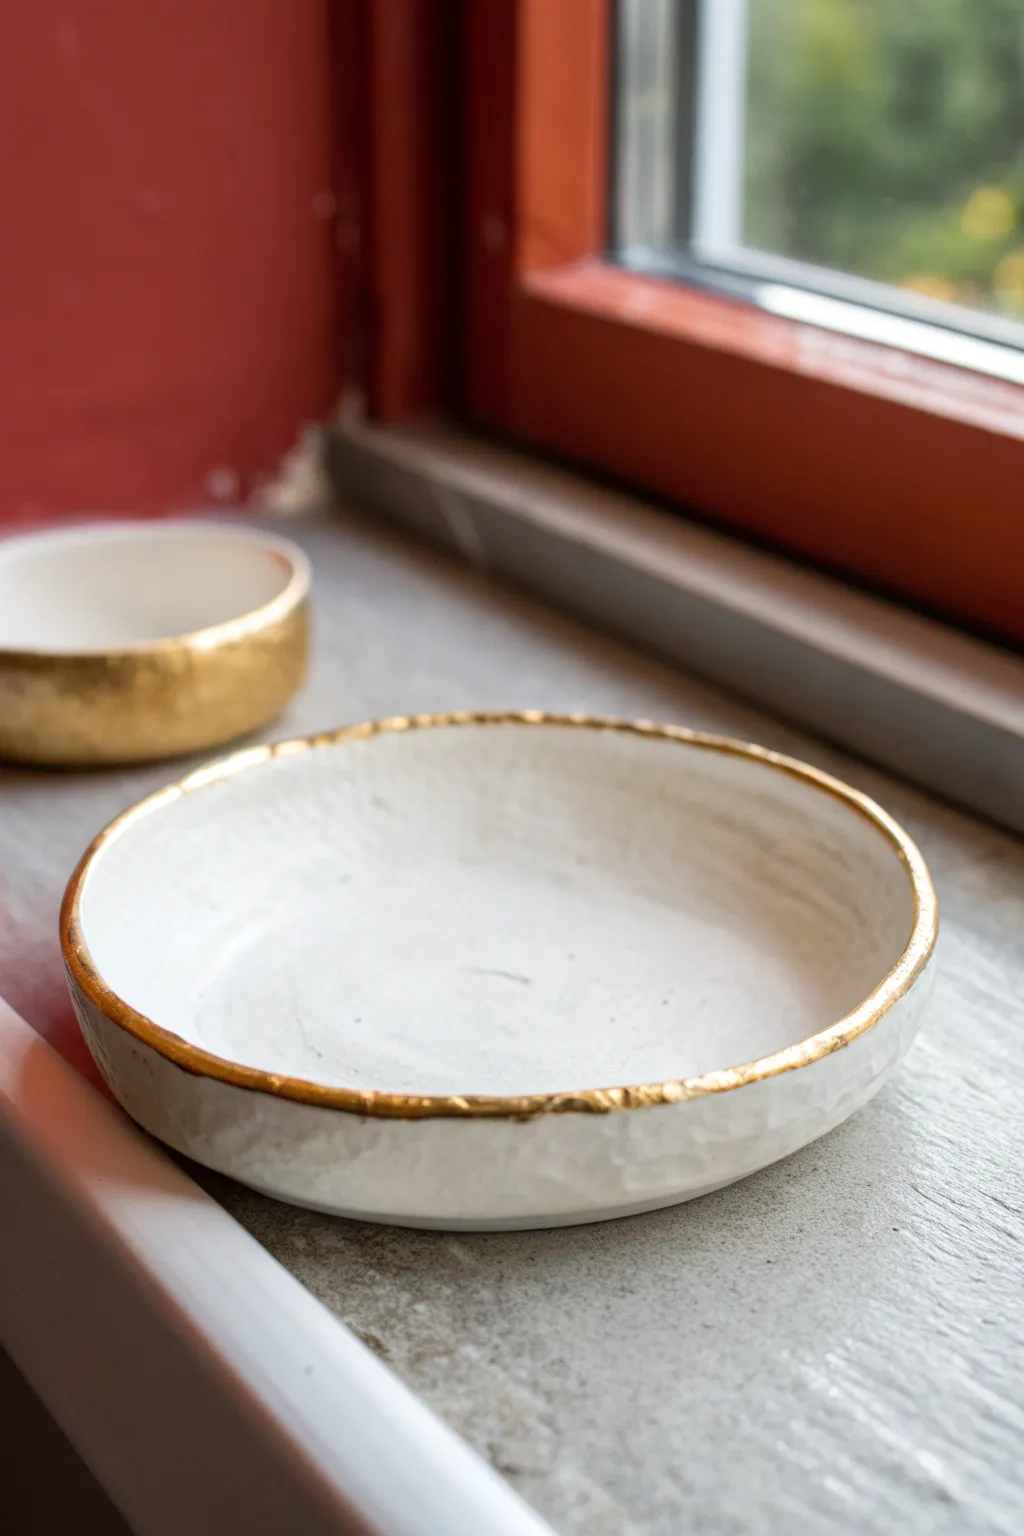
This minimalist bowl captures the effortless beauty of natural stone with a surprising twist—it’s made from simple air dry clay. With its organic edges and subtle coffee-ground speckling, this piece brings a calming, earthy element to any bedside table.
Step-by-Step Guide
Materials
- White air dry clay (Das or similar)
- Dried coffee grounds (used and fully dried)
- Rolling pin
- Parchment paper or canvas mat
- A round bowl (soup or cereal size) to use as a mold
- Craft knife
- Sponge
- Water
- Fine grit sandpaper (220-400 grit)
- Matte acrylic varnish or sealant
Step 1: Prepping the Clay
-
Condition the clay:
Begin by taking a generous handful of white air dry clay. Knead it in your hands for several minutes to warm it up and make it pliable. This helps prevent cracks later on. -
Add texture:
Flatten the clay slightly and sprinkle a pinch of dried coffee grounds into the center. Fold the clay over and knead again to distribute the grounds. I like to keep the specks fairly sparse for that subtle stone look, so start with less than you think you need. -
Roll it out:
Place the clay on a sheet of parchment paper or a canvas mat. Using a rolling pin, roll the clay out evenly until it is about 1/4 inch thick. Try to keep the thickness consistent across the entire slab to ensure even drying.
Smoother Finish
Use a damp artist’s sponge to wipe down your clay immediately after shaping. This creates a super smooth surface and reduces the amount of sanding you’ll need later.
Step 2: Shaping the Form
-
Cut the circle:
Find a bowl or round object slightly larger than your desired finished dish size. Place it upside down on your clay slab and use a craft knife to trace around it, cutting out a perfect circle. -
Soften the edges:
Dip your finger in a little water and run it along the cut edge of the clay circle. Smooth out any sharp angles or rough bits left by the knife until the rim looks rounded and soft. -
Prepare the mold:
Take the bowl you are using as a mold. To prevent sticking, you can either drape a piece of plastic wrap over it or lightly dust the inside with cornstarch. -
Slump the clay:
Gently lift your clay circle and place it inside the bowl. Use your fingers to press it softly against the curve of the bowl, ensuring it takes the shape of the bottom. -
Refine the rim:
While it’s in the mold, check the rim. If you prefer the organic, slightly wavy look seen in the photo, gently press down on a few sections of the rim to create subtle undulations.
Gilded Edge
For a luxe upgrade, paint just the very rim of the dried dish with liquid gold leaf or metallic acrylic paint. It highlights the organic shape beautifully.
Step 3: Drying and Finishing
-
Initial drying:
Let the clay sit in the mold for about 24 hours. Because air flow is restricted on one side, it will dry slowly. -
Remove from mold:
Once the dish is firm enough to hold its shape (leather hard), carefully remove it from the bowl. Place it upside down on a wire rack so air can reach the bottom. -
Complete drying:
Allow the dish to dry completely for another 24 to 48 hours. The clay should turn a chalky white and feel room temperature (not cold) to the touch when fully dry. -
Sand the surface:
Using fine-grit sandpaper, gently sand the rim and any rough patches on the surface. Be gentle around the coffee grounds, as aggressive sanding can sometimes dislodge them. -
Clean up dust:
Wipe the entire dish with a slightly damp sponge or cloth to remove all clay dust before sealing. -
Apply sealer:
Brush on a thin coat of matte varnish. This seals the clay and protects the coffee grounds from moisture. Let it dry according to the bottle instructions. -
Second coat:
Apply a second coat of varnish for extra durability, paying special attention to the inside curve where jewelry will sit.
Now you have a chic, modern vessel ready to hold your favorite daily rings and studs


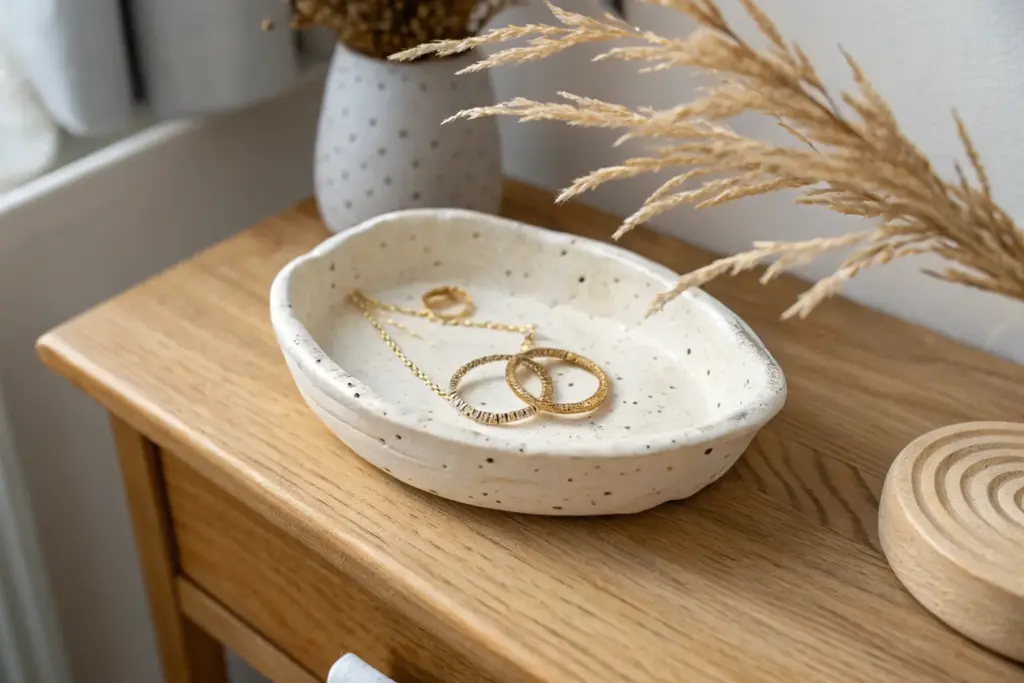
Minimal Oval Catchall Dish
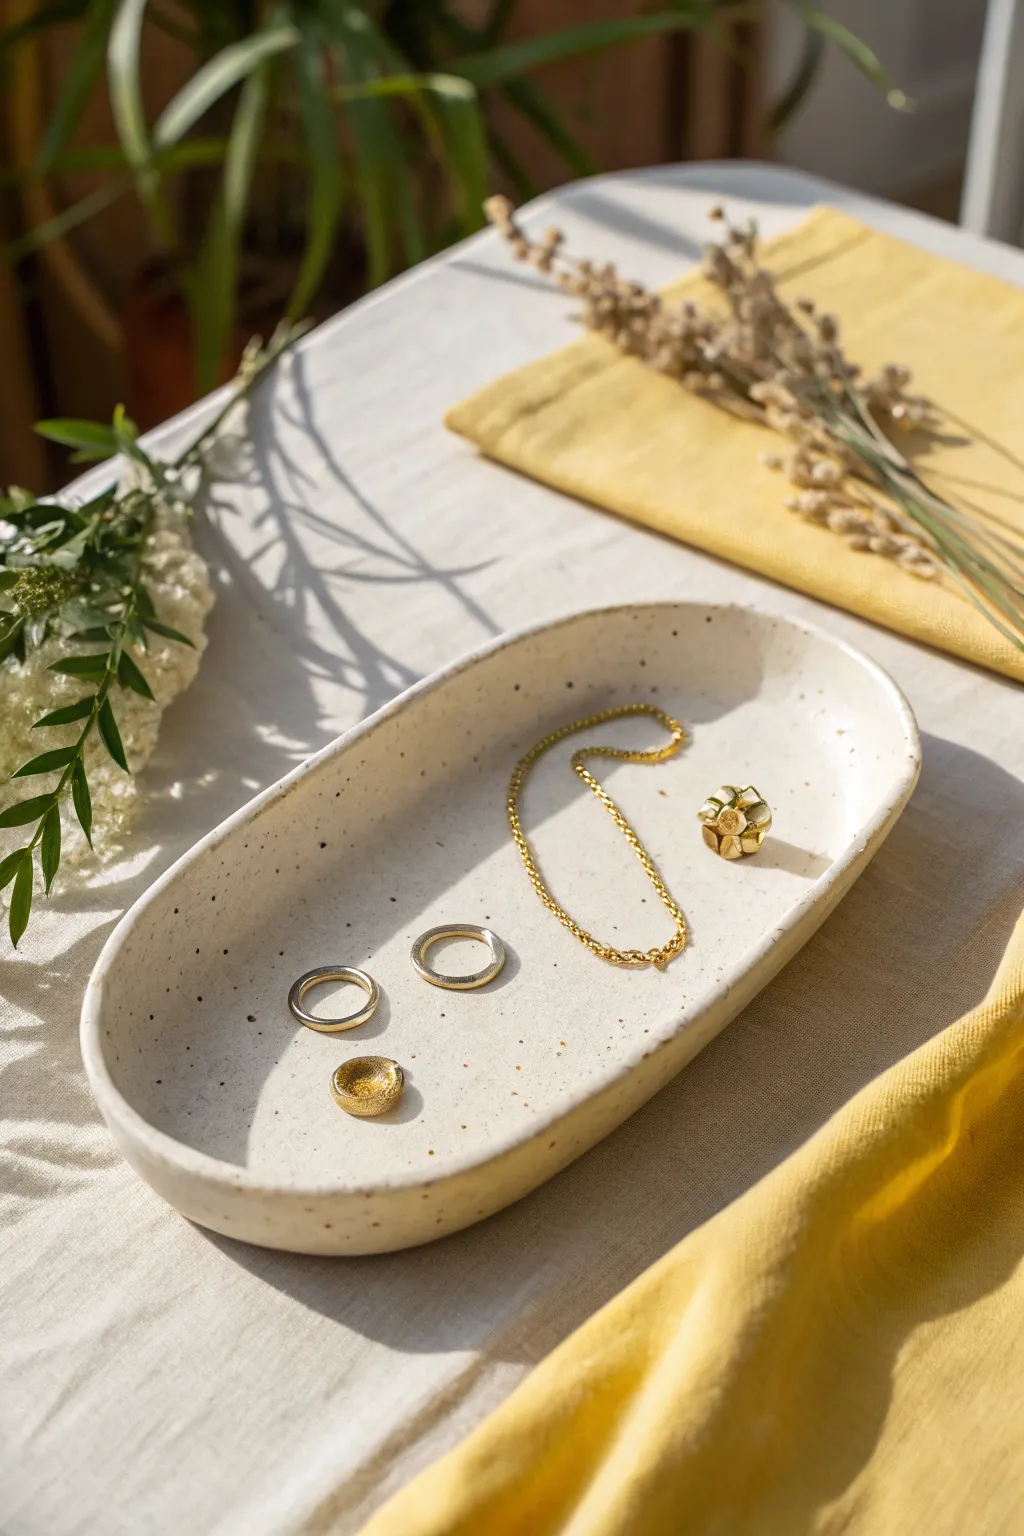
This elegant tray embraces minimalism with its smooth, elongated curves and subtle speckled pattern. It’s the perfect size for keeping rings, necklaces, and small treasures organized in soft, neutral style.
Step-by-Step
Materials
- White air-dry clay
- Rolling pin
- Craft knife or scalpel
- Oval paper template (approx. 8 inches long)
- Small bowl of water
- Sponge
- Fine-grit sandpaper (220-400 grit)
- Black acrylic paint
- Old toothbrush or stiff bristle brush
- Matte or satin varnish/sealant
- Parchment paper or canvas mat
Step 1: Shaping the Form
-
Prepare your workspace:
Lay down parchment paper or a canvas mat to prevent the clay from sticking to your table. -
Condition the clay:
Take a generous handful of white air-dry clay and knead it in your hands until it feels soft, warm, and pliable. -
Roll it out:
Use your rolling pin to flatten the clay. Aim for an even thickness of about 1/4 inch (approx. 5-6mm) throughout the slab. -
Cut the shape:
Place your oval paper template onto the rolled clay. Using a craft knife, carefully trace around the template to cut out your base oval shape. -
Create a coil:
Roll a separate piece of clay into a long, even ‘snake’ or coil. This should be long enough to go around the entire perimeter of your oval base. -
Score and slip:
Use your craft knife to make tiny hatch marks (scoring) along the top edge of the base and one side of the coil. Dab a little water (slip) on the scored areas. -
attach the rim:
Gently press the coil onto the edge of the oval base. The water acts as glue. Overlap the ends of the coil and slice through both at an angle to create a seamless join. -
Blend the seams:
Using your thumb or a modeling tool, drag the clay from the coil down onto the base on the inside, and from the base up onto the coil on the outside. Do this until the seam disappears completely.
Fixing Cracks
If small cracks appear during drying, mix a tiny bit of fresh clay with water to make a paste (slip). Fill the crack, let it dry, and sand it smooth again.
Step 2: Refining and Drying
-
Smooth the walls:
Dip your sponge lightly in water and run it over the entire surface. Focus on smoothing out fingerprints and ensuring the rim has a gentle, rounded top edge rather than a sharp one. -
Check the profile:
Look at the dish from the side. The walls should rise gently and slightly outward. I usually give the sides a final gentle push outwards with my fingers to get that open, shallow bowl look. -
Let it dry:
Place the dish in a cool, dry spot away from direct sunlight. Let it dry for 24-48 hours. Turn it over halfway through so the bottom dries evenly. -
Sand for perfection:
Once bone dry, use fine-grit sandpaper to buff away any remaining bumps or rough edges especially along the rim. Wipe away the dust with a barely damp cloth.
Step 3: Decorating
-
Prepare the speckle paint:
Mix a small amount of black acrylic paint with a few drops of water. You want a runny, ink-like consistency. -
Test the splatter:
Dip an old toothbrush into the watered-down paint. Test the spray on a piece of scrap paper by running your thumb across the bristles. -
Apply the speckles:
Holding the brush about 6-8 inches above the dish, flick the bristles to create a fine mist of speckles across the white surface. Less is more for a minimalist look. -
Allow paint to set:
Let the paint dry completely, which should only take about 15-20 minutes since the layers are thin. -
Seal the piece:
Apply two thin coats of matte or satin varnish to protect the clay from moisture and scratches, allowing drying time between coats.
Even Splatters
For finer, more controlled speckles, try flicking a stiff paintbrush against a stick or another brush handle instead of using your thumb.
Now you have a serene, modern resting place for your favorite jewelry pieces


Sweet Heart-Shaped Dish
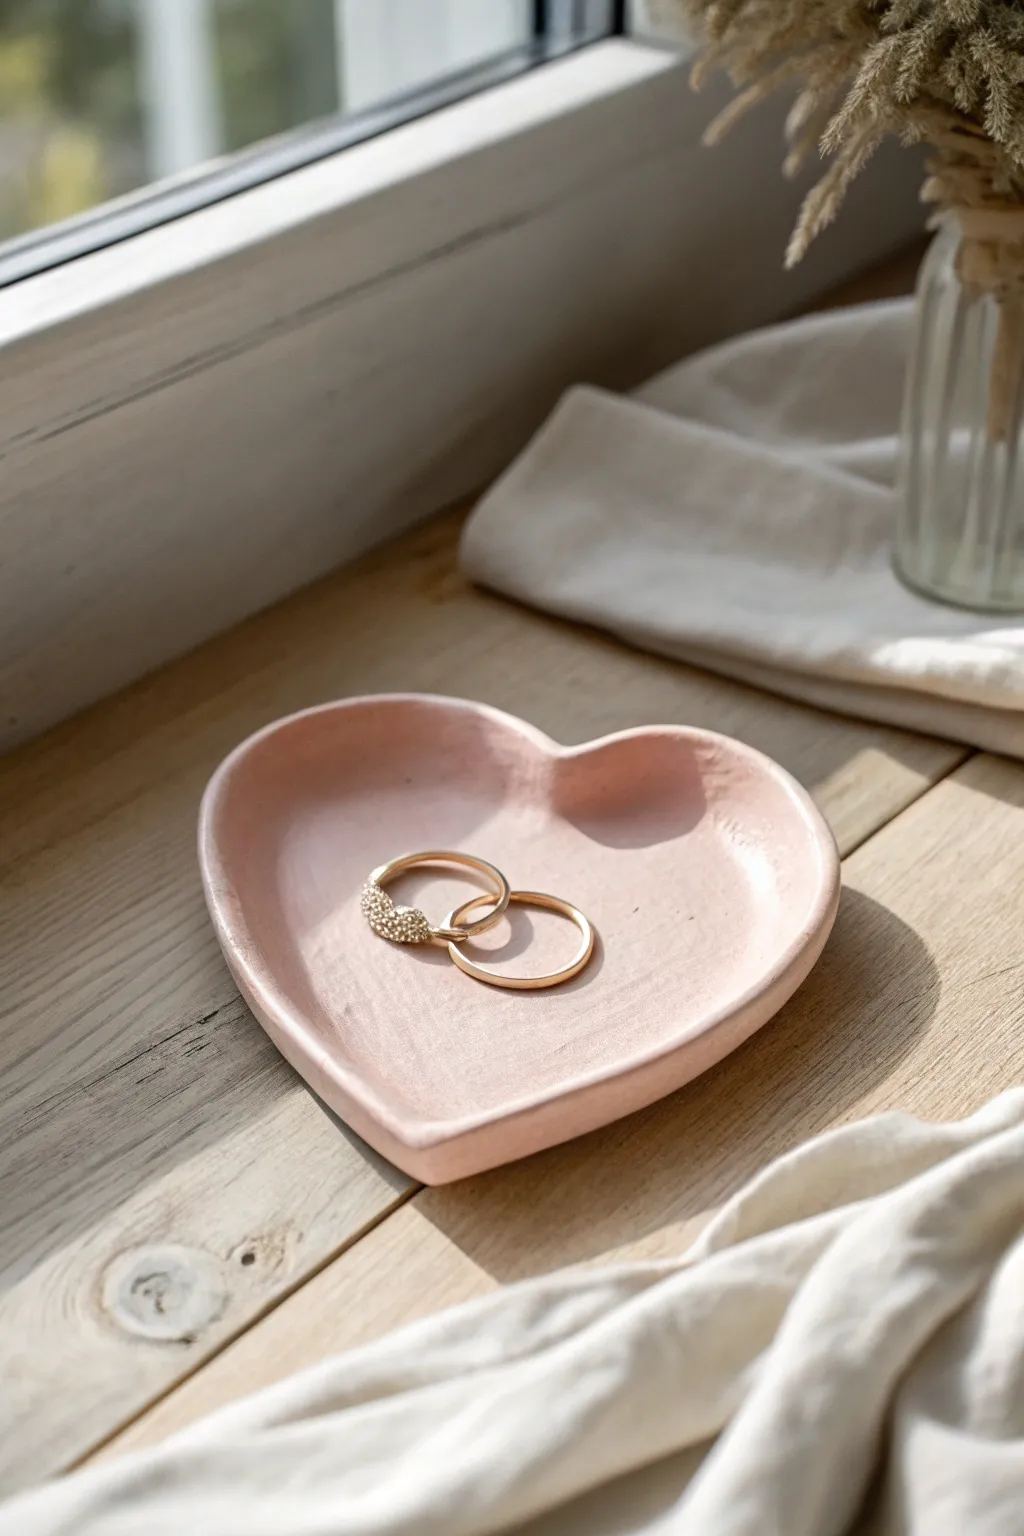
Capture a bit of romance with this soft, dusty pink heart dish that serves as the perfect minimalist resting place for your daily rings. Its organic shape and matte finish give it a modern, stoneware-like feel without the need for a kiln.
Step-by-Step Tutorial
Materials
- White air-dry clay (smooth texture)
- Acrylic paint (dusty pink or mix white with a touch of red/brown)
- Small rolling pin
- Heart-shaped paper template (hand-drawn)
- Craft knife or clay tool
- Small bowl of water
- Fine grit sandpaper (200-400 grit)
- Matte varnish or sealant
- Soft paintbrush
- Sponge
Step 1: Shaping the Foundation
-
Prepare your clay:
Take a handful of white air-dry clay and knead it well in your hands to warm it up and remove air bubbles. This conditioning step prevents cracks later. -
Roll out a slab:
Flatten the clay on a clean, smooth surface. Using your rolling pin, roll it out to an even thickness of about 1/4 inch (6mm). Rotate the clay occasionally so it doesn’t stick. -
Create a template:
Draw a simple, rounded heart shape on a piece of paper and cut it out. This ensures your final dish has the exact proportions you want. -
Cut the shape:
Place your paper heart onto the rolled slab. Use a craft knife to carefully trace around the edge, cutting vertically to get a clean outline. Peel away the excess clay. -
Smooth the edges:
Dip your finger in a little water and run it along the cut edges of the heart to soften any sharp angles left by the knife.
Cracks Appearing?
If small cracks form while drying, mix a tiny bit of fresh clay with water to make a paste (slip). Fill the cracks, smooth over, and let dry again.
Step 2: Forming the Dish
-
Lift the edges:
Gently pinch the edges of the heart upwards to create a shallow rim. I like to work slowly around the perimeter, lifting just a little at a time to keep it even. -
Smooth the interior:
As you lift the sides, smooth the transition between the base and the walls with a damp finger or a sponge. You want a gentle curve, not a sharp corner. -
Refine the rim:
Check the rim thickness. If it feels too thick, gently pinch and smooth it to taper slightly. Ensure the top edge is level. -
Dry completely:
Set the dish aside in a safe spot to dry. Depending on humidity, this usually takes 24-48 hours. Flip it halfway through drying to let the bottom breathe.
Step 3: Finishing Touches
-
Sand for smoothness:
Once bone dry, use fine-grit sandpaper to buff away any fingerprints or rough bumps. Wipe away the dust with a slightly damp cloth. -
Mix your color:
Create a dusty pink shade by mixing white acrylic paint with a tiny drop of red and a microscopic dot of brown or yellow ochre to mute the brightness. -
Apply base coat:
Paint the entire dish, top and bottom. Use long, smooth strokes. Let the first coat dry fully. -
Add a second coat:
Apply a second layer of paint for opaque, solid coverage. This helps achieve that ceramic look. -
Seal the piece:
Finish with a layer of matte varnish to protect the paint and clay from moisture, keeping the look natural and shine-free.
Professional Edge
To get a perfectly uniform rim height, place the drying dish on a flat surface and look at it from eye level. It helps reveal uneven dips you might miss from above.
Place this lovely little dish on a windowsill or nightstand to add a gentle touch of warmth to your room


Scalloped Flower Trinket Dish
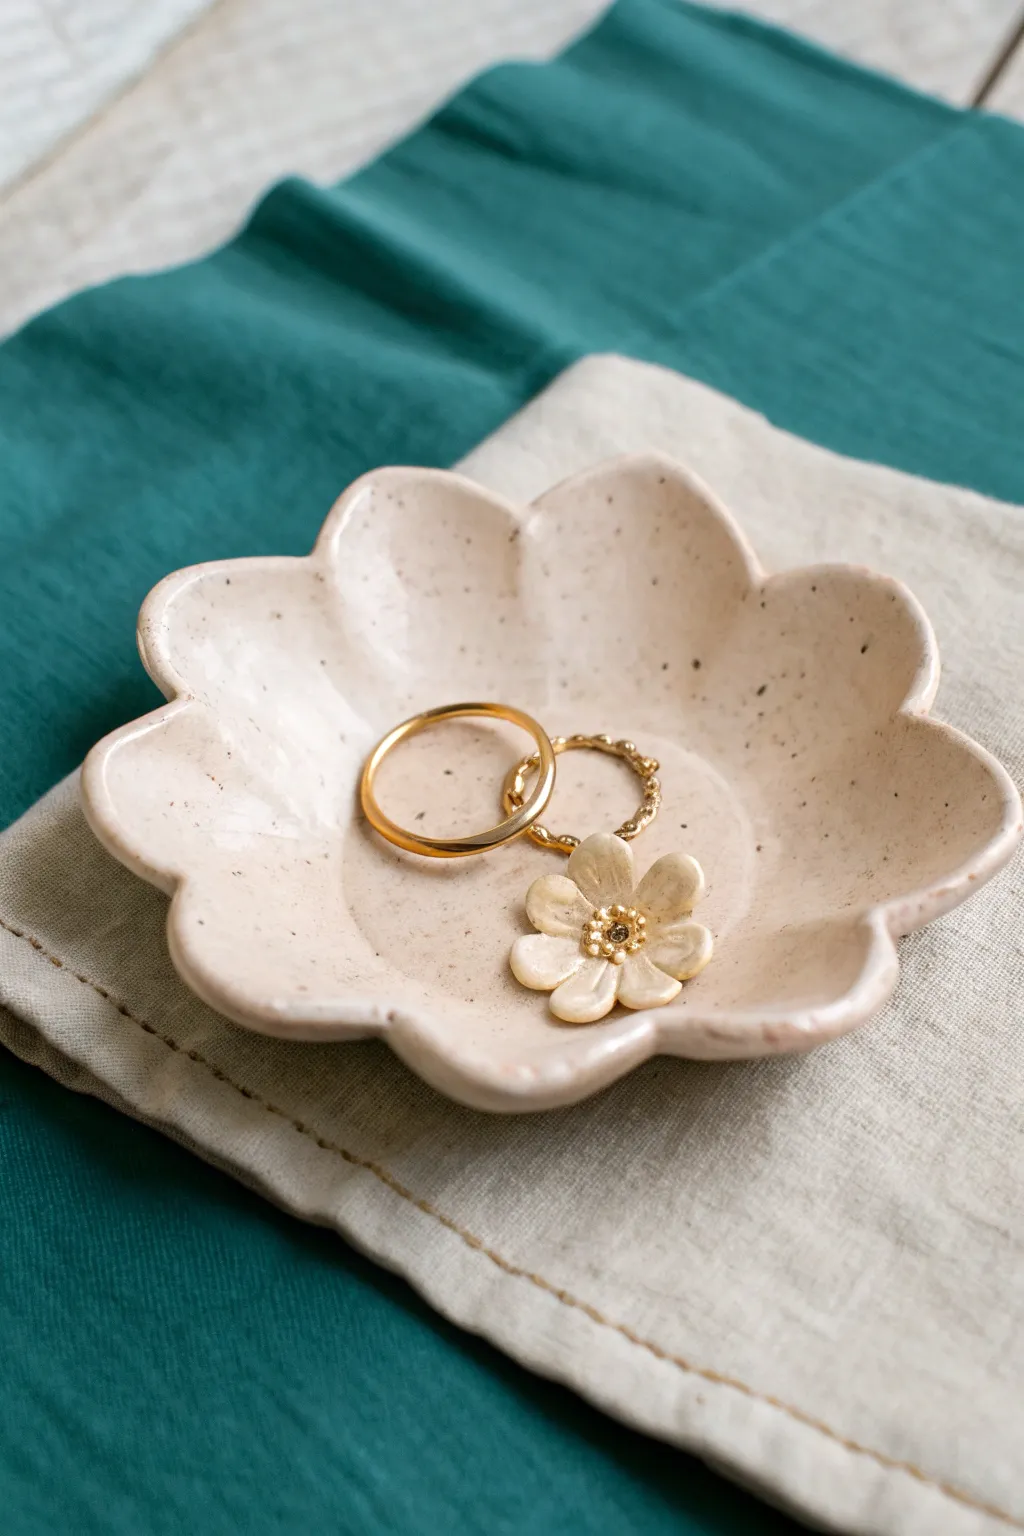
This charming trinket dish combines a soft, scalloped petal shape with a modern speckled finish that mimics high-end stoneware. It is perfect for holding delicate rings or studs and adds an organic, handmade touch to any bedside table.
Step-by-Step
Materials
- White air dry clay
- Rolling pin
- Flower-shaped cookie cutter (large) or paper template
- Craft knife
- Small bowl or sponge for shaping
- Sandpaper (fine grit)
- Acrylic paint (pale beige/creamy white)
- Acrylic paint (brown or black for speckling)
- Old toothbrush
- High-gloss varnish or sealant
- Water and sponge for smoothing
Step 1: Shaping the Clay
-
Condition the clay:
Begin by taking a handful of white air dry clay and kneading it in your hands until it becomes soft, pliable, and free of air bubbles. -
Roll it out:
Roll the clay out onto a smooth surface to an even thickness of about 1/4 inch. If you want a consistent thickness, you can place guide sticks on either side of your roller. -
Cut the shape:
Place your large flower-shaped cookie cutter onto the clay and press down firmly. If you are using a paper template instead, lay it lightly on the clay and trace around the petals with a craft knife. -
Smooth the edges:
Dip your finger in a little bit of water and gently run it along the cut edges of the flower to smooth out any roughness or sharp corners left by the cutter. -
Form the curve:
Carefully pick up your clay flower and drape it inside a shallow bowl or over a curved object like a melon to give it a cupped shape. You want the petals to gently curve upward. -
Refine the petals:
While it sits in the mold, use your thumb to gently press the center down and ensure the petals are spaced evenly. I like to pinch the very tips of the petals slightly to give them a more defined shape. -
Initial drying:
Let the dish dry in the mold for at least 24 hours. Keep it away from direct heat sources to prevent cracking.
Uneven Speckles?
If you get a large blob of paint while flicking, immediately dab it up with a wet Q-tip before it dries. You can touch up the area with base paint.
Step 2: Finishing and Decorating
-
Remove and dry completely:
Once the top feels dry, carefully remove the dish from the mold and turn it upside down to let the bottom dry fully. This usually takes another 24 hours. -
Sand for smoothness:
When completely bone dry, use fine-grit sandpaper to buff away any uneven spots on the rim or surface. Wipe away the dust with a barely damp cloth. -
Base coat:
Apply a coat of pale beige or creamy white acrylic paint to the entire dish. You might need two layers to get an opaque, even finish. -
Create the speckles:
Dilute a small amount of dark brown or black acrylic paint with water until it is quite runny. -
Flick the paint:
Dip an old toothbrush into the runny paint. Hold it over the dish and run your thumb across the bristles to flick tiny specks onto the surface. Practice on a piece of paper first to control the spray. -
Seal the deal:
Once the paint is totally dry, apply a high-gloss varnish. This is crucial for achieving that faux-ceramic stoneware look seen in the photo. -
Final cure:
Let the varnish cure according to the manufacturer’s instructions before placing any jewelry inside.
Gold Rim Upgrade
For an elegant touch, use a small detail brush to paint the very edge of the scalloped rim with liquid gold leaf or metallic gold paint.
Your new faux-ceramic dish is now ready to cradle your favorite rings

The Complete Guide to Pottery Troubleshooting
Uncover the most common ceramic mistakes—from cracking clay to failed glazes—and learn how to fix them fast.
Simple Cloud-Shaped Dish
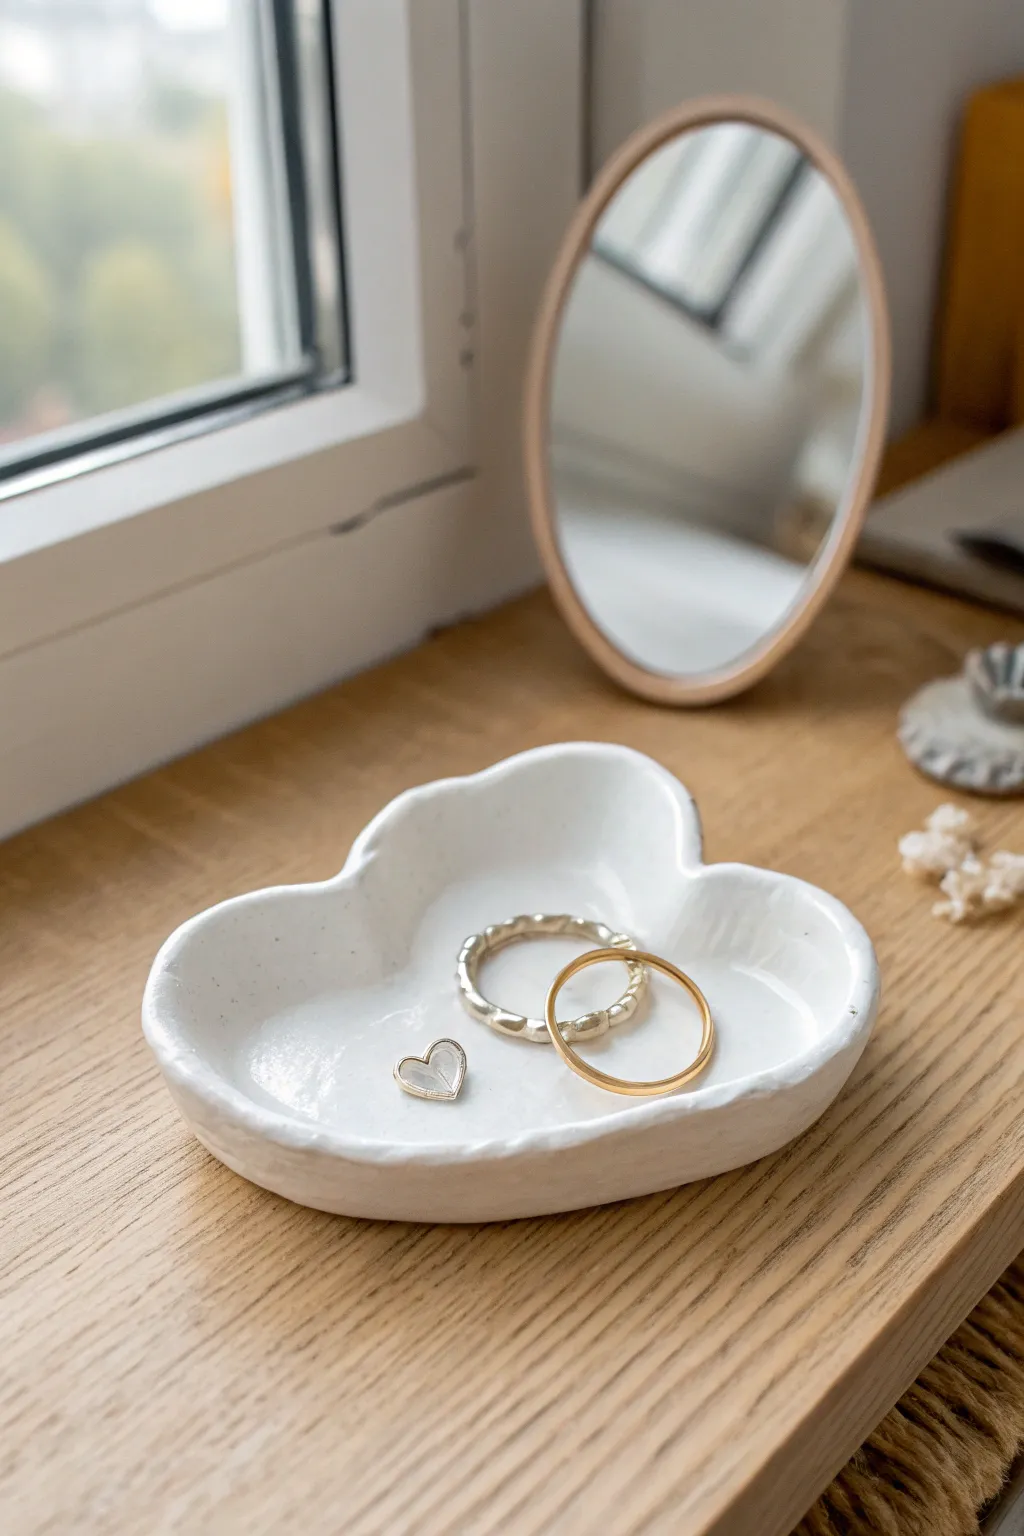
This charming little catch-all captures the soft, organic curves of a fluffy cloud in a minimalist design. Its uneven rim and glossy white finish give it the sophisticated appearance of hand-thrown pottery without needing a kiln.
Step-by-Step Tutorial
Materials
- White classic air dry clay
- Rolling pin (acrylic or wooden)
- Small kitchen knife or clay needle tool
- Paper template of a cloud shape
- Small bowl with water
- Sanding sponge or fine-grit sandpaper (220 grit)
- White acrylic paint (optional, for extra opacity)
- High-gloss varnish or generous layer of Mod Podge (Gloss)
- Soft-bristle brush
Step 1: Shaping the Cloud
-
Prepare your clay:
Take a handful of air dry clay and knead it in your hands for a minute until it feels pliable and warm. This conditioning step prevents cracks later. -
Roll out a slab:
Place the clay on a clean, flat surface or craft mat. Use your rolling pin to create a smooth slab that is roughly 1/4 inch (about 6mm) thick. Try to keep the thickness consistent across the entire piece. -
Cut the shape:
Lay your cloud paper template gently on top of the clay slab. Using a clay needle tool or a small knife, trace around the template to cut out your cloud shape. Peel away the excess clay. -
Begin the pinch method:
Remove the paper template. Gently pick up the clay cloud and begin to pinch slightly upwards around the very edge of the shape. You want to create a small wall that is about half an inch high. -
Smooth the interior:
Dip your finger into a little bit of water—just a drop essentially—and run it along the inside where the base meets the wall to smooth out that transition curve. -
Refine the rim:
Work your way around the top rim. I like to pinch and press it gently between my thumb and forefinger to create that slightly organic, undulating look shown in the photo. It doesn’t need to be perfectly straight; the wobble adds charm. -
Final smoothing:
Use a damp sponge or finger to smooth out any fingerprints or rough textures on the surface of the dish. Pay close attention to the outer edge. -
Dry properly:
Set the dish aside in a cool, dry place safe from drafts. Let it dry for at least 24-48 hours. Flip it over gently halfway through the drying process to ensure the bottom dries evenly.
Cracks happen
If you see hairline cracks while drying, mix a tiny bit of fresh wet clay with water to make a paste (slip) and fill the crack. Smooth it over and let it dry again.
Step 2: Finishing Touches
-
Sand for smoothness:
Once the clay is bone dry and hard (it should feel room temperature, not cool to the touch), use fine-grit sandpaper to buff away rough edges, especially around the rim. -
Dust off:
Wipe the entire dish down with a barely damp cloth or a dry brush to remove all the clay dust from sanding. -
Paint (Optional):
If your clay dried a bit grey or off-white, apply one or two thin coats of white acrylic paint to get that bright, clean ceramic look. -
Apply the glaze:
This is where the magic happens. Apply a thick coat of high-gloss varnish (or gloss Mod Podge). Use a soft brush to avoid leaving streak marks. -
Re-coat for shine:
Let the first coat dry completely according to the bottle instructions. Then, apply a second or even third coat. Multiple layers build up that thick, glassy finish that mimics fired ceramic glaze. -
Cure:
Allow the varnish to cure fully for roughly 24 hours before placing any jewelry inside to ensure it doesn’t stay tacky.
Smooth edges trick
Dip your finger in water before smoothing the rim. The water reactivates the clay surface, essentially erased fingerprints and jagged bits like a magic eraser.
Now your jewelry has the softest resting place imaginable, looking perfectly at home on your nightstand
Leaf-Imprint Nature Dish
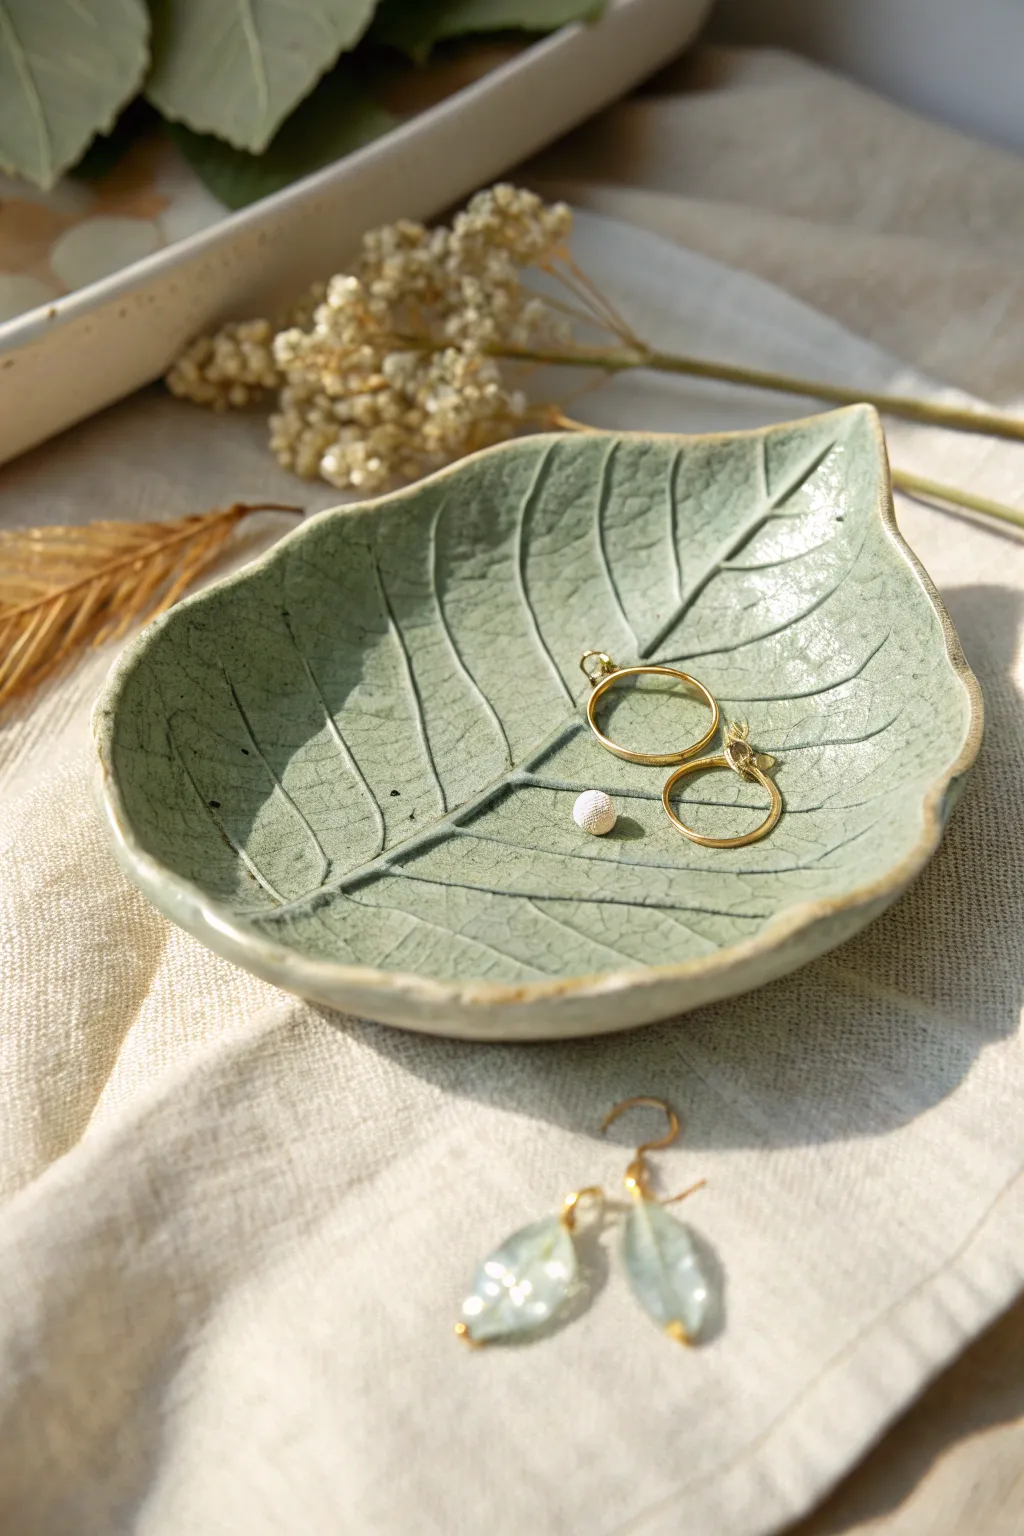
Capture the delicate beauty of nature with this elegant leaf-shaped dish, perfect for holding rings or small treasures. The resulting piece features realistic vein textures and a soothing sage green glaze that mimics actual ceramic pottery.
How-To Guide
Materials
- Air dry clay (white or terracotta)
- Fresh leaf with prominent veins (like hydrangea or grape)
- Rolling pin
- sharp craft knife or clay tool
- Small bowl (for shaping)
- Sandpaper (fine grit)
- Sage green acrylic paint
- Gloss varnish or sealant
- Small sponge or paintbrush
- Water cup
Step 1: Shaping and Imprinting
-
Prepare the clay:
Begin by kneading a ball of air dry clay until it is soft, pliable, and free of cracks. If it feels too dry, add a drop or two of water. -
Roll out the slab:
Roll the clay out on a smooth surface or canvas mat to a uniform thickness of about 1/4 inch. Ensure it is wide enough to accommodate your chosen leaf. -
Position the leaf:
Place your fresh leaf face down onto the clay slab. The vein side should be pressing into the clay to get the best texture detail. -
Imprint the texture:
Gently roll over the leaf with your rolling pin one or two times. apply firm, even pressure to transfer the veins without thinning the clay too much. -
Cut the shape:
Use a sharp craft knife to carefully trace around the edge of the leaf, cutting away the excess clay. Remove the excess clay but leave the leaf in place for a moment. -
Reveal the details:
Carefully peel the leaf off the clay by lifting the stem. This is always the most satisfying part as you see the intricate veins revealed. -
Smooth the edges:
Dip your finger in a little water and gently run it along the cut edges of the clay leaf to smooth out any sharpness or roughness. -
Create the curve:
Lift the clay leaf and gently drape it inside a small shallow bowl. This supports the clay in a curved shape while it dries. -
Dry the piece:
Allow the dish to dry completely in a cool, dry place. This usually takes 24-48 hours. Don’t rush this step, or the clay might crack.
Fixing Cracks
If small hairline cracks appear during drying, mix a tiny bit of fresh clay with water to make a paste (slip) and fill the cracks. Smooth and dry again.
Step 2: Finishing and Glazing
-
Sand imperfections:
Once fully dry, lightly sand the edges with fine-grit sandpaper to remove any remaining rough spots. Wipe away the dust with a barely damp cloth. -
Base coat:
Mix a watery wash of sage green acrylic paint. Apply this wash over the entire dish, letting the paint settle into the deep vein crevices. -
Wipe back:
While the paint is still wet, use a damp sponge or paper towel to wipe the surface gently. This leaves darker paint in the veins and lighter color on the surface. -
Solid coat (optional):
If you prefer the opaque look shown in the photo, apply a solid coat of sage green paint instead of a wash. I find two thin coats are better than one thick one. -
Highlight the rim:
For a subtle detail, you can lightly distress the rim with a tiny bit of darker paint or brown ink to mimic a fired ceramic edge. -
Apply varnish:
Once the paint is completely dry, apply a generous coat of high-gloss varnish. This protects the dish and gives it that ceramic-like shine. -
Final cure:
Let the varnish cure according to the bottle instructions before placing any jewelry inside.
Leaf Selection Pro Tip
Choose leaves with thick, prominent veins on the underside like hydrangea or hibiscus. Thin leaves won’t leave a deep enough impression.
Place your delicate new dish on a bedside table to hold your favorite rings or earrings


What Really Happens Inside the Kiln
Learn how time and temperature work together inside the kiln to transform clay into durable ceramic.
Lace-Texture Impression Dish
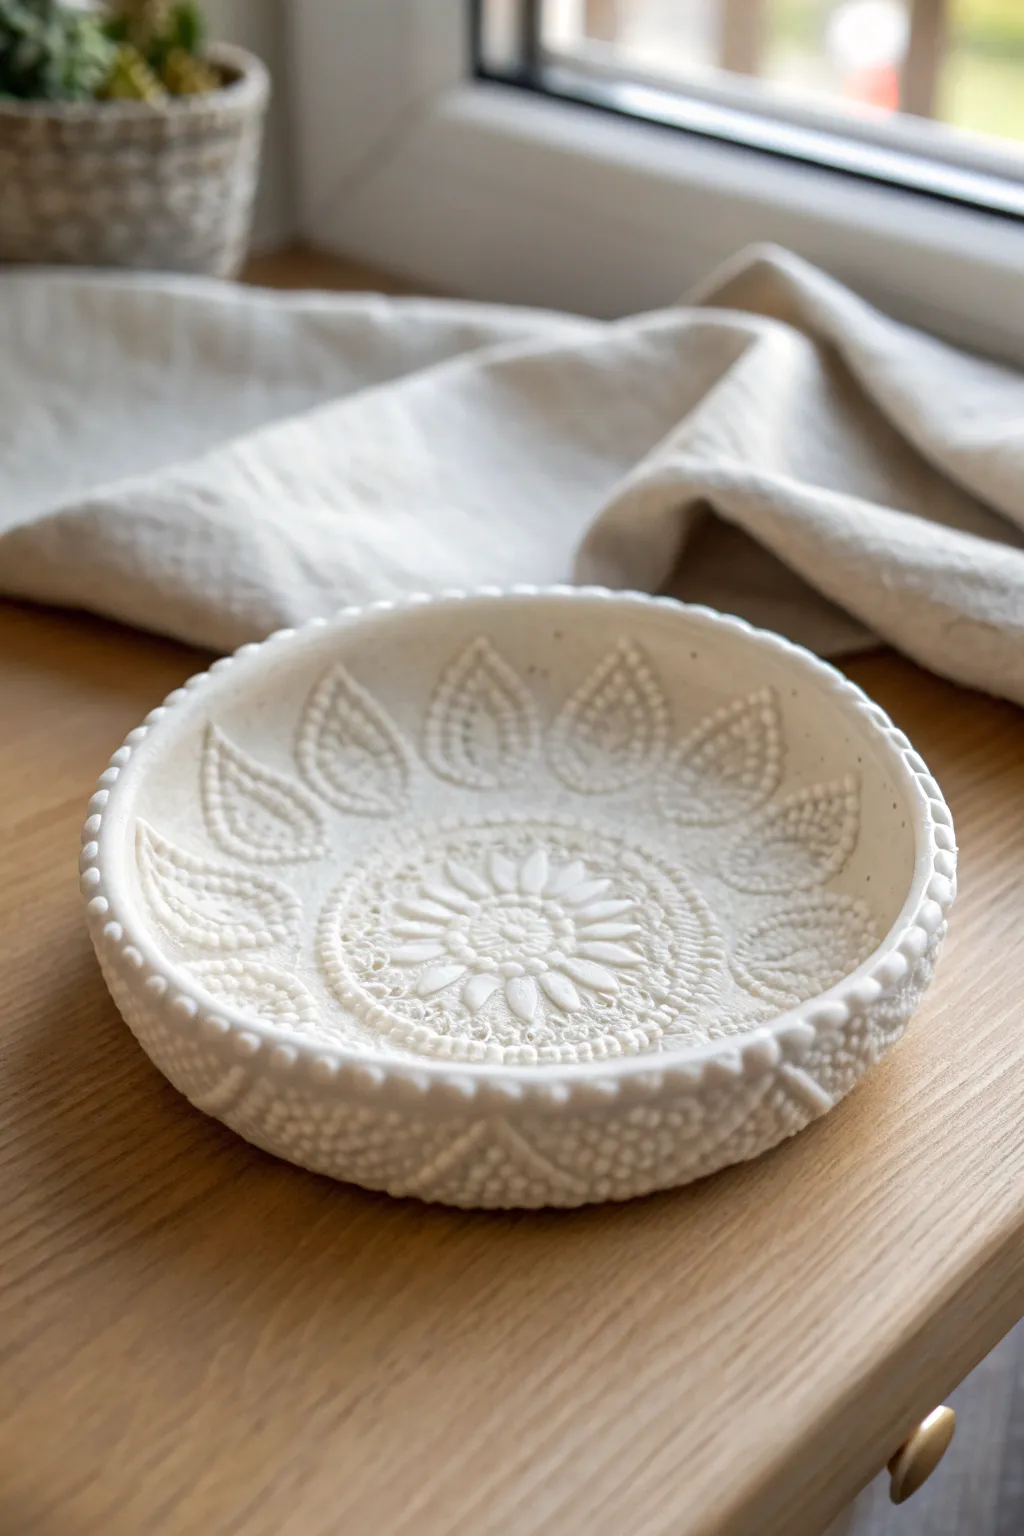
Transform simple air dry clay into a stunning piece of home decor with this detailed lace impression dish. The intricate raised patterns create an elegant, textured surface perfect for holding jewelry or simply admiring on a shelf.
Detailed Instructions
Materials
- White air dry clay
- Rolling pin or smooth glass bottle
- Texture tool: Vintage lace doily or lace ribbon with prominent stitching
- Small bowl (for use as a mold)
- Small ball tool or rounded end of a paintbrush
- Craft knife or clay cutter
- Fine grit sandpaper
- Clear matte varnish or sealant
- Plastic wrap (optional)
- Sponge and water
Step 1: Preparing the Base
-
Condition the Clay:
Start by taking a handful of air dry clay and kneading it in your hands until it feels soft, warm, and pliable. This helps prevent cracks later on. -
Roll out the Slab:
Place the clay on a smooth surface or a silicone mat. using your rolling pin, roll it out into an even slab about 1/4 inch thick. Rotate the clay frequently to ensure a circular shape. -
Smooth the Surface:
Dip your finger or a slightly damp sponge into water and gently gently smooth out any surface imperfections or tiny cracks on your clay slab.
Pattern Popping Pro-Tip
For a deeper texture, lightly mist the lace with water before rolling. This prevents sticking and helps the fibers press cleanly into the clay.
Step 2: Creating the Texture
-
Position the Lace:
Carefully lay your chosen lace doily or fabric over the clay slab. Ensure the center of the doily aligns roughly with the center of your clay circle for a symmetrical design. -
Impress the Pattern:
Using the rolling pin, roll firmly over the lace. You need to apply enough pressure to push the fabric deeply into the clay to capture the intricate threads, but not so much that you thin the clay out too much. -
Reveal the Design:
Find the edge of the doily and slowly peel it back to reveal the embossed pattern. I love this moment—seeing the detail transfer is so satisfying. -
Cut the Shape:
Place a circular cutter or template over the best part of the pattern. Use your craft knife to cut out a clean circle. -
Refine the Edges:
Dip your finger in water again and smooth the cut edge of the circle so it is rounded and neat, removing any sharp cutting marks.
Fixing Cracks
If hairline cracks appear while drying, mix a tiny bit of clay with water to make a paste and fill the crack, then smooth it over with a wet finger.
Step 3: Adding Bead Details
-
Prepare Tiny Spheres:
Roll many tiny balls of clay, about the size of a peppercorn. You will need enough to go around the entire rim of your dish. -
Score and Slip:
Lightly scratch the top rim of your clay circle with a needle tool and dab a tiny amount of water or liquid clay (slip) on the roughed area. -
Attach the Beads:
Press the tiny clay balls gently onto the rim, spacing them evenly. They should sit right on the edge to frame the lace pattern. -
Secure the Beads:
Using a small ball tool, gently press the connection point where the bead meets the main dish to ensure they adhere well without flattening the bead completely.
Step 4: Forming and Finishing
-
Shape the Dish:
Carefully lift your clay circle and lay it inside a small bowl. Gravity will help it slump into a curved dish shape. If you’re worried about sticking, line the bowl with plastic wrap first. -
Gentle Pressing:
Use a soft sponge to gently press the clay against the bowl’s curve, ensuring the bottom is somewhat flat so the finished piece will sit stable. -
Drying Time:
Let the clay dry in the bowl for at least 24 hours. Once the surface looks white and chalky, carefully remove it from the mold and let the underside dry for another 12-24 hours. -
Sanding:
Once fully dry, take your fine grit sandpaper and gently sand any rough spots on the rim or the underside. Be very careful not to sand away your beautiful lace texture. -
Sealing:
Apply a thin coat of clear matte varnish to protect the clay from moisture and dust. This also deepens the white color slightly.
Now you have a delicate, handmade vessel that looks deceptively complex but was joyfully simple to make
Decoupage Pattern Trinket Dish

Bring a touch of rustic charm to your vanity with this decoupage-style trinket dish. The combination of air-dry clay’s natural texture and a warm, floral motif creates a cozy resting place for your favorite rings and small treasures.
Step-by-Step Guide
Materials
- White AIR-DRY clay
- Rolling pin
- Small bowl (to use as a mold)
- Sandpaper (fine grit)
- Decorative paper napkin or floral tissue paper
- Mod Podge (matte finish)
- Soft synthetic paintbrush
- Scissors
- Craft knife
- Clear acrylic sealer (optional)
Step 1: Shaping the Dish
-
Condition the clay:
Begin by taking a handful of white air-dry clay. Knead it in your hands for a minute or two until it feels warm and pliable, which helps prevent cracking later. -
Roll it out:
Use a rolling pin to flatten the clay into a slab about 1/4 inch thick. If the clay sticks to your surface, you can lay down a piece of parchment paper first. -
Cut the circle:
Find a circular object slightly larger than your desired finished dish size—a large mug or small bowl works well. Press it gently into the clay to leave an impression, then cut along that line with a craft knife. -
Form the shape:
Place your clay circle inside a small bowl to give it a curved shape. Gently press it against the bottom and sides so it takes the bowl’s form. -
Create the texture:
To mimic the rustic, handmade look in the photo, don’t smooth the rim too perfectly. Use your fingertips to gently tap the edge, leaving it slightly uneven and organic. -
Let it dry:
Allow the clay to dry completely inside the bowl mold. This usually takes 24-48 hours depending on humidity. You’ll know it’s ready when the clay turns a bright, chalky white and feels hard.
Wrinkle Rescue
If the napkin wrinkles while gluing, don’t panic. The texture of the clay hides imperfections well. Simply press the wrinkle down gently with your wet brush; it often adds to the vintage look.
Step 2: Applying the Design
-
Sand the surface:
Once fully dry, pop the dish out of the mold. Briefly run fine-grit sandpaper over any sharp jagged bits on the rim, but keep the overall texture rough. -
Prepare your paper:
Take your floral napkin and separate the layers. You only want the very top, printed ply. It should be incredibly thin, almost transparent. -
Cut the motifs:
Using small, sharp scissors, cut out individual flowers, leaves, and stems from the napkin pattern. create a ‘fussy cut’ close to the design edge for the best look. -
Plan the layout:
Before gluing, dry-fit your paper pieces inside the bowl. Arrange the stems so they flow naturally from the center or sides, ensuring the design looks balanced. -
First glue layer:
Apply a very thin layer of Mod Podge to a small section of the clay where your first flower will go. -
Place the paper:
Gently lay the cutout onto the wet glue. I like to start from the center of the paper piece and gently tap outward to avoid trapping air bubbles. -
Seal the motif:
Immediately dip your brush in more Mod Podge and gently brush *over* the top of the paper. Use a light touch to prevent tearing the delicate wet napkin. -
Continue the pattern:
Repeat this process for the remaining leaves and flowers, overlapping stems slightly to mimic a growing garden. -
Final coat:
Once all cutouts are applied, brush a final coat of Mod Podge over the entire interior of the dish to unify the texture. -
Finish the rim:
For a truly finished look, you can dab a tiny bit of brownish-orange paint on the very edge of the rim to highlight the uneven texture, though leaving it plain works too.
Vintage Patina
Mix a tiny drop of brown paint into your final Mod Podge layer. This creates an ‘antique’ glaze that makes the white clay look aged and the colors softer.
Place your new dish on a bedside table to keep your jewelry safe and stylish

TRACK YOUR CERAMIC JOURNEY
Capture glaze tests, firing details, and creative progress—all in one simple printable. Make your projects easier to repeat and improve.
Easy Marble-Swirl Dish
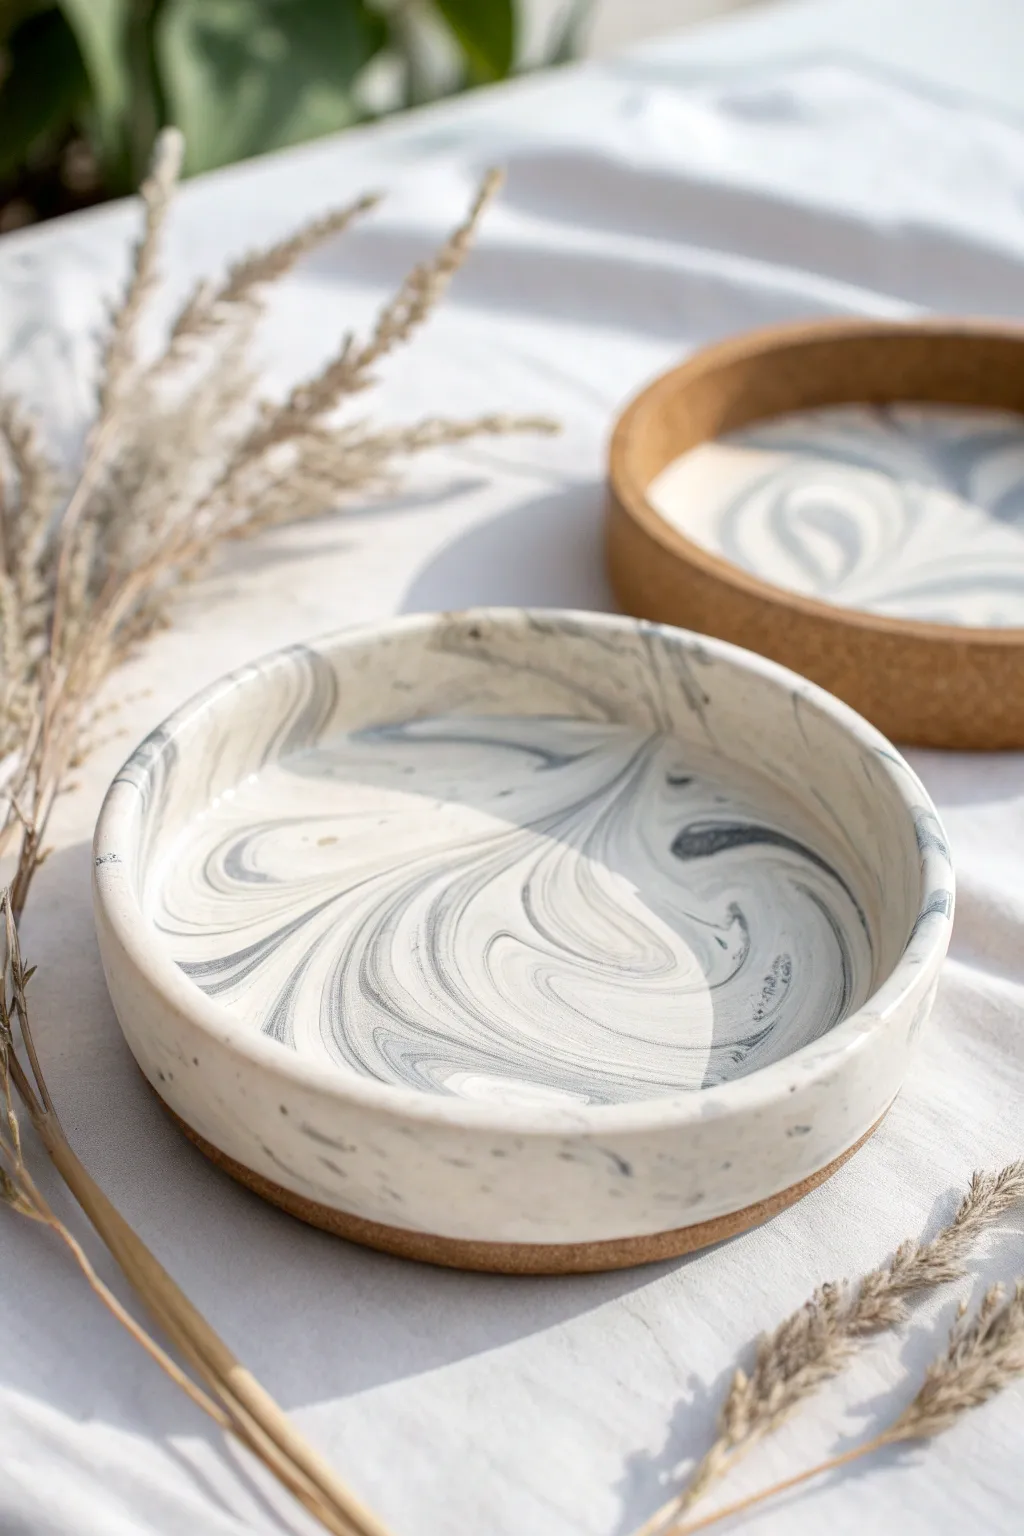
These sophisticated trinket dishes combine the organic elegance of gray and white marbling with the sturdy warmth of a cork base. The result is a modern, functional piece that looks like high-end ceramic but is surprisingly simple to craft at home using air dry clay.
How-To Guide
Materials
- White cosmetic-grade air dry clay
- Gray air dry clay (or white clay mixed with a drop of black acrylic paint)
- Thick cork sheet (approx. 3-5mm thick)
- Strong craft glue or E6000
- Rolling pin
- Circle cutter or a round bowl to use as a template
- Craft knife or scalpel
- Fine-grit sandpaper (400 and 800 grit)
- Gloss varnish or polyurethane sealer
- Water in a small bowl
- Sponge
Step 1: Marbling the Clay
-
prepare your clay colors:
Start with a large ball of white air dry clay, roughly the size of a tennis ball. Prepare a smaller amount of gray clay, about one-quarter the volume of the white. If you don’t have pre-colored gray clay, simply knead a tiny drop of black acrylic paint into white clay until uniform. -
create the ropes:
Roll both the white and gray clay into long, snake-like ropes. I usually aim for them to be about half an inch thick. -
twist them together:
Lay the ropes next to each other and twist them together into a single, spiraled log. Fold this log in half and twist it again. -
knead gently:
Squish the twisted clay into a ball and knead it very slightly—just 3 or 4 times. Be careful not to over-knead, or the distinct colors will blend into a solid light gray mud instead of creating veins. -
roll the slab:
Place the marbled ball on a smooth surface and use your rolling pin to flatten it into a slab about 1/4 inch thick. Roll in different directions to stretch the marble pattern organically.
Don’t Over-Mix
Stop twisting your clay ropes sooner than you think. The rolling pin does a lot of the mixing work. If you mix too much by hand before rolling, you lose the stark white definition.
Step 2: Shaping the Dish
-
cut the base circle:
Place your circle template or bowl onto the rolled slab. Use a craft knife to cut partly through the clay to mark the size, or cut the circle out completely if you prefer a slab-building method. -
form the walls:
For the raised edge shown in the photo, cut a long strip of your remaining marbled clay, about 3/4 inch wide. Wrap this strip around the circumference of your circular base. -
join the seams:
Score (scratch) the contact points where the wall meets the base and where the wall ends meet. Apply a little water or slip (clay mush) and press firmly to join. -
smooth the transitions:
Using a slightly damp finger or a wet sponge, smooth the seam on the inside of the dish so the wall flows seamlessly into the floor. The outside seam can be left straight for a modern look. -
straighten the rim:
Flip the dish upside down gently for a moment to flatten the top rim against your work surface, ensuring the height is even all the way around.
Gold Rim Upgrade
For an extra touch of luxury, paint just the very top rim of the dried dish with liquid gold leaf or metallic acrylic paint before you apply the final glossy varnish coat.
Step 3: Finishing and Assembly
-
allow to dry:
Let the clay dry completely for 24 to 48 hours. Place it away from direct sunlight to prevent cracking as it shrinks. -
sand specifically:
Once bone dry, take your sandpaper to the piece. Start with 400 grit to remove big bumps, then switch to 800 grit for a silky smooth finish. Pay special attention to the rim. -
cut the cork base:
Place your dried clay dish onto the cork sheet and trace around the bottom with a pencil. Use a sharp craft knife to cut out this cork circle; try to cut slightly inside the line for a flush fit. -
attach the cork:
Apply a strong adhesive like E6000 or heavy-duty craft glue to the bottom of the clay dish. Press the cork circle onto the clay and weigh it down with a heavy book while the glue sets. -
seal the clay:
Apply two or three thin coats of gloss varnish or polyurethane sealer to the inside and sides of the dish. This protects the clay from moisture and gives it that ceramic-like shine visible in the image.
Once the sealer cures, your chic organizer is ready to hold jewelry or keys
Terrazzo Confetti Trinket Dish
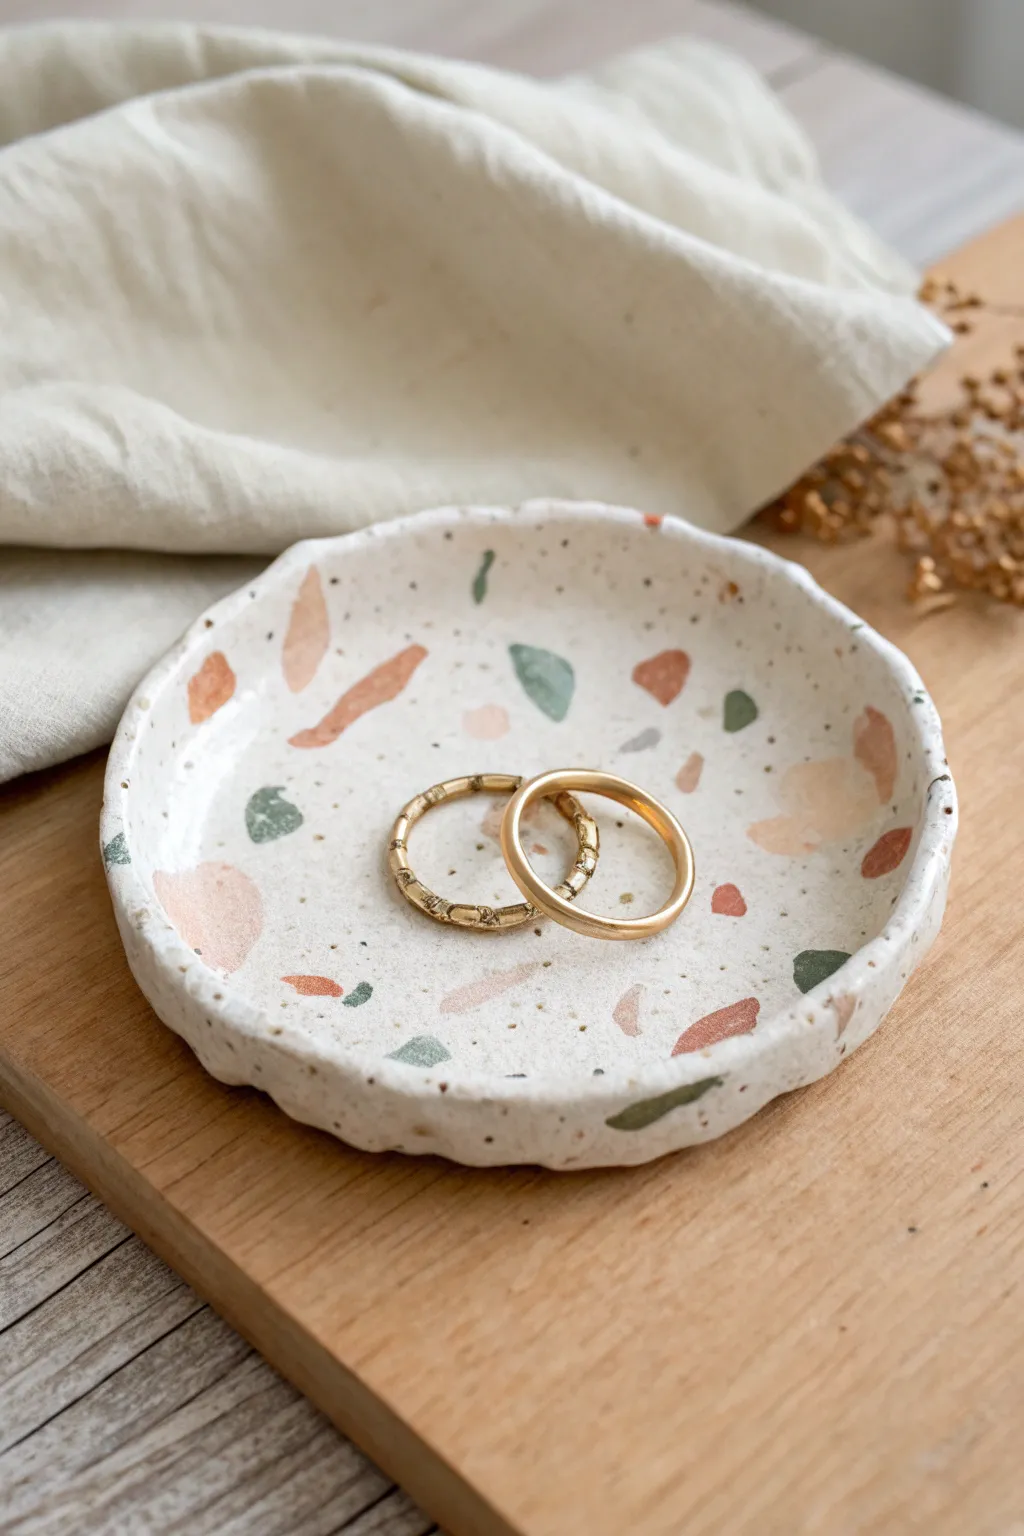
Capture the trendy, fragmented beauty of terrazzo stone without the heavy lifting. This project uses colorful chips of clay embedded into a white base to create a playful, speckled jewelry holder that looks effortlessly chic.
Step-by-Step
Materials
- White air dry clay
- Colored air dry clay (terracotta, sage green, blush pink) or acrylic paints to tint white clay
- Rolling pin
- Circle cutter or a round bowl to use as a template
- Craft knife
- Small bowl for shaping
- Fine grit sandpaper
- Glossy varnish or sealant
- Brush for sealing
Step 1: Creating the Confetti
-
Mix your colors:
If you don’t have pre-colored clay, take three small balls of white clay. Knead a drop of acrylic paint into each one until the color is solid and uniform. You want earthy tones like terracotta, sage green, and a soft blush pink. -
Flatten the colors:
Roll each colored ball out very thinly, about the thickness of cardstock or a heavy sheet of paper. They don’t need to be perfect shapes. -
Make the chips:
Tear the thin colored sheets into small, irregular shards. Aim for variety—some tiny specks and some larger, angular chunks. Let these sit for about 10-15 minutes to slightly firm up, which makes them easier to handle.
Cracks in the Clay?
If small hairline cracks appear while drying, mix a tiny amount of wet clay and water into a paste (slip) and smooth it into the cracks with your finger.
Step 2: Forming the Slab
-
Roll the base:
Take a larger chunk of white clay and roll it out into a slab about 1/4 inch thick. Ensure the surface is relatively smooth. -
Scatter the pattern:
Sprinkle your colored clay chips randomly over the white slab. Don’t overthink it; the beauty of terrazzo lies in its randomness. Leave plenty of negative white space. -
Embed the chips:
Gently run your rolling pin over the slab again. Press effectively enough to flatten the colored chips flush into the white base, creating a single, smooth surface. You might need to roll in different directions to keep the shape even. -
Cut the circle:
Place your circle cutter or inverted bowl onto the patterned slab. Use your craft knife to trace and cut out a perfect circle. -
Softening edges:
Dip your finger in a little water and gently run it along the cut edge of the circle. This smooths out any sharp cuts or drag marks from the knife.
Make it Luxe
Add gold leaf flakes along with your colored clay chips before the final roll. The gold will embed into the surface for a touch of embedded sparkle.
Step 3: Shaping and Finishing
-
Curving the form:
Lift your circular slab carefully and drape it into a shallow bowl. This will act as a mold to give the dish its curved shape. -
Adding texture:
For that handmade, organic look seen in the photo, gently press and pinch the rim of the clay with your fingers to create a slight wavy, uneven edge. It shouldn’t be perfectly round. -
Speckling effect:
To mimic the tiny grit often found in real stone, you can gently flick a toothbrush loaded with diluted brown or grey paint over the wet clay, adding minute speckles between the larger chips. -
Dry time:
Allow the dish to dry completely inside the bowl for at least 24-48 hours. Drying it in the mold ensures it keeps that cupped shape. -
Sanding:
Once fully cured and hard, use fine-grit sandpaper to smooth the edges. You can also lightly sand the surface if any colored chips aren’t perfectly flush. -
Gloss coat:
Apply a coat of glossy varnish or sealant. This protects the clay from moisture and makes the colored chips pop, giving it that polished stone appearance.
Place your favorite rings in your new dish and admire the modern stone look you created from scratch
Two-Tone Dip-Painted Dish
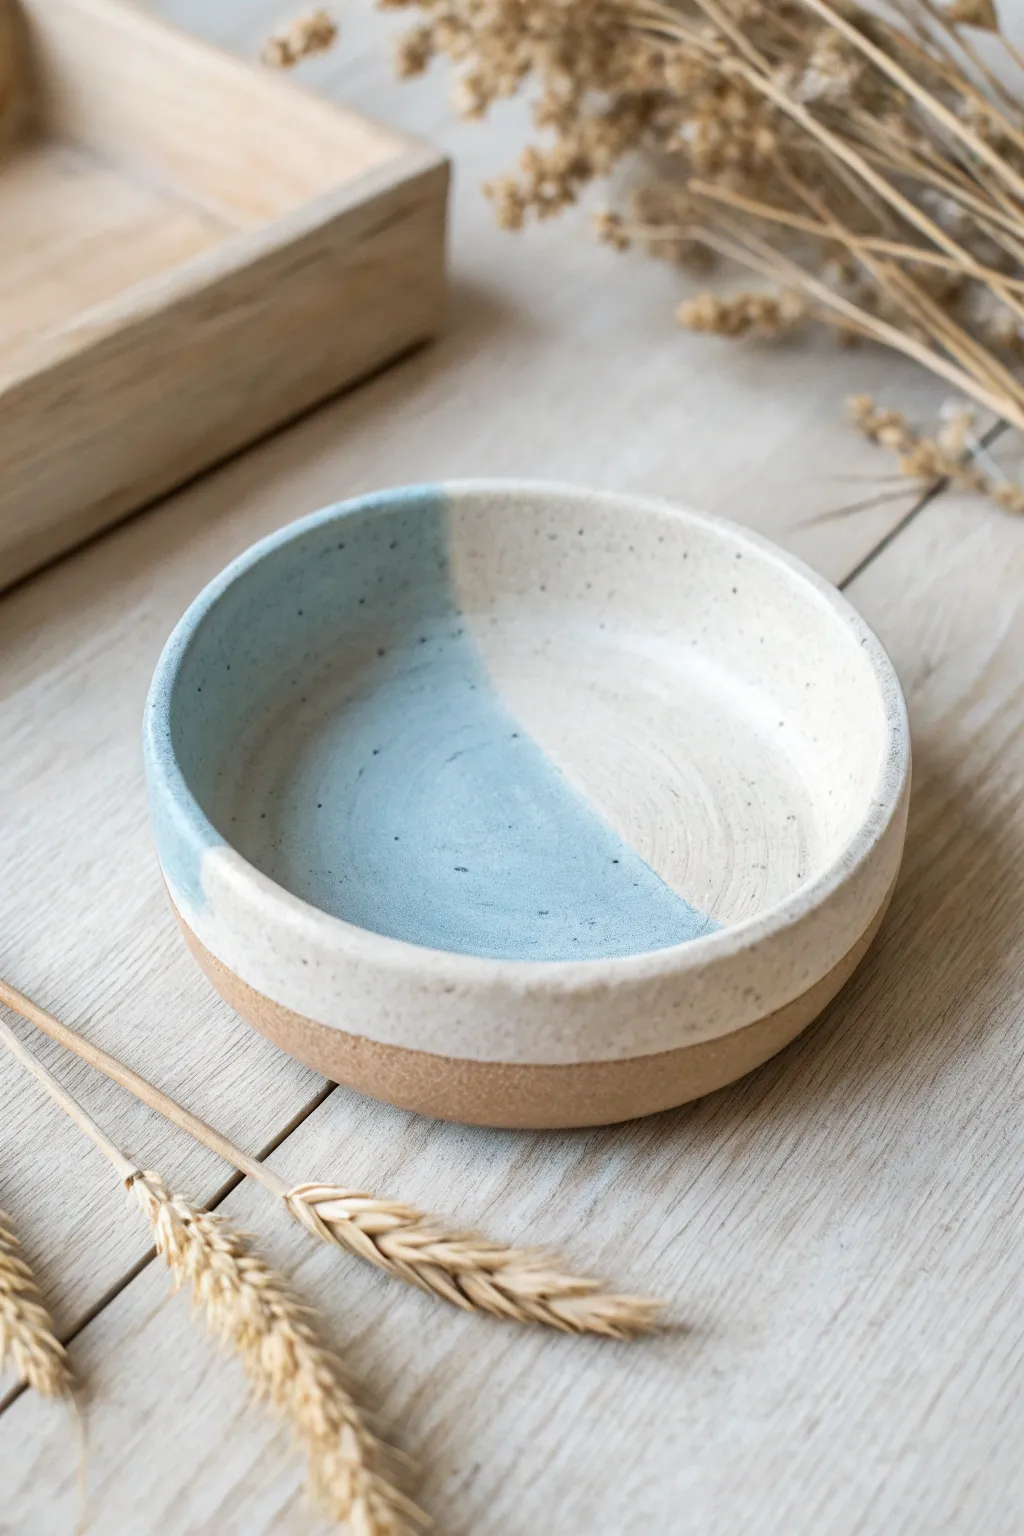
Bring a touch of coastal charm to your dresser with this beautifully simple, two-tone trinket dish. The project combines the rustic texture of raw faux-speckle clay with a smooth, glazed dip effect for a modern, minimalistic finish.
Step-by-Step Tutorial
Materials
- Air dry clay (white or light terracotta)
- Acrylic paint (Light Blue, White, Tan/Beige)
- Old toothbrush or stiff bristle brush
- Rolling pin
- Small bowl (to use as a mold)
- Sandpaper (fine grit)
- Craft knife
- Paintbrushes (flat and round)
- Gloss varnish or sealant
- Water cup
Step 1: Shaping the Dish
-
Prepare the Clay:
Cut off a chunk of air dry clay about the size of a tennis ball. Knead it in your hands for a minute or two to warm it up and make it pliable, which helps prevent cracks later on. -
Roll it Out:
Using a rolling pin, flatten the clay into a circle about 1/4 inch thick. If the clay sticks, you can roll it out on a piece of parchment paper or canvas. -
Cut the Shape:
Place a bowl or large circle cutter gently on top of your rolled slab as a guide. Use a craft knife to cut a clean, perfect circle around the edge. -
Create the Form:
Lift your clay circle and drape it inside your small molding bowl to create a gentle curve. Press it down lightly so it takes the shape of the bowl bottom. -
Smooth the Edges:
Dip your finger in a little water and run it along the rim of the clay to smooth out any rough cut marks. This is the best time to fix imperfections while the clay is still wet. -
Let it Dry:
Allow the dish to dry completely inside the mold for at least 24-48 hours. Once the surface looks white and chalky, pop it out and let the bottom dry fully if it’s still damp.
Step 2: Creating the Speckled Effect
-
Sand for Smoothness:
Take your fine-grit sandpaper and gently sand the rim and interior of the dish. Wipe away the dust with a slightly damp tack cloth or paper towel. -
Base Tone Mixing:
Mix a small amount of tan or beige acrylic paint with a drop of water to create a wash. Paint the bottom third of the exterior to mimic a raw, sandy stoneware look. -
Base Coating:
Paint the entire interior and the upper rim of the dish with a creamy off-white acrylic paint. You may need two coats for full opacity. -
Create the Speckles:
I usually mix a tiny bit of brown or black paint with water until it’s very runny. Dip an old toothbrush into this mixture. -
Splatter Technique:
Hold the toothbrush over the dish and run your thumb across the bristles to flick tiny speckles onto the white painted areas. This creates that authentic ceramic clay look.
Clean Edges Trick
Use masking tape to create the separation line between the tan ‘raw’ base and the white upper section before painting for a crisp, professional divide.
Step 3: The Dipped Finish
-
Prepare the Blue Wash:
Mix a soft, light blue acrylic paint with a little glazing medium or water. You want it to be slightly translucent, like a ceramic glaze. -
Mark the Dip Line:
Lightly visualize or mark where you want your ‘dip’ line to be. The image shows a side-dip that covers about half the interior. -
Apply the Blue:
Using a wide, flat brush, paint the light blue color onto one side of the dish interior, creates a clean, swooping line across the center. -
Refine the Edge:
Go back over the edge where the blue meets the white to ensure the curve is smooth. The paint should look like it was casually dipped rather than perfectly drawn. -
Add Exterior Detail:
Carry a bit of the blue paint just over the rim and down the outside slightly, stopping before you hit the tan ‘raw’ base section. -
Coat with Varnish:
Once all paint is completely dry, apply a coat of high-gloss varnish to the entire painted area (white and blue). Leave the tan base matte for contrast.
Faux-Ceramic Texture
Mix a small pinch of baking soda into your white base paint. This adds a slight grit that makes the air dry clay feel more like fired stoneware.
Now you have a serene little catch-all dish perfect for holding rings or finishing off a coffee table vignette
Gold-Rim Accent Dish
Elevate a simple handmade dish by adding a luxurious touch of metallic gold to its organic borders. The stark contrast between the matte white clay and the shimmering rim creates a piece that looks effortlessly high-end.
How-To Guide
Materials
- White baking clay or air dry clay (white)
- Acrylic rolling pin
- Rolling guides or popsicle sticks
- Circle cutter (or bowl to trace)
- Craft knife
- Small bowl of water
- Sponge
- Fine grit sandpaper
- Gold leaf adhesive (sizing)
- Gold leaf sheets
- Soft brush (for leaf application)
- Clear sealant (gloss or matte)
- Newsprint or canvas to work on
Step 1: Shaping the Clay Form
-
Condition the clay:
Begin by taking a handful of clay and kneading it in your hands until it becomes soft, pliable, and free of cracks. -
Roll the slab:
Place your clay on a flat working surface. Using rolling guides for even thickness, roll the clay out until it is approximately 1/4 inch thick. -
Cut the circle:
Place your circle cutter or a small bowl onto the clay slab and cut out a perfect circle shape using your craft knife. -
Initial shaping:
Gently lift the edges of the circle upwards with your fingers to create a shallow curve. I like to cup the clay in my palm to find the natural shape. -
Pinch the walls:
Using your thumb and forefinger, pinch around the rim to thin it out slightly and raise the walls higher, creating a dish depth of about an inch. -
Smooth the interior:
Dip your finger or a slightly damp sponge into water and smooth out the inside of the bowl to remove any fingerprints or deep dings. -
Create the texture:
Unlike perfectly smooth pottery, this look relies on a bit of organic texture. Leave the outside of the bowl slightly rougher or gently press a crumpled piece of plastic wrap against the exterior for subtle dimpling. -
Refine the rim:
Run a damp sponge along the top edge of the rim to soften any sharp cuts, but maintain the slightly uneven, wobbly character that gives the piece its charm.
Leaf Won’t Stick?
If the gold leaf pulls away, you likely applied it too soon while the glue was wet. Wait until the adhesive turns clear and feels very sticky before trying again.
Step 2: Drying and Sanding
-
Let it dry:
Allow the dish to dry completely according to your clay package instructions. This usually takes 24-48 hours for air dry clay. -
Inspect for flaws:
Once fully dry and hard, check the dish for any sharp jagged bits that might be uncomfortable to touch. -
Light sanding:
Use fine-grit sandpaper to gently smooth the bottom so the dish sits flat, and lightly buff the rim if there are any burrs. -
Dust off:
Wipe the entire dish down with a dry cloth or soft brush to remove all clay dust, as dust will prevent the gold leaf from sticking.
Step 3: The Gilded Finish
-
Apply adhesive:
Using a small brush, carefully paint a strip of gold leaf adhesive (sizing) along the very top edge of the rim. Let it drip down just slightly in a few spots for an organic look. -
Wait for tackiness:
Allow the adhesive to sit until it becomes tacky. It should feel sticky but not wet to the touch (usually 10-15 minutes depending on the brand). -
Apply gold leaf:
Gently press a sheet of gold leaf onto the tacky rim. Don’t worry about being neat; just ensure the glue is covered. -
Burnish the gold:
Use a dry, soft brush to dab and sweep away the excess gold leaf. The gold will only stick where you successfully applied the adhesive. -
Seal the piece:
Once the gold is set, coat the entire dish, including the gold rim, with a clear sealant to protect the clay and prevent the metal leaf from tarnishing over time.
Liquid Gold Alternative
Make the process faster by skipping the leaf and using liquid gilding paint. Paint it on with a fine brush for a similar, though slightly less textured, effect.
Now you have a stunning little vessel perfect for holding your rings or loose change
Geometric Stamped Pattern Dish
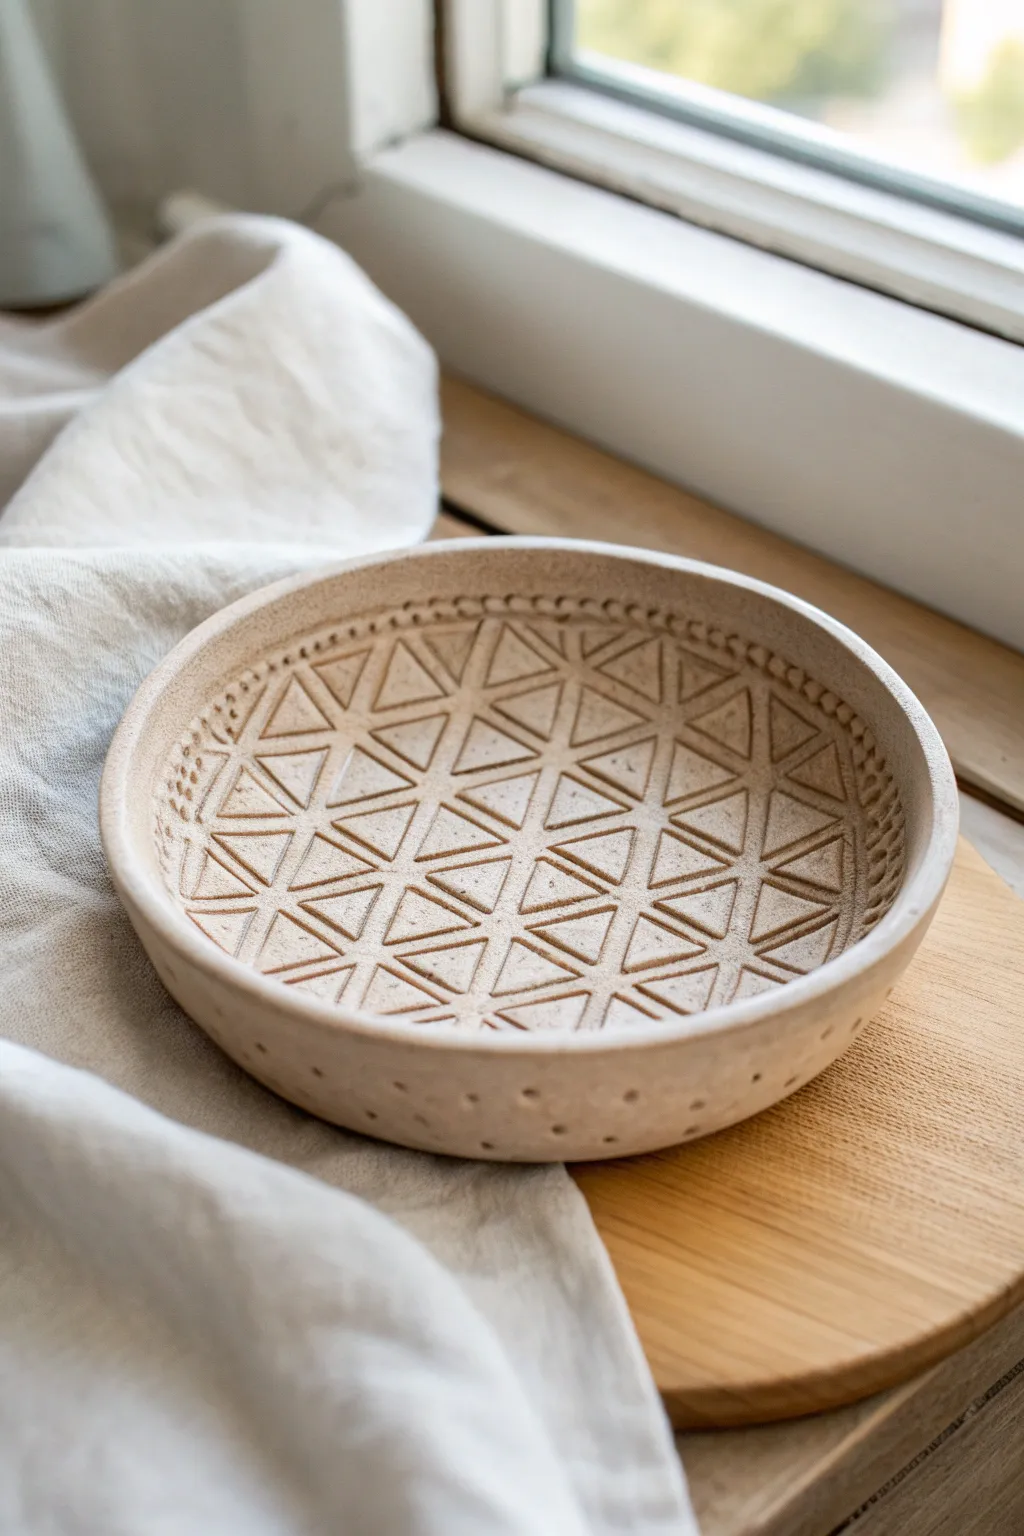
This earthy, textured dish brings a touch of modern bohemian style to any tabletop using nothing more than simple air dry clay and a few household tools. The intricate triangle pattern looks complex, but it is actually created with a simple repetitive stamping technique that is deeply satisfying to execute.
Step-by-Step Guide
Materials
- Air dry clay (white or terracotta)
- Acrylic rolling pin
- Circle template (roughly 6-8 inches, like a bowl or plate)
- Craft knife or needle tool
- Small bowl (for shaping)
- Plastic wrap
- Triangle stamp (or a sturdy triangular object/tool)
- Small round tool (like a knitting needle end or chopstick)
- Sponge and water
- Sandpaper (fine grit)
- Matte sealant or varnish
Step 1: Preparing the Base
-
Condition the Clay:
Begin by taking a generous handful of air dry clay. Knead it in your hands for a minute or two to warm it up and ensure there are no air bubbles trapped inside. -
Roll it Out:
Place the clay on a smooth surface or a mat. Using your acrylic rolling pin, roll the clay out evenly until it is about 1/4 inch thick. Aim for a consistent thickness so the drying process is uniform. -
Cut the Circle:
Place your circle template (a kitchen bowl works perfectly) onto the rolled slab. Use your craft knife or needle tool to trace around the edge, cutting out a perfect circle. -
Smooth the Edges:
Dip your finger in a little bit of water and run it along the cut edge of the clay circle. This smooths out any harsh cuts or jagged bits from the knife.
Step 2: Stamping the Design
-
Plan Your Center:
While the clay is still flat on your work surface, locate the approximate center. You don’t need to mark it, just eyeball where your pattern will begin. -
First Impression:
Take your triangle stamp or tool. Press it firmly into the clay near the center, ensuring you apply even pressure so all three sides make a mark. Do not press all the way through. -
Build the Pattern:
Align the next triangle right up against the side of the first one, mirroring it to create a diamond or larger triangle shape. Continue stamping outward in concentric circles or rows. -
Mind the Spacing:
Be careful to leave a tiny gap between impressions if you want the ‘grout lines’ to show, or press them touching for a seamless look. The dish in the image uses touching triangles to create a grid. -
Create the Border:
Stop your triangle pattern about 1/2 inch from the outer rim. This negative space will frame your design beautifully. -
Add Dotted Details:
Using a small round tool, like the end of a chopstick or a knitting needle, press small dots around the perimeter of the triangle pattern, creating a dotted border.
Stamp Hack
Don’t have a triangle stamp? Carefully bend a thin strip of metal or cut a sturdy eraser into a triangle shape to make your own custom tool.
Step 3: Shaping and Finishing
-
Prepare the Mold:
Take a bowl that has a slightly curved bottom. Turn it upside down (or right side up depending on the depth you want) and cover it loosely with plastic wrap to prevent sticking. -
Form the Curve:
Carefully lift your stamped clay circle and place it into or onto your bowl mold. Gently press the clay down so it takes on the curved shape of the bowl. -
Detail the Exterior:
While the clay is in the mold, you can add extra texture to the outside rim. Use your round tool to add a row of dots along the lower exterior edge, just like in the inspiration photo. -
Let it Dry:
Allow the clay to dry in the mold for at least 24 hours. I usually place it in a cool, dry spot away from direct sunlight to prevent cracking. -
Remove and Flip:
Once the clay is firm enough to hold its shape (usually after a day), carefully remove it from the mold and remove the plastic wrap. Let it dry upside down for another 12-24 hours to ensure the bottom dries. -
Sand for Smoothness:
When the dish is bone dry and chalky white, take your fine-grit sandpaper and gently buff the rim and any rough spots on the bottom. Wipe away the dust with a slightly damp cloth. -
Antique Wash (Optional):
To get the look in the photo, mix a tiny bit of brown acrylic paint with water to make a thin wash. Brush it over the texture and immediately wipe it back with a sponge, leaving color only in the grooves. -
Seal the piece:
Finish by applying a coat of matte varnish or sealant to protect the clay from moisture and give it a finished, professional look.
Make it Speckled
Knead dried coffee grounds or cracked black pepper into your white clay before rolling to mimic the look of expensive speckled stoneware ceramics.
Now you have a stunning, geometric catch-all dish that looks like it came straight from a pottery studio
Ring Cone Center Trinket Dish
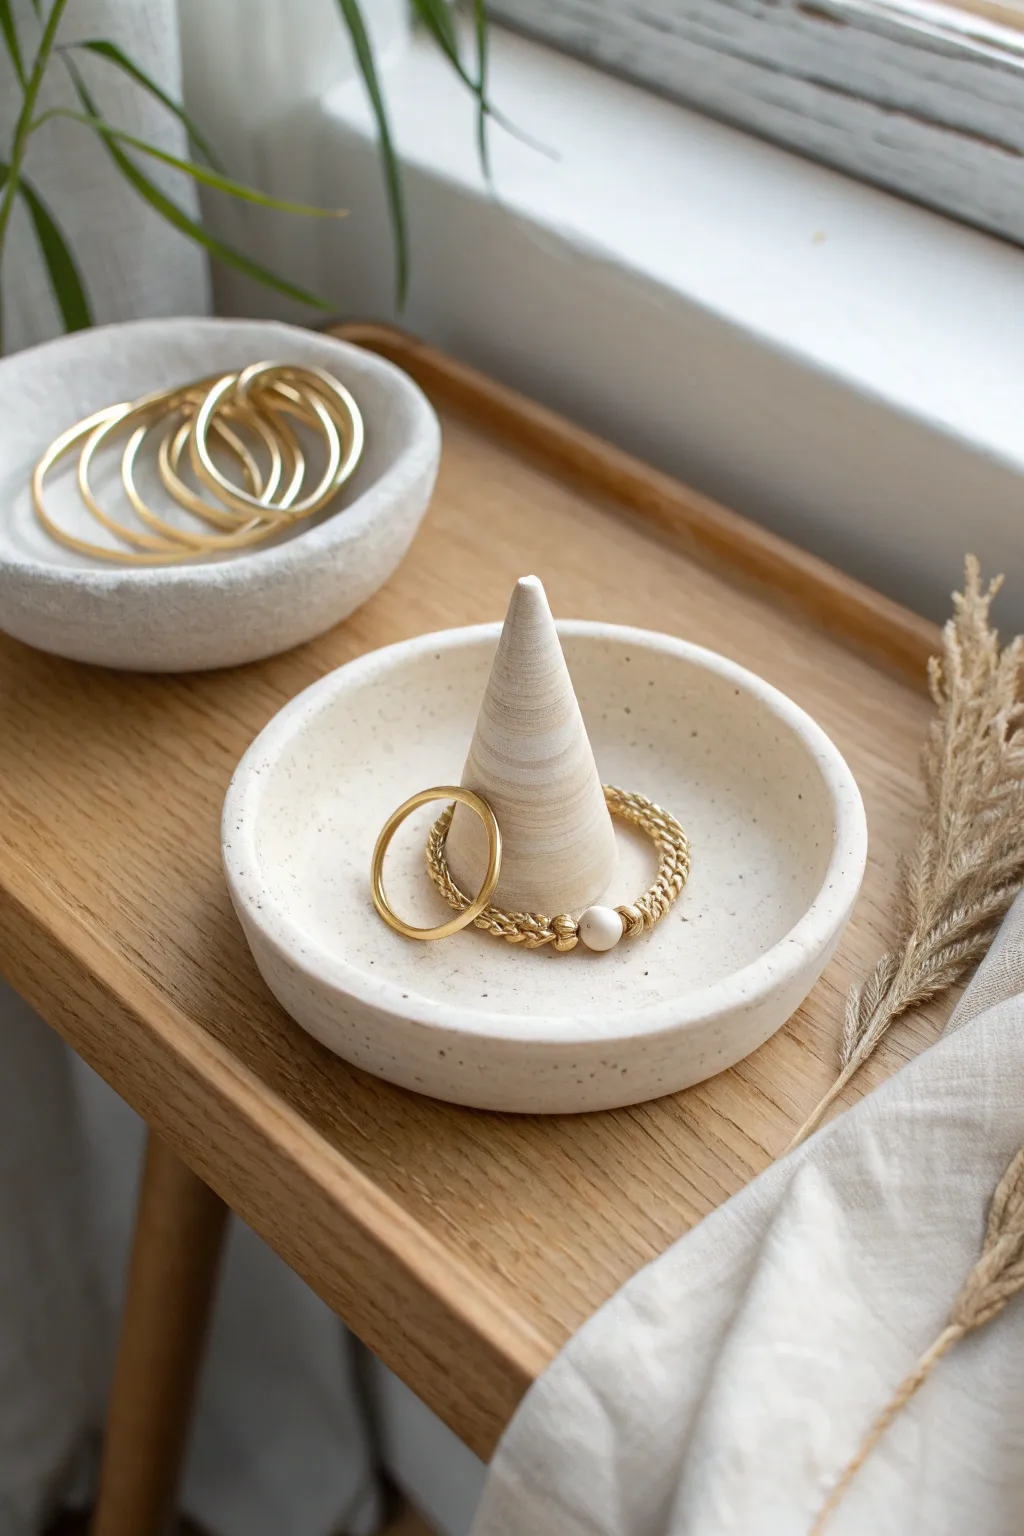
This minimalist jewelry dish combines the functionality of a ring cone with the convenience of a catch-all bowl. The faux-stone speckled finish gives it a high-end ceramic look without needing a kiln, making it a perfect addition to any bedside table or vanity.
Detailed Instructions
Materials
- White or cream air dry clay
- Rolling pin
- Round cookie cutter or bowl (approx. 4-5 inches)
- Craft knife or clay tool
- Small bowl of water
- Fine-grit sandpaper
- Acrylic paint (tan/beige and black/dark brown)
- Stiff paintbrush or toothbrush
- Matte sealant or varnish
- Small rolling guide (optional, for even thickness)
- Sponge
Step 1: Shaping the Dish
-
Roll the Base:
Start by taking a handful of clay and rolling it out on a flat surface. Aim for an even thickness of about 1/4 inch. If you have rolling guides, use them here to keep the slab perfectly level. -
Cut the Circle:
Place your round cutter or a bowl template onto the clay slab and press down to cut a perfect circle. Remove the excess clay and set it aside for the cone. -
Form the Rim:
Gently lift the edges of your circle upwards to create a shallow vertical rim. You can pinch the clay slightly between your thumb and forefinger to define the wall, smoothing the transition from base to wall with a damp finger to remove any cracks. -
Refine the Shape:
Once the walls are raised, dampen your sponge slightly and run it along the top edge of the rim to round it off and ensure it looks polished rather than sharp.
Cone Won’t Stick?
If the cone wobbles after drying, the seam wasn’t blended enough. Make a ‘snake’ of clay, wrap it around the cone base, and smoosh it down to reinforce the connection.
Step 2: Forming the Cone
-
Shape the Cone Base:
Take a smaller piece of your leftover clay and roll it into a ball, then start rolling it back and forth on one side to taper it into a cone shape. -
Adjust the Height:
Check the cone against your dish. It should be tall enough to hold rings but stable at the base. Trim the bottom flat using your craft knife so it stands perfectly upright. -
Score and Slip:
To attach the cone, score (scratch cross-hatch marks) the bottom of the cone and the exact center of your dish. Add a drop of water or liquid clay slip to both scored areas. -
Attach the Cone:
Press the cone firmly into the center of the dish. Use a small clay tool or your finger to smooth the clay from the base of the cone onto the floor of the dish, blending the seam until it is completely invisible.
Step 3: Finishing and Painting
-
Let it Dry:
Allow the piece to dry completely. This usually takes 24-48 hours depending on humidity. Flip it strictly occasionally to ensure the bottom dries evenly. -
Sand Smooth:
Once bone dry, use fine-grit sandpaper to gently smooth out any fingerprints, bumps, or rough edges on the rim and cone tip. Wipe away the dust with a barely damp cloth. -
Base Coat:
Paint the entire dish with a coat of creamy beige or off-white acrylic paint. This creates a uniform canvas and mimics the look of unglazed stoneware. -
Create the Speckles:
Dilute a tiny amount of black or dark brown paint with water until it’s very fluid. I find a toothbrush works best here—dip the bristles in the paint and flick them with your thumb over the dish to create tiny, random speckles. -
Dry and Seal:
Let the paint dry fully. Finish by applying two thin coats of matte varnish to protect the surface from scratches and moisture while maintaining that natural, earthy aesthetic.
Marble Effect
Before rolling your initial slab, twist a small amount of brown or grey clay into your white clay. Stop mixing before it blends fully to create swirls.
Once sealed and dried, your new jewelry dish is ready to elegantly organize your favorite rings and trinkets
Nested Trio of Mini Dishes
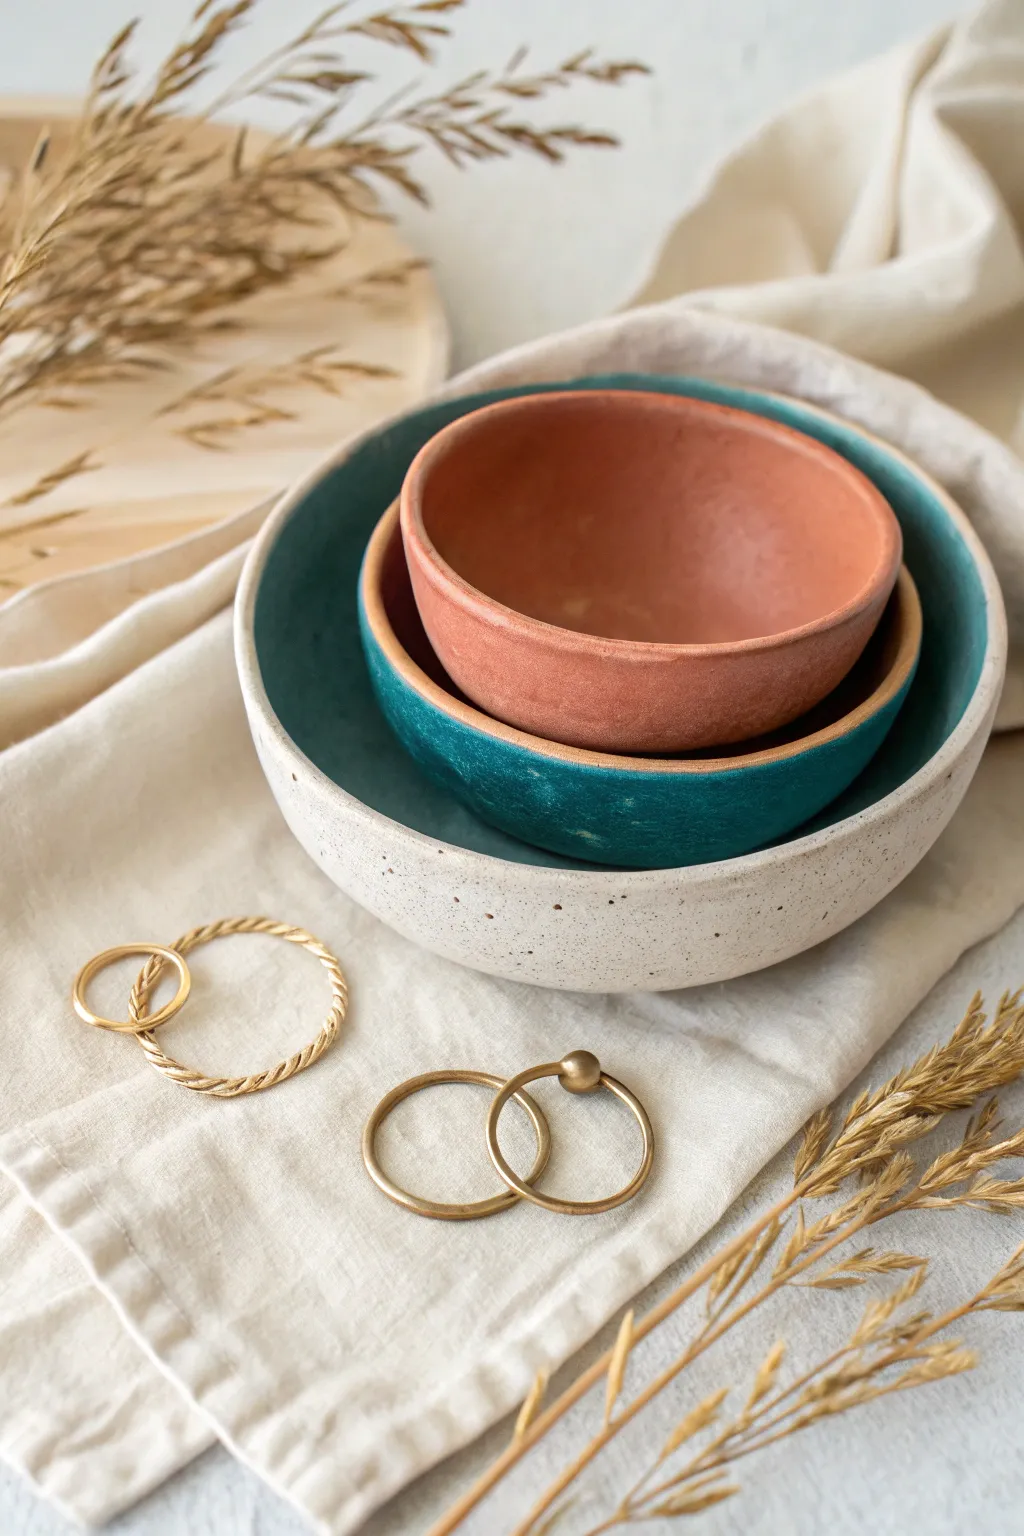
Embrace the beauty of imperfection with this set of three nesting bowls, perfect for holding rings or simply resting as a sculptural accent. The design features an organic, handmade feel with a stunning contrast between speckled oatmeal, deep teal, and warm terracotta tones.
Step-by-Step Tutorial
Materials
- Air dry clay (white or light grey base)
- Acrylic paints (Terracotta/Burnt Sienna, Deep Teal/Emerald, Unbleached Titanium/Cream)
- Black acrylic paint or ink (for speckling)
- Rolling pin
- Three bowls of varying sizes (to use as molds)
- Sandpaper (fine grit)
- Paintbrushes (soft bristle flat and old toothbrush)
- Knife or clay cutting tool
- Sponge
- Water
- Matte varnish or sealant
Step 1: Shaping the Clay
-
Condition the clay:
Cut off a substantial chunk of air dry clay and warm it up in your hands by kneading it. This makes it pliable and prevents cracking later. -
Roll it out:
Using a rolling pin on a flat, clean surface, roll the clay to an even thickness of about 1/4 inch. If you want a more organic rim like the photo, you don’t need to be perfectly uniform. -
Cut the circles:
Find three circular templates (like existing bowls or jar lids) that nest inside each other. Place them on the clay and cut around them with your knife. You need a large, a medium, and a small circle. -
Form the large bowl:
Take your largest clay circle and drape it inside your largest mold bowl. Gently press the clay down into the curve, smoothing it with a damp sponge to remove fingerprints. -
Form the medium and small bowls:
Repeat the process for the medium and small circles, placing them inside their respective mold bowls. Ensure the curves complement each other so they will nest well. -
Refine the rims:
With a slightly wet finger, run along the rim of each clay bowl to smooth out sharp edges, but leave a bit of that delightful wobble for a handmade look. -
Initial drying:
Let the bowls sit in their molds for about 24 hours until they hold their shape on their own.
Step 2: Sanding and Painting
-
Remove and dry completely:
Pop the clay forms out of the molds. Let them dry upside down for another 24-48 hours until they are completely hard and room temperature to the touch. -
Sand the surfaces:
Using fine-grit sandpaper, gently buff away any rough patches or sharp ridges on the rims or bases. Wipe away the dust with a barely damp cloth. -
Paint the small bowl:
Mix a warm terracotta hue using Burnt Sienna with a touch of red or orange. Paint the inside and outside of the smallest bowl. It may need two coats for full opacity. -
Paint the medium bowl:
For the middle bowl, use a rich teal color. Paint the interior and the exterior, ensuring the brushstrokes follow the curve of the bowl. -
Paint the large base bowl:
Mix Unbleached Titanium with a tiny drop of brown to get that oatmeal stone color. Paint the entire large bowl. -
Create the speckle effect:
To get the stone-effect on the large bowl, dilute a small amount of black paint with water. Dip an old toothbrush into the mixture. -
Apply the speckles:
Hold the toothbrush over the dry, cream-colored bowl and run your thumb across the bristles to flick tiny splatter dots onto the surface. I find doing a test spray on paper first helps gauge the splatter density. -
Add texture to the colored bowls:
Once the base coats are dry on the terracotta and teal bowls, use a slightly dry sponge to dab a tiny bit of lighter or darker paint on the surface to give it a weathered, matte texture. -
Seal the set:
Finish all three pieces with a coat of matte varnish. This protects the paint and gives the clay a high-end ceramic feel without adding unwanted shine.
Cracks happen
If small drying cracks appear, mix a tiny bit of fresh clay with water to make a paste (slip). Fill the crack, smooth it over, and let it dry again before sanding.
Metallic Touch
Paint the very top rim of the teal bowl with gold leaf paint. This adds a subtle luxurious element that ties in beautifully with gold jewelry.
Now stack your beautiful trio and display your favorite rings in style
Lidded Trinket Dish With Tiny Knob
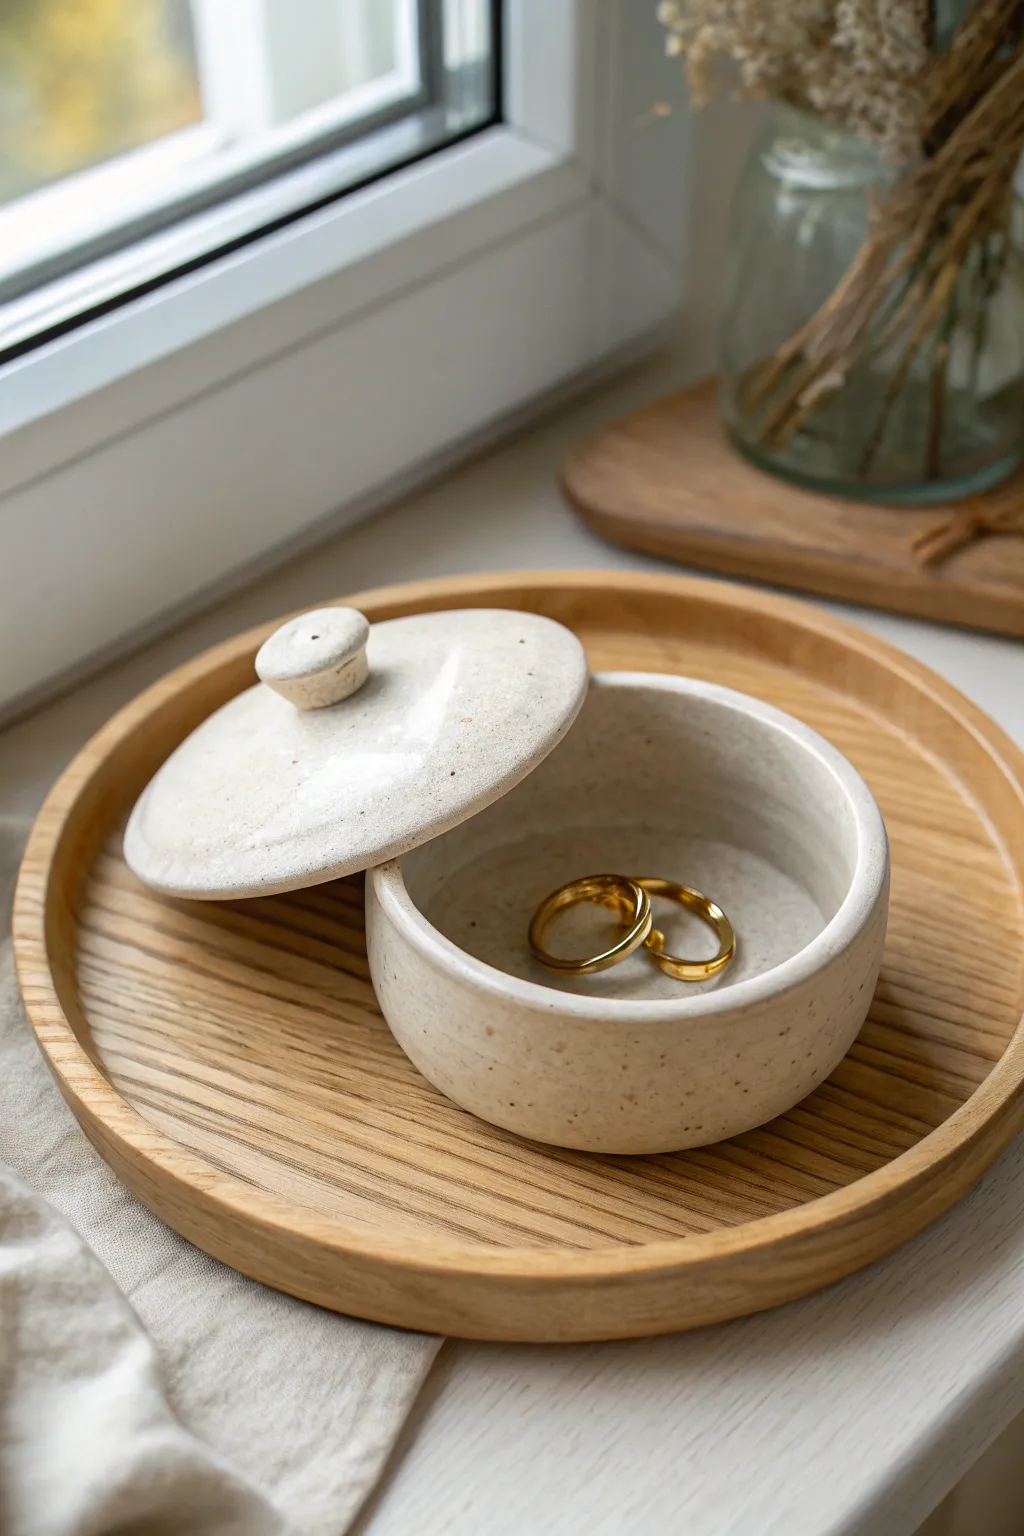
This charming, rustic lidded vessel mimics the look of high-fire speckled stoneware using simple air dry clay. Perfect for keeping earrings or special rings safe, the design features a satisfyingly chunky lid and a natural, matte finish.
Step-by-Step Guide
Materials
- White air dry clay
- Rolling pin
- Circular cookie cutters (two sizes: approx. 3.5-inch and 3-inch)
- Small bowl relative to your cutter size (for shaping)
- Clay knife or craft blade
- Sponge and water
- Sandpaper (fine grit)
- Acrylic paint (cream/off-white and brown)
- Old toothbrush (for splattering)
- Matte spray varnish or Mod Podge
Step 1: Forming the Base
-
Roll the Slab:
Begin by conditioning a handful of clay and rolling it out to an even thickness of about 1/4 inch. You want this pot to feel substantial, so avoid going too thin. -
Cut the Base:
Use your larger circular cutter (around 3.5 inches) to stamp out a flat circle. This will form the floor of your trinket dish. -
Cut the Wall Strip:
Roll out a long, rectangular strip of clay, maintaining that same 1/4 inch thickness. Measure the circumference of your base circle and cut the strip to match that length, with a height of about 1.5 to 2 inches. -
Attach the Walls:
Score the outer edge of your base circle and the bottom edge of your rectangular strip. Apply a little water or slip, then wrap the strip around the base, pressing the edges firmly together. -
Smooth the Seams:
Blend the clay where the wall meets the base on both the inside and outside. Use a modelling tool or your finger to make the transition seamless. -
Refine the Rim:
Smooth the top rim of the pot with a damp sponge. It should be flat but with slightly rounded edges to mimic thrown pottery.
Step 2: Creating the Lid
-
Measure the Lid:
Roll out another slab of clay. Use your larger cutter again to cut a circle that is slightly wider than the opening of your pot, so it can rest on top without falling in. -
Form the Dome:
Place this clay circle over a small bowl or a sphere shape to give it a gentle, domed curve. Let it stiffen in this shape for about 20-30 minutes. -
Make the Knob:
Roll a small ball of clay for the knob. Flatten the bottom slightly and shape the top into a tiny mushroom cap or a simple tapered cylinder. -
Attach the Knob:
Score the center of your domed lid and the bottom of your knob. Join them with a dab of water, pressing down firmly to ensure a strong bond. -
Create the Flange (Optional):
If you want the lid to sit securely without sliding, roll a thin coil of clay and attach it to the *underside* of the lid, referencing the inner diameter of your pot so it fits inside the rim. -
Dry Completely:
Allow both the pot and lid to dry for 24-48 hours. I find flipping the pieces occasionally helps them dry evenly and prevents warping.
Seamless Seams
When joining the wall strip, cut the ends at a 45-degree angle (a bevel cut). Overlapping these angled cuts creates a stronger, invisible seam compared to a blunt join.
Step 3: Finishing Touches
-
Sand Smooth:
Once bone dry, sand the entire piece with fine-grit sandpaper. Focus on the rim and the knob to ensure they feel pleasant to the touch. -
Base Coat:
Paint the entire dish and lid with a creamy off-white acrylic paint. You may need two coats to get an opaque, ceramic-like coverage. -
Create the Speckle:
Mix a small amount of dark brown paint with water until it’s quite runny. Dip an old toothbrush into this mixture. -
Apply the Speckles:
Hold the toothbrush over the dish and run your thumb across the bristles to flick tiny droplets of paint onto the surface. Practice on paper first to control the spray. -
Seal:
Finish with a coat of matte spray varnish to protect the paint and give it that soft, non-glossy stoneware texture.
Cracked Clay Fix
If hairline cracks appear while drying, don’t panic. Mix a tiny bit of fresh clay with water to make a paste (slip) and fill the cracks, then sand smooth once dry.
Now you have a sophisticated little hiding spot for your favorite jewelry that looks just like expensive pottery