Air dry clay vases are my favorite kind of project because they look like real pottery but feel totally doable on a cozy afternoon. Let’s play with simple shapes, fun textures, and easy finishes that make your vase look intentionally handmade (in the best way).
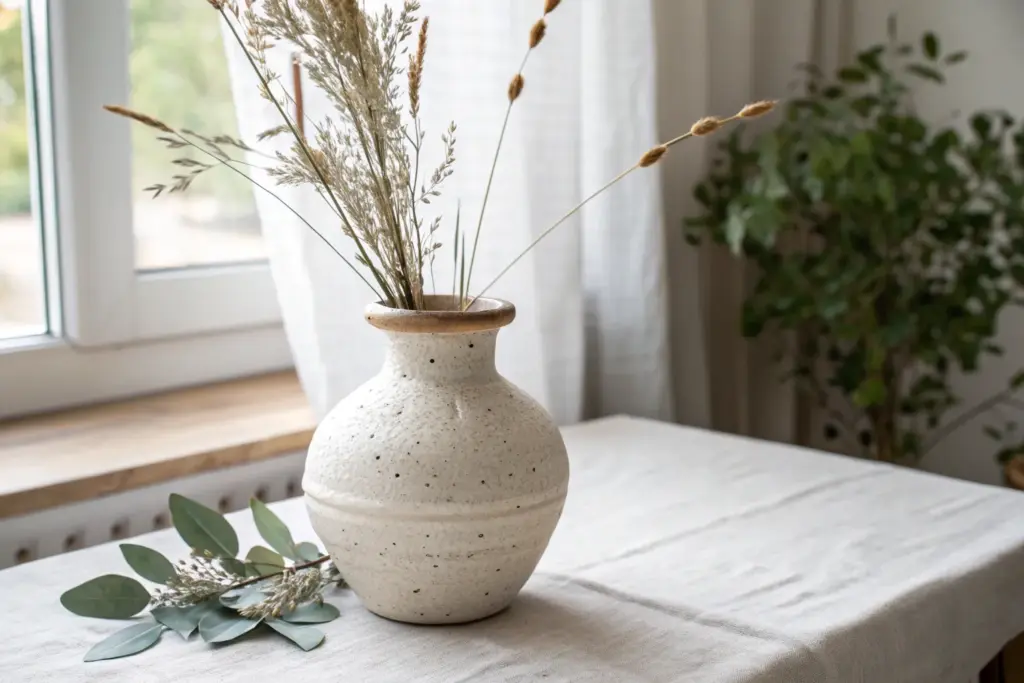
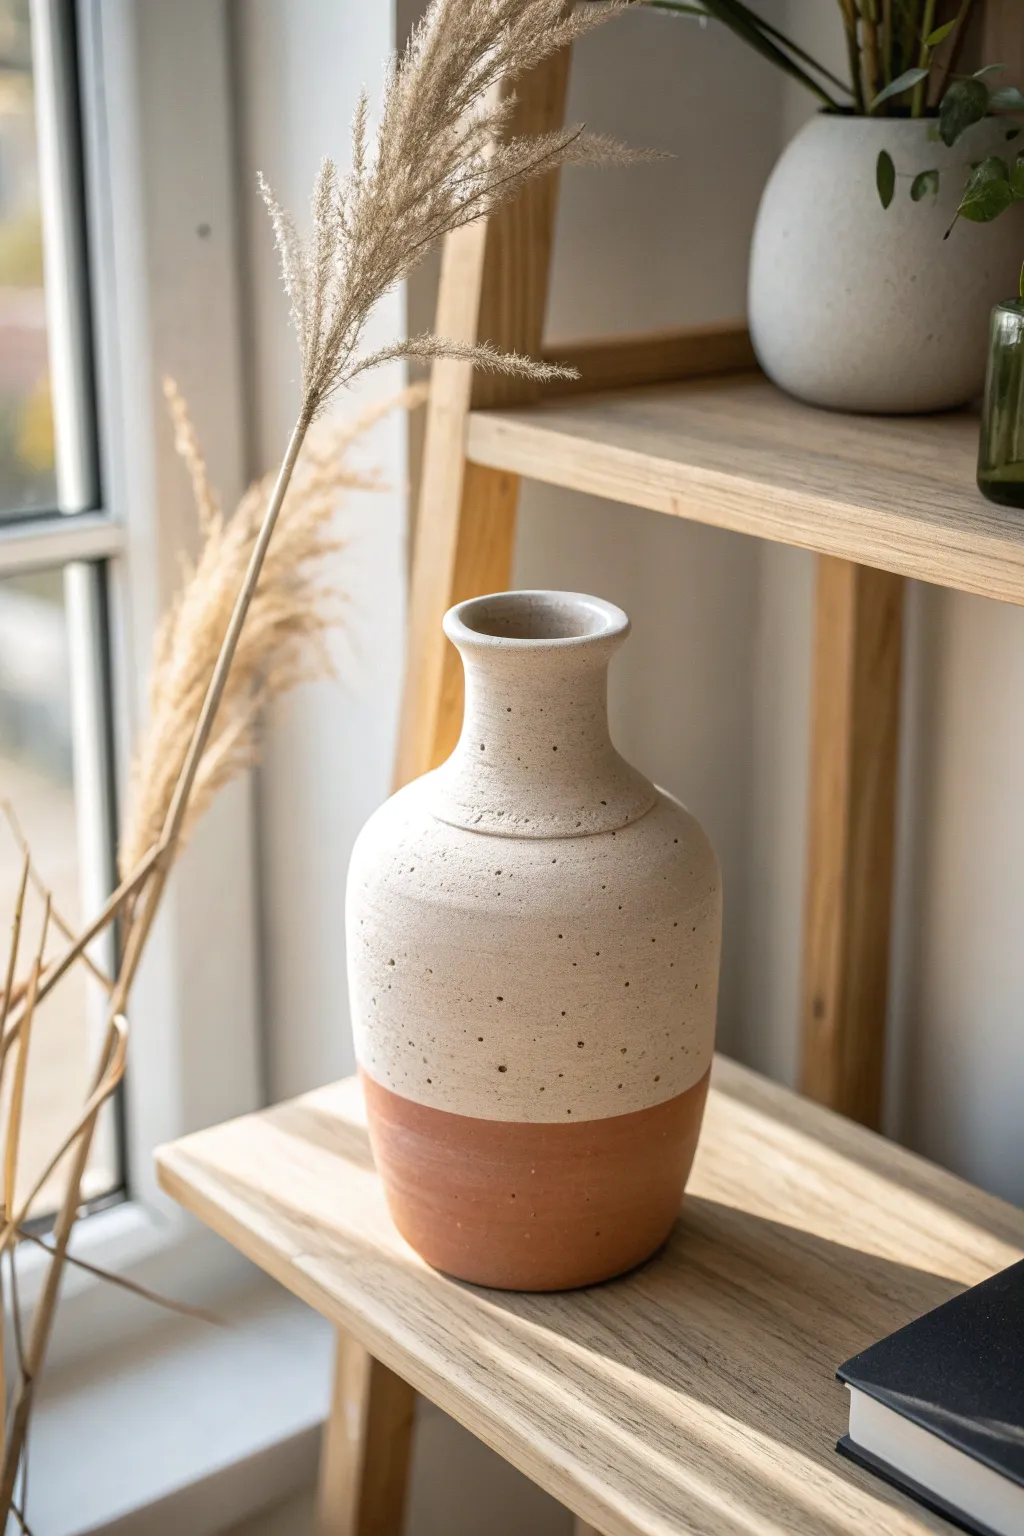
Classic Pinch-Pot Bud Vase
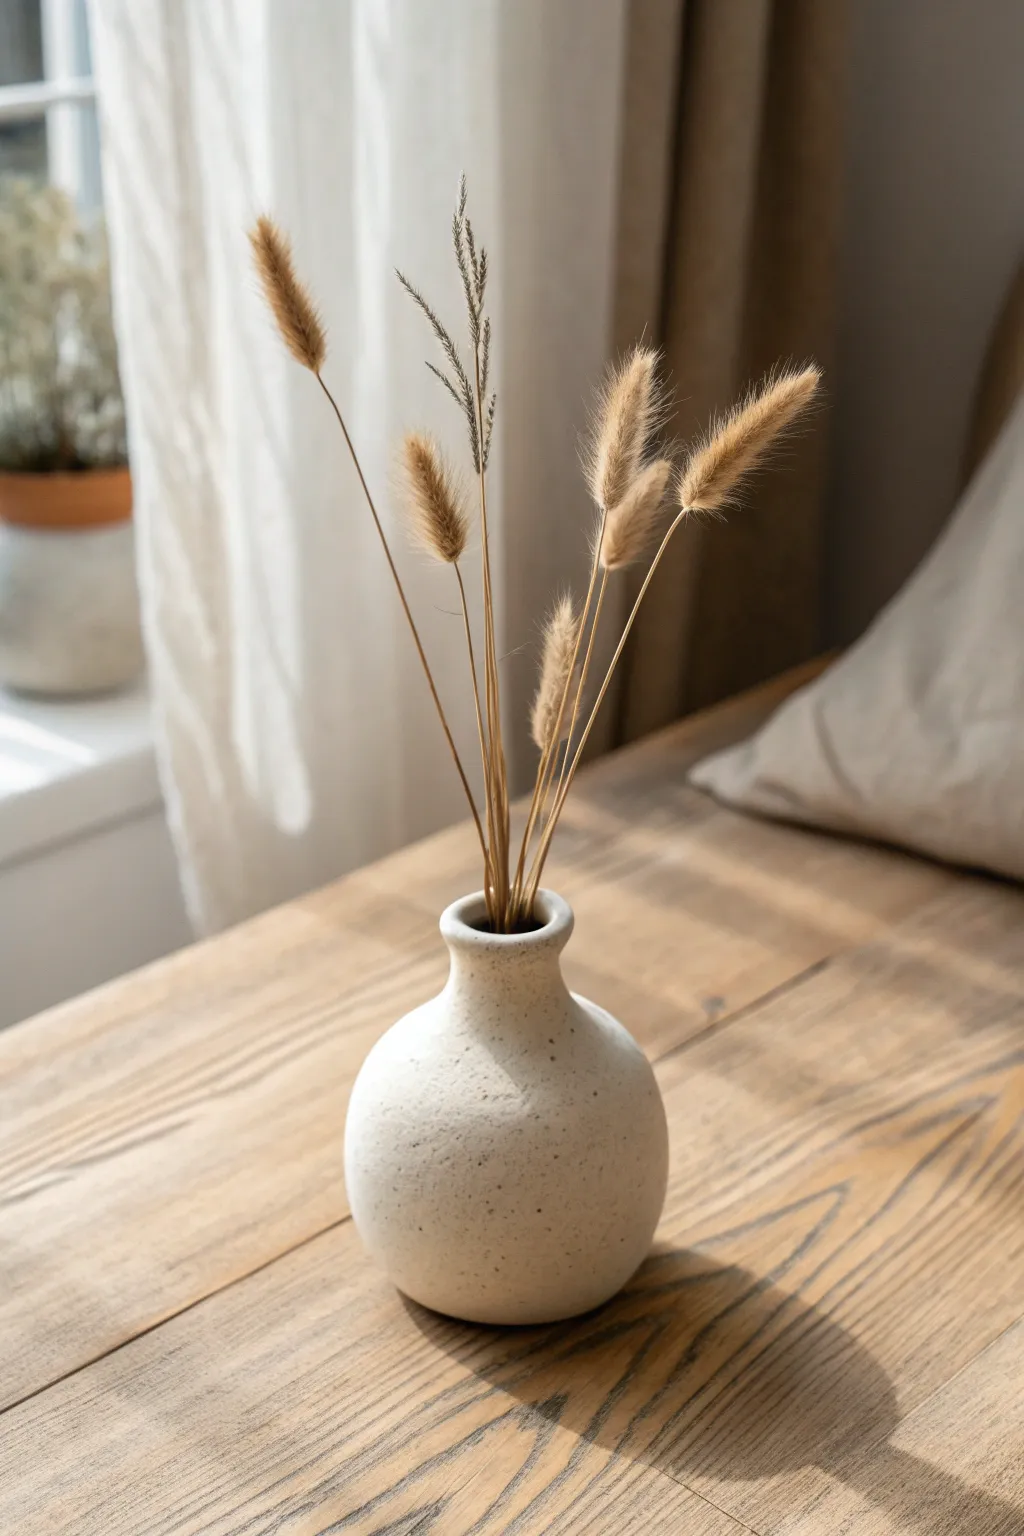
Embrace the beauty of imperfection with this charmingly rustic bud vase, featuring a classic rounded belly and a narrow neck. Its speckled, stone-like finish and matte texture give it an organic, earthy feel perfect for displaying dried grasses.
Detailed Instructions
Materials
- White air-dry clay (approx. 300g)
- Small bowl of water
- Sponge
- Rolling pin (optional)
- Pottery needle tool or toothpick
- Fine-grit sandpaper (220 grit)
- Acrylic paint (white or cream)
- Black or brown acrylic paint (for speckles)
- Old toothbrush
- Matte varnish or sealant
- Paintbrush
Step 1: Forming the Base Shape
-
Condition the clay:
Begin by taking a handful of air-dry clay and kneading it in your hands until it feels soft, pliable, and free of air bubbles. Roll it into a smooth, tight sphere about the size of a tennis ball. -
Start the pinch pot:
Hold the clay ball in your non-dominant hand. Gently press your thumb into the center of the ball, stopping about half an inch from the bottom to leave a solid base. -
Pinch the walls:
Using your thumb on the inside and fingers on the outside, gently pinch and rotate the clay. Work your way from the bottom upwards, aiming for an even thickness of about 1/4 inch throughout the walls. -
Shape the belly:
As you pinch, gently push the walls outward to create a rounded, bulbous belly shape. Keep the opening at the top slightly gathered rather than flaring out too wide. -
Smooth the exterior:
Dip your finger in a little water and smooth out any major cracks or uneven bumps on the outside surface. Don’t worry about perfection; the handmade look is part of the charm.
Crack Control
If small cracks appear while drying, don’t panic. Mix a small amount of fresh clay with water to make a paste (slip) and fill the cracks, then sand smooth once dry.
Step 2: Creating the Neck and Rim
-
Narrow the opening:
Gently collar the clay at the top opening by encircling it with your hands and applying light inward pressure. This will start to define the transition from the belly to the neck. -
Add a coil:
Roll a small snake of clay about the thickness of a pencil. Score the top rim of your base and the underside of the coil, apply a dab of water, and attach the coil to build up the neck height. -
Blend the coil:
Use your thumb or a modeling tool to smear the clay of the coil downwards into the body on the outside, and upwards on the inside, until the seam completely disappears. -
Refine the rim:
Smooth the very top lip of the vase. You can slightly flare it out if you prefer, or keep it thick and rounded like the reference image for a sturdy, rustic look. -
Final shaping:
Tap the bottom of the vase gently on your table to flatten the base so it sits stable. smooth the entire piece one last time with a slightly damp sponge to remove fingerprints.
Faux Stone Texture
Mix baking soda into your white acrylic paint before applying. This creates a grainy, gritty texture that mimics real stoneware or ceramic beautifully.
Step 3: Finishing and Decorating
-
Let it dry:
Place your vase in a cool, dry spot away from direct sunlight. Allow it to air dry for 24-48 hours. I find rotating it occasionally helps it dry evenly without warping. -
Sand for smoothness:
Once bone dry, use fine-grit sandpaper to gently buff the surface. Focus on any sharp ridges or bumps, but leave some texture to maintain the organic character. Wipe away dust with a dry cloth. -
Apply base coat:
Paint the entire exterior and the inner rim with a creamy white acrylic paint. You may need two coats for opaque coverage. Let this dry completely. -
Create the speckles:
Dilute a tiny amount of black or dark brown paint with water. Dip an old toothbrush into this mixture, aim it at the vase, and run your thumb across the bristles to flick tiny speckles onto the surface. -
Vary the pattern:
Turn the vase as you flick to ensure even coverage. Go lightly at first—you can always add more speckles, but you can’t easily take them away. -
Seal the piece:
After the paint is fully dry, apply a coat of matte varnish. This protects the clay and gives it a finished, ceramic-like quality without adding distracted shine.
Fill your new handmade vessel with dried bunny tails or wheat for a cozy display corner


Cylinder Vase Wrapped Around a Glass Insert
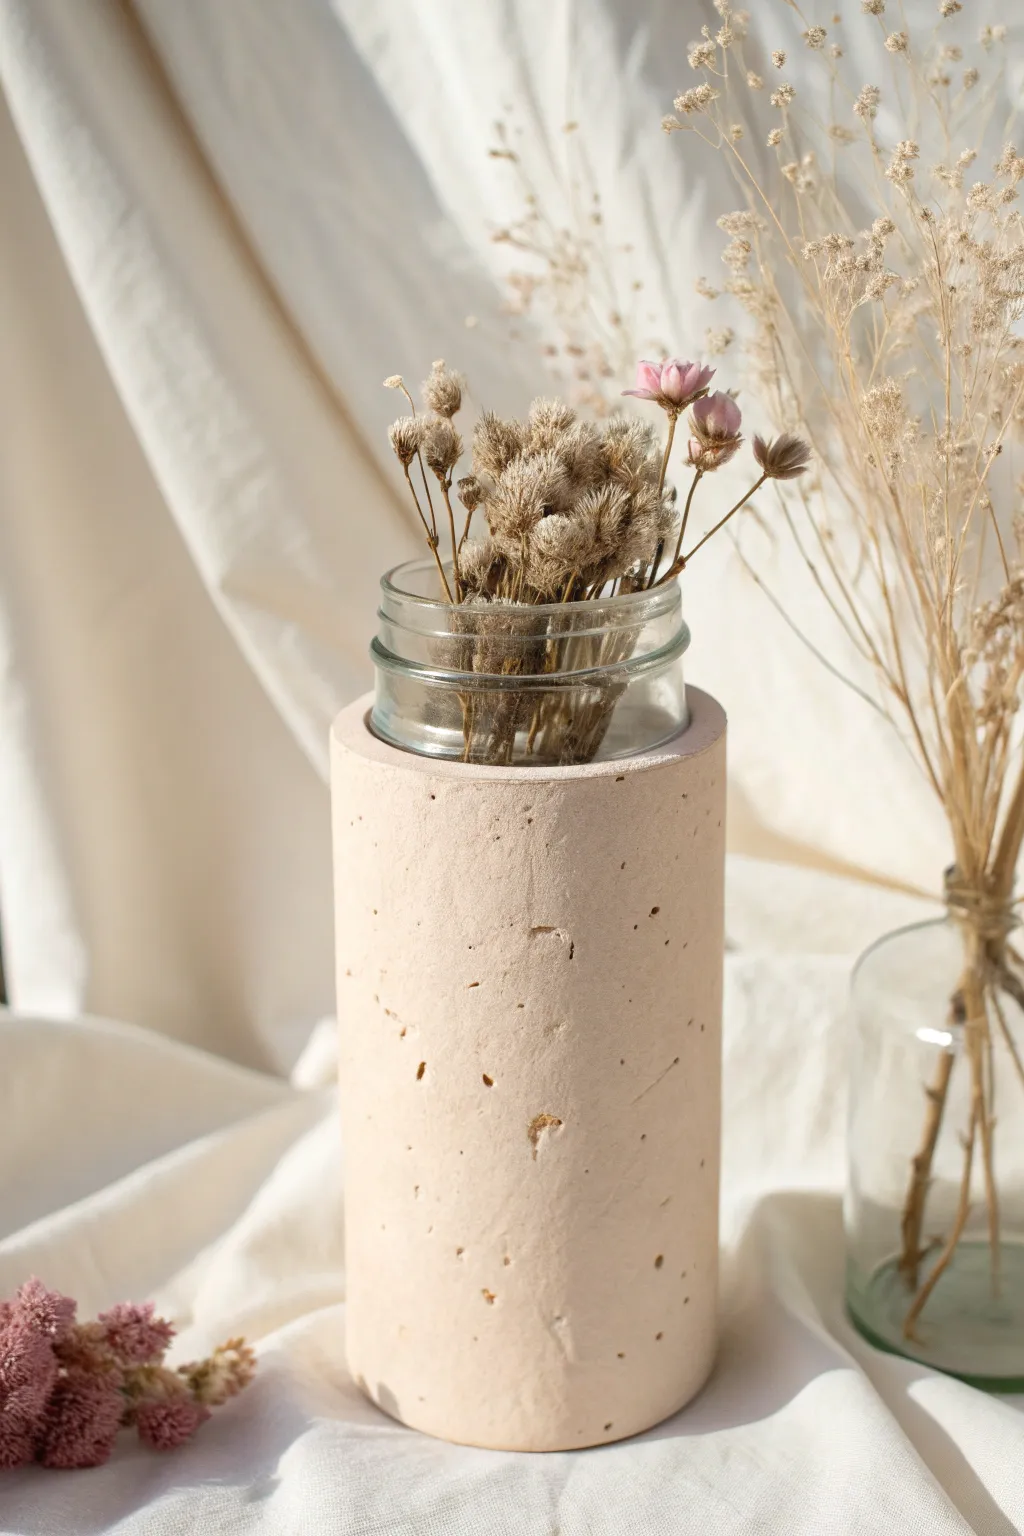
Achieve the minimal, industrial-chic look found in high-end boutiques by wrapping a simple glass jar in a textured clay sleeve. This project uses the glass as structural support, allowing you to focus purely on creates a beautiful, pitted stone finish in a soft peach hue.
How-To Guide
Materials
- White air-dry clay (approx. 500g)
- Small glass jar (straight-sided jam jar or mason jar)
- Acrylic paint (peach or terracotta)
- Rolling pin
- Parchment paper or craft mat
- Craft knife or scalpel
- Small cup of water
- Dough scraper or spatula
- Sea sponge or crumpled aluminum foil
- Toothbrush (for texturing)
- Fine-grit sandpaper (optional)
- Matte spray varnish
Step 1: Preparation and Tinting
-
Clean the glass insert:
Begin by thoroughly washing and drying your glass jar to remove any labels or glue residue. This ensures a clean fit, even though the clay won’t permanently adhere to the glass. -
Prepare the clay:
Cut off a substantial block of white air-dry clay. Work it in your hands to warm it up and make it pliable. -
Tint the clay:
Create a thumbprint indentation in your clay ball and add a small dollop of peach or terracotta acrylic paint. Fold the clay over the paint and knead thoroughly until the color is completely uniform. Add more paint if you want a deeper tone, but remember it dries slightly lighter.
Step 2: Forming the Sleeve
-
Roll out a slab:
Place your clay on parchment paper. Roll it out into a long rectangle, aiming for a thickness of about 1/4 inch (6mm). Ensure the length is sufficient to wrap fully around your glass jar with a little overlap. -
Check the height:
Place your jar on its side next to the clay slab. Use your craft knife to trim the top and bottom edges of the clay so the slab is slightly taller than the glass jar body, but shorter than the neck threads if it’s a mason jar. -
Cut straight edges:
Trim the short ends of your rectangle to ensure they are perfectly straight and parallel. This will make the seam much cleaner. -
Wrap the jar:
Carefully lift the clay slab and wrap it around the standing glass jar. I find it easiest to roll the jar onto the clay to pick it up. -
Join the seam:
Bring the two ends of the clay together. Score the edges (make scratch marks) with your knife, apply a dab of water, and press them firmly together to create a bond. -
Smooth the connection:
Dip your finger in water and smooth over the seam line until it disappears. You want the cylinder to look like a solid, continuous piece.
Shrinkage Factor
Air-dry clay shrinks slightly as it dries. Wrap the clay slightly loosely around the glass initially; as it shrinks, it will tighten around the jar for a perfect fit.
Step 3: Refined Texturing
-
Level the rim:
Stand the vase up. If the top rim looks uneven, gently run your finger or a wet sponge around it to flatten and smooth the edge. It should look thick and substantial. -
Create the pitted texture:
This is crucial for the concrete look. Take a toothbrush or a stiff bristle brush and stipple (poke repeatedly) the surface of the clay. -
Add larger craters:
Use a crumpled ball of foil or the rough side of a sea sponge to press random, deeper indentations into the clay. Don’t be afraid to make a few distinct marks to mimic air bubbles in cast concrete. -
Soften the texture:
Lightly brush your wet finger over the entire surface. This knocks down any sharp peaks created by the texturing tools, leaving behind the ‘worn stone’ look.
Cracking Seams?
If the seam starts to pull apart while drying, fill the gap immediately with a ‘slip’ made of clay scraps mixed with water, then smooth it over.
Step 4: Finishing
-
Allow to dry:
Let the vase sit undisturbed in a cool, dry place. Rotate it occasionally to ensure even drying. This usually takes 24-48 hours depending on thickness. -
Sand for precision (optional):
Once fully dry, if the top rim feels too sharp or rough, very gently sand it flat with fine-grit sandpaper. -
Seal the surface:
Take the project outside and apply a coat of matte spray varnish. This protects the clay from humidity and seals the paint color without making it glossy.
Place your favorite dried florals inside and enjoy structural elegance of your new faux-concrete vase


Soft-Edge Coil-Built Vase
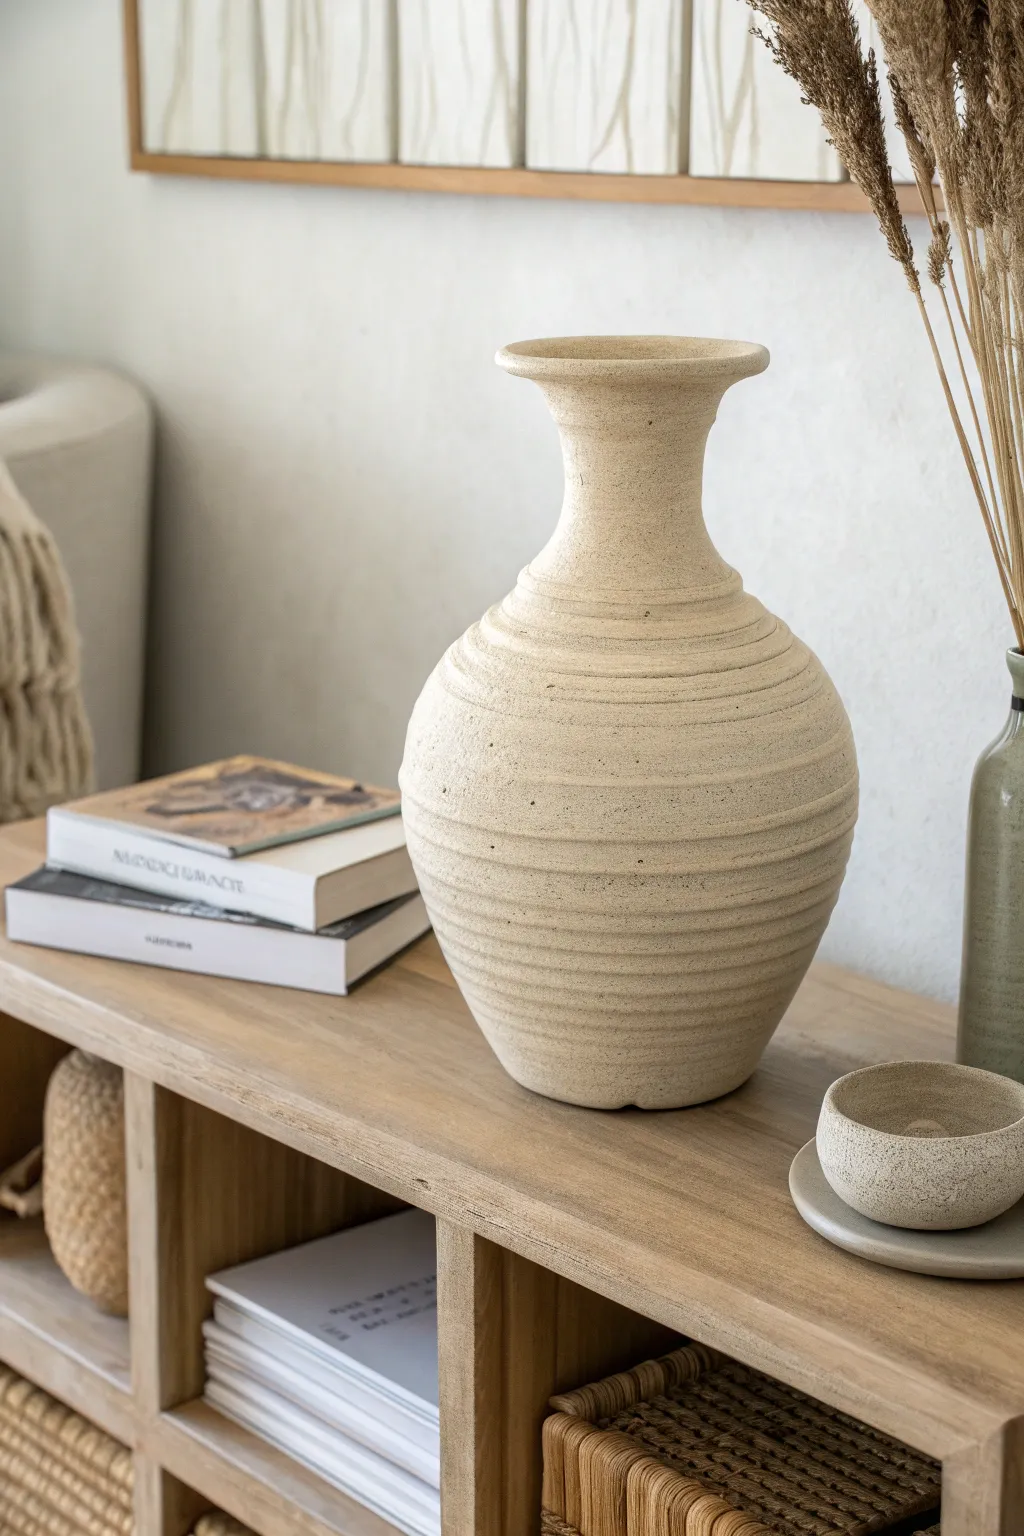
Embrace the beauty of imperfection with this large, coil-built vessel that mimics the look of carved sandstone. Its soft horizontal ridges and speckled matte finish add an organic warmth that fits perfectly in any modern or bohemian space.
Detailed Instructions
Materials
- High-quality air dry clay (approx. 2-3kg)
- Wide-mouth glass jar or plastic bottle (for armature/support)
- Rolling pin
- Clay scoring tool or fork
- Slip (clay mixed with water)
- Wooden modeling tool or butter knife
- Sponge
- Sandpaper (medium and fine grit)
- Acrylic paint (beige, cream, and taupe)
- Old toothbrush (for speckling)
- Matte spray varnish
Step 1: Building the Base and Body
-
Prepare the foundation:
Start by rolling out a thick, flat circle of clay, about 1cm thick. This will be the base of your vase. If you are using a jar as an internal support, make sure the base is slightly wider than the jar. -
Roll your coils:
Take chunks of clay and roll them into long, even snakes on your work surface. Aim for coils that are roughly the thickness of your thumb to ensure structural stability for such a large piece. -
Begin stacking:
Score the outer edge of your base and apply a little slip. Lay your first coil around the edge. Use your thumb or a wooden tool to smudge the clay downwards on the *inside* of the pot to fuse it to the base. -
Build outward:
Continue adding coils. To create the widening, bulbous shape, place each new coil slightly further out than the one below it. Don’t smooth the outside just yet; we want to keep those ridges visible. -
Manage the seams:
As you stack, ensure you are firmly blending the coils together on the interior surface. This is crucial for strength. On the exterior, I like to gently press the coils together without fully smoothing them to maintain that ribbed texture. -
Incorporate support:
Once the body is about halfway up and quite wide, you might find the clay sagging. If you have a jar or bottle for an armature, place it inside now to support the neck as you build upwards.
Keep it Steady
If the belly of the vase starts slumping while building, stop adding coils. Let the lower section firm up for 30-45 minutes before continuing upward.
Step 2: Shaping the Neck and Rim
-
Taper the form:
Start placing your coils slightly inward with each layer to narrow the shape towards the neck. This requires patience; move slowly to ensure the heavy belly of the vase doesn’t collapse. -
Create the vertical neck:
Once you reach the desired narrowness, stack three or four coils directly on top of each other vertically to create the elongated neck. -
Flare the lip:
For the final rim, add two coils that flare slightly outward. Use your fingers to pinch and flatten the top edge, creating a smooth, wide lip similar to the image. -
Refine the texture:
Take a damp sponge and very lightly run it over the exterior coils. You want to soften the harsh lines between coils into gentle ‘soft-edge’ ridges, rather than erasing them completely.
Aged Patina
Mix baking soda into your acrylic paint before applying. This creates a gritty, plaster-like texture that makes the vase look like an ancient artifact.
Step 3: Finishing and Faux-Stone Effect
-
Dry partially:
Let the vase sit for about an hour until it’s leather-hard. It should be firm but still cool to the touch. This creates a better surface for texturing. -
Add pitting texture:
Use a stiff-bristled brush or a balled-up piece of foil to gently tap against random spots on the surface. This creates the subtle pitting seen in natural stone. -
Full dry:
Allow the vase to dry completely. For a piece this thick, this can take 3-5 days. Don’t rush it, or cracks may appear. -
Sand for stone feel:
Once bone dry, use sandpaper to rough up any overly shiny spots, reinforcing the matte, earthen look. -
Base coat:
Paint the entire vessel with a mixture of beige and cream acrylic paint. It doesn’t need to be perfect; uneven coverage adds depth. -
Speckle technique:
Dip an old toothbrush into taupe or diluted brown paint. Run your thumb over the bristles to flick tiny speckles across the vase surface. This mimics the grit of sandstone. -
Seal:
Apply two coats of matte spray varnish to protect your work without adding an artificial shine.
Place your dried floral arrangements inside and enjoy the earthy elegance of your handcrafted centerpiece


Wavy Rim Organic Vase
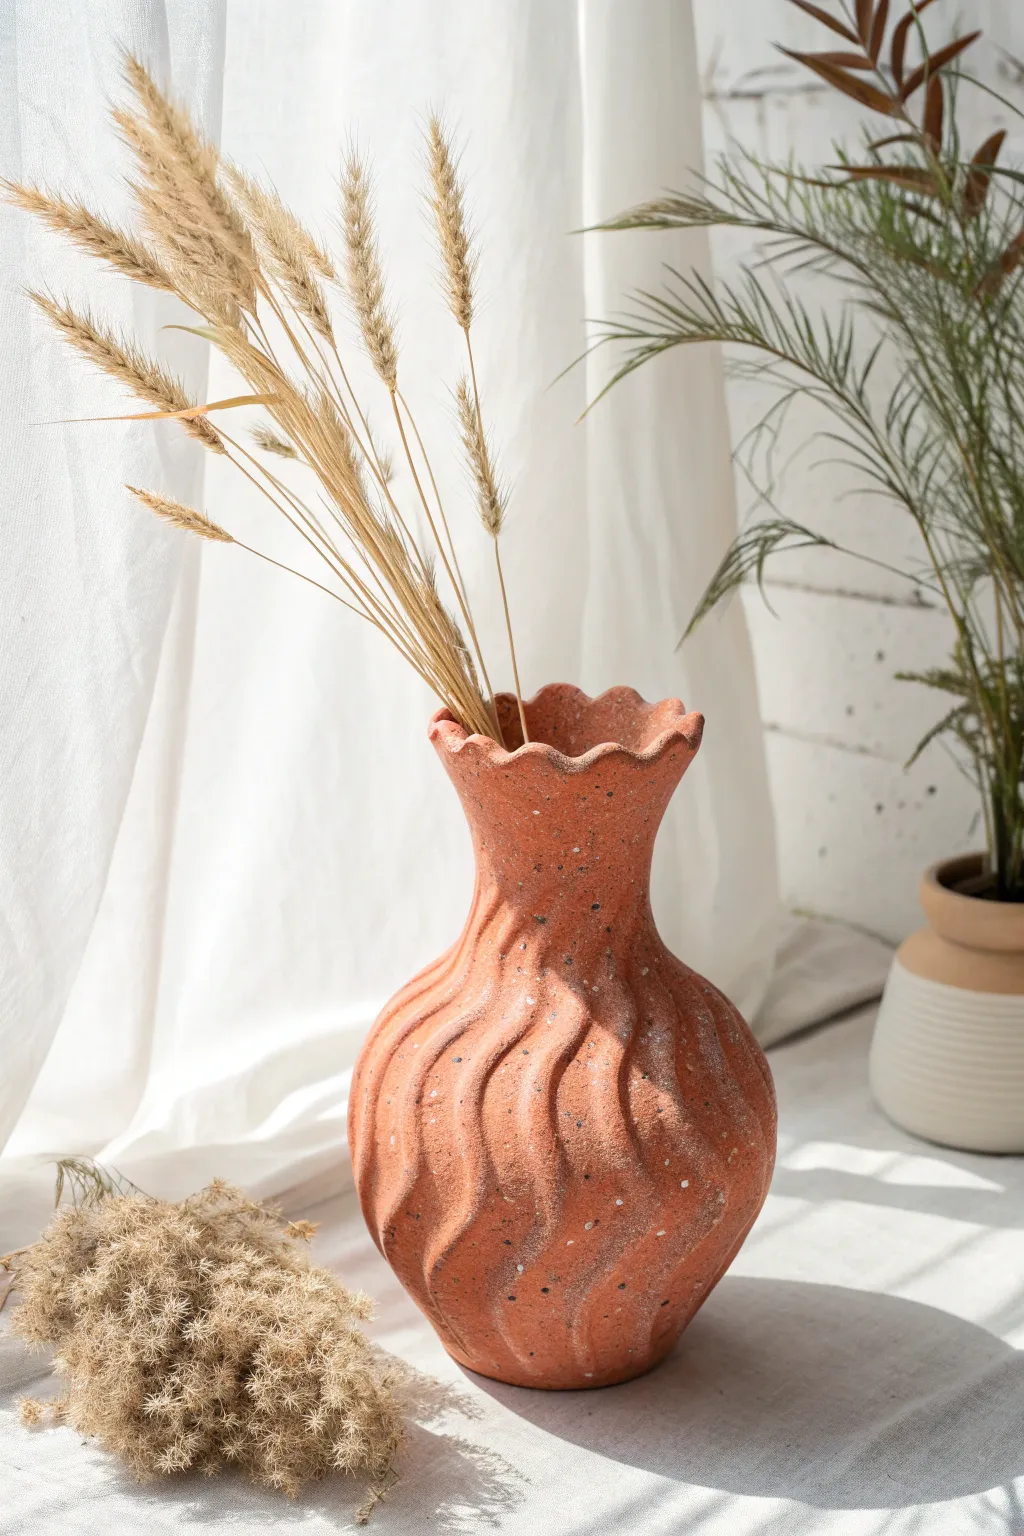
Bring earthy, organic charm into your home with this textured vase that mimics the look of fired terracotta. Featuring gentle spiral waves along the body and a whimsical scalloped rim, this piece is surprisingly simple to sculpt using the coil method.
How-To Guide
Materials
- High-quality air dry clay (terracotta color preferred, or white)
- Small rolling pin
- Clay sculpting tools (rib tool, needle tool)
- Sponge and water bowl
- Spray bottle with water
- Acrylic paints (burnt sienna, black, white)
- Old toothbrush
- Matte spray varnish or sealant
- Medium grit sandpaper
Step 1: Building the Base Form
-
Prepare the base:
Start by rolling a ball of clay roughly the size of a tennis ball. Flatten it with your palm or a rolling pin until it forms a circle about 3-4 inches in diameter and 1/4 inch thick. This will be the sturdy bottom of your vase. -
Roll your coils:
Take substantial chunks of clay and roll them into long, even snakes on your work surface. Aim for coils that are about the thickness of your thumb to ensure the walls can support the textured waves later. -
Begin stacking:
Place the first coil onto the outer edge of your base. Score (scratch) both touching surfaces with a needle tool and apply a little water or slip (clay mush) to act as glue, then press firmly. -
Build the belly:
Continue stacking coils, slightly stepping them outward with each layer to create the widening ‘belly’ of the vase. Smooth the inside seams completely with your thumb or a rib tool as you go to strengthen the structure. -
Narrow the neck:
Once you reach the widest point of the vase, start stepping your coils slightly inward to create the tapered neck. Don’t close it off too much; keep the opening wide enough to work with the rim.
Waterproofing Pro-Tip
Air dry clay purely decorative and will dissolve if you put water directly in it. To hold fresh flowers, find a small glass jar or plastic cup that fits inside the neck before you start sculpting.
Step 2: Sculpting the Texture
-
Blend the exterior:
Once your basic vase shape is built, blend all the exterior coils together until the surface is relatively smooth. It doesn’t need to be perfect, as we are about to add heavy texture. -
Carve the waves:
Using a looped sculpting tool or the back of a spoon, verify the clay is leather-hard (firm but still impressionable). Carve wide, vertical grooves that spiral slightly from the base up to the neck. I find it helpful to mark the lines lightly with a needle tool first. -
Refine the ridges:
Use a damp sponge to soften the sharp edges of your carved grooves. You want the transitions between the raised ridges and the valleys to look eroded and organic, not mechanically cut. -
Create the scalloped rim:
Focus on the top opening. Pinch the clay continuously around the edge to thin it slightly. Then, use your thumb and forefinger to push sections of the rim outward and inward, creating a gentle wavy or flower-petal bloom shape. -
Add surface texture:
To mimic the gritty look of raw terracotta, take a coarse sandpaper or a rough stone and gently press it against the wet clay all over the exterior. This creates tiny pores and imperfections. -
Dry completely:
Let the vase dry slowly away from direct heat or sunlight. This usually takes 24-48 hours depending on humidity. Rotate it occasionally so it dries evenly.
Step 3: Faux-Ceramic Finish
-
Base coat painting:
If you used white clay, paint the entire vase with a mix of burnt sienna and a touch of orange to get that terracotta hue. If you started with terracotta clay, you can skip this full coat or just enhance any patchy areas. -
Adding depth:
Mix a very watery wash of dark brown or black acrylic paint. Brush this into the carved grooves and immediately wipe the high points off with a paper towel. This leaves shadows in the recesses. -
Creating the speckled effect:
Dilute some white paint until it is milky. Dip an old toothbrush into it, point it at the vase, and run your thumb over the bristles to flick tiny speckles onto the surface. Repeat this sparingly with black paint for a realistic stone look. -
Seal the piece:
Once the paint is totally dry, take the vase to a well-ventilated area and apply two thin coats of matte spray varnish. This protects the paint and unifies the finish.
Cracks while drying?
Mix a small amount of fresh clay with water to make a paste (slip). Fill any cracks that appear during the drying process with this paste, smooth it over, and let it dry again.
Fill your new vessel with dried grasses or faux botanicals to complete the natural aesthetic

The Complete Guide to Pottery Troubleshooting
Uncover the most common ceramic mistakes—from cracking clay to failed glazes—and learn how to fix them fast.
Textured Vertical-Line Vase
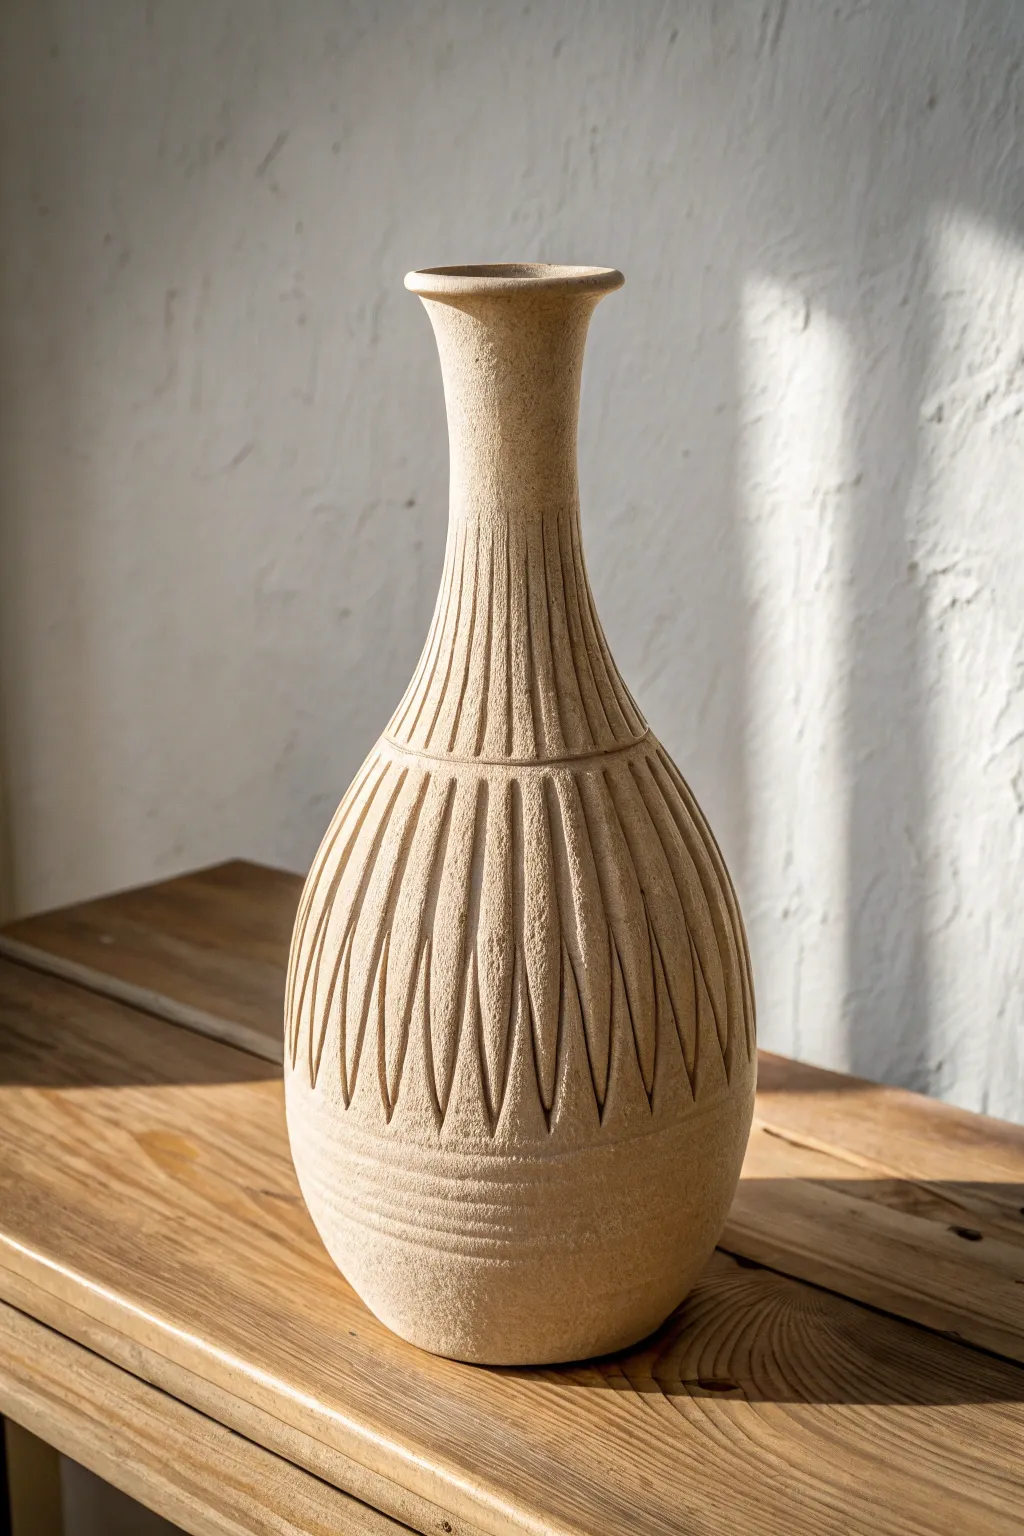
Transform simple air dry clay into a high-end decor piece that mimics the look of carved sandstone. This project features elegant vertical ribbing and organic petal motifs, resulting in a timeless vessel perfect for dried florals.
Step-by-Step
Materials
- Air dry clay (stone or white color)
- Glass bottle or jar (for the armature)
- Rolling pin
- Clay carving tools (needle tool, loop tool)
- Sponge
- Water cup
- Sandpaper (fine grit)
- Acrylic paint (optional warm beige/sand color)
- Matte sealant spray
Step 1: Building the Form
-
Prepare the armature:
Select a glass bottle with a shape you love to serve as the internal structure; this ensures your vase is watertight and maintains a perfect silhouette. -
Roll out the slab:
Roll your air dry clay into a large, even slab about 1/4 inch thick. You want it substantial enough to carve into later, but not so thick that it takes weeks to dry. -
Wrap the bottle:
Wrap the clay slab completely around your glass bottle, pressing it firmly against the glass to remove air pockets. -
Create the seam:
Join the edges of the clay where they meet. Score both sides (scratch them up), apply a little water or slip, and press them together. -
Smooth the surface:
Use your fingers and a damp sponge to smooth out the seam until it is invisible. Add extra clay to the bottom to build out that bulbous, rounded base shape seen in the reference, blending it seamlessly upward. -
Shape the neck:
Refine the neck area. If your bottle has a screw-top rim, add a rolled coil of clay around the top edge to create a smooth, flared lip.
Clean Lines Hack
Use a flexible ruler or a strip of cardstock as a guide when carving the vertical lines on the neck to keep them perfectly straight.
Step 2: Carving the Texture
-
Initial setting time:
Let the clay dry for about 1-2 hours until it is ‘leather hard.’ It should be firm to the touch but still cool and carveable. -
Mark the sections:
Lightly trace a horizontal line around the vase where the neck meets the body to separate your design zones. -
Carve the neck lines:
Using a fine carving tool or needle, drag vertical lines down the neck, stopping at your horizontal guide mark. Keep the spacing tight and consistent. -
Draft the petal shapes:
On the rounded body, lightly sketch tall, elongated triangle or petal shapes. They should be wider at the top and taper to a point near the bottom. -
Deepen the main grooves:
Use a V-gouge or loop tool to carve out the outlines of these petal shapes deeply. This creates the shadow and depth that defines the pattern. -
Add internal texture:
Inside each petal shape, carve fine vertical lines similar to the neck texture. This contrast between the smooth dividers and textured petals mimics natural stone carving. -
Detail the base:
Below the petal points, carve three or four horizontal rings around the base of the vase to ground the design.
Faux Stone Texture
Mix a teaspoon of used coffee grounds or fine sand into your clay before rolling it out. This adds speckles and grit for a realistic stone effect.
Step 3: Finishing and Sealing
-
Clean up burrs:
Once the carving is done, use a soft brush or your finger to gently rub away any little clay crumbs or sharp burrs created by the tools. -
Full drying:
Allow the vase to dry completely. This usually takes 24-48 hours depending on humidity. Turning it occasionally helps it dry evenly. -
Sanding:
Gently sand any rough spots with fine-grit sandpaper, being careful not to erase your beautiful texture. -
Painting (Optional):
If you used white clay, I like to mix a watery wash of beige and warm sand acrylic paint to give it that natural sandstone hue. Sponge it on and wipe away excess so the dark paint settles in the carved grooves. -
Seal the work:
Finish with a matte spray sealant to protect the clay from moisture and give it a professional, finished look.
Place your finished vase near a window to let the natural light highlight those beautiful carved textures
Dot-Stamped Minimal Vase
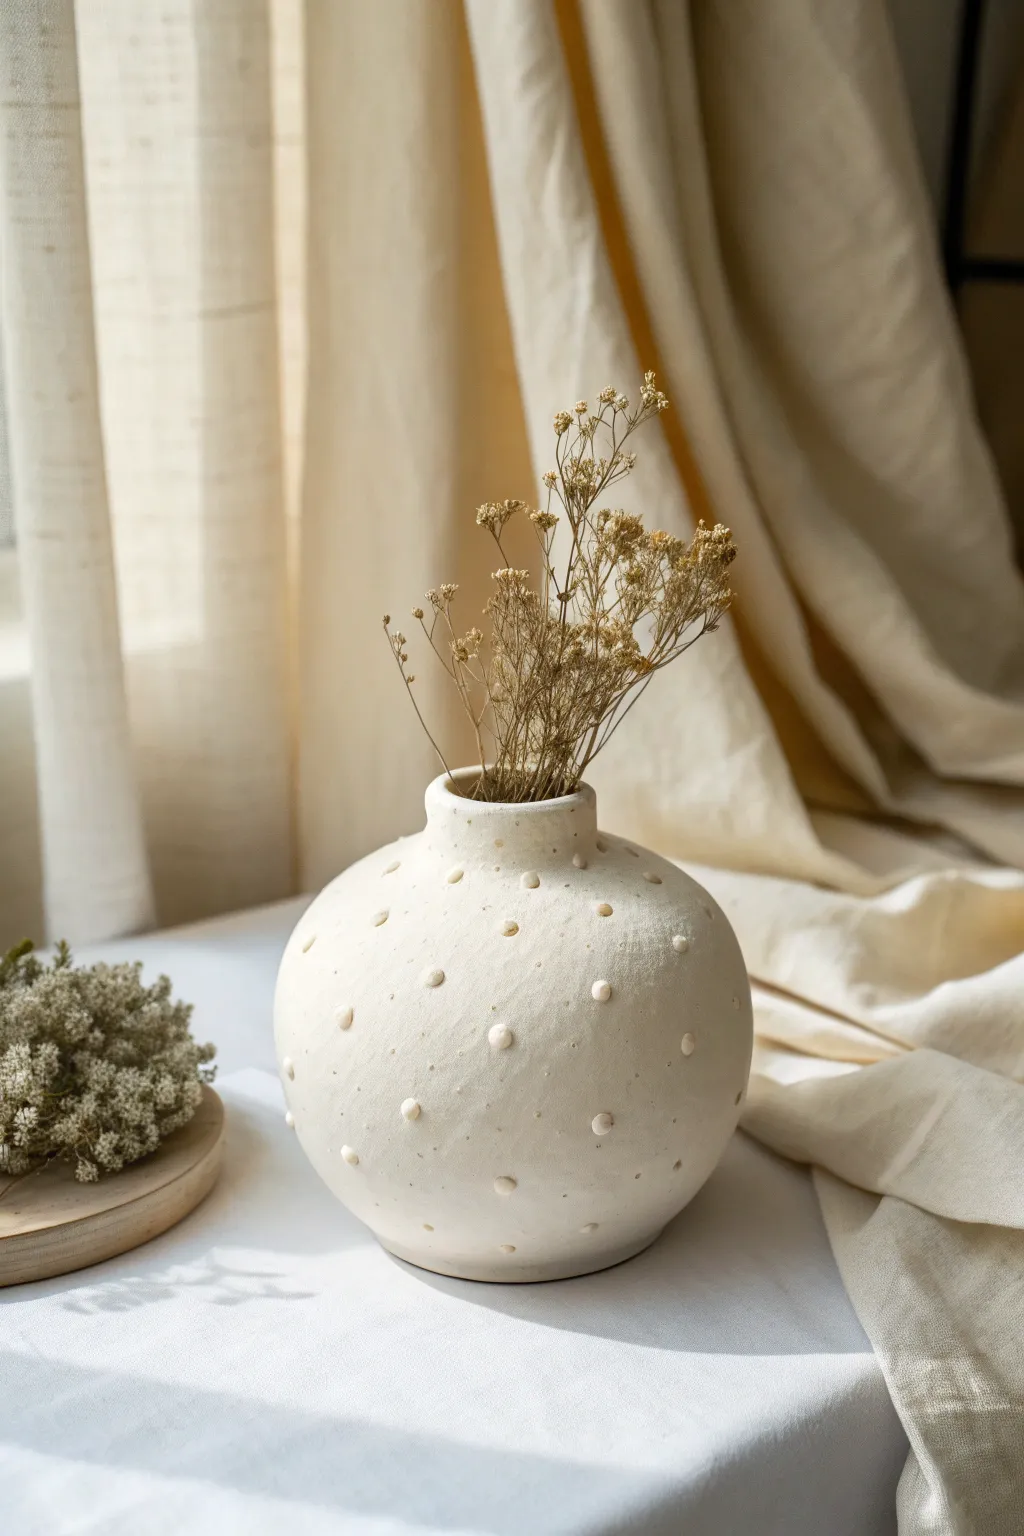
Embrace the beauty of simplicity with this sphere-shaped vase that features a charming pattern of raised dots. The creamy, matte finish gives it a high-end ceramic look without the need for a kiln, perfect for displaying dried botanicals.
Step-by-Step Tutorial
Materials
- White air dry clay (approx. 1kg)
- Rolling pin
- Small bowl relative to desired vase size (for molding support)
- Clay slip (clay mixed with water)
- Pottery sponge
- Needle tool or toothpick
- Clean water
- Sandpaper (fine grit)
- Acrylic paint (cream or off-white)
- Matte sealant or varnish
Step 1: Forming the Base
-
Prepare the Clay:
Start by conditioning your clay. Knead it thoroughly in your hands until it is warm, pliable, and free of any air bubbles. -
Roll the Pinch Pots:
Divide your clay into two equal balls. These will become the top and bottom halves of your sphere. -
Shape the First Hemisphere:
Take one ball and press your thumb into the center just deep enough to start an opening. Gently pinch the walls while rotating the clay, creating a bowl shape. -
Create the Second Hemisphere:
Repeat the process with the second ball of clay. Try to make the rim diameter matching the first bowl so they fit together perfectly. -
Join the Halves:
Score the rims of both bowls with a needle tool (scratch hatch marks) and apply a generous amount of clay slip. Press the two rims together firmly to form a hollow sphere. -
Seal the Seam:
Roll a very thin coil of clay and place it over the seam where the bowls meet. Smear the clay upwards and downwards with your thumb to blend the coil completely into the surface.
Collapsing Sphere?
If the sphere sags while joining, gently stuff the inside with crumpled newspaper or plastic wrap before closing it up. This supports the shape while drying.
Step 2: Sculpting and Refining
-
Create the Opening:
Identify the top center of your sphere. Use your needle tool to carefully cut out a circular hole for the vase opening. -
Add the Neck:
Fashion a thick coil of clay into a ring that matches the size of your opening. Score and slip the area around the hole, then attach the ring to create a short, upright neck. -
Blend the Neck Seamlessly:
Use your fingers or a modeling tool to smooth the clay from the neck down onto the body of the vase so it looks like one continuous piece. -
Smooth the Surface:
Dip a pottery sponge in a little water and wipe it over the entire vase to remove fingerprints and bumps. I like to spend extra time here to get that really clean, spherical look. -
Create the Dots:
Roll many tiny balls of clay, aiming for roughly the size of a pea. You will need about 30-40 depending on your spacing preference. -
Attach the Dots:
One by one, score a tiny spot on the vase, add a dot of slip, and press the clay ball onto the surface. Flatten it slightly with your fingertip to ensure it adheres well. -
Arrange the Pattern:
Continue attaching dots around the vase. The image shows a somewhat random, organic spacing rather than a rigid grid, so allow for some natural variation. -
Final Smoothing:
Once all dots are attached, run a slightly damp finger over each one to smooth out any rough edges and integrate them visually with the vase body.
Step 3: Finishing Touches
-
Dry Completely:
Let the vase dry for 24-48 hours. Turn it occasionally to ensure airflow reaches the bottom. -
Sand Imperfections:
Once bone dry, use fine-grit sandpaper to gently buff away any remaining rough patches or unevenness on the main body of the vase. -
Paint:
Apply two coats of cream or off-white acrylic paint. This unifies the color of the clay and gives it that soft tailored look. -
Seal:
Finish with a matte varnish to protect the surface while maintaining the natural, non-glossy aesthetic.
Level Up: Texture Play
Before painting, mix baking soda into your acrylic paint. This creates a grainy, stoneware-like texture that mimics real rough ceramic perfectly.
Place your favorite dried stems inside and enjoy the calm, organic presence this piece brings to your space


What Really Happens Inside the Kiln
Learn how time and temperature work together inside the kiln to transform clay into durable ceramic.
Ribbed Vase With Banding Texture
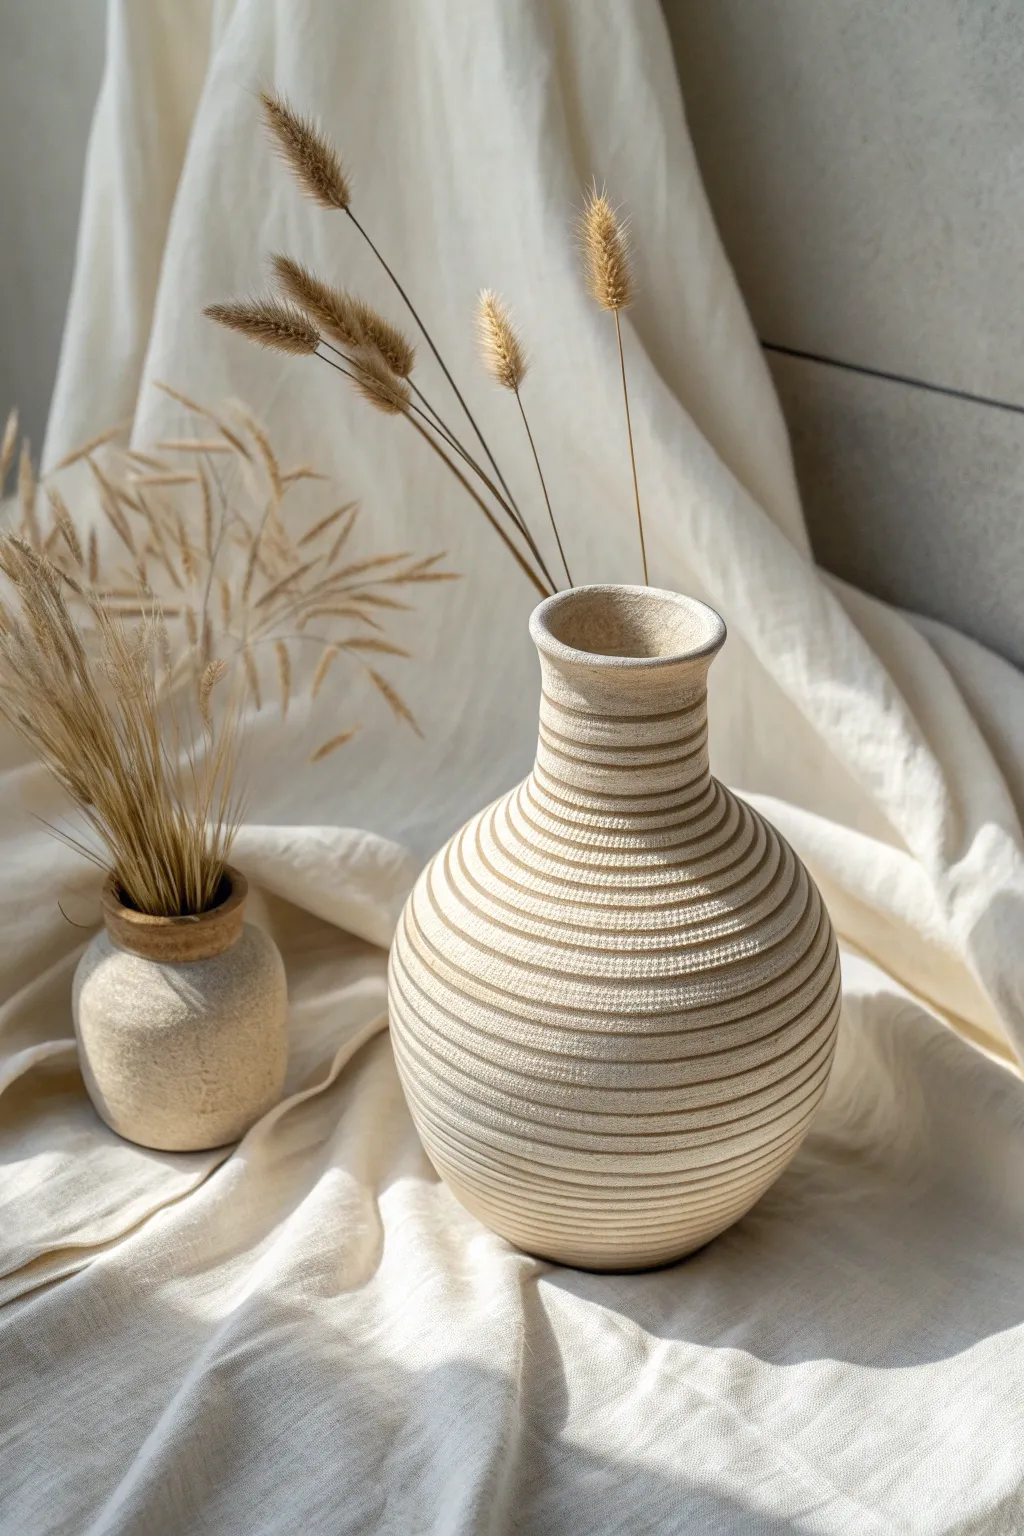
Embrace the beauty of repetition with this stunning air dry clay vase, featuring a satisfyingly tactile ribbed surface. The continuous horizontal grooves create a mesmerizing sense of movement and shadow, turning a simple vessel into a sculptural centerpiece.
Step-by-Step Guide
Materials
- High-quality air dry clay (white or light cream)
- Rolling pin
- Clay sculpting tools (specifically a needle tool or loop tool)
- Small sponge
- Water in a small bowl
- Wooden slat or thick cardboard (as a depth guide)
- Potter’s rib (metal or wood)
- Fine-grit sandpaper (220 and 400 grit)
- Clay slip (clay mixed with water)
- Clear matte acrylic sealer
- Parchment paper or canvas mat
Step 1: Forming the Base Structure
-
Prepare the workspace:
Lay down your canvas mat or parchment paper to prevent the clay from sticking to your table. Knead a large ball of clay to remove air bubbles and warm it up for pliability. -
Create the base:
Roll out a slab of clay about 1/2 inch thick. Cut a perfect circle, roughly 4-5 inches in diameter, to serve as the sturdy bottom of your vase. -
Begin coiling:
Roll out several long, even ropes (coils) of clay, approximately the thickness of your thumb. Score the outer edge of your base and the underside of your first coil, add a dab of slip, and attach the coil. -
Build the belly:
Stack subsequent coils on top of each other. To create the wide belly shape, place each new coil slightly further outward than the one below it. -
Blend the coils:
As you build, smudge the clay coils together on the *inside* of the vase using your thumb or a modeling tool to ensure structural integrity. Keep the outside distinct for now, but ensure the layers are firmly connected. -
Taper the neck:
Once you reach the widest point of the belly, begin placing coils slightly inward to narrow the form toward the neck. Continue until the opening is about 2 inches wide. -
Shape the rim:
Add one final coil that flares slightly outward to create the elegant lip. Smooth the very top rim with a damp sponge. -
Smooth the exterior canvas:
Before adding texture, smooth the exterior surface completely using a potter’s rib. You need a clean, uniform wall surface to carve the ribs onto. The coil structure underneath should disappear.
Step 2: Carving the Ribbed Texture
-
Let it firm up:
Allow the vase to dry until it reaches a ‘leather-hard’ state. This is crucial; if it’s too soft, the texture will deform, but too dry and you can’t carve. It should feel cool and firm. -
Mark your guides:
I find it helpful to lightly sketch horizontal lines around the vase with a needle tool to plan the spacing of the ribs. Aim for consistent, parallel bands. -
Carve the grooves:
Using a loop tool or a modeling tool with a rounded tip, gently carve into the clay along your guide lines. Don’t dig too deep—you just want to create a valley between the ‘ribs’. -
Refine the ridges:
Go back over the raised areas (the ribs) and round them off slightly with a damp finger or sponge so they look organic rather than sharp. -
Detail the neck:
Ensure the banding continues all the way up the neck, tightening the spacing slightly if needed to fit the vertical curve. -
Initial clean up:
Brush away any clay crumbs created during carving with a soft, dry brush.
Keeping it Symmetrical
Place your vase on a lazy susan while carving. Being able to spin the piece while holding your hand steady creates much straighter, continuous horizontal lines.
Step 3: Finishing and Sealing
-
Dry thoroughly:
Let the vase dry completely. This may take 2-4 days depending on humidity. Rotate it occasionally so it dries evenly. -
Sand for perfection:
Once bone dry, use fine-grit sandpaper to gently smooth any rough burrs inside the carved grooves. Be gentle to maintain the ribbed definition. -
Wipe down:
Use a barely damp cloth or sponge to remove all sanding dust. -
Apply a natural wash (optional):
To match the beige, stone-like tone in the image, mix a tiny amount of diluted acrylic paint (a mix of white and raw sienna) and wash it over the vase, then wipe it back so pigment settles in the grooves. -
Seal the piece:
Apply two coats of clear matte acrylic sealer. This protects the finish and gives it that professional ceramic look.
Add a Speckled Look
Before sealing, flick a stiff-bristled toothbrush loaded with diluted brown paint over the vase. This mimics the look of stoneware clay with iron flecks.
Fill your new textured vessel with dried ornamental grasses to complete the serene, monochromatic aesthetic
Terracotta-Style Painted Vase
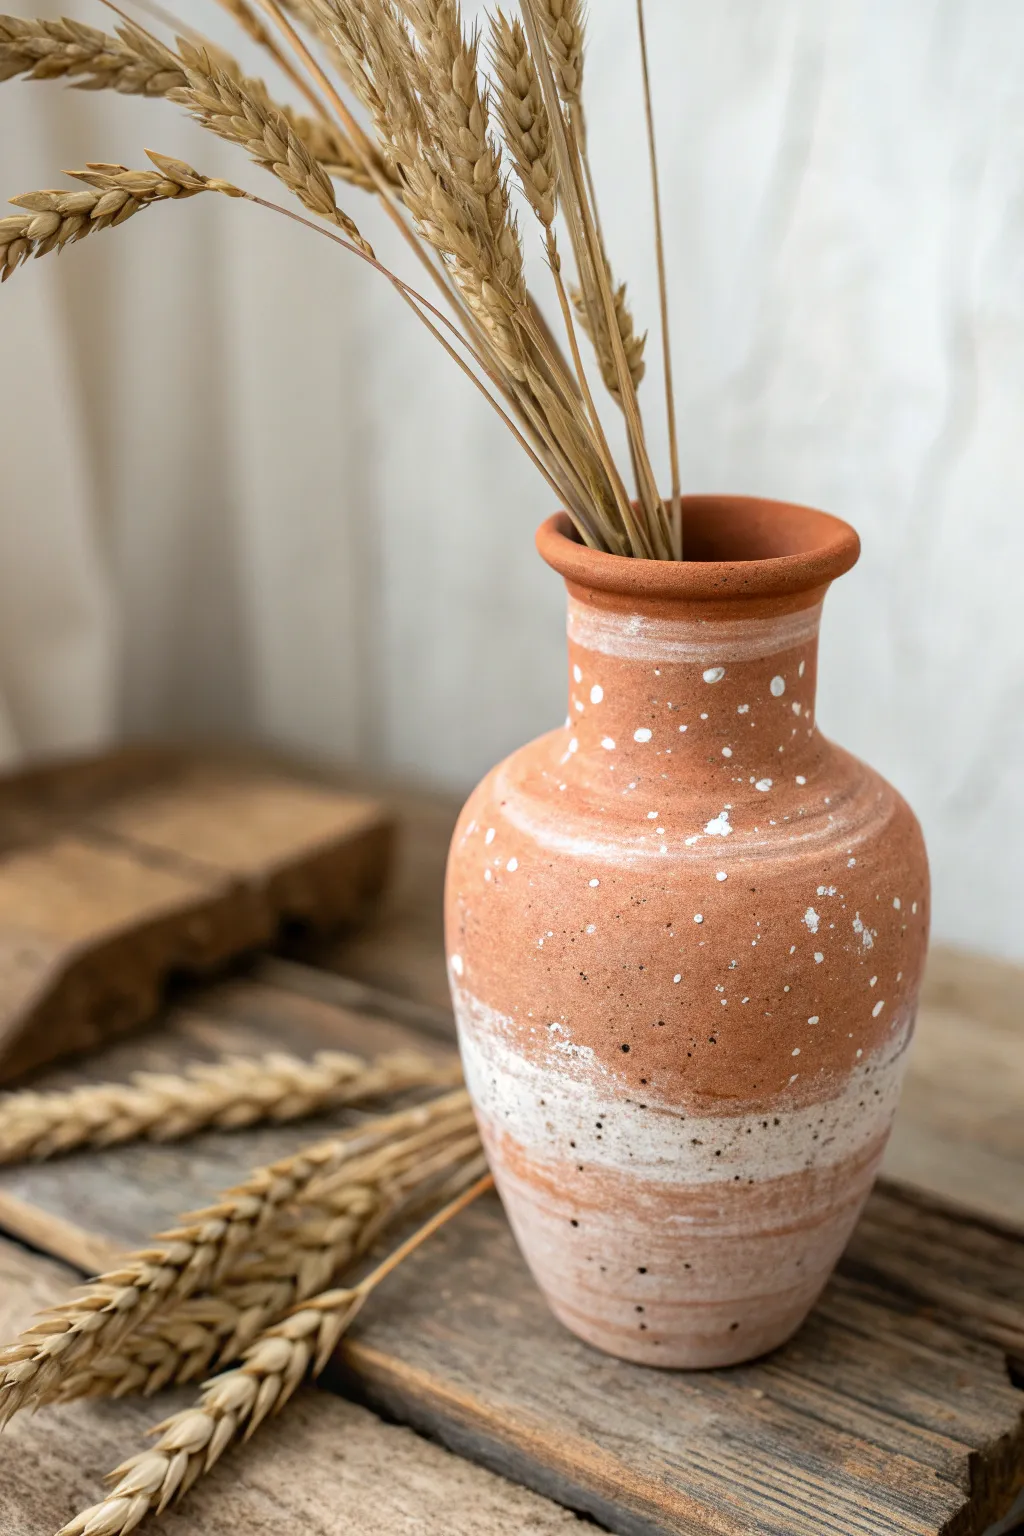
Recreate the rustic charm of aged pottery with this simple air dry clay project that mimics the warmth of terracotta. Using simple hand-building techniques and a clever paint application, you can achieve a wonderfully textured, earthen look perfect for dried botanicals.
Step-by-Step Tutorial
Materials
- Air dry clay (white or grey)
- Sponge or small bowl of water
- Rolling pin
- Clay sculpting tools (or a butter knife)
- Terracotta colored acrylic paint
- White acrylic paint
- Paintbrushes (medium flat brush and stiff bristle toothbrush)
- Fine grit sandpaper
- Matte spray sealant
Step 1: Sculpting the Form
-
Prepare the clay:
Begin by wedging a large ball of air dry clay to remove air bubbles. You want a smooth, pliable consistency before starting construction. -
Create the base:
Roll a small portion of clay into a ball, then flatten it into a circle about 3 inches wide. This disc will serve as the sturdy bottom of your vase. -
Roll your coils:
Take the remaining clay and roll it into long, even snakes about the thickness of your index finger. Keep them uniform to ensure the walls rise evenly. -
Build the first layer:
Place the first coil onto the outer edge of your base disc. Use your thumb or a modeling tool to smudge the clay downwards, blending the coil seamlessly into the base. -
Build the belly:
Continue stacking coils. To widen the vase (creating the ‘belly’ shape see in the photo), place each new coil slightly toward the outer edge of the one below it. -
Smooth as you go:
After every 2-3 coils, stop to blend the seams on both the inside and outside. I find using a slightly damp sponge helps wipe away fingerprints here. -
Narrow the neck:
Once the vase is as wide as you like, start placing coils slightly inward to taper the shape back in, creating the neck of the vessel. -
Form the rim:
Add a final, slightly thicker coil at the very top. Flare it outward gently with your fingers to create a defined lip. -
Create texture:
Instead of smoothing the surface perfectly, leave some subtle horizontal ridges or dab the clay with a stiff brush to mimic groggy earthenware. -
Dry completely:
Let the vase dry for at least 24-48 hours. It should turn a chalky white and feel room temperature (not cool) when fully dry.
Uneven Splatter?
If your paint splatter blobs too big, immediately dab it gently with a dry paper towel. This lifts the excess paint and leaves a softer mark.
Step 2: Painting the Terracotta Finish
-
Sand imperfections:
Gently sand any sharp burrs or unwanted bumps, but remember to keep the surface somewhat organic and rustic. -
Base coat:
Paint the entire exterior with your terracotta acrylic paint. You may need two coats for full opacity. -
Add the whitewash:
Mix a small amount of white paint with water (50/50 ratio). Dip a brush in, wipe most off, and dry-brush the bottom third of the vase horizontally. -
Layer the wash:
While the white wash is still wet, use a cloth to wipe some back, revealing the terracotta underneath. This creates that weathered, calcium-deposit look. -
Create the rim detail:
Lightly dry-brush a tiny amount of the watered-down white paint just under the rim of the neck to highlight the shape. -
Speckle effect:
Dip a stiff toothbrush into undiluted white paint. Hold it near the vase and flick the bristles with your thumb to spray fine droplets over the terracotta surface. -
Darker speckles:
Repeat the splatter process with a dark brown or black paint, but use this very sparingly to add depth and imitate real fired clay perfections. -
Seal the work:
Once all paint requires is bone dry, spray the vase with a matte clear coat to protect the finish without adding an artificial glossy shine.
Add Real Texture
Mix baking soda or coffee grounds into your terracotta paint base. This adds a gritty, physical texture that looks incredibly realistic.
Fill your new vessel with dried wheat or grasses to complete the warm, harvest-inspired aesthetic

TRACK YOUR CERAMIC JOURNEY
Capture glaze tests, firing details, and creative progress—all in one simple printable. Make your projects easier to repeat and improve.
Two-Tone Color-Blocked Vase
This project combines the raw, warm beauty of terracotta with a creamy, textured upper section for a stunning minimalist look. The speckled finish adds a touch of organic charm, making this vase feel like a high-end ceramic studio piece.
Step-by-Step Guide
Materials
- Air-dry clay (white or light grey)
- Terracotta air-dry clay (or terracotta acrylic paint)
- Rolling pin
- Clay sculpting tools (rib tool, sponge, needle tool)
- Water in a small bowl
- Sandpaper (medium and fine grit)
- Acrylic paint (warm cream/off-white)
- Dark brown or black acrylic paint (for speckles)
- Old toothbrush or stiff bristle brush
- Matte varnish or sealant
- Glass bottle or jar (to use as an internal form/armature)
Step 1: Building the Form
-
Prepare the armature:
Select a glass bottle or jar that matches the general height and width you want for your vase. This will act as a sturdy internal support since air-dry clay isn’t waterproof and needs structure. -
Roll out the base clay:
Start with your terracotta-colored clay. If you don’t have colored clay, use standard white clay and we will paint it later. Roll it out into a slab about 1/4 inch thick. -
Create the bottom base:
Cut a circle from your slab that is slightly larger than the base of your glass jar. Place the jar on top of this circle. -
Wrap the lower section:
Cut a rectangular strip of the terracotta clay long enough to wrap around the bottom third of the jar. Gently press it onto the jar and blend the seam where the ends meet using a little water and your finger. -
Blend the bottom seam:
Use a sculpting tool to firmly blend the clay wall into the base circle you created earlier. Smooth it upward so there is no visible separation between the wall and the floor of the vase. -
Add the upper section:
Roll out your white air-dry clay. Cut a larger rectangular strip to cover the remaining upper portion of the jar and the neck. Wrap this around the top two-thirds of the form. -
Join the two clays:
Where the white clay meets the terracotta clay, score both edges (scratch them up with a needle tool) and add a little water (slip). Press them together firmly. I like to drag a bit of clay across the seam to ensure a really strong bond. -
Shape the neck:
Gently mold the white clay around the neck of the bottle. Create a flared lip at the very top by pinching the clay slightly outward. Don’t worry about perfection; a little waviness adds character. -
Smooth the surface:
Dip a sponge in water and wring it out well. Wipe the entire surface of the vase to remove heavy fingerprints and smooth out the transition between the two clay colors (or the single clay body). -
Let it dry completely:
Air dry clay shrinks as it dries, so leave it in a cool, dry place for at least 24-48 hours. Keep it away from direct heat sources to prevent cracking.
Cracks happen?
If small cracks appear during drying, create a ‘slurry’ by mixing a scrap of clay with water until it’s a paste. Fill the cracks, smooth it over, and let it dry again before sanding.
Step 2: Finishing and Painting
-
Sand for texture:
Once fully dry, use medium-grit sandpaper to shape any uneven areas. Follow up with fine-grit sandpaper, but don’t over-polish; you want to maintain a slightly rough, stone-like texture. -
Paint the bottom section:
If you used white clay for the whole piece, paint the bottom third with a terracotta-colored acrylic paint. If you used colored clay, you can skip this step or enhance the color with a wash. -
Paint the top section:
Mix a warm cream or off-white acrylic paint. Apply two coats to the upper section of the vase, letting the first coat dry before applying the second. Be careful to create a clean, straight line where it meets the terracotta color. -
Detail the transition:
Look closely at the join line. If you want a more organic look, simulate a small indented ring or ‘belt’ line where the colors meet using the edge of a file or a dull knife, then touch up the paint. -
Prepare the speckle mix:
Dilute a small harsh of dark brown or soft black paint with water until it is quite runny and inky. -
Apply the speckles:
Dip an old toothbrush into the diluted paint. Hold it near the vase and run your thumb across the bristles to flick tiny droplets onto the surface. Rotate the vase to cover all sides evenly. -
Control the density:
Focus the speckles primarily on the white upper section, letting them fade out slightly as they reach the terracotta bottom for a cohesive look. -
Seal the project:
Once the paint is totally dry, apply a coat of matte varnish. This seals the clay and protects the paint job without adding an artificial gloss.
Faux Stone Texture
Mix a teaspoon of baking soda into your cream acrylic paint before applying it. This creates a grainy, ceramic-like texture that looks incredibly realistic once dry.
Place your dried stems or faux botanicals inside and enjoy the modern, handcrafted vibe this vase brings to your shelf
Speckled Terrazzo-Look Vase

Bring a touch of modern earthiness to your decor with this speckled vase that mimics the look of high-end terrazzo ceramics. Using simple air-dry clay and a clever painting technique, you can achieve this textured, artisanal finish without a kiln.
Detailed Instructions
Materials
- White air-dry clay (approx. 1kg)
- Glass bottle or jar (for armature)
- Rolling pin
- Clay knife or craft knife
- Small bowl of water
- Sponge
- Fine-grit sandpaper (220 grit)
- Acrylic paints: Cream/Off-white (base), Black, Burnt Sienna, Ochre/Yellow Oxide
- Old toothbrush
- Small round paintbrush (size 2 or 4)
- Matte varnish or sealant
Step 1: Building the Form
-
Prepare the workspace:
Lay down parchment paper or a canvas mat to prevent sticking. Knead your air-dry clay until it is warm, pliable, and free of cracks. -
Roll the slab:
Roll out a large slab of clay to an even thickness of about 1/4 inch. Ensure it is wide enough to wrap completely around your glass bottle armature. -
Wrap the base:
Place your glass bottle in the center of the slab. Carefully lift the clay and wrap it around the bottle, meeting at a vertical seam. Ideally, cut the excess clay first for a clean butt joint rather than overlapping. -
Seal the seam:
Score the edges where the clay meets (crosshatch marks), apply a little water, and press firmly together. Smooth the seam down with your thumb so it disappears. -
Shape the neck:
Mold the clay up towards the neck of the bottle. If your bottle narrows significantly, gently pinch and remove excess triangular wedges of clay to taper the shape without bunching. -
Create the rim:
Roll a thick coil of clay. Score and slip the top edge of your vase neck, then attach the coil. Flatten and flare it slightly outwards to create distinct, rounded lip shown in the photo. -
Smooth the surface:
Dip your sponge in a little water and run it over the entire vase to remove fingerprints and bumps. Allow the vase to dry completely, which usually takes 24-48 hours depending on humidity.
Uneven Seams?
If the seam cracks while drying, mix a tiny bit of fresh clay with water to make a paste (slip). Fill the crack, let it dry, then sand it flush.
Step 2: Refining and Priming
-
Sand imperfections:
Once fully dry, take your fine-grit sandpaper and gently buff the surface. Focus on the rim and any lingering seam marks to get that smooth, poured-ceramic look. -
Clean dust:
Wipe the vase down with a slightly damp cloth to remove all sanding dust. This is crucial for paint adhesion. -
Apply base coat:
Paint the entire vase with a cream or warm off-white acrylic paint. You may need two coats to get a solid, opaque finish that hides the raw clay color.
Step 3: The Terrazzo Effect
-
Prepare splatter paint:
Dilute a small amount of black acrylic paint with water until it reaches an ink-like consistency. It needs to be fluid enough to flick off a brush easily. -
Create fine speckles:
Dip an old toothbrush into the watered-down black paint. Point the bristles toward the vase and run your thumb across them to spray a fine mist of tiny dots. Rotate the vase to cover all sides. -
Paint medium spots:
Switch to your small round brush. Using undiluted black paint, randomly dab small, irregular dots over the dried splatter. Keep them sparse to leave room for colors. -
Add first color accent:
Using the Burnt Sienna (reddish-brown), paint slightly larger, irregular blobs scattered across the surface. I like to group a few near each other and leave other areas empty for a natural stone look. -
Add second color accent:
Repeat the process with the Ochre (mustard yellow) paint. These dots should vary in size—make some tiny like pinpricks and others about the size of a peppercorn. -
Review and balance:
Step back and look at the pattern. If an area looks too empty, add a few more black specks or a colored dot to balance the composition.
Texture Boost
Mix baking soda into your cream base paint before applying. This creates a grainy, stone-like texture that feels more authentic.
Step 4: Finishing
-
Dry completely:
Allow the paint layers to dry fully. The thicker dots may take a little longer than the base coat. -
Seal the work:
Apply a coat of matte varnish. A matte finish is essential here; a glossy finish will ruin the natural stone illusion you’ve created.
Place your dried floral stems inside and enjoy the sophisticated, handcrafted charm of your new vase
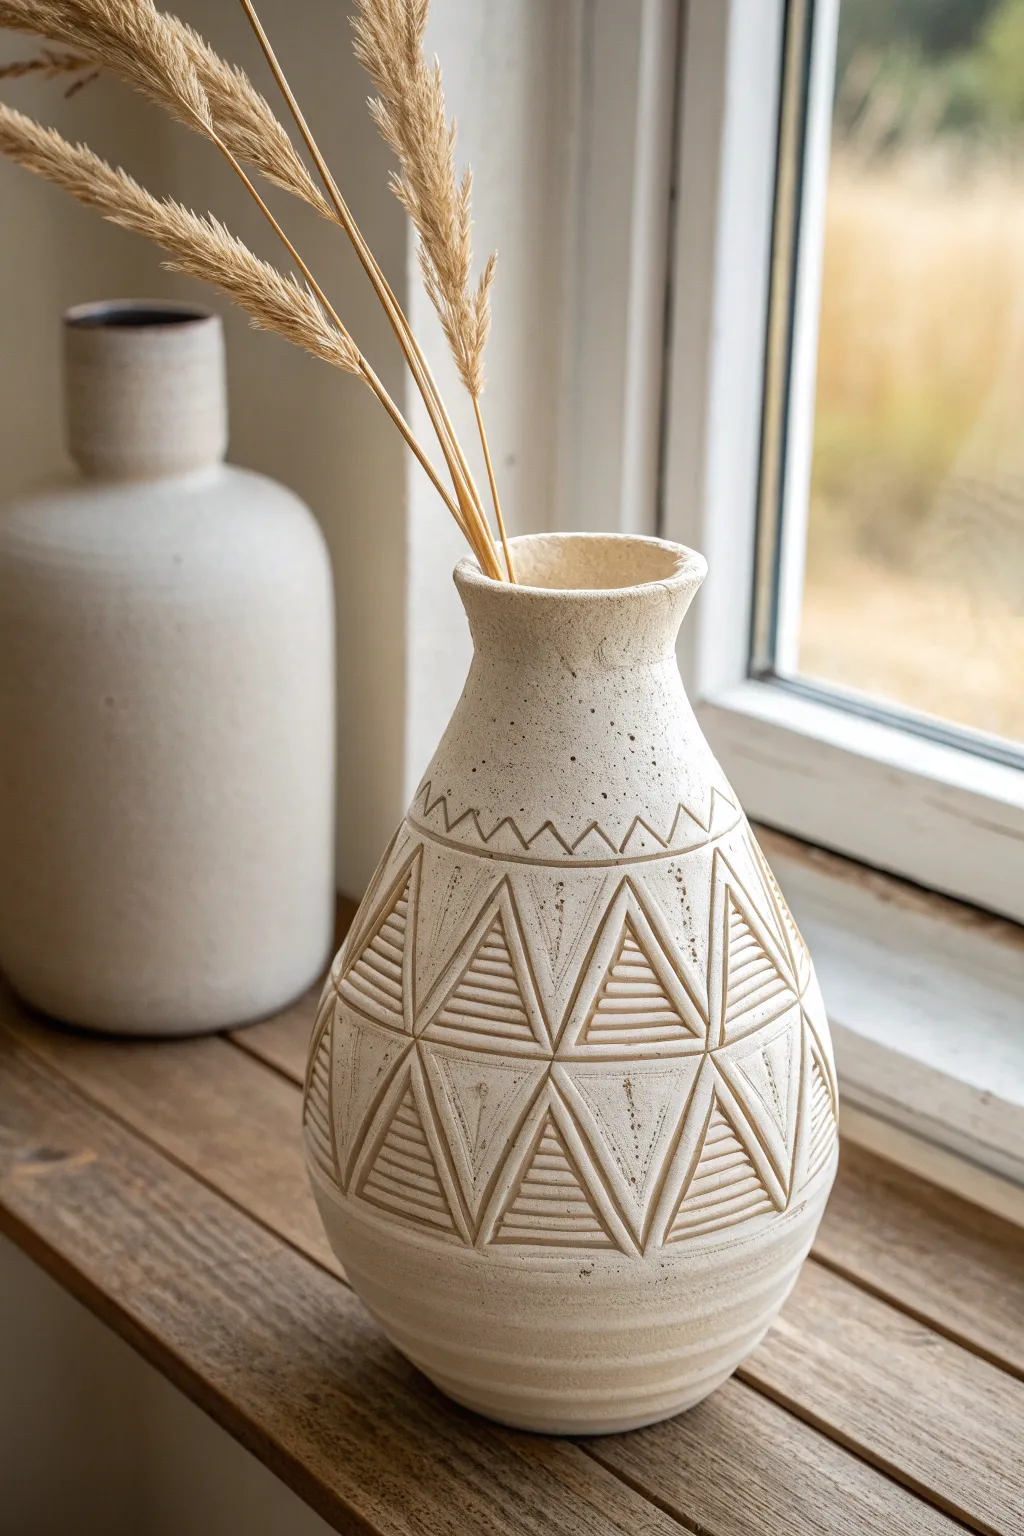
Stamped Pattern Vase With Repeat Motifs
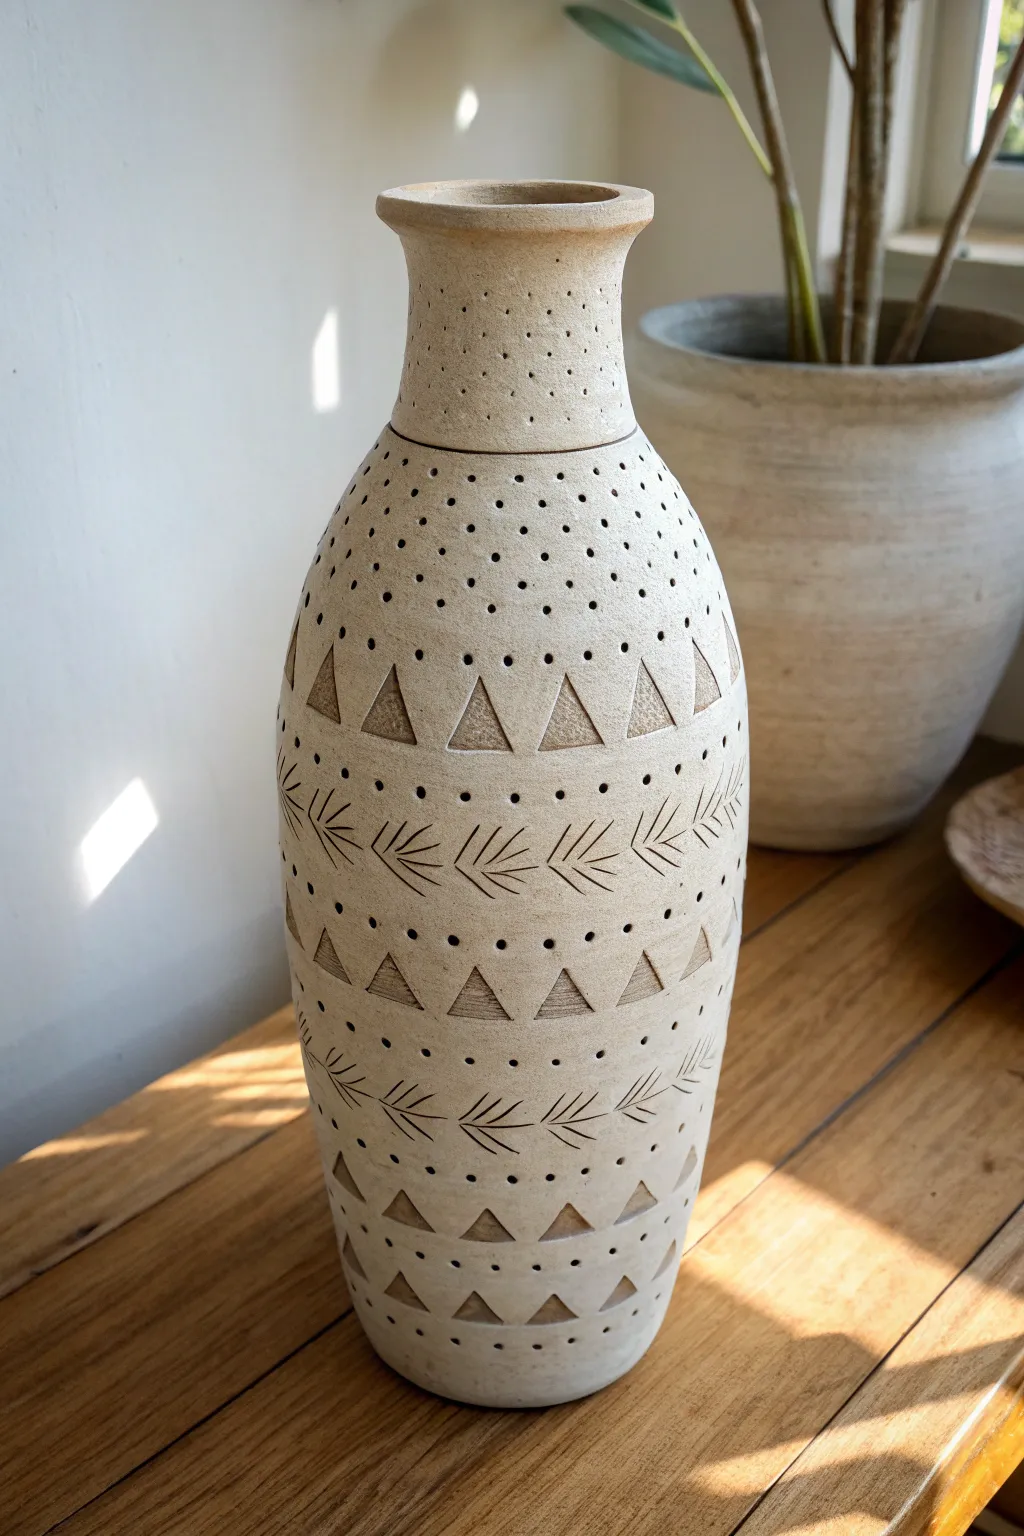
Bring earthy elegance to your home with this tall, textured vase featuring rythmic geometric patterns. By combining simple dots, carved triangles, and leaf motifs, you’ll create a piece that looks like authentic, wheel-thrown pottery using humble air dry clay.
How-To Guide
Materials
- White or natural air dry clay (approx. 2kg)
- Rolling pin
- Tall cylindrical mold form (glass jar or smooth plastic bottle)
- Clay knife or fettling knife
- Needle tool or toothpick
- Small triangular stamp (or linoleum cutter to carve one)
- Leaf/chevron shaped stamp (or carving tool)
- Small round piping tip (for dot impressions)
- Sponge and water
- Sandpaper (medium and fine grit)
- Clear matte varnish or sealant
Step 1: Forming the Base Structure
-
Prepare the Clay Slab:
Begin by wedging your air dry clay to remove air bubbles. Roll it out into a large, rectangular slab about 1/4 inch thick. Aim for an even thickness throughout to prevent cracking during drying. -
Cut to Size:
Measure the height and circumference of your cylindrical mold. Cut the clay slab to these dimensions, adding a slight overlap for the seam. -
Wrap the Form:
Carefully lift your clay slab and wrap it around your mold. Score the overlapping edges with a needle tool and add a dab of water (slip) to join them securely. -
Smooth the Seam:
Use your fingers or a modeling tool to blend the seam until it’s invisible. If the clay feels dry, I like to dampen my finger slightly to help the clay meld together smoothly. -
Shape the Neck:
To achieve the tapered neck shown in the image, gently squeeze and mold the top portion of the cylinder inward. Add a small coil of additional clay to the rim to create a flared lip, smoothing it seamlessly into the main body.
Step 2: Creating the Patterns
-
Map Out the Design:
Lightly score horizontal guidelines around the vase where each pattern band will sit. This ensures your triangles and leaves stay level as you work around the circumference. -
Detail the Neck:
Start at the top neck section. Using a needle tool or a very small round piping tip, press random, scattered dots into the clay surface. Keep the pressure light to create texture without puncturing through. -
Carve the Upper Dots:
Moving down to the shoulder area, press a dense field of organized dots. These should be more uniform than the neck texture, creating a distinct ‘pebbled’ zone before the main patterns start. -
Stamp the Triangles:
For the triangle bands, press your triangular stamp into the clay. If you don’t have a stamp, use a knife to outline triangles and a needle tool to scratch texture inside them, mimicking the rough look in the photo. -
Add Leaf Motifs:
Create the horizontal bands of leaf or chevron patterns in between the triangle rows. You can press a pre-made stamp or freely carve these V-shapes using a sharp carving tool, ensuring the ‘veins’ of the leaves are distinct. -
Fill the Gaps:
Return to your dotting tool and add lines of small dots between the major pattern bands. These serve as borders, visually separating the triangles from the leaf motifs. -
Repeat Downwards:
Continue alternating your bands—triangles, leaves, and dots—until you reach the bottom of the vase. Maintain consistent spacing for a cohesive look.
Cracks Appearing?
If hairline cracks appear while drying, mix a small amount of clay with water to create a thick paste. Fill the crack, smooth it over, and cover with plastic to dry slowly again.
Step 3: Finishing Touches
-
Slow Drying:
Place the vase in a cool, dry area away from direct sunlight. To prevent cracking, cover it loosely with plastic wrap for the first 24 hours to slow down the drying process. -
Remove the Mold:
Once the clay is leather-hard (firm but not fully dry), carefully slide out your internal mold. Let the vase continue drying completely, which may take 48-72 hours depending on humidity. -
Sand for Smoothness:
Use medium-grit sandpaper to smooth out any rough edges on the rim or base. Switch to fine-grit sandpaper to gently polish the surface without erasing your beautiful stamped textures. -
Enhance the Texture:
Wipe away all sanding dust with a slightly damp sponge. This step clarifies the carved lines and preps the surface for sealing. -
Seal the piece:
Apply two coats of clear matte varnish or sealant. This protects the clay and gives it that finished ceramic appearance, though remember it won’t be water-tight for fresh flowers.
Antique Wash Effect
Dilute brown acrylic paint with water and brush it over the texture. Wipe the surface immediately with a rag. The dark paint stays in the grooves, making the pattern pop.
Place your stunning new vase on a sunlit shelf to let those intricate shadows really shine
Leaf-Imprint Botanical Vase
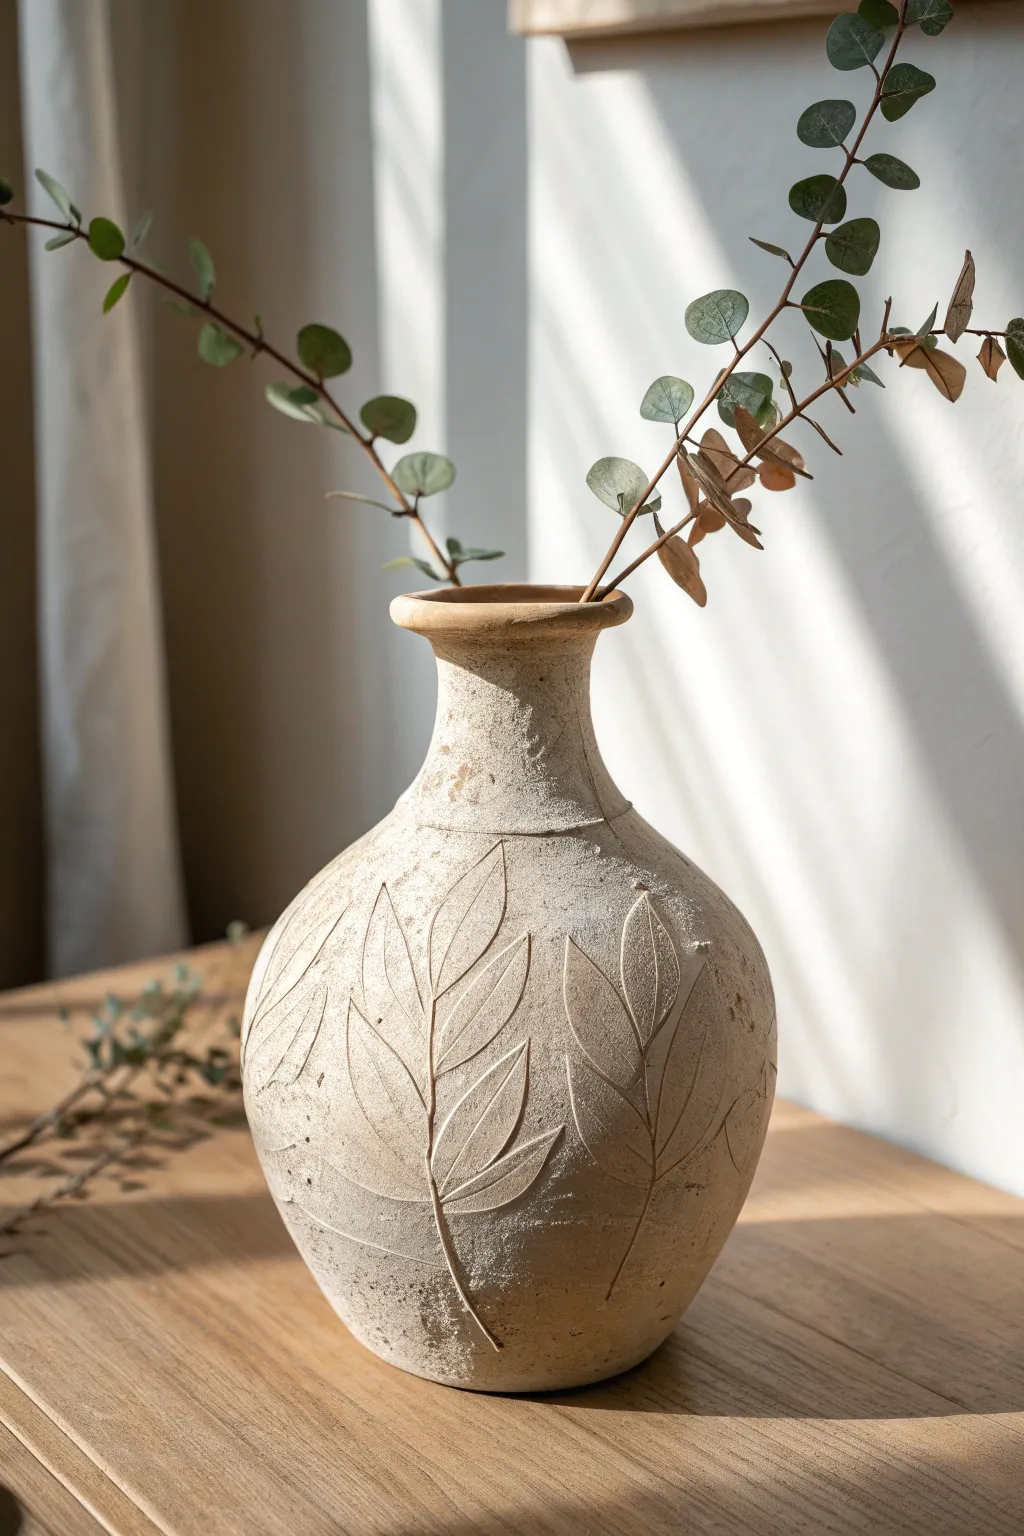
Embrace the raw beauty of natural textures with this stone-effect vase featuring elegant leaf carvings. The technique creates a rustic, aged pottery look using simple air dry clay and careful sculpting methods.
Detailed Instructions
Materials
- Air dry clay (white or grey, approx. 1kg)
- Glass or plastic bottle (to use as an internal armature)
- Rolling pin
- Clay carving tools (needle tool and loop tool)
- Small bowl of water
- Sponge
- Acrylic paints (cream, light beige, diluted brown)
- Baking soda (for texture)
- Fine grit sandpaper
- Paintbrushes (flat and detail)
- Matte sealant spray
Step 1: Forming the Base Structure
-
Preparation:
Clean your chosen glass or plastic bottle thoroughly. This will serve as the permanent armature inside your vase, ensuring it remains waterproof and holds its shape. -
Roll the slab:
Roll out a large slab of air dry clay to a thickness of about 1/4 inch (6mm). Aim for a rectangular shape that is tall enough to cover your armature bottle and wide enough to wrap around it fully. -
Wrap the armature:
Carefully lift your clay slab and wrap it around the bottle. Press the seam edges together firmly. I like to score (scratch) the edges and add a little water (slip) before joining to ensure a strong bond. -
Smooth the seams:
Using wet fingers or a damp sponge, smooth over the vertical seam until it disappears completely. Work the clay upwards to cover the neck and fold it slightly over the rim.
Fixing Cracks
If hairline cracks appear while drying, mix a small amount of fresh clay with water to make a paste (slip) and fill the gaps. Smooth over and let dry again.
Step 2: Sculpting the Shape
-
Build volume:
To achieve the rounded, bulbous shape shown in the image, add extra coils of clay around the lower/middle section. Blend these coils onto the surface thoroughly, smoothing them out to create a seamless, swollen belly. -
Refine the lip:
Add a thick coil of clay to the top rim. Flatten it slightly and flare it outwards to create that distinct, pottery-wheel style lip. Smooth the transition between the neck and the new rim. -
Create surface texture:
Instead of smoothing the clay perfectly, dab a stiff coarse sponge or a crumpled ball of aluminum foil all over the surface. This creates a stone-like, pitted texture.
Natural Texture
Instead of carving, press real leaves deeply into the wet clay and peel them away to leave an authentic, highly detailed botanical impression.
Step 3: Carving the Design
-
Sketch the leaves:
Once the clay has stiffened slightly (leather hard), use a needle tool to faintly sketch the outline of large, simple leaves rising from the base. -
Carve the stems:
Using a loop tool or a sharp sculpting knife, carve out the central stems of the leaves. Make the cut slightly deeper than the surrounding lines to emphasize the structure. -
Define the veins:
Carve the leaf outlines and internal veins. Use a beveling technique where you angle your tool to remove a thin sliver of clay, creating a distinct groove that catches the light. -
Clean up edges:
Use a slightly damp soft brush to gently sweep over your carvings. This softens any sharp crumbs of clay without erasing the definition of your lines.
Step 4: Finishing and Painting
-
Dry completely:
Allow the vase to dry fully. This usually takes 24-48 hours depending on humidity. The clay will turn white and feel hard to the touch. -
Mix textured paint:
Mix a cream or light beige acrylic paint with a teaspoon of baking soda. This mixture creates a gritty, faux-ceramic finish when applied. -
Base coat:
Paint the entire exterior of the vase with your textured mixture. Use a dabbing motion rather than long strokes to enhance the rough surface. -
Aging wash:
Create a wash by heavily diluting brown acrylic paint with water. Brush this into the carved leaf crevices and surface textures. -
Wipe back:
Immediately wipe the high points of the vase with a clean cloth or paper towel. The dark wash will remain in the carved grooves and texture pits, highlighting the design. -
Seal the work:
Finish with a coat of matte spray sealant to protect the paint job and give the piece a unified, professional appearance.
Place your favorite dried stems inside and enjoy the serene, natural accent you’ve created for your home
Stone-Like Rough Texture Vase
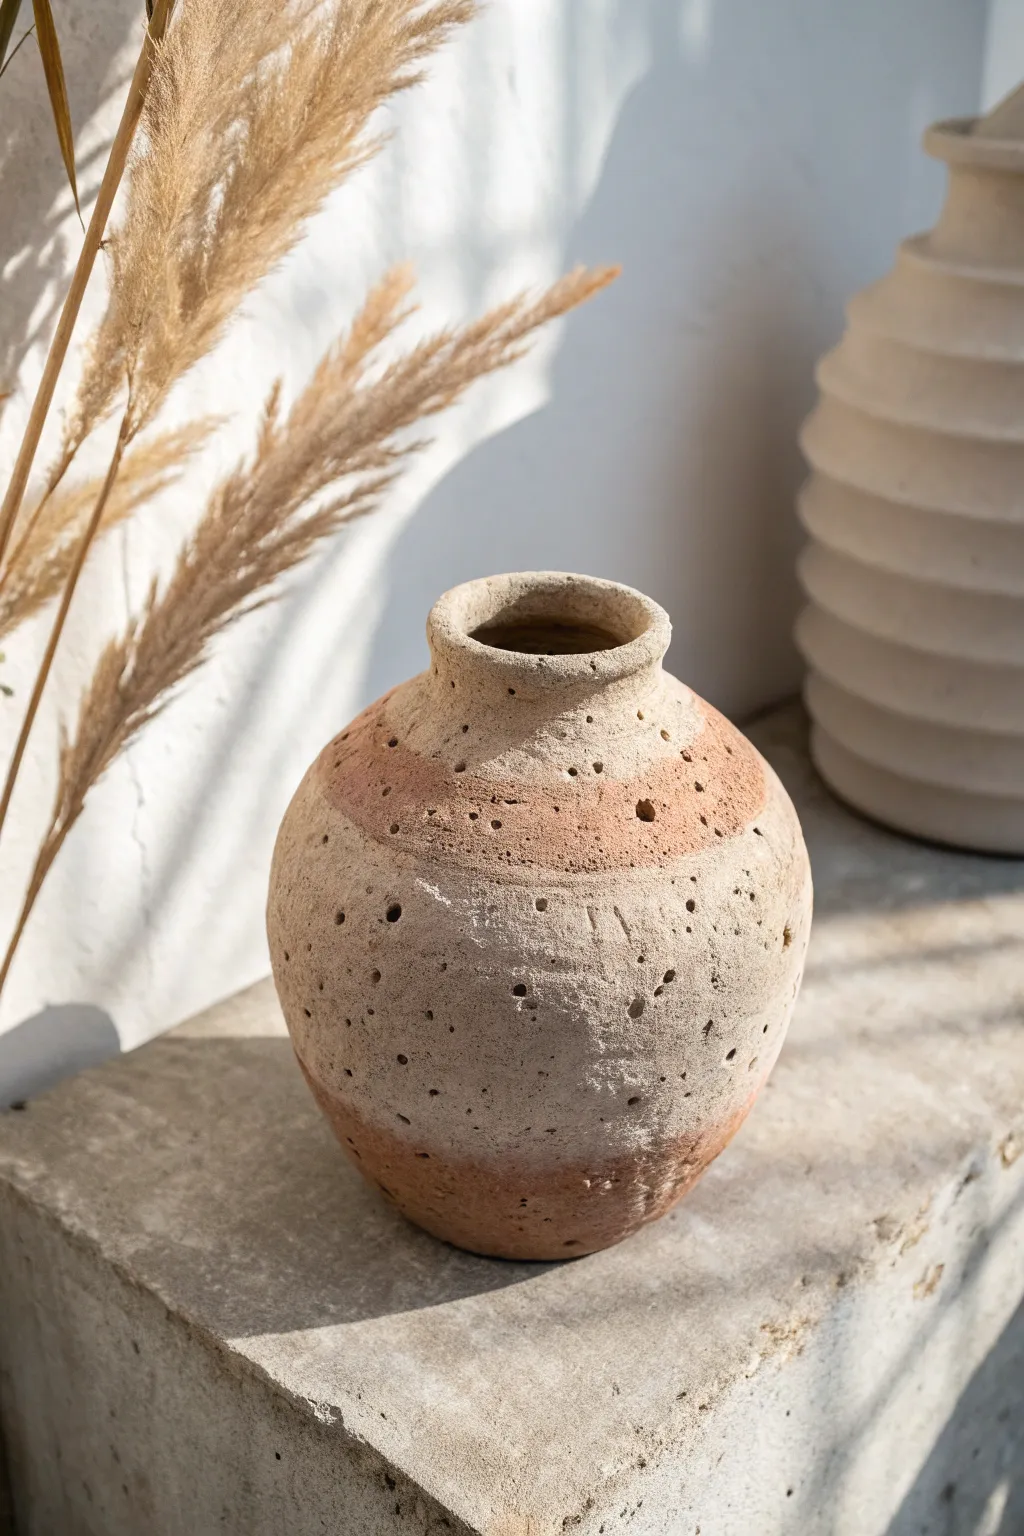
Capture the essence of an ancient archaeological find with this heavily textured air-dry clay vessel. The rough, pitted surface and warm, tri-color earth tones give it the look of weathered sandstone or aged terracotta.
Step-by-Step Tutorial
Materials
- Air-dry clay (white or light grey)
- Terracotta colored acrylic paint
- Cream/Beige acrylic paint
- Baking soda or fine sand
- Coarse salt (for texture)
- Old toothbrush or stippling brush
- Needle tool or toothpick
- Sponge
- Water
- Rolling pin
- Cardboard or plastic workspace mat
Step 1: Shaping the Vessel
-
Form the base:
Start with a large ball of air-dry clay, roughly the size of a grapefruit. Flatten the bottom slightly on your work surface by tapping it down gently so it stands upright without rolling. -
Create the pinch pot:
Insert your thumb into the center of the ball, pushing down until you are about half an inch from the bottom. Begin pinching the clay walls between your thumb and fingers, rotating the ball as you go to thin out the walls evenly. -
Build the belly:
Continue pinching while pushing the clay outward from the inside to create a bulbous, round shape. Aim for the widest point to be slightly below the center of the vase. -
Narrow the neck:
As you move upward, begin gathering the clay inward to form the neck. You can do this by gently collaring the clay—cupping your hands around the top and squeezing lightly while rotating the pot. -
Flare the rim:
Once the neck is narrow, use your thumb to gently push the very top edge outward to create a small, distinct lip. Smooth the rim with a damp finger to prevent cracking.
Natural Pits
Press coarse rock salt into the wet clay. Once dry, brush with a little water to dissolve the salt crystals, leaving behind jagged, realistic craters.
Step 2: Texturing and Distressing
-
Apply the initial texture:
Before the clay dries, take an old toothbrush or a stiff-bristled brush and vigorously tap the entire surface of the vase. Don’t brush it; stipple it straight up and down to create a rough, limestone-like skin. -
Create deep pitting:
For that aged, volcanic stone look, use a needle tool or the end of a paintbrush to poke holes of varying sizes randomly across the surface. Focus on clustering some holes together for a natural, organic appearance. -
Embed coarse material:
If you want extra grittiness, press coarse salt or sand into the wet clay surface now. The salt will eventually dissolve or fall out, leaving interesting divots, while sand adds permanent grit. -
Allow to dry:
Let the vase dry completely. This creates a solid base for painting. Depending on the humidity and thickness, this may take 24 to 48 hours.
Step 3: Painting the Tri-Tone Effect
-
Mix the texture paint:
Mix your cream acrylic paint with a tablespoon of baking soda. The baking soda acts as a thickening agent and adds a gritty, matte finish that mimics stone perfectly. -
Paint the middle band:
Apply this thick cream mixture to the center section of the vase. Don’t worry about neat lines; a rough, uneven edge looks more authentically ancient. -
Mix the terracotta tone:
Prepare your terracotta color. I like to mix a little brown into standard orange paint to dull it down. Mix this with baking soda as well. -
Apply the top and bottom bands:
Dab the terracotta mixture onto the bottom third and the top shoulder/neck area of the vase. Blend the transition areas slightly by stippling the wet paints into each other using a dry sponge. -
Enhance the pits:
Once the paint is dry, use a dark grey or brown wash (paint diluted heavily with water) and brush it over the pitted areas. Quickly wipe the surface with a paper towel, leaving the dark pigment inside the holes to accentuate the depth. -
Dusting finish:
For a final dusty look, dip a dry brush into a tiny amount of white paint and lightly graze it over the highest points of the texture.
Make it Waterproof
Since air-dry clay isn’t water-tight, insert a small glass jar or plastic cup inside the finished vase if you plan to hold fresh flowers.
Place your new artifact on a sunlit shelf to highlight its rugged, timeless texture
Carved Geometric Linework Vase
Embrace the beauty of raw texture with this bohemian-inspired vase project, featuring intricate-looking geometric carvings that are surprisingly simple to execute. The result is a stunning, matte cream vessel with deep, earthy grooves that mimics high-end artisanal pottery.
Step-by-Step
Materials
- White or cream air-dry clay (approx. 1kg)
- Wide-mouth glass bottle or plastic vase (to use as an armature)
- Rolling pin
- Carving tools (V-gouge, needle tool, or clay loop tool)
- Sponge
- Water cup
- Fine-grit sandpaper
- Acrylic paint (cream/off-white and light ochre/brown)
- Matte spray varnish
Step 1: Building the Form
-
Prepare the Armature:
Select a glass jar or bottle that has the general shape you want—a bulbous base and a slightly narrower neck works best. Clean and dry the surface so the clay adheres initially without sliding. -
Roll Surface Slabs:
Roll out your air-dry clay on a clean surface to about 1/4 inch thickness. You don’t want it too thin, or it will crack when you carve into it later. -
Cover the Base:
Cut a circle for the bottom of your armature and press it firmly onto the glass. Then, cut rectangular slabs to wrap around the main body of the vase. -
Blend the Seams:
As you wrap the clay around the form, overlap the edges slightly. Use a little water and your thumb to vigorously smooth the seams until they completely disappear and the clay feels like one solid piece. -
Shape the Neck:
Add a separate coil or strip of clay to the top to form the vase neck and rim. Flare it out slightly with your fingers to match the silhouette in the photo. -
Create Texture:
Using a slightly damp sponge, wipe down the entire vase. You aren’t aiming for perfection here; the slightly speckled, rough texture adds to the stone-like effect.
Stubborn Seams?
If seams reappear while drying, mix a small ‘slip’ (clay + water paste) and fill the cracks immediately. Smooth over with a damp finger and let dry again.
Step 2: Carving the Design
-
Initial Drying Phase:
Let the vase sit for about 1-2 hours. It needs to be ‘leather hard’—firm to the touch but still cold and carveable—before you start the design. -
Mark Guidelines:
Lightly trace a horizontal line around the shoulder of the vase with a needle tool. I find it helpful to place the vase on a lazy susan to get a continuous line. -
Carve the Zig-Zag:
Using your V-gouge or a sharp knife, carve a continuous zig-zag pattern just below the neck. Keep the cuts shallow but distinct. -
Outline the Main Triangles:
Below the zig-zag, use a needle tool to lightly sketch large triangles that alternate (pointing up and pointing down) around the entire belly of the vase. -
Deepen the Outlines:
Go back over your triangle outlines with the carving tool to create deep, V-shaped grooves. These will form the main structure of the geometric pattern. -
Add Inset Details:
Inside the upward-pointing triangles, carve horizontal lines that get progressively smaller towards the top. Inside the downward-pointing triangles, carve smaller nested triangles. -
Clean Up Crumbs:
Use a soft, dry paintbrush to sweep away the little balls of clay debris (burrs) created by carving. Don’t smudge them back into the surface.
Level Up: Faux Stone
Mix a small amount of literal baking soda into your cream acrylic paint. This creates a gritty, calcified texture that looks incredibly like real stoneware.
Step 3: Finishing Touches
-
Full Dry:
Allow the vase to dry completely for 24-48 hours. The clay should turn pure white and feel room temperature, not cold. -
Sand Imperfections:
Gently sand the rim and any sharp peaks on the carving with fine-grit sandpaper. Be careful not to sand away the texture you deliberately created. -
Apply Base Color:
Paint the entire vase with an off-white or cream acrylic paint. Dab the paint into the crevices to ensure full coverage. -
Antique the Grooves:
Mix a diluted wash of light ochre or brown paint. Brush it into the carved lines, then immediately wipe the surface with a damp cloth, leaving the darker color only in the deep recesses. -
Speckle Effect:
Dip an old toothbrush into diluted brown paint and flick the bristles with your thumb to spray tiny speckles over the vase for a ceramic stone look. -
Seal:
Finish with a coat of matte spray varnish to protect the surface and lock in the paint.
Place your favorite dried grasses inside and display your handcrafted artifact on a sunny windowsill
Scalloped Edge Mini Vase Set
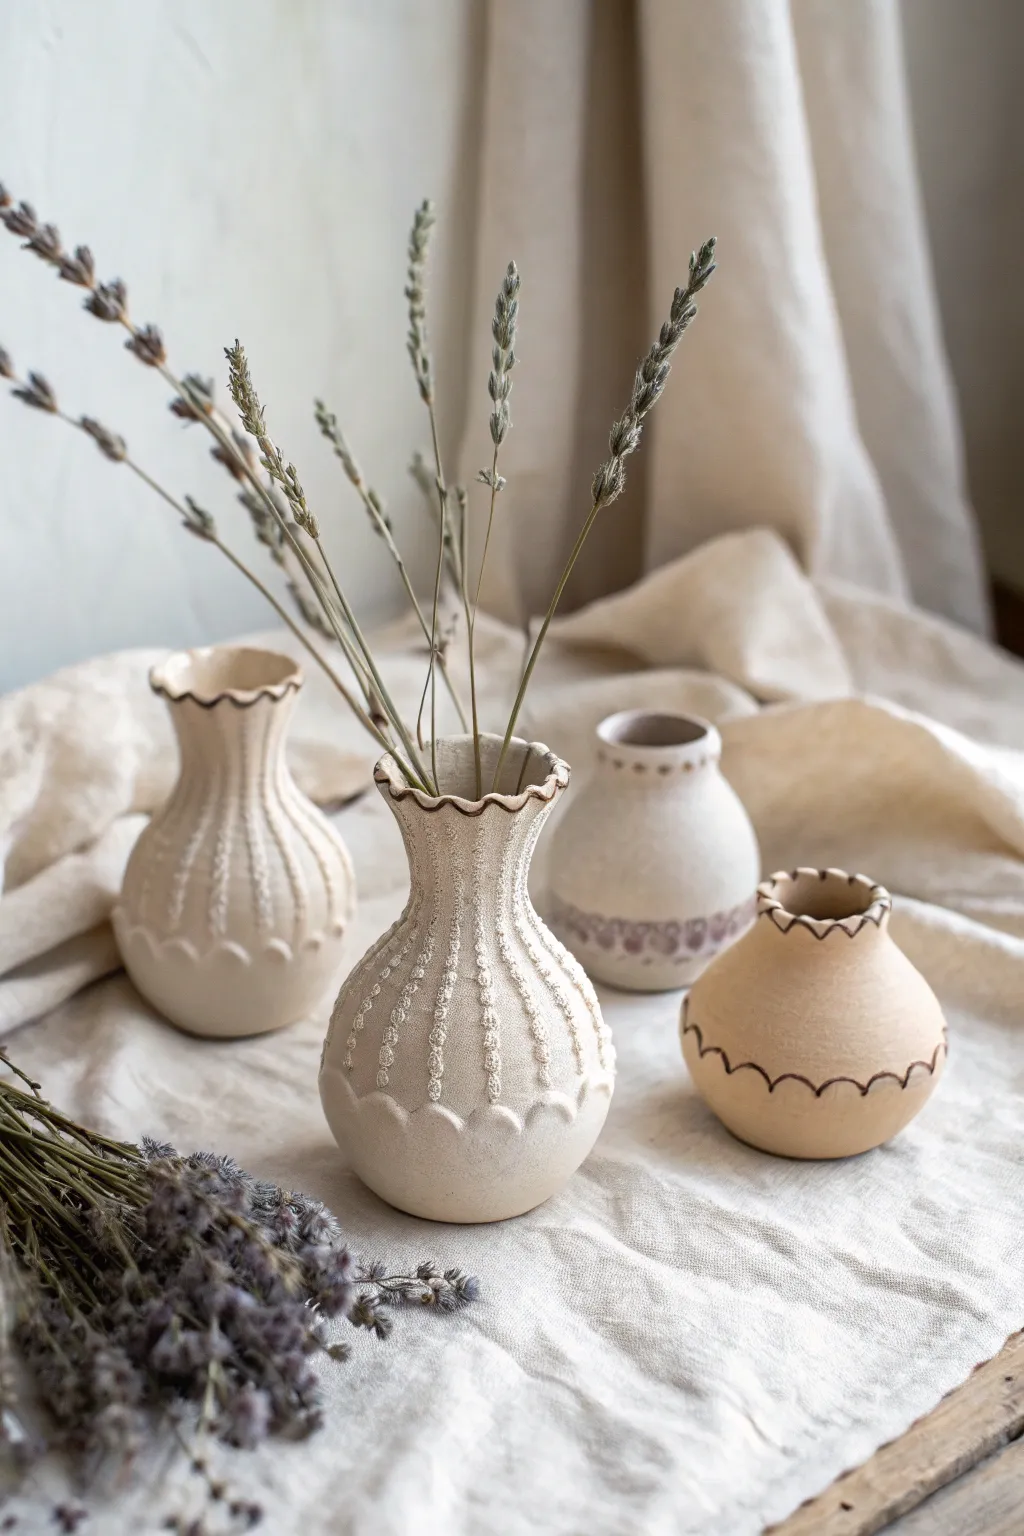
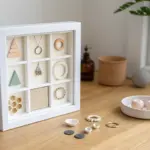
These charming miniature vases combine organic textures with delicate scalloped detailing for a look that feels both handmade and refined. The raised vertical patterns and wavy rims create a beautiful play of light and shadow, perfect for displaying dried sprigs or lavender.
Detailed Instructions
Materials
- Air dry clay (white or cream)
- Small rolling pin
- Pottery sponge
- Needle tool or toothpick
- Small cup of water (slip)
- Piping bag with fine tip (or makeshift plastic bag)
- Fine grit sandpaper
- Brown acrylic paint or brown ink
- Detail paintbrush (size 0 or 00)
- Matte spray varnish
Step 1: Shaping the Base Vases
-
Create the pinch pots:
Start by rolling balls of clay roughly the size of a tangerine for the shorter vases and a large orange for the taller ones. Press your thumb into the center and gently pinch the walls upward while rotating the ball to form a basic hollow shape. -
Refine the forms:
For the taller vases, gently squeeze the neck inward to create an hourglass silhouette, flaring the rim slightly outward. For the shorter vases, keep them round and bulbous, tapping the bottom on the table to create a flat, stable base. -
Smooth the surfaces:
Dip your finger or a slightly damp sponge into water and run it over the exterior to remove any fingerprints or cracks. Aim for a smooth, matte finish before moving on to detailing.
Cracks while drying?
Mix a tiny amount of fresh clay with water to make a ‘slip’ paste. Use a brush to fill the cracks, smooth it over with a wet finger, and let it dry again.
Step 2: Adding Texture & Relief
-
Prepare paper clay slip:
Take a small chunk of your clay and mix it with water in a separate container until it reaches a thick paste consistency, like frosting. I find crushing the clay into small bits first speeds up this process. -
Load the piping tool:
Transfer your clay paste into a piping bag with a very fine tip (or use a sandwich bag with the tiniest corner snipped off). -
Pipe vertical lines:
On the taller vases, pipe vertical lines running from just below the neck down to the belly of the vase. Space them evenly around the circumference. -
Add texture dots:
While the piped lines are wet, use a needle tool to gently indent them at regular intervals, creating a ‘beaded’ or rope-like texture along each strip. -
Create the scalloped rim:
For the fluted top edges, pinch the clay rim between your thumb and forefinger at regular intervals to create a wavy, scalloped shape. Smooth the edges with a wet finger so they aren’t sharp. -
Carve bottom scallops:
On the base of the taller vases, you can use a loop tool or the back of a knife to gently carve a scalloped relief pattern near the bottom edge.
Make it watertight
Air dry clay isn’t waterproof. To use fresh flowers, insert a small plastic test tube or pill bottle inside the vase to hold the water safely.
Step 3: Drying and Refining
-
Allow to dry:
Let the vases sit in a dry, room-temperature area for 24-48 hours. Turn them occasionally to ensure the bottoms dry evenly. They should turn chalky white when fully dry. -
Sand imperfections:
Once fully cured, use fine-grit sandpaper to gently smooth the rim and any rough patches on the body. Be very careful around the piped texture to avoid sanding it off. -
Dust off debris:
Use a dry, soft brush to wipe away all clay dust before painting.
Step 4: Painting and Finishing
-
Mix the edging color:
Dilute a small amount of dark brown acrylic paint with a drop of water to make it flow like ink. -
Paint the rim:
Using your finest detail brush, carefully paint a thin, dark line along the very edge of the scalloped top rim. A shaky hand actually adds to the rustic charm here. -
Paint surface patterns:
For the shorter round vase, paint a scalloped line pattern around the belly or base to mimic the relief texture of the taller vases. -
Final seal:
Spray the vases with a matte varnish to protect the paint and seal the clay. Apply two light coats rather than one heavy one to avoid drips.
Place your dried lavender stems inside and enjoy the organic warmth these pieces add to your space
Twisted Neck Sculptural Vase
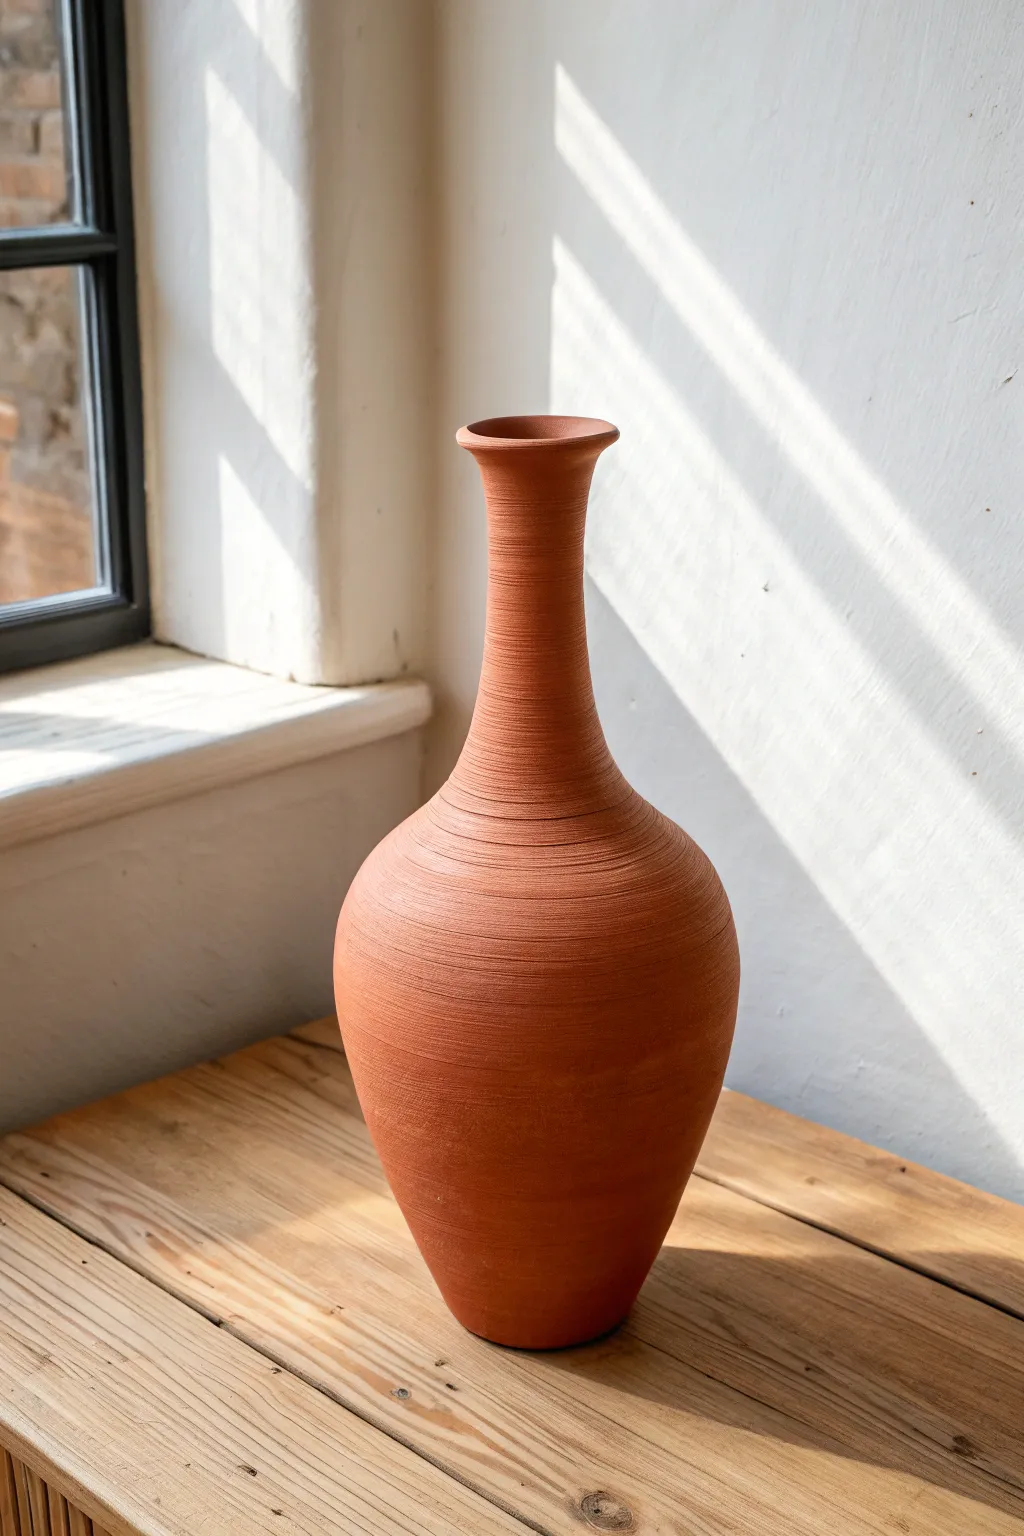
This project captures the rustic warmth of traditional pottery with an elegant, elongated silhouette. The distinct horizontal striations create a subtle texture that mimics the look of a wheel-thrown vessel without needing any heavy machinery.
Step-by-Step
Materials
- Terracotta-colored air dry clay (2-3 lbs)
- Wide-mouth glass bottle (as an armature)
- Rolling pin
- Pointed pottery tool or sculpting needle
- Sponge
- Bowl of water
- Slip (clay mixed with water)
- Sandpaper (fine grit)
- Wire clay cutter
- Matte sealant spray
Step 1: Building the Armature
-
Select your base:
Choose a tall, narrow glass bottle to serve as the internal support structure. A wine bottle or olive oil bottle works perfectly for this elongated shape. -
Prepare the clay:
Cut off a substantial chunk of orange or terracotta-colored air dry clay using your wire cutter. Knead it until it is warm and pliable to prevent cracking later. -
Roll the base slab:
Roll out a flat slab of clay approximately 1/4 inch thick. Cut a circle slightly larger than the bottom of your glass bottle. -
Attach the base:
Place the bottle onto the clay circle. Score the edges of the clay and apply a little slip, then pull the excess clay up slightly onto the glass to secure it.
Clean Lines Pro-Tip
Don’t have a pottery wheel? Place your vase on a piece of paper on a table. Rotate the paper slowly with one hand while holding your carving tool steady with the other.
Step 2: Forming the Body
-
Roll coils:
Roll several long, even snakes of clay, keeping them about the thickness of your thumb. -
Begin coiling:
Starting at the bottom edge where you attached the base, begin wrapping the coil around the bottle, working your way upward. -
Blend the seams:
As you stack the coils, use your thumb or a modeling tool to smudge the clay downward on the inside (against the glass) and upward on the outside to deliver a seamless surface. -
Build outward:
To create the bulbous bottom shape shown in the image, add extra clay thickness around the lower half of the bottle. I like to paddle this area gently with a flat wooden tool to ensure it is symmetrical. -
Taper the neck:
As you move up the bottle toward the neck, gradually reduce the amount of clay you add, hugging the bottle tightly to create that slender, elongated profile.
Step 3: Adding the Rim and Texture
-
Form the rim:
At the very top, add a final coil that flares out slightly. Smooth it carefully to create a clean, rounded lip that overhangs the neck just a bit. -
Smooth the surface:
Dip your sponge in water (wring it out well) and wipe down the entire vase to remove fingerprints and major bumps. The surface should be relatively smooth before texturing. -
Create the striations:
Using a pointed sculpting tool or needle, place the vase on a banding wheel or lazy susan if you have one. If not, slowly rotate the vase manually. -
Etch the lines:
Hold your tool steady against the clay and rotate the vase to carve shallow horizontal lines. Start from the bottom and work your way up to the rim. -
Vary the pressure:
Intentionally vary your pressure slightly; you want these lines to look organic and hand-thrown, not mechanically perfect.
Clay Shrinkage Alert
Air dry clay shrinks as it dries. If using a glass armature, wrap the bottle in a thin layer of cling film first so the clay can slide slightly without cracking against the unyielding glass.
Step 4: Finishing Touches
-
Initial dry:
Let the vase sit for about an hour until the clay is leather-hard. This prevents the texture from getting smudged while you do final checks. -
Refine the texture:
Once firm, lightly run a dry finger over the textured lines to knock off any sharp crumbs of clay without smoothing away the grooves. -
Full dry:
Allow the vase to dry completely for 24-48 hours. Keep it away from direct heat sources to dry evenly. -
Sand the rim:
Use fine-grit sandpaper to gently smooth just the very top rim of the vase, ensuring there are no rough edges. -
Seal:
Finish with a matte spray sealant to protect the clay and deepen the terracotta color without adding an artificial sheen.
Now you have a stunning, artisanal centerpiece that brings a touch of earthy elegance to your windowsill
Face-Detail Modernist Vase
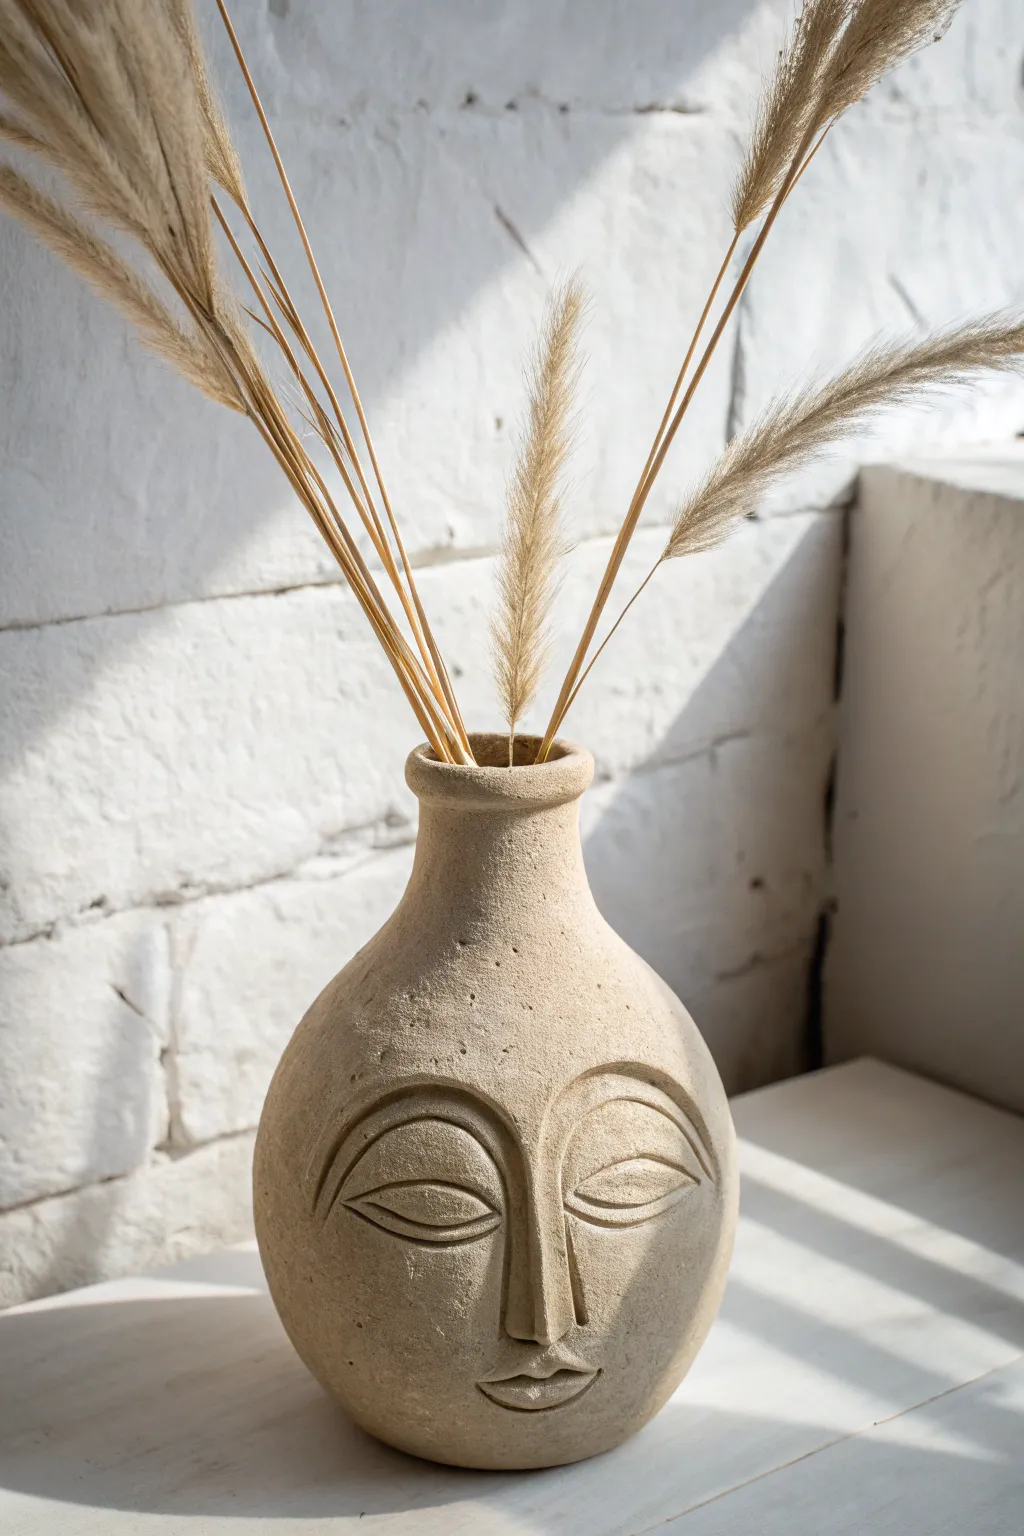
Embrace the beauty of modern minimalism with this textured, face-detailed vase that looks like high-end stoneware. The air-dry clay technique creates an organic, matte finish perfect for displaying dried pampas grass or wheat stems.
How-To Guide
Materials
- White or beige air-dry clay (approx. 2 lbs)
- Round glass bottle or jar (as an armature)
- Rolling pin
- Modeling tools (or a butter knife and spoon)
- Small bowl of water
- Sponge
- Sandpaper (fine grit)
- Acrylic paint (beige/stone color, optional)
- Baking soda (for texturing paint, optional)
Step 1: Building the Base Form
-
Prepare the workspace:
Lay down a canvas cloth or non-stick mat to work on. Knead your air-dry clay until it is pliable and warm, which reduces the chance of cracks forming later. -
Roll out the slab:
Use your rolling pin to flatten a large portion of clay into a consistent slab, roughly 1/4 inch thick. Aim for a rectangular shape that is tall enough to wrap around your chosen glass armature. -
Wrap the armature:
Place your glass bottle in the center of the slab and gently wrap the clay around it. Cut off any excess clay, leaving just enough to join the seam. -
Seal the seam:
Score the overlapping edges of the clay (scratch cross-hatch marks), dampen with a little water, and press them firmly together. Smooth the join with your thumb until the seam disappears. -
Shape the neck:
Gently squeeze and mold the clay around the neck of the bottle to taper it inward. If your bottle has a wide mouth, you can build up the neck higher with a coil of clay to create that narrow, elegant opening shown in the photo. -
Refine the rim:
Roll a small coil of clay and attach it to the very top rim. Smooth it down to create a rounded, slightly thickened lip for a finished look.
Cracks Appearing?
Make a ‘slip’ paste by mixing clay scraps with water. Fill any cracks that appear during drying with this paste, let dry, and sand smooth.
Step 2: Sculpting the Features
-
Map out the face:
Lightly trace the facial features onto the clay surface using a needle tool or toothpick. Center the nose vertically and mark large almond shapes for the eyes. -
Form the nose:
Roll a small carrot-shaped piece of clay. Score and slip the area where the nose will go, then press the clay onto the vase. Blend the edges seamlessly into the ‘cheeks’, keeping the bridge straight and distinct. -
Create the eyes:
Roll two thin coils of clay for the upper eyelids and two slightly thinner ones for the lower lids. Attach them over your traced eye outlines to create raised, sleepy almond shapes. -
Define the eyelids:
Using a modeling tool, carve a distinct crease above the upper eyelid coil to create depth. I find smoothing this line with a slightly damp brush helps it look like carved stone rather than added clay. -
Add the mouth:
Attach a very small, flattened oval of clay below the nose. Use a knife tool to press a horizontal line across the center, creating the separation for the lips.
Step 3: Texturing and Finishing
-
Add texture:
Take a stiff-bristled brush or a crumpled ball of aluminum foil and gently tap it all over the vase’s surface. This stippling effect mimics the gritty look of sandstone or concrete. -
Dry thoroughly:
Let the vase sit in a dry, cool area for 24 to 48 hours. Rotate it occasionally so all sides dry evenly. -
Sand imperfections:
Once fully cured, use fine-grit sandpaper to knock down any sharp burrs or incredibly rough patches, while preserving the stone texture you created. -
Create stone paint:
Mix a beige acrylic paint with a teaspoon of baking soda. This mixture will fluff up and create a grainy, matte finish. -
Paint the vase:
Apply the baking soda paint mixture in a dabbing motion rather than long strokes. This enhances the faux-stone effect. -
Highlight features:
While the paint is still slightly tacky, wipe a dry paper towel gently over the raised areas (nose, eye lids) to create subtle highlights and depth. -
Seal (Optional):
If you want extra protection, apply a matte varnish spray, though leaving it raw maintains the most authentic stone look.
Make It Ancient
Dilute brown paint with lots of water to make a ‘wash’. Brush it over the dry vase and wipe it off immediately to darken the crevices.
Now you have a stunning, museum-worthy piece ready to display your favorite dried botanicals
Abstract Body-Form Vase
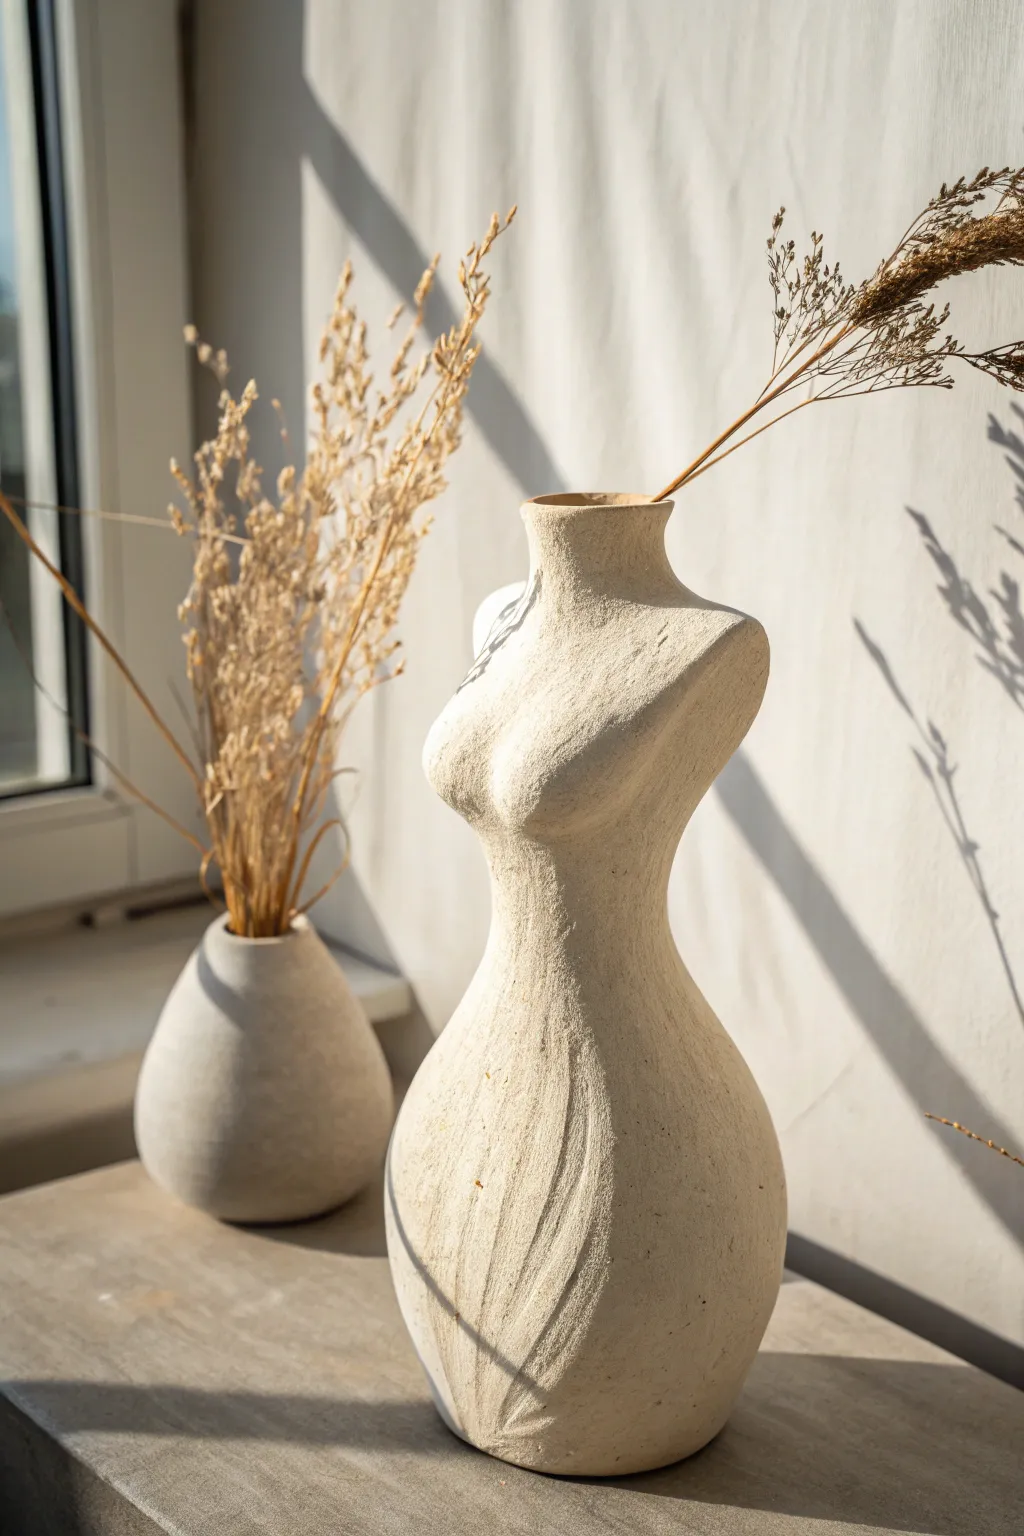
Capture the beauty of the human form with this elegant, artistic vase that mimics the look of high-end ceramic bisque. Its textured, curved silhouette and natural off-white tone make it a perfect minimalist centerpiece for holding dried botanical stems.
Step-by-Step
Materials
- High-quality air dry clay (2-3 lbs, white or stone color)
- Glass or plastic bottle (to serve as the hidden armature)
- Bowl of water
- Rolling pin
- Modeling tools (or a butter knife and spoon)
- Sponge
- Fine grit sandpaper
- Acrylic paint (cream, beige, or white)
- Baking soda (for texture)
- Matte spray varnish
Step 1: Building the Form
-
Prepare the armature:
Select a bottle with a narrow neck to act as the internal support; clean and dry it thoroughly. -
Roll out the slab:
Roll your air dry clay out onto a flat surface until it is roughly a quarter-inch thick rectangle, large enough to wrap completely around your bottle. -
Wrap the bottle:
Gently drape the clay sheet around the bottle, overlapping the seam slightly. Press the clay firmly against the glass to ensure it sticks, trimmed off any significant excess at the bottom. -
Seal the seams:
Dip your finger in water and smooth out the vertical seam where the clay joined, blending it until the line disappears completely. -
Build the mass:
Add extra chunks of clay to the upper section to bulk out the chest area, and add smaller coils around the hips to create a wider silhouette.
Armature Pro-Tip
Apply a thin layer of PVA glue (white school glue) to the glass bottle before wrapping the clay. This prevents the clay from sliding down the glass as you sculpt.
Step 2: Sculpting the Silhouette
-
Shape the waist:
Using wet hands, gently squeeze the clay inward at the center of the bottle to define a narrow waistline. -
Form the chest:
Smooth the added bulk at the top into two distinct rounded forms for the chest, blending the edges seamlessly into the main body. -
Refine the shoulders:
Trim the clay at the very top into a slight diagonal angle to suggest the slope of shoulders, ensuring the bottle opening remains accessible. -
Smooth the surface:
Use a damp sponge to wipe over the entire sculpture, softening any harsh tool marks or fingerprints. -
Add artistic texture:
For that imperfect, hand-carved look seen in the photo, use a tool or rough sponge to create vertical drag marks or subtle indentations along the hips and stomach. -
Let it dry:
Place the vase in a cool, dry spot away from direct sunlight. Allow it to dry for at least 24 to 48 hours until it is hard and lighter in color.
Cracking Issues?
If small cracks appear while drying, don’t panic. Simply mix a small amount of fresh clay with water to make a paste (slip) and fill in the cracks, then sand smooth.
Step 3: Faux-Ceramic Finish
-
Sand imperfections:
Once fully dry, use fine-grit sandpaper to knock down any sharp ridges or bumps, wiping away the dust with a dry cloth afterward. -
Mix textured paint:
Mix a dollop of beige or cream acrylic paint with a teaspoon of baking soda; the baking soda causes the paint to fluff up and become gritty, mimicking stone. -
Apply base coat:
Paint the entire vase with your textured mixture, using a stippling motion (dabbing up and down) to enhance the stony effect. -
Layering color:
I find that adding a second coat with a slightly lighter shade on the high points—like the chest and hips—adds wonderful dimension. -
Seal the work:
Finish with a light mist of matte spray varnish to protect the surface without making it shiny. -
Add botanicals:
Once the varnish is dry, arrange your favorite dried grasses or wheat stems inside the neck.
Now you have a stunning, sculptural piece of decor that looks like it came straight from an art gallery
Pocket Wall Vase for Dried Stems

This minimalist wall vase brings a touch of wabi-sabi charm to any room with its organic oval shape and raw limestone-like texture. It acts as the perfect sculptural home for delicate dried grasses or wildflowers, mounting flush against the wall for a clean, floating effect.
How-To Guide
Materials
- Air dry clay (white or stone color)
- Rolling pin
- Wax paper or canvas work mat
- Cardboard (for template)
- Craft knife or clay tool
- Small circular cutter (or bottle cap)
- Slip (water mixed with small clay scraps)
- Sandpaper (medium and fine grit)
- Matte white acrylic paint (optional)
- Baking soda (optional for texture)
- Matte varnish sealant
- Strong mounting square or D-ring hook
- Dried floral stems
Step 1: Shaping the Base
-
Prepare the slab:
Begin by conditioning a large ball of air dry clay until it is warm and pliable. Roll it out into an even slab about 1/4 inch thick. Aim for consistency here so the wall of the vase is sturdy. -
Create a template:
Sketch a simple elongated oval shape onto a piece of cardboard to serve as your guide. It should look somewhat like a stretched egg. Cut this template out. -
Cut the back panel:
Place your cardboard template onto the rolled clay. Use a craft knife to trace around it carefully, creating the flat back piece of your vase. Set this aside on a flat surface. -
Form the front pocket:
For the front, you need a slightly curved volume. Roll a second slab of clay, slightly thinner than the back. Gently drape this slab over a crumpled ball of newspaper or foil shaped like an oval mound to give it a convex form. -
Trim the front:
While it is draped and holding its curved shape, trim this front piece into an oval that matches the width of your back piece but is slightly longer to account for the outward curve. -
Create the feature hole:
Use a small circular cutter or a plastic bottle cap to punch a clean hole in the front curved piece, positioned slightly above the vertical center.
Structure Secret
Keep a ball of plastic wrap inside the pocket while joining the seams. It supports the hollow shape and prevents collapsing. Remove it carefully once the clay begins to firm up.
Step 2: Assembly
-
Score and slip:
Rough up the outer edges of the flat back piece and the inner edges of the curved front piece with a needle tool or fork. Apply a generous amount of slip (clay glue) to the scored areas. -
Join the halves:
Press the curved front piece onto the flat back piece. Ensure the edges meet perfectly. Leave the very top edge unsealed to create the opening for your flowers. -
Smooth the seams:
Use your fingers or a clay rib dipped in a little water to smooth the joined edges until the seam becomes invisible. The piece should look like one continuous stone. -
Refine the shape:
If the front pocket collapsed slightly during joining, gently insert a tool or finger through the top opening to push the wall back out. -
Add texture:
Instead of smoothing it perfectly, take a dry sponge or a crumpled piece of aluminum foil and tap it gently all over the surface. This creates the stone-like, organic texture seen in the photo.
Step 3: Finishing Touches
-
Drying duration:
Lay the vase flat on its back to dry. Because of the enclosed shape, this project needs slow drying—allow at least 48 to 72 hours. Flip it occasionally if possible to let air reach the back. -
Sanding:
Once bone dry, use fine-grit sandpaper to soften any sharp edges around the circular hole and the top opening, but leave the surface texture rough. -
Faux-stone painting:
Mix white acrylic paint with a teaspoon of baking soda. This mixture creates a gritty, limestone effect. Paint the entire exterior of the vase. -
Sealing:
Apply a coat of matte varnish to protect the clay from humidity and dust. Avoid glossy finishes to maintain the natural look. -
Mounting:
Glue a strong D-ring hanger or a heavy-duty mounting tape square to the flat back of the vase. -
Styling:
Fill the pocket with tall dried stems, allowing them to spray upward and slightly overlap the decorative hole.
Earth Tones
For a variegated look, marble a tiny bit of brown or grey clay into your white clay before rolling. It mimics the subtle veins found in natural river stones.
Enjoy the calm, organic presence this handcrafted vase brings to your wall decor
Stacked Pebble-Form Vase
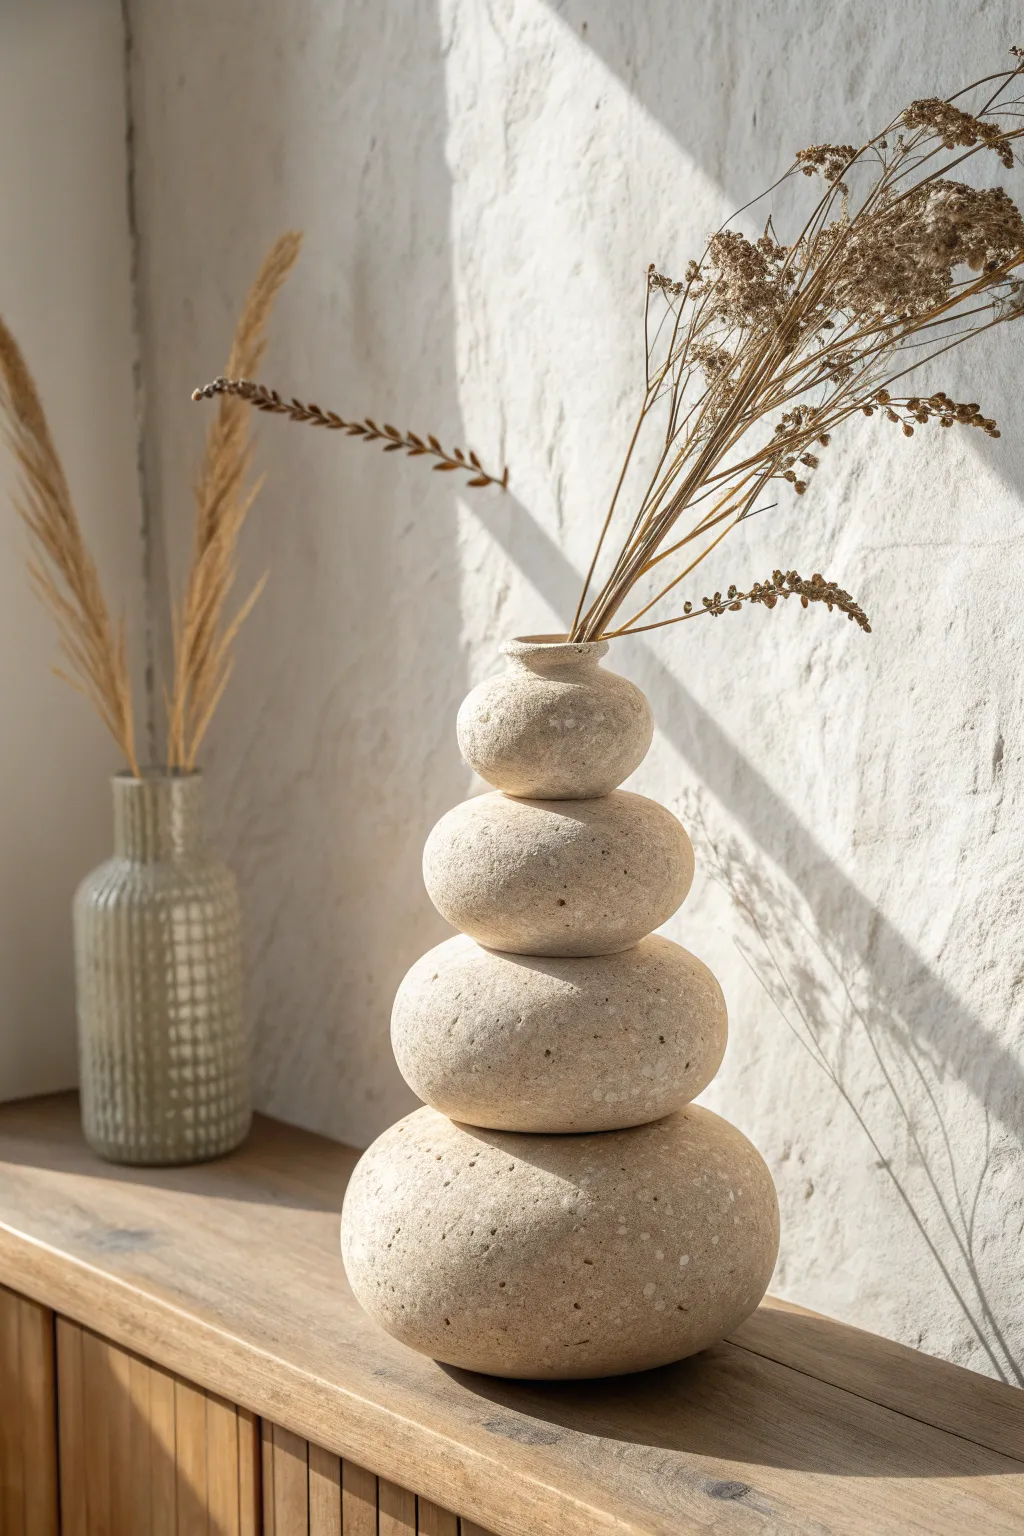
Bring the calming aesthetic of a cairn into your home with this striking faux-stone vase. By stacking simple organic forms and finishing them with a clever speckling technique, you’ll create a sculptural piece that looks like it was carved from polished river rocks.
Step-by-Step Tutorial
Materials
- White or stone-colored air dry clay (approx. 1.5kg)
- Small glass or plastic tube (for the internal water vessel)
- Wooden rolling pin
- Water and a small bowl
- Modeling tools (or a butter knife)
- Sponge or scourer
- Sandpaper (medium and fine grit)
- Acrylic paints (beige, stone gray, white, dark brown)
- Old toothbrush (for specific paint effects)
- Matte spray varnish
Step 1: Shaping the Stones
-
Prepare the Core:
Select your glass or plastic tube first; this will hide inside the stack to hold water for fresh flowers. Measure its height, as this determines the total height of your clay stack. -
Portion the Clay:
Divide your clay into four uneven balls. You want a distinct graduation in size: a large base, two medium middle sections, and a small top piece. -
Form the Base Pebble:
Take the largest ball and flatten it slightly into a ‘mentos’ or pebble shape. It needs a flat bottom for stability, so press it firmly onto your work surface. -
Create the Channels:
Using the end of your rolling pin or a cutting tool, create a vertical hole through the center of the base pebble. Ensure it is wide enough for your insert tube to pass through comfortably. -
Repeat for Middle Sections:
Shape the two middle clay balls into flattened pebbles. Punch a hole through the center of each, just like the base, checking the fit against your tube frequently. -
Shape the Topper:
Form the smallest ball into the top pebble. Instead of a full hole, create a deep well or socket that fits the top rim of your insert tube snugly, creating a seamless lip. -
Test the Stack:
dry-fit the clay pieces over the tube without gluing them yet. The tube should be completely hidden, and the ‘stones’ should look balanced but organic.
Step 2: Assembly and Texture
-
Score and Slip:
Remove the tube. Score (scratch) the contact surfaces between the stones and apply a little water or liquid clay ‘slip’ to act as gluten. -
Join the Stack:
Press the stones together firmly in your desired order. I like to re-insert the tube while doing this to ensure the internal alignment stays perfectly straight. -
Blend the Neck:
Refine the top opening. Use a little water to smooth the clay around the rim of your insert tube (if leaving it in permanently) or ensure the clay rim is neat enough to stand alone. -
Add Surface Texture:
The image shows a porous, natural stone look. Achieve this by gently pressing a coarse sponge or a scourer into the wet clay surface to create random pitting. -
Drying Time:
Let the sculpture dry completely. Because the pieces are thick, this may take 48 to 72 hours. Rotate it occasionally for even airflow. -
Sanding:
Once bone dry, use medium grit sandpaper to smooth out any harsh fingerprints or joining ridges, but leave the sponge texture intact.
Cracking Issues?
If hairline cracks appear while drying, mix a paste of clay dust and white glue. Fill the crack, let dry, and sand smooth before painting.
Step 3: The Faux-Stone Finish
-
Base Coat:
Mix a warm beige acrylic paint. Apply a solid base coat over the entire vase and let it dry. -
Color Variation:
Mix a watery wash of a slightly darker stone gray. Dab this onto the sponge and lightly press it over the beige to create uneven, organic shadows. -
The Speckle Technique:
Mix a small amount of dark brown paint with water until it’s inky. Dip an old toothbrush into it. -
Applying Speckles:
Hold the toothbrush near the vase and run your thumb across the bristles to flick tiny droplets of paint onto the surface. This mimics the mineral deposits seen in real river rock. -
White Highlights:
Repeat the toothbrush technique with white paint. This adds depth and makes the stone texture pop. -
Seal the Project:
Finish with two coats of matte spray varnish to protect the paint and give it a non-glossy, natural stone sheen.
Pro Tip: Weight it Down
Before sealing the bottom stone, push a few heavy metal washers into the wet clay base. This lowers the center of gravity so the vase won’t tip over easily.
Place your favorite dried grasses inside and find a sunny spot for your new stone sculpture