Air dry clay wall hangings are my favorite kind of weekend project because they look high-end but feel totally doable. You can keep it simple with clean shapes or layer in boho textures, cord, and natural wood for that cozy, studio-made vibe.
Minimalist Geometric Slab Hanging
Capture the essence of modern bohemian decor with this minimalist rainbow wall hanging. Its soothing neutral palette and beautifully imperfect texture add a calm, organic touch to any corner of your home.
Step-by-Step
Materials
- Air dry clay (white or terracotta, depending on desired base)
- Rolling pin
- Sharp clay knife or X-Acto knife
- Cardboard or cardstock (for templates)
- Pencil and ruler
- Texture tools (old toothbrush, sandpaper, or stiff brush)
- Acrylic paints (cream, beige, taupe)
- Paintbrushes
- Water cup
- Strong craft glue or hot glue gun with glue sticks
- Jute twine or cotton cord
- Sandpaper (fine and medium grit)
- Wooden skewer or awl
Step 1: Planning and Rolling
-
Create your template:
Begin by sketching your rainbow shape on a piece of cardboard or cardstock to serve as a guide. Draw four concentric arches, each slightly wider than the last to create that nested look. -
Cut the templates:
Cut out each individual arch shape from your cardstock. Having separate templates for each layer ensures your clay pieces will fit together perfectly later. -
Condition the clay:
Take a generous amount of air dry clay and knead it in your hands until it’s warm and pliable. This prevents cracking and makes rolling much smoother. -
Roll it out:
Use your rolling pin to flatten the clay into a slab about 1/4 inch thick. Aim for an even thickness throughout so the drying time is consistent. -
Add surface texture:
Before cutting, gently dab the surface of the clay slab with an old toothbrush, a stiff bristle brush, or even a crumpled ball of aluminum foil. This creates that lovely organic, porous stone look seen in the photo.
Curling Edges?
If clay edges lift while drying, gently flip the pieces over halfway through the drying process. Weighting them down with a heavy book (on paper) also keeps them flat.
Step 2: Cutting and Refining
-
Trace and cut the arches:
Place your cardstock templates onto the textured clay slab. Use your sharp knife to carefully trace around each template, cutting out four distinct arch shapes. -
Smooth the edges:
Dip your finger in a little water and run it along the cut edges of each arch to smooth out any sharpness or stray bits of clay. -
Create the hanging hole:
Take the largest (outermost) arch. Use a skewer or awl to pierce a hole directly in the top center. Wiggle it slightly to ensure the hole is large enough for your twine to pass through later. -
Dry the pieces:
Lay all four arches flat on a clean surface to dry. I find that placing a sheet of parchment paper underneath helps prevent sticking. Let them dry for 24-48 hours until completely hard and white. -
Sand for finish:
Once fully dry, use fine-grit sandpaper to gently refine any rough spots on the edges, being careful not to sand away the surface texture you created earlier.
Natural Stone Hack
Mix coffee grounds or fine sand directly into your wet clay before rolling. This creates authentic speckles and grit that you won’t need to paint on later.
Step 3: Assembly and Finishing
-
Mix your colors:
Prepare a palette of neutral earth tones. Mix white with tiny drops of brown or yellow ochre to create varying shades of cream, beige, and light taupe to mimic natural stone. -
Paint a base wash:
Apply a watered-down wash of creamy white paint over all the arches. This seals the clay while enhancing the textured pits and bumps. -
Add subtle variation:
Paint the second and third arches in slightly deeper beige or taupe tones to create contrast. Keep the paint thin so the texture shows through. -
Glue the structure:
Arrange the arches in their final rainbow formation. Apply strong craft glue along the side edges where the arches touch each other, pressing them gently together. Alternatively, you can glue them onto a backing piece of cardboard if you want extra stability. -
Attach the hanger:
Cut a length of jute twine. Thread one end through the hole in the top arch and tie a secure knot. You can create a decorative loop knot at the top for extra flair. -
Final touch:
Inspect your hanging for any loose spots or missed paint. A final light sanding over the painted surface can distress it slightly for an aged, rustic vibe.
Hang your new textured rainbow near a window to let the light play across its beautiful earthy surfaces


Moon Phase Wall Hanging
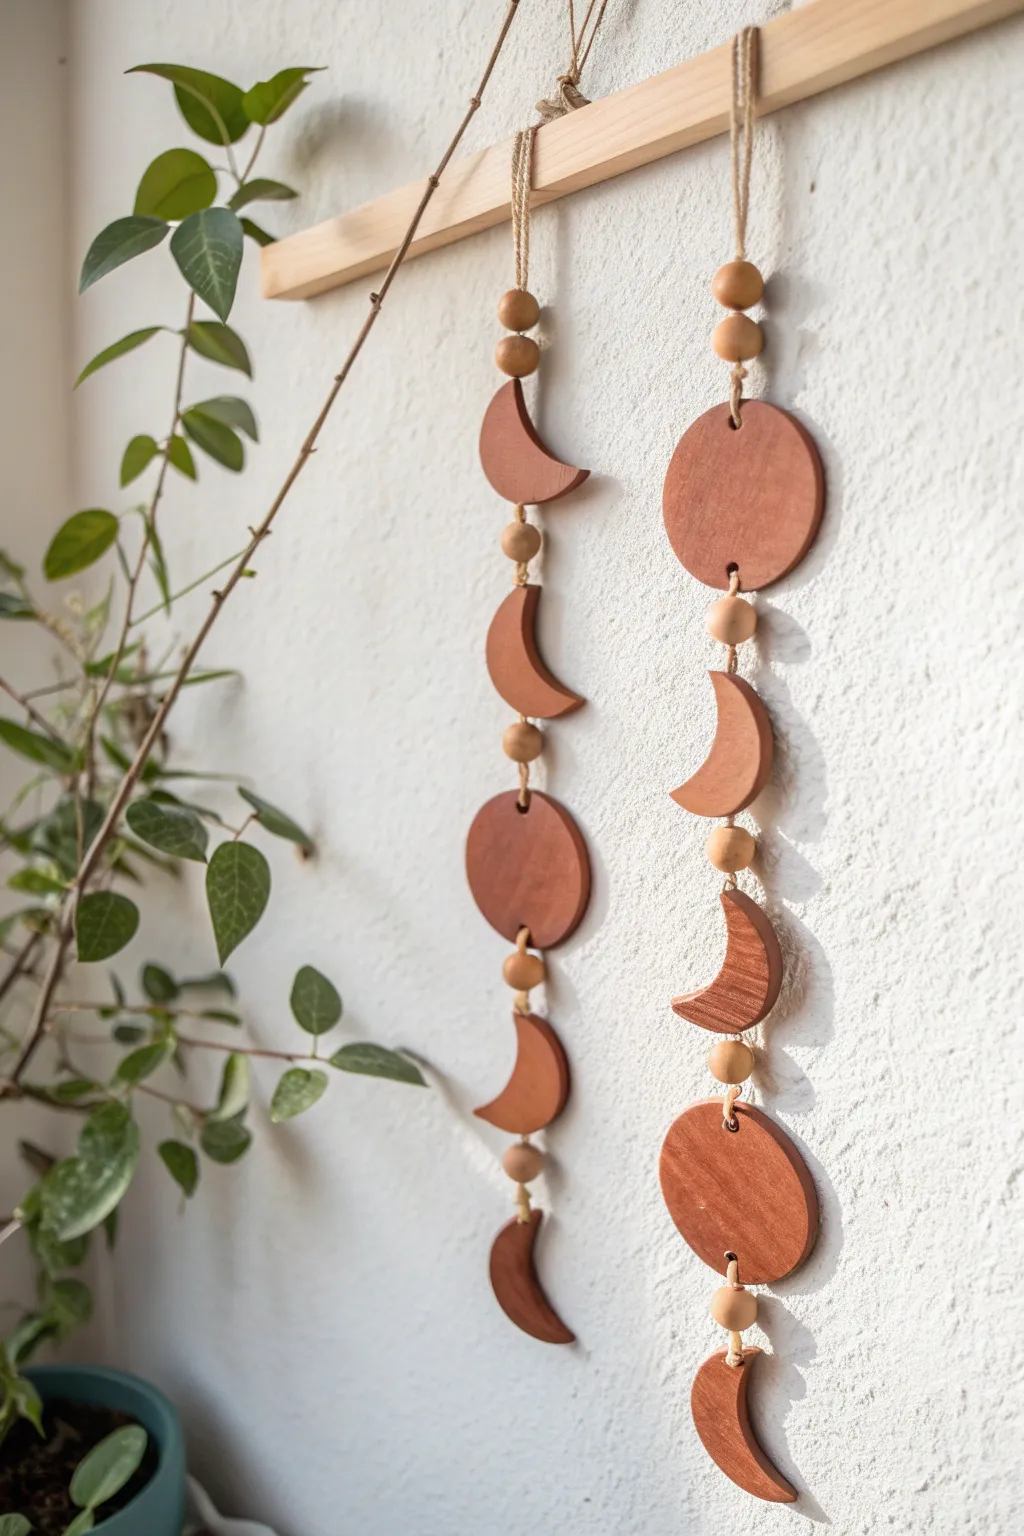
Bring celestial charm to your walls with this earthy, bohemian moon phase hanging crafted from air dry clay. Using a rich terracotta tone and natural wooden beads, you’ll create a soothing vertical mobile that captures the lunar cycle in style.
Detailed Instructions
Materials
- Air dry clay (terracotta color or white)
- Rolling pin
- Circle cookie cutters (approx. 2-3 inches diameter)
- Craft knife or clay tools
- Sandpaper (fine grit)
- Acrylic paint (rich terracotta/russet brown if using white clay)
- Matte sealant or varnish
- Natural twine, hemp cord, or jute
- Wooden beads (unfinish, various sizes)
- Small wooden dowel or driftwood branch
- Skewer or toothpick (for poking holes)
- Parchment paper or craft mat
Step 1: Shaping the Moons
-
Prepare your workspace:
Lay down parchment paper or a craft mat to prevent the clay from sticking. Knead a large handful of air dry clay until it is soft, pliable, and free of cracks. -
Roll the clay slab:
Using your rolling pin, flatten the clay to an even thickness of about 1/4 inch. Aim for a consistent level so all your moon pieces have the same visual weight. -
Cut the full circles:
Use your circle cookie cutter to punch out several full circles. For the design shown, you will need at least three full circles (one for the center of the left strand, two for the right strand). -
Create crescent shapes:
To make the crescent moons, first cut out a full circle. Then, offset the same cutter slightly over the circle you just cut and press down again to slice away a crescent shape. Create different sizes of crescents if desired. -
Smooth the edges:
Dip your finger in a little water and run it along the cut edges of each shape to smooth down any roughness or clay burrs.
Keep it Straight
To prevent your clay pieces from warping while drying, place a light book or cutting board on top of them after they are ‘leather hard’ (about halfway dry).
Step 2: Refining and Assembly Prep
-
Add hanging holes:
While the clay is still wet, use a skewer or toothpick to poke holes. Full moons need a hole at the top and bottom (carefully aligned in the center). Crescents need a hole at the top and bottom tips. -
Let them dry completely:
Place your clay pieces on a flat surface to dry. This usually takes 24-48 hours depending on humidity. Flip them over halfway through to ensure even drying and prevent curling. -
Sand for perfection:
Once fully cured, use fine-grit sandpaper to gently buff out any remaining uneven edges or surface bumps. -
Paint or seal:
If you used white clay, paint the pieces now with a terracotta or russet brown acrylic paint to match the earthy look in the photo. If you used colored clay, simply apply a matte sealant to protect them.
Step 3: Construction
-
Cut the cord:
Cut two long lengths of twine or jute cord, measuring about 2-3 feet each to give yourself plenty of slack for knotting. -
Attach to the dowel:
Fold a piece of twine in half and create a lark’s head knot over your wooden dowel or branch. Repeat for the second strand, spacing them a few inches apart. -
Start the first strand:
Thread both ends of the twine through a wooden bead and push it up near the dowel. Tie a knot underneath the bead to secure it. -
Attach the top moon:
Thread the twine through the top hole of your first clay piece. I find it easiest to tie a knot immediately behind the hole to keep it flat, or just let it rest on the next knot below. -
Add spacing beads:
Thread a wooden bead onto the twine below the clay piece. Tie a knot below the bead to hold it in place. -
Continue the pattern:
Repeat the process—clay shape, knot, bead, knot—moving down the strand. Follow the pattern in the image: crescent, bead, full circle, bead, crescent. -
Finish the strands:
Once your last crescent or circle is attached, tie a sturdy double knot at the very bottom and trim any excess twine. -
Hang firmly:
Tie a separate piece of twine to both ends of the wooden dowel to create the main hanger, balancing it so the dowel sits horizontally.
Golden Touch
Paint the edges of your moon phases with gold leaf paint or a metallic marker to catch the light and add a touch of luxe to the rustic look.
Now you have a stunning, handmade piece of celestial art ready to warm up your favorite room


Celestial Stars and Moons Mobile
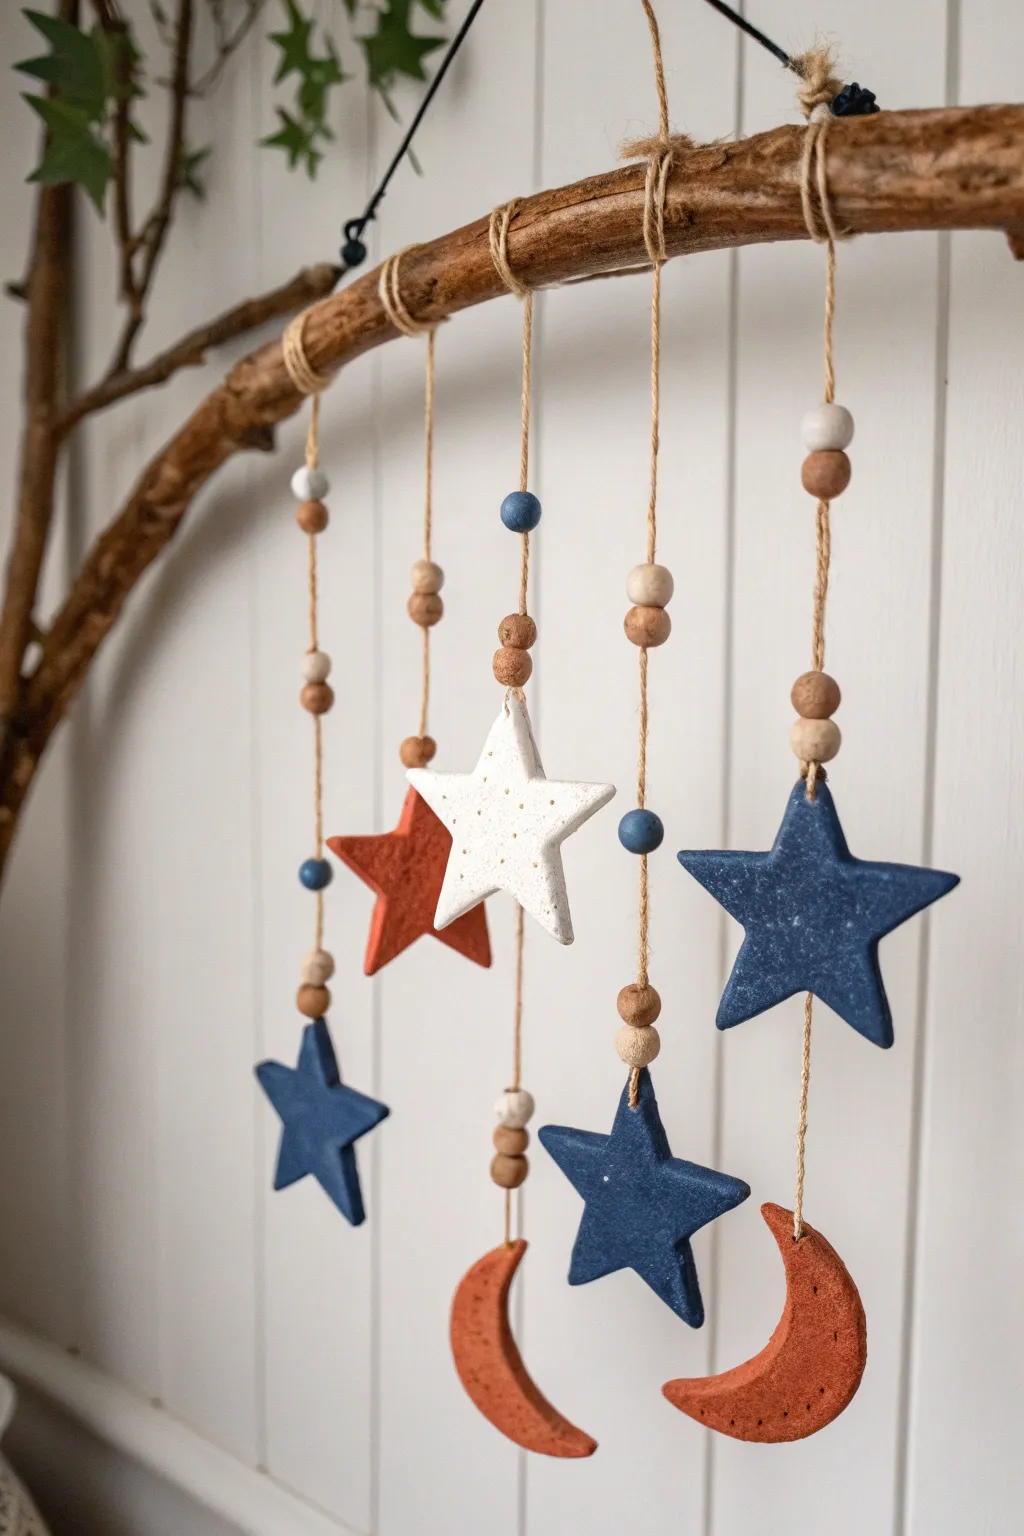
Bring the night sky indoors with this charmingly rustic wall hanging featuring textured clay stars and moons dangling from a natural branch. The earthy red, deep blue, and white tones create a warm Americana or nautical vibe perfect for a nursery or cozy corner.
How-To Guide
Materials
- Air dry clay (white)
- Acrylic paints (deep navy blue, terra cotta/rust, white)
- Cookie cutters (star and crescent moon shapes in varying sizes)
- Wooden branch (approx. 12-18 inches long)
- Natural jute twine
- Wooden beads (natural and white/light grey, assorted sizes)
- Rolling pin
- Sandpaper or nail file
- Toothpick or skewer
- Paintbrushes
- Clear matte sealant (optional)
Step 1: Shaping the Celestial Bodies
-
Roll out the clay:
Take a portion of your air dry clay and warm it up in your hands slightly before rolling it out on a smooth surface to about 1/4 inch thickness. Try to keep the thickness consistent so all pieces dry at the same rate. -
Cut the shapes:
Using your cookie cutters, press out several star shapes and at least two crescent moon shapes. For the design shown, you’ll need one large white star, a mix of medium red and blue stars, and two blue stars for the lowest tier, plus two red moons. -
Create hanging holes:
While the clay is still wet, use a toothpick or skewer to poke a hole through each shape depending on how it will hang. Most shapes need a top and bottom hole to act as connectors, but the bottom-most pieces (like the moons and lowest stars) only need a top hole. -
Add texture:
To mimic the stony look in the photo, gently press a piece of rough sandpaper or a crumpled ball of aluminum foil onto the surface of the wet clay stars and moons. -
Smooth the edges:
Dip your finger in a little water and run it along the cut edges of your shapes to remove any jagged bits or clay burrs for a cleaner finish. -
Let them dry:
Place your clay pieces on a wire rack or parchment paper to dry completely. This usually takes 24-48 hours depending on humidity; turn them over halfway through so the backs dry evenly.
Clean Hole Tip
Make your holes slightly larger than the twine while wet. Clay shrinks as it dries, and trying to drill a hole in dry clay often leads to cracking.
Step 2: Painting and Prep
-
Sand gently:
Once fully cured, briefly run fine-grit sandpaper over the edges if any sharp points remain. -
Paint the navy stars:
Select your star shapes destined for blue and coat them with deep navy acrylic paint. I usually do two thin coats for opaque coverage. -
Paint the terra cotta pieces:
Paint the crescent moons and the designated medium stars with a rust or terra cotta color. Use a tapping motion with your brush to enhance the textured look. -
Finish the white star:
Paint the large central star with white acrylic, or leave it natural if your clay is bright white. You can create a speckled effect by flicking a toothbrush with diluted brown paint over it very lightly. -
Seal the pieces:
For longevity, apply a coat of clear matte sealant to all sides of the painted clay pieces.
Step 3: Assembly and Hanging
-
Prep the branch:
Ensure your branch is clean and dry. You can lightly sand it if needed, but the natural bark adds to the rustic aesthetic. -
Cut the twine strings:
Cut five lengths of jute twine. You need varying lengths to create the staggered mobile look: a short one for the center, two medium lengths, and two longer outer strands. -
Start the central strand:
Tie a knot at the end of your shortest twine piece. Thread on a wooden bead, then thread the twine through the top hole of the large white star. Secure it with a knot above the bead if necessary to keep it in place. -
Build the tiered strands:
For the other four strands, start from the bottom piece (a moon or bottom star). Tie a knot, add a bead, and thread the clay piece. Continue moving up the twine, adding knots and beads to hold the upper clay shapes at specific intervals. -
Incorporate painted beads:
Notice in the image that some strands have small blue painted beads. Thread these intermittently between the natural wooden beads for a pop of color. -
Attach to the branch:
Tie the top of each completed twine strand onto the branch. Adjust the spacing so they hang evenly without tangling. -
Secure the knots:
Once you are happy with the lengths, double knot the twine around the branch and trim any excess tail. A dab of glue on the knot prevents slipping. -
Add a hanger:
Finally, tie a separate piece of sturdy twine or cord to both ends of the branch to create the main hanging loop for the wall.
Level Up: Driftwood
Replace the standard garden branch with a piece of bleached smooth driftwood for a beach-house version of this mobile.
Hang your new celestial creation near a window to catch the light and enjoy the gentle movement


Textured Leaf Imprint Hanging
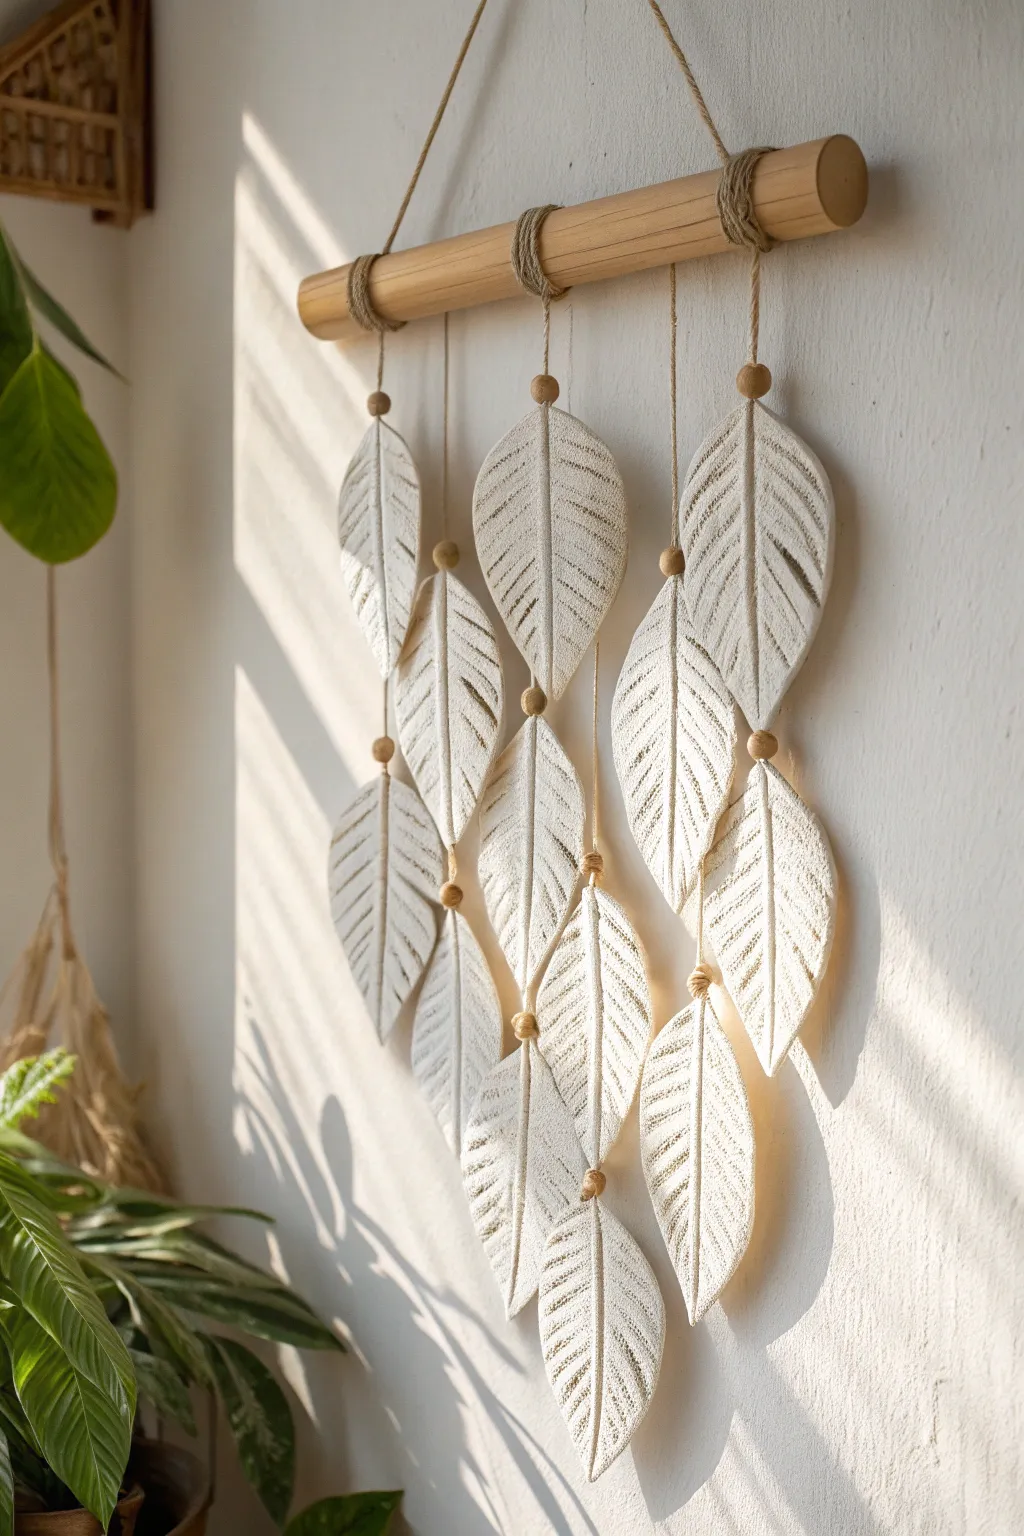
Bring a touch of organic serenity to your walls with this cascading arrangement of textured clay leaves. The natural twine and minimal white clay highlight the delicate vein patterns, creating a piece that feels both rustic and refined.
Detailed Instructions
Materials
- White air dry clay
- Rolling pin
- Real leaves (with prominent veins) or leaf texture stamps
- Clay knife or craft scalpel
- Small wooden dowel (12-16 inches)
- Small wooden beads (approx. 20-25)
- Jute twine or hemp cord
- Sandpaper (fine grit)
- Straw or skewer (for poking holes)
- Optional: White acrylic paint or matte sealer
Step 1: Prepping the Clay Leaves
-
Roll the clay:
Cut a portion of your air dry clay and knead it briefly to soften. Roll it out on a smooth surface to an even thickness of about 4-5mm. If the clay sticks, dusting your surface with a tiny bit of cornstarch can work wonders. -
Impress the texture:
Place your real leaves (vein side down) or texture stamps onto the rolled clay. Press firmly and evenly with a roller to transfer the intricate vein details deep into the clay surface. -
Cut the shapes:
Using a clay knife or scalpel, carefully cut around the outline of your leaf impressions. If you want a more stylized look like the reference photo, cut smooth, elongated almond or feather shapes instead of following a jagged leaf edge perfectly. -
Create hanging holes:
While the clay is still wet, use a straw or a skewer to poke a hole near the top stem end of each leaf. Ensure the hole is large enough for your twine to pass through easily. -
Smooth the edges:
Dip your finger in a little water and run it along the cut edges of each leaf to smooth out any roughness or loose clay crumbs. -
Dry thoroughly:
Lay the leaves on a flat surface lined with parchment paper. Let them dry completely for 24-48 hours, flipping them halfway through to prevent curling.
Curling Clay?
If leaves curl while drying, place a lightweight book on top of them once they are leather-hard (partially dry) to keep them flat.
Step 2: Refining and Assembly
-
Sand and seal:
Once bone dry, lightly sand any remaining rough edges. If you want a stark white finish, you can paint them with white acrylic or simply apply a matte varnish to protect the raw clay. -
Prepare the dowel:
Cut three long lengths of jute twine (approx. 3-4 feet each) to serve as the main hanging strands. Tie these onto the wooden dowel using a lark’s head knot or a simple double knot, spacing them evenly. -
String the first tier:
For the top tier, thread a wooden bead onto one of the twine strands. Slide it up to your desired height positioned below the dowel. Thread the twine through a clay leaf, then loop it back up around the outside of the leaf hole and tie a knot underneath or behind the leaf to secure it. -
Add floating beads:
To secure the leaf and add detail, I like to thread the twine through the leaf hole and then tie a knot *below* a small wooden bead placed directly under the leaf, holding everything in place. -
Build the layers:
Continue adding leaves down the length of the string. Leave about 2-3 inches of space between each leaf. Use wooden beads as stoppers and decorative accents between the clay pieces. -
Vary the heights:
Repeat this process for all three vertical strands. Adjust the starting height of the leaves on the side strands so they sit slightly higher or lower than the center strand, creating a staggered, natural composition. -
Secure the bottom:
Once the final bottom leaf is attached to a strand, tie a secure double knot below the bottom bead and trim any excess twine for a clean finish. -
Create the hanger:
Cut a final piece of twine for the main hanger. Tie each end securely to the outer edges of the wooden dowel so it creates a triangle shape for hanging.
Add Some Color
Mix a tiny drop of brown or sage green acrylic paint into your clay before rolling for a marbled, earth-toned effect.
Hang your new botanical artwork near a window where the light can catch the textured ridges of the leaves

The Complete Guide to Pottery Troubleshooting
Uncover the most common ceramic mistakes—from cracking clay to failed glazes—and learn how to fix them fast.
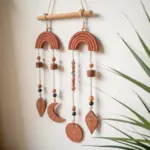
Boho Tassel and Clay Bead Hanging
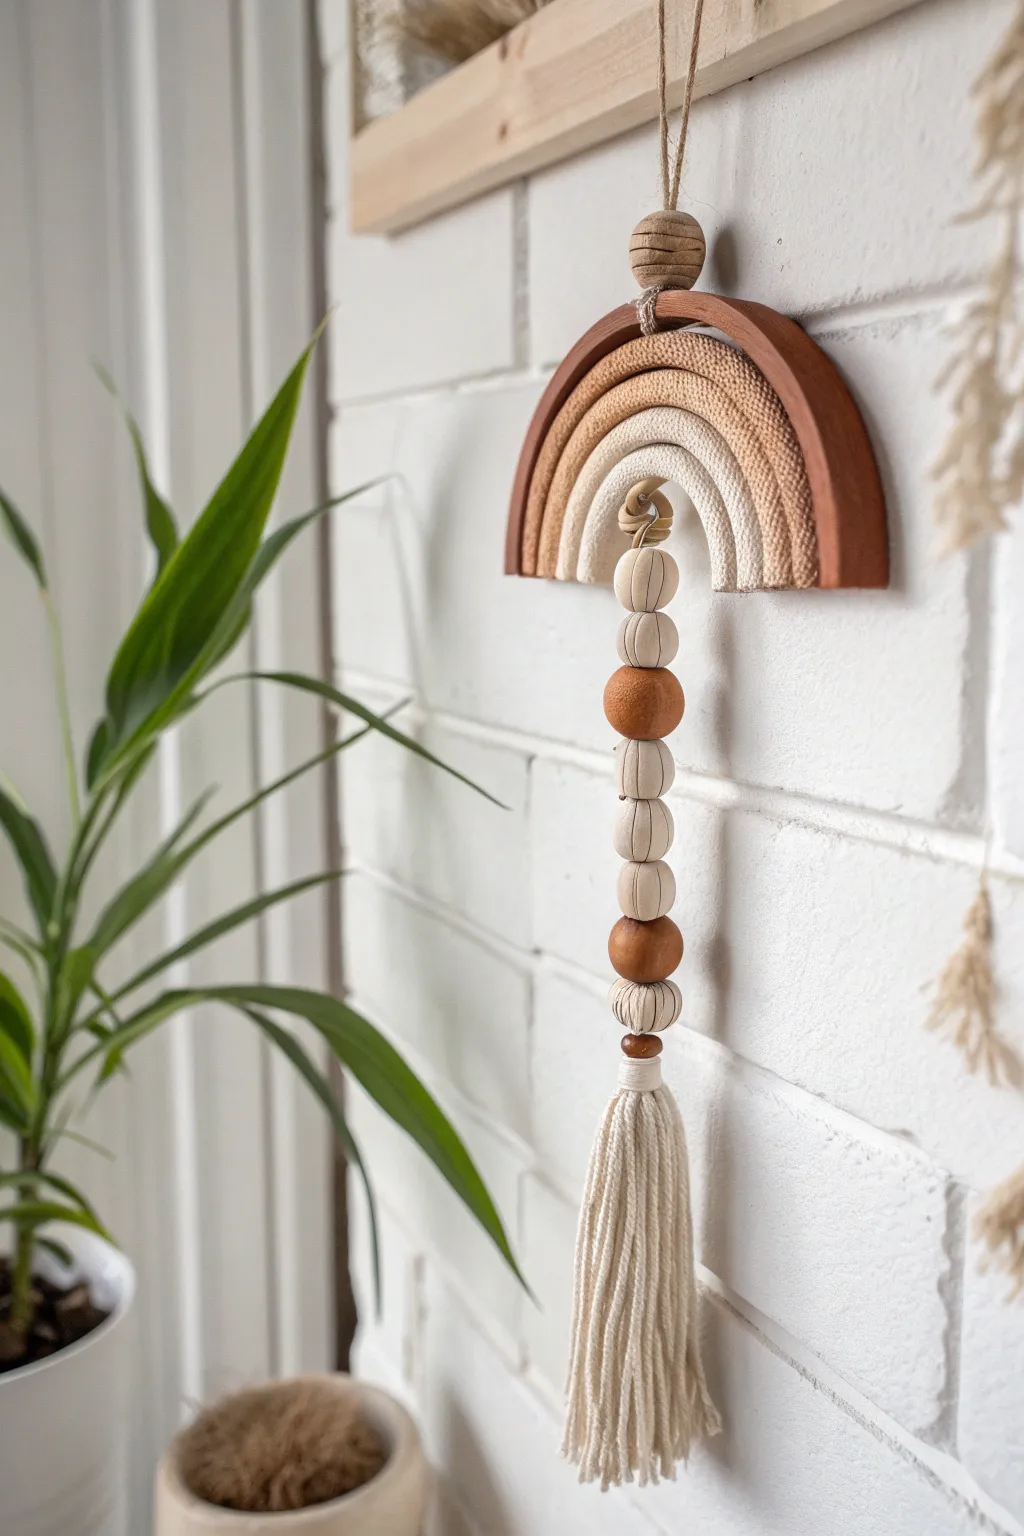
This earthy wall hanging combines the warmth of terracotta-toned clay with the softness of natural fiber tassels. It features a unique rainbow arch supporting a cascading strand of handmade clay beads and a lush fringe, perfect for adding texture to a blank wall.
Step-by-Step
Materials
- Air dry clay (white or terracotta)
- Acrylic paint (burnt sienna, cream/beige)
- Macrame cord (natural cotton, 3mm or 4mm)
- Thick cotton rope (for the inner arches, approx 8mm)
- Jute twine
- Rolling pin
- Craft knife or clay cutter
- Sandpaper (fine grit)
- Hot glue gun and glue sticks
- Skewer or toothpick (for piercing holes)
- Comb (for the tassel)
Step 1: Crafting the Clay Elements
-
Roll the main arch:
Begin by conditioning a large ball of air dry clay until pliable. Roll it out into a flat slab about 1/4 inch thick. Use a circular object or template to cut out a large semi-circle arch shape that will serve as the top structure. -
Smooth the edges:
Dip your finger in a little water and run it along the cut edges of your clay arch to smooth out any roughness or stray clay bits. -
Create the beads:
Roll several medium-sized pieces of clay into balls. For this design, create a mix of round spheres and slightly flattened discs. You’ll need about 6-8 beads total. -
Add texture:
To mimic the carved wood look in the photo, take a craft knife or a sculpting tool and gently press vertical lines around the circumference of your spherical beads. Leave the disc beads smooth. -
Pierce holes:
Using a skewer, carefully pierce a hole through the center of each bead. Ensure the hole is wide enough for your macrame cord to pass through later. Also, poke a hole at the top center of your main clay arch for hanging. -
Drying time:
Set all your clay pieces aside on a flat surface to dry completely. This usually takes 24-48 hours. Flipping them halfway through helps prevent warping.
Cracking Clay?
If your beads crack while drying, mix a tiny bit of fresh clay with water to make a paste (slip). Fill the cracks, smooth with your finger, and let it dry again before painting.
Step 2: Painting and Prep
-
Sand for smoothness:
Once fully dry, lightly sand the edges of your arch and the surface of your beads to remove any imperfections. -
Paint the arch:
Mix a rusty, reddish-brown acrylic paint color (burnt sienna works well). Paint the entire clay arch, front and back, to give it that rich terracotta look. -
Paint the beads:
Paint your textured spherical beads in a creamy beige or light taupe. Paint the smooth disc beads in the same rust color as the arch to create contrast.
Step 3: Creating the Fiber Arches
-
Cut the rope base:
Cut two lengths of your thick cotton rope. One should fit snugly inside the clay arch, and the second should be slightly smaller to fit inside the first rope. -
Wrap the outer rope:
Secure the end of your beige macrame cord or thin yarn to the first rope length with a dot of hot glue. Tightly wrap the cord around the entire length of the rope until covered. -
Wrap the inner rope:
Repeat the wrapping process for the smaller rope piece, but use a lighter shade of cream or white cord to create a gradient effect. -
assemble the rainbow:
Using strong craft glue or hot glue, attach the wrapped ropes inside the curve of the painted clay arch. Ensure everything sits flush and secure.
Add Essential Oils
Before sealing your clay beads, add a drop of essential oil to the raw clay or the unfinished wood bead. This turns your wall hanging into a passive diffuser for the room.
Step 4: Assembly and Tassel
-
Create the tassel:
Cut about 20 strands of macrame cord, each roughly 12 inches long. Fold them in half over a central holding cord. -
Secure the tassel head:
Take a separate piece of string and perform a ‘gathering knot’ around the top of your folded bundle to create the head of the tassel. Trim the ends evenly. -
String the beads:
Thread your central tassel cord through your painted clay beads, alternating between the textured beige spheres and the rust-colored discs. -
Connect to the arch:
Tie the top of the beaded strand to the bottom center of the fiber rainbow section. You can discreetly glue it between the rope layers or tie it around the innermost arch. -
Add the hanger:
Thread a piece of jute twine through the hole at the top of the clay arch. String one final textured bead onto this loop before knotting it to finish the look. -
Comb out fringes:
Use a fine-tooth comb to brush out the tassel cords until they are fluffy and soft. Give the bottom one final trim for a clean edge.
Hang your new boho creation near a window to let the natural textures catch the light softly
Abstract Line-Painted Clay Panel
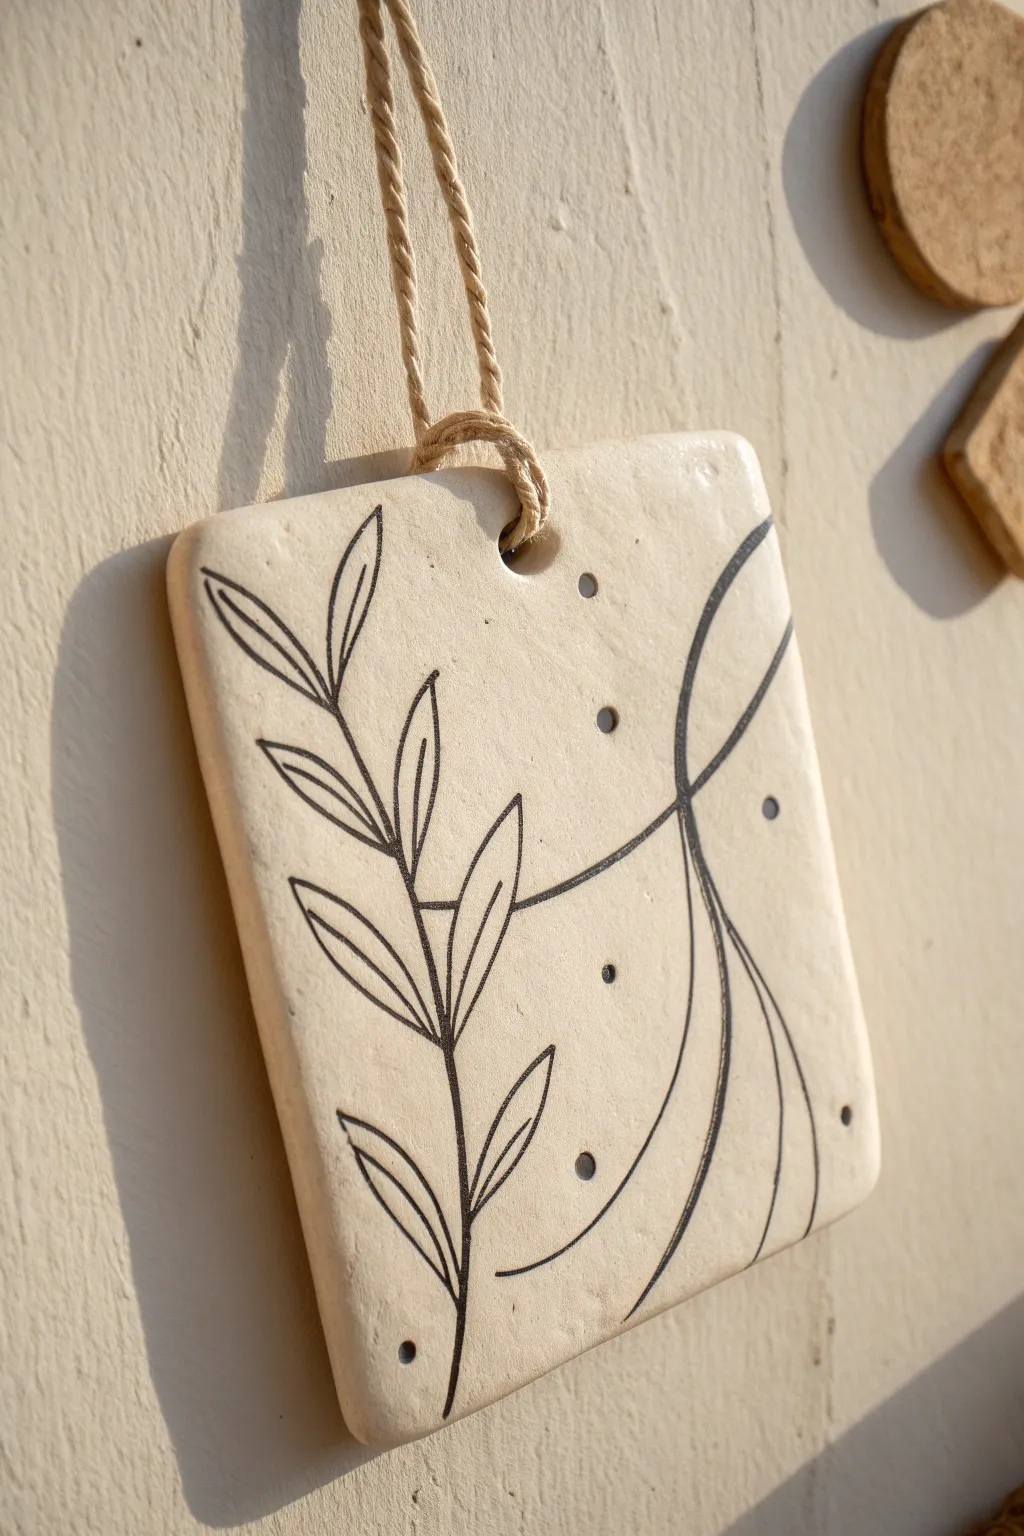
Embrace minimalist design with this organic air-dry clay wall hanging, featuring elegant line work and natural textures. The combination of a stark botanical motif against creamy clay creates a sophisticated yet earthy piece of decor.
Step-by-Step Tutorial
Materials
- White or light beige air dry clay
- Rolling pin
- Square cookie cutter (approx. 4×4 or 5×5 inches) or a knife and ruler
- Fine-grit sandpaper (220 grit)
- Black fine-tip acrylic paint marker or permanent marker
- Or: Black acrylic paint and a size 0 round brush
- Straw or wooden skewer
- Jute twine or hemp cord
- Small bowl specific for water
- Parchment paper or non-stick mat
Step 1: Shaping the Base
-
Condition the Clay:
Begin by taking a handful of air-dry clay and kneading it in your hands to warm it up. This conditioning process helps prevent cracks later on. -
Roll It Out:
Place the clay on a non-stick mat or parchment paper. Using a rolling pin, roll the clay out evenly until it is approximately 1/4 inch thick. Try to keep the thickness consistent across the entire slab. -
Cut the Square:
Press your square cutter firmly into the clay. If you don’t have a cutter large enough, measure a square with a ruler and carefully cut along the edges with a craft knife for a clean shape. -
Soften the Edges:
Dip your finger into a little bit of water and run it gently along the sharp cut edges of the square to smooth and round them out slightly. This gives the finished piece a more polished, ceramic look. -
Create the Hanging Hole:
While the clay is still wet, use a straw or a chopstick to punch a hole centered near the top edge. Ensure the hole is large enough for your twine to pass through easily once the clay shrinks slightly during drying. -
Let it Dry:
Set the clay tile on a flat surface to dry for at least 24-48 hours. I like to flip the piece over halfway through the drying process to ensure both sides dry evenly and to prevent warping.
Step 2: Refining and Designing
-
Sand for Smoothness:
Once the tile is fully bone-dry and hard, take your fine-grit sandpaper and lightly sand the surface and edges. Wipe away any clay dust with a slightly damp cloth or dry brush. -
Plan the Layout:
Before committing to ink, you might want to lightly sketch your design with a pencil. Start with a vertical branch stem ascending on the left side. -
Draw the Branch:
Using your black paint marker or thin brush, draw the central stem starting from the bottom corner. Add almond-shaped leaves branching off in pairs, keeping the lines crisp and deliberate. -
Add Abstract Curves:
To the right of the botanical element, draw a flowing, abstract curve that intersects the space. Let the line weight vary slightly for an organic feel, creating a loop or swoop that balances the composition. -
Detail with Dots:
Place a few small, solid black dots randomly in the negative space around the curves. These act as confetti-like accents that tie the whole design together. -
Seal the Design (Optional):
If you want extra protection, apply a thin coat of matte varnish over the painted side. This step is optional but helps prevent smudging if you used a water-based marker.
Smooth Operator
To get a glassy-smooth surface without sanding later, smooth the wet clay with a tiny bit of baby oil on your fingertip before it dries.
Step 3: Assembly
-
Cut the Cord:
Cut a length of jute twine or hemp cord, approximately 12 inches long, depending on how low you want the piece to hang. -
Loop Through:
Fold the twine in half. Push the folded loop through the hole in the clay tile from front to back. -
Secure the Knot:
Pass the loose ends of the twine through the loop and pull tight to create a lark’s head knot directly on the tile. -
Tie the Top:
Bring the two loose ends of the twine together at the top and tie a simple overhand knot to close the loop for hanging.
Marker Bleeding?
If your ink bleeds into the clay, the clay might not be 100% dry. Wait another day, or seal with a spray matte varnish BEFORE drawing.
Hang your new art piece in a sunlit spot to enjoy the subtle shadows cast by the clay texture


What Really Happens Inside the Kiln
Learn how time and temperature work together inside the kiln to transform clay into durable ceramic.
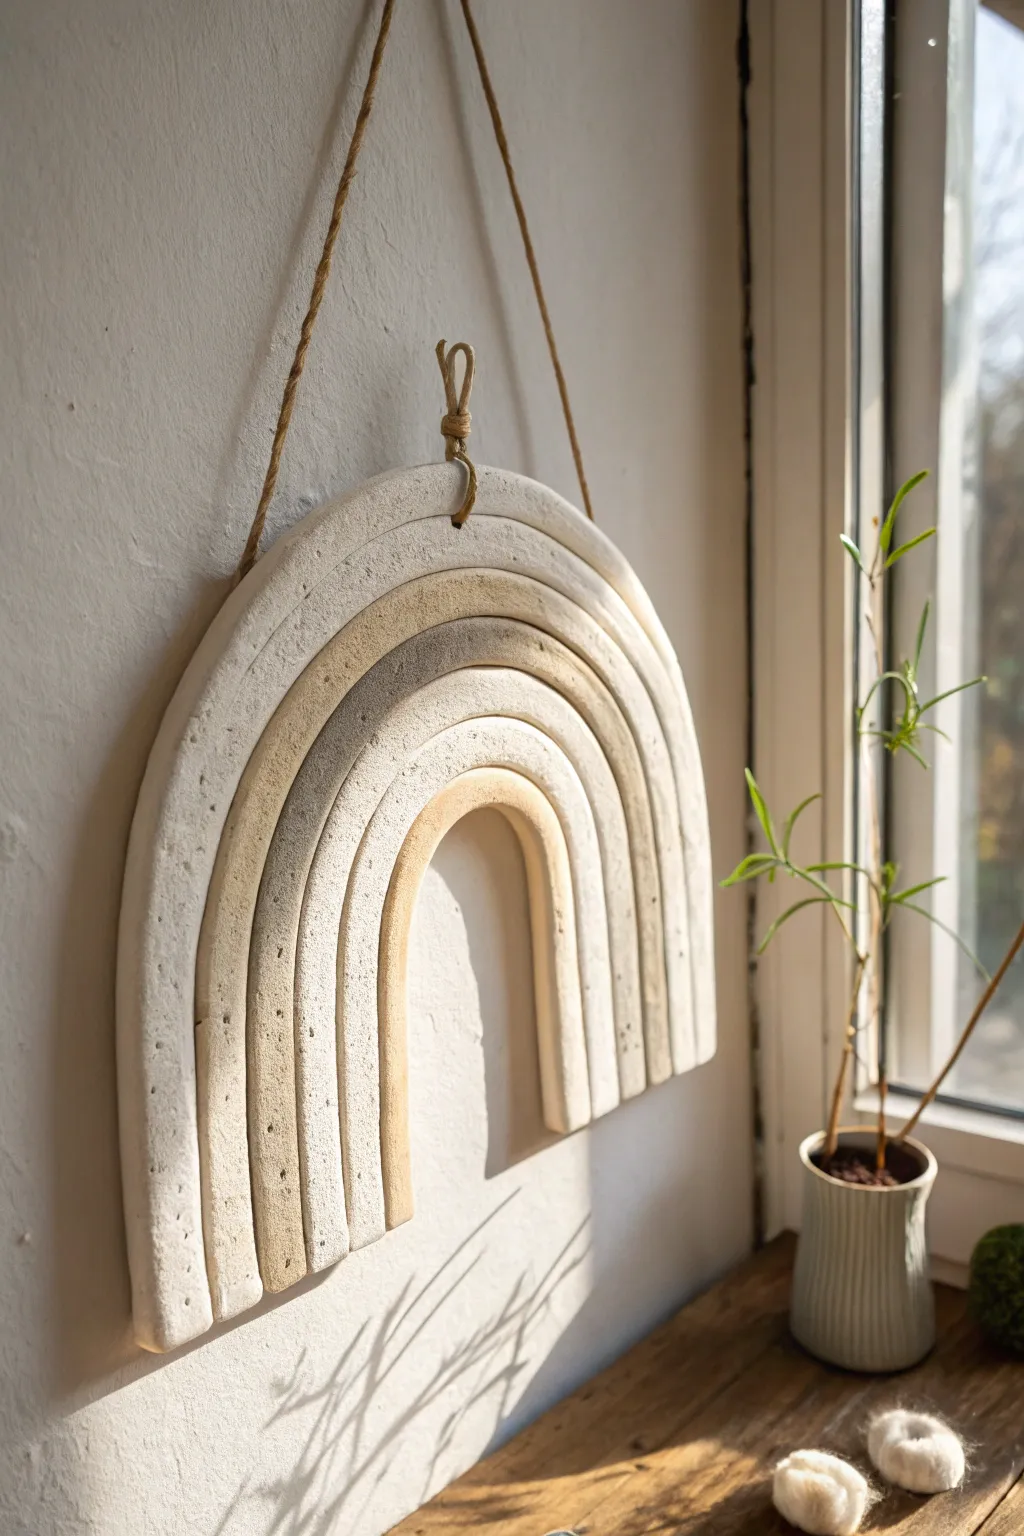
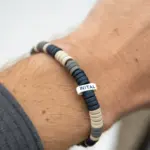
Speckled Stone-Look Hanging
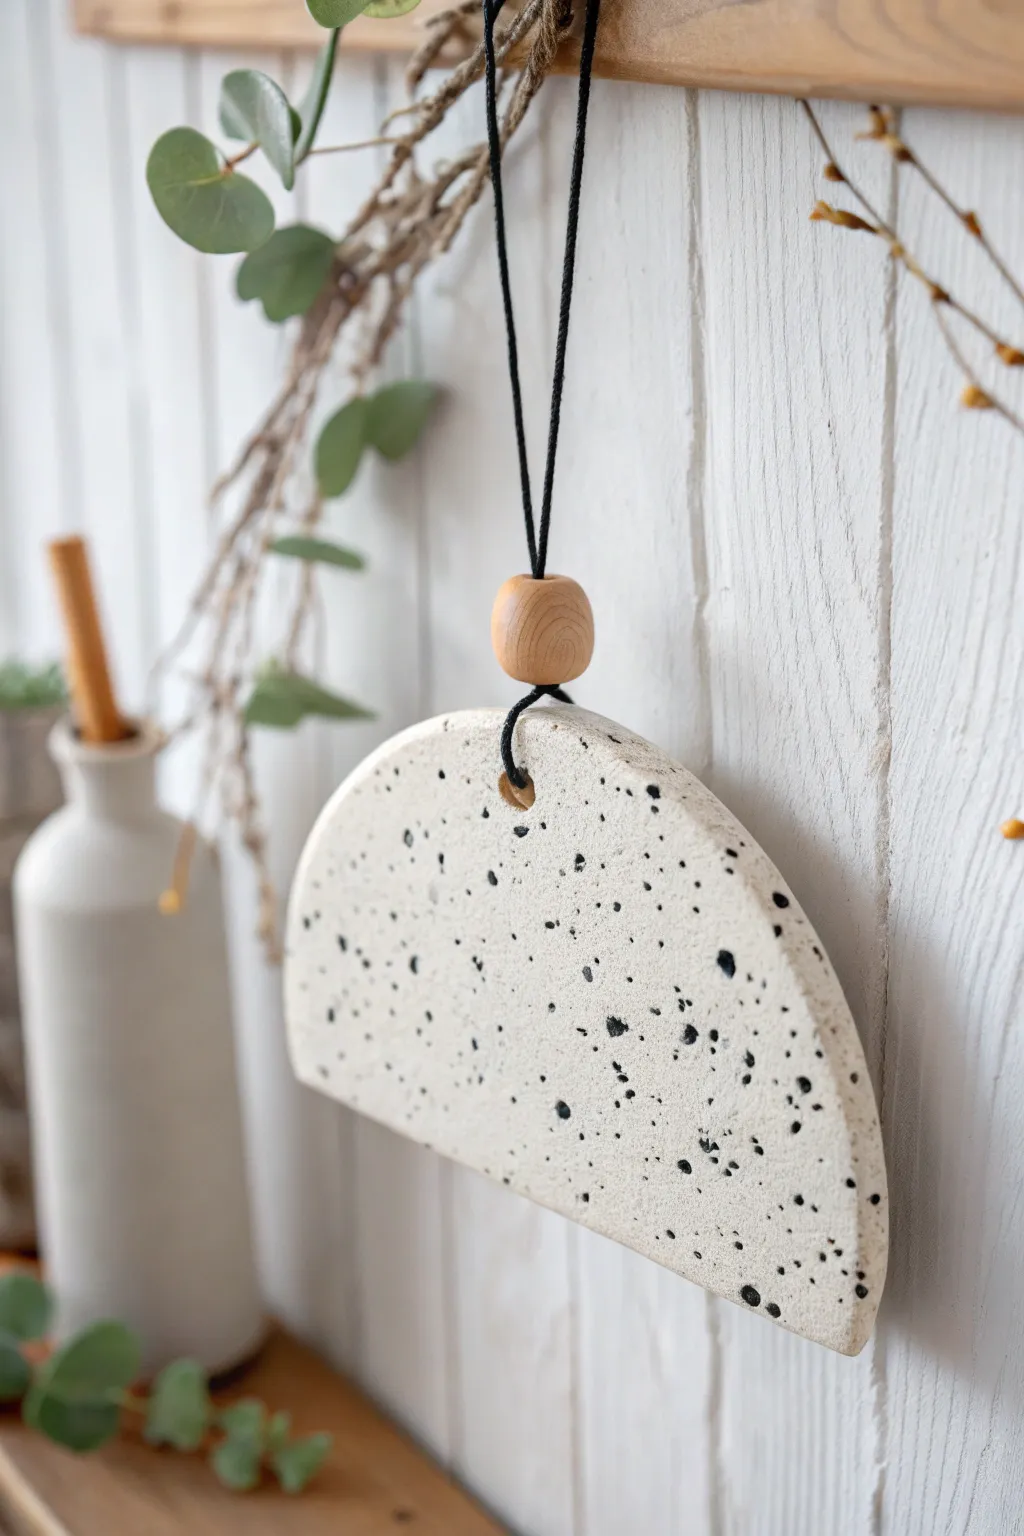
Embrace the minimal beauty of stone without the heavy weight using this clever air dry clay technique. This semicircular wall hanging features a convincing speckled finish and a natural wood accent for a modern, organic look.
How-To Guide
Materials
- White smooth air dry clay
- Rolling pin
- Clay knife or craft blade
- Round cookie cutter or bowl (approx. 4-5 inch diameter)
- Black acrylic paint
- Old toothbrush or stiff bristle brush
- Fine grit sandpaper
- Wooden bead
- Black cotton cord or twine
- Straw or skewer (for hole punching)
- Matte sealant or varnish
- Water based sealer (optional)
Step 1: Shaping the Clay
-
Condition the clay:
Begin by taking a handful of white air dry clay and kneading it in your hands to warm it up. Condition it until it is pliable and smooth, ensuring there are no hidden air bubbles inside. -
Roll out the slab:
Place the clay on a clean, smooth surface or a silicone mat. Use your rolling pin to flatten the clay into a slab that is roughly 1/4 inch thick. Try to keep the thickness consistent across the entire piece for even drying. -
Cut the circle:
Using a large round cookie cutter or a bowl as a template, cut out a perfect circle from your clay slab. Remove the excess clay from around the edges. -
Form the semicircle:
Take your clay knife and cut the circle precisely in half. You will now have two semicircles; set one aside for a future project or roll it back up, as we only need one for this hanging. -
Refine the edges:
Dip your finger in a little bit of water and run it along the cut edges of the semicircle. This smooths down any sharpness or jagged bits left by the knife. -
Create the hanging hole:
Find the top center point of the semicircle’s curved edge. Use a straw or a skewer to punch a clear hole about 1/4 inch down from the edge. Wiggle the tool slightly to ensure the hole is clean and wide enough for your cord.
Fixing Warped Clay
If your semicircle curls while drying, slightly dampen the concave side and place it under a heavy book overnight to flatten it back out.
Step 2: Creating the Stone Effect
-
Initial drying phase:
Let the clay dry flat for about 24-48 hours. I usually flip it over halfway through the drying process to prevent the edges from curling upward. -
Sand for smoothness:
Once fully dry and hard, take fine-grit sandpaper and gently sand the surface and edges. This removes any fingerprints and makes the piece look more like cut stone. -
Prepare the splatter paint:
Squeeze a small amount of black acrylic paint onto a palette and dilute it slightly with a few drops of water. You want a fluid consistency, roughly like heavy cream. -
Apply the speckles:
Dip an old toothbrush into the black paint. Hold the brush over your clay piece and run your thumb across the bristles to flick paint onto the surface. Vary your distance to create different sized speckles. -
Seal the surface:
Allow the paint speckles to dry completely. Apply a coat of matte varnish or sealant over the entire piece to protect the clay and give it a finished, stone-like texture.
Level Up: Color Tint
Knead a tiny drop of beige or gray acrylic paint directly into the wet clay before rolling it out for an even more authentic limestone base color.
Step 3: Assembly
-
Prepare the cord:
Cut a length of black cotton cord, approximately 12-15 inches long depending on how low you want it to hang. -
Thread the wood bead:
Fold the cord in half to create a loop. Thread the folded end through your natural wooden bead so the bead sits near the middle of the doubled cord. -
Attach to the clay:
Push the looped end of the cord through the hole in your clay semicircle from the front to the back. -
Secure the loop:
Pull the loop open on the back side and pass the two loose ends of the cord (and the rest of the loop assembly) through it to create a lark’s head knot directly on the clay. -
Position the bead:
Slide the wooden bead down so it rests closer to the clay, or leave it suspended slightly higher up the cord as shown in the inspiration photo. -
Knot and finish:
Tie a secure overhand knot at the very ends of the cord to close the hanging loop and trim any excess string.
Now you have a chic, minimalist piece of art ready to hang on your wall.
Sunburst Medallion Wall Hanging
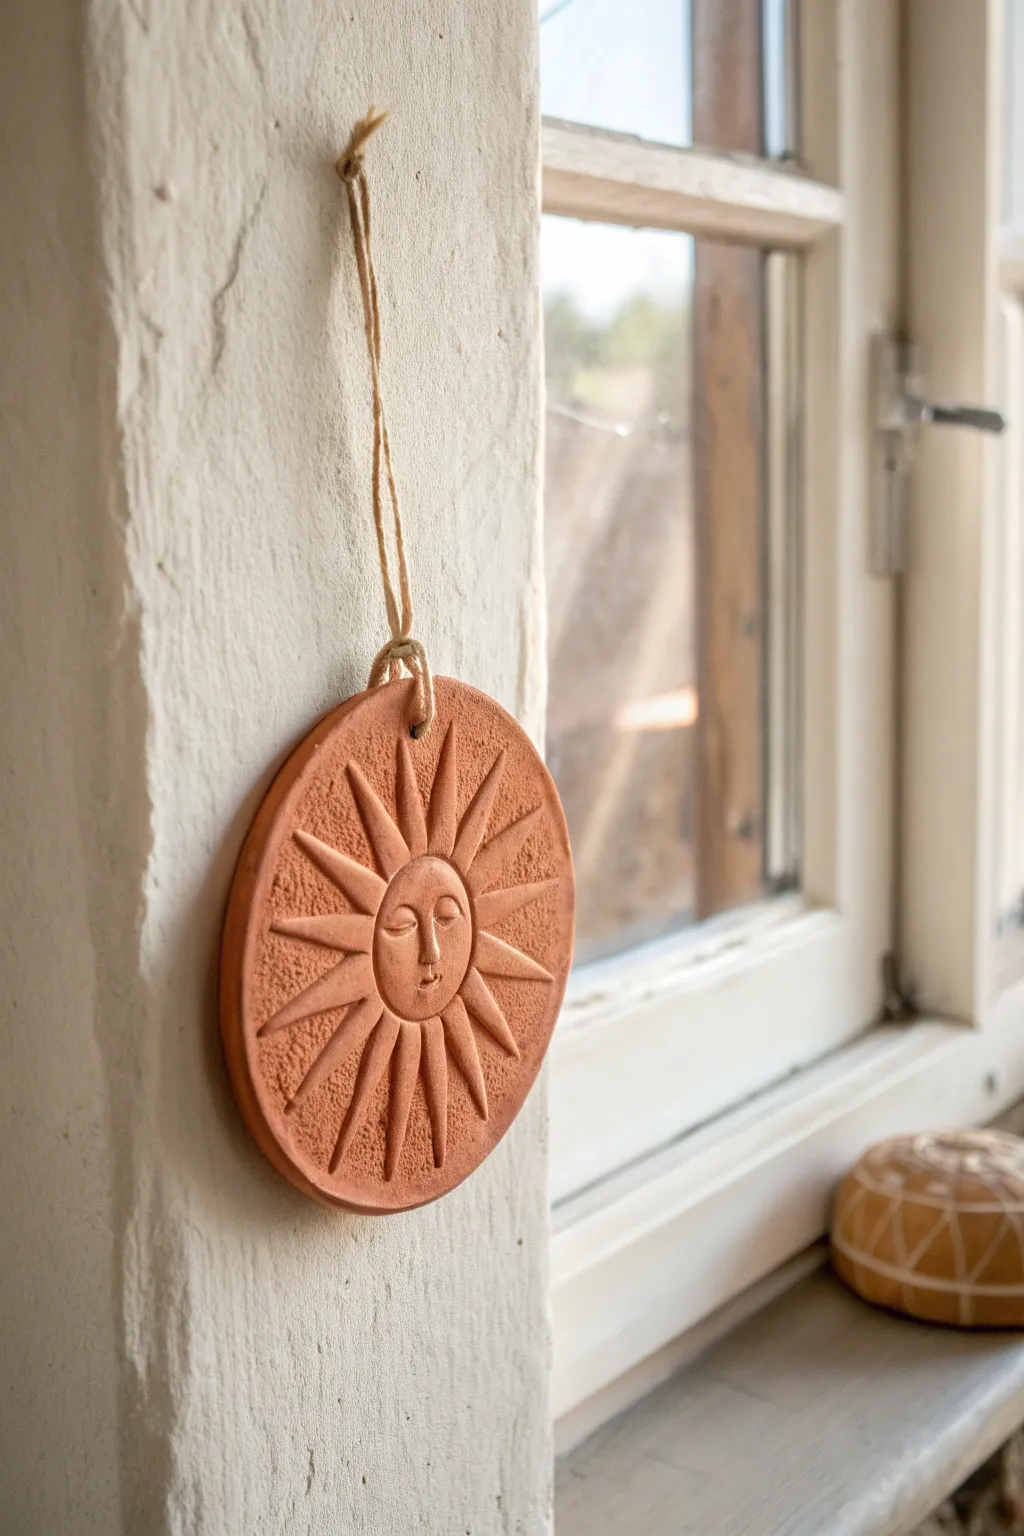
Bring a touch of cosmic warmth into your home with this earthy sun-faced wall hanging. Using terracotta-tinted air dry clay, you’ll create a relief sculpture that mimics the look of ancient fired pottery without needing a kiln.
Detailed Instructions
Materials
- Terracotta-colored air dry clay (approx. 500g)
- Rolling pin
- Circle cutter or a small bowl (approx. 4-5 inches diameter)
- Sharp knife or X-Acto blade
- Sculpting tools (specifically a needle tool and a small spoon tool)
- Small cup of water
- Sponge
- Jute twine or hemp cord
- Fine-grit sandpaper
- Matte sealant spray (optional)
Step 1: Base Preparation
-
Condition the clay:
Begin by kneading your terracotta air dry clay until it feels pliable and warm in your hands. This activates the binders and prevents cracking later hanging. -
Roll the slab:
Roll out the clay to a uniform thickness of about 1/4 to 1/3 inch. Avoid going too thin, as the medallion needs structure to support the relief work. -
Cut the circle:
Place your circle cutter or bowl onto the slab and press down firmly to cut your main medallion shape. Peel away the excess clay. -
Smooth the edges:
Dip your finger in a little water and run it along the cut edge of the circle to create a smooth, rounded finish. -
Create the hanging hole:
Using a straw or a sculpting tool, punch a hole near the top edge. Make sure it’s at least half an inch from the rim so the weight doesn’t pull through the clay.
Clean Lines Pro-Tip
To get super sharp definition on the sun rays, dip your sculpting tool in water frequently. It acts like a lubricant, polishing the clay as you shape the ridges.
Step 2: Sculpting the Sun Face
-
Form the central mound:
Roll a small ball of clay, roughly the size of a large marble, and flatten it slightly. Score both the back of this piece and the center of your medallion with a needle tool. -
Attach the face:
Apply a tiny bit of water to the scored areas (slip) and press the flattened ball firmly onto the center of the medallion. Smooth the edges of the ball down onto the base so it looks like one continuous piece. -
Initial carving:
Using a needle tool, lightly sketch the vertical line for the nose and the horizontal line for the eyes to ensure symmetry. -
Sculpt the nose:
Add a tiny snake of clay along the nose line. Use a small modeling tool to blend it into the face, building up the bridge and nostrils. -
Define the eyes:
Press the bowl of a small spoon tool gently into the eye sockets. Form two tiny almond shapes from clay, place them in the sockets, and blend. Add eyelids by pressing a thin line across the middle of the almonds. -
Shape the mouth:
Carve a small, serene smile. I usually like to use the side of a needle tool to gently press the lips apart rather than cutting clay away.
Step 3: Creating the Rays
-
Mark the ray positions:
Lightly mark lines radiating from the face to the edge of the circle, spacing them evenly like clock hands. -
Roll the rays:
Roll thin, tapered coils (snakes) of clay. They should be thicker near the face and taper to a point near the rim. -
Attach the rays:
Score the path of each ray on the medallion. Brush on water, then press your clay coils onto the lines. -
Refine the shape:
Use a sculpting tool to press the edges of the rays down onto the medallion, creating a sharp ridge down the center of each ray for a crisp, carved look. -
Texture the background:
Using the tip of a stiff paintbrush or a crumpled ball of foil, gently stipple the negative space between the rays to add that stone-like texture seen in the photo.
Level Up: Antique Look
After sealing, rub a dark brown acrylic wash over the piece and wipe it back immediately with a cloth. The dark paint stays in the crevices for an aged effect.
Step 4: Finishing
-
Slow drying:
Place the medallion on a wire rack to dry. To prevent warping, place a light book on top (with parchment paper in between) once it’s semi-dry, or flip it carefully every few hours. -
Sanding:
Once fully cured (24-48 hours), use fine-grit sandpaper to smooth out any rough spots on the rim or the back. -
Seal:
Spray with a matte fixative or varnish to protect the clay while keeping the natural, chalky terracotta appearance. -
Stringing:
Cut a length of jute twine. Fold it in half, push the loop through the hole from front to back, and pull the tails through the loop to create a lark’s head knot.
Now you have a timeless piece of solar art ready to brighten up your window corner

TRACK YOUR CERAMIC JOURNEY
Capture glaze tests, firing details, and creative progress—all in one simple printable. Make your projects easier to repeat and improve.
Clay Tile Garland Wall Hanging

Embrace a relaxed bohemian vibe with this simple yet striking clay garland, featuring alternating diamonds of natural terracotta and soft white. Suspended on rugged jute twine against a dark wooden rail, these textured tiles catch the light beautifully near a window or doorway.
Step-by-Step Guide
Materials
- Air dry clay (white)
- Air dry clay (terracotta/earth tone)
- Square cookie cutter (approx. 2-3 inches)
- Rolling pin
- Jute twine (natural brown)
- Dark wood strip or branch (approx. 12-14 inches)
- Sandpaper (fine grit)
- Skewer, straw, or chopstick
- Scissors
- Measuring tape
- Clear matte sealant spray (optional)
Step 1: Preparing the Clay Tiles
-
Roll out the white clay:
Begin by taking a chunk of your white air dry clay. Knead it slightly to warm it up, then use a rolling pin to flatten it to an even thickness of about 1/4 inch. If you want a textured look like the example, roll it on a canvas cloth or gently press a piece of rough fabric onto the surface before cutting. -
Cut the white diamonds:
Using your square cookie cutter, cut out at least 6-8 squares. If you don’t have a cutter, you can make a paper template and cut around it with a craft knife. -
Pierce the hanging holes:
While the clay is still wet, turn your squares into diamonds by rotating them 45 degrees. Use a straw or skewer to poke a hole near the top corner and the bottom corner of each diamond. Make sure the hole is large enough for your jute twine to pass through easily. -
Repeat with terracotta clay:
Clean your workspace and rolling pin, then repeat the rolling and cutting process with the terracotta-colored clay. Aim for a similar thickness so the garland hangs evenly. -
Add texture and holes:
Poke the top and bottom holes in your terracotta diamonds just as you did with the white ones. I find that slightly wiggling the tool creates a cleaner hole that needs less sanding later. -
Allow to dry completely:
Lay all your clay pieces on a flat surface lined with parchment paper. Let them dry for 24-48 hours, flipping them occasionally to prevent curling. -
Sand the edges:
Once fully dry and hard, take a piece of fine-grit sandpaper and gently smooth any rough edges or irregularities around the holes.
Smooth Surface Trick
To fix minor cracks or uneven spots without sanding, dip your finger in a tiny bit of water and smooth the clay surface while it’s still leather-hard before it fully dries.
Step 2: Preparing the Wood Mount
-
Select your wood piece:
Find a flat strip of reclaimed darker wood or a piece of driftwood. It should be wide enough to support two strands of garland spaced a few inches apart. -
Drill mounting holes:
Drill two small holes through the wood strip where you want the garlands to hang from. Space them evenly so the garlands will hang parallel to each other.
Step 3: Assembling the Garland
-
Measure and cut twine:
Cut two long lengths of jute twine. Measure fairly generously—about 1.5 times the desired final length—to account for the knots you will be tying. -
Thread the first tile:
Start with the top tile of your first strand. Thread the twine through the top hole and tie a simple overhand knot above the tile to secure it to the wood mount later (or loop it directly onto the wood if you prefer). -
Secure the tile position:
Tie a hefty knot immediately below the bottom hole of the first tile. This knot acts as a stopper for the next section of twine. -
Create spacing:
Decide on the gap you want between tiles—about 2 inches works well. Tie another knot at this distance mark. -
Add the second tile:
Thread the twine through the top hole of your second tile (alternating colors if desired), sliding it down until it rests on the knot you just made. -
Continue the pattern:
Thread the twine through the bottom hole of the current tile, tie a knot underneath it, measure your gap, tie the next supporting knot, and add the next tile. Repeat this until your strand reaches the desired length. -
Finish the first strand:
Once the final tile is on, tie a secure double knot at the very bottom. You can trim the excess twine short or leave a small tassel if you like. -
Assemble the second strand:
Repeat the threading and knotting process for your second strand. Try to align the knots with the first strand so the diamonds hang side-by-side symmetrically. -
Attach to the wood:
Feed the top ends of your twine strands through the holes in your wooden rail. Adjust the height so they are level, then knot them securely at the back or front of the wood depending on your aesthetic preference. -
Hang the rail:
Add a master loop of twine to the top of your wooden rail or attach D-ring hangers to the back to mount it on the wall.
Scent Infusion
Since terracotta is porous, you can add a few drops of essential oil to the back of the finished unsealed tiles to make your wall hanging double as a subtle room diffuser.
Now step back and enjoy the earthy, rhythmic pattern your new handmade garland brings to the space.
Tiny Hanging Shelf Ledge Accent
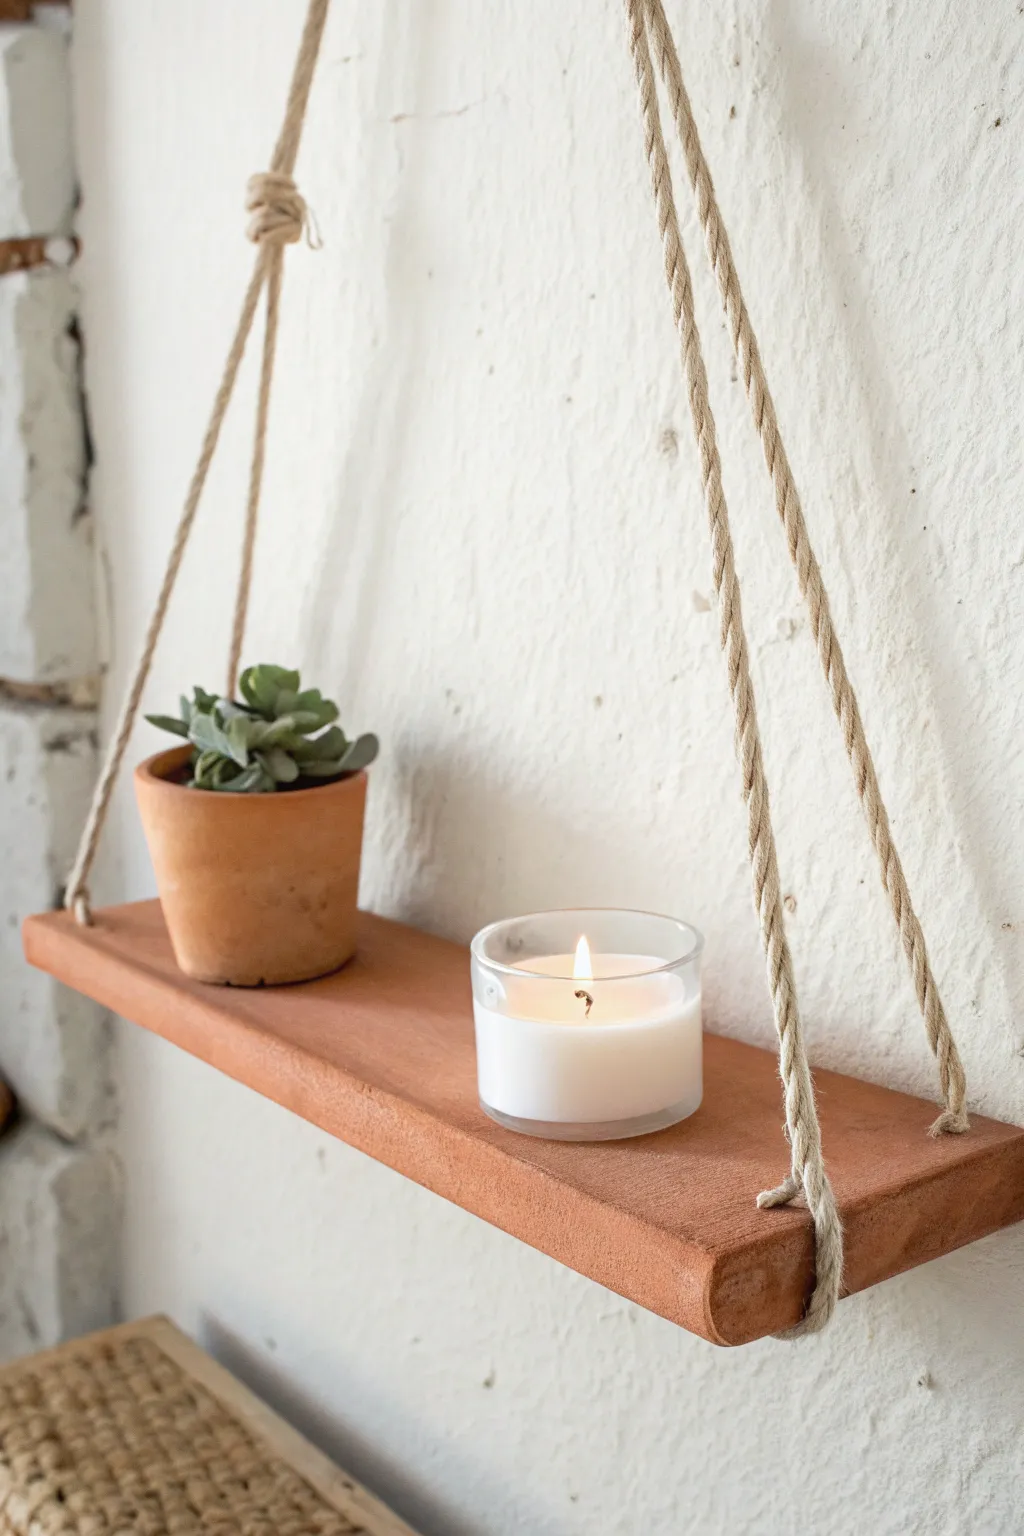
Create a charming, rustic floating shelf that looks like fired terracotta but is actually crafted from air-dry clay. This minimalist accent piece is perfect for showcasing tiny treasures like a small succulent or a tealight candle, bringing warmth and texture to any empty wall space.
How-To Guide
Materials
- Air-dry clay (terracotta color or white to be painted)
- Acrylic rolling pin
- Sharp crafting knife or clay slicer
- Two pieces of parchment paper
- Ruler
- Four thick straws or a dowel (for making holes)
- Fine-grit sandpaper
- Acrylic paint (burnt orange/terracotta mix if using white clay)
- Matte sealant or varnish
- Thick jute rope or natural cotton cord (approx. 4 feet)
- Scissors
- Water in a small cup
Step 1: Shaping the Shelf Base
-
Prepare your workspace:
Lay down a piece of parchment paper on a flat, sturdy surface. Take a large handful of air-dry clay and knead it well to remove any air bubbles and make it pliable. -
Roll out the slab:
Place the clay between two sheets of parchment paper to prevent sticking. Use your acrylic rolling pin to roll the clay into a thick, even slab. Aim for a thickness of about 1/2 to 3/4 inch to ensure the shelves are strong enough to hold weight. -
Measure and cut:
Using a ruler and a sharp knife, measure a rectangle approximately 4 inches wide and 10-12 inches long. Slice cleanly through the clay to create straight edges. -
Smooth the edges:
Dip your finger in a little water and run it along the cut edges of the rectangle. Soften the sharpness slightly and smooth out any imperfections or cracks on the surface. -
Create suspension holes:
Measure about 1 inch in from each of the four corners. Mark these spots gently. -
Pierce the clay:
Using a thick straw or a dowel that is slightly wider than your intended rope, punch holes strictly vertically through the marked spots. Twist the straw as you push down to get a clean cut, then remove the core of clay.
Warping Woes?
If the corners curl while drying, place a lightweight book on the center of the drying clay (with parchment paper in between) to gently weigh it down flat.
Step 2: Drying and Refining
-
Initial drying:
Leave the shelf on the parchment paper in a safe spot. Let it air dry for at least 24-48 hours. I find flipping the slab over carefully halfway through the drying process helps prevent it from warping or curling at the edges. -
Check for dryness:
The clay should light in color and feel hard and room temperature to the touch (not cold). If it feels cool, it still contains moisture. -
Sand the surface:
Once fully dry, take fine-grit sandpaper and gently sand the edges and flat surfaces. Focus on the inside of the holes to ensure the rope will pass through smoothly without snagging. -
Dust off:
Wipe the entire piece down with a dry cloth or a slightly damp paper towel to remove all sanding dust.
Step 3: Finishing and Assembly
-
Paint (Optional):
If you used white clay and want the look in the photo, mix burnt orange, brown, and a touch of white acrylic paint. Apply a wash of this color for a natural, terracotta look. If you used terracotta clay, you can skip this step. -
Seal the shelf:
Apply a coat of matte varnish or sealant to the top, bottom, and sides. This protects the clay from moisture, which is especially important if you plan to put a plant on it. -
Cut the rope:
Cut two equal lengths of thick jute rope, each about 4 to 5 feet long, depending on how low you want the shelf to hang. -
Thread the left side:
Take one piece of rope. Thread one end down through the front-left hole and tie a sturdy overhand knot underneath the shelf. Thread the other end of the same rope down through the back-left hole and tie a matching knot underneath. -
Thread the right side:
Repeat the process with the second piece of rope on the right side, ensuring the knots are tight and bulky enough so they won’t slip through the holes. -
Level the ropes:
Pull up the loops formed by the ropes on both sides. Hold them together at the top center. Adjust the knots underneath if necessary to ensure the shelf hangs perfectly level. -
Create the hanging loop:
Gather both rope loops at the top center. Tie them together into a single large master knot. Trim any excess rope if desired, or leave a tassle for decoration.
Make it Stronger
For extra durability, you can knead a small amount of PVA glue into your air-dry clay before rolling it out. This helps prevent cracking as it dries.
Now you have a beautiful, minimalistic ledge ready to display your favorite small decor pieces
Driftwood Bar and Clay Charm Hanging
This earthy, bohemian wall hanging combines the rustic texture of driftwood with the warmth of terracotta-colored clay shapes. Suspended on varying lengths of natural cord, the geometric charms create a mesmerizing, mobile-like effect that feels organic and handmade.
Step-by-Step Guide
Materials
- Air dry clay (terracotta or reddish-brown color)
- Air dry clay (white or cream color)
- Driftwood branch (approx. 12-18 inches long)
- Natural cotton twine or hemp cord
- Rolling pin
- Clay cutting tools (knife, needle tool)
- Cookie cutters (circles of various sizes)
- Straw or skewer (for poking holes)
- Sandpaper (fine grit)
- Wooden beads (natural and reddish-brown)
- Matte varnish or sealant (optional)
- Scissors
Step 1: Shaping the Clay Elements
-
Prepare the workspace:
Cover your surface with parchment paper or a canvas mat to prevent sticking. Knead the terracotta clay until it is pliable and smooth. -
Roll out the slab:
Use your rolling pin to flatten the terracotta clay to an even thickness of about 1/4 inch. If you want a perfectly uniform look, place two magazines or wooden slats on either side of the clay to guide the rolling pin height. -
Cut the rainbow arches:
To make the rainbow shapes, cut out a large circle using a cutter or a bowl as a template. Cut the circle in half to make two semicircles. For the nested rainbow look, use a smaller cutter to remove the inner section, creating an arch. -
Form the solid semicircles:
Cut another large circle and slice it perfectly in half to create the solid semicircles seen on the outer and far-right strands. One will have a textural finish, which we will add later. -
Create the crescent moons:
Use a round cutter to punch a circle, then move the cutter slightly over and punch again to intersect the first cut, leaving you with a crescent moon shape. You will need two of these for the bottom tier. -
Make the circular connectors:
Switch to your cream-colored clay (or mix white and a tiny bit of terracotta for a beige tone). Roll it out and cut small circles. Use a straw to punch a large hole in the center of the larger discs to create the ‘donut’ shapes seen on the second strand. -
Add texture:
Take one of the solid terracotta semicircles (for the rightmost strand) and gently press a piece of rough sandpaper, a crumpled foil ball, or a stiff brush into the surface to create a pitted, stone-like texture. -
Pierce holes for hanging:
Using a skewer or a straw, poke holes through the top and bottom of each piece that needs to connect to another. For the bottom pieces (like moons), only poke a hole in the top. Make sure the holes are large enough for your twine.
Smooth Edges Pro-Tip
dip your finger in water and run it along the cut edges of your wet clay before drying. This smooths out rough cuts immediately and saves you significant sanding time later.
Step 2: Finishing and Assembly
-
Allow to dry:
Let all your clay pieces dry completely for 24-48 hours. I like to flip them over halfway through the drying process to ensure they dry flat and don’t curl at the edges. -
Sand and smooth:
Once bone dry, take your fine-grit sandpaper and gently sand the edges of each piece to remove any burrs or sharp points. Wipe away the dust with a slightly damp cloth. -
Prepare the driftwood:
Cut a long piece of twine to serve as the main hanger. Tie each end securely to the outer edges of your driftwood branch. -
Cut suspension cords:
Cut four lengths of twine, each about 24-30 inches long. You will trim the excess later, so it’s better to have them too long than too short. -
Attach cords to the branch:
Tie the four cords onto the driftwood using a lark’s head knot or a simple double knot. wrap the excess twine around the branch a few times for a decorative look before securing. -
String the first charm:
Starting with the leftmost strand, thread a small wooden bead, then a cream disc, then a terracotta bead. Tie knots below each bead if you want them fixed in place, or let them rest on the clay piece below. -
Assemble the middle tiers:
Thread the twine through the top hole of your clay shape and out the bottom hole. If the piece doesn’t have a bottom hole (like the solid semicircle), simply tie the knot inside the hole or behind the piece. -
Add the rainbow details:
For the strands with rainbows, you can nest a smaller arch inside a larger one by tying them separately or gluing them together before hanging. In this design, the rainbows hang independently. -
Attach the bottom weights:
Tie on the final bottom pieces—the crescent moons and small semicircles. Ensure your knots are tight and trim any loose ends close to the knot. -
Final adjustments:
Hang the driftwood on the wall to check the balance. Adjust the spacing of the four strands on the branch so they hang evenly and don’t tangle.
Level Up: Color Block
After the clay dries but before assembling, paint geometric patterns or stripes on just one or two shapes using white or gold acrylic paint for a modern pop of contrast.
Now you have a stunning, organic art piece ready to bring warmth to your walls
Lace-Pressed Doily Texture Hanging
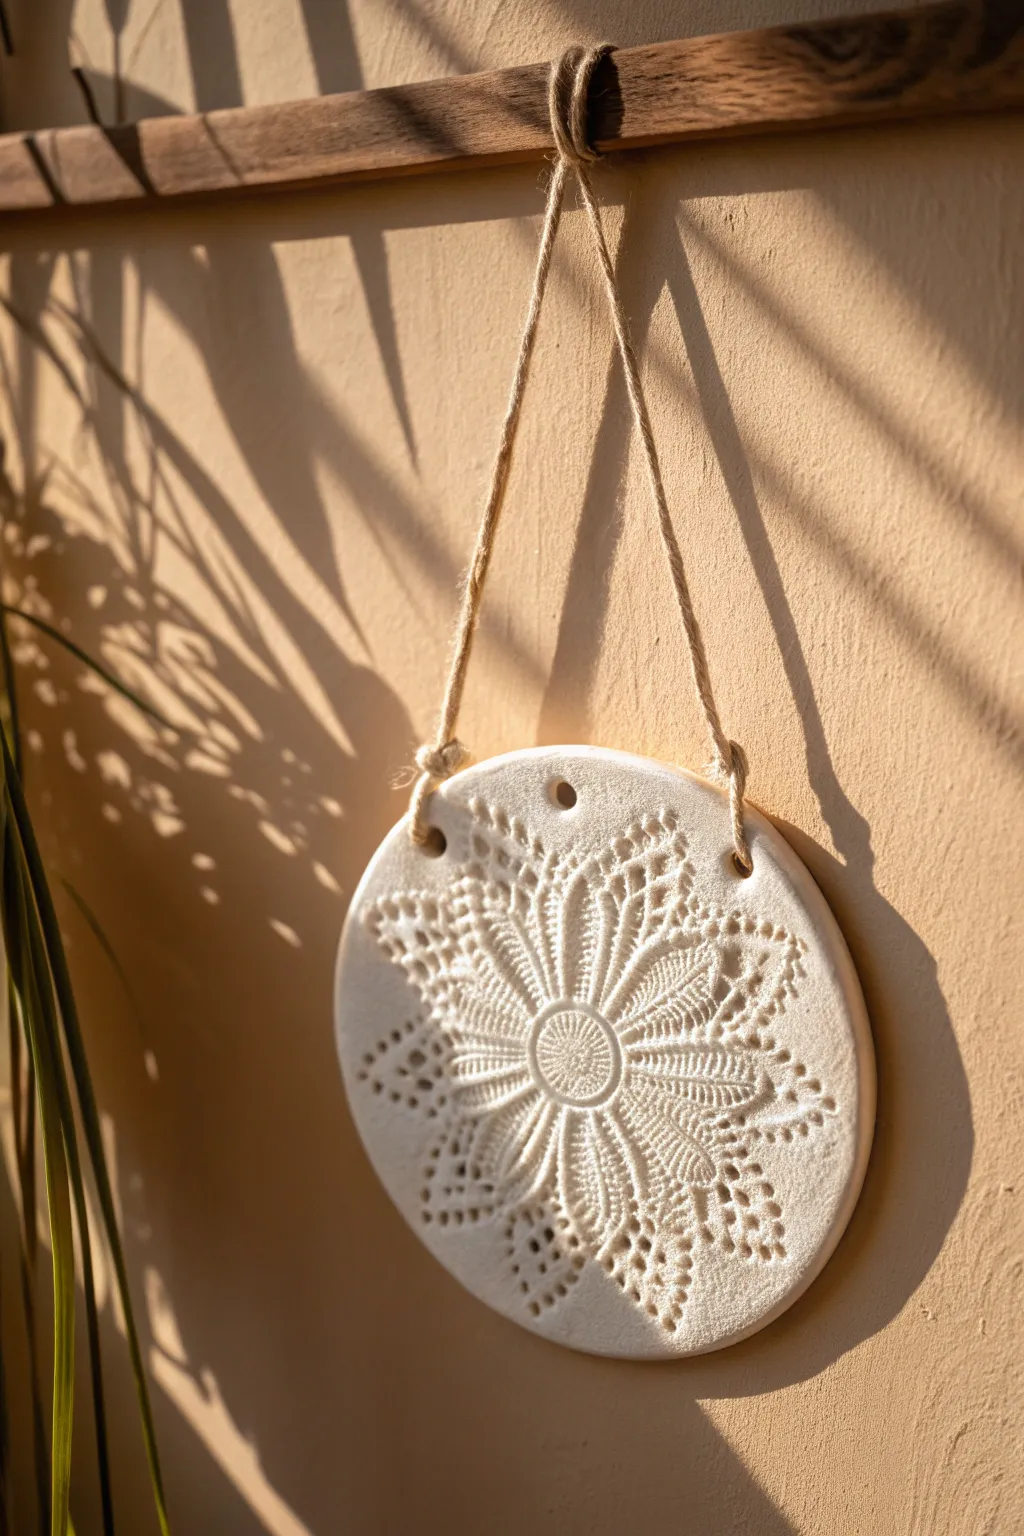
Capture the delicate beauty of vintage lace in a modern, minimalist wall hanging. This project uses the simple technique of impression to turn a plain circle of air-dry clay into an intricate, textured art piece that catches shadows beautifully.
Step-by-Step
Materials
- White polymer clay or air-dry clay
- Rolling pin or acrylic roller
- Circular cookie cutter or a bowl (approx. 4-5 inches diameter)
- Vintage lace doily (crocheted style works best)
- Sharp knife or clay blade
- Straw or small round tool for hole punching
- Fine grit sandpaper (optional)
- Natural jute twine
- Small wooden dowel or branch
- Parchment paper
Step 1: Prepping and Rolling the Canvas
-
Condition the Clay:
Begin by taking a generous handful of white air-dry clay. Knead it thoroughly in your hands to warm it up and remove any air bubbles, ensuring the texture is smooth and pliable. -
Set Up Your Work Surface:
Lay down a sheet of parchment paper or work on a clean, non-stick mat. This prevents the clay from sticking and makes it easier to move later without distorting the shape. -
Roll the Slab:
Using your rolling pin, roll the clay out into an even slab. You’re aiming for a thickness of about 1/4 inch—too thin and it might crack, too thick and it becomes heavy. -
Smooth the Surface:
Check the surface for any little bumps or fingernail marks. Gently smooth these out with a tiny bit of water on your fingertip if you’re using air-dry clay.
Step 2: Creating the Lace Impression
-
Position the Doily:
Place your lace doily directly onto the center of your rolled clay. I like to take a moment here to ensure the center of the doily’s pattern aligns where I want the middle of my ornament to be. -
Press the Design:
Take your rolling pin and roll firmly over the doily. Don’t be afraid to apply pressure; you want the deep texture of the threads to really sink into the clay. -
Remove the Lace:
Carefully peel back the doily from one edge to reveal the imprinted design. Do this slowly to ensure you don’t pull up chunks of clay with intricate lace fibers. -
Cut the Circle:
Place your circular cutter or an upside-down bowl over the imprinted area to frame the pattern perfectly. Press down firmly to cut the shape. If using a bowl, trace around it with a sharp knife. -
Clean the Edges:
Remove the excess clay from around the circle. Use your finger or a little water to gently smooth the raw cut edge of the circle so it looks polished.
Sticky Situation?
Does the clay stick to the doily? Lightly dust the clay surface with cornstarch before placing the lace down. This acts as a release agent and brushes off easily once dry.
Step 3: Finishing and Assembly
-
Create Hanging Holes:
Using a drinking straw or a small round tool, punch two holes near the top edge of the circle. Space them about 1-2 inches apart to create stability when hanging. -
Drying Time:
Move the parchment paper with the clay to a flat, safe area to dry. Let it sit for 24-48 hours. Flip it over halfway through the drying process to prevent curling. -
Sand for Perfection:
Once fully cured and hard, check the edges one last time. If there are sharp spots, lightly sand them with fine-grit sandpaper for a professional finish. -
Cut the Twine:
Cut a length of jute twine, roughly 18-24 inches long, depending on how low you want the piece to hang. -
Thread the Clay:
Feed one end of the twine through the front of the left hole and the other end through the front of the right hole. Pull them through to the back and tie small stopper knots if needed, or simply loop them. -
Attach to Dowel:
Take the loose ends of the twine and tie them securely to your wooden dowel or branch. Ensure the lengths are equal so the clay charm hangs level. -
Create the Top Loop:
Cut a second, shorter piece of specific twine. Tie this to the center of the wooden dowel to serve as the main hanging point for the wall.
Make It Pop
After drying, use a dry brush technique with acrylic paint. Lightly brush a contrasting color (like gold or terracotta) over the raised texture to highlight the lace details.
Hang your textured masterpiece in a spot where the sunlight hits it to enjoy the beautiful shadows it casts
Cutout Negative-Space Shape Hanging

This striking wall hanging features a minimalist arch shape with deep, grooved details that create a sophisticated ribbed effect. The rich indigo blue paint contrasts beautifully with the natural wooden ring and hemp cord, making it a modern statement piece for any room.
Step-by-Step
Materials
- Air dry clay (white or terracotta)
- Rolling pin
- Parchment paper or canvas mat
- U-shaped paper template (approx. 6-8 inches wide)
- Sharp craft knife or clay blade
- Modeling tool with a rounded or slightly pointed tip (for grooves)
- Small circular cutter or straw (for the hanging hole)
- Fine-grit sandpaper (220-400 grit)
- Acrylic paint (Deep Navy or Indigo)
- Matte spray varnish or sealant
- Small wooden ring (approx. 1.5 – 2 inches diameter)
- Natural jute twine or hemp cord
- Paintbrush (soft bristle)
- Cup of water (for smoothing)
Step 1: Shaping the Clay Base
-
Prepare your workspace:
Lay down parchment paper or a canvas mat on a flat surface to prevent the clay from sticking. Tape down the corners if needed to keep it steady. -
Condition the clay:
Take a large chunk of air dry clay and knead it in your hands to warm it up and remove any air bubbles. It should feel pliable and smooth before you start rolling. -
Roll out the slab:
Using your rolling pin, roll the clay out into an even slab. You want a consistent thickness of about 1/4 inch to ensure durability without making it too heavy. -
Cut the arch shape:
Place your U-shaped paper template onto the clay slab. Using a sharp craft knife held vertically, carefully trace around the template to cut out your main arch shape. Remove the excess clay. -
Smooth the edges:
Dip your finger in a little water and run it along the cut edges of the arch. This softens the sharp corners and fixes any tiny tears from the cutting process.
Step 2: Adding Texture and Details
-
Mark the grooves:
To create the rainbow effect, lightly sketch three concentric U-shapes on the surface of your arch using a needle tool or very light pressure with your knife. These will be guides for your grooves. -
Carve the channels:
Using a rounded modeling tool, press firmly into your guide lines and drag the tool along the curve to create deep, recessed channels. I find going over each line twice helps make the depth consistent. -
Refine the lines:
Smooth out any clay crumbs that build up on the edges of your grooves using a damp paintbrush. You want the channels to look clean and intentional. -
Create the hanging hole:
Use a small circular cutter or a straw to punch a hole at the very top center of the arch. Make sure it’s positioned at least half an inch from the edge to prevent breakage later. -
Final smoothing:
Do one last check over the entire piece. Smooth out fingerprints with a slightly damp sponge or finger. Let the piece dry flat for 24-48 hours, flipping it halfway through to prevent warping.
Fixing Cracks
If tiny cracks appear while drying, don’t panic. Mix a small amount of fresh clay with water to make a paste (slip) and fill the cracks, then sand smooth once dry.
Step 3: Painting and Assembly
-
Sand imperfections:
Once the clay is bone dry and hard, use fine-grit sandpaper to gently buff away any rough spots on the edges or surface. Wipe away the dust with a dry cloth. -
Apply the base coat:
Paint the entire front and sides of the arch with your deep navy acrylic paint. Use a soft brush to get into the grooves without leaving thick blobs of paint. -
Add a second coat:
Let the first coat dry completely, then apply a second layer for a rich, opaque finish. Painting the back is optional but recommended for a professional look. -
Seal the piece:
Once the paint is fully cured, spray the arch with a matte varnish. This protects the finish and gives the indigo color a nice, velvety appearance. -
Attach the ring:
Cut a short piece of jute twine to create a loop. Thread it through the hole in the clay arch and then loop it around the bottom of the wooden ring. -
Secure the knot:
Tie the twine securely behind the arch or use a lark’s head knot on the ring itself depending on the look you prefer. Trim any excess string close to the knot. -
Add the hanging cord:
Cut a longer piece of jute twine. Tie this to the top of the wooden ring to serve as the main hanger.
Make it Shine
For a glamorous twist, paint inside the carved grooves with metallic gold leaf paint after the navy base coat dries. It adds a stunning recessed shimmer.
Hang your new indigo artwork near a window where shadows can play across the textured grooves throughout the day
Layered Clay and Fiber Wall Weave
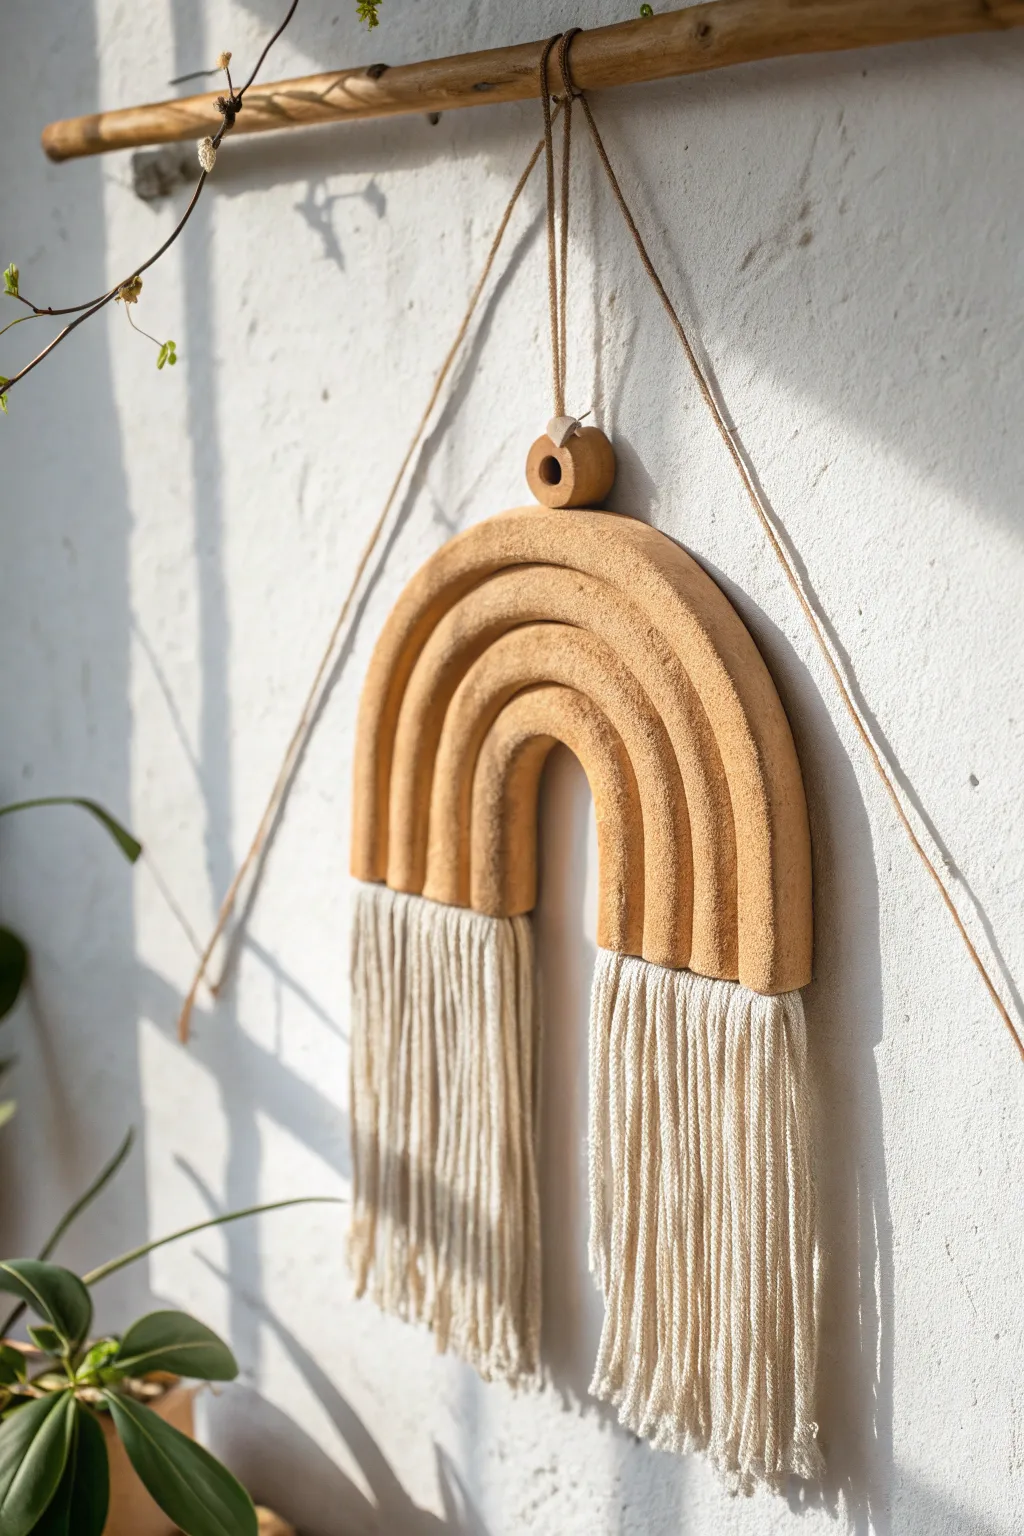
Embrace earthy warmth with this boheme-inspired wall hanging that combines tactile clay textures with the softness of macramé fringe. The finished piece mimics the look of rough-hewn terracotta pottery, creating a cozy and organic statement for any wall.
Step-by-Step Guide
Materials
- Air dry clay (white or terracotta colored)
- Acrylic paint (burnt sienna, ochre, and brown for a terracotta mix)
- Baking soda (for texture)
- Rolling pin
- Clay knife or craft knife
- Cotton macramé cord (3mm or 4mm, natural or cream color)
- Strong craft glue (e.g., E6000 or sturdy tacky glue)
- Natural wood branch or dowel
- Jute twine for hanging
- Sandpaper (medium grit)
- Paintbrush
- Bowl of water
- Cardboard or stiff paper for a template
Step 1: Shaping the Clay Rainbow
-
Create a template:
Before touching the clay, draw a four-tiered rainbow arch on a piece of cardboard or stiff paper. Cut it out to use as your guide, ensuring the bottom edges are perfectly flat and level. -
Roll out the slab:
Knead your air dry clay until it’s pliable and smooth. Roll it out on a flat surface to an even thickness of about 1/4 inch to 1/2 inch. You want it sturdy enough to hold the fringe but not too heavy. -
Cut the shape:
Place your cardboard template onto the rolled clay. Using a sharp craft knife, carefully trace around the template to cut out the main rainbow arch. -
Carve the bands:
Instead of cutting separate loose coils, use a modeling tool or the back of your knife to gently carve deep grooves into the flat surface. This creates the illusion of four separate stacked arches while keeping the piece structurally sound as one solid unit. -
Soften the edges:
Dip your finger in a little water and run it along the cut edges and the carved grooves to smooth out any sharp ridges or crumbs of clay. -
Create the hanging bead:
Roll a small ball of leftover clay and flatten opposite sides to make a thick disc-shaped bead. Use a pencil or straw to poke a hole through the center large enough for your twine. -
Add texture:
To mimic the rough stone look in the photo, take a stiff-bristled brush or a crumpled ball of aluminum foil and gently press it all over the wet clay surface. This removes that manufactured smooth look. -
Dry completely:
Let the clay rainbow and the bead dry on a flat surface for 24-48 hours. I find flipping it over halfway through the drying process helps prevent warping.
Warp Warning
Clay shrinks as it dries, which can lift the edges. Dry your piece on a wire cooling rack to improve airflow, or weigh it down gently with a heavy book once it’s ‘leather hard’ to ensure flatness.
Step 2: Painting and Assembly
-
Mix textured paint:
Mix burnt sienna, yellow ochre, and a touch of brown acrylic paint to achieve a warm terracotta hue. Stir in a teaspoon of baking soda to the paint; this creates a gorgeous, gritty texture that looks like real pottery. -
Apply the color:
Paint the entire front and sides of the rainbow and the bead. The baking soda paint will be thick, so use a dabbing motion to get into the crevices you carved earlier. -
Prepare the fringe:
While the paint dries, cut lengths of cotton macramé cord. You will need enough strands to cover the width of both legs of the rainbow. Cut them twice as long as you want the final fringe to be. -
Attach the fringe:
Once the paint is fully dry, flip the rainbow over to the back side. Apply a generous line of strong craft glue along the bottom edge of each rainbow leg. -
Secure the cords:
Lay your macramé cords side-by-side into the glue, pressing them down firmly. Let this dry completely—usually several hours—before handling. -
Comb and trim:
Flip the rainbow right-side up. Gently comb out the macramé cords if you want a fuller look, or leave them twisted for texture. Trim the bottoms straight across with sharp scissors. -
Thread the bead:
Cut a long piece of jute twine. Thread it through the clay bead you made earlier, positioning the bead so it sits just above the center of the rainbow arch. -
Glue the hanger:
Glue the ends of the jute twine to the back of the rainbow arch at the top center, ensuring the bead sits visible just above the clay edge on the front side. -
Mount to branch:
Tie the loose ends of the jute twine to your wooden branch or dowel, balancing the length so the rainbow hangs evenly.
Dip Dye Drama
For extra dimension, dip the bottom 1 inch of your macramé fringe into a diluted bath of tea on coffee. This creates a subtle ombré transition that complements the earthy terracotta tones perfectly.
Now you have a stunning, textural piece of art that brings a grounded, natural feel to your space
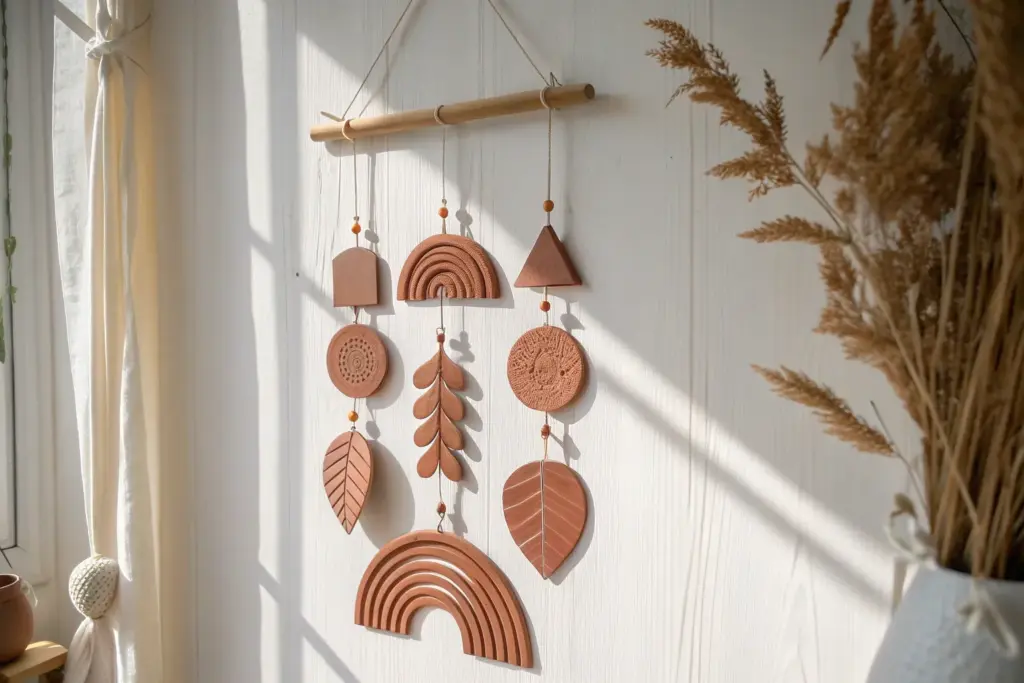
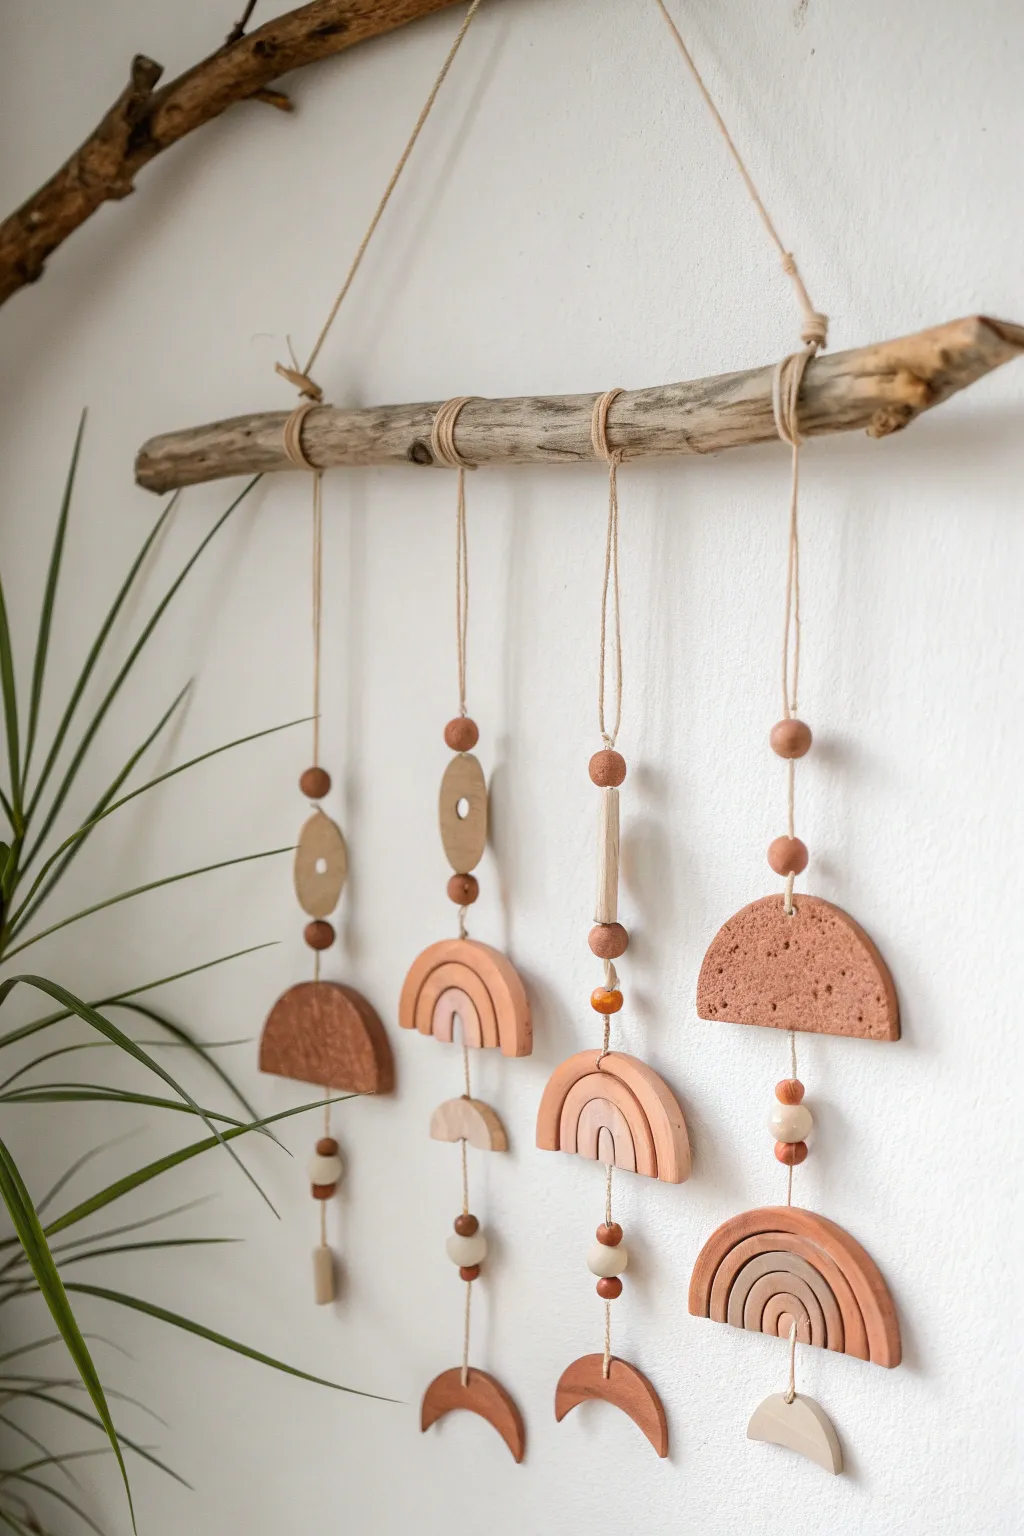
Asymmetrical Mobile With Mixed Shapes
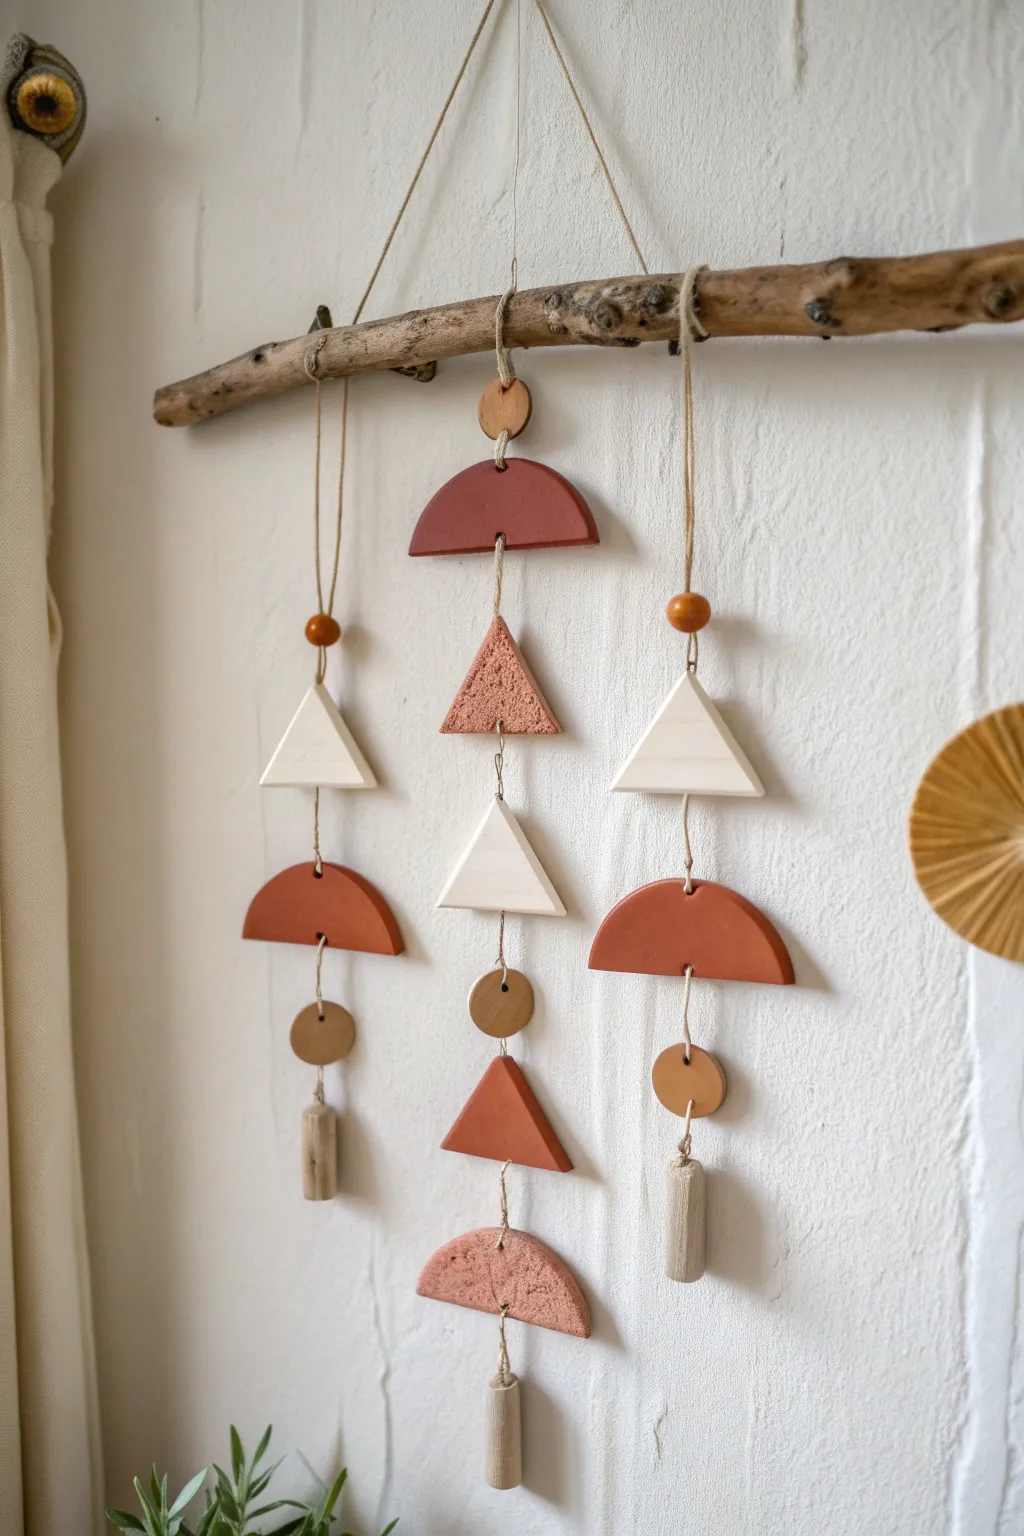
This rustic modern wall hanging combines earthy terra cotta tones with creamy whites and natural wood to create a warm, textured focal point. The mix of geometric shapes—arches, triangles, and circles—dangling from a raw branch gives it an organic, perfectly imperfect charm.
How-To Guide
Materials
- Air dry clay (white)
- Acrylic paints (terra cotta/burnt sienna, cream/off-white)
- Rolling pin
- Clay sculpting tools or a sharp knife
- Cookie cutters (circle and triangle) or paper templates
- Sandpaper (fine grit)
- Natural tree branch (approx. 18-20 inches)
- Jute twine or hemp cord
- Wooden beads (assorted sizes)
- Small paintbrush
- Skewer or toothpick (for poking holes)
- Baking parchment or canvas mat
Step 1: Planning and Shaping the Clay
-
Prepare your workspace:
Lay down a piece of baking parchment or a canvas mat to prevent sticking. Knead a large chunk of air dry clay in your hands to warm it up and make it pliable. -
Roll it out:
Use your rolling pin to flatten the clay to an even thickness, aiming for about 1/4 inch. If you want a smooth surface, you can lightly mist the clay with water, but the slight texture adds character here. -
Cut the semicircles:
To make the arches, cut out large circles first (using a large cutter or a bowl as a guide). Slice these circles strictly in half to create two semicircles. You will need one large red arch and two medium ones, plus one textured bottom arch. -
Fabricate the triangles:
Cut out your triangle shapes. You need about five triangles of varying sizes. Three will be painted cream, one red, and one textured red. -
Create the connector pieces:
Cut three small circles (about 1 inch diameter) for the connectors. Additionally, form three small cylindrical weights for the very bottom of each strand by rolling a thick snake of clay and cutting it into 1.5-inch segments. -
Add texture:
For the specific textured pieces (the middle red triangle and the bottom pinkish arch), take a crumpled ball of aluminum foil or a stiff-bristled brush and press it gently into the wet clay to create a pitted, stone-like surface. -
Pierce holes for hanging:
Use a skewer or toothpick to poke holes in every piece. Crucially, most pieces need a hole at the top *and* bottom to connect to other pieces. The bottom cylinders only need a top hole.
Fix Cracking Clay
If small cracks appear as the clay dries, don’t panic. Mix a tiny bit of fresh wet clay with water to make a paste (slip) and fill in the cracks, then sand smooth once dry.
Step 2: Finishing and Assembly
-
Allow to dry completely:
Let all your clay pieces dry flat for at least 24-48 hours. I like to flip them over halfway through the process to ensure the backs dry evenly and don’t curl. -
Sand edges:
Once fully cured, use fine-grit sandpaper to smooth out any rough edges or burrs left from cutting. Wipe away the dust with a barely damp cloth. -
Paint the terra cotta pieces:
Mix a burnt sienna or rust-colored acrylic paint. Paint the large top arch, the two side arches, the lower triangle, and the small circle connectors. The textured pieces should get a lighter wash of this color mixed with a little white to highlight the pits. -
Paint the cream accents:
Paint the smooth triangles a solid cream or off-white color. Leave the bottom cylindrical weights unpainted or give them a very light beige wash for a raw clay look. -
Prepare the branch:
Clean up your natural branch, removing loose bark if desired. Cut a long piece of jute twine and tie it to both ends of the branch to serve as the main hanger. -
Assemble the center strand:
Cut a long length of twine. Tie it to the center of the branch. Thread on a wooden bead, then the large red arch, followed by the textured triangle, smooth triangle, circle connector, red triangle, and finally the textured arch. Knot underneath each piece to hold it in place. -
Assemble the side strands:
Create the two flanking strands similarly. Start with a wooden bead, then a cream triangle, red arch, circle connector, and finish with the cylindrical weight at the bottom. Tie these strands onto the branch on either side of the center. -
Secure and trim:
Adjust the spacing of the strands on the branch so everything hangs balanced. Trim any excess twine tails close to the knots for a clean finish.
Level Up: Ombré Effect
Mix slightly different amounts of white into your terra cotta paint for each tier. This creates a subtle gradient effect as the eye travels down the mobile.
Hang your new mobile near a window where the light can catch the different textures and cast interesting shadows on your wall