I’m obsessed with how air dry clay can turn into the sweetest little keepsakes with just a few simple shapes and some paint. If you’re craving cute clay ideas that feel totally doable (even on a chill crafting night), you’re in the right place.
Tiny Chubby Animal Figurines
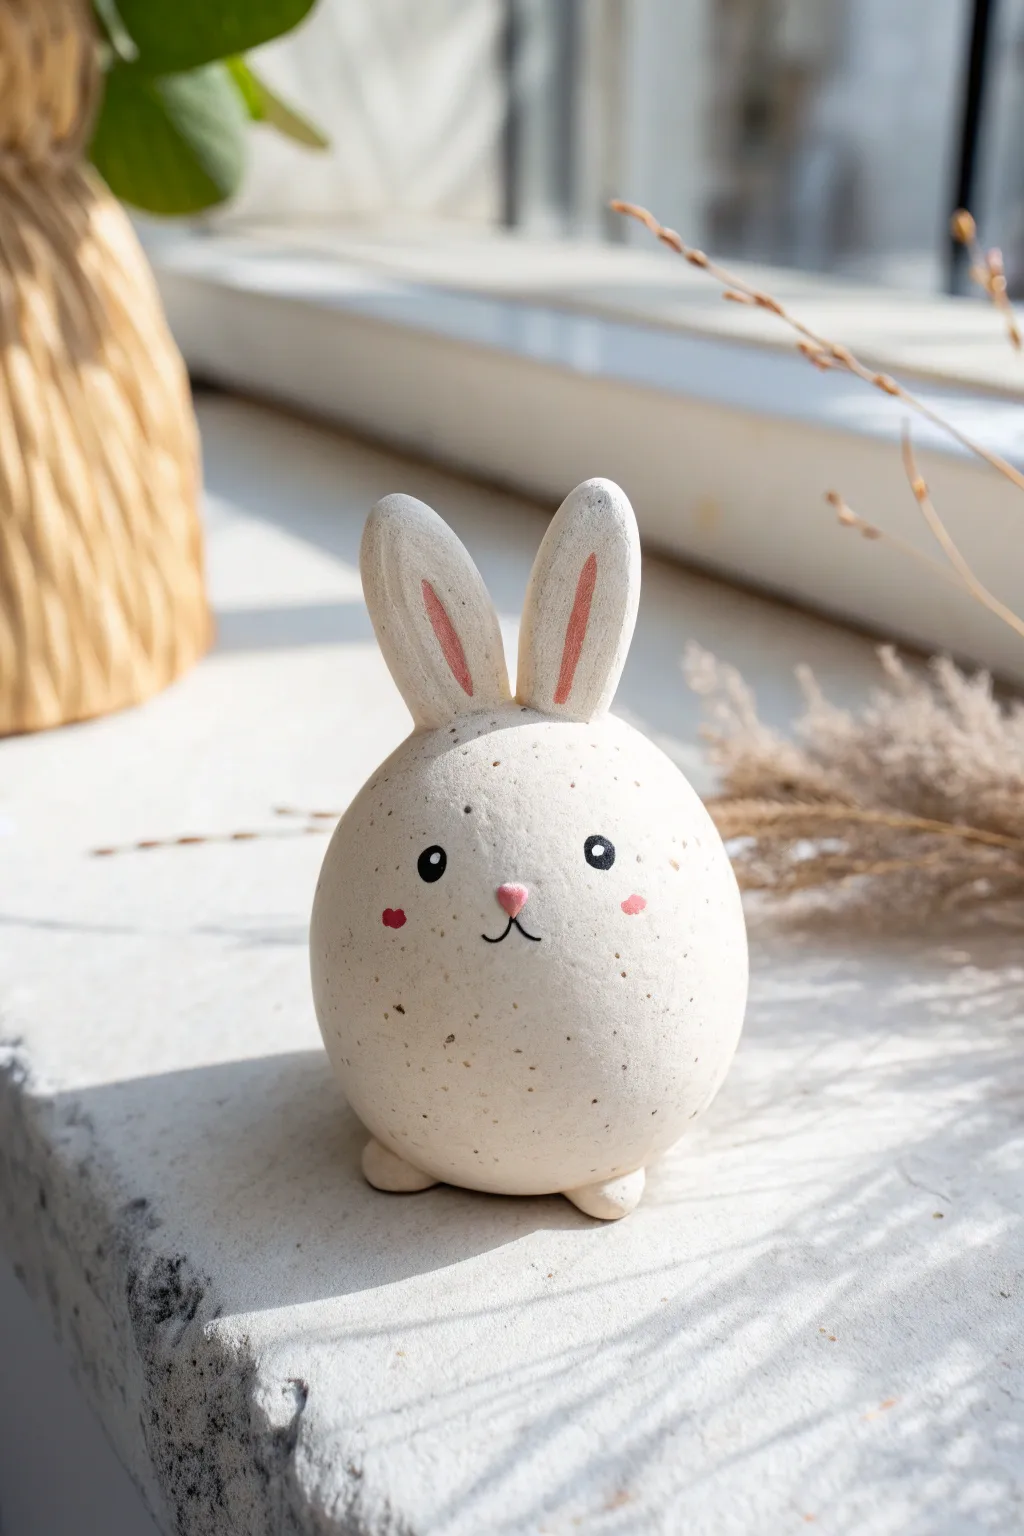
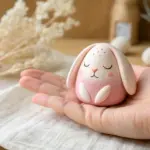
This adorable, round rabbit figurine captures the charm of a speckled egg with its simple shape and delicate painted details. It makes for a perfect springtime decoration or a sweet desktop companion that sits sturdily on its tiny feet.
How-To Guide
Materials
- White air dry clay
- Rolling pin
- Aluminum foil (for the core)
- Clay tools (needle tool, smoothing tool)
- Water and sponge
- Acrylic paints (black, soft pink, darker rose pink)
- Fine detail paintbrush
- Old toothbrush or stiff bristle brush
- Brown watercolor or diluted acrylic paint (for speckles)
- Matte varnish or sealant
Step 1: Sculpting the Base
-
Create a foil core:
Crumple a piece of aluminum foil into a tight ball, then gently squeeze it into an egg shape. This saves clay and helps the figure dry evenly. -
Cover the core:
Roll out a sheet of white air dry clay to about 1/4 inch thickness. Wrap this sheet around your foil egg, trimming away excess clay. -
Smooth the seams:
Use a little water on your finger to blend the seams together until the surface is completely seamless and smooth. The shape should be wider at the bottom. -
Add tiny feet:
Roll two small balls of clay and flatten them slightly into oval discs. Attach these to the bottom front of the body using a ‘scratch and attach’ scoring method so the bunny sits slightly tilted back.
Cracks Appearing?
If small cracks form while drying, mix a tiny bit of fresh clay with water to make a paste (slip). Fill the cracks with this paste and smooth over immediately.
Step 2: Ears and Details
-
Form the ears:
Roll two equal-sized tapered logs of clay. Flatten them gently so they look like long petals or surfboards. -
Indent the ears:
Use a modeling tool or the handle of a paintbrush to press a shallow groove down the center of each ear, creating the inner ear space. -
Attach the ears:
Score the top of the head and the base of the ears. Add a dab of water or slip, and press the ears firmly onto the head. Blend the clay at the join line so they don’t pop off later. -
Check balance:
Set the bunny down on a flat surface to ensure it stands stable on its feet and bottom. Adjust the feet if necessary. -
Dry completely:
Let the figure dry for 24-48 hours. Turn it occasionally so the bottom dries too. It should feel room temperature and light when done.
Step 3: Painting and Finishing
-
Sand imperfections:
Once fully dry, use fine-grit sandpaper to gently buff away any fingerprints or rough bumps, wiping away the dust with a damp cloth. -
Paint the face:
Using a very fine brush and black acrylic paint, add two small circles for eyes. Add a tiny white reflection dot in each eye once the black is dry. -
Add the nose:
Paint a small, upside-down rounded triangle in pink for the nose. Draw a thin black anchor shape underneath for the mouth. -
Rosy cheeks and ears:
Paint the inner grooves of the ears with soft pink. Use a darker rose pink to add two small heart or oval shapes on the cheeks. -
Create the speckles:
Dilute some brown paint with water. Dip a toothbrush into it, and flick the bristles with your thumb to spray a fine mist of speckles over the bunny. I recommend practicing on paper first to control the spray. -
Seal the piece:
Protect your work with a coat of matte varnish. This keeps the speckles in place and gives the clay a lovely finished ceramic look.
Make it a shaker
Before sealing the foil core, put a few dried beans or beads inside a hollow plastic egg instead of foil. Your bunny will gently rattle when shaken.
Place your finished bunny near a window to catch the light and show off those delicate speckled details


Sweet Face Trinket Dishes
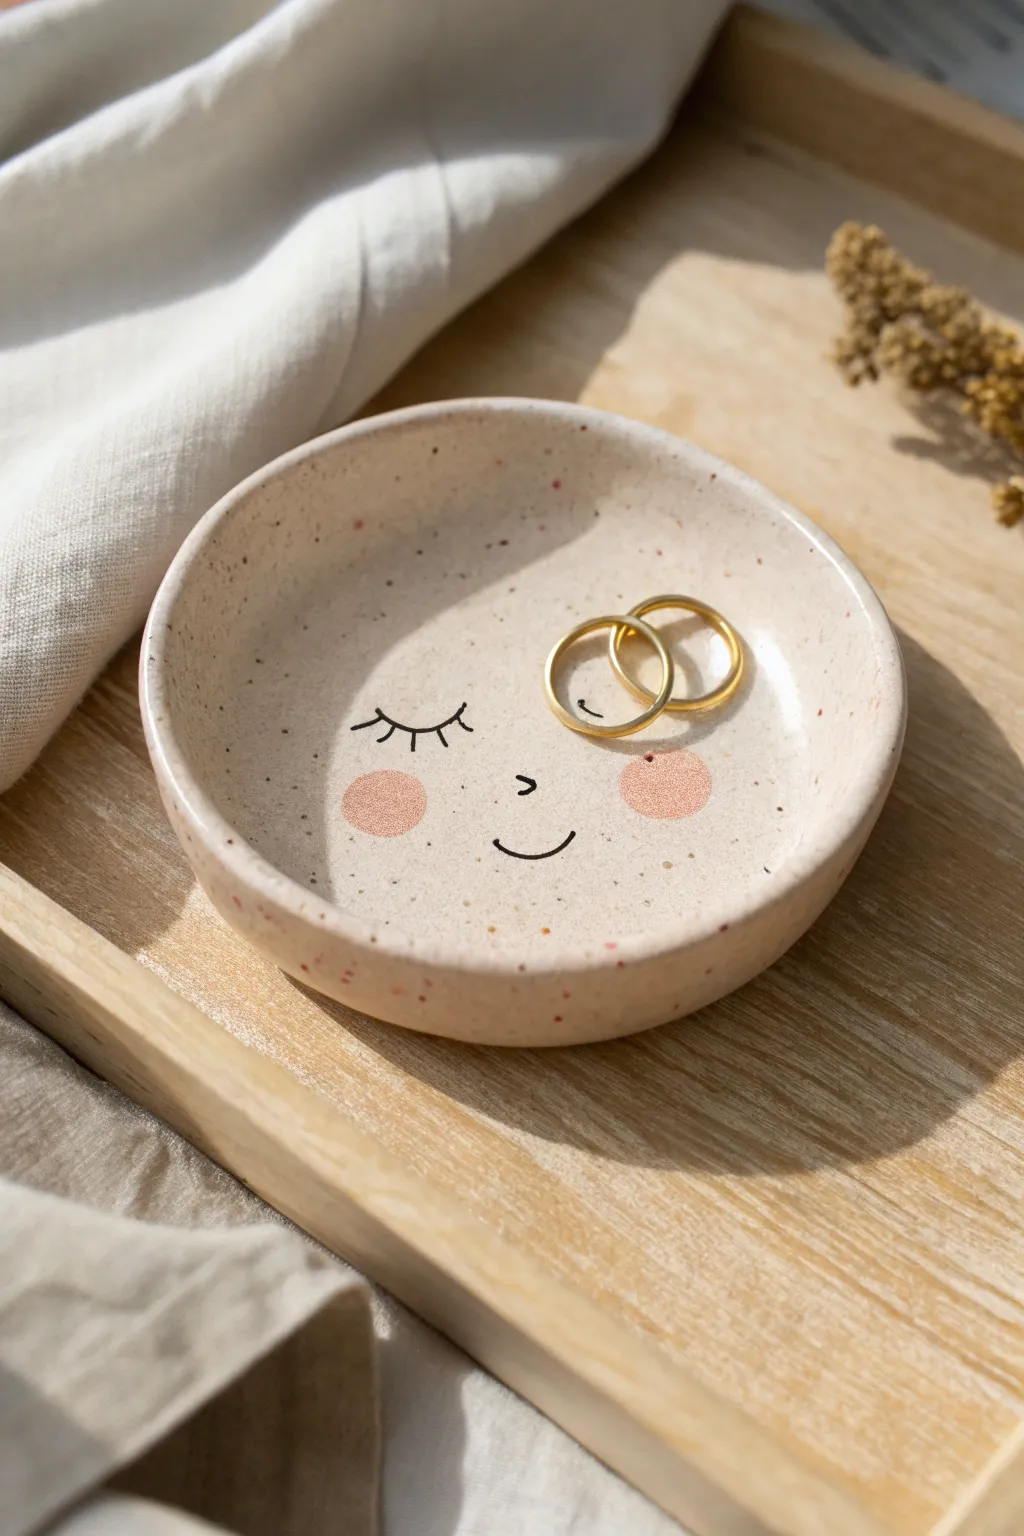
Brighten up your bedside table with this charming little catch-all, perfect for keeping your favorite rings safe. The gentle speckled finish gives it a ceramic look without the need for a kiln, while the sweet hand-drawn face adds a touch of whimsy.
Step-by-Step
Materials
- White air dry clay
- Rolling pin
- Circle cutter or small bowl (approx. 4-inch diameter)
- Small bowl for molding (for curvature)
- Sandpaper (fine grit)
- Acrylic paint: Brown, Black, Pink/Salmon
- Old toothbrush (for speckling technique)
- Fine detail paintbrush or black paint pen
- Glossy varnish or sealant (specifically clay-safe)
Step 1: Shaping the Base
-
Prepare the Clay:
Start by taking a handful of white air dry clay and kneading it in your hands until it becomes soft, pliable, and free of cracks. If it feels too dry, add a tiny drop of water. -
Roll it Out:
Using a rolling pin, flatten the clay on a smooth surface or canvas mat. Aim for an even thickness of about 1/4 inch. -
Cut the Circle:
Press your circle cutter or a small bowl firmly into the rolled clay to cut out a perfect disc. Remove the excess clay from around the edges. -
Smooth the Edges:
Dip your finger in a little water and gently run it along the cut edge of the circle. This smooths out any harsh lines or roughness from the cutter. -
Create the Curve:
I like to gently press the clay circle into a slightly larger, shallow bowl to give it form. Alternatively, you can pinch the edges upward manually to create a gentle rim. -
Dry Completely:
Let the dish sit in a safe, dry place for at least 24-48 hours. Turn it over halfway through the drying process to ensure the bottom dries evenly.
Cracks Appearing?
Mix a tiny bit of clay with water to create a paste (slip). Fill the crack with this paste, smooth it over with your finger, and let it dry again before sanding.
Step 2: Decoration & Details
-
Sand for Smoothness:
Once fully dry, lightly sand the surface and edges with fine-grit sandpaper. Wipe away any dust with a slightly damp cloth. -
Mix the Base Tone:
To achieve that warm, oatmeal color seen in the photo, mix a tiny amount of brown acrylic paint into a larger amount of white paint. You want a very pale beige. -
Apply Base Coat:
Paint the entire dish, front and back, with your beige mixture. You may need two coats for full opacity, letting it dry between layers. -
Create the Speckles:
Dilute a small amount of reddish-brown or terracotta paint with water. Dip an old toothbrush into this mixture and use your thumb to flick the bristles, spraying tiny speckles across the dish. -
Paint the Cheeks:
Using a salmon-pink paint and a medium brush or sponge dabber, paint two soft, round circles for the rosy cheeks. Place them slightly lower than center. -
Draw the Face:
With a fine detail brush and black paint (or a fine tip paint pen), carefully draw two curved lines for the closed eyes. Add small lashes flicking outward. -
Add the Smile:
Paint a small, simple ‘u’ shape between the cheeks for the mouth, and a tiny nose bump just above it if you wish. -
Seal the Dish:
Once all paint is bone dry, apply a glossy varnish over the entire piece. This protects the paint and gives it that finished, ceramic-like shine.
Clean Lines Pro Tip
Sketch your face design lightly with a pencil first before committing to paint. You can gently erase pencil marks on dried clay if you make a mistake.
Now you have a sweet little spot to rest your jewelry at the end of the day


Mini Cloud Ring Holders
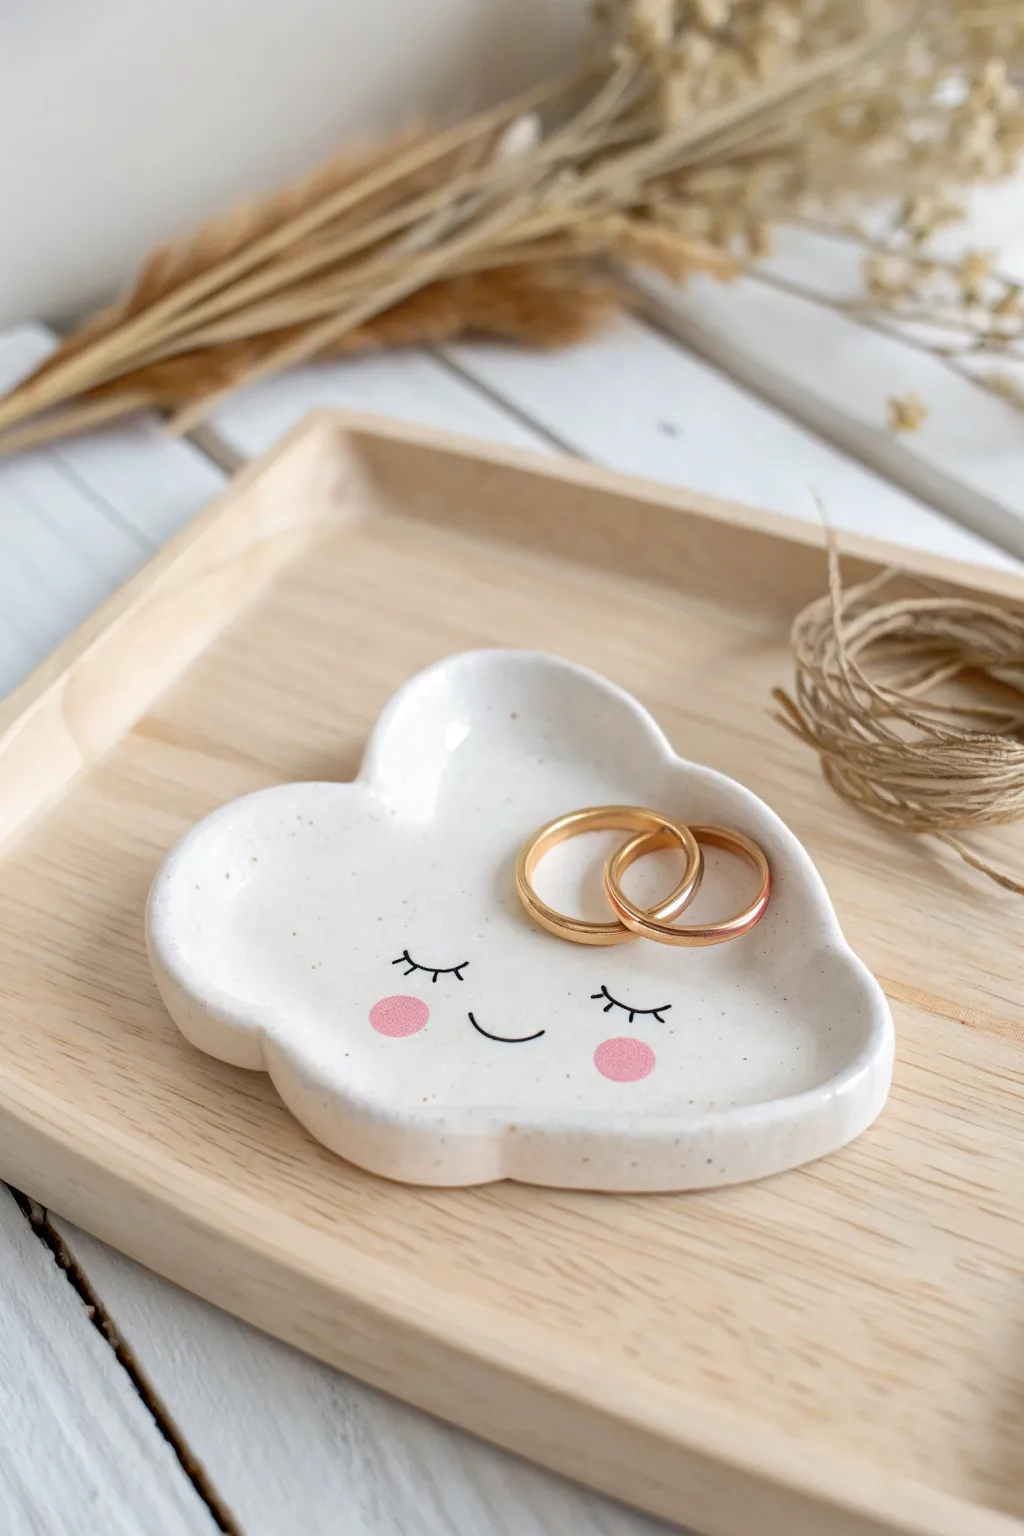
Keep your favorite jewelry safe in the sweetest way possible with this charming cloud-shaped trinket dish. With its gentle sleeping face and speckled finish, it adds a touch of whimsical calm to any bedside table.
Step-by-Step Tutorial
Materials
- White air dry clay
- Rolling pin
- Clay knife or craft knife
- Cloud template (printed or hand-drawn on paper)
- Small bowl or sponge for shaping
- Water
- Fine grit sandpaper
- Acrylic paints (black, soft pink)
- Fine detail paintbrush
- Old toothbrush (for speckling)
- Brown or tan acrylic paint (for speckles)
- Gloss or matte varnish (sealant)
Step 1: Shaping the Cloud
-
Condition the clay:
Begin by taking a handful of white air dry clay and kneading it in your hands until it becomes warm, soft, and pliable. This prevents cracks later on. -
Roll it out:
Use your rolling pin to flatten the clay into an even slab. Aim for a thickness of about 1/4 inch (approx. 5-6mm) to ensure it’s sturdy but not too chunky. -
Cut the shape:
Place your cloud template on top of the slab. Use your craft knife to carefully trace around the edges, cutting out the cloud shape. Remove the excess clay. -
Smooth the edges:
Dip your finger in a little bit of water and run it along the cut edges of the cloud. Use a circular motion to round them off so they look soft and puffy rather than sharp. -
Create the curvature:
To give the dish its bowl shape, gently lift the edges of the cloud upwards. You can pinch the corners slightly or place the clay cloud inside a shallow bowl to hold its shape while it dries. -
Refine the form:
While it’s cupped, smooth out the inside surface again with a damp finger to ensure the bottom is nice and even for holding rings. -
Let it dry completely:
Place the cloud in a safe, dry spot away from direct sunlight. Let it cure for 24-48 hours, flipping it over halfway through so the bottom dries evenly.
Splatter Control
Test your toothbrush speckling technique on a piece of scrap paper first to control the size of the dots before spraying your beautiful clay cloud.
Step 2: Painting and Finishing
-
Sand for smoothness:
Once the cloud is bone dry and hard, take your fine grit sandpaper and gently buff the entire surface. Focus on the rim to make sure it feels perfectly smooth to the touch. -
Wipe it down:
Use a dry cloth or a slightly damp paper towel to remove all the sanding dust before you start painting. -
Create the speckles:
Dilute a tiny drop of brown or tan paint with water. I find it easiest to dip an old toothbrush into this mixture and flick the bristles with my thumb to splatter tiny dots across the white clay for that organic, ceramic look. -
Let the speckles dry:
Wait about 10-15 minutes for the splatter to dry completely so you don’t smudge it while painting the face. -
Paint the rosy cheeks:
Dip a small round brush or the back of a paintbrush handle into soft pink paint. Dab two circle cheeks onto the lower half of the cloud. -
Draw the sleeping eyes:
Using your finest detail brush and black acrylic paint, carefully paint two closed eyelids with little eyelashes just above the rosy cheeks. -
Add the smile:
Paint a small, simple ‘u’ shape between the cheeks for a sweet, contented smile. -
Seal the dish:
Once all the paint works are fully dry, apply a coat of varnish over the entire piece. This protects the clay from moisture and gives it a professional finish.
Golden Lining
Paint the very rim of the cloud with liquid gold leaf or metallic gold paint to verify the high-end ceramic look and add a touch of luxury.
Now you have a serene little spot to rest your treasures at the end of the day


Smiley Magnet Set
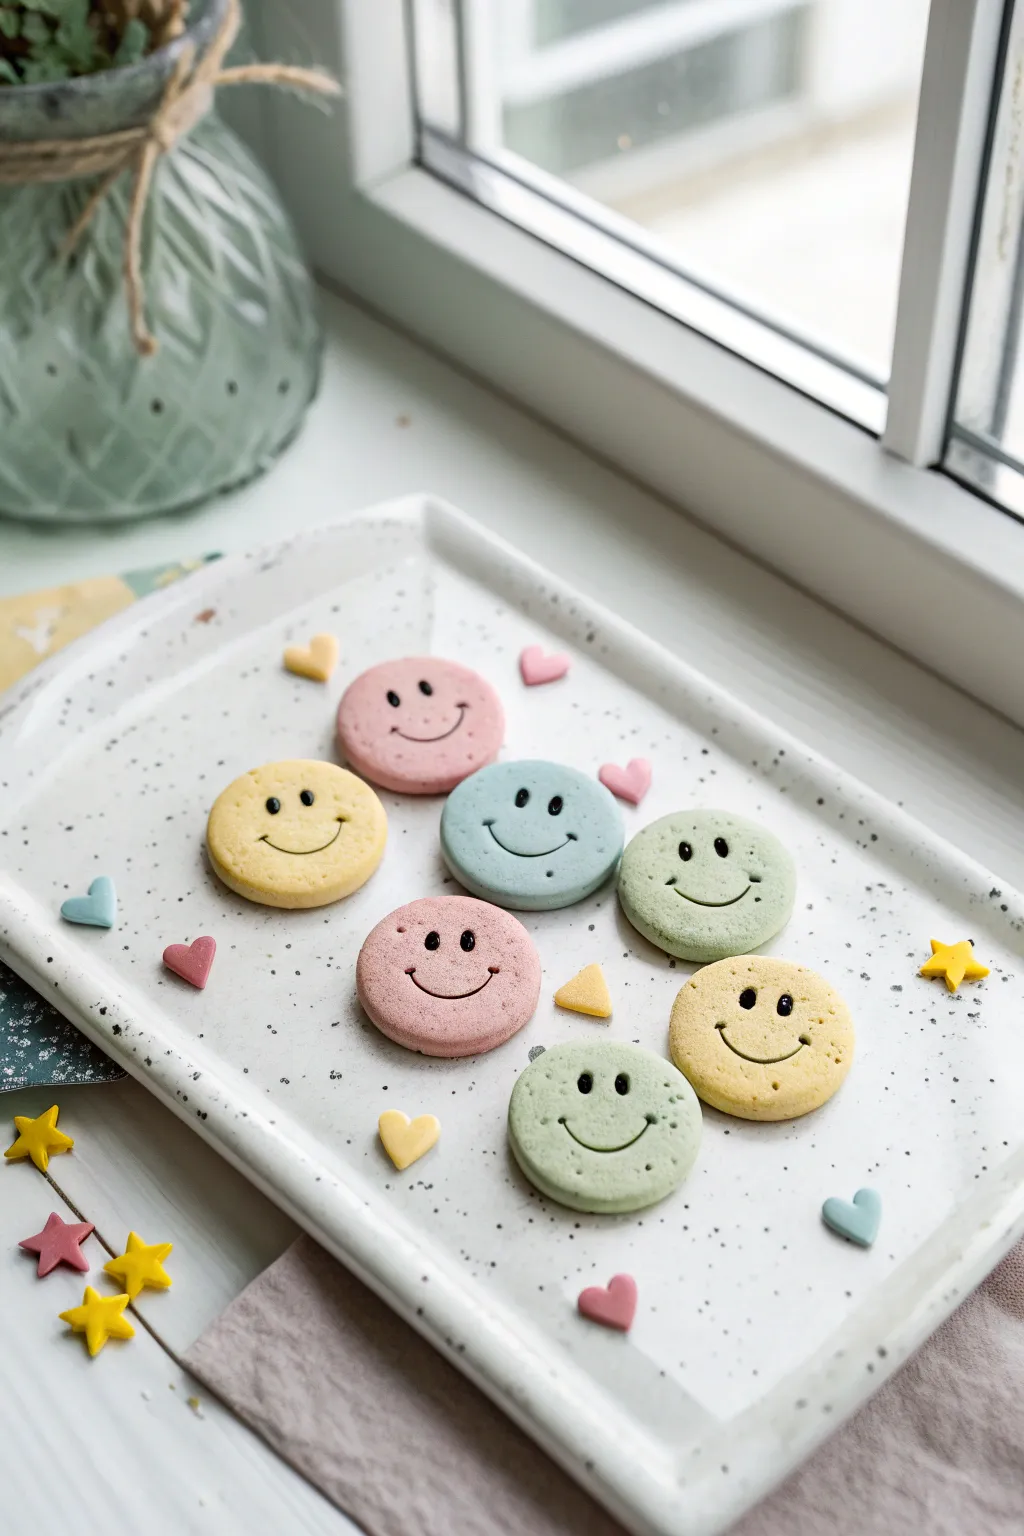
Brighten up your fridge or magnetic board with these adorable, candy-colored smiley face magnets. With their soft matte finish and cheerful expressions, they look almost good enough to eat—but they’ll last much longer.
Step-by-Step Guide
Materials
- Air dry clay (white)
- Acrylic paints (pastel pink, yellow, mint green, baby blue, black)
- Rolling pin
- Circle cookie cutter (approx. 1.5 – 2 inches)
- Small heart and star mini cutters (optional)
- Potter’s needle tool or a tapestry needle
- Ball stylus tool (medium size)
- Fine grit sandpaper
- Strong craft glue (E6000 or similar)
- Small round magnets
- Matte varnish or sealant
Step 1: Prepping the Dough
-
Color the Clay:
Start by dividing your white air dry clay into four equal portions. Add a very small drop of acrylic paint to each ball—one pink, one yellow, one mint, and one blue—and knead thoroughly until the color is uniform and pastel. -
Check Consistency:
If the clay becomes too sticky from the paint, let it sit for five minutes or dust your hands lightly with cornstarch. If it’s cracking, work in a tiny drop of water. -
Roll it Out:
On a smooth, non-stick surface, roll out each colored ball of clay to an even thickness of about 1/4 inch (6mm). You want them substantial enough to hold the magnet but not too heavy.
Clean Cuts Only
To prevent the clay from sticking inside the cutter, dip the rim of your cookie cutter into cornstarch or baby powder before each press.
Step 2: Shaping the Faces
-
Cut the Circles:
Using your circle cookie cutter, press firmly into the rolled clay to cut out your shapes. Gently push them out of the cutter, smoothing any rough edges with a wet fingertip. -
Create the Eyes:
Take your ball stylus tool and press straight down into the upper half of the circle to create two deep indentations for eyes. Wiggle the tool slightly to widen the sockets if needed. -
Carve the Smile:
Use the needle tool or a small curved clay tool to carve a wide, U-shaped mouth. Press deep enough so the smile remains visible after drying, as clay sometimes shrinks slightly. -
Make Mini Accents:
Use your leftover clay scraps to cut out tiny hearts and triangles. These make great filler magnets or decorative accents for the main piece. -
Smooth the Surface:
Before drying, dip your finger in water and very lightly run it over the surface of each face to remove fingerprints or tool marks.
Add Some Blush
Before sealing, dry brush a tiny amount of darker pink pastel chalk or watered-down paint onto the ‘cheeks’ for an extra cute expression.
Step 3: Finishing Touches
-
Allow to Dry:
Place the pieces on a piece of parchment paper or a drying rack. Let them air dry for at least 24-48 hours, flipping them over halfway through to ensure the backs dry evenly. -
Sand the Edges:
Once fully cured and hard, gently sand the edges with fine-grit sandpaper to create a smooth, professional finish. -
Fill the Features:
Using a very fine detail brush or a toothpick dipped in black acrylic paint, carefully fill inside the eye indentations and the carved smile line. -
Clean Up Lines:
If any black paint gets on the surface, quickly wipe it away with a damp cotton swab or wait for it to dry and gently scratch it off. -
Seal the Clay:
Apply a coat of matte varnish over the entire front and sides of the magnet. I find this protects the pastel color and gives it a nice finished texture without being too glossy. -
Attach the Magnet:
Flip the dry smiley face over. Apply a dab of strong craft glue to the back center and press your round magnet firmly into place. -
Final Cure:
Let the glue set completely according to the manufacturer’s instructions before sticking finished pieces to your fridge.
Now you have a charming set of buddies to hold up your grocery lists and favorite photos

What Really Happens Inside the Kiln
Learn how time and temperature work together inside the kiln to transform clay into durable ceramic.
Tiny Animal Planters
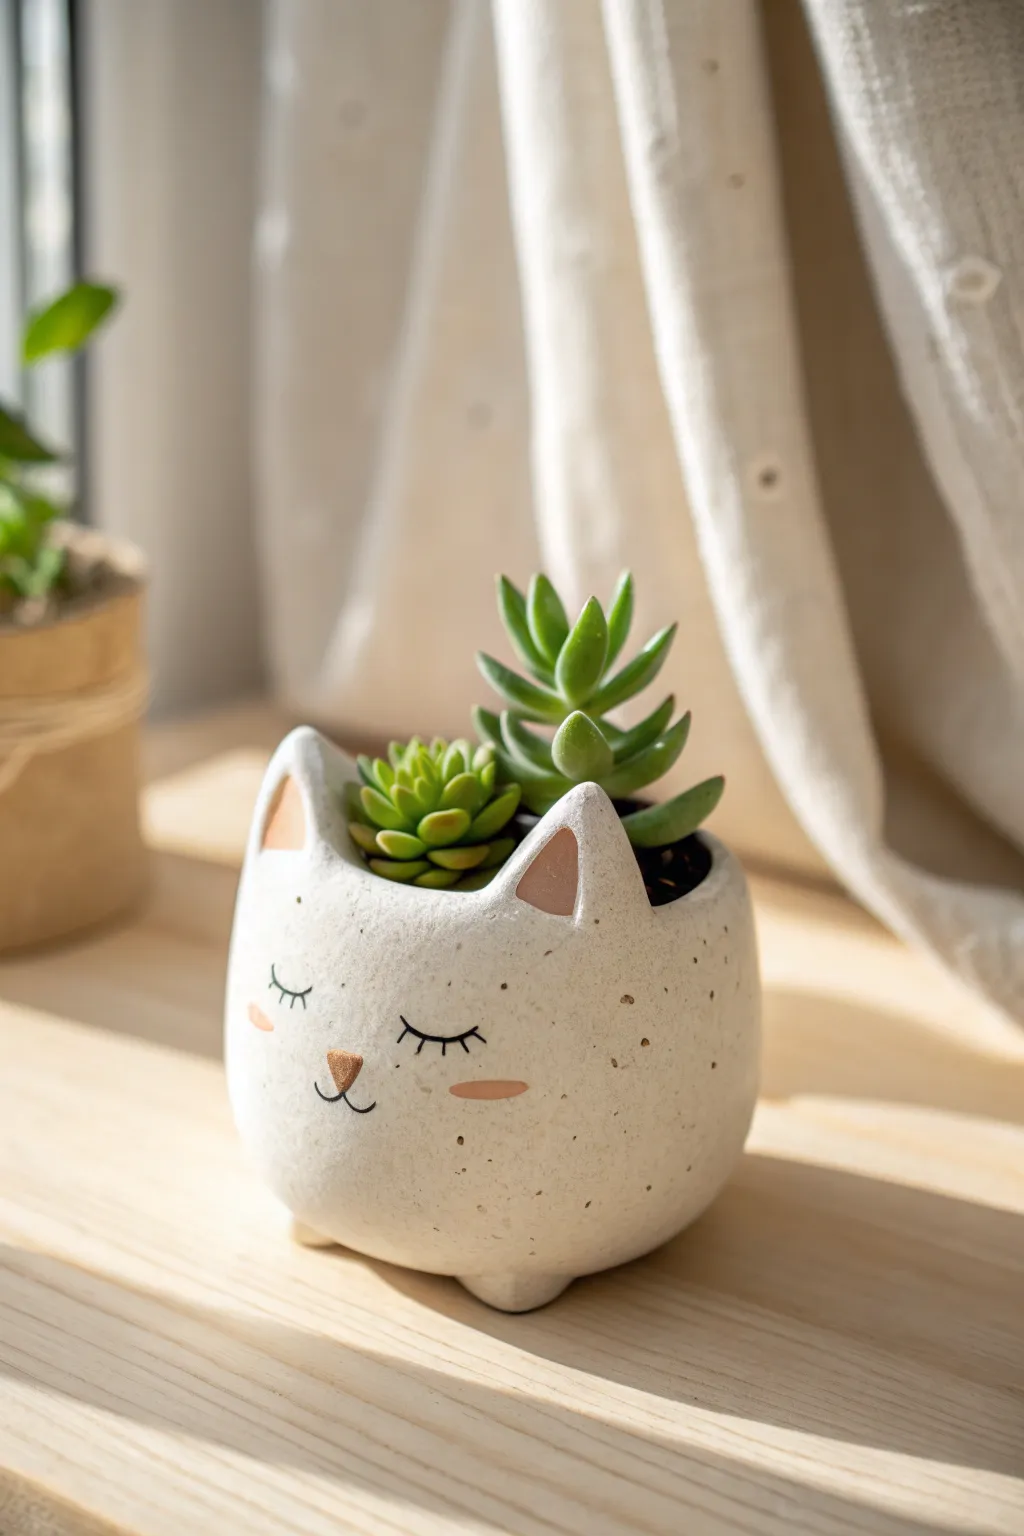
Create a cozy home for your tiniest succulents with this adorable clay cat planter. Its speckled finish, blushing cheeks, and peaceful sleeping expression make it a serene addition to any windowsill.
Detailed Instructions
Materials
- White air-dry clay (approx. 500g)
- Small rolling pin
- Clay sculpting tools or a butter knife
- Small bowl of water
- Sponge or textured rock (for speckling)
- Fine grit sandpaper
- Acrylic paints: Black, Soft Pink, Terra Cotta
- Fine detail paintbrush
- Matte sealant or varnish
- Toothpick or needle tool
Step 1: Shaping the Base
-
Form the main ball:
Start by conditioning a large handful of clay until it is pliable and smooth. Roll it into a sphere about the size of a large orange or grapefruit, depending on how big you want your planter. -
Hollow out the center:
Press both thumbs into the center of the sphere and gently pinch the walls outward while rotating the ball. Aim for an even wall thickness of about 1/4 inch to ensure stability. -
Flatten the bottom:
Once you have a bowl shape, tap it gently on your work surface to create a flat, stable bottom so it won’t roll away. -
Add the feet:
Roll four small marbles of clay for the paws. Score the bottom of the pot and the tops of these marbles, add a dab of water, and press them firmly onto the underside of the pot to elevate it slightly.
Step 2: Adding Cat Features
-
Shape the ears:
Form two triangular wedges of clay for the ears. They should be slightly rounded at the tips for a soft look. -
Attach the ears:
Score the top rim of your bowl where the ears will go. Use a little water as ‘glue’ and press the ears into place. Smooth the clay seams downward into the body of the pot so they look seamless. -
Refine the rim:
Dip your finger in water and run it along the top rim of the pot and around the ears to smooth out any cracks or harsh edges. The transition from ear to rim should be gentle and curved.
Cracking Clay?
If small cracks appear while drying, don’t panic. Mix a small amount of fresh clay with water to make a paste (slip) and fill in the cracks, then sand smooth once dry.
Step 3: Creating Texture
-
Add the speckled texture:
Before the clay dries, take a coarse sponge or a clean textured rock and gently press it all over the outside surface. This mimics the stone-like, speckled finish seen in the photo. -
Let it dry completely:
Set your planter aside in a cool, dry place. Allow it to air dry for 24-48 hours. I find flipping it over halfway through helps the bottom dry evenly.
Tail Variation
Before drying, roll a long snake of clay and attach it to the back curve of the pot to create a tail that wraps around toward the front paws for extra cuteness.
Step 4: Refining and Painting
-
Sand for smoothness:
Once fully dry, use fine-grit sandpaper to gently buff away any unwanted bumps, paying special attention to the rim. -
Fleck the surface:
Mix a tiny bit of brown or black paint with water. Dip an old toothbrush in it and flick the bristles to spray fine speckles over the white clay, enhancing the stone effect. -
Paint the inner ears:
Using the soft pink paint, fill in the triangle shapes inside the ears. Keep the edges neat. -
Add the face details:
With a fine detail brush and black paint, carefully draw two curved lines for the closed eyes. Add the eyelashes by painting three small flicks extending from the center of each eye. -
Nose and mouth:
Paint a small, inverted triangle in terra cotta for the nose. Then, use the black paint to draw the ‘w’ shape for the mouth directly underneath. -
Blush those cheeks:
Add two small oval dashes of pink or terra cotta on the cheeks to give the cat a sweet, flushed look. -
Seal the planter:
Apply two coats of matte varnish to protect your paint job. Make sure to seal the inside thoroughly if you plan to put soil directly in it, though a plastic liner pot is safer for clay longevity.
Pop in your favorite succulent and enjoy your new peaceful desk companion
Mushroom Buddy Decor
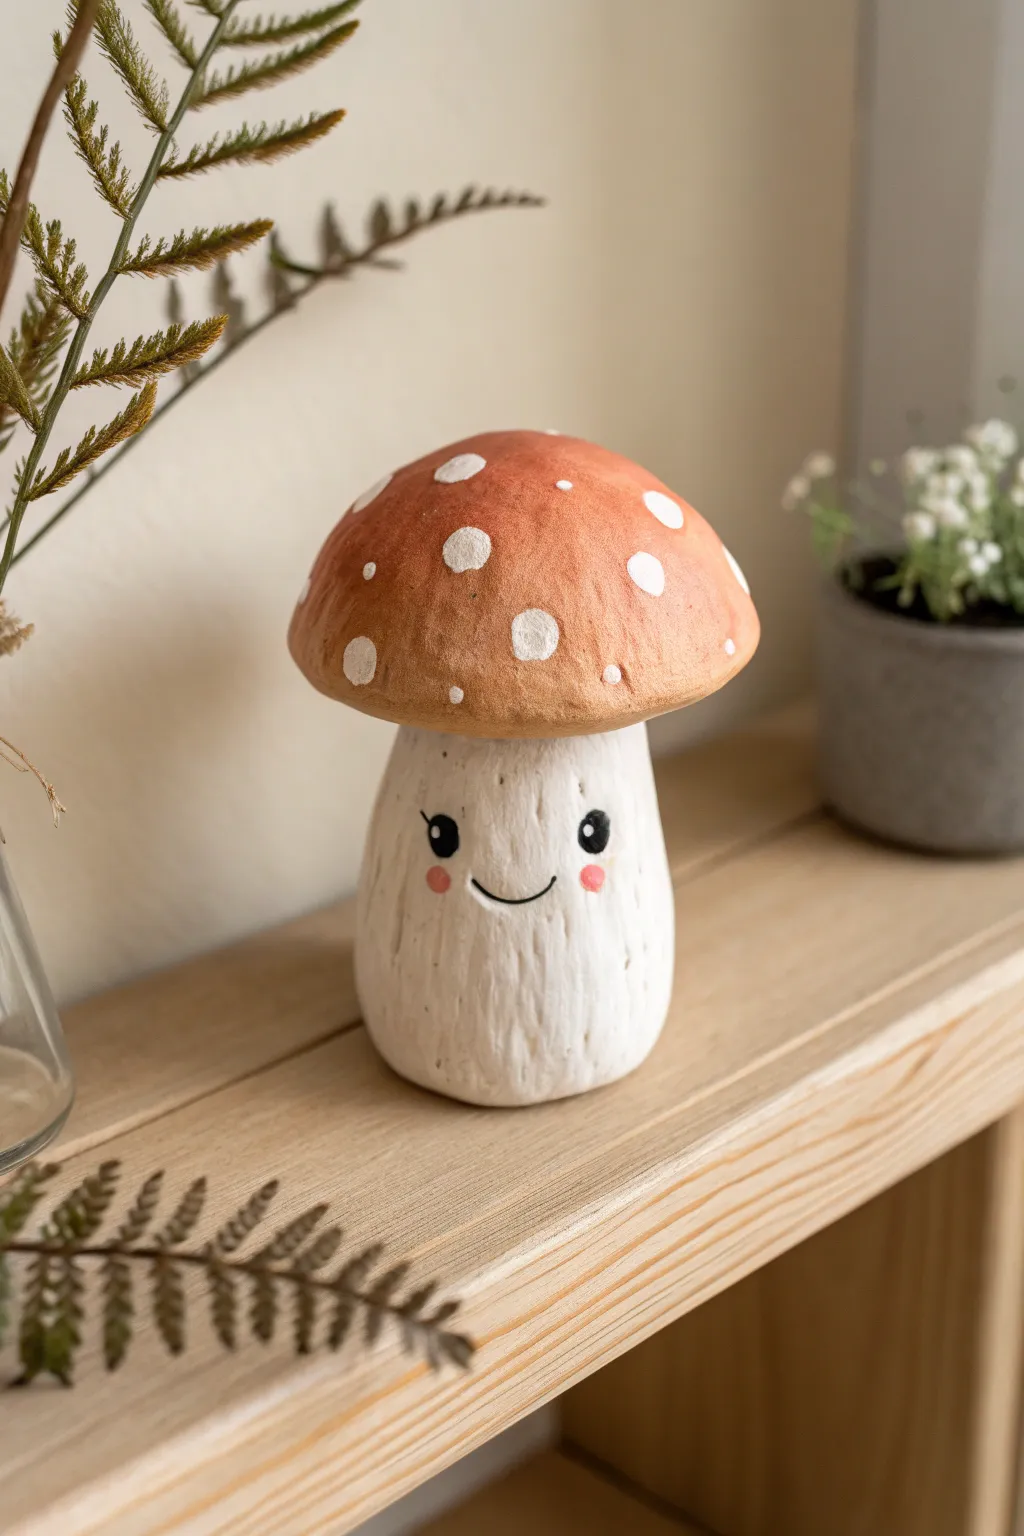
Bring a touch of forest charm to your shelf with this adorable, hand-sculpted mushroom friend. With its rustic texture, warm terracotta cap, and sweet smiling face, this air dry clay project is the perfect beginner-friendly decoration.
Step-by-Step Guide
Materials
- Air dry clay (white)
- Aluminum foil
- Acrylic paints (terracotta/burnt orange, white, black, pink)
- Clay sculpting tools (needle tool, texturing brush)
- Paintbrushes (medium flat brush, fine detail brush)
- Cup of water
- Hobby knife (optional)
- Matte varnish or sealant
Step 1: Sculpting the Base
-
Create the foil armature:
Start by scrunching a piece of aluminum foil into a shape that resembles a stout mushroom stem mixed with a cap shape on top. This saves clay and makes the finished piece lighter. -
Roll out the stem clay:
Take a generous handful of clay and knead it until soft. Roll it into a thick slab or flatten it with your hands. -
Cover the stem:
Wrap the clay around the bottom part of your foil structure to form the stem. Ideally, create a slightly tapered cylinder that is wider at the bottom for stability. -
Shape the cap:
Roll a ball of clay, flatten it into a thick disk, and drape it over the top of the foil armature. Mold it into a dome shape, smoothing the edges downward to create that classic mushroom cap overhang. -
Join the pieces:
Use a little water on your finger to smooth the seam where the cap meets the stem underneath. While blending, I like to ensure the connection is thick enough so the head doesn’t droop.
Smooth Operator
Keep a small bowl of water nearby while sculpting. Dipping your finger in water helps smooth out cracks instantly before the clay begins to set.
Step 2: Adding Texture & Details
-
Texture the stem:
Using a needle tool or a stiff wire brush, drag vertical lines down the stem. Vary the pressure to create deep and shallow grooves that mimic organic bark or stalk textures. -
Texture the cap:
Gently tap the surface of the mushroom cap with a stiff-bristled brush or a balled-up piece of aluminum foil to give it a porous, realistic finish. -
Refine the shape:
Look at your mushroom from all angles. Tap the bottom gently on the table to ensure it sits flat and straight. -
Dry completely:
Set your buddy aside to dry. Depending on humidity and thickness, this usually takes 24-48 hours. Rotate it occasionally so the bottom dries evenly.
Fairy Garden Glow
Paint the white spots on the cap with glow-in-the-dark acrylic paint. Your mushroom buddy will become a magical nightlight when the lights go out.
Step 3: Painting & Finishing
-
Base coat the cap:
Paint the top of the mushroom cap with a burnt orange or terracotta acrylic paint. Apply two thin coats for opaque coverage, letting the first dry before adding the second. -
Paint the stem:
Paint the stem white. Don’t worry about getting paint into every deep crack; leaving some shadows adds to the textured look. -
Add cap spots:
Using a smaller brush, dab irregular circles of white paint onto the orange cap. Keep them loose and slightly imperfect for a natural feel. -
Paint the eyes:
With a fine detail brush and black paint, draw two small, solid black circles for eyes about halfway down the stem. -
Add eye sparkles:
Once the black is dry, use a toothpick or the very tip of your brush to add a tiny white dot in the upper corner of each eye. -
Create the smile:
Paint a thin, simple ‘U’ shape between the eyes using black paint. Keep the line very fine for a delicate expression. -
Add rosy cheeks:
Mix a tiny bit of red with white to make pink, then dab two small circles just below the eyes. -
Seal the piece:
Protect your paint job by applying a layer of matte varnish over the entire sculpture.
Now you have a charming woodland companion to sit on your desk or bookshelf


The Complete Guide to Pottery Troubleshooting
Uncover the most common ceramic mistakes—from cracking clay to failed glazes—and learn how to fix them fast.
Puffy Heart Wall Tiles
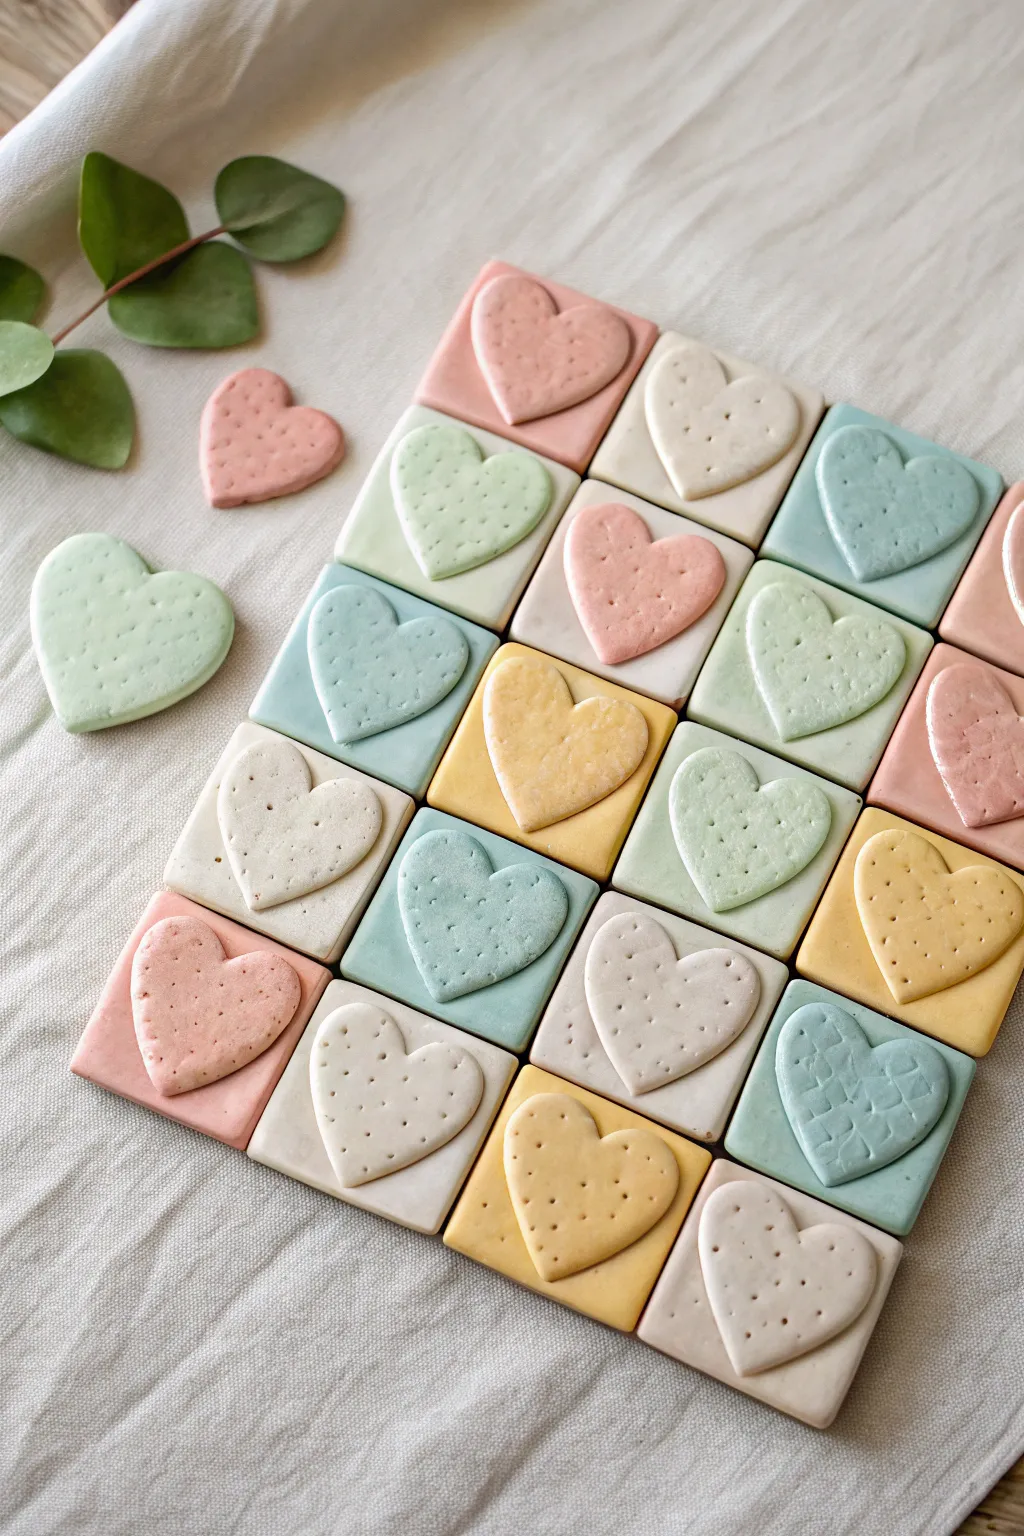
Create a soothing mosaic of love with these dimensional, double-layer clay tiles. Featuring a soft pastel palette and charming speckled textures, these wall-worthy squares combine geometric precision with the sweetness of puffy hearts.
Detailed Instructions
Materials
- Air-dry clay (white)
- Acrylic paints (pastel pink, mint green, pale yellow, dusty blue, beige)
- Square cookie cutter (approx. 2-3 inches)
- Heart cookie cutter (slightly smaller than the square)
- Rolling pin
- Parchment paper or silicone mat
- Toothpick or needle tool
- Small paintbrush
- Water in a small cup
- Sandpaper (fine grit)
- Strong craft glue
- Matte varnish or sealant
Step 1: Preparing the Clay Base
-
Color the Clay:
Divide your white air-dry clay into five separate balls. Knead a small drop of different acrylic paint into each ball to create your pastel palette: pink, mint, yellow, blue, and beige. Keep kneading until the color is uniform. -
Roll the Slabs:
Take your first colored ball and roll it out on parchment paper to an even thickness of about 1/4 inch. Try to keep the thickness consistent for all colors so your final grid lies flat. -
Cut the Squares:
Using your square cookie cutter, stamp out several base tiles from each color. You’ll need enough squares to form your desired grid size, plus a few extras just in case. -
Smooth the Edges:
Dip your finger in a little water and gently run it along the cut edges of each square to remove any sharpness or clay burrs. Lay them flat to dry.
Clean Cuts
If your clay sticks to the cutters, dust the cutter edges with cornstarch or dip them in a bit of water before pressing down for a clean release.
Step 2: Creating the Puffy Hearts
-
Roll Clay for Hearts:
Re-roll your colored clay scraps. This time, you want the slab to be slightly thicker centrally if possible, or just standard 1/4 inch thickness to give the hearts volume. -
Cut the Hearts:
Use the heart cutter to punch out shapes from every color. Make sure you have a mix of colors that contrast nicely with your square bases. -
Soften the edges:
Pick up each heart and gently tap the edges inward with your fingers to round them off. You want a ‘puffy’ look rather than a sharp, flat cut. -
Add Texture:
Take a toothpick or needle tool and gently poke shallow dots all over the surface of the heart. This mimics the look of a classic biscuit or cracker and adds lovely tactile interest. -
Initial Drying:
Place the hearts on parchment paper alongside the squares. Let everything dry for at least 24-48 hours, flipping them occasionally to prevent warping.
Step 3: Assembly and Finishing
-
Test the Layout:
Once dry, play with the arrangement. Place different colored hearts on top of contrasting colored squares until you find a balanced mix of pastels. -
Sand Irregularities:
If any squares have rough edges or uneven bottoms, briefly rub them against fine-grit sandpaper to smooth them out. -
Glue Together:
Apply a generous dab of strong craft glue to the back of a heart and press it firmly into the center of its designated square. I usually hold it there for ten seconds to ensure a good initial bond. -
Seal the Project:
Once the glue is set, brush a thin layer of matte varnish over the entire face of the tile. This protects the clay from moisture and gives the colors a smooth, unified finish. -
Mounting:
To display them as a grid like the photo, you can glue the tiles onto a backing board or use adhesive hanging strips directly on the wall.
Make it Magnetic
Glue round ceramic magnets to the back of each finished tile to turn this art project into a set of adorable refrigerator magnets.
Arrange your charming tile mosaic on a wall or tabletop to bring a gentle splash of color to your space
Pocket Worry Stones With Faces
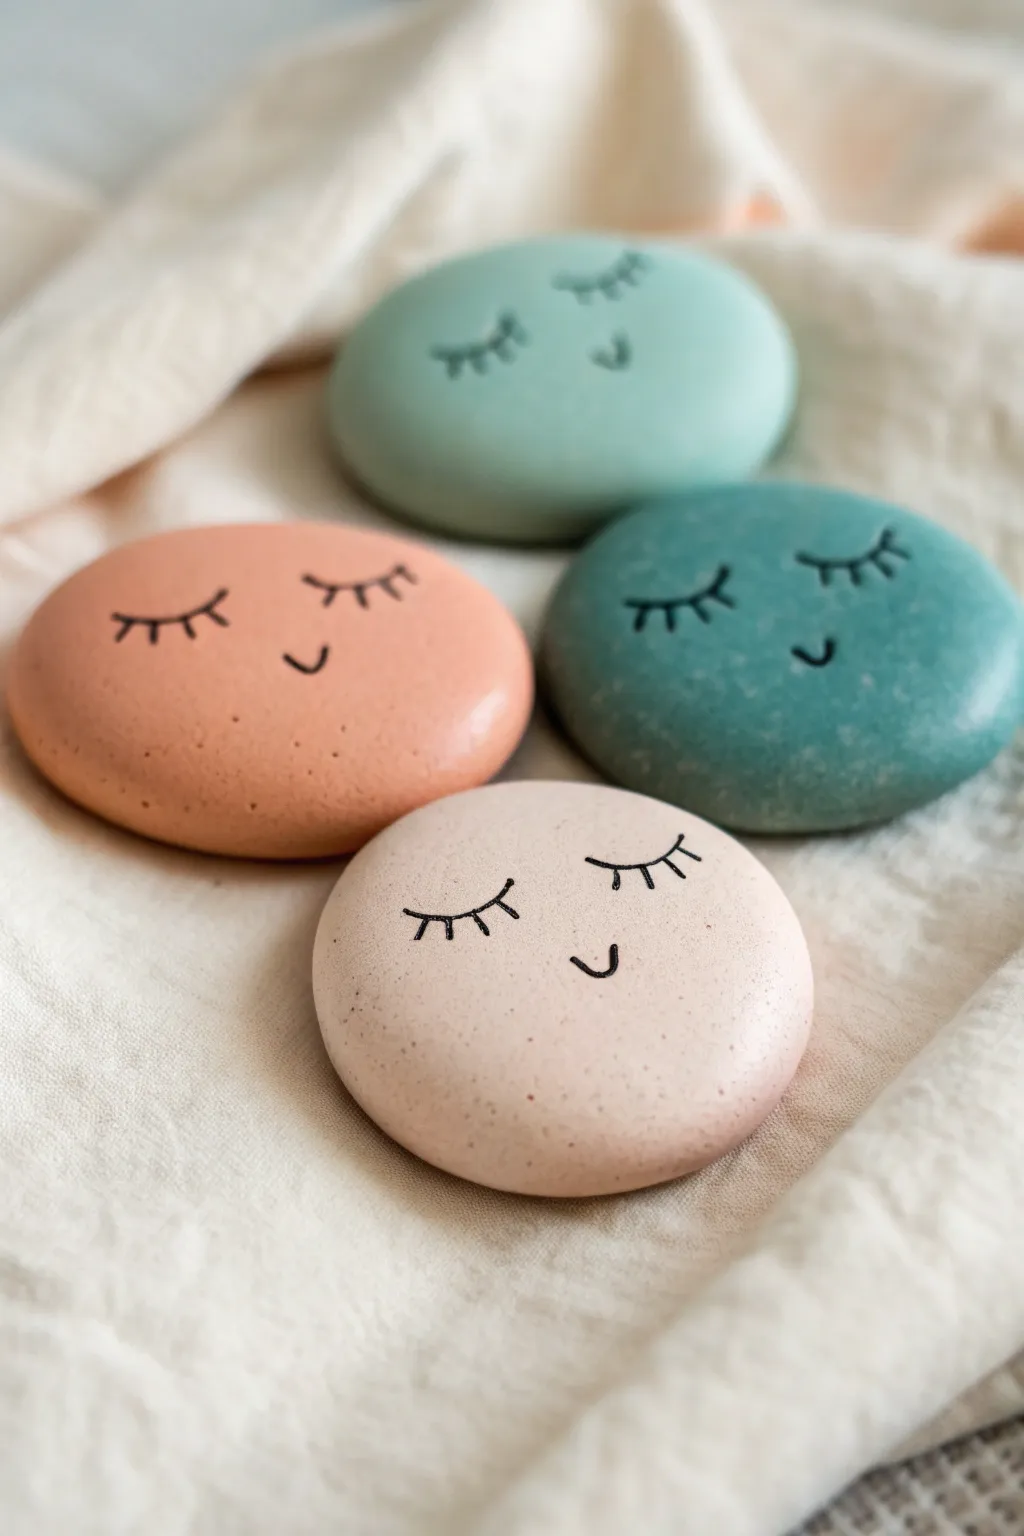
These comforting pocket companions combine the tactile soothing nature of worry stones with sweet, serene expressions. The soft, rounded shapes and muted pastel tones make them perfect little sensory tools to ground you during a busy day.
How-To Guide
Materials
- White air dry clay
- Acrylic paints (teal, mint, salmon pink, pale beige)
- Fine tip black permanent marker (0.3mm or 0.5mm)
- Small rolling pin
- Fine grit sandpaper (320-400 grit)
- Matte varnish or sealant
- Soft synthetic paintbrush
- Small bowl of water
- Sponge or paper towels
Step 1: Shaping the Stones
-
Condition the clay:
Begin by taking a chunk of white air dry clay roughly the size of a walnut. Knead it in your hands for about a minute until it feels warm, pliable, and free of any lumps. -
Roll a sphere:
Roll the conditioned clay between your palms to create a smooth, seamless ball. Look closely for cracks; if you see any, dip your finger in a tiny bit of water and smooth them over now. -
Flatten into a disc:
Place the ball on your work surface and gently press it down with your palm. You want a thick disc shape, roughly 1/2 inch to 3/4 inch thick. Avoid making it too thin, as you want a nice weight to hold. -
Refine the edges:
Pick up the clay disc and use your thumb to gently round off the sharp top and bottom edges. The goal is to make it look like a river rock worn smooth by water. -
Smooth the surface:
Dip your finger in water and run it over the entire surface to create a flawlessly smooth finish. I find that spending an extra minute here saves a lot of sanding time later. -
Repeat the process:
Make 3-4 more stones, varying the sizes slightly for a natural look. Let them dry completely, flipping them every few hours to prevent warping. This usually takes 24-48 hours.
Smooth Operator
To get that ultra-smooth ceramic look, dip your fingertip in a slurry (clay mixed with water) and rub it over the dry clay to fill micro-cracks before painting.
Step 2: Painting & Decoration
-
Sand for perfection:
Once bone dry, take your fine-grit sandpaper and gently buff away any little bumps or fingerprints. Wipe away the dust with a slightly damp sponge. -
Mix pastel shades:
Prepare your palette with soft, calming colors. You’ll want a dusty mint green, a deeper teal, a warm salmon pink, and a very pale beige-pink. Mix white into your standard acrylics to achieve these soft, milky tones. -
Apply base coats:
Paint each stone in a solid color. Use a soft brush to minimize stroke marks. You will likely need two or three thin coats for full opacity, allowing the paint to dry fully between layers. -
Add speckles (optional):
To mimic the look of natural stone or ceramic, you can mix a slightly darker shade of paint, load a toothbrush, and flick tiny speckles onto the dry surface. Keep this very subtle. -
Draft the face:
Pencil in the face lightly before committing to ink. The eyes should be closed arcs with lashes pointing down, positioned slightly wider than the center. Place a tiny ‘u’ shape for the smiling mouth between and below the eyes. -
Draw the details:
Using your fine tip black marker, carefully trace over your pencil lines. Use a steady hand and light pressure to keep the lines crisp. Draw three small lashes on each eye. -
Seal the project:
Protect your work with a matte varnish. A glossy finish can feel sticky, so matte is best for a worry stone you simply want to rub with your thumb. Apply one or two thin coats.
Scented Comfort
Add a drop of essential oil, like lavender or eucalyptus, to the unsealed clay on the *bottom* of the stone. The porous clay will diffuse the scent as you hold it.
Enjoy the calming presence of your new little pocket friends

TRACK YOUR CERAMIC JOURNEY
Capture glaze tests, firing details, and creative progress—all in one simple printable. Make your projects easier to repeat and improve.
Tiny Sea Creature Friends
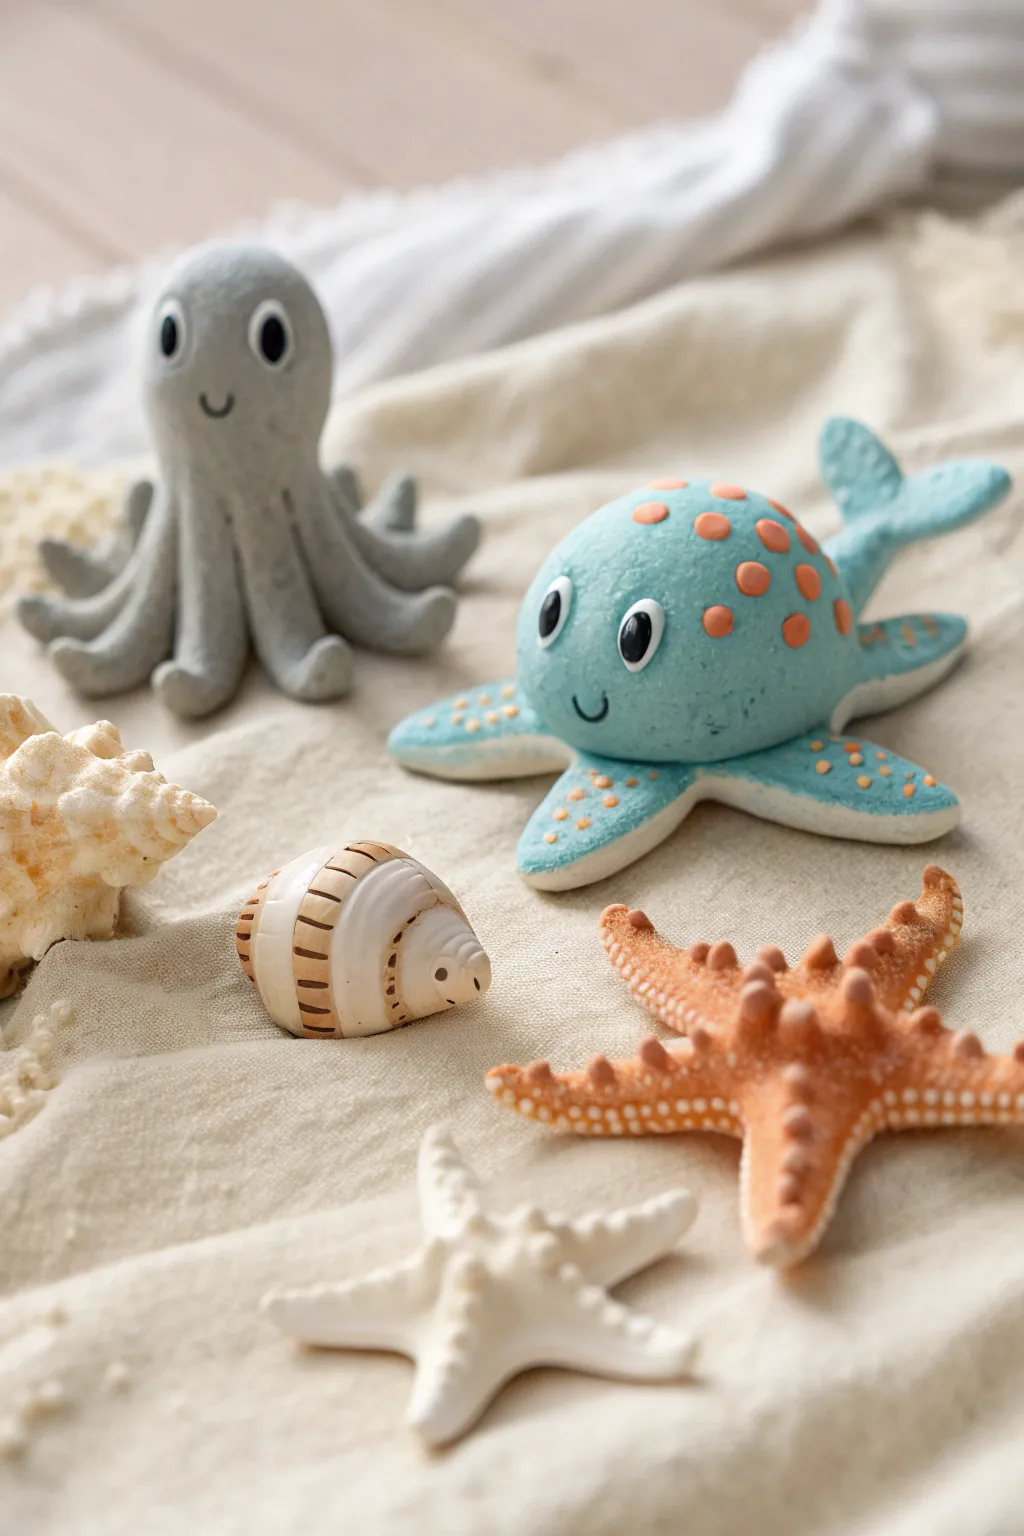
Bring the ocean to your tabletop with this adorable collection of air dry clay creatures, featuring friendly octopuses and starfish with distinct textures. The soft, matte finish and playful details like painted eyes make these tiny friends perfect for nursery decor or imaginative play.
Step-by-Step
Materials
- Air dry clay (white)
- Acrylic paints (light gray, teal blue, orange, brown, black, white)
- Fine grit sandpaper
- Small rolling pin
- Sculpting tools (needle tool, small ball tool)
- Paintbrushes (detail round, small flat)
- Water cup
- Toothpick or wire for armature (optional)
Step 1: Sculpting the Gray Octopus
-
Shape the head:
Start with a ball of clay roughly the size of a golf ball. Roll it until smooth and then gently elongate the top to form a pear-shaped head. -
Form the tentacles:
Flatten the bottom base slightly. Roll out eight small tapered snakes of clay. Attach these to the base of the head, blending the clay upwards with your thumb or a modeling tool so no seams are visible. -
Adding movement:
Curl the tips of the tentacles upwards and outwards to give the octopus a dynamic, floating appearance. -
Create the face:
While the clay is still wet, use a small tool to gently indent where the eyes will go, ensuring they are symmetrical. Add a tiny curved indentation for a smiling mouth.
Step 2: Sculpting the Spotted Whale-pus
-
Form the body:
Roll a larger, slightly flattened sphere for the body. Pinch the back end and pull it outwards to create a tail shape. -
Shape the flukes:
Split the end of the tail and flatten each side into flukes. Add a slight curve to make it look like it’s swimming. -
Add the limbs:
Unlike the octopus, this creature has star-like limbs at the base. Attach four flattened, triangular shapes to the bottom front and sides, smoothing the joins seamlessly. -
Skin texture:
Before the clay dries, take a stiff-bristled brush or a textured sponge and gently tap it all over the surface to create a rough, skin-like texture.
Cracking Up?
If you see hairline cracks forming as the clay dries, dip your finger in a little water and smooth a tiny bit of fresh clay paste into the crack to seal it.
Step 3: Starfish & Shells
-
Base starfish shape:
Roll out a flat star shape with five arms. Pinch the center of each arm to create a ridge line running from the tip to the center body. -
Adding bumps:
Roll very tiny balls of clay and press them along the ridges of the starfish arms to mimic knobby textures. -
The conch shell:
Roll a cone shape and twist it gently. Use a needle tool to score spiral lines around the cone. If you want it to be a character, add a tiny smiling face near the opening.
Textured Touch
To get the pitted texture on the teal creature, gently press a clean piece of sandpaper or a rough stone against the clay while it is still soft.
Step 4: Painting & Details
-
Base coats:
Once fully dry (24-48 hours), paint the octopus a soft matte gray and the whale-creature a muted teal blue. Paint the knobby starfish a warm orange. -
Adding spots:
For the teal creature, mix a soft orange paint. Using the back of a paintbrush handle, dot large circles on the back and smaller dots on the flippers. -
Starfish details:
Dry brush a lighter peach or cream color over the orange starfish to highlight the raised bumps. -
Painting the shell:
Paint the conch shell cream, then carefully paint thin brown lines inside the spiral grooves using your finest brush. -
Bringing them to life:
For the eyes, paint solid black ovals. Once dry, add a tiny white dot in the upper corner of each eye for a ‘sparkle’ reflection. Use a thin black line to paint the smiles.
Now you have a whole ocean family ready to display on your shelf
Miniature Fairy House Charms
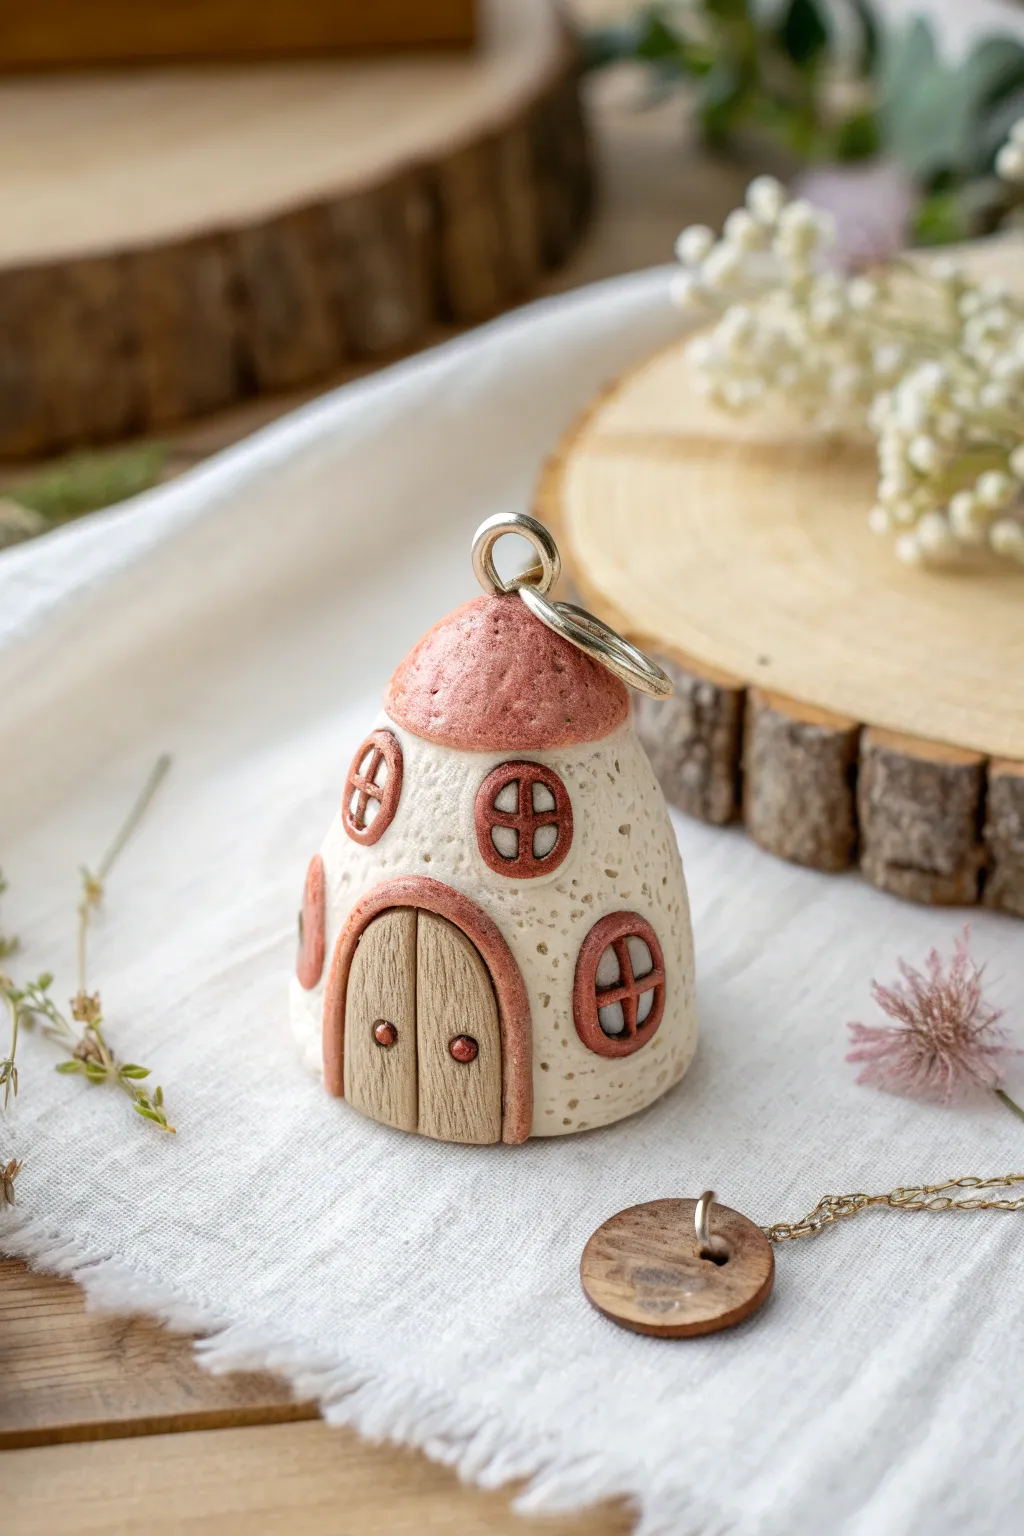
Capture the magic of a fairy tale with this adorable miniature house charm, perfect for necklaces or keychains. Sculpted from air-dry clay, this tiny dwelling features speckled textures, a rustic conical roof, and charming wooden details.
Step-by-Step Tutorial
Materials
- White air-dry clay (high quality, fine grain)
- Acrylic paints: Burnt Sienna, Antique White, Dark Brown, Gold
- Sculpting tools: needle tool, small ball stylus, blade/knife
- Toothbrush or stiff bristle brush (for texture)
- Sandpaper (fine grit)
- Metal screw eye pin or wire loop
- Strong craft glue or PVA
- Matte varnish or sealant
- Two jump rings (shiny gold or brass tone)
Step 1: Shaping the Base
-
Prepare the clay:
Start by conditioning a walnut-sized ball of white air-dry clay until it is smooth and pliable. This will become the main body of the cottage. -
Form the body:
Roll the clay into a smooth cylinder, then gently taper the top half to create a dome or bullet shape. Flatten the bottom against your work surface so it stands upright independently. -
Add texture:
Using a stiff toothbrush or a stippling sponge, gently press texture into the entire surface of the house walls. This mimics the porous look of stone or stucco and helps hide fingerprints. -
Create the door indentation:
Press a small, arched indentation near the base with your thumb or a modeling tool to mark where the door will eventually sit.
Step 2: Roof and Hardware
-
Form the roof cap:
Take a smaller piece of clay and flatten it into a thick disc. Mold it over the top of your house shape, smoothing the edges downward to create a distinct roofline. -
Insert the eye pin:
While the clay is still wet, screw the metal eye pin into the very top center of the roof. Dip the threads in a tiny dot of glue before inserting to ensure it stays secure once dry. -
Texture the roof:
Use your needle tool or the toothbrush again to give the roof a rougher, mossy texture compared to the walls.
Cracking Clay?
If you see cracks forming as it uses, smooth a tiny bit of water or vinegar over the crack with your finger to mend it before it hardens completely.
Step 3: Sculpting Details
-
Make the door:
Roll a small amount of clay flat and cut out an arch shape that fits your door indentation. Use a blade to score a vertical line down the center for the double doors, and add wood grain lines. -
Frame the door:
Roll a very thin snake of clay and wrap it around the arched door as a frame. Use a needle tool to blend the outer edges of this frame onto the house body. -
Create window frames:
Roll small circles of clay for the windows. Press them gently onto the cottage walls. Use a needle tool to impress a cross (+) shape deeply into each circle to create the window panes. -
Frame the windows:
Like the door, add tiny thin snakes of clay around each window circle to create raised frames. -
Add door knobs:
Roll two microscopic balls of clay and attach them to the center of the double doors to serve as knobs. Let the entire piece dry completely, usually for 24-48 hours.
Pro Tip: Rustic Texture
Use a crumpled ball of aluminum foil instead of a toothbrush to texture the roof; it creates deeper, rock-like indentations that catch paint washes beautifully.
Step 4: Painting and Finishing
-
Base coat the walls:
Paint the main body of the house with Antique White. I prefer to dab the paint on to preserve the stippled texture rather than brushing it smooth. -
Paint the roof and frames:
Carefully paint the roof, door frame, and window frames with a reddish Burnt Sienna tone. Keep a steady hand to avoid getting paint on the white walls. -
Detail the door:
Paint the wooden door area with a lighter tan or wood color. Once dry, you can use a diluted dark brown wash to settle into the wood grain grooves for depth. -
Highlight the knobs:
Dot the tiny doorknobs with gold or copper paint to make them pop against the wood texture. -
Speckle effect:
Mix a watery brown paint. Dip a toothbrush into it and flick the bristles with your thumb to spray tiny speckles over the white walls, giving it an organic, aged look. -
Seal the charm:
Apply a coat of matte varnish over the entire piece to protect the paint and clay. This is crucial for jewelry that might rub against clothing. -
Attach hardware:
Once the varnish is cured, open a jump ring with pliers, loop it through the eye pin on top, and add a larger ring or clasp for your necklace chain.
Now your tiny cottage is ready to be worn as a magical accessory or gifted to a friend
Cute Desk Buddy Pencil Cup
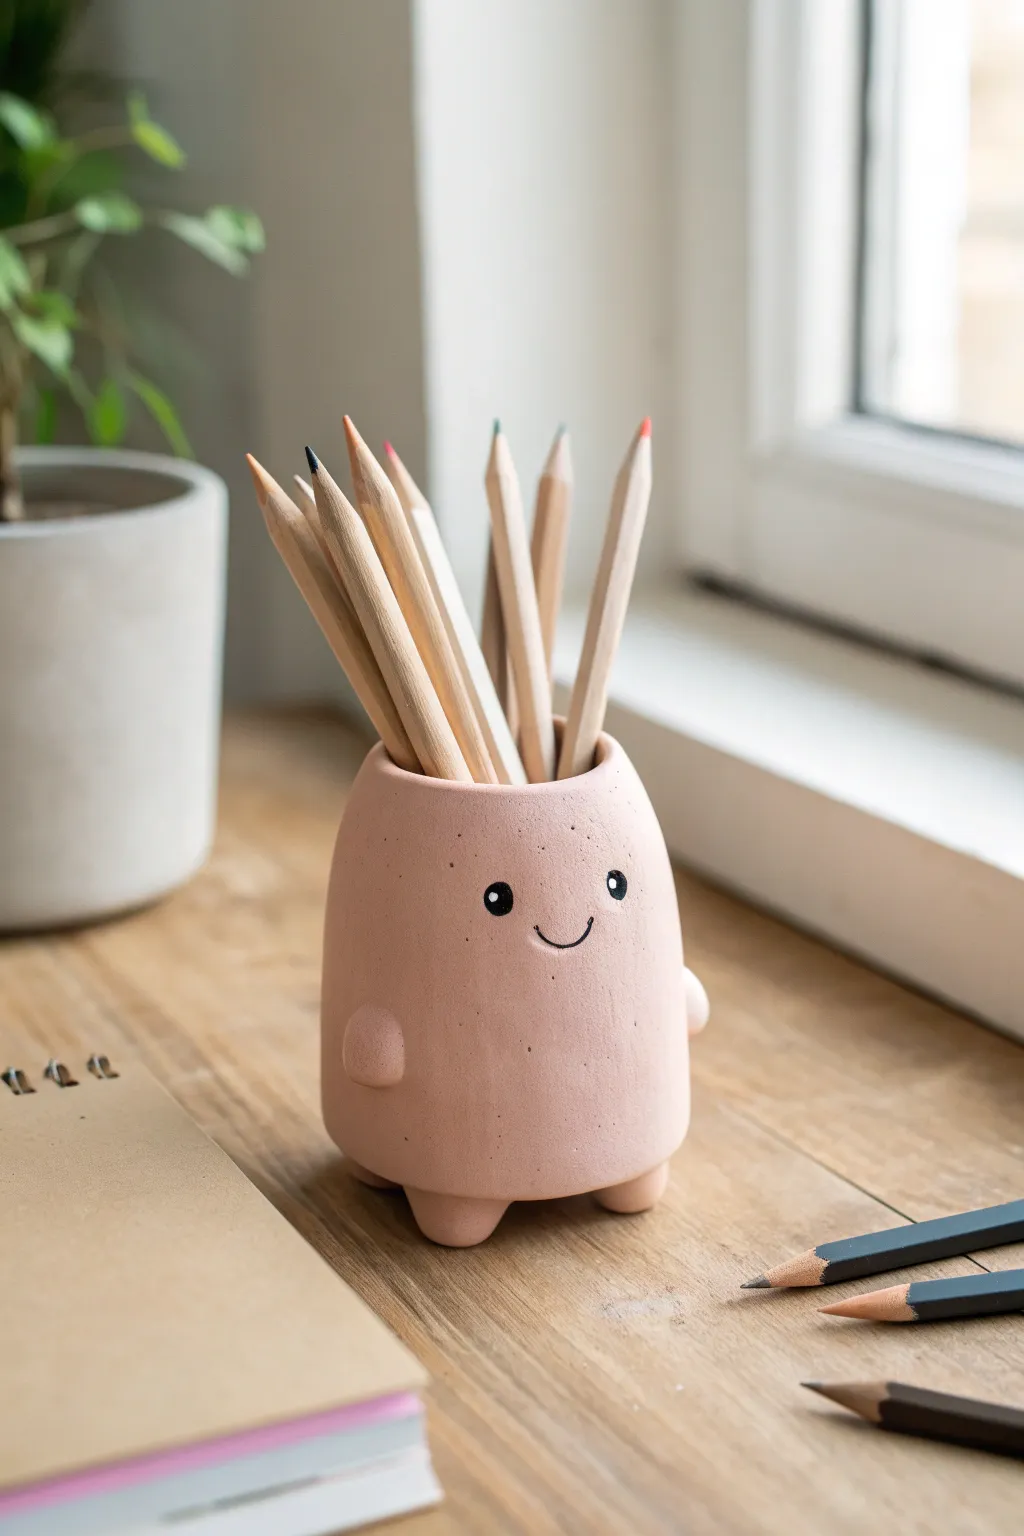
This adorable desk organizer looks like a friendly little creature ready to hug your pencils. With its soft pink finish, nubby limbs, and simple smile, it adds a touch of whimsy to any workspace while keeping your writing tools tidy.
How-To Guide
Materials
- White air dry clay (approx. 500g)
- Acrylic rolling pin
- Small cup or jar (for sizing reference)
- Clay tools (needle tool, blending tool)
- Water in a small dish
- Sandpaper (fine grit)
- Pale pink acrylic paint
- Black acrylic paint or fine brush pen
- White gel pen (optional)
- Matte varnish or sealant
Step 1: Shaping the Body
-
Prepare the clay:
Start by conditioning your air dry clay. Knead a large handful until it is soft, pliable, and free of cracks. Roll it into a smooth, large ball. -
Form the cylinder:
Gently press your thumb into the center of the ball and begin pinching the walls upwards to create a pot shape. Aim for a slightly tapered look, wider at the bottom and narrowing slightly at the top, like an egg with the top cut off. -
Smooth the walls:
Use a little water on your finger to smooth out any cracks on the outside. Ensure the walls are roughly 1/4 inch thick so the cup is sturdy enough to hold pencils without collapsing. -
Check the depth:
Test the height with a pencil. You want the container to cover about two-thirds of a standard pencil. Adjust the height by pinching the clay up further or trimming the rim if necessary.
Step 2: Adding Details
-
Create the feet:
Roll four small, equal-sized balls of clay, roughly the size of large marbles. These will become the legs. -
Attach the feet:
Flip your pot upside down. Score the bottom of the pot and the top of each clay ball with your needle tool. Apply a dab of water (slip) and press the four feet securely onto the base. -
Blend the seams:
I prefer using a silicone blending tool or just my finger to smooth the clay where the feet meet the body, ensuring there are no visible lines and the bond is strong. -
Make the arms:
Roll two smaller balls of clay for the arms. Flatten one side of each ball slightly so it sits flush against the body. -
Attach the arms:
Position the arms on the lower half of the body. Score, slip, and blend them on just like the feet. They should look like little nubs sticking out slightly. -
Final smoothing:
Do one last pass over the entire sculpture with a barely damp sponge or finger to remove fingerprints. Let the piece dry completely, usually for 24-48 hours depending on humidity.
Cracks Appearing?
If you see hairline cracks while drying, mix a tiny bit of fresh clay with water to make a paste (slip). Fill the cracks with this paste, smooth it over, and let it dry again.
Step 3: Painting and Finishing
-
Sand imperfections:
Once fully dry, gently sand any rough spots or unevenness on the rim and body using fine-grit sandpaper. Wipe away the dust with a dry cloth. -
Base coat:
Paint the entire pencil cup with a pale terracotta or soft pink acrylic paint. You may need two or three coats for an opaque, even finish. Let each coat dry fully before adding the next. -
Create the texture:
To mimic the speckled stone look in the photo, dip an old toothbrush into slightly watered-down dark grey or brown paint. Run your thumb over the bristles to fleck tiny specks onto the pink base. -
Paint the eyes:
Using a very fine detail brush and black paint, add two small circles for eyes. Place them fairly wide apart on the upper half of the body for that cute ‘kawaii’ look. -
Add the smile:
Paint a small, simple ‘U’ shape between the eyes for the mouth. Keep the line thin and delicate. -
Add highlights:
Dip the end of a toothpick or needle tool into white paint and add a tiny white dot to the upper corner of each black eye pupil. This brings the character to life. -
Seal the piece:
Protect your new desk buddy with a coat of matte varnish. This will prevent the paint from chipping and give the clay a professional finish.
Make it Functional
Before the clay dries, press a strong magnet into the creature’s ‘hand’ area. Once painted, your pencil cup can also hold paperclips on its side.
Enjoy styling your new desk buddy with your favorite set of pencils
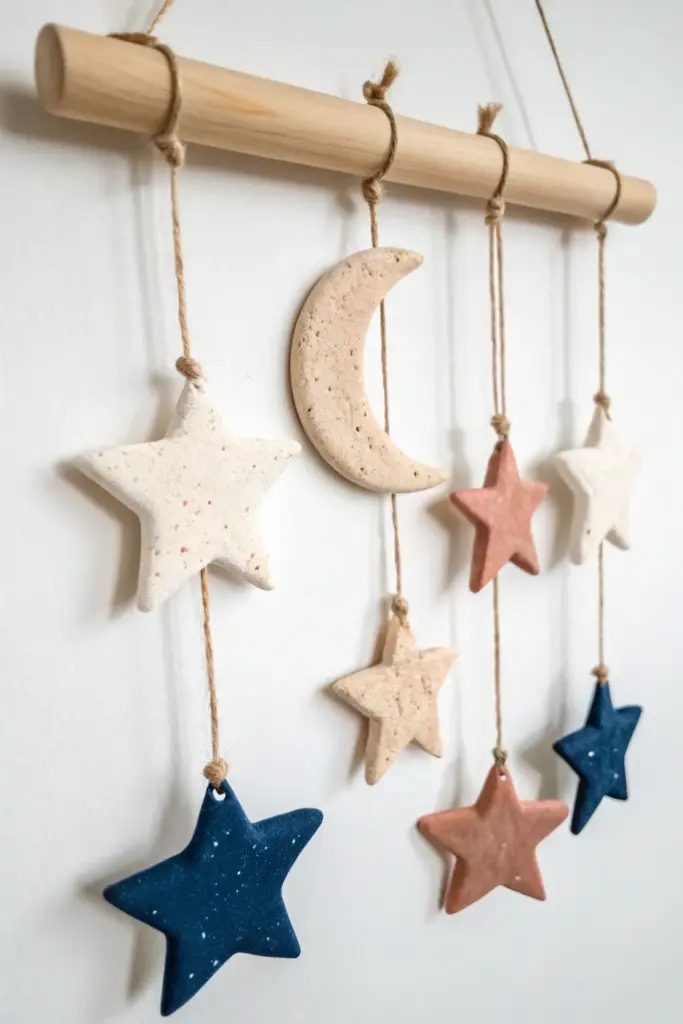
Moon And Star Mini Mobile

Bring the magic of the night sky into your home with this charming rustic mobile featuring textural moons and stars. This project combines soothing earth tones with deep midnight blues for a piece that looks perfect in a nursery or cozy corner.
Step-by-Step Tutorial
Materials
- White or terracotta air dry clay
- Wooden dowel (approx. 12 inches)
- Jute twine or natural hemp cord
- Rolling pin
- Star cookie cutters (various sizes)
- Circle cutter or glass (for the moon)
- Acrylic paints (Cream, Terracotta/Dusty Pink, Navy Blue, White)
- Medium paintbrush and fine detail brush
- Toothpick or skewer
- Sandpaper (fine grit)
- Toothbrush (for spattering)
Step 1: Shaping the Heavens
-
Preparation:
Begin by conditioning your air dry clay. Knead a large handful until it is soft, pliable, and free of cracks. If it feels too dry, add a tiny drop of water. -
Rolling Out:
Roll your clay out on a smooth surface or a silicone mat to an even thickness of about 1/4 inch. Don’t go too thin, or the pieces might be fragile when hanging. -
Cutting Stars:
Using your star-shaped cookie cutters, cut out a variety of stars. For this specific look, aim for about 2 large stars and 4-5 smaller stars. Gently push the clay out of the cutters to avoid warping the points. -
Creating the Moon:
Use a circle cutter or the rim of a glass to cut a large circle. Then, shift the cutter slightly off-center and cut again to create a crescent moon shape. Soften the sharp edges with a wet finger. -
Adding Texture:
Before the clay hardens, you can add subtle texture. Gently press a piece of sandpaper or a textured fabric into the surface, or prick it lightly with a toothbrush to mimic a cratered surface. -
Piercing Holes:
Use a toothpick or skewer to poke a hole through the top point of every star and the top tip of the moon. Wiggle the tool slightly to ensure the hole is large enough for your twine to pass through later. -
Drying Time:
Lay all your pieces flat on a piece of parchment paper to dry. This process usually takes 24-48 hours. I find flipping them over halfway through helps them dry evenly and prevents curling.
Step 2: Painting the Sky
-
Smoothing:
Once fully dry, lightly sand any rough edges or uneven spots with fine-grit sandpaper. Wipe away the dust with a dry cloth. -
Base Coats:
Paint the moon and the large star in a solid cream or off-white color. Use the terracotta paint for the medium stars, and cover the remaining stars in deep navy blue. You may need two coats for full coverage. -
Speckled Effect:
To get that starry night look seen in the photo, dip an old toothbrush into white paint. Run your thumb across the bristles to flick tiny specks of paint onto the navy blue stars. -
Earth Tone Speckles:
Repeat the speckling technique on the cream and terra cotta shapes, but use a contrasting brownish-grey paint mixed with a little water for a natural, stony look. -
Sealing (Optional):
If you want extra durability, apply a matte varnish over all sides of the dried painted pieces.
Stone Effect Trick
Mix a small pinch of dried coffee grounds or sand into your white acrylic paint before applying it. This adds instant gritty, realistic texture to your moon without any special tools.
Step 3: Assembly
-
Cutting Twine:
Cut five lengths of jute twine. Vary the lengths to create visual interest—some short, some long. You’ll need extra length for tying knots. -
Attaching Shapes:
Thread the twine through the holes in your clay pieces. Secure them with a simple overhand knot right at the top of the shape. -
Double Hanging:
Notice that some strands have two shapes. For these, tie the bottom star first, then thread a second star onto the same string, tying a knot further up the line where you want it to sit. -
Tying to Dowel:
Tie each string securely onto the wooden dowel. Space them out evenly. The moon usually looks best slightly off-center or in the middle, depending on your preference. -
Final Suspension:
Cut a final long piece of twine and tie it to both ends of the wooden dowel to create the main hanger. trimming any excess loose ends for a clean finish.
Curling Clay?
If your stars start curling up while drying, place a light book on top of them (with parchment paper in between) once they are semi-dry to press them back flat.
Hang your beautiful celestial creation where it can gently catch the breeze and admire your handiwork