When I want a quick creative win, I reach for air dry clay and keep the shapes simple, round, and ridiculously sweet. These easy cute ideas are all about tiny details—dot eyes, blushy cheeks, and beginner-friendly forms that still look totally finished.
Kawaii Cat Head Minis
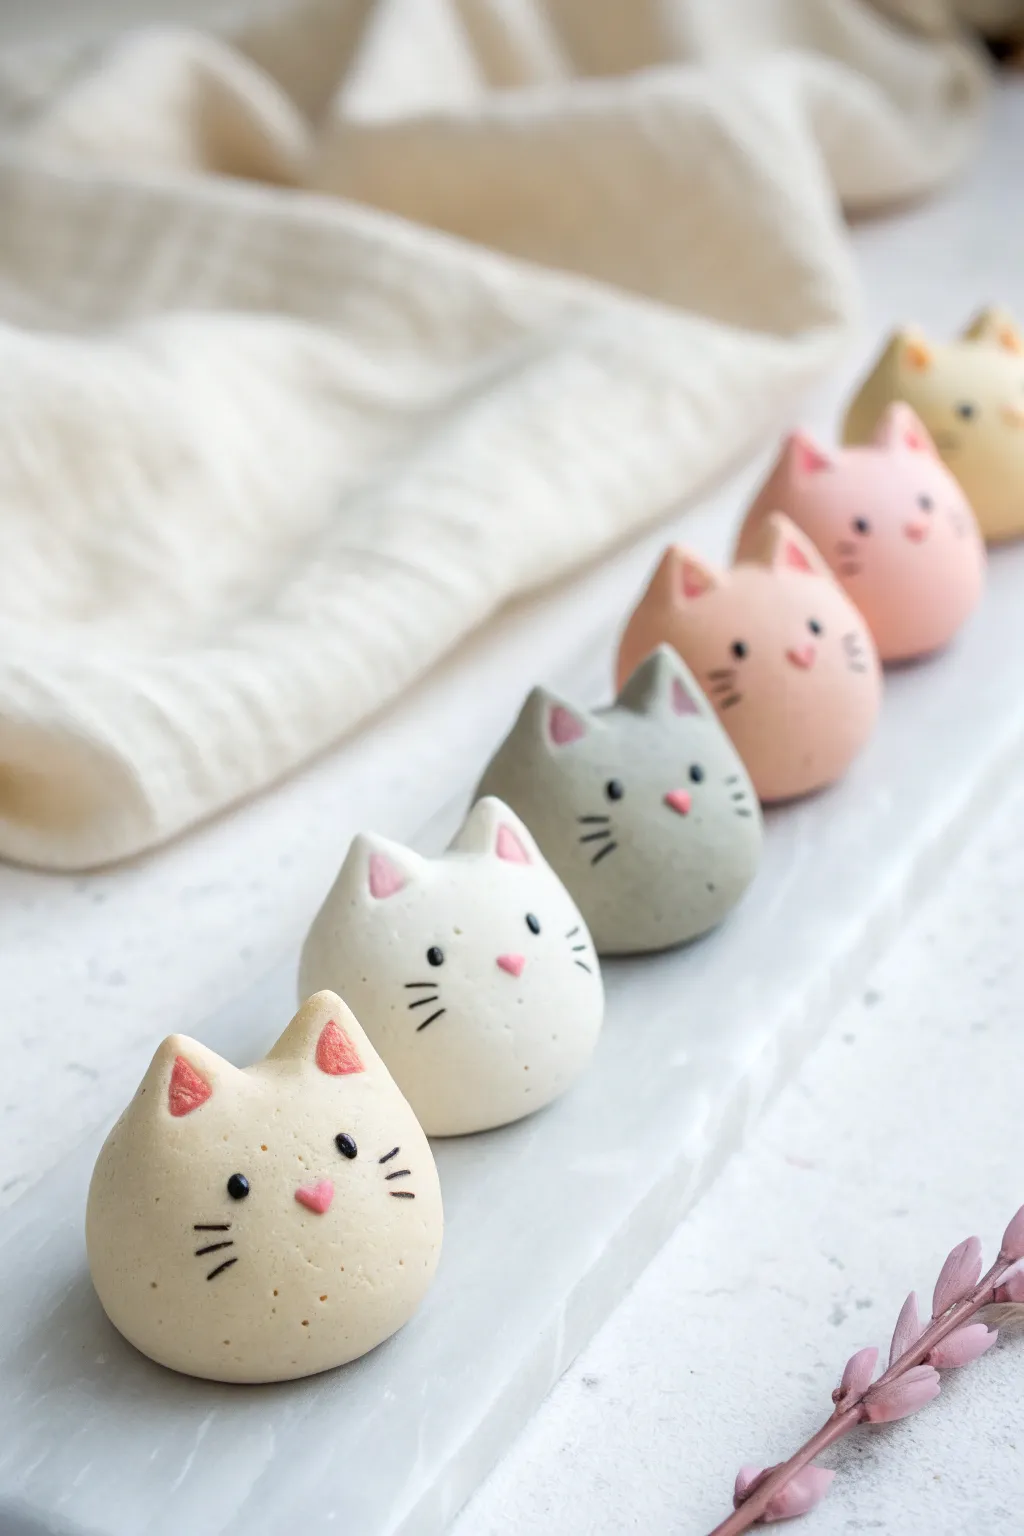
These adorable, simplistic cat minis are the essence of kawaii charm, featuring smooth, spherical shapes and delicate facial details. Their minimalist design makes them an ideal project for beginners looking to practice achieving smooth finishes and precise features with air dry clay.
Step-by-Step
Materials
- Air dry clay (white)
- Acrylic paints (pastel yellow, grey, soft pink, black)
- Smooth work surface or silicone mat
- Small bowl of water
- Fine detail paintbrush (size 0 or 00)
- Clay sculpting tool or toothpick
- Fine-grit sandpaper (optional)
- Matte sealant or varnish
Step 1: Basic Shaping
-
Prepare the clay:
Begin by conditioning your air dry clay. Knead it thoroughly in your hands until it is pliable, warm, and free of any cracks. -
Color mixing (optional):
If you want colored clay rather than painting later, mix a tiny drop of acrylic paint into the raw clay now to create pastel shades like cream, grey, or pink. Knead until the color is uniform. -
Roll the sphere:
Take a walnut-sized amount of clay and roll it between your palms to create a perfect sphere. Aim for a shape that is slightly flattened at the bottom so it sits stably without rolling away. -
Smooth the surface:
Dip your finger in a little water and gently run it over the sphere to remove any fingerprints or minor imperfections. The surface should be completely smooth.
Step 2: Adding Features
-
Form the ears:
Pinch off two tiny, pea-sized balls of clay for the ears. Roll them into small cones or triangles. -
Attach the ears:
Score the top of the head slightly where you want the ears to sit. Apply a tiny amount of water or liquid clay (slip) to the base of your ear triangles and press them gently onto the head. -
Blend the seams:
Here I prefer to use a silicone tool, but a finger works too: gently drag the clay from the base of the ear down onto the head to seamless blend the join. The ears should look like they grew out of the head, not just stuck on. -
Shape the ear interior:
Use the rounded end of a small tool or a paintbrush handle to gently press an indentation into the front of each ear triangle, creating the inner ear shape.
Smooth Operator
Use a little bit of water on your finger to smooth out the clay while shaping. It acts like a polish and removes fingerprints instantly.
Step 3: Drying and Refining
-
Initial dry:
Let the figures sit undisturbed. Depending on your humidity, this could take 24-48 hours. Turn them over occasionally to ensure the bottom dries thoroughly. -
Sanding:
Once bone dry, inspect your cat for rough spots. Use very fine-grit sandpaper to gently buff away any bumps, being careful not to flatten the round shape. -
Dust off:
Wipe the figure down with a dry, soft brush or cloth to remove any clay dust from sanding.
Magnet Magic
Before the clay dries, press a small, strong magnet into the flat back or bottom of the cat head to turn these into adorable fridge magnets.
Step 4: Painting and Details
-
Base coat:
If you didn’t pre-color your clay, paint the entire head now with your chosen body color (cream, grey, white, or pink). You might need two thin coats for opaque coverage. -
Paint the inner ears:
Mix a soft pink color. Using your finest brush, carefully paint the triangular indentation inside each ear. -
Add the nose:
Using the same soft pink, paint a tiny inverted triangle or heart shape in the center of the face for the nose. Keep it small to maintain the cute factor. -
Draw the eyes:
Dip a fine detail brush or a dotting tool into black acrylic paint. Place two small dots wide apart, aligned horizontally with the top of the nose. -
Add whiskers:
With a steady hand and very little paint on your brush, paint three short, fine lines on each cheek. Ensure the lines are thin and delicate. -
Seal:
Once the paint is fully dry, apply a coat of matte varnish to protect your new friend and give it a finished, professional look.
Now you have a whole litter of tiny clay kittens ready to decorate your desk


Chubby Frog Pebble Buddies
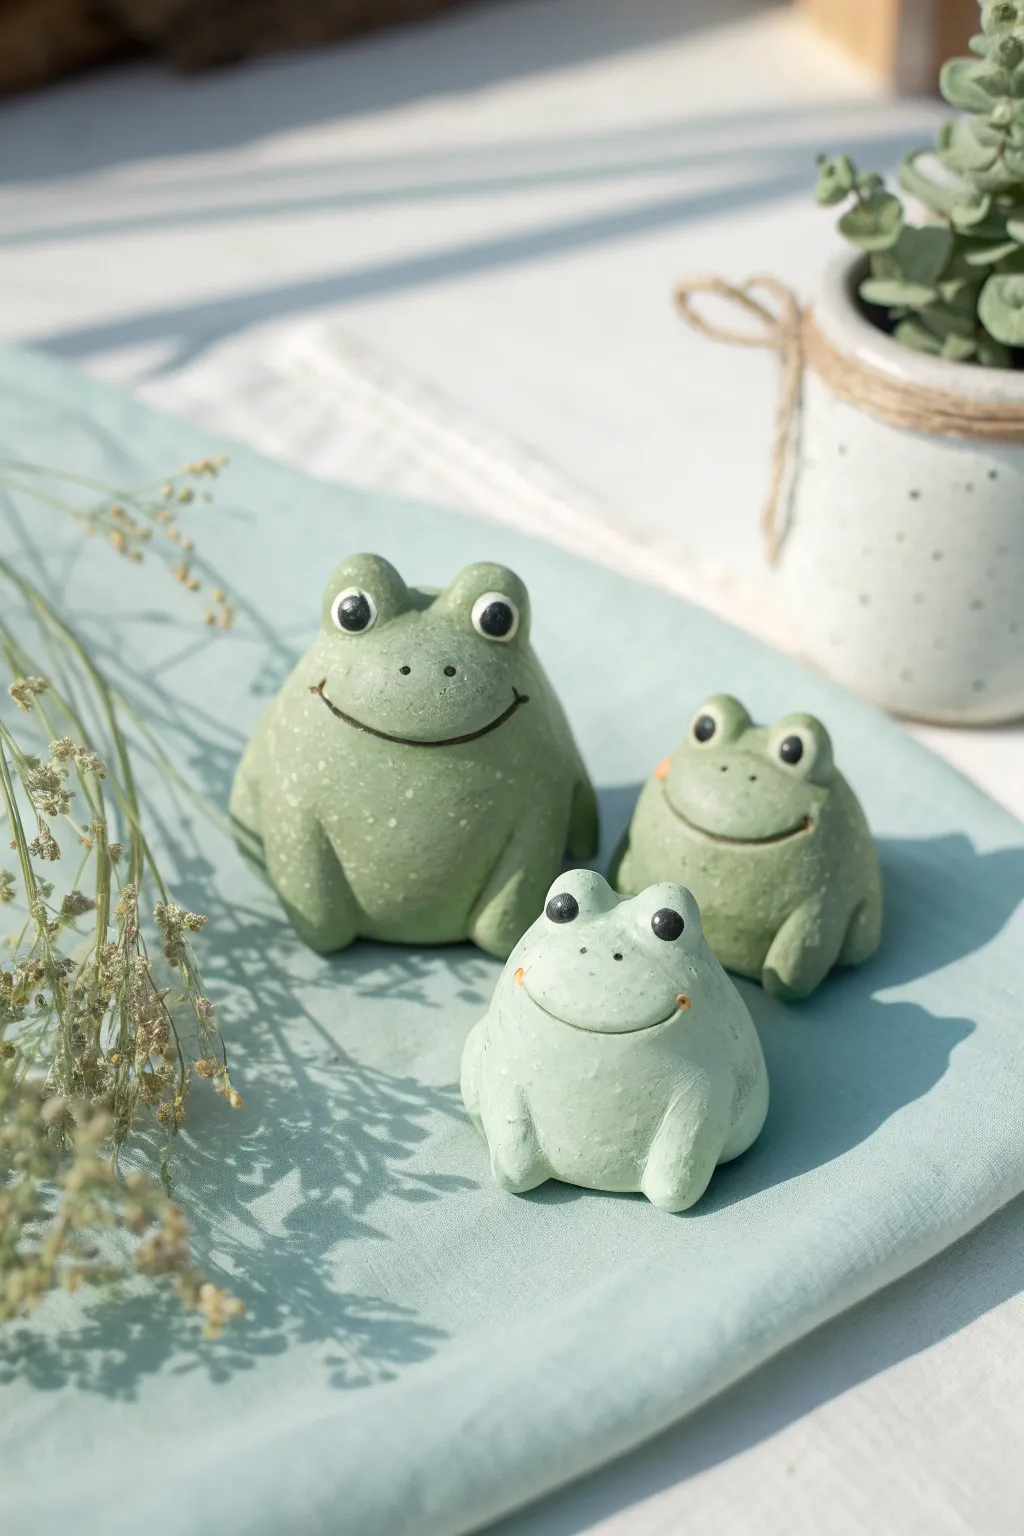
These delightful frog figurines capture the essence of a smooth river stone brought to life with a happy smile. Perfect for beginners, this project turns simple spheres of clay into a charming trio of speckled green friends for your desk or planters.
Detailed Instructions
Materials
- Air dry clay (white or pre-colored green)
- Acrylic paints (sage green, dark green, black, white, orange)
- Small cup of water
- Aluminum foil (optional, for armature)
- Smoothing sponge or soft paintbrush
- Fine-grit sandpaper
- Modeling tools or a toothpick
- Paintbrushes (flat brush and fine detail brush)
- Old toothbrush (for speckling)
- Matte varnish or sealant
Step 1: Shaping the Bodies
-
Prepare your clay:
Start by kneading your air dry clay until it is soft and pliable. If you are making a trio like the photo, portion out three different amounts of clay to create a large, medium, and small frog. -
Create the base form:
Roll each portion of clay into a smooth, tight ball. Gently tap the bottom of the ball against your work surface to flatten it slightly so the frog sits stable without rolling away. -
Refine the shape:
Use your palms to gently press the sides near the top, tapering the ball slightly so it looks a bit like a rounded pyramid or a gumdrop shape. This gives the frog a sturdy, sitting posture.
Smooth Operator
For the smoothest finish, keep a damp piece of chamois leather or a soft makeup sponge nearby to wipe the clay while shaping.
Step 2: Adding Features
-
Form the eyes:
Roll two very small balls of clay for the eyes. Their size should be proportional to the body—large enough to be cute but not overwhelming. Place them on top of the head, spaced slightly apart. -
Blend the seams:
Dip your finger or a clay tool in a tiny bit of water. Gently stroke the clay where the eyes meet the head to blend the seams together, making the eyes look like they are part of the body rather than just stuck on. -
Adding legs:
Roll two small sausage shapes for the front legs. Attach these vertically to the front of the body, blending the top of the ‘sausage’ into the body so only the bottom paw part protrudes slightly. -
Sculpting the back legs:
For the hind legs, create two curved, teardrop shapes. attach these to the sides of the body near the bottom, blending the edges so they look like folded legs resting against the frog’s sides. -
Carving the smile:
Using a curved modeling tool or the side of a toothpick, press a wide, gentle smile into the face just below the eyes. Make the indentation deep enough to hold paint later. -
Final smoothing:
Dip a soft paintbrush or sponge in water and go over the entire sculpture to remove fingerprints and smooth out any bumps. I find this step crucial for getting that stone-like finish. -
Drying time:
Set your frogs aside in a cool, dry place. Let them dry for 24-48 hours until they are completely hard and white (if using white clay).
Lily Pad Displays
Make small, flat discs of clay with a ‘V’ cut out of them to create custom lily pad coasters for your new frog friends to sit on.
Step 3: Painting and Finishing
-
Sanding:
Once fully dry, lightly gently buff the surface with fine-grit sandpaper to remove any rough spots or uneven textures. -
Base coat:
Mix a soft sage green acrylic paint. Apply an even coat over the entire frog. You may need two thin layers to get opaque coverage. -
Add texture:
To mimic the speckled stone look, dilute a slightly lighter green or white paint with water. Load an old toothbrush with the paint and run your thumb over the bristles to flick tiny speckles onto the frog. -
Paint the eyes:
Using a fine detail brush and black paint, carefully fill in the protruding eye bumps. Try to keep the edges round and neat. -
Add highlights:
Once the black paint is dry, add a tiny dot of white paint to the upper corner of each eye to bring the expression to life. -
Define the mouth:
Mix a very dark green or watered-down black paint. Use your smallest brush to paint inside the carved smile line. -
Cheeky details:
Dab a tiny amount of orange or pink wash on the cheeks for a subtle blush effect, just at the ends of the smile. -
Seal the deal:
Finish by applying a coat of matte varnish. This removes the ‘chalky’ look of the paint and protects your frogs from moisture.
Arrange your trio on a shelf or windowsill to bring a touch of joy to your space


Tiny Dino Nugget Charms
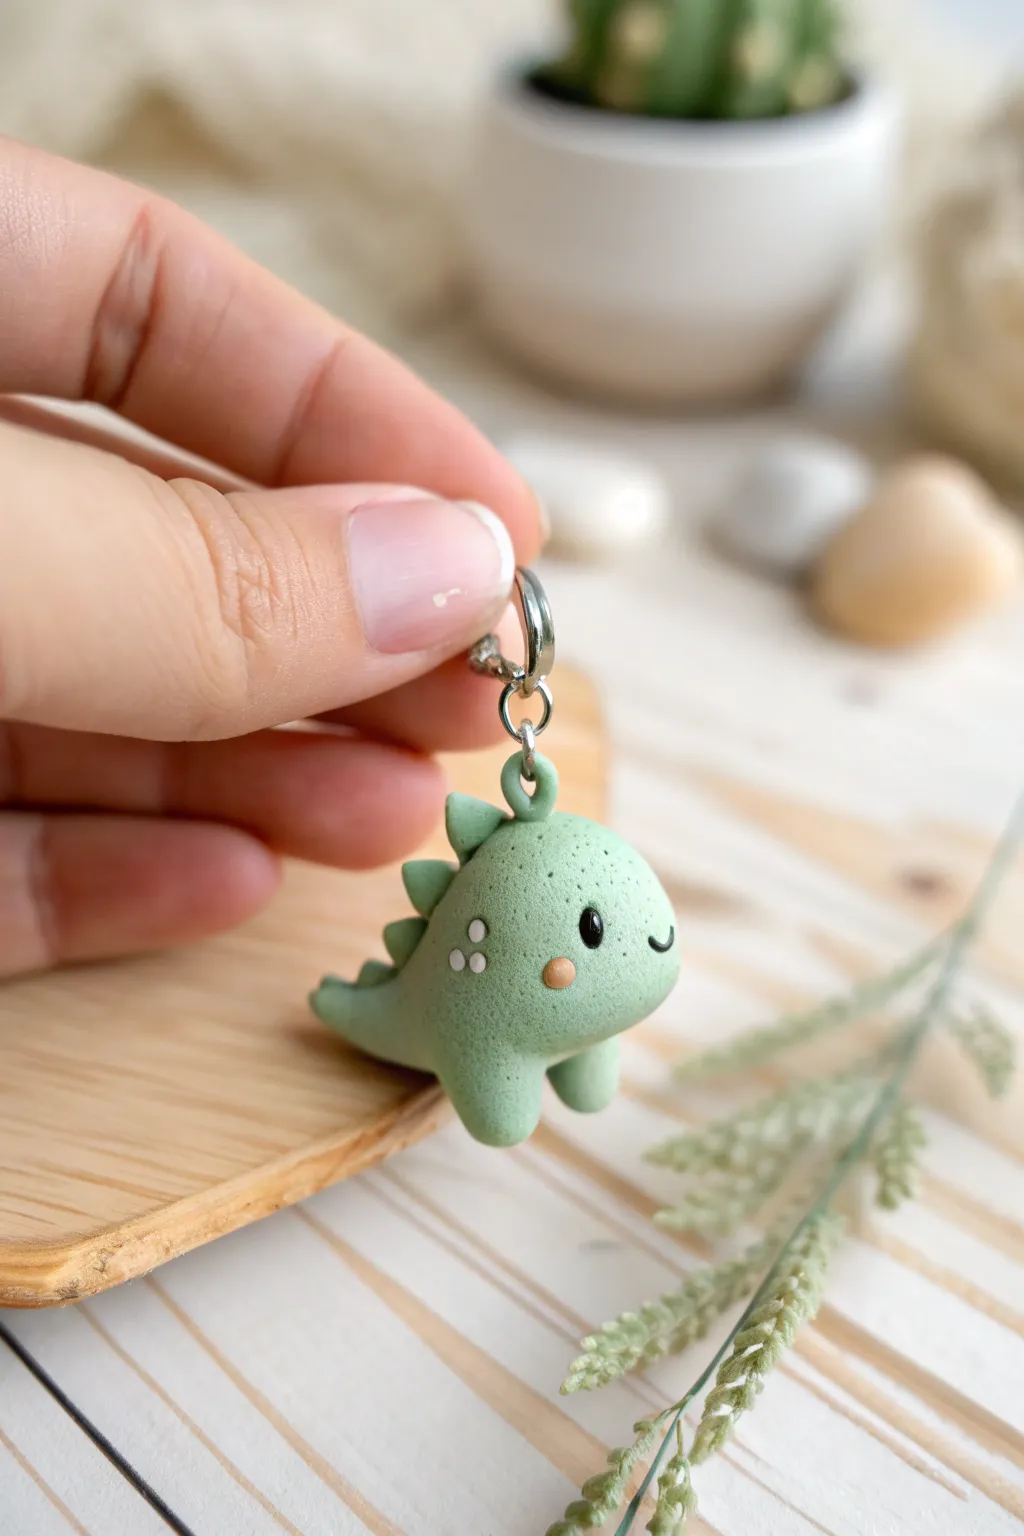
This adorable little green dinosaur charm is perfect for adding a touch of prehistoric cuteness to your keychain or zipper. With its simple shapes and sweet expression, it’s a beginner-friendly project that results in a surprisingly polished, textured finish.
Step-by-Step Guide
Materials
- Light green air-dry clay
- Darker green air-dry clay (for spikes)
- Black acrylic paint or clay (for eyes)
- Light pink or peach acrylic paint (for cheeks)
- White acrylic paint (for highlights/details)
- Old toothbrush or stiff bristle brush
- Dotting tool or toothpick
- Eye pin or screw eye
- Jump ring and lobster clasp
- Gloss glaze or varnish (optional)
Step 1: Shaping the Body
-
Form the base:
Start by rolling a small ball of light green clay, about the size of a large marble or a walnut, depending on how big you want your charm. -
Create the teardrop:
Gently roll one side of the ball between your palms to taper it slightly, creating a chubby teardrop shape. The wider end will be the head and the tapered end becomes the tail. -
Curving the tail:
Bend the tapered tail end upwards just a little bit to give the dino a playful, seated look. -
Adding legs:
Roll two very small, identical cylinders of the same green clay for the legs. They should be short and stubby. -
Attach the legs:
Press the legs onto the bottom front of the body. Use a tiny bit of water to blend the seams smooth so they look like part of the main shape, not just stuck on.
Cracked Clay Crisis?
If small cracks appear while drying, mix a tiny bit of fresh clay with water to make a paste (slip) and smooth it over the cracks with your finger.
Step 2: The Textured Finish
-
Wait for firmness:
Let the clay sit for about 10-15 minutes so the outer layer isn’t sticky but still pliable. This makes texturing much easier. -
Stipple technique:
Take an old toothbrush or a stiff brush and gently tap it all over the surface of the dinosaur. This stippling creates that stone-like, nugget texture seen in the photo. -
Refining the texture:
Be careful not to press too hard and flatten your shape. If you accidentally squash a leg, just reshape it and re-texture lightly.
Step 3: Details & Assembly
-
Insert hardware:
Dip the end of your eye pin or screw eye into a tiny bit of white glue or clay slip and push it centrally into the top of the dinosaur’s back. -
Create the spikes:
Using a slightly darker shade of green clay (or painting the base clay later), roll 4-5 tiny triangles or cones. -
Attach the spine:
Line the spikes up down the back of the dinosaur, starting behind the head and going down towards the tail. Press them firmly into place. -
Make the loop:
For the top loop where the hardware sits, you can fashion a tiny snake of clay into a ring around the eye pin base for a seamless look, blending it into the body.
Make it Sparkle
Mix a pinch of fine biodegradable glitter into your varnish or glaze before the final coat to give your dinosaur magical, shimmering skin.
Step 4: Bringing it to Life
-
Drying time:
Allow the figure to dry completely. For air-dry clay, this usually takes 24-48 hours depending on humidity. -
Painting the eyes:
Use a small dotting tool to paint two solid black circles for the eyes. Place them relatively low on the face for that ‘cute’ proportion. -
Adding the blush:
Dab a tiny amount of pink or peach paint just below the eyes to create sweet cheeks. I find a toothpick works great for this precision. -
Highlights and mouth:
Add a tiny white spec to each black eye for a sparkle. Use a very fine brush or pen to draw a small ‘u’ shape for the smile. -
Body spots:
Add three small white dots in a cluster on the side of the body for extra detail. -
Final assembly:
Once all paint is dry, open a jump ring with pliers, loop it through the eye pin, and attach your lobster clasp. -
Seal it up:
Apply a coat of matte or satin varnish to protect your paint job and give the charm a finished look.
Now you have a rugged little prehistoric pal ready to guard your keys


Smiling Strawberry and Peach Charms
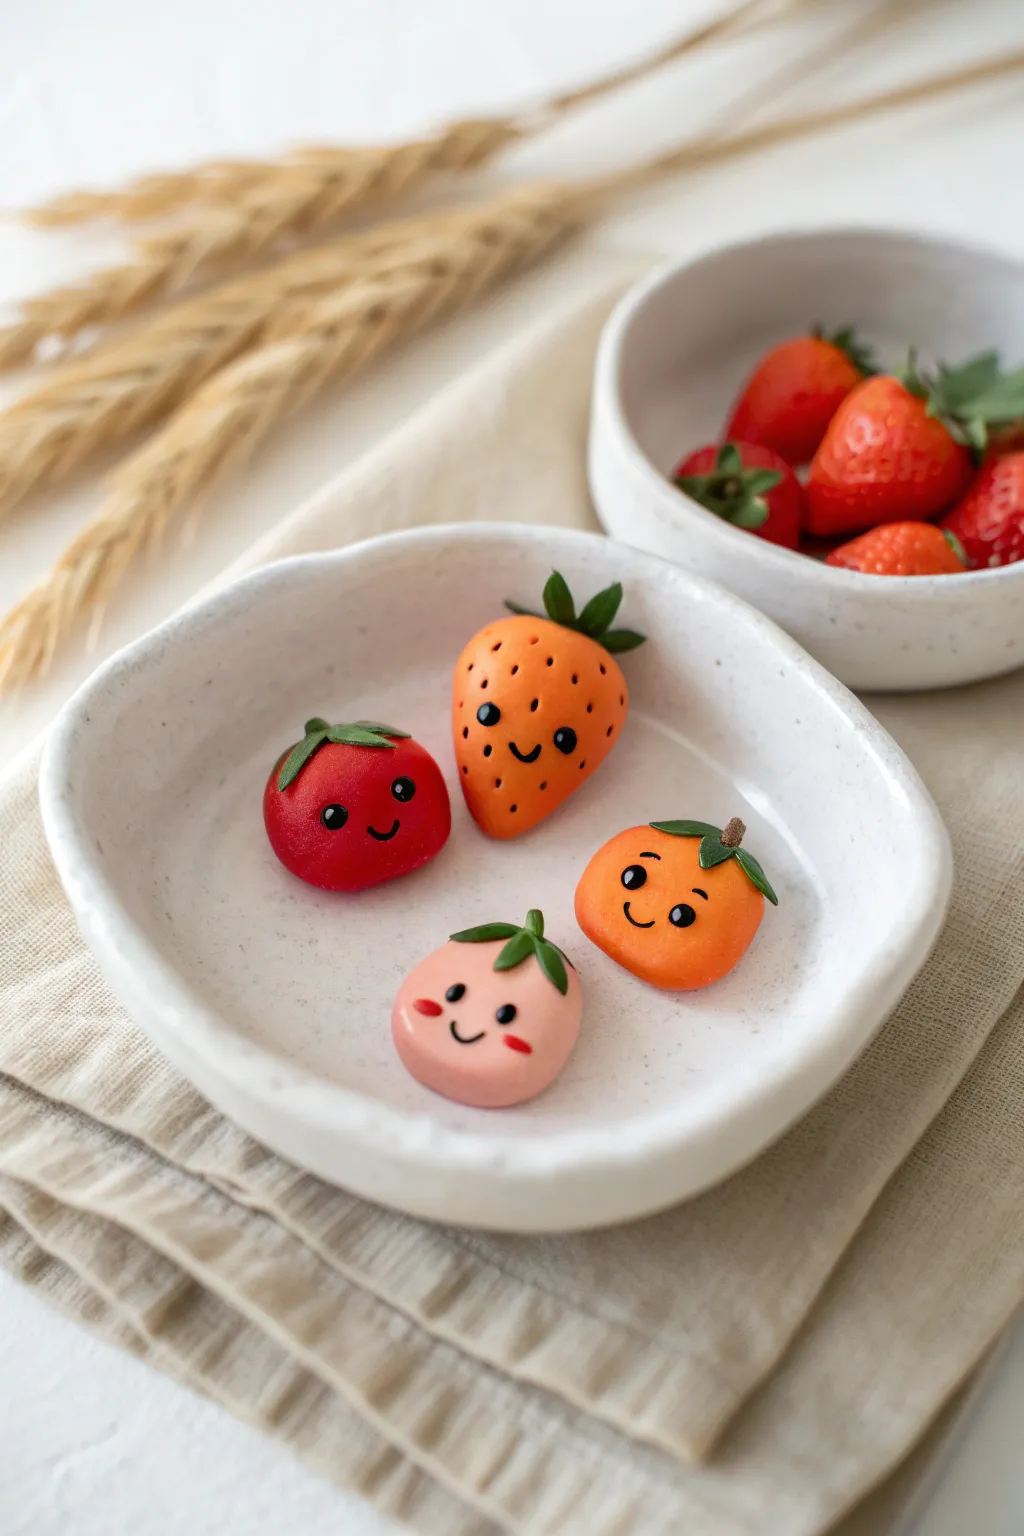
Brighten your desk or jewelry box with this adorable quartet of smiling fruit figurines. These Kawaii-inspired charms—featuring a strawberry, peach, orange, and apple—are surprisingly simple to sculpt with just a few basic shapes and expressions.
How-To Guide
Materials
- Air dry clay (white)
- Acrylic paints (bright red, fiery orange, soft peach, deep green, black)
- Fine detail paintbrush (0 or 00 size)
- Toothpick or needle tool
- Water in a small cup
- Sculpting tool with a small ball end
- Matte or glossy varnish (optional)
Step 1: Prepping the Base Shapes
-
Conditioning the Clay:
Begin by kneading a small amount of air dry clay until it is soft and pliable. If it feels too dry, dip your finger in water and work it into the clay to prevent cracking. -
Dividing the Portions:
Roll four balls of clay, each about the size of a large grape or small walnut. Size them slightly differently to give each fruit unique character. -
Shaping the Strawberry:
Take one ball and gently roll it into a tapered teardrop shape. Flatten the wider bottom slightly so it can sit upright without rolling away. -
Forming the Stone Fruits:
For the peach and orange, flatten the balls slightly into rounded discs, almost like tiny hamburger buns. Keep the peach slightly more oval and the orange rounder. -
Sculpting the Tomato/Apple:
For the red fruit (which looks like a happy tomato or apple), keep the shape spherical but press down gently on the top to create a small indentation for the stem. -
Smoothing the Edges:
Use a tiny drop of water on your fingertip to smooth out any fingerprints or cracks on the surface of your shapes. A smooth canvas makes painting much easier later.
Cracks Appearing?
If small cracks form while drying, mix a tiny bit of fresh clay with water to make a paste (slip) and fill the cracks. Smooth it over with a damp finger and let dry again.
Step 2: Adding Details & Texture
-
Creating the Strawberry Pits:
Take your needle tool or a toothpick and gently poke small indentations all over the surface of the teardrop shape to mimic strawberry seeds. -
Creating Leaves:
Roll tiny, rice-grain-sized bits of clay for the leaves. I find it easiest to press these flat on my work surface first, creating small stars or individual teardrops. -
Attaching the Greenery:
Dab a tiny amount of water on the top of each fruit. Place the leaf shapes on top—use a star shape for the tomato and individual leaves for the others. -
Adding Stems:
Roll a minuscule cylinder of clay for the stems. Attach these to the center of the leaves, pressing down gently with a tool to secure the bond.
Turn Them into Jewelry
Insert a metal eye pin into the top of the fruit while the clay is still wet. Once dry, you can attach jump rings to turn these into earrings, keychains, or phone charms.
Step 3: Painting & Personality
-
Base Coating:
Once the clay is fully dry (usually 24 hours), paint the base colors. Use bright orange for the strawberry, soft pinkish-peach for the peach, red for the tomato, and orange for the tangerine. -
Painting the Greens:
Carefully paint the leaves and stems with a deep forest green. A steady hand is key here, so anchor your pinky on the table for stability. -
Drafting the Faces:
Before painting the faces, use a pencil to very lightly mark where the eyes and mouths will go. This ensures your happy expressions are centered. -
Adding Eyes:
Dip the back end of your paintbrush or a ball tool into black acrylic paint. Dot the eyes onto the fruits for perfect, round circles. -
Drawing Mouths:
Switch to your finest detail brush. Paint small, U-shaped smiles between the eyes. Keep the lines thin and delicate. -
Adding Blush:
Mix a tiny bit of red with white paint (or use watered-down red) to create pink cheeks. Dab two small dots or dashes under the eyes for a rosy glow. -
The Final Sparkle:
Once the black eye paint is dry, use a toothpick to add a tiny white dot to the upper corner of each eye. This ‘catchlight’ brings them to life. -
Sealing the Work:
Protect your paint job with a coat of varnish. A matte finish looks natural, while a glossy coat makes them look like polished ceramic.
Now you have a refreshing little fruit bowl collection that will stay sweet forever

What Really Happens Inside the Kiln
Learn how time and temperature work together inside the kiln to transform clay into durable ceramic.
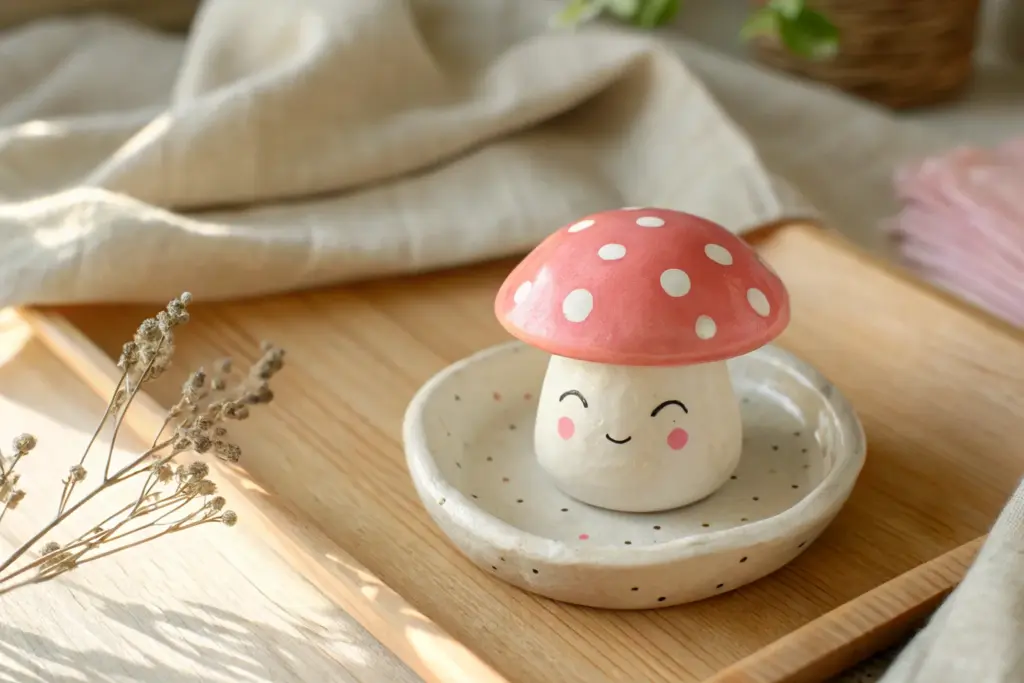
Mushroom Pond Trinket Dish
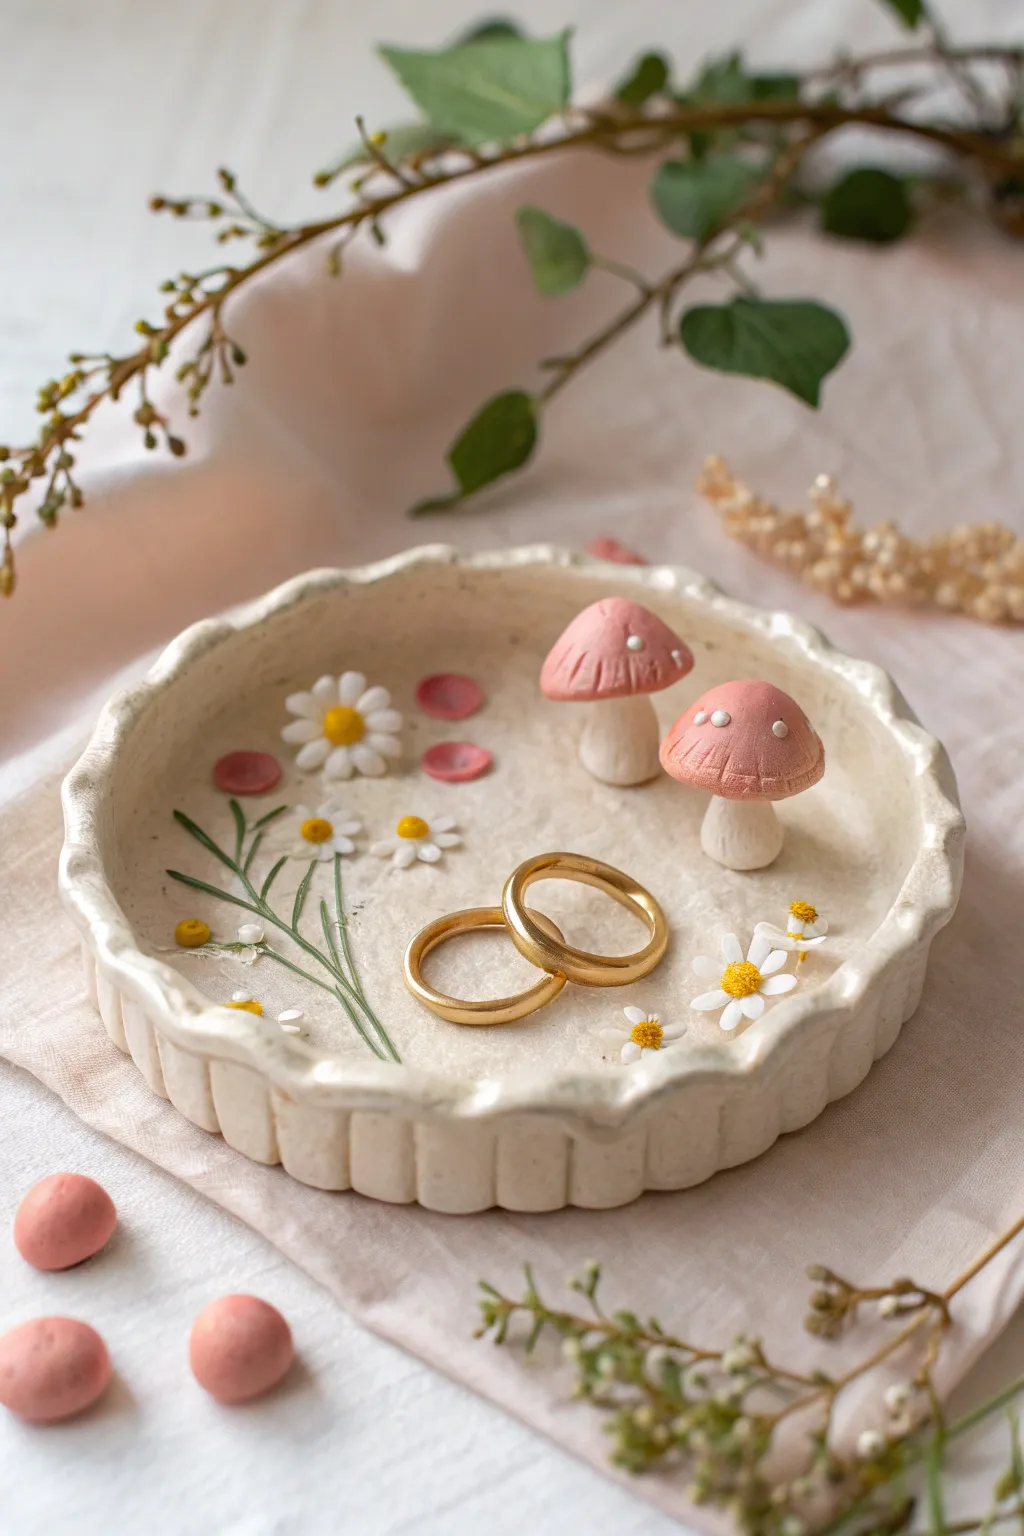
Create a fairytale resting spot for your jewelry with this enchanting air-dry clay dish. Featuring delicate mushrooms, sculpted daisies, and a glossy finish, it brings a touch of woodland magic to any dresser.
Step-by-Step Guide
Materials
- White air-dry clay
- Rolling pin
- Small round bowl (for mold/shape guide)
- Clay tools (needle tool, small ball stylus)
- Acrylic paints (pastel pink, yellow, white, sage green)
- Fine detail paintbrushes
- Gloss varnish or clear resin
- Water and sponge for smoothing
- Sandpaper (fine grit)
Step 1: Shaping the Base
-
Roll the Slab:
Begin by conditioning your clay until it’s pliable. Roll it out into a smooth, even slab about 1/4 inch thick. Aim for a consistent thickness to prevent cracking as it dries. -
Cut the Circle:
Place your bowl upside down on the clay as a template and cut out a circle. Gently lift the circle and place it inside your bowl (which should be lined with cling wrap for easy release) to create a curved dish shape. -
Sculpt the Fluted Rim:
To create the scalloped ‘pie crust’ edge, use your thumb and forefinger to gently pinch the rim at regular intervals. Push the clay inward slightly between pinches to emphasize the textured, wavy effect. -
Smooth the Surface:
Dip a small sponge or your finger in a little water and smooth out any fingerprints or cracks on the surface of the dish. A smooth base is crucial for the delicate details to adhere properly.
Cracked Clay?
If small cracks appear as the clay dries, mix a tiny bit of fresh clay with water to make a paste (slip) and fill them in before painting.
Step 2: Creating the Woodland Details
-
Form Mushroom Stems:
Roll two small, thick cylinders of clay for the mushroom stalks. Make the bases slightly wider for stability. Score the bottom of the stems and the spot on the dish where they will sit, add a dab of water (slip), and press them firmly into place. -
Shape Mushroom Caps:
Roll two balls of clay and flatten them into domes. Use a needle tool to gently etch texture lines underneath the caps if you like extra detail. Attach these caps to the stems using the score-and-slip method. -
Sculpt Tiny Daisies:
Roll tiny balls of clay and flatten them into petals. Arrange five or six petals in a circle directly onto the dish floor. add a tiny yellow ball in the center and press lightly with a tool to texture the center. -
Add Greenery:
Roll very thin snakes of clay to create grassy stems. Press them gently onto the dish surface near the daisies. You can use a needle tool to create leaf impressions alongside these stems. -
Dry Completely:
Allow the entire piece to dry fully. This usually takes 24-48 hours depending on humidity. Resist the urge to touch it while it’s cool to the touch, which means moisture is still evaporating.
Make it Sparkle
Mix a tiny pinch of fine iridescent glitter into your final varnish coat to give the ‘pond water’ surface a magical, shimmering quality.
Step 3: Painting and Finishing
-
Base Coat:
Once dry, lightly sand any rough edges. Paint the main dish (surface and rim) with a creamy white or light beige acrylic paint to unify the clay color. -
Paint the Mushrooms:
Paint the mushroom caps a soft pastel pink. Once the pink is dry, use a very fine brush or a toothpick to add tiny white highlight dots. -
Detail the Flowers:
Carefully paint the daisy centers yellow and the stems a muted sage green. Keep the petals white, perhaps adding a tiny touch of white paint if the clay looks dull. -
Add Pink Accents:
Paint a few small, flat circles of clay pink to look like fallen petals or stones scattered on the dish floor, as seen in the image. -
Seal for Gloss:
Finish by applying a generous coat of high-gloss varnish or a thin layer of UV resin over the entire inside of the dish. This gives it the ‘wet’ pond look and protects your paint work.
Now you have a charming little landscape to keep your rings safe and sound
Pastel Rainbow Arch Ring Dish
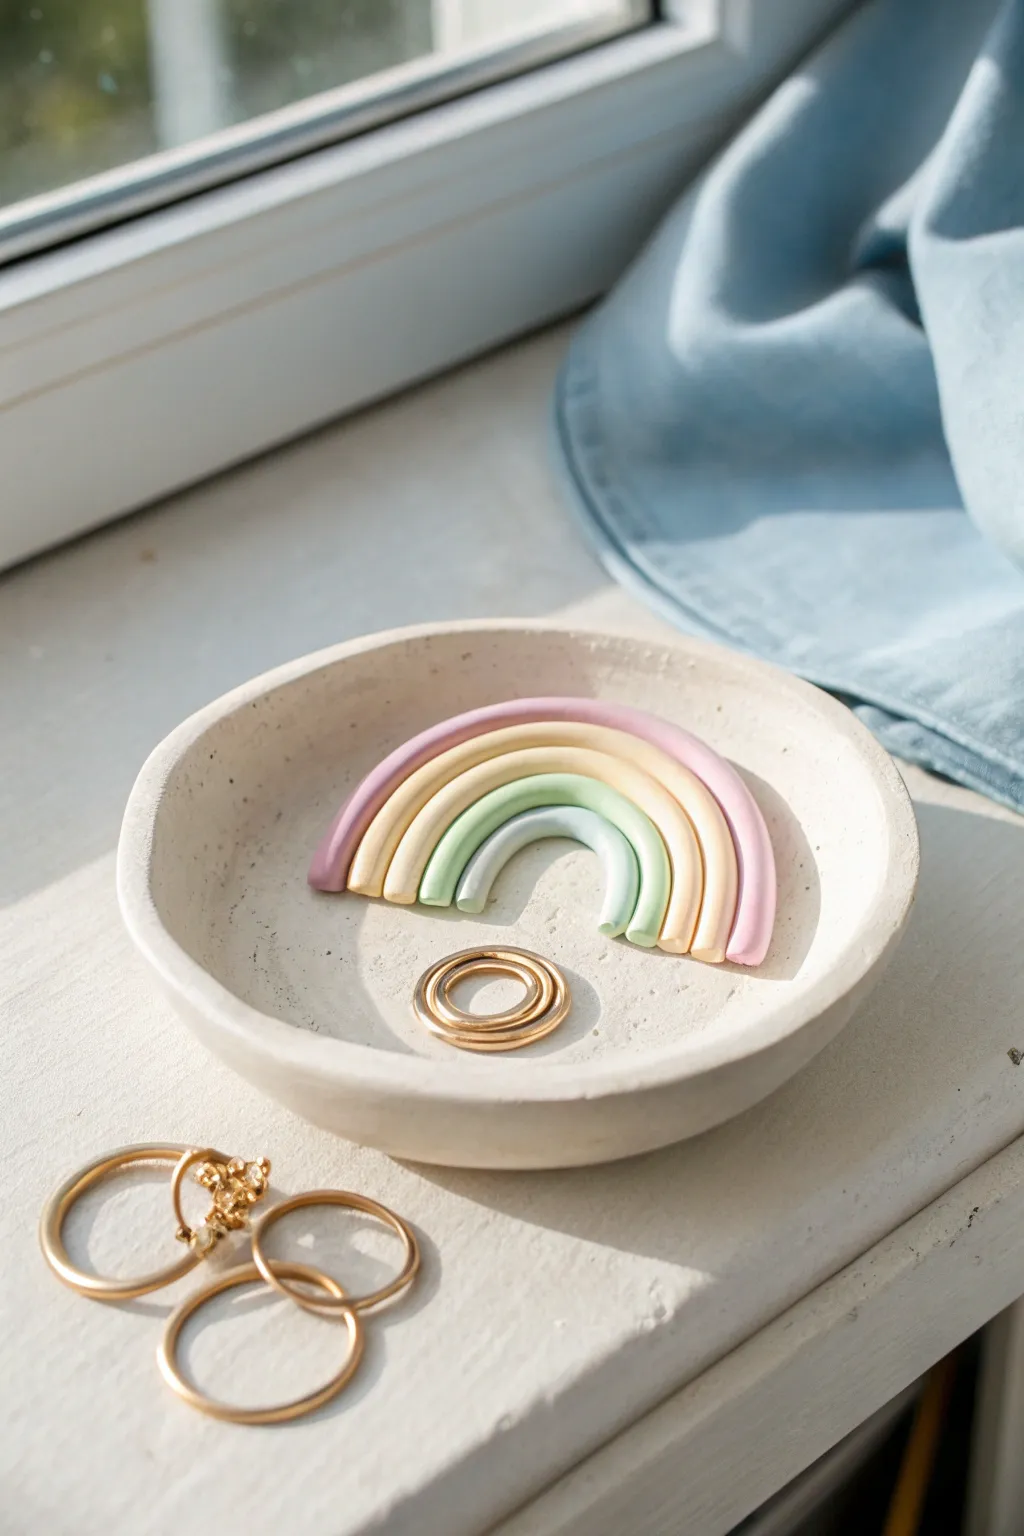
This charming trinket dish combines a minimalist stone-textured base with a soft pop of pastel color. It’s the perfect size for holding your favorite rings and adds a touch of whimsical sweetness to any dresser or windowsill.
Step-by-Step Tutorial
Materials
- White air dry clay
- Pastel acrylic paints (light pink, buttery yellow, mint green, baby blue)
- Small rolling pin
- Parchment paper or craft mat
- X-acto knife or craft knife
- Small bowl (approx. 4-5 inches diameter) to use as a template and mold
- Sandpaper (fine grit)
- Water in a small cup
- Sponge or textured foam
- Matte varnish or sealant
Step 1: Creating the Dish Base
-
Condition the Clay:
Begin by taking a large handful of air dry clay and kneading it in your hands until it becomes soft, pliable, and free of cracks. -
Roll out a Slab:
Place the clay on parchment paper and use your rolling pin to roll it into a flat, even slab about 1/4 inch thick. Try to keep the thickness consistent for even drying. -
Cut the Circle:
Invert your small bowl onto the clay slab and use your craft knife to trace around the rim, cutting out a perfect circle. -
Form the Dish Shape:
Gently lift the clay circle and place it inside the same bowl to give it a curved shape. Ensure the clay is smoothed against the bowl’s curve without pressing too hard. -
Add Texture:
To mimic the stone-like finish seen in the photo, take a slightly damp sponge or piece of textured foam and dab it all over the surface of the clay sitting in the bowl. This creates a natural, matte texture. -
Smooth the Rim:
Dip your finger in a little water and run it along the cut edge of the rim to soften any sharp angles or rough bits from cutting.
Cracks Appearing?
If small cracks form while drying, mix a tiny amount of clay with water to make a paste and fill them in, then smooth with a damp finger.
Step 2: Sculpting the Rainbow Arch
-
Mix Pastel Colors:
Separate four small balls of clay. Knead a drop of acrylic paint into each ball—pink, yellow, green, and blue—until the color is fully incorporated and uniform. Alternatively, you can sculpt with white clay and paint later, but mixing color into the clay gives a smoother finish. -
Roll the Coils:
Roll each colored ball into a long, thin snake or ‘worm’ shape. Aim for them to be roughly the same thickness, about 1/8 to 1/4 inch. -
Form the Arches:
Take the blue coil and form a small U-shape in the center of your dish. Cut the excess ends with your knife so they sit flush with the dish surface. -
Layer the Colors:
Repeat this process with the green, yellow, and pink coils, arching each one tightly over the previous color. I prefer to add a tiny dab of water between the coils to help them stick together securely. -
Trim the Bottoms:
Use your craft knife to make a straight, clean cut across the bottom of all four rainbow legs so they sit perfectly flat and even on the dish surface. -
Attach to Dish:
Score the surface of the dish where the rainbow will sit and add a little water or slip (clay and water paste). Press the rainbow firmly into place in the center of the dish.
Step 3: Finishing Touches
-
Initial Drying:
Let the dish dry inside the bowl mold for at least 24 hours. This prevents the edges from curling up as it shrinks. -
Remove and Cure:
Once the top feels dry, gently pop the clay out of the bowl and let it air dry completely on a wire rack for another day or two. The bottom needs air circulation to harden fully. -
Sand Imperfections:
If there are any rough spots on the rim or the back of the dish, gently buff them away with fine-grit sandpaper. -
Enhance Texture (Optional):
If you want more of that concrete look, mix a tiny bit of grey or beige paint with water and lightly mist or flick it onto the white parts of the dish. -
Seal the piece:
Apply a coat of matte varnish over the entire piece to protect the clay from moisture and stains, ensuring your jewelry holder lasts a long time.
Make it Sparkle
Paint the bottom edge of the rainbow arches with liquid gold leaf or metallic paint for a luxe, dipped-gold effect.
Let your new jewelry dish brighten up your space with its sunny vibes and practical charm


The Complete Guide to Pottery Troubleshooting
Uncover the most common ceramic mistakes—from cracking clay to failed glazes—and learn how to fix them fast.
Bear Paw Ring Holder

This adorable bear paw trinket dish brings a touch of woodland charm to your vanity while keeping your favorite rings safe. With its natural, stone-like texture and minimalist design, it’s a functional piece of art that looks surprisingly high-end.
Step-by-Step
Materials
- Stone-effect or white air dry clay
- Rolling pin
- Parchment paper or silicone mat
- Paw print template (printed or sketch)
- Craft knife or clay needle tool
- Ball tool (large size) or a rounded teaspoon
- Small bowl of water
- Fine grit sandpaper (220 or higher)
- Clear matte varnish (optional)
Step 1: Shaping the Base
-
Prepare the Clay:
Begin by grabbing a handful of air dry clay, roughly the size of a tangerine. Knead it in your hands for a minute or two to warm it up; this makes it pliable and prevents cracks from forming later on. -
Roll it Out:
Place the clay onto your parchment paper or mat. Using a rolling pin, flatten the ball into an even slab that is about 1/4 to 1/2 inch thick. You want it substantial enough to hold the indentations without becoming too thin. -
Trace the Shape:
Lightly place your paw print template on top of the clay. If you don’t have a template, you can sketch the outline of a main pad and four toe beans lightly directly onto the clay using a needle tool. -
Cut the Outline:
Take your craft knife or needle tool and carefully cut around the perimeter of the paw shape. Slice straight down rather than dragging the blade to keep the edges clean. -
Smooth the Edges:
Dip your finger into a small bowl of water and gently run it along the cut edges of the clay. This softens the sharp cuts and gives the piece that polished, professional look seen in the photo.
Stone Texture Trick
To get a speckled look like the photo, mix a tiny pinch of used coffee grounds or black pepper into white clay before rolling it out.
Step 2: Creating the Details
-
Mark the Pads:
Before pressing down, lightly score where the main pad and the four toe pads will go. This ensures your spacing is symmetrical before you commit to the deep indentations. -
Indent the Main Pad:
Use your thumb or the back of a large spoon to press gently but firmly into the center area for the main pad. Create a smooth, shallow depression that is slightly deeper in the center. -
Form the Toes:
For the four toe beans, I find using a large ball tool works best, but a rounded measuring spoon works too. Press into each toe area to create clean, oval-shaped divots. -
Refine the Depressions:
Go back over your indentations with a wet finger. You want to smooth out any fingerprints or tool marks inside the heavy depressions to ensure they are perfectly sleek. -
Final Shaping:
Check the overall silhouette. If the pressing caused the paw shape to distort slightly, gently nudge the edges back into a nice, rounded curve with your palms.
Step 3: Finishing Touches
-
Allow to Dry:
Move the parchment paper with the clay on it to a safe, flat spot. Let it air dry for at least 24 to 48 hours. Flip it over gently halfway through the drying process to ensure the bottom dries evenly. -
Sanding:
Once completely bone dry, the clay will turn a lighter shade. Take your fine-grit sandpaper and lightly buff the edges and surface to remove any remaining jagged bits or imperfections. -
Dusting Off:
Wipe the piece down with a dry cloth or a soft brush to remove all the sanding dust. -
Sealing (Optional):
To protect your ring dish from moisture or oils, apply a thin coat of clear matte varnish. This preserves the natural, stone-like aesthetic while adding durability.
Prevent Curling
If the edges start to curl upward while drying, place a light book on top of the drying clay (with parchment in between) to keep it perfectly flat.
Place this little paw on your nightstand and enjoy a safe spot for your treasures
Cloud-Shaped Jewelry Tray with Blush Cheeks
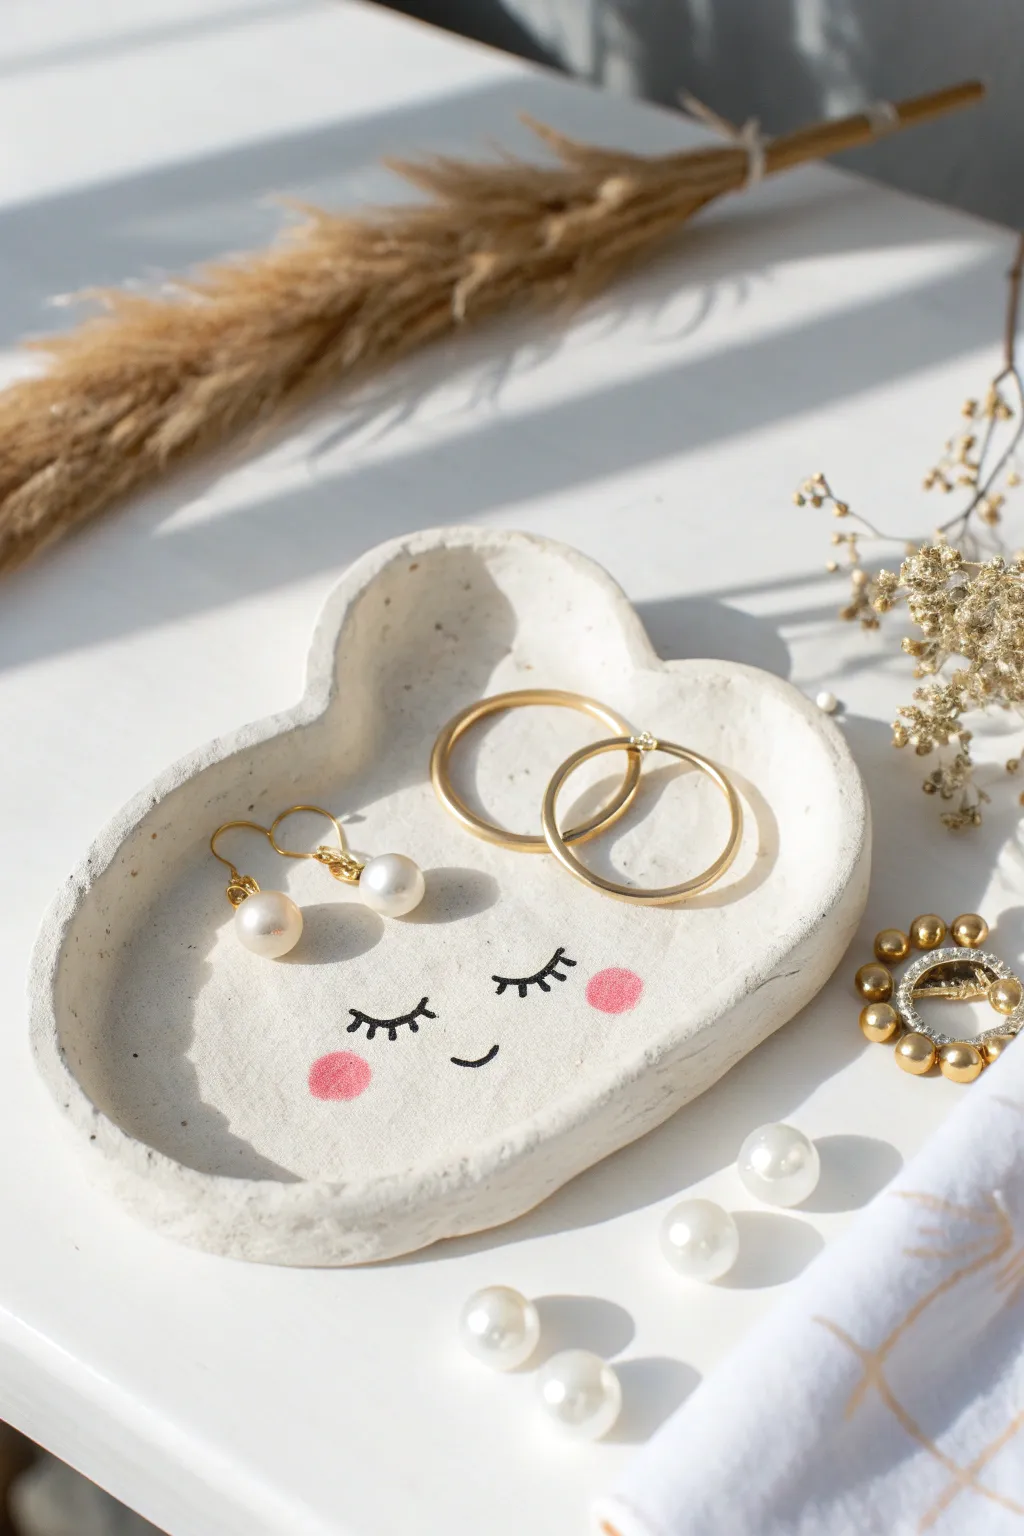
Keep your favorite rings and earrings safe in this adorable cloud-shaped trinket dish made from air-dry clay. Its gentle curves, sleepy face, and rosy cheeks add a touch of whimsy to any dresser or vanity setup.
Detailed Instructions
Materials
- White air-dry clay
- Rolling pin
- Parchment paper or craft mat
- Cloud template (printed or hand-drawn on paper)
- Craft knife or clay tool
- Small bowl with water
- Fine grit sandpaper (220-400 grit)
- Black fine-tip acrylic paint marker or permanent marker
- Pink acrylic paint
- Small round paintbrush or sponge doubber
- Matte or glossy varnish (optional)
Step 1: Shaping the Cloud Base
-
Prepare your clay:
Take a generous handful of white air-dry clay and knead it in your hands until it becomes soft, pliable, and free of cracks. -
Roll it out:
Place the clay on parchment paper or a craft mat. Use a rolling pin to flatten it to an even thickness of about 1/4 inch (6mm). If you want a smoother surface, I like to place a second sheet of parchment paper on top before rolling. -
Cut the shape:
Lay your cloud template lightly on top of the rolled clay. Using a craft knife or a needle tool, carefully trace around the edge of the template to cut out your cloud shape. -
Remove excess:
Peel away the excess clay from the outside edges of your cut shape, saving it for future projects. Lift the template off the clay. -
Smooth the edges:
Dip your finger into a small bowl of water and gently run it along the cut edges of the clay to smooth out any roughness or sharp corners.
Step 2: Forming the Rim
-
Lift the edges:
Gently pinch and lift the outer perimeter of the cloud upwards to create a raised rim. You want the edges to stand about 1/2 inch high to hold jewelry securely. -
Blend the rim:
Use your thumb to smooth the inside curve where the floor of the tray meets the raised wall. This transition should be seamless and rounded, not a sharp angle. -
Establish the curves:
Go around the rim and emphasize the ‘fluffy’ bumps of the cloud shape. Push in slightly between the curves to define the indentations. -
Final smooth:
Do one last pass with a wet finger over the entire surface—rims, floor, and outside edges—to ensure everything feels polished and uniform before drying. -
Dry completely:
Set the tray aside in a dry, safe place. Let it cure for 24-48 hours. Turn it over halfway through the drying process to ensure the bottom dries evenly.
Smooth Surface Secret
Use a tiny amount of water on your finger to ‘polish’ the clay before it dries. It works like wet-sanding but happens while the clay is still workable.
Step 3: Finishing Touches
-
Sand for perfection:
Once fully hard, inspect the tray for any imperfections. Use fine-grit sandpaper to gently buff away rough spots on the rim or surface until it feels smooth to the touch. -
Dust off:
Wipe the tray with a slightly damp cloth or a dry soft brush to remove all sanding dust. The surface needs to be clean for the paint to adhere properly. -
Draw the lashes:
Using a fine-tip black paint marker, draw two downward-curving arcs for closed eyes near the center. Add three small, delicate lashes to the outer corner of each arc. -
Add the smile:
Positioned just below and between the eyes, draw a tiny, simple ‘u’ shape for a sweet, contented smile. -
Paint blush cheeks:
Dip a small round brush or a sponge dauber into pink acrylic paint. Dab off most of the paint on paper first, then gentle press two round pink circles onto the clay cheeks, just outside the smile. -
Seal it:
Allow the paint to dry completely, then apply a coat of matte or glossy varnish to protect the clay from moisture and give it a professional finish.
Curling Edges?
If the edges curl up while drying, place a light book on top of the tray once it’s semi-dry (leather hard) to gently force it back to flat.
Now you have a charming spot to rest your trinkets at the end of the day

TRACK YOUR CERAMIC JOURNEY
Capture glaze tests, firing details, and creative progress—all in one simple printable. Make your projects easier to repeat and improve.
Happy Face Mini Magnets
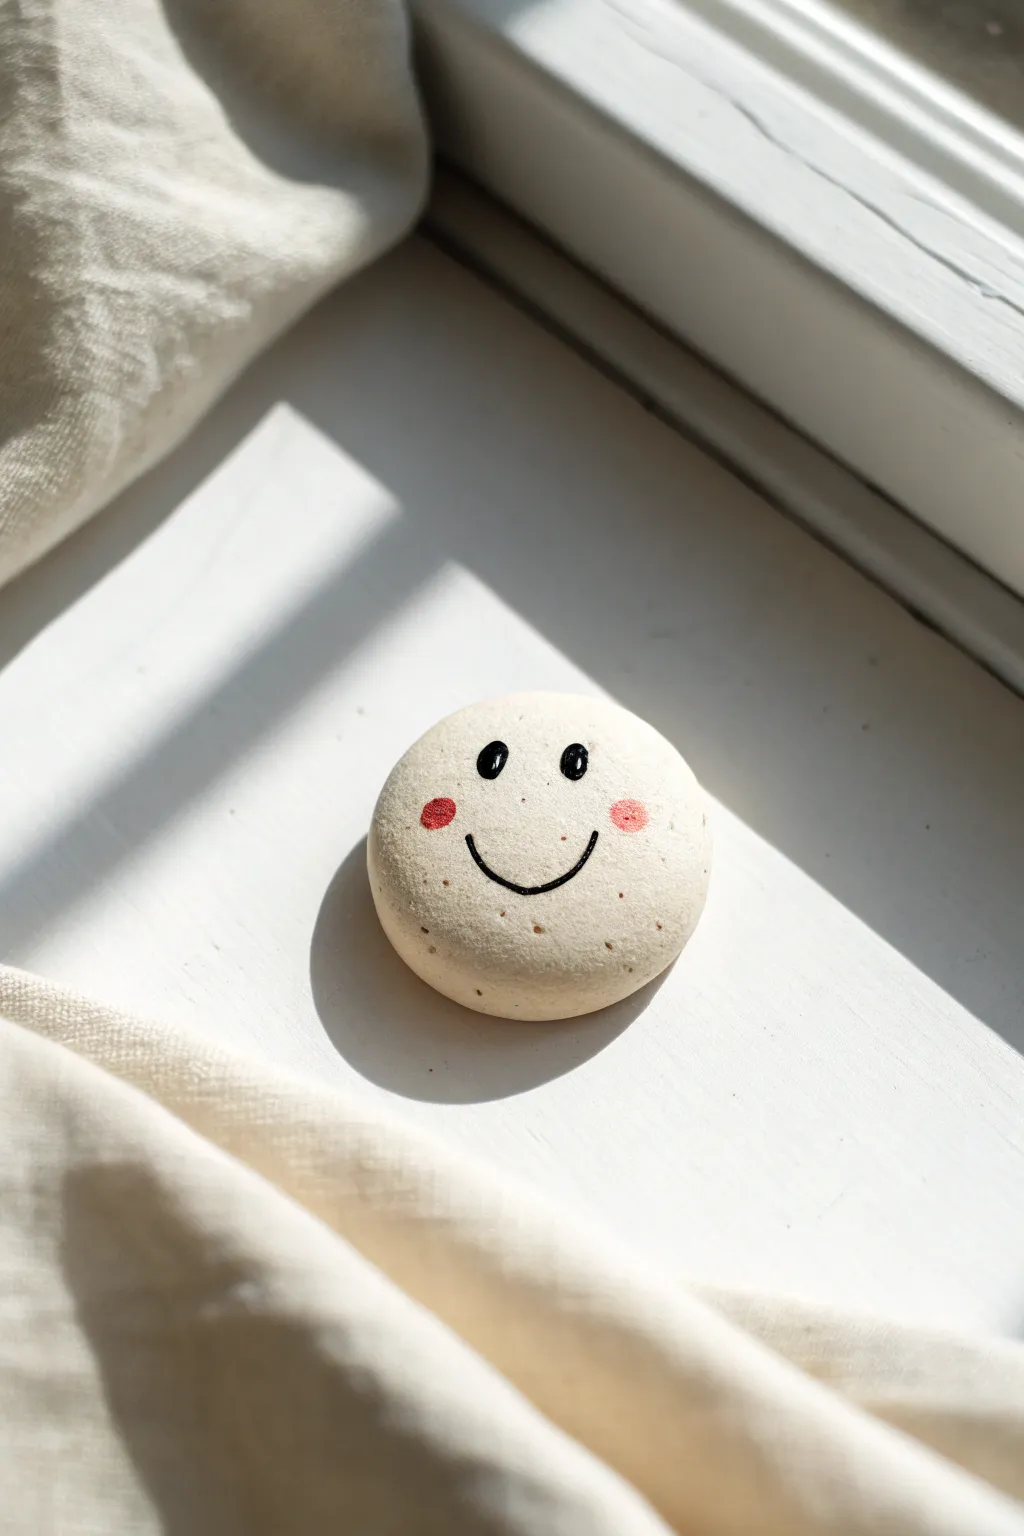
Brighten up your fridge or magnetic board with these irresistibly cheerful mini magnets. This project combines the smooth, organic look of air-dry clay with a minimalist painted expression that’s sure to bring a smile to your face.
Step-by-Step
Materials
- White polymer or air-dry clay
- Rolling pin or smooth glass jar
- Small circle cutter (approx. 1.5 inches) or bottle cap
- Fine-grit sandpaper (optional)
- Black acrylic paint or fine-tip permanent marker
- Soft pink or red acrylic paint
- Small round paintbrush
- Dotting tool or toothpick
- Strong craft glue (E6000 or similar)
- Small round magnets
- Matte varnish or sealant (optional)
Step 1: Shaping the Clay Base
-
Condition the cay:
Begin by taking a small amount of white air-dry clay and kneading it in your hands until it becomes soft, pliable, and free of cracks. -
Roll it out:
Place the clay on a clean, smooth surface and use a rolling pin to flatten it. Aim for a thickness of about 1/4 inch so the magnet will be sturdy but not too heavy. -
Cut the shape:
Press your small circle cutter or a clean bottle cap firmly into the clay to create a perfect disc. Lift the cutter and gently pop the clay circle out. -
Soften the edges:
Dip your finger in a tiny bit of water and run it gently around the perimeter of the circle to smooth down any sharp ridges left by the cutter. You want a soft, pebble-like edge. -
Allow to dry:
Place your clay circle on a piece of parchment paper or a drying rack. Let it dry completely according to the package instructions, usually 24 to 48 hours. Turn it over halfway through to ensure even drying. -
Sand imperfections:
Once fully cured and hard, check the surface. If there are rough spots, lightly buff them away with fine-grit sandpaper for a pristine canvas.
Step 2: Painting the Expression
-
Plan the face:
Before committing with paint, you can very lightly sketch the placement of the eyes and mouth with a pencil to ensure the face looks balanced. -
Paint the eyes:
Using a small detail brush dipped in black acrylic paint, create two small, vertical ovals for the eyes. I find that making them slightly taller than they are wide gives that cute, cartoonish look. -
Add the smile:
With a very steady hand and a liner brush (or a fine-tip permanent marker), draw a simple ‘U’ shape for the smile. Keep the line thin and crisp. -
Add rosy cheeks:
Dip a dotting tool, the handle end of a paintbrush, or even a Q-tip into your pink or red paint. Dab off the excess on a paper towel, then gently stamp a circle on either side of the smile. -
Add texture details:
To mimic the speckled look in the photo, you can dilute a tiny bit of brown paint and flick a stiff toothbrush over the piece, or use a toothpick to add minuscule freckles. This step is subtle but adds organic character. -
Let paint dry:
Allow the painted face to dry completely. Acrylic paint usually dries to the touch within 15-20 minutes.
Cracked Clay?
If small cracks appear while drying, don’t panic. Mix a tiny bit of fresh clay with water to make a paste (slip) and fill in the cracks. Smooth it over with your finger and let it dry again.
Step 3: Finishing Up
-
Seal the surface:
Apply a thin layer of matte varnish or sealant over the front of the clay. This protects the paint from scratching and gives the piece a professional finish without making it too glossy. -
Attach the magnet:
Flip the dry clay piece over. Place a pea-sized drop of strong craft glue in the center of the back. -
Press and hold:
Press your round magnet into the glue. Hold it in place for a few seconds to ensure a good bond, then let the glue cure fully before sticking it to your fridge.
Pro Tip: Eye Highlights
Add a tiny speck of white paint to the top right corner of each black eye. This ‘catchlight’ instantly brings the character to life and adds extra cuteness.
Now you have a cheerful little companion to hold up your grocery lists and photos
Mini Animal Pencil Toppers
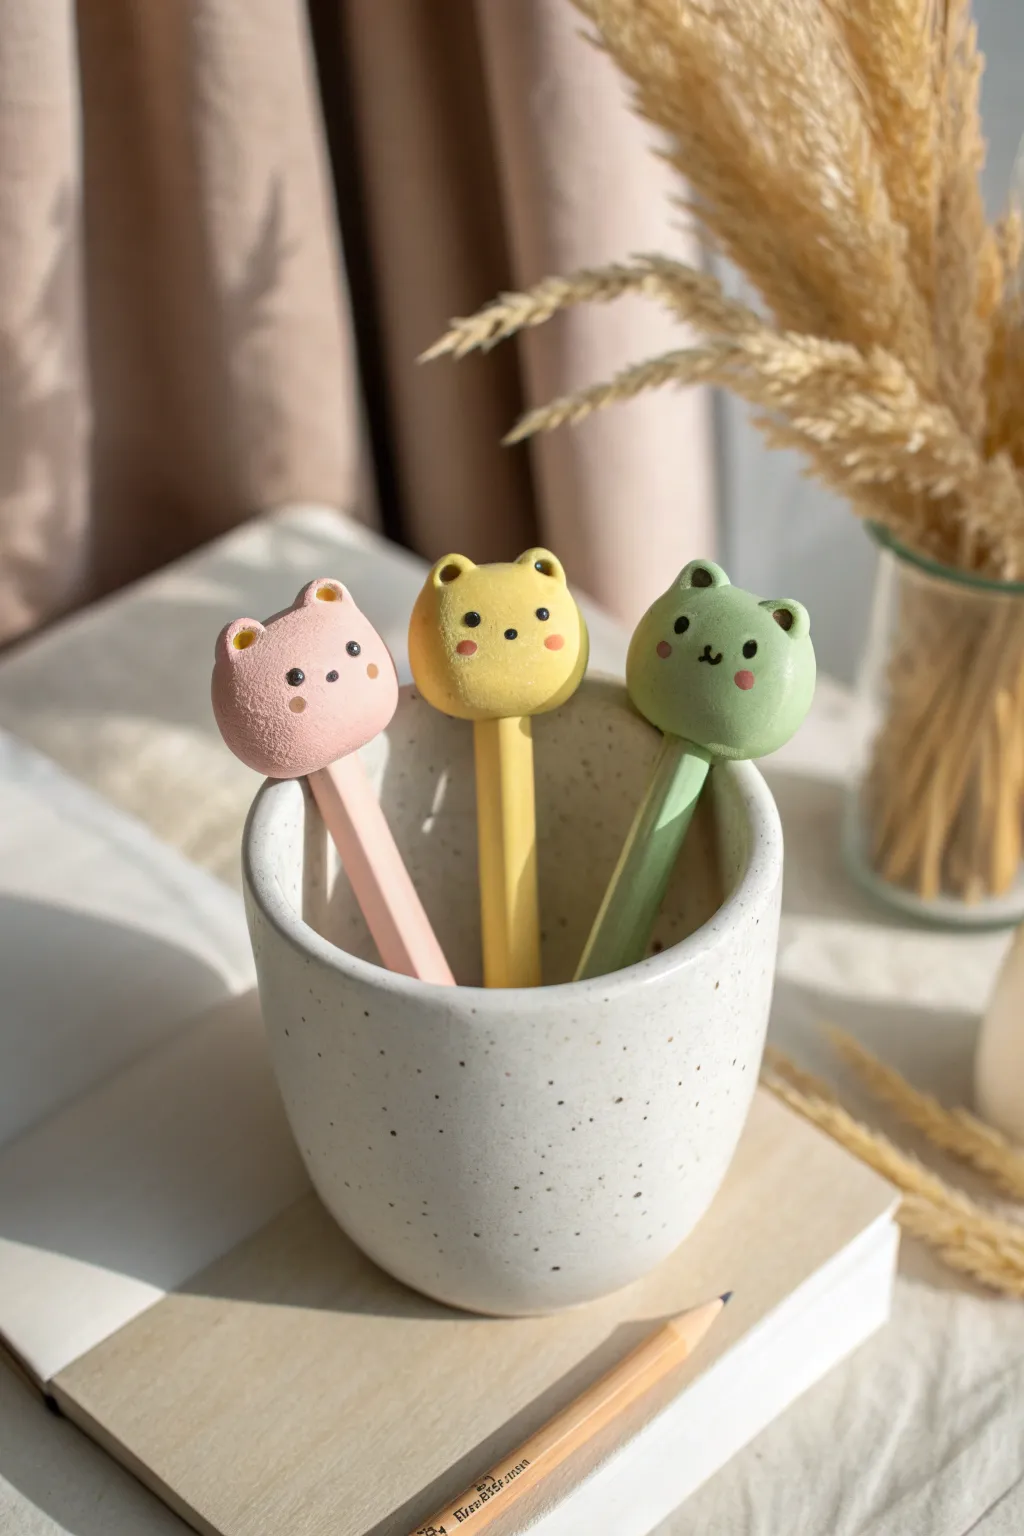
Brighten up your writing routine with these adorable pastel bear, cat, and frog pencil toppers. Their minimalist faces and soft matte finish make them a charming addition to any desk setup.
Step-by-Step Tutorial
Materials
- Air dry clay (white)
- Acrylic paints (pastel pink, pastel yellow, pastel green, black, white)
- Pencils (standard hexagonal or round)
- Sculpting tools (ball tool or toothpick)
- Fine detail paintbrush or dotting tool
- Water for smoothing
- Matte varnish or sealant (optional)
Step 1: Prepping the Base
-
Mixing Colors:
Start by tinting your white air dry clay. Take three ping-pong ball sized lumps of clay. Mix a tiny drop of pastel pink paint into one, yellow into the second, and green into the third. If your clay is already colored, skip this step. -
Kneading:
Knead the color thoroughly into each clay ball until the shade is uniform and streak-free. Add a drop of water if the clay feels too dry or crumbly. -
Sizing:
Pinch off a piece of colored clay roughly the size of a large grape or small walnut. This will form the main head of the topper. -
Rolling:
Roll the clay between your palms to create a perfectly smooth sphere. Inspect it for cracks and smooth them out with a slightly damp finger. -
Mounting:
Take your pencil and gently push the eraser end into the bottom of the clay sphere. Push it in about halfway to ensure it stays secure. -
Securing:
Mold the clay around the pencil shaft slightly to create a tight seal. I like to roll the pencil between my hands upside down to smooth the connection point. -
Shaping the Head:
Once mounted, gently pat the sphere to flatten it slightly into a more bun-like shape, rather than a perfect circle.
Keep it Clean
Use a baby wipe to clean your hands thoroughly between colors. Pastel clay shows dust and dirt easily, so work on a pristine surface.
Step 2: Sculpting the Features
-
Making Ears:
For the bear (pink) and frog (green), roll two tiny pea-sized balls of matching clay. For the cat (yellow), shape tiny triangles instead. -
Attaching Ears:
Score the top of the head slightly with a tool where the ears will go. Press the ears firmly onto the head. -
Blending Seams:
Use a sculpting tool or your finger to blend the clay from the back of the ears down into the head so they don’t fall off later. -
Ear Details:
For the bear, use a small ball tool to gently indent the center of each round ear. Leave the frog and cat ears flat. -
Drying:
Stand the pencils upright in a jar or cup. Let the clay dry completely for 24-48 hours. Rotate them occasionally so they dry evenly.
Loose Toppers?
If the clay shrinks while drying and the topper becomes loose on the pencil, simply remove it, add a drop of superglue, and slide it back on.
Step 3: Painting the Faces
-
Dotting Eyes:
Dip a dotting tool or the back of a paintbrush into black acrylic paint. Stamp two wide-set eyes onto the face. -
Adding Noses:
Using a very fine brush, paint a tiny oval nose between the eyes in black. -
Drawing Mouths:
Paint a small vertical line down from the nose for the bear. For the cat or frog, paint a tiny ‘w’ shape for the mouth. -
Rosy Cheeks:
Mix a slightly darker shade of the body color (or use soft pink for all). Dip a Q-tip or small brush into the paint, dab off the excess, and stamp rosy cheeks outside the eyes. -
Finishing Touches:
Add tiny white highlights to the black eyes for extra cuteness if desired. Seal with a matte varnish once the paint is fully dry.
Now you have a set of friendly desk companions ready to help with your next creative project
Flower Coasters with Tiny Faces
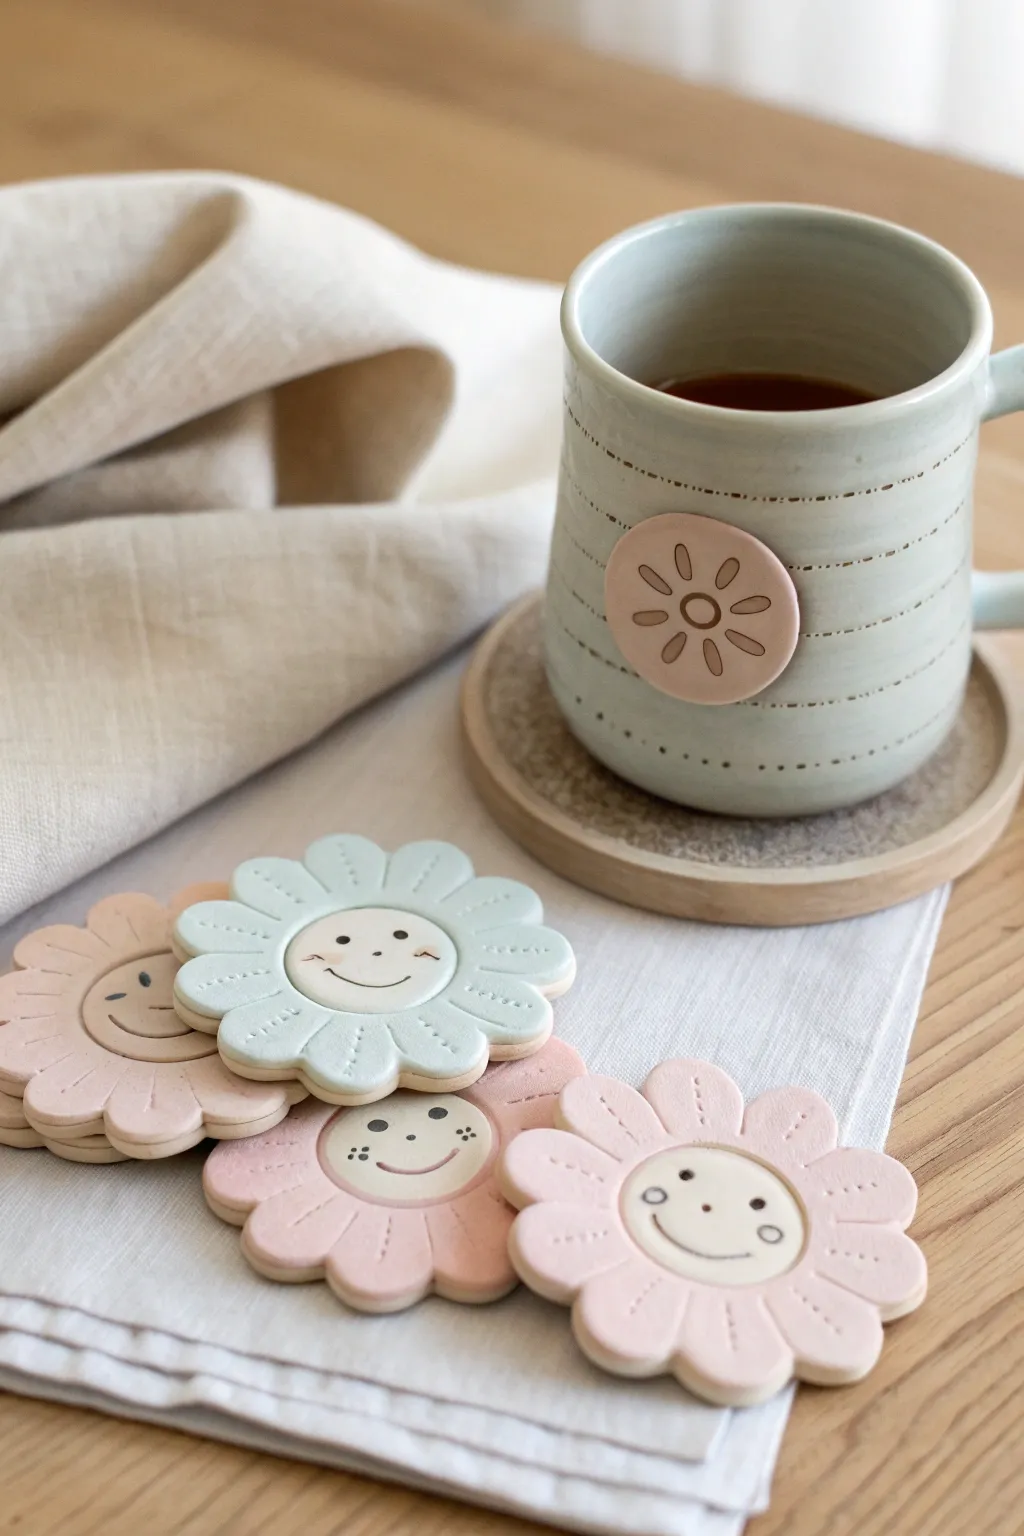
Add a sprinkle of joy to your coffee table with these charming pastel flower coasters. Featuring hand-sculpted petals and impossibly cute painted expressions, they are almost too sweet to cover with a mug.
How-To Guide
Materials
- White air dry clay
- Rolling pin
- Flower cookie cutter (approx. 3.5-4 inches)
- Small circle cutter (approx. 1.5 inches)
- Modelling tool or dull knife
- Fine sandpaper (320 grit)
- Acrylic paints: pastel pink, pastel blue, cream/off-white, black
- Very fine detail paintbrush
- Small flat paintbrush
- Matte varnish or sealant
- Water and sponge for smoothing
Step 1: Shaping the Blooms
-
Condition the Clay:
Begin by kneading a good handful of white air dry clay until it feels warm, pliable, and free of cracks. -
Roll it Out:
Use your rolling pin to flatten the clay into an even slab. Aim for a thickness of about 1/4 inch (6mm)—thick enough to be sturdy but not chunky. -
Cut the Shape:
Press your large flower-shaped cookie cutter firmly into the clay. If you don’t have a cutter, you can print a simple daisy template and cut around it with a craft knife. -
Refine the Edges:
Dip your finger in a little water and gently smooth around every petal edge to remove any ragged bits left by the cutter. -
Create the Center:
Take your smaller circle cutter and gently press it into the center of the flower. Don’t cut all the way through; just create a clear indented ring to define the face area. -
Add Stitch Details:
Using a needle tool or a toothpick, press tiny dashed lines into the petals, radiating outward from the center circle. This mimics a hand-stitched fabric look.
Smooth Operator
Use a slightly damp synthetic sponge to wipe the raw clay before drying. This removes fingerprints better than just water.
Step 2: Painting and Personality
-
Let it Dry:
Allow your coasters to dry completely on a flat surface for 24-48 hours. Flip them halfway through to ensure the bottom dries evenly. -
Sand Smooth:
Once fully dry and hard, take your fine-grit sandpaper and gently buff the surface and edges to make them buttery smooth. -
Base Coat:
Paint the petals in your chosen pastel shades—soft pink or baby blue—using a small flat brush. Leave the center circle unpainted (white) for now. -
Second Coat:
Apply a second coat of pastel paint to the petals for solid, opaque coverage. -
Paint the Center:
Fill in the center circle with a cream or off-white acrylic paint. This creates a warm background for the face. -
Wait for Drying:
Ensure all base layers are completely bone dry before attempting the detail work, or the black paint might bleed. -
Draft the Face:
You might want to lightly sketch the facial features with a pencil first to get the spacing right. -
Paint the Details:
Using your finest detail brush and black paint, carefully add two small dots for eyes and a curved line for a smile. -
Add Cheeks:
Mix a tiny drop of pink into your cream paint. Use the back of a paintbrush handle to dot on rosy cheeks, or paint tiny freckles. -
Seal the Deal:
Finish with a coat of matte varnish to protect your coaster from moisture and stains.
Make a Set
Create a matching mug embellishment by rolling a thin clay circle, stamping a pattern, and gluing it to a mug.
Now you have the perfect charming spot to rest your morning tea
Tiny Snail Succulent Planter
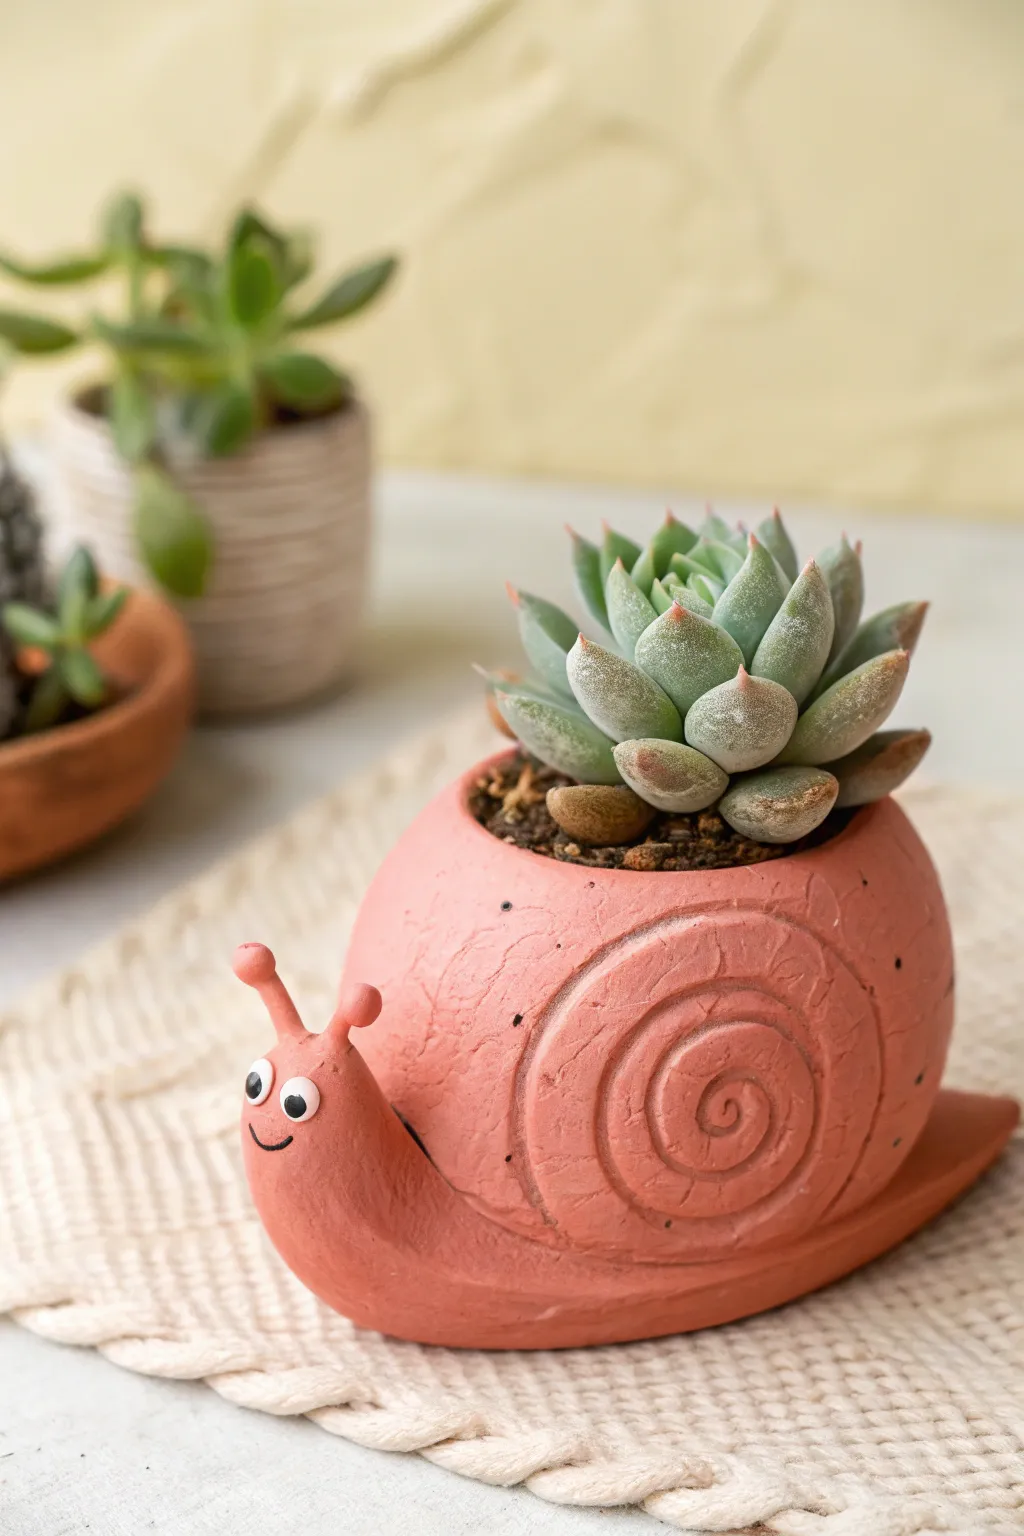
Bring a slow and steady charm to your windowsill with this adorable snail planter. Sculpted from air dry clay, features a textured spiral shell and a friendly smiling face, perfect for holding your favorite miniature succulent.
Step-by-Step Tutorial
Materials
- Air dry clay (terracotta or white color)
- Acrylic paint (if using white clay) or pinkish-terracotta tint
- Rolling pin
- Clay sculpting tools (needle tool, small spatula)
- Small bowl relative to your succulent size
- Plastic wrap
- Water in a small cup
- Small googly eyes
- Super glue or craft glue
- Black fine-point permanent marker
- Clear sealant (matte or satin)
Step 1: Forming the Shell Base
-
Prepare the core:
Start by finding a small bowl or cup that is slightly larger than the root ball of your intended succulent. Wrap the outside of this form tightly with plastic wrap to prevent sticking. -
Roll the clay:
Condition your clay by kneading it until pliable. Roll out a slab about 1/4 inch thick. It needs to be sturdy enough to hold soil without cracking. -
Shape the pot:
Drape the clay slab over your plastic-wrapped form. Gently press and smooth it against the mold to create a rounded cup shape. Trim away excess clay at the rim for a clean edge. -
Create the texture:
While the clay is still on the mold, use a needle tool or sculpting tool to carve a deep spiral into both sides of the rounded pot. This mimics the snail’s shell pattern. I usually tap the surface lightly with a toothbrush or crumpled foil here to add a stone-like texture.
Step 2: Sculpting the Snail Body
-
Form the base:
Roll a thick, tapered sausage shape of clay. This will become the snail’s foot and head. The thicker end will be the head, tapering down to a flat tail. -
Flatten the foot:
Gently press the bottom of this roll against your work surface to flatten it so the planter sits stably. Curve the tail slightly to the side if you want a dynamic look. -
Attach the shell:
Score (scratch) the top of the snail’s back and the bottom of your shell pot. Apply a little water or liquid clay (slip) to the scored areas and press the shell firmly onto the body. -
Blend the seams:
Use a modeling tool or your finger to smooth the clay where the shell meets the body, ensuring a strong bond so they don’t separate later. -
Make the antennae:
Roll two very small, thin coils of clay. Attach tiny balls to the tops to make the eye stalks. -
Attach antennae:
Score the top of the snail’s head and attach the antennae. Blend the clay at the base carefully so they stand upright.
Waterproofing Tip
Since air dry clay melts when wet, line the inside with a plastic cup or apply resin for a truly waterproof barrier before planting.
Step 3: Finishing Touches
-
Let it dry:
Allow the sculpture to dry completely. This usually takes 24-48 hours depending on humidity. Remove the inner mold carefully once the clay is leather-hard to help the inside dry. -
Sand imperfections:
Once fully dry, use fine-grit sandpaper to smooth out any rough edges on the rim or the base. -
Paint (Optional):
If you didn’t use pre-colored clay, paint the entire sculpture with a terracotta or coral pink acrylic paint. Let the paint dry completely. -
Seal the planter:
Coat the inside and outside with a waterproof sealant. Since air dry clay dissolves in water, this step is crucial for a planter. Do at least two coats. -
Add the face:
Glue two small googly eyes onto the side of the head. Using a fine-point marker, draw a simple, curved smile below the eyes. -
Planting:
Place your succulent into the opening. Use a succulent-specific soil mix, and be careful not to overwater since this pot doesn’t have drainage holes.
Shell Variations
Make a coil pot ‘shell’ instead of carving a solid lump! Roll long snakes of clay and spiral them up to form the pot for authentic texture.
Now you have a cheerful garden friend ready to brighten up your desk space
Star Base Photo and Card Holders
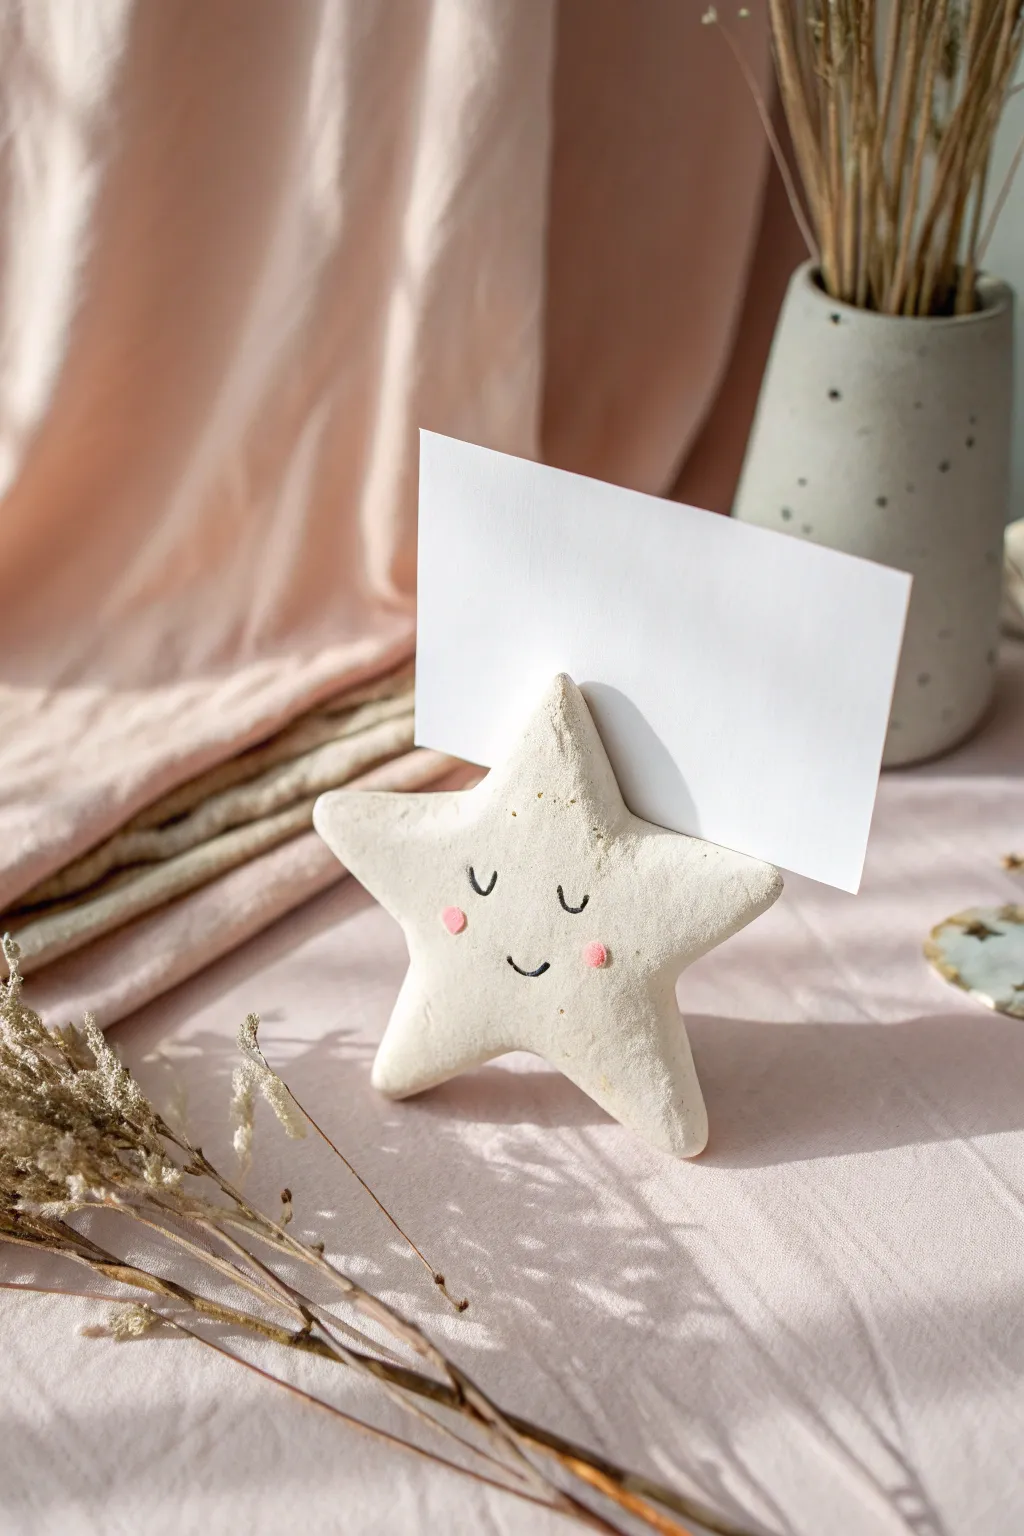
This whimsical little star brings a touch of celestial charm to your desk or table setting with its sweet, sleeping expression. Crafted from simple air-dry clay, its sturdy points and gentle curves make it the perfect functional piece for holding special photos, place cards, or notes.
Detailed Instructions
Materials
- White air-dry clay (e.g., DAS or Crayola)
- Rolling pin or smooth glass jar
- Star-shaped cookie cutter (approx. 3-4 inches wide)
- Craft knife or plastic clay, modeling tool
- Small bowl of water
- Fine-grit sandpaper (220 grit or higher)
- Black acrylic paint or extra-fine permanent marker
- Soft pink acrylic paint
- Small detailing paintbrush
- Scrap piece of cardstock (for sizing)
- Clear matte varnish (optional)
Step 1: Shaping the Star
-
Condition the clay:
Begin by taking a handful of air-dry clay and kneading it in your hands until it feels warm, pliable, and smooth. This conditioning step prevents cracks from forming later. -
Roll out the slab:
Place the clay on a smooth surface or craft mat. Use your rolling pin to flatten it into an even slab. You want this creating to be quite thick—aim for about 1/2 inch to 3/4 inch thickness so the final star is heavy enough to stand upright. -
Cut the shape:
Press your star-shaped cookie cutter firmly into the clay slab. If the clay sticks to the cutter, wiggle it slightly before lifting. Peel away the excess clay from the outside. -
Smooth the edges:
Dip your finger in a little water and run it along the cut edges of the star. Gently round off the sharp corners created by the cutter to give it that soft, pillowy look shown in the photo.
Cracks Appearing?
Mix a tiny bit of fresh clay with water to create a ‘slip’ paste. Use your finger to rub this paste into any cracks, smooth it over, and let it dry again.
Step 2: Creating the Card Slot
-
Mark the center:
Identify the top point of your star. You will be making a slot directly behind this top point, cutting horizontally across the wide body of the star. -
Cut the groove:
Using your craft knife or a thin modeling tool, slice a straight line across the top ridge of the star. I find it helpful to gently rock the blade back and forth to widen the cut slightly without distorting the shape. -
Test the fit:
Take your scrap piece of cardstock and gently insert it into the slot to ensure it fits. Wiggle it slightly to ensure the opening is wide enough to hold paper without bending it. -
Check stability:
Stand the star up on its two bottom points. If it feels wobbly, gently tap the bottom points against the table to flatten them slightly, creating a more stable base.
Step 3: Drying and Refining
-
Initial dry time:
Set your star in a safe, dry place away from direct heat. Let it dry for at least 24 to 48 hours. Turn it over halfway through the process to ensure the bottom dries evenly. -
Sanding imperfections:
Once the star is bone dry and turns a chalky white, take your fine-grit sandpaper and lightly buff the surface. Focus on smoothing out any fingerprints or rough ridges on the sides. -
Final dusting:
Wipe the star down with a dry cloth or soft brush to remove all the clay dust before you start painting.
Clean Lines
If you are nervous about painting the face freehand, lightly sketch the features with a soft pencil first. You can easily erase mistakes on dry clay.
Step 4: Adding the Face
-
Paint the eyes:
Using a very fine detail brush and black acrylic paint (or a permanent marker), draw two small ‘U’ shapes in the center of the star face for the closed, sleeping eyes. -
Add the lashes:
If you wish, add a tiny flick to the outer corner of each ‘U’ to create a sweet eyelash detail. -
Paint the mouth:
Just below and centered between the eyes, paint a small, simple upward curve for the smile. -
Add the cheeks:
Dip the end of a paintbrush handle or a cotton swab into the soft pink paint. Dab two small dots on either side of the smile for rosy cheeks. -
Seal the piece:
To protect your holder from scratches, apply a thin coat of matte varnish over the entire star once the face paint is fully dry.
Place your favorite photo or a welcoming note in the slot and enjoy your new celestial friend
Mini House Lantern for LED Tealights
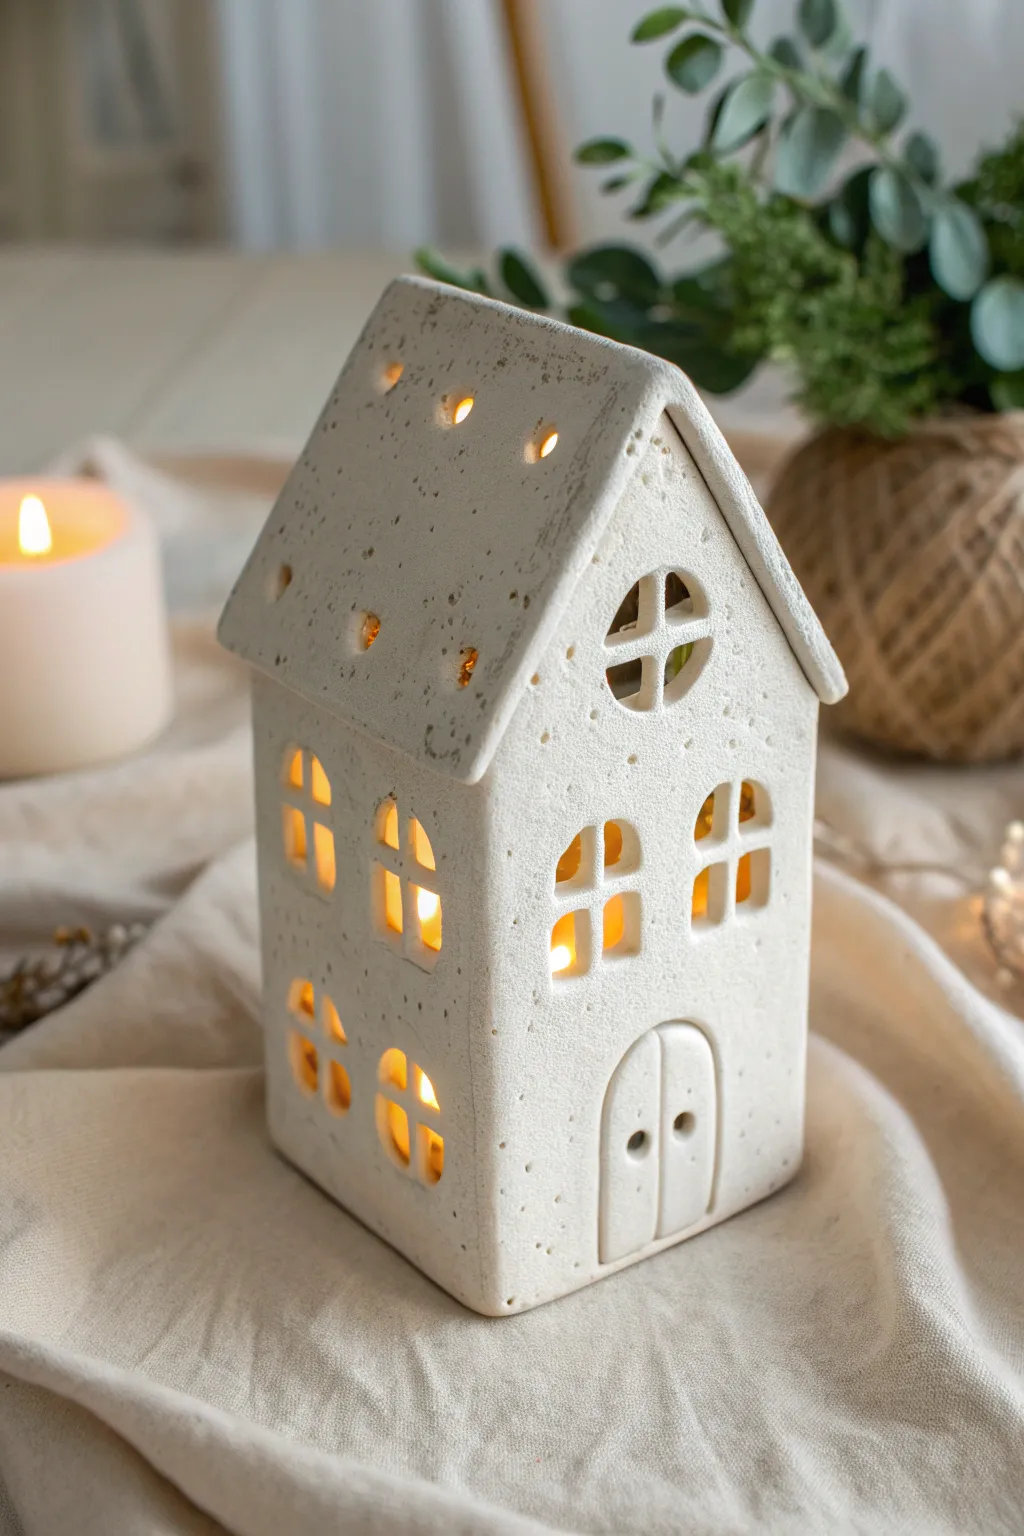
Bring a warm, whimsical glow to your mantle with this charming ceramic-style cottage. The textured finish gives it a rustic, stoneware feel, while the arched windows allow the flickering LED candlelight to dance through.
Step-by-Step Tutorial
Materials
- White or stone-colored air dry clay
- Rolling pin
- Parchment paper or canvas mat
- Ruler
- Clay knife or X-Acto blade
- Small square and round clay cutters (optional)
- Modeling tools or a toothpick
- Slip (clay mixed with water)
- Old toothbrush or bristle brush for texture
- Sandpaper (fine grit)
- Battery-operated LED tealight
Step 1: Preparing the Walls
-
Roll out the clay:
Start by kneading a large ball of air dry clay to condition it. Place it on parchment paper and roll it out to an even thickness of about 1/4 inch (6mm). Using thickness guides or two stacked rulers on either side can help you keep it perfectly flat. -
Create templates:
Sketch a simple house pattern on paper or cardstock. You’ll need two rectangular side walls and two front/back pieces with peaked gable tops. Cut these templates out with scissors. -
Cut the shapes:
Lay your paper templates onto the rolled clay slab. Carefully trace around them with your clay knife or blade, cutting out the four main wall pieces. Gently lift away the excess clay. -
Add texture:
For that rustic, speckled stone look, I like to gently tap the surface of the wet clay with an old, dry toothbrush or a crumpled ball of aluminum foil. This breaks up the perfect smoothness.
Clean Cuts Hack
Wait about 20 minutes after rolling the slab before cutting windows. Slightly drier clay cuts much cleaner and drags less than freshly rolled, wet clay.
Step 2: Carving Details
-
Mark the windows:
While the walls are lying flat, lightly outline where you want your windows. A symmetrical grid of four arched windows on the front and sides looks classic. -
Cut the openings:
Carefully cut out the window shapes. You can use small clay cutters if you have them, or use your blade to cut a rectangle and round off the top. Smooth the inner edges of the cutouts with a dampened fingertip or a brush. -
Make the attic window:
On the front panel with the peaked roof, cut a circular opening near the top. To replicate the windowpane cross, you can leave thin strips of clay intact, or cut a full circle and insert two small clay snakes in a ‘plus’ sign shape later. -
Create the door:
Roll a small, separate piece of clay into an arched shape for the door. Use a needle tool to score a vertical line down the center for double doors, and press two tiny indentations for doorknobs. Attach this to the front wall using a bit of slip.
Step 3: Assembly & Roofing
-
Dry to leather hard:
Let your flat pieces sit for about an hour or two until they are ‘leather hard’—firm enough to stand up without slumping, but soft enough to join. -
Score and slip:
Scratch the vertical edges of your walls (scoring) and apply a dab of clay-water mix (slip). Press the four walls together to form the house box, reinforcing the inside seams with a small coil of clay. -
Cut the roof panels:
Roll out two rectangular slabs for the roof. They should be slightly wider and longer than the house footprint to create an overhang. Texture these panels just like you did the walls. -
Ventilation holes:
Before attaching, poke a few random holes or small decorative slits in the roof panels. This adds charm and lets heat escape if you ever use a slightly warmer light. -
Attach the roof:
Score the top edges of the house walls. Place the roof panels on top so they meet at the peak. Use slip to secure them to the walls and to each other at the apex. -
Smooth the peak:
Gently smooth the seam where the two roof panels meet. You can add a thin coil of clay along the top ridge and blend it in for extra strength.
Warping Walls?
If walls curl while drying flat, flip them over every 30 minutes. Placing a light book on top of them (sandwiched in parchment) also keeps them perfectly straight.
Step 4: Finishing Touches
-
Final drying:
Let the house dry slowly away from direct sunlight for 24-48 hours. Turn it occasionally if possible to ensure even drying. -
Sanding:
Once bone dry, use fine-grit sandpaper to smooth any sharp edges or rough seams, but be careful not to sand away your toothbrush texture. -
Optional painting:
The house looks lovely in natural white, but if you want that specific speckled look, you can splatter it lightly with watered-down brown or grey acrylic paint using a stiff brush. -
Light it up:
Place your LED tealight on a surface and set the finished house over it to see your cozy cottage come to life.
Now you have a delightful little sanctuary to brighten up your bookshelf or holiday display
Kawaii Thumb Page Opener
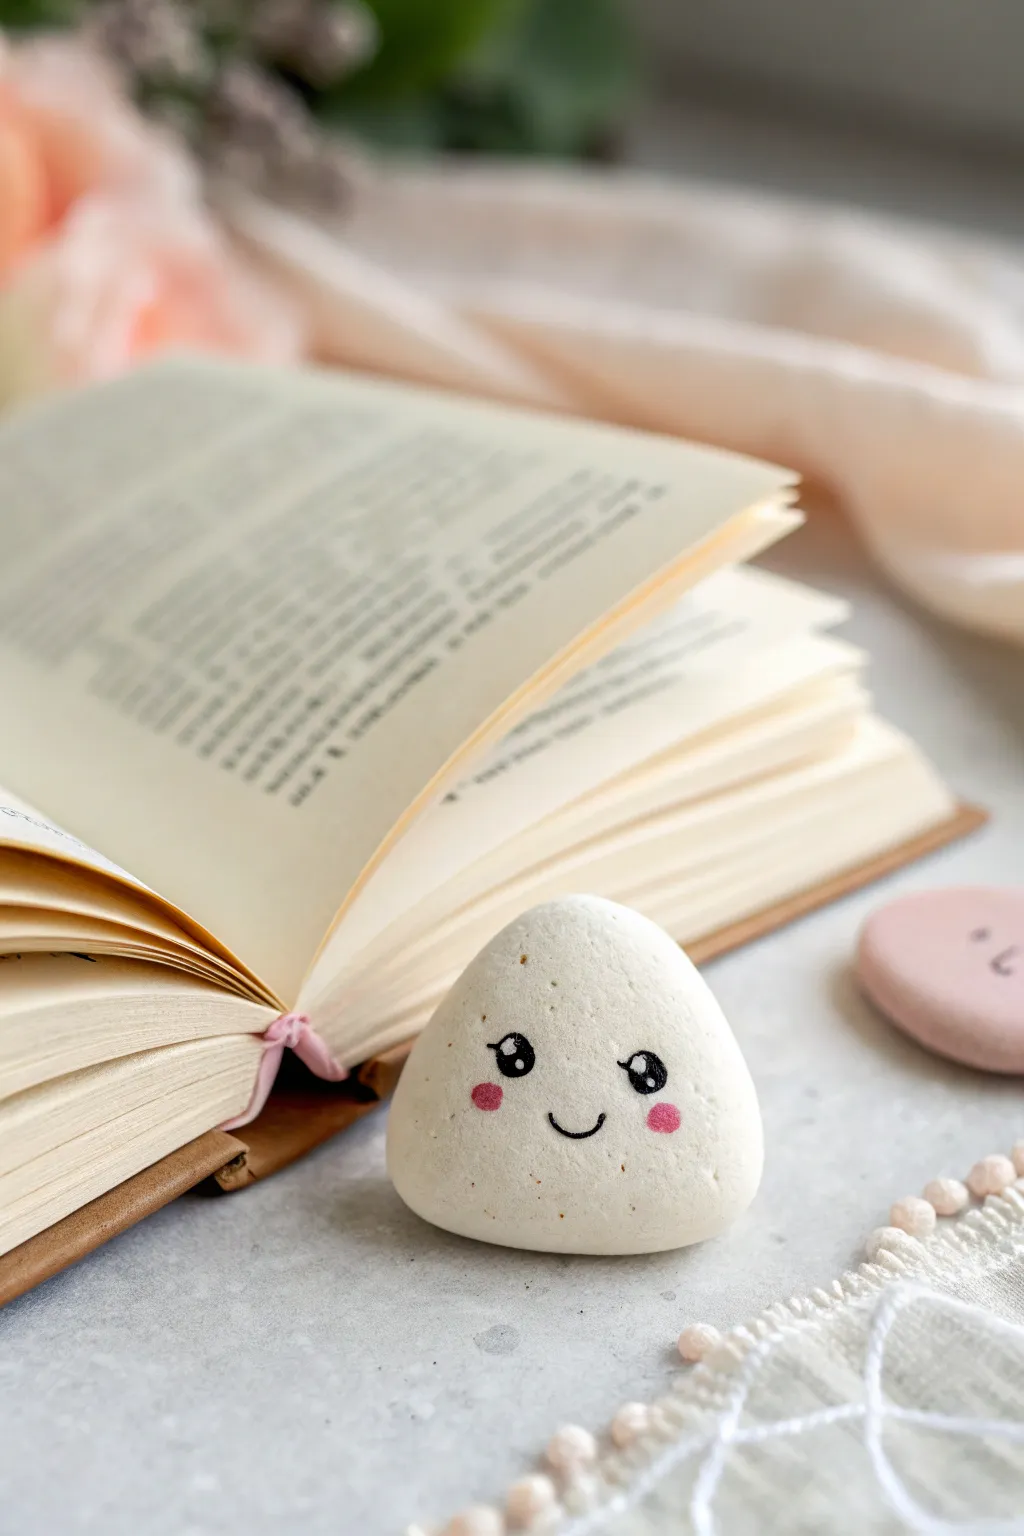
This adorable little reading companion isn’t just a sweet decoration; its sturdy, triangular shape is perfect for holding your pages open. With a smooth white finish and a minimalist blushing face, it captures the charm of a Japanese rice ball in a functional clay form.
Step-by-Step Guide
Materials
- White smooth air-dry clay
- Rolling pin or smooth round glass jar
- Craft knife or clay cutter
- Fine-grit sanding sponge
- Water in a small cup
- Fine-tip black acrylic paint pen (or liner brush)
- Pink acrylic paint
- Small dotting tool or toothpick
- Matte or satin sealant spray
Step 1: Shaping the Base
-
Condition the clay:
Start by taking a walnut-sized ball of white air-dry clay. Knead it thoroughly in your hands until it feels warm, pliable, and free of any large cracks. -
Form a ball:
Roll the conditioned clay between your palms to create a smooth, tight sphere. The smoother you get it now, the less sanding you’ll need later. -
Flatten slightly:
Place the ball on your work surface and gently press down with your palm or a rolling pin until it’s about 1.5 cm thick. You want it substantial enough to have some weight. -
Create the triangle shape:
Cup your hands around the clay and gently press three sides inward to form a soft triangle. The corners should remain rounded, referencing the shape of an onigiri (rice ball). -
Refine the edges:
Pick up the piece and tap the flat edges against your table to straighten them slightly. Use your finger dipped in a tiny bit of water to smooth out any fingerprints or tiny cracks. -
Check the profile:
Ensure the front surface is slightly domed rather than perfectly flat, giving it a friendly, organic feel. The back should be flat so it sits stable on a book. -
Slow drying:
Set the piece aside on a piece of parchment paper to dry. Flip it over after about 4 hours to ensure the bottom dries evenly. Let it cure for a full 24-48 hours depending on humidity.
Pro Tip: Weighted Base
To make it hold pages better, embed a small, flat washer or coin inside the clay ball before shaping. This adds necessary heft.
Step 2: Refining and Decorating
-
Sand for smoothness:
Once fully dry, take your fine-grit sanding sponge and gently buff the entire surface. We want this to feel like a smooth river stone, so pay attention to the rounded corners. -
Dust off:
Wipe the piece down with a slightly damp cloth or a dry soft brush to remove all white clay dust before you start painting. -
Draft the face:
If you are nervous about placement, lightly sketch the eyes and mouth with a pencil first. Position them low on the triangle for that classic “cute” proportion. -
Draw the eyes:
Using your fine-tip black paint pen, draw two small circles for eyes. Fill them in solid black, spacing them fairly wide apart. -
Add the smile:
Draw a small, shallow ‘U’ shape right between the eyes. Keep the line thin and delicate. -
Add eye highlights:
Dip the very tip of a toothpick into white paint (or use a white gel pen) and add two tiny dots inside the black eyes—one large dot at the top right, and a smaller one at the bottom left. -
Give it a lash:
If you want extra character, flick a tiny curved line off the top outer corner of each eye to create eyelashes. -
Rosy cheeks:
Dip a dotting tool or the blunt end of a toothpick into pink acrylic paint. Dab a small circle just below and to the outside of each eye. -
Seal the project:
Allow the paint to dry completely for about 30 minutes. Take the project to a ventilated area and apply a light coat of matte sealant spray to protect your work from handling.
Troubleshooting: Cracks?
If hairline cracks appear while drying, don’t worry. Mix a tiny bit of fresh clay with water to make a paste and fill them in, then sand smooth.
Now you have the perfect little study buddy to keep your place while you take notes
Mini Cozy Corner Shadowbox Scene
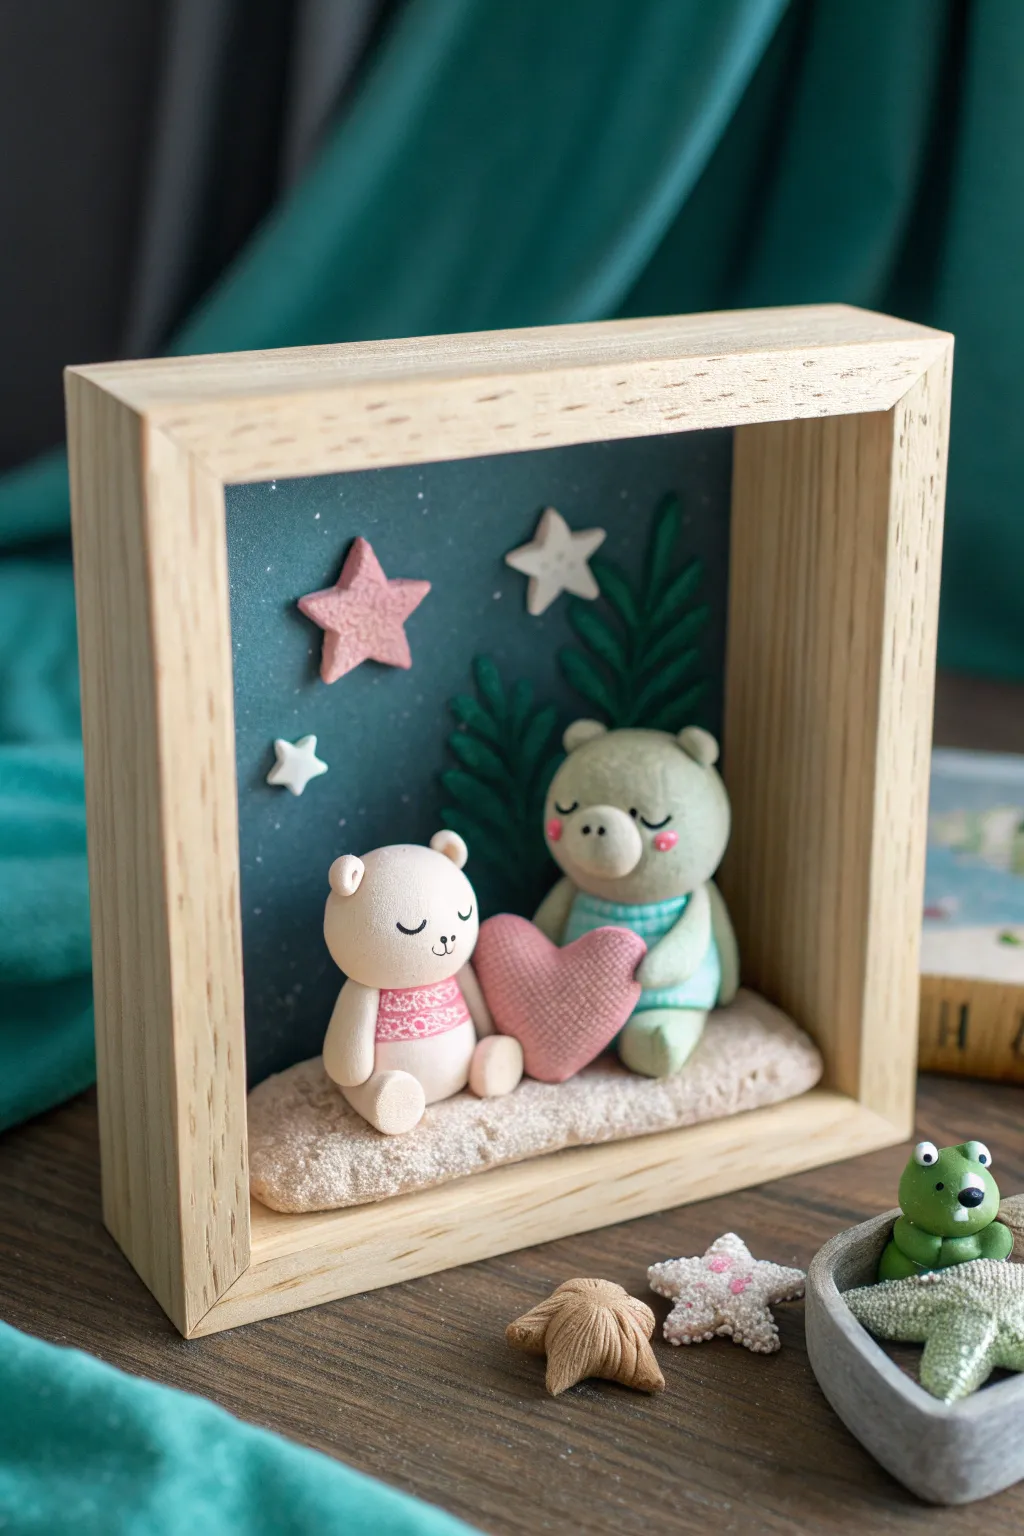
Capture a heartwarming moment between two adorable bears with this charming shadowbox display. Using air-dry clay and a simple wooden frame, you’ll create a 3D snapshot complete with a starry night sky and lush foliage.
Step-by-Step Tutorial
Materials
- Air-dry clay (white, pink, sage green, dark green)
- Deep square wooden shadowbox frame
- Dark teal or navy blue cardstock (for background)
- Acrylic paints (pink, black, white)
- Small detail paintbrush
- Clay sculpting tools (needle tool, ball tool)
- Texturing tool (toothbrush or stiff bristle brush)
- Strong craft glue or E6000
- Rolling pin
- Scissors
Step 1: Setting the Scene
-
Prepare the background:
Measure the inner back panel of your shadowbox frame. Cut a piece of dark teal cardstock to fit perfectly and glue it securely to the back panel. -
Create the leafy backdrop:
Roll thin snakes of dark green clay for the fern stems. Flatten small teardrop shapes of clay and attach them along the stems to create stylized leaves. Arrange these flat against the cardstock background to create depth. -
Make the stars:
Roll out a small amount of pink and white clay. Use a small star cutter or cut freehand shapes with a craft knife. Soften the edges with your fingers and adhere them to the ‘sky’ area of the background. -
Sculpt the ground base:
Form a thick, oblong slab of beige or white clay to serve as the ground. Use a toothbrush or stiffness brush to tap all over the surface, giving it a realistic, stone-like texture. Let this base dry partially so it holds its shape.
Cracks Appearing?
Work a small amount of water into smooth cracks immediately. If dry, fill with a fresh clay ‘slurry’ paste.
Step 2: Sculpting the Bears
-
Shape the bodies:
Roll two smooth balls of clay—one in pale pink/white and one in sage green—to create the main body shapes. Gently flatten the bottoms so they sit stable on the textured base. -
Add heads and ears:
Roll slightly smaller balls for the heads and attach them to the bodies using a dab of water or slip. Create tiny balls for ears, indenting the centers with a ball tool before attaching them. -
Form the limbs:
Roll small sausages for arms and legs. Attach the legs to the front of the bodies in a seated position. Position the arms so they are reaching forward, ready to hold the heart. -
Create the heart:
Sculpt a puffy heart shape from pink clay. Press a fabric texture onto it using a piece of scrap fabric or by gently cross-hatching with a needle tool. -
Assemble the hug:
Place the heart between the two bears. Gently press their paws onto the heart to make it look like they are sharing it. -
Add sweaters details:
For the pink bear, paint a delicate pattern across the chest area to mimic a sweater. For the green bear, you can add thin strips of lighter clay or paint a grid pattern to create a plaid effect.
Pro Tip: Seamless Bond
Score (scratch) the connecting surfaces of the clay before adding water or glue for a much stronger hold.
Step 3: Finishing Touches
-
Paint facial features:
Once the clay has formed a skin, use a very fine brush to paint simple sleeping eyes (small upturned crescents), tiny noses, and rosy cheeks. -
Dry completely:
Allow the bear sculpture and the base to dry fully. This usually takes 24-48 hours depending on humidity. -
Final assembly:
Glue the dry bear scene onto the textured base if they weren’t attached previously. Then, glue the entire base securely to the bottom ledge inside the shadowbox frame.
Place your finished shadowbox on a shelf where it can add a touch of quiet whimsy to your room