One of my favorite little clay miracles is turning a simple hollow form into a creature that actually sings when you blow into it. These animal clay whistle ideas are all about hiding the whistle mechanics inside cute, sturdy animal shapes while keeping the details simple and fun.
Chubby Bird Whistle Pinch Pot
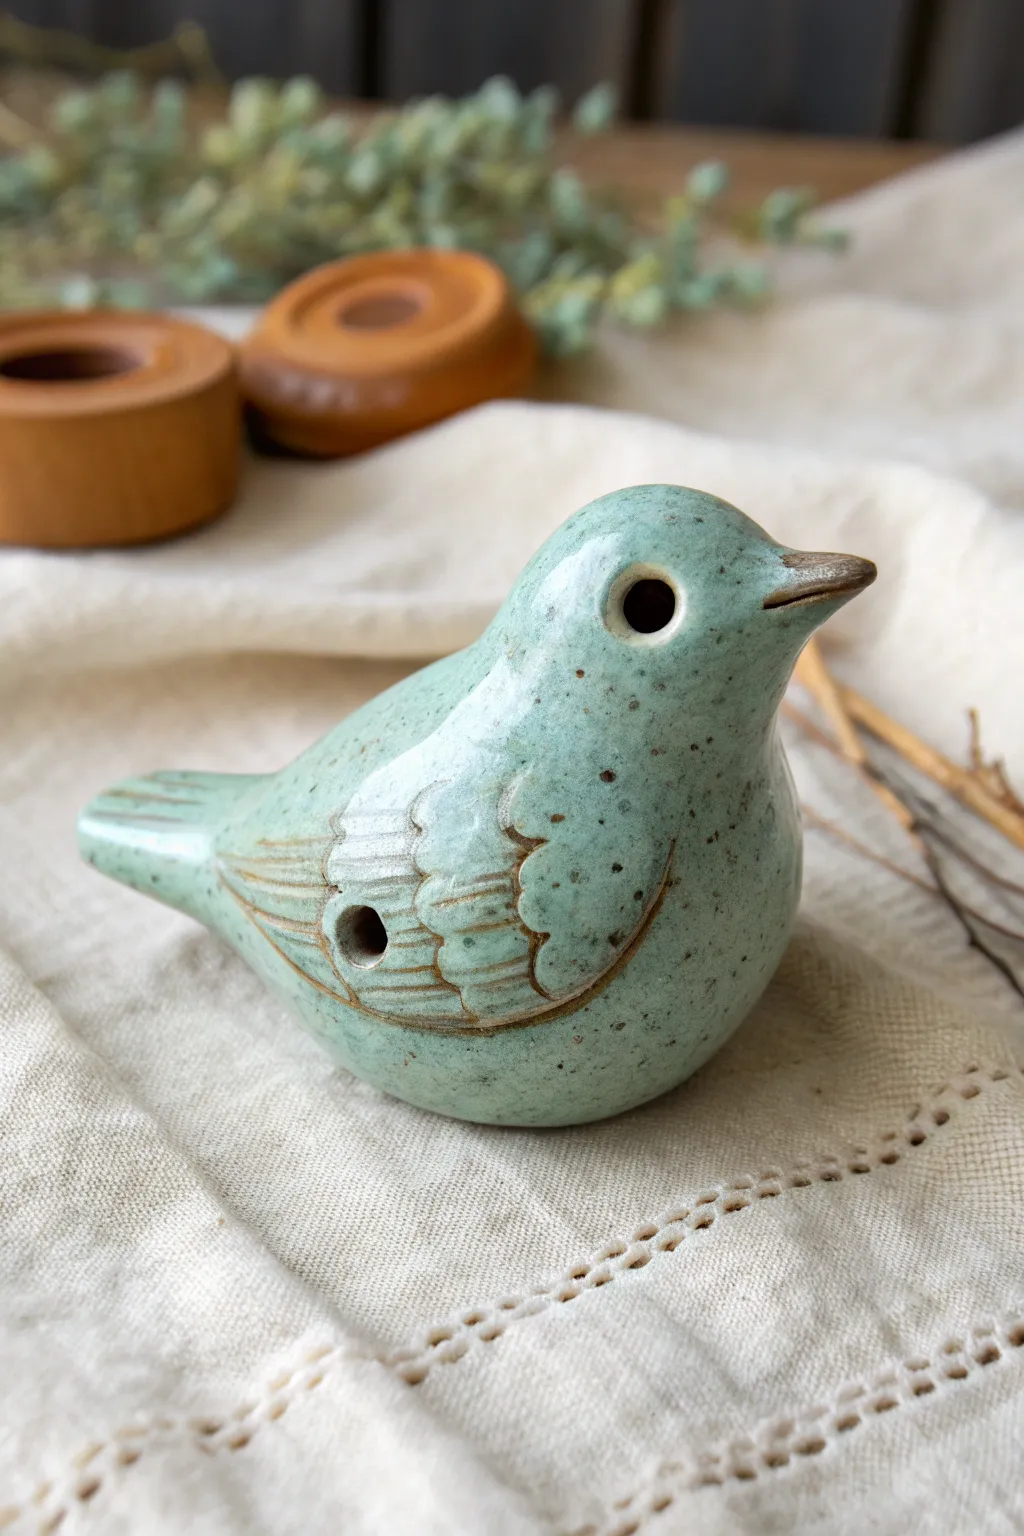
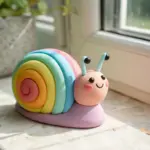
Transform a simple lump of clay into a charming, speckled turquoise songbird that actually sings. This pinch pot project results in a round, sturdy form with sweet carved feather details and a classic rustic glaze finish.
How-To Guide
Materials
- Stoneware clay (smooth or fine grog)
- Popsicle stick or wooden modeling tool
- Fettling knife
- Needle tool
- Slip (clay mixed with water)
- Turquoise stoneware glaze (speckled if available)
- Iron oxide wash (optional, for beak/wing detail)
- Sponge
- Water
Step 1: Forming the Body
-
Start with a Pinch Pot:
Begin with a ball of clay roughly the size of a tangerine. Stick your thumb into the center and gently pinch the walls while rotating the ball until you have an even, cup-like shape. -
Close the Form:
Gently curve the rim of your pinch pot inward until the edges meet. Pinch and smooth the clay together to seal it completely, trapping air inside to create a hollow sphere. -
Shape the Bird:
Hold the hollow sphere in your palm and gently squeeze one side to start elongating it into a tail shape. On the opposite side, pull up a slightly thicker section to form the head and neck area. -
Refine the Silhouette:
Tap the bottom of the bird gently on your work surface to create a flat base so it stands securely. Smooth the transition between the head and body for that chubby, integrated look.
Silent Bird?
If no sound comes out, the air isn’t hitting the splitting edge correctly. Re-insert the stick and adjust the bevel’s sharpness or angle before the clay dries.
Step 2: Creating the Whistle Mechanism
-
Make the Mouthpiece:
On the tail section, flatten the end slightly. Insert a flat popsicle stick horizontally into the tail end to create the air channel. Aim it straight toward the hollow center of the bird. -
Cut the Window:
Turn the bird over to see the underside of the tail. Using your fettling knife or a specialized whistle tool, cut a small rectangular ‘window’ (the fipple) about an inch in from the tail end. -
Create the Bevel:
This is the crucial part: Use your tool to create a sharp, angled edge (about 45 degrees) on the side of the window closest to the body. This splitting edge is what creates the sound. -
Test the Sound:
Leave the popsicle stick in the mouthpiece channel to guide your alignment. Blow gently through the tail. If it doesn’t whistle, adjust the angle of the bevel slightly until you get a clear tone.
Keep it Clear
Glaze is the enemy of a good whistle sound. Apply wax resist to the bevel capability edge and the interior air channel before dipping to keep the airway open.
Step 3: Adding Details
-
Add the Beak:
Form a very small cone of clay. Score and slip the area on the face, then attach the cone. Blend the edges seamlessly into the head, keeping the beak pointy and distinct. -
Define the Wings:
Using a needle tool, lightly sketch an oval wing shape on the bird’s flank. Once satisfied with the placement, carve deeper lines to outline the wing. -
Carve Feathers:
Within the wing outline, carve three tiers of ‘U’ shaped scallops to represent feathers. Press slightly deeper at the top of each curve to give them dimension. -
Add Tail Feathers:
Use your needle tool to incise straight lines along the tail section, mimicking the look of tail feathers extending from the body. -
Make the Eyes:
Use the blunt end of a small paintbrush or a dedicated hole cutter to press circular indentations for the eyes on either side of the head. -
Create Tuning Holes:
To make it an ocarina (capable of playing notes), punch a small round hole on the side of the wing using a hole cutter. Test the sound again to ensure it still works.
Step 4: Glazing and Finishing
-
Bisque Fire:
Let the bird dry slowly under plastic for a day, then uncovered until bone dry. Fire it in the kiln to bisque temperature (usually Cone 04). -
Apply Oxide Wash:
Brush an iron oxide wash into the carved wing lines and around the beak. Wipe back the excess with a damp sponge, leaving the dark color only in the recesses to highlight the texture. -
Glaze the Body:
Dip the bird into a glossy, speckled turquoise glaze. Be careful not to let glaze clog the whistle airway—I like to stick a piece of paper in the slot just to be safe. -
Clear the Airway:
Before the glaze dries completely, double-check the window and mouthpiece. If any glaze dripped inside, clean it out carefully with a needle tool. -
Final Fire:
Fire the piece again to the maturity temperature of your clay and glaze (likely Cone 5 or 6 for stoneware).
Once cooled, your little ceramic friend is ready to sit on a shelf or sing a cheerful tune


Classic Fish Whistle With Tail Mouthpiece
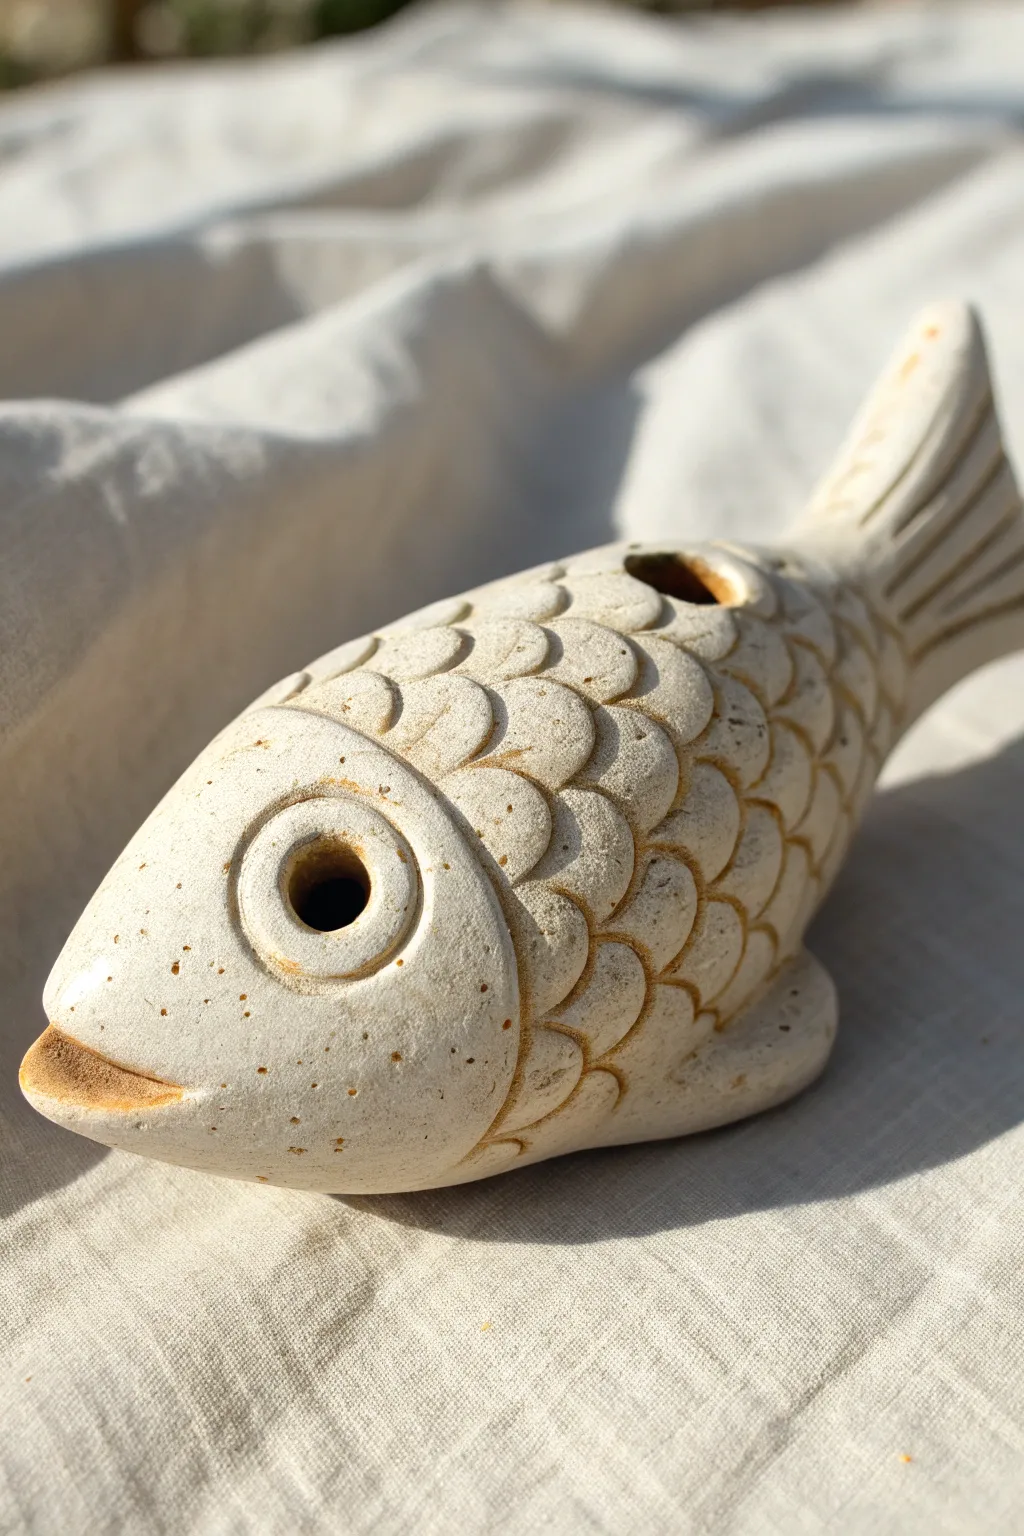
Craft a charming musical instrument with this textured ceramic fish whistle, featuring deeply carved scales and a matte, natural finish. This project combines hollow-form construction with sound mechanism fundamentals to create a piece that looks as lovely as it sounds.
Step-by-Step Guide
Materials
- Stoneware clay (smooth body preferred)
- Wooden modeling tool
- Popsicle stick or fettling knife
- Loop tool for carving
- Needle tool
- Slip and scoring tool
- Sponge
- Small paintbrush
- Iron oxide wash (optional)
Step 1: Forming the Body
-
Pinch the Basics:
Begin with a ball of clay roughly the size of a lemon. Split it into two equal halves and form two simple pinch pots, ensuring the walls are an even thickness of about 1/4 inch. -
Join the Halves:
Score the rims of both pinch pots thoroughly and apply slip. Presses the rims together firmly to create a hollow sphere, trapping the air inside. -
Shape the Fish:
Wait a few minutes for the join to firm up, then gently paddle and squeeze the sphere into an elongated oval shape. Taper one end slightly for the mouth and pull the other end out to form the base of the tail. -
Add the Tail:
Add a small wedge of clay to the back taper to form the tail fin. Flatten it slightly and shape it into a flared distinct tail shape, smoothing the seams completely into the body.
Silent Fish?
If the whistle stops working after detailing, clear debris from the airway. Use your stick to gently re-clear the channel without altering the bevel angle.
Step 2: Creating the Whistle Mechanism
-
Create the Airway:
Carefully insert a rectangular popsicle stick into the tail end to create the mouthpiece channel. It should go straight in towards the hollow cavity. -
Cut the Sound Hole:
On the underside of the fish (or top, depending on your design preference), cut a small square hole where the stick ends inside the body. This is your bevel window. -
Sculpt the Sharp Edge:
Using a small tool, press the clay on the far side of the square hole down at a 45-degree angle to create a sharp splitting edge (the labium). This edge must align perfectly with the airway in the tail. -
Test the Sound:
Gently blow through the tail mouthpiece. Adjust the angle of the sharp edge until you get a clear whistle sound. Once it works, leave it alone to stiffen.
Step 3: Adding Details and Texture
-
Carve the Mouth:
Use a modeling tool to slice a horizontal line at the front nose area, slightly parting the clay to create distinct upper and lower lips. -
Sculpt the Eyes:
Roll two small balls of clay and attach them to the sides of the head with slip. Flatten them into discs. -
Detail the Iris:
Press a smaller tool or tube into the center of the eye discs to create a pupil and define the outer rim of the eye. -
Define the Gills:
Carve a curved line behind the head area to separate the face from the main body, creating a gill flap. -
Scale Patterning:
Using a small U-shaped loop tool or the end of a wooden tool, press repeating semi-circle patterns into the clay body. Start from the tail and work your way forward to the gill line so the scales overlap correctly. -
Tail Texture:
Draw deep, straight lines radiating from the body out to the tail tips to simulate fin ribbing. -
Refine the Surface:
Gently smooth any sharp burrs with a slightly damp sponge, but be careful not to erase the texture of the scales.
Make it an Ocarina
Turn your whistle into an ocarina by piercing 2-4 small holes on the sides of the fish body deeply enough to reach the hollow cavity. Cover holes to change pitch.
Step 4: Finishing Touches
-
Dry Slowly:
If you want to add distinct spots like the reference, you can use a needle tool to stipple tiny dots around the face and fins. -
Bisque Fire:
Allow the fish to dry completely under plastic (slow drying prevents cracks) before bisque firing to cone 04. -
Optional Oxide:
For that earthy look, brush an iron oxide wash over the piece and wipe it back with a sponge, leaving color deep in the scale crevices.
Give your new aquatic friend a test blow and enjoy the simple, ancient joy of clay music


Turtle Shell Whistle With Hidden Window

Sculpt a charming, resonant friend with this turtle whistle project, featuring an intricate hexagonal shell pattern and a smooth, earthy finish. This functional piece of art combines the hollow-form technique with precise carving to create a keepsake that looks as lovely as it sounds.
Step-by-Step Tutorial
Materials
- Earthenware or stoneware clay (grooless or fine grog recommended)
- Small wooden modeling tool or popsicle stick
- Pin tool or needle tool
- Flexible metal rib or rubber kidney
- Fettling knife
- Small sponge
- Slip (clay mixed with water)
- Scoring tool (or serrated rib)
- Popsicle stick or flat sculpting tool (for beveling the mouthpiece)
Step 1: Forming the Hollow Body
-
Start with a pinch pot:
Begin with a ball of well-wedged clay about the size of a tangerine. Stick your thumb in the center and pinch around the sides to create an even, cup-like shape. This will become the turtle’s shell. -
Close the form:
Once the walls are an even thickness (about 1/4 inch), gently shape the opening inwards until it touches, creating a closed hollow sphere. Flatten the bottom slightly against your table to create the turtle’s belly. -
Smooth and refine:
Using a metal rib or rubber kidney, smooth the exterior of the sphere to remove any fingerprints or lumps. The goal is a nice, high dome for the shell.
Silent Whistle?
If you get only air noise, re-sharpen the bevel edge (the angled cut). That edge must be knife-sharp and perfectly aligned with the air stream to split the wind and create sound.
Step 2: Creating the Whistle Mechanism
-
Form the mouthpiece:
Add a small rectangular block of clay to the back end of the shell (where the tail would be). Blend it seamlessly into the body. -
Insert the airway:
Carefully insert a flat popsicle stick or specialized whistle tool into the mouthpiece block. Aim straight towards the center of the hollow cavity. -
Cut the aperture:
On the underside (belly) or lower rear slope of the turtle, measure where the stick ends inside the clay. Cut a small rectangular window (the bevel) at a 45-degree angle so the sharp edge splits the air coming from the mouthpiece. This is the trickiest part, so take your time aligning it. -
Test the sound:
Before adding details, gently blow into the mouthpiece. If it whistles, great! If not, adjust the angle of your bevel or clear debris from the airway.
Step 3: Adding Appendages
-
Sculpt the head:
Roll a cylinder of clay with a rounded end for the head. It should be proportional to the shell, roughly the size of a large grape. -
Attach the head:
Score tightly and apply slip to both the neck area of the shell and the back of the head piece. Press them together firmly. -
Create the legs:
Shape four small, flat tab-like pieces for the flippers or feet. These should be sturdy enough to support the turtle’s slight weight. -
Attach the legs:
Score and slip the legs onto the underside of the body, positioning them so the turtle stands slightly elevated but stable. -
Smooth the seams:
Use a small modeling tool or your finger to blend all attachment points (neck and legs) so the clay looks continuous.
Tuning Tip
Make your finger holes different sizes. Larger holes create higher pitch jumps, while smaller holes create subtler changes. Test blow gently as you pierce to hear the note.
Step 4: Detailing the Shell
-
Outline the rim:
Using a needle tool, draw a line around the base of the shell to distinguish the carapace from the plastron (the bottom shell). -
Draw the rim segments:
Add vertical tick marks along this bottom rim to create a segmented border texture. -
Sketch the hexagons:
Lightly sketch a honeycomb pattern on the top of the dome. Start with one hexagon in the very center and work your way out. -
Carve the pattern:
Once you like the spacing, go over your sketch lines with deeper cuts using a specialized carving tool or the needle tool to make the pattern distinct. -
Add texture:
I like to gently scratch fine lines inside each hexagon to mimic the natural growth rings of a real tortoise shell.
Step 5: Final Touches
-
Add the eyes:
Press a small round tool or the back of a paintbrush into the sides of the head to create deep, expressive eye sockets. -
Create the mouth:
Use a fettling knife to slice a simple, horizontal mouth line under the nose area. -
Drill finger holes:
To make this an ocarina rather than a single-note whistle, carefully drill 2-4 small holes into the top of the shell. These will change the pitch when covered. -
Final smooth:
Wipe the entire piece down with a barely damp sponge to soften any sharp burrs from carving.
Allow your turtle to dry slowly under loose plastic to prevent the legs from cracking before firing.


Sweet Pig Whistle With Snout Details
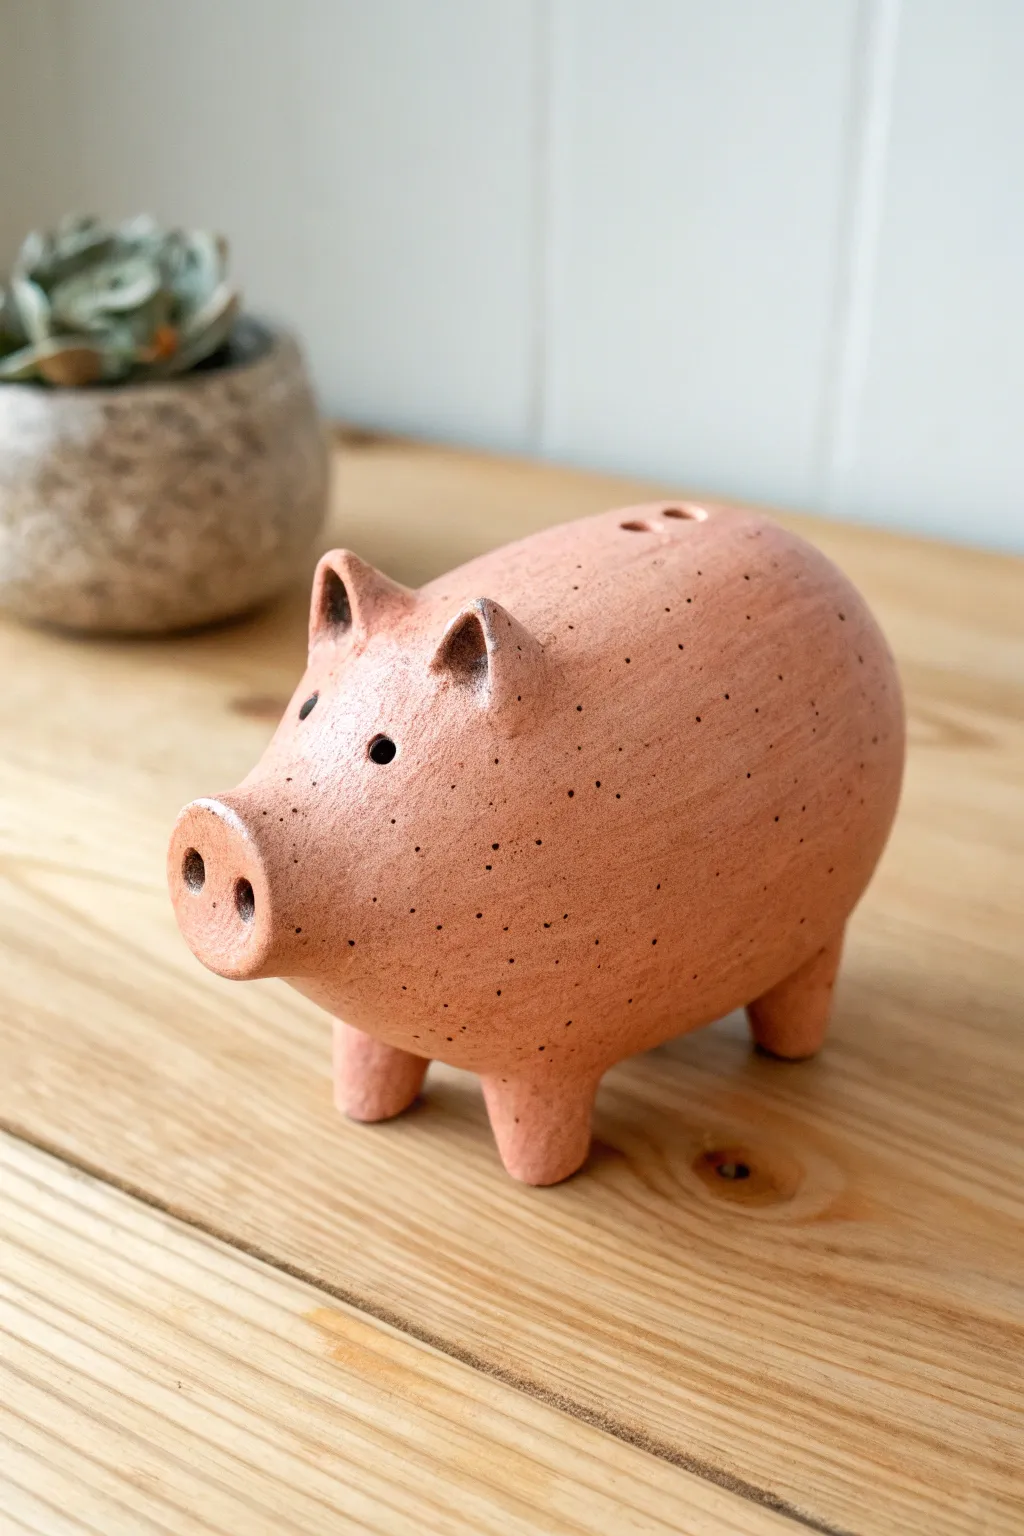
This charming, rustic pig sculpted from speckled clay features a smooth, rounded body and an endearing snout that asks to be booped. Its minimalist design relies on the natural beauty of the clay body and clean shaping techniques to create a timeless little noisemaker.
Step-by-Step
Materials
- Speckled brown stoneware or terracotta clay
- Wooden modeling tool
- Pin tool or needle tool
- Popsicle stick or flat fettling knife
- Slip (clay mixed with water)
- Sponge
- Small drill bit or hole cutter (optional)
Step 1: Forming the Body
-
Prepare the Clay:
Start by wedging a baseball-sized amount of speckled clay to remove air bubbles. This is crucial for preventing explosions in the kiln later. -
Pinch Pot Base:
Form the ball into a neat sphere. Press your thumb into the center and rotate the clay in your palm, pinching the walls to create an even, hollow pot. -
Close the Form:
Continue pinching the walls upward and inward until they meet at the top. Seal the seam completely to create a trapped air bubble inside. -
Shape the Oval:
Gently paddle or roll the hollow sphere between your palms to elongate it into a smooth, egg-like oval shape. This forms the pig’s main body.
Clear The Airway
If the whistle stops working while sculpting, resist the urge to blow hard. Instead, run your flat tool back through the air channel to remove debris.
Step 2: Creating the Sound Mechanism
-
Cut the Mouthpiece:
On the rounded rear end (the top curve), use a popsicle stick to create a rectangular entryway for the air. This will be the mouthpiece of the whistle. -
Form the Bevel:
Using a sharp tool, cut a bevel (a 45-degree angle) into the clay wall just past the air entryway. The sharp edge splits the air to create sound. -
Test the Tone:
Blow gently through the mouthpiece. Adjust the angle of the bevel until you get a clear whistle sound. Once it works, leave this area alone. -
Add Finger Holes:
Carefully poke two small holes along the pig’s back using a small drill bit or hole cutter to create different notes.
Step 3: Adding Piggy Features
-
Make the Legs:
Roll four small, equal-sized coils of clay. Score and slip the bottom of the body and attach these coils to form the legs. -
Attach the Snout:
Flatten a small ball of clay into a disk. Score the front of the pig’s face and attach the disk securely. -
Define the Nostrils:
Use the back of a paintbrush or a large detail tool to press two distinct, deep indentations into the snout disk for nostrils. -
Sculpt the Ears:
Fashion two small triangles of clay. Pinch the centers slightly to curve them, then score and slip them onto the head, blending the back seams smooth. -
Create the Eyes:
Use a small, round tool to press indentations for the eyes just below and in front of the ears.
Curly Tail Twist
Roll a very thin coil of clay and wrap it around a pencil to create a spiral. Score and slip this onto the rear for a classic curly pig tail.
Step 4: Refining and Finishing
-
Smooth the Surface:
Use a damp sponge to wipe down the entire piece, smoothing out fingerprints and refining the transition areas where limbs were attached. -
Checking the Whistle:
Give the whistle one final soft test blow to ensure smoothing didn’t clog the airway. Clear any clay crumbs carefully. -
Drying:
Let the pig dry slowly under plastic for a day to equalize moisture, then uncover for full drying. -
Bisque Fire:
Fire the piece to cone 04 (or your clay’s specific temperature). Since this unglazed look is desired, you may stop here or add a clear matte glaze.
You have crafted a musical little companion perfect for a shelf or garden.
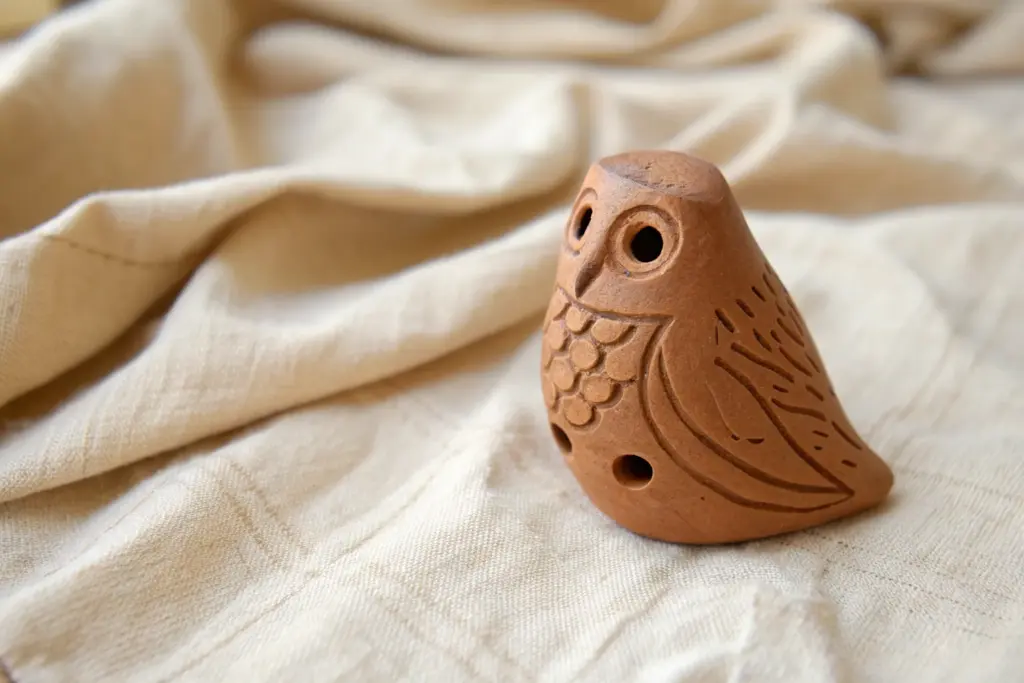
Wide-Eyed Owl Whistle Body
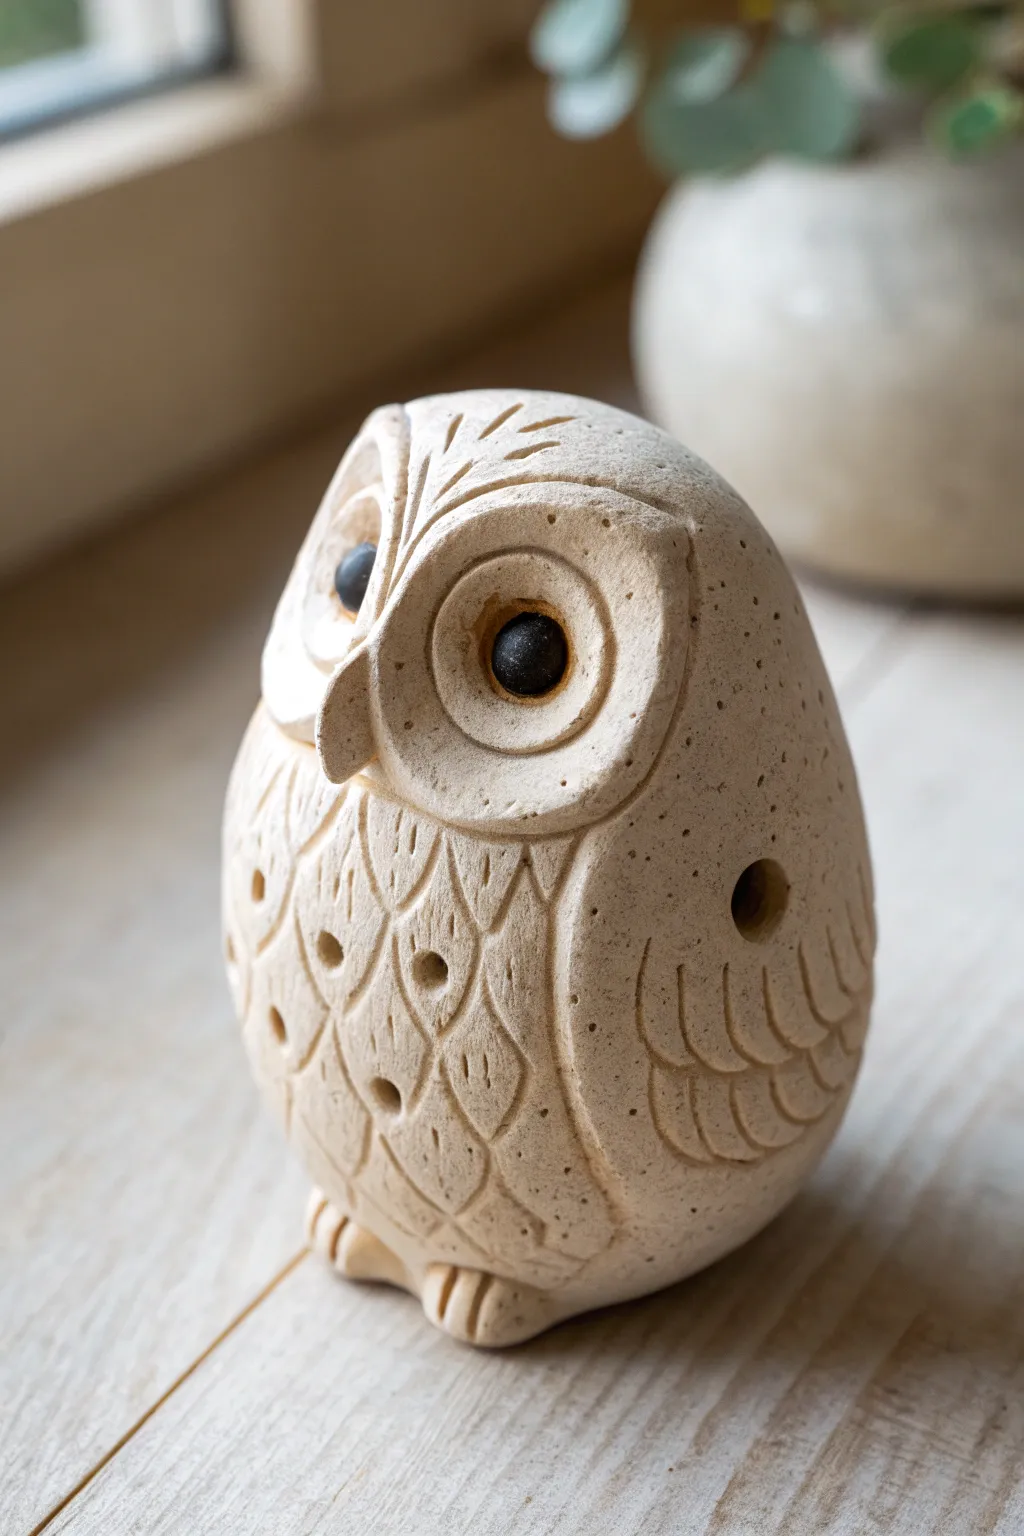
This charming, wide-eyed owl whistle combines a functional windway with delicate textures to create a delightful woodland sound. With its rounded form and carved feather details, this project is perfect for practicing precision in clay sculpting while making a playful instrument.
Detailed Instructions
Materials
- Stoneware clay (smooth or fine grit)
- Popsicle stick or specialized clay whistle tool
- Loop tool (small)
- Needle tool
- Small carving gouge (u-shaped)
- Black underglaze or slip
- Finishing sponge
- Water slip
Step 1: Forming the Base
-
Shape the Primary Form:
Begin with a ball of well-wedged clay roughly the size of a lemon. Gently roll and tap it on your work surface to create a rounded egg shape, slightly flatter on the bottom so it stands independently. -
Hollow the Body:
Create a pinch pot from this egg shape. Insert your thumb into the bottom center and pinch the walls evenly as you rotate the clay, aiming for a thickness of about 1/4 inch. Close the hole back up by pinching the clay together at the bottom, trapping the air inside to keep the form rigid. -
Refine the Silhouette:
Smooth out the exterior using a damp sponge and a rib tool. The owl should have a continuous, smooth curve from the head down to the base without a defined neck indentation.
Lost Your Hoot?
If the whistle stops working after detailing, clay crumbs likely fell into the airway. Let it dry completely, then shake it upside down to dislodge debris.
Step 2: Constructing the Whistle Mechanism
-
Create the Mouthpiece:
Select the location for the tail/mouthpiece at the lower rear of the owl. Pinch a small amount of clay out to form a slight protrusion where you will blow. -
Insert the Airway:
Using a flat popsicle stick or a specialized whistle tool, insert it into the mouthpiece protrusion. Keep the tool parallel to the ground and push it straight in until it reaches the hollow interior. -
Cut the Sound Hole:
On the underside of the owl (or very low on the back), underneath where your stick is inserted, cut a small rectangular window. This hole should intercept the airway you just created. The sharp edge of this window (the blade) is crucial for sound. -
Angle the Blade:
Carefully bevel the edge of the window furthest from the mouthpiece at a 45-degree angle. The air coming from the mouthpiece needs to be split by this sharp edge. I find it helpful to test the sound gently here before proceeding. -
Refine the Airway:
Clean up any clay burrs around the whistle mechanism using a needle tool. Even tiny crumbs can ruin the sound, so be meticulous. -
Add Tuning Holes:
Use a small hole punch or drill tool to add two finger holes on the sides of the owl’s body. Test the pitch changes as you create them.
Step 3: Sculpting the Features
-
Add the Eye Discs:
Roll two small balls of clay and flatten them into discs. Score and slip the face area, then attach these discs firmly. Use your thumb to create a concave depression in the center of each, leaving a raised rim. -
Shape the Beak:
Form a small, triangular pyramid of clay. Attach this between the lower edges of the eye discs, blending the top edge smoothly into the forehead area while leaving the hooked tip distinct. -
Refine the Eyes:
Place a small ball of clay into the center of each eye socket for the pupil. Smooth them into perfect domes. -
Define the Feet:
Roll two small coils and attach them to the very bottom front edge. Use a modeling tool to press indentations, creating three toes for each foot.
Glaze Resist Trick
Apply wax resist to the bevel (the sharp splitting edge) before glazing. Glaze pooling here will dull the sound, but raw clay keeps the edge sharp.
Step 4: Texturing and Finishing
-
Carve Feather Patterns:
Using a U-shaped gouge or a needle tool, carve overlapping ‘U’ shapes on the owl’s chest to mimic breast feathers. Keep the pressure consistent for uniform depth. -
Detail the Wings:
On the sides of the body, switch to longer, curved lines to suggest wing feathers. These should swoop downwards and towards the back. -
Forehead Details:
Carve short, radiating lines above the eye discs to suggest the texture of facial feathers. -
Apply Contrast:
Once leather hard, paint only the pupils with a black underglaze or slip. This makes the wide-eyed expression pop against the natural clay body. -
Final Smoothing:
Gently run a barely damp sponge over the carved areas to knock down any sharp burrs without erasing the texture.
Allow your owl to dry slowly to prevent cracking before firing it to the appropriate temperature for your clay body
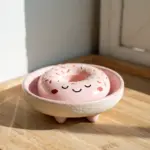
Sleepy Cat Whistle In a Loaf Pose
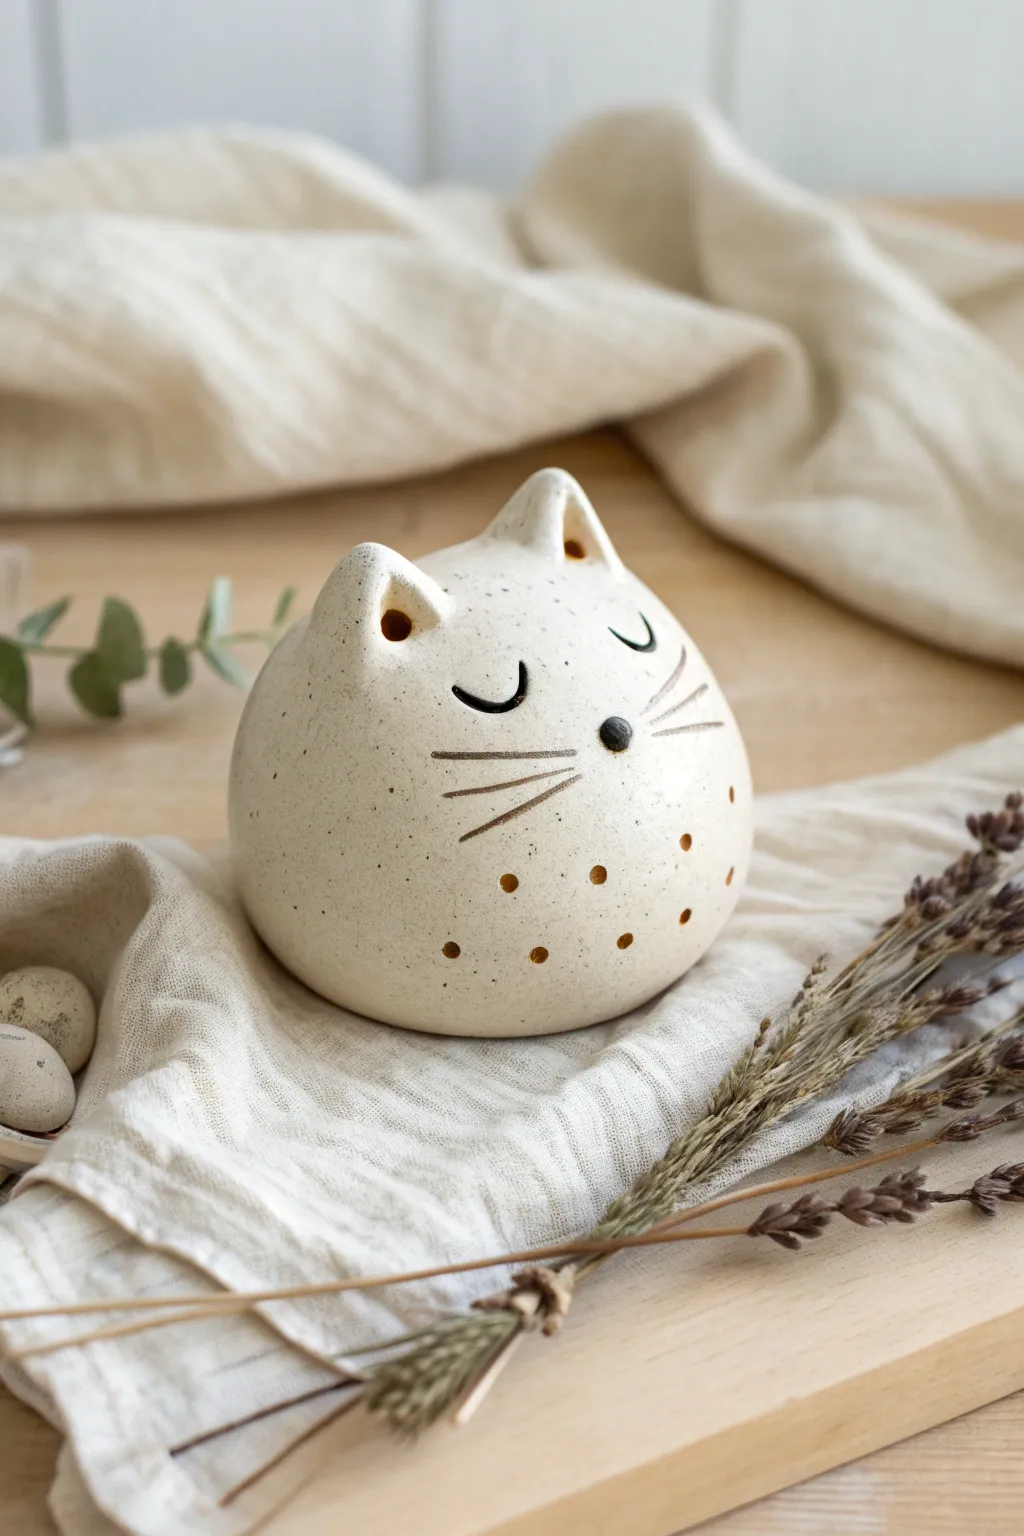
Craft a charming ceramic companion designed to look like a peaceful, sleeping cat in a perfect spherical loaf pose. This hand-built clay project features a creamy, speckled glaze finish and delicate carved details that give it a soothing, handcrafted aesthetic.
How-To Guide
Materials
- White earthenware or stoneware clay
- Wooden modeling tools
- Pin tool or needle tool
- Whistle mechanism (small separate clay piece or built-in, depending on preferred whistle style)
- Black underglaze
- Cream or off-white speckled glaze
- Fine sponge
- Small drill bit or hole cutter (optional)
Step 1: Forming the Body
-
Shape the sphere:
Begin with a fist-sized ball of white clay. Gently pat and roll it between your palms until you achieve a smooth, perfect sphere. -
Create the hollow form:
Using the pinch pot method, insert your thumb into the center and rotate the ball, pinching the walls to an even thickness of about 1/4 inch. Close the opening back up carefully to trap the air inside, forming a hollow bubble. -
Smooth the surface:
Roll the closed bubble on your work surface gently to re-round it. Use a rib tool or your fingers to smooth out any seams or lumps until the surface is uniform. -
Flatten the base:
Tap the bottom of the sphere lightly against the table. This creates a flat stable base so your cat won’t roll away.
Silent Whistle?
If you hear air but no whistle, the bevel edge is likely misaligned. Re-angle the sharp edge so the air stream from the mouthpiece splits exactly in half against it.
Step 2: Sculpting Features
-
Form the ears:
Pinch two small triangles of clay from your excess supply. Score and slip the top of the head, then firmly attach these triangles. -
Refine the ear shape:
Using a wooden modeling tool, blend the seams of the ears downward so they look like they grow naturally from the head. Gently press a small indentation into the front of each ear. -
Add the nose:
Roll a tiny, lentil-sized ball of clay. Score the center of the face and press this ball on to act as the nose button. -
Carve the expression:
With a needle tool or very fine carving loop, carefully incise two U-shapes for sleeping eyes. Add three whiskers on each cheek and a small vertical line below the nose.
Step 3: Whistle Mechanics
-
Create the mouthpiece:
Form a small rectangular tab of clay at the back or underneath the cat. This will serve as your blowing point. -
Carve the airway:
Insert a flat tool creates the airway channel into the mouthpiece, aiming towards a sharp bevel edge you cut into the body wall. This alignment is crucial for sound. -
Tune the whistle:
Blow gently to test the sound. Adjust the angle of the bevel edge until you get a clear tone. It usually takes a few tries to get the geometry just right. -
Add sound holes:
Punch small holes along the bottom rim of the cat using a small straw or drill tool. While decorative, these can be positioned to alter the pitch if covered.
Level Up: Luminary Cat
Enlarge the bottom holes slightly and leave the base open. Now your whistle doubles as a tiny tea-light holder that glows warmly through the decorative spots.
Step 4: Finishing Touches
-
Bisque fire:
Allow the cat to dry slowly under plastic to prevent cracking. Once bone dry, fire the piece in a kiln to bisque temperature. -
Highlight the details:
Apply black underglaze into the carved eye lines, whiskers, and onto the nose nub. additional black into the inner ear indentations. -
Wipe back:
Use a damp sponge to wipe away the excess black underglaze from the surface, leaving color only in the recessed lines and on the nose. -
Glaze application:
Dip or brush the entire piece with a cream speckled glaze. Avoid clogging the whistle airway with glaze; I prefer to use a bit of wax resist near the air channel. -
Final wipe:
Ensure the bottom of the piece is free of glaze so it doesn’t fuse to the kiln shelf. -
Glaze fire:
Fire the piece again to the maturation temperature of your specific glaze to achieve that smooth, glossy finish.
Place your finished sleepy cat on a shelf where its peaceful expression can bring a moment of calm to your day


Sturdy Dog Whistle With Floppy Ears

Capture the spirit of a faithful companion with this sturdy, hand-built clay whistle shaped like a sitting dog. Its upward-gazing pose and floppy ears give it personality, while the integrated whistle mechanism near the tail makes it a functional musical instrument.
Step-by-Step
Materials
- Stoneware or earthenware clay (with some grog for stability)
- Small wooden modeling tools
- Popsicle stick or fettling knife
- Serrated rib or scoring tool
- Slip (clay mixed with water)
- Whistle voicing tool (wooden skewer or specialized whistle tool)
- Sponge
- Small metal loop tool
Step 1: Forming the Body and Whistle
-
Pinch Pot Base:
Start by creating two pinch pots of roughly equal size. Score and slip the rims, then join them together to form a hollow egg shape. This enclosed air pocket will become the sounding chamber of your whistle. -
Shape the Seat:
Gently paddle or tap the wider end of the egg onto your work surface to create a flat bottom tailored for a sitting pose. The narrower end should point upwards to eventually support the neck. -
Construct the Whistle Mechanism:
On the rounded back area (where the dog’s tail would be), build a rectangular mouthpiece extension. Insert your voicing stick into the mouthpiece to create the windway. -
Cut the Window:
Where the stick ends inside the hollow chamber, cut a small square hole (the window) on the underside. Bevel the edge of the hole at a 45-degree angle to split the air stream—this sharpness is crucial for a clear sound. -
Test the Sound:
Once the mechanism is clean of debris, blow gently to test the tone. If it whistles clearly, you are ready to sculpt the rest of the dog around this functional core.
Step 2: Sculpting the Dog
-
Add the Neck:
Roll a thick coil of clay and attach it to the top of your hollow form. Blend the clay downwards onto the body thoroughly so no seams are visible. -
Form the Head:
Shape a solid tapered oval of clay for the head. Score and slip the connection point, then attach it to the neck, angling the nose upward as if the dog is looking at its owner. -
Define the Legs:
Roll four sturdy coils for legs. Attach the back legs first, bending them to sit flush against the body hips. Add the front straight legs, ensuring they touch the ground alongside the back paws for stability. -
Refine the Paws:
Use a modeling tool to press indents into the ends of each leg to suggest toes. The paws should be slightly flattened where they meet the ground.
Airflow Tuning
If the whistle sounds breathy, the splitting edge (labium) might be dull. Sharpen that 45-degree angle again with a clean knife tool.
Step 3: Adding Details and Texture
-
Attach the Flop Ears:
Cut two teardrop shapes from a flattened slab of clay. Attach these to the sides of the head using slip, smoothing the top seam so they appear to hang naturally. -
Sculpt the Face:
Carve a horizontal line for the mouth and press small indentations for the eyes. Use a needle tool to add whisker dots on the muzzle. -
Collar Detail:
Roll a thin strip of clay and wrap it around the neck. Add a small ball of clay at the front and press a loop of wire or a tiny clay coil into it to resemble a tag. -
Surface Texture:
I like to wipe the entire piece with a damp sponge now to smooth out fingerprints, but leave a slightly sandy texture which mimics short fur. -
Ventilation Hole:
Use a needle tool or small drill bit to create a hidden hole, perhaps under the collar or near the ear, to allow trapped air in the solid head/neck to escape during firing. -
Sound Hole Check:
Ensure the whistle window (the hole on the back/side) remains unobstructed. Use a tool to gently clear any clay burrs that might have appeared during handling.
Collapsing Belly?
If the hollow body starts to sag while you add the heavy solid head, let the base stiffen to a leather-hard state before attaching the neck.
Allow your loyal friend to dry slowly before firing to ensure the whistle mechanism stays perfectly aligned.
Squat Frog Whistle With Big Eyes

Sculpt a charming, woodland-inspired frog whistle featuring a glossy green glaze with warm, earthy undertones. This squat little fellow has large, expressive eyes and a beautifully resonant spotted back that doubles as a musical instrument.
How-To Guide
Materials
- Stoneware clay (smooth)
- Small rolling pin
- Wooden sculpting tools
- Fettling knife
- Needle tool
- Sponge
- Slip (clay mixed with water)
- Popsicle stick (for mouthpiece)
- Green gloss glaze (celadon or translucent)
- Brown iron oxide wash or underglaze
- Small round brush
- Loop tool (for scouring)
Step 1: Forming the Body
-
Shape the base:
Start with a ball of clay roughly the size of a tennis ball. Gently tap it against your work surface to flatten the bottom, then pinch and pull the clay upwards to form a rounded, slightly elongated tear-drop shape for the frog’s body. -
Hollow the form:
Using a loop tool or your thumbs, hollow out the underside of the body to create the resonance chamber. Ensure the walls are an even thickness, about 1/4 inch, leaving the air chamber fully enclosed by sealing the clay back up at the bottom. -
Refine the silhouette:
Smooth the outer surface with a damp sponge. Gently push the front of the body upward to create a subtle lift where the head will be, giving the frog an alert, sitting posture.
Silent Whistle?
If you hear rushing air but no tone, the splitting edge is likely dull or misaligned. Sharpen the edge again with a knife and ensure it lines up perfectly with the air channel.
Step 2: Creating the Sound Mechanism
-
Create the mouthpiece:
Flatten a small piece of clay at the rear of the frog to form the mouthpiece area. Insert a flat popsicle stick horizontally into the clay to create the airway channel. -
Cut the fipple:
Turn the frog over to access the underside. Near the end of the airway channel you just made, cut a small rectangular window. The edge of this window needs to be sharp and angled at 45 degrees to split the air stream. -
Test the sound:
Remove the stick and clear any debris. Blow gently through the mouthpiece. Ideally, you want a clear, sharp tone; adjust the angle of your splitting edge with a needle tool until the whistle sings clearly. -
Add finger holes:
Once the whistle works, use a small hole cutter or straw to punch several holes along the frog’s back. In the reference image, there isn’t a traditional scale, but scattered ‘spots’ that can act as tuning holes.
Step 3: Sculpting the Features
-
Add hind legs:
Roll two thick coils of clay. Shape them into folded legs and attach them to the sides of the body using the score and slip technique. The knees should tuck close to the body, with feet resting flat. -
Form the front legs:
Create two smaller, straighter coils for the front legs. Attach them vertically under the chest area, blending the clay smoothly into the torso so they look like natural extensions of the body. -
Detail the toes:
Press lightly into the feet with a wooden tool to suggest webbed toes. The reference shows simplified, rounded toes rather than sharp claws. -
Build the eyes:
Roll two small spheres of clay. Attach them prominently to the top of the head. Roll thin coils to wrap around the base of each eye, creating eyelids that blend into the skull. -
Carve the mouth:
Use a fettling knife or needle tool to incise a wide, smiling line that wraps around the front of the snout. Deepen this line slightly to create a shadow.
Pro Tip: Depth of Color
Don’t wipe the oxide wash away completely. Leaving a subtle haze on the raised areas gives the green glaze a varied, organic tone rather than a flat commercial look.
Step 4: Glazing and Finishing
-
Bisque fire:
Allow the clay to dry slowly under plastic for a day, then uncover until bone dry. Fire the piece in the kiln to cone 04 (or your clay’s specific bisque temperature). -
Apply oxide wash:
Mix brown iron oxide with water. Brush this wash over the entire frog, focusing on the recesses around the eyes, mouth, and leg joints. Wipe the excess off with a damp sponge, leaving the dark brown color only in the textures and creases. -
Wax the eyes:
Paint a circle of black underglaze for the pupil. Once dry, carefully use wax resist over the pupil and the brown rim of the eye to keep them defined during glazing. -
Apply green glaze:
Dip or brush a coat of translucent green gloss glaze over the entire piece. The translucency is key here as it allows the brown oxide in the crevices to show through, creating that rich, earthy depth. -
Final wipe:
Wipe the glaze off the bottom of the feet to prevent sticking to the kiln shelf. I always double-check the airway hole has no glaze clogging it before the final firing. -
Glaze fire:
Fire the piece again to the appropriate temperature for your glaze (typically cone 5 or 6 for stoneware). The glaze should melt into a smooth, shiny finish resembling wet amphibian skin.
Let your finished frog cool completely before testing out its cheerful new song
Dolphin Whistle With Smooth Streamlined Form
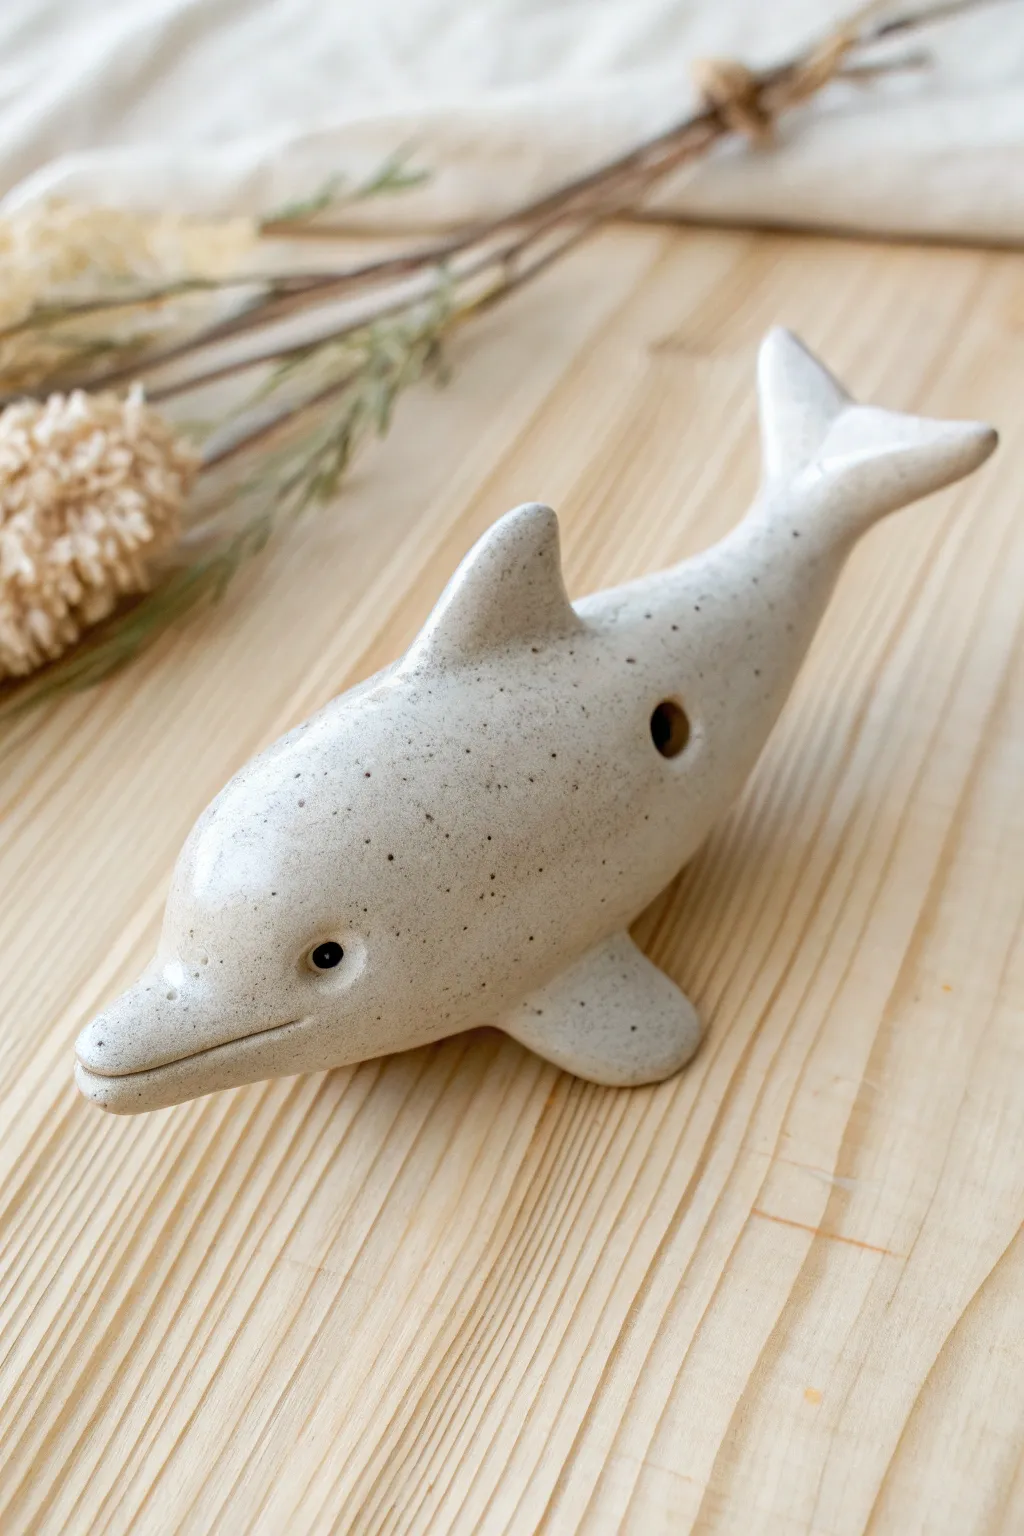
Capture the fluid grace of the ocean with this charming dolphin whistle, crafted from a speckled clay body that mimics the pattern of sea spray. Its streamlined form fits perfectly in the hand, making it not just a musical instrument but a delightful tactile sculpture.
Step-by-Step
Materials
- Speckled Stoneware or Earthenware Clay (light grey/beige)
- Fettling Knife
- Popsicle Stick or Beveled Modeling Tool
- Whistle Modelling Tool (rectangular or square dowel)
- Needle Tool
- Small Sponge
- Slip (clay mixed with water)
- Clear Glaze (high gloss)
Step 1: Forming the Body
-
Shape the pinch pots:
Begin with two balls of speckled clay, one slightly larger than the other. Create two pinch pots and join them together by scoring and slipping the edges, forming a closed hollow egg shape. -
Elongate the form:
Gently roll and squeeze the hollow egg to elongate it into a torpedo shape. Taper one end significantly to form the tail area and the other end slightly less for the nose. -
Shape the snout:
On the thicker end, pinch and pull the clay forward to create a distinct, rounded snout. Use your thumb to smooth the transition from the forehead to the nose, creating the classic dolphin ‘beak’ profile. -
Smooth the surface:
Using a rib tool or your fingers, compress the clay surface to remove any lumps or joining seams. The goal is a completely seamless, aerodynamic curve.
No Sound?
If the whistle sounds airy or silent, the splitting edge (labium) isn’t sharp or aligned. Re-insert the stick and carefully sharpen that slicing edge again.
Step 2: Creating the Whistle Mechanism
-
Cut the mouthpiece:
At the tail end, determine where you will blow air. Flatten this area slightly and insert your rectangular dowel stick straight in to create the air channel. -
Make the sound hole:
On the underside or side of the dolphin body (where shown in the reference), cut a small box-shaped hole. The angled blade edge – the ‘labium’ – needs to be sharp and precisely aligned with the air channel you just made. -
Align and test:
Carefully connect the mouthpiece channel to the sound hole. I find that holding the whistle up to a light source helps ensure the air path hits the sharp edge of the hole perfectly. Give a gentle test blow to check for a clear tone.
Step 3: Adding Fins and Details
-
Shape the dorsal fin:
Form a small triangle of clay and curve slightly backwards. Score the connection point on the dolphin’s back and attach the fin with slip, blending the edges seamlessly so it looks like it grew from the body. -
Attach pectoral flippers:
Create two smaller flattened teardrop shapes for the side flippers. Attach them low on the body’s sides, angling them slightly downwards and backwards. -
Form the tail flukes:
Flatten the tapered tail end you created earlier. Split it down the middle with a knife and flare the two sides out to create the flukes, curving them slightly upward for a playful swimming motion. -
Detail the face:
Use a needle tool to gently scribe a long smile line along the beak. Press small indentations for the eyes just above the corner of the mouth; you can insert tiny balls of black clay here for definition or glaze them later.
Make a Pod
Vary the size of the internal hollow chamber to create different pitches. Make a larger ‘mother’ dolphin for deep notes and a tiny calf for high-pitched peeps.
Step 4: Finishing Touches
-
Sponge smooth:
Once the added parts are secure, take a barely damp sponge and wipe down the entire piece. This removes fingerprints and exposes the grog or speckles in the clay body. -
Bisque fire:
Allow the dolphin to dry slowly under loose plastic to prevent the fins from cracking. Once bone dry, bisque fire according to your clay body’s specifications. -
Glaze application:
Apply a clear, high-gloss glaze to the entire piece. This will make the clay body’s natural speckles pop and give the dolphin a wet, shiny appearance. -
Final firing:
Fire the piece a final time to the glaze temperature. Ensure the blowhole and sound hole remain clear of flowing glaze.
Once fired, your ceramic dolphin will be ready to sing its own song of the sea
Simple Horse Whistle With Mane Texture
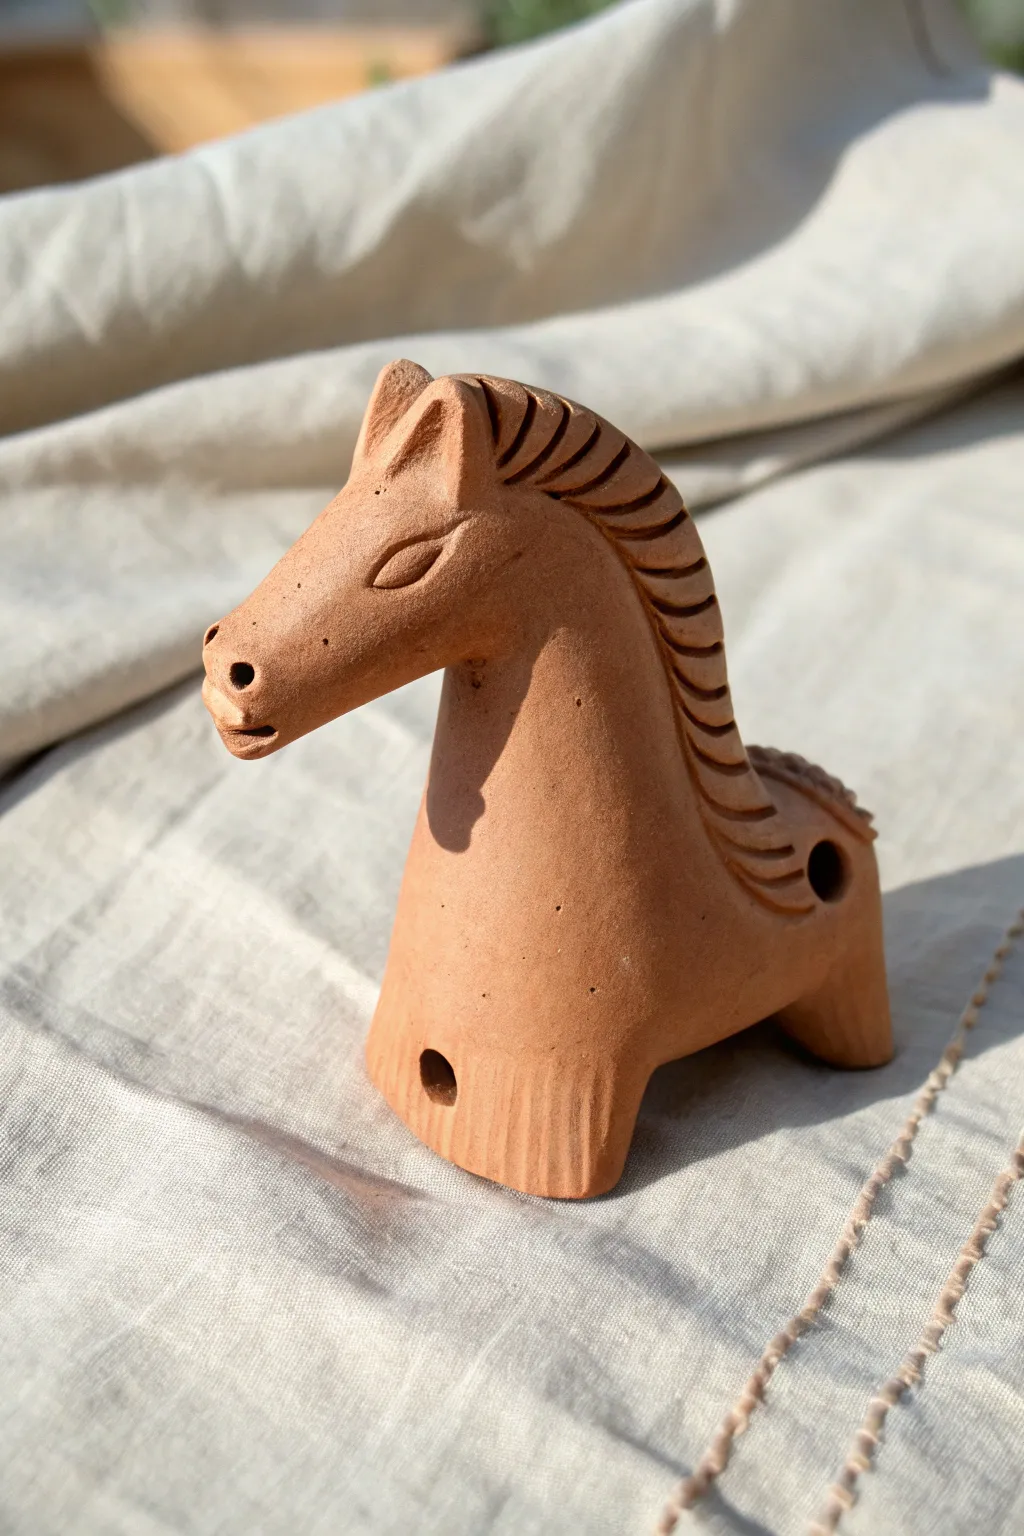
This charming, rustic horse whistle captures the spirit of traditional folk art with its stylized mane and warm, unglazed finish. Its sturdy, grounded shape makes it a wonderful beginner project for learning the mechanics of clay whistles.
Step-by-Step Guide
Materials
- Terracotta or earthenware clay (low fire)
- Popsicle stick or modeling tool
- Fettling knife
- Wooden skewer or needle tool
- Small sponge
- Slip (clay mixed with water)
Step 1: Forming the Body & Sound Chamber
-
Shape the pinch pots:
Start with two balls of clay, one slightly larger than a golf ball. Use your thumbs to press into the center of the larger ball to create a deep, even pinch pot. Creation of a secondary, smaller pinch pot isn’t necessary for this monolithic style, but hollowing the main body is key. -
Close the form:
If you made two pots, join them; otherwise, curve the edges of your single pinch pot inward to close it into a hollow, enclosed egg shape. Score and slip the seams well to ensure no air escapes. -
Stand it up:
Gently tap the hollow form on your table to flatten the bottom. This will become the horse’s chest and stability base. Pinch the upper part of the clay to begin hinting at a neck rising from the body. -
Create the mouthpiece:
Add a small rectangular block of clay to the back of the figure (the tail end). This creates the material needed for the whistle mechanism. Blend it seamlessly into the main body.
Silent Whistle?
If you hear rushing air but no whistle, the blade edge is likely too thick or dull. Re-slice the bevel to make it razor-sharp and ensure it aligns perfectly with the air channel.
Step 2: Creating the Whistle Mechanism
-
Cut the bevel:
On the top of the ‘tail’ block you just added, cut a 45-degree angle slice into the clay. This creates the sharp edge (the blade) that splits the air. -
Make the airway:
I prefer to use a flat popsicle stick for this. Push it straight into the back of the tail block, aiming precisely for the sharp edge of your bevel cut. The air must travel under the stick and hit the blade. -
Open the sound hole:
Where your bevel cut meets the hollow body, clear out a small window downwards into the hollow chamber. Ensure no clay debris is hanging inside. -
Test the sound:
Before sculpting further, blow gently into the mouthpiece. If it hisses, adjust the angle of the blade or clear the airway. Only proceed once you have a clear tone.
Level Up: Burnishing
Before the clay fully dries (leather hard), rub the smooth areas with the back of a metal spoon. This compresses the clay and creates a beautiful, natural shine after firing.
Step 3: Sculpting the Horse Features
-
Add the neck and head:
Roll a thick coil of clay for the neck and a slightly tapered oval for the head. Score and slip to attach the neck to the front of the body, then attach the head to the neck at a slight downward angle. -
Blend the seams:
Use your thumb or a modeling tool to smooth the clay where the neck meets the body, ensuring strong structural integrity. The transition should look muscular and thick. -
Sculpt the ears:
Pinch two small, triangular pieces of clay and attach them to the top of the head. Use the back of a tool to press a small indentation into the front of each ear. -
Refine the face:
Poke two small holes for nostrils at the snout. Use a needle tool to incise an almond shape for the eye and draw a simple line for the eyelid.
Step 4: Textures and Details
-
Apply the mane:
Roll a long, thin coil of clay. Attach it running from between the ears down the back of the neck. Flatten it slightly against the neck. -
Texturize the mane:
Using a fettling knife or edge of a tool, press rhythmic, diagonal lines into the mane coil to simulate hair texture. Continue these lines down the back of the neck for a stylized look. -
Define the legs:
Since this is a stylized base, simply carve vertical lines into the bottom of the body to suggest legs, rather than sculpting individual limbs. Add faint texture lines here to match the mane. -
Smooth the surface:
Use a slightly damp sponge to wipe down the smooth areas of the horse (cheeks, flank), removing any fingerprints but being careful not to erase your incised mane texture. -
Final drying:
Let the piece dry slowly under loose plastic to prevent the neck from cracking. Once bone dry, fire it in a kiln according to your clay body’s specifications.
Enjoy the timeless sound of your handcrafted instrument once it comes out of the kiln
Chunky Dinosaur Whistle With Tail Mouthpiece
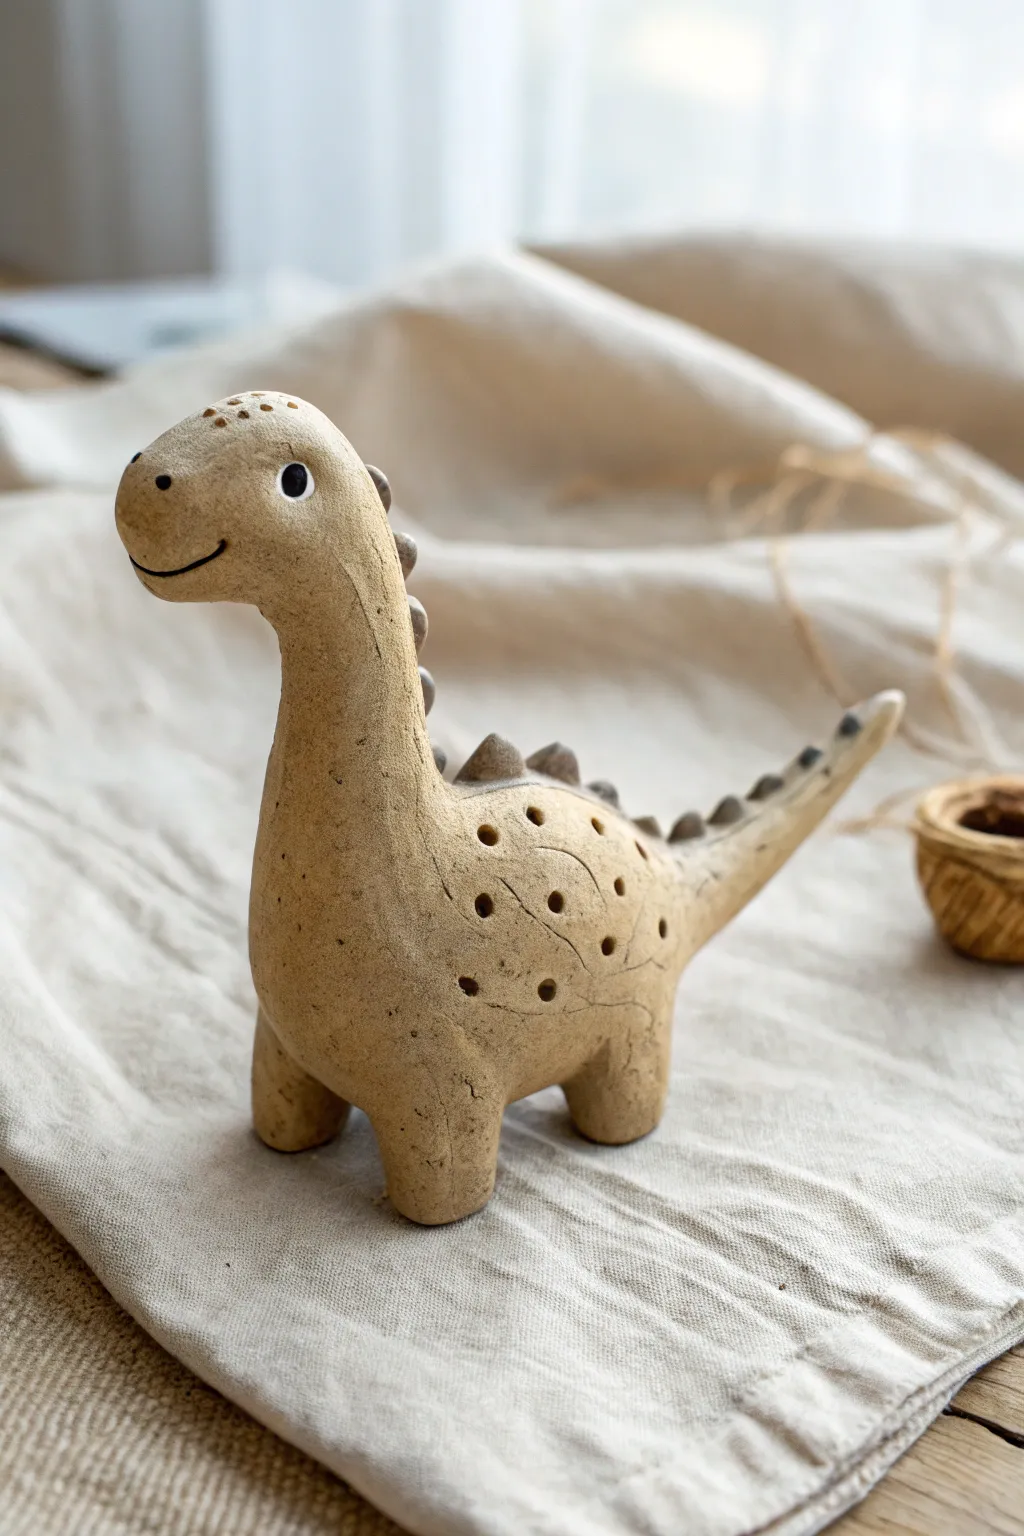
This charming, hand-built clay whistle takes the shape of a friendly dinosaur with a textured body and a sweet, smiling face. Its unglazed, sandy finish gives it a natural, rustic appeal perfect for a desk companion or a musical toy.
How-To Guide
Materials
- Stoneware clay with grog (sandy color)
- Popsicle stick or modeling tool
- Underglaze (black)
- Small fine-tipped brush
- Needle tool
- Sponge
- Score and slip tool (or serrated rib)
- Slip (clay and water mixture)
- Cylindrical tool (for punching holes)
Step 1: Forming the Hollow Body
-
Pinch Pot Base:
Start with a ball of clay about the size of a tangerine. Stick your thumb into the center and gently pinch the walls while rotating to create a hollow, uniform pinch pot. -
Close the Form:
Gently gently curve the rim of your pinch pot inward until the opening closes completely. Smooth the seam thoroughly so you have a sealed, hollow egg shape. This traps the air inside, which provides support while you work. -
Refine the Shape:
Tap the clay egg gently on your work surface to create a flat bottom so the dinosaur will stand on its own later. Smooth out the surface with a damp sponge or your fingers.
Silent Dino?
If the whistle stops working after attaching legs, you likely squeezed the airway. Re-insert your stick to clear the passage and sharpen the bevel edge again.
Step 2: Creating the Whistle Mechanism
-
Pull the Tail:
While holding the body, gently pull a section of clay from one end to elongate it into a thick, tapered tail. This will become the mouthpiece. -
Create the Airway:
Insert a popsicle stick flat into the end of the tail to create the airway. Aim straight towards the hollow cavity of the body. -
Cut the Window:
Flip the dinosaur over. On the underside of the tail, near where it meets the body, cut a small rectangular ‘window’ (bevel adjustment). Use your needle tool to cut a 45-degree angle on the side of the window closest to the body. This sharp edge splits the air to make the sound. -
Test the Sound:
Clear out any clay crumbs from the airway and blow gently into the tail. It should whistle. If not, adjust the angle of the splitting edge slightly until you get a clear tone.
Tuning Tip
To change the pitch, make the hollow body cavity larger (for a deeper sound) or smaller (for a higher pitch) before sealing it up.
Step 3: Sculpting the Dinosaur
-
Attach the Neck:
Roll a thick coil of clay for the neck and head. Score and slip the attachment point on the front of the body, then firmly press the neck into place. -
Shape the Head:
Mold the top of the coil into a rounded head shape, ensuring it flows smoothly from the neck without a harsh seam. I like to tilt the head slightly for a curious expression. -
Add Legs:
Roll four small, chunky cylinders for legs. Score and slip the bottom of the body, attach the legs, and blend the clay upwards so they look integrated, not just stuck on. -
Spike Detail:
Pinch tiny triangles of clay and attach them in a row running down the back of the neck, over the body, and down the tail to create the spinal ridges.
Step 4: Texture and Features
-
Body Markings:
Using a small cylindrical tool or the back of a paintbrush, press circular indentations randomly over the sides of the body to create a spotted texture. -
Etched Lines:
Use a needle tool or a dull pencil to draw faint, curving lines connecting some of the dots, mimicking cracked earth or reptile skin. -
Facial Features:
Carve a simple, wide smile using your needle tool. Use the same tool to poke small nostrils at the front of the snout. -
Adding Eyes:
Paint two small circles of black underglaze for the eyes. Once dry, add a tiny dot of white slip or glaze to create a highlight, bringing the character to life. -
Final Surface Check:
Wipe the entire piece gently with a barely damp sponge to soften any sharp burrs from your carving tools, preserving the rustic texture. -
Firing:
Let the piece dry slowly and completely before bisque firing. If you want a shiny finish, add a clear glaze before the final firing, or leave it bare for the matte look shown.
Enjoy the deep, earthy tone of your new prehistoric friend once it comes out of the kiln
Cozy Bear Whistle With Rounded Paws
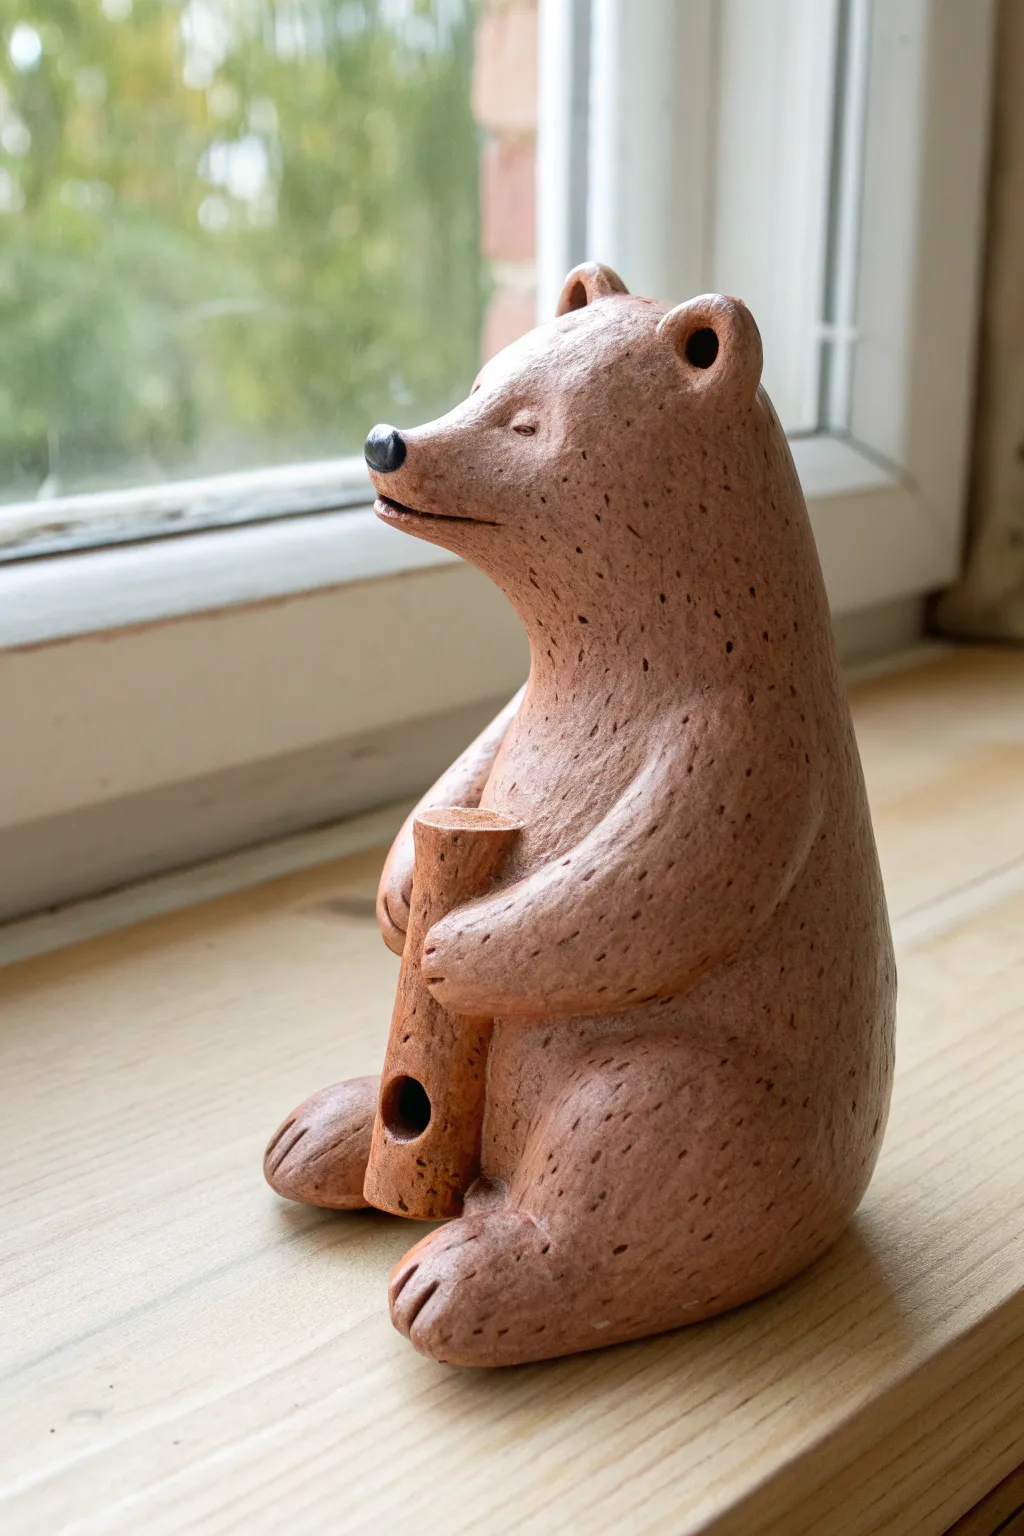
Create a charming, musical companion with this clay bear whistle tutorial. This project features a seated bear with soft, rounded paws clutching the instrument, finished with a warm, speckled glaze that gives it a natural, cozy feel.
Step-by-Step Tutorial
Materials
- Earthenware or stoneware clay (speckled or plain terracotta)
- Wooden modeling tools
- Fettling knife
- Slip (clay mixed with water)
- Popsicle stick or flat wooden spatula (for the whistle mechanism)
- Small sponge
- Needle tool
- Black underglaze (for the nose)
- Clear matte glaze
Step 1: Forming the Body and Head
-
Shape the main form:
Begin with a ball of clay about the size of a large orange. Gently roll and elongate it into a rounded pear shape. This will serve as the seated body and neck of the bear. -
Define the head:
At the narrower top end of your pear shape, pinch and pull the clay slightly forward to create the snout. Use your thumbs to gently indent the area where the neck meets the shoulders to distinguish the head from the body. -
Smooth the contours:
Use a damp sponge or your fingers to smooth out any lumpy areas, ensuring a continuous, organic curve from the back of the head down to the base. The bear should look like it is slouching comfortably. -
Add the ears:
Roll two small, pea-sized balls of clay. Flatten them slightly and attach them to the top of the head using the score and slip method. Use a rounded tool to create the inner ear depression, blending the clay seamlessly into the skull.
Step 2: Creating the Whistle Mechanism
-
Form the whistle cylinder:
Roll a separate cylinder of clay, roughly the thickness of your thumb and about 3 inches long. This will be the object the bear holds, which functions as the whistle. -
Hollow the chamber:
Carefully hollow out the cylinder from the bottom end using a loop tool, leaving the top end (near where the bear’s chin will be) capped and solid. -
Create the mouthpiece:
Flatten the bottom end slightly to form a mouthpiece. Insert a popsicle stick into the mouthpiece to create the airway (windway). Pull it out and cut a 45-degree angle bevel (the blade) on the top surface of the cylinder, about an inch from the mouthpiece end. -
Connect the airway:
Reinsert the popsicle stick into the windway. Carefully refine the bevel so the air stream coming from the stick hits the sharp edge of the blade exactly. Test the sound by blowing gently; adjust the angle until you get a clear tone.
Clear Sound Tip
The sharp edge of the whistle’s ‘blade’ must be perfectly aligned with the airway. If the sound is breathy, the air isn’t splitting cleanly against this edge.
Step 3: Assembly and Detailing
-
Attach the whistle:
Score and slip the back of the whistle cylinder and the front of the bear’s belly. Press the whistle firmly against the bear so it sits vertically against the chest. -
Add the legs:
Roll two thick sausages of clay for the legs. Bend them slightly to form a knee and attach them to the sides of the body base. The feet should stick out forward, with the paws resting flat. -
Sculpt the arms:
Create two smaller coils for the arms. Attach them at the shoulders and curve them around the whistle cylinder. Blend the clay at the shoulders so it looks like the fur flows naturally. -
Refine the paws:
At the ends of the arms and legs, use a modeling tool to press in three lines to suggest toes. Round over the edges to keep the paws soft and chubby. -
Define the face:
Use a needle tool or small knife to carve a horizontal slit for the mouth. Just above the snout, make two tiny, angled indentations for the closed, sleepy eyes. -
Add the nose:
Roll a tiny bead of clay and attach it to the very tip of the snout. Flatten it slightly to create a cute button nose. -
Texture the fur:
Using a needle tool or a stiff bristled brush, lightly scratch specific areas around the chest and back to mimic fur texture, or leave it smooth if you prefer the look in the reference image.
Glaze Clogging
Glaze can easily fill the small airway and ruin the sound. Apply wax resist to the bevel area and inside the mouthpiece before dipping to keep the airway open.
Step 4: Finishing and Firing
-
Check the sound again:
Handling the clay can distort the whistle. Give it one final test blow to ensure the tone is still clear. If not, carefully re-insert the stick to clear the airway. -
Bisque fire:
Let the piece dry completely (slowly, under loose plastic for the first day) and then bisque fire it according to your clay body’s instructions. -
Apply accents:
Once fired, apply a dab of black underglaze solely to the nose bead. Wipe away any excess if it drips. -
Glaze:
Dip or brush the entire bear (except the bottom) in a clear matte glaze. If your clay isn’t naturally speckled, use a speckled clay glaze to achieve the spotted effect. -
Final fire:
Glaze fire the piece to the recommended temperature (e.g., Cone 5 or 6). I always double-check that the whistle airway is clear of glaze before placing it in the kiln.
Once cooled, your bear is ready to sit on the windowsill and play a tune whenever you need a little cheer
Pocket Bunny Whistle With Long Ears
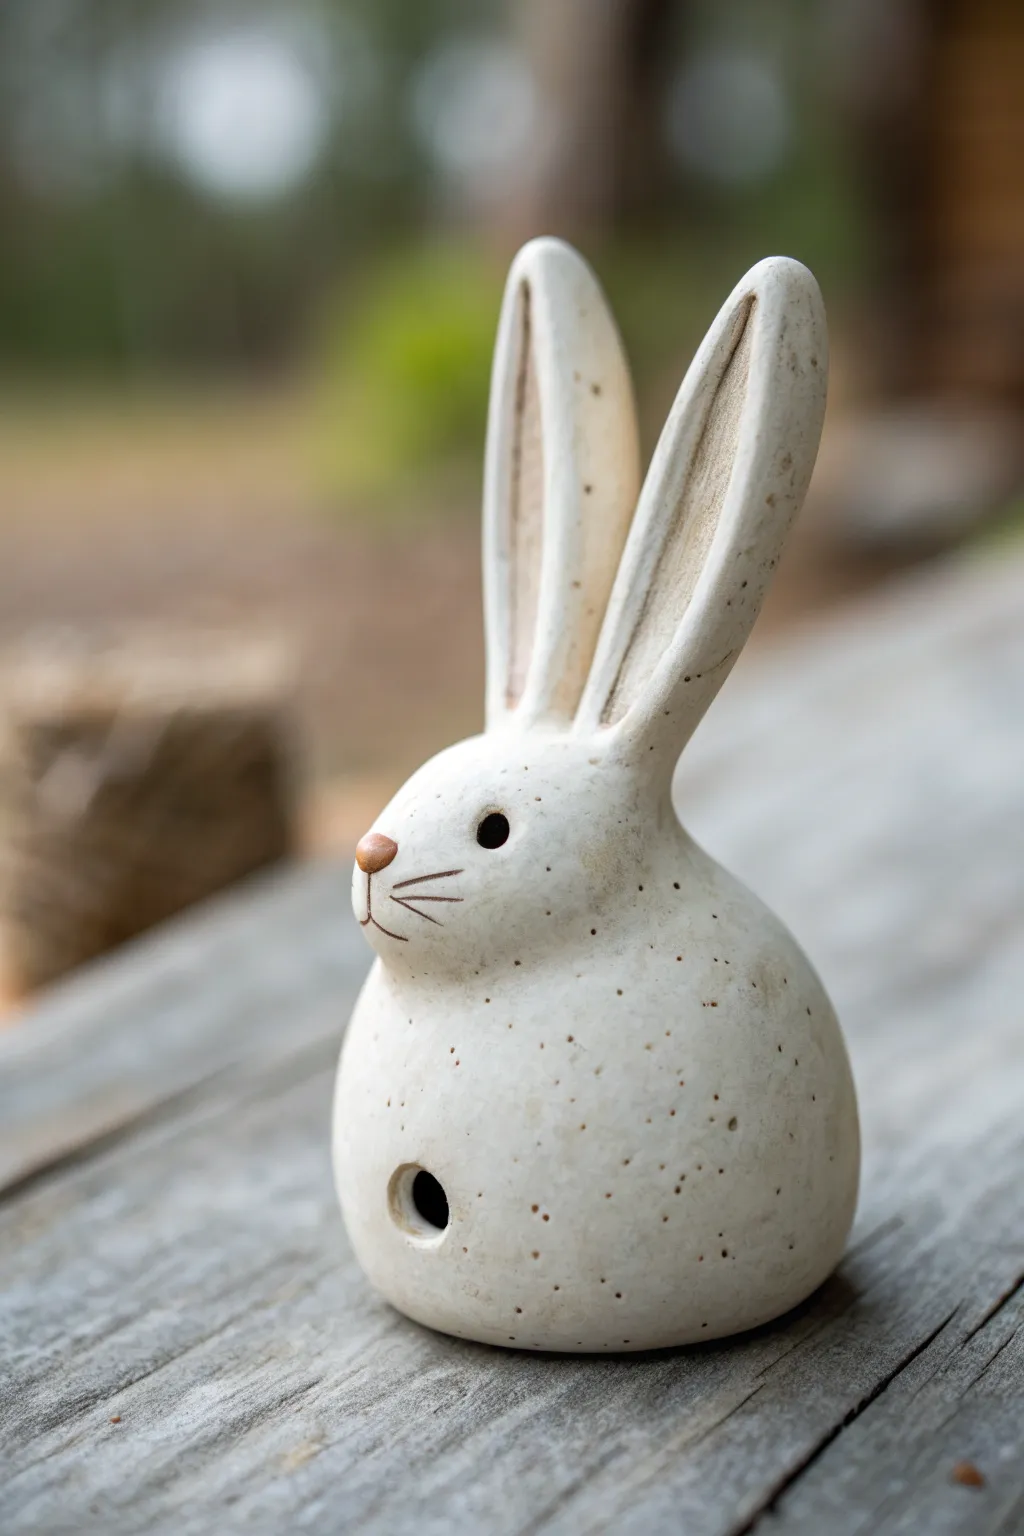
This charming ceramic whistle combines the playful shape of a long-eared rabbit with a functional musical instrument. The design features a smooth, rounded body made from speckled white clay, giving it a rustic, handcrafted appeal perfect for spring decor or as a pocket companion.
Step-by-Step Guide
Materials
- White speckled stoneware clay (or plain white clay)
- Popsicle stick or flat modeling tool
- Whistle voicing tool (bevel cutter or sharpened stick)
- Needle tool
- Small sponge
- Slip (clay mixed with water)
- Small round paintbrush
- Clear glaze (matte or satin recommended)
- Underglaze (black for eyes, brown/terracotta for nose)
Step 1: Forming the Whistle Body
-
Create a pinch pot:
Start with a ball of clay roughly the size of a golf ball or slightly larger. Insert your thumb into the center and gently pinch the walls while rotating the ball to create a small, hollow cup shape. Keep the walls even, about 1/4 inch thick. -
Close the form:
Gently gently curve the top edges of your pinch pot inward until they meet, trapping air inside to create a hollow sphere. Seal the seam thoroughly by smearing the clay across the join until it disappears. -
Shape the bunny:
Roll the hollow sphere on your work surface to smooth it out. Gently manipulate the form to be slight pear-shaped, with a slightly narrower top for the head and a wider base for the body, but keep it mostly rounded. -
Flat base:
Tap the bottom of the sphere on your table to create a small, flat surface so the bunny will sit upright without rolling away.
Whistle Won’t Whistle?
No sound usually means the air isn’t hitting the splitting edge correctly. Re-insert the stick into the airway and adjust the sharp edge up or down until it lines up perfectly with the airflow.
Step 2: Creating the Whistle Mechanism
-
Cut the mouthpiece:
Identify the back of the bunny. Using a flat tool or stick, press a horizontal slot into the lower back area to form the mouthpiece where you will blow. I usually make this rectangular and narrow. -
Make the air channel:
Insert your flat tool into the mouthpiece slot and push it straight into the hollow body cavity. Wiggle it slightly to ensure a clear, flat tunnel for air to travel through. -
Cut the fipple hole:
On the underside or lower front of the bunny (where you see the round hole in the photo), cut a small opening. This hole determines the sound. Use a sharp tool to cut a 45-degree angle on the distinct edge of this hole facing the mouthpiece channel. This ‘splitting edge’ is crucial for sound. -
Test the sound:
Blow gently through the mouthpiece. If you don’t hear a clear tone, adjust the angle of the splitting edge or clean out any clay debris in the air channel. It must be sharp and clean.
Step 3: Sculpting Features
-
Form the ears:
Roll two coils of clay that are thick in the middle and tapered at the ends. Flatten them slightly to resemble long rabbit ears. They should be roughly the same height as the body. -
Attach the ears:
Score the top of the bunny head and the base of the ears. Apply slip and press the ears firmly in place, standing tall and parallel. Smooth the clay at the attachment point so they look seamless. -
Refine ear shape:
Use a modeling tool to create shallow depressions down the center of each ear’s front face, giving them depth and character. -
Add facial details:
Roll a very tiny ball of clay for the nose and attach it with a dab of water. Use a needle tool to scratch three simple whiskers on each side of the cheeks. -
Create the eyes:
Use a small, round tool or the back of a drill bit to press circular indentations for the eyes. Don’t poke all the way through; just make a deep divot on either side of the head.
Pro Tip: Ear Stability
Long ears can be fragile during drying. Prop them up with small pieces of foam or a wad of paper towel until the clay stiffens to leather hard, ensuring they don’t droop.
Step 4: Finishing and Firing
-
Smooth the surface:
Once the clay is leather hard, wipe the entire piece with a damp sponge to remove fingerprints and harsh tool marks. This exposes the grog or speckles in the clay nicely. -
Bisque fire:
Allow the bunny to dry completely (slowly, to prevent cracking at the ear joints). Fire it to bisque temperature (usually cone 04). -
Underglaze details:
Apply a tiny dot of black underglaze into the eye indentations and a touch of terracotta or brown underglaze onto the nose bump. -
Glaze application:
Dip or brush the entire piece with a clear matte or satin glaze. Ensure you don’t clog the whistle airway with glaze; clear it out with a pipe cleaner if needed. -
Final fire:
Fire the piece to the maturity temperature of your clay body (e.g., cone 5 or 6 for stoneware). The speckles will show through the milky white finish beautifully.
This little ceramic rabbit will sit patiently on your shelf until you’re ready to make a cheery sound
Pointy Fox Whistle With Carved Fur Lines
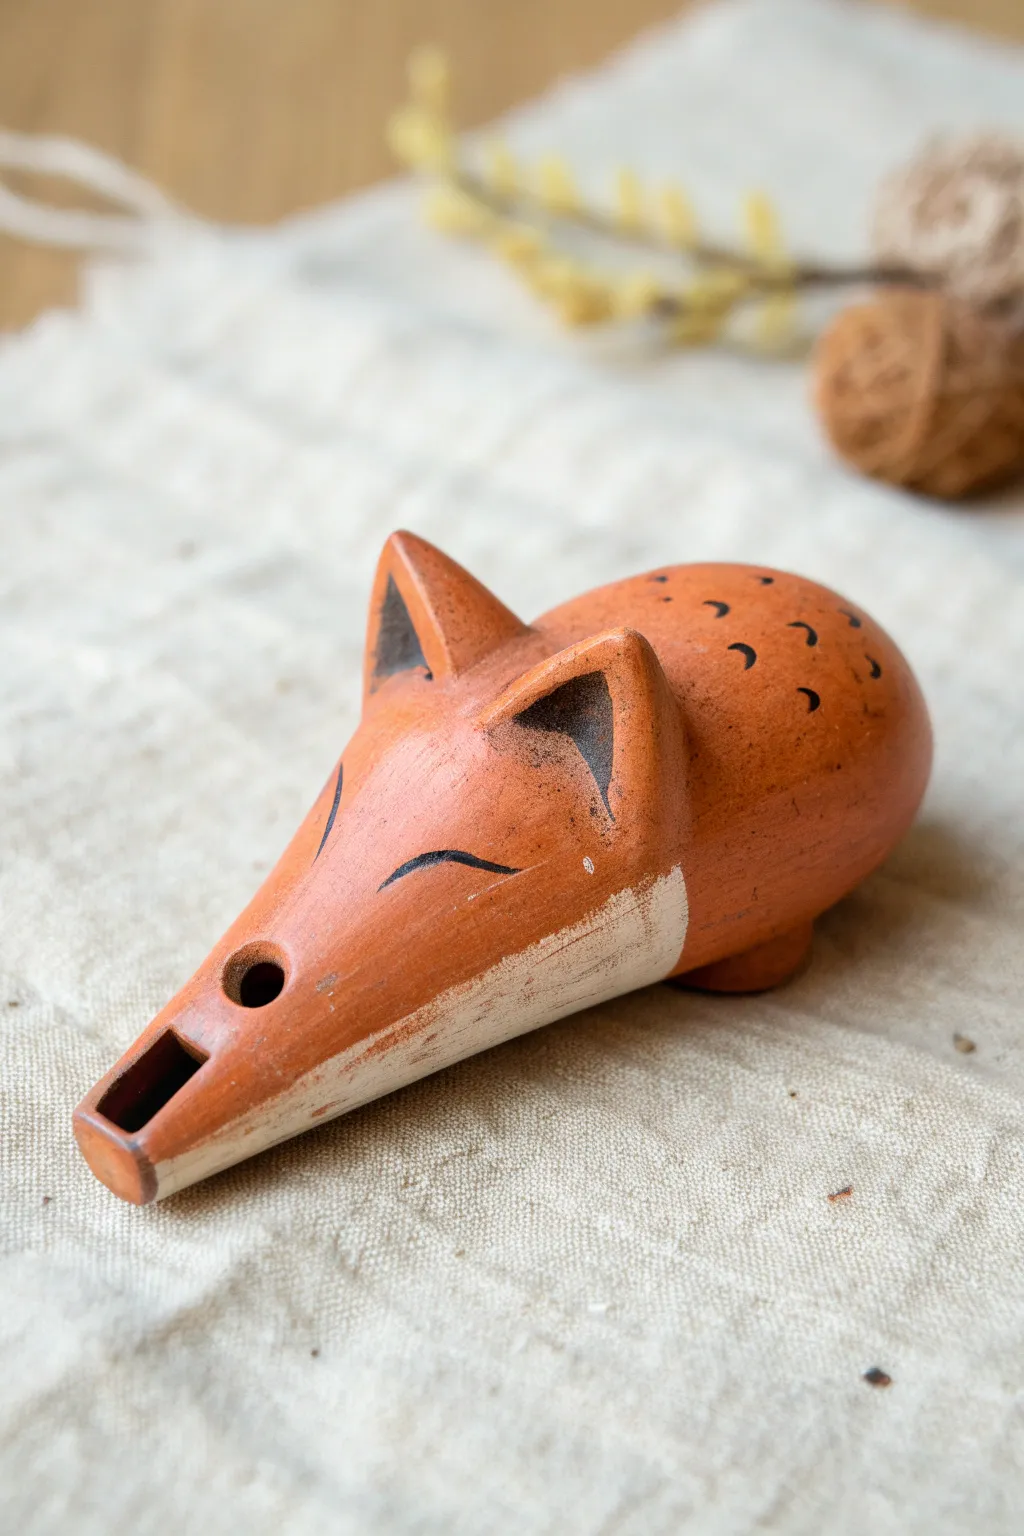
Capture the charm of a woodland friend with this delightful ceramic fox whistle. Its smooth, rounded back and pointed snout create a stylized silhouette that fits perfectly in the hand, while minimal painting brings its sleepy expression to life.
Step-by-Step
Materials
- Earthenware clay (terracotta or low-fire red clay)
- Popsicle stick or wooden modeling tool
- Fettling knife
- Small sponge
- Slip (clay mixed with water)
- Scoring tool or needle tool
- Underglaze or acrylic paints (Black, White)
- Small paintbrush
- Clear glaze (optional, if firing)
- Beveled edge wooden stick (for the airway)
Step 1: Forming the Body
-
Shape the Pinch Pot:
Start with a ball of clay about the size of a tangerine. Stick your thumb into the center and gently pinch the walls while rotating the ball to create a smooth, even hollow sphere. -
Elongate the Shape:
Gently gently squeeze the sphere into an elongated teardrop or egg shape. This will form the main body of the fox. -
Close the Form:
If your pinch pot was open, gently pinch the rim together to seal the hollow air pocket inside completely. Smooth over the seam so it disappears. -
Pull the Snout:
Identify the narrower end of your egg shape. Gently pull and smooth the clay outward to create a long, tapered snout. Keep this area thick enough to accommodate the mouthpiece later. -
Refine the Surface:
Use a damp sponge or your fingers to smooth the entire surface. The fox should have a continuous, flowing curve from the top of the head down to the nose.
Silent Whistle?
If you get only air noise, the bevel edge isn’t splitting the stream. Re-insert the stick and ensure it points exactly at the sharp edge of the window.
Step 2: Creating the Whistle Mechanism
-
Create the Mouthpiece:
At the very tip of the snout, press a rectangular opening. Insert your beveled stick straight into this opening to create an air channel directed toward the main body hollow. -
Cut the Sound Hole:
On the underside of the snout (or top, depending on your preference, though this image shows the hole on the underside/chin area), cut a small square or rectangular window. This needs to be positioned exactly where your air channel ends. -
Create the Bevel:
Using a knife or tool, cut an angled bevel on the side of the sound hole furthest from the mouthpiece. This sharp edge splits the air to create sound. -
Test the Sound:
Gently blow through the mouthpiece. If it doesn’t whistle, adjust the angle of the bevel or clear any clay debris from the airway. I find small adjustments here make a huge difference.
Creative Twist
Try painting the fox in arctic colors! Use white clay or paint the whole body white, then use soft greys for the shadows and detailing.
Step 3: Adding Fox Features
-
Shape the Ears:
Form two small triangles from leftover clay. Make them thick at the base and slightly curved to mimic alert fox ears. -
Attach the Ears:
Score the top of the head and the bottom of your ear triangles. Apply a dab of slip and press the ears firmly onto the head, smoothing the seams so they look integrated. -
Add Small Feet:
create two small, flattened balls of clay and attach them to the rear bottom of the whistle. This acts as a stand so the fox doesn’t roll over. -
Dry or Fire:
Allow the clay to dry completely to the bone-dry stage. If you are using kiln-fire clay, bisque fire it now. If using air-dry clay, wait until it is fully hardened.
Step 4: Painting and Finishing
-
Paint the White Accents:
Using white underglaze or acrylic paint, brush the bottom jaw, the neck area, and the underside of the snout. Create an uneven, fur-like edge where the white meets the red clay. -
Add Facial Details:
With a fine brush and black paint, draw two curved lines for the sleeping eyes. Add a thin line for the mouth along the side of the snout. -
Detail the Ears and Body:
Paint the triangular insides of the ears black. Add rows of small, curved tick marks on the back of the fox to suggest fur texture or spots. -
Seal or Glaze:
If you used ceramic glazes, fire the piece again. For acrylics on air-dry clay, apply a matte varnish to protect the paint.
Once the paint is dry, your sleeping fox is ready to surprise everyone with its cheerful song
Mini Elephant Whistle With Trunk Mouthpiece
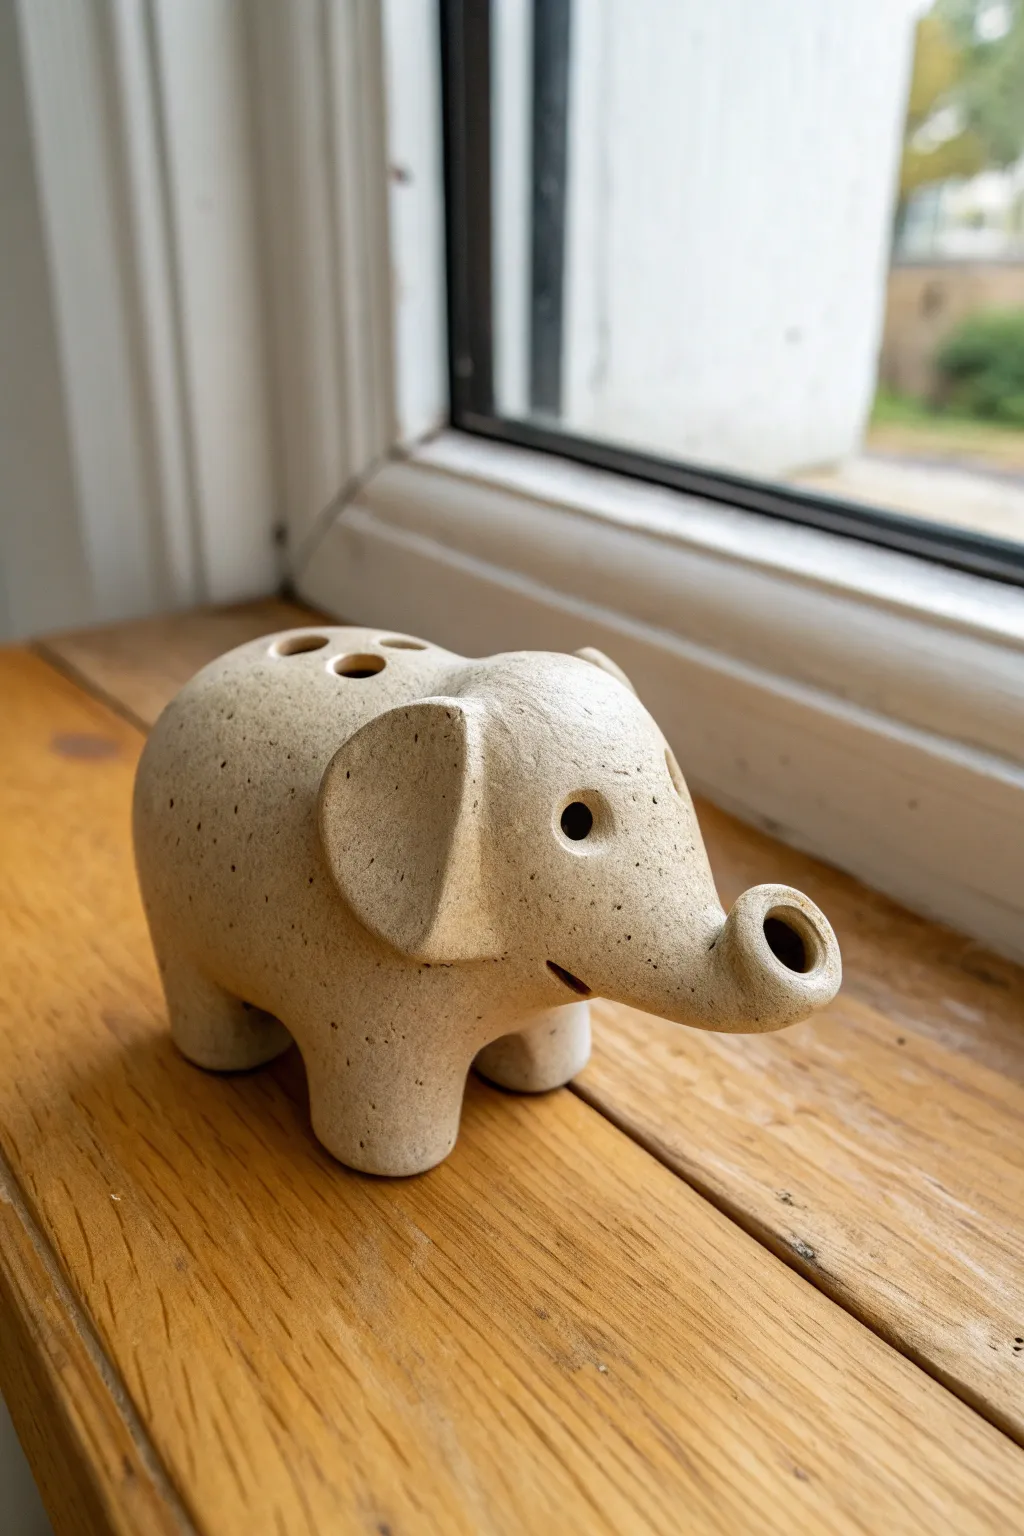
This charming little elephant whistle combines simple shapes with clever functionality, using its trunk as the mouthpiece for a playful finish. Its smooth, rounded form and speckled clay body give it a delightful, natural aesthetic that feels wonderful to hold.
Detailed Instructions
Materials
- Speckled stoneware clay (or polymer clay)
- Popsicle stick or flat modeling tool
- Pointed wooden skewer or needle tool
- Sponge
- Water bowl
- Sharp knife or clay cutter
- Slip (clay mixed with water)
- Smooth wooden rib (optional)
Step 1: Forming the Body and Head
-
Prepare the clay:
Start with a ball of well-wedged speckled clay about the size of a tangerine. Ensure there are no air bubbles. -
Pinch the body:
Using your thumb, open the clay ball to create a basic pinch pot. Keep the walls relatively thick (about 1/4 to 3/8 inch) to support the upcoming sculpting. -
Close the form:
Gently gently curve the walls inward until they meet, trapping air inside to create a hollow sphere. Seal the seam completely and smooth it over. -
Shape the elephant:
Roll the sphere gently on your work surface to elongate it slightly into an oval. Tap one end to flatten it for the whistle mechanism, and pull the other end slightly upward to suggest the head area.
Lost Your Sound?
If the whistle stops working, the splitting edge (the bevel) isn’t sharp or aligned enough. Clean the opening with a blade and re-angle the mouthpiece slightly.
Step 2: Building the Whistle Mechanism
-
Create the mouthpiece:
Fashion a small, tapered coil to serve as the trunk. This will be your mouthpiece. Hollow it out carefully with a skewer to create an air channel. -
Attach the trunk:
Score and slip the front of the head and the base of the trunk. Press the trunk firmly onto the face, ensuring the air channel is unobstructed and angled correctly into the hollow body. -
Cut the fipple window:
On the underside of the neck (or wherever the trunk airstream hits the body wall), cut a small rectangular window. The edge of this window needs to be sharp—I like to use a very fine knife for this precision cut. -
Align the airway:
Insert your flat tool into the trunk’s airway and adjust the angle until the air splits against the sharp edge of the window (the bevel). Test the sound gently as you work; getting a clear tone is the priority here.
Make a Herd
Change the size of the hollow body to change the pitch! A larger, hollower elephant will produce a deeper, lower toot, while a smaller baby one will chirp high.
Step 3: Sculpting the Features and Tuning
-
Add the legs:
Roll four short, stout cylinders of clay. Score and slip the bottom of the body and attach these legs, blending the clay upwards so there are no visible seams. -
Refine the stance:
Press the elephant gently onto the table to flatten the feet, ensuring it stands stable and level. -
Create the ears:
Flatten two small balls of clay into teardrop shapes. Attach them to the sides of the head using slip, smoothing the back edge onto the body while leaving the front edge slightly lifted for dimension. -
Detail the eyes:
Use the blunt end of a small tool or a straw to press round indentations for eyes on either side of the trunk. -
Add finger holes:
Pierce two to four small tuning holes on the back of the elephant using a drill bit or hole cutter. These allow you to change the pitch when played. -
Smooth the surface:
Wipe the entire piece with a barely damp sponge to remove fingerprints and reveal the grog or speckles in the clay.
Step 4: Finishing Touches
-
Final tune check:
Give the whistle one last soft blow to ensure the airway wasn’t distorted while attaching legs or smoothing. -
Clean the holes:
Check the finger holes and the main window hole; remove any clay burrs that might obstruct airflow. -
Dry slowly:
Let the elephant dry slowly under plastic for a day or two to prevent cracking, especially around the leg attachments. -
Fire:
Bisque fire the piece, then apply a clear matte glaze if desired, or leave the raw clay texture exposed as shown in the photo, before firing to the clay’s maturity temperature.
Once fired, you’ll have a wonderfully tactile little companion that sings whenever you wish.
Curly Chameleon Whistle Tail Blow Tube
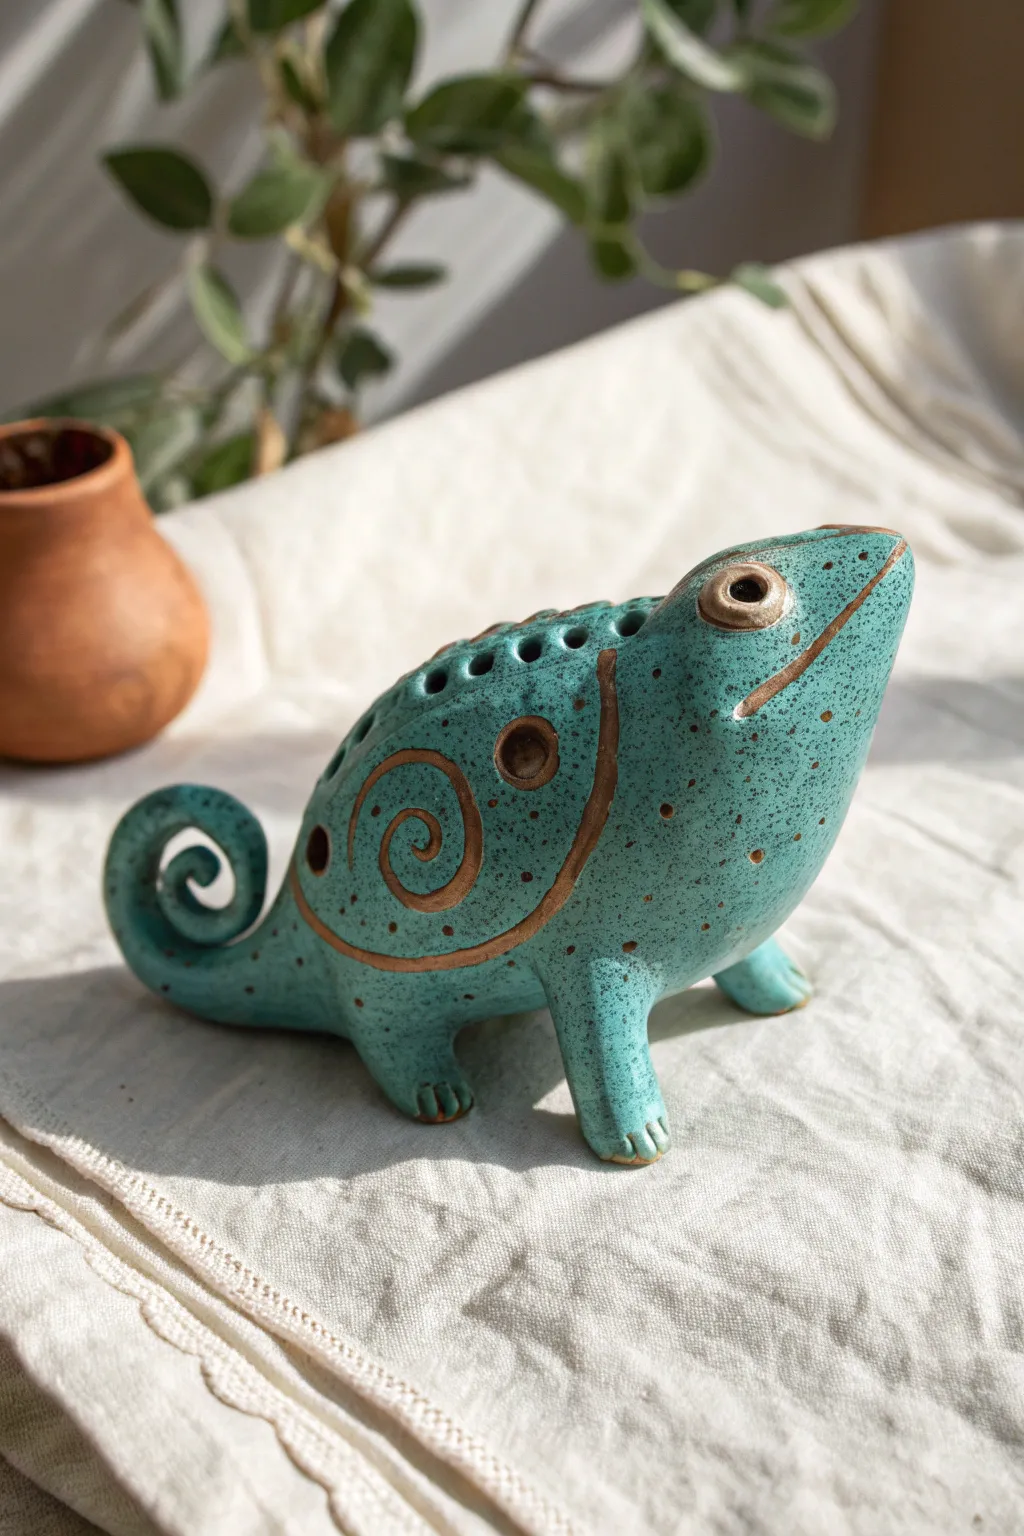
This charming chameleon whistle combines whimsical design with functional art, featuring a speckled turquoise glaze and rustic unglazed accents. Its body serves as the resonating chamber, while the playful curly tail ingeniously doubles as the mouthpiece for the whistle mechanism.
Step-by-Step Tutorial
Materials
- Earthenware or stoneware clay (white or light buff)
- Clay modeling tools (needle tool, loop tool, wooden rib)
- Popsicle stick or flat wooden modeling tool (for whistle mechanism)
- Slip (clay mixed with water)
- Sponge
- Turquoise speckled glaze (cone 04-06 or appropriate for your clay)
- Wax resist
- Small paintbrush
- Kiln
Step 1: Forming the Body
-
Start with a pinch pot:
Begin with a ball of well-wedged clay about the size of a tennis ball. Insert your thumb and pinch the walls evenly to create a hollow, elongated egg shape. This will be the main resonating chamber. -
Close the form:
Gently gently taper the open end of your pinch pot closed, trapping the air inside. Smooth the seam completely with your thumb or a rib so the air remains sealed within the hollow form. -
Shape the chameleon:
Manipulate the hollow egg to form the chameleon’s high-arched back and tapered head. Gently push the clay to define a distinct snout area, keeping the underside relatively flat for stability.
Clear Sound Tip
Keep the ‘window’ (the hole below the bevel) clear of glaze. Even a tiny drip here can silence the whistle completely. Use a pipe cleaner to check the airway before firing.
Step 2: Creating the Whistle Mechanism
-
Form the tail mouthpiece:
Roll a coil of clay that tapers slightly. Attach this to the rear of the body where the tail would be. Bend it into a tight, upward spiral curl. -
Create the airway:
Using a flat popsicle stick or fettling knife, carefully slice a rectangular airway through the tail, aiming directly towards the main body cavity. Do not pierce the main cavity yet. -
Cut the bevel:
On the underside of the body, just where the tail meets the torso, cut a sharp 45-degree angle notch (the bevel). The sharp edge of this notch is what splits the air to create sound. -
Connect the airway:
Insert your stick back through the tail mouthpiece and gently push until it pierces the body wall, emerging right at the bevel’s sharp edge. The air stream must hit this edge perfectly for a clean whistle sound. -
Refine and tune:
Blow gently through the tail to test the sound. Adjust the angle of the bevel edge slightly if needed until you get a clear, crisp tone. Clean up any clay burrs around the hole.
Color Play
Try rubbing iron oxide wash into the textured spiral and dots before glazing. Wipe it back so it stays in the crevices to add ancient-looking depth to the raw clay areas.
Step 3: Sculpting Details
-
Add the legs:
Roll four short, sturdy cylinders of clay. Score and slip them onto the underside of the body. Press down firmly to attach and shape small toes at the ends with a needle tool. -
Form the eyes:
Roll two small balls of clay. Flatten one side slightly and attach them high on the head using score and slip. Use a small tool to impress a pupil in the center giving him an alert expression. -
Carve the spiral design:
Use a needle tool or small loop tool to carve a large spiral onto the chameleon’s flank. Make the lines deep enough to hold the glaze separation but smooth the edges. -
Add textured dots:
Using the blunt end of a small paintbrush or a detail tool, impress small dots all over the body, avoiding the carved spiral area and the eyes. Vary the pressure for a natural look. -
Create the spine ridge:
I usually like to pinch the clay slightly along the spine to create a ridge. Use a small hole cutter or stick to create a row of decorative vent holes along the very top of the back.
Step 4: Glazing and Finishing
-
Bisque fire:
Let the piece dry slowly and completely (bone dry) before firing it in the kiln to bisque temperature (usually Cone 04). -
Apply wax resist:
Carefully paint wax resist over the areas you want to remain raw clay—specifically the carved spiral line, the rim of the eye, and the mouth line. This will repel the glaze. -
Glaze the body:
Apply 2-3 coats of turquoise speckled glaze to the entire body. Be careful not to clog the whistle airway or the bevel notch with glaze; wipe these clean specifically. -
Clean the accents:
Use a damp sponge to wipe away any glaze that might have beaded up on the waxed areas, ensuring clean, sharp lines where the raw clay shows through. -
Final wipe:
Wipe the bottoms of the feet completely clean so the piece doesn’t stick to the kiln shelf. -
Glaze fire:
Fire the piece again to the maturation temperature of your specific glaze and clay body.
Once the kiln cools, you’ll have a charming sculpted companion ready to sing its crafty tune
Textured Hedgehog Whistle With Stamped Spines
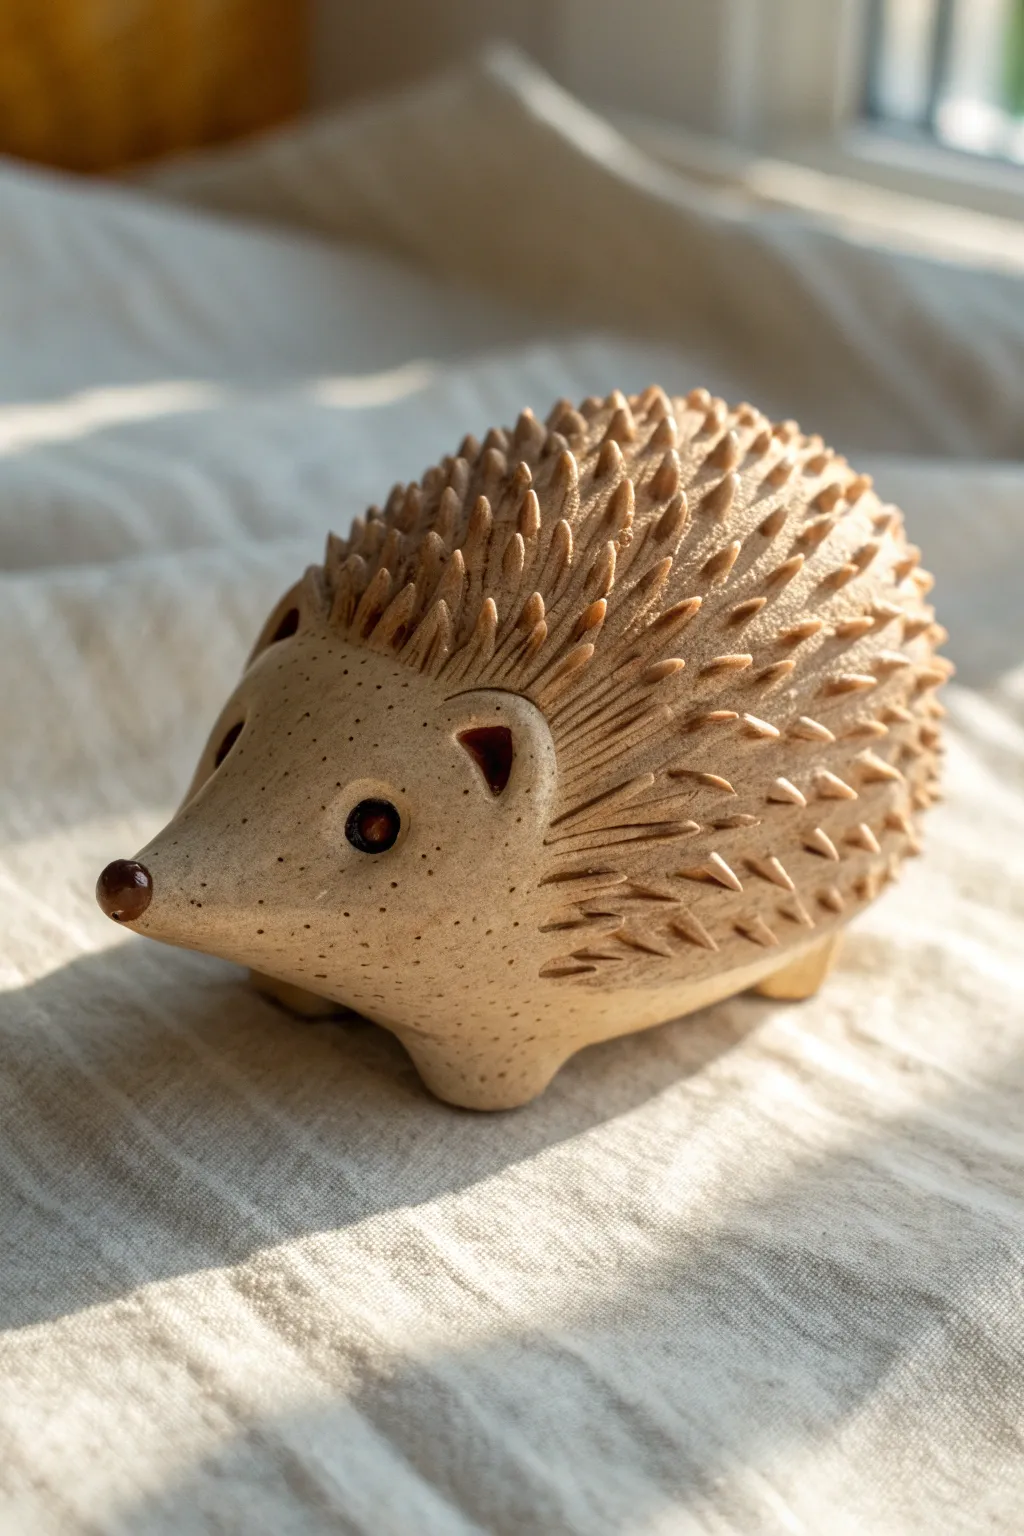
This charming ceramic whistle captures the endearing roundness of a hedgehog with a clever textured back. The smooth, speckled clay body contrasts beautifully with the rhythmically stamped spines, creating a piece that feels as lovely to hold as it is to play.
Step-by-Step
Materials
- Speckled buff stoneware clay
- Popsicle stick or wooden modeling tool
- Needle tool
- Small sponge
- Slip (clay mixed with water)
- Small loop tool
- Dark brown underglaze
- Clear glaze (optional)
Step 1: Forming the Whistle Body
-
Shape the Pinch Pot:
Start with a ball of speckled clay about the size of a tangerine. Insert your thumb and gently pinch the walls while rotating the ball to create a hollow, uniform sphere. This pinch pot forms the resonant chamber of the whistle. -
Close the Sphere:
Gently collar the opening of your pinch pot inward until it closes completely. Trap the air inside, which will help the hollow form hold its shape while you sculpt. Smooth the join line until it disappears. -
Mold the Hedgehog Shape:
Manipulate the hollow sphere into an elongated teardrop shape. One end should remain bulbous for the body, while the other tapers into a gentle snout. Tap the bottom lightly on your work surface to create a flat base so it sits stable. -
Pull the Legs:
Instead of attaching separate legs, I prefer to gently pinch and pull four small, stubby nubs directly from the underside of the body. Smooth them so they are integrated seamlessly into the main form.
Clear the Airway
Before firing, double-check the airway one last time. As clay dries, it shrinks and can close the gap. Run your stick through the mouthpiece gently once more when leather hard.
Step 2: Creating the Instrument
-
Construct the Airway:
On the tail end (opposite the snout), create a mouthpiece block by adding a small rectangle of clay. Insert a flat popsicle stick horizontally into this block to create the windway. -
Cut the Bevel:
About an inch in from the mouthpiece, on the underside, use a knife or needle tool to cut a small rectangular window. Use a bevel tool or knife to cut a sharp 45-degree angle on the side of the window furthest from the mouthpiece. This “splitting edge” is crucial for sound. -
Test the Sound:
With the popsicle stick still in the channel to clear any debris, give a gentle blow. Adjust the angle of the splitting edge until you get a clear, clean tone. Once it whistles, handle this area delicately.
Muffled Sound?
If the whistle sounds breathy, the splitting edge (the sharp ramp inside the hole) might be dull or misaligned. Re-sharpen that edge to be as crisp as a knife blade.
Step 3: Adding Textures and Details
-
Define the Face:
Use a smooth kidney tool or your thumb to burnish the face area, keeping it distinct from where the spines will go. The smoothness here is key to the final contrast. -
Sculpt the Ears:
Form two small semi-circles of clay. Score and slip them onto the head, just behind where the face meets the future textured back. Press a small indentation into the center of each ear for depth. -
Stamp the Spines:
Using a small, teardrop-shaped loop tool or a custom wooden stamp, press into the clay body starting behind the ears. Press down and drag slightly backward to lift a small ‘spine’ of clay. Repeat this in rows all the way down the back. -
Refine the Eyes:
Use the back of a small paintbrush to make indentations for the eyes. Roll tiny balls of clay, place them into the sockets, and gently flatten them. Use a needle tool to define the eyelids slightly. -
Nose Detail:
Roll a very small ball of clay for the nose tip. Score and slip it onto the very point of the snout.
Step 4: Finishing Touches
-
Drying:
Allow the hedgehog to dry slowly under loose plastic. This prevents the delicate spines from cracking off as the clay shrinks. -
Apply Underglaze:
Once bone dry (or bisque fired, depending on your preference), apply a dot of dark brown underglaze to the eyes, the tip of the nose, and the inside of the ears. -
Highlight the Spines:
For extra depth, you can lightly sponge a thin wash of oxide or stain over the spines and wipe it back, leaving color just in the crevices, though the natural speckled clay often looks great on its own. -
Final Firing:
Fire the piece to the temperature recommended for your specific clay body. The heat will reveal the beautiful speckles in the clay.
Now you have a woodland friend that sings as well as it sits on your shelf
Nighty Bat Whistle With Folded Wings
Sculpt a spooky yet charming nocturnal friend that doubles as a functional instrument. This matte black bat whistle features a conical body, an expressive upturned snout, and distinctive folded wings that give it a unique perched silhouette.
Step-by-Step Tutorial
Materials
- Black stoneware clay (fine grog)
- Popsicle stick or flat modeling tool
- Whistle voicing tool (or sharpened dowel)
- Sponge
- Needle tool
- Slip (clay mixed with water)
- Kiln (cone 5-6 recommended)
Step 1: Forming the Body & Whistle Mechanism
-
Shape the main cone:
Start with a ball of clay roughly the size of a tangerine. Gently roll and tap it on your work surface to form a solid cone shape with a flat bottom and a rounded top, about 2.5 to 3 inches tall. -
Hollow the base:
Turn the cone over and carefully use your thumbs to hollow out the interior, creating a pinch pot structure. Maintain an even wall thickness of about 1/4 inch, ensuring the top dome remains closed. -
Form the mouthpiece:
Locate the spot for the mouthpiece on the back of the cone (opposite where the face will be). Pinch a small, protruding rectangle of clay outwards from the base wall to create the blowing channel. -
Cut the fipple window:
On the body itself, just above where the mouthpiece connects, cut a small square or rectangular hole with a vertical back wall and a 45-degree angled front wall (the splitting edge). -
Create the airway:
Insert a flat tool (like a popsicle stick) through the mouthpiece so it aims directly at the splitting edge of the window. The air should hit the sharp edge exactly in the middle to produce sound. -
Test and tune:
Blow gently to test the sound. Adjust the angle of the splitting edge or clean debris from the airway until you get a clear tone. I find it helpful to smooth the airway with a damp brush here.
Step 2: Sculpting the Head & Features
-
Attach the head:
Roll a smaller ball of clay for the head. Score and slip the top of the cone body and the bottom of the head, then press them firmly together, blending the clay at the neck seam for a smooth transition. -
Form the snout:
Press a small, rounded nub of clay onto the front of the face for the snout. Use a specialized round tool or the end of a paintbrush to press a deep, circular indentation into it, creating the bat’s distinctive O-shaped mouth. -
Add the ears:
Shape two triangular wedges of clay. Press your thumb into the center of each to create the inner ear curve, then score and attach them to the top of the head, blending the back edges smooth. -
Detail the eyes:
Use a needle tool or a small stylus to poke two tiny holes for eyes. Place them fairly wide apart, midway between the ears and snout, to capture that classic bat expression.
Lost Your Squeak?
If the whistle stops working after attaching the head, you likely squished the air chamber. Re-insert your stick tool gently to clear the airway and reshape the chamber without distorting the outside.
Step 3: Adding the Wings & Finishing
-
Roll the wing slabs:
Roll out a flat slab of clay about 1/4 inch thick. Cut out two large, elongated triangular shapes that mimic the look of bat wings. -
Texture the wing membranes:
Use a modeling tool to carve deep grooves radiating from a central point at the top corner of the wing down to the scalloped bottom edge. This simulates the finger bones supporting the wing membrane. -
Scallop the edges:
Using the ‘finger bone’ lines as a guide, carefully cut or mold the bottom edge of each wing into concave curves (scallops) between the ribs. -
Position the wings:
This bat is resting, so position the wings pointing downwards. Score the side of the body and the top inner edge of the wings heavily. -
Attach and support:
Press the wings firmly onto the sides of the body. The top of the wing should attach near the neck/shoulder area, draping down like a cloak. If needed, prop them up with foam or paper towels while the join stiffens. -
Smooth the surface:
Before firing, go over the entire piece with a slightly damp sponge to remove fingerprints and sharp burrs. For the matte look in the photo, ensure the clay surface is burnished slightly smooth but not glazed. -
Fire the piece:
Allow the whistle to dry slowly under loose plastic to prevent the wings from cracking. Once bone dry, bisque fire, and then fire to temperature (black clay often looks best unglazed or with a clear matte wash).
Midnight Textures
To enhance the ‘stone’ look, lightly sponge the surface with a tiny bit of manganese wash before firing. It settles into the grooves of the wings and creates depth.
Once fired, you’ll have a beautifully deeply colored bat sculpture that surprises everyone with its clear, resonant song.