If you’re craving cute clay ideas that feel doable in one cozy crafting session, you’re in the right place. I pulled together my favorite small, happy-making projects that lean hard into that sweet, simple kawaii aesthetic.
Blob Cats With Tiny Faces
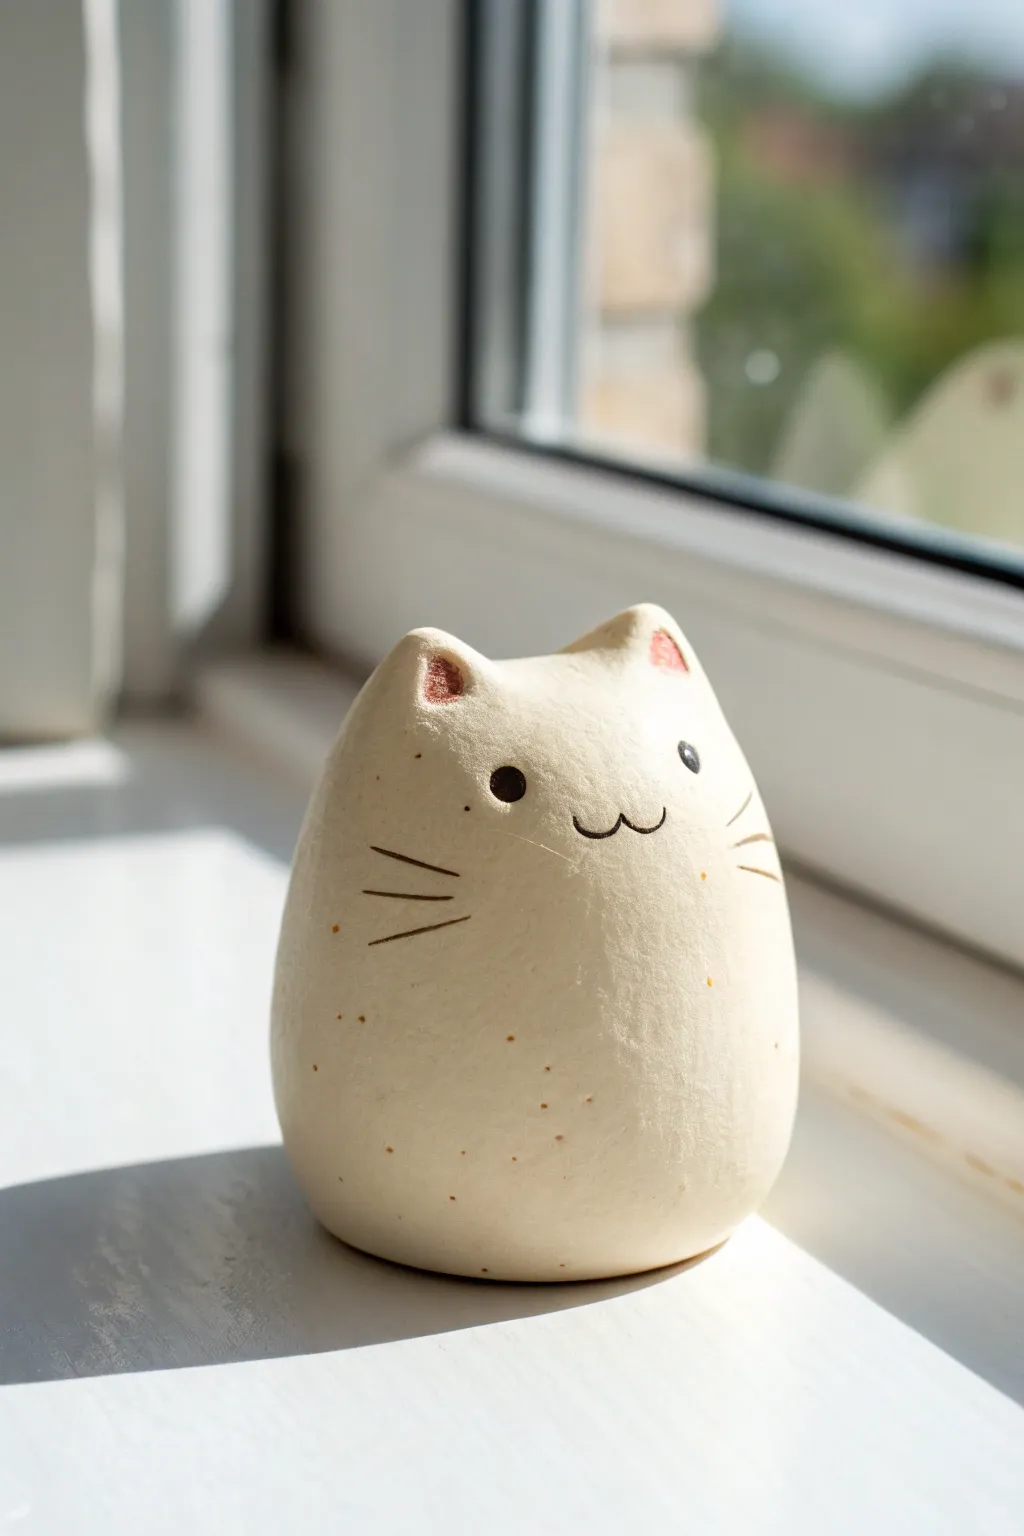
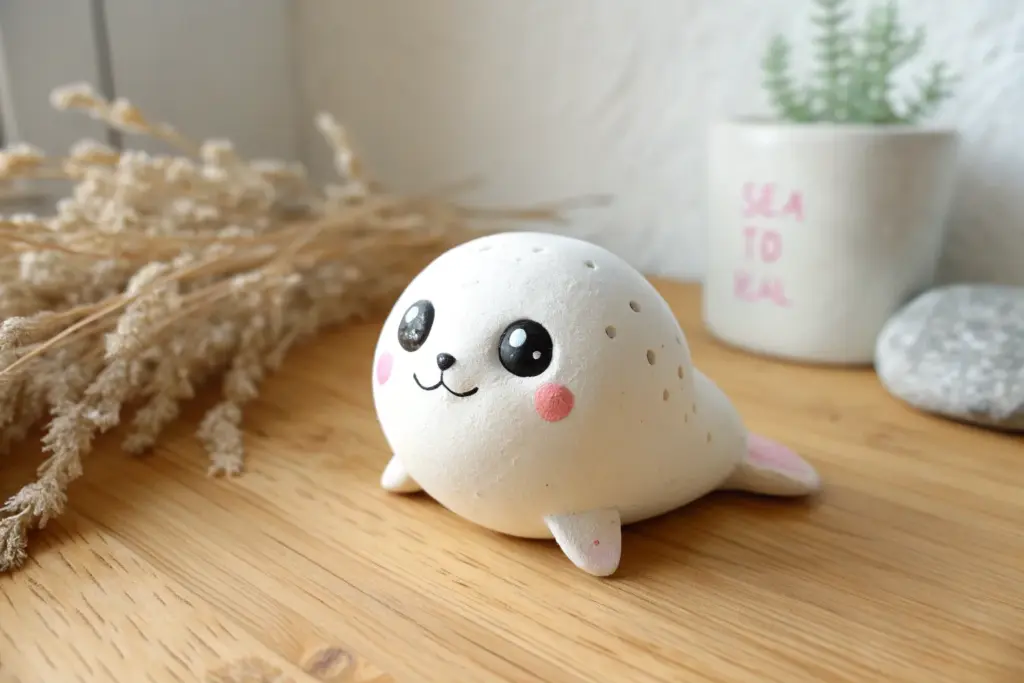
These delightfully chubby, egg-shaped cat figurines capture the essence of a serene feline basking in sunlight. With their minimalist faces and speckled, earthy texture, they make the perfect unassuming guardian for your windowsill plants.
How-To Guide
Materials
- White or cream polymer clay (approx. 200g)
- Speckled clay inclusions (e.g., ground black pepper, dried tea leaves, or faux granite clay mix)
- Modelling tools (or a toothpick and a smooth spoon)
- Black acrylic paint
- Fine-point paintbrush or dotting tool
- Soft pink pastel chalk or acrylic paint
- Matte varnish
- Aluminum foil (for core)
- Oven for baking (if using polymer clay)
Step 1: Shaping the Base
-
Prepare the Clay Body:
Start by conditioning your white or cream clay until it is soft and malleable. If your clay doesn’t already have speckles, knead in a tiny pinch of coarse black pepper or dried tea leaves to achieve that organic, pottery-like texture. -
Form the Core:
Crumple a piece of aluminum foil into tight ball, roughly the size of a golf ball or a large walnut. This saves clay and ensures the piece isn’t too heavy. -
Wrap the Core:
Flatten your conditioned clay into a pancake and wrap it completely around the foil ball. Roll it vigorously between your palms to smooth out any seams. -
Create the Egg Shape:
Gently gently roll the clay ball on your work surface, applying slightly more pressure near the top to taper it. You want an egg shape that is wider at the bottom for stability. -
Smooth the Surface:
Inspect the surface for fingerprints. I like to dip my finger in a tiny bit of baby oil (or water for air-dry clay) and glide it over the clay to buff it completely smooth.
Step 2: Sculpting the Features
-
Pinch the Ears:
At the narrower top of your egg shape, use your thumb and forefinger to gently pinch up two small triangles of clay. Keep them small and spaced apart. -
Refine Ear Shape:
Use a smooth tool or the back of a spoon to blend the base of the ears back into the head so they look integrated, not just stuck on top. Round the tips slightly for a softer look. -
Flatten the Base:
Press the figurine firmly onto your table to create a flat bottom. Check that it sits upright without wobble. -
Baking or Drying:
Bake the figurine according to the clay manufacturer’s instructions (usually 275°F/130°C for polymer clay). If using air-dry clay, let it sit for at least 24-48 hours until fully hardened.
Unwanted Fingerprints?
If you can’t smooth out a fingerprint, dampen a brush with acetone (for polymer clay) and lightly brush the area before baking. It melts the surface just enough to erase prints.
Step 3: Painting and Finishing
-
Cooling Down:
Allow the piece to cool completely before applying any paint. Warm clay can make acrylics dry too fast and streak. -
Drafting the Face:
Lightly mark the position of the eyes and mouth with a pencil. The eyes should be wide-set and placed roughly in the middle of the ‘face’ area. -
Painting the Eyes:
Using a dotting tool or the handle end of a paintbrush, dip into black acrylic paint and stamp two solid black circles for eyes. -
Drawing the Mouth:
With an ultra-fine detail brush, paint a small ‘w’ shape between the eyes for the mouth. Keep the lines thin and delicate. -
Adding Whiskers:
Paint three simple horizontal lines on each cheek. Start the stroke near the face and flick outward so the lines taper naturally. -
Blushing the Ears:
To get that soft, fuzzy look inside the ears shown in the photo, grate a little pink pastel chalk into dust. Apply the dust inside the ear triangles with a small dry brush. -
Sealing the Piece:
Once the paint is totally dry, apply a coat of matte varnish. This removes the ‘plastic’ sheen of the clay and protects your painted details. -
Adding Speckles (Optional):
If your clay wasn’t pre-speckled, you can flick a toothbrush dipped in watered-down brown paint over the finished piece for faux ceramic spots.
Weighted Bottoms
For a sturdier paperweight feel, press a few heavy flat washers or a small stone into the bottom of the raw clay before flattening the base and baking.
Place your little clay friend on a windowsill where the light catches its sweet profile


Chubby Frogs Sitting Pretty
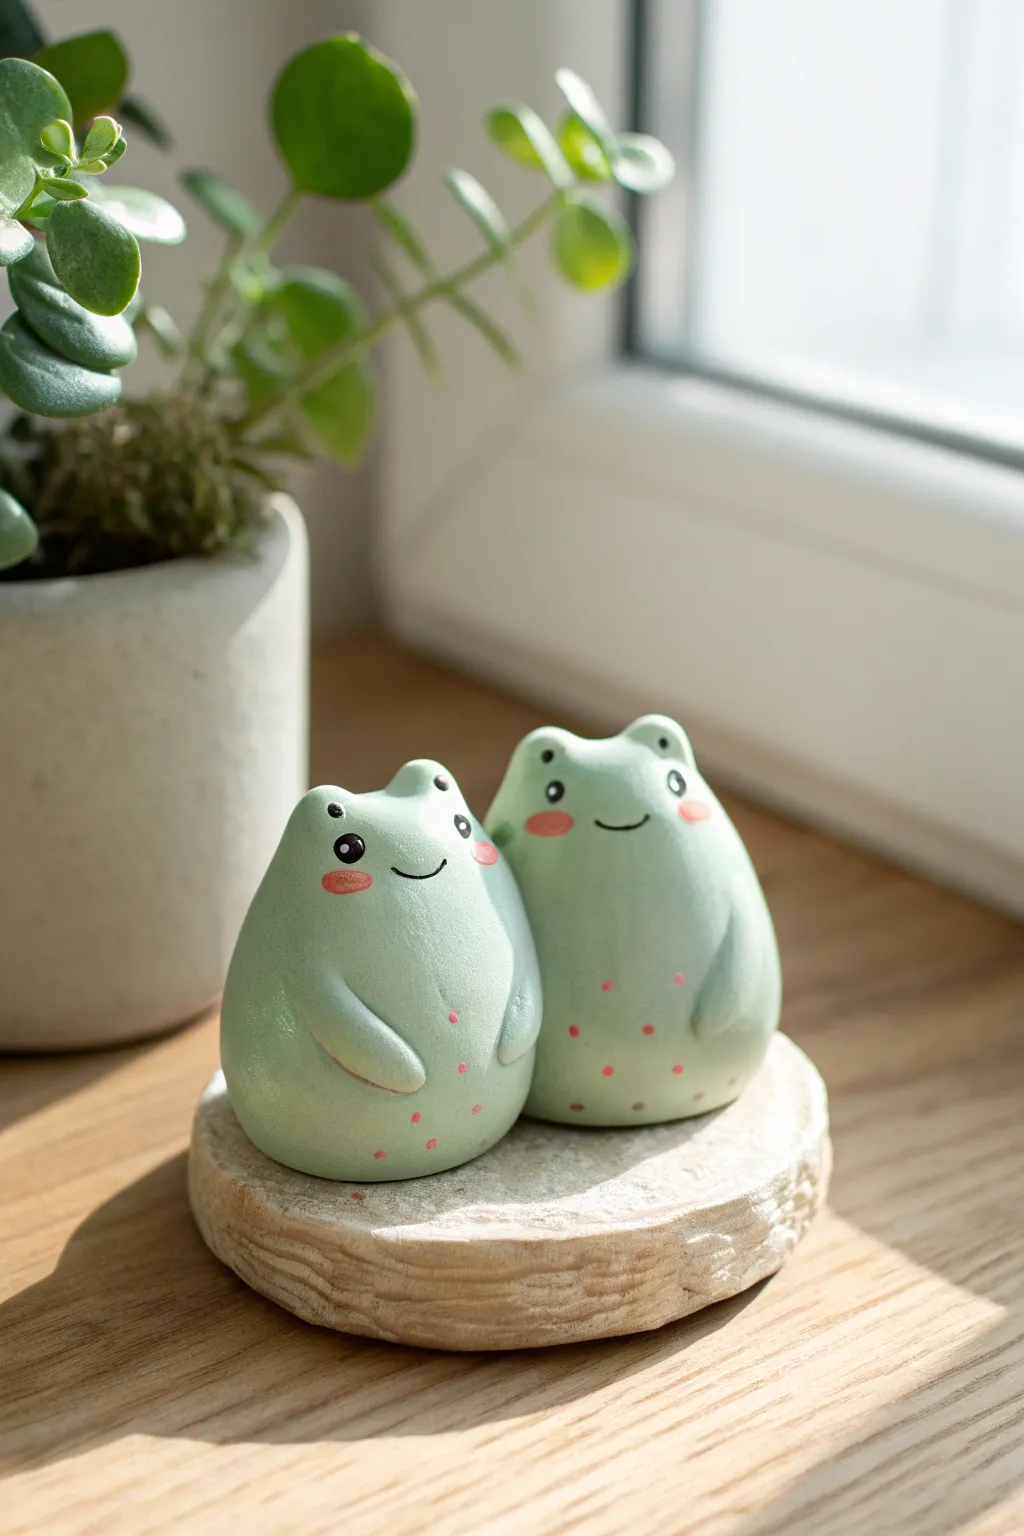
These delightfully round frog figurines are full of personality with their blushing cheeks and speckled bellies. Perfect for a windowsill or plant shelf, this project is beginner-friendly and results in an adorable piece of decor.
Step-by-Step Tutorial
Materials
- Polymer clay or air-dry clay (pale green)
- Acrylic paints (black, pink, white)
- Fine detail paintbrushes
- Dotting tool or toothpick
- Clear matte varnish
- Small round stone or wood slice for the base (optional)
- Clay sculpting tools (specifically a smoothing tool)
Step 1: Sculpting the Shapes
-
Prepare the Clay:
Start by conditioning your pale green clay until it is soft and pliable. If you are using white clay, mix in a very small amount of green pigment or paint to achieve a soft, pastel mint shade. -
Form the Bodies:
Roll two balls of clay, making one slightly larger than the other if you want a size variation. Gently flatten the bottom of each ball so they sit upright. -
Create the Pear Shape:
While keeping the base flat, gently taper the top of the clay ball to create the frog’s head area. The overall shape should resemble a chubby pear or a gumdrop. -
Add the Eye Mounds:
Roll two very tiny balls of green clay for each frog. Press them onto the top of the head area to create the prominent eye bumps characteristic of frogs. -
Blend the Seams:
Using a clay smoothing tool or your finger, gently blend the bottom seams of the eye mounds into the main body so they look like one continuous piece rather than attached balls. -
Create the Arms:
Roll two small, thin logs of green clay for the arms. They should be slightly tapered at one end. -
Attach the Arms:
Press the arms against the sides of the body, curving them forward so they rest on the frog’s belly. Blend the shoulder area into the body for a seamless look. -
Smooth the Surface:
Take a moment to smooth out any fingerprints. I find dipping a finger in a tiny bit of water (for air-dry clay) or baby oil (for polymer) helps achieve a glass-smooth finish. -
Final Shaping:
If you plan to display them together as a pair, press them gently against each other while the clay is still soft so their sides conform perfectly.
Step 2: Finishing Details
-
Dry or Bake:
Follow the manufacturer instructions for your specific clay. If baking polymer clay, let it cool completely before painting. If using air-dry clay, allow 24-48 hours for full drying. -
Paint the Eyes:
Using a fine detail brush and black acrylic paint, add two small circles on the front of the eye mounds. Be careful to space them widely for that cute, derpy look. -
Add Eye Highlights:
Once the black paint is dry, use a toothpick to add a tiny white dot to the upper corner of each eye. This spark of life is crucial for cuteness. -
Draw the Mouth:
With the finest brush or a fine-tip black marker, draw a simple, small curved line between the eyes for a smile. -
Blush the Cheeks:
Mix a soft pink paint. Apply oval-shaped blush marks right under the eyes. Keeping the paint slightly translucent here adds softness. -
Add Belly Speckles:
Using the same pink paint and a dotting tool or toothpick end, add random tiny dots across the lower belly area of the frogs. -
Seal the Project:
Once all paint is fully dry, coat the frogs in a clear matte varnish. This protects the paint and gives the clay a finished, professional texture. -
Mount on Base:
For the final touch shown in the photo, glue your finished frogs onto a small textured stone or wood slice using a strong adhesive like E6000.
Fixing Cracks
If air-dry clay cracks while drying, mix a small amount of fresh clay with water to make a paste (slip). Fill the cracks, smooth over, and let dry again.
Make it a Trio
Add a third, tiny frog baby that sits on top of one of the larger frog’s heads. Use a lighter shade of green to make the baby pop visually.
Enjoy your new chubby amphibian friends sitting happily on their perch


Mini Axolotls With Frilly Gills
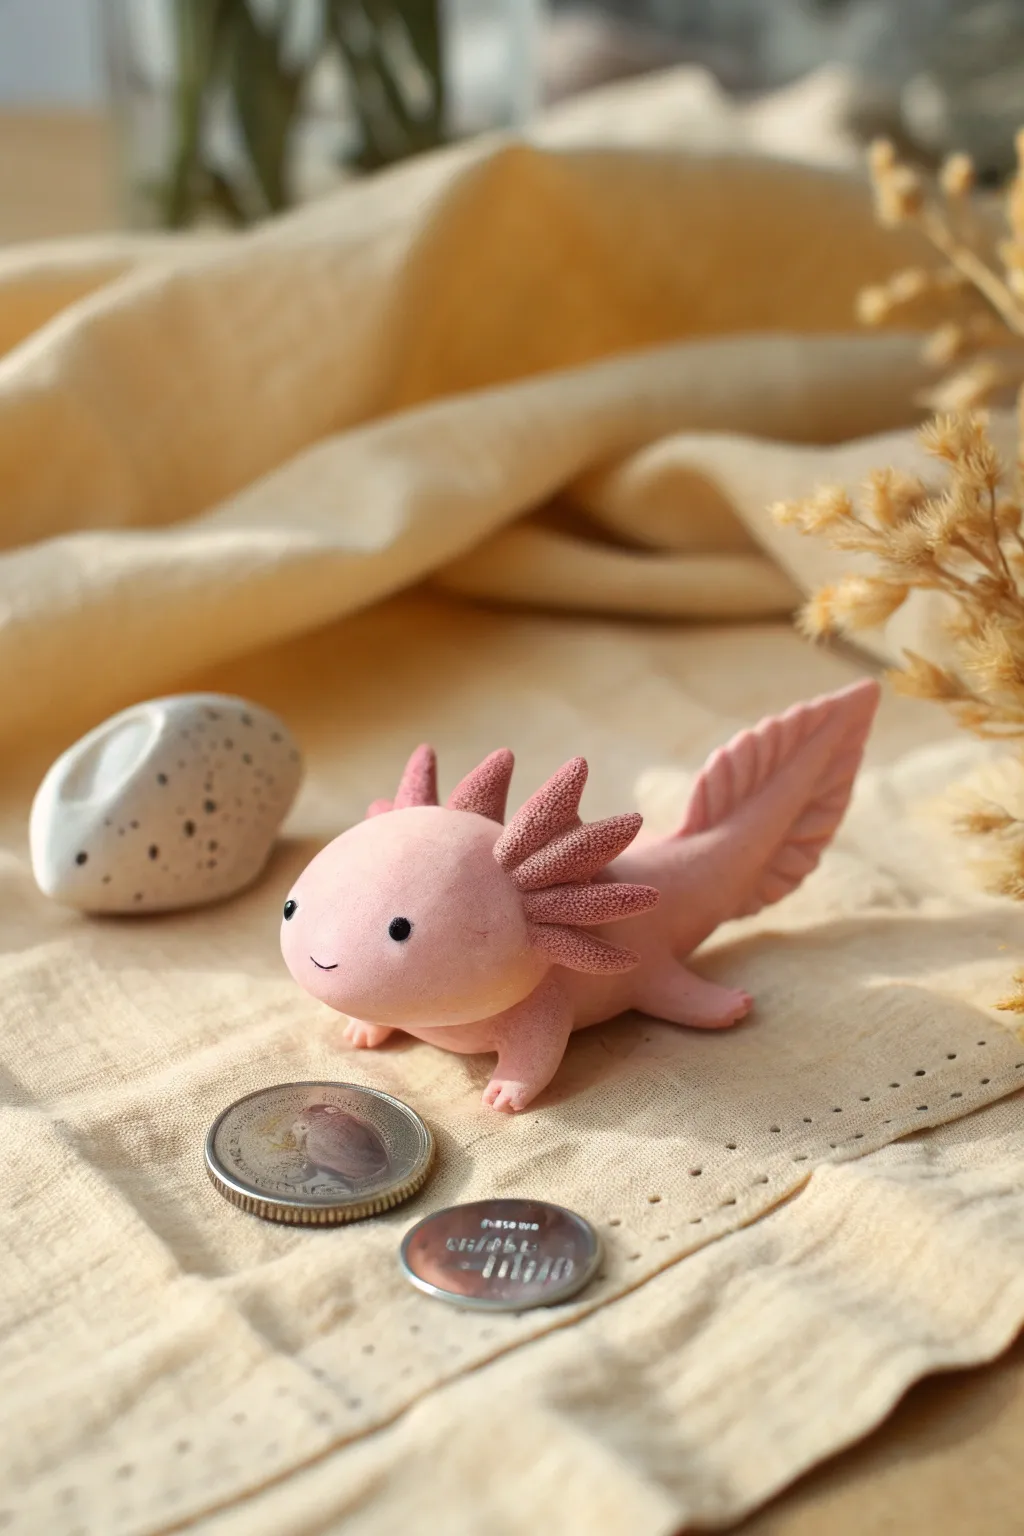
This adorable little amphibian captures the gentle charm of an axolotl with its smooth, matte finish and intricate, feathery gills. Sculpted from polymer clay, this miniature design relies on soft curves and subtle textures to achieve a heartwarming, kawaii aesthetic perfect for a desk buddy.
How-To Guide
Materials
- Light pink polymer clay (soft body tone)
- Darker pink or mauve polymer clay (for gills)
- Black polymer clay (tiny amount for eyes)
- Needle sculpting tool or toothpick
- Small ball stylus tool
- Soft paintbrush (for smoothing)
- Rubbing alcohol
- Ceramic tile or glass work surface
- Oven for baking
Step 1: Shaping the Base Body
-
Condition the clay:
Begin by thoroughly kneading your light pink clay until it is warm and pliable. This prevents cracks and ensures a smooth finish later on. -
Form the head:
Roll a ball of light pink clay roughly the size of a large grape. Gently flatten it slightly into a rounded oval shape to form the axolotl’s wide, friendly head. -
Create the body:
Roll a second piece of clay into a teardrop shape that is slightly longer than the head. This will be the main torso and tail trunk. -
Connect head and body:
Press the wider end of the body teardrop against the back of the head piece. Use your thumb or a silicone tool to blend the seam underneath so the clay joins securely without a visible line. -
Extend the tail:
Pinch the end of the body teardrop to flatten it vertically, creating the start of the tail fin. It should curve slightly upward for a dynamic pose.
Step 2: Adding Limbs and Facial Features
-
Make the legs:
Roll four tiny sausages of light pink clay for the legs. They should be quite chubby and short to match the cute proportions. -
Attach the legs:
Place two legs forward near the neck and two near the back hips. Blend the upper edges into the body using a small ball tool or your finger so they look seamless. -
Define the toes:
Use a needle tool or toothpick to gently press three or four indentations into the end of each foot to suggest tiny toes. -
Position the eyes:
Roll two impossibly small spheres of black clay. Press them gently onto the face, spacing them wide apart to create that innocent, wide-eyed look. -
Carve the smile:
Use the edge of a curved tool or a very steady hand with a needle tool to impress a tiny, simple smile right between the eyes.
Clean Clay Pro-Tip
Since light pink picks up lint easily, keep a scrap piece of white clay nearby. Roll it in your hands before handling the pink clay to lift off dust from your fingers.
Step 3: Texturing the Fin and Gills
-
Shape the dorsal fin:
Take a small strip of light pink clay and flatten it completely. Attach this along the top ridge of the tail. -
Detail the fin:
Using your needle tool, press light vertical lines along the tail fin to create ribbed texture, mimicking the fin structure seen in the photo. -
Create gill stalks:
Switch to your darker pink or mauve clay. I prefer a slightly dusty rose color here for contrast. Roll six small cones. -
Texture the gills:
Before attaching them, hold each cone and use your needle tool to poke hundreds of tiny dots or scratches all over the surface. This creates the ‘frilly’ coral-like texture. -
Attach the gills:
Press three textured gills onto each side of the head, behind the eyes. Arrange them in a fanned-out pattern. -
Final smoothing:
Dip a soft paintbrush in a tiny bit of rubbing alcohol and gently brush over the light pink body (avoiding the textured gills) to remove fingerprints and dust. -
Bake:
Bake the sculpture according to your clay package instructions (usually 275°F/135°C for 15-30 minutes per 1/4 inch thickness).
Level Up: Magic Shimmer
Before baking, brush a tiny amount of pearl Ex mica powder over the smooth body. It gives the axolotl an aquatic, wet sheen without needing glossy varnish.
Once cooled, your little smiling amphibian is ready to guard your loose change or sit proudly on a shelf


Smiling Mushrooms in Pastels
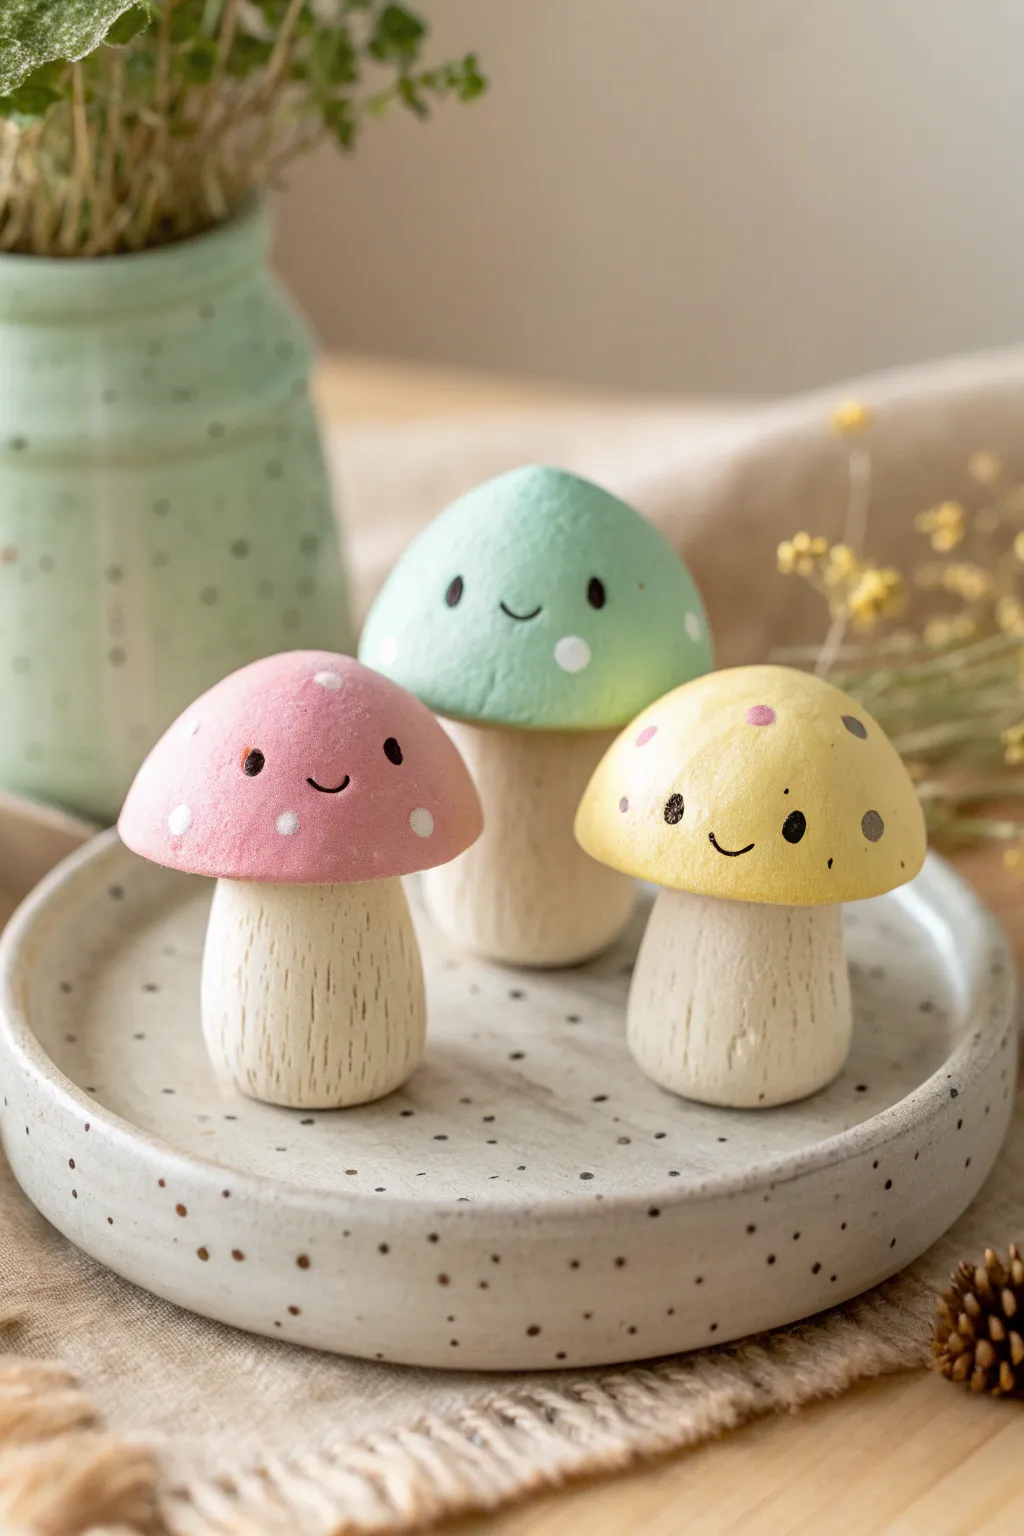
Brighten up your shelf with these adorable, minimalistic mushroom figurines featuring raw wood stems and soft pastel caps. This project combines the natural texture of wood with cheerful clay tones, perfect for adding a touch of sweetness to any corner of your home.
Step-by-Step
Materials
- Polymer clay (pastel pink, mint green, pale yellow)
- Small wooden dowels or unfinished wooden peg doll bodies (approx. 1 inch diameter)
- Black acrylic paint
- White or light pink acrylic paint (for dots)
- Fine-grit sandpaper
- Fine-point detail paintbrush or dotting tool
- Craft knife or clay blade
- Strong craft glue or E6000
- Liquid clay (optional but helpful)
- Matte varnish (optional)
Step 1: Preparing the Stems
-
Shape the wood:
If using standard wooden dowels, cut them into 1.5 to 2-inch lengths. Use sandpaper to round off the bottom edges slightly so they don’t look too sharp. -
Create texture:
To achieve the organic, striated Iove seen in the reference photo, take a craft knife and gently crave shallow vertical grooves down the length of the wood. Don’t press too hard; you just want surface texture. -
Smooth the base:
Determine which side will be the top. Sand the top surface flat so the clay cap will sit securely later. -
Finish sanding:
Lightly sand over your carved grooves with fine-grit sandpaper to remove splinters while keeping the rustic look.
Step 2: Sculpting the Caps
-
Condition the clay:
Start with your pastel pink clay. Knead it thoroughly in your hands until it is warm, pliable, and free of cracks. -
Form a ball:
Roll the clay into a smooth sphere, roughly 1.5 inches in diameter. -
Shape the dome:
Gently press the sphere onto a work surface to flatten the bottom, then use your palms to round the top into a classic mushroom cap shape. It should look like a smooth gumdrop. -
Check the fit:
Place the clay cap onto your wooden stem to ensure the proportions look right. The cap should overhang the stem slightly. -
Create the hollow:
Use the end of the wooden stem or a large ball tool to press an indentation into the bottom center of the cap. This helps it sit snugly on the wood later. -
Repeat for all colors:
Repeat the shaping process with your mint green and pale yellow clays to complete the trio. -
Bake the caps:
Bake the clay pieces according to the manufacturer’s instructions (usually 275°F for 15-30 minutes). Let them cool completely before handling.
Natural Texture Hack
If carving wood feels daunting, drag a stiff wire brush vertically down the soft wood dowel. It creates instant wood-grain grooves perfectly.
Step 3: Assembly and Painting
-
Attach the caps:
Apply a dab of strong craft glue or E6000 to the top of a wooden stem and press the cooled clay cap firmly into place. I find holding it for 30 seconds helps the initial bond set. -
Map out the faces:
Visualize where the eyes and mouth will go. They should be placed relatively low on the cap for maximum cuteness. -
Paint the eyes:
Using a very fine paintbrush or the tip of a toothpick dipped in black acrylic paint, create two small oval shapes for the eyes. Keep them widely spaced. -
Add the smile:
With the finest brush you have, paint a tiny, shallow ‘U’ shape between the eyes for the smile. -
Add decorative dots:
Dip a dotting tool or the non-brush end of a paintbrush into white or light pink paint. Add a few random dots around the cap for texture. -
Seal the work:
Once the paint is fully dry, apply a thin coat of matte varnish over the clay caps to protect the paint and give them a finished look.
Woodland Setting
Glue a small piece of preserved moss or dried baby’s breath to the base of the stem to make it look like it was freshly plucked from the forest floor.
Arrange your trio together on a shelf or desk for an instant mood booster every time you look at them

The Complete Guide to Pottery Troubleshooting
Uncover the most common ceramic mistakes—from cracking clay to failed glazes—and learn how to fix them fast.
Onigiri-Style Rice Ball Charms
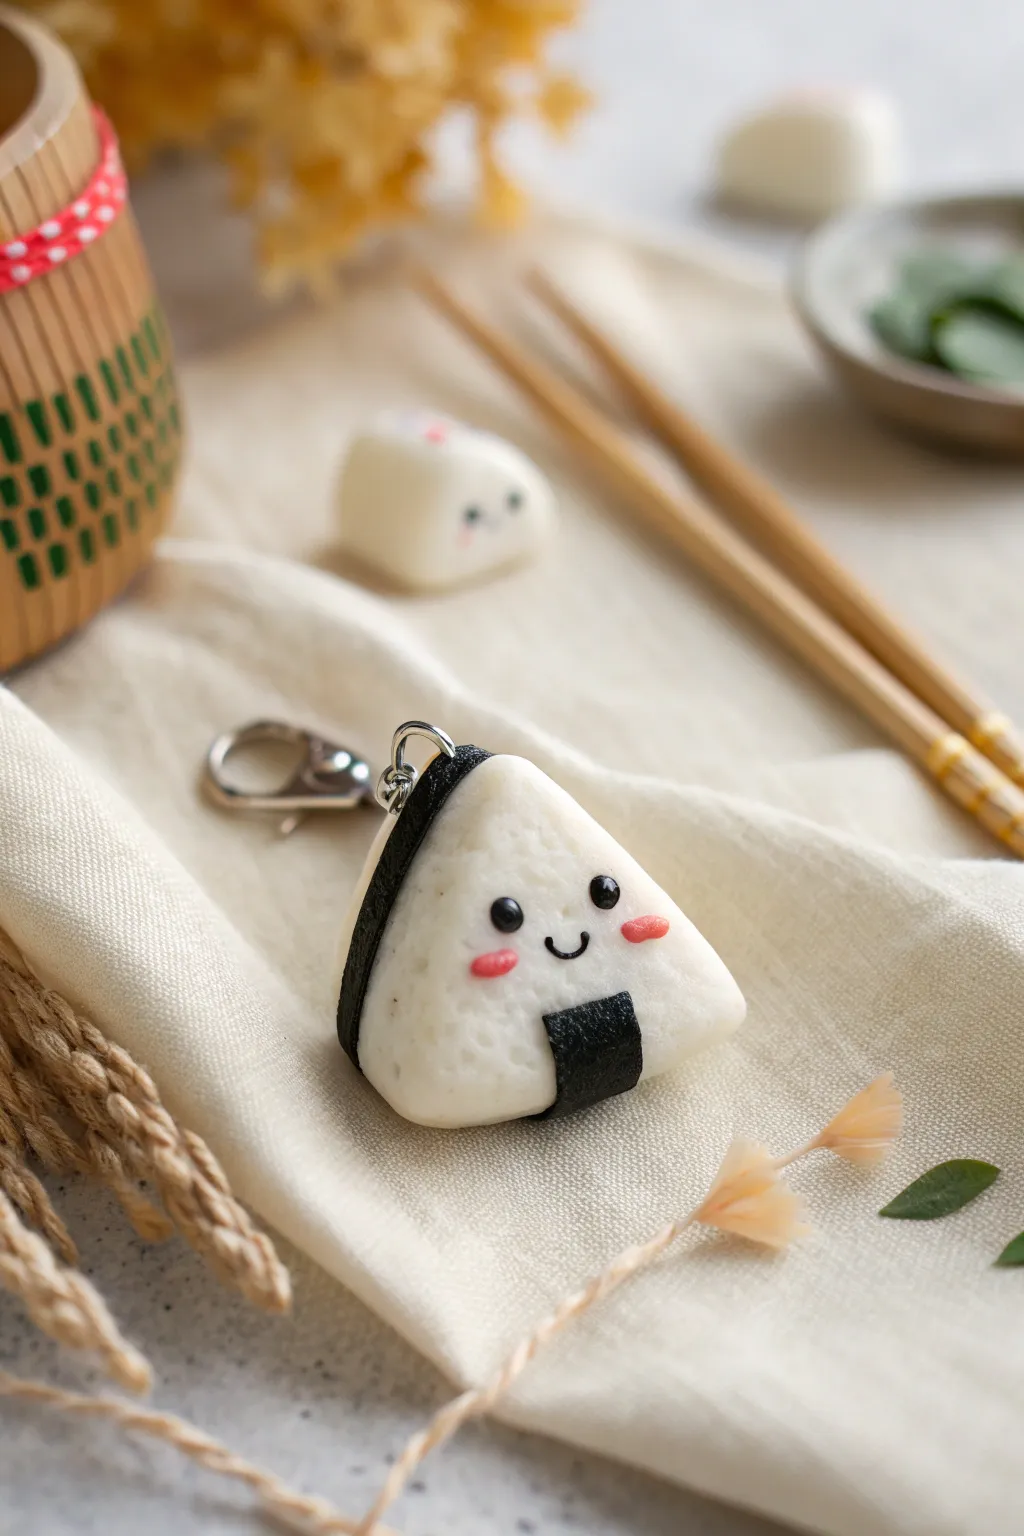
Capture the charm of Japanese cuisine with this adorable rice ball keychain, complete with a textured rice finish and a sweet, rosy-cheeked expression. This simple polymer clay project makes for a delightful gift or a cute accessory for your own bag.
How-To Guide
Materials
- White polymer clay (approx. 1/2 block)
- Black polymer clay (small amount)
- Pink polymer clay (tiny amount or pink chalk pastel)
- Translucent liquid clay or bake-and-bond
- Old toothbrush or stiff bristle brush
- Needle tool or toothpick
- Ball tool (small)
- Eye pin or screw eye
- Keychain hardware (lobster clasp and jump ring)
- Gloss glaze (water-based polyurethane)
- Clay blade or craft knife
- Sculpting mat or parchment paper
Step 1: Shaping the Rice Base
-
Condition the white clay:
Start by kneading the white polymer clay in your hands until it becomes soft, pliable, and free of cracks. Roll it into a smooth ball about the size of a walnut. -
Form the triangle shape:
Place the ball on your work surface and gently flatten it slightly. Using your thumb and forefinger, pinch the top to form a peak, and flatten the sides to create a rounded triangle shape typical of onigiri. -
Soften the edges:
Press the triangle gently against your work surface to flatten the bottom. Use your fingertips to round off all sharp corners so the rice ball looks soft and chubby rather than geometric. -
Create the rice texture:
Take an old toothbrush or a stiff bristle brush and gently tap it all over the surface of the white clay. Do this repeatedly to create a porous, rice-like texture. Be careful not to press too hard and distort the main triangle shape.
Step 2: Adding Details & Expression
-
Prepare the nori strip:
Condition a small piece of black clay and roll it out into a thin sheet, or use a pasta machine on a thin setting. Cut a rectanglar strip that is proportionate to the bottom of your rice ball. -
Attach the nori:
Apply a tiny dot of liquid clay to the bottom center of the white triangle. Wrap the black strip from the front bottom edge, underneath, and slightly up the back. Press it gently to adhere without squishing the rice texture. -
Create the black band detail:
Roll a very thin snake of black clay. Flatten it slightly to make a ribbon shape. Attach this diagonally across the top left corner of the triangle to mimic the wrapper style seen in the photo. -
Form the eyes:
Roll two tiny balls of black clay for the eyes. I find it easiest to pick these up with the tip of a needle tool. Press them gently onto the face area, spacing them somewhat wide for a cute look. -
Make the smile:
Roll an extremely thin thread of black clay. Cut a tiny u-shaped segment and place it between the eyes using your needle tool to create a happy smile. -
Add rosy cheeks:
Take two minuscule amounts of pink clay and roll them into flat ovals. Place one under each eye. Alternatively, you can brush on a little pink chalk pastel powder with a dry brush for a softer blush effect. -
Add eye highlights:
Using the tip of a toothpick or a very fine dotting tool, place a microscopic dot of white clay (or white paint after baking) in the upper right corner of each black eye pupil to bring the character to life.
Clean Clay Tip
Keep separate baby wipes nearby. Wipe your hands and tools thoroughly between handling black and white clay to prevent dark lint or smudges from ruining the pristine white rice.
Step 3: Finishing Up
-
Insert hardware:
Trim an eye pin to an appropriate length (about 1cm). Dip the end into liquid clay or strong glue for extra security, then insert it into the top center of the rice ball. -
Bake the charm:
Bake the piece according to the manufacturer’s instructions for your specific brand of clay (usually around 275°F/135°C for 15-30 minutes). Let it cool completely before handling. -
Glaze the eyes:
Once cool, apply a drop of gloss glaze or UV resin specifically to the black eyes and the nori strip to make them look wet and shiny, contrasting with the matte rice texture. -
Attach the keychain:
Open a jump ring using two pairs of pliers. loop it through the eye pin and the keychain hardware, then close the jump ring securely.
Make it a Set
Make a slightly smaller, rounder version without the nori strip to serve as a ‘baby’ rice ball, or change the expression to a winking face for a varied matching pair.
Now you have a charming little companion ready to hang on your keys or backpack
Tiny Donuts With Frosting Drips
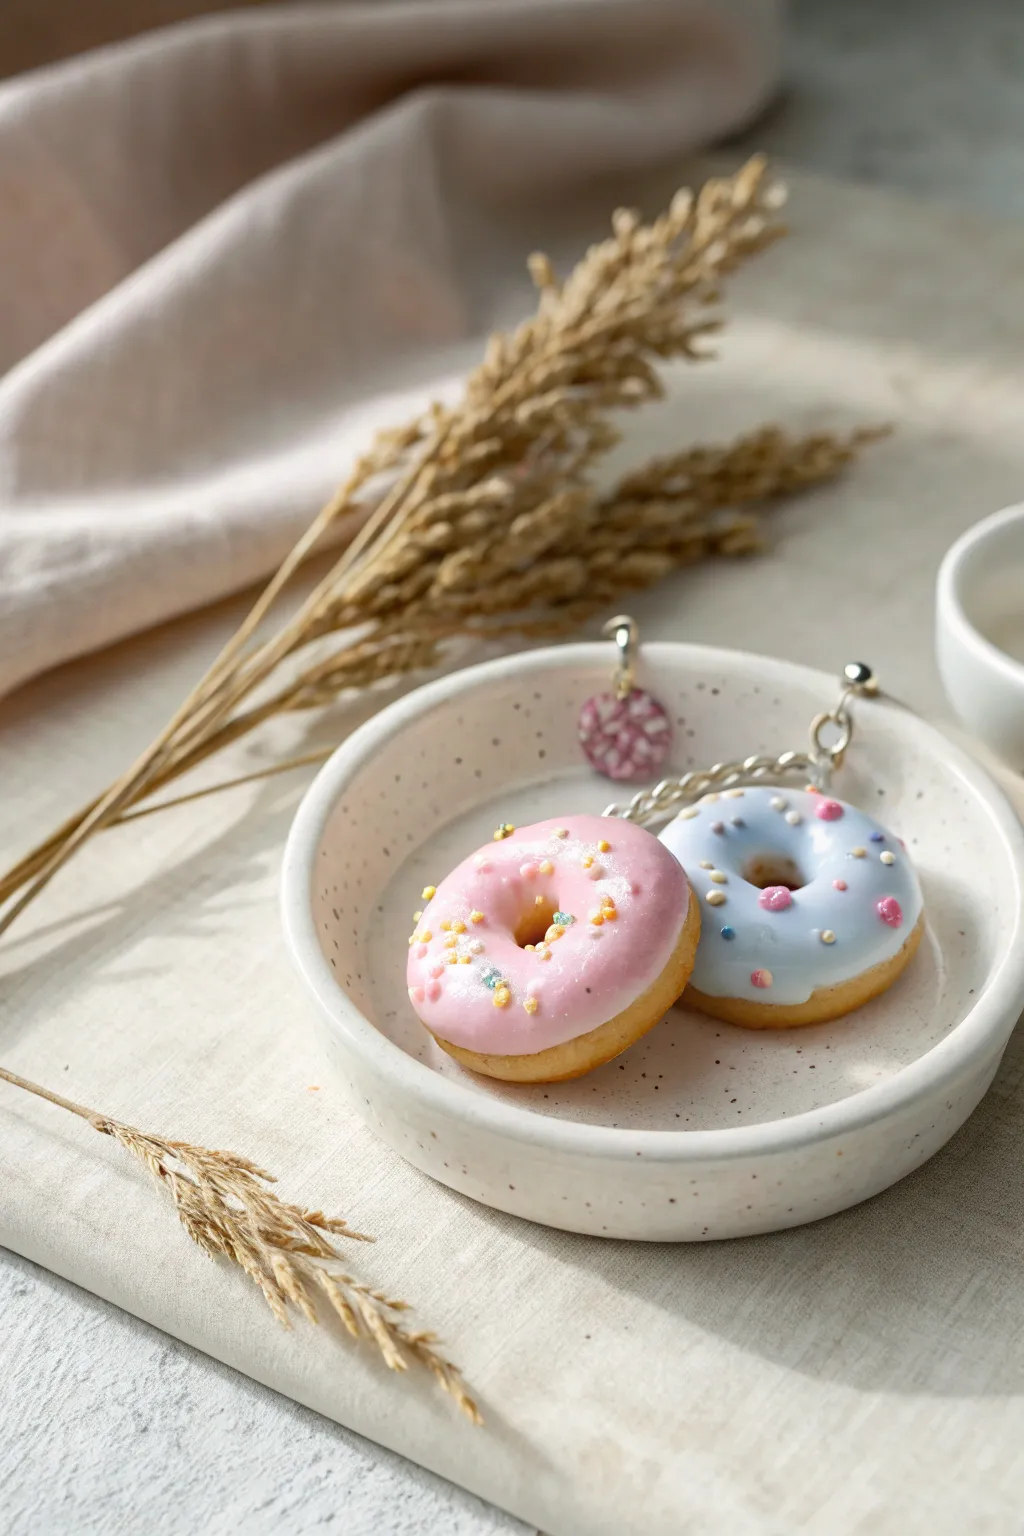
Create these adorable, bite-sized donut charms that look good enough to eat but are designed to be sweet accessories. With realistic glossy frosting and tiny sprinkles, these miniature treats make perfect pendants, earrings, or zipper pulls for any dessert lover.
Step-by-Step
Materials
- Polymer clay (tan/beige for dough)
- Polymer clay (light pink and pastel blue for frosting)
- Liquid polymer clay (translucent or white)
- Chalk pastels (orange, yellow, brown)
- Soft paintbrush
- Dotting tool or ball stylus
- Needle tool or toothpick
- Small eye pins
- Gloss glaze or UV resin
- Jewelry findings (jump rings, chain)
- Craft knife or scalpel
Step 1: Shaping the Dough Base
-
Condition the Clay:
Begin by conditioning your tan or beige polymer clay until it is soft and malleable. Roll it into two smooth, equal-sized balls, roughly 1.5 cm in diameter. -
Form the Donut Shape:
Gently flatten each ball slightly with your thumb to create a thick disc shape. Be careful not to make them too thin; you want that fluffy, raised donut look. -
Create the Center Hole:
Using a dotting tool or the back of a paintbrush, press directly into the center of the disc to create a hole. Wiggle the tool gently in a circular motion to widen it slightly. -
Soften the Edges:
Smooth out the area around the hole with your fingertip or a silicone tool so the transition looks rounded and baked, rather than sharp. -
Add Texture:
Take a clean toothbrush or a balled-up piece of aluminum foil and gently tap it all over the surface of the donut bases to create a realistic baked bread texture.
Step 2: Baking the Look
-
Shade the Dough:
Shave some yellow, orange, and brown chalk pastels into fine powder. Dip a soft, dry brush into the powder. -
Apply the shading:
Dust the “golden brown” chalk mix around the outer edges and the bottom of the donuts, leaving a lighter tan stripe around the middle to mimic the classic “fry line” seen on real donuts. -
Pre-Bake:
Insert an eye pin into the side or top of each donut base if you plan to hang them. Bake the bases according to your clay package instructions for about 10-15 minutes to set the shape before frosting.
Fixing Runny Icing
If your liquid clay frosting is running too much, let it sit on a piece of paper for 10 minutes. The paper will leech out some plasticizer, thickening the mix instantly.
Step 3: Frosting and Decorating
-
Prepare the Frosting:
Mix a small amount of liquid polymer clay with your pink solid clay until you achieve a consistency similar to heavy cream or thick icing. Repeat this process with the blue clay for the second donut. -
Apply the Icing:
Carefully dab the liquid clay mixture onto the tops of your cooled donut bases. Use a needle tool to drag the icing down the sides in random spots to create realistic drips. -
Make Tiny Sprinkles:
Roll out incredibly thin snakes of scrap clay in various pastel colors. Bake these strands for 5 minutes, then chop them into tiny bits with a craft knife to make sprinkles. -
Decorate the Donuts:
While the frosting is still wet, gently press your pre-baked sprinkles into the icing. For the blue donut, add larger round nonpareil shapes; for the pink one, use tiny cylinders. -
Final Bake:
Place the frosted donuts back in the oven for a full bake cycle according to the clay manufacturer’s directions (usually 30 minutes at 275°F/130°C).
Scented Jewelry
Mix a tiny drop of vanilla or strawberry fragrance oil into the liquid clay frosting before applying it. Your donuts will smell as sweet as they look for weeks!
Step 4: Finishing Touches
-
Glaze:
Once fully cooled, coat just the frosting area with a high-gloss glaze or a thin layer of UV resin to make it look wet and sugary. I like to leave the dough part matte for realism. -
Secure Findings:
If your eye pin feels loose after baking, pull it out, add a drop of superglue, and reinsert it. -
Make the Bonus Charm:
To recreate the background charm, flatten a small ball of purple clay, texture it, and glaze it similarly to create a matching accent piece. -
Assemble Jewelry:
Use jump rings to attach your finished donuts to a chain necklace or earring hooks to complete your wearable art.
Enjoy wearing your bakery-fresh creations or box them up as a delightful handmade gift for a friend


What Really Happens Inside the Kiln
Learn how time and temperature work together inside the kiln to transform clay into durable ceramic.
Strawberry Milk Cartons With Faces

This adorable project transforms simple clay into a charming, miniature milk carton with a sweet personality. With its soft pink finish and dimensional strawberry accent, it makes a delightful desk companion or a unique gift for kawaii enthusiasts.
Detailed Instructions
Materials
- Polymer clay (white and pink)
- Acrylic paints (black, white, darker red, leafy green)
- Rolling pin or clay machine
- Sharp craft blade or X-Acto knife
- Ruler
- Dotting tool or toothpick
- Small fine-point paintbrush
- Liquid clay or bake-and-bond
- Matte varnish or sealant
- Sandpaper (fine grit)
Step 1: Shaping the Carton Base
-
Condition the clay:
Begin by conditioning your pink polymer clay until it is soft and pliable. If you don’t have pastel pink, mix a tiny amount of red into white clay until you achieve a uniform, milky strawberry hue. -
Create a block:
Form the clay into a thick rectangular block. You want this to be the main body of the carton, approximately 2 inches tall and 1 inch wide. -
Refine the sides:
Use a ruler or a flat acrylic block to flatten each of the four sides. Press gently against your work surface to ensure the bottom is perfectly flat so the carton stands upright without wobbling. -
Sharpen the edges:
Running your blade gently along the corners helps sharpen them. We want a distinct box shape, not a rounded blob, so take your time getting those 90-degree angles crisp.
Uneven Eyes?
If you struggle to paint symmetrical eyes, mark their position lightly with a pencil first. You can also use the head of a pin instead of a brush for perfect round dots.
Step 2: Forming the Carton Top
-
Shape the triangular top:
Pinch the top portion of your rectangular block to form a triangular prism shape, mimicking the gable of a milk carton. Smooth the clay so there is no seam between the box body and this new angled top. -
Add the ridge detail:
Roll a small, flat strip of pink clay, about the same thickness as cardstock. Cut it into a rectangle that matches the width of your carton top. -
Attach the ridge:
Place this strip vertically along the very peak of the triangular top to represent the sealed fold of a real carton. Blend the bottom edge slightly, but leave the top edge distinct. -
Create the side folds:
Use your craft blade to gently impress a horizontal line where the triangular top meets the square body on all sides. This separates the ‘roof’ from the container visually.
Step 3: Adding Details & Baking
-
Sculpt the strawberry:
Take a tiny amount of red clay (or paint white clay red later) and shape it into a small, flattened teardrop for the strawberry body. -
Add the leaves:
Form two tiny green teardrops, flatten them, and attach them to the top of the strawberry. Place the finished strawberry on the front center of the carton. -
Add the cheeks:
Roll two minuscule balls of slightly darker pink clay. Press them onto the carton face area, spacing them out to leave room for the eyes and mouth in between. -
First bake:
Bake the piece according to your polymer clay package instructions. I usually tent foil over it to prevent the delicate pink color from scorching. -
Cool and sand:
Once fully cooled, lightly sand any fingerprints or rough edges with fine-grit sandpaper for a professional, smooth finish.
Add a Function
Turn this into a functional memo holder by inserting a twisted wire coil into the top ridge before baking. It makes the cutest photo clip for your desk.
Step 4: Painting the Face
-
Paint the eyes:
Using a dotting tool dipped in black acrylic paint, place two solid black circles just above the level of the pink cheeks. -
Add the smile:
With your finest brush and black paint, draw a tiny, thin ‘U’ shape exactly between the eyes. Keep the line weight very delicate. -
Highlight the eyes:
Once the black paint is dry, dip a toothpick in white paint and add a tiny reflection dot in the upper corner of each eye. This brings the character to life. -
Strawberry seeds:
Using the very tip of a toothpick and white paint, add tiny dots in a grid pattern onto the red strawberry relief. -
Seal the work:
Finish by applying a coat of matte varnish over the entire piece to protect the paint and give the clay a unified, soft texture.
Enjoy your sweet new desk accessory and experiment with making a chocolate or banana version next
Heart-Shaped Trinket Dishes With Blush
Bring a little warmth to your vanity with this adorable, grinning trinket dish. Crafted in a classic heart shape, the blush spots and tiny smile give it a personality that makes holding your rings feel like a sweet gesture.
How-To Guide
Materials
- Speckled Stoneware Clay (white or buff base)
- Heart-shaped cookie cutter (approx. 4 inches) or paper template
- Rolling pin
- Canvas mat or slab roller
- Small sponge
- Fettling knife or needle tool
- Underglaze pencil (black) or very fine liner brush with black underglaze
- Pink or coral underglaze (for cheeks)
- Small round paintbrush
- Clear or transparent lavender glaze (food safe recommended)
- Kiln (or access to a firing service)
Step 1: Shaping the Clay
-
Roll the Slab:
Start by wedging your speckled clay to remove air bubbles. Roll it out on your canvas mat to a thickness of about 1/4 inch. Ensure the thickness is even across the entire slab to prevent warping later. -
Cut the Shape:
Place your heart-shaped cutter or paper template onto the clay. Press down firmly to cut the shape. If using a template, trace around it carefully with your needle tool. -
Soften the Edges:
Since cut clay can have sharp edges, gently dampen your sponge and run it along the rim of the heart. Smooth out any burrs or rough spots without distorting the shape. -
Form the Dish:
Pick up the heart slab and cup it gently in your palm. Use your thumbs to press the center down slightly while curling the edges upward. -
Define the rim:
Work your way around the perimeter, pinching and smoothing the walls to create a shallow dish profile. Aim for a gentle curve rather than a steep wall. -
Dry Slowly:
Set the dish aside to dry to a ‘leather-hard’ state. This usually takes a day or two depending on humidity. Covering it loosely with plastic can help it dry evenly.
Rim Perfection
To get that exposed clay rim, wipe the glaze off just the top edge with a damp sponge before firing instead of using wax resist.
Step 2: Adding Personality
-
Smooth the Surface:
Once leather-hard, use a slightly damp sponge to do a final smoothing pass on the interior surface where the face will go. This ensures your drawing surface is pristine. -
Mark the Face:
Lightly sketch the position of the eyes and mouth with a pencil. Don’t worry, the graphite will burn off in the kiln. -
Paint the Features:
Using a very fine liner brush and black underglaze, paint two small, solid circles for eyes. Add tiny white dots (using white underglaze) inside the black circles for a sparkle effect. -
Draw the Smile:
Paint a small, U-shaped hook curve between the eyes for the smile. Keep the line thin and deliberate. -
Add the Blush:
Dip a small round brush into your pink or coral underglaze. Dab two soft, round circles on either side of the smile to create rosy cheeks. I prefer to dab excess paint off first for a softer look. -
Bisque Fire:
Allow the underglaze to dry completely, then load the piece into the kiln for a bisque firing (typically Cone 04).
Gold Accents
Apply gold luster over the rim or cheeks after the glaze firing. This requires a third, lower-temperature firing (Cone 018).
Step 3: Glazing & Finishing
-
Wax Resist (Optional):
For a clean rim like the original, carefully apply wax resist just along the very top edge of the heart’s wall. This prevents glaze from adhering there. -
Apply Glaze:
Pour a transparent lavender glaze into the interior of the dish, swirl it quickly to coat the bottom, and pour the excess out. Alternatively, brush on 2-3 coats if using a brush-on glaze. -
Check the Exterior:
Decide if you want the exterior glazed. For the look in the photo, brush a solid matching pink or lavender glaze on the outside walls, avoiding the bottom if you aren’t using stilts. -
Clean the Foot:
Use a damp sponge to wipe any stray glaze off the bottom of the dish so it doesn’t fuse to the kiln shelf. -
Final Fire:
Fire the piece again to your clay and glaze’s maturation temperature (often Cone 5 or 6 for stoneware). -
Cool and Enjoy:
Let the kiln cool completely before retrieving your new cheerful trinket dish.
Now you have a charming little spot to keep your favorite rings safe

TRACK YOUR CERAMIC JOURNEY
Capture glaze tests, firing details, and creative progress—all in one simple printable. Make your projects easier to repeat and improve.
Sleepy Cloud Pins With Raindrops
This adorable polymer clay pin features a peaceful, slumbering cloud with dangling pastel raindrops. Its gentle expression and soft movement make it a charming accessory for any jacket or tote bag.
Step-by-Step Tutorial
Materials
- White polymer clay
- Soft pink polymer clay
- Light blue polymer clay
- Black acrylic paint or fine detail marker
- Liquid clay (TLS) or strong craft glue
- Rolling pin or pasta machine
- Cloud-shaped cutter (or X-acto knife)
- Small teardrop cutter (optional)
- Needle tool or toothpick
- 6 small gold jump rings
- Jewelry pliers
- Pin back or brooch finding
- Gloss glaze (optional)
Step 1: Sculpting the Cloud
-
Condition the clay:
Start by kneading your white polymer clay until it is soft and pliable. This prevents cracking later on. -
Roll and cut:
Roll the white clay out to a thickness of about 1/4 inch (6mm). Use a cloud-shaped cutter to punch out your shape, or sketch a cloud on paper and cut around it with an X-acto knife. -
Soften the edges:
Gently tap the edges of the cloud with your finger to round them off, removing any sharp angles left by the cutter for a puffier look. -
Add pierced holes:
Using a needle tool, carefully pierce three holes horizontally along the bottom edge of the cloud. Ensure they are close enough to the edge to attach rings later, but not so close that the clay will break.
Step 2: Creating the Raindrops
-
Shape the drops:
Roll out small amounts of pink and blue clay. Cut three small teardrop shapes—two pink and one blue—about 1/2 inch tall. -
Smooth the forms:
Refine the teardrop shapes with your fingertips so they are smooth and rounded. -
Pierce the drops:
Use your needle tool to poke a hole through the top point of each raindrop. Make sure the hole is large enough for your jump rings to pass through.
Uneven Holes?
If your pierced holes shrunk during baking, carefully use a small hand drill or twisting motion with a sharp craft knife to widen them just enough for the rings.
Step 3: Adding Details & Baking
-
Add rosy cheeks:
Take two tiny balls of pink clay and flatten them into thin ovals. Press them gently onto the cloud where the cheeks should be. -
Texture the cheeks:
I like to use a toothbrush or a ball tool to lightly texture the pink cheeks, giving them a soft, felt-like appearance. -
Insert eye pins (alternative):
If you struggle with pierced holes, you can insert small metal eye pins into the bottom of the raw cloud and the tops of the raindrops instead of making holes. -
Bake:
Place all clay pieces on a baking tile or parchment-lined tray. Bake according to your clay manufacturer’s instructions (usually 275°F/135°C for 15-30 minutes). Let them cool completely.
Make it Sparkle
Mix a pinch of iridescent glitter or mica powder into the white clay before sculpting to give your cloud a magical, shimmering ‘silver lining’ effect.
Step 4: Assembly & Finishing
-
Paint the face:
Once cool, use a fine detail brush with black acrylic paint (or a waterproof fine-liner) to draw the sleeping eyelids with lashes and a small ‘u’ shaped smile. -
Attach the jump rings:
Using two pairs of jewelry pliers, twist open a jump ring. Loop it through the hole in a pink raindrop. -
Connect to cloud:
Before closing that ring, attach a second jump ring to it. Loop this second ring through the corresponding hole on the bottom of the cloud so the drop dangles freely. Repeat for all three drops. -
Attach pin back:
Flip the cloud over. Apply a strong glue or liquid clay to the back of a pin finding and press it firmly onto the center back of the cloud. -
Secure the backing:
For extra durability, you can place a small strip of clay over the pin back bar (if using liquid clay) and bake again briefly, or simply let the strong glue cure fully. -
Optional glaze:
If you prefer a shiny finish, brush a thin layer of gloss glaze over the raindrops or the whole piece.
Pin this sweet little cloud to your lapel and enjoy carrying your own personal weather forecast everywhere you go
Mini Bunnies With Simple Ears
This charming, minimalistic bunny figurine brings a touch of warmth to any shelf with its smooth lines and earthy tones. The design focuses on simple geometric breakdown—a rounded body, a bulbous head, and tall, expressive ears—making it a perfect project for beginners.
Step-by-Step Guide
Materials
- Air-dry clay (white or natural stone color)
- Acrylic paint (warm yellow ochre/mustard, black)
- Small paintbrush
- Fine-grit sandpaper
- Cup of water
- Toothpick or clay scoring tool
- Matte varnish or sealant
Step 1: Sculpting the Base Form
-
Form the body:
Start with a lump of clay about the size of a golf ball. Roll it into a smooth sphere, then gently taper the top half to create a pear or gumdrop shape. The bottom should be wide and flat enough to stand on its own. -
Create the head:
Take a slightly smaller piece of clay and roll it into a neat sphere for the head. It should be proportional to the body but distinct. -
Attach head to body:
Score the top of the body and the bottom of the head with crisscross lines using your toothpick. Dab a little water on the scored areas (this acts as slip) and press the head firmly onto the body. -
Smooth the seam:
Use your finger or a modeling tool to gently blend the clay at the neck seam just enough to secure it, though retaining the definition between head and body adds to the cute, stacked look.
Smooth Operator
Keep a small bowl of water nearby while sculpting. Dip your finger in and run it over the clay frequently to smooth out cracks before they dry.
Step 2: Adding Details
-
Shape the ears:
Roll two equal-sized small logs of clay. Flatten them slightly and taper one end to a point to create the classic rabbit ear shape. -
Attach the ears:
Score the bottom of the ears and the top of the head. Use a tiny bit of water and press the ears onto the head, positioning them upright and parallel. Support them for a moment if they droop. -
Refine the ear shape:
Once attached, you can gently pinch the tips or curve them slightly to add character. Smooth the connection point at the base of the ears so they look like they grow naturally from the head. -
Add the arms:
Roll two very small, teardrop-shaped pieces of clay for the arms. They shouldn’t be much bigger than a fingernail. -
Attach lower limbs:
Press these teardrops onto the sides of the lower body, angling them slightly inward as if the bunny is holding its belly. Blend the back edge of the arm into the body so only the front relief pops out.
Texture Twist
Before the clay dries, gently press a clean piece of linen fabric or burlap against the surface to give your bunny a subtle, woven texture.
Step 3: Finishing Touches
-
Let it dry:
Allow your bunny to dry completely. Depending on humidity and clay thickness, this usually takes 24 to 48 hours. Turn it occasionally so the bottom dries evenly. -
Sand imperfections:
Once bone dry, take fine-grit sandpaper and gently buff away any fingerprints or rough bumps, paying special attention to the ears and the roundness of the face. -
Paint the base color:
Mix a warm yellow ochre or mustard acrylic paint. Dilute it slightly with water to create a wash that allows some clay texture to show through, giving it a natural, stonelike finish. Apply one or two coats. -
Paint the face:
Dip the very tip of a toothpick or a fine detail brush into black acrylic paint. Dot two small eyes wide apart on the face. -
Add the nose:
Between and slightly below the eyes, paint a tiny ‘X’ or a small ‘Y’ shape for the nose and mouth. Keep it minimal. -
Seal the piece:
Finish with a coat of matte varnish to protect the paint and give the bunny a finished look without making it too shiny.
Now you have a sweet clay companion ready to decorate your window sill
Tiny Ducks on Lily Pads
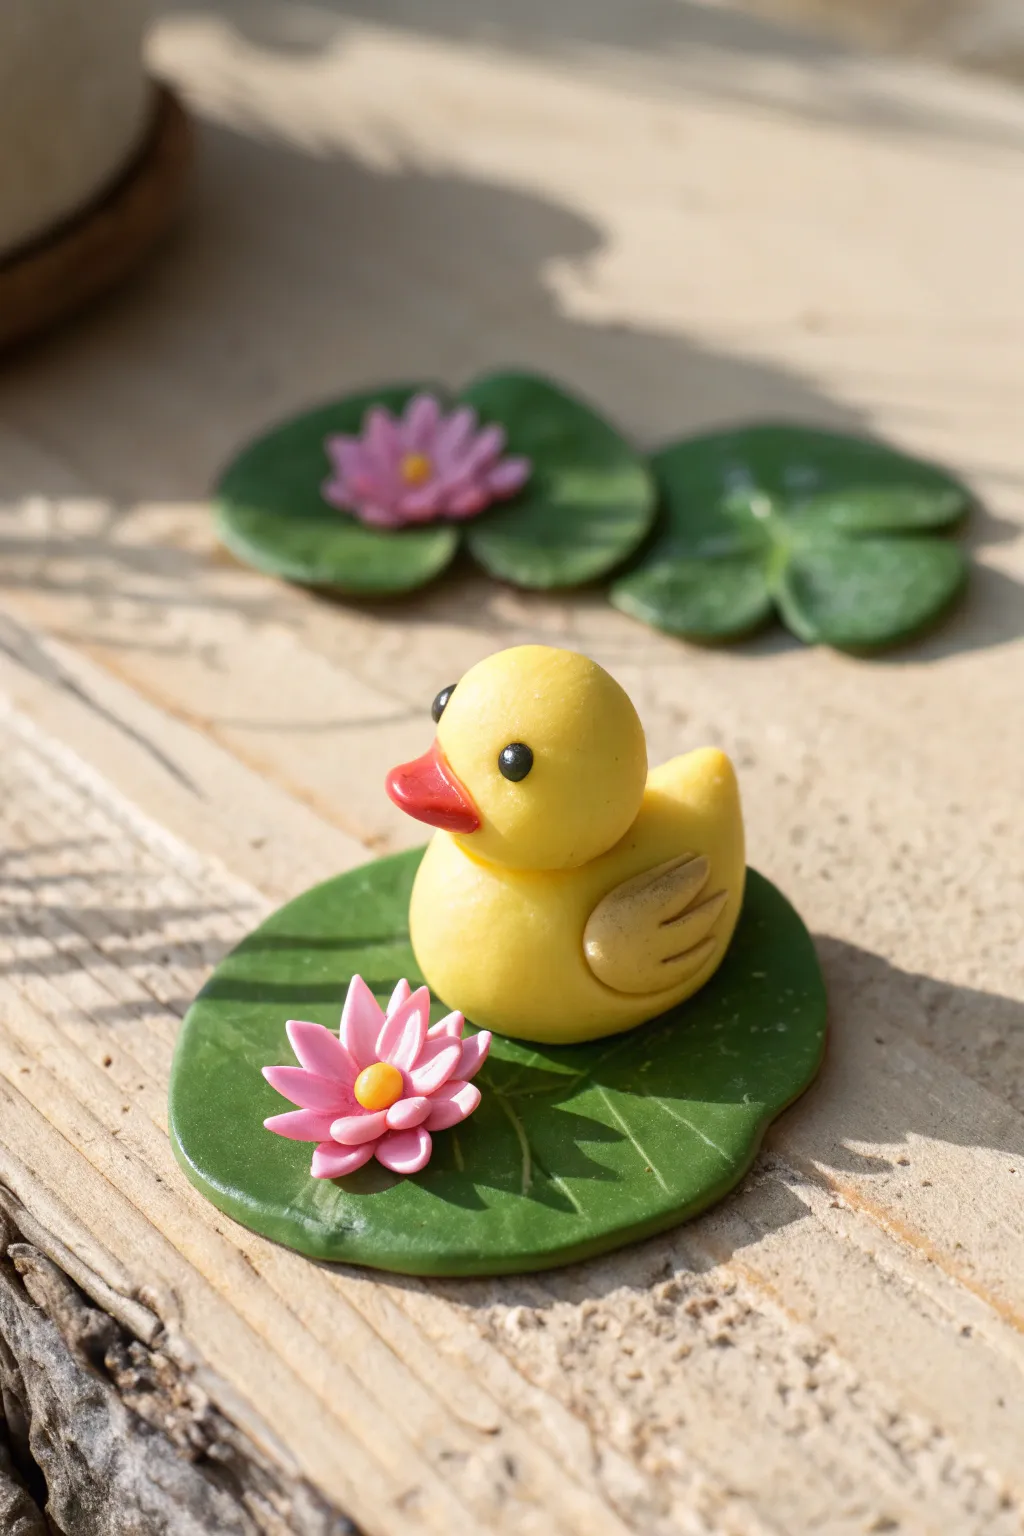
Bring the serene charm of a park pond to your desk with this adorable polymer clay miniature. This project features a cheerful yellow duck resting on a textured lily pad, accompanied by delicate pink lotuses.
Step-by-Step Tutorial
Materials
- Polymer clay (Yellow, Green, Pink, Orange/Red, Black, White)
- Clay sculpting tools (needle tool, ball stylus)
- Acrylic rolling pin
- Clean work surface (tile or glass)
- Baking sheet
- Oven (for curing)
- Golden mica powder or soft pastel (optional, for wings)
- Gloss glaze (optional)
Step 1: Sculpting the Lily Pad Base
-
Prepare the green clay:
Start by conditioning a 1-inch ball of green polymer clay until it is soft and pliable. Flatten it gently with your palm or a roller to create a disk about 2-3mm thick. It doesn’t need to be perfectly round; a slightly organic shape looks more natural. -
Create the notch:
using a craft knife or a circular cutter, remove a small triangular wedge from one side of the green disk. This creates the classic ‘pac-man’ shape of a lily pad. -
Texture the leaf:
Take a needle tool and gently score veins into the surface. Start from the center point of the notch and draw lines radiating outward toward the edges of the pad. -
Soften the edges:
Gently tap the edges of the lily pad with your finger to round them off so they don’t look too sharp or freshly cut. You can pinch the edges slightly to give the leaf some dimension.
Dust Magnets?
Polymer clay loves dust. Keep baby wipes nearby to clean your hands between colors, especially before handling the bright yellow clay, or the duck might look dirty.
Step 2: Forming the Duck
-
Shape the body:
Roll a ball of yellow clay roughly the size of a large marble. Gently taper one end slightly to create a tear-drop shape, which will become the tail end of the duck. -
Flatten the base:
Press the yellow body gently onto your work surface to flatten the bottom so the duck sits stably without tipping over. -
Add the head:
Roll a slightly smaller ball of yellow clay for the head. Place it on top of the rounded end of the body. Blend the seam at the neck very gently with a smoothing tool if needed, though simpler assembly often looks cute too. -
Attach the beak:
Take a tiny bit of orange or red clay and form a small cone. Press this onto the center of the face, flattening it slightly to create a bill shape. -
Insert the eyes:
Roll two miniscule balls of black clay. Use a needle tool to make tiny indents on the head where the eyes should go, then press the black beads into place. Add extremely tiny specks of white clay for highlights if you’re feeling ambitious. -
Create the wings:
Form two small, flat teardrop shapes from yellow clay. I like to dust these lightly with gold mica powder before attaching them to give the feathers a distinct sheen. -
Detail the wings:
Press the wings onto the sides of the body. Use a knife tool to press three horizontal indents into the back of each wing to suggest layers of feathers.
Step 3: Crafting the Lotus Flower
-
Make the petals:
Roll out a very thin snake of pink clay. Cut off 6-8 tiny equal segments. Roll each segment into a ball, then flatten and pinch one end to create teardrop-shaped petals. -
Assemble the flower:
Arrange the pink petals in a circle, with the pointed ends facing inward and touching. Press them together gently at the center point. -
Add a second lawyer:
Create 4-5 slightly smaller pink petals and layer them on top of the first ring, offsetting them so they sit in the gaps between the lower petals. -
Place the center:
Roll a tiny ball of yellow clay and press it into the very center of the pink petals to lock the flower together.
Secure Bonding
If the duck or flower feels loose after baking, a tiny dot of superglue underneath them will permanently attach them to the lily pad base without showing.
Step 4: Assembly and Baking
-
Position the duck:
Gently lift your yellow duck and place it firmly onto the green lily pad. Ensure the bottom of the duck makes good contact with the textured leaf. -
Place the lotus:
Lift your pink lotus flower with a blade and position it on the lily pad next to the duck. If the clay is dry, use a dab of liquid clay or bake-and-bond to secure it. -
Final check:
Look over your piece for any fingerprints. You can smooth them away with a brush dipped lightly in baby oil or rubbing alcohol. -
Bake:
Place the artwork on a ceramic tile or baking sheet. Bake according to your clay manufacturer’s instructions (usually 275°F/135°C for 15-30 minutes). -
Cool and finish:
Let the piece cool completely before handling. Once cool, the clay hardens to its final strength.
This cheerful little scene makes for a perfect handmade gift or a bright spot in a miniature garden collection
Mini Snails With Swirly Shells
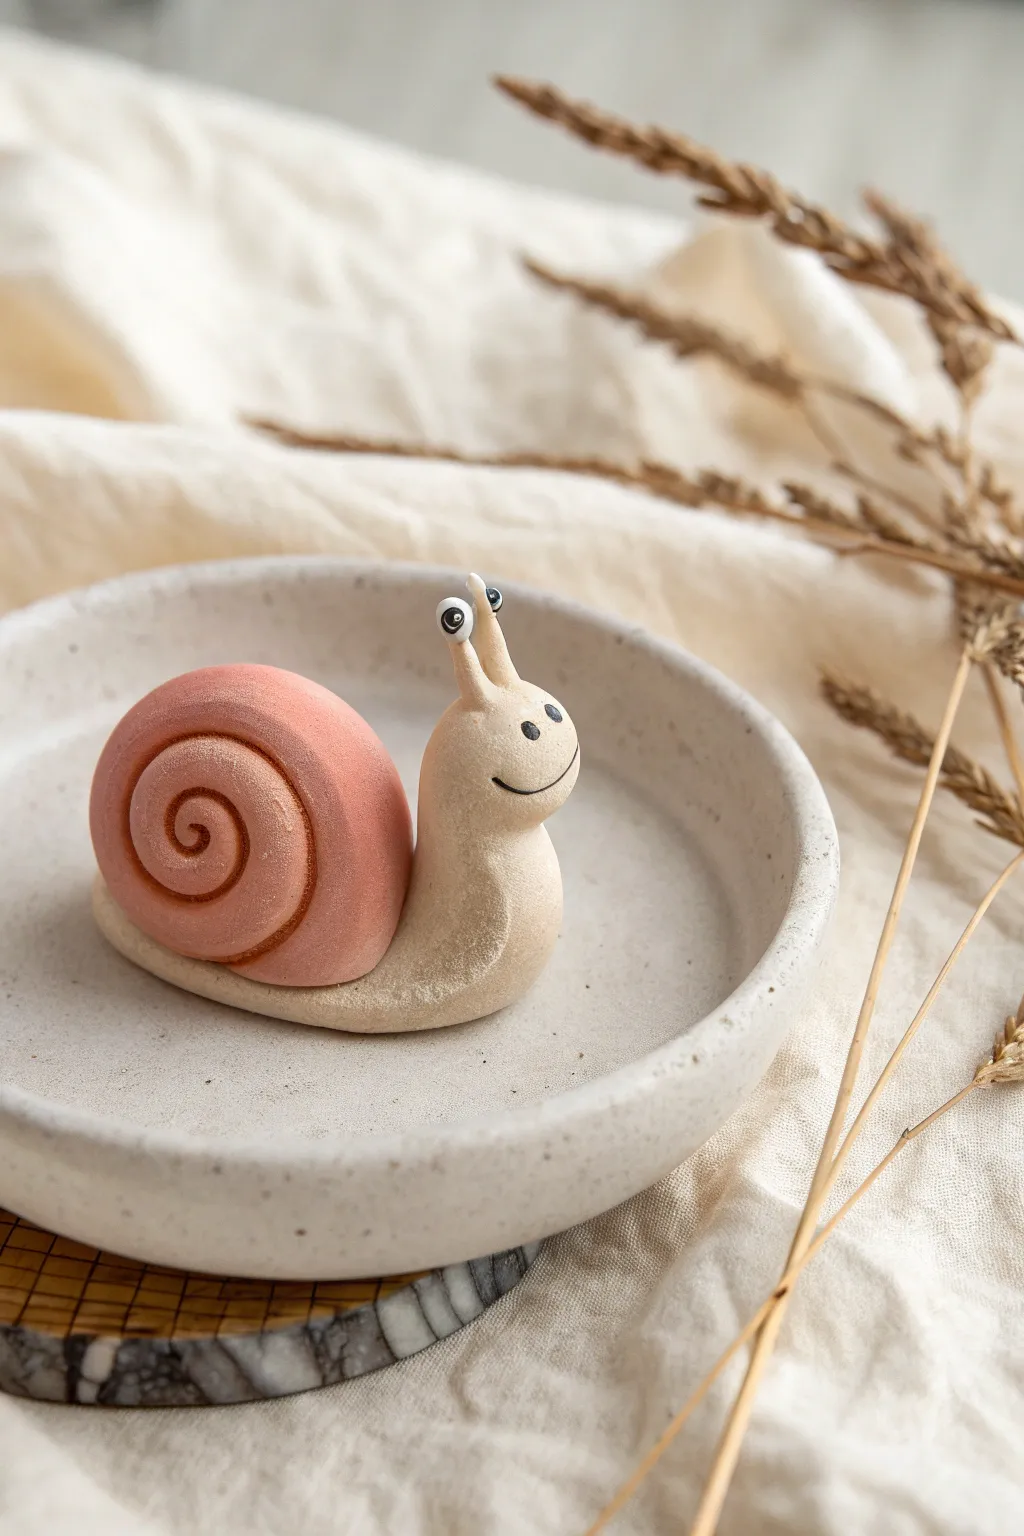
This adorable miniature snail features a soft, dusty pink shell and a creamy, textured body that brings a whimsical touch to any desk or shelf. With its simple shapes and sweet expression, this project is perfect for beginners looking to practice their sculpting skills with polymer or air-dry clay.
Step-by-Step Guide
Materials
- Polymer clay or air-dry clay (Pale Beige, Dusty Pink, White, Black)
- Clean work surface (ceramic tile or silicone mat)
- Dotting tools or ball stylus (various sizes)
- Needle tool or toothpick
- Soft pastel chalks (optional, for shading)
- Soft brush
- Acrylic roller
- Oven (if using polymer clay)
Step 1: Shaping the Shell
-
Prepare the pink clay:
Condition a medium-sized ball of dusty pink clay until it is soft and pliable. If the color is too bright, mix in a tiny bit of white or beige to achieve that matte, pastel look. -
Roll the coil:
Roll the pink ball into a long, tapered snake. One end should be thicker than the other, gradually thinning out to a point at the tail end. -
Form the spiral:
Starting from the thinnest end, begin curling the clay inward to create a tight spiral. Keep the coil vertical as you roll so the shell stands upright like a wheel. -
Secure the shape:
Gently press the end of the coil against the side of the shell to secure it. You can smooth the seam slightly with your finger, but leave the spiral definition visible. -
Enhance the groove:
Use a needle tool or a small ball tool to deepen the groove between the spiral layers if they got squished during rolling. This adds depth to the swirl.
Secret Texture Tip
For a powdery, matte finish like the photo, dust the raw clay with cornstarch before texturing. It prevents sticking and adds a soft look.
Step 2: Creating the Body
-
Form the base cylinder:
Take a ball of pale beige clay, slightly larger than the one used for the shell. Roll it into a thick cylinder. -
Shape the neck and tail:
Pinch and elongated one end to form the tail, flattening the bottom so it sits stably. Bend the other end upward to create the neck and head area. -
Curve the neck:
Gently curve the upright neck portion forward slightly. Smooth the transition between the horizontal body and the vertical neck so it looks organic. -
Texture the clay:
To mimic the matte, stone-like texture in the photo, lightly tap the surface of the beige clay with a clean toothbrush or crinkled aluminum foil. I find this subtle texture hides fingerprints beautifully. -
Attach the shell:
Press the pink shell firmly onto the back of the beige body. You may need to create a slight indentation in the body first to help the shell sit securely.
Step 3: Adding the Face Details
-
Make the eye stalks:
Roll two small, thin logs of beige clay for the eye stalks. Attach them to the top of the head, blending the clay at the base so they look seamless. -
Create the eyeballs:
Roll two tiny balls of white clay. Place one on top of each stalk, pressing gently to adhere them without squashing. -
Add pupils:
Using the smallest dotting tool or a needle tip, press a tiny speck of black clay into the center of each white eyeball for the pupils. -
Sculpt the smile:
Use a needle tool or a curved blade to press a simple, wide smile into the side of the face. -
Add dimples:
Press a small dotting tool at each end of the smile line to create cute, deep dimples. -
Bake or Dry:
If using polymer clay, bake according to the manufacturer’s instructions (usually 275°F/130°C for 15-30 minutes). If using air-dry clay, let it sit undisturbed for 24-48 hours.
Moss & Mushrooms
Make a tiny garden scene! Place your snail on a slice of wood or a flat stone, and surround it with tiny clay mushrooms and glued-on dried moss.
Now you have a charming little friend ready to slowly make its way into your heart.
Bubble Tea Cups With Pearls

Capture the sweetness of your favorite drink with this adorable miniature bubble tea charm. Featuring a realistic milky tea color, tiny black tapioca pearls, and a happy little face, this project combines resin and clay for a delightful finish.
How-To Guide
Materials
- Translucent polymer clay
- Beige or light brown polymer clay
- Black polymer clay
- Pink polymer clay
- UV resin (clear)
- UV lamp
- Miniature plastic cup and dome lid (or clear plastic tubing to make one)
- Black acrylic paint
- Liquid clay (TLS or similar)
- Needle tool
- Dotting tool
- Small eye screw or jump ring
- Sandpaper (fine grit)
Step 1: Prepping the Pearls and Cup
-
Make the Pearls:
Roll a small amount of black polymer clay into a very thin snake. Cut tiny, equal-sized pieces and roll them into spheres between your fingers to create the boba pearls. -
Bake the Pearls:
Place your tiny black pearls on a ceramic tile or baking sheet. Bake them for just 5-10 minutes according to your package directions, as they are very small and can burn easily. -
Prepare the Vessel:
I like to use pre-made miniature plastic cups for ease, but if you don’t have one, you can mold clear tubing or resin. Ensure your cup is clean and dust-free. -
Fill the Bottom:
Mix a small amount of clear UV resin with a tiny drop of translucent liquid clay to create a slightly cloudy base. Pour a thin layer into the bottom of the cup and cure under the UV lamp.
Sticky Situation?
If your UV resin remains tacky after curing, wipe it with a cotton pad soaked in rubbing alcohol, or place the charm in direct sunlight for 30 minutes.
Step 2: Creating the Milk Tea
-
Mix the Tea Color:
Take your beige polymer clay and mix it with a significant amount of translucent clay and liquid clay. You want a thick, syrup-like consistency that looks like milk tea. Alternatively, mix beige acrylic paint into UV resin for a more liquid look. -
Add Pearls:
Drop a layer of your baked black pearls into the bottom of the cup. Arrange them so they crowd the bottom edges, making them visible from the outside. -
Pour the First Layer:
Pour your clay-resin mixture (or colored resin) over the first layer of pearls. Tap the cup gently on the table to release trapped air bubbles. Cure or bake depending on your chosen medium. -
Build the Layers:
Add more pearls on top of the cured layer, sticking some to the side walls of the cup with a dot of liquid clay or resin so they appear to be floating. Pour more ‘tea’ mixture to cover them and cure again.
Step 3: The Cute Face
-
Paint the Eyes:
Once the cup is filled and solidified, use a dotting tool dipped in black acrylic paint to place two round eyes on the outside of the plastic cup. -
Add the Smile:
Use a very fine detail brush or a needle tool dipped in black paint to draw a small ‘U’ shape between and slightly below the eyes. -
Highlight the Eyes:
Add a tiny speck of white paint to the upper corner of each black eye dot to bring the character to life. -
Seal the Face:
Once dry, brush a thin layer of UV resin over the painted face area and cure it to prevent the paint from chipping off the plastic.
Flavor Variations
Change the ‘tea’ color to pastel green for matcha, purple for taro, or bright pink for strawberry milk tea to make a whole colorful set.
Step 4: Lid, Straw, and Assembly
-
Make the Straw:
Roll a thin snake of pink clay. Insert a thin wire or needle tool through the center if you want it hollow, or leave it solid. Cut it to size and bake it. -
Attach the Lid:
Place the dome lid onto the cup. If using resin, use a little UV resin on the rim to seal it shut and cure. -
Insert the Straw:
Drill a hole in the lid if there isn’t one, or insert the baked straw through the opening before the resin fully sets. Secure with a drop of resin. -
Add Hardware:
Drill a small hole into the side of the dome lid or the top near the straw. Screw in a small eye screw or attach a jump ring through the hole. -
Final Cure:
Give the entire piece a final cure under the UV lamp to ensure all resin components are non-tacky and fully hardened.
Now you have a refreshing little accessory to brighten up your keychain or bag
Tiny Peach and Avocado Besties
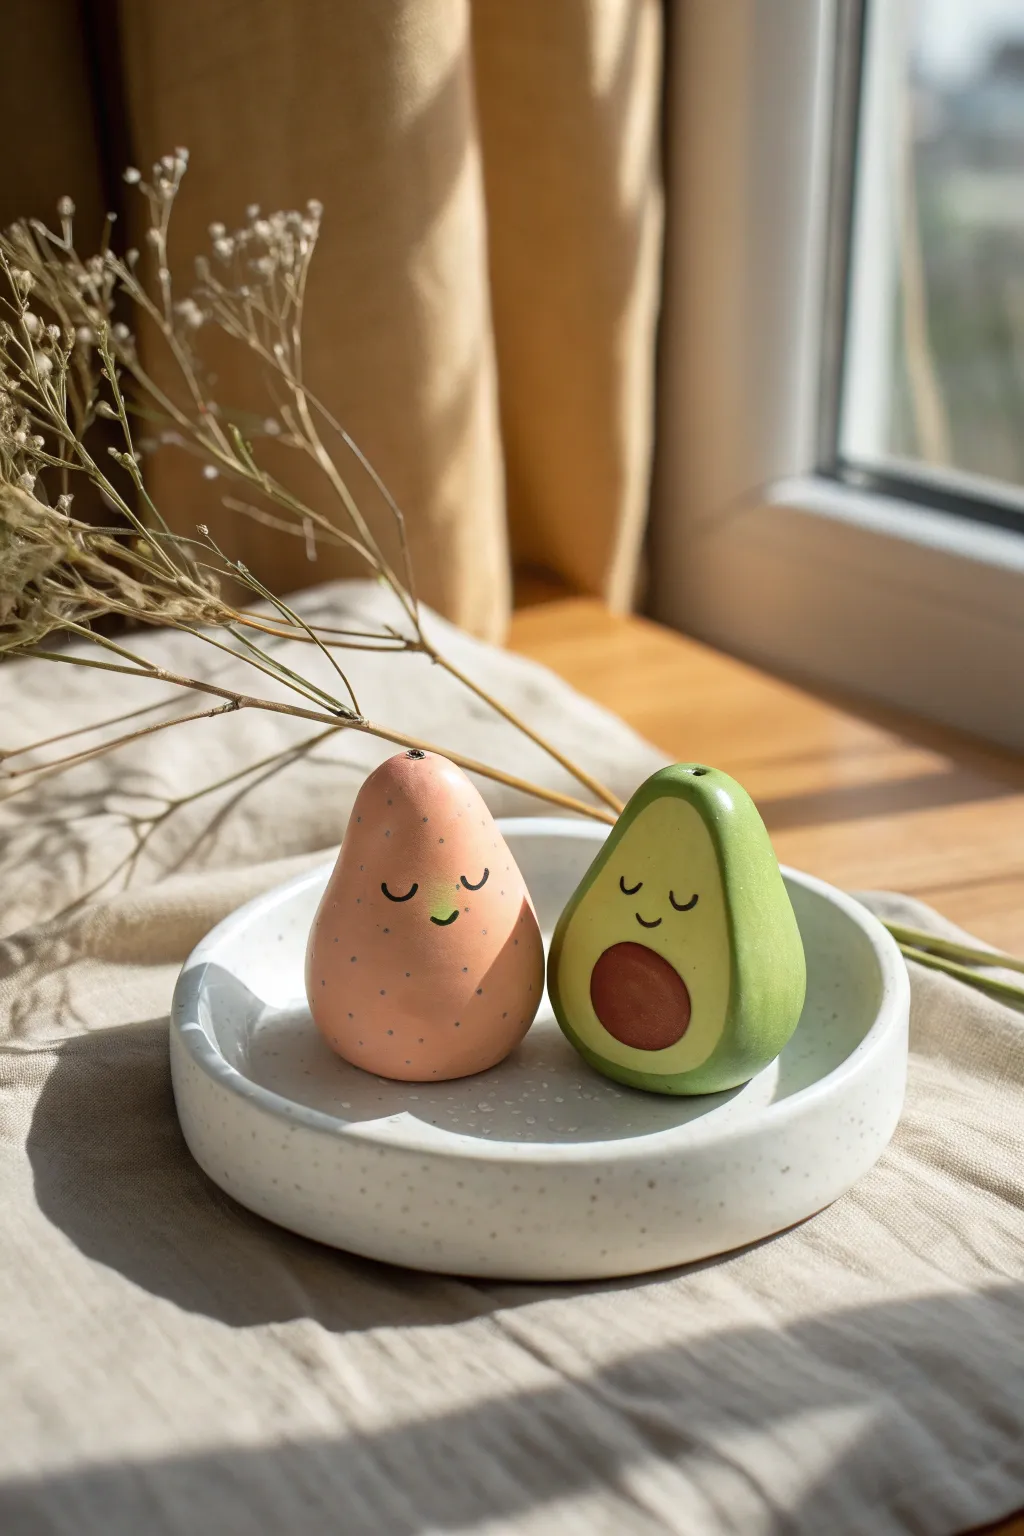
Create a charming pair of anthropomorphic fruit friends to brighten up your desk or shelf. This project involves sculpting simple organic shapes from polymer clay and adding sweet, minimalist painted details for a warm, handcrafted look.
Step-by-Step
Materials
- Polymer clay (light pink/peach, light green, dark green, brown)
- Acrylic paints (black, pink for blush, white)
- Fine detail paintbrush (000 size)
- Dotting tool or toothpick
- Sculpting tools (smooth roller, needle tool)
- Small crumpled aluminum foil ball
- Gloss varnish or glaze
- Oven for baking
Step 1: Sculpting the Avocado
-
Shape the Base:
Condition a piece of light green clay by kneading it until warm and pliable. Roll it into a smooth ball, then gently elongate the top half to create a classic pear-like avocado shape. -
Flatten the Face:
Press the shape gently against your work surface to flatten the back, then use your thumb to create a slightly flat, smooth area on the front where the face and pit will go. -
Add the Skin:
Roll out a thin sheet of darker green clay. Carefully drape this over the back and sides of your light green shape, leaving the front ‘flesh’ area exposed. -
Blend the Seams:
Gently smooth the transition where the dark skin meets the light flesh using your finger or a soft silicone tool so it looks like a natural cut. -
Create the Pit:
Roll a small ball of brown clay. Press this firmly into the lower half of the avocado’s belly. You want it to bulge out slightly but still adhere completely. -
Add the Stem Hole:
Use a needle tool or a toothpick to poke a small, neat hole at the very top of the avocado for a realistic detail.
Perfect Fingerprints
To remove fingerprints before baking, lightly brush your raw clay with a little baby oil or cornstarch. It smooths the surface instantly.
Step 2: Sculpting the Peach
-
Form the Body:
Take your light pink or peach-colored clay and roll it into a ball. Similar to the avocado, taper the top slightly to get that teardrop fruit shape, but keep it a bit rounder at the bottom. -
Texture the Surface:
For a subtle, realistic texture, I like to gently roll a crumpled ball of aluminum foil over the surface of the peach. This breaks up the shiny smoothness of the clay. -
Create the Stem:
Poke a small indentation at the very top of the peach shape. Insert a tiny snake of dark brown clay into this hole to act as the stem remainder.
Step 3: Baking & Painting
-
Bake the Pieces:
Place both figures on a baking sheet lined with parchment paper. Bake according to your polymer clay manufacturer’s instructions (usually around 275°F/135°C for 15-30 minutes). -
Cool Down:
Allow the pieces to cool completely inside the oven or on a wire rack before painting. Painting hot clay can cause the acrylics to dry too fast and clump. -
Paint the Faces:
Using your finest brush and black acrylic paint, carefully draw two ‘U’ shapes for closed, sleepy eyes on both figures. Add a tiny curved smile in the center. -
Add Peach Details:
Mix a watery wash of darker pink or orange paint. Use a toothbrush or stiffness brush to flick tiny speckles onto the peach for that spotted skin look. -
Blushing Cheeks:
Dip a dotting tool or the end of a paintbrush into pink paint and dab small circles next to the smiles for rosy cheeks. -
Varnish:
Once the paint is fully dry, apply a coat of semi-gloss or matte varnish to protect your work. I recommend glazing the avocado pit with a high-gloss varnish to make it look shiny and hard.
Wobbly Faces?
If you’re nervous about painting the faces directly, sketch them lightly with a pencil first. Or, use a fine-tip permanent marker instead of paint.
Set your new little friends on a sunny windowsill and enjoy their comforting presence
Mini Book Buddy Characters
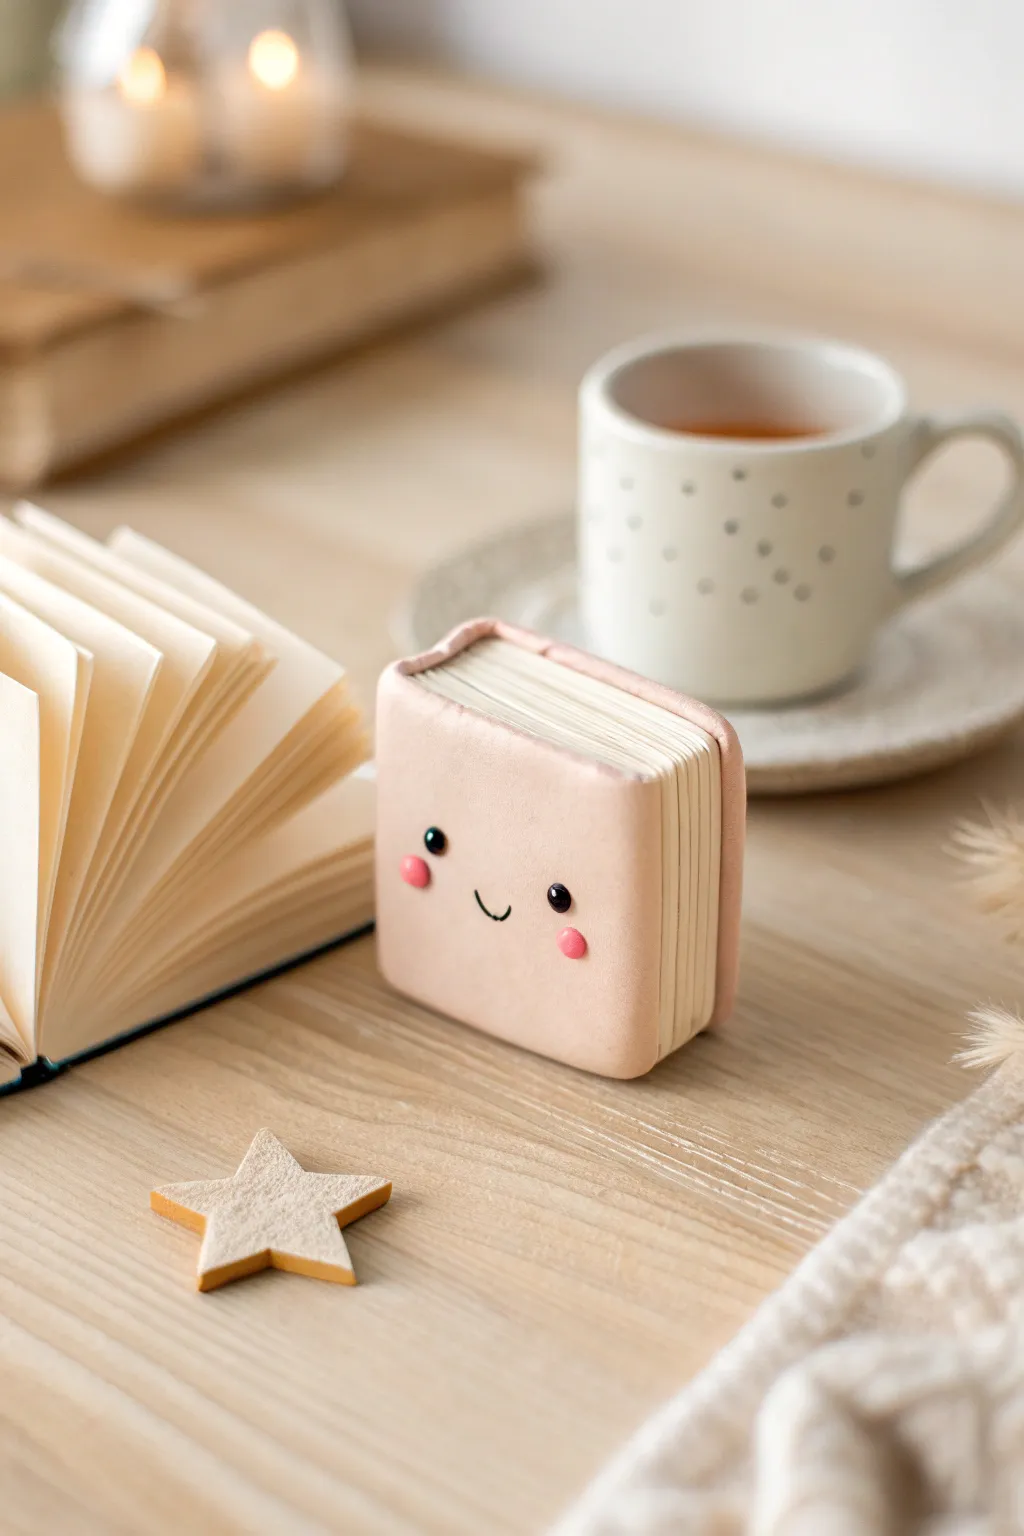
Bring your love for reading to life with this adorable miniature book character made from polymer clay. With its soft peach cover, textured pages, and sweet little smile, this tiny companion is the perfect desk accessory or gift for a bibliophile.
Step-by-Step Guide
Materials
- Polymer clay in light peach (cover) and white (pages)
- Black polymer clay or black acrylic paint
- Pink polymer clay or soft pastels
- Rolling pin or pasta machine
- sharp craft blade or exacto knife
- Needle tool or toothpick
- Fine-grit sandpaper (optional)
- Ball stylus tool
- Liquid polymer clay (optional)
- Oven and baking tray
Step 1: Creating the Pages
-
Condition the white clay:
Start by kneading your white polymer clay until it is soft and pliable. This prevents cracks later on. -
Form the page block:
Shape the white clay into a rectangular block. Aim for a thickness of about 1.5 cm to 2 cm, depending on how chubby you want your book to look. -
Trim the edges:
Using your sharp craft blade, slice the sides of the block cleanly to ensure they are perfectly straight and rectangular. Keep the corners sharp. -
Texture the pages:
Take your craft blade or a needle tool and gently score horizontal lines along three sides of the white block (top, bottom, and right side). These lines mimic the look of stacked paper pages. -
Soften the texture:
If the lines look too harsh, lightly brush your finger over them to soften the edges while keeping the page texture visible.
Step 2: Crafting the Cover
-
Roll the cover clay:
Roll out the peach-colored clay into a flat, even sheet, approximately 2-3mm thick. I find a pasta machine helps get a uniform thickness here. -
Measure the strip:
Cut a long rectangular strip from the peach clay. The width must match the height of your white page block, plus a tiny bit extra for overhanging edges if desired. -
Fit the cover:
Wrap the peach clay strip around the spine (the un-textured back side) of your white block. Gently press it onto the front and back ‘covers’ of the block. -
Round the spine:
Before pressing firmly, ensure the clay covering the spine is slightly rounded outward, rather than flat against the block, to simulate a bound book. -
Trim excess:
Carefully trim any excess peach clay so it aligns neatly with the white page block edges, or leave a slight overhang for a realistic hardcover look. -
Smooth the seams:
Use your finger to gently smooth the edges of the peach clay to remove sharp cuts and fingerprints.
Sticky Fingerprints?
If fingerprints are ruining the smooth cover, lightly brush the unbaked clay with a little baby oil or cornstarch. This smooths the surface instantly without altering the shape.
Step 3: Adding the Kawaii Face
-
Mark eye placement:
Use a needle tool to make two tiny indents on the front cover where you want the eyes to sit. Spacing them wide apart adds to the cute factor. -
Insert the eyes:
Roll two minuscule balls of black clay. Place them into the indents and press gently to flatten them slightly against the surface. -
Add highlights:
For extra sparkle, add a microscopic dot of white clay or white paint to the upper corner of each black eye. -
Create the smile:
Roll a very thin ‘snake’ of black clay and curve it into a ‘U’ shape for the mouth. Press it gently between the eyes. -
Apply the cheeks:
Roll two small balls of pink clay and flatten them into discs. Place these below and slightly outside the eyes for rosy cheeks. -
Final inspection:
Check the entire piece for dust or lint. You can remove stray particles with a bit of tape or rubbing alcohol on a brush. -
Bake the piece:
Bake according to your clay manufacturer’s instructions (usually 275°F/130°C for 15-30 minutes). Let it cool completely before handling.
Make it a Necklace
Insert a metal eye pin into the top center of the book spine before baking. Once baked, secure it with a drop of superglue, and you can string your book buddy onto a chain.
Once baked and cooled, your tiny book buddy is ready to sit on your shelf and keep you company while you read
Cottagecore Nature Vignettes
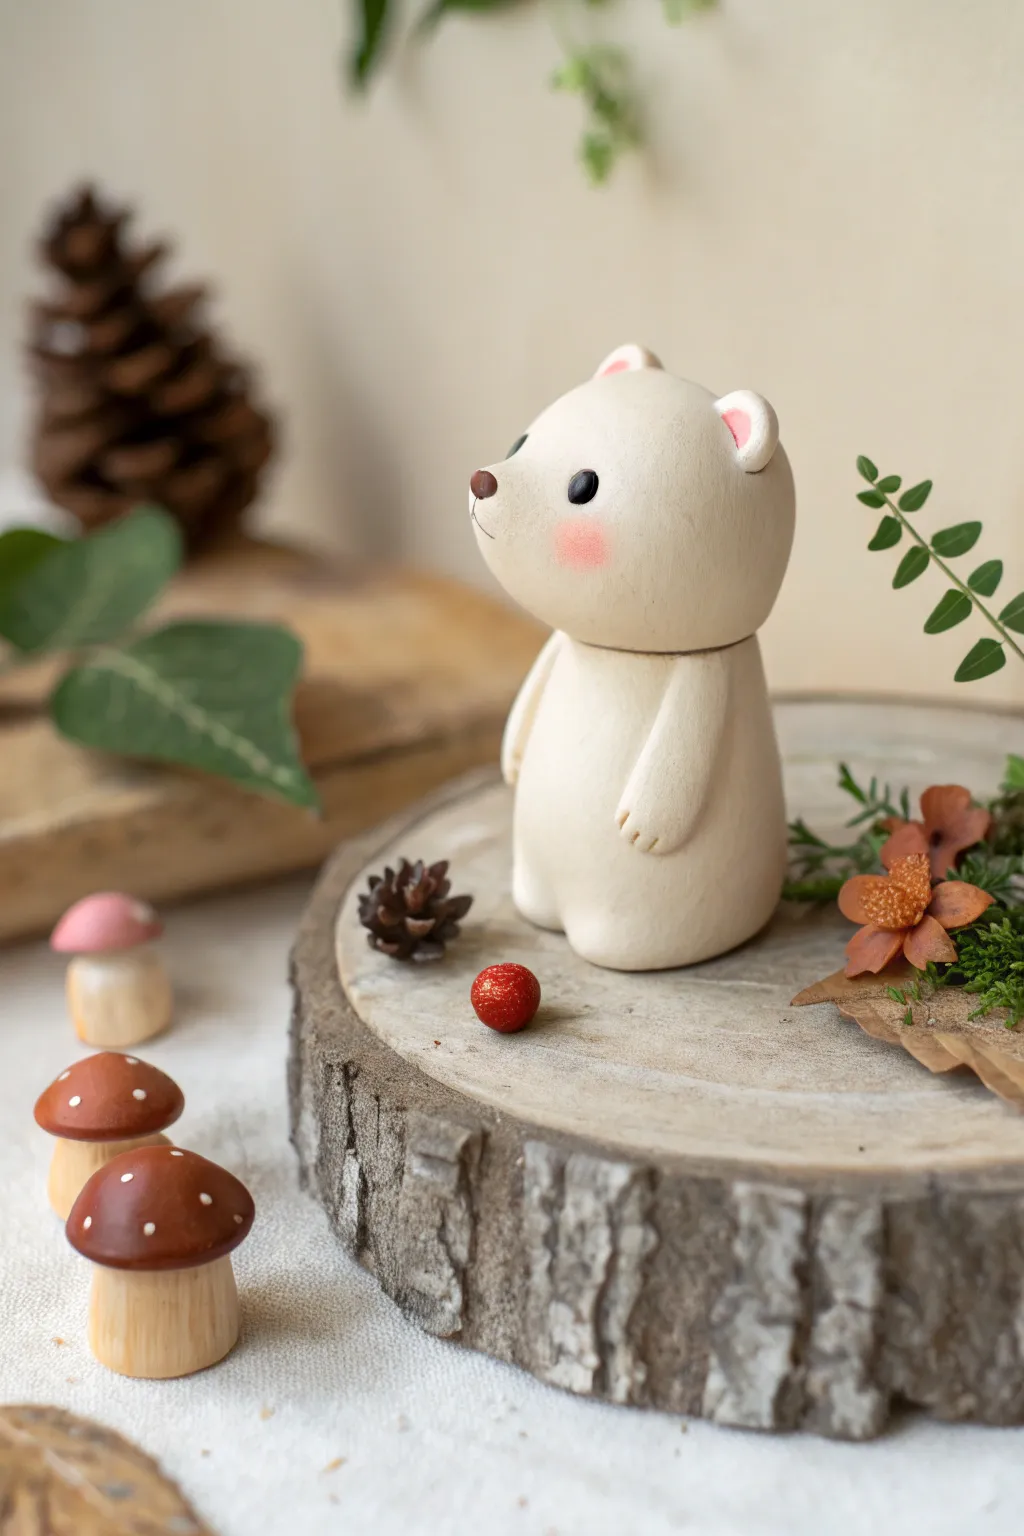
Capture the magic of the forest floor with this adorable white bear figurine, styled to look like smooth carved wood. With rosy cheeks and a minimalist expression, this little friend brings a touch of cottagecore sweetness to any shelf or nature vignette.
Detailed Instructions
Materials
- White polymer clay (or air-dry clay)
- Aluminum foil (for armature)
- Sculpting tools (needle tool, rubber shaper)
- Acrylic paints (black, pink, burnt sienna)
- Fine detail paintbrush
- Soft pastel chalk (pink/blush)
- Small fluffy brush (for blush)
- Matte varnish or sealant
- Wood slice base (optional for display)
- Sandpaper (fine grit)
Step 1: Sculpting the Body
-
Internal Structure:
Begin by crumpling a small piece of aluminum foil into a pear shape. This core keeps the figurine lightweight and saves clay. The foil shape should be slightly smaller than you want the final bear’s body to be. -
Wrapping the Core:
Condition your white clay until it is soft and pliable. Flatten a sheet of clay and wrap it completely around the foil pear, smoothing the seams together until you have a seamless surface. -
Shaping the Torso:
Refine the pear shape. The bottom should be wider and rounder for a stable base, tapering slightly towards the top where the head will attach. Gently roll it on your work surface to ensure it stands upright without tipping. -
Creating the Legs:
Instead of attaching separate legs, use a modeling tool to create an indentation at the bottom front center of the body. Smooth the clay around this notch to suggest two stubby legs emerging from the main form. -
Attaching the Arms:
Roll two small sausage shapes of white clay for the arms, tapering one end of each. Attach the wider ends to the shoulders of the body, pressing and smoothing the clay so the seam disappears. -
Detailing the Paws:
Let the arms hang naturally at the bear’s sides. Use a needle tool or knife to verify delicately press three small lines into the tip of each arm to create the suggestion of claws or fingers.
Head Slumping?
If the head feels too heavy for the neck during sculpting, insert a toothpick or a piece of wire halfway into the body and halfway into the head to act as a hidden spine for stability.
Step 2: Forming the Head
-
The Head Shape:
Roll a separate ball of white clay for the head. It should be slightly oval-shaped. Gently pinch the front of the oval to pull out a subtle snout area, keeping the transition smooth rather than sharp. -
Adding Ears:
Create two tiny semi-circles of clay. Attach these to the top of the head using a little liquid clay or water (depending on your clay type) as an adhesive. Use a dotting tool to make a small indentation in the center of each ear. -
Connecting Head to Body:
This bear has a distinct separation between head and body, almost like a wooden doll. Place the head on the body without blending the neck seam fully; leaving a slight groove adds to that toy-like charm. -
Smoothing:
Before baking or drying, do a final pass over the entire sculpture with a finger dipped in a little baby oil or water to remove fingerprints. -
Baking or Drying:
Follow the manufacturer’s instructions for your specific clay. If using polymer clay, bake it in the oven. If using air-dry clay, allow it to cure fully for 24-48 hours.
Step 3: Painting & Finishing
-
Sanding:
Once fully cured, use fine-grit sandpaper to buff away any remaining lint or bumps. This mimics the texture of smooth, sanded wood. -
The Nose:
Mix a tiny amount of brown acrylic paint. Using your finest brush, paint a small, inverted soft triangle on the tip of the snout. -
The Eyes:
Using black acrylic paint and a dotting tool (or the back of a paintbrush handle), stamp two solid black circles for the eyes. Keep them relatively wide-set for a cuter look. -
Rosy Cheeks:
Scrape a pink soft pastel stick into a fine powder. Dip a soft, dry brush into the powder and gently dab it onto the bear’s cheeks, right below the eyes. Build the color slowly for a soft, airbrushed effect. -
Ear Details:
Use a very light wash of pink paint or the same pastel powder to tint the insides of the ears. -
Final Varnish:
Seal the figurine with a matte varnish. Avoid glossy finishes, as the matte look contributes to the organic, natural aesthetic.
Wood Grain Texture
For a faux-wood look, before painting, lightly scratch vertical lines into the clay with a stiff wire brush. After baking, do a brown wash to highlight the ‘grain’.
Place your finished bear on a rustic wood slice alongside some gathered pinecones to complete your forest scene
Mini Planters With Face Details
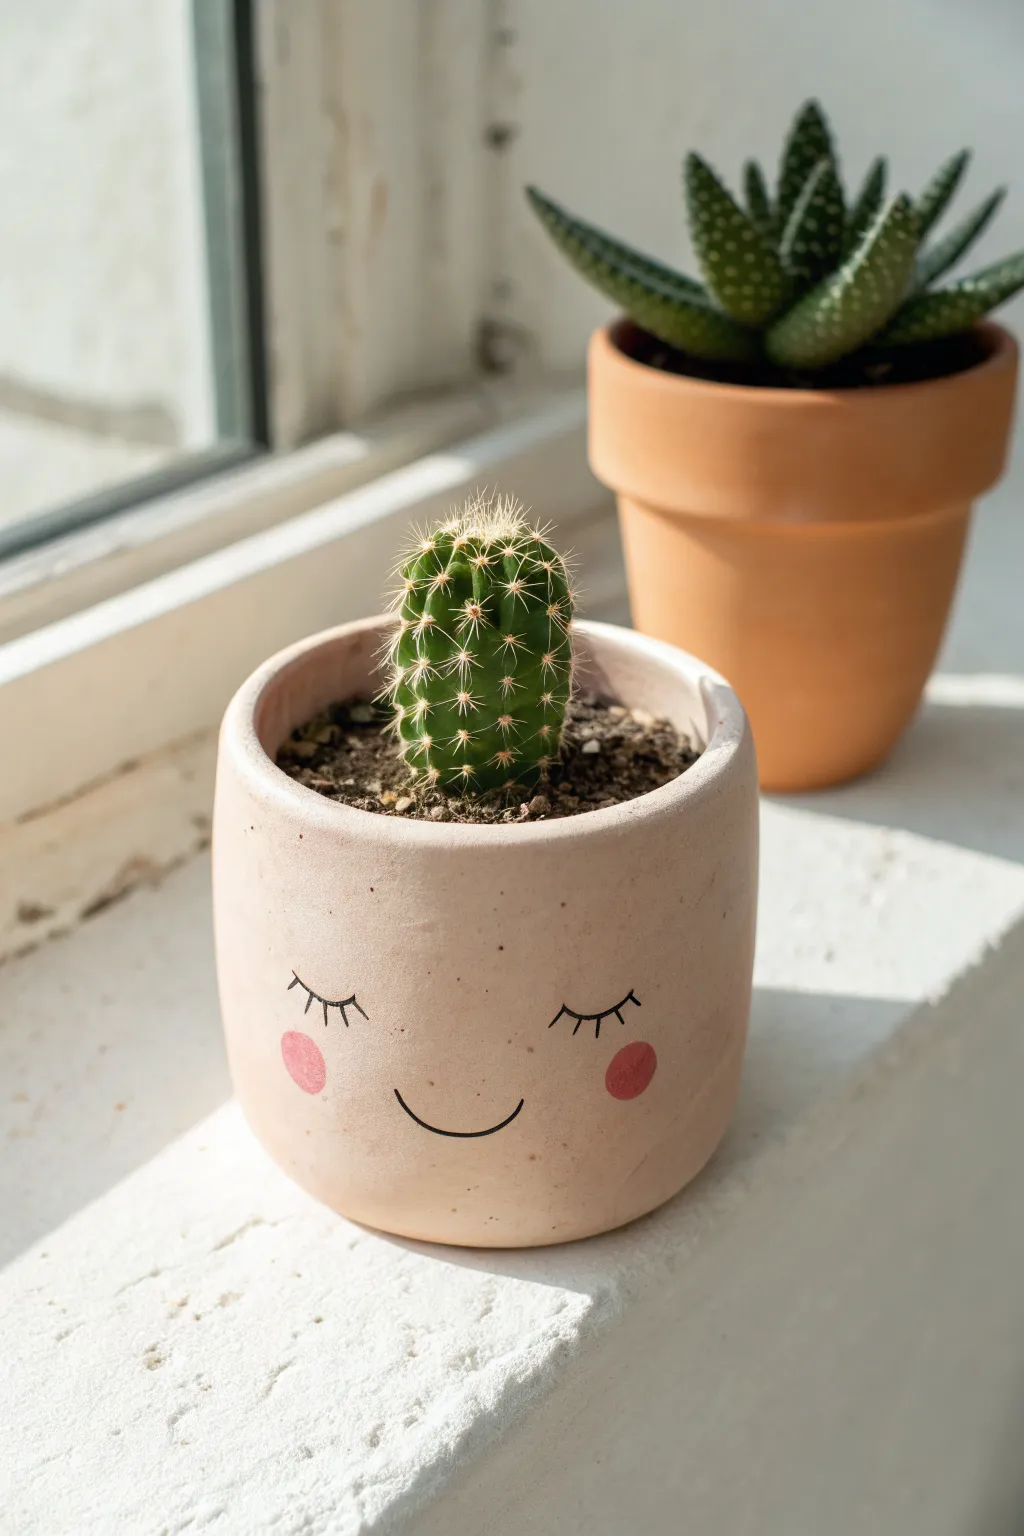
Bring a touch of whimsy to your windowsill with this adorable clay planter featuring a minimalist sleeping face. Its soft peach tone and simple line work make it a charming home for your favorite mini cactus or succulent.
How-To Guide
Materials
- Air-dry clay (white or light terracotta) OR Oven-bake polymer clay
- Rolling pin
- Cylindrical mold (like a glass jar or tin can)
- Clay knife or craft blade
- Small bowl of water (for smoothing)
- Fine-grit sandpaper
- Acrylic paints: Pale peach/blush, Black, bright Pink
- Fine detail paintbrush or black paint marker
- Small round sponge dabber or Q-tip
- Matte sealant or varnish
- Small cactus and potting soil
Step 1: Forming the Pot Base
-
Prepare the Clay:
Knead a generous handful of clay until it is soft, pliable, and free of cracks. If using air-dry clay, keep your hands slightly damp. -
Roll the Slab:
Roll the clay out on a flat surface to an even thickness of about 1/4 inch. Ensure it is long enough to wrap around your chosen cylindrical mold. -
Cut the Base:
Place your cylindrical mold on the rolled clay and trace around the bottom with your knife to create a perfect circle for the base of the pot. -
Cut the Wall:
Measure the height you want for your pot (around 3-4 inches) and cut a long rectangular strip from the remaining clay slab. Check that the length wraps fully around your mold with a little overlap. -
Assemble the Cylinder:
Wrap the rectangular strip around your mold or simply curl it into a cylinder shape. Gently score the overlapping ends with a tool, dab with a little water, and press them together to form a seam. -
Smooth the Seam:
Use your fingers or a smoothing tool to blend the seam on both the inside and outside until the join is invisible. I find using a tiny bit of water helps create a seamless finish here. -
Attach the Base:
Score the edges of the circular base and the bottom rim of your cylinder. Apply a little water slip, then press the cylinder onto the base. Smooth the clay upwards from the base to the wall to secure the bond.
Cracks appeared?
Mix a small amount of fresh clay with water to create a thick paste. Fill the cracks, let dry, and sand smooth before painting.
Step 2: Refining and Painting
-
Create Drainage (Optional):
If you plan to plant directly into the pot, use a straw or tool to poke a small hole in the center of the bottom base for water drainage. -
Smooth the Rim:
Use a damp sponge or wet finger to gently round off the top rim of the pot so it isn’t sharp or jagged. -
Drying Time:
Allow the pot to dry completely according to your clay’s instructions. Air-dry clay may take 24-48 hours; polymer clay will need baking. -
Sanding:
Once hardened, lightly sand the exterior with fine-grit sandpaper to remove any fingerprints or bumps, creating a smooth canvas for painting. -
Base Coat:
Paint the entire exterior and inner rim with the pale peach or blush acrylic paint. You may need two coats for full, opaque coverage. -
Mapping the Face:
Lightly sketch the facial features with a pencil. Place the eyes about halfway down the pot and centering the mouth below them. -
Painting the Eyes:
Using a very fine liner brush and black paint, or a black paint pen, carefully trace the downward curved lines for the closed eyelids. -
Adding Lashes:
Add three small, distinct lashes to the outer corner of each eyelid. Keep your strokes quick and light to keep them sharp. -
Adding the Smile:
Draw a simple, wide U-shape for the smile centered between the eyes. -
Rosy Cheeks:
Dip a small round sponge dabber or a Q-tip into pink paint. Gently press it onto the pot cheeks just below the outer corners of the eyes to create perfect circles. -
Sealing:
Once the paint is fully dry, coat the pot with a clear matte varnish to protect the paint from moisture and soil.
Perfect Cheeks
Instead of a brush, use the eraser end of a standard pencil as a stamp. Dip it in pink paint for perfectly round, identical cheeks every time.
Pop your tiny cactus inside and enjoy your new friendly desk companion
Pocket-Sized Charm Sets With Themes
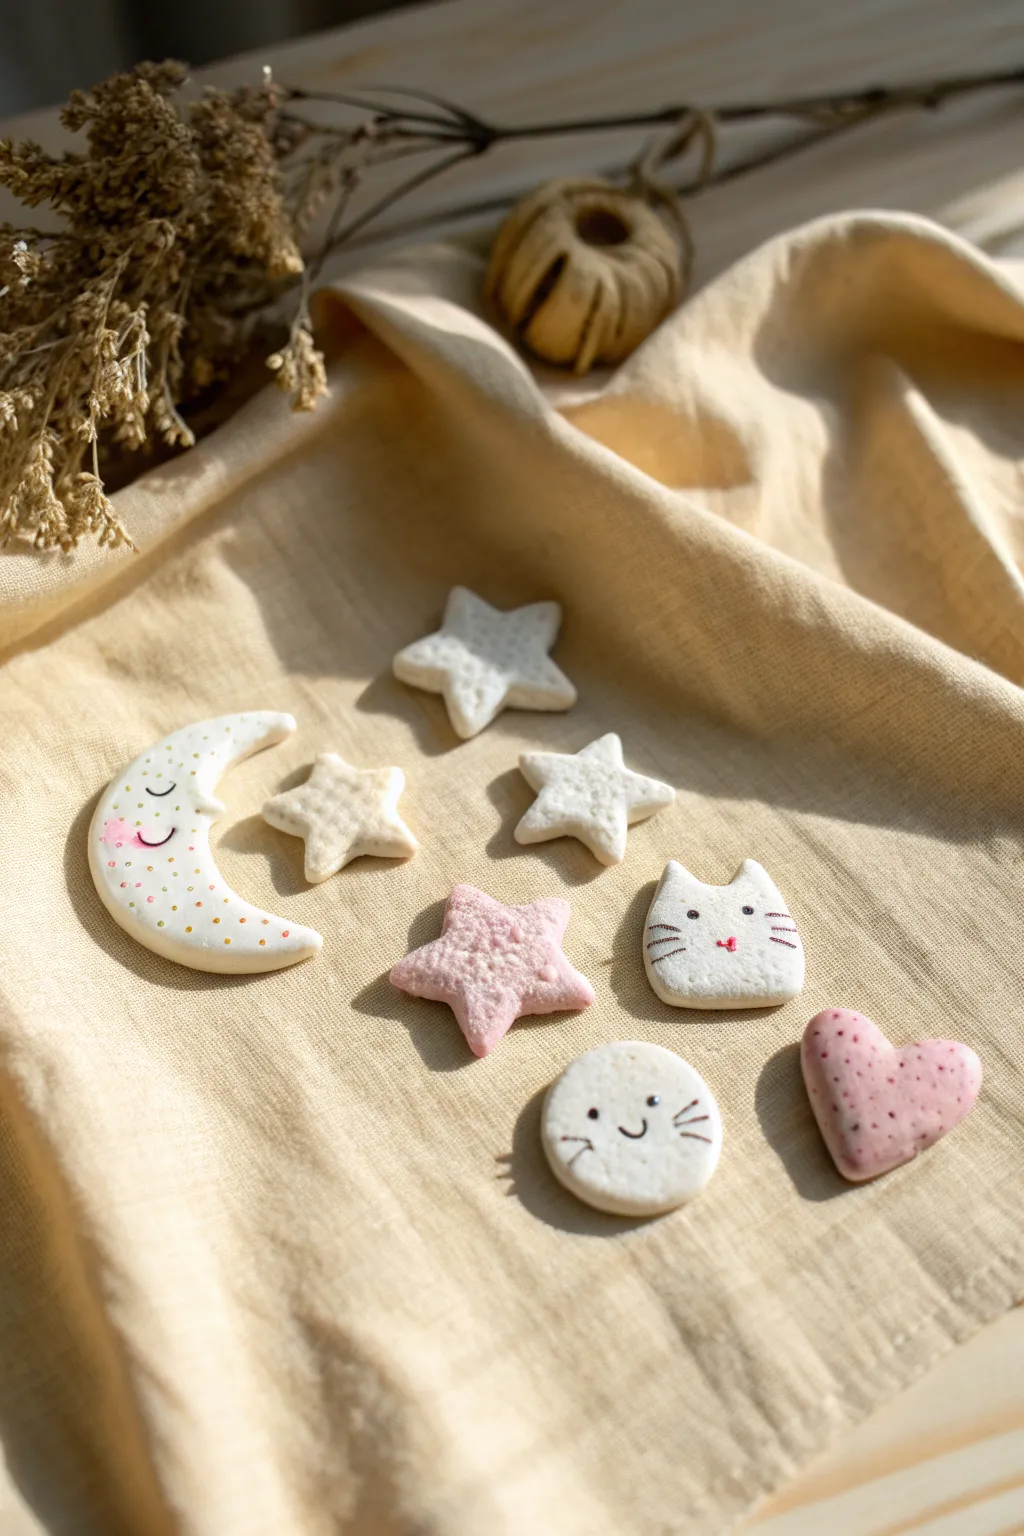
Capture the magic of a dreamy night sky mixed with adorable feline friends in this pocket-sized charm set. These handcrafted clay pieces feature a soft matte finish, gentle pastel speckles, and sweet smiling faces, perfect for gifting or keeping as tiny treasures.
Detailed Instructions
Materials
- Air-dry clay or polymer clay (white)
- Acrylic rolling pin
- Small cookie cutters (star, crescent moon, heart, circle, cat head)
- Modeling tools (or a toothpick)
- Sandpaper (fine grit)
- Acrylic paints (pink, black, gold/mustard)
- Fine detail paintbrush (size 0 or 00)
- Texturing tool (clean toothbrush or sandpaper)
- Matte varnish or sealant
Step 1: Shaping the Charms
-
Condition and roll:
Begin by conditioning your white clay until it is soft and pliable. Roll it out on a clean, flat surface to a uniform thickness of about 1/4 inch (6mm). -
Cut the shapes:
Use your small cookie cutters to punch out the shapes seen in the image: one crescent moon, three stars, one heart, one cat head, and one round circle. -
Soften the edges:
Gently tap the edges of each cut shape with your finger to round them off slighty, removing the sharp ‘cut’ look for a softer, pillowy appearance. -
Add texture:
For a natural, stone-like feel, gently press a clean toothbrush or a piece of crumpled foil onto the surface of the stars and the heart. Leave the moon and faces relatively smooth. -
Create the pink clay:
Take a small portion of your leftover white clay and mix in a tiny drop of pink acrylic paint (or use pre-colored pink clay). Knead until the color is fully uniform. -
Cut colored shapes:
Roll out the pink clay and cut one star and the heart shape again if you haven’t already made them from white clay to paint later. I prefer tinting the clay itself for a smoother look.
Step 2: Refining and Drying
-
Dry the pieces:
Lay all your shapes on a flat drying surface. If using air-dry clay, let them sit for 24-48 hours, flipping halfway through. If using polymer, bake according to package instructions. -
Sand for smoothness:
Once fully cured, use fine-grit sandpaper to buff away any fingerprints or rough edges, creating a perfectly smooth canvas for painting.
Uneven Edges?
If your clay drags or leaves jagged edges when using cutters, dip the cutter into cornstarch or water before pressing down for a clean release.
Step 3: Painting and Details
-
Paint the pink star:
If you made a white star for the pink one, paint it now with a soft, speckled pink color. Dab the brush to create texture. -
Paint the heart:
Paint the heart charm pink. Add tiny darker pink speckles by flicking a stiff brush or stippling with a dry brush to mimic stone texture. -
Detail the moon’s face:
Using your finest brush and black paint, draw a sleeping eye (a simple U-shape with lashes) and a small smile on the crescent moon. -
Add moon blushes:
Dilute a tiny bit of pink paint with water and wash a gentle pink circle onto the moon’s cheek. -
Decorate the moon:
Add tiny dots of yellow or gold paint all over the moon’s surface for a magical, starry effect. -
Draw the cat face:
On the cat head shape, use the fine black brush to paint two small dot eyes, whiskers, and a tiny nose. Add a small pink heart or triangle for the nose if desired. -
Paint the round face:
On the circular charm, paint wide-set eyes and a happy U-shaped smile. Add whiskers to turn it into a round kitten face. -
Seal:
Finish all pieces with a coat of matte varnish to protect the paint and give them a professional, finished look.
Turn Them into Jewelry
Before the clay dries or bakes, insert a small metal eye pin into the top of each shape. Once dry, you can attach them to chains or earring hooks.
Arrange your finished charms on a soft cloth to admire your handiwork before gifting them or turning them into jewelry