When you’re craving a quick, satisfying make, oven-bake clay is my go-to because you can create something adorable and durable in a single afternoon. Here are my favorite bake clay ideas—starting with the classic staples and ending with a few studio-style surprises.
Marbled Ring Dish
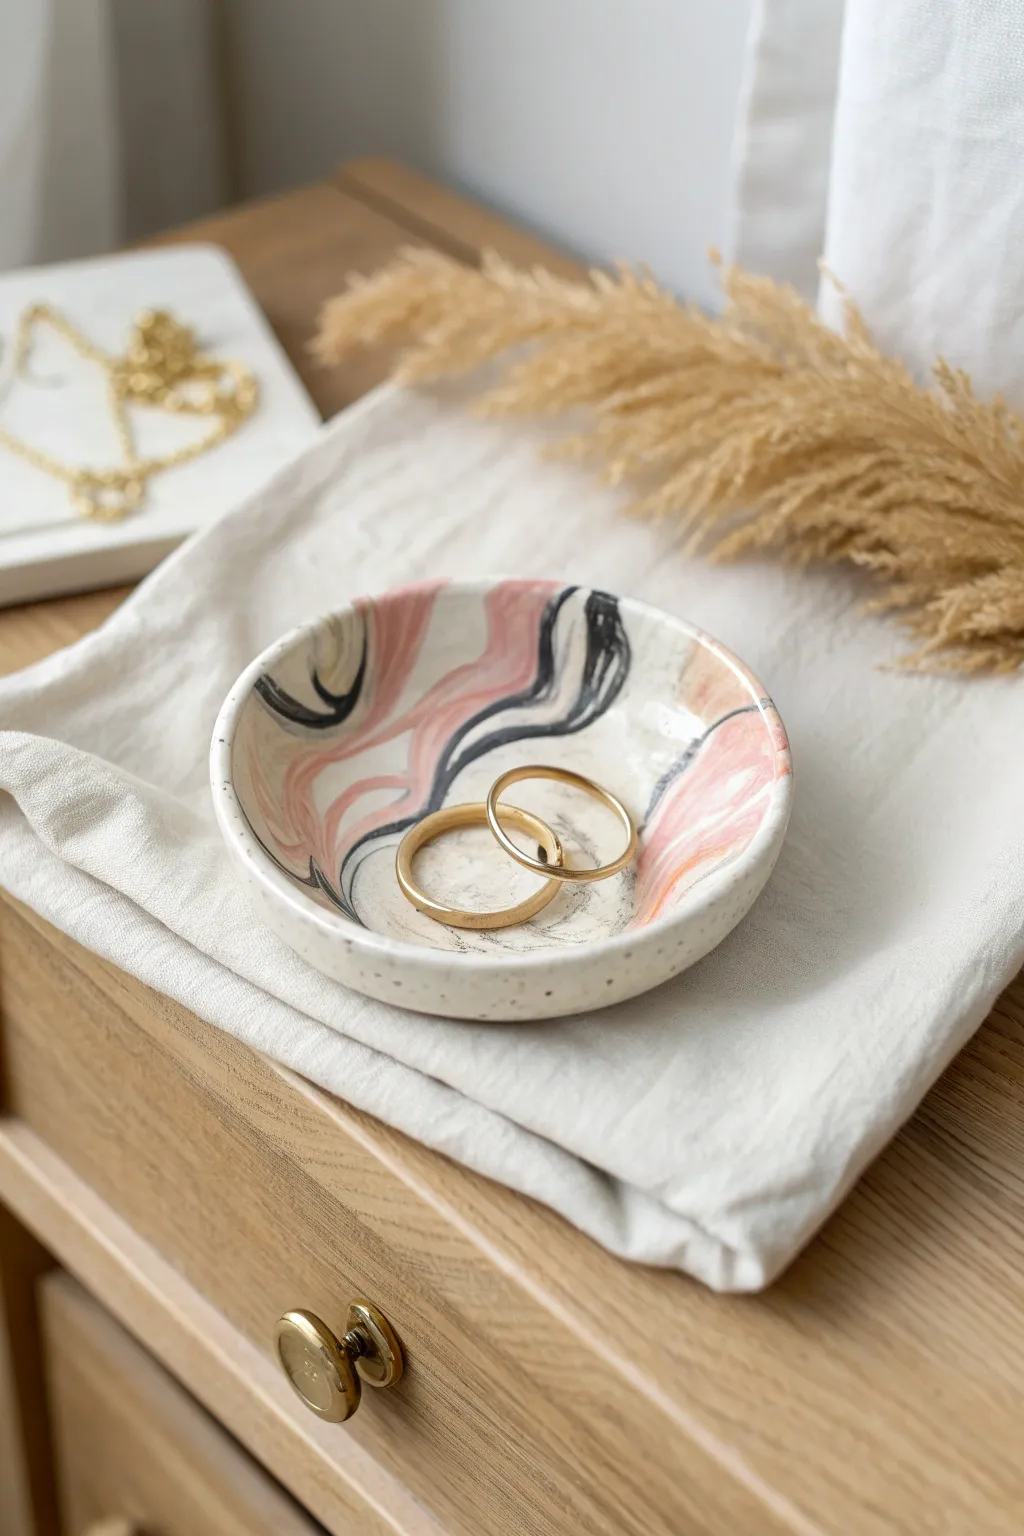
Capture the elegance of modern ceramics with this simple clay ring dish. Featuring soft pink and bold black abstract swirls on a speckled cream base, this piece is perfect for holding your favorite jewelry on a bedside table.
Step-by-Step
Materials
- White polymer clay (approx. 2 oz)
- Speckled clay affect paint or ground pepper (optional)
- Acrylic paints (Soft Pink, Black, Golden Ochre)
- Fine detail paintbrushes
- Rolling pin or acrylic roller
- Small oven-safe bowl (for shaping)
- Circle cutter or a glass to trace (approx. 3-4 inches diameter)
- Sandpaper (fine grit)
- Gloss glaze or polyurethane varnish
- Craft knife
- Oven (for baking per clay instructions)
Step 1: Forming the Base
-
Prepare the clay:
Begin by conditioning your white polymer clay in your hands until it is soft and pliable. If you want a speckled effect like the inspiration image, knead in a tiny pinch of ground black pepper or utilize pre-speckled ‘granite’ style clay. -
Roll it out:
Use your rolling pin or acrylic roller to flatten the clay into an even sheet. Aim for a thickness of about 1/4 inch (6mm) to ensure the dish feels substantial and not brittle. -
Cut the circle:
Place your circle cutter or a drinking glass onto the clay sheet. Press down firmly to cut out a perfect circle. If using a glass, trace around the edge with your craft knife carefully. -
Smooth the edges:
Dip your finger in a little bit of water (or baby oil if the clay is sticky) and gently run it along the cut edge of the circle to smooth out any harsh lines or burrs.
Step 2: Shaping and Baking
-
Shape the curvature:
Take your clay circle and gently place it inside your oven-safe bowl. Press it down lightly so it takes on the curved shape of the bowl’s interior. You don’t want deep walls, just a shallow, gentle curve. -
Check the form:
Ensure the clay is centered in the shaping bowl so the rim is even all the way around. -
Bake the clay:
Place the oven-safe bowl with the clay inside into your oven. Bake according to the specific temperature and time directions on your package of polymer clay (usually around 275°F / 135°C for 15-30 minutes). -
Cool down:
Once baked, remove the bowl from the oven and let it cool completely before trying to pop the clay dish out. Removing it while hot can cause warping. -
Sand for perfection:
After the dish is cool and removed from the mold, use fine-grit sandpaper to buff the rim and the underside, ensuring a professional, smooth finish.
Smooth Moves
To remove fingerprints from raw clay before baking, lightly brush the surface with a little bit of cornstarch or baby oil.
Step 3: Painting the Design
-
Base coat (optional):
If your clay isn’t the perfect off-white shade, apply a thin layer of cream acrylic paint to the inside of the dish and let it dry. -
Start the pink waves:
Using a medium round brush and soft pink paint, create organic, flowing shapes. Start from one edge and sweep inward. The strokes should be wavy and varied in width, not perfect straight lines. -
Add dimension:
While the pink is still slightly wet, I like to blend in a tiny touch of white or a darker rose in a few spots to give the ribbon-like shape some depth. -
Add black accents:
Switch to a finer brush and black paint. Paint thin, confident lines that follow the curvature of your pink shapes. Let some lines be thick and others taper off to nothing, similar to ink calligraphy. -
Incorporate subtle earth tones:
Wash your brush well and pick up a small amount of golden ochre or light tan paint. Add just one or two small swoops near the pink areas to warm up the color palette. -
Let the paint cure:
Allow the paint to dry completely. Since acrylic dries fast, 20 minutes should be sufficient.
Gold Leaf Luxe
Instead of ochre paint, try using liquid gold leaf or a gold paint pen for the final accents to add real metallic shimmer.
Step 4: Sealing
-
Apply varnish:
Using a soft, wide brush, apply a coat of gloss glaze or polyurethane varnish to the inside of the dish. This protects the paint from scratching and gives it that ceramic-like shine. -
Check for bubbles:
Inspect the wet glaze immediately for air bubbles. If you see any, gently blow on them or pop them with a pin before the glaze sets. -
Seal the back:
Once the top is dry to the touch, flip the dish over and seal the bottom and sides for a uniform finish. -
Final cure:
Let the dish dry for at least 24 hours before placing any jewelry inside to ensure the varnish is fully hardened.
Place your new handmade dish on your dresser and enjoy the chic, artistic touch it adds to your space


Geometric Statement Earrings
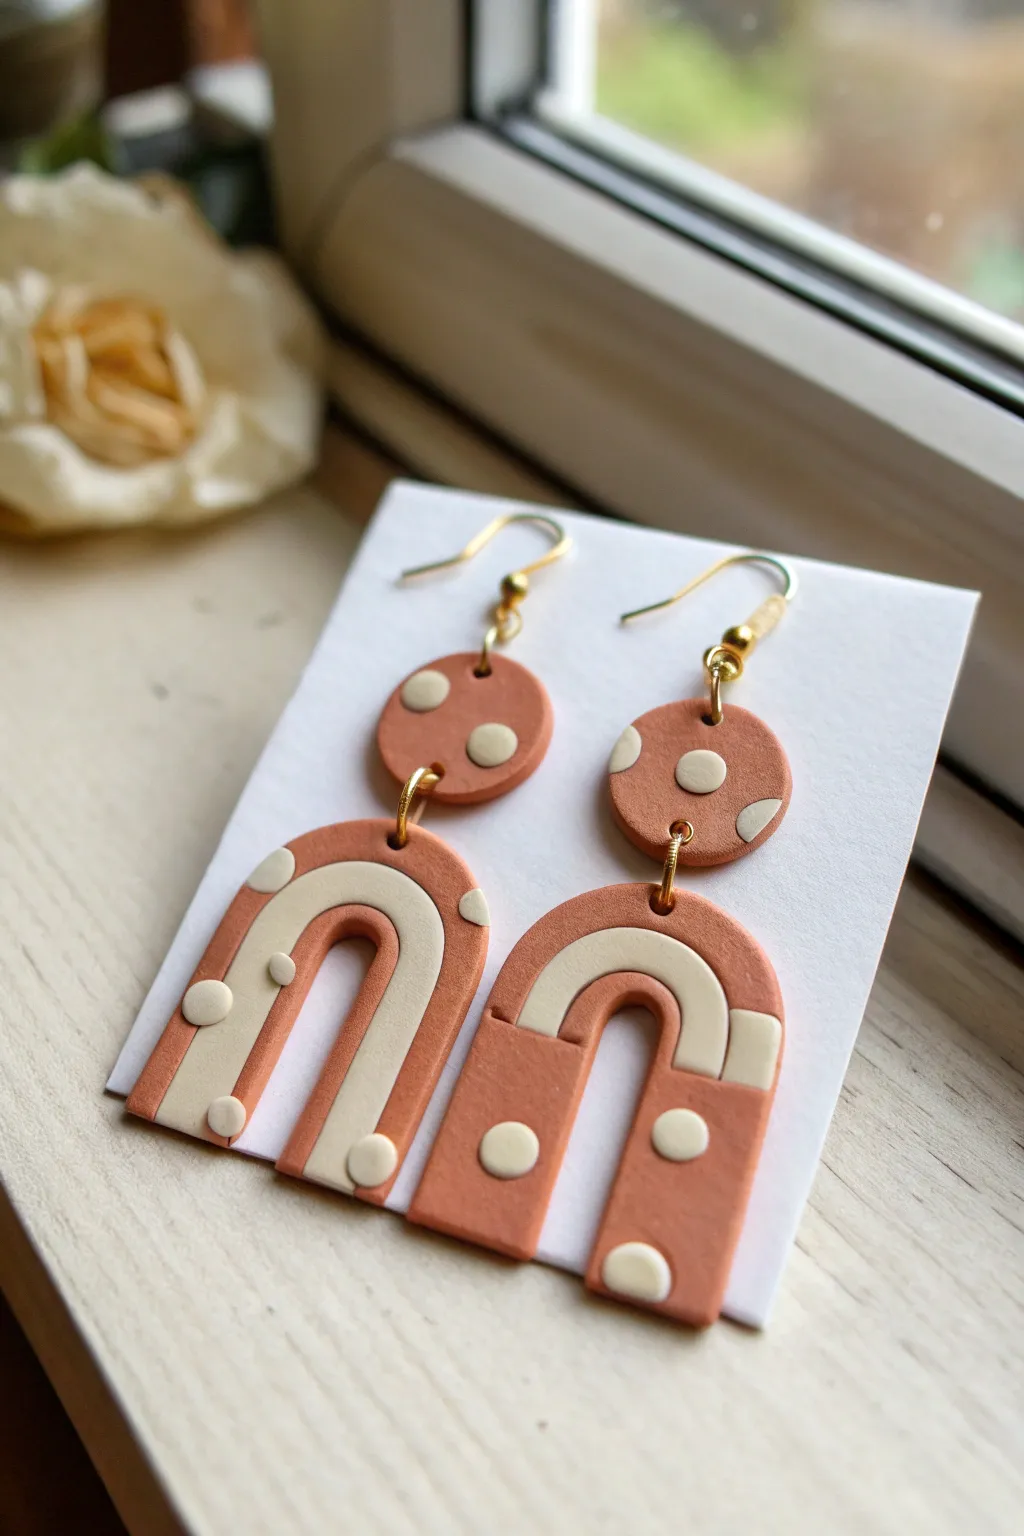
These warm, earthy geometric earrings combine classic terracotta tones with playful cream accents for a modern boho look. Featuring inlaid polka dots and a sleek arch shape, they are a perfect introduction to slab techniques and precise cutting.
Step-by-Step Tutorial
Materials
- Polymer clay in terracotta (burnt orange) and cream (off-white)
- Acrylic rolling pin and depth guides (approx. 3mm)
- Circle cutters: small (approx. 1cm) and tiny (approx. 3-4mm)
- U-shape or arch clay cutter (medium size)
- Flexible tissue blade
- Small ball stylus or needle tool
- Hand drill or pin vibe
- Jump rings (gold, 6-8mm)
- Earring hooks (gold)
- Jewelry pliers (flat nose and round nose)
- Ceramic tile or baking sheet with parchment paper
- Fine grit sandpaper (optional)
Step 1: Preparing the Slab
-
Condition the clay:
Begin by thoroughly conditioning your terracotta clay until it is soft and pliable. Do the same for the cream clay, washing your hands between colors to avoid staining the lighter shade. -
Roll the base sheet:
Roll out the terracotta clay into a smooth, even sheet. Aim for a thickness of about 3mm—I personally use depth guides here to ensure the finished earrings have a consistent weight. -
Roll the accent sheet:
Roll out a small portion of the cream clay. This sheet should be slightly thinner than your base, perhaps 2mm, if you plan to layer it on top, or the same thickness if you want to inlay it completely.
Bubbles appearing?
If you see small air bubbles after rolling the slab, gently pierce them with a needle and smooth the air out with your finger before cutting your shapes.
Step 2: Creating the Pattern
-
Cut the accent shapes:
Using your arch cutter, cut two cream arches. Then, using a smaller cutter or a craft knife, trim these into thinner nesting arches that will fit inside your main shape. Also, use your tiniest circle cutter to punch out several small cream dots. -
Apply the accents:
Gently place the cream arch strips onto the terracotta slab. Arrange the small cream dots randomly around the slab where you plan to cut your shapes. Press them down lightly with your finger to adhere them. -
Flatten the slab:
Place a sheet of parchment paper over your decorated slab. Roll over the entire piece firmly with your acrylic roller. This embeds the cream clay into the terracotta base, creating a smooth, unified surface or ‘veneer’.
Step 3: Cutting and Baking
-
Cut the main shapes:
Position your U-shaped cutter over the patterned slab. Try to align the cream arch segment so it sits nicely within the cutter frame. Press down firmly to cut two arch shapes. -
Cut the top studs:
Use your 1cm circle cutter to cut two round pieces from the remaining polka-dotted areas of the slab. These will form the top connection points for your earrings. -
Smooth the edges:
Gently lift the shapes or peel away the excess clay. Before baking, smooth the cut edges with your finger to remove any stray clay bits or fingerprints. -
Add holes:
Using a needle tool or a small tube, poke a hole at the top center of each arch and at the bottom center of each circle stud. Make sure the hole is large enough for your jump rings. -
Bake:
Transfer the pieces to a ceramic tile or baking sheet. Bake according to your clay manufacturer’s instructions, usually around 275°F (135°C) for 30-45 minutes.
Try terrazzo!
Instead of polka dots, chop the cream clay into tiny irregular fragments and scatter them onto the terracotta base for a funky terrazzo stone effect.
Step 4: Assembly
-
Cool and sand:
Allow the pieces to cool completely. If the edges feel rough, you can sand them lightly with fine-grit sandpaper under running water. -
Connect the pieces:
Open a jump ring by twisting it sideways with your pliers. Thread it through the hole in the arch and the corresponding hole in the circle stud, then close the ring securely. -
Attach the hooks:
Open the loop on your earring hook. Ideally, you might need a second small jump ring at the top of the circle stud to ensure the earring faces forward given the orientation of the hooks. -
Final check:
Double-check that all jump rings are tightly closed so your creation doesn’t fall apart while wearing it.
Now you have a stunning pair of geometric statement earrings ready to wear or gift


Simple Clay Beads Bracelet
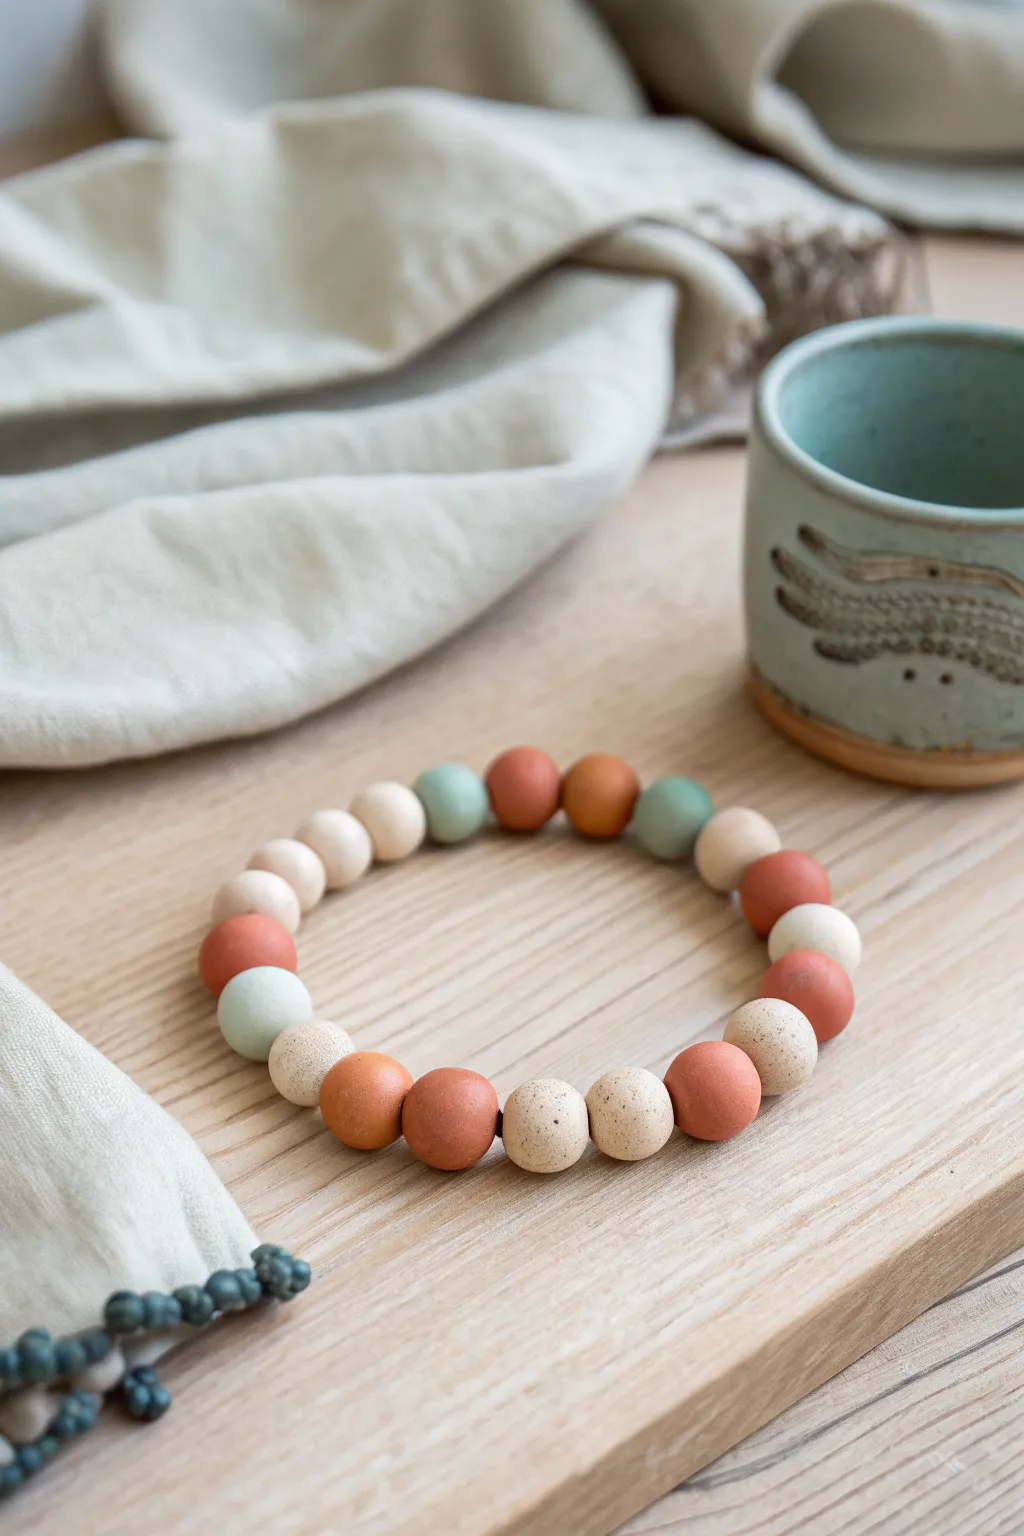
This project features a charming, minimalist bracelet made from handmade polymer clay beads in soft, natural hues. With a speckled texture and a matte finish, these beads evoke a rustic stoneware pottery feel that pairs perfectly with casual wear.
Detailed Instructions
Materials
- Polymer clay (terracotta, white, beige, and sage green)
- Speckled clay or ground black pepper/dried coffee grounds (for texture)
- Bead rolling tool or acrylic block
- Toothpick, needle tool, or bead pins
- Baking tray and parchment paper
- Elastic stretch cord (0.7mm or 0.8mm)
- Superglue or jewelry knot glue
- Wet sandpaper or denim fabric (for buffing)
- Scissors
Step 1: Preparing the Clay
-
Condition the clay:
Begin by kneading each color of your polymer clay separately until it is soft and malleable. This is crucial to prevent cracking later on. -
Mix custom colors:
To achieve the specific muted palette seen in the photo, mix a tiny amount of beige into your green to create a sage tone, and soften any bright orange clay with a touch of brown for a terracotta look. -
Create the speckled effect:
For the cream and beige beads specifically, you want that stone-like texture. Mix a small pinch of specialized speckled clay or even finely ground black pepper into your white and beige clay balls. -
Portion the clay:
Roll each color into a long, even log snake about the thickness of a marker. Slice the logs into equal segments to ensure your beads will be roughly the same size.
Step 2: Shaping and Piercing
-
Roll spheres:
Take each segmented piece and roll it between your palms to form a smooth ball. I prefer to finish rolling them on a flat surface with an acrylic block to get them perfectly round. -
Check for consistency:
Line up your rolled spheres to check for size consistency. The beads in the image are uniform, but slight organic variations add to the handmade charm. -
Create the holes:
Gently twist a toothpick or needle tool through the center of each bead. Rotate the bead as you push the tool through to avoid deforming the sphere shape. -
Widen the openings:
Once the hole is made, gently wiggle the tool to ensure the opening is wide enough for your elastic cord to pass through easily, especially if you plan to double wrap the knot. -
Smoothing fingerprints:
Give each bead one final gentle roll or pat with your finger to smooth out any exit holes or fingerprints left during the piercing process.
Natural Texture
To get a true stone effect, rub the unbaked beads lightly with an old toothbrush. This adds subtle pitting that mimics earthenware.
Step 3: Baking and Finishing
-
Arrange for baking:
Place your beads on a baking tray lined with parchment paper. To keep them perfectly round, you can bake them on a bed of cornstarch or arranged on a bead rack pin. -
Bake the clay:
Bake according to your specific clay manufacturer’s instructions. Usually, this is around 275°F (135°C) for 15-30 minutes depending on the bead size. -
Cool down:
Allow the beads to cool completely before handling them. Polymer clay is still slightly soft when hot and hardens as it cools. -
Matte finishing:
To achieve the matte, stone-like texture shown in the photo, stick to sanding rather than varnishing. Lightly buff the cooled beads with a piece of denim or very fine wet sandpaper.
Hole Distortion?
If your beads squish into ovals while piercing, let the raw clay sit in the fridge for 10 minutes to firm up before making the holes.
Step 4: Assembly
-
Plan the pattern:
Lay out your beads on a table to design your pattern. The image uses a repeating sequence of terracotta, speckled cream, and sage green, sometimes grouping two of the same color. -
Refine the length:
Check the length against your wrist. An average adult bracelet needs about 6.5 to 7.5 inches of beads. -
String the beads:
Cut a piece of elastic cord about 10-12 inches long. Simply thread your beads onto the cord in your chosen order. -
Pre-stretch the cord:
Give the elastic a few gentle tugs before tying. This pre-stretching prevents the bracelet from sagging or loosening immediately after you wear it. -
Tie the knot:
Secure the bracelet with a surgeon’s knot (loop the thread through twice on the first tie, then once on the second). Pull it tight. -
Secure and trim:
Add a tiny drop of superglue or jewelry cement to the knot for security. Let it dry, then trim the excess cord so the knot can slide inside a bead hole.
Now you have a beautiful, durable piece of jewelry that captures the warmth of natural ceramics


Minimal Tea Light Holder
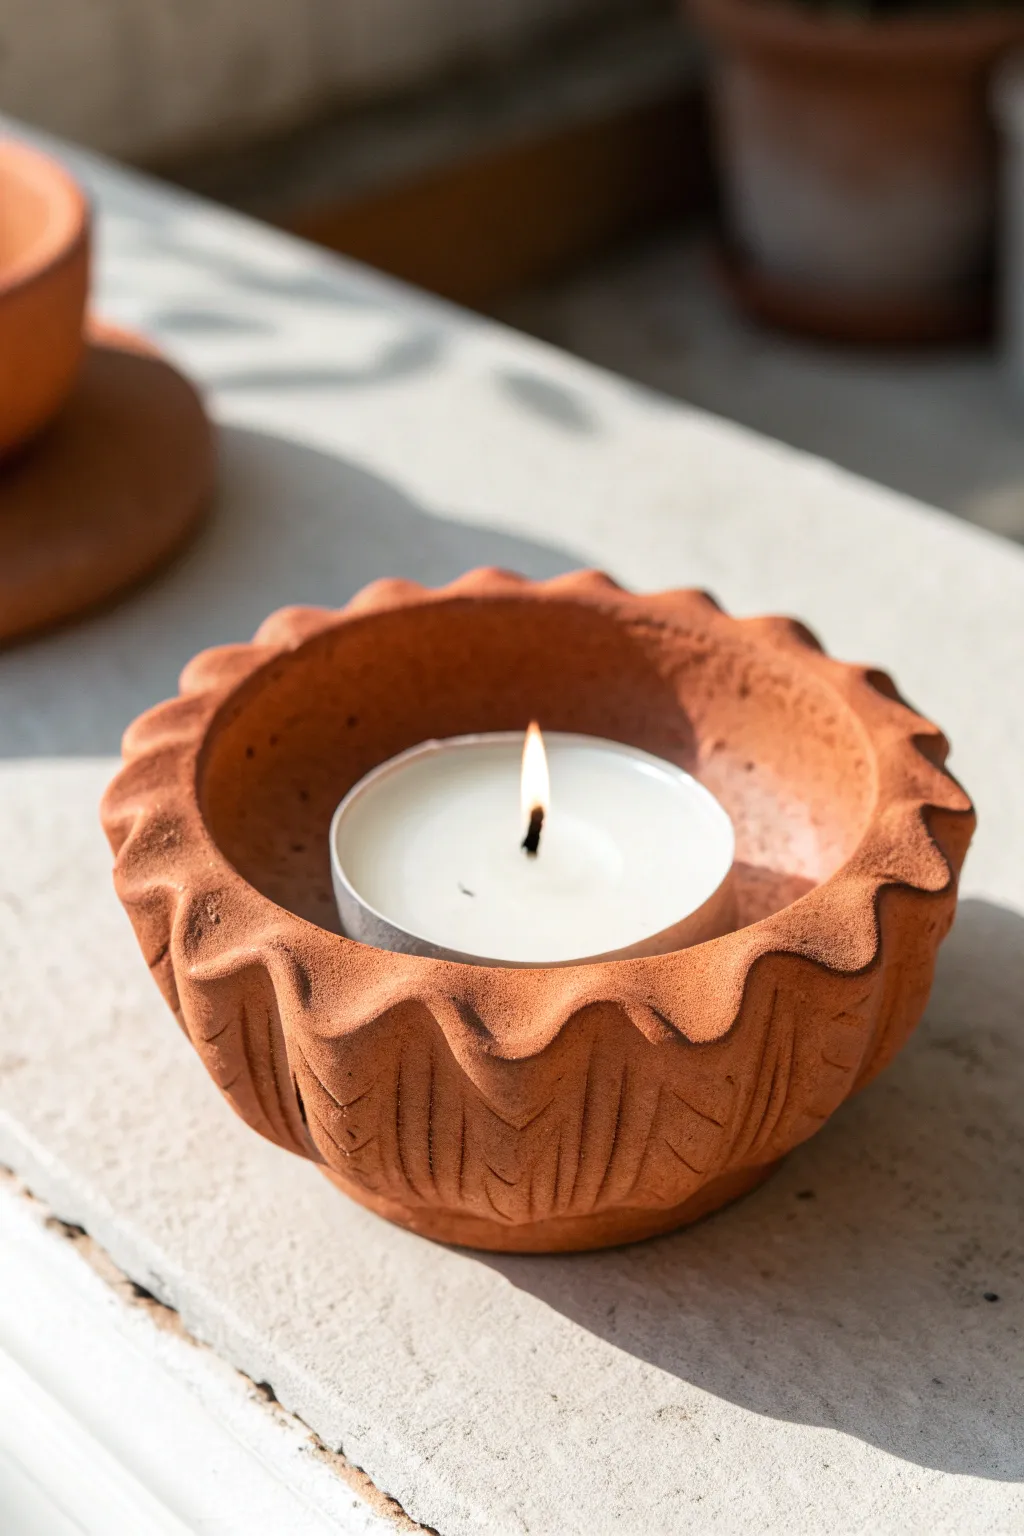
Bring warmth to any corner of your home with this hand-sculpted clay tea light holder featuring organic scalloped edges and carved geometric details. The raw terracotta finish gives it an earthy, artisanal feel that looks beautiful illuminated by candlelight.
Step-by-Step
Materials
- Oven-bake clay (specifically a terracotta color)
- Tea light candle (for sizing)
- Rolling pin or smooth glass jar
- Circle cookie cutter (approx. 4 inches) or a bowl to trace
- Craft knife or clay tool set
- Small carving tool or needle tool
- Small bowl of water (for smoothing)
- Parchment paper
- Baking sheet
- Sandpaper (fine grit)
Step 1: Forming the Base
-
Prepare your workspace:
Lay down a sheet of parchment paper on a flat surface to prevent the clay from sticking while you work. -
Condition the clay:
Take a generous ball of terracotta-colored oven-bake clay and knead it in your hands until it becomes soft, pliable, and free of cracks. -
Roll out a slab:
Using your rolling pin, flatten the clay ball into an even slab that is roughly 1/4 inch thick. Aim for consistent thickness to ensure even baking later. -
Cut the base circle:
Use a 4-inch circle cutter or trace around a small bowl with your craft knife to cut out a perfect circle. This will form the bottom of your holder. -
Create the walls:
Roll out a long snake of clay and flatten it into a long strip about 1.5 inches wide and 1/4 inch thick. -
Attach the wall:
Wrap the strip around the edge of your circle base. Trim any excess length where the ends meet. -
Seal the seams:
Gently press the clay together where the wall meets the base and where the two ends join. I like to use a small modeling tool to pull clay from one side to the other to create a strong bond. -
Smooth the surfaces:
Dip your finger in a little water and smooth out the seams on both the inside and outside until the transition is seamless.
Step 2: Sculpting and Detailing
-
Rough out the scallops:
Use your thumb and index finger to gently pinch the top rim of the wall at regular intervals, creating a wavy, undulating pattern. -
Refine the waves:
Go back around the rim and deepen the curves. Press down slightly in the valleys and pinch the peaks to make them sharper and more defined. -
Check the fit:
Place your actual tea light candle inside gently to ensure it fits comfortably with a little room to spare. Remove it before continuing. -
Mark the carving zones:
Using a needle tool, lightly scratch vertical guidelines down from each ‘valley’ of your scalloped rim to the base. This helps align your pattern. -
Carve the chevrons:
Use a small carving tool to etch inverted ‘V’ shapes or chevron patterns between your vertical guidelines. Vary the pressure to create texture. -
Add vertical lines:
Carve deeper vertical lines in the valleys to emphasize the scalloped shape, extending them down the side of the pot. -
Texture the peaks:
Add small dashes or hash marks near the peaks of the scallops for extra visual interest and a handmade touch. -
Final smoothing:
Run a damp finger over any rough burrs created by the carving tools, but be careful not to erase your design.
Keep it Clean
Keep baby wipes nearby to clean your hands and tools often. Terracotta pigment can stain easily and transfer to other surfaces.
Step 3: Baking and Finishing
-
Bake the project:
Transfer the clay (still on the parchment paper) to a baking sheet. Bake according to the specific temperature and time instructions on your package of clay. -
Cool completely:
Once baked, turn off the oven and let the piece cool down slowly inside, or remove it and let it sit undisturbed until fully cold. -
Sand edges:
Check the bottom and the top rim for any sharp spots. Use fine-grit sandpaper to gently buff these areas until they feel smooth to the touch.
Collapsing Walls?
If the walls sag while sculpting, the clay is too warm. Pop it in the fridge for 10 minutes to firm it up before carving.
Place your favorite scented tea light inside and enjoy the cozy glow of your handmade creation

The Complete Guide to Pottery Troubleshooting
Uncover the most common ceramic mistakes—from cracking clay to failed glazes—and learn how to fix them fast.
Pinch Pot Mini Planter
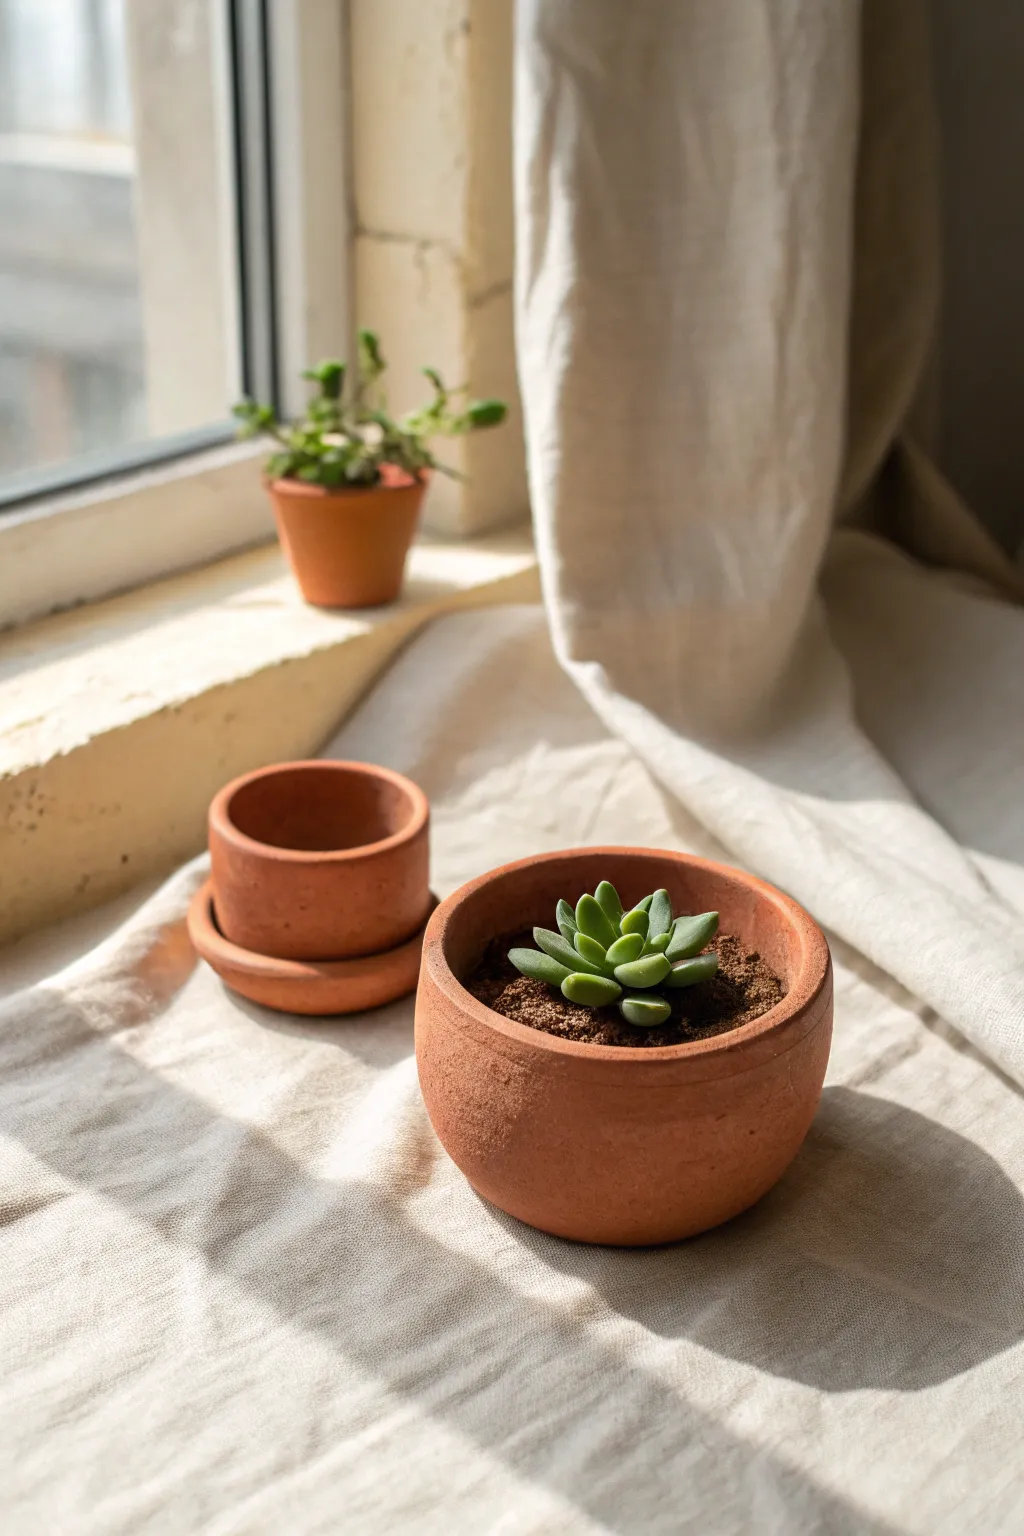
Embrace the imperfect, organic beauty of handmade ceramics with these simple terracotta-style bake clay planters. This project captures the warm, earthy tones of traditional pottery in a miniature size perfect for your favorite succulents.
How-To Guide
Materials
- Terracotta-colored polymer clay (or oven-bake clay)
- Clay carving tools or a wooden skewer
- Rolling pin or smooth glass jar
- Circle cutter or a small round object (like a cup rim)
- Parchment paper
- Baking sheet
- Oven (for curing)
- Fine-grit sandpaper (optional)
- Matte varnish (optional)
Step 1: Prepping the Clay
-
Conditioning:
Begin by taking a substantial chunk of your terracotta-colored polymer clay. Knead it thoroughly in your hands until it is soft, pliable, and free of any cracks. The warmth of your hands is essential here. -
Portioning:
Divide your clay into two balls. For the set seen in the photo, make one ball significantly larger (about the size of a tennis ball) for the main planter, and a smaller one (golf ball size) for the mini pot.
Step 2: Shaping the Main Planter
-
Starting the Pinch Pot:
Hold the larger clay ball in your non-dominant hand. Press your thumb into the center of the ball, pushing down about three-quarters of the way, but be careful not to poke through the bottom. -
Pinching the Walls:
Using your thumb on the inside and fingers on the outside, gently pinch the clay while rotating the ball. Work your way from the bottom up to the rim. -
Refining the Shape:
Aim for an even thickness of about 1/4 inch all around. I like to frequently set the pot down on a flat surface to flatten the bottom so it sits stably without wobbling. -
Creating the Rim:
For the specific look in the photo, create a slight groove near the top rim. Use a sculpting tool or the side of a wooden skewer to gently press a horizontal line around the circumference, about a half-inch from the top edge. -
Smoothing:
Wet your finger slightly with water (if using air dry clay) or baby oil (if using polymer) to smooth out any harsh fingerprints. However, leave some texture to maintain that rustic, handmade charm.
Smooth Operator
To remove deep fingerprints before baking, lightly brush the raw clay with a little baby oil or clay softener. It melts the surface just enough to blend marks away.
Step 3: Creating the Mini Pot & Saucer
-
Forming the Mini Pot:
Repeat the pinch pot process with your smaller ball of clay. Keep the walls vertical and simple, mimicking a tiny cylinder. -
Rolling the Saucer Base:
Take a leftover scrap of clay and roll it out flat on parchment paper until it is about 1/4 inch thick. -
Cutting the Saucer:
Use a circle cutter or a small glass to cut out a round disc that is slightly wider than the base of your mini pot. -
Curving the Saucer:
Gently lift the edges of the flat disc with your fingertips to create a very slight lip, turning it into a shallow saucer shape.
Faux Stone Effect
Mix black pepper or used dried coffee grounds into your terracotta clay before sculpting. It adds speckles and texture that looks exactly like real stone.
Step 4: Finishing Touches
-
Texturing:
To mimic the gritty look of real terracotta, you can gently tap the surface of your pots with a stiff toothbrush or a crumpled ball of aluminum foil. -
Baking:
Place your finished pieces on a parchment-lined baking sheet. Bake according to your specific clay package instructions (usually 275°F/135°C for 15-30 minutes depending on thickness). -
Cooling:
Turn off the oven and open the door slightly, letting the pieces cool down slowly inside. This helps prevent cracking from sudden temperature changes. -
Drainage Holes (Optional):
If you plan to use live plants, you can carefully drill a hole in the bottom after baking, or poke a hole with a straw before baking. -
Sanding:
Once fully cool, use fine-grit sandpaper to smooth any rough edges on the rims, giving it a professional finish. -
Sealing:
Since polymer clay is naturally water-resistant, sealing isn’t strictly necessary, but a coat of matte varnish can protect the surface and enhance that stone-like finish.
Fill your new creations with soil and miniature succulents to complete your sunny window display
Cactus Ring Holder

This charming ring holder combines functionality with adorable southwest style, featuring a glossy sage green finish and delicate gold speckles. It’s designed with two sturdy arms perfect for stacking rings, while the base doubles as a catch-all for bracelets or earrings.
Step-by-Step Tutorial
Materials
- Polymer clay (white or light grey)
- Ceramic or acrylic paint (Sage Green)
- Glossy glaze or varnish (polyurethane based)
- Gold metallic paint pen or fine brush
- Clay sculpting tools
- Rolling pin
- Baking sheet and parchment paper
- Sandpaper (fine grit)
- Strong craft glue or liquid clay
Step 1: Sculpting the Base Form
-
Condition the clay:
Begin by warming your polymer clay in your hands, kneading it thoroughly until it creates a smooth, pliable ball free of cracks. -
Form the main column:
Roll a cylinder of clay approximately 4-5 inches tall and 1 inch thick. Round off the top gently to create the main body of the cactus. -
Shape the arms:
Roll a smaller snake of clay for the arms. Cut two pieces: one short and one slightly longer. Bend each into an ‘L’ shape, curving the corner so it looks organic rather than sharp. -
Attach the arms:
Score the side of the main column and the base of each arm with a needle tool. Apply a drop of liquid clay or blending medium, then press the arms onto the body—place one slightly higher than the other for a natural look. -
Blend the seams:
Using a blending tool or your thumb, smooth the clay where the arms meet the body until the seam disappears completely. I like to double-check from all angles to ensure the connection is strong.
Drooping Arms?
If the clay arms sag during sculpting, insert short pieces of toothpick or wire inside them to act as an internal skeleton for support.
Step 2: Texturing and Base
-
Add ribbing texture:
Use a dull knife or a sculpting tool to gently press vertical lines up the main column and along the arms. These ridges mimic the natural ribs of a saguaro cactus. -
Create the dish base:
To make the separate bracelet dish, roll a ball of clay and flatten it into a thick disc. Use your thumbs to gently depress the center, creating a shallow bowl shape while keeping the rim rounded and thick. -
Refine the surface:
Dip your finger in a little rubbing alcohol or baby oil and lightly smooth over the entire piece to remove fingerprints before baking. -
Bake carefully:
Place your cactus upright and the dish flat on parchment paper. Bake according to your brand’s package instructions (usually 275°F/135°C for 15-30 minutes). -
Cool and sand:
Let the clay cool completely inside the oven to prevent cracking. Once cool, lightly sand any rough spots or fingerprints with fine-grit sandpaper.
Step 3: Painting and Finishing
-
Apply the base color:
Paint the entire cactus and the dish with sage green acrylic paint. You will likely need 2-3 thin coats for opaque coverage, letting each coat dry fully in between. -
Add the spines:
Once the green is bone dry, take your gold paint pen or a fine brush dipped in metallic gold paint. Make tiny dots in vertical rows following the indented ridges you sculpted earlier. -
Seal tightly:
Apply a high-gloss varnish over the entire piece. This is crucial for achieving that ceramic-like shine shown in the reference photo. -
Connect the pieces (Optional):
If you want a single unit, use strong craft glue to attach the bottom of the cactus column into the center of the dish. Alternatively, leave them separate for versatile styling.
Make it Luxe
Instead of dots, paint the very tips of the cactus arms in gold leaf for a dipped, modern aesthetic distinct from the classic polka dots.
This lovely little jewelry stand is now ready to organize your treasures on your dresser or nightstand


What Really Happens Inside the Kiln
Learn how time and temperature work together inside the kiln to transform clay into durable ceramic.
Personalized Initial Keychain
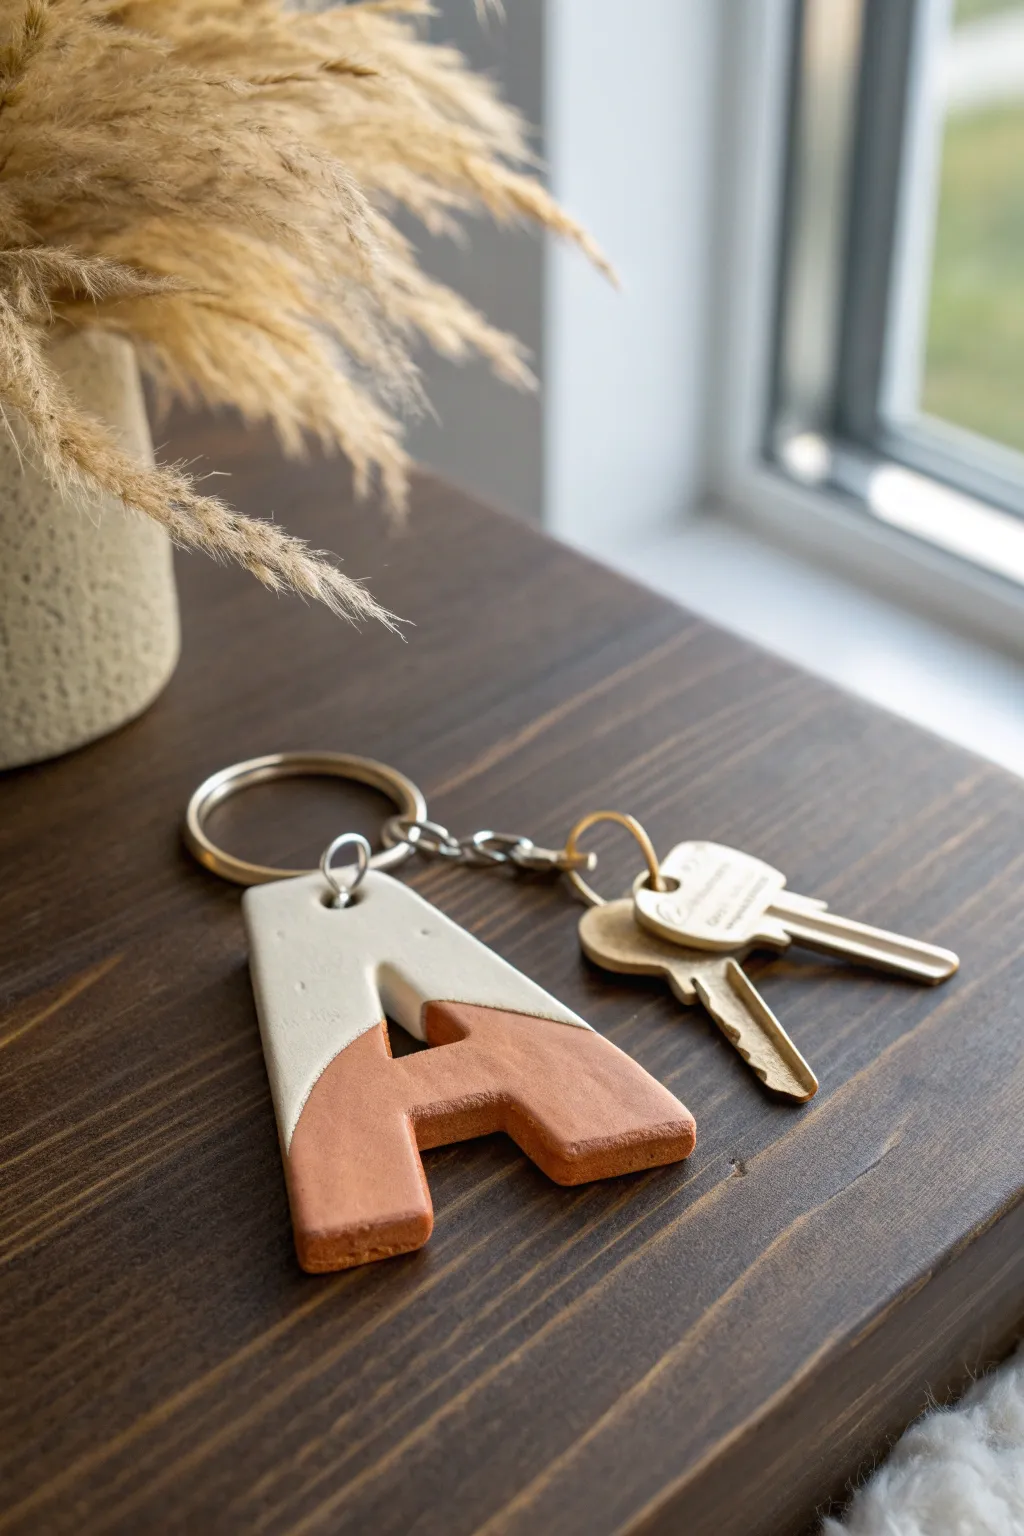
Customize your keyring with this modern, minimalist initial crafted from polymer clay. The design features a chic diagonal split between creamy white and earthy terracotta tones, giving it a sophisticated, handcrafted look.
Step-by-Step Guide
Materials
- White polymer clay
- Terracotta or burnt orange polymer clay
- Rolling pin or pasta machine
- Clean craft knife or clay blade
- Letter template (paper or cardstock)
- Needle tool or small drinking straw
- Baking sheet
- Parchment paper
- Fine-grit sandpaper (400-600 grit)
- Jump ring
- Keyring hardware with chain
- Jewelry pliers
Step 1: Preparing the Clay
-
Condition the Clay:
Begin by kneading the white and terracotta clay blocks separately in your hands until they are soft, pliable, and free of cracks. This conditioning step is crucial for preventing breakage later. -
Roll Out Slabs:
Roll each color out onto a clean surface to an even thickness of about 1/4 inch (approx. 6mm). If you have a pasta machine, use the thickest setting; otherwise, a rolling pin with guide rings works perfectly. -
Create the Diagonal Cut:
Using your blade, cut a clean diagonal line across both the white and terracotta slabs. The angle doesn’t need to be precise, but it should be straight. -
Join the Colors:
Take the top diagonal piece of the white clay and the bottom diagonal piece of the terracotta clay. Press the cut edges together firmly on your work surface to form a single two-tone sheet. -
Smooth the Seam:
Gently roll over the joined seam with your rolling pin to bond the two pieces together. I prefer to flip the clay over and rub the seam on the back with my thumb to ensure it’s secure.
Step 2: Shaping and Refining
-
Place the Template:
Position your paper letter template over the clay slab. Adjust it so the diagonal seam runs through the letter in a visually pleasing way, dividing the colors nicely. -
Cut the Initial:
Carefully trace around the template with your craft knife or blade. Keep the blade perpendicular to the work surface for straight, clean edges. -
Smooth the Edges:
Lift the letter gently. Use your fingertip dipped in a tiny bit of water (or cornstarch) to smooth any rough cutting marks along the sides of the letter. -
Add Suspension Hole:
Use a needle tool or a small straw to punch a hole at the top of the letter. Make sure it is centered and not too close to the edge to prevent tearing.
Fixing Cracks
If the seam splits after baking, apply a tiny amount of liquid polymer clay or superglue into the crack, then sand smooth. Future prevention: ensure you firmly press seams together.
Step 3: Baking and Finishing
-
Bake:
Place your clay letter on a baking sheet lined with parchment paper. Bake according to the manufacturer’s instructions on your specific package of clay (usually around 275°F/135°C for 15-30 minutes). -
Cool Down:
Once baked, remove from the oven and let the piece cool completely before handling. It will still be slightly soft when hot but hardens as it cools. -
Sand for Perfection:
Dip the sandpaper in water and gently sand the edges and flat surfaces of the letter. This removes fingerprints and creates that professional, matte finish seen in the photo. -
Rinse and Dry:
Rinse off any sanding dust and dry the letter thoroughly with a soft cloth. -
Attach Hardware:
Using jewelry pliers, twist open a heavy-duty jump ring laterally. Thread it through the hole in the clay letter. -
Secure the Keyring:
Before closing the jump ring, slide on the last link of your keychain hardware. Twist the jump ring closed tightly so the ends sit flush.
Seamless Finish
To erase fingerprints before baking, lightly brush the clay with a little baby oil or cornstarch. This minimizes the amount of sanding you’ll need to do later.
Now you have a sturdy, personalized accessory ready to organize your keys in style
Wind Chime With Clay Shapes
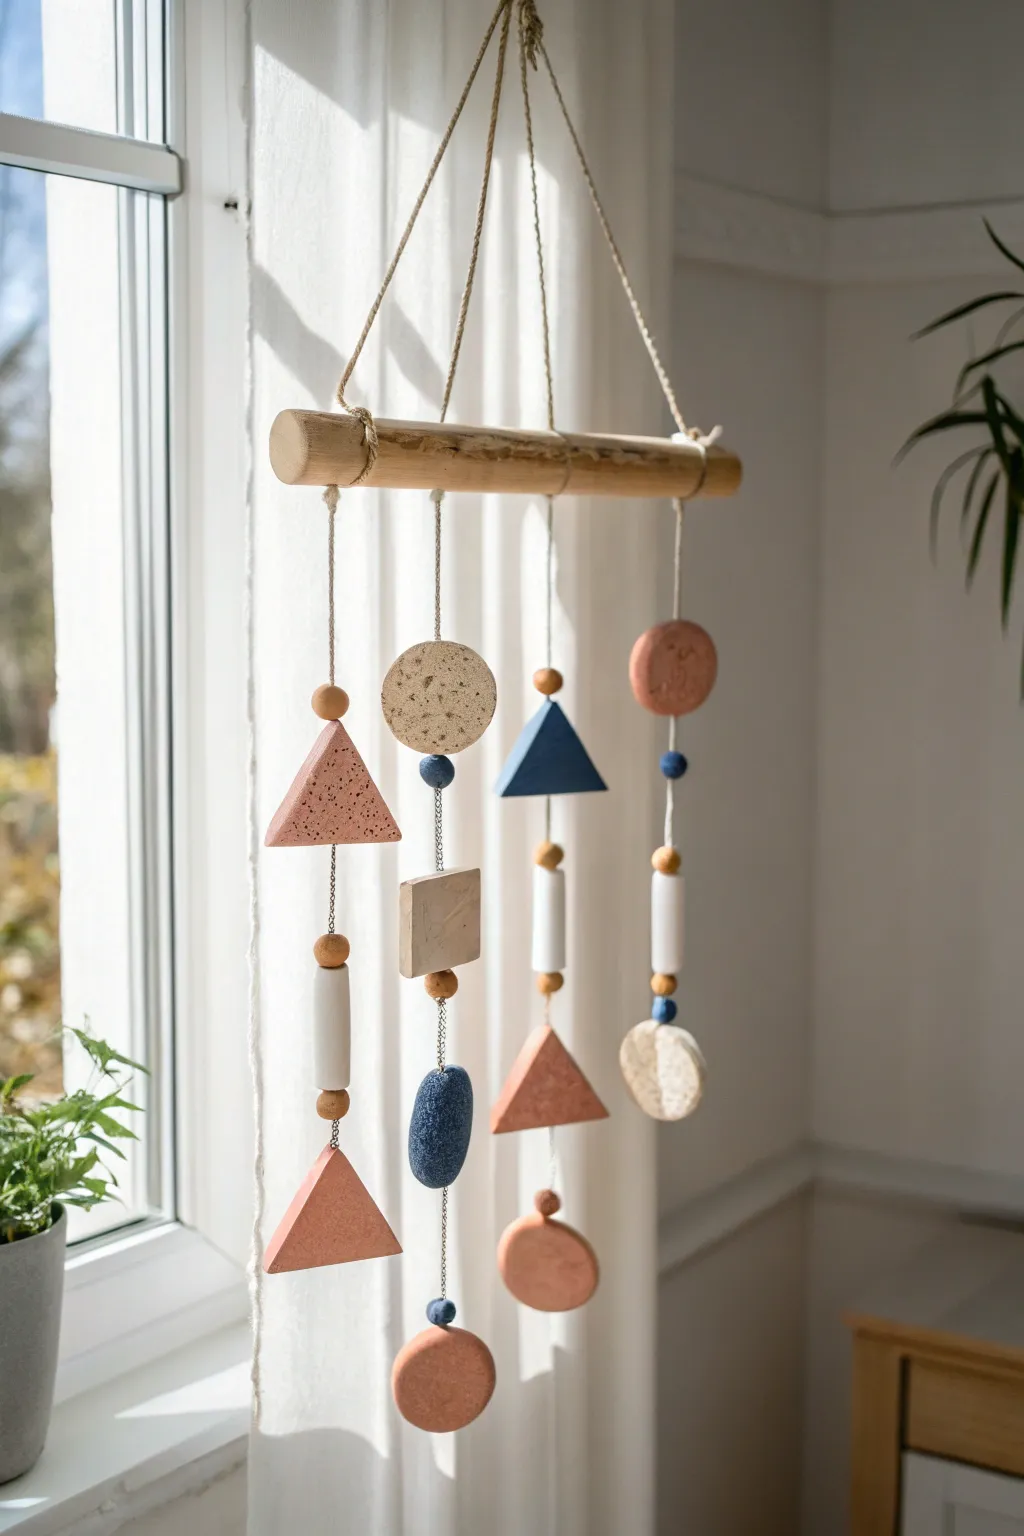
Bring a touch of modern bohemian charm to your window with this geometric wind chime. Featuring earthy tones and varied shapes, this hanging mobile catches the light beautifully and adds a calming artistic element to any room
Detailed Instructions
Materials
- Polymer clay (terracotta/rust, speckled white, deep blue, natural/stone)
- Wooden dowel or natural branch (approx. 12 inches)
- Small wooden beads (approx. 8-10mm)
- Jute twine or strong hemp cord
- Rolling pin
- Clay cutting tools (knife blade)
- Shape cutters (circles, triangles) or paper templates
- Toothpick or skewers for making holes
- Baking sheet and parchment paper
- Oven (if using oven-bake clay)
- Scissors
Step 1: Shaping the Clay Elements
-
Conditioning:
Start by warming up your polymer clay in your hands. Knead colors separately until they are soft and pliable to prevent cracking during the baking process. -
Create the Speckled Texture:
For the light beige circles, I like to mix a tiny pinch of black pepper or dried coffee grounds into white or translucent clay to achieve that organic, speckled stone look naturally. -
Rolling Out Sheets:
Roll out your various clay colors onto a smooth surface to an even thickness of about 1/4 inch. Thicker pieces hang better and are less fragile. -
Cutting Triangles:
Cut out four large triangles from the rust/terracotta clay and two smaller triangles from the blue clay. You can use a metal cutter or simply use a knife and a ruler for sharp lines. -
Cutting Circles:
Create the circular elements. You will need three or four medium-sized circles (some in speckled beige, some in rust) and one organic oval shape in blue. Varying sizes adds visual interest. -
Canes and Tubes:
Roll small logs of white clay and cut them into 1-inch cylinders. You’ll need about two or three of these to act as long spacer beads. -
Making Connections:
Before the clay hardens, carefully pierce holes in each piece. Most pieces need a hole at the top and bottom center to string through. The bottom-most pieces (like the large triangles) only need a top hole. -
Baking:
Arrange your shapes on a parchment-lined baking sheet. Bake according to your specific clay package instructions, usually around 275°F (135°C) for 15-30 minutes.
Step 2: Assembly and Hanging
-
Prepare the Hanger:
Cut a piece of jute twine about 24 inches long. Tie each end securely to the outer edges of your wooden dowel or branch to create the main hanger. -
Cut Vertical Strings:
Cut four lengths of twine, each about 20-25 inches long. These will hold your clay columns. -
Stringing Column One:
Starting from the bottom of your first string, tie a knot to secure a rust triangle. Thread upward, adding a small wooden bead, then tie a knot higher up to hold a rust cylinder, then another knot for a circle. -
Stringing Column Two:
For the second strand, attach a blue organic oval at the bottom. Leave a gap, tie a knot, and thread on a square or rectangle shape (if you made one) or a circle, followed by a speckled circle near the top. -
Stringing Column Three:
Create the third strand with a rust triangle at the bottom, a white cylinder bead in the middle, and a blue triangle at the top. Use small wooden beads as spacers between the clay and the knots for a cleaner look. -
Stringing Column Four:
Finish with the final strand using a circle or oval at the bottom, a long cylinder, and a rust circle at the top. Ensure the overall length varies slightly from the other strands for balance. -
Attaching to Dowel:
Tie each of your four completed beaded strands onto the wooden dowel. Space them out evenly, leaving about 2-3 inches between each strand. -
Securing Knots:
Trim any excess string from your knots. For extra security, you can place a tiny drop of clear craft glue on the final knots on the dowel to ensure they don’t slip.
Hole Distortion?
If holes squish while poking, let the clay sit in the fridge for 10 mins to firm up, then drill carefully with a hand twisting motion instead of pushing.
Natural Texture
Before baking, gently press a piece of coarse sandpaper or a rough stone onto the clay surface to give it a realistic, grainy stone texture.
Now you have a unique, handmade piece of art ready to catch the morning sunlight in your favorite window