When I want a project that’s cute, quick, and actually lasts, I reach for bakeable clay—especially oven-bake clay for all those crisp details. Here are my go-to ideas that feel totally doable at your kitchen table but still look like something you’d proudly display or gift.
Marbled Ring Dishes
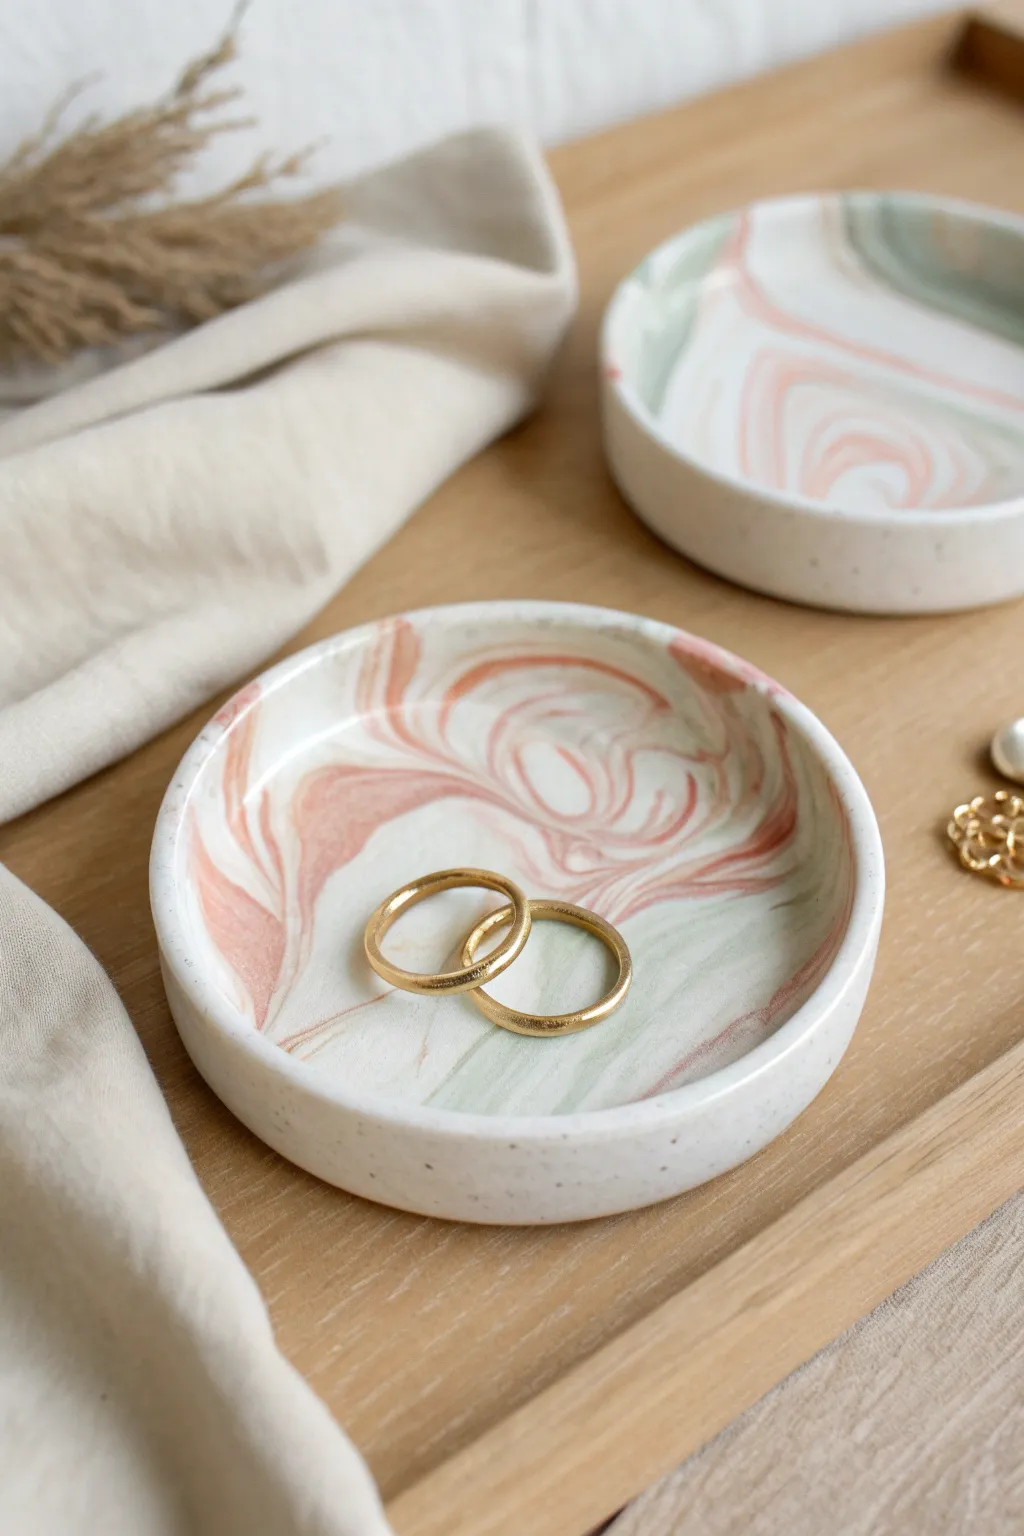
These elegant marbled ring dishes combine cloudy white polymer clay with soft coral and sage green veins for a modern, organic look. They are the perfect size for keeping your favorite jewelry safe and add a touch of handcrafted luxury to any bedside table.
How-To Guide
Materials
- Polymer clay (White, Coral/Pink, Sage Green, and a speckled/granite efffect clay)
- Acrylic rolling pin
- Circle cookie cutter (approx. 4-inch diameter)
- Small oven-safe bowl or ramekin (for shaping)
- Craft knife or clay blade
- Fine-grit sandpaper (400-600 grit)
- Gloss or matte glaze (optional)
- Soft paintbrush
- Parchment paper
Step 1: Preparing the Clay
-
Condition the white base:
Begin by taking a large chunk of white polymer clay. Knead it thoroughly in your hands until it becomes soft, pliable, and warm to the touch. -
Add texture:
Mix a small amount of speckled or granite-effect clay into the white. Knead until the speckles are evenly distributed, giving the base a natural, stone-like appearance. -
Prepare accent colors:
Condition small amounts of the coral and sage green clay separately. Roll them into long, thin snakes, about the thickness of a spaghetti noodle. -
Create the base log:
Roll your prepared white clay into a thick log, approximately 1 inch in diameter and 4-5 inches long.
Don’t Over-Mix!
Stop twisting and folding sooner than you think. If you mix too much, the distinctive veins will blur, turning the clay into a solid, muddy secondary color rather than a crisp marble pattern.
Step 2: Marbling and Shaping
-
Apply the veins:
Lay the thin snakes of coral and sage green lengthwise along the white log. Don’t be too perfect; random placement creates more natural-looking marble veins. -
Twist the log:
Grasp both ends of the clay log and twist them in opposite directions like you are wringing out a towel. This wraps the colors around the white core. -
Fold and roll:
Fold the twisted log in half, bringing the ends together. Roll it back into a smooth log shape on your work surface to merge the layers. -
Repeat the twist:
Twist the log one more time. Be careful not to over-twist or over-knead at this stage, or the distinct colors will muddy into a single brownish hue. -
Roll out the slab:
Ball up the clay and place it on parchment paper. Using your acrylic rolling pin, roll the clay out into a smooth slab about 1/4 inch thick. Rotate the clay frequently to ensure an even thickness. -
Check the pattern:
Inspect your slab. If you want more swirling, you can fold and roll it once more, but remember that less is often more with marbling.
Bubbles in the Clay?
If you see an air bubble trapped under the surface while rolling, gently pierce it with your craft knife or a needle, release the air, and smooth the clay back down with your finger.
Step 3: Cutting and Forming
-
Cut the circle:
Press your circle cutter firmly into the most visually interesting part of the clay slab. Lift away the excess clay. -
Smooth the edges:
Dip your finger in a tiny bit of water (or baby oil) and gently run it along the cut edge of the circle to smooth out any harsh lines or burrs. -
Form the dish:
Gently lift the clay circle and drape it inside your oven-safe bowl or ramekin. Press it down lightly so it takes the curved shape, ensuring the bottom is flat enough to sit stably. -
Refine the rim:
Use your thumb to gently press the rim of the clay against the wall of the bowl to create a slight vertical lip, rather than just a simple curve.
Step 4: Baking and Finishing
-
Bake the clay:
Place the bowl with the clay inside into a preheated oven. Bake according to the manufacturer’s instructions for your specific brand of clay (usually around 275°F for 15-30 minutes). -
Cool completely:
Remove the bowl from the oven and let it cool completely before attempting to pop the clay dish out. Removing it while hot can cause warping. -
Sand the edges:
Once cool, remove the clay dish. If the rim feels sharp, wet your fine-grit sandpaper and gently sand the edges in a circular motion until smooth. -
Seal the piece:
For a glossy ceramic look, apply a thin coat of polymer clay glaze. I find a soft brush works best here to avoid brushstrokes. Let it dry fully before use. -
Add gold rim (optional):
If you want extra flair, you can paint the very top edge of the rim with liquid gold leaf for a metallic finish.
Place your newly finished dish on your dresser and enjoy the chic organization it brings to your space


Simple Statement Earrings
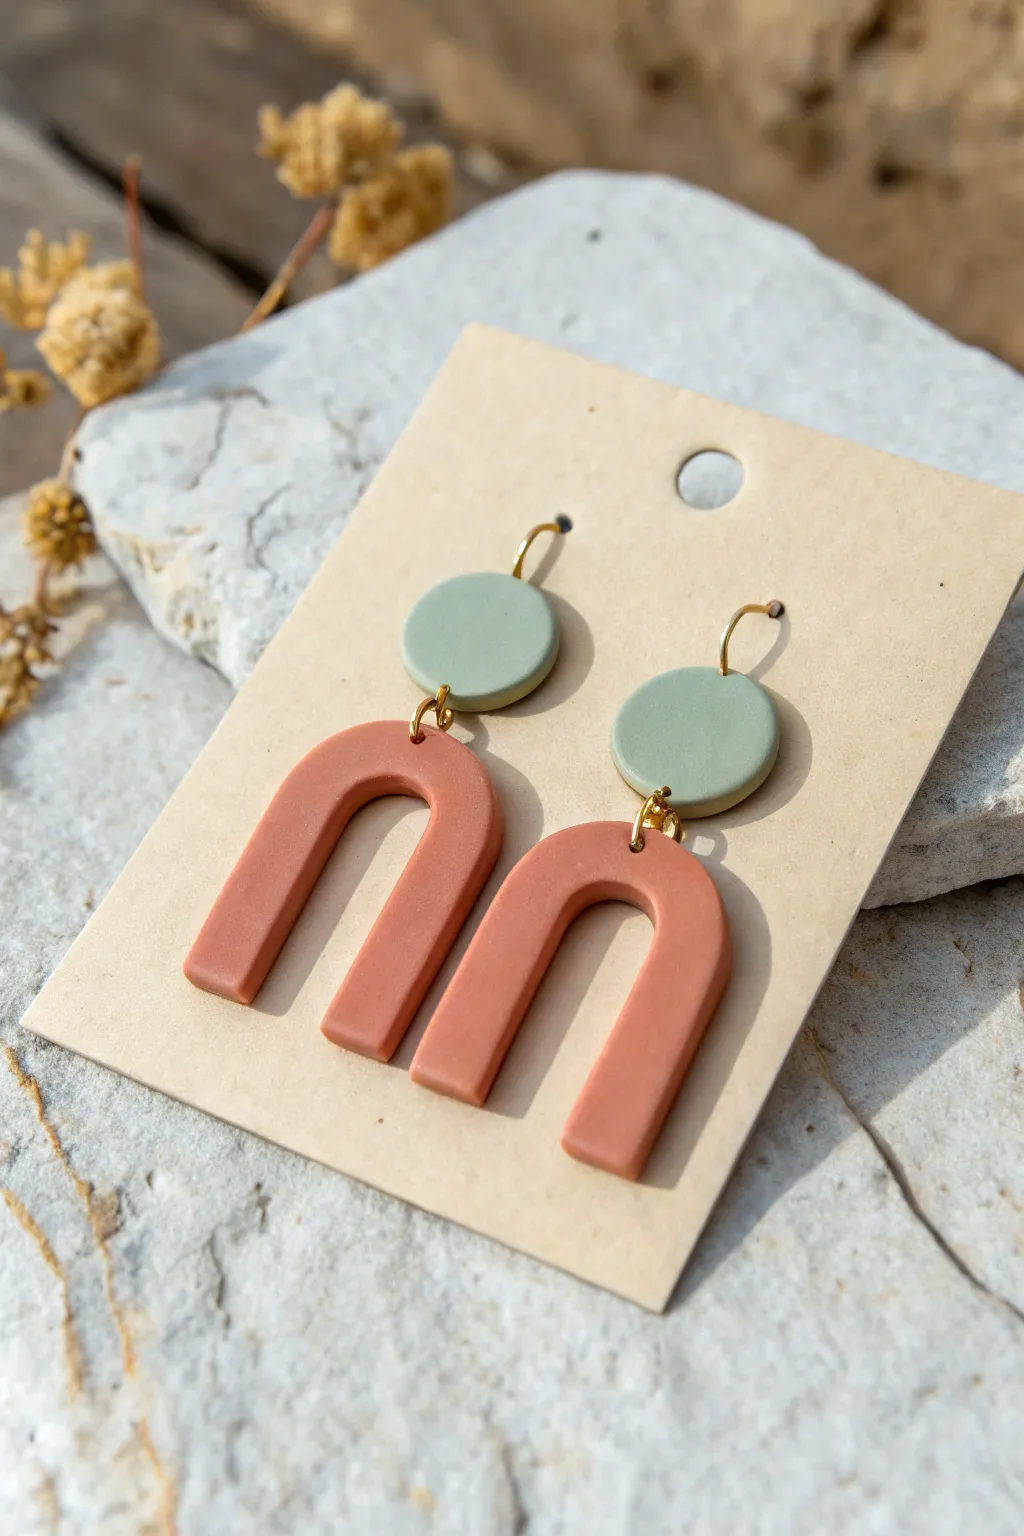
Embrace the beauty of earthy tones with these modern, minimalist earrings featuring a muted sage green stud and a warm terracotta arch. The simple geometric shapes and matte finish give them a sophisticated, high-end look that belies how easy they represent to make at home.
Detailed Instructions
Materials
- Polymer clay (Sage Green and Terracotta/Warm Brick colors)
- Acrylic rolling pin or pasta machine
- Small circle cutter (approx. 10-12mm)
- U-shape or Arch cutter (approx. 25-30mm wide)
- X-Acto knife or tissue blade
- Parchment paper or ceramic tile
- Needle tool or toothpick
- Fine-grit sandpaper (400 to 1000 grit)
- Gold jump rings (4-6mm)
- Earring hooks (gold)
- Jewelry pliers (flat nose and chain nose)
- Oven for baking
Step 1: Clay Preparation
-
Condition the clay:
Start by warming the polymer clay in your hands. Knead both the sage green and terracotta colors separately until they are soft, pliable, and free of any cracks. -
Roll it out:
Using your acrylic roller or a pasta machine on a medium setting (around 3mm or 1/8 inch thick), roll each color into a flat, even sheet. Ensure the thickness is consistent for a professional finish. -
Smooth the surface:
Gently rub your finger over the clay sheets to smooth out any fingerprints or texture left by the roller. You can also lay a piece of plastic wrap over the clay before cutting to create softer, rounded edges.
Clean Edges HACK
Before cutting your clay shapes, place a sheet of cling film (plastic wrap) over the clay. Press your cutter down through the plastic. This creates lovely beveled, rounded edges that require almost no sanding!
Step 2: Cutting and Piercing
-
Cut the circles:
Take your small circle cutter and punch out two circles from the sage green clay slab. These will form the top connector pieces. -
Cut the arches:
Using your U-shape cutter, press firmly into the terracotta clay slab to cut out two identical arches. If you don’t have an arch cutter, you can cut a rectangle, round the top with your blade, and use a smaller circle cutter to remove the inner negative space. -
Refine the edges:
Lift the excess clay away from your shapes. If any edges look rough, gently tap them with your fingertip to smooth them down. I find a light touch here saves sanding time later. -
Pierce the holes:
Using a needle tool, carefully poke a hole at the top center of each green circle (for the hook) and another at the bottom center (for the jump ring). -
Pierce the arches:
Poke a single hole in the center top of each terracotta arch. Ensure the holes are large enough for your jump rings to move freely but not so close to the edge that the clay tears.
Step 3: Baking and Finishing
-
Bake the pieces:
Transfer your clay shapes onto a ceramic tile or a baking sheet lined with parchment paper. Bake according to your brand of clay’s instructions (usually around 275°F/135°C for 30 minutes). -
Cool down:
Once baked, turn off the oven and let the pieces cool completely before handling them. Warm clay is fragile, but fully cooled clay is surprisingly durable. -
Sanding:
Dip your fine-grit sandpaper in a little water and gently sand the edges of your pieces to remove any bumps or seams. This wet-sanding technique prevents dust and creates a super smooth, matte finish. -
Buffing:
Rinse the pieces to remove sanding residue and pat them dry. For an extra nice touch, buff them vigorously with a piece of denim or a soft cotton cloth to bring out a subtle sheen.
Bubbles in Clay?
If you see tiny air bubbles on the surface before baking, gently slice them open with your blade and smooth the clay back down. Trapped air can cause bumpy surfaces after baking.
Step 4: Assembly
-
Open the jump rings:
Hold a jump ring with two pairs of pliers. Twist one hand forward and the other back to open the ring sideways—never pull it apart, as this weakens the metal. -
Connect the shapes:
Slide the open jump ring through the bottom hole of a green circle and the top hole of a terracotta arch. Twist the jump ring closed securely until the ends meet perfectly. -
Attach the hooks:
Open the small loop at the bottom of your earring hook using your pliers. Thread it through the top hole of the green circle. -
Secure the hook:
Twist the hook’s loop closed gently. Repeat the assembly process for the second earring. -
Final check:
Hold both earrings up to ensure they hang straight and all connections are secure. Your modern clay dangles are now ready to wear.
Now you have a stunning pair of handmade earrings that look professionally crafted and ready to elevate any outfit


Clay Bead Necklaces and Bracelets
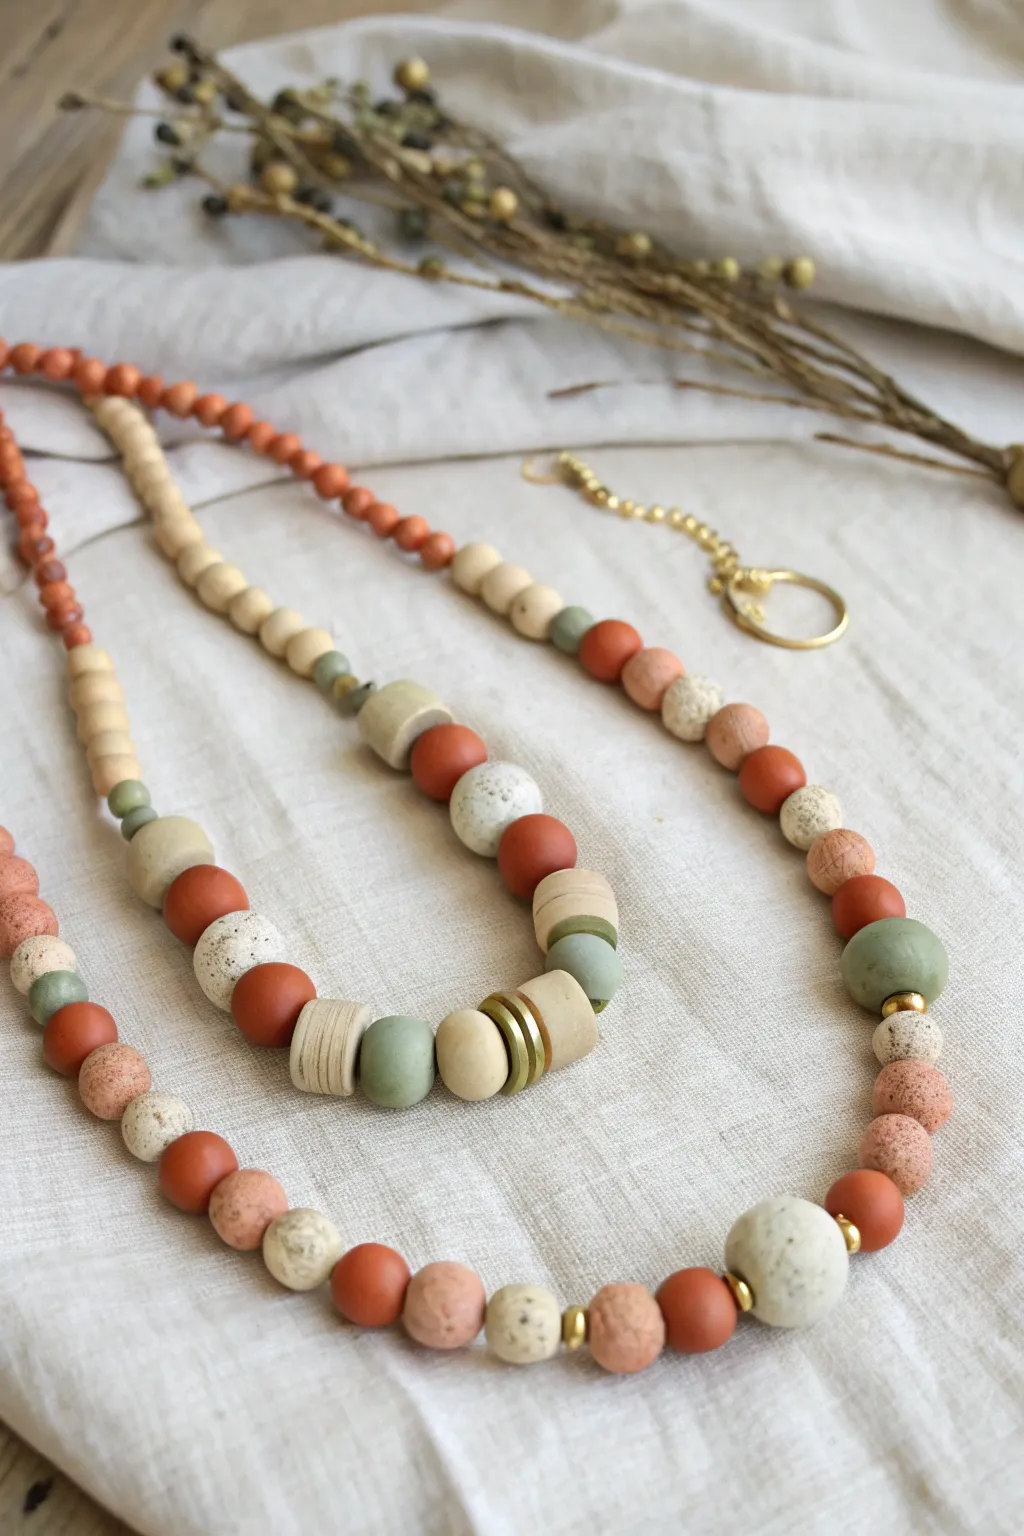
Embrace a natural, organic aesthetic with this stunning beaded necklace featuring a mix of speckled, matte, and geometric clay beads. The combination of terracotta, sage, and cream tones creates a versatile accessory that feels both modern and timeless.
Step-by-Step Guide
Materials
- Polymer clay (terracotta, sage green, cream/white, beige)
- Black pepper or dried coffee grounds (for speckling)
- Acrylic rolling pin
- Bead piercing pins or toothpicks
- Needle tool
- Strong beading cord (nylon or silk)
- Brass or gold-tone spacer beads (small rounds and flat discs)
- Sandpaper (various grits)
- Oven and baking sheet
- Parchment paper
- Jewelry clasp and crimp beads
Step 1: Prepping the Clay
-
Condition the clay:
Begin by kneading each color of polymer clay separately until it is soft and pliable. This prevents cracking later. -
Create the speckled mix:
Take a portion of your cream or beige clay. Sprinkle in some coarse black pepper or dried coffee grounds and knead it thoroughly until the specks are evenly distributed to mimic stone. -
Mix custom shades:
To achieve that muted, earthy look, try mixing a tiny bit of brown or grey into your sage green and terracotta colors.
Clean Hands, Clean Clay
Always wash your hands or use baby wipes when switching between colored clays, especially right before handling white or cream clay, to keep the colors pure.
Step 2: Shaping the Beads
-
Roll spheres:
Pinch off varying amounts of clay to create different sized balls. Aim for a mix of large statement beads (approx. 2cm) and smaller spacer beads. -
Form geometric shapes:
For the cylindrical beads, roll a smooth ‘snake’ of clay and slice it into even segments. gently tap the ends on your work surface to flatten them. -
Create disc beads:
Take small balls of the sage green or cream clay and press them flat with your finger or an acrylic block to create uneven, organic disc shapes. -
Make the focal beads:
For the largest beads, consider combining two colors slightly for a marbled effect, or keep them solid for a bold look like the large central speckled sphere. -
Pierce the holes:
Using a bead pin or needle tool, carefully pierce a hole through the center of each bead. I find twisting the pin as you push helps maintain the bead’s shape. -
Check hole size:
Ensure the hole is large enough for your specific cord to pass through, perhaps widening it slightly by wiggling the tool.
Fixing Fingerprints
If you notice fingerprints on your raw beads, highly light brushing with a bit of cornstarch or baby oil before baking smooths them right out.
Step 3: Baking and Finishing
-
Prepare for baking:
Arrange your beads on a baking sheet lined with parchment paper. Using a crumpled piece of foil to nestle round beads can help prevent flat spots from forming during baking. -
Bake the clay:
Bake according to your clay manufacturer’s instructions (usually around 275°F/135°C for 15-30 minutes). Let them cool completely before handling. -
Sand for texture:
Once cool, use fine-grit sandpaper to buff the beads. This gives them a professional matte finish and removes any fingerprints. -
Clean the beads:
Wipe the beads down with a damp cloth or rinse them to remove any sanding dust.
Step 4: Assembly
-
Layout your design:
Before stringing, lay your beads out on a mat. Experiment with the pattern, alternating sizes and colors to match the photo’s asymmetrical, organic flow. -
Add brass accents:
Interject the metallic spacer beads between your clay beads. Place the flat brass discs next to the cylindrical shapes for a polished contrast. -
String the beads:
Thread your needle and cord, then carefully string your arranged pattern. -
Secure the clasp:
Finish the ends by attaching your clasp using crimp beads. Squeeze the crimp beads tight with pliers to secure everything in place. -
Final check:
Trim any excess cord and ensure the necklace drapes nicely before your first wear.
Enjoy styling your unique, handcrafted piece with your favorite neutral outfits


Letter and Name Keychains
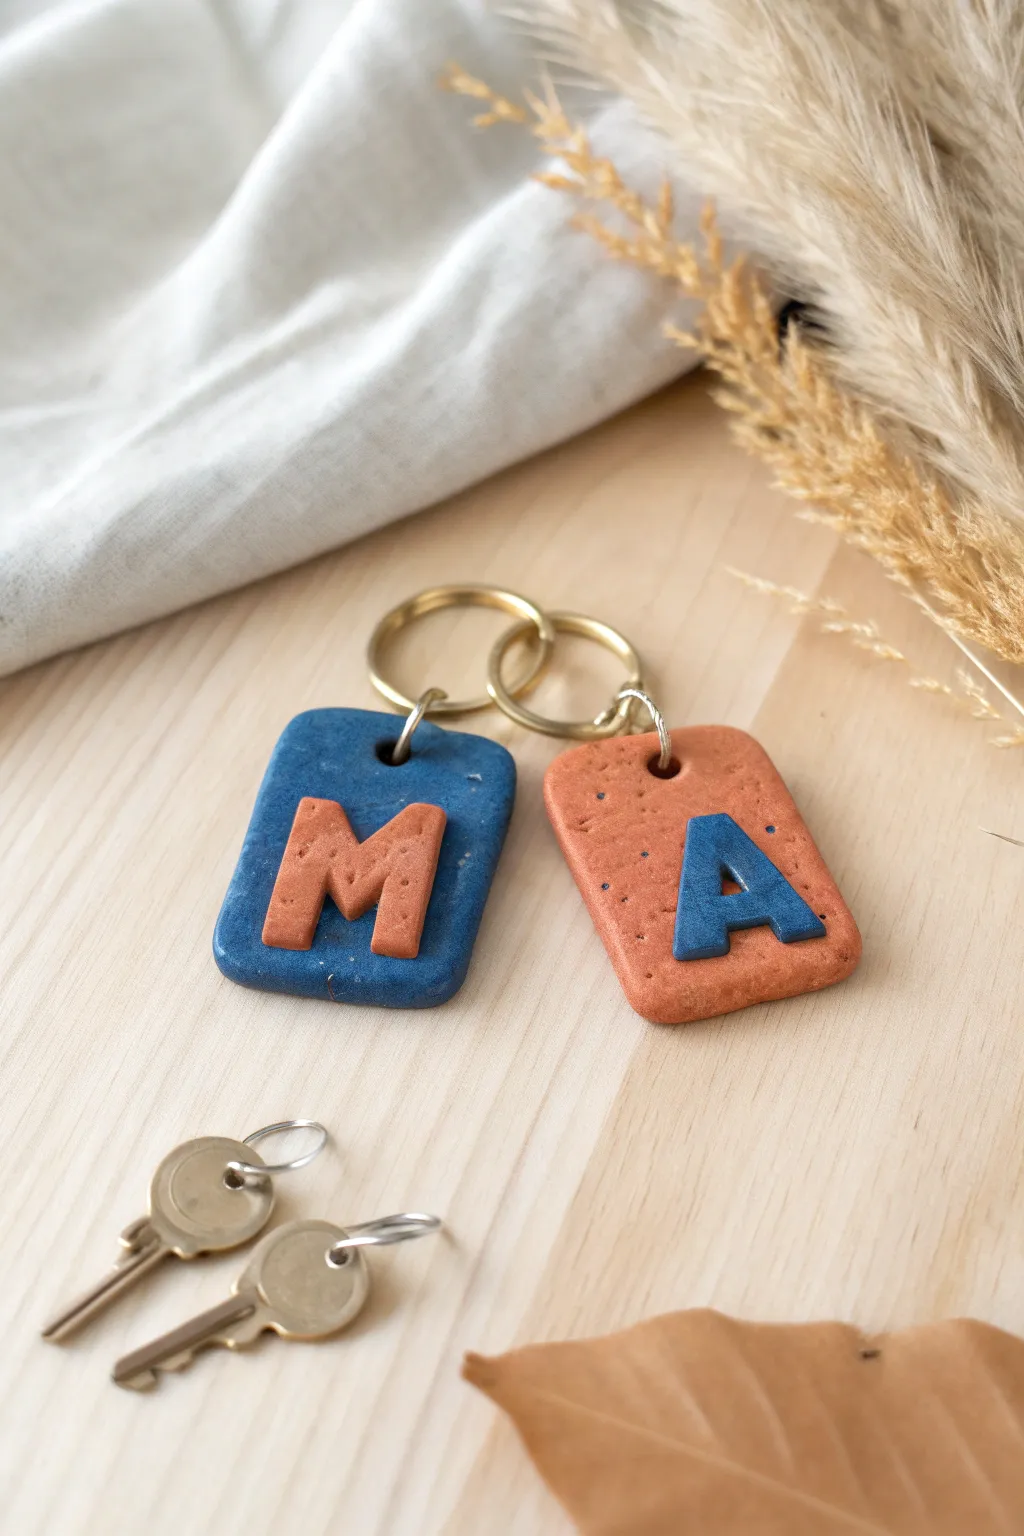
These charming, personalized keychains feature a delightful play of contrasting colors and subtle textures. With their speckled stone-like finish and bold typography, they make perfect gifts or stylish additions to your own keyring.
Detailed Instructions
Materials
- Polymer clay (navy blue and terracotta orange)
- Black pepper or dried coffee grounds (for texture)
- Acrylic rolling pin or pasta machine
- Clay knife or craft blade
- Small rectangular clay cutter (approx. 1.5″ x 2″)
- Full alphabet clay cutters or letter stamps
- Toothpick or small skewer
- Standard oven and baking sheet
- Parchment paper
- Gold tone jump rings (large)
- Gold tone key rings
- Jewelry pliers (needle-nose and flat-nose)
Step 1: Preparation & Mixing
-
Condition the Clay:
Start by warming up your navy blue and terracotta orange polymer clay separately in your hands. Knead them until they are soft, pliable, and easy to work with. -
Add Texture:
To achieve that organic, stone-like speckle, flatten your clay slightly and sprinkle a tiny pinch of ground black pepper or dried coffee grounds onto it. Fold the clay over and knead it again just enough to distribute the specks evenly without making the color muddy. -
Roll Out the Base:
Roll both colors of clay out into sheets approximately 1/4 inch (about 5-6mm) thick. You want the base to be sturdy enough to withstand daily use on a keyring. -
Cut the Rectangles:
Using your small rectangular cutter, cut one shape from the blue sheet and one from the orange sheet. If you don’t have a cutter, use a ruler and craft knife to measure and slice precise rectangles. Smooth the edges gently with your finger.
Uneven Texture?
If your pepper or coffee grounds are clumping, mix them into a smaller ball of translucent clay first, then blend that into your main color for even dispersal.
Step 2: Lettering & Assembly
-
Create the Letters:
Roll out the remaining scraps of blue and orange clay, but slightly thinner this time—around 1/8 inch is ideal. Use your alphabet cutters to punch out an ‘M’ from the orange clay and an ‘A’ from the blue clay (or whichever initials you prefer). -
Position the Initials:
Place the orange ‘M’ onto the blue rectangular base and the blue ‘A’ onto the orange base. Center them carefully, leaving a little room at the top for the hardware hole. -
Bond the Clay:
Gently press the letters down to ensure they adhere. I like to use the flat side of an acrylic block to press evenly without leaving fingerprints. You typically don’t need liquid clay for raw-to-raw adhesion, but a tiny dab can help if your clay feels dry. -
Create Hardware Holes:
Using a toothpick or a small skewer, poke a hole centered near the top edge of each rectangle. Wiggle the tool slightly to ensure the hole is large enough for your jump rings to pass through easily.
Step 3: Baking & Finishing
-
Bake:
Place your assembled tags on a baking sheet lined with parchment paper. Bake according to your specific polymer clay brand’s instructions (usually 275°F/135°C for about 30 minutes). -
Cool Down:
Once the baking time is up, remove the tray from the oven and let the pieces cool completely. Handling them while warm might cause them to warp or bend. -
Prep the Hardware:
While the clay cools, engage your jewelry pliers. Take a gold jump ring and twist it open sideways—never pull the ends directly apart, as this weakens the metal. -
Attach the Jump Ring:
Slide the open jump ring through the hole you created in the clay tag. Before closing it, hook the larger keyring loop onto the jump ring as well. -
Secure the Connection:
Using your pliers, twist the jump ring back into a closed position, ensuring the two ends meet flush without a gap. Repeat this process for the second keychain.
Smooth Operator
Before baking, gently wipe the clay surface with a little rubbing alcohol or baby oil on your finger to remove any stray dust or fingerprints.
Attach your house keys and enjoy the custom, handcrafted flair every time you head out the door

The Complete Guide to Pottery Troubleshooting
Uncover the most common ceramic mistakes—from cracking clay to failed glazes—and learn how to fix them fast.
Terrazzo Coasters
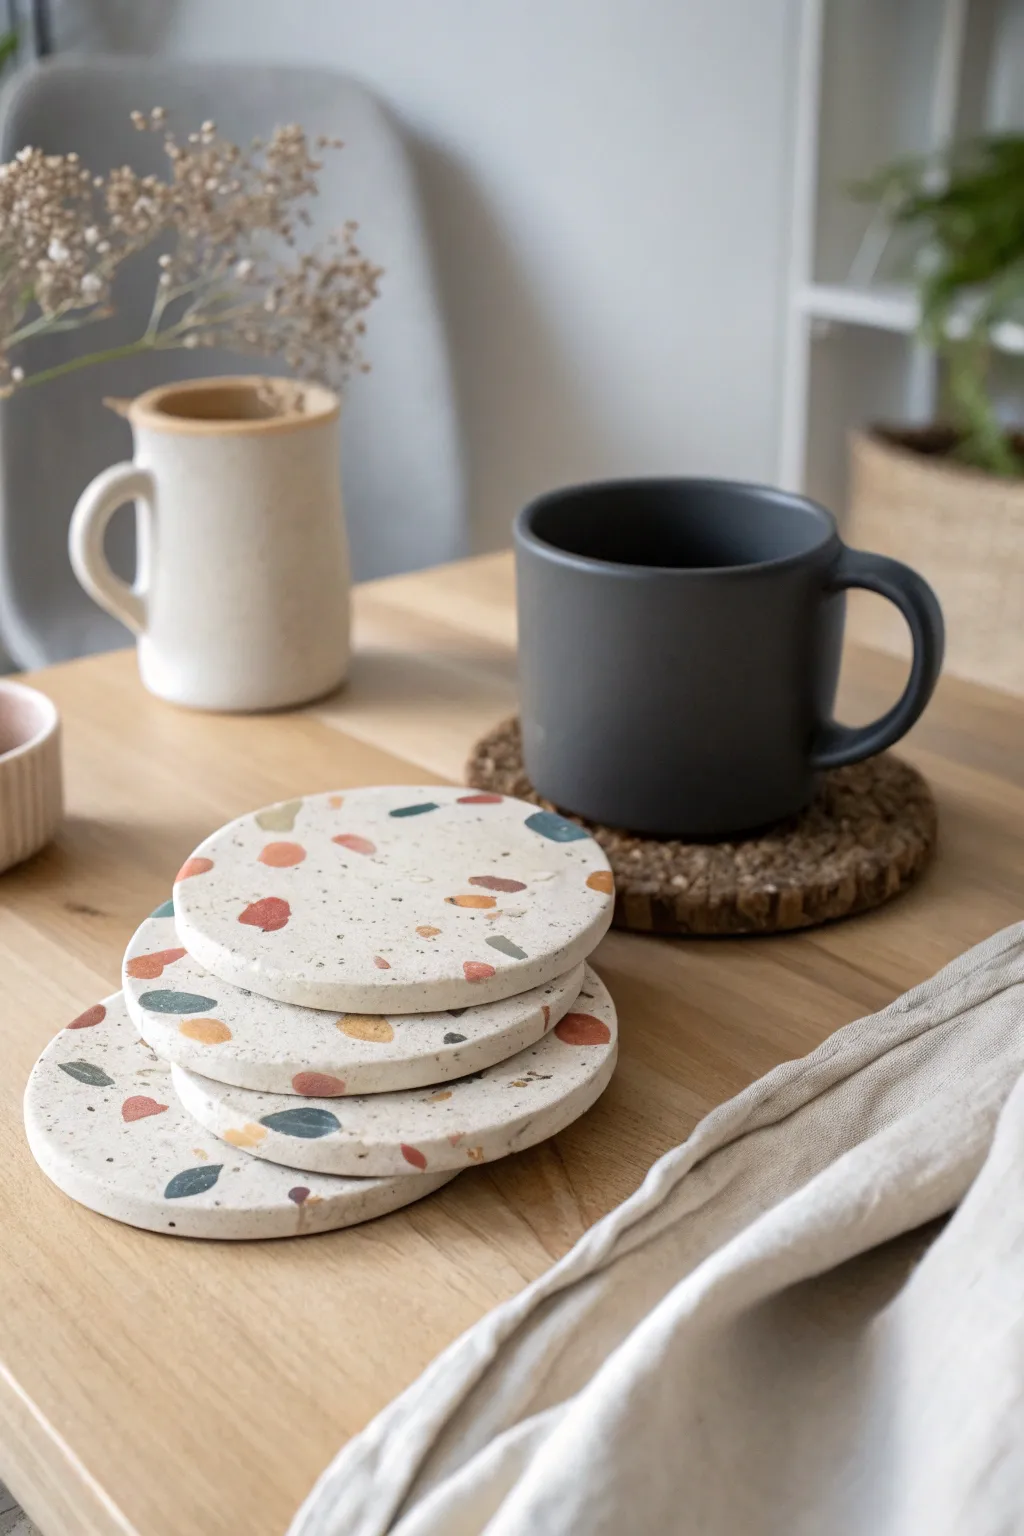
Bring the timeless elegance of Italian flooring to your coffee table with these stunning faux-terrazzo coasters. By embedding colorful chips of polymer clay into a neutral base, you can create a sophisticated, polished look that fits perfectly in any modern home.
How-To Guide
Materials
- White polymer clay (approx. 2oz per coaster)
- Polymer clay in accent colors (burnt orange, teal, charcoal grey, mustard yellow)
- Acrylic rolling pin or pasta machine
- Round cookie cutter (approx. 4 inches)
- Parchment paper or baking mat
- sharp craft blade or tissue blade
- Sanding paper (wet/dry, ranging from 400 to 1000 grit)
- UV resin or polyurethane gloss varnish (optional for finish)
- Felt backing or cork sheet (optional)
Step 1: Prepping the Chips
-
Condition the accent colors:
Start by taking small amounts of your accent colors—orange, teal, grey, and yellow. Knead each color individually until soft and pliable to prevent cracking later. -
Flatten the accents:
Roll each conditioned color out into a very thin sheet. You want these to be quite delicate, roughly the thickness of a playing card or thinner. -
Create the terrazzo fragments:
Using your craft blade, chop these thin sheets into erratic, irregular confetti shapes. Aim for variety in size and angularity to mimic real stone chips. -
Separate the pieces:
Gently scatter the chopped pieces onto a piece of parchment paper so they aren’t sticking together in clumps. I like to keep the colors somewhat segregated at this stage.
Chips popping out?
If chips fall out during sanding, your initial rolling wasn’t firm enough. Next time, roll in multiple directions to bond the clays tightly before baking.
Step 2: Forming the Base
-
Condition the white clay:
Thoroughly knead your block of white polymer clay. Since this is the main body of the coaster, ensure there are no air bubbles trapped inside. -
Initial rolling:
Roll the white clay into a thick slab, approximately 1/4 inch thick. Don’t worry about the perfect shape just yet, but ensure it’s wide enough for your circle cutter. -
Apply the chips:
Take your colored clay ‘confetti’ and press pieces randomly onto the surface of the white slab. Don’t overthink the pattern; randomness mimics natural stone best. -
Embed the pattern:
Once one side is covered to your liking, use your acrylic roller to gently press the colored chips flat into the white base. They should become flush with the surface.
Add some sparkle
For a glamorous twist, mix small flakes of gold or copper leaf into your colored confetti pile before pressing them into the white base.
Step 3: Shaping and Baking
-
Cut the shape:
Place your round cookie cutter onto the patterned slab. Press down firmly to cut out your coaster shape, twisting slightly to release it cleanly. -
Smooth the edges:
Lift the circle and gently run your finger along the rim to soften any sharp cutting ridges. This saves time on sanding later. -
Prepare for baking:
Transfer the coaster to a baking sheet lined with parchment paper. To prevent the clay from shiny spots, you can also bake it on a piece of plain paper. -
Bake the clay:
Bake according to your specific clay brand’s instructions (usually 275°F/135°C for about 30 minutes). Ensure good ventilation in your workspace. -
Cool completely:
Remove from the oven and allow the clay to cool completely before handling. It will be slightly soft while hot but hardens as it cools.
Step 4: Finishing Touches
-
Wet sanding:
Dampen your sandpaper and place it on a flat surface. Rub the coaster face-down in circular motions, starting with coarse grit (400) and moving to fine (1000). -
Reveal the pattern:
The sanding process is crucial as it removes the top layer of white clay smear, making the colored chips crisp and vibrant against the background. -
Wash and dry:
Rinse the coaster under cold water to remove all clay dust and dry thoroughly with a lint-free cloth. -
Buff or seal:
For a matte look (like the image), simply buff vigorously with a soft denim cloth. If you prefer high gloss, apply a thin layer of UV resin or varnish. -
Add backing:
Glue a circle of felt or cork to the bottom of the coaster to protect your furniture and give the piece a finished, professional feel.
Stack your new set of coasters on the table and enjoy the modern, artistic touch they add to your decor
Minimal Taper Candle Holders
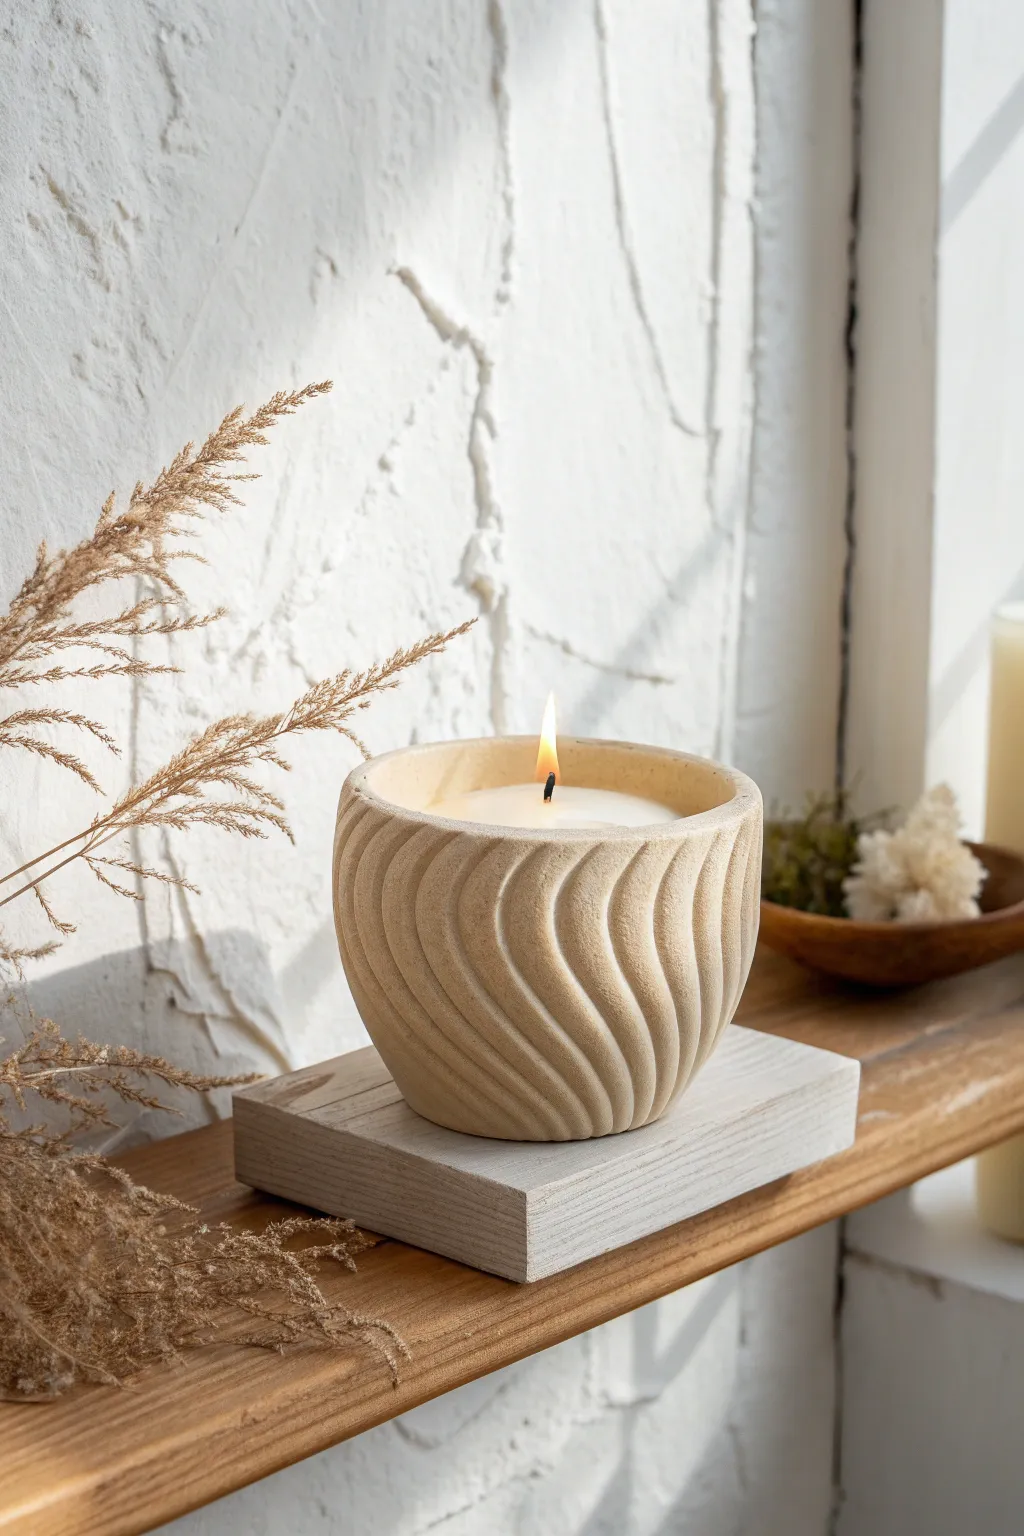
Create a sophisticated, stonelike vessel that serves as a stunning home for your favorite poured candles. This project uses polymer clay and a clever carving technique to mimic the organic flow of carved sandstone.
Step-by-Step Guide
Materials
- Stone-effect polymer clay (granite or limestone finish)
- Small glass votive holder or heat-safe jar (to use as a base)
- Rolling pin
- Carving tools (loop tool or linoleum cutter)
- Hobby knife
- Sandpaper (medium to fine grit)
- Liquid polymer clay (optional)
- Work surface (tile or glass mat)
- Oven
Step 1: Preparation and Base Layer
-
Condition the Clay:
Begin by thoroughly conditioning your stone-effect clay. Knead it in your hands until it becomes warm, pliable, and easy to stretch without cracking. -
Roll Out a Sheet:
Using your rolling pin, roll the clay out into a long strip. Aim for a thickness of about 1/4 inch (6mm) to ensure enough depth for carving later. -
Measure the Vessel:
Measure the height and circumference of your glass insert. Trim the clay strip to be slightly taller than the glass rim and just long enough to wrap around with a small overlap. -
Prepare the Glass:
Wipe down the exterior of your glass votive with alcohol to remove any oils. I like to smear a very thin layer of liquid polymer clay on the glass to help the solid clay adhere, though this is optional. -
Wrap the Glass:
Carefully wrap the clay strip around the glass. Press it firmly against the glass surface to remove any trapped air bubbles between the glass and the clay.
Clean Carving Tip
Chill your clay-covered jar in the fridge for 20 minutes before carving. Firmer clay carves cleanly without dragging or distorting the shape.
Step 2: Shaping and Seaming
-
Join the Seam:
Where the clay ends meet, cut through both layers simultaneously with your knife for a perfect flush fit. Remove the excess scraps. -
Smooth the Join:
Use a modeling tool or your fingers to smudge the clay across the seam line, blending it until the join is completely invisible. -
Secure the Rim:
Fold the slight excess clay at the top over the rim of the glass and smooth it down to create a finished, rounded edge. Do the same for the bottom edge if necessary. -
Create a Concave Shape:
Gently gently press the clay inward slightly near the top rim to give the vessel a slightly tapered, rounded opening rather than a straight cylinder.
Step 3: Carving the Texture
-
Mark Guide Lines:
Lightly trace S-shaped spiral curves around the vessel with a needle tool to plan out the spacing of your grooves. -
Begin the Channels:
Using a loop tool or U-shaped linoleum cutter, start carving out the clay along your guide lines. Start shallow at the bottom. -
Deepen the Curves:
Go back over your channels, carving deeper and wider in the middle of the curve, then tapering back to shallow near the top rim. -
Refine the Ridges:
Clean up the raised areas between the grooves. They should feel relatively smooth and consistent in width. -
Softening Edges:
Use your finger or a rubber tipped tool to gently run along the carved grooves to soften any sharp clay crumbs or jagged edges.
Adding Contrast
After baking, apply a diluted brown or grey acrylic wash into the grooves, then wipe the high points clean. This emphasizes depth and shadows.
Step 4: Finishing
-
Final Surface Prep:
Inspect the vessel for fingerprints or unwanted marks. A light buff with a little baby oil on your fingertip can smooth these out before baking. -
Bake:
Bake the bowl according to your specific clay brand’s package instructions. Since this is a thicker piece, ensure you bake it for the full recommended time. -
Cool Down:
Turn off the oven and let the vessel cool down inside the oven slowly to prevent thermal shock to the glass insert. -
Sanding:
Once fully cool, use sandpaper to rough up the exterior just slightly. This enhances the ‘stone’ look and removes any final tool marks. -
Remove Dust:
Wash the vessel with water and a soft brush to remove the sanding dust, revealing the beautiful speckled stone texture.
Now you have a stunning, heavy-weight candle holder that looks like it was hand-carved from natural sandstone


What Really Happens Inside the Kiln
Learn how time and temperature work together inside the kiln to transform clay into durable ceramic.
Incense Holder Dishes
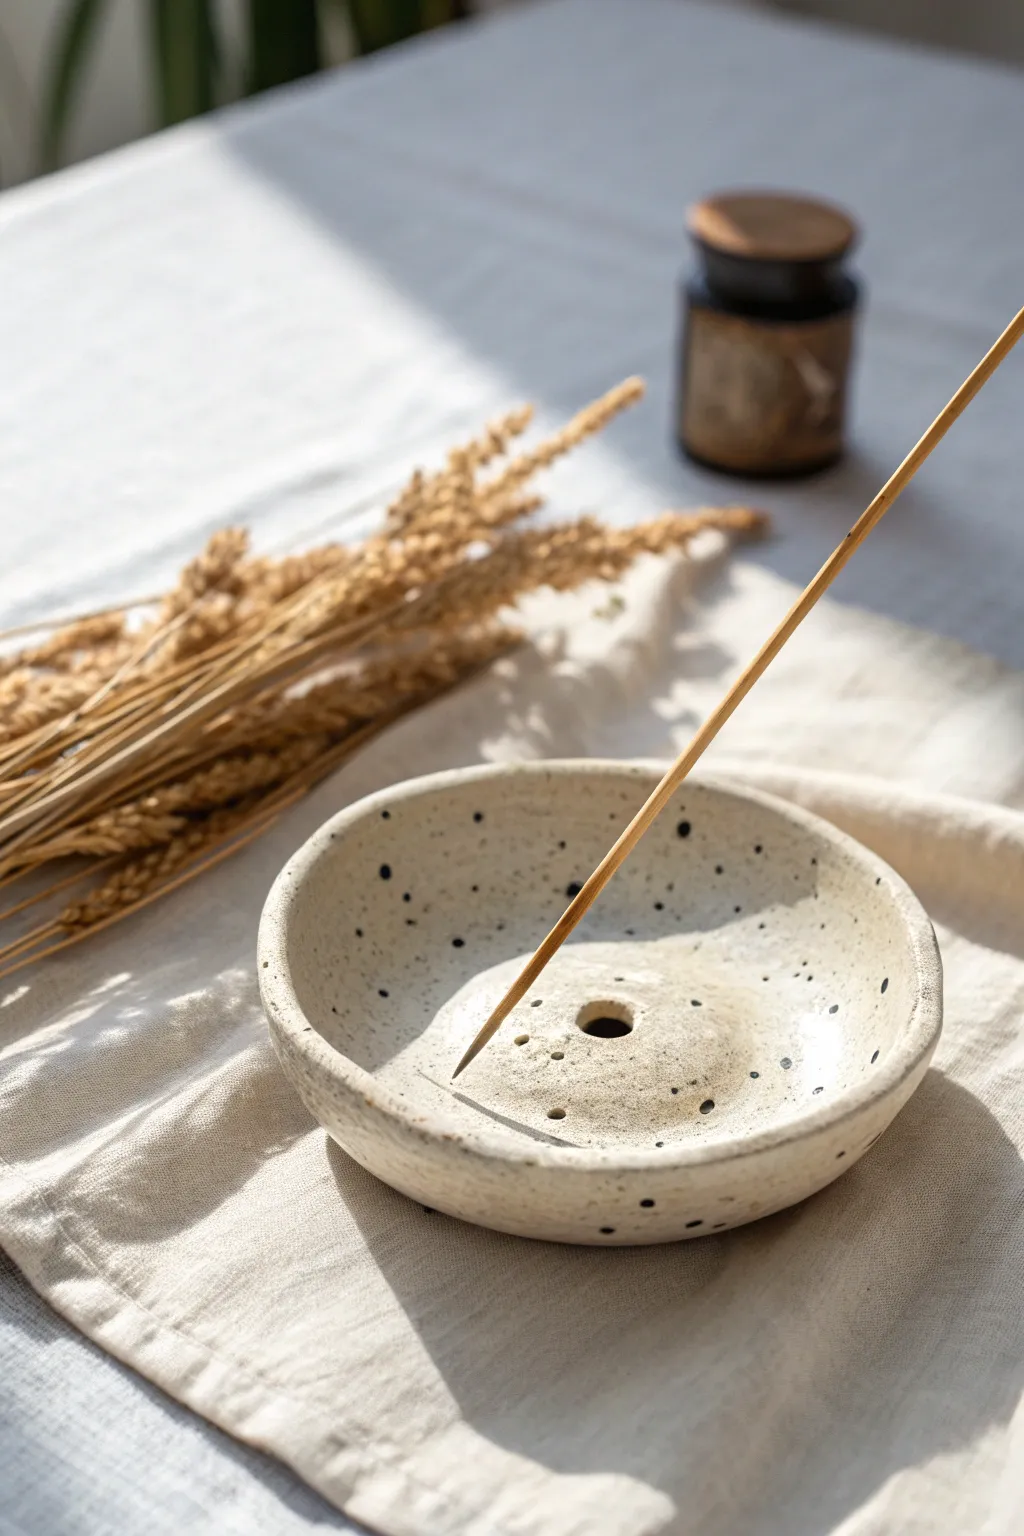
This minimalist incense holder mimics the look of high-end speckled pottery using accessible bakeable clay. With its organic shape and faux-stone finish, it captures the ash while adding a serene, wabi-sabi element to your decor.
Detailed Instructions
Materials
- White polymer clay (approx. 2-3 oz)
- Black acrylic paint
- Rolling pin or glass jar
- Small bowl or ramekin (for molding shape)
- Craft knife or clay blade
- Medium grit sandpaper
- Toothpick or skewer
- Old toothbrush
- Round cutter or large bottle cap (approx. 1 inch)
- Matte varnish (optional)
Step 1: Preparation & Shaping
-
Condition the clay:
Begin by warming the white polymer clay in your hands, kneading it until it is soft and pliable. This prevents cracking later. -
Create the speckled effect:
Flatten the clay slightly. Dip an old toothbrush into black acrylic paint and flick fine speckles onto the raw clay. Fold the clay over and knead it until the specks are distributed throughout the mass like natural stone inclusions. -
Roll the slab:
Roll your speckled clay into a smooth ball, then use your rolling pin to flatten it into an even circle, about 1/4 inch thick. Aim for a diameter between 4 and 5 inches. -
Cut the base circle:
Use a round cutter or trace around a bowl to cut a perfect circle from your rolled slab. If you prefer a more organic look, you can smooth the edges with your finger instead of cutting. -
Form the curve:
Gently lift your clay circle and drape it into your molding bowl or ramekin. Press it lightly so it takes on the curved, concave shape of a shallow dish.
Step 2: Detailing & Structure
-
Create the center island:
Roll a small separate ball of clay, roughly the size of a large marble. Flatten it slightly into a thick disk. -
Attach the center:
Place this disk directly in the center of your bowl. Press the edges down firmly to blend it onto the main dish surface, ensuring a strong bond. -
Make the main hole:
Using a tool slightly larger than an incense stick (like a chopstick or the back of a thin paintbrush), press a deep hole into the center of the raised disk. Angle it slightly if you want your incense to lean. -
Test the fit:
I always test this with an actual incense stick before baking to ensure the hole is wide enough, as clay shrinks slightly when baked. -
Add decorative perforations:
Use a toothpick or a small needle tool to puncture random, tiny holes around the central raised area and the floor of the bowl. This mimics the porous look of volcanic stone.
Natural Speckles
Instead of acrylic paint, mix in dried coffee grounds or black pepper into your white clay for genuine grainy texture and color variation.
Step 3: Finishing & Baking
-
Refine the texture:
Before baking, lightly tap the surface with a crumpled ball of aluminum foil or heavy-grit sandpaper to give the clay a stone-like, non-plastic texture. -
Bake the piece:
Bake the clay inside the molding bowl according to the package instructions (usually 275°F for 15-30 minutes). Let it cool completely inside the mold. -
Sand the edges:
Once cool, pop the holder out of the mold. Use wet sandpaper to smooth any sharp edges on the rim. -
Enhance the specks:
If the sanding removed too many specks, you can flick a tiny bit more black paint onto the surface now. -
Seal:
Finish with a coat of matte varnish to protect the surface from ash while maintaining the natural, unglazed pottery look.
Earth Tones
Before baking, lightly brush parts of the rim with diluted brown paint or soft pastels to create a ‘toasted’ ceramic burnt-edge effect.
Place your favorite scent current in the center and enjoy the calm atmosphere you have crafted
Scalloped Trinket Trays
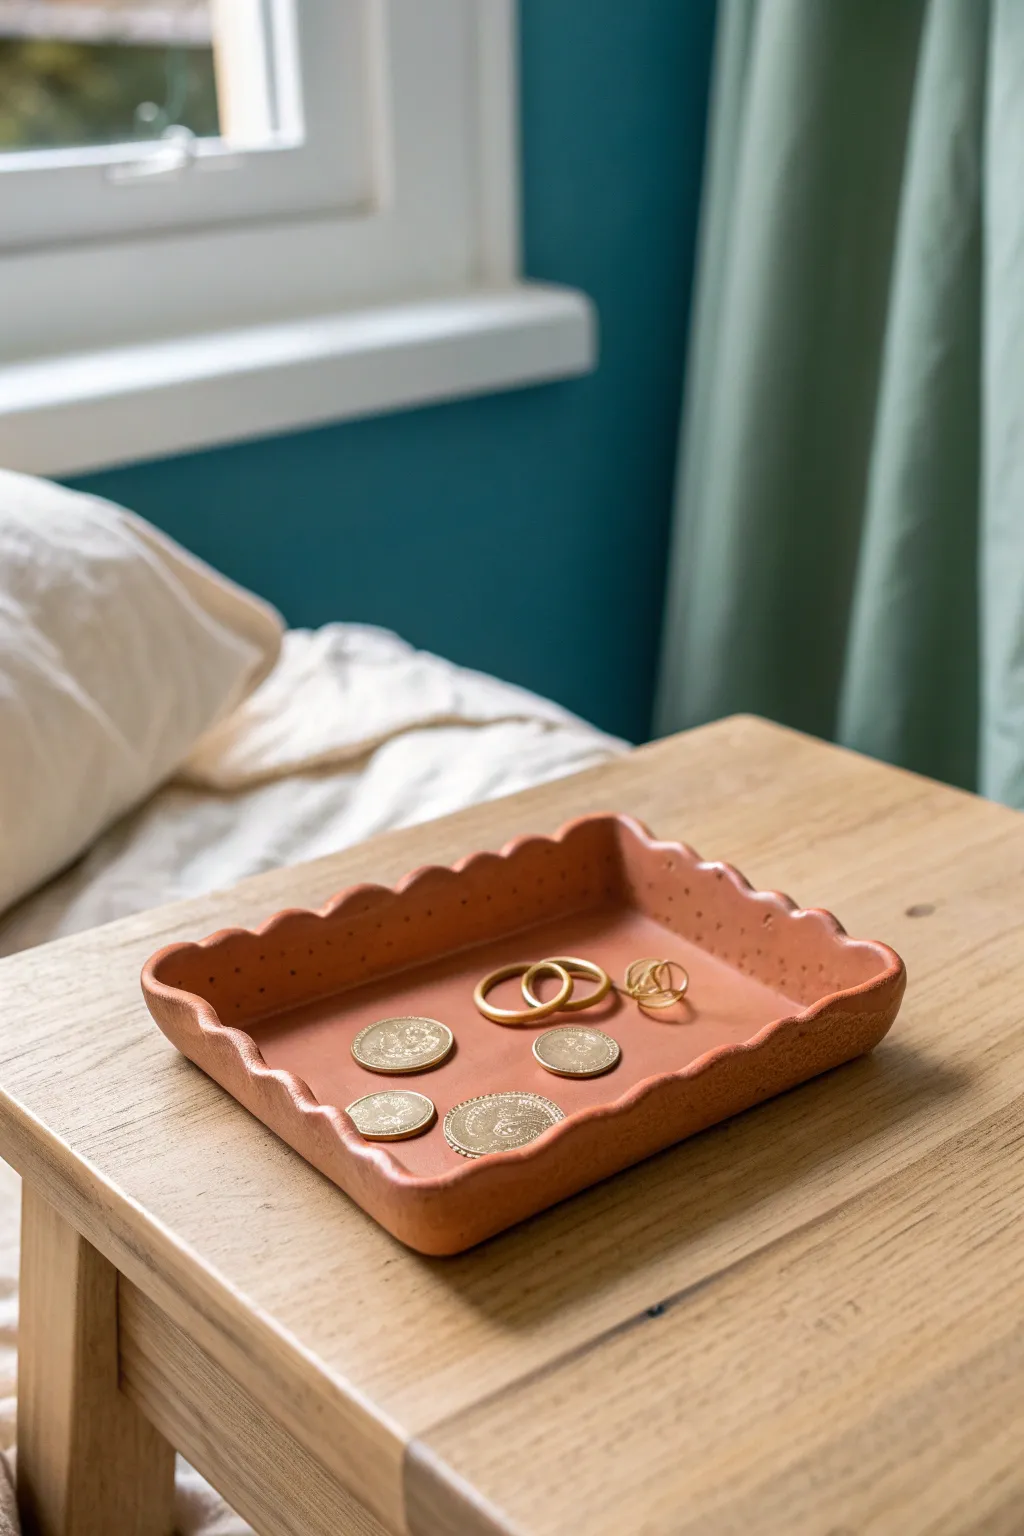
This charming trinket tray combines the earthy warmth of terracotta with delicate, scalloped edges for a sophisticated bedside accessory. The subtle dotted texture along the rim adds a handcrafted touch that feels both modern and vintage.
Step-by-Step Guide
Materials
- Terracotta-colored bakeable polymer clay (approx. 2-4 oz)
- Acrylic rolling pin or clay machine
- Rectangle clay cutter (approx. 4×6 inches) or craft knife and ruler
- Small round cutter (approx. 0.5 inch diameter)
- Needle tool or toothpick
- Smooth ceramic tile or baking sheet
- Parchement paper
- Cornstarch (optional for preventing sticking)
- Oven
- Matte varnish (optional)
Step 1: Preparing the Base
-
Condition the clay:
Start by warming the terracotta polymer clay in your hands, kneading it until it is soft, pliable, and free of air bubbles or cracks. -
Roll the slab:
Using your acrylic roller, flatten the clay into an even slab. You’re aiming for a thickness of about 1/4 inch (6mm) to ensure the tray feels substantial and durable. -
Cut the rectangle:
Place your rectangle cutter onto the slab and press down firmly. If you don’t have a cutter, use a ruler and a craft knife to cut a precise 4 x 6-inch rectangle. -
Smooth the edges:
Gently run your finger along the cut edges of the rectangle to soften any sharpness left by the blade, ensuring a smooth finish later.
Clay Too Soft?
If your clay gets too warm and sticky while blending the walls, pop the whole project in the fridge for 10 minutes to firm it up before continuing detailing
Step 2: Creating the Scalloped Rim
-
Roll a coil:
Take the remaining clay and roll it into a long, even snake or coil. It should be slightly thicker than the base slab, roughly 1/3 inch thick. -
Flatten the coil strip:
Gently flatten this coil into a long strip with your roller. It needs to be long enough to wrap around the entire perimeter of your rectangular base. -
Create the scallops:
Using the small round cutter, cut a series of half-circles along one long edge of your strip. This creates the undulating, scalloped pattern. -
Measure and trim:
Lay the scalloped strip alongside the base to check the length. Trim the ends at a 45-degree angle where they will meet at the corners for a cleaner join.
Step 3: Assembly and detailing
-
Attach the wall:
Place the scalloped strip on top of the base’s edge, standing it upright. The straight edge of the strip should sit flush against the base, with the scallops facing up. -
Blend the seams:
Use a modeling tool or your finger to firmly smudge the clay from the inside of the wall down onto the base floor. This bonding is crucial for structural integrity. -
Smooth the exterior:
Repeat the blending process on the outside seam, ensuring the transition from the base to the wall is invisible and smooth. -
Refine the shape:
Once attached, gently push the scalloped walls outward slightly to give the tray an open, inviting shape rather than a strict boxy look. -
Add texture:
Take your needle tool and carefully press a single dot into the center of each scallop peak on the interior side. Then, add a second row of dots just below, in the valleys between the scallops. -
Final smooth:
I like to do a final check with a distinct light source to spot any fingerprints. Buff them away gently with a tiny bit of cornstarch on your fingertip.
Make it Speckled
Mix black pepper or dried coffee grounds into the terracotta clay before rolling to create a faux-stone speckled texture
Step 4: Baking and Finishing
-
Bake carefully:
Place the tray on a ceramic tile or parchment-lined baking sheet. Bake according to your brand of clay’s instructions—usually around 275°F (130°C) for 30 minutes. -
Cool down:
Let the tray cool completely in the oven with the door slightly ajar. This prevents thermal shock and potential cracking. -
Optional varnish:
If you want to protect the surface from oils or dirt, apply a thin coat of matte varnish. This keeps the natural terracotta look while adding durability.
Place your finished tray on your nightstand to keep your daily treasures organized and beautiful

TRACK YOUR CERAMIC JOURNEY
Capture glaze tests, firing details, and creative progress—all in one simple printable. Make your projects easier to repeat and improve.
Cute Mini Food Charms
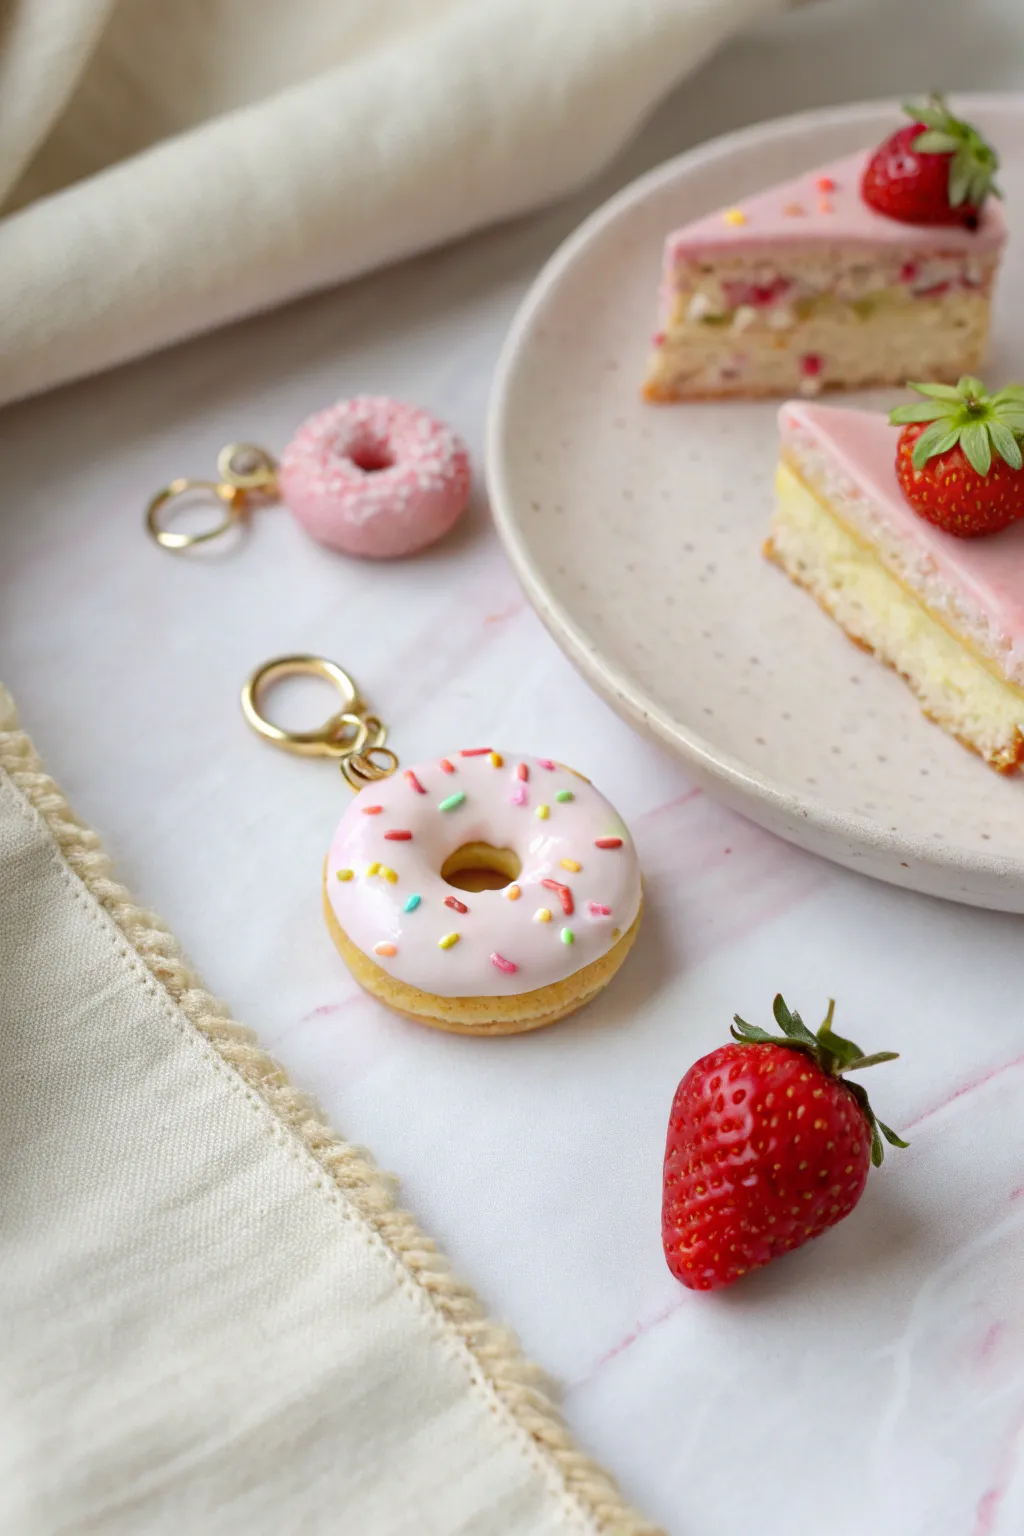
Indulge your creative cravings with these hyper-realistic polymer clay donut charms that look good enough to eat. With pillowy dough textures and glossy pastel icing, they make the perfect sweet addition to any keychain or jewelry collection.
Step-by-Step Tutorial
Materials
- Beige polymer clay (dough color)
- Pink polymer clay (icing color)
- Translucent liquid polymer clay
- Soft artist chalk pastels (ochre/orange/brown)
- Assorted polymer clay sprinkles (can be pre-baked scrap clay)
- Gloss glaze or UV resin
- Gold keychain hardware with screw eye pin
- Small paintbrush
- Toothbrush or texturing tool
- X-acto knife or clay blade
- Small circle cutter (approximately 1 inch)
- Tiny circle cutter or straw (for the donut hole)
Step 1: Shaping the Dough Base
-
Condition and Roll:
Begin by conditioning your beige polymer clay until it is soft and pliable. Roll it into a smooth ball, ensuring there are no cracks on the surface. -
Flatten and Cut:
Gently press the ball down to flatten it slightly into a thick disc. It should be chubby, resembling a real raised donut. Use your larger circle cutter to trim the edges if you want a perfect circle, or shape it by hand for a more organic look. -
Create the Hole:
Using a small straw or a tiny circle cutter, punch a hole directly in the center of the disc. Gently remove the center plug of clay. -
Soften the Edges:
Use your fingertip to gently tap around the inner and outer edges of the donut to round them off. You don’t want sharp, cut angles; real donuts have soft, fried curves. -
Add Texture:
Take a clean toothbrush or a stiff bristle brush and tap it all over the surface of the dough. This mimics the porous texture of fried cake.
Sticky Situation?
If your liquid clay icing is too runny and dripping off the donut entirely, let the mixture sit for 10-15 minutes to thicken slightly before applying.
Step 2: Adding the Golden Bake
-
Prepare the Shading:
Scrape a small amount of yellow ochre, orange, and light brown chalk pastel into fine dust piles. -
Apply the Base Shade:
Dip a soft, dry paintbrush into the yellow ochre dust. Brush it gently over the entire donut to give it a warm undertone. -
Deepen the Color:
Using the orange and light brown dust, shade the edges and the bottom of the donut more heavily. This creates the illusion of a golden-brown fried crust. -
Create the ‘Tan Line’:
Leave the very center horizontal line of the donut slightly lighter than the top and bottom. This subtle detail mimics how real donuts float in the fryer, creating a lighter band around the middle.
Pro Tip: Realistic Sprinkles
Make your own sprinkles by extruding thin snakes of colored clay, baking them for 5 minutes, and then chopping them into tiny bits with a blade.
Step 3: Icing and Finishing
-
Mix Liquid Clay:
In a small cup or on a tile, mix a small amount of pink clay with translucent liquid polymer clay. Stir until you have a thick, syrup-like consistency that resembles melted frosting. -
Apply the Frosting:
Carefully dab the liquid clay mixture onto the top of your donut using a toothpick or small tool. Let it drip slightly down the sides organically, just like real glaze would. -
Add Sprinkles:
While the liquid clay is still wet, gently press your multi-colored clay sprinkles into the pink icing. I personally like to use fine tweezers here to place them exactly where I want for a balanced look. -
Insert Hardware:
Screw the eye pin into the top of the donut. If the clay is soft enough, you can push it in directly; if not, twist it gently like a screw. -
Bake:
Bake the charm according to your specific polymer clay manufacturer’s instructions (usually around 275°F or 130°C for 15-30 minutes). Let it cool completely. -
Glaze:
Once cool, apply a coat of gloss glaze or UV resin only to the pink icing area. This makes the frosting look wet and sticky while keeping the dough matte and realistic. -
Attach Keychain:
Use pliers to open the jump ring on your keychain hardware and attach it securely to the eye pin on the donut.
Your adorable donut is now ready to add a sprinkle of sweetness to your day
Chibi-Style Animal Figurines
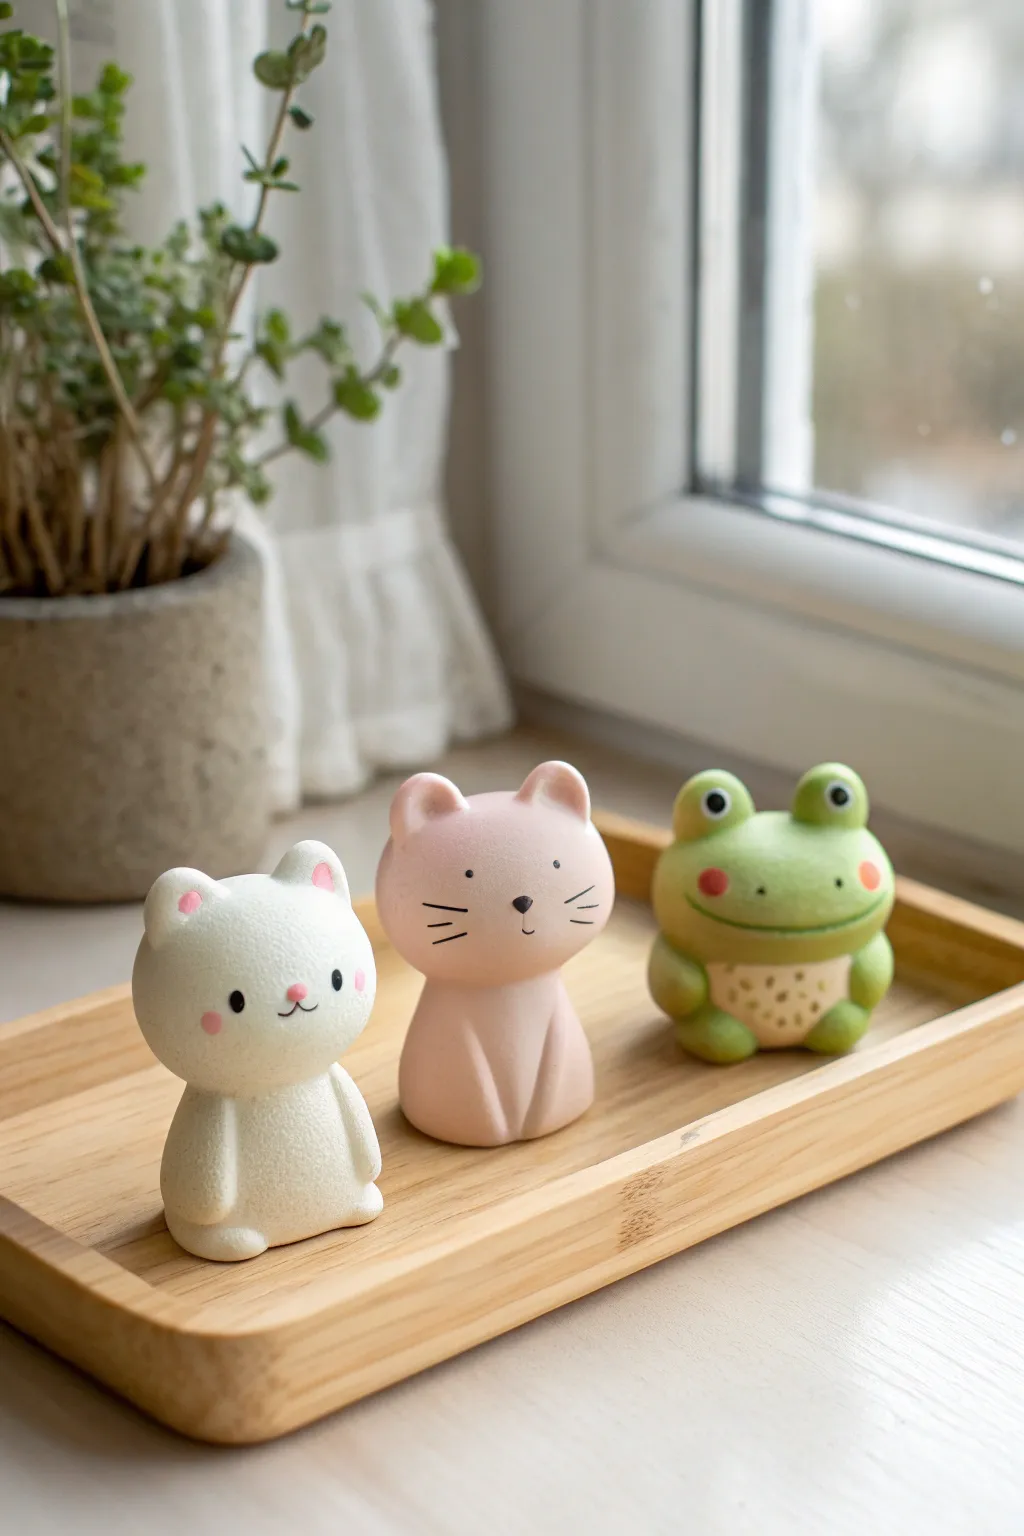
These adorable desktop companions prove that you don’t need complex tools to create something heartwarming. With their simple, rounded shapes and minimalist expressions, this white cat, pink cat, and green frog make a perfect beginner set for mastering smooth clay joins.
Step-by-Step
Materials
- Polymer clay (White, Pastel Pink, Leaf Green, Beige, Black)
- Clean work surface (glass or tile recommended)
- Needle tool or toothpick
- Ball stylus tool (small)
- Soft pastel chalks (pink and reddish-orange) for blushing
- Small soft brush
- Fine-grit sandpaper (optional)
- Oven for curing
Step 1: Shaping the White Cat
-
Form the base:
Start by conditioning a chunk of white clay until pliable. Roll it into a smooth ball about the size of a golf ball for the head, slightly flattening the bottom where it will attach to the body. -
Create the body:
Roll a slightly smaller piece of white clay into a rounded cone or gumdrop shape. The base should be wide enough to stand stable. -
Attach head to body:
Press the head onto the top of the body. Gently blend the clay at the seam using your finger or a smoothing tool so the two pieces become one solid unit. -
Add the ears:
Form two tiny triangles of white clay. Soften the points slightly for a cuddlier look and press them onto the top of the head. Add tiny dots of pink clay inside the ears. -
Basic facial features:
Roll two minuscule balls of black clay for eyes and press them onto the face level with each other. Add a tiny pink triangle nose right between and slightly below the eyes. -
Arms and paws:
Roll two small sausage shapes for arms. Attach them vertically to the sides of the body, blending the shoulder area so they look seamless.
Step 2: Crafting the Pink Cat Variant
-
Replicate the shape:
Using pastel pink clay, repeat the head and body steps you used for the white cat. I like to make the pink cat’s head slightly wider than the white one for variety. -
Add defining whiskers:
Instead of a pink nose, use black clay for a tiny triangular nose. Before baking, use a needle tool to gently etch three whisker lines on each cheek, or paint them later after baking. -
Refine the pose:
Attach the arms similarly, but curve them slightly inward at the bottom to suggest the cat is sitting politely.
Clean Clay Tip
Keep baby wipes nearby! Clean your hands thoroughly when switching from the dark green or black clay back to the white clay to prevent lint and color transfer.
Step 3: Sculpting the Green Frog
-
Body formation:
Roll a ball of green clay for the head-body unit. For the frog, you can keep it as one larger, slightly squashed sphere rather than a distinct head and neck. -
The prominent eyes:
Roll two small balls of green clay and attach them to the very top of the head. Press tiny white clay discs onto these mounds, followed by minuscule black pupils. -
Belly details:
Flatten a small piece of beige clay into a half-circle and press it onto the lower belly area. Use a needle tool to poke shallow indentations for texture. -
Froggy limbs:
Create two small green balls for feet and attach them at the base. Add two curved sausage shapes for arms resting on the belly. -
The wide smile:
Take a long, very thin snake of black clay or use a needle tool to carve a wide, U-shaped mouth that stretches across the face.
Make Them Functional
Before baking, use a craft knife to cut a vertical slot across the top of their heads. After curing, these figurines can double as adorable photo or card holders.
Step 4: Finishing Touches
-
Blushing cheeks:
Scrape a little pink or red chalk into a powder. Use a soft brush to gently dab ‘blush’ onto the cheeks of all three figures before baking. -
Baking:
Place your trio on a baking sheet. Follow your clay package instructions for temperature and time (usually around 275°F/135°C for 15-30 minutes). -
Cooling:
Let the figures cool completely in the oven with the door slightly open to prevent cracking from thermal shock.
Set your new trio on a window sill or desk to bring a quiet, cheerful presence to your daily routine.
Mini Succulents That Never Die
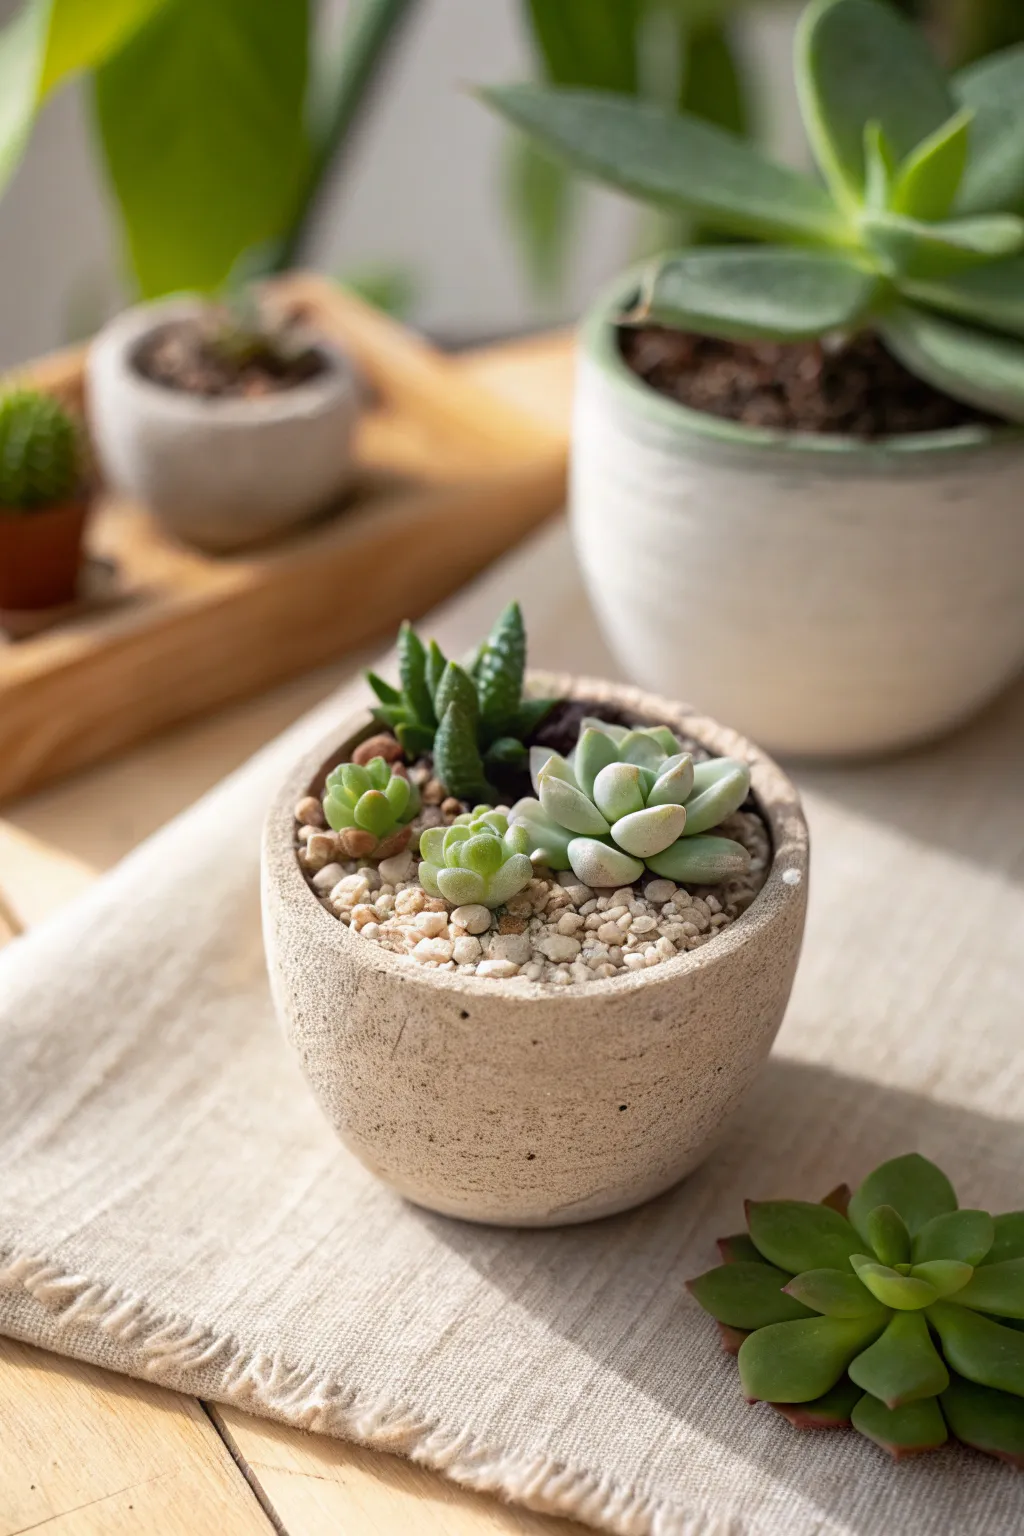
Capture the beauty of desert flora without the need for a green thumb by crafting these ultra-realistic mini succulents from polymer clay. Nestled in a handmade textured pot, this arrangement brings a permanent touch of nature to your workspace or windowsill.
How-To Guide
Materials
- Polymer clay (white, translucent, leaf green, olive green, dark green, burgundy)
- Bakeable clay or air-dry clay (granite or beige stone effect) for the pot
- Liquid polymer clay (optional)
- Small ball stylus tool
- Needle tool
- Pastel chalks (pink, purple, reddish-brown)
- Soft paintbrush for shading
- Small scissors
- Real sand or small decorative pebbles
- Aluminum foil
- Pottery sponge or toothbrush for texturing
Step 1: Crafting the Textured Pot
-
Shape the base:
Roll a ball of granite or beige stone-effect clay into a sphere roughly the size of a tangerine using your palms. -
Hollow the form:
Press both thumbs into the center of the ball and gently pinch the walls while rotating to create a bowl shape, keeping the walls fairly thick for stability. -
Add weathered texture:
Gently tap the exterior with a coarse pottery sponge or an old toothbrush to create a pitted, stone-like surface. -
Finalize pot shape:
Flatten the bottom slightly so it sits stable, and smooth the rim just enough to look finished but still organic. -
Pre-bake the pot:
Bake the pot according to your clay manufacturer’s instructions (usually 275°F/135°C for 15-30 minutes) and let it cool completely.
Pro Tip: Realistic texture
Before baking, lightly dust the succulent leaves with cornstarch or baby powder to remove fingerprints and give them a natural matte, powdery finish known as epicuticular wax.
Step 2: Sculpting the Echeveria (Rosette Succulent)
-
Mix the perfect green:
Combine leaf green clay with a generous amount of white and a touch of translucent clay to get a soft, pale mint color. -
Form the petals:
Roll tiny teardrop shapes in graduating sizes; you will need about 15-20 petals total. -
Flatten and shape:
Gently flatten each teardrop between your fingers, keeping the wide end plump and slightly curving the pointed end upward. -
Isolate the blush:
Use a soft brush to dust the very tips of the petals with a tiny amount of pink pastel chalk before assembling. -
Assemble the rosette:
Start with a small cone of scrap clay and attach the smallest petals at the top, working your way down in overlapping layers with larger petals.
Level Up: Variation
Mix tiny distinct spots of glitter or white sand into your stone-effect pot clay before sculpting to mimic the look of speckled granite or terrazzo concrete.
Step 3: Creating the Haworthia (Spiky Succulent)
-
Prepare dark clay:
Mix dark green clay with a speck of black or brown to deepen the tone. -
Roll spikes:
Create long, thin tapered logs that look like pointed fingers, about 1 inch long. -
Add zebra stripes:
Take a tiny bit of white clay, roll it into a microscopic thread, and press small horizontal stripes across the dark green leaves. -
Cluster the leaves:
Press the bottoms of the leaves together into a tight bundle, ensuring the taller leaves are in the center.
Step 4: Assembly & Finishing
-
Fill the pot foundation:
Ball up a piece of aluminum foil to fill the bottom of your baked pot, then cover it with a thin layer of scrap raw clay to act as an anchor. -
Insert the plants:
Press your raw succulent creations firmly into the raw clay base inside the pot; I usually use a drop of liquid clay here to ensure a permanent bond. -
Add baby succulents:
Fill any gaps with tiny balls of light green clay, indented in the center with a ball tool to look like budding sprouts. -
Ground cover:
Press small beige pebbles or coarse sand into the exposed raw clay surface around the plants. -
Final bake:
Bake the entire assembled piece again for 30 minutes to cure the plants and set them in the pot.
Place your everlasting mini garden on a sunny sill and enjoy the greenery year-round.
Tiny Planters for Small Plants
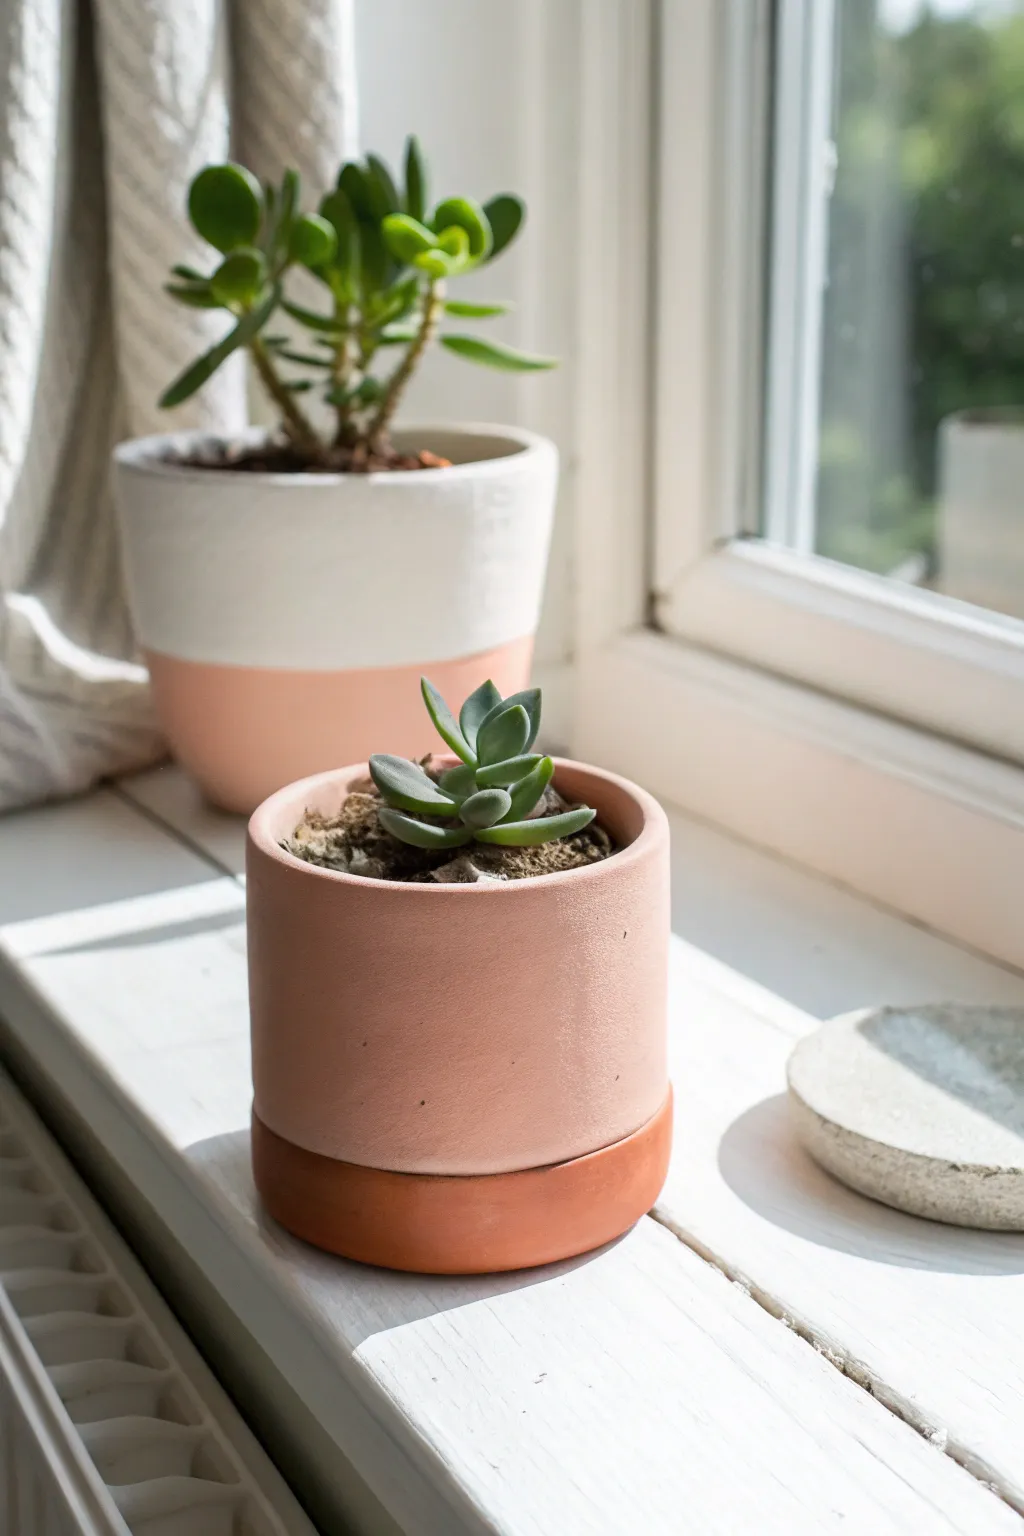
Achieve the rustic, sun-baked warmth of traditional terracotta without needing a kiln using simple polymer clay. This tutorial focuses on the foreground design: a minimalist cylindrical pot with a sleek, darker rim base that perfectly houses tiny succulents.
Detailed Instructions
Materials
- Terracotta-colored polymer clay (approx. 2-3 blocks)
- Darker burnt-orange polymer clay (for the base)
- Small rolling pin or acrylic roller
- Circle cutters (two sizes, one slightly larger for the base)
- Craft knife or clay blade
- Ruler
- Smooth work surface (ceramic tile or glass)
- Baking sheet
- Parchment paper
- Fine-grit sandpaper
- Optional: Clay extruder (for even walls)
Step 1: Creating the Base
-
Condition the clay:
Start by warming up the darker burnt-orange clay in your hands. Knead it thoroughly until it becomes pliable and soft, ensuring there are no air bubbles trapped inside. -
Roll the slab:
Roll this darker clay out into a thick, even slab, approximately 1/4 inch thick. This needs to be sturdy because it will form the foundation of your pot. -
Cut the base disc:
Use your slightly larger circle cutter to punch out a disc. If you don’t have a cutter, trace a small jar lid and carefully cut around it with your craft knife. -
Smooth the edges:
Gently run your finger around the cut edge of the disc to smooth out any sharp angles or drag marks from the cutting tool.
Step 2: Building the Cylinder Walls
-
Prepare the main color:
Condition the lighter terracotta-colored clay. I find mixing a tiny bit of white into standard orange clay helps achieve that soft, chalky pastel look seen in the photo. -
Create a long strip:
Roll this clay out into a long, rectangular strip. Aim for a thickness of about 1/8 to 1/4 inch. Use your ruler and craft knife to trim the top and bottom edges so you have a perfect, straight-edged rectangle. -
Measure the circumference:
Wrap the strip loosely around your base disc to estimate the length needed. Mark the spot where the ends meet, adding just a tiny bit of overlap for joining. -
Cut to size:
Trim the strip to your measured length. Ensure the cuts on ends are perfectly vertical to create a clean seam. -
Determine the height:
Decide on the height of your pot. The example image shows a squat cylinder, roughly as tall as it is wide. Trim the width of your strip to match this desired height.
Seamless Finish
Use a little cornstarch on your fingers to smooth the clay without leaving prints. It buffs away easily after baking for a flawless matte look.
Step 3: Assembly and Refining
-
Attach wall to base:
Place the long strip on top of the dark base disc. Slowly curl it around the perimeter, pressing the bottom edge of the wall firmly onto the top of the base. -
Seal the seam:
Where the two ends of the wall meet, gently push the clay together. Use a modeling tool or your fingertip to smudge the clay across the join line until it vanishes. -
Smooth the interior:
Don’t forget the inside seam. reach in and smooth that join as well to ensure structural integrity during baking. -
Refine the rim:
Check the top rim of the pot. If it’s uneven, gently slice off any high points with your blade, or simply tap it upside down on your work surface to level it. -
Add the faux-saucer band:
Roll out a thin strip of the darker clay (the same used for the base). Wrap this around the very bottom of the cylinder, covering the seam where the wall meets the floor, creating the illusion of a saucer. -
Blend the band:
Smooth this band onto the pot so it feels like a cohesive part of the structure, not just a sticker. The slight lip creates that classic two-tone aesthetic.
Two-Tone Twist
For the background pot look, create the top ‘bowl’ section from plain white clay and attach it to a thick disc of the terra-cotta color.
Step 4: Baking and Finishing
-
Final inspection:
Before baking, give the pot a once-over. Smooth out any fingerprints with a drop of baby oil or water. -
Bake:
Place the pot on a parchment-lined baking sheet. Bake according to your clay manufacturer’s instructions—usually around 275°F (135°C) for 15-30 minutes per 1/4 inch of thickness. -
Cool down:
Let the pot cool completely in the oven with the door cracked. This prevents thermal shock and cracking. -
Sand for texture:
To get that matte, unglazed terracotta feel, lightly sand the exterior with fine-grit sandpaper. This removes the plastic sheen of the polymer clay. -
Waterproofing check:
Since polymer clay is water-resistant but not perfectly waterproof at seams, avoid overwatering or seal the inside with a matte varnish if using real soil.
Pop in your favorite tiny succulent and enjoy your new miniature garden on the sill
Cactus Ring Holders
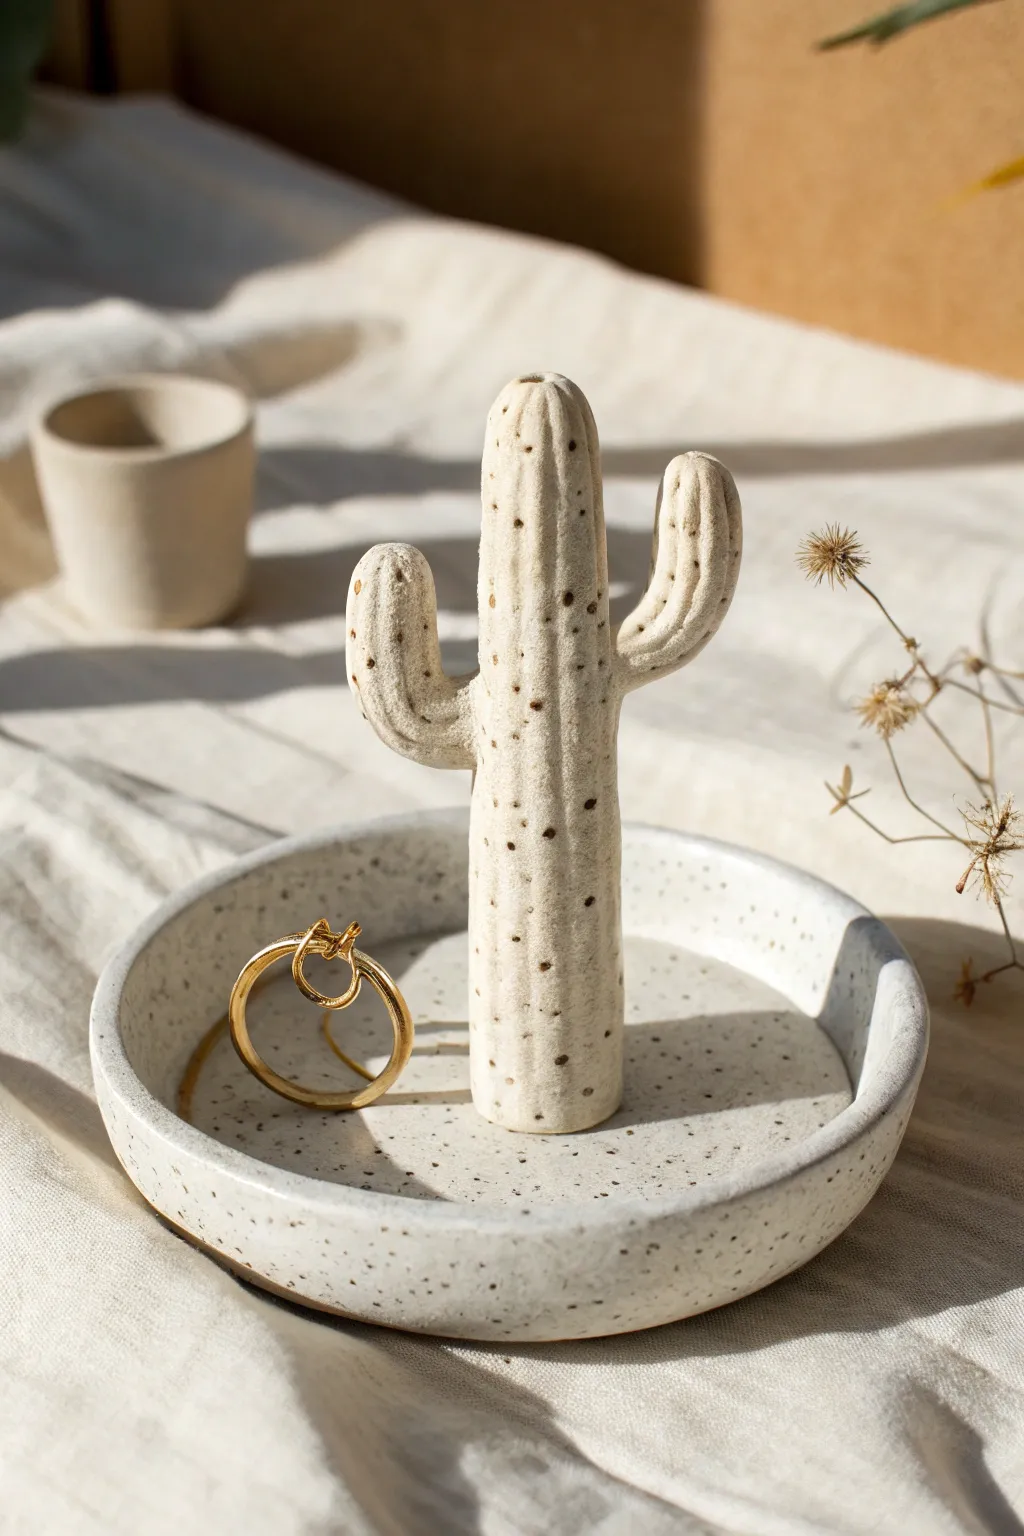
Bring a touch of the Southwest to your dresser with this charming speckled clay ring holder. The natural, stone-like texture combined with a minimalist saguaro shape creates a functional piece of decor that looks like expensive ceramic.
How-To Guide
Materials
- White polymer clay (oven-bake)
- Black pepper or dried coffee grounds (for speckling)
- Acrylic rolling pin
- Circle cutter (approx. 4-5 inches)
- Craft knife or clay blade
- Needle tool or toothpick
- Liquid polymer clay (Bake & Bond)
- Smooth work surface (ceramic tile or glass)
- Oven
Step 1: Preparing the Speckled Clay
-
Conditioning:
Begin by warming up a large block of white polymer clay in your hands until it becomes soft and pliable. -
Adding texture:
Flatten the clay slightly and sprinkle a pinch of ground black pepper or finely dried coffee grounds onto the surface. -
Mixing:
Fold the clay over the speckles and knead repeatedly until the particles are evenly distributed throughout the entire batch, creating a faux-stone look. -
Rolling out:
Using your acrylic rolling pin, roll about half of the clay into a smooth slab approximately 1/4 inch thick.
Stone Effects
For a ‘granite’ look, mix in a tiny amount of translucent clay with the white before adding your pepper specs.
Step 2: Forming the Dish Base
-
Cutting the circle:
Press your circle cutter firmly into the rolled slab to create the base. If you don’t have a cutter, trace a bowl with a needle tool. -
Creating the rim:
Roll a long, thin snake of clay about the thickness of a pencil. Measure it against the circumference of your circle base. -
Attaching the rim:
Apply a tiny amount of liquid polymer clay around the edge of the circle base, then press the clay snake onto it. -
Blending seams:
Use your thumb or a modeling tool to smooth the seam between the snake and the base on the inside and outside, creating a seamless, raised lip.
Make it Shine
Apply a coat of gloss polyurethane varnish or UV resin after baking to give the piece a glazed ceramic appearance.
Step 3: Sculpting the Cactus
-
Main pillar:
Roll a thick cylinder of clay for the main cactus trunk. It should differ slightly in thickness from bottom to top, rounding off at the peak. -
Crafting arms:
Create two smaller, curved cylinders for the cactus arms. One should be slightly longer than the other for an asymmetrical, natural look. -
Assembly:
Score the attachment points on the main trunk and the arms with your needle tool. Apply a dot of liquid clay and press the arms firmly onto the trunk. -
Blending the joints:
Carefully smooth the clay where the arms meet the trunk using a blending tool or your finger so they look like organic growth rather than stuck-on pieces. -
Adding ridges:
Use the side of a chopstick or a blunt modeling tool to gently press vertical indentations running up the trunk and arms to mimic cactus ribs. -
Dotting texture:
With your needle tool, poke shallow holes in vertical lines along the ridges to simulate the areoles where needles would grow.
Step 4: Final Assembly & Baking
-
Centering:
Find the center of your dish base and score the surface slightly for better adhesion. -
Mounting:
Apply liquid clay to the bottom of the cactus and press it firmly into the center of the dish. -
Reinforcing:
I like to roll a very thin thread of clay and wrap it around the base of the cactus, smoothing it down to create a stronger anchor point. -
Final check:
Inspect the piece from all angles to ensure the cactus stands straight and remove any fingerprints with a drop of baby oil. -
Baking:
Bake the piece according to your clay package instructions (typically 275°F for 15-30 minutes). Let it cool completely in the oven to prevent cracking.
Place your favorite rings on the cactus arms and marvel at your handmade desert oasis.
Moon Phase Wall Garlands
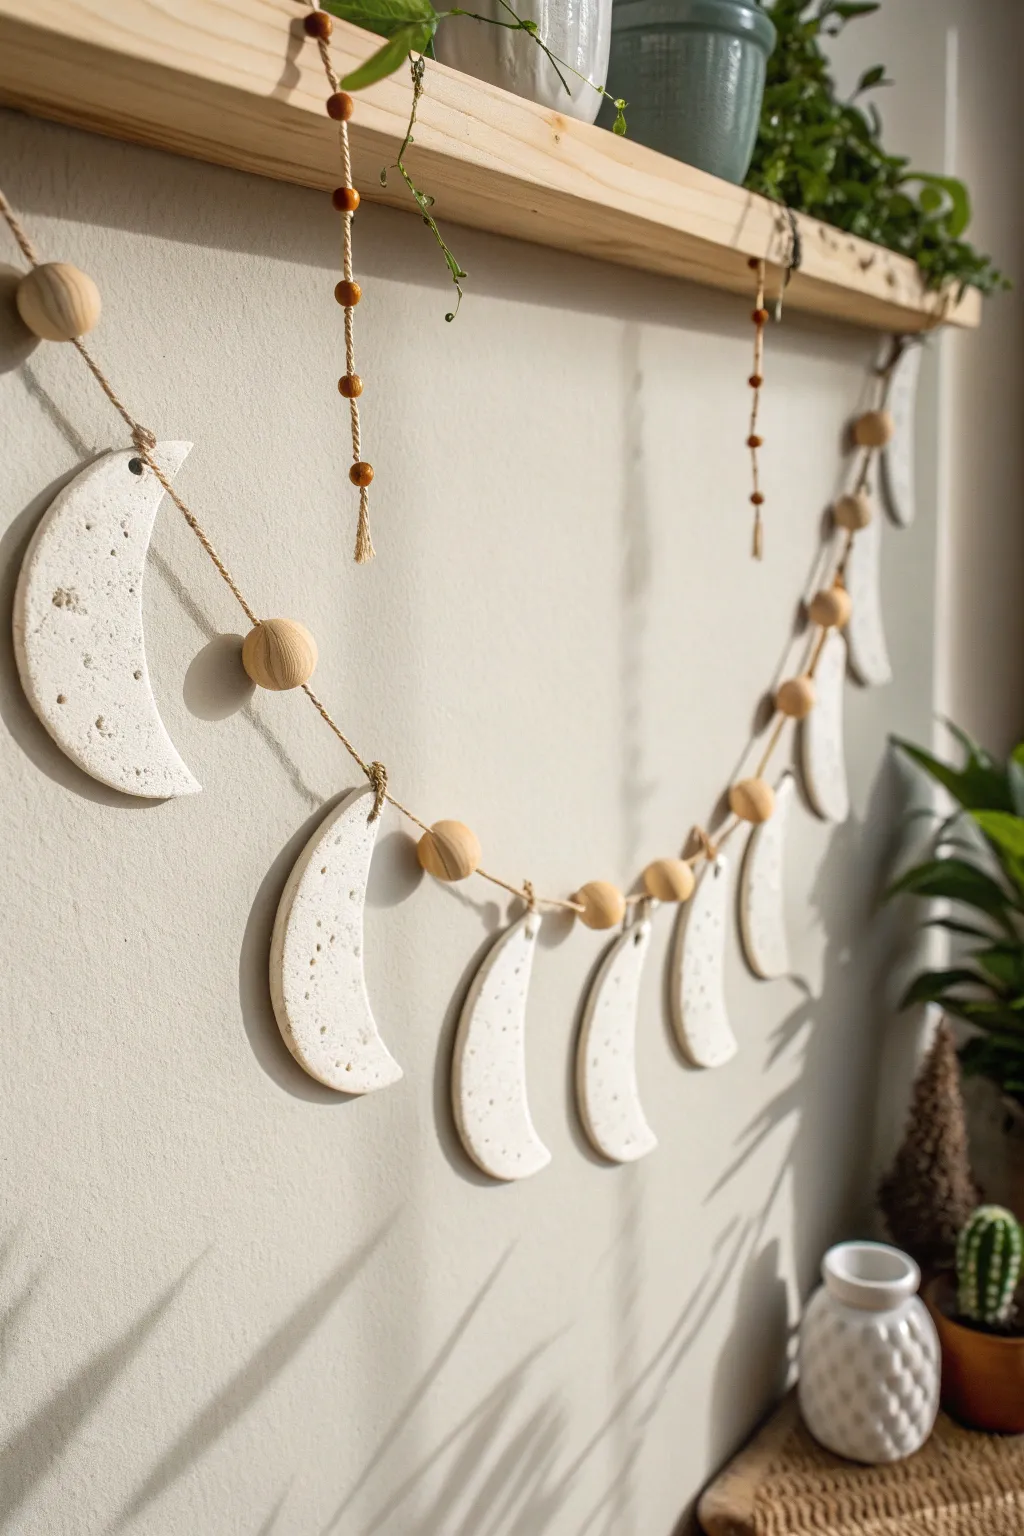
Bring a celestial touch to your space with this serene garland featuring textured white clay crescents and natural wooden beads. The unique speckled finish gives the moons an organic, stone-like appearance that pairs beautifully with minimalist or boho decor.
Step-by-Step Tutorial
Materials
- White polymer clay (oven-bake)
- Small amount of black pepper or dark sand (for speckling)
- Rolling pin or acrylic roller
- Round cookie cutter (approx. 3 inches diameter)
- Craft knife or clay blade
- Small straw or toothpick
- Natural wood beads (various sizes, 10mm-20mm)
- Jute twine or hemp cord
- Scissors
- Baking sheet with parchment paper
- Fine grit sandpaper
Step 1: Shaping the Moons
-
Condition the Clay:
Start by taking a block of white polymer clay and kneading it in your hands until it becomes soft and pliable. This conditioning step is crucial to prevent cracks later on. -
Add Texture:
To achieve that stony, speckled look seen in the photo, flatten your clay slightly and sprinkle a small pinch of cracked black pepper or dark crafting sand into the center. Fold the clay over and knead again until the specks are evenly distributed throughout. -
Roll It Out:
On a clean, flat surface, roll the clay out to a uniform thickness of about 1/4 inch. If you want a more rustic surface texture, you can lightly roll over the clay with a piece of canvas or textured fabric at the very end. -
Cut the Base Circles:
Use your round cookie cutter to punch out several circles from the clay sheet. For the garland shown, you will need at least seven circles to create the crescents. -
Form the Crescents:
To make the crescent shape, take the same cookie cutter and offset it on one of your clay circles. cut into the circle again, removing a smaller ‘bite’ to leave behind perfect crescent moon shapes. -
Refine the Edges:
Gently smooth the cut edges with your fingertip to remove any sharpness. I like to lightly tap the tips of the crescent to round them off just slightly so they aren’t fragile. -
Create Hanging Holes:
Use a small straw or a toothpick to poke a hole near the top point of each crescent. Ensure the hole is large enough for your twine to pass through easily, and place it about 1/4 inch from the edge to ensure strength.
Step 2: Baking and Assembly
-
Bake the Clay:
Arrange your moons on a parchment-lined baking sheet. Bake according to the manufacturer’s instructions on your clay package (usually 275°F for 15-30 minutes depending on thickness). -
Cool and Sand:
Allow the pieces to cool completely on the baking sheet to harden. Once cool, use fine-grit sandpaper to smooth out any rough spots on the edges or back. -
Prepare the Garland Cord:
Cut a long length of jute twine, measuring about 4-5 feet depending on where you plan to hang it. Tie a loop at one end for hanging. -
Begin Stringing:
Thread the twine through the hole of your first moon. Position it near the center or start from one end if you prefer a symmetrical buildup. -
Secure the Moon:
To keep the moon facing forward and sitting correctly, tie a simple overhand knot right above the hole on the twine. This acts as a stopper. -
Add Bead Accents:
Thread one large wooden bead onto the twine immediately after the knot. The bead should sit snugly against the knot you just made. -
Complete the Strand:
Continue this pattern—tying a knot, adding a moon, tying a knot, adding a bead—until all seven moons are attached. Space them evenly, leaving about 3-4 inches of twine between each assembly. -
Create Decorative Droplets:
For the vertical beaded strands shown hanging from the shelf above, cut three shorter pieces of twine (approx. 10 inches). -
Bead the Droplets:
Tie a knot at one end of a short string, add a small wooden bead, then tie another knot about 2 inches up. Repeat this spacing for 3-4 beads per strand. -
Finish the Ends:
Fray the very bottom knot of these vertical strands to create a tassel effect, and attach the top of the strand to your main garland hooks or drape them separately from the shelf edge.
Cracked Clay Fix
If your clay cracks while hole-punching, it’s likely too dry. Add a drop of clay softener or baby oil and knead well before re-rolling.
Metallic Touch
Mix gold leaf flakes into the white clay instead of pepper for a glamorous, shimmering marble effect suitable for holiday decor.
Hang your new garland near a window or above a bed to enjoy the calm, rhythmic beauty of the moon phases
Hair Clip Toppers
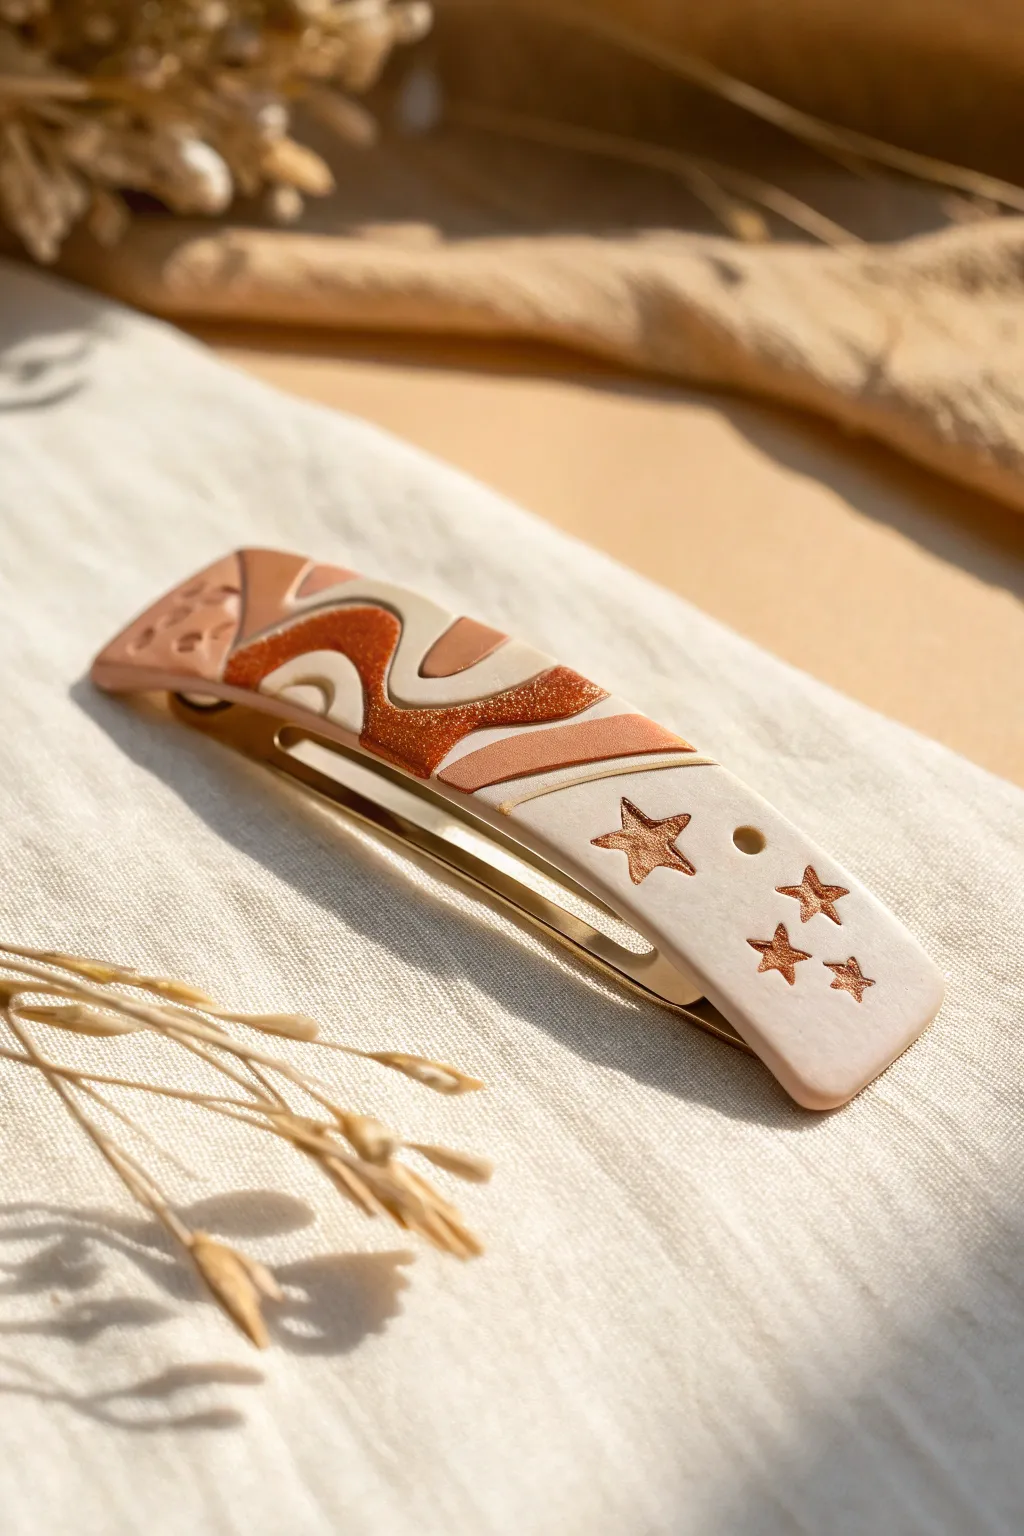
Channel warm retro vibes with this earthy, celestial-inspired hair clip made from polymer clay. The design blends abstract waves with shimmery accents and star details for a functional piece of art.
Step-by-Step Guide
Materials
- Polymer clay (terracotta, beige/cream, translucent, gold glitter/mica)
- Metal French barrette blank (approx. 3-4 inch)
- Acrylic rolling pin or pasta machine
- Craft knife or scalpel blade
- Small star-shaped clay cutters (various sizes)
- Dotting tool or small ball stylus
- Texture sponge or sandpaper (optional)
- Oven
- Strong adhesive (E6000 or 2-part epoxy)
Step 1: Planning and Mixing
-
Condition the clay:
Start by thoroughly conditioning your clay blocks until they are soft and pliable. You’ll need three main colors: a solid beige/cream, a warm terracotta, and a glittery copper or dark gold tone. -
Size the base:
Roll out a sheet of scrap clay or your beige color to about 2mm thickness. Place your metal barrette on top to gauge the size, and cut a rectangle slightly larger than the metal clip to serve as your canvas.
Uneven Surface?
If your inlaid waves feel bumpy, place parchment paper on top and burnish firmly with the back of a spoon to level the clay before baking.
Step 2: Creating the Pattern
-
Cut the wavy lines:
Roll out small amounts of each of your three colors into thin sheets. Using your craft knife, cut fluid, organic wavy strips from the terracotta and glitter clays. -
Assemble the waves:
Lay the beige base sheet flat. Begin placing the wavy strips onto the left and center sections of the base, interlocking them like a puzzle to create that retro ’70s swirling effect. -
Fill the gaps:
Fill any remaining spaces between the colored waves with pieces of the cream clay so the surface is level. -
Smooth the seams:
Place a piece of parchment paper over the patterned area. Gently rub with your finger or roll lightly with the acrylic roller to fuse the seams together until the surface is completely smooth.
Step 3: Adding Texture and Details
-
Texturize the end:
On the far left end (the terracotta section), use a dotting tool to gently press random divots into the clay, creating a moon-surface or crater texture. -
Prepare the star canvas:
Ensure the right side of the clip is a solid block of the cream/beige clay. Smooth it out if necessary to prepare for the star imprints. -
Stamp the stars:
Take your small star cutters. Instead of cutting all the way through, gently press them into the cream clay to create an embossed outline. Use different sizes for variety. -
Create the starry fill:
Inside the star outlines you just created, carefully fill the shape with a tiny amount of the glittery copper clay, or use a needle tool to add texture inside the star boundaries. -
Add the tiny hole:
Use a small straw or circular cutter to punch a decorative hole near the stars if desired, mirroring the design in the reference.
Add Some Shine
After baking, apply a thin coat of UV resin or gloss glaze just over the glittery copper waves to make them pop against the matte clay.
Step 4: Finishing
-
Cut final shape:
Once the entire rectangular slab is patterned and texturized, place your metal barrette over it again to check sizing. Use your blade to cut the final clean border, rounding the corners slightly for a soft look. -
Bake the piece:
Transfer the clay piece to a baking sheet lined with parchment paper. Bake according to your polymer clay package instructions (usually 275°F/135°C for 30 minutes). -
Cool down:
Allow the clay to cool completely before handling. It needs to be fully rigid before you attach the hardware. -
Attach the clip:
Mix your strong adhesive or 2-part epoxy. Apply a thin, even layer to the top of the metal barrette blank. -
Final assembly:
Press the metal clip firmly onto the back of your baked clay piece. I usually let this cure for a full 24 hours to ensure the bond is permanent.
Clip this into a messy bun or half-up style to add a touch of handmade warmth to your look
Photo and Card Holder Stands
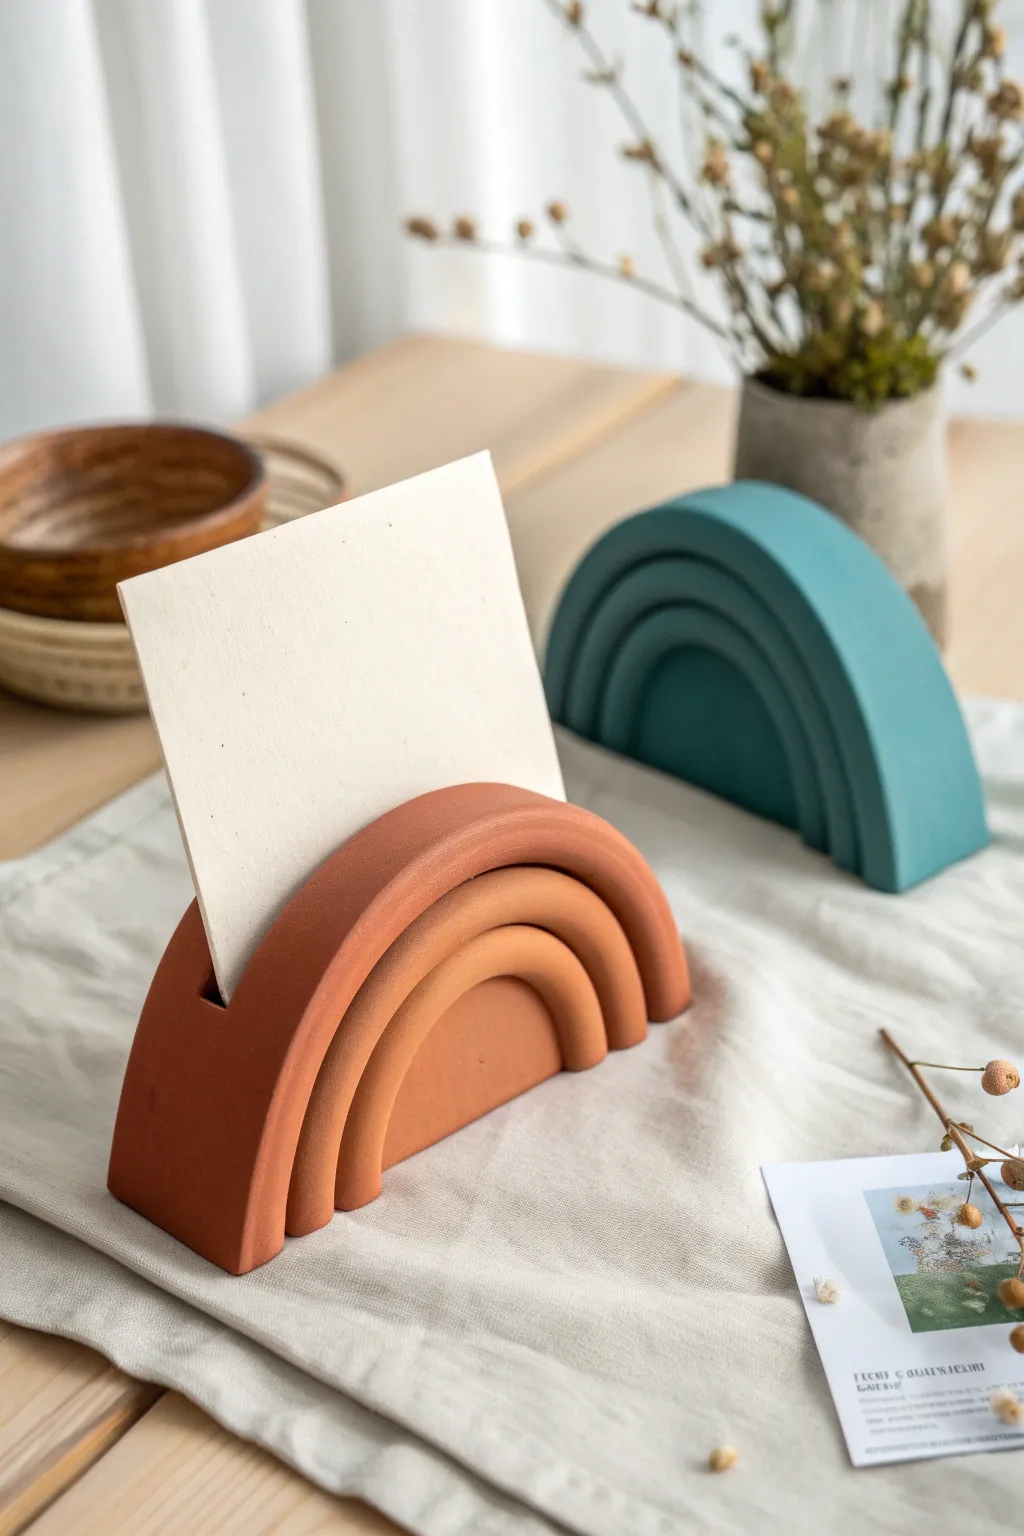
Add a touch of modern bohemian style to your desk with these sculptural rainbow card holders. Their smooth, matte finish and organic arch shape make them the perfect minimal stand for displaying photos, postcards, or important notes.
Step-by-Step Tutorial
Materials
- Polymer clay (terracotta or teal color)
- Acrylic rolling pin
- Sharp craft knife or tissue blade
- Circle cutters (graduated set of 3 sizes)
- Flat baking sheet
- Parchment paper
- Fine-grit sandpaper (optional)
- Ruler
- Oven
Step 1: Preparing and Cutting the Shapes
-
Condition the clay:
Begin by working your block of polymer clay in your hands until it becomes soft, pliable, and free of cracks. Warm clay is essential for getting those smooth edges later on. -
Roll out the slab:
Place the conditioned clay on a clean surface or parchment paper. Use your acrylic roller to flatten it into a thick slab, aiming for a thickness of about 1/2 inch (1.25 cm). This thickness is crucial for stability. -
Cut the largest arch:
Take your largest circle cutter (approx. 4-5 inches depending on preference) and press firmly into the slab to cut a perfect circle. Remove the excess clay from around the cutter. -
Create the middle arch:
Using the medium-sized circle cutter, press it into the center of the circle you just cut. Try to keep it as centered as possible to ensure even spacing between the rainbow bands. -
Cut the smallest arch:
Repeat the process with the smallest circle cutter in the very center. You should now have three concentric rings (like a bullseye). -
Halve the circles:
Remove the cutters. Use your long tissue blade or a straight ruler to slice the entire concentric circle arrangement exactly in half. This creates two identical rainbow sets from one batch of rolling.
Clean Cuts Pro Tip
To avoid distorting the circle shape when cutting the slab in half, pop the clay in the fridge for 10 minutes first. The firmer clay slices much cleaner.
Step 2: Assembly and Refining
-
Separate the bands:
Gently separate the semi-circle bands. You want them to remain distinct pieces rather than a solid block, as this adds dimension to the final piece. -
Smooth the edges:
Use your finger, dipping it lightly in a bit of baby oil or water if needed, to smooth out the cut edges of each arch band. Round them off slightly to get that soft, ceramic look. -
Reassemble the rainbow:
Place the smallest semi-circle on your parchment-lined baking sheet. Place the medium arch over it, and the largest arch over that. Leave a minuscule gap between them so they are defined, but press the bottom flat edges together so they align perfectly. -
Create the card slot:
You need a gap for the photo to sit in. Slice a rectangular block of scrap clay about 2 inches long. Place this block behind the front rainbow facade you just built. -
Back support:
Create a second, identical rainbow set (or just a solid semi-circle slab) to act as the back piece. Attach this to the other side of the rectangular spacer block. -
Seal the seams:
Where the spacer block meets the front and back rainbow pieces, smudge the clay together on the underside and sides to create a strong bond. Ensure the top slot remains open and clean. -
Double-check the slot:
Before baking, lightly test the slot width with a piece of thick cardstock to ensure it isn’t too tight or too loose. Adjust the spacer thickness if necessary.
Textured Stone Finish
Mix coarse black pepper or dried potting soil specks into your clay before rolling it out. When sanded after baking, it creates a convincing faux-granite look.
Step 3: Baking and Finishing
-
Bake the project:
Transfer the baking sheet to your oven. Follow the specific temperature and time instructions on your package of clay, as brands vary. Generally, thicker pieces like this need a lower, slower bake to cure fully without burning. -
Cool down:
Let the piece cool completely in the oven with the door slightly ajar. I find this prevents thermal shock and potential cracking. -
Sand for matte effect:
Once fully cold, take the fine-grit sandpaper and wet-sand the surface under running water. This removes fingerprints and gives the clay that high-end, stone-like texture. -
Clean up:
Rinse off any sanding dust and dry the piece thoroughly with a lint-free cloth.
Now your desk has a functional piece of art ready to hold your favorite memories
Propagation Station Bases
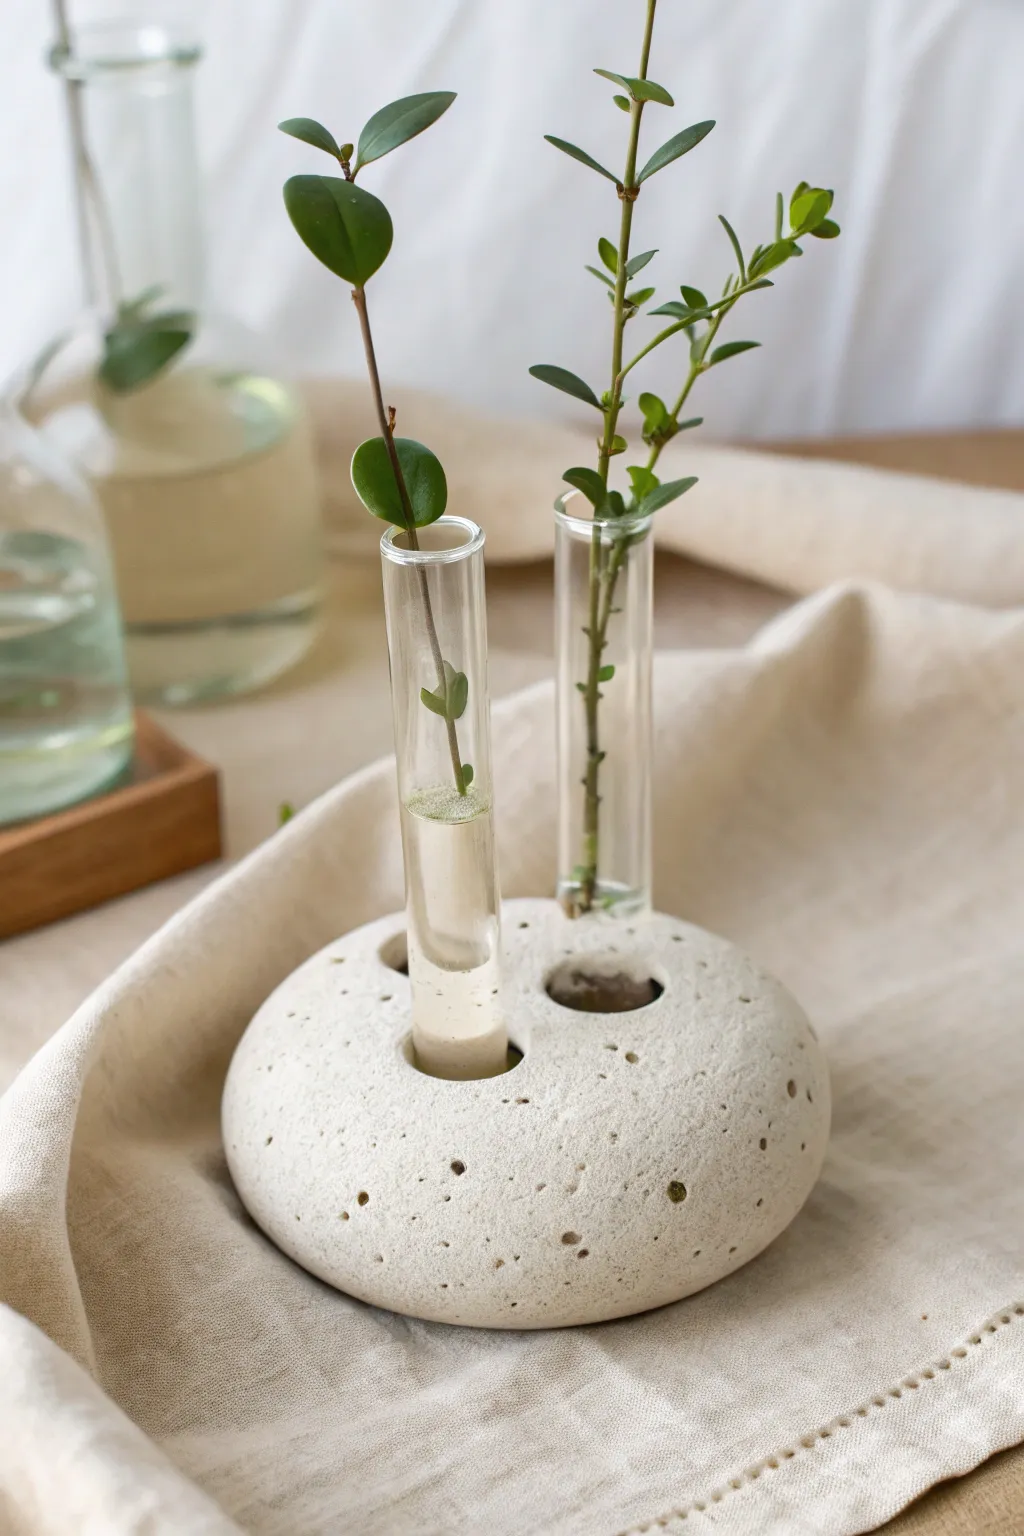
Bring a touch of organic serenity to your space with this modern propagation station that mimics the look of porous river stone or coral. Using bakeable clay and a few clever texturing tricks, you can create a perfectly minimalist base to root your favorite plant cuttings.
How-To Guide
Materials
- White or beige polymer clay (approx. 8 oz)
- Granite-effect polymer clay (optional, for mixing)
- Glass test tubes (15mm or 20mm diameter)
- Coarse sea salt or kosher salt
- Rolling pin or acrylic roller
- Circle cutter (approx. 4-5 inches)
- Needle tool or toothpick
- Stiff-bristled toothbrush or texture sponge
- Cornstarch (for release)
- Baking sheet and parchment paper
- Oven
Step 1: Shaping the Base
-
Condition the Clay:
Begin by thoroughly conditioning your white polymer clay until it is soft and malleable. If you want a more natural, speckled stone look, mix in a small amount of granite-effect clay, blending just enough to swirl the colors without fully combining them. -
Form a Sphere:
Roll the conditioned clay into a smooth, tight ball between your palms, ensuring there are no trapped air bubbles or large cracks. -
Flatten into a Disc:
Place the ball on your work surface and gently press down with your palm or a roller to create a thick disc shape. You want it to look like a river stone, so aim for rounded, organic edges rather than sharp corners. The final thickness should be about 1.5 inches to ensure it’s heavy enough to support the glass. -
Smooth the Edges:
Dip your finger in a tiny bit of water or clay softener and run it around the perimeter of the disc to smooth out any fingerprints or harsh lines, maintaining that soft, pebble-like curvature.
Salt Size Matters
Mix kosher salt and coarse sea salt for the texturing step. The different grain sizes create a much more realistic, organic ‘volcanic rock’ appearance.
Step 2: Creating the Structure
-
Mark Hole Placements:
Take your test tubes and gently press them into the top of the clay disc just enough to leave a light ring impression. Arranging three holes in a triangle pattern usually offers the best stability and visual balance. -
Insert Tubes for Sizing:
dust the bottom of your test tubes with a little cornstarch to prevent sticking. Press them firmly into the clay where you made your marks, going about two-thirds of the way down into the base. Do not push all the way through to the bottom. -
Wiggle and Remove:
Gently wiggle the tubes in a circular motion to widen the holes very slightly—this accounts for minor clay shrinkage during baking—and then carefully twist and pull them out. -
Refine the Openings:
The insertion process might have distorted the top surface. Use your fingers to gently pat the clay back down around the rim of each hole, ensuring the surface remains level.
Tubes Won’t Fit?
If the clay shrunk too much during baking and the tubes are tight, use rolled-up sandpaper or a small round file to gently sand the interior of the holes until the glass slides in.
Step 3: Texturing and Finishing
-
Initial Roughing:
To start the stone effect, press a stiff toothbrush or a coarse sponge all over the surface of the clay. This removes the plastic-like sheen and creates a basic matte texture. -
Apply Salt Texture:
This is the secret to the porous look: press coarse sea salt crystals firmly into the surface of the clay. Push some deep and leave others near the surface to create varied crater sizes. -
Add deep pores:
Use a needle tool or toothpick to poke singular, deeper holes randomly across the surface, varying the angle slightly to mimic natural erosion. -
Bake the Piece:
Place your clay base on a parchment-lined baking sheet. Bake according to the manufacturer’s instructions for your specific brand of clay—usually around 275°F (135°C) for 30-45 minutes given the thickness. -
Cool Down:
Allow the piece to cool completely in the oven with the door cracked open. This prevents thermal shock and cracking in thicker clay pieces. -
Dissolve the Salt:
Once fully cool, submerge the clay base in a bowl of warm water. Let it soak for 10-15 minutes to dissolve the salt crystals. Use a brush to scrub away any remaining salt residue. -
Final Assembly:
Dry the piece thoroughly with a towel. Place your glass test tubes into the holes, fill them with water, and add your plant cuttings.
Now you have a serene, minimalist display ready to help your plant collection grow
Napkin Rings for a Cute Tablescape
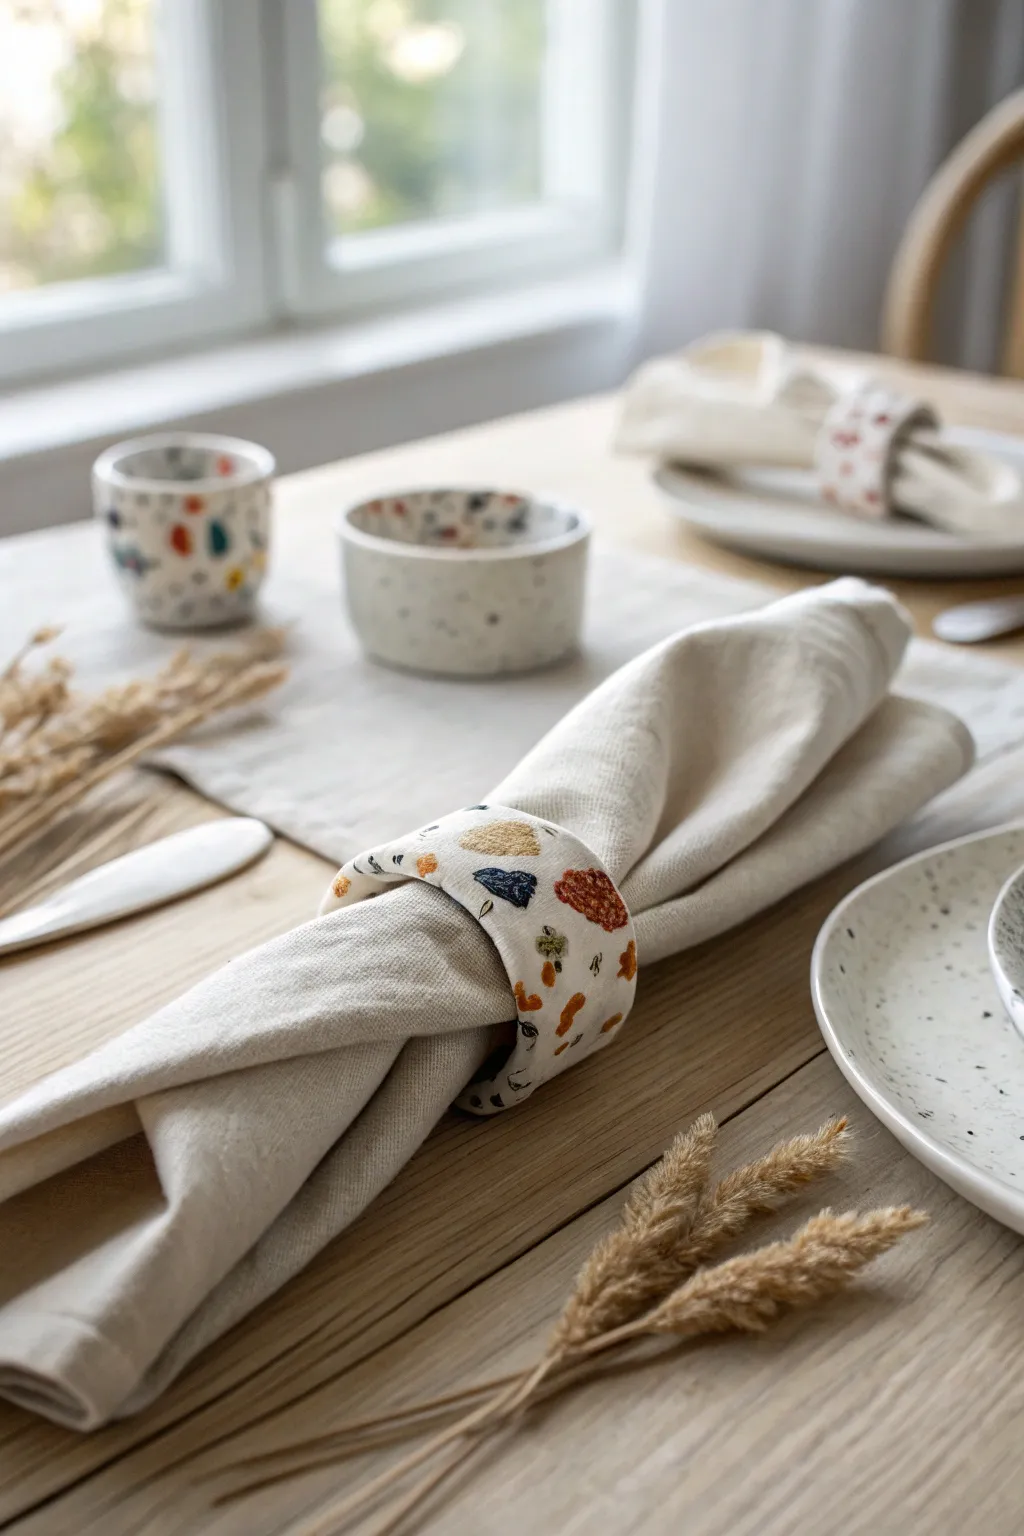
Elevate your table setting with these charming, rustic napkin rings that act as mini canvases for your creativity. The finish mimics terrazzo or hand-painted ceramics, featuring warm earth tones like ochre, terracotta, and slate blue on a clean white base.
Step-by-Step
Materials
- White polymer clay (approx. 2oz per ring)
- Acrylic rolling pin or glass jar
- Sharp clay blade or craft knife
- Cardboard toilet paper roll or dedicated clay tube form
- Parchment paper
- Fine-grit sandpaper (400-600 grit)
- Acrylic paints (White, Ochre/Mustard, Terracotta/Burnt Orange, Navy Blue, Sage Green)
- Small fine-point paintbrush
- Matte polymer clay varnish or sealant
Step 1: Shaping the Base
-
Condition the clay:
Begin by warming the white polymer clay in your hands. Knead and fold it repeatedly until it feels soft, pliable, and free of any cracks. -
Roll out a slab:
Place the clay between two sheets of parchment paper to prevent sticking. Use your acrylic roller to flatten the clay into a long, even strip about 1/4 inch thick. Consistency is key here for a professional look. -
Trim the edges:
Use your sharp clay blade to cut a clean, straight rectangular strip. Aim for dimensions roughly 1.5 inches wide and about 6 inches long. -
Form the ring:
Wrap a small piece of parchment paper around your cardboard tube. Then, gently lift your clay strip and wrap it around the parchment-covered tube. -
Seal the seam:
Where the two ends of the clay meet, press them together firmly. I like to use a sculpting tool or my finger to smooth the clay over the seam so it disappears completely. The connection needs to be strong. -
Refine the shape:
While on the form, gently tap the edges to ensure they aren’t too sharp. If you want that slightly organic, oval look seen in the photo, you can gently press the tube into an oval shape if the cardboard has give, or wait until after baking to shape the napkin inside.
Step 2: Baking and Smoothing
-
Bake the clay:
Preheat your oven according to the manufacturer’s instructions on your specific package of clay. Place the tube upright on a baking sheet and bake for the recommended time (usually 15-30 minutes). -
Cool down:
Once baked, turn the oven off and let the rings cool slowly inside with the door cracked, or remove them and let them cool completely on a wire rack. -
Remove the form:
Slide the cardboard tube and parchment paper out from the center of the ring. If it sticks slightly, twist the cardboard gently to loosen it. -
Sand the surface:
Dip your fine-grit sandpaper in a little water (wet sanding prevents dust) and gently buff the entire surface of the ring. Pay special attention to the edges and the seam area to make it buttery smooth. -
Clean up:
Wash the ring with mild soap and water to remove any sanding residue, then dry it thoroughly with a lint-free cloth.
Pro Tip
To get perfectly straight edges on your clay strip, use a ruler as a guide for your blade. Don’t drag the blade; press straight down to avoid distorting the clay.
Step 3: Painting the Design
-
Base coat (optional):
If your white clay has slight discoloration from baking, apply a thin coat of white acrylic paint to create a pristine canvas. Let this dry completely. -
Mix your palette:
Prepare small dabs of your chosen colors: mustard yellow, burnt orange, navy blue, and a muted sage green. -
Paint the abstract shapes:
Using your fine-point brush, paint small, random organic shapes scattered across the surface. Think of them like small pebbles or terrazzo chips. Keep the spacing somewhat airy. -
Add detail:
For the darker shapes (like the navy blue), you can scratch tiny lines into the wet paint or layer a slightly lighter blue on top to give it visual texture. -
Create the speckled effect:
To mimic the tiny dots seen in the image, dip the very tip of your brush (or a toothpick) into the paint and add microscopic dots in the empty white spaces between the larger shapes. -
Seal the deal:
Allow the paint to cure for several hours. Finally, apply a coat of matte varnish to protect the paint from chipping and give the piece a finished, ceramic-like quality.
Level Up
Instead of painting, knead tiny bits of colored clay into your white block before rolling. This creates a true chaotic terrazzo pattern embedded directly into the material.
Now you have a stunning set of custom napkin rings ready to impress at your next dinner party
Salt Dough Ornaments You Can Paint
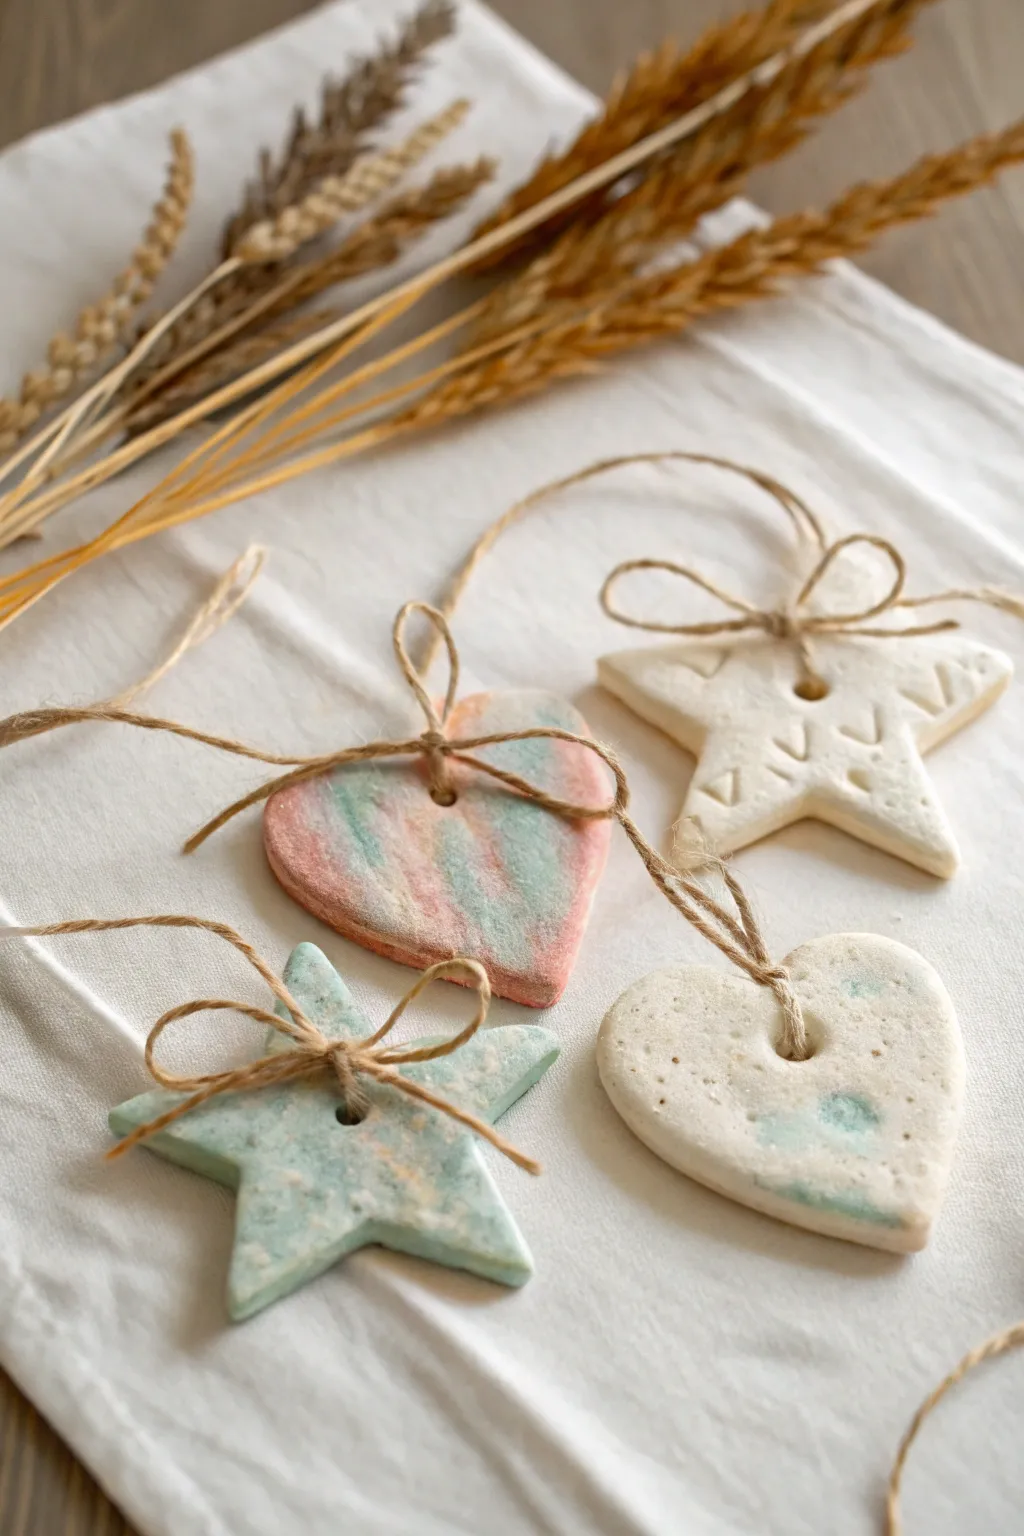
These charming rustic ornaments combine the classic simplicity of salt dough with soft, marbled pastels and delicate textures. Perfect for holiday trees or gift tags, they offer a tactile, handmade quality that feels both traditional and fresh.
Step-by-Step Guide
Materials
- All-purpose flour (2 cups)
- Table salt (1 cup)
- Warm water (approx. 1 cup)
- Liquid watercolors or food coloring (pink and teal/green)
- Heart and star cookie cutters
- Rolling pin
- Parchment paper
- Baking sheet
- Drinking straw or skewer
- Jute twine
- Optional: Texture tools (stamps, lace, or patterned rollers)
- Clear acrylic sealer (matte or satin spray)
Step 1: Preparing the Dough
-
Mix dry ingredients:
In a large mixing bowl, whisk together the flour and salt until they are completely combined. -
Add water gradually:
Slowly pour in the warm water while stirring. You may not need the full cup, or you might need a splash more, so go slowly until a dough begins to form. -
Knead until smooth:
Turn the mixture onto a clean surface and knead firmly for about 5 to 10 minutes. The dough should become smooth, pliable, and soft like playdough, without cracking edges. -
Divide the dough:
Separate your dough ball into two or three smaller portions. Leave one portion plain white.
Step 2: Creating the Marbling
-
Color the portions:
Take the other dough portions and add a few drops of liquid watercolor or food coloring to each. Knead one with pink dye and another with a teal or soft green until the color is fully integrated. -
Combine for marbling:
To achieve the look in the photo, take small chunks of the white, pink, and teal dough. Gently press them together into a single ball, but don’t over-knead, or the colors will turn muddy. -
Twist and fold:
Give the combined ball a brief twist and one fold. This helps swirl the colors through the white base just enough to create that stone-like effect. -
Roll out the slab:
Place the marbled ball on parchment paper and roll it out to an even thickness, roughly 1/4 inch thick. You should see the colors stretching into beautiful veins.
Don’t Over-mix!
When combining your colored and white doughs, stop kneading the moment they come together. Too much mixing destroys the distinct marble veins and turns the dough a solid, muddy color.
Step 3: Cutting and Texturing
-
Cut the shapes:
Press your heart and star cookie cutters firmly into the rolled dough. Wiggle slightly to ensure a clean cut, then lift the cutter. -
Add texture details:
For the plain white stars shown in the project, use a small tool or stamp to press repetitive patterns—like small triangles or dots—into the surface before baking. -
Create hanging holes:
Using a plastic drinking straw or a skewer, poke a hole near the top center of each shape. Make sure the hole is wide enough to fit your jute twine later. -
Transfer to baking sheet:
Peel away the excess dough and carefully lift the parchment paper with your shapes onto a baking sheet.
Scented Dough
Add a sensory element by kneading a few drops of essential oil like cinnamon, peppermint, or lavender into the dough mix before baking for ornaments that smell as good as they look.
Step 4: Baking and Finishing
-
Bake low and slow:
Place the tray in an oven preheated to 200°F (95°C). Bake for about 2 to 3 hours. I like to flip them halfway through to ensure the backs dry evenly. -
Check for hardness:
The ornaments are done when they are completely hard and sound hollow when tapped. If they feel soft in the center, give them more time. -
Cool and seal:
Let the ornaments cool completely on a wire rack. Once cool, spray them with a light coat of clear acrylic sealer to protect them from moisture and preserve the colors. -
Cut the twine:
Cut lengths of jute twine, approximately 10-12 inches long for each ornament. -
Thread and tie:
Thread the twine through the hole. Instead of a simple loop, tie a small bow right at the front of the ornament hole as shown in the photo, creating a rustic decorative knot.
Hang your beautiful new creations on a branch or wrap them onto gifts for a personalized touch