If you’re craving basic clay ideas that actually feel doable, you’re in the right headspace. I’m sharing beginner-friendly projects built from simple shapes—balls, coils, slabs, and little pinch pots—so you can make something cute (and useful) without overthinking it.
Classic Pinch Pot Bowl
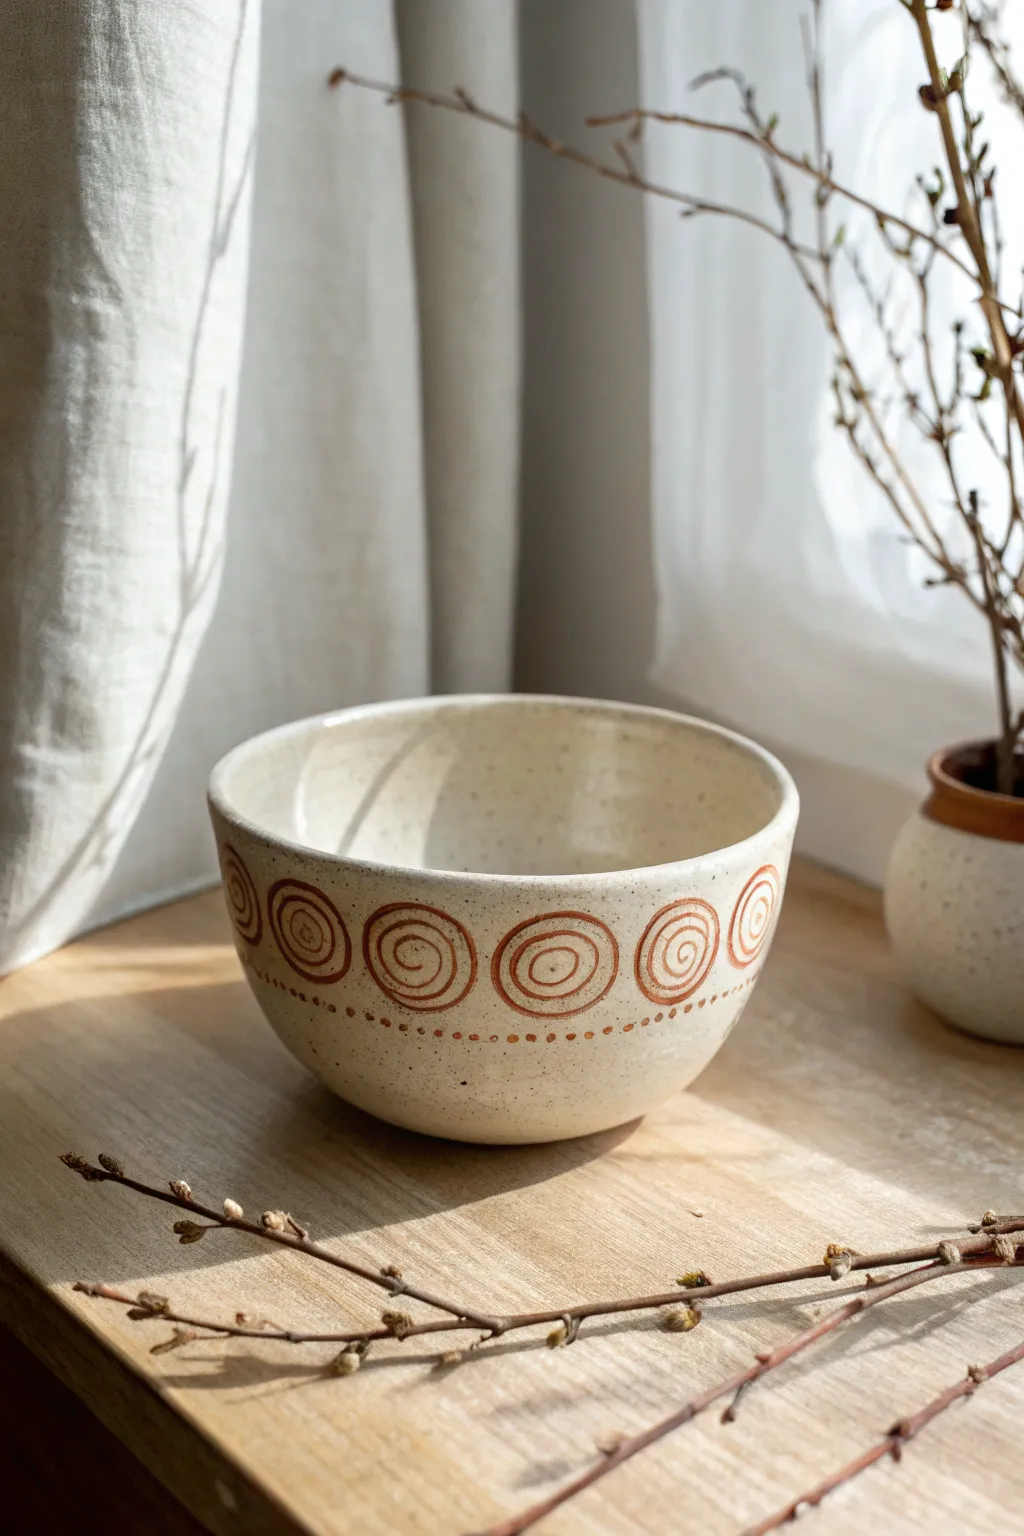
Here is a charmingly rustic bowl featuring a warm, speckled cream glaze and hand-painted rust-colored spiral motifs. This classic pinch pot technique creates a slightly organic shape that feels wonderfully handmade and cozy.
Step-by-Step Tutorial
Materials
- Stoneware clay (speckled or buff)
- Pottery wheel (optional, can be fully hand-built)
- Stylus tool or wooden rib
- Underglaze (terracotta or rust color)
- Fine detail brush
- Clear or translucent cream dipping glaze
- Sponge
- Kiln access
Step 1: Forming the Bowl
-
Prepare the Clay:
Start with a ball of clay about the size of a large orange. Wedge it thoroughly to remove air bubbles and ensure even consistency. -
Open the Form:
Hold the ball in one hand and press your thumb into the center, stopping about half an inch from the bottom to create the base. -
Pinch the Walls:
Gently pinch the clay between your thumb and fingers, rotating the ball as you work. Move from the bottom up to thin the walls and expand the shape. -
Refine the Shape:
Once the basic bowl shape is established, place it on a flat surface. Use your fingers or a smooth rib to gently curve the walls upward, aiming for a consistent thickness. -
Smooth the Rim:
Run a damp sponge or piece of chamois leather over the rim to soften any sharp edges and create that comfortable, rounded lip seen in the photo. -
Dry to Leather Hard:
Let the bowl sit uncovered until it reaches the leather-hard stage—firm enough to hold its shape without distorting, but still cool to the touch.
Even Walls Pro Tip
Keep a needle tool handy to check thickness. Poke it through the wall near the base; if it’s too thick, pinch more. Patch hole immediately.
Step 2: Decoration & Glazing
-
Outline the Band:
Lightly sketch a guideline around the middle of the bowl using a needle tool or pencil to mark where your pattern band will sit. -
Paint the Spirals:
Using a fine detail brush and your rust-colored underglaze, paint a series of tight spirals evenly spaced around the bowl’s circumference. -
Add the Dots:
Dip the back end of a paintbrush into the underglaze creating a dotting tool. Stamp a row of small dots just below your spiral band. -
Bisque Fire:
Once the underglaze is completely dry, load the bowl into the kiln for a bisque firing (usually cone 04 or 06). -
Wax Resist (Optional):
If you want the raw clay texture on the spirals to remain unglazed, carefully apply wax resist over your painted designs. Otherwise, proceed to glazing for a smooth finish. -
Apply Glaze:
I usually prefer dipping for an even coat. Dip the entire bowl into a translucent cream or speckled white glaze. If you didn’t use wax resist, the underglaze will show through the semi-transparent glaze. -
Clean the Foot:
Use a damp sponge to wipe any glaze off the very bottom of the bowl so it doesn’t fuse to the kiln shelf. -
Glaze Fire:
Fire the bowl a second time to the maturation temperature of your specific clay and glaze (often cone 5 or 6 for stoneware).
Level Up: Texture
Before painting, use a carving tool to physically incise the spiral lines into the clay, then inlay the underglaze for a tactile finish.
Enjoy your beautiful new bowl for morning cereal or as a decorative piece on your shelf


Simple Slab Trinket Dish
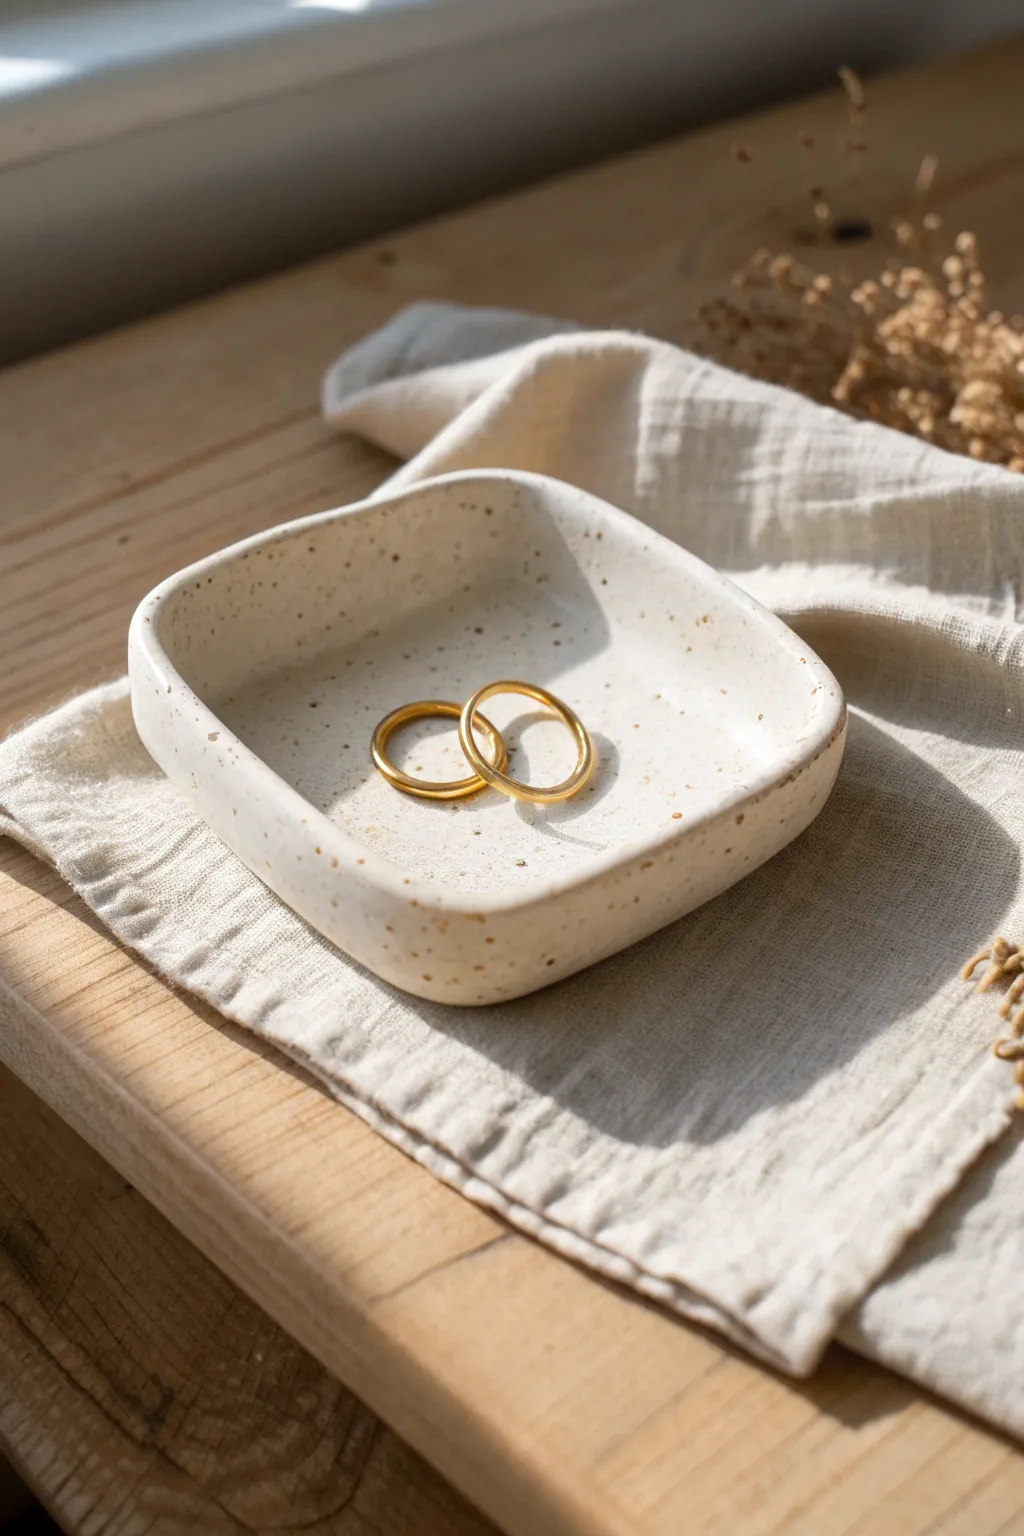
This charming little trinket dish combines a modern square shape with soft, organic edges for a perfectly imperfect look. The speckled clay body shines through a clear glaze, creating a warm, minimalist home for your favorite rings or earrings.
Step-by-Step Tutorial
Materials
- Speckled clay body (white stoneware with grog/speckles)
- Rolling pin
- Canvas or heavy fabric mat
- Square paper template (approx. 4×4 inches)
- Needle tool or fettling knife
- Sponge
- Soft rib tool (silicone or rubber)
- Small bowl of water
- Clear transparent glaze
- Kiln access (or use speckled air-dry clay + varnish for a non-food safe dupe)
Step 1: Planning and Rolling
-
Prepare your clay:
Begin with a ball of speckled clay about the size of a tennis ball. Wedge it thoroughly to remove any air bubbles, which helps prevent cracking later in the kiln. -
Set up your workspace:
Lay down a piece of canvas or heavy fabric. This prevents the clay from sticking to your table and adds a slight texture to the bottom, which I appreciate for stability. -
Roll the slab:
Using your rolling pin, flatten the clay ball into an even slab. Aim for a thickness of about 1/4 inch. Try to keep the pressure consistent so one side isn’t thinner than the other. -
Smooth the surface:
Take your soft rib tool and gently drag it across the surface of the clay slab. This compresses the clay particles and removes any canvas texture from the top side.
Step 2: Shaping the Dish
-
Cut the shape:
Place your square paper template onto the smooth slab. Use a needle tool to cut vertically around the template. Don’t worry about sharp corners yet; just get the basic square. -
Soften the edges:
Remove the excess clay. dampen a sponge slightly and run it along the cut edges to round them off. This removes the sharp ‘cut’ look and prepares the rim for lifting. -
Pinch the corners:
Gently lift the slab. To create the shallow bowl shape, carefully pinch each of the four corners upward. Imagine creating a dart without actually cutting the clay. -
Lift the walls:
Once the corners are lifted, use your fingers to gently push the walls up between the corners. You want a subtle curve from the base to the rim, not a sharp 90-degree angle. -
Refine the curve:
Place the dish back down. Use your thumb on the inside and fingers on the outside to smooth the transition where you pinched. The goal is a fluid, organic wave rather than a rigid box.
Rim Perfection
Run a piece of plastic wrap over the clay before cutting your shape with a cookie cutter. The plastic pulls the clay down slightly, creating an instantly rounded, professional rim.
Step 3: Finishing and Glazing
-
Dry partially:
Let the dish dry until it reaches a ‘leather hard’ state. It should be firm enough to handle without warping but still cool to the touch. -
Final smoothing:
With a slightly damp sponge, do a final pass over the rim and inside surface. Remove any fingerprints or rough spots that might catch on jewelry later. -
Bisque fire:
Allow the piece to dry completely (bone dry) before loading it into the kiln for the first firing (bisque fire). -
Apply glaze:
Once bisqued, dip the entire dish into a clear transparent glaze. If you used speckled clay, the specks will show through beautifully. Shake off excess glaze gently. -
Clean the foot:
Use a sponge to wipe the glaze completely off the bottom of the dish so it doesn’t fuse to the kiln shelf. -
Glaze fire:
Fire the piece again to the temperature required by your specific clay and glaze (usually Cone 5 or 6 for stoneware).
Gold Touch
Apply a gold luster overglaze to the very rim of the dish after the glaze firing. You’ll need to fire it a third time at a much lower temp, but the luxe finish is worth it.
Place this lovely dish on your bedside table or vanity to hold your daily treasures safely


Thumbprint Ring Dish
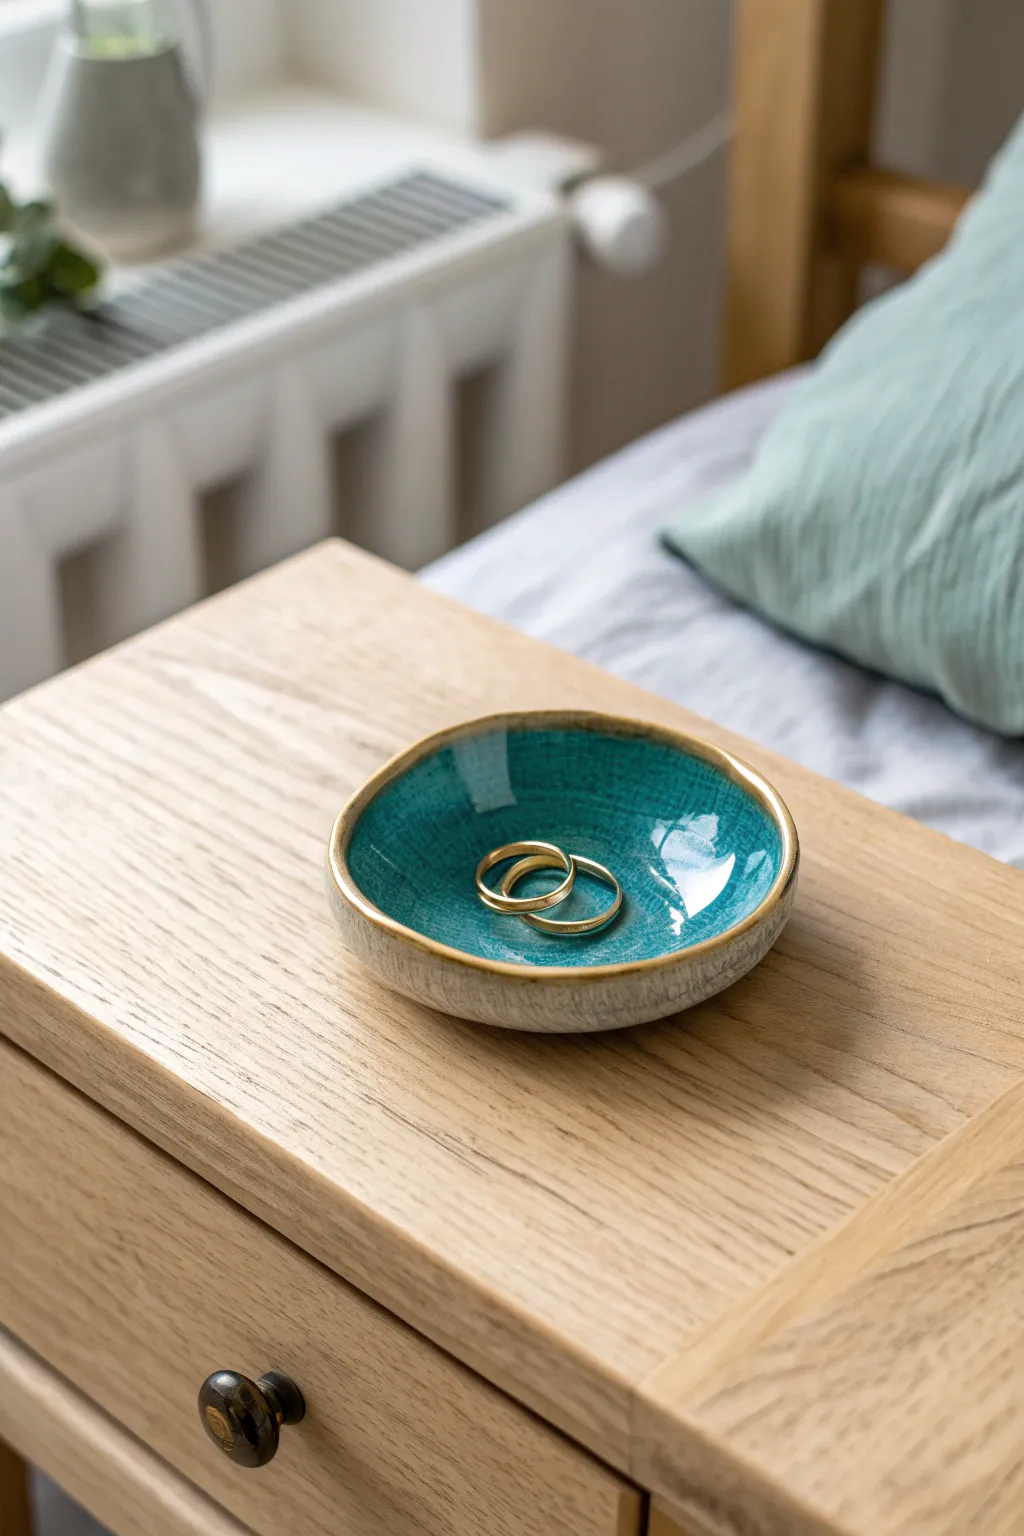
This elegant little pottery piece combines a rustic, textured exterior with a stunningly glossy turquoise interior. It is the perfect size for keeping your most precious jewelry safe on a bedside table.
How-To Guide
Materials
- Air-dry clay or kiln-fire clay (white stoneware recommended)
- Rolling pin
- Small circular cookie cutter or a drinking glass
- Sponge
- Modeling tool or butter knife
- Pottery glaze (Turquoise crackle) or acrylic paints + gloss varnish
- Gold leafing pen or liquid gold leaf
- Small paintbrush
- Fine-grit sandpaper
Step 1: Shaping the Clay
-
Prepare the Clay:
Start by kneading a small ball of clay until it is warm and pliable. This ensures there are no air bubbles trapped inside, which is crucial for structural integrity. -
Roll it Out:
Use your rolling pin to flatten the ball into a slab about 1/4 inch thick. Aim for an even thickness throughout to prevent cracking during the drying process. -
Cut the Circle:
Press your circular cutter or the rim of a glass firmly into the clay slab to cut out a perfect circle. Remove the excess clay from around the edges. -
Form the Rim:
Gently pinch the edges of the circle upward to create a shallow lip. I like to use my thumb on the inside and forefinger on the outside to curve the walls up naturally. -
Smooth the Edges:
Dip your finger or a small sponge in a little bit of water and run it along the rim to smooth out any sharp edges or cracks that formed while pinching. -
Create Texture (Optional):
If you want the exterior to have that rustic, hand-thrown look shown in the photo, leave the outside slightly rough or gently press a coarse fabric against the outer wall. -
Final Shaping:
Press the center of the dish gently to ensure the bottom is flat so it will sit stable on a table. Let the clay dry completely according to package instructions (usually 24-48 hours).
Step 2: Decorating and Finishing
-
Sand and Refine:
Once fully dry, take a piece of fine-grit sandpaper and lightly sand any rough spots on the rim or bottom. Wipe away the dust with a slightly damp cloth. -
Base Glazing:
If using kiln-fire clay, apply a clear or white matte glaze to the exterior and fire it. If using air-dry clay, paint the exterior with a matte off-white or light grey acrylic paint to mimic raw stoneware. -
Painting the Interior:
Apply your turquoise color to the inside of the bowl. For that specific look in the photo, use a glaze (or paint) that has a high-gloss finish. You may need 2-3 coats for rich opacity. -
Adding the Crackle Effect:
If using acrylics, you can apply a specific crackle medium over the teal paint before sealing. If using kiln glaze, choose a glaze formula specifically designed to craze or crackle upon firing. -
Gloss Coat (Air Dry Only):
For air-dry clay projects, apply a thick layer of high-gloss varnish to the interior *only*. This mimics the look of fired glass glaze. Let this cure completely. -
Gilding the Rim:
Shake your gold leafing pen or open your liquid gold leaf. Carefully run the pigment along the very top edge of the rim. -
Refining the Gold:
Allow the gold to naturally be slightly uneven; a little wobble adds to the organic, handmade aesthetic. -
Final Cure:
Allow the gold accents and any varnish to dry completely in a dust-free area before placing any jewelry inside.
Cracked Clay?
If your air-dry clay cracks while drying, mix a tiny bit of fresh wet clay with water to make a paste (slip) and fill in the cracks, then sand smooth once dry.
Make it Personal
Before the clay dries, press a rubber stamp into the center bottom of the dish to imprint a monogram or a small symbol like a heart or star.
Now you have a chic, handmade vessel ready to hold your favorite rings


Mini Sphere Penguin
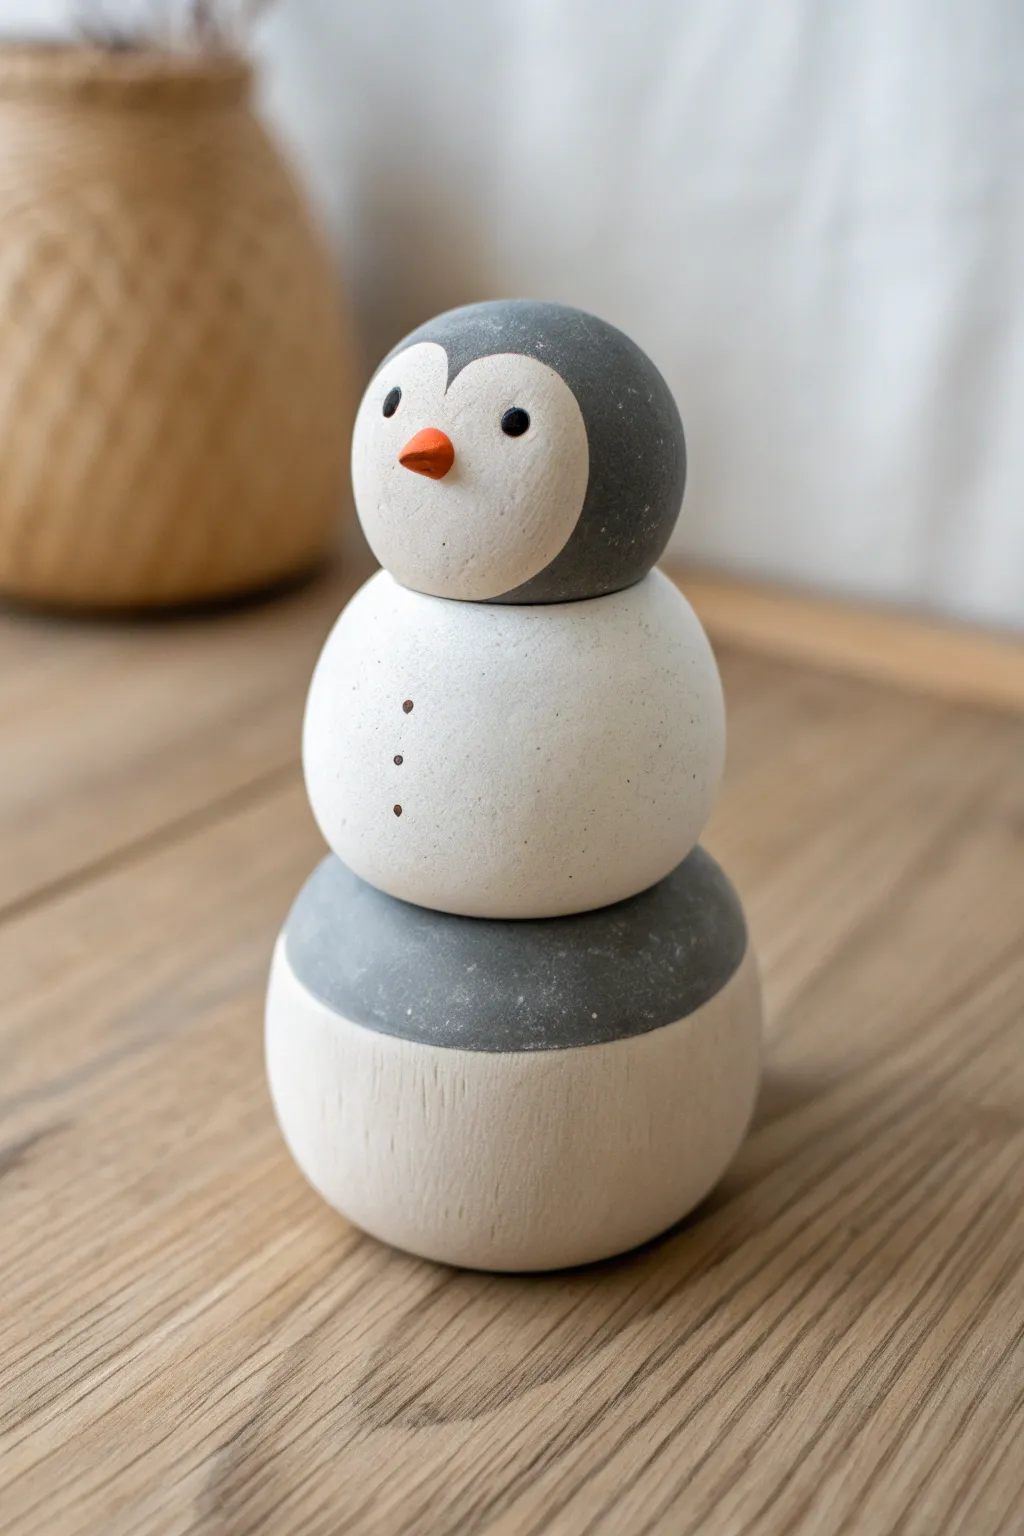
This charming, minimalist figure combines simple geometric forms to create a penguin with a modern twist. By stacking three distinct clay spheres and using a muted gray and white palette, you’ll craft a delightful desk companion that feels both playful and sophisticated.
Step-by-Step Guide
Materials
- Air-dry clay or polymer clay (white)
- Acrylic paints (charcoal gray, white, orange, black)
- Fine grit sandpaper
- Small detail paintbrush
- Medium flat paintbrush
- Toothpicks or a thin wooden dowel (for internal structure)
- Matte varnish (optional)
Step 1: Shaping the Body
-
Form the base:
Start by rolling a ball of clay roughly 2 inches in diameter. This will be the bottom segment of your penguin. Roll it firmly between your palms until it is perfectly smooth. -
Flatten the bottom:
Gently press the sphere onto your work surface to create a small flat spot. This ensures the figure will stand upright without rolling away. -
Create the middle section:
Roll a second sphere that is slightly smaller than the base, perhaps around 1.5 inches wide. Smooth out any cracks or seams with a wet finger. -
Shape the head:
Roll the third and smallest sphere for the head, aiming for about 1.25 inches in diameter. Keep this one very round. -
Add structure:
Insert a toothpick or a short piece of thin dowel halfway into the center of the base sphere. Ideally, add a dab of slip or liquid clay at the connection point for strength. -
Stack the body:
Push the middle sphere onto the exposed toothpick. Insert another toothpick piece into the top of the middle sphere, then carefully press the head onto that. Gently press the layers together to ensure they bond. -
Refine and dry:
Check the silhouette from all angles to make sure the stack is straight. Allow the clay to dry completely according to package instructions (usually 24-48 hours for air-dry clay).
Seamless Stacking
Flatten the contact points between the spheres slightly before stacking. This increases the surface area for the glue or clay bond, making the tower much more stable.
Step 2: Sanding and Painting
-
Smooth the surface:
Once fully dry, take a piece of fine-grit sandpaper and lightly buff the entire surface. Focus on removing any fingerprints or slight irregularities to get that clean, modern look. -
Paint the base coat:
Apply a coat of white acrylic paint to the middle sphere and the lower half of the bottom sphere. You might need two layers to get an opaque finish. -
Block in the gray connection:
Mix a charcoal gray paint. Paint the top hemisphere of the bottom sphere. Create a clean, straight horizontal line where the gray meets the white lower half to mimic the dip-dyed look in the reference. -
Paint the head cap:
Using the same charcoal gray, paint the back and top of the head sphere. Leave a heart-shaped or rounded ‘face mask’ area white on the front. -
Detail the face:
Take your smallest detail brush. Carefully paint the specific white face shape if you haven’t already, ensuring the gray curves around the cheeks. -
Add the beak:
You can either paint a small orange triangle, or for a 3D effect shown in the image, attach a tiny cone of clay before drying. If painting, use a bright orange for a small, sharp beak right in the center of the face. -
Dot the eyes:
Dip the non-brush end of a small paintbrush or a toothpick into black paint. Dot two wide-set eyes on either side of the beak. -
Add buttons:
Using a toothpick or a very fine brush, add three tiny vertically aligned brown or black dots on the middle white sphere to represent buttons. -
Create texture (optional):
To mimic the stone-like texture in the image, you can lightly stipple the gray paint with an old, dry brush or a sponge while it’s wet. -
Seal the work:
Protect your penguin with a coat of matte varnish. Avoid glossy finishes to maintain the natural, earthy aesthetic.
Paint Bleeding?
If you struggle to paint a straight line on the sphere, wrap a piece of masking tape or a rubber band around the curve to act as a guide for your brush, then peel it away carefully.
Place your finished penguin on a shelf or desk for a touch of winter whimsy that looks great year-round

The Complete Guide to Pottery Troubleshooting
Uncover the most common ceramic mistakes—from cracking clay to failed glazes—and learn how to fix them fast.
Ball-Chain Caterpillar
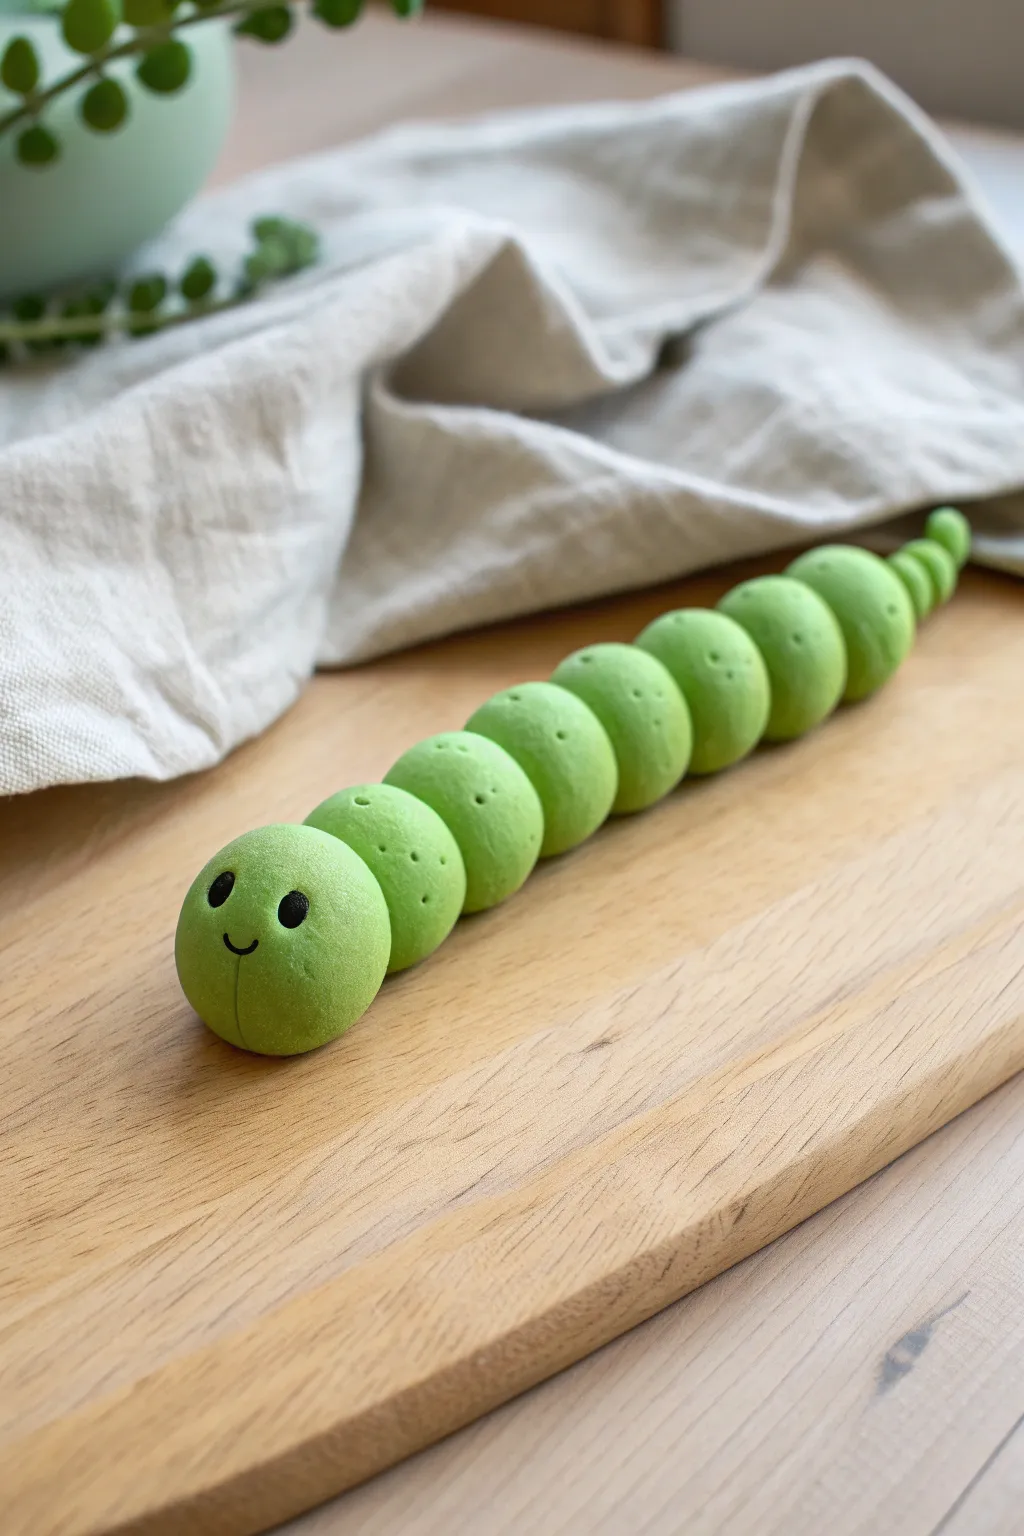
This charming little crawler is perfect for beginners, constructed entirely from a simple chain of clay spheres. Its matte, sugary texture and sweet, minimalist face give it a distinctively friendly personality that looks great on a shelf.
How-To Guide
Materials
- Green polymer clay (or air-dry clay)
- Black polymer clay (small amount)
- Needle tool or toothpick
- Ball stylus tool (medium size)
- Clean work surface or rolling mat
- Aluminum foil (optional, for baking)
- Soft bristle brush (optional, for texture)
Step 1: Forming the Body Segments
-
Proportion the clay:
Start by pinching off about ten chunks of green clay. You want graduating sizes: one larger piece for the head, several medium pieces for the main body, and three or four increasingly smaller pieces for the tail. -
Roll the spheres:
Take each chunk of clay and roll it between your palms to create smooth, even balls. The goal is to get them as round as possible without visible cracks. -
Create the texture:
To mimic the slightly sugary, porous surface seen in the photo, gently tap the surface of each ball with a soft bristle brush or a crumpled piece of aluminum foil. This removes the shiny, plastic look of the clay. -
Connect the main body:
Take the largest sphere (the head) and the next largest size. Press them gently together. If using polymer clay, the contact is usually enough, but you can score the touching sides slightly for a better grip. -
Build the chain:
Continuing attaching the spheres in descending size order behind the head. Instead of a perfectly straight line, add a gentle S-curve wiggle to the body as you press them together to give it a sense of movement. -
Adjust the tail:
Ensure the very last few spheres are quite small to create that tapered tail effect. I find it helps to lift the tail slightly upward for a jauntier look. -
Detail the segments:
Using your needle tool, poke two small, shallow holes near the top of each body segment (skipping the head). These add a playful, organic detail to the creature.
Step 2: Adding the Face
-
Create eye sockets:
On the head sphere, use your ball stylus tool to make two small indents where the eyes will go. Spacing them slightly apart adds to the cute factor. -
Form the eyes:
Take a tiny amount of black clay and roll two miniscule balls. They should be just small enough to fit into the indents you made. -
Place the eyes:
Gently press the black balls into the sockets. Flatten them just slightly so they don’t bulge out too much. -
Carve the mouth:
Use the needle tool to draw a small ‘U’ shape between the eyes for the smile. I like to press a little deeper at the top corners of the mouth to emphasize the cheeks. -
Add the chin line:
Draw a faint vertical line extending straight down from the center bottom of the smile. This creates a soft ‘cleft chin’ look that adds definition to the round face.
Sticky Situation
If your clay spheres aren’t sticking together well, a tiny drop of liquid clay (fimo liquid/Bake & Bond) or simple PVA glue acts as a perfect adhesive between the segments.
Step 3: Finishing Up
-
Final check:
Look over your caterpillar from all angles. Smooth out any accidental fingerprints that might have occurred during assembly. -
Fix the posture:
Make sure the head is lifted slightly so it’s not resting flat on the table; this makes the caterpillar look attentive. -
Bake or dry:
If using polymer clay, bake according to the package directions (usually around 275°F/135°C for 15-30 minutes). If using air-dry clay, leave it in a dry, room-temperature spot for 24 hours.
Rainbow Bright
Don’t stick to just green! Try marbling two colors of clay together for each sphere, or create a gradient caterpillar by lightening the green with white clay for each subsequent segment.
Now your adorable green friend is ready to inch its way across your desk
Teardrop Hedgehog Buddy
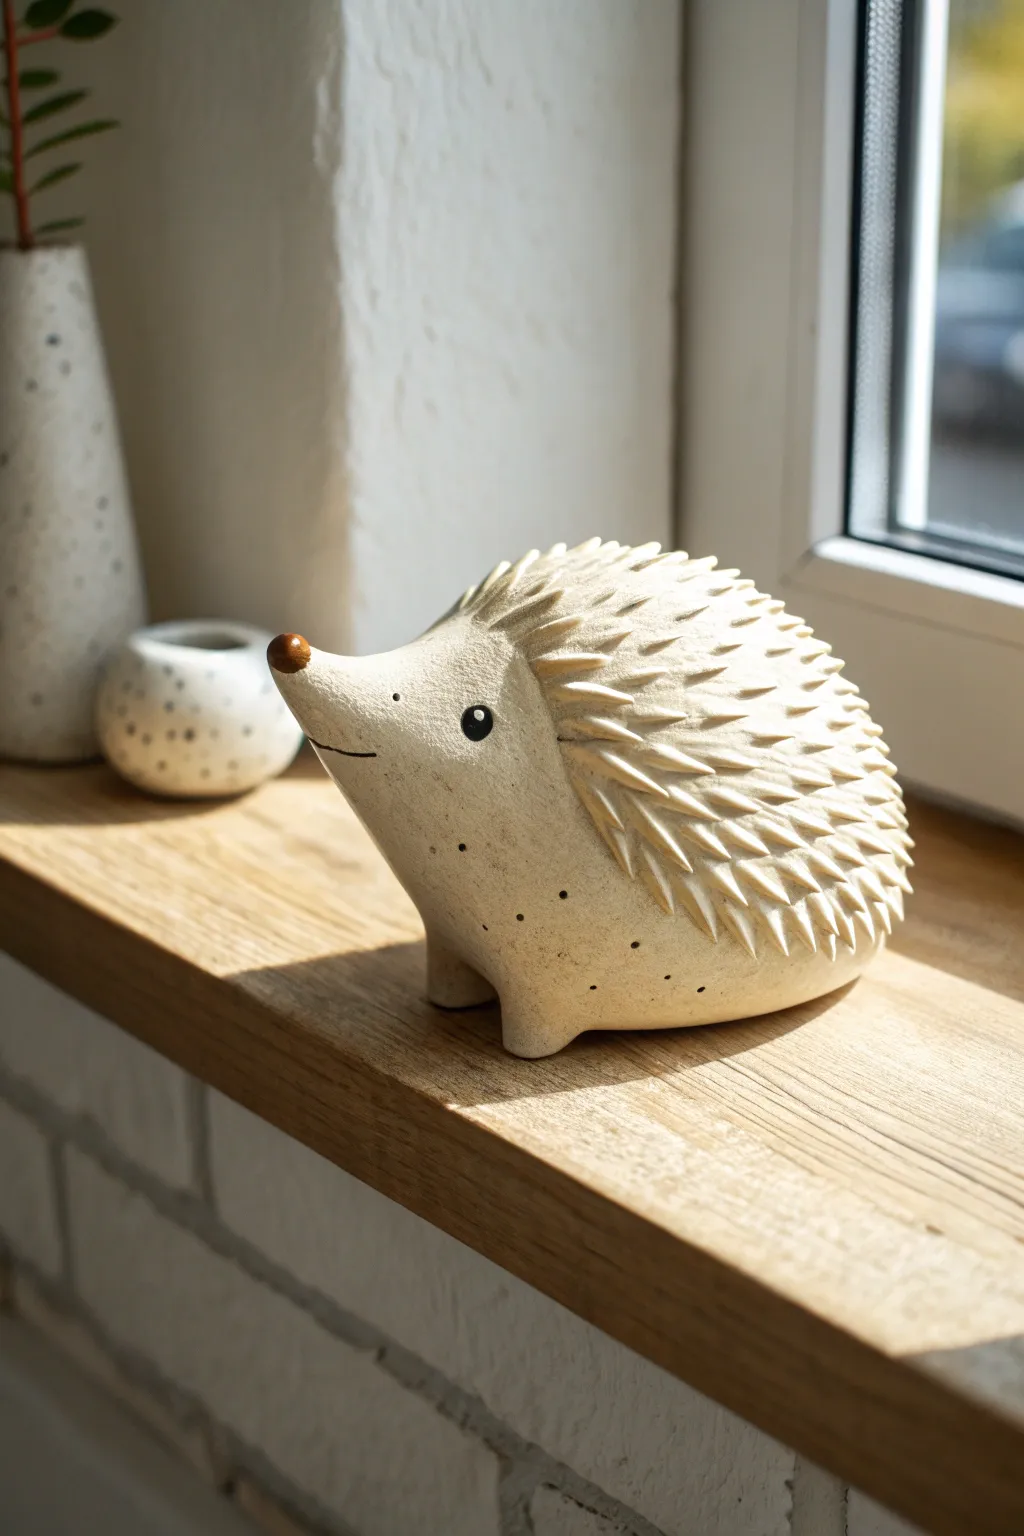
This adorable spiky friend is simpler to make than he looks, relying on a basic teardrop form that transforms into a woodland creature with just a few clever textures. The finished piece has a charming, rustic stoneware look that fits perfectly in any cozy corner.
Step-by-Step Tutorial
Materials
- White or speckled light-colored clay (stoneware or polymer)
- Small wedge-shaped loop tool or linoleum cutter
- Pointed sculpting tool or needle tool
- Small paintbrush
- Brown underglaze or acrylic paint (for nose)
- Black underglaze or acrylic paint (for eye)
- Smoothing sponge
- Slip (if using ceramic clay)
Step 1: Shaping the Base
-
Form the basic shape:
Start with a baseball-sized lump of clay and roll it into a smooth sphere. Gently manipulate one side into a cone shape to create a large teardrop, keeping the rounded end plump for the body. -
Define the snout:
At the pointy end of your teardrop, slightly upturn the tip to create a perky snout. I like to pinch the very end just a bit to give the nose some distinct definition. -
Flatten the bottom:
Tap the belly of the hedgehog gently against your work surface. You want a flat, stable base so your buddy doesn’t roll away, but keep the top rounded and domed. -
Add the feet:
Roll four small, pea-sized balls of clay. Flatten them slightly and score-and-slip them onto the bottom corners of the body, two near the front and two near the back. Blend the seams upward so they look integrated, not stuck on.
Step 2: Creating Texture
-
Map out the face:
Before texturing, use the back of a fingernail or a light tool mark to delineate where the smooth face ends and the spines begin. This usually curves behind the ear area and over the forehead. -
Carve the first spines:
Using a small wedge-shaped loop tool or a U-shaped carving tool, scoop out a small divot of clay starting from the ‘hairline’ and pulling back towards the tail. The removed clay leaves a raised, spike-like ridge. -
Continue the pattern:
Work your way back in rows. Stagger the carving marks like bricks or fish scales so the spines layer naturally over one another rather than forming straight grid lines. -
Refine the texture:
As you reach the rounded rear, curve your carving strokes downward to follow the spherical shape of the body. Clean away any clay crumbs hanging off the tips of the spines. -
Smooth the face:
Use a slightly damp sponge to carefully wipe the face area, removing any fingerprints and ensuring the contrast between the rough spines and the smooth snout is sharp.
Clean Cuts
Let the clay stiffen to ‘leather hard’ before carving the spines. If the clay is too soft, the loop tool will drag and smear rather than creating crisp, sharp spikes.
Step 3: Detailing and Finishing
-
Sculpt the mouth:
Use a needle tool or knife to carve a simple, curved line for the mouth. Make it slightly deep so the shadow defines the smile. -
Add character spots:
Using the point of a needle tool, poke a few tiny, random holes or dots on the lower sides of the body and belly area for extra tactile interest. -
Paint the nose:
Dip a small brush into brown underglaze (or acrylic if using air-dry clay) and carefully paint the very tip of the snout. A round, button-like application works best. -
Paint the eye:
Place a single dot of black paint or underglaze for the eye. Keep it round and relatively simple; adding a tiny white speck as a highlight after it dries brings it to life. -
Dry and fire:
Allow the clay to dry completely (slowly, under loose plastic if it’s ceramic). Fire according to your clay type’s instructions. If you used polymer clay, bake it now. -
Final wash (optional):
If you want to highlight the texture, apply a very watered-down brown wash over the spines and wipe it back with a sponge, leaving darkness only in the crevices.
Make it a set
Make three hedgehogs in graduating sizes. Vary their nose angles—one looking up, one straight, one down—to create an interacting family group.
Place your finished hedgehog near a window or plant to let natural light play across those carved textures


What Really Happens Inside the Kiln
Learn how time and temperature work together inside the kiln to transform clay into durable ceramic.
Chunky Little Dino
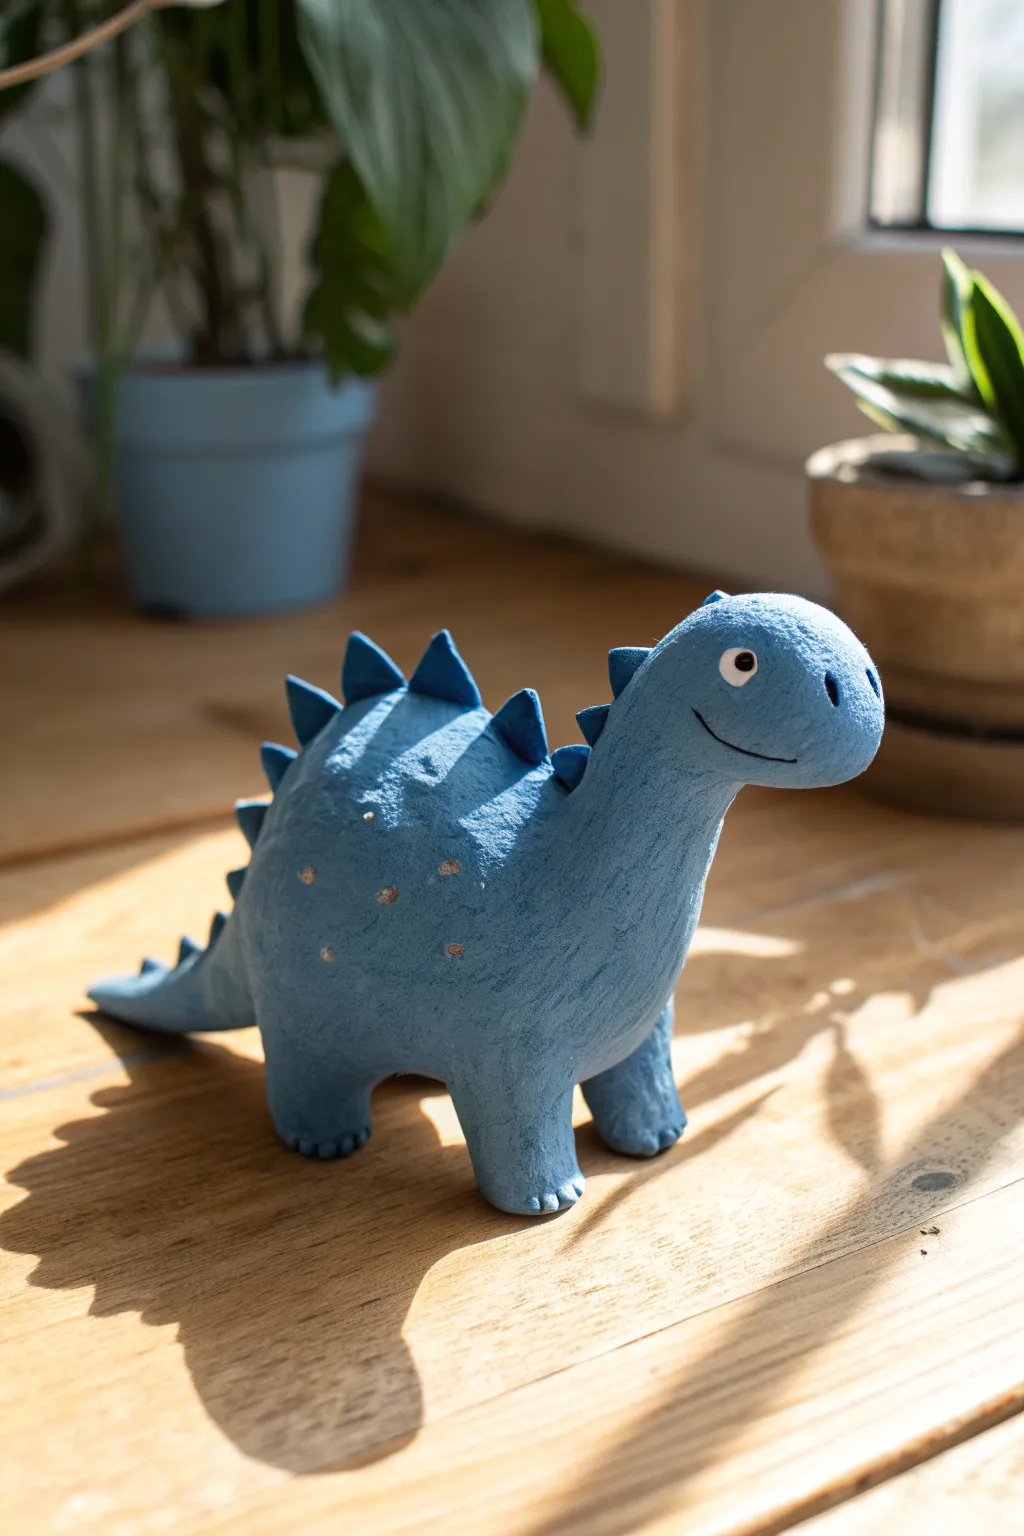
This charming, chunky dinosaur brings a pre-historic smile to any shelf with its textured blue finish and friendly expression. The project uses basic hand-building techniques to create a sturdy, lovable Stegosaurus character perfect for beginners.
How-To Guide
Materials
- Air-dry clay or polymer clay (white or light grey base)
- Acrylic paints: Slate blue, light grey, black, white, bronze/gold
- Sculpting tools (needle tool, smoother)
- Texture sponge or rough fabric
- Aluminum foil (for armature)
- Paintbrushes (flat shader, fine detail liner)
- Cup of water
- Matte varnish (optional)
Step 1: Forming the Body
-
Create the core:
Start by crumpling a piece of aluminum foil into a large egg shape. This saves clay and keeps the dinosaur lightweight while providing a solid structure. -
Cover the armature:
Roll out a thick slab of clay and wrap it completely around your foil egg. Smooth all seams together until you have a solid, seamless clay egg. -
Pull the neck:
Identify the front of your egg and gently pinch and pull the clay upwards and outwards to form a thick, sturdy neck. It shouldn’t be too long; keep it somewhat stubby for that chunky look. -
Shape the head:
At the top of the neck, mold a rounded, blunt snout shape. The head should flow smoothly from the neck without a sharp definition line. -
Form the tail:
On the opposite end, pull the clay outwards into a tapered tail. Keep the base thick where it meets the body and let it curve slightly downward or to the side.
Step 2: Adding Legs and Texture
-
Attach the legs:
Roll four short, stout cylinders of clay. Score and slip (scratch the surface and add water) to attach them to the underside of the body. Blend the clay upwards so there are no seams. -
Check stability:
Gently press the dinosaur down onto your work surface to flatten the bottoms of the feet. Ensure it stands distinctively on its own; adjust the legs if it wobbles. -
Add toe details:
Use a needle tool or a small knife to press three small indentations into the front of each foot to imply toes. -
Create surface texture:
Take a coarse sponge or a piece of rough fabric and gently dab it all over the clay surface. This gives it that specific rough, skin-like texture seen in the photo.
Cracking Clay?
If you see small cracks appearing as the clay dries, mix a tiny bit of fresh clay with water to make a paste and fill in the gaps immediately.
Step 3: Spikes and Drying
-
Make the plates:
Roll out a small strip of clay and cut triangles of varying sizes. You will need larger ones for the back and smaller ones for the neck and tail. -
Attach the plates:
Score the bottom of each triangle and the spine of the dinosaur. Attach them in a single row running from the top of the head down to the tail, blending the base of each spike into the body. -
Final smoothing:
Re-texture any areas around the spikes that got smoothed out during attachment. Check the overall silhouette one last time. -
Let it dry:
Allow the sculpture to dry completely. For air-dry clay, this might take 24-48 hours depending on thickness. If using polymer, bake according to package instructions.
Make it a Duo
Try making a second, smaller dinosaur in a contrasting earthy color like terracotta or sage green to display them together as a pair.
Step 4: Painting and Finishing
-
Apply base coat:
Paint the entire dinosaur with a slate blue acrylic paint. You may need two coats to get full, opaque coverage over the textured surface. -
Dry brushing:
I like to mix a little white into the blue paint to make a lighter shade. Wipe most of the paint off your brush and lightly sweep it over the texture to highlight the bumps. -
Paint the face:
Using a fine liner brush, paint a simple curved black line for the mouth. For the eyes, paint white circles, let them dry, and add small black pupils. -
Add decorative spots:
Dip the end of a paintbrush handle or a dotting tool into bronze or gold paint. Add a cluster of small dots on the dinosaur’s flank for a bit of sparkle. -
Seal the work:
Once all paint is fully dry, apply a coat of matte varnish to protect your new prehistoric friend.
Place your finished dino near a plant or window to enjoy its friendly presence
Veggie Characters in a Set
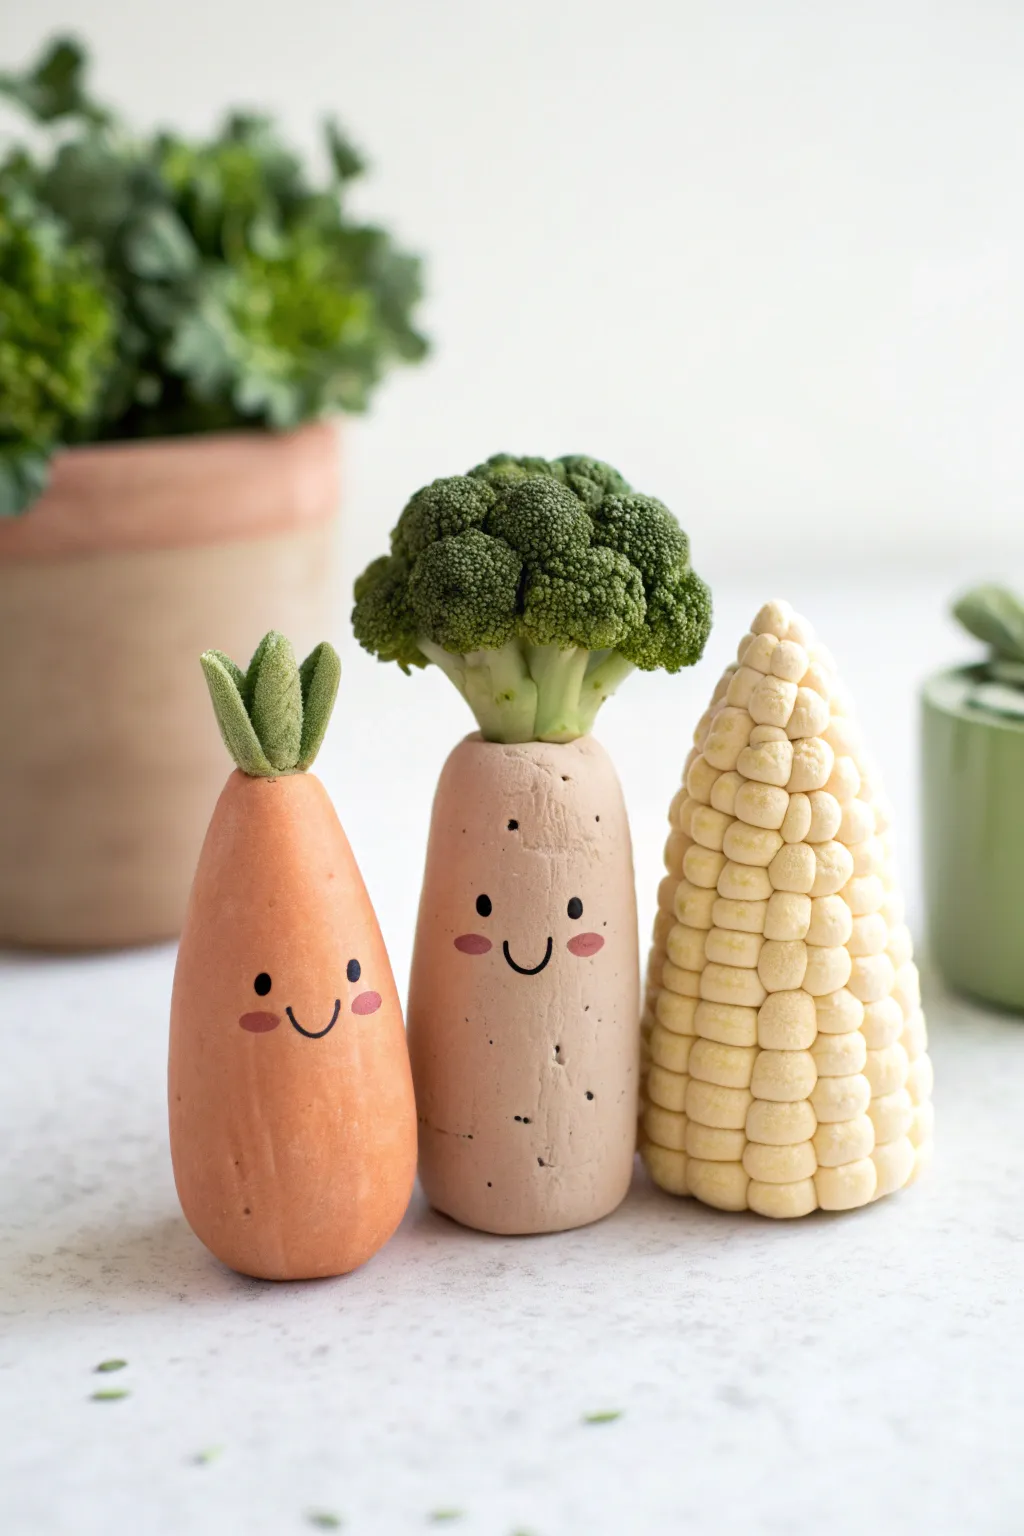
Brighten up your desk or shelf with this adorable set of handmade clay vegetable friends. Featuring a smiling carrot, a playful potato-broccoli hybrid, and a textured corn cob, these minimalist figures combine natural produce shapes with kawaii-inspired expressions.
Step-by-Step Guide
Materials
- Polymer clay or air-dry clay (orange, beige/light tan, light yellow)
- Real broccoli floret (dried) or preserved moss (for the broccoli hair)
- Green felt or green clay (for carrot top)
- Acrylic paints (black, pink, darker beige)
- Fine detail paintbrush or dotting tool
- Sculpting tools (needle tool, small ball tool)
- Strong craft glue or E6000
- Matte varnish (optional)
Step 1: Sculpting the Carrot Friend
-
Form the base:
Start by conditioning a ball of orange clay until it is soft and pliable. Roll it into a smooth egg shape, then gently taper the top third to create a classic carrot silhouette that is slightly wider at the bottom for stability. -
Create the greenery:
For the carrot top, you have two options. You can sculpt three small teardrop shapes from green clay and texture them, or use thick green felt cut into small pointed leaves. If using clay, press them firmly onto the top center of the carrot body. -
Smooth the surface:
Before curing or drying, give the carrot a final smoothing with your finger to remove any fingerprints. If desired, you can add very faint horizontal lines with a needle tool for texture, but the example keeps it quite smooth.
Uneven Corn Kernels?
If your corn kernels aren’t sticking or look messy, try flattening the back of each ball slightly before pressing it onto the core. A touch of liquid clay or water helps adhesion.
Step 2: Creating the Potato-Broccoli Character
-
Shape the body:
Take your beige or light tan clay and roll it into a cylinder. Flatten the bottom so it stands upright, and round off the top shoulders slightly. It should look like a tall potato. -
Add texture:
Using a needle tool or a stiff toothbrush, gently stipple the surface of the clay to give it an organic, potato-skin texture. Poke a few deeper, random holes to mimic potato eyes. -
Prepare the head opening:
Create a shallow indentation or hole at the very top of the cylinder where the broccoli floret will eventually sit. This ensures a secure fit later. -
Bake or dry:
At this point, if you are using polymer clay, bake your carrot and potato bodies according to the package instructions. If using air-dry clay, allow them to dry completely for 24-48 hours.
Accessorize Your Veggies
Give them even more personality by sculpting tiny accessories! A small pair of wire glasses for the corn or a little clay bowtie for the broccoli adds major character.
Step 3: Crafting the Corn Cob
-
Form the core:
Roll a cone shape from light yellow clay. The base should be wide enough to stand, tapering up to a rounded point. -
Add kernels:
I find this step meditative: roll dozens of tiny, pea-sized balls of the same yellow clay. Starting at the bottom, attach them in horizontal rows around the cone. -
Refine the shape:
As you stack the rows higher, slightly offset the kernels or press them gently together so there are no large gaps. Continue until you reach the vary tip, using smaller balls for the peak. -
Bake or dry the corn:
Cure the corn piece separately. Since it has many small attached parts, handle it gently when moving it to the oven or drying rack.
Step 4: The Broccoli Transformation & Details
-
Attach the broccoli hair:
Once the potato body is fully hardened and cool, take your dried real broccoli floret or a clump of preserved moss. Apply strong glue to the indentation you made earlier and press the ‘hair’ firmly in place. -
Paint the faces:
Using a fine detail brush and black acrylic paint, add two small dots for eyes on the carrot and potato. For the potato, place the eyes wider apart. Add a small U-shaped smile between them. -
Blush effect:
Mix a tiny amount of pink paint. Dip the end of a toothpick or a small dotting tool into the paint and dab cute oval cheeks onto the characters just below their eyes. -
Refining the potato:
To make the potato look more realistic, you can use a dry brush with darker brown paint to lightly dust the ‘eyes’ or indentations you sculpted earlier, adding depth to the skin. -
Final assembly check:
Ensure the carrot top is secure (glue if necessary for felt) and that all paint is dry. Arrange your trio together to ensure they balance each other in height and style.
Now you have a whimsical little vegetable family to bring a touch of joy to your workspace

TRACK YOUR CERAMIC JOURNEY
Capture glaze tests, firing details, and creative progress—all in one simple printable. Make your projects easier to repeat and improve.
Basic Mushroom Sculpture
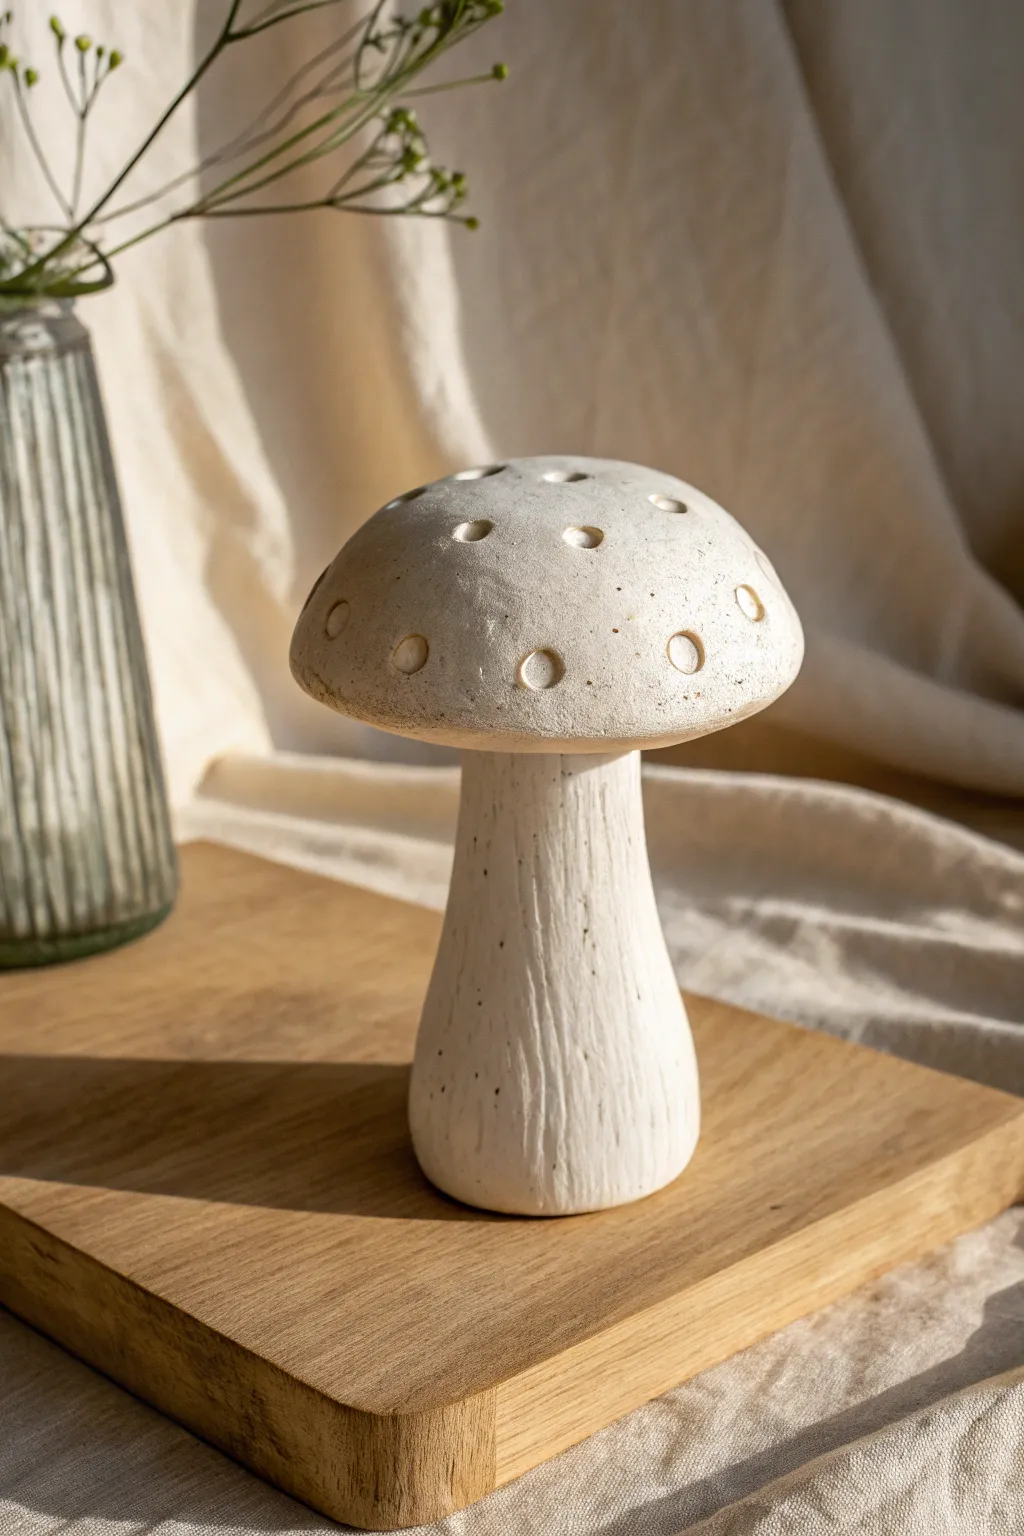
Embrace the imperfect, organic beauty of nature with this simple clay mushroom sculpture. Its textured stem and charmingly dotted cap make it a perfect minimalist accent for any shelf or desk.
How-To Guide
Materials
- Air-dry clay or white polymer clay
- Rolling pin
- Aluminum foil
- Sculpting tools (needle tool and loop tool)
- Small cup of water
- Sponge or soft brush
- Sandpaper (fine grit)
- Drinking straw or similar small circular cutter
- Wire cutters (optional)
Step 1: Forming the Stem
-
Prepare the core:
Start by scrunching a piece of aluminum foil into a thick cylindrical shape. It should be slightly wider at the bottom than the top to mimic a natural mushroom stem. This foil core saves clay and reduces drying time. -
Wrap the clay:
Roll out a slab of white clay to about a 1/4 inch thickness. Wrap this slab entirely around your foil cylinder, overlapping the edges slightly. -
Blend the seams:
Use your fingers or a modeling tool to smooth out the seam where the clay overlaps. Wet your finger slightly with water to help blend the clay if it starts to crack. -
Create the base flare:
Gently press the mushroom stem onto your work surface to flatten the bottom. Use your thumb to push the clay outward slightly at the base, creating a subtle, stable flare. -
Add vertical texture:
Take a needle tool or a stiff bristled brush and drag it vertically up the stem. Don’t worry about being perfectly straight; these irregular lines simulate the organic growth patterns found in real fungi.
Natural Speckling
For a speckled stone look, mix used coffee grounds or cracked black pepper into your white clay before sculpting. Sanding after drying reveals the specks beautifully.
Step 2: Creating the Cap
-
Shape the foil cap:
Create a second armature from foil, shaping it into a flattened dome or hemisphere. Make sure the underside is somewhat flat or slightly concave. -
Cover with clay:
Roll out another slab of clay, perhaps slightly thicker than the stem piece. Drape it over your foil dome, smoothing it down the sides and tucking it underneath the rim. -
Smooth the surface:
Use a damp sponge to wipe over the top of the cap. We want a smooth, matte finish that contrasts nicely with the textured stem we made earlier. -
Add the signature dots:
Using the end of a drinking straw or a small loop tool, press gently into the clay cap to create circular indentations. Scatter them randomly—some near the edge, some near the top—for a natural look. -
Clean up the impressions:
If the tool raised any rough edges around the circles, gently tap them down with your fingertip. I find that leaving a tiny bit of unevenness actually adds to the rustic charm.
Step 3: Assembly and Finishing
-
Score and slip:
Rough up the top of the stem and the center underside of the cap with your needle tool. Apply a little water or liquid clay (slip) to both scored areas. -
Join the pieces:
Press the cap firmly onto the stem. Give it a gentle wiggle to ensure the bond is secure, checking from all angles to make sure the cap sits relatively straight. -
Reinforce the neck:
Roll a very thin snake of clay and wrap it around the connection point underneath the cap. Smooth this out with a tool to seamlessly fuse the two parts together. -
Final texture check:
Look over your mushroom one last time. If you smudged the texture on the stem while attaching the cap, re-etch those vertical lines now. -
Dry properly:
Set the mushroom in a safe, dry place away from direct sunlight. If using air-dry clay, rotate it occasionally so it dries evenly. -
Sanding the details:
Once fully cured, use fine-grit sandpaper to smooth any overly sharp edges on the cap or base, giving the piece a soft, stone-like feel.
Top-Heavy Troubles?
If the cap keeps sliding off or slumping while wet, insert a toothpick or heavy wire vertically through the stem and into the cap to act as internal support.
Place your finished sculpture near a window or amongst house plants for a delightful touch of woodland magic
Flower-Shaped Coasters
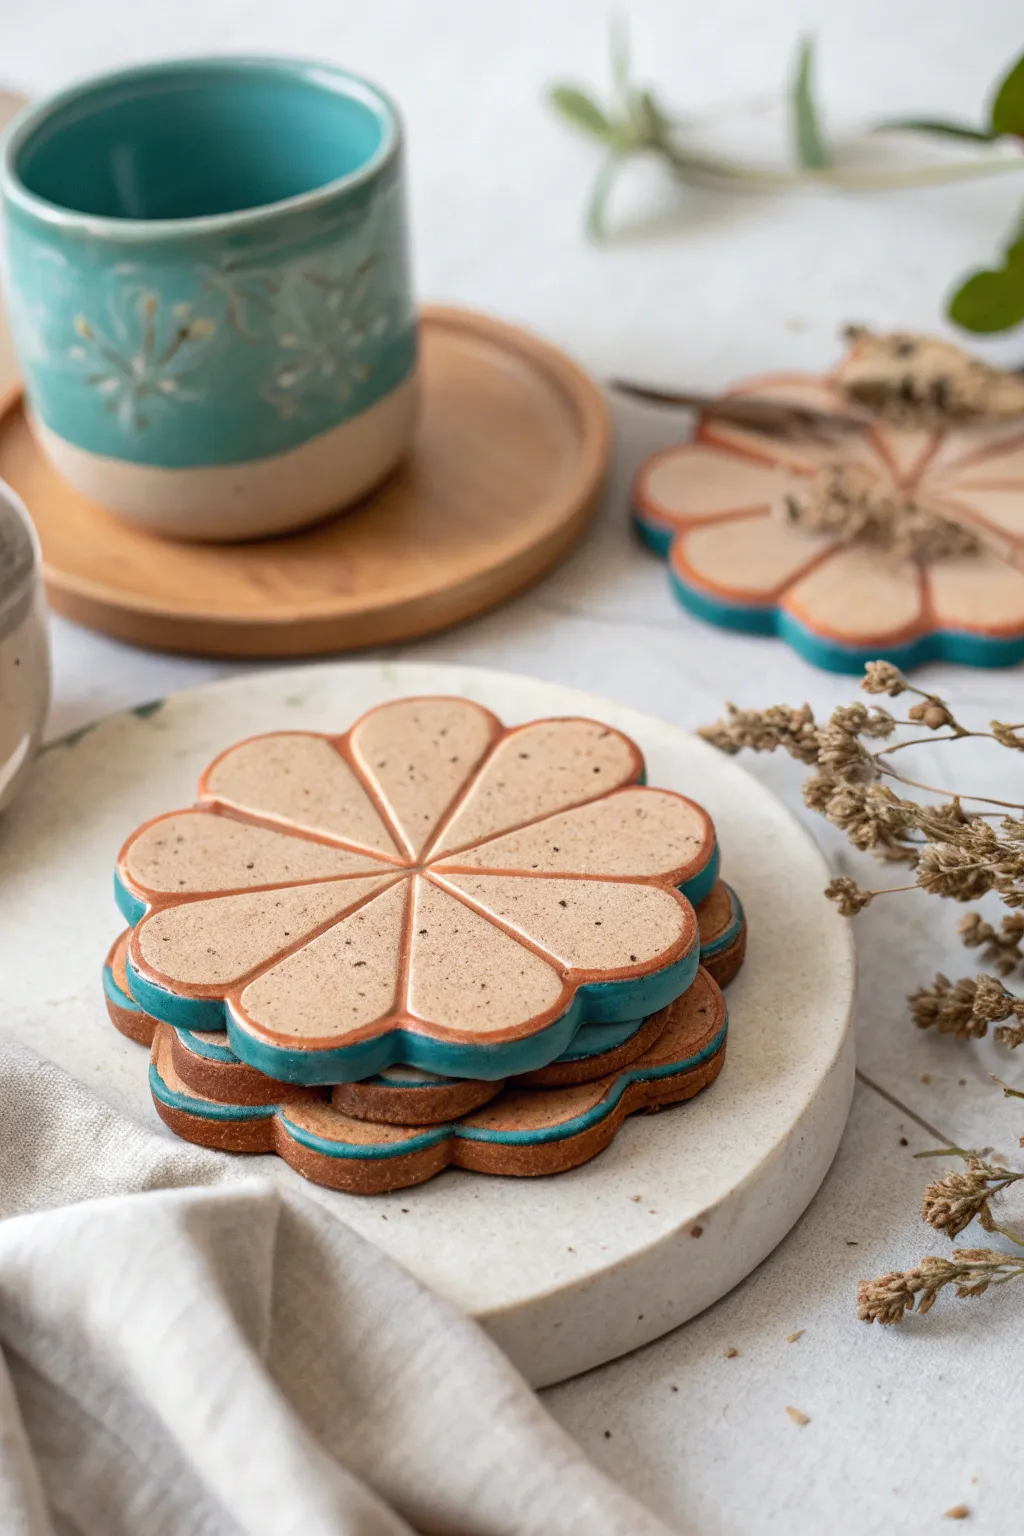
Enhance your coffee table with this stack of delightful flower-shaped coasters, featuring a natural speckled clay body and a striking teal rim. The segmented petal design adds a refined, graphic touch while the glossy finish ensures they are as functional as they are beautiful.
Step-by-Step Tutorial
Materials
- Speckled stoneware clay (mid-fire) or speckled polymer clay
- Rolling pin
- Rolling guides or slat sticks (approx. 5-7mm)
- Flower-shaped cookie cutter (large, approx. 4 inches) or paper template
- Fettling knife or needle tool
- Rib tool (rubber or metal)
- Sponge
- Underglaze pencil or carving tool
- Teal glaze (for rim)
- Clear transparent glaze
- Kiln (if using stoneware) or oven (if using polymer)
Step 1: Shaping the Clay Foundation
-
Prepare your clay:
Start by wedging your speckled clay thoroughly to remove any air bubbles. If you are using polymer clay, condition it until it is soft and pliable. -
Roll out a slab:
Place your clay between rolling guides or slat sticks on a canvas or non-stick board. Roll the clay into an even slab, aiming for a thickness of about a quarter-inch (5-7mm). This thickness gives the coaster durability without being too heavy. -
Smooth the surface:
Before cutting, take a rib tool and gently compress the surface of the slab. I find doing this now saves a lot of cleanup time later by removing canvas texture and aligning the clay particles. -
Cut the flower shape:
Press a large flower-shaped cookie cutter firmly into the slab. If you don’t have a cutter, place a paper template on the clay and carefully trace around it with a needle tool or fettling knife. -
Refine the edges:
Once the shape is cut, lift it gently. Use a damp sponge or your finger to smooth the sharp edges cut by the tool, rounding them slightly for a finished look.
Warping Woes?
Flat objects love to warp. Dry ceramic coasters very slowly between pieces of drywall or wood. Flip them daily to ensure even airflow on both sides.
Step 2: Adding the Petal Details
-
Mark the center:
Find the approximate center of your flower. Make a tiny, superficial mark here to guide your lines. -
Create the segments:
Using a blunt tool or the back of a knife, gently impress lines radiating from the center to the indentation between each petal. You want to create deep grooves that define the segments without cutting all the way through the clay. -
Deepen the definition:
Go over your lines a second time to ensure they are distinct. The glaze will pool slightly in these grooves, highlighting the design. -
Dry slowly (Ceramic only):
If using real pottery clay, place the coasters between two boards or weigh them down lightly with a piece of drywall to prevent warping while they dry to the leather-hard stage. -
Bisque fire:
Once fully bone dry, fire the pieces in a kiln to cone 04 (or your clay’s specific bisque temperature). If using polymer clay, skip to the baking step.
Step 3: Glazing and Finishing
-
Clean the bisque:
Wipe the bisqued coaster with a damp sponge to remove any dust that might interfere with glaze adhesion. -
Apply the rim color:
Using a small, steady brush, apply teal underglaze or glaze specifically to the outer vertical edge of the coaster. Extend this color slightly onto the top rim to create that defined border seen in the image. -
Line the segments:
To accentuate the petals, you can carefully paint a thin line of the same teal color into the central grooves you created earlier. Alternatively, leave them bare to let the clay’s natural speckle shine. -
Apply clear glaze:
Dip the entire coaster into a clear, transparent glaze, or brush on two to three even coats. This will seal the clay and make the speckles pop. -
Wipe the foot:
Ensure the bottom of the coaster is completely free of glaze. Use a wax resist before glazing or wipe it clean with a sponge afterwards to prevent it from sticking to the kiln shelf. -
Final firing:
Fire the coaster again to the maturation temperature of your clay and glaze (typically cone 5 or 6 for stoneware). If using polymer clay, bake according to the package instructions and seal with a gloss varnish. -
Finishing touches:
Once cooled, check the bottom for rough spots. Sand lightly if needed to ensure it won’t scratch your table surfaces.
Level Up: Texture
Before cutting the shape, roll a textured fabric or lace over the clay slab. The glaze will break beautifully over the pattern, adding vintage charm.
Stack your new set on a coffee table and enjoy the handmade charm they add to your daily routine (no exclamation mark)
Texture-Stamped Clay Tiles

These elegant clay tiles showcase the incredible versatility of simple stamping tools to create complex surface designs. Featuring four distinct patterns ranging from organic overlapping arches to crisp geometric lines and raised dots, this project is a perfect introduction to relief techniques.
Detailed Instructions
Materials
- White air-dry clay or polymer clay
- Rolling pin
- Square cookie cutter (approx. 4 inches)
- Small wooden dowel or chopstick (for dots)
- Circular fondant cutter or lipstick cap (for raised circles)
- Metal ruler or straight edge
- Pottery wire loop tool or bent paperclip (for detailed carving)
- Canvas mat or parchment paper
- Sandpaper (fine grit)
- Sealant (acrylic matte finish, optional)
Step 1: Preparation & Shaping
-
Condition the Clay:
Begin by kneading your white clay until it is smooth, pliable, and free of cracks. If you are using air-dry clay, keep your hands slightly moist to prevent drying. -
Roll the Slabs:
Roll out the clay on a canvas mat or parchment paper to an even thickness of about 1/4 inch. Try to keep the thickness consistent so all four tiles match. -
Cut Squares:
Using your square cookie cutter or a ruler and knife, cut out four identical squares. Smooth the cut edges gently with your finger to remove any sharp burrs.
Fixing Warp
If tile corners curl up while drying, flip them over halfway through the drying process. Placing a light book on top (with paper in between) during the final dry can also flatten them.
Step 2: Creating the Dot Pattern
-
Mark the Grid:
Take the first tile. Lightly visualize a grid or gently mark spacing points to keep your pattern aligned, though a random scatter works for a more organic look. -
Indent Small Dots:
Using the tip of a small wooden dowel or a blunt skewer, press repeatedly into the clay surface. Vary the pressure slightly or use two different sized tools to create the subtle variation seen in the speckled tile.
Step 3: Creating the Raised Circles
-
Select the Circle Tool:
For the second tile, you need a tool that compresses the background while leaving the circle raised. A small circular fondant plunger or a makeshift stamp cut from a dowel works well here. -
Stamp the Grid:
Press your circular tool firmly into the clay in evenly spaced rows. The goal is to push the clay down *around* the circle shape, creating a relief effect.
Level Up: Color Wash
Dilute acrylic paint with water and brush it over the textured tiles. Wipe the surface quickly with a rag—paint will stay in the deep grooves, highlighting your stamped patterns.
Step 4: Creating Geometric Lines
-
Draw Main Shapes:
On the third tile, use your ruler and a needle tool or toothpick to lightly sketch the diamond and triangle layout before committing to deep cuts. -
Carve the Lines:
Go back over your sketch lines with deeper pressure. I like to use a small ribbon tool here to actually remove a thin strip of clay, making the lines distinct and bold. -
Add Accents:
Press small circles or spirals into the negative spaces of the geometric design using a small stamp or the end of a paintbrush handle to add visual interest.
Step 5: Creating Scalloped Arches
-
Start the Base Row:
For the fourth tile, create the Art Deco wave pattern. Use a U-shaped wire loop tool or a bent paperclip. Press it into the bottom edge of the tile to create the first arch. -
Detail the Arch:
Inside that first arch, press smaller, concentric arches to fill the shape with lines. -
Build the Pattern Upwards:
Move to the next row, positioning the center of the new arch directly above the valley between the two arches below it. Continue this overlapping scale pattern until the tile is filled.
Step 6: Finishing
-
Dry Slowly:
Place all tiles on a flat surface away from direct heat or drafts. Let them dry for 24-48 hours. Drying too fast can cause curling corners. -
Sand Edges:
Once fully cured and hard, gently sand the edges and corners with fine-grit sandpaper to give them a professional, finished feel. -
Seal (Optional):
If these will be used as coasters, apply a matte acrylic sealant to protect them from moisture.
Arranging these tiles together creates a stunning mini-gallery of textures that invites touch and admiration
Flat Shape Magnets
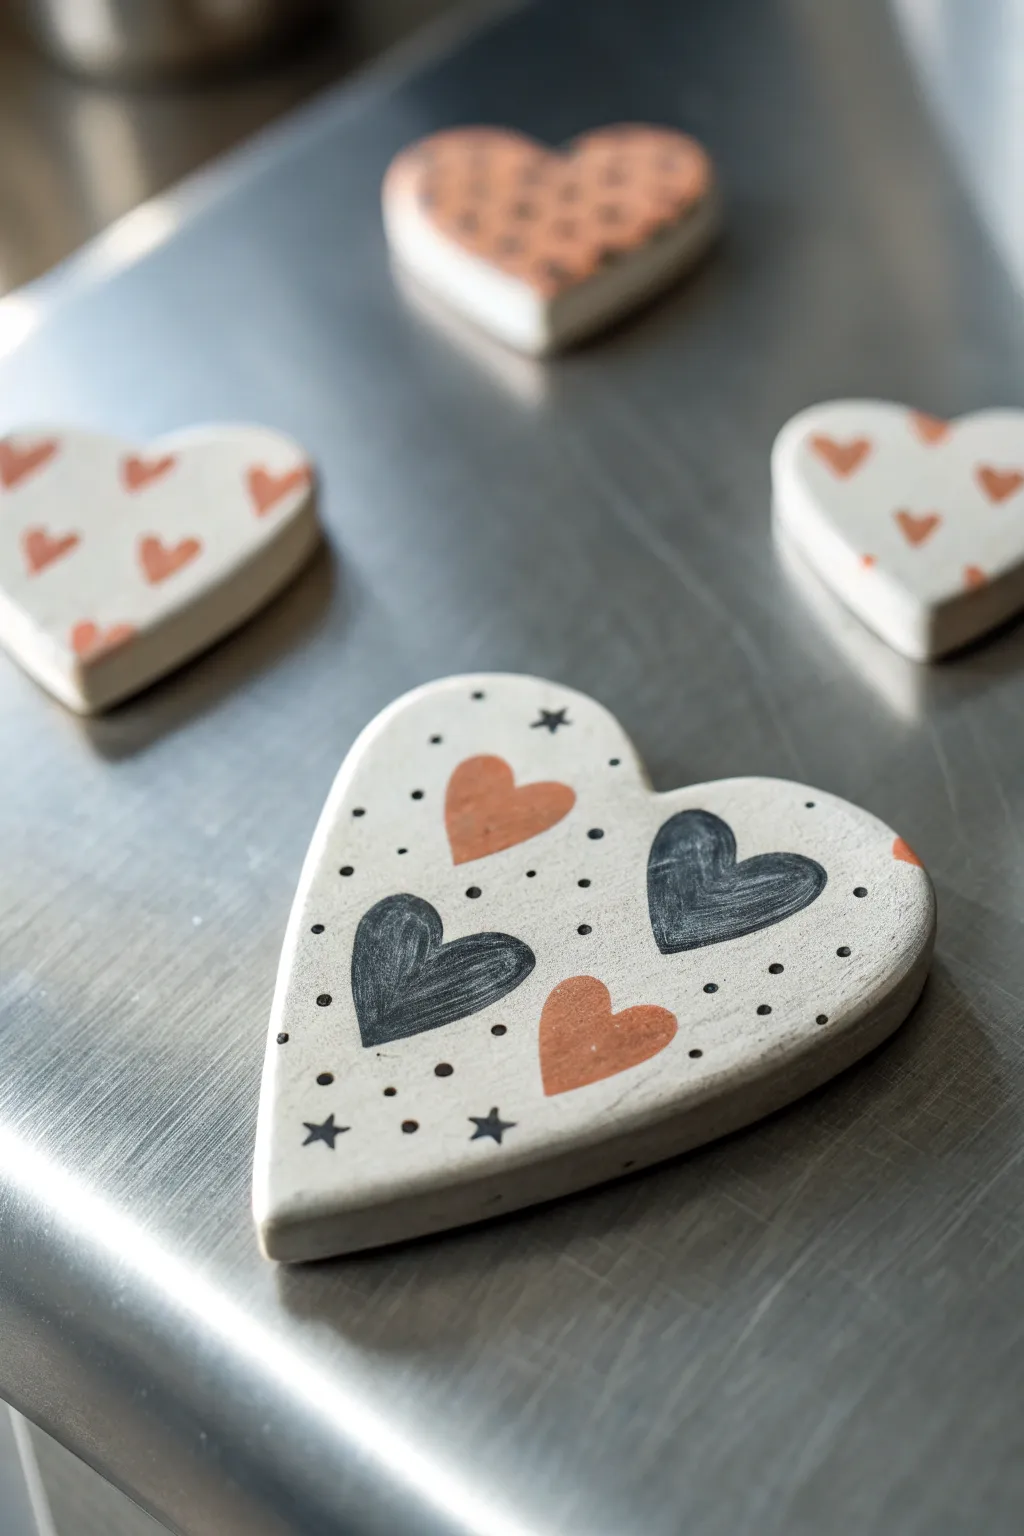
These charming, flat heart magnets are a perfect beginner project that combines simple clay shaping with freehand doodling. The finished look is rustic yet polished, featuring a creamy white background adorned with black and terracotta-colored hearts, stars, and dots.
Step-by-Step
Materials
- Air-dry clay (white) or polymer clay (white/cream)
- Heart-shaped cookie cutter (medium size)
- Rolling pin
- Parchment paper or non-stick mat
- Fine-grit sandpaper (optional)
- Acrylic paints: Black and Burnt Sienna/Terracotta
- Fine-point paintbrush (size 0 or 00)
- Dotting tool or toothpick
- Clear matte or satin varnish
- Round ceramic magnets or magnetic tape strips
- Strong craft glue (E6000 or similar)
Step 1: Shaping the Clay Base
-
Prepare your workspace:
Lay down a sheet of parchment paper or a silicone mat to prevent the clay from sticking. This also makes moving the wet shapes easier later. -
Condition the clay:
Take a handful of white clay and knead it in your hands until it becomes soft, pliable, and free of cracks. Warm hands help this process go faster. -
Roll out the slab:
Using your rolling pin, roll the clay out to an even thickness of about 1/4 inch (approx. 6mm). Keep it relatively thick so the magnets will be sturdy. -
Cut the shapes:
Press your heart-shaped cookie cutter firmly into the clay slab. Wiggle it slightly to ensure a clean cut, then lift the cutter. -
Smooth the edges:
Carefully remove the excess clay. Dip your finger in a little water and run it gently along the edges of the cut heart to smooth out any roughness or jagged bits. -
Dry the clay:
If using air-dry clay, let the hearts sit undisturbed for 24-48 hours, flipping them halfway through to ensure even drying. If using polymer clay, bake according to the package instructions. -
Sand for perfection:
Once fully dry or cool, check for any sharp edges. I like to run a piece of fine-grit sandpaper lightly over the surface and edges for a professional, smooth finish.
Uneven Clay Surface?
If your clay dried with lumps, wet sand it. Dip waterproof sandpaper in water and sand in circles. This creates a slurry that fills tiny pits for a glass-smooth finish.
Step 2: Decorating the Hearts
-
Plan your placement:
Visualize where your main design elements will go. For the featured design, imagine four hearts arranged somewhat centrally—two large black ones and two smaller terracotta ones. -
Paint the black hearts:
Using your fine-point brush and black acrylic paint, paint two slightly tilted hearts. One near the bottom left and one near the top right. Fill them in solidly, allowing brush strokes to add texture. -
Add the terracotta hearts:
Switch to your burnt sienna or terracotta paint. Paint two smaller hearts in the empty spaces—one near the top center and one near the bottom center. -
Draw the stars:
With the black paint and the very tip of your fine brush, add small five-point stars. Place them sporadically, perhaps one near the bottom left point and one near the top edge. -
Add dot details:
Use a dotting tool or the blunt end of a toothpick dipped in black paint. Add tiny polka dots randomly around the hearts to fill the negative space. -
Let the paint set:
Allow the acrylic paint to dry completely. This usually takes about 15-20 minutes since the layers are thin. -
Seal the surface:
Apply a thin coat of clear matte or satin varnish over the entire front and sides. This protects the clay from moisture and prevents the paint from chipping.
Step 3: Assembly
-
Attach the magnet:
Flip the heart over to the blank side. Apply a pea-sized dot of strong craft glue to the center. -
Secure and cure:
Press the magnet firmly into the glue. Let the glue cure fully according to the manufacturer’s directions before sticking it to your fridge.
Try Stamped Texture
Before drying, press lace or rubber stamps gently into the wet clay. After drying, paint the recessed areas in a dark color and wipe the surface for an antique look.
Now your custom magnets are ready to organize notes or just add a little warmth to your kitchen surfaces
Blob Pencil or Brush Cup

Brighten up your workspace with this adorable, hand-built ceramic cup featuring a friendly face and a playful color block design. Perfect for holding paintbrushes or pencils, this project uses simple pinch pot techniques to create a charmingly organic form.
Step-by-Step Guide
Materials
- Earthenware or stoneware clay (white firing)
- Pottery wheel (optional, but hand-building works too)
- Needle tool
- Rib tool (kidney scraper)
- Sponge
- Salmon pink underglaze
- Turquoise/teal underglaze
- Fine liner brush
- Small round brush
- Black underglaze (for the face)
- Clear transparent glaze
- Kiln access
Step 1: Shaping the Clay Body
-
Prepare your clay:
Start with a ball of clay roughly the size of a large orange. Wedge it thoroughly to remove any air pockets, ensuring a smooth consistency for building. -
Open the form:
If using a wheel, center the clay and open it up. If hand-building, push your thumb into the center of the ball and gently pinch outwards to create a hollow shape. -
Pull the walls:
Pull the clay upwards to create a cylinder. Aim for a shape that is slightly wider at the bottom and gently tapers inward toward the top rim, giving it that cozy, rounded look. -
Smooth the surface:
While the wheel is spinning slowly, or holding the pot in your hand, use a rib tool to smooth the exterior walls. You want to remove finger ridges but keep the organic, slightly curvy silhouette. -
Refine the rim:
Using a slightly damp sponge, gently compress and round off the top rim. This ensures it’s comfortable to touch and less likely to chip later. -
Dry to leather hard:
Set your cup aside until it reaches the leather-hard stage. It should be firm enough to handle without deforming but still cool to the touch.
Perfect Specks
Test your splatter technique on a scrap piece of paper first. Vary the distance of the brush from the cup to control the density of the speckles.
Step 2: Decorating and Glazing
-
Mark the horizon line:
Using a pencil (the graphite will burn off in the kiln), lightly sketch a horizontal line around the lower third of the cup to separate your color zones. -
Apply the top color:
Using a soft brush, apply three even coats of salmon pink underglaze to the upper section and the interior of the cup. Allow each coat to dry until matte before adding the next. -
Apply the bottom color:
Coat the bottom third of the cup with three layers of turquoise underglaze. Overlap the pink slightly or butt the edges together neatly at your pencil line. -
Paint the face details:
Dip a fine liner brush into black underglaze. Paint two small dots for eyes and a simple U-shape for the smile centered on the pink section. -
Add the cheeks:
Add two tiny vertical dashes under each eye to give the face rosy cheeks. I personally find that keeping these marks extremely small makes the face look sweeter. -
Create the speckled texture:
Load a stiff toothbrush or a small bristle brush with diluted black underglaze. Run your thumb over the bristles to flick tiny speckles onto the turquoise section. -
Detail the transition:
Use the liner brush to add a row of very small black dots right along the painted horizon line where the pink meets the turquoise. -
Bisque fire:
Place the bone-dry piece in the kiln for a bisque firing (usually around Cone 04) to harden the clay and set the underglaze. -
Clear glaze application:
Once cool, dip the entire cup into a clear transparent glaze. Shake off any excess drips gently. -
Wipe the foot:
Use a damp sponge to wipe all glaze off the very bottom of the cup so it doesn’t fuse to the kiln shelf. -
Final firing:
Fire the piece again to the maturation temperature of your specific clay and glaze (typically Cone 06 or Cone 6).
Add Texture
Before firing, try leaving the turquoise bottom section unglazed (raw clay) for a lovely matte, tactile contrast against the glossy pink top.
Now you have a cheerful companion for your creative tools that will make you smile every time you reach for a brush
Tiny Bud Vase From a Coil
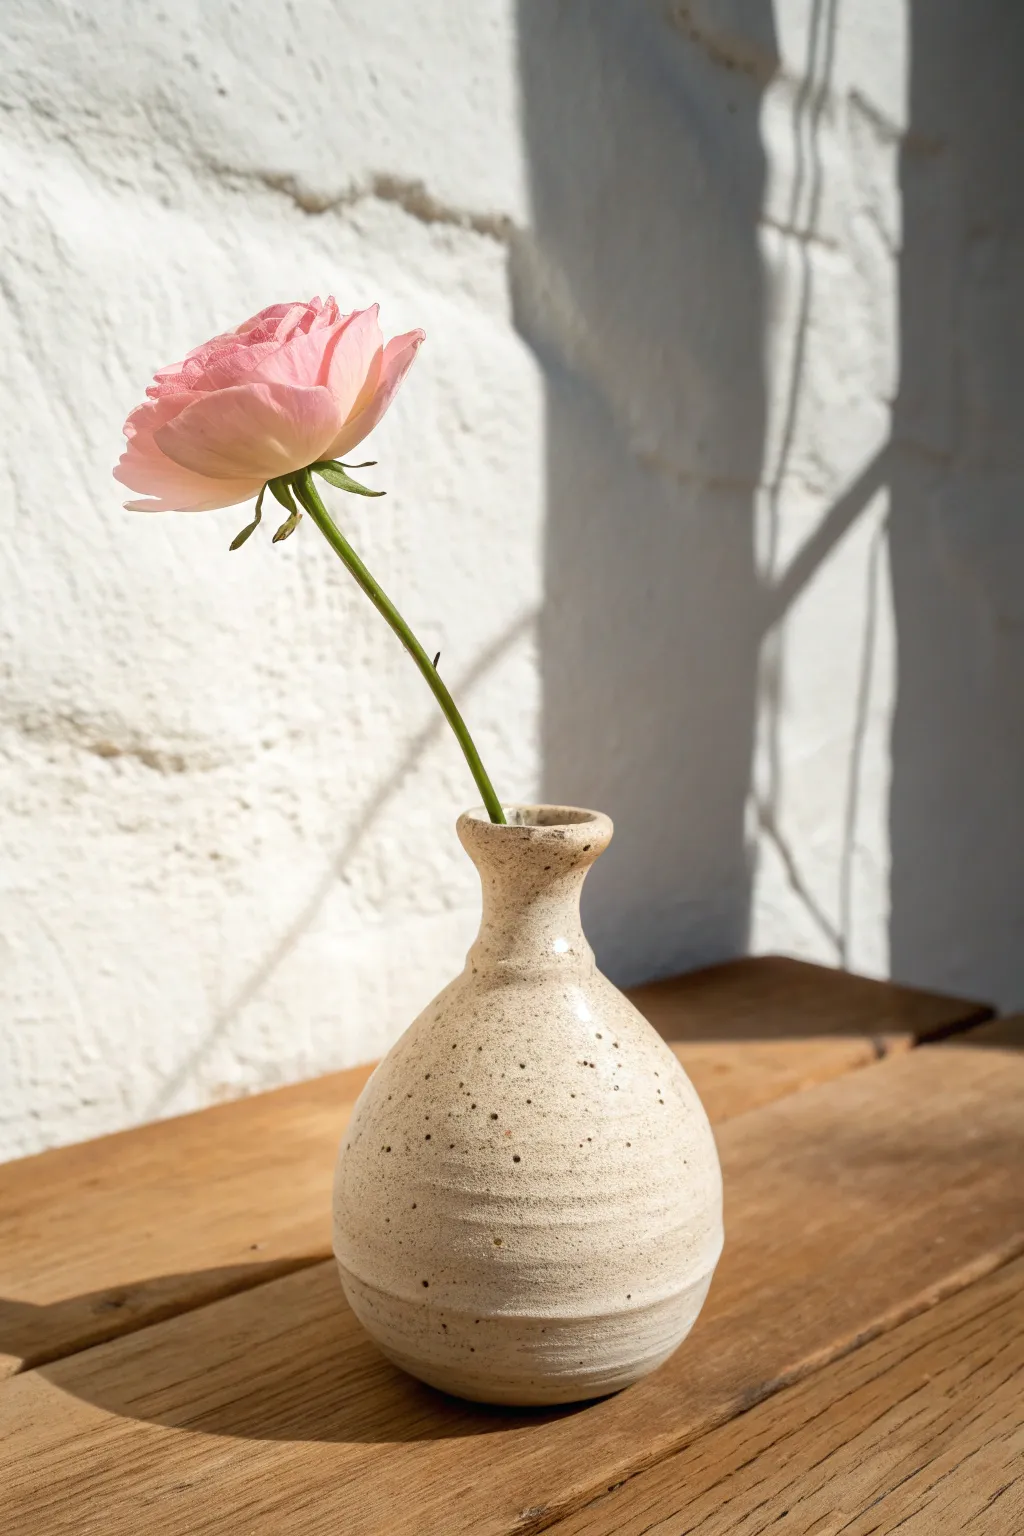
Create a delicate home for a single bloom with this charming wheel-thrown bud vase. Featuring a classic bulbous form and a distinctively speckled, creamy glaze, this project celebrates the texture of clay with subtle throwing rings left visible for a handmade touch.
Step-by-Step
Materials
- Speckled stoneware clay (approx. 1 lb)
- Pottery wheel
- Bucket of water
- Sponge
- Wooden throwing rib
- Wire cutter
- Needle tool
- Chamois leather strip
- Clear or translucent white glazes
- Kiln
Step 1: Preparing and Centering
-
Wedge the clay:
Begin with a small ball of speckled stoneware clay, roughly the size of a large orange. Wedge it thoroughly to remove air pockets and ensure an even consistency. -
Secure to the wheel:
Throw the ball of clay firmly onto the center of a dry wheel head. Pat it into a rounded cone shape to ensure it’s well-adhered. -
Center the clay:
Start the wheel at a moderate-high speed. Using wet hands, cone the clay up and push it back down several times until the mound is perfectly centered and stable.
Collaring collapse?
If the neck walls buckle while narrowing, you are squeezing too hard or the clay is too dry. Add a little water and use gentler, more gradual pressure over multiple passes.
Step 2: Throwing the Form
-
Open the clay:
Drill your thumbs into the center of the mound, leaving about a half-inch of clay at the bottom for the base. Widen the opening slightly, but keep it narrower than a bowl since this is a bottle form. -
Pull the first cylinder:
Slow the wheel down slightly. Pinch the clay at the base and pull the walls upward. Keep the cylinder fairly narrow, focusing on even wall thickness rather than height initially. -
Collar the neck:
As you get higher, gently ‘collar’ or squeeze the top third of the cylinder inward with wet hands to begin defining the narrow neck area. -
Belly out the form:
This is the fun part where the shape emerges. Insert a sponge or fingers inside the pot and push gently outward against the bottom two-thirds of the wall to create that rounded, bulbous belly. -
Add texture:
Instead of smoothing the outside perfectly with a rib, I like to leave the faint ridges from my fingertips visible. Gently drag a finger up the side as the wheel turns to accentuate these horizontal throwing lines on the lower belly. -
Refine the neck:
Continue to collar the neck inward until it is quite narrow. Pull the clay up slightly to elongate the neck, ensuring the transition from the round body to the vertical neck is smooth.
Design Pro Tip
Leave the throwing rings slightly deeper near the bottom third. The glaze will pool in these recesses, creating beautiful subtle stripes that highlight the handmade quality.
Step 3: Finishing Touches
-
Flare the rim:
At the very top of the neck, gently press outward with a fingertip or tool to create a small, inviting flare. This helps support the flower stem later. -
Smooth the lip:
Use a damp strip of chamois leather held over the rim while the wheel spins to compress the clay and make the lip buttery smooth. -
Trim the undercut:
Use a wooden knife tool to trim away excess clay at the very base where the vase meets the wheel head, creating a clean undercut. -
Wire off:
Run a wire cutter under the pot to separate it from the wheel. Slide it onto a ware board to dry to a leather-hard state.
Step 4: Trimming and Glazing
-
Trim the foot:
Once leather hard, center the vase upside down on the wheel. Trim the bottom to clean up the shape and carve a shallow foot ring. -
Bisque fire:
Allow the vase to dry completely (bone dry) before loading it into the kiln for a bisque firing (usually cone 04 or 06). -
Select the glaze:
Choose a glaze that is translucent or breaks over texture. A clear glaze or a semi-opaque white works best to let the natural speckles of the clay body shine through. -
Dip and wipe:
Dip the vase into the glaze bucket. Once dry to the touch, use a sponge to carefully wipe the glaze off the foot ring to prevent it from sticking to the kiln shelf. -
Final fire:
Fire the glazed piece to the maturity temperature of your clay body (likely cone 5 or 6 for stoneware).
Place a single wildflower in your new vase and enjoy the simple elegance of your creation