Whenever I’m craving that toes-in-the-sand feeling, I reach for clay and start building little bits of the coast right on my work table. These beachy clay ideas are all about easy textures, ocean-inspired colors, and pieces you’ll actually want to use or display.
Seashell Trinket Dishes
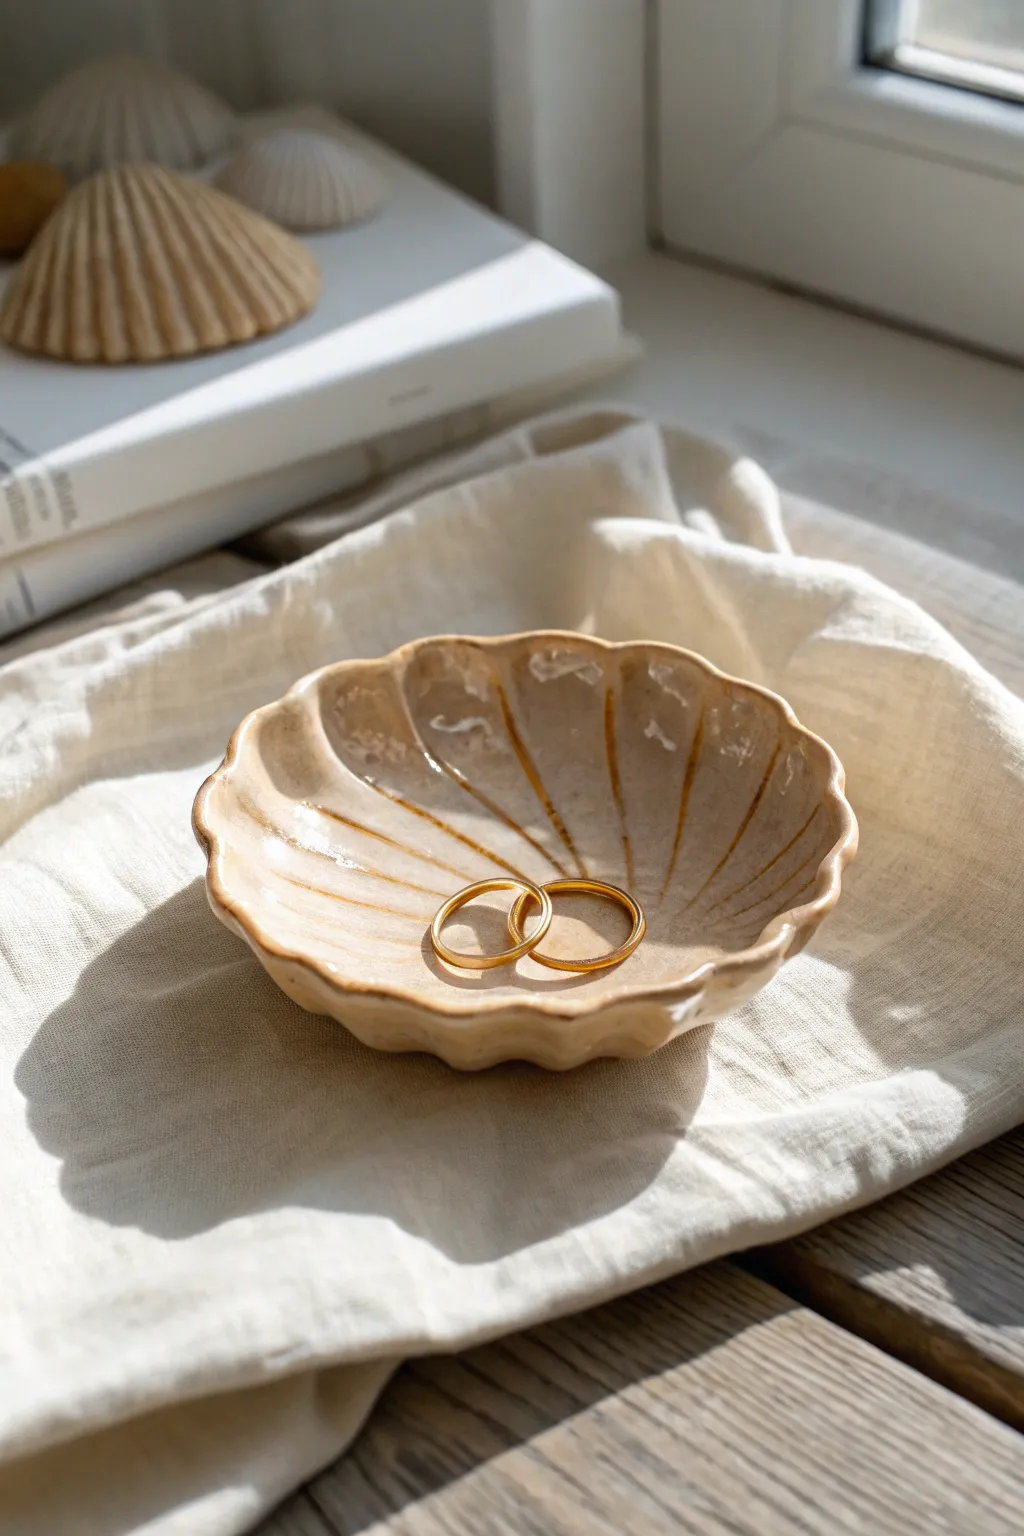
Capture the essence of the shore with this delicate, scallop-shaped trinket dish. Featuring soft ridges and a subtle, glossy finish, it provides the perfect resting spot for your favorite rings.
Step-by-Step Guide
Materials
- White air-dry clay or polymer clay
- Rolling pin
- Real scallop shell (to use as a mold or template)
- Clay knife or craft scalpel
- Small bowl of water
- Sponge or soft brush
- Sandpaper (fine grit)
- Acrylic paints (creamy beige, white)
- Gold paint or gold leaf pen
- High-gloss varnish or resin
- Small paintbrush
Step 1: Shaping the Clay
-
Prepare your clay:
Start by conditioning a ball of white clay in your hands until it is pliable and smooth. Roll it into a sphere about the size of a golf ball. -
Roll it out:
Using your rolling pin, flatten the ball into a circle roughly 1/4 inch thick. Aim for an even thickness throughout so the dish dries uniformly. -
Create the shape:
Place your real scallop shell lightly on top of the clay as a guide, or freehand the shape by cutting a rounded fan silhouette with a flat bottom edge using your craft knife. -
Form the ridges:
If you aren’t pressing into a real shell, use the back of your knife or a modeling tool to gently indent radiated lines fanning out from the bottom center to the top edges. Don’t cut through the clay, just press down to create grooves. -
Curve the edges:
Gently lift the clay circle and cup it in your palm to give it a shallow bowl shape. Pinch the edges slightly to enhance the ‘scalloped’ look, following the lines of your grooves. -
Smooth the texture:
Dip your finger or a sponge into a little water and run it over the edges and surface to erase any fingerprints or harsh cut marks. I like to spend extra time here to ensure the rim looks soft and weathered. -
Dry the form:
Let the clay dry completely according to the package instructions. To maintain the curved shape, let it dry inside a small bowl lined with a paper towel.
Step 2: Painting and Finishing
-
Sand imperfections:
Once fully dry and hard, lightly sand any rough edges with fine-grit sandpaper until the surface feels smooth to the touch. -
Base coat application:
Mix a touch of brown or yellow ochre into white acrylic paint to create a warm, creamy beige. Paint the entire dish, front and back, and allow it to dry. -
Add dimension:
Dilute a slightly darker shade of beige with water to create a wash. Brush this into the grooves of the shell and wipe away the excess on the raised areas with a paper towel, leaving the shadows in the crevices. -
Highlight the ridges:
Using a very fine brush and gold paint, carefully trace the indented lines of the shell. You don’t need to be perfectly opaque; a semi-transparent line adds a lovely natural shimmer. -
Paint the rim:
Run a thin line of gold paint along the very edge of the scalloped rim to frame the piece elegantly. -
Seal the piece:
Finish by applying two coats of high-gloss varnish. This mimics the wet look of a shell fresh from the ocean and protects your paint work. -
Final cure:
Allow the varnish to cure fully in a dust-free area for at least 24 hours before placing any jewelry in the dish.
Smooth Moves
Use a damp makeup sponge instead of a finger to smooth the raw clay. It covers more surface area evenly and leaves zero fingerprints behind.
Pearl Effect
Mix a tiny amount of iridescent medium into your final varnish coat. It gives the dish a genuine mother-of-pearl sheen that catches the light beautifully.
This charming handmade dish now brings a permanent piece of seaside serenity to your vanity


Ocean Wave Trinket Tray
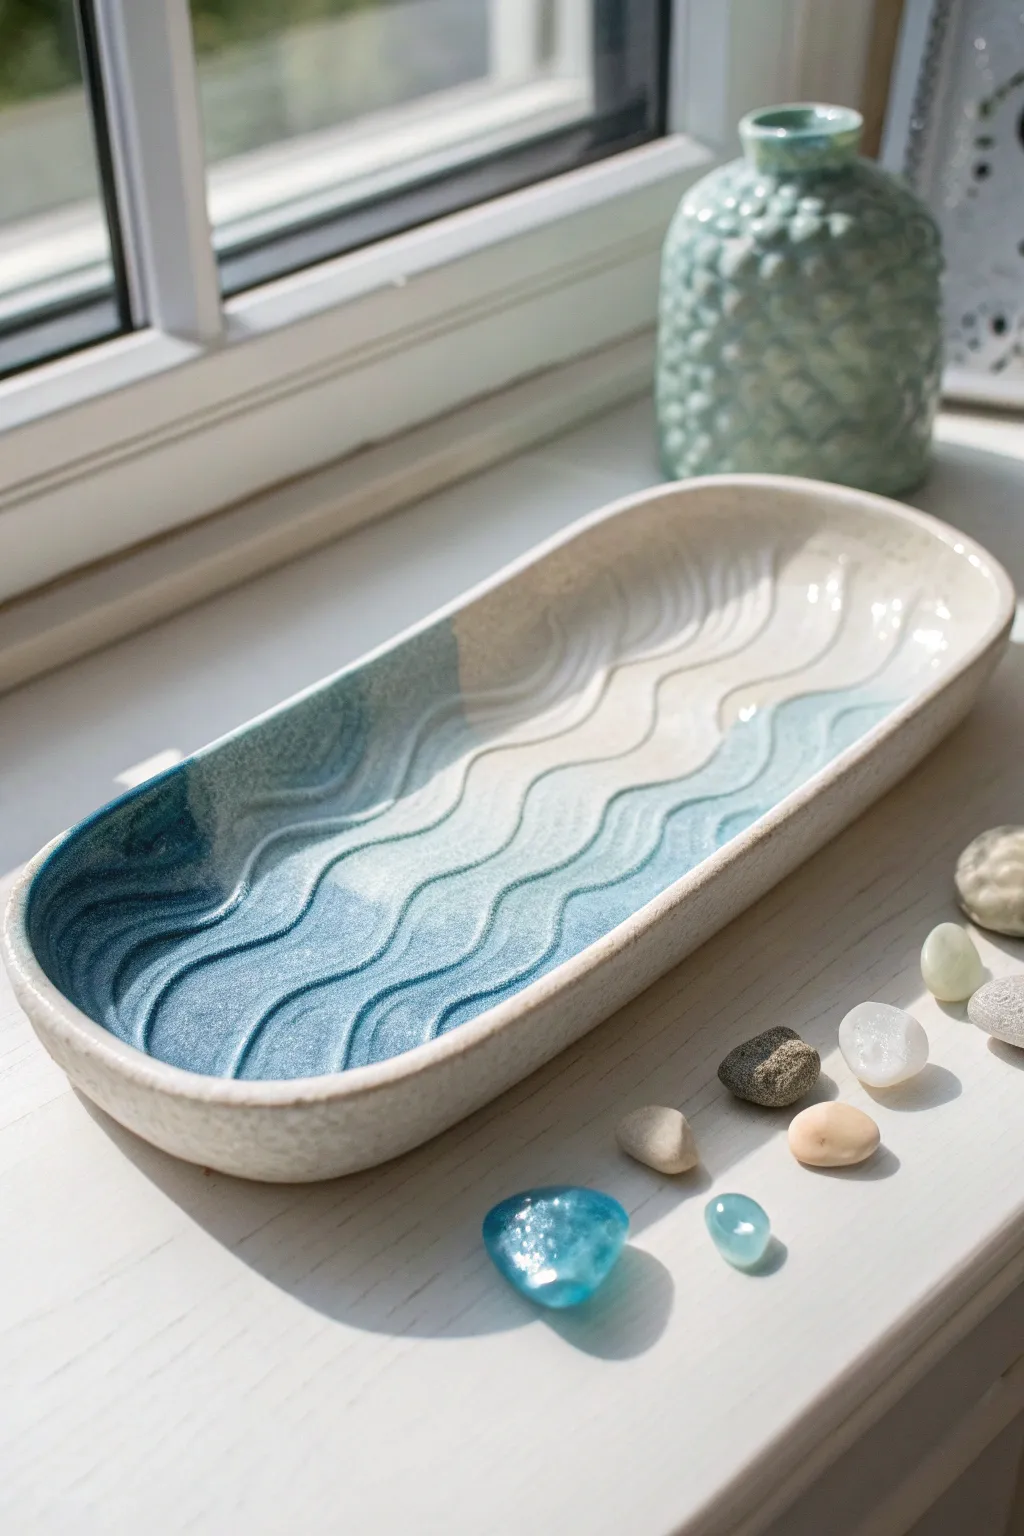
Bring the calming rhythm of the ocean into your home with this ceramic trinket tray, featuring gentle carved ripples and a soothing blue gradient. The textured waves create a tactile experience that mimics the look of the tide rolling onto sandy shores.
Step-by-Step Tutorial
Materials
- Speckled stoneware clay (beige or sand-colored)
- Rolling pin with guide strips (approx. 1/4 inch thick)
- Long oval paper template
- Fettling knife or needle tool
- Loop carving tool (medium width)
- Ribs (metal and soft rubber)
- Sponge
- Underglazes or glazes: Deep Ocean Blue, Turquoise, White/Cream
- Clear transparent glaze (if using underglazes)
- Soft fan brushes
- Kiln for firing
Step 1: Forming the Base
-
Prepare the slab:
Begin by wedging your speckled stoneware clay thoroughly to remove air bubbles. Roll it out into a long, even slab, using guide strips to ensure a uniform thickness of about 1/4 inch. -
Cut the shape:
Place your long oval paper template onto the clay slab. Trace around it with a needle tool or fettling knife to cut out the base shape. -
Create the walls:
Roll out a separate long coil or thin strip of clay for the walls. Score and slip the outer edge of your oval base, then attach the coil firmly, building up a rim about 1 inch high. -
Smooth the connections:
Use a modeling tool or your fingers to meld the wall coil into the base on both the inside and outside seams. I find that dragging the clay from the coil down to the base creates the strongest bond. -
Refine the rim:
Use a damp sponge or piece of chamois leather to smooth the top rim of the tray, ensuring it is rounded and comfortable to the touch.
Step 2: Carving the Waves
-
Dry to leather hard:
Allow the piece to dry slowly until it reaches a leather-hard state where it is firm enough to carve without warping, but still holds moisture. -
Sketch the flow:
Lightly sketch wavy, parallel lines across the interior floor of the tray using a needle tool. These should mimic the organic, meandering path of ocean waves. -
Carve the channels:
Using a medium-width loop tool, carve along your sketched lines. Vary the depth slightly to create a natural, rolling texture, but be careful not to carve too deep and puncture the bottom. -
Clean up burrs:
Once the carving is complete, gently brush away any clay crumbs. Use a soft, damp sponge or stiff brush to smooth down any sharp clay burrs left by the carving tool. -
Bisque fire:
Let the tray dry completely (bone dry) before loading it into the kiln for the preliminary bisque firing.
Fixing Warp
If your tray starts warping while drying, weight it down gently with a small sandbag placed in the center during the drying phase to keep the bottom flat.
Step 3: Glazing the gradient
-
Apply the deep blue:
Start at the left end of the tray. Apply a coat of Deep Ocean Blue glaze, filling the textured grooves. Brush this color about one-third of the way across the tray. -
Blend the middle:
Apply the Turquoise glaze in the middle section. Where it meets the deep blue, use a slightly wet brush to feather the two colors together, encouraging them to mix in the carved grooves. -
Add the sandy shore:
Apply the White or Cream glaze to the remaining third of the tray on the right side. Feather this into the Turquoise section to complete the gradient transition. -
Wipe the rim:
Carefully wipe any excess glaze off the top rim using a clean, damp sponge to reveal the natural speckled clay body, creating a nice frame for the sea colors. -
Glaze fire:
Fire the piece again according to your glaze and clay body’s specific cone requirements.
Make it Sparkle
Add a pinch of crushed turquoise glass to the bottom of the deepest blue grooves before final firing for pooled, gem-like water effects.
Now you have a serene piece of the coast ready to hold your treasures


Starfish Wall Hanging Tiles
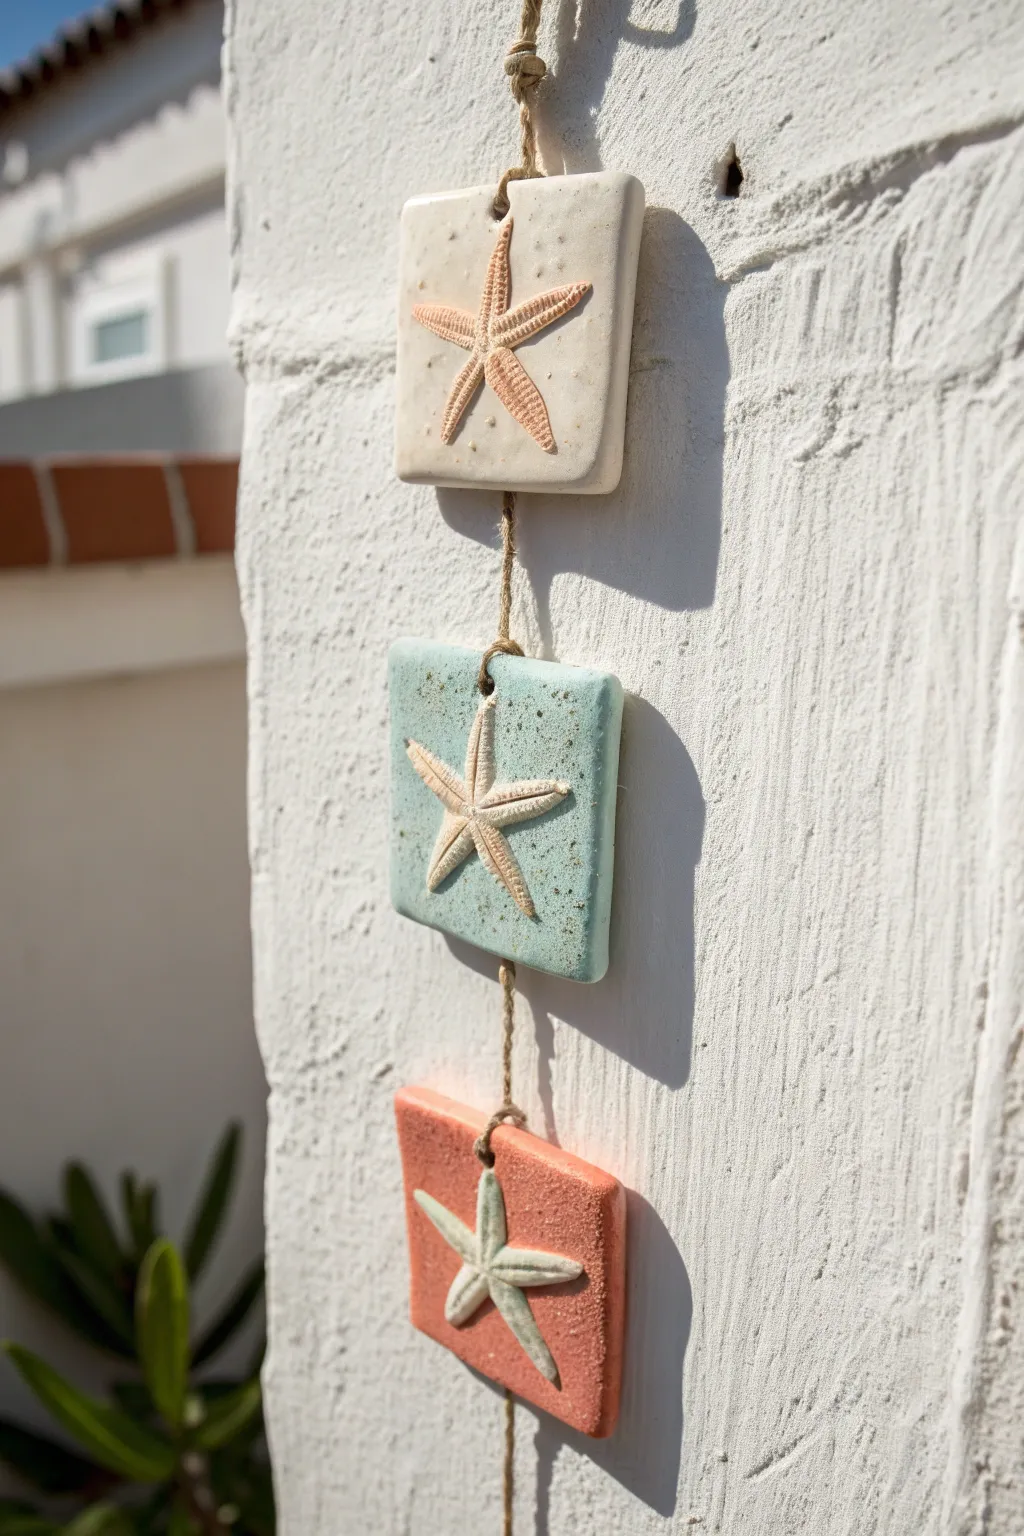
Bring the serene vibes of the shore into your home with this textured clay wall hanging. This project combines simple slab-building techniques with modeled starfish reliefs to create a rugged, weathered piece that looks like it was washed up by the tide.
Detailed Instructions
Materials
- Air-dry clay (white or light cream)
- Small starfish mold OR real dried starfish (for texture reference)
- Rolling pin
- Square cookie cutter (approx. 3-4 inches) or ruler and knife
- Jute twine or rustic hemp cord
- Straw or small circular tool (for holes)
- Acrylic paints (terracotta/peach, light teal/aqua, off-white)
- Small paintbrushes (flat and detail)
- Sea salt or coarse sand (for texture)
- Matte spray sealant or clear varnish
- Texture tool (sponge, old toothbrush, or sandpaper)
Step 1: Shaping the Clay Tiles
-
Roll out the slab:
Begin by conditioning your air-dry clay until it’s pliable. Roll it out to a uniform thickness of about 1/4 inch. If you want a more rustic look, don’t worry about making the surface perfectly smooth. -
Add surface texture:
Before cutting your shapes, sprinkle a tiny bit of coarse sand or salt onto the clay slab and gently roll over it once more to press the granules in. This gives the finished piece a sandy, weathered feel. -
Cut the squares:
Using a square cookie cutter or a ruler and craft knife, cut out three identical squares. Soften the sharp edges slightly with a damp finger to mimic tumbled sea glass. -
Create hanging holes:
Using a straw or a small circular tool, punch a hole in the center of the top and bottom edge of two squares. For the bottom-most square, you only need one hole at the top.
Step 2: Sculpting the Starfish
-
Form the starfish base:
For each tile, take a small ball of clay and shape it into a five-pointed star. Alternatively, press a small ball of clay into a silicone starfish mold if you prefer uniform shapes. -
Detail the arms:
If sculpting by hand, gently pull and pinch the five points to form slender arms. Use a needle tool or toothpick to poke tiny equidistant holes down the center of each arm for that classic starfish texture. -
Attach to the tiles:
Score the back of each starfish and the center of each square tile. Apply a dab of water or slip (liquid clay) to the scored areas and press the starfish firmly onto the center of the tile. -
Refine the connection:
Use a modeling tool to verify the starfish edges are adhered well. I find it helpful to gently wiggle the starfish to ensure the clay bond is secure before letting it set. -
Allow to dry:
Place your tiles on a flat surface, flipping them occasionally to prevent warping. Let them dry completely, which usually takes 24-48 hours depending on humidity.
Cracked Clay Crisis?
If cracks appear while drying, don’t panic! Mix a tiny bit of fresh clay with water to make a paste and fill in the gaps. Smooth it over with a wet finger.
Step 3: Painting and Assembly
-
Base coat the tiles:
Once dry, paint each square tile. Leave the top one natural or paint it a warm cream. Paint the middle tile a soft, dusty teal or aqua. Paint the bottom tile a muted terracotta or coral color. -
Starfish contrast:
Paint the starfish relief so it stands out. For the cream tile, paint the starfish a light peach. For the teal tile, paint the starfish cream. For the coral tile, paint the starfish a pale aqua or white. -
Distress the surface:
To enhance the beachy look, use a dry sponge to dab a little watered-down brown or grey paint lightly over the textures and edges. This ‘antiquing’ highlights the sand texture and imperfections. -
Seal the artwork:
Spray all three tiles with a matte sealant. This protects the clay from moisture and gives the colors a finished, cohesive appearance. -
Tie the top loop:
Cut a long length of jute twine. Fold it in half and tie a knot at the top to create a hanging loop. -
String the first tile:
Thread the two loose ends of the twine through the top hole of the first (cream) tile. Tie a sturdy knot right below the hole (at the back or bottom edge) to hold the tile in place. -
Connect the middle tile:
Leave a gap of about 1-2 inches of twine, then thread through the top hole of the middle (teal) tile. Knot below the hole to secure its position. -
Attach the final tile:
Repeat the process for the final (coral) tile, leaving the same spacing gap. Tie a secure double knot at the very bottom and trim any excess twine for a neat finish.
Driftwood Topper
Instead of a simple twine loop, tie the top string around a small piece of found driftwood to serve as a rustic handle for hanging.
Hang your new coastal creation in a sunny spot to capture that easy-breezy seaside feeling.


Sea Glass-Style Beads
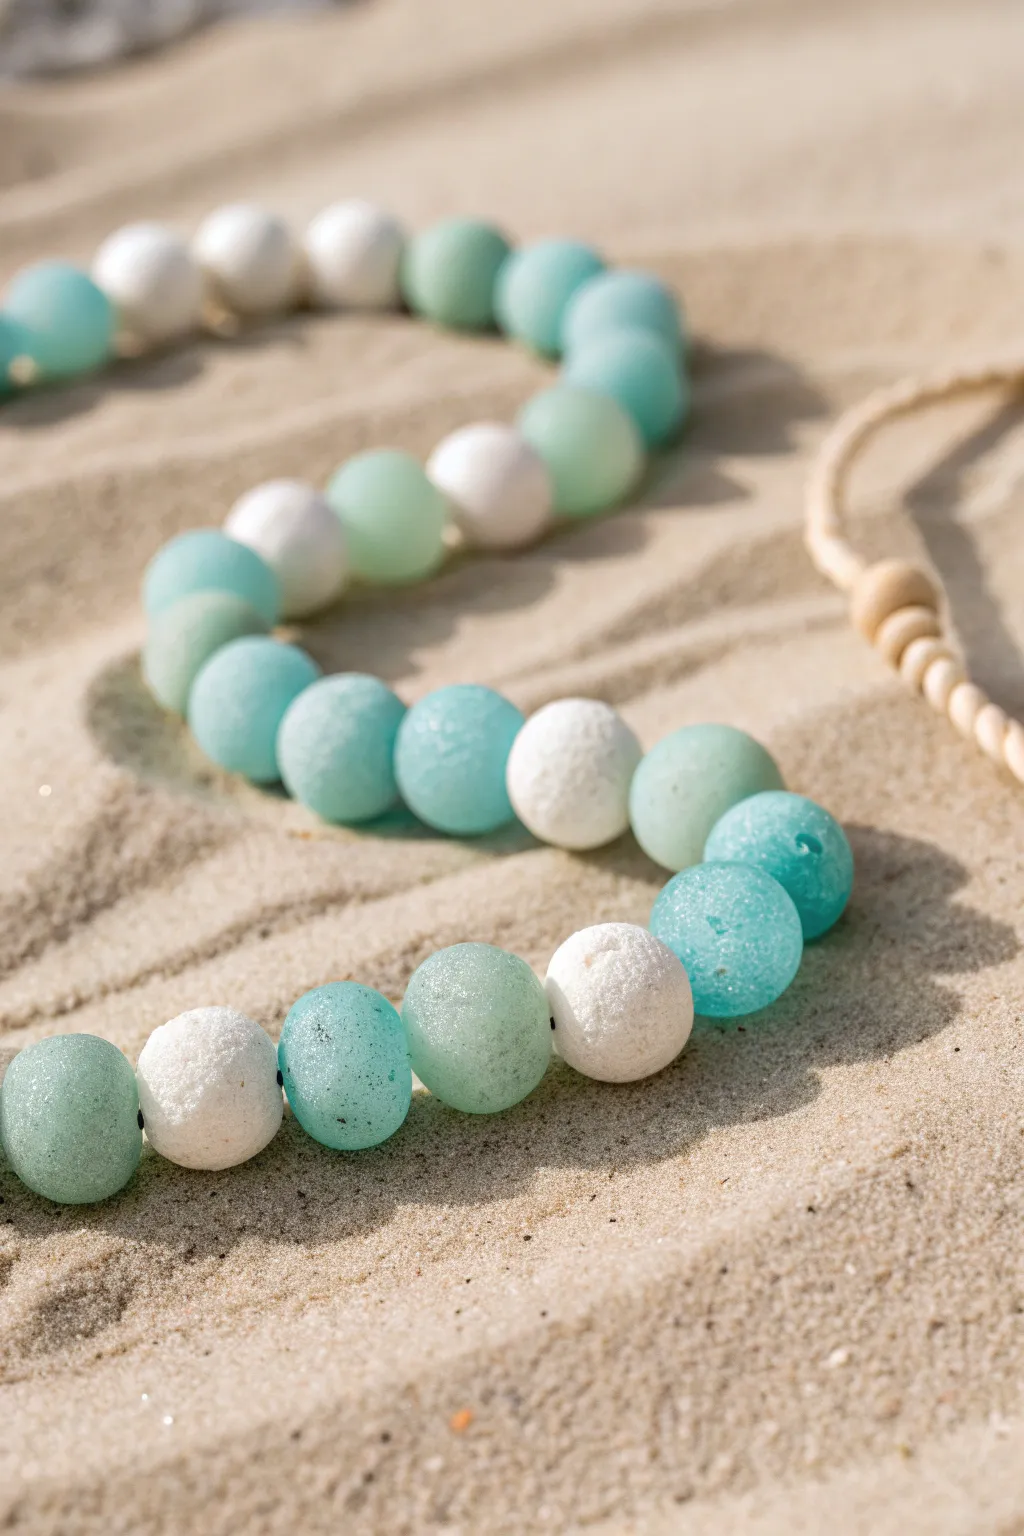
Capture the magic of beachcombing with these polymer clay beads that mimic the soft, tumbled look of sea glass. Through a clever use of translucent clay and surface texturing, you can recreate that salty, sun-worn finish right in your own studio.
Step-by-Step
Materials
- Translucent polymer clay (white or colorless)
- Alcohol inks (teal, turquoise, seafoam green, white)
- Coarse sea salt or kosher salt
- Baking soda
- Medium grit sandpaper (optional)
- Bead piercing pins or toothpicks
- Oven for baking
- Large bowl of water
- Gloves (to protect hands from ink)
Step 1: Color Mixing and Shaping
-
Prepare the translucent base:
Begin by conditioning your translucent polymer clay until it is soft and pliable. Divide the clay into three or four equal portions, depending on how many distinct sea glass shades you wish to create. -
Tint the clay:
Add just a drop or two of alcohol ink to each portion of clay to tint it. Aim for a gradient: keep one portion plain (or very light white) for the ‘white sea glass’ look, use a tiny bit of teal for a light seafoam, and slightly more turquoise for a deeper ocean blue. Knead thoroughly—I suggest wearing gloves here to avoid stained fingers. -
Let the clay rest:
If the clay feels sticky from the ink, let it sit on your work surface for about 10–15 minutes. This allows the alcohol solvent to evaporate, returning the clay to a workable consistency. -
Roll into bead logs:
Roll each colored lump into a long, even snake or log shape. Try to keep the thickness consistent, roughly the diameter you want your final beads to be. -
Portion the beads:
Using a tissue blade or craft knife, slice the logs into equal segments. This ensures your beads will be roughly the same size. -
Shape the spheres:
Roll each segment between your palms to form a round ball. Don’t worry about perfection; real sea glass isn’t perfectly spherical, and slight irregularities add to the organic charm.
Pro Tip: Avoid Fingerprints
Cool the clay in the fridge for 5 mins before rolling in salt. Firmer clay resists fingerprints better, ensuring only the salt texture marks the surface.
Step 2: Texturing and Baking
-
Create the salt bath:
Pour a generous amount of coarse sea salt or kosher salt into a small bowl. The grain size of the salt will determine the size of the pits on your bead surface, so choose a coarser grain for a heavily tumbled look. -
Texture the surface:
Roll each unbaked bead firmly in the salt. Press gently so the crystals embed into the surface of the clay, but be careful not to distort the round shape too much. -
Add deeper texture (optional):
For a more weathered appearance, you can also roll the beads in a mix of baking soda and salt. The baking soda creates tinier micro-pits that enhance the frosted effect. -
Pierce the beads:
Carefully pierce holes through each bead using your bead pins or toothpicks. Twist the tool gently as you push through to avoid squashing the bead. -
Prepare for baking:
Suspension is best for round beads. Arrange your piercing pins on a bead rack or an improvised foil tray so the beads hang freely and don’t touch any surfaces. -
Bake the clay:
Bake the beads according to the manufacturer’s instructions for your specific brand of polymer clay (usually around 275°F or 130°C for 15–30 minutes).
Step 3: Finishing the Frost
-
Cool down:
Once baked, remove the beads from the oven and let them cool completely. They must be cool to the touch before the next step. -
Dissolve the salt:
Submerge the cooled beads in a bowl of warm water. Let them soak for 10–20 minutes. The water will dissolve the salt crystals embedded in the surface. -
Reveal the texture:
Use an old toothbrush to scrub the beads while they are submerged, ensuring all salt residue is washed away. You will see the pitted, pockmarked texture emerge. -
Dry partially:
Pat the beads dry with a paper towel. At this stage, they might look a bit dull but will feel textured. -
Enhance the matte finish:
If the beads are still too shiny for your taste, gently sand them with medium-grit sandpaper or a sanding sponge. I like to do this under running water to keep dust down. -
Apply a final dusting:
For an ultra-powdery finish that looks like dry sea glass, you can tumble the finished dry beads in a tiny amount of translucent powder or cornstarch, then brush off the excess. This kills any remaining shine.
Level Up: Beach Sand Surprise
Mix a tiny pinch of real sand or black pepper into the clay itself before shaping. This adds internal speckles that mimic sediment trapped in old glass.
String these beauties onto a simple cord and enjoy wearing a piece of the ocean wherever you go.

The Complete Guide to Pottery Troubleshooting
Uncover the most common ceramic mistakes—from cracking clay to failed glazes—and learn how to fix them fast.
Mini Coastal Clay Houses
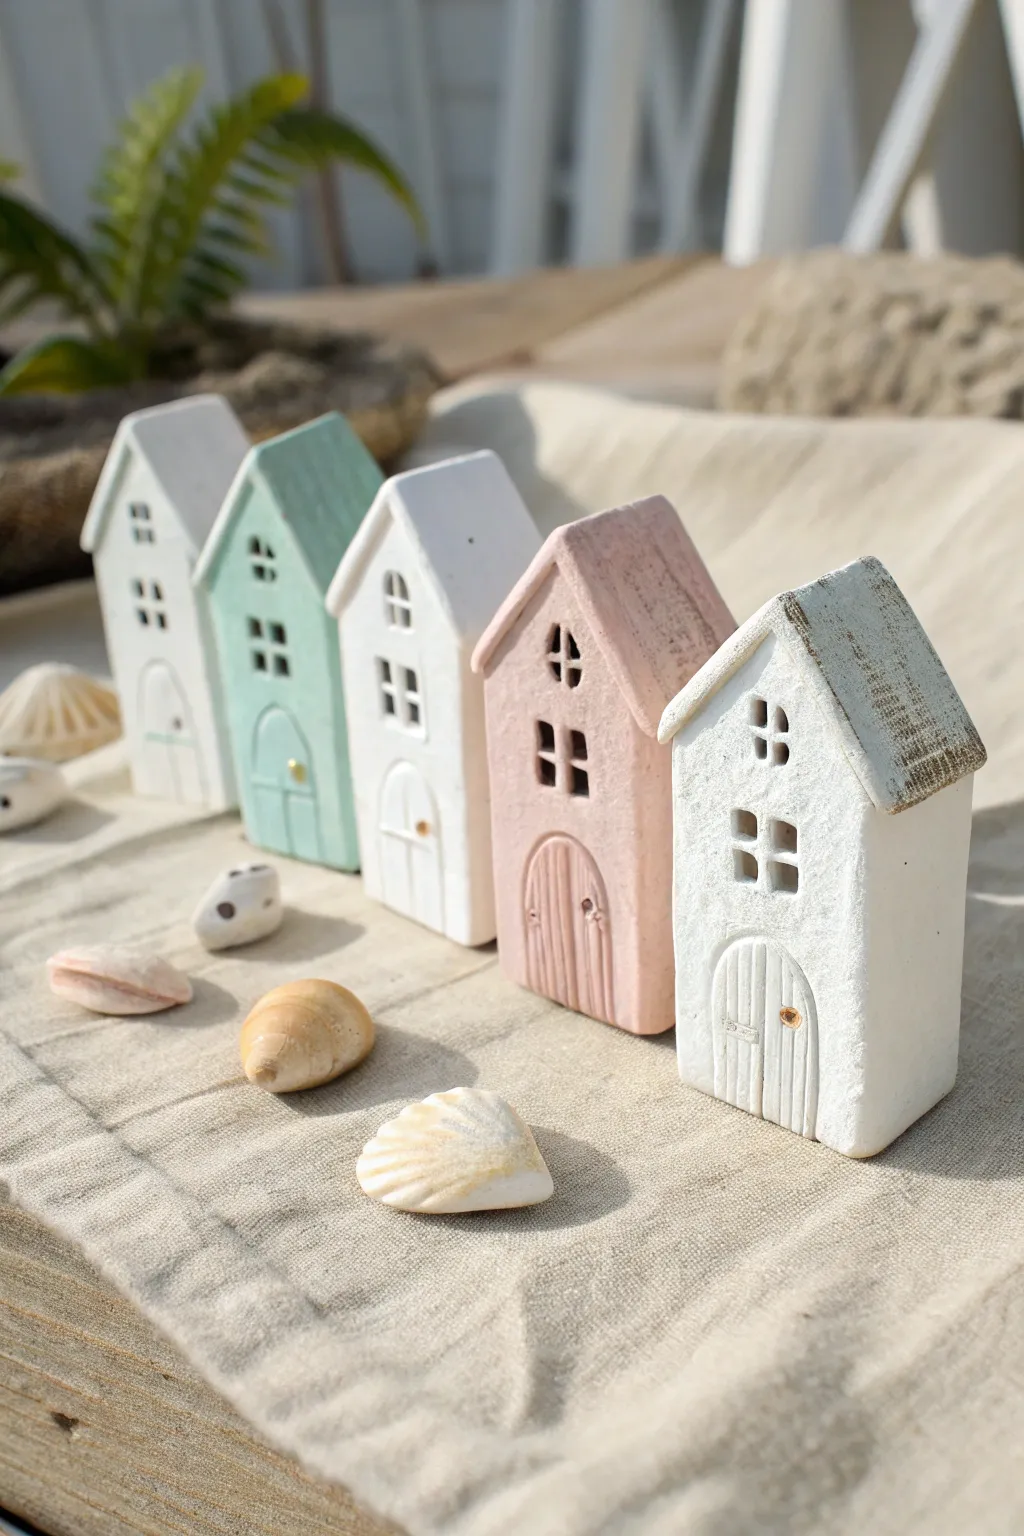
Bring the serene charm of a coastal village to your shelf with these adorable clay houses. Featuring a rustic matte finish and a palette of driftwood white, sage green, and soft coral, this row of tiny abodes captures the breezy simplicity of seaside living.
Step-by-Step Guide
Materials
- Air-dry clay (white or terracotta)
- Rolling pin with guide rings (approx. 1 cm thickness)
- Sharp craft knife or scalpel
- Ruler
- Clay sculpting tools (specifically a needle tool and a small flat-head tool)
- Fine-grit sandpaper
- Acrylic paints: White, Sage Green, Pastel Pink, light Brown/Beige
- Small flat paintbrush
- Fine detail paintbrush
- Water cup and paper towels
- Matte varnish or sealant (optional)
Step 1: Shaping the Structures
-
Preparation:
Start by kneading a handful of air-dry clay until it is soft, pliable, and free of cracks. If it feels too dry, add a tiny drop of water. -
Roll the block:
Form the clay into a thick, rectangular block. Instead of rolling it flat like a cookie, shape a substantial prism that is roughly 1 inch deep and 2 inches wide. -
Cut the base shapes:
Using your sharp craft knife, slice the long block into five separate segments of varying widths. Don’t worry about them being identical; variety adds character. -
Form the roofs:
Take one segment and identify the top. Using the craft knife, slice two diagonal cuts to form a peaked roof. Vary the pitch of the roofs—make some steep and pointed, others shallower. -
Refine the edges:
Dip your finger in a little water and smooth out sharp edges on the sides and roofs. The goal is a slightly softened, weather-worn look rather than perfect geometric precision.
Cracks in the Clay?
Prepare a “slurry” by mixing a small chunk of clay with water into a paste. Fill any unwanted cracks with this paste and smooth over with a damp finger before painting.
Step 2: Carving Details
-
Outline the doors:
With the needle tool, lightly sketch an arched doorway at the base of each house. Ensure the arch is centered. -
Create door texture:
Press vertical lines into the door shape to mimic wooden planks. You can add a tiny dot for a doorknob using the point of the needle. -
Carve the windows:
Use the small flat-head sculpting tool or the tip of your knife to press square or rectangular indentations for windows. A classic four-pane window works beautifully. -
Deepen the relief:
Go back over your carvings to make them distinct. I find that making the indentations slightly deeper than neccesary helps, as paint can sometimes fill them in later. -
Drying time:
Place the houses on a wire rack or parchment paper. Let them dry completely for 24-48 hours, flipping them occasionally to ensure even drying.
Step 3: Painting & Finishing
-
Sand imperfections:
Once fully dry and hard, use fine-grit sandpaper to gently smooth the flat surfaces, removing any fingerprints or rough burrs from the clay. -
Base coat:
Paint two coats of white acrylic paint on two of the houses. This provides a neutral, bright base. -
Pastel washing:
For the colored houses, mix sage green and pastel pink with a tiny bit of white to keep the tones soft and chalky. Paint one house green and another pink, applying two thin coats. -
Roof detailing:
For the house on the far right, paint the roof a distinct grey-brown to mimic slate or weathered shingles. Use a ‘dry brush’ technique to keep it looking rustic. -
Distressing:
Once the main colors are dry, take fine sandpaper and very lightly sand the edges and corners of the painted houses to reveal a bit of the raw clay or white underneath. -
Highlighting windows:
Using a very fine brush and dark grey or black paint diluted with water, carefully fill the deep recesses of the windows to create depth and shadow. -
Final touches:
Add tiny metallic gold or brass paint dots to the doorknobs for a small pop of shine against the matte finish. -
Seal (Optional):
If you want to protect the paint without adding shine, apply a layer of ultra-matte varnish.
Add a Chimney
Before the clay dries, attach a tiny cube of clay to the slope of a roof using water and scoring. Paint it a contrasting brick red for extra charm.
Arranging these little houses alongside some collected seashells creates a peaceful vignette that reminds you of summer days
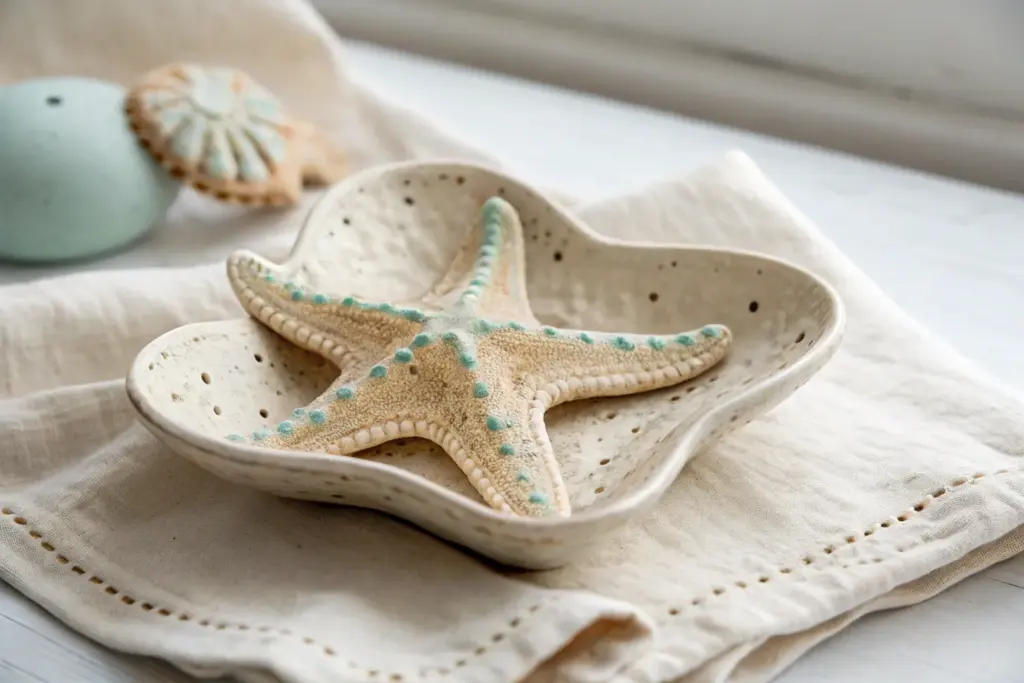
Sand Dollar Ornaments
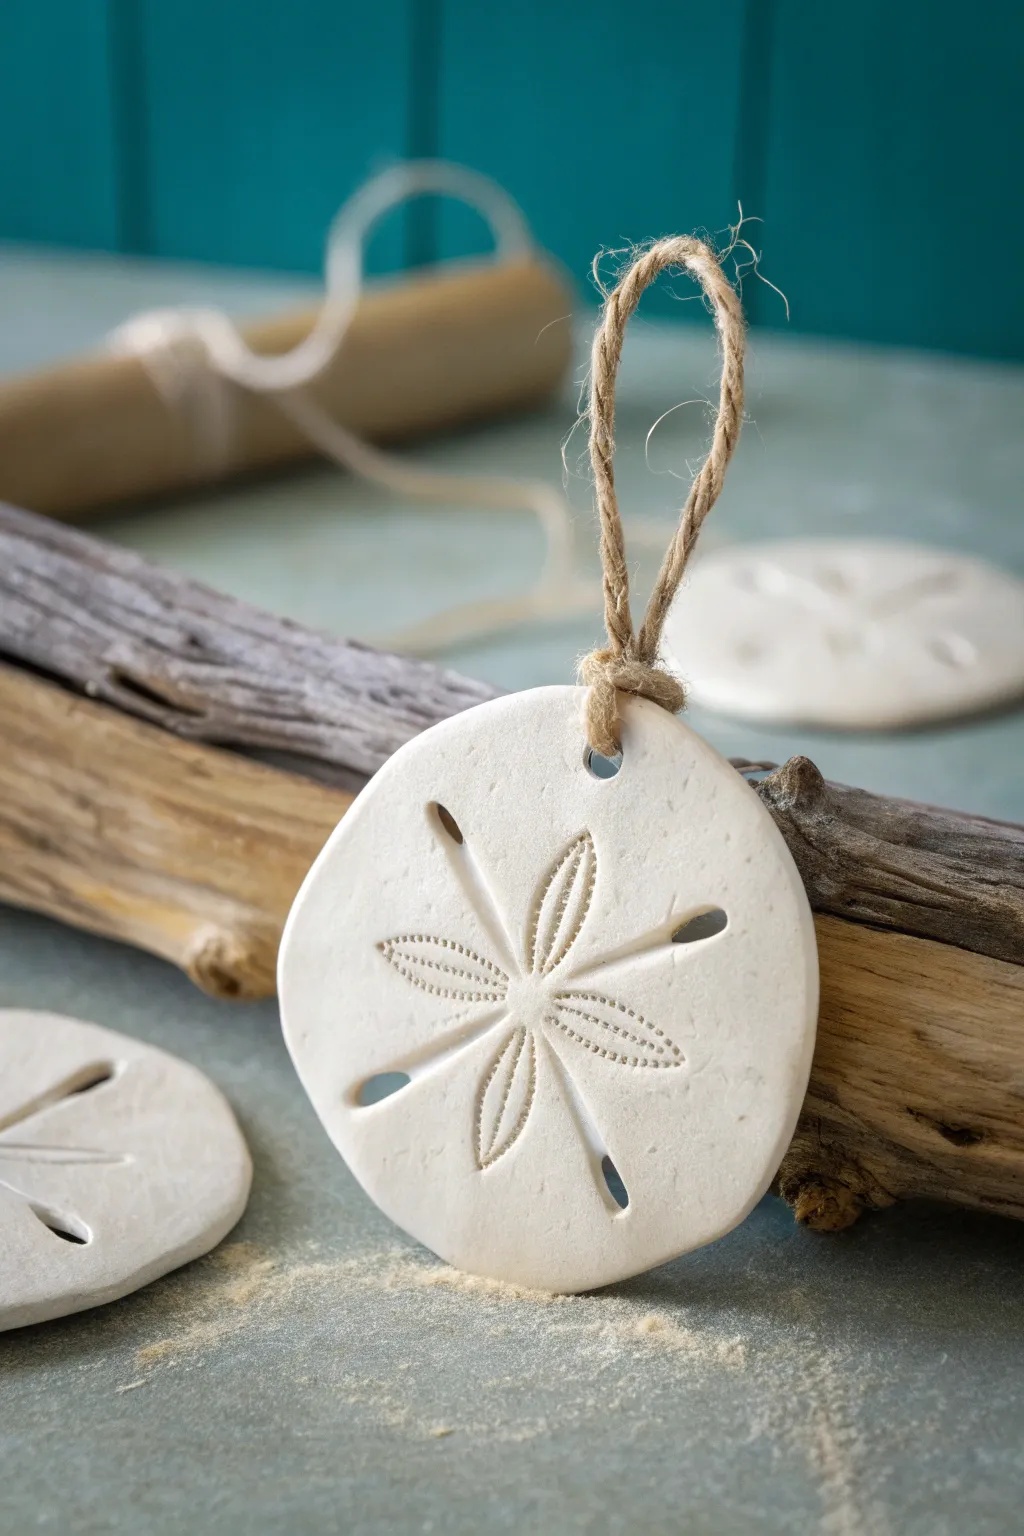
Capture the essence of a beachcombing adventure with these charming clay sand dollars. Their organic, matte white finish and delicate etched details give them an authentic coastal feel, perfect for holiday tree trimming or year-round nautical decor.
Step-by-Step Guide
Materials
- White air-dry clay or polymer clay
- Rolling pin
- Circle cookie cutter (approx. 3 inches)
- Needle tool or toothpick
- Small teardrop cutter (optional)
- Straw or small circle tool for the hanging hole
- Fine-grit sandpaper
- Twine or jute cord
- Parchment paper or craft mat
- Small sponge (damp)
Step 1: Shaping the Base
-
Preparation:
Begin by conditioning your clay. Knead a handful of white air-dry clay or polymer clay until it is soft, pliable, and free of cracks. Lay down a sheet of parchment paper to work on. -
Roll it out:
Use your rolling pin to flatten the clay into a smooth sheet. Aim for a thickness of about 1/4 inch. You want it substantial enough to be sturdy but not too heavy. -
Cut the circles:
Press your circle cookie cutter firmly into the clay to create your base shapes. Carefully lift away the excess clay. -
Create the hole:
Using a straw or a small circle tool, punch a hole near the top edge of each circle. Position it about a half-inch down from the rim to ensure the clay doesn’t crack when hanging. -
Soften edges:
Dip your finger or a small sponge in a tiny bit of water and gently run it around the cut edges of the circle. This smooths out any sharp cutter marks and gives the ornament a more weathered, natural sea-glass feel.
Natural Imperfections
Don’t aim for a perfectly round circle. Gently warping the edges slightly with your fingers before drying makes the sand dollar look more organic and realistic.
Step 2: Detailing the Star
-
Mark the center:
Lightly press a tiny dot in the exact center of your circle with your needle tool. This will be the guide for your radial flower pattern. -
Create the petals:
Imagine a five-point star or flower radiating from that center dot. Using a modeling tool or the side of a toothpick, gently press five long, narrow oval indentations extending outward. -
Add texture:
Inside each of the five ‘petals’ you just pressed, use your needle tool to poke rows of tiny dots. These mimic the pores found on real sand dollar skeletons. I like to do two parallel rows of dots inside each petal. -
Carve the slots:
At the outer tip of each petal, use a small teardrop cutter or a craft knife to cut a small, narrow slot or deep indentation. This is the classic keyhole feature of a sand dollar. -
Refine the surface:
Once your carving is done, lightly brush away any clay crumbs. If you see any fingerprints, buff them out gently with a damp fingertip.
Sparkle Finish
Brush a very thin layer of dilute white glue over the surface and dust with super-fine clear glitter to mimic wetter sand or glistening salt crystals.
Step 3: Finishing Touches
-
Drying time:
If using air-dry clay, leave the ornaments on a flat surface to dry for 24-48 hours, flipping them halfway through to prevent curling. If using polymer clay, bake according to the package instructions. -
Sanding:
Once fully dry or cured and cooled, take a piece of fine-grit sandpaper and very gently sand the edges and surface. You want to knock back any roughness to achieve a smooth, matte finish. -
Dusting off:
Wipe the ornament down with a dry cloth or a slightly damp paper towel to remove all sanding dust. -
Protect (Optional):
For extra durability, you can apply a layer of ultra-matte varnish. However, leaving the clay raw often looks more like natural shell. -
Add the hanger:
Cut a length of jute twine or rustic cord, about 6-8 inches long. -
Looping:
Fold the twine in half and thread the loop end through the hole in the ornament from front to back. -
Securing the knot:
Pull the loose ends of the twine through the loop and tighten gently to create a lark’s head knot that sits securely at the top of the sand dollar. -
Tying off:
Tie the two loose ends of the twine together in a simple overhand knot to close the loop for hanging.
Hang your finished ornaments on a tree or driftwood branch to bring a calm coastal vibe to your home


What Really Happens Inside the Kiln
Learn how time and temperature work together inside the kiln to transform clay into durable ceramic.
Fish-Shaped Hanging Decor
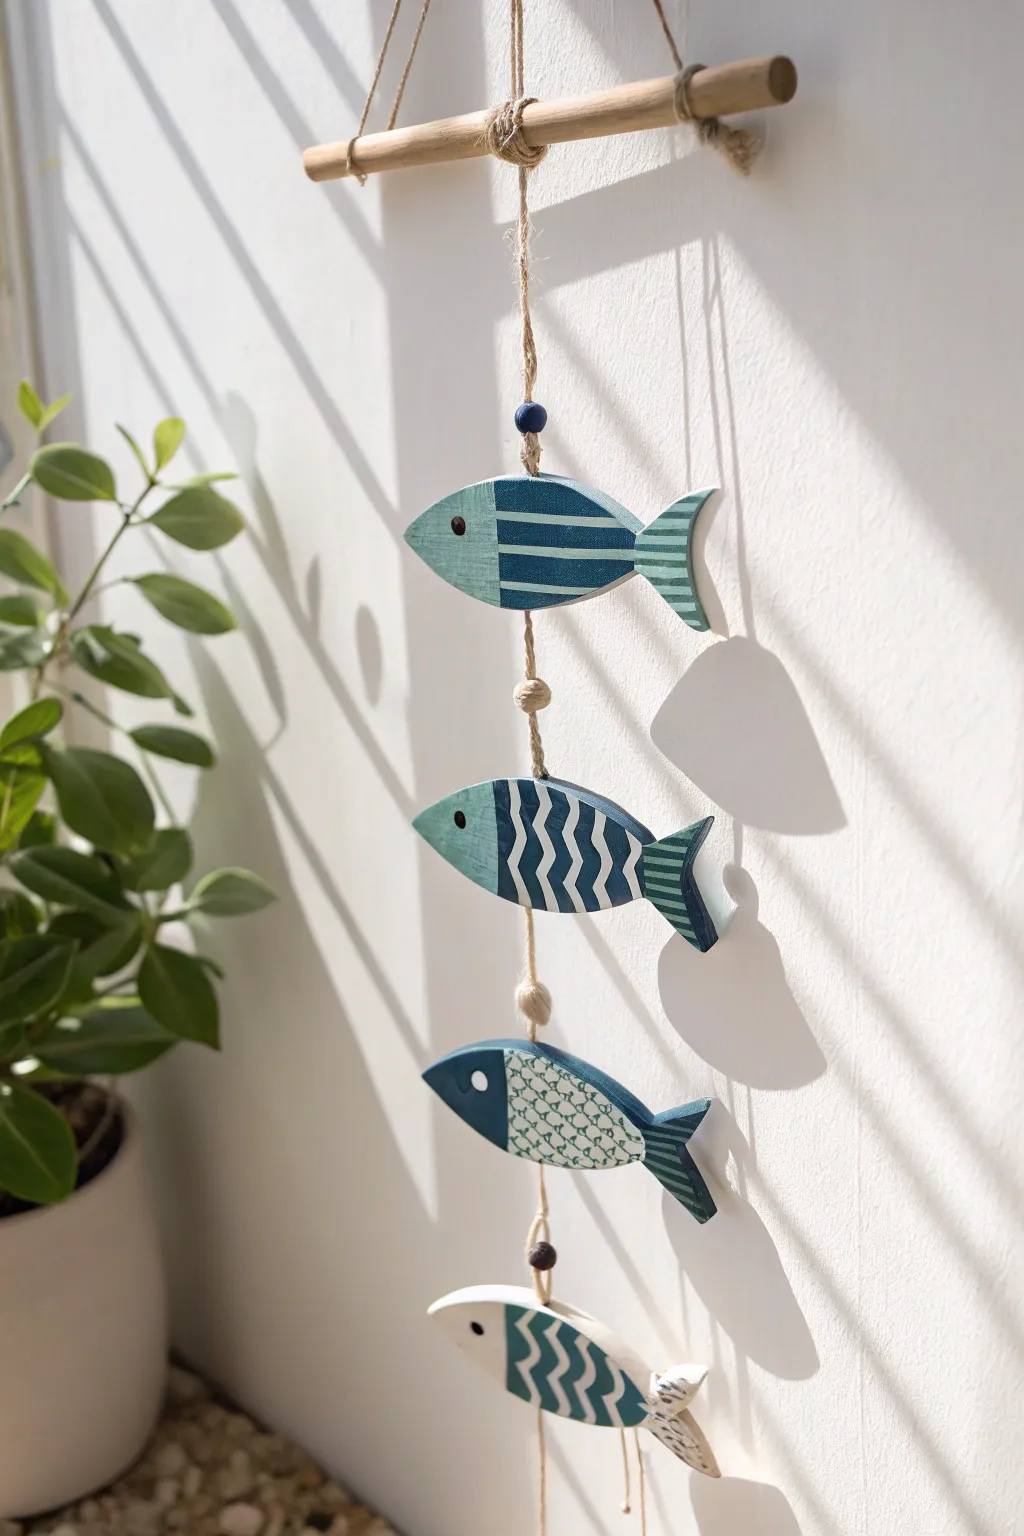
Bring the calming spirit of the coast into your home with this charming fish-shaped hanging mobile. Featuring a soothing palette of teals, blues, and whites with playful geometric patterns, this clay project captures the effortless beauty of beachside decor.
Step-by-Step Tutorial
Materials
- Air-dry clay (white)
- Small rolling pin
- Fish-shaped cookie cutter (or craft knife and paper template)
- Acrylic paints (teal, navy blue, white)
- Detail paintbrushes (fine tip and small flat brush)
- Natural jute twine
- Small wooden dowel or branch (approx. 8-10 inches)
- Wooden beads (natural and blue)
- Small straw or skewer (for making holes)
- Sandpaper (fine grit)
- Matte sealant or varnish
Step 1: Shaping the School
-
Roll out the clay:
Begin by kneading your air-dry clay until it’s smooth and pliable. Roll it out on a non-stick surface to a uniform thickness of about 1/4 inch. If you want a textured look, you could gently press a piece of canvas onto the surface before cutting. -
Cut the shapes:
Using a fish-shaped cookie cutter, press firmly into the clay to create four distinct fish. If you don’t have a cutter, simply sketch a simple fish outline on paper, cut it out, and trace around it on the clay with a craft knife. -
Smooth the edges:
Dip your finger in a little water and gently run it along the cut edges of each fish to soften any roughness. This little step makes the final painted product look much more polished. -
Create hanging holes:
Using a straw or a skewer, pierce a hole through the top dorsal area and the bottom belly area of the first three fish. For the fourth (bottom) fish, you only need a top hole. Make sure the holes are large enough for your twine. -
Dry thoroughly:
Place the clay fish on a wire rack to dry. Refer to your clay package instructions, but generally, allow 24-48 hours. Flip them halfway through so they dry evenly and don’t curl. -
Sand for perfection:
Once fully dry, lightly sand the edges and surfaces with fine-grit sandpaper to remove any bumps or uneven areas.
Step 2: Painting the Patterns
-
Base coat the heads and tails:
For the first fish, paint the head section a light teal and the tail section with teal stripes. Leave the middle section blank for now. Repeat for the other fish, varying the shades of blue and teal for interest. -
Pattern the bodies:
This is where the personality shines. Paint distinct geometric patterns on the middle section of each fish. Try horizontal stripes for one, zig-zags (chevron) for another, and a scale-like crosshatch for a third. -
Add the details:
Using your finest brush, paint a small white circle for the eye on each fish. Once the white is dry, add a tiny black dot in the center for the pupil. -
Seal the deal:
Apply a coat of matte sealant or varnish over each fish. This protects the paint and gives the clay a durable finish without making it too shiny.
Clean Lines
For crisp stripes and chevron patterns, apply thin strips of washi tape to the dried clay before painting. Peel it off while the paint is still slightly wet.
Step 3: Assembly
-
Prepare the dowel:
Cut a length of jute twine about 18 inches long. Tie each end securely to the left and right sides of your wooden dowel to create the main hanger. -
Start the central line:
Cut a long piece of twine (approx. 3-4 feet). Fold it in half and loop it around the center of the wooden dowel using a lark’s head knot. -
Thread the first fish:
Thread the two ends of the twine through the top hole of your first fish. I find wrapping a bit of tape around the twine ends acts like a needle and makes threading much easier. -
Secure with knots:
Once the fish is at the desired height, tie an overhand knot directly underneath the top hole to keep the fish in place, or thread the twine through the bottom hole and knot it there. -
Add spacers:
Between each fish, thread a wooden bead onto the twine. Secure the bead with a knot above and below it to keep it stationary and create visual separation between the fish. -
Complete the chain:
Continue adding fish and beads until all four are attached. Trim any excess twine at the very bottom or fray the ends slightly for a rustic tassel effect.
Driftwood Dreams
Instead of a standard wooden dowel, scavenge for a real piece of driftwood. The weathered texture and unique shape add instant authentic beach vibes.
Hang your new mobile near a window where the sunlight can catch the colors and enjoy the coastal vibe
Coral-Inspired Pinch Bowls
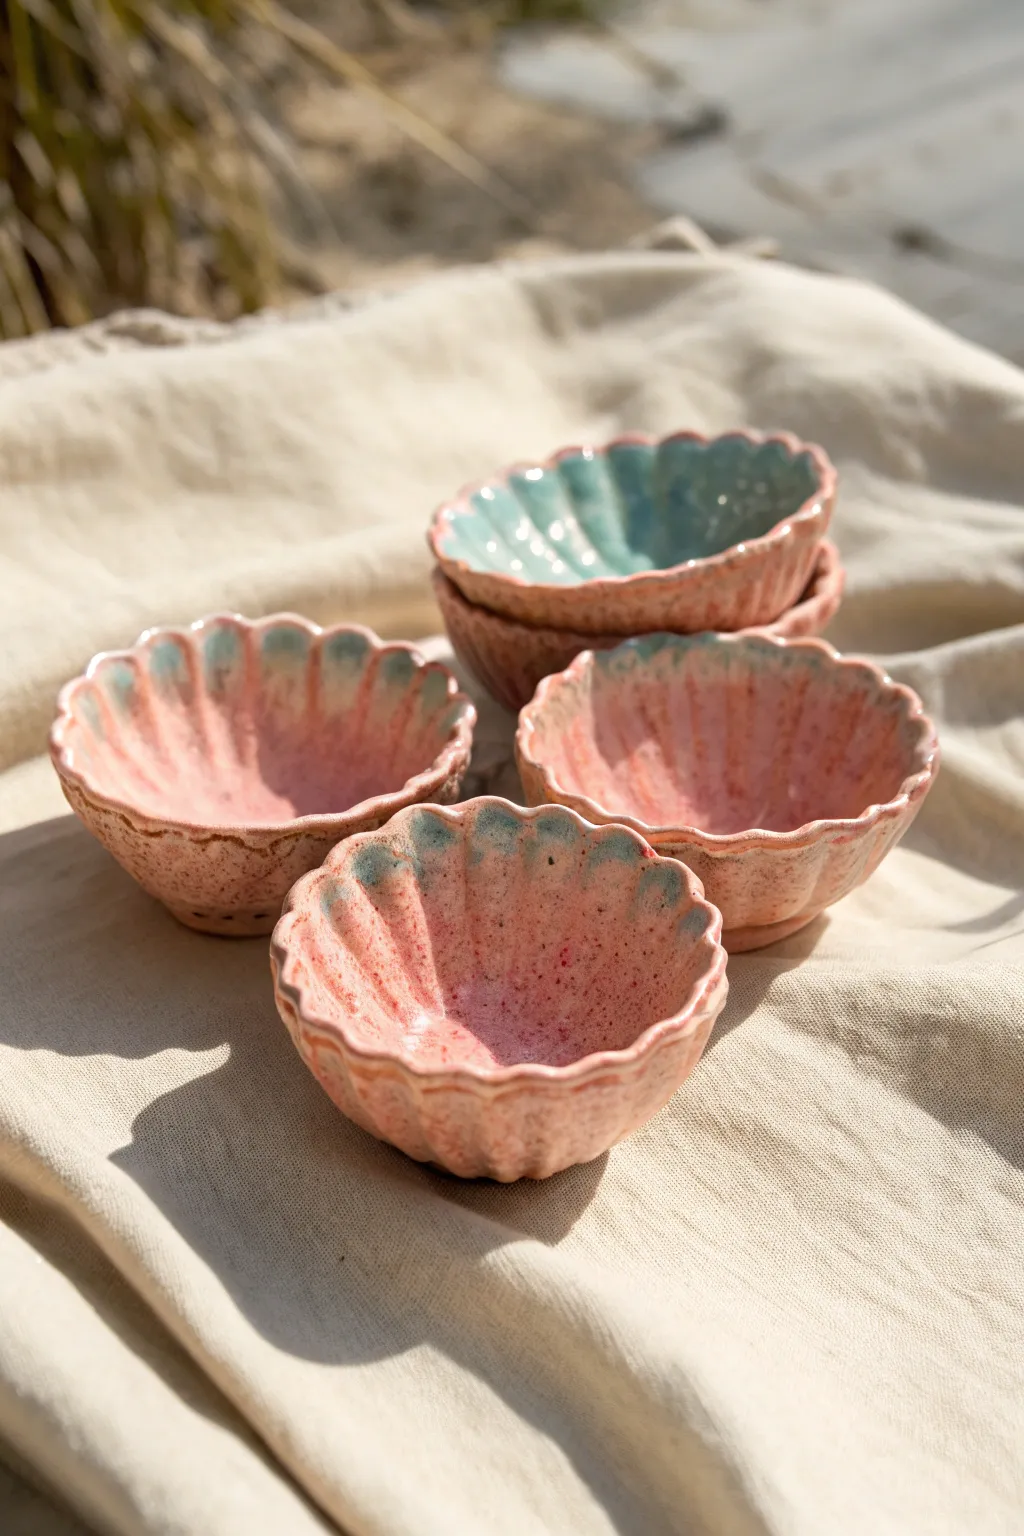
These charming, palm-sized bowls capture the essence of a beachcombing treasure with their scalloped edges and dual-tone glazing. Their organic, coral-like texture makes them perfect for holding jewelry or adding a coastal touch to your vanity.
Step-by-Step Guide
Materials
- Speckled stoneware clay (mid-fire)
- Pottery sponge
- Rib tool
- Loop tool (small)
- Needle tool
- Coral pink ceramic glaze
- Teal or aqua ceramic glaze
- Kiln access
- Soft fan brush
Step 1: Forming the Bowl
-
Prepare your clay:
Cut off a small chunk of speckled stoneware clay, roughly the size of a clementine. Use your palms to roll this into a smooth, even ball. -
Open the center:
Hold the clay ball in your non-dominant hand. Gently press your thumb into the very center, pushing down until you are about a quarter-inch from the bottom. -
Pinch the walls:
Begin pinching the clay between your thumb (inside) and fingers (outside). Rotate the ball slowly as you pinch, working from the bottom up to thin the walls evenly. -
Shape the curve:
As the walls get thinner, gently push them outward to create a wider, open bowl shape rather than a tall cup shapes. Aim for a wall thickness of about 1/4 inch. -
Smooth the interior:
Run a slightly damp sponge along the inside bottom and walls to remove any deep fingerprints or cracking, ensuring a smooth surface for your glaze later. -
Define the rim:
Gently tap the rim with your fingers to ensure it isn’t too sharp. It should be relatively level, though a little organic waviness adds to the natural look.
Texturizing Tip
Don’t over-smooth the clay body. Using a clay with grog or speckles adds natural inclusions that pop through the glaze, mimicking real sand.
Step 2: Creating the Scalloped Texture
-
Mark the segments:
Using a needle tool, lightly scratch vertical lines on the outside of the bowl, dividing it into roughly 16-20 sections to guide your carving. -
Carve the grooves:
Take a small loop tool and carve vertical channels along your guide lines, starting from just under the rim and pulling down toward the foot. -
Identify the ridges:
You should now have alternating ridges and carved valleys. If the ridges look too square, use your damp finger or sponge to round them off softly. -
Scallop the rim:
Where each carved groove meets the rim, gently press down with your thumb to create a dip. This naturally forces the ridges upward to create the high points of the scallop. -
Refine the fluting:
Go back over the outside with a damp sponge. You want the texture to feel soft like a worn seashell, not sharp or mechanical. -
Dry and bisque fire:
Allow the bowls to dry slowly until bone dry. Once moisture-free, bisque fire them in the kiln according to your clay body’s specifications (usually Cone 04).
Step 3: Glazing
-
Wipe down:
After bisque firing, wipe the bisque ware with a damp sponge to remove any kiln dust that might resist the glaze. -
Apply the exterior color:
Brush two coats of the coral pink glaze onto the exterior of the bowl. For that ‘beachy’ transitions effect, lay the glaze slightly thinner near the rim. -
Glaze the interior:
For the inside, you can match the exterior with pink, or for contrast (like the top bowl in the photo), pour in a teal glaze, swirl to coat, and pour out the excess. -
Accentuate the rim:
I like to dab a tiny bit of the teal glaze right into the dips of the rim on the pink bowls. During firing, this can create beautiful melts and color breaks. -
Wipe the foot:
Use a heavy sponge to completely clean glaze off the bottom of the bowl so it doesn’t stick to the kiln shelf. -
Final firing:
Glaze fire the pieces to the temperature required by your clay and glaze combination (likely Cone 5 or 6).
Uneven Drying?
If the rim dries much faster than the base, it may warp. Cover the rim loosely with a strip of damp plastic to let the whole piece dry at the same rate.
Now you have a set of oceanic pinch bowls ready to hold your tiniest treasures

TRACK YOUR CERAMIC JOURNEY
Capture glaze tests, firing details, and creative progress—all in one simple printable. Make your projects easier to repeat and improve.
Mermaid Tail Spoon Rest
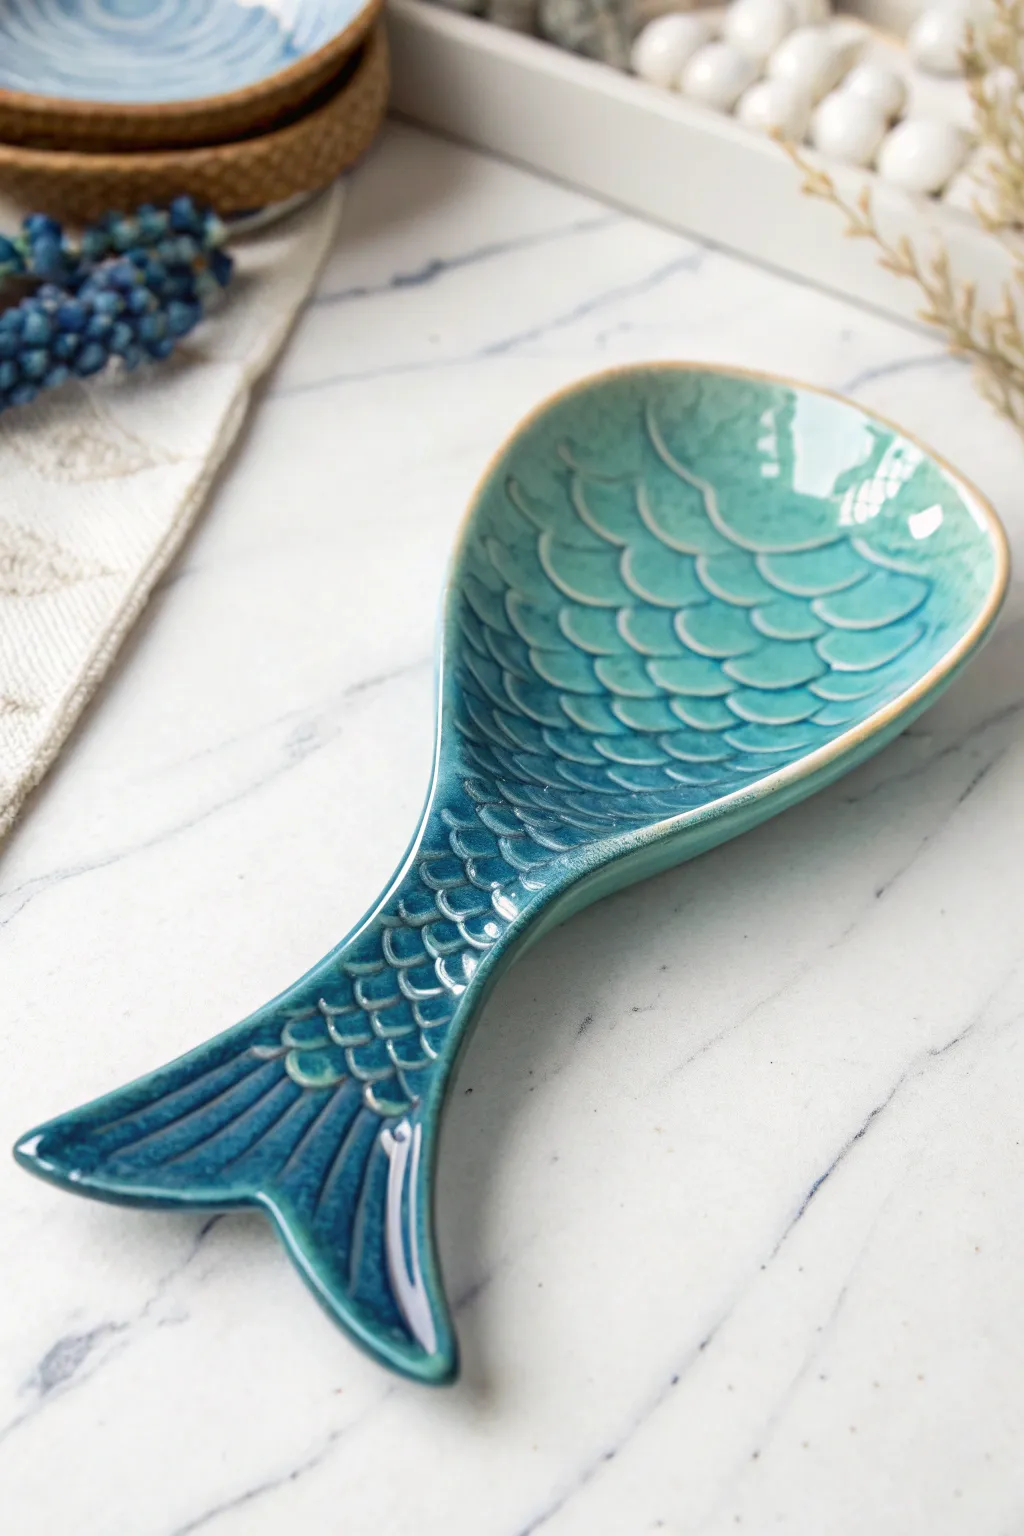
Capture the magic of the ocean with this functional mermaid tail spoon rest, featuring a stunning turquoise glaze that pools beautifully in iridescent scales. This project combines simple slab building with texture work to create a practical kitchen accessory that feels like a treasure from the deep.
How-To Guide
Materials
- Light-colored stoneware or porcelain clay body
- Rolling pin
- Canvas work surface
- Tail template (paper or cardstock)
- Needle tool or fettling knife
- Loop tool (teardrop shape)
- Small carving tool or U-gouge
- Sponge
- Celadon or transparent turquoise glaze (breaking type)
- Kiln access
Step 1: Shaping the Form
-
Roll the slab:
Begin by rolling out a slab of clay to an even thickness of about 1/4 inch. Smooth the surface with a rib tool to compress the clay particles, which helps prevent warping later. -
Cut the shape:
Place your paper template onto the slab. Trace around the mermaid tail shape—a wide oval at the top tapering down to fluked fins at the bottom—using a needle tool, then cut away the excess clay. -
Smooth the edges:
Run a damp sponge or your finger along the cut edges to round them off. Sharp edges can become brittle after firing, so softening them now is crucial. -
Create the curve:
Gently lift the wide part of the tail (the spoon resting area) and crinkle up some newspaper or plastic wrap underneath it. This creates a concave curve to hold the spoon, while keeping the bottom of the tail flat for stability.
Scale Depth
Vary your pressure when carving scales. Pressing harder at the bottom of the ‘U’ shape creates deeper pockets for glaze to pool, intensifying the ombre effect.
Step 2: Texturing the Scales
-
Plan the flow:
Before carving, lightly sketch a guideline down the center if needed. The scales should flow downwards from the wide top toward the narrow tail. -
Carve the first row:
Using a U-shaped loop tool or carving gouge, press and drag slightly to create the first row of semi-circle indentations at the very top edge. Pressing deeper at the bottom of each scale creates that nice ridge. -
Layer the pattern:
Move down to the second row, offsetting the scales so the peak of the new scale creates a brick-like or fish-scale pattern. I find it easiest to work row by row to keep things symmetrical. -
Refine the tail fin:
As you reach the narrow neck, stop the scale pattern. Instead, scratch long, flowing vertical lines into the fin area to mimic the ribbing of a tail fin. -
Clean up debris:
Once the carving is complete, use a soft, dry brush to sweep away any clay crumbs or ‘burrs’ created by the carving tools. -
Dry slowly:
Cover the piece loosely with plastic to let it dry slowly to the bone-dry stage. This prevents the curved edges from lifting or curling.
Warping Woes?
If the spoon rest rocks or won’t sit flat after drying, gently sand the bottom on a flat surface before the first firing to create a stable base.
Step 3: Glazing and Firing
-
Bisque fire:
Fire the piece to cone 04 (or your clay’s specific bisque temperature). This hardens the clay and prepares it for glazing. -
Wipe down:
After the kiln cools, wipe the bisque ware with a damp sponge to remove any dust that might resist the glaze. -
Choose the right glaze:
Select a translucent turquoise or sea-green glaze that is known for ‘breaking.’ This means it will appear thinner (lighter) on high spots and pool thicker (darker) in the textures. -
Apply the glaze:
Brush on 2-3 coats of glaze, or dip the piece if you have a large enough bucket. Ensure the glaze gets into every carved scale groove. -
Check the rim:
If the glaze looks too thick on the rim, wipe a tiny bit back. This allows the clay body color to show through slightly, creating a nice outlined effect like in the photo. -
Clean the foot:
Thoroughly wipe all glaze off the very bottom of the spoon rest so it doesn’t fuse to the kiln shelf during firing. -
Glaze fire:
Fire the piece to the maturity temperature of your clay and glaze (typically cone 5 or 6 for stoneware). Let the kiln cool completely before opening.
Now you have a stunning, functional piece of art ready to hold your cooking utensils with seaside flair
Lighthouse Tea Light Holder
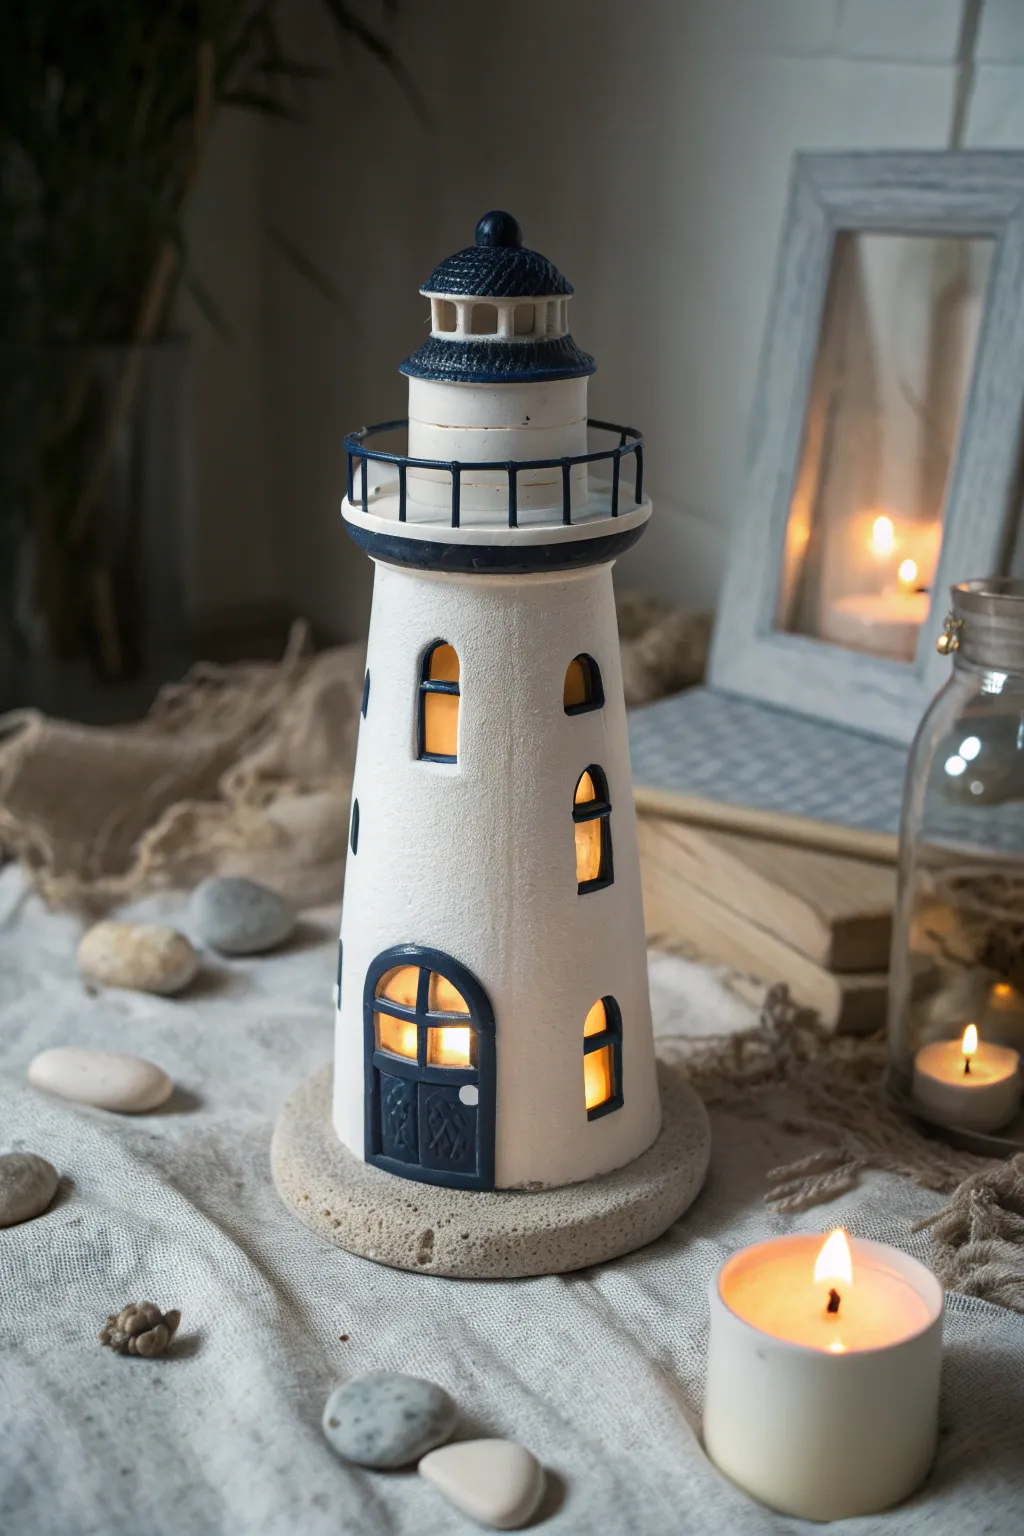
This charming lighthouse isn’t just a decoration; it’s a functional lantern that brings warm, nautical vibes to any room. Crafted from air-dry or polymer clay, this project features cutout windows that let soft candlelight flicker through, mimicking a real beacon by the sea.
Step-by-Step Tutorial
Materials
- White creative paper clay or air-dry clay (approx. 500g)
- Acrylic rolling pin and guides (to ensure even thickness)
- Hollow cardboard cone or sturdy paper mache cone (as a base/armature)
- Craft knife or scalpel with fresh blades
- Small square and arch-shaped clay cutters (optional)
- Navy blue and white acrylic paint
- Matte spray varnish
- Small flat paintbrushes and a fine liner brush
- Textured stone/sand paste or sandpaper (for the base)
- Strong craft glue or clay slip
- Wire or thin dowels (for railing)
Step 1: Forming the Base Structure
-
Prepare the Armature:
Begin by covering your cardboard cone with a layer of parchment paper or plastic wrap so the clay doesn’t stick permanently. This allows you to remove the form later if you’re using air-dry clay. -
Roll the Clay:
Roll out a large slab of white clay to about 1/4 inch thickness. I like to use wooden guide sticks here to keep the slab perfectly uniform. -
Wrap the Cone:
Gently drape the clay sheet around the cone, trimming the excess with a craft knife where the edges meet. Score and dampen the seam, then smooth it together with your fingers until invisible. -
Create the Doorway:
At the bottom of the structure, cut an arched doorway shape. Don’t discard this piece entirely; you’ll need to sculpt a door to fit inside it that is slightly recessed.
Smoother Windows
Cutting clay windows can warp the walls. Let the clay firm up to ‘leather hard’ before cutting; the knife will slice cleanly without squishing the shape.
Step 2: Constructing the Keep & Lantern
-
Add the Upper Deck:
Cut a clay circle slightly wider than the top of your tower. Attach this to the top of the main cone to serve as the observation deck floor. -
Form the Lantern Room:
Roll a smaller cylinder of clay for the actual light room. Attach this centered on top of your deck circle. It should be slightly narrower than the tower body. -
Sculpt the Roof:
Create a small, shallow cone or dome shape for the roof. Before attaching it, gently press a textured sponge or fabric against it to give it a shingled or tiled appearance. -
Detail the Lantern Room:
Carefully cut out rectangular vents along the perimeter of the lantern room cylinder. These are small, so work slowly with a sharp blade. -
Assemble the Top:
Secure the roof onto the lantern room using a little clay slip or water to bond the pieces.
Step 3: Windows and Texturing
-
Position the Windows:
Mark the locations for your windows. Place two arched windows on the middle level and two smaller arched windows near the top, ensuring they are symmetrical. -
Cut the Openings:
Slice out the window shapes cleanly. If the clay drags, let it dry for 15 minutes to firm up before cutting. -
Smooth the Edges:
Dip your finger in water and smooth the raw edges of all your window and door cuts to remove any sharpness. -
Create the Texture:
To mimic stucco or whitewashed stone, gently tap the entire surface of the tower with a stiff bristle brush or a crumpled ball of aluminum foil. -
Make the Rocky Base:
Form a thick, irregular disc of clay for the lighthouse to sit on. Press real sand or coarse salt into the surface to create a realistic rocky texture.
Cracking Clay?
If small cracks appear as it dries, mix a tiny bit of fresh clay with water to make a paste (slip) and fill the cracks. Sand smooth once dry.
Step 4: Finishing Details
-
Refine the Door:
Take a thin piece of clay and fill the doorway recess. Use a needle tool to press in vertical lines for wood planks and sculpt tiny cross-beams. -
Drying Time:
Allow the entire structure to dry completely. For air-dry clay, this usually takes 24-48 hours. Keep it away from direct heat to prevent cracking. -
Base Coat:
Once dry, paint the main body a creamy off-white. Use a matte paint to maintain that chalky, weathered look. -
Nautical Accents:
Paint the roof, the observation deck rim, and the door frame in a deep, classic navy blue. A steady hand is crucial here, so rest your pinky on the table for stability. -
Installing the Railing:
Cut small pieces of wire for the railing posts and a longer piece for the rail. Glue them onto the observation deck rim and paint them navy blue to match. -
Final Seal:
Spray the entire piece with a matte varnish to protect the paint and give the lighthouse a unified finish.
Place an LED tea light inside on a timer to enjoy a warm, guiding glow every evening
Tide Pool Mini Dish Set
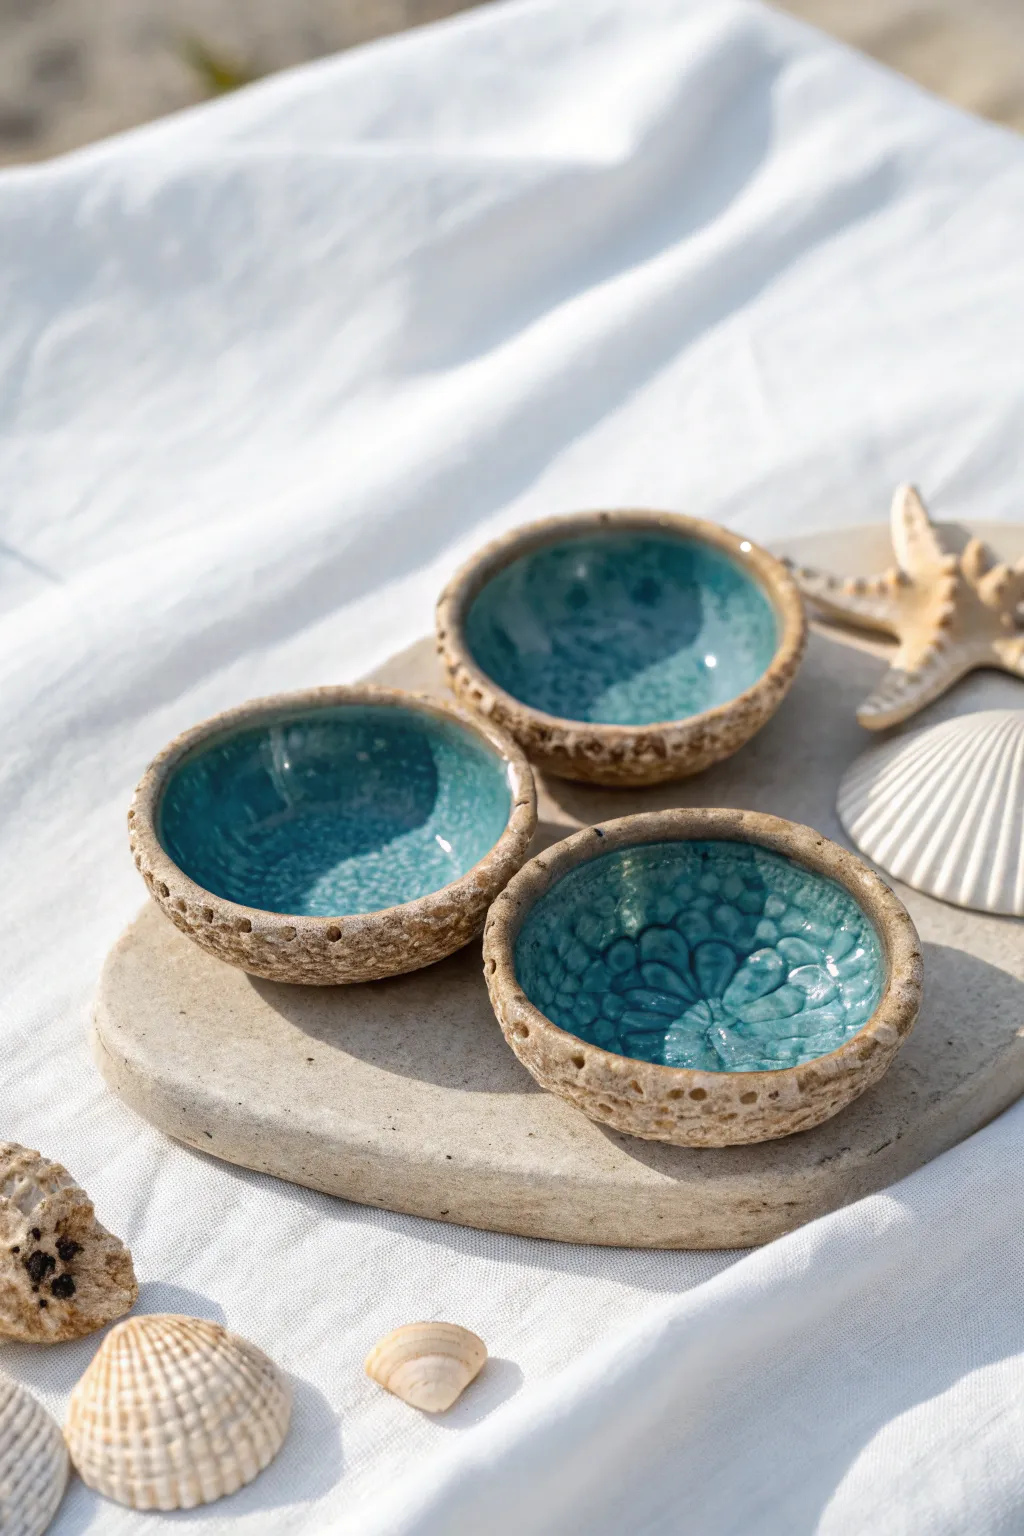
Capture the magic of low tide with these rugged yet elegant ceramic mini dishes. Featuring a textured, sandy exterior and a glassy, vibrant teal glaze that pools at the bottom, these pinch pots are perfect for holding jewelry or sea salt.
Step-by-Step
Materials
- Speckled buff or stoneware clay (grogged)
- Small rolling pin
- Wooden spoon or texture tool
- Needle tool
- Sponge
- Turquoise or ocean blue reactive glaze
- Clear glaze (optional for rim)
- Kiln (or oven if using polymer/air-dry clay alternatives, though glaze results will differ)
Step 1: Forming the Pinch Pots
-
Prepare clay balls:
Cut your clay into three equal portions, each about the size of a golf ball or slightly larger, and roll them into smooth spheres between your palms. -
Open the center:
Hold a clay ball in your non-dominant hand. Gently press your thumb into the center, stopping about a quarter-inch from the bottom to ensure a sturdy base. -
Pinch the walls:
Rotate the ball slowly while rhythmically pinching the clay between your thumb (inside) and fingers (outside). Work from the base upwards to thin the walls evenly. -
Shape the vessel:
Aim for a wide, shallow bowl shape rather than a tall cup. Gently tap the bottom against your work surface to create a flat, stable foot so the dish won’t rock. -
Refine the rim:
Lightly smooth the rim with a damp sponge, but don’t over-perfect it. An organic, slightly uneven lip adds to the natural, beach-found aesthetic we want.
Prevent Cracks
If the rim starts cracking while you pinch, your clay is too dry. Moisten your fingers slightly or compress the rim immediately with a damp chamois cloth.
Step 2: Adding Texture & Detail
-
Create exterior texture:
The outside needs a coral-like roughness. Take a tool with a small, blunt end—like the back of a paintbrush or a specialized texture tool—and press tiny indentations all over the lower exterior walls. -
Pierce the details:
For the specific look in the photo, create a row of deeper, evenly spaced small holes just beneath the rim using a needle tool, being careful not to distort the pot’s shape. -
Interior stamping:
Before the clay dries, choose one dish to have a patterned center. Use a flower stamp or the end of a marker cap to press a design firmly into the bottom interior floor. -
Dry slowly:
Cover the pots loosely with plastic for the first day to equalize moisture, then uncover and let them dry completely to the bone-dry stage before the bisque firing. -
Bisque fire:
Load your kiln and fire the pieces to cone 04 (or according to your clay body’s instructions) to prepare them for glazing.
Glassy Bottoms
Add a pinch of clear crushed glass into the bottom of the pot before the final firing. It melts into a stunning, crackled pool that mimics seawater.
Step 3: Glazing the Ocean
-
Wax the bottom:
Apply wax resist to the bottom foot of each dish and slightly up the textured exterior to prevent glaze from running onto the kiln shelf. -
Glaze the interior:
Pour a generous amount of turquoise reactive glaze into the bowl. Swirl it around to coat the inside walls completely, then pour the excess back into your container. -
Clean the rim:
I prefer to wipe the very top edge of the rim with a damp sponge, removing the blue glaze to expose the raw, sandy clay body, creating a nice contrast. -
Exterior wash (optional):
Leave the exterior largely unglazed to highlight the clay’s texture. You can lightly sponge a thin iron oxide wash over the texture if you want to emphasize the ‘rocky’ look. -
Glaze firing:
Fire the pieces to cone 5/6 (mid-range). The reactive glaze will melt and pool in the stamped depressions and bottom, creating that depth-filled water effect.
Enjoy arranging these little pools of blue on your vanity or coffee table
Surfboard Keychain Tags
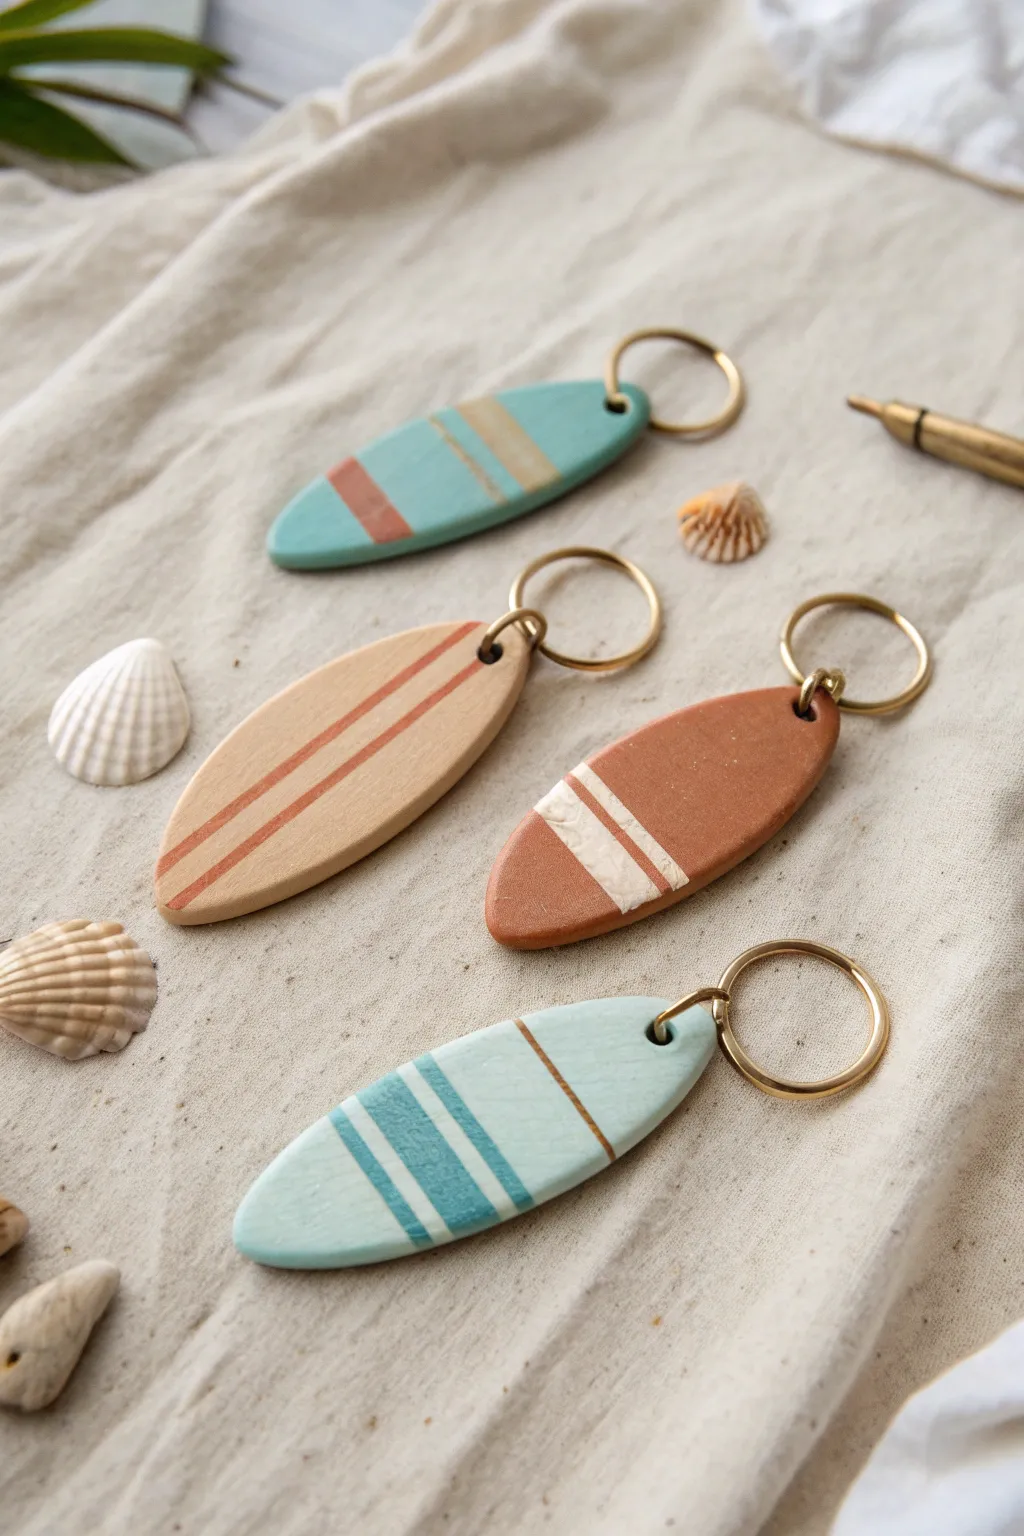
Capture the laid-back vibes of the coast with these sleek surfboard keychains, featuring cool blue, terracotta, and sand tones. They make perfect zippers pulls for beach bags or gifts for your surfing buddies.
Step-by-Step Tutorial
Materials
- Polymer clay (teal/light blue, terracotta/rust, beige/sand, white)
- Clay roller or pasta machine
- Surfboard clay cutter (or a sharp craft knife and paper template)
- Needle tool or small drill bit
- Sandpaper (fine grit)
- Jump rings (gold or brass)
- Keyrings (gold or brass)
- Pliers (flat nose and round nose)
- Jewelry glaze or matte varnish (optional)
- Baking sheet and parchment paper
- Clean work surface (glass or tile)
Step 1: Preparing the Base
-
Condition the clay:
Start by warming up your polymer clay in your hands. Knead each color separately until it is soft and pliable, ensuring there are no air bubbles trapped inside. -
Roll out the sheets:
Use your acrylic roller or pasta machine to roll out slabs of your main base colors (teal, beige, and terracotta) to a consistent thickness, roughly 3-4mm. You want them thick enough to be sturdy but not bulky. -
Cut the shapes:
Press your surfboard cutter firmly into the clay slabs. If you don’t have a cutter, I like to sketch a surfboard shape on cardstock, cut it out, place it over the clay, and carefully trace around it with a craft knife. -
Smooth the edges:
Gently rub your finger along the cut edges of each surfboard to soften any sharp corners or drag marks left by the cutter.
Smooth Surface Secret
Before baking, wipe your raw clay lightly with a tiny amount of baby oil or rubbing alcohol on a finger to remove any stray fingerprints or lint.
Step 2: Creating the Designs
-
Mix stripe colors:
Prepare small amounts of contrasting colors for the stripes. For the beige board, use terracotta clay; for the terracotta board, use white or cream clay. -
Roll thin striping sheets:
Roll these contrasting colors out very thinly, much thinner than your base shapes. -
Cut the stripes:
Use a long, sharp blade to slice narrow, straight strips from the thin clay. Vary the widths—some super skinny pinstripes and some wider bands create a nice visual rhythm. -
Apply the stripes:
Gently lay the strips across your surfboard bases. You can place them horizontally, diagonally, or length-wise depending on the look you want. Press them down lightly so they adhere. -
Trim the excess:
Use your craft knife to carefully trim the overhanging ends of the stripes flush with the edge of the surfboard. -
Embed the design:
Place a piece of parchment paper over the decorated surfboard and gently roll over it with your roller. This helps embed the stripes into the base so the surface becomes unified and smooth.
Hole Distortion?
If punching the hole deforms the board’s shape, bake the piece first without a hole, then carefully drill one using a small hand drill after it has cooled.
Step 3: Finishing and Assembly
-
Make the hole:
Use a needle tool or a small drinking straw to punch a hole near the top center or slightly off-center at the top of the board. Ensure the hole is not too close to the edge to prevent tearing. -
Bake carefully:
Arrange the pieces on a parchment-lined baking sheet. Bake according to your specific clay brand’s instructions (usually around 275°F/135°C for 15-30 minutes). Let them cool completely before handling. -
Sand for perfection:
Once cool, use fine-grit sandpaper to buff the edges and surface if needed. This gives that professional, matte finish seen in the photos. -
Open the jump ring:
Use two pairs of pliers to twist a jump ring open sideways (never pull it apart outwards). -
Attach hardware:
Slide the open jump ring through the hole in the surfboard and attach the main keyring loop. -
Secure the ring:
Close the jump ring by twisting it back into place until the ends meet perfectly flush.
Now you have a set of stylish, custom accessories ready for your keys or bag