
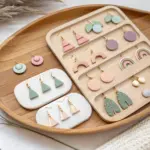
If you’ve been curious about silver clay jewellery, you’re in for such a satisfying kind of magic—soft clay in, real silver out. These beginner-friendly ideas lean on nature textures and simple shapes so you can get gorgeous results without fussy metalsmithing steps.
Textured Round Medallion Pendant
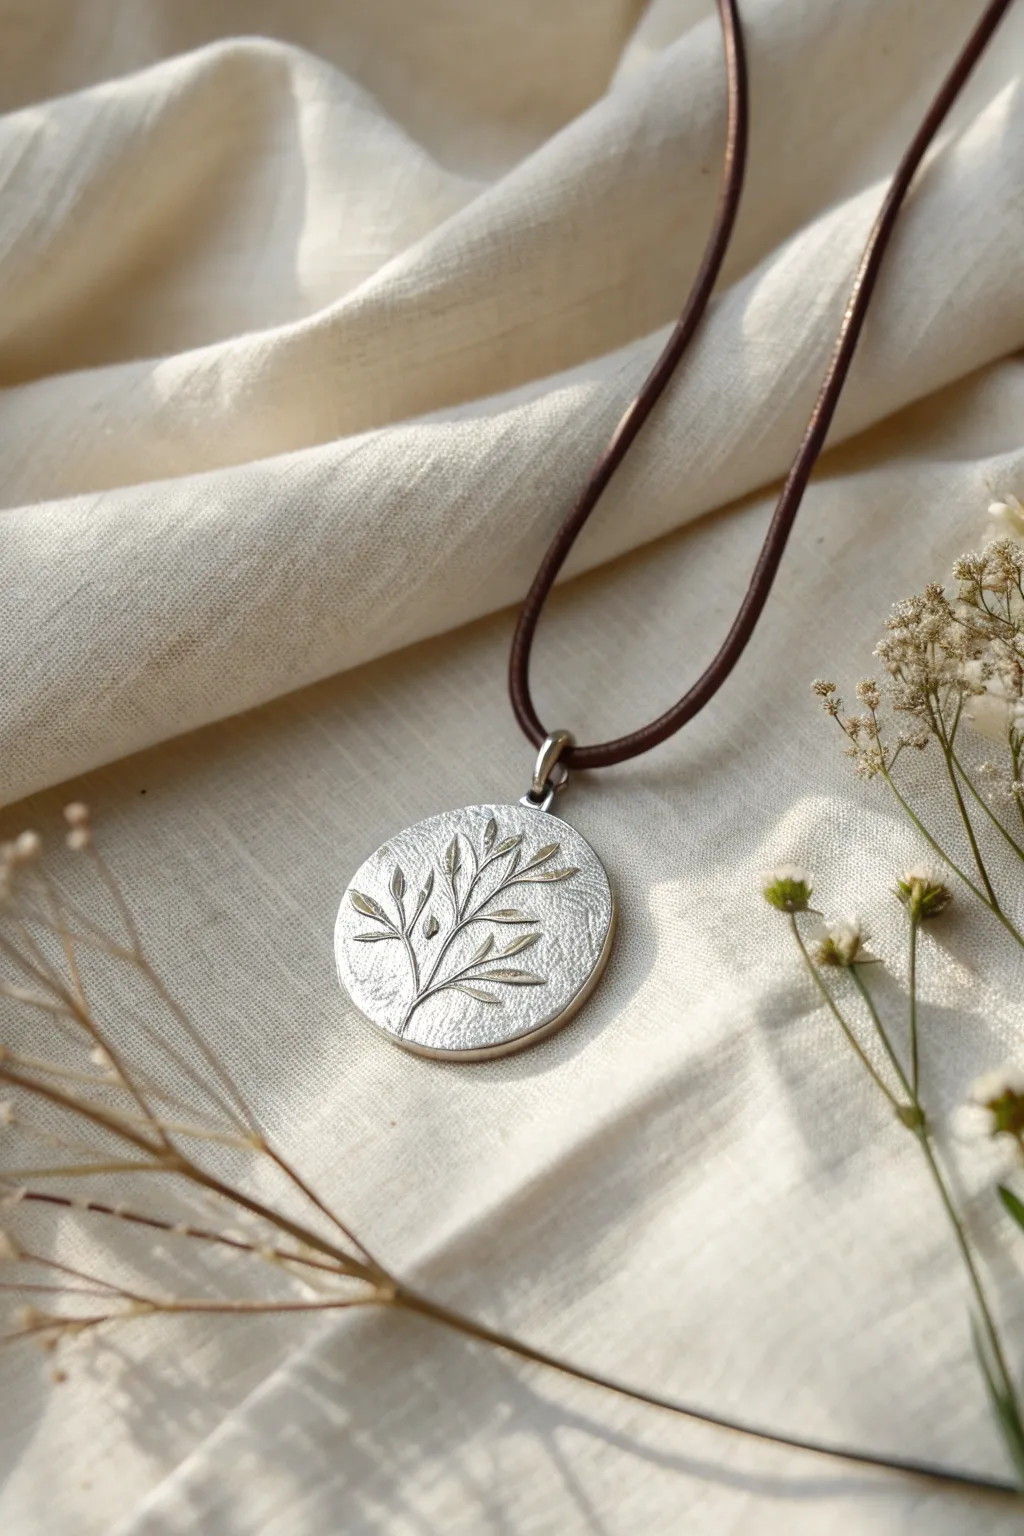
This elegant medallion captures the delicate beauty of nature with a raised olive branch motif set against a softly textured background. The contrast between the polished silver leaves and the matte, organic surface creates a timeless piece perfect for everyday wear.
Step-by-Step
Materials
- Silver metal clay (approx. 10g package)
- Small rolling pin or acrylic roller
- Plastic spacers or playing cards (1.5mm thickness)
- Olive oil or Badger balm (release agent)
- Small circular cutter (approx. 25-30mm)
- Fine-grit sandpaper or sanding sponge
- Needle tool or clay scribe
- Rubber block or carving surface
- Gas torch or kiln
- Brass brush
- Polishing cloth or agate burnisher
- Leather cord and jump ring
- Textured placemat, coarse fabric, or sandpaper (for background texture)
Step 1: Preparation and Rolling
-
Prepare your workspace:
Begin by cleaning your work surface thoroughly. Place a non-stick sheet or a laminated card down to work on to prevent sticking. -
Lubricate tools:
Rub a tiny amount of olive oil or balm onto your hands, the roller, and your work surface. This is crucial as silver clay can be quite sticky. -
Condition the clay:
Take the clay out of the package and knead it briefly in your fingers until it feels pliable and smooth, ensuring there are no cracks. -
Set the thickness:
Place your spacers or stacks of playing cards on either side of the clay ball. For a substantial pendant like this, aim for about 1.5mm thickness (roughly 5-6 cards). -
Roll the base:
Roll the clay into a smooth, even slab. Check that the thickness is uniform across the entire surface.
Cracks appeared?
If you see hairline cracks while drying, make a paste by mixing a tiny bit of clay with water. Paint it into the cracks, let dry, and sand smooth.
Step 2: Texturing and Carving
-
Apply background texture:
Press your textured material (like coarse linen or a texture mat) gently into the clay slab. Don’t press too hard; you just want a subtle surface noise, not a deep impression. -
Cut the shape:
Use your circular cutter to punch out a clean round disc. Lift away the excess clay immediately and wrap it in cling film to keep it moist for future use. -
Draft the design:
Using a very light touch with a needle tool, sketch the central spine of your branch. I find it helpful to start slightly off-center at the bottom and curve upwards. -
Sculpt the leaves:
Instead of removing clay, shape the leaves by pressing and dragging the clay slightly with a small modeling tool or the tip of a paintbrush handle to create raised leaf shapes, or add tiny snakes of clay and blend them down. -
Refine the motif:
Use a needle tool to define the edges of the leaves and the central stem, ensuring they stand out clearly against the textured background. -
Smooth the edges:
Dip a paintbrush in a little water and gently smooth the rim of the circle to remove any sharpness from the cutter. -
Attach the bail:
Form a small loop or half-circle from excess clay. Use a drop of water as paste to attach this securely to the top of the disc for the jump ring to pass through later.
Step 3: Firing and Finishing
-
Dry completely:
Let the piece dry for at least 24 hours. The clay must be bone dry before firing; it should feel room temperature, not cool to the touch. -
Pre-fire refinement:
Gently sand any rough edges with fine-grit sandpaper. Be very gentle with the branch design as the dry clay is brittle. -
Fire the piece:
Place the piece on a firing block. Using a butane torch, heat evenly until the binder burns off and the piece glows a peachy-orange color. Hold this temperature for 2-3 minutes (or follow package directions for kiln firing). -
Cool and brush:
Allow the pendant to cool completely. It will look white and chalky. Vigorously brush it with a brass spark brush and soapy water to reveal the silver shine. -
Burnish the details:
Take your agate burnisher or a steel spoon back and rub specifically on the raised leaf pattern. This compresses the silver and makes the design shine brightly against the matte background. -
Assembly:
Open a sturdy silver jump ring, thread it through the bail loop, and attach your leather cord to complete the necklace.
Make it antique
Apply a liver of sulfur patina solution to darken the recessed areas, then polish high spots again to make the branch design pop dramatically.
Wear your handcrafted silver token with pride, knowing it holds a unique botanical fingerprint
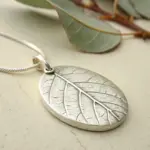

Real Leaf-Imprint Pendant
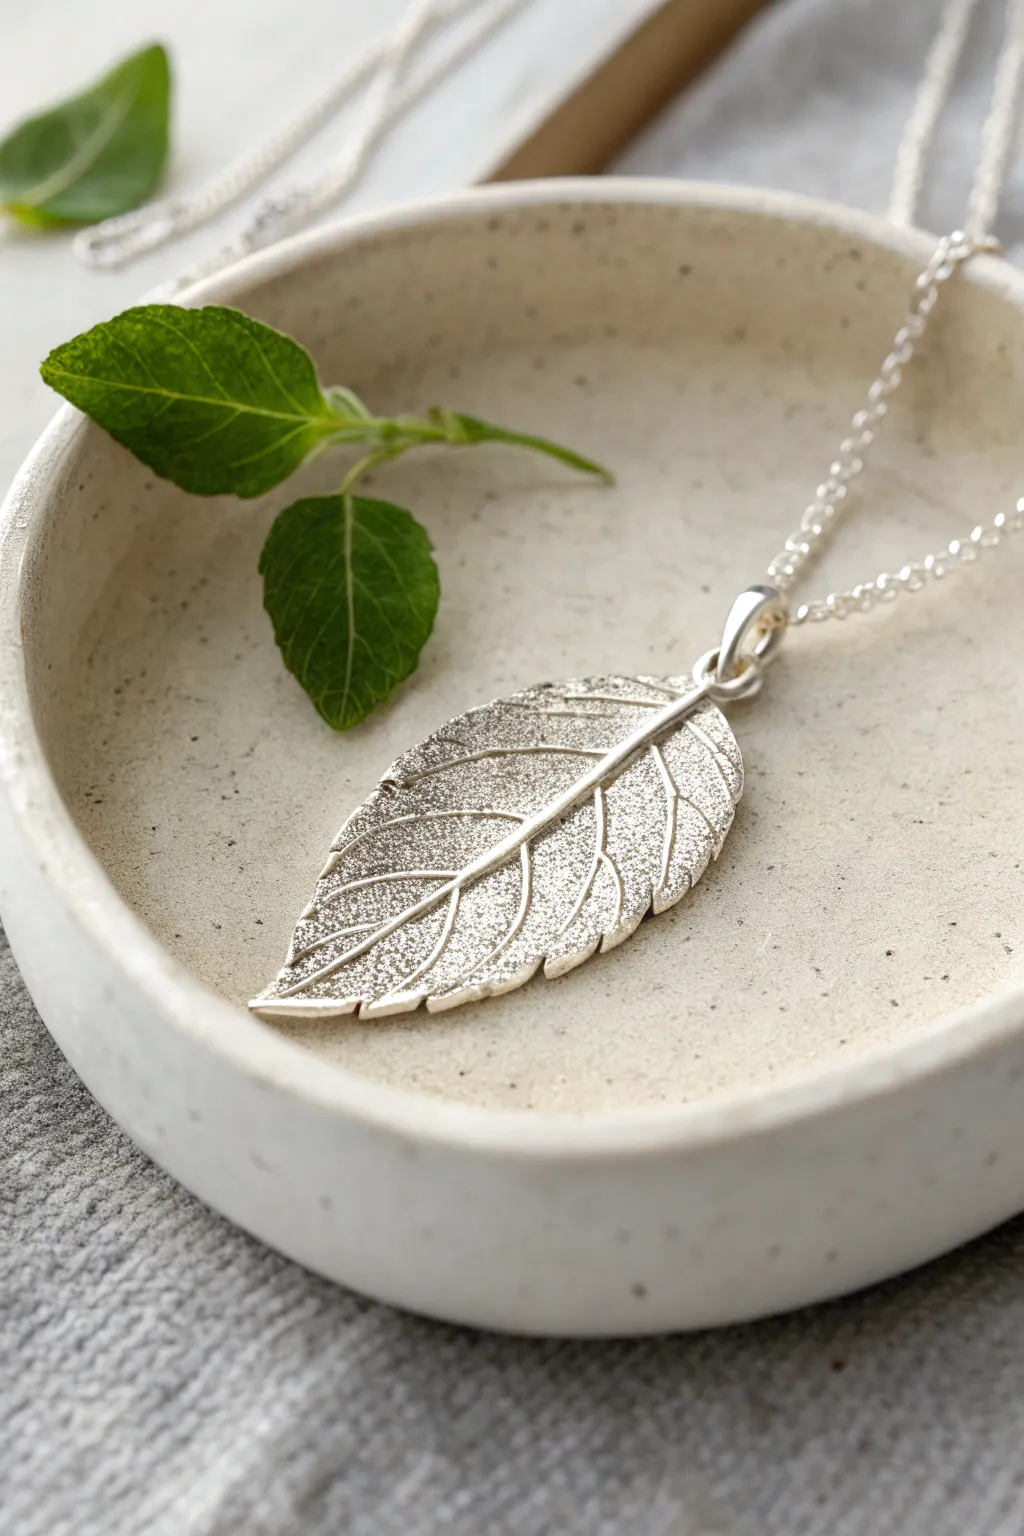
Capture the delicate veins of nature forever with this beginner-friendly silver clay project. While the finished piece looks intricate and professional, the process essentially relies on impressing a real leaf into clay to create a unique botanical pendant.
Step-by-Step Guide
Materials
- Silver clay (7g to 10g pack)
- Fresh leaf with strong veins (mint, sage, or hydrangea work well)
- Olive oil or badger balm (release agent)
- Acrylic rolling pin
- Playing cards or spacers (1mm to 1.5mm thick)
- Scalpel or sharp craft knife
- Small paintbrush
- Silver clay paste (optional, for repairs)
- Butane torch or kiln
- Stainless steel brush (brass brush can discolor silver)
- Agate burnisher
- Polishing papers or sanding pads
- Jump ring and silver chain
Step 1: Preparation and Impression
-
Select the perfect leaf:
Choose a fresh, firm leaf that fits your desired pendant size. Mint leaves, like the one in the photo, are excellent because they have deep, prominent veins on the underside which transfer beautifully to the clay. -
Prepare your workspace:
Lay down a non-stick work surface, such as a Teflon sheet or laminated card. Lightly coat your hands, the work surface, and your rolling pin with a tiny bit of olive oil or badger balm to prevent sticking. -
Condition the silver clay:
Open your silver clay package and knead it briefly in your hands until it feels pliable and smooth. Don’t overwork it, as silver clay dries out quickly. Keep the excess wrapped in cling film. -
Roll out the slab:
Place the ball of clay on your work surface. Put your spacers or playing cards (stacked about 3-4 high) on either side of the clay. Roll the clay into a slab, ensuring the rolling pin rests on the spacers for an even thickness. -
Oil the leaf:
Take your chosen leaf and apply a very thin layer of oil to the *veiny underside*. This allows the leaf to peel away easily without tearing the clay later. -
Create the imprint:
Place the leaf, vein-side down, onto the slab of silver clay. Roll over it once firmly with the roller. I find that passing over it just once prevents double images or blurring the delicate texture.
Step 2: Shaping and Refining
-
Cut the shape:
Using a scalpel or sharp craft knife, carefully trace around the edge of the leaf. You can cut exactly to the leaf margin or leave a tiny border of clay depending on your preference. -
Remove the organic leaf:
Using tweezers or the tip of your knife, very gently lift the stem and peel the real leaf away from the clay to reveal the impression. -
Shape the drape:
While the clay is still wet, you can gently curve the tip or the sides to make it look more natural, rather than perfectly flat. Place it over a curved object like a spoon handle or a drying form to hold this shape. -
Add the bail attachment:
You can either pierce a hole near the stem using a straw or adhere a small loop of fresh clay to the back using a little water. Ensure the hole is large enough to accommodate a jump ring after firing (the clay will shrink). -
Dry thoroughly:
Let the piece dry completely. You can use a dehydrator, a hot plate on low, or just air dry for 24 hours. The clay must be bone dry before firing to prevent exploding. -
Refine the edges:
Once dry, use a fine grit sanding pad to gently smooth any sharp edges or rough spots from the cutting process. Be careful not to sand away the surface texture.
Vein Visibility
Always use the back (underside) of the leaf for your impression. The veins are significantly more prominent there than on the top, resulting in a much crisper, deeper silver imprint.
Step 3: Firing and Finishing
-
Fire the pendant:
Place your dry piece on a heat-proof brick. Ignite your butane torch and heat the piece until it glows a peachy-orange color. Hold this temperature for the time specified by your clay manufacturer (usually 2-5 minutes). Alternatively, fire in a kiln. -
Quench and brush:
Once cool, the piece will look white and powdery. Brush it vigorously with a stainless steel brush to burnish the surface. The white, crystalline layer will disappear, revealing the shining silver underneath. -
Burnish for highlights:
For a high-shine finish on the raised veins, run an agate burnisher over the prominent lines of the leaf. This creates a beautiful contrast against the slightly more matte texture of the leaf body. -
Attach hardware:
Open a sterling silver jump ring using two pairs of pliers. Thread it through the hole or loop you created, attach it to your silver chain, and close the ring securely.
Level Up: Patina
Dip the fired silver in liver of sulfur (oxidizing solution) to turn it black, then polish the high points. The dark recesses will make the vein structure pop dramatically.
Wear your botanical silver replica with pride, knowing you’ve preserved a tiny piece of nature
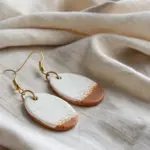

Stamped Initial Tag Charm
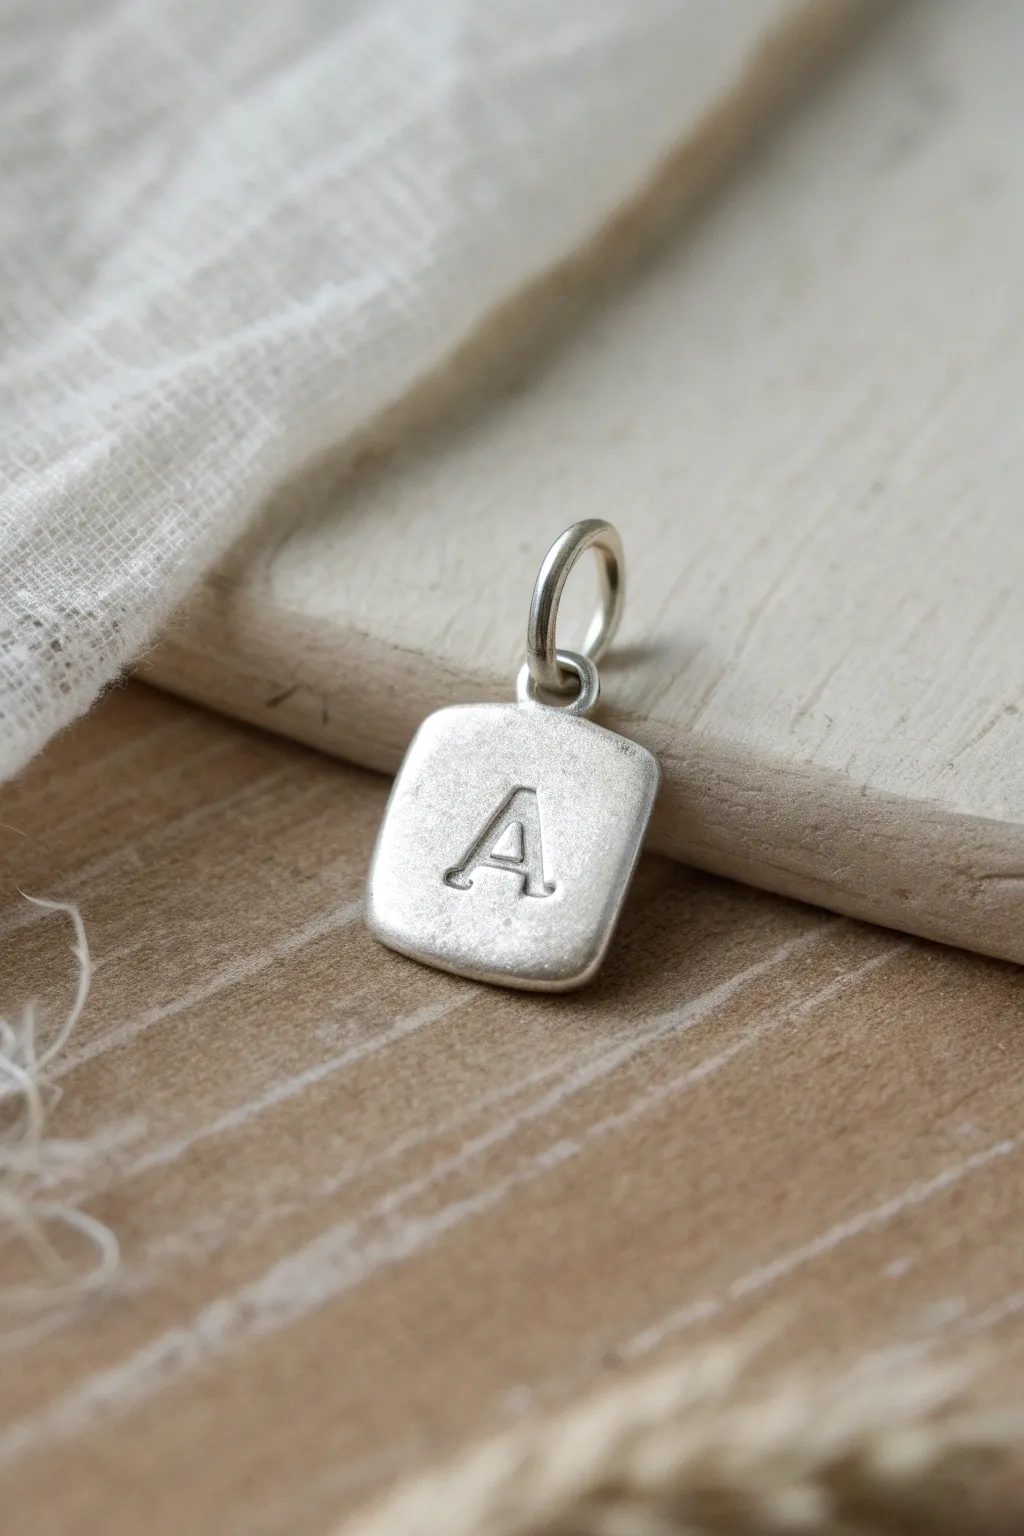
Create a timeless keepsake with this simple yet elegant silver clay project. This square tag features soft, rounded edges and a deeply stamped initial, resulting in a piece that looks beautifully rustic and handmade.
Detailed Instructions
Materials
- Silver metal clay (approx. 3-5g)
- Small square clay cutter or craft knife
- Acrylic roller
- Playing cards or 1.5mm spacers
- Letter stamp set
- Badger balm or olive oil (release agent)
- Small straw or drinking straw
- Sanding sponges (fine and superfine)
- Burnishing tool or spoon back
- Gas hob, culinary torch, or kiln
- Brass or steel wire brush
- Large oval jump ring (sterling silver)
- Two pairs of flat-nose pliers
- Work surface (Teflon sheet or laminated card)
Step 1: Shaping and Stamping
-
Prepare your surface:
Begin by lightly coating your work surface, your hands, and your roller with a tiny amount of badger balm or olive oil to prevent the clay from sticking. -
Condition the clay:
Take a small lump of silver clay—about the size of a marble—and knead it briefly in your fingers until it feels pliable and smooth. I like to do this quickly to preserve moisture. -
Roll out the clay:
Place your spacers or stack of playing cards (about 3-4 cards high) on either side of the clay. Roll over the clay with your acrylic roller until it is an even slab, roughly 1.5mm thick. -
Cut the shape:
Using a small square cutter, press firmly into the clay to cut your tag shape. If you don’t have a cutter, carefully cut a square freehand using a craft knife and a straight edge. -
Smooth the edges:
While the clay is still wet, gently tap the edges with your finger or a damp paintbrush to round off the sharp corners, mimicking the soft pillowy look in the photo. -
Stamp the initial:
Lubricate your chosen letter stamp. Position it carefully in the center of the square and press down firmly and evenly. Don’t wiggle the stamp; just press straight down and lift straight up. -
Create the hole:
Using a small straw or a needle tool, create a hole near the top center for the jump ring. Ensure the hole is large enough to accommodate post-firing shrinkage (the hole will get smaller).
Clean Impressions
If your stamp leaves unwanted square border marks in the clay, gently smooth them away with a rubber-tipped tool or a slightly damp paintbrush before drying.
Step 2: Drying and Refining
-
Dry the piece:
Allow the clay to dry completely. You can let it air dry for 24 hours, or speed this up by placing it on a cup warmer or in a dehydrator until it is bone dry. -
Pre-fire sanding:
Once bone dry, the clay is fragile, so handle with care. Gently sand the edges and the surface with a fine sanding sponge to remove any burrs or rough spots. -
Check the back:
Don’t forget to sand the back of the charm flat, as drying can sometimes cause slight warping or uneven texture.
Cracked Clay?
If small cracks appear while rolling, your clay is too dry. Dab a tiny amount of water on your finger, work it into the clay, and re-roll immediately to fix it.
Step 3: Firing and Finishing
-
Fire the clay:
Fire the piece using a gas hob, culinary torch, or kiln according to your specific clay brand’s instructions. The binder will burn away, typically causing a small flame, leaving pure silver behind. -
Cool down:
Once the firing time tends, allow the silver to cool completely. It will look white and chalky initially—this is normal. -
Brush the surface:
Vigorously brush the fired piece with a brass or steel wire brush. This compresses the surface and transforms the white matte finish into a shining silver metal. -
Burnish for shine:
For that soft satin glow seen in the photo, rub the high points of the charm with a burnisher or the back of a spoon. This polishes the surface further without making it mirror-glossy. -
Attach the jump ring:
Using two pairs of flat-nose pliers, twist your large oval jump ring open sideways. Thread it through the hole in your charm. -
Close the ring:
Twist the jump ring back into place, ensuring the two ends meet perfectly flush for a secure finish.
Now you have a charming, personalized pendant ready to wear or gift to someone special


Tiny Heart Charm Necklace
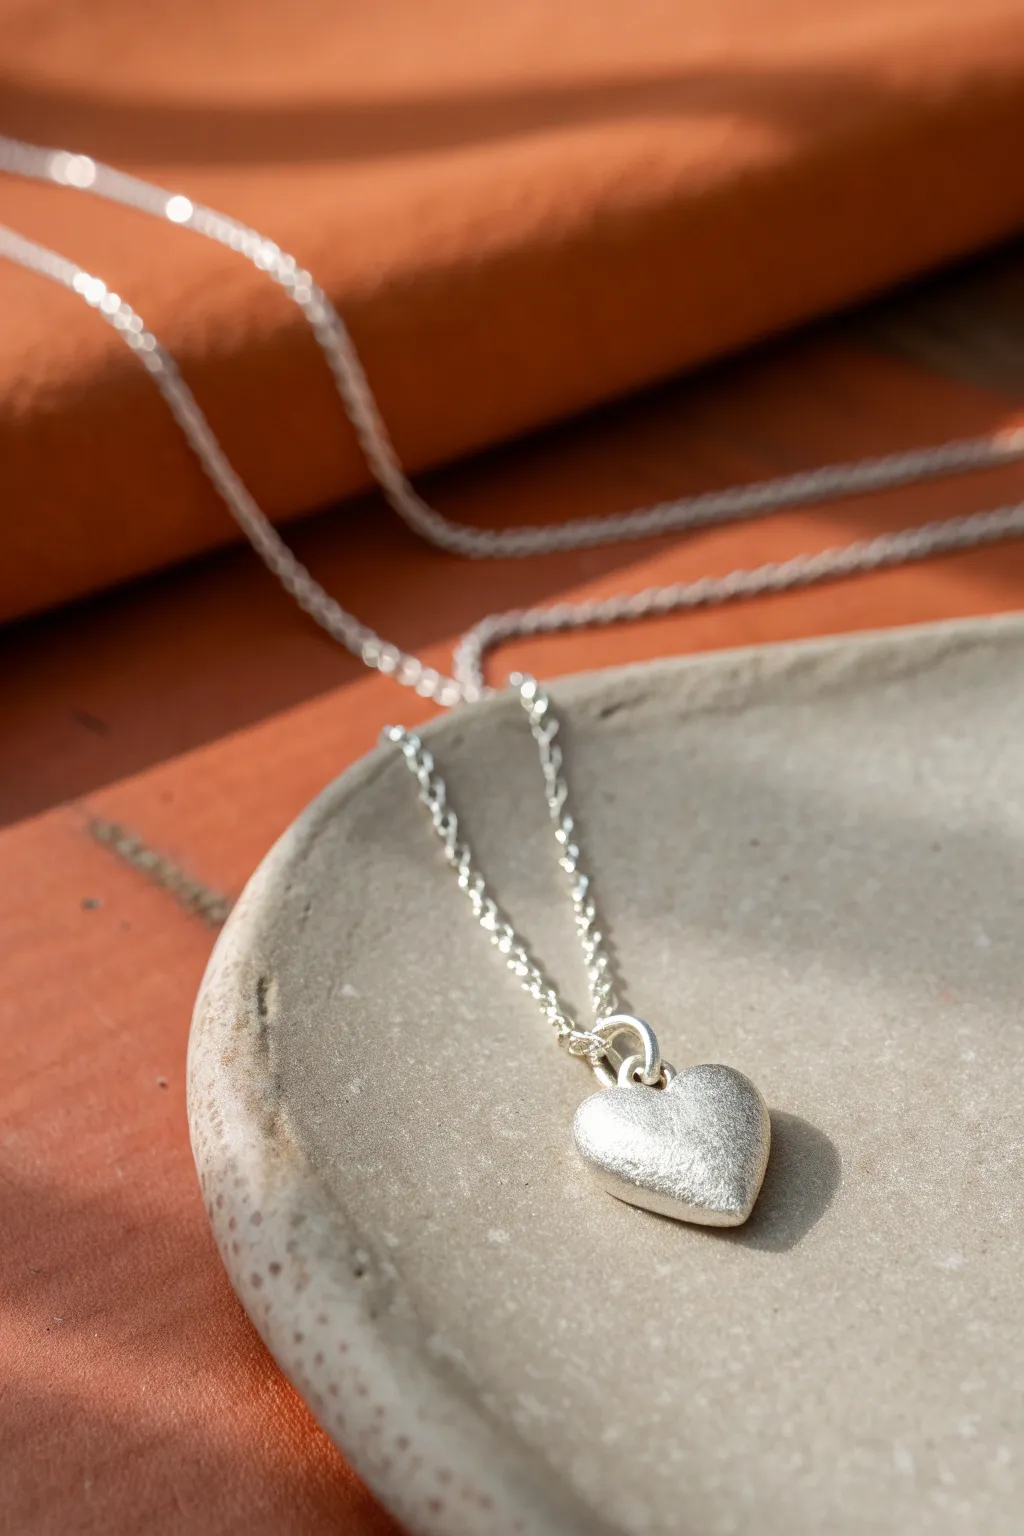
Create a classic and sweet silver heart charm that boasts a beautiful soft matte finish and a comforting weight. This beginner-friendly project focuses on shaping a simple form and achieving that lovely brushed texture that catches the light so gently.
Step-by-Step Tutorial
Materials
- 7g Silver Clay (PMC or Art Clay Silver)
- Small Rolling pin and spacers (1.5mm or 3 playing cards)
- Small heart cutter (approx. 1cm)
- Small paintbrush and water
- Drinking straw or 3mm drill bit
- Needle tool
- Teflon work surface or badger balm
- Firing method (kiln or butane torch)
- Brass scratch brush
- Agate burnisher (optional)
- Sterling silver jump ring (5mm)
- Sterling silver chain
- Fine sandpaper (600 – 1000 grit)
Step 1: Shaping the Clay
-
Prepare your space:
Set up your workspace by lightly greasing your Teflon sheet and rolling pin with a tiny amount of badger balm or olive oil to prevent sticking. -
Roll the clay:
Take your lump of silver clay and roll it into a smooth ball in your palms to remove cracks. Place it on the mat and roll it out until it is about 1.5mm thick using your spacers. -
Cut the shape:
Position your small heart cutter to maximize clay usage and press down firmly. Wiggle slightly to separate the shape and lift the cutter. -
Soften the edges:
The cutter leaves a sharp edge. Dip your finger or a small paintbrush in water and gently run it around the perimeter of the heart to round off that sharp angle, giving it a ‘puffy’ look. -
Create the heavy texture:
To mimic the finish in the photo, take an old toothbrush or a stiff stippling brush and tap it repeatedly all over the surface of the wet clay. This creates that organic, cratered look.
Secret Textures
Don’t have a texture tool? Gently pressing a piece of rough sandpaper or a sponge onto the wet clay surface creates a similar ‘frosted’ effect.
Step 2: Refining and Drilling
-
Drill the hole:
While the clay is still wet, use a small drinking straw or a needle tool to punch a hole near the top of one of the heart’s lobes. Ensure it’s not too close to the edge to prevent breakage. -
Initial Drying:
Let the piece dry completely. You can place it on a mug warmer for 20 minutes or leave it air dry for 24 hours. It must be bone dry. -
Refine the dry clay:
Once dry, use a fine sanding pad to gently smooth the back and sides. Be careful not to sand away the texture you created on the front. -
Check the hole:
Sometimes the hole shrinks during drying. Use a hand drill bit (held in your fingers) to gently ream out the hole to ensure your jump ring will fit later. -
Dust off:
Use a soft, dry brush to whisk away any clay dust from the sanding process.
Step 3: Firing and Finishing
-
Fire the piece:
Place the dry heart on a firing block. If using a butane torch, heat until it glows a peachy orange color and hold that temperature for 2 minutes (or follow your clay brand’s kiln schedule). -
Cool down:
Let the piece cool naturally on the block. Don’t quench it in water, as thermal shock can sometimes stress the metal. -
Check appearance:
The silver will be white and matte. This is the crystalline structure of the silver and is normal. -
Brush for satin finish:
Use a brass scratch brush with a little soapy water to brush the surface vigorously. This compresses the silver and reveals the shine without making it mirror-polished. -
Burnish highlights (optional):
I like to take an agate burnisher and rub just the very highest points of the texture to make them sparkle a bit more against the matte background. -
Assemble:
Open your sterling silver jump ring using two pliers (twist, don’t pull). Thread it through the drilled hole and attach your chain. -
Close the ring:
Twist the jump ring back completely closed so the gap disappears and your heart stays secure.
Cracks Appearing?
If you see tiny hairline cracks while shaping, your clay is drying out. Dab a tiny amount of water on the crack and smooth with a rubber tool immediately.
Wear your new silver heart with pride, knowing you crafted it from scratch

The Complete Guide to Pottery Troubleshooting
Uncover the most common ceramic mistakes—from cracking clay to failed glazes—and learn how to fix them fast.
Minimalist Textured Bar Pendant
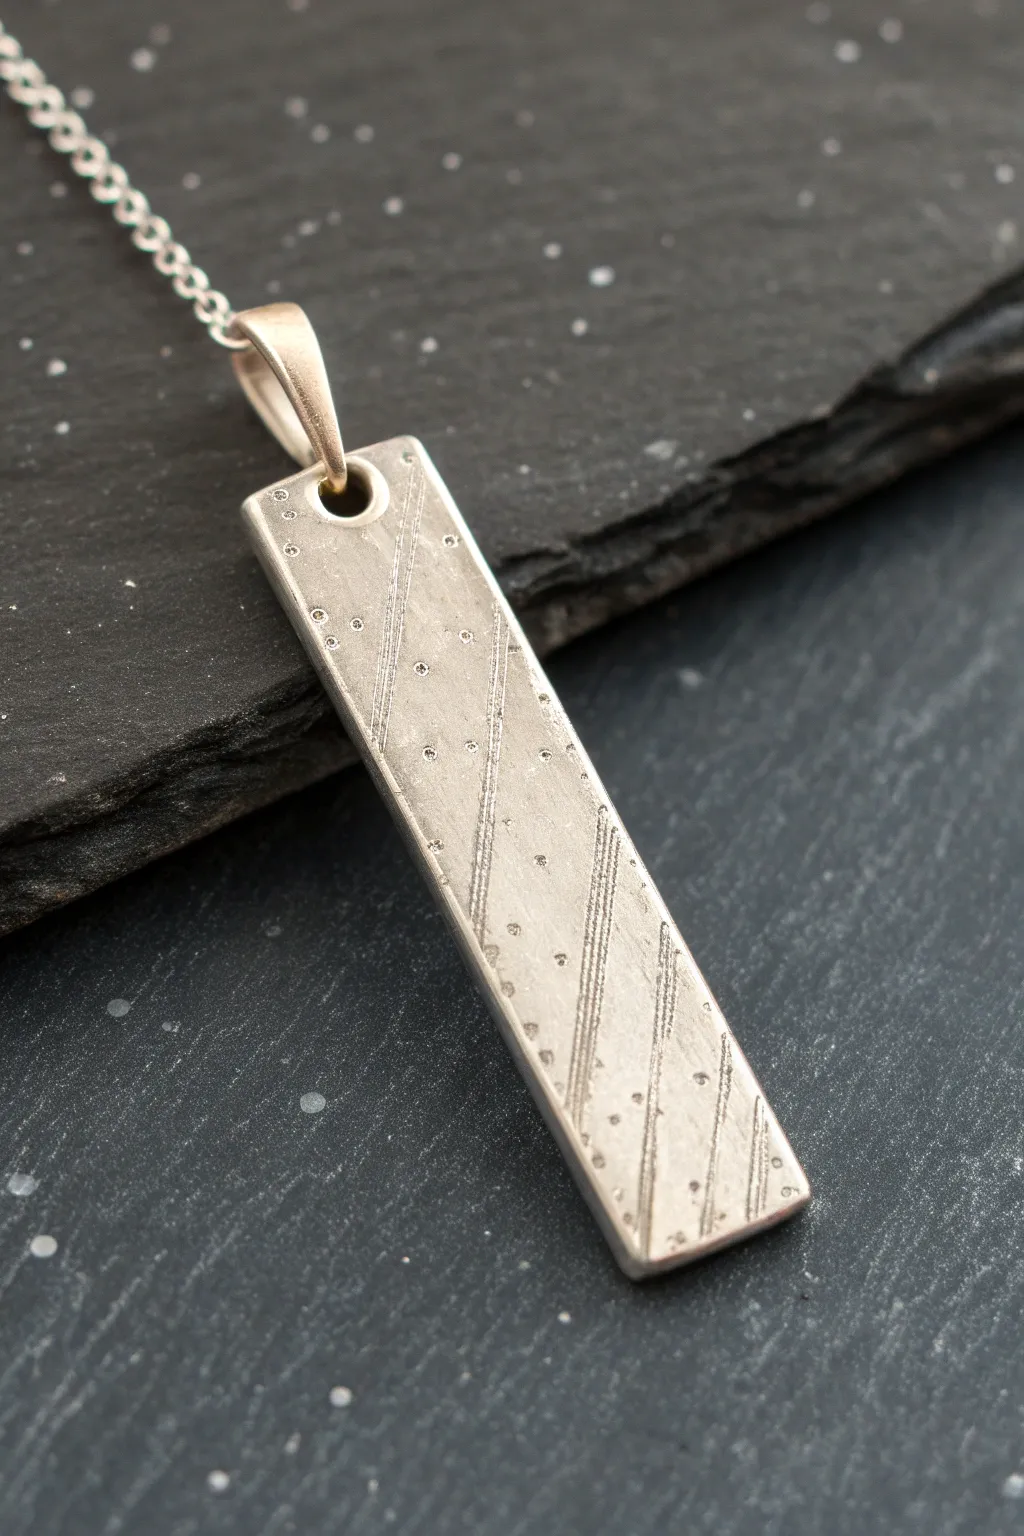
This elegant rectangular pendant combines a modern silhouette with organic, hand-applied textures. The diagonal lines and scattered dots create a subtle, celestial feel that catches the light beautifully when finished.
Step-by-Step Guide
Materials
- Silver metal clay (approx. 7-10g)
- Acrylic rolling pin and slats (1.5mm thickness)
- Teflon work surface or laminated card
- Sharp clay blade or tissue blade
- Needle tool or awl
- Small straw or tubing (for the bail hole)
- Small detail paintbrush
- Water container
- Fine grit sanding pads (sponge or paper)
- Kiln or butane micro torch
- Stainless steel wire brush
- Burnishing tool
- Sterling silver jump ring and chain
Step 1: Shaping the Clay
-
Condition the clay:
Begin by taking your silver clay out of the package. Knead it briefly in your fingers until it feels pliable and smooth, ensuring there are no cracks. If it feels dry, add a tiny drop of water. -
Roll the slab:
Place your clay on the Teflon sheet between two 1.5mm slats. Roll over the clay with your acrylic roller to create a smooth, even slab of uniform thickness. -
Cut the rectangle:
Use your sharp tissue blade to cut a long, clean rectangle. A good dimension for this pendant is approximately 1cm wide by 4cm long, though you can adjust this to your taste. -
Refine the edges:
With a slightly damp paintbrush, gently smooth the cut edges of the rectangle to remove any sharpness or burrs left by the blade. -
Create the hole:
At one end of the rectangle, use a small straw or plastic tube to punch out a hole for the jump ring. Ensure the hole is centered and at least 2-3mm away from the top edge to prevent breakage.
Cracks Appearing?
If you see hairline cracks while rolling, your clay is too dry. Dab a tiny amount of water on your finger, work it into the crack, and re-roll immediately to smooth it out.
Step 2: Adding Texture
-
Draw diagonal lines:
Using a needle tool, gently drag diagonal lines across the surface. Create groups of two or three parallel lines, varying the pressure slightly for a more organic, etched look. -
Add the dots:
Take the tip of your needle tool or a small dotting tool and press small indentations randomly around the lines. I like to group some together and leave other areas sparse. -
Final smoothing:
Inspect your work carefully. If the texturing raised any small ridges of clay, very gently pat them down with a finger or smoothing tool so they don’t become sharp points after firing. -
Drying:
Allow the clay to dry completely. This creates the ‘greenware’ state. You can let it air dry for 24 hours or use a hot plate/dehydrator for faster results. -
Pre-fire sanding:
Once bone dry, use a fine-grit sanding sponge to gently refine the edges and corners. Do not sand the textured surface, or you will lose your design.
Step 3: Firing and Finishing
-
Fire the piece:
Place the dry pendant on a firing brick. Fire using a butane torch or kiln according to your specific clay brand’s instructions (typically holding at temperature for several minutes). -
Quench and brush:
Once fired and cooled (or quenched in water if your clay allows), the piece will look white. Vigorously brush it with a stainless steel wire brush to reveal the silver shine. -
Burnish for contrast:
Use a steel burnisher to rub the high points of the surface. This makes the smooth areas gleam while leaving the recessed lines and dots slightly more matte and textured. -
Assembly:
Open a heavy-gauge sterling silver jump ring using jewelry pliers. Thread it through the hole you created and close it securely. -
Final polish:
Give the pendant a final rub with a polishing cloth to bring out a mirror-like shine on the edges before threading it onto your chain.
Make it Darker
To highlight the texture, apply a liver of sulfur patina solution after firing. It will darken the recessed lines and dots, creating bold contrast when you polish the high spots.
With the texture beautifully highlighted, your minimalist silver bar is ready to wear
Simple Disc Dangle Earrings
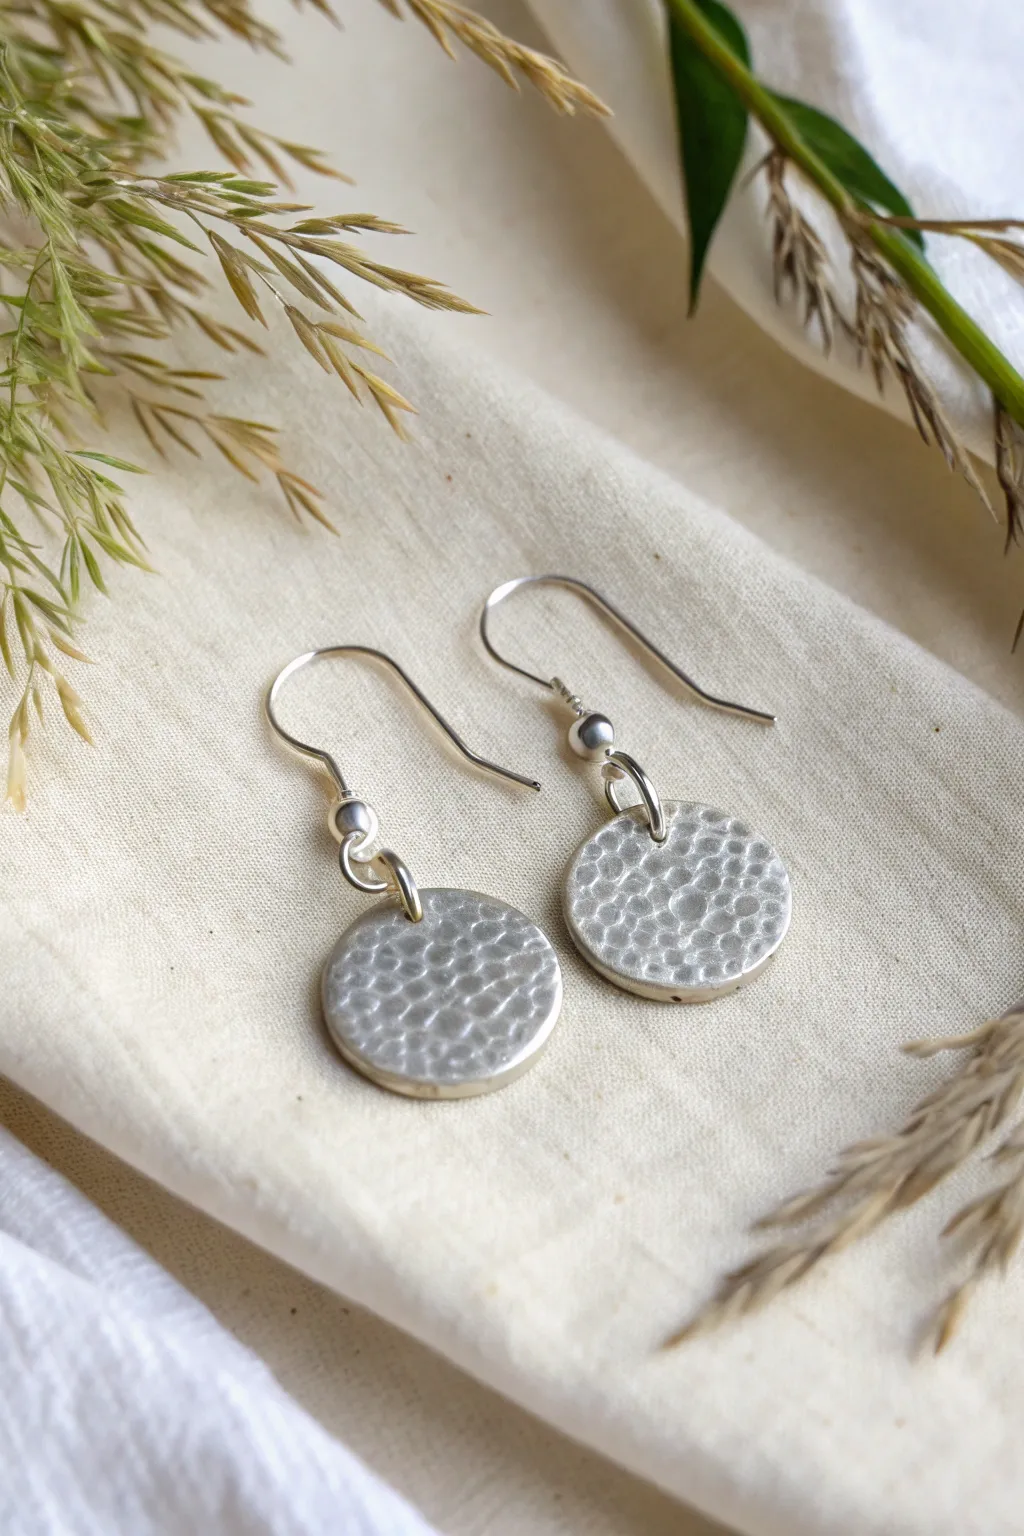
These elegant dangle earrings feature a classic round shape with a captivating hammered surface that catches the light beautifully. Perfect for beginners, this project introduces you to rolling, texturing, and firing silver clay to create jewellery that looks professionally silversmithed.
Step-by-Step
Materials
- Silver metal clay (approx. 5-7g)
- Clay roller
- Rolling spacers or playing cards (1.5mm thickness)
- Round cutter (approx. 10-12mm)
- Hammered texture sheet or actual texturing hammer
- Badger balm or olive oil (release agent)
- Small straw or pin drill
- Sanding sponges (medium to fine)
- Butane torch or kiln
- Brass brush
- Burnishing tool (agate or steel)
- 2 Sterling silver jump rings
- 2 Sterling silver ear wires
- Pliers (chain nose and flat nose)
Step 1: Shaping the Clay
-
Prepare your workspace:
Begin by greasing your hands, work surface, and tools lightly with badger balm or a little olive oil to prevent the silver clay from sticking. -
Roll out the clay:
Place your clay between two spacers (about 1.5mm thick). Roll the clay into a smooth, even slab. If you see any air bubbles, prick them gently and re-roll. -
Apply the texture:
Lightly oil your textured sheet. Place it firmly onto the clay slab and roll over it once with confident pressure to imprint the ‘hammered’ dimples deeply. -
Cut the shapes:
Using your round cutter, press straight down into the textured clay to cut out two discs. Avoid twisting the cutter as you lift, which can distort the circle. -
Add holes:
Use a small straw or a needle tool to punch a hole near the top edge of each disc. Remember that clay shrinks during firing, so make the hole slightly larger than your jump rings require. -
Dry the pieces:
Set the discs aside to dry completely. You can place them on a mug warmer for 20 minutes or let them air dry for 24 hours. They must be bone dry before firing.
Shrinkage Factor
Silver clay shrinks 8-10% when fired. Use a cutter slightly larger than your desired final size, and ensure your drilled holes are big enough to fit hardware later.
Step 2: Refining and Firing
-
Sand the edges:
Once dry, gently sand the edges of your discs with a fine sanding sponge to smooth out any roughness. Be very gentle, as the unfired clay is brittle. -
Clean the holes:
Double-check that the holes are clean and free of debris. Use a small hand drill or a needle file gently if you need to neaten them up. -
Fire the clay:
Place the discs on a soldering block. Ignite your butane torch and heat the pieces evenly until they glow a peachy-orange color. Hold this temperature for the time specified by your clay manufacturer (usually 2-3 minutes). -
Quench and cool:
After firing, push the pieces into a bowl of water to quench them, or let them air cool completely if you prefer.
Step 3: Finishing Touches
-
Brush the silver:
The fired silver will look white and matte. Scrub vigorously with a brass brush and soapy water to compress the surface and reveal the silver shine. -
Burnish for high shine:
For that extra sparkle seen in the photo, rub an agate burnisher or a polished steel tool over the high points of the texture. I find this creates a lovely contrast with the recessed areas. -
Open the jump rings:
Using two pairs of pliers, twist your sterling silver jump rings open sideways—never pull them apart. -
Attach the ear wires:
Thread an open jump ring through the hole in your silver disc, then hook on the loop of your ear wire. -
Close the rings:
Gently twist the jump ring back into a closed position, wiggling it slightly back and forth until the ends meet flush with a satisfying click.
Oxidize for Depth
Dip the finished silver discs in liver of sulphur gel to darken them, then polish the high spots again. This makes the hammered texture pop with incredible contrast.
Now you have a timeless pair of silver earrings ready to wear or gift


What Really Happens Inside the Kiln
Learn how time and temperature work together inside the kiln to transform clay into durable ceramic.
Botanical Texture Stud Earrings
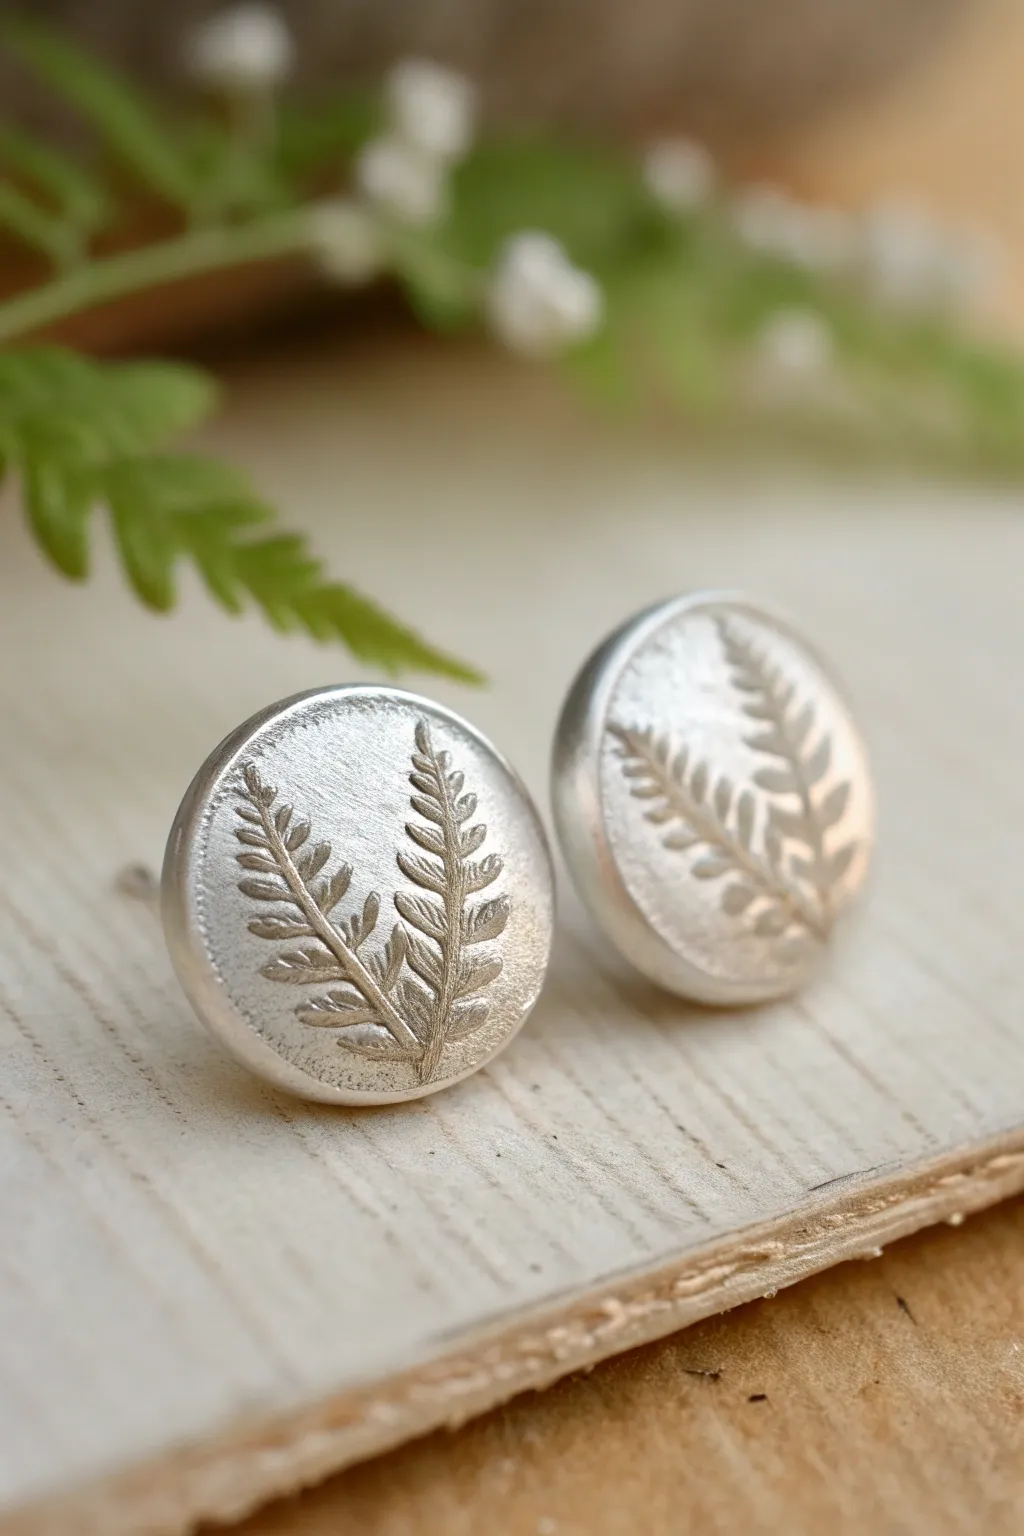
Capture nature’s intricate details forever with these elegant silver clay stud earrings. Using real botanical elements, you’ll create a fine silver keepsake with a beautiful, earthy texture highlighted by a dark patina.
How-To Guide
Materials
- Silver clay (7g to 10g should be plenty for a pair)
- Small fern leaf or similar botanical element
- Badger balm or olive oil (release agent)
- Playing cards or spacers (1.5mm thickness)
- Cling film or plastic wrap
- Rolling pin (acrylic or PVC)
- Small round cutter (approx. 10mm – 12mm)
- Needle tool or craft knife
- Sanding sponges (medium and fine grit)
- Butane torch and firing block (or kiln)
- Brass brush
- Liver of Sulphur (patina)
- Polishing cloth
- Sterling silver earring posts and butterfly backs
- Two-part epoxy glue (jeweller’s grade)
Step 1: Preparation and Texturing
-
Prepare your workspace:
Set up a clean, non-stick work surface. A Teflon sheet or a laminated card works perfectly. Keep a small dish of water and your release agent nearby. -
Lubricate your tools:
Apply a very thin layer of badger balm or olive oil to your work surface, rolling pin, and your hands to prevent the clay from sticking. -
Select your leaf:
Choose a small, fresh fern leaf. The veins on the underside of the leaf usually leave the deepest and most detailed impression, so plan to press that side down. -
Roll out the clay:
Take a lump of silver clay and place it between two stacks of playing cards (about 3-4 cards high) or use 1.5mm spacers. Roll the clay out into an even slab. -
Impress the texture:
Place your fern leaf face down onto the clay slab. Gently roll over the leaf once with firm, even pressure to embed it into the clay. Don’t roll back and forth, as this can create a double image. -
Cut the shapes:
Position your round cutter over the most attractive part of the texturing. Press down firmly to cut your circle. If the clay sticks inside the cutter, gently push it out using the blunt end of a paintbrush.
Clay Cracking edges?
If edges crack while rolling, your clay is likely too dry. Dab a tiny bit of water on the crack and smooth with a rubber shaper, or knead in a drop of water before rolling again.
Step 2: Refining and Firing
-
Dry the pieces:
Carefully lift the clay circles and let them dry completely. You can use a food dehydrator, a cup warmer, or just let them sit for 24 hours. They are dry when they feel hard and room temperature to the touch. -
Refine the edges:
Once bone dry, use a medium-grit sanding sponge to smooth the edges. Hold the piece gently to avoid snapping it. I like to sand in a circular motion to keep the round shape perfect. -
Pre-finish sanding:
Switch to a fine-grit sponge to remove any deeper scratches from the sides and back. Dust off any excess powder with a soft brush. -
Fire the clay:
Place the pieces on a firing block. Ignite your butane torch and heat the pieces evenly until they glow a peachy-orange color. Hold this temperature for the time recommended by your clay manufacturer (usually 2-3 minutes). Alternatively, kiln fire according to instructions. -
Quench and brush:
Once fired, let the pieces cool or quench them in water. They will look white and powdery. Briskly scrub them with a brass brush and a little soapy water to reveal the silver shine.
Step 3: Finishing Touches
-
Apply patina:
Prepare a warm solution of Liver of Sulphur. Dip the earrings into the solution until they turn a dark grey or black. Rinse immediately in clean water to stop the reaction. -
Polish for contrast:
Use a polishing cloth or a superfine sanding pad to buff the high points of the silver. This removes the black patina from the surface but leaves it in the deep recesses of the fern pattern, creating beautiful contrast. -
Attach the posts:
Mix a small amount of two-part epoxy glue. Apply a dab to the flat pad of a sterling silver earring post and press it firmly onto the center of the back of your silver stud. -
Final cure:
Allow the glue to cure undisturbed for at least 24 hours to ensure a strong, permanent bond before wearing.
Creative Spark
Try using slightly different plants for each ear, like a fern on one and a tiny wildflower on the other, for a mismatched ‘forest floor’ aesthetic.
Now you have a stunning pair of nature-inspired studs ready to wear or gift.
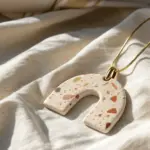
Adjustable Open Band Ring
This rustic silver ring features a beautifully textured surface and a singular, polished granule accent. Its open-band design makes it forgiving for beginners and versatile for fit, showcasing the organic charm unique to metal clay.
Step-by-Step
Materials
- Silver metal clay (approx. 7-10g)
- Texture sheet or textured object (e.g., bark, fabric, stamp)
- Work surface (Teflon sheet or laminated card)
- Clay roller
- slats or playing cards (1.5mm thick)
- Craft knife or needle tool
- Ring mandrel (wooden or metal)
- Post-it note or paper strip
- Tape
- Slip (paste) or a little water
- Torch or kiln for firing
- Stainless steel brush
- Sandpaper (various grits)
- Polishing cloth
Step 1: Sizing and Rolling
-
Measure your size:
Wrap a paper strip loosely around your finger where the ring will sit. Mark the overlap, then add about 10-15% extra length to account for the shrinkage that happens during firing. This longer length is your cutting template. -
Prepare the clay:
Remove your silver clay from the package. Knead it briefly in your palms, keeping your hands slightly lubricated with balm to prevent sticking. You want a consistent, crack-free lump. -
Roll the slab:
Place the clay on your non-stick surface between your thickness spacers (1.5mm is ideal for a sturdy ring). Roll the clay out into a long rectangle shape, slightly wider and longer than your paper template.
Step 2: Texturing and Cutting
-
Apply texture:
Lightly mist your chosen texture sheet or object with cool slip or olive oil. Place it onto the clay slab and roll over it once with firm, even pressure. Avoid rolling back and forth, as this creates ‘ghost’ images. -
Cut the band:
Lay your paper template over the textured clay. Using a sharp craft knife or needle tool, cut straight lines along the long edges. For the ends, you can cut them straight or round them off slightly for a softer look. -
Refine edges:
Lift the excess clay away. If the edges look rough, gently smooth them with a rubber clay shaper or a slightly damp brush, being careful not to smudge your beautiful texture.
Cracks appearing?
If you see hairline cracks while bending the dry clay, brush a little water or paste into the fissure immediately to heal it before firing.
Step 3: Forming and Detailing
-
Form the ring:
Wrap a Post-it note around a wooden ring mandrel to prevent sticking. Carefully lift your clay strip and wrap it around the mandrel. since this is an open band, the ends shouldn’t touch; leave a small gap. -
Dry partially:
Let the ring dry on the mandrel for about 10-15 minutes until it holds its shape but isn’t bone dry. I like to check if it’s firm enough to hold the granule without sagging. -
Make a granule:
Take a tiny pinch of leftover clay and roll it into a small, perfect ball. This will be your decorative accent. -
Attach the detail:
Apply a tiny dot of paste or water to the spot on the ring where you want the granule. Place the ball on top and gently press it down just enough to secure it. Blend the seam slightly with a small brush if needed. -
Full drying:
Allow the ring to dry completely—either overnight or on a mug warmer. It must be bone dry before firing to prevent popping.
Add a Gemstone
Before drying, press a fireable cubic zirconia into the wet clay instead of the silver ball for a sparkly, jeweled version of this band.
Step 4: Refining and Firing
-
Pre-fire sanding:
Once dry, gently sand the edges and the inside of the band with fine grit sandpaper. Do not sand the texture on the front. Clean away dust with a soft brush. -
Fire the piece:
Place the ring on a firing brick. If torch firing, heat until the binder burns off and the piece glows a peachy orange, holding that temperature for around 2 minutes. If kiln firing, follow the clay manufacturer’s specific firing schedule. -
Cool and brush:
Quench the hot ring in water or let it air cool. It will appear white. Use a stainless steel wire brush and a little soapy water to brush the surface vigorously until the silver shine appears.
Step 5: Finishing Touches
-
Burnish the detail:
Take a steel burnisher or the smooth side of a spoon and rub the little granule accent. This compresses the silver and makes that specific spot shine extra bright against the texture. -
Final polish:
Buff the entire ring with a polishing cloth. If you want to highlight the texture further, you can apply a liver of sulfur patina to darken the recessed areas before a final polish.
Slip this custom piece onto your finger and enjoy the handcrafted feel of pure silver.

TRACK YOUR CERAMIC JOURNEY
Capture glaze tests, firing details, and creative progress—all in one simple printable. Make your projects easier to repeat and improve.
Charm Bracelet With Mini Silver Tags
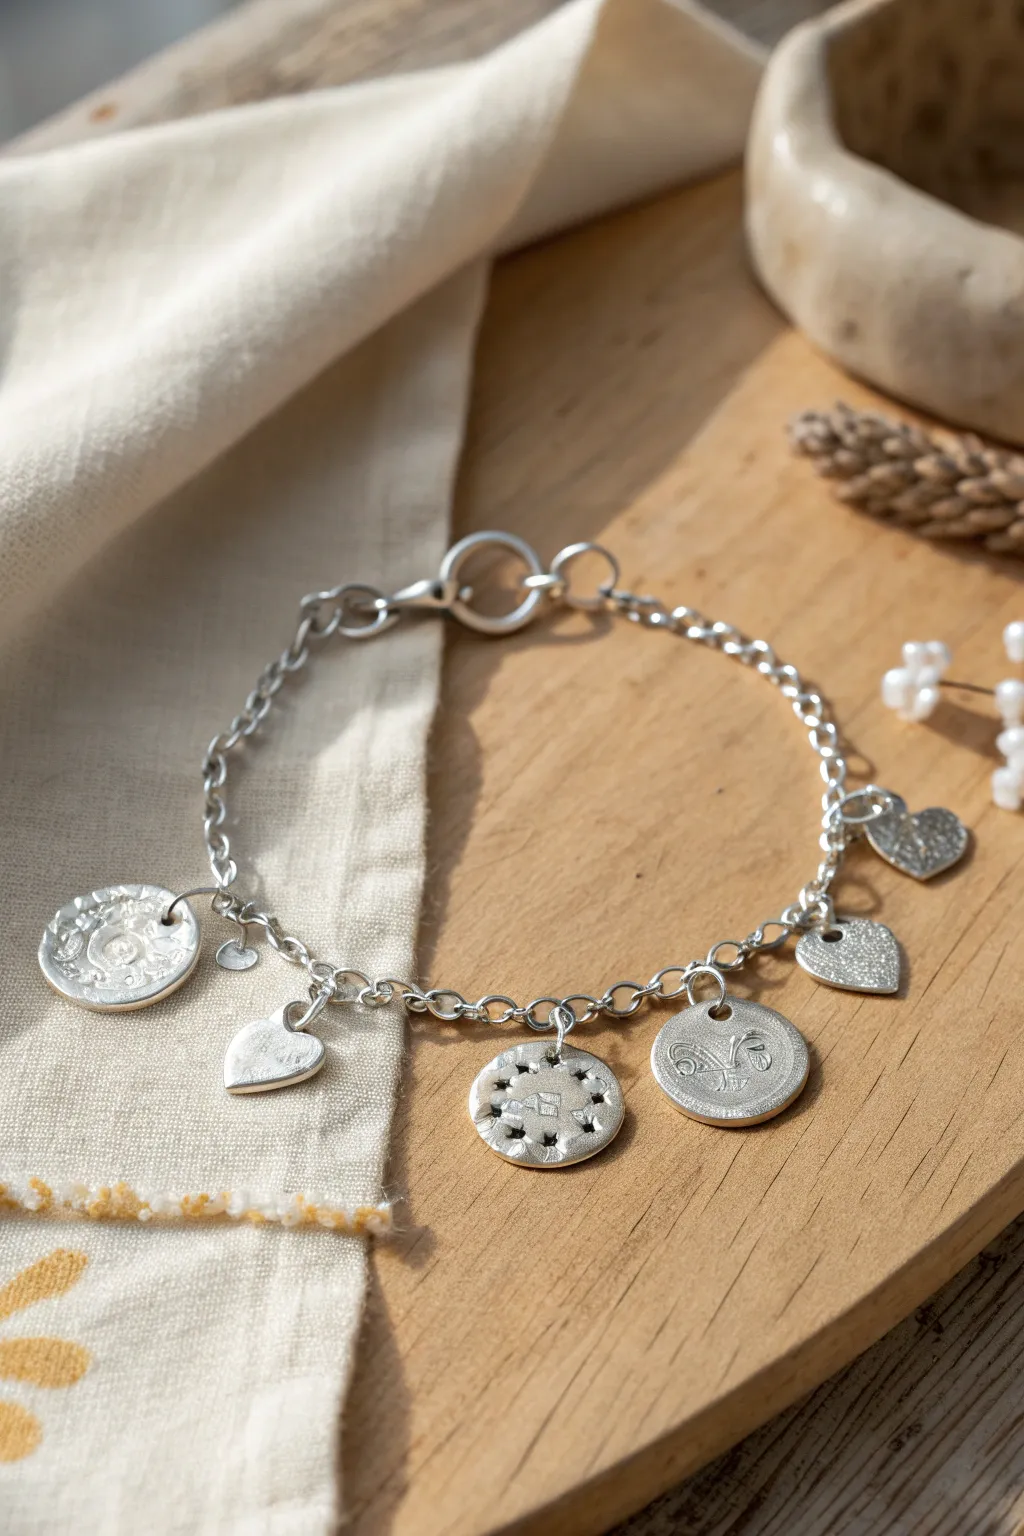
Create a personalized heirloom-style piece with this beginner-friendly silver clay project. By crafting individual mini-tags with varied textures and shapes, you’ll build a charmingly eclectic bracelet that looks professionally silversmithed.
Step-by-Step Guide
Materials
- Silver metal clay (approx. 7-10g)
- Small textured stamps or texture mats (florals, symbols)
- Small shape cutters (circle and heart)
- Rolling pin and acrylic spacers (1.5mm thickness)
- Badger balm or olive oil (release agent)
- Cocktail stick or small straw
- Torch or kiln for firing
- Brass bristle brush
- Sandpaper or sanding sponges (various grits)
- Sterling silver chain bracelet blank
- Jump rings (open, sterling silver)
- Two pairs of chain-nose pliers
Step 1: Shaping the Charms
-
Prepare your workspace:
Set up a clean, non-stick surface like a Teflon sheet or a laminated card. Lightly coat your hands and the rolling pin with a tiny amount of badger balm or olive oil to prevent the clay from sticking. -
Condition the clay:
Take your silver clay out of the package. Knead it very briefly in your fingers just until it feels pliable and smooth, ensuring there are no cracks. -
Roll the slab:
Place the clay between your 1.5mm spacers. Roll over it smoothly with the roller to create an even slab. This thickness is ideal for charms that feel substantial but aren’t too heavy. -
Apply texture:
Lightly oil your chosen texture stamp. Press it firmly and evenly into the clay slab. Don’t press all the way through; you just want a deep, clear impression of the design. -
Cut the shapes:
Position your small circle or heart cutter over the textured area to capture the best part of the design. Press down firmly to cut the shape. -
Create the hole:
While the clay is still wet, use a cocktail stick or a very small straw to punch a hole near the top edge of the charm. Make sure the hole is large enough to accommodate your jump rings, keeping in mind the clay will shrink slightly during firing. -
Refine the edges:
If the edges look rough from cutting, gently smooth them with a damp paintbrush or the tip of your finger. Repeat the rolling and cutting process to make 5-7 different charms.
Cracked Clay?
If edges crack while rolling, your clay is drying out. Dab a tiny drop of water on the crack and smooth it. Work quickly and keep unused clay wrapped tight in cling film.
Step 2: Firing and Finishing
-
Dry completely:
Allow your charms to dry for at least 24 hours at room temperature, or use a dehydrator/hair dryer to speed this up. The clay must be bone dry before firing to prevent exploding. -
Pre-fire sanding:
Once bone dry, inspect the edges again. Use a fine-grit sanding sponge to gently smooth away any burrs or sharp corners. Be very gentle, as the dry clay is brittle. -
Fire the charms:
Place the charms on a soldering block if torch firing, or in your kiln. Follow the manufacturer’s specific instructions for your brand of clay. Typically, torch fire until the piece glows a peachy-orange color for the required time (usually 2-3 minutes). -
Cool and brush:
Let the silver cool completely. It will look white and chalky. Vigorously brush each charm with a brass bristle brush under running water with a drop of dish soap. This burnishes the silver and reveals the metallic shine. -
Polish (optional):
For the matte finish shown in the photo, stick to the brass brush. If you want high shine, use a polishing cloth or tumble polisher.
Step 3: Assembly
-
Open jump rings:
Using two pairs of pliers, grip a jump ring on either side of the split. Twist one hand forward and the other back to open the ring sideways—never pull it apart. -
Attach to chain:
Thread the open jump ring through the hole in your charm, and then hook it onto a link of your bracelet chain. I like to lay the chain flat first to space the charms evenly. -
Secure the ring:
Use the pliers to twist the jump ring back into a closed position, wiggling it slightly back and forth until the two ends meet perfectly flush. -
Final check:
Repeat for all charms. Give each charm a gentle tug to ensure the jump rings are secure and won’t slip off the chain.
Add Patina
To make the textures pop, dip the fired silver in liver of sulphur solution. It darkens the recesses. Polish the raised areas back to silver for high contrast.
Now you have a stunning, handcrafted bracelet ready to wear or gift.
Antiqued Patina to Pop Texture
This project transforms a simple lump of metal clay into a stunning botanical pendant that looks like a vintage heirloom. By darkening the recessed areas with patina, the delicate fern impression pops brightly against the moody background.
How-To Guide
Materials
- Silver metal clay (approx. 7-10g)
- Small fern leaf or deep-texture rubber stamp
- Oval cutter
- Badger balm or olive oil (release agent)
- Roller and spacers (1.5mm thick)
- Small straw or metal tube (for the bail loop)
- Jump ring (heavy gauge)
- Silver clay paste (slip) and fine paintbrush
- Liver of Sulphur (LOS) gel or patina solution
- Polishing pads and fine sandpaper (600-1200 grit)
- Torch or kiln for firing
- Brass brush
Step 1: Shaping the Clay
-
Condition the Clay:
Begin by rubbing a tiny amount of badger balm or olive oil onto your hands. Take your silver clay out of the package and knead it gently for a few moments until it feels pliable and crack-free, keeping it covered when not in active use to prevent drying. -
Roll the Slab:
Place the clay on a non-stick work surface or playing card. Set your 1.5mm spacers on either side and roll the clay into an even, smooth slab. Ensure the surface is free of fissures. -
Texture the Surface:
Apply a very thin film of oil to your fern leaf or texture stamp. Press it firmly into the center of the rolled clay. If using a real leaf, roll over it once gently with the roller to embed the veins, then carefully peel it away to reveal the impression. -
Cut the Shape:
Position your oval cutter over the impression to frame the fern nicely. Press down firmly to cut the shape. Remove the excess clay from around the outside before lifting the cutter away. -
Dry the Piece:
Set the oval aside to dry completely. This can take 24 hours at room temperature or about 20 minutes on a mug warmer. The clay must be bone dry before you proceed to the next phase.
Fixing Cracks
If you see hairline cracks while drying, worry not! Mix a tiny bit of clay with water to make a thick paste. Fill the crack, let it dry, and sand smooth before firing.
Step 2: Refining and Adding the Bail
-
Sand the Edges:
Once dry, use a fine grit sanding pad to smooth the outer edges of the oval. Use a light touch to avoid altering the shape, just focusing on removing any roughness from the cutting process. -
Create the Bail Loop:
Roll a small snake of fresh clay and wrap it around a straw or dowel to form a sturdy loop. Join the ends with a little silver paste. Alternatively, you can embed a commercially made fine silver bail eyelet into the top edge. -
Attach the Bail:
Drill a shallow indentation at the top center of your dry oval if needed. Apply silver paste (slip) as glue and press your bail loop firmly onto the top edge. Add a little extra paste around the seam for security and smooth it out with a damp brush. -
Create the Rim (Optional):
To mimic the slight edge seen in the photo, roll a very thin snake of clay. Paint a line of slip around the perimeter of the pendant and gently lay the snake on top. flatten it slightly with a tool to integrate it, creating a framed effect. -
Final Drying and Refining:
Key to success is ensuring the added wet clay bits are totally dry. Once bone dry, do a final pass with fine sandpaper to ensure the back is smooth and the rim is neat.
Step 3: Firing and Finishing
-
Fire the Clay:
Fire the piece according to your clay manufacturer’s instructions, using either a butane torch or a kiln. When torch firing, hold the piece at a peach-glow temperature for the recommended time (usually 2-3 minutes minimum) then let it cool. -
Brush Down:
The fired silver will look white and matte. Scrub it vigorously with a brass brush under running water with a drop of dish soap. This burnishes the surface and brings out the silver shine. -
Apply the Patina:
Prepare a hot Liver of Sulphur solution. Dip the pendant into the dark liquid until the entire piece turns a dark charcoal grey or black. Rinse immediately in cold water to stop the reaction. -
Polish for Contrast:
Using a polishing pad or fine steel wool, buff the high points of the design. You want to remove the black patina from the rim and the raised leaf surfaces, leaving the dark color in the recessed background to create that antique pop. -
Final Shine:
Finish by buffing the silver areas with a jewelry polishing cloth to achieve a high luster, ensuring the jump ring fits through the bail freely.
Add a Gemstone
For a sparkle, set a small, fireable cubic zirconia into the clay near the stem base before drying. Ensure the stone’s table is level with the clay surface.
Wear your finished botanical pendant with pride, knowing you’ve captured nature in silver forever.
Botanical Cutout Silhouette Pendant
Capture nature’s intricate details forever with this elegant silver clay pendant. By using a real leaf as a template, you’ll create a textured, organic piece that highlights the beautiful vein structure in fine silver.
Step-by-Step
Materials
- Silver metal clay (approx. 5-7g)
- Fresh leaf with strong veins (e.g., sage, hydrangea, or rose)
- Rolling pin or acrylic roller
- Playing cards or spacer slats (1.5mm thick)
- Craft knife or scalpel
- Badger balm or olive oil (release agent)
- Texture sheet or work mat
- Clay shaper tool
- Needle tool
- Small jump ring
- Sanding sponges (various grits)
- Butane torch or kiln
- Brass brush
- Agate burnisher
- Silver chain
Step 1: Preparation & Rolling
-
Prepare your workspace:
Begin by setting up a clean, non-stick work surface. Rub a tiny amount of badger balm or olive oil onto your hands, the work mat, and your roller to prevent the silver clay from sticking. -
Condition the clay:
Take your lump of silver clay out of the package. Knead it quickly and gently in your palms for just a moment to ensure it is pliable and crack-free, forming it into a smooth ball. -
Select your leaf:
Choose a fresh leaf slightly smaller than the amount of clay you have. Ensure the back of the leaf has raised, distinct veins, as this is the side needed for a clear impression. -
Roll the base layer:
Place your clay ball between two stacks of playing cards (about 5-6 cards high) or 1.5mm spacers. Roll the clay out into an even slab, ensuring it’s wide enough to accommodate your chosen leaf.
Cracked Edges?
If small cracks appear while rolling, your clay might be dry. Dab a tiny bit of water on the crack and smooth with a brush before cutting.
Step 2: Texturing & Cutting
-
Apply the leaf:
Place the leaf face-down onto the rolled clay slab. The veined back should be pressing into the clay. Gently roll over the leaf once with firm pressure to embed the texture deep into the silver. -
Cut the shape:
Using a sharp craft knife or scalpel, carefully trace around the outer edge of the leaf. Keep your blade vertical to get a nice clean edge, cutting away the excess clay. -
Refine the veins:
Carefully peel the leaf away to reveal the texture. If the central vein or side veins aren’t defined enough, I like to gently accentuate them now using a clay shaper or a blunt needle tool to deepen the lines slightly. -
Add a bail loop:
Roll a very small snake of leftover clay and form it into a loop. Attach this securely to the top of the leaf stem using a tiny drop of water and paste (made by mixing clay crumbs with water) to act as glue. -
Smooth the edges:
Dip your finger or a paintbrush in a little water and gently run it along the cut edges of the pendant to smooth out any sharpness or drag marks from the knife.
Step 3: Drying & Refining
-
Dry the piece:
Let the clay dry completely. You can air dry it for 24 hours, or speed up the process by placing it on a mug warmer or in a dehydrator for about 20-30 minutes. -
Check for dryness:
To test if it’s ready, place the hot clay on a cold mirror; if no condensation forms after a few seconds, it is bone dry and ready for the next step. -
Pre-fire sanding:
Use fine-grit sanding sponges to gently refining the edges and outline. Be very delicate, as the dry clay is brittle and feels like chalk at this stage.
Level Up: Patina
Apply liver of sulphur solution to darken the recessed veins, then polish the high points to create dramatic contrast and depth.
Step 4: Firing & Finishing
-
Fire the pendant:
Place the piece on a soldering block. Torch fire by heating evenly until the binder burns off and the piece glows a peachy-orange color. Hold this temperature for the time recommended by your clay manufacturer (usually 2-3 minutes). -
Quench and brush:
Once fired, quench the piece in water to cool it down. It will look white and matte. Vigorously brush it with a brass brush and soapy water to burnish the surface and reveal the silver shine. -
High polish (optional):
For the shiny finish seen in the photo, rub an agate burnisher over the raised areas of the leaf surface. This compresses the silver particles further, creating mirror-like highlights against the textured matte veins. -
Attach the chain:
Open a small sterling silver jump ring using two pairs of pliers. Thread it through the fired bail loop you created earlier and attach your silver chain before closing the ring securely.
Wear your botanical masterpiece with pride, knowing you’ve captured a unique piece of nature in solid silver
Lace-Imprint “Vintage” Pendant
Capture the delicate beauty of antique textiles in pure silver with this elegant pendant project. By pressing a piece of textured lace into soft silver clay, you’ll create a sophisticated, heirloom-quality piece that looks far more complex than it actually is.
Step-by-Step Guide
Materials
- Silver metal clay (approx. 7-10g)
- Small piece of textured lace or a lace-patterned texture mat
- Oval cutter (medium size)
- Acrylic roller or PVC pipe
- Playing cards or slate spacers (1.5mm thickness)
- Olive oil or Badger Balm (release agent)
- Straw or small intricate cutter for the bail hole
- Sanding sponges (medium and fine grit)
- Torch or kiln for firing
- Brass wire brush
- Polishing cloth
- Jump ring and silver snake chain
Step 1: Preparation and Rolling
-
Prepare your workspace:
Begin by cleaning your work surface thoroughly. Lay down a non-stick work mat or a piece of Teflon sheet to prevent the clay from sticking. -
Apply release agent:
Lightly coat your hands, the roller, and the work surface with a tiny amount of olive oil or Badger Balm. This is crucial for handling sticky clay. -
Condition the clay:
Remove the silver clay from the package and knead it gently for a few seconds until it feels pliable and smooth, ensuring there are no cracks. -
Set up spacers:
Place your spacers (playing cards) on either side of the clay. You’ll want a stack about 1.5mm high to ensure the pendant has a luxurious weight and isn’t too fragile. -
Roll the base layer:
Roll the clay into a smooth, even slab. Check that the surface is flawless before proceeding to the texture step.
Step 2: Texturing and Cutting
-
Prepare the lace:
Take your chosen piece of lace or texture mat and lightly lubricate it with your release agent to ensure it peels away cleanly. -
Imprint the design:
Place the lace face-down onto the rolled clay. Using your roller, press firmly and roll over the texture once. Do not roll back and forth, as this can create a ‘ghosting’ or double image effect. -
Reveal the pattern:
Carefully lift the lace straight up to reveal the imprinted design. This is always my favorite moment—seeing the detail emerge in the clay. -
Cut the shape:
Position your oval cutter over the most interesting part of the pattern. Press down firmly and lift away the excess clay around the outside. -
Create the hanging point:
Use a small straw or a tiny circular cutter to punch a hole near the top edge for the jump ring. Ensure there is at least 2mm of clay between the hole and the edge. -
Dry the piece:
Set the piece aside to dry completely for at least 24 hours, or use a dehydrator/mug warmer to speed up the process. The clay must be bone dry before firing.
Clearer Textures
For deeper impressions, remove one playing card from your spacer stack before rolling the texture. This forces the lace deeper into the clay without thinning the overall slab too much.
Step 3: Refining and Firing
-
Sand the edges:
Once bone dry, use the sanding sponges to smooth the edges of the oval. Be gentle; the clay is very brittle in this state. -
Slight surface sanding:
Briefly run a fine-grit sponge over the back to make it smooth, ensuring it will sit comfortably against the skin. -
Fire the pendant:
Place the piece on a kiln block or designated torch-firing surface. Fire according to your clay manufacturer’s instructions. For torch firing, bring it to a glow and hold for the required time. -
Cool and brush:
Allow the silver to cool completely. It will look white and powdery. Briskly brush it with a brass wire brush and soapy water to reveal the silver shine. -
Burnish highlights:
Use a polishing cloth or an agate burnisher to rub the raised areas of the lace pattern. This creates contrast between the shiny ‘threads’ and the matte background. -
Assembly:
Open a heavy-duty jump ring, attach your bail or directly loop it through the hole, and thread onto your snake chain to finish.
Clay Sticking?
If the clay sticks to your texture mat or lace, you likely didn’t use enough release agent. Lightly oil the texture again, ball up the clay, re-roll, and try again immediately.
Wear your new silver heirloom with pride, knowing you’ve preserved a beautiful textile pattern forever
Seashell Impression Coastal Charms
Capture the delicate details of the ocean with these stunning pure silver charms made directly from real seashells. Using metal clay allows you to create effortless, realistic textures that look like professional casting right from your kitchen table.
Detailed Instructions
Materials
- 7g Silver Metal Clay (Art Clay Silver or PMC3)
- Clean, small seashells (scallop or cockle shells work best)
- Olive oil or Badger Balm (release agent)
- Two-part silicone molding putty
- Rolling pin and spacer slats (1.5mm thickness)
- Clay shaper or craft knife
- Small straw or pin drill (for the hole)
- Sanding sponges (medium to superfine)
- Butane torch or kiln
- Brass wire brush
- Polishing cloth and burnisher
- Silver jump rings and chain
Step 1: Creating the Molds
-
Select your shells:
Choose small, deeply textured shells for the best results. The ridges on scallop or cockle shells translate beautifully into silver. Clean and dry them thoroughly before starting. -
Mix the silicone putty:
Take equal parts of the two-component silicone putty (usually yellow and white or blue and white). Knead them together quickly with your fingers until you have a uniform color with no streaks. -
Press the mold:
Roll the mixed putty into a smooth ball, then flatten it slightly. Press your chosen shell firmly into the putty to create a deep impression. Leave this to cure according to the package instructions—usually about 10–20 minutes. -
Remove the shell:
Once the silicone is firm to the touch, gently flex the mold to pop the shell out. Inspect the inside to ensure you have captured all the fine ridges and details.
Clean Edges Only
When sanding the dry clay (greenware), avoid touching the textured front. Only sand the back and outer rim to keep the shell ridges crisp.
Step 2: Forming the Charms
-
Lubricate the mold:
Apply a very thin layer of olive oil or balm to your silicone mold. This ensures your precious silver clay won’t stick inside the crevices. -
Pack the clay:
Take a pea-sized ball of silver clay and press it firmly into the mold. I like to start in the center and push outwards to ensure the clay fills every ridge without trapping air bubbles. -
Add a backing:
If the back of the charm looks messy, add a tiny bit more clay to level it off, or smooth it down with a slightly damp finger so the charm has a neat, flat reverse side. -
Release the shape:
Immediately gently flex the mold to pop the wet clay shape out. Do not let it dry in the mold, as it will shrink and could get stuck. -
Pierce the hole:
While the clay is still wet, use a small cocktail straw to punch a clean hole near the top hinge of the shell. Alternatively, shape a small loop of excess clay and attach it to the top with a little water and pressure.
Step 3: Refining and Firing
-
Dry thoroughly:
Place your clay pieces on a warming plate or simply air dry them for 24 hours. They must be bone dry before firing; if they feel cool to the touch, they still contain moisture. -
Sand and refine:
Using fine grit sanding pads, gently smooth the edges of your dried clay. Be careful not to sand away the beautiful shell texture on the front, but ensure the back and sides are smooth. -
Fire the clay:
Place the dried pieces on a firing brick. Ignite your butane torch and heat the pieces evenly until they glow a pale peach color. Hold this temperature for the time specified by your clay manufacturer (usually 2–3 minutes). -
Cool down:
Allow the silver pieces to cool naturally on the brick. Once cool, they will look white and chalky—this is normal crystallized silver.
Go Oxidized
Use Liver of Sulphur gel to blacken the grooves fully. This high-contrast ‘antique’ look makes identical silver charms look much more expensive.
Step 4: Finishing Touches
-
Brush the surface:
Scrub the fired pieces vigorously with a brass wire brush and a little soapy water. This removes the white crystallization and reveals the shining silver beneath. -
Burnish for shine:
For high highlights, rub the raised ridges of the shell with an agate burnisher or the back of a spoon. This compresses the silver even further, making those details sparkle. -
Optional patina:
To make the recessed lines pop like the photo, dip the charm in liver of sulphur solution until dark, then polish the high points again to create contrast. -
Assemble the necklace:
Open a sterling silver jump ring using two pairs of pliers. Thread it through the hole in your charm and attach it to your chain.
Enjoy wearing your permanent keepsakes of the seaside that will bring summer memories to any outfit
Acorn Cap Mold Pendant
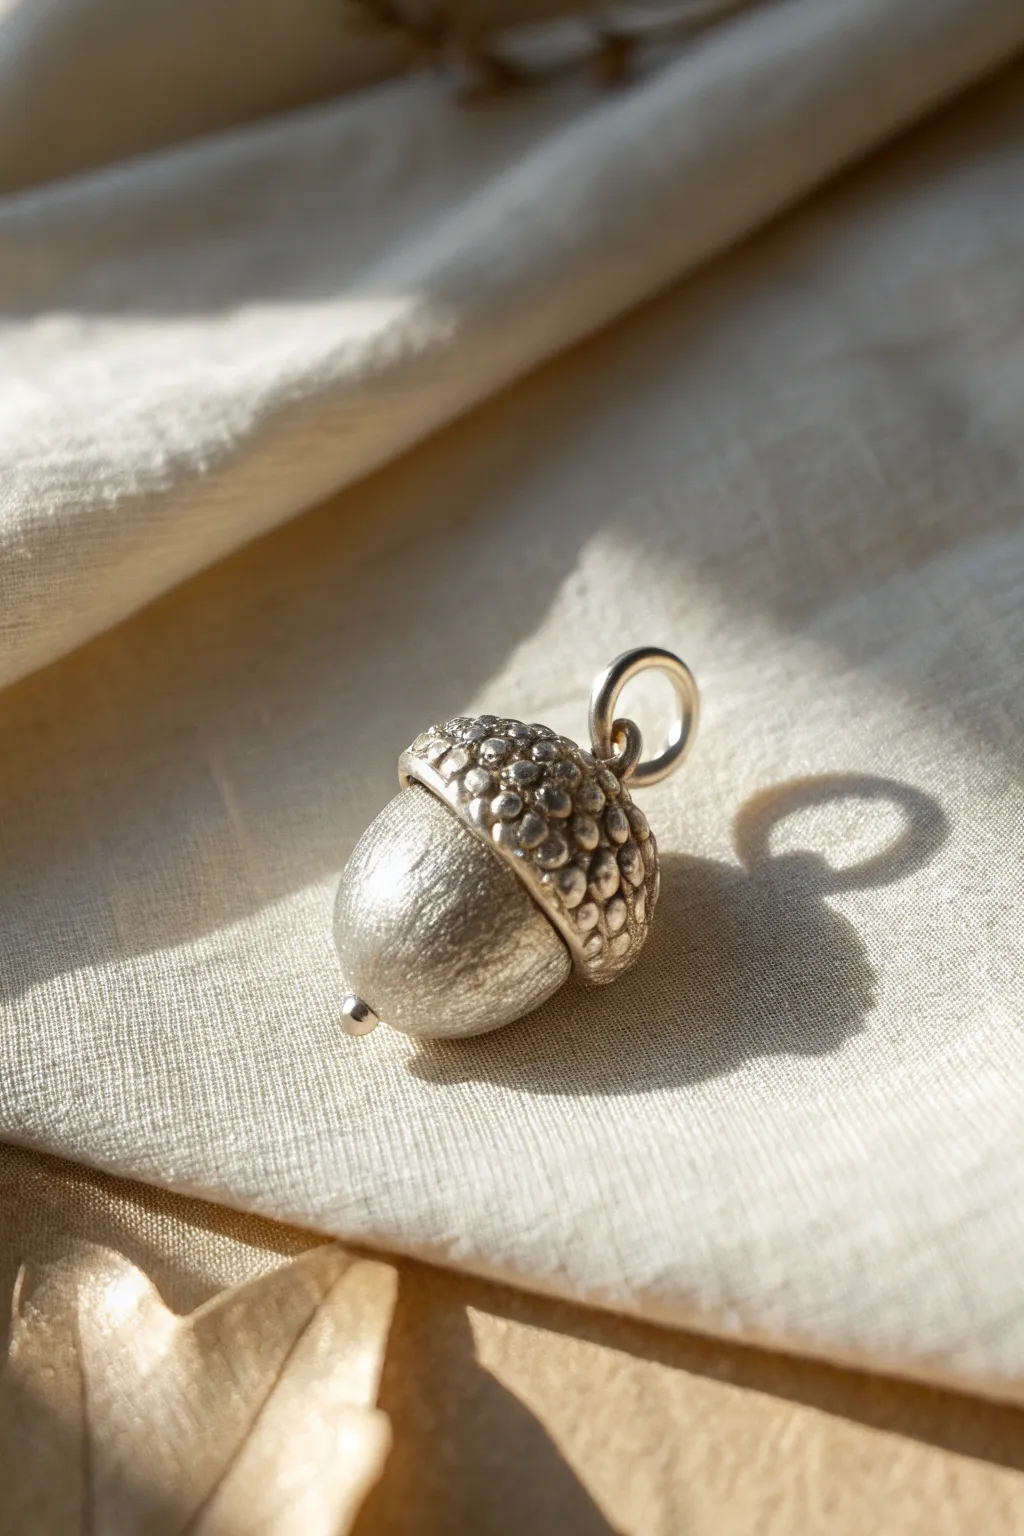
Capture the woodland charm of autumn with this stunning silver acorn pendant. By combining a natural textured cap with a smooth, burnished nut, you’ll create a piece of fine silver jewellery that feels both organic and elegant.
Step-by-Step
Materials
- Silver metal clay (approx. 7-10g)
- Small real acorn cap (dried and cleaned)
- Two-part molding compound (silicone putty)
- Olive oil or badger balm (release agent)
- Playing cards or spacers (1.5mm thickness)
- Roller
- Scalpel or clay knife
- Small water brush
- Needle tool
- Sanding sponges (medium to superfine)
- Small jump ring (sterling or fine silver)
- Gas hob, torch, or kiln for firing
- Brass brush
- Burnishing tool
Step 1: Creating the Cap Mold
-
Prepare the acorn cap:
Select a real acorn cap that is sturdy and has distinct texture. Ensure it is completely dry and clean any debris from the inside with an old toothbrush. -
Mix the mold compound:
Take equal parts of your two-part silicone molding putty (usually part A and part B). Knead them together quickly until the colour is uniform and streak-free. -
Impress the texture:
Form the mixed putty into a smooth ball. Press your real acorn cap deeply into the putty to capture the outer texture. Wiggle it slightly to ensure the sides are captured, then let the mold cure according to the package instructions.
Hollow or Solid?
A solid clay acorn is heavy and costly. Use a cork clay core or wood clay ball inside the nut! It burns away during firing, leaving a lightweight, hollow silver shell.
Step 2: Sculpting the Silver Acorn
-
Lubricate the mold:
Once cured, remove the real cap. Lightly grease the inside of your silicone mold with a tiny amount of olive oil or badger balm to prevent sticking. -
Form the cap clay:
pinch off a ball of silver clay roughly the size of the cap void. Roll it until smooth and press it firmly into the mold. Use your thumb to create a hollow indentation in the center, forming a bowl shape similar to a real cap. -
Shape the nut portion:
Roll a second, slightly larger ball of clay for the acorn nut. Roll it into an oval or egg shape, tapering one end slightly to a point. -
Join the pieces:
Apply a small amount of water or silver paste (slip) to the inside of your molded cap and the top of your egg-shaped nut. Gently press the nut into the cap. I find twisting it slightly helps form a suction bond. -
Refine the seam:
Use a damp paintbrush or a rubber shaper to smooth the clay where the nut meets the cap on the inside edge, ensuring a seamless connection. You don’t want a visible gap here. -
Add a bail:
Roll a tiny snake of clay or use a syringe to create a small loop at the very top of the cap for the jump ring. Secure it well with paste and blend the ends into the texture. -
Add the point detail:
Roll a very tiny sphere of clay and attach it to the bottom tip of the nut with a dot of water. This mimics the little point found on real acorns. -
Dry thoroughly:
Place the acorn on an electric warmer or allow it to air dry for at least 24 hours. The piece is thick, so ensure it is completely bone dry before firing.
Cracks while Drying?
If you see hairline cracks as the clay dries, mix a thick paste of clay dust and water. Paint it over the crack, let it dry, and sand smooth before firing.
Step 3: Refining & Firing
-
Pre-fire sanding:
Once dry, gently sand the ‘nut’ portion of the acorn with fine sanding sponges to remove fingerprints and bumps. Be careful not to sand away the texture of the cap. -
Fire the piece:
Fire the acorn using a butane torch, gas hob, or kiln. If using a torch, place the acorn on a firing block and heat until it glows a pale peach colour. Hold this temperature for the time recommended by your clay brand (usually 2-5 minutes). -
Quench and brush:
Once cooled (or quenched in water if your clay allows), the piece will look white. Vigorously brush it with a brass scratch brush and soapy water to reveal the silver shine. -
Burnish for contrast:
For the lovely contrast seen in the photo, take a polished steel burnisher and rub it firmly over the smooth nut area. This compresses the silver crystals, creating a high-shine mirror finish that contrasts beautifully with the matte, textured cap. -
Attach hardware:
Open your sterling silver jump ring with two pairs of pliers. Thread it through the loop you created on the cap and close it securely.
Wear your silver acorn on a long chain as a reminder of nature’s simple beauty
Pinecone Scale Texture Charm
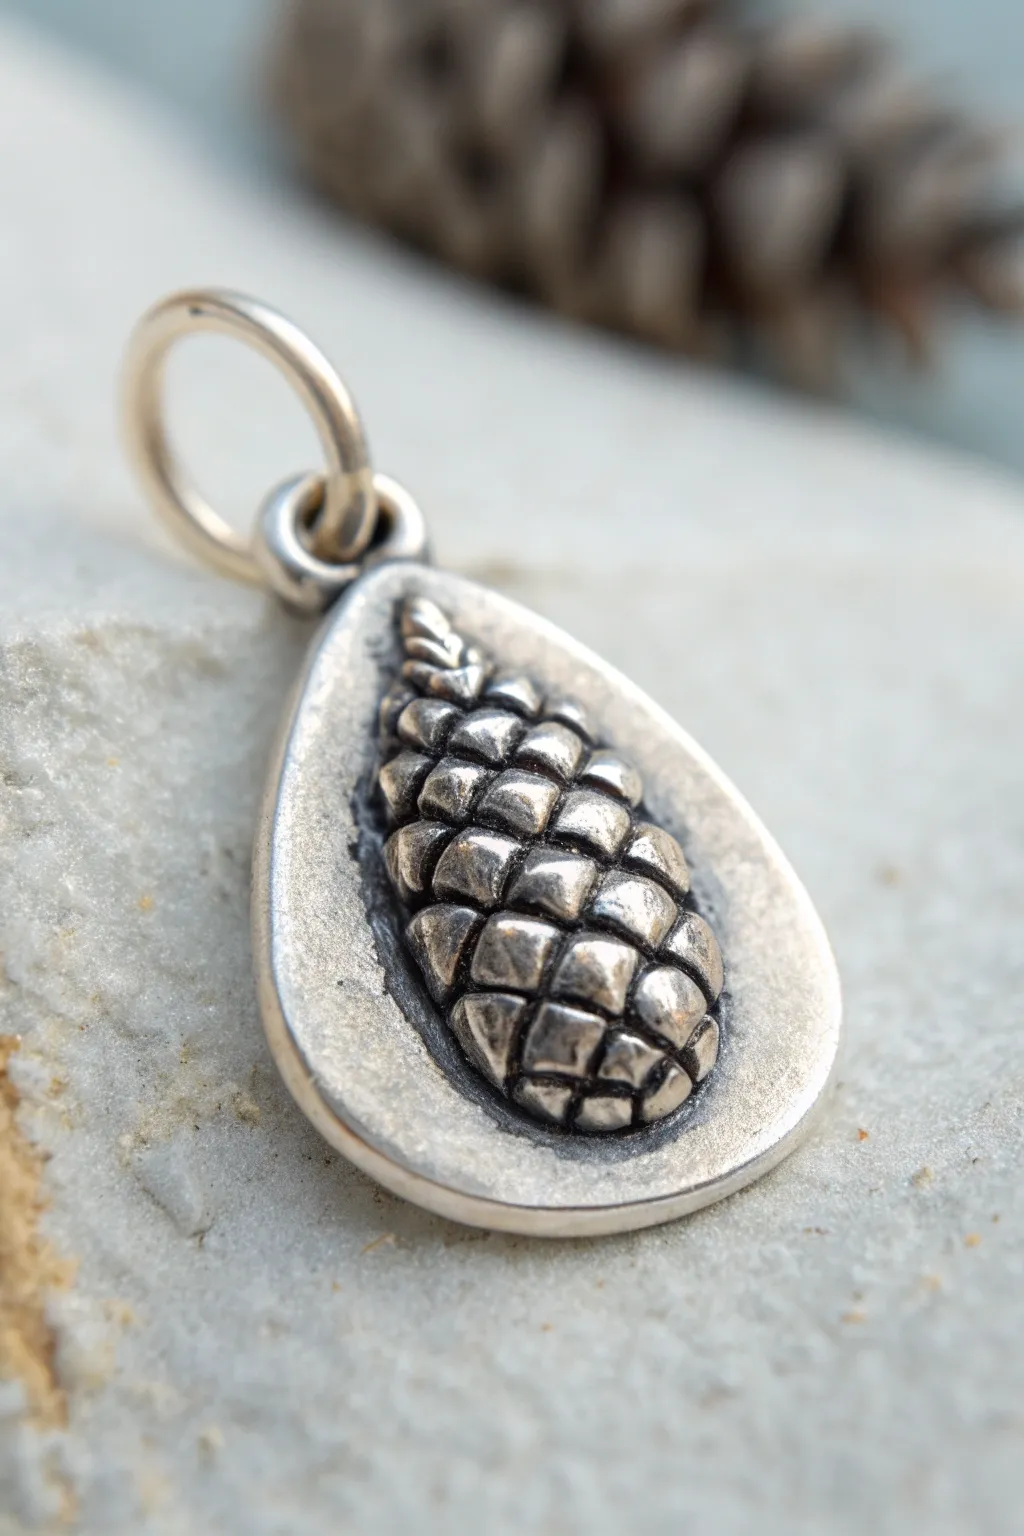
This project captures the organic beauty of the forest with a stunningly realistic miniature pinecone nestled in a smooth silver teardrop. By creating a mold from a natural texture, you’ll produce a pendant that feels like a tiny, wearable fossil.
Step-by-Step Guide
Materials
- Silver metal clay (approx. 5-7g)
- Two-part silicone molding putty
- Small pinecone (dry and clean)
- Roller or acrylic brayer
- Playing cards or slat spacers (1mm and 0.5mm)
- Olive oil or Badger balm (release agent)
- Clay shaper or craft knife
- Small teardrop cutter (optional, or cut by hand)
- Small round cutter or straw (for hanging hole)
- Sanding sponges (fine and superfine)
- Butane torch or kiln
- Stainless steel brush
- Liver of Sulfur (gel or chunks)
- Polishing cloth
- Sterling silver jump ring (heavy gauge)
Step 1: Creating the Texture Mold
-
Prepare the molding compound:
Mix equal parts of your two-part silicone molding putty until the color is uniform and streak-free. You only need a ball about the size of a large marble. -
Capture the impression:
Roll the putty into a smooth ball and flatten it slightly. Press your chosen small pinecone firmly into the putty to capture the scale texture. Wiggle it gently to release it without dragging the details. -
Let it cure:
Set the mold aside to cure until it is firm to the touch, usually about 10–20 minutes depending on the brand.
Mushrooming Clay?
If clay squishes out when you press the molded pinecone onto the base, your clay was too wet or pressed too hard. Let the molded part dry slightly for 5 mins before attaching.
Step 2: Shaping the Clay
-
Roll the base canvas:
Prepare your workspace by lightly greasing your surface and roller. Roll out a lump of silver clay between 1mm spacers to create the base thickness. -
Create the pinecone detail:
Roll a smaller, separate ball of clay. Lightly oil your new silicone mold and press this small ball firmly into the pinecone depression. -
Extract the molded shape:
Flex the mold to pop out the textured clay pinecone. Trim away any excess clay around the edges of the scales so you have a clean, isolated pinecone shape. -
Attach the pinecone:
Score the center of your rolled triangular base and the back of your molded pinecone. Apply a tiny dab of water or slip (clay paste) to join them, pressing gently so you don’t squash the scales. -
Cut the teardrop shape:
Using a needle tool or craft knife, cut a loose, organic teardrop shape around the central pinecone, leaving a smooth border of about 3-4mm. Alternatively, use a teardrop cutter if you want perfect symmetry. -
Refine the border:
I prefer to use a damp brush or a rubber clay shaper to smooth the edges of the teardrop, giving it a soft, tumbled stone appearance rather than sharp cut lines.
Step 3: Finishing and Firing
-
Add the bail attachment:
At the top point of the teardrop, use a small cutter or a drinking straw to punch a hole for your jump ring. Ensure there is enough clay around the hole for strength. -
Full dry:
Allow the piece to dry completely on a warming plate or overnight. It must be bone dry before firing to prevent cracking. -
Pre-fire refinement:
Once dry, gently sand the edges and the back with fine sanding sponges to remove any burrs or roughness. Be careful not to sand the textured pinecone scales. -
Fire the clay:
Place the piece on a firing brick. Fire with a butane torch, bringing it to a peachy glow and holding that temperature for the time recommended by your clay manufacturer (usually 2-3 minutes). You can also kiln fire it. -
Brush it down:
After cooling, scrub the white, sintered silver with a brass or stainless steel brush and a little soapy water. The silver shine will start to appear.
Level Up: Nature’s Border
Instead of a smooth border, roll the clay on a textured mat or sandpaper before attaching the pinecone. This gives the background a sandy or rocky appearance.
Step 4: Patina and Polish
-
Apply oxidization:
Prepare a hot Liver of Sulfur solution. Dip the pendant until it turns a dark gray or black. This darkness is essential for making the texture pop. -
Rinse and dry:
Rinse the piece thoroughly in clean water to stop the chemical reaction and dry it well. -
Polish high points:
Use a polishing cloth or a sanding sponge to rub the surface of the pinecone scales and the smooth border. This removes the black oxidation from the raised areas while leaving it in the recesses. -
Final assembly:
Open a heavy gauge sterling silver jump ring sideways using pliers. Thread it through the hole at the top of the pendant and close it securely.
Now you have a beautiful, permanent keepsake of the forest to wear or gift.
Smooth Pebble “Worry Stone” Pendant
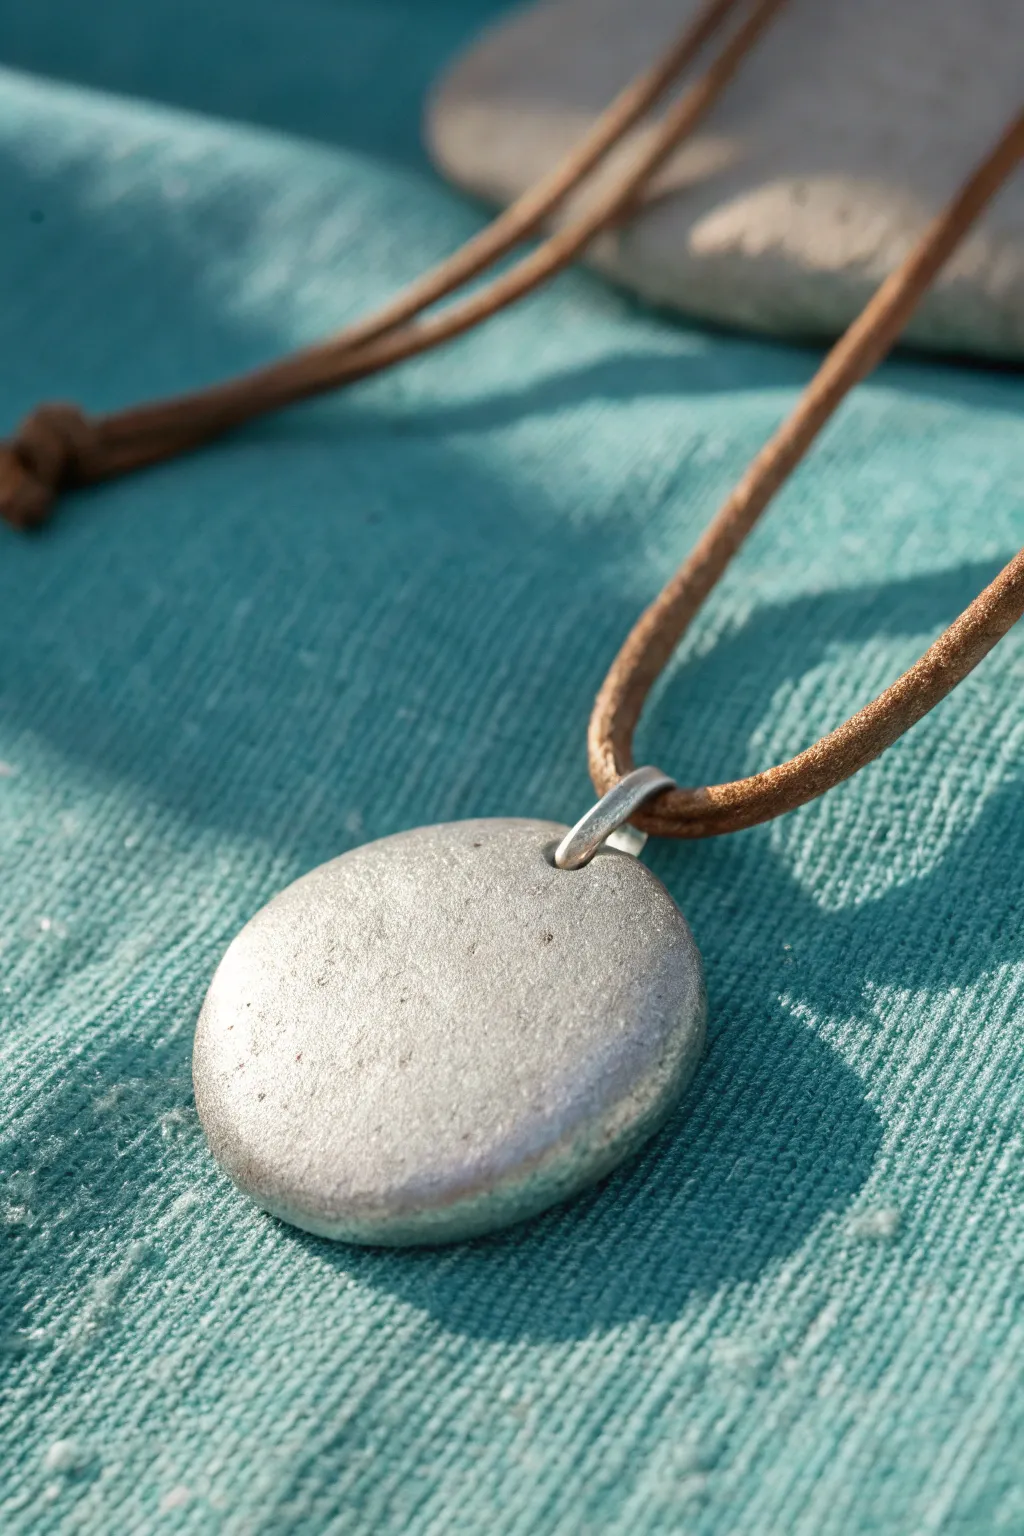
Create your own soothing “worry stone” pendant with this beginner-friendly silver clay project. Its perfectly imperfect round shape and soft matte finish make it tactile and grounding to wear.
Detailed Instructions
Materials
- 7-10g Silver metal clay (PMC or Art Clay Silver)
- Cling film, Teflon non-stick sheet, or clay working mat
- Plastic rolling pin or acrylic roller
- 1.5mm spacers or playing cards
- Circle cutter (approx. 2.5cm) or small jar lid
- Small straw or metal tubing (for the hole)
- Sanding sponges (medium to fine grit)
- Burnishing tool or agate burnisher
- Stainless steel wire brush
- Gas hob, kiln, or handheld butane torch for firing
- Leather or suede cord (brown)
Step 1: Shaping the Pebble
-
Prepare your workspace:
Set up a clean, non-stick surface using a Teflon sheet or a piece of cling film taped down. Rub a tiny drop of badger balm or olive oil on your hands and roller to prevent sticking. -
Condition the clay:
Remove the silver clay from its packet and knead it gently in your fingers for a few seconds until it feels pliable and smooth, minimising air exposure as much as possible. -
Form a ball:
Roll the clay into a smooth, tight sphere between your palms. Inspect it closely to ensure there are no cracks; if you see any, smooth them out with a moistened finger. -
Flatten the pebble:
Place the ball on your work surface. Use your spacer guides (about 3-4 playing cards thick) on either side and gently roll over the clay once or twice. Alternatively, just press down firmly with your thumb for a more organic, uneven feel. -
Refine the shape:
If you want a clearer circle, use a small round cutter now. However, for that true ‘pebble’ look, I prefer to simply tap the edges gently with a flat tool to round them off without cutting. -
Create the bail hole:
Take a small drinking straw or a piece of metal tubing. Pierce a hole near the top edge of your pebble, leaving at least 3mm of clay between the hole and the edge to ensure strength. -
Smooth the surfaces:
Dip your finger in water and very gently run it over the surface and edges to remove any fingerprints or tiny fissures. The smoother it is now, the easier the finishing will be.
Cracks Appearing?
If you see hairline cracks while shaping the wet clay, apply a tiny dab of water with a paintbrush and smooth them over immediately. Paste form clay can fill deeper cracks.
Step 2: Drying and Refining
-
Let it dry:
Allow the piece to dry completely. You can air dry it for 24 hours, or place it on a cup warmer or dehydrator for about 20-30 minutes. It must be bone dry. -
Check for moisture:
To test, place the warm dry clay on a cold mirror. If condensation appears after a few seconds, it needs more drying time. Don’t rush this step or the pebble may crack during firing. -
Sand the pre-fire clay:
Using a fine-grit sanding sponge, gently sand the edges and surface. Silver clay is very fragile at this ‘greenware’ stage, so use a light touch to perfect that rounded pebble contour. -
Dust off debris:
Use a soft, fluffy brush to whisk away all the clay dust from sanding. Any dust left on the surface will fuse there permanently.
Make it Personal
Before drying, press a textured fabric, a leaf, or a rubber stamp gently into the surface to add a subtle relief pattern or an initial to your pebble.
Step 3: Firing and Finishing
-
Fire the pendant:
Place your piece on a soldering block. Using a butane torch, heat evenly until the piece glows a peachy-orange colour. Hold this temperature for the time recommended by your clay manufacturer (usually 2-3 minutes for small pieces). -
Cool down:
Allow the newly fired silver to cool completely on the block. It will look white and matte, which is normal—this is the crystallised silver surface. -
Brush firmly:
Scrub the cooled pendant vigorously with a stainless steel wire brush. This removes the white crystallisation and reveals the silver metal underneath. -
Burnish for shine:
For that soft, satiny glow seen in the photo, rub an agate burnisher or the back of a spoon firmly over the surface. This compresses the silver particles further and brings out a lustre without making it too shiny. -
Add the jump ring:
Open a large, heavy-gauge sterling silver jump ring using two pairs of pliers. Thread it through the hole you created and close it securely. -
Attach the cord:
Thread a simple brown leather or suede cord through the jump ring. Knot the ends of the leather cord to finish the necklace.
Enjoy wearing your handcrafted silver pebble as a calming reminder of your creativity
Fingerprint Keepsake Charm
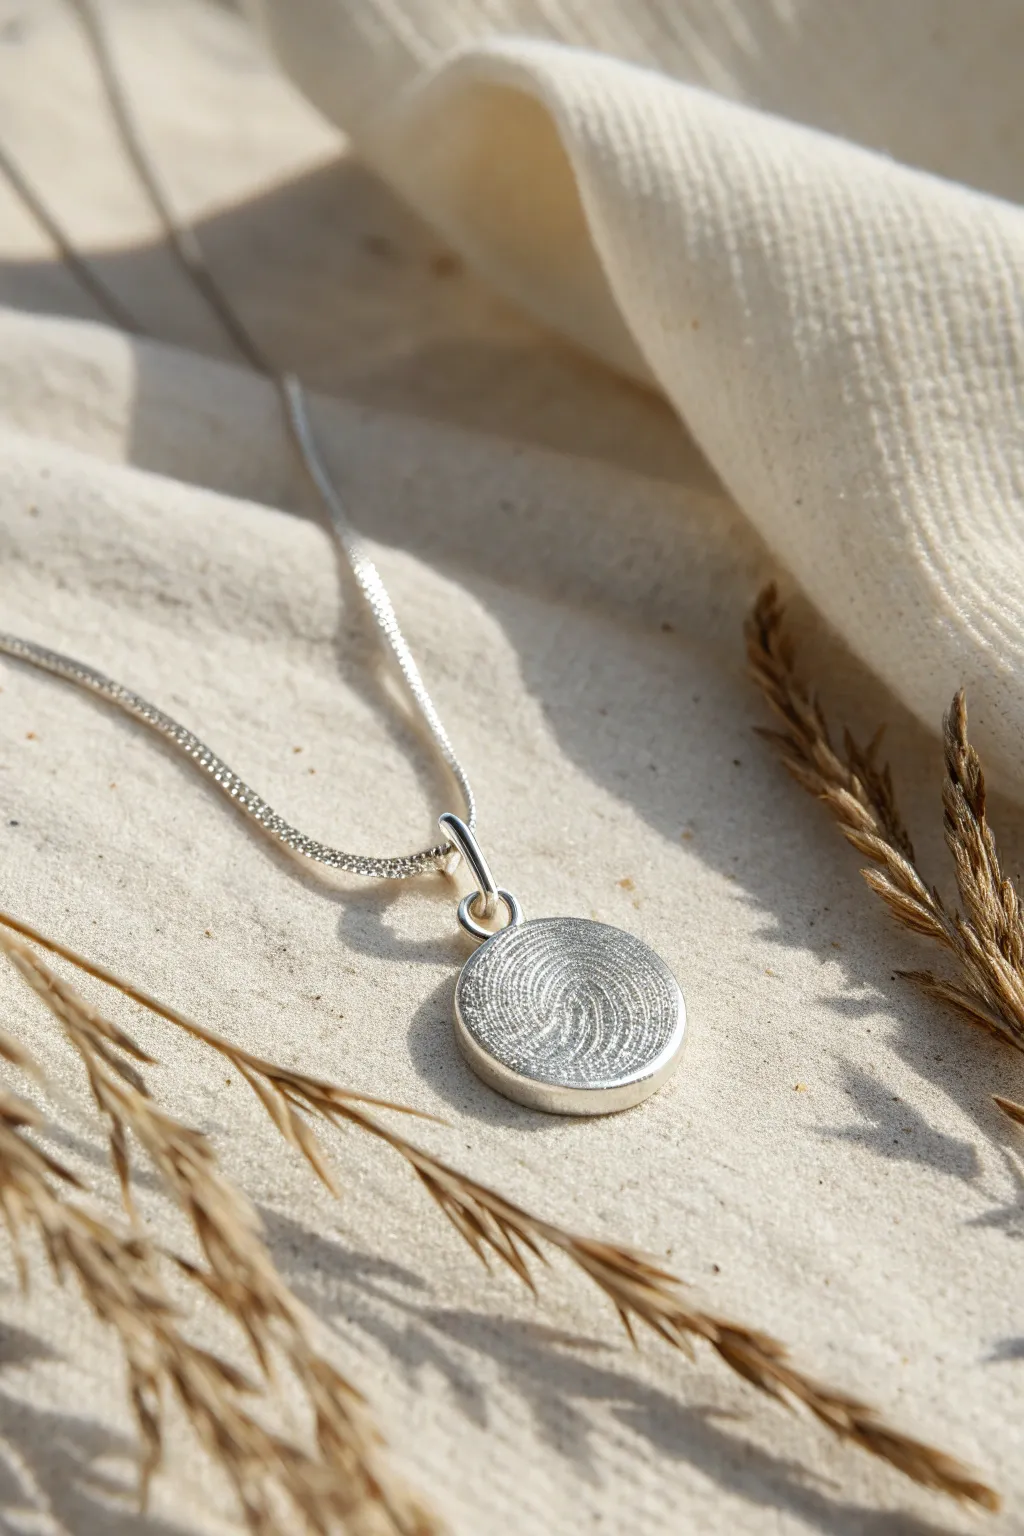
Immortalise a loved one’s unique print in fine silver with this elegant, minimalist keepsake charm. The result is a beautifully textured, circular pendant that captures every ridge and whorl with perfect clarity.
Step-by-Step
Materials
- Silver clay (7-10g is more than enough for a beginner)
- Non-stick rolling mat or Teflon sheet
- Rolling pin (specifically for clay)
- Small circle cutter (approx. 1.5 cm diameter)
- Playing cards or spacers (1.5mm thick)
- Olive oil or Badger balm (release agent)
- Small straw or pin drill (for the hole)
- Butane torch or kiln
- Fine sandpaper or sanding sponges (various grits)
- Polishing cloth and burnishing tool
- Sterling silver jump ring and snake chain
Step 1: Preparation & Impression
-
Prepare the workspace:
Set up your workspace by laying down your non-stick mat and lightly coating your hands and the rolling equipment with a tiny amount of olive oil involved to prevent sticking. -
Condition the clay:
Take a small ball of silver clay out of the packet and roll it quickly between your palms until it is smooth and crack-free. Do this swiftly to prevent it from drying out. -
Roll to thickness:
Place the ball on your mat. Set your spacers or playing cards on either side of the clay to ensure an even thickness of about 1.5mm, then roll the clay smooth with your roller. -
Prepare the finger:
Lightly oil the finger you intend to use for the impression. This is crucial as dry skin can stick to the clay and ruin the fine details when you lift the finger away. -
Capture the print:
Press the finger firmly and evenly into the centre of the rolled clay. Don’t wiggle it; just press straight down and lift straight up to leave a clean, deep impression of the whorls.
Blurred lines?
If the print looks indistinct, your clay might be too dry or you didn’t press hard enough. Re-roll the ball with a drop of water and try pressing the finger immediately.
Step 2: Shaping & Refining
-
Cut the shape:
Position your small circle cutter over the best part of the fingerprint. Press down sharply to cut a clean circle, encompassing the most interesting details of the print. -
Remove excess clay:
Carefully lift away the excess clay from around the circle. Wrap this scrap clay tightly in cling film immediately so you can use it for another project. -
Create the hanging loop:
Since the pendant in the photo uses a jump ring through a top hole, use a small cocktail straw or a specialized cutter to punch a small hole near the top edge. Ensure there is at least 2mm of clay between the hole and the edge. -
dry completely:
Let the piece air dry for 24 hours, or speed it up by placing it on a cup warmer or dehydrator. The clay must be bone dry before firing; it should feel like hard plaster. -
Pre-fire sanding:
Once bone dry, take fine sandpaper (600-1000 grit) to the edges. Smooth the rim and the back, but be extremely careful not to sand over the fingerprint itself.
Love Heart Back
Texturing the back adds a secret touch. Before cutting the circle, roll the clay on a texture mat featuring tiny hearts or dates, so the reverse side is as decorative as the front.
Step 3: Firing & Finishing
-
Fire the clay:
Place the piece on a heat-proof brick. Ignite your butane torch and move the flame in circles over the piece. Once it glows a peachy colour, hold that temperature for 2-3 minutes to sinter the metal. -
Quench:
Once the firing time is up, turn off the torch and wait a moment. Then, drop the hot piece into a bowl of water to quench it. It will turn white, which is the crystallized silver surface. -
Brush the surface:
Use a brass wire brush with soapy water to vigorously scrub the pendant. This removes the white layer and reveals the glittering silver underneath. -
Burnish the details:
To make the high points of the fingerprint shine intensely like the photo, rub a burnishing tool firmly over the raised ridges. This creates a beautiful contrast with the satin texture of the deeper lines. -
Final polish:
Buff the entire piece with a silver polishing cloth to bring up a high lustre. -
Assemble:
Twist open a sterling silver jump ring using two pairs of pliers. Thread it carefully through the hole you made earlier. -
Attach the bail:
Close the jump ring ensuring a flush join. Thread your silver snake chain through this ring to complete the necklace.
Wear your unique silver memory close to your heart or gift it to someone special
Reversible Double-Texture Pendant
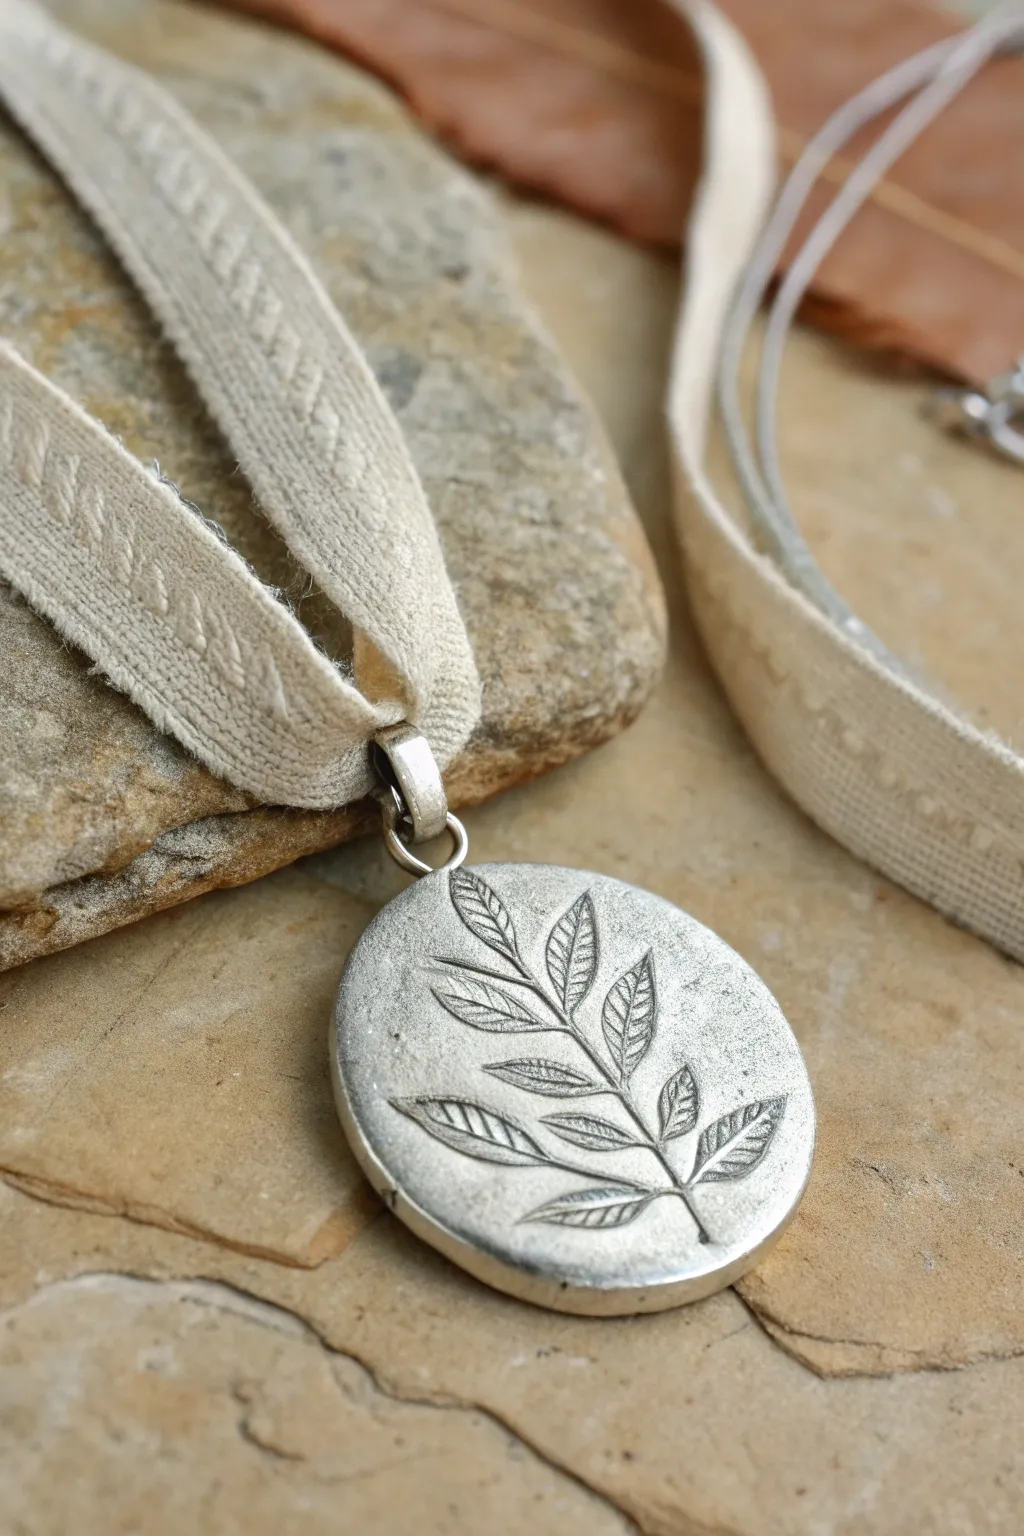
This elegant pendant captures the delicate beauty of nature in solid silver, featuring a deep leaf impression on a soft, rounded disc. Its reversible design allows you to showcase a different texture on the back, making it a versatile piece perfect for everyday wear.
Step-by-Step Guide
Materials
- Silver metal clay (approx. 7-10g)
- Small rolling pin
- Playing cards or spacers (1.5mm thickness)
- Small circular cutter (approx. 20-25mm)
- Fresh leaf with prominent veins (e.g., fern, sage, or mint)
- Texture sheet or textured wallpaper (for the reverse side)
- Badger balm or olive oil (release agent)
- Straw or small drinking straw (for the bail hole)
- Fine grit sanding pads (sponge type)
- Butane torch or kiln
- Brass wire brush
- Polishing cloth
- Burnishing tool
- Jump ring (heavy gauge)
- Textured linen or cotton ribbon
Step 1: Preparation & Texturing
-
Prepare your workspace:
Set up a clean, non-stick work surface like a Teflon sheet or laminated card. Lightly coat your hands, the roller, and the work surface with a tiny amount of badger balm or olive oil to prevent sticking. -
Condition the clay:
Take your silver clay out of the package and knead it briefly in your fingers. You want it to be pliable and crack-free, similar to fresh putty, but work quickly so it doesn’t dry out. -
Set up the thickness guides:
Place a stack of playing cards (about 3-4 cards thick) or 1.5mm spacers on either side of your working area to ensure an even roll. -
Roll the base slab:
Place the ball of clay in the center and roll it out into a smooth slab. Ensure the roller rides on top of your spacers for consistent thickness. -
Apply the back texture:
Since this is reversible, place your chosen texture sheet (for the back) face up. Put the clay slab on top of it, and roll over it once firmly to imprint the pattern on the underside. -
Position the focal leaf:
Flip the clay over so the smooth side is up. Select your fresh leaf and press it vein-side down onto the clay. I find that stiffer leaves give a much crisper impression than soft ones. -
Imprint the leaf:
Gently but firmly roll over the leaf once. Don’t go back and forth, as this can create a double image or shift the leaf.
Clean Edges Pro-Tip
Before drying, dip your finger in water and run it gently around the cut edge of the wet clay circle. This smooths out the ‘drag’ marks from the cutter so you have less sanding later.
Step 2: Cutting & Refining
-
Cut the shape:
Position your circular cutter over the leaf impression to frame it nicely. Press down straight and lift away the excess clay around the circle. -
Remove the leaf:
Carefully use a needle tool or tweezers to lift the edge of the leaf and peel it away to reveal the detailed impression. -
Create the bail hole:
Using a small straw or a larger drill bit, punch a hole near the top edge of the pendant. Make sure not to get too close to the edge—leave at least 2mm of clay for strength. -
Dry the piece:
Allow the clay to dry completely. You can air dry it overnight or place it on a cup warmer for about 20 minutes. It must be bone dry before firing. -
Sand and refinement:
Once dry, use a fine-grit sanding sponge to smooth the edges of the circle. Gently round off the sharp corners, but be careful not to sand away your textures.
Level Up: Gemstone Accent
Set a small, fireable cubic zirconia (CZ) into the clay before drying. Place it near the stem of the leaf for a sparkling dew-drop effect that survives the torch firing.
Step 3: Firing & Finishing
-
Fire the pendant:
Place the piece on a soldering block. Torch fire by heating evenly until the binder burns off and the piece glows a peachy-orange color. Hold this temperature for the time recommended by your clay manufacturer (usually 2-3 minutes). -
Quench and brush:
Once fired and cooled (or quenched in water), the silver will look white and powdery. Vigorously brush it with a brass wire brush and soapy water to reveal the silver shine. -
Burnish the design:
To make the leaf pop, use a steel burnishing tool to rub the high points of the leaf veins and the rim of the pendant. This creates a mirror-like shine that contrasts with the matte background. -
Patina (Optional):
If you want more contrast, apply a liver of sulfur solution to darken the recesses, then polish the high spots again to bring back the bright silver. -
Assembly:
Open a heavy-gauge jump ring using two pairs of pliers. Thread it through the hole in the pendant and close it securely. -
Add the ribbon:
Thread a textured linen or cotton ribbon through the jump ring to complete the rustic, organic look shown in the image.
Wear your botanical creation with pride as a permanent keepsake of the natural world