The sweetest best friend gifts are the ones you can actually share—two pieces that feel like they belong together. I pulled together my favorite clay projects that make matching, split, and personalized keepsakes you and your bestie will want to carry everywhere.
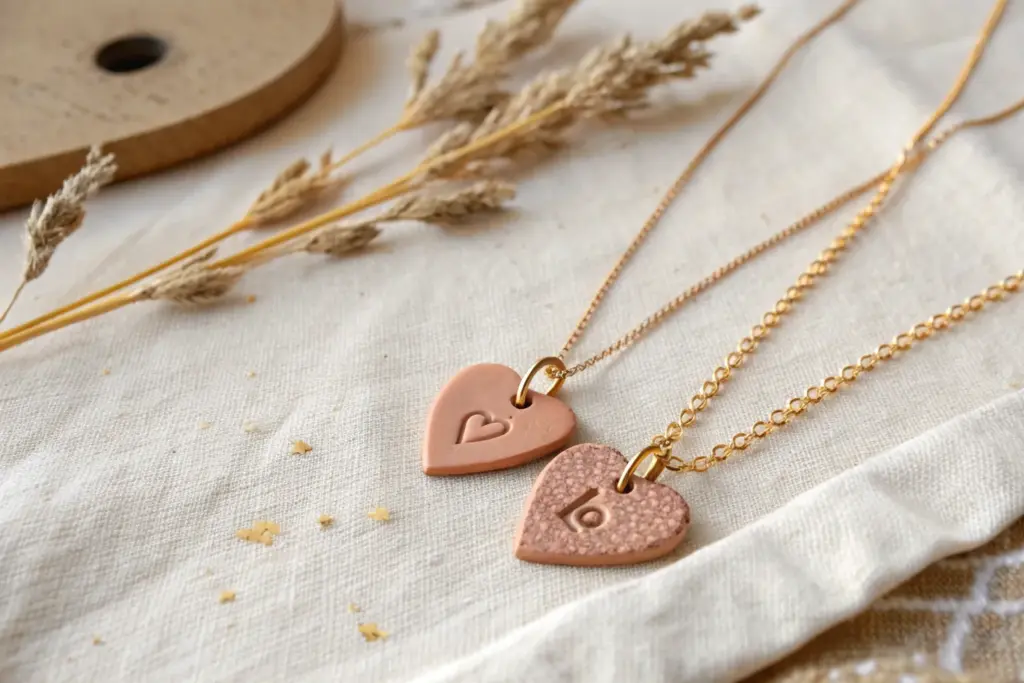
Split-Heart Pendant Set

Reimagine the classic friendship necklace with these sleek, minimalist split-heart pendants made from polymer clay. Featuring a clever negative-space heart cutout and soft, earthy tones, this project combines nostalgia with contemporary style.
Step-by-Step
Materials
- Polymer clay in terracotta and soft blush pink
- Rolling pin or pasta machine
- Heart-shaped clay cutter (medium size)
- Small heart-shaped cutter (for the center)
- Sharp tissue blade or X-Acto knife
- Gold jump rings (10-12mm)
- Darning needle or small drill bit
- Parchment paper or ceramic tile
- Oven for baking polymer clay
- Jewelry pliers
- Fine-grit sandpaper (optional)
Step 1: Shaping the Base Hearts
-
Condition the clay:
Begin by thoroughly conditioning your terracotta and blush pink polymer clay separately. Knead the clay in your hands until it is warm, pliable, and free of any cracks. -
Roll out the slab:
Using a rolling pin or a pasta machine on a medium setting, roll the clay out into an even sheet. Aim for a thickness of about 3-4mm so that the pendants feel substantial but aren’t too heavy. -
Cut the main hearts:
Place your medium heart cutter onto the clay slab. Press down firmly to cut out two separate heart shapes—one from the terracotta clay and one from the pink clay. -
Smooth the edges:
Gently lift the clay hearts. If there are any jagged edges from the cutter, smooth them down lightly with your fingertip to give the piece a professional finish.
Clean Cuts Pro-Tip
Before slicing your clay with the tissue blade, wipe the blade with a little cornstarch or baby powder. This prevents the clay from dragging and distorting the straight line.
Step 2: Creating the Split Design
-
Position the center cutout:
Take your smallest heart cutter and position it exactly in the visual center of one large clay heart. Press it all the way through to remove the center clay. -
Slice the heart:
With your sharp blade, make a vertical cut straight down the middle of the heart, intersecting the top and bottom points of the small negative-space heart you just created. This splits the pendant into two distinct halves. -
Separate slightly:
Gently nudge the two halves apart just a fraction of a millimeter. This ensures they don’t fuse back together during baking, while keeping the matched shape intact. -
Add the gradient effect:
For the pink heart shown in the photo, create a subtle dipped look. Take a very small amount of terracotta clay, roll it paper-thin, and gentle press it onto the bottom tip of the pink heart half, blending the seam with your finger for an ombre effect. -
Repeat for the second set:
Do the same cutting and splitting process for the second heart so you have two full sets of split pendants.
Level Up: Texture
Before cutting your heart shapes, gently roll a piece of fabric or sandpaper over the clay slab. This transfers a subtle, stone-like texture that looks amazing on terracotta colors.
Step 3: Finishing Touches
-
Pierce hole for hardware:
Use a darning needle to carefully poke a hole through the top lobe of each heart half. Make sure the hole is large enough to accommodate your gold jump rings. -
Bake the pieces:
Arrange your pieces on a ceramic tile or parchment-lined baking sheet. Bake according to your brand of clay’s specific temperature and time instructions—usually around 275°F (135°C) for 15-30 minutes. -
Let them cool:
I always recommend letting the clay cool completely inside the oven with the door slightly ajar; this annealing process helps make the clay stronger and prevents cracking. -
Sand for perfection:
Once cool, check the edges. If they feel rough, lightly buff them with fine-grit wet/dry sandpaper under running water until smooth. -
Attach the hardware:
Open your gold jump rings using two pairs of jewelry pliers. Twist the ends sideways (never pull them apart) to open. -
Close the rings:
Thread the open jump ring through the hole you pierced earlier. Twist the ring back shut until the ends meet perfectly flush.
Now you have a charming set of modern heirlooms ready to share with your favorite person


Puzzle Piece Keychain Pair
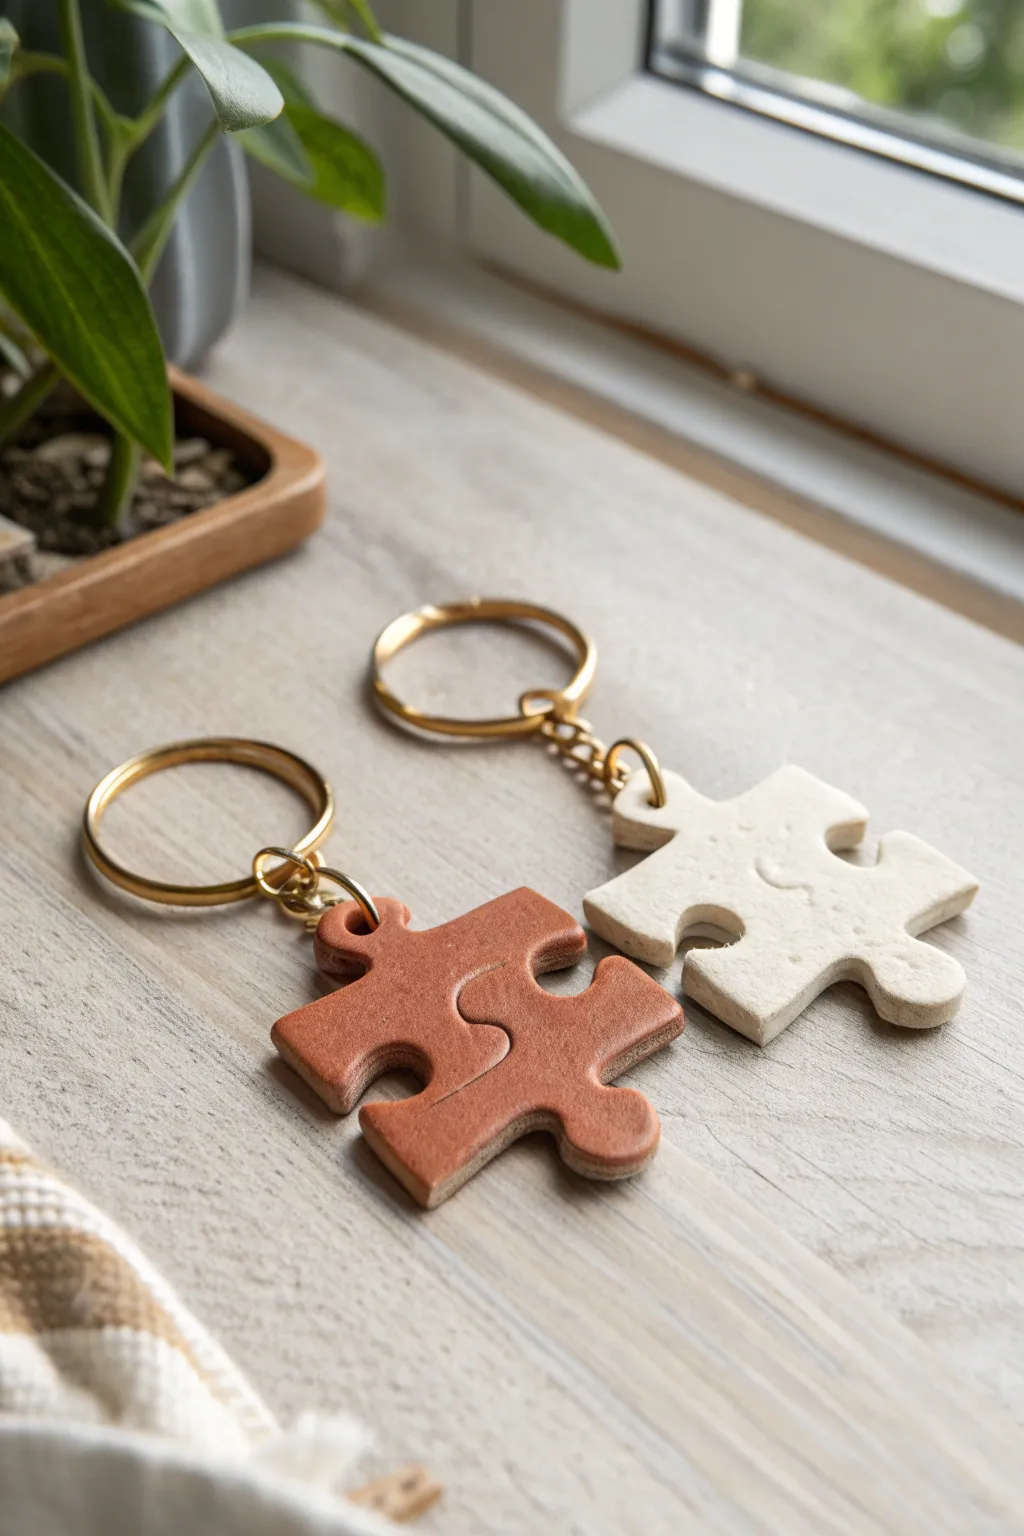
These interlocking puzzle piece keychains are a sweet, understated way to carry a connection with your best friend wherever you go. With a convincing leather-like texture and warm earth tones, they feel modern and sophisticated rather than like a children’s craft.
How-To Guide
Materials
- Polymer clay (terracotta or reddish-brown color)
- Polymer clay (off-white, cream, or ecru color)
- Puzzle piece cookie cutter (or a printed template and craft knife)
- Rolling pin or acrylic roller
- Texture sheet (leather grain) or a crumpled ball of aluminum foil
- Small eye screws (gold)
- Gold keyrings with chains
- Jump rings (gold)
- Pliers (round nose and flat nose)
- Fine-grit sandpaper (optional)
- Matte varathane varnish (optional)
Step 1: Shaping the Clay
-
Condition the clay:
Start by kneading the terracotta clay in your hands until it becomes soft, pliable, and free of cracks. Repeat this process separately for the cream-colored clay. -
Roll it out:
Using your acrylic roller or rolling pin, flatten the clay into a slab. Aim for a thickness of about 4mm to 5mm—you want it substantial enough to be durable but not bulky. -
Add leather texture:
To achieve that realistic leather look seen in the photo, gently press a leather-grain texture sheet into the raw clay. If you don’t have a specific sheet, I often just gently roll a crumpled ball of aluminum foil over the surface for a similar organic dimpled effect. -
Cut the shapes:
Use your puzzle piece cutters to punch out one shape from the terracotta clay and one from the cream clay. If using a template, lay the paper on the clay and carefully trace around it with a sharp craft knife. -
Test the fit:
Before doing anything permanent, gently slide the two raw clay pieces together to ensure they interlock perfectly. If the edges are too tight, carefully trim a sliver of clay off the inner curves. -
Smooth the edges:
Dip your finger in a little bit of water (or baby oil if using polymer clay) and run it along the cut sides of the puzzle pieces to soften any sharp ridges left by the cutter.
Loose Eye Screw?
If the screw feels loose after baking, unscrew it, put a drop of super glue on the threads, and screw it back in. Let it cure fully before attaching the ring.
Step 2: Hardware and Baking
-
Insert the eye screws:
While the clay is still soft, identify the corner where you want the keychain to attach. Carefully screw the small gold eye pin directly into the center of the clay edge. Just push it in gently and twist until only the loop is visible. -
Secure the pin:
For extra security, you can remove the pin, add a tiny dab of liquid clay or bake-and-bond adhesive to the threads, and screw it back into the same hole. -
Bake the pieces:
Place your puzzle pieces on a parchment-lined baking sheet or a ceramic tile. Bake according to the manufacturer’s instructions on your specific package of clay (usually 275°F/135°C for 15-30 minutes depending on thickness). -
Cool down:
Remove the pieces from the oven and let them cool completely. The clay hardens as it cools, so resist the urge to handle firmly while hot.
Texturing Tip
When texturing, dust your foil or texture sheet with a tiny bit of cornstarch first. This prevents the clay from sticking and ruining your pattern.
Step 3: Assembly
-
Sand edges (optional):
If there are any rough spots on the sides after baking, lightly sand them with fine-grit sandpaper for a professional finish. -
Prepare the jump rings:
Use your two pairs of pliers to twist open a gold jump ring. Always twist the ends away from each other (front to back) rather than pulling them apart horizontally, which weakens the ring. -
Attach the hardware:
Thread the open jump ring through the eye screw embedded in the clay, and then loop on the chain of your gold keyring. -
Close the ring:
Use your pliers to twist the jump ring back into a closed position, ensuring the ends meet flush so the chain doesn’t slip out. -
Seal (optional):
If you want to protect the finish, lightly brush on a layer of matte varnish. However, leaving the clay raw creates the most realistic leather-like finish shown in the example.
Now you have a durable, personalized set of keychains ready to wrap up for your best friend.


Stamped Initial Coin Necklaces
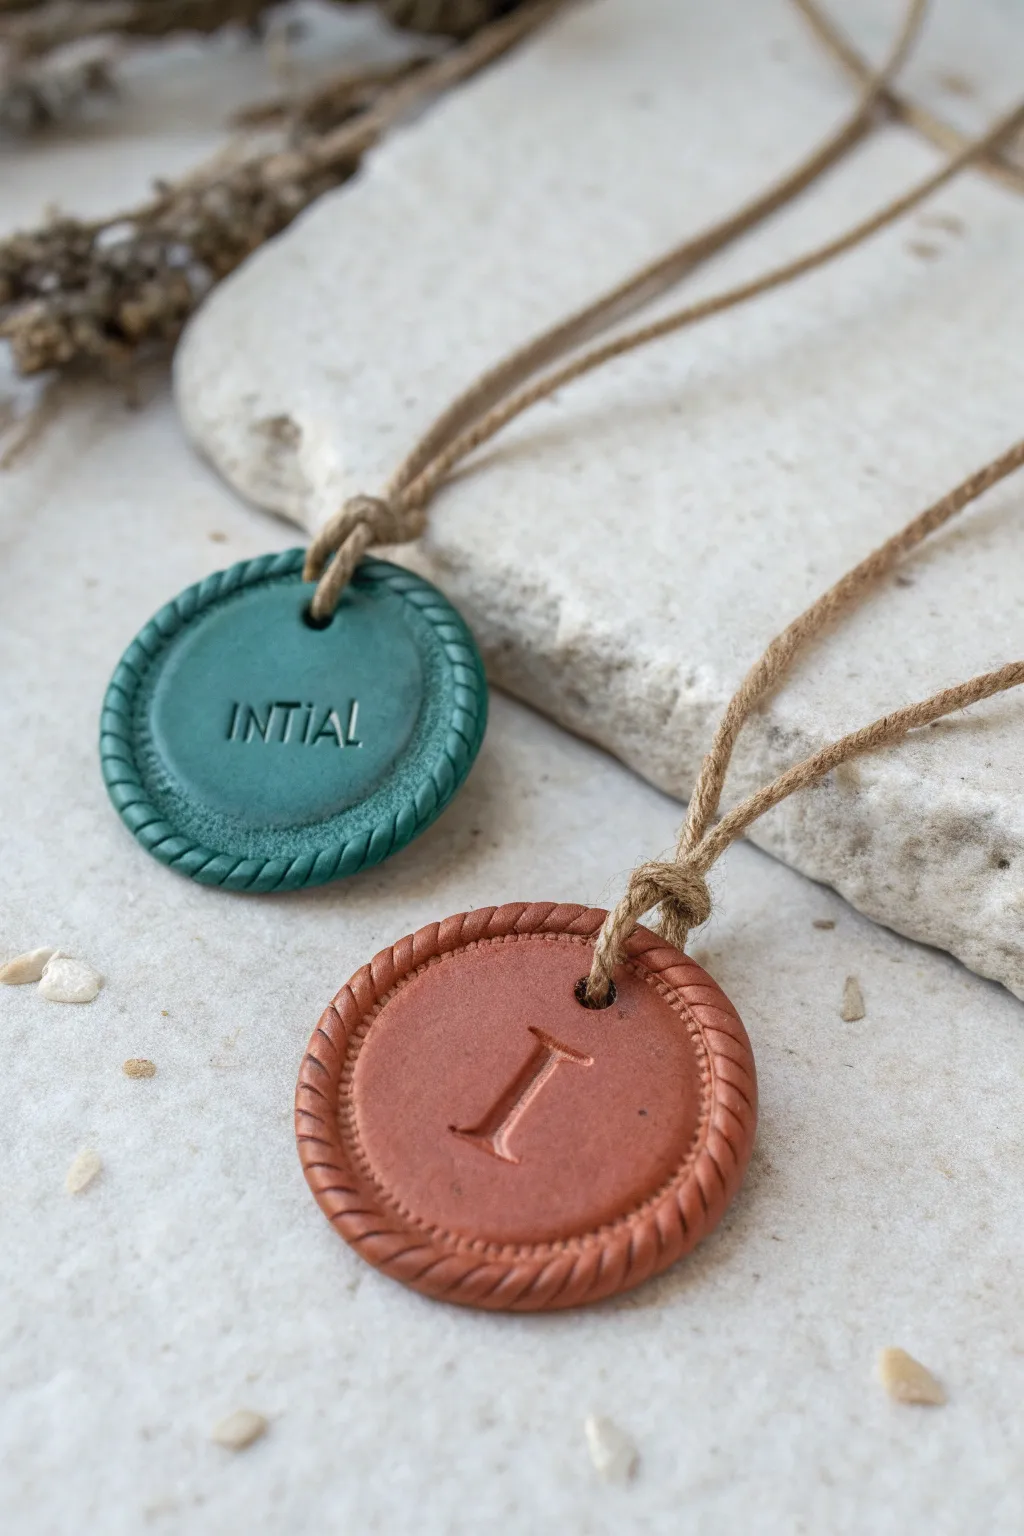
Create beautiful, personalized keepsakes with these earthy clay coin necklaces featuring a classic rope border. The textured finish and stamped letters give them an ancient-artifact feel that pairs perfectly with natural hemp cord.
Step-by-Step
Materials
- Polymer clay (Teal and Terracotta colors)
- Round cookie cutter or drinking glass (approx. 1.5 inch diameter)
- Stamping tool set (alphabet letter stamps)
- Rolling pin or smooth glass jar
- Parchment paper or craft mat
- S straw, wooden skewer, or toothpick
- Hemp cord or suede lace
- Exacto knife or clay blade
- Antique wax or dark acrylic paint (optional for detail)
- Oven and baking sheet
Step 1: Shaping the Base
-
Condition the clay:
Start by taking a chunk of your terracotta or teal clay and kneading it in your hands until it becomes soft, warm, and pliable. This conditioning step prevents cracks later on. -
Roll it out:
Place the clay on parchment paper and use your rolling pin to flatten it. You want an even slab that is roughly 1/8 to 1/4 inch thick—thick enough to hold a stamp, but not too heavy. -
Cut the circles:
Press your round cookie cutter firmly into the clay slab to create a clean circle. If the clay sticks inside the cutter, gently push it out from the back without distorting the shape. -
Smooth the edges:
Use your fingertip, dipped slightly in water or baby oil, to gently smooth down any sharp edges left by the cutter so the coin feels nice against the skin.
Step 2: Creating the Rope Border
-
Make thin snakes:
Take a fresh piece of the same colored clay and roll it into a very long, thin snake on your work surface. Aim for a diameter similar to a piece of spaghetti. -
Twist the pair:
Fold the snake in half (or use two separate pieces) and gently twist them together to create a unified rope pattern. Keep the twist tight and consistent. -
Attach the border:
Carefully lay the twisted rope around the perimeter of your clay disk. Press it down lightly so it adheres to the base without flattening the lovely texture you just made. -
Trim the excess:
Where the two ends of the rope meet, slice through both layers at a diagonal angle with your blade. Remove the excess bits and nudge the cut ends together; smoothing the seam with a tool makes it invisible.
Seamless Borders
Brush a tiny bit of liquid clay (or Translucent Liquid Sculpey) around the rim before laying down your rope twist. This acts as a superb glue for a permanent bond.
Step 3: Stamping and Finishing
-
Position your stamp:
Choose your desired initial or word. Hover the stamp over the center of the pendant to check spacing before committing. -
Press designs:
Press the stamp firmly and evenly into the center. Don’t push all the way through; just deep enough to leave a crisp impression. -
Create the hole:
Use a straw or skewer to poke a hole near the top of the coin, just below the rope border. Make sure the hole is wide enough to fit your hemp cord through later. -
Final smooth:
Check the back of the pendant where the hole was punched and smooth away any displaced clay bumps. -
Bake the clay:
Transfer the pendants to a baking sheet lined with paper. Bake according to your specific clay package instructions, usually around 275°F (135°C) for 15-30 minutes. -
Cool down:
Let the pendants cool completely in the oven with the door cracked open. This gradual cooling makes the clay more durable. -
Antiquing (Optional):
To make the letters pop like the photo, brush a tiny amount of antique wax or diluted brown paint into the crevices, then immediately wipe the surface clean with a cloth, leaving darkness only in the recessed lines. -
String it up:
Cut a length of hemp cord. Fold it in half, push the loop through the pendant hole, and pull the tails through the loop for a lark’s head knot, or simply tie it securely.
Sticky Stamps?
If your letter stamps are sticking to the raw clay and pulling it up, dip the stamp face into a little cornstarch or water before pressing it down.
Wear your personalized token proudly or gift the matching one to your best friend


Bestie Trinket Dish Duo
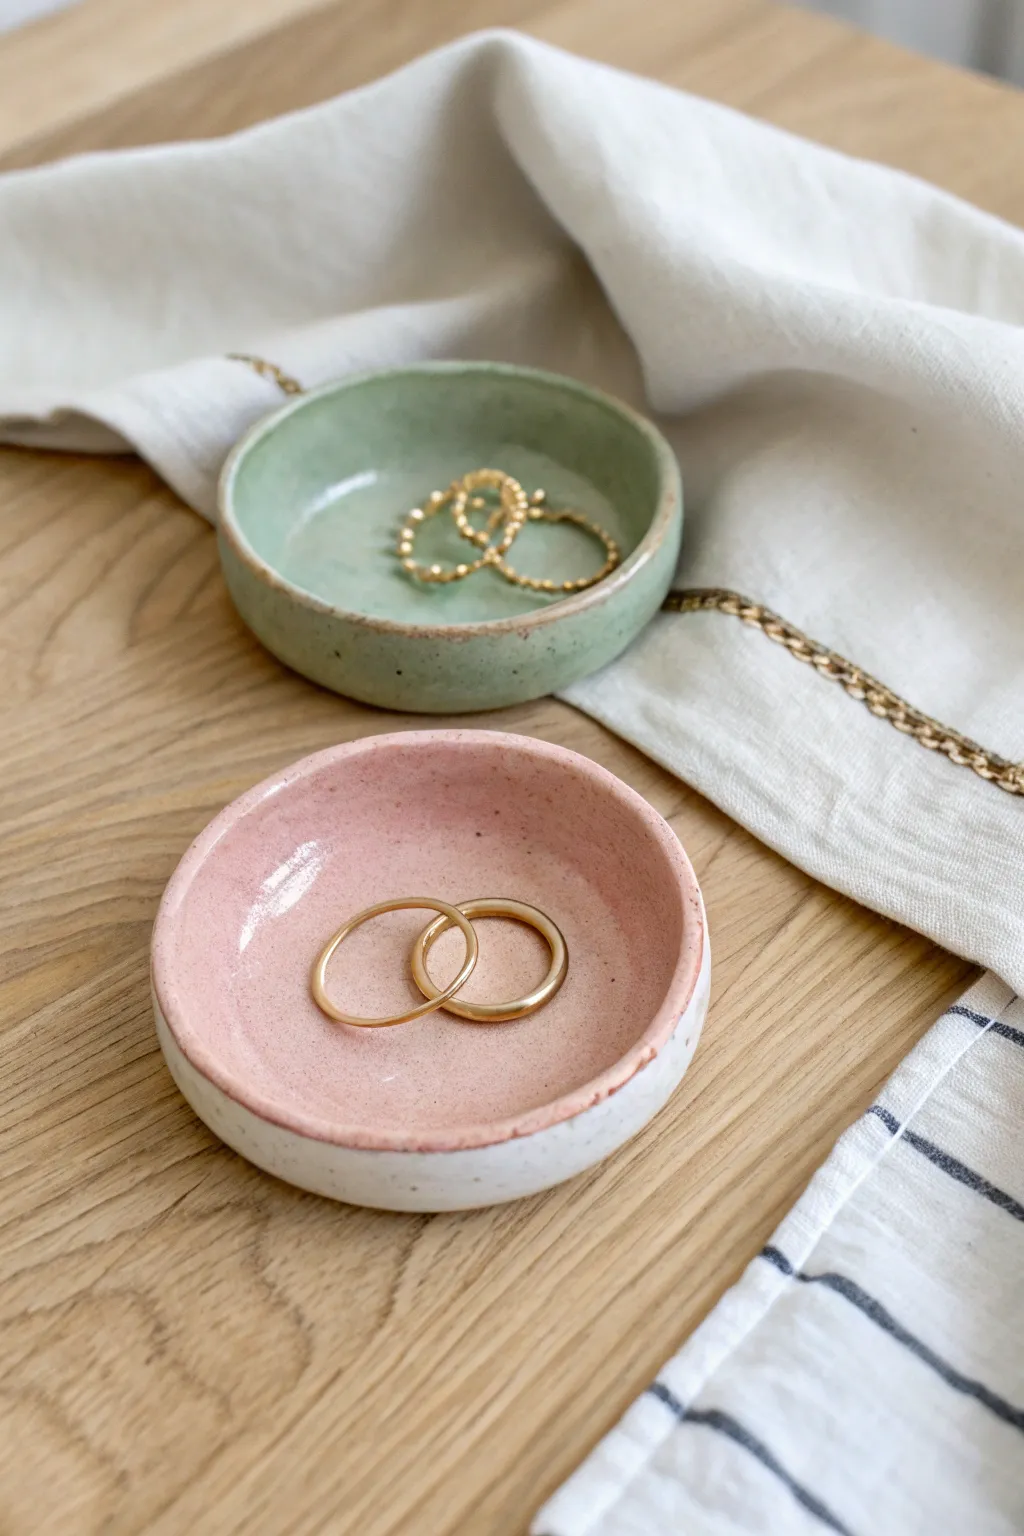
These complementary trinket dishes—one sage green and one blush pink—are the perfect handmade project to share with your best friend. With their rustic, hand-shaped rims and glossy glazed interiors, they make an elegant home for your favorite everyday jewelry.
How-To Guide
Materials
- Air-dry clay (white) or polymer clay (white/speckled)
- Acrylic paints (Sage Green, Blush Pink, White)
- Gloss varnish or resin sealant
- Rolling pin
- Circle cutter or a small bowl/mug (approx. 3-4 inches diameter)
- Small bowl for shaping (optional)
- Fine-grit sandpaper
- Cup of water and sponge
Step 1: Shaping the Clay
-
Condition the clay:
Begin by taking a chunk of your white clay and kneading it in your hands until it becomes soft, pliable, and free of cracks. -
Roll it out:
Using your rolling pin, flatten the clay to an even thickness of about 1/4 inch. If the clay sticks, you can roll it onto a piece of canvas or parchment paper. -
Cut the circles:
Press your circle cutter or the rim of a mug firmly into the clay to cut two identical rounds. Peel away the excess clay. -
Form the rim:
Gently pinch the edges of the circle upward with your thumb and forefinger to create a raised lip. Rotate the piece as you go to ensure the wall is relatively even. -
Smooth the edges:
Dip your finger in a little bit of water and run it along the rim to smooth out any rough textures or fingerprints. The goal is a slightly organic, handmade look, so it doesn’t need to be mechanically perfect. -
Create the curve:
To get that gentle bowl shape, you can either gently press the center down with your thumbs or place the clay circle inside a small bowl to hold its shape while it dries. -
Dry thoroughly:
Set your dishes aside in a dry, room-temperature area. Let them air dry completely for 24-48 hours, flipping them once halfway through to ensure the bottom dries evenly.
Rim Technique
Don’t over-smooth the rim! Leaving a slightly uneven, wavy edge makes the dish look more like hand-thrown pottery than a factory-made item.
Step 2: Refining and Painting
-
Sand the surface:
Once bone dry, take fine-grit sandpaper and gently buff away any sharp edges or uneven bumps on the rim and exterior. -
Wipe clean:
Use a slightly damp cloth or sponge to remove all the clay dust from sanding before you start painting. -
Paint the exterior base:
Apply a coat of white acrylic paint to the outside and bottom of the dish. I like to dab the brush to create a slightly textured, stone-like dull finish here. -
Add speckles (optional):
To mimic the speckled clay look in the photo, dilute a tiny bit of black or brown paint on an old toothbrush and flick the bristles to spray tiny dots onto the white exterior. -
Paint the interiors:
Paint the inside of one dish with your sage green acrylic and the other with the blush pink. Apply 2-3 thin coats for full opacity, letting each layer dry in between. -
Clean up the rim:
If any pastel paint got onto the white rim, touch it up with white paint or carefully wipe it back for a clean transition.
Step 3: Sealing
-
Apply the gloss:
Once the paint is fully cured, apply a thick coat of high-gloss varnish or a thin layer of resin to the *interior* only. This mimics the look of fired ceramic glaze. -
Seal the exterior:
For the outside, apply a matte sealant to maintain that natural, stoneware texture. -
Final cure:
Allow the varnish or resin to cure completely according to the manufacturer’s instructions before placing any jewelry inside.
Gold Touches
For a luxe upgrade, paint the very top edge of the rim with metallic gold leaf paint. This adds a beautiful contrast to the pastel interior.
Wrap one of these darling dishes up for your bestie and keep the other for yourself as a sweet reminder of your friendship

The Complete Guide to Pottery Troubleshooting
Uncover the most common ceramic mistakes—from cracking clay to failed glazes—and learn how to fix them fast.
Avocado Half Charm Set
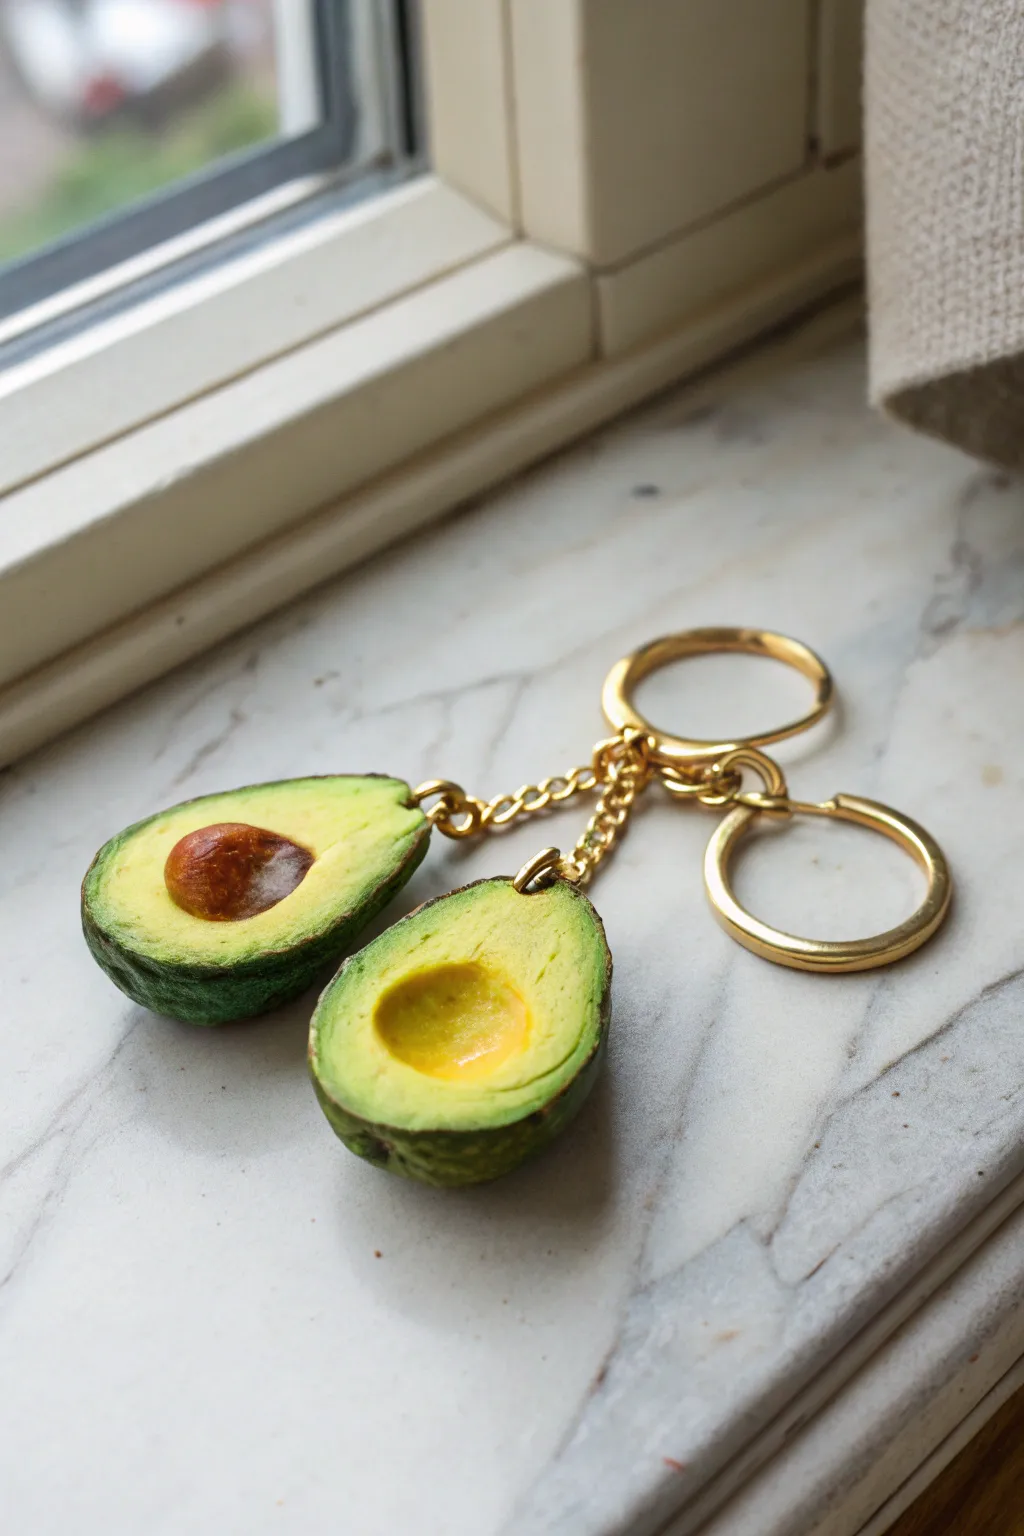
Celebrate your other half with this adorable pair of polymer clay avocado charms. One friend carries the pit, the other has the perfect spot for it to fit, making these the ultimate symbol of connection. The realistic texture on the skin and the subtle color gradients give these little fruits a surprisingly premium look.
Step-by-Step
Materials
- Polymer clay (dark green, light yellow-green, translucent white, brown)
- Acrylic paints (burnt sienna, raw umber, yellow ochre)
- Gloss glaze or polyurethane varnish
- Gold screw eye pins (2 small)
- Gold keychain rings and chains (2 sets)
- Needle tool or toothpick
- Texture tool (sandpaper, toothbrush, or crumpled foil)
- Soft pastel chalks (dark green, yellow)
- Sculpting tools with ball ends
- Pliers
- X-acto knife or craft blade
Step 1: Sculpting the Base
-
Mix the Flesh Tone:
Start by mixing a cheerful yellow-green clay. To get that realistic avocado flesh look, I find that mixing in a small amount of translucent clay helps it look less ‘plastic’ and more organic. -
Form the Shape:
Roll your mixed clay into a smooth ball about the size of a large grape. Gently flatten it and pinch the top slightly to form that classic pear-like avocado silhouette. -
Split in Half:
Use your craft blade to slice the pear shape cleanly in half vertically. You now have two perfectly matching halves, which is crucial for the ‘puzzle piece’ effect. -
Create the Pit Hollow:
On one half, use a large ball tool or the tip of your thumb to press a smooth, round indentation into the center of the widest part. Smooth the edges so it slopes gently.
Adding Realism
For the most realistic look, mix a tiny speck of brown or red into your green skin color. Pure green can look unnatural, but a muddy ‘avocado’ tone tricks the eye perfectly.
Step 2: Adding the Pit
-
Form the Seed:
Take a piece of brown clay and roll it into a ball that fits perfectly into the hollow you just created. It should bulge out slightly, just like a real avocado pit. -
Texture the Pit:
Before attaching it completely, lightly scratch the surface of the brown clay with a needle tool or toothbrush to give it a woody texture. Attach it permanently to the *other* half of the avocado (the one without the hole). -
Verify the Fit:
Gently press the two halves together to ensure the pit nestles comfortably into the hollow side without deforming the clay. Separate them again for detailing.
Level Up: Magnet Surprise
Embed tiny neodymium magnets inside the clay behind the pit and the hollow before baking. The two halves will ‘snap’ together satisfyingly when brought close.
Step 3: Creating the Skin
-
Prepare the Skin Layer:
Roll out a thin sheet of dark green clay. It needs to be thin enough to wrap without adding too much bulk but thick enough to handle handling. -
Wrap the Avocados:
Cut strips of the dark green clay and carefully wrap them around the curved outer back and sides of both avocado halves. Trim the excess flush with the flat face of the fruit. -
Texturize the Skin:
This is the secret to realism: use crumpled aluminum foil, coarse sandpaper, or a stiff toothbrush to press a bumpy, pebbled texture into the dark green skin. Don’t be afraid to be firm here.
Step 4: Coloring and Details
-
Shade the Flesh:
Use a soft brush and some shaved dark green pastel chalk to dust the outer edges of the yellow flesh, blending inward. This mimics the gradient where the flesh meets the skin. -
Insert Hardware:
Screw a small gold eye pin into the top center of each avocado half. I recommend dipping the tip in a tiny bit of liquid clay or glue before inserting for extra security. -
Bake:
Bake the pieces according to your polymer clay package instructions. Usually, this is around 275°F (135°C) for 15-30 minutes, depending on thickness.
Step 5: Finishing Touches
-
Paint the Pit:
Once cooled, dilute some brown and burnt sienna acrylic paint with water to create a wash. Brush this over the pit to settle into the texture lines, then wipe off the raised areas to accentuate the depth. -
Glaze the Pit:
Apply a coat of gloss glaze strictly to the brown pit area. This makes it look moist and fresh, contrasting nicely with the matte flesh. -
Assemble Keychains:
Using your pliers, open the jump rings on your keychain hardware and attach them to the eye pins on your finished avocados. Close the rings tightly.
Give the half with the pit to your grounding friend and keep the hollow half for yourself to stay connected wherever you go
Sun and Moon Best Friend Pendants
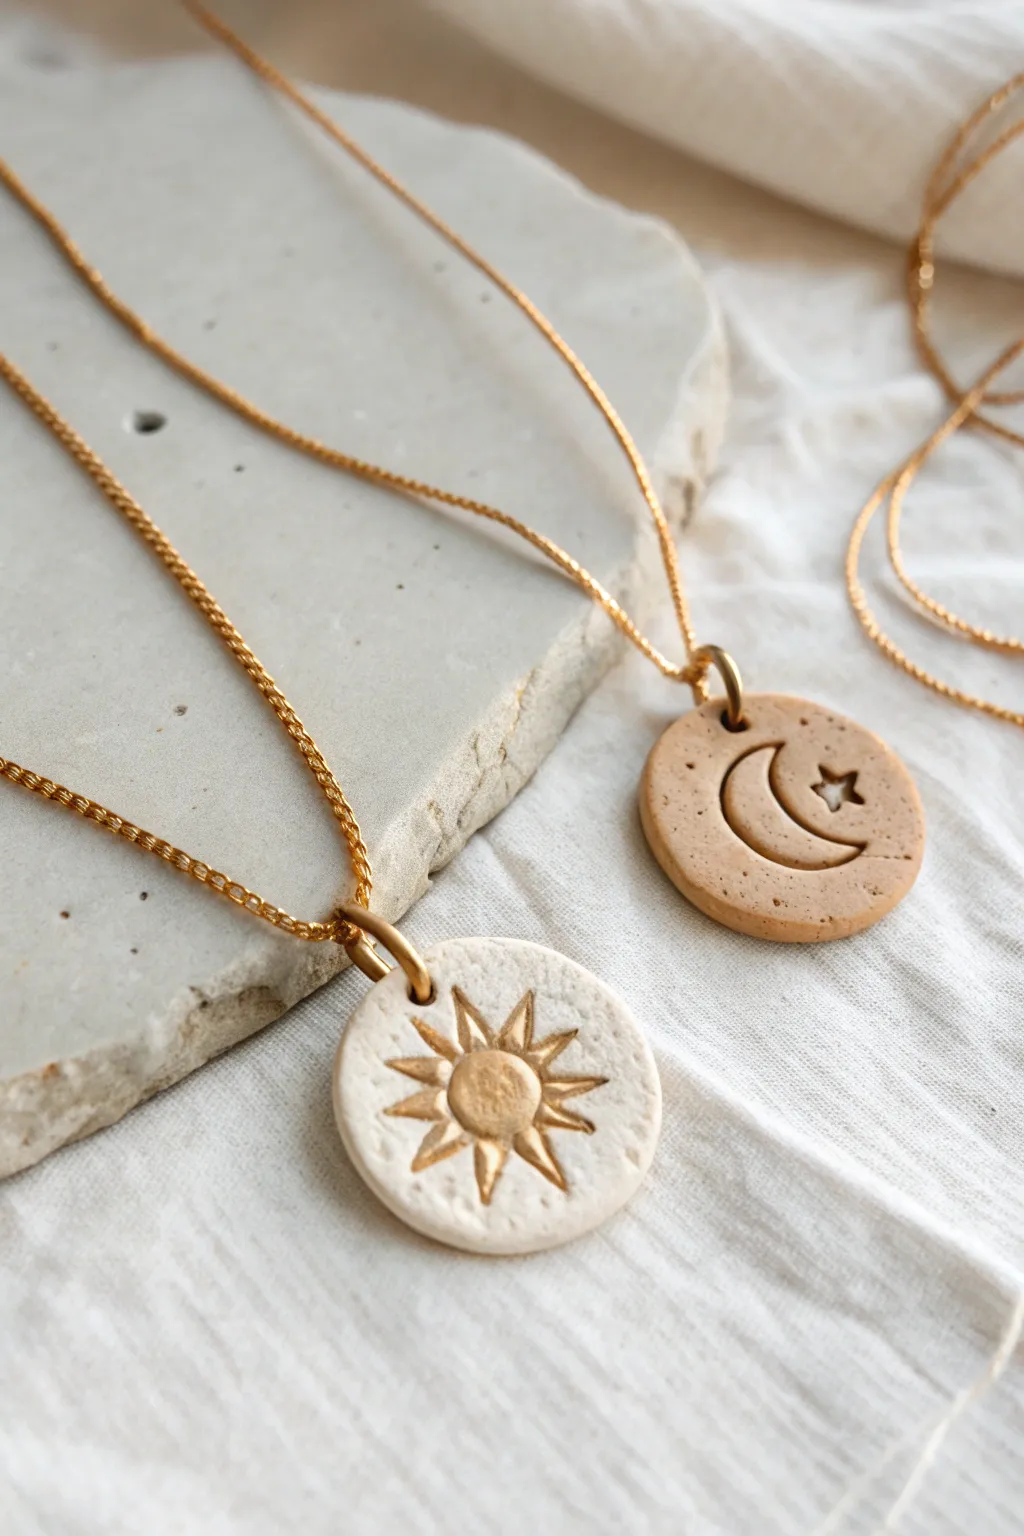
Celebrate your bond with these charming, minimalist sun and moon pendants made from polymer clay. The textured finish and gold leaf accents give them a modern, boutique look that pairs perfectly with delicate gold chains.
Detailed Instructions
Materials
- Polymer clay (white and terracotta/beige colors)
- Gold leaf paint or liquid gold leaf
- Fine detail paintbrush
- Small circle cutter (approx. 1 inch)
- Small rolling pin
- Exacto knife or clay needle tool
- Jump rings (gold finish)
- 2 necklace chains (gold finish)
- Parchment paper
- Small pliers
- Gloss glaze (optional)
Step 1: Prepping the Base
-
Condition the clay:
Start by warming up your polymer clay in your hands. Knead the white clay and the beige clay separately until they are soft and pliable, ensuring there are no air bubbles trapped inside. -
Roll it out:
Place the clay on a sheet of parchment paper. Using your rolling pin, roll each color out to a uniform thickness, roughly 1/8th of an inch thick. You want them sturdy but not too heavy. -
Cut the circles:
Press your circle cutter firmly into the white clay sheet and then the beige clay sheet to create two perfect discs. If you don’t have a cutter, trace around a bottle cap with your knife. -
Smooth the edges:
Gently run your finger around the rim of each clay circle to soften any sharp edges left by the cutter. This professional touch makes a big difference in the final feel. -
Add jump ring holes:
Use a needle tool or a toothpick to poke a small hole near the top edge of each pendant. Ensure the hole is large enough for your jump rings to slide through easily.
Step 2: Sculpting the Celestial Designs
-
Sketch the moon:
On the beige pendant, lightly mark out a crescent moon shape and a small star using the tip of your needle tool. Don’t dig deep yet; just create a guide. -
Carve the moon details:
Use your needle tool or a small carving tool to gently scoop out the clay inside your crescent moon and star outlines. You want an indented, debossed effect rather than a simple line drawing. -
Create the sun spikes:
For the sun pendant, roll very tiny, thin snakes of white clay. Cut these into small triangular points and arrange them in a starburst pattern on the surface of the white disc. -
Form the sun center:
Roll a small ball of white clay, flatten it slightly, and press it into the center of your sunburst pattern precisely where the rays meet. -
Blend the sun seams:
I like to take a soft modeling tool here to gently press the edges of the sun rays and center into the base so they adhere completely and won’t pop off later. -
Add texture:
To mimic the stone-like texture in the photos, gently tap a clean toothbrush or a crumpled ball of foil over the surface of both pendants (avoiding the sun relief).
Baking Woes?
If your white clay looks slightly browned after baking, you likely overcooked it. Keep temperature low, or tent the tray with aluminum foil to protect the white pigment.
Step 3: Baking and Gilding
-
Bake the pieces:
Arrange the pendants on a baking sheet lined with parchment paper. Bake according to your polymer clay package instructions (typically 275°F for about 15-20 minutes). -
Cool down completely:
Let the pendants cool fully before moving to the painting stage. Painting warm clay can result in tacky, uneven coverage. -
Paint the sun:
Dip your fine detail brush into the gold leaf paint. Carefully paint only the raised sun relief—the center circle and the protruding rays—leaving the background white. -
Fill the moon:
For the beige pendant, carefully paint the recessed inside of the moon crescent and the little star indentation with the gold paint. -
Let the paint set:
Allow the gold paint to dry completely. If you want extra protection, you can apply a thin coat of gloss glaze over the painted areas, but the matte clay look is lovely on its own.
Make It Sparkle
Before baking, lightly press a tiny rhinestone or crystal into the center of the star or sun for a bit of extra shimmer that catches the light.
Step 4: Assembly
-
Open the jump rings:
Use two pairs of pliers to twist your gold jump rings open sideways (never pull them apart outward, or they lose their shape). -
Attach the chains:
Slide the open jump ring through the hole in your clay pendant, then loop the necklace chain into the ring as well. -
Close and wear:
twist the jump ring back into a closed position using your pliers until the ends meet perfectly flush.
Set aside an afternoon with your best friend to craft these matching tokens of your unique friendship


What Really Happens Inside the Kiln
Learn how time and temperature work together inside the kiln to transform clay into durable ceramic.
Cloud and Raindrop Charm Pair
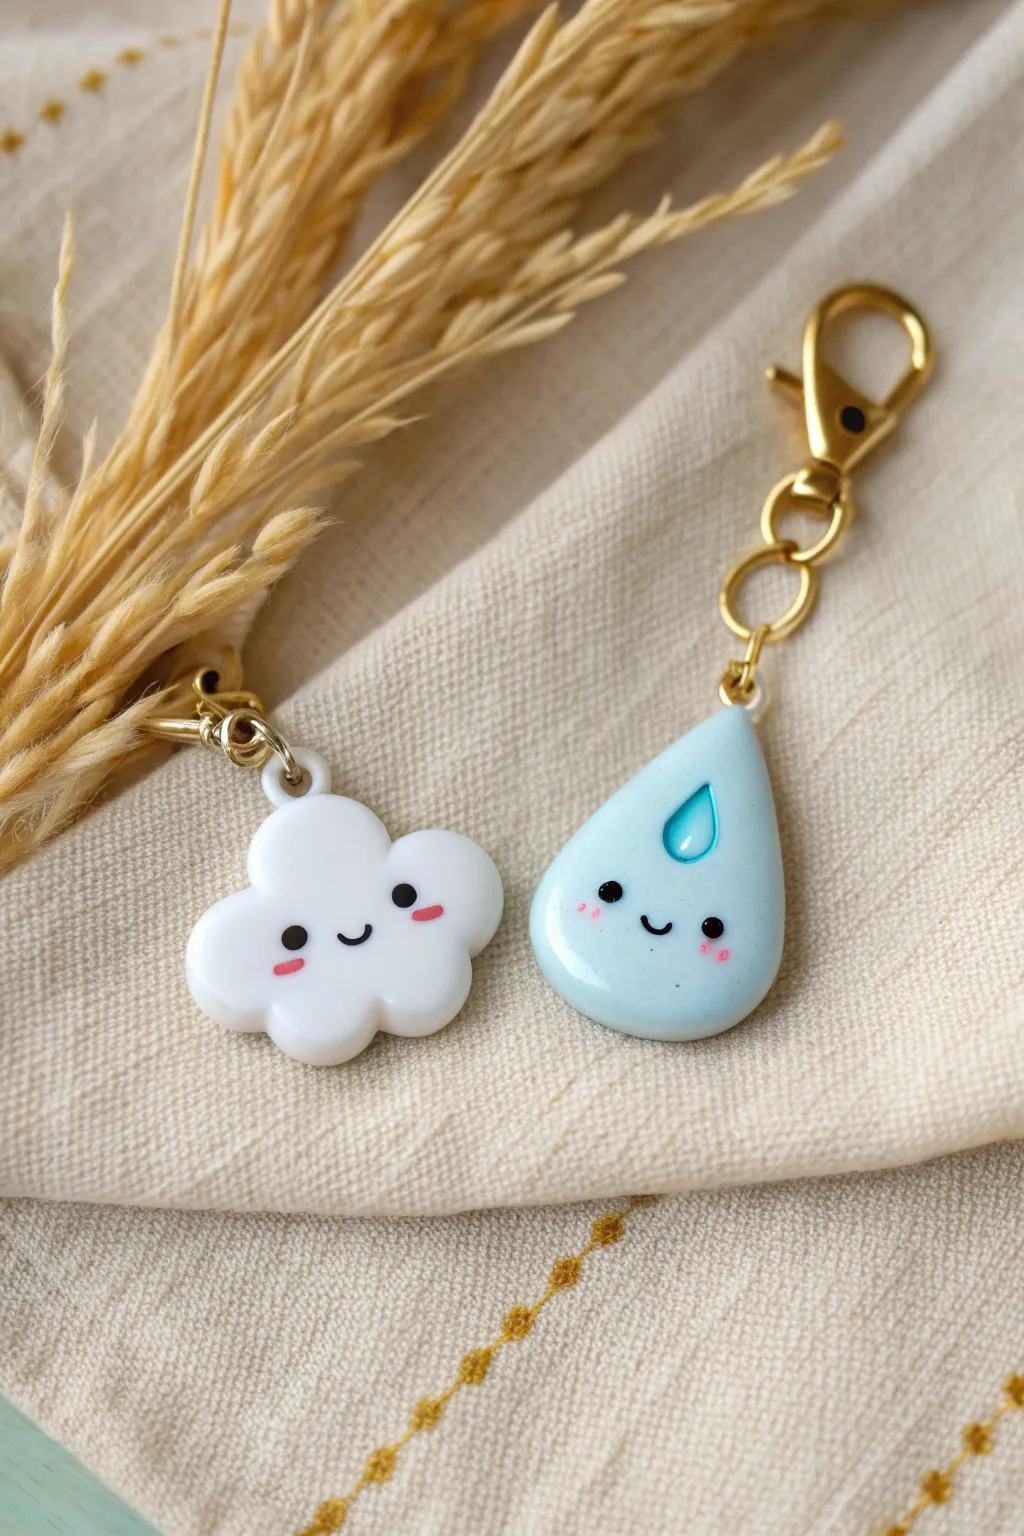
Celebrate a perfect friendship with this adorable polymer clay duo. One takes the shape of a fluffy white cloud while the other is a gentle blue raindrop, both featuring matching kawaii faces and gold hardware for a polished finish.
How-To Guide
Materials
- White polymer clay
- Light blue polymer clay
- Translucent liquid clay (optional)
- Black acrylic paint or clay for eyes
- Pink acrylic paint or chalk pastel for cheeks
- Darker blue acrylic paint or clay for the teardrop detail
- UV resin or gloss glaze
- 2 small screw eye pins (gold)
- 2 gold jump rings
- 2 gold keychain lobster clasps
- Clay sculpting tools (dotting tool, needle tool)
- X-acto knife or clay blade
- A small paintbrush
- Oven and baking tray
Step 1: Shaping the Cloud
-
Condition the white clay:
Start by kneading a chunk of white polymer clay until it is soft and pliable. This prevents cracks and makes it easier to shape. -
Form the base:
Roll the clay into a smooth ball, then flatten it slightly into a thick disc, about 5-7mm thick. -
Create the scalloped edges:
Using your fingers or a large ball tool, gently push inwards at the edges to create indentations. You want to form about five or six round bumps to give it that fluffy cloud silhouette. -
Smooth the surface:
Run your finger lightly over the surface to remove any fingerprints. If the clay gets too warm and sticky, let it sit for a few minutes. -
Insert the hardware:
Take one gold screw eye pin and gently twist it into the top center bump of the cloud. Remove it, add a tiny dot of liquid clay or glue to the threads, and screw it back in for a secure hold.
Smooth Operator
Before baking, lightly brush your unbaked clay with a tiny amount of baby oil or clay softener to erase stubborn fingerprints and achieve a professional finish.
Step 2: Sculpting the Raindrop
-
Prepare the blue clay:
Condition your light blue clay. If you don’t have pastel blue, mix a tiny bit of blue into a larger amount of white clay until you get a soft sky color. -
Shape the drop:
Roll the clay into a ball, then pinch and roll just one side to create a tapered point. Flatten it gently so it matches the thickness of your cloud charm. -
Refine the curve:
Smooth out the rounded bottom so it looks plump and cute. Ensure the top point is sturdy enough to hold hardware. -
Add the mini drop detail:
Use a ball tool to press a small teardrop-shaped indentation into the upper center of the raindrop charm. I like to fill this indent with a tiny bit of darker blue clay or liquid clay mixed with blue pigment. -
Add the hardware:
Just like with the cloud, screw a gold eye pin into the very top point of the raindrop, securing it with a touch of adhesive.
Make It Sparkle
Mix a tiny pinch of fine holographic glitter into the UV resin before doming the charms. It gives the rain and cloud a magical, shimmering weather effect.
Step 3: Baking & Detailing
-
Bake the pieces:
Place both charms on a baking sheet lined with parchment paper. Bake according to your clay manufacturer’s instructions (usually 275°F/135°C for 15-30 minutes). -
Cool down:
Let the charms cool completely before handling. They are slightly fragile while warm. -
Paint the faces:
Using a very fine dotting tool or a toothpick, paint two small black oval eyes on each charm. Use a needle tool or super fine brush to paint a small ‘u’ shape for the smile between the eyes. -
Add the cheeks:
Dab two tiny pink ovals underneath the eyes for blushing cheeks. You can use pink paint or dry brush a little pink chalk pastel dust. -
Glaze:
Establish a protective finish by coating the front and sides of both charms with UV resin. Cure under a UV lamp for a glossy, domed look. Alternatively, use a high-gloss water-based varnish. -
Assemble the keychains:
Open a gold jump ring using two pairs of pliers. Slide on the charm’s eye pin and the lobster clasp, then close the jump ring securely. Repeat for the second charm.
Give one half to your best friend and keep the other so you’re always connected, rain or shine
Two-Piece Heart Magnet Set
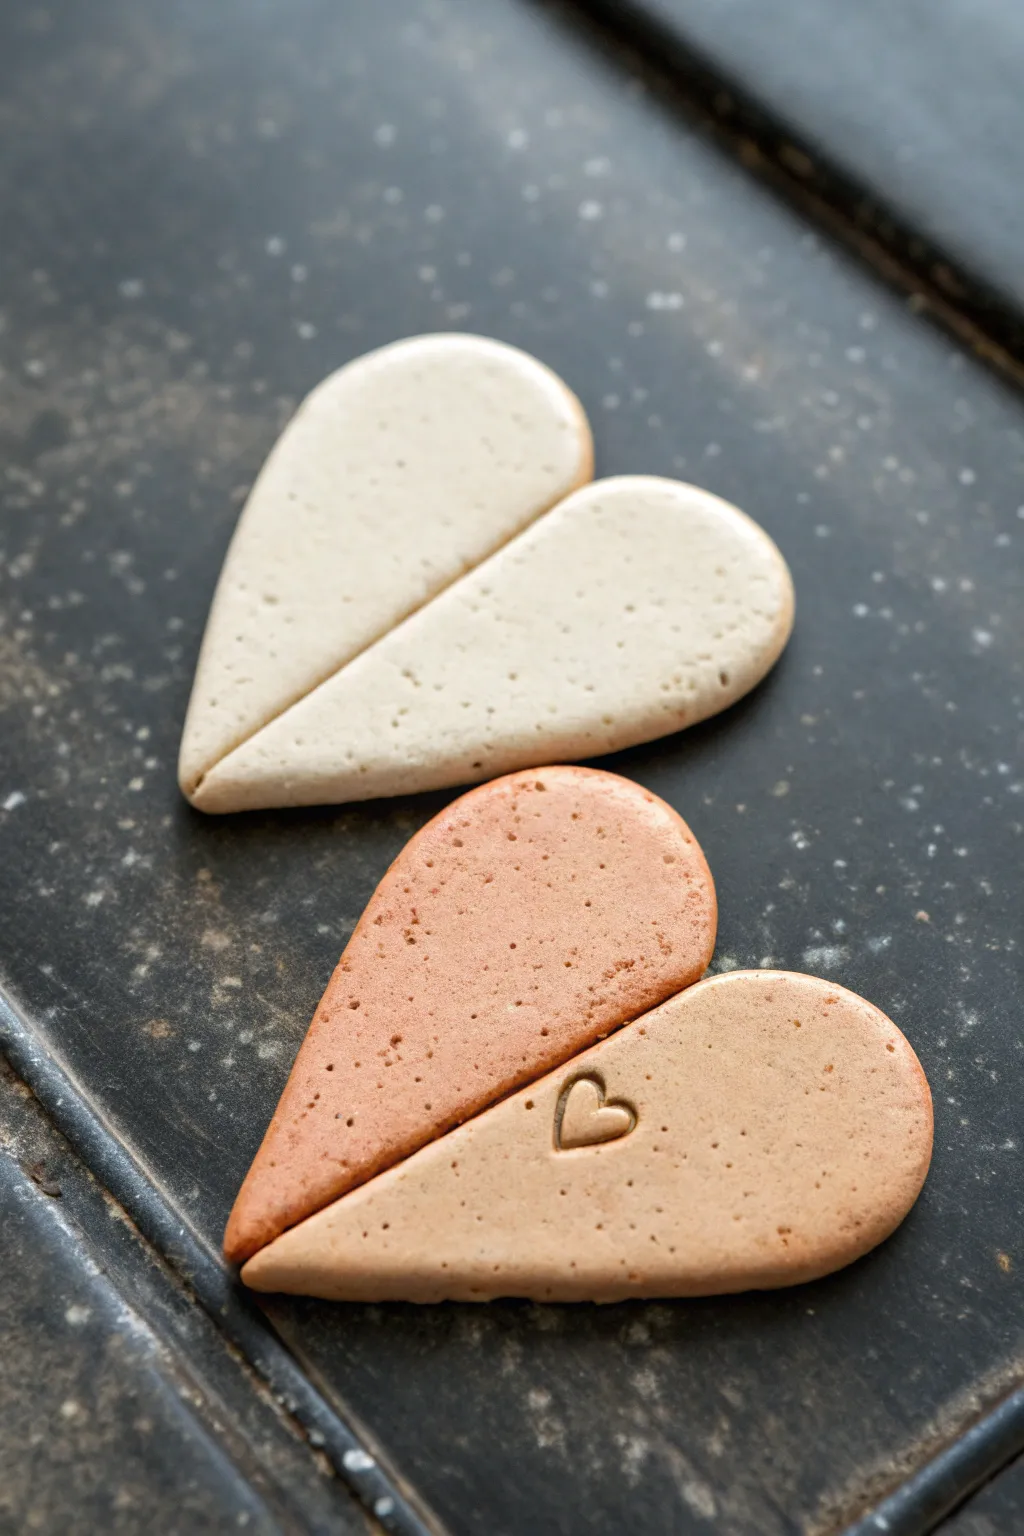
These charming, organic-looking magnets are a modern take on the classic friendship necklace, featuring earthy tones and a subtle speckled texture. The design relies on clean lines and a simple stamped heart to create a minimalist token of affection perfect for sharing.
Step-by-Step Tutorial
Materials
- Polymer clay (white, beige, and terracotta/light brown colors)
- Rolling pin or pasta machine
- Heart-shaped cookie cutter (medium size)
- X-Acto knife or sharp clay blade
- Small heart stamp or sculpting tool
- Ground pepper or spent coffee grounds (for speckled effect)
- Fine-grit sandpaper (400-600 grit)
- Strong craft glue (E6000 or similar)
- Small round magnets
Step 1: Preparing the Clay
-
Mix your colors:
Start by conditioning your clay. For the top heart, use plain white or mix a tiny bit of beige into white for an off-white bone color. For the bottom heart, create a marbled blend or a solid terracotta tone. -
Add texture:
To achieve the stone-like speckled finish seen in the photo, sprinkle a tiny pinch of ground pepper or dried coffee grounds onto your conditioned clay before rolling it out. -
Knead and roll:
Fold the clay over the speckles and knead briefly to distribute them evenly without over-blending. Roll the clay out to a thickness of about 1/4 inch (6mm) to ensure the magnets will be sturdy.
Uneven Seams?
If the two halves don’t fit perfectly after cutting, lightly sand the cut edges flat against a piece of sandpaper on a table to true them up.
Step 2: Shaping the Hearts
-
Cut the shapes:
Press your heart-shaped cutter firmly into the rolled clay. You will need to cut two full hearts—one from the light clay and one from the darker tone. -
Plan the split:
Take your sharp blade and carefully plan a diagonal cut across the heart. You want to slice it so it looks like two interlocking puzzle pieces. -
Make the cut:
Using a confident, straight motion, slice through both clay hearts. Here I prefer to cut them individually to keep the edges crisp, but you can also stack them if your blade is very sharp. -
Swap and pair:
Ideally, you now have four pieces. For this specific look, pair one dark half with one light half, though the example image shows two separate hearts in single tones split down the middle. -
Smooth the edges:
Gently run your finger along the cut edges. You want to soften the sharpness just enough so it isn’t jagged, but keep the edge straight so the pieces still look like they fit together.
Cornstarch Trick
To prevent fingerprints, dust your fingers and the clay surface lightly with cornstarch before the final smoothing. It brushes off easily after baking.
Step 3: Detailing and Baking
-
Stamp the mini heart:
On the darker heart half (or whichever side you prefer), gently press a small heart stamp into the surface. If you don’t have a stamp, use a small dotting tool to carefully draw a heart indentation. -
Check for lint:
Inspect the surface for any dust or fingerprints. Use a little rubbing alcohol on your finger to smooth away any unwanted imperfections before baking. -
Bake:
Place your clay pieces on a ceramic tile or baking sheet lined with parchment paper. Bake according to the manufacturer’s instructions for your specific brand of clay (usually 275°F/135°C for 15-30 minutes). -
Cool down:
Let the pieces cool completely before handling them. Warm clay is fragile and can snap easily.
Step 4: Finishing Touches
-
Sand for smoothness:
Once fully cooled, take your fine-grit sandpaper and lightly buff the edges and surface. This enhances the matte, stone-like quality. -
Wipe clean:
Use a damp cloth to remove any sanding dust. Ensure the back of the clay is completely clean and dry. -
Attach magnets:
Apply a small dab of strong craft glue to the back of each heart half. Press a magnet firmly into the glue. -
Let it cure:
Allow the glue to cure fully (usually 24 hours) before sticking these to your fridge or packaging them up for your best friend.
Wrap one half in a small box for your friend and keep the other for yourself as a sweet reminder of your bond

TRACK YOUR CERAMIC JOURNEY
Capture glaze tests, firing details, and creative progress—all in one simple printable. Make your projects easier to repeat and improve.
Best Friend Quote Mini Plaques

Create these delightful house-shaped ceramic ornaments, perfect for gifting to your best friend with a sweet sentiment inside. The design features a beautifully glazed central square framed by delicate polka dots and natural raffia ties for a rustic, handmade charm.
Step-by-Step
Materials
- Air-dry clay or polymer clay (white or terracotta)
- Rolling pin
- House-shaped cookie cutter (or craft knife and ruler)
- Small circular cutter or straw (for hanging hole)
- Acrylic paints (Terracotta/Burnt Orange, Navy Blue, Cream/Off-White)
- Fine detail paintbrush
- Medium flat paintbrush
- Sculpting tool with a needle point
- Sandpaper (fine grit)
- Matte or satin varnish
- Natural raffia ribbon
Step 1: Shaping the Clay
-
Roll the slab:
Begin by conditioning your clay until it is pliable, then roll it out on a clean, flat surface to an even thickness of about 1/4 inch (6mm). Using depth guides can help keep it perfectly uniform. -
Cut the house shapes:
Use a house-shaped cookie cutter to press firmly into the slab. If you don’t have a cutter, use a ruler and craft knife to cut a rectangle, then trim off the top corners to form a peaked roof. -
Add the hanging hole:
While the clay is still wet, use a straw or a small circular cutter to punch a hole near the top peak of the roof. Make sure it’s centered and not too close to the edge to prevent cracking. -
Clean the edges:
Dip your finger in a little water and smooth down any rough edges or stray bits of clay around the perimeter and the hole for a professional finish. -
Dry completely:
Place your clay pieces on a wire rack or parchment paper to dry. Depending on your clay type and humidity, this could take 24-48 hours. I like to flip them halfway through to ensure they dry flat. -
Sand for smoothness:
Once fully dry and hard, gently sand the edges and surface with fine-grit sandpaper to remove any imperfections.
Step 2: Painting the Design
-
Base coat:
Paint the entire front surface with a cream or off-white acrylic paint. You may need two thin coats for full coverage; let the first coat dry before applying the second. -
Outline the center square:
Using a ruler and a pencil, very lightly mark a square in the center of the house shape. This will be the main color block. -
Score the border detail:
Before painting the center, use a needle tool to gently scratch a dashed line or tiny indentations just outside your pencil mark. This creates the textured border look seen in the image. -
Paint the color block:
Using a flat brush, carefully fill in the central square. Use a deep navy blue for one plaque and a warm terracotta or burnt orange for the other. Keep the edges crisp. -
Add the dot accents:
dip the handle end of a paintbrush into the navy blue paint. Gently dot the paint around the outer perimeter of the cream border. Space them evenly for a tidy look. -
Paint the edges:
For a cohesive look, paint the very outer side edges of the clay (the thickness of the slab) to match the central square color—orange for the orange plaque, blue for the blue one. -
Create the inner border texture:
Once the center square is dry, emphasize that scored line you made earlier. You can lightly run a very fine brush with diluted brown paint over it, or simply leave the texture as is.
Smooth Surface Trick
Before painting, wipe the dried clay with a slightly damp sponge. This removes sanding dust and helps the acrylic paint glide on much smoother.
Step 3: Finishing Touches
-
Seal the artwork:
Protect your painting with a coat of matte or satin varnish. This prevents the acrylics from chipping and gives the piece a completed ceramic look. -
Add the sentiment (Optional):
If you wish to add a best friend quote, use a white paint pen to write it inside the colored square now, or leave it blank as a minimalist decorative tile. -
Attach the tie:
Cut a length of natural raffia. Fold it in half, push the loop through the hole from front to back, then pull the loose ends through the loop to create a lark’s head knot. -
Tie the bow:
Tie the loose ends of the raffia into a simple bow at the top, trimming the tails to your desired length to complete the rustic effect.
Curling Edges?
If your clay starts curling up while drying, weigh it down gently with a heavy book placed over a piece of parchment paper once it’s partially dry.
These charming mini plaques are now ready to be gifted or hung up as a reminder of friendship
Matching Photo Holder Stands
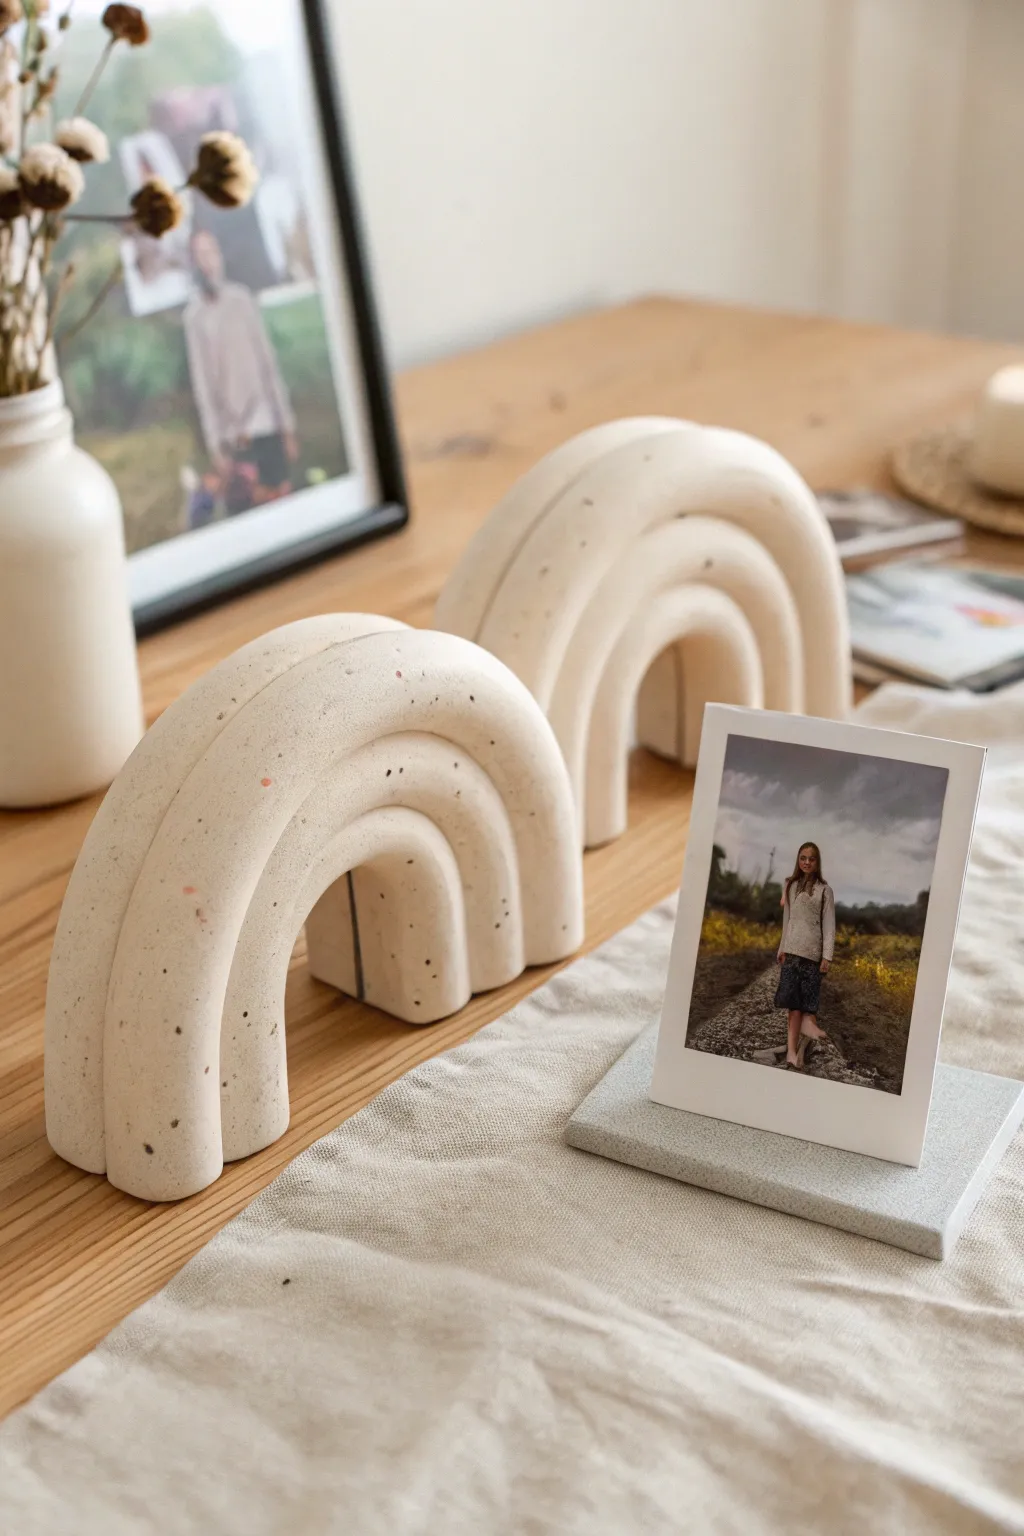
Celebrate friendship with these minimalist, modern clay accessories that look like high-end decor. This set features matching rainbow arches and a sleek, rectangular base designed to hold your favorite shared memories.
Step-by-Step Guide
Materials
- White air-dry clay or polymer clay (approx. 1kg)
- Faux stone spray paint or speckle additive (black sand/coarse pepper)
- Rolling pin
- Sharp craft knife or clay slicer
- Ruler
- Varnish (matte finish)
- Sandpaper (fine grit)
- Cardboard or sturdy paper (for templates)
- Water and sponge (for smoothing)
- Small block of wood or foam (for drying support)
Step 1: Creating the Photo Base
-
Prepare your clay:
Begin by conditioning your clay. If you want the speckled look to be embedded rather than painted, knead in a small amount of black sand or coarse black pepper directly into the white clay until distributed evenly. -
Form the base slab:
Roll out a portion of clay into a flat slab, approximately 1/2 inch thick. It needs to be substantial enough to act as a weight. -
Cut the rectangle:
Using your ruler and craft knife, cut a clean rectangle about 4 inches by 5 inches. Smooth the cut edges with a damp finger to remove any sharpness. -
Create the photo slot:
Carefully press the edge of your ruler or a thick piece of cardstock into the center of the slab to create a groove. Ensure it’s deep enough to hold a photo but not deep enough to slice the base in half.
Stone Effect Secret
Mix dried used coffee grounds or cracked pepper into your wet clay before sculpting for an instant, natural granite look without needing paint.
Step 2: Sculpting the Rainbow Arches
-
Map out your arches:
Draw three concentric rainbow arches on a piece of cardboard to use as a guide. The largest arch should be thick and sturdy, about 4-5 inches tall. -
Roll the first coil:
Roll a long, thick snake of clay for the inner arch. Flatten it slightly so it has a rectangular cross-section rather than a round one, mimicking the modern blocky look in the photo. -
Shape the inner arch:
Curve the clay over your cardboard template. Trim the bottom ends flat with your blade so the arch stands straight. -
Build the second layer:
Roll a second, larger coil. Brush a tiny amount of water (or liquid clay if using polymer) onto the outer edge of the first arch to act as glue. -
Attach the middle arch:
Press the second coil firmly against the first, shaping it over the top. The connection needs to be seamless but visibly distinct as a separate layer. -
Add the final outer arch:
Repeat the process for the third and largest arch. Ensure you press the sides together firmly to prevent gaps from forming during drying. -
Level the bottom:
Once all three layers are joined, stand the rainbow up and press it gently onto your work surface to ensure the bottom is perfectly flat and stable. -
Smooth the surface:
Use a slightly damp sponge to wipe away fingerprints and smooth the transition lines between the arches. I find this step crucial for that professional, polished finish. -
Repeat for the second piece:
Follow the same steps to create a matching rainbow for your best friend, ensuring they are roughly the same size.
Step 3: Refining and Finish
-
Looking after the drying process:
For air-dry clay, let the pieces dry slowly away from direct sunlight for 24-48 hours. Turn them occasionally to ensure even drying. -
Sand for perfection:
Once bone dry (or baked and cooled for polymer), use fine-grit sandpaper to smooth any rough edges on the bottom or sides. -
Apply the stone effect:
If you didn’t mix speckles into the clay earlier, now is the time to apply a light mist of stone-effect spray paint or manually flick diluted brown and black paint onto the surface for that terrazzo look. -
Seal the deal:
Finish with a coat of matte varnish to protect the surface without making it glossy, keeping that natural stone aesthetic intact.
Dual Purpose Design
Make the rainbow arches thicker and heavier so they can double as bookends for your shared favorite novels.
Pair these handmade sculpts with a cherished photo for a gift that truly cements your friendship
Split Cookie Charm Duo
Celebrate your bond with these delightful matching keychains that snap together to form a whole chocolate chip cookie. Crafted from polymer clay and textured to realistic perfection, this project is a sweet way to say “we go together like cookies and chips.”
How-To Guide
Materials
- Polymer clay (beige/tan for dough, dark brown for chips)
- Round clay cutter (approx. 1.5 – 2 inches diameter)
- Blade or craft knife
- Aluminum foil (crumbled into a ball)
- Clean toothbrush (for texturing)
- Needle tool or toothpick
- Soft pastel chalks (orange, brown) & soft brush
- Translucent liquid clay
- 2 small screw eye pins
- 2 keychain rings with chains
- Oven for baking
Step 1: Shaping the Base
-
Condition the Clay:
Begin by conditioning your beige or tan clay until it is soft and pliable. Roll it into a smooth ball, ensuring there are no cracks on the surface. -
Flatten the Cookie:
Press the ball flat onto your work surface using your palm or an acrylic roller until it is about 1/4 inch thick. Aim for a thickness that feels sturdy but not bulky. -
Cut the Circle:
Use your round clay cutter to punch out a perfect circle. This creates clean, uniform edges for your starting cookie shape. -
Create the Split:
Using a zigzag motion with your blade or a dedicated crinkle cutter, slice a wandering line through the cookie. I prefer to cut slightly off-center to create a distinct “slice” shape for one charmp. -
Refine the Cut Edges:
Gently pull the two pieces apart. Use your finger to slightly soften the sharp edges of the cut so the “crumb” looks baked, not sharply sliced.
Loose Chips?
If a chocolate chip falls out after baking, don’t panic. A tiny dot of superglue (cyanoacrylate) will bond it permanently back into its indentation.
Step 2: Texturing and Details
-
Add Base Texture:
Take your crumpled ball of aluminum foil and roll it gently over the top surface and sides of both cookie halves. This mimics the uneven surface of a real baked good. -
Deepen the Texture:
For finer details, tap a clean toothbrush over the clay surface. Focus especially on the jagged edges where the cookie was split to make the interior crumb look realistic. -
Shade for Realism:
Scrape a small amount of orange and brown soft pastel chalk into a powder. Use a soft brush to dust the edges and the textured top lightly, giving it a golden-baked appearance. -
Make the Chocolate Chips:
Roll your dark brown clay into a thin snake, then cut tiny pieces off. Roll these snippets into small, imperfect balls to serve as chocolate chips. -
Embed the Chips:
Press the chocolate chips firmly into the cookie halves. Don’t be afraid to squish them slightly flat or bury some deeper than others for a natural look. -
Secure the Chips:
To ensure they don’t pop out after baking, I like to use a tiny needle tool to drag a bit of the surrounding cookie dough over the edges of the chips.
Glossy Finish
For an extra touch, brush a thin layer of satin or gloss glaze just on the chocolate chips to make them look slightly melted and gooey.
Step 3: Assembly and Baking
-
Insert Eye Pins:
Dip the end of a screw eye pin into a tiny bit of liquid clay. Screw it gently into the top curved edge of the larger cookie half. -
Repeat for the Slice:
Do the same for the smaller wedge piece, ensuring the eye pin is centered and straight so the charm hangs correctly. -
Smooth the Entry Point:
If the clay bulged around the insertion point of the eye pin, use your needle tool to smooth it back down and re-texture that tiny spot. -
Bake:
Place your pieces on a ceramic tile or baking sheet. Bake according to your polymer clay manufacturer’s instructions (usually 275°F for 15-30 minutes). -
Cool Down:
Allow the cookies to cool completely before determining which side is the ‘front’ or ‘back’ (though both should look good). -
Attach Hardware:
Using pliers, open the jump ring on your keychain finding and thread it through the eye pin. Close the ring securely.
Give one half to your best friend and keep the other to show everyone that you two are the perfect mix
Bestie Figurines With Mini Details
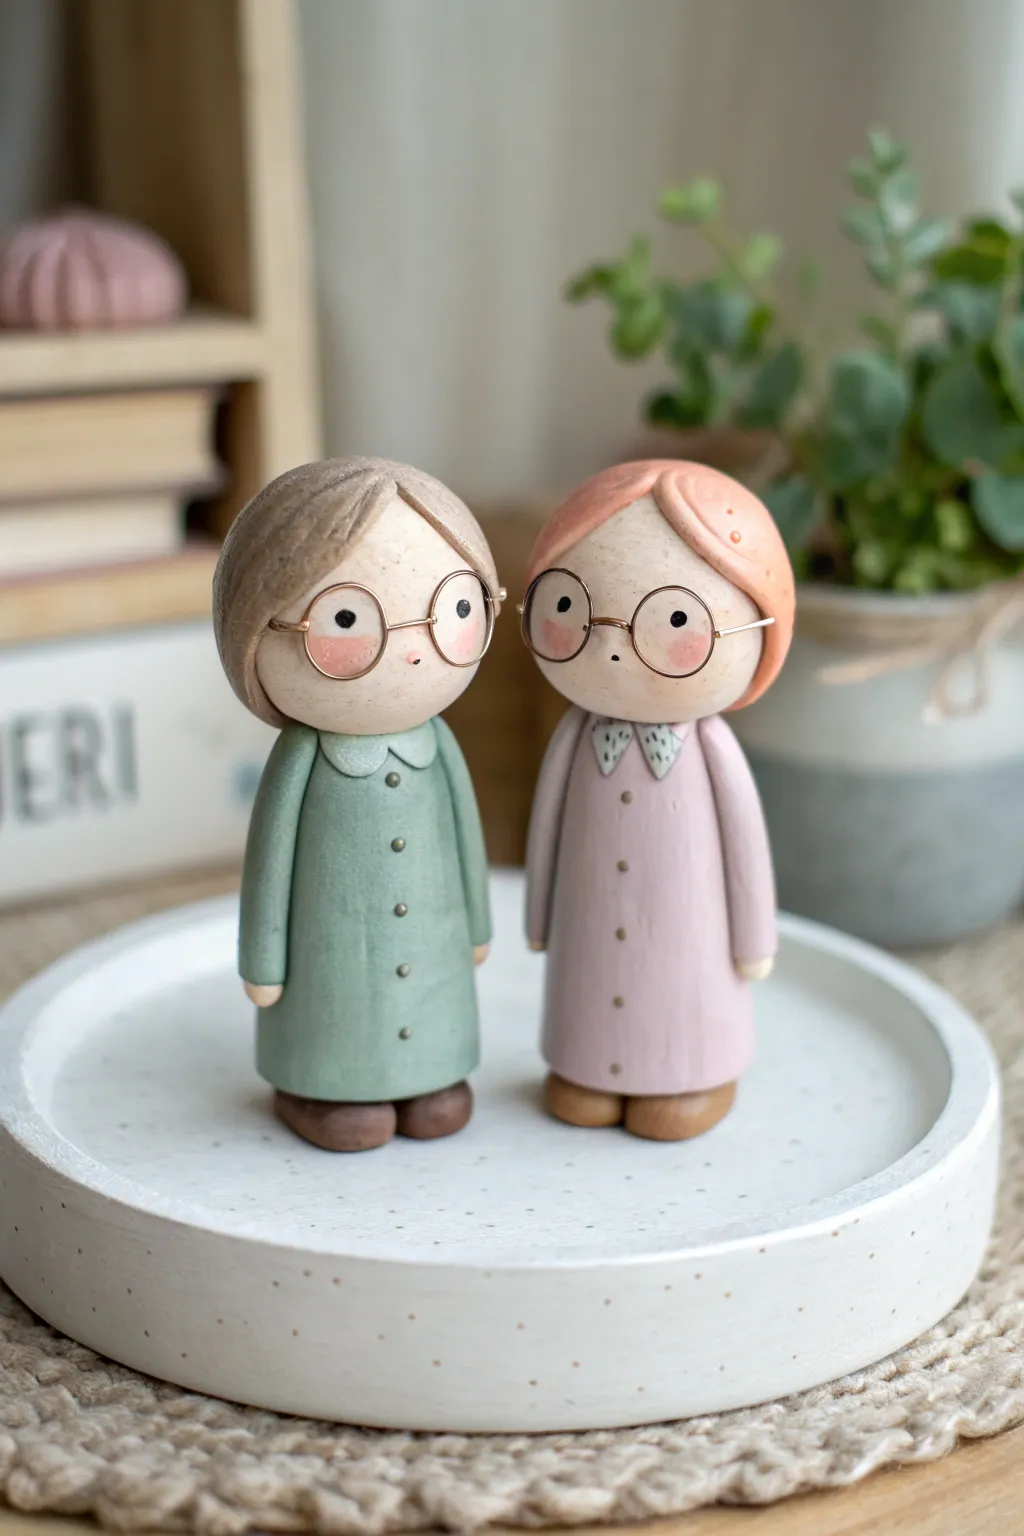
Celebrate your unbreakable bond with these charming clay figurines, featuring sweet wire-rimmed glasses and pastel dresses. This project captures the essence of friendship through simple shapes and delicate details, resulting in a keepsake that’s both modern and heartwarming.
Step-by-Step Guide
Materials
- Polymer clay (beige for skin, sage green, dusty pink, brown, light peach)
- Thin gold or copper crafting wire (24-26 gauge)
- Round nose pliers and wire cutters
- Sculpting tools (needle tool, ball stylus)
- Black acrylic paint or fine-point marker
- Small paintbrush
- Liquid polymer clay (optional, for adhesion)
- Oven and baking sheet
- Matte varnish (optional)
Step 1: Sculpting the Base Forms
-
Shape the bodies:
Start by conditioning your sage green and dusty pink clay until soft. Roll each color into a smooth ball, then gently roll one side against your work surface to create a tapered cone shape. Flatten the bottom so they stand sturdily and flatten the top slightly where the head will sit. -
Create the heads:
Roll two equal-sized spheres of beige skin-tone clay. Ensure they are proportional to your cone bodies—slightly oversized heads add to the cute factor. Press them gently onto the necks of the dresses. I find a small dab of liquid clay here ensures they won’t pop off after baking. -
Form the arms:
Roll thin snakes of the dress-colored clay. Cut two equal lengths for each figure to serve as arms. Attach them to the sides of the dresses, blending the clay at the shoulder joint so it looks seamless, while leaving the hands (small beige balls added to the ends) resting naturally at their sides. -
Add the shoes:
Shape two small, flattened ovals from brown clay for each figure. Place the dress cones on top of these shoe shapes so just the tips of the shoes peek out from under the hem.
Uneven Glasses?
If bending wire is tricky, draw the glasses template on paper first. Lay your wire over the drawing as you bend it to ensure perfect symmetry.
Step 2: Hairstyling & Clothing Details
-
Style the first friend:
For the figure in green, flatten a disk of brown clay. Drape it over the back of the head, smoothing it down. Use a sculpting tool to etch a center part and delicate hair strands. Add two small flattened pieces at the front to frame the face like bangs. -
Style the second friend:
For the figure in pink, use light peach clay. Create a similar base cap for the back of the head. For the front, shape a sweeping side bang piece and gently press it onto the forehead, blending the seam at the top. -
Collar details:
Roll tiny, paper-thin pieces of clay for the collars. For the green dress, shape a rounded ‘Peter Pan’ collar. For the pink dress, cut two small triangles for a pointed collar. Carefully press these around the necklines. -
Dress buttons:
Using your smallest ball stylus or a needle tool, gently impress a vertical line of tiny dots down the center of each dress to mimic buttons. If you prefer raised buttons, roll microscopic balls of clay and press them on instead.
Level Up: Accessories
Personalize them! Add tiny clay books, a miniature coffee cup, or a beloved pet sitting at their feet to match your real-life hobbies.
Step 3: The Signature Spectacles
-
Form the wire frames:
This is the defining feature! Wrap your thin crafting wire around a paintbrush handle or dowel to create two perfect loops. Twist the wire between the loops to form the nose bridge. -
Size and trim:
Hold the glasses up to the clay faces to check the width. The loops should encircle where the eyes will go. Trim the side arms of the glasses so they are just long enough to press into the clay hair near the ears. -
Attach the glasses:
Gently press the side arms of the wire glasses into the soft clay at the sides of the head. The nose bridge should hover just slightly off the face.
Step 4: Baking & Finishing Touches
-
Bake carefully:
Place your besties on a baking sheet lined with parchment paper. Bake according to your clay manufacturer’s instructions—usually around 275°F (135°C) for 30 minutes. Let them cool completely before handling. -
Paint the eyes:
Once cool, use a fine-point black marker or a toothpick dipped in black paint to create two solid black dots for eyes inside the wire frames. Keep them simple and wide-set for innocence. -
Apply blush:
Using a dry paintbrush and a tiny amount of pink pastel chalk or diluted paint, gently buff rosy cheeks onto the faces, just under the glasses. This brings them to life. -
Pattern the collar:
For the pink figure, use a super fine liner brush or pen to add tiny speckles or a pattern to the white collar triangles, giving it a fabric texture look.
Display your charming duo on a shelf or gift one to your best friend as a sweet reminder of your connection
Half-and-Half Friendship Vase
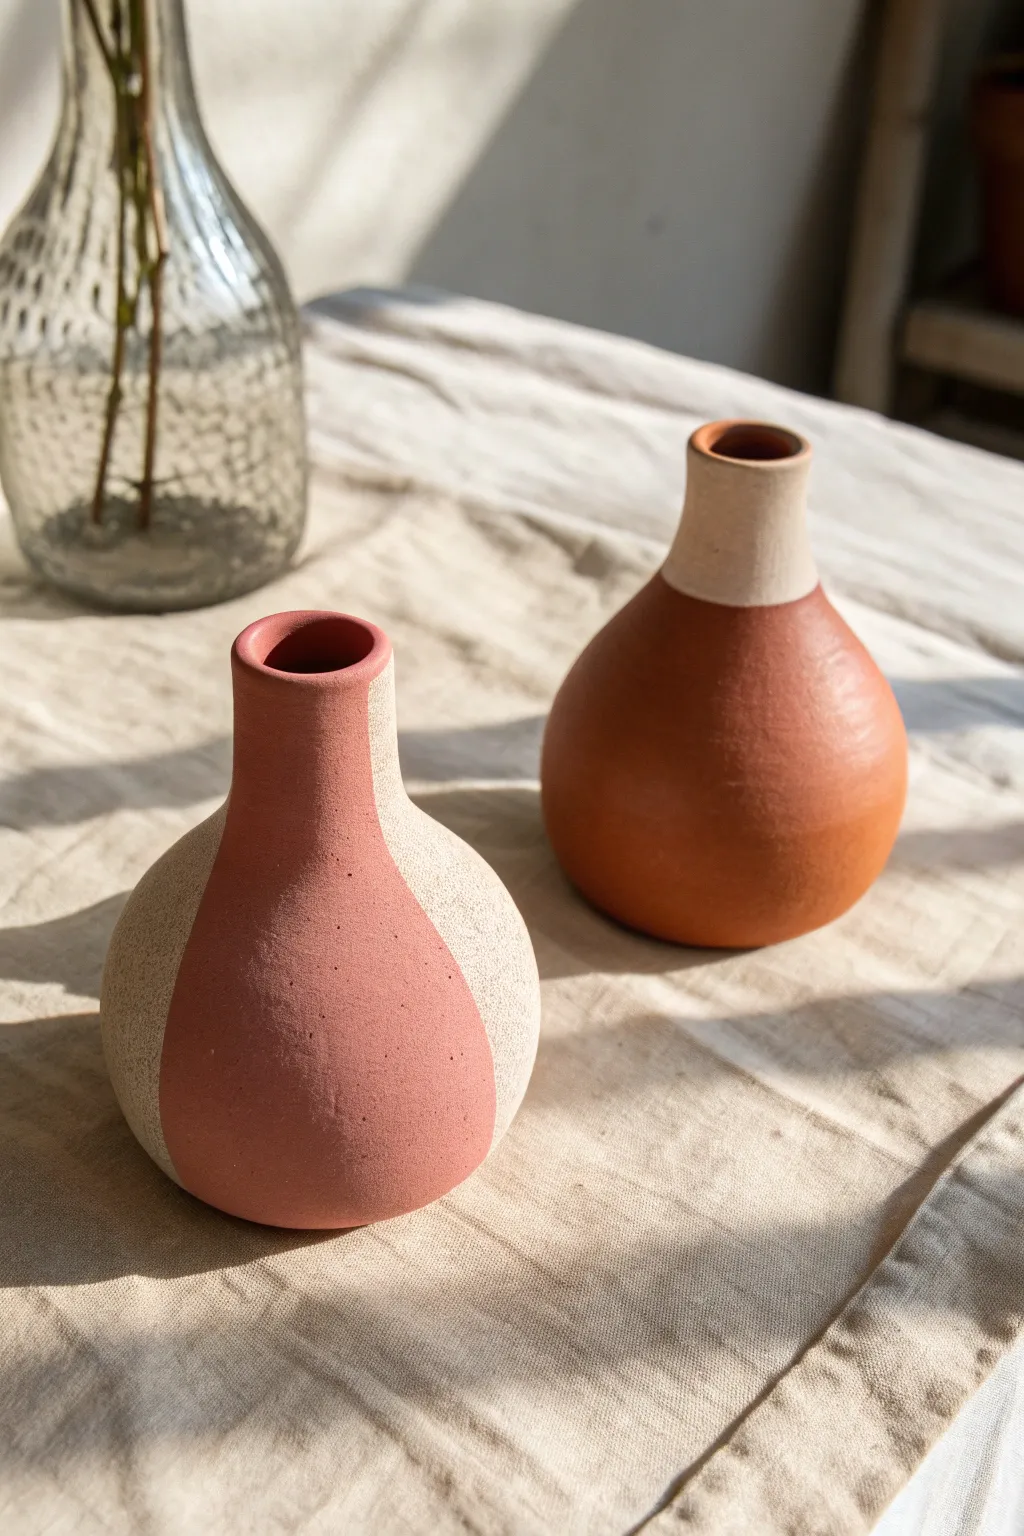
These charming, complementary bud vases are a perfect symbol of friendship, featuring simple bulbous forms and distinct half-and-half glazing. The raw, textured clay contrasts beautifully with smooth, matte-color sections, creating a modern and earthy aesthetic.
How-To Guide
Materials
- Air-dry clay or kiln-fire clay (terracotta color recommended)
- Pottery wheel (optional, can be hand-built)
- Pinch pot tools (rib, sponge, trimming tool)
- Water and slip
- Sanding sponge or fine-grit sandpaper
- Matte acrylic craft paint (terracotta/rust red and blush pink)
- Painter’s tape or masking tape
- Matte spray sealant or clear glaze (if kiln firing)
- Paintbrushes (medium flat brush)
Step 1: Forming the Vases
-
Prepare the Clay:
Start with two equal balls of clay, roughly the size of a large orange. Wedge the clay thoroughly to remove air bubbles and ensure a consistent texture. -
Establish the Base:
If hand-building, begin by creating two pinch pots. Push your thumb into the center of the ball and gently pinch the walls upward while rotating. Aim for a rounded, bulbous shape for the bottom two-thirds. -
Form the Neck:
For the neck, gently collar the clay inward at the top of your bulb. Squeeze gently with wet hands to narrow the opening, pulling the clay upward to create a cylindrical neck about 1.5 inches tall. -
Refine the Shape:
The charm of these vases is their symmetry. Use a small wooden rib or a smoothing tool to refine the curve of the belly and ensure the neck transitions smoothly from the body without a sharp angle. -
Smooth the Surface:
Use a slightly damp sponge to wipe away any fingerprints or deep grooves. The surface should be relatively smooth, though a little texture adds to the organic look. -
Slow Drying:
Allow the vases to dry slowly. Cover them loosely with plastic for the first 24 hours to prevent cracking, then uncover them to dry completely until they are bone dry. -
Sanding:
Once fully dry, use fine-grit sandpaper or a sanding sponge to gently smooth the outside. Wear a dust mask for this step. Focus on the lip of the vase to ensure it’s rounded and soft.
Uneven Lines?
If your taped lines look jagged, dip a small angled brush in the base clay color (or a mix close to it) and carefully paint along the edge to straighten it out.
Step 2: Designing the Two-Tone Look
-
Initial Sealing (Air Dry Clay Only):
If using air-dry clay, apply a thin coat of matte sealant now to seal the material before painting. If using kiln clay, you would bisque fire at this stage. -
Taping the Vertical Design:
For the vase with the vertical stripe (left in image), place strips of painter’s tape vertically. You want to mask off the sides, leaving a wide, curved central panel exposed. I find pressing the tape firmly into the curves prevents paint bleed. -
Painting the Vertical Curve:
Check your tape edges again. Using a flat brush, paint the exposed central section with the reddish-pink paint. Apply thin layers, letting each dry before the next, to get an opaque finish. -
Taping the Horizontal Design:
For the second vase (right in image), apply tape horizontally around the neck. You want to create a clean line right where the neck begins to widen into the body. -
Painting the Horizontal Dip:
Paint the bottom bulbous section with your terracotta or rust-colored paint, leaving the neck in its raw, natural clay color. This creates a ‘dipped’ look. -
Reveal the Design:
Wait until the paint is dry to the touch but not fully cured before peeling off the tape. Pull the tape away slowly at a 45-degree angle to keep the lines crisp. -
Touch Ups:
If any paint bled under the tape, use a crafting knife or a tiny bit of damp sandpaper to gently scrape or wipe away the excess for a sharp line. -
Final Protection:
Seal the painted areas (and the raw areas if desired) with a coat of matte spray varnish. Note that unless glazed and fired in a kiln, air-dry clay vases are for dry flowers only.
Waterproof it
To hold fresh flowers in air-dry clay, hide a small glass vial or test tube inside the neck of the vase. This keeps water away from the clay entirely.
Place these side by side on a sunny shelf to enjoy the interplay of color and texture
Secret Message Capsule Charms
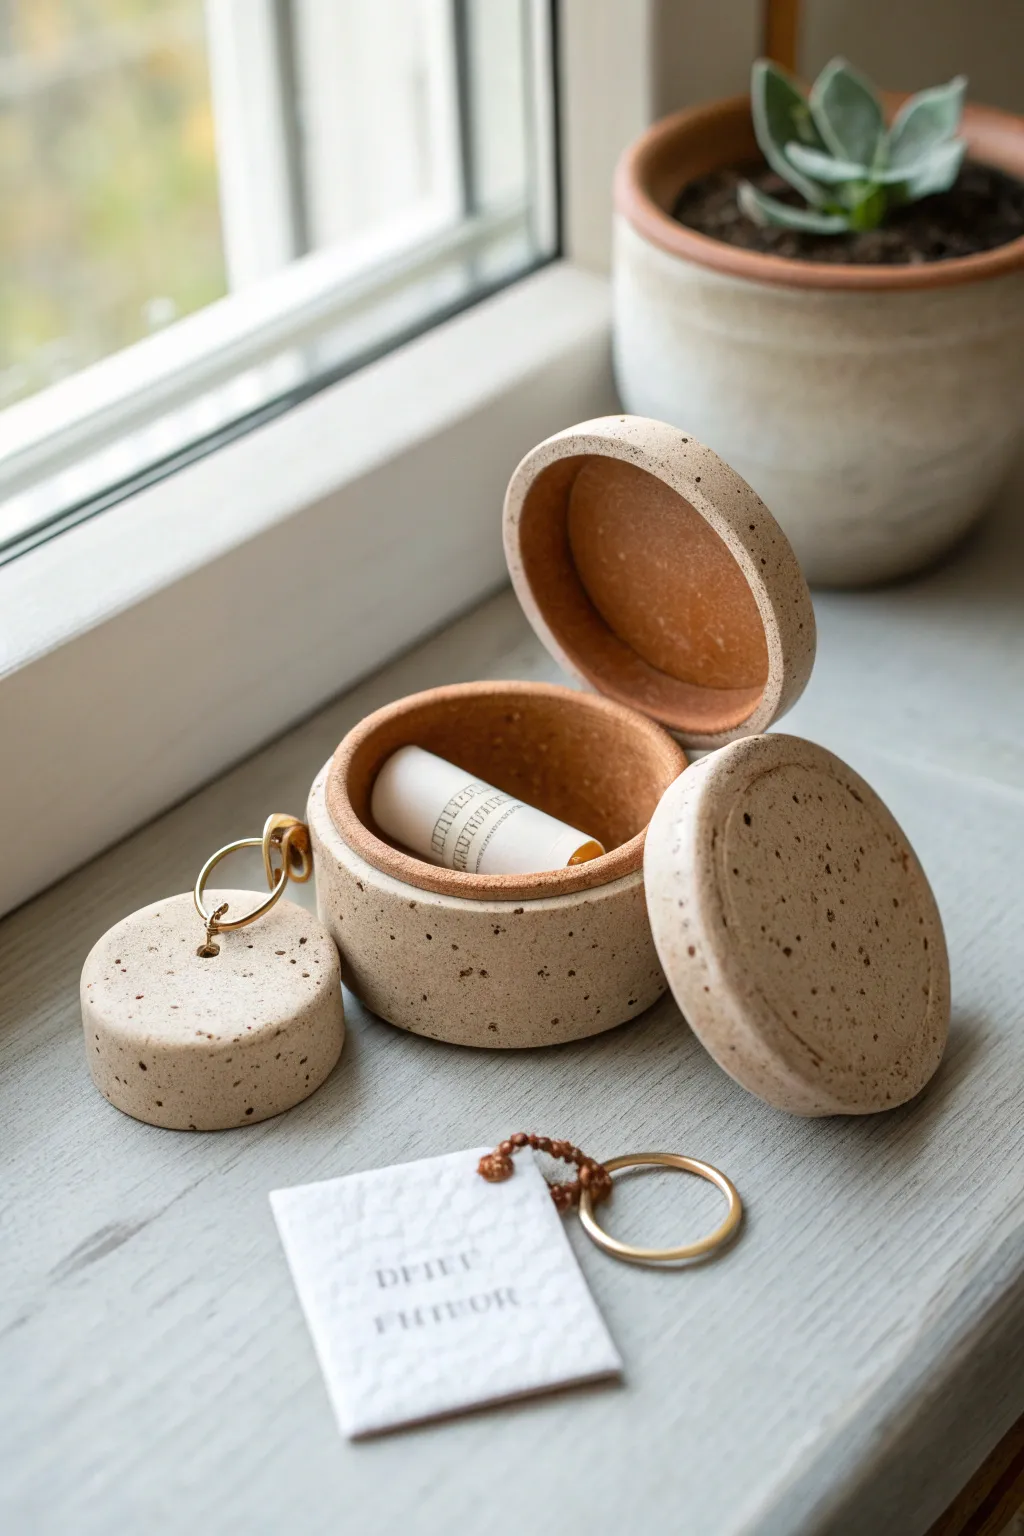
Create these delightful little vessels designed to hold handwritten notes or tiny treasures for your best friend. Their natural, speckled finish gives them a high-end ceramic look, while the hidden compartment adds a touch of mystery and sentimentality.
Step-by-Step Guide
Materials
- Speckled polymer clay (like ‘granite’ or ‘stone’ effect)
- Small circle cutters (two sizes)
- Acrylic rolling pin
- Liquid polymer clay (bakeable adhesive)
- Needle tool
- Sandpaper (various grits)
- Small metal jump rings
- Parchment paper
- Oven
Step 1: Forming the Base Capsule
-
Condition the clay:
Begin by warming the speckled polymer clay in your hands until it is pliable and soft, ensuring there are no air bubbles trapped inside. -
Create the base cylinder:
Roll a thick snake of clay and slice off a solid section, shaping it into a short, squat cylinder about the width of a quarter. Smooth the sides with your finger. -
Hollow out the center:
Use a smaller circle cutter or a carving tool to carefully remove the center of the cylinder, leaving a wall thickness of about 3-4mm. Don not go all the way through; leave a solid bottom. -
Refine the rim:
I like to gently tap the rim against my work surface to flatten it perfectly, which ensures the lid will sit flush later. -
Create the internal lip:
Roll a very thin strip of clay and adhere it around the inner rim of the base using a tiny smear of liquid clay. This lip will hold the lid in place so it doesn’t slide off.
Step 2: Creating the Lids and Charms
-
Cut the lid shape:
Roll out a fresh slab of clay to the same thickness as your base walls. Use your main circle cutter to punch out a disc that perfectly matches the diameter of your capsule. -
Check the fit:
Before baking, gently place the lid onto the base to ensure it sits comfortably on the internal lip you created. Adjust the shape if necessary. -
Make the mini charm version:
For the smaller charm shown in the image, repeat the process but on a miniature scale. Create a tiny solid cylinder or a very shallow hollow one. -
Add hardware holes:
For the mini charm, use a needle tool to pierce a hole through the center or add a small clay loop on top where a jump ring can be attached later. -
Texture and smooth:
Rub your finger over all cut edges to soften them. If you want extra texture to mimic the photo, you can lightly dab the surface with a toothbrush.
Lid Won’t Stay?
If the lid is too loose after baking, apply a thin layer of liquid polymer clay to the inner rim or the lid’s edge, rebake for 10 mins, and sand for a tighter friction fit.
Step 3: Baking and Finishing
-
First bake:
Place all components on parchment paper and bake according to your clay manufacturer’s instructions (usually 275°F/135°C for 15-30 minutes). -
Cool down:
Let the pieces cool completely in the oven with the door slightly ajar to prevent thermal shock cracks. -
Sanding for stone effect:
Once cool, wet-sand the pieces under running water. Start with 400 grit and move to 800 grit. This reveals the beautiful speckles and creates that matte, ceramic-like finish. -
Attach hardware:
Using pliers, open a brass jump ring and thread it through the hole or loop on your mini charm lid. -
Write the note:
Cut a strip of paper, write a secret message, roll it into a tight scroll, and place it inside the larger capsule.
Faux Ceramic Look
After baking, buff the clay with a piece of denim or heavy canvas fabric. This creates a soft, satin sheen that looks incredibly professional and pottery-like.
Now you have a timeless keepsake that securely holds a piece of your friendship
Matching Desk Buddy Animals
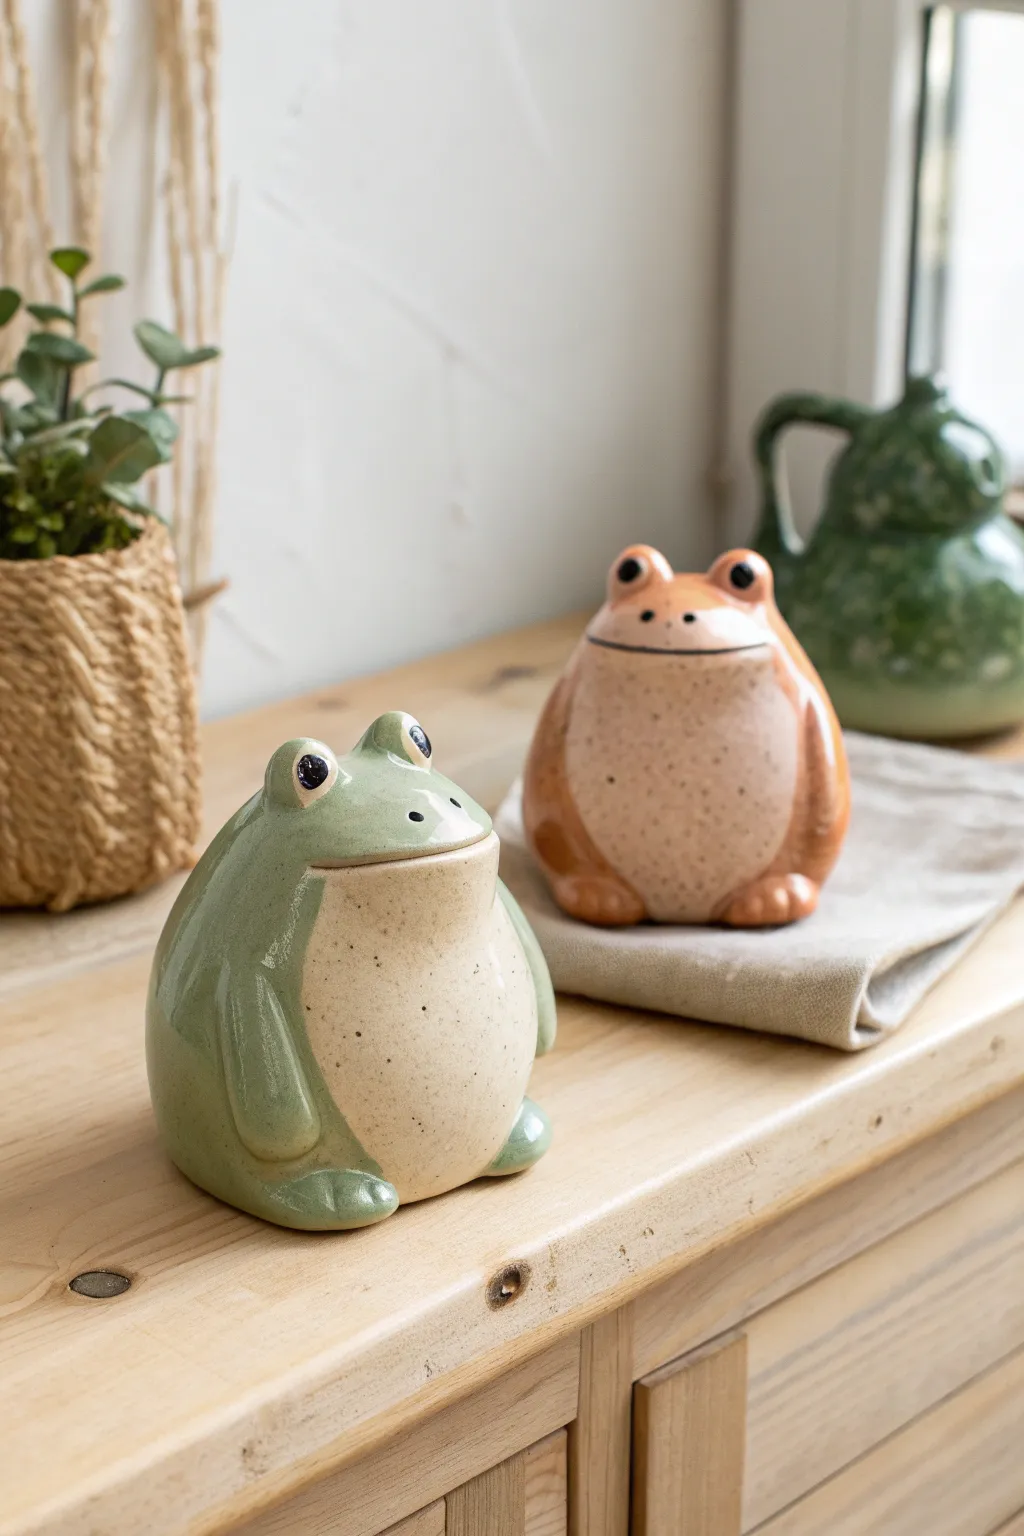
These adorable, rotund frog figurines are perfect matching desk buddies, featuring a playful, stylized silhouette and a smooth, speckled glaze finish. Their simple shape makes them an ideal project for getting comfortable with hollow-form construction while creating a charming keepsake.
Step-by-Step Tutorial
Materials
- Light-colored stoneware clay (white or buff)
- Pottery wheel (optional, can be hand-built)
- Needle tool
- Rib tool (metal or rubber)
- Scoring tool or old toothbrush
- Slip (clay and water slurry)
- Sponge
- Underglaze (Black)
- High-gloss glazes (Celadon Green and Warm Terracotta)
- Clear speckled glaze (or Iron Oxide wash for speckles)
- Small liner brush
- Kiln
Step 1: Creating the Body Form
-
Form the base shape:
Begin with a ball of clay about the size of a large orange. If wheel-throwing, center the clay and pull a closed-form bulb shape, narrowing it at the top until it seals completely. -
Trapping the air:
If hand-building, create two pinch pots and score and slip the rims together to create a sealed hollow sphere. Gently paddle the outside to smooth the seam and compress the clay. -
Shape the belly:
Once the hollow sphere is leather hard, gently tap the bottom against your table to create a flat base so the frog sits stably. Use your hands to gently push the sides to be wider at the bottom, creating that classic ‘dumping’ frog posture.
Step 2: Sculpting Features
-
Add the eye mounds:
Roll two small balls of clay and attach them to the ‘head’ area using the score and slip method. Blend the clay downwards into the main body so they look like protrusions rather than stuck-on marbles. -
Carve the mouth:
Use a needle tool or fettling knife to slice a long, horizontal mouth line. I like to curve it very slightly upwards at the corners for a subtle smile. -
Form the front legs:
Roll two thick coils of clay. Flatten one end of each coil to create feet and attach the other end to the sides of the body, blending the upper shoulder area seamlessly into the torso. -
Detail the toes:
Use a modeling tool or needle to gently press indentations into the flattened feet, suggesting toe separation without cutting all the way through. -
Vent the piece:
Crucial step: Since this is a closed hollow form, take your needle tool and poke a small, inconspicuous hole in the bottom or under a leg to allow expanding air to escape during firing. -
Smoothing:
Run a damp sponge over the entire surface to remove fingerprints and harsh tool marks.
Air Trap Issues
If the body collapses while shaping, the air inside might have escaped. Reseal any holes immediately; the trapped air pressure supports the walls.
Step 3: Decoration and Glazing
-
Bisque fire:
Allow the frogs to dry slowly and completely before loading them for the bisque firing (cone 04 typically). -
Wax resist application:
Once fired, apply wax resist to the very bottom of the frog to prevent glaze from sticking to the kiln shelf. -
Define the eyes:
Use a small brush to paint a solid circle of black underglaze for the pupils on the eye mounds. -
Glaze the belly:
Dip or paint the belly area with a cream or clear speckled glaze. Let this layer dry before moving to the main body color. -
Apply main color:
Carefully paint the green (or orange) glaze over the back, legs, and head, being careful to skirt around the cream belly patch to create a defined line. -
Add speckling:
If your glaze doesn’t have speckles built-in, you can flick a toothbrush dipped in iron oxide wash lightly over the surface. -
Clean up the eyes:
If glaze dripped onto the black pupils, carefully scrape it away with a knife tip so the black remains distinct. -
Final Fire:
Load the pieces into the kiln for the glaze firing (usually Cone 5 or 6 depending on your clay body).
Personalize It
Before glazing, carve initials or a short message into the bottom of the frog so your friend thinks of you whenever they pick it up.
Place your finished frogs side-by-side on a shelf to enjoy their charming company
Our Hangout Mini Diorama Pair
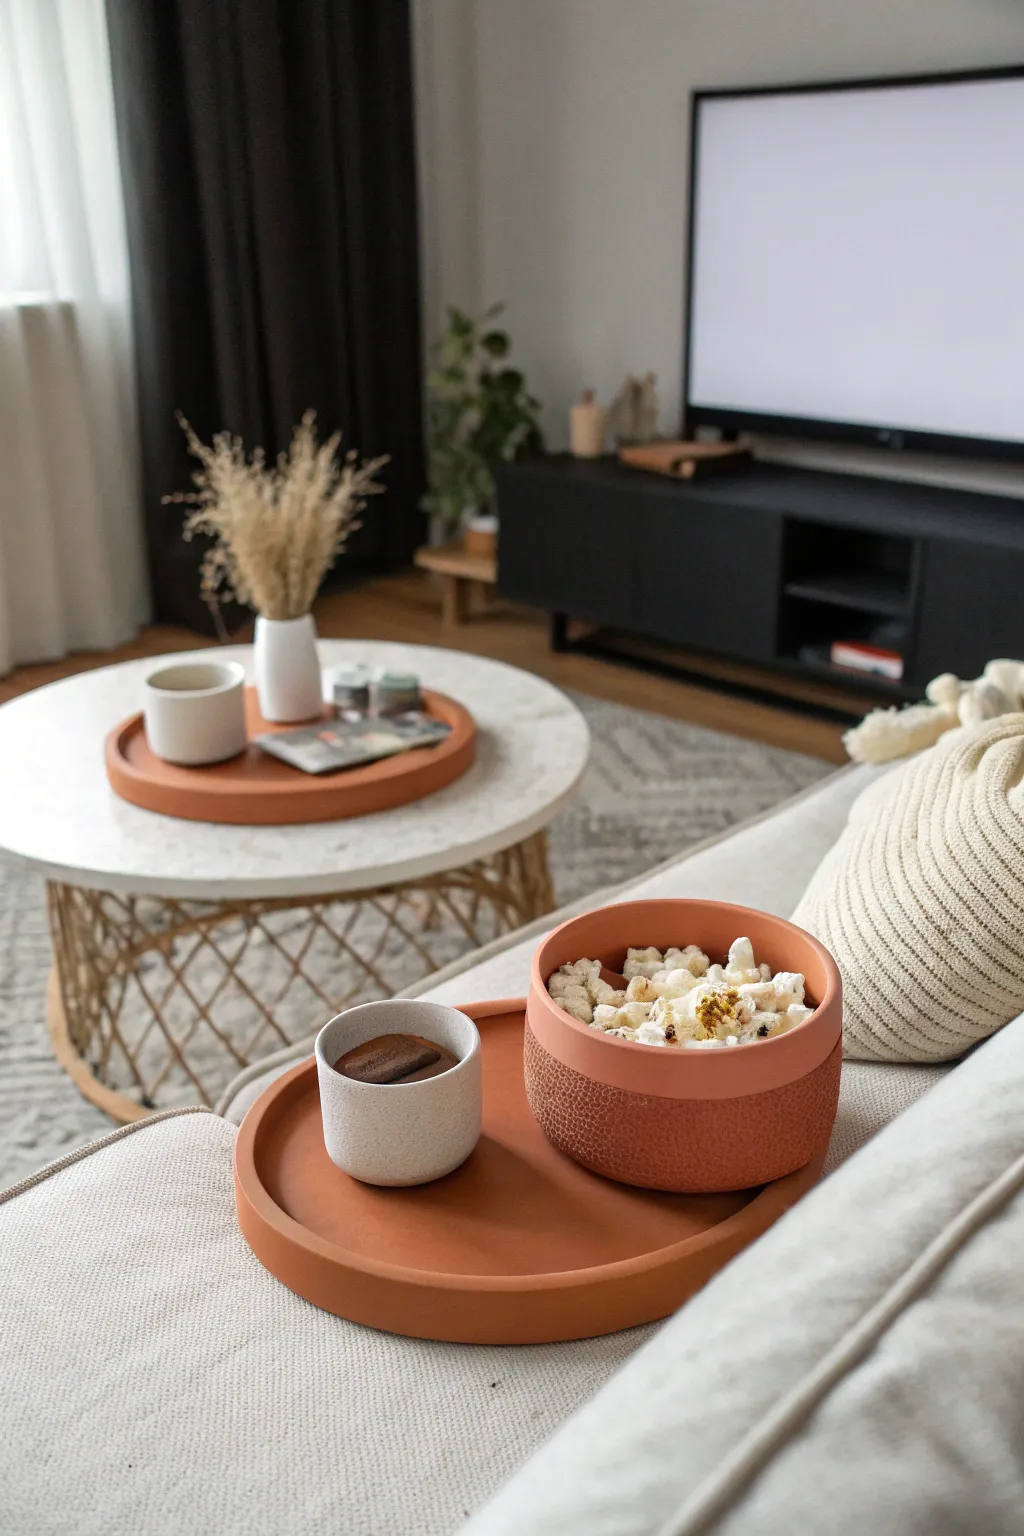
Create a sophisticated matching snack set perfect for movie nights with your best friend. This project mimics the warm, earthy look of unglazed terracotta pottery using air-dry clay and clever texturing techniques.
Step-by-Step Guide
Materials
- Air-dry clay (terracotta or reddish-brown color)
- Air-dry clay (white or light grey)
- Rolling pin
- Circle templates (various sizes or bowls to trace)
- Craft knife or clay cutter
- Small bowl relative to your desired snack bowl size (for molding)
- Sandpaper (fine and medium grit)
- Texture sponge or stiff-bristled brush
- Water and a small sponge
- Matte sealant or varnish (food-safe if using directly with dry food, though use liners recommended)
- Acrylic paint (optional, for color matching)
Step 1: Shaping the Trays
-
Roll the base slab:
Begin by rolling out a distinct slab of terracotta-colored clay to a thickness of about 1/4 inch. Ensure it is large enough to cut a circle approximately 10-12 inches in diameter. -
Cut the tray circle:
Place your large circle template or a dinner plate onto the clay and carefully cut around it with your craft knife to create a clean, round base. -
Prepare the rim coil:
Roll a long snake of clay for the rim. Flatten it slightly with your rolling pin so it becomes a long, rectangular strip about 1 inch tall and the same thickness as your base. -
Attach the rim:
Score the outer edge of your base circle and one edge of your strip. Apply a little water or slip, then wraps the strip around the base to form the tray’s wall. -
Blend the seams:
Using your thumb or a modeling tool, smooth the clay where the rim meets the base on both the inside and outside until the seam disappears completely. Repeat this process to make a second tray for the coffee table if desired.
Cracking Up?
If you see small hairline cracks appearing while drying, mix a small amount of fresh clay with water to make a paste and fill them in immediately, then smooth over.
Step 2: Creating the Snack Bowl
-
Mold the bowl shape:
Roll out a slab of terracotta clay. Drape it over an upside-down bowl (covered in plastic wrap) to act as a mold, trimming the excess at the bottom to create a flat base. -
Refine the rim:
While the clay is still on the mold, use your knife to trim the rim so it is straight and even all the way around. -
Add texture:
For the two-tone textured look shown in the image, mask off the top inch of the bowl. Take a stiff brush or texture sponge and stipple the bottom portion of the bowl to create a rough, pitted surface. -
Create the smooth band:
Remove the mask and use a wet finger to smooth the top band perfectly, creating a stark contrast between the rough bottom and smooth rim.
Step 3: Sculpting the Speckled Cup
-
Mix the faux granite clay:
Take a ball of white clay and mix in tiny bits of dried grey or black clay, or coarse black pepper/sand, kneading until it looks like speckled stone. -
Form the cylinder:
Roll the clay into a thick cylinder shape. You can use the pinch pot method or build it with slabs for straight vertical sides. -
Flatten the rim:
Turn the cup upside down and press gently to flatten the rim, giving it that modern, thick-walled aesthetic seen in the photo.
Color Pop
Instead of a textured base, paint the bottom half of your bowl in a soft pastel color like sage green or blush pink to coordinate with your living room decor.
Step 4: Finishing Touches
-
Slow drying:
Allow all pieces to dry slowly away from direct sunlight for 24-48 hours. I find turning them over halfway through helps prevent warping. -
Sanding:
Once fully dry, use fine-grit sandpaper to smooth out any fingerprints or sharp edges on the untextured areas. -
Sealing:
Apply a matte varnish to protect the clay. If you plan to put popcorn directly in the bowl, ensure you use a certified food-safe sealant, otherwise use a napkin liner.
Now you have a stunning, modern snack set ready for your next movie marathon