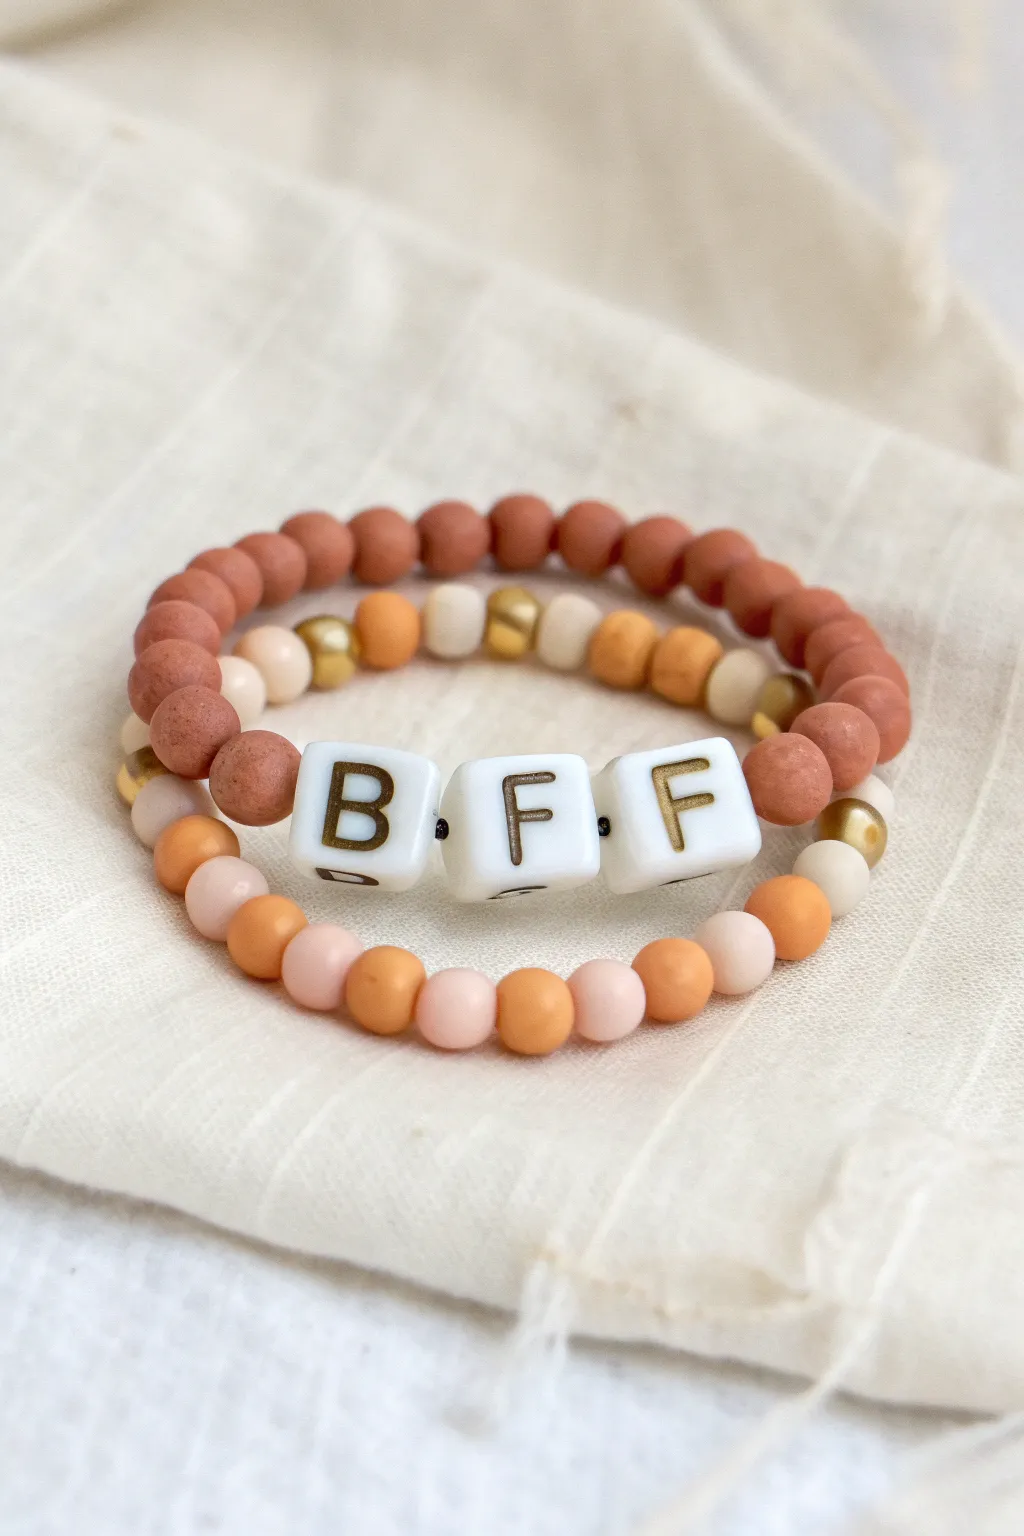
If you’re making BFF clay bead bracelets, the magic is in that “we match, but we’re still our own people” vibe. Here are my favorite paired ideas that feel giftable, wearable, and totally best-friend worthy.
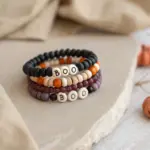
Classic BFF Letter Bead Center
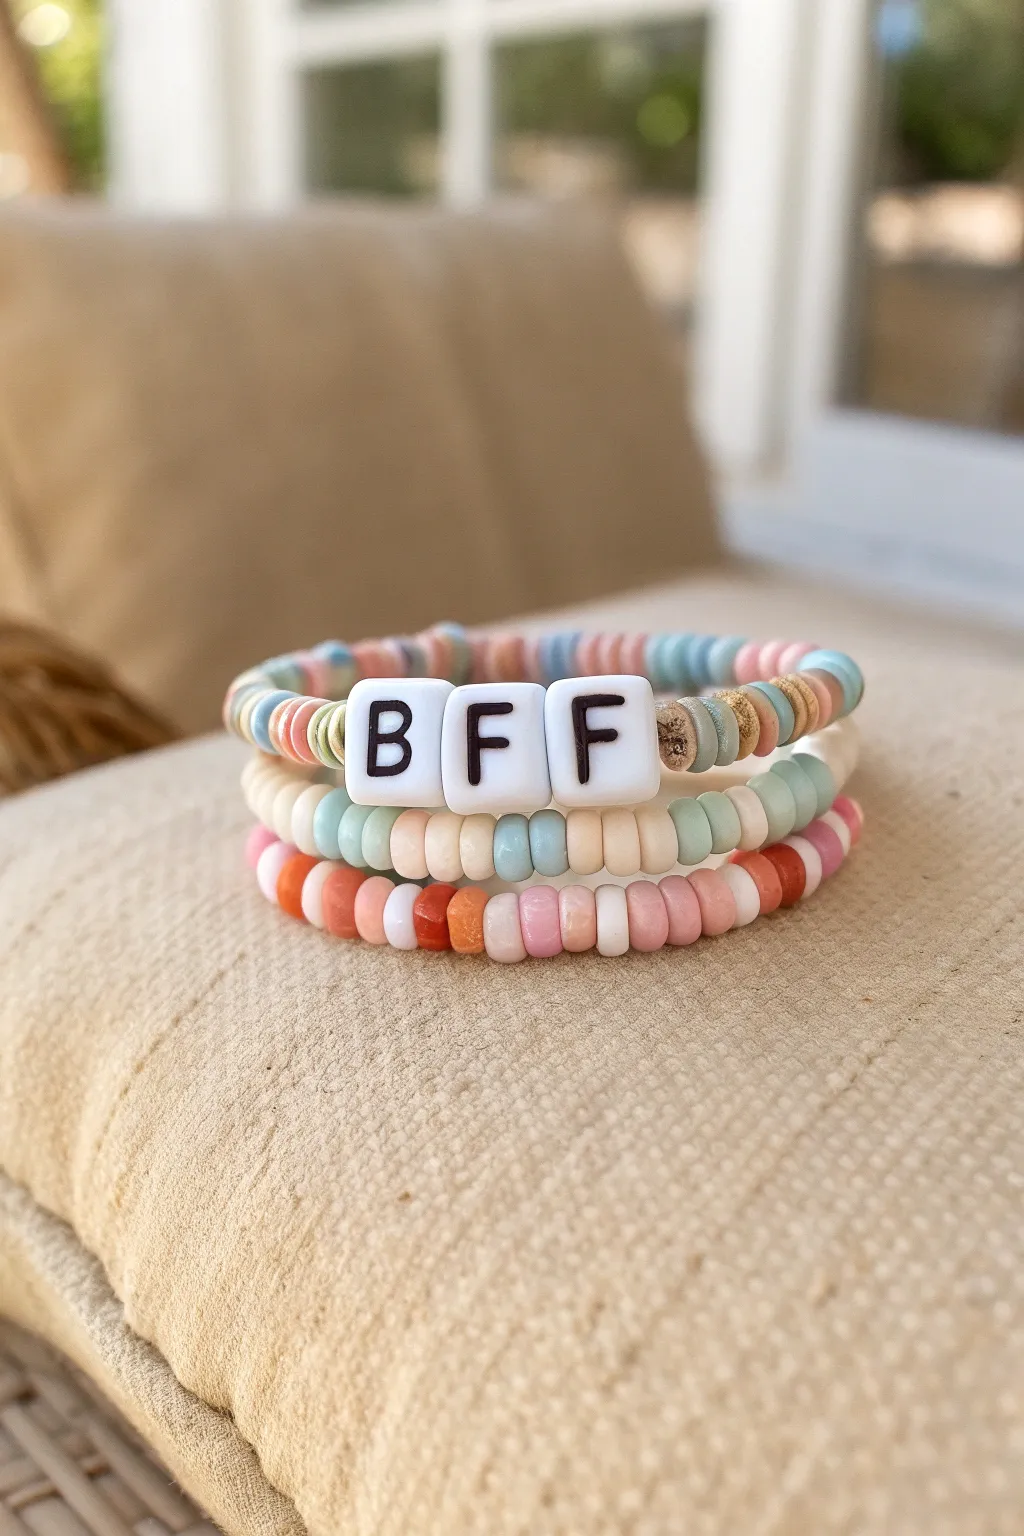
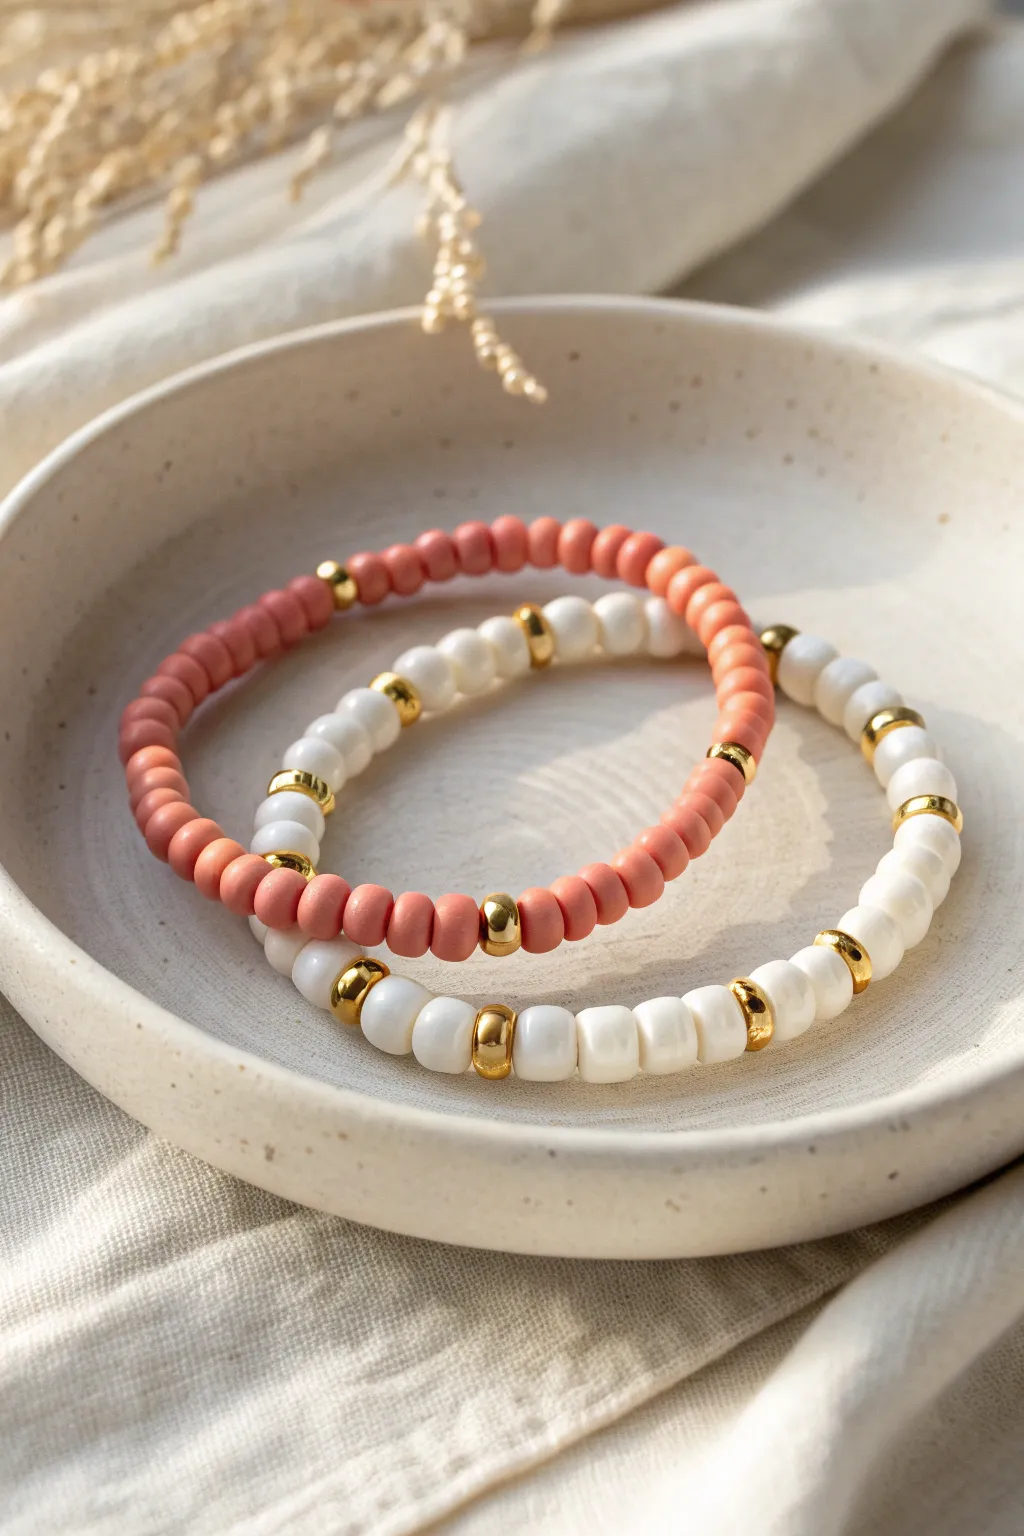
Create a nostalgic yet trendy friendship statement with this stack of three coordinating bracelets. The set features a classic letter-bead centerpiece flanked by colorful polymer clay heishi discs and complementary round spacer beads.
Detailed Instructions
Materials
- Elastic beading cord (0.7mm or 0.8mm clear stretchy string)
- 6mm Polymer clay heishi beads (mix of pastel pink, blue, cream, tan, and white)
- White square letter beads with black text (letters B, F, F)
- Small round spacer beads (pastel mint, cream, and pink/coral tones)
- Textured or wooden spacer discs (optional, for the top bracelet)
- Beading needle (optional but helpful for heishi beads)
- Scissors
- Super glue or jewelry cement
Step 1: Planning and Preparation
-
Measure your wrist:
Wrap a piece of string around your wrist to find the comfortable length, then add about an inch to account for the bulk of the beads. Cut a piece of elastic cord about 3-4 inches longer than this measurement to ensure you have plenty of room for tying knots. -
Structure your stack:
This project involves three distinct bracelets: a top beaded strand with the ‘BFF’ letters, a middle strand with smooth round pastel beads, and a bottom strand with smaller colorful spacer beads. I like to lay out the beads for all three strands on a bead board or towel first to visualize how the colors will interact.
Knot Slipping?
If your elastic knot feels insecure, add a second surgeon’s knot on top of the first one before gluing. Pull tight on all four strands (the two tails and the loop itself) to cinch it.
Step 2: Creating the BFF Strand
-
Start the letter strand:
Begin threading your first piece of elastic. Create a pattern using the polymer clay heishi beads. For this look, alternate between small sections of pastel blue, soft pink, and neutral tan or wooden texture beads. -
Add texture:
To mimic the top bracelet in the image, intersperse a few textured or slightly darker tan beads every 5-6 colorful discs to give it an organic, beachy feel. -
Check the midpoint:
String beads until you have reached approximately the halfway point of your desired bracelet length. -
Insert the message:
Thread on the three white square letter beads in order: B, F, F. Ensure they are facing the correct direction so they read properly when worn. -
Finish the first strand:
continue the beaded pattern on the other side of the letters, mirroring the sequence you created on the first half until the strand reaches the full length.
Add a Charm
Make it extra special by attaching a small gold or silver heart charm to the ‘BFF’ bracelet using a jump ring right next to the letter beads for added sparkle.
Step 3: Crafting the Complementary Strands
-
Begin the middle bracelet:
For the second bracelet, use the larger, smoother round beads. Focus on a soft palette—creamy whites, pale mint greens, and light tans. -
Establish a consistent pattern:
Create a simple repeating pattern, such as two mint beads, two cream beads, and two tan beads. This strand should be simpler to let the letter bracelet shine. -
Start the bottom bracelet:
For the third and final bracelet, use slightly smaller round or disc beads with more vibrant pops of color. Include coral, darker pink, and white spacer beads. -
Mix the colors freely:
This bottom layer looks great with a more randomized pattern. String the beads freely, mixing pinks, corals, whites, and touches of blue to tie all three bracelets together visually.
Step 4: Finishing Touches
-
Pre-stretch the cord:
Before tying off, gently pull on the ends of the elastic cord for each bracelet. This ‘pre-stretching’ helps prevent the bracelet from sagging or loosening after the first few wears. -
Tie the surgeon’s knot:
Bring the two ends of the elastic together. Tie a standard overhand knot, but loop the end through twice instead of once before pulling tight. This creates a secure surgeon’s knot. -
Secure the knot:
Apply a tiny dot of super glue or jewelry cement directly onto the knot. Be careful not to get glue on the surrounding beads. -
Hide the knot:
Once the glue is tacky but not fully dry, try to slide the knot inside the hole of a neighboring bead if the hole is large enough. If not, trim the excess elastic close to the knot after the glue has fully cured.
Stack them up together or gift one to your best friend to complete the look


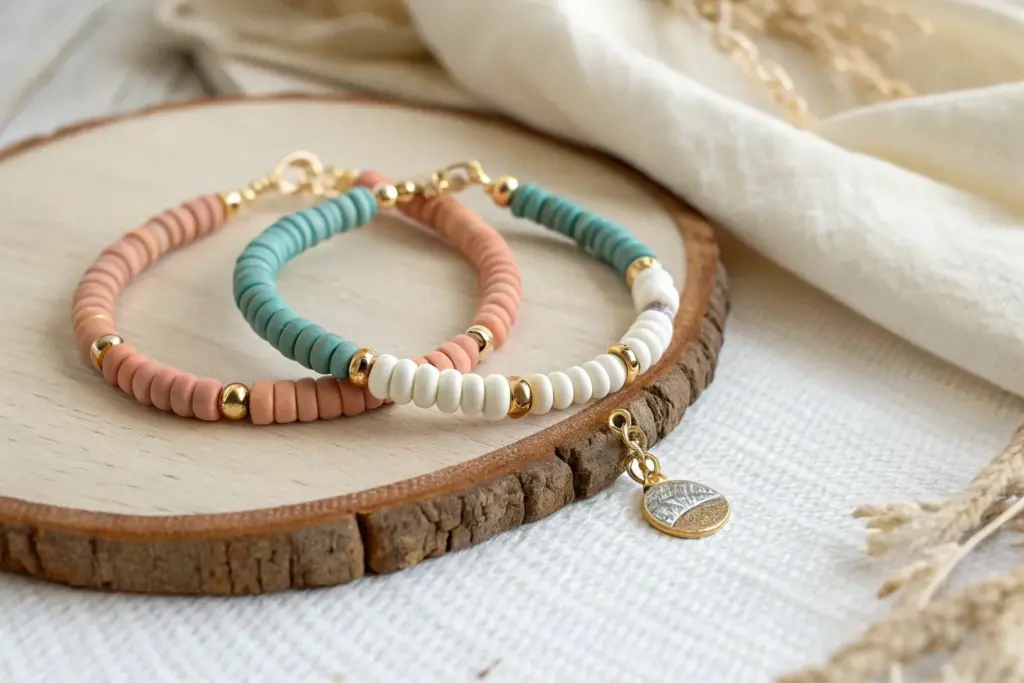
Split Palette Color Swap Duo

Celebrate your connection with this chic pair of complementary bracelets that perfectly balances soft pastels with luxurious gold accents. One bracelet features a rhythmic pattern of blue, pink, and gold, while its partner is a solid strand of rose-pink beads carrying a delicate hammered charm.
Step-by-Step
Materials
- Polymer clay Heishi beads (light blue, rose pink, cream/white)
- Gold tone spacer beads (approx. 4-5mm, rounded disc with textured edge)
- Small gold tone round charm (hammered or plain disc)
- Gold tone jump ring (approx. 4mm)
- Elastic stretch cord (0.8mm clear)
Step 1: Planning and Prep
-
Measure your wrist:
Wrap a measuring tape loosely around your wrist to find your size, then add about half an inch for comfort. Cut two lengths of elastic cord, making sure to leave at least 3 extra inches on each end for tying knots later. -
Secure the ends:
Tape one end of each elastic string to your work surface or use a bead stopper clip. This prevents your beads from sliding off while you design your pattern.
Knot Slipping?
If your elastic knot refuses to stay tight, add a tiny dot of clear jewelry glue or clear nail polish directly onto the knot before hiding it.
Step 2: Creating the Patterned Bracelet
-
Start the sequence:
Begin threading your first section. I like to start with the cream beads to create a neutral base. Thread on three cream Heishi beads. -
Add color definition:
Follow the cream section with three light blue beads. This creates the first color block. -
Insert the gold accent:
Slide on one gold spacer bead. These specific spacers have a rounded, tire-like shape with grooves that catch the light beautifully. -
Continue the pattern:
Add three rose pink beads, followed by three cream beads, then another three blue beads. The sequence is essentially groups of three standard beads interrupted by gold accents. -
Establish the rhythm:
Repeat this specific sequence: Gold Spacer → 3 Pink → 3 Cream → 3 Blue → Gold Spacer. Continue until the strand reaches your desired length. -
Check the fit:
Wrap the beaded strand around your wrist to ensure the pattern ends cleanly. Ideally, you want to finish right before a gold spacer so the pattern looks continuous when tied.
Step 3: Creating the Solid Charm Bracelet
-
Build the solid base:
For the second bracelet, focus purely on the rose pink Heishi beads. Thread them continuously onto your second piece of elastic. -
Fill the length:
Keep adding pink beads until this strand is the exact same length as your first patterned bracelet. Regular visual checks against the first bracelet will keep them uniform. -
Prepare the charm:
Open your gold jump ring using two pairs of pliers. Twist the ends away from each other (don’t pull apart) to open the ring. -
Attach the charm:
Slide your small gold disc charm onto the open jump ring. Close the jump ring securely by twisting the ends back together until they meet perfectly. -
Integrate the charm:
Slide the jump ring (with the charm attached) onto the elastic cord. It should sit freely among the pink beads.
Level Up: Mix & Match
Make a third bracelet using only the blue and cream beads to complete a full ‘trio’ set that shares the same color palette.
Step 4: The Finishing Knots
-
Pre-stretch the cord:
Before tying, give both ends of the elastic a gentle tug. This pre-stretching prevents the bracelet from loosening up the first time you wear it. -
Tie the surgeon’s knot:
Cross the ends of the cord like a normal knot, but loop the top strand through twice instead of once. Pull tight. -
Secure the second knot:
Tie a standard overhand knot on top of the surgeon’s knot for extra security. Pull firmly until you feel the elastic bite into itself. -
Hide the knot:
Trim the excess elastic, leaving tiny tails. Carefully tug on the bracelet to pull the knot inside one of the larger beads (if possible) or simply rotate it so it sits inconspicuously between beads.
Wear your matching set together or gift the charm bracelet to your BFF for a stylish connection


Half-Heart Pair Set
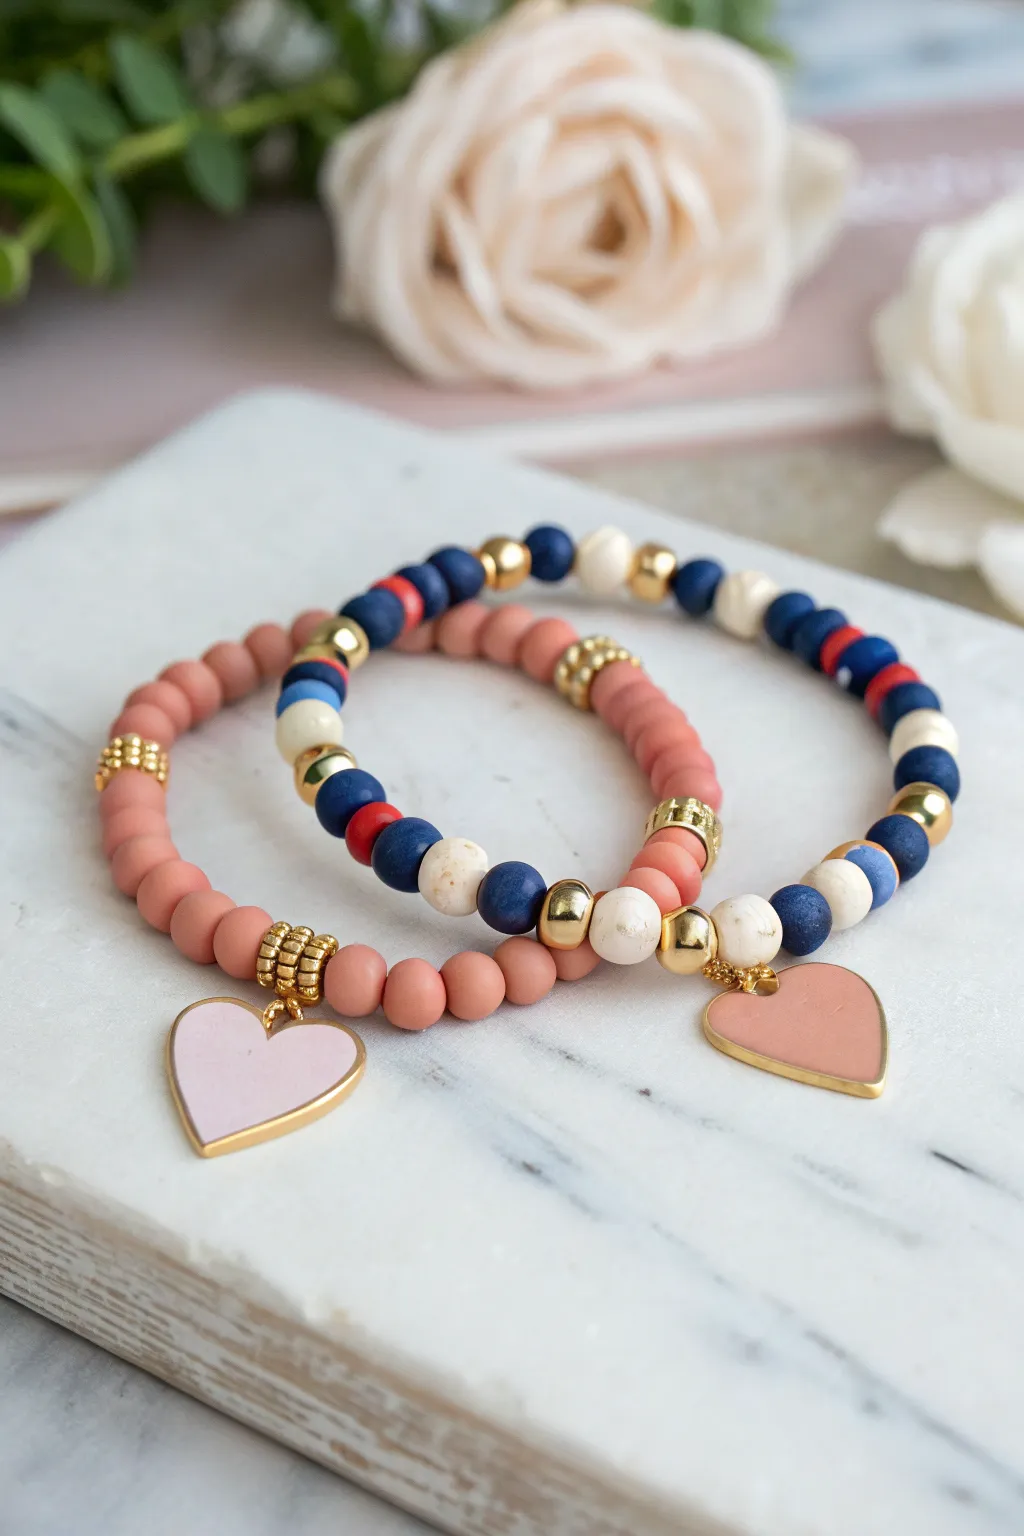
These charming bracelets combine matte clay beads with shiny gold accents for a sophisticated take on friendship jewelry. One design keeps it simple with a monochromatic dusty rose palette, while its partner mixes things up with a playful navy, white, and red pattern, both united by matching heart charms.
Step-by-Step Tutorial
Materials
- Polymer clay heishi beads (dusty rose/terra cotta)
- Polymer clay heishi beads (navy blue, cream/white, red)
- Gold spacer beads (smooth round beads, approx 4mm)
- Gold textured/ribbed spacer beads (rondelle shape)
- Gold enamel heart charms (one light pink, one dusty rose)
- Elastic cord (0.8mm clear stretch cord)
- Jewelry glue or clear nail polish
- Scissors
- Bead stopper or tape
- Chain nose pliers (optional, for jump rings)
- Gold jump rings (6mm)
Step 1: Planning the Dusty Rose Bracelet
-
Measure and cut:
Cut a piece of elastic cord about 10-12 inches long. This gives you plenty of extra room for tying the knot later without losing your beads. -
Secure the end:
Attach a bead stopper or a piece of tape to one end of the cord to prevent beads from slipping off as you work. -
Start the pattern:
Begin threading the dusty rose clay beads. String about 15-20 beads to start the first section. -
Add first gold accent:
Slide on one gold ribbed spacer bead. These add a lovely texture contrast to the smooth clay. -
Continue the main color:
String another substantial section of the dusty rose clay beads, aiming for about 2 inches of length. -
Create the focal point:
Thread on three ribbed gold spacers in a row. This creates a bold metallic section that will sit opposite the charm. -
Finish the bead strand:
Continue adding dusty rose beads until the bracelet is close to your desired wrist size, leaving about a half-inch of space. -
Prepare the charm connection:
Add three ribbed gold beads to finish the strand. These will frame the heart charm perfectly.
Knot Security
Pre-stretch your elastic cord firmly before stringing any beads. This prevents the bracelet from stretching out and becoming loose after just a few wears.
Step 2: Assembling the Patterned Bracelet
-
Set up the second cord:
Cut another 12-inch length of elastic and secure the end just like the first bracelet. -
Begin the mixed pattern:
This pattern is more freeform. Start with three navy blue beads, followed by one red bead and one cream bead. -
Insert gold spacers:
Add a smooth round gold bead. I find these round spacers break up the flat heishi beads nicely. -
Repeat with variation:
Continue the pattern: 3-4 navy beads, a single red or cream bead, and then a gold spacer. Don’t worry about being perfectly symmetrical; a little irregularity adds charm. -
Mid-bracelet check:
Wrap the strand around your wrist to check the fit. Insert a section of solid dusty rose beads (about 1 inch) in the middle to visually link it to the first bracelet. -
Finish the pattern:
Complete the strand with your navy/red/cream mix until it matches the length of the first bracelet. -
Frame the ends:
End the strand with a smooth gold bead on either side to protect the knot.
Step 3: Finishing Touches
-
Attach the charms:
Open a gold jump ring using pliers (twist, don’t pull apart). Slide on the light pink heart charm for the solid bracelet and the darker heart for the patterned one. Hook the jump ring onto the elastic cord between the gold beads at the end. -
Close the rings:
Use your pliers to twist the jump ring back into a closed position, ensuring the gap is completely flush so the cord doesn’t slip out. -
Tie the surfer’s knot:
Bring ends of the elastic together. Perform a surgeon’s knot: cross right over left, then wrap it twice; pull tight. Then cross left over right and pull tight again. -
Secure the knot:
Apply a tiny dot of jewelry glue or clear nail polish to the knot. Let it dry completely before trimming the excess cord close to the knot. -
Hide the knot:
Gently tug the bracelet so the knot slides inside one of the adjacent gold spacer beads to hide it from view.
Level Up: Initial It
Replace the three-bead gold section opposite the charm with white letter beads spelling out initials or a short word like ‘BFF’ or ‘LOVE’ for personalization.
Slip these on your wrist and admire how the colors compliment each other perfectly.


Matching Smiley Pop Accents
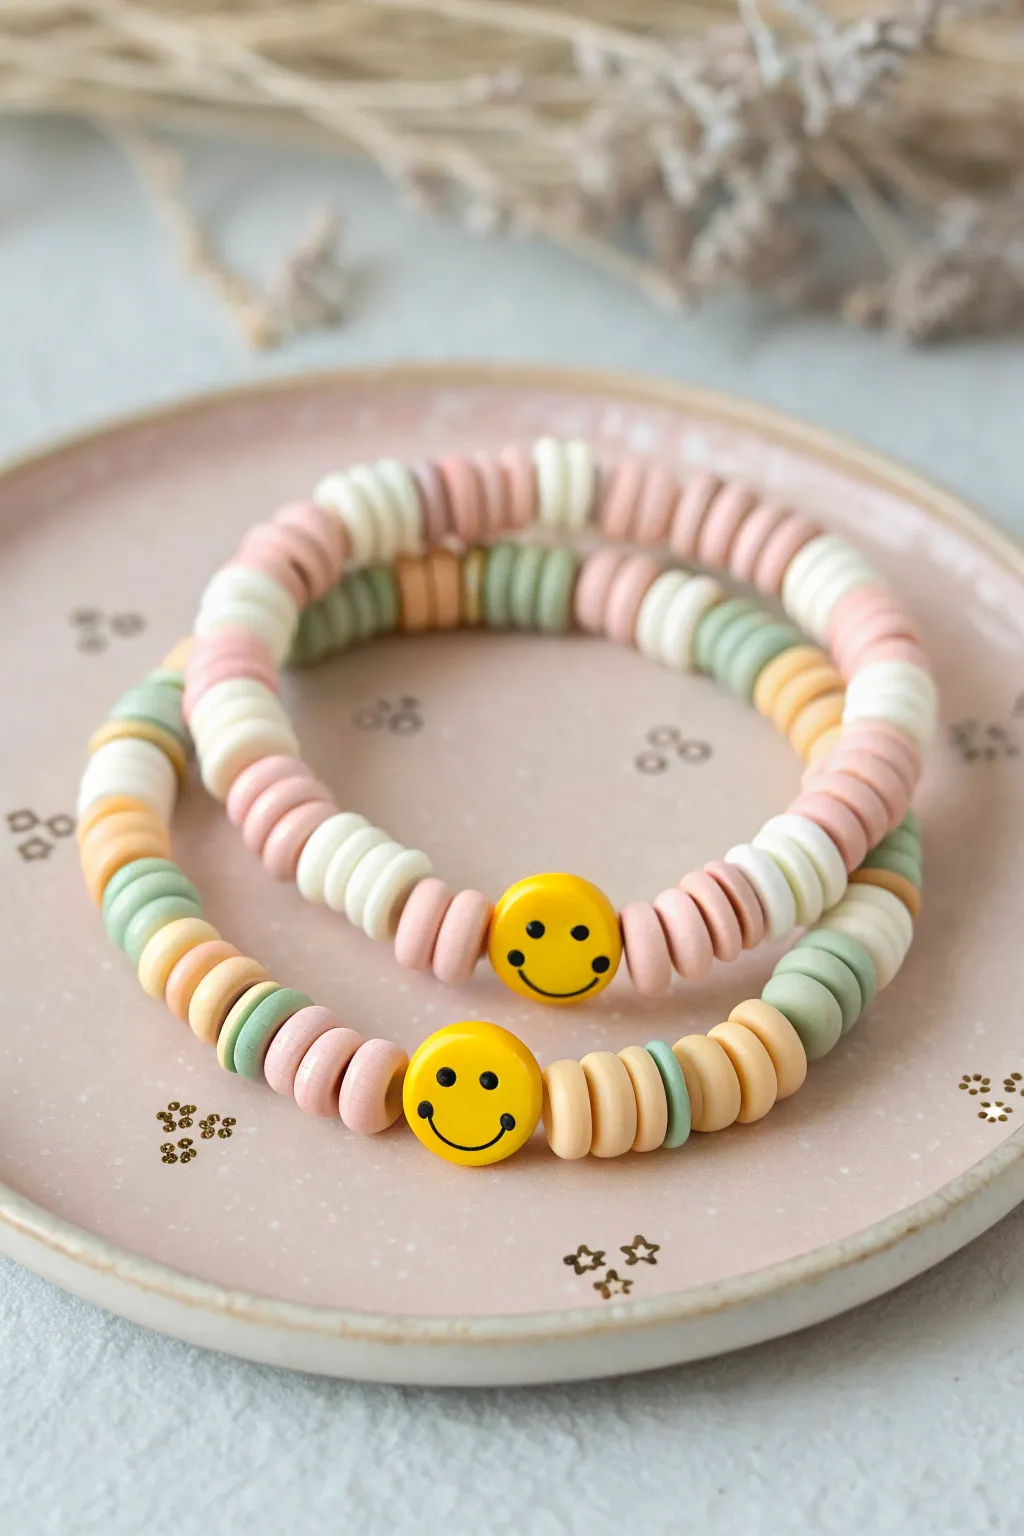
Embrace a soft, cheerful aesthetic with these coordinating bracelets featuring classic smiley faces. The gentle palette of peach, sage, cream, and mustard creates a soothing backdrop for the standout yellow focal beads.
Step-by-Step Guide
Materials
- 6mm flat clay heishi beads in: cream white, muted peach/dusty rose, sage green, and honey mustard/tan
- Two 10mm yellow smiley face beads (flat round shape)
- 0.8mm clear elastic stretch cord
- Jewelry glue or clear nail polish
- Scissors
- Bead stopper or masking tape
- Ruler or measuring tape
Step 1: Planning dimensions
-
Measure the wrist:
Wrap a measuring tape comfortably around your wrist and add about 1/2 inch to determining your stringing length. -
Prepare the cord:
Cut a piece of elastic cord about 10-12 inches long. This extra length is crucial for tying secure knots later. -
Secure the end:
Attach a bead stopper or a piece of masking tape to one end of the cord to prevent beads from sliding off while you work.
Loose Knot Fix
If the knot slips, try a double surgeon’s knot: loop the thread through twice on the first pass instead of once for extra friction.
Step 2: Creating the Color Blocks
-
Start the first segment:
Begin threading your cream white heishi beads. Add about 5-6 beads to create a small block of solid color. -
Add the second color:
Switch to the dusty rose or peach beads. Thread on another 5-6 beads. Notice how the flat discs stack neatly against each other. -
Continue the pattern:
Add a segment of sage green beads, followed by a segment of honey mustard beads. Maintain that same 5-6 bead count for uniformity. -
Vary the segments:
Look at the reference image; for the top bracelet, try longer segments of pink and white (around 8 beads) and shorter accents of green. -
Create asymmetry:
For the bottom bracelet, I like to mix it up by using very short bursts (2-3 beads) of green between longer tan sections to create a different rhythm. -
Check the length:
Continue adding color blocks until you have beaded approximately half of your desired wrist circumference.
Gold Accents
Add a gold spacer bead or a tiny gold star charm next to the smiley face to give the bracelet a slightly more upscale finish.
Step 3: The Focal Point
-
Center the smile:
Thread on the yellow smiley face bead. Ensure the face is oriented correctly so it won’t be upside down when worn. -
Balance the sides:
Immediately follow the smiley bead with a color that contrasts well. In the image, the top bracelet uses pink on both sides, while the bottom uses tan. -
Finish the strand:
Continue your color-blocking pattern on the other side of the smiley face until you reach the full bracelet length. -
Verify the fit:
Wrap the unfinished strand around your wrist to check the size. Ideally, the ends should touch without stretching the elastic.
Step 4: Finishing Touches
-
Pre-stretch the cord:
Before tying, give the ends of the cord a gentle tug. This pre-stretching helps prevent the bracelet from loosening up after the first wear. -
Tie the knot:
Remove the bead stopper and tie a surgeon’s knot (right over left, left over right) or a strong square knot carefully. -
Secure with glue:
Place a tiny drop of jewelry glue or clear nail polish directly onto the knot. Let it dry completely before trimming. -
Hide the knot:
Once dry, trim the excess tails close to the knot and gently slide the knot inside the hole of a neighboring heishi bead to conceal it.
Stack these cheerful bracelets together for a coordinated look or share one with a best friend

The Complete Guide to Pottery Troubleshooting
Uncover the most common ceramic mistakes—from cracking clay to failed glazes—and learn how to fix them fast.
Soft Pastel Ombre Pair
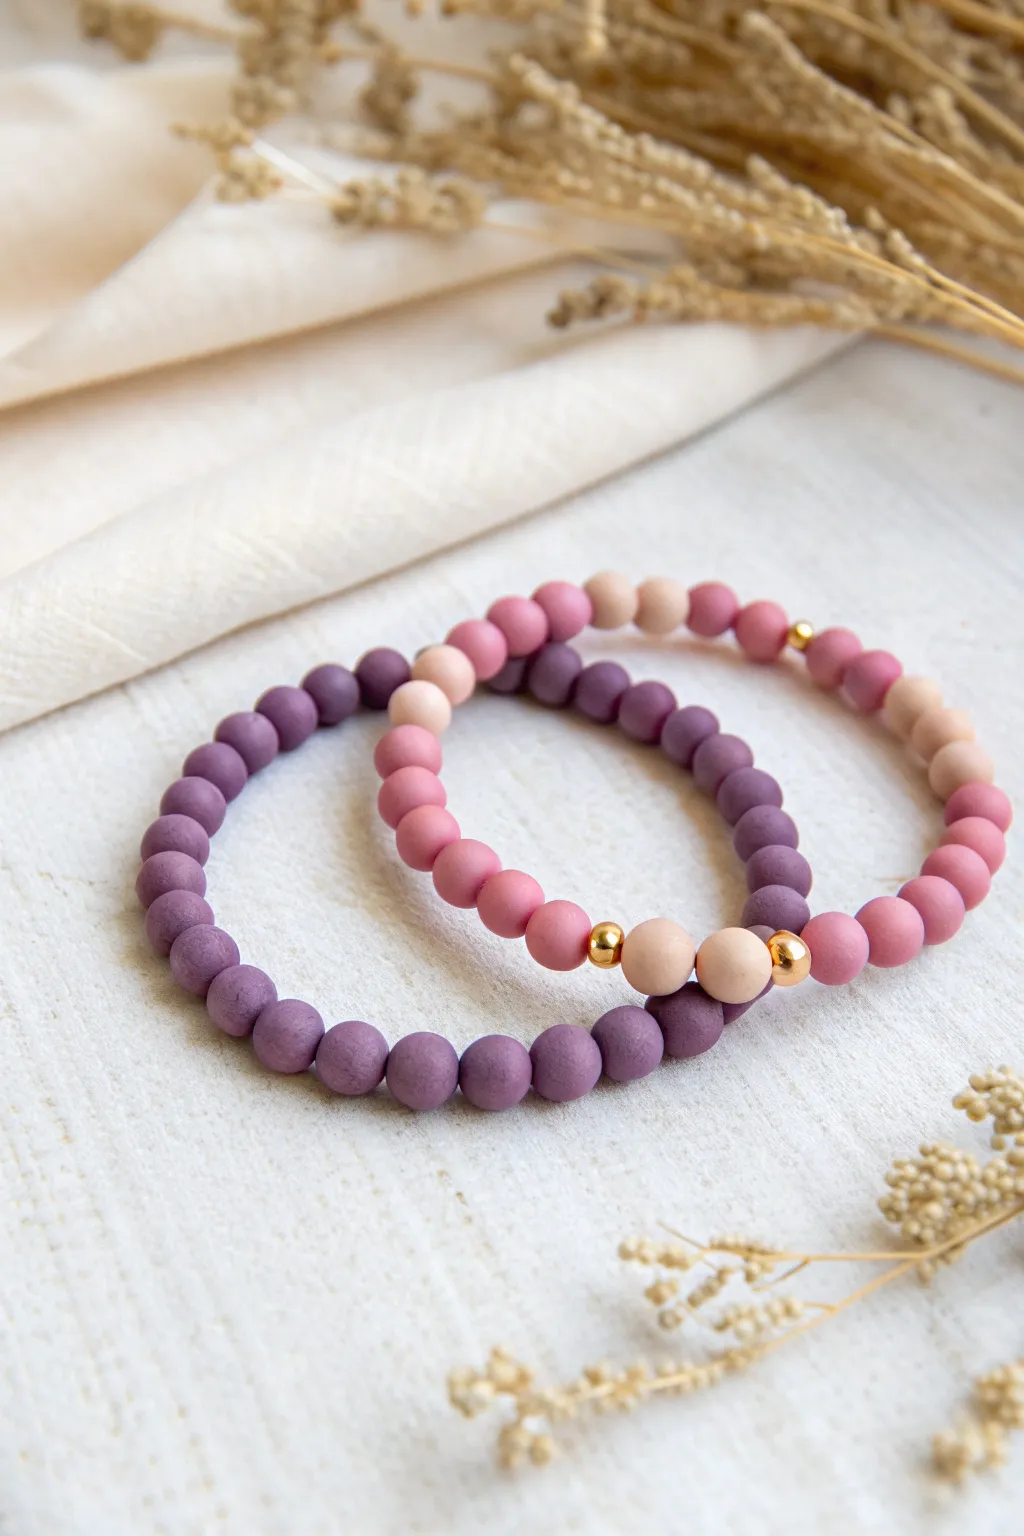
Embrace the soothing transition of colors with this sophisticated pair of matte polymer clay bracelets. The soft, dusty textures of plum, mauve, and blush create a seamless gradient that looks effortlessly chic on any wrist.
Detailed Instructions
Materials
- Matte round polymer clay beads (6mm or 8mm) in: deep plum, dusty purple, mauve, rose pink, and pale nude/beige
- Small gold round spacer beads (3mm or 4mm)
- Strong elastic cord (0.8mm recommended)
- Super glue or jewelry cement
- Scissors
- Bead stopper or painter’s tape
- Ruler or measuring tape
Step 1: Planning the Gradient
-
Measure your wrist:
Wrap a measuring tape comfortably around your wrist to find your size. Add about half an inch to this measurement to ensure the bracelet isn’t too tight once beaded. -
Cut the cord:
Cut two lengths of elastic cord, making each one about 10-12 inches long. This generous length gives you plenty of room to tie knots without struggling. -
Pre-stretch the elastic:
Hold both ends of a cord segment and firm pull it a few times. Pre-stretching prevents the finished bracelet from sagging after the first few wears. -
Secure the end:
Place a bead stopper or a piece of tape on one end of your first cord to stop beads from sliding off while you work.
Step 2: Creating the Solid Plum Bracelet
-
Start the base color:
For the darker bracelet shown in the image, begin stringing your deep plum matte beads. Continue until you have covered about one-third of your desired length. -
Add a gold accent:
Slide on one gold spacer bead, followed by three light beige or pale nude beads. This creates a focal highlight which breaks up the solid color. -
Finish the highlight:
After the three beige beads, slide on a second gold spacer bead to frame this lighter section. -
Complete the loop:
Resume stringing the deep plum beads until the strand reaches your total desired length minus the knot allowance.
Keep it Matte
Avoid using oils or heavy lotions immediately before wearing these, as the porous clay texture can absorb oils and turn shiny or darker over time.
Step 3: Designing the Ombre Bracelet
-
Lay out your palette:
On a bead board or towel, arrange your colors in order from darkest (dusty purple) to lightest (pale pink/nude). Visually checking the transition before stringing is crucial for a smooth ombre effect. -
Begin the transition:
String about 8-10 of your darkest purple beads first. This anchors the design with a visual weight similar to the partner bracelet. -
Create the fade:
Switch to your medium mauve tone for the next 8-10 beads. Then, move to the rose pink beads for the next section. -
Add the lightest touches:
Finish the gradient with your pale nude/beige beads. I like to insert a gold spacer bead right where the darkest purple meets the lightest nude to create a metallic ‘kiss’ between the two extremes. -
Final check:
Hold the two ends together to encircle your wrist. Ensure the colors flow nicely and the fit is correct before tying.
Texture Twist
Replace the central 3 light beads on the solid bracelet with tiny freshwater pearls or lava stones for an elegant mix of natural textures.
Step 4: Securing the Knots
-
Tie the first knot:
Remove the tape or stopper. Bring both ends together and tie a simple overhand knot, pulling it gently but firmly so the beads sit snug against each other. -
Tie a surgeon’s knot:
For the second knot, loop the elastic through twice before pulling tight. This extra pass creates friction that prevents slipping. -
Apply adhesive:
Dab a tiny drop of super glue or jewelry cement directly onto the knot. Be careful not to get glue on the colored beads, as it can ruin the matte finish. -
Hide the knot:
While the glue is still slightly tacky but not wet, pull the knot inside the hole of the nearest bead (preferably one of the larger clay beads) to conceal it entirely. -
Trim excess:
Once dry, use sharp scissors to snip the excess elastic as close to the bead hole as possible without nicking the knot itself.
Now you have a stunning, velvety set of bracelets ready to stack and style with your favorite outfits
Gold Spacers for a Giftable Finish
Elevate simple clay bead designs into boutique-quality gifts by incorporating shiny metallic accents. This project creates a stunning pair of complementary bracelets—one in soft coral and one in creamy white—both punctuated with luxurious gold spacer beads.
Step-by-Step Tutorial
Materials
- 6mm flat disc heishi beads (matte salmon/coral pink)
- 6mm flat disc heishi beads (matte cream/white)
- 4mm gold-plated or gold-filled round spacer beads
- 0.8mm clear elastic stretch cord
- Jewelry glue or clear nail polish
- Scissors
- Masking tape or bead stopper
- Ruler
Step 1: Preparation & Sizing
-
Measure your wrist:
Wrap a piece of string around your wrist to find the desired length, then add about half an inch for a comfortable fit. An average adult bracelet is around 7 inches. -
Cut the cord:
Cut a piece of elastic cord approximately 10-12 inches long. Having extra length makes the final knotting process much easier. -
Secure the end:
Place a piece of masking tape over one end of the cord or attach a bead stopper. This prevents your beads from sliding off while you work. -
Pre-stretch the elastic:
Before you begin stringing, give your elastic cord a few gentle tugs. This essential step prevents the bracelet from stretching out permanently after the first wear.
Knot Security
When tightening your final knot, pull on all four strands (the two tails and the two bracelet loops) simultaneously to seat the knot firmly.
Step 2: Stringing the Coral Bracelet
-
Start the pattern:
Begin by stringing approximately 10 to 12 of the coral pink heishi clay beads onto the cord. -
Add a gold accent:
Slide on one gold round spacer bead. This creates the first shiny break in the matte texture. -
Repeat the sequence:
Continue the pattern: string 10-12 coral beads followed by one gold spacer. I like to visually check the spacing to ensure the gold beads will be distributed evenly around the wrist. -
Check the length:
Periodically wrap the strand around your wrist. Stop adding beads when the ends meet comfortably without being tight. -
Finish the pattern:
Ensure your pattern ends with a set of coral beads so that when you tie it, you don’t have two gold spacers right next to each other.
Step 3: Stringing the Cream Bracelet
-
Prepare the second cord:
Cut and prep a second piece of elastic just like the first one. -
Create the white pattern:
String about 6 to 8 of the cream heishi beads onto the cord. -
Insert gold spacers:
Add a gold spacer bead. Note that for this white bracelet, we are using fewer clay beads between the gold accents compared to the coral one, creating a slightly more bead-heavy, luxurious look. -
Continue stringing:
Repeat the pattern of 6-8 cream beads followed by a gold spacer until you reach the desired length.
Mixed Metals
Try swapping the gold spacers for rose gold or silver beads to match your best friend’s favorite jewelry tone for a personalized touch.
Step 4: Finishing Touches
-
Prepare to knot:
Remove the tape or bead stopper from the first bracelet. carefully bring the two ends of the cord together. -
The surgeon’s knot:
Tie a standard overhand knot, but loop the end through the circle a second time before pulling tight. This is a surgeon’s knot and holds stretchy cord much better than a standard square knot. -
Secure with glue:
Apply a tiny dab of jewelry glue or clear nail polish directly onto the knot. This creates a permanent bond. -
Hide the knot:
While the glue is still tacky, gently pull the knot inside one of the adjacent beads if the hole is large enough. If not, simply let it trim closely. -
Trim excess cord:
Once the glue is fully dry, use your scissors to snip off the excess tail of the elastic cord as close to the knot as possible. -
Repeat for the pair:
Perform the same tying and gluing steps for the second bracelet to complete your matching set.
Stack these beautiful bracelets together or share one with a friend for a stylish, handmade connection.


What Really Happens Inside the Kiln
Learn how time and temperature work together inside the kiln to transform clay into durable ceramic.
Birth-Color BFF Bracelets
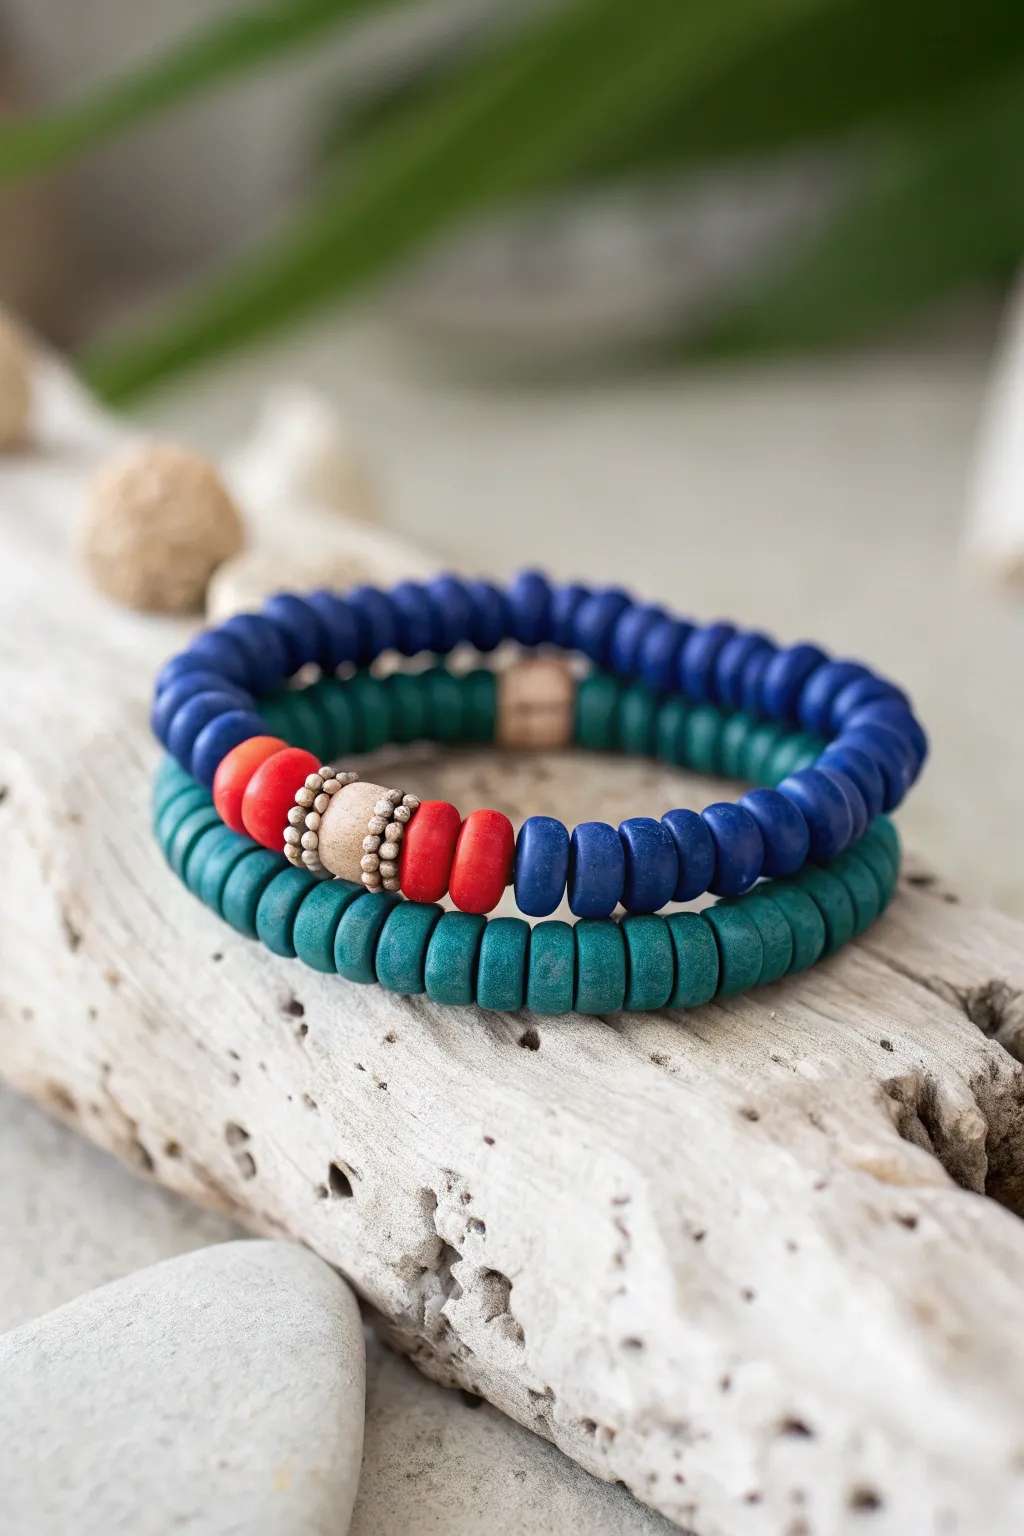
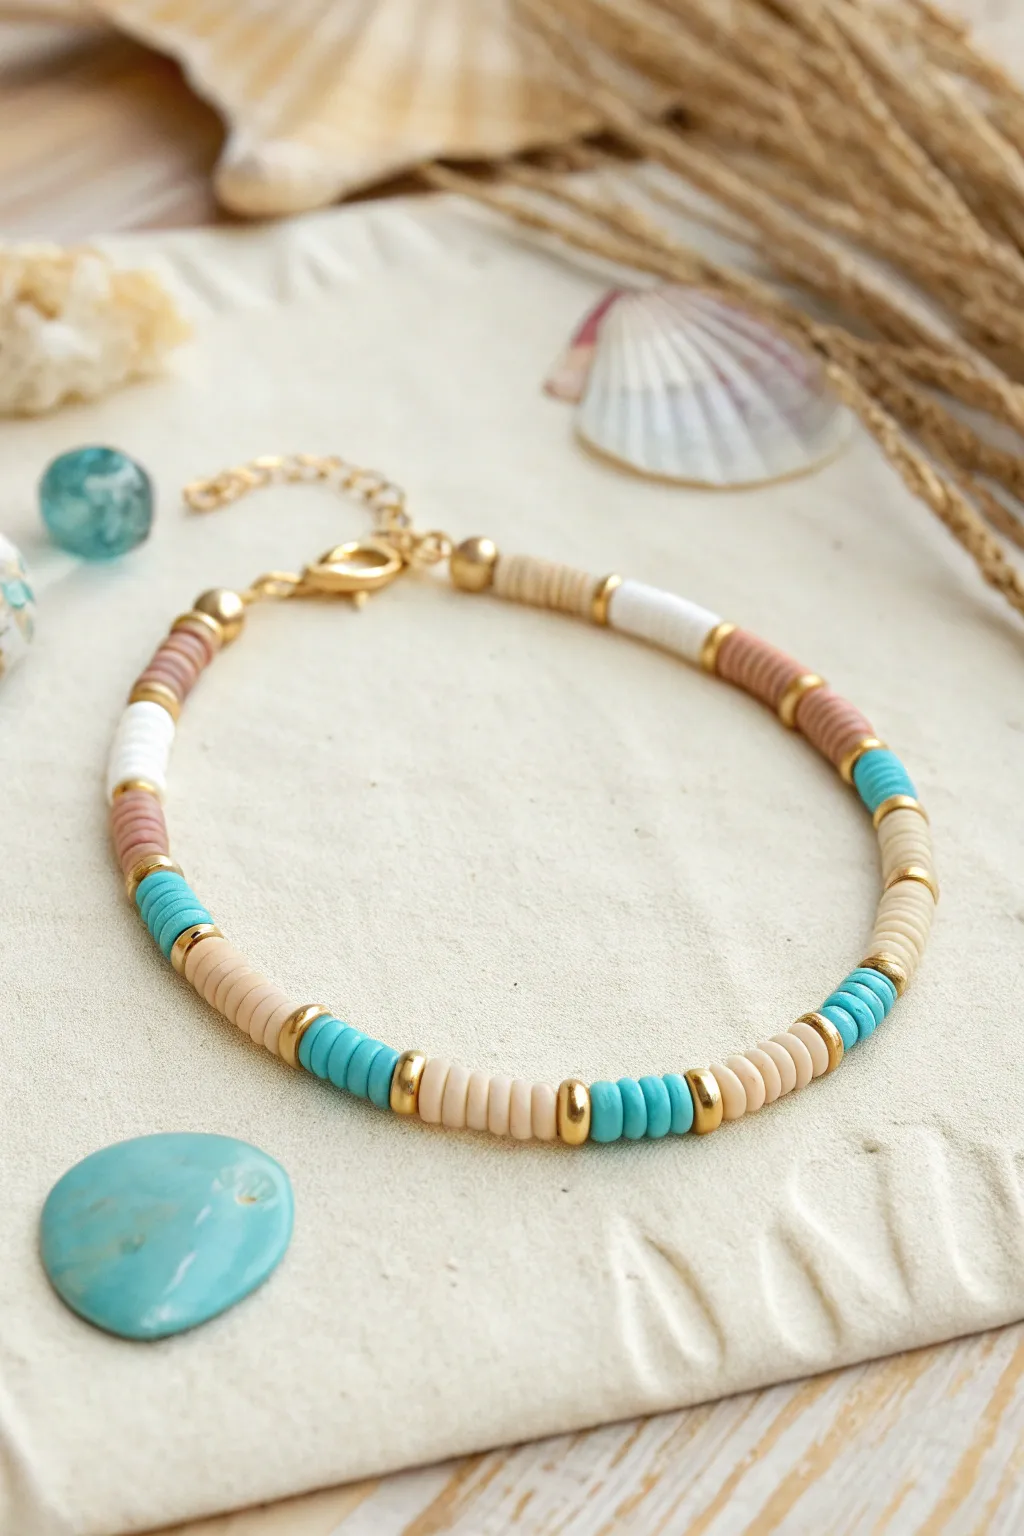
These two complementary bracelets evoke the feel of the shore with deep ocean blues, vibrant coral reds, and calming teal greens. The beauty lies in the simple, rhythmic stacking of clay heishi beads accented by natural textures and warm metallic touches.
Step-by-Step
Materials
- Deep blue clay heishi beads (6mm)
- Teal/dark green clay heishi beads (6mm)
- Bright red/orange clay heishi beads (6mm)
- Beige/natural wood disc bead (8-10mm)
- Small gold or bronze seed beads (size 11/0 or 8/0)
- Elastic stretch cord (0.7mm or 0.8mm)
- Jewelry glue or clear nail polish
- Scissors
- Bead stopper or tape
- Optional: Ruler or measuring tape
Step 1: Preparation
-
Measure your wrist:
Wrap a measuring tape around your wrist to find your size. Add about half an inch to this measurement to ensure the bracelets fit comfortably without being too tight. -
Cut the cord:
Cut two lengths of elastic cord, each about 10-12 inches long. This generous length gives you plenty of room to tie secure knots later without struggling. -
Secure the ends:
Attach a bead stopper or simply place a piece of tape on one end of each cord. This prevents your beads from sliding off while you design your pattern.
Step 2: Creating the Blue Focal Bracelet
-
Start the blue base:
Begin threading the deep blue heishi beads onto your first cord. Continue until you have covered approximately one-third of your total bracelet length. -
Add first color pop:
Slide on two bright red/orange heishi beads. These provide a stark, vibrant contrast against the dark blue. -
Create the center accent:
Thread on three small gold or bronze seed beads. Follow this with the larger beige wooden disc bead, which serves as the central focal point. -
Complete the center detail:
Add three more gold/bronze seed beads after the wooden bead to mirror the other side, then finish the focal section with two more red/orange heishi beads. -
Finish the blue strand:
Resume threading the deep blue heishi beads until the bracelet reaches your desired length. Wrap it around your wrist to check the fit before tying off.
Knot Security
When tying your final knot, pull the elastic taut while tightening to ensure no gaps form between the beads.
Step 3: Creating the Green Companion Bracelet
-
Begin the green strand:
On your second cord, begin threading the teal/dark green heishi beads. This bracelet has a simpler design but acts as a grounding partner to the first. -
Add the wooden accent:
Once you have reached the halfway point of the bracelet length, add a single beige/natural wood bead or a small gold spacer bead to hide the knot later, or simply keep it solid green for a minimal look. -
Continue beading:
Fill the rest of the cord with the teal/green beads until it matches the length of your blue bracelet. -
Check consistency:
Lay the two un-tied bracelets side by side. I like to double-check that they are roughly the same length so they stack neatly on the wrist.
Design Twist
Use birthstone-colored seed beads instead of gold spacers to personalize the focal section for you and your BFF.
Step 4: Finishing Touches
-
Pre-stretch the cord:
Gently pull on the ends of the elastic cord for each bracelet. This pre-stretching step helps prevent the elastic from sagging or loosening after you’ve worn it a few times. -
Tie the surfer’s knot:
Remove the tape or stopper. Tie a standard overhand knot, pull it tight, and then tie a surgeon’s knot (looping the end through twice) for extra security. -
Add adhesive:
Place a tiny drop of jewelry glue or clear nail polish directly onto the knot. This seals the threads and prevents the knot from slipping undone over time. -
Hide the knot:
Once the glue is tacky but not fully dry, try to slide a nearby bead (preferably one with a larger hole) over the knot to conceal it. -
Trim excess cord:
After the glue has fully dried, use your scissors to trim the excess cord ends close to the knot, being careful not to snip the main bracelet strand.
Now slip on your stacked set and enjoy the handcrafted, beachy vibe you’ve created
Stripes vs Dots Complement Set
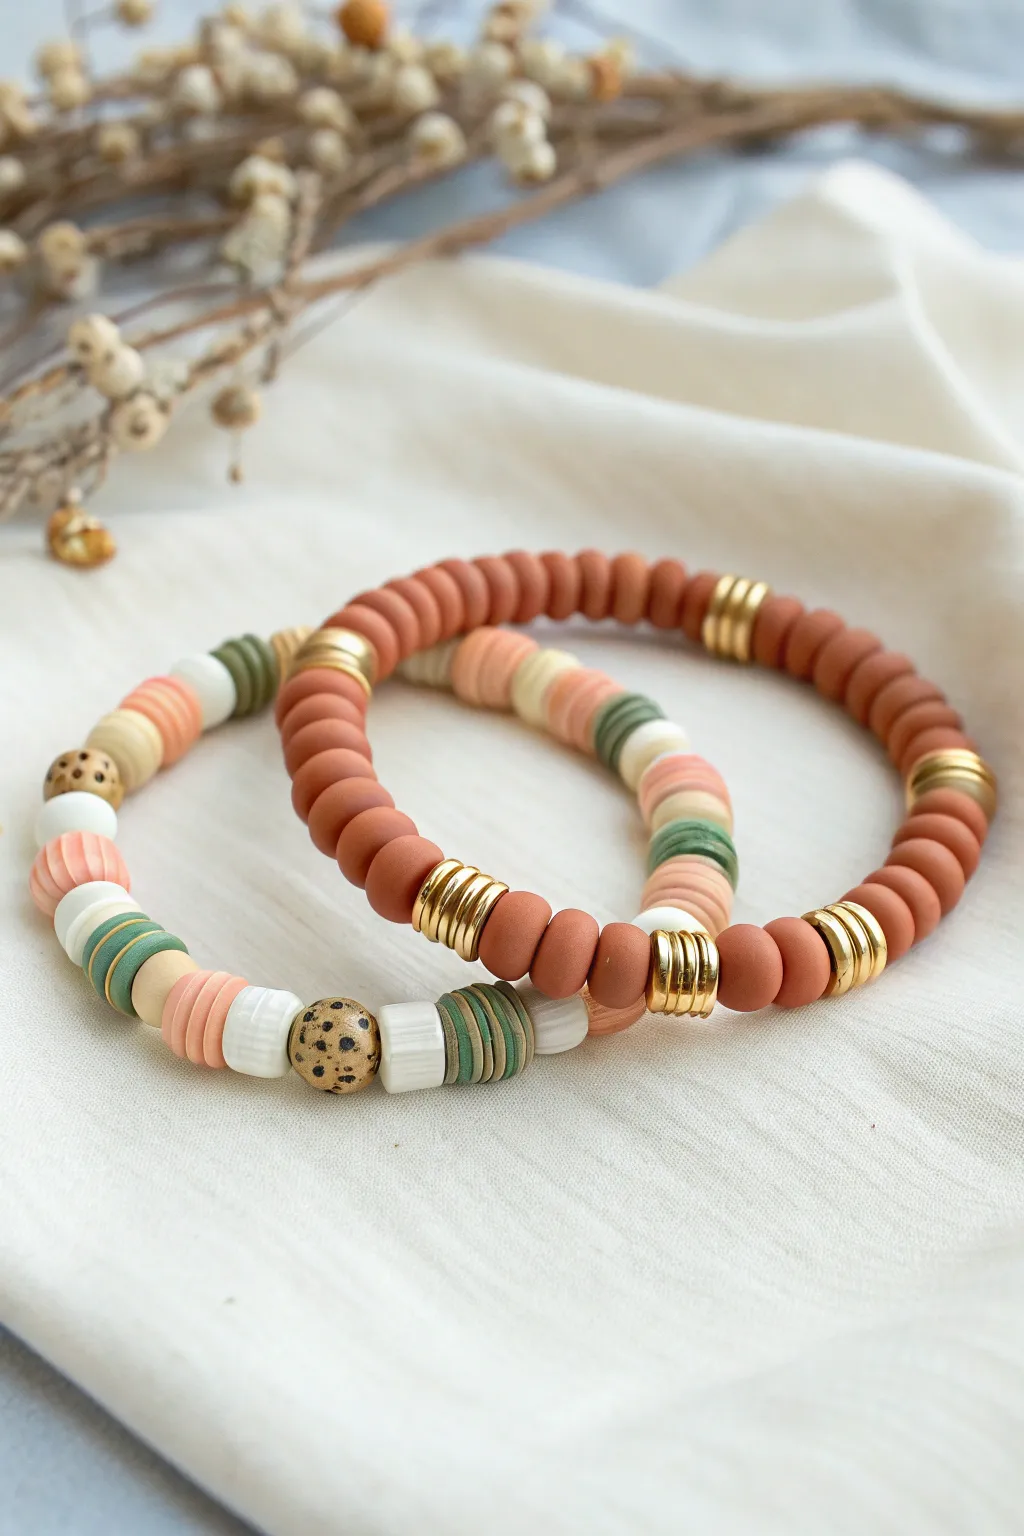
Embrace earthy elegance with this complementary bracelet set that balances solid warmth with playful patterned segments. The pairing of rich terracotta clay beads alongside speckled and striped accents creates a sophisticated boho look perfect for sharing with a best friend.
Step-by-Step Guide
Materials
- heishi clay disc beads (terracotta/rust color)
- heishi clay disc beads (cream/off-white)
- heishi clay disc beads (muted peach/salmon)
- heishi clay disc beads (sage green)
- round polymer clay beads (beige with dark speckles)
- gold or brass ring spacers (approx. 4-6mm)
- gold ridged drum beads or wheel spacers
- elastic stretch cord (0.5mm or 0.8mm)
- jewelry glue
- scissors
- bead stopper or masking tape
Step 1: Planning the Design
-
Measure your wrist:
Cut two lengths of elastic cord, each about 10-12 inches long. This gives you plenty of extra room for tying knots later. -
Secure the ends:
Attach a bead stopper or simply tape down one end of each cord to your work surface to prevent beads from sliding off while you design. -
Visualize the patterns:
This set features two distinct designs: one solid color with metallic focal points (The Solid) and one segmented multi-color pattern (The Stripe). Lay out your beads on a bead board or soft cloth first to finalize your sequence.
Knot Slipping?
If your elastic keeps undoing itself, try clamping the knot with a pair of flat-nose pliers for 10 seconds after gluing. The pressure helps the knot set firmly.
Step 2: Creating Bracelet 1: The Solid Terracotta
-
Start the base:
Thread approximately 1.5 inches of the solid terracotta heishi beads onto your first cord. -
Add first metal accent:
Slide on a stack of 3-4 thin gold ring spacers. These metallic breaks add a luxurious shine to the matte clay. -
Continue the pattern:
Add another long section of terracotta beads, aiming for about 1.5 to 2 inches of length. -
Add second metal accent:
Instead of rings, use a larger gold ridged drum spacer or a stack of 5-6 wheel spacers here for variety. -
Complete the strand:
Continue alternating large sections of terracotta clay with small gold accents until you reach the desired wrist length (usually 6.5 to 7 inches).
Level Up: Texture
Mix in wooden beads or small freshwater pearls instead of the speckled clay beads. The natural textures pair beautifully with the matte finish of the clay discs.
Step 3: Creating Bracelet 2: The Multi-Color Stripe
-
Create the green segment:
Begin with a small section of sage green beads, sandwiched by thin gold ring spacers on either side. -
Add a creamy contrast:
Thread on about 5-6 cream-colored heishi beads. This neutral tone helps separate the colors. -
The speckled focal point:
Slide on one large, round speckled beige bead. This adds a texture change from the flat discs. -
Build the peach section:
Add a few more cream beads, then transition into a segment of muted peach/salmon heishi beads. -
Repeat the sequence:
Mirror the pattern or repeat the segments (Green -> Cream -> Speckled Bead -> Cream -> Peach) until the bracelet matches the length of the first one. -
Check fit:
Hold both ends of the cord and wrap it around your wrist to ensure it sits comfortably without gaps.
Step 4: Finishing Touches
-
Pre-stretch the cords:
Before tying, give both bracelets a gentle pull to pre-stretch the elastic. This prevents them from sagging immediately after you wear them. -
Tie the knot:
Remove the bead stopper and tie a strong surgeon’s knot (right over left, left over right, looping through twice) on each bracelet. -
Secure with glue:
I like to dab a tiny drop of jewelry glue onto the knot itself. Careful not to get glue on the beads, as it can discolor the clay. -
Hide the knot:
Once the glue is tacky but not fully hard, slide a bead with a slightly larger hole over the knot to conceal it. -
Trim excess:
Once fully dry, use sharp scissors to trim the excess cord close to the bead.
Stack them together on your wrist or gift one to your best friend for a stylish, coordinated connection

TRACK YOUR CERAMIC JOURNEY
Capture glaze tests, firing details, and creative progress—all in one simple printable. Make your projects easier to repeat and improve.
Beachy Surfer BFF Colorway
Capture the essence of a perfect beach day with this surfer-style bracelet featuring a relaxing palette of sand, sea foam, and driftwood tones. The mix of flat clay heishi beads and gold accents creates a laid-back yet polished accessory perfect for sharing with your best friend.
Step-by-Step Tutorial
Materials
- 6mm flat clay heishi beads: Light Sand/Beige
- 6mm flat clay heishi beads: White
- 6mm flat clay heishi beads: Dusty Rose/Mauve
- 6mm flat clay heishi beads: Turquoise/Aqua
- 4mm gold metal spacer beads (rounded/donut shape)
- Small gold crimp beads (2mm)
- Gold lobster clasp
- Gold extension chain (5-link)
- Gold jump rings (4mm)
- Flexible beading wire (Tiger Tail or similar)
- Wire cutters
- Flat nose or crimping pliers
Step 1: Planning and Prep
-
Measure the wrist:
Before you cut any wire, measure your wrist (or your BFF’s) to determine the length. For a standard fit, aim for about 6 to 6.5 inches of beaded length, knowing the clasp and extension chain will add adjustability. -
Cut the beading wire:
Cut a piece of beading wire approximately 10 inches long. This generous extra length makes it much easier to hold the ends while you secure the clasps later. -
Prepare the starting end:
Thread a crimp bead onto one end of the wire. Loop the wire back through a jump ring attached to the extension chain, then pass it back through the crimp bead. -
Secure the crimp:
Use your flat nose pliers to squash the crimp bead firmly. Give the wire a gentle tug to ensure it holds tight, then trim the excess short tail of wire.
Varied Bead Textures
Don’t fret if your heishi beads vary slightly in thickness. This irregularity is part of the charm and helps the bracelet sit more comfortably on the wrist.
Step 2: Stringing the Pattern
-
Begin the sequence:
Start by threading on two small gold metal spacer beads. These act as bookends for your colorful sections and give the bracelet a professional finish. -
First color block: Sand:
String on about 5 to 6 beads of the Light Sand color. The slight irregularity in the number of beads between sections adds to that organic, surfer vibe. -
Add a gold separator:
Slide on one gold spacer bead after the sand section. -
Second color block: White:
Thread on a small section of White beads. I like to keep the white sections slightly shorter, maybe 3 or 4 beads, to act as a highlight rather than a main color. -
Gold accent:
Add another gold spacer bead. -
Third color block: Dusty Rose:
Add a section of Dusty Rose beads, roughly 5 beads long. This warmth balances the cooler tones coming up next. -
Gold accent:
Slide on another gold spacer bead. -
Fourth color block: Turquoise:
Now for the pop of color! Thread on about 4 Turquoise beads. This mimics the bright blue of tropical water against the sand tones. -
Repeat until filled:
Continue this alternating pattern: Sand section, Gold, White section, Gold, Dusty Rose section, Gold, Turquoise section, Gold. Repeat the sequence until you reach your desired length, ending with two gold spacer beads just like you started.
Loose Beads?
If you notice gaps after crimping, you likely didn’t pull the wire taut enough. Before flattening the final crimp, hold the bracelet in a ‘U’ shape to check the tension.
Step 3: Finishing Touches
-
Add the final crimp:
Thread a crimp bead onto the open end of the wire. Follow this with a jump ring attached to the lobster clasp. -
Loop and tighten:
Feed the wire tail back down through the crimp bead and into the first few beads of your bracelet pattern. Pull the wire tight so there are no visible gaps between the beads, but not so tight that the bracelet becomes stiff. -
Secure the end:
Flatten the crimp bead securely with your pliers. -
Clean up:
Trim the remaining excess wire carefully with wire cutters, getting as close to the beads as possible without snipping the main cord.
Now you have a stylish, resort-ready bracelet pair to share on your next adventure
Candy Swirl Marbled Clay Beads
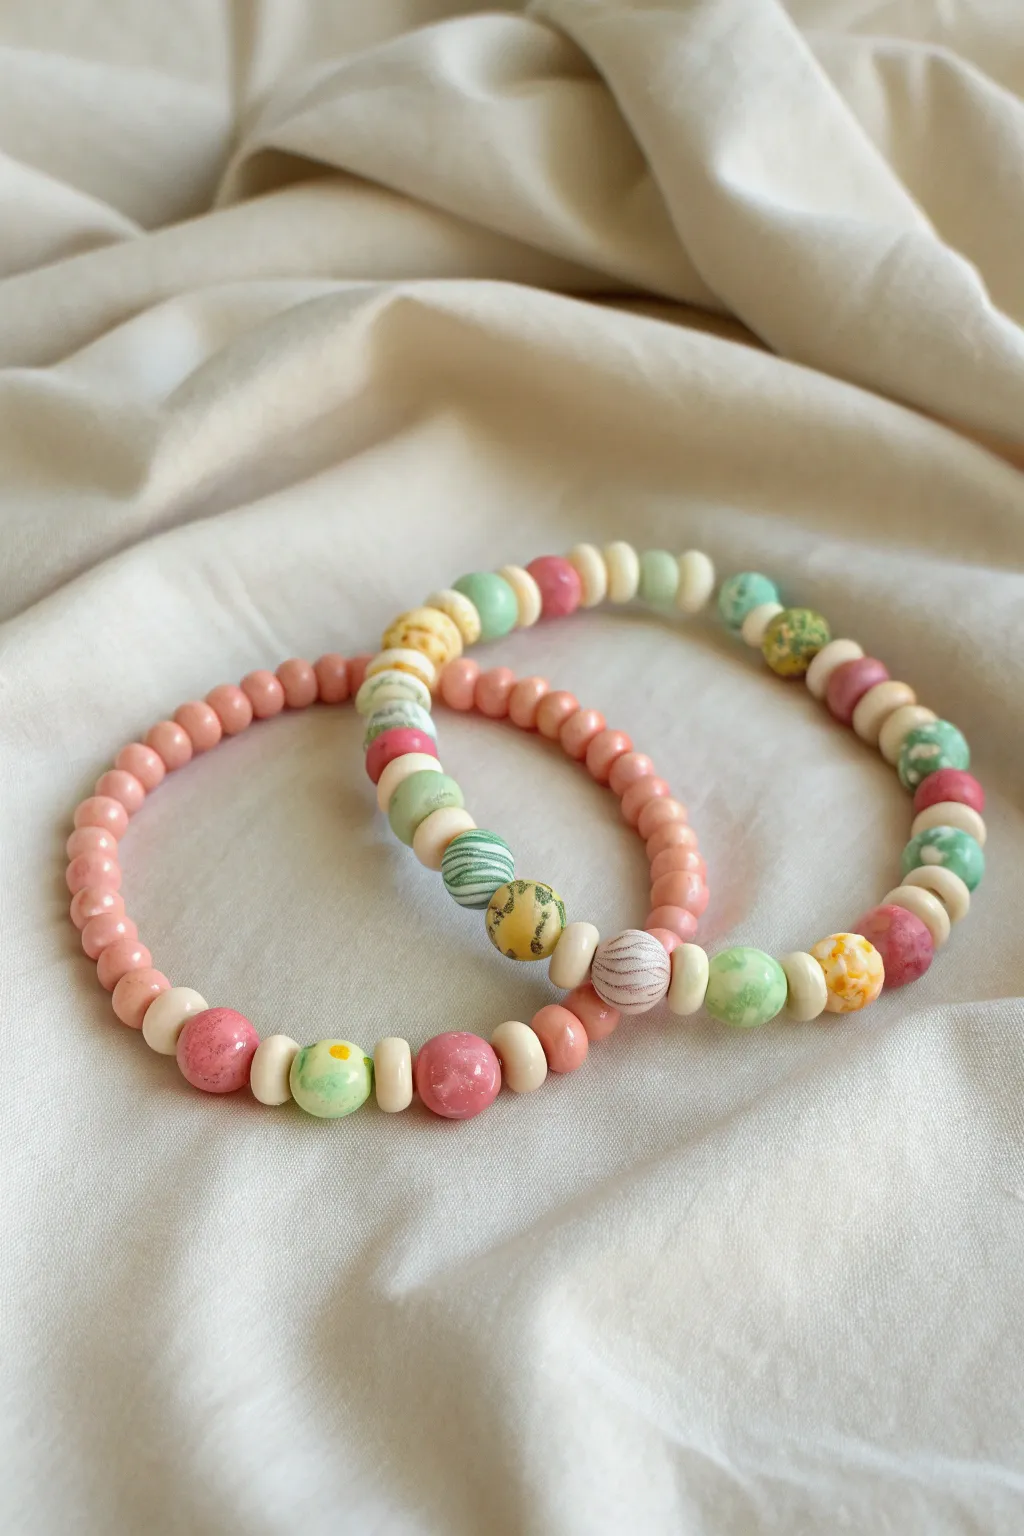
These sweet bracelets combine uniform peach spacer beads with striking handmade marbled beads that look just like tiny candies. The soft palette of pinks, greens, and yellows swirled with white creates a delightful, nostalgic aesthetic perfect for sharing with a best friend.
Step-by-Step Guide
Materials
- Polymer clay in pastel pink, mint green, pale yellow, and white
- Solid peach-colored polymer clay (for spacer beads)
- Acrylic rolling pin and clay slicer blade
- Toothpicks or a bead piercing tool
- Elastic jewelry cord (0.8mm recommended)
- Super glue or jewelry knot cement
- Scissors
- Baking sheet and parchment paper
- Bead design board (optional)
- Wet sandpaper or buffing cloth (optional)
Step 1: Creating the Solid Spacer Beads
-
Condition the peach clay:
Begin by kneading the peach-colored polymer clay until it is soft and pliable. This ensures your smaller spacer beads won’t crack during baking. -
Roll a uniform snake:
Roll the peach clay into a long snake with an even diameter, about 5mm thick. Since you need many of these, try to keep the thickness consistent along the entire length. -
Cut into segments:
Using your clay slicer, cut the snake into small, equal segments. Aim for pieces that are roughly 4-5mm long to create rounder spacer beads. -
Roll into spheres:
Take each small segment and roll it between your palms or fingers to create a perfect sphere. Repeat this until you have about 30–40 peach beads per bracelet. -
Pierce the beads:
Gently twist a toothpick or bead pin through the center of each sphere to create the stringing hole. Rotate the tool as you push to avoid squashing the bead’s round shape.
Muddied Colors?
If your marbled swirls look gray or dull, you may verify you aren’t over-mixing complementary colors. Stick to mixing colors with white only for that clean, bright candy look.
Step 2: Making Marbled Candy Beads
-
Prepare the mixing colors:
Condition your white clay and separate it into three equal lumps. Do the same with your pink, green, and yellow clays. -
Create color ropes:
Roll thin ropes of white clay and pair them with thin ropes of your colored clays. Twist a white rope and a pink rope together to start the marbling process. -
Marbling technique:
Fold the twisted rope in half and twist it again. Repeat this fold-and-twist motion a few times until you see fine streaks of color, but stop before the colors blend completely into a new solid shade. -
Form the marbled beads:
Roll your marbled cane into a smooth snake, cut segments, and roll them into spheres just like you did with the peach spacers. Make slightly larger beads for focal points if desired. -
Create variations:
Repeat the marbling process with your green/white and yellow/white combinations. For a ‘confetti’ look, chop tiny bits of colored clay and mix them into a white ball. -
Pierce and bake:
Pierce holes in all your marbled creations. Arrange all beads (peach and marbled) on a parchment-lined baking sheet and bake according to your clay manufacturer’s instructions, usually around 275°F (135°C) for 15-30 minutes.
Texture Play
Before baking, gently roll your marbled beads over a piece of textured sandpaper or a clean toothbrush to give them a sugary, frosted surface texture.
Step 3: Assembling the Bracelet
-
Cool and finish:
Let the beads cool completely after baking. I prefer to lightly sand any rough edges near the holes or buff them with a soft cloth for a subtle sheen. -
Plan the pattern:
Lay out your design on a flat surface. For the look in the photo, create a section of solid peach beads, then transition into an alternating pattern of white spacers and colorful marbled beads. -
Measure the cord:
Cut a piece of elastic cord about 10-12 inches long. This gives you plenty of extra room for tying knots without struggling. -
String the beads:
Thread your beads onto the elastic cord following your planned pattern. Check the length against your wrist occasionally to ensure a perfect fit. -
Tie the knot:
Once strung, bring the ends together and tie a surgeon’s knot (looping the elastic through twice before pulling tight). Pull the cord firmly to secure. -
Secure and trim:
Add a tiny drop of super glue or jewelry cement to the knot for extra security. Allow it to dry, then trim the excess cord, tucking the knot inside a bead hole if possible.
Now you have a set of delightful custom jewelry ready to wear or gift to your favorite person
Terrazzo Confetti Best Friends Set
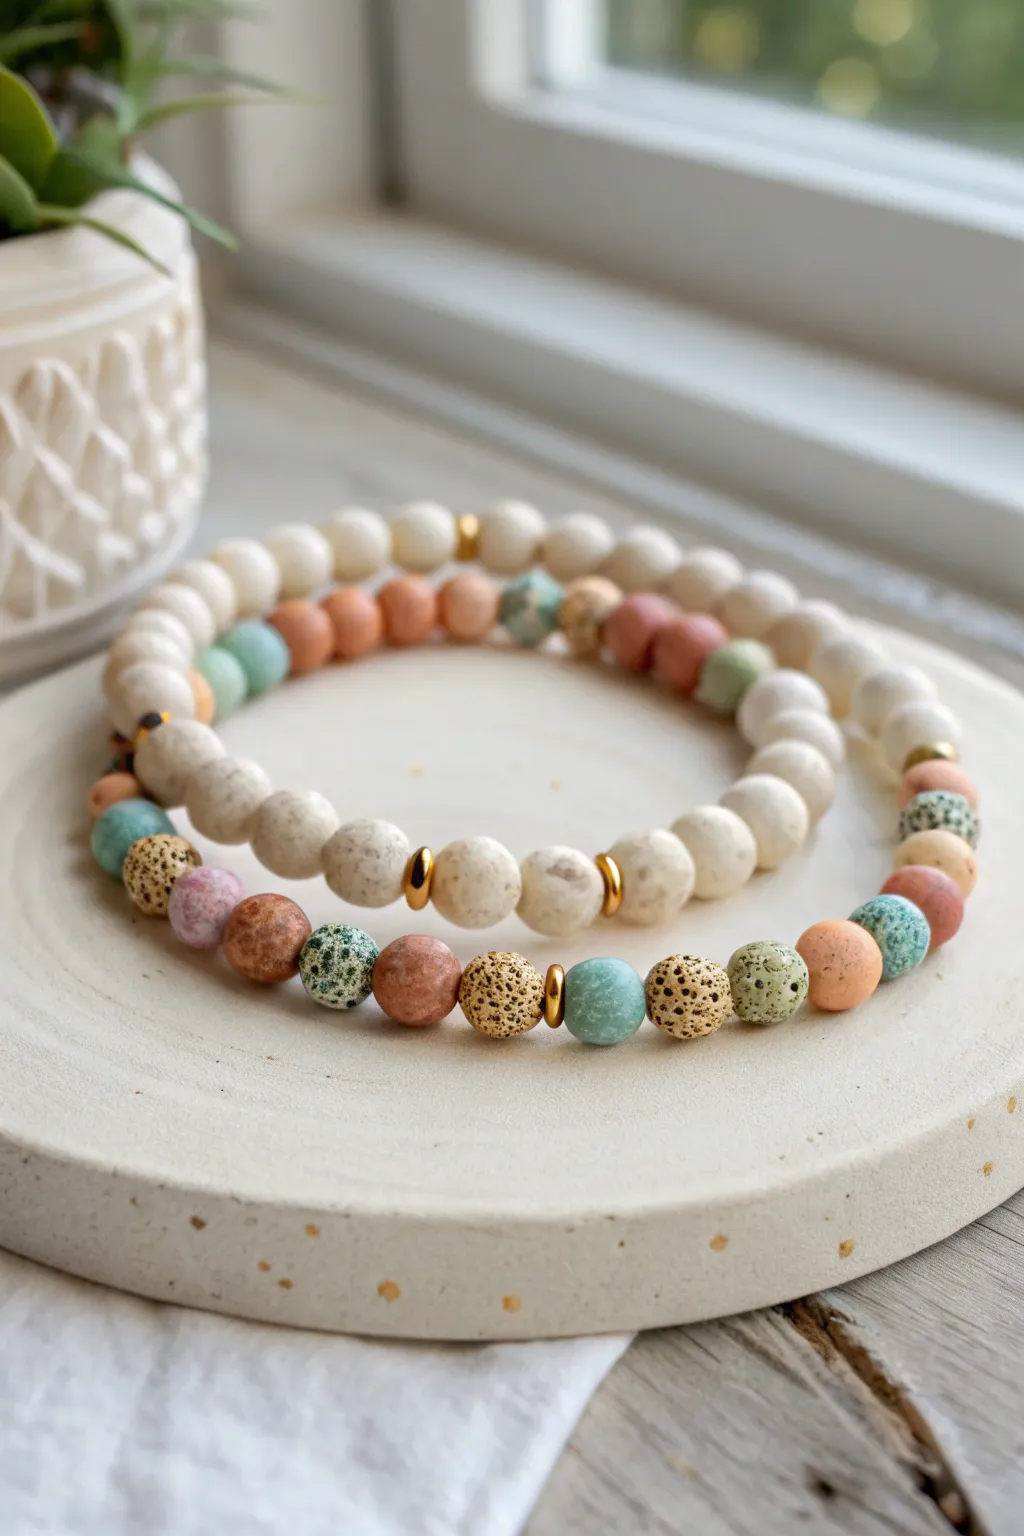
These coordinating bracelets combine creamy matte textures with playful speckled accents to create a sophisticated yet fun accessory. The organic terrazzo-style beads add pops of muted color that look beautiful stacked together or shared between best friends.
Step-by-Step
Materials
- 8mm matte cream or off-white polymer clay beads (round)
- 8mm speckled terrazzo polymer clay beads (varied colors: pink, blue, green, peach)
- Small gold disc spacer beads (heishi style)
- Small gold ball spacer beads
- 0.8mm elastic stretch cord
- Jewelry adhesive or super glue
- Scissors
- Bead stopper or masking tape
- Ruler or measuring tape
Step 1: Planning Your Designs
-
Measure the wrist:
Before you begin, measure your wrist and your friend’s wrist. A standard adult bracelet is usually about 7 inches combined, but customization is the best part of DIY. -
Cut the cord:
Cut two pieces of elastic cord, each about 10-12 inches long. This extra length makes tying the final knots much easier. -
Secure the end:
Attach a bead stopper or a piece of masking tape to one end of your first cord to prevent beads from slipping off while you work. -
Lay out the primary bracelet design:
For the first bracelet (the simpler one), lay out your design on a bead board or flat surface. This one relies heavily on the cream beads. -
Create the focal pattern:
Design a small focal section for this primary bracelet. Try threading a gold disc spacer, a matte cream bead, another gold disc spacer, and perhaps one or two colorful terrazzo beads in the center before returning to the main cream color.
Step 2: Assembling the Confetti Bracelet
-
Start the colorful strand:
For the second bracelet—the ‘confetti’ version—you will mix the textures more frequently. Start by threading three or four cream beads to act as a neutral base. -
Add a gold accent:
Slide on a small gold disc spacer followed by a textured cream bead. -
Introduce the color:
Begin your speckled pattern. Alternate between different colored terrazzo beads—like peach, speckled blue, and mauve—and textured gold or porous lava-style beads. -
Create spacing:
To keep it cohesive, I like to insert a gold disc spacer every 4 to 5 colorful beads. This echoes the hardware in the first bracelet. -
Check the length:
Wrap the strand around your wrist to check the fit. Add or remove cream beads at the ends to adjust the final size without disrupting your center pattern.
Knot Security Tip
Use a surgeon’s knot (looping the thread twice instead of once) for extra grip. Dab a tiny amount of clear nail polish on the knot if you don’t have jewelry glue.
Step 3: Finishing Touches
-
Pre-stretch the cord:
Once beaded, gently pull on both ends of the elastic cord several times. This pre-stretching prevents the bracelet from sagging later. -
Tie the knot:
Remove the bead stopper and tie a surgeon’s knot. This is just a standard square knot looped through an extra time for security. -
Add adhesive:
Place a tiny drop of jewelry glue or super glue specifically on the knot. Be careful not to glue the beads to the cord. -
Hide the knot:
While the glue is still slightly tacky but not wet, pull the knot inside the hole of the nearest large bead to hide it. -
Trim excess cord:
Once the glue is fully dry, trim the excess elastic cord close to the bead. -
Repeat for the second bracelet:
Follow the same tying and finishing steps for your second bracelet.
Scent Infusion
If you use porous lava stone beads alongside the clay ones, add a drop of essential oil to them. Your BFF bracelets will double as calming diffusers.
Now you have a chic, coordinated set ready to gift to your best friend or wear as a stylish stack
Hidden Message Inner-Bead Pair
Create a sophisticated take on the classic friendship bracelet with this stacked duo featuring matte clay beads in warm terracotta, peach, and cream tones. The design cleverly nests a smaller letter-bead strand within a chunkier clay bead loop, giving it a unique, dimensional look that elevates the standard “BFF” style.
Detailed Instructions
Materials
- Matte round polymer clay beads (terracotta/rust color, approx. 6mm)
- Matte round polymer clay beads (peach/coral color, approx. 4mm)
- Matte round polymer clay beads (cream/beige color, approx. 4mm)
- Square white letter beads with gold lettering (B, F, F)
- Gold spacer beads (small rounds or heishi style)
- Elastic cord (0.8mm clear stretch cord recommended)
- Scissors
- jewelry glue (optional)
- Bead stopper or tape
Step 1: Planning the Design
-
Measure your wrist:
Before cutting any cord, wrap a piece of string around your wrist to find your comfortable size, then add about 2-3 inches extra for tying knots. -
Layout the outer strand:
On a bead board or a towel, lay out the rust-colored clay beads. This will be the distinct, darker outer loop shown in the photo. -
Plan the inner strand pattern:
Arrange the lighter peach and cream beads in a random or alternating pattern for the second bracelet. Place the ‘BFF’ letter beads in the center, flanked by gold spacers.
Pro Tip: Matte Finish
If you can’t find matte beads, lightly buff regular glossy polymer clay beads with ultra-fine sandpaper or a nail buffer to achieve that trendy, soft earthy look.
Step 2: Stringing the Inner & Outer Bands
-
Prepare the cord:
Cut two lengths of elastic cord. Secure one end of each with a bead stopper or a piece of tape to prevent beads from sliding off. -
String the rust beads:
Thread the matte terracotta clay beads onto the first cord until it reaches your desired wrist length. This strand is straightforward and acts as the bold frame. -
String the mixed strand:
On the second cord, start threading your peach and cream beads. I like to mix the sizes slightly to create texture. -
Insert gold accents:
Periodically add a gold spacer bead between the peach and cream clay beads to add a touch of shine. -
Add the message:
Once you reach the middle of the strand, thread the ‘B’, then a spacer (optional), then ‘F’, another spacer, and the final ‘F’. -
Check the fit:
Wrap both unfinished strands around your wrist to ensure they sit comfortably together. The letter strand should be slightly snugger to sit ‘inside’ the larger bead strand if wearing them stacked closely.
Step 3: Finishing the Bracelets
-
Pre-stretch the elastic:
Gently pull on the ends of the cord for each bracelet. This pre-stretching helps prevent the bracelet from sagging after you wear it a few times. -
Tie the surgeon’s knot:
Take the two ends of the rust bracelet. Cross right over left, then left over right twice. Pull tight. -
Secure the knot:
Repeat the knotting process for the peach/cream bracelet. Add a tiny dot of jewelry glue to the knots for extra security. -
Hide the knot:
Once the glue is tacky but not fully dry, slide an adjacent bead over the knot to hide it inside the bead hole. -
Trim excess cord:
Wait for the glue to cure completely, then use sharp scissors to trim the excess tail of the elastic cord as close to the bead as possible. -
Stack and style:
Wear them together! The matte texture of the clay beads creates friction that helps them stay stacked nicely on your wrist.
Troubleshooting: Rolling Beads
If the letter beads keep flipping upside down, use flat heishi beads directly next to them instead of round beads to stabilize the square shape.
Now you have a stylish set of bracelets ready to gift to your best friend or keep for yourself
Glow-Style Night-Out Bestie Duo
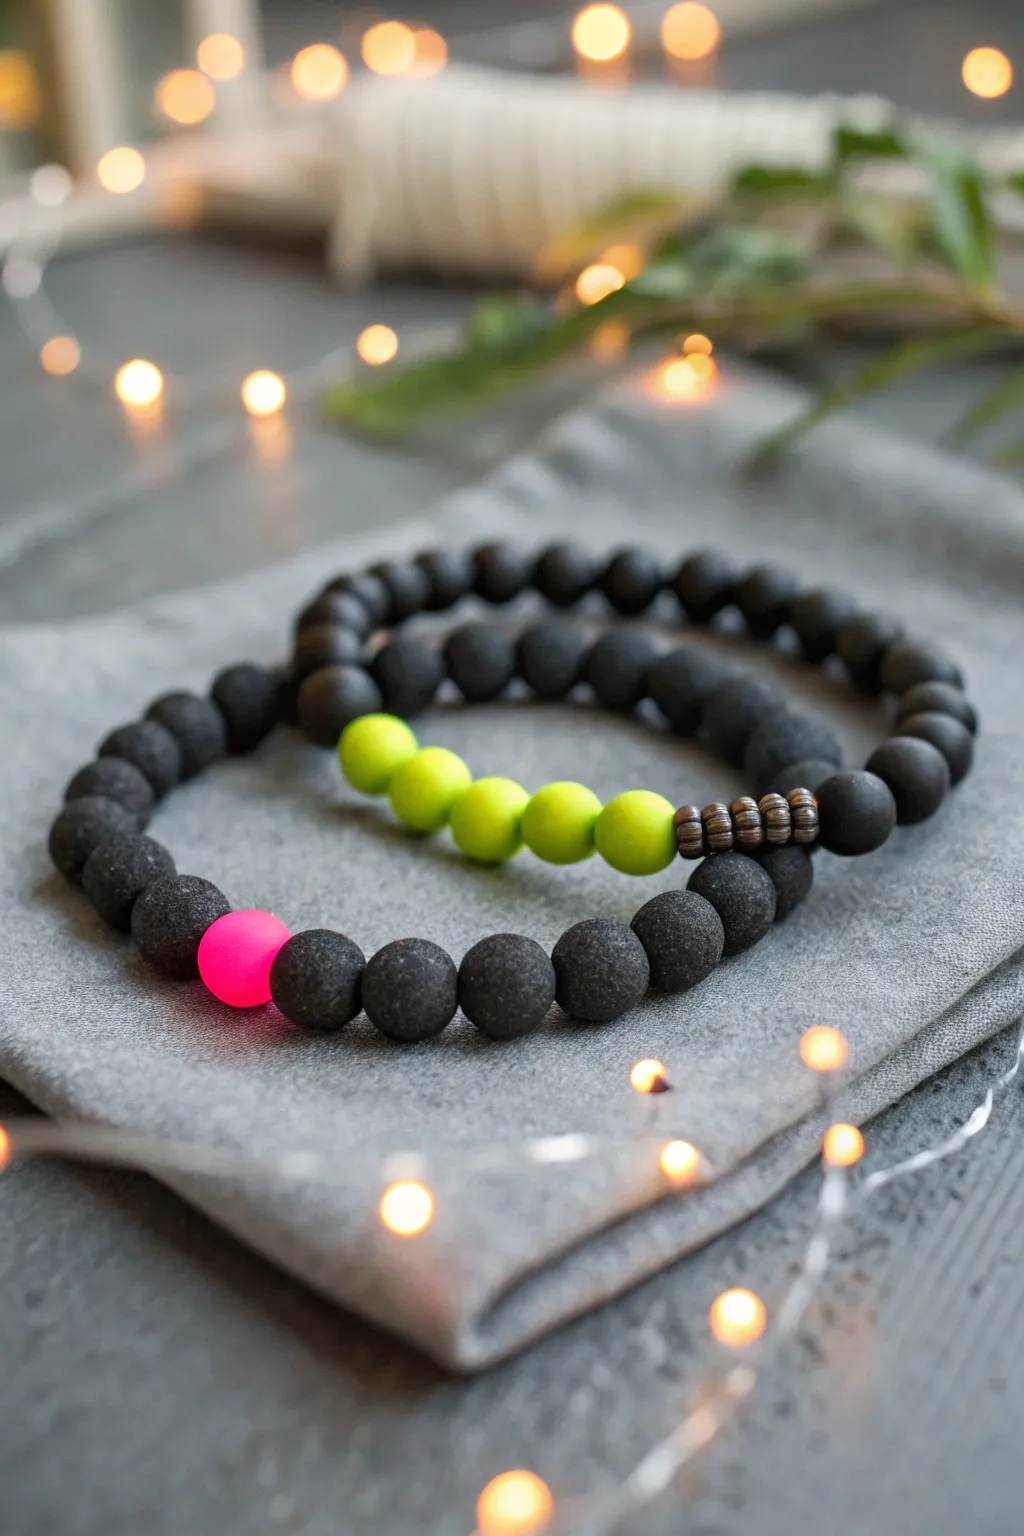
These sleek, matte black bracelets hide a vibrant secret that really pops under evening lights. Designed as a coordinating set for best friends, one features a shocking pink accent while the other glows with lime green, symbolizing your bright connection.
Step-by-Step Guide
Materials
- Matte black polymer clay round beads (approx. 8mm)
- Neon pink polymer clay round bead (8mm)
- Neon lime green polymer clay round beads (8mm)
- Small antique bronze or gunmetal spacer discs (ribbed or textured)
- Strong elastic cord (0.8mm or 1mm thickness)
- Jewelry glue or clear nail polish
- Scissors
Step 1: Preparation
-
Measure your wrist:
Wrap a piece of string around your wrist to find the comfortable length, then cut two pieces of elastic cord about 4 inches longer than that measurement to leave plenty of room for tying knots. -
Pre-stretch the elastic:
Give each piece of elastic a firm tug two or three times. This is a crucial step I always do to prevent the bracelet from stretching out permanently after the first wear.
Sticky Situation
If the knot won’t hide inside a bead, use a bead reamer or a thick needle to gently widen the hole of the bead adjacent to the knot.
Step 2: Pink Pop Bracelet Construction
-
Start the sequence:
Begin threading your matte black beads onto the first elastic cord. You’ll want to thread enough to cover roughly half of your wrist circumference. -
Add the accent:
Slide on the single neon pink bead. This will act as the focal point of the design. -
Finish the strand:
Continue threading the remaining matte black beads until the bracelet reaches your desired length. -
Check the fit:
Wrap the beaded strand around your wrist to ensure it fits comfortably without gaps, adding or removing black beads if necessary.
Step 3: Lime Green Duo Bracelet Construction
-
Begin the second strand:
For the partner bracelet, start by stringing about a third of your required matte black beads onto the second cord. -
Insert spacers:
Add four small antique bronze spacer discs. These add a nice industrial texture that contrasts with the smooth clay. -
Add the green section:
Thread on four neon lime green beads directly after the spacers. The repetition here creates a bold block of color. -
Complete the circle:
Finish the strand by filling the rest of the length with the remaining matte black beads.
Level Up
Use UV-reactive neon beads for the colored accents so your bracelets actually glow under blacklight at parties or bowling alleys.
Step 4: Final Assembly
-
Prepare the knot:
Bring the two ends of the elastic together on the pink bracelet first. Pull out any slack between the beads. -
Tie the surgeon’s knot:
Cross the ends, wrap one end under twice (instead of just once like a standard shoelace knot), and pull tight. Repeat this knotting process once more for security. -
Apply adhesive:
Dab a tiny drop of jewelry glue or clear nail polish directly onto the knot. This prevents it from slipping over time. -
Hide the mechanics:
Once the glue is tacky but not fully set, gently pull the elastic so the knot slides inside the hole of the nearest black bead to hide it. -
Trim the excess:
Carefully snip the extra elastic tail ends close to the bead, being careful not to cut the main knot. -
Repeat for the second bracelet:
Follow the same tying, gluing, and hiding steps for the lime green bracelet to complete the set.
Now you have a stylish, understated set of accessories that keeps you connected even when the lights go down