Nothing says “we’re a set” like matching BFF clay charms you can split, swap, and wear every day. These ideas are all about making two pieces that look cute on their own, but feel extra special together.
Classic Split Heart Charms
Immortalize your friendship with these nostalgic, interlocking clay charms that combine rustic texture with a sweet, glossy finish. These matching necklaces feature a soft pink hue with stamped lettering and a subtle sparkle, perfectly designed to fit together just like you and your bestie.
Detailed Instructions
Materials
- Pink polymer clay (soft pink/bubblegum shade)
- Iridescent white glitter (finely cut)
- Clean rolling pin or acrylic roller
- Heart-shaped cookie cutter (medium size)
- X-acto knife or clay blade
- Alphabet stamp set (small font)
- Small heart stamp or embossing tool
- Toothpick or straw (for piercing)
- Brown acrylic paint (for antiquing)
- Paper towel or baby wipe
- High-gloss glaze or polyurethane varnish
- Natural jute twine or hemp cord
- Soft paintbrush
- Oven and baking tray
Step 1: Shaping the Base
-
Prepping the clay:
Start by conditioning your polymer clay until it’s soft and pliable. If you want that subtle shimmer seen in the photo, knead in a pinch of fine iridescent white glitter at this stage, mixing until evenly distributed. -
Rolling out:
Roll your clay out on a smooth, clean surface to a thickness of about 1/4 inch (6mm). You want it thick enough to be durable but thin enough to wear comfortably. -
Cutting the heart:
Press your heart-shaped cutter firmly into the clay. Give it a tiny wiggle to ensure it cuts all the way through, then remove the excess clay from around the shape before lifting the cutter. -
Smoothing edges:
Gently tap down any sharp edges left by the cutter with your fingertip to give the heart a soft, rounded look. -
Creating the split:
Using your clay blade or X-acto knife, freehand a zig-zag line down the center of the heart. Try not to make it too complicated—a simple three-point zig-zag usually fits back together best. -
Separating the halves:
Carefully pull the two halves apart. If the clay drags a bit, use your finger to smooth the cut edges slightly so they aren’t sharp, but keep the zig-zag shape distinct.
Uneven Split?
If your zig-zag cut deforms the clay, let the heart sit in the fridge for 10 minutes before cutting. Firmer clay holds the intricate shape better without dragging under the knife blade.
Step 2: Stamping and Detailing
-
Planning the text:
Before stamping, visualize where the words ‘BEST’ and ‘FRIENDS’ will go on the left half. They should be centered vertically and aligned nicely. -
Stamping the letters:
Gently press your alphabet stamps into the clay. Apply even pressure so the impression is deep enough to hold paint later, but not so deep it distorts the clay shape. -
Adding the symbol:
On the right half, press a small heart stamp into the center. If you don’t have a stamp, I sometimes use the end of a paintbrush handle or a stylus to effectively draw a sunken heart shape. -
Creating connection points:
Use a straw or a thick toothpick to pierce a hole at the top of each heart half. Make sure the hole is wide enough for your twine to pass through later. -
Baking:
Place both halves on a parchment-lined baking sheet and bake according to your clay manufacturer’s specific instructions (usually 275°F/135°C for 15-30 minutes). Let them cool completely.
Step 3: Finishing Touches
-
Antiquing the impressions:
Dilute a tiny drop of brown acrylic paint with water. Paint it over the stamped letters and the sunken heart, getting deep into the crevices. -
Wiping back:
Immediately use a damp paper towel or baby wipe to wipe the paint off the surface. The brown paint should stay trapped inside the letters, making them pop against the pink. -
Glazing:
Apply a coat of high-gloss glaze or varnish to the front and sides of the charms. This seals the paint and gives the piece that candy-like shine. -
Drying:
Allow the glaze to dry fully in a dust-free area for the time recommended on your bottle. -
Adding the twine:
Cut two lengths of jute twine. Fold one piece in half, push the loop through the hole from front to back, and pull the tails through the loop to create a lark’s head knot. -
Final check:
Bring the two halves together one last time to revel in how perfectly they fit, then gift one half to your favorite person.
Secret Sparkle
For extra depth, fill the small stamped heart on the right side with liquid sculpey or resin mixed with chunky white glitter before glazing to make it look like a mini gemstone inlay.
Enjoy wearing your matching tokens of friendship everywhere you go


Peanut Butter and Jelly Toast Pair

Celebrate friendship with this adorable pair of polymer clay toast magnets or charms, perfectly stylized to look like peanut butter and jelly besties. These sweet little slices feature realistic textures and cute, smiling faces that bring breakfast to life.
Step-by-Step
Materials
- White or beige polymer clay (for the bread base)
- Translucent liquid polymer clay
- Chalk pastels (orange, brown, and yellow)
- Acrylic paint (dark brown/black for eyes/mouth, red for jam)
- Sculpting tools (needle tool, toothbrush for texture)
- Small round piping tip or cookie cutter (optional)
- Gloss glaze or UV resin
- Paintbrushes
- Oven
Step 1: Shaping the Bread
-
Mix the Dough Color:
Start by conditioning your white or beige clay. If it’s too bright white, knead in a tiny speck of yellow and brown to achieve a natural dough color. -
Form the Slices:
Roll the clay into a sheet about 1/4 inch thick. Cut out two identical square shapes, then gently pinch the bottom corners to taper them slightly. -
Create the Crust:
For the top ‘crust,’ use your fingers or a round tool to indent the top center, creating that classic double-hump bread shape. -
Add Texture:
This is crucial for realism: take a clean toothbrush or a balled-up piece of aluminum foil and press it firmly all over surface of the clay. Don’t forget the sides. -
Shade the Edges:
Scrape some orange and brown chalk pastel into a powder. Using a soft paintbrush, dust the outer edges of the bread to make it look perfectly toasted.
Too Runny?
If your liquid clay mixture runs off the bread, let it sit on a piece of paper for 10 minutes before applying. The paper absorbs excess plasticizer, thickening the ‘sauce’ so it holds its shape.
Step 2: Spreading the Toppings
-
Mix the Peanut Butter:
Mix liquid polymer clay with a little scraped orange and brown pastel (or clay pigment) until you get a creamy peanut butter color. -
Apply the PB Layer:
Spread this mixture onto the center of both toast slices. On the left slice, cover most of the face area; on the right slice, create a smooth, thinner layer. -
Create the Jam Hair:
For the left toast, mix liquid clay with red pastel or a tiny drop of red translucent alcohol ink. Apply it thickly at the top left corner to look like a dollop of jam ‘hair’. -
Create Jam Dots:
On the right toast, use the same red mixture to create a ring of small dots around the perimeter, resembling a decorative jam border. -
Bake:
Bake the pieces according to your clay manufacturer’s instructions (usually 275°F for 15-30 mins). Let them cool completely.
Step 3: Adding Personality
-
Paint the Eyes:
Using a very fine detail brush or a dotting tool, dab two small dots of black acrylic paint for eyes on each slice. Place them wide apart for maximum cuteness. -
Draw the Smiles:
Carefully paint a thin, U-shaped mouth between the eyes using the black paint. You can curve them slightly differently to give each toast unique character. -
Highlight the Cheeks:
For the jam-ring toast, add two tiny red dots near the bottom corners for cheeks. -
Add Shine:
Once the paint is dry, coat the ‘topping’ areas (peanut butter and jam) with a gloss glaze or UV resin to make them look wet and sticky. -
Final Finish:
Leave the crust areas matte to maintain the dry bread texture. Glue magnets or bails to the back once everything is set.
Make it Jewelry
Before baking, insert metal screw eye pins into the top center of each slice. After baking, you can attach jump rings to turn these into matching BFF necklaces or keychains for you and a friend.
Now you have a charming set of breakfast buddies ready to share or display


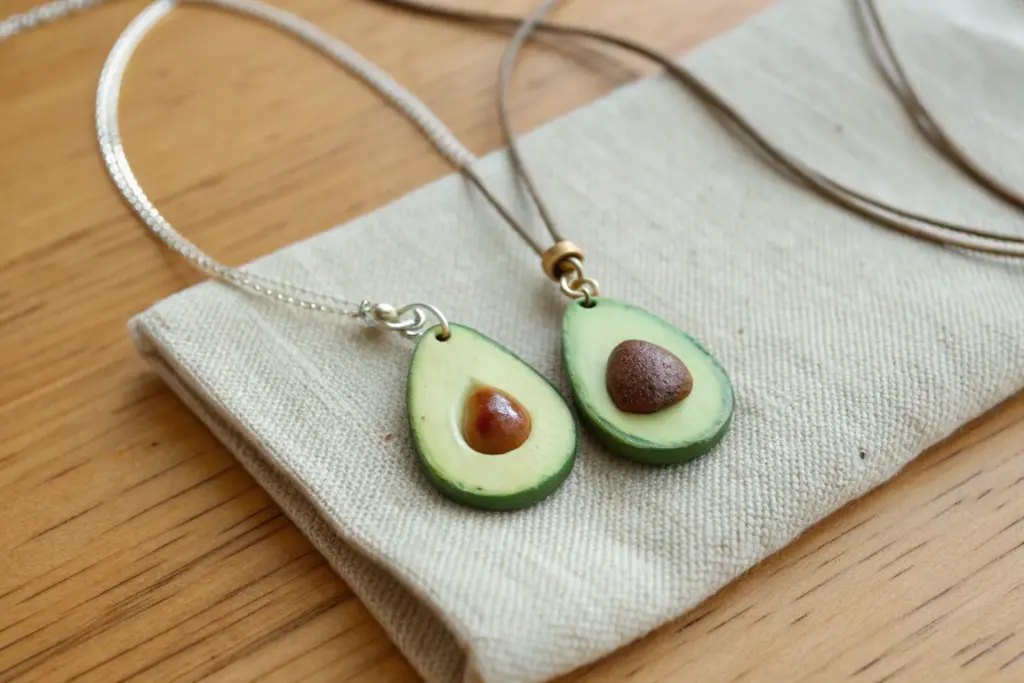
Avocado Half Best Friend Set
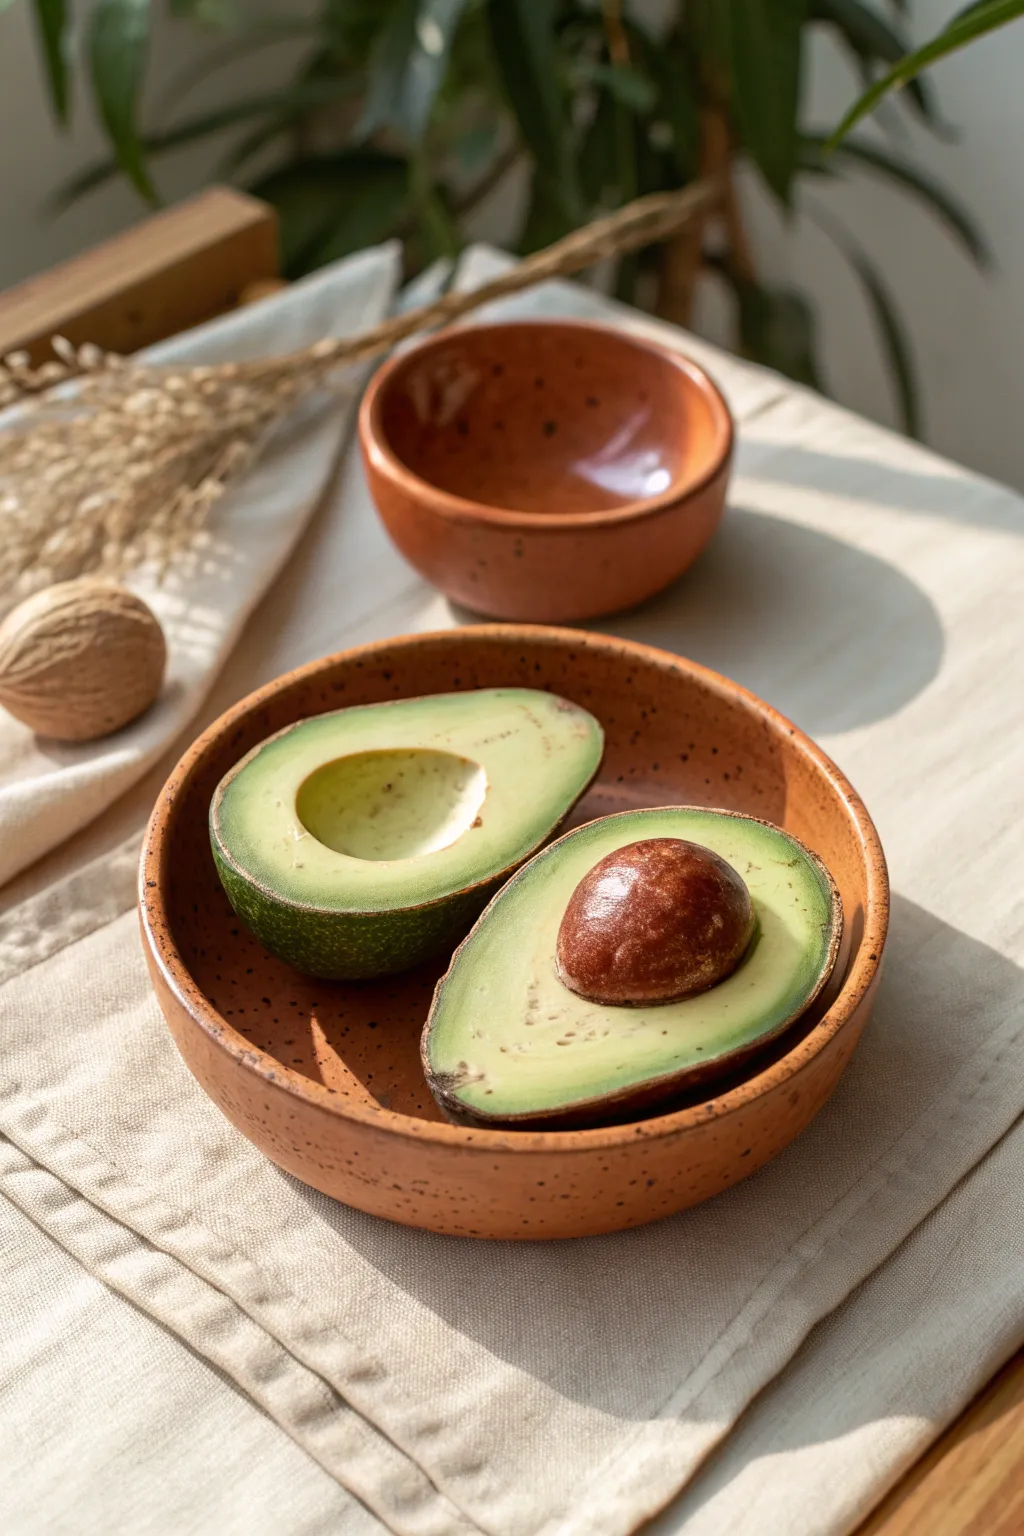
Sculpt the perfect matching set of clay avocados, one featuring the pit and the other its cozy hollow. These realistic charms make a heartwarming gift representing how two friends complete each other perfectly.
Step-by-Step Tutorial
Materials
- Polymer or air-dry clay (translucent, green, yellow, brown/copper)
- Acrylic paints (various greens, yellow, ochre, brown)
- Sculpting tools (needle tool, ball stylus)
- Texture sponge or toothbrush
- Gloss varnish or resin
- Matte varnish
- Paintbrushes (soft blending brush, detail brush)
- Aluminum foil (for the core)
- Cutting blade
Step 1: Sculpting the Base Form
-
Prepare the core:
Ball up a small piece of aluminum foil into a pear shape. This significantly reduces the weight of your clay piece and saves material. -
Mix your base color:
Knead together translucent clay with a very small amount of yellow and pale green clay. You want to achieve that creamy, inner avocado flesh color. -
Wrap and shape:
Roll your mixed clay into a sheet and wrap it smoothly around the foil core, ensuring there are no air bubbles trapped underneath. -
Refine the silhouette:
Roll the clay shape between your palms to smooth out seams and refine that classic pear-like avocado silhouette. -
Slice it open:
Use a sharp blade to slice the pear shape directly down the middle vertically. I find a slow, sawing motion helps prevent squashing the clay.
Step 2: Creating the Detail
-
Form the pit area:
On one half, use a large ball stylus or your thumb to press a smooth, perfect indentation into the lower rounded section. -
Sculpt the seed:
Mix brown clay with a touch of copper or gold mica powder for a slight shimmer. Roll it into a ball that fits snugly into the indentation you just made. -
Attach the seed:
Ideally, bake the seed separately first so it holds its shape, or gently press raw clay into the matching half so it protrudes perfectly. -
Add skin texture:
Roll a thin sheet of dark green clay. Carefully wrap the exterior of both halves with this ‘skin layer’, trimming the edges flush with the cut face. -
Texturize the skin:
Gently stipple the dark green exterior with a toothbrush or rough sponge to mimic the bumpy texture of ripe avocado skin. -
Texture the flesh:
On the flat cut faces, use a needle tool to create very faint concentric circles or radial lines, giving it a fibrous appearance.
Avocado Realism
Mix a tiny bit of brown into your green paint when shading the edges. Real avocados often have oxidized spots or imperfect coloring near the skin.
Step 3: Painting & Finishing
-
Bake or dry:
Follow your clay manufacturer’s instructions to cure the pieces completely before painting. -
Gradient painting:
Mix a vibrant lime green acrylic paint. Using a dry-brush technique, paint the outer edge of the flesh (near the skin), fading it toward the center. -
Enhance the rim:
Paint a very thin, darker green line right at the border where the skin meets up with the flesh to create depth. -
Detail the pit:
Add dimension to the brown seed by dabbing slightly lighter brown paint on the highlight area and darker brown in the crevices. -
Seal the skin:
Apply a coat of matte varnish to the dark green exterior skin to keep it looking natural and leathery. -
Gloss the pit:
Paint a generous layer of high-gloss varnish or UV resin onto the seed to make it look wet and shiny. -
Finish the flesh:
Apply a satin or semi-gloss varnish to the cut face of the fruit for that slightly moist, freshly cut look.
Make it a Necklace
Before baking, insert an eye-pin into the top of each half. Once finished, attach jump rings and chains so you and your BFF can wear matching halves.
Once sealed, your charming avocado halves are ready to celebrate a friendship that is as perfect a fit as a pit in its hollow


Mac and Cheese Mini Charm Duo
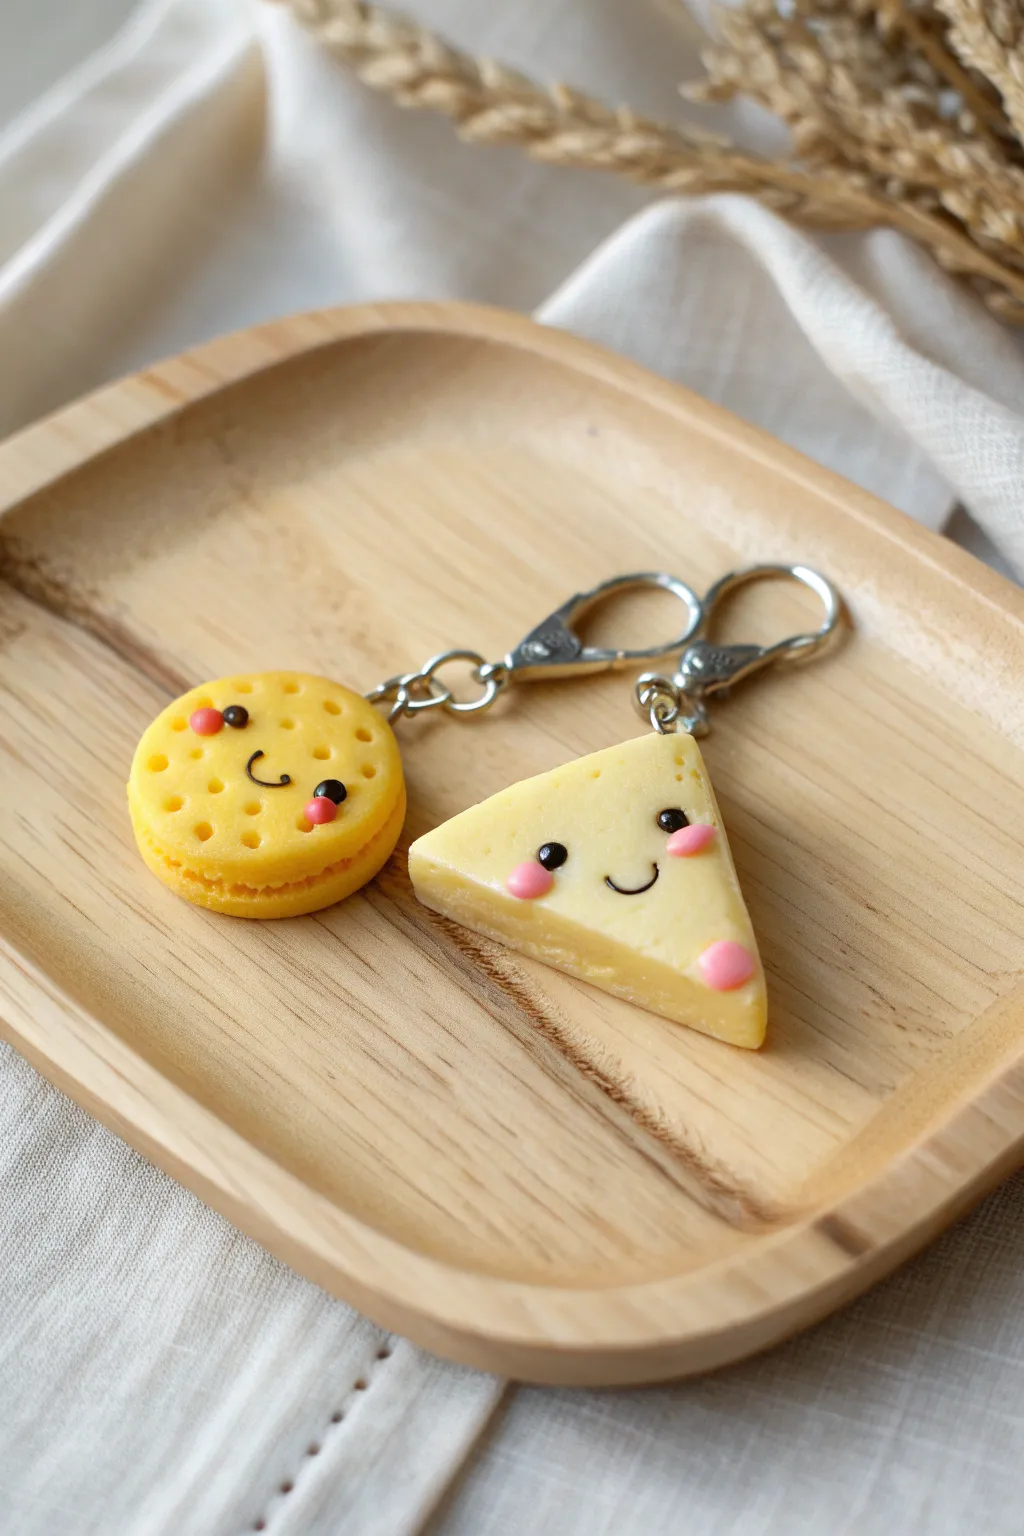
Celebrate your friendship with this adorable pair of polymer clay charms representing the ultimate comfort food combination. These tiny, smiling mac and cheese pieces fit together perfectly on a keychain, making them the sweetest way to stay connected with your bestie.
Step-by-Step Tutorial
Materials
- Polymer clay (yellow, light beige/translucent, black, pink)
- Dotting tools (various sizes)
- Needle tool or toothpick
- Texture tool (toothbrush or stiff brush)
- Small circle cutter
- Blade or X-Acto knife
- Eye pins (2)
- Jump rings and lobster clasp keychains
- Gloss glaze (optional)
- Oven for baking
Step 1: The Cracker Cookie
-
Mix the color:
Start by mixing yellow clay with a tiny pinch of orange or brown to achieve a warm, baked cracker color. Condition the clay until it is soft and pliable. -
Shape the base:
Roll the clay into a ball and flatten it into a thick disc. Use a circle cutter to ensure it is perfectly round and has clean, sharp edges. -
Create the texture:
Gently press a needle tool or small dotting tool around the perimeter of the circle to indent small holes, mimicking a cracker or waffle pattern. Keep these evenly spaced. -
Add the smile:
Roll an incredibly thin snake of black clay. Cut a tiny U-shape and gently press it into the center of the cracker to form a smile. I find using a needle tool helps position this delicate piece without squishing it. -
Make the eyes:
Roll two tiny balls of black clay. Press them onto the face above the smile. For that extra cute factor, add a microscopic dot of white clay or white paint to each eye as a highlight later. -
Blush the cheeks:
Form two small, flattened ovals of pink clay and press them onto the cheeks, right next to the smile. Alternatively, you can brush on dry chalk pastel dust for softer rosiness.
Step 2: The Cheese Wedge
-
Mix the cheese tone:
Take your yellow clay and mix in a generous amount of translucent or light beige clay. This gives the cheese a realistic, slightly waxy finish rather than looking like plastic. -
Cut the wedge:
Flatten a thick slab of your cheese-colored clay. Use a blade to cut a clean triangle shape. Soften the sharp cut edges slightly with your finger so they look organic. -
Add the rind:
If desired, texture the back edge (the crust) slightly with a toothbrush to simulate a different texture, though a smooth finish works well for processed cheese styles. -
Indent the holes:
Using a medium-sized dotting tool, press a few indentations into the surface and sides of the wedge to create that classic Swiss cheese look. -
Apply the face:
Just like the cracker, add a tiny black clay smile, two black bead eyes, and rosy pink cheeks. Try to position the face centrally on the flat surface of the wedge.
Clean Clay Tip
Keep baby wipes nearby! Yellow clay picks up dust easily. Clean your hands and tools thoroughly before handling lighter colors to prevent smudges.
Step 3: Assembly & Finish
-
Insert hardware:
Trim two eye pins to have short stems. Insert one into the top edge of the cracker and one into the top corner of the cheese wedge. Add a dab of liquid clay or bake-and-bond to the stem for security. -
Texture detail:
Before baking, lightly tap a toothbrush over the surface of the cracker (avoiding the face) to give it a realistic baked goods texture. -
Bake:
Bake both pieces according to your clay package instructions. Usually, this is around 275°F (135°C) for 15-20 minutes depending on thickness. -
Cool down:
Let the pieces cool completely inside the oven or on the counter. Do not touch them while hot as the clay is still fragile. -
Glaze:
Once cool, apply a thin layer of gloss glaze to the eyes and mouth to make them shine. You can leave the rest matte for a more realistic food texture. -
Attach chains:
Use pliers to open a jump ring, thread it through the eye pin loop, and attach your lobster clasps or keychain hardware. Close the ring securely.
Personalized Initials
Stamp or carve the first letter of each friend’s name on the back of the charms before baking for a truly custom BFF gift.
Now you and your best friend have a matching set that is as inseparable as the two of you

The Complete Guide to Pottery Troubleshooting
Uncover the most common ceramic mistakes—from cracking clay to failed glazes—and learn how to fix them fast.
Split Cookie Bestie Keychains

Celebrate your unbreakable bond with these adorable, realistic chocolate chip cookie keychains that fit perfectly together just like you and your bestie. The textured finish and tiny chocolate chips make them look good enough to eat, creating a sweet keepsake you can carry everywhere.
Step-by-Step
Materials
- Light brown or beige polymer clay (cookie dough color)
- Dark brown polymer clay (chocolate chip color)
- Translucent liquid polymer clay (optional)
- Soft pastels (browns and ochres) for shading
- Paintbrush for shading
- Texture tool (toothbrush or stiff brush)
- Needle tool or toothpick
- Round cookie cutter (approx. 1.5 – 2 inches)
- Small blade or X-Acto knife
- 2 Gold keychain rings with chains
- 2 Gold screw eye pins
- Needle nose pliers
- Oven for baking
Step 1: Mixing the Dough
-
Prepare the dough color:
Start by conditioning your light brown clay. If you don’t have the perfect cookie dough shade, mix a large amount of white with a small amount of brown and a tiny pinch of yellow ochre until you achieve a warm, tan color. -
Create chocolate chips:
Take your dark brown clay and roll it into a thin snake. Chop this snake into tiny, uneven bits to resemble real chocolate chips. I like to make them slightly different sizes for realism. -
Form the cookie base:
Roll your light brown clay into a smooth ball, then flatten it into a thick disk. It should be about 1/4 inch thick to make sure it’s sturdy enough for a keychain.
Step 2: Shaping and Selling the Illusion
-
Texture the surface:
Using a clean toothbrush or a stiff texture brush, tap vigorously all over the top and sides of your clay disk. This stippling effect mimics the airy, baked texture of a real cookie. -
Create the split:
Use your blade to cut a triangular wedge out of the circle. Don’t make the cut perfectly straight; give it a slightly jagged, organic edge so it looks like it was broken off naturally. -
Refining the break:
Pull the two pieces apart gently. Use a needle tool to pick at the raw edges you just cut, pulling small bits of clay outward to simulate the crumbly texture of the inside of a cookie. -
Adding the chips:
Press your tiny dark brown bits into the surface of both clay pieces. Push them in firmly so they are embedded but still protruding slightly. -
Re-texturing:
Go back over the areas around the chocolate chips with your texture tool to ensure there are no smooth fingerprints left behind.
Sticky Situation?
If your clay is too soft and picking up fingerprints, pop it in the fridge for 10 minutes. A firmer clay holds texture details much better.
Step 3: Baking and Assembly
-
Add shading:
Scrape some brown and orange soft pastel into a fine dust. Use a dry brush to dust the edges of the cookie pieces and the top surfaces lightly to give them a ‘baked’ golden-brown appearance. -
Insert hardware:
Screw the eye pins into the top edge of each cookie piece. For extra security, remove the pin, dip the tip in a tiny bit of liquid clay or bake-and-bond, and screw it back in. -
Bake:
Place your pieces on a ceramic tile or parchment paper. Bake according to your clay manufacturer’s instructions (usually 275°F for 15-30 minutes). -
Cool down:
Allow the clay pieces to cool completely before handling. They are fragile when hot and reach their full hardness only after cooling. -
Attach the keychains:
Using your needle nose pliers, open the jump ring at the end of the keychain assembly. Loop it through the eye pin on your cookie. -
Secure the jump ring:
Close the jump ring securely using the pliers. Make sure the ends of the ring meet flush so the chain doesn’t slip off. -
Final check:
Give the keychain a gentle tug to ensure everything is secure. Verify that the two cookie halves still fit together nicely like a puzzle.
Realistic Crumb Hack
Mix some translucent liquid clay with dry pastel shavings to create a ‘melted chocolate’ smear near the chips for extra delicious detail.
Now you have a charming set of matching accessories to surprise your favorite person with
Donut and Donut Hole Pair
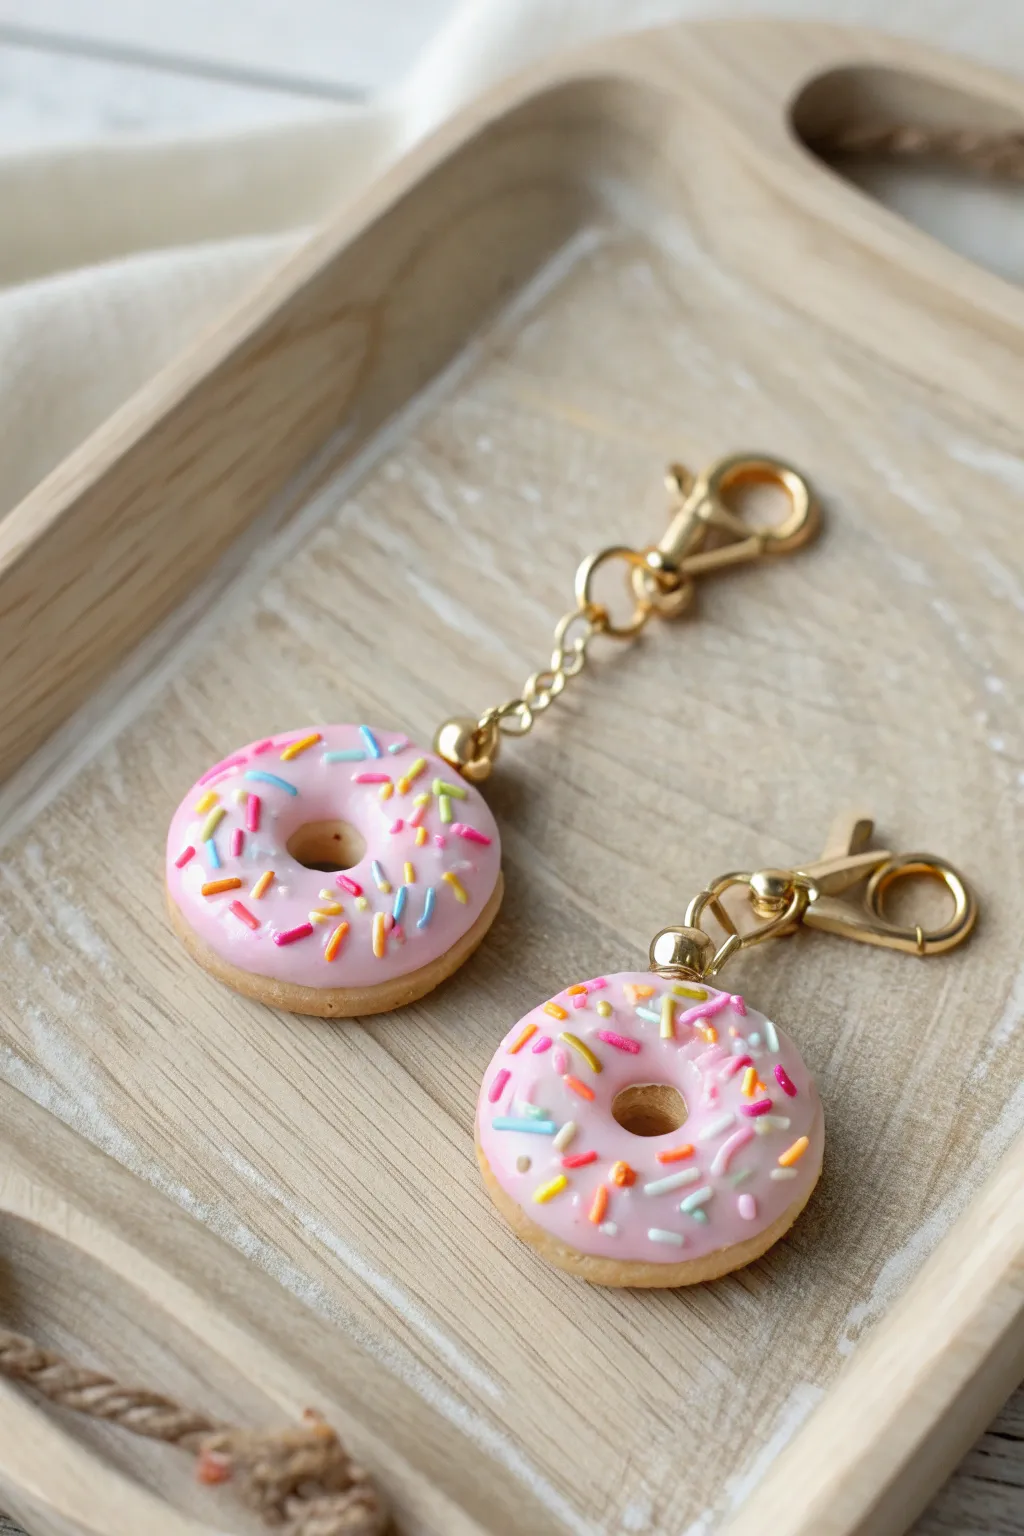
Create this adorable pair of miniature donut charms, perfect for sharing with your best friend. These realistic-looking polymer clay treats feature a glossy pink glaze and tiny rainbow sprinkles suspended on elegant gold hardware.
Step-by-Step Tutorial
Materials
- Light tan or beige polymer clay (dough)
- Pink polymer clay (frosting)
- Pre-made polymer clay sprinkles (or assorted colored scraps)
- Translucent liquid polymer clay (Liquid Sculpey or Fimo Liquid)
- Gold screw eye pins (2 small)
- Gold keychain findings (lobster clasp with chain)
- Needle tool or toothpick
- Small circle cutter (approx. 1 inch)
- Tiny circle cutter or straw (for the donut hole)
- Soft pastel chalks (orange/brown)
- Paintbrush (soft)
- Gloss glaze or UV resin
- Jewelry pliers
- Toaster oven dedicated to clay
Step 1: Shaping the Donut Base
-
Condition the Clay:
Begin by thoroughly kneading your light tan clay until it is soft and pliable. Roll it into a smooth ball to remove any air bubbles or cracks. -
Flatten Slightly:
Gently press the ball down against your work surface with your palm to create a thick disc shape. It should still be quite rounded on the edges, resembling a real donut. -
Create the Holey Center:
Use your tiny circle cutter or a small straw to punch a hole directly in the center of the disc. If the clay distorts, gently reshape the donut back into a circle. -
Texture the Surface:
Take a toothbrush or a ball of aluminum foil and lightly tap it all over the surface of the donut. This creates a realistic baked texture that isn’t too perfectly smooth. -
Add Baked Effects:
Shave a small amount of orange and brown soft pastel chalk into a powder. Use a soft, dry paintbrush to dust the edges and bottom of the donut, giving it a golden-brown, baked appearance. -
Create the Indent:
Before adding frosting, I sometimes like to use a ball tool to press a very shallow trench around the top surface where the glaze will sit, ensuring it doesn’t run down the sides too much.
Frosting Runny?
If your liquid clay mix is too thin, let it sit on a piece of cardboard for 10 minutes. The paper will leech out some plasticizer, thickening the mix.
Step 2: Frosting and Sprinkles
-
Prepare the Frosting:
Mix a small amount of pink clay with translucent liquid clay in a small cup or on a tile. Stir until you achieve a consistency similar to heavy cream or thick frosting. -
Apply the Glaze:
carefully drip the liquid clay mixture onto the top of your textured donut. Use a needle tool to guide the ‘frosting’ towards the edges, letting it drip naturally in a few spots. -
Add Sprinkles:
While the liquid clay is still wet, gently drop your pre-made polymer clay sprinkles onto the surface using tweezers for precise placement. -
Insert Hardware:
Screw a small gold eye pin into the top side of the donut. For extra security, you can dip the tip of the screw in a tiny bit of liquid clay before inserting it. -
Bake:
Place your donuts on a ceramic tile or baking sheet lined with parchment paper. Bake according to your clay manufacturer’s instructions (usually 275°F/135°C for 15-30 minutes).
Step 3: Finishing Touches
-
Cool Down:
Let the donuts cool completely inside the oven or on the counter before handling them. The clay is fragile while hot. -
Glaze for Shine:
Apply a thin coat of gloss varnish or UV resin specifically over the pink frosting area. This mimics the wet look of real sugar glaze. -
Attach Keychain:
Using two pairs of jewelry pliers, twist open the jump ring at the end of your gold keychain finding. -
Connect Pieces:
Loop the open jump ring through the eye pin embedded in your donut, then twist the jump ring closed securely so there is no gap. -
Final Check:
Ensure the hardware is tight and the glaze is fully dry before gifting one half of the pair to your best friend.
Pro Tip: Realistic texture
Use a specialized shading brush to apply the pastel dust only on the ‘high points’ of the texture for a freshly-fried look.
Now you have a charming set of matching accessories ready to show off your friendship style


What Really Happens Inside the Kiln
Learn how time and temperature work together inside the kiln to transform clay into durable ceramic.
Pizza Slice Set for Two (or More)
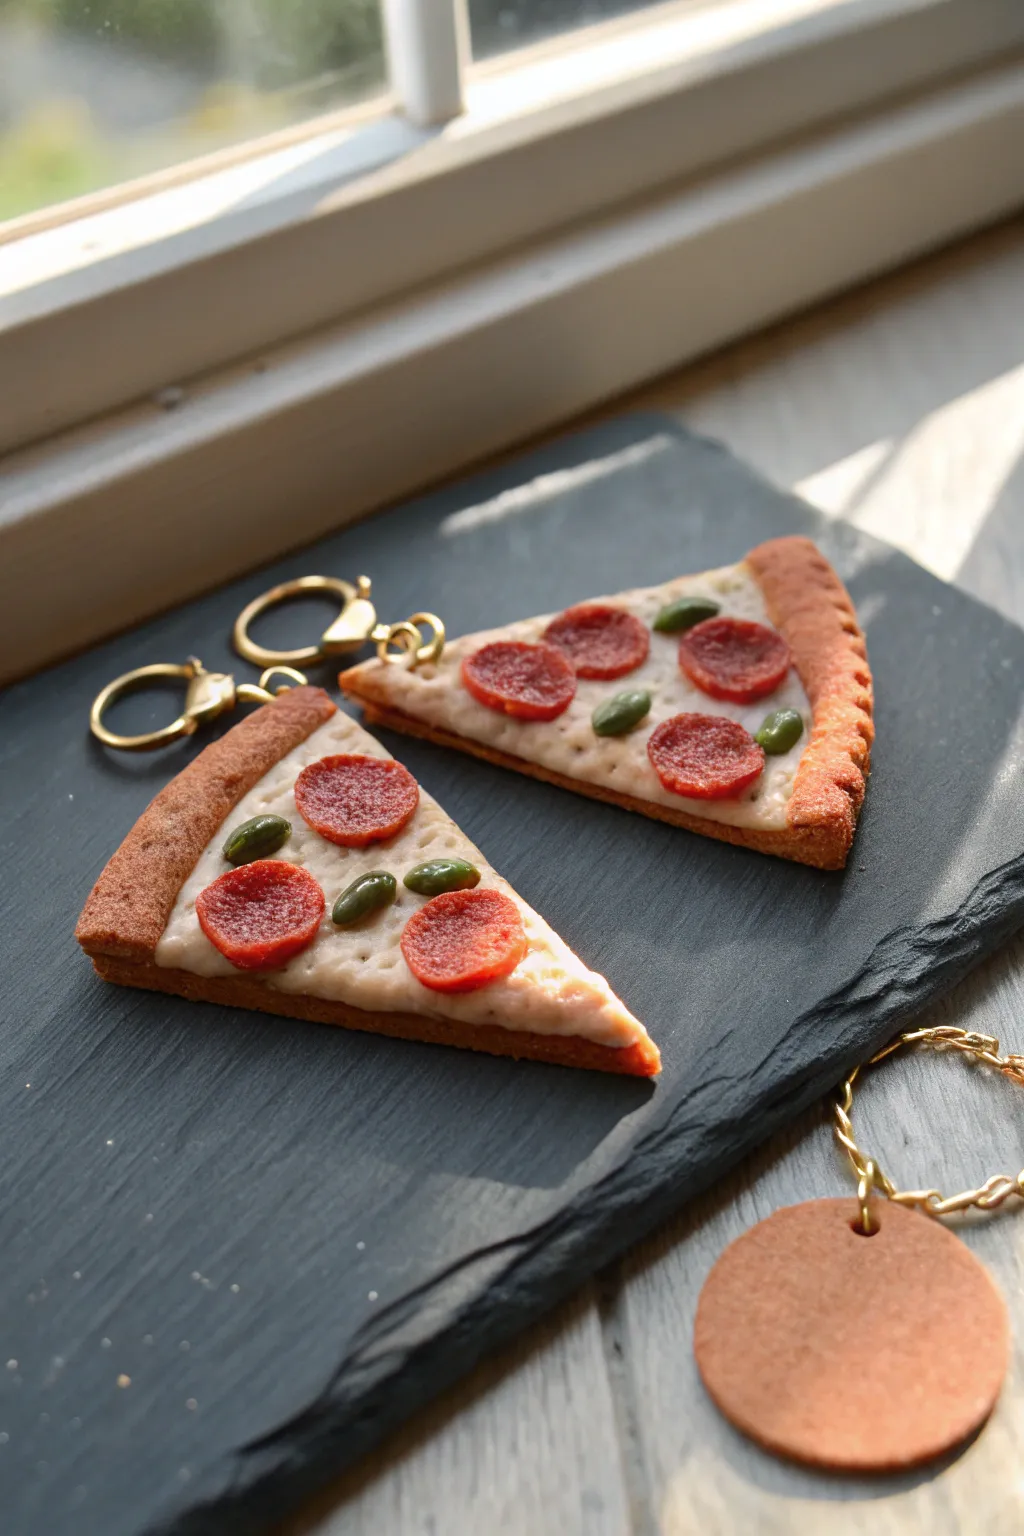
These hyper-realistic pizza slice keychains are the ultimate symbol of friendship—after all, sharing a pizza is basically a sacred bond. With textured crusts, melty-looking cheese, and cute pepperoni toppings, these durable charms fit together perfectly or stand alone as tasty accessories.
Step-by-Step Guide
Materials
- Polymer clay (dough color/beige, white, translucent, red, green)
- Liquid polymer clay (translucent or white)
- Pastel chalks (browns, oranges, yellows) for shading
- Texture tools (toothbrush, needle tool, crumpled foil)
- Rolling pin or pasta machine
- Blade or X-acto knife
- Gold keychain findings (jump rings and clasps)
- Gloss glaze (optional)
- Small paintbrush
Step 1: Creating the Crust Base
-
Mix the Dough Color:
Start by conditioning your beige clay. If it’s too pale, mix in a tiny, pinhead-sized amount of brown or translucent clay to give it a more realistic, baked-dough appearance. -
Shape the Slices:
Roll the clay into a thick sheet, about 1/4 inch thick. Cut out a large triangle, then use your blade to slice it down the middle to create two identical, matching slices. -
Texture the Bottoms:
Before working on the top, gently press a clean toothbrush or a ball of crumpled foil against the back and sides of the slices to create a bread-like texture. -
Build the Crust Edge:
Roll a snake of the same dough-colored clay. Attach it to the wide top edge of each triangle, smoothing the seam on the back but leaving a distinct raised lip on the front to form the crust. -
Pre-shading the Crust:
Using a soft brush, dust the raised crust edge and the sides with crushed yellow and light brown chalk pastels. I like to concentrate darker brown on the very edges to mimic a crispy oven bake.
Fixing the Cheese
Is your cheese paste too runny? It might flow off the slice while baking. Let the mixture sit on a piece of paper for 20 minutes before applying; the paper will leech out excess oils and thicken it.
Step 2: Adding Sauce and Cheese
-
Prepare the Cheese Mix:
Mix white polymer clay with a significant amount of translucent clay (about a 50/50 ratio). This ensures the cheese looks slightly see-through and greasy when cured, rather than like solid plastic. -
Mix Liquid Clay:
Chop your cheese mixture into tiny bits and mix it into liquid polymer clay until you have a thick, spreadable paste. If you don’t have liquid clay, soften the solid block with baby oil until it’s spreadable. -
Spread the Cheese:
Using a needle tool or toothpick, spread the cheese mixture onto the triangular area of the slices, bringing it right up to the crust edge. texture it by swirling the tool to make it look melted and bubbly. -
Add Sauce Tint:
Grate a tiny bit of orange chalk pastel onto the wet cheese layer in random spots to simulate tomato sauce peeking through from underneath.
Make it a Set
Use a circle cutter to make a round ‘tag’ from the leftover crust-colored clay (as seen in the photo). You can stamp your bestie’s initial into this tag before baking for a personalized touch.
Step 3: Toppings and Assembly
-
Make the Pepperoni:
Mix red clay with a touch of brown and translucent. Roll it into a thin log (cane). Place the log in the fridge for 10 minutes to firm up, then slice very thin rounds. -
Texture the Meat:
Press a piece of coarse sandpaper or a toothbrush onto each tiny pepperoni slice to give it a meaty texture before placing them onto your cheese layer. -
Create Green Peppers:
Take a small pinch of green clay and roll tiny, oblong shapes. Press a needle tool into the center of each to create a slight indentation, mimicking the curve of a diced bell pepper. -
Arrange Toppings:
Press the pepperoni and peppers gently into the liquid cheese mixture so they look embedded rather than just sitting on top. -
Insert Hardware:
Insert a screw-eye pin into the top corner of the crust (or heavy-duty eyepin). Ensure it goes deep into the clay for security. -
Final Texture Check:
Use a needle tool to stipple the cheese around the toppings one last time to ensure everything looks cohesive and melted together.
Step 4: Baking and Finishing
-
Bake:
Bake according to your clay package directions (usually 275°F/130°C for 15-30 minutes). Use an oven thermometer to ensure you don’t burn the light-colored cheese. -
Cool Down:
Le the slices cool completely before handling. The clay is fragile when hot. -
Final Glaze (Optional):
If you want that greasy pizzeria look, dab a very thin layer of gloss glaze specifically on the pepperoni slices and a few spots on the cheese. -
Attach Chains:
Open your gold jump rings with pliers and attach the pizza slices to the keychain clasps.
Now you have a permanent slice of happiness to share with your favorite person
Sun and Moon Bestie Charms
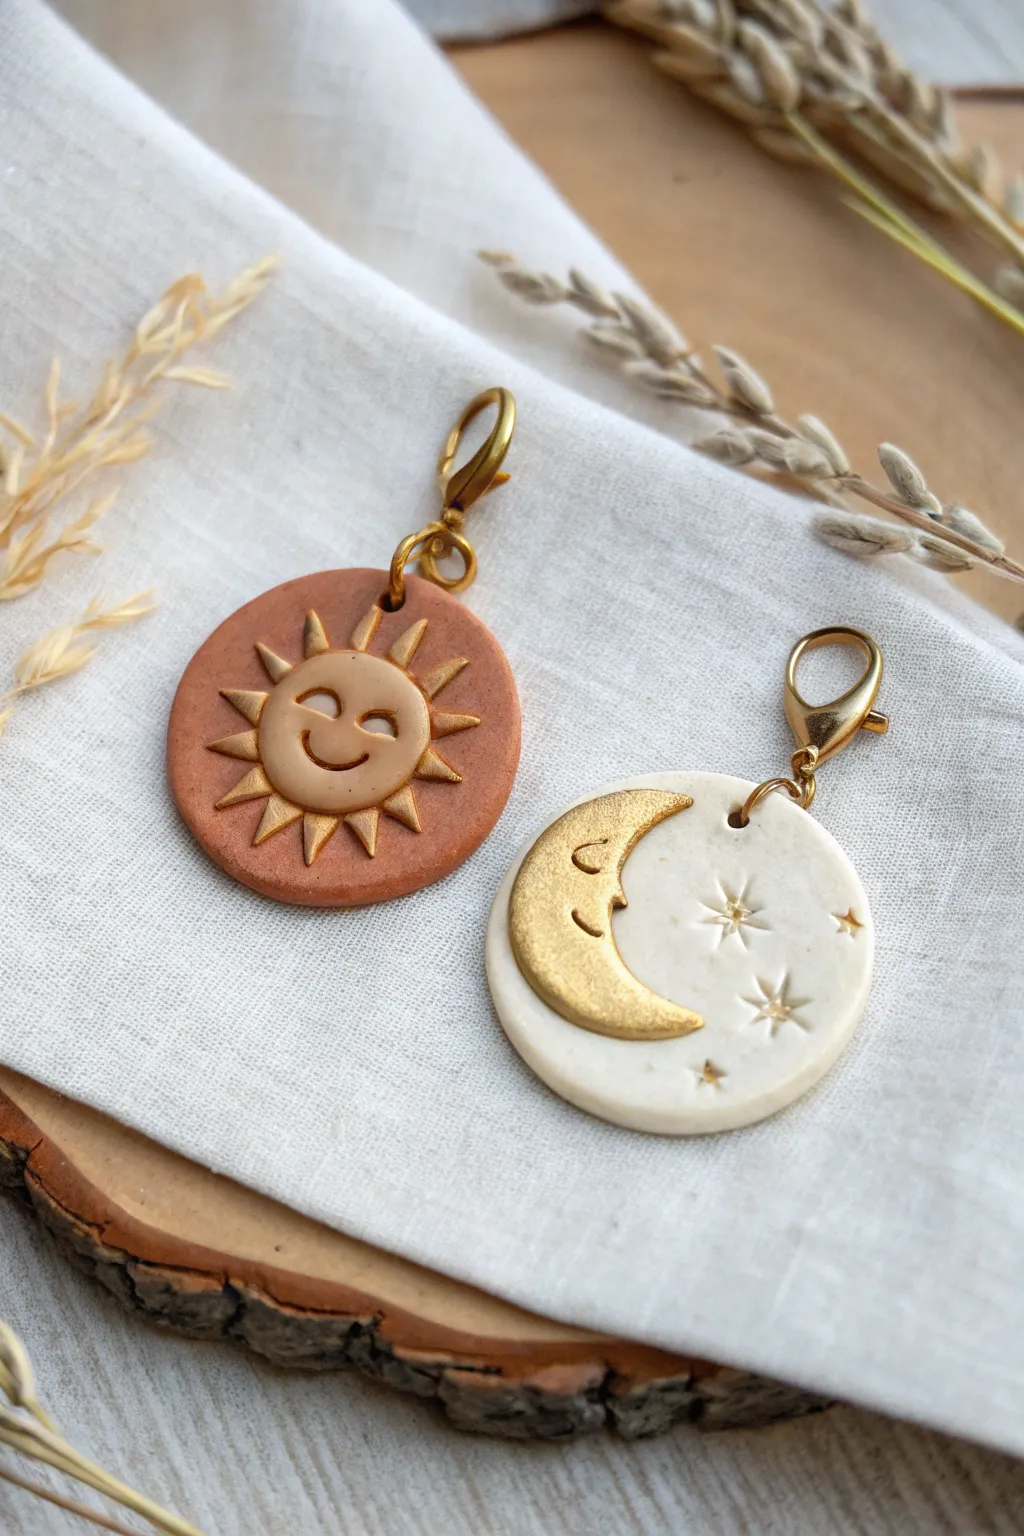
Celebrate your friendship with these complementary celestial charms, featuring a warm terracotta sun and a serene white moon. These polymer clay pieces are accented with brilliant gold touches, making them the perfect matching set for necklaces, keychains, or bag pulls.
Detailed Instructions
Materials
- Polymer clay: terracotta, white, and a beige/sand tone
- Gold acrylic paint or gold gilding wax
- Round clay cutters (approx. 1.5 inch diameter)
- Small detail knife or X-Acto blade
- Needle tool or toothpick
- Small ball stylus tool
- Rolling pin (acrylic roller)
- Gold jewelry jump rings (6-8mm)
- Gold lobster claw clasps
- Jewelry pliers
- Baking sheet and parchment paper
- Oven
Step 1: Creating the Sun Base
-
Condition and Roll:
Start by conditioning your terracotta-colored clay until it is soft and pliable. Roll it out into a sheet about 3mm thick to ensure the charm is sturdy. -
Cut the Circle:
Use your round cutter to punch out a clean circle for the sun charm’s base. Smooth the edges with your finger if needed. -
Make the Sun Face:
Take a small ball of the beige or sand-colored clay. Flatten it into a slightly smaller, thick disc and place it exactly in the center of your terracotta circle. -
Create the Rays:
Using the same beige clay, form several tiny, identical tear-drop shapes. Arrange these radially around the central face disc to form the sun’s rays. -
Sculpt Features:
With a needle tool or small knife, gently press indentations into the center disc to form two smiling eyes and a curved mouth. I find using a gentle rocking motion creates a cleaner smile line. -
Add Texture:
Use the needle tool to press lines into the clay rays, giving them dimension. -
Pierce the Top:
Before baking, use a tool to create a hole near the top edge of the terracotta circle large enough for your jump ring.
Clean Lines
Keep a pack of baby wipes or rubbing alcohol nearby. Wiping your hands and tools before switching from the terracotta clay to the white clay prevents unwanted color transfer.
Step 2: Crafting the Moon Base
-
Base Preparation:
Clean your hands and roller thoroughly to avoid transferring dark clay colors. Condition and roll out the white clay to the same 3mm thickness. -
Cut the Circle:
Punch out a matching circle using the same round cutter you used for the sun. -
Form the Crescent:
Roll a small snake of white clay, flatten it, and shape it into a crescent moon profile. You can also press a smaller circle cutter into a flat piece of clay to ‘bite’ out a perfect crescent shape. -
Attach the Moon:
Press the crescent shape onto the left side of the white circle base, blending the edges slightly if you prefer a seamless look, or leaving it raised for relief. -
Sculpt Moon Face:
Like the sun, use your needle tool to carve a sleeping eye (a simple U-shape with eyelashes) and a small smile into the crescent profile. -
Star Impressions:
On the empty space of the white circle, use a small star-shaped stamp or carefully carve starburst patterns using your X-Acto knife. -
Pierce the Hole:
Create the hole for the hardware at the top of the charm.
Step 3: Details & Assembly
-
Bake:
Place both charms on parchment paper and bake according to your clay package instructions (usually 275°F/135°C for 15-30 minutes). Let them cool completely. -
Apply Gold Accents:
Once cool, use a fine brush to apply gold acrylic paint or rub gold gilding wax onto specific areas: the crescent moon, the sun’s rays, and inside the star indentations. -
Let Dry:
Allow the paint or wax to dry fully. If you used paint, a second coat might be needed for opacity. -
Seal (Optional):
For extra durability, you can apply a thin layer of matte or gloss glaze over the painted areas. -
Attach Hardware:
Use two pairs of pliers to twist open a jump ring. Thread it through the hole in the clay charm. -
Add Clasp:
Slide the lobster claw clasp onto the open jump ring, then twist the ring closed securely.
Make it Sparkle
Embed tiny rhinestone crystals into the center of the stars on the moon charm before baking. Press them in deeply so the clay holds them tight as it cures.
Clip these onto your bags and enjoy showing off your celestial bond

TRACK YOUR CERAMIC JOURNEY
Capture glaze tests, firing details, and creative progress—all in one simple printable. Make your projects easier to repeat and improve.
Cloud and Raindrop Matching Pair
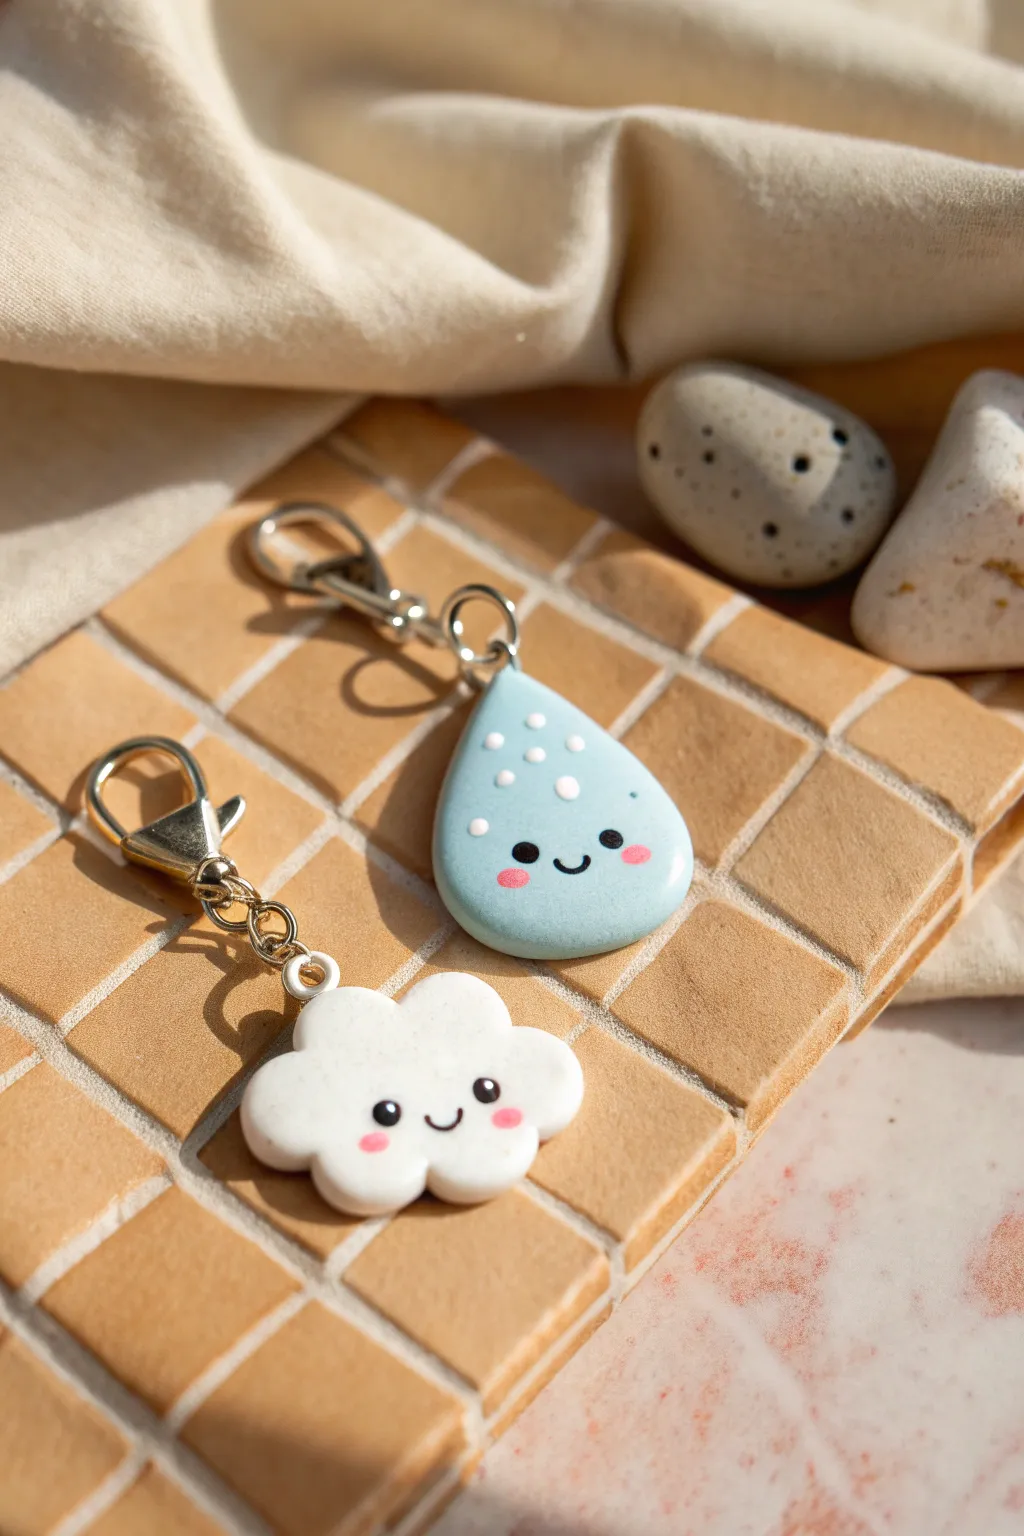
Celebrate your friendship with this adorable weather-themed duo featuring a fluffy white cloud and a cheerful blue raindrop. These polymer clay charms are perfect for matching keychains, capturing a cute and bubbly aesthetic that’s easy to customize.
Step-by-Step
Materials
- White polymer clay
- Light blue polymer clay
- Black acrylic paint
- Pink acrylic paint or pastel chalk
- Small dotting tool or toothpick
- Eye pins (silver or gold)
- Jump rings and lobster clasp keychains
- Gloss glaze or UV resin (optional)
- Small rolling pin
- X-acto knife or clay blade
- Fine detail paintbrush
Step 1: Shaping the Cloud
-
Condition the white clay:
Start by kneading a chunk of white polymer clay until it is soft and pliable, ensuring there are no air bubbles trapped inside. -
Form the base:
Roll the clay into a smooth ball, then flatten it gently into a thick disc, about 5-6mm thick. -
Create the fluff:
To make the scalloped cloud edges, roll 5-6 smaller balls of white clay in varying sizes. -
Attach the edges:
Press these small balls around the perimeter of your main disc. Use your fingers or a silicone tool to blend the seams on the back so it becomes one solid unit, while keeping the front bubbly and defined. -
Insert hardware:
Gently push a metal eye pin into the top center of the cloud. If the pin is too long, trim it first with wire cutters.
Secure That Pin!
Dip the end of your eye pin in liquid clay or super glue before inserting it into the raw clay. This acts as an anchor so the pin won’t pull out after baking.
Step 2: Shaping the Raindrop
-
Condition blue clay:
Knead a piece of light blue clay until soft. I prefer a pastel baby blue for a softer look. -
Form the drop shape:
Roll the clay into a ball, then pinch and roll one side between your fingers to create a tapered point, forming a classic teardrop shape. -
Flatten gently:
Press the teardrop down on your work surface to flatten it so it matches the thickness of your cloud charm, ensuring a uniform look. -
Smooth the surface:
Check for fingerprints and gently rub them away with a tiny bit of baby oil or cornstarch if needed. -
Insert hardware:
Insert your eye pin into the pointed top of the raindrop, ensuring it goes in straight.
Step 3: Baking & Decoration
-
Bake the charms:
Place both pieces on a baking sheet lined with parchment paper. Bake according to your clay package instructions (usually around 275°F/135°C for 15-30 minutes). -
Cool down:
Let the pieces cool completely before painting. Painting on warm clay can make the paint dry too fast and look clumpy. -
Paint the faces:
Using a fine detail brush or a dotting tool dipped in black acrylic paint, add two small eyes and a simple U-shaped smile to the lower half of both charms. -
Add rosy cheeks:
Dip a dotting tool into pink paint and dab small circles just below the eyes on each cheek. -
Decorate the raindrop:
To convey the ‘wet’ look, use a dotting tool and white paint (or white clay pieces applied before baking) to add random polka dots on the upper part of the blue drop. -
Seal the charms:
Once the paint is fully dry, coat both charms with a layer of gloss glaze or UV resin to protect the paint and give them a shiny, professional finish. -
Attach keychains:
Open a jump ring using pliers, slide it through the eye pin loop, and attach your lobster clasp keychain before closing the ring securely.
Fixing Debris
If you see dust specks on your light clay before baking, use a Q-tip dipped in rubbing alcohol or acetone to gently wipe the surface clean.
Enjoy gifting one half of this weather-perfect set to your best friend
Magnet-Back Charms That “Click” Together
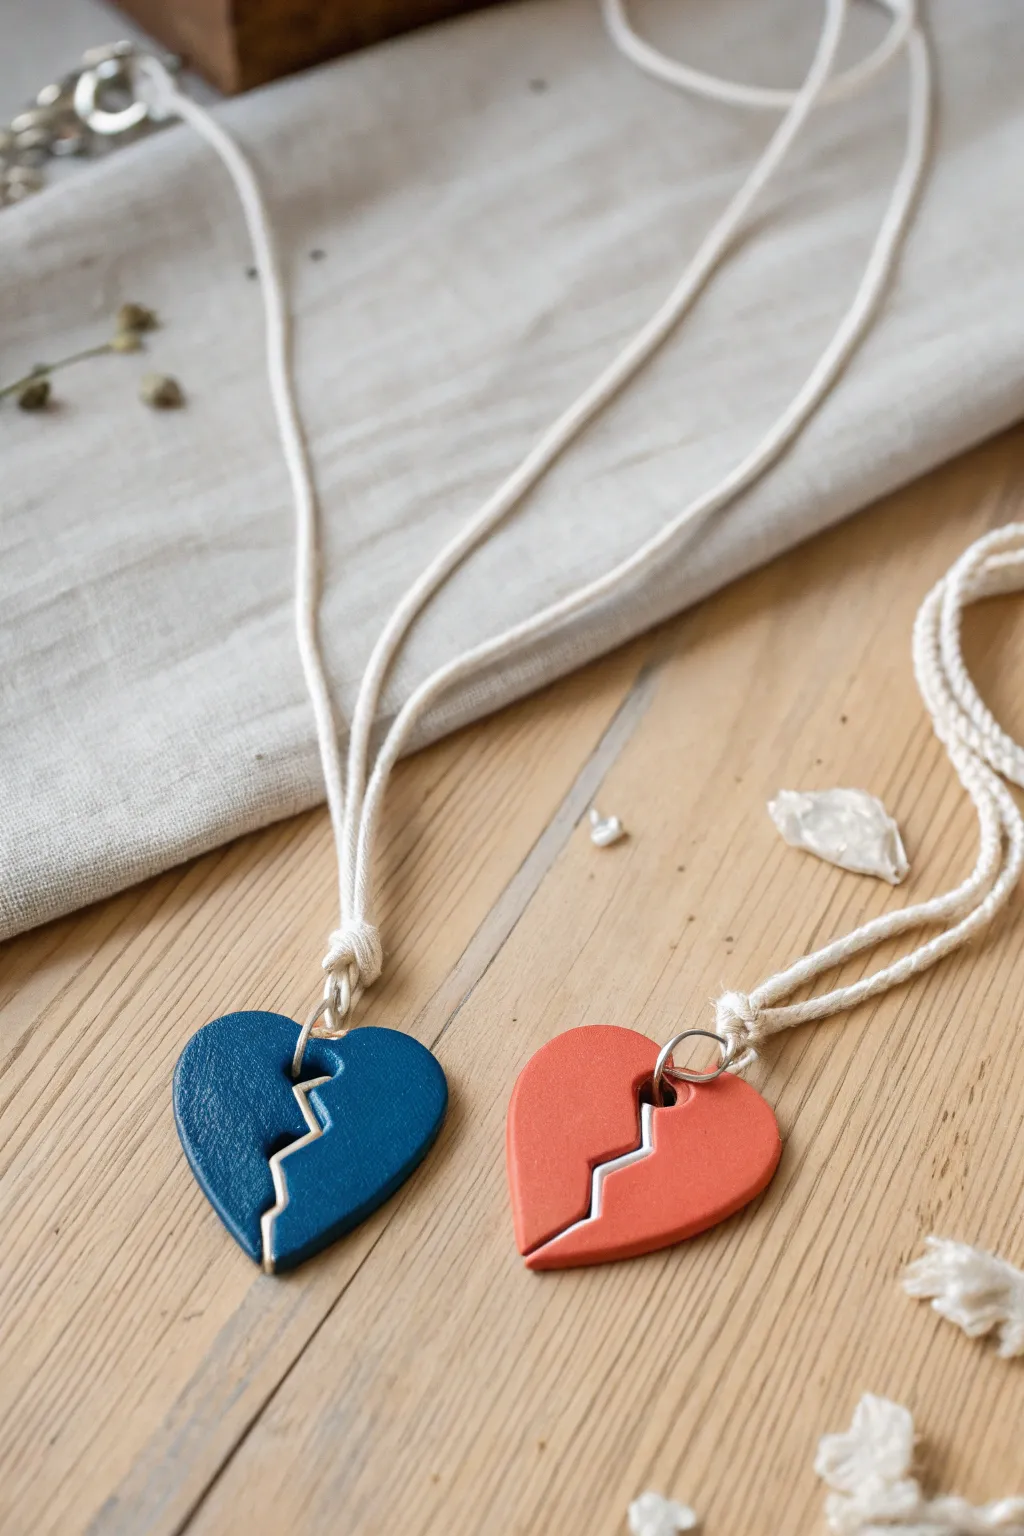
These charming polymer clay pendants put a clever spin on the classic BFF necklace by using hidden magnets to satisfyingly snap together. The minimalist zigzag crack and soft, matte finish give them a modern look that serves as a secret handshake between best friends.
How-To Guide
Materials
- Polymer clay (Deep Blue and Terracotta Orange)
- Small but strong neodymium craft magnets (approx. 3mm diameter)
- Clay roller or pasta machine
- Heart-shaped clay cutter (medium size)
- X-acto knife or flexible clay blade
- Ball stylus tool or toothpick
- Super glue (cyanoacrylate)
- White acrylic paint (optional for the edge)
- Fine grit sandpaper (400-600 grit)
- Clear jewelry varnish (matte or satin)
- Waxed cotton cord (cream or white)
- 4 large jump rings (silver finish)
- Parchment paper
Step 1: Shaping the Hearts
-
Condition the clay:
Begin by warming the blue and orange clay in your hands separately until they are pliable and soft. This conditioning step is crucial to prevent cracking later. -
Roll out the slab:
Roll each color out onto parchment paper to a thickness of about 1/4 inch (6mm). You want them slightly thicker than a standard charm to accommodate the magnets hidden inside. -
Cut the shapes:
Use your heart-shaped cutter to punch out one heart from the blue slab and one from the orange slab. Gently push them out of the cutter, smoothing any fingerprints lightly with your thumb. -
Create the signature break:
Take your flexible blade or X-acto knife and cut a jagged, zigzag line down the center of each heart. I find a simple three-point zigzag works best for structure. -
Separate the halves:
Gently pull the halves apart. For this project, you will use the left half of the blue heart and the right half of the orange heart for one set, or keep the matching colors together depending on your preference.
Step 2: Embedding the Magnets
-
Mark magnet spots:
On the cut edge of the ‘broken’ side, use a tool to verify where the magnets will sit so they align perfectly. Mark a small dot in the center of the zigzag edge on both mating pieces. -
Create the recessed hole:
Using a tool slightly smaller than your magnet, carefully dig a small hole into the clay edge at your marked spot. Test fit the magnet; it should sit flush or slightly below the surface. -
Check polarity:
Before gluing, hold the magnets together to see which sides attract. Mark the back of the magnets with a permanent marker so you don’t accidentally glue them in repelling each other. -
Secure the magnets:
Place a tiny drop of super glue into the recessed hole and press the magnet in. Once dry, smooth a tiny, paper-thin layer of clay over the magnet to hide it completely, smoothing the seam with your finger. -
Pierce the jump ring hole:
Use a toothpick or dedicated clay piercer to create a hole at the top of each heart lobe for the jump ring. Ensure the hole is wide enough for your cord but not too close to the edge.
Magnet Issues?
If the magnets won’t stay put, scratch the back of the magnet with sandpaper before gluing to give the adhesive more grip on the smooth metal surface.
Step 3: Baking and Finishing
-
Bake the pieces:
Place your heart halves on a parchment-lined baking sheet. Bake according to your brand of polymer clay instructions (usually around 275°F/135°C for 30 minutes). -
Cool and sand:
Let the pieces cool completely. Once hard, use fine-grit sandpaper to smooth the flat surfaces and especially the cut ‘broken’ edges to sharpen the zigzag definition. -
Paint the edge (optional):
To make the crack pop like in the photo, paint the zigzag edge with white acrylic paint. If you covered your magnet with clay, this helps camouflage that area even more. -
Seal the charm:
Apply a thin coat of matte or satin varnish to protect the surface and the paint. Let this dry fully before handling. -
Attach hardware:
Open a large jump ring with pliers, loop it through the hole in the clay, and close it securely. -
Add the cord:
Take your cream cotton cord and fold it in half. Feed the looped end through the jump ring, then pull the loose ends through that loop to create a lark’s head knot. -
Final adjustments:
Tie the ends of the cord to your desired length. Now, bring the two necklaces together and watch them snap into a whole heart.
Make it Sparkle
Mix a small amount of translucent liquid clay with fine glitter and fill the ‘crack’ line instead of painting it white for a geode crystal effect.
Wear these half-hearts with pride knowing they will always find their way back to each other.
Interlocking Yin-Yang Bestie Pendant
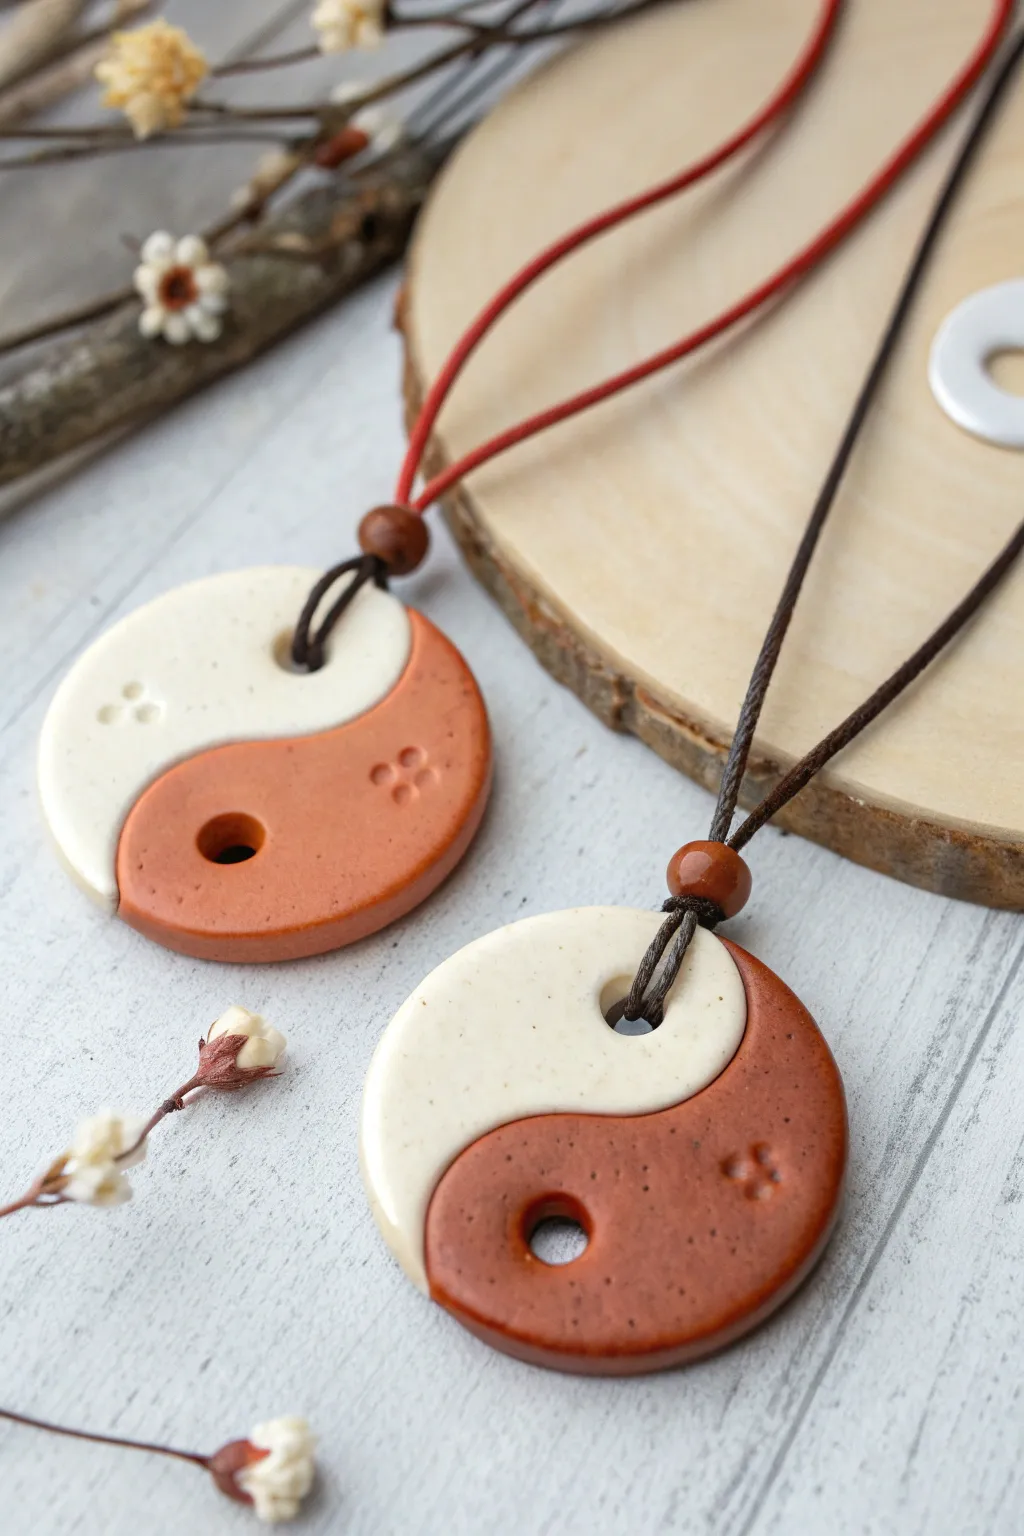
Celebrate balanced friendship with these handcrafted ceramic-style yin-yang pendants. The warm terracotta and creamy white glazes create an earthy, organic look that feels both modern and timeless.
Step-by-Step
Materials
- Polymer clay or air-dry clay (Terracotta color and White)
- Acrylic rolling pin
- Circle cookie cutter (approx. 1.5 – 2 inches diameter)
- X-Acto knife or clay blade
- S-shaped paper template or freehand tool
- Small straw or cocktail stick (for holes)
- Dotting tool or small ball stylus
- Glossy varnish or glaze (ceramic effect)
- Fine-grit sandpaper
- Brown wax cord
- Wooden beads (dark brown)
- Oven (if using polymer clay)
Step 1: Shaping the Base
-
Condition the clay:
Start by kneading your terracotta and white clay separately until they are soft and pliable. If you’re using air-dry clay, keep a damp cloth nearby to prevent it from drying out while you work. -
Roll out slabs:
Roll each color into a slab about 1/4 inch thick. Aim for an even thickness so the finished pendants have a substantial, ceramic-like weight. -
Cut the circles:
Using your circle cutter, punch out one full circle from the white clay and one from the terracotta clay.
Seam Separation?
If the two colors separate after baking, use a tiny amount of strong superglue or E6000 in the crack, then fill with a mix of glaze and clay dust to hide the repair.
Step 2: Creating the Yin-Yang Design
-
Mark the S-curve:
Lightly trace an ‘S’ curve down the center of each circle to divide it into two yin-yang tear shapes. You can make a small paper template first to ensure both are identical. -
Slice and separate:
carefully cut along your traced line with a sharp clay blade. Separate the halves. -
Swap and rejoin:
Take one white half and fit it puzzle-piece style against a terracotta half. Gently press the seam together. Smooth the back with your finger or a tool to bond them without distorting the round shape. -
Repeat for the second pendant:
Do the same with remaining halves so you have two identical mixed-color discs. I find flipping the disc over and smoothing the back seam really helps structural integrity.
Speckled Pottery Look
Before rolling, mix cracked black pepper or dried tea leaves into your white clay. This faux-stone effect mimics expensive speckled ceramic glazes perfectly.
Step 3: Detailing and Refining
-
Main suspension hole:
Use a straw to punch a clean hole near the top of the ‘head’ of the white teardrop section. This is where the cord will eventually go. -
Decorative accent hole:
Punch a second, purely decorative hole in the bottom center of the terracotta section. This mirrors the suspension hole and adds to the balanced aesthetic. -
Add texture details:
Using a small dotting tool, press a cluster of four tiny dots into the clay surface. Place one cluster on the white side and one on the terracotta side for a cute floral touch. -
Smooth the edges:
Dip your finger in a little water (for air-dry) or baby oil (for polymer) and run it around the outside edge to soften any sharp cuts.
Step 4: Finishing and Assembly
-
Bake or dry:
Cure your pendants according to the clay package instructions. If baking polymer clay, tent it with foil to prevent scorching the white sections. -
Sand for perfection:
once fully cured and cooled, lightly sand the edges and surface with fine-grit sandpaper to mimic the smooth feel of fired pottery. -
Apply the glaze:
Brush on a thick coat of high-gloss varnish. This is crucial for achieving that ‘wet’ ceramic look seen in the photo. Let it dry completely. -
String the cord:
Cut a length of brown wax cord. Fold it in half and thread the loop through the top hole of the pendant. -
Secure the bail:
Pass the loose ends of the cord through the loop (lark’s head knot) and tighten it gently against the clay. -
Add the bead:
Thread a wooden bead onto both cord ends and slide it down until it sits just above the knot on top of the pendant. -
Tie off:
Finish the necklace by tying adjustable sliding knots or a simple clasp at the ends of the cord.
Now you have a matching set of meaningful jewelry to share with your closest friend
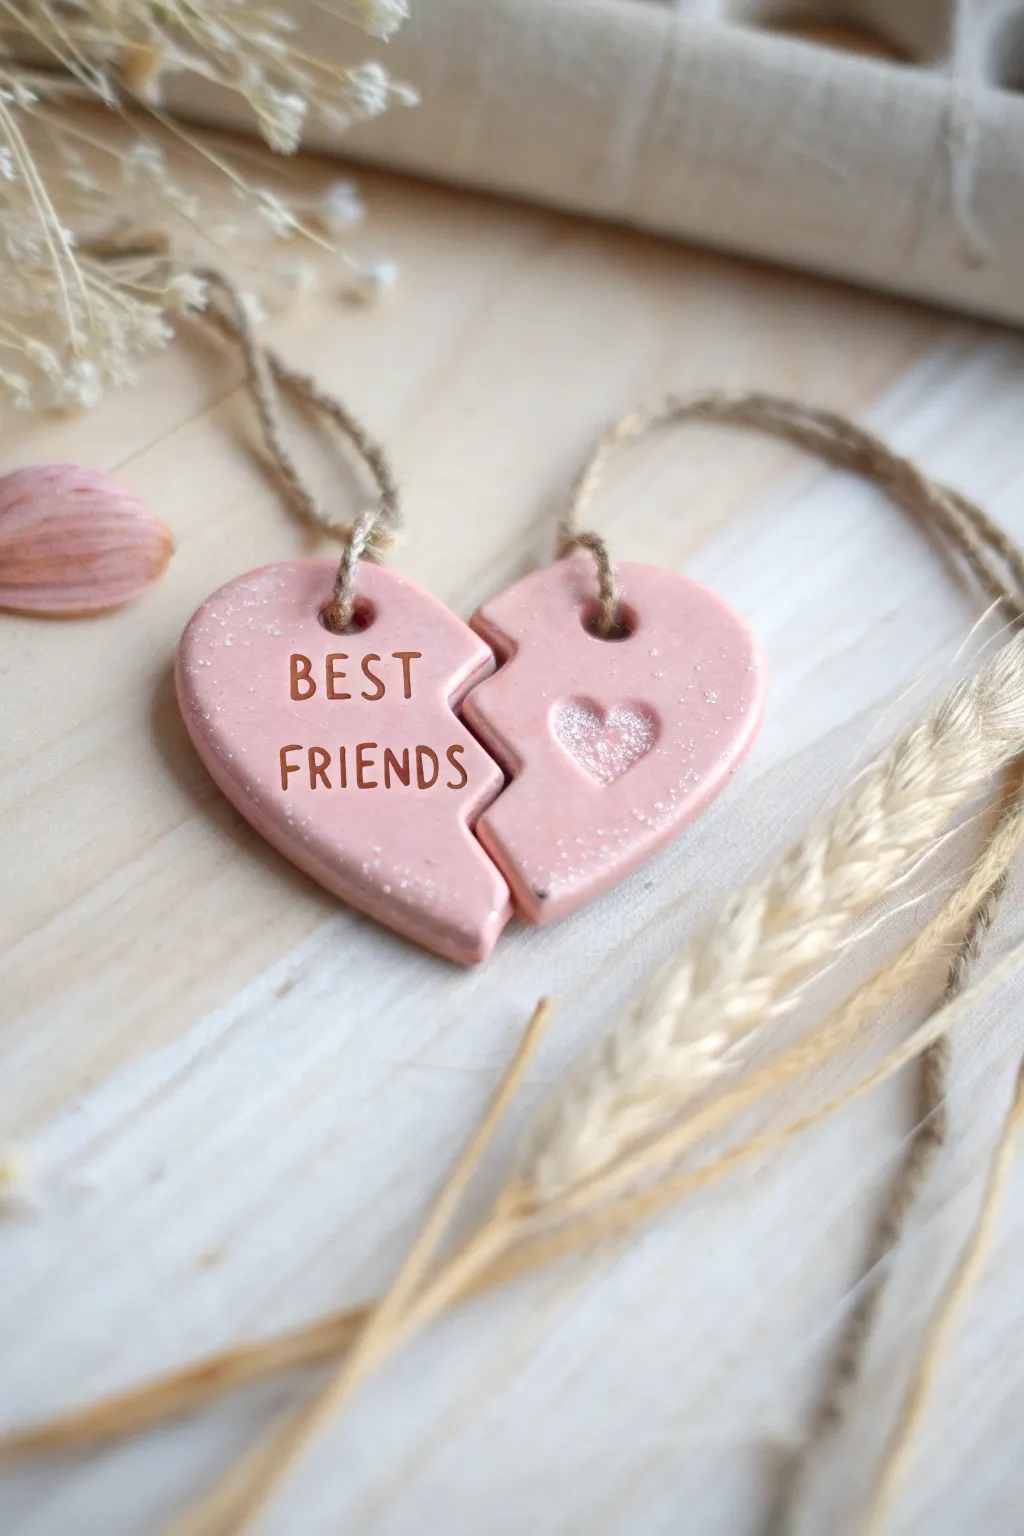
Best and Friends Text Split Tokens
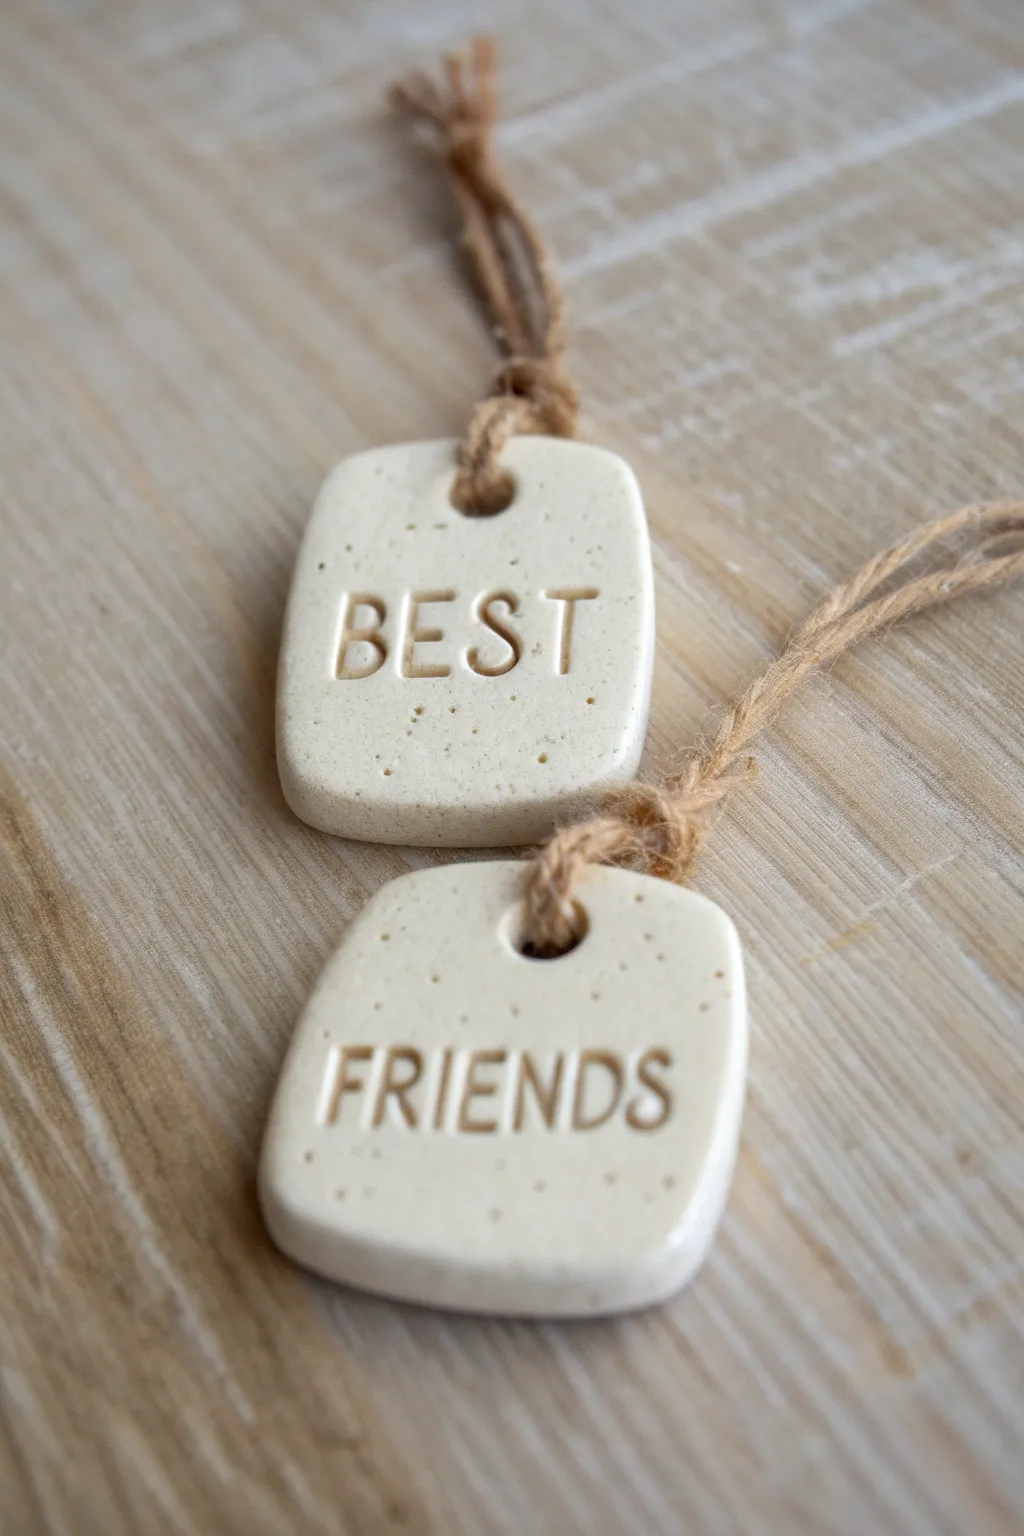
These charming rustic tokens, stamped with simple “BEST FRIENDS” text, make for a heartfelt and durable keepsake. The speckled stone effect gives them a natural, earthy elegance, perfect for tying onto gift wrap or stringing together as matching necklaces.
How-To Guide
Materials
- White polymer clay (speckled or granite finish)
- Small square clay cutter (rounded corners, approx. 1.5 inches)
- Alphabet letter stamps (serif font)
- A small straw or round tool (for hole punching)
- Natural jute twine
- Rolling pin or pasta machine
- Ceramic tile or baking sheet
- Fine-grit sandpaper (optional)
- Matte varnish (optional)
Step 1: Preparation and Shaping
-
Condition the Clay:
Begin by warming the speckled clay in your hands. Knead it thoroughly until it is soft, pliable, and free of cracks to ensure a smooth finish later. -
Roll it Out:
Using a rolling pin or clay pasta machine, flatten the clay into an even slab. Aim for a thickness of about 1/4 inch (6mm) so the tokens feel substantial and not brittle. -
Smooth the Surface:
Before cutting, gently run your finger over the surface to remove any fingerprints or air bubbles. A smooth base is crucial for clean stamping. -
Cut the First Shape:
Press your square cutter firmly into the clay to create the first token. Wiggle it slightly to ensure a clean cut before lifting it away. -
Cut the Second Shape:
Repeat the cutting process to create a matching second square. Place both shapes onto your baking tile or sheet.
Clean Impressions
Dust your letter stamps with a tiny bit of cornstarch or baby powder before pressing them into the clay. This prevents the stamps from sticking and ripping the clay.
Step 2: Stamping and Detailing
-
Align the Stamps:
Select the letters B-E-S-T for the first token. I find it helpful to arrange the stamps on the table first to visualize the spacing. -
Stamp ‘BEST’:
Gently press the letters into the center of the first square. Apply even pressure so the impression is deep enough to read but doesn’t distort the clay shape. -
Arrange the Second Word:
Gather the letters for F-R-I-E-N-D-S. This is a longer word, so you will need to be more mindful of spacing to fit it comfortably across the token. -
Stamp ‘FRIENDS’:
carefully stamp the second word into the other token, ensuring it is centered horizontally. -
Check for Distortions:
If the stamping process pushed the sides of the clay out slightly, gently reshape the squares with your fingers or a flat edge to return them to a perfect form. -
Create Hanging Holes:
Use a small straw or a round tool to poke a hole near the top center of each token. Make sure the hole is wide enough to accommodate the jute twine later. -
Soften the Edges:
Dip your finger in a tiny bit of water (or baby oil if using polymer clay) and run it along the cut edges to smooth out any sharpness.
Step 3: Baking and Assembly
-
Bake the Clay:
Place the tile with your tokens into the oven. follow the temperature and time instructions specific to your brand of clay, usually around 275°F (135°C) for 15-30 minutes. -
Cool Down:
Once baked, turn the oven off and open the door slightly. Let the clay cool completely inside the oven or on the counter to prevent thermal shock cracking. -
Sand Rough Spots:
Inspect the cooled pieces. If there are any sharp burrs or rough edges, lightly buff them away using fine-grit sandpaper. -
Seal (Optional):
For extra durability, you can brush on a thin layer of matte varnish, though the raw stone look is beautiful on its own. -
Cut the Twine:
Cut two lengths of natural jute twine, each about 8-10 inches long. -
Attach the Twine:
Fold a piece of twine in half to create a loop. thread the loop through the hole from the front to the back. -
Secure the Loop:
Pull the loose ends of the twine through the loop you just created and pull tight to create a lark’s head knot right at the top of the token. -
Finish the Knot:
Tie the loose ends of the twine together in a simple overhand knot to close the loop, making it ready to hang.
Make it Pop
After baking, rub brown or black acrylic paint into the letters, then wipe the surface clean. The paint stays in the grooves, making the text much easier to read.
Now you have a timeless set of tokens ready to share with your closest companion
Inside-Joke Charm Pair (Only You Two Get)
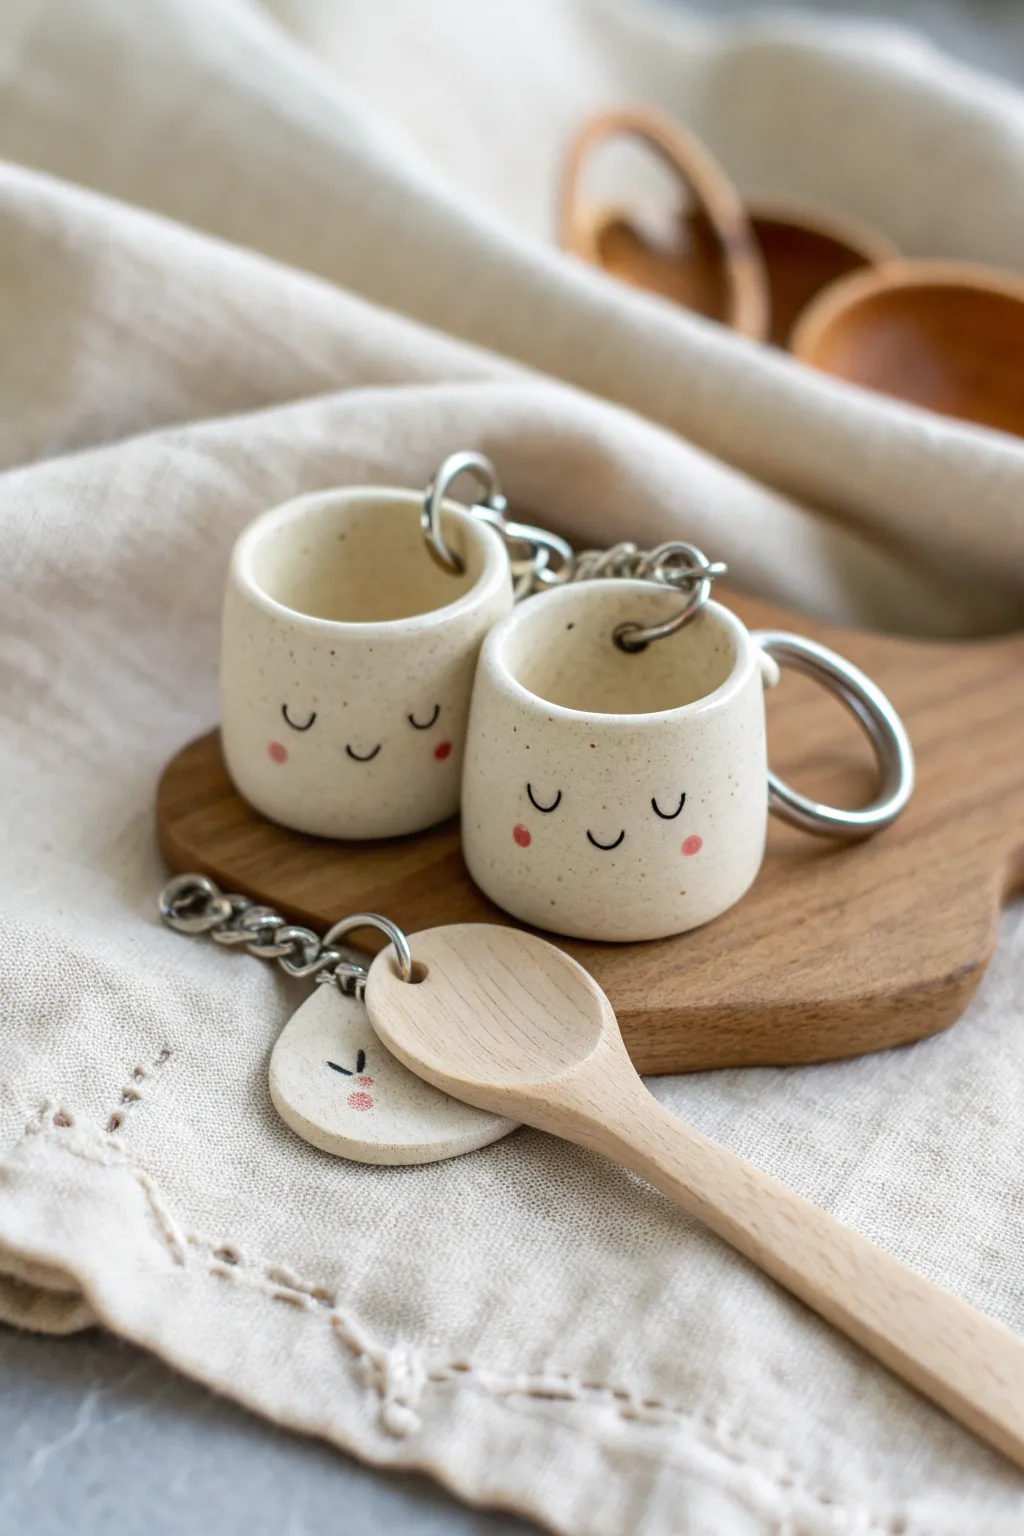
Immortalize your favorite inside joke or shared coffee obsession with these adorable miniature mug charms. With their sweet smiley faces and sturdy little handles, these speckled clay creations are perfect for hanging on keychains or necklaces as a daily reminder of your BFF.
Detailed Instructions
Materials
- White polymer clay (cernit or fimo)
- Black acrylic paint or fine-tip black marker
- Pink acrylic paint or pastel chalk
- Glossy varnish or UV resin
- Ball stylus tool or rounded chopstick end
- Eye pins (silver tone)
- Jump rings and keychains
- Needle tool
- Sandpaper (fine grit)
- Small paintbrush
- Optional: Real nutmeg or cinnamon for speckling
Step 1: Shaping the Mugs
-
Prepare the Speckled Clay:
Start by conditioning your white polymer clay until it’s soft and pliable. To achieve that organic, ceramic look, grate a tiny amount of nutmeg or cinnamon into the clay and knead it thoroughly until the speckles are evenly distributed. -
Form the Base Cylinder:
Roll two equal-sized balls of clay, roughly 1 inch in diameter. Use your fingers to gently shape each ball into a short, thick cylinder, flattening the bottom so it stands upright on your work surface. -
Hollow the Cup:
Take a ball stylus or the rounded end of a chopstick and press it into the top center of the cylinder. Rotate the tool gently to widen the opening, creating the hollow space of the mug, leaving the walls about 3-4mm distinct. -
Smooth the Rim:
The rim might get a bit jagged during hollowing. Use your fingertip to gently tap and smooth the top edge, ensuring it looks like a comfortable, rounded ceramic lip. -
Create the Handle:
Roll a very thin snake of clay about 2mm thick. Cut a small segment, curve it into a ‘C’ shape, and press it firmly against the side of the mug to form the handle. You may need to blend the attachment points slightly with a needle tool for extra strength. -
Flatten the Face Area:
Before adding details, gently pat the front of the mug where the face will go to ensure it’s a smooth, receptive surface for painting later.
Pro Tip: Clean Prints
Before baking, wipe your raw clay gently with a q-tip dipped in rubbing alcohol. This removes fingerprints and lint, giving you that smooth, professional porcelain finish.
Step 2: Hardware & Baking
-
Insert the Headpin:
Take a metal eye pin. If it’s too long, trim it with wire cutters. Press the straight end into the inside bottom of the mug or secure it into the thickened rim near the handle, ensuring the loop sticks out clearly. -
Secure the Pin:
For extra security, I like to bend a tiny zigzag at the bottom of the wire before inserting it so it anchors into the clay better. Smooth the clay around the entry point. -
Create the Tag (Optional):
Roll out a small scrap of clay flat and cut a small circle or teardrop shape. Poke a hole near the top. This will be the little tag charm shown on the keychain. -
Bake the Pieces:
Place your mugs and tags on a ceramic tile or baking sheet. Bake according to your polymer clay package instructions (usually 230°F – 275°F for 15-30 minutes). Let them cool completely before handling.
Level Up: Latte Art
Fill the ‘coffee’ part with brown liquid clay or resin. Before curing, swirl in a drop of white to create a tiny latte art heart for your bestie.
Step 3: Finishing Touches
-
Paint the Faces:
Using a very fine brush and black acrylic paint (or a waterproof fine-liner), carefully draw two ‘U’ shapes for sleeping eyes and a tiny smile in the center. Keep the lines thin and delicate. -
Add Rosy Cheeks:
Dip a ball tool or the end of a toothpick into pink paint. Dot two small circles on either side of the smile for blushing cheeks. Alternatively, you can brush on a little crushed pink pastel chalk for a softer look. -
Seal with Gloss:
Once the paint is totally dry, coat the entire mug with a high-gloss varnish or UV resin. This mimics the look of fired ceramic glaze and protects the face details. -
Assemble the Keychain:
Use pliers to open a jump ring. Loop it through the eye pin on the mug and connect it to your keychain findings. Attach the little clay tag and perhaps a miniature wooden spoon charm if you have one.
Now you have a durable, adorable set of mugs that celebrates your friendship wherever you go
Opposite Colorway Twins With Matching Faces
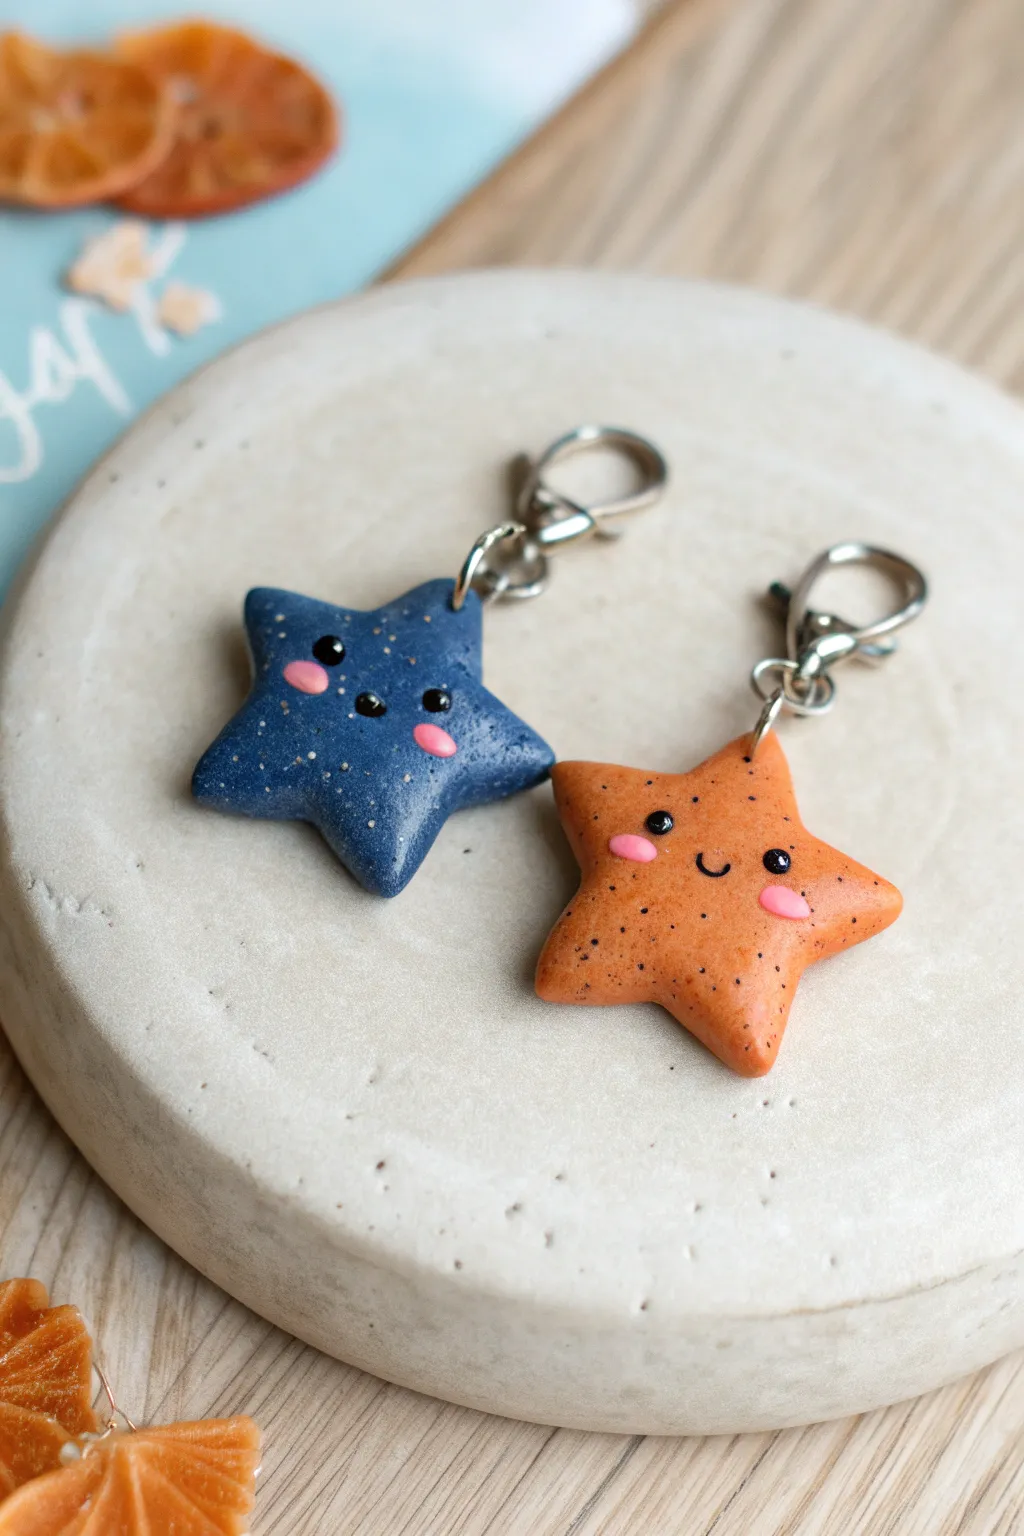
Celebrate your friendship with these adorable celestial twins, featuring a deep night-sky blue and a warm sunset orange color palette. These polymer clay stars are speckled with glitter or faux-stone effects and finished with matching kawaii faces for maximum cuteness.
Step-by-Step Guide
Materials
- Polymer clay (dark blue and muted orange)
- Fine glitter (gold or silver) or faux-stone clay mix
- Black liquid clay or black acrylic paint
- Pink polymer clay or pink paint for cheeks
- Star-shaped clay cutter (approx. 1.5 inches)
- Rolling pin or pasta machine
- Eye pins (silver tone)
- Lobster clasp keychain findings
- Jump rings
- Dotting tool or small ball stylus
- Needle tool
- Fine detail paintbrush (if painting faces)
- Gloss glaze (UV resin or polyurethane varnish)
- Pliers (round nose and flat nose)
- Baking sheet and parchment paper
Step 1: Preparing the Galaxy Clay
-
Condition the base colors:
Begin by thoroughly kneading your blue and orange clay separately until they are soft and pliable. This conditioning step is crucial to prevent cracks later on. -
Add the sparkle:
To achieve the speckled effect seen in the photo, mix a small amount of fine glitter or ‘granite’ effect clay into both colors. Knead it in well until the speckles are evenly distributed throughout the dough. -
Roll out the slab:
Roll each color out to a consistent thickness of about 4-5mm. You want them thick enough to hold an eye pin securely but not too bulky.
Step 2: Shaping and Structuring
-
Cut the stars:
Use your star-shaped cutter to punch out one blue star and one orange star. Smooth the edges with your finger to remove any sharp ridges left by the cutter. -
Soften the points:
Gently tap the points of each star against your work surface to blunt them slightly; this makes the finished charm looks softer and friendlier, rather than sharp and geometric. -
Insert hardware:
Trim your eye pins if they are too long. Carefully insert the straight end of an eye pin into the top point of each star, ensuring it goes in straight and doesn’t poke through the front or back faces.
Uneven Eyes?
Use a piece of paper as a guide. Mark two dots on the paper edge for spacing, hold it over the clay, and gently mark the eye positions with a needle tool before committing.
Step 3: Creating the Faces
-
Position the eyes:
Using a dotting tool, make small indentations where you want the eyes to sit. This helps the paint or liquid clay stay in place. -
Add the cheeks:
Take two tiny balls of pink clay, flatten them into small ovals, and press them onto the face area, just below and outside where the eyes will go. Alternatively, you can paint these on after baking. -
Add the smile:
For the mouth, I find it easiest to use a very fine needle tool to gently impress a small ‘u’ shape into the clay between the cheeks. If you plan to paint it, skip this indentation. -
Bake the clay:
Place your stars on parchment paper and bake according to your specific clay brand’s instructions (usually 275°F/135°C for 15-30 minutes). Let them cool completely before handling.
Level Up: Glow in the Dark
Add a pinch of glow-in-the-dark pigment powder or use glow clay mixed into the blue star to create a true ‘night sky’ effect when the lights go out.
Step 4: Finishing Touches
-
Paint the features:
If you didn’t use clay for the details, now is the time to use a small dotting tool to add black circles for eyes and a fine liner brush for the smile. Add a tiny white dot in each eye for a ‘sparkle’ highlight. -
Seal the piece:
Apply a coat of gloss glaze or UV resin over the entire star (or just the eyes) to give it a polished, durable look. Cure or dry as directed. -
Attach the clasp:
Open a jump ring with your pliers using a twisting motion (don’t pull apart). Slide it through the loop of the eye pin and the loop of the lobster clasp. -
Secure the hardware:
Close the jump ring tightly, ensuring the ends meet perfectly so the charm doesn’t slip off.
Clip these onto your backpacks or keys and carry a piece of your friendship wherever you go
Mini “BFF Emergency Kit” Charms in Two Parts
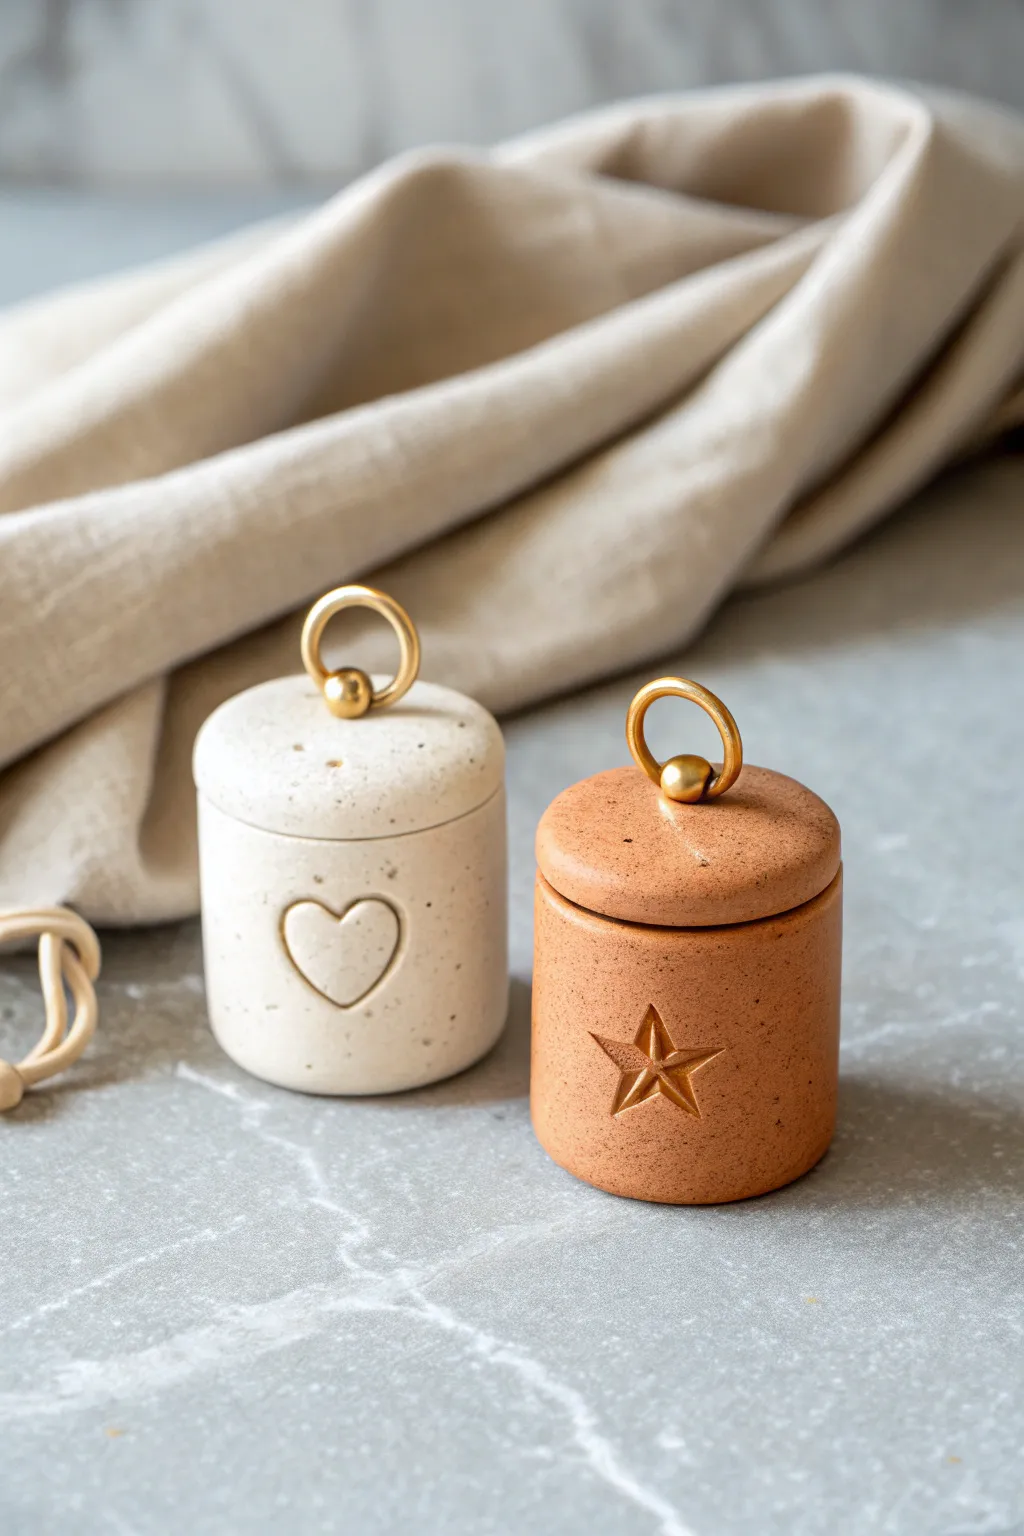
These charming little vessels are perfect for holding tiny treasures or sealing a friendship promise. With their speckled finish and elegant gold ring handles, they look like professional ceramic wear but are completely achievable at home.
Step-by-Step Tutorial
Materials
- Polymer clay (white and terracotta/orange)
- Speckling agent (crushed dried herbs, black pepper, or craft sand)
- Rolling pin
- Small round cookie cutter (approx. 1.5 inches)
- Clay knife or blade
- Gold jewelry jump rings (large, thick gauge)
- Gold beads (optional, to secure the ring)
- Small stamps (heart and star shape)
- Sandpaper or nail file
- Gloss glaze (optional)
Step 1: Prepping the Clay
-
Condition the clay:
Begin by warming up your polymer clay in your hands until it becomes soft and pliable. You’ll need two separate balls: one in white (or cream) and one in a terracotta shade. -
Create the speckled effect:
To mimic the stone-like texture in the photo, mix a tiny pinch of black pepper, craft sand, or crushed dried herbs into each clay ball. Fold and knead until the speckles are evenly distributed, but don’t overwork it or the clay might get too sticky. -
Roll out slabs:
Roll each ball of clay flat to a consistent thickness of about 1/4 inch. I find that using guide rails or playing cards on either side of the roller helps keep everything perfectly even.
Step 2: Forming the Base
-
Cut the bases:
Using your small round cutter, punch out two circles for each jar. One will be the absolute bottom, and the other will serve as the lid base. -
Cut the walls:
Measure the circumference of your base circle. Cut a rectangular strip of clay that matches this length and is as tall as you want the jar to be (around 1.5 to 2 inches). -
Assemble the cylinder:
Wrap the rectangular strip around the circumference of the bottom circle. Gently press the edges together where they meet to form a cylinder. -
Smooth the seams:
Using a clay tool or your finger, carefully blend the vertical seam and the seam where the wall meets the floor. Smooth the inside and outside until the joins are invisible.
Sticky Seams?
If your seams won’t blend, apply a tiny drop of liquid polymer clay or baby oil to the joint. It acts as a solvent and helps merge the clay effortlessly.
Step 3: Creating the Lids
-
Shape the lid dome:
Take the second circle you cut earlier. Gently mold the edges downward with your fingertips to create a slight dome shape that will sit nicely on top of the jar walls. -
Create the inner lip:
Roll a very thin snake of clay and attach it to the underside of the lid, slightly inward from the edge. This creates a stopper so the lid doesn’t slide off. -
Attach the handle:
Take a large gold jump ring. Push the open ends into the center of the lid’s top. Secure it by pressing a small ball of clay (or a gold bead if you prefer the look) around the base of the ring to lock it in place.
Clean Imprints
Dust your stamps with a tiny bit of cornstarch or dip them in water before pressing into the clay. This releases the stamp cleanly without pulling the clay.
Step 4: Decorating and Baking
-
Stamp the designs:
Firmly press your heart stamp into the white jar and the star stamp into the terracotta jar. Ensure the impression is deep enough to be visible but not so deep that it pierces the wall. -
Final smoothing:
Check for any fingerprints or uneven spots. Rub them gently with a drop of baby oil on your finger to smooth everything out perfectly. -
Bake carefully:
Place your pieces on a ceramic tile or baking sheet. Bake according to your polymer clay package instructions (usually around 275°F or 130°C) for 15-30 minutes. -
Cool and finish:
Let the jars cool completely inside the oven to prevent cracking. Once cool, you can lightly sand any rough edges with fine-grit sandpaper.
Give one to your best friend and keep the other so you’re always connected by your craft