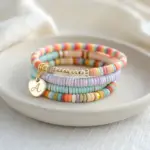
Whenever I’m not sure what vibe I want, I start with black clay heishi beads—they’re the easiest way to make a bracelet look pulled-together without trying too hard. Here are my favorite black clay bead bracelet ideas, from classic everyday stacks to a few fun twists that still feel totally wearable.
Classic All-Black Minimalist Strand
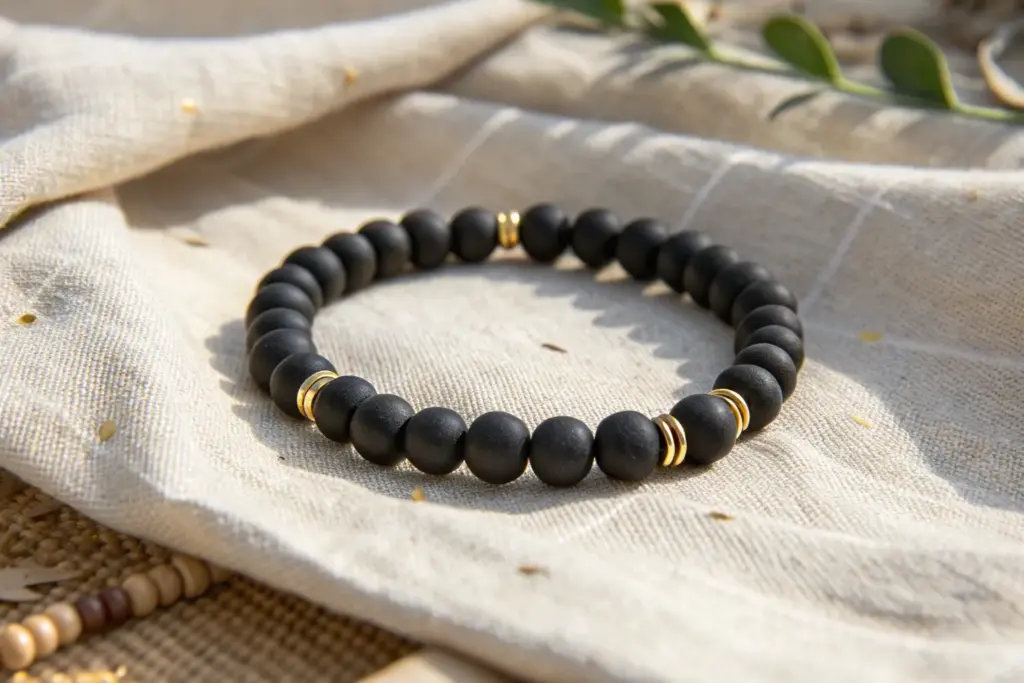
Embrace the sleek sophistication of pure monochrome with this matte black clay bead bracelet. Its uniform look mimics expensive onyx or black matte agate, providing a versatile accessory that pairs effortlessly with everything from casual wear to formal suits.
Step-by-Step Tutorial
Materials
- Black polymer clay (e.g., Fimo Soft or Sculpey Premo)
- Bead rolling tool or acrylic block
- Toothpicks or a bead piercing pin
- Medium-grit sandpaper (optional, for texture)
- Elastic stretch cord (0.8mm or 1mm thickness)
- Jewelry glue or clear nail polish
- Ruler
- Scissors or wire cutters
- Oven and baking tray
- Parchment paper
Step 1: Crafting the Clay Beads
-
Condition the Clay:
Begin by taking a block of black polymer clay and kneading it thoroughly in your hands until it becomes soft, pliable, and warm to the touch. -
Create Uniform Portions:
Roll the conditioned clay into a long snake with an even thickness of about 1/2 inch. Using a ruler and a blade, slice the snake into equal segments to ensure all your beads end up the same size. -
Roll Spheres:
Take a segment and roll it between your palms to form a rough ball. For a perfectly spherical shape, I like to use an acrylic block or a bead roller, moving it in a circular motion over the clay on a flat surface. -
Matte Finish:
To achieve the specific matte texture seen in the photo, gently roll the surface of the unbaked beads over a piece of medium-grit sandpaper or a clean piece of paper, avoiding fingerprints as much as possible. -
Pierce the Holes:
Carefully insert a toothpick or bead pin through the center of each sphere. Rotate the toothpick as you push to prevent flattening the bead. -
Bake the Beads:
Arrange your beads on a baking tray lined with parchment paper. Bake them according to the manufacturer’s instructions on your clay package (usually around 230°F – 275°F for 15-30 minutes). -
Cool Down:
Once baked, remove the tray from the oven and let the beads cool completely before handling. They will harden fully as they cool.
Step 2: Assembly & Finishing
-
Measure the Cord:
Wrap the elastic cord loosely around your wrist to determine the length, adding about 3 inches of extra length on each side for easier tying. -
Pre-stretch the Cord:
Give the elastic cord a few firm tugs. This pre-stretching step is crucial as it prevents the bracelet from sagging or stretching out permanently after the first wear. -
String the First Bead:
Thread your first black bead onto the cord. You can tape one end of the cord to your work surface if you’re worried about beads slipping off. -
Complete the Strand:
Continue threading beads until the strand reaches your desired length. For an average wrist, this usually takes between 20 to 24 beads depending on their diameter. -
Check the Fit:
Wrap the strung beads around your wrist to check the fit. It should sit comfortably without pinching the skin or drooping too low on the hand. -
Tie the Knot:
Tie the ends together using a surgeon’s knot: cross the ends, loop one side under twice, pull tight, and repeat. -
Secure the Knot:
Apply a tiny drop of jewelry glue or clear nail polish directly onto the knot. This seals the fibers and prevents unraveling. -
Hide the Knot:
While the glue is still slightly tacky but not wet, gently pull the knot inside the hole of the nearest bead to conceal it completely. -
Trim Excess:
Once the glue is fully dry, trim the excess cord tail close to the bead hole using sharp scissors.
Pro Tip: Fingerprint Eraser
Before baking, lightly brush your raw clay beads with a tiny amount of cornstarch or baby powder. This smooths out accidental fingerprints and enhances that ultra-matte, stone-like finish.
Level Up: The Spacer Bead
Add a single, subtle accent like the flat disc bead shown in the image reference. You can make this by flattening a small ball of clay or using a metal washer bead for contrast.
Wear your new minimalist bracelet solo for a clean look or stack it with other textures for a personalized style


Black and Gold Spacer Rhythm
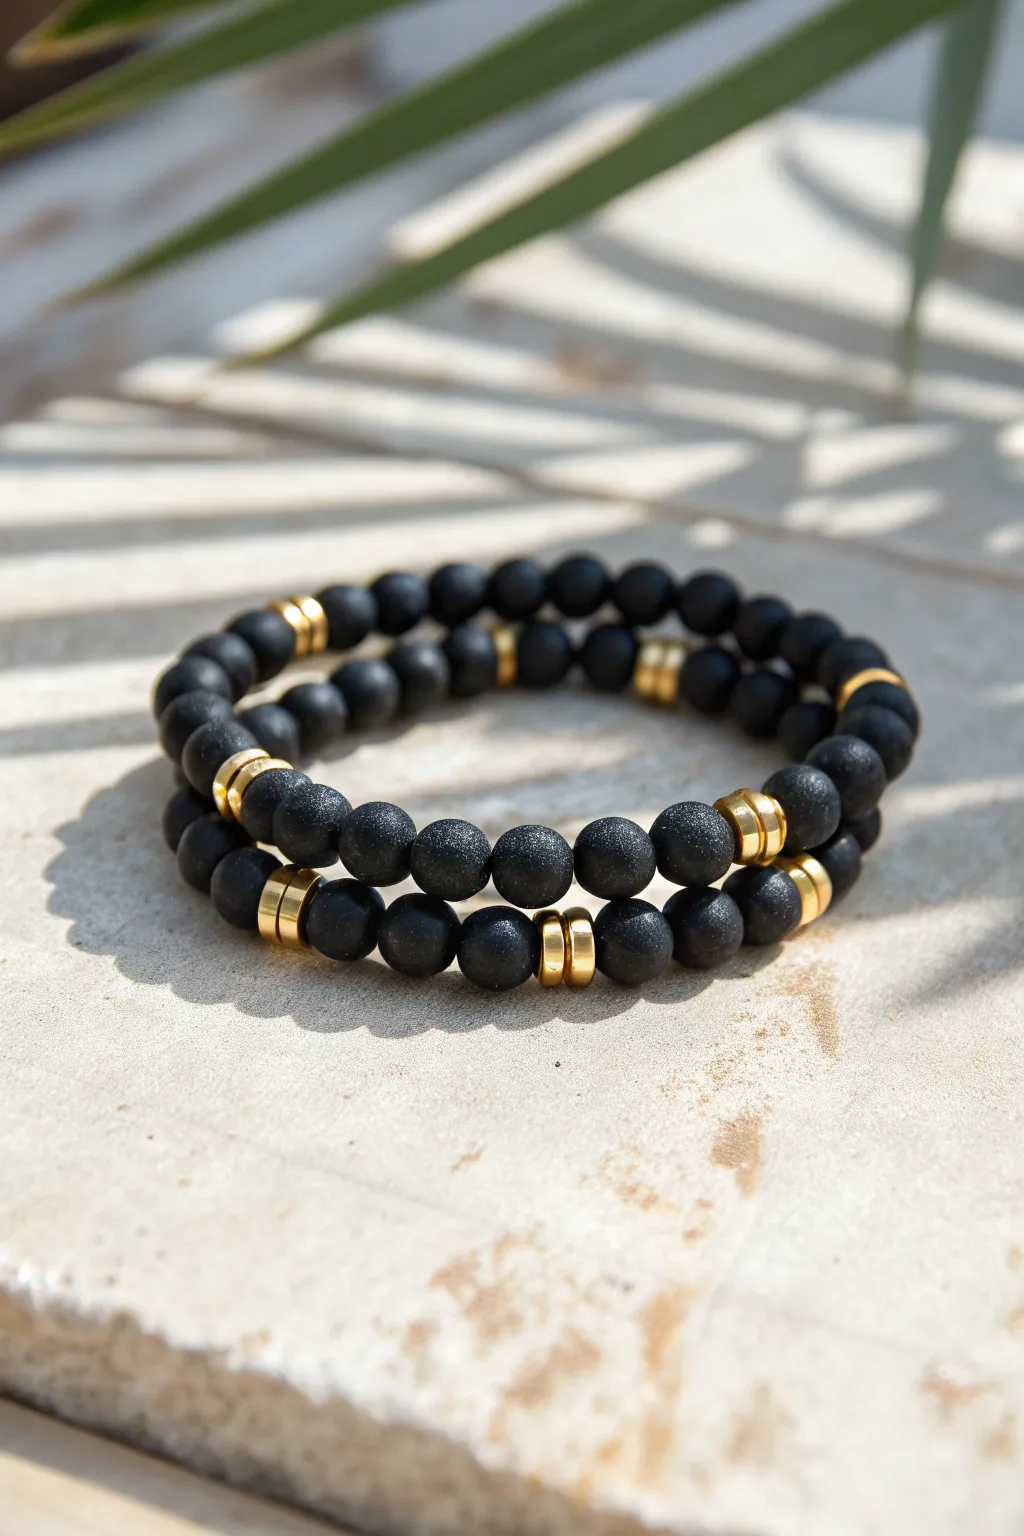
Elevate your wrist game with this sophisticated dual-bracelet set featuring matte black clay beads punctuated by striking gold accents. This design relies on a specific rhythmic pattern of spacers to create a seamless, high-end look perfect for stacking.
Step-by-Step
Materials
- Matte black polymer clay beads (10mm, round)
- Gold hematite or brass disc spacer beads (5-6mm diameter)
- Strong elastic cord (0.8mm or 1mm transparent)
- Jewelry glue (E6000 or G-S Hypo Cement)
- Scissors or flush cutters
- Bead stopper or masking tape
- Measuring tape
Step 1: Preparation & Design
-
Measure your wrist:
Wrap a measuring tape comfortably around your wrist where you want the bracelets to sit. Add about 0.5 to 1 inch to this measurement depending on how loose you prefer fit. This total is your target length. -
Prepare the elastic:
Cut two pieces of elastic cord, each about 10-12 inches long. This generous length gives you plenty of room to tie knots without struggling against tension. Pre-stretch the cord by pulling it gently a few times to prevent sagging later. -
Secure the ends:
Place a bead stopper or a piece of masking tape on one end of each cord to prevent beads from sliding off while you work. I like to prepare both cords at once so I can compare sizes as I go.
Step 2: Beading the Pattern
-
Start the sequence:
Begin by threading three matte black clay beads onto the cord. The matte texture is key to this look, providing a modern contrast to the shiny gold. -
Add the first gold accent:
Instead of a single spacer, use two gold disc spacers side-by-side. This double-spacer technique creates a thicker, more deliberate gold band that defines the style. -
Continue the rhythm:
String another set of three black beads, followed by another pair of gold spacers. Repeat this pattern: 3 black beads, 2 gold spacers. -
Adjust the pattern spacing:
About halfway through, check the visual weight. If you prefer wider spacing, you can switch to sections of four or five black beads between the gold sets, though the image shows a tight 3-bead rhythm. -
Check the length:
Wrap the beaded cord around your wrist to check the fit. Ideally, you want to end the pattern with a set of black beads so the knot can be hidden inside one of them, or between two black beads for less visibility. -
Repeat for the second bracelet:
Recreate the exact same pattern on your second piece of elastic cord. Wearing them as a matching pair creates that chunky, substantial look seen in the photo.
Knot Slipping?
If the knot won’t stay tight while gluing, have a friend hold a finger on the first loop of the knot, or use a binder clip to clamp the cord ends while the glue sets.
Step 3: Finishing Touches
-
Prepare for the knot:
Remove the bead stopper and bring the two ends of the elastic together carefully. -
Tie the surgeon’s knot:
Cross the ends, wrap one side over twice, and pull tight. Then cross them again and pull tight to secure. This extra loop prevents slipping. -
Secure with glue:
Dab a tiny amount of jewelry glue directly onto the knot. Be careful not to get glue on the neighboring beads, as it can spoil the matte finish. -
Hide the knot:
While the glue is still slightly tacky, gently pull the elastic so the knot slides inside the hole of the adjacent black bead. This makes the finish seamless. -
Trim the excess:
Once the glue is fully dry (check your glue’s instructions), use flush cutters to trim the excess elastic as close to the bead hole as possible without cutting the knot itself. -
Final polish:
Wipe the gold spacers softly with a clean cloth to remove any fingerprints from handling, making them shine brightly against the dark clay.
Mix & Match
Incorporate a single lava stone bead into the pattern. It looks identical to matte clay but allows you to add a drop of essential oil for a hidden aromatherapy feature.
Enjoy styling your sleek new bracelet set with both casual and formal outfits


Black Heishi With a White Center Bar
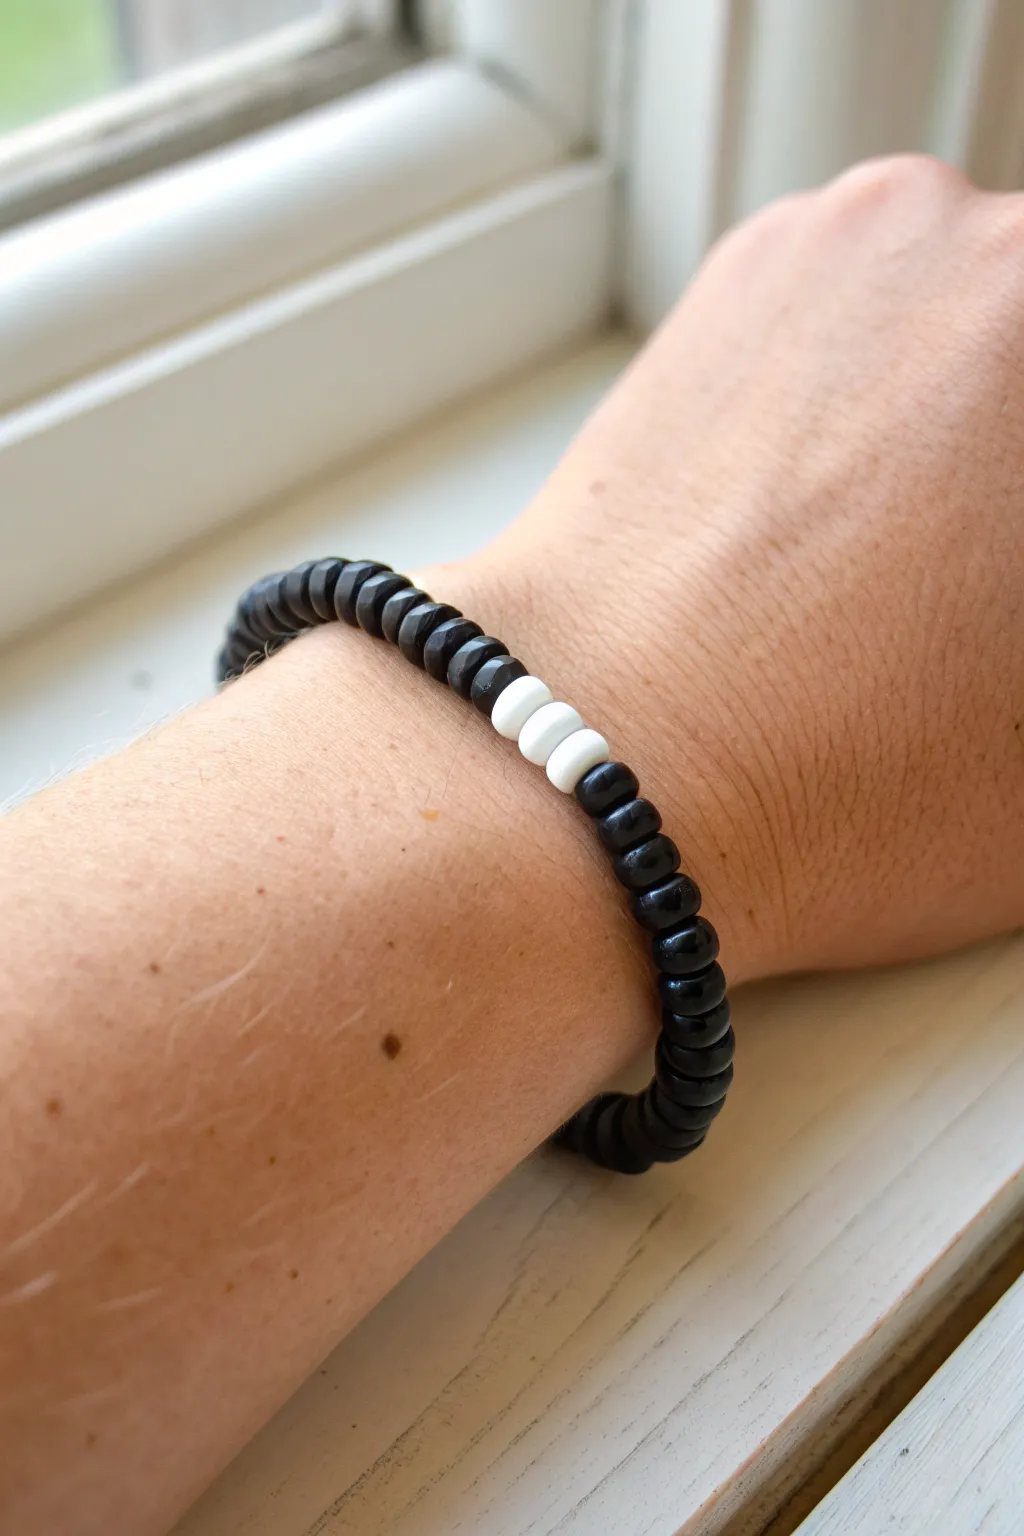
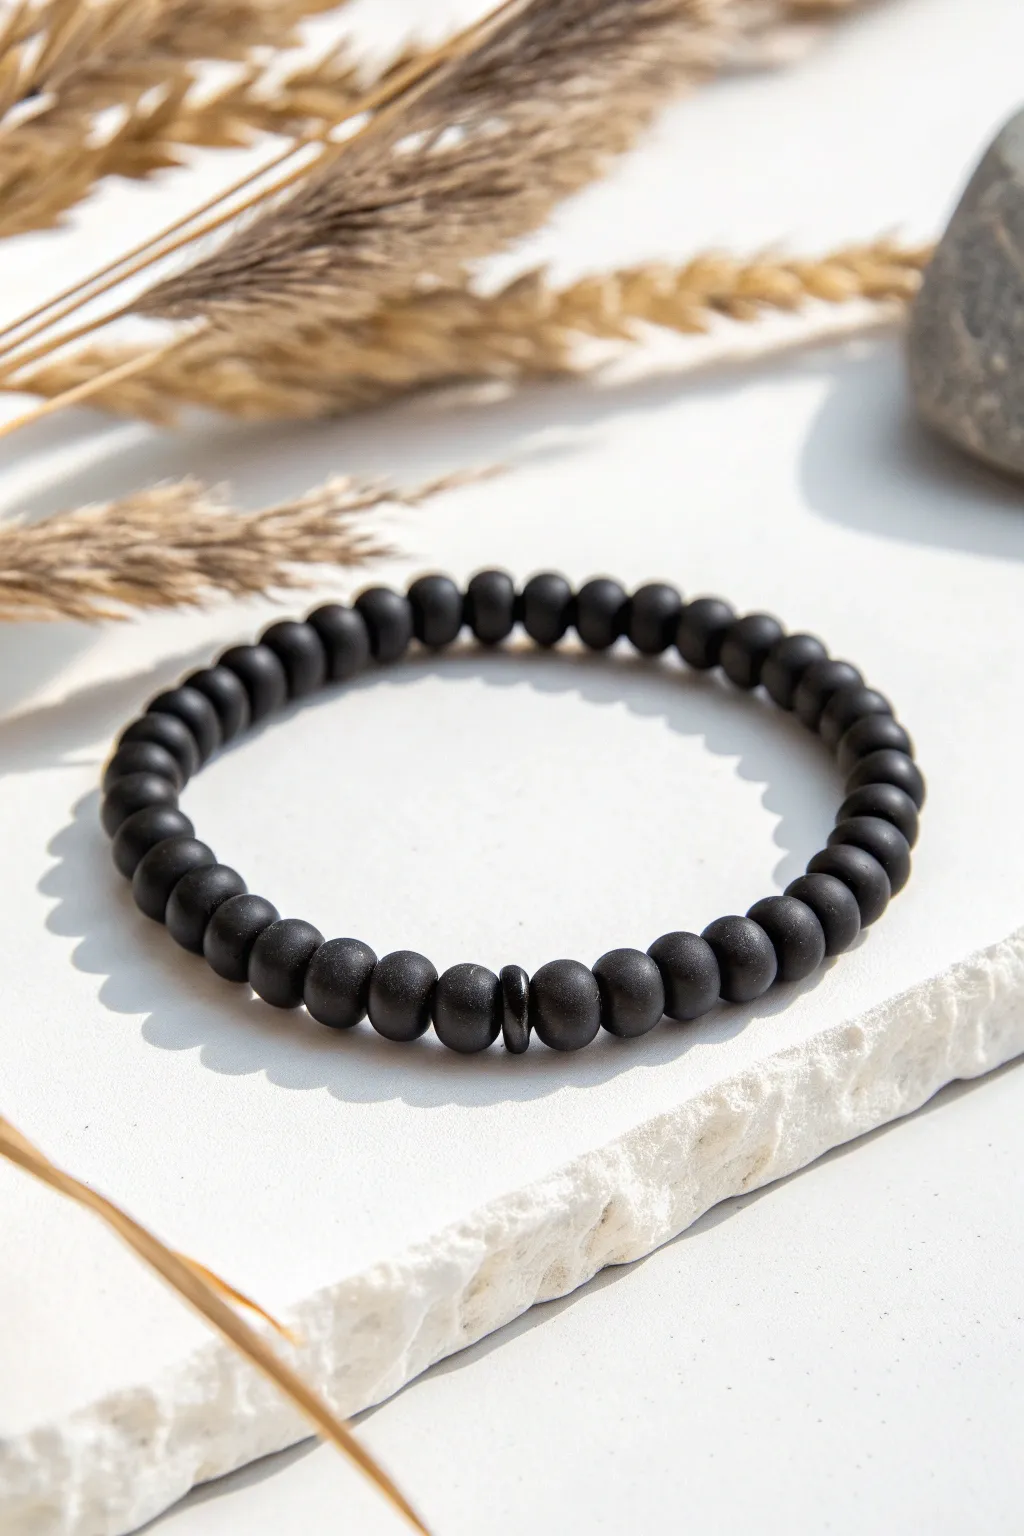
Embrace simplicity with this striking black and white heishi bead bracelet suitable for any occasion. The matte black discs create a sleek, modern texture broken only by a stark, clean trio of white beads at the center.
Step-by-Step
Materials
- Black polymer clay heishi beads (6mm)
- White polymer clay heishi beads (6mm)
- Clear elastic beading cord (0.8mm or 1mm)
- Super glue or jewelry cement
- Scissors
- Bead stopper or binder clip
- Tape measure or ruler
Step 1: Preparation
-
Measure your wrist:
Before cutting any cord, wrap a measuring tape around your wrist to find your exact size. Add about 0.5 inches to this measurement for a comfortable fit that isn’t too tight. -
Prepare the cord:
Cut a length of clear elastic cord about 10-12 inches long. Having extra length makes knotting significantly easier later on. -
Pre-stretch the elastic:
Gently pull tightly on the elastic cord a few times. This pre-stretching step helps prevent the bracelet from sagging or loosening after you’ve worn it a few times. -
Secure the end:
Attach a bead stopper or a simple binder clip to one end of your cut cord. This ensures your beads won’t slide right off while you are working.
Step 2: Beading
-
Start with black beads:
Begin threading the black heishi beads onto the elastic. You’ll want to string enough to cover approximately half of your desired bracelet length. -
Check for consistency:
As you string them, discard any beads that are broken, unevenly sliced, or much thinner than the others to keep the texture uniform. -
Add the focal point:
Once you have reached the halfway point, thread on exactly three white heishi beads. I find this trio creates the perfect visual balance without being overwhelming. -
Finish the strand:
Resume threading with your black heishi beads. Continue adding them until the entire beaded section matches the length calculation you made in the first step. -
Check the fit:
Wrap the unfinished strand around your wrist to verify the size. The two ends of beads should meet comfortably without gaps, but not be tight enough to pinch your skin.
Knot Hiding Trick
Use a bead with a slightly larger hole right next to your knot. This makes it effortless to tuck the knot inside for a seamless, professional finish.
Step 3: Finishing
-
Prepare for the knot:
Remove the bead stopper or clip carefully, holding both ends of the elastic firmly so no beads escape. -
Tie the first loop:
Cross the ends and make a simple overhand knot, pulling it down close to the beads to remove any slack in the line. -
Tie a surgeon’s knot:
For the second knot, cross the ends again but loop the top strand through the bottom loop twice instead of just once. This extra wrap creates friction that holds the elastic secure. -
Tighten the knot:
Pull all four strands (the two tail ends and the two bracelet sides) firmly to cinch the knot down tight. You should feel it lock into place. -
Secure with glue:
Apply a tiny drop of super glue or jewelry cement directly onto the knot. Be careful not to get glue on the surrounding beads, as it can discolor them. -
Let it dry:
Allow the glue to dry completely according to the manufacturer’s instructions before proceeding to the final trim. -
Hide the knot:
Trim the excess elastic ends close to the knot, leaving about 1mm. Gently pull on the beads adjacent to the knot to pop it inside one of the bead holes, hiding it from view.
Avoiding Gaps
If you see gaps between beads after tying, you didn’t pull the elastic tight enough during the first knot. Keep tension high while tying to prevent slack.
Slip on your new bracelet and enjoy the subtle contrast of this modern accessory.


Black Beads With a Single Initial
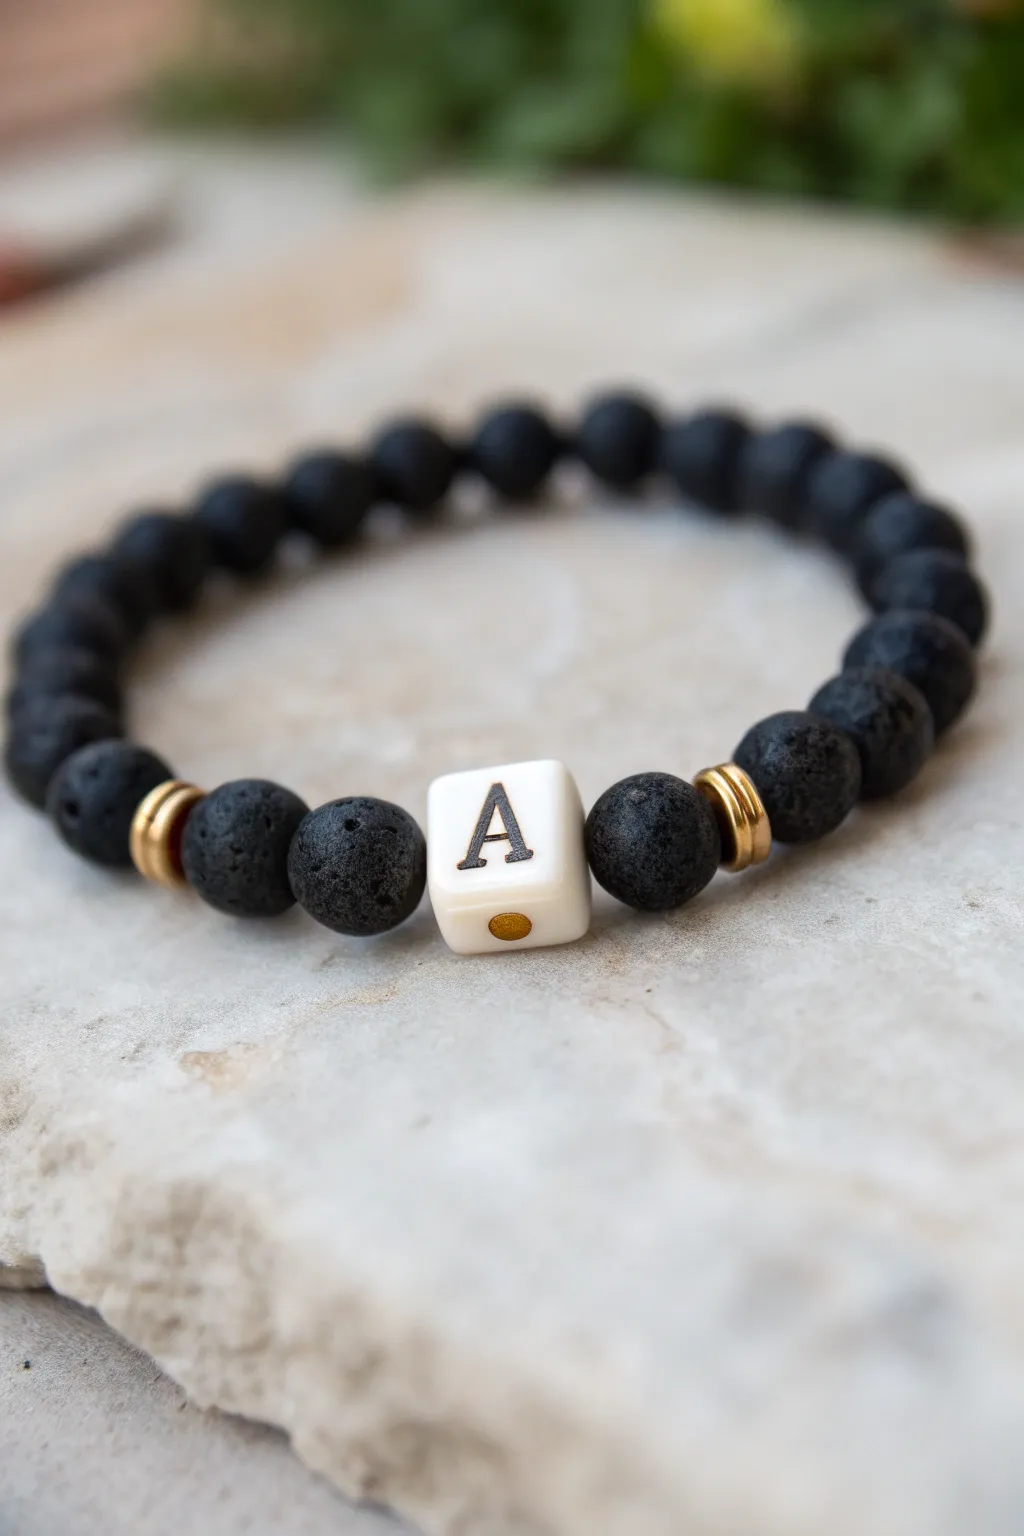
Combine the raw, organic texture of black lava rock with the clean simplicity of a single initial bead for a personalized accessory that feels both earthy and modern. The contrast between the dark, porous stone, the creamy white letter block, and the subtle gold accents creates a balanced and sophisticated look.
How-To Guide
Materials
- 8mm black lava rock beads (approx. 20-24 depending on wrist size)
- One 10mm or 12mm white square initial bead (letter ‘A’ or chosen initial)
- Two gold washer spacer beads (heishi style)
- 0.8mm clear elastic stretch cord
- Jewelry adhesive or G-S Hypo Cement
- Scissors
Step 1: Setting the Stage
-
Measure your wrist:
Before you begin stringing, take a moment to wrap a piece of string or a flexible measuring tape around your wrist to find your perfect fit. Add about half an inch to this measurement to account for the bulk of the 8mm beads. -
Cut the cord:
Cut a piece of your elastic cord to about 10-12 inches long. Having this extra length makes tying the final knot significantly easier than struggling with short ends. -
Pre-stretch the elastic:
Ideally, hold both ends of the cut elastic and give it a few firm (but not snapping) tugs. This helps prevent the bracelet from stretching out and becoming loose immediately after you wear it. -
Secure the end:
Place a piece of tape or a bead stopper on one end of the cord to prevent your beads from sliding right off while you work.
Step 2: Designing the Centerpiece
-
Start with the foundation:
Begin by threading the majority of your black lava rock beads onto the cord. For an average wrist, you will likely need about 18-20 of these black beads, but exact count depends on your earlier measurement. -
Balance the design:
Once your main run of black beads is on, test the length by wrapping it around your wrist. The ends should almost touch, leaving a gap of about an inch for your focal point section. -
Add first gold accent:
Slide on the first gold washer spacer bead. This flat, metallic disc acts as a visual frame that separates the rough texture of the lava rock from the smooth initial bead. -
Place the initial:
Thread your white square initial bead next. Ensure the letter is facing the correct direction relative to how you want to wear it. -
Add second gold accent:
Slide on the second gold washer spacer bead immediately after the letter block to complete the central focal section. -
Finish the loop:
Add two final black lava rock beads after the second gold spacer. This balances the focal point so the letter sits nicely in the center of the design rather than right against the knot.
Sticky Situation
If you can’t pull the knot inside a bead hole, don’t force it. Just trim ends very close and rotate the bracelet so the knot sits opposite the letter bead.
Step 3: Finishing Touches
-
Prepare to knot:
Bring the two ends of the cord together carefully, removing the tape or bead stopper. Check the size one last time around your wrist to ensure it isn’t too tight. -
Tie the surgeon’s knot:
Cross the right end over the left, then loop it under twice. Pull tight. This is the first half of a surgeon’s knot, which holds much better than a standard overhand knot. -
Complete the knot:
Now cross the left end over the right and loop it under once. Pull both ends firmly to secure the knot tight against the beads. -
Apply adhesive:
Place a tiny dab of jewelry glue directly onto the knot. Be careful not to get glue on the beads themselves, as it can stain the porous lava rock. -
Hide the knot:
While the glue is still tacky but not wet, gently pull the knot inside the hole of the nearest lava bead if the hole is large enough. If not, trim the ends very close to the knot once dry. -
Final trim:
Use your scissors to snip off the excess elastic cord as close to the knot (or bead hole) as possible, ensuring no sharp plastic ends are poking out.
Scent Infusion
Since lava rock is porous, add a drop of essential oil to the black beads. They act as a natural diffuser, carrying the scent with you all day.
Slip on your new custom bracelet and enjoy the stylish contrast of textures on your wrist

The Complete Guide to Pottery Troubleshooting
Uncover the most common ceramic mistakes—from cracking clay to failed glazes—and learn how to fix them fast.
Black Friendship Word Bracelet
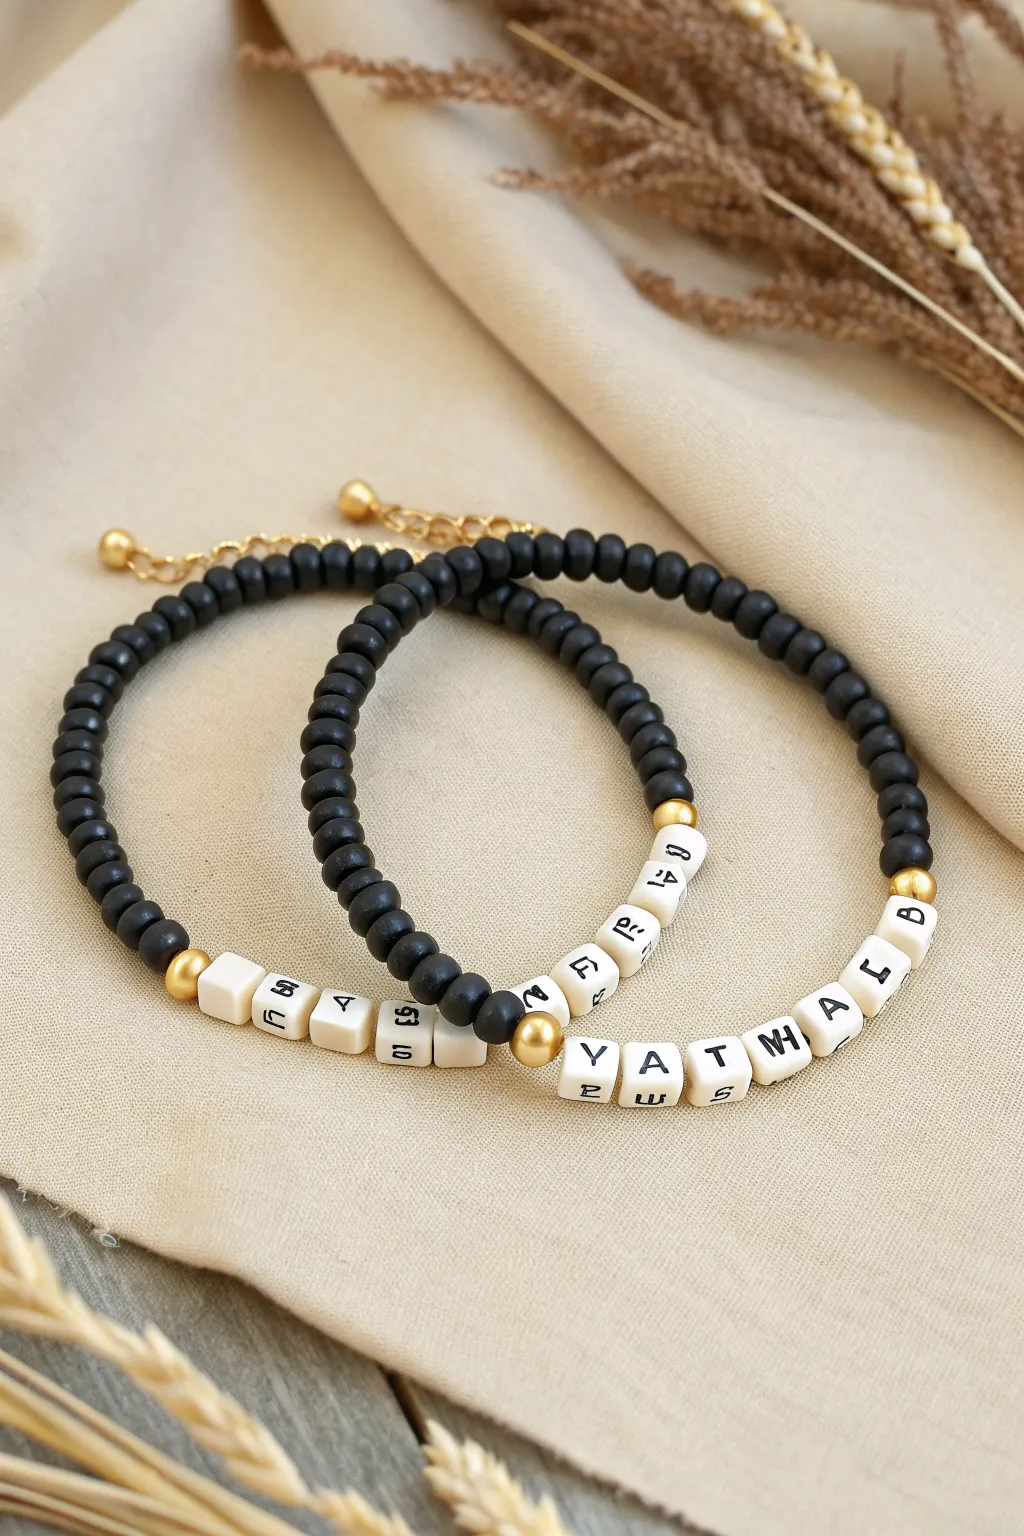
These sleek friendship bracelets combine the matte elegance of black heishi beads with personalized white letter cubes and striking gold accents. The design features a professional finish with gold crimp covers and lobster clasps, making them perfect for elevated everyday wear or thoughtful gifts.
Step-by-Step
Materials
- 4mm or 6mm black polymer clay heishi beads (flat discs)
- 6mm square white acrylic letter beads with black text
- 4mm gold-plated round spacer beads
- Gold-plated lobster claw clasps
- Gold-plated extension chains
- Gold tone jump rings (4mm or 5mm)
- Small gold clam shell bead tips or crimp covers
- Strong beading wire (e.g., Tiger Tail or flexible nylon-coated wire)
- Crimp beads
- Jewelry pliers (chain nose and flat nose)
- Wire cutters
- Bead design board (optional)
Step 1: Planning and Layout
-
Determine the phrase:
Decide on the name or word you want to spell out. In the reference image, the bracelets spell ‘YATMHLIB’ and a coordinate or date sequence. -
Select letters:
Pick out the required white square letter beads from your organizer. -
Arrange the pattern:
Lay out your design on a bead board or soft cloth. Center the word, flanking each end of the word with one gold round spacer bead. -
Measure the length:
Estimate the wrist size (usually 6-7 inches for women). Arrange enough black clay beads on either side of the gold spacers to reach the desired total length.
Placement Tip
Add 4-5 extra heishi beads to the ‘pinky’ side of the bracelet slightly offsetting the text. This helps the word sit on top of the wrist rather than sliding underneath.
Step 2: Stringing the Beads
-
Cut the wire:
Cut a piece of beading wire approximately 10-12 inches long. This gives you plenty of room to work with the clasps. -
Start with a stopper:
Place a piece of tape or a bead stopper on one end of the wire to prevent beads from sliding off while you work. -
String the first section:
Begin threading the black clay heishi beads onto the wire. Keep stringing until you reach the point where the gold accent should be. -
Add first gold accent:
Slide on one gold round spacer bead. This acts as a visual break between the dark clay and the bright letters. -
Thread the word:
Carefully thread your letter beads in the correct order. Double-check the spelling before moving on. -
Add second gold accent:
Place the second gold round spacer bead immediately after the last letter. -
Finish stringing:
Thread the remaining black clay heishi beads to complete the bracelet’s symmetry.
Step 3: Attaching the Clasps
-
Prepare the first end:
Remove the tape/stopper. Thread the wire end through a crimp bead, then loop it through the small ring on a clamp shell bead tip (or directly through a jump ring if not using tips). -
Secure the crimp:
Pass the wire back through the crimp bead. Use your pliers to flatten the crimp bead securely against the wire, locking it in place. -
Hide the crimp:
I usually slide the clam shell tip over the crimp bead and gently close it with pliers to hide the mechanics for a polished look. -
Tighten the beads:
Push all beads down toward the finished end to remove slack, but leave a tiny bit of wiggle room so the bracelet stays flexible. -
Prepare the second end:
Repeat the crimp bead and clam shell process on the other end of the wire, ensuring the beads remain snug. -
Trim excess wire:
Using your wire cutters, snip off the excess tail of beading wire as close to the crimp/bead tip as possible. -
Add hardware:
Open a jump ring with your pliers. Attach the lobster clasp to one end loop of the bracelet. -
Attach extension chain:
Open another jump ring and attach the gold extension chain to the opposite end. This allows the bracelet to fit various wrist sizes comfortably.
Level Up: Gemstones
Swap the black clay beads for authentic matte black Onyx or lava stone beads. The texture difference adds weight and a luxurious, organic feel to the jewelry.
Now you have a sophisticated, personalized accessory ready to stack or share.
Black With Neon Pop Color Blocks
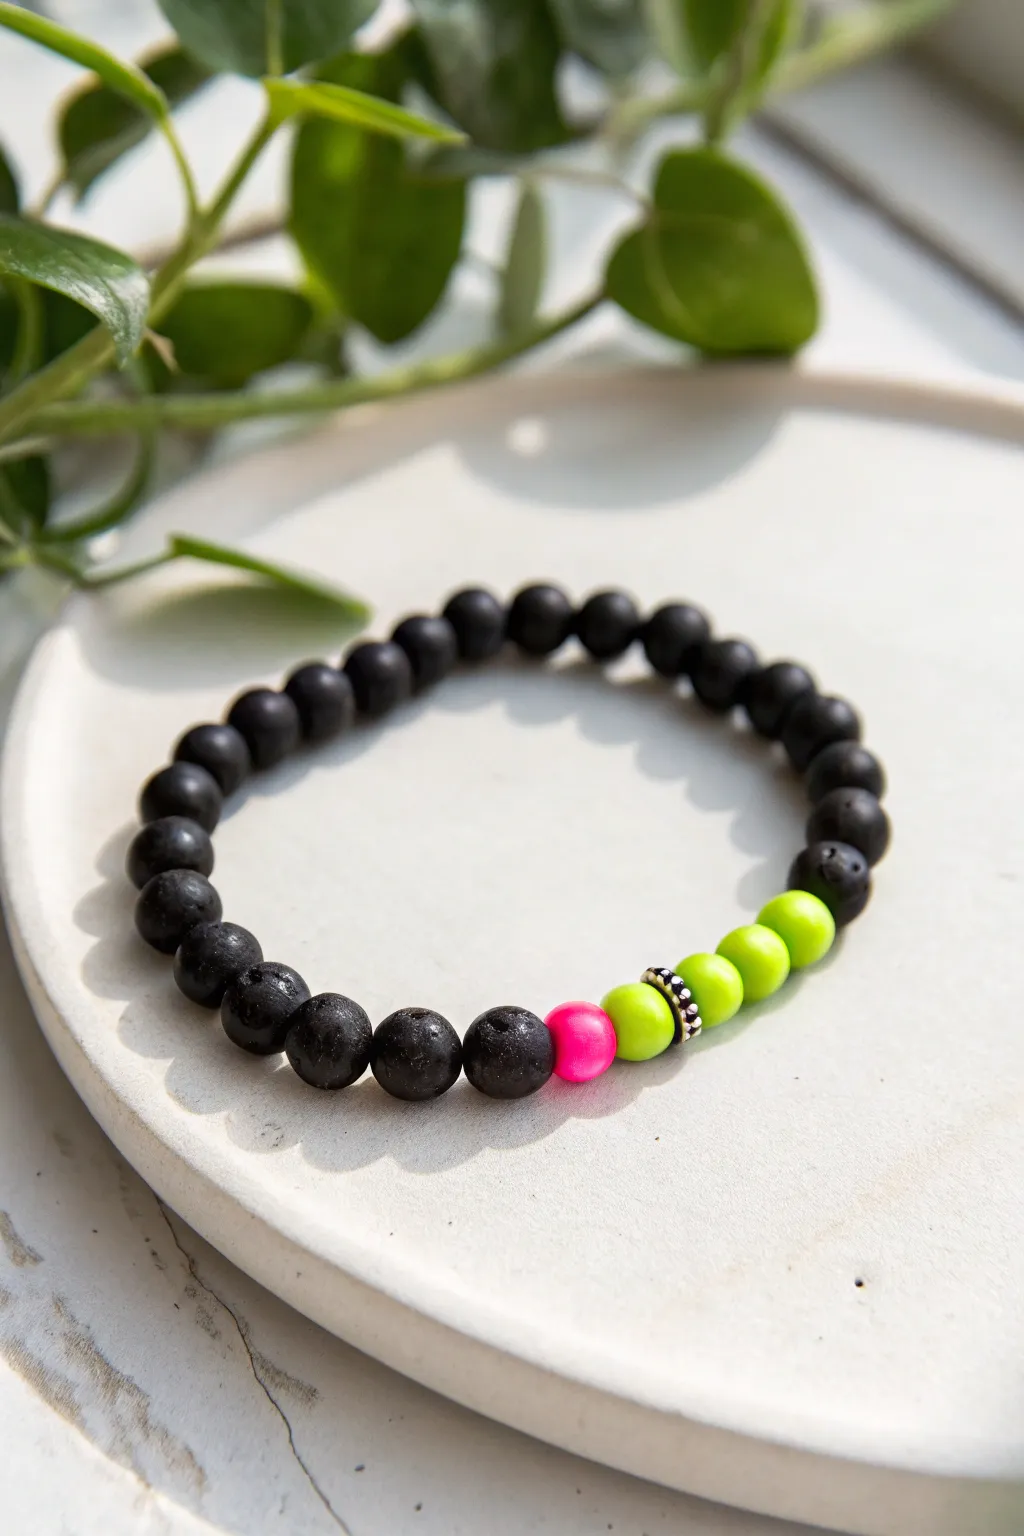
Contrast is key in this modern design, pairing the matte, rugged texture of black lava stone with the electric smoothness of neon beads. Whether you use true clay or stone, this simple string-on project creates an eye-catching accessory that feels both earthy and energetic.
How-To Guide
Materials
- 20-22 Black lava stone or matte black clay beads (8mm)
- 3 Neon lime green beads (8mm, acrylic or polymer clay)
- 1 Neon hot pink bead (8mm, acrylic or polymer clay)
- 1 Silver decorative spacer ring (daisy spacer or textured ring)
- Strong elastic bead cord (0.8mm or 1mm thickness)
- Scissors
- Hypo-cement or jewelry glue
- Bead stopper or tape
Step 1: Preparation & Planning
-
Measure and cut:
Cut a length of elastic cord about 10-12 inches long. Having this extra length makes tying the final knot significantly easier than struggling with short ends. -
Pre-stretch the cord:
Give your elastic cord a few firm tugs before you start beading. This pre-stretching helps prevent the bracelet from sagging or loosening up immediately after you wear it. -
Secure the end:
Attach a bead stopper to one end of your cord, or simply use a piece of masking tape folded over the end to stop beads from sliding off while you work. -
Check your fit:
Wrap the string of beads loosely around your wrist before stringing to estimate how many black beads you will need to complete the circle effectively.
Knot Slipping?
If your elastic knot feels slick and won’t hold, dust it with a tiny bit of cornstarch or baby powder before tying. The friction helps grip.
Step 2: Stringing the Pattern
-
Start with black matte:
Begin by threading about half of your black lava stone beads onto the cord. Starting with the main color keeps the knot hidden away from the focal point later. -
Add the first neon accent:
Slide on the single hot pink neon bead. This vibrant pop breaks up the monochrome look instantly. -
Place the lime separator:
Next, add one lime green bead directly beside the pink one. -
Insert the sparkle:
Thread your silver spacer ring onto the cord. It should sit snugly next to the first green bead, adding a tiny metallic highlight. -
Finish the neon cluster:
Add the remaining two lime green beads after the silver spacer. This creates an asymmetrical color block—one pink, followed by a green section interrupted by silver. -
Complete the circle:
Fill the rest of the cord with the remaining black lava beads until the bracelet reaches your desired length.
Step 3: Finishing Touches
-
The surgeon’s knot:
Remove the bead stopper. Bring the two ends of the elastic together and tie a standard overhand knot, but loop the end through the circle twice instead of once before pulling tight. -
Tighten securely:
Pull the cords firmly to cinch the knot. I discourage pulling so hard the elastic snaps, but it needs to be tight enough that no gaps show between the beads. -
Add security:
Apply a tiny dab of hypo-cement or strong jewelry glue directly onto the knot. Let this dry for a few minutes to ensure it won’t slip undone. -
Hide the mechanism:
Once the glue is tacky or dry, trim the excess elastic tails close to the knot. -
Tuck it away:
Gently pull the elastic so that the knot slides inside the hole of the nearest black lava bead, making the finish completely invisible.
Aromatic Upgrade
Use actual porous lava stone for the black beads. Drip essential oils onto them to turn your accessory into a portable aromatherapy diffuser.
Enjoy the striking contrast of your new modern accessory on your wrist


What Really Happens Inside the Kiln
Learn how time and temperature work together inside the kiln to transform clay into durable ceramic.
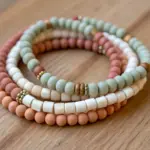
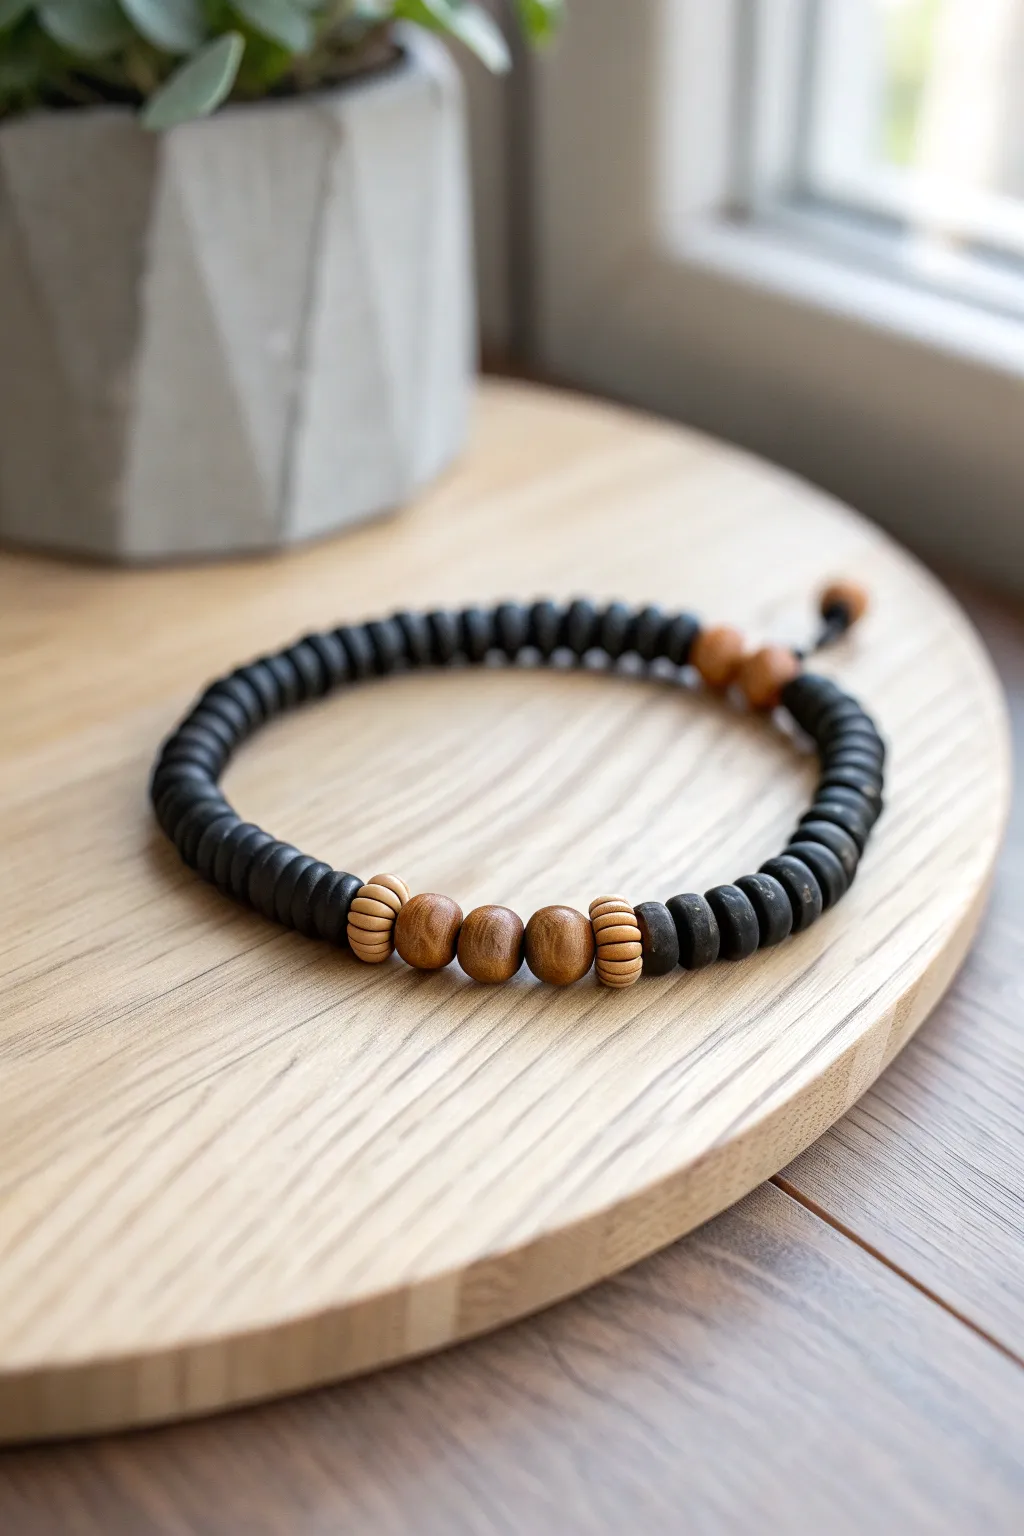
Black and Earthy Stone Mix
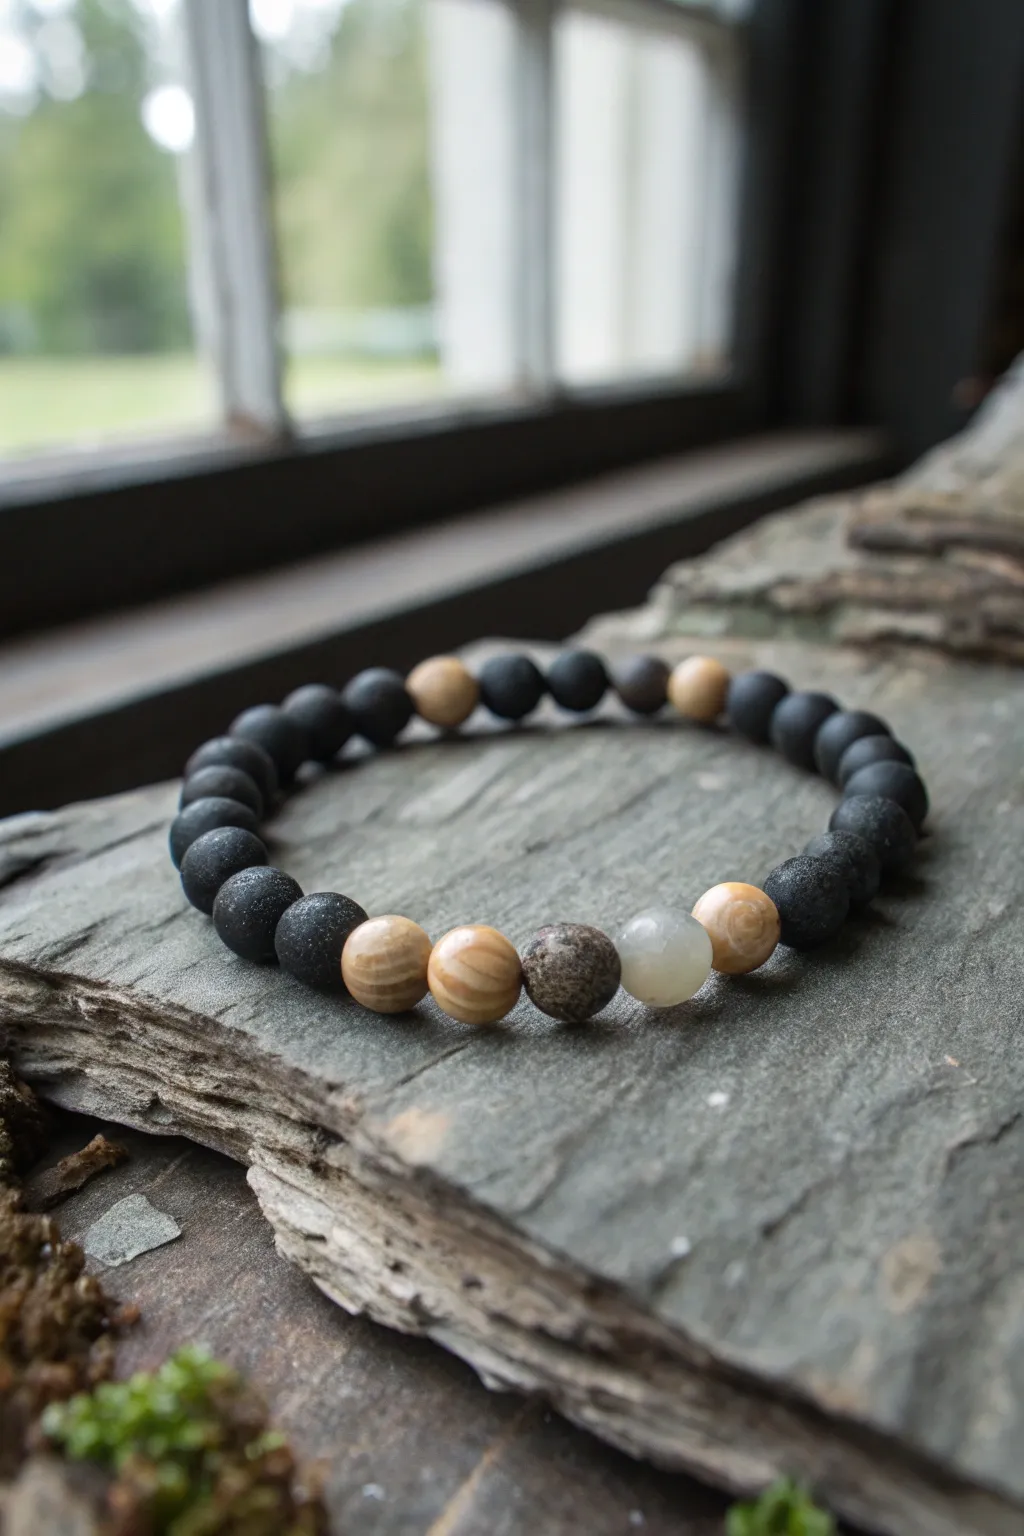
This project combines deep matte black beads with warm wood tones and interesting focal stones to create a grounded, nature-inspired accessory. It’s a perfect beginner-friendly project that relies on simple symmetry and subtle texture contrasts for a sophisticated look.
Step-by-Step Tutorial
Materials
- Matte black round beads (8mm or 10mm) – likely black clay, lava stone, or matte onyx
- Light wood round beads (same size as black beads)
- One speckled grey stone bead (focal)
- One milky white or moonstone bead (focal)
- Strong elastic beading cord (0.8mm or 1mm)
- Jewelry glue or clear nail polish
- Scissors
- Bead stopper or masking tape
Step 1: Planning and Preparation
-
Measure your wrist:
Before cutting any cord, wrap a measuring tape around your wrist to find your size. Add about 0.5 to 1 inch to this measurement depending on how loose you want the fit. -
Cut the elastic cord:
Cut a piece of elastic cord that is at least 4-5 inches longer than your final bracelet size. This extra length makes tying the knot much easier later. -
Pre-stretch the cord:
Hold the cord firmly at both ends and give it a few gentle tugs. This pre-stretching step is crucial to prevent the bracelet from sagging or stretching out permanently after you first wear it. -
Secure one end:
Attach a bead stopper or simply place a piece of masking tape on one end of the cord so your beads don’t slide off while you are working.
Knot Slipping?
If your elastic knot feels loose, try tying it while the cord is under tension. Pulling tight as you knot helps the elastic grip itself more effectively.
Step 2: Creating the Pattern
-
String the first wood bead:
Start by threading one light wood bead onto the cord. This will end up being one side of your focal section. -
Add the textured focal bead:
Next, add the speckled grey stone bead. Its rougher texture contrasts beautifully with the smooth wood. -
String the milky focal bead:
Follow distinctly with the milky white or semi-translucent stone bead. This creates an asymmetrical but balanced center. -
Close the focal section:
Add your second wood bead. Now you have the central design element: Wood – Grey Stone – White Stone – Wood. -
Begin the black bead section:
String about 6 to 8 black matte beads. The exact number will depend on your wrist size, but this creates one side of the band. -
Insert an accent bead:
After your run of black beads, add a single light wood bead. This acts as a nice spacer to break up the dark color. -
String the back section:
Add 3 to 4 more black beads. This section will sit at the very back of the wrist. -
Insert the second accent bead:
Place your final single wood bead. This mirrors the solitary wood bead you added on the other side. -
Finish the bead stringing:
Finish stringing by adding the remaining black beads necessary to reach your desired length. I usually check the fit by wrapping it around my wrist before tying.
Aromatic Twist
Use unfinished wood beads or porous lava stone for the black beads. Add a drop of essential oil to them to turn your bracelet into a personal diffuser.
Step 3: Finishing Touches
-
Check the symmetry:
Lay the bracelet circle flat and ensure your pattern looks balanced. The focal stones should be opposite the back section. -
Tie the surgeon’s knot:
Remove the tape or stopper. Cross the ends, loop one end through twice, and pull tight. Repeat this process to create a secure surgeon’s knot. -
Secure with glue:
Apply a tiny dab of jewelry glue or clear nail polish directly onto the knot. This prevents it from slipping over time. -
Hide the knot:
While the glue is still slightly tacky but not wet, gently pull the knot inside the hole of the nearest bead to hide it completely. -
Trim excess cord:
Use sharp small scissors to snip off the excess elastic cord as close to the bead hole as possible without cutting the knot itself.
Enjoy wearing your new handcrafted piece or gift it to someone special who loves natural textures
Black With Warm Wood Bead Accents
Blend the sleek, modern look of matte black heishi beads with the organic warmth of natural wood in this textured bracelet design. The contrast between the flat black discs and the chunky, round wood accents creates a sophisticated accessory perfect for everyday wear.
Step-by-Step
Materials
- 6mm black polymer clay heishi beads (disk beads)
- Three 8mm round natural wood beads (medium brown stain)
- Two 6mm ridged/fluted wooden spacer beads (lighter wood tone)
- Two 6mm round wooden beads (for knot ends)
- 0.8mm elastic stretch cord (black preferred)
- Super glue or jewelry cement
- Scissors
- Bead stopper or masking tape
- Measuring tape
Step 1: Planning and Preparation
-
Measure your wrist:
Wrap a measuring tape comfortably around your wrist where you want the bracelet to sit. Add about half an inch to this measurement to account for the bulk of the beads. -
Cut the cord:
Cut a piece of elastic cord about 10-12 inches long. This generous length gives you plenty of room to tie secure knots later without struggling with short ends. -
Prepare the cord:
Pre-stretch the elastic by pulling it firmly between your hands a few times. This prevents the bracelet from stretching out permanently after wearing it. Attach a bead stopper or a piece of tape to one end.
Step 2: Stringing the Core Pattern
-
Begin the black section:
Start by threading approximately 2-2.5 inches of the black heishi clay beads onto the cord. Keep them snug against each other to check the visual length. -
Start the focal point:
Slide on one of the ridged, lighter wooden spacer beads. This acts as a transition point between the flat clay texture and the round wood beads. -
Add the round wood beads:
Thread on the first 8mm round wood bead. Follow it with the second, then the third. These three larger beads form the central warm accent of the piece. -
Finish the focal point:
Add the second ridged wooden spacer bead to mirror the other side, framing the three central round beads perfectly. -
Complete the loop:
Continue stringing the remaining black heishi beads until you reach your total desired length. Wrap it around your wrist to check the fit before tying off.
Beading Pro_Tip
Cut your elastic cord at a sharp angle. This creates a makeshift ‘needle’ point that makes threading the tiny holes of the clay heishi discs much faster and easier.
Step 3: Finishing Touches
-
Tie the main knot:
Remove the bead stopper carefully. Bring both ends together and tie a surgeon’s knot (loop the right end over the left, twist it through twice, pull tight, then repeat). -
Secure the knot:
I always add a tiny drop of super glue or jewelry cement directly onto the knot. Let this dry for a moment before trimming the excess cord, leaving about 0.5 to 1 inch of tail on both ends. -
Decorate the tails:
Usually, we hide the knot, but this style leaves the tails visible as a design feature. Thread a small matching wooden bead onto each of the short tail ends. -
Knot the ends:
Tie a simple overhand knot at the very tip of each tail to keep the small wooden beads in place. Pull these very tight. -
Final trim:
Trim any excess cord sticking out past the final overhand knots for a clean finish.
Level_Up Ideas
Swap the central round wood bead for a lava stone bead. You can add a drop of essential oil to the porous stone, turning your bracelet into a subtle aromatherapy diffuser.
Now you have a stylish, textural accessory that pairs beautifully with almost any casual outfit

TRACK YOUR CERAMIC JOURNEY
Capture glaze tests, firing details, and creative progress—all in one simple printable. Make your projects easier to repeat and improve.
Black Heishi With Micro Bead Rings

This sophisticated bracelet design elevates simple black heishi beads with strategically placed gold accents for a luxe finish. The contrast between the matte black clay and the gleaming metal creates a versatile piece perfect for stacking or wearing solo.
Step-by-Step
Materials
- 6mm black polymer clay heishi beads
- Gold-plated textured micro spacer beads (3mm or 4mm)
- Gold-plated smooth ring spacer beads (flat washers, 4mm)
- 4mm gold crimp covers (optional but recommended)
- Gold lobster clasp and extender chain
- Gold crimp beads
- Clear elastic beading cord (0.7mm or 0.8mm) or beading wire
- Jewelry pliers (chain nose and flat nose)
- Scissors or wire cutters
Step 1: Preparation & Planning
-
Measure your wrist:
Start by wrapping a piece of string or a soft measuring tape around your wrist to find your size. Add about half an inch to this measurement to ensure the bracelet fits comfortably without being too tight. -
Prepare your workspace:
Lay out a bead board or a soft felt cloth. This prevents your heishi beads from rolling away while you work, which is a lifesaver with these tiny discs. -
Establish the pattern:
Study the design in the photo. The pattern relies on groups of black beads separated by specific gold sequences. A common repeat here is roughly 10-12 black beads, followed by a gold accent section.
Uneven Spacing?
If your black sections look uneven in length despite equal bead counts, measure them with a ruler instead. Heishi beads can vary slightly in thickness.
Step 2: Stringing the Beads
-
Cut the cord:
Cut a length of elastic or wire about 10 inches long. This gives you plenty of extra room for tying knots or attaching clasps later. -
Start with the clasp side:
If using wire and a clasp, thread a crimp bead and your clasp onto one end, loop the wire back through the crimp bead, and flatten it with pliers. If using elastic, you can simply start stringing, but I like to tape one end down to the table so beads don’t slide off. -
String the first black section:
Thread on approximately 10 to 12 black heishi beads. This forms the first dark segment of the bracelet. -
Add first gold accent:
Slide on one textured gold spacer ring. Follow this immediately with a second textured gold spacer ring. This double-ring look adds visual weight. -
String second black section:
Thread on another set of 10 to 12 black heishi beads, keeping the count consistent with your first section. -
Add mixed gold accent:
For variety, this accent uses contrasting shapes. Slide on one smooth flat gold ring, followed by one textured spacer, and then another smooth flat ring. This creates a sandwiched gold highlight. -
Continue the pattern:
Repeat the process: a section of black beads, then an accent of gold. Alternate between the ‘double textured ring’ accent and the ‘smooth-textured-smooth’ accent as you go around. -
Check the length:
Periodically wrap the strand around your wrist. Stop adding sections when the bracelet ends comfortably meet. -
Finish the bead string:
End your pattern with a few gold ball beads or a final gold spacer near the closure to give it a professional tapered look.
Keep it Snug
When stringing flat heishi beads, ensure there are no gaps on the cord. They should sit flush enough to create a solid ‘tube’ but still flex comfortably.
Step 3: Closing the Bracelet
-
Secure the second end (Wire):
If you used wire, thread on a crimp bead and the jump ring of your extender chain. Loop the wire back through the crimp bead and into the last few beads of your bracelet. -
Crimp firmly:
Use your pliers to flatten the crimp bead securely. Trim the excess wire flush with the beads. -
Tying the knot (Elastic):
If you used elastic, tie a surgeon’s knot (right over left, left over right). Pull it tight, stretching the elastic slightly to lock the knot in place. -
Hide the knot:
Apply a tiny dab of jewelry glue to the knot. Once dry, trim the ends and gently pull the knot inside one of the adjacent heishi beads to hide it. -
Attach crimp covers:
To make the finish look polished, place a gold crimp cover over your flattened crimp bead (or knot) and gently squeeze it shut with pliers until it looks like a round gold bead.
Enjoy styling this classic black and gold piece with your everyday wardrobe
Black and White Checkerboard Sections
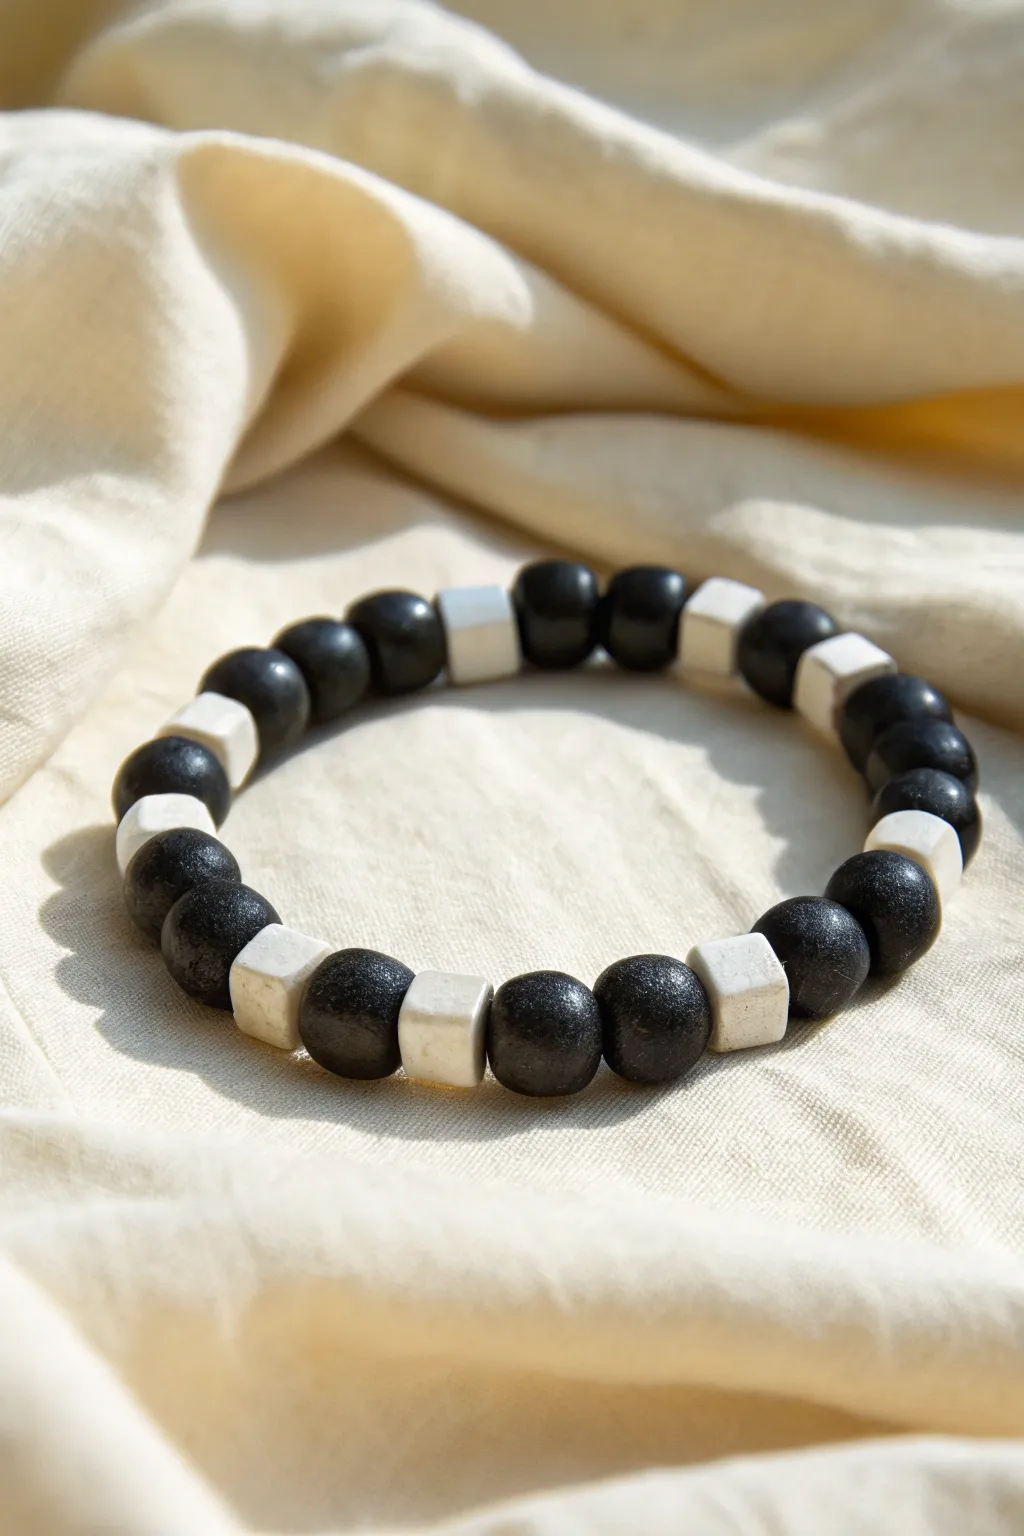
This striking bracelet uses the classic contrast of black and white to create a modern accessory with organic texture. By alternating sections of matte black round beads with crisp white squares, you achieve a sophisticated rhythm that elevates a simple stringing project.
Step-by-Step Tutorial
Materials
- Black polymer clay (or pre-made black round clay beads, roughly 8-10mm)
- White polymer clay (or pre-made white cube beads, roughly 6-8mm)
- Elastic beading cord (0.8mm or 1mm thickness)
- Super glue or jewelry cement
- Scissors
- Beading needle (optional but helpful)
- Ruler
- Bead design board (optional)
Step 1: Preparation & Bead Selection
-
Measure your wrist:
Before you begin, wrap a flexible measuring tape around your wrist to find your size. Add about half an inch to this measurement to ensure the bracelet isn’t too tight. -
Sort your beads:
Lay out your black round beads and white square beads. If you are making the beads yourself from polymer clay, ensure they are baked and fully cooled before starting assembly. -
Plan the pattern:
Create a repeating sequence to test the look. The pattern shown here uses two or three black round beads followed by a single white cube, then another set of black beads, then a white cube. I like to lay the entire design out on a bead board first to visualize the final rhythm. -
Cut the cord:
Cut a piece of elastic cord about 10-12 inches long. This extra length makes it much easier to tie the finishing knots without struggling. -
Pre-stretch the elastic:
Gently pull on your length of elastic cord a few times. This pre-stretching step is crucial because it prevents the bracelet from sagging out of shape after the first time you wear it.
Seamless Hiding
Try to plan your knot placement next to a black round bead rather than a white cube. The round beads usually have larger holes, making it easier to hide the knot inside.
Step 2: Stringing the Design
-
Start the sequence:
Thread your first set of black round beads onto the cord. Start with two or three black beads depending on how spaced out you want your white accents. -
Add the contrast:
Slide on one white cube bead. Ensure the hole is centered so the cube sits cleanly against the round beads. -
Develop the rhythm:
Continue the pattern: add your set of black beads, followed by a white cube. As you work, verify that the white cubes are oriented consistently if they have a specific grain or side texture. -
Check the length:
Periodically wrap the strung beads around your wrist. Stop adding beads when the ends touch comfortably without squeezing your skin. -
Adjust the pattern:
If you reach the end and your pattern is cut off mid-sequence, you may need to add or remove one black bead from each section to make the fit perfect while keeping the symmetry. -
Verify the ends:
Ensure your pattern starts and ends in a way that will look seamless when tied. Ideally, you want to end with a white cube if you started with a black section, or vice versa, so the pattern continues unbroken.
Step 3: Finishing Touches
-
Prepare the knot:
Bring the two ends of the elastic together, removing any slack from the bead line but not pulling so tight that the bracelet buckles. -
Tie the first knot:
Tie a simple overhand knot to bring the beads into a circle. -
Secure with a surgeon’s knot:
For the second knot, loop the elastic through twice before pulling tight. This is known as a surgeon’s knot and it holds elastic much more securely than a standard double knot. -
Apply adhesive:
Dab a tiny drop of super glue or jewelry cement directly onto the knot. Be careful not to get glue on the beads themselves. -
Hide the knot:
While the glue is still slightly tacky but not wet, gently pull the elastic so the knot slides inside the hole of the nearest bead (preferably one of the larger black round ones). -
Trim the excess:
Once the glue is fully dry, use sharp scissors to trim the remaining tails of the elastic cord as close to the bead hole as possible.
Knot Slipping?
If your elastic knot keeps slipping undone before you can glue it, try clamping a binder clip on one end of the cord while you manipulate the other to keep tension.
Now you have a chic, minimalist bracelet ready to stack or wear solo
Black Yin-Yang Focal Bracelet
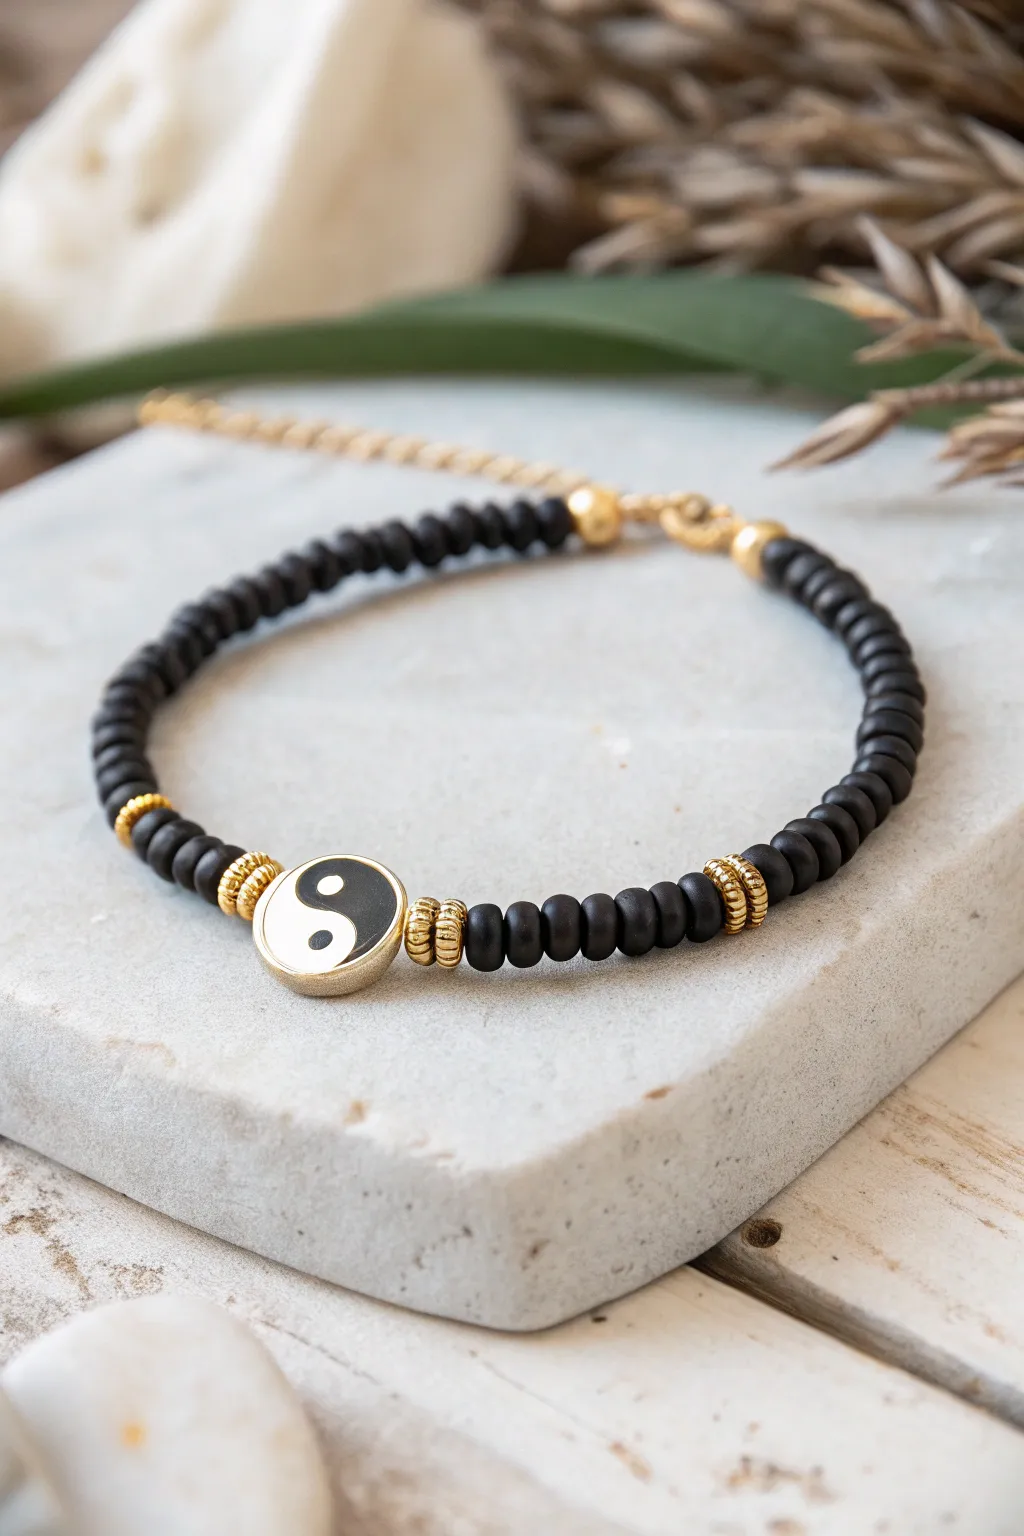
Find your center with this elegantly balanced beaded bracelet featuring matte black clay discs and gleaming gold accents. The classic yin-yang centerpiece adds a touch of philosophical cool to a sophisticated, minimalist design.
How-To Guide
Materials
- Matte black polymer clay disc beads (approx. 4-6mm)
- Gold-tone yin-yang charm (enamel and metal)
- Gold-tone textured spacer beads ( rondelle or disc shape)
- Small gold crimp beads
- Gold jump rings (4mm or 5mm)
- Gold lobster clasp
- Gold extender chain
- Beading wire (e.g., Tiger Tail, 0.38mm)
- Wire cutters
- Chain nose pliers
- Crimping pliers
Step 1: Preparation and Center
-
Measure the wire:
Cut a length of beading wire approximately 10-12 inches long. This gives you plenty of extra room to work with the clasp and crimps without feeling crowded. -
Secure one end:
Before you start stringing, place a piece of tape or a bead stopper on one end of the wire. This simple step saves your beads from sliding right off while you work on your pattern. -
Prepare the focal:
Depending on your yin-yang charm, it might have a loop at the top or holes running through it. If it’s a charm with a top loop, attach a jump ring to it so it hangs or lays flat. The charm in the image appears to be a bead-style component or a charm laid flat, so ensure it sits oriented correctly. -
Start the center sequence:
Thread the yin-yang charm onto the middle of your wire. Slide one gold textured spacer bead onto each side of the charm so they frame it immediately. -
Add first black beads:
On the right side of the charm, slide on three matte black clay beads. -
Place gold accents:
After the three black beads, add another gold textured spacer bead. Then, add a second gold spacer bead immediately after it for a double-gold look. -
Mirror the design:
Repeat this exact sequence on the left side of the charm: three black clay beads followed by two gold textured spacers.
Pro Tip: Textured Spacers
Look for “corrugated” or “granulated” gold spacers. Their rough texture catches light better than smooth rings, creating a richer contrast against matte clay.
Step 2: Stringing the Band
-
Continue the pattern:
Now that the central focal section is complete, fill the rest of the wire with just the matte black clay beads. String them continuously on both sides. -
Check the length:
Periodically wrap the bracelet around your wrist or a sizing cone. You want the beaded section to cover most of your wrist, leaving about an inch gap for the clasp hardware. -
Add final gold touch:
Once you reach the desired length on both ends, slide a single smooth gold bead or a small gold spacer onto each end as a finishing cap before the clasp. -
Verify symmetry:
Lay the bracelet flat on your table. Ensure both sides of black beads are equal in length so the yin-yang symbol sits perfectly centered on your wrist.
Troubleshooting: Stiff Wire
If the bracelet feels rigid, you pulled the wire too tight before crimping. Leave a tiny 1mm gap of bare wire near the clasp to allow flexibility.
Step 3: Finishing the Clasp
-
String the first crimp:
On one end of the wire, slide on a crimp bead. Then, thread the wire through the loop of your lobster clasp. -
Create the loop:
Pass the wire tail back through the crimp bead and pull it snug, but leave just a tiny bit of slack so the clasp can wiggle freely. -
Secure the crimp:
Use your crimping pliers to flatten or fold the crimp bead securely. Give the wire a gentle tug to make sure it holds tight. -
Trim excess wire:
Trim the short tail of the wire close to the crimp bead using your flush cutters. If you can, tuck the tiny end into the first adjacent gold bead. -
Prepare the other end:
On the opposite end of the bracelet, slide on a crimp bead followed by the first link of your extender chain. -
Loop and cinch:
Just like before, pass the wire back through the crimp bead. Pull the wire to remove slack from the entire bracelet, ensuring the beads are touching but not so tight that the bracelet becomes stiff. -
Final crimp:
Crimp the bead securely with your pliers. I usually give it one last firm tug test here just to be certain. -
Final trim:
Cut the remaining wire tail flush. Your balanced black and gold bracelet is now ready to wear.
Enjoy the calm vibe this stylish bracelet adds to your daily outfit
Black Smiley Focal Bracelet
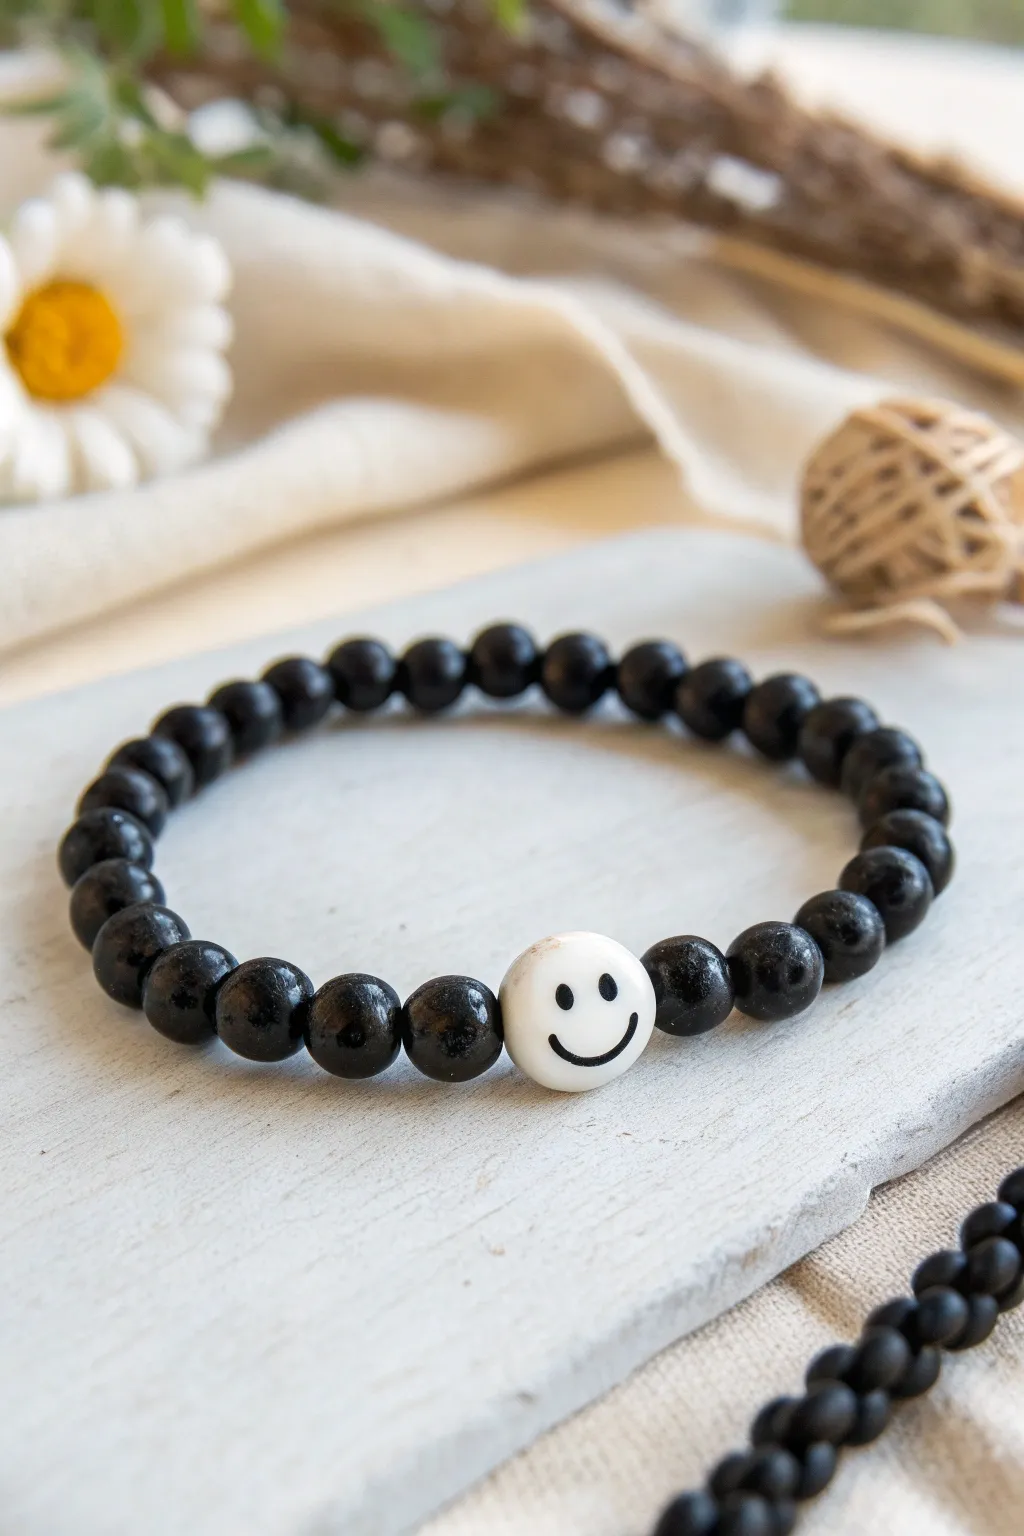
This minimalist bracelet design proves that sometimes less is more, featuring a sleek strand of black beads centered around a single, cheerful focal point. It combines the sophisticated look of dark clay or stone beads with a playful white smiley face charm for a trendy everyday accessory.
Step-by-Step
Materials
- Black round beads (6mm or 8mm, polymer clay, lava stone, or wood)
- White ceramic or acrylic smiley face bead (8mm or 10mm)
- Strong elastic cord (0.8mm or 1mm)
- Jewelry glue or clear nail polish
- Scissors
Step 1: Preparation
-
Measure your wrist:
Wrap a flexible measuring tape comfortably around your wrist to find your size. Add about half an inch to this measurement to ensure the bracelet isn’t too tight. -
Cut the elastic:
Cut a piece of elastic cord approximately 12 inches long. This extra length makes tying the final knot much easier than fighting with short ends. -
Pre-stretch the cord:
Hold the ends of the elastic and give it a few gentle stretched pulls. This prevents the bracelet from stretching out permanently after wearing it for the first time. -
Secure the end:
Place a piece of tape on one end of the cord or attach a bead stopper to prevent your beads from sliding right off as you work.
Knot Security
Look for beads with slightly larger holes for the ends. Being able to pull the knot inside a neighboring bead prevents it from rubbing against your skin.
Step 2: Stringing the Beads
-
Count your beads:
Divide your total number of black beads roughly in half. You want an even number of black beads on either side of the focal bead to keep the design balanced. -
Start stringing:
Begin threading the first half of your black round beads onto the elastic cord. -
Add the focal bead:
Slide on the white smiley face bead. Orient it so the face is aligned with the hole direction if necessary, though most are drilled vertically. -
Finish the strand:
Thread the remaining black beads onto the cord after the smiley face. -
Check the fit:
Wrap the unfinished strand around your wrist to check the sizing. If it feels too loose, remove a black bead from each end; if tight, add one to each end to maintain symmetry.
Add Some Texture
Mix black matte beads with glossy ones for subtle texture, or sandwich the smiley face with two small gold spacer beads for a metallic pop.
Step 3: Finishing the Bracelet
-
Prepare to tie:
Remove the tape or bead stopper carefully while holding both ends of the cord firmly. -
Tie the first knot:
Cross the ends over and loop one under, pulling it tight against the beads to remove any slack so no gaps show. -
Tie a surgeon’s knot:
For the second knot, loop the end through twice before pulling tight. This extra loop creates a much stronger hold than a standard square knot. -
Secure with glue:
I like to apply a tiny dab of jewelry glue directly onto the knot. Be careful not to get glue on the beads themselves, as it can mar the finish. -
Allow to dry:
Let the glue set for a few minutes until it is no longer tacky. -
Hide the knot:
Trim the excess cord ends close to the knot, then gently tug the bracelet so the knot slides inside the hole of the nearest black bead to conceal it.
Your new bracelet is ready to bring a smile to your face every time you look at your wrist
Black Beads With Simple Dangle Charms
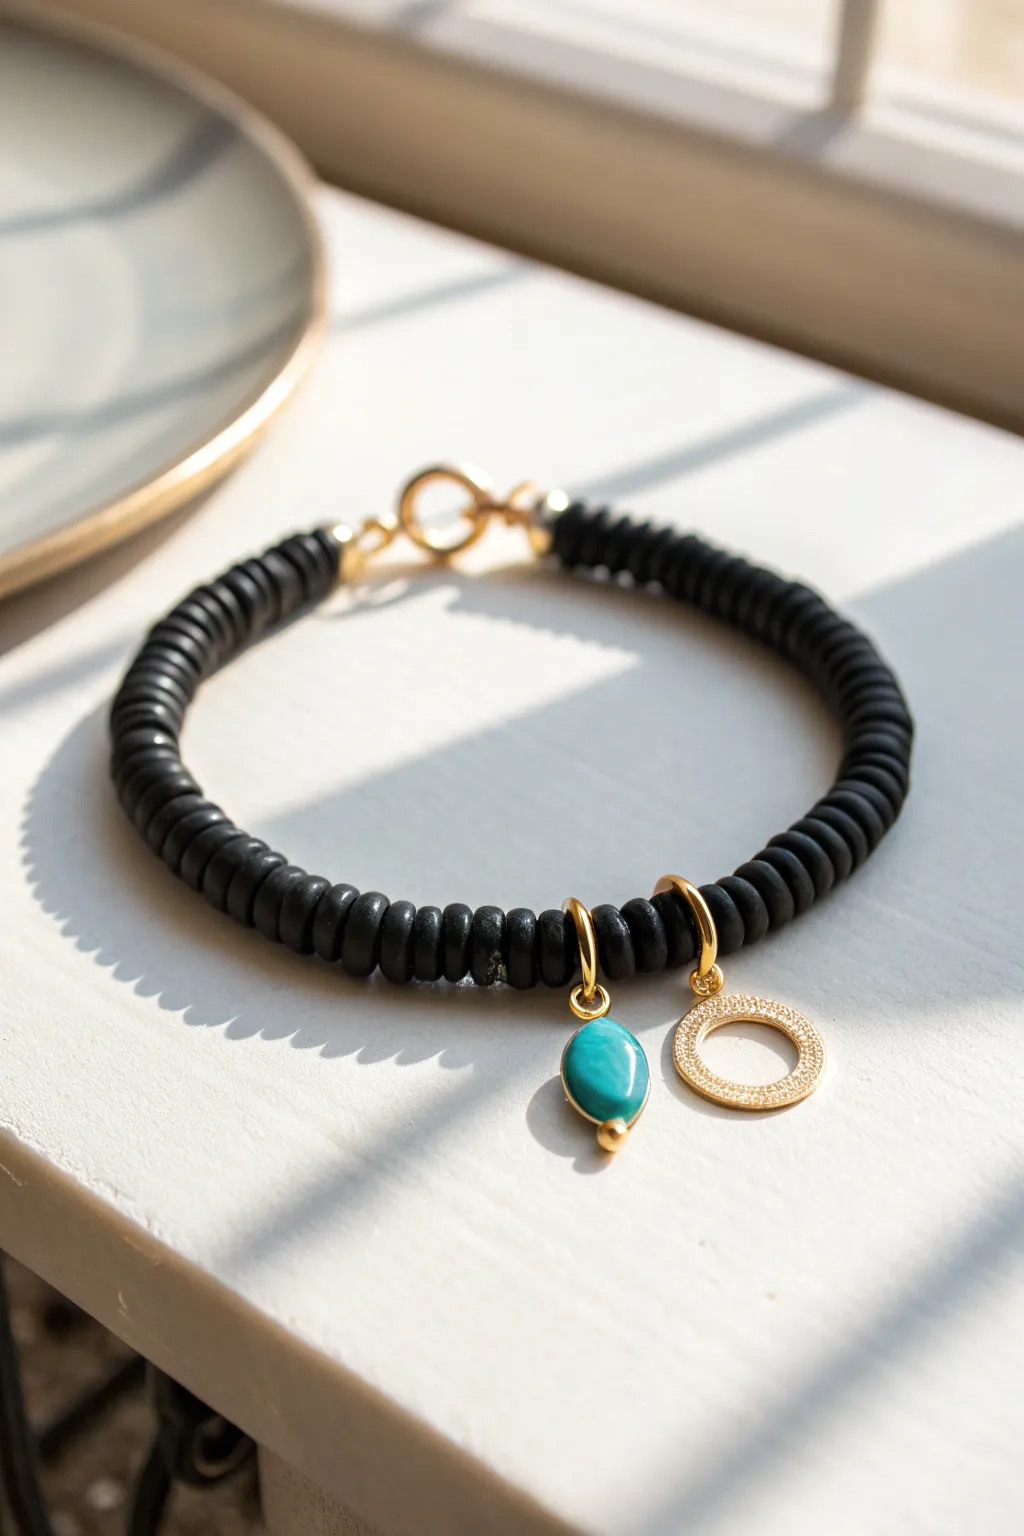
Elevate a simple strand of matte black Heishi beads with a touch of sophisticated asymmetry. This project combines the edgy texture of vinyl disc beads with the classic elegance of gold and turquoise charms for a versatile accessory.
Detailed Instructions
Materials
- 6mm black polymer clay Heishi beads (vinyl disc beads)
- Gold-filled lobster clasp
- Gold-filled closed jump ring (usually 6mm or larger)
- Two 6mm gold open jump rings
- Marquis-shaped turquoise charm with gold bezel
- Gold pavé open circle charm
- Beading wire (nylon-coated stainless steel, heavy-duty)
- Two gold crimp beads (2mm)
- Two gold crimp covers (3mm, optional)
- Wire cutters
- Crimping pliers
- Flat nose pliers
Step 1: Stringing the Base
-
Measure your wrist:
Before cutting any wire, wrap a measuring tape around your wrist to find your size. Add about 1/2 to 1 inch to this measurement to account for the thickness of the beads and ease of wear. -
Prepare the wire:
Cut a length of beading wire roughly 4 inches longer than your final bracelet size. This extra length gives you plenty of room to work with the clasps without frustration. -
Secure the first end:
Slide one crimp bead onto the wire, followed by the closed jump ring that will serve as part of your clasp. Thread the wire back through the crimp bead to create a small loop. -
Crimp it closed:
Use your crimping pliers to flatten the crimp bead securely. I like to give a gentle tug on the wire to ensure it holds firm before moving on. -
Optional finish:
If you are using crimp covers, place one over the flattened crimp bead and gently close it with pliers to make it look like a seamless gold bead. -
String the beads:
Begin threading the black Heishi beads onto the wire. These flat disc beads stack up quickly, creating a dense, textured black rope. -
Check the length:
Continue stringing until the beaded section is just shy of your desired total length, accounting for the clasp assembly you will add at the end.
Loosey Goosey?
If the bracelet feels stiff, you crimped too tight! Leave a tiny hair’s width of slack in the wire before crimping so beads can rotate and drape comfortably on the wrist.
Step 2: Adding the Charms
-
Determine placement:
Decide where you want your charms to sit. For this specific look, they aren’t centered but rather placed near the clasp or slightly off-center. You can attach them directly to the wire now, or attach them to jump rings later. -
Prepare the jump rings:
Using two pairs of pliers, gently twist open two 6mm gold jump rings. Remember to twist the ends away from each other laterally rather than pulling them apart, which weakens the metal. -
Attach the turquoise charm:
Slide your turquoise marquis charm onto one open jump ring. Hook this ring around the strand of black beads at your chosen location—usually slipping it between two specific discs works best. -
Close the ring:
Use your pliers to twist the jump ring closed again, ensuring the ends meet perfectly flush so the charm doesn’t slip off. -
Attach the circle charm:
Repeat the process with the gold pavé circle charm. Place it just a few beads away from the turquoise one to create a clustered look.
Step 3: Final Assembly
-
Finish the strand:
Once all standard beads are on, slide a second crimp bead onto the end of the wire, followed by the lobster clasp. -
Create the loop:
Thread the tail of the wire back through the crimp bead and through the last couple of black Heishi beads. Pull the wire taut so there are no large gaps, but leave a tiny bit of slack so the bracelet moves fluidly. -
Secure the end:
Use the crimping pliers to flatten this final crimp bead securely. Make sure the clasp can still wiggle freely in its loop. -
Trim excess wire:
Use your flush cutters to trim the remaining tail of wire as close to the beads as possible. Be careful not to nick the main wire. -
Cover the crimp:
If using a crimp cover, place it over this second crimp bead and gently close it with your flat nose pliers for a polished, professional finish.
Charm Security
For extra durability with heavy charms, use oval jump rings instead of round ones. The opening is on the long side, making it much harder for the charm to slip through the gap.
Now you have a chic, modern bracelet that stacks beautifully with gold bangles or stands elegantly on its own.
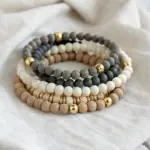
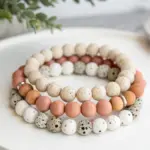
Black “Night Sky” Speckle Stack
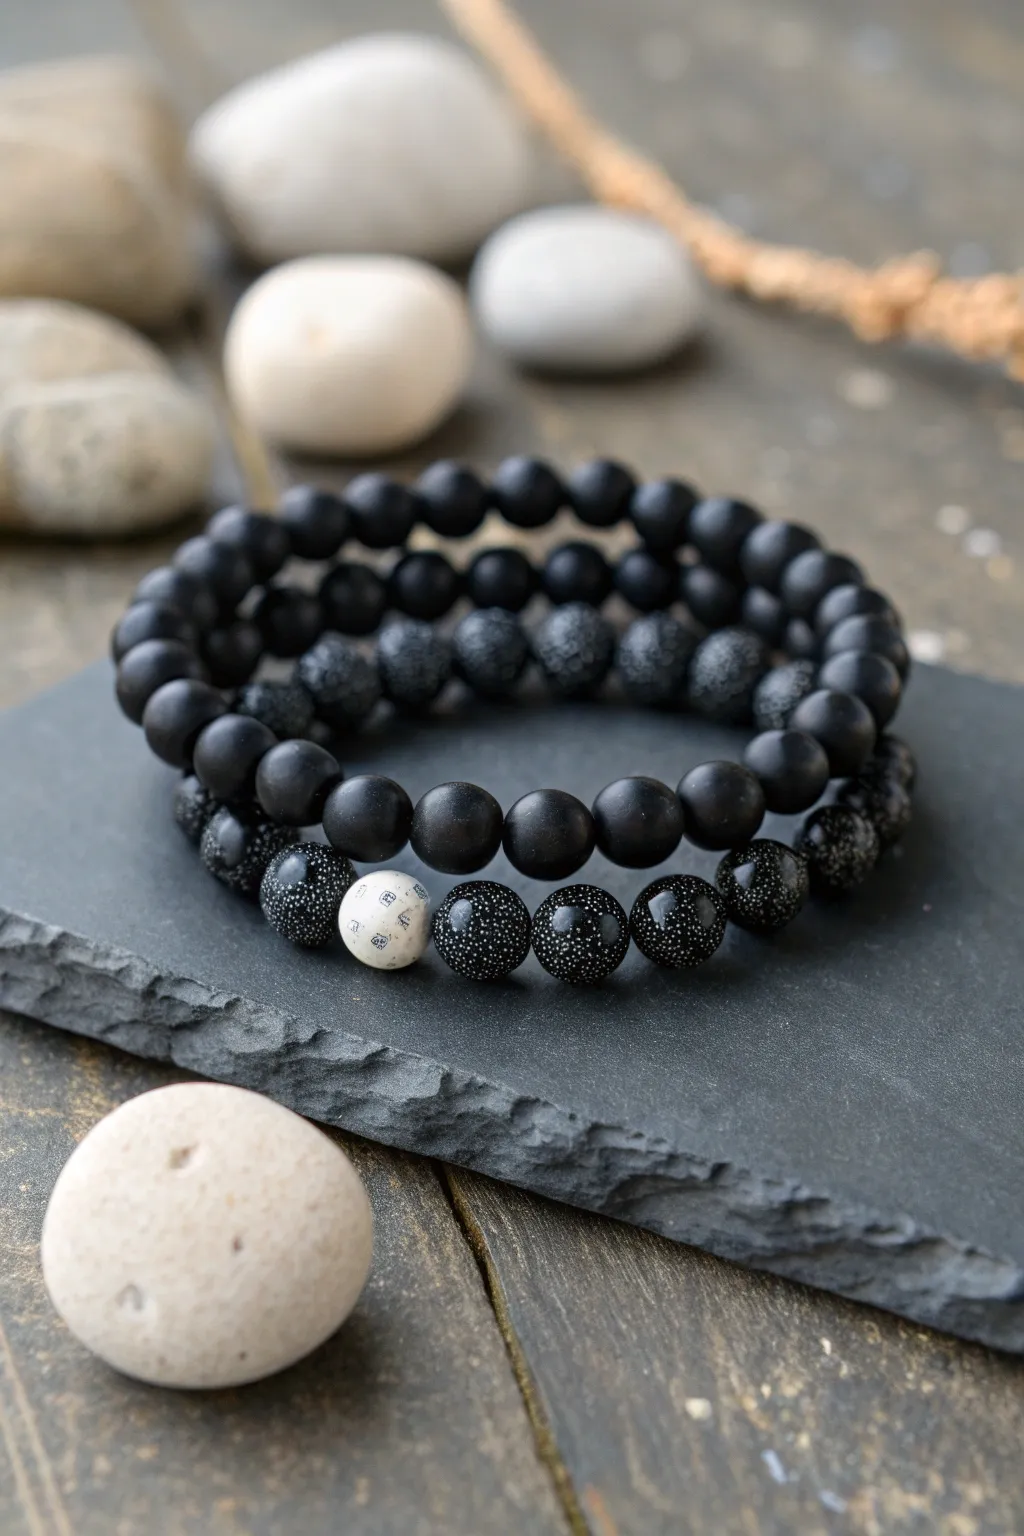
Capture the mysterious beauty of a starry night with this handsome stack of stretch bracelets. By combining matte textures, porous lava rock, and glimmering speckled beads, you’ll create a unified set that feels both rugged and refined.
Step-by-Step
Materials
- Matte black onyx or agate beads (8mm)
- Black lava stone beads (8mm)
- Black sandstone or ‘blue goldstone’ beads with glitter/speckles (8mm)
- One single white speckled bead (8mm) for contrast (e.g., Dalmatian jasper or white turquoise)
- Strong elastic bead cord (0.8mm or 1mm)
- Bead stopper or masking tape
- Jewelry glue or clear nail polish
- Scissors
Step 1: Planning and Preparation
-
Measure your wrist:
Wrap a measuring tape loosely around your wrist where you want the bracelets to sit. Add about half an inch to this measurement to ensure a comfortable fit that isn’t too tight. -
Pre-stretch the cord:
Cut three lengths of elastic cord, each about 10-12 inches long. Before threading, give each piece a few firm tugs; this ‘pre-stretching’ helps prevent the bracelets from sagging later on. -
Secure the ends:
Attach a bead stopper or simply place a piece of masking tape on one end of each cord length so your beads don’t slide right off while you work.
Knot Security
Hide the knot inside a bead with a larger hole (like the lava beads) if it won’t fit in the matte or stone beads. This protects it from wear.
Step 2: Creating the Matte Black Strand
-
String the matte beads:
Thread your 8mm matte black onyx beads onto the first cord one by one. -
Check the length:
Continue adding beads until the strand matches your calculated wrist length. Wrap it around your wrist to double-check the fit before tying. -
Tie the knot:
Tie a secure surgeon’s knot—this is like a standard square knot but looped through twice on the first pass for extra grip. Pull it tight. -
Secure and trim:
Dab a tiny drop of jewelry glue on the knot. Let it dry for a moment, then trim the excess cord carefully, tucking the knot inside a bead hole if possible.
Step 3: Creating the Lava Stone Strand
-
Select your lava beads:
For the second bracelet, pick out your lava stone beads. I like to check them first to make sure there are no overly sharp edges that might irritate the skin. -
Thread the lava strand:
String the lava beads onto your second piece of prepared cord, aiming for the same length as the first bracelet. -
Finish the lava strand:
Repeat the knotting process: tie a strong surgeon’s knot, apply a dot of adhesive, let it set, and trim the tails closely.
Scent Infusion
Add a drop of essential oil (like cedarwood or peppermint) to the porous lava beads; they act as a natural diffuser throughout the day.
Step 4: Creating the Night Sky Speckle Strand
-
Design the focal point:
Lay out your black speckled (sandstone/goldstone) beads on a bead board or towel. Decide where you want the single white contrast bead to sit. -
String the first half:
Thread approximately half of your black speckled beads onto the final cord. -
Add the contrast bead:
Slide on the single white stone bead. This creates the ‘moon’ in your night sky concept. -
Finish stringing:
Add the remaining black speckled beads until this strand matches the length of the previous two. -
Final knotting:
Tie off this final bracelet with your sturdy surgeon’s knot. -
Hide the knot:
Try to maneuver the knot so it sits inside the hole of the white bead or one of the adjacent black beads for a seamless professional look. -
Final inspection:
Put all three bracelets on together to ensure they stack nicely and are uniform in size.
Enjoy wearing this versatile stack that brings a touch of cosmic texture to your everyday style