Whenever I pull out black clay, I get that instant “modern and moody” vibe—everything looks crisp, graphic, and a little magical. If you’re craving projects with high-contrast details and finishes that can go from velvety matte to slick glossy, these ideas are going to keep your studio brain busy.
Black Cat Figurines
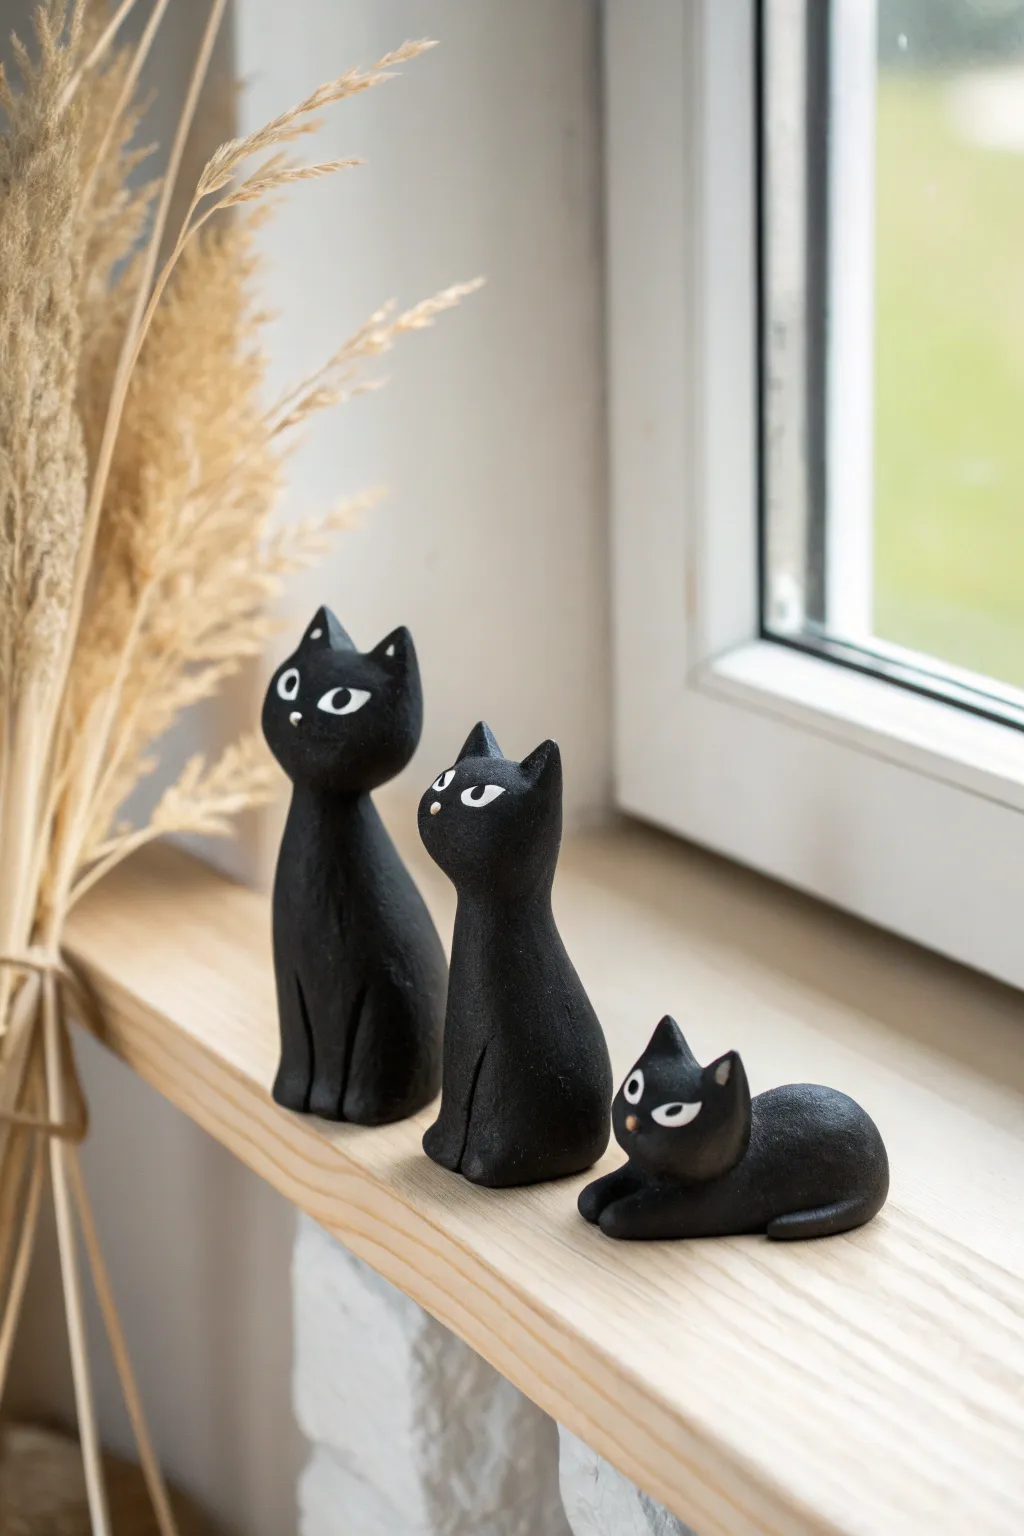
Create a charming family of minimalist black cats to guard your windowsill or bookshelf. These sleek, matte figurines rely on simple shapes and expressive eyes to bring distinctive personality to a classic subject.
How-To Guide
Materials
- Black polymer clay (or air-dry clay painted black)
- White acrylic paint
- Small detail paintbrush (size 0 or 00)
- Clay sculpting tools (specifically a smoothing tool and a needle tool)
- Aluminum foil (for armatures slightly larger figures)
- Fine-grit sandpaper (optional)
- Matte varnish (optional)
Step 1: Shaping the Bodies
-
Prepare the clay:
Begin by conditioning your block of black clay until it is soft and malleable. Warm clay is much easier to smooth later on. -
Form the large cat’s base:
Roll a medium ball of clay into a smooth teardrop shape. Flatten the bottom so it sits securely upright. This tall cone shape forms the body of the largest cat. -
Refine the posture:
Gently gently pressing the ‘chest’ area forward slightly to give the cat an alert, seated posture. The top of the teardrop should remain thick enough to support the head. -
Create the medium cat:
Repeat the teardrop process with a slightly smaller amount of clay. For this one, you might curve the neck slightly to one side to differentiate it from the leader of the pack. -
Sculpt the lying cat:
For the smallest reclining cat, roll an oval log shape instead of a teardrop. Press it gently onto your work surface so it lies flat, slightly raising one end where the head will attach.
Step 2: Adding Heads and Details
-
Shape the heads:
Roll three balls of clay proportional to their respective bodies. Instead of a perfect sphere, taper the chin area slightly to create a subtle heart-shaped face. -
Form the ears:
Pinch two small triangular points at the top of each head. Using your fingers, smooth the clay from the ear down into the head so there are no visible seams. -
Attach heads to bodies:
Press the heads firmly onto the bodies. I like to blend the clay at the neck seam downward with a sculpting tool to ensure they won’t pop off later, then smooth it out with a fingertip. -
Define the legs:
Use a needle tool or a dull knife tool to gently score vertical lines into the front of the seated cats. This suggests front legs without needing to sculpt them separately. -
Add tails:
Roll thin snakes of clay for the tails. Wrap them naturally around the base of the seated cats and along the side of the lying cat, blending the attachment point at the back. -
Smooth the surface:
Dip your finger in a tiny bit of water (for air-dry clay) or baby oil (for polymer) and gently rub out any fingerprints. The finish needs to be very smooth for that sleek look.
Pro Tip: Seamless necks
If the heads feel heavy or wobbly, insert a short piece of toothpick or wire into the neck connection before baking. This acts as an internal spine.
Step 3: Finishing Touches
-
Bake or dry:
Follow the manufacturer’s instructions for your specific clay. If baking polymer clay, consider tenting foil over them to prevent the black clay from scorching or looking shiny. -
Paint the eye background:
Once cool and plain, use your smallest brush to paint two diagonal, almond-shaped white ovals on each face. Apply two thin coats for opaque coverage. -
Add pupils:
Dip the very tip covering of your brush handle or a dotting tool into black paint (or use a scrap of black clay). Place a dot in the center of the white sections, creating a side-glance or cross-eyed look for character. -
Add nose details:
With the tiniest amount of white or grey paint, add a microscopic dot for the nose tip to help orient the face.
Troubleshooting: Lint issues
Black clay shows every speck of dust. If white lint gets stuck in your raw clay, lift it out with a piece of clear scotch tape wrapped around your finger.
Arranging your new feline family on a shelf adds a perfect touch of whimsical mystery to your decor


Minimalist Black Clay Earrings
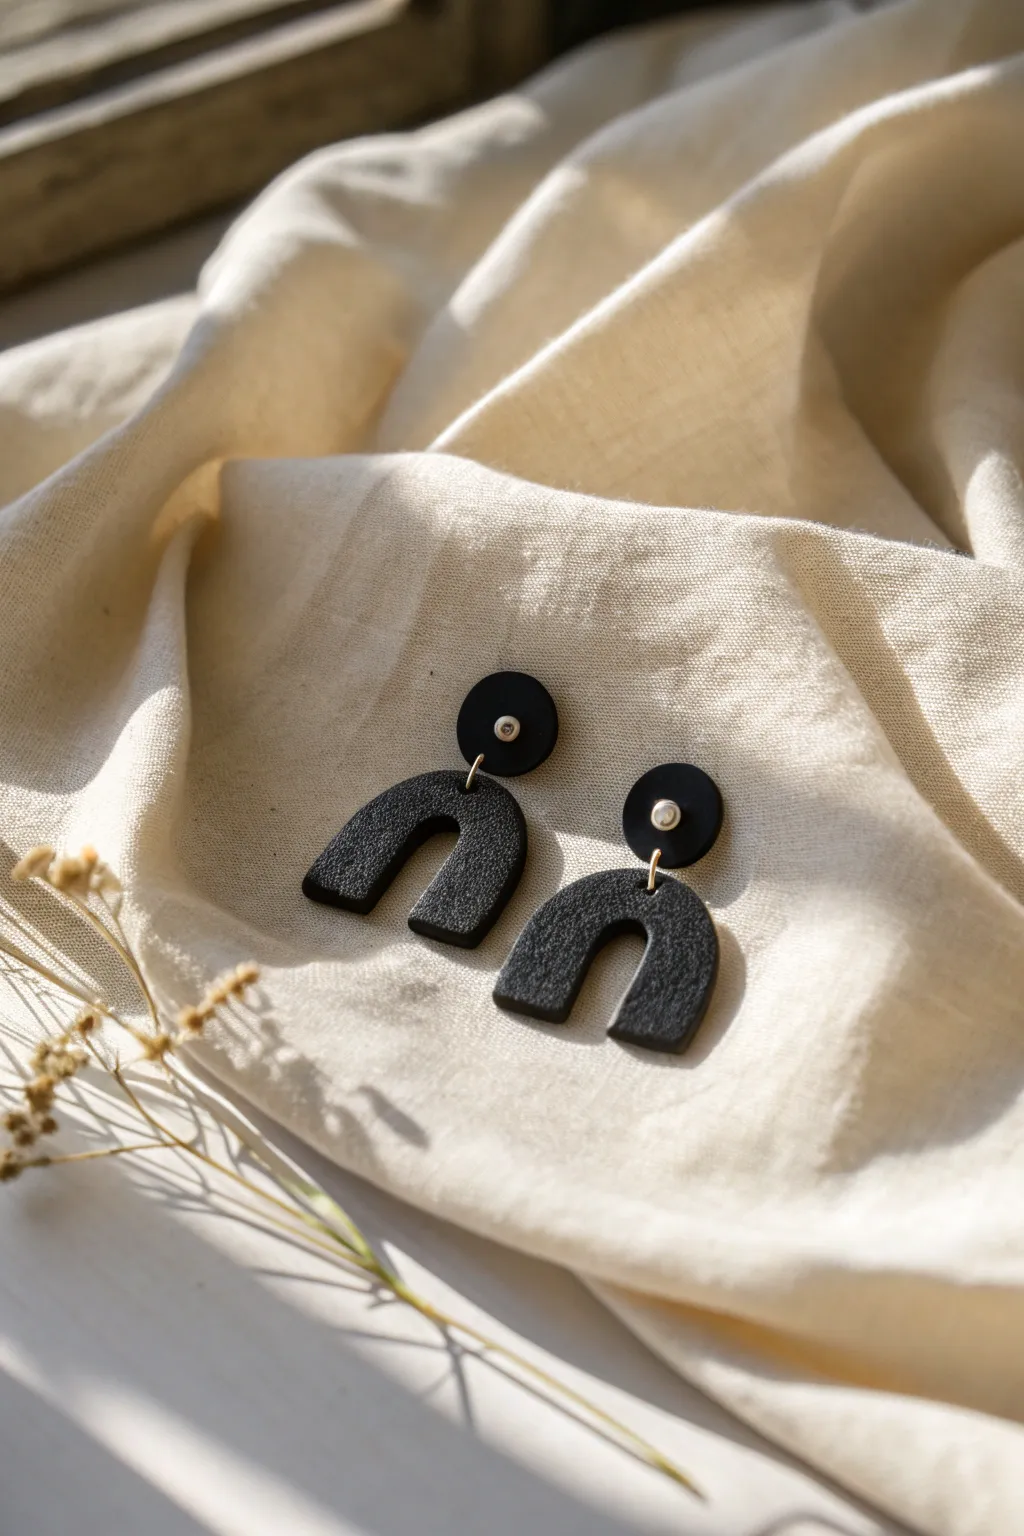
These sophisticated earrings feature a striking u-shaped arch suspended from a simple stud, all crafted in a deep, matte black finish. The subtle textured surface mimics natural stone or leather, giving these minimalist accessories a high-end, artisanal feel.
Detailed Instructions
Materials
- Black polymer clay (pardo, fimo, or sculpey)
- Acrylic rolling pin or clay machine
- U-shape / Arch clay cutter (approx. 1 inch width)
- Small circle clay cutter (approx. 0.4 inch diameter)
- Coarse sandpaper or a toothbrush (for texturing)
- Needle tool or toothpick
- Parchment paper style baking surface
- Oven thermometer
- 2 Gold jump rings (6mm or 7mm)
- 2 Flat pad earring posts
- Jewelry pliers (flat nose and round nose)
- Superglue or E6000 adhesive
Step 1: Conditioning and Cutting
-
Warm up the clay:
Begin by slicing off a block of your black polymer clay. Work it thoroughly in your hands, rolling and squishing it until it is warm, pliable, and free of cracks. This conditioning step is crucial for durability. -
Roll out a slab:
Using your acrylic roller or pasta machine, flatten the clay into an even slab. You want a medium thickness—roughly 3mm (or setting 1 on most machines)—so the earrings feel substantial but not heavy. -
Add texture:
Before cutting, create that lovely stone-like finish. Gently press a piece of coarse sandpaper or the bristles of a clean toothbrush onto the surface of the clay slab. Rotate your tool to avoid a repeating pattern. -
Cut the shapes:
Press your U-shaped cutter firmly into the textured slab to create two arch pieces. Next, use the small circle cutter to create two round stud pieces. -
Clean the edges:
Carefully lift the shapes away from the excess clay. If there are any jagged bits on the edges, gently smooth them down with your fingertip. I find a little bit of cornstarch on my finger helps glide over the clay without leaving prints. -
Pierce holes:
Using a needle tool, poke a hole at the very top center of each U-shape arch. Then, poke a hole at the very bottom center of each circle stud. Make sure the holes are large enough for your jump rings to move freely.
Clean Edges Trick
Before cutting your shapes, place a sheet of cling wrap over the clay. Press the cutter down through the plastic. This creates softly rounded ‘beveled’ edges that require zero sanding later.
Step 2: Baking and Assembly
-
Prepare for baking:
Transfer your clay pieces onto a baking sheet lined with parchment paper or a ceramic tile. -
Bake the clay:
Bake according to your specific brand’s package instructions. Usually, this is around 275°F (130°C) for 30 minutes. Use an oven thermometer to ensure the temperature is accurate to prevent burning the black pigment. -
Cool down:
Once the timer goes off, remove the tray and let the pieces cool completely to room temperature. Do not try to flex them while they are still warm. -
Open the jump rings:
Use two pairs of pliers to grip a jump ring on either side of the split. Twist one hand forward and the other back to open the ring sideways (never pull it apart outwards). -
Connect the pieces:
Thread the open jump ring through the hole in the U-shape arch and then through the hole in the circle stud. Close the ring by twisting it back into place until the ends meet perfectly. -
Attached the posts:
Turn the earrings over so the backs are facing up. Apply a small dot of strong glue (like E6000 or gel superglue) to the flat pad of an earring post. -
Secure the backing:
Press the glued post onto the back of the small circle stud, ensuring it is centered but doesn’t block the jump ring hole. Let the glue cure fully before wearing.
Speckled Granite Look
Mix a tiny amount of white or translucent clay with black pepper or dried used coffee grounds into your black clay. It adds organic speckles that make the texture pop even more.
Now you have a versatile pair of modern matte earrings ready to pair with any outfit


Goth Black Pumpkin Lanterns
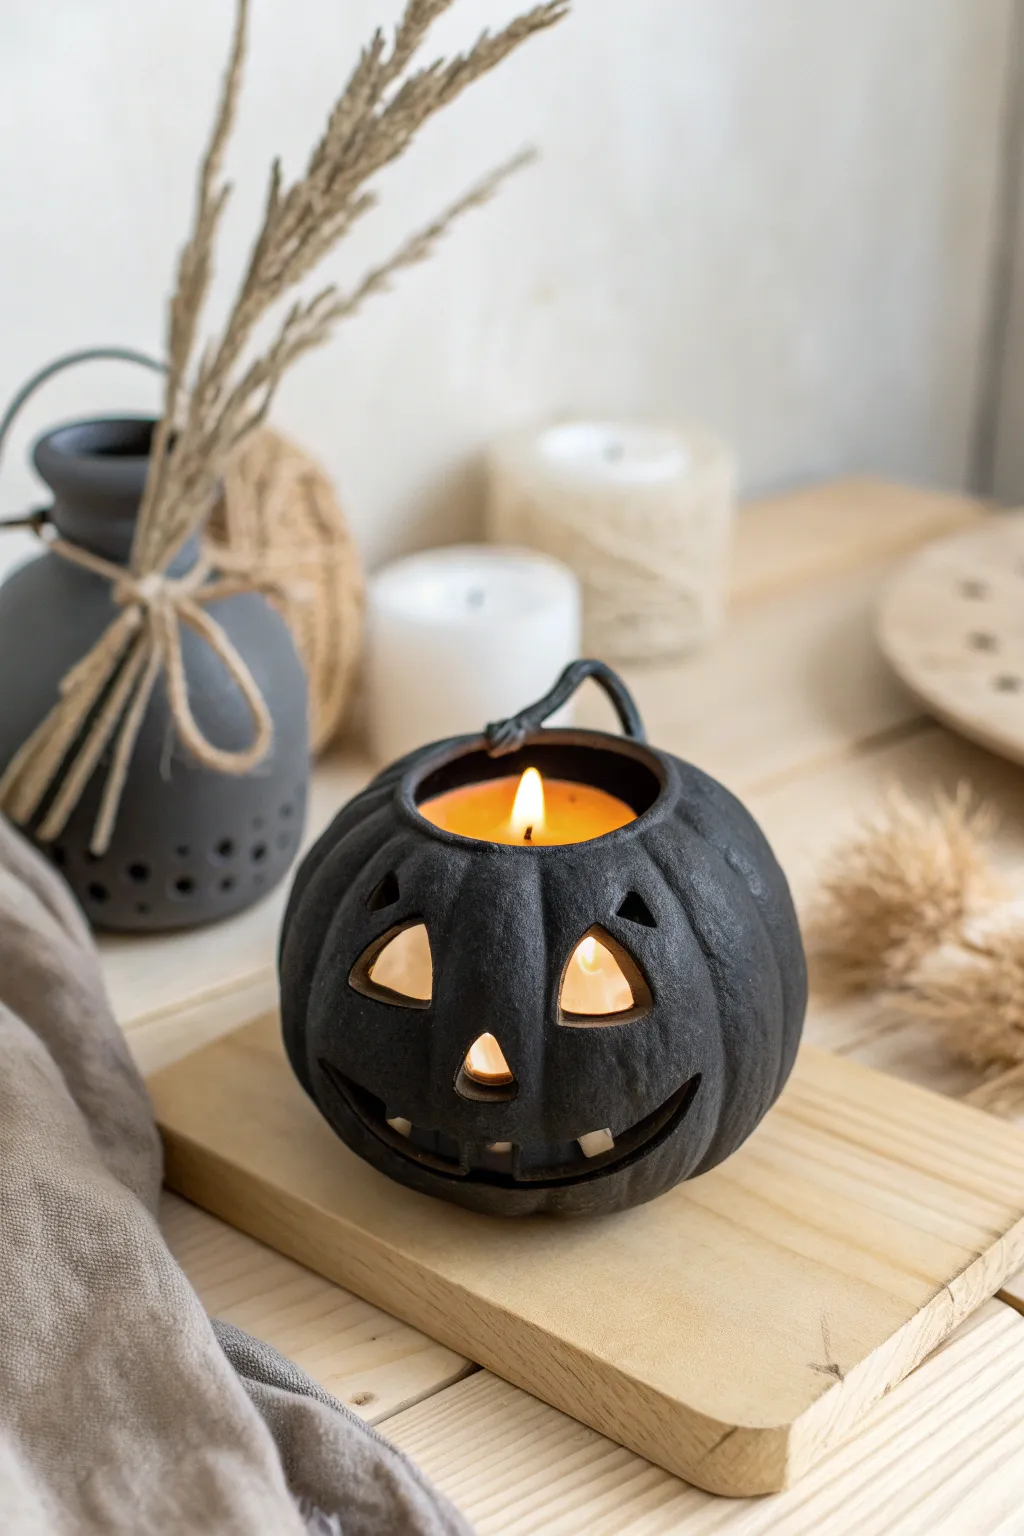
Embrace a darker aesthetic this autumn with a handcrafted jack-o’-lantern made from rich black clay. This charmingly spooky vessel features triangular eyes, a jagged grin, and a removable lid, perfect for housing a flickering tealight to cast eerie shadows.
Detailed Instructions
Materials
- Black stoneware clay or polymer clay (oven-bake)
- Pottery wheel (optional) or rolling pin for slab building
- Loop tools for carving
- Needle tool
- Fettling knife
- Small sponge
- Rib tool (wooden or silicone)
- Slip and scoring tool (if using ceramic clay)
- Black matte glaze (if using ceramic clay)
- Clear satin varnish (if using polymer clay)
- Tealight candle
Step 1: Forming the Base
-
Prepare the clay body:
Begin by wedging your black clay thoroughly to remove air bubbles. This is crucial for preventing cracks during firing or baking. -
Create the hollow form:
If throwing on a wheel, pull a small, enclosed sphere shape. If hand-building (which I often find more meditative), create two pinch pots of equal size. -
Join the halves:
Score the rims of your two pinch pots, apply slip (or liquid clay), and press them firmly together to form a sealed hollow ball. Smooth the seam completely with a rib tool until invisible. -
Shape the pumpkin ridges:
While the clay is leather-hard but still pliable, use your thumb or a wide modeling tool to gently press vertical indentations from top to bottom, mimicking the natural segments of a pumpkin. -
Flatten the bottom:
Gently tap the sphere onto your work surface to create a stable, flat base so the lantern won’t roll away.
Clean Cuts Pro Tip
Let the clay dry to a ‘leather hard’ state before carving the face. Soft clay drags and deforms, but firmer clay cuts crisply like cheddar cheese.
Step 2: Carving the Features
-
Cut the lid opening:
Use a needle tool or fettling knife to cut a circular opening at the very top. Cut at an inward angle so the lid has a ‘seat’ to rest on and won’t fall inside. -
Refine the lid:
Remove the cut piece carefully. Smooth the raw edges of both the opening and the lid piece with a damp sponge. -
Add a stem handle:
Roll a small coil of black clay and attach it to the center of the lid. Twist it slightly for a gnarled, organic look, curving the end over like a vine. -
Sketch the face:
Lightly trace your jack-o’-lantern face onto the clay surface using a needle tool. Aim for classic triangular eyes and a wide, toothy grin. -
Carve the eyes:
Using a sharp fettling knife or scalpel, carefully cut out the triangular eye shapes. Clean up any ragged bits from the corners with a small brush. -
Sculpt the nose:
Cut a small, triangular nose hole in the center of the face, keeping it proportional to the eyes. -
Create the mouth:
Carve out the mouth shape, leaving small square tabs of clay to represent the teeth. This negative space is key for the candlelight to shine through later. -
Smooth the cutouts:
Dip a brush in water (or clay softener) and gently round off the sharp edges inside the eyes, nose, and mouth cuts for a professional finish.
Step 3: Finishing and Firing
-
Texture the surface:
For a rustic touch, lightly sponge the exterior to create a stone-like texture, or leave it smooth for a modern look. -
Dry the piece:
Allow the clay to dry slowly under loose plastic if using ceramic clay, or prepare for baking according to package instructions if using polymer. -
Bisque fire or bake:
Fire the ceramic piece to bisque temperature (usually cone 04) or bake your polymer clay at the recommended temperature. -
Apply finish:
If using ceramic clay, apply a matte black glaze solely to the outside if you want a consistent sheen, or leave the raw dark clay body if it fires black. For polymer, a light sanding followed by a matte varnish works wonders. -
Final firing:
If glazed, fire the piece again to the maturation temperature of your clay and glaze combination. -
Clean the interior:
Once cool, wipe out any dust from the interior to ensure a safe surface for your candle.
Level Up: Scented Glow
Mix a pinch of dried clove or cinnamon into the clay body (if using polymer) or place a scented wax melt inside a ceramic version for a multi-sensory treat.
Light your tealight, place the lid on top, and enjoy the cozy, spooky atmosphere your creation brings to the room


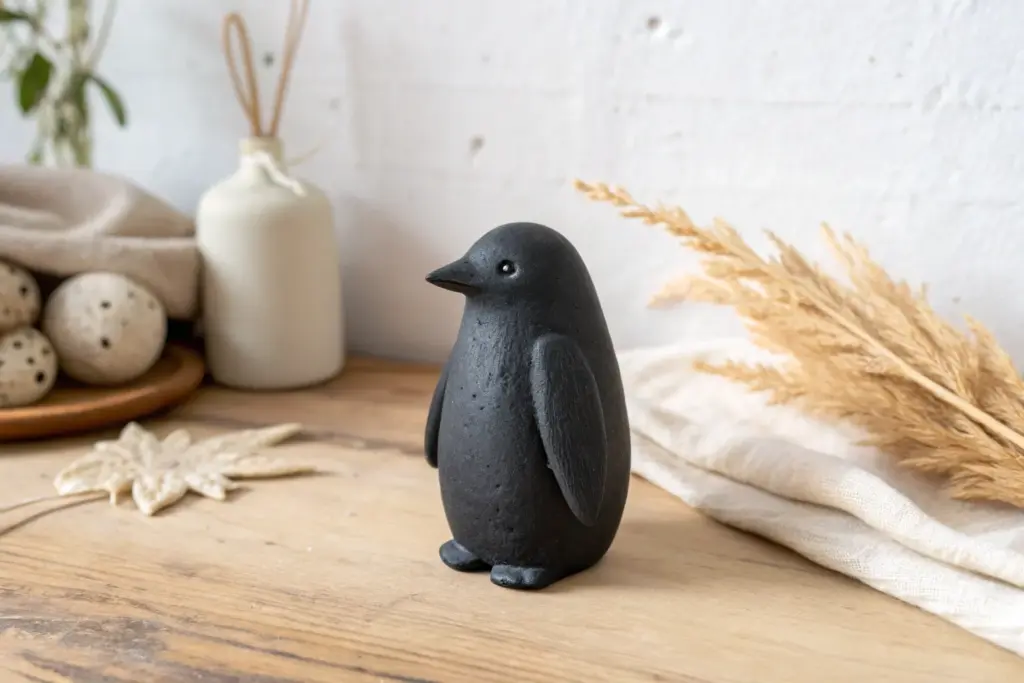
Penguin Minis With Bold Contrast
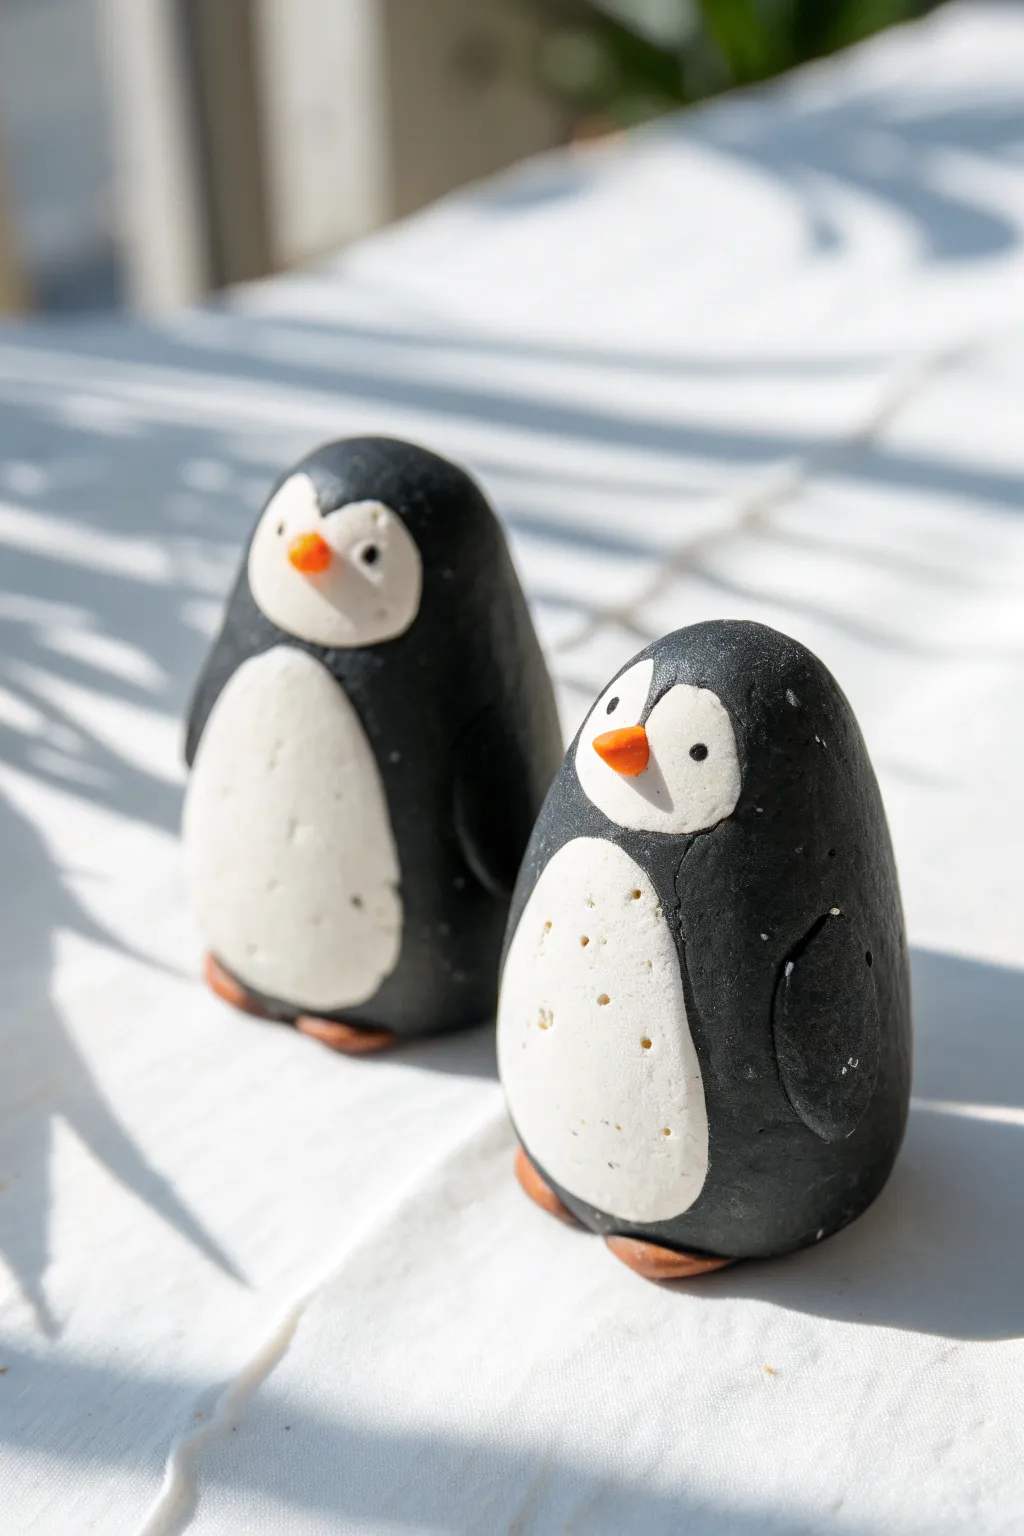
These adorable, stout penguin figurines rely on the striking contrast between deep black clay and bright white accents to pop. Their simple, pebble-like shapes make them an ideal project for beginners looking to practice smoothing and joining techniques without intricate sculpting.
How-To Guide
Materials
- Black polymer clay
- White or translucent white polymer clay
- Orange polymer clay
- Brown polymer clay
- Basic clay sculpting tools (needle tool, ball tool)
- Acrylic rolling pin
- Rubbing alcohol and cotton swabs (for cleaning)
- Oven for baking
- Gloss glaze (optional)
Step 1: Shaping the Bodies
-
Condition the Clay:
Begin by thoroughly conditioning your black clay until it is soft and pliable. Black clay can be stiff, so take your time warming it up in your hands to prevent cracking later. -
Form the Base Shape:
Roll two balls of black clay, making one slightly larger than the other if you want a varied pair. Gently roll each ball into a smooth, egg-like oval, creating a slightly flatter bottom so they stand upright easily. -
Clean Your Hands:
Before touching white clay, clean your hands and tools meticulously with baby wipes or rubbing alcohol. Black pigment transfers easily and will ruin the pristine white look we need for the next steps.
Step 2: Adding the White Details
-
Create the Bellies:
Condition a piece of white clay and roll it out into a thin, consistent sheet. Use a small oval cutter or a craft knife to cut out two oval shapes suitable for the penguin bellies. -
Attach the Bellies:
Gently press the white ovals onto the lower front of your black egg shapes. Use your thumb to smooth the edges down until the white clay seems inlaid into the black, rather than just sitting on top. -
Form the Face Mask:
Roll two very small balls of white clay for each penguin. Flatten them into discs and press them side-by-side onto the upper part of the body, just above the belly. -
Blend the Face:
Using a smoothing tool or your finger, gently merge the seam where the two white face circles meet so it looks like a single, heart-shaped mask. Ensure the top edges remain rounded. -
Texture the White Clay:
If you want a slightly organic look like my example, lightly tap the white areas with a toothbrush or crumpled foil to give it a subtle stone-like texture, or keep it smooth for a modern finish.
Smudged White Clay?
If black residue gets on the white belly, dip a cotton swab in rubbing alcohol or acetone (carefully!) and gently wipe the surface. It usually lifts the top layer of pigment right off.
Step 3: Features and Limbs
-
Making the Beaks:
Take a tiny amount of orange clay and roll it into a small cone. Press this gently into the center of the white face mask, pointing slightly downward. -
Adding Eyes:
Roll microscopic balls of black clay for the eyes. Pressing gently, attach them to the white mask area on either side of the beak. Alternatively, you can use a needle tool to make small indentations first to seat the eyes. -
Sculpting the Wings:
Create teardrop shapes from black clay. flatten them slightly and curve them to fit the contour of the body. -
Attaching Wings:
Press the rounded end of the teardrop onto the shoulder area of the penguin. Blend the clay at the shoulder joint so it is seamless, leaving the tip of the wing slightly raised from the body. -
Creating Feet:
Roll small balls of brown clay and flatten them into discs. Tuck two of these slightly under the front of each penguin so just the rounded edge peeks out.
Weight Issues
To save clay and make baking faster, ball up a tight core of aluminum foil for the center of the body, then cover it with a layer of black clay. This keeps the figurine light.
Step 4: Finishing Touches
-
Final Smoothing:
Check the entire piece for fingerprints. I like to lightly brush the surface with a little baby oil or clay softener on a finger to remove any lingering prints before baking. -
Bake:
Place your penguins on a ceramic tile or cardstock. Bake according to your polymer clay manufacturer’s instructions (usually around 275°F or 130°C for 15-30 minutes depending on thickness). -
Cool Down:
Allow the figures to cool completely in the oven with the door slightly ajar to prevent thermal shock cracks. -
Varnish (Optional):
If you want to seal the clay or add a shine to the eyes and beak, apply a thin coat of water-based polyurethane varnish or UV resin.
Set your new flightless friends on a shelf or desk where their high-contrast charm can brighten your day

The Complete Guide to Pottery Troubleshooting
Uncover the most common ceramic mistakes—from cracking clay to failed glazes—and learn how to fix them fast.
Modern Bud Vases in Black Clay
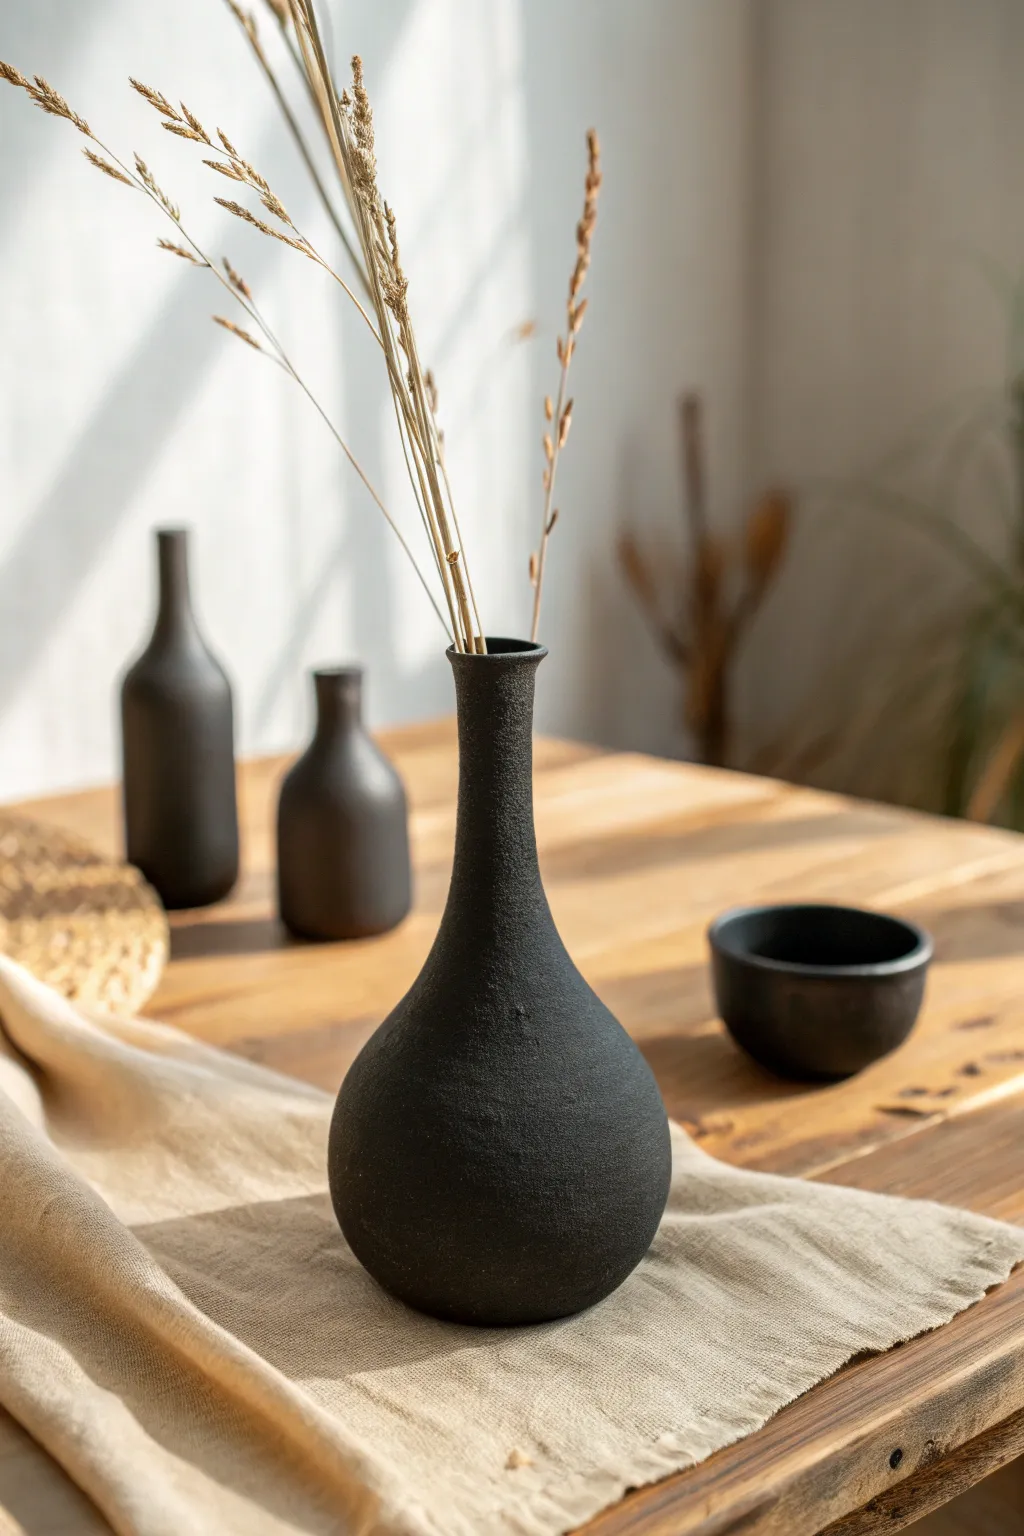
Capture the essence of modern wabi-sabi with this striking, textured bud vase made from dark stoneware. Its raw, unglazed finish highlights the natural grit of the clay, creating a silhouette that is both elegant and grounded.
Detailed Instructions
Materials
- Black stoneware clay (e.g., Black Mountain or a similar groggy body)
- Pottery wheel
- Throwing sponge
- Needle tool
- Wire cutter
- Wooden rib tool
- Metal rib (optional for smoothing)
- Trimming tools (loop tool)
- Chamois leather strip
- Kiln
Step 1: Prepping and Centering
-
Wedge the clay:
Begin by thoroughly wedging about 1.5 to 2 pounds of black stoneware clay. This dark clay can be stiff, so ensure you remove all air bubbles to prevent future explosions in the kiln. -
Form a cone:
Slam the ball onto the wheel head and get the wheel spinning at a medium-fast speed. Cone the clay up and push it back down to ensure it is perfectly centered. -
Check density:
Black clay often has heavy grog; feel the texture as you center. If it feels too abrasive, keep your hands well-lubricated with slurry to protect your skin.
Step 2: Throwing the Form
-
Open the clay:
Drill your thumbs into the center of the mound, leaving about half an inch of clay at the bottom for the foot. -
Establish the floor:
Pull the opening outward to create a narrow floor, no wider than 2.5 inches, as this will result in the tighter, bulbous base seen in the photo. -
Initial pull:
Perform your first pull, bringing the walls up into a thick cylinder. Don’t worry about the shape yet; just focus on getting even wall thickness. -
Belly out the form:
From the inside, apply gentle outward pressure with your fingers to swell the bottom third of the cylinder into a round, spherical belly. -
Collar the neck:
As you move past the belly, use both hands on the outside to gently squeeze or ‘collar’ the clay inward. This requires slow movement to avoid rippling the clay. -
Refining the neck:
Pull the clay at the neck upward to elongate it. I like to re-collar and pull a few times to get that distinctively long, slender throat. -
Flare the lip:
At the very top, gently press outward with your fingertip to create a subtle flare for the rim.
Uneven Drying?
A long skinny neck dries much faster than a round belly. Wrap the neck in plastic or wax resist the rim while the bottom dries to leather-hard to prevent cracking.
Step 3: Refining and Texture
-
Dry exterior:
Remove excess water from the outside of the vase using a rib. For the specific look in the photo, avoid perfectly smoothing it; let the grog create a minute texture. -
Smooth the rim:
Use a strip of chamois leather held over the rim while the wheel spins slowly to compress and soften the lip edge. -
Cut off:
Run a wire cutter underneath the vase to separate it from the wheel head. -
Leather hard drying:
Allow the piece to dry to a leather-hard state. Cover the rim loosely with plastic if the thin neck is drying too much faster than the thick belly.
Testing for Vitrification
Since this is unglazed, ensure your kiln reaches the clay’s full maturity temp. If it’s under-fired, the vase will be porous and leak water.
Step 4: Trimming and Firing
-
Secure for trimming:
Center the leather-hard vase upside down on the wheel. You may need a chuck (a tall cylinder of clay) to hold it steady without damaging the long neck. -
Trim the foot:
Use a sharp loop tool to carve away excess weight from the bottom. Define a clean foot ring that lifts the bulbous shape slightly off the table. -
Burnish (Optional):
If you want a smoother feel without glaze, rub the surface with the back of a spoon or a smooth stone while it’s still slightly damp to compress the particles. -
Bisque fire:
Fire the piece in the kiln to cone 04 for the bisque stage. -
Final fire:
For the matte look shown, fire the unglazed piece to cone 5 or 6 (depending on your clay body’s maturation point). The black clay will vitrify and darken naturally without glaze.
Fill your new vase with dried grasses or a single fresh stem to create a stunning, high-contrast display.
Textured Snack Bowls That Show Every Shadow
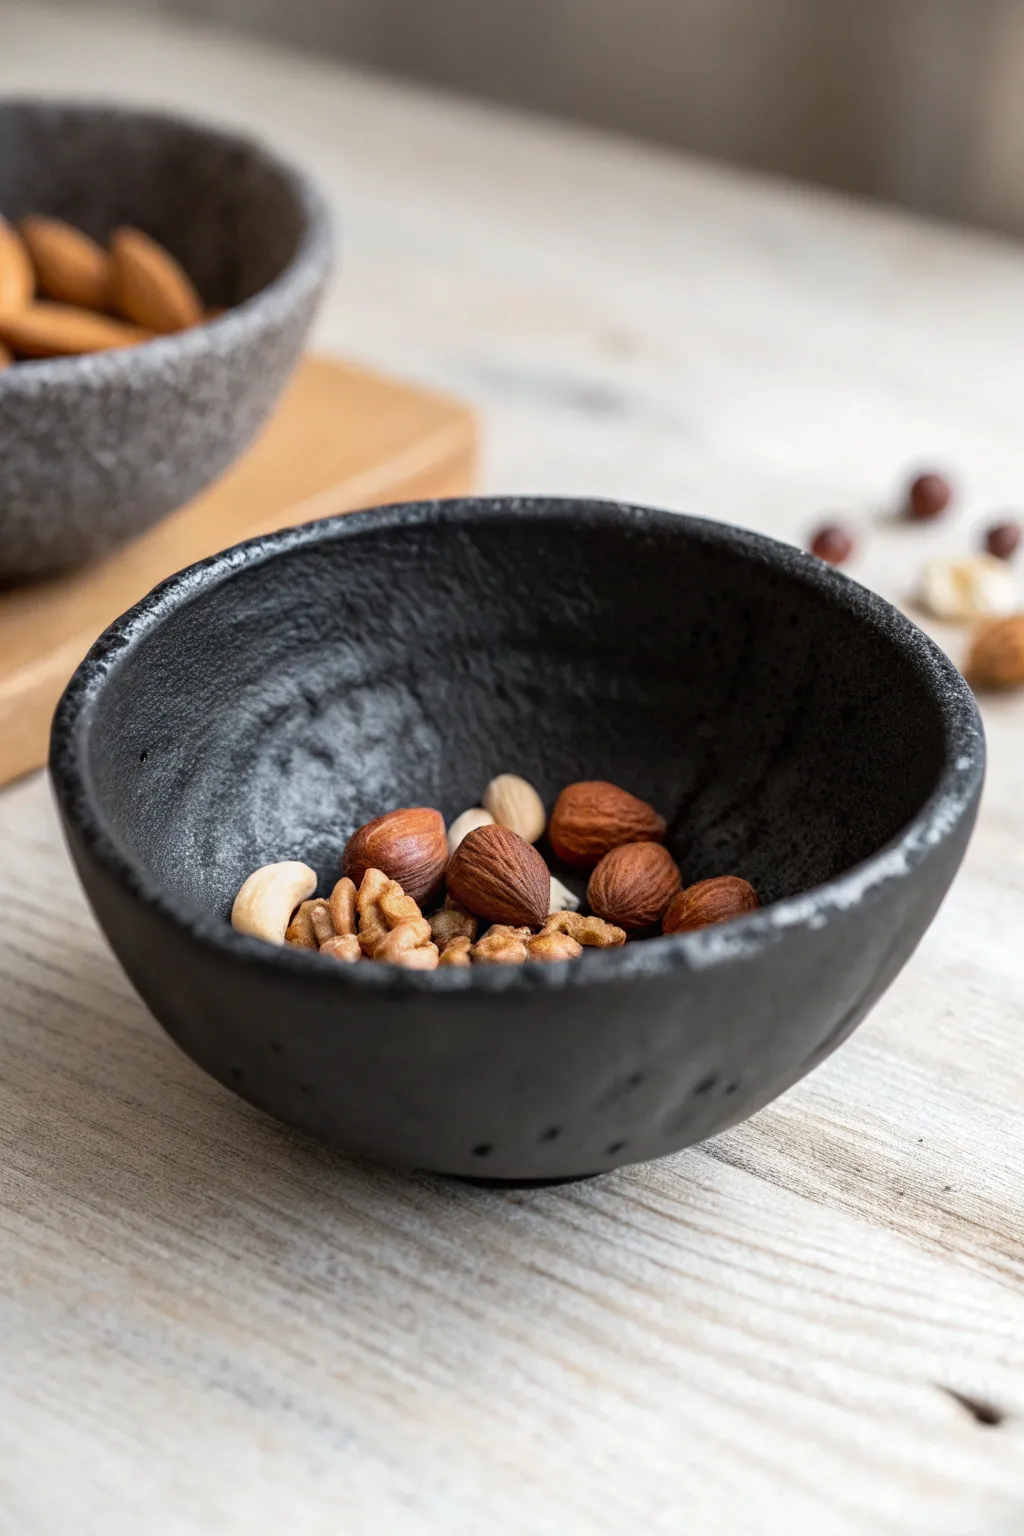
These dramatic bowls rely on a deep black clay body and intentionally rugged surfacing to catch light and cast tiny, fascinating shadows across their form. The result is a piece of tableware that feels earthy, elemental, and incredibly tactile in your hands.
Step-by-Step
Materials
- Black stoneware clay (groggy/toothed texture preferred)
- Small wooden pottery ribs
- Wire clay cutter
- Loop tool (trimming)
- Sponge
- Fettling knife
- Matte black or clear glaze (food safe)
- Small wooden paddle or spoon (optional for shaping)
- Pottery wheel (ideal) or pinch pot tools
Step 1: Forming the Rough Shape
-
Prepare the clay:
Start by wedging a baseball-sized amount of black stoneware clay thoroughly to remove air bubbles. Black clay can be stiff, so ensure it is pliable. -
Throwing the base:
Center your clay on the pottery wheel. Open the center and pull the walls up and outward to create a classic U-shape. Keep the walls slightly thicker than usual—about 1/4 to 1/2 inch—because we need excess material for carving later. -
Establish the curve:
Use a rib on the inside to smooth the interior curve perfectly, ensuring it’s comfortable for scooping snacks. The outside should remain rougher. -
Alternative pinch method:
If you don’t have a wheel, form a smooth ball and push your thumb into the center. -
Pinching walls:
Rotate the ball in your hand, pinching rhythmically to thin the walls and create the bowl shape. Aim for that slightly thicker, rustic wall profile mentioned above.
Clean Hands, Clean Clay
Black clay contains manganese and iron which stain badly. Keep a separate bucket for washing tools and hands to avoid contaminating lighter clays in your studio.
Step 2: Texturing and Refining
-
Dry to leather hard:
Allow the bowl to dry until it reaches a leather-hard state. It should be firm enough to hold its shape but soft enough to carve without chipping. -
Create the rough exterior:
This is the crucial step for the ‘shadow’ affect. Take a trimming tool or a rough wooden paddle and scrape the exterior surface. -
Adding deep pits:
Dig slightly deeper in random spots to create small craters and divots. Don’t smooth these out; the ruggedness is key. -
Rim treatment:
Use your thumb to unevenly press the rim. We want an organic, undulating edge rather than a perfect circle. Cracks that form on the lip should be softened with a sponge but not completely erased. -
Refining the foot:
Turn the pot over and trim a small foot ring if desired, or simply flatten the bottom so it sits stable. I like to tap the bottom against a canvas board to give it a nice flat seat. -
Final sponge wipe:
Use a barely damp sponge to gently wipe down sharp burrs that would be uncomfortable to touch, but be careful not to wash away the texture you just carved.
Step 3: Firing and Finishing
-
Bisque fire:
Let the bowl dry completely (bone dry) before loading it into the kiln for a bisque fire (usually Cone 04). -
Cleaning bisque:
Wipe the bisqued piece with a wet sponge to remove any kiln dust before glazing. -
Glazing strategy:
For the interior, pour in a food-safe matte glaze (black or dark grey works best to maintain the monochromatic look). Swirl it to coat the inside and pour out the excess. -
Exterior treatment:
Leave the exterior unglazed to showcase the raw black clay texture. If your clay body isn’t fully vitrified (watertight) at your firing temperature, apply a very thin wash of clear matte glaze instead. -
Lip glaze:
Dab a sponge with your interior glaze along the erratic rim. This creates a transition line like the one in the photo, where the glaze catches the light on the rough edge. -
Final wipe:
Clean the bottom/foot of the bowl thoroughly so it doesn’t stick to the kiln shelf. -
Glaze fire:
Fire the piece to the maturation temperature of your specific clay and glaze combination (often Cone 5 or 6 for stoneware).
Add Metallic Flair
Brush a tiny amount of gold luster or oxide wash onto the deepest texture crevices before the final firing to create subtle metallic sparkles.
Once cooled, fill your new textured vessel with almonds or cashews and admire how the dark surface highlights the food


What Really Happens Inside the Kiln
Learn how time and temperature work together inside the kiln to transform clay into durable ceramic.
Black Clay Soap Dishes With Drainage Ridges
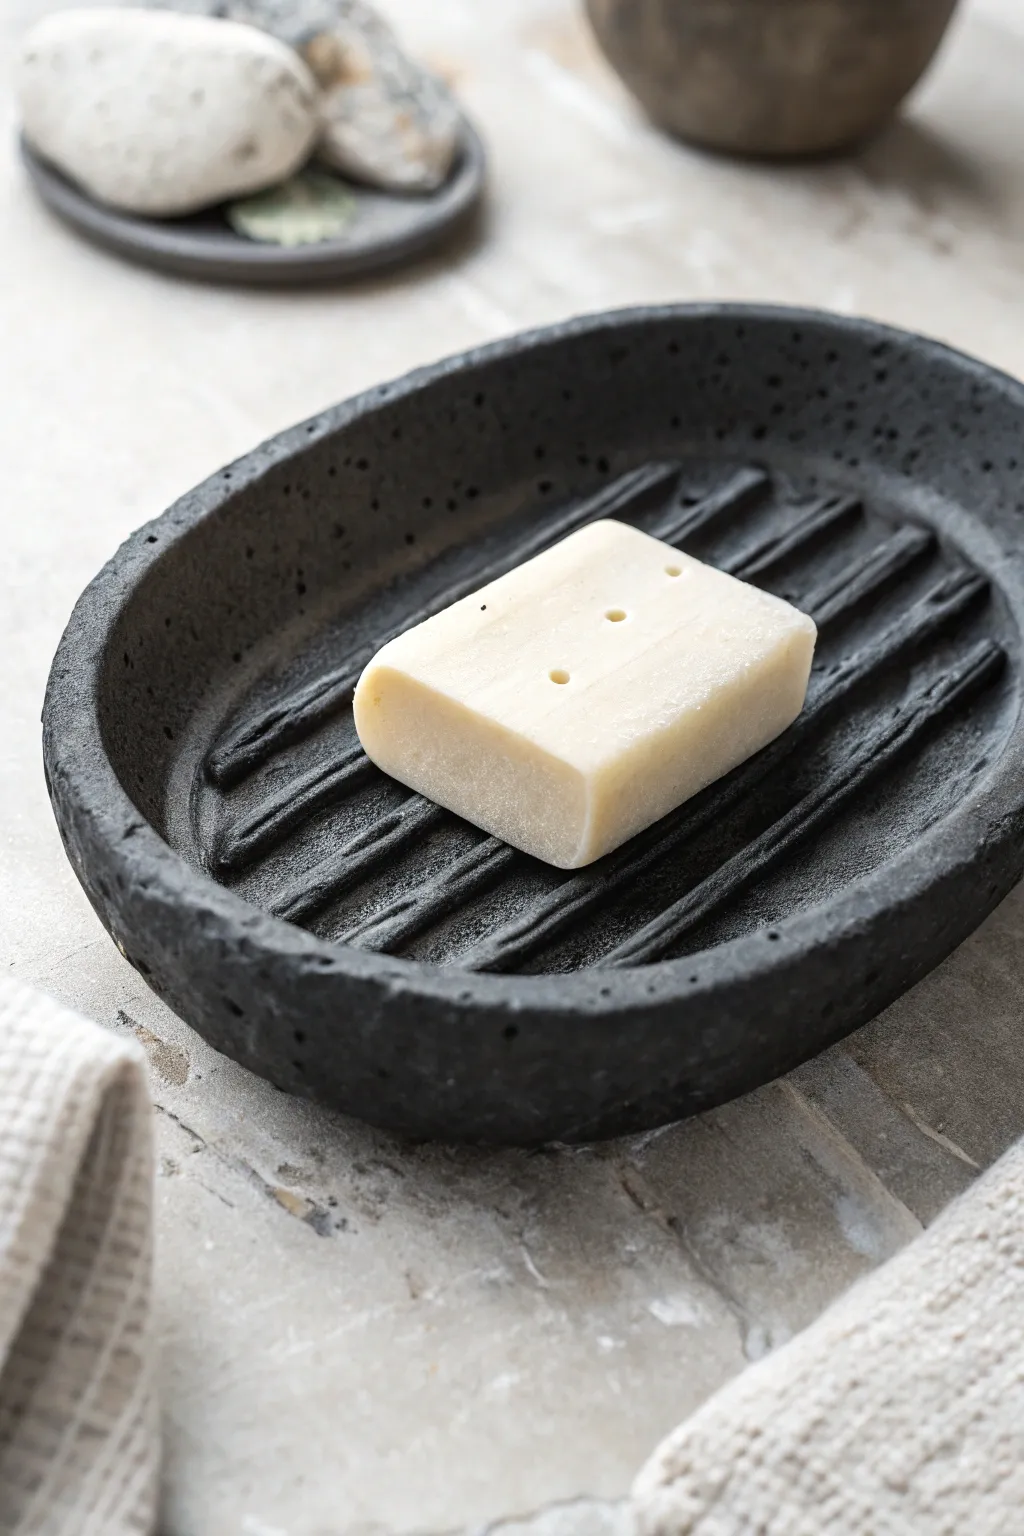
This striking soap dish uses black clay to mimic the heavy, porous texture of volcanic stone, creating a naturally elegant addition to any bathroom. The deep drainage ridges aren’t just practical; they add a rhythmic architectural element that contrasts beautifully with a smooth bar of soap.
Step-by-Step Guide
Materials
- Black stoneware clay (groggy texture preferred)
- Black underglaze (optional, to deepen color)
- Matte transparent glaze (or leaving unglazed if vitreous)
- Wooden modeling tool or clay rib
- Loop tool (medium size)
- Fettling knife
- Sponge
- Rolling pin
- Canvas board or mat
- Oval template (paper or cardstock)
Step 1: F orming the Base
-
Prepare the slab:
Begin by rolling out a thick slab of black stoneware clay. Aim for a substantial thickness, about 3/4 of an inch to a full inch, as this piece relies on visual weight and heaviness. -
Texture the surface:
Before cutting, I like to gently tap the surface with a stiff brush or a rough stone to enhance that natural, porous rock texture shown in the photo. -
Cut the oval:
Place your oval template onto the clay slab. Using a fettling knife, cut straight down around the perimeter to create a clean, vertical edge. -
Softening the rim:
Use a damp sponge or your finger to slightly round over the sharp top edge of the rim, but keep the side walls relatively straight.
Step 2: Carving the Interior
-
Mark the basin:
Lightly sketch an inner oval about 1/2 inch from the edge. This will guide where the dish begins to slope inward. -
Hollow out the center:
Using a large loop tool, begin carving away the interior clay. Scoop downwards to create a gentle, concave basin, leaving the rim thick and substantial. -
Refine the curve:
Smooth the interior curve with a rib tool or your thumb, ensuring there are no sharp angles where the basin meets the floor of the dish. -
Texture touch-up:
If smoothing erased your texture on the rim, re-apply it now by dabbing with a stiff bristles or a rock.
Warping Woes?
If the oval turns into a banana shape while drying, place it on a piece of drywall and weigh down the center rim gently with a small sandbag during the leather-hard stage.
Step 3: Creating Drainage Ridges
-
Plan the lines:
Use a needle tool or the tip of a knife to lightly mark parallel lines running across the width of the dish interior. -
Carve the first groove:
Select a U-shaped loop tool. Drag it firmly along your first marked line to create a deep channel. The photo shows significant depth here, so don’t be shy. -
Repeat across surface:
Continue carving parallel grooves across the entire basin. Try to keep the ‘bumpy’ ridges between the grooves roughly equal in width. -
Soften the ridges:
The carved ridges will look sharp initially. Run a damp finger or a soft, damp paintbrush along the tops of the ridges to round them off gently. -
Clean the grooves:
Check the bottom of each groove for clay burrs or crumbs. Use a small, firm brush to sweep these out so the drainage channels are clear.
Pro Tip: Oxide Wash
For extra depth, apply a black iron oxide wash after bisque firing and wipe it back. This fills the tiny pits and textures, making the ‘stone’ look ancient and authentic.
Step 4: Finishing and Firing
-
Create porosity:
To mimic the ‘lava rock’ look, poke small, random holes into the clay surface with a needle tool, particularly on the rim and outer walls. -
Dry slowly:
Because the base is thick, cover the piece loosely with plastic and let it dry very slowly over several days to prevent warping or cracking. -
Bisque fire:
Fire the piece to bisque temperature (usually Cone 04 or 06) once it is bone dry. -
Glaze application:
For the finish, you can either leave the raw black clay (if vitreous at your temp) or apply a very thin coat of matte transparent glaze to seal it without making it glossy. -
Final wipe:
Wipe back any glaze from the textured pits so the clay body color shows through strongly. -
Glaze fire:
Fire to the final maturity temperature of your specific clay body (e.g., Cone 5, 6, or 10).
Place your favorite artisan soap on the ridges and enjoy the raw, earthy vibe this piece brings to your daily routine
Candle Holders With Cutout Patterns
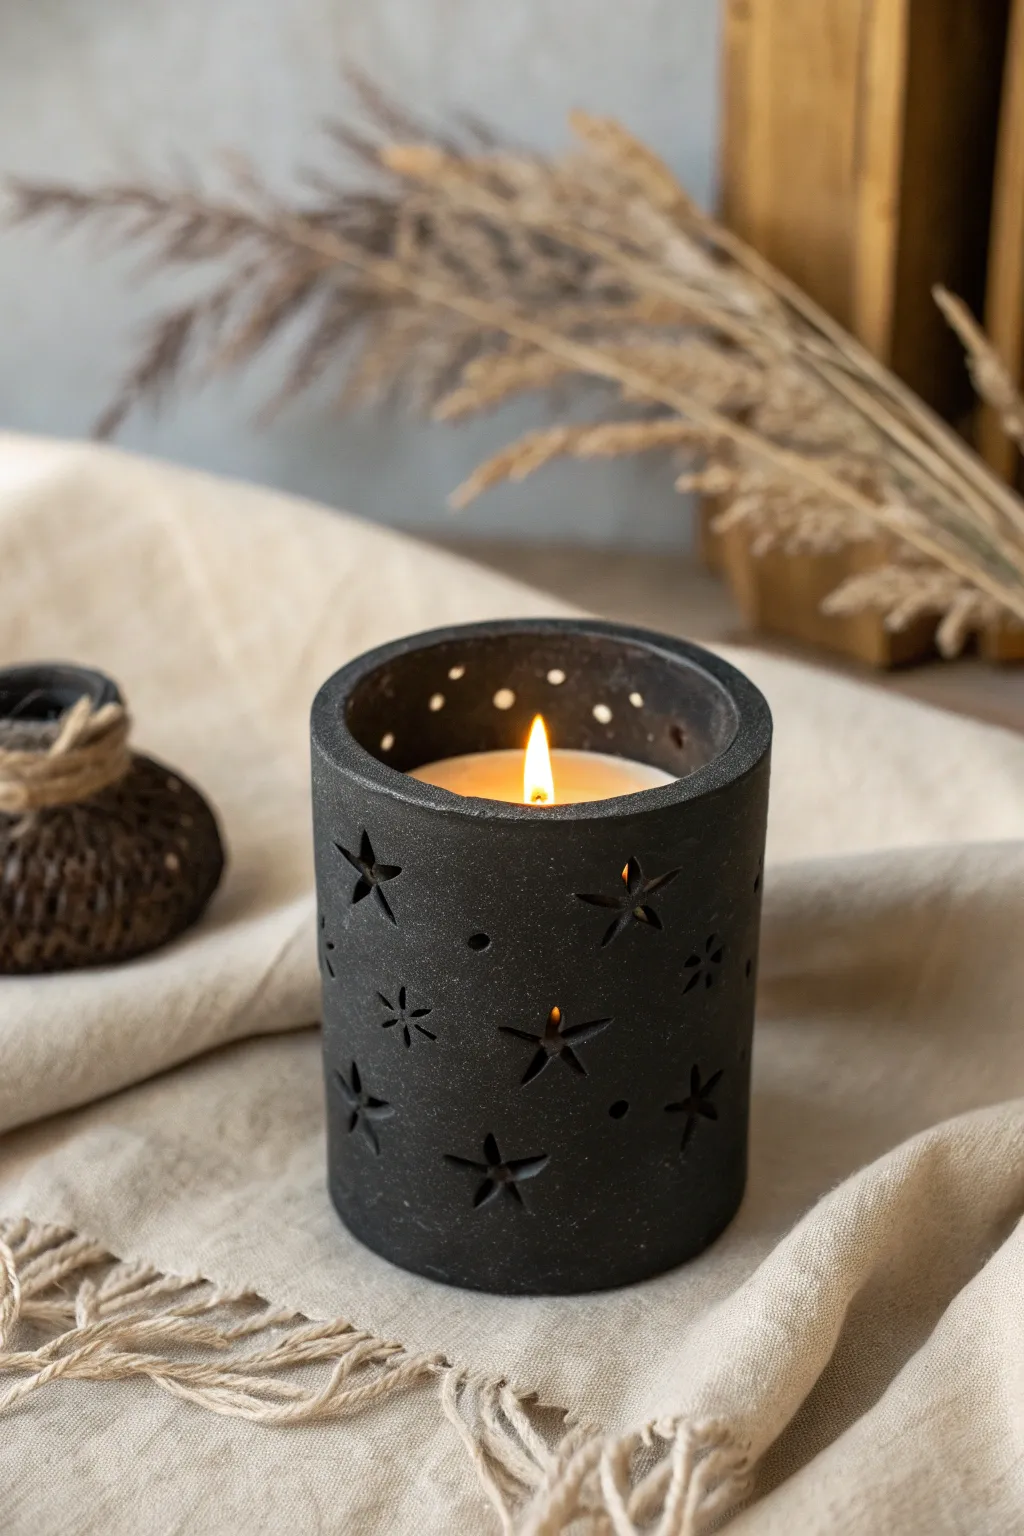
This striking candle holder combines the raw, earthy texture of black clay with whimsical celestial cutouts that cast beautiful shadows when lit. It’s a hand-built cylinder project that focuses on clean carving techniques and contrasting smooth interiors with matte exteriors.
Step-by-Step
Materials
- Black stoneware clay (groggy texture recommended)
- Rolling pin
- Fabric or canvas for rolling
- Cylindrical form (PVC pipe or rolling pin) approx. 3-4 inches diameter
- Needle tool
- Small star-shaped cookie cutters (optional)
- Small star carving tool or X-Acto knife
- Small circular hole cutter or drill bit
- Scoring tool or serrated rib
- Slip (made from your clay body)
- Fettling knife
- Smoothing sponge
- Paddle (wooden kitchen spoon works)
Step 1: Slab Preparation
-
Roll the clay:
Begin by wedging your black clay to remove air bubbles, then slam it onto a canvas-covered surface. Roll it out into an even slab about 1/4 inch thick. I like to use guide sticks on either side to ensure the thickness is perfectly uniform. -
Smooth the surface:
Use a soft rib or a damp sponge to compress the clay fibers on both sides of the slab. This smoothing step is crucial for that clean, modern finish seen in the photo. -
Measure and cut:
Determine the circumference of your cylinder form. Cut a long rectangle from your slab that matches this length plus an extra half-inch for the overlap, and cut a circle for the base.
Slumping Walls?
If the cylinder starts to warp while cutting, the clay is too wet. Stop immediately and let it sit uncovered for 30-60 minutes until it holds its shape firmly.
Step 2: Forming the Cylinder
-
Wrap the form:
Wrap a piece of paper or newsprint around your cylindrical mold to prevent sticking. Gently lift your rectangular slab and wrap it around the form. -
Score and slip the seam:
Where the two ends of the clay meet, use a serrated tool to rough up the edges. Apply a generous amount of slip, press the edges together firmly, and smooth the seam until it disappears. -
Attach the base:
Score and slip the bottom edge of your cylinder and the outer edge of your circular base. Press the cylinder onto the base. Use a modeling tool to blend the clay from the outside of the cylinder down onto the base for a seamless connection. -
Refine the shape:
While the clay is still supported by the intnernal form, use a paddle to gently tap the sides if it needs reshaping. Then, carefully slide the cylinder off the mold. -
Clean the rim:
Use a damp sponge or piece of chamois leather to smooth the top rim. It should be flat and thick, just like the image.
Glow Up
After firing, rub a tiny amount of wax or mineral oil on the exterior. This deepens the black color significantly and gives it a subtle, satin sheen.
Step 3: Carving the Design
-
Let it firm up:
Allow the cylinder to dry to a ‘leather hard’ state. This is critical; if the clay is too soft, the walls will collapse when you cut into them. -
Plan the stars:
Lightly sketch your star pattern onto the exterior using a needle tool. Create a mix of larger and smaller stars, spacing them randomly but evenly around the body. -
Cut the larger stars:
Using a sharp X-Acto knife or a specialized clay carving tool, carefully cut out the star shapes. Support the wall from the inside with your other hand to prevent warping as you press. -
Add circular details:
Use a small hole cutter or the back of a drill bit to punch small circles near the top rim and interspersed among the stars. These represent distant stars or ‘snow’ depending on your interpretation. -
Bevel the edges:
Once cuts are made, look closely at the edges. I prefer to gently smooth the sharp corners of the stars with a tiny damp brush to remove crumbly bits without losing the crisp shape.
Step 4: Finishing
-
Final smooth:
Check the surface for any fingerprints or tool marks. Use a fine sponge to give the piece a final wipe-down. -
Dry slowly:
Cover the piece loosely with plastic for a day to equalize the moisture, then uncover and let it dry completely before firing. -
Firing:
Fire according to your black clay’s specifications. Black clay often looks best unglazed to maintain that matte, stone-like quality, but you can add clear glaze to the inside if you wish.
Place a tea light inside your new vessel and watch the stars dance on your walls

TRACK YOUR CERAMIC JOURNEY
Capture glaze tests, firing details, and creative progress—all in one simple printable. Make your projects easier to repeat and improve.
Monochrome Planters With a Raw Rim
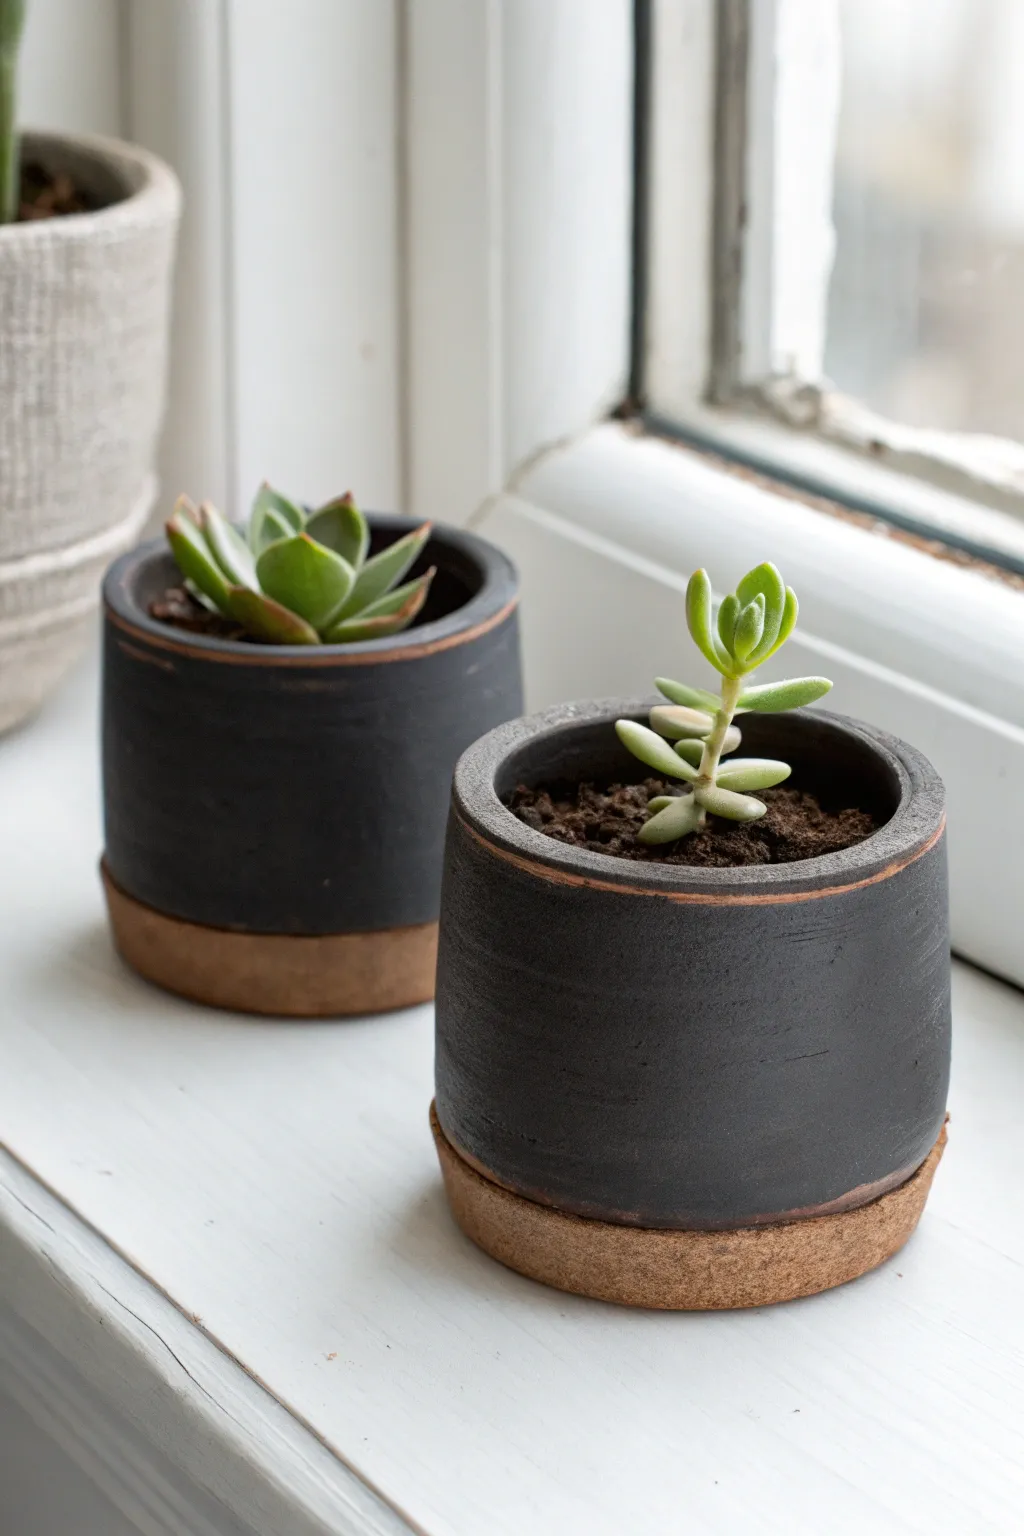
These striking monochrome planters combine the sleekness of black stoneware with the earthy warmth of raw clay for a modern, grounded aesthetic. By leaving the base unglazed or using a contrasting clay body, you achieve a beautiful two-tone effect that highlights the natural texture of the material.
Step-by-Step Tutorial
Materials
- Black stoneware clay body (or dark brown clay that fires black)
- Pottery wheel (or rolling pin and canvas for slab building)
- Needle tool
- Rib tool (wooden or metal)
- Wire cutter
- Sponge
- Trimming tools
- Clear matte glaze (optional)
- Wax resist emulsion
- Small paintbrush
- Kiln
Step 1: Forming the Cylinder
-
Prepare the clay:
Begin by wedging about 1 to 1.5 pounds of black stoneware clay per pot to remove air bubbles and ensure consistency. The black color usually comes from added manganese or stains, so wearing gloves isn’t a bad idea if you have sensitive skin. -
Center on the wheel:
Throw the ball of clay firmly onto the wheel head. Use water and steady pressure to center the clay until it spins perfectly smooth without wobbling. -
Open the form:
Press your thumbs into the center to open the clay, leaving about a half-inch of thickness for the floor. This thickness is crucial because we need enough material at the bottom to trim out that distinct foot later. -
Pull the walls:
Slowly pull the clay upward to create a cylinder. Aim for straight, vertical walls rather than a tapered bowl shape. Keep the walls even, about a quarter-inch thick. -
Refine the rim:
Compress the rim with a chamois or your finger to make it smooth and durable. A defined, flat rim adds to the modern look seen in the photo. -
Smooth the exterior:
Use a metal or wooden rib to scrape the outside of the cylinder while the wheel spins slowly. This removes throwing lines and creates that sleek, industrial surface texture. -
Cut and dry:
Run a wire cutter under the pot to separate it from the wheel head. Let it dry to a ‘leather hard’ state, where it is stiff enough to handle but still retains moisture.
Clean Lines Pro-Tip
For a razor-sharp glaze line, use automotive pinstriping tape instead of just freehand wax. Tape the line, wax over it, then peel the tape before dipping.
Step 2: Trimming and Detailing
-
Secure for trimming:
Invert your leather-hard pot onto the center of the wheel. Secure it with small lugs of soft clay. -
Define the base:
Using a sharp trimming tool, cut away excess clay from the bottom. This is the most important step for the look: carve a distinct ‘step’ or deep groove about half an inch up from the bottom. -
Create the faux-saucer look:
Trim the very bottom section slightly wider than the main body if you want it to look like a separate saucer, or simply trim a clean, sharp line to separate the ‘rim’ area from the main black body. -
Smooth the transition:
Use a damp sponge to smooth any rough grog marks brought up by the trimming tool, particularly on the raw rim section. -
Bisque fire:
Once fully bone dry, load the pots into the kiln for a bisque firing (usually to Cone 04 or 06, depending on your clay).
Clay Body Trouble
If your black clay looks brown after firing, you likely didn’t fire it hot enough, or your clear glaze is too milky. Test tiles are essential for dark clays.
Step 3: Glazing and Finishing
-
Clean the bisque:
Wipe the fired pot with a damp sponge to remove any kiln dust ensuring the glaze adheres properly. -
Apply wax resist:
This is the trick for the two-tone look. Carefully paint liquid wax resist over the bottom half-inch of the pot—the area you trimmed to be the ‘raw rim.’ Be very precise with this line. -
Glaze the interior:
Pour a liner glaze (like a clear or simple black) inside, swirl it around to coat the entire interior, and pour out the excess. -
Glaze the exterior:
Dip the exterior into your chosen glaze. The photo shows a matte finish, so a satin clear glaze over black clay works perfectly. The wax will repel the glaze from the bottom rim. -
Wipe back mistakes:
Even with wax, small beads of glaze might remain on the rim. Use a damp sponge to wipe the waxed area completely clean so the raw clay is fully exposed. -
Final fire:
Fire the pot to the maturity temperature of your clay (often Cone 5 or 6). I find black clay bodies can bloating if over-fired, so check your specific clay’s guidelines carefully. -
Sand the bottom:
Once cool and out of the kiln, use high-grit sandpaper to smooth the unglazed bottom rim so it doesn’t scratch your windowsill.
Now you have a stunning architectural planter ready to showcase your favorite succulents
Black Clay Beads With Tiny Color Inlays
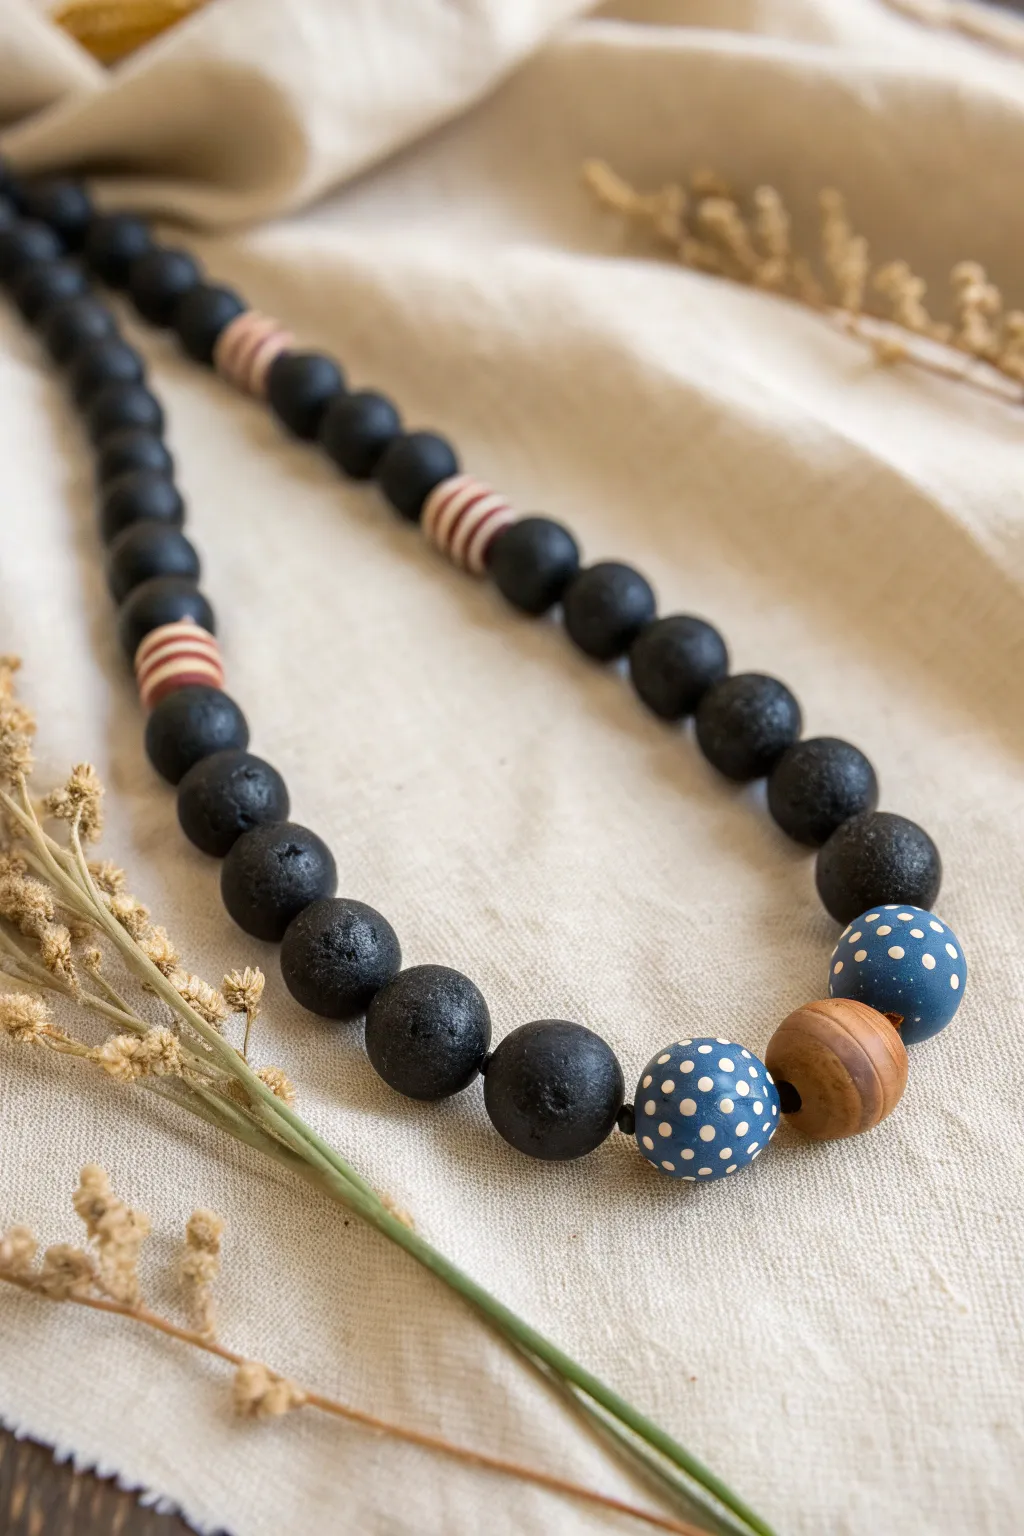
This striking necklace combines the rugged, earthy texture of black clay with playful pops of blue and white polka dots. The contrast between the matte, stone-like finish and the smooth, painted accents creates a sophisticated yet whimsical accessory perfect for everyday wear.
Step-by-Step Guide
Materials
- Black polymer clay (or air-dry clay)
- White acrylic paint
- Blue acrylic paint (denim or navy shade)
- Wooden bead (approx. 20mm)
- Strong beading cord or waxed cotton thread
- Toothpicks or a bead piercing tool
- Fine grit sandpaper
- Texturing tool (stiff brush, crumpled foil, or sandpaper block)
- Small detail paintbrush or dotting tool
- Striped beads (optional, or make with clay)
- Oven for baking (if using polymer clay)
Step 1: Creating the Clay Beads
-
Condition the clay:
Begin by conditioning your black clay until it is soft and pliable. If it’s too hard, warm it in your hands for a few minutes to prevent cracking later. -
Form the base beads:
Roll approximately 30 to 40 spheres of clay. Aim for a diameter of about 15-18mm for a chunky look, trying to keep them relatively uniform in size. -
Add texture:
To achieve that specific lava-stone or rough earthen look seen in the photo, gently roll the surface of each black bead over a piece of coarse sandpaper or tap it repeatedly with a stiff-bristled toothbrush. You aren’t looking for perfection distinct smoothness here. -
Create the accent beads:
Roll two beads of the same size as your black ones, or slightly larger. You can make these out of scrap clay since they will be painted later, or use black clay if you plan to prime them first. -
Pierce the holes:
Using a toothpick or bead piercing tool, carefully bore a hole through the center of every bead. Rotate the tool as you push through to avoid deforming the sphere. -
Bake or dry:
Follow the manufacturer’s instructions for your specific clay. Bake polymer clay on a dedicated sheet or bead rack. Allow them to cool completely before handling.
Fixing Bead Distortion
If your beads flatten while piercing holes, let the clay sit for 15 minutes to firm up slightly before piercing, or gently re-roll them after the hole is made.
Step 2: Painting & Finishing
-
Base coat the accents:
Take the two beads designated for the blue color. Paint them with your denim blue acrylic paint. You may need two thin coats for full opacity. Let them dry thoroughly. -
Add polka dots:
Dip the tip of a toothpick or a small dotting tool into white acrylic paint. Carefully apply small, evenly spaced dots all around the blue beads. I find it helps to work in a triangular pattern to keep the spacing random but balanced. -
Prepare the striped beads:
If you aren’t using pre-bought striped beads, paint thin red and white stripes onto two or three of your black clay beads, or model them by stacking discs of colored clay. -
Seal the painted beads:
Once the paint is dry, apply a matte or satin varnish to the blue and striped beads to protect the design. Leave the black beads unvarnished to maintain their raw, matte texture.
Step 3: Assembly
-
Plan your layout:
Lay out your beads on a table. The central focal point should be the large wooden bead, flanked by the two blue polka dot beads. From there, string the black textured beads outward. -
Incorporate striped accents:
Place your striped accent beads symmetrically further up the strand, perhaps after every 8-10 black beads, to break up the monochrome pattern. -
String the beads:
Cut a length of cord about 30 inches long. Knot one end securely (or tape it down) and thread your beads according to your layout. -
Secure the ends:
Once all beads are strung, tie the two ends of the cord together securely with a square knot. You can hide the knot by tucking it inside the hole of the last bead.
Varnish Variety
Mix textures by using a high-gloss glaze on just the blue polka dot beads. This makes them pop against the super-matte, rough finish of the black clay.
Enjoy wearing your handcrafted necklace that perfectly balances rustic texture with cheerful color
Moon Phase Wall Hanging in Black Clay
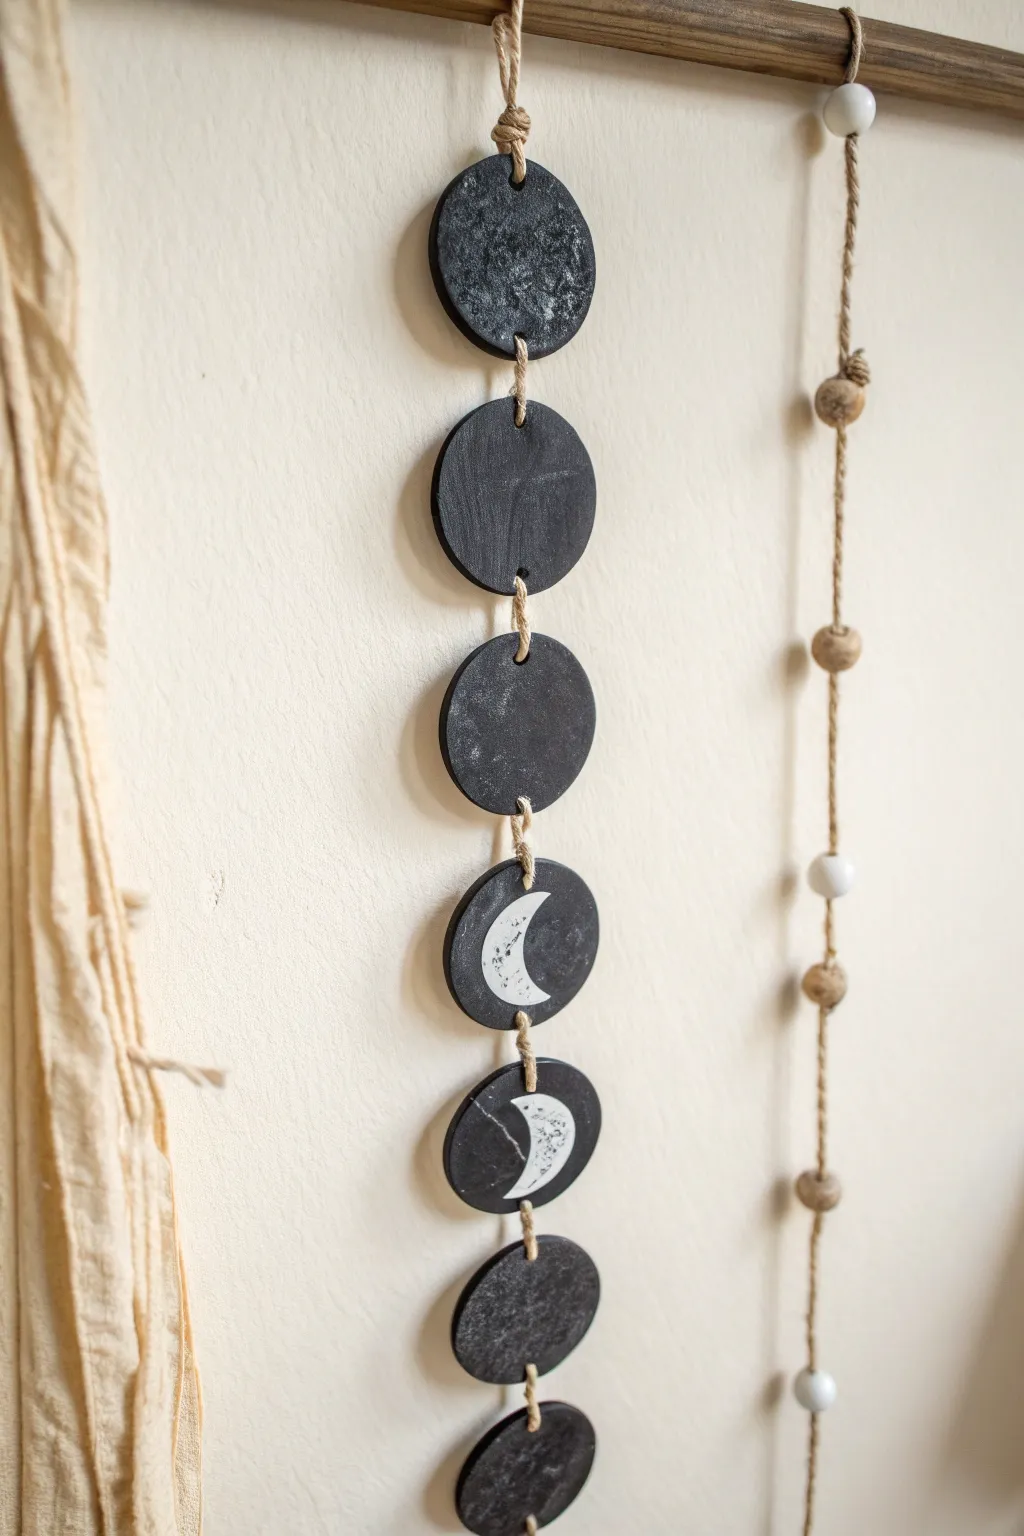
Bring the mystery of the cosmos into your home with this stunning moon phase wall hanging sculpted from rich black clay. The textured surface and subtle white painted details create a modern, bohemian piece that captures the delicate transitions of the lunar cycle.
Step-by-Step
Materials
- Black polymer clay or air-dry clay (approx. 1lb)
- Round cookie cutter or drinking glass (approx. 2.5-3 inches)
- Acrylic rolling pin
- Parchment paper or craft mat
- White acrylic paint
- Small detail paintbrush
- Toothpick or skewer (for piercing holes)
- Natural jute twine
- Wooden dowel or branch (for hanging)
- Optional: Sandpaper for smoothing edges
- Optional: Texture sponge or toothbrush
Step 1: Shaping the Moons
-
Condition the clay:
Begin by warming up your black clay in your hands. Knead it thoroughly until it is soft, pliable, and free of any air bubbles or cracks. -
Roll out the slab:
Place the clay on a sheet of parchment paper. Use your acrylic rolling pin to roll the clay out to a uniform thickness, aiming for about 1/4 inch. -
Cut the circles:
Using your round cutter or a glass, press firmly into the clay to cut out seven perfect circles. These will represent the different phases of the moon. -
Smooth the edges:
Dip your finger in a little water (if using air-dry clay) or baby oil (if using polymer) and gently run it along the cut edges of each circle to remove any roughness or stray bits. -
Add texture:
For that realistic lunar look, gently dab the surface of your wet clay circles with a texture sponge or an old toothbrush. This creates a subtle, crater-like surface. -
Create hanging holes:
Using a skewer or toothpick, pierce two holes in each circle—one at the very top and one at the very bottom center. Ensure the holes are large enough for your twine to pass through.
Step 2: Baking and Painting
-
Dry or bake:
Follow the manufacturer’s instructions for your specific clay. If using polymer, bake on a lined sheet. If using air-dry clay, let the pieces sit undisturbed for 24-48 hours until fully hardened. -
Sand imperfections:
Once fully cured and cool, lightly sand the edges if they feel sharp or uneven. Wipe away any dust with a slightly damp cloth. -
Outline the crescents:
On the two center discs, use a pencil to very lightly sketch the shape of a crescent moon. I find it helpful to look at a reference photo of moon phases to get the curve just right. -
Paint the phases:
Dip a small brush into white acrylic paint. Fill in your crescent shapes carefully. For the ‘full moon’ looking discs at the top and bottom, you can dry-brush a little white texture or leave them pure black for a new moon look. -
Add splatter detail:
To mimic the starry texture shown in the inspiration, dilute a tiny drop of white paint with water. Flick the bristles of an old toothbrush or stiff brush to speckle the black areas of the clay subtlely. -
Let paint cure:
Allow the paint to dry completely before handling the discs again to prevent smudging.
Keep it Straight
To ensure your moons hang perfectly straight without twisting, gently flatten the back of the clay area around the holes before baking so the knot sits flush.
Step 3: Assembly
-
Cut the twine:
Cut a long length of jute twine, roughly 4 feet long. Fold it in half to find the center point. -
Attach the first moon:
Thread the twine through the top hole of your top disc (usually a full dark moon or new moon) and tie a knot to secure it to the dowel or hanging ring later. Then thread through the bottom hole. -
Knotting the spacing:
Decide on the spacing between your moons—about 1 to 1.5 inches usually looks balanced. Tie a knot in the twine where the top of the next moon should sit. -
Thread the sequence:
Thread the next moon onto the twine, resting its top hole on the knot you just made. Pass the twine through the back and out the bottom hole. -
Finish the strand:
Repeat this knot-and-thread process for all seven moons, ensuring they hang vertically straight. Tie a final knot at the bottom of the last moon to secure everything. -
Secure to dowel:
Tie the top of your moon strand securely to the center of your wooden dowel or branch. Ensure the knot is tight. -
Optional bead accent:
If you like the look in the photo, create a second strand of twine with wooden beads knotted at intervals and hang it next to your moon strand for added texture.
Uneven Clay Surface?
If your hand-rolled clay has finger indentations, place a sheet of parchment paper over the clay before your final roll to smooth the surface completely.
Hang your lunar creation in a well-lit spot to enjoy the beautiful contrast between the matte black clay and the white painted details.
Sgraffito Patterns That Pop on Black Clay
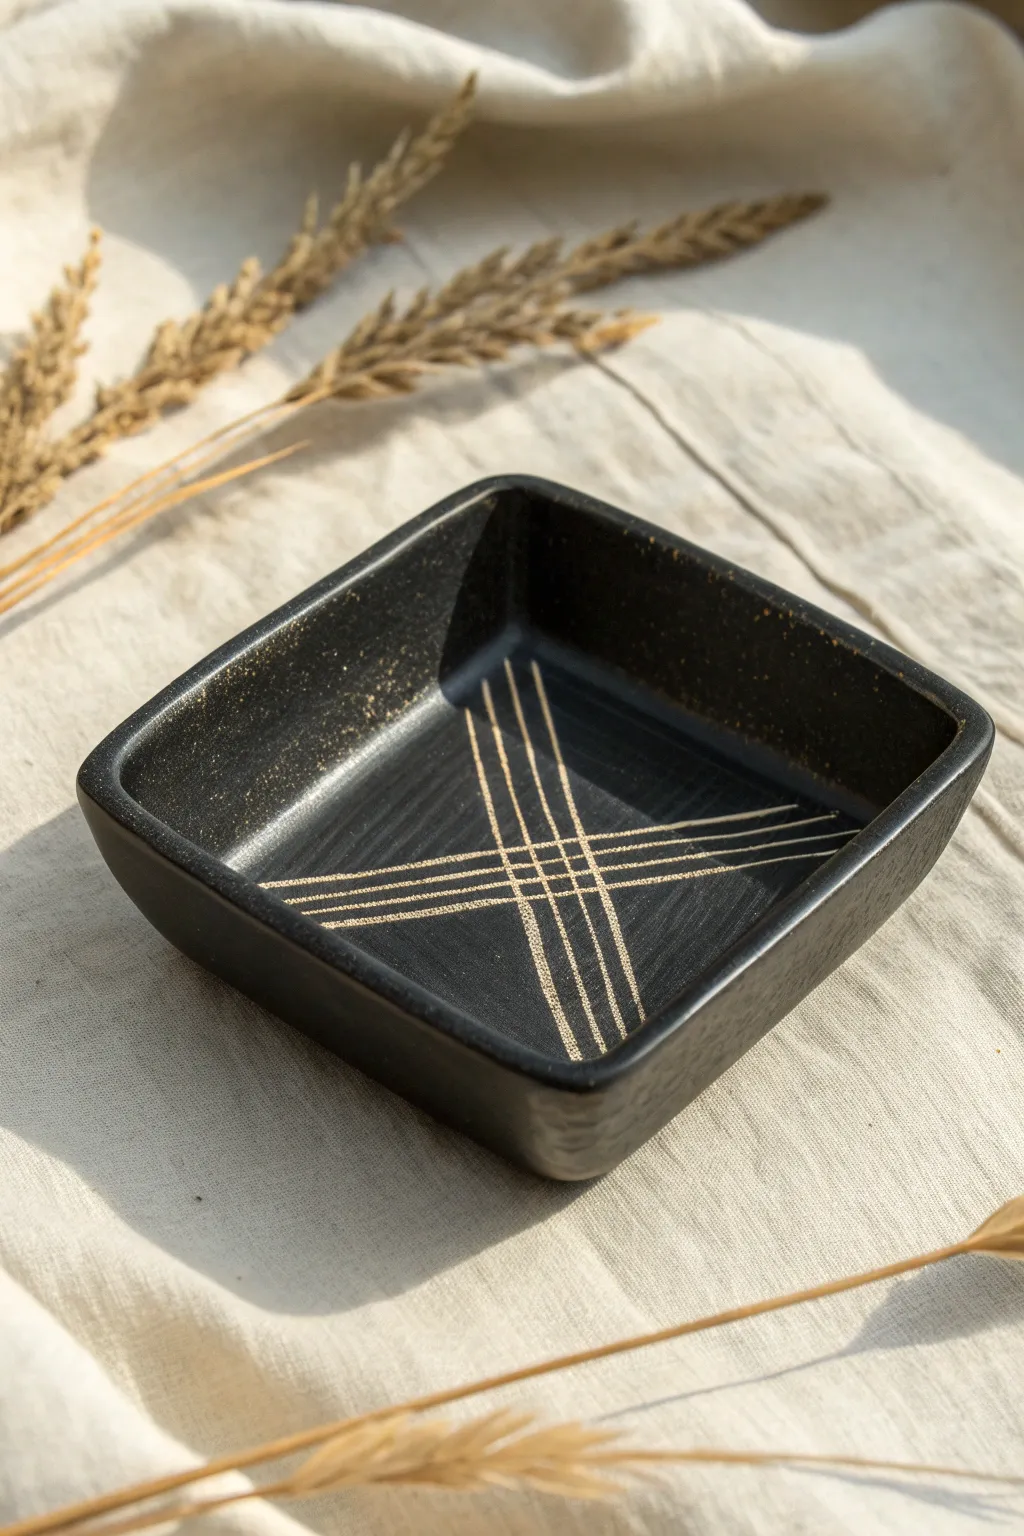
This sleek square dish showcases the natural beauty of black stoneware clay enhanced by simple, striking sgraffito lines. The contrast between the dark, raw clay body and the lighter clay underneath creates a modern, minimalist aesthetic perfect for holding trinkets or keys.
Detailed Instructions
Materials
- Black stoneware clay
- Rolling pin
- Square slump mold or plaster drape mold (approx. 5-6 inches)
- Canal wood rib or rubber kidney rib
- Needle tool or fettling knife
- Sgraffito tool (small wire loop or sharp carving tool)
- Ruler
- Damp sponge
- Clear matte glaze (optional, for interior only)
Step 1: Forming the Base
-
Prepare the Clay:
Begin by wedging a pound of black stoneware clay thoroughly to remove air bubbles. This clay can be stiffer than others, so ensure it is pliable before rolling. -
Roll the Slab:
Roll out a slab to an even thickness of about 1/4 inch. For a consistent thickness, use wooden guide sticks on either side of your roller. -
Compress the Surface:
Use a rubber kidney rib to compress the slab on both sides. This aligns the clay particles, preventing warping later, and creates that smooth, dark canvas we need for carving. -
Cut the Square:
Using a ruler and needle tool, cut out a precise square from your slab. Make it slightly larger than your mold to account for the depth of the dish. -
Shape the Dish:
Gently lift your slab and place it into your square slump mold. Use your damp sponge to press the clay into the corners, ensuring full contact with the mold form. -
Refine the Rim:
While the clay is still in the mold, use your fettling knife to trim the excess clay flush with the mold’s edge. Smooth the rim with a damp finger or chamois to round off sharp edges. -
Initial Drying:
Allow the dish to dry to a firm leather-hard state inside the mold. This is crucial; if it’s too soft, the lines will be messy, but if it’s too dry, the black clay will chip.
White Lines Won’t Show?
If your carving doesn’t reveal a contrast, your clay might be black all the way through. For high contrast, apply white slip over the black clay *before* carving.
Step 2: Carving the Design
-
Plan the Layout:
Once leather-hard, remove the dish from the mold. Identify the center point if you want perfect symmetry, or eye it for a more organic feel. -
Mark Guide Points:
Lightly press four tiny guide dots with your needle tool where the grid lines will start and end on the interior walls. This helps keep your lines straight while carving. -
First Horizontal Cut:
Take your sgraffito tool and carve the first central line across the bottom, extending up the interior walls. Apply creating consistent pressure to reveal the texture inside the cut without going too deep. -
Complete Horizontal Set:
Carve three parallel lines next to your first one. I find it easiest to work from the center outward to keep the spacing even. -
Cross-Hatching:
Now, turn the dish 90 degrees. Carve the perpendicular set of four lines, crossing over the first set to create the central grid intersection. -
Clean Up Burrs:
Wait until the clay is bone dry before cleaning up the carving crumbs. Lightly brush the surface with a soft, dry brush to remove the ‘burrs’ created by the tool. -
Smooth the Surface:
Give the non-carved areas one final burnish with a soft cloth to maximize that subtle sheen black clay often has.
Add Some Sparkle
Mix a tiny amount of gold luster into the carved lines after the final glaze firing and do a third luster firing for a luxurious metallic grid effect.
Step 3: Firing and Finishing
-
Bisque Fire:
Fire the piece to cone 04 (or your clay body’s bisque temperature). Ensure good ventilation, as dark clay bodies can off-gas sulfur during this stage. -
Washing:
After the bisque, rinse the piece quickly to remove dust. Let it dry completely. -
Glazing Decision:
You can leave the raw black clay unglazed for a decorative bowl. If you want it food safe, brush a thin coat of clear matte glaze only on the interior. -
Wipe Back:
If glazing, carefully wipe any excess glaze off the rim with a damp sponge so the transition from glazed interior to raw edge is crisp. -
Final Fire:
Glaze fire the piece to the maturity temperature of your black stoneware (usually Cone 5 or 6). Be careful not to overfire, as black clay can bloat easily.
Place this striking black dish on a light-colored table runner to really let that geometric pattern shine.
White Inlay Lines for Crisp Geometry
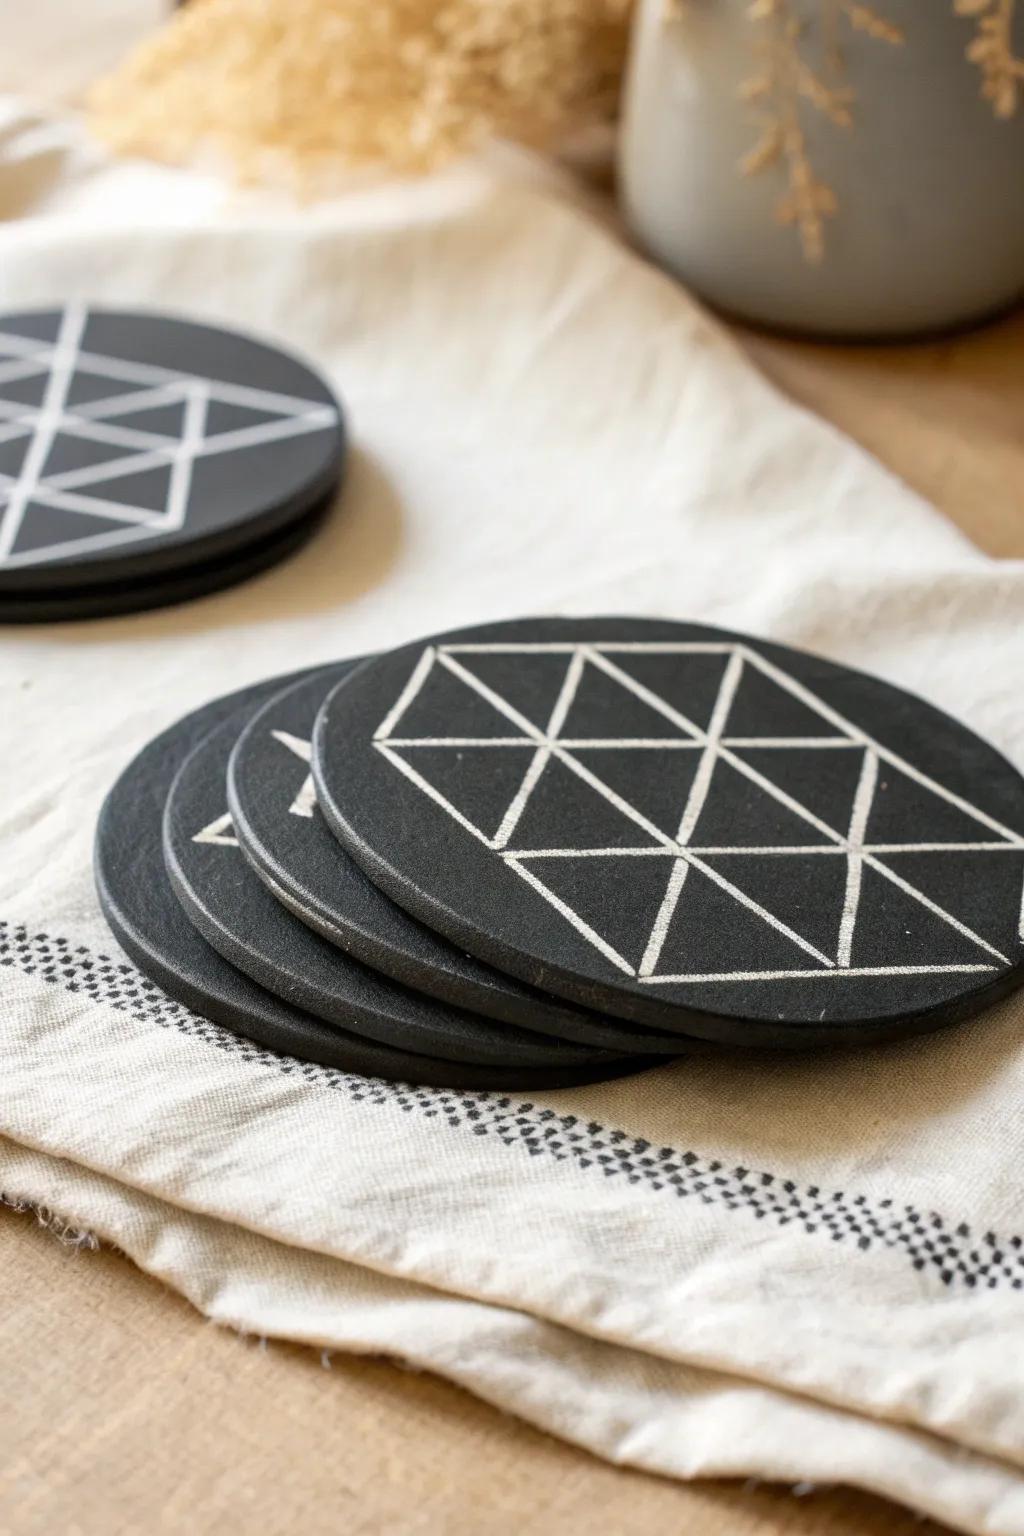
Achieve a striking contrast with these matte black coasters featuring crisp white geometric lines. The ancient technique of Mishima—inlaying slip into carved lines—creates a flush, professional finish that feels as good as it looks.
Step-by-Step Guide
Materials
- Black stoneware clay or porcelain
- White ceramic slip or underglaze
- Rolling pin
- Guide sticks (approx. 5-7mm thick)
- Round cookie cutter (approx. 10cm diameter)
- Needle tool or small carving tool
- Ruler or straight edge
- Metal kidney scraper or ribs
- Sponge
- Clear matte glaze (optional)
- Kiln
Step 1: Shaping the Canvas
-
Prepare the slab:
Begin by wedging your black clay to remove air bubbles. Roll it out into a smooth, even slab. Using guide sticks on either side of your rolling pin ensures a uniform thickness, which is crucial for flat coasters. -
Smooth the surface:
Before cutting, compress the slab on both sides using a rib tool. This aligns the clay particles to prevent warping later and creates a pristine surface for your design. -
Cut the shapes:
Use your round cutter to punch out coaster circles. If you don’t have a cutter large enough, trace around a bowl with a needle tool. Clean up the edges with a damp sponge or your finger to soften any sharp cuts. -
Dry to leather hard:
Place the rounds between boards or under plastic to dry slowly until they reach a leather-hard state where they are firm but still cool to the touch and able to be carved without dragging.
Step 2: Carving the Geometry
-
Mark the center:
Lightly find the center of your coaster. You can make a tiny indentation or just eyeball it, but centering your geometric pattern helps keep the triangles balanced. -
Draft the grid:
Using a ruler and a very light touch with a needle tool, sketch out your triangular grid. Start with a central vertical line, then add diagonal lines crossing it to form a six-pointed star or hexagon base. -
Carve the lines:
Once happy with the layout, retrace your sketched lines with a carving tool. You want a groove that is distinct but not too deep—about 1-2mm is perfect for holding the slip. -
Clean debris:
Brush away any clay crumbs created during carving. Don’t use water here, just a soft dry brush, to keep the channels crisp and open.
Smearing Issues?
If the white slip smears across the black clay while scraping, the slip is too wet. Wait longer for it to dry, or use a sharper metal rib to cut the clay rather than drag it.
Step 3: Inlay & Finishing
-
Apply the white slip:
Using a soft brush, generously paint white slip or underglaze into the carved grooves. It’s okay if you get messy; actually, I prefer to overfill the lines slightly to account for shrinkage. -
Let it set:
Allow the white slip to dry until it is no longer shiny. It needs to be firm enough that it won’t smear when you scrape it. -
Scrape back:
Taking a metal kidney or a sharp scraping tool, gently scrape the surface of the coaster. Work in different directions to shave off the excess white slip sitting on the top surface. -
Reveal the contrast:
Continue scraping until the black clay underneath is revealed and the white remains trapped perfectly inside the carved lines. The surface should be completely flush. -
Final smooth:
Wipe the surface once very gently with a barely damp sponge to remove any dusting of white residue, but act quickly to avoid washing out the inlay. -
Slow drying:
Sandwich the coasters between drywall boards or weigh them down lightly while drying to bone dry. This is critical for flat objects like coasters that love to curl. -
Bisque fire:
Fire the pieces to bisque temperature according to your clay’s specifications. -
Glaze and fire:
Apply a clear matte glaze if desired, or leave the black clay raw for a stone-like texture if it is fully vitrified. Fire to maturity in your kiln.
Make it a Set
Don’t just stick to triangles! Try varying the geometric pattern on each coaster—squares, hexagons, or chevrons—to create a dynamic, mismatched modern set.
Enjoy the satisfying tactile feel of your new custom coaster set
Matte vs Glossy Black Clay Finish Pair
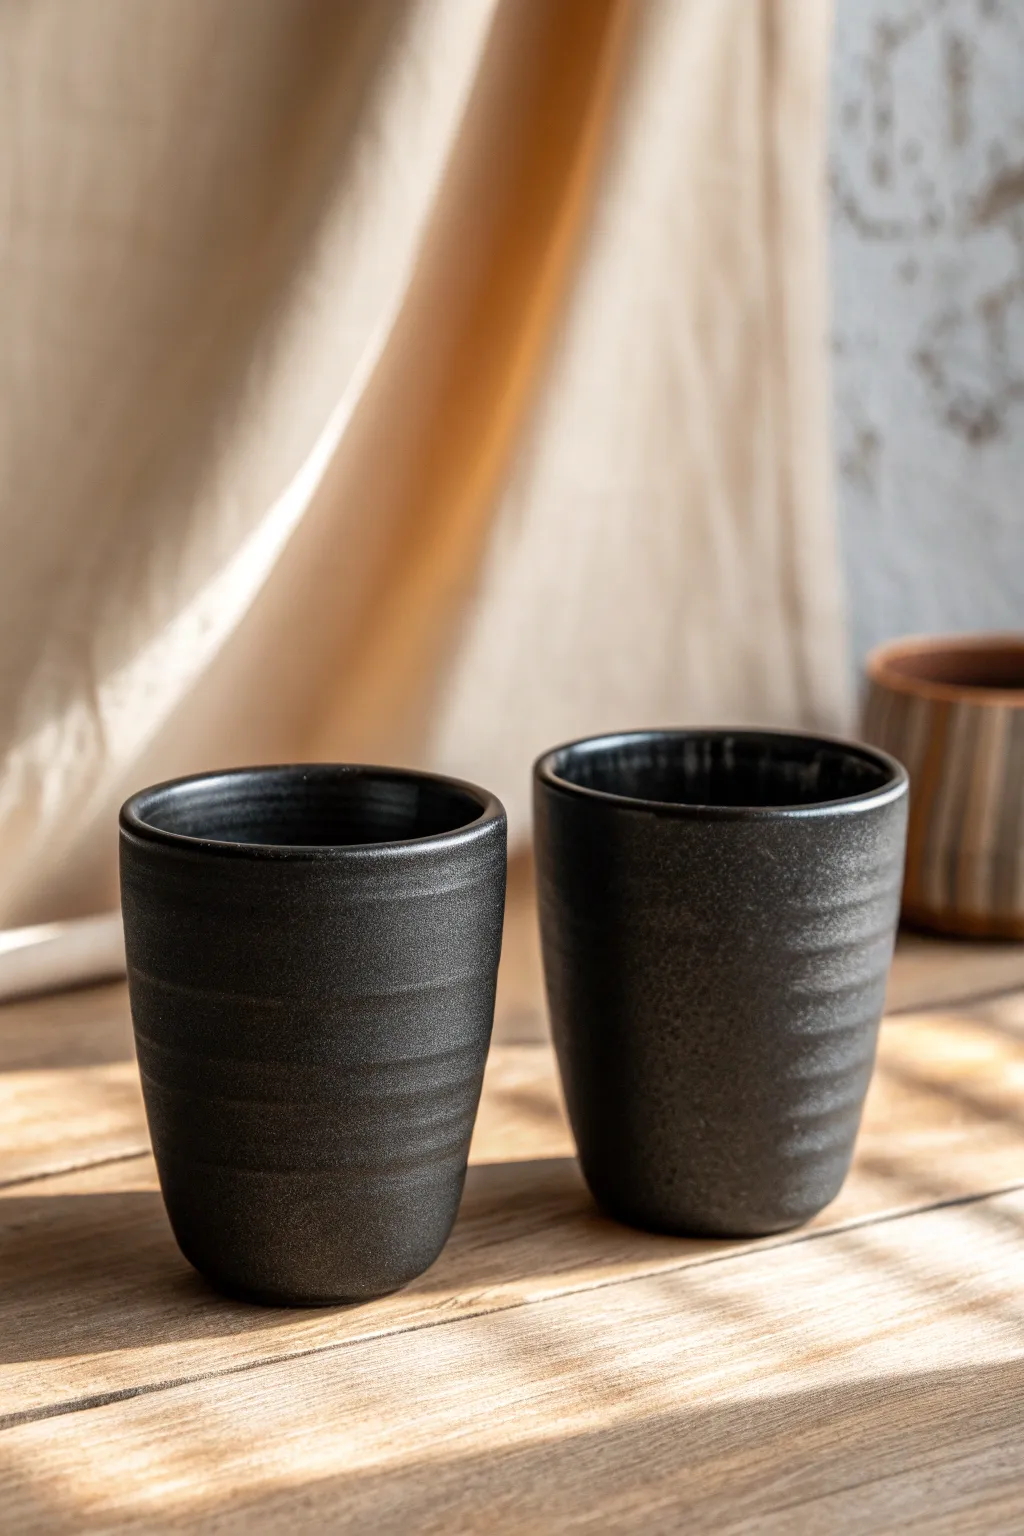
These elegant wheel-thrown tumblers showcase the natural beauty of black stoneware with a sophisticated matte finish and subtle ribbed texture. The dark clay body provides a striking, modern look that feels substantial and grounded in your hands.
Step-by-Step
Materials
- Black stoneware clay (smooth or fine grog)
- Pottery wheel
- Throwing sponge
- Wooden or metal rib tool (optional)
- Wire cutter
- Trimming tools
- Clear matte glaze or satin black glaze
- Kiln
Step 1: Throwing the Form
-
Prepare the Clay:
Begin by thoroughly wedging about 1 to 1.5 pounds of black stoneware clay per cup. Black clay can be stiffer than other bodies, so ensure it is pliable and completely free of air bubbles before centering. -
Center on the Wheel:
Slam the clay onto the wheel head and center it using firm pressure. Because black clay often contains manganese or iron, I always wash my hands thoroughly afterward, though wearing thin gloves is an option if you have sensitive skin. -
Open the Clay:
Open the centered mound, establishing a flat interior floor. Aim for a floor thickness of about a quarter-inch. Use your fingers to compress the floor well to prevent s-cracks during drying. -
Pull the Walls:
Begin pulling the walls upward into a cylinder. Keep your pulls steady and slow. Aim for a slightly tapered shape that is wider at the top than the bottom, but generally cylindrical. -
Add the Ribbed Texture:
This is the signature detail. Instead of smoothing the walls perfectly, use the side of your finger or a throwing stick during your final pull. Gently press in at intervals as you move up the wall to create subtle, organic horizontal ridges. -
Refine the Rim:
Compress the rim with a chamois cloth or a small piece of plastic to make it smooth and pleasant for drinking. Ensure the rim isn’t too thin, as this can lead to chipping later. -
Cut from the Wheel:
Run a wire tool under the base of the pot to separate it from the wheel head. Carefully lift it off using pot lifters or dry hands and set it on a ware board to dry to a leather-hard state.
Sticky Situation
Black clay residues can stain porous surfaces and canvas. dedicate a specific bat or work surface to dark clays, or clean immediately after throwing to prevent cross-contamination with white clays.
Step 2: Trimming and Firing
-
Center for Trimming:
Once leather hard (stiff but still cool to the touch), place the tumbler upside down on the wheel. Secure it with small wads of clay. -
Trim the Foot:
Using a sharp trimming tool, carve away excess clay from the bottom. Create a clean, defined foot ring that complements the vertical shape of the tumbler. Smooth the trimmed area with a damp sponge or a rubber rib. -
Bisque Fire:
Allow the tumblers to dry completely. This can take longer with black clay as it is dense. Fire them in a bisque kiln to approximately Cone 04 (or as per your clay body’s instructions). -
Glazing Strategy:
To maintain the raw clay look shown in the photo, you have two options. You can leave the exterior unglazed if the clay vitrifies completely and is food safe, or use a very thin matte clear glaze. -
Glaze Application:
Pour a food-safe liner glaze (like a glossy black or clear) inside the cup and pour it out. For the outside, dip the exterior briefly in a matte satin finish if desired, or wipe it clean to show the raw clay texture. -
Glaze Firing:
Load the glazed pieces into the kiln. Fire to the maturity temperature of your specific black clay body (common ranges are Cone 5 or 6). Consult the clay manufacturer’s notes, as over-firing black clay can cause bloating. -
Sanding the Base:
After the kiln cools, remove the pieces. Black clay can sometimes feel rough after firing. Sand the bottom foot ring with wet-dry sandpaper or a diamond sanding pad to ensure it won’t scratch your table surfaces.
Metallic Sheen
Want a subtle metallic luster? Rub a tiny amount of manganese or copper oxide wash into the ribbed texture before the gloss firing to catch the light.
Enjoy your morning coffee in these sophisticated, tactile vessels that celebrate the raw beauty of earth
Abstract Cellular Sculptures With Highlighted Texture
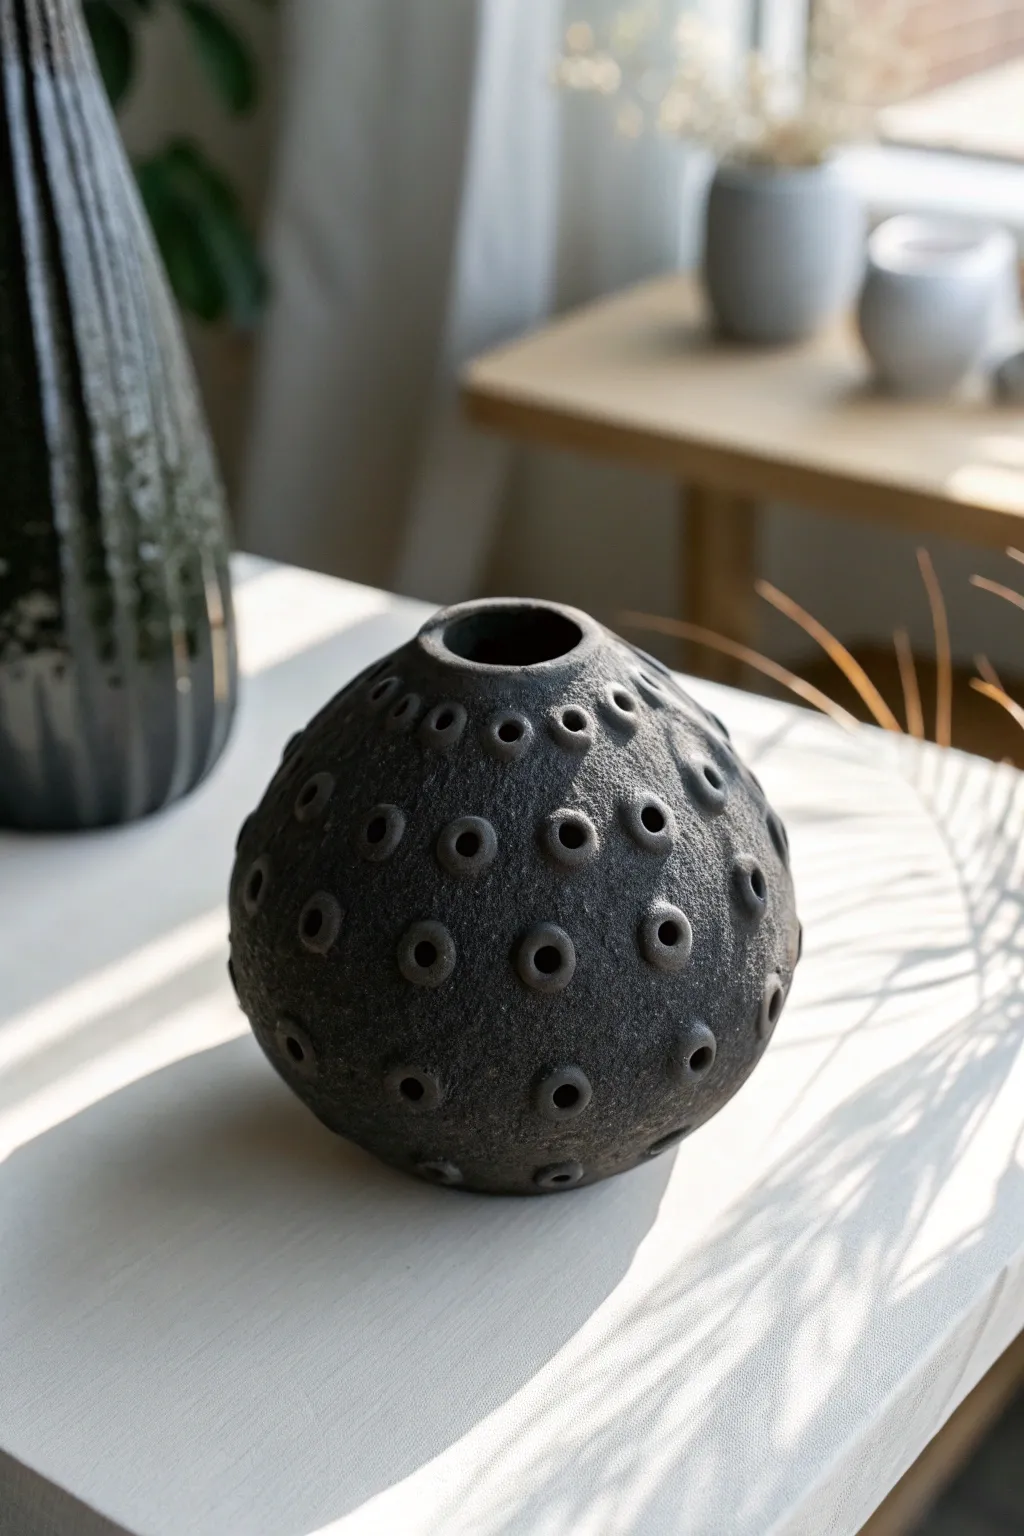
This striking spherical vase combines a rustic, organic form with a precise, cellular pattern that mimics moon craters or natural seed pods. Using black clay allows the raw texture to shine without the need for additional glazes, creating a stunning piece of modern decor.
Step-by-Step Tutorial
Materials
- Black stoneware clay (groggy texture preferred)
- Potter’s wheel (optional, can be hand-built)
- Wooden rib tool
- Metal rib tool
- Loop tool (small, circular)
- Sponge
- Cutting wire
- Bat for wheel
- Plastic sheet for slow drying
Step 1: Forming the Sphere
-
Prepare the Clay:
Begin by thoroughly wedging about 3-4 pounds of black stoneware clay to remove air bubbles and ensure a consistent texture, which is crucial for dark clays. -
Center on the Wheel:
Secure the clay to the bat and center it. Because we are making a closed form, aim for a slightly wider, lower mound rather than a tall cylinder initially. -
Open and Pull:
Open the clay and begin pulling the walls up. Focus on creating a volumetric curve early on, gently pushing the belly of the pot outward from the inside. -
Collar the Neck:
As you reach the top third, gradually collar the neck inward to close the sphere. Do this in stages, compressing the rim after each collaring to prevent buckling. -
Refine the Shape:
Use a wooden rib on the exterior to smooth the curve into a perfect sphere while applying gentle pressure from the inside. Leave a small, clean opening at the top, perhaps 1.5 inches wide. -
Initial Drying:
Let the piece dry to a firm leather-hard stage. It needs to be sturdy enough to handle the texture carving without deforming.
Grog is Good
Choose a clay body with high grog (sand) content. The rougher the clay, the more ‘ancient’ and stone-like the final texture will appear.
Step 2: Adding Texture and Detail
-
Rough the Surface:
Using a metal rib or a serrated kidney tool, scrape the entire exterior surface. I like to do this vigorously to expose the grog in the clay, creating that beautiful pitted, stone-like background texture. -
Smooth the Rim:
Use a damp sponge or your finger to burnish just the lip of the opening, ensuring a clean, finished contrast to the rough body. -
Map the Pattern:
Visualize the placement of your ‘craters.’ You don’t need to draw them, but aim for a somewhat irregular, organic distribution rather than a perfect geometric grid. -
Create the Indentations:
Take a small ball-ended tool or the back of a paintbrush. Press it into the clay to create the concave centers of your craters. -
Sculpt the Rings:
Around each indentation, use a small loop tool to carve away a tiny amount of clay, defining a raised ring around the central hole. Alternatively, press a small, hollow metal tube (like a specialized hole cutter) halfway into the clay to form the ring. -
Refine the Cells:
Use a stiff brush to soften the sharp edges of your carved circles, blending them slightly back into the rough surface so they feel grown rather than stamped.
Step 3: Finishing and Firing
-
Slow Drying:
Cover the vase loosely with plastic. Black clay can be sensitive to drying speeds, so let it dry very slowly over several days to prevent cracking. -
Bisque Fire:
Once bone dry, bisque fire the piece to Cone 04 (or according to your clay body’s specs). -
No Glaze Required:
Since the beauty lies in the raw black clay, you don’t need a full glaze. However, you can apply a light clear matte wash to just the inside if you intend to hold water. -
Final Firing:
Fire to maturity (often Cone 5 or 6 for stoneware). The heat will deepen the black color and vitrify the form. -
Sanding (Optional):
If the bottom feels rough after firing, use wet-dry sandpaper or a diamond pad to smooth the foot so it won’t scratch your furniture.
Cracks Appearing?
Spherical forms trap air and tension. If cracks appear while drying, you likely let the walls get too uneven or dried it too fast. Wrap tightly to re-hydrate.
Place your finished vessel in a spot with strong side-lighting to dramatically emphasize the deep textures you created