When you’re making a clay bead bracelet for a boy, the vibe usually needs to feel clean, sporty, and not too fussy. These ideas stick to bold color choices, simple patterns, and a few fun themes that still feel totally wearable day to day.
Classic Black and White Heishi Stack
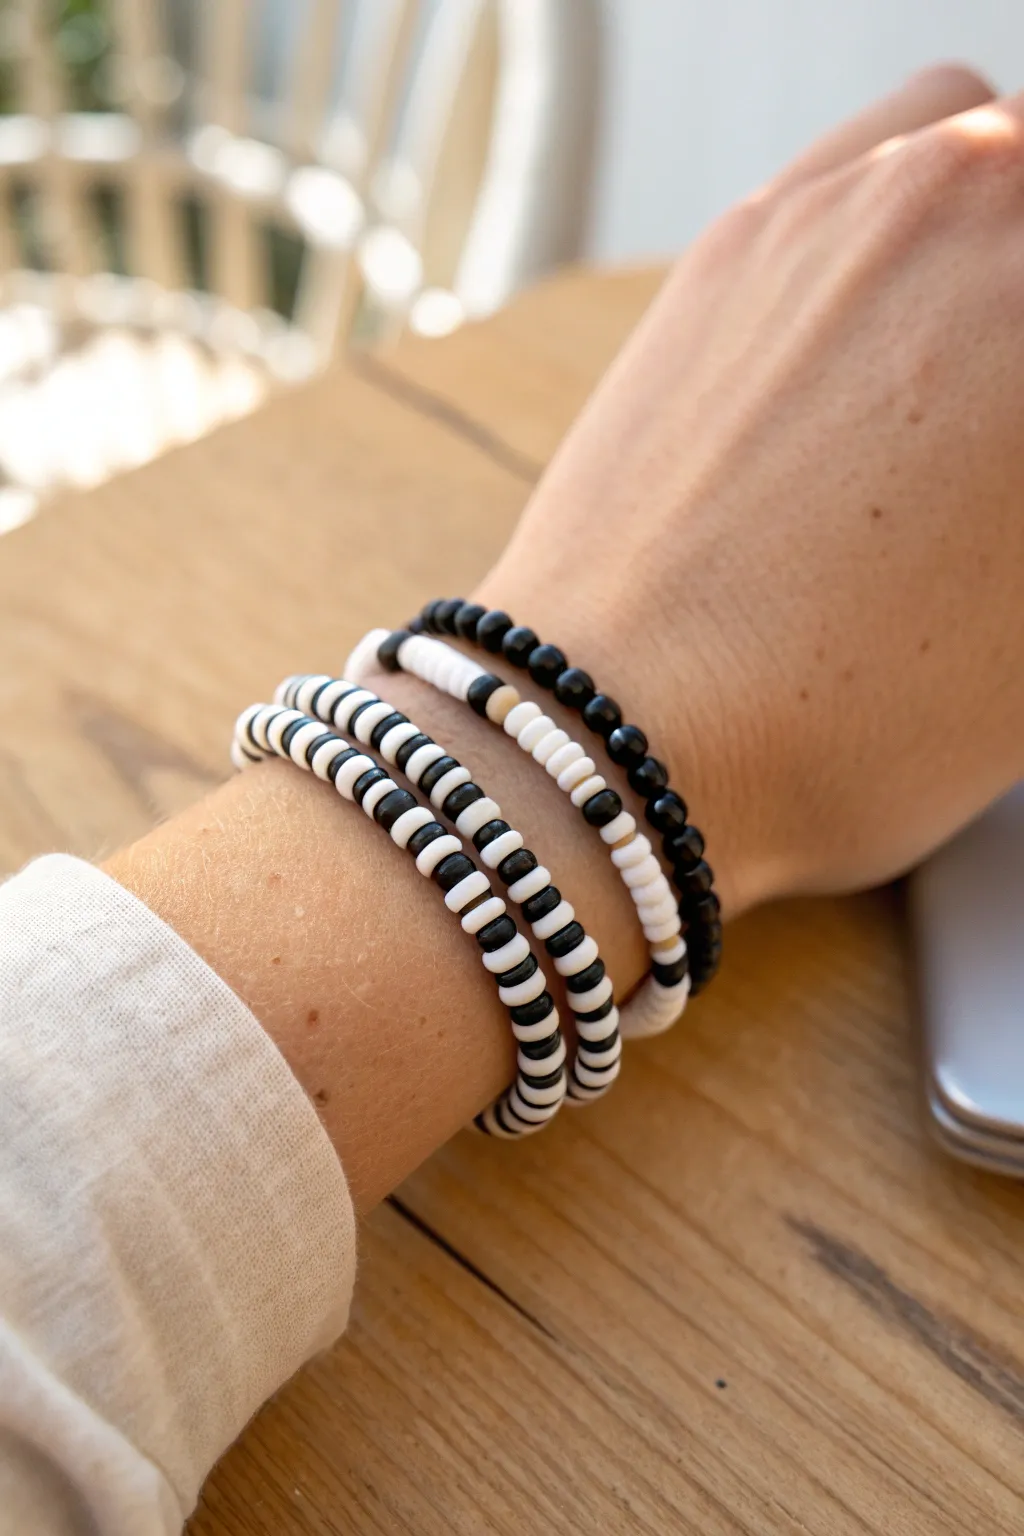
Achieve a sleek and versatile look with this four-piece bracelet stack combining classic black and white tones. This set mixes texture and pattern by blending solid seed beads with striped heishi disc patterns for a modern wrist accessory.
Detailed Instructions
Materials
- Elastic beading cord (0.8mm clear)
- 6mm flat polymer clay heishi beads (white)
- 6mm flat polymer clay heishi beads (black)
- 4mm round beads (matte black – agate or glass)
- Small gold spacer beads or accent beads
- Super glue or jewelry cement
- Scissors
Step 1: Planning the Stack
-
Measure your wrist:
Before cutting any cord, wrap a measuring tape loosely around your wrist to find your size. Add about half an inch to this measurement for a comfortable fit that isn’t too tight. -
Prepare the cord:
Cut four lengths of elastic cord, each about 10-12 inches long. Having this extra length makes tying the final knots much easier than struggling with short ends. -
Secure the ends:
Attach a piece of tape or a bead stopper to one end of each cord segment to prevent beads from sliding off while you work.
Pre-stretch the Cord
Before stringing, give your elastic cord a few firm tugs. This ‘pre-stretching’ prevents the bracelet from sagging or loosening up after the first few wears.
Step 2: The Thin Black Round Bracelet
-
Start stringing:
Take your first cord and begin threading the 4mm round black beads. This bracelet is a solid color strand, acting as a grounding element for the stack. -
Check the length:
Continue adding beads until the strand reaches your desired wrist measurement. Wrap it around your wrist to check the fit before tying off. -
Tie the knot:
Tie a square knot (right over left, left over right) to secure the bracelet. Pull it tight, add a tiny drop of glue to the knot, let it dry, and trim the excess cord.
Knot Slipping?
If your elastic knots won’t hold, try a surgeon’s knot instead of a square knot. Loop the cord through twice on the first pass for extra friction before pulling tight.
Step 3: The White Accent Bracelet
-
Create the base:
For the second bracelet, string a long section of white heishi beads. This will be the predominantly white strand in the stack. -
Add asymmetry:
About two-thirds of the way through, interrupt the white pattern with a single black round bead, followed by a few white heishi beads, a gold spacer, and another black round bead. This asymmetric detail adds visual interest. -
Finish the strand:
Complete the length with more white heishi beads, then knot, glue, and trim just like the first bracelet.
Step 4: The Striped Heishi Bracelets (Make 2)
-
Establish the pattern:
For the final two bracelets, you will create a high-contrast striped pattern. String three white heishi beads followed by three black heishi beads. -
Repeat the sequence:
Continue this alternating 3-white, 3-black pattern. I find it helpful to lay the beads out on a mat first to ensure the pattern stays consistent. -
Create the first stripe bracelet:
Fill the entire length of the third cord with this repeating striped pattern until it matches the size of your other finished bracelets. -
Create the second stripe bracelet:
Repeat the exact same process for the fourth cord. Having two identical striped strands balances the stack against the solid white and solid black bracelets. -
Final assembly:
Knot, glue, and trim these last two strands. Once the glue is fully cured on all four pieces, roll them onto your wrist to enjoy your complete stack.
Enjoy mixing and matching your new graphic stack with any outfit for a touch of modern flair


Navy, Gray, and White Color Blocks
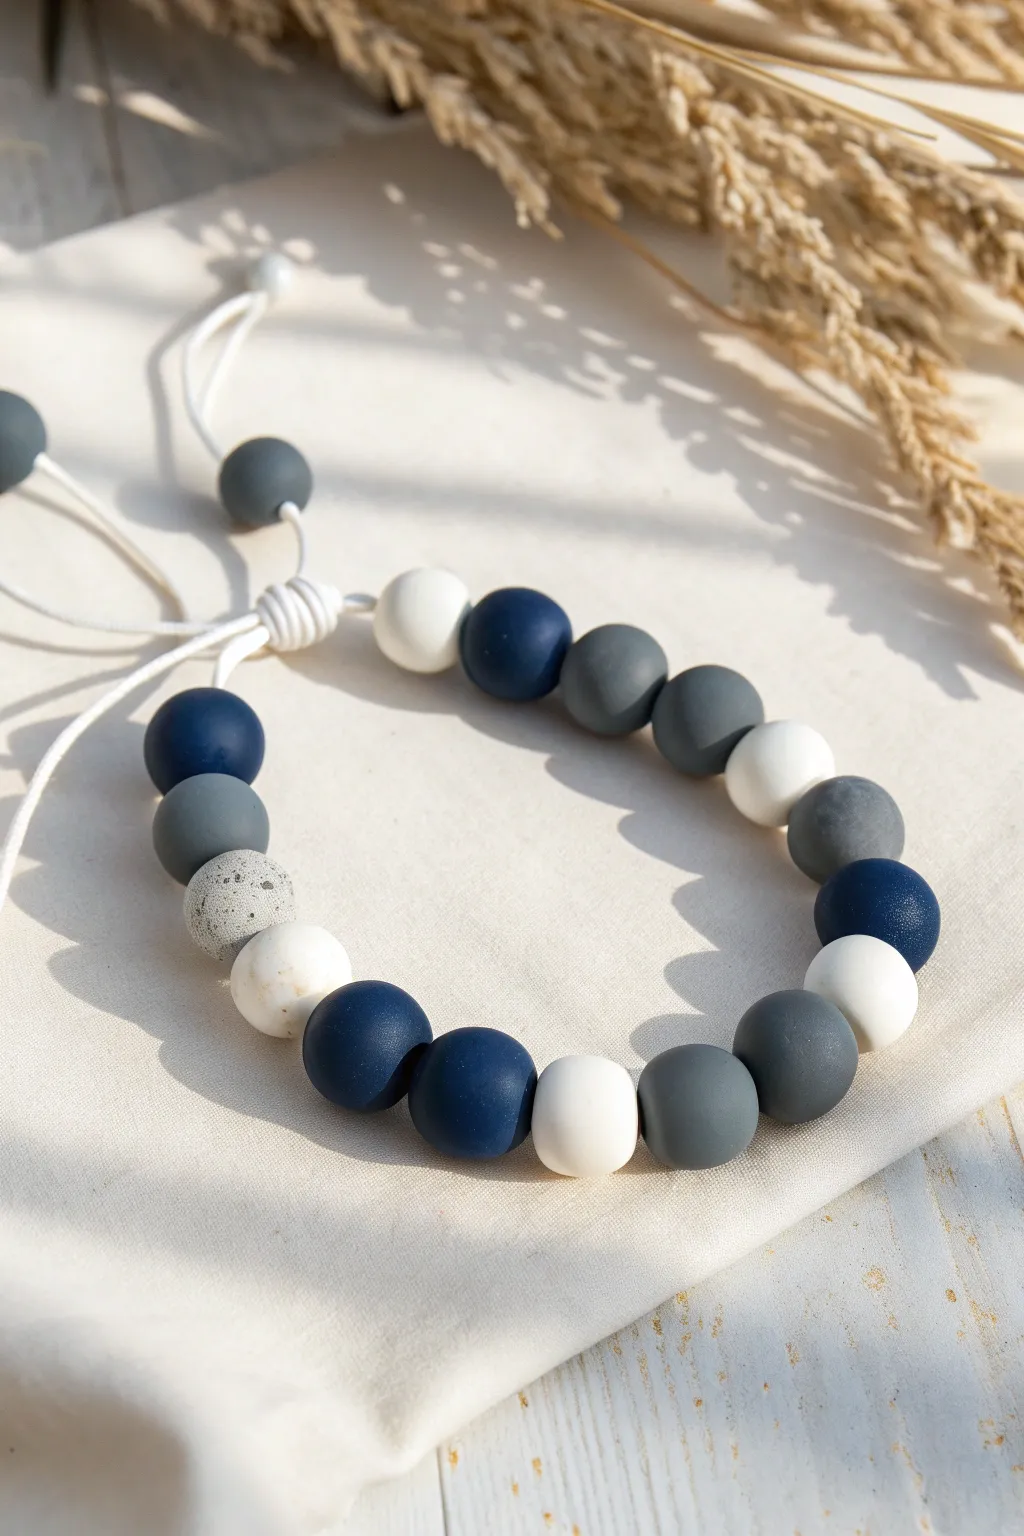
This handsome bracelet combines matte navy, slate gray, and crisp white beads for a clean, masculine look perfect for boys of all ages. The addition of a speckled stone-effect bead adds just the right amount of texture to this classic color-blocked design.
Step-by-Step Tutorial
Materials
- 12mm round silicone or polymer clay beads (Navy Blue)
- 12mm round silicone or polymer clay beads (Dark Gray/Charcoal)
- 12mm round silicone or polymer clay beads (Light Gray/Slate)
- 12mm round silicone or polymer clay beads (White)
- 12mm round silicone or polymer clay bead (Speckled Granite/Stone effect)
- 1.5mm white satin nylon cord or waxed cotton cord
- Scissors
- Lighter (for sealing cord ends)
- Tape or clipboard (optional, for holding cord)
Step 1: Preparation and Cord Setup
-
Measure the cord:
Cut a length of white nylon cord approximately 30 inches long. This generous length gives you plenty of room to work with the adjustable sliding knot later. -
Seal the ends:
Quickly pass the very tips of your cord ends through a lighter flame to melt them slightly. This prevents fraying and makes threading the beads much smoother. -
Fold and knot:
Fold the cord in half to create a loop at the top. Tie an overhand knot about 2 inches down from the fold to create the starting loop for your adjustable clasp system, or simply use a single strand if you prefer a simpler tie-on style.
Pro Tip: Threading Ease
If the cord is too thick for the bead holes, wrap a small piece of masking tape tightly around the cord tip to create a stiff ‘needle’ for easier threading.
Step 2: Beading the Pattern
-
Start with the focal section:
Begin threading your beads onto the cord. Start with one white bead, followed by one navy blue bead. -
Add the grays:
Next, slide on a medium gray bead, followed by a dark charcoal gray bead. This creates a gradient effect. -
Create a white break:
Place one white bead next to separate the dark tones. Follow this immediately with a dark gray bead. -
Mirror the blues:
Add a navy blue bead. You can see how the pattern is starting to alternate between dark blocks and light spacers. -
Add the second white spacer:
Thread on another white bead. These white beads really help the darker colors pop. -
The back section:
Add a dark gray bead, followed by a medium gray bead to continue the flow around the wrist. -
Feature the speckled bead:
Now for the texture accent. Slide on the speckled granite-look bead. Then follow it with a white bead. -
Final color block:
Finish the main beading sequence with one navy blue bead followed by another navy blue bead to anchor the design. -
End cap bead:
Add one final white bead to balance the start of the bracelet.
Step 3: Finishing the Adjustable Closure
-
Secure the beads:
Tie an overhand knot flush against the last white bead to keep all your hard work in place. -
Form the sliding mechanism:
Cross the two loose tail ends of the cord over each other. You can use a separate short piece of cord (about 8 inches) to tie a square knot or ‘macramé sliding knot’ over these crossed strands. -
Tighten the slide:
Pull the macramé knots tight so they grip the main cords but still slide when pulled firmly. -
Trim excess:
Trim the ends of your sliding knot cord close to the knot and carefully melt the ends with a lighter to fuse them, ensuring you don’t burn the main bracelet cords. -
Add stopper beads:
On the very ends of the original trailing cords, thread one small dark gray bead on each side. -
Final knots:
Tie a small knot at the very end of each cord to keep the stopper beads from falling off, then trim and singe the tips one last time.
Level Up: Wood Accents
Swap out the white spacer beads for unfinished light wood beads. The natural timber grain looks fantastic against the matte navy and gray silicone.
Step 4: Testing the Fit
-
Check the slide:
Gently pull the two stopper beads away from each other to tighten the bracelet, simulating how it will fit on a wrist. -
Final inspection:
Ensure the beads sit flat and the color blocking looks balanced before gifting or wearing.
Now you have a stylish, durable bracelet that adds a cool pop of color to any outfit


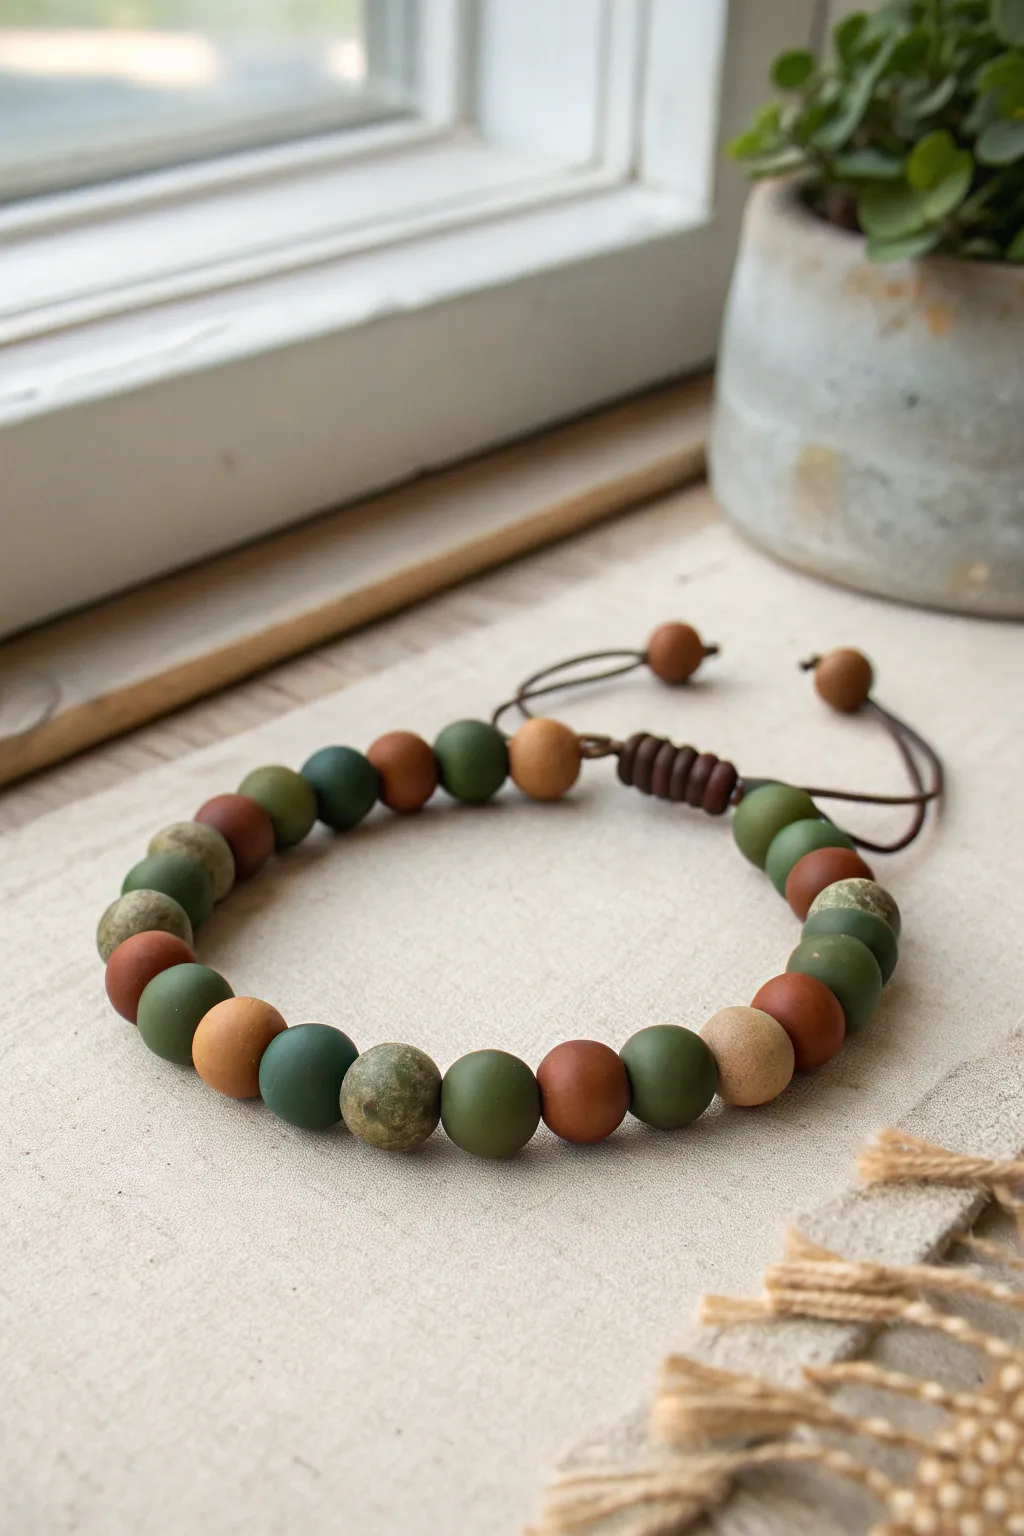
Earth-Tone Surfer Style Beads

Capture the laid-back vibe of the beach with this earthy, textured bracelet. Combining polymer clay beads in muted tones with a rugged leather cord creates a durable accessory perfect for everyday wear.
Step-by-Step
Materials
- Polymer clay (terracotta, olive green, sandy beige, speckled granite)
- Round leather cord (1.5mm – 2mm, brown)
- Toothpick or bead piercing tool
- Baking sheet and parchment paper
- Sandpaper (fine grit)
- Small wooden spacer beads (optional)
- Ruler
- Scissors
Step 1: Crafting the Clay Beads
-
Condition the Clay:
Start by warming up each color of polymer clay in your hands until it becomes soft and pliable. This prevents cracking later on. -
Portion the Clay:
Pinch off equal-sized pieces of clay, roughly the size of a marble. You’ll need about 12-14 large beads for a standard wrist size. -
Create the Textures:
Roll the pieces into round balls. For the speckled granite beads, mix a bit of white clay with black pepper or dried coffee grounds if you don’t have pre-mixed granite clay. -
Add Surface Detail:
Take the beige/sandy beads and gently roll them over a piece of coarse sandpaper or a textured fabric to give them that pitted, stone-like appearance seen in the photo. -
Pierce the Holes:
Using your toothpick or piercing tool, carefully bore a hole through the center of each bead. Make sure the hole is wide enough to accommodate your leather cord—give it a little wiggle just to be sure. -
Bake the Beads:
Place your beads on a baking sheet lined with parchment paper. Follow the baking instructions on your specific brand of clay, usually baking at 275°F (130°C) for about 15-20 minutes. -
Cool Down:
Let the beads cool completely before handling. They harden as they cool.
Uneven Holes?
If the bead holes distort while piercing, let the clay rest for 10 minutes to firm up, then drill carefully with a twisting motion rather than pushing straight through.
Step 2: Assembling the Bracelet
-
Prepare the Cord:
Cut a length of leather cord approximately 12-14 inches long. This gives you plenty of room for knots and adjustments. -
Start the Knot:
Tie a simple overhand knot about 3 inches from one end of the cord. This will act as the stopper for your beads. -
String the Beads:
Thread your cooled clay beads onto the leather cord. Alternate the colors—green, tan, terracotta, speckle—to create a random, organic pattern. -
Add Wooden Accents:
At one end of your bead run, add 3-4 small wooden spacer beads. This adds a nice textural contrast to the smooth leather and matte clay. -
Secure the Beads:
Once all beads are strung, tie another tight overhand knot snug against the last bead (or wooden spacers) to keep everything in place. -
Create the Sliding Knot:
Bring the two tail ends of the leather cord together so they overlap. You are going to create a sliding adjustable knot. -
Knot the Overlap:
Take a separate small scrap of leather cord (about 4 inches). Tie a square knot around the two overlapping main cords. -
Finish the Slider:
Tighten the square knot firmly but ensure the main cords can still slide back and forth through it. Trim the excess from the knot scrap. -
Final Touches:
Tie a small knot at the very tip of each tail end of the main cord to prevent them from slipping through the slider. Trim any remaining excess length.
Add Weathering
After baking, lightly sand the surface of the terracotta and olive beads to give them a matte, sun-bleached look that mimics sea glass or tumbled stones.
Now you have a rugged, handmade accessory that brings a bit of the coast to any outfit


Team-Color Stripe Bracelet

Show off your team colors or patriotic pride with this bold, sporty bracelet design. By combining classic round beads with flat heishi discs, you create a dynamic texture that looks great on any wrist.
Step-by-Step Tutorial
Materials
- Matte round beads (approx. 8mm) in navy blue
- Matte round beads (approx. 8mm) in red
- Polymer clay heishi disk beads in red
- Polymer clay heishi disk beads in white
- Polymer clay heishi disk beads in navy blue
- Thin flat disk spacer beads in white (optional)
- Elastic beading cord (0.8mm or 1mm)
- Scissors
- Super glue or jewelry cement
- Tape or a bead stopper clip
- Silver crimp beads or a knot cover (optional, for the clasp area)
Step 1: Preparation & Planning
-
Measure the wrist:
Before cutting any string, measure the wrist intended for the bracelet. Add about an inch to this measurement to ensure a comfortable fit that isn’t too tight. -
Cut the cord:
Cut a piece of elastic cord about 3-4 inches longer than your final measurement. This extra length will make tying the knot at the end much easier. -
Secure the end:
Attach a piece of tape or a bead stopper clip to one end of the cord so your beads don’t slide off while you work.
Step 2: Creating the Striped Accents
-
Design the striped section:
This bracelet features special focal points made of flat disc beads. For the first accent, gather your red, white, and navy heishi beads. -
Create the first stripe block:
Thread a red clay disk bead onto the cord, followed by a white disk bead, and then a navy blue disk bead. This mimics the patriotic tri-color look. -
Add a round separator:
Slide on one round red matte bead. This bead acts as a bridge between your flat stripe sections. -
Create the second stripe block:
Now, reverse or vary the pattern slightly to add interest. Thread a navy blue round bead, then place a white thin spacer or white heishi bead, followed by a navy blue heishi bead. -
Complete the focal zone:
Finish this detailed section with another round red bead, followed by a thick block of red, white, and navy heishi beads arranged to mirror your first set.
Make It Matte
The ‘frosted’ look of the round beads is key here. Search for ‘matte acrylic’ or ‘matte agate’ beads specifically to get that rugged, non-shiny texture shown in the photo.
Step 3: Stringing the Main Body
-
Begin the alternating pattern:
Moving away from the striped focal point, you will now alternate mostly between the round solid beads. Thread on a navy blue round bead. -
Alternate colors:
Follow the navy bead with a red round bead. Continue this simple 1-to-1 alternating pattern for the majority of the bracelet’s length. -
Check the length:
Periodically wrap the strand around your wrist. You want the Alternating Round pattern to cover most of the wrist, leaving the Striped Accent section to sit prominently on top.
Team Spirit Swap
Customize the heishi disc sections! Swap the red, white, and blue for green and yellow, or purple and gold, to create instant custom fan gear for your favorite local sports team.
Step 4: Finishing Touches
-
Prepare to close:
Once the bracelet reaches the perfect length, remove the tape or stopper from the end carefully. -
Tie the knot:
Bring both ends of the elastic together. Tie a standard square knot first—right over left, then left over right. -
Secure firmly:
Pull the cords tight to secure the knot. I find adding a tiny drop of super glue or jewelry cement right on the knot ensures it never slips undone. -
Hide the knot:
While the glue is still slightly tacky but set, gently pull the knot inside the hole of the nearest large round bead to hide it from view. -
Trim excess:
Use your scissors to snip off the excess cord tails as close to the bead hole as possible without cutting the knot itself. -
Optional clasp detail:
If you prefer the look in the photo, you can add two silver jump rings or a decorative silver bead right next to the knot location before gluing to simulate a closure.
You now have a durable and stylish accessory ready for game day or everyday wear

The Complete Guide to Pottery Troubleshooting
Uncover the most common ceramic mistakes—from cracking clay to failed glazes—and learn how to fix them fast.
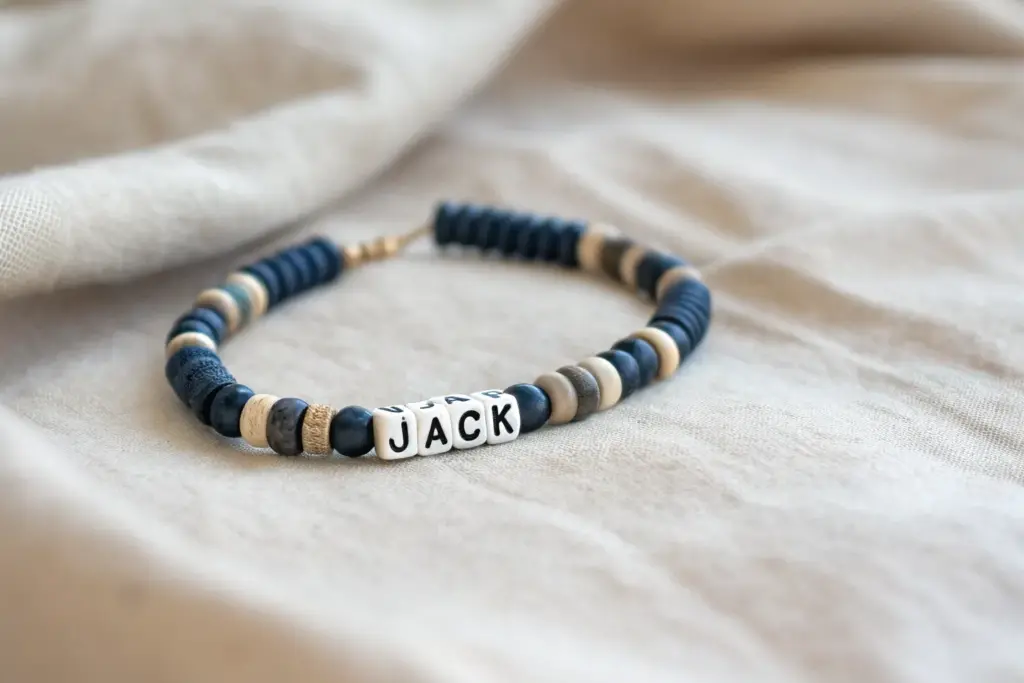
Initials With Bold Letter Beads
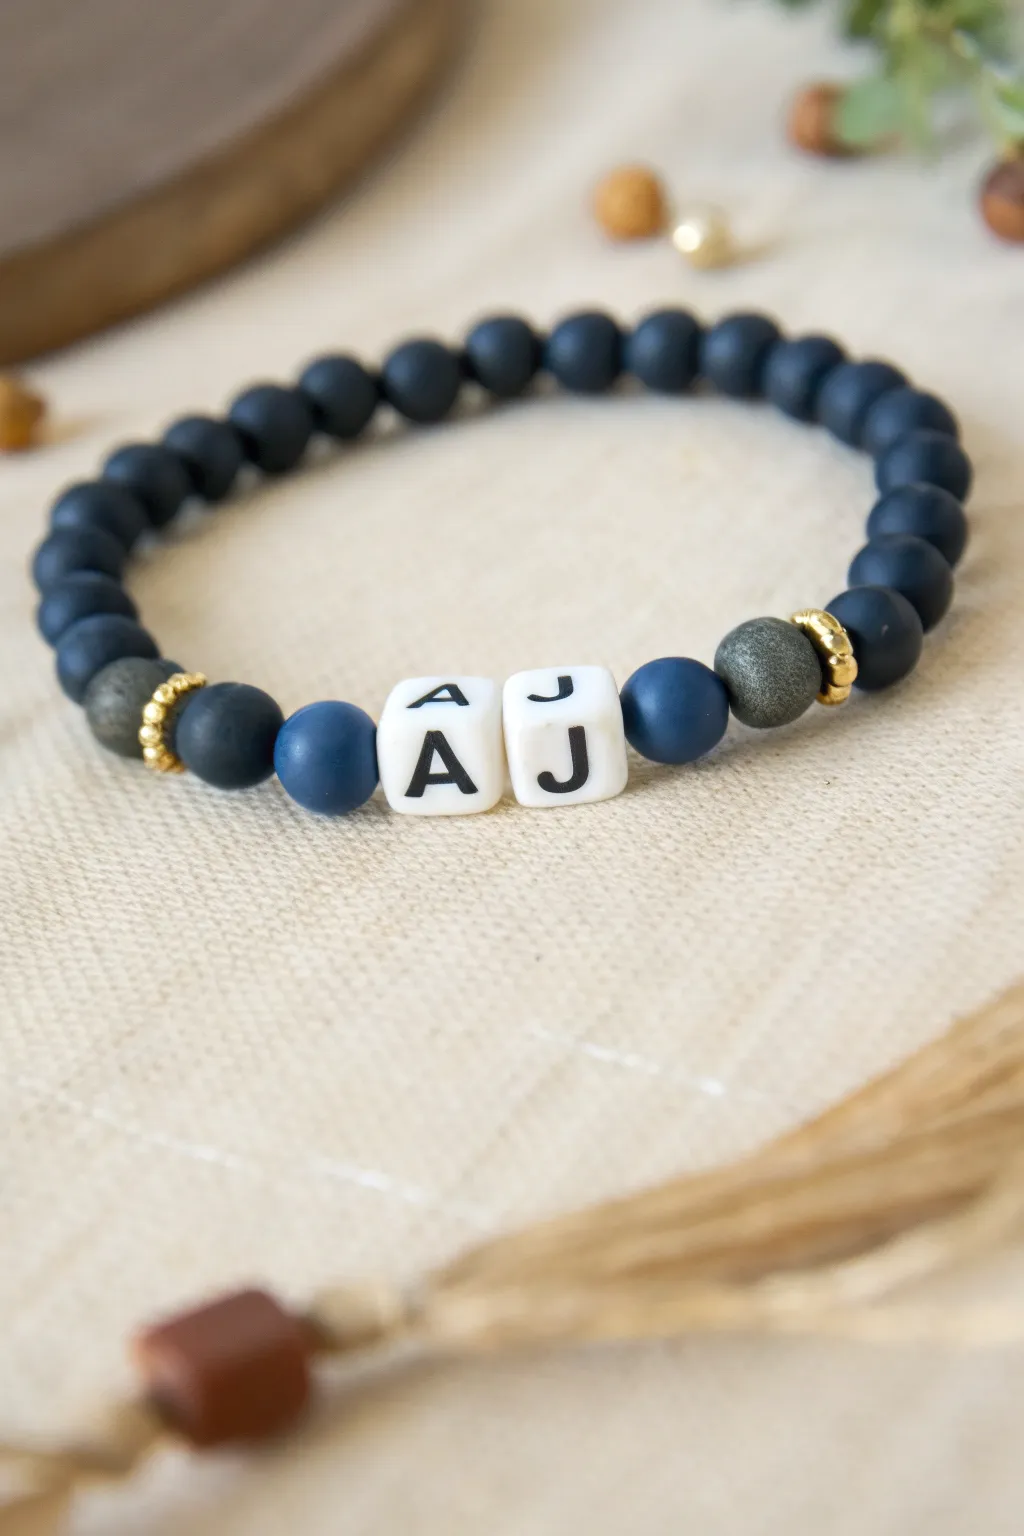
This custom bracelet blends sophistication with a personal touch, featuring matte stone beads and crisp letter accents. The dark, understated color palette makes it a versatile accessory that feels both modern and masculine.
Detailed Instructions
Materials
- Matte black onyx or agate beads (6mm or 8mm)
- White cube letter beads (letters ‘A’ and ‘J’ shown)
- Two gold rondelle spacer beads (textured/beaded edge)
- Two dark grey lava or shimmering obsidian accent beads
- Two navy blue matte accent beads (slightly larger than the main black beads)
- Strong elastic stretch cord (0.8mm or 1.0mm recommended)
- Scissors
- Bead stopper or tape
- Jewelry glue or clear nail polish
Step 1: Planning & Setup
-
Measure the wrist:
Before cutting any cord, measure the recipient’s wrist with a flexible measuring tape. Add about 0.5 to 1 inch to this measurement depending on how loose they prefer the fit. -
Cut the cord:
Cut a piece of elastic cord about 10-12 inches long. This extra length will make tying the final knot much easier without struggling against tight ends. -
Prep the elastic:
Pre-stretch your elastic cord by pulling it firmly a few times. This crucial step prevents the finished bracelet from sagging or stretching out permanently after the first wear. -
Secure the end:
Place a bead stopper or a piece of masking tape on one end of the cord so your beads don’t slide off while you work.
Step 2: Creating the Centerpiece
-
String the first accent:
Begin your pattern by threading one of the matte navy blue accent beads onto the cord. -
Add the first letter:
Slide on the first white cube letter bead (e.g., ‘A’). Ensure the letter is facing the correct direction relative to how you want it read. -
Add the second letter:
Thread the second letter bead (e.g., ‘J’) right next to the first one. -
Finish the focal point:
Complete the central section by adding the second matte navy blue bead. You should now have a symmetric group: Blue bead, Letter, Letter, Blue bead.
Knot Hider
Make sure the hole of the bead next to your knot is large enough to hide it. If the matte beads have tiny holes, hide the knot inside the larger navy accent bead instead.
Step 3: Adding the Decorative Flanks
-
Add texture with stone:
On the right side of your centerpiece, thread one of the textured dark grey beads (like lava stone or shimmering obsidian). -
Balance the other side:
Repeat this on the left side: remove your bead stopper temporarily to add the second dark grey bead, then replace the stopper. Now your center group is flanked by grey stones. -
Insert gold spacers:
Add a gold rondelle spacer bead next to each of the grey stone beads. This tiny pop of metallic adds a refined finish to the rugged textures.
Texture Play
Swap the grey lava stone for a wooden geometric bead or a metallic hematite bead to change the vibe from natural to industrial.
Step 4: Completing the Band
-
Build the bracelet body:
Begin stringing the main matte black beads. I like to alternate adding them to each side to keep the design perfectly centered, but you can also just string them all on one side. -
Check the length:
Continue adding black beads until the bracelet reaches your target length. Wrap it around a mandrel or your wrist to check the fit, making sure the letter beads sit centered on top. -
Prepare to knot:
Once you are happy with the size, remove the bead stopper. Bring the two ends of the elastic together carefully. -
Tie the knot:
Tie a secure surgeon’s knot. This involves wrapping the cord through the loop twice before pulling it tight. Pull the cords firmly to cinch the knot. -
Secure with glue:
Apply a tiny dab of jewelry glue or clear nail polish strictly to the knot itself. Let it dry for a few minutes to ensure it won’t slip. -
Hide the knot:
Trim the excess cord ends to about 2mm. Gently tug the bracelet so the knot slides and hides inside the hole of one of the adjacent black beads.
Now you have a sleek, personalized bracelet perfect for gifting or stacking with other accessories
Jersey Number or Graduation Year

Celebrate a milestone with this rugged, adjustable bracelet featuring a graduation year or jersey number as the centerpiece. Combining matte beads, natural wood tones, and porous lava stones creates a masculine yet stylish accessory perfect for daily wear.
Step-by-Step
Materials
- White or cream square alphabet/number beads (numbers 2, 0, 2, 6)
- Dark navy blue matte round beads (looks like silicone or coated acrylic, approx. 8mm)
- Grey matte round beads (silicone or acrylic, approx. 8mm)
- Natural wood round beads (approx. 8mm)
- Black lava stone beads (porous texture, approx. 8mm)
- Dark grey disc spacer beads (heishi style)
- Thin metal spacer beads (bronze or copper tone)
- Dark blue or grey nylon cord (1mm or 0.8mm appropriate for macramé)
- Scissors
- Lighter (to seal cord ends)
- Tape or a clipboard (to hold work in place)
Step 1: Preparation & Centerpiece
-
Cut the cord:
Begin by cutting a piece of nylon cord about 30 inches long. This generous length ensures you have plenty of room for knotting the adjustable closure later. -
Seal the end:
Briefly run a lighter flame near one end of the cord to melt it into a sharp, stiff point. This acts as a built-in needle, making threading much easier. -
String the year:
Thread your number beads onto the center of the cord. For the ‘2026’ design shown, slide them on in order. Place a dark grey heishi (disc) bead between each number to space them out and add texture. -
Secure the center:
Tie a simple overhand knot immediately before the first number and immediately after the last number. Adjust these knots so they sit snug against the outer numbers, keeping the centerpiece fixed in the middle of your cord.
Step 2: Creating the Bead Pattern
-
Start the left side:
On the left side of your centerpiece knot, slide on one small wood bead followed by a tiny bronze metal spacer. -
Add texture:
Next, add a black lava stone bead. These have a great pitted surface that contrasts nicely with the smoother beads. -
Continue the pattern:
Thread on a light wood bead, then a dark navy blue bead. -
Finish the left strand:
Complete this side with a black lava bead, a light wood bead, a grey matte bead, another light wood bead, and finally a navy blue bead. -
Mirror the right side:
Repeat the exact same sequence on the right side of the centerpiece: wood bead, metal spacer, lava stone, light wood, navy blue, black lava, light wood, grey matte, light wood, and navy blue. -
Check fit:
Wrap the beaded section around the wrist to check the length. The beads should cover most of the wrist, leaving a gap of about 1-2 inches for the closure. Add or remove beads symmetrically if needed. -
Secure the strands:
Tie a tight overhand knot at the end of the bead sequence on both the left and right sides to keep all beads in place.
Aromatic Touch
Add 1-2 drops of essential oil (like sandalwood or cedar) directly onto the black lava stone beads. Being porous, they act as a natural diffuser that holds the scent for days.
Step 3: The Sliding Knot Closure
-
Form a circle:
Bring the two cord ends together so they overlap parallel to each other, forming the bracelet’s circle shape. You can tape the bracelet down to a table at this stage to keep the cords side-by-side. -
Cut closure cord:
Cut a separate scrap piece of the same nylon cord, about 8-10 inches long. -
Start the square knots:
Place the scrap cord under the two main overlapping bracelet cords. Tie a standard square knot (macramé knot) around the bundle. -
Build the closure:
Continue tying square knots until you have a closure section about half an inch long. Pull each knot tight for durability. -
Trim closure ends:
Cut the excess tails of the knotting cord (not the main bracelet cords!) very close to the knots. Use a lighter to carefully melt the tips so they fuse into the knot block. -
Finish the pull cords:
Test the sliding mechanism. Then, tie a small knot at the very end of each main pull cord to prevent them from slipping through the closure. Trim any final excess.
School Spirit Upgrade
Swap the navy and grey beads for your specific school or team colors. You can also replace the year with a jersey number for a personalized athlete’s gift.
Now you have a durable, personalized accessory that marks a special year with style


What Really Happens Inside the Kiln
Learn how time and temperature work together inside the kiln to transform clay into durable ceramic.
Basketball Accent Bead Centerpiece
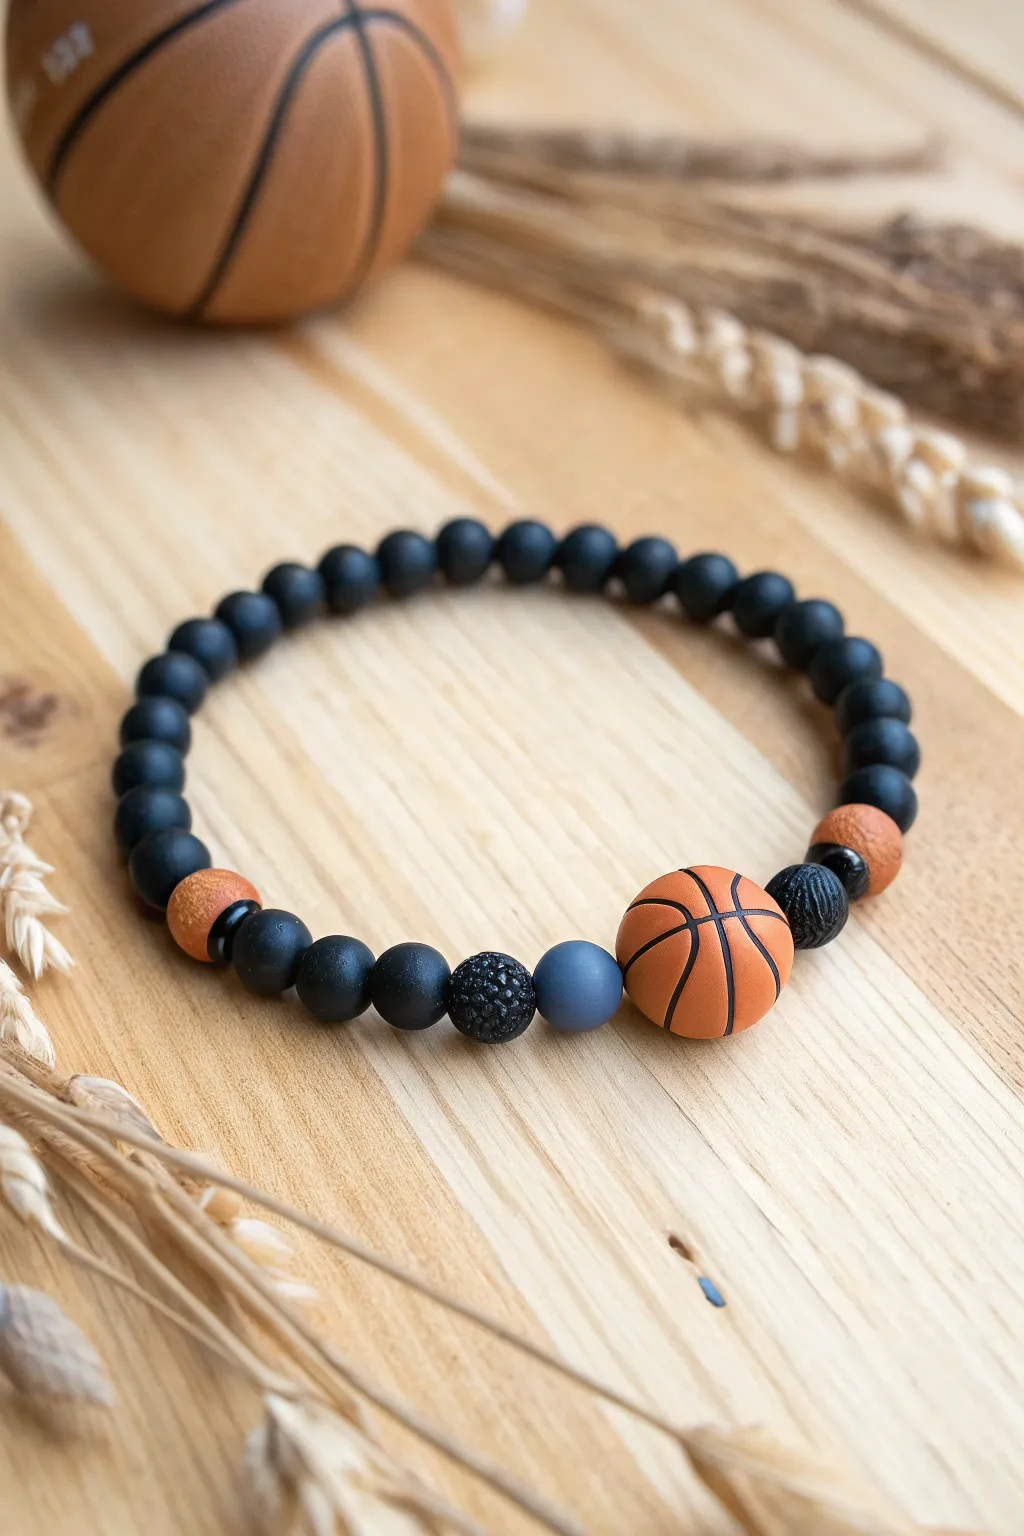
This sporty design puts a playful spin on a classic matte black aesthetic by featuring a bold basketball centerpiece. With varied textures and earthy accents, it’s the perfect accessory for any young athlete or sports enthusiast looking to show off their team spirit.
How-To Guide
Materials
- Stretch cord (0.8mm or 1mm thickness)
- Black matte agate or onyx beads (8mm)
- Large polymer clay or silicone basketball bead (12-14mm)
- Solid grey matte bead (8mm)
- Two textured black round beads (lava stone or stardust finish, 8mm)
- Two brown round spacer beads (wood or speckled clay, 8mm)
- Two small black disc spacers (heishi style)
- Jewelry glue or clear nail polish
- Scissors
- Bead stopper or tape
Step 1: Preparation
-
Measure the Cord:
Cut a piece of stretch cord about 10-12 inches long. This generous length gives you plenty of room to tie knots without struggling against tension. -
Pre-stretch the Cord:
Hold both ends of the cord and give it a few firm (but not snapping) tugs. I confirm this helps prevent the bracelet from sagging or stretching out permanently after the first wear. -
Secure the End:
Place a bead stopper or a piece of masking tape on one end of the cord to stop your beads from rolling off while you work.
Step 2: Creating the Focal Section
-
Start with the Centerpiece:
Thread the large basketball bead onto the cord first. This will be the anchor of your design. -
Add the Right Accent:
On the right side of the basketball, slide on one textured black bead. -
Add the Right Spacer:
Follow the textured bead with one of the brown round spacer beads. -
Add the Left Accent:
Now, thread from the other side (or simply push the basketball down). On the left side of the basketball, add the single solid grey matte bead. -
Add the Left Texture:
Next to the grey bead, add the second textured black bead. -
Insert Disc Spacers:
Place a small black disc spacer after the brown bead on the right side, and another one after the textured black bead on the left side. -
Final Left Accent:
Finish the focal section on the left side by adding the second brown round bead.
Loose Fit Issues?
If the bracelet feels too loose, remove two black matte beads. If it’s too tight but one bead is too much, try adding two extra disc spacers instead.
Step 3: Completing the Band
-
Fill with Matte Black:
Begin threading the standard 8mm matte black beads onto both ends of the cord. You will need roughly 18-22 beads total, depending on the wrist size. -
Check for Balance:
Try to add an equal number of black beads to each side so the basketball focal point stays centered opposite the knot. -
Test the Fit:
Wrap the unfinished strand around your wrist. It should sit comfortably against the skin without digging in or drooping excessively. -
Adjust Length:
Add or remove one matte black bead at a time until the size is perfect. Remember that the knot will take up a tiny bit of space.
Team Spirit Upgrade
Swap the grey matte bead for a bead in your favorite team’s color (like red, blue, or yellow) to customize your support on game day.
Step 4: Finishing Up
-
Tie the Knot:
Remove the bead stopper or tape. Bring the two ends together and tie a surgeon’s knot (right over left twice, then left over right). -
Tighten Securely:
Pull all four strands (the two tails and the two loop sides) gently but firmly to cinch the knot down tight. -
Glue the Knot:
Apply a tiny dab of jewelry glue or clear nail polish to the knot. Let it dry for a few minutes to ensure it won’t unravel. -
Hide the Knot:
Once dry, trim the excess cord ends close to the knot. Gently pull on the beads to slide the knot inside the hole of the nearest matte black bead to conceal it.
Now you have a durable, stylish accessory ready for the court or just hanging out with the team
Minimal Metallic Spacer Breaks
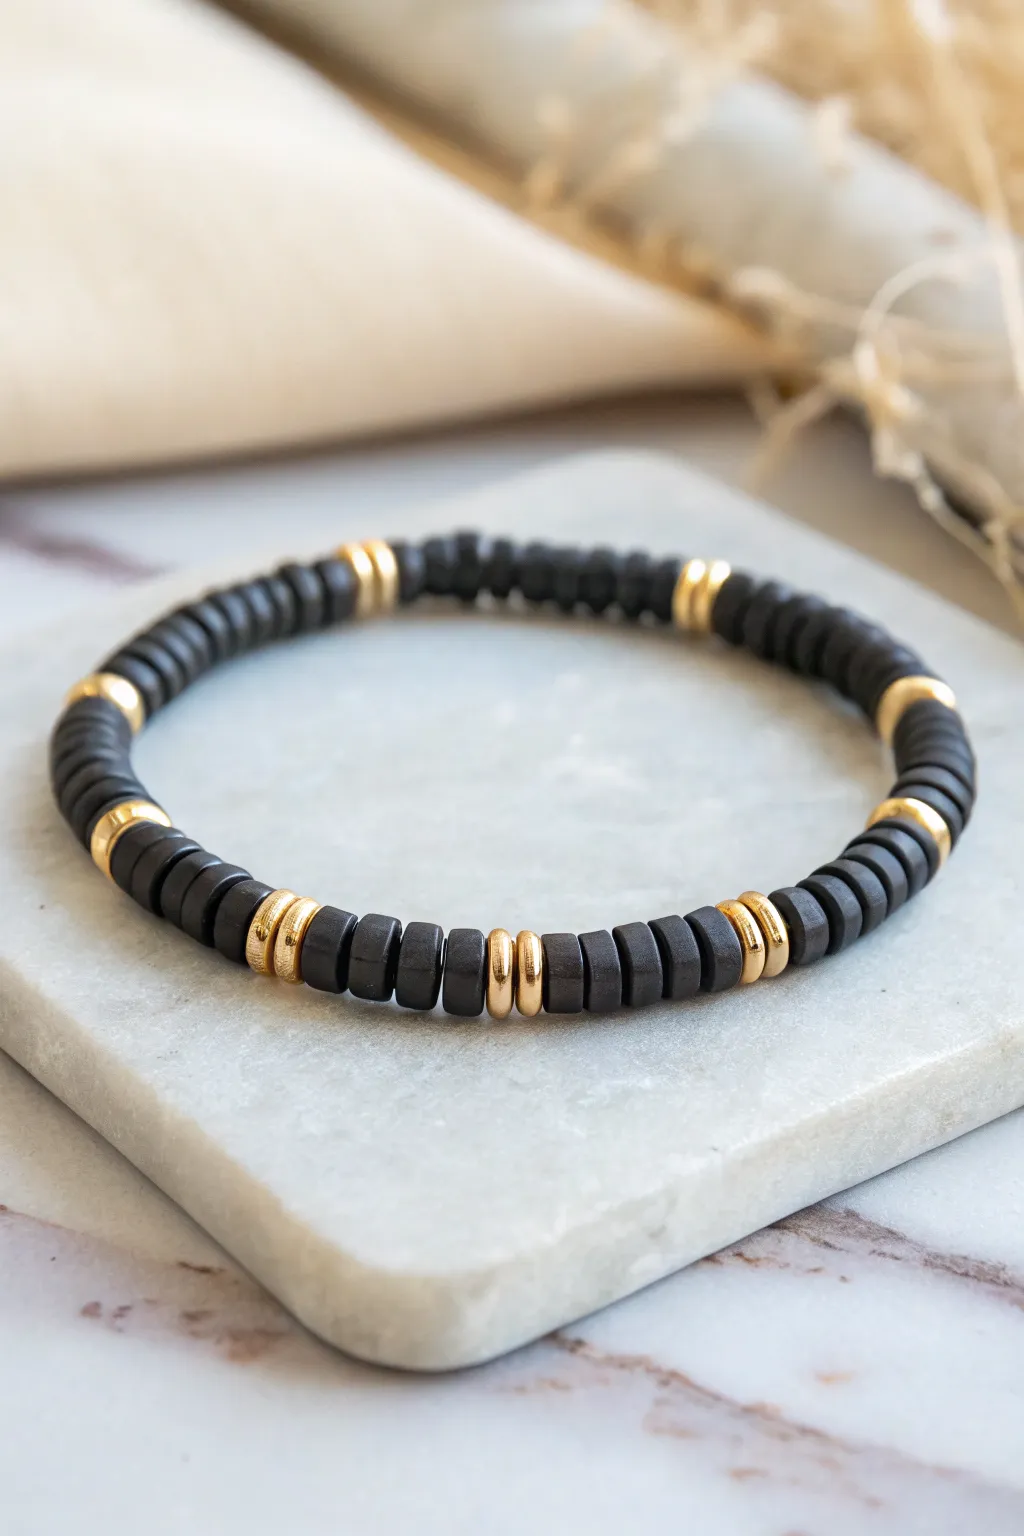
This sleek bracelet design combines matte black heishi beads with shimmering gold accents for a look that is both modern and understated. It’s the perfect beginner project that balances a rugged texture with just a hint of sophisticated shine.
Step-by-Step Tutorial
Materials
- 6mm black polymer clay disc beads (heishi beads)
- 4mm or 6mm gold plated brass spacer beads (rounded edge)
- 0.8mm clear elastic stretch cord
- Jewelry glue or clear nail polish
- Scissors
- Tape or a bead stopper clip
- Ruler or measuring tape
Step 1: Preparation & Planning
-
Measure your wrist:
Wrap a measuring tape loosely around your wrist to determine the circumference. Add about 0.5 inches to this measurement to ensure a comfortable fit that isn’t too tight. -
Cut the cord:
Cut a piece of elastic cord roughly 10-12 inches long. Having this extra length makes tying the final knot significantly easier than struggling with short ends. -
Pre-stretch the elastic:
Hold the cord ends and give them a few firm tugs. Pre-stretching prevents the bracelet from drooping or becoming loose immediately after you finish making it. -
Secure the end:
Place a piece of tape or a bead stopper clip on one end of the cord. This safety measure stops your beads from sliding right off onto the floor as you string them.
Loose Elastic?
If the bracelet gapes, you didn’t pre-stretch enough. Before knotting, pull tight to remove slack, but ensure the bracelet sits flat without buckling.
Step 2: Stringing the Pattern
-
Start with black clay:
Begin by threading on a section of black clay beads. For this random-but-balanced look, I usually start with about 8 to 10 black discs. -
Add the first highlight:
Slide on two gold spacer beads. Using two spacers together creates a stronger visual break than a single thin bead would. -
Vary section lengths:
Thread next section of black beads. To keep the design organic, don’t count perfectly; try adding 12 or 15 beads this time before the next gold break. -
Insert second gold pair:
Add another pair of gold spacer beads. Ensure they sit flush against the clay discs without any gaps. -
Continue the sequence:
Repeat the pattern—block of black clay beads followed by dual gold spacers—until you reach your desired length. Aim for about 5 to 6 gold sections total for a standard wrist size. -
Check the sizing:
Wrap the unfinished strand around your wrist to check the fit. There should be no gaps between beads, but the elastic shouldn’t be stretched out yet.
Step 3: Finishing Touches
-
Prepare for the knot:
Remove the tape or clip. Carefully bring both ends of the elastic together, ensuring the beads are pushed together snugly but not buckled. -
Tie a surgeon’s knot:
Cross right over left and loop under, then cross left over right and wrap it through the loop twice. This double-loop friction holds the elastic much better than a standard knot. -
Tighten securely:
Pull all four strands (the two loose ends and the two emerging from the bracelet) firmly to cinch the knot down tight. -
Secure with adhesive:
Dab a tiny drop of jewelry glue or clear nail polish directly onto the knot. Let this dry completely before moving or cutting anything to ensure longevity. -
Hide the knot:
Trim the excess cord ends to about 2mm. Gently pull the elastic to slide the knot inside the hole of the nearest black bead to hide it from view.
Level Up: Matte Finish
Swap shiny gold spacers for brushed copper or matte gunmetal beads to create an even more industrial, rugged look suitable for everyday wear.
Now you have a stylish, stackable accessory ready to wear or gift

TRACK YOUR CERAMIC JOURNEY
Capture glaze tests, firing details, and creative progress—all in one simple printable. Make your projects easier to repeat and improve.
Skate-Inspired Checker Pattern
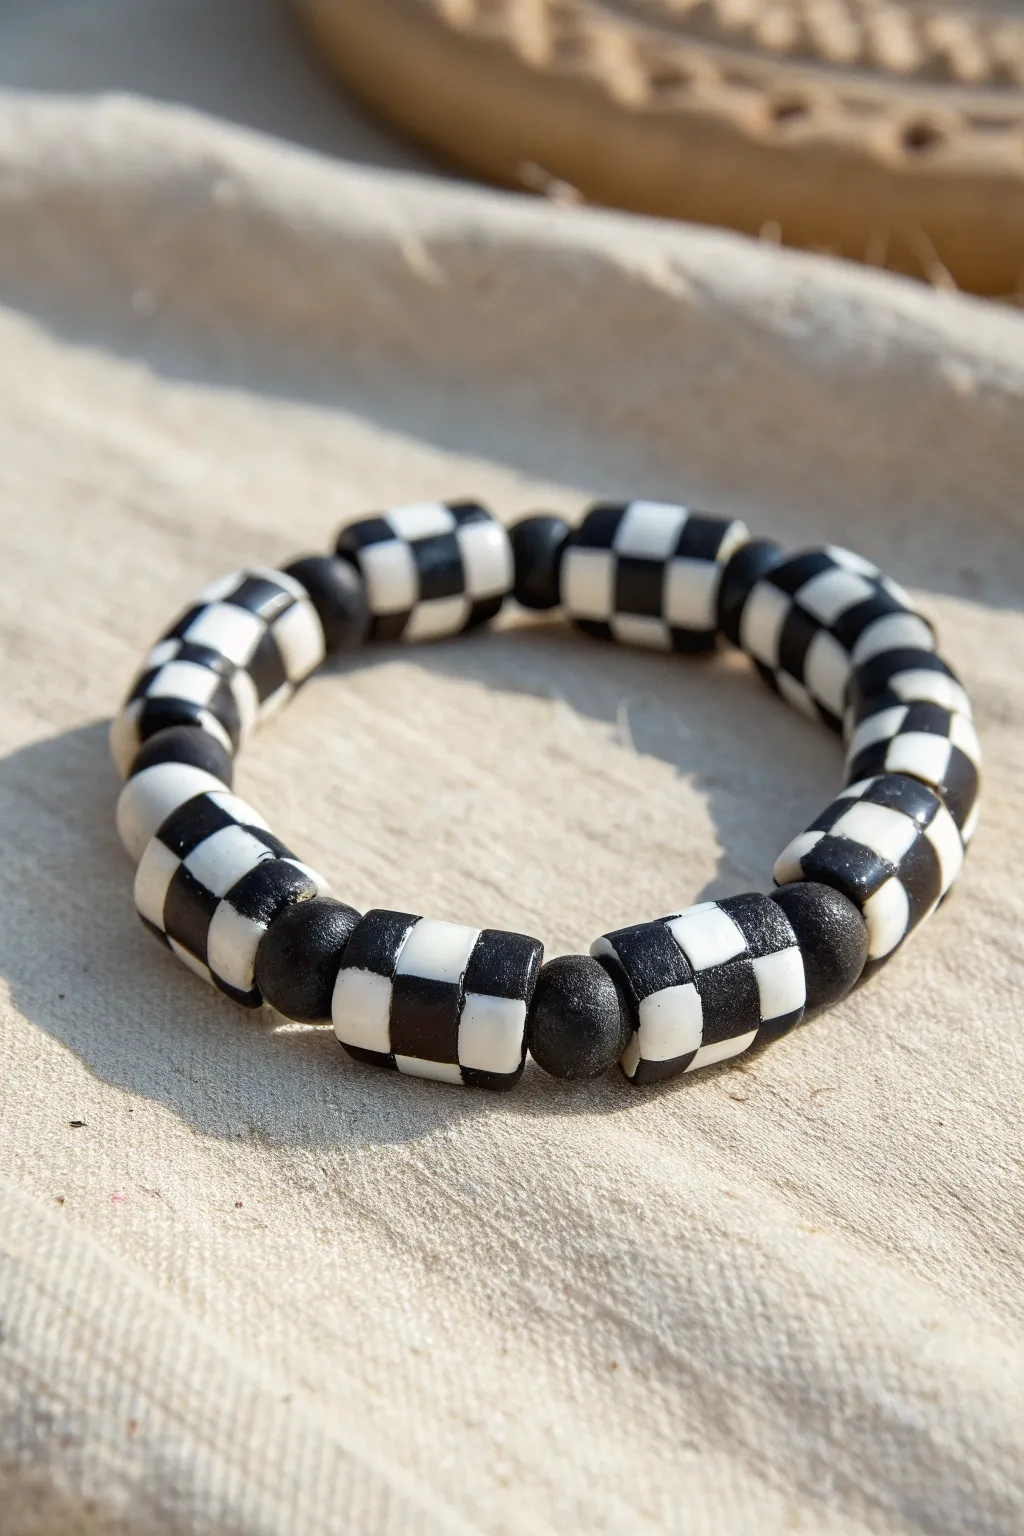
Channel effortless skate-park cool with this monochromatic checkerboard bracelet. The bold contrast between black and white clay beads creates a timeless, geometric look that works perfectly for a boy’s everyday accessory.
How-To Guide
Materials
- Black polymer clay
- White polymer clay
- Elastic cord (0.8mm or 1mm)
- Clay roller or pasta machine
- Clay blade or craft knife
- Toothpick or bead piercing pin
- Ruler
- Oven for baking
- Super glue (optional)
Step 1: Creating the Skate Cane
-
Condition the Clay:
Start by kneading both the black and white polymer clay separately until they are soft, pliable, and free of cracks. -
Roll Logs:
Roll out a thick log of black clay and a matching log of white clay. Aim for them to be roughly square in cross-section if possible, or mold them into blocks about 1cm thick. -
Cut Strips:
Using your clay blade, cut four identical long strips from the black block and four from the white block. Use a ruler to ensure they are the same width and height. -
Stack the Checkerboard:
Create the first layer by placing a black strip next to a white strip. For the second layer, place a white strip on top of the black one, and a black strip on top of the white one. -
Build the Block:
Continue this alternating pattern until you have a 4×4 or 3×3 block (depending on how large you want the check pattern). Press the stack firmly together to remove air gaps. -
Reduce to Size:
Gently squeeze and roll the square cane to reduce its size. Elongate it until the cross-section is the diameter you want for your beads, likely around 8-10mm. -
Shape into Cylinder:
Once reduced, gently roll the square cane on your work surface to round off the corners, transforming the square profile into a cylinder while keeping the internal checker pattern intact.
Clean Lines Tip
Chill your clay cane in the fridge for 15 minutes before slicing. Firm clay cuts cleaner and prevents the black and white checks from smearing together.
Step 2: Forming Beads and Assembly
-
Slice the Beads:
Cut the long cylinder cane into individual bead segments. A length of about 10-12mm works well for these tubular beads. -
Create Spacers:
Roll small balls of leftover black clay to create the round spacer beads. These should be roughly half the diameter of your main checkerboard beads. -
Pierce the Holes:
Carefully twist a toothpick or bead pin through the center of each checkerboard bead and black spacer bead. Rotating the bead while pushing prevents the shape from flattening. -
Bake:
Arrange your beads on a baking tray or tile. Bake according to your polymer clay package instructions (usually 275°F/135°C for 15-30 minutes). -
Cool Down:
Let the beads cool completely before handling. I usually leave them inside the oven with the door open to cool gradually. -
Measure Elastic:
Cut a piece of elastic cord about 10 inches long. Pre-stretch it by pulling it firmly a few times to prevent sagging later. -
String the Pattern:
Thread the beads onto the elastic, alternating one checkerboard tube with one black round spacer. Continue until the bracelet fits comfortably around the wrist. -
Check the Fit:
Wrap the strand around your wrist to verify sizing. Add or remove a bead set if necessary. -
Tie the Knot:
Tie a strong surgeon’s knot (right over left, left over right). Pull tight to secure the beads together. -
Secure and Hide:
Add a tiny drop of super glue to the knot for extra security. Once dry, snip the excess cord and tuck the knot inside one of the larger checkerboard beads.
Smudged Colors?
If black clay smears onto white during handling, lightly wipe the white areas with a Q-tip dipped in rubbing alcohol or acetone before baking.
Now you have a durable, custom accessory ready for the skate park or school
Camo-Inspired Green and Brown Mix
Embrace the outdoors with this rugged, camo-inspired bracelet featuring matte polymer clay beads in earthy greens and warm browns. The adjustable sliding knot closure adds a practical touch, making it perfect for growing boys or casual everyday wear.
Step-by-Step Guide
Materials
- 10mm polymer clay beads (olive green)
- 10mm polymer clay beads (forest green)
- 10mm polymer clay beads (terracotta/rust brown)
- 10mm polymer clay beads (tan/beige)
- 10mm patterned round beads (green marble or speckled stone effect)
- 1mm or 1.5mm brown waxed cotton cord
- Scissors
- Craft glue or clear nail polish
- Tape or a clipboard
Step 1: Preparation
-
Measure the cord:
Cut a piece of waxed cotton cord approximately 18 to 20 inches long. You want plenty of excess length to work with the adjustable knots later. -
Stiffen the ends:
If your cord ends are fraying, dip them briefly in a tiny bit of glue or clear nail polish and roll them between your fingers to create a needle-like point. -
Secure the base:
Tape one end of your cord to a table or clamp it into a clipboard. This tension makes threading significantly easier.
Knot Security Tip
When trimming the sliding knot cord, leaving 1mm and melting it carefully with a lighter (if using synthetic cord) creates a permanent seal.
Step 2: Beading the Pattern
-
Start the sequence:
Begin threading your beads. Start with a solid forest green bead followed by a lighter tan or beige bead to establish contrast early. -
Introduce texture:
Add one of your patterned green stone-effect beads next. This breaks up the solid matte colors. -
Continue the pattern:
Follow with a terracotta brown bead, then an olive green bead. The goal is a random but balanced look, so don’t be afraid to mix the order slightly. -
Repeat the sequence:
Continue adding beads until you have about 6 to 7 inches of beaded length, or enough to fit the intended wrist comfortably. -
Check the symmetry:
While a random look is good, ensure your darker greens and lighter browns are evenly distributed so one side isn’t heavier in color than the other. -
Center the beads:
Once all beads are strung, remove the tape and slide the entire group of beads to the exact center of your cord.
Add Personalized Flair
Replace one of the center beads with a flat letter bead for an initial, or swap the stopper beads for metallic spacers for a modern twist.
Step 3: Creating the Adjustable Closure
-
Form a circle:
Bring the two loose ends of the cord together, overlapping them so they lay parallel to each other above the beads. -
Cut a knotting cord:
Cut a separate, shorter piece of the brown waxed cord, about 8 inches long. This will be used to make the sliding square knots. -
Position the knotting cord:
Place this new short cord underneath the two overlapping main cords. -
Start the square knot:
Take the right end of the short cord, pass it over the main cords and under the left short cord end. -
Complete the first half-knot:
Take the left end of the short cord, pass it under the main cords and up through the loop formed on the right. Pull tight. -
Finish the square knot:
Repeat the process starting with the left side this time to complete a full square knot. I advise pulling quite firmly here to ensure the mechanism grips well. -
Build the slider:
Continue tying square knots until you have a closure section about half an inch long (roughly 5-6 full knots). -
Trim the slider ends:
Trim the excess tails of the *knotting* cord very close to the knots. Secure these tiny cut ends with a dab of glue so they don’t unravel.
Step 4: Finishing Touches
-
Add stopper beads:
On each of the two main cord tails hanging from the slider, thread one small brown wooden or clay bead. -
Knot the ends:
Tie a simple overhand knot at the very end of each cord tail so the stopper bead can’t fall off. -
Final trim:
Trim any excess cord past the endpoint knots for a clean, professional finish.
Now you have a durable, rugged bracelet ready for any adventure
Matte “Stone” Speckle Bead Look
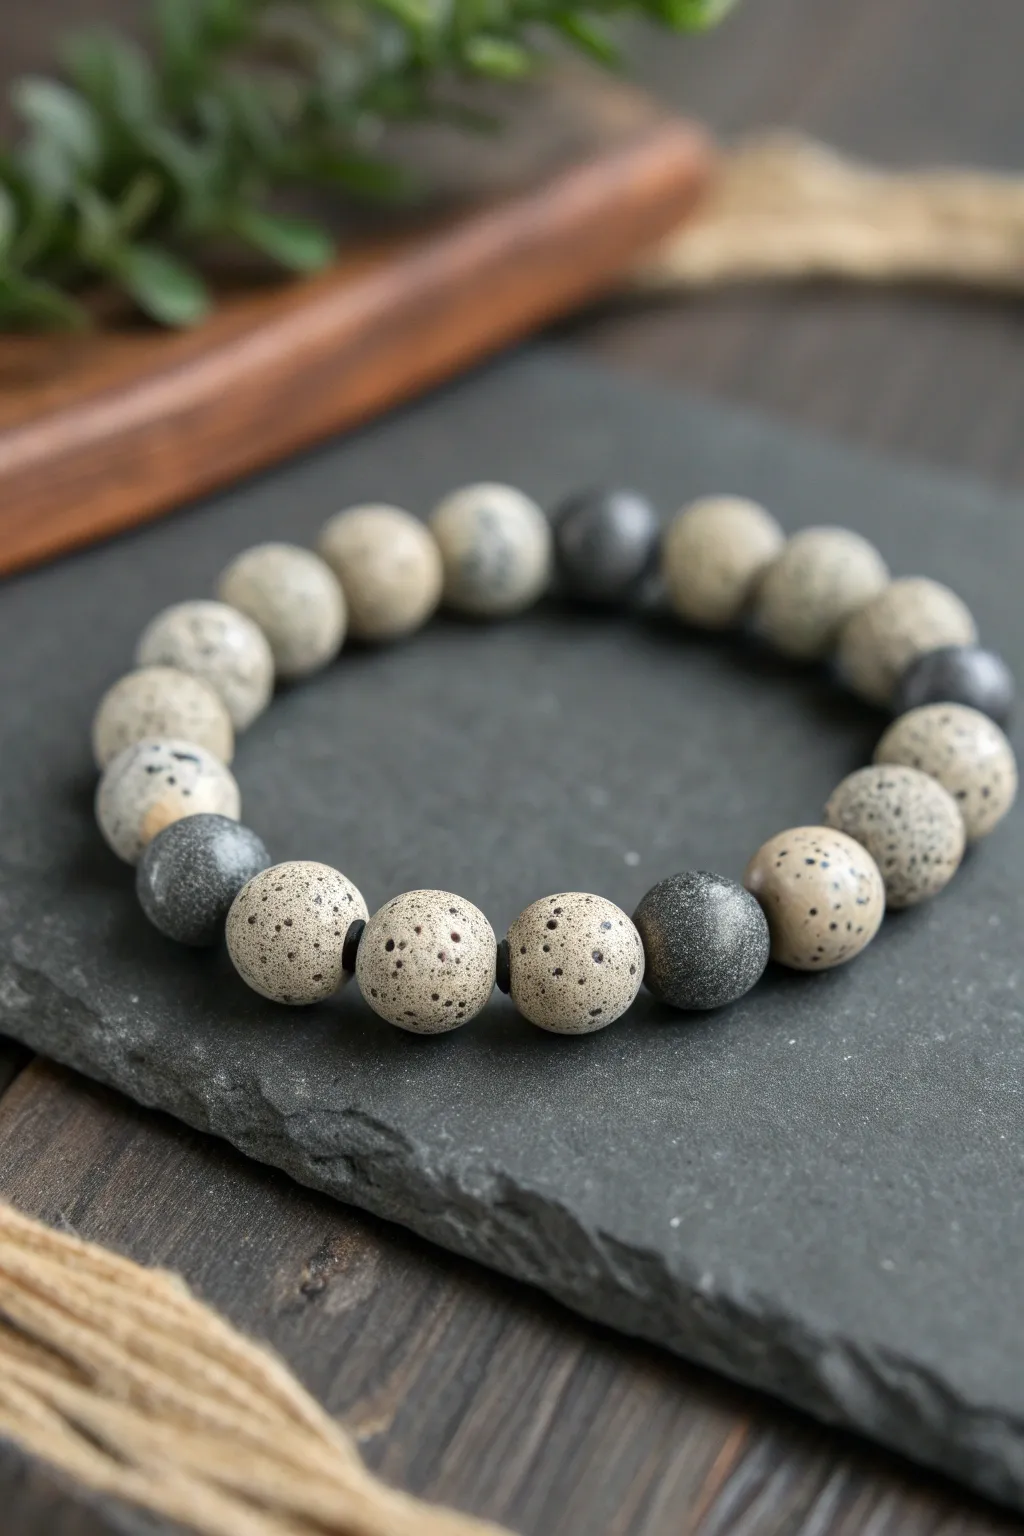
Recreate the natural, rugged look of river stones using polymer clay and a simple speckling technique. This bracelet features a handsome mix of sandy beige and charcoal beads with a matte finish that mimics real rock perfectly.
How-To Guide
Materials
- Polymer clay (beige/ecru and black/charcoal)
- Black acrylic paint
- Coarse ground black pepper or dried coffee grounds (optional for texture)
- Old toothbrush or stiff bristle brush
- Bead piercing pins or toothpicks
- Clear elastic bead cord (0.8mm or 1mm)
- Super glue or jewelry adhesive
- Baking sheet with parchment paper
- Wet/dry sandpaper (400 and 800 grit)
- Matte varnish (optional)
Step 1: Creating the Clay Stone Mix
-
Condition the base colors:
Start by thoroughly conditioning your beige and charcoal polymer clays separately until they are soft and pliable. You want the clay warm enough so it doesn’t crack when rolled. -
Add texture to beige clay:
For the sandy beads, flatten your beige clay into a pancake. Sprinkle a very small amount of coarse black pepper or dried coffee grounds onto the clay. Fold the clay over and knead it until the speckles are distributed evenly throughout the mass. -
Create the grey variant:
Take a small portion of your black clay and mix it into a portion of the beige clay. Stop mixing before it’s fully uniform if you want a marbled look, or blend completely for a solid dark grey base. -
Form the beads:
Roll the clay into a long snake of even thickness. Slice the snake into equal segments to ensure your beads will be the same size. -
Roll into spheres:
Roll each segment between your palms to create perfectly round spheres. Aim for a size of about 8mm to 10mm for a standard bracelet look.
Splatter Control
Test your toothbrush flicking technique on a piece of paper first. If the blobs are too big, move the brush further away or remove excess paint.
Step 2: Speckling and Piercing
-
Prepare the splatter paint:
Dilute a small amount of black acrylic paint with water until it is the consistency of ink or thin milk. -
Apply the speckles:
Dip an old toothbrush into the thinned paint. Hold it over your unbaked beige beads and run your thumb across the bristles to flick tiny droplets of paint onto the clay surface. -
Let the paint dry:
Allow the paint speckles to dry completely on the raw clay. This usually takes about 10-15 minutes since the layer is so thin. -
Texturize the dark beads:
For the dark charcoal beads, gently roll them over a piece of coarse sandpaper or a textured sponge to give them a porous, volcanic rock appearance. -
Pierce the holes:
Once dry, gently pierce the center of each bead with a bead pin or toothpick. I find twisting the pin while pushing helps prevent the bead from squishing out of shape.
Step 3: Baking and Finishing
-
Bake the beads:
Arrange the beads on a parchment-lined baking sheet or a bead rack. Bake according to your polymer clay manufacturer’s instructions (usually 275°F/135°C for 30 minutes). -
Cool down:
Let the beads cool completely before handling them. They are fragile when hot. -
Sand for matte effect:
Under running water, lightly sand the beads with 400 grit and then 800 grit sandpaper. This removes fingerprints and creates that realistic, soft matte stone texture. -
Apply varnish (optional):
If you want to protect the paint speckles further, apply a very thin coat of ultra-matte varnish. Avoid glossy finishes as they will ruin the natural stone look.
Fossil Find
Press a small sea shell or the head of a screw into a few wet clay beads to create ‘fossil’ impressions before baking for extra detail.
Step 4: Assembly
-
Measure the cord:
Cut a piece of elastic cord about 10 inches long. Pre-stretch the elastic by pulling it firmly a few times; this prevents the bracelet from stretching out later. -
String the pattern:
Thread your beads onto the elastic. Looking at the reference, try an alternating pattern: three or four speckled beige beads followed by one dark charcoal bead. -
Tie the knot:
Tie the ends together using a surgeon’s knot (a square knot with an extra loop through). Pull it tight. -
Secure and hide:
Add a tiny drop of super glue to the knot. Once dry, trim the excess cord and gently tug the knot inside one of the beads to hide it.
Now you have a rugged, earth-toned bracelet that pairs perfectly with casual wear
Thin Neon Stripe on Dark Base
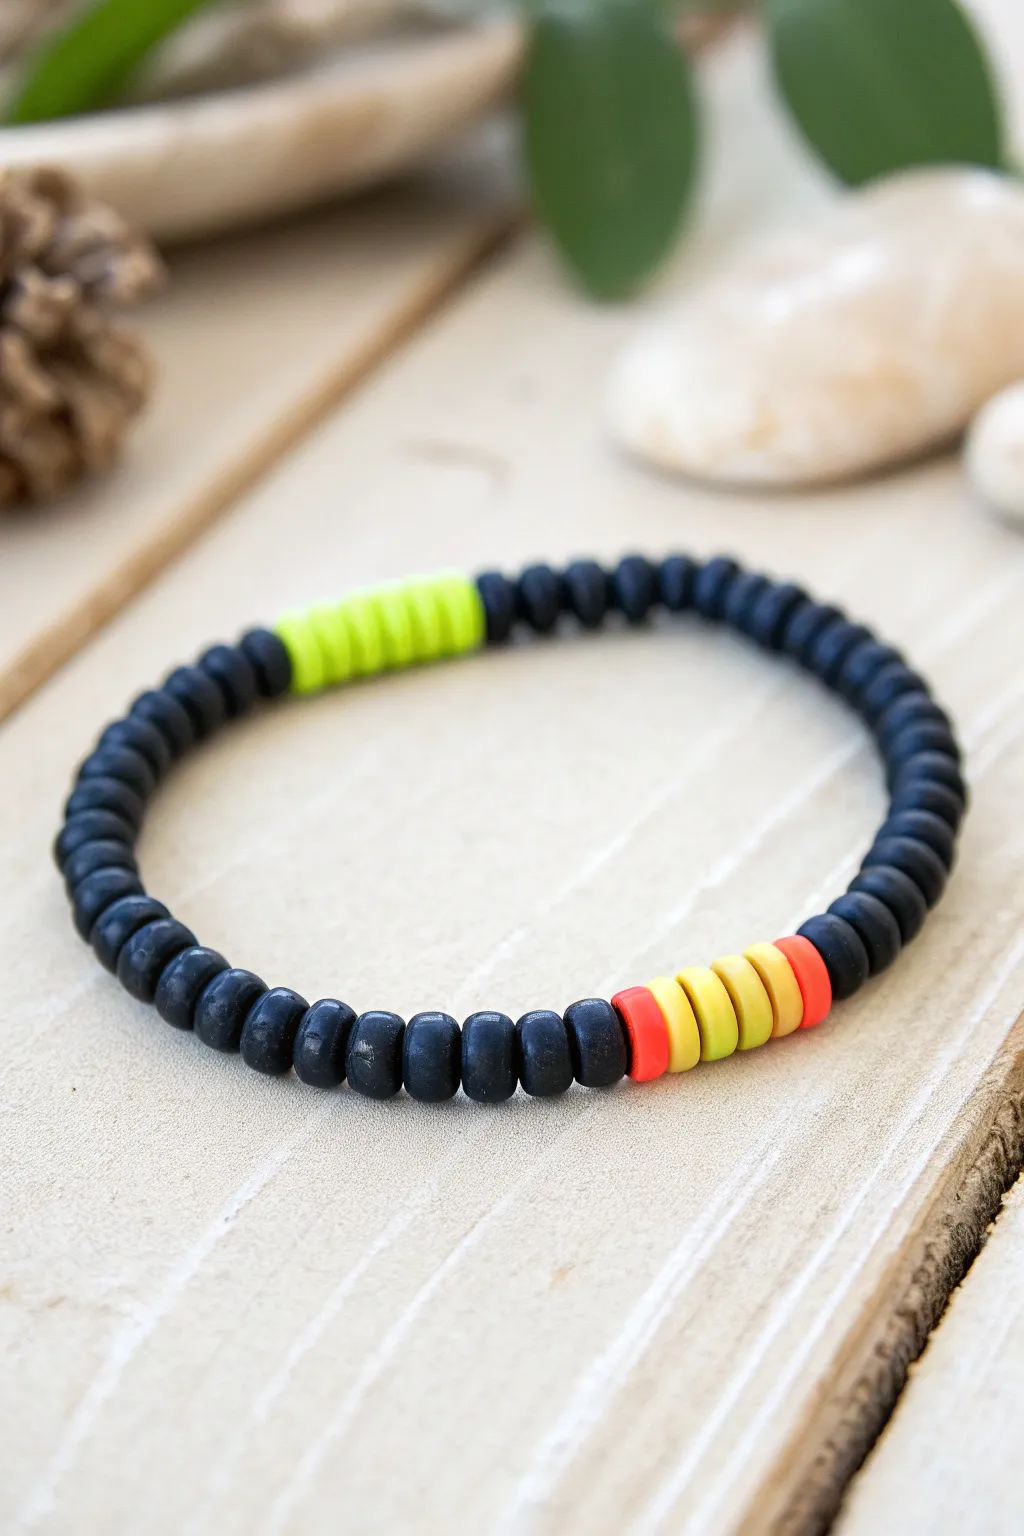
This sleek bracelet design balances a cool, minimalist vibe with just enough electric energy to stand out. By using a matte black base, the small bursts of neon polymer clay beads pop incredibly well, making it a perfect understated accessory.
Step-by-Step Tutorial
Materials
- Matte black polymer clay disc beads (6mm or similar)
- Neon lime green polymer clay disc beads
- Bright yellow polymer clay disc beads
- Neon orange/coral polymer clay disc beads
- Elastic cord (0.8mm clear stretch cord recommended)
- Small dab of clear jewelry glue or strong superglue
- Scissors
Step 1: Planning and Measuring
-
Measure your wrist:
Wrap a flexible measuring tape around your wrist to find the circumference. Add about half an inch to this measurement to ensure the bracelet isn’t too tight. -
Cut the cord:
Cut a piece of elastic cord roughly 10 inches long. This extra length makes tying the final knots much easier than struggling with short ends. -
Secure the end:
Attach a piece of tape to one end of your cord or knot it loosely around a bead stopper to prevent your hard work from sliding off while you drape.
Color Pop Pro-Tip
For maximum impact, check your clay beads under UV light. Many neon polymer clays are blacklight reactive, making this design glow at parties.
Step 2: Creating the Pattern
-
Start the dark base:
Begin stringing your matte black clay beads. Thread on about one-third of your total required length in black beads. -
Add the first neon block:
Now, create the solid neon accent. Thread on approximately 8 to 10 neon lime green beads in a row. This creates a solid block of color against the dark background. -
Resume the dark base:
Continue stringing the black beads for the next section. This should be the longest black section, covering roughly half of the bracelet’s circumference. -
Create the sunset stripe:
For the second accent, we’ll create a small gradient. Thread one neon orange bead, followed by one yellow bead, then another yellow bead to center it, one more yellow, and finally one orange bead. -
Finish the strand:
Fill the remaining space on your cord with black beads until you reach your target bracelet length.
Knot Slipping?
If your elastic knot won’t stay tight, try a Surgeon’s Knot instead of a square knot. Loop the cord through twice on the first pass for extra friction.
Step 3: Finishing Touches
-
Check the fit:
Wrap the unfinished strand around your wrist to verify the size. The ends should meet comfortably without stretching the cord. -
Pre-stretch the cord:
Gently pull on both ends of the elastic cord a few times. I find this simple step prevents the bracelet from loosening up permanently the first time you wear it. -
Tie the knot:
Remove your tape or bead stopper and tie a square knot (right over left, left over right). Pull it tight. -
Secure with glue:
For extra durability, apply a tiny drop of jewelry glue directly onto the knot. Let it dry completely before moving it. -
Hide the knot:
Trim the excess cord ends close to the knot, then gently slide a bead over the knot to conceal it inside the hole.
Now you have a sharp, modern accessory that looks professionally made and perfectly personalized
Two-Row Sporty Double Strand
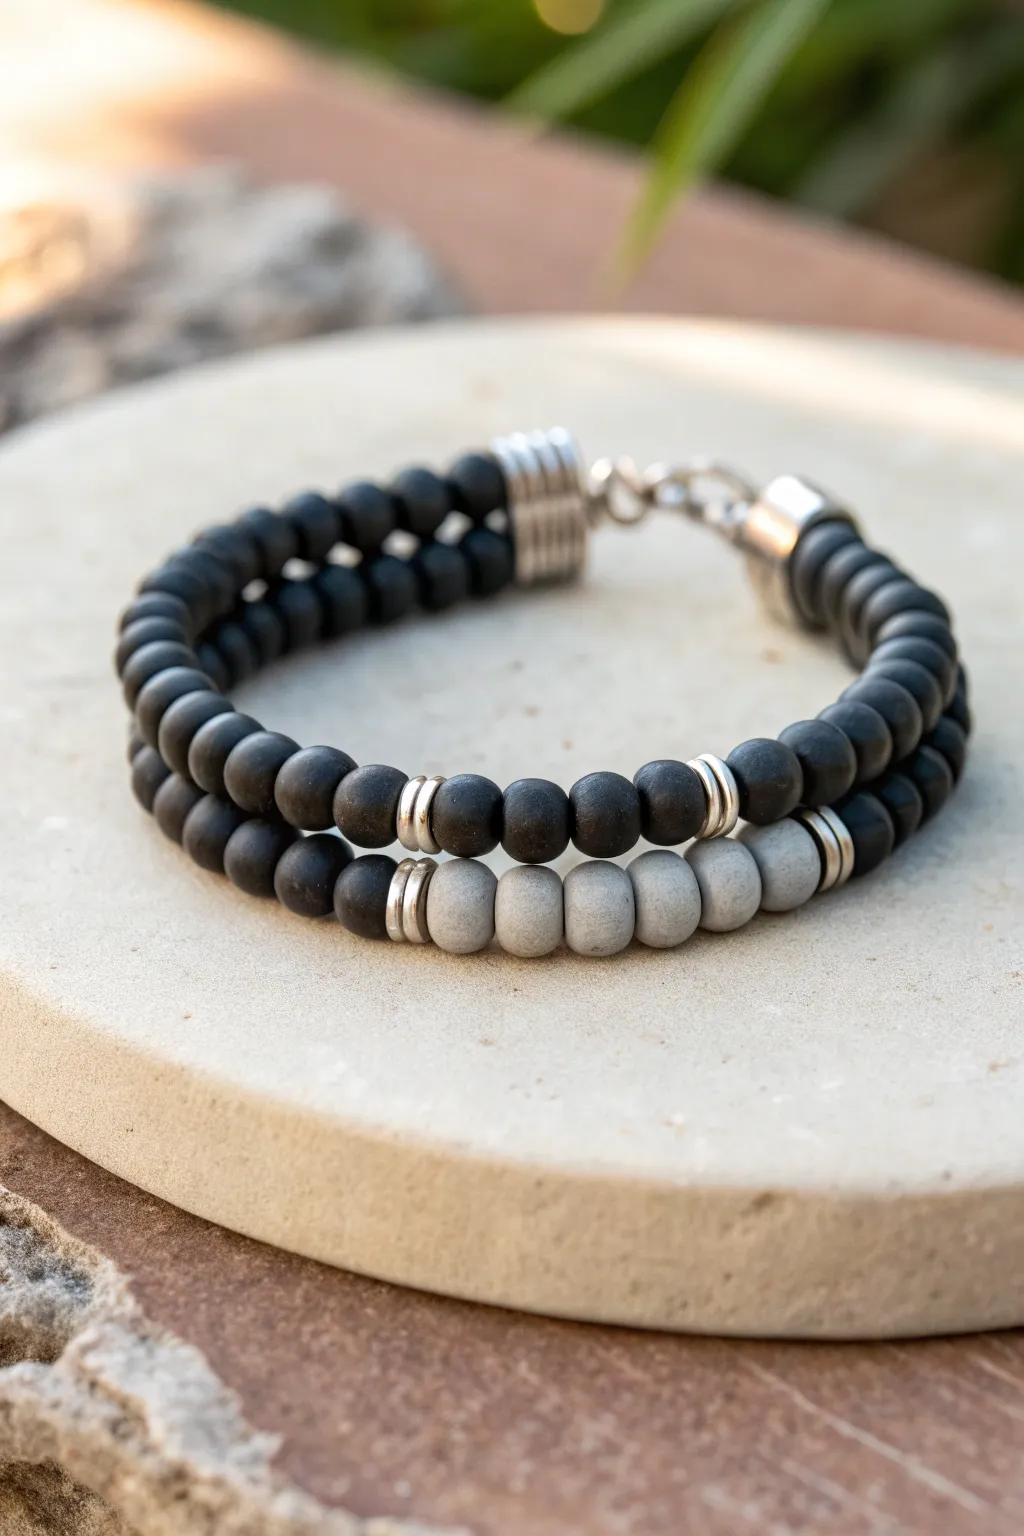
This rugged, masculine design features two strands of matte beads held together with sleek silver accents. Ideally suited for everyday wear, the combination of jet black and slate grey beads creates a sporty, versatile accessory.
How-To Guide
Materials
- 6mm matte black onyx or agate beads (approx. 40-50 beads)
- 6mm matte grey map stone or jasper beads (5 beads)
- Silver spacer rings or heishi beads (4 pieces)
- Double-strand connector clasp (silver finish)
- Strong beading wire (e.g., 49-strand nylon coated)
- 4 crimp tubes (2mm, sterling silver or silver-plated)
- 4 wire guardians (silver)
- Crimping pliers
- Wire cutters
Step 1: Preparing the Strands
-
Measure and Cut Wire:
Cut two lengths of beading wire, each about 10-12 inches long. Having extra length makes it much easier to finish the ends securely without fumbling. -
Attach First Ends:
Take one piece of wire and feed on a crimp tube followed by a wire guardian. Thread the wire through the loop of one side of your clasp, then back through the guardian and the crimp tube. -
Secure the First Crimp:
Slide the crimp tube snugly against the guardian, ensuring the wires aren’t crossed inside the tube. Use your crimping pliers to flatten the tube securely, then trim the short excess tail of wire. -
Repeat for Second Strand:
Repeat the previous attachment process with the second piece of wire on the *same* side of the connector clasp, so you have two long wires trailing from one clasp half.
Uneven Lengths?
If one strand looks looser than the other when worn, un-crimp the looser side immediately. It’s vital to check tension while holding the bracelet in a curved ‘worn’ shape.
Step 2: Beading the Top Strand
-
Start the Black Pattern:
On the top wire, begin threading your matte black beads. You will need enough to cover the majority of the wrist circumference. -
Insert Center Detail:
Once you reach the center point of the strand, slide on one silver spacer ring, followed by four black beads, and then a second silver spacer ring. -
Finish Top Beading:
Continue threading matte black beads until this strand reaches your desired length. Check the fit against your wrist, remembering the clasp adds length.
Step 3: Beading the Bottom Strand
-
Mirror the Start:
On the second (bottom) wire, string on the same number of black beads as you did for the first section of the top strand. -
Create the Grey Feature:
Now for the contrast: slide on a silver spacer ring, followed simply by five matte grey beads to create that sporty block of color. -
Close the Grey Section:
Add your fourth silver spacer ring immediately after the grey beads to frame this section perfectly. -
Complete the Bottom Strand:
Finish stringing the rest of the black beads onto the bottom wire. Ensure both strands are exactly the same length visually before proceeding.
Matte Bead Care
Matte natural stones can absorb oils from skin over time, turning slightly shiny. Wipe them occasionally with a damp cloth and mild soap to maintain that dry, rugged look.
Step 4: Final Assembly
-
Prepare End Crimps:
Slide a crimp tube onto the end of the top wire, followed by a wire guardian. -
Connect to Clasp:
Loop the wire guardian through the corresponding loop on the other half of your clasp. Feed the wire back through the crimp tube. -
Tighten and Secure:
Pull the wire taut so there are no gaps between beads, but leave just enough wiggle room so the bracelet stays flexible. Crimp the tube securely. -
Finish Second Strand:
Repeat the crimping process for the bottom strand, attaching it to the remaining loop on the clasp. -
Trim Excess:
I usually thread the excess wire tail back through the first 2-3 beads for extra security before trimming it flush with flush cutters.
Now you have a durable, custom-fitted accessory ready for effortless daily style
Mixed Disc and Tube Beads for Texture

This earthy, masculine-style bracelet combines simple wooden discs with textured clay or stone accents for a rugged look. The sliding knot closure makes it adjustable and easy to wear, perfect for stacking or wearing solo.
Step-by-Step Tutorial
Materials
- 1mm dark brown waxed cotton cord or leather cord
- Light natural wooden heishi beads/disc beads (approx. 8-10mm)
- Round wooden beads (8mm, natural finish)
- Textured round beads (8mm, grey granite or speckled clay look)
- Rondelle wood spacers (darker brown)
- Scissors
- Tape or clipboard (to hold work in place)
- Super glue (optional for knot security)
Step 1: Preparation & Bead Selection
-
Cut the Cord:
Cut a piece of your dark brown cord to approximately 20 inches in length. This generous length gives you plenty of room to work with the sliding knots later. -
Sort Your Beads:
Lay out your beads on a soft surface or bead mat. You’ll need a mix of the flat disc beads (the main body), round wooden beads, and the speckled grey accent beads. -
Plan the Pattern:
Before stringing, decide on your sequence. The design shown features a long central section of stacked disc beads, flanked by symmetrical patterns of round and textured beads on either side.
Sticky Situation
If the sliding knot is too stiff to move, gently roll it between your fingers to soften the wax on the cord. If it’s too loose, re-tie it with one extra wrap.
Step 2: Stringing the Design
-
Anchor the Cord:
Tape one end of your cord to a table or clip it into a clipboard. This prevents beads from sliding off while you work. -
Start with Symmetry:
Begin stringing from one side. Thread on a single round wooden bead, followed by a speckled grey bead, and then another wooden round bead. -
Add Transition Beads:
Add a darker wood rondelle or a slightly different toned bead to create a visual break before the main section. -
Create the Center Section:
Thread on the light wooden disc beads. For this look, stack about 15-20 of them together. They should sit flush against each other to create a solid, tube-like texture. -
Mirror the Pattern:
Once the center stack is done, reverse your initial pattern. Add the transition bead, then the round wood bead, the speckled grey bead, and finish with the final round wood bead. -
Check the Length:
Wrap the beaded section around your wrist. The beads should cover the top and sides of your wrist, leaving a gap of clear cord at the bottom for the closure.
Make it Yours
Swap the central wooden discs for coconut shell slices or bone beads to change the color palette while keeping the organic texture.
Step 3: Creating the Adjustable Closure
-
Form a Loop:
Bring both cord ends together so they overlap parallel to each other. The bracelet should form a circle. -
Prepare the Sliding Knot:
You can either use a separate piece of cord to tie a square knot macrame closure over the overlapped cords, or create a sliding barrel knot mechanism. -
Tie the Slide Knot:
For the style shown, wrap a separate short piece of cord (about 6 inches) around the two main cords. Wrap it tightly 3-4 times to create a coil. -
Secure the Coil:
Thread the ends of that wrapping cord back underneath the coil you just made and pull tight. This creates the ‘barrel’ that slides back and forth. -
Trim the Closure:
Trim the excess tails of the knotting cord close to the coil. I like to add a tiny dab of super glue here to ensure it doesn’t unravel, but be careful not to glue the main cords.
Step 4: Finishing Touches
-
Knot the Ends:
On the main cord tails, tie a simple overhand knot at the very end of each side to prevent the cord from slipping out of the sliding mechanism. -
Add End Beads (Optional):
If you have small leftover beads with large holes, you can thread one onto each tail before tying the final knot for a decorative touch. -
Final Adjustments:
Trim any remaining excess cord from the very ends. Slide the knot back and forth a few times to loosen it up slightly for smoother operation.
Now slip on your custom-made bracelet and enjoy the rugged, natural style you’ve created
Glow Accent Beads for Night Games
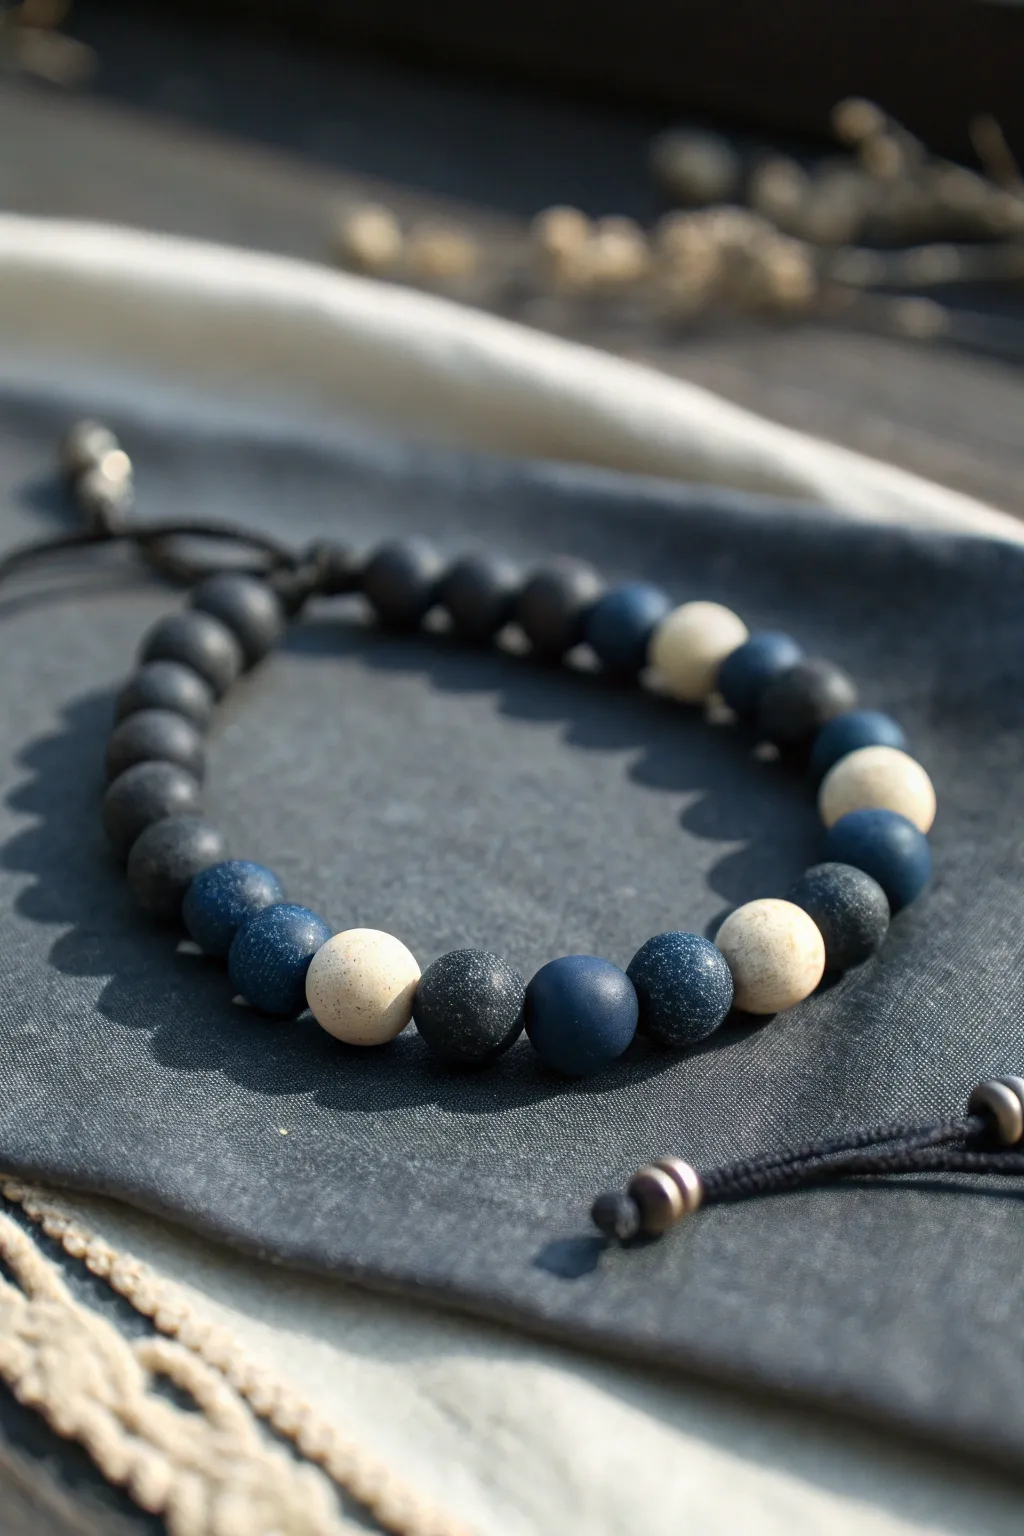
Perfect for evening adventures, this bracelet combines rugged matte black clay beads with cream accents and deep blue glitter beads that catch the moonlight. The adjustable macramé closure ensures it stays secure during active games while adding a professional finish to the design.
How-To Guide
Materials
- Matte black polymer clay beads (8mm or 10mm)
- Deep blue glitter or ‘galaxy’ polymer clay beads (same size)
- Cream or beige speckled polymer clay beads (same size)
- Black nylon cord or waxed cotton cord (1mm diameter)
- Scissors
- Lighter or clear craft glue (for sealing knots)
- Tape or a clipboard (to hold the cord while working)
- Two smaller metallic accent beads (for the pull strings)
Step 1: Planning the Pattern
-
Measure your cord:
Cut a piece of nylon cord approximately 12-14 inches long. This will be your base strand where the beads sit. Cut a second piece about 10 inches long and set it aside for the sliding knot closure later. -
Secure the base:
Tape one end of your longer cord to a table or secure it in a clipboard. Leave about 4 inches of tail at the top before the tape so you have room to finish the bracelet later. -
Lay out the design:
Before threading, arrange your beads on a flat surface to visualize the pattern shown in the image. You’ll want a repeating sequence. -
Establish the sequence:
The specific pattern mimics a night sky: Use a block of 3-5 matte black beads, followed by a ‘star’ sequence. The star sequence is one blue glitter bead, one beige bead, one blue glitter bead, and another beige bead. -
Check the symmetry:
Notice the image has a symmetrical feel. Try to place the lightest beige beads equal distances apart to balance the darker tones.
Sticky Slider?
If the sliding knot is too tight to move, gently roll the knotted section between your fingers to loosen the fibers slightly without undoing the weave.
Step 2: Stringing the Beads
-
Start threading:
Begin threading your beads onto the secured cord. If the cord end is fraying, briefly singe it with a lighter or add a dab of super glue to stiffen it into a needle-like point. -
String the first black section:
Slide on about 5-6 matte black beads to start the side of the bracelet that sits near the wrist bone. -
Add the feature section:
Now transition to the color. Thread a blue glitter bead, then a cream bead. I find the contrast looks best if the cream bead has slight speckles rather than being pure white. -
Complete the center pattern:
Continue the pattern: add a black glittery bead, a plain blue bead, and a black glittery bead again, effectively breaking up the solid colors with subtle texture changes as seen in the photo. -
Mirror the design:
Finish the stringing by reversing your pattern back to the solid matte black beads on the other side until the beaded section is about 6-7 inches long (or fits the intended wrist).
Glow Up
Swap the cream beads for phosphorescent clay beads. They look ivory in daylight but will glow bright green or blue in the dark for night games.
Step 3: Creating the Adjustable Closure
-
Prepare for the knot:
Unhook your cord and bring the two tails of the bracelet together, crossing them over each other to form a circle. They should overlap by about 2-3 inches. -
Position the knotting cord:
Take your shorter 10-inch piece of cord strings and place it underneath the two crossed bracelet trails, centered right at the crossover point. -
Tie the first square knot:
Create a square macramé knot. Take the right end of the short cord, cross it over the bracelet tails. Take the left end, go over the right cord, under the bracelet tails, and up through the loop on the right. Pull tight. -
Continue knotting:
Repeat the square knot process, alternating starting sides (left, then right) to create a flat band of knots about half an inch long. This acts as the slider mechanism. -
Trim the slider:
Cut off the excess ends of the knotting cord (not the bracelet tails!) very close to the knots. Use a lighter to carefully melt the ends so they fuse to the knot, or use a drop of glue. -
Add decorative ends:
On the two remaining tails of the bracelet, slide on a small metallic or dark bead. Tie a simple overhand knot at the very end of the cord to keep this bead in place. -
Final adjustment:
Trim any excess cord past the final knots and give the slider a test pull to ensure it moves smoothly but stays firm.
Now you have a rugged, adjustable bracelet ready for nighttime hide-and-seek or just hanging out