A broken clay pot doesn’t have to be a heartbreak moment—honestly, it can be the start of your cutest project. I love turning cracked and shattered pots into upcycled garden decor that looks intentional, playful, and totally one-of-a-kind.
Classic Tiered Fairy Garden Planter
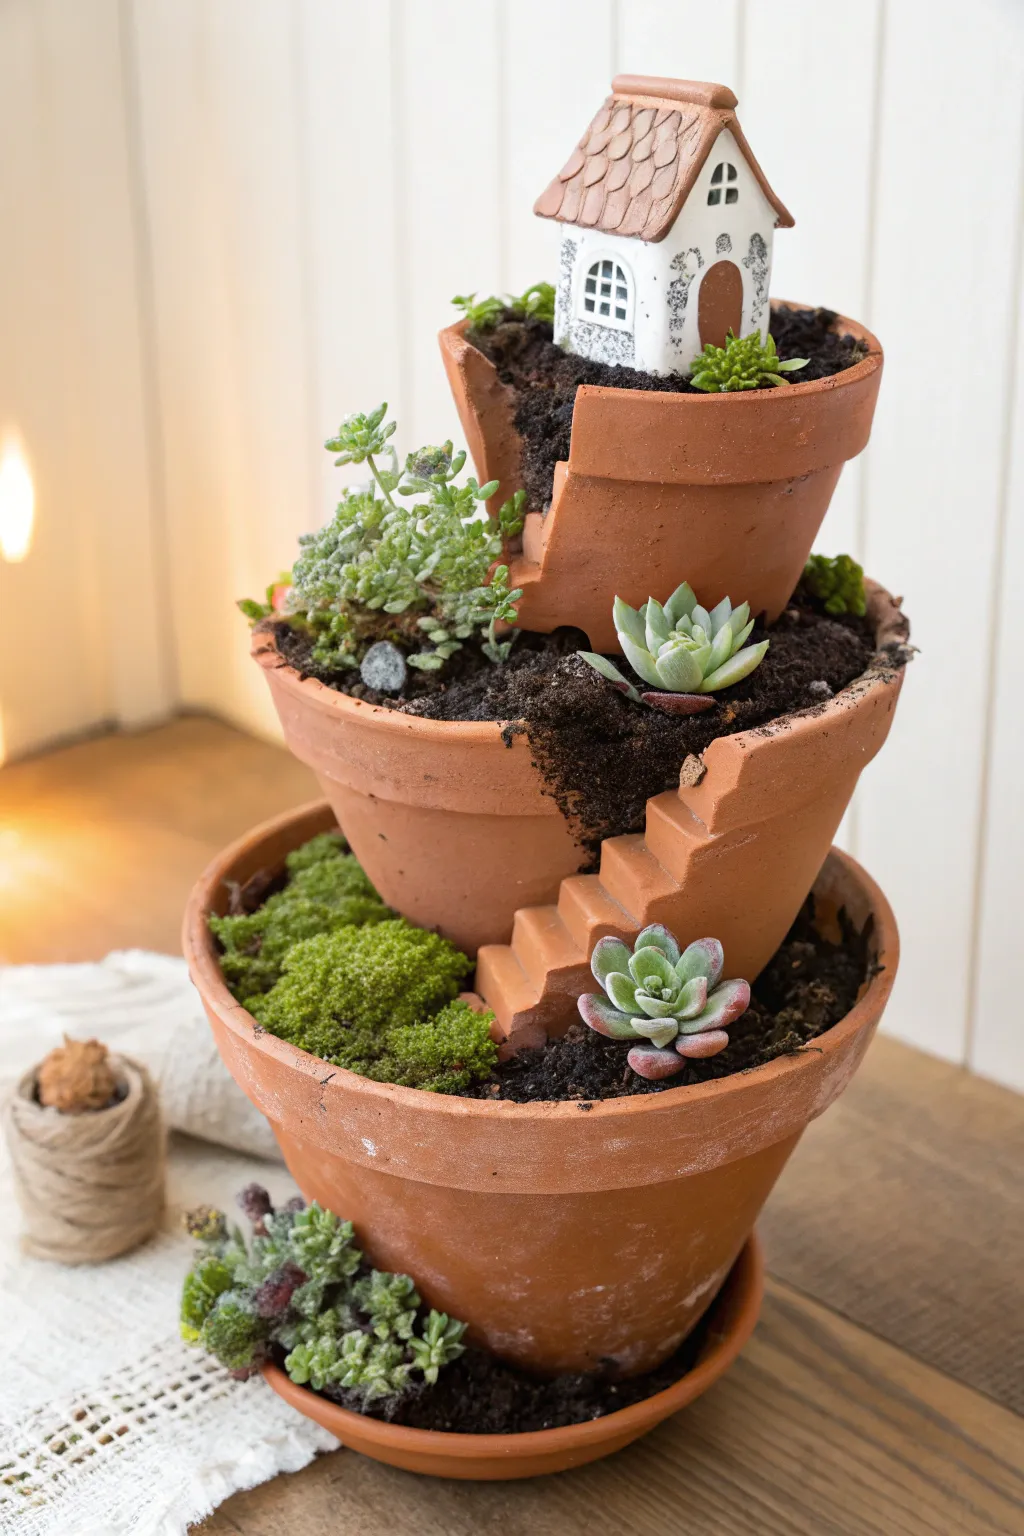
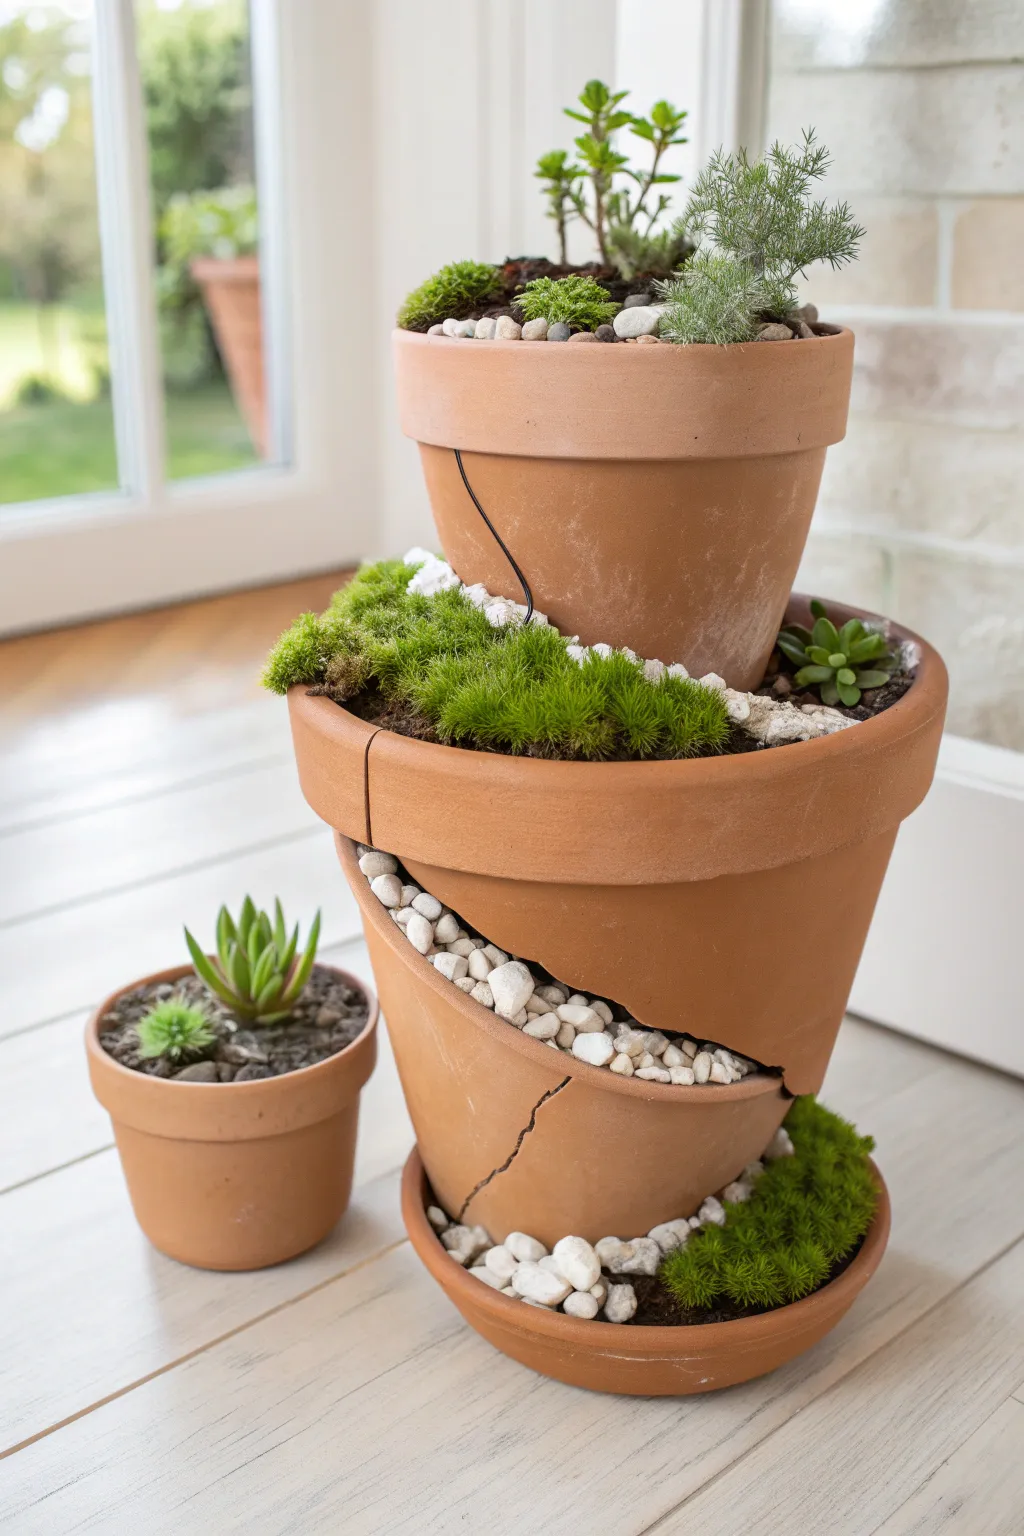
Transform accidental breakage into a magical miniature landscape with this classic tiered fairy garden. Featuring a charming ceramic cottage at the summit and winding succulent pathways, this project turns terracotta shards into a stunning vertical planter.
How-To Guide
Materials
- 1 large terracotta pot (approx 10-12 inch)
- 1 medium terracotta pot (approx 6-8 inch)
- 1 small terracotta pot (approx 4-5 inch)
- Hammer and safety glasses
- Potting soil (cactus/succulent mix preferred)
- Sheet moss or preserved moss
- Assorted small succulents (e.g., Echeveria, Sedum)
- Miniature ceramic house figurine
- Terracotta shards (saved from the breaking process)
- Small trowel or spoon
- Decorative stones or pebbles (optional)
Step 1: Preparing the Pots
-
Safety First:
Put on your safety glasses before beginning. You’ll be intentionally breaking pottery, and small shards can fly unexpectedly. -
Create the Breaks:
Take your hammer and gently tap the front rim of the medium and small pots to create an opening. You want a jagged, descending break that opens up the front of the pot while keeping the back intact to hold soil. -
Keep the Shards:
Don’t discard the broken pieces! Collect the curved shards, as we will use these to create the retaining walls and the winding staircase effect later on. -
Soak the Pots:
I like to soak the terracotta pots in water for about 10-15 minutes before planting. This prevents the dry clay from wicking all the moisture out of your new soil immediately.
Clean Breaks Tip
Score a line with a file or craft knife before hammering to guide the break. It helps get that perfect curved shape without shattering the whole pot.
Step 2: Building the Tiers
-
Fill the Base:
Fill the largest (bottom) pot about 3/4 full with your potting soil. Pack it down slightly so it’s firm enough to support the weight of the next pot. -
Position the Second Tier:
Nestle the medium-sized broken pot into the soil of the base pot. Angle it slightly backward so the opening faces front, creating a terraced look. -
Pack in Soil:
Add soil around the base of the medium pot to secure it tightly in place. Fill the medium pot itself with soil up to the broken rim. -
Add the Top Tier:
Place the smallest broken pot into the soil of the medium pot. Again, tilt it slightly back and offset it if desired to create a winding visual path. -
Final Soil Fill:
Fill the top pot with soil, mounding it slightly to give your ceramic cottage a nice high perch.
Step 3: Creating the Hardscape
-
Construct the Stairs:
Select small, relatively flat shards from your breakage pile. Press them into the soil of the middle tier, stacking them in an ascending pattern to look like a staircase leading from the bottom level up to the middle. -
Place the Cottage:
Set your miniature ceramic house firmly into the soil at the very top of the structure. Ensure it is level and visible. -
Add Side Shards:
If there are gaps where soil might spill out, insert vertical shards into the soil as retaining walls. This adds to the ‘ruined castle’ aesthetic.
Tiered Magic
Add battery-operated LED fairy lights around the cottage or under the plant leaves. It creates a glowing night scene that looks stunning indoors.
Step 4: Planting and Decorating
-
Plant the Base:
Tuck larger succulents or generous patches of moss into the exposed soil of the bottom pot. The green moss contrasts beautifully with the orange clay. -
Decorate the Middle:
Plant a small, rosette-shaped succulent like an Echeveria near the ‘staircase’ on the middle tier. It acts like a decorative shrub for your fairy garden. -
Top Tier Greening:
Add creeping sedum or tiny ground cover plants around the base of the ceramic cottage to make it look established and overgrown. -
Plant the Side Pockets:
Don’t forget the saucer at the very bottom! I prefer to tuck small overflow plants, like sedum cuttings, into the saucer edge to ground the whole arrangement. -
Final Water:
Use a spray bottle or a very small watering can to gently water the soil, being careful not to wash away your carefully placed dirt stairs. -
Clean Up:
Use a soft brush to sweep any loose soil off the leaves of the succulents and the roof of the cottage for a polished finish.
Enjoy your enchanting new centerpiece which brings a touch of storybook magic to any corner of your home


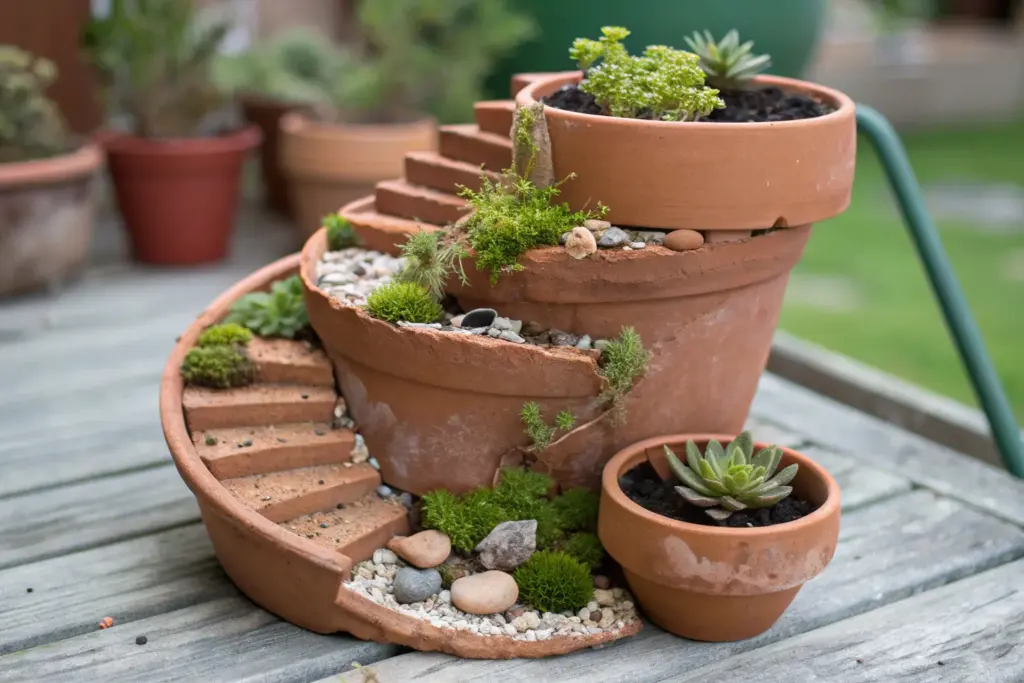
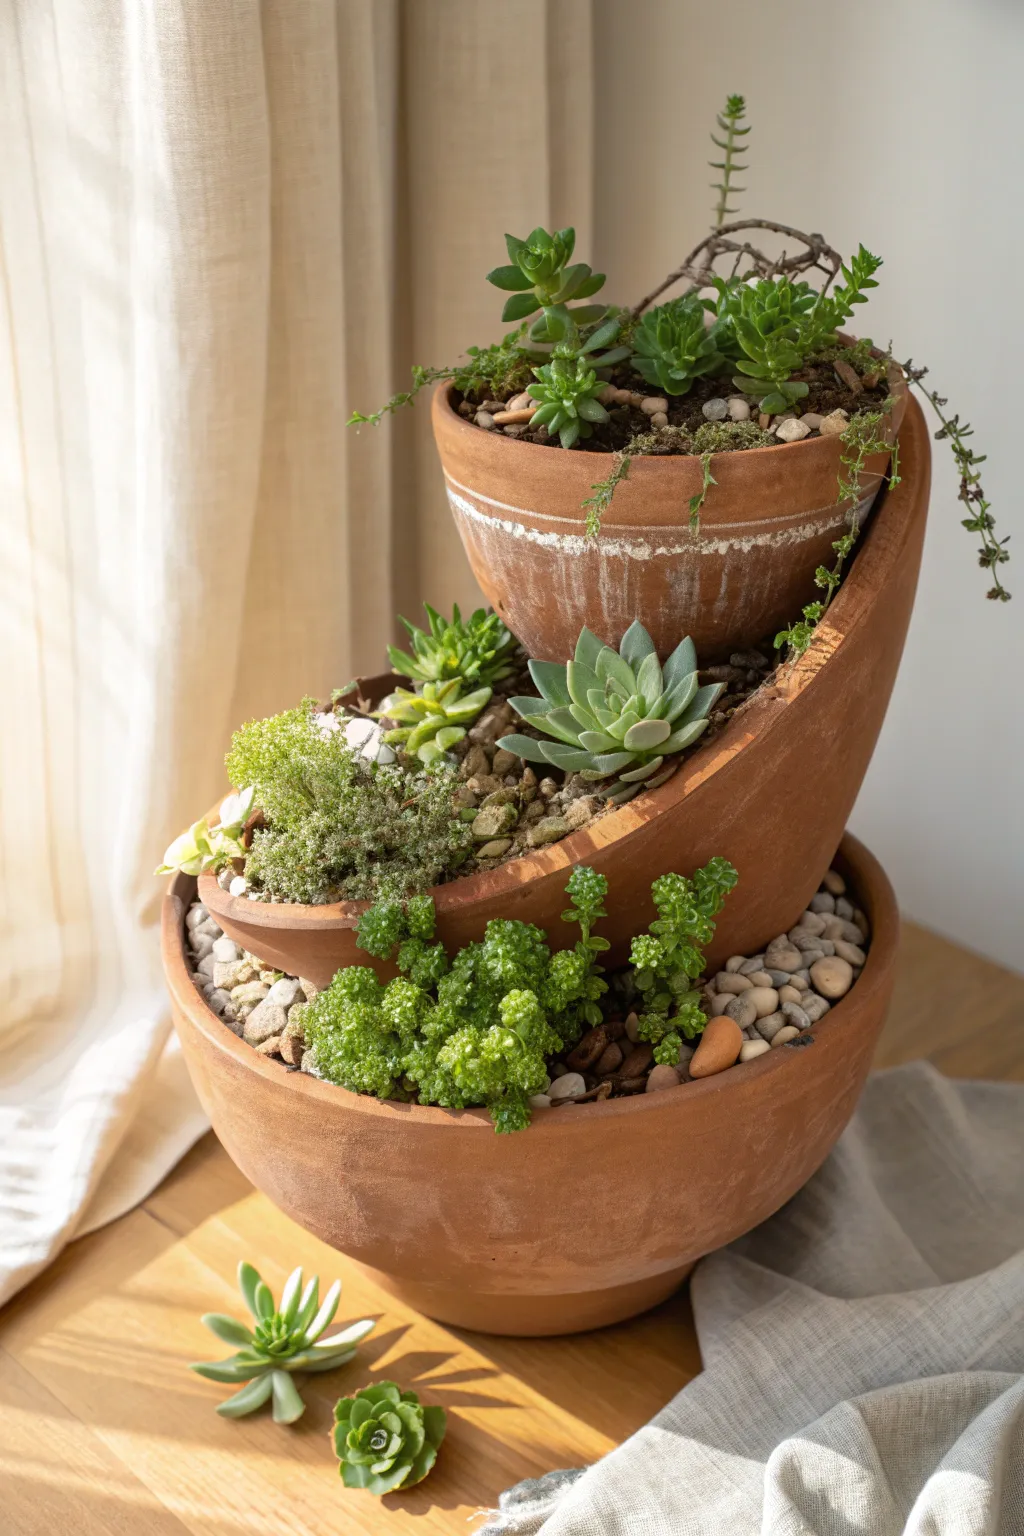
Spiral Staircase from Pot Shards
Transform a broken or purposely cut planter into a whimsical multi-level succulent garden. This project creates a stunning spiral staircase effect that leads the eye upward to a crowning centerpiece, turning simple clay shards into an architectural miniature landscape.
Detailed Instructions
Materials
- Large, shallow terracotta bowl (approx. 12-14 inches)
- Small standard terracotta pot (approx. 4 inches)
- Terracotta shards or a second medium pot to break
- Cactus/Succulent potting soil
- Fine white sand
- Small white decorative pebbles
- Assorted small succulents (Echeveria, Haworthia, Sedum)
- Hammer and safety glasses
- Strong adhesive (optional, for stabilizing stairs)
- Spoon or small trowel
Step 1: Preparing the Structure
-
Safety First:
Before breaking any pottery, put on your safety glasses. If you don’t have pre-broken shards, gently wrap a medium-sized terracotta pot in a towel and tap it firmly with a hammer to create large curved pieces. -
Establish the Base:
Fill the large shallow bowl about halfway with succulent soil. Pack it down slightly to create a firm foundation for your vertical elements. -
Position the Summit:
Place the small, whole terracotta pot at the highest point of your arrangement. It should sit near the back edge of the main bowl. Fill around its base with soil to secure it in place. -
Create the Retaining Wall:
Select a large, curved shard to act as the main retaining wall for the upper level. Orient it so it curves away from the center, creating a distinct separation between the ‘upper hill’ and the ‘lower valley’.
Loose Steps?
If stairs slide down the dirt slope, prop them up with varied lengths of wooden dowels hidden underneath the soil until roots grow in to hold the earth together.
Step 2: Building the Staircase
-
Sort Your Steps:
Look through your terracotta fragments and find small, roughly rectangular pieces of similar width to serve as stair treads. You may need to use tile nippers to shape them if your shards are too irregular. -
Cut the Risers:
For a clean look like the photo, you might want to use thicker square pieces or actually cut small terracotta blocks. Alternatively, you can pack soil firmly to act as the riser and place the shard flat on top. -
Install the First Step:
Start at the bottom of where your spiral will begin. Press the first shard firmly into the soil base. -
Climb the Slope:
Gradually build the staircase upwards, curving along the retaining wall shard you placed earlier. Each step should slightly overlap the one below it or sit on a mound of soil just behind the previous step. -
Secure the Steps:
If the steps feel wobbly, I prefer to use a dab of waterproof outdoor adhesive or silicone to bond the shards to the retaining wall or to each other for stability. -
Top the Steps:
Sprinkle a thin layer of light-colored grit or sand onto each stair tread to make them pop visually against the terracotta orange.
Step 3: Landscaping and Planting
-
Plant the Crown:
Fill the top small pot with soil and plant a striking, spiky succulent like a small Agave or Aloe to serve as the focal point. -
Fill the Upper Terrace:
Add soil behind your retaining wall and staircase to create a slope. Plant trailing sedums or rosette succulents in the pockets of soil along the slope. -
Create the Sands of Time:
In the lowest section of the bowl (the ‘valley’), carefully pour fine white sand. Use a spoon to smooth it out, creating a clean contrast with the dark soil areas. -
Pebble Defined Zones:
On the right side of the bowl, separate from the sand, add a layer of small white pebbles. This texture variation adds visual interest and defines a separate ‘garden bed’. -
Final Planting:
Nestle small Echeveria rosettes into the pebble area and along the border of the sand. Use a soft brush to sweep any stray soil off the leaves. -
Accessorize:
Place a few larger smooth river stones near the base of the stairs or in the sand area to anchor the scene naturally.
Pro Tip: Watering
Use a squeeze bottle or syringe to water the specific plants directly at their roots. This prevents the water from washing away your carefully arranged white sand path.
Enjoy your miniature architectural marvel as the plants grow and soften the edges over time


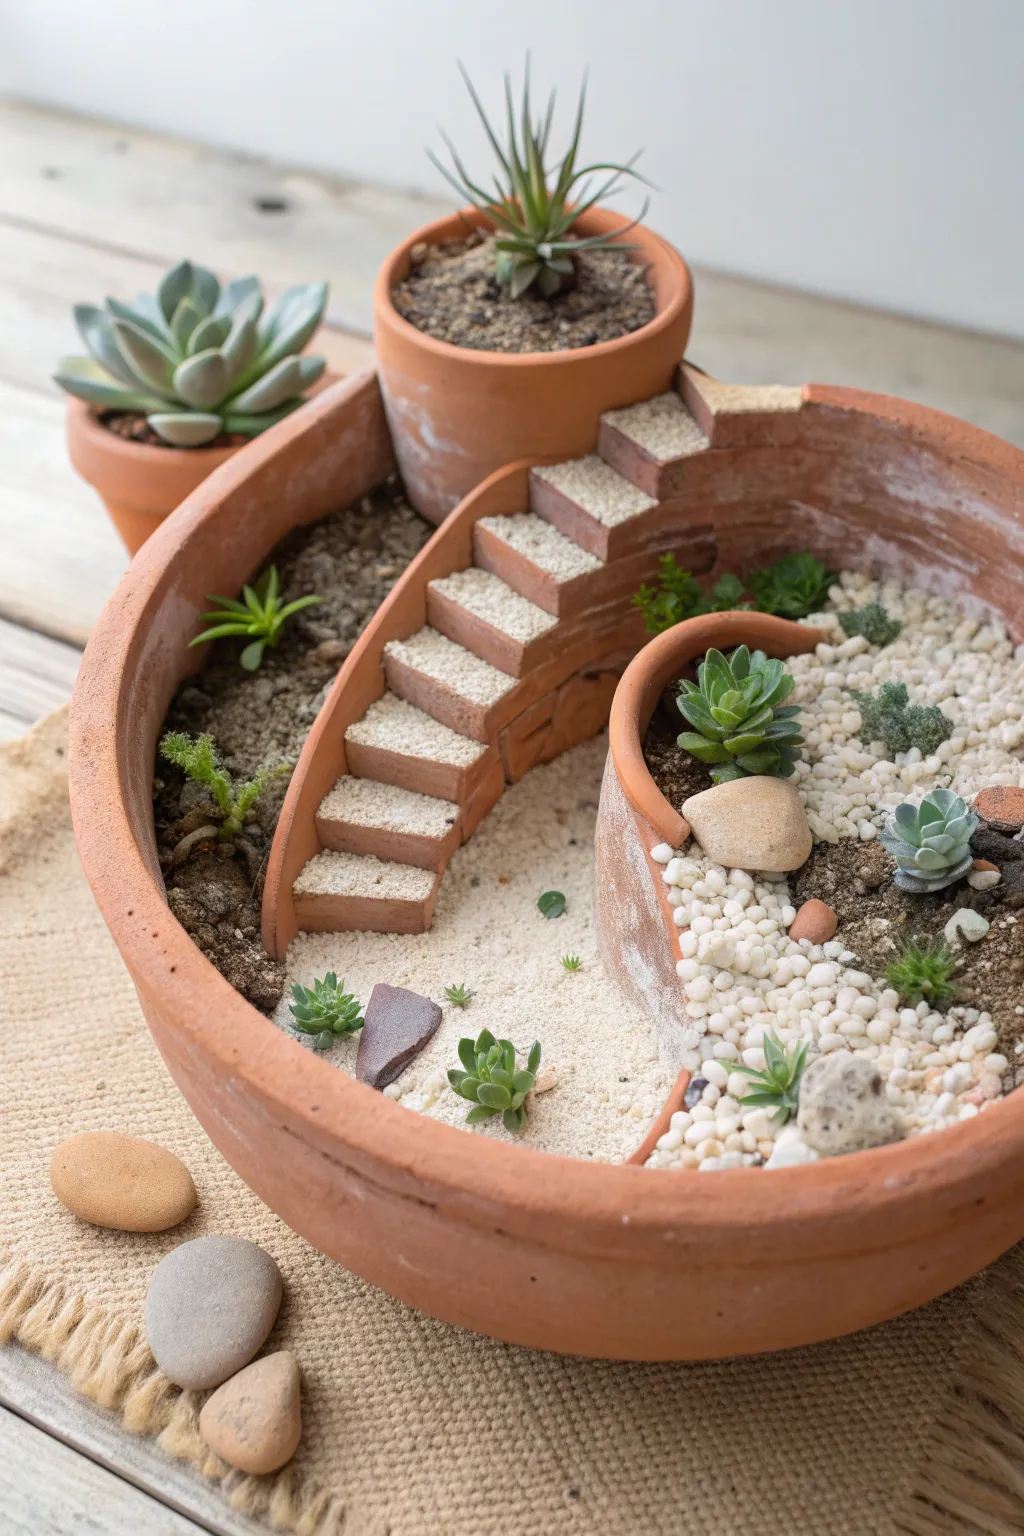
Broken Pot Two-Level “Stack and Plant” Look
Transform accidental breakage into intentional beauty with this clever tiered planter design. By stacking a broken shard inside a larger bowl and topping it with a smaller pot, you create a captivating spiral staircase for your succulents.
Step-by-Step Guide
Materials
- Large, wide terra cotta bowl (base)
- Medium terra cotta pot (about 4-6 inches shorter than the base)
- Small terra cotta pot (intact)
- One large curved shard from a broken pot (roughly 1/3 height of base)
- Cactus/Succulent potting mix
- Small pebbles or gravel (neutral tones)
- Assorted succulents (e.g., Echeveria, Sedum, Crassula)
- Moss (optional)
- Trowel or scoop
- Protective gloves (for handling shards)
Step 1: Setting the Foundation
-
Prepare the base:
Start with your large terra cotta bowl. Ensure the drainage hole is clear, and if you like, add a small piece of mesh over it to keep the soil in while letting water out. -
Initial soil layer:
Fill the bottom of the large bowl with about two inches of succulent potting mix. This doesn’t need to be firmly packed yet; just create a cushioned base. -
Position the shard:
Take your large, curved broken shard. This piece acts as the retaining wall for the second ‘level.’ Place it into the soil towards the back-right of the bowl, angling it slightly so it curves inward. -
Anchor the shard:
Press the shard deep enough into the soil so it stands upright on its own. You want it stable before adding more weight. -
Add backfill soil:
Scoop more potting mix behind the shard (on the inside of the curve) to build up the height for the next tier. Pack this down gently but firmly to prevent shifting later.
Step 2: Creating the Upper Tier
-
Place the top pot:
Nestle the smallest intact pot into the mound of soil you just created behind the shard. It should sit higher than the bowl’s rim, tilting very slightly forward for better visibility. -
Secure the stack:
Add soil around the base of this top pot to lock it into place. The soil level should now slope downwards from the top pot, behind the shard, and down to the front of the main bowl. -
Refine the slope:
Smooth out the soil on the middle tier—the area created by the broken shard wall. Create a gentle grade that connects the high point to the low point, mimicking a hillside. -
Top pot planting:
Fill the top pot with soil and plant your trailing or taller succulents here. I prefer using sedum varieties that will eventually drape over the edges softening the look. -
Dress the rim:
If your top pot has a decorative white band or salt deposits like the one in the photo, wipe it gently to highlight that weathered texture.
Shard Safety
Freshly broken terra cotta can be razor-sharp. Before assembling, run a piece of coarse sandpaper over the jagged edges to smooth them out and prevent cuts while planting.
Step 3: Planting the Layers
-
Select middle-tier plants:
Choose compact rosette succulents, like Echeveria, for the middle section held by the shard. Position them centrally in that pocket of soil. -
Planting the base:
In the lowest section of the big bowl, plant clustering ground cover succulents. Bright green sedums or ‘creeping jenny’ look fantastic here and provide contrast. -
Fill the gaps:
Look for empty spaces between the main plants. Tuck in very small cuttings or baby succulents to make the arrangement feel lush and established immediately. -
Tuck in moss:
For a softer, woodland feel, press small clumps of dried or live moss into the crevices between the rocks and plants on the middle tier.
Fairy Garden Twist
Turn this into a fantasy dwelling by adding a tiny wooden ladder connecting the lower bowl to the upper rim, or nestle a miniature cottage into the top pot.
Step 4: Finishing Touches
-
Add the gravel:
Carefully pour your small neutral pebbles over any exposed soil. Use a small spoon to guide the stones under the leaves without burying the plants. -
Create a rock accent:
Place a few slightly larger river stones near the base of the shard wall to create a transition between the levels. -
Clean up:
Use a soft brush (a clean makeup brush works wonders) to sweep any stray dust or soil grains off the succulent leaves. -
Initial watering:
Wait about a week before the first watering to let any damaged roots heal. When you do water, use a squeeze bottle to target the soil directly, avoiding the rosettes.
Place your new creation in a bright, sunny spot and watch your miniature tiered landscape flourish over time


Tiny House on the Top Tier
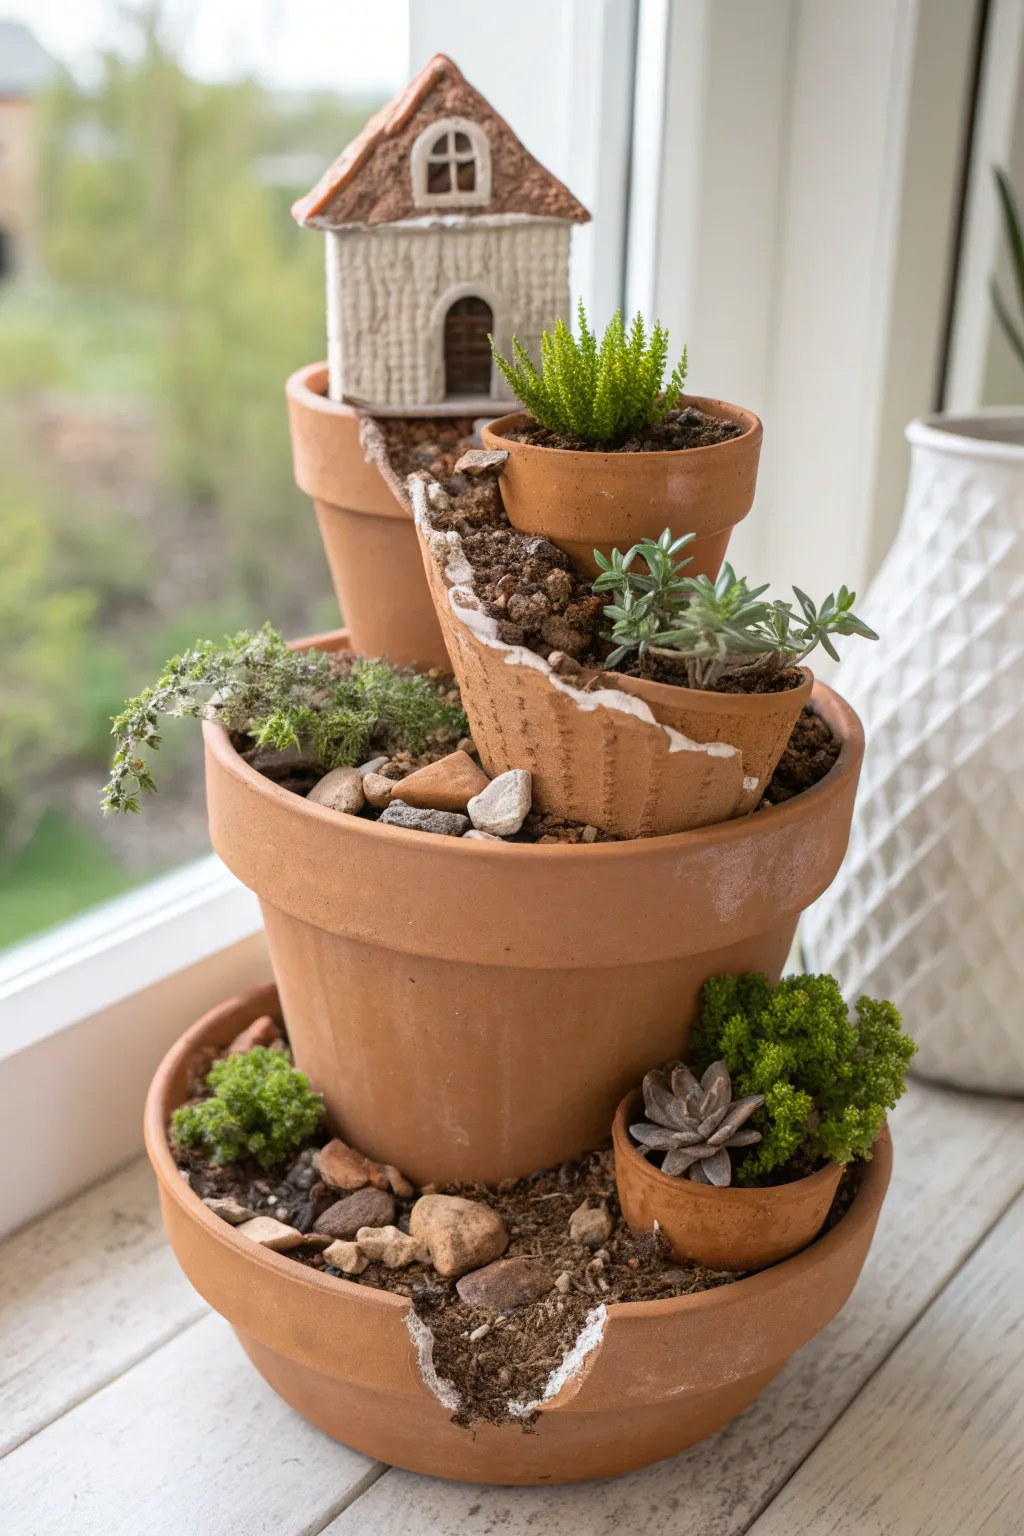
Transform ordinary broken terracotta into a charming miniature world with this tiered fairy garden project. Featuring a tiny ceramic house perched atop cascading levels of greenery and stone, this centerpiece brings a storybook quality to any windowsill.
Step-by-Step Tutorial
Materials
- One large terracotta pot (approx 10-12 inches) with a clean break on one side
- One medium terracotta pot (approx 6-8 inches)
- One small terracotta pot (approx 4 inches)
- Several curved terracotta shards (from broken pots)
- Small ceramic house figurine
- Potting soil (cactus or succulent mix recommended)
- Small pebbles or gravel
- Assorted small plants (creeping thyme, succulents like sedum or echeveria, miniature moss)
- Hammer (for breaking shards further if needed)
- Safety glasses
- Small trowel or spoon
Step 1: Setting the Foundation
-
Prepare the base:
Start with your largest terracotta pot. If it isn’t already broken, use a hammer to gently tap out a curved section from the front rim extending halfway down. Ideally, you want a jagged, natural-looking edge. -
Initial filling:
Fill the large base pot about one-third full with soil. Pack it down slightly to create a firm foundation for the next tier. -
Position the second tier:
Take the medium-sized pot and nestle it into the soil of the large base pot. It should sit towards the back, leaving space in the front ‘window’ created by the broken edge. -
Secure the levels:
Add more soil around the base of the medium pot to lock it in place. The soil level in the large pot should slope downwards toward the front opening.
Shard Safety
Terracotta breaks can be incredibly sharp. Briefly sand the raw broken edges with coarse sandpaper before assembly to prevent cuts while planting.
Step 2: Creating the Staircase
-
Plan the path:
Visualize a winding path that leads from the bottom opening up to the top tier. You will use broken shards to retain soil and create steps. -
Install the first retainers:
Insert a large, curved terracotta shard vertically into the soil at the front of the medium pot. This acts as a wall to hold the soil for the next level up. -
Add the top tier:
Place the smallest pot (or just the top rim of a broken one) onto the soil inside the medium pot. This will be the platform for your house. -
Build the shard steps:
Starting from the bottom opening, press smaller curved shards into the soil to create a cascading staircase effect. I find it helpful to overlap them slightly to prevent soil washout. -
Backfill with soil:
Carefully add soil behind each shard ‘step’ and fill the top and medium pots to their rims. Ensure the soil is level on the platform where the house will sit.
Lighting the Way
Tuck a tiny battery-operated LED fairy light string behind the plants or inside the ceramic house to make the windows glow warmly in the evening.
Step 3: Planting and Decorating
-
Place the cottage:
Set your ceramic house firmly on the very top tier. Ensure it is level and pressed slightly into the soil so it doesn’t tip over. -
Plant the top greenery:
Plant a small, upright succulent or miniature shrub (like the mossy plant shown) next to the house to frame it. -
Fill the middle tier:
Tuck creeping plants, such as thyme or sedum, into the soil pockets created by your shard retaining wall. Let them drape slightly over the edges. -
Populate the lowest level:
In the bottom base pot, plant larger succulents or moss clumps near the opening. Leave some space for stones. -
Add the mini pot detail:
Nestle a tiny, planted terracotta pot or saucer into the lowest level on the right side for an extra layer of detail. -
Clean up the edges:
Use a soft brush to sweep away any loose soil from the rims of the pots and the roof of the tiny house. -
Rock accents:
Arrange small pebbles and stones around the plants and along the ‘steps’ to simulate a rocky path and cover exposed dirt. -
Final wander:
Water the arrangement gently using a spray bottle or a watering can with a very narrow spout to settle the soil without displacing your hard work.
Place your new miniature garden in a bright spot and watch your tiny landscape thrive

The Complete Guide to Pottery Troubleshooting
Uncover the most common ceramic mistakes—from cracking clay to failed glazes—and learn how to fix them fast.
Pebble Paths and Moss “Lawns” in Cracks
Transform a broken terracotta planter into a multi-tiered architectural wonder featuring winding pebble pathways and lush miniature lawns. This project uses the natural curve of pottery shards to create a spiral staircase effect, perfect for showcasing small succulents and soft mosses.
Step-by-Step Guide
Materials
- One large terracotta pot (about 8-10 inches)
- One medium terracotta pot (to fit inside)
- Small saucer for the base
- Potting soil (succulent/cactus mix preferred)
- Hammer and safety glasses
- Small white decorative pebbles
- Live moss (sheet moss or cushion moss)
- Assorted small succulents (e.g., sedum, crassula)
- Small succulent or herb for the top tier
- Water spray bottle
- Chopstick or pencil for tamping soil
Step 1: Breaking and Shaping
-
Prepare for breakage:
If your large pot isn’t already broken, you’ll need to create the break deliberately. Soak the pot in water for a few minutes to reduce dust and sharp shards. Put on your safety glasses. -
Create the main fracture:
Gently tap the side of the pot with a hammer to create a diagonal break that starts high on one side and spirals down toward the base. You want a large, clean shard to serve as the front wall. -
Refine the edges:
Save the large broken piece. You usually want the main pot to retain its base and about half of its back wall intact. Use pliers or gentle hammer taps to nibble away jagged edges if they are too sharp.
Soil Stability Trick
If the soil keeps sliding down the slope, mix a little clay or water into the mix to make it stickier during construction, or use small flat stones as hidden retaining walls under the soil.
Step 2: Building the Structure
-
Establish the base:
Place the broken base pot into the saucer. Fill the bottom few inches with potting soil, packing it down firmly to create a stable foundation. -
Position the top tier:
Nestle the medium, intact terracotta pot into the soil at the back of the large broken pot. It should sit high enough to act as the ‘penthouse’ of your garden structure. -
Install the retaining wall:
Take the large shard you broke off earlier and insert it into the soil in the front. Angle it slightly to create a ramp or terrace effect that bridges the gap between the saucer level and the main pot rim. -
secure the levels:
Backfill behind this shard with more soil. I prefer to pack this quite tight so the soil doesn’t wash away later. Ensure the soil level slopes gently downward, following the curve of the broken shard.
Add a Miniature Scene
Turn this into a narrative by adding a tiny wooden door at the base or a miniature bench on the moss ‘lawn’ to give it a lived-in fairytale vibe.
Step 3: Planting and Landscaping
-
Plant the crown:
Fill the top medium pot with soil and plant your tallest specimen there—perhaps a woody herb or a taller succulent like the one shown. -
Add side succulents:
Tuck small rosette succulents, like hens-and-chicks, into the pockets of soil on the middle tier. Use a chopstick to help guide their delicate roots into tight spaces. -
Lay the moss foundation:
Take chunks of fresh, green moss and press them firmly onto the exposed soil surfaces. Focus on the triangular open areas on the mid-level ‘terrace’ and the lowest level in the saucer. -
Create the pebble river:
This is the defining detail. carefully pour small white pebbles along the crack lines where the shard meets the main pot. -
Define the path edges:
Push the pebbles slightly into the soil so they stay put. The white stones should look like a dry riverbed or path winding up the spiral. -
Fill the lower basin:
Add a generous patch of moss to the bottom saucer level, creating a soft landing pad at the foot of your structure. -
Add final stone accents:
Scatter a few more white pebbles around the moss at the base to visually connect the bottom level to the spiraling path above. -
Clean up:
Use a small, soft brush to sweep any loose soil off the leaves of the succulents, the rim of the pots, and the white stones. -
Initial watering:
Instead of pouring water, use a spray bottle to mist the moss heavily and the succulents lightly. This prevents your soil grading and pebble work from washing away.
Place your new multi-level creation in a bright spot and enjoy the unique architecture you built from broken pieces
Mosaic Stepping Stone from Pot Pieces
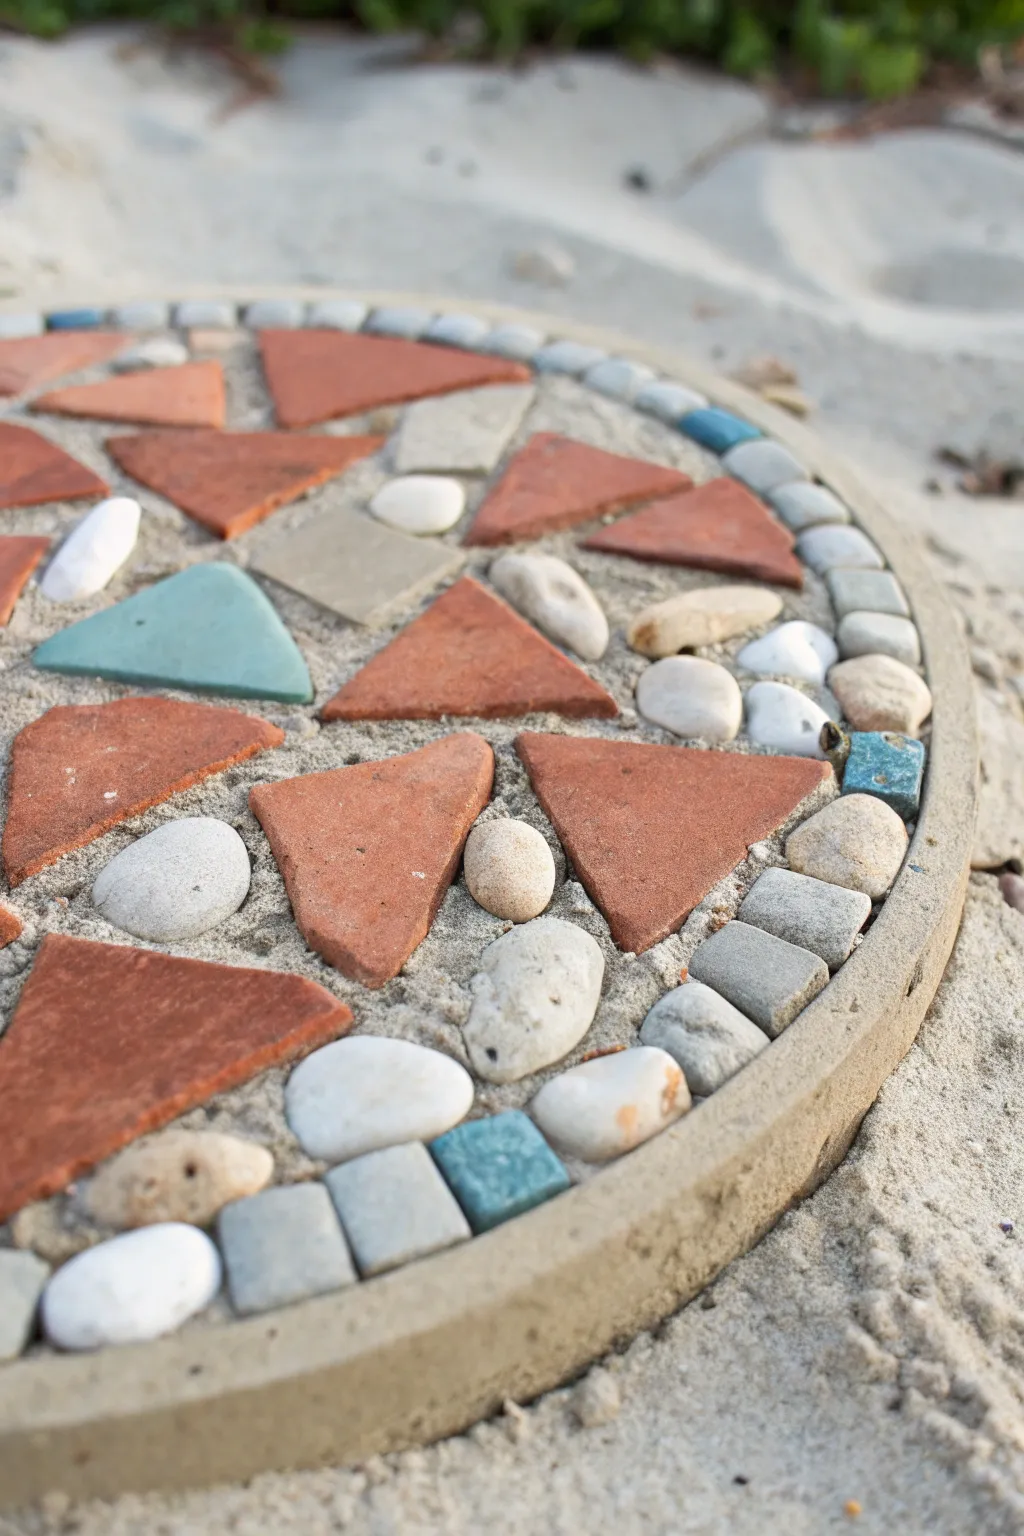
Transform broken garden pots into a stunning pathway accent with this mosaic stepping stone. By combining jagged clay shards with smooth river stones and subtle pops of blue tile, you’ll create a texturally rich piece that feels both rustic and refined.
Step-by-Step Tutorial
Materials
- Plastic or silicone mold (12-14 inch, round)
- Broken terracotta pot pieces (sherds)
- Pre-mixed concrete or mortar mix
- Small white and grey river rocks
- Mosaic tile nippers or hammer
- Safety glasses
- Small square tiles (grey/blue hues)
- One larger turquoise ceramic piece (optional triangle)
- Small trowel or spatula
- Sponge and bucket of water
- Mold release spray or cooking oil
Step 1: Preparation & Breaking
-
Prepare the sherds:
Gather your broken terracotta pots. If the pieces are too large, place them inside an old pillowcase or wrap them in a heavy towel. Wearing safety glasses, gently strike the wrapped pots with a hammer to create manageable shards, aiming for triangles roughly 2-3 inches wide. -
Sort the materials:
Separate your best terracotta triangles—those with relatively flat surfaces work best. Organise your filler materials: the smooth white pebbles, grey river stones, and small square accent tiles so they are within easy reach. -
Prep the mold:
Clean your circular mold thoroughly. Spray it lightly with mold release spray or wipe it down with a thin layer of cooking oil. This essential step ensures your heavy stone will pop out easily once it’s fully cured.
Step 2: Pouring & Setting
-
Mix the concrete:
In a bucket, mix your concrete or mortar according to the package instructions. You want a consistency similar to thick oatmeal or peanut butter—stiff enough to hold the stones up, but wet enough to pour. -
Fill the mold:
Pour the concrete mixture into your lubricated mold until it’s about 1.5 to 2 inches thick. Give the mold a few firm taps against your work surface or shimmy it back and forth to release trapped air bubbles and level the surface. -
Set the border:
Starting at the outer edge, gently press a ring of small, square grey tiles or small flat stones into the wet concrete. Leave about a half-inch of concrete visible on the very outside to form a smooth rim, exactly like the reference image.
Uneven Surface?
If jagged terracotta edges are sticking up too high after the initial pour, wait 20 minutes for the mix to stiffen slightly, then press them deeper or tap them down gently with a rubber mallet.
Step 3: Creating the Mosaic Design
-
Place main focal points:
Take your largest terracotta shards and press them firmly into the wet concrete. Arrange them somewhat randomly but try to keep the spacing balanced across the circle. I like to push them down so they are level with the border tiles. -
Add color accents:
Place your special turquoise triangle and any scattered blue square tiles in the empty spaces between the large clay pieces. These small pops of cool color contrast beautifully with the warm orange clay. -
Fill the gaps:
Using the white pebbles and grey river stones, fill in the remaining channels and gaps between the terracotta. Vary the sizes of the stones to fit tight corners, creating a dense, cobble-like texture. -
Level everything:
Once all pieces are placed, place a flat board across the top of the mold and press down gently. This helps ensure all your tesserae (mosaic pieces) are sitting at the same height, preventing sharp edges from sticking up.
Pro Tip: Hidden Mesh
For extra durability, cut a circle of chicken wire or hardware mesh slightly smaller than your mold and press it halfway into the wet concrete during the pouring phase to act as rebar.
Step 4: Finishing Touches
-
Initial set:
Let the stone sit for about 30 to 60 minutes until the concrete begins to firm up but hasn’t fully hardened. The pieces should feel stable if you wiggle them slightly. -
Clean the surface:
Dampen a sponge (wring it out well so it’s not dripping) and gently wipe across the surface of the stones and tiles. This removes any cement film or haze from the tops of your design elements. -
Deep clean and smooth:
Rinse your sponge frequently and continue wiping carefully around the edges of the stones to smooth out the concrete ‘grout’ lines. You want the concrete to be slightly lower than the stones to create texture. -
Final cure:
Allow the stepping stone to cure in the mold for at least 24 to 48 hours. Keep it in a shaded spot, as direct sun can dry the concrete too fast and cause cracking. -
Unmold:
Carefully flip the mold over and tap gently to release the stone. If prepared correctly, it should slide right out. -
Wait before walking:
Although it looks done, concrete takes time to reach full strength. Let the stone cure outside the mold for another 5-7 days before placing it in the garden to be walked on.
Now you have a durable, custom piece of garden art that gives new life to your old broken planters


What Really Happens Inside the Kiln
Learn how time and temperature work together inside the kiln to transform clay into durable ceramic.
Broken Pot Shard Border for Garden Edging
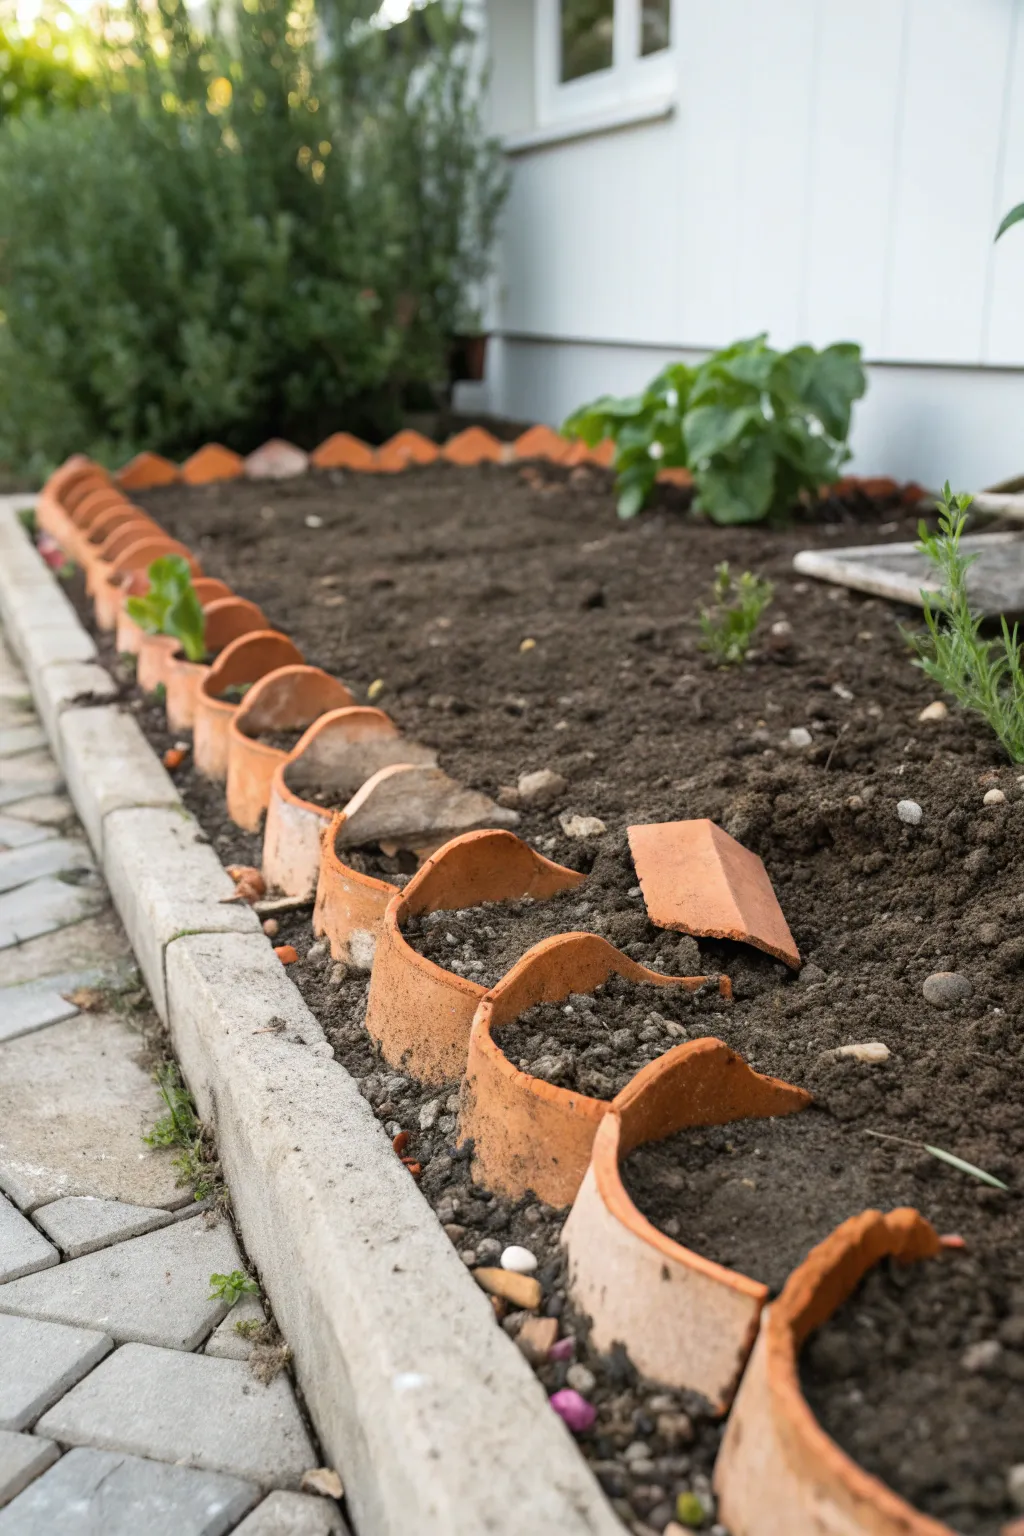
Give your garden beds a rustic, upcycled charm by repurposing broken terracotta pots into a unique scalloped edging. This project turns the misfortune of cracked planters into a functional border that defines your planting space and keeps mulch in place.
Step-by-Step Tutorial
Materials
- Several broken terracotta pots (specifically the curved rims and upper sides)
- Small hand shovel or trowel
- Rubber mallet
- Gardening gloves
- Safety glasses (for breaking extra pots)
- Garden soil or compost (for backfilling)
- Existing garden bed with a concrete curb or distinct edge
Step 1: Preparation and Collection
-
Assess your materials:
Gather all your broken terracotta pots. For this specific look, you need pieces that still have the curved rim attached, as these create the scalloped ‘wave’ effect along the top. -
Break supplementary pots:
If you don’t have enough pre-broken shards, you’ll need to create more. Put on your safety glasses and gloves. -
Controlled breakage:
I find it helpful to wrap a pot in an old towel before striking it gently with a rubber mallet. This contains the shards and helps create larger, usable curved sections rather than dust. -
Sort the shards:
Separate your pieces into piles. You want C-shaped rim pieces that are roughly the same height when placed vertically. Set aside flatter shards for filling gaps later. -
Prepare the trench:
Use your hand trowel to dig a narrow, shallow trench just inside your garden bed’s concrete curb or existing border. -
Check trench depth:
The trench should be about 2-3 inches deep, allowing the bottom jagged edge of the shards to settle firmly while leaving the smooth rim exposed.
Curve Control
For a tighter fit, overlap the edges of the pot fragments like roof shingles. This creates a stronger barrier against soil erosion during heavy rain.
Step 2: Installing the Border
-
Place the first shard:
Starting at one end of the bed, press your first rim piece into the soil vertically. The curve should face inward, cupping the garden soil. -
Align the second piece:
Take the next rim shard and nest it slightly behind or next to the first one. Follow the line of your garden bed. -
Create the rhythm:
Continue placing shards side-by-side. Try to overlap the edges slightly so there are no gaping holes for soil to wash through. -
Vary the sizes:
Don’t worry if the pieces aren’t identical. Position smaller arcs and larger arcs together organically; the irregularity adds to the rustic aesthetic. -
Tap into place:
Once a few pieces are aligned, use the rubber mallet to gently tap the top rims. This seats them firmly into the bottom of the trench. -
Check stability:
Wiggle each piece gently. If it moves too much, dig slightly deeper or pack a bit of loose soil under the shard’s base. -
Manage corners:
When you reach the back corner of the bed, you may need smaller fragments. Use triangular shards to bridge the turn if you don’t have a perfectly curved corner piece. -
Backfill the front:
Use your trowel to push the loose soil back against the front (outer) face of the shards, pressing it tight against the terracotta. -
Backfill the rear:
Fill the space behind the shards (the garden side) with fresh soil or compost. This pressure from behind is crucial for keeping the shards upright. -
Review the height:
Stand back and look at the line. The tops of the pots should be relatively level with your concrete curb, or slightly higher to retain the garden soil. -
Adjust as needed:
If a piece sits too high, remove it and scoop out more dirt. If too low, add a pad of soil underneath. -
Final packing:
Firmly tamp down the soil on both sides of your new terracotta wall with your gloved hands or the handle of your trowel. -
Water the border:
Gently water the soil immediately around the shards. This helps the dirt settle into the crevices and locks the pottery in place.
Living Wall
Plant creeping thyme or sedum in the small pockets between the shards. Over time, the plants will spill over the terracotta for an aged, fairytale look.
Your garden now features a charming, eco-friendly boundary that tells a story of reuse and creativity