Brown clay is my go-to when I want instant warmth, texture, and that earthy handmade vibe without a single drop of paint. Here are my favorite brown clay ideas—from classic rustic pieces to cute miniatures that look perfect in their natural color.
Rustic Pinch Pot Bowls

Embrace the imperfect beauty of handcrafted pottery with these rustic pinch pot bowls. Featuring a warm terracotta hue and natural speckling, this project is perfect for beginners looking to create functional, earthy decor for their home.
Detailed Instructions
Materials
- Speckled brown stoneware clay or terracotta clay with grog
- Sponge
- Small bowl of water
- Wooden rib tool or smooth stone
- Needle tool
- Wire cutter
- Clear matte glaze (optional)
- Black iron oxide wash (optional)
Step 1: Forming the Base
-
Prepare the Clay:
Cut a block of clay and wedge it thoroughly on a canvas board or plaster bat. This removes air bubbles and ensures the clay has an even consistency. -
Portioning:
Divide your wedged clay into three equal balls, each roughly the size of a tennis ball. Roll them between your palms until they are smooth and round. -
Starting the Pinch:
Hold one ball in your non-dominant hand. Gently press your thumb into the center of the ball, stopping about a half-inch from the bottom. Avoid pushing all the way through. -
Pinching Walls:
With your thumb inside and fingers on the outside, begin to pinch the clay gently. Rotate the ball slightly with each pinch to ensure even wall thickness. -
Work Upwards:
Start pinching from the bottom and slowly work your way up to the rim. Keep your movements rhythmic. -
Checking Thickness:
Pause occasionally to feel the walls. You are aiming for a consistent thickness of about 1/4 inch throughout the entire bowl.
Step 2: Refining and Shaping
-
Smooth the Interior:
Dip your sponge lightly in water—squeeze it out well so you don’t saturate the clay—and run it smoothly along the inside of the bowl to compress the surface. -
Shape the Rim:
I like to gently tap the rim of the bowl upside down on my work surface to level it slightly, though keeping a slight organic wave adds character. -
Refining the Exterior:
Use a wooden rib tool or a smooth river stone to burnish the outside. This compresses the clay particles and gives that lovely smooth texture seen in the photo. -
Repeat the Process:
Repeat these steps for the remaining two balls of clay. Try to keep them relatively similar in width so they stack nicely later. -
Slow Drying:
Cover the bowls loosely with plastic to let them dry slowly to a leather-hard state. This usually takes about a day depending on humidity.
Crack Control
If you see tiny cracks forming on the rim while shaping, compress the clay downward immediately with a damp sponge. Cracks often mean the clay is getting too dry.
Step 3: Finishing Touches
-
Rim Emphasis (Optional):
To recreate the darker rim effect, you can lightly brush a very diluted black iron oxide wash exclusively along the lip of the bowl once leather hard. -
Bone Dry:
Remove the plastic and let the bowls dry completely until they are bone dry. They will feel room temperature to the touch, not cool. -
Bisque Fire:
Fire the pieces in a kiln to a bisque temperature (usually cone 04). This hardens the clay and prepares it for glazing or final use if leaving raw. -
Glazing or Sealing:
For a functional food-safe bowl, coat the interior with a clear matte glaze. The exterior can be left unglazed to maintain that raw, tactile clay feel. -
Final Firing:
Fire the bowls a second time according to your specific clay and glaze instructions (often cone 5 or 6 for stoneware).
Texture Play
Before the clay dries, gently press coarse fabric or dried flowers into the exterior surface for a subtle, fossil-like imprint.
Stack your finished set on a linen cloth to enjoy their warm, inviting presence on your table


Terracotta-Style Mini Planters
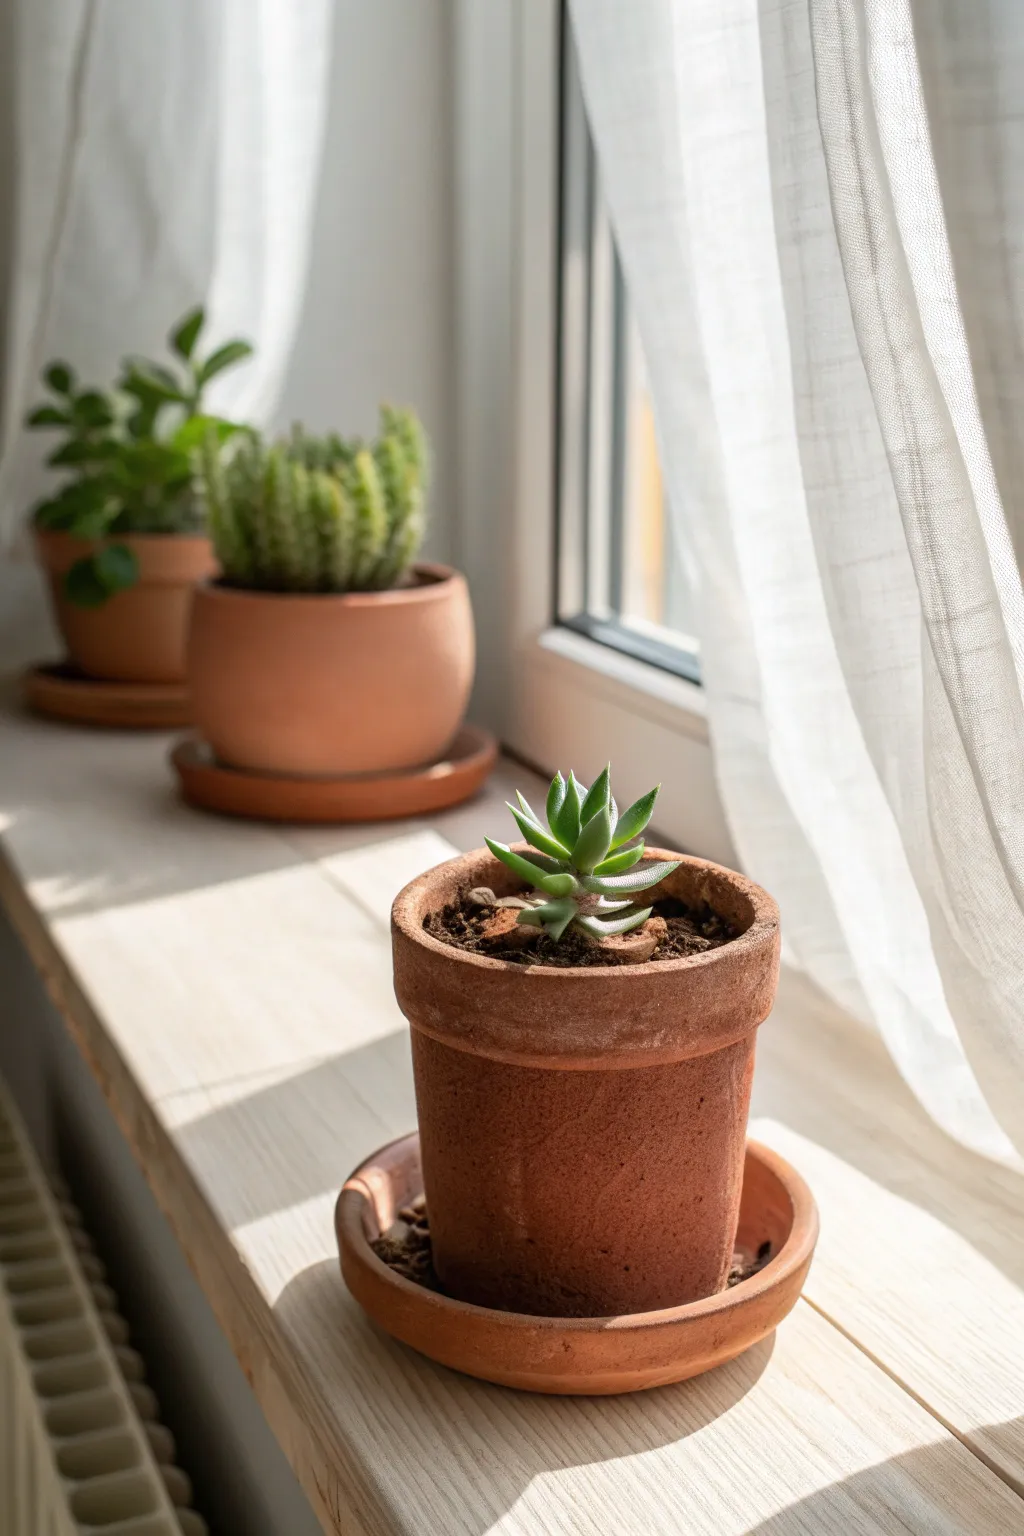
Capture the charm of well-weathered garden pottery with this polymer clay project that mimics the gritty texture of real terracotta. This tutorial guides you through sculpting a perfectly rustic mini planter and saucer, ideal for housing tiny succulents on a sunny windowsill.
Step-by-Step Tutorial
Materials
- Terracotta-colored polymer clay (approx. 2-3 oz)
- Coarse black pepper or dried coffee grounds
- Rolling pin or acrylic roller
- Small circular cookie cutter (approx. 2 inches)
- Clay blade or craft knife
- Toothbrush or texture sponge
- Small jar or round form (for shaping)
- Parchment paper
- Oven
Step 1: Preparing the Textured Clay
-
Conditioning the clay:
Start by kneading the terracotta polymer clay in your hands until it becomes soft and pliable. This warmth prevents cracking later on. -
Adding the grit:
To achieve that authentic, grainy stoneware look, sprinkle a generous pinch of coarse black pepper or dried coffee grounds onto the flattened clay. -
Incorporating texture:
Fold the clay over the inclusions and knead thoroughly until the specks are evenly distributed throughout the batch. I usually do this until the texture feels consistent under my thumb. -
Rolling out the slab:
Place the clay between two sheets of parchment paper and roll it out to a consistent thickness of about 1/4 inch.
Fixing Cracks
If you see tiny cracks before baking, rub a drop of baby oil or clay softener over the area and smooth it with your finger to heal the fissure.
Step 2: Forming the Pot Body
-
Cutting the base:
Use your circular cookie cutter or template to punch out a perfect circle from the rolled clay. This will serve as the bottom of your pot. -
Creating the walls:
Cut a rectangular strip from the remaining clay slab. Measure the circumference of your base circle first to ensure the strip is long enough to wrap all the way around. -
Attaching the walls:
Wrap the rectangular strip around the circular base, matching the edges carefully. Place the bottom circle inside the cylinder walls rather than underneath to hide the seam better. -
Blending the seams:
Use a modeling tool or your finger to smooth the vertical side seam and the interior bottom seam where the wall meets the base. The connections should be invisible. -
Adding the rim:
Roll a thin snake of clay and flatten it slightly. Wrap this around the top exterior edge of the pot to create the classic thickened rim found on terracotta planters. -
Blending the rim:
Smooth the bottom edge of this added rim downwards into the main body of the pot, leaving the top edge distinct.
Step 3: Texture and Finishing
-
Surface texturing:
Gently tap the entire exterior surface with a toothbrush or a rough texture sponge. This breaks up the smooth plastic look of the polymer clay and mimics fired earth. -
Aging effects:
Create small imperfections by lightly pressing a crumpled ball of foil against random spots on the pot to simulate weathering. -
Making the saucer:
Roll out a small amount of remaining clay and cut a circle slightly larger than the base of your pot. Gently curl up the edges to form a shallow dish shape. -
Texturing the saucer:
Don’t forget to apply the same toothbrush texture to the saucer’s rim so it matches the pot perfectly. -
Baking:
Place the pot and saucer on a parchment-lined baking sheet. Bake according to your clay package instructions, usually at 275°F (130°C) for 15-30 minutes. -
Cooling:
Allow the pieces to cool completely in the oven with the door cracked open to prevent thermal shock. -
Final assembly:
Once cool, your mini planter is ready. You can fill it with a small succulent and potting soil.
White Wash Finish
After baking, dry brush a tiny amount of diluted white acrylic paint over the textured areas to mimic salty mineral deposits found on old pots.
Place your new mini planter near a window to catch the afternoon light, emphasizing that lovely handmade texture


Two-Tone Dip-Glaze Mug

This project combines the raw, earthy texture of brown stoneware with a creamy, speckled glaze for a cozy, farmhouse aesthetic. By leaving the bottom third unglazed, you create a beautiful visual and tactile contrast that highlights the natural beauty of the clay body.
How-To Guide
Materials
- Brown speckled stoneware clay (approx. 1 lb per mug)
- Pottery wheel
- Throwing tools (sponge, rib, needle tool, wire cutter)
- Trimming tools
- Bucket of water
- Sponge for smoothing
- Cream or Oatmeal Speckle dipping glaze
- Wax resist (brush-on)
- Small paintbrush
- Kiln (bisque and glaze firing capabilities)
Step 1: Throwing the Form
-
Prepare the clay:
Begin by thoroughly wedging about 1 pound of brown speckled stoneware clay to remove air bubbles and ensure consistency. -
Center on the wheel:
Throw the ball of clay onto the center of the wheel head and use water and pressure to center it perfectly. -
Open the clay:
Using your thumbs, open the centered clay down to the base, leaving about a half-inch of thickness for the bottom of the mug. -
Pull the walls:
Establish the floor and begin pulling the walls upward into a cylinder. Aim for straight, even walls that are slightly wider than typical to account for shrinkage. -
Shape the vessel:
Using a rib tool on the exterior and your hand on the interior, gently belly out the form slighty to create a classic, comfortable mug shape while keeping the rim straight. -
Refine the rim:
Compress the rim using a chamois or your fingertips to ensure it is smooth and pleasant for drinking. -
Cut off:
Run a wire cutter underneath the base and set the cylinder aside on a ware board until it reaches a leather-hard consistency.
Clean Lines
For a razor-sharp transition line, use masking tape instead of freehand wax. Apply the tape, wax below it, peel the tape, and then dip.
Step 2: Trimming and Handles
-
Trim the foot:
Once leather-hard, center the mug upside down on the wheel. Trim away excess clay from the bottom to define the foot ring. -
Texture the base:
Because we are leaving the bottom unglazed, I like to lightly sponge the trimmed area to bring out the grog and texture of the brown clay. -
Pull a handle:
Pull a strip of clay for the handle, tapering it slightly. Curve it into an ear shape and let it stiffen slightly. -
Attach the handle:
Score and slip both the attachment points on the mug and the handle ends. Press firmly to join, smoothing the seams with a modeling tool or wet finger. -
Make the thumb rest:
Shape the handle so it has a gentle curve that accommodates the hand, ensuring alignment is straight. -
Bisque fire:
Allow the mug to dry completely (bone dry) before loading it into the kiln for a bisque firing (typically Cone 04).
Step 3: Glazing Process
-
Clean the bisque:
Wipe the fired bisque mug with a damp sponge to remove any dust that could prevent glaze adherence. -
Mark the glaze line:
Decide where you want the glaze to stop—usually about one-third up from the bottom. Makes things easier if you visualize the line before dipping. -
Apply wax resist:
Paint liquid wax resist onto the bottom third of the mug, including the foot ring. Be precise with your top line, as this defines the two-tone look. -
Mix the glaze:
Stir your Cream Speckle glaze thoroughly. It should be the consistency of heavy cream. -
The dip:
Holding the mug by the foot (or using glazing tongs), dip the mug upside down into the glaze bucket, stopping just past where the wax resist begins. -
Clean and fire:
Once the glaze is dry, use a sponge to wipe away any stray glaze droplets on the waxed bottom section. Fire to the maturity temperature of your clay (typically Cone 5 or 6).
Glaze Crawling?
If the glaze pulls away from the clay during firing, your bisque might have been too dusty or oily (from lotion). Wash hands and bisque well.
Once cooled, your sturdy mug is ready for a hot coffee, showcasing the beautiful contrast between raw earth and smooth glaze


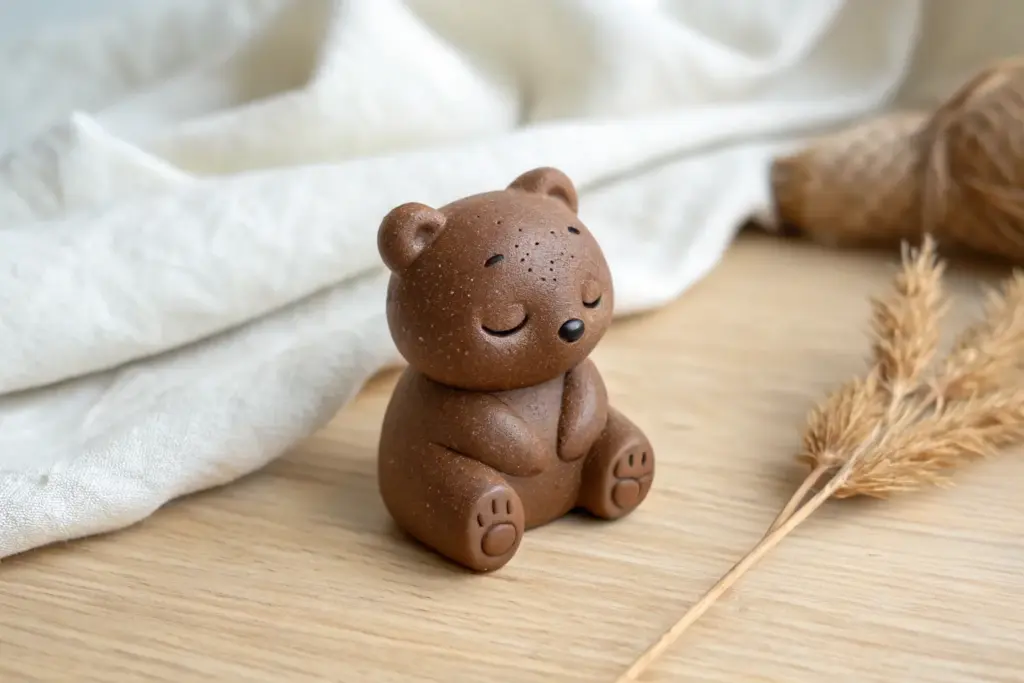
Cute Bear Miniature
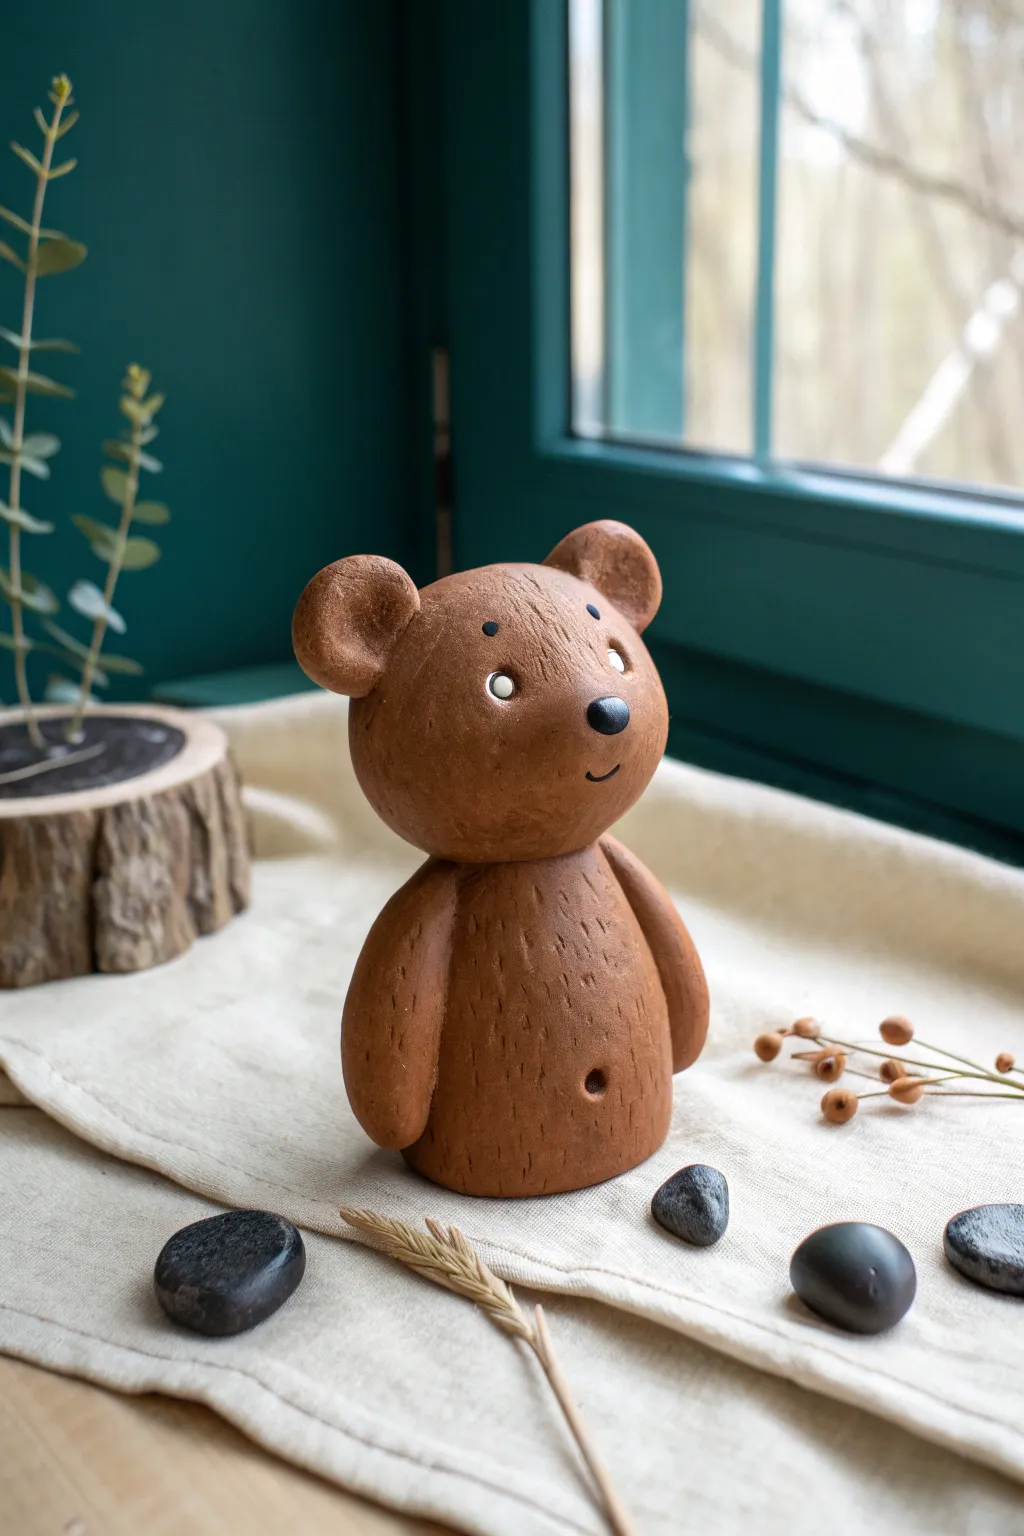
This charming clay bear miniature brings a touch of woodland whimsy to any shelf with its warm brown tones and simple, expressive features. The textured finish gives it a handcrafted, rustic feel that is perfect for beginners and seasoned sculptors alike.
Step-by-Step
Materials
- Brown polymer clay (or air-dry clay painted brown)
- Black polymer clay (tiny amount)
- White acrylic paint
- Aluminum foil
- Sculpting tools (needle tool, small ball stylus)
- Wire texturing brush or stiff toothbrush
- Rolling pin
- Oven (if using polymer clay)
- Small fine-point paintbrush
Step 1: Shaping the Core
-
Condition the Clay:
Begin by kneading your brown clay until it is soft, pliable, and free of cracks. Warm clay is much easier to work with and smooths out better. -
Create the Foil Armature:
Crumple a small piece of aluminum foil into a tight ball about the size of a walnut. This will serve as the core for the head, keeping the sculpture lightweight and saving clay. -
Cover the Head:
Flatten a piece of brown clay and wrap it completely around the foil ball. smooth the seams carefully by rolling it between your palms until you have a perfect sphere. -
Form the Body:
Take a separate lump of brown clay, slightly larger than the head. Roll it into a smooth ball and then gently taper the top to create a sturdy pear shape for the body. -
Connect Head and Body:
Press the spherical head firmly onto the narrower top of the pear-shaped body. You can insert a small piece of toothpick or wire between them for extra stability if needed. -
Blend the Seams:
Use your thumb or a modeling tool to gently blend the clay from the neck area downwards, ensuring the two pieces are securely fused while maintaining the distinct head-separation look.
Pro Tip: Eye Sparkle
To make the bear look truly alive, add a microscopic dot of white paint to the upper corner of the black pupil. This ‘catchlight’ gives the face instant personality.
Step 2: Adding Features and Limbs
-
Shape the Ears:
Roll two small pea-sized balls of brown clay. Press them slightly flat and pinch one edge to create a secure attachment point. -
Attach the Ears:
Place the ears on top of the head, spaced equally apart. Use a blending tool to smooth the clay at the base of the ears into the head so they don’t fall off during baking. -
Indent the Ears:
Use a ball stylus or the round end of a paintbrush handle to press a gentle indentation into the center of each ear for depth. -
Create the Arms:
Roll two sausage shapes for the arms. They should be slightly thicker at the shoulder and rounded at the hand end. -
Attach the Arms:
Press the arms against the sides of the body. I like to curve them slightly forward to give the bear a relaxed, friendly posture. -
Add the Nose:
Take a tiny speck of black clay, roll it into an oval, and press it firmly onto the center of the face for the nose. Alternatively, you can sculpt a small bump and paint it black later. -
Create a Belly Button:
Use a small dotting tool or a toothpick to press a cute little belly button indentation into the lower center of the tummy.
Step 3: Texturing and Finishing
-
Add Fur Texture:
Using a needle tool or a stiff wire brush, gently scratch short, vertical lines all over the bear’s body and head. Keep the pressure light to suggest fur without destroying the shape. -
Sculpt the Eyes:
Use a small ball tool to make two shallow indentations where you want the eyes to be. This helps guide your painting later. -
Bake or Dry:
Follow the manufacturer’s instructions for your specific clay. If using polymer, bake at the recommended temperature. If using air-dry clay, let it sit for 24-48 hours. -
Paint the Eyes:
Once cool or dry, use a fine-point brush to paint the eye indentations white. Let dry, then add tiny black pupils (paint or marker) looking off to the side. -
Final Details:
Paint a very thin, curved black line for the smile and add three small dots above the eyes for eyebrows/whiskers to complete the expression.
Troubleshooting: Fingerprints
If you notice fingerprints on your smooth bear before texturing, brush a tiny amount of baby oil or clay softener over the surface to melt them away.
Now you have an adorable woodland companion ready to display or give as a thoughtful handmade gift

What Really Happens Inside the Kiln
Learn how time and temperature work together inside the kiln to transform clay into durable ceramic.
Hedgehog and Squirrel Friends
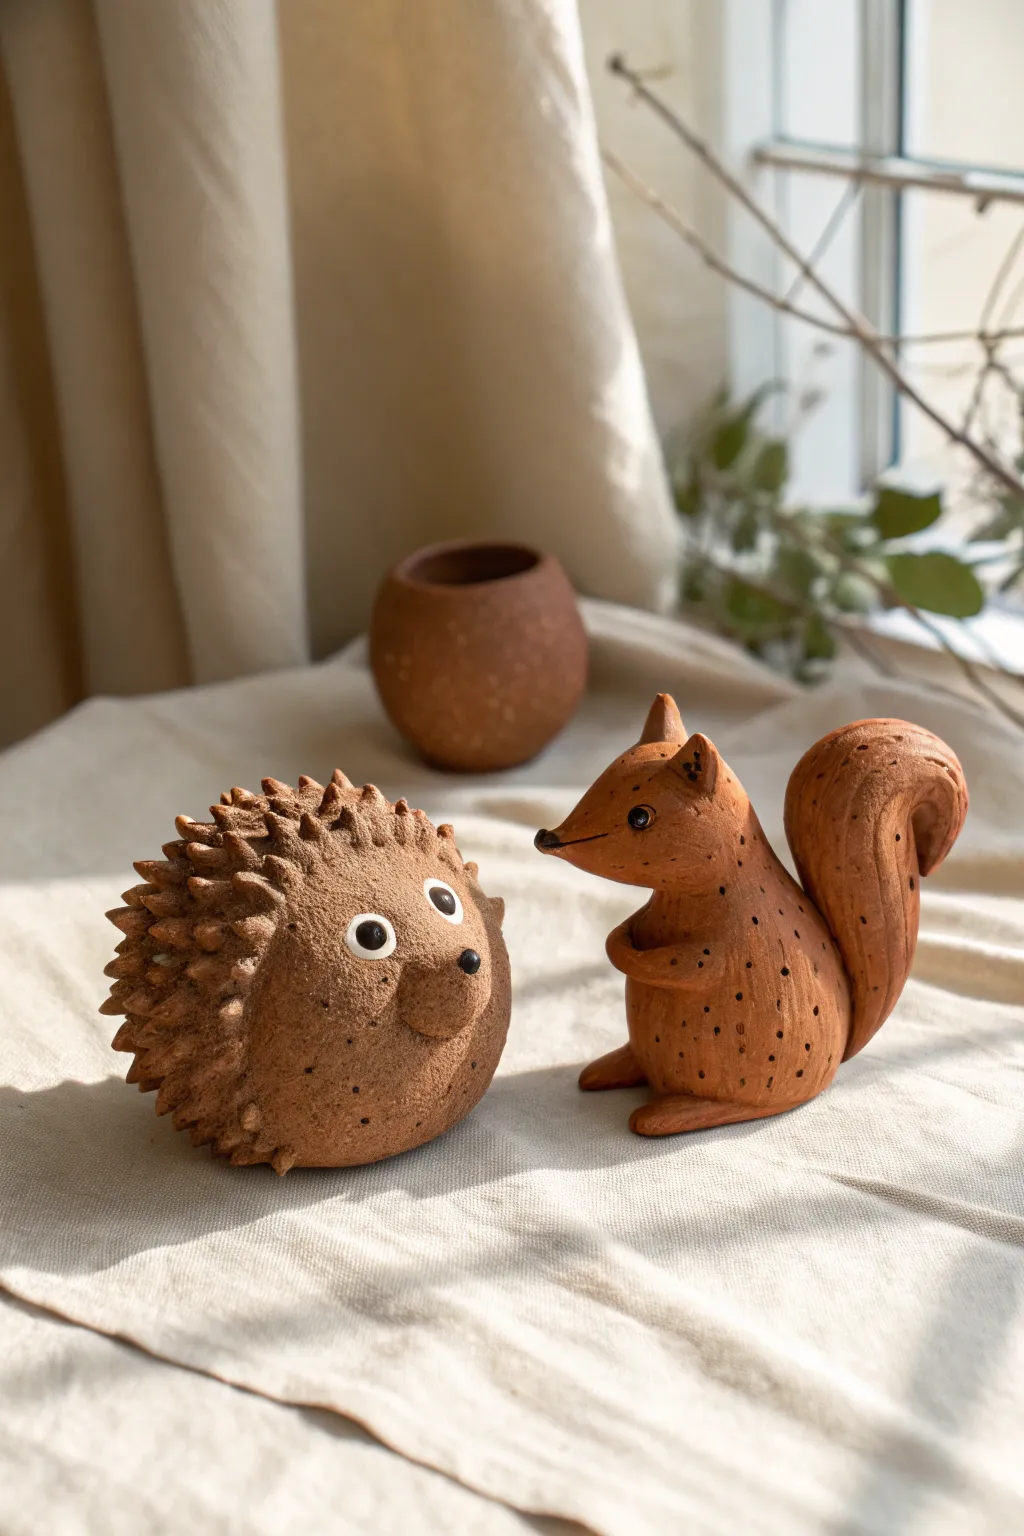
Bring the charm of the forest inside with this delightful pair of clay creatures. Featuring a heavily textured hedgehog and a sleek, upright squirrel, this project explores contrasting surface techniques using simple brown clay.
Detailed Instructions
Materials
- Brown stoneware or earthenware clay
- Basic clay tools (needle tool, modeling tool)
- Small scissors or nail scissors (for hedgehog spikes)
- Slip and scoring tool
- Sponge
- Small round brushes
- Acrylic paints (White and Black) or underglazes if firing
- Matte varnish (optional)
Step 1: Sculpting the Hedgehog
-
Form the base:
Start with a ball of clay roughly the size of a large orange. Roll it between your palms until smooth, then gently tap the bottom on your work surface to create a flat, stable base so it doesn’t roll away. -
Shape the face:
Pinch a small amount of clay on one side of the sphere to pull out a slight snout. It shouldn’t be too long; just a gentle protrusion to distinguish the face from the body. -
Add the nose:
Roll a tiny pea-sized ball of clay and attach it to the tip of the snout using a dab of water or slip. Press it on firmly to become the nose. -
Create the spikes:
This is the fun part. Using small, sharp scissors, make shallow snips into the clay surface starting from the back and moving forward. Angle the scissors slightly so the clay lifts up to form triangular spikes. -
Refine the texture:
Continue snipping all over the back and sides, leaving the face area smooth. If a spike looks odd, just smooth it back down and re-snip. Vary the spacing slightly for a natural look. -
Add decorative details:
Use a needle tool to poke tiny dots randomly on the smooth face area and lower body for extra texture that mimics freckles or fur pores.
Clean Snips
Wipe your scissors with a damp sponge every few cuts when making the hedgehog spikes. Clean blades prevent the clay from tearing and keep the spikes sharp.
Step 2: Crafting the Squirrel
-
Build the body and head:
Form two balls of clay: a larger oval for the body and a smaller tear-drop shape for the head. Score and slip the connecting surfaces, then press the head onto the narrower top of the body. -
Seamless blending:
I like to use a wooden modeling tool here to drag clay across the seam, blending the neck until the join is invisible. Smooth it over with a damp sponge. -
Add the tail:
Roll a thick coil of clay that tapers at both ends. Flatten it slightly and curve it into a ‘S’ shape. Attach one end to the lower back of the squirrel, pressing it upwards against the body. -
Shape the ears:
Pinch two small triangles of clay and attach them to the top of the head. Use your fingers to curve them slightly forward for an alert expression. -
Attach the arms and feet:
Create small sausage shapes for arms and flat ovals for feet. Attach the arms folded in front of the chest and the feet peeking out at the base to stabilize the figure. -
Detail the squirrel:
Use a needle tool to scratch delicate lines into the tail to suggest fur. Poke small decorative holes on the body similar to the hedgehog’s details to tie the two pieces together stylistically.
Acorn Accessory
Make a tiny acorn for the squirrel to hold. Roll a small oval and add a textured cap before slipping it between the squirrel’s folded paws.
Step 3: Finishing Touches
-
Dry thoroughly:
Allow your woodland friends to dry slowly under a loose plastic sheet for the first day, then uncover them to dry completely. This prevents cracking, especially on the squirrel’s tail. -
Fire or cure:
If using kiln-fire clay, bisque fire to the appropriate cone. If using air-dry clay, ensure it is bone dry before painting. -
Paint the eyes:
Dip a brush handle or small round brush into white paint to make round circles for eyes. Once dry, add smaller black pupils. Add a dot of black to the noses as well. -
Define features:
Use a fine liner brush with diluted black paint or a black ink pen to outline the eyes and add tiny highlights. This makes them pop against the raw brown clay.
Place them on a windowsill or shelf to add a touch of handcrafted warmth to your room
Deer Ornament in Brown Clay
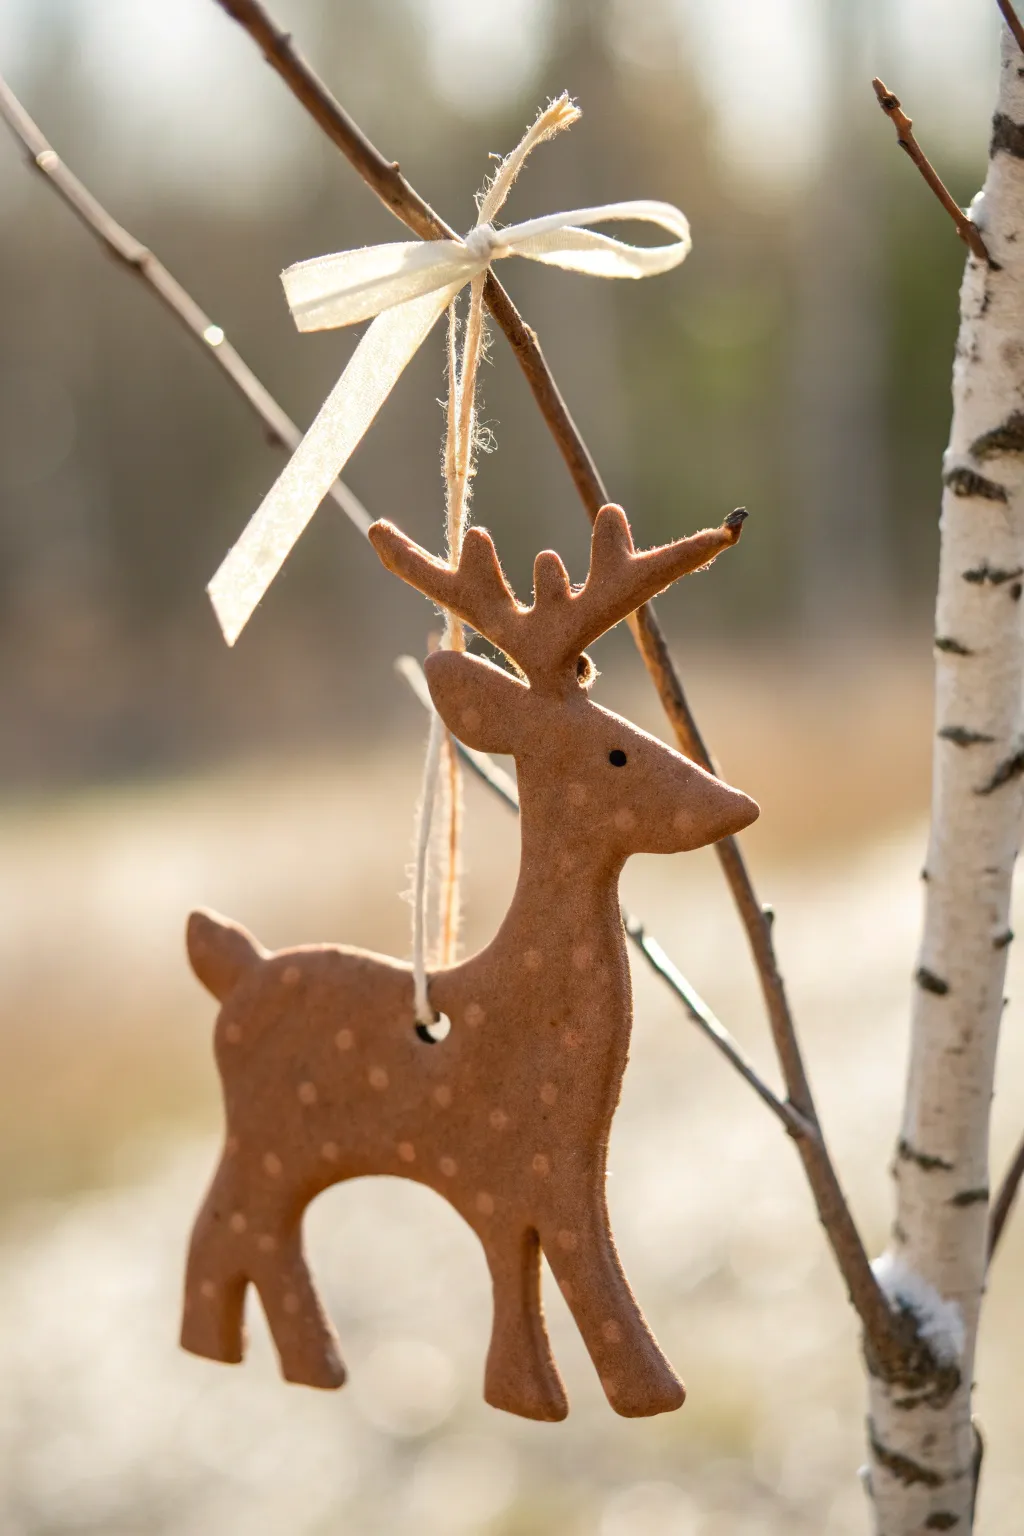
Capture the charm of the forest with this simple yet elegant deer ornament that looks just like a gingerbread cookie. Crafted from brown clay and speckled with delicate white finishings, it brings a warm, Scandinavian feel to any branch or holiday display.
Step-by-Step Tutorial
Materials
- Brown polymer clay or air-dry terracotta clay
- Deer-shaped cookie cutter
- Rolling pin
- Parchment paper or silicone mat
- Fine-grit sandpaper (optional)
- Small straw or skewer (for the hole)
- White acrylic paint
- Very fine detail brush or dotting tool
- Natural jute twine
- Sheer cream ribbon
- Scissors
Step 1: Shaping the Base
-
Prepare the Clay:
Begin by conditioning your brown clay. Knead it in your hands until it is pliable and smooth, ensuring there are no air bubbles trapped inside. -
Roll it Out:
Place the clay between two sheets of parchment paper or directly on a silicone mat. Roll it out to an even thickness of about 1/4 inch (6mm). You want it sturdy enough to hang but not too heavy. -
Cut the Shape:
Press your deer-shaped cookie cutter firmly into the clay. Give it a subtle wiggle before lifting to ensure clean edges. -
Smooth the Edges:
After removing the excess clay, dip your finger in a little water (if using air-dry clay) or baby oil (if using polymer) and gently smooth the cut edges of the deer to remove any sharpness or burrs. -
Create the Hanging Hole:
Using a small straw or a skewer, poke a hole through the main body of the deer, positioning it centrally near the back/spine area so the deer will hang balanced and level.
Uneven Surface?
If your clay surface looks bumpy after rolling, try rolling over parchment paper instead of directly on the clay. This prevents roller marks and sticking.
Step 2: Baking and Refining
-
Bake or Dry:
If using polymer clay, bake according to the package instructions (usually around 275°F/135°C for 15-30 minutes). If using air-dry clay, let it sit undisturbed for 24-48 hours until fully hardened. -
Cool Down:
Allow the piece to cool completely on a flat surface to prevent any warping. -
Sand for Perfection:
Once cool, inspect the edges. I find that a quick pass with fine-grit sandpaper can remove any lingering rough spots, giving the ornament a more professional finish. -
Clean the Surface:
Wipe the deer down with a slightly damp cloth to remove any sanding dust before you begin decorating.
Scented Clay
Mix a teaspoon of cinnamon or clove powder into your air-dry clay before rolling. Your ornament will smell like gingerbread cookies all season long.
Step 3: Decorating and Assembly
-
Paint the Eye:
Dip the very tip of a fine paintbrush or a toothpick into black paint. Carefully place a single small dot on the head to create the eye. -
Create the Spots:
Using white acrylic paint and a dotting tool (or the blunt end of a skewer), apply small, random dots across the deer’s back and flank to mimic a fawn’s markings. Keep the pressure light for consistent dot sizes. -
Let it Dry:
Allow the paint to dry completely. This usually takes only about 10-15 minutes for thin acrylic layers. -
Cut the Cord:
Cut a length of natural jute twine, approximately 8 inches long. -
Thread the Hanger:
Fold the twine in half and push the looped end through the hole in the deer’s back. Pull the tails through the loop to create a lark’s head knot, or simply tie it off at the top. -
Add the Ribbon:
Cut a piece of sheer cream ribbon. Tie it into a small, neat bow around the jute twine, positioning it a few inches above the deer’s back. -
Final Adjustments:
Trim the ends of the ribbon at an angle to prevent fraying and ensure the bow sits squarely on the twine.
Hang your lovely woodland creation on a branch and enjoy the cozy atmosphere it creates


The Complete Guide to Pottery Troubleshooting
Uncover the most common ceramic mistakes—from cracking clay to failed glazes—and learn how to fix them fast.
Puppy or Kitten Figurines
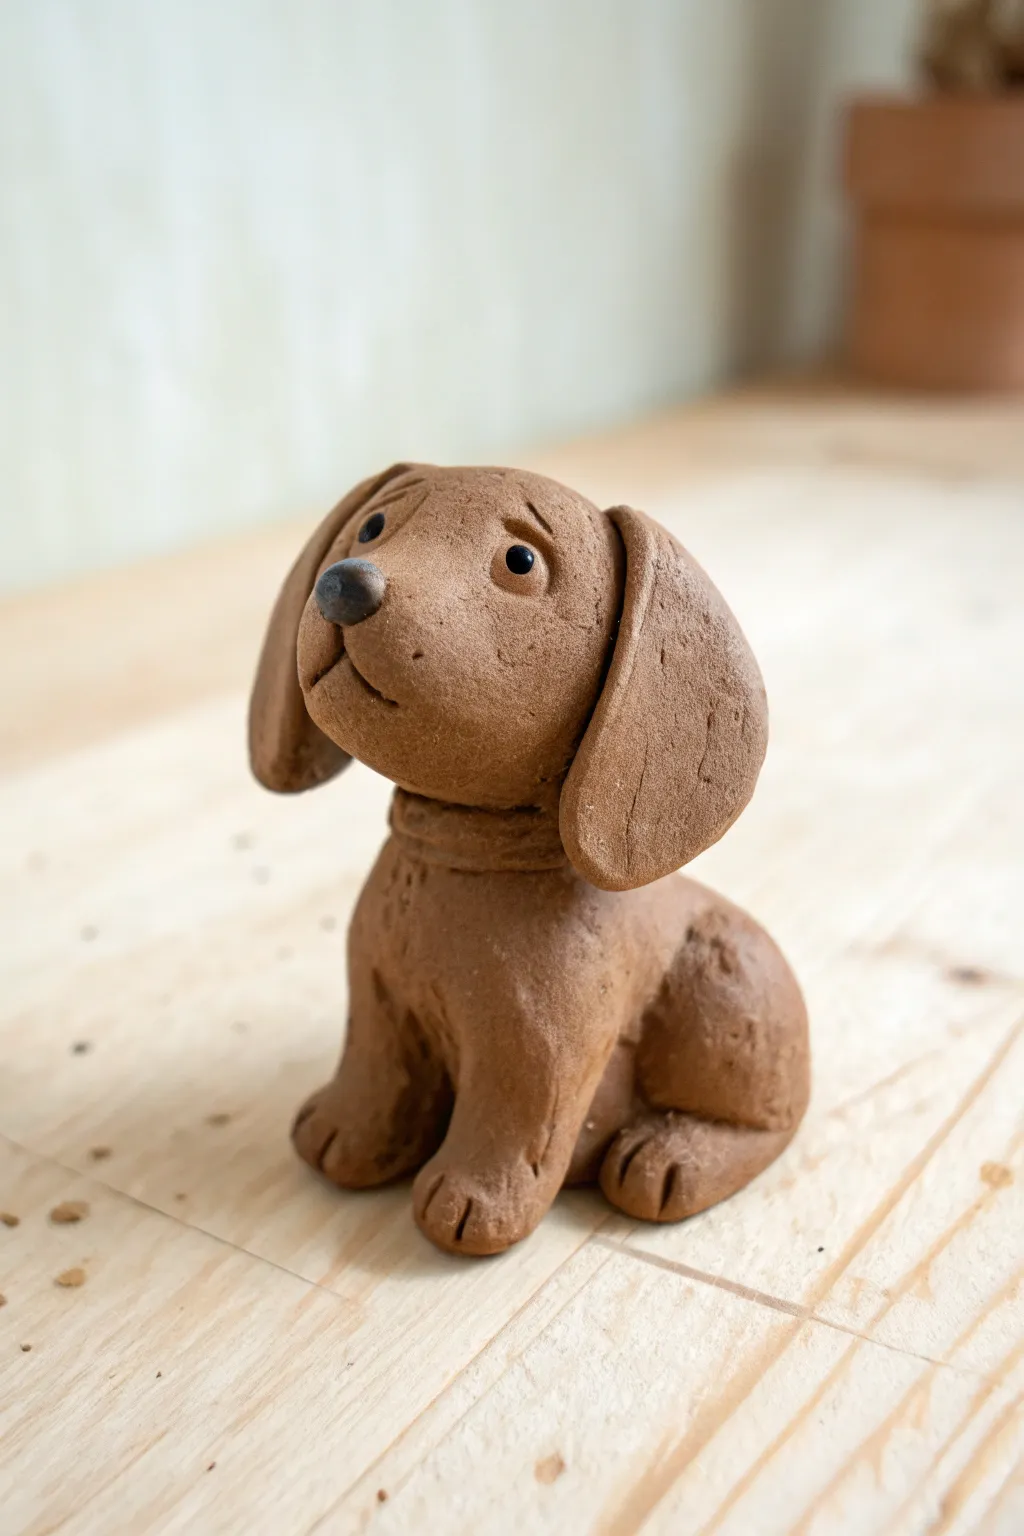
Capture the sweetness of man’s best friend with this adorable sitting puppy figurine made from warm brown clay. The finished piece features lovable floppy ears, a tilted head, and a smooth, earthy texture that looks great on any shelf.
Step-by-Step
Materials
- Brown polymer clay or air-dry clay (terra cotta color)
- Black clay (very small amount for eyes/nose)
- White clay (tiny speck for eye highlights)
- Needle tool or toothpick
- Ball stylus tool
- Clay knife or craft blade
- Smooth work surface
Step 1: Shaping the Base Body
-
Form the torso:
Start with a medium ball of brown clay about the size of a walnut. Roll it into a smooth sphere, then gently elongate it into a pear shape. This will be the puppy’s seated body. -
Flatten the base:
Tap the wider bottom of your pear shape against your work surface. You want it to sit flat and stable so your puppy doesn’t tip over later. -
Create the front legs:
Roll two smaller, equal-sized logs of clay for the front legs. Attach them vertically to the front of the body, blending the clay at the top shoulder area securely into the torso so no seams show. -
Add the hind legs:
Form two rounded, slightly flattened balls for the haunches. Press these onto the lower sides of the body. They should look like bent knees in a seated position.
Step 2: Head and Expression
-
Create the head shape:
Roll a slightly smaller ball of clay for the head. Gently press it to slightly flatten the front where the face will be, keeping the back rounded. -
Attach the collar:
Before adding the head, roll a thin snake of clay and wrap it around the top of the body’s neck area. Press it down gently to form a collar. -
Mount the head:
Place the head onto the neck. I like to tilt it slightly to the side to give the puppy a curious, pleading expression. Blend the clay at the back of the neck to secure it. -
Add the muzzle:
Make a small oval of clay and press it onto the lower center of the face. This creates the snout area. -
Sculpt the mouth:
Using your needle tool or knife, carefully carve a small inverted ‘Y’ shape into the muzzle to create the mouth and cleft lip. -
Add the nose:
Take a tiny piece of black clay, roll it into a triangle with rounded corners, and press it firmly onto the top of the muzzle.
Fixing Cracks
If you see small cracks forming as you blend pieces, dip your finger in a tiny bit of water (for air-dry) or baby oil (for polymer) and smooth the area in circular motions.
Step 3: Ears and Details
-
Make the ears:
Shape two flat, teardrop-shaped pieces of clay. These should be fairly thick so they don’t crack easily. -
Attach the ears:
Press the narrow end of the teardrops onto the sides of the head. Bend the wide ends downward so they flop naturally against the cheeks. -
Create eye sockets:
Use a ball stylus to make two small indents above the muzzle where the eyes will go. -
Insert the eyes:
Roll two tiny balls of black clay and press them into the sockets. Add microscopic specks of white clay on top for a life-like glint. -
Refine the brows:
Use a needle tool or your fingernail to gently impress small eyebrows above the eyes. Angling them upwards in the center creates a sweet, sad-puppy look. -
Sculpt the paws:
Use your knife tool to press two or three lines into the bottom of each front leg and hind foot to differentiate the toes. -
Final smoothing:
Check the entire sculpture for fingerprints. Gently rub them away with your finger or a slightly damp brush to ensure a professional finish before baking or drying.
Add Texture
Before the clay hardens, tap the surface gently with a stiff-bristled toothbrush. This removes the plastic shine and creates a realistic furry texture.
Once dry or baked according to your clay’s instructions, your loyal little companion carries a charm that is sure to make everyone smile
Chocolate-Dipped Donut Charms
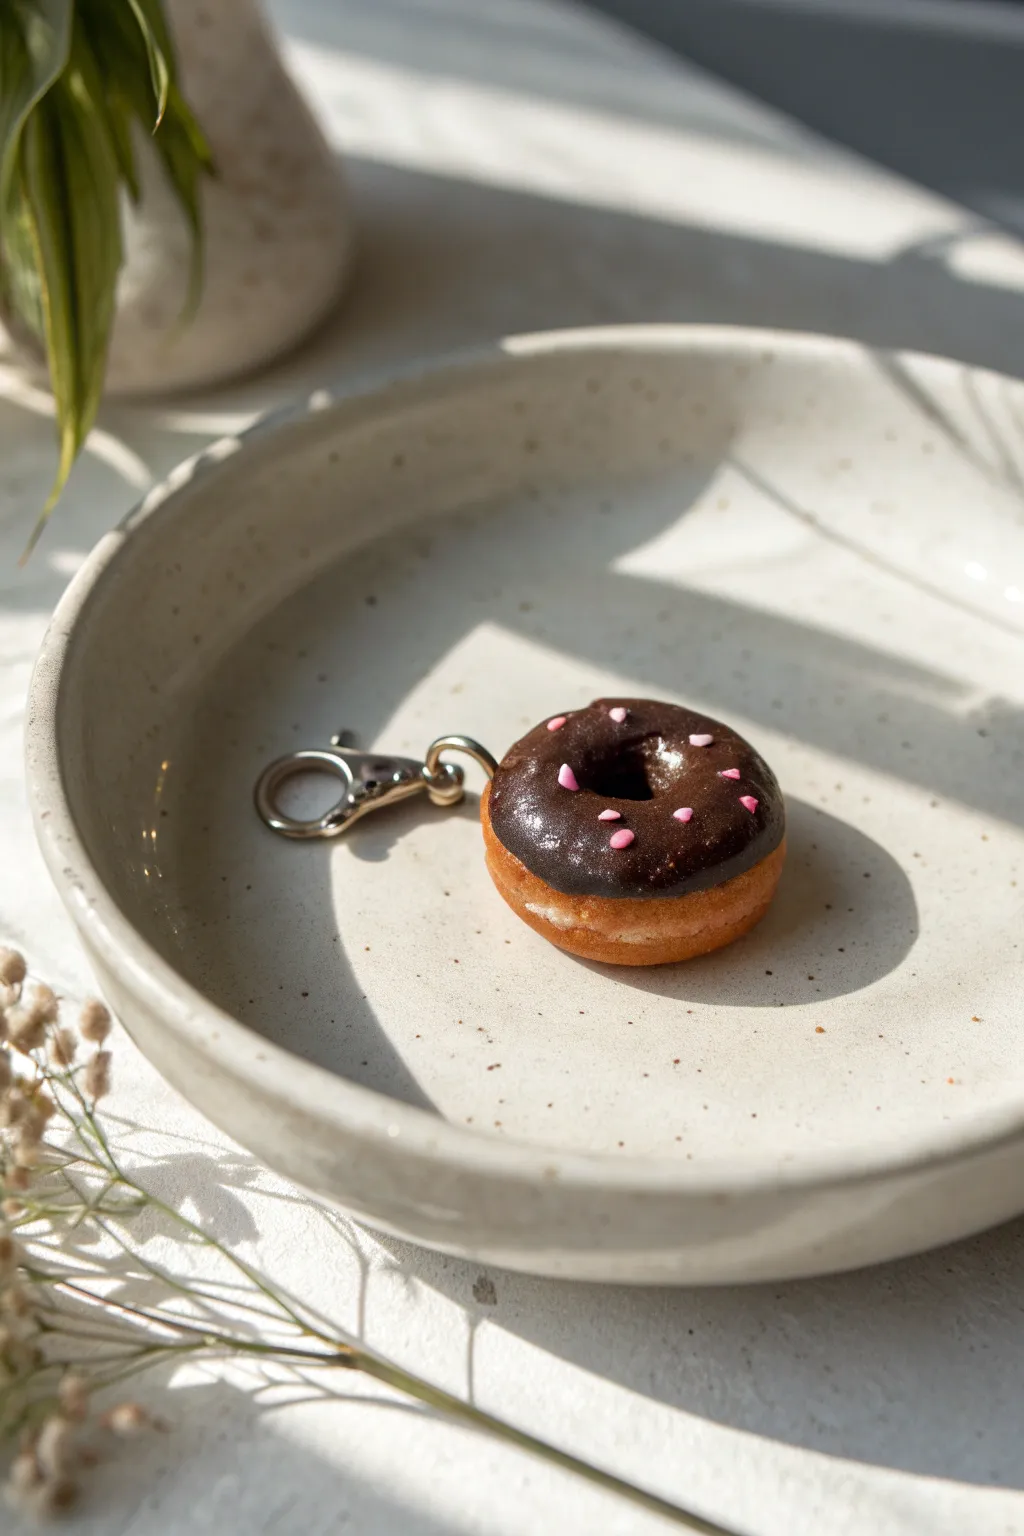
This bite-sized charm captures the delicious appeal of a chocolate-dipped donut with startling realism. Using polymer clay and liquid sculpey, you’ll create a durable accessory perfect for keychains or zipper pulls.
Detailed Instructions
Materials
- Tan or beige polymer clay (dough color)
- White polymer clay
- Liquid polymer clay (translucent or white)
- Dark brown soft pastels or chalk
- Pink polymer clay
- Metal eye pin
- Lobster claw clasp and jump ring
- Toothbrush or crumpled foil (for texture)
- Needle tool or toothpick
- Dotting tool or small ball stylus
- Gloss glaze (UV resin or polyurethane varnish)
- Needle nose pliers
- Artist paintbrush
Step 1: Shaping the Donut Base
-
Mix the dough color:
Begin by conditioning your tan clay. If it looks too dark, mix in a small amount of white to achieve a light, baked-dough shade. -
Form the basic shape:
Roll a small ball of the tan clay, about the size of a marble (roughly 1 inch diameter). flatten it slightly into a thick disc. -
Create the center hole:
Use a dotting tool or the end of a paintbrush handle to press an indentation into the center of the disc. Don’t punch all the way through yet; instead, flip it over and press from the other side until the holes meet, creating a smooth donut shape. -
Refine the edges:
Gently soften the edges of the hole and the outer rim with your fingertips so the donut looks puffy and risen, not sharp.
Pro Tip: The Perfect Tan
For the realistic ‘baked’ stripe in the middle, apply lighter chalk pastels first, then layer darker oranges/browns only on the very top and bottom curves.
Step 2: Texturing and Baking Effect
-
Add realistic texture:
Lightly tap a clean toothbrush or a ball of crumpled aluminum foil over the entire surface of the clay. This mimics the porous texture of a fried donut. -
Create the bake line:
Use soft pastels (yellow ochre and burnt sienna) shaved into a powder. With a dry fluffy brush, dust the top and bottom of the donut, leaving a lighter horizontal strip around the middle untouched. This ‘tan line’ is key for realism. -
Insert hardware:
Trim a metal eye pin to about half an inch. Insert it into the side of the donut. You can add a speck of liquid clay to the shaft to help it bond permanently during baking.
Step 3: Adding the Glaze and Sprinkles
-
Prepare the chocolate sauce:
Mix liquid polymer clay with shaved dark brown pastel chalk. Stir thoroughly on a palette until you have a thick, opaque chocolate syrup consistency. -
Apply the icing:
Carefully dab or drip the chocolate mixture onto the top of the donut using a needle tool or toothpick. Guide the liquid near the edges, letting it pool slightly but not drip all the way down the sides. -
Make the sprinkles:
Roll a very tiny snake of pink polymer clay—as thin as a thread. Bake this strand for just 2-3 minutes to harden it slightly, then chop it into tiny segments with a blade. -
Decorate the top:
Using tweezers or a slightly damp toothpick, pick up the tiny pink segments and place them randomly onto the wet chocolate icing.
Troubleshooting: Runny Icing
If your liquid clay chocolate is running down the sides too fast, let the mixture sit open for 20 minutes to thicken, or add a pinch of cornstarch.
Step 4: Finishing Touches
-
Bake the project:
Bake the charm according to your clay manufacturer’s instructions (usually 275°F for 15-30 minutes). I like to support the eye pin on a bit of foil so it doesn’t droop. -
Cool down:
Allow the piece to cool completely before handling. It will be slightly soft when hot but hardens as it cools. -
Add the shine:
Apply a coat of gloss glaze or UV resin specifically to the chocolate area. This makes the icing look wet and sticky while keeping the dough matte. -
Create the filling look:
If you want a ‘cream-filled’ look peeking out, dab a tiny bit of white paint or liquid clay mixed with white chalk into the center hole area before sealing. -
Attach the clasp:
Open a jump ring using your pliers. Thread it through the eye pin on the donut and the loop of the lobster clasp. -
Secure the hardware:
Close the jump ring tightly, ensuring the ends meet flush so the charm doesn’t slip off.
Enjoy clipping this sweet, zero-calorie treat onto your bag or keys

TRACK YOUR CERAMIC JOURNEY
Capture glaze tests, firing details, and creative progress—all in one simple printable. Make your projects easier to repeat and improve.
Mini Chocolate Bar Tiles

Create deceptively realistic mini chocolate bars using brown polymer clay and clever texturing techniques. These charming tiles look good enough to eat and make perfect additions to miniature scenes or novelty jewelry.
Step-by-Step Guide
Materials
- Brown polymer clay (chocolate shade)
- Translucent polymer clay
- Rolling pin or pasta machine
- Grid texture sheet or square cutter
- Sharp craft knife
- Soft pastel chalks (lighter brown/tan)
- Soft paintbrush
- Satin varnish or glaze
- Baking tile or parchment paper
- Oven
Step 1: Preparing the Clay Base
-
Mixing the Color:
Start by conditioning your brown polymer clay until it is soft and pliable. If the brown is too flat, I like to mix in a tiny amount of translucent clay to give it that waxy, realistic chocolate depth. -
Rolling the Sheet:
Roll the conditioned clay out into an even sheet, approximately 4mm thick. A pasta machine on a medium setting ensures consistency, but a rolling pin with depth guides works perfectly well. -
Cutting the Shape:
Using your sharp craft knife or a rectangular cutter, slice a clean rectangle from the clay sheet. Aim for a size around 3 inches by 1.5 inches for a standard mini-bar look. -
Refining Edges:
Gently tap the sides of your rectangle against your work surface to square them up and remove any sharp cutting ridges.
Clean Cuts Secret
Chill your clay sheet in the fridge for 10 minutes before cutting the grid lines. Firm clay won’t drag or distort, giving you crisper ‘chocolate’ segments.
Step 2: Creating the Grid Pattern
-
Marking Guidelines:
Lightly plan out your grid. You want a 3×8 or 3×6 pattern depending on your rectangle’s length. Make tiny tick marks along the edges to guide your cuts. -
Scoring the Lines:
Press the back (dull side) of your craft knife or a thin metal ruler into the clay to create deep indentations. Don’t cut all the way through; press down about 50% of the thickness. -
Creating the Squares:
Repeat the scoring process perpendicular to your first lines to complete the grid. Ensure the lines are straight and the squares look uniform. -
Softening the Grid:
Chocolate flows slightly when molded, so use a soft-bristled brush or your finger to very gently tap the intersections of the grid, slightly rounding the sharp corners of each ‘square’. -
Beveling the Outer Edge:
Ideally, chocolate bars aren’t sharp at the perimeter. Run a smoothing tool or your finger along the very outer edges to create a slight bevel.
Bite Marks
Use a crinkle cutter or tear a corner off before baking to simulate a bite mark. Add texture inside the ‘break’ with a needle tool for realism.
Step 3: Texturing and Finishing
-
Simulating the ‘Bloom’:
Chocolate often has a slight powdery look or ‘bloom’. Scrape a small amount of lighter brown or tan soft pastel chalk into a powder. -
Applying the Dust:
Load a dry, fluffy paintbrush with the pastel powder and dab off the excess. Lightly dust the surface of the unbaked clay, focusing on the high points of the squares. -
Adding Surface Texture:
To mimic the slight imperfections seen in the photo, take a stiff toothbrush or a piece of crumpled foil and very gently tap it over the surface. You want microscopic texture, not deep pits. -
Baking:
Transfer the piece to a ceramic baking tile or parchment paper. Bake according to your brand of clay’s instructions—usually 275°F (130°C) for about 30 minutes. -
Cooling:
Allow the clay to cool completely inside the oven or on the counter before handling. It is fragile while warm. -
Sealing Options:
For a highly polished look, apply a satin glaze. However, for the matte, artisanal look in the photo, you might skip this step or use a matte varnish sparingly.
Now you have a batch of incredibly realistic chocolate tiles ready to display or turn into jewelry
Pretzel Magnets or Keychains
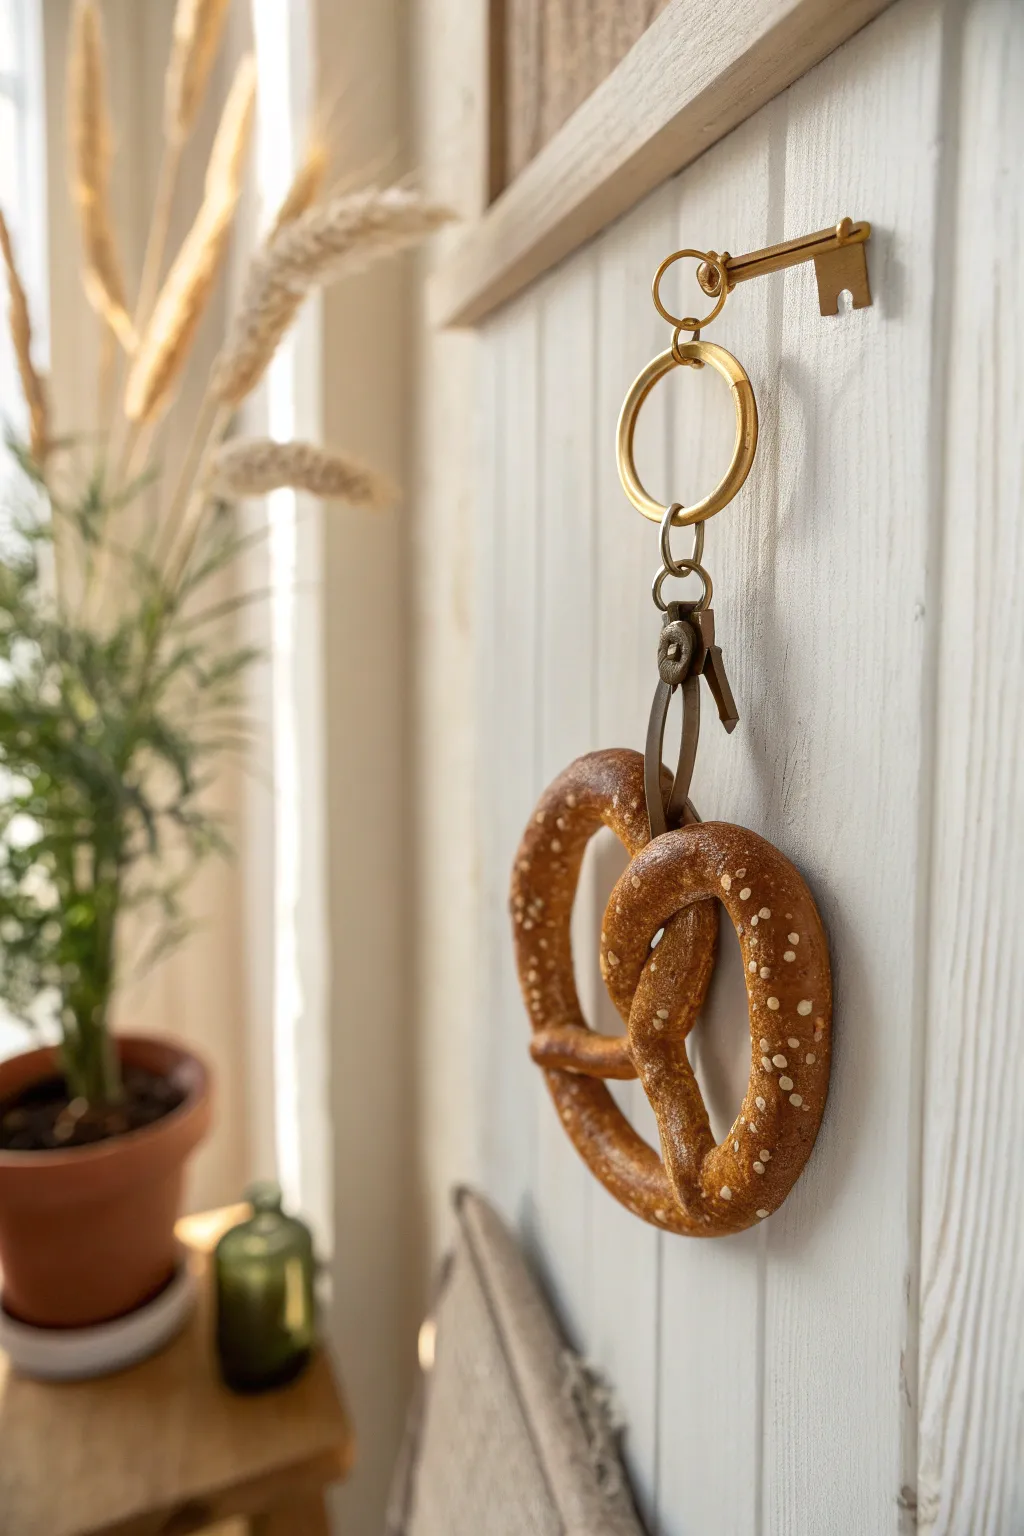
Add a savoury twist to your décor with this ultra-realistic clay pretzel that looks good enough to eat. It captures that classic knotted shape and golden-brown finish, complete with little faux salt crystals for texture, and hangs elegantly from a leather strap.
Step-by-Step Tutorial
Materials
- Polymer clay (dough color/beige/translucent mix)
- Soft pastels (yellow ochre, burnt sienna, dark brown)
- Paintbrush (soft, fluffy)
- White coarse glitter, crushed glass, or white opaque polymer clay bits (for salt)
- Leather cord or strip (brown)
- Liquid polymer clay (Fimo liquid or similar)
- Gloss varnish or polyurethane meant for clay
- Small metal jump ring
- Awl or needle tool
- Key ring hardware (brass finish recommended)
- Clay blade or craft knife
Step 1: Shaping the Dough
-
Mix the Base Color:
Start by conditioning your polymer clay. You want a realistic dough color, so I like to mix a standard beige with a fair amount of translucent clay. This gives the final piece that slightly waxy, baked-good depth rather than looking like flat plastic. -
Roll the Log:
Take a walnut-sized ball of your conditioned clay and roll it out into a long, even snake. Aim for it to be about 8-10 inches long and roughly the thickness of a pencil, tapering slightly at the very ends. -
Form the U-Shape:
Lay the snake on your work surface in a U-shape. This is the foundation of the classic pretzel knot. -
Create the Twist:
Take the two tails of the U and cross them over each other once. Then, while holding the intersection, twist them around each other one more time. -
Secure the Knot:
Bring the twisted ends down towards the bottom curve of the U. Press the tapered ends gently onto the bottom curve at the 4 o’clock and 8 o’clock positions to seal the shape.
Too Orange?
If your pretzel looks too orange after shading, brush heavily with cornstarch or translucent powder before baking. This tones down the saturation and mimics flour dust.
Step 2: Coloring and Texturing
-
Prepare the Pastels:
Shave some chalk pastels into fine powder using your craft knife. You’ll need a gradient: yellow ochre, a medium burnt sienna, and a darker brown. -
Apply the Base Coat:
Using a soft, dry brush, dust the entire pretzel with the yellow ochre powder. This acts as the initial ‘lightly baked’ undercoat. -
Build the Browning:
Dip your brush into the burnt sienna and apply it to the top surfaces of the pretzel—the parts that would naturally brown faster in an oven. Leave the crevices and the underside lighter. -
Add Crispy Edges:
Use the darkest brown sparingly on the very tops of the twist and the outer curves to simulate that deep golden crust. -
Insert Formatting Hole:
Before baking, use an awl or needle tool to poke a hole through the top central loop of the pretzel. Make sure it’s wide enough for your leather cord.
Realistic Salt
For the most realistic salt, use translucent clay w/ white paint mixed in. Bake a thin sheet, chop it into irregular squares, and use these ‘grains’ on the pretzel.
Step 3: The Salt & Finish
-
Add the Adhesive:
Dab tiny dots of liquid polymer clay randomly over the top surface where you want the salt grains to sit. -
Sprinkle the Salt:
Carefully place your white chunks—whether it’s coarse white glitter, crushed glass, or tiny bits of baked white clay—onto the liquid clay dots. Press them down very gently. -
Bake:
Bake the pretzel according to your clay manufacturer’s instructions (usually 275°F/130°C for 15-30 minutes). Let it cool completely. -
Varnish:
Apply a coat of semi-gloss or gloss varnish to the browned areas to mimic an egg wash finish, avoiding the crevices to keep some matte floury texture.
Step 4: Assembly
-
Thread the Leather:
Cut a thin strip of leather cord. Thread it through the hole you made in the pretzel. -
Create the Loop:
Fold the leather over to create a loop and secure it. You can stitch it with a needle and heavy thread, or use a small rivet if you have the tools. Alternatively, a simple knot works for a rustic look. -
Attach Hardware:
Open a large jump ring and slide it through your leather loop. Connect this to your brass keyring hardware and close the jump ring securely using pliers.
Hang your delicious-looking creation by the door or use it as a quirky keychain to enjoy every day
Coffee and Cocoa Mini Cups
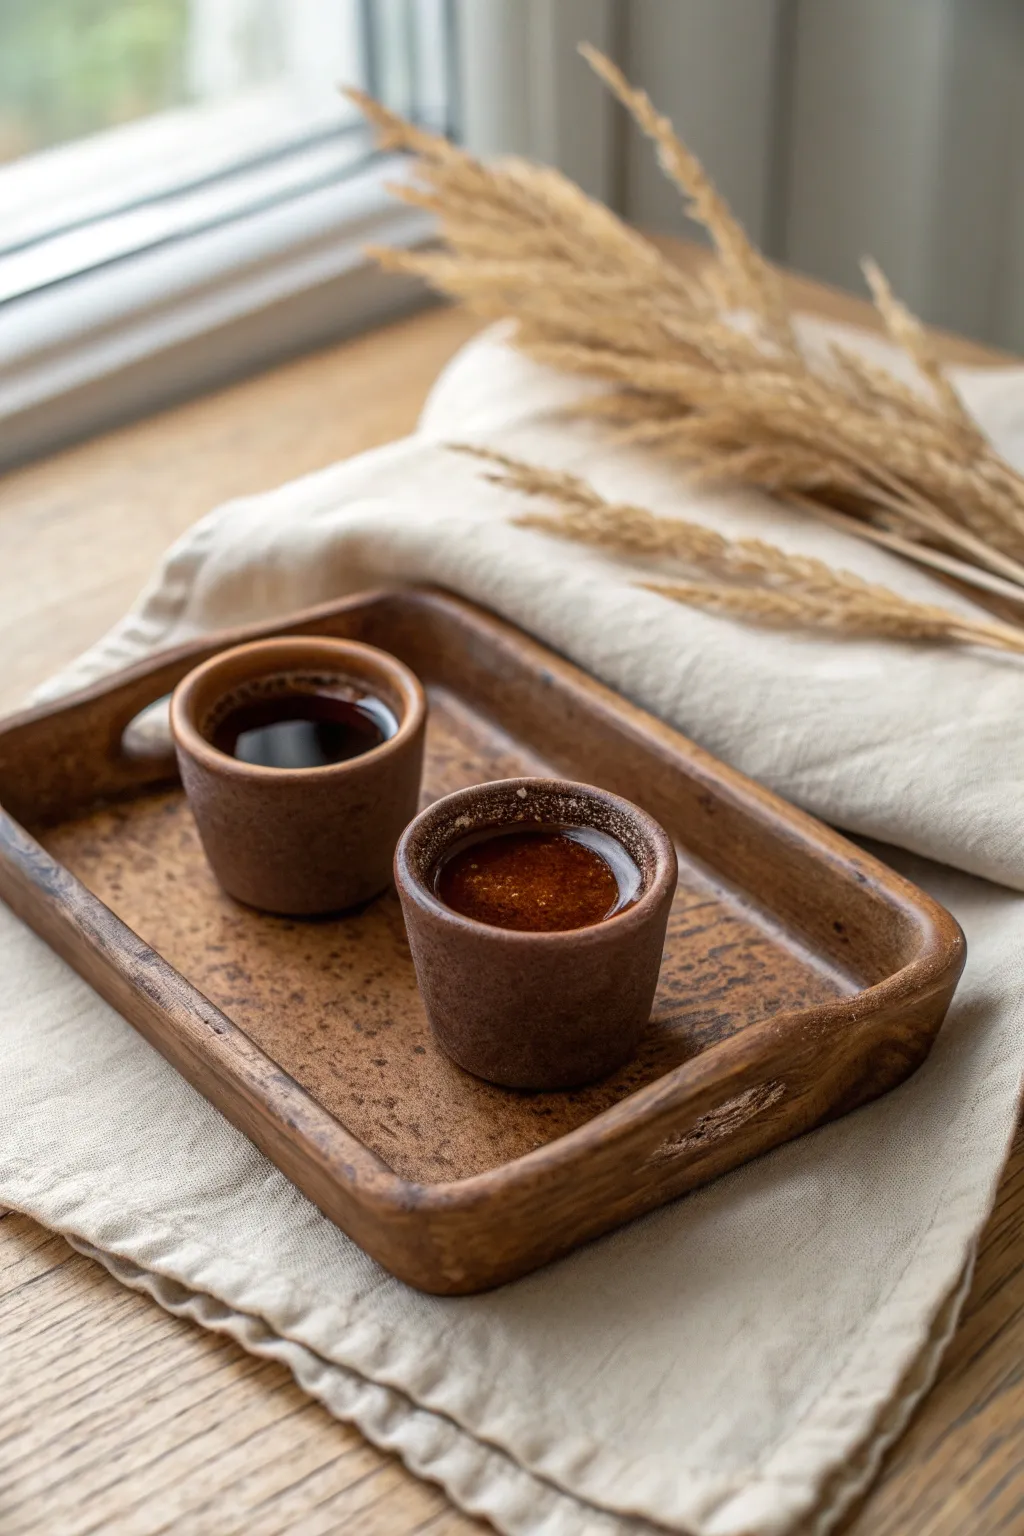
These charming, shooter-sized cups feature an earthy, unglazed texture that mimics the warmth of raw timber and stone. Paired with a matching rectangular tray, this set brings a grounded, artisanal feel to your espresso or hot cocoa service.
Detailed Instructions
Materials
- Red or brown stoneware clay (with grog for texture)
- Pottery wheel (or can be hand-built)
- Wooden throwing ribs
- Wire clay cutter
- Loop trimming tools
- Sponge
- Clear food-safe glaze (for interior only)
- Rolling pin (for tray)
- Fettling knife
- Small wooden spatula tool
Step 1: Shaping the Cups
-
Prepare the Clay:
Begin by wedging two small balls of brown stoneware clay, roughly the size of a tangerine (about 200g each). Ensure there are no air bubbles. -
Center on the Wheel:
Throw one ball onto the wheel head. Use wet hands to center it firmly, creating a low, wide mound rather than a tall cone since these cups are small. -
Open the Form:
Press both thumbs into the center to open the well. Stop about 1/4 inch from the bottom to leave enough thickness for trimming later. -
Pull the Walls:
Gently pull up the walls. Keep them relatively thick (about 3-4mm) to maintain that rustic, sturdy appearance seen in the photo. Aim for a simple cylinder shape with straight sides. -
Refine the Rim:
Use a chamois or a wet sponge to round off the lip. You want a smooth, comfortable drinking edge. -
Cut and Release:
Run a wire tool under the base of the cup and lift it off the wheel with dry hands. Repeat the process for the second cup.
Burnishing Tip
For a smoother feel on the unglazed lips, rub the clay with a smooth spoon back when leather-hard. This compresses the particles for a soft, satin finish.
Step 2: Crafting the Tray
-
Roll the Slab:
Take a larger portion of clay and roll it out into a slab about 1/4 inch thick. I like to roll it onto canvas to pick up a subtle fabric texture on the bottom. -
Cut the Rectangle:
Use a fettling knife to cut a rectangle approximately 6 inches by 9 inches. Smooth the cut edges with a damp finger. -
Form the Rim:
Pinch the edges of the slab upwards to create a raised lip about 1/2 inch high. This contains spills. -
Add Handles:
Using a small loop tool or knife, carve out two semi-circle notches on the shorter sides of the tray to verify the ‘handle’ look. -
Create Texture:
Before the clay hardens, gently tap the surface with a rough stone or a distinctively textured wooden paddle to create the speckled, worn look.
Speckle Effect
If you don’t have groggy clay, sprinkle iron oxide or granular manganese onto your slab and roll it in to create those dark speckles artificially.
Step 3: Finishing and Glazing
-
Trimming:
Once the cups are leather-hard, trim the bottoms with a loop tool to create a clean, flat foot. -
Bisque Fire:
Allow all three pieces to dry completely (bone dry) before loading them into the kiln for the initial bisque firing. -
Interior Glazing:
Pour a glossy, clear, food-safe glaze into the interior of the cups. Swirl it around to coat, then pour out the excess. Wipe any drips off the exterior rim immediately. -
Natural Exterior:
Leave the outside of the cups and the entire tray unglazed. This preserves the beautiful, matte brown clay texture. -
High Fire:
Fire the pieces to the temperature appropriate for your stoneware (usually Cone 5 or 6) to fully vitrify the clay.
Now brew a rich espresso and enjoy the tactile comfort of your handmade creation
Wood-Grain Trinket Dish
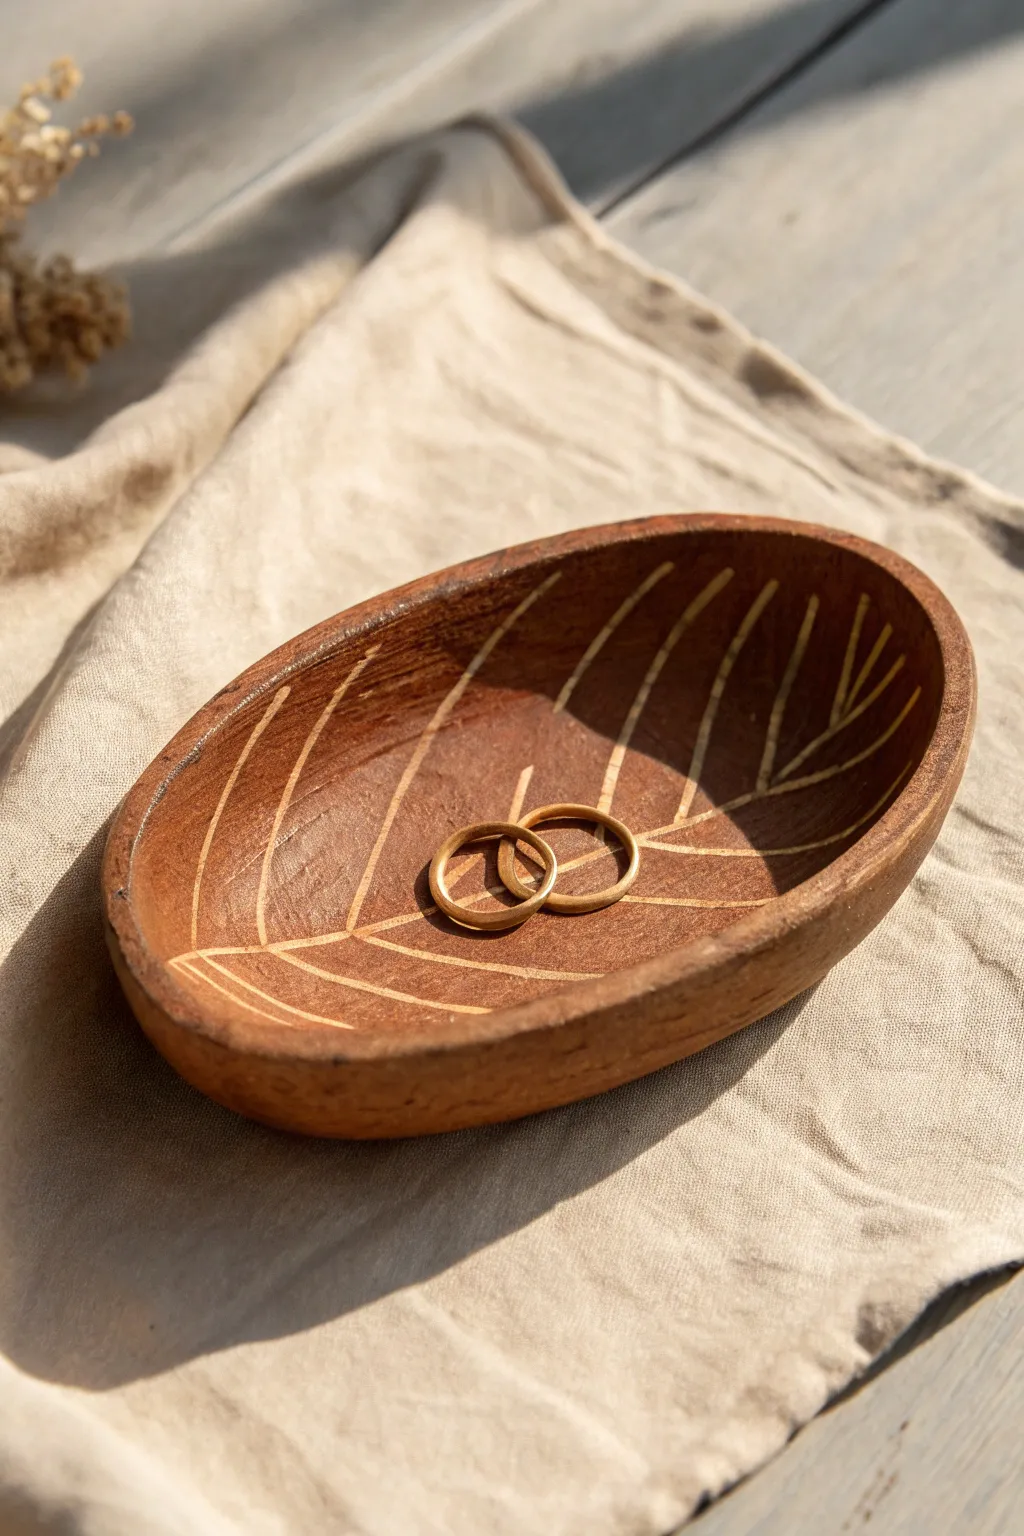
Embrace the warmth of nature with this handcrafted oval trinket dish, fashioned from earthy brown clay to mimic a fallen leaf. The carved vein details reveal the raw clay beneath a rich, burnished surface, creating a simple yet striking home for your favorite rings.
Step-by-Step
Materials
- Terracotta or brown air-dry clay
- Rolling pin
- Clay knife or fettling tool
- Small oval template (paper or cardboard)
- Sponge
- Carving tool or needle tool
- Small bowl or mold for shaping
- Sandpaper (fine grit)
- Clear matte varnish or sealant
- Water
Step 1: Shaping the Form
-
Condition the clay:
Begin by kneading a handful of brown clay until it is soft, warm, and pliable. This prevents cracks later on. -
Roll the slab:
Use your rolling pin to flatten the clay into an even slab, aiming for a thickness of about 1/4 inch. -
Cut the oval:
Place your oval paper template onto the slab. Using your clay knife, carefully trace around the edge to cut out the base shape. -
Smooth the edges:
Dip your finger or a small sponge in a little water and run it along the cut rim to soften any sharp angles or jagged bits. -
Form the curve:
Gently lift the clay oval and place it inside a shallow bowl or over a curved mold to give it a cupped shape. Press lightly so it takes the form without thinning the clay too much. -
Refine the rim:
While it’s in the mold, double-check the rim thickness. If it looks too chunky, gently pinch and smooth it for a delicate finish. -
Initial drying:
Allow the clay to dry until it is leather-hard. It should be firm enough to hold its shape but still soft enough to carve into.
Fixing Cracks
If hairline cracks appear while drying, mix a tiny bit of clay with water to make a paste (slip). Fill the crack, smooth it over, and let it dry slowly.
Step 2: Carving and Finishing
-
Map the central vein:
Using your needle tool, lightly sketch a central line running lengthwise slightly off-center, resembling a leaf’s midrib. -
Sketch the veins:
Lightly draw curved lines branching out from the center line to the rim. Keep the spacing somewhat organic rather than perfectly symmetrical. -
Carve the design:
Once happy with the placement, go over your sketched lines with a V-shaped carving tool or press deeper with the needle tool to create distinct grooves. -
Clean the burrs:
Carving often leaves little crumbs of clay. Wait for them to dry slightly, then brush them away with a soft, dry paintbrush. -
Full dry:
Let the piece dry completely according to your clay’s package instructions. This usually takes 24 to 48 hours for air-dry clay. -
Sanding:
Once bone dry, take fine-grit sandpaper and gently smooth the rim and the outside bottom. Be careful not to sand away your carved veins. -
Dust cleanup:
Wipe the entire dish with a slightly damp cloth to remove all sanding dust before sealing. -
First coat of seal:
Apply a thin layer of matte varnish to the interior. I find a soft synthetic brush works best here to get into the carved grooves without leaving brush marks. -
Finish sealing:
Once the inside is dry, flip it over and seal the bottom. Apply a second coat to the whole piece for durability.
White Vein Effect
For high contrast, paint white acrylic into the carved grooves after drying. Wipe the surface quickly with a damp cloth so paint stays only in the recesses.
Place your finished dish on a bedside table or vanity to add an organic touch to your daily routine
Tree Stump Tealight Holder
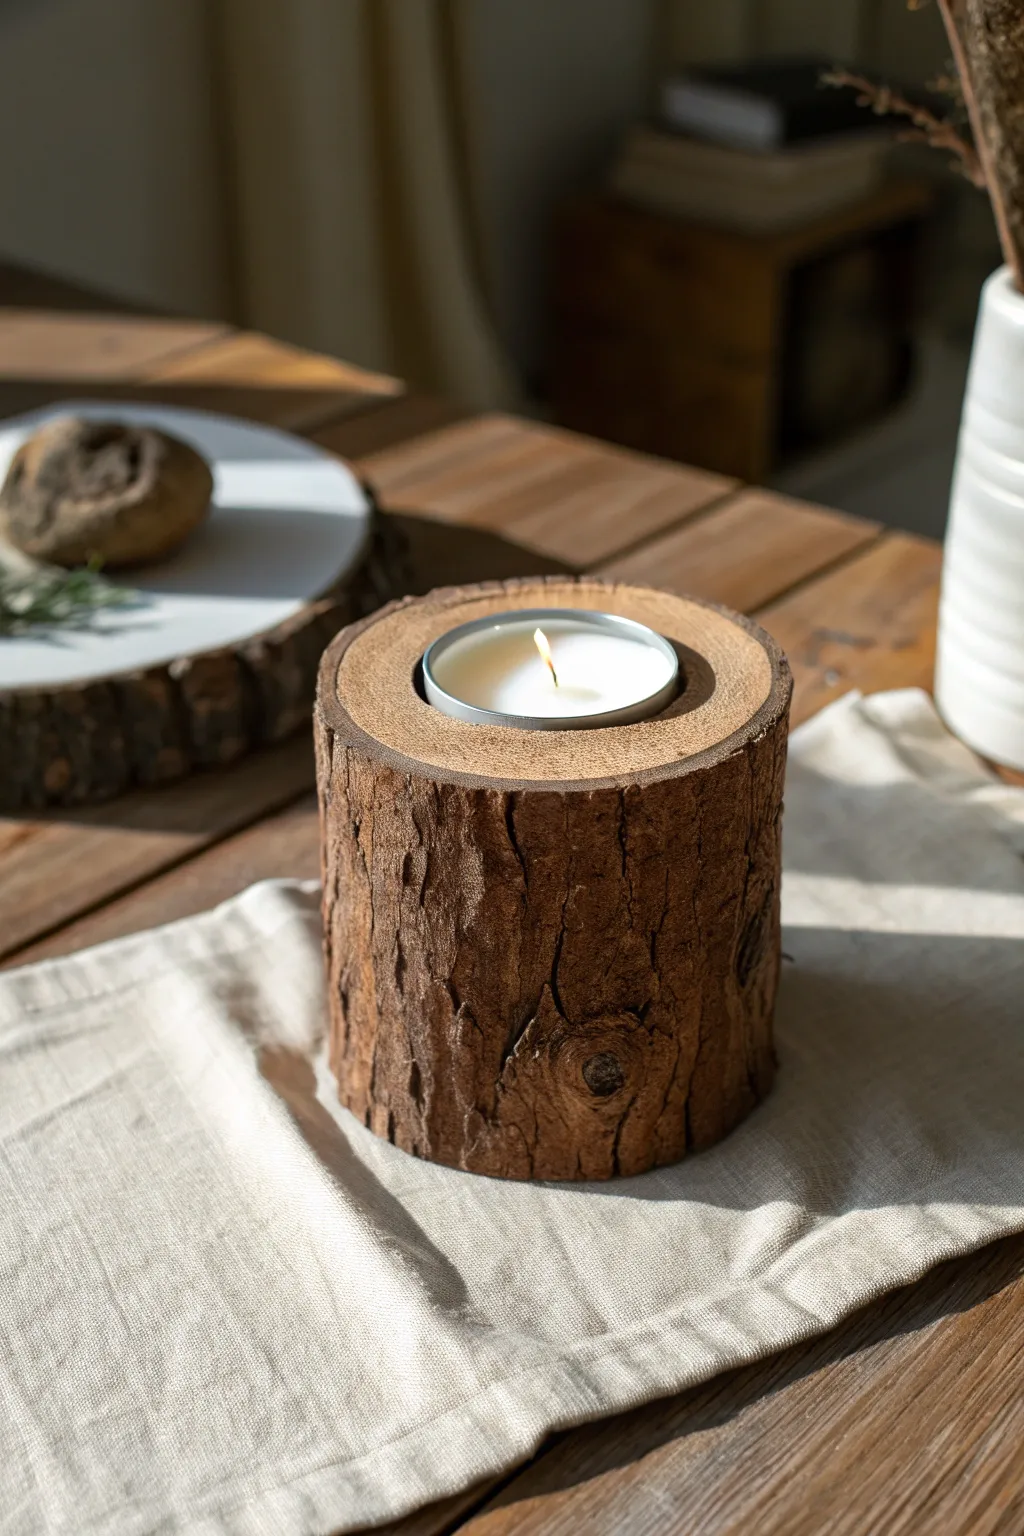
Transform simple brown clay into a remarkably realistic tree stump candle holder that brings a cozy, woodland vibe to any table setting. This project focuses on texture and natural detailing to mimic the intricate look of real bark without needing any woodworking tools.
Step-by-Step Guide
Materials
- Brown air-dry clay or polymer clay (approx. 500g)
- Tealight candle (for sizing)
- Aluminum foil
- Rolling pin
- Needle tool or toothpick
- Wire texture tool or stiff bristled brush
- Craft knife
- Acrylic paints (dark brown, black, grey, cream)
- Paintbrushes (detail and flat)
- Matte varnish
Step 1: Forming the Base
-
Prepare the core:
Start by crumpling a ball of aluminum foil into a cylinder shape roughly the size you want your stump to be. This saves clay and keeps the holder lightweight. -
Flatten the foil:
Press the top and bottom of your foil cylinder firmly against a table to create flat, stable surfaces. -
Roll out the clay:
Roll out a slab of brown clay to about a 1/4 inch thickness. Ensure it’s large enough to wrap around the circumference of your foil core. -
Wrap the core:
Wrap the clay slab around the foil cylinder. Trim any excess overlap, pinch the vertical seam together securely, and smooth it out with your fingers until invisible. -
Create the top surface:
Roll a smaller circle of clay for the top. Place your tealight candle in the center and press down gently to create a perfect indentation for the candle to sit in. -
Attach the top:
Place the indented circle onto the top of the cylinder. Blend the edges downward onto the sides of the stump, smoothing the clay so it looks like one solid piece of wood.
Cracked Clay?
If clay cracks while drying, mix a tiny bit of fresh clay with water to make a paste (slip) and fill in the cracks, then smooth over.
Step 2: Texturing the Bark
-
Rough up the surface:
Using a wire texture tool or a stiff brush, drag vertical lines all around the sides of the cylinder. This creates the primary grain of the bark underneath the deeper cracks. -
Carve deep fissures:
Take a craft knife or needle tool and carve deep, irregular vertical cracks. Vary the pressure to make some cracks wide and rugged, mimicking old bark. -
Add knot details:
I like to pick a spot on the side to create a ‘wood knot.’ Press a small tool in a circular motion to make a swirl, then drag your bark lines around this circle rather than through it. -
Lift the edges:
Where you carved the deepest cracks, use your needle tool to slightly lift and peel back the edges of the ‘bark’ to give it a 3D, flaking appearance. -
Texture the top rings:
On the flat top surface around the candle hole, use a needle tool to gently scribe concentric circles, imitating the growth rings of a tree. -
Refine the rim:
Rough up the sharp edge where the top meets the sides. Real logs rarely have a perfect 90-degree corner, so soften and chip at this edge for realism.
Mossy details
Glue small bits of dried green preserved moss into a few of the deepest bark crevices for an enchanting forest floor look.
Step 3: Finishing Touches
-
Dry the piece:
Let the clay dry completely according to package instructions. Air-dry clay may take 24-48 hours depending on thickness. -
Base coat painting:
Paint the entire bark area with a dark brown acrylic paint. Make sure to get the paint deep into all the cracks and crevices you carved. -
Dry styling the top:
Paint the top surface (growth rings) a lighter, creamy beige color to look like freshly cut wood. -
Highlighting the bark:
Using a dry-brush technique with a lighter warm brown or grey, lightly brush over the raised surfaces of the bark. This highlights the texture without filling the dark cracks. -
Adding final depth:
Mix a watery black or dark grey wash and dab it into the deepest fissures and around the knot to exaggerate the shadows. -
Seal the work:
Finish with a coat of matte varnish to protect the paint and give it a natural, non-glossy wood finish.
Place your favorite tealight inside and enjoy the warm, rustic glow of your handcrafted stump
Mushroom Cluster on Forest Base
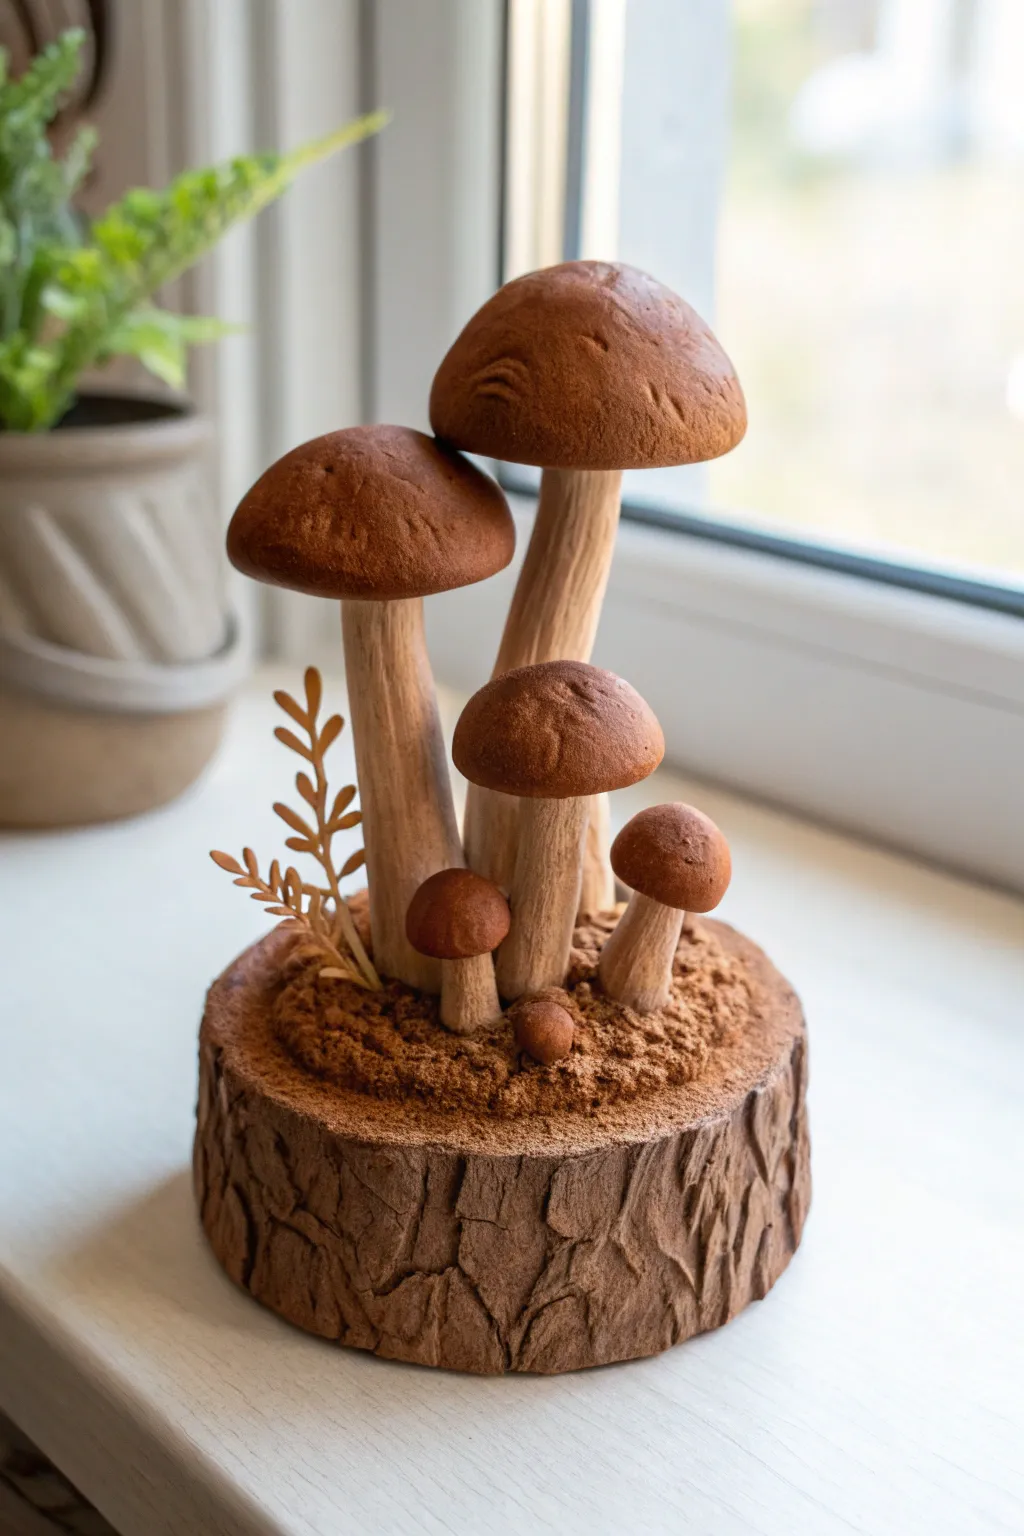
Bring a touch of woodland magic indoors with this realistic mushroom cluster sculpture. Perched atop a textured stump base, these handcrafted fungi feature natural earthy tones and lifelike details that make for a charming rustic display.
How-To Guide
Materials
- Brown air-dry clay or polymer clay (terracotta or dark brown shade)
- Lighter beige or tan clay for stems
- Aluminum foil (for armatures)
- Wooden skewers or stiff wire
- Texture tools: needle tool, stiff brush, crumpled foil ball
- Acrylic paints: dark brown, burnt umber, cream, ochre
- Fine grit sandpaper
- Craft knife
- Small dried plant sprigs or thick paper for leaves
- Strong craft glue or liquid clay
- Matte varnish
Step 1: Base Construction
-
Core Structure:
Begin by crumpling aluminum foil into a tight cylinder shape to form the core of your stump base. This saves clay and reduces drying time. -
Covering the Base:
Roll out a slab of dark brown clay about 1/4 inch thick. Wrap this around the sides of your foil cylinder, blending the seam for a continuous bark surface. -
Adding Bark Texture:
Using a craft knife or needle tool, carve deep, vertical fissures into the clay sides to simulate rough tree bark. Vary the depth and wiggle your lines slightly for a natural look. -
Creating the Top Soil:
Cover the top of the cylinder with a slightly indented layer of clay. Texture this surface vigorously with a stiff toothbrush or a ball of crumbled foil to create a messy, dirt-like appearance.
Cracked Clay Rescue
If air-dry clay shrinks and cracks while drying, fill the fissures with a ‘slip’ made of clay mixed with water. Smooth over the repair with a damp finger and let dry again.
Step 2: Sculpting the Mushrooms
-
Stem Armatures:
Cut wooden skewers or wire to various lengths for your mushroom stems. Insert these firmly into the base where you want your mushrooms to stand. -
Forming Stems:
Wrap the lighter beige clay around the skewers to build up the stems. I find it helpful to make the bases slightly thicker and bulbous, tapering gently as they go up, just like real stalks. -
Stem Texture:
Lightly drag a needle tool vertically up the stems to create subtle striations. This prevents them from looking too smooth and plastic. -
Cap Creation:
Roll balls of the darker brown clay and flatten them into domes. For the younger mushrooms, keep the caps round and tight; for the taller ones, flatten them out slightly more. -
Attaching Caps:
Place the caps onto the stems. If using polymer clay, a dab of liquid clay helps adhesion; for air-dry, scratch both joining surfaces and add a touch of water or glue. -
Under-Cap Detail:
Use a tool to gently texture the underside of the caps if visible, creating a spongy look typical of bolete mushrooms, rather than gills. -
Tiny Fungi:
Roll tiny balls and stems for the smallest baby mushrooms near the base. These don’t need wire support and can be pressed directly into the ‘soil’ texture.
Step 3: Finishing Details
-
Adding Growth:
If you have small paper cutouts or dried botanical sprigs, press them into the soft clay base near the stems to resemble forest undergrowth. -
Drying or Curing:
Bake according to package instructions if using polymer clay, or let air-dry clay sit for 24-48 hours until completely hard. -
Dry Brushing:
Once hard, dry brush a lighter tan paint over the bark texture to highlight the raised ridges. This instantly adds depth and realism to the wood. -
Dusting the Caps:
To mimic the soft, velvety look of porcini mushrooms, dab a tiny amount of cocoa powder or brown soft pastel dust onto the caps before sealing, or paint with a matte brown wash. -
Soil Enhancement:
Paint the top soil area with a wash of dark burnt umber. You can even sprinkle real dried coffee grounds or fine grit into wet paint for extra texture. -
Sealing:
Finish the entire piece with a matte varnish. Avoid glossy finishes, as real forest mushrooms and old wood usually have a dull, organic sheen.
Mossy Touch
After sealing, glue tiny bits of preserved reindeer moss or green flocking powder into the crevices of the bark and around the mushroom bases for a fresh, damp forest feel.
Place your sculpture on a windowsill or shelf to enjoy a permanent piece of nature’s quiet beauty
Leather-Look Brown Clay Earrings
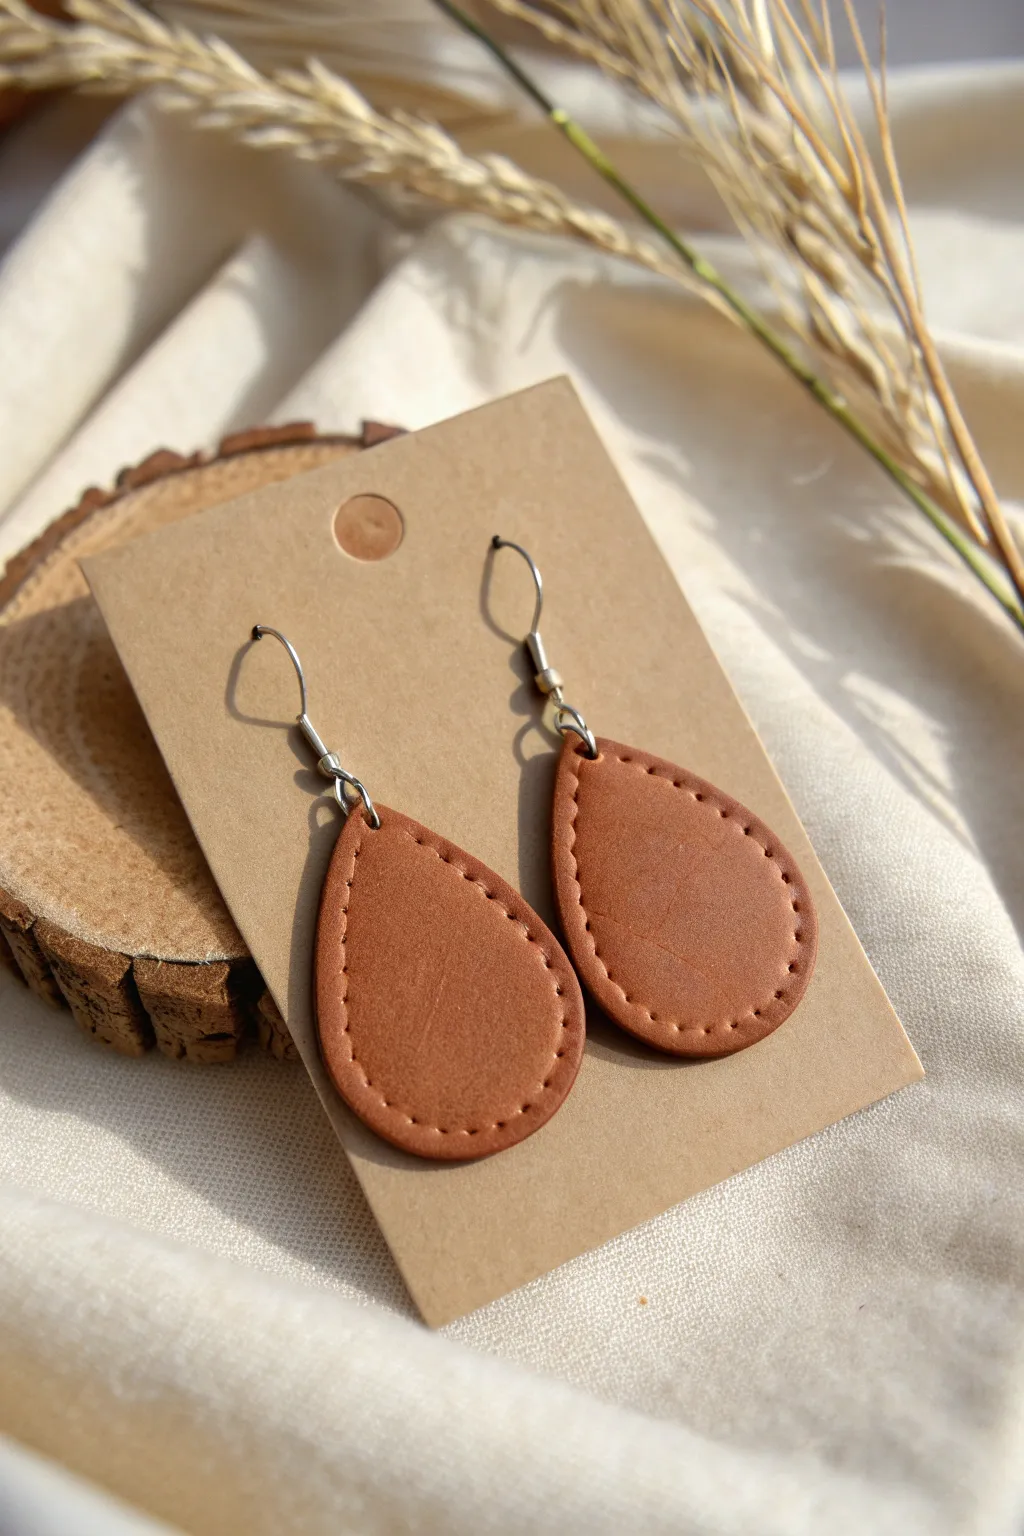
Achieve the rustic, warm look of leather without any sewing or animal products using this remarkably realistic polymer clay technique. These lightweight teardrop earrings feature convincing stitch details and a rich cognac brown finish that pairs perfectly with casual denim or cozy knits.
Step-by-Step Guide
Materials
- Polymer clay (cognac or saddle brown)
- Teardrop clay cutter (medium size)
- Clay roller or pasta machine
- Texture sponge or crumpled aluminum foil
- Needle tool or toothpick
- Brown acrylic paint (burnt umber)
- Paper towel or wet wipe
- Jump rings (silver or antique silver)
- Earring hooks (fishhook style)
- Jewelry pliers (flat nose)
- Hand drill or small round cutter
Step 1: Creating the Leather Texture
-
Condition the Clay:
Begin by warming your brown polymer clay in your hands, kneading it until it is soft and pliable. This conditioning step is crucial to prevent cracking later on. -
Roll Out a Sheet:
Roll the clay out onto your work surface to a thickness of about 3mm. You want it substantial enough to hold the texture but thin enough to be lightweight for ears. -
Texturizing:
Take your texture sponge (a coarse household scouring pad works great) or a ball of crumpled aluminum foil. Press it firmly and repeatedly into the entire surface of the clay sheet. -
Inspect the Surface:
Look closely at the clay. If there are any smooth spots remaining, go back over them with your texturing tool. The key to the leather look is a completely uneven, organic surface. -
Cut the Shapes:
Place your teardrop cutter onto the textured clay. Press down firmly to cut out two identical shapes. If the clay sticks to the cutter, you can gently dust the cutter with cornstarch first. -
Soften the Edges:
Gently tap the cut edges of your teardrops with your finger to round them off slightly. Real leather doesn’t have sharp, 90-degree manufactured edges.
Step 2: Adding Stitch Details
-
Mark the Stitch Line:
Using a needle tool, very lightly score a guide line about 2-3mm inside the perimeter of the teardrop. This helps keep your stitches even. -
Create Faux Stitches:
Press the tip of your needle tool or a small blunt point into the clay along your guide line. Space these indentations evenly to mimic the look of a sewing machine stitch. -
Pierce the Hanger Hole:
Use a small round cutter or a specialized piercing tool to create a hole at the very top point of the teardrop for the hardware. Make sure the hole is big enough for your jump ring. -
Bake:
Place your clay pieces on a baking sheet lined with parchment paper. Bake according to your specific brand of clay’s instructions (usually around 275°F or 130°C for 15-30 minutes). -
Cool Down:
Allow the pieces to cool completely before handling. Polymer clay is still slightly soft when hot and hardens as it returns to room temperature.
Sticky Textures?
If your sponge or foil pulls the clay up when texturing, mist the clay surface lightly with water first. This acts as a release agent without affecting the baking process.
Step 3: Finishing and Assembly
-
The Antiquing Wash:
Mix a small amount of dark brown acrylic paint with a drop of water. Brush this wash over the entire surface of the cooled clay, making sure it gets into the texture and stitch marks. -
Wipe Away Excess:
Immediately use a paper towel or slightly damp wipe to remove most of the paint from the raised surface. The dark paint should remain only in the crevices and stitch holes, emphasizing the leather effect. -
Open Jump Rings:
Using two pairs of flat nose pliers, twist a jump ring open. The motion should be a twist away from you, not pulling the ends apart sideways, to maintain the circle shape. -
Attach the Hook:
Slide the open jump ring through the hole in the clay teardrop. Add the earring hook onto the open jump ring as well. -
Close the Ring:
Use your pliers to twist the jump ring back into a closed position, ensuring the ends meet perfectly flush so the hook doesn’t slip out. -
Repeat for Second Earring:
Perform the same assembly steps on the second earring to complete your pair.
Level Up: Glossy Edges
For a refined ‘burnished leather’ look, limit your gloss varnish application to just the very outer rim of the clay, leaving the center matte and textured.
Enjoy styling these versatile faux-leather earrings that bring an earthy elegance to any outfit
Baked Cookie Coaster Set
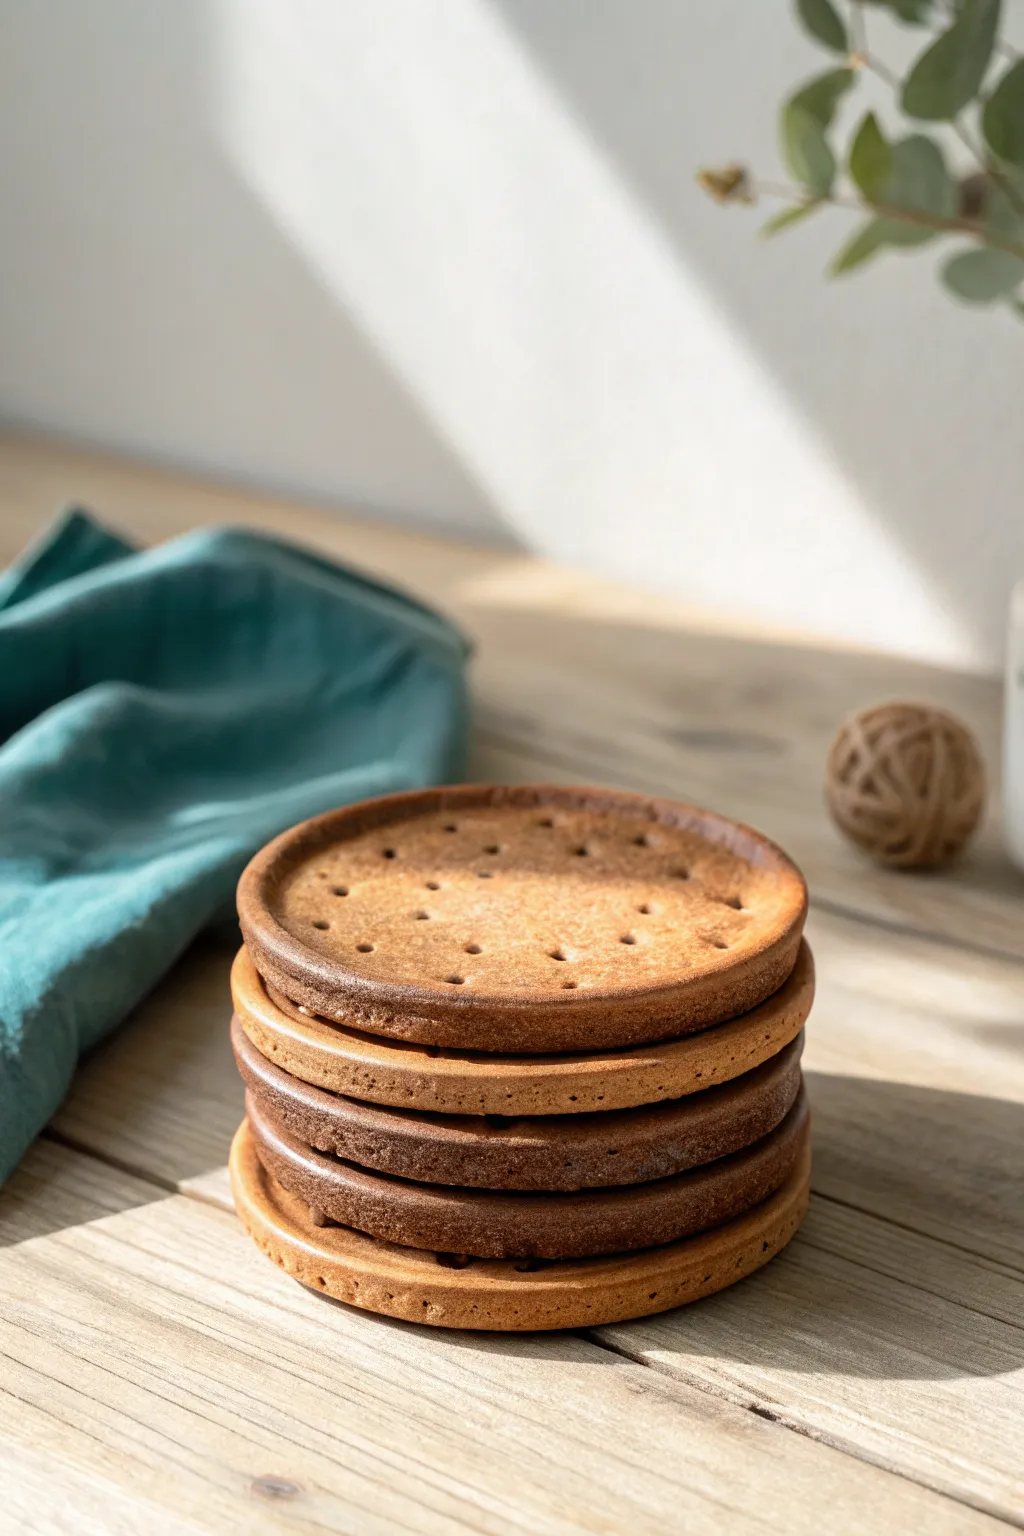
Transform humble brown clay into a charming set of coasters that look indistinguishable from perfectly baked biscuits. These sturdy, round coasters feature classic docking holes and a raised rim, adding a touch of cozy whimsy to any coffee table.
Step-by-Step
Materials
- Brown polymer clay or air-dry clay (terra cotta color works well)
- Rolling pin
- Circle cutter (approx. 3.5-4 inches diameter)
- Smaller circle cutter or jar lid (slightly smaller than the main cutter)
- Toothpick or skewer
- Soft pastel chalks in dark brown and burnt orange (for shading)
- Fluffy paintbrush
- Sandpaper (fine grit)
- Matte varnish or sealant
- Felt sheet (optional backing)
Step 1: Shaping the Dough
-
Condition the clay:
Begin by kneading your brown clay thoroughly until it’s soft and pliable. If you are using polymer clay, this warms it up; for air-dry clay, it ensures a smooth consistency without cracks. -
Roll it out:
Roll the clay out on a smooth surface to an even thickness of about 1/4 inch. Use depth guides or stacked playing cards on either side of your roller to keep the slab perfectly level. -
Cut the base shapes:
Using your large circle cutter, punch out four to six circles. These will be the foundation of your coasters. -
Create the rim indent:
Take your slightly smaller circle cutter or a jar lid and press it gently into the center of each clay circle. Don’t cut all the way through; simply make a distinct impression to define the raised outer rim. -
Soften the edges:
Use your finger or a specialized smoothing tool to gently round over the sharp top edges of the rim. Biscuits usually have soft, baked edges rather than sharp cuts.
Bakery Fresh Look
Mix a tiny pinch of translucent clay into your brown clay mix. This gives the ‘dough’ a slight depth that mimics real flour-based baking better than opaque color.
Step 2: Adding Texture & Detail
-
Dock the cookies:
Using a toothpick or a skewer, poke small holes (docking marks) into the center recessed area of the coaster. Arrange them in a loose grid or a circular pattern, just like a real cracker. -
Texture the surface:
To mimic a baked texture, gently tap the surface of the clay with a stiff toothbrush or a ball of crinkled aluminum foil. This removes the artificial smoothness of fresh clay. -
Shade the edges:
Before baking (if using polymer), scrape some dark brown and burnt orange soft pastel chalk into a powder. Use a fluffy brush to dust this powder onto the raised rim and the very edges of the coaster. -
Create a gradient:
Concentrate the darker powder on the high points where a cookie would naturally brown faster in an oven. This creates that realistic ‘golden-baked’ gradient. -
Cure the clay:
Bake the coasters according to your polymer clay package instructions, or let them air-dry completely (24-48 hours) if using air-dry clay.
Step 3: Finishing Touches
-
Sand the defects:
Once fully cured and cooled, inspect the edges. If there are any sharp jagged bits solely from the cutting process, sand them away lightly with fine-grit sandpaper. -
Seal the surface:
To protect your coaster from condensation, apply a thin coat of matte varnish. Avoid glossy finishes, as real cookies aren’t usually shiny. -
Add a protective back:
Trace the coaster shape onto a piece of felt and cut slightly inside the line. Glue this to the bottom of the coaster to prevent scratching your furniture. -
Final inspection:
Check the seal to ensure the docking holes are protected but not clogged with varnish, and let everything dry completely before use.
Sweet Variation
Before sealing, use white liquid clay or puffy paint to ‘pipe’ a design or message in the center of the coaster, making it look like an iced festive cookie.
Stack them up on your coffee table for a fun conversation starter that looks good enough to eat
Slip-Resist Vase With Brown Body
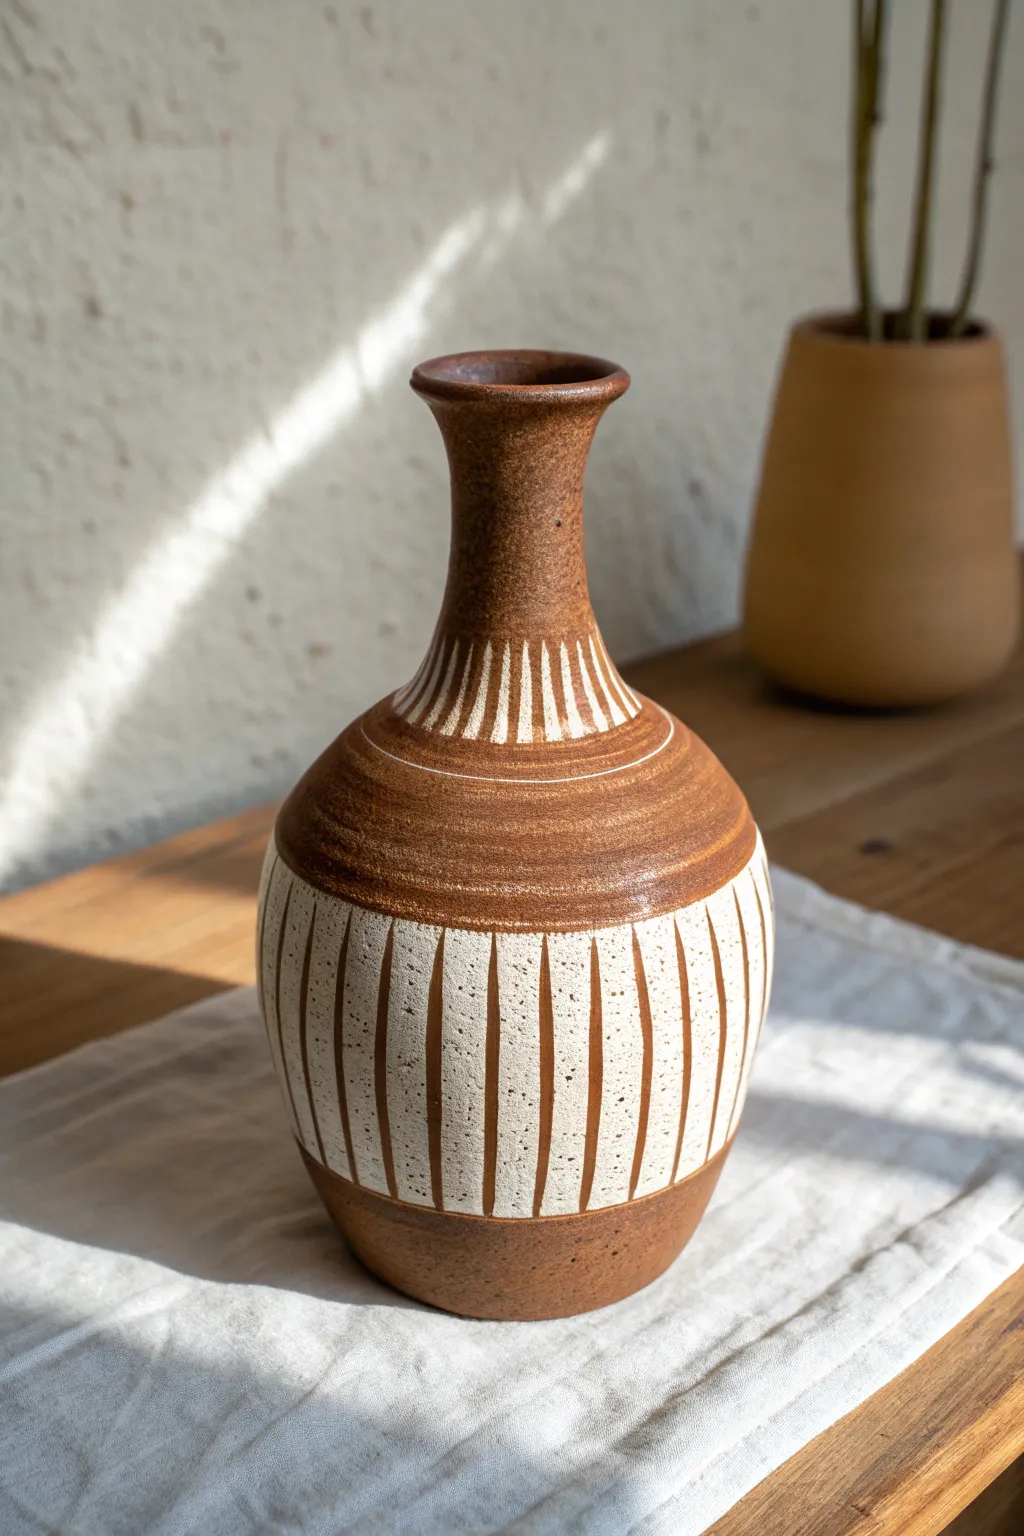
This elegant bottle vase showcases the natural warmth of brown stoneware clay contrasted against a creamy white slip decoration. The rhythmic vertical carving technique creates a tactile surface that feels both modern and hand-crafted.
Step-by-Step Guide
Materials
- Brown stoneware clay (smooth body recommended)
- White decorative slip or engobe
- Pottery wheel
- Throwing tools (sponge, rib, wire cutter)
- Trimming tools
- Soft fan brush or hake brush for slip application
- Sgraffito tool or small loop tool for carving
- Clear matte or satin glaze
- Kiln
Step 1: Throwing the Form
-
Center and Open:
Start with about 2-3 lbs of brown stoneware heavy clay. Center it firmly on the wheel and open the interior, establishing a base width of about 3-4 inches. -
Pull the Cylinder:
Begin pulling up the walls to create a tall cylinder. Keep the walls even, ensuring you have enough clay height to later collar in the neck. -
Shape the Belly:
Using a rib tool on the outside and your hand on the inside, gently push the belly of the pot outward to create a rounded, bulbous base. -
Collar the Neck:
Slowly collar in the upper portion of the clay to narrow the neck. Do this in several passes, compressing the clay after each pass to prevent buckling. -
Refine the Rim:
Flare the rim slightly outward for a classic bottle shape. Use a chamois or sponge to compress and smooth the lip for a professional finish. -
Initial Dry:
Cut the vase from the bat with a wire tool and let it dry to a leather-hard state. It needs to be firm enough to handle without warping.
Clean Lines?
If slip chips while carving, the clay is too dry. Spritz lightly with water, wrap in plastic for 30 mins, then try again. If lines are messy, the clay is too wet.
Step 2: Trimming and Surface Prep
-
Trim the Foot:
Once leather-hard, center the pot upside down on the wheel (using a chuck if necessary due to the narrow neck). Trim a neat foot ring and remove excess weight from the lower belly. -
Smooth the Surface:
Before applying slip, run a smooth rubber rib over the entire surface to remove any throwing lines or grog that might interfere with your carving later. -
Mark Banding Lines:
Place the pot back on the wheel right-side up. Using a needle tool while the wheel spins slowly, lightly inscribe two horizontal guides: one defining the shoulder area and one defining the bottom of the patterned section.
Level Up: Oxide Wash
Before clear glazing, apply a thin iron oxide wash over the carving and wipe it back. This will settle into the recesses and darken the brown clay lines for extra depth.
Step 3: Slip Application and Carving
-
Apply White Slip:
Apply 2-3 even coats of white slip to the belly section (below the shoulder line) and the neck section. Leave a wide band of bare clay on the shoulder and at the very bottom. -
Dry to Leather Hard:
Let the slip set until it is leather hard again. It should be dry to the touch but not chalky. I find that if it’s too wet, the carving lines will be mushy; too dry, and the slip will chip off. -
Carve the Neck:
Using your sgraffito or small loop tool, carve vertical lines through the slip on the neck. Start from the collar and pull downward toward the shoulder, tapering the stroke as you go. -
Carve the Body:
Repeat the vertical carving process on the main belly section. Create evenly spaced vertical stripes, removing the white slip to reveal the brown clay body underneath. -
Define the Borders:
Carve thin horizontal rings bordering the top and bottom of the brown shoulder band to create a sharp, intentional transition between the slipped and bare areas. -
Clean Up Burrs:
Once the pot is fully bone dry, gently brush off any clay crumbs or ‘burrs’ created during carving. Be careful not to smudge the white slip.
Step 4: Firing and Glazing
-
Bisque Fire:
Load the vase into the kiln and bisque fire to cone 04 (or your clay’s specific bisque temperature). -
Wax Resist:
Apply wax resist to the foot ring to prevent glaze adhesion to the kiln shelf. -
Apply Clear Glaze:
Dip the entire vase into a clear matte or satin glaze. This will seal the clay and heighten the contrast between the brown body and white slip without obscuring the design. -
Final Fire:
Fire the piece to maturity (Cone 5, 6, or 10 depending on your clay body). Allow the kiln to cool naturally.
Once fired, the rich contrast between the earthy clay and the bright slip creates a timeless piece perfect for holding dried branches or standing alone.
Botanical Impression Wall Tiles
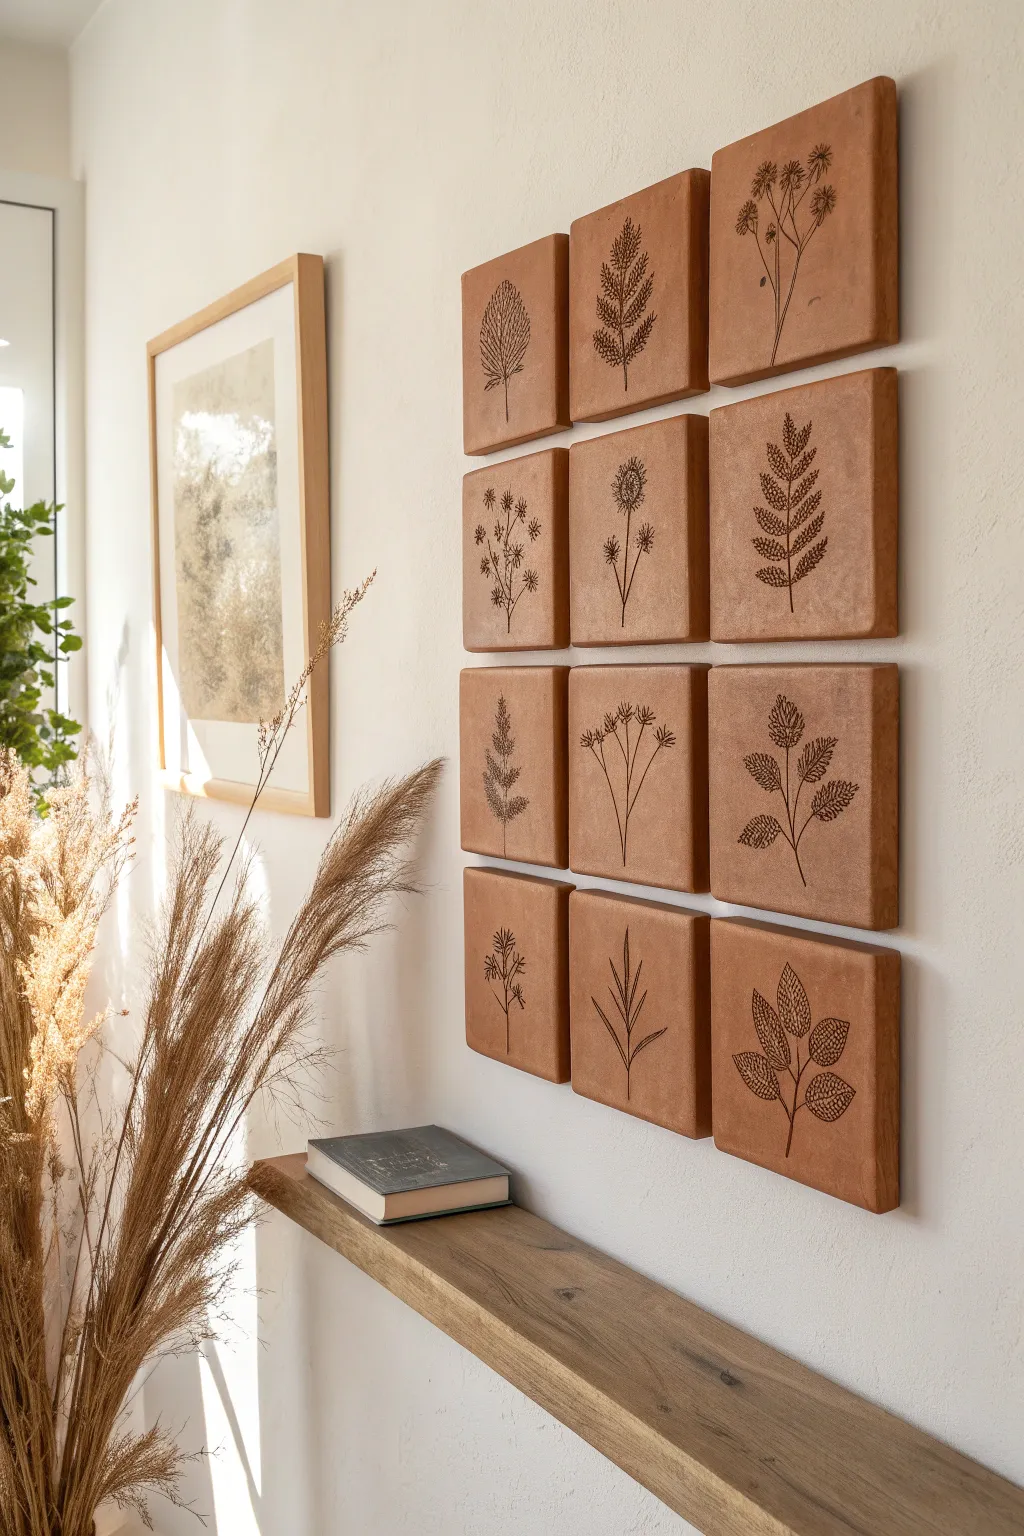
Bring the warmth of the earth indoors with this striking wall installation featuring individual clay tiles. The contrast of delicate black botanical illustrations against the textured, rust-colored surface creates a timeless, organic focal point for any room.
Step-by-Step
Materials
- Air-dry clay (terracotta color) or polymer clay
- Square cookie cutter (approx. 4-5 inches)
- Rolling pin
- Rolling guides or wooden slats (approx. 1/2 inch thick)
- Sandpaper (fine grit)
- Black ink fine-liner pens (archival, waterproof) or fine brush and acrylic paint
- Ruler
- Clean work surface or silicone mat
- Heavy-duty mounting tape or construction adhesive
- Matte spray varnish (optional)
Step 1: Shaping the Canvas
-
Prepare your workspace:
Set up a clean, non-stick surface. Since you’ll need 12 identical tiles, ensure you have plenty of room for all of them to dry flat. -
Condition the clay:
Knead your terracotta-colored clay thoroughly. This warm-up process removes air bubbles and makes the material pliable, preventing cracks later on. -
Set the thickness:
Place your rolling guides or wooden slats on either side of your clay ball. These will ensure every single tile has the exact same depth, which is crucial for a uniform look on the wall. -
Roll out the slab:
Roll your rolling pin over the guides, flattening the clay until the pin rests on the slats. Aim for a substantial thickness, around half an inch, to give the tiles presence. -
Cut the squares:
Using your square cutter, press firmly into the clay slab. Create 12 squares total. If you don’t have a cutter large enough, measure and cut carefully with a ruler and craft knife. -
Smooth the edges:
Dip your finger in a little water and gently run it along the cut edges of each square to soften any sharpness or burrs. -
Let them dry:
Allow the tiles to dry completely according to the manufacturer’s instructions. Air-dry clay often takes 24-48 hours. Carefully flip them halfway through so the backs dry evenly.
Straight Lines Secret
Use a spacer—like a small block of wood cut to your gap size—between tiles as you mount them. It guarantees perfect spacing without constant measuring.
Step 2: Artistic Details
-
Sanding for smoothness:
Once bone dry, lightly sand the surface of each tile. You want a relatively smooth canvas so your pen won’t catch on clay grit. -
Plan your botanicals:
Sketch out 12 different plant designs on scrap paper first. Think about variety—combine ferns, tall grasses, and flowering stems. -
Pencil guidelines:
Very lightly sketch your chosen botanical onto the tile with a soft pencil. Keep the lines faint so they are easy to erase or cover. -
Inking the stems:
Using your fine-liner, trace the main stems first. I prefer starting from the bottom center and working upward to establish the plant’s posture. -
Adding texture:
Fill in the leaves and petals using techniques like stippling (dots) or fine hatching lines to mimic the texture seen in the reference image. -
Sealing the work:
If desired, spray a light coat of matte varnish over the tiles. This protects the ink and seals the clay without making it look glossy.
Step 3: Installation
-
Measure the grid:
Decide on the spacing on your wall. A gap of about 1 inch between tiles usually looks best. Use a level and pencil to mark the placement for the top row first. -
Apply adhesive:
Apply strong mounting tape or construction adhesive to the back of the first tile. Ensure the back is dust-free before sticking. -
Mount the tiles:
Press the tiles onto the wall, following your marked grid. Work row by row to maintain alignment.
Level Up: Relief Effect
Instead of drawing, press real leaves or flowers into the wet clay before drying. Once dry, paint the indented impression black for a textured fossil look.
Step back and admire how this grid transforms a plain wall into an earthy gallery space