Cartoon clay ideas are my go-to when I want something cute, fast, and guaranteed to make me smile at the worktable. With a few simple shapes in polymer clay or air-dry clay, you can turn that classic cartoon style into little characters that look polished without feeling intimidating.
Chibi Animal Buddy Figurines
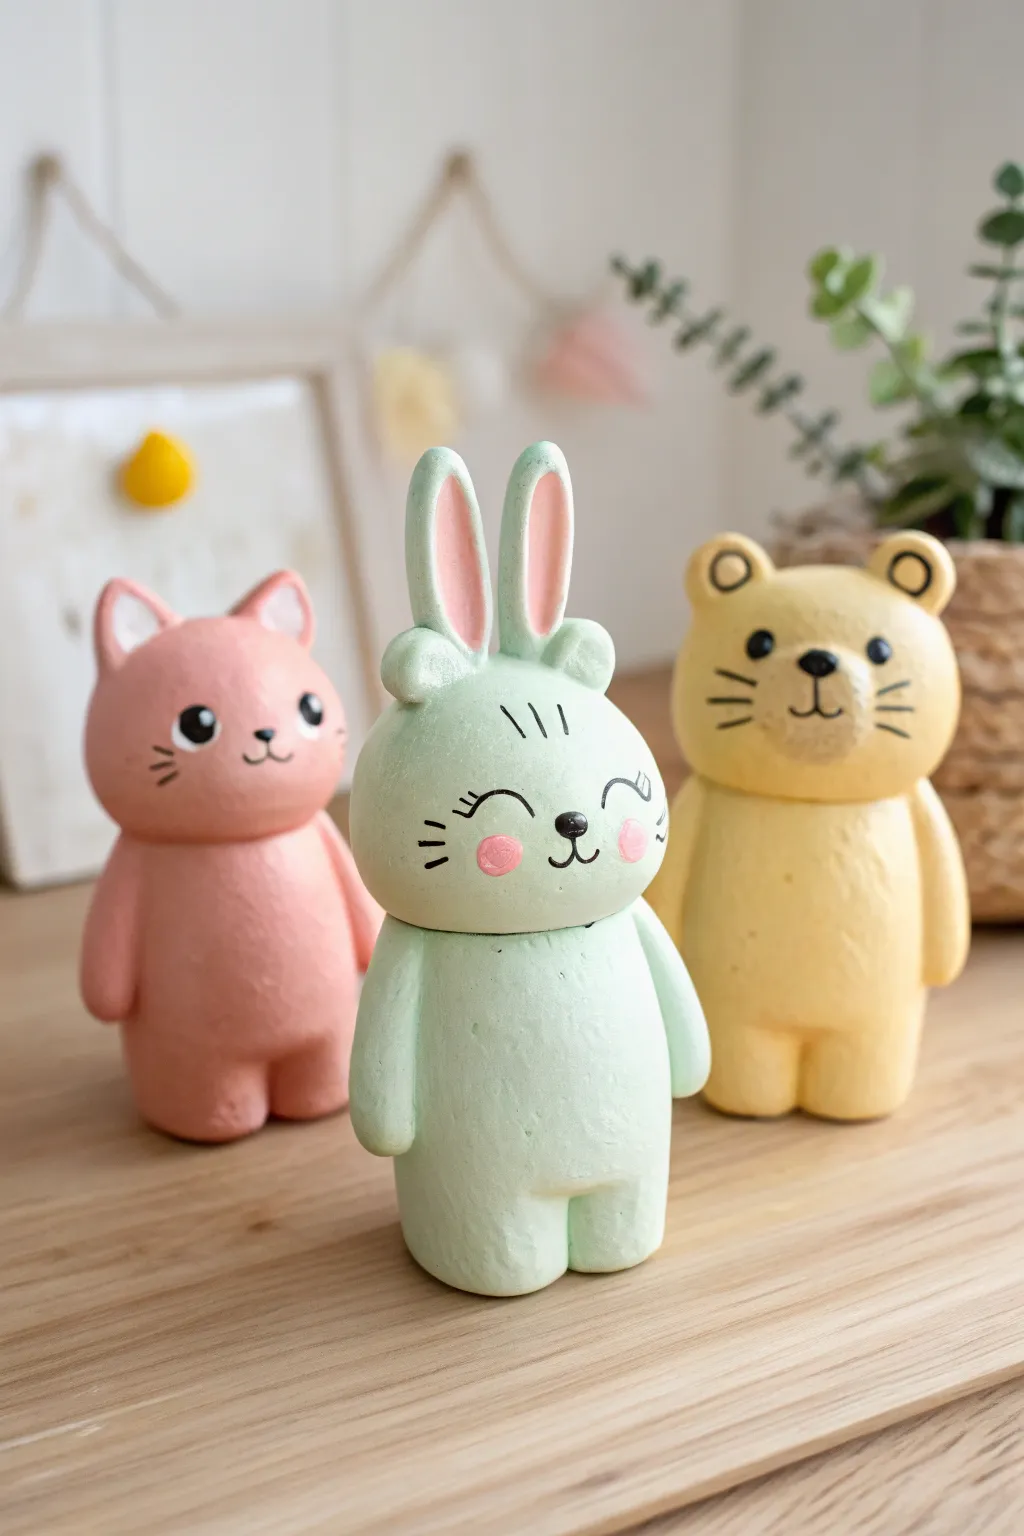
Create a trio of delightful, simplified animal figurines with soft pastel tones and sweet expressions. These chubby, minimalist characters—a pink cat, a mint bunny, and a yellow bear—are perfect for beginners due to their rounded, basic shapes.
Step-by-Step Guide
Materials
- Air-dry clay (white) or polymer clay
- Acrylic paints (pastel pink, mint green, soft yellow, white, black)
- Small rolling pin
- Modeling tools (or toothpicks/skewers)
- Fine-grit sandpaper
- Fine detail paintbrush (size 0 or 00)
- Medium flat paintbrush
- Water cup and paper towels
- Matte varnish/sealant (optional)
Step 1: Shaping the Bodies
-
Prepare the base:
Start by kneading your clay until it is smooth and pliable. Divide the clay into three equal portions, one for each animal character. -
Form the torsos:
Roll each portion of clay into a thick, elongated cylinder or pill shape. Keep the bottom flat so the figure stands stably on its own. Gently press the top to curve it slightly. -
Define the head divide:
Using a modeling tool or the side of your finger, create a very subtle indentation about one-third of the way down from the top. You don’t want a full neck, just a slight separation between the round head area and the chubby body. -
Add arms:
Roll two small sausage shapes for arms. Attach them vertically to the sides of the body, blending the clay at the shoulder joint so they look seamless. -
Create legs:
Instead of adding separate legs, use a knife or flat tool to cut a small inverted ‘V’ notch at the bottom center of the standing cylinder. Smooth the edges to create two stubby legs.
Cracks Appearing?
If small cracks form while drying, mix a tiny bit of fresh clay with water to make a paste (slip). Fill the cracks, smooth it over, and let it dry again.
Step 2: Adding Animal Features
-
Sculpt the cat ears:
For the cat, shape two small triangles. Gently pinch them and attach them to the top of the head, blending the clay downwards. -
Form the bunny ears:
Roll two long, thin ovals for the rabbit. Press a smaller tool into the center of each to create the inner ear definition. Attach them upright on the rabbit’s head. -
Make the bear ears:
Roll two tiny balls for the bear. Press them slightly flat and indent the centers. Attach these rounded ears to the sides of the bear’s head. -
Smooth everything out:
Dip your finger in a little water (for air-dry clay) or clay softener and gently rub over all seams and fingerprints. The goal is a matte, smooth texture like a marshmallow. -
Dry thoroughly:
Allow your figures to dry completely. This creates the best canvas for painting. I find waiting 24-48 hours ensures the core is solid.
Step 3: Painting and Details
-
Sand imperfections:
Once dry, lightly use fine-grit sandpaper to remove any rough bumps or lint that stuck to the clay. -
Paint the base colors:
Paint the cat with pastel pink, the bunny with mint green, and the bear with soft yellow. You will likely need two coats for opaque, solid coverage. -
Highlight the ears:
Mix a lighter shade of pink (or white) to paint the inner triangles of the cat ears. Use pink for the inside of the bunny ears. -
Paint the cheeks:
Dip the tip of a round brush or a cotton swab into pink paint. Dab circular blush spots onto the cheeks of all three animals. -
Draw the faces:
Using your finest brush and black paint, carefully add the features. For the bunny, paint closed ‘u’ shaped eyes with lashes. For the cat and bear, paint small round eyes. -
Add clear highlights:
Dip a toothpick into white paint and place a tiny dot near the top of the black eyes on the cat and bear to bring them to life. -
Whiskers and noses:
Paint tiny triangular noses and thin lines for whiskers. Keep the lines very delicate to maintain the cute, minimal style. -
Seal the work:
Protect your paint job with a coat of matte varnish. This removes the chalky feel of air-dry clay and keeps the colors vibrant.
Make Them Functional
Before drying, insert a heavy-duty magnet into the back to create fridge magnets, or drill a hole in the top for a cute keychain attachment.
Group your finished trio together on a shelf or desk for an instant boost of cuteness whenever you look at them


Big-Eyed Mini Monster Squad
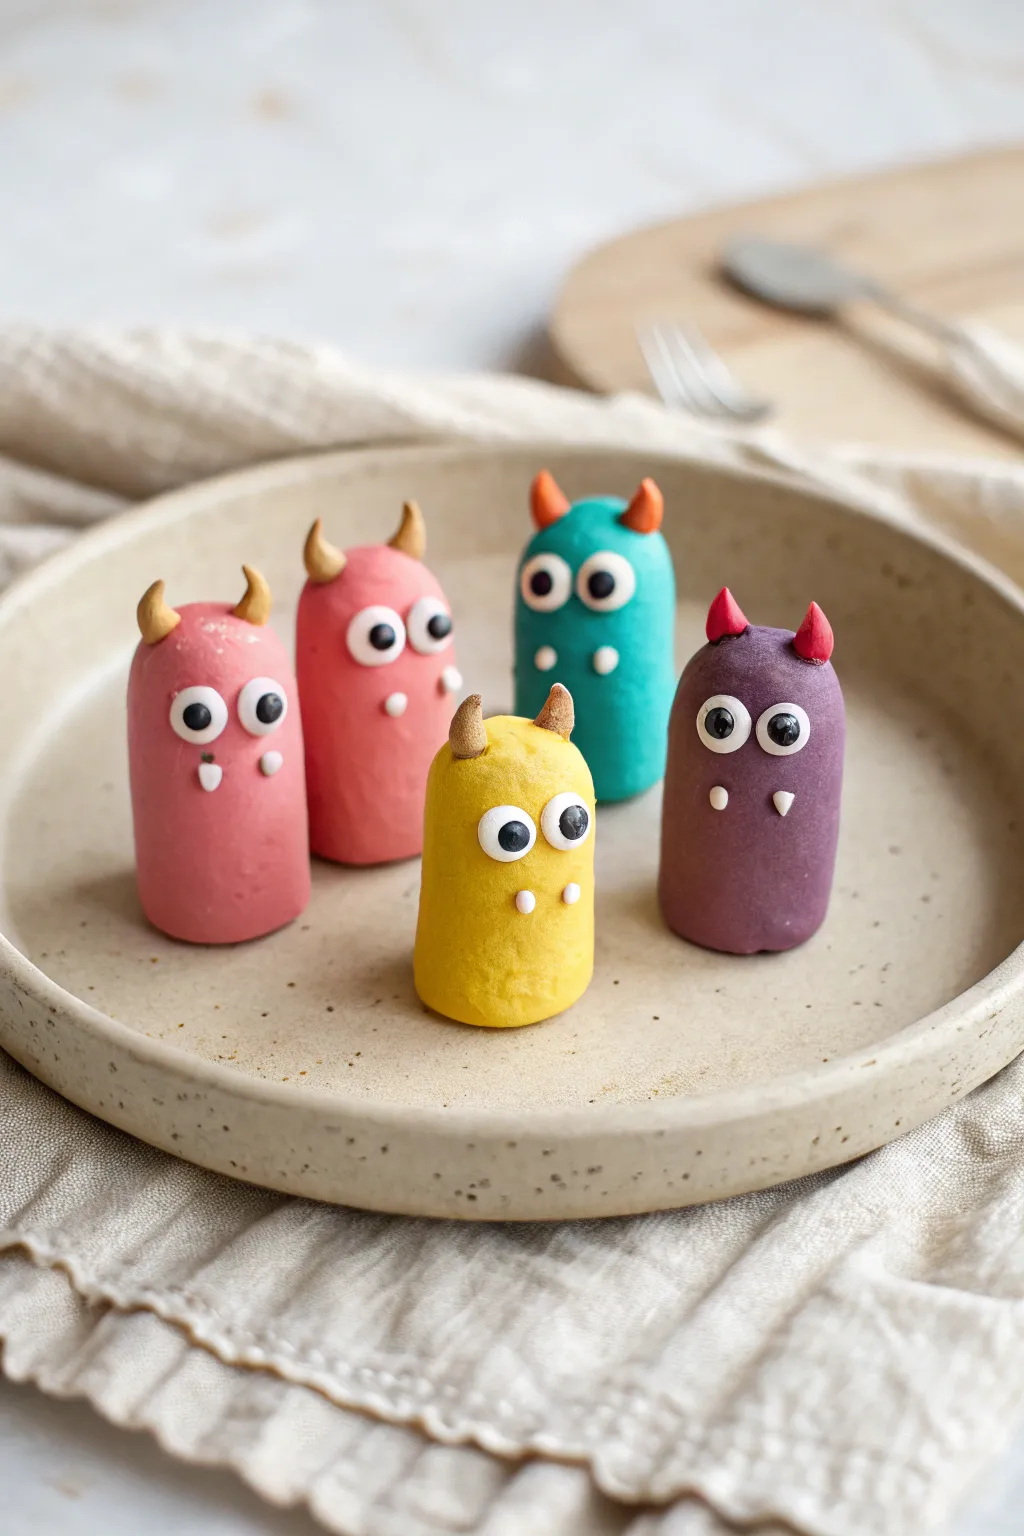
Create a charming team of wide-eyed monster friends using colorful clay or fondant that look almost too cute to be scary. These cylindrical pals feature expressive googly eyes, tiny horns, and simple snaggle-tooth smiles that give each one a unique personality.
Detailed Instructions
Materials
- Polymer clay or modeling dough (Pink, dark coral, teal, yellow, purple)
- White clay
- Black clay
- Translucent liquid clay or bake and bond (optional)
- Small ball tool or toothpick
- Clay roller or smooth surface for rolling logs
- Blade or craft knife
- Clean work surface (ceramic tile or silicone mat)
- Small pointy tool for texture (optional)
Step 1: Shaping the Bodies
-
Condition the colored clay:
Start by taking a piece of your first body color (like the bright yellow or teal). Knead it thoroughly in your hands until it is warm, soft, and pliable to prevent cracks later. -
Roll main cylinders:
Form the clay into a smooth ball first to remove seams, then gently roll it back and forth on your work surface to create a thick, short cylinder. Aim for a shape about 1.5 to 2 inches tall. -
Refine the shape:
Stand the cylinder up and gently tap the top to round it off slightly into a dome shape, while keeping the bottom flat so the monster stands securely. -
Repeat for the squad:
Repeat this process for the remaining colors—pink, dark coral, and purple—making them all roughly the same height, though slight variations add character. -
Texture the surface (optional):
If you want a slightly matte or organic look like the photo, gently dab the surface with a piece of sandpaper or a stiff brush to remove fingerprints.
Clean Hands
Clay picks up dust easily. Keep a pack of baby wipes nearby and clean your hands when switching from dark colors (like the purple body) to light colors (like the white eyes).
Step 2: Adding the Horns
-
Prepare horn colors:
Select contrasting colors for the horns. For the yellow monster, mix a little brown into your yellow clay to create a dark ochre, or simply use a contrasting shade. -
Shape tiny cones:
Roll extremely small balls of clay, smaller than a pea. Using your finger, roll one side of the ball against your palm to taper it into a tiny cone shape. -
Curving the horns:
Give the tip of the cone a very slight bend. This little curve adds a lot of movement and expression to the final figure. -
Attach to the head:
Place two horns on the top of the rounded head. Press them down firmly but gently to blend the seam slightly. A tiny dot of liquid clay can help them stick securely.
Step 3: Creating the Face
-
Make the eye bases:
Roll small balls of white clay. Flatten them slightly into thick discs. Vary the sizes slightly—some monsters look cuter with slightly uneven eyes. -
Attach the whites:
Press the white discs onto the upper half of the cylinder body. Ensure they are close together or touching for that classic cartoon look. -
Add pupils:
Roll tiny specks of black clay into balls. Press these onto the white discs. Placing them slightly cross-eyed or looking in different directions creates a goofy personality. -
Add light catchers:
For extra life, take a microscopic speck of white clay and place it on the black pupil. This reflection makes the eyes look wet and alert. -
Make the teeth:
Roll tiny, rice-grain-sized pieces of white clay. Taper one end to a dull point. -
Place the teeth:
Press two little teeth onto the body below the eyes. Spacing them apart creates a silly ‘snaggletooth’ effect rather than a scary bite. -
Final smoothing:
Check over your monsters for any stray lint or fingerprints. Use a tiny bit of baby oil on your finger to smooth out imperfections if using polymer clay. -
Bake or Dry:
Follow the specific instructions for your clay type. For polymer clay, bake on a tile at the manufacturer’s recommended temperature (usually 275°F/135°C) for 15-20 minutes.
Sticky Situation
If your clay is too soft and sticky, making it hard to shape tall cylinders, leech it by placing the clay between two sheets of plain white paper for an hour to absorb excess oil.
Once baked and cooled, your colorful mini monster squad is ready to decorate your desk or shelf


Smiling Cartoon Snack Charms
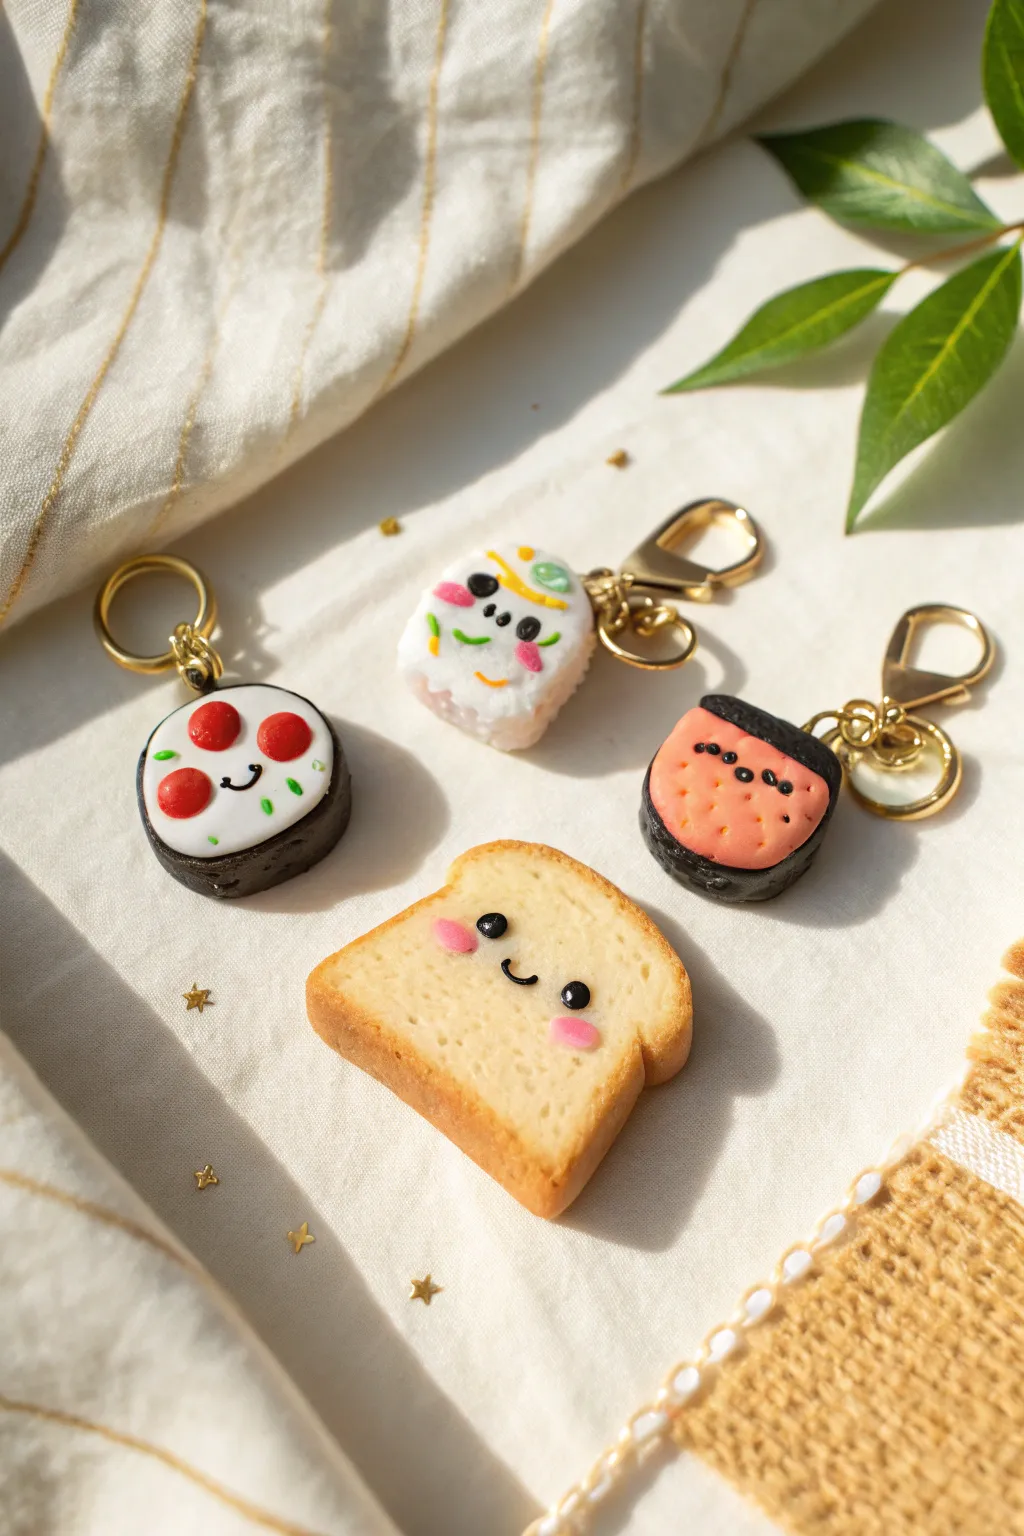
Brighten up your keyring with this adorable set of smiling snack charms, featuring happy toast and grinning sushi pieces. These bite-sized clay creations are finished with a glossy glaze and golden hardware, making them perfect little companions for your bag or keys.
How-To Guide
Materials
- Polymer clay (white, beige/tan, black, red, pink, green, yellow)
- Clay sculpting tools (dotting tool, needle tool, craft knife)
- Gold screw eye pins (4 pieces)
- Gold lobster clasp keychains with jump rings
- Liquid clay or bake-and-bond
- Soft pastels (brown/orange) for shading
- Paintbrush (soft bristle)
- Jewelry pliers
- Gloss glaze or UV resin
- Oven for baking
Step 1: Sculpting the Happy Toast
-
Shape the Base:
Start by mixing white and a tiny bit of yellow/orange clay to make a pale bread color. Flatten a ball of this clay and cut it into a rough square, then round off the top two corners to create the classic bread loaf shape. -
Add the Crust:
Roll a thin snake of tan or light brown clay. Wrap this around the entire edge of your bread shape, smoothing the seam where the ends meet so it looks like a continuous crust. -
Texture and Shade:
Use a toothbrush or a ball of aluminum foil to gently tap the white surface, giving it a porous bread texture. Then, shave some orange-brown soft pastel into a powder and lightly brush it onto the crust edges for a baked look. -
Create the Face:
Roll two tiny black balls for eyes and press them into the center. Roll a very thin black snake for a smile. Add two small pink ovals for blushing cheeks. -
Insert Hardware:
Carefully screw an eye pin into the top center of the toast crust. You can add a dab of liquid clay to the screw threads for extra security.
Step 2: Crafting the Sushi Friends
-
Form the Round Roll:
Role a ball of white clay and flatten it into a thick disc. Wrap a flattened strip of black clay around the edge to simulate the nori (seaweed) wrapper. -
Decorate the Roll:
Add three small red circles on top (like pepperoni or tuna). Use a needle tool to scratch tiny ‘rice’ textures into the white area. Add a tiny black smile and eyes, similar to the toast. -
Shape the Musubi:
Form a small rounded rectangle of white clay for the rice base. Create a slightly smaller, rounded rectangle of pink clay for the meat and place it on top. Texture the pink clay with a needle tool to mimic the texture of spam. -
Wrap the Musubi:
Roll a strip of black clay and wrap it around the center, binding the pink meat to the white rice. Add a face to the pink section using tiny bits of black clay. -
Create the Onigiri:
Shape a white ball of clay into a soft, rounded triangle. Using your needle tool or a stiff brush, texture the entire surface to look like grains of rice. -
Add Onigiri Details:
Add tiny ropes of green, yellow, and red clay to the top corner as sprinkles or seasoning. Place a happy face in the center, using pink clay for cheeks. -
Secure the Hardware:
Insert gold eye pins into the top of each sushi piece just like you did for the toast.
Sticky Fingerprints?
If you leave fingerprints on the clay, lightly brush the raw clay with a bit of baby oil or cornstarch before texturing. This smoothes it out perfectly.
Step 3: Baking and Assembly
-
Bake:
Place all four charms on a baking sheet lined with parchment paper. Bake according to your polymer clay package instructions (usually around 275°F or 130°C for 15-30 minutes). -
Cool Down:
Allow the pieces to cool completely before handling them. They will be slightly soft when hot but harden as they cool. -
Glaze:
Apply a coat of gloss glaze or UV resin to the sushi toppings and the toast’s eyes/cheeks for a shiny finish. I usually leave the bread part of the toast matte for realism. -
Attach Keychains:
Using jewelry pliers, open the jump ring on your gold lobster clasp keychain. Loop it through the eye pin on your charm and close the jump ring securely.
Pro Tip: Eye Placement
Place the eyes lower on the face (aligned with the mouth) rather than high up. This ‘low face’ style instantly makes characters look cuter and more ‘kawaii’.
Now you have a whole menu of miniature, smiling snacks ready to accompany you on your daily adventures


Cute Cartoon Robot Pal
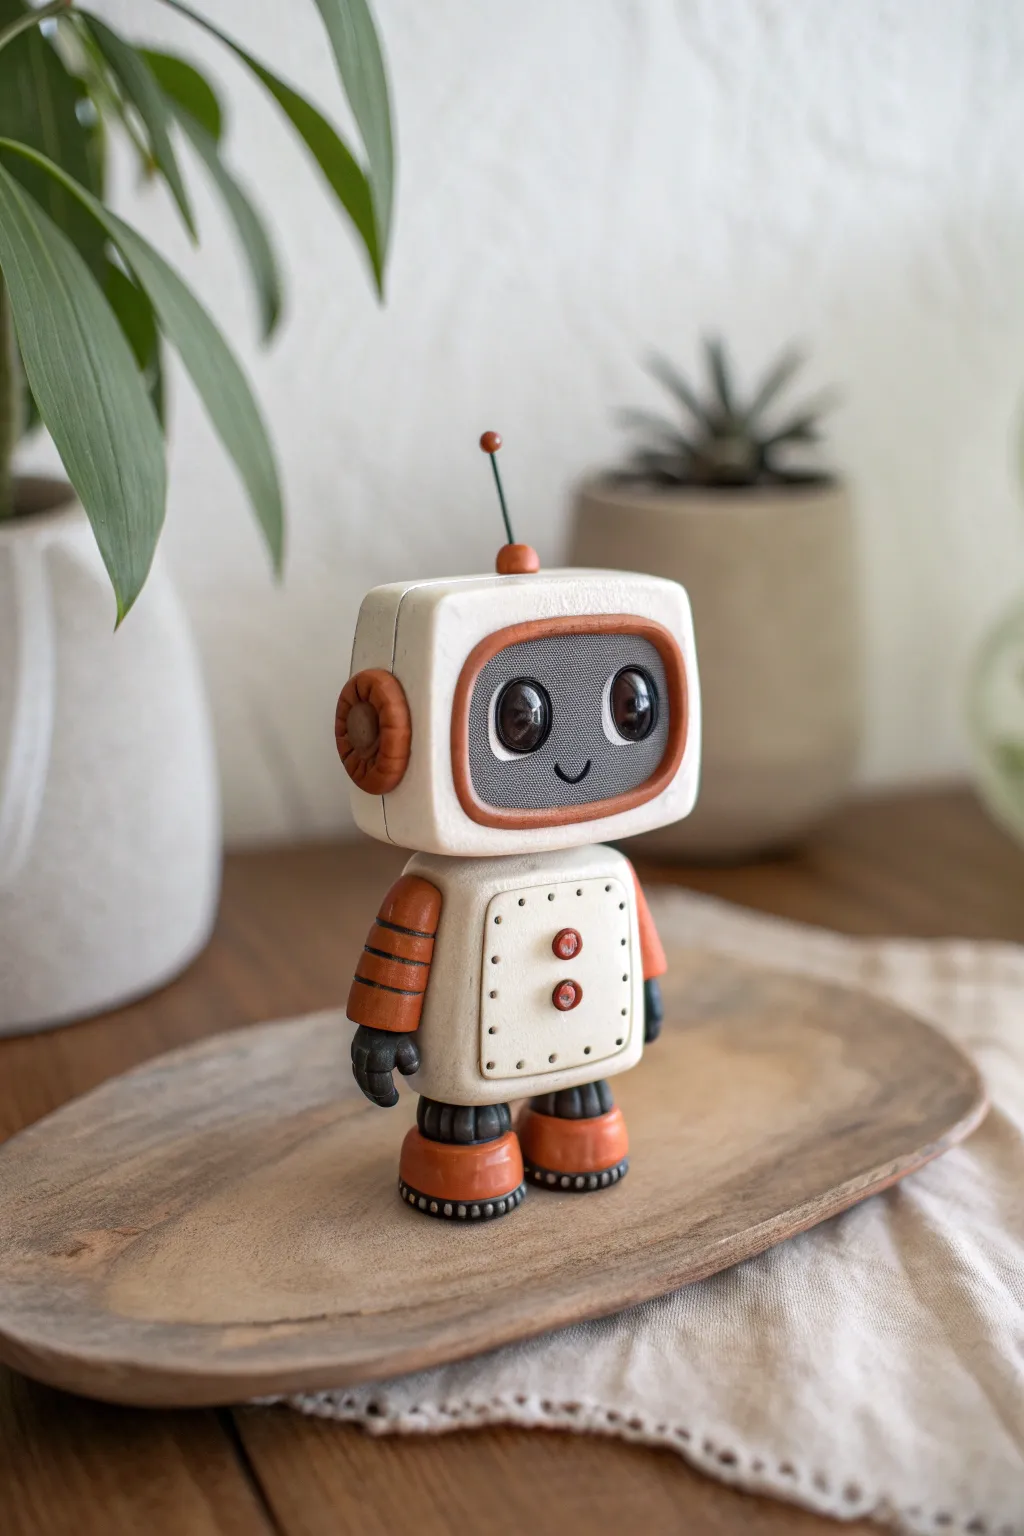
This adorable desktop companion brings a touch of vintage technology to life with its TV-screen face and chunky, delightful proportions. Crafted from polymer clay, the finished robot features a smooth, matte texture with glossy eyes that really make it pop.
Detailed Instructions
Materials
- White polymer clay
- Burnt orange or terracotta polymer clay
- Black polymer clay
- Grey polymer clay
- Clay sculpting tools (dotting tool, needle tool, cutting blade)
- Black glossy UV resin or gloss glaze
- Thin crafting wire (for the antenna)
- Small red or orange bead (for antenna tip)
- Oven for baking
- Aluminum foil (for armature core)
Step 1: Sculpting the Head & Screen
-
Form the core:
Start by balling up a small piece of aluminum foil into a rough cube shape to serve as the lightweight core for the robot’s head. -
Wrap and shape the head:
Condition a block of white clay until pliable, then flatten it into a sheet. Wrap this sheet around your foil cube, smoothing all seams until you have a perfect, soft-cornered rectangle. -
Create the screen recess:
Using a blunt sculpting tool or your thumb, gently press a large, rectangular indentation into the front. This indentation will house the faceplate. -
Make the screen border:
Roll a thin snake of terracotta orange clay. Carefully line the inner edge of your recessed rectangle with it, smoothing it against the white clay to create a seamless frame. -
Insert the faceplate:
Flatten a piece of grey clay and cut it to the exact size of the framed recess. Press it gently inside; adding a subtle mesh texture with a needle tool gives it a speaker-grill look. -
Add the eyes:
Press two large, shallow indents into the grey clay for eye sockets. Place flattened balls of black clay into them. I like to press them in firmly so they sit flush with the surface.
Step 2: Building the Body & Limbs
-
Shape the torso:
Form a second, slightly smaller rectangle from white clay for the body. Round the corners significantly so it looks soft and friendly. -
Create the chest panel:
Roll a very thin square of white clay and place it on the chest. Use a needle tool to poke tiny ‘rivet’ holes around the perimeter for that industrial cartoon vibe. -
Add chest details:
Press two tiny circles of terracotta clay onto the chest panel as buttons. Use a small dotting tool to indent the centers. -
Form the arms:
Roll two cylinders of terracotta clay. Use a knife tool to gently score horizontal lines around them to simulate flexible tubing. -
Shape the hands:
Fashion simple mitten-like shapes from black or dark grey clay and attach them to the ends of the orange arms. -
Construct the legs:
Create short, thick cylinders using grey clay for the upper legs. Connect these to larger, rounded terracotta feet shapes.
Clean Clay Pro-Tip
Keep separate baby wipes nearby while working. Clean your hands thoroughly when switching from the orange or black clay back to white to prevent color transfer and staining.
Step 3: Assembly & Finishing Touches
-
Attach the head:
Insert a short piece of wire into the top of the body and push the head onto it to secure the connection. -
Attach limbs:
Using liquid clay or scoring the surface for grip, press the arms to the sides of the body and the legs to the bottom. Ensure the robot stands balanced. -
Install the antenna:
Cut a small length of wire. Stick one end into a small orange clay ball and the other into the top of the head slightly off-center. -
Add ear details:
Shape a circular orange piece with a textured pattern and attach it to the side of the head like a dial. -
Bake carefully:
Bake the figure according to your clay manufacturer’s instructions, usually around 275°F (135°C) for 30 minutes. Let it cool completely. -
Glaze the eyes:
Once cool, carefully apply UV resin or high-gloss glaze only to the black eyes. This creates that soulful, glassy reflection.
Sagging Clay Fix
If the head feels too heavy and squishes the neck while working, pre-bake the body and legs for 15 minutes to harden them before adding the heavy head on top.
Place your little robot near a plant or on your desk for a daily dose of cuteness

The Complete Guide to Pottery Troubleshooting
Uncover the most common ceramic mistakes—from cracking clay to failed glazes—and learn how to fix them fast.
Sticker-Style Face Tokens
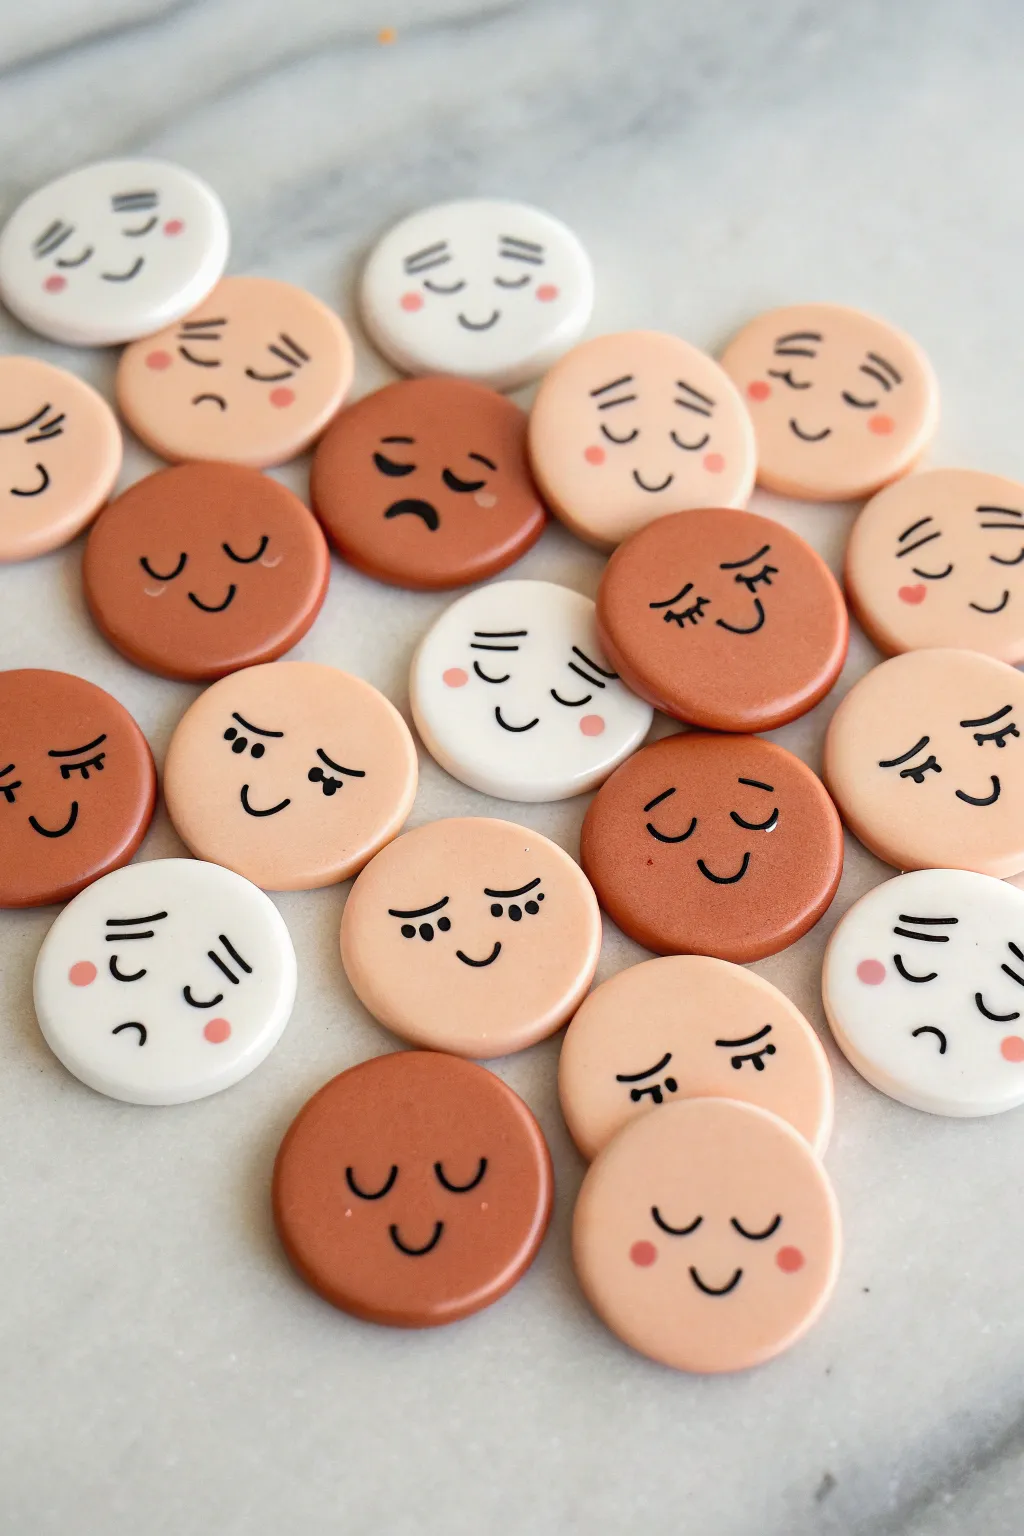
These charming clay tokens are like handmade emojis you can hold in your hand. With a variety of skin tones and simple, delicate facial features, they make perfect game pieces, magnets, or cute decorative accents.
How-To Guide
Materials
- Polymer clay (white, beige, tan, dark brown)
- Acrylic rolling pin
- Small circle cutter (approx. 1 inch)
- Parchment paper or baking tile
- Fine grit sandpaper (optional)
- Black fine-point acrylic paint pen or permanent marker
- Pink acrylic paint or soft pastels
- Small dotting tool or toothpick
- Matte or satin glaze (optional)
Step 1: Prepping Body Tones
-
Conditioning the clay:
Start by warming up your polymer clay in your hands. Knead each color separately until it is soft and pliable to prevent cracking later. -
Mixing custom shades:
To achieve the variety of skin tones seen in the photo, mix your base colors. Try blending white with a tiny bit of brown for a pale beige, or mix tan and dark brown for a rich medium tone. -
Rolling it out:
Place your conditioned clay on a smooth surface or parchment paper. Use your acrylic roller to flatten the clay into a sheet about 1/4 inch thick. Uniform thickness helps them bake evenly.
Step 2: Shaping the Tokens
-
Cutting circles:
Press your small circle cutter firmly into the clay sheet. Give it a little wiggle before lifting to ensure a clean cut. -
Releasing the shapes:
Gently push the clay circle out of the cutter. If the clay sticks, you can dip the cutter in a little cornstarch beforehand. -
Smoothing edges:
Run your fingertip lightly around the rim of each circle to soften any sharp edges left by the cutter. This gives the token a soft, polished finish. -
Baking time:
Arranging the blank circles on a parchment-lined baking sheet or a ceramic tile. Bake according to your specific brand’s package instructions, usually around 275°F (135°C) for 15-30 minutes. -
Cooling down:
Let the clay discs cool completely before handling them. They harden fully as they cool, providing a solid surface for drawing.
Smudged Ink?
If you make a mistake with the paint pen, dip a cotton swab in rubbing alcohol and gently wipe the error away. It cleans up easily on baked clay.
Step 3: Adding Personality
-
Planning expressions:
Sketch a few simple face ideas on scrap paper first. The charm comes from simplicity—think closed u-shaped eyes, tiny smiles, or little winks. -
Drawing the eyes:
Using a fine-point black paint pen, carefully draw the eyes on the upper half of the circle. I like to keep lines thin and delicate for that sticker-style aesthetic. -
Adding the mouth:
Draw small, simple mouths. A little curved line or a tiny ‘o’ shape works perfectly to convey different moods. -
Creating rosy cheeks:
Dip a dotting tool or the very tip of a toothpick into pink acrylic paint. Dab two tiny dots under the eyes for cheeks. -
Alternative cheek method:
For a softer look, scrape a little pink soft pastel into powder and brush it onto the cheeks with a small, dry paintbrush before sealing. -
Adding eyelashes:
If you want a more feminine look, add two or three microscopic ticks to the outer corners of the closed eyes representing lashes. -
Allowing paint to dry:
Let the paint or ink dry completely. Since the surface is non-porous, this might take a few minutes longer than on paper. -
Sealing the work:
Apply a thin coat of matte or satin glaze over the face to protect the paint from scratching off over time.
Turn Them Into Magnets
Glue small neodymium magnets to the back using superglue or E6000. They make adorable fridge accessories for holding up photos or grocery lists.
Now you have a whole collection of friendly faces ready to brighten up your desk or crafting space
Tiny Cartoon Keychain Sidekicks
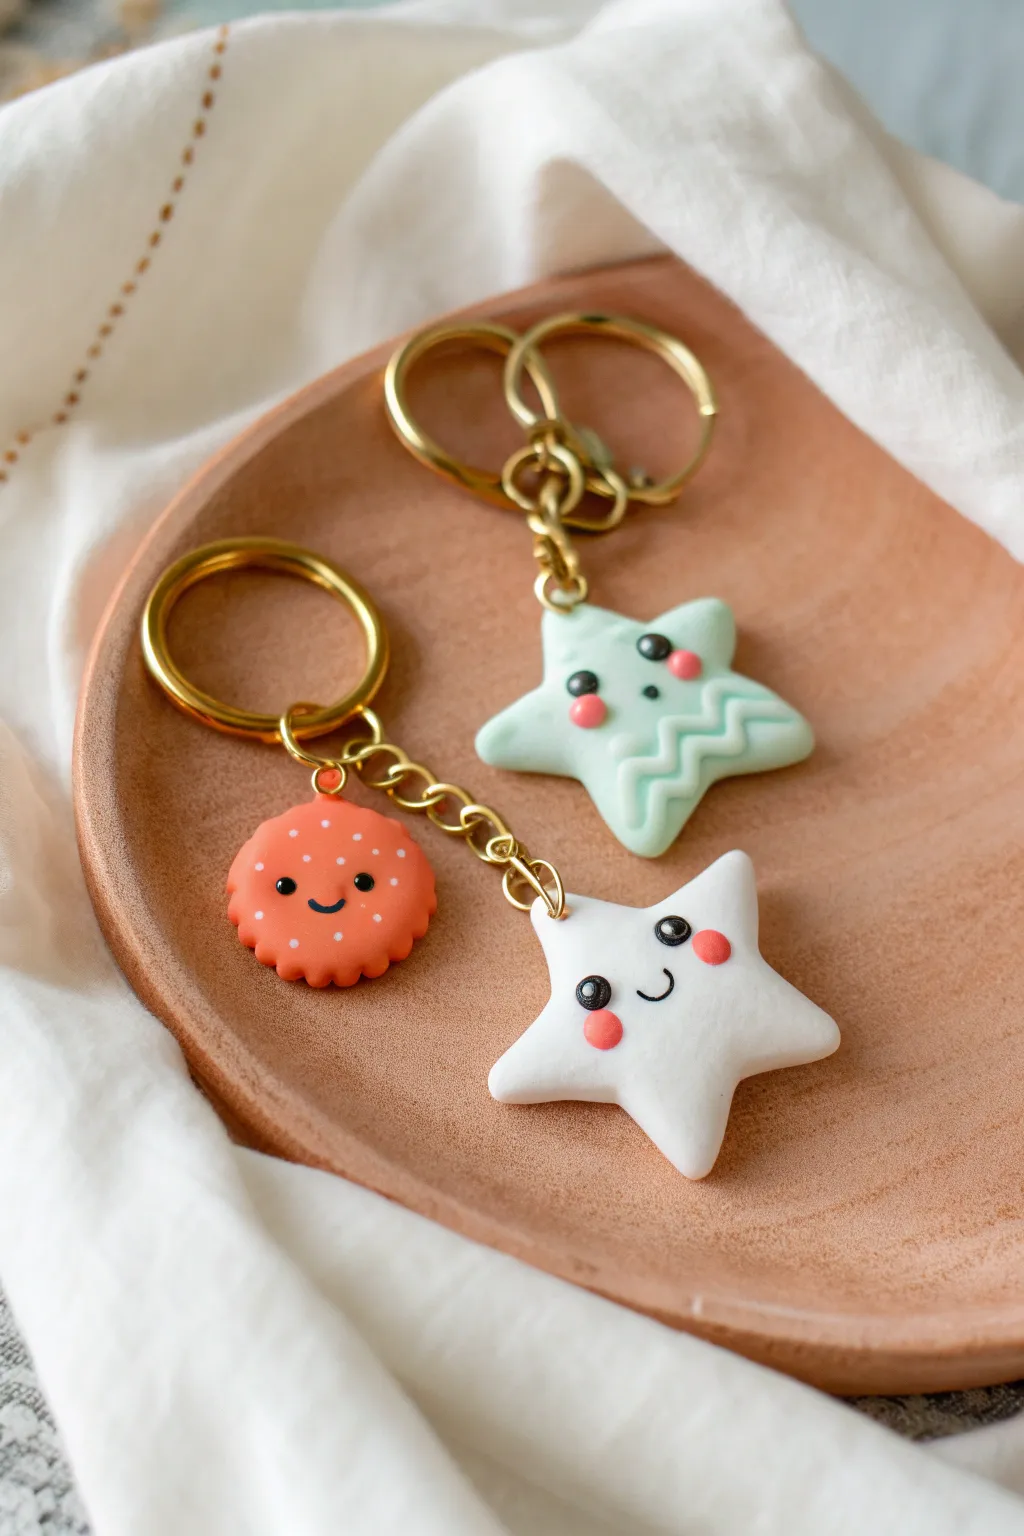
Brighten up your keys with these adorable polymer clay companions featuring a happy white star and its minty celestial twin. With their sweet rosy cheeks and simple smiling faces, these charms are perfect tiny sidekicks to customize your daily carry.
Detailed Instructions
Materials
- Polymer clay (white, mint green, coral/orange, pink, black)
- Clay roller or pasta machine
- Star-shaped cookie cutters (small)
- Small round cutter or circle punch
- Dotting tools or ball stylus (various sizes)
- Needle tool or toothpick
- Eye pins (gold or silver)
- Jump rings
- Keyring components (split rings and chain)
- Jewelry pliers (round nose and flat nose)
- Baking sheet and parchment paper
- Gloss glaze (optional)
Step 1: Shaping the Stars
-
Condition the white clay:
Start by warming up a chunk of white polymer clay in your hands until it’s soft and pliable. Roll it into a smooth ball to remove any air pockets. -
Create the white star base:
Flatten the white ball slightly with your palm, then use a roller to create an even slab about 1/4 inch thick. Use your star cutter to punch out the main shape. -
Soften the edges:
Gently rub your finger along the sharp cut edges of the star to round them off slightly. This gives the charm a softer, puffier, almost marshmallow-like appearance. -
Make the mint star:
Repeat the conditioning and cutting process with the mint green clay to create the second star charm. -
Create the mint texture:
For the mint star, roll thin snakes of the same mint clay and arrange them in zigzag patterns on the bottom points of the star. Gently press them down so they adhere but keep their texture.
Smoother Surfaces
Before baking, lightly brush your clay with a little baby oil or cornstarch. This removes fingerprints and stray dust for a professional finish.
Step 2: Adding Faces and Details
-
Pre-make the eyes:
Roll tiny specks of black clay into balls. Press these onto the stars to create wide-set eyes. Add an even tinier speck of white to each black eye for that classic ‘cartoon high/light’ sparkle. -
Add rosy cheeks:
Take small bits of pink clay, roll them into balls, and flatten them into discs. Press these firmly onto the face just below and slightly outside the eyes. -
Carve the smile:
Use a needle tool or a small curved carving tool to impress a simple ‘u’ shape mouth between the cheeks. I find pressing straight down rather than dragging the tool keeps the clay from bunching up. -
Create the sun charm:
Roll a small ball of coral/orange clay and flatten it into a thick disc. Use a needle tool to press ridges around the outer edge to create a scalloped, sun-ray effect. -
Detail the sun:
Add a tiny face to the sun charm just like the stars. Use a needle tool or small dotting tool to add white freckles across the top half of the face.
Glow Up
Use glow-in-the-dark polymer clay for the white star or the tiny white eye highlights so your keychain friends are visible at night.
Step 3: Assembly and Baking
-
Insert eye pins:
Trim your metal eye pins if they are too long. Carefully push the straight end into the top point of each star and the top of the sun disc. Secure the clay around the metal wire so it won’t pull out later. -
Bake the pieces:
Place all charms on a parchment-lined baking sheet. Bake according to your clay package instructions (usually 275°F/135°C for 15-30 minutes). Let them cool completely before handling. -
Attach the sun:
Using two pairs of pliers, twist open a jump ring. Thread it through the eye pin of the sun charm and attach it to the chain section of your gold keychain finding. -
Attach the white star:
Attach the main white star to the end of the chain using a larger jump ring. This creates a cute dangling effect where the sun sits higher than the star. -
Finish the mint keychain:
Attach the mint green star directly to its own keyring assembly using jump rings. Ensure all rings are closed tightly so pieces don’t slip off.
Clip these cheerful charms onto your bag or keys for an instant dose of happiness every time you leave the house.


What Really Happens Inside the Kiln
Learn how time and temperature work together inside the kiln to transform clay into durable ceramic.
Cartoon Animal Pencil Toppers
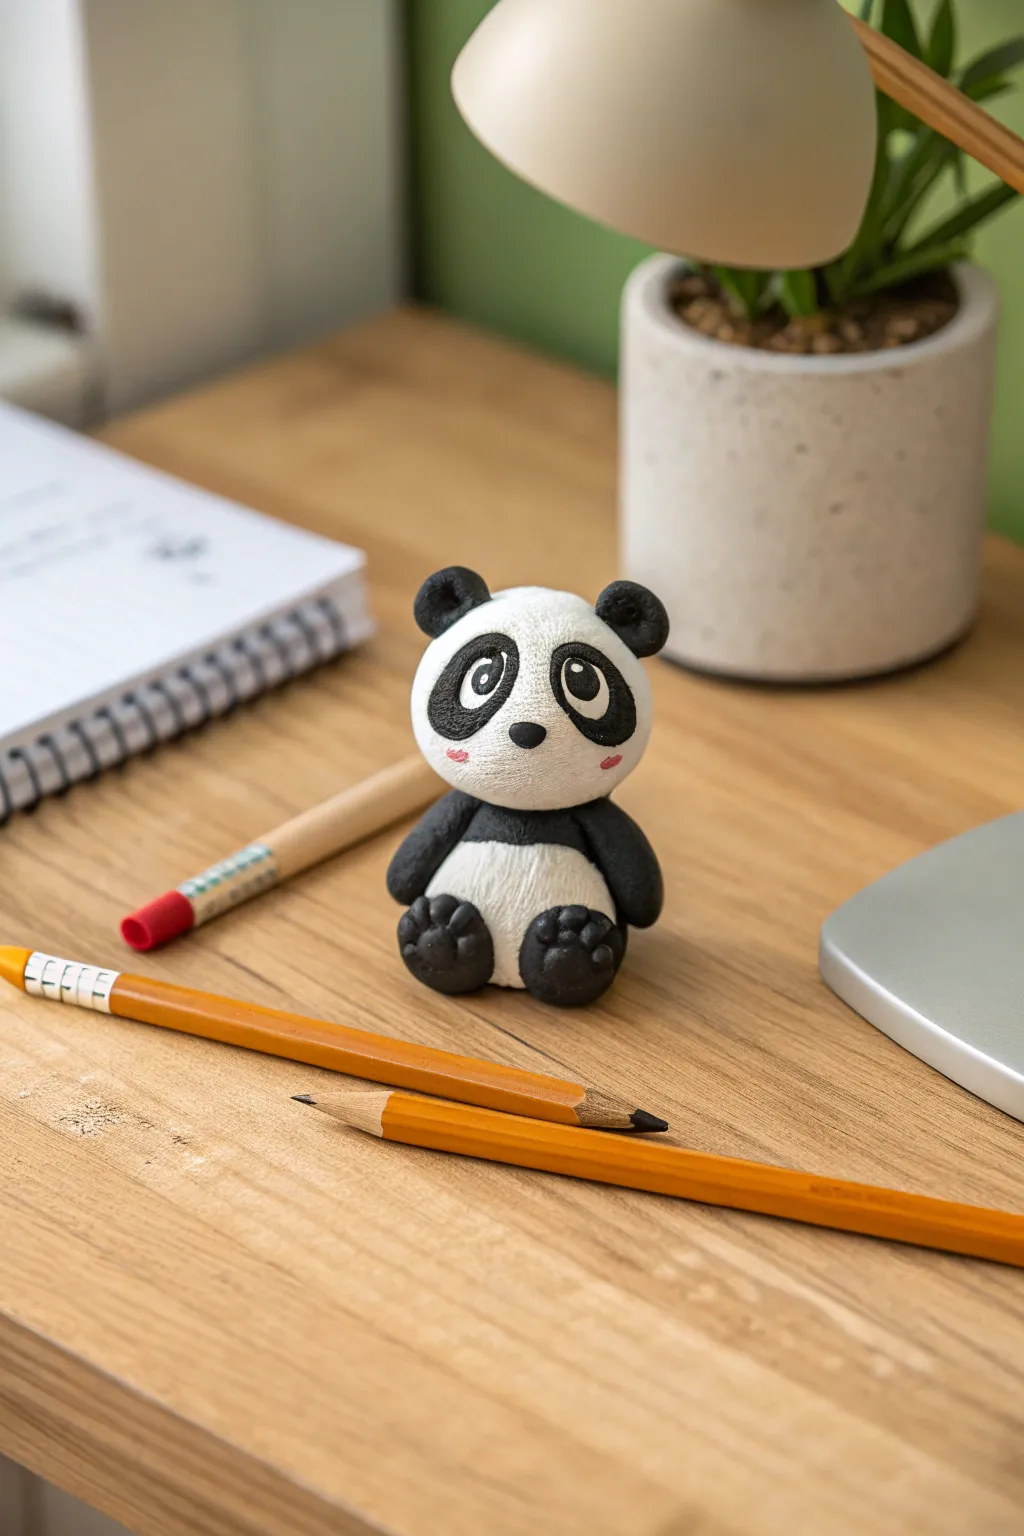
This adorable, slightly textured panda figurine brings a sense of calm cuteness to any workspace. With its oversized head, sweet expression, and stubby limbs, it’s the perfect beginner-friendly project to practice simple clay shapes.
Step-by-Step Guide
Materials
- White polymer clay (or air-dry clay)
- Black polymer clay
- Small amount of pink clay (or pink acrylic paint)
- White acrylic paint (for eye highlights)
- Needle tool or toothpick
- Ball stylus tool (small)
- Clean work surface or mat
- Aluminum foil (optional, for armature)
- Soft brush (for texture)
- Oven (if using polymer clay)
Step 1: Shaping the Body
-
Form the Core:
Start by conditioning your white clay until it is soft and pliable. Roll a large ball for the head and a slightly smaller, egg-shaped piece for the body. -
Join Head and Body:
Gently press the head onto the narrower end of the body piece. Since the head is quite large, inserting a small piece of toothpick or wire between the two can add stability. -
Create the Texture:
To achieve that soft, matte finish seen in the photo, gently tap the surface of the white clay with a stiff-bristled brush or a balled-up piece of aluminum foil. Do this lightly so you don’t distort the shape.
Smudgy Clay?
Black clay stains white clay easily! Wash hands thoroughly or use baby wipes between colors. Alternatively, sculpt the white parts first, then add black details.
Step 2: Adding Black Details
-
Make the Eye Patches:
Take two small balls of black clay and flatten them into teardrop shapes. Press these onto the face, angled slightly downwards towards the nose area. -
Sculpt the Ears:
Roll two small balls of black clay. Press your thumb or a ball tool into the center of each to create a slight cup shape, then attach them to the top of the head. -
Add the Arms:
For the arms, create two small sausage shapes from black clay. Curve them slightly and press them against the sides of the white body, near the neck seam. -
Form the Legs:
Roll two larger balls of black clay for the legs. Flatten them slightly and press them against the bottom front of the body so the panda looks like it is sitting. -
Detail the Paws:
Using a needle tool, press three small indentations into the bottom of each leg to create toe separation, giving it that cartoonish paw look. -
The Belly Band:
If you want a more integrated look, you can flatten a thin strip of black clay and wrap it around the upper back and chest, blending it into the arms.
Turn it into a Topper
Before baking, press the bottom of the panda onto the end of a pencil to create a custom-fit hole. Bake the clay separately, then glue it onto the pencil later.
Step 3: Final Facial Features
-
Add the Eyes:
Roll two tiny balls of white clay and press them into the upper part of the black eye patches. Flatten them gently. -
Pupils and Nose:
Place even tinier flattened balls of black clay onto the white eye circles for pupils. Add a small, oval-shaped black piece for the nose right between the eye patches. -
Sweet Cheeks:
Take the tiniest scraping of pink clay and apply it just below the eye patches for a blushing effect. I prefer blending the edges slightly so it looks soft. -
Bake or Dry:
Follow the manufacturer instructions for your specific clay. If baking polymer clay, tent it with foil to prevent scorching. -
The Sparkle:
Once hard and cooled, use a toothpick to dot a tiny spec of white acrylic paint onto the black pupils. This ‘life light’ really wakes up the expression.
Enjoy your new little desk mascot as you get to work creatively
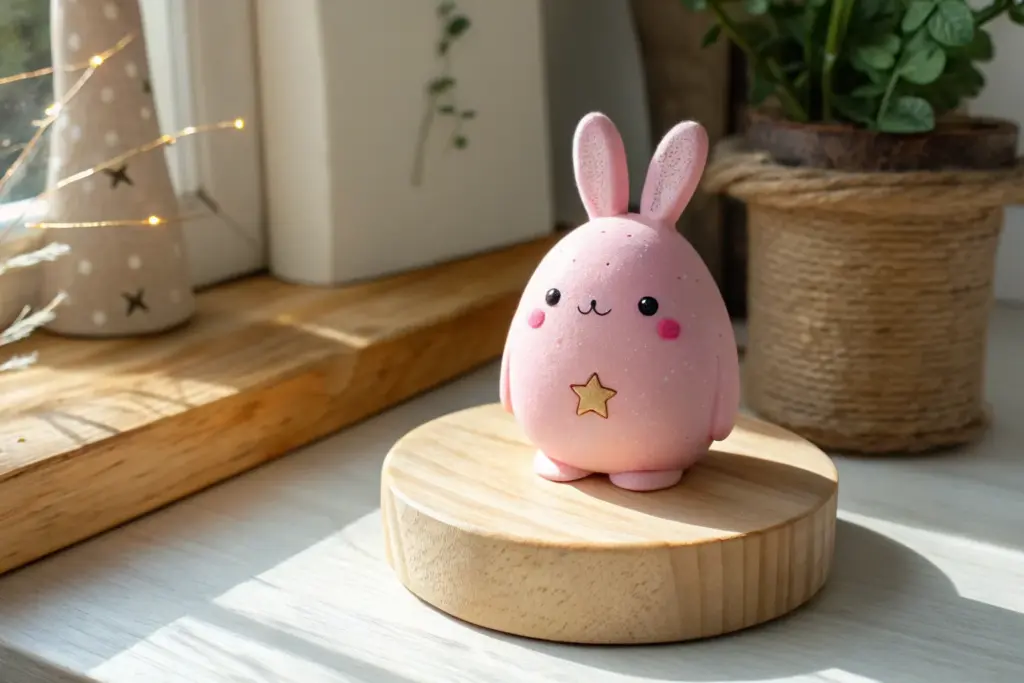
Cartoon Pet in a Cup
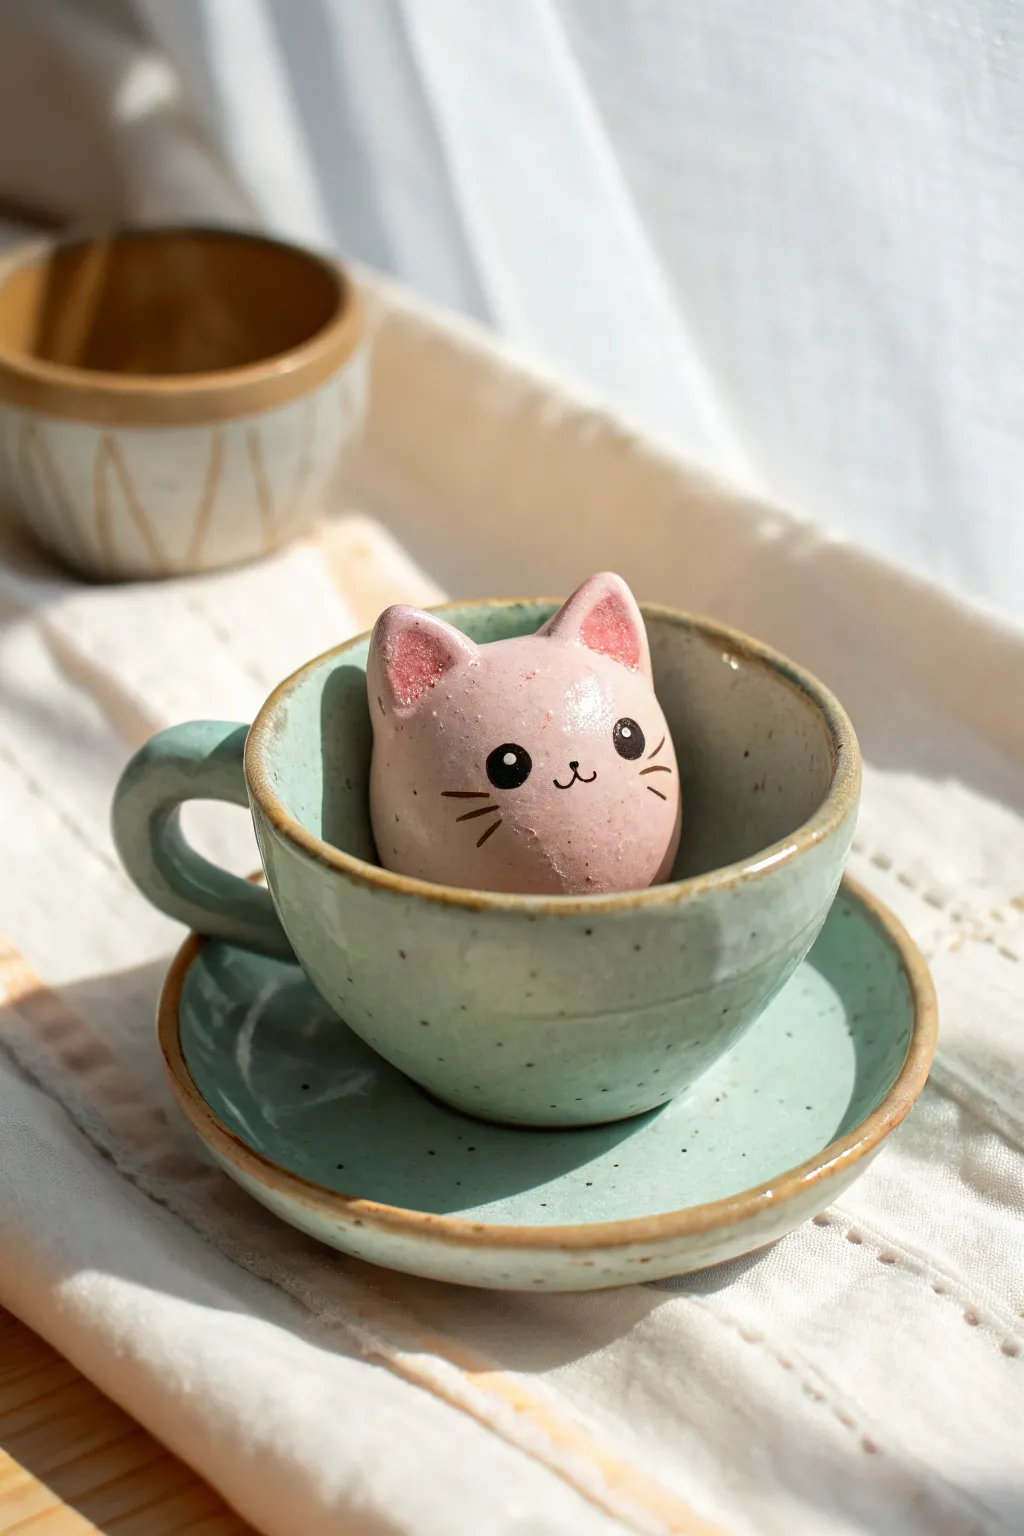
Create a delightfully round and deceptively simple pink cat figurine that fits perfectly into a miniature teacup. This glossy, smooth clay project captures the essence of a marshmallow-like cartoon cat with minimal features and maximum cuteness.
Step-by-Step
Materials
- Polymer clay (baby pink or petal pink)
- Polymer clay (darker rose pink for ears)
- Acrylic paint (black)
- Small teacup and saucer (for sizing and display)
- Fine detail paintbrush (size 0 or 00)
- Ball stylus tool
- Gloss glaze or polyurethane varnish
- Baking sheet and parchment paper
- Clay sculpting tools or a toothpick
Step 1: Shaping the Base
-
Prepare the clay:
Condition your baby pink polymer clay by kneading it until it is soft, pliable, and free of cracks. Warm hands help this process significantly. -
Check the size:
Before sculpting, grab a ball of clay and test it inside your chosen teacup. You want a sphere that sits comfortably inside without getting lost at the bottom, peeking just over the rim. -
Roll the main form:
Roll the clay into a very smooth sphere. Gently tap the bottom on your work surface to create a slightly flat base so the kitty will sit upright on its own. -
Refine the shape:
While keeping it round, gently press the sides to make it slightly oval shaped, resembling a chubby marshmallow or an egg.
Smooth Surface Secret
Before baking, lightly brush the unbaked clay with a little baby oil or cornstarch. This removes fingerprints and creates a porcelain-like finish.
Step 2: Adding the Ears
-
Form the ears:
Take two small, equal-sized pieces of the same baby pink clay. Roll them into balls and then pinch them into small triangles. -
Make the inner ear:
Take tiny pinched amounts of the darker rose pink clay. Flatten them into smaller triangles that fit inside the pink ear shapes. -
Assemble the ears:
Press the dark pink triangles onto the light pink ears. Gently smooth the edges so they become one cohesive piece. -
Attach to the head:
Place the ears on top of the head, spacing them moderately apart. Use your finger or a smoothing tool to blend the back seam of the ears into the head so they don’t pop off later. -
Final smoothing:
Use a tiny bit of baby oil or clay softener on your finger to gently buff away any fingerprints on the main surface before baking.
Add a Sweet Scent
Mix a tiny drop of vanilla or strawberry essential oil into the clay while conditioning. Your kitty will smell as sweet as a marshmallow!
Step 3: Baking and Painting
-
Bake the clay:
Place your cat on parchment paper and bake according to your clay manufacturer’s instructions. Usually, this is around 275°F (135°C) for 15-30 minutes depending on thickness. -
Cool down:
Let the figurine cool completely. Painting on warm clay can make the paint dry too fast and clump up. -
Paint the eyes:
Using a fine detail brush and black acrylic paint, paint two solid black circles for the eyes. Position them fairly wide apart for that ‘kawaii’ look. -
Add the highlights:
Dip the tip of a toothpick into white paint and place a tiny dot near the top right of each black eye pupil. This spark of life is crucial. -
Draw the mouth:
With the finest brush tip or even a fine-point black paint pen, draw a tiny ‘w’ shape between the eyes for the mouth. -
Add whiskers:
Paint three short, thin lines on each cheek. Try to keep your hand very steady and use quick, light strokes. -
Apply the glaze:
Once the paint is fully dry, apply a coat of gloss glaze over the entire piece. I find a thick, glossy coat gives it that ceramic or candy-like finish shown in the photo. -
Let it cure:
Allow the glaze to dry completely before placing your new friend into their teacup home.
Now your charming little ceramic-style cat is ready to bring a smile to anyone enjoying tea time

TRACK YOUR CERAMIC JOURNEY
Capture glaze tests, firing details, and creative progress—all in one simple printable. Make your projects easier to repeat and improve.
Mini Chibi Family Portrait Set
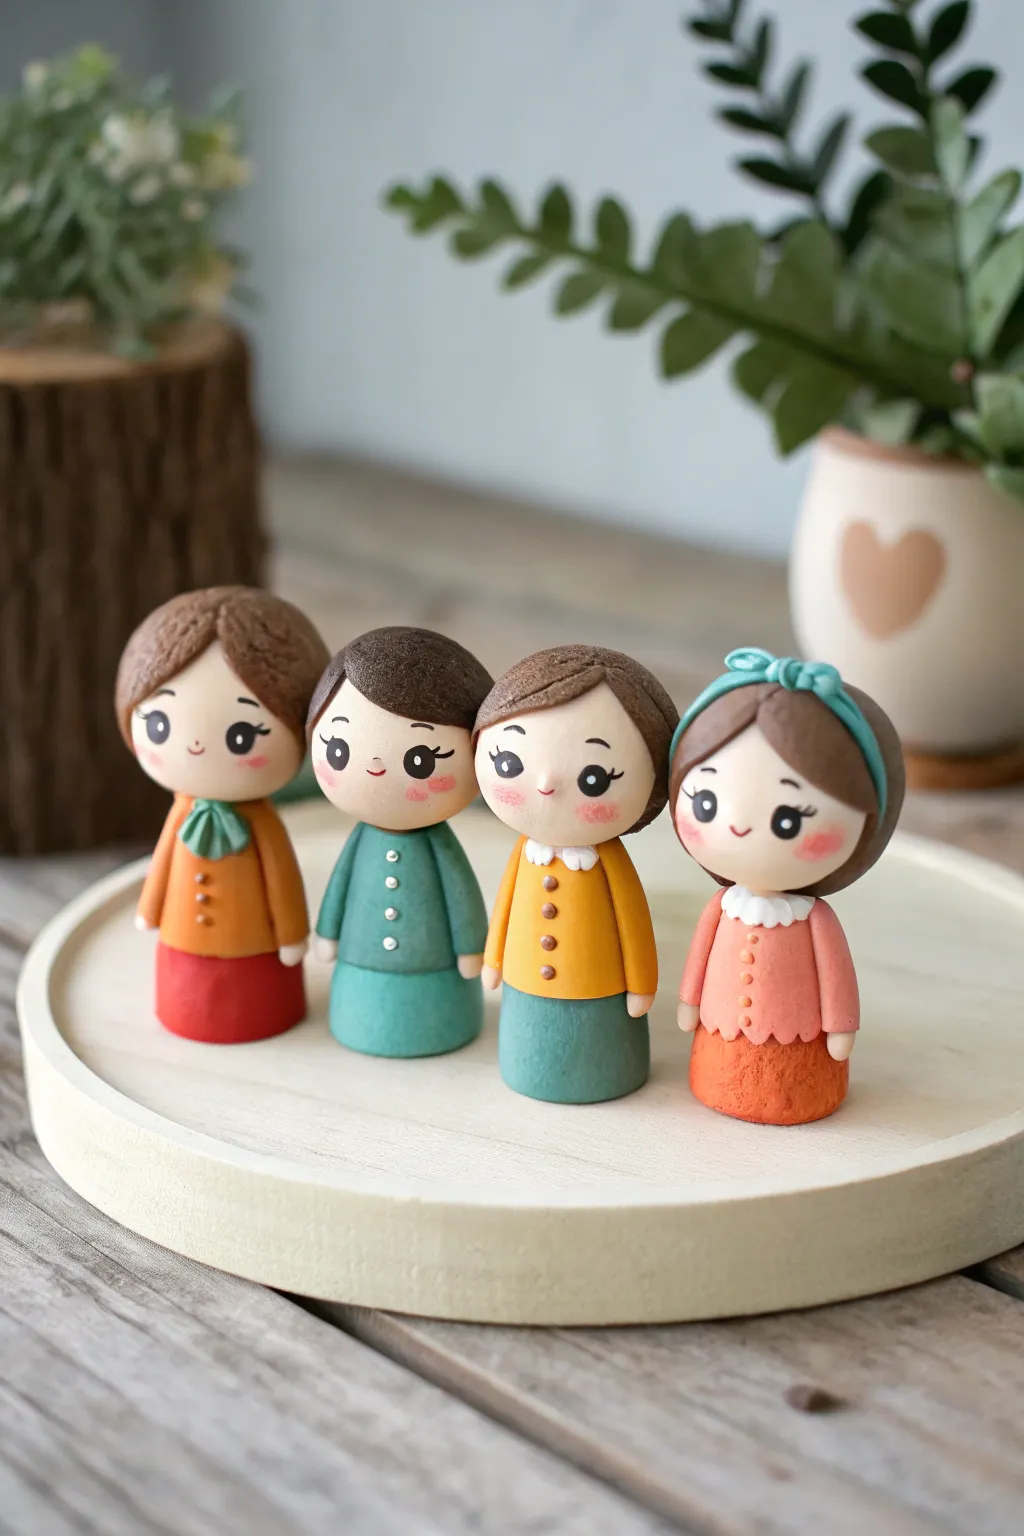
Capture the personalities of your favorite people with this adorable set of handmade clay figures. Featuring oversized heads and stylized, simple outfits, these chibi dolls make for a heartwarming keepsake or a unique family portrait.
Step-by-Step Guide
Materials
- Polymer clay (skin tone, various hair and clothing colors)
- Set of clay sculpting tools (needle tool, ball stylus)
- Aluminum foil (for armature cores)
- Acrylic rolling pin
- Liquid polymer clay (or bake and bond)
- Pastel chalks (pink for cheeks)
- Soft brush for pastels
- Black acrylic paint and fine detail brush (or fine tip marker)
- Oven for baking
Step 1: Forming the Base Structure
-
Create the core:
Start by rolling small balls of aluminum foil, roughly 1 inch in diameter, to serve as the core for the heads. This saves clay and keeps the figures lightweight. -
Cover the head:
Condition your skin-tone clay until it’s soft and pliable, then flatten it into a sheet. Wrap this sheet smoothly around the foil ball, rolling it in your palms to remove any seams or fingerprints. -
Shape the body:
Roll a simple cylinder shape for the body using a colored clay of your choice for the outfit’s base layer. It should be slightly shorter and narrower than the head to achieve that classic chibi proportion.
Clean Clay Pro-Tip
Keep baby wipes or hand sanitizer nearby. Clean your hands thoroughly when switching from dark clay (like the hair) to light clay (like the skin) to avoid muddy smudges.
Step 2: Dressing the Figures
-
Add skirts:
For the female figures, roll out a contrasting color of clay into a thin strip. Wraps this around the bottom half of the body cylinder to create a skirt, smoothing the seam at the back. -
Create torsos:
If adding jackets or cardigans, roll a thin sheet of a third color. Cut a rectangle and wrap it around the upper torso, leaving a gap in the front if you want an open-jacket look. -
Attach the head:
Insert a small piece of toothpick or wire into the neck area of the body for support. I like to add a drop of liquid clay here before pressing the head firmly onto the body to ensure a permanent bond. -
Detail the clothing:
Using a needle tool or small dotting tool, press tiny indents down the front of the shirts to mimic buttons. Small flattened dots of white or gold clay can also be placed inside these indents for 3D buttons. -
Add collars and bows:
Cut tiny triangles for collars or roll microscopic teardrops to form bows. Attach these carefully around the neck area using a needle tool to press them into place gently.
Level Up: Accessories
Personalize your family further by adding tiny props in their hands, like a miniature clay book, a coffee mug, or even a tiny pet sitting at their feet.
Step 3: Hairstyling and Face
-
Base hair layer:
Roll a sheet of hair-colored clay and cover the back and top of the head first. This creates the ‘skull cap’ on which you will build the style. -
Front bangs:
Fashion the bangs by cutting separate flat shapes of clay. For side-swept looks, use a curved teardrop shape; for blunt bangs, use a rectangle with softened edges. Press these onto the forehead. -
Add texture:
Use a needle tool to gently etch flow lines into the hair clay, following the direction the hair would naturally fall. This breaks up the flat surface and adds realism. -
Accessories:
For the figure on the right, roll a very thin snake of teal clay for a headband. Add a tiny bow on top to finish the look. -
Add arms:
Roll small sausages of clothing-colored clay for sleeves and attach them to the sides of the body. Add tiny balls of skin-tone clay at the ends for hands. -
Bake the figures:
Place your completed clan on a parchment-lined baking sheet. Bake according to your customized clay package instructions (usually 275°F/135°C for 15-30 minutes per 1/4 inch thickness).
Step 4: Bringing Them to Life
-
Cool down:
Let the figures cool completely in the oven with the door slightly ajar to prevent cracking from thermal shock. -
Paint the eyes:
Using a fine detail brush and black acrylic paint, paint two large oval eyes low on the face. Adding the eyes lower makes the characters look younger and cuter. -
Eye highlights:
Dip a toothpick in white paint and add two tiny dots to each black eye oval—one larger dot near the top and a smaller one near the bottom—to create a sparkle. -
Blush the cheeks:
Scrape a little pink pastel chalk into a fine powder. Use a soft, dry brush to gently dust this powder onto the cheeks for a sweet, rosy glow. -
Final mouth detail:
Draw a tiny, simple ‘u’ shape between the eyes with a fine-tip brown marker or very thin paint for a smiling mouth.
Arrange your little family on a shelf or glue them to a wooden disc for a permanent display that brings a smile to everyone’s face
Mix-and-Match Cartoon Expressions
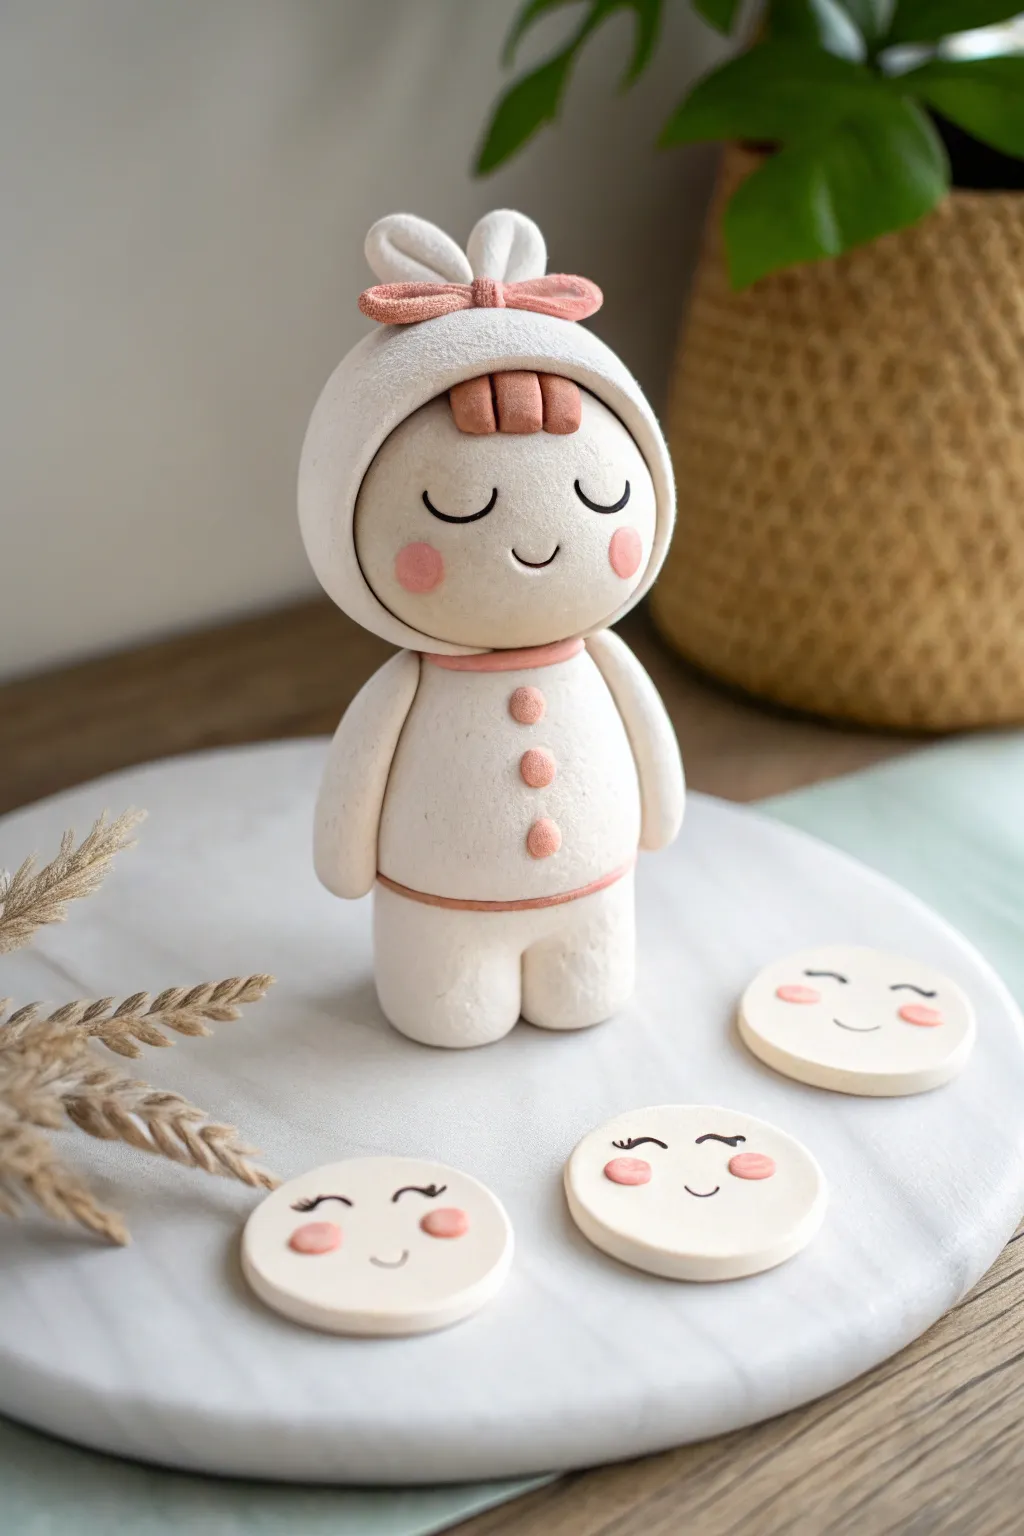
Create a charming character that can adapt to your mood with this clever mix-and-match clay project. By sculpting simple face discs that slide or stick onto a hooded figurine, you can swap expressions whenever you like.
Step-by-Step
Materials
- White polymer clay (or air-dry clay)
- Flesh-tone polymer clay
- Pink polymer clay
- Ceramic modeling tools (ball tool, needle tool)
- Fine-point black marker or black acrylic paint
- Small circle cutter (cookie cutter style)
- Rolling pin
- Oven (if using polymer clay)
Step 1: Sculpting the Body Base
-
Form the legs:
Begin with two equal balls of white clay, roughly the size of large marbles. Press them together side-by-side and flatten the bottoms slightly so they stand upright securely. -
Shape the torso:
Roll a larger ball of white clay into a rounded cylinder shape for the body. Gently press this onto the leg section, blending the clay at the seam or using a dab of liquid clay for adhesion. -
Add costume details:
Roll a very thin snake of pink clay. Wrap it around the waist area to create a belt, pressing gently to secure it. Add three tiny flattened dots of pink clay up the center of the chest for buttons. -
Attach the arms:
Create two simple sausage shapes from white clay for arms. Attach them to the sides of the torso, blending the clay at the shoulder attachment point so they hang naturally.
Step 2: Creating the Hooded Head
-
Form the head sphere:
Roll a large ball of white clay for the head. It should be slightly larger than the torso to give it that cute, chibi proportion. -
Create the face recess:
This is the crucial step. Before attaching the head, press your circle cutter gently into the front center of the face to mark the area. Carefully scoop out or press in the clay within this circle to create a shallow, flat recessed area where the discs will eventually sit. -
Attach the head:
Place the head onto the body. I like to insert a small piece of toothpick or wire between the head and body for extra structural support before pressing them together. -
Detail the hood:
Roll a thin strip of white clay and wrap it around the edge of the face recess to create the rim of the hood. Smooth the seam where it meets the back of the head. -
Add ears and bow:
Shape two teardrop pieces of white clay for bunny ears and attach them to the top. Create a small pink bow and place it right in front of the ears. -
Insert hair accent:
Inside the top of the hood recess, place a small, flattened rectangle of flesh-tone or brownish clay. Score vertical lines into it to resemble bangs peeking out.
Magnetic Personality
Embed a tiny neodymium magnet into the center of the head recess and on the back of each face disc before baking. This snaps them securely in place.
Step 3: Making the Expression Discs
-
Cut the discs:
Roll out a sheet of flesh-tone clay to about 3mm thickness. Use the same circle cutter from earlier to punch out four circles. -
Test the fit:
Gently check that your discs fit inside the hood recess you created. They should slot in comfortably without falling out too easily. -
Bake or dry:
If using polymer clay, bake the figurine and the separate face discs according to the package instructions. If using air-dry clay, allow everything to dry completely for 24 hours. -
Add facial features:
Once hardened and cool, use a fine-point black marker or a tiny brush with black paint to draw different expressions on each disc. Closed eyes with lashes are easiest for beginners. -
Apply blush:
Mix a tiny amount of pink paint with water (or use chalk pastel dust) to dab soft, rosy cheeks onto each face disc.
Wardrobe Change
Make additional bodies with different colored outfits or animal themes (like a bear or cat hood) that are compatible with the same set of face discs.
Display your finished figure on a shelf and enjoy swapping the faces to match your daily vibe
Flat 2D Cartoon Relief Plaques
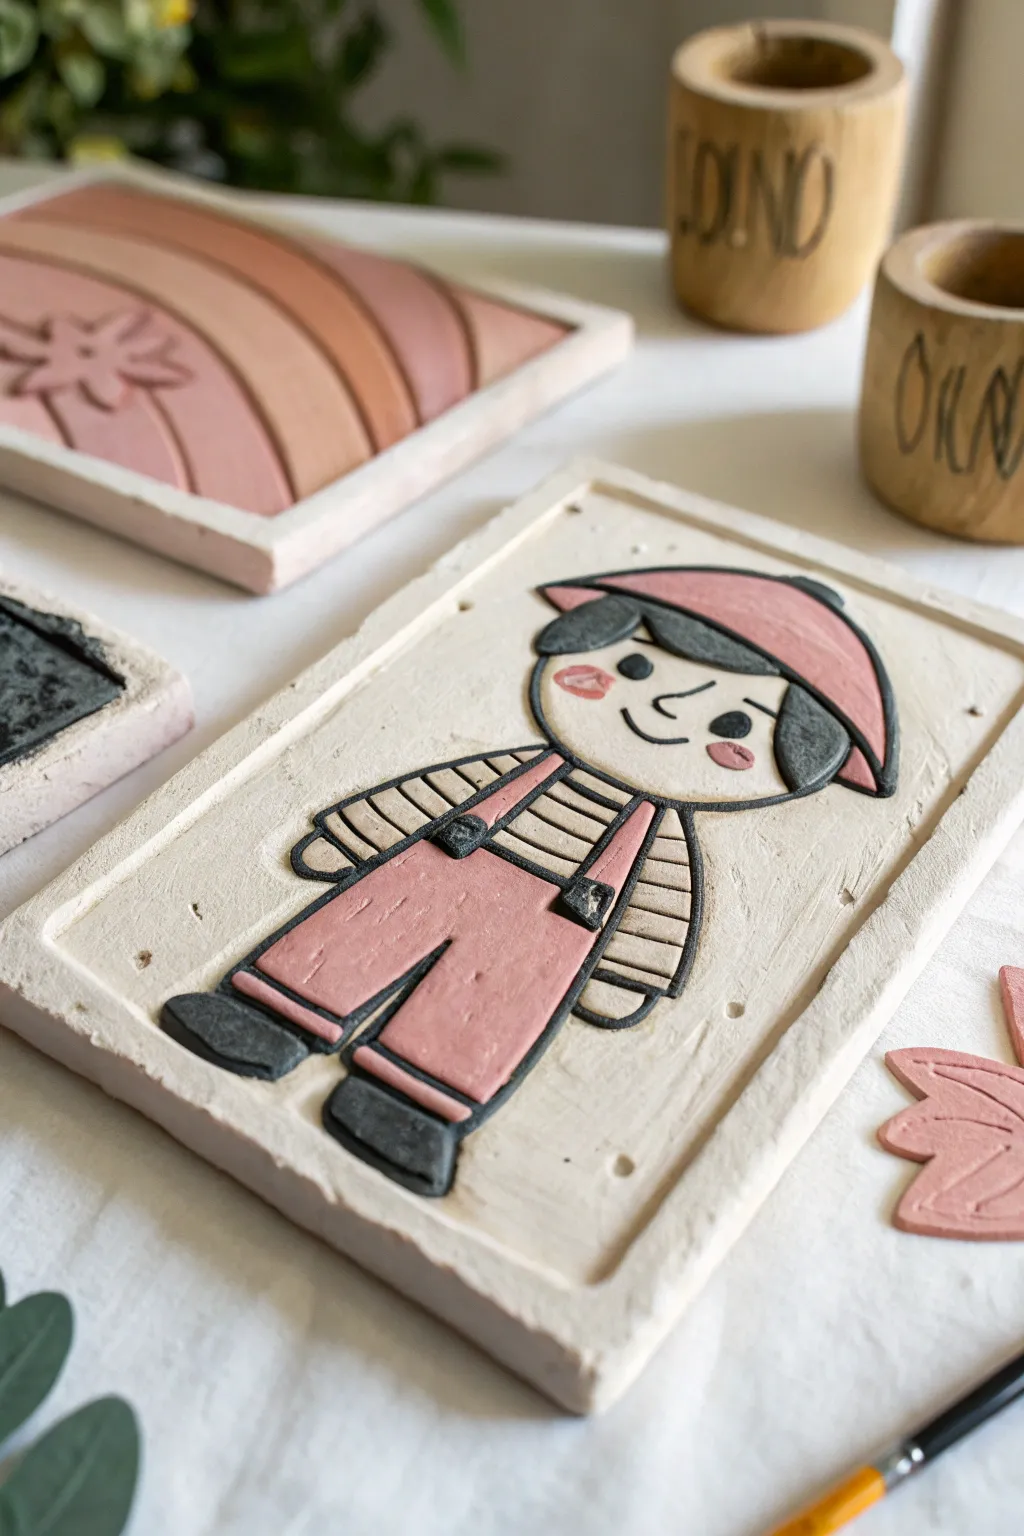
Recreate this charming, toy-like character in a structured, framed relief plaque that feels both modern and handmade. The project combines flat, illustrative shapes with subtle 3D textures, perfect for adding a playful touch to a nursery or kids’ room.
Step-by-Step Tutorial
Materials
- White air-dry clay or polymer clay (approx. 500g)
- Rectangular clay cutter or ruler and craft knife
- Rolling pin with depth guides (about 5mm and 3mm)
- Small pottery tools (needle tool, small loop tool)
- Acrylic paints (dusty pink, charcoal grey/black, pale skin tone, white)
- Fine detail paintbrush
- Water cup and palette
- Fine-grit sandpaper
- Clear matte varnish (optional)
Step 1: Preparing the Base
-
Roll the main slab:
Start by conditioning your clay until it is smooth and pliable. Roll out a thick, even slab roughly 1cm thick to serve as the sturdy base of your plaque. -
Cut the rectangle:
Using a ruler and a craft knife, cut a clean rectangle, roughly 4×6 inches. Keep your cuts straight, but don’t worry about perfection; a little organic wobble adds character. -
Form the raised border:
To create the framed look, roll thin snakes of clay. Flatten them slightly and attach them to the outer perimeter of your rectangle using a little water or liquid clay (slip) to score and join them securely. -
Smooth the frame:
Use your finger or a modeling tool to blend the seam where the frame meets the base, ensuring it looks like one solid piece of stone or ceramic.
Warping Woes?
If your plaque starts curling up while drying, gently weigh down the edges with small books or tiles once the surface is touch-dry to keep it flat.
Step 2: Sculpting the Character
-
Sketch the outline:
Lightly etch the outline of the little boy character directly onto the clay base using a needle tool. Map out the head, hat, overalls, and striped shirt. -
Create the head and hat:
Roll a thin sheet of clay (approx. 3mm). Cut out the shape of the face and the hat. Attach the face first, then layer the hat slightly over the top of the forehead to create depth. -
Form the hair:
Cut small, curved shapes for the hair peeking out from under the hat. Tuck these pieces gently under the hat brim and press them down. -
Build the body:
Cut shapes for the torso and legs. For this relief style, you want the pieces flat like a puzzle. Attach the striped shirt area first, then layer the overall straps and pants on top. -
Add details:
Roll tiny balls for the shoes and flatten them into place. Create small rectangular buckles for the overalls and press them onto the straps. -
Refine the edges:
Go around outlining your character with a needle tool to define the separation between the figure and the background. This deepens the ‘engraved’ look. -
Dry the piece:
Allow the clay to dry completely. For air-dry clay, this usually takes 24-48 hours. Turn it over halfway through to prevent warping.
Step 3: Painting and Finishing
-
Sand the surface:
Once bone dry, use fine-grit sandpaper to smooth out any rough fingerprints on the frame or the character’s face. Wipe away dust with a barely damp cloth. -
Base coat the skin:
Paint the face and hands with a pale cream or skin-tone acrylic. You may need two thin coats for opaque coverage. -
Paint the clothing pink:
Mix a dusty pink shade. Carefully paint the hat and the overalls. Use a steady hand to keep the paint within the sculptured lines. -
Add the charcoal accents:
Use a dark charcoal grey or soft black for the hair, shoes, and stripe details. I find that a slightly watered-down paint helps create smoother lines for the stripes. -
Outline and features:
Using your finest brush, paint the outline around the character to make it pop. Add the simple curved eyes, nose, and smiling mouth. Don’t forget the rosy pink cheeks! -
Final touches:
If desired, protect your work with a coat of clear matte varnish to seal the paint and give the clay a professional finish.
Clean Lines Hack
Use a black fine-tip paint pen instead of a brush for the thin outlines and stripes. It gives you way more control and a crisp, illustrative finish.
Hang this cheerful relief up or lean it on a shelf to bring a smile to anyone who sees it
Cartoon Scene Jar Diorama
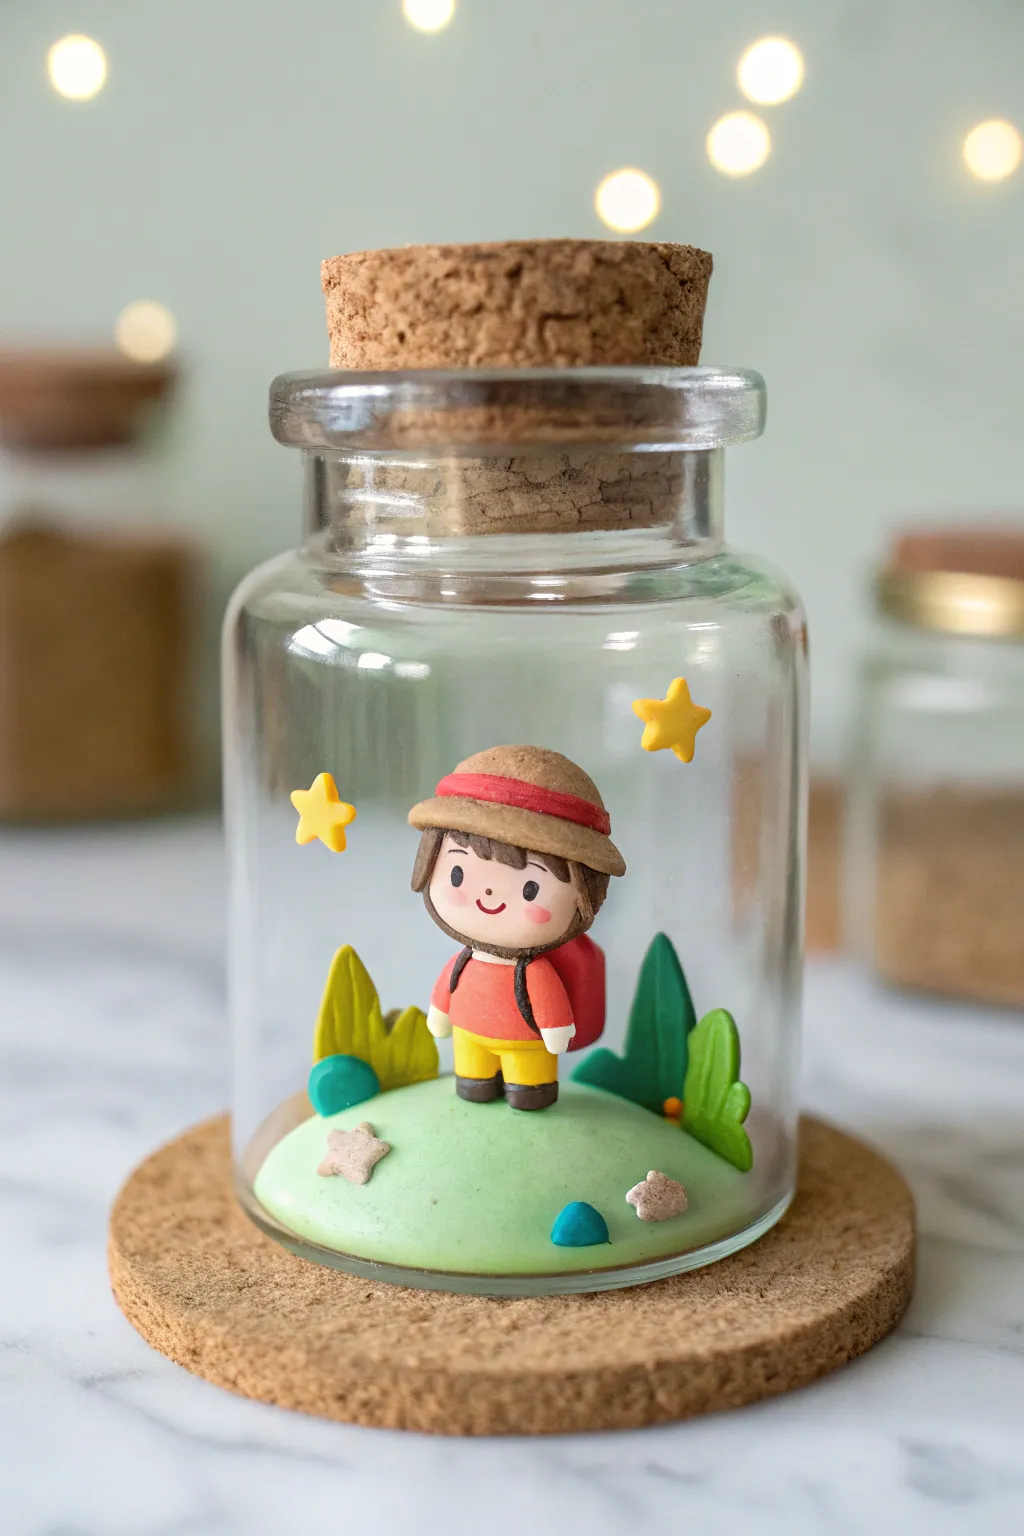
Capture the spirit of exploration in this adorable miniature scene encased in glass. This charming clay diorama features a tiny hiker surrounded by stylized nature elements, all preserved safely within a corked bottle.
How-To Guide
Materials
- Polymer clay (greens, red, brown, yellow, beige, skin tone)
- Small glass jar with cork stopper
- Round cork coaster (sized for the jar)
- Clay tools (ball tool, needle tool, blade)
- Baking sheet and parchment paper
- Super glue or strong craft adhesive
- tweezers
- Acetate sheet or clear thin wire (optional for floating stars)
Step 1: The Grassy Foundation
-
Base prep:
Start by conditioning a large ball of light green clay. Flatten the bottom slightly so it sits stable, creating a gentle dome shape that fits comfortably inside your chosen glass jar. -
Jar check:
Before adding details, briefly test the fit of your green dome inside the jar to ensure you have enough clearance for the figure. -
Adding texture:
Scatter a few tiny, irregularly shaped flat pieces of grey clay onto the grass to simulate small rocks or pathway stones. -
Ground details:
Roll tiny balls of teal or blue clay and press them down gently into the grass as scattered pebbles.
Clean Glass Trick
Before the final assembly, wipe the inside of the jar with rubbing alcohol and a lint-free cloth. This removes fingerprints and ensures your view remains crystal clear forever.
Step 2: Sculpting the Adventurer
-
Legs and body:
Create the legs using two small sausages of yellow clay, capped with dark brown shoes. Attach these to a rounded rectangle of coral-red clay for the torso. -
Head and face:
Roll a ball of skin-tone clay for the head. Use a small ball tool to indent eye sockets, then insert tiny black clay balls for eyes and add a small red mouth and pink cheeks. -
Hair styling:
Fashion brown clay into flat sheets and layer them over the head to create a short, layered haircut. -
The hat:
Mold a light brown disc for the brim and a dome for the top of the hat. Wrap a thin red clay snake around the base of the dome for the band, then place it atop the head. -
Backpack:
Form a small rounded square of dark red clay. Add tiny straps and attach it to the character’s back. -
Final assembly:
Carefully join the head to the body. You can use a small piece of wire or a toothpick inside for extra stability.
Night Mode
Mix glow-in-the-dark powder into your yellow clay for the stars. When the lights go out, your little adventurer will have a glowing night sky to guide their journey.
Step 3: Atmospheric Elements
-
Stylized trees:
Create flat, teardrop-shaped pieces of green clay in varying shades. Layer them slightly to look like stylized bushes or distant trees. -
Making stars:
Cut or mold two small five-pointed stars from bright yellow clay. These will be attached to the inner glass later. -
Baking time:
Place your adventurer, the grassy base, trees, and stars on a parchment-lined sheet. Bake according to your clay manufacturer’s instructions.
Step 4: Assembly and Display
-
Base adhesion:
Once cool, glue the grassy mound onto the center of the cork coaster. Then, glue the adventurer securely onto the mound. -
Planting trees:
Glue the flat tree pieces behind the character, creating a sense of depth. -
Star power:
For the ‘floating’ effect, carefully glue the yellow stars directly onto the inside wall of the glass jar using a tiny dot of super glue. -
Sealing the scene:
Clean the inside of the jar thoroughly. Place the glass jar over the scene, gluing the rim of the glass to the cork coaster base to seal your world inside. -
Top it off:
Insert the cork stopper into the top of the jar to complete the bottled look.
Place your finished jar on a shelf where it can catch the light and inspire your next real-world journey
Glow-Style Alien Cartoon Crew
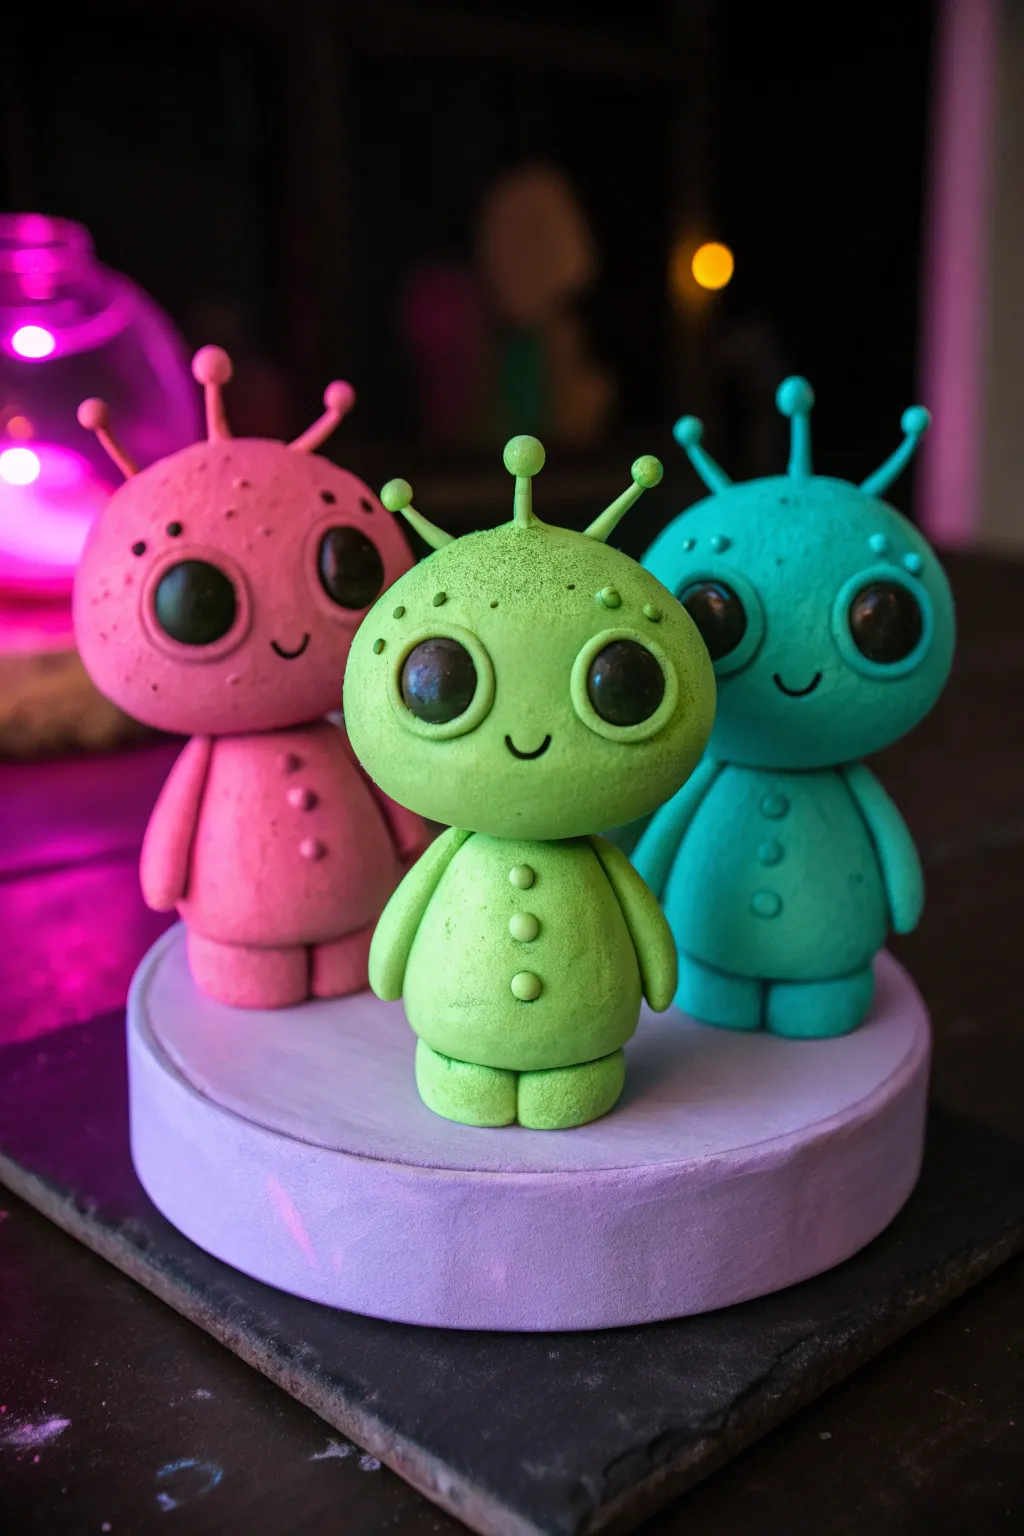
Blast off into creativity with these adorable, oversized-headed alien figures that look like they just landed from a neon galaxy. This project creates a charming crew of three with a soft, matte finish and distinct, glassy eyes that bring them to life.
Detailed Instructions
Materials
- Polymer clay (Bright Pink, Lime Green, Teal/Blue, Black)
- Circular wooden base or thick clay slab for the platform
- Acrylic paint (Lavender/Light Purple)
- Gloss varnish or UV resin
- Ball stylus tools (various sizes)
- Needle tool
- Soft paintbrush
- Aluminum foil (for armatures)
- Small roller
Step 1: Forming the Base & Bodies
-
Prepare the Launchpad:
Start by preparing your circular base. If using wood, paint it a soft lavender color and let it dry completely. Alternatively, roll out a thick slab of light purple clay into a perfect circle, smoothing the edges to create a clean, minimalist platform. -
Core Structure:
Crumple three small balls of aluminum foil, each about the size of a walnut. These will serve as the lightweight cores for the aliens’ large heads, preventing the clay from being too heavy. -
Shape the Torsos:
Condition your pink, green, and teal clay until soft. For each alien, roll a portion of clay into a smooth, teardrop-shaped cylinder for the body. Flatten the bottom slightly so they stand firmly. -
Attach the Legs:
Roll two small, flattened balls of matching clay for feet and press them underneath the body. Use a modeling tool to blend the seam slightly at the back for stability, but keep the definition of the feet visible in the front.
Step 2: Sculpting the Alien Heads
-
Cover the Cores:
Roll out sheets of your colored clays. Wrap a sheet around each foil ball, smoothing the seams gently with your fingers until you have a perfect, seamless sphere. -
Refine the Shape:
Gently press the spheres into a slightly oval shape to give them that classic cartoon alien look. I find it helpful to roll them swiftly between my palms to remove any fingerprints. -
Create Eye Sockets:
Using your largest ball stylus or the back of a paintbrush, press two deep, large indentations into the face area where the eyes will go. Space them widely apart for maximum cuteness. -
Insert the Eyes:
Roll balls of black clay that are slightly smaller than your indentations. Press them firmly into the sockets. Flatten them just enough so they look integrated but slightly bulging. -
Add the Antennae:
Roll three tiny snakes of clay for each head. Attach them to the top of the skull. Add a tiny ball of clay to the tip of each antenna for a bobble effect, blending the base of the stalk into the head with a needle tool. -
Connect Head to Body:
Insert a toothpick or wire into the neck of the body and press the head down onto it. This internal support is crucial for keeping those big noggins secure.
Head Slumping?
If the heavy heads cause the figures to lean while baking, prop them up with a ramp of polyester batting or crumpled paper towels. This supports the weight until the clay hardens.
Step 3: Details & Finishing
-
Arm Assembly:
Roll two sausage shapes for arms for each figure. Attach them to the sides of the body, letting them hang straight down in a relaxed pose. Blend the shoulder connection smooth. -
Belly Buttons:
Create three tiny balls of matching clay for the buttons. Press them in a vertical line down the center of each alien’s tummy, flattening them slightly. -
Face Details:
Use a small needle tool to sketch a tiny, curved smile between the eyes. For extra texture, you can add minute freckle indentations on the forehead or cheeks using a small dotting tool. -
Baking:
Place your figures (and base, if clay) on a baking sheet. Bake according to your polymer clay package instructions—usually around 275°F (135°C) for 15-30 minutes depending on thickness. -
Cooling Down:
Allow the figures to cool completely inside the oven by cracking the door open. This gradual cooling helps prevent cracking. -
The Glossy Look:
Once cool, carefully apply a coat of gloss varnish or UV resin ONLY to the black eyes. This is the secret to getting that wet, lifelike shine shown in the photo. -
Assembly:
If you baked the figures separately from the base, use a strong super glue or epoxy to secure them to the purple platform in a tight grouping.
Pro Tip: Surface Texture
Before baking, gently tap the skin of the aliens with a clean, old toothbrush or stiff bristle brush. This creates a subtle stone-like texture that makes the glossy eyes pop even more.
Display your new extraterrestrial friends near a lamp to catch those shiny eye highlights