If you’re itching to paint something feline on ceramics, you’ve got so many fun options beyond the basic kitty face. I pulled together my favorite cat pottery painting ideas that look awesome on real, usable pieces and feel totally doable at any skill level.
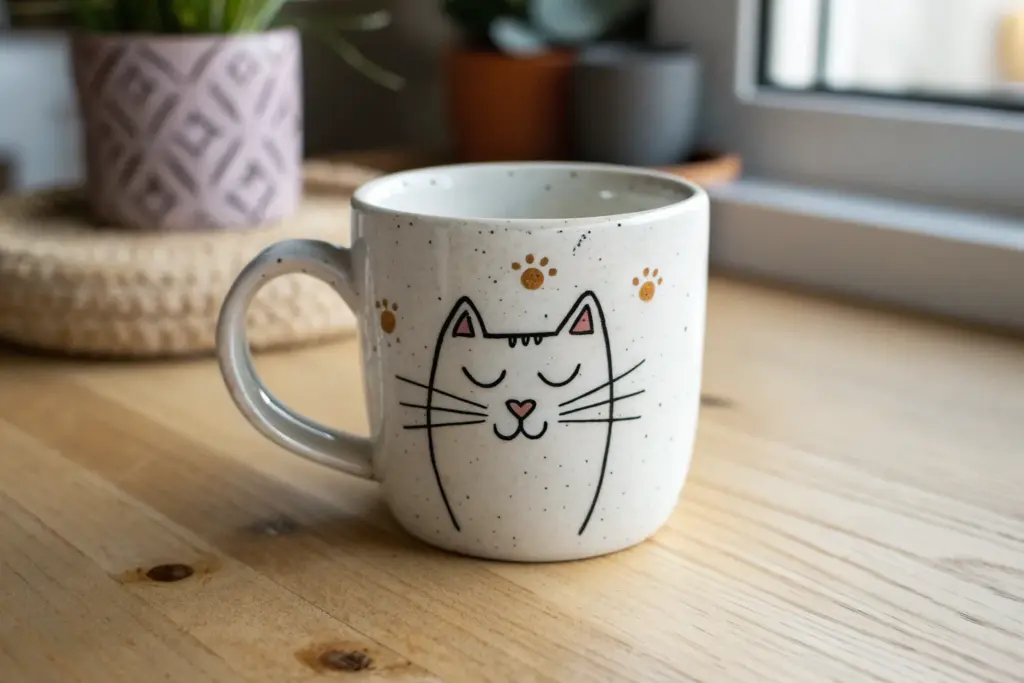
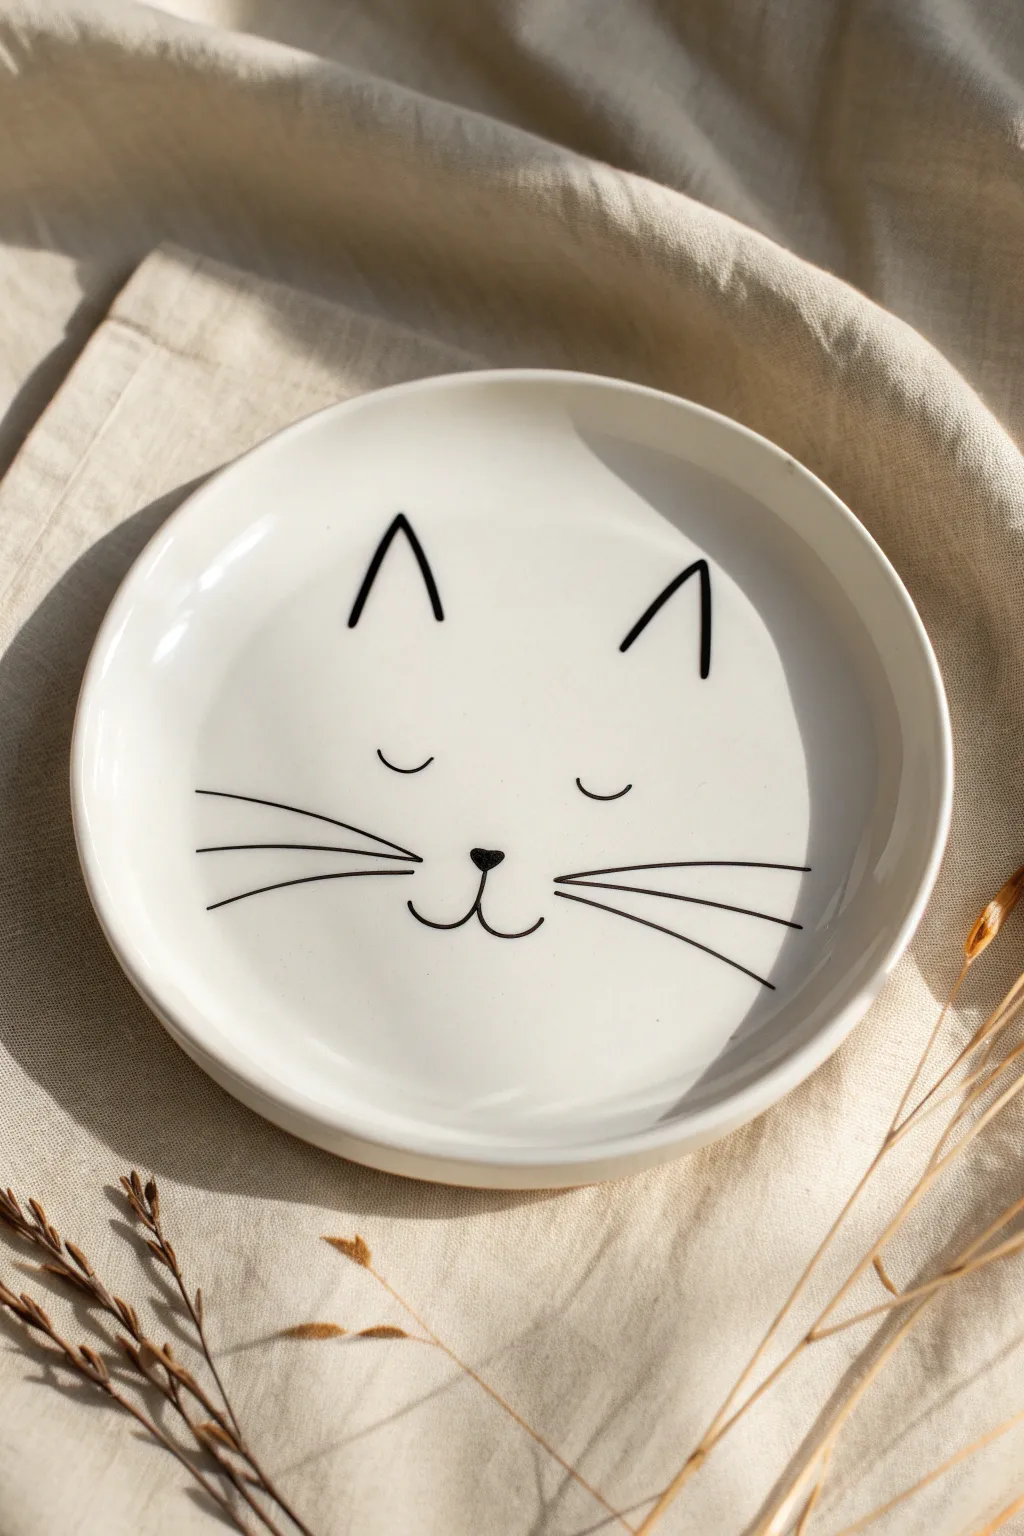
Classic Cat Face Mug
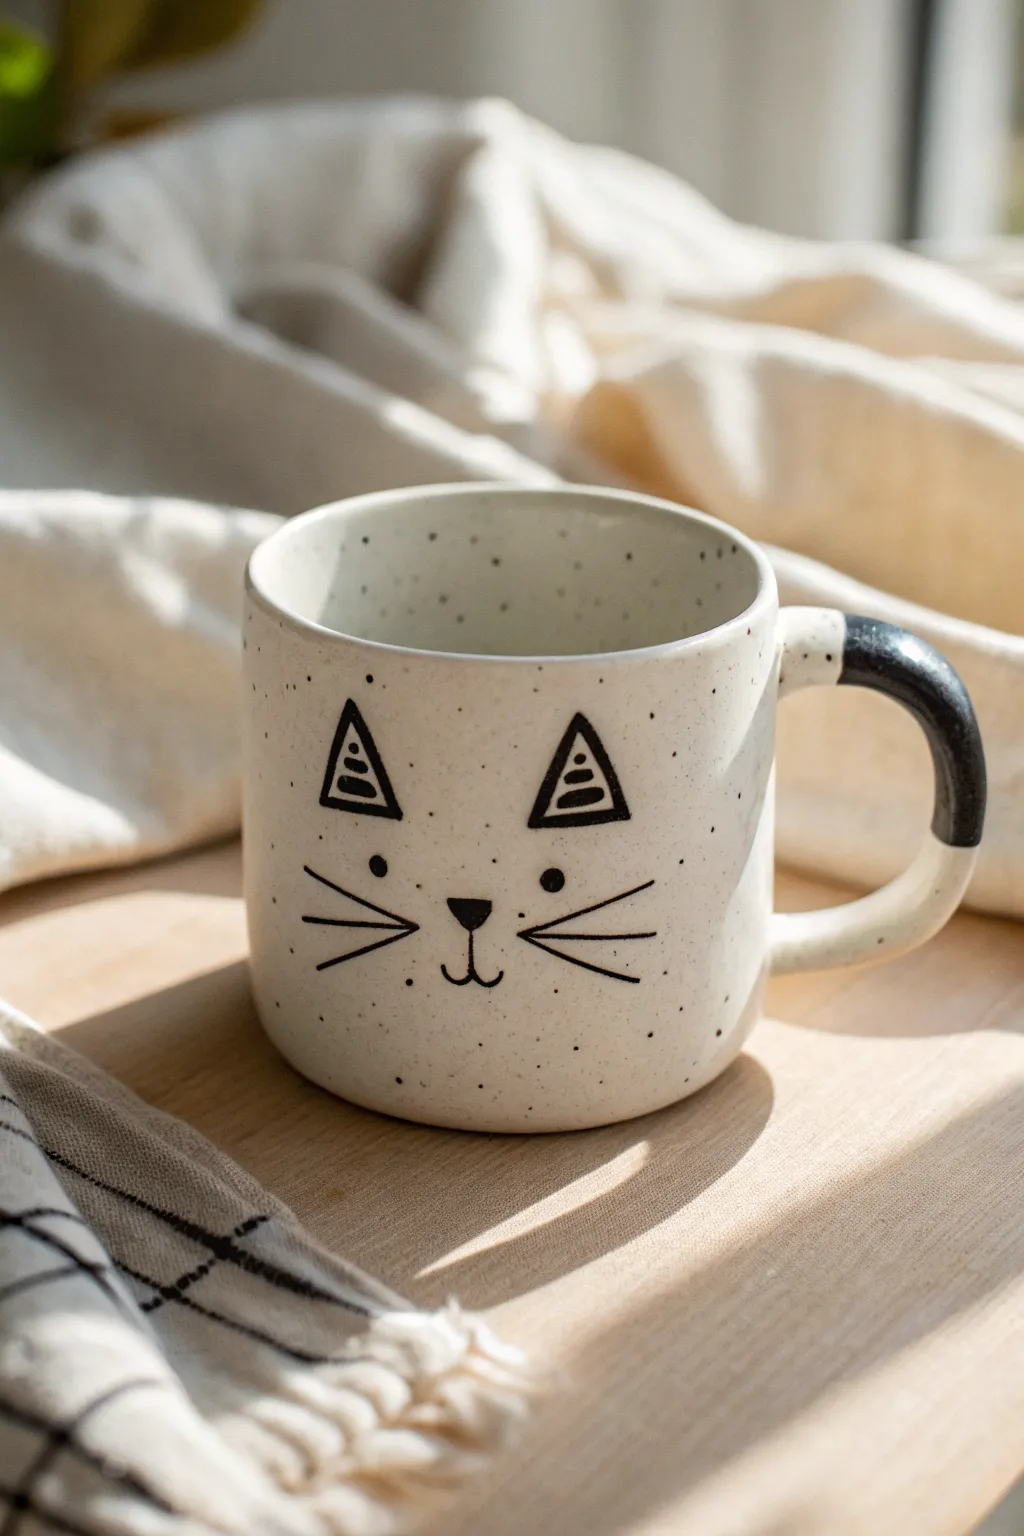
This charming project combines a rustic, speckled finish with simple lined illustrations to create a cozy, modern mug. The design relies on clean black lines against a creamy white base, making it a perfect beginner-friendly pottery painting project.
Detailed Instructions
Materials
- Bisque fired mug (simple cylindrical shape)
- Creamy white underglaze (speckled variety preferred)
- Black underglaze
- Fan brush (for base coats)
- Fine liner brush (size 0 or 00)
- Medium round brush
- Pencil
- Clear dipping glaze
- Sponge and water
- Toothbrush (if speckles aren’t in the glaze)
Step 1: Preparation & Base Coat
-
Clean surface:
Begin by wiping down your bisque mug with a damp sponge. This removes any dust or oils from handling that might prevent the glaze from adhering properly. -
Mix the base color:
Shake your creamy white underglaze thoroughly. If you are using a pre-speckled glaze (like a ‘Speckled Buff’ or similar), ensure the particles are well-distributed. -
Apply first layer:
Using a fan brush, apply a smooth, even coat of the cream underglaze to the entire exterior and interior of the mug. Work in long, horizontal strokes. -
Dry and repeat:
Let the first coat dry until it’s chalky and cool to the touch. Apply a second coat, this time using vertical strokes to cross-hatch and ensure full coverage. -
Final base layer:
Apply a third and final coat of the cream color. If your glaze creates its own speckles, you are done with the base. If not, dip a stiff toothbrush into thinned black underglaze and gently flick tiny specks onto the surface for that rustic look.
Step 2: Painting the Cat Face
-
Sketch the design:
Once the base is completely dry, lightly sketch the cat face using a pencil. Start with two triangles for ears near the rim, two dots for eyes, a small triangle nose, and the whiskers. The pencil lead will burn off in the kiln, so don’t worry about mistakes. -
Outline the ears:
Dip your fine liner brush into the black underglaze. Carefully trace the outer triangles of the ears. Keeping the pressure light ensures a thin, consistent line. -
Fill ear details:
Inside each ear triangle, paint horizontal stripes or a smaller, filled-in triangle shape. The example uses a playful stacked line pattern, which adds a nice geometric touch. -
Paint the eyes:
Reload your brush or use the back end of a small paintbrush dipped in black paint to create perfectly round dots for the eyes. Space them widely apart for a cuter expression. -
Nose and mouth:
Paint a small inverted triangle for the nose. Extend a straight vertical line down from the nose, and curve it outward to the left and right to form the mouth anchor. -
Add whiskers:
Using quick, confident flicks of your fine liner brush, paint three whiskers on each cheek area. I find that pulling the brush away from the face creates the sharpest tapered ends.
Smudged Lines?
If you smudge a black line, let it dry completely. Then, gently scratch the mistake away with a wooden skewer or toothpick before retouching with cream.
Step 3: Handle Detail & Finishing
-
Mark the handle:
Decide where the black accent on the handle will stop. Use your pencil to mark a line about one-third of the way down the handle curve. -
Paint handle top:
Using a medium round brush, paint the top portion of the handle black. Carefully cut in the line where it meets the cream color to keep it crisp. -
Second coat for black:
Wait for the black areas (ears, face, handle) to dry, then gently apply a second coat to the larger solid black areas on the handle to ensure opacity. -
Clean up:
Check the bottom of the mug (the ‘foot’) and wipe away any glaze with a wet sponge so it doesn’t stick to the kiln shelf. -
Glaze and fire:
Once all underglaze is bone dry, dip the entire mug into a clear dipping glaze. Allow it to dry, and then fire it in the kiln according to the clay and glaze specifications.
Pro Tip: Consistency
Thin your black underglaze slightly with a drop of water. An ink-like consistency flows better from liner brushes, preventing jagged lines on the whiskers.
Once fired, you will have a delightful, custom mug perfect for your morning coffee or tea


Minimalist Black Cat Silhouette
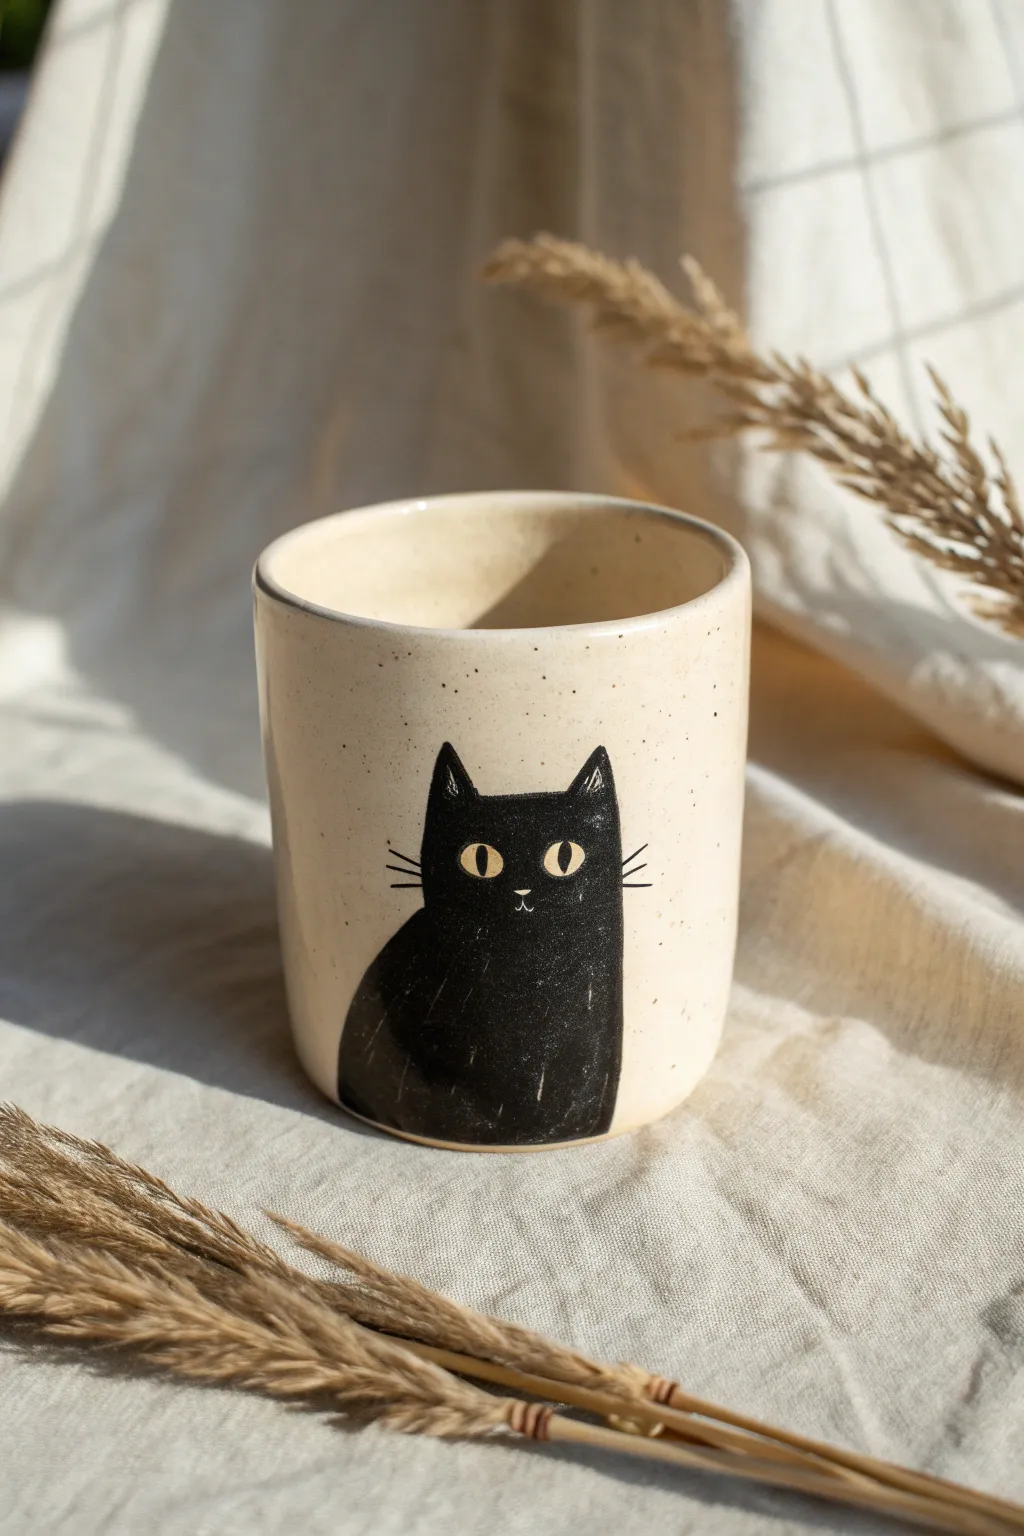
Capture the charm of a curious feline with this simple yet striking design on a speckled cream mug. The minimalist black silhouette pops beautifully against the neutral stoneware, creating a cozy piece perfect for your morning brew.
How-To Guide
Materials
- Bisque-fired ceramic mug (handleless cylinder shape prefered)
- Speckled cream or oatmeal underglaze
- Solid black underglaze
- Detailing tool or needle tool
- Small round brush (size 2 or 4)
- Fine liner brush (size 0 or 00)
- Pencil
- Clear dipping glaze
- Sponge
Step 1: Base Preparation
-
Clean the Bisque:
Begin by wiping down your bisque mug with a slightly damp sponge. This removes any dust that could prevent the glaze from adhering properly. -
Apply Base Color:
Using a soft fan brush or wide flat brush, apply 2-3 coats of the speckled cream underglaze to the entire exterior of the mug. Let each coat dry until it loses its sheen before applying the next. -
Smooth the Surface:
Once the final coat of cream underglaze is dry to the touch, gently smooth out any brush strokes with a clean, dry fingertip if necessary.
Step 2: Sketching the Silhouette
-
Position the Design:
Visualize where your cat will sit. The bottom of the cat should align with the bottom edge of the mug for a grounded look. -
Light Sketching:
Use a pencil to lightly sketch the outline of the cat directly onto the dried cream underglaze. Draw a simple gumdrop shape for the body. -
Adding Ears:
Top the body shape with two triangular ears. Keep them slightly pointed and distinct from the head curve for that alert cat expression. -
Refining the Shape:
Step back and look at your sketch. The pencil lines will burn off in the kiln, so don’t worry about being messy here. Adjust the proportions until you are happy with the silhouette.
Sgraffito Success
Work gently when scratching out the eyes. You only need to remove the top layer of black paint, not dig deep into the clay itself
Step 3: Painting the Cat
-
Outline in Black:
Dip your fine liner brush into partial-strength black underglaze and carefully trace your pencil outline. This creates a barrier for filling in later. -
Fill the Body:
Switch to your small round brush. Load it with solid black underglaze and fill in the body shape. I find it best to work from the center outward to avoid accidentally going over the lines. -
Second Coat:
Allow the black layer to dry fully. Apply a second coat of black to ensure an opaque, solid dark finish. Patchiness here will show in the final firing. -
Adding Whiskers:
Using your finest liner brush with black underglaze, paint three thin, straight lines extending from each cheek. Use a light flicking motion for tapering.
Smudge Alert
If you smudge black paint onto the cream background, let it dry completely, then scrape it off gently with an X-ACTO knife before glazing
Step 4: Sgraffito Details
-
Wait for Dryness:
This is crucial: wait until the black underglaze is leather-hard dry but not bone dry. It should feel cool and firm but not powdery. -
Carving the Eyes:
Using a needle tool or sgraffito tool, gently scratch away the black paint in two oval shapes to reveal the cream color underneath. These will be the eyes. -
Adding Pupils:
Inside your scratched-out ovals, leave a small vertical almond shape of black in the center for the pupils. If you carve too much, just dot a bit of black back in. -
Nose and Mouth:
Scratch a tiny inverted triangle for the nose and a small ‘w’ shape just slightly beneath it for the mouth. -
Texture Accents:
For extra depth, create a few very light scratches on the ears or body to simulate fur texture, letting the cream base peek through subtly. -
Clean Up:
Gently blow away or brush off any crumbs of dried underglaze from the carving process. Be careful not to smudge the black areas.
Step 5: Final Glazing
-
Clear Glaze Application:
Dip the entire mug into a clear dipping glaze. Ensure you have a firm grip, perhaps using glazing tongs, and dip quickly and evenly. -
Wipe the Foot:
Use a damp sponge to completely wipe any glaze off the very bottom (foot) of the mug to prevent it sticking to the kiln shelf. -
Final Fire:
Fire the mug in the kiln according to the clay and glaze specifications (typically Cone 5 or 6 for stoneware).
Once fired, the speckles will emerge, and your little black cat will be ready to keep you company


Peeking Cat Over the Rim
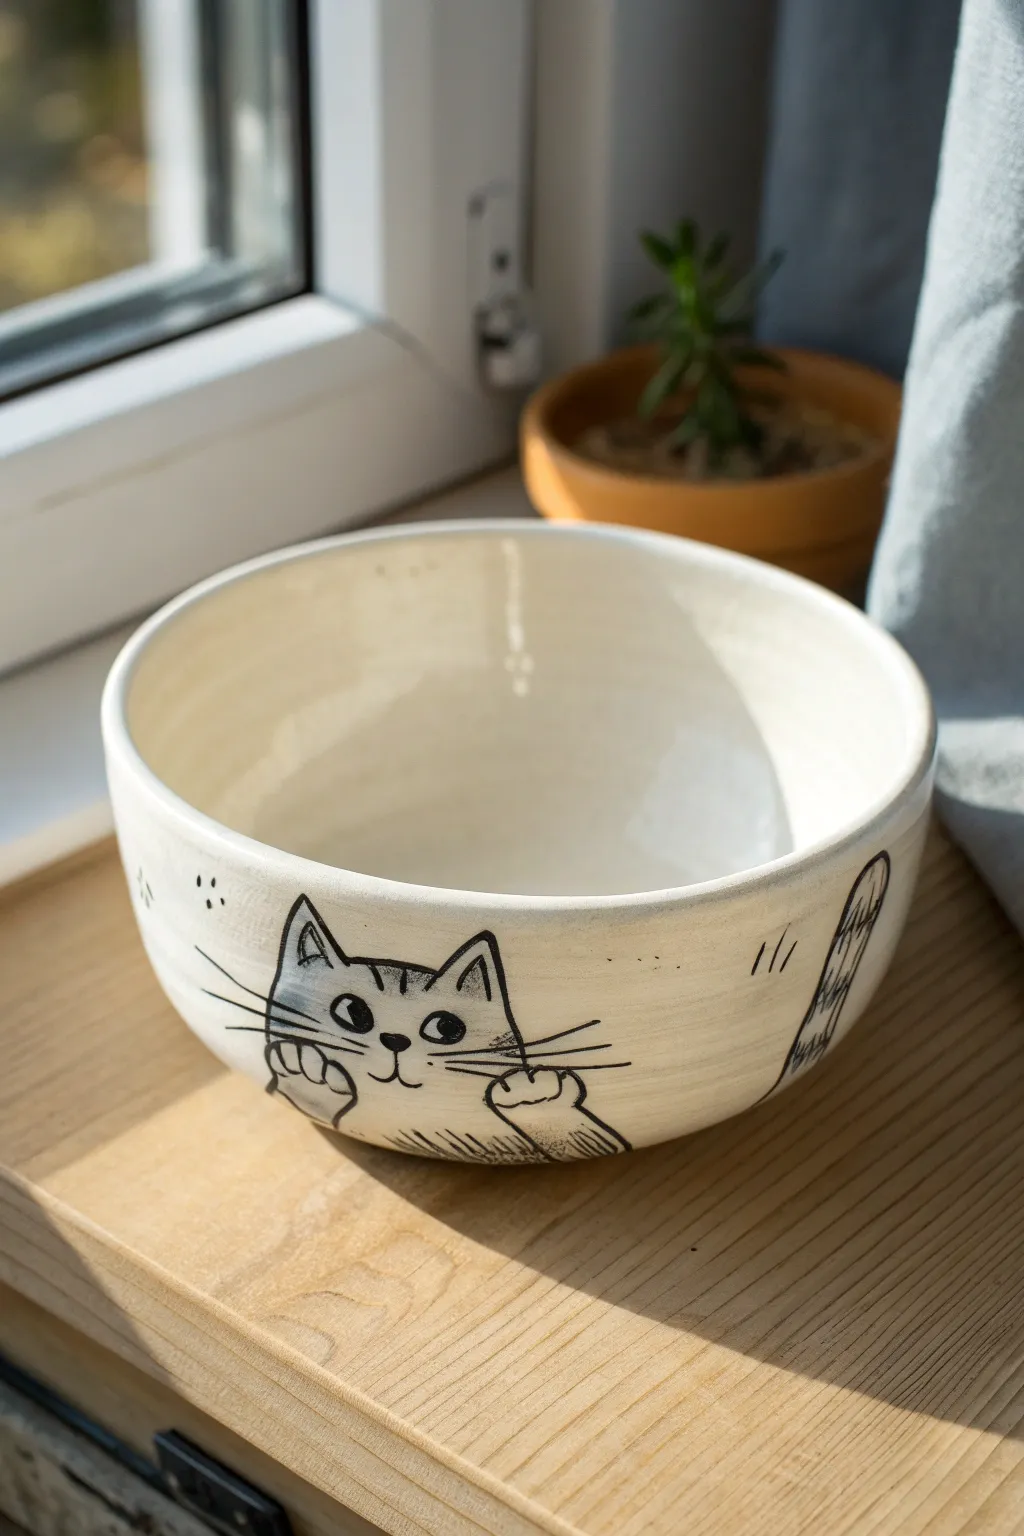
Capture the playful curiosity of a feline friend peeking over an edge with this charming bowl design. The minimalist black line work against a creamy off-white glaze creates a modern, illustrated look that is perfect for beginners.
Step-by-Step Tutorial
Materials
- Bisque-fired ceramic bowl
- Underglaze pencil (black)
- Fine liner brush (size 0 or 00)
- Black underglaze
- Clear dipping glaze
- Sponge
- Water cup
- Pencil (standard graphite)
Step 1: Preparation & Sketching
-
Clean surface:
Begin by wiping down your bisque bowl with a damp sponge. This removes any dust that could prevent the glaze from adhering properly. -
Identify placement:
Ideally, you want the cat’s face to sit low on the exterior curve, as if it is peeking up from under the table. Choose a smooth section of the bowl for the face. -
Rough sketch:
Using a standard graphite pencil, lightly sketch the outline of the cat. Don’t worry about mistakes; the graphite will burn off in the kiln. Start with the the head shape and two triangular ears. -
Paws in position:
Add two rounded paws just below the chin area. They should look like they are gripping the surface, so position the toes pointing upward. -
Facial features:
Sketch two large oval eyes, a small triangular nose, and the mouth lines. Keep the expression simple and wide-eyed. -
Tail placement:
Rotate the bowl slightly to the right of the face. Sketch a long, upright tail that curves slightly, as if wrapping around the bowl’s side.
Shaky Hands?
If painting fine lines with a brush is difficult, use a black underglaze pencil or a precision applicator bottle with a metal tip for sturdier control over the whiskers.
Step 2: Line Work
-
Prepare the underglaze:
Squeeze a small amount of black underglaze onto a palette. Add a drop or two of water to thin it slightly until it has an ink-like consistency for smooth flow. -
Outline the head:
Using your fine liner brush, carefully trace over your pencil lines for the ears and head. I find that pulling the brush toward me gives me steadier lines than pushing away. -
Detail the paws:
Outline the paws, adding small curved lines to define the toes. This gripping gesture is key to the ‘peeking’ effect. -
Fill the eyes:
Outline the eyes first, then fill in the pupils with solid black. Leave a tiny white dot unpainted in each eye for a highlight, or add a dot of white underglaze later if you forget. -
Whiskers and accents:
This is the most critical step for personality. With a very light hand, flick the brush outward to create three long whiskers on each side. Add three small floating dots above the head for whimsy. -
Stripes and texture:
Add small triangular stripes to the forehead and cheeks. Use quick, short strokes to suggest fur texture on the body area below the paws. -
Painting the tail:
Outline the tail shape you sketched earlier. Fill it with diagonal stripes or a cross-hatch pattern to match the cat’s markings. Add ‘motion lines’ near the tail to suggest movement.
Step 3: Finishing Touches
-
Clean up:
If you made any stray marks or smudges with the black underglaze, use a clean, damp brush or a scratch tool to gently remove them from the bisque. -
Drying:
Allow the black underglaze to dry completely. It should look chalky and matte when ready. -
Glazing:
Dip the entire bowl into a clear transparent glaze. Ensure an even coat inside and out. This will seal the clay and make the black lines pop after firing. -
Final wipe:
Wipe the foot (the bottom ring) of the bowl with a sponge to ensure no glaze is left there, preventing it from sticking to the kiln shelf.
Add a hidden surprise
Paint a small mouse, a paw print, or a fish bone on the inside bottom of the bowl. It will be a cute surprise revealed only when the user finishes their soup or cereal.
Once fired, you’ll have an adorable, durable piece of art ready for your morning cereal


Sleeping Cat Curled Up Plate
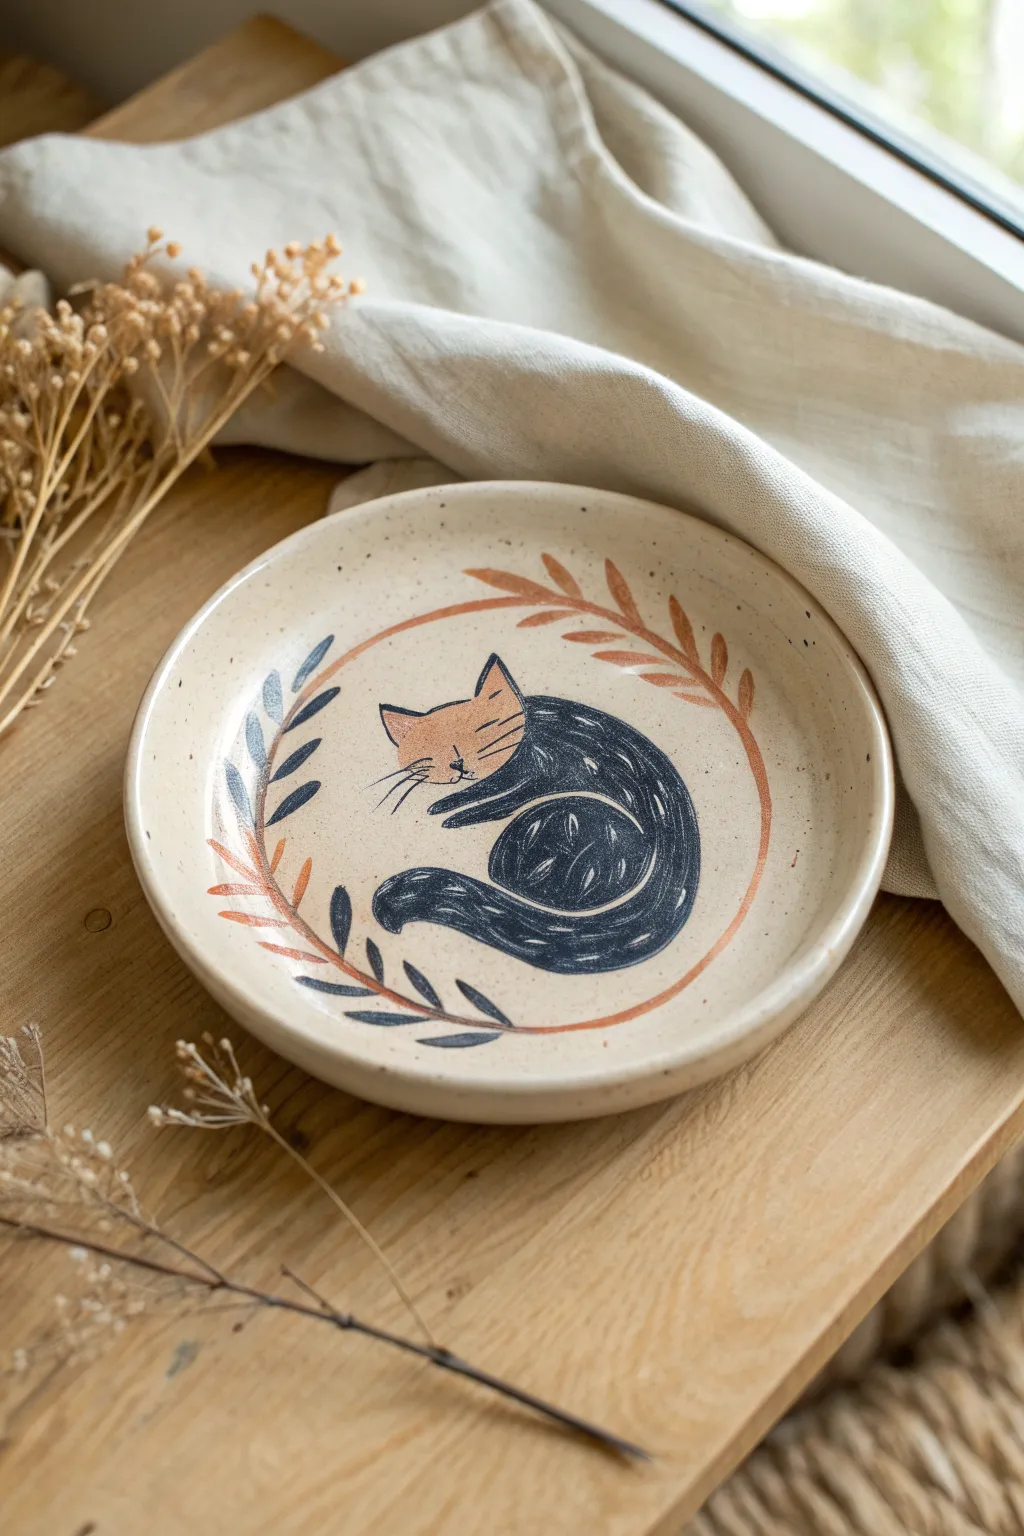
Capture the peaceful essence of a sleeping feline with this charming pottery project, featuring a glossy black cat nestled within a delicate wreath of copper and sage leaves. The speckled clay body adds a natural, rustic warmth that perfectly complements the simple line work and earthy tones.
Step-by-Step Guide
Materials
- Bisque-fired ceramic plate (speckled cream clay body recommended)
- Underglaze in Black (opaque)
- Underglaze in dusty/sage Blue-Grey
- Underglaze in Rust/Copper Orange
- Underglaze in Peach/Light Orange (for the face)
- Pencil (HB or lighter)
- Fine liner brush (size 0 or 00)
- Small round brush (size 2 or 4)
- Clear transparent glaze
- Sponge and water bowl
Step 1: Preparation & Sketching
-
Clean the surface:
Begin by wiping down your bisque plate with a slightly damp sponge. This removes any kiln dust or oils from your hands that might resist the glaze application. -
Mark the center:
Lightly find the visual center of the plate. You don’t need a ruler; just eyeball where you want the cat to rest so the composition feels balanced. -
Lightly sketch the wreath:
With a regular pencil, draw a loose circle around the center area. This will serve as the guide for your leafy wreath stems. Keep the pressure very light so you don’t etch into the bisque. -
Outline the cat:
Sketch the cat’s shape in the center. Start with a kidney-bean curve for the body curled into a circle, add a triangle for the head, and a fluffy tail wrapping around the curve.
Sgraffito Trick
For the fur texture, scratching through the dry black paint with a needle tool reveals the clay color underneath, creating perfect sharp ‘white’ lines.
Step 2: Painting the Cat
-
Block in the face:
Using your small round brush, fill in the cat’s face area (excluding the ears and body) with the peach or light orange underglaze. Apply 2-3 coats for solid coverage, letting each coat dry matte. -
Paint the body base:
Switch to the black underglaze. Carefully paint the cat’s body, ears, and tail. Leave the peach face area clear. I like to use the tip of the brush to carefully cut in around the face shape first. -
Add texture to the fur:
While the black underglaze is still slightly damp (leather hard), use a sgraffito technique or a very fine brush with water to lift small dashes of paint, creating the texture of fur on the flank and tail. Alternatively, paint thin, lighter grey strokes over the black once dry. -
Define facial features:
Once the peach base is totally dry, use your finest liner brush and black underglaze to draw the sleeping eyes (two small curved lines), a tiny nose, mouth, and long whiskers extending past the face. -
Add the ear details:
Paint the insides of the ears with a touch of the peach tone, or simply outline them in black to define their triangular shape against the body.
Step 3: The Wreath & Finishing
-
Paint the rust stems:
Using the rust/copper orange underglaze and a liner brush, trace over the bottom half of your pencil circle guide, extending curved branches upwards on the right side. -
Add rust leaves:
Paint simple, almond-shaped leaves coming off the rust stem. Arrange them in pairs or alternating patterns, keeping the stroke loose and organic. -
Paint the blue stems:
Switch to your dusty blue-grey color. Paint the stems on the left side of the wreath, curving them to meet the rust stems at the bottom and top. -
Add blue leaves:
Fill in the blue section with similar almond-shaped leaves. Keep the leaves slightly separated so the speckled clay background shows through. -
Add final speckles (optional):
If your clay body isn’t naturally speckled, you can flick a toothbrush loaded with watered-down black iron oxide or brown underglaze lightly over the whole plate. -
Clear glaze application:
Once all underglaze design work is bone dry (no longer cool to the touch), dip the entire plate into clear transparent glaze. Ensure an even coat and shake off excess drips. -
Fire the piece:
Fire the plate in the kiln according to the clay and glaze manufacturer’s instructions (usually cone 5 or 6 for stoneware).
Smudged Paint?
If you accidentally smudge black paint on the raw bisque, don’t wipe it! Let it dry completely, then gently scrape it off with a craft knife.
Unload the kiln to reveal your sweet, sleeping kitty plate ready for display or a slice of cake

The Complete Guide to Pottery Troubleshooting
Uncover the most common ceramic mistakes—from cracking clay to failed glazes—and learn how to fix them fast.
Tabby Stripes Made Simple
Transform a plain ceramic mug into a cozy companion with this adorable sleeping tabby design. Featuring simple linework and warm, rustic tones, this project captures the peaceful essence of a cat nap on a speckled oatmeal background.
Detailed Instructions
Materials
- Bisque ceramic mug (rounded shape preferred)
- Speckled oatmeal or cream underglaze (background)
- Dark chocolate brown underglaze (fine lines)
- Warm chestnut brown underglaze (stripes/ears)
- Soft pink underglaze (cheeks)
- Wide fan brush
- Fine liner brush (size 0 or 00)
- Small round brush (size 2)
- Pencil
- Clear dipping glaze
Step 1: Base Coat Application
-
Clean the bisque:
Wipe down your ceramic mug with a barely damp sponge to remove any kiln dust. This ensures the underglaze adheres smoothly without cratering. -
Apply the background color:
Using a wide fan brush, apply the speckled oatmeal underglaze to the entire exterior of the mug. Use long, smooth strokes to minimize texture. -
Layering up:
Let the first coat dry until it’s chalky to the touch. Apply a second and, if necessary, a third coat to get full, opaque coverage. The speckles in the glaze add that lovely rustic texture. -
Dry completely:
Allow the base coat to dry fully before sketching your design. If you rush this, your pencil might dig into the soft glaze.
Fixing Smudges
If you smudge a dark line, let it dry completely. Then, gently scratch the mistake away with a wooden toothpick or a stiff brush until the base color reappears.
Step 2: Sketching the Tabby
-
Outline the head:
Using a pencil, lightly sketch two triangular ears near the rim of the mug. Connect them with a soft, curved line for the top of the head. -
Mark the features:
Draw two small U-shapes for closed sleeping eyes in the center. Add a small inverted triangle for the nose just below them. -
Plan the stripes:
Sketch three small triangles on the forehead between the ears. Move down to the bottom of the mug and draw curved triangles coming in from the sides to represent the tabby’s body stripes or paws. -
Add whiskers:
Lightly mark three radiating lines on each cheek area. Dont worry about mistakes; the pencil lead will burn off in the kiln.
Make it Personal
Customize your cat by changing the stripe color to grey or orange! You can also paint a small tail curling around the handle for a hidden detail.
Step 3: Painting the Details
-
Fill the ears:
Load your small round brush with warm chestnut brown. Fill in the inside of the ear triangles, leaving a small border of the background color visible around the edges. -
Paint the forehead stripes:
Using the same chestnut brown, carefully fill in the small triangles on the forehead. I find it helpful to pull the brush downward to keep the points sharp. -
Create the body markings:
Paint the larger curved triangles at the base of the mug with the chestnut brown. Ensure the paint is thick enough so the background color doesn’t show through. -
Apply the blush:
Dip a clean round brush or a sponge dobber into the soft pink underglaze. Gently dab two circles on the cheeks, right where the whiskers will start. -
Line the ears and head:
Switch to your fine liner brush and dark chocolate brown underglaze. Outline the ears and draw the top line of the head connecting them only partially—keep the lines distinct.
Step 4: Fine Lines and Finishing
-
Draw the eyes:
With the liner brush and chocolate brown, trace over your sketched eye curves. Keep the pressure light to maintain a delicate line. -
Define the nose and mouth:
Fill in the nose triangle with solid chocolate brown. From the bottom point of the nose, draw a small ‘w’ shape to create the mouth. -
Add whiskers:
Paint three thin, sweeping lines on each cheek for whiskers. Quick, confident strokes work best here to avoid shaky lines. -
Outline the body stripes:
For extra definition, loosely outline the chestnut body stripes with the thin dark brown liner brush, but don’t close the shapes completely for a more illustrative look. -
Clear glaze application:
Once all design work is bone dry, carefully dip the mug into clear glaze. Hold it for about three seconds to ensure an even coat. -
Firing:
Fire the piece in the kiln according to the manufacturer’s instructions for your specific clay and glaze combination.
Enjoy sipping your morning coffee with your calm and cozy tabby creation
Calico Patchwork Cat
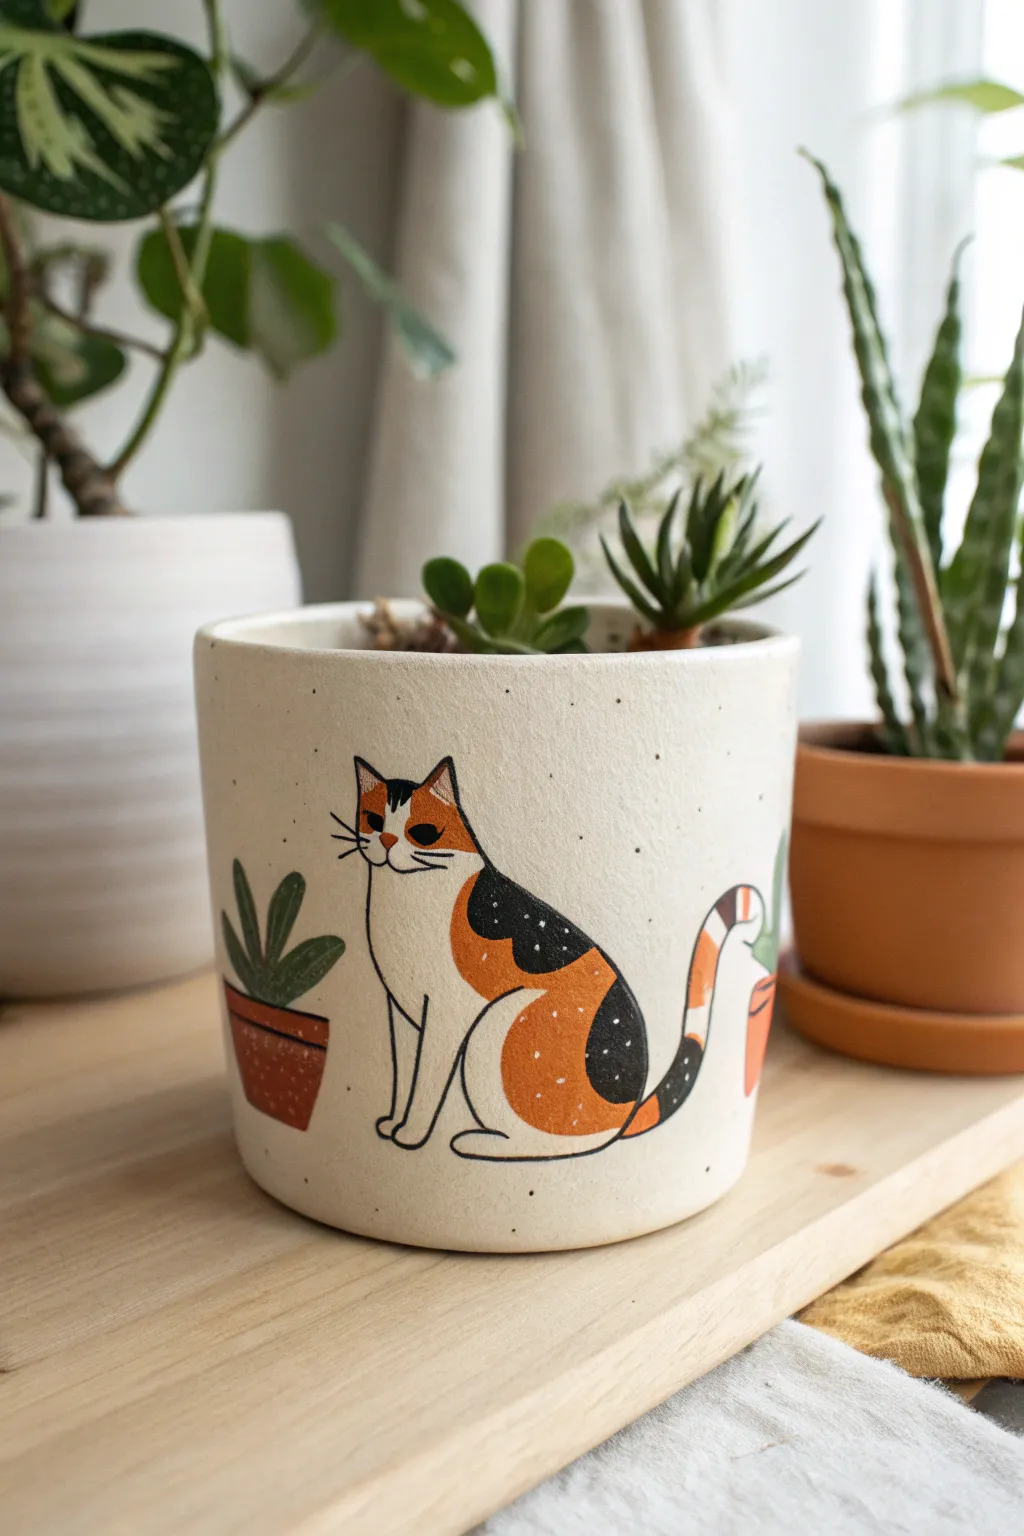
Transform a plain ceramic pot into a cozy home for your succulents with this charming calico cat design. The illustrative style uses bold patches of color and delicate line work to create a sweet, personality-filled feline friend.
Step-by-Step
Materials
- White or cream ceramic planter pot (matte finish preferred)
- Acrylic paints (black, terracotta orange, deep green, brown, white)
- Pencil for sketching
- Fine liner brush (size 00 or 000)
- Small flat brush (size 4 or 6)
- Medium round brush
- Matte spray sealer or varnish
- Palette or mixing plate
- Paper towels and water cup
Step 1: Preparation & Sketching
-
Clean the surface:
Begin by wiping down your ceramic pot with a damp cloth to remove any dust or oils. Let it dry completely to ensure the paint adheres properly. -
Map out the composition:
Using a light pencil, gently sketch the outline of the sitting cat in the center of the pot. Aim for a simple, rounded shape for the body and a perched head. -
Add the accessories:
Sketch a small potted plant to the left of the cat and perhaps the edge of another pot on the right side to frame the character. Keep the lines faint so they’re easy to cover later. -
Draft the patchwork pattern:
Lightly draw curves on the cat’s body to mark where the color patches will go. Mark out the tail’s striping pattern and the distinctive patches over the eyes.
Step 2: Blocking in Color
-
Paint the orange patches:
Mix a warm terracotta orange. Using your medium round brush, fill in the large patch on the cat’s side, the tail stripes, and the markings over the left eye. -
Paint the black patches:
Switch to black paint. Fill in the patch on the cat’s back (just above the orange one), the tip of the tail, and the marking over the right eye. -
Fill the body:
If your pot isn’t perfectly white or has blemishes, carefully paint the rest of the cat’s body with white or cream paint to give it a solid, opaque base. -
Color the terracotta pots:
Use a darker brown-orange shade to fill in the pots next to the cat. I like to do two thin coats here to get that earthy clay look without brushstrokes showing. -
Add greenery:
With a deep green, paint the leaves of the plant next to the cat. Simple, elongated oval shapes work best for this illustrative style.
Pro Tip: Smooth Lines
Add a tiny drop of water to your black acrylic paint when lining. Ink-like consistency flows much smoother off the brush than thick paint.
Step 3: Details & Line Work
-
Outline the cat:
Using your finest liner brush and black paint (or a black paint pen if you have a shaky hand), carefully trace the outline of the entire cat. -
Define the legs:
Draw the lines separating the front legs and the curve of the back leg. Keep the lines thin and fluid. -
Paint the face:
Add two small dots for eyes, a tiny triangle nose, and the mouth lines. Don’t forget the long, delicate whiskers extending from the cheeks. -
Add texture to patches:
Dip a toothbrush or stiff brush in white paint and flick it very gently over the black and orange patches to create a speckled, starry texture. Alternatively, use your fine brush to add tiny white dots manually. -
Detail the plants:
Outline the terracotta pots and plant leaves with fine black lines to match the cat’s illustrative style. Add a rim to the pots for dimension. -
Enhance the background:
Add tiny black speckles around the empty space of the pot to create an organic, ceramic-glaze texture effect.
Level Up: 3D Texture
Mix baking soda into your terracotta paint for the plant pots. It creates a gritty, realistic clay texture that contrasts with the smooth cat.
Step 4: Finishing Touches
-
Let it cure:
Allow the paint to dry for at least 24 hours to ensure all layers are fully set. -
Seal the artwork:
Spray the entire pot with a clear matte sealer. This protects your artwork from water damage when you water your real plants.
Now your little painted companion is ready to guard your favorite houseplant


What Really Happens Inside the Kiln
Learn how time and temperature work together inside the kiln to transform clay into durable ceramic.
Tuxedo Cat With a Bow Tie
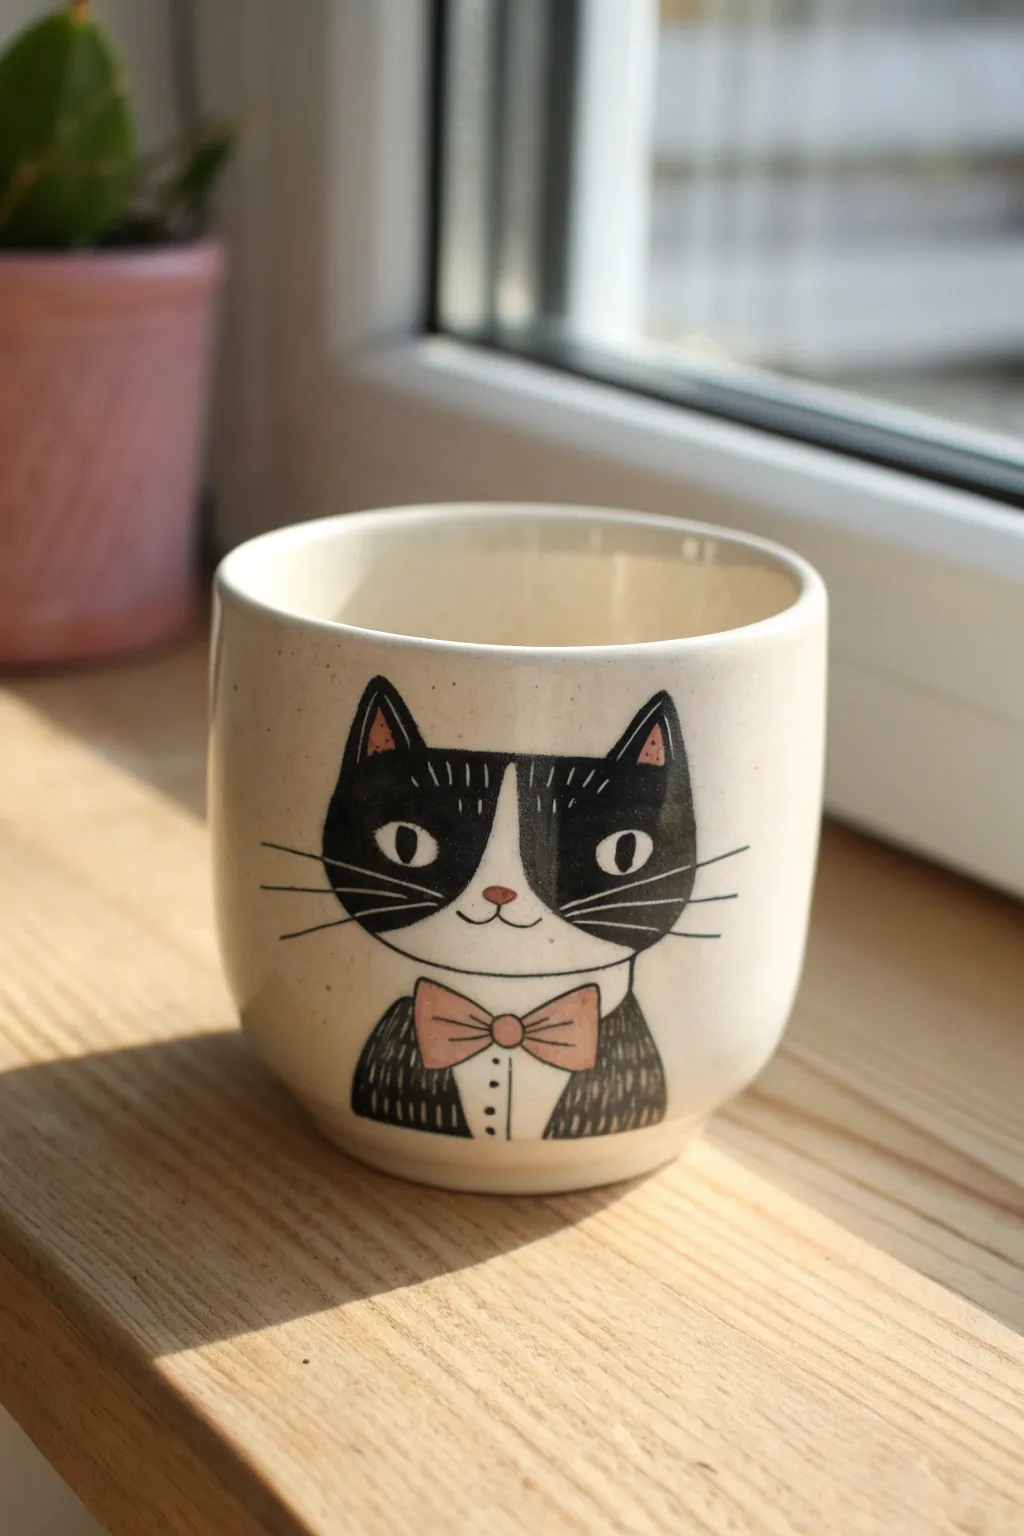
Transform a simple white ceramic cup into a sophisticated piece of art with this tuxedo cat design. Featuring charming details like a pink bow tie and whimsical whiskers, this project is perfect for adding a touch of personality to your morning coffee routine.
Step-by-Step Guide
Materials
- Bisque-fired ceramic cup or planter (off-white or cream)
- Black underglaze
- Baby pink underglaze
- Clear dipping glaze
- Pencil for sketching
- Fine detail brush (size 0 or 00)
- Small round brush (size 2)
- Sponge and water bowl
Step 1: Preparation & Sketching
-
Prepare the surface:
Begin by wiping down your bisque piece with a damp sponge. This removes any dust or oils from handling, ensuring the glaze adheres properly to the ceramic surface. -
Map the center:
Locate the center of the cup where you want the face to sit. Lightly mark a vertical centerline with your pencil to help keep the cat’s features symmetrical. -
Outline the head:
Sketch a U-shape for the bottom of the cat’s head. Add two pointed triangles on top for the ears, keeping them relatively large and expressive. -
Define the tuxedo mask:
Draw the signature tuxedo marking inside the head shape. This line should start at the top of the head, swoop down between the ears, curve around where the eyes will be, and meet in the middle of the nose to create a white ‘mask’ area. -
Sketch the outfit:
Draw a smaller U-shape beneath the head for the body. Inside this, sketch a classic bow tie shape right under the chin and two vertical lines for the jacket lapels.
Uneven Lines?
If your fine lines are shaky, try resting your pinky finger on the cup for stability. Thinning your underglaze slightly with a drop of water can also help the brush glide smoothly.
Step 2: Painting the Design
-
Fill the black tonal areas:
Using your size 2 round brush and black underglaze, carefully fill in the outer areas of the face (the ears and cheeks) and the jacket area. Leave the central mask, muzzle, and shirt white. -
Apply second coats:
Black underglaze can sometimes look streaky with just one layer. Allow the first coat to dry until it’s chalky, then apply a second and third coat for a solid, opaque finish. -
Add pink accents:
Switch to clean water and your brush. Dip into the baby pink underglaze and fill in the bow tie. Use the very tip of the brush to dab a tiny pink triangle for the nose and fill the inner triangles of the ears. -
Paint the eyes:
With the detail brush, paint two black oval shapes for the eyes in the white mask area. Leave plenty of white space between them to give the cat a wide-eyed look. -
Add the pupils:
Once the black eye ovals are dry, take a fine point tool or the back of a brush handle, dip it in white glaze (or scratch through the black if preferred/easier), and add vertical slivers for pupils. This gives that intense cat stare.
Step 3: Fine Details
-
Texture the fur:
Using your finest brush with black underglaze, add tiny dashes along the top of the head between the ears and on the shoulders of the jacket to suggest fur texture. -
Draw the mouth:
Carefully paint two small curved lines extending outward from the bottom of the pink nose to form the mouth. -
Define the buttons:
Add three distinct black dots vertically down the center of the white shirt area to create the vest buttons. -
Outline the bow tie:
Outline the pink bow tie with a very thin black line to make it pop against the white shirt. -
Add whiskers:
Paint three long, thin whiskers extending horizontally from each cheek. Keep your hand loose to get a tapered line that looks natural. -
Final clean up:
Check for any smudges or stray marks. You can gently scrape away small mistakes with a toothpick or a clean, stiff brush and a little water. -
Glaze and fire:
Once the underglaze is completely dry, dip the entire mugs into a clear dipping glaze. Fire the piece according to your clay and glaze specifications (usually cone 06 or cone 6).
Level Up Your Kitty
Customize the personality by changing the accessory! Swap the bow tie for a painted bandana, a pearl necklace, or a collar with a little gold-lustered bell.
Enjoy using your new sophisticated mug for your favorite warm beverage
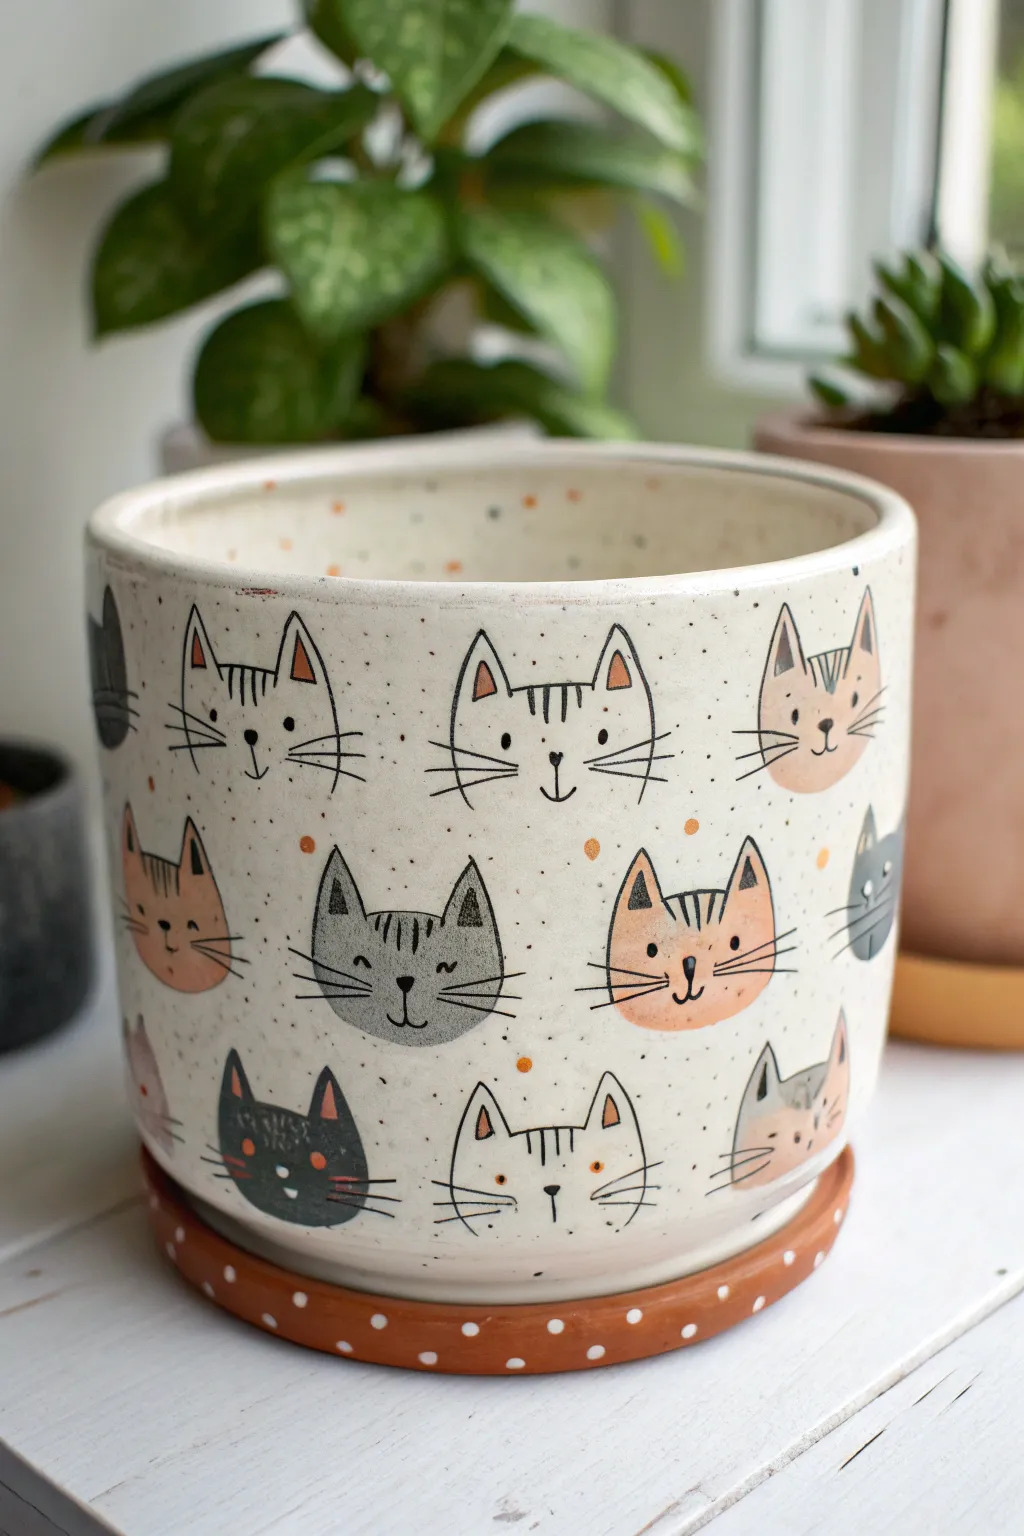
Cats and Paw Prints Border
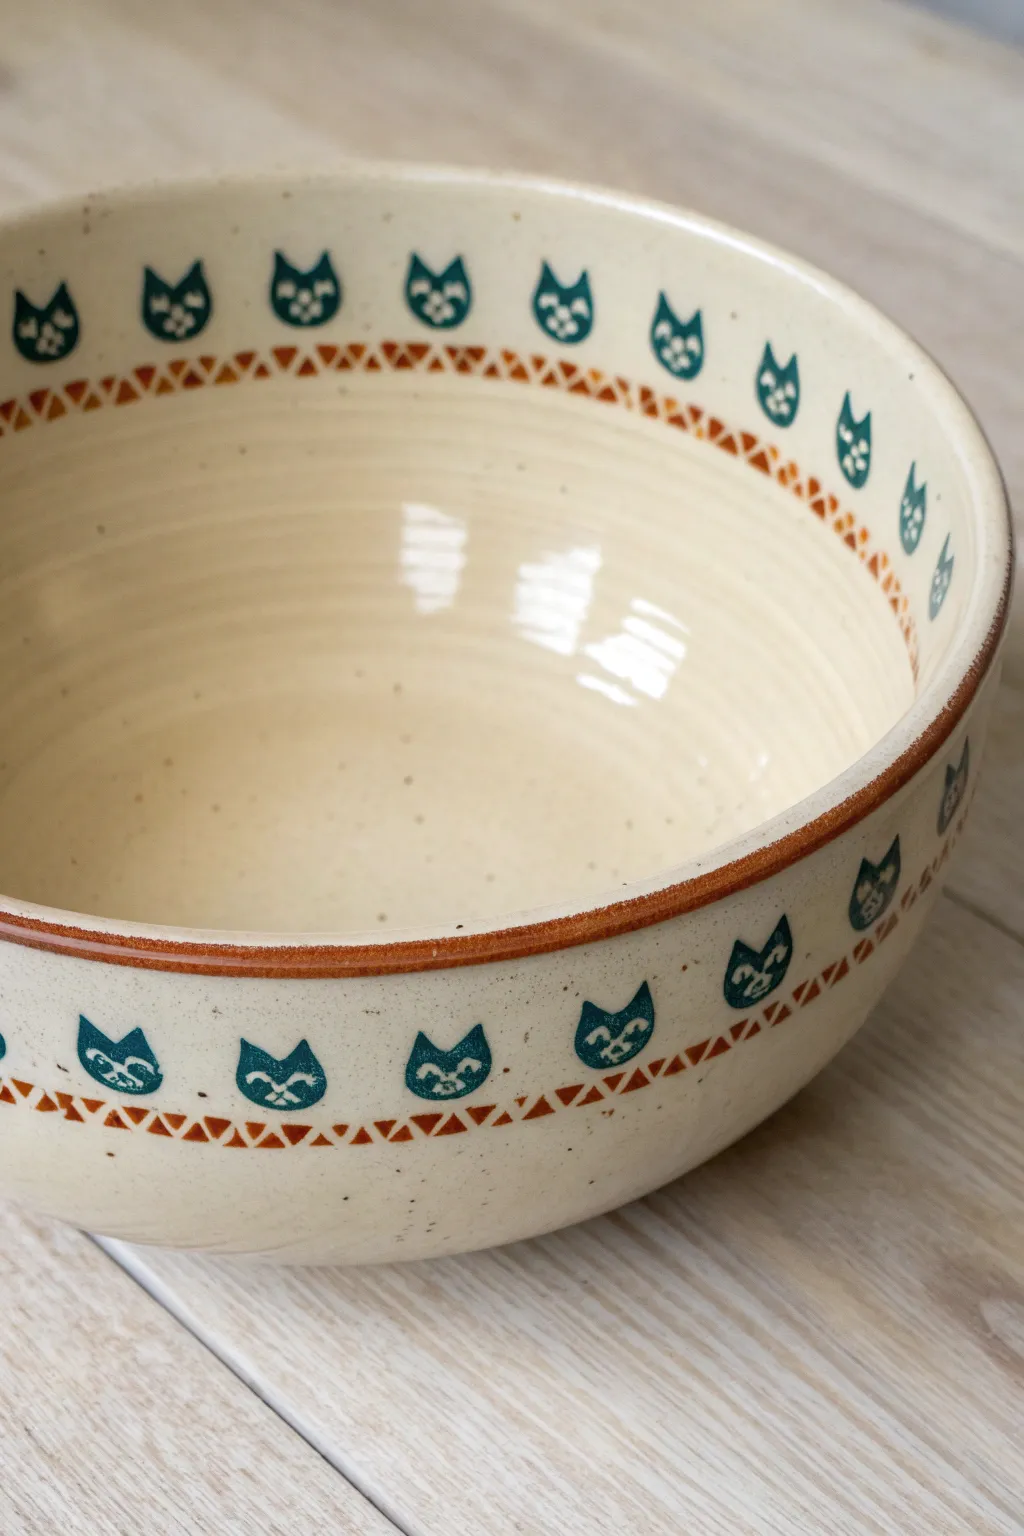
This charming ceramic bowl features a playful repeating pattern of stylized cat faces bordered by a geometric triangle band. Its cream-colored glaze and earthy accents give it a cozy, handcrafted feel perfect for serving warm meals.
Step-by-Step Tutorial
Materials
- Bisque ceramic bowl (wheel-thrown or cast)
- Cream/off-white speckled glaze
- Dark teal/petrol blue underglaze
- Rust/terracotta orange underglaze
- Clear dipping glaze
- Small detail brush (size 0 or 00)
- Medium round brush
- Wax resist
- Pencil (optional)
- Damp sponge
Step 1: Preparation & Base Layout
-
Clean the bisque:
Start by wiping your bisque bowl with a slightly damp sponge to remove any dust or oils from handling, which helps the glaze adhere properly. -
Mark your guidelines:
Using a pencil, lightly sketch two horizontal lines around the exterior circumference of the bowl—one near the rim and one slightly lower to define the border area. Repeat this on the inside rim. -
Sketch the cat placement:
Lightly mark the positions for the cat heads. They should be evenly spaced above the triangle border line on the outside, and below the rim on the inside.
Detail Disaster?
If you scratch off too much glaze during the sgraffito step for the face, just dab a little wet teal underglaze back over the mistake, let it dry, and scratch again
Step 2: Painting the Cat Motifs
-
Outline the cat shapes:
Load your small detail brush with the dark teal underglaze. Paint the outline of the cat heads, focusing on the pointed ears and rounded bottom jaw. -
Fill the faces:
Gently fill in the cat head silhouette with the teal color. You want an opaque, solid color, so apply a second coat if the first looks streaky after drying slightly. -
Carve the details (Sgraffito):
Once the teal patches are leather-hard (dry to the touch but not dusty), use a needle tool or wooden skewer to gently scratch away the glaze to reveal the eyes, nose, and whiskers. This negative space technique creates the face features. -
Repeat inside:
Use the same technique to paint the row of cat heads on the interior upper rim of the bowl.
Step 3: Adding the Geometric Borders
-
Start the exterior triangles:
Switch to your rust or terracotta underglaze. Using a fine point brush, paint a row of small, connecting triangles just below the exterior cat heads. -
Paint the bottom triangles:
Paint a matching row of inverted triangles directly beneath the first row so their points almost touch, creating a zig-zag negative space effect. -
border the interior:
Recreate this same dual-triangle pattern on the inside of the bowl, placing it just below the interior row of cats. -
Rim the edge:
Dip your brush in the rust underglaze and carefully paint the very top lip of the bowl rim to frame the entire piece.
Make it Yours
Try alternating the cat expressions! Give some cats winking eyes, glasses, or different whisker patterns to add individual personality to the repeating border
Step 4: Glazing & Finishing
-
Apply wax resist:
If you want the raw clay texture to show through on the bottom, apply wax resist to the foot of the bowl so glaze won’t stick there. -
Prepare the base glaze:
Stir your cream speckled glaze thoroughly to ensure the speckles are evenly distributed. -
Dip or pour glaze:
Dip the entire bowl into the cream clear glaze. Alternatively, pour the glaze inside, swirl to coat, pour out, and then dip the exterior. I find dipping ensures the smoothest coverage. -
Clean the details:
If the cream glaze is too thick over your underglaze designs, you can gently wipe it back slightly with a sponge, though a transparent glaze should show the design clearly regardless. -
Final wipe:
Clean any glaze drips off the foot of the bowl with a sponge to prevent it sticking to the kiln shelf. -
Fire the piece:
Load the bowl into the kiln and fire to the specific temperature required by your clay and glaze combination (usually Cone 5 or 6).
Once fired, you will have a delightful, durable bowl ready for your morning cereal or soup

TRACK YOUR CERAMIC JOURNEY
Capture glaze tests, firing details, and creative progress—all in one simple printable. Make your projects easier to repeat and improve.
Crowd of Tiny Cat Faces Pattern
Transform a plain ceramic planter into a delightful gallery of feline friends using this approachable pattern technique. The result creates a playful, speckled texture with a charming crowd of tiny, illustrated cat faces wrapping around your favorite houseplant.
Step-by-Step
Materials
- Bisque-fired ceramic planter and saucer
- Underglaze paints (White, Black, Grey, Peach/Orange)
- Speckled ‘eggshell’ underglaze (optional, or mix black flecks into white)
- Fine liner brush (size 0 or 00)
- Medium flat brush (size 4 or 6)
- Pencil
- Sponge
- Clear dipping glaze
- Kiln access
Step 1: Preparation & Base Coat
-
Wipe down bisque:
Start by gently wiping your bisque planter with a slightly damp sponge to remove any kiln dust. This ensures your underglaze adheres properly without crawling. -
Apply base color:
Using the medium flat brush, apply three even coats of a creamy white underglaze to the exterior of the pot. Allow the surface to become chalky and dry to the touch between each coat. -
Add the speckles:
To achieve that organic, pottery-studio look, apply a layer of speckled underglaze over your white base. If you don’t have a pre-mixed speckled glaze, you can create the effect by loading a toothbrush with watered-down black or brown underglaze and flicking the bristles to splatter tiny dots across the surface.
Step 2: Blocking the Cat Shapes
-
Sketch the pattern:
Lightly sketch the outlines of the cat heads using a pencil directly onto the dry underglaze. Draw simple u-shapes with triangle ears. I like to stagger them in rows—like a brick pattern—so the faces nestle nicely together without leaving awkward gaps. -
Paint solid colors:
Select a few cat outlines to fill in completely with color. Paint some heads with the grey underglaze and others with the peach/orange tone, leaving the majority as simple outlines on the white background. Two coats are usually enough for these small shapes. -
Create bi-color cats:
For variety, paint just the top half or just the ears of a few cats to create ‘patches.’ This breaks up the visual rhythm and adds character to the crowd. -
Let colors set:
Wait until all your colored blocks are completely dry before moving to the line work. If the paint is wet, your fine lines will bleed.
Fixing Smudges
Black line went rogue? Let it dry completely, then gently scratch the mistake off with a toothpick or exacto knife. Re-dab the base color if needed.
Step 3: Detailed Line Work
-
Outline the heads:
Load your fine liner brush with black underglaze. Keep the consistency fluid, like ink. Carefully trace over your pencil lines for the ears and head shapes. -
Draw the striped details:
Add three or four short vertical dashes between the ears on the foreheads of the white and orange cats. This simple detail instantly makes them recognizable as tabbies. -
Add facial features:
Place two small dots for eyes wide apart on the face. In the center below them, draw a tiny nose (a small triangle or u-shape) and a vertical line dropping down to an anchor shape for the mouth. -
Whisker work:
With a very light touch, flick three horizontal lines outward from the cheek area on each side. Quick, confident strokes make for the best whiskers. -
Fill the background dots:
Using the back end of your paintbrush or a dotting tool, dip into the peach/orange glaze and stamp random dots in the empty spaces between the cat heads to tie the color palette together.
Brush Control
Thin your black underglaze slightly with water. It should flow like ink—if it drags or skips, it’s too thick for fine line work.
Step 4: The Polka Dot Saucer
-
Base coat the saucer:
Paint the rim of the saucer with three coats of the peach/orange underglaze to match the accent colors on the pot. -
Remove dots:
Instead of painting white dots on top, try the ‘sgraffito’ or wipe-back method. Dip the eraser end of a pencil into water and twist it onto the dry orange paint to lift circles of color, revealing the white clay underneath. -
Refine the dots:
If the edges of your wiped dots are messy, you can tidy them up with a clean, damp brush or simply paint white underglaze into the circles for a crisper look. -
Glaze and fire:
Once everything is bone dry, sponge a clear glaze over the entire piece (or dip it) and fire it according to your clay body’s specifications.
Now you have a purr-fectly customized planter ready for your favorite succulent
Sitting Cat on a Tall Vase
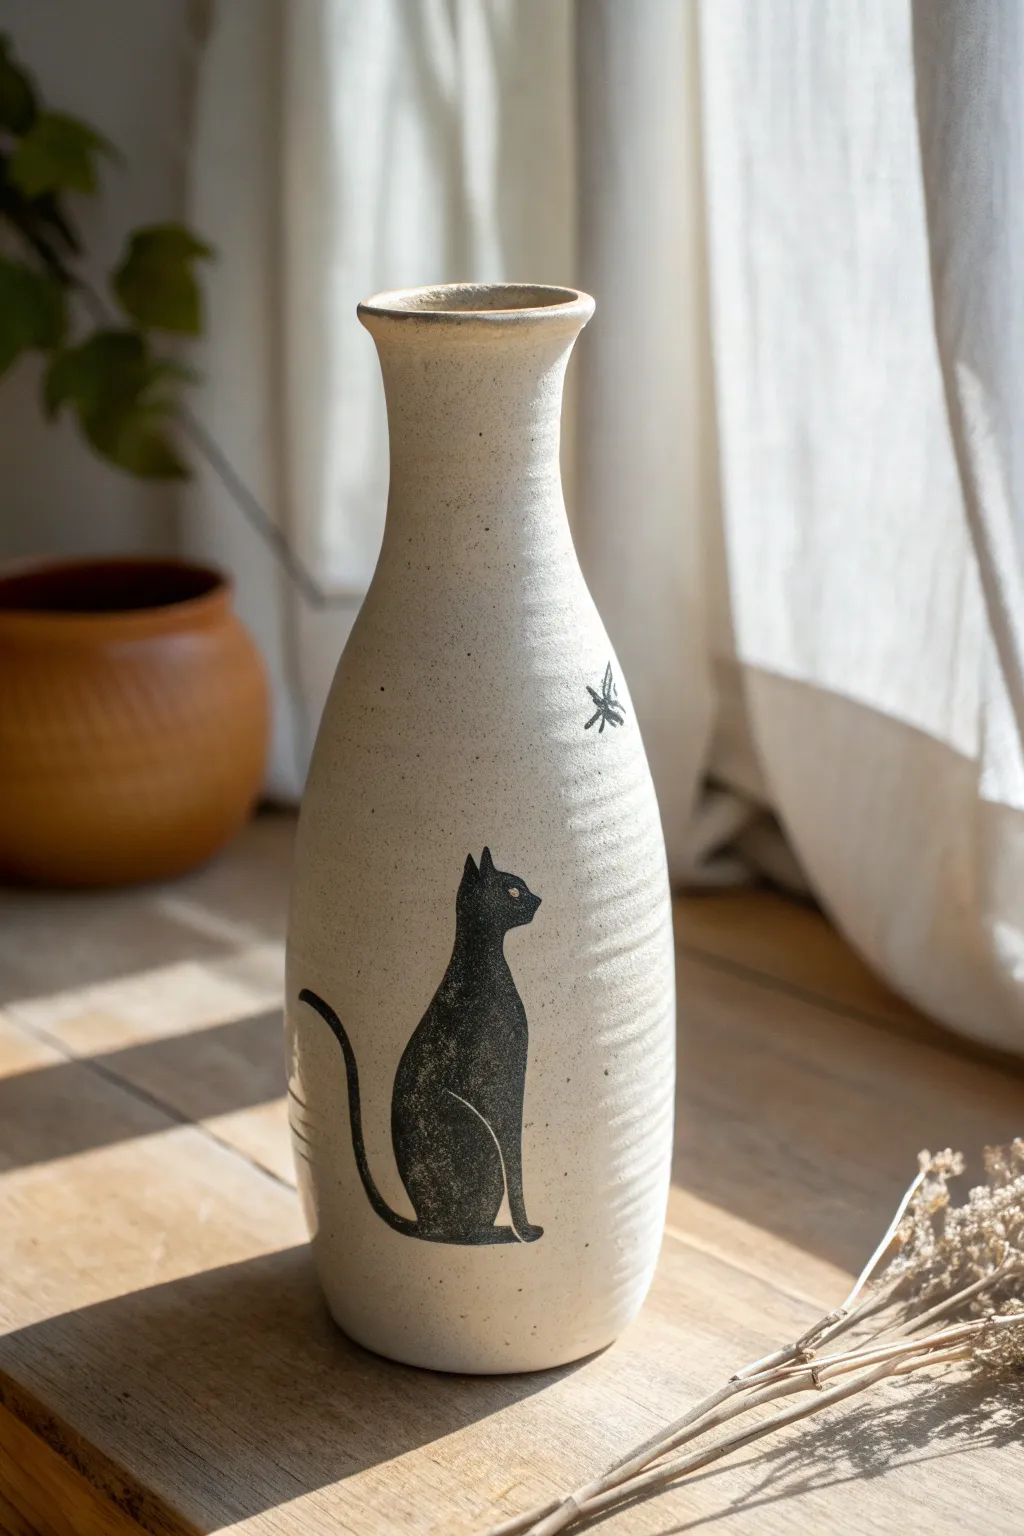
This elegant project transforms a simple stoneware vase into a piece of distinct character with a minimalist black cat silhouette. The textured cream glaze provides a rustic backdrop for the crisp, playful interaction between the cat and a tiny flying insect.
How-To Guide
Materials
- Tall, narrow-neck bisque-fired vase (stoneware clay body preferred)
- Black underglaze (Jet Black or similar deep hue)
- Matte cream or speckled oatmeal glaze (stoneware temperature)
- Pencil for sketching
- Fine liner brush (size 0 or 00)
- Small round brush (size 2 or 4)
- Wax resist emulsion
- Sponge and bucket of water
- Kiln (or access to firing services)
Step 1: Preparation & Sketching
-
Clean the bisque:
Begin by wiping down your bisque-fired vase with a damp sponge. This removes any kiln dust or oils from handling that might interfere with the glaze adhesion. -
Position your subject:
Decide on the placement of the cat. For this design, position the base of the cat about one-third of the way up from the bottom, utilizing the wider belly of the vase to accommodate the sitting posture. -
Draft the outline:
Lightly sketch the cat silhouette directly onto the bisque using a pencil. Start with an elongated tear-drop shape for the body and a smaller circle for the head. The graphite will burn off in the kiln, so don’t worry about being messy. -
Add details:
Refine the shape by adding pointed ears and a long, S-curved tail that wraps slightly around the curve of the vase. Sketch a tiny insect shape hovering near the neck of the vase, right where the cat’s gaze is directed.
Glaze Beading Up?
If glaze beads on the wax refuse to wipe off cleanly, wait for the glaze to dry completely, then use a dry, stiff brush to flick the dried beads off the waxed area.
Step 2: Underglaze Application
-
Outline the cat:
Using your fine liner brush loaded with black underglaze, carefully trace over your pencil lines. Keep your hand steady to ensure crisp edges, as the silhouette relies on clean lines for its impact. -
Fill in the body:
Switch to the small round brush to fill in the body of the cat. Apply the underglaze in smooth, even strokes. I prefer to do two to three thin coats rather than one thick one to ensure solid opacity without flaking. -
Define the eye:
Leave a tiny, almond-shaped negative space unpainted on the head for the eye. Alternatively, paint the whole head black and scratch the eye out later with a sgraffito tool once the underglaze is dry. -
Paint the insect:
Using the fine liner brush again, paint the small insect. Use simple cross-lines for the body and delicate loops for wings to invoke the look of a dragonfly or moth. -
Dry thoroughly:
Allow the black underglaze to dry completely. It should lose its sheen and look chalky when it remains untouched.
Crisper Lines
For ultra-sharp edges, skip the wax. Use a tiny brush to paint the background glaze AROUND the cat silhouette. It takes longer but eliminates wax ‘halos’.
Step 3: Wax Resist & Glazing
-
Apply wax resist:
Carefully paint a layer of wax resist directly over your dried black cat and insect design. This will protect your illustration from the dipping glaze. -
Check the edges:
Ensure the wax extends just a hair’s breadth past the black edge to prevent the overglaze from crawling over your design, but try to keep it as tight as possible. -
Prepare the dipping glaze:
Stir your matte cream or oatmeal stoneware glaze thoroughly. If the glaze has suspenders or speckles, ensure they are well-distributed so you get that lovely texture seen in the photo. -
Dip the vase:
Holding the vase by the foot (or using dipping tongs), submerge it into the glaze bucket for about 3 seconds. Pull it out in a smooth motion and shake gently to remove excess drips. -
Clean the design:
Once the glaze dries to the touch (usually a few minutes), use a damp sponge or your fingertip to gently wipe away any beads of glaze that are sitting on top of the waxed silhouette areas. -
Clean the distinct features:
Pay special attention to the cat’s eye and the thin insect legs—make sure no white glaze beads obscure these tiny details. -
Wipe the foot ring:
Remove all glaze from the bottom foot of the vase with a sponge to prevent it from sticking to the kiln shelf.
Step 4: Final Firing
-
Final inspection:
Check the surface one last time. Smudge out any pinholes in the cream glaze with your finger. -
Fire the piece:
Fire the vase to the maturity temperature of your clay and glaze (typically Cone 5 or 6 for stoneware). This high fire will melt the glaze into that beautiful speckled matte finish and permanently set the black silhouette.
Once cooled, fill your new vase with dried botanicals to complement the rustic, earthy aesthetic of your creation
Cat Tail Wraparound Design
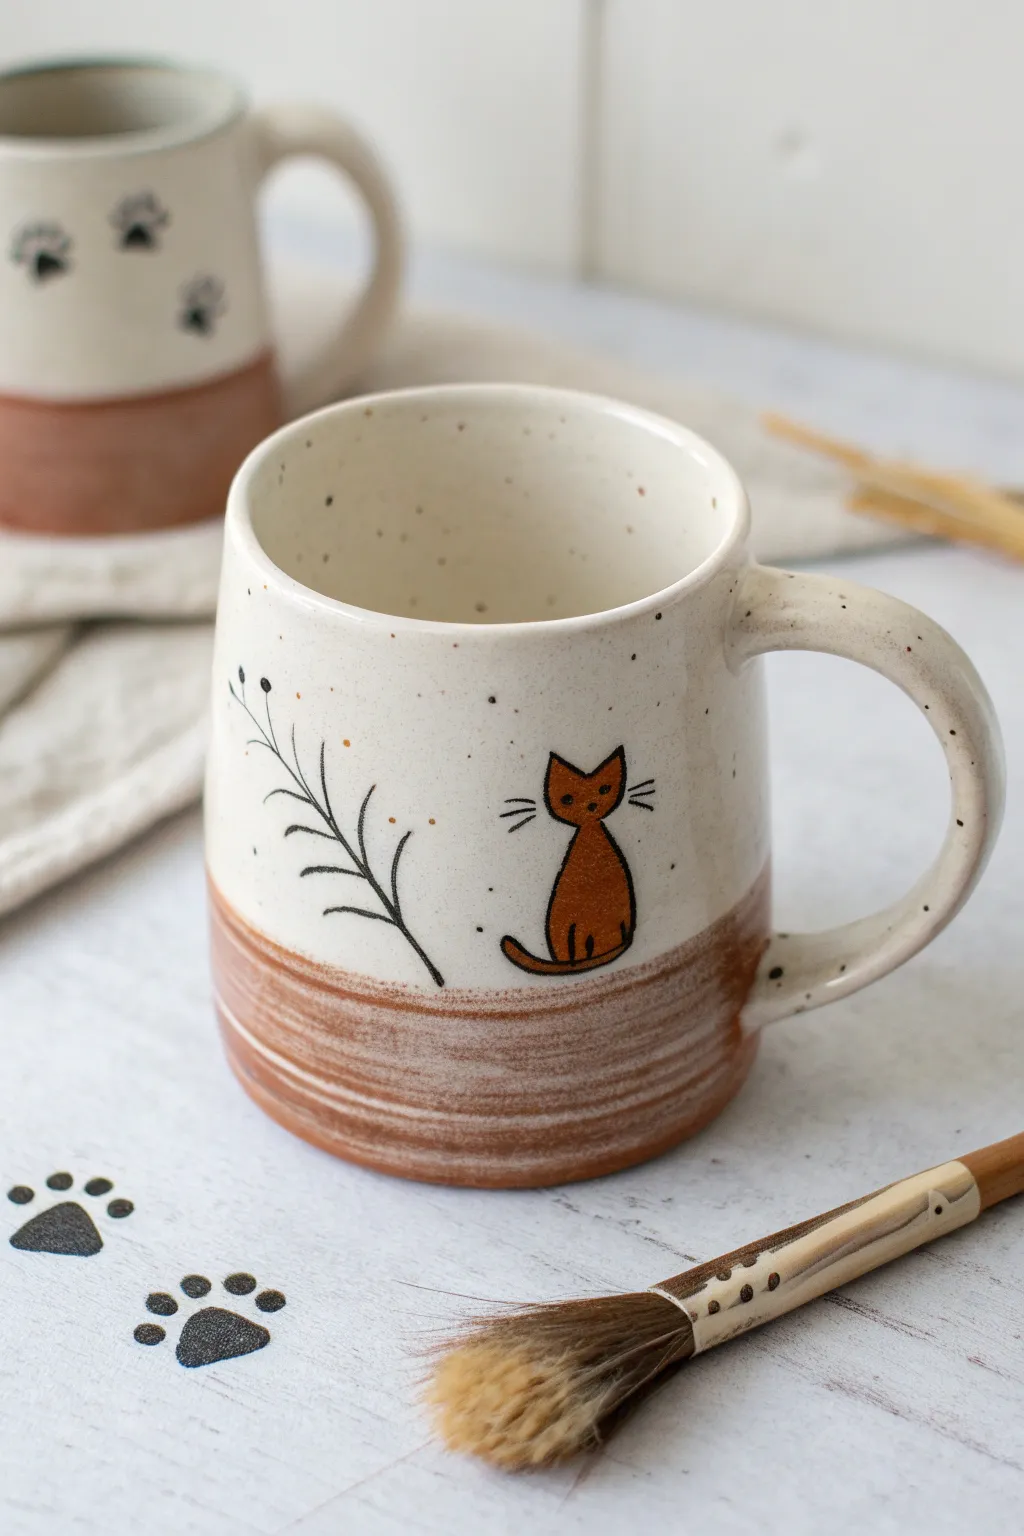
Capture quiet charm with this rustic-inspired mug design, featuring a stylized amber cat and delicate botanical lines against a speckled cream background. The raw clay bottom adds a wonderful tactile contrast to the smooth glaze, making it perfect for cozy mornings.
Step-by-Step
Materials
- Bisque ceramic mug (straight-sided)
- Glaze: Speckled Cream or Vanilla Dip
- Underglaze: Warm Amber/Rust Brown
- Underglaze: Jet Black
- Fine liner brush (size 0 or 00)
- Small round brush (size 2 or 4)
- Wide flat fan brush (optional, for base)
- Pencil (for light sketching)
- Clear dipping glaze (if using non-glossy underglazes)
- Damp sponge
Step 1: Preparation & Base Coat
-
Clean the bisque:
Start by wiping down your bisque mug with a damp sponge. This removes any dust that might prevent the glaze from adhering properly. -
Mark the horizon line:
Decide where you want the glazed section to end. Lightly sketch a horizontal line around the mug, leaving the bottom third purely as raw clay for that earthy texture. -
Apply the speckled base:
Using a wide soft brush, apply three even coats of your speckled cream glaze to the inside of the mug and the outside, stopping at your marked line. -
Create the drippy edge:
For the transition area between glaze and raw clay, feather the edge slightly so it isn’t a hard line, or let a tiny bit of glaze overlap naturally. -
Add faux texture loop:
Apply a thin wash of brown underglaze in horizontal streaks just below the cream glaze line to simulate the throwing rings seen in the photo. This enhances the rustic potter’s wheel look.
Step 2: Painting the Cat Motif
-
Sketch the silhouette:
Once the base glaze is dry to the touch, use a pencil to lightly outline a simple teardrop shape for the cat’s body and a rounded triangle for the head. -
Block in the color:
Use your small round brush and the Warm Amber underglaze to fill in the cat’s body and head. You’ll likely need 2-3 coats for solid opacity. -
Connect the shapes:
Ensure the head sits snugly on the top of the teardrop body. The simpllicity of the shape is key to the folk-art style. -
Paint the tail:
Extend a curved line from the base of the body, sweeping it upward slightly towards the back. Keep it fairly thick to match the stylized body. -
Define the ears:
Add two distinct triangular points to the top of the head circle. Keep them sharp and attentive. -
Let it dry:
Wait until the amber underglaze is completely dry and chalky before adding any black details on top.
Clean Lines Tip
Use wax resist over your dried amber cat shape before painting the background glaze if you struggle with overlaying colors cleanly.
Step 3: Fine Details & Botanical Elements
-
Outline the cat:
Switch to your fine liner brush and Jet Black underglaze. Carefully outline the entire cat silhouette to make it pop against the cream background. -
Add facial features:
Paint three tiny dots for the eyes and nose. I find that placing them lower on the face makes the cat look cuter. -
Whiskers and paws:
flick out three thin whiskers on each side of the face. Add two small vertical lines at the base of the body to suggest front paws. -
Start the branch:
To the left of the cat, paint a long, thin, curved black line acting as the main stem of the plant. Curve it gently so it mimics the mug’s rounded surface. -
Add the leaves:
Painting outwards from the stem, add simple pairs of curved lines or thin leaf shapes. Keep them loose and sketchy rather than biologically perfect. -
Tiny accents:
Dip the very end of a brush handle into black paint and dot random specks around the cat and plant to integrate the specific design with the speckled background glaze. -
Final clear glaze:
If your cream base wasn’t a glossy glaze, now is the time to dip the entire mug (excluding the raw clay bottom) into a clear dipping glaze to seal your artwork.
Design Variation
Paint small orange berries on the black branch tips to tie the floral element back to the cat’s amber color palette.
Fire your mug according to the glaze manufacturer’s instructions to reveal your cozy new companion
Cat Eyes in the Dark
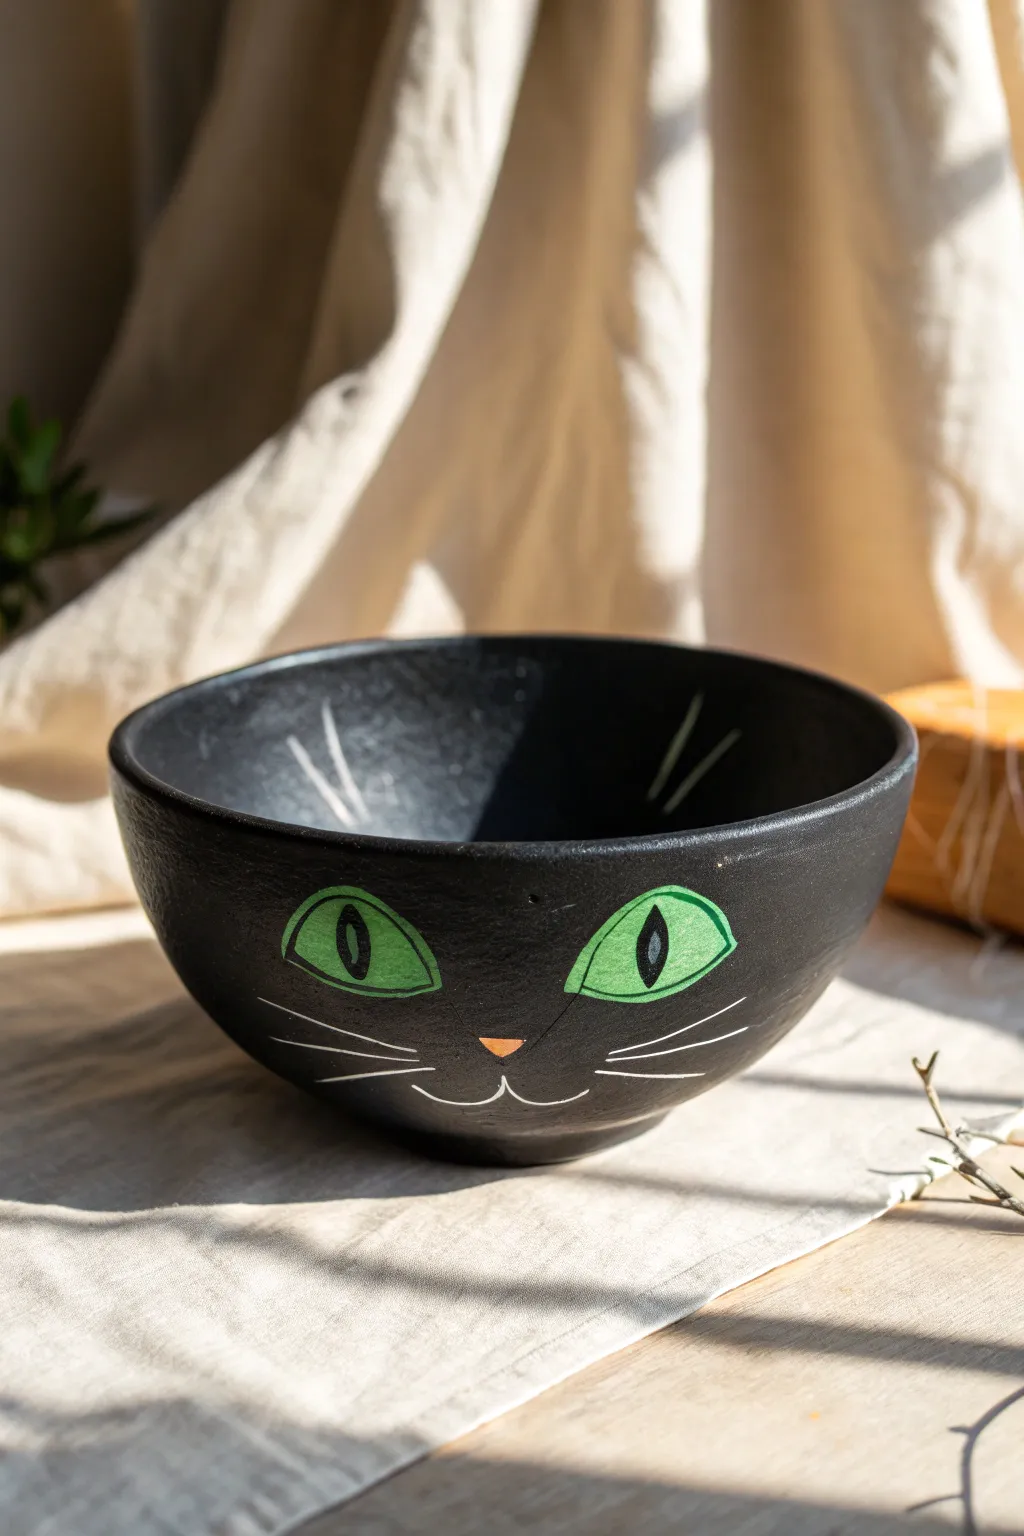
Transform a plain ceramic bowl into a sleek, mischievous black cat that seems to peer out from the shadows. This monochromatic design uses bold contrast to create a stunning piece of functional décor perfect for Halloween or year-round feline fans.
How-To Guide
Materials
- Bisque fired ceramic bowl (cereal or soup size)
- Glossy black underglaze or ceramic paint
- Bright lime green underglaze
- Bright white underglaze
- Small amount of coral or soft orange underglaze
- Wide flat brush (for base coat)
- Detail liner brush (size 0 or 00)
- Small round brush (size 2)
- Pencil (for sketching)
- Clear dipping glaze
- Sponge and water
Step 1: Base Preparation
-
Clean the bisque:
Wipe down your entire bisque bowl with a slightly damp sponge to remove any kiln dust or oils from your hands, ensuring the paint adheres perfectly. -
Map out the eyes:
Using a pencil, lightly sketch two large, almond-shaped eyes on the front of the bowl. Make them wide and expressive, angled slightly upwards at the outer corners. -
Add facial features:
Sketch a small, inverted triangle for the nose centered below the eyes, and trace a simple ‘w’ shape for the mouth. Don’t worry about pencil marks; they burn off in the kiln.
Step 2: Applying the Background
-
Outline the features:
With your detail brush and black underglaze, carefully paint around the outside of your pencil lines for the eyes and nose. This ‘cutting in’ method keeps your feature areas clean. -
Fill the exterior:
Switch to your wide flat brush and apply a coat of black underglaze to the entire outside of the bowl, painting right up to your outlined features. -
Paint the interior:
Coat the inside of the bowl with black underglaze as well. Ensure you get full coverage right down to the bottom. -
Apply second and third coats:
Let the first layer dry until it’s chalky and not shiny. Apply two more coats of black suitable for solid coverage, alternating brush stroke directions to minimize streaks.
Fixing Smudges
If you accidentally drip green paint onto the black background, don’t wipe it! Let it dry completely, then paint a patch of black over the mistake.
Step 3: The Glowing Eyes
-
Base coat the eyes:
Using a clean small round brush, fill in the almond eye shapes with your bright lime green underglaze. -
Layer the green:
Apply 2-3 coats of green, allowing drying time in between. The black background consumes light colors, so thick, solid application here is crucial for that popping effect. -
Paint the pupils:
Once the green is dry, take your liner brush with black paint and draw a thin, vertical slit in the center of each eye for the pupil. -
Add the nose:
Fill in the small triangle nose with the coral or soft orange underglaze. I find two coats is usually sufficient for this small detail.
Make It Pop
Add a tiny dot of white in the upper corner of each pupil to create a ‘catchlight,’ making the cat look more alive and alert.
Step 4: Fine Details
-
Create the mouth:
Load your liner brush with white underglaze. Carefully trace over the ‘w’ pencil line you made earlier to create the mouth. -
Whiskers part one:
Using the very tip of your liner brush and white paint, flick three long, thin lines outward from each cheek area for the main whiskers. -
Interior details:
On the inside rim of the bowl, opposite the face, paint three simple white dashes or ‘floating whiskers’ to add visual interest to the dark interior. -
Eye highlights:
There is a very subtle detail that brings life to the eyes: outline the green iris with a very thin black line to sharpen the edge if your initial background painting was messy. -
Final check:
Inspect the bowl for any black smudges on the green eyes or white whiskers and gently scratch them off with a wooden skewer if found.
Step 5: Finishing
-
Dry completely:
Allow the entire piece to dry for at least 24 hours before glazing. -
Glaze and fire:
Dip the bowl in clear glaze and fire it in the kiln according to your clay and glaze specifications (usually cone 06 underglaze, cone 6 fire).
Now you have a mysterious feline friend to keep you company during your morning cereal routine
Whiskers and Nose Minimal Line Art
This project embraces the beauty of simplicity with a clean, modern design featuring a peaceful sleeping cat face. Using fine black lines on crisp white ceramic, you’ll create a charming piece that brings a sense of calm to any table setting.
Detailed Instructions
Materials
- Bisque-fired white ceramic plate (salad or dessert size)
- Black underglaze (or ceramic paint)
- Clear transparent glaze
- Fine liner brush (size 0 or 00)
- Pencil (HB or lighter)
- Clean sponge
- Bowl of water
- Palette or small tile for paint
Step 1: Preparation & Planning
-
Clean the bisque:
Start by wiping down your bisque plate with a slightly damp sponge. This removes any ceramic dust that could prevent the glaze from adhering properly. -
Find the center point:
Lightly mark the center of the plate with your pencil to help you gauge the placement of the cat’s features. Remember, pencil marks will burn away in the kiln, so don’t be afraid to sketch directly on the piece. -
Sketch the nose:
Draw a small, inverted triangle with rounded corners for the nose, placing it slightly below the center mark you made. -
Draft the mouth:
From the bottom point of the nose, sketch a short vertical line down, then branch out into two curved ‘u’ shapes to create the smiling mouth. -
Add sleeping eyes:
Above the nose, draw two small, downward-curving arcs for the closed eyes. Try to keep them symmetrical and spaced evenly from the center line. -
Outline the ears:
Near the top rim of the plate, sketch two inverted ‘V’ shapes for the ears. They should be relatively large and wide to frame the face.
Step 2: Painting the Lines
-
Prepare the underglaze:
Squeeze a small amount of black underglaze onto your palette. If it feels too thick, add a single drop of water to improve the flow for fine lines. -
Load the liner brush:
Dip your fine liner brush into the black underglaze. Roll the bristles on the palette to create a sharp point and ensure the paint is evenly distributed. -
Paint the nose:
Carefully fill in the nose shape with solid black. I find it easiest to outline the shape first and then fill the center to keep the edges crisp. -
Trace facial features:
Using light pressure, trace over your pencil lines for the mouth and the sleeping eyes. Keep your hand steady and rest your pinky on the plate for stability. -
Define the ears:
Paint the two ‘V’ shapes for the ears. Try to make the lines slightly thicker than the eye lines for a bold graphic look. -
Check line consistency:
Look closely at your black work. If any areas look transparent or patchy, let them dry for a moment and go over them with a second thin coat.
Steady Hand Trick
Rest your painting hand on a stable object, like a heavy mug or a stack of books, positioned next to your plate. This elevation gives you better control for fine detail work.
Step 3: Whiskers & Finishing
-
Position the whiskers:
Lightly pencil in three long whiskers on each cheek area. Start them near the nose/mouth area and flare them outward toward the rim. -
Paint the whiskers:
With a freshly loaded brush, paint the whiskers using a ‘flick’ motion. Apply more pressure at the start of the line near the nose and lift off as you move outward to create a majestic taper. -
Clean up smudges:
If you made any small mistakes with the black paint, use a clean, damp stiffer brush or a scraping tool to gently scratch or wipe away the stray mark. -
Final dry:
Allow the black underglaze to dry completely. It should look matte and chalky when it is ready for the next step. -
Clear glaze application:
Apply two or three coats of clear transparent glaze over the entire plate. Use a large fan brush to ensure smooth, even coverage without smearing your black lines.
Add a Pop of Color
Paint two soft, pink circles on the cheeks using a very watery wash of pink underglaze. This creates a cute, rosy-cheeked effect without overpowering the design.
Now your plate is ready for firing, resulting in a sleek and lovable piece of cat-themed decor
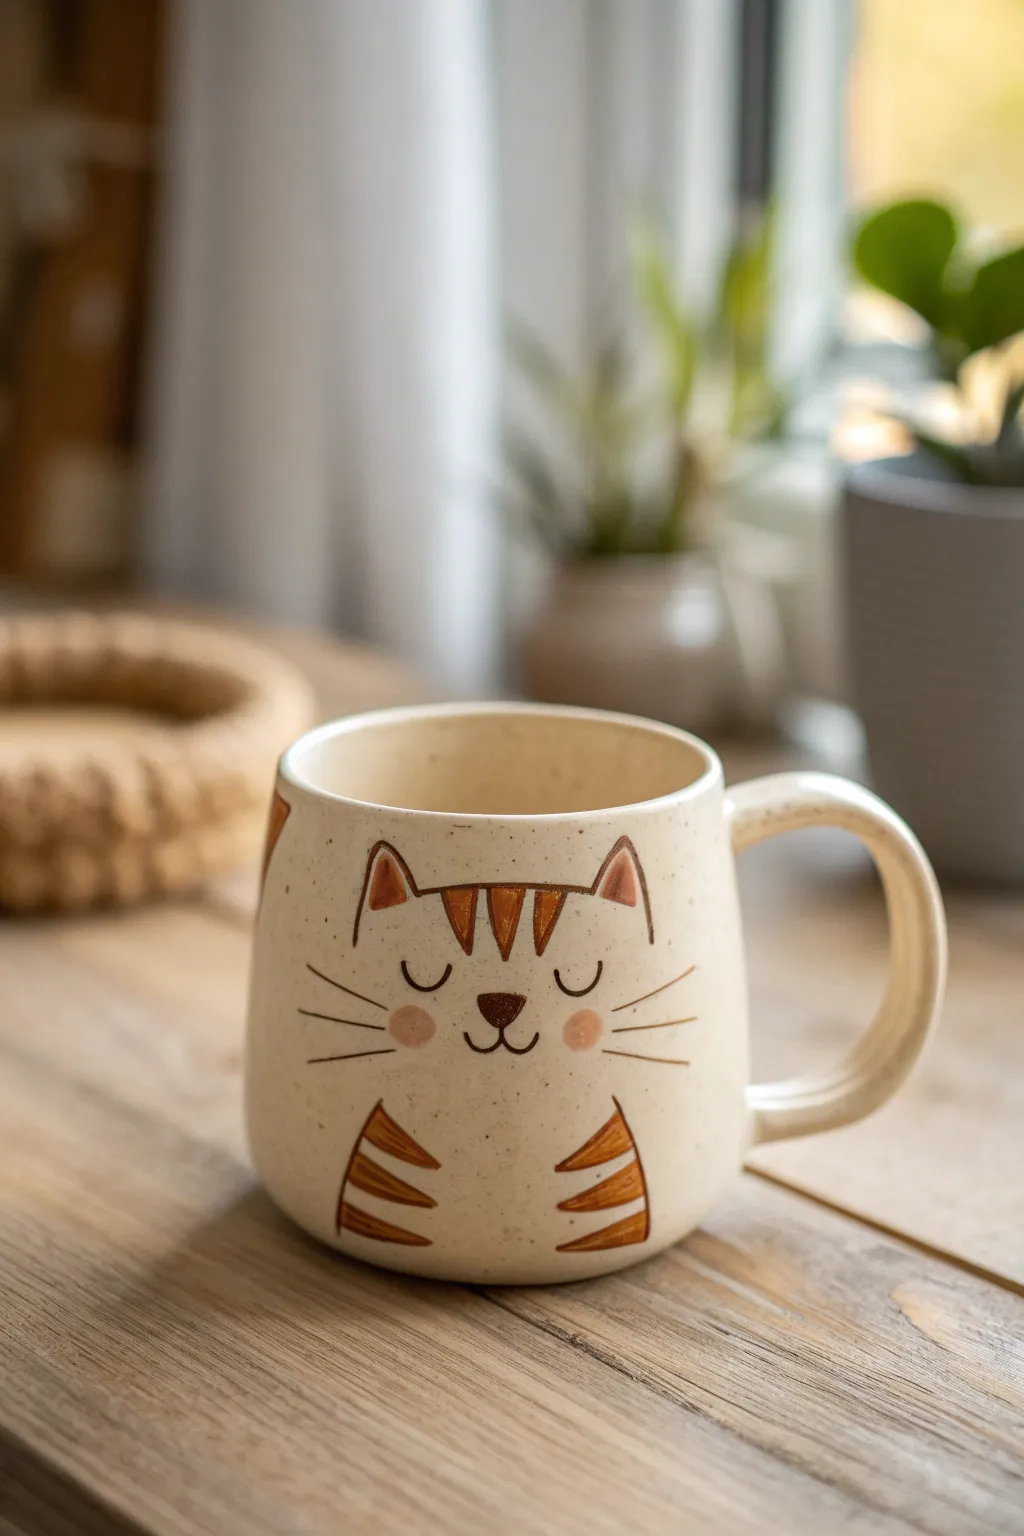
Cute Cartoon Cat Character
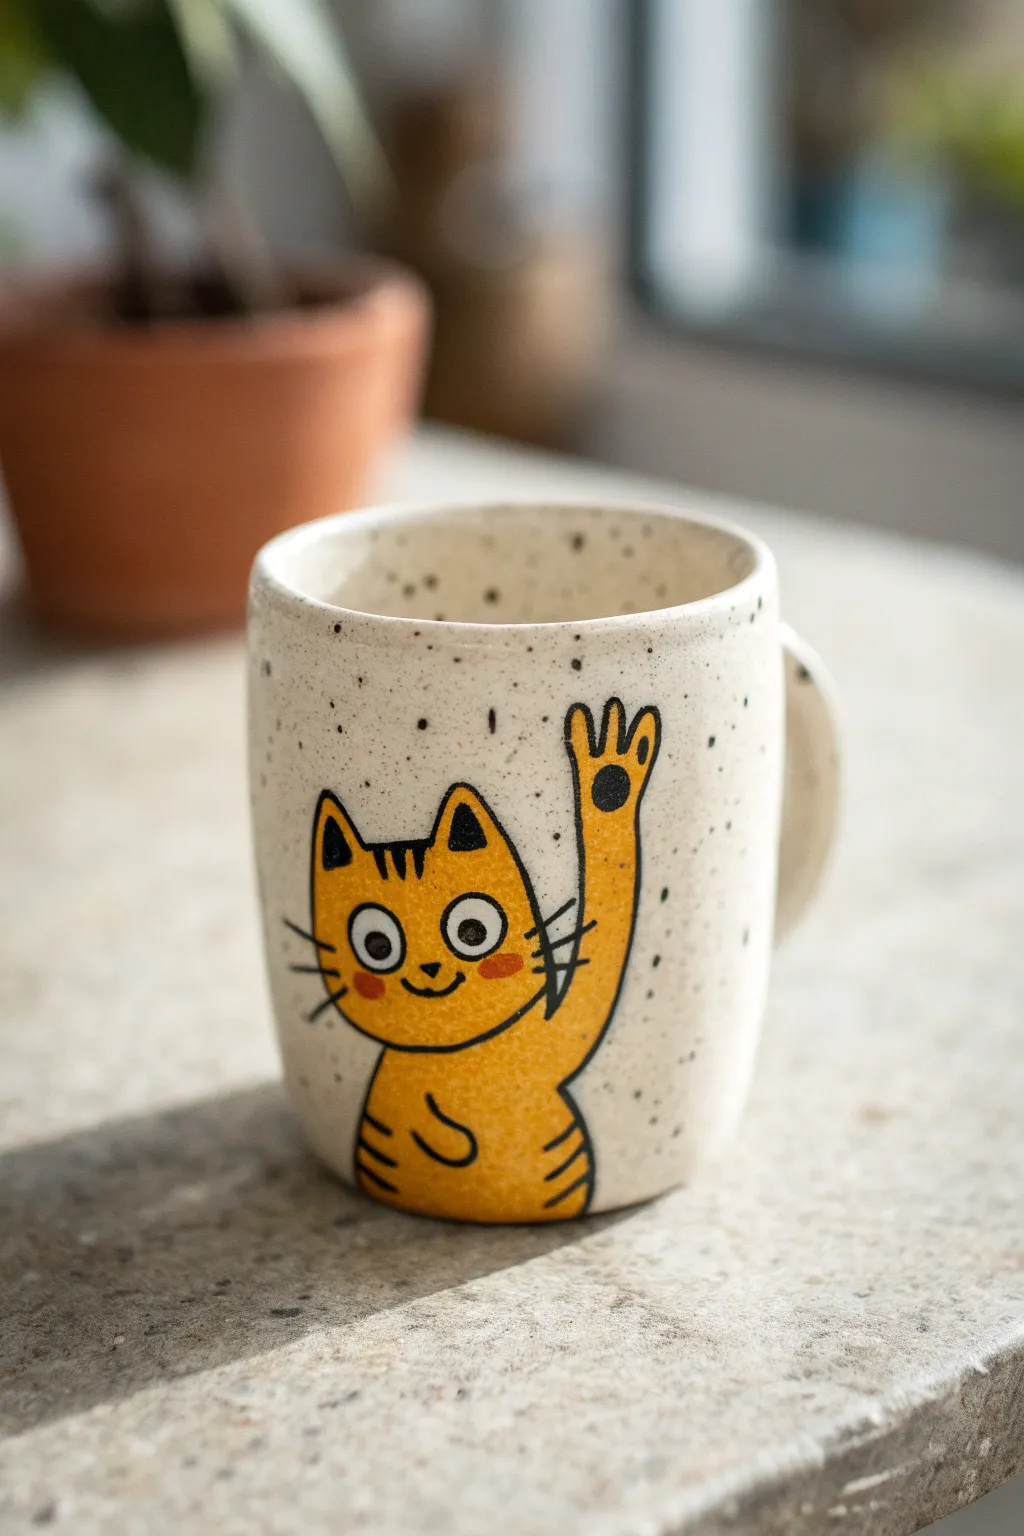
This cheerful project features a friendly orange tabby cat waving hello on a speckled ceramic mug. Its cartoonish style and bold outlines make it an approachable design for beginners looking to add personality to their pottery.
Step-by-Step Guide
Materials
- Bisque-fired ceramic mug (plain straight-sided shape)
- Underglaze pencil (HB or light grey)
- Underglaze paints: Bright Orange-Yellow, White, Black, Rosy Pink
- Detail brush (size 0 or 00)
- Small round brush (size 2 or 4)
- Clear dipping glaze (food safe)
- Speckled transparent glaze (optional, if you want the dots all over)
- Sponge and water bowl
Step 1: Preparation & Sketching
-
Clean the bisque:
Before starting, wipe down your bisque mug with a damp sponge. This removes any dust that might prevent the glaze from adhering properly. -
Position the character:
Finding the ‘face’ of the mug is crucial. Hold the mug by the handle; the area facing you (or slightly to the right for right-handed drinkers) is your canvas. -
Draft the outline:
Using a light underglaze pencil, lightly sketch the cat’s shape. Start with a large U-shape for the body and a rounded shape on top for the head. -
Add the waving arm:
Sketch a long, extended arm reaching upwards on the right side. Make the paw distinct with four rounded fingers or toes spread out in a wave. -
Sketch facial features:
Draw two large circles for eyes. Add triangular ears on top of the head. Don’t worry about perfection; pencil marks will burn off in the kiln.
Pro Tip: Steady Hands
Rest your painting hand on a heavy book or stack of sponges to keep it level with the mug while doing the fine black outlines.
Step 2: Painting the Base Colors
-
Apply the orange base:
Load your round brush with the bright orange-yellow underglaze. Construct the cat’s body and head. Be careful to paint around the large eye circles—you want those to stay white. -
Second coat:
Once the first layer is dry to the touch (it will look chalky), apply a second coat of orange to ensure solid, opaque coverage. -
Third coat:
Apply a third and final coat of orange. Solid block colors usually need three layers to avoid streakiness after firing. -
Fill the eyes:
Using a clean small brush, fill the eye circles with white underglaze. Even if your bisque is white, adding white underglaze makes the eyes pop more against the glaze later. -
Add rosy cheeks:
Dab two small ovals of rosy pink just below the eye area for the cheeks. I find doing this while the orange is still slightly damp helps them blend softly.
Step 3: The Details
-
Outline the body:
Switch to your finest detail brush and black underglaze. Carefully trace the outer edge of the entire orange shape. Keep your hand steady by resting your pinky on the mug. -
Stripe details:
Paint small black triangles for stripes on the forehead and sides of the body. Add curved lines on the belly area to suggest roundness. -
The face:
Paint small black dots in the center of the white eyes. Add a small nose and a simple W-shaped mouth. -
Whiskers and paw:
Ideally using a very fine liner brush, flick three thin whiskers on each cheek. Add a small black pad to the palm of the raised paw. -
Speckling effect:
To mimic the stone-effect look, you have two options. You can flick a toothbrush loaded with thinned black underglaze over the whole mug before glazing, or use a specific ‘speckled’ clear glaze later.
Level Up: Hidden details
Paint a small ball of yarn or a little mouse on the backside of the mug or inside the bottom so the drinker gets a surprise at the end!
Step 4: Finishing
-
Clear glazing:
Once the underglaze is completely dry (give it a few hours), dip the entire mug into a clear glaze. If you didn’t do the splatter step, you can use a speckled transparent glaze here instead. -
Clean the foot:
Wipe the glaze off the very bottom of the mug with a sponge so it doesn’t stick to the kiln shelf. -
Final Fire:
Fire the mug in the kiln according to the clay and glaze manufacturer’s instructions (usually Cone 06 or Cone 6 depending on your materials).
Once fired, you’ll have a lovable, permanent companion for your morning coffee routine
Cat and Houseplant Planter Scene

This charming ceramic project brings a cozy scene to life on a simple speckled pot, featuring a sitting cat surrounded by its own botanical jungle. The design uses earthy tones and fine line work to create a sweet, illustrated look that feels both modern and handmade.
Step-by-Step Tutorial
Materials
- Bisque ceramic planter (rounded bottom shape)
- Speckled cream or oatmeal underglaze
- Underglaze pencil or fine liner brush (black/dark grey)
- Underglazes: Terra cotta orange, sage green, dark forest green, warm grey, white
- Clear dipping glaze
- Small round brushes (sizes 0, 2, and 4)
- Sponge
- Water cup
- Kiln (or access to a pottery studio)
Step 1: Base Preparation
-
Clean the bisque:
Start by wiping down your bisque pot with a damp sponge to remove any dust or oils from your hands, ensuring the glaze adheres properly. -
Apply the base coat:
Using a wide soft brush, apply three even coats of a speckled cream or oatmeal underglaze to the entire exterior of the pot. Allow each coat to dry until it’s chalky to the touch before adding the next. -
Optional texture:
If your base glaze doesn’t have speckles built-in, you can flick a toothbrush loaded with diluted brown underglaze over the surface to create that organic, earthy texture.
Smudge Fix
If you smear black line work, wait for it to dry completely, then gently scratch the mistake away with a pin tool or craft knife before reapplying the correct line.
Step 2: Painting the Scene
-
Sketch the horizon:
Lightly sketch a horizontal line about a quarter of the way up from the bottom using a regular pencil. This ‘ground line’ anchors your scene. Don’t worry, the graphite burns off in the kiln. -
Block in the cat:
Mix a warm grey underglaze. In the center of your horizon line, paint a simple silhouette of a sitting cat using a size 4 brush. The shape should be smooth and rounded. -
Add the botanical elements:
To the left of the cat, paint a tall, vertical stem with pairs of oval leaves using terra cotta orange. I find it helpful to start at the bottom and work upwards to get a natural tapering effect. -
Paint the spiky plant:
On the right side, create a cluster of sharp, upward-pointing leaves reminiscent of a snake plant or aloe. Use a dark forest green here to contrast with the orange. -
Add floating details:
Fill the empty space above the cat with tiny, delicate details. Paint a small heart and a little beetle or bug shape just floating in the ‘air’ above the cat’s head.
Step 3: Line Work and Details
-
Outline the ground:
Using a very fine liner brush and black underglaze (or an underglaze pencil/bottle applicator), trace over your horizon line. Add a second parallel line just below it for a decorative border effect. -
Define the cat:
Outline the cat’s body with thin black lines. Add two small triangles for ears, dots for eyes, a tiny nose, and a tail that wraps along the ground line. -
Detail the orange plant:
Add a central vein line to the orange leaves if you like, or leave them solid for a block-print look. Add small dots or dashes around the leaves for texture. -
Detail the green plant:
Outline the sharp green leaves. You can add a darker stripe down the middle of each leaf to give it dimension. -
Add decorative fillers:
Scatter groups of three small black dots around the background to fill negative space without cluttering the design. Add little legs and antennae to your floating bug. -
Rim check:
Wipe the rim with a damp sponge if any stray paint landed there, keeping a clean transition to the inside of the pot.
Make it Personal
Customize the cat to match your own pet! Use orange stripes or black patches instead of solid grey to turn this generic kitty into a portrait of your feline friend.
Step 4: Finishing
-
Clear glaze application:
Once your design is bone dry, carefully dip the entire pot into a clear glaze. Hold it by the foot and rim or use dipping tongs. -
Clean the foot:
Thoroughly wipe all glaze off the very bottom of the pot (the foot ring) so it doesn’t fuse to the kiln shelf during firing. -
Check for pinholes:
Rub the dry glaze surface gently with your finger to smooth out any bubbles or pinholes before it goes into the kiln. -
Final fire:
Fire the piece in the kiln according to the temperature requirements of your clay and clear glaze.
Once fired, you’ll have a delightful, durable home for your favorite succulent
Pet Portrait Cat on a Mug
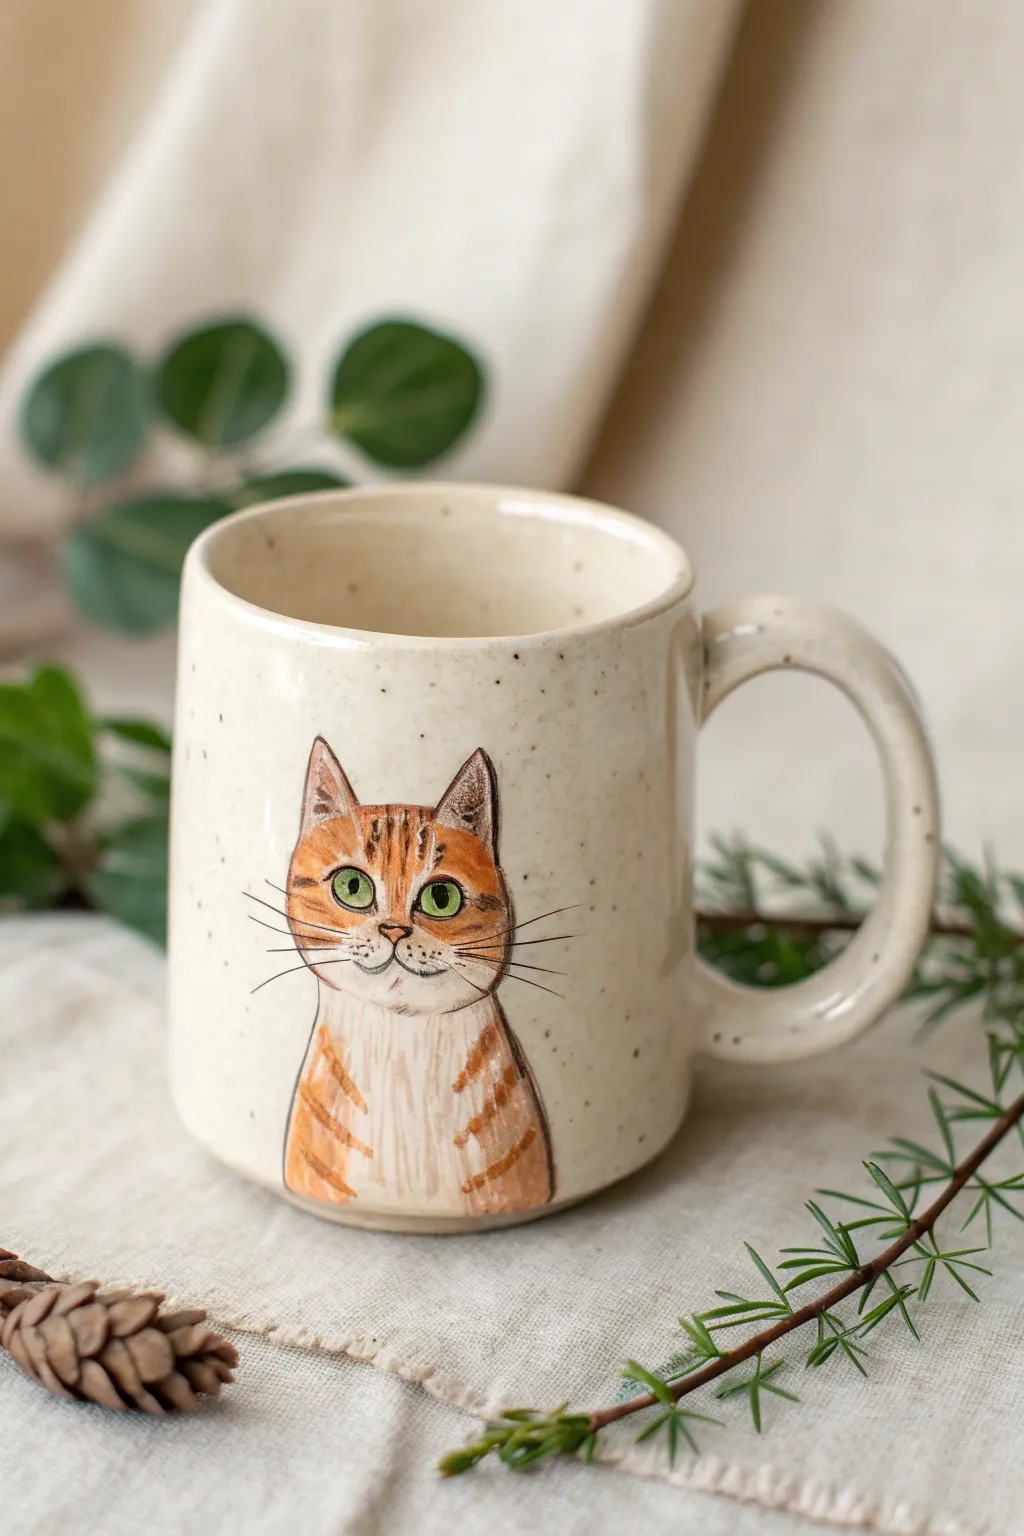
Capture the charm of a sweet orange tabby with this hand-painted pottery project. Using underglazes on a speckled clay body or beneath a speckled glaze creates a warm, rustic finish that perfectly complements the cat’s expressive green eyes.
Detailed Instructions
Materials
- Bisque-fired ceramic mug (preferably speckled clay)
- Underglaze pencil (black or dark brown)
- Underglazes: Orange, Cinnamon Brown, White, Bright Green, Black
- Small round brushes (size 0 and 2)
- Detail liner brush (size 00)
- Sponge and water
- Clear transparent glaze (or speckled clear glaze if using plain clay)
- Pencil and paper for sketching
- Kiln for firing
Step 1: Sketching and Setup
-
Clean your canvas:
Begin by wiping down your bisque mug with a damp sponge. This removes any dust that could prevent the glaze from adhering properly. -
Initial sketch:
Lightly sketch the outline of the cat directly onto the mug using a regular graphite pencil. Don’t worry about mistakes; the graphite will burn off in the kiln. Focus on the triangular ears, the round face shape, and the chest area. -
Defining the features:
Mark the positions for the large almond-shaped eyes, the small triangular nose, and the mouth. Keep the lines faint so they guide you without becoming distraction.
Step 2: Base Layers
-
Painting the white base:
Using a size 2 brush, apply white underglaze to the muzzle area, chin, and central chest fur. I find that applying two thin coats gives better coverage than one thick one. -
Adding the orange:
Fill in the mask of the face, the ears, shoulders, and the sides of the chest with your orange underglaze. Be careful to paint around the eyes; leave them bare bisque for now. -
Coloring the eyes:
Carefully paint the iris area with bright green underglaze using your size 0 brush. You might need two coats to make the green pop against the clay. -
Inner ear details:
Mix a tiny amount of brown with white to create a soft beige. Paint the insides of the ears with this lighter shade to create depth.
Smudge Control
If you accidentally smudge the black outline, don’t wipe it! Let it dry, then gently scratch the mistake off with a toothpick or a cleanup tool.
Step 3: Detailing the Portrait
-
Creating texture:
Once the orange base is dry to the touch, use the Cinnamon Brown underglaze to add the tabby stripes. Paint ‘M’ shapes on the forehead and curved stripes on the cheeks and chest using a size 0 brush. -
Fur texture:
Using a slightly dry brush technique with the white underglaze, feather some white strokes over the edges where the orange meets the white chest to simulate fluffy fur. -
Outlining:
This is a critical step for the illustrative look. Take your underglaze pencil (or a very fine liner brush with black underglaze) and outline the entire cat. Use broken, sketchy lines to suggest fur rather than a solid hard line. -
Facial features:
With the detail liner brush and black underglaze, paint the vertical pupil slits in the green eyes. Outline the eyes carefully, adding a small ‘tear duct’ detail. -
Nose and mouth:
Outline the nose and mouth. Add tiny dots on the white muzzle area where the whiskers will grow from. -
The whiskers:
Using your finest liner brush and thinned black underglaze, paint the long whiskers. Use quick, confident strokes starting from the muzzle and flicking outward to keep lines thin. -
Highlights:
Add a tiny dot of white underglaze to each eye to create a ‘catchlight.’ This brings the cat to life.
Pro Tip: Fur Depth
Layer translucent washes of watered-down orange underglaze over the white chest area to create soft shadows and make the cat look less flat.
Step 4: Glazing and Firing
-
Final drying:
Let all your underglaze work dry completely. It should feel chalky and room temperature, not cool. -
Clear coat:
Dip the entire mug into a clear transparent glaze. If you used plain white clay but want the look in the photo, use a ‘speckled clear’ glaze instead. -
Cleaning the foot:
Wipe the bottom of the mug clean with a wet sponge to prevent it sticking to the kiln shelf. -
Final Fire:
Fire the mug in the kiln according to the clay and glaze manufacturer’s instructions (usually Cone 5 or 6).
Once cooled, fill your new handmade mug with coffee and enjoy the cozy company of your painted feline friend