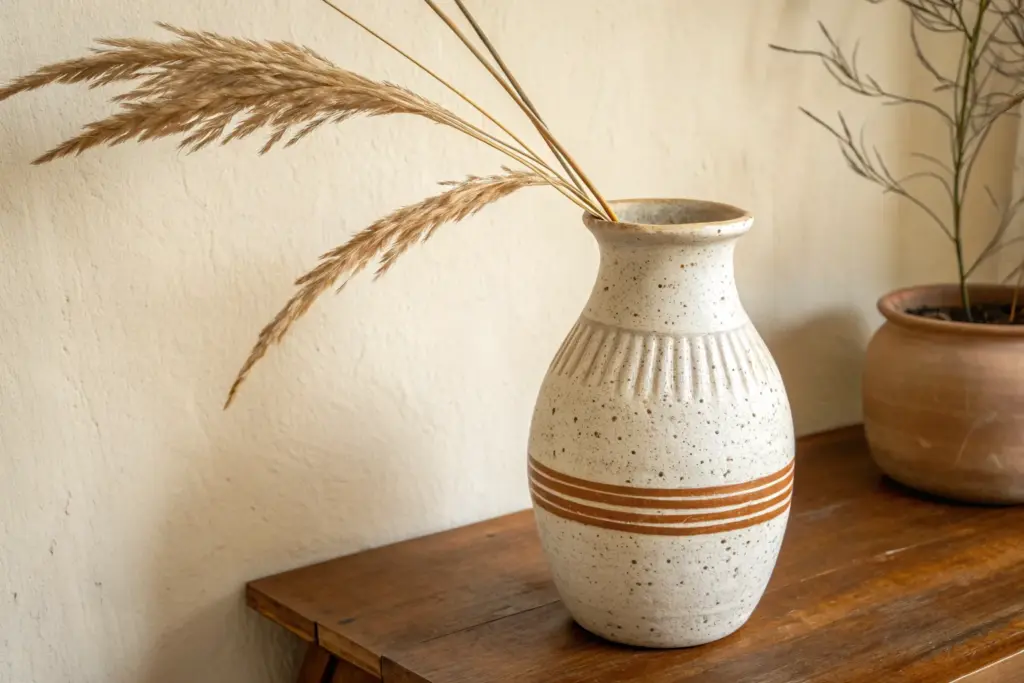
When you’re craving fresh ceramic art ideas, it helps to start with forms that feel friendly and then play with color, texture, and tiny sculptural details. Here are my go-to projects that balance handbuilding with seriously satisfying surface design—the kind of pieces you’ll actually want to keep out on display.
Botanical Painted Mugs

Capture the delicate beauty of a meadow on your morning coffee vessel with this charming pottery project. Featuring dainty wildflowers painted in earthy underglazes on a speckled clay body, this mug combines rustic raw texture with elegant illustration.
Detailed Instructions
Materials
- Speckled stoneware clay (mid-fire)
- Pottery wheel (or slab roller for hand-building)
- Needle tool
- Rib tool
- Sponge
- Wire cutter
- Trimming tools
- White or clear matte glaze
- Underglazes (Rust Orange, Olive Green, Hunter Green, Deep Brown)
- Fine detail brushes (sizes 0 and 00)
- Wax resist
- Kiln
Step 1: Forming the Mug
-
Weigh and wedge:
Begin with about 1 pound of speckled clay. Wedge thoroughly to remove air bubbles and align the particles, ensuring a smooth throwing experience. -
Throw the cylinder:
Center the clay on the wheel and open it up. Pull the walls to create a straight-sided cylinder about 3.5 to 4 inches tall. Keep the rim slightly thickened for durability. -
Shape the body:
Using a rib tool, gently curve the walls if you prefer a slight taper, or keep them straight for a modern look. Smooth the surface to remove throwing lines, providing a clean canvas for your painting later. -
Make the handle:
Pull a strap handle from a separate piece of wedged clay. Aim for a comfortable width that matches the visual weight of the cup. Let it set up to a ‘soft leather hard’ stage alongside the mug body. -
Attach the handle:
Score and slip both the attachment points on the mug and the handle ends. Press the handle firmly onto the mug, smoothing the joints with a damp sponge or modeling tool for a seamless connection. -
Dry to leather hard:
Cover the mug loosely with plastic and let it dry slowly until it reaches a leather-hard state. This firmness is crucial for the precise underglaze work to come.
Step 2: Painting the Botanicals
-
Sketch the layout:
Lightly sketch your floral design directly onto the leather-hard clay using a very soft pencil. Don’t worry about marks; the graphite will burn off in the kiln. -
Paint the stems:
Using your thinnest brush (size 00) and Olive Green underglaze, paint thin, sweeping lines for the stems. Vary the pressure slightly to give the lines an organic, natural taper. -
Add the leaves:
Switch to a slightly larger detail brush (size 0). Mix Olive Green with a touch of Hunter Green for depth. Paint the almond-shaped leaves, pressing down at the base and lifting usually at the tip to create a point. -
Paint the main flower:
For the prominent rust-colored flower, use Rust Orange underglaze. Paint elongated petal shapes radiating from a central point. I like to do a second coat here to ensure the color pops against the speckled clay. -
Detail the filler flowers:
Use a dotting technique for the seed heads and smaller buds. Dip a toothpick or the back of a brush into Deep Brown or Rust Orange to create tiny, precise dots at the ends of the delicate stems. -
Define the outlines:
Once the color blocks are dry to the touch, use a heavily diluted Deep Brown or black underglaze to add very fine outlines or center details to the flowers, giving them a crisp, illustrative look. -
Bisque fire:
Allow the mug to dry completely to the bone-dry stage. Load it into the kiln and bisque fire to Cone 04 (or your clay’s specific bisque temperature).
Smudged Lines?
If you smudge underglaze while painting, don’t wipe it wet! Let it dry completely, then gently scrape the mistake off with an X-Acto knife or needle tool.
Step 3: Glazing and Finishing
-
Wax the bottom:
Apply wax resist to the bottom half-inch of the mug’s exterior foot. This creates the ‘dipped’ look where the raw, toasted clay is exposed at the base. -
Apply clear glaze:
Dip the mug into a clear or transparent shiny glaze. Hold it by the foot (where the wax is) and submerge fully for a few seconds. Shake off excess drips as you pull it out. -
Clean unglazed areas:
Use a damp sponge to wipe any glaze droplets off the wax-resisted bottom section. The contrast between the glossy glazed top and the matte raw clay bottom is key to this aesthetic. -
Glaze fire:
Load the glazed mug into the kiln again. Fire to the maturation temperature of your clay and glaze (typically Cone 5 or 6 for stoneware). -
Sand the foot:
After firing and cooling, check the unglazed bottom. If the raw clay feels rough, sand it gently with wet-dry sandpaper to ensure it won’t scratch your table.
More Texture
Carve lightly into the painted leaves with a sgraffito tool before bisque firing to reveal the clay body underneath and add physical texture.
Brew your favorite herbal tea and enjoy the warmth of your handmade meadow in a mug.


Geometric Color-Blocked Planters
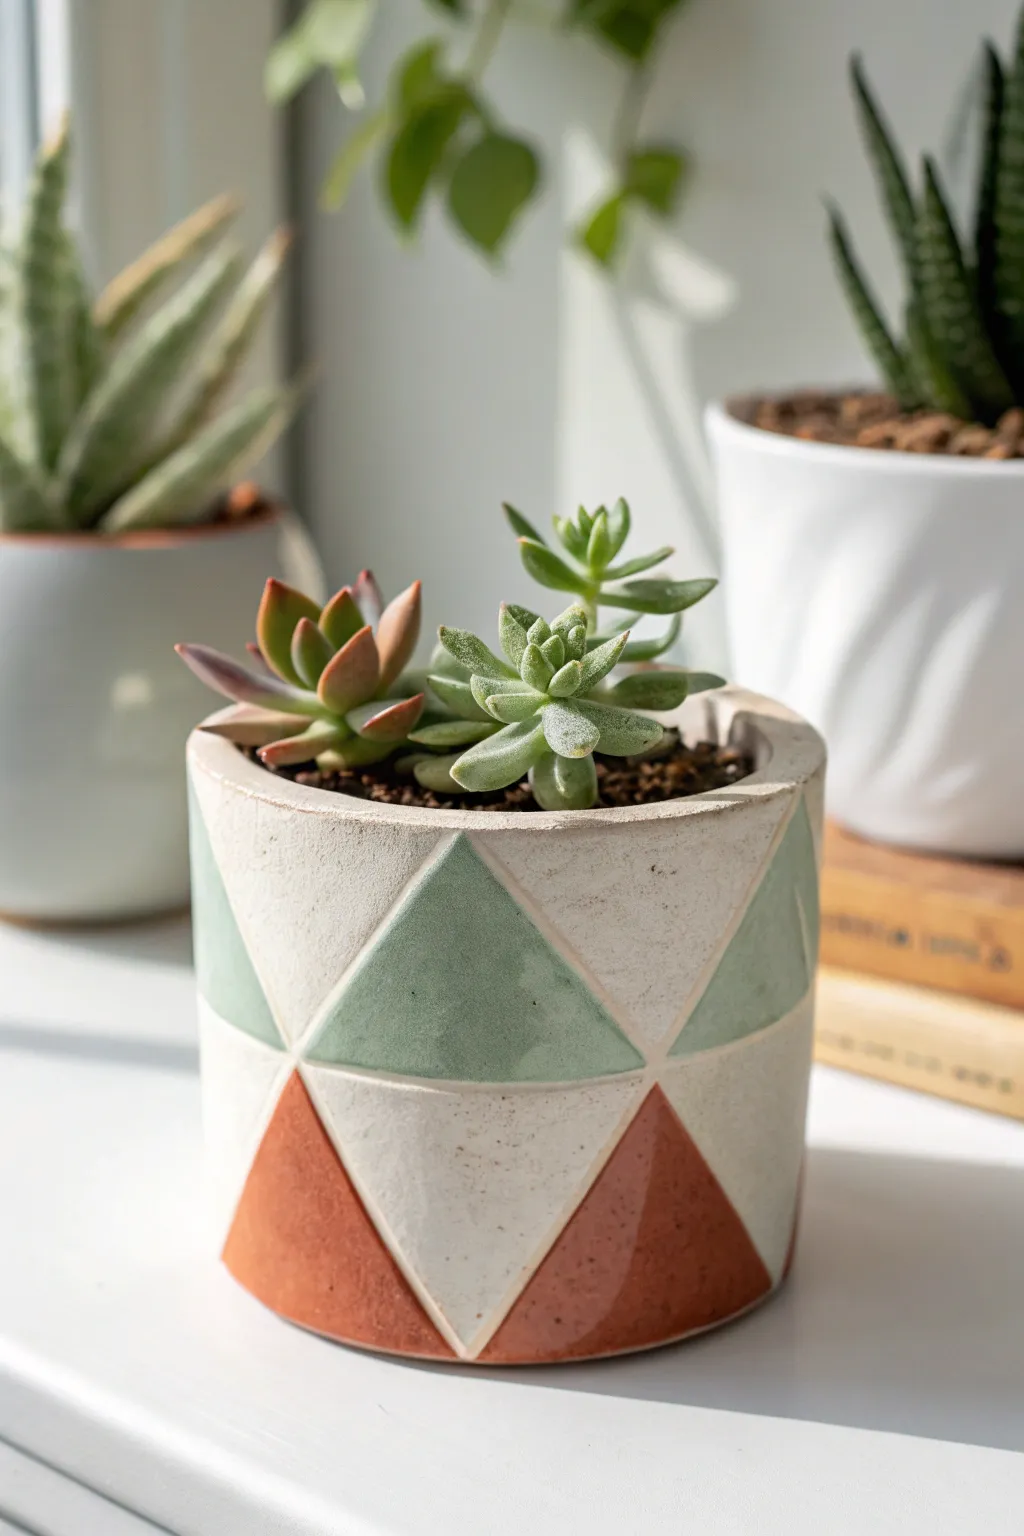
Transform a plain ceramic cylinder into a modern statement piece with this geometric color-blocked design. Featuring a soothing palette of sage green, warm terracotta, and creamy speckled white, the interlocking triangle motif adds sophisticated structure to your succulent collection.
Step-by-Step
Materials
- Small cylindrical ceramic planter (bisque or glazed white)
- Acrylic paints (Sage Green, Terracotta/Rust, Cream/Off-White)
- Fine grit sandpaper (if using a glazed pot)
- Flat shader paintbrush (small size)
- Fine liner paintbrush
- Painter’s tape or masking tape (1/4 inch width is ideal)
- Pencil and ruler
- Matte spray sealant or varnish
- Palette or small dish for mixing
- Paper towels and water cup
Step 1: Preparation & Mapping
-
Surface prep:
Begin by ensuring your ceramic pot is clean and dry. If you are upcycling a glossy glazed pot, lightly scuff the surface with fine-grit sandpaper to give the paint something to grip. -
Base coating:
Apply a base coat of the cream or off-white acrylic paint over the entire exterior. This ensures a uniform background and makes the top colors pop. Let this dry completely. -
Speckling effect (optional):
To mimic the stone-like texture seen in the photo, create a splatter effect. Dilute a tiny amount of grey or brown paint with water, dip a toothbrush in it, and flick the bristles to create subtle speckles over the dried cream base. -
Measuring the grid:
Measure the circumference of your pot and divide it by an even number (like 4 or 6) to determine the width of your triangles. Mark vertical lines lightly with a pencil at these intervals. -
Drawing the diagonals:
Measure the varying heights for your triangle points. Using a ruler, connect your vertical marks with diagonal lines to create a zig-zag pattern around the middle and bottom of the pot, forming the interlocking triangle shapes.
Step 2: Painting the Pattern
-
Taping the first set:
Apply painter’s tape along the OUTSIDE edges of the triangles you intend to paint sage green first. Press the tape edges down firmly with your fingernail to prevent any paint bleed. -
Painting green sections:
Using a flat shader brush, fill in the masked triangles with your sage green paint. Applying two thin coats is better than one thick coat for a smooth, brush-stroke-free finish. -
Removing tape:
Peel off the tape while the paint is still slightly tacky—not fully dry—to ensure a crisp, clean line. Allow the green sections to dry completely before moving on. -
Taping the second set:
Once the green is dry, tape off the areas designated for the terracotta triangles. Be careful not to put tape over fresh paint that hasn’t fully cured. -
Painting terracotta sections:
Fill in the lower triangles with the terracotta or rust-colored paint. Again, aim for even coverage, dabbing into the corners carefully. -
Freehand touch-ups:
Remove the second round of tape. You will likely have small white gaps between the colored triangles where the tape lines were. Use your fine liner brush and the cream paint to tidy up these negative space lines, creating a uniform lattice effect. -
Refining edges:
If any color bled or lines look shaky, use the fine liner brush with the appropriate color to sharpen the edges. I find steadying my hand against the table helps immensely here.
Crisp Lines Secret
Paint a thin layer of the *base color* (cream) over the tape edge first. This seals the gap so if any paint bleeds under, it matches the background.
Step 3: Finishing Touches
-
Rim detailing:
Check the top rim of the planter. If paint got smudged there, wipe it clean or paint a solid ring of the cream color for a polished look. -
Final drying:
Set the pot aside in a dust-free area and let it cure for at least 24 hours. The acrylics need to harden fully before sealing. -
Sealing the work:
Take the pot to a well-ventilated area and apply a clearer matte spray sealant. This protects the design from water damage when you water your plants. -
Potting:
Once the sealant is dry and no longer smells of fumes, add your soil and succulents to your new custom home.
Metallic Upgrade
Replace the white separator lines with gold leaf paint or a metallic gold paint pen for a glamorous, high-end geometric look.
Step back and admire how a little paint and geometry turned a simple pot into a modern art piece for your windowsill


Minimal Line-Art Plates
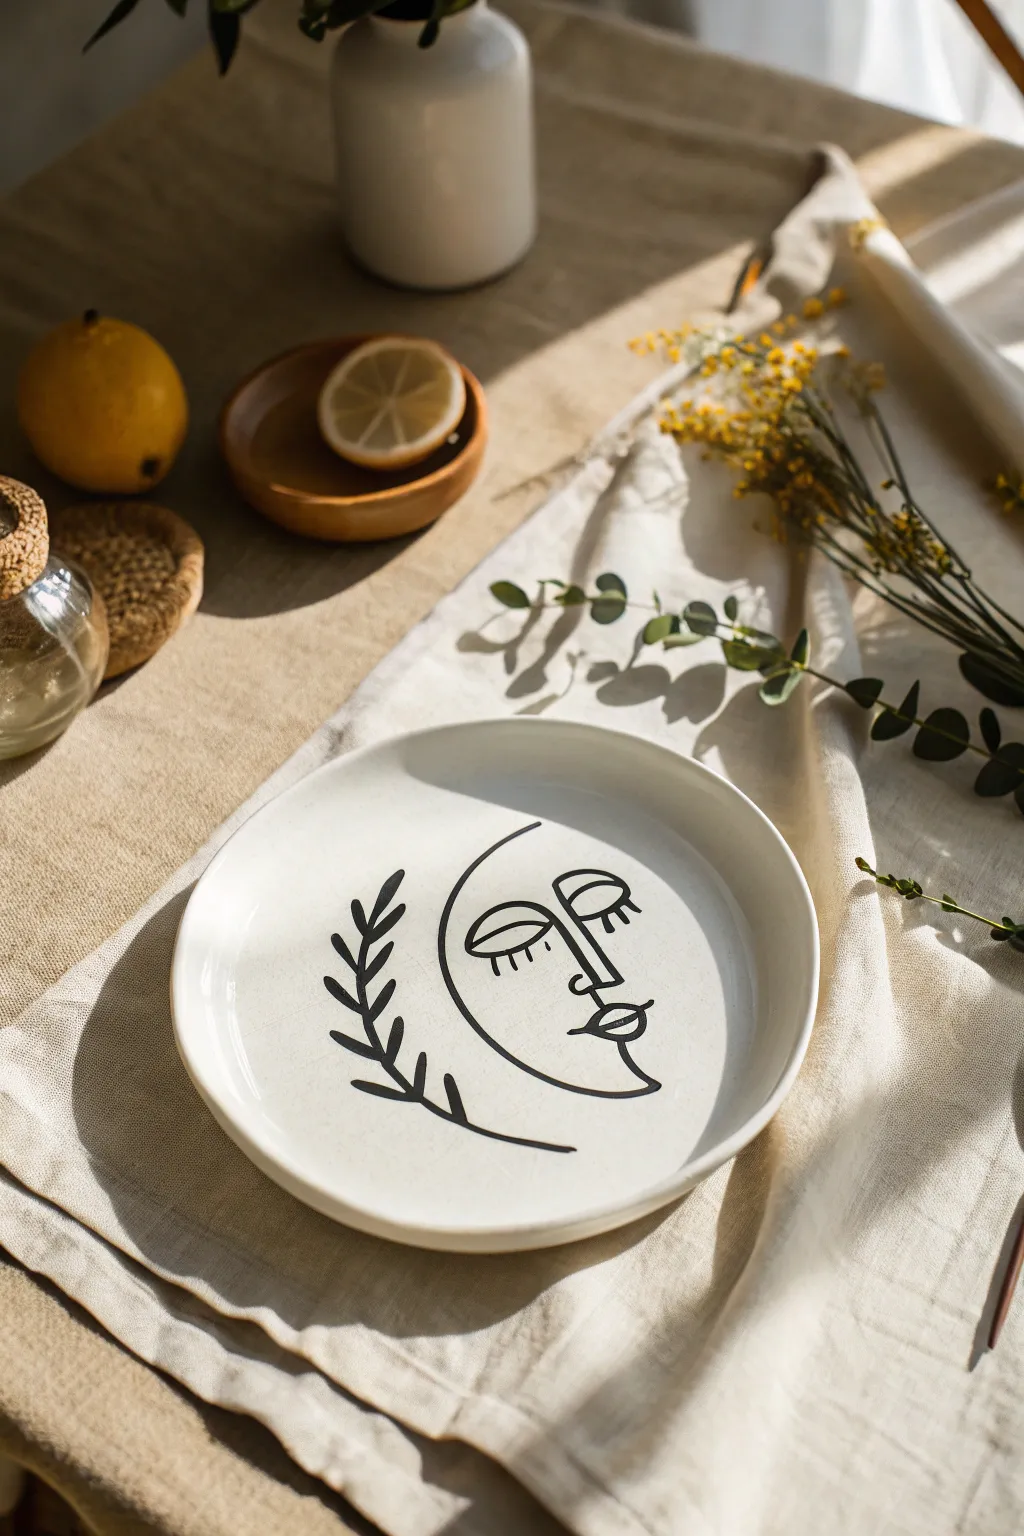
Transform a plain ceramic dish into a trendy piece of décor with this elegant line-art design. Featuring a stylized profile that doubles as a crescent moon alongside a botanical sprig, this project captures the essence of modern minimalist aesthetics.
How-To Guide
Materials
- White or cream ceramic plate (glazed)
- Pebeo Porcelaine 150 paint (Anthracite Black) or high-quality ceramic marker
- Fine liner detail brush (size 0 or 00)
- Rubbing alcohol
- Cotton pads
- HB Pencil
- Carbon transfer paper (optional)
- Painter’s tape or masking tape
- Clean water for rinsing
- Paper towel
- Domestic oven (for baking)
Step 1: Preparation & Planning
-
Surface Cleaning:
Before you begin, wipe the entire surface of the plate with rubbing alcohol on a cotton pad. This removes any oils or fingerprints that could prevent the paint from adhering properly. -
Drying Time:
Allow the alcohol to evaporate completely. Avoid touching the center of the plate with your bare hands from this point forward. -
Sketching the Concept:
On a piece of scratch paper, practice drawing the design. Focus on the continuous curve of the moon face—a C-shape that starts at the forehead and swoops down to the chin. -
Design Transfer:
If you aren’t confident freehanding directly on the ceramic, tape a piece of carbon paper and your sketch onto the plate. Use a pencil to firmly trace the lines, transferring a faint guide onto the surface.
Steady Hand Trick
Rest your pinky finger on a dry part of the plate while painting. This anchors your hand, giving you better control for smooth curves and fine details.
Step 2: Painting the Design
-
Loading the Brush:
Dip your fine liner brush into the black porcelain paint. You want the paint to have an ink-like consistency, so if it feels too thick, dip the very tip of your brush in water to loosen it slightly. -
The Main Curve:
Start with the main profile line. Paint a confident, smooth arc starting from the top right, curving down to the left to form the ‘cheek’ and back up slightly for the chin. -
Nose and Brow:
Add the nose by drawing a straight line down the center of the face, connecting to a bridge between the eyes. Keep the lines consistent in thickness. -
Adding Eyes:
Paint the two eyes. These are stylized semi-circles with straight lines across the middle. Add three small vertical dashes below the left eye for lashes. -
The Lips:
Create the mouth with two small, stacked oval shapes. I find it easier to paint the top lip first, then the bottom one right underneath to ensure they align with the nose. -
The Leafy Branch:
To the left of the face, paint a long, gently curving stem that mirrors the curve of the face profile. -
Adding Leaves:
Paint small, pointed oval leaves coming off the stem. Alternate them left and right as you move up the branch. -
Refining Lines:
Look over your work. If any lines look shaky or too thin, carefully go over them one more time to build opacity. -
Correction:
If you make a mistake, use a damp cotton swab or a toothpick to gently scrape or wipe away the wet paint immediately.
Metallic Accent
For a luxe look, trace inside the lip ovals or the eyelids with a gold paint pen after the black outline dries, adding a touch of shimmer.
Step 3: Curing & Baking
-
Initial Drying:
Let the plate sit in a dust-free area for at least 24 hours. This air-drying phase is crucial for the paint to settle before heat is applied. -
Oven Loading:
Place the plate into a cool, unheated oven. Do not preheat the oven, as the sudden temperature shock could crack the ceramic. -
Baking:
Set the oven to 300°F (150°C) and bake for 35 minutes (or follow specific instructions on your paint bottle). -
Cooling Down:
Turn the oven off after the baking time is up, but leave the door closed. Let the plate cool completely inside the oven before removing it. -
Final Check:
Once cool, the design is permanent. Gently wash with soapy water to remove any remaining sketch marks or residue.
Now you have a stunning, gallery-worthy piece of home décor that looks effortless and chic


Pinch Pot Trinket Dishes With Painted Motifs
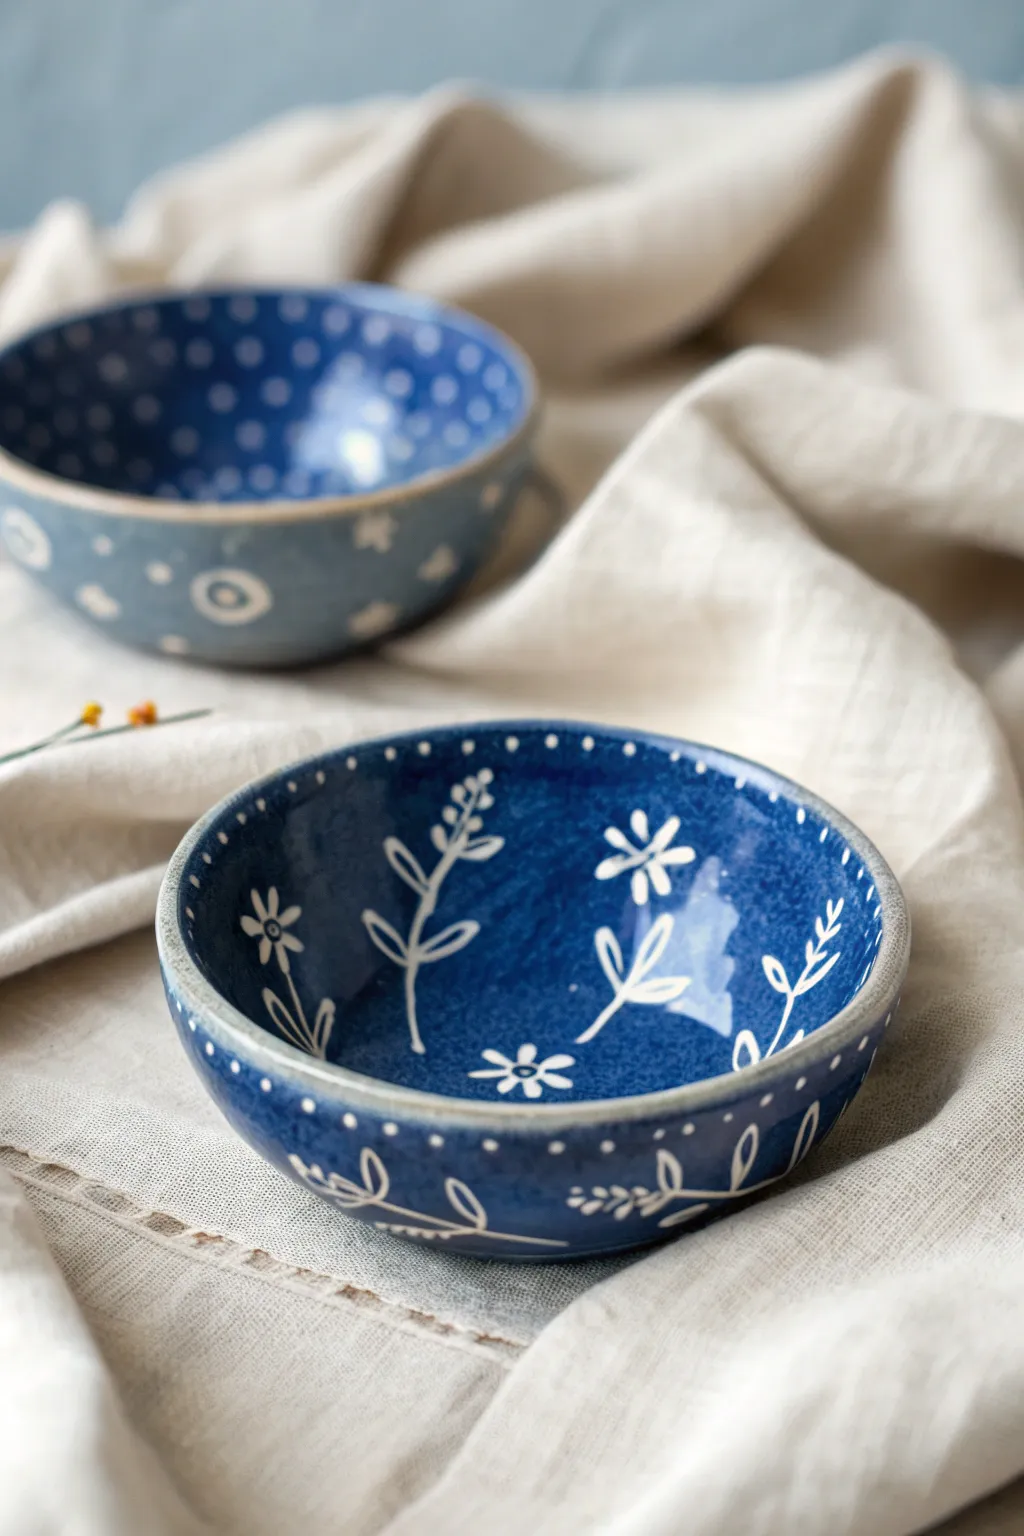
These charming, hand-built ceramic bowls feature a deep cobalt blue finish adorned with delicate white floral and dotted motifs. Their slightly organic shape and rustic rim give them a cozy, artisanal feel perfect for holding trinkets or serving small snacks.
Detailed Instructions
Materials
- White stoneware clay or earthenware clay
- Pottery tools (needle tool, rib tool, slightly damp sponge)
- Cobalt blue underglaze
- White underglaze (opaque)
- Small fine-tipped paintbrushes
- Clear transparent glaze (food safe if using for food)
- Rolling pin or slab roller (optional but helpful for base)
- Canvas mat or work surface
- Kiln access
Step 1: Forming the Bowl
-
Prepare the clay:
Start by wedging a softball-sized amount of white clay to remove any air bubbles. Divide this clay into two equal balls if you plan to make a matching set like the image. -
Open the pinch pot:
Hold a clay ball in one hand and push your thumb into the center, stopping about a half-inch from the bottom. Gently pinch the clay between your thumb and fingers, rotating the ball as you go to thin out the walls evenly. -
Refine the shape:
Continue pinching upwards to create height. Aim for a wall thickness of about 1/4 inch. Don’t worry if the rim is slightly uneven; this adds to the organic, handmade charm. -
Smooth the surface:
Use a flexible rib tool or a slightly damp sponge to smooth out finger marks on both the interior and exterior. I find that lightly compressing the rim with a damp piece of chamois leather gives it a professional, finished look. -
Flatten the base:
Gently tap the pot on your work surface to create a flat, stable foot so the bowl won’t wobble. Let the clay dry to a ‘leather-hard’ state before proceeding to decoration.
Sgraffito Alternative
Instead of painting white on blue, paint the bowl blue first, let it dry to leather hard, and carve through the blue layer to reveal the white clay beneath for the lines.
Step 2: Applying the Cobalt Base
-
Apply the first coat:
Stir your cobalt blue underglaze thoroughly. Using a soft, wide brush, apply a smooth, even coat to the entire interior and exterior of the bowl, stopping just short of the very bottom if you want an exposed clay foot, or covering it all if using stilts later. -
Layer for depth:
Allow the first coat to dry until it’s no longer shiny. Apply a second and possibly third coat to ensure a rich, opaque blue that hides the white clay body completely. -
Clean the rim:
If you prefer the look in the image where the rim shows a hint of natural clay color, wipe the very top edge gently with a damp sponge to remove some of the blue underglaze, creating a subtle border.
Step 3: Painting the Motifs
-
Plan your design:
The image features two distinct patterns: a dotted interior rim with floral sprays, and a dotted/star pattern. Decide which style you are creating. Lightly sketching with a pencil on top of the dried blue underglaze can help with spacing (the graphite burns off in the kiln). -
Paint the stems:
Using a fine liner brush loaded with opaque white underglaze, paint the thin, curving stems of the plant motifs. Use a light touch to keep lines delicate. -
Add leaves and petals:
Add small teardrop shapes for leaves along the stems. For the flowers, paint simple five-petal daisy shapes or clusters of small dots for buds. -
Detail the rim:
Dip the handle end of a paintbrush or a specialized dotting tool into the white underglaze. Dot evenly spaced white circles around the inner rim of the bowl. -
Decorate the exterior:
Don’t forget the outside! Continue your floral vine pattern around the lower exterior of the bowl, mirroring the flow of the inside design. -
Second pass for brightness:
White underglaze over dark blue can sometimes appear translucent after firing. I prefer to carefully dab a second layer of white on the flower petals once the first is dry to ensure they pop brilliantly against the blue.
Wax Resist Magic
Paint your floral designs with liquid wax resist over the raw clay first. Then, sponge the blue underglaze over everything—the wax resists the blue, leaving designs white.
Step 4: Glazing and Firing
-
Bisque fire:
Once the underglaze is completely dry, load the bowls into the kiln for a bisque fire (usually Cone 04). This hardens the clay and sets the decoration. -
Apply clear glaze:
After the bisque firing, dip the bowl into a clear transparent glaze, or brush it on ensuring full coverage. This will seal the piece and make the colors distinct. -
Wipe the foot:
Use a sponge to wipe the clear glaze off the very bottom of the bowl where it touches the shelf, preventing it from fusing to the kiln. -
Final firing:
Fire the piece again to the maturation temperature of your specific clay and glaze (often Cone 5 or 6 for stoneware). Allow the kiln to cool completely before opening.
Once cooled, your bowls are ready to add a touch of handmade elegance to your table or dresser.

The Complete Guide to Pottery Troubleshooting
Uncover the most common ceramic mistakes—from cracking clay to failed glazes—and learn how to fix them fast.
Sgraffito Bowls With Carved Patterns
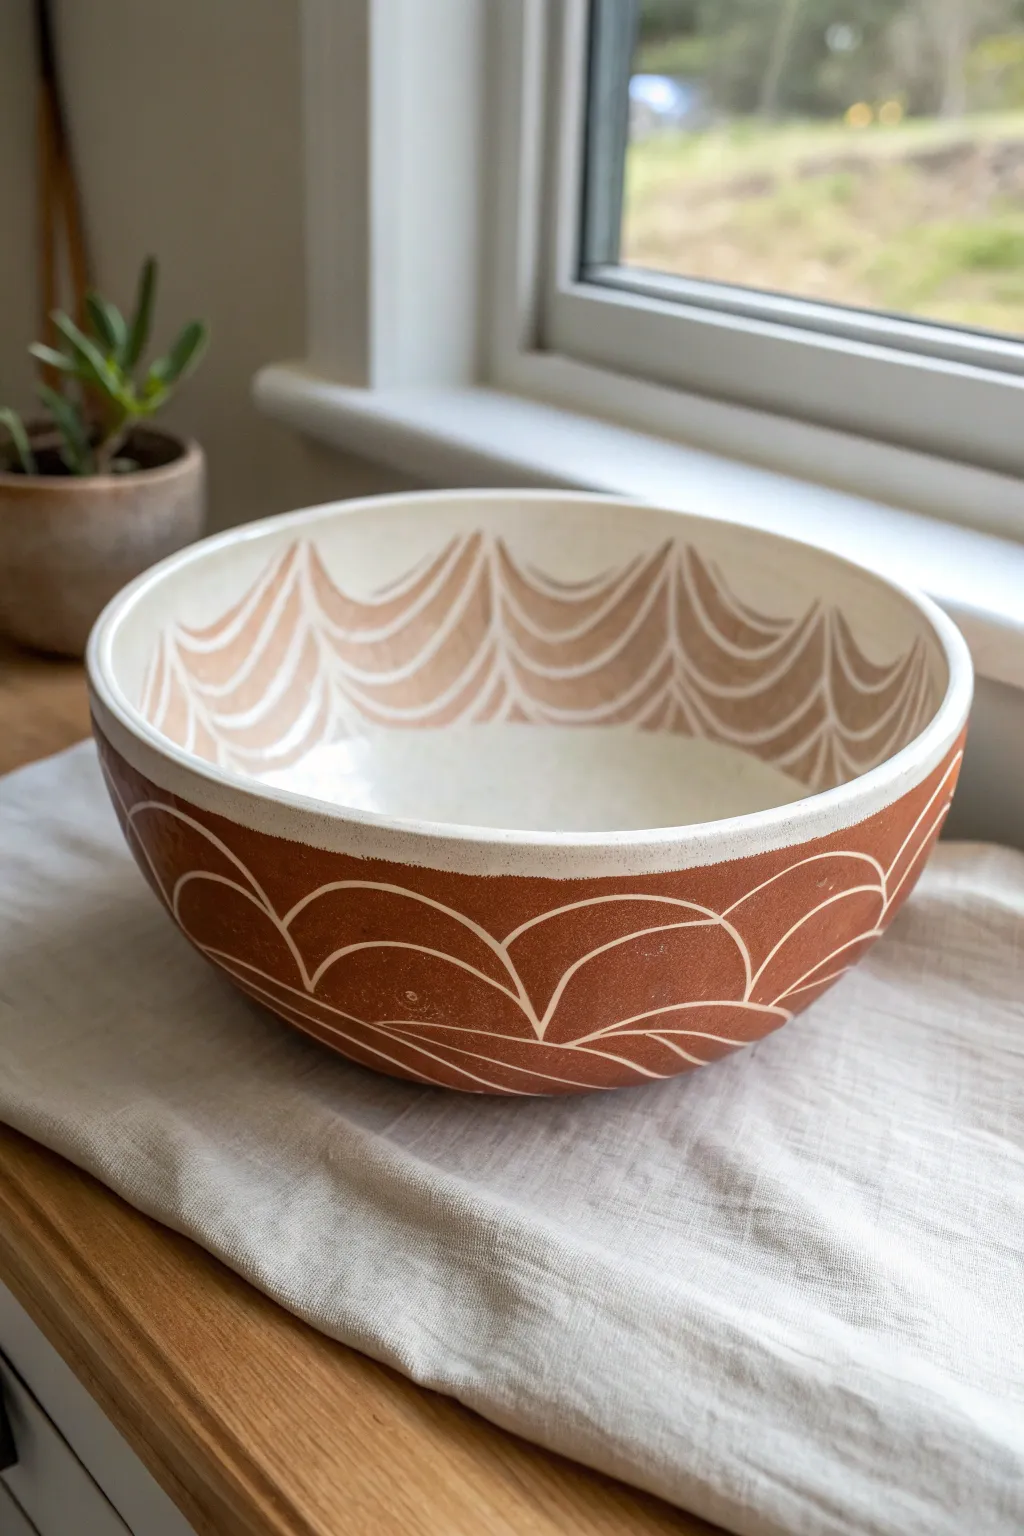
This rustic yet modern bowl technique combines the warmth of raw red clay with the crisp contrast of sgraffito carving. The design features repeating scalloped arches that flow seamlessly from the interior rim to the exterior base, creating a rhythmic visual movement.
Step-by-Step Tutorial
Materials
- Stoneware or earthenware clay (preferably a red or terracotta body)
- White underglaze or slip
- Clear transparent glaze
- Pottery wheel (or slab roller/molds for hand-building)
- Rib tool (metal or rubber)
- Loop carving tool (small wire)
- Sgraffito tool or needle tool
- Soft fan brush
- Sponge
Step 1: Shaping the Form
-
Center and open:
Begin with about 3-4 pounds of red clay on the wheel. Center it firmly and open the vessel to establish a wide, curved floor. -
Pull the walls:
Pull the clay upward to create a hemi-spherical bowl shape. Aim for a generous curve that isn’t too steep, allowing the interior pattern to be easily visible. -
Refine the rim:
Compress the rim with a chamois or your sponge to ensure it is smooth and sturdy. A slightly thickened rim adds durability. -
Smooth the surface:
Use a flexible metal or rubber rib to smooth both the interior and exterior walls. This step is crucial because a smooth canvas makes the carving much cleaner later. -
Let it firm up:
Allow the bowl to dry to a sturdy leather-hard stage. It needs to be firm enough to handle without warping but soft enough to carve easily.
Clean Lines
Carve when the clay is leather hard—like sharp cheddar cheese. Too wet, and the lines will be mushy; too dry, and the clay will chip.
Step 2: Designing the Interior
-
Map the interior band:
Using a faint line or a guide, decide how far down the interior wall your pattern will go. In the example, the scallops stop about halfway down the bowl. -
Apply the contrasting slip:
If you are using a dark clay body, apply a band of white slip or underglaze to the upper interior section where you plan to carve. Let this set until it’s no longer tacky. -
Carve the interior arches:
Using a loop tool, carve away the white slip in repeating U-shapes or scallops. The goal is to reveal the raw clay underneath the white layer to create the negative space design. -
Refine the interior lines:
Go back over your carved lines to ensure they have sharp edges. Brush away any clay crumbs carefully with a soft dry brush.
Reverse the Effect
Try painting the entire bowl black and carving through to white clay for a dramatic, high-contrast ‘night mode’ version of this design.
Step 3: Carving the Exterior
-
Apply exterior underglaze:
Flip the bowl over (trim a foot ring first if needed). Apply 2-3 coats of a terra-cotta or reddish-brown underglaze if your base clay isn’t naturally this dark color. If your clay *is* dark red, you can skip this, or apply a white slip and carve through it for the reverse effect shown in the image. -
Establish the rim line:
Carve a straight, horizontal line about half an inch below the rim on the exterior. This acts as a border for your scalloped pattern. -
Draft the scallops:
Lightly scratch in your arches with a needle tool first to ensure spacing is even around the circumference. -
Execute the sgraffito:
Using a sharp sgraffito tool or small wire loop, carve firm, confident lines through the surface layer to reveal the contrasting clay body beneath. -
Layer the arches:
Create the ‘fish scale’ or wave effect by starting the next row of arches from the mid-point of the arches above it. Repeat this down the side of the bowl. -
Clean up:
Once all carving is done and the piece is bone dry, gently rub the surface with a scouring pad or your finger to remove any sharp burrs created during carving.
Step 4: Glazing and Firing
-
Bisque fire:
Fire the piece to cone 04 (or your clay’s specific bisque temperature) to harden it. -
Wax resin (optional):
If you want the exterior texture to remain matte and raw, apply wax resist over the carved exterior area. -
Apply clear glaze:
Dip or brush a clear, food-safe glaze over the interior. I like to glaze the interior rim but leave the exterior sgraffito un-glazed or use a very thin matte glaze to preserve the texture. -
Final fire:
Fire the bowl to the final maturity temperature for your specific clay body (e.g., Cone 6 for stoneware).
This beautiful bowl is now ready to hold fresh fruit or serve as a stunning centerpiece on your table
Coil-Built “Worm” Vases With Intentional Texture
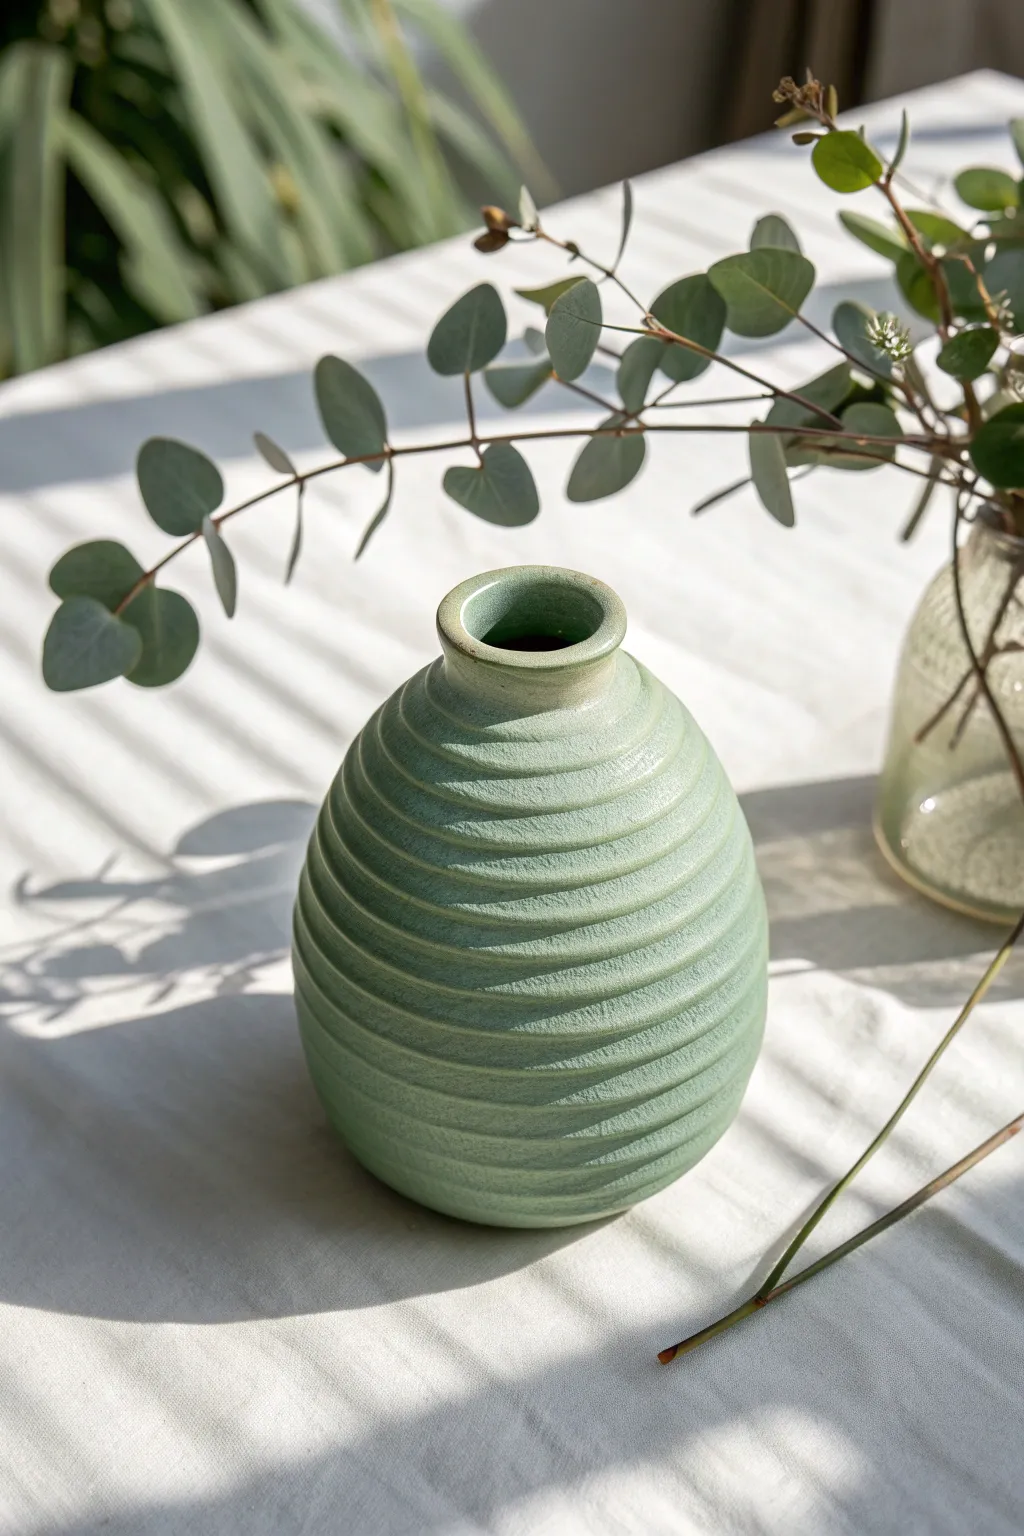
This project explores the meditative beauty of coil building, celebrating the construction process rather than hiding it. The result is a charming, bulbous vase with visible, rhythmic ridges and a soothing matte sage glaze that catches the light beautifully.
How-To Guide
Materials
- Stoneware clay (smooth or slightly groggy)
- Scoring tool or serrated rib
- Slip (clay mixed with water)
- Wooden modeling tool
- Potter’s turntable (banding wheel)
- Sponge
- Cutting wire
- Matte sage green or celadon glaze
- Kiln
Step 1: Base Construction
-
Prepare the Clay:
Begin by wedging your clay thoroughly to remove air pockets and ensure an even consistency. For a vase of this size, you’ll need approximately 2-3 pounds of stoneware clay. -
Create the Floor:
Roll out a slab of clay creating a circle about 3.5 inches in diameter and roughly ¼ inch thick. This will serve as the stable base for your vase. -
Score and Slip:
Using your scoring tool, scratch the outer perimeter of your circular base. Apply a generous amount of slip to the scored area to act as the glue for your first coil.
Seamless Transitions
Cut coil ends at a 45-degree angle where they meet. This creates a stronger join and hides the vertical seam better than a blunt butt-joint.
Step 2: Coiling the Form
-
Roll the Coils:
Roll out several long, even snakes of clay. Aim for a thickness similar to your pinky finger. Consistency here is key to achieving that uniform ribbed look. -
Lay the First Ring:
Place your first coil onto the slipped edge of the base. Gently press it down to adhere it. -
Blend the Interior:
THIS is the crucial structural step: while leaving the outside texture visible, use your thumb or a wooden tool to blend the *inside* of the coil down into the base (and subsequent coils into the ones below them). This ensures the pot is water-tight. -
Build Outward:
Continue stacking coils. stack each new coil slightly toward the outside of the previous one to widen the belly of the vase. Remember to score and slip between every single layer. -
Shape the Belly:
As you build the widest part of the form, keep blending the interior seams smooth. I find using a banding wheel helps keep the bulbous shape symmetrical as I turn it. -
Taper Inward:
Once you reach the desired width (about halfway up), begin stacking the coils slightly toward the inside to close the form. -
Refine the Ridges:
Pause occasionally to gently run your finger or a damp sponge along the exterior grooves. You don’t want to smooth them away, just soften any sharp crumbles or harsh edges.
Step 3: Neck and Finishing
-
Form the Neck:
As the opening gets smaller, stack two or three coils straight up vertically to create the distinct neck collar shown in the image. -
Smooth the Rim:
Use a damp detailed sponge or a piece of chamois leather to compress and round off the very top rim. This should be smooth and comfortable to the touch. -
Dry Slowly:
Cover the vase loosely with plastic for the first day to let the moisture equalize, then uncover it to dry completely to the bone-dry stage. -
Bisque Fire:
Fire the piece in the kiln to cone 04 (or according to your clay body’s bisque temperature). -
Glazing:
Pour a matte sage green glaze inside the vase, swirl to coat, and pour out the excess. Then, dip the exterior or brush the glaze onto the outside. -
Clean and Fire:
Wipe the bottom of the foot completely clean of glaze using a wax resist or a wet sponge. Fire the piece to the glaze’s maturity temperature (likely cone 5 or 6 for stoneware).
Graduated Color
Dip the top third of the vase in a slightly lighter glaze color (like white or pale cream) to create an ombre effect that highlights the coil texture.
Place your finished vase near a window where the shadows will play across the coil ridges


What Really Happens Inside the Kiln
Learn how time and temperature work together inside the kiln to transform clay into durable ceramic.
Lace-Impressed Catchall Trays
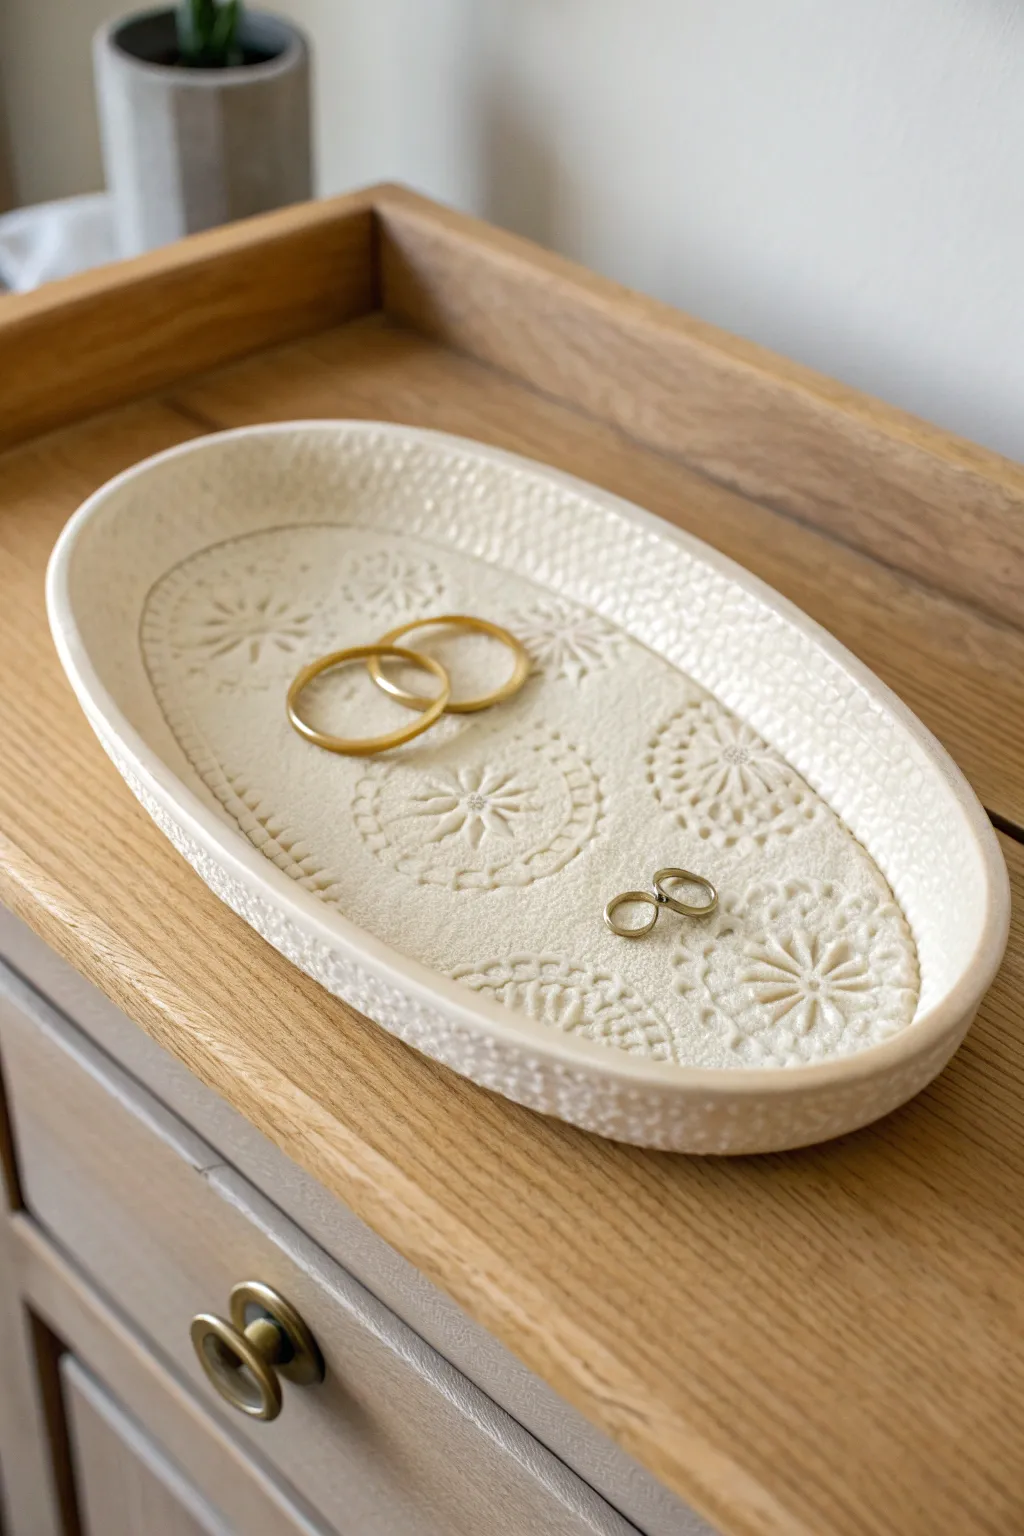
This elegant catchall tray combines the raw beauty of hand-built ceramics with delicate, vintage-inspired textures. By pressing actual lace doilies into soft clay, you achieve a sophisticated relief pattern that is highlighted perfectly by a creamy, stone-like glaze.
Step-by-Step Tutorial
Materials
- White stoneware clay or air-dry clay (if not firing)
- Vintage lace doilies or crochet coasters (various sizes)
- Rolling pin
- Canvas mat or wooden board (to prevent sticking)
- Oval paper template
- Needle tool or fettling knife
- Potter’s rib (rubber or wood)
- Small sponge
- Soft-bristle brush
- Satin white or cream glaze
- Bowl of water
Step 1: Creating the Slab
-
Prepare the workspace:
Begin by setting up your canvas mat or wooden board. This ensures your clay won’t stick to the table as you work. Take a manageable chunk of white stoneware clay and wedge it briefly to remove air bubbles. -
Roll out the slab:
Using your rolling pin, roll the clay out into a uniform slab. Aim for a thickness of about 1/4 inch. If you want the rim specifically textured like the reference photo, ensure your slab is slightly wider than your intended final shape. -
Smooth the surface:
Before adding texture, take your potter’s rib and gently compress the clay surface. This aligns the clay particles and removes any canvas texture from the initial rolling.
Sticking Lace?
If the lace sticks to the clay, lightly dust the fabric with cornstarch before placing it down. This acts as a release agent and burns off harmlessly in the kiln.
Step 2: Impressing the Texture
-
Arrange the lace:
Place your lace doilies onto the smooth clay slab. To match the example, use a mix of larger circular patterns and smaller rosette motifs. Arrange them somewhat randomly but balanced, leaving some negative space between them. -
Roll in the pattern:
With the lace in place, take the rolling pin and roll firmly over the doilies once. Do not roll back and forth, as this can shift the fabric and blur the impression. You want a deep, clean embossment. -
Remove the lace:
Carefully peel back the lace to reveal the intricate raised pattern left in the clay. If any small fibers adhere to the clay, pick them off gently with the needle tool. -
Texturing the rim (Optional):
In the reference image, the very edge of the tray has a rough, pebbled texture. You can achieve this by gently tapping the outer perimeter of your slab with a coarse sponge or a crumpled ball of aluminum foil before cutting the shape.
Add Color Depth
Apply a dark oxide wash (like iron oxide) into the texture and sponge it off before glazing. This adds an antique look and makes the lace pattern pop dramatically.
Step 3: Shaping and Refining
-
Cut the oval shape:
Place your paper oval template over the textured area. Using a needle tool or fettling knife, cut straight down around the template to create your tray shape. -
Soften the edges:
Run a damp sponge or your finger along the cut edge to smooth away any sharp corners or burrs left by the knife. I prefer to do this now while flat, rather than after lifting the sides. -
Lift the walls:
Gently lift the edges of the oval slab upwards to create a shallow rim. You can support the lifted edge with small pieces of foam or crumpled newspaper underneath until the clay stiffens. -
Refine the form:
Use your fingers to pinch and shape the rim slightly, ensuring it stands up enough to hold items like rings, as seen in the photo. Smooth the interior transition where the wall meets the floor of the tray.
Step 4: Finishing and Glazing
-
Dry slowly:
Loosely cover the tray with plastic and let it dry slowly to the leather-hard stage, then uncover to let it become bone dry. This prevents warping. -
Bisque fire:
Fire the piece in a kiln to cone 04 (or according to your clay’s instructions). If using air-dry clay, simply wait until it is fully hardened. -
Apply the glaze:
Select a satin cream or white glaze. Pour a small amount into the tray and swirl it to coat the interior, or brush it on evenly. The glaze should settle into the deep lace impressions, which helps highlight the pattern. -
Wipe back (Optional):
For more definition, you can gently wipe the high points of the texture with a damp sponge immediately after glazing. This exposes a bit more of the clay body on the raised details. -
Final fire:
Glaze fire the piece to the temperature required by your specific clay and glaze combination (often Cone 5 or 6 for stoneware). Once cooled, your tray is ready for jewelry.
Place your newly fired tray on a dresser or nightstand to display your favorite rings in style.
Terrazzo-Style Speckled Ceramics
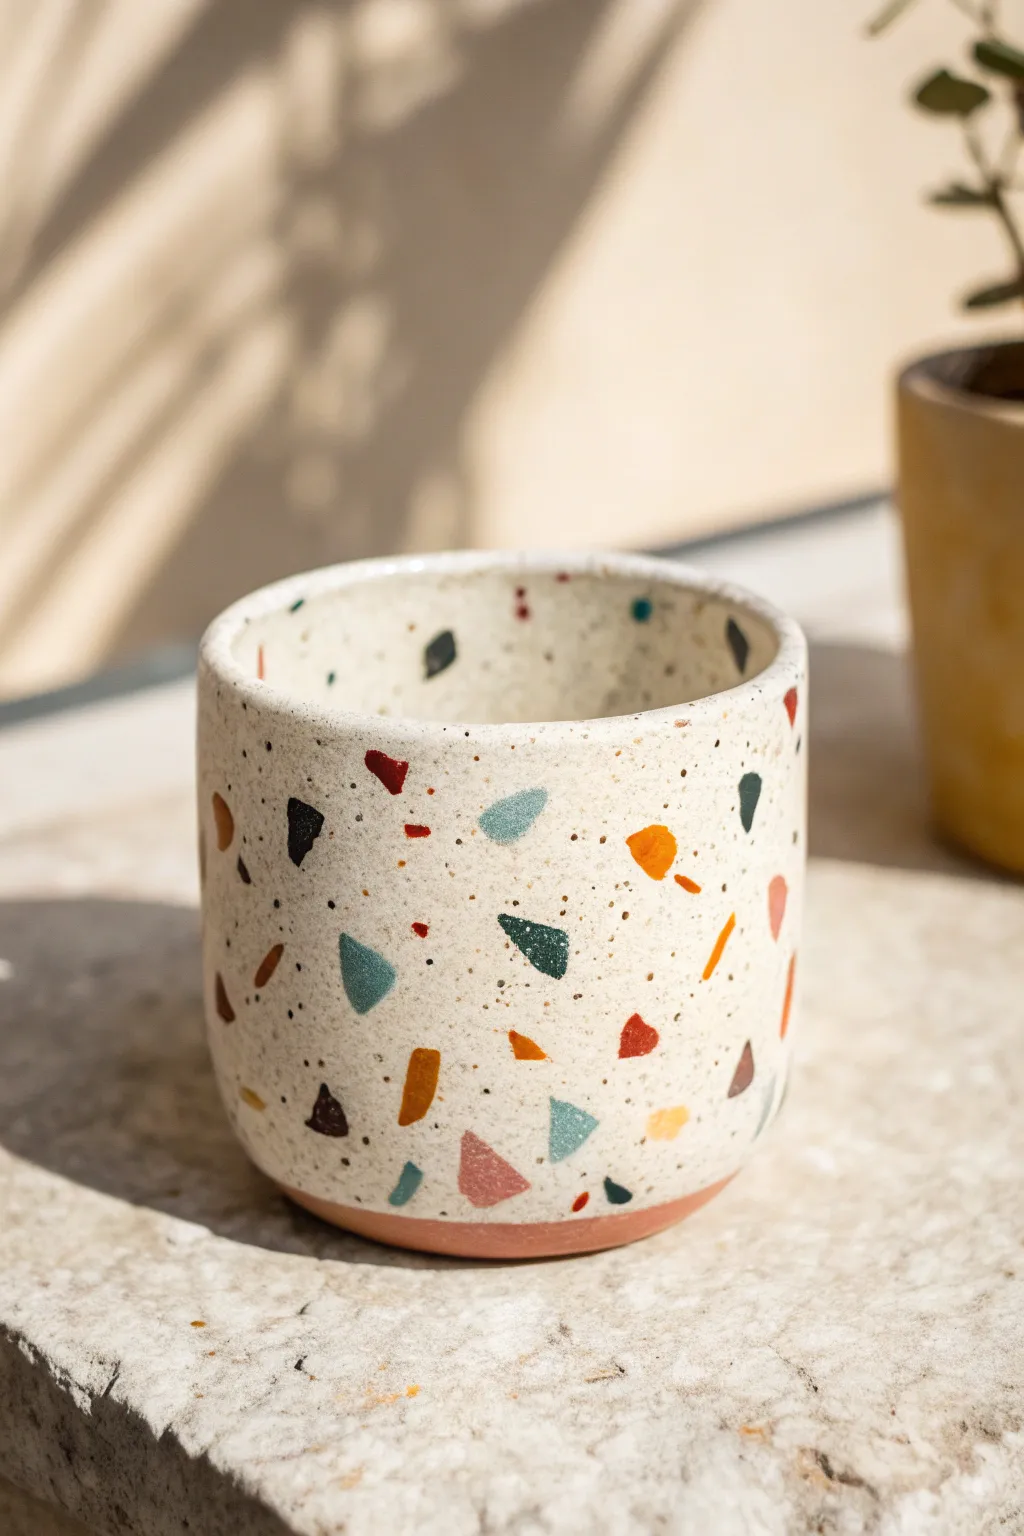
Capture the trendy, energetic look of terrazzo flooring in a palm-sized ceramic vessel. Using colored clay inclusions within a neutral body creates a playful, scattered pattern that feels both modern and retro.
How-To Guide
Materials
- White or cream stoneware clay
- Mason stains or colored clay scraps (teal, orange, red, black, yellow, green)
- Terracotta clay (for the base slab)
- Rolling pin and canvas mat
- Needle tool
- Fettling knife
- Serrated rib or scoring tool
- Slip (clay slurry)
- Small sponge
- Matte clear glaze
Step 1: Preparing the Terrazzo Chips
-
Mix Color Batches:
If you don’t have pre-colored clay, mix small walnut-sized balls of white clay with mason stains. Knead thoroughly until the color is uniform—aim for a palette of teal, mustard yellow, burnt orange, black, and muted red. -
Create Thin Sheets:
Roll each colored ball into a very thin sheet, about 1/8th of an inch thick or even thinner. Let these sheets dry until they are leather-hard; they need to be firm enough to snap or cut cleanly without smearing. -
Make the Confetti:
Once firm, chop the colored sheets into erratic, geometric shards. Create a mix of sizes, from tiny specks to larger triangles, but keep them generally under 1/2 inch to ensure they bond well with the cup wall.
Fixing Smears
Did the darker colors bleed into the white clay? After the bisque firing, but before glazing, lightly sand the surface with wet-dry sandpaper to remove the smeared top layer and reveal crisp shapes.
Step 2: Forming the Slab
-
Roll the Main Body:
Roll out your primary cream stoneware clay into a rectangular slab about 1/4 inch thick. This will be the wall of your vessel, so ensure it is long enough to form the desired circumference. -
Embed the Shards:
Scatter your prepared colored chips randomly across the surface of the wet slab. Don’t overthink the placement; randomness is key to the terrazzo aesthetic. -
Press Inclusions:
Gently roll over the slab again with your rolling pin to press the colored chips flush into the surface. Move the rolling pin in multiple directions to slightly distort the shapes for a natural look. -
Flip and Repeat:
Carefully flip the slab over and repeat the scattering and rolling process on the other side. This ensures the pattern is visible on the interior of the pot as well.
Go Geometric
Instead of random shards, use small cookie cutters or a knife to cut specific shapes (like triangles or perfect circles) from the colored clay for a more structured, Memphis-design vibes.
Step 3: Construction
-
Cut to Size:
Using a ruler and fettling knife, trim your terrazzo slab into a clean rectangle. Bevel the short vertical edges at a 45-degree angle to create a seamless overlap join later. -
Prepare the Base:
Roll out a small slab of terracotta clay for the contrasting base. Use a circular cookie cutter or trace a lid to cut a perfect circle that matches your intended vessel diameter. -
Score and Slip:
Deeply score the beveled edges of your wall slab and the outer edge of your terracotta base circle. Apply a generous amount of slip to all scored areas. -
Form the Cylinder:
Stand the rectangular wall slab up on the canvas and curve it into a cylinder. Press the beveled edges together firmly to create the seam, supporting the wall from the inside with your hand. -
Attach the Base:
Place the cylinder onto the scored terracotta base. Gently paddle the outside of the wall where it meets the floor to compress the join, ensuring a watertight seal between the cream wall and red base. -
Clean and Smooth:
Use a damp sponge to smooth the rims and the vertical seam. If the colored chips smeared slightly during rolling, you can gently scrape the surface with a metal rib to reveal sharp edges again.
Step 4: Firing and Glazing
-
Bisque Fire:
Allow the piece to dry slowly to prevent warping, then bisque fire it according to your clay body’s specifications (usually cone 04). -
Apply Glaze:
Pour a translucent or matte clear glaze inside the vessel and swirl to coat. Dip the exterior quickly or brush the clear glaze on. I prefer a matte finish here because it mimics the texture of actual terrazzo stone. -
Wipe the Base:
Using a wax resist or a clean wet sponge, ensure the terracotta base is completely free of glaze so the warm, red clay remains visible and the pot doesn’t stick to the kiln shelf. -
Final Fire:
Glaze fire the vessel to the maturation temperature of your stoneware (typically cone 5 or 6). This will fuse the colored chips permanently into the body.
Fill your new planter with a succulent and admire how the colorful flecks make the greenery pop

TRACK YOUR CERAMIC JOURNEY
Capture glaze tests, firing details, and creative progress—all in one simple printable. Make your projects easier to repeat and improve.
Fruit-Inspired Mini Dishes
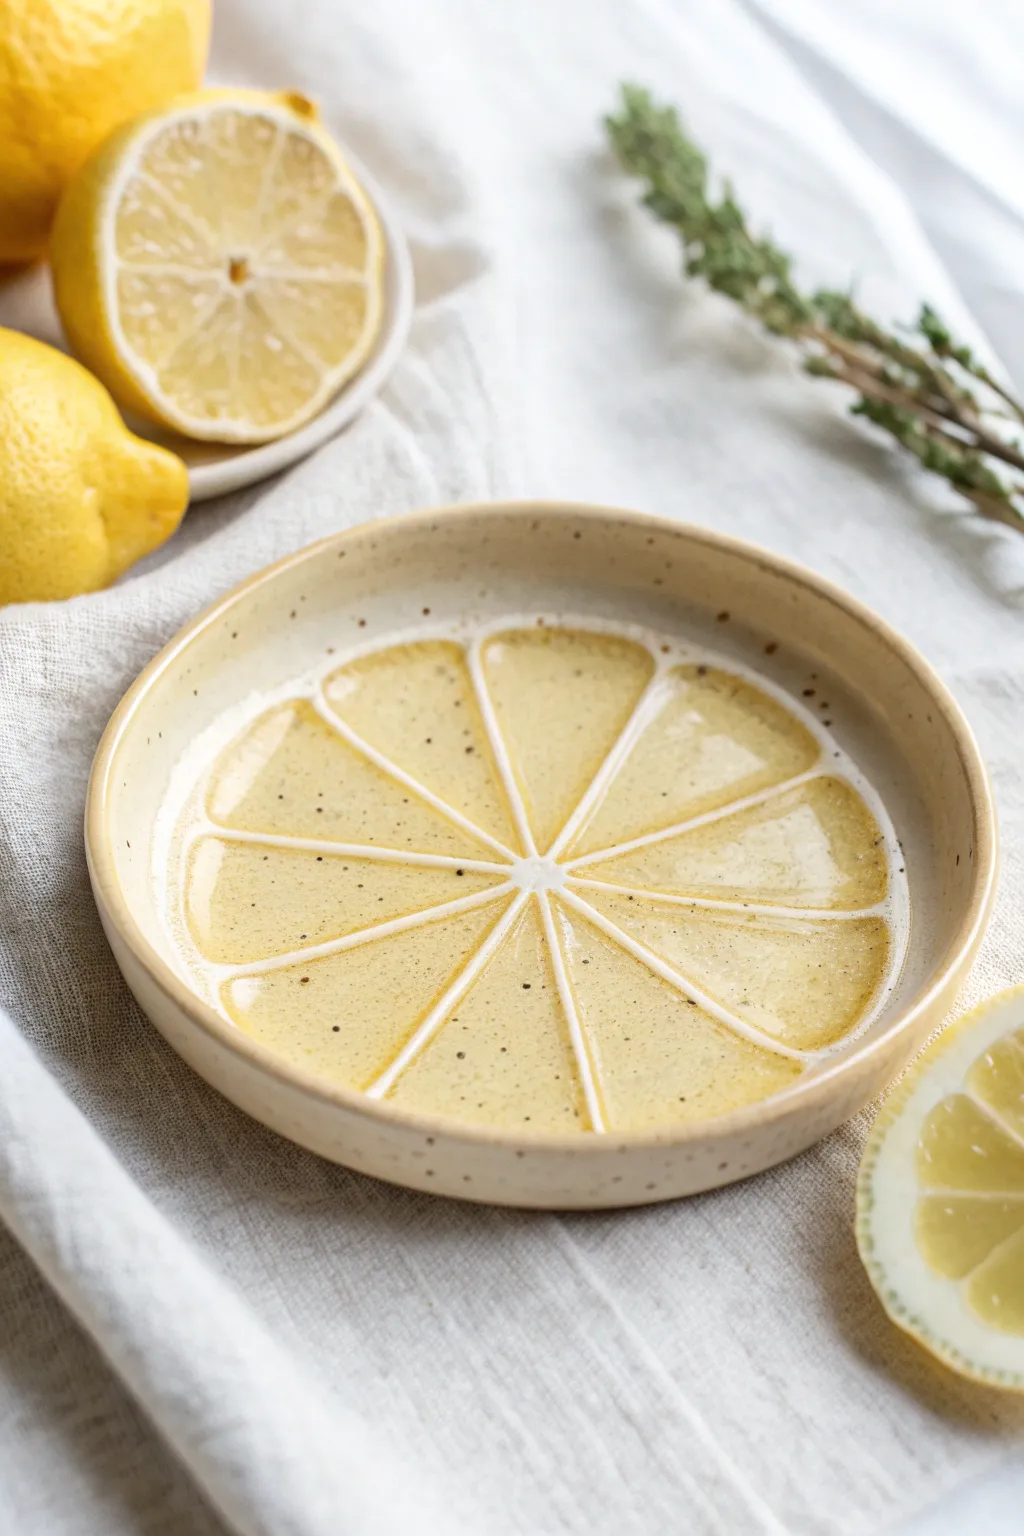
Bring a fresh squeeze of citrus to your home decor with this delightful lemon slice dish, perfect for holding jewelry or spooning olive oil. The piece features a warm, speckled clay body with translucent yellow glaze pooling in the segments to mimic juicy fruit flesh.
Detailed Instructions
Materials
- Speckled buff stoneware clay
- Rolling pin
- Circular cookie cutter or template (approx. 4-5 inches)
- Small sponge
- Modeling tool or dull needle tool
- Carving tool (loop tool)
- Translucent yellow glaze (glossy)
- Clear glaze (optional)
- Small paintbrush
- White underglaze or slip (optional for pith lines)
- Wax resist
Step 1: Forming the Base
-
Roll the slab:
Begin by rolling out your speckled buff stoneware clay to an even thickness, roughly 1/4 inch. If you want a perfectly flat bottom, compress the slab with a rib tool to align the clay particles. -
Cut the circle:
Using your circular cutter or a needle tool tracing around a template, cut out a clean circle. This will form the foundation of your citrus splice. -
Create the rim:
To give the dish its depth, create a small coil of clay. Score and slip the outer edge of your circle, then attach the coil on top of the rim to create a vertical wall about 1/2 inch high. -
Blend the coil:
Smooth the coil into the base on both the inside and outside using your thumb or a modeling tool. The transition should be seamless, making the wall look like it was thrown or pinched up from the base. -
Refine the shape:
Use a damp sponge to smooth the rim, ensuring it is rounded and comfortable to touch. Verify the wall thickness is consistent all the way around.
Step 2: Detailing the Fruit
-
Mark the center:
Lightly press a small dot or circle in the exact center of the dish’s interior. This will be the hub from which all your lemon segments radiate. -
Draft the segments:
Using a needle tool, very lightly sketch straight lines radiating from the center to the rim, dividing the circle into equal pie slices. Aim for 8 to 10 segments for a realistic lemon look. -
Round the ends:
Modify your sketched triangles by rounding the outer corners near the rim. You want the shape of a tear-drop or a rounded wedge, leaving a small gap between the segment and the outer wall (the pith). -
Carve the grooves:
Using a small loop tool, gently carve out the interior of each segment slightly. You don’t need to go deep; just creating a subtle depression helps the glaze pool later, which adds depth to the ‘juice’. -
Define the pith:
The raised lines of clay between your carved segments represent the white pith. Refine these ridges with a damp brush to ensure they are smooth and distinct. -
Bisque fire:
Let the piece dry slowly to the bone-dry stage. Once dry, load it into the kiln for a bisque firing.
Keep it Clean
Use a distinct white underglaze on the pith lines before waxing. This creates a sharper contrast against the yellow juice segments.
Step 3: Glazing
-
Wax the pith lines:
If you want the dividing lines to remain the natural sandy color of the clay, carefully apply wax resist to the raised ridicule lines (the pith) and the top rim. -
Prepare the yellow glaze:
Stir your translucent yellow glaze thoroughly. You want a glaze that breaks well over texture, appearing darker where thick and lighter where thin. -
Fill the segments:
Load a soft brush with the yellow glaze and pool it into the carved depressions of the fruit segments. I usually apply a slightly thicker coat here to really get that juicy, glossy effect. -
Glaze the exterior:
You can leave the exterior unglazed for a raw, tactile feel, or apply a clear matte glaze to seal the speckled clay without changing its color. -
Clean up:
Use a damp sponge to wipe away any stray droplets of yellow glaze that may have landed on the rim or the pith lines (The wax resist helps here, but double-checking is good). -
Final Fire:
Fire the piece to the temperature recommended by your clay and glaze manufacturers (typically Cone 5 or 6 for stoneware).
Uneven Pooling?
If the glaze pools unevenly, your carving might be too deep or irregular. Keep unexpected depressions shallow for consistent color.
Once cooled, your ceramic slice is ready to hold tiny treasures or serve simply as a joyful pop of color on your table
Animal Planters With Sweet, Simple Faces
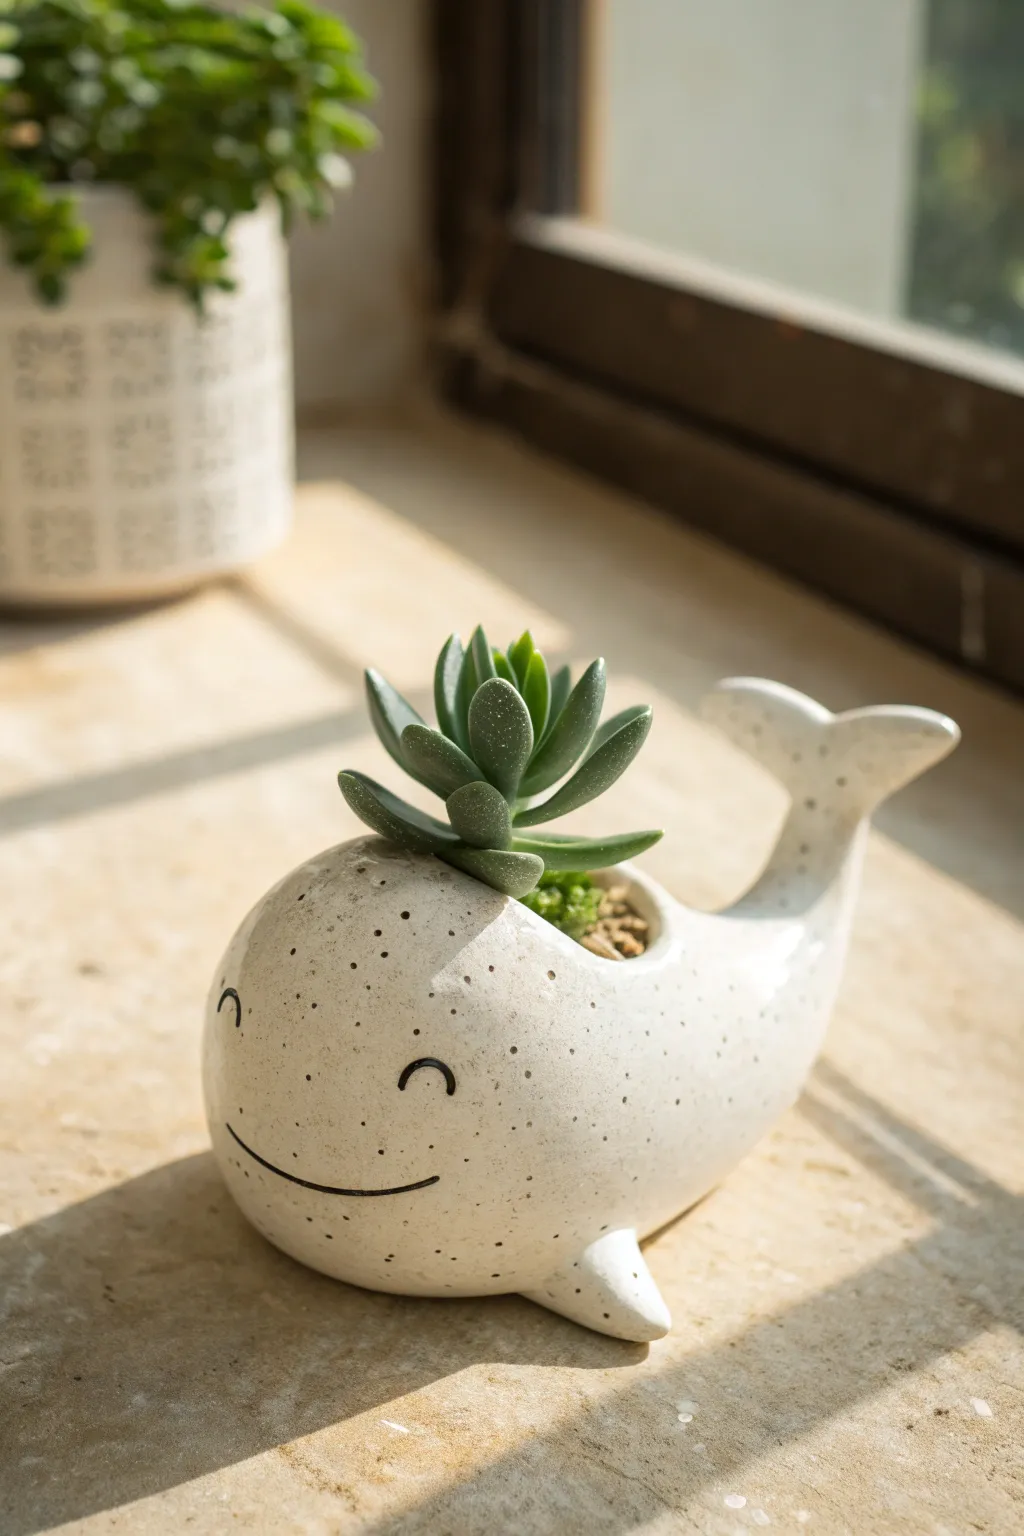
Bring a splash of joy to your windowsill with this adorable whale-shaped ceramic planter. Featuring a minimalist smiley face and a speckled glaze finish, this project is perfect for housing small succulents or air plants.
Step-by-Step Tutorial
Materials
- White stoneware clay
- Rolling pin
- Clay knife or needle tool
- Scoring tool (or an old toothbrush)
- Slip (clay mixed with water)
- Wooden modeling tools
- Sponge
- Speckled white glaze (or white glaze adding iron oxide specks)
- Black underglaze
- Fine detail brush
- Clear transparent glaze (optional, depending on speckled glaze)
- Kiln
Step 1: Shaping the Whale Body
-
Prepare the clay:
Start by wedging a baseball-sized amount of white stoneware clay to remove any air bubbles. Flexibility is key here, so ensure your clay is moist and workable. -
Form the pinch pot:
Create the main body by forming a classic pinch pot. Push your thumb into the center of the ball and gently pinch the walls while rotating, aiming for an oval, slightly elongated shape rather than a perfect circle. -
Refine the shape:
Gently tap the bottom of the pot onto your work surface to create a flat base so the whale sits stably without rolling over. -
Smooth the exterior:
Use a damp sponge or a flexible rib to smooth out any fingerprints or bumps on the outside of the pot, ensuring a clean, rounded surface.
Step 2: Adding Fins and Tail
-
Make the tail fluke:
Roll a small coil of clay and flatten one end into a ‘V’ shape to resemble a whale’s tail. I like to smooth the edges so they look soft and organic rather than sharp. -
Attach the tail:
Score the back of the whale body and the attachment point of the tail deeply. Apply slip generously to both sides. -
Secure and blend:
Press the tail firmly onto the body, angling it slightly upward. Use a modeling tool to blend the clay seams until they disappear completely, making the tail look like it grew from the body. -
Create side fins:
Shape two small, identical triangles from remaining clay for the pectoral fins. Round off the tips slightly. -
Attach the fins:
Score and slip the bottom sides of the whale’s body. Attach the fins so they stick out slightly, providing extra stability and character. Blend the seams thoroughly.
Tail Support
Prop the tail up with a small sponge or ball of paper towel while the clay dries. This prevents gravity from drooping the tail before the clay hardens.
Step 3: Detailing and Drying
-
Refine the opening:
Check the rim of the planter opening. If it has become distorted during attachment, gently reshape it into a clean oval and smooth the lip with a damp sponge. -
Drainage hole check:
If you plan to plant directly in the pot, use a straw or hole cutter to poke a drainage hole in the very center of the bottom. -
Slow drying:
Loosely cover the whale with plastic and let it dry slowly to the leather-hard stage. This prevents the tail from cracking off due to uneven shrinkage. -
Bisque fire:
Once the piece is bone dry, fire it in the kiln to cone 04 (or your clay’s specified bisque temperature).
Water Spout Upgrade
Add a tiny hole on top of the whale’s head, separate from the main plant opening. You can stick a dried flower or air plant there to look like a water spout.
Step 4: Glazing and Finishing
-
Clean the bisque:
Wipe the fired piece with a damp sponge to remove any kiln dust that might resist the glaze. -
Paint the face:
Using a fine liner brush and black underglaze, paint the face features. Draw two small, downward-curved arches for smiling eyes and a wide, shallow U-shape for the smile. Keep the lines thin. -
Make it speckle:
Dip the entire piece into a white speckled glaze. If you don’t have a pre-mixed speckled glaze, you can flick tiny droplets of iron oxide mixed with water onto a wet white glaze layer. -
Clean the foot:
Wipe the bottom of the whale and the tips of the fins (anywhere touching the shelf) completely clean of glaze to prevent it from sticking to the kiln shelf. -
Final firing:
Fire the piece again to the maturation temperature of your glaze (usually cone 5 or 6). Once cool, plant your favorite succulent inside.
Place your finished whale in a sunny spot and watch how the simple face brings a cheerful personality to the room
Wall Pocket Planters for Tiny Greens
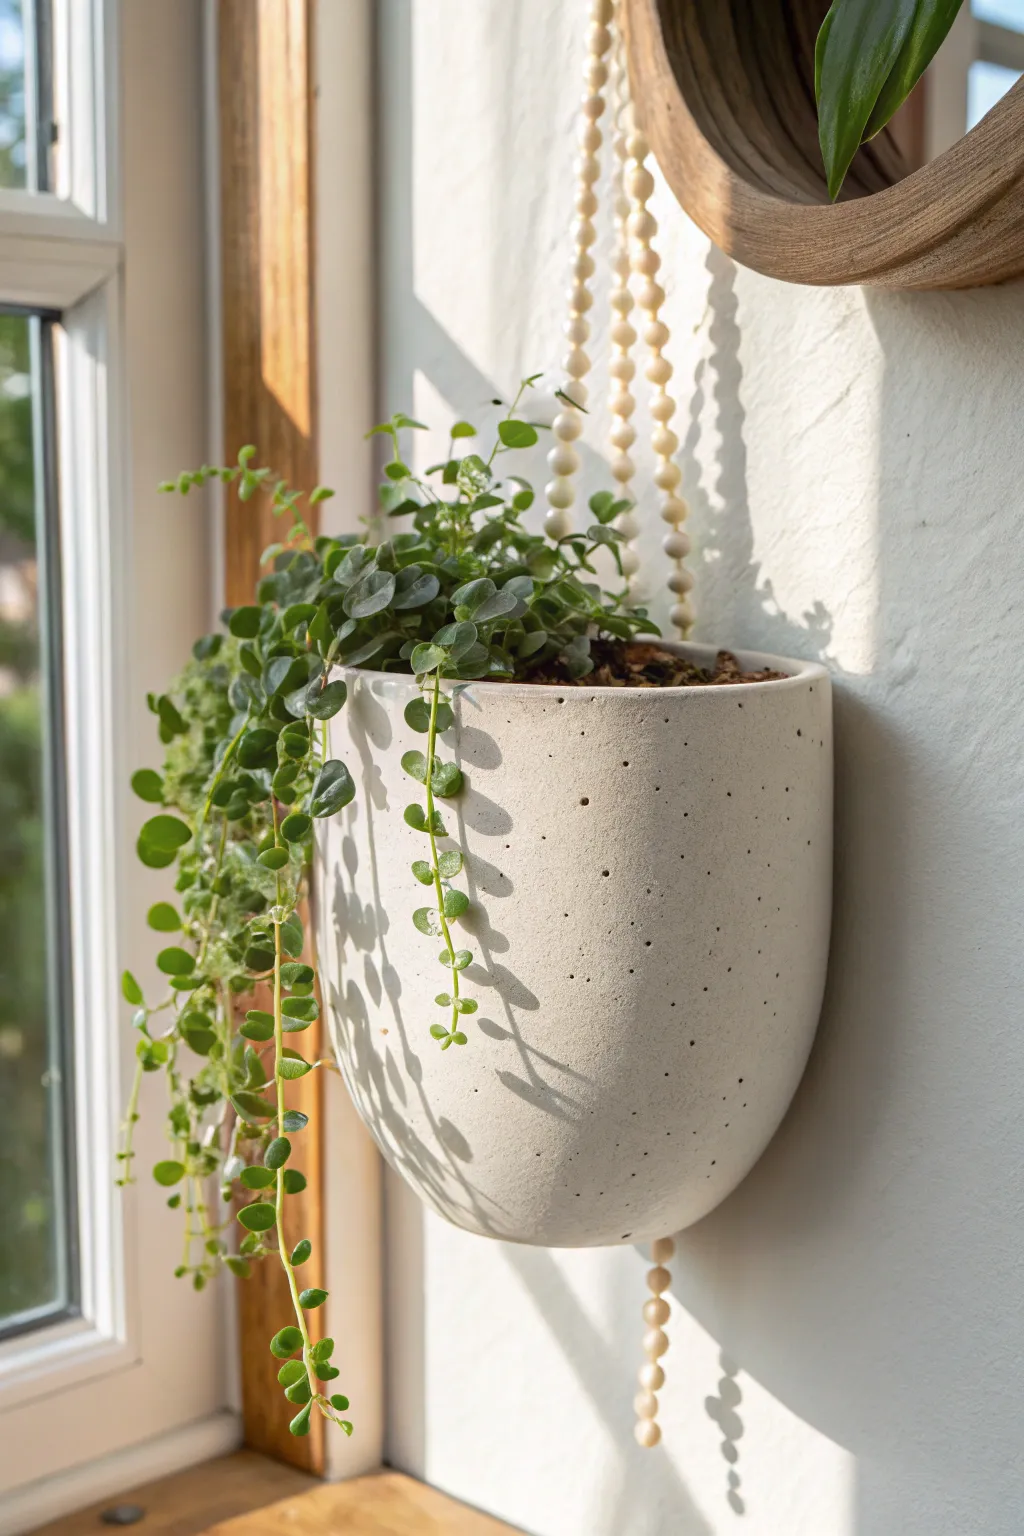
Bring life to vertical spaces with this minimalist ceramic wall pocket, perfect for trailing greens like strings of pearls or hearts. This project balances earthy, speckled clay textures with a sleek, modern form that seems to float effortlessly against your wall.
How-To Guide
Materials
- White stoneware clay (preferably with grog for strength)
- Speckled pottery glaze (matte white or cream with iron flecks)
- Rolling pin
- Guide sticks (1/4 inch thickness)
- Circular template (approx. 6-7 inches diameter)
- Potter’s needle tool
- Rib tool (smooth wood or rubber)
- Score and slip tool (or serrated kidney)
- Sponge
- Hole punch tool or straw
- Beaded macramé cord or leather strap for hanging
- Kiln
Step 1: Forming the Pocket
-
Prepare the slab:
Begin by wedging your white stoneware clay thoroughly to remove air bubbles. Using guide sticks to ensure an even thickness, roll out a slab to approximately 1/4 inch thick on a canvas mat. -
Cut the primary shape:
Place your circular template onto the slab. Using the needle tool, cut cleanly around the circle. You will also need to cut a separate ‘D’ shaped piece for the back panel, slightly smaller than the diameter of your main circle folded in half. -
Create the pocket curve:
Gently fold the large circle in half, but don’t crease it sharply. Instead, cup it in your hands to create a soft, rounded belly that will hold the soil. This U-shape forms the front and bottom of the planter. -
Fit the back panel:
Hold the folded circle against your ‘D’ shaped back panel to check the fit. The U-shaped piece should wrap around the curved edge of the ‘D’ panel, creating the enclosed pocket. -
Score the edges:
Where the two pieces will meet (the curved edge of the back panel and the inner edge of the front piece), rough up the clay surface using your scoring tool. -
Apply slip and join:
Apply a generous amount of clay slip to the scored areas. Press the pieces together firmly to create a bond. I like to wiggle the pieces slightly as I press to ensure the slip really locks the clay particles together. -
Reinforce the seam:
Roll a very thin coil of clay and press it into the interior seam where the back meets the front. Smooth this out with your finger or a modeling tool to ensure the planter is watertight.
Warped Back Panel?
If the back isn’t flat, it won’t hang flush. Dry the piece slowly upside down (rim down) on a flat board. You can also lightly weigh down the back panel during the initial drying phase.
Step 2: Refining and Finishing
-
Smooth the exterior:
Using a rib tool, smooth the outside seam where the pieces joined. You want this transition to be invisible, creating the illusion of a single continuous form. -
Shape the rim:
Use a damp sponge to soften the top rim of the planter. It should be level and smooth, with no sharp edges that could damage plant stems. -
Add hanging holes:
Using a hole punch tool or a simple straw, punch two holes near the top of the back panel on either side. Ensure they are at least half an inch from the edge to prevent cracking under weight. -
Slow drying:
Loosely cover the planter with plastic and let it dry slowly to the leather-hard stage, then uncover to let it reach bone dry. Uneven drying can warp the flat back panel. -
Bisque firing:
Fire the bone-dry piece in the kiln to cone 04 (or your clay’s specific bisque temperature). This hardens the clay and prepares it for glazing. -
Glazing:
Dip the piece into a matte white or cream speckled glaze. Shake off excess glaze gently and use a sponge to wipe the bottom (and the back, if you want it unglazed against the wall) completely clean. -
Glaze firing:
Fire the piece again to cone 6 (or the temperature required by your specific glaze and clay body). The iron flecks in the glaze will melt to create the speckled effect seen in the photo. -
Final assembly:
Once cool, thread your beaded cord through the holes. Knot securely on the inside. Fill with potting mix and your favorite trailing plant.
Level Up: Texture
Before folding the slab, press a piece of rough linen or lace into the clay surface. The glaze will break beautifully over the subtle texture, adding depth to the white finish.
Hang your new ceramic pocket near a bright window and watch your tiny greens thrive in their handmade home
Rippled Slab-Built Vases
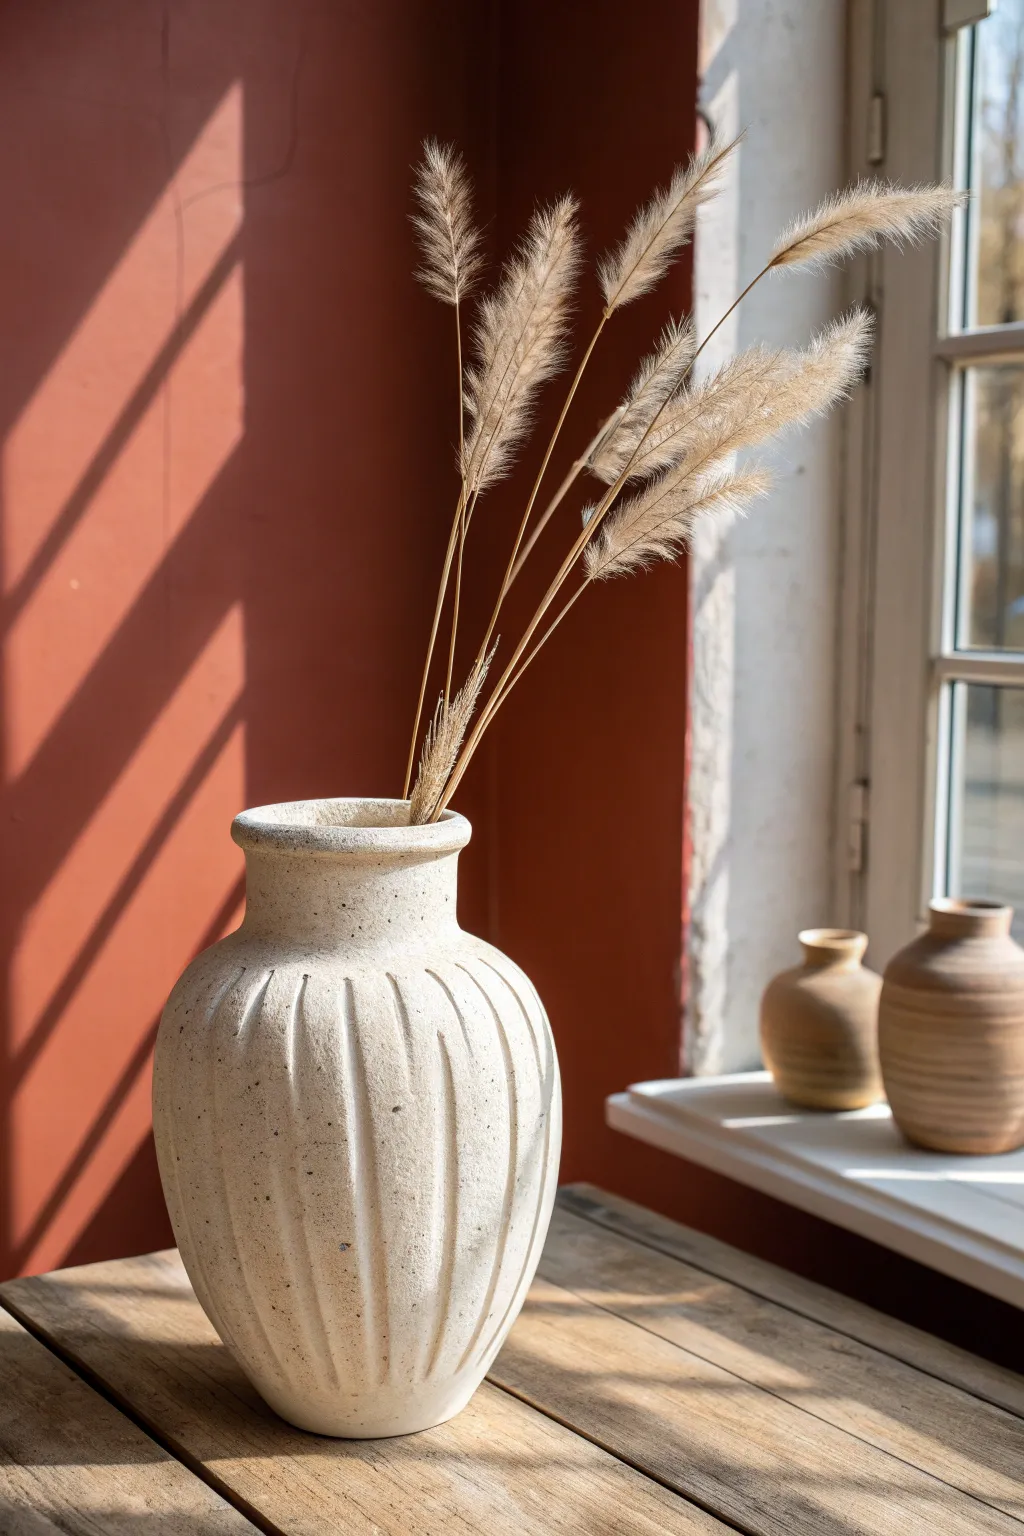
Capture the earthy elegance of Mediterranean stoneware with this textured, slab-built vase. Its defining feature is the organic, fluted surface that mimics carved stone, finished with a speckled matte glaze that catches the light beautifully.
Detailed Instructions
Materials
- Stoneware clay body (speckled or white with added grog)
- Rolling pin
- Canvas work surface
- Clay knife or fettling knife
- Rib tool (metal or rubber)
- Scoring tool and slip
- Wooden modeling tool or spoon handle
- Carving loop tool (medium width)
- Sponge
- Matte white or cream glaze
- Kiln
Step 1: Preparing the Slab Base
-
Roll the main slab:
Begin by rolling out a substantial slab of stoneware clay to approximately 3/8-inch thickness. You want it sturdy enough to stand but not overly heavy. -
Compress the clay:
Use a firmly held rib tool to compress the slab on both sides. This aligns the clay particles, preventing future warping, and creates a nice smooth canvas for your texture. -
Cut the body rectangle:
Measure and cut a large rectangle for the body of the vase. For the proportions shown, a rectangle heavily wider than it is tall works best—try roughly 16 inches by 10 inches.
Collapsing Walls?
If the belly sags while shaping, stuff the inside loosely with crumpled newspaper. This supports the curve from the inside while the clay stiffens up leather-hard.
Step 2: Adding the Texture
-
Mark the spacing:
Before rolling the cylinder, lightly mark vertical guidelines along your flat slab where you want the ripples to be. They don’t need to be perfectly equidistant; slight variation adds character. -
Carve the fluting:
Using a medium-width loop tool, drag vertical channels down the length of the flat slab. Press firmly at the start and maintain even pressure to create deep, consistent grooves. -
Soften the ridges:
Once carved, run a damp finger or a soft sponge over the sharp ridges created by the loop tool. I find this prevents chipping later and gives that weathered stone look. -
Add surface noise:
To mimic the stone texture, tap a stiff bristle brush or a rough stone against the clay surface between the grooves to add subtle pitting.
Faux-Stone Effect
Mix a small amount of granular manganese or heavy grog into your white slip. Brush this over the texture before glazing for an even rougher, ancient stone finish.
Step 3: Assembling the Form
-
Form the cylinder:
Carefully stand the slab up and curve it into a cylinder. Bevell the vertical edges at a 45-degree angle to create a seamless overlap joint. -
Score and slip:
Aggressively score the beveled edges and apply clay slip. Press the seam firmly together, working from the inside to avoid crushing your exterior texture. -
Create the belly shape:
With one hand inside the cylinder and one outside, gently push the clay wall outward from the inside to create a bulbous, swollen belly shape. Do this gradually to avoid splitting the clay. -
Narrow the neck:
Gently collar (squeeze inward) the top rim to narrow the opening, creating the distinct neck seen in the photo. -
Attach the bottom:
Place your cylinder on a fresh piece of rolled slab. Trace around the base, cut the circle, score both surfaces, and attach the bottom firmly.
Step 4: Finishing and Glazing
-
Refine the rim:
Add a small coil to the top rim to thicken it, then smooth it over with a chamois cloth for a professional, finished lip. -
The crucial drying phase:
Let the vase dry slowly under plastic for at least two days to equalize moisture, then air dry completely before bisque firing. -
Bisque fire:
Fire the piece to cone 04 (or your clay’s specific bisque temperature). -
Apply the glaze:
Dip or spray a matte white or cream glaze. Avoid glossy glazes, as they will hide the subtle stone-like texture you worked hard to create. -
Wipe back slightly:
If your glaze is thick, gently wipe the high points of the ridges with a damp sponge to let the raw clay speckles peek through. -
Final firing:
Glaze fire to maturity (likely cone 5 or 6 depending on your stoneware).
Fill your new vessel with dried pampas grass to complete the organic aesthetic
Stamped Pattern Cups With Repeating Texture
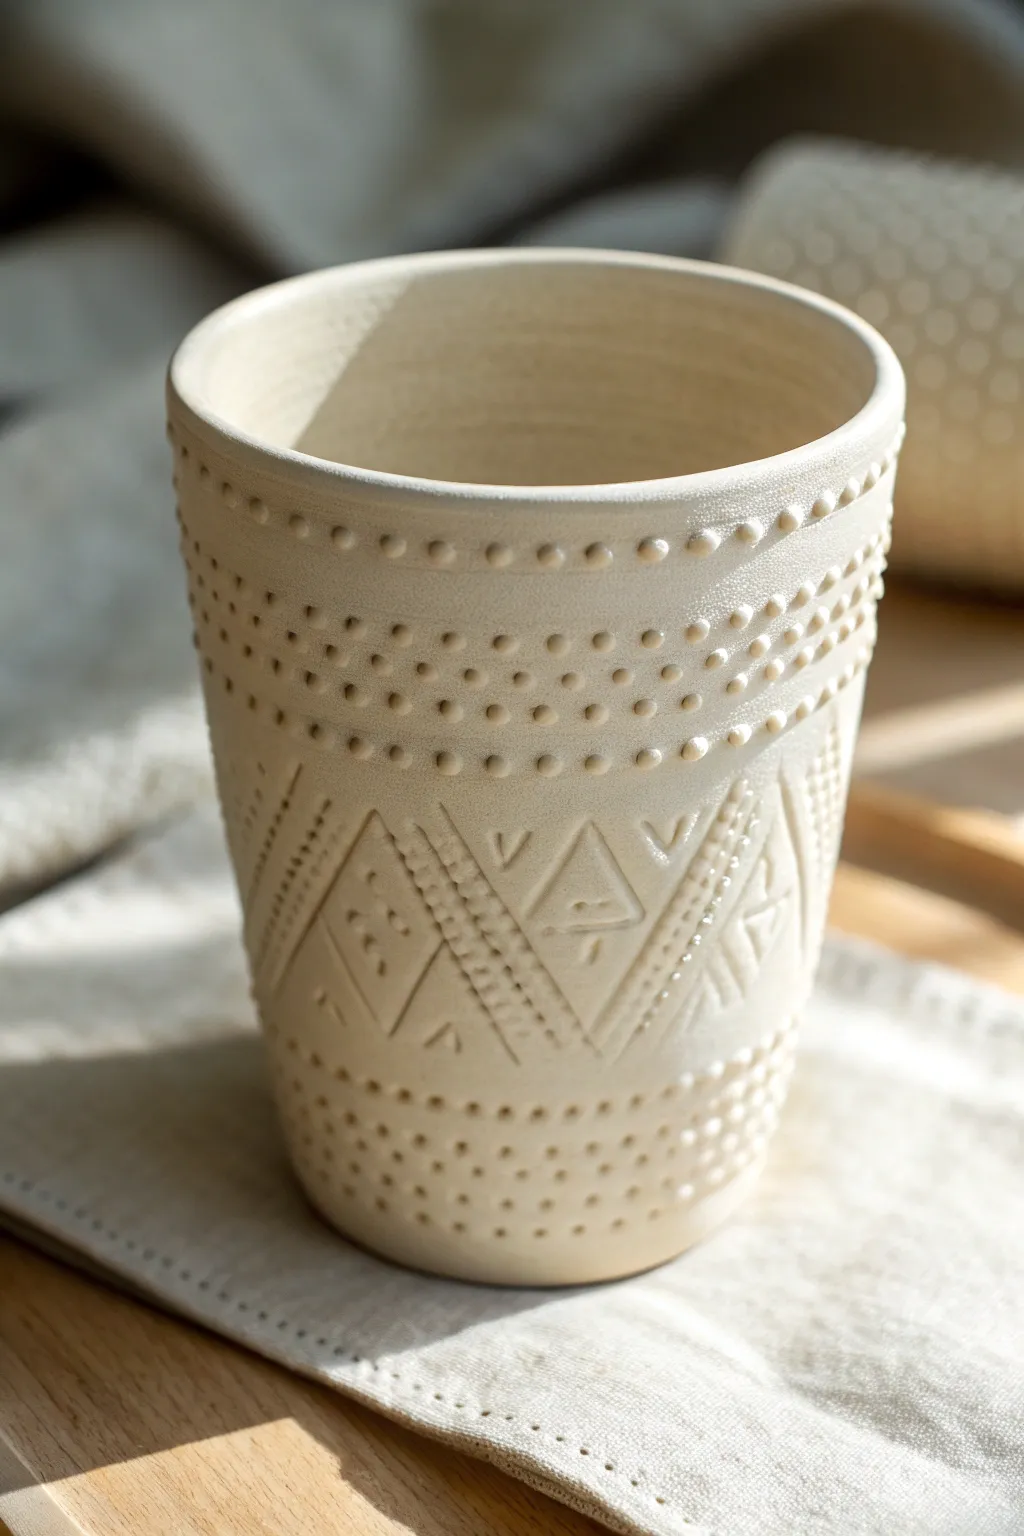
This project explores the satisfying rhythm of repeating patterns on raw clay. You will create a handleless tumbler featuring bands of raised dots and incised geometric triangles that catch the light beautifully.
Step-by-Step Tutorial
Materials
- Light-colored stoneware clay (smooth body)
- Pottery wheel (or slab roller/rolling pin for hand building)
- Wooden rib tool
- Metal kidney scraper
- Needle tool
- Small round piping tip or drill bit (for dot stamping)
- Carving tool or sgraffito loop tool
- Sponge
- Cutting wire
Step 1: Forming the Vessel
-
Center and Open:
Begin by centering about 1 pound of clay on your wheel. Open the center to create a flat floor, compressing it well to prevent cracks later. -
Pull the Walls:
Pull the walls up into a tall, vertical cylinder. Aim for a shape that is slightly tapered at the bottom and flares almost imperceptibly at the top rim. -
Smooth the Surface:
Before adding any texture, use a metal kidney scraper to remove all throwing lines from the outside. The surface needs to be perfectly smooth and canvas-like for the stamping to look crisp. -
Clean the Rim:
Chamois or sponge the rim to ensure it is rounded and comfortable for drinking. Cut the pot from the bat but leave it in place to firm up slightly to leather-hard.
Step 2: Creating the Dot Texture
-
Mark Guidelines:
With the wheel spinning slowly or using a banding wheel, lightly score horizontal guidelines with a needle tool to define where your pattern bands will go. You need a wide band at the top, a middle section for triangles, and a bottom band. -
Choose Your Dot Tool:
For the raised dots, use the back end of a small drill bit, a dedicated beading tool, or a small piping tip. The goal is a uniform, small circular impression. -
Stamp the Top Band:
Starting just below the rim, press your tool gently into the clay to create row after row of dots. I like to stagger the alignment slightly to create a honeycomb effect rather than a grid. -
Create the Bottom Band:
Repeat this process for the bottom section of the cup, creating another dense field of dots. Leave the middle band completely smooth for now.
Sticky Stamps?
If your stamp tool pulls clay up when you lift it, the clay is too wet. Dust the area lightly with cornstarch or wait 20 minutes for the surface to dry further.
Step 3: Carving the Geometrics
-
Sketch the Triangles:
Lightly trace a zigzag pattern in the smooth middle band using a needle tool. Create large equilateral triangles that touch at their points. -
Carve the Outlines:
Using a carving tool, deepen these zigzag lines. You can double the lines to create a border effect, adding small hash marks between the double lines for extra detail. -
Detail the Interiors:
Inside the upward-facing triangles, carve a smaller, floating triangle. Add a small ‘V’ shape or dot inside that for nested complexity. -
Texture the Downward Triangles:
For the downward-facing triangles, add textural variety. You might carve vertical lines, small diamonds, or simply leave them smooth depending on your preference. -
Clean Up Burrs:
Let the cup dry until it is bone dry. Gently rub the surface with a green kitchen scouring pad or a soft brush to knock off any sharp clay crumbs or burrs created during carving. -
Bisque Fire:
Fire the piece to bisque temperature (usually Cone 04 or 06). This prepares it for glazing. -
Glaze Approach:
To mimic the image, only glaze the interior with a liner glaze. Leave the exterior raw or apply a very thin matte wash to highlight the texture without filling it in.
Make it Pop
After bisque firing, rub a dark oxide wash (like iron oxide) into the textures and wipe away the excess with a damp sponge to make the pattern stand out dramatically.
Once fired, the tactile surface makes holding this cup a truly sensory experience
Half-Dipped Glaze Bowls
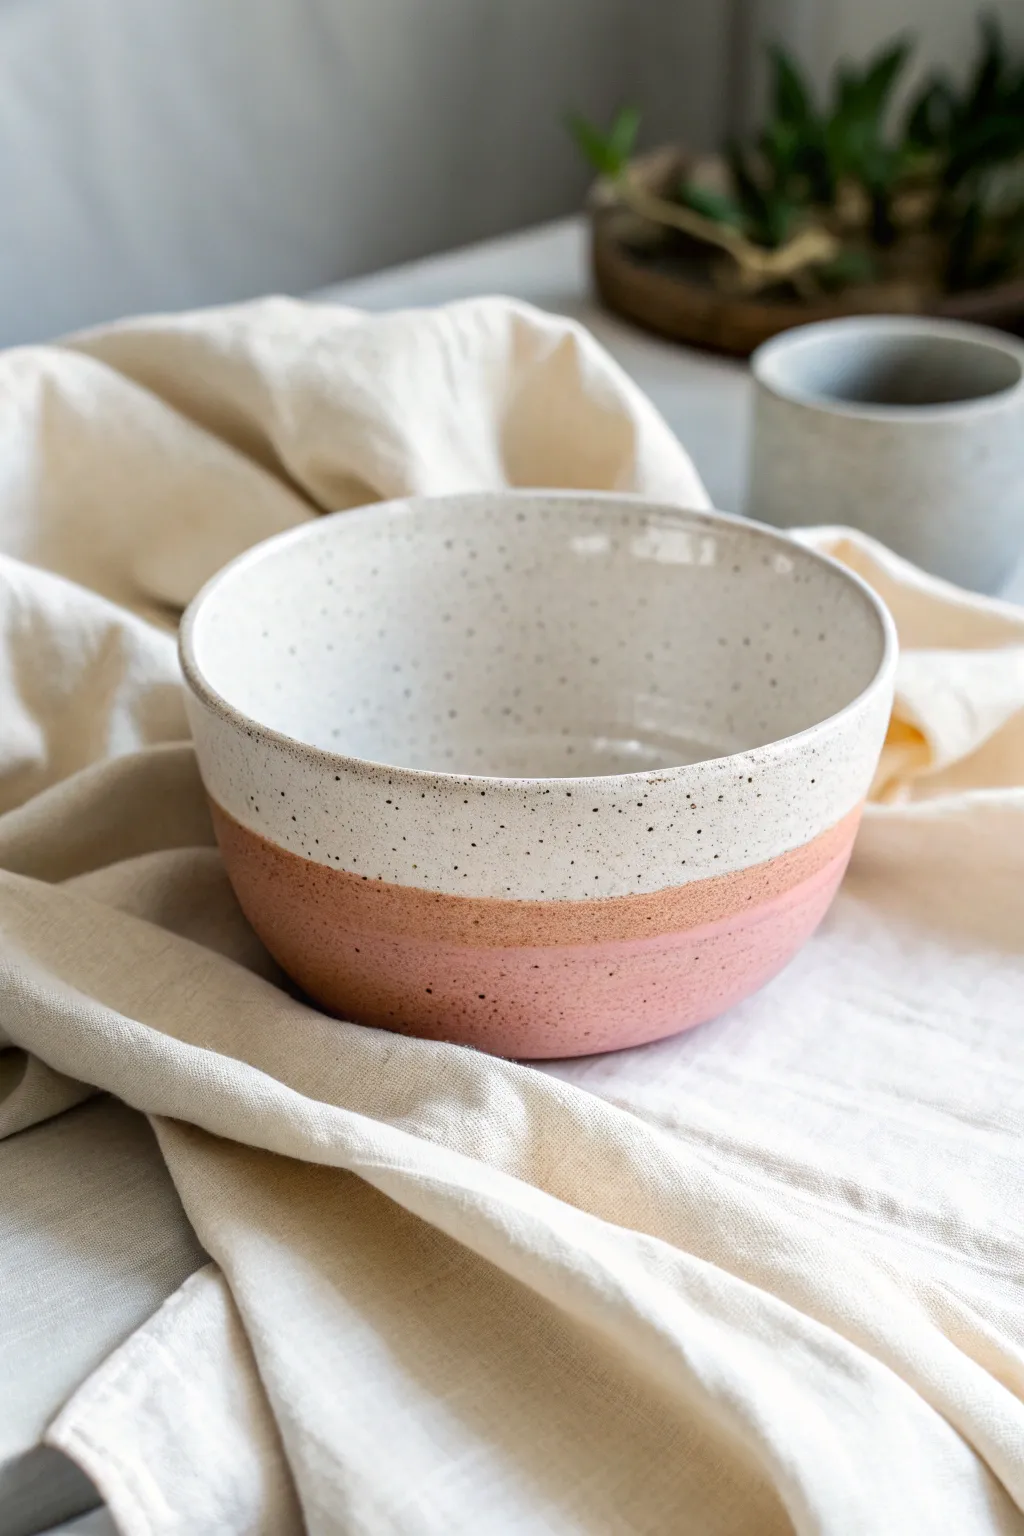
This project features a beautifully minimalist bowl that combines the raw texture of speckled clay with a soft, dipped glaze aesthetic. The design relies on the contrast between the warm, unglazed pinkish-terracotta clay body at the bottom and the smooth, creamy white glaze that covers the upper portion and interior.
Step-by-Step Guide
Materials
- Speckled stoneware clay (buff or lightly reddish body)
- Pottery wheel (or hand-building tools: rolling pin, slat guides, bowl mold)
- Throwing tools: sponge, ribs (wood and metal), wire cutter
- Trimming tools
- Bisque kiln and Glaze kiln
- Satin or Matte White dipping glaze
- Wax resist (optional)
- Clean bucket of water
- Sponge or finishing rubber
Step 1: Forming the Bowl
-
Prepare your clay:
Begin with about 1.5 to 2 pounds of speckled stoneware clay. Wedge it thoroughly to remove air bubbles and ensure particle alignment, which is crucial for a smooth throwing experience. -
Center on the wheel:
Secure the clay to the wheel head and center it. You want a medium-width base to support the gentle upward curve of the bowl. -
Open and pull the walls:
Open the clay and pull the walls up and slightly outward to create a rounded, open shape. Aim for a consistent wall thickness, tapering slightly towards the rim. -
Shape the profile:
Use a kidney-shaped rib to smooth the interior curve, removing throwing lines if you prefer a cleaner look. Support the outside with your hand or a sponge while refining the curve to match the gentle, rounded silhouette seen in the photo. -
Refine the rim:
Compress the rim gently with a shammy or a small piece of plastic to ensure it is smooth and rounded, preventing sharp edges later. -
Dry to leather hard:
Cut the bowl from the wheel and allow it to dry slowly to a leather-hard state. This usually takes a day or two depending on humidity.
Step 2: Trimming and Bisque Firing
-
Trim the foot:
Center the leather-hard bowl upside down on the wheel. Trim away excess clay from the bottom to define a neat foot ring. This step also lightens the bowl and refines the exterior curve. -
Smooth the texture:
Since the bottom portion will remain unglazed, take a moment to smooth the exterior clay with a damp sponge or finishing rubber. This reveals the speckles and ensures the unglazed surface feels pleasant to the touch. -
Bisque fire:
Load the bone-dry bowl into the kiln and bisque fire it to usually cone 04 or 06. This hardens the clay and prepares it for glazing.
Uneven Glaze Line?
If you struggle to get a straight dip line, apply a band of wax resist or masking tape at the desired height on the exterior before dipping. Peel tape immediately after dipping.
Step 3: Glazing Technique
-
Cleaning the bisque:
Wipe the bisque-fired bowl with a damp sponge to remove any kiln dust. This ensures the glaze adheres properly without crawling. -
Prepare the glaze:
Stir your satin or matte white glaze thoroughly. It should have the consistency of heavy cream. If it’s too thin, the speckles might show through too much; if too thick, you might get drips. -
Technique choice: Dipping or pouring:
For the interior, pour a generous amount of glaze inside, swirl it to coat the entire inner surface, and pour out the excess. I find rotating the bowl as you pour out helps get an even coat near the rim. -
Dip the exterior:
Hold the bowl by the foot (or use glazing tongs if you prefer) and dip it straight down into the glaze bucket. Stop about two-thirds of the way down the exterior wall to create that distinct horizontal line. -
Wait and lift:
Hold it submerged for a count of three to allow the glaze to build up, then lift straight up. Shake it very gently once to remove excess drips before turning it right-side up. -
Clean the line:
Once the glaze is dry to the touch, inspect the dip line. If it’s uneven, you can carefully tidy it up with a damp sponge, but the charm of this style is often the organic nature of the dip. -
Check the foot:
Ensure the foot ring is completely free of glaze. Even though you didn’t dip that low, splashes happen. Wipe any stray drops off the raw clay section.
Add Color Contrast
Use a dark iron-rich clay body instead of buff speckled clay. The white glaze will create a bold, high-contrast graphic look against dark chocolate brown clay.
Step 4: Final Firing
-
Loading:
Place the bowl in the glaze kiln. Ensure it doesn’t touch other pots. -
Fire to maturity:
Fire to the maturation temperature of your specific clay and glaze combination (commonly cone 5 or 6 for stoneware). This will melt the glaze into that smooth white finish and darken the raw clay to a warm pinkish-tan hue. -
Cooling:
Allow the kiln to cool naturally before opening to avoid thermal shock.
Enjoy using your new handmade bowl for your morning cereal or displaying it as a standalone piece of art.
Marbled Clay Jewelry Dishes
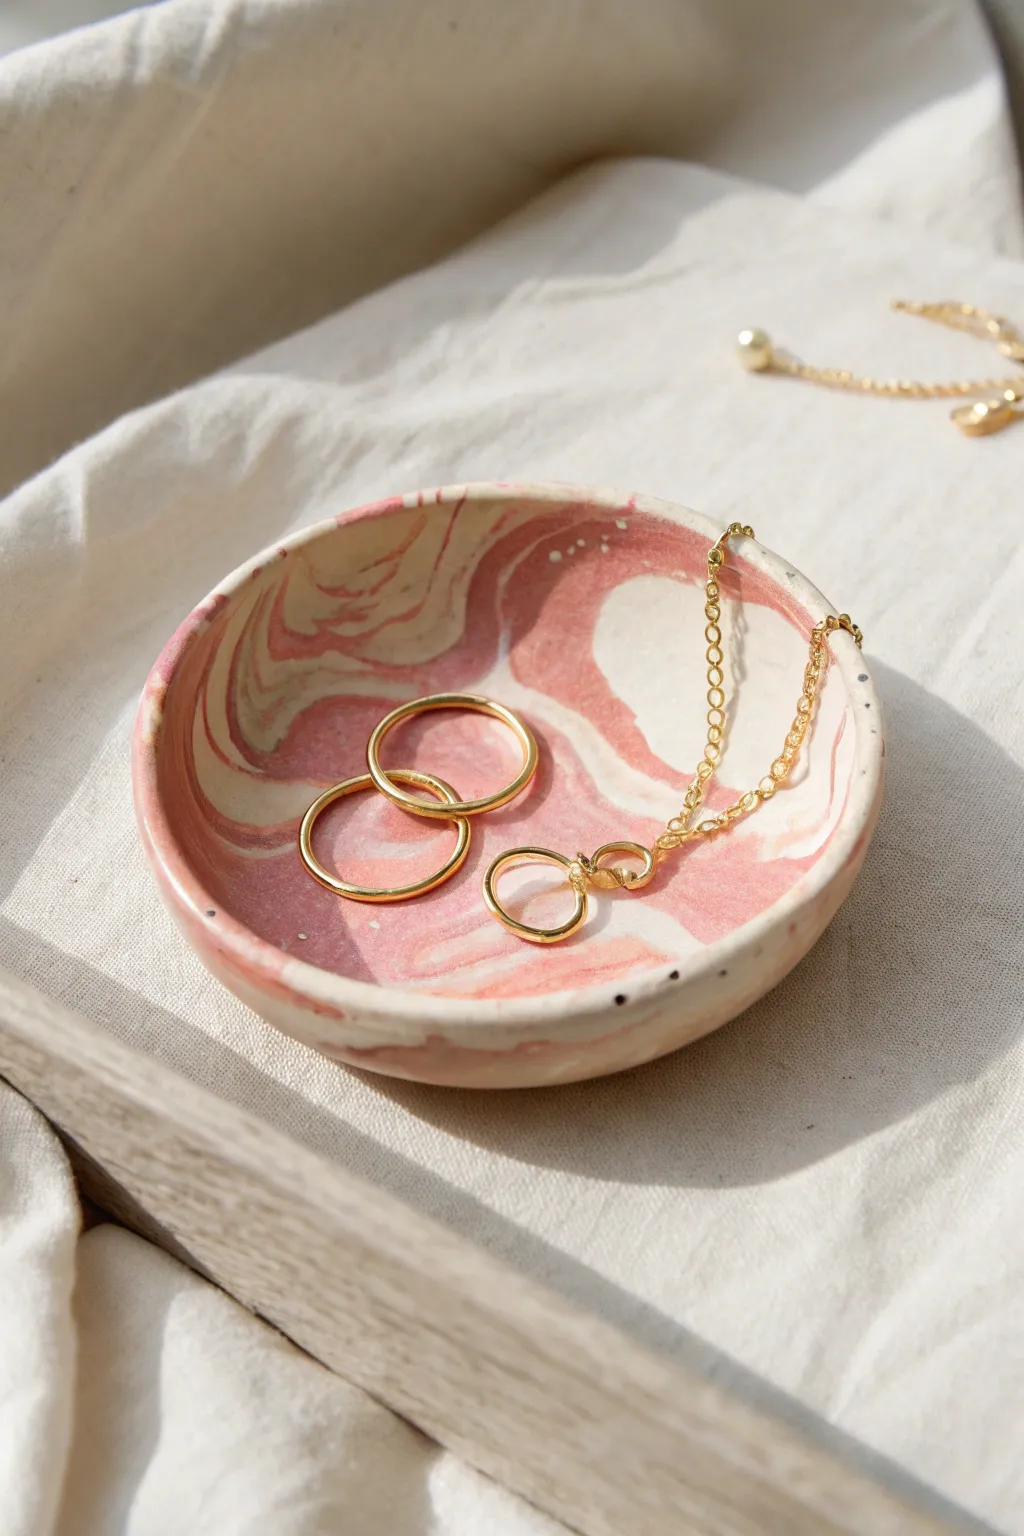
Create a sophisticated catch-all for your tiny treasures with this marbled clay jewelry dish. Swirling soft pink and white clays together creates a unique, organic pattern that mimics natural stone, while a speckled finish adds subtle texture.
Step-by-Step
Materials
- Polymer clay (white)
- Polymer clay (dusty pink or terracotta)
- Speckled clay or faux granite polymer clay (optional, for texture)
- Acrylic rolling pin or glass jar
- Circle cookie cutter (approx. 4 inches) or bowl
- Small oven-safe bowl (for shaping)
- X-acto knife or clay blade
- Fine-grit sandpaper (400-600 grit)
- Gloss or matte glaze (polyurethane or resin)
- Soft paintbrush
- Parchment paper
Step 1: Preparing the Clay
-
Condition the white clay:
Begin by taking a chunk of white polymer clay and kneading it in your hands until it becomes soft, pliable, and warm to the touch. -
Condition the pink clay:
Repeat the process with your pink or terracotta-colored clay. If you are using a speckled accent clay, condition a very small amount of that as well. -
Create clay snakes:
Roll each color of clay into long, thin snakes or ropes, roughly the width of a pencil. You’ll want about two parts white to one part pink for the look in the photo. -
Twist the ropes:
Lay the snakes side-by-side and twist them together into one large, spiraled rope. This begins the marbling process.
Muddy Colors?
If your colors are blending into one solid shade, stop twisting immediately. Let the clay cool down in the fridge for 10 minutes, then slice the slab open to find the crisp marbling inside.
Step 2: Marbling Process
-
Fold and roll:
Fold the twisted rope in half, then roll it smooth into a longer snake again. I like to repeat this fold-and-roll motion about 3-4 times. -
Check the pattern:
Stop twisting once you see distinct streaks. Don’t over-mix, or the colors will blend into a solid muddy pink rather than defined marble swirls. -
Form a ball:
Roll the marbled snake into a tight ball, ensuring there are no air bubbles trapped inside. -
Flatten the clay:
Place the ball on a sheet of parchment paper. Use your acrylic roller to flatten the ball into a disc, rolling in different directions to keep it circular. -
Roll to thickness:
Continue rolling until the slab is about 1/4 inch thick. If the pattern looks too chunky, you can gently fold the slab over and roll widely again to stretch the streaks.
Pro Tip: Gold Rim
For an extra touch of luxury, paint the very edge of the rim with liquid gold leaf paint after the glaze has fully dried.
Step 3: Shaping and Baking
-
Cut the circle:
Press your circle cutter or a clean bowl rim into the clay slab to cut a perfect circle. Remove the excess scraps. -
Smooth the edges:
Dip your finger in a tiny bit of water or baby oil and run it along the cut edge of the circle to smooth out any harsh lines or burrs. -
Form the curve:
Gently lift the clay circle and place it inside your oven-safe bowl. Press it lightly so it takes the curved shape of the bowl’s bottom. -
Bake the dish:
Place the bowl with the clay inside into your oven. Bake according to your specific clay brand’s package instructions (usually around 275°F for 15-30 minutes). -
Cool down:
Once baked, turn off the oven and let the dish cool completely inside the oven or on a wire rack before trying to pop it out of the mold.
Step 4: Finishing Touches
-
Sand the rim:
Take your fine-grit sandpaper and wet it slightly. Gently sand the rim of the dish to make it perfectly smooth and rounded. -
Wipe clean:
Use a damp cloth to wipe away any sanding dust or residue from the surface of the dish. -
Apply glaze:
Using a soft brush, apply a thin coat of gloss or matte glaze to the inside of the dish to seal it and give it a finished ceramic look. -
Final cure:
Let the glaze dry completely according to the bottle’s instructions; some glazes may need a final quick bake to set permanently.
Place your favorite rings inside and enjoy the modern elegance this handmade piece adds to your dresser
Cloud-Shaped Trays With Soft Pastel Glaze
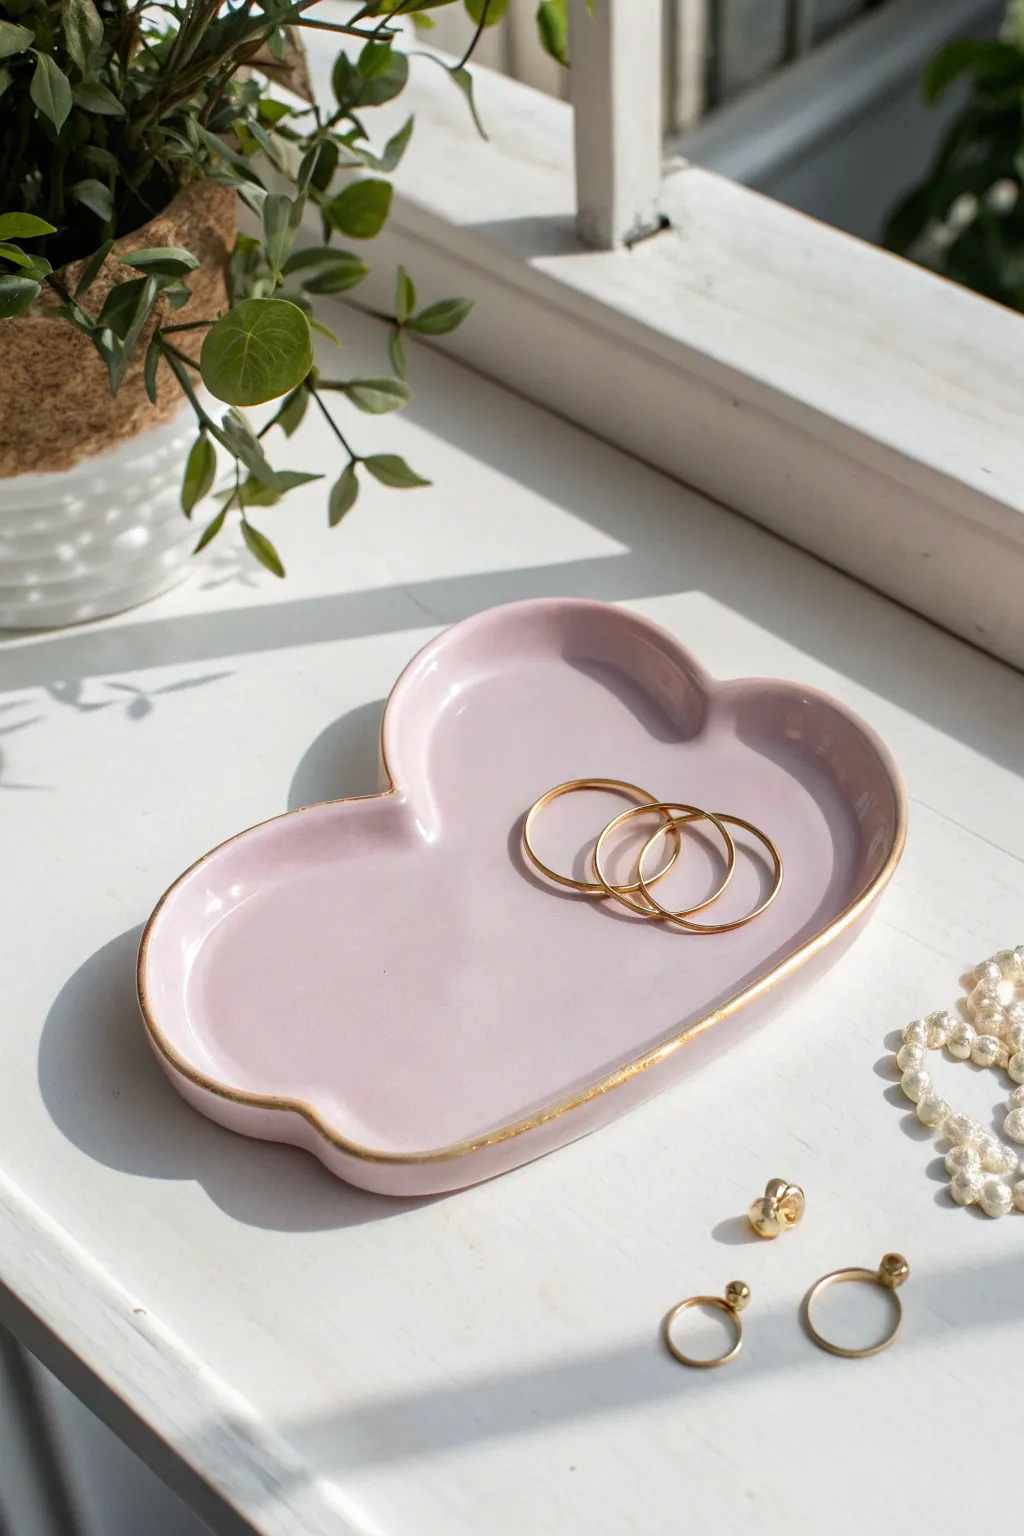
Capture the whimsy of the sky with this charming, high-gloss ceramic tray. Shaped like a fluffy cloud and finished with a luxurious gold rim, it’s the perfect resting place for your favorite delicate jewelry pieces.
Step-by-Step
Materials
- Low-fire white earthenware clay
- Rolling pin
- Canvas mat or guide strips (approx. 1/4 inch thick)
- Cloud template (paper cutout)
- Needle tool or fettling knife
- Potter’s sponge
- Soft rib tool (silicone or rubber)
- Modeling tool (curved)
- Kiln
- Soft pink glossy glaze (pale pastel)
- Gold luster overglaze
- Small liner brush (for gold)
- Fan brush or soft glazing brush
Step 1: Shaping the Cloud
-
Prepare the slab:
Begin by wedging your white earthenware clay thoroughly to remove air bubbles. Roll it out into a smooth, even slab about 1/4 inch thick. Using guide strips on either side of your rolling pin ensures a perfectly uniform thickness across the entire piece. -
Cut the shape:
Place your paper cloud template gently onto the clay slab. Using a needle tool held perpendicular to the table, trace around the template to cut out your cloud shape. Remove the excess clay. -
Soften the edges:
Once cut, the edges will be sharp and square. Use a damp sponge to gently round over the top and bottom edges of the silhouette. This creates that soft, puffy look essential for a cloud. -
Lift the rim:
To transform this from a flat tile into a tray, gently lift the edges of the cloud with your fingers. Working slowly around the perimeter, push the clay slightly upward to create a shallow rim, curving it continuously so there are no hard angles. -
Refine the curve:
Use a smooth modeling tool or your thumb to blend the interior curve where the floor meets your new wall. I like to run a curved rib tool along the inside to ensure the transition is seamless and smooth. -
Dry slowly:
Cover the tray loosely with plastic to let it dry slowly to a leather-hard state. This prevents warping, especially with flat-bottomed pieces. Once bone dry, bisque fire the piece to cone 04 (or according to your clay’s instructions).
Warped Tray?
b’If the edges curled up while drying, try weighting the center down with a sandbag during the leather-hard stage to keep the floor perfectly flat.’
Step 2: Glazing and Gilding
-
Clean the bisque:
Wipe your bisque-fired cloud with a damp sponge to remove any kiln dust. This step is crucial preventing pinholes in your final glaze. -
Apply the pastel pink:
Using a soft fan brush, apply a generous coat of pale pink glossy glaze. Ensure you brush in one direction for the first coat, let it dry until it’s chalky, and then apply a second coat in a crosswise direction. -
Check coverage:
Most commercial dipping or brushing glazes require three coats for full opacity. Apply a final third coat if typically recommended by your glaze manufacturer to get that luscious, deep finish. -
Clear the footing:
Use a damp sponge or wax resist to clean the very bottom of the tray where it will touch the kiln shelf. Clean margins ensure your piece doesn’t fuse to the shelf during firing. -
Glaze firing:
Fire the piece again, this time to the maturity temperature of your glaze (typically cone 05 or 06 for low-fire earthenware). Allow the kiln to cool completely before opening. -
Prep for luster:
Once the piece is cool and clean, prepare your gold luster. Work in a well-ventilated area, as gold overglaze has strong fumes. Dip a very fine liner brush into the gold essence. -
Paint the rim:
Carefully paint a thin, steady line of gold along the very top edge of the rim. The smooth, glazed surface makes the brush glide easily, but a steady hand is key here. Fix any drips immediately with a cotton swab and a little luster thinner. -
Third firing:
Place the tray back in the kiln for a third and final firing. Luster firings are much cooler, usually around cone 018 to 020. This fuses the gold permanently to the glass surface.
Make it a Set
b’Create a set of three nesting clouds in different sizes (small, medium, large) using varying shades of pink or adding a baby blue version.’
Once the final firing is complete, your dreamy jewelry tray is ready to hold your treasures