If you’re making a ceramic ashtray, the sweet spot is always the same: it needs to work beautifully and still feel like a little piece of art. Here are my favorite ideas that balance function and style, from classic forms to quirky conversation-starters.
Classic Round Ashtray With Rim Notches
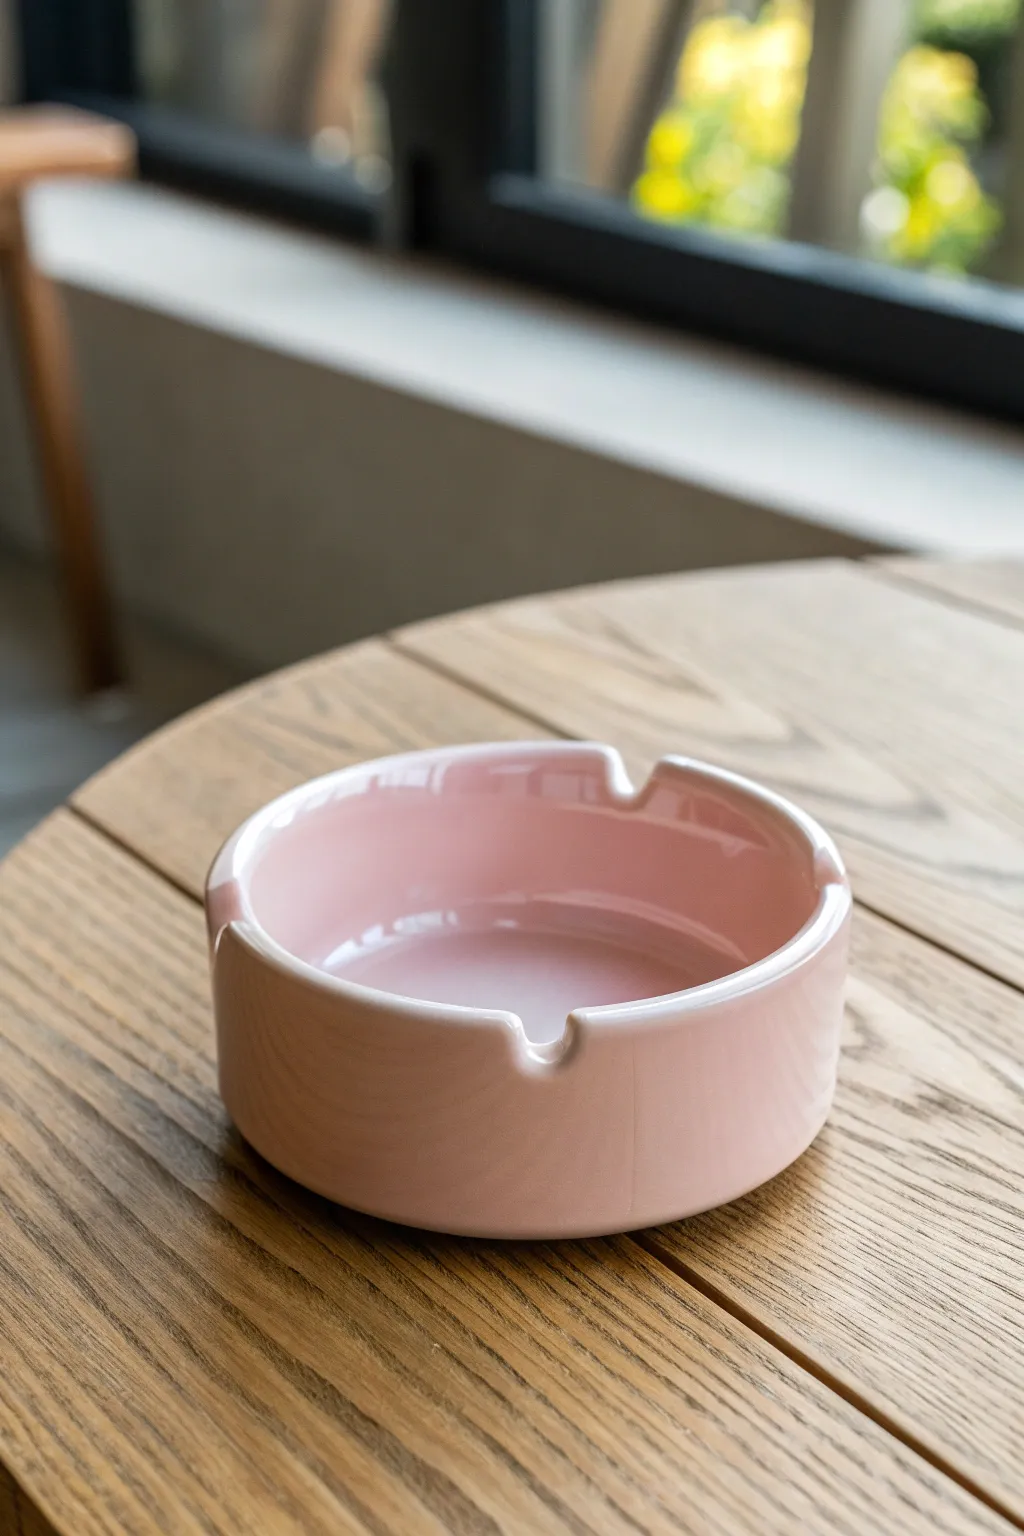
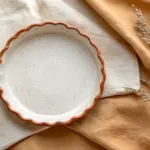
This tutorial guides you through crafting a timeless, round ceramic ashtray with a glossy pastel pink glaze. Its minimalist design relies on clean lines and a smooth, flawless finish, making it a perfect project for honing your wheel-throwing or hand-building precision.
Detailed Instructions
Materials
- Light-colored stoneware or porcelain clay
- Potter’s wheel (or rolling pin for hand-building)
- Needle tool
- Rib tool (metal and rubber)
- Sponge
- Wire clay cutter
- Loop trimming tool
- Fettling knife or specialized notch cutter
- Pastel pink glossy glaze
- Kiln
- Base bat
Step 1: Forming the Base
-
Prepare your clay:
Begin by thoroughly wedging about 1 to 1.5 pounds of clay to remove air bubbles. Form it into a smooth, round ball before slamming it onto the center of your wheel bat. -
Center the clay:
Using the wheel, cone the clay up and down to align the clay particles. Center it into a low, wide puck shape related to the final width of your ashtray, roughly 5-6 inches across. -
Open the form:
Open the centered clay, leaving a floor thickness of about a quarter-inch. Compress the floor with a flat rib to prevent S-cracks later during firing. -
Pull the walls:
Pull the walls up to create a shallow cylinder. For this classic heavy-rim style, keep the walls thicker than you would for a bowl—aim for nearly half an inch thickness at the top. -
Shape the rim:
Using a wet chamois or a soft sponge, compress and round over the top rim. I like to fold the clay slightly inward to create a distinct, rounded lip that feels substantial. -
Refine the interior:
Use a flexible rib to smooth the interior curve, ensuring a seamless transition from the floor to the wall. This concave smoothness is key for easy cleaning later. -
Wire off:
Run a wire cutter underneath the pot to separate it from the bat. Leave it to dry to a leather-hard state.
Step 2: Trimming and Notching
-
Trim the foot:
Once leather-hard, center the piece upside down on the wheel. Use a loop tool to trim the excess clay from the bottom, carving out a clean foot ring. -
Smooth the surface:
Before flipping it back over, run a damp sponge or a soft rubber rib over the trimmed areas to erase any tool marks and create a perfectly smooth surface. -
Mark the notch placements:
Divide the rim into three equal sections. You can visualize a triangle or use a decorating disk to mark the spots lightly with your needle tool. -
Carve the notches:
Using a loop tool or a round file, gently carve out the U-shaped rests in the rim at your marked points. Press a round tool handle into the fresh cut to smooth and round the notch edges. -
Final smoothing:
Use a damp sponge to soften the edges of your notches. Sharp ceramic edges can be dangerous after firing, so ensure every corner is rounded and buttery smooth. -
Bisque fire:
Allow the piece to dry completely until bone dry. Load it into the kiln for a bisque firing to cone 04 (or your clay’s specific bisque temperature).
Uneven Notches?
If your notches look lopsided, don’t just curve tool. Use a dowel or a marker pen sized to a cigarette’s width. Press it gently into the damp clay to mold the exact U-shape.
Step 3: Glazing and Finishing
-
Clean the bisque:
Wipe the bisqued piece with a damp sponge to remove any dust, which can prevent the glaze from adhering properly. -
Apply the pink glaze:
Pour your pastel pink glaze into the interior, swirl it to coat, and pour out the excess. For the exterior, dipping usually provides the most even coat, but careful brushing works too. -
Check the thickness:
Ensure the glaze isn’t too thick near the notches, as it could pool and obscure the shape. Tidy up drips immediately with a brush. -
Clean the foot:
Use a sponge or a waxing technique to completely remove any glaze from the bottom foot ring so it doesn’t fuse to the kiln shelf. -
Glaze fire:
Fire the piece again to the maturity temperature of your clay and glaze combination (commonly cone 5 or 6 for stoneware).
Add a Retro Vibe
Before the final glaze firing, apply a wax resist pattern, like polka dots or stripes, to reveal the raw clay body underneath for a fun textural contrast.
Let your ashtray cool completely in the kiln before removing it to admire that glossy, seamless finish.


Minimalist Square Slab Ashtray
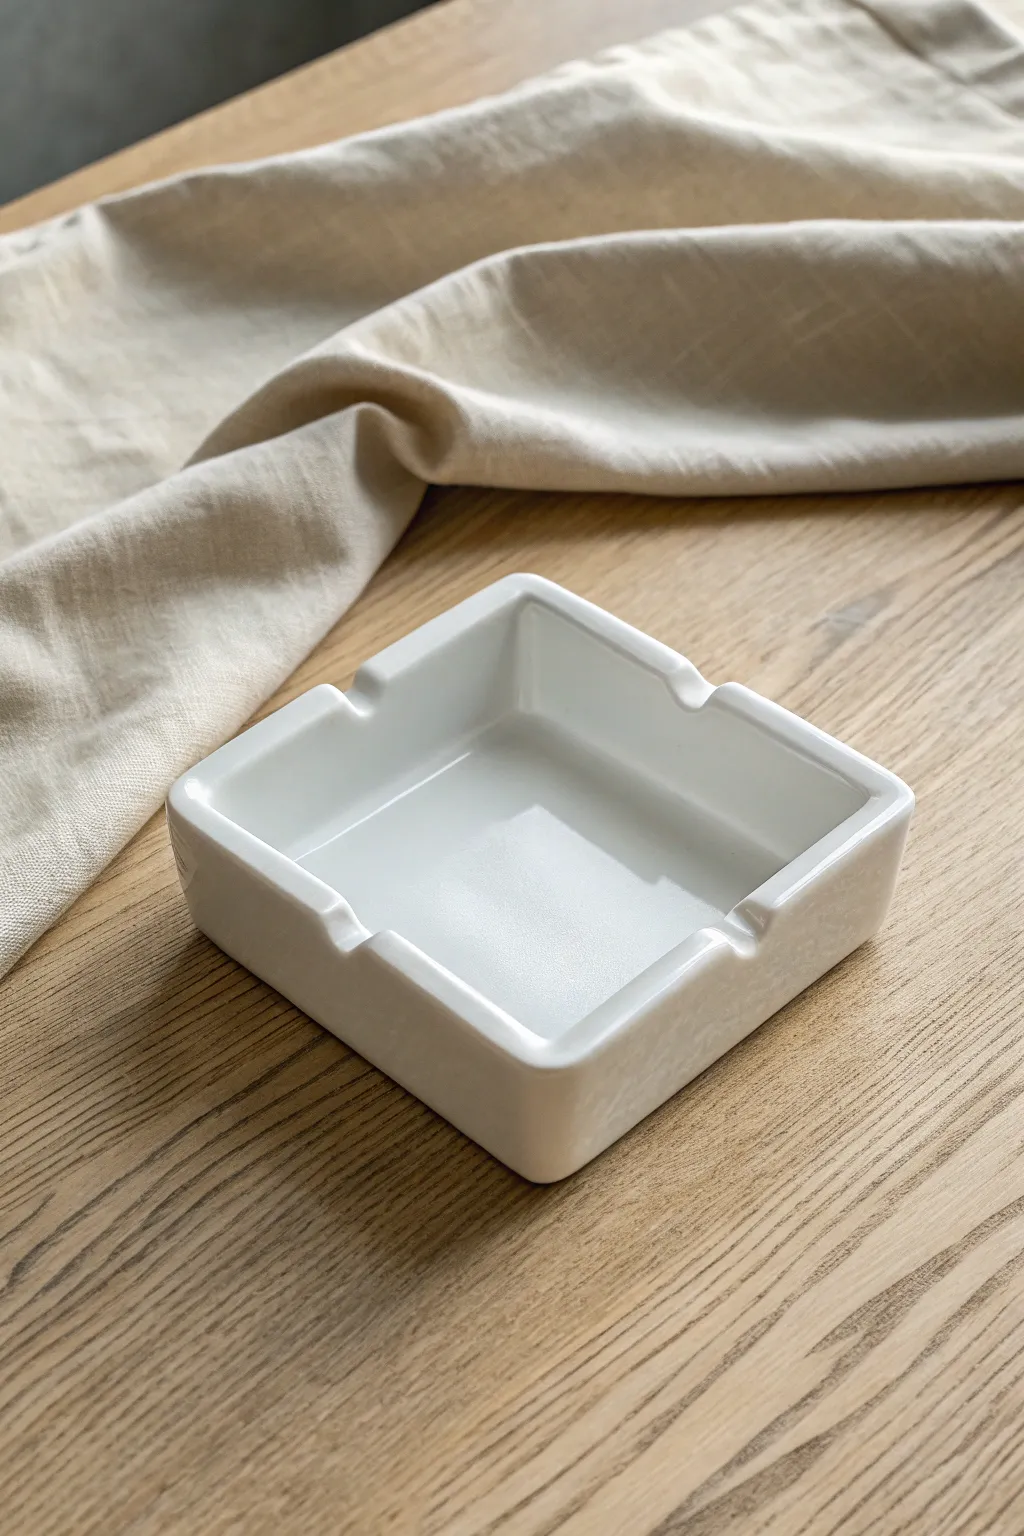
This tutorial guides you through creating a sleek, minimalist square ashtray using slab-building techniques. The result is a high-gloss, pure white piece with clean lines and classic functionality, perfect for a modern coffee table setting.
Step-by-Step
Materials
- White stoneware or porcelain clay body
- Rolling pin
- Two thickness strips (approx. 1/4 inch or 6mm)
- Clay knife or fettling knife
- Needle tool
- Flexible metal rib
- Sponge
- Slip (clay and water mixture)
- Scoring tool or serrated rib
- Small carving tool or loop tool (for the notches)
- Ruler or square templates
- Clear high-gloss glaze or bright white glaze (depending on clay body)
Step 1: Preparing the Slabs
-
Wedge the Clay:
Begin by thoroughly wedging your white clay to remove any air bubbles and ensure an even consistency, which is crucial for straight slab work. -
Roll the Slab:
Using your thickness strips as guides on either side of the clay, roll out a large, even slab. Aim for a thickness of about 1/4 inch (6mm) to keep the look refined but sturdy. -
Compress the Clay:
Take your flexible metal rib and firmly drag it across the surface of the slab on both sides. This compresses the particles, preventing warping during firing and creating a super smooth canvas. -
Measure and Cut:
Using a ruler or a paper template, cut out a perfect square for the base (e.g., 4×4 inches). Next, cut four rectangular strips for the walls, ensuring they are all exactly the same height (about 1.5 inches). -
Let it Stiffen:
I usually let these cut pieces sit for about 30-45 minutes until they are leather-hard. They need to be stiff enough to hold their shape upright without slumping.
Warping Walls?
If the walls bow inward during drying, place a small block of foam or crumpled newspaper inside the box to support the shape as the clay shrinks.
Step 2: Assembly
-
Score the Edges:
Score the outer edges of your base square and the bottom/side edges of your wall strips thoroughly using a scoring tool. -
Apply Slip:
Dab a generous amount of slip onto the scored areas to act as your glue. -
Attach the First Wall:
Press the first wall onto the base. Use a small square tool or block to ensure it is standing at a perfect 90-degree angle. -
Complete the Box:
Attach the remaining three walls, scoring and slipping the vertical joints where the walls meet. Depending on your preference, you can use miter joints (45-degree angle cuts) or butt joints. -
Reinforce the Seams:
Roll tiny distinct coils of soft clay and press them into the interior seams of the box. Smooth them down completely with a modeling tool so they disappear, adding structural integrity.
Step 3: Refining and Notching
-
Smooth the Exterior:
Use a slightly damp sponge to clean up the exterior joints. If you used butt joints, make sure the seams are blended so the outside looks like one continuous piece. -
Round the Rims:
Gently run a damp sponge or a chamois cloth over the top rim of the ashtray. You want to soften the sharp edges created by the knife for a more professional feel. -
Mark the Rests:
Find the exact center point of each of the four walls along the top rim and mark it lightly with your needle tool. -
Carve the Notches:
Using a loop tool or simply the handle of a paintbrush, gently press or carve out a semi-circle indentation at each mark. These act as the cigarette rests. -
Smooth the Notches:
Use your finger and a little water to smooth the inside of these indentations so they are perfectly rounded and comfortable to the touch. -
Final Polish:
Give the entire piece one last wipe-down with a sponge to remove any fingerprints or clay burrs. Let it dry slowly to prevent warping.
Clean Corners Pro Tip
After assembly, lightly tap the leather-hard box on a flat table surface on all four sides. This helps square up the angles and ensures the bottom is perfectly flat.
Step 4: Glazing and Firing
-
Bisque Fire:
Fire the piece to cone 04 (or your clay’s specific bisque temperature). -
Wipe Down:
Once cool, wipe the bisque ware with a larger damp sponge to remove any kiln dust ensuring the glaze adheres properly. -
Dip Glaze:
For that seamless look shown in the image, dip the entire piece into a bright white or clear high-gloss glaze. Use tongs to dip it, or pour the glaze over it if dipping isn’t possible. -
Clean the Foot:
Wipe the bottom of the ashtray completely clean of glaze so it doesn’t fuse to the kiln shelf. -
Glaze Fire:
Fire to the final maturity temperature of your clay and glaze (likely Cone 5/6 or Cone 10).
Enjoy the clean simplicity of your new handmade ceramic piece which works just as well as a trinket dish as it does an ashtray


Deep Bowl Ashtray for Easy Cleanup
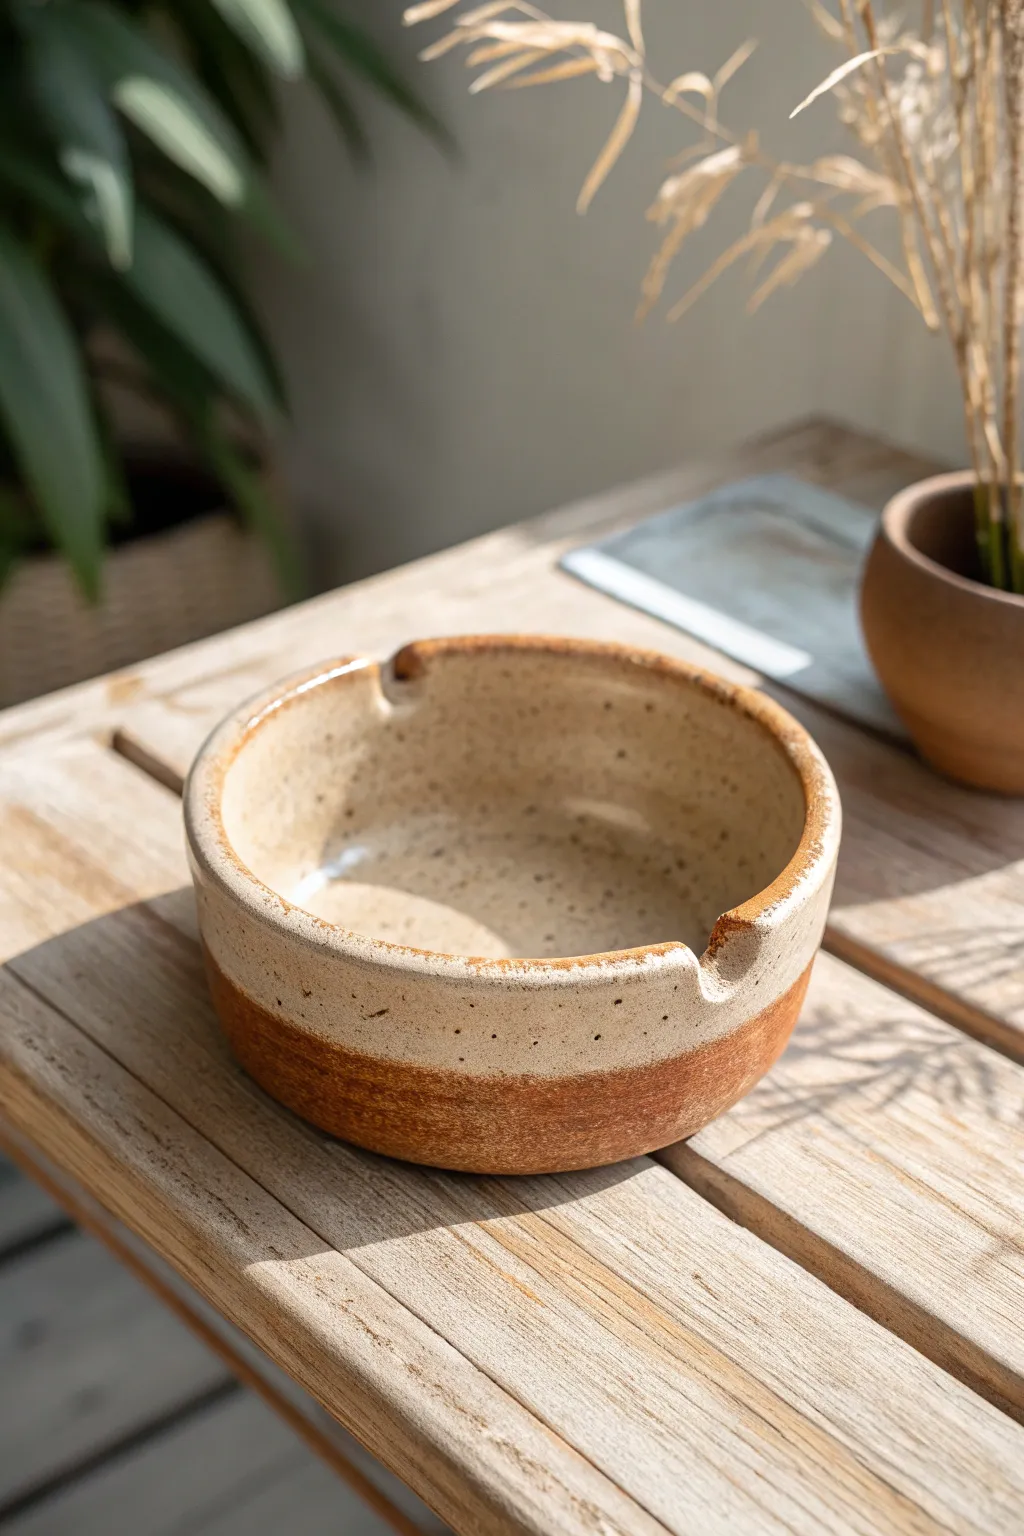
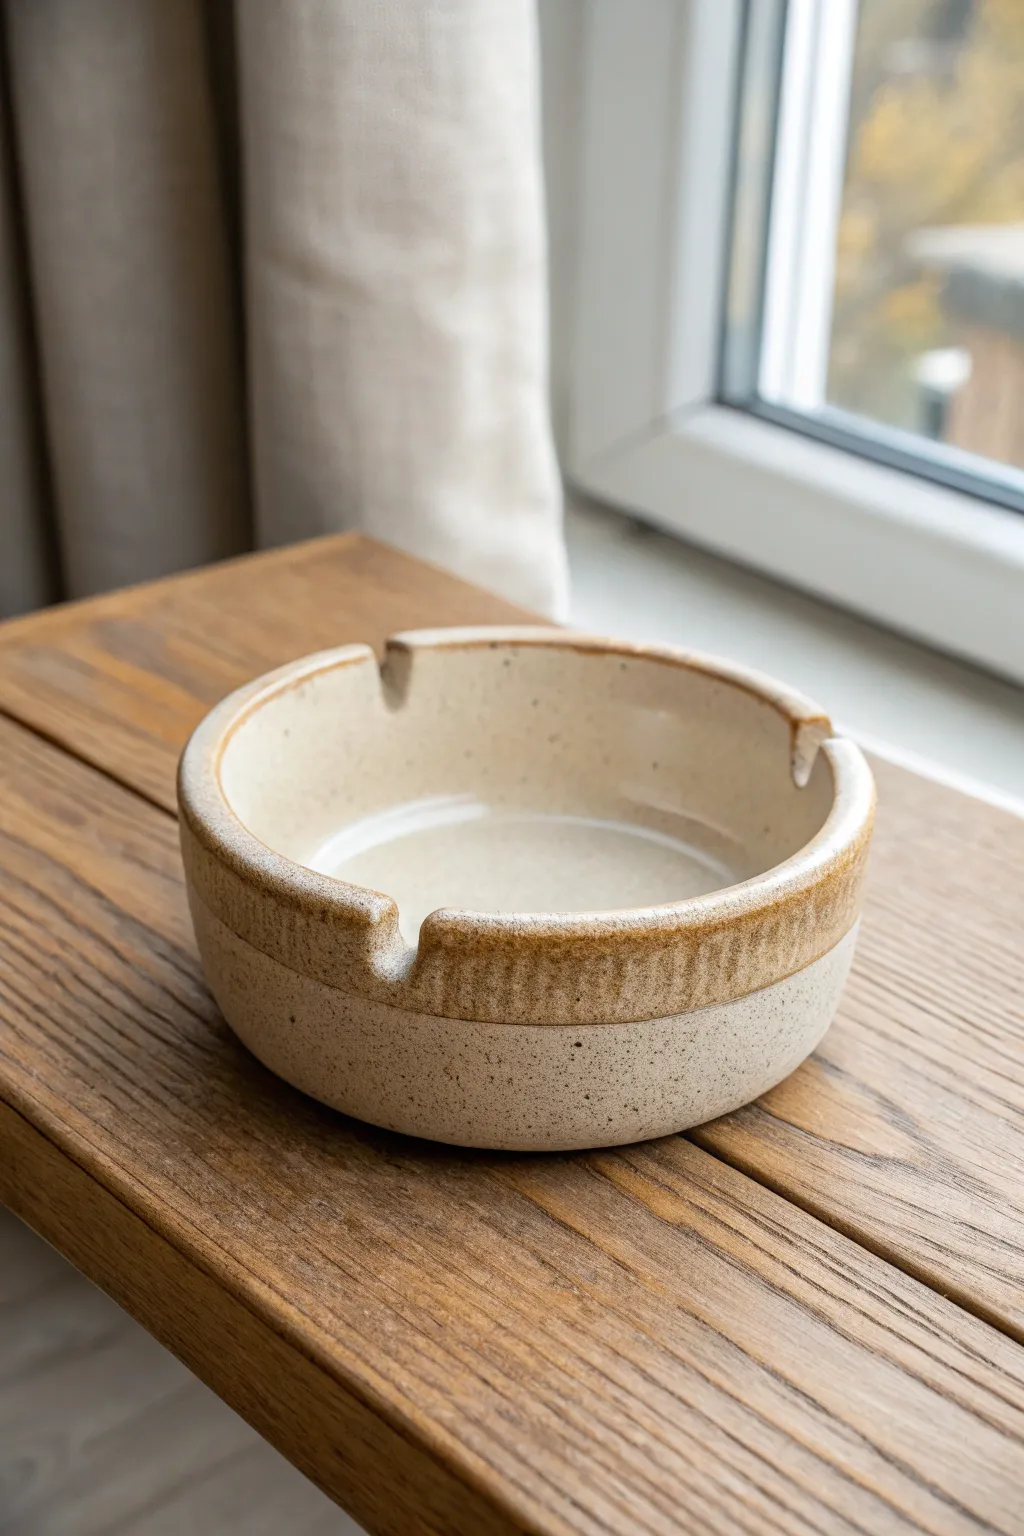
This project features a substantial, deep-walled ashtray designed to keep ash containted and messes to a minimum. The aesthetic relies on the contrast between a creamy, speckled glaze and the raw, warm earth tones of the clay body underneath.
Step-by-Step Guide
Materials
- Stoneware clay (preferably a speckled or sandy body)
- Pottery wheel
- Throwing sponge
- Needle tool
- Rib tool (wooden or metal)
- Wire cutter
- Trimming tools (loop tool)
- Round file or carving tool
- Cream or oatmeal speckled glaze
- Wax resist
- Kiln
Step 1: Throwing the Form
-
Center the clay:
Begin with a ball of clay roughly the size of a large grapefruit. Secure it to the wheel head and center it thoroughly using steady hand pressure and water. -
Open the form:
Create the opening in the center, pressing down until you are about a half-inch from the bat. Instead of pulling outward immediately for a plate shape, keep the floor relatively narrow to support vertical walls. -
Establish the floor:
Compress the floor with a sponge or wooden rib. This is crucial for preventing S-cracks later, especially given the thick base of this hefty piece. -
Pull the walls:
Pull the clay upward to create a cylinder. Aim for a wall thickness of about 1/4 to 3/8 inch. You want this piece to feel substantial, not delicate. -
Shape the bowl:
Using a rib on the inside, gently belly the walls out slightly while keeping the rim upright. The goal is a deep, enclosed bowl shape rather than a wide, open dish. -
Define the rim:
Compress the rim with a chamois or your sponge to make it smooth and rounded. Ensure the rim is thick enough to support the notches you will cut later. -
Cut from the wheel:
Run a wire tool underneath the base to separate it from the bat. Leave it to dry to a leather-hard state.
Clean Lines Pro-Tip
For a razor-sharp glaze line, use automotive detailing tape or masking tape instead of freehanding the wax resist. Peel the tape off *before* firing.
Step 2: Trimming and Carving
-
Secure for trimming:
Once leather hard, center the pot upside down on the wheel. Secure it with clay lugs or a Giffin Grip. -
Trim the base:
There is no foot ring on this piece; instead, trim the bottom flat and clean up the lower curve of the wall. I like to leave the bottom quite heavy to add stability. -
Smooth the surface:
Use a smooth metal rib to burnish the exterior slightly, removing any grog marks that might feel rough on the unglazed portion. -
Mark notch placements:
Turn the pot right-side up. Visualize where you want your cigarette rests—usually three or four equally spaced around the rim. -
Carve the notches:
Using a round file or a loop tool, gently carve semi-circular channels into the rim. They should angle slightly downward into the bowl to encourage ash to fall inside. -
Refine the cuts:
Smooth the edges of your notches with a damp sponge or fingertip so there are no sharp burrs. -
Bisque fire:
Allow the piece to dry completely (bone dry) before loading it into the kiln for the bisque firing.
Level Up: Texture
Before the clay dries, gently tap the lower raw section with a stiffer brush or a textured sponge to enhance the contrast against the smooth upper glaze.
Step 3: Glazing
-
Apply wax resist:
Paint a band of wax resist around the bottom third of the exterior wall and the entire base. This creates the clean, straight line between the glazed top and the raw clay bottom. -
Prepare the glaze:
Mix your speckled oatmeal glaze thoroughly. If the glaze is too thick, the speckles might hide; too thin, and the clay body will show through too much. -
Dip the piece:
Hold the ashtray by the waxed foot and dip it rim-first into the glaze bucket. Submerge it until the glaze reaches your wax line, then pull it out promptly. -
Clean the edges:
After the glaze dries to the touch, use a damp sponge to wipe any stray droplets off the waxed area, ensuring a crisp transition line. -
Glaze fire:
Fire the piece to the maturity temperature of your clay and glaze (typically Cone 5 or 6 for stoneware) and let the kiln cool slowly.
Place your finished piece on a side table to enjoy its blend of rustic texture and modern utility


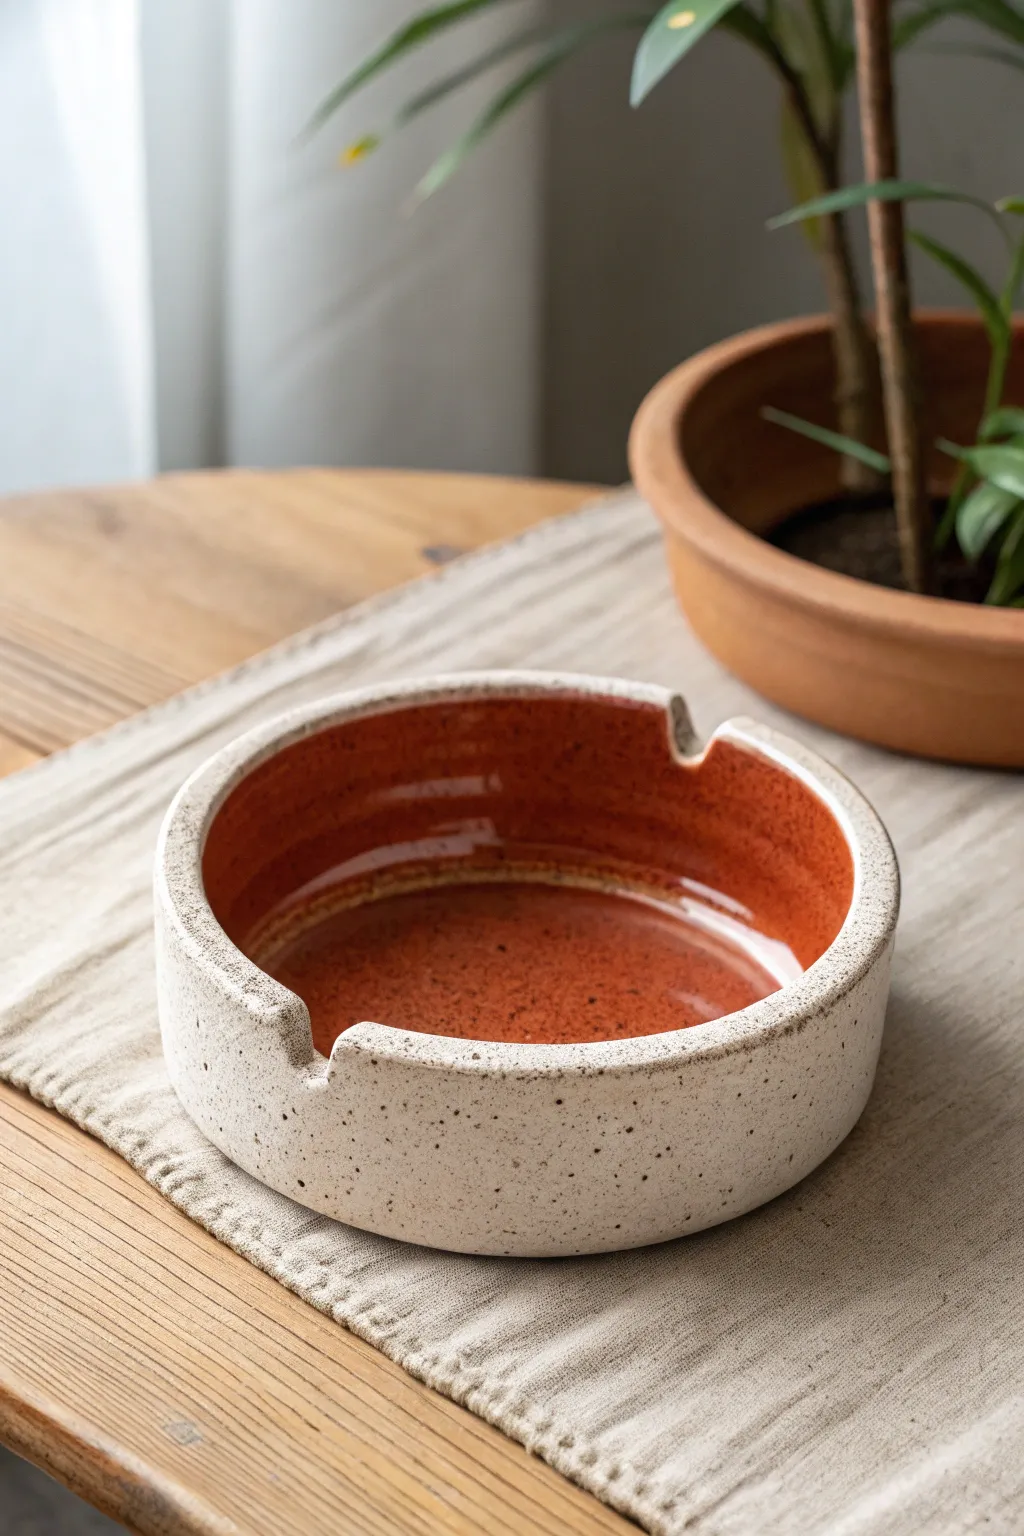
Four-Rest “Group Hang” Ashtray
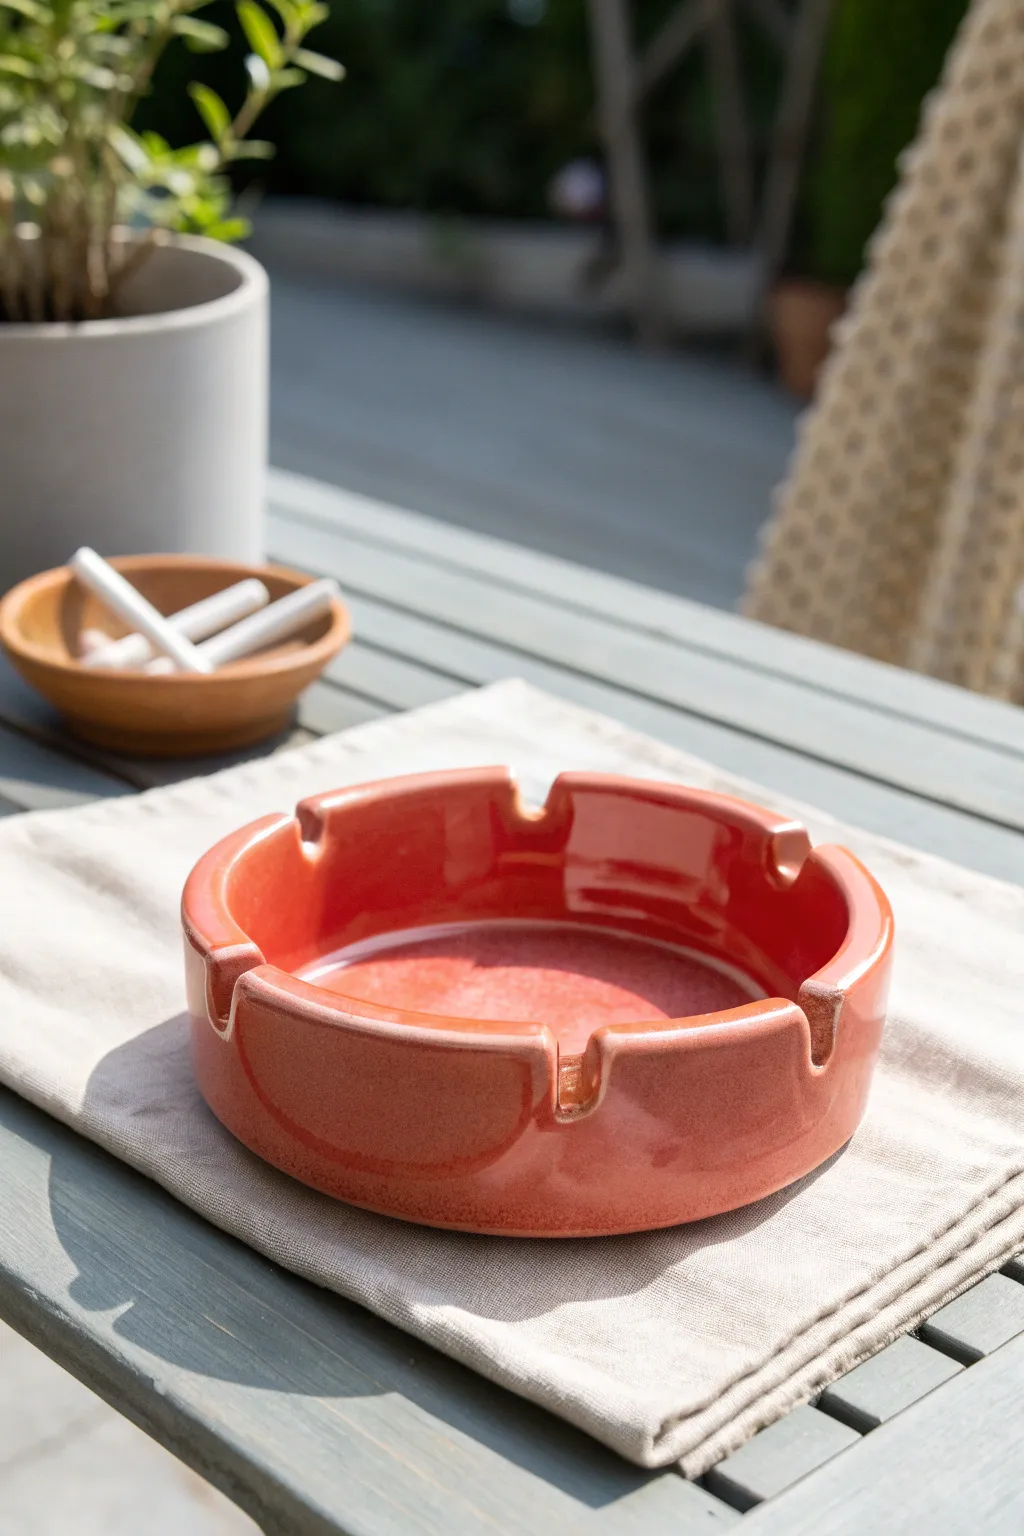
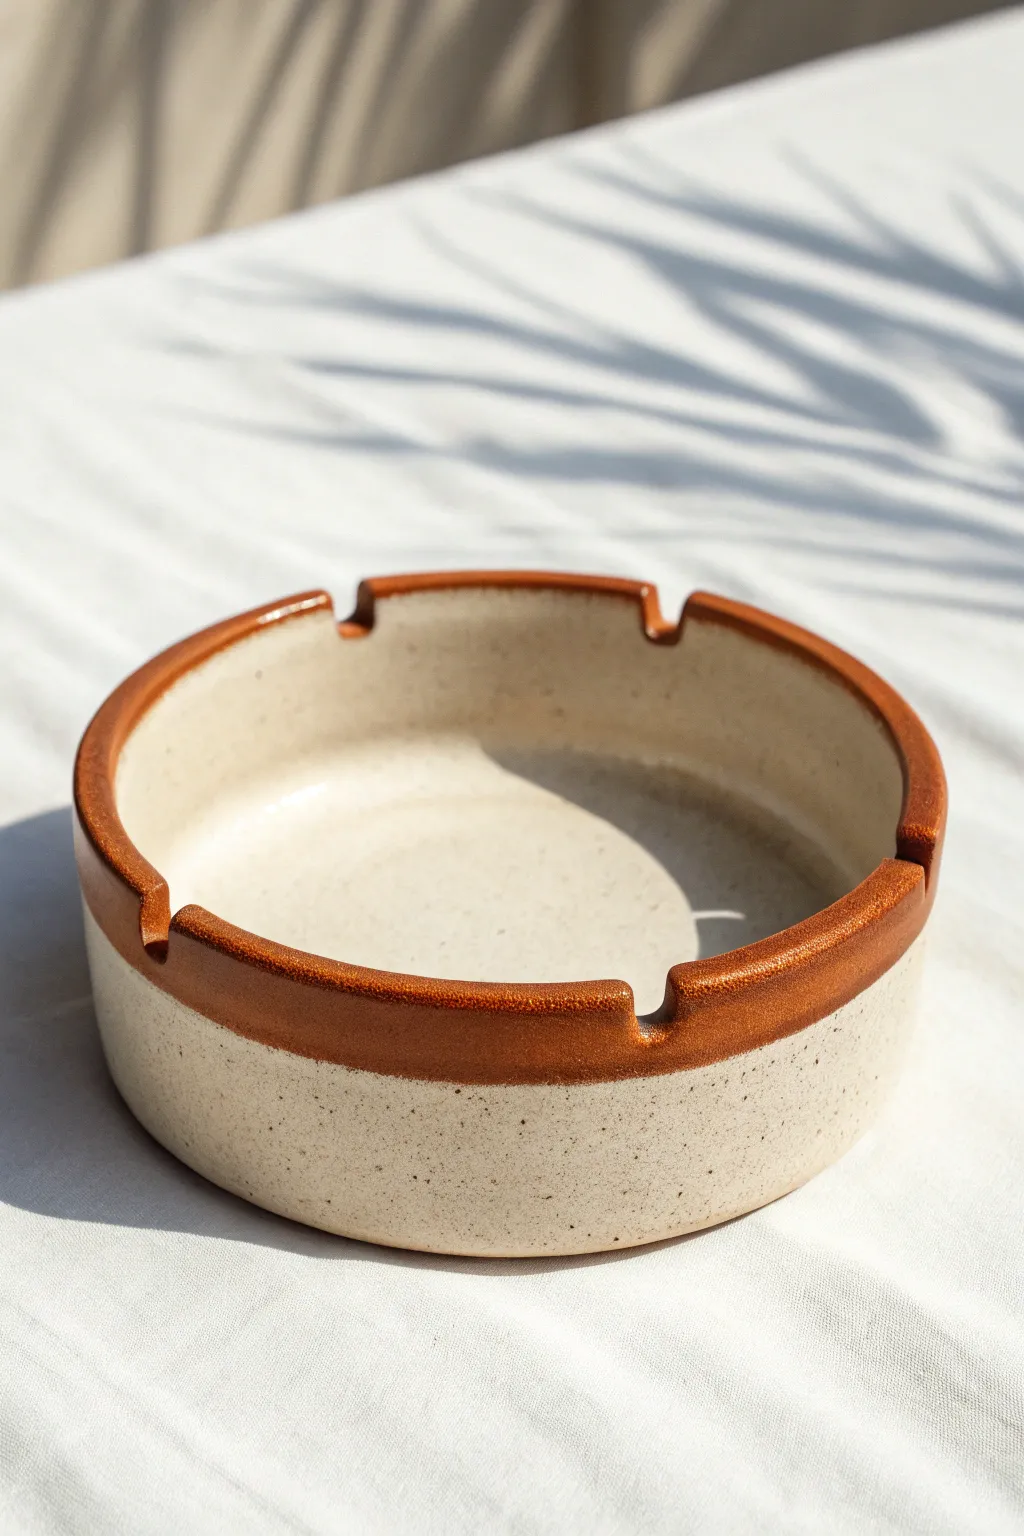
Evoke the warmth of a Mediterranean patio with this chunky, glossy reddish-orange ashtray. Its classic four-notch design makes it perfect for group gatherings, while the thick, rounded walls offer a satisfyingly sturdy feel.
Detailed Instructions
Materials
- Terracotta or red stoneware clay (approx. 1.5 – 2 lbs)
- Pottery wheel (or can be hand-built with coils)
- Wooden throwing ribs
- Wire clay cutter
- Needle tool
- Sponge
- Loop trimming tool
- Round carving tool or specialized ashtray notcher
- Glossy red-orange glaze (e.g., Amaco Potter’s Choice or similar stoneware glaze)
- Kiln access
Step 1: Throwing the Form
-
Prepare the clay:
Begin by thoroughly wedging your red clay to remove air bubbles and ensure a uniform consistency. Form it into a smooth ball. -
Center on the wheel:
Slam the clay onto the center of the wheel batt. Use water and steady pressure to center the clay perfectly before opening. -
Open the clay:
Press your thumbs into the center to open the mound, leaving a floor thickness of about half an inch. You want a heavy bottom for stability. -
Pull the walls:
Slowly pull the clay outward and upward to create low, thick walls. Unlike a bowl, you want verticality here. Aim for walls about 1.5 to 2 inches high. -
Define the rim:
Use a chamois or a wet sponge to compress and round the rim significantly. The signature look of this piece relies on a thick, comfortable lip. -
Flatten the floor:
Use a flat wooden rib to compress the floor inside the pot, ensuring it is perfectly flat and smooth, meeting the walls at a crisp angle. -
Refine the exterior:
Run a rib along the outside to remove throwing lines and create a clean, cylindrical silhouette with a slight curvature at the base. -
Wire off:
Run your wire cutter underneath the pot to separate it from the batt, then set it aside to dry to a leather-hard state.
Clean Rests
Use a damp paintbrush handle or a dowel the approximate size of a cigarette to burnish the notches smooth. This ensures a perfect fit and easier cleaning later.
Step 2: Trimming and Notching
-
Centering for trim:
Once leather hard, place the piece upside down on the wheel. Secure it with clay lugs to keep it centered. -
Trim the foot:
Use a loop tool to trim away excess weight from the bottom, carving a neat foot ring that defines the base. -
Mark the quadrants:
Flip the piece right side up. Use a needle tool to lightly mark four equidistant points on the rim where the rests will go. -
Carve the rests:
Using a round carving tool or a carefully angled loop tool, press into the rim at your marks. I like to rock the tool gently back and forth to create a smooth, U-shaped cradle. -
Smooth the notches:
Dip your finger in a little water and smooth the raw edges of your cuts so they blend seamlessly into the rounded rim. -
Final sponge:
Wipe down the entire piece with a barely damp sponge to remove any burrs or sharp bits before drying.
Uneven Glaze?
If the glaze pools too thickly in the notches, it can obscure the shape. Blow gently on the notches right after dipping to clear excess liquid before it dries.
Step 3: Glazing and Firing
-
Bisque fire:
Load the bone-dry piece into the kiln for a bisque firing (usually to Cone 04) to prepare it for glazing. -
Wax the foot:
Apply wax resist to the bottom foot ring to prevent glaze from fusing the ashtray to the kiln shelf. -
Pour the interior:
Pour your orangey-red glaze inside the ashtray, roll it around to coat the floor and inner walls, and pour out the excess. -
Dip the exterior:
Holding the piece by the foot, dip the exterior into the bucket of glaze. Ensure the rim and notches are fully coated. -
Glaze fire:
Fire the piece to the maturation temperature of your specific clay and glaze body (likely Cone 5 or 6 for stoneware).
Place your finished piece locally on a patio table and enjoy the sturdy craftsmanship

The Complete Guide to Pottery Troubleshooting
Uncover the most common ceramic mistakes—from cracking clay to failed glazes—and learn how to fix them fast.
Central Snuffer Island Ashtray
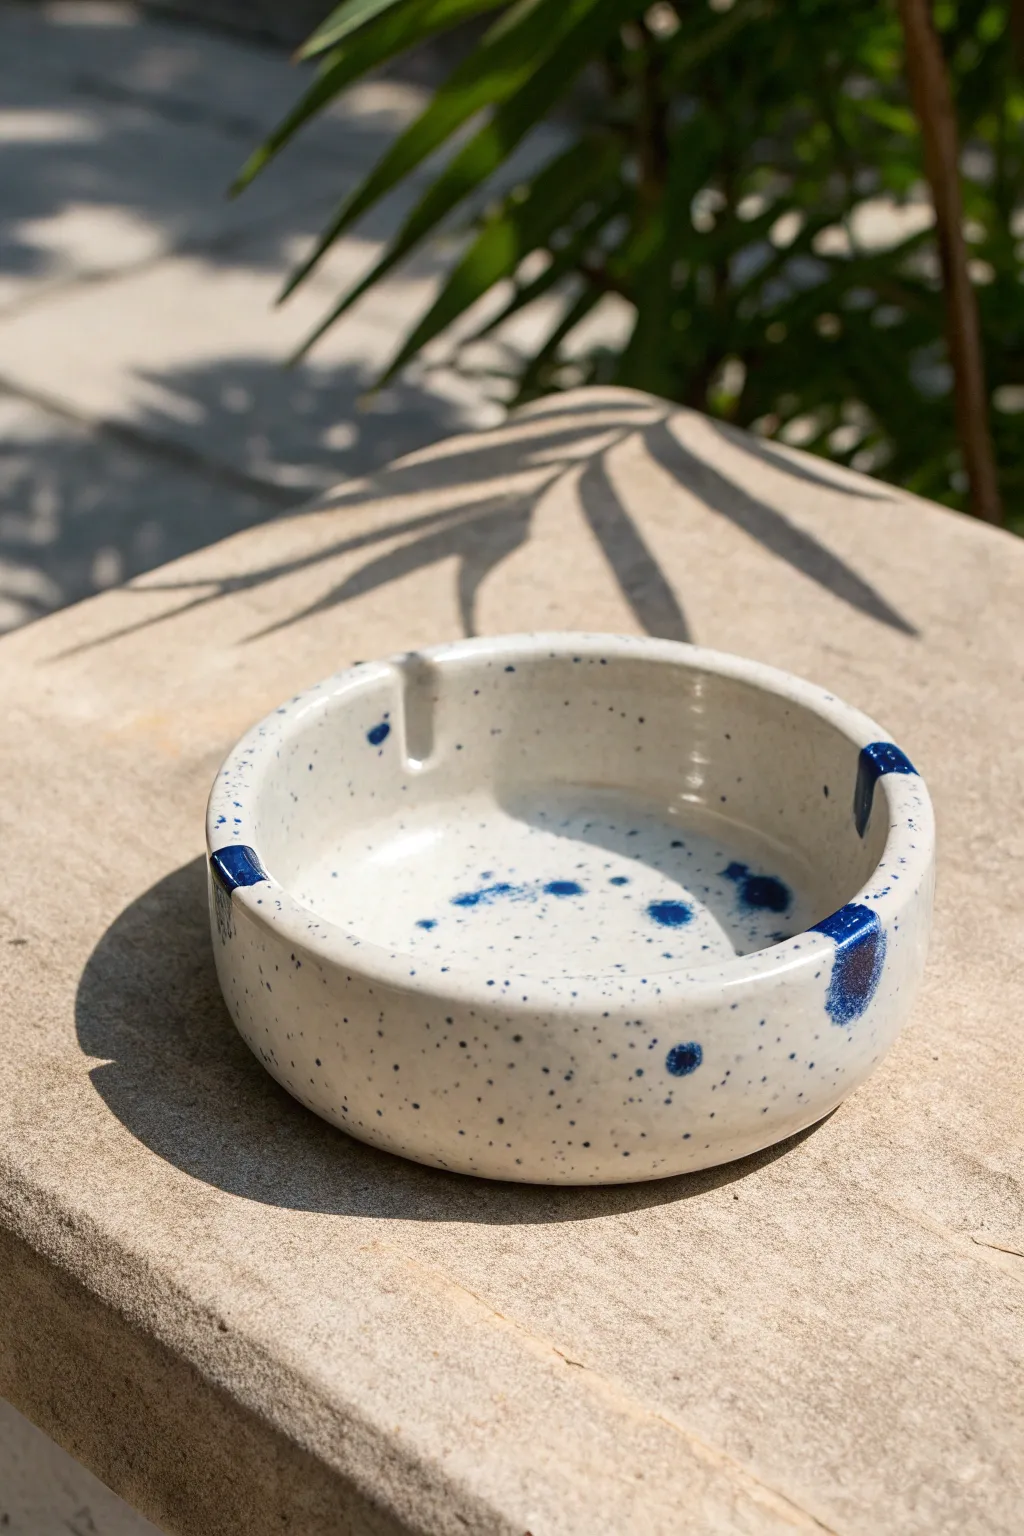
Embrace a minimalist aesthetic with this wheel-thrown ceramic ashtray featuring a classic speckled white glaze and striking cobalt blue accents. This project focuses on clean lines, functional notches, and a playful yet controlled glaze application that makes each piece unique.
Step-by-Step
Materials
- White stoneware clay (speckled or plain)
- Pottery wheel
- Throwing sponge
- Rib tool (metal or rubber)
- Wire cutter
- Trimming tools
- Needle tool or fettling knife
- Glossy white glaze
- Cobalt blue glaze or underglaze
- Stiff bristle brush (for splattering)
- Medium soft brush (for rim accents)
- Kiln
Step 1: Throwing the Form
-
Center the Clay:
Begin with about 1.5 to 2 pounds of well-wedged white stoneware clay. Secure it firmly to the wheel head and center it using water and steady pressure until it spins without wobbling. -
Open the Form:
Open the clay down to the bat, leaving about a 1/4 inch thickness for the base. Widen the opening to establish the floor of your ashtray, compressing the bottom well with your fingers or a rib to prevent cracking. -
Pull the Walls:
Pull the walls up to create a low cylinder, aiming for a height of about 1.5 to 2 inches. Ensure the wall thickness is consistent from bottom to top. -
Shape the Profile:
Using a rib tool on the inside and a sponge on the outside, gently shape the walls to have a slight inward curve or a straight vertical stance, depending on your preference. The example shows a relatively vertical wall with a softened rim. -
Finish the Rim:
Compress the rim with a chamois or your sponge to make it smooth and rounded. Cut the pot from the wheel with a wire tool and set it aside to dry to a leather-hard state.
Splatter Control
Practice your flicking motion on a piece of newspaper first. The distance of your thumb from the bristles determines the droplet size.
Step 2: Trimming and Carving
-
Trim the Foot:
Once leather hard, center the piece upside down on the wheel. Trim excess clay from the bottom to create a clean, defined foot ring that mirrors the vertical walls. -
Mark Notch Placement:
Flip the piece right side up. Decide where you want your cigarette rests. Standard placement is usually three or four notches, evenly spaced. -
Carve the Notches:
Using a fettling knife or a specialized carving tool, carefully cut U-shaped notches into the rim. They should be wide enough to hold a cigarette but not so deep that they compromise the wall’s structure. -
Smooth the Cuts:
I always take a damp sponge or finger to smooth the raw edges of the notches immediately after cutting to remove any sharp burrs. -
Bisque Fire:
Let the piece dry completely to bone dry, then load it into the kiln for a bisque firing (usually to Cone 04).
Center Island Option
Leave a raised mound of clay in the very center when throwing. This creates a ‘snuffer island’ to extinguish cigarettes without dirtying the base.
Step 3: Glazing
-
Apply Base Glaze:
Wipe the bisque ware with a damp sponge to remove dust. A dip or pour method works best here: coat the entire piece in a glossy white glaze. If your clay body isn’t naturally speckled, choose a ‘speckled white’ glaze. -
Create the Splatter:
Dip a stiff-bristle brush into your cobalt blue glaze. Hold the brush near the interior of the ashtray and flick the bristles with your thumb to spray fine droplets across the bottom and inner walls. -
Paint the Rim Accents:
Load a medium soft brush with the same cobalt blue. Paint distinct, bold rectangular patches over the rim, allowing the color to drip slightly down the exterior for an organic feel. -
Check the Foot:
Ensure the bottom foot ring is completely free of glaze. Wipe it clean with a sponge to prevent the piece from fusing to the kiln shelf. -
Final Fire:
Load the glazed ashtray into the kiln for the final glaze firing according to your clay and glaze specifications (typically Cone 5 or 6 for stoneware).
Once cooled, your durable stoneware ashtray is ready for use or display
Rustic Speckled Stoneware Ashtray
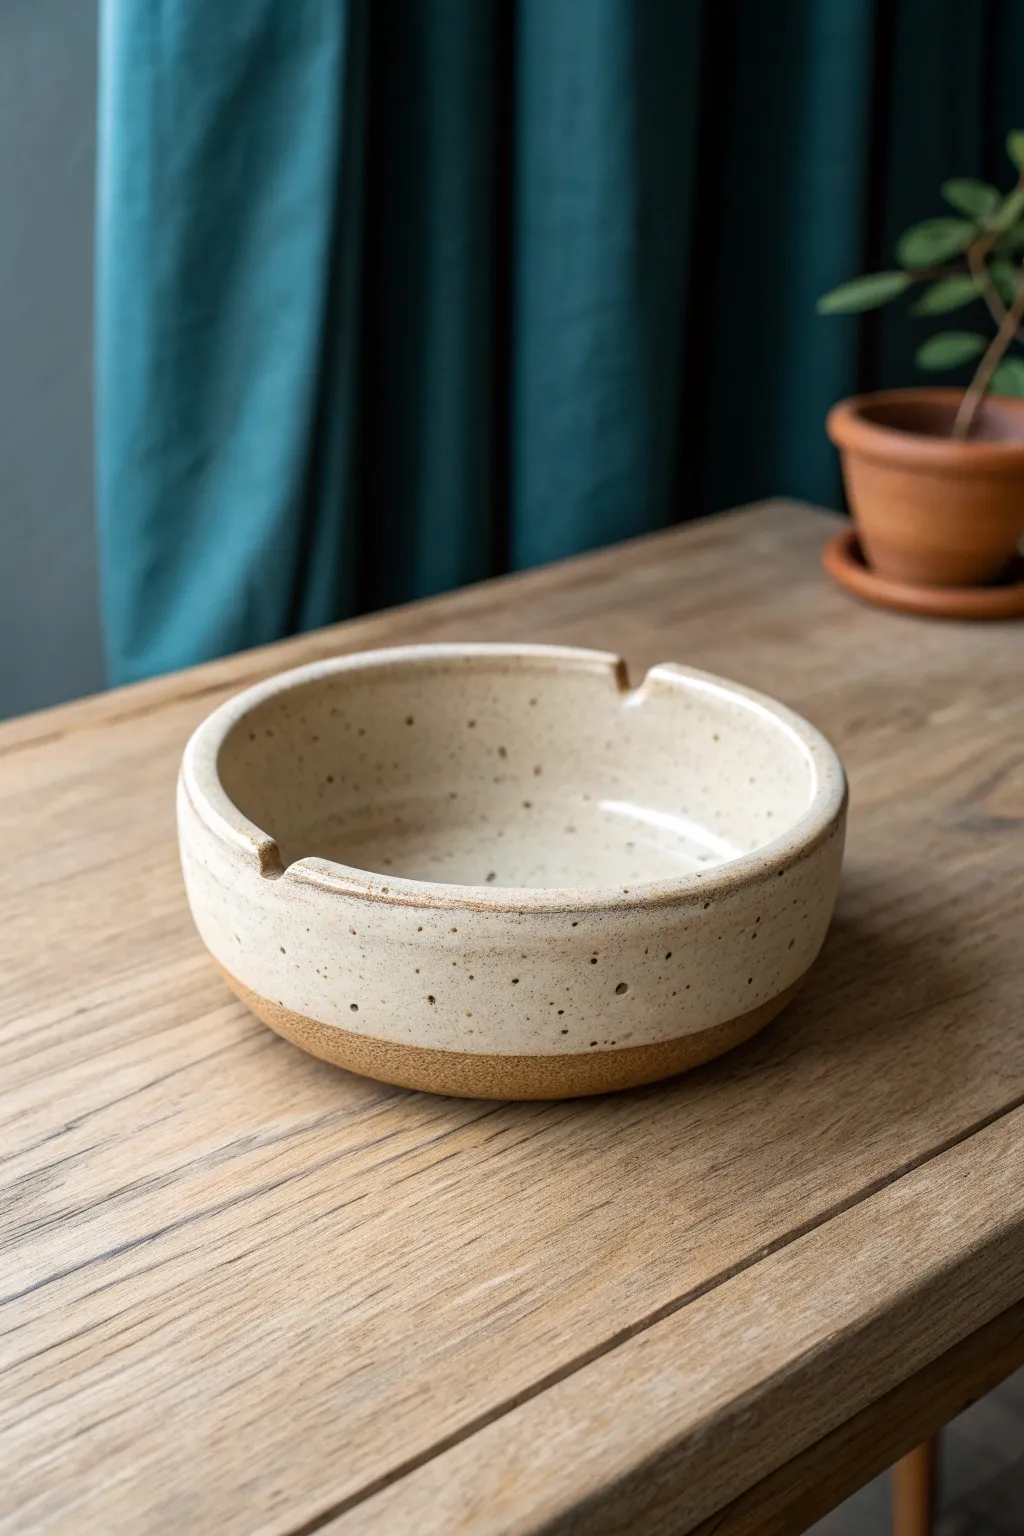
This project embraces the warmth of raw clay paired with a classic creamy glaze to create a functional piece of art. The finished ashtray features a beautiful contrast between the glossy, speckled interior and the gritty, unglazed base, perfect for adding a touch of rustic elegance to any table.
Step-by-Step Guide
Materials
- Speckled stoneware clay body (cone 6)
- Pottery wheel
- Throwing sponge
- Wire cutter tool
- Rib tool (wooden or metal)
- Trimming tools
- Needle tool
- Small round file or carving tool
- Creamy white speckle glaze (cone 6)
- Wax resist
- Glaze brush
- Bucket of water
Step 1: Throwing the Form
-
Prepare the Clay:
Begin by wedging about 1.5 to 2 pounds of speckled stoneware clay. Wedging removes air bubbles and aligns the clay particles, which is crucial for a smooth throwing process. -
Center on the Wheel:
Slam the ball of clay onto the center of the pottery wheel bat. With wet hands and high wheel speed, apply pressure to center the clay until it feels stable and doesn’t wobble. -
Open the Clay:
Press your thumbs into the center of the spinning clay to create the opening, leaving about half an inch of thickness at the bottom for the floor. This thickness is necessary for trimming later. -
Establish the Floor:
Pull the clay outward to create a flat, wide floor. Compress the floor with a damp sponge or your fingers, moving from the center out, to prevent S-cracks during drying. -
Pull the Walls:
Creating a low cylinder requires gentle pulling. Slow the wheel down slightly and pull the walls up. Since this is an ashtray, keep the walls relatively thick and sturdy, aiming for a height of about 1.5 to 2 inches. -
Shape the Rim:
Using a rib tool or your fingers, gently curve the walls inward slightly so the rim doesn’t flare out. Compress the rim with a piece of chamois or a sponge to make it smooth and rounded. -
Refine the Interior:
Use a rib to smooth the inside curve where the wall meets the floor. A crisp, clean interior curve makes the piece easier to clean later. -
Cut and Release:
Run a wire tool under the base of the pot to separate it from the bat. Carefully set the piece aside on a ware board and allow it to dry to a leather-hard state.
Iron Oxide Pop
If your clay body isn’t naturally speckled, mix a tiny pinch of granular iron oxide or ilmenite into your white glaze to fake that rustic, peppercorn look.
Step 2: Trimming and Detailing
-
Center for Trimming:
Once the clay is leather-hard (firm but still cold to the touch), center it upside down on the wheel. Secure it with small clay lugs. -
Define the Foot:
Using a trimming tool, shave away the excess clay from the lower outer wall. Create a slight undercut to distinguish the foot ring, mimicking the exposed clay look in the reference photo. -
Smooth the Texture:
After trimming, run a damp sponge or a smooth rib over the trimmed area to burnish the grog back into the clay, ensuring the unglazed part won’t be too scratchy. -
Create the Notches:
Flip the piece right-side up. Using a carving tool or the side of a large needle tool, I like to gently press down two opposing notches into the rim. Ensure these are wide enough to hold a cigarette comfortably. -
Smooth the Notches:
Use a damp sponge or your finger to smooth the edges of the cut notches. Sharp edges here can become brittle after firing. -
Bisque Fire:
Allow the piece to dry completely until bone dry. Place it in the kiln for a bisque firing (usually to Cone 04) to prepare it for glazing.
Step 3: Glazing and Finishing
-
Wax the Base:
Apply wax resist to the bottom half-inch of the exterior wall and the entire underside. This creates the clean, straight line visible in the project image where the glaze stops. -
Apply the Glaze:
Dip the piece into a creamy white speckle glaze, or brush on 3 even coats if using brush-on glaze. Ensure the glaze covers the interior and the rim completely, stopping at the wax line. -
Clean Up:
Use a damp sponge to wipe away any glaze beads that may be sitting on top of the waxed area. The transition line should be crisp. -
Glaze Fire:
Load the kiln for the final glaze firing (Cone 6 for stoneware). Ensure the piece doesn’t touch any other pottery. -
Final Sanding:
Once cooled and removed from the kiln, use wet sandpaper (around 400 grit) to briefly sand the unglazed bottom foot, ensuring it is perfectly smooth and won’t scratch table surfaces.
Level Up: Agateware
Combine two different colored clays (like white and brown stoneware) when wedging to create a marbled agateware effect that shows through on the unglazed bottom section.
Your finished stoneware piece is now ready for use or display, bringing a lovely handmade warmth to your space


What Really Happens Inside the Kiln
Learn how time and temperature work together inside the kiln to transform clay into durable ceramic.
Two-Tone Dip-Glazed Rim Ashtray
This project leans into the classic charm of mid-century modern design with a speckled, creamy clay body and a distinct rust-brown rim. The two-tone glaze application is achieved through a simple dipping technique that creates a crisp, professional line and a warm, earthy contrast.
Detailed Instructions
Materials
- Speckled stoneware clay (white or light buff)
- Pottery wheel
- Throwing tools (sponge, wooden rib, wire cutter)
- Needle tool
- Loop trimming tool
- Small round carving tool (for notches)
- Clear matte or satin glaze
- Rust/burnt orange glossy glaze
- Wax resist
- Large sponge for smoothing
- Kiln
Step 1: Throwing the Form
-
Prepare Clay:
Begin by wedging about 1-1.5 pounds of speckled stoneware clay to remove air bubbles. Ensure the clay is centered firmly on your wheel head. -
Open and Widen:
Open the centered clay and pull the floor out until it reaches roughly 5-6 inches in diameter. Compress the floor well with a rib to prevent S-cracks later. -
Pull the Walls:
Pull the walls straight up to form a cylinder, aiming for a height of about 2 inches. Keep the walls vertical rather than flaring them out to maintain that modern cylindrical profile. -
Define the Rim:
Thicken the rim slightly by compressing it with a chamois or sponge. You want the rim to be substantial enough to support the notches later. -
Smooth the Surface:
Use a straight metal or wooden rib against the outside wall while the wheel is spinning slowly to remove throwing lines and create a perfectly smooth, flat exterior. -
Cut and Dry:
Wire the pot off the wheel but leave it on the bat if possible. Let it dry to a leather-hard state, which usually takes about a day depending on humidity.
Rim Smoothness
Check the notches immediately after dipping the rim. Glaze tends to pool in these crevices; wipe them slightly with a finger to prevent sharp edges.
Step 2: Trimming and Notching
-
Trim the Foot:
Once leather hard, center the piece upside down on the wheel. Use a loop tool to trim the bottom, creating a clean, flat foot or a slight foot ring depending on your preference. -
Flip and Mark:
Turn the piece right-side up. Using a needle tool, lightly mark three equidistant points (at 12, 4, and 8 o’clock positions) on the rim where the cigarette rests will go. -
Carve the Notches:
Use a round carving tool or a small loop tool to gently carve out the U-shaped notches at your marked points. Press straight down, curving outward slightly. -
Refine Edges:
Smooth the edges of your fresh cuts with a slightly damp sponge or finger to ensure there are no sharp burrs that will snag later. -
Bisque Fire:
Allow the ashtray to dry completely until bone dry. Load it into the kiln for a bisque firing (Cone 04 or 06).
Step 3: Glazing Process
-
Wash and Prep:
Wipe the bisque-fired piece with a damp sponge to remove any kiln dust. This ensures the glaze adheres properly. -
Base Glaze:
Pour a clear matte or satin glaze inside the ashtray and swirl it to coat the interior, then pour the excess out. If you want the exterior base to be raw clay, leave it unglazed. If you want a sheen, dip the whole piece in clear glaze first. -
Wax Resist (Optional):
If you dipped the whole piece in clear, apply a band of wax resist to the lower body if you want to ensure the brown rim stops at a specific line, though free-hand dipping is often more organic. -
Dip the Rim:
Prepare your rust-orange glossy glaze. Turn the ashtray upside down. Holding it by the foot, dip the rim straight down into the rust glaze about 1 inch deep. -
Hold and Lift:
Hold it submerged for 3-5 seconds to build up opacity. Lift it straight up quickly to minimize drips. I find a quick, confident motion works best here. -
Clean Up:
Once the glaze is dry to the touch, gently rub away any unwanted drips or unevenness on the line with a stiff brush or sponge. -
Final Fire:
Load the glazed piece into the kiln for the final glaze firing (typically Cone 5 or 6 depending on your clay body).
Texture Twist
Before the first firing, lightly press coarse sand or grog into the exterior clay wall for an even more tactile, rustic hand-feel.
Enjoy the satisfying weight and earthy tones of your new handmade pottery piece.
Matte Outside, Glossy Inside Ashtray
This project celebrates the beautiful contrast between raw, earthy textures and smooth, functional surfaces. You will create a sturdy, thick-walled ashtray featuring a speckled matte base and a rich, glossy glazed interior.
Step-by-Step
Materials
- Speckled buff stoneware clay (or a clay body with grog/speckles)
- Pottery wheel (or hand-building tools if preferred)
- Needle tool
- Ribs (wooden and rubber)
- Wire cutter
- Trimming tools
- Sponge
- Clear gloss glaze
- Honey or amber semi-transparent glaze (optional for rim)
- Wax resist
- Kiln access
Step 1: Forming the Base
-
Prepare the Clay:
Begin by wedging about 1.5 to 2 pounds of speckled buff stoneware clay. Ensure there are no air bubbles, as these can cause explosions in the kiln. I find that thoroughly wedged clay makes centering much easier. -
Center on the Wheel:
Throw the ball of clay onto the center of the wheel head. Using wet hands and steady pressure, center the clay until it spins without wobbling. -
Open the Clay:
Press your thumbs into the center of the mound to open it, leaving about a half-inch of thickness at the bottom for the base. This thickness is crucial for trimming later. -
Establish the Floor:
Pull the clay outward to create a flat floor. Use a wooden rib or sponge to compress the floor thoroughly; this prevents S-cracks during drying. -
Pull the Walls:
Pull the walls up vertically. Keep the walls relatively thick—about a quarter-inch to 3/8-inch—to give the ashtray a substantial, chunky feel. -
Shape the Cylinder:
Use a straight rib on the outside against your inside hand to ensure the walls are perfectly vertical and the surface is smooth. Define the rim by compressing it with a chamois or sponge. -
Cut from Wheel:
Run a wire cutter underneath the pot to separate it from the wheel head. Carefully lift it off using pot lifters or dry hands and place it on a ware board to stiffen up to leather-hard.
Step 2: Trimming and Carving
-
Center for Trimming:
Once the piece is leather-hard (stiff but still cool to the touch), flip it over and center it on the wheel head. Secure it with small lugs of soft clay. -
Trim the Foot:
Using a trimming tool, remove excess clay from the bottom and lower walls. Aim for a flat base that transitions smoothly into the vertical walls. -
Carve the Notches:
Turn the pot right-side up. Identify three equidistant points on the rim. Use a round carving tool or a fettling knife to gently carve out U-shaped notches for the cigarettes. Smooth the edges with a damp finger. -
Add Texture (Optional):
If your throwing lines weren’t distinct, you can use a serrated rib or trimming tool to gently scratch vertical texture into the upper third of the exterior wall, creating a band for the glaze to break over. -
Bisque Fire:
Allow the piece to dry completely (bone dry). Fire it in the kiln to bisque temperature (usually Cone 04 or 06) to permanentize the shape.
Uneven Drying?
If the rim is drying faster than the thick base, loosely drape a piece of plastic over the rim. This slows evaporation, equalizing moisture levels.
Step 3: Glazing and Finishing
-
Clean the Bisque:
Wipe the bisque-fired piece with a damp sponge to remove any dust, which can prevent glaze adherence. -
Apply Wax Resist:
Apply wax resist to the bottom of the piece and up the side walls, stopping right where the textured rim band begins. This ensures the bottom stays raw and matte. -
Glaze the Interior:
Pour a clear gloss glaze inside the ashtray. Roll it around to coat the bottom and inner walls completely, then pour out the excess. Wipe any drips off the rim immediately. -
Glaze the Rim:
Using a brush or by carefully dipping just the top, apply an amber or honey-colored semi-transparent glaze to the rim and the upper exterior band. The wax resist will stop the glaze from running down the matte section. -
Wipe Back:
Use a damp sponge to clean up the line where the glaze meets the raw clay. It should be a clean, sharp transition. -
Final Fire:
Load the piece into the kiln for the final glaze firing (usually Cone 5 or 6, depending on your clay and glaze). Ensure the glazed rim doesn’t touch any other pots.
Variable Texture
Create a ‘chattering’ effect on the trim band by vibrating a trimming tool against the leather-hard clay, adding a rhythmic pattern under the glaze.
Once cooled, your ashtray is ready to serve as a stylish, functional piece of decor

TRACK YOUR CERAMIC JOURNEY
Capture glaze tests, firing details, and creative progress—all in one simple printable. Make your projects easier to repeat and improve.
Reactive Glaze “Cosmic” Ashtray
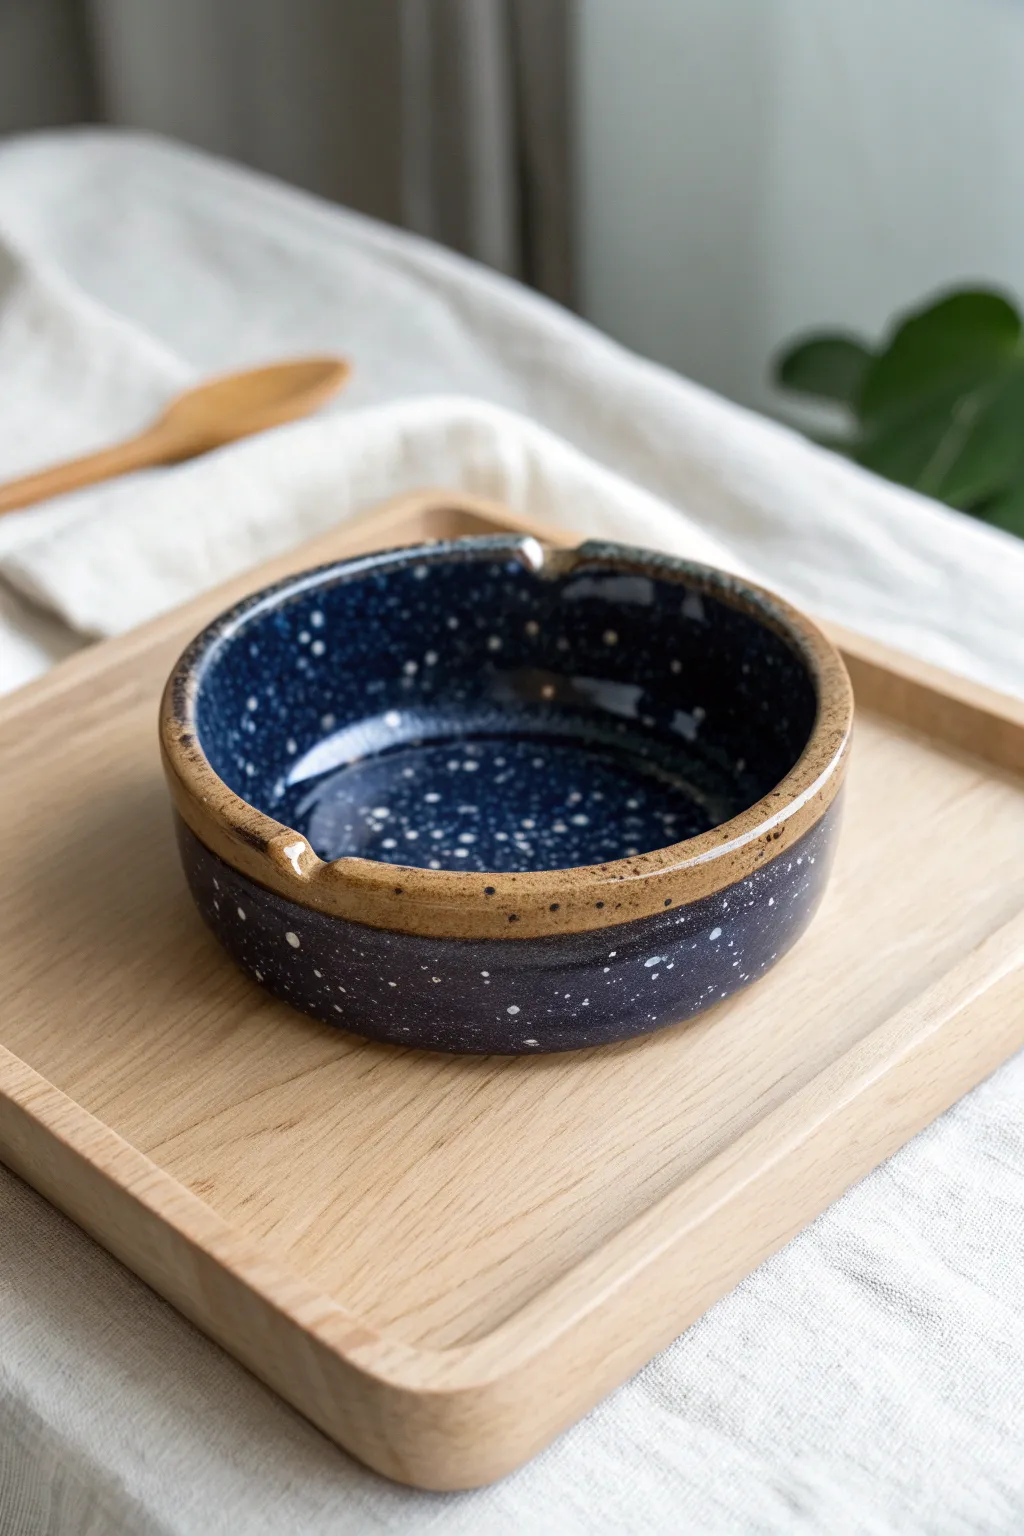
This stunning ceramic piece captures the mystery of the cosmos with its deep indigo glaze and scattering of starlight speckles. The contrast between the glossy, galactic interior and the earthy, unglazed rim gives it a grounded yet ethereal aesthetic perfect for modern decor.
How-To Guide
Materials
- Stoneware clay body (buff or speckled)
- Pottery wheel (or slab roller for hand-building)
- Small sponge
- Rib tool (wooden or metal)
- Wire cutter
- Trimming tools
- Fettling knife or small round file
- Glossy dark blue reactive glaze (e.g., Midnight Blue)
- White glaze or underglaze for speckling
- Stiff bristle brush (e.g., toothbrush)
- Wax resist emulsion
- Kiln access
Step 1: Forming the Base
-
Prepare the clay:
Begin by thoroughly wedging about 1 to 1.5 lbs of stoneware clay to remove any air bubbles. Pat it into a round ball and throw it forcefully onto the center of your wheel head. -
Center and open:
Use water and firm pressure to center the clay. Open the mound, focusing on creating a wide, flat bottom rather than a deep bowl shape. You want a floor that is about 1/4 inch thick. -
Pull the walls:
Slowly pull up the walls to a height of about 2 inches. Keep the walls strict and vertical, perpendicular to the wheel head, rather than bowing them out like a bowl. Aim for a distinct, straight-sided cylinder shape. -
Define the rim:
Compress the rim with your chamois or sponge. I like to leave the rim slightly thicker than the walls to give it that substantial, rustic look seen in the photo. Flat or slightly rounded works best here. -
Refine the interior:
Use a rib tool to smooth the interior floor and walls, ensuring there are no throwing rings. A smooth surface will help the glaze pool beautifully later. -
Remove from wheel:
Run a wire cutter underneath the pot and carefully transfer it to a ware board. Let it dry to leather-hard consistency.
Step 2: Trimming and Carving
-
Trim the foot:
Once leather hard, center the piece upside down on the wheel. Trim away excess weight from the bottom and carve a clean foot ring. This elevates the piece physically and visually. -
Carve the rests:
Turn the piece right-side up. Using a fettling knife or a small round tool, gently carve out two or three U-shaped notches on the rim. These will serve as the rests. Smooth the edges of these cuts with a damp sponge so they aren’t sharp. -
Bisque fire:
Allow the ashtray to dry completely (bone dry). Load it into the kiln for a bisque firing, typically to Cone 04, to prepare it for glazing.
Rim Resist Issues
If glaze beads up badly on the wax, wait for the glaze to dry slightly before wiping. Wiping wet glaze often smears it into the clay pores, staining the bare rim.
Step 3: The Cosmic Glaze
-
Wax the rim:
Paint a band of wax resist along the top rim and slightly down the exterior, roughly 1/2 inch. This preserves the raw clay look shown in the image and prevents glaze from adhering there. -
Apply base glaze:
Dip the entire piece (or pour inside and out) using your deep blue reactive glaze. Hold it upside down for a few seconds to let excess drips run off. The wax on the rim will repel the glaze. -
Clean the rim:
Even with wax, some beads of glaze stick. Use a damp sponge to wipe the waxed rim area completely clean, ensuring a sharp line between the raw clay and the blue glaze. -
Create the stars:
Dip a stiff toothbrush or bristle brush into a white glaze (thinned slightly). Use your thumb to flick the bristles, spraying a fine mist of white dots over the blue glaze. Concentrate some sprays inside the bowl to create Milky Way-like clusters. -
Check the foot:
Ensure the bottom foot ring is completely free of glaze so it doesn’t fuse to the kiln shelf. -
Glaze fire:
Fire the piece to the maturation temperature of your clay and glaze (usually Cone 5 or 6 for stoneware). The heat will melt the blue and white specks together, creating the cosmic effect.
Depth Perception
Layer a semi-transparent black glaze under the deep blue for added depth. The speckles will float between the layers, making the finish look deeper.
Once cooled, you will have a functional galaxy right in the palm of your hand
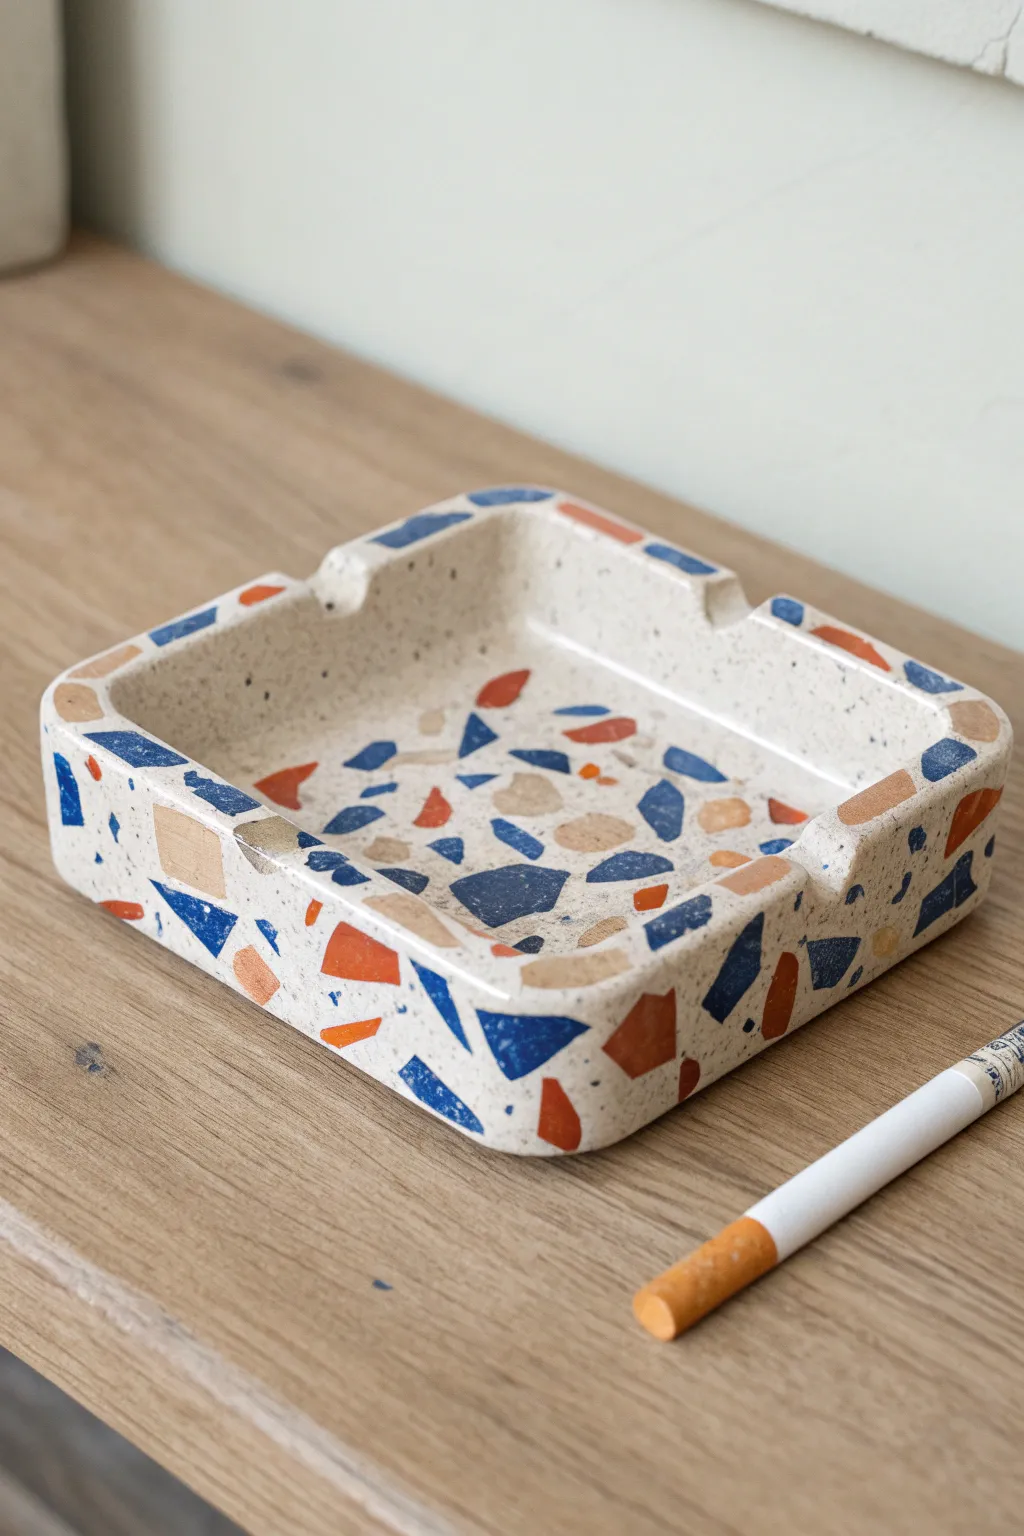
Terrazzo-Style Slip-Speckled Ashtray
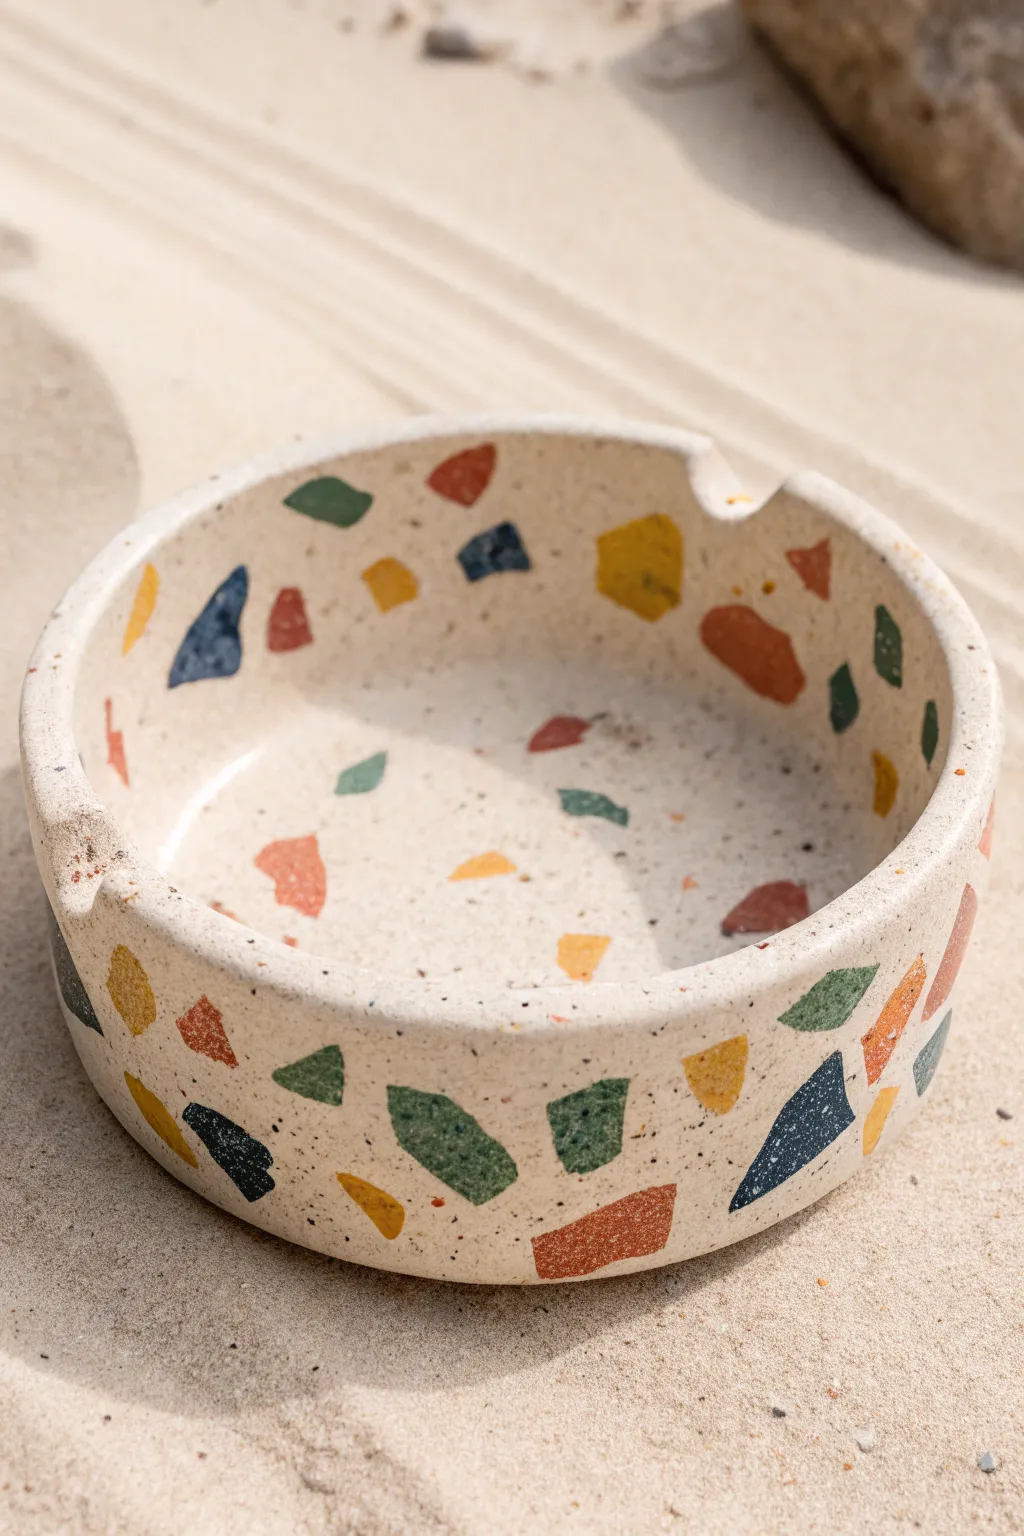
Capture the playful and modern aesthetic of terrazzo flooring in this charming handcrafted ceramic ashtray. Using colored clay inclusions within a neutral base, you will create a functional piece that feels both organic and stylishly retro.
Detailed Instructions
Materials
- Light-colored stoneware or earthenware clay (beige/white)
- Colored clay slips or underglazes (blue, green, orange, yellow, red)
- Small amounts of colored clay (alternatively use mason stains to color scraps)
- Rolling pin
- Canvas work surface or slab roller
- Circular template or cookie cutter (approx. 4-5 inches)
- Fettling knife or needle tool
- Rib tool (metal or rubber)
- Scoring tool (serrated rib)
- Slip (clay glue)
- Sponge
- Clear matte glaze (optional)
- Kiln access
Step 1: Preparing the Terrazzo ‘Chips’
-
Mix your colors:
If you don’t have pre-colored clay, take small golf-ball-sized chunks of your base clay and knead in Mason stains or oxides to create your palette: deep blue, forest green, burnt orange, mustard yellow, and a rusty red. I like to wear gloves here to avoid staining my hands. -
Flatten the colored clay:
Roll each colored ball into a very thin slab, approximately 1/8 inch thick. Uniformity isn’t crucial here, but thinness helps them integrate later. -
Create the shards:
Allow these thin colored slabs to dry until they are leather-hard. Once firm, break or cut them into random geometric shapes—triangles, trapezoids, and jagged pieces work best for that authentic terrazzo look. -
Sort your chips:
Separate your chips by color and size so you can easily grab what you need during the slab rolling process.
Clean Rolling
When rolling chips into the slab, place a piece of canvas or wax paper on top first. This prevents the colors from smearing or dragging across the white base clay.
Step 2: Building the Form
-
Roll the base slab:
Roll out a substantial slab of your neutral base clay, aiming for about 1/4 inch to 3/8 inch thickness. This will be the main body of your ashtray. -
Embed the chips:
Scatter your colored clay chips onto the surface of the wet base slab. Arrange them randomly, ensuring a good distribution of colors and spacing. Don’t press them in yet. -
Roll to integrate:
Take your rolling pin and gently roll over the chips and the base slab. You want to press the chips flush into the surface of the clay so it becomes one smooth, unified sheet. -
Cut the base:
Using your circular template, cut a round disc from the terrazzo slab. This will be the floor of your ashtray. -
Cut the wall strip:
From the remaining terrazzo slab, cut a long rectangular strip. The width determines the height of your ashtray (about 1.5 to 2 inches) and the length should match the circumference of your base disc.
Step 3: Assembly and Refining
-
Score and slip:
Score the outer edge of the circular base and the bottom long edge of your wall strip. Apply a generous amount of slip to the scored areas. -
Attach the wall:
Wrap the rectangular strip around the base disc. Press firmly to join the seams. At the point where the wall strip ends meet, cut through both layers at an angle (beveled cut) for a seamless vertical joint. -
Smooth the seams:
Use a tool or your finger to smooth the interior seam where the wall touches the floor. On the outside, blend the vertical seam so it disappears into the pattern. Support the wall from the inside while working. -
Refine the rim:
Use a damp sponge or a chamois cloth to smooth the top rim of the ashtray. It should be rounded and comfortable to the touch. -
Carve the rests:
Using a needle tool or a small carving loop, gently scoop out 2 to 3 semi-circle divots on the top rim. These will serve as the cigarette rests. Smooth the edges of these cuts with a wet finger. -
Drying:
Cover the piece loosely with plastic to let it dry slowly to the leather-hard stage, then uncover to bone dry. This prevents warping.
Chips Keep Popping Out?
If chips fall out during rolling, the base clay was likely too dry. Mist the slab slightly with water before scattering the chips to help them adhere instantly.
Step 4: Finishing
-
Bisque fire:
Load the bone-dry ashtray into the kiln for a bisque firing (usually Cone 04 or 06, depending on your clay). -
Sanding (optional):
Once bisqued, you can lightly sand the surface with high-grit sandpaper to really make those colors pop and ensure the surface is smooth. Wear a dust mask for this step. -
Glazing:
Apply a clear matte glaze to the interior and exterior to seal functionality while keeping the raw stone look. Alternatively, leave the outside unglazed for texture if the clay is vitreous. -
Final firing:
Fire the piece again to the maturation temperature of your clay and glaze (e.g., Cone 5/6 or Cone 10).
Once cooled, your custom terrazzo ashtray is ready to add a splash of retro color to any table setting
Sgraffito Line-Art Ashtray
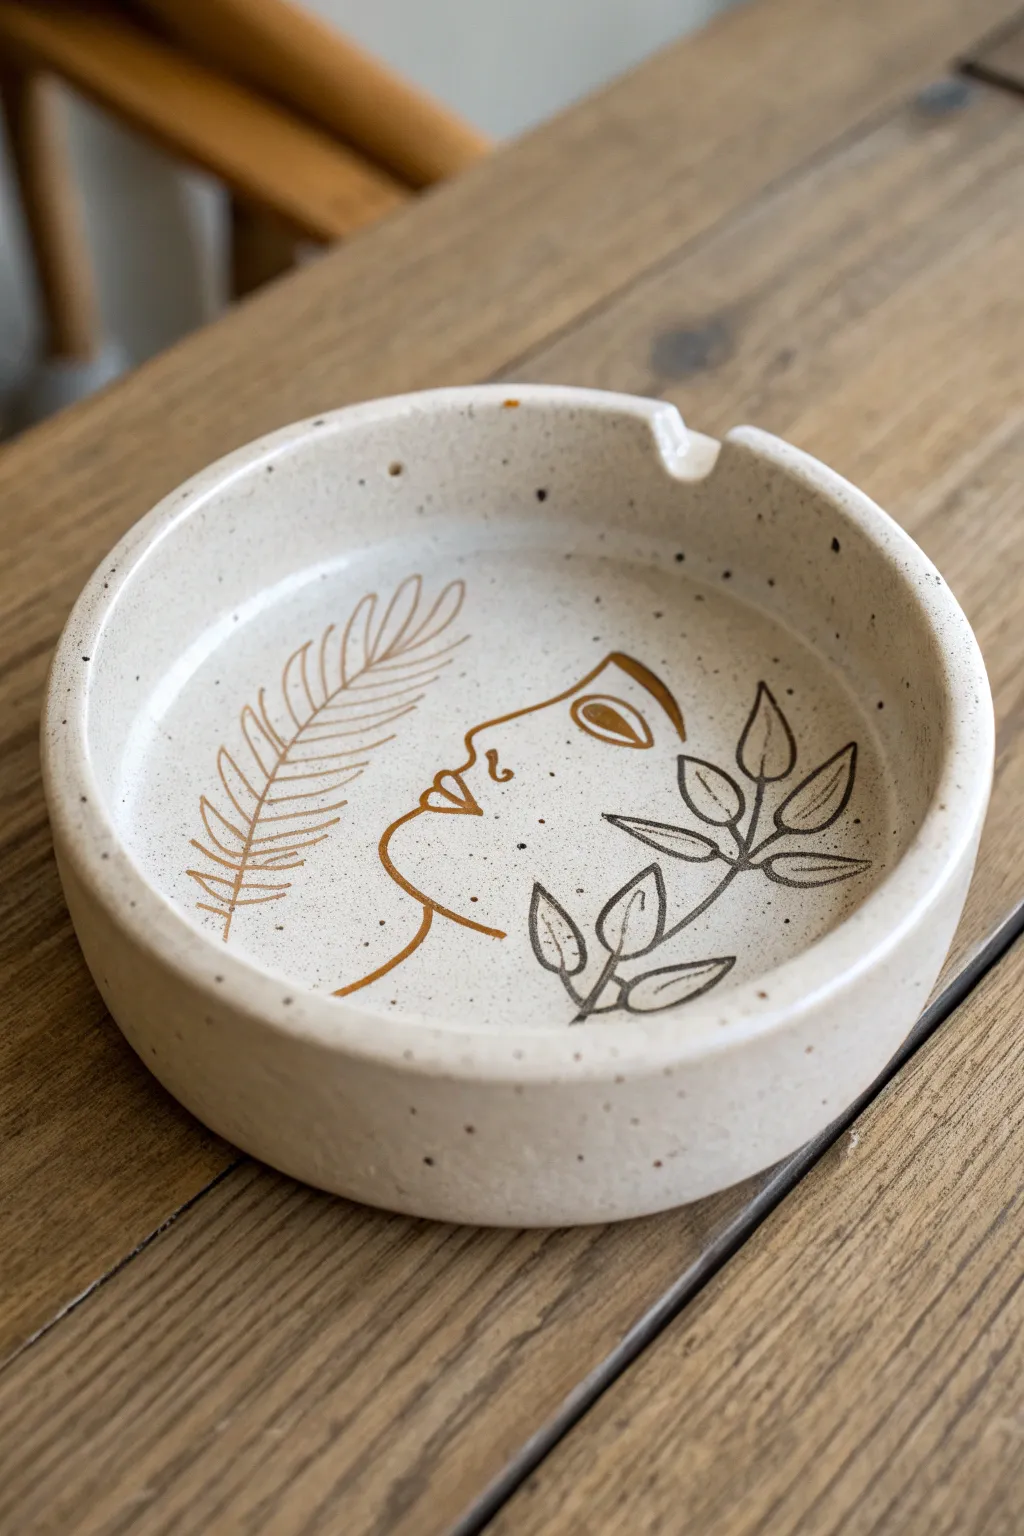
This project combines minimalist line art with earthy ceramics to create a speckled ashtray featuring a serene face profile surrounded by botanical elements. The light stoneware clay provides a perfect canvas for the delicate brown line work, resulting in a piece that feels both ancient and contemporary.
Step-by-Step
Materials
- Speckled stoneware clay (white or light buff)
- Rolling pin
- Circle template or bowl (approx. 5-6 inches)
- Clay knife or needle tool
- Sponge
- Brown underglaze or dark slip
- Fine-point sgraffito tool or etching needle
- Small paintbrush
- Clear glossy glaze
- Kiln access
Step 1: Forming the Base
-
Roll the slab:
Begin by rolling out your speckled stoneware clay into an even slab, aiming for a thickness of about 1/4 to 3/8 of an inch to ensure durability. -
Cut the circle:
Place your circle template or a bowl onto the slab and cut around it using a needle tool to create the base of your ashtray. -
Create the walls:
Cut a long strip of clay from the remaining slab, approximately 1.5 inches wide and long enough to wrap around the circumference of your base. -
Attach the walls:
Score and slip both the edge of the circular base and the bottom edge of the clay strip. Press the strip firmly onto the base to form the walls. -
Blend the seams:
Using your thumb or a wooden modeling tool, blend the clay at the seam where the wall meets the floor, both on the inside and outside, until the join is invisible. -
Smooth the rim:
Take a slightly damp sponge and run it over the rim to soften any sharp edges, leveling the top surface so it sits flat. -
Add cigarette rests:
Use your thumb or the handle of a tool to gently press down two or three indentations into the rim for the cigarette rests.
Clean Lines Hack
Change your sponge water frequently during the wipe-back phase. Dirty water will smear a haze over your clay surface.
Step 2: Designing the Art
-
Dry to leather hard:
Allow the piece to dry slowly until it reaches a leather-hard state. It should be firm enough to handle without warping but soft enough to carve. -
Sketch the profile:
Lightly sketch the outline of the face profile in the center using a pencil. The graphite will burn off in the kiln, so don’t worry about mistakes. -
Position the botanicals:
Sketch a fern frond curving along the left side of the face and a leafy branch on the right side to frame the portrait. -
Carve the lines:
Using your fine-point sgraffito tool, gently carve over your pencil lines. You want to create shallow, clean grooves rather than deep cuts. -
Clean the burrs:
After carving, brush away any little clay crumbs (burrs) with a soft dry brush to keep the lines crisp. I find a makeup brush works perfectly here.
Step 3: Inlaying and Glazing
-
Apply underglaze:
Paint the brown underglaze liberally over the carved lines, ensuring the liquid flows deep into the grooves you created. -
Wipe back:
Once the underglaze is touch-dry, use a clean, slightly damp sponge to wipe the surface. This removes the excess paint from the flat surface but leaves it trapped inside the carved lines. -
Bisque fire:
Place your ashtray in the kiln for a bisque fire (usually Cone 04) to harden the clay and set the underglaze design. -
Apply clear glaze:
Dip or brush a coat of clear transparent glaze over the entire piece. This will seal the clay and make the speckles pop. -
Final fire:
Fire the piece again to the maturation temperature of your specific clay body (likely Cone 5 or 6) to finish the ceramic process.
Gilded Touch
After the final glaze firing, apply ceramic gold luster to the face profile lines and re-fire at a low temp for a luxurious finish.
Now you have a functional piece of art that brings a touch of calm elegance to any table
Stamped Pattern Ashtray With Underglaze Wash
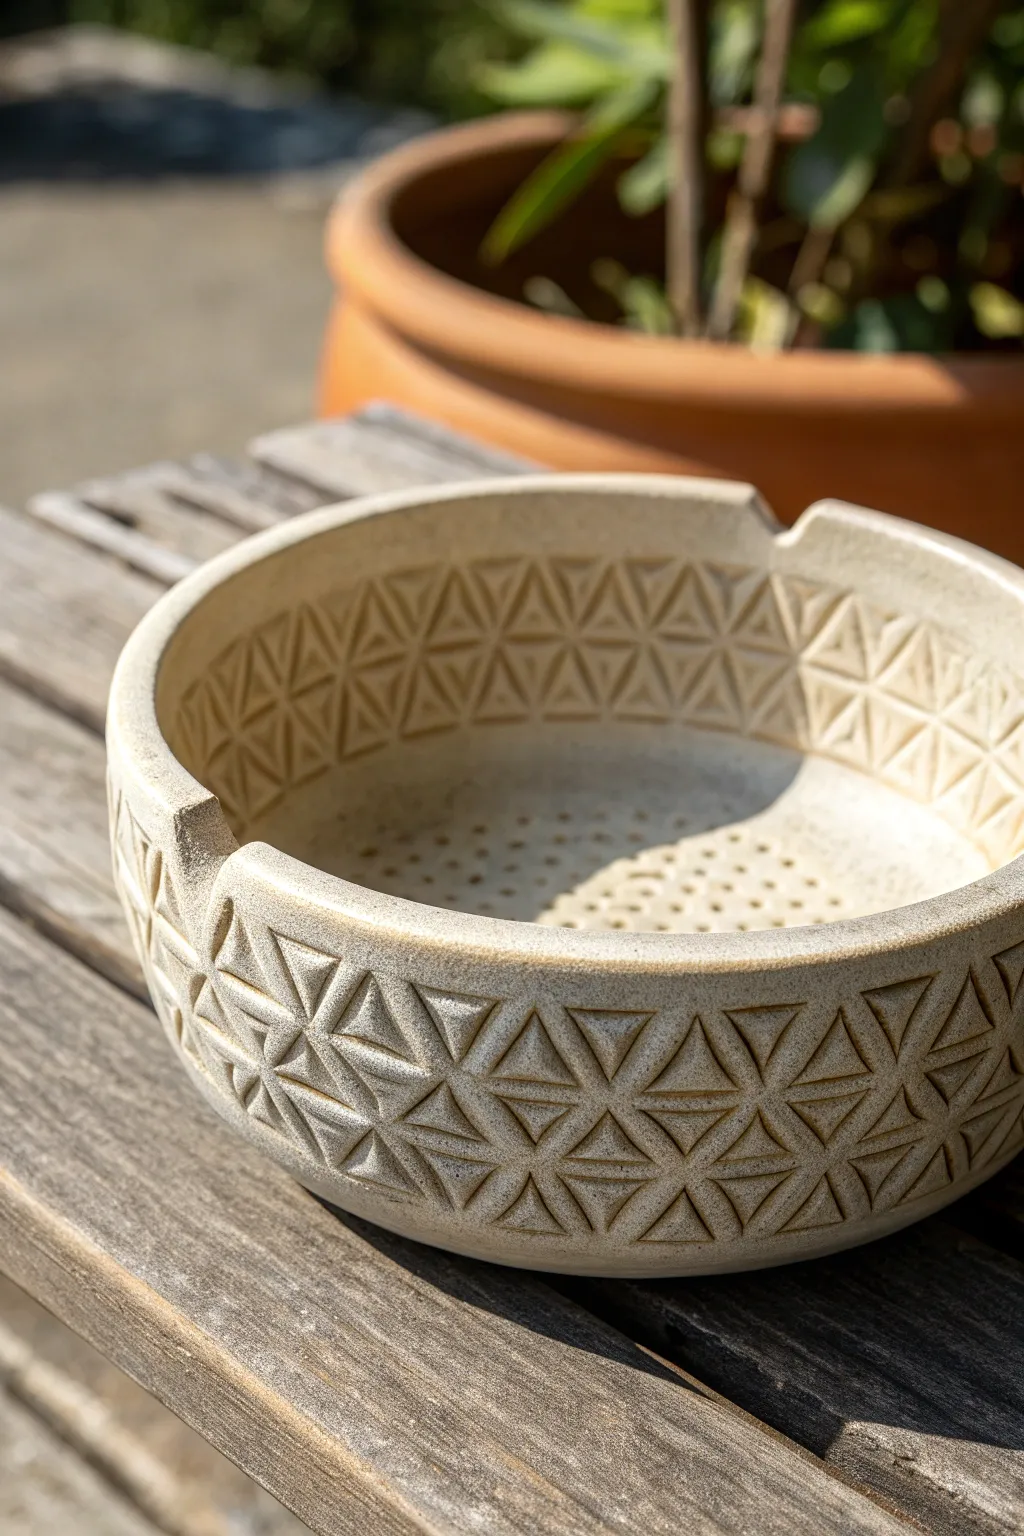
This project features a robust, wheel-thrown or hand-built ceramic ashtray adorned with a crisp, repeating triangle pattern. The magic comes from highlighting the stamped texture with a subtle wash that settles into the crevices, creating depth and accentuating the geometric design.
Step-by-Step Tutorial
Materials
- Speckled stoneware clay (approx. 2-3 lbs)
- Pottery wheel (or rolling pin for hand-building)
- Needle tool
- Rib tool (metal or wood)
- Geometric triangle stamp (bisque, 3D printed, or wood)
- Sponge
- Wire cutter
- Dark oxide wash (e.g., iron oxide or a dark mason stain mix)
- Clear matte glaze or transparent satin glaze
- Small trimming tool
- Paintbrush for applying wash
Step 1: Forming the Base Vessel
-
Prepare your clay:
Begin by wedging your speckled stoneware clay thoroughly to remove any air bubbles. You want a consistent texture throughout to ensure the walls throw evenly. -
Center and open:
Center the clay on the wheel head. Open it up, focusing on creating a wide, flat bottom rather than a tall vessel. You are aiming for a wide cylinder shape, roughly 6-7 inches in diameter. -
Pull the walls:
Pull the walls up to a height of about 2.5 to 3 inches. Keep the walls relatively thick—slightly thicker than a standard mug (about 1/4 to 3/8 inch)—to accommodate the stamping process later without deformation. -
Flatten the rim:
Use a chamois or your fingers to compress and flatten the rim slightly. A wide, flat rim provides a nice visual weight and durable edge. -
Refine the floor:
Use a rib or sponge to compress the floor of the pot. This is essential to prevent S-cracks during firing, especially with a wide, flat bottom. -
Dry to leather hard:
Cut the pot from the wheel but leave it on a bat if possible. Let it dry slowly until it reaches a sturdy leather-hard stage. It needs to be firm enough to handle pressure but soft enough to accept an impression.
Warped Walls?
If stamping deforms your round shape, stamp gently while the pot is still on the wheel. Afterwards, do one final slow spin with a rib inside to push walls back to perfect roundness without erasing texture.
Step 2: Stamping and Detailing
-
Trim the base:
Once leather hard, flip the piece over and trim the bottom. Create a distinct foot ring if desired, or just smooth the bottom flat. Ensure the wall thickness is even from top to bottom. -
Mark your grid:
Lightly visualize or mark horizontal bands around the exterior wall where your pattern will go. I find it helpful to make a very faint line with a needle tool while the wheel spins slowly to keep my rows straight. -
Stamp the exterior:
Support the wall from the inside with one hand. With the other, press your triangle stamp firmly into the exterior clay. Work your way around the circumference, row by row, nesting the triangles to create the tessellated pattern. -
Stamp the interior rim:
Repeat the stamping process on the upper inside wall of the ashtray. This creates a cohesive look that connects the inside and outside visually. -
Cut the rests:
Ideally, place 3 or 4 notches on the rim for holding cigarettes. Use a circular trimming tool or a sharp knife to carve out semi-circular notches. Smooth the cut edges with a damp sponge or finger. -
Create the snuffer grid:
In the center of the interior floor, create a texture for extinguishing. You can use a small round tool or the back of a drill bit to gently press a grid of small indentations into the floor. Don’t poke all the way through. -
Slow drying:
Wrap the piece loosely in plastic to dry very slowly. This evens out the moisture content between the compressed stamped areas and the rest of the clay, reducing warping.
Step 3: Glazing and Finishing
-
Bisque fire:
Once bone dry, fire the piece in your kiln to cone 04 (or your clay body’s bisque temperature). -
Apply the wash:
Mix a small amount of dark oxide wash (like iron oxide) with water. Brush it generously over all the stamped areas. You want it to get deep into the texture. -
Wipe back:
Using a clean, damp sponge, wipe away the excess wash from the high points of the surface. The dark color should remain only in the recessed stamped lines, emphasizing the geometry. -
Inside glazing:
Pour a clear matte or satin glaze into the interior. Swirl it around to coat the bottom and sides, then pour out the excess. This makes the ashtray functional and easy to clean. -
Outside glazing (optional):
For the exterior, you can leave the raw clay exposed if it’s vitrified, or apply a very thin coat of matte clear glaze. The raw clay provides a nice tactile contrast. -
Final clean up:
Wipe the foot ring completely clean of any glaze to prevent it from sticking to the kiln shelf. -
Glaze fire:
Fire the piece to your clay’s maturity temperature (e.g., cone 6 or cone 10) to vitrify the stoneware.
Make Your Own Stamp
Customize this project by carving your own signature stamp from a small block of dried clay. Bisque fire it, and you’ll have a unique tool that creates patterns no one else can replicate.
Once fired, the subtle speckles of the clay interacting with the darkened pattern lines create a timeless, artifact-like quality to your piece
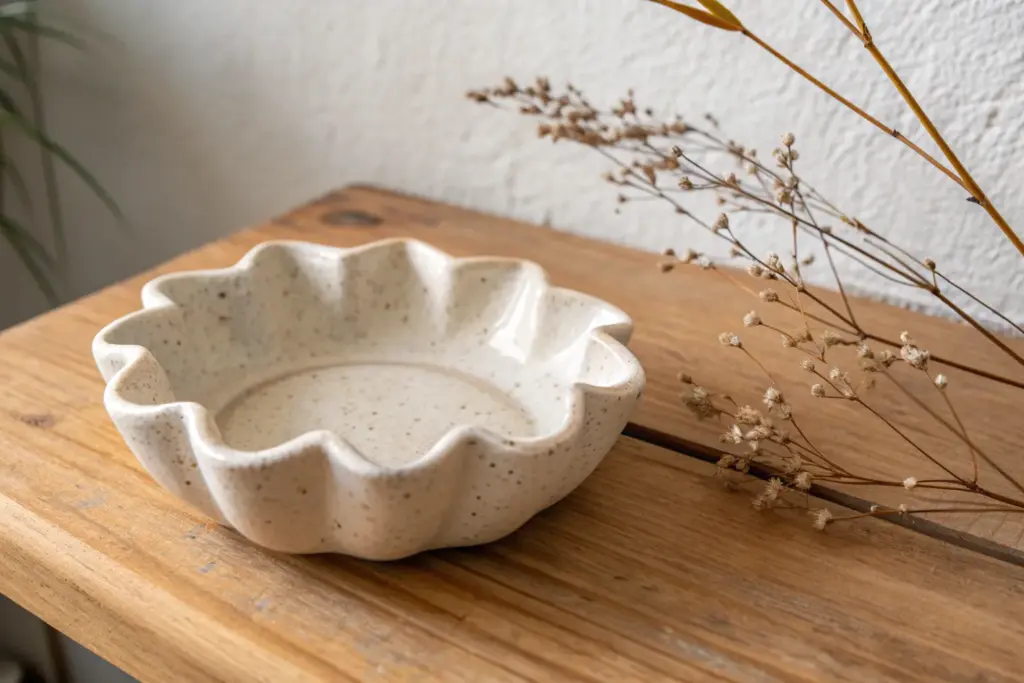
Fluted Shell-Inspired Ashtray
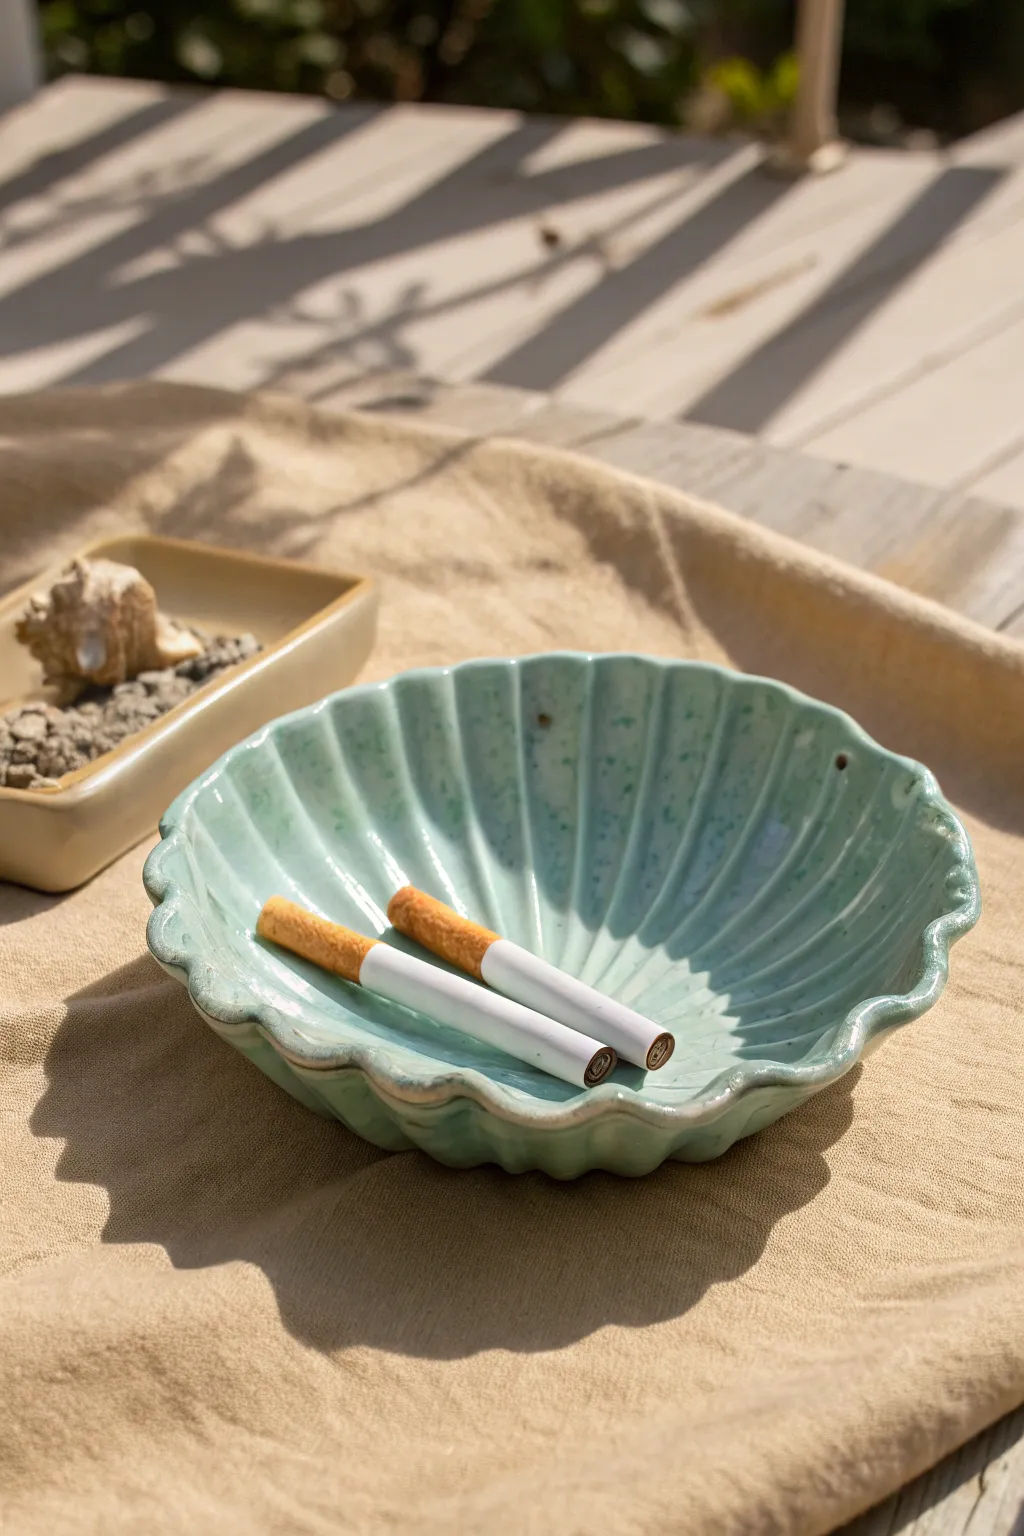
Bring a touch of coastal elegance to your smoking area with this handmade ceramic piece that mimics the gentle curves of a scallop shell. The glossy seafoam green glaze and organic fluted texture make it a functional object that doubles as stunning decor.
Detailed Instructions
Materials
- Light-colored stoneware clay (approx. 1 lb)
- Rolling pin
- Canvas work surface or ware board
- Needle tool
- Rib tool (wooden or silicone)
- Sponge
- Loop tool or carving tool
- Small bowl or slump mold (scallop shape preferred, but round works)
- Seafoam green reactive glaze
- Clear glaze (optional)
- Kiln access
Step 1: Forming the Base
-
Prepare the slab:
Begin by wedging your clay thoroughly to remove air bubbles. Roll it out into an even slab, approximately 1/4 inch thick. I like to rotate the clay periodically while rolling to ensure consistent thickness. -
Cut the rough shape:
Using a needle tool, cut out a circle roughly 6-7 inches in diameter. It doesn’t need to be geometrically perfect; a slightly organic edge adds to the shell aesthetic. -
Smooth the edges:
Take a damp sponge and run it along the cut rim of your clay circle. This softens the sharp angles left by the needle tool and prevents future chipping. -
Slump the form:
Gently lift your clay slab and drape it *inside* a bowl or slump mold to give it a concave shape. Press gently from the center outwards to ensure it conforms to the curve without trapping air.
Glaze Pooling Magic
Choose a ‘breaking’ or semi-transparent glaze. These pool in the flutes, creating darker colors in the depths and lighter colors on the ridges, emphasizing the texture.
Step 2: Texturing and Refining
-
Mark the flutes:
While the clay is still inside the mold and relatively soft, use the wooden end of a tool or your finger to lightly mark where the flutes (ridges) will go. They should radiate from the center bottom up to the rim. -
Create the ridges:
Using your thumb or a rounded rib tool, press firmly into the clay between your markings to create the deeper channels of the shell. Support the outside of the clay against the mold while you do this. -
Sculpt the rim:
Where each ridge meets the rim, gently push the clay inward to create a scalloped edge. Pinch the high points of the rim slightly to define the shell shape. -
Refine the interior:
Use a damp sponge to smooth out any harsh tool marks in the channels. The transition from the center to the fluted walls should be seamless and fluid. -
Dry to leather hard:
Allow the piece to dry in the mold until it is leather hard. This means it’s stiff enough to hold its shape but still retains moisture.
Step 3: Finishing and Firing
-
Trim the foot:
Remove the piece from the mold and flip it over. Using a loop tool, trim away excess weight from the bottom and carve a small foot ring so the ashtray sits stable on a table. -
Initial bisque fire:
Once fully bone dry, fire the piece in a kiln to cone 04 (or your clay’s specific bisque temperature). This hardens the clay and prepares it for glazing. -
Wipe down:
After the bisque fire, wipe the piece with a damp sponge to remove any kiln dust, which can prevent the glaze from adhering properly. -
Apply the glaze:
Dip or brush on your seafoam green reactive glaze. Ensure you get good coverage inside the fluted channels. For the look in the photo, allow the glaze to pool slightly in the crevices. -
Accentuate the rim:
If your glaze breaks (thins) naturally over edges, the rim will darken on its own. If not, wipe a tiny bit of glaze off the very edge of the scalloped rim to expose the clay body slightly. -
Clean the foot:
use a wax resist on the bottom foot ring capable or wipe it completely clean with a sponge. Any glaze left on the bottom will fuse your work to the kiln shelf. -
Glaze fire:
Fire the piece again to cone 5 or 6 (mid-range), or according to your specific glaze and clay instructions. Let the kiln cool completely before opening.
Warping Woes
If your shell shape warps during drying, dry it more slowly by covering it loosely with plastic. Uneven drying causes tension that pulls the rim out of round.
Place your finished piece in the sun to watch the light play across the glossy ridges
Ashtray With Built-In Match Strike Strip
This project mimics the rustic elegance of artisanal pottery with a functional twist. You will create a sturdy, speckled stoneware vessel featuring a matte exterior perfect for striking matches and a glossy, warm amber-glazed interior.
Step-by-Step Guide
Materials
- Speckled stoneware clay (mid-fire)
- Pottery wheel (or slab roller/rolling pin for hand-building)
- Needle tool
- Rib tool (metal and rubber)
- Wire cutter
- Trim tool (loop tool)
- Sponge
- Glossy amber or rust-colored glaze
- Wax resist
- Kiln
Step 1: Throwing the Form
-
Prepare the Clay:
Begin by thoroughly wedging about 1.5 to 2 pounds of speckled stoneware clay to remove air bubbles and ensure consistency. -
Center on the Wheel:
Secure the clay ball to the wheel head and center it using wet hands and steady pressure. -
Open the Clay:
Press your thumbs into the center to open the clay, leaving a floor thickness of about half an inch to allow for later trimming. -
Pull the Walls:
Pull the walls up to create a vertical cylinder, keeping them relatively thick (approx. 1/4 to 1/3 inch) for a substantial, sturdy feel. -
Refine the Shape:
Use a straight rib tool against the outside while pulling to ensure the walls are perfectly vertical and the bottom corner has a crisp, 90-degree transition. -
Finish the Rim:
Compress the rim with a chamois or sponge to make it smooth and rounded. -
Remove from Wheel:
Run a wire cutter underneath the pot and set it aside on a ware board until it reaches a leather-hard state.
Step 2: Trimming and Carving
-
Invert and Center:
Once leather hard, flip the pot upside down on the wheel head and center it precisely. -
Trim the Exterior:
Use a sharp loop tool to trim away excess clay from the bottom, defining a clean foot ring and smoothing the outer walls to a uniform texture. -
Smooth the Surface:
I find that running a barely damp sponge over the trimmed exterior helps bring the ‘speckles’ (manganese or iron spots) to the surface. -
Mark the Notches:
Turn the pot right-side up. Visualize a clock face and lightly mark the rim at the 3 and 9 o’clock positions for your cigarette rests. -
Carve the Rests:
Using a U-shaped carving tool or a small loop tool, gently carve out curved notches at your marks. Smooth the cut edges with a damp finger so they aren’t sharp. -
Bisque Fire:
Allow the piece to dry completely (bone dry) before loading it into the kiln for a bisque fire (usually Cone 04).
Match Strike Troubleshooting
If matches won’t strike on the finished exterior, your clay body might be too smooth. Use a more grotesque clay with grog, or refrain from burnishing the outside during the throwing phase.
Step 3: Glazing and Finishing
-
Clean the Bisqueware:
Wipe the fired piece with a damp sponge to remove any kiln dust ensuring the glaze adheres properly. -
Apply Wax Resist:
Apply wax resist carefully to the entire exterior wall and the top rim. This is crucial as we want the raw, rough clay exposed on the outside for that match-strike texture. -
Pour the Interior Glaze:
Pour your glossy amber or rust glaze into the center of the pot. Swiftly swirl it around to coat the interior walls and floor, then pour out the excess. -
Clean Mistakes:
If any glaze dripped onto the waxed exterior, wipe it away immediately with a wet sponge. The exterior must remain bare. -
Glaze Fire:
Load the piece into the kiln for the final glaze firing (match the temperature to your clay body, likely Cone 5 or 6). -
Final Sanding:
Once fired and cooled, use high-grit sandpaper to lightly smooth the unglazed bottom foot to prevent scratching your furniture.
Level Up: Textural Contrast
Add a dedicated strike patch. Before bisque firing, mask off a rectangle on the side and brush on a ‘match strike’ slip (mixture of grit and clay) for a dedicated functional area.
Place your finished piece on a side table to add a touch of warm, earthy ceramics to your decor
Stackable Nesting Ashtray Set
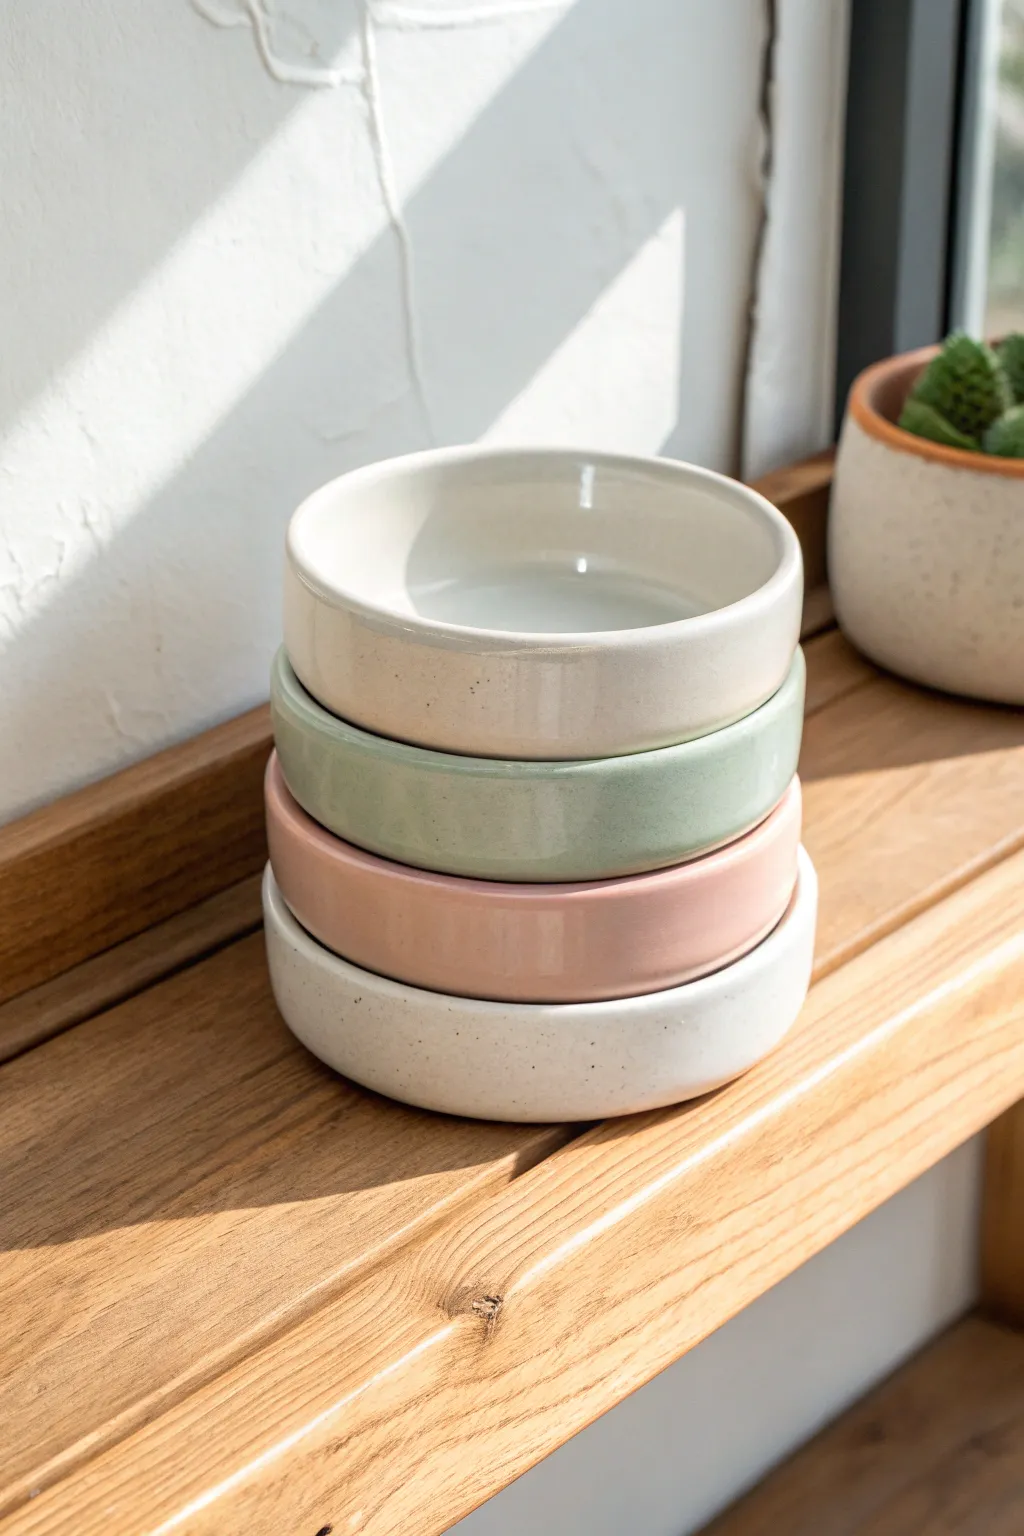
Create a sleek, functional set of ceramic nesting dishes that prioritize clean lines and subtle, calming hues. This project builds a beautifully stacked collection featuring soft pastel glazes and a satisfyingly smooth finish that looks right at home in a modern interior.
Step-by-Step
Materials
- White stoneware clay body
- Pottery wheel (or slab roller for hand-building)
- Wire cutter
- Rib tools (wood and metal)
- Trimming tools (loop tool)
- Calipers
- Sponge
- Kiln
- Glazes: Glossy Cream, Celadon Green, Blush Pink, Speckled White or Grey
- Wax resist
Step 1: Throwing the Forms
-
Prepare the Clay:
Begin by wedging four equal-sized balls of white stoneware clay to remove air bubbles. Aim for about 1 pound of clay per ball to ensure uniform sizing for your set. -
Center the Clay:
Place the first ball on the wheel head. Using steady pressure and water for lubrication, center the clay into a low, wide mound rather than a tall cone. -
Open the Floor:
Open the clay to establish a flat interior floor. Compress the bottom thoroughly with your fingers or a wooden rib to prevent S-cracks during drying. -
Pull the Walls:
Gently pull the walls up. Unlike a cereal bowl, you want the walls to be distinct and vertical with a slight outward flare. Keep the walls thick enough—about 1/4 inch—to withstand stacking. -
Measure for Nesting:
For the first bowl, establish your baseline width. For the subsequent three bowls, use calipers to measure the rim diameter of the previous bowl. You want each subsequent bowl to be identical in diameter to allow them to stack flush, or slightly gradated if you prefer a true nesting fit. -
Refine the Rim:
Use a chamois or a small strip of plastic to compress and round the rim. A rounded rim is essential for chip resistance when these pieces are stacked. -
Smooth the Profile:
Before removing from the wheel, use a metal rib on the exterior to remove throwing lines. The goal is a clean, modern silhouette as seen in the photo.
Uneven Stacking?
If bowls wobble when stacked, the rims or feet aren’t level. After trimming, place the inverted bowl on a flat board to check for rocking. Use a rasp to level the leather-hard rim before firing.
Step 2: Trimming and Drying
-
Dry to Leather Hard:
Allow the four pieces to dry slowly until they reach a leather-hard state. They should be firm enough to handle without deforming but soft enough to carve. -
Secure for Trimming:
Center a piece upside down on the wheel. Secure it with small lugs of fresh clay. -
Trim the Foot:
Using a sharp loop tool, trim away excess weight from the base. Create a distinct, flat foot ring. I like to make the foot ring wide and flat to ensure stability when the ashtrays are stacked. -
Refine the Bottom Curve:
Ensure the curve from the wall to the foot is smooth and continuous. Burnish the trimmed area with a smooth stone or the back of a spoon to tighten the clay particles. -
Bisque Fire:
Once fully bone dry, load the pieces into the kiln and bisque fire them (usually to cone 04) to prepare them for glazing.
Step 3: Glazing and Finishing
-
Clean the Bisque:
Wipe down each bisque-fired piece with a damp sponge to remove any dust, which can cause pinholing in the glaze. -
Apply Wax Resist:
Carefully paint wax resist on the bottom foot ring of each piece. This prevents glaze from fusing the pot to the kiln shelf. -
Mix Your Palette:
Prepare your four distinct glaze colors. For the look in the image, you need a glossy cream, a soft sage/celadon, a dusty blush pink, and a white glaze with iron specks. -
Dip and Pour:
Dip each bowl into its designated color. Hold it submerged for about 3 seconds for an even coat. Shake off excess glaze gently as you pull it out. -
Check the Fit:
Before the final firing, ensure no glaze is too thick near the rim, as running glaze could ruin the clean lines. -
Glaze Fire:
Load the kiln carefully, ensuring pieces aren’t touching. Fire to the maturity temperature of your clay and glaze (typically Cone 5 or 6 for stoneware). -
Sand the Feet:
After the kiln has cooled and you’ve unloaded, use wet-dry sandpaper or a diamond sanding pad to smooth the unglazed foot rings. This prevents scratching when the pieces are stacked.
Add Texture
For the bottom ‘speckled’ bowl, try mixing fine grog or dark sand into your white clay body before throwing. This creates a natural texture that shows through a sheer white glaze.
Stack your finished set on a side table or window sill to enjoy the beautiful gradient of tones you have created
Cat Face Ashtray With Corner Rests
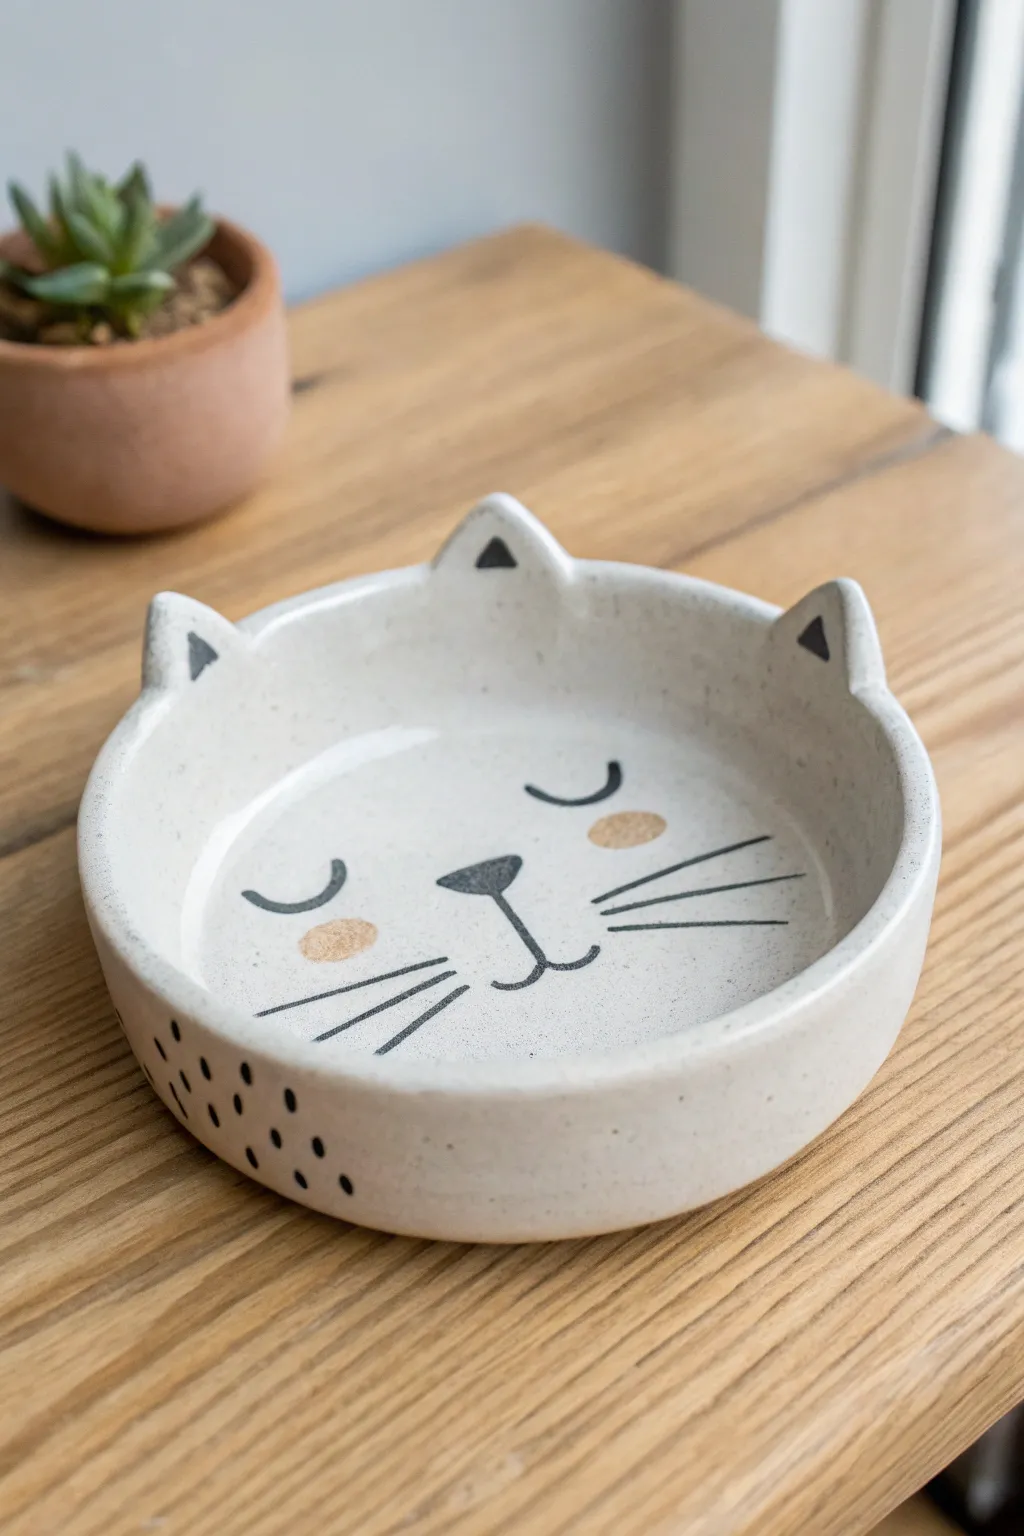
This charming ceramic piece combines functionality with a playful, minimalist cat design. Featuring a speckled white glaze and delicate hand-painted facial features, this shallow dish uses the cat’s ears as clever rests for a seamless blend of form and utility.
Detailed Instructions
Materials
- White stoneware clay with speckles (or standard white clay)
- Rolling pin
- Canvas mat or slab roller
- Circular template or bowl (approx. 5-6 inches diameter)
- Needle tool or fettling knife
- Rib tool (kidney)
- Scoring tool or serrated rib
- Slip (clay and water mixture)
- Sponge
- Small liner brush
- Black underglaze
- Peach or light pink underglaze
- Clear transparent glaze (food safe if doubling as a snack dish)
- Kiln
Step 1: Forming the Base
-
Roll the slab:
Begin by wedging your speckled stoneware clay to remove air bubbles. Roll it out into a smooth, even slab about 1/4 inch thick using your rolling pin and canvas mat. If you want that natural speckled look shown in the photo, ensure your clay body has grog or speckles in it. -
Cut the circle:
Place your circular template or an inverted bowl onto the slab. Using a needle tool, trace and cut out a perfect circle. This will form the main body of the ashtray. -
Smooth the surface:
Take a damp sponge or a soft rib and gently compress the clay surface on both sides. This removes the canvas texture and aligns the clay particles to prevent cracking later. -
Create the walls:
Roll a long coil of clay, approximately the thickness of your pinky finger. Score the outer edge of your circular base and apply a little slip. -
Attach the coil:
Place the coil on top of the scored edge to build the wall. Using your thumb or a modeling tool, blend the coil downward into the base on both the inside and outside until the seam is invisible. -
Shape the rim:
Pinch the wall gently to reach a uniform height of about 1 inch. Use a sponge to smooth the rim so it is rounded and comfortable to the touch.
Keep it Clean
Wipe your underglaze designs with a barely damp sponge if you make a mistake before firing. The pigment sits on top and can be erased easily.
Step 2: Sculpting the Ears
-
Form the ears:
From your leftover slab, cut out three small triangles. I find that slightly rounding the tips makes them look softer and friendlier. These will serve as the cat’s ears and the corner rests. -
Position the ears:
Arrange the three triangles on the rim. Place two closer together at the ‘top’ for the cat’s head ears, and place the third one exactly opposite at the bottom, or space them equally in a triangle formation depending on preference. -
Attach and blend:
Score the bottom of the triangles and the corresponding spots on the rim. Apply slip and press them firmly into place. Use a small tool to blend the clay of the ears seamlessly into the rim wall so they look like one continuous piece. -
Refine the shape:
Once attached, smooth out any tool marks with a damp sponge. Ensure the ‘ears’ serve as functional rests by checking that a cigarette could rest securely in the dips between the ear and the rim.
Make it a Set
Create a matching smaller dish for matches or a lighter! Make it a ‘kitten’ by scaling down the dimensions by 30%.
Step 3: Decoration & Glazing
-
Bisque fire:
Allow the piece to dry slowly under plastic for a day, then uncover until bone dry. Fire it in the kiln to bisque temperature (usually cone 04). -
Paint the face:
Using a very fine liner brush and black underglaze, paint the sleeping eyes (two U-shapes), a small upside-down triangle nose, and the mouth anchors. Add three whiskers on each side. -
Add the cheeks:
Dip a round brush or your fingertip into peach or pink underglaze and dab two circles on the cheeks for a rosy blush effect. -
Detail the ears:
Paint small black triangles inside the sculpted clay ears to give them depth and definition. -
Add texture spots:
On the lower outside wall of the ashtray, paint small black dots in a random pattern to add visual interest to the exterior. -
Glaze application:
Once the underglaze is dry, dip the entire piece into a clear, transparent glaze. Shake off excess gently. -
Final wipe:
Wipe the foot (bottom) of the ashtray clean with a sponge to prevent it from sticking to the kiln shelf. -
Glaze fire:
Fire the piece again to the maturity temperature of your clay and glaze (often cone 5 or 6). This will reveal the speckles in the clay and seal the design.
Now you have a purr-fectly unique ceramic piece ready for use or display.
Disguised-Object Novelty Ashtray
Create a sleek, modern statement piece with this faux-terrazzo tutorial, featuring bold blue and burnt orange chips embedded in a creamy stone-like base. Using jesmonite or eco-resin allows you to achieve that professional ceramic look without needing a kiln.
Step-by-Step Tutorial
Materials
- Jesmonite AC100 kit (liquid and powder) or similar eco-resin
- Pigments (blue, burnt orange, beige/brown)
- Silicone square ashtray mold
- Digital scale
- Mixing cups and stir sticks
- Non-stick plastic sheet or silicone mat
- Sandpaper assortment (80, 120, 240, 400 grit)
- Jesmonite sealer or beeswax
Step 1: Making the Terrazzo Chips
-
Mix the chip colors:
Start by mixing valid small batches of Jesmonite for your chips. You’ll need about 30g total for each color. Mix the liquid and powder according to the manufacturer’s ratio (usually 1:2.5). -
Pigment the batches:
Tint one batch deep blue, one burnt orange, and one a softer beige-brown. Add pigment drop by drop until fully saturated, ensuring you don’t exceed the recommended pigment ratio. -
Spread into thin layers:
Pour these colored mixtures onto your non-stick plastic sheet or silicone mat. Spread them out thinly with a stir stick until they are about 2-3mm thick. -
Let the sheets cure:
Allow these thin sheets to set completely. Depending on your room temperature, this typically takes about 20-30 minutes until they are hard and snap easily. -
Crush into chips:
Once fully cured, peel the sheets off the mat. Break them up by hand or crush them in a bag to create irregular, angular chips of varying sizes.
Step 2: Casting the Ashtray
-
Determine volume:
Fill your ashtray mold with water and pour it into a measuring cup to determine the exact volume needed, then dry the mold thoroughly. Calculate your Jesmonite mix based on this volume. -
Mix the base material:
Weigh out your base liquid and powder. Mix thoroughly until smooth and lump-free. I like to add a tiny drop of yellow oxide or beige pigment to warm up the white base color slightly. -
Incorporate the chips:
Add your crushed terrazzo chips into the wet base mixture. Reserve a small handful of chips if you want to manually place some on the surface later. -
Thorough mixing:
Stir the chips into the base well so every piece is coated. The mixture should be thick but pourable. -
Fill the mold:
Pour the mixture into your silicone mold. Pour slowly to help prevent trapping large air bubbles. -
Vibration is key:
Tap the mold firmly against the table repeatedly for at least a minute. This forces bubbles to the surface and ensures the chips settle nicely against the mold walls. -
Allow to cure:
Let the ashtray sit undisturbed. While it might feel hard after 30 minutes, wait at least one hour before demolding to ensure structural integrity.
Chip Distribution Secret
Wait 2-3 minutes after mixing before pouring. If the mix is too runny, heavy chips sink to the bottom. A slightly thicker mix suspends them evenly.
Step 3: Revealing the Design
-
Demold carefully:
Gently peel back the silicone mold to release the raw casting. It will look plain at first since the chips are hidden under a thin layer of the base material. -
Begin sanding:
Start wet-sanding with your coarsest grit (80 grit). Sand evenly over all surfaces until the colorful chips begin to appear clearly. -
Refine the surface:
Move to 120 grit, then 240, and finally 400. Wash the piece between each grit change to remove debris. -
Check for pinholes:
If sanding reveals tiny air bubbles, you can fill them with a small slurry of fresh base mixture, let it dry, and lightly sand again. -
Seal the piece:
Once dry and smooth, apply a penetrating sealer or beeswax with a soft cloth to protect the surface from ash and stains and to make the colors pop.
Air Bubble Troubles?
If you see bubbles on the surface after demolding, don’t panic. Deep sanding usually eliminates them. If they are deep, use the ‘slurry fill’ step detailed above.
Now you have a durable, custom-designed ashtray that looks like high-end Italian terrazzo